

Kontrol Kube Advanced Complete Owner's Manual
COMPLETE
™
Mobile Containment. Simplifi ed.
TM
TM
Kontrol Kube Advanced
Owners Manual
ww w.kontrolkube.com • 80 0.342.3755
®
1

IMPORTANT SAFETY INFORMATION
SAVE THESE INSTRUCTIONS.
CAREFULLY READ AND FOLLOW THESE INSTRUCTIONS.
WARNING: Failure to follow all instructions may result in serious injury.
INSPECTION
1. Inspect for damage or missing parts before each use.
2. Never use with missing or damaged parts.
3. Check to see that all parts are in good condition.
4. Never repair a damaged unit without consultation with the manufacturer.
PROPER SET UP AND USE
1. Inspect for damage or missing parts before each use.
2. READ ALL LABELS!
3. DANGER! METAL CONDUCTS ELECTRICITY! BE CAREFUL! Use care when using near electrical lines and
circuits.
4. You should never use a unit if you are not in good physical condition.
5. Unit wheel base is designed to support the weight of one person and material. Maximum weight not to
exceed 500 lbs.
6. Use caution when in front of and adjacent to unlocked doors.
7. Place unit on rm level ground.
8. Do not use on slippery surfaces.
9. Never place anything under unit wheel base to gain height or adjust for uneven surfaces.
10. Check that all four casters are locked and rmly supported to prevent excessive movement.
11. Use extreme caution getting into and out of the unit.
12. Never move, or have someone else move the unit while in the unit.
13. If using a ladder inside the unit, read, understand and follow ladder manufacturer’s instructions.
14. Do not use any components not supplied or approved by the manufacturer of this product.
15. Do not use if interior surfaces are wet. If wet, surfaces may be slippery. Dry interior surfaces before
entering enclosure.
PROPER CARE AND STORAGE
1. Always keep unit clean of all foreign materials.
2. Never store materials on unit.
3. Properly support and restrain unit in transit or storage. Wear damage from transit may weaken the unit.
4. For additional care, use, and safety instructions contact your employer, dealer or the manufacturer.
The Kontrol Kube must be used only as part of a comprehensive airborne contaminant control program. This
program must include sta training in the set-up and use of the Kontrol Kube and related equipment. Unit
should always be set up in advance in a mock situation to determine that the Kontrol Kube is performing to
expectations, and that sta understands proper use
2

Table of Contents
IMPORTANT SAFETY INFORMATION ..........................................................................................................................................2
Initial Set Up
Section 1: Initial Enclosure Set up .................................................................................................................................................... 4
Part A: Inserting frame bottom into bottom of enclosure.................................................................................................4
Part B: Inserting poles into frame base ..................................................................................................................................... 4
Part C: Inserting frame top into enclosure top ......................................................................................................................4
Part D: Final assembly of unit .......................................................................................................................................................5
Section 2: Attaching AirBase (negative air machine base) .....................................................................................................6
Section 3: Attaching Negative Air Machine ..................................................................................................................................7
Basic Operation
Section 1: Raising and Positioning ..................................................................................................................................................8
Section 2: Lowering the Unit .............................................................................................................................................................8
Section 3: Collapsing the Unit ...........................................................................................................................................................8
Section 4: Quick Set Up of the Unit ................................................................................................................................................ 10
Section 5: Attaching Flange ............................................................................................................................................................ 10
Part A: Attaching anteroom ange ......................................................................................................................................... 10
Applications
Section 1: Construction and Maintenance ................................................................................................................................ 11
Part A: Overhead containment access ................................................................................................................................... 11
Part B: Wall containment ............................................................................................................................................................. 11
Part C: Anteroom containment ..........................................................................................................................................11-12
Section 2: Short Term Airborne Infection Isolation.................................................................................................................12
Part A: Anteroom containment ................................................................................................................................................ 12
Additional Information
Washing & Care .................................................................................................................................................................................... 13
Warranty ................................................................................................................................................................................................. 13
3
Initial Set Up
Section 1: Initial Enclosure Set Up
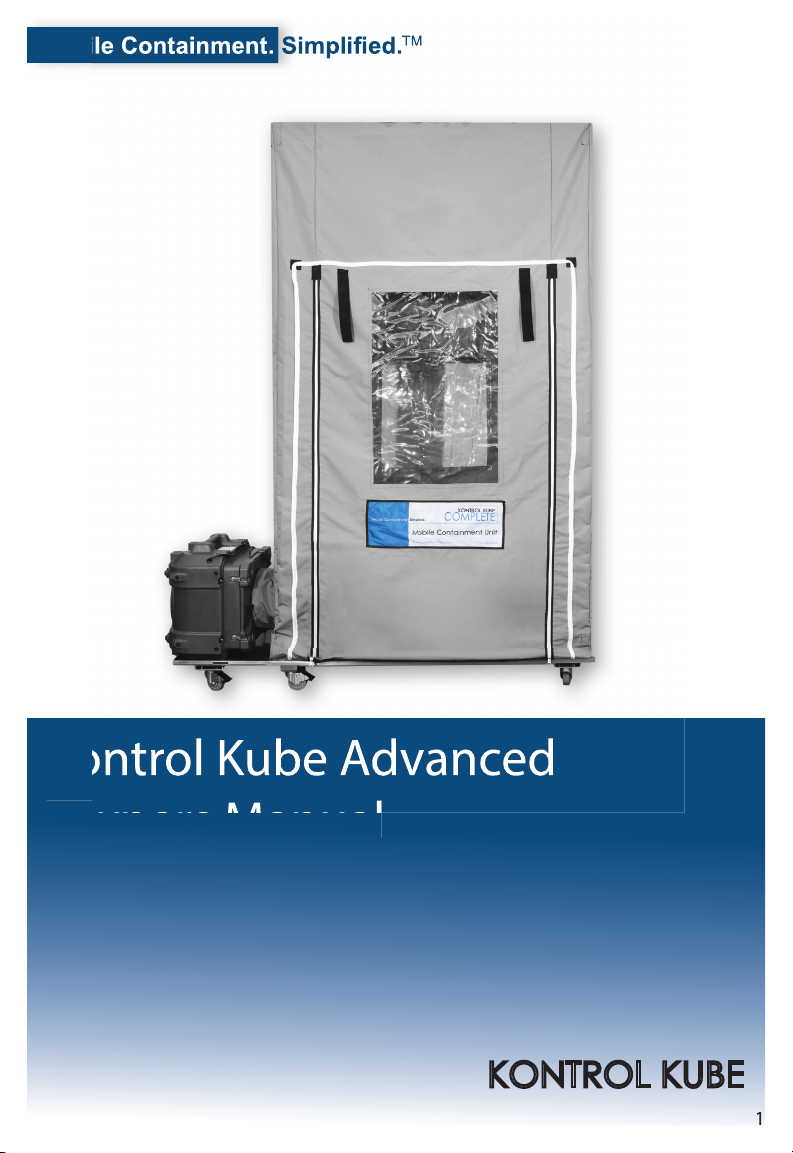
Part A: Inserting frame bottom into bottom of enclosure
1. Unfold enclosure and place bottom (gray reinforced vinyl portion) at on the oor.
2. Place bottom frame into the enclosure, sockets up. Corners of frame should rest on the enclosures
reinforced webbing.
Part B: Inserting poles into frame base
1. Remove pins from bottom frame.
2. Insert pole into the bottom frame. Make sure that all slots and channels in the poles are facing in.
Repeat for each pole.
3. Insert pins through frame and pole and reattach the locking clasp.
4. Lower each pole to the lowest position. The black handle should rest on the bottom of the vertical
channel.
Part C: Inserting frame top into enclosure top
1. Insert top frame into the top of the enclosure. Corners of frame should rest into the enclosures
reinforced webbing.
2. Wrap Velcro tabs near the top corners of the enclosure around the frame and secure (2 per corner).
4
Initial Set Up
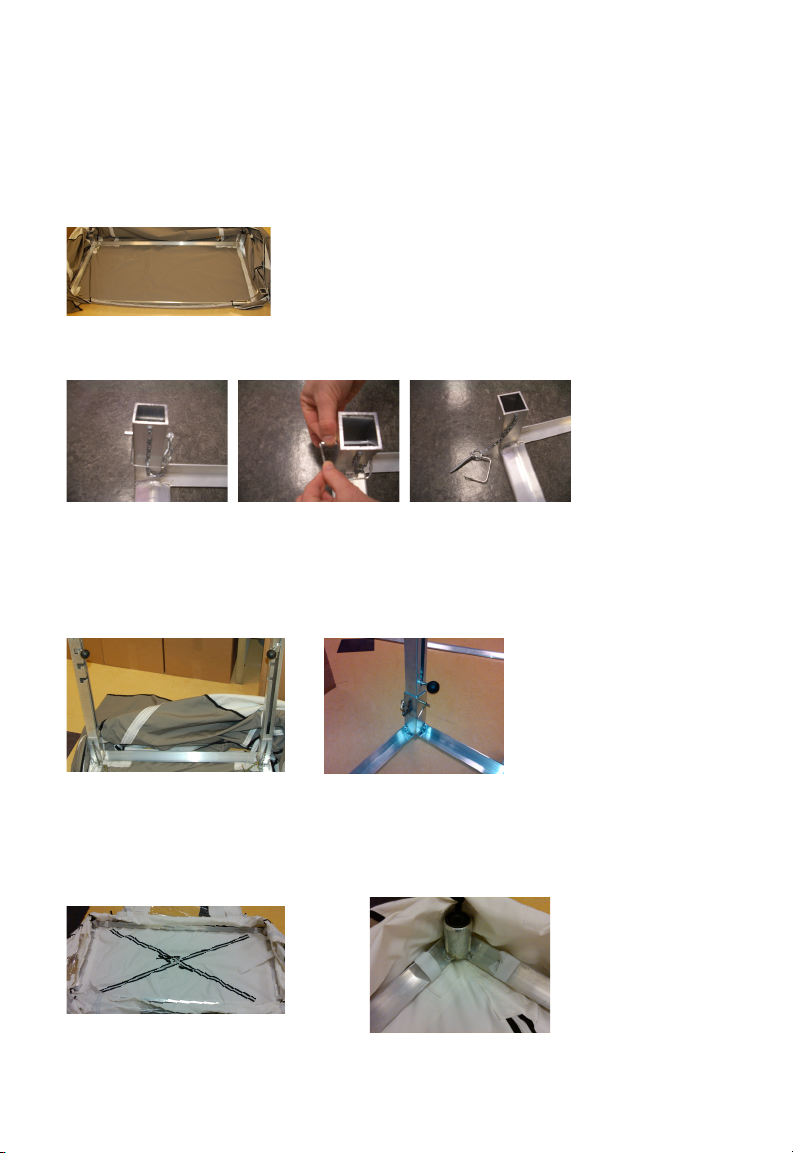
Part D: Final assembly of unit - two person operation
1. With a person on each end of the unit, lift the top frame and enclosure over the top of the poles one at a
time. Lift the enclosure and top frame over one pole and then the other on the same long side of the
unit. Repeat this on the other long side of the unit, lifting it over the two remaining poles.
2. From inside the unit, place rubber gaskets on frame top over poles and pull down until the pole locks
into place. Repeat for each pole.
3. Raise the enclosure, with each person holding two handles, by rotating handles into the vertical channel
and lifting. Consider opening the 4-way clear vinyl ceiling zipper when partially raised before zipper
tabs are out of reach. Once unit is raised, rotate handles into a support channel until they drop into the
locking slots. It is recommended to raise at 3 or 4 increments per side until desired height is reached.
Prior to lifting the unit to full height, be aware of any overhead obstructions (ceilings, sprinklers, etc.)
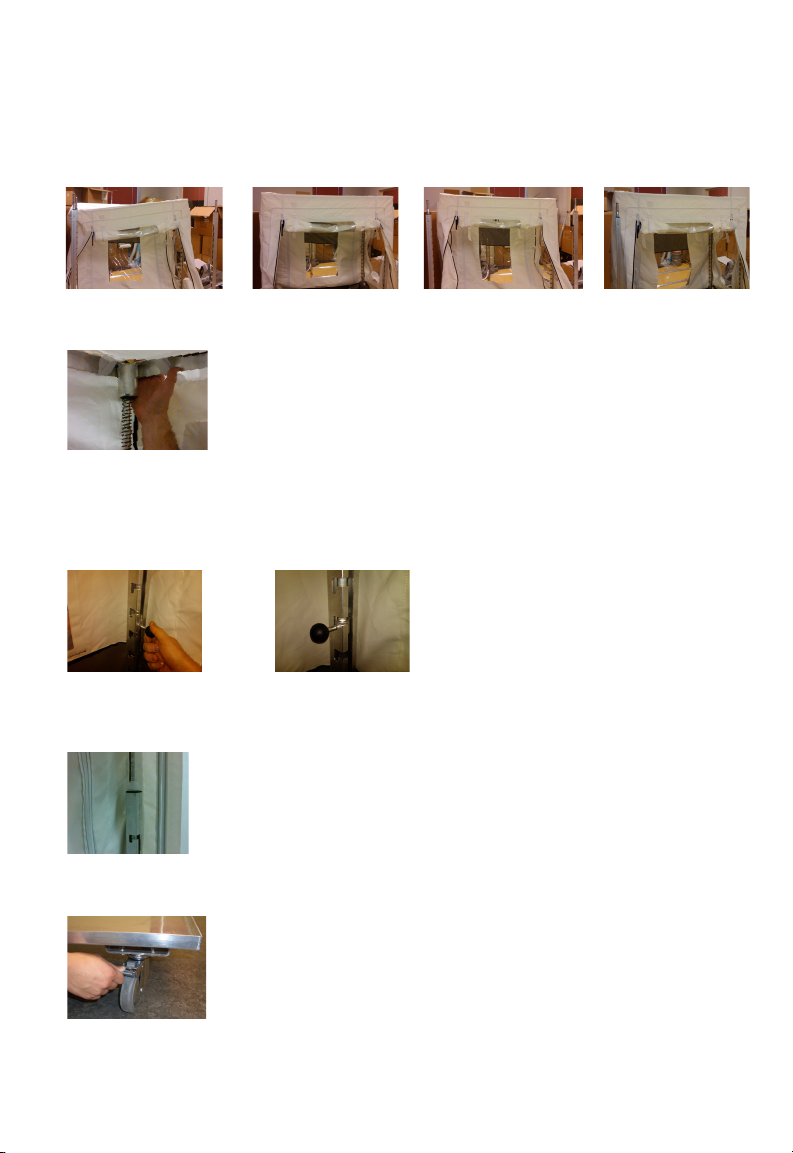
4. Wrap Velcro® tabs (anti-sag restraints), located half way up the enclosure at each corner, around pole
and secure. Ensure that the Velcro is above the lower section of the pole and tight enough to prevent it
from slipping over the lower section.
5. Place unit wheelbase at on the oor and lock all four casters by pressing the locking mechanism into
the down position.
Lift the containment unit, by the poles, and place unit onto the wheelbase. Watch out for overhead
obstructions.
5
 Loading...