

Page 1
AUFSTELLANLEITUNG
19790 Tablet-PC-Stativhalter
- Effizient und flexibel- die Tablet-Halterung mit 3/8" (5/8")-Anschlußgewinde
- Schreiben, lesen, surfen, Bilder und Videos betrachten
- Gleichermaßen geeignet für Bühne, Heim und Studio
- Für Tablets aller möglichen Hersteller – keine Bindung an bestimmte Marke
- Für Bildschirmgrößen (Höhe: 222 - 334 mm, Breite: 128 - 232 mm)
- Mit hilfreicher Skalierung für wiederkehrende Größeneinstellungen
- Mit Verstellmöglichkeiten die keine Wünsche offenlassen:
- Tabletgröße, Neigungswinkel, Ausrichtung, Hoch/Quer
SICHERHEITSHINWEISE
Vielen Dank, dass Sie sich für dieses Produkt entschieden haben. Diese Anleitung informiert Sie über alle wich tigen Schritte bei Aufbau und Handhabung.
Wir empfehlen, sie auch für den späteren Gebrauch aufzubewahren.
Bitte beim Montieren des Tablet-PC sicherstellen,
dass dieses gemäß dieser Anleitung im Halter sicher
platziert und auf sicheren Sitz geprüft ist.
Für unsachgemäßen Gebrauch und die daraus
entstehenden Folgen bzw. Schäden wird seitens
K&M nicht gehaftet!
- Geeignete Stative verwenden - das setzt voraus:
- Standfestigkeit, Tragkraft, zentrische Belastung,
- 3/8" (5/8")-Anschlußgewinde, z.B. K&M 199, 260, 260/1,
201A/2, 25680, 26085, 26125, 26150, 262, 26250
- den Tablet-PC sorgfältig platzieren und durch
- anziehen der Schrauben fixieren,
- anschließend auf sicheren Halt prüfen
- Halterung umsichtig handhaben; v.a. bei
- Änderungen der Einstellung (Neigung, Format)
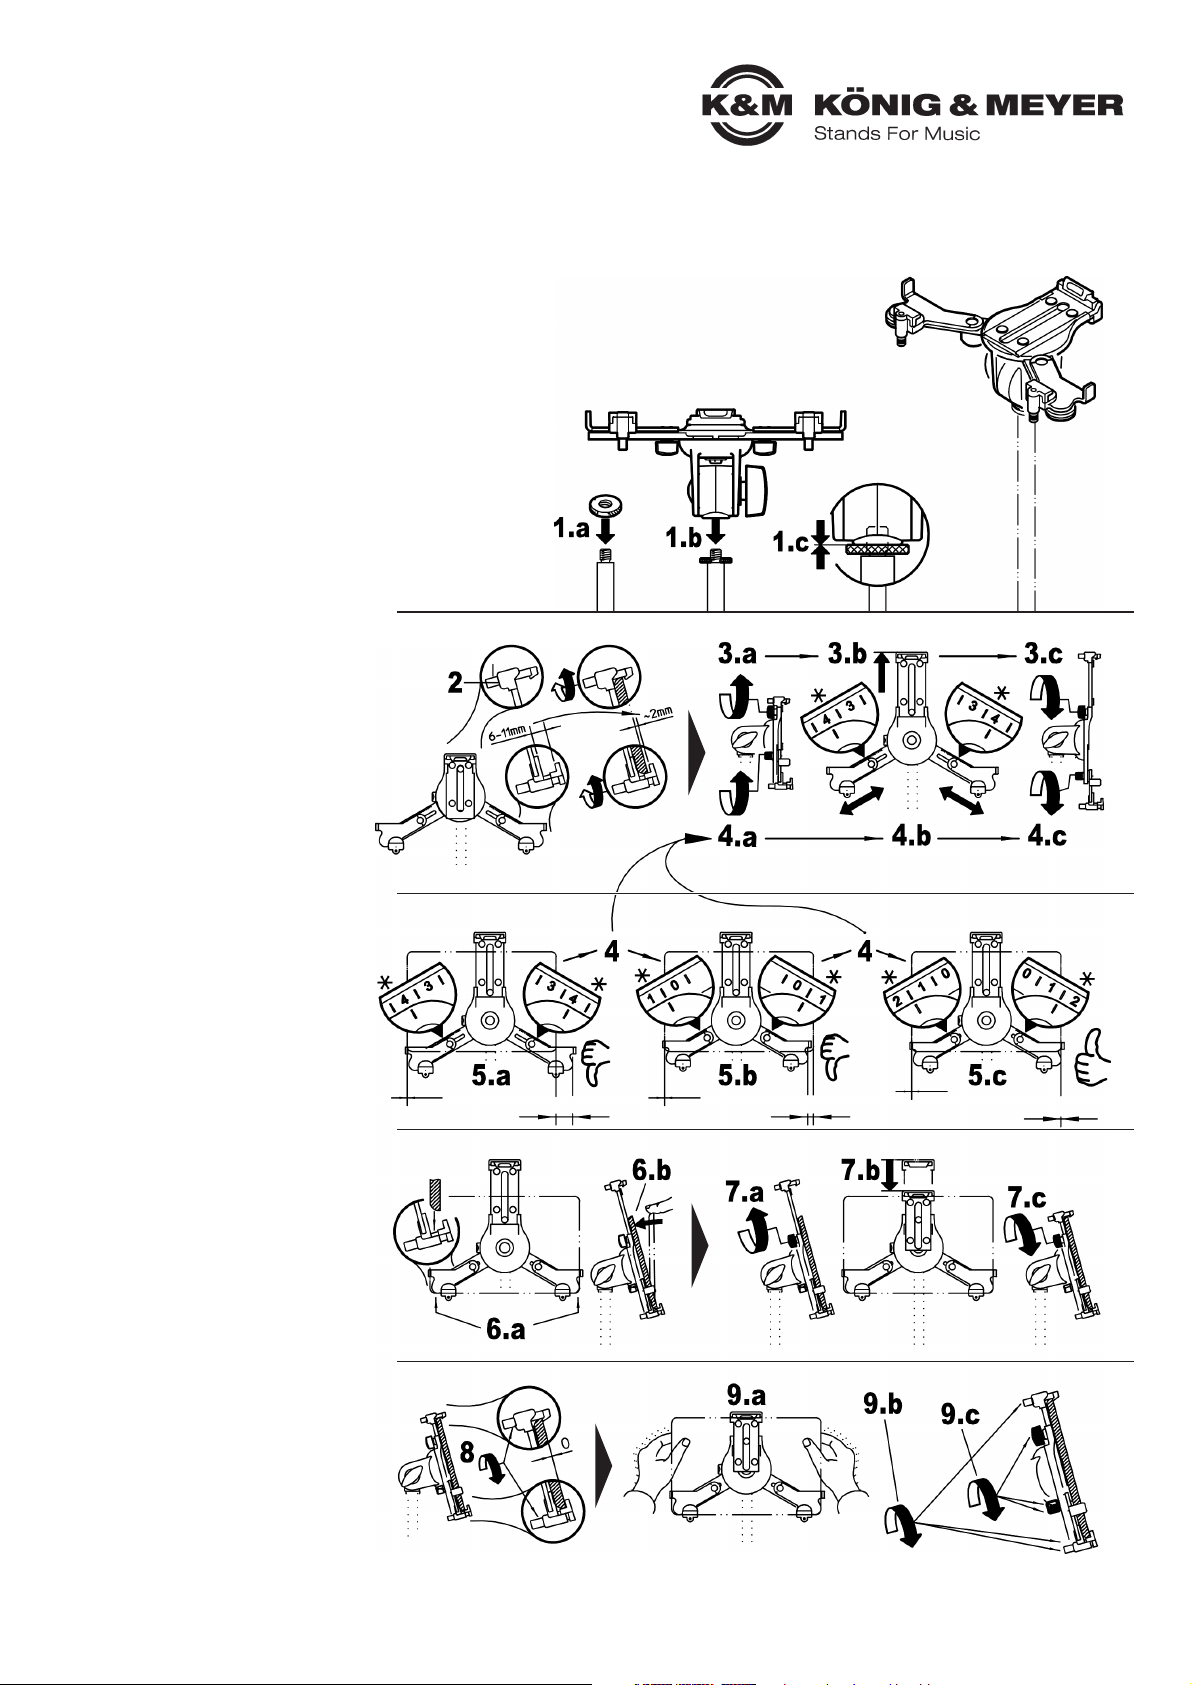
ERSTMALIGES EINLEGEN des Tablet (2-9)
TABLET am STATIV BEFESTIGEN (1)
* Zahlenwerte der Skala sind nur Beispiel (Auswahl div.Tablets s.Beiblatt)
TABLET am STATIV BEFESTIGEN (1)
1 a. Rändelscheibe des Stativs bis zum
1 a. Anschlag auf den Gewindebolzen drehen
1 b. Tablet-Halter auf Gewindebolzen schrauben
1 c. Rändelschraube mit der Halterung verspannen
ERSTMALIGES EINLEGEN des Tablet (2-9)
Viele Einstellungen sind möglich - finden wir
die Passende
2 Zunächst alle drei Rändelstifte öffnen bis
2 sichergestellt ist, dass in der Halterung
2 genügend Platz für das Tablet ist
3 a. Oberen Haltearm lösen,
3 b. max. ausfahren und
3 c. Klemmschraube wieder festziehen
4 a. seitliche Haltearme lösen und diese...
4 b. ...mit Hilfe der Skalen symmetrisch in
4 b. eine ungefähre Position ausfahren,
4 c. Beide Klemmschrauben wieder festziehen
5 Tablet probehalber in die Halteecken führen
5 a. Tablet zu schmal: Haltearme wieder etwas
5 a. einfahren (symmetrisch) bis es passt.
5 b. Tablet zu breit: Haltearme weiter
5 b. ausfahren (symmetrisch) bis es passt.
5 c. Tablet passt, wenn die Halteecken ohne
5 c. seitlichen Luftspalt anliegen.
6 a. Tablet in beide Halteecken einlegen...
6 b. ...und oben anlegen und festhalten
7 Oberen Haltearm einfahren
7 a. Klemmschraube lösen und Arm einfahren...
7 b. ...bis das Tablet spielfrei eingefasst ist.
7 c. Klemmschraube wieder festziehen
8 Tablet in den Halteecken sanft einklemmen
8 durch Anziehen der Rändelstifte
9 Ihr Tablet sollte jetzt sicher positioniert sein.
9 Bitte vergewissern Sie sich, dass dem so ist.
9 a. Sitzt das Tablet spielfrei in den Halterungen?
9 b. Sind die drei Rändelgriffe fest angezogen?
9 c. Sind die drei Kunststoffflügel fest angezogen?
Falls nicht, bitte anhand der Punkte (2-8)
korrigieren.
passt passt
passt
Tab zu schmal Tab zu breit Tab passt
0
Page 2

KÖNIG & MEYER GmbH & Co. KG
Kiesweg 2, 97877 Wertheim, www.k-m.de
19790-316-55/19790-516-55 Rev.08 03-80-080-01 3/17
TECHNISCHE DATEN / SPEZIFIKATION
Material
Halterung, Gelenk: Polyamid PA-6
Schrauben: Stahl, verzinkt
Traglast
Tablets Höhe: min. 222 mm, max. 334 mm
Tablets Breite: min.128 mm, max. 232 mm
Tablets Tiefe: min. 6 mm, max. 11 mm
Maße Außenmaße B x T x H: 230/342 x 95 x 149/253 mm
Karton B x T x H: 254 x 104 x 150 mm
Gewicht netto 0,3 kg, brutto 0,4 kg
AUFSTELLANLEITUNG
FEHLERSUCHE (F) und BESEITIGUNG (B)
F: Halterung wackelt
F: B: Verschraubung mit Stativ prüfen, ggf. nachziehen (1)
F: Tablet sitzt nicht richtig
F: B: Position der seitlichen Haltearme korrigieren, so dass die Halteecken
F: B: spielfrei am Tablet anliegen (2-9)
F: B: Achten Sie auf symmetrische Einstellung der unteren Haltearme (4,5)
F: B: Assymetrisch eingestellte Arme stören die Optik und gefährden den Halt
F: B: des Tablets.
F: B: Tablet am oberen Haltearm nicht nur anlehnen, sondern korrekt
F: B: einfassen (7,8).
F: B: Mindest- bzw. Maximalabmessungen beachten (20)
BENUTZERHINWEISE und FUNKTIONEN
Das Tablet kann verstellt werden in
Neigung & Format.
Zu diesem Zweck muss das Tablet
nicht aus der Halterung entnommen
werden.
NEIGUNG (16-18)
Das Tablet kann zwischen senk- und
waagerechter Endstellung in jeder
Position fixiert werden. Dazu:
16 Tablet halten und Flügelmutter etwas lösen
17 Tablet neigen wie gewünscht und...
18 ...Flügelmutter wieder festziehen
FORMAT (19)
Die Halterung verfügt über eine
90°-Verdrehfunktion.
Dadurch kann das Tablet hochkant
oder quer präsentiert werden.
19 Halterung nehmen und ins
19 Quer- bzw. Hochformat drehen
19 - oder in die Schräge!
19 BEACHTE: Unsichtbare Anschläge
19 in der Halterung begrenzen die
19 Verdrehung.
ABMESSUNGEN (20)
Die Minimal- bzw. Maximalmaße können
aufgrund ungünstiger Längen/Breitenverhältnisse des Tablets möglicherweise
nicht erreicht werden.
NEIGUNG (16-18)
FORMAT (19) ABMESSUNGEN (20)
ENTNEHMEN des Tablet (10-12)
ERNEUTES EINLEGEN des Tablet (13-15)
5-11 mm
ca. 2 mm
0
Endstellung:
- waagerecht
- am Anschlag
Endstellung:
- senkrecht
- am Anschlag
Zwischenposition:
- schräg (0-90°)
- frei wählbar (Pos. sichern durch
- festes Anziehen der Flügelmutter 18
Endstellung:
- quer (landscape)
- eingerastet
Endstellung:
- hoch (portrait)
- eingerastet
Verdehung (Zwischenposition):
- schräg
- nicht eingerastet, behält jedoch
die gewählte Einstellung
ENTNEHMEN des Tablet (10-12)
10 Rändelstifte etwas lösen
11 Tablet festhalten u. oberen Haken ANHEBEN
12 Tablet herausklappen und ENTNEHMEN
Wenn Sie stets das gleiche Tablet verwenden,
empfehlen wir, die eingestellten Haltearme
in dieser Position zu belassen.
ERNEUTES EINLEGEN des Tablet (13-15)
bei voreingestellten Haltearmen
13 Tablet in untere Halteecken einlegen
14 Tablet am oberen Haken anlehnen und
14 sanft gegendrücken bis es einrastet
15 Rändelstifte anziehen bis das Tablet
14 wieder sanft eingeklemmt ist
Anschließend Festsitz prüfen wie in 9 beschrieben.
Page 3

KÖNIG & MEYER GmbH & Co. KG
Kiesweg 2, 97877 Wertheim, www.k-m.de
Rev.01 03-80-084-01 4/16
Hersteller Bezeichnung Nennmaß Abmessungen (B x H x T) Skala-Zahl
amazon fire HDX 8.9 8.9” 158,0 x 231,0 x 7,8 mm 0,4
Apple
iPad 1
iPad 2,3,4 Gen.
iPad Air
iPad Air 2
iPad Pro 9.7
iPad Pro
9.7”
9.7”
9.7”
9.7”
9.7”
12.9”
189,7 x 242,8 x 8,8 mm
185,7 x 241,2 x 9,4 mm
169,5 x 240 x 7,5 mm
169,5 x 240 x 6,1 mm
169,5 x 240 x 6,1 mm
220,6 x 305,7 x 6,9 mm
1,6
1,5
1,4
1,4
1,4
7,8
Asus Transformer TF300T 10.1” 180,8 x 263 x 9,9 mm 3,6
google Pixel C 180 x 242 x 7 mm 1,6
hp HP Pro Slate 12 220 x 300,3 x 8 mm 7,3
Huawei Mediapad M2 10 9.6” 172,8 x 239,8 x 7,4 mm 1,3
Lenovo
ThinkPad 8
ThinkPad 10
8.3”
10.1”
132 x 224 x 9 mm
177 x 256,5 x 8,95 mm
-0,1
3,0
LG G Pad II 10.1” 161,1 x 254,3 x 7,8 mm 2,8
Microsoft Surface Pro 3 12” 201,4 x 292,1 x 9,1 mm 6,4
Samsung
GALAXY Tab A
GALAXY Tab S
GALAXY Note Pro
9.7”
10.5”
12.2”
166,8 x 242,5 x 7,6 mm
177,3 x 247,3 x 6,6 mm
204 x 295,6 x 7,95 mm
1,6
2,1
6,8
Sony
Xperia Z2
Xperia Z4
10.1”
10.1”
172 x 266 x 6,4 mm
167 x 254 x 6,1 mm
3,9
2,8
INFOBLATT für
19790 Tablet-PC-Stativhalter
19791 Tablet-PC-Halter
19792 Tablet-PC-Tischstativ
19793 Tablet-PC-Stativ
A. GRÖSSE der Tablets
Der Tablet PC Halter kann Tablet PC
unterschiedlicher Größen aufnehmen.
Das "Fassungsvermögen" reicht
- in der Breite von 222 - 334 mm
- in der Höhe von 128 - 232 mm
- in der Tiefe von 6 - 11 mm.
B. Die SKALA an den Haltearmen
Die drei Haltearme sorgen für spielfreien Sitz des
Tablet PC. Wie dies bewerkstelligt wird ist in der
Gebrauchsanleitung im Kapitel ERSTMALIGES
EINLEGEN Schritt-für-Schritt dokumentiert.
Die SKALA erfüllt dabei zwei wichtige Funktionen:
a. sie hilft bei der geforderten SYMMETRISCHEN
a. Einstellung der beiden unteren Haltearme
b. sie ermöglich das rasche WIEDERFINDEN einmal
b. gemerkter Einstellungen für bestimmte Tablets
b. - s.u. eine Auswahl diverser Tablets (Stand 4/2016)
C. AUSWAHL diverser Tablet PC (Stand: April 2016)
- mit passender Skala-Voreinstellung an den Haltearmen
BEACHTE!
Die hier angegebenen SkalaZahlen erleichtern es, die
passende Voreinstellung der
Haltearme zu finden.
Dessen ungeachtet, muss bei
jedem erstmaligen oder erneutem
Einlegen des Tablets der
passende, d.h. spaltfreie Sitz der
Halterung überprüft und bei
Bedarf durch Korrektur der
Haltearme hergestellt werden
- wie in der Aufstellanleitung
beschrieben in: ERSTMALIGES
EINLEGEN.
Page 4

SETUP
19790 Tablet PC stand holder
- Efficient and flexible - the Tablet Holder comes with a 3/8” (5/8”) connection thread
- Write, read, surf, look at pictures or watch videos - made easy
- Equally suited for the stage, home and studio.
- For tablets of all manufacturers - not bound to a specific brand
- Screen sizes (Width: 222 - 334 mm, Height: 128 - 232 mm)
- Helpful settings for quick setup and adjustments
- Provides any number of adjustments:
- Tablet Size, Adjustment Angle, Direction, Portrait/Landscape
SAFETY NOTES
Thank you for choosing this product. The instructions provide directions to all
of the important setup and handling steps. We recommend you keep these
instructions for future reference.
When mounting the Tablet PC ensure that it is property
placed and secured according to the instructions. K&M
is not liable in the case of improper use and associated
consequences i.e. damages!
- Only use suitable stands - the prerequisites are:
- stability, weight bearing load, centered load, 3/8" (5/8")
- connection thread, e.g. K&M 199, 260,
- 260/1, 201A/2, 25680, 26085, 26125, 26150,
- 262, 26250
- Place the Tablet PC carefully in position and
- tighten the screws, then check that the Tablet PC
- is securely in place
- Handle the holder with care, in particular when
- adjusting settings (angle, format)
FIRST TIME PLACEMENT of the Tablet (2-9)
ATTACH Tablet to the STAND (1)
* Scale settings are only examples (Selection of various Tablets see
* Supplementary Sheet)
ATTACH Tablet to the STAND (1)
1 a. Turn the the stand's knurled disc as far
1 a. as it will go onto the stand’s threaded bolt
1 b. Screw the Tablet holder onto the threaded bolt
1 c. Tighten the knurled screw to the mount
FIRST TIME PLACEMENT of the Tablet (2-9)
Many settings are possible - identify the
required settings
2 First open the three knurled pins until
2 there is enough room to place the tablet
3 a. Release the upper support arm,
3 b. extend it out as far as it goes and
3 c. tighten the clamping screw.
4 a. Release side support arms and...
4 b. ...with the help of the scale symmetrically
4 b. extend to a rough position,
4 c. tighten both clamping screws.
5 Place the tablet into the corner supports to
5 ensure that it fits
5 a. Tablet is too narrow: Retract the support
5 a. arms a bit (symmetrically) until it fits.
5 b. Tablet is too wide: Extend the support
5 b. arms (symmetrically) until it fits.
5 c. Tablet fits, if the corner supports do not show
5 c. any space between the tablet and the holder
5 c. when looking at it from the side.
6 a. Place the tablet in both corner supports...
6 b. ...and hold the tablet
7 Retract the upper support arm
7 a. Release the clamp screw and retract the support arm...
7 b. ...until the tablet is securely held in place.
7 c. Tighten the clamping screw.
8 Gently clamp the tablet into the corner
8 supports by tightening the knurled pins
9 Your Tablet should be securely positioned now.
9 Please ensure that this is the case.
9 a. Does the Tablet sit securely in the holder
9 a. without any play?
9 b. Are the three knurled handles properly tightened?
9 c. Are the three plastic finger screws properly tightened?
If this is not the case, please refer to points (2-8).
fits fits
fits
Tab too narrow Tab too wide Tab fits
0
Page 5

KÖNIG & MEYER GmbH & Co. KG
Kiesweg 2, 97877 Wertheim, www.k-m.de
19790-316-55/19790-516-55 Rev.08 03-80-080-01 3/17
TECHNICAL DATA
Material
Holder, joint: Polyamid PA-6
Screws: Steel, galvanized
max. load
Tablets Height: min. 222 mm, max. 334 mm
Tablets Width: min. 128 mm, max. 232 mm
Tablets Depth: min. 6 mm, max. 11 mm
Dimensions External Dimensions W x D x H: 230/342 x 95 x 149/253 mm
Packaging W x D x H: 254 x 104 x 150 mm
Weight net 0.3 kg, gross 0.4 kg
SETUP
FAULT-FINDING (F) and REPAIR (R)
F: Holder is unstable
F: R: Check that it is properly screwed into the stand, if needed tighten
F: R: the screws 1.
F: Tablet is not securely in place
F: R: Correct the position of the side support arms, so that the corner
F: R: supports are properly set on the Tablet without any play (2-8)
F: R: Ensure that the lower support arms setting are symmetrical (4,5).
F: R: Asymmetric setting of the support arms looks bad and does not
F: R: ensure that the Tablet is securely held in place.
F: B: Do not only place the Tablet on the upper support arm, but be sure
F: R: it clicks into place (7,8).
F: B: Observe the minimum i.e maximum dimensions
USAGE NOTES and FUNCTIONS
The angle and format of the
tablet can be adjusted.
The (securely positioned) Tablet
does not have to be removed
from the holder.
ANGLE (16-18)
The Tablet can be adjusted to
any final position by adjusting it
vertically and horizontally. To do this:
16 Hold the Tablet and loosen the wing
16 nut somewhat
17 Pick the position (vertical/horizontal) and...
18 ...re-tighten the wing nut.
FORMAT (19)
The holder has a
90°-Twist Function.
The Tablet can be presented
in landscape and portrait positions.
19 Take the holder and turn it to
19 the landscape, portrait or tilted
19 - position!
19 NOTE- Hitches within the mount limit
19 how far the holder can be turned.
DIMENSIONS (20)
The minimum and maximum size cannot
be achieved due to the Tablet’s
unfavorable length/width ratios.
ANGLE (16-18)
FORMAT (19) DIMENSIONS (20)
REMOVING the Tablet (10-12)
REPEATED PLACEMENT of the Tablet (13-15)
5-11 mm
ca. 2 mm
0
Final Position
- horizontal
- as far as it goes
Final Position
- vertical
- as far as it goes
Interim Position:
- tilted (0-90°)
- select any position (Secure position
- by tightening the wing nut (18)
Final Position
-landscape
- clicked into place
Final Position
portrait
- clicked into
- place
Twist (Interim Position):
- tilted
- not clicked into place, however it
- does stay in the selected position
REMOVING the Tablet (10-12)
10 Loosen the knurled pins a bit
11 Hold the tablet and LIFT UP the catch
12 Flip out the Tablet and REMOVE
If you always use the same tablet, we
recommend that the support arm settings
remain in this position.
REPEATED PLACEMENT of the Tablet (13-15)
For previously set support arms
13 Place the tablet in the lower corner
13 supports
14 Place the tablet into the upper catch and
14 gently press until it clicks into place
15 Tighten the knurled pins until the tablet
14 is gently pressed into place
Then check that the Tablet is secure as
described in 9.
Page 6

KÖNIG & MEYER GmbH & Co. KG
Kiesweg 2, 97877 Wertheim, www.k-m.de
Rev.01 03-80-084-01 4/16
Manufacturer
Description
Nominal
Size
Dimensions (W x H x D)
Scale
Setting No
amazon fire HDX 8.9 8.9” 158,0 x 231,0 x 7,8 mm 0,4
Apple
iPad 1
iPad 2,3,4 Gen.
iPad Air
iPad Air 2
iPad Pro 9.7
iPad Pro
9.7”
9.7”
9.7”
9.7”
9.7”
12.9”
189,7 x 242,8 x 8,8 mm
185,7 x 241,2 x 9,4 mm
169,5 x 240 x 7,5 mm
169,5 x 240 x 6,1 mm
169,5 x 240 x 6,1 mm
220,6 x 305,7 x 6,9 mm
1,6
1,5
1,4
1,4
1,4
7,8
Asus
Transformer TF300T
10.1”
180,8 x 263 x 9,9 mm
3,6
google Pixel C
180 x 242 x 7 mm
1,6
hp HP Pro Slate 12 220 x 300,3 x 8 mm
7,3
Huawei
Mediapad T1 10
9.6”
150 x 248,5 x 8,3 mm
1,3
Lenovo
ThinkPad 8
ThinkPad 10
8.3”
10.1”
132 x 224 x 9 mm
177 x 256,5 x 8,95 mm
-0,1
3,0
LG
G Pad II
10.1”
161,1 x 254,3 x 7,8 mm
2,8
Microsoft
Surface Pro 3
12”
201,4 x 292,1 x 9,1 mm
6,4
Samsung
GALAXY Tab A
GALAXY Tab S
GALAXY Note Pro
9.7”
10.5”
12.2”
166,8 x 242,5 x 7,6 mm
177,3 x 247,3 x 6,6 mm
204 x 295,6 x 7,95 mm
1,6
2,1
6,8
Sony
Xperia Z2
Xperia Z4
10.1”
10.1”
172 x 266 x 6,4 mm
167 x 254 x 6,1 mm
3,9
2,8
INFO SHEET for
19790 Tablet PC stand holder
19791 Tablet PC holder
19792 Tablet PC table stand
19793 Tablet PC stand
A. TABLET SIZE
The Tablet PC Holder is suitable for
Tablet PC of various sizes.
The "storage capacity" is
- from 222 - 334 mm in width
- from 128 - 232 mm in height
- from 6 - 11 mm in depth
B. The SCALE SETTINGS on the Support Arms
The three support arms provide for the secure hold of the
Tablet PC. The step by step instructions to accomplish this
are provided in the Usage Instructions in Section FIRST
TIME PLACEMENT.
The SCALE SETTINGS fulfill two important functions:
a. they help when making the required SYMMETRICAL
a. settings of both lower support arms
b. they allow one to QUICKLY SETUP the support arms
b. for a specific tablet according to the initial settings
b. - see a selection of various tablets (4/2016 version) below
C. SELECTION OF VARIOUS Tablet PCs (Version: April 2016)
- with the SCALE SETTINGS for the Support Arms
NOTE!
The Scale Setting numbers
provided here make it easier
to identify the proper settings for
the support arms.
Regardless of this fact, when
placing the tablet in the holder for
the first time or thereafter, ensure
that the tablet is securely placed
into the holder and that there is
no space between the tablet and
the holder. If this is not the case
adjust the support arms
accordingly - as described in the
FIRST TIME PLACEMENT
section.
 Loading...