

Page 1
Keyboardständer Grundtisch 18880
zusammenlegbar
Aufstellanleitung
Sicherheitshinweise:
Seitenteile 7 auf gleiche Höhe einstellen - waagerechte Keyboardauflage erforderlich. Festigkeit
aller Schraubverbindungen kontrollieren.
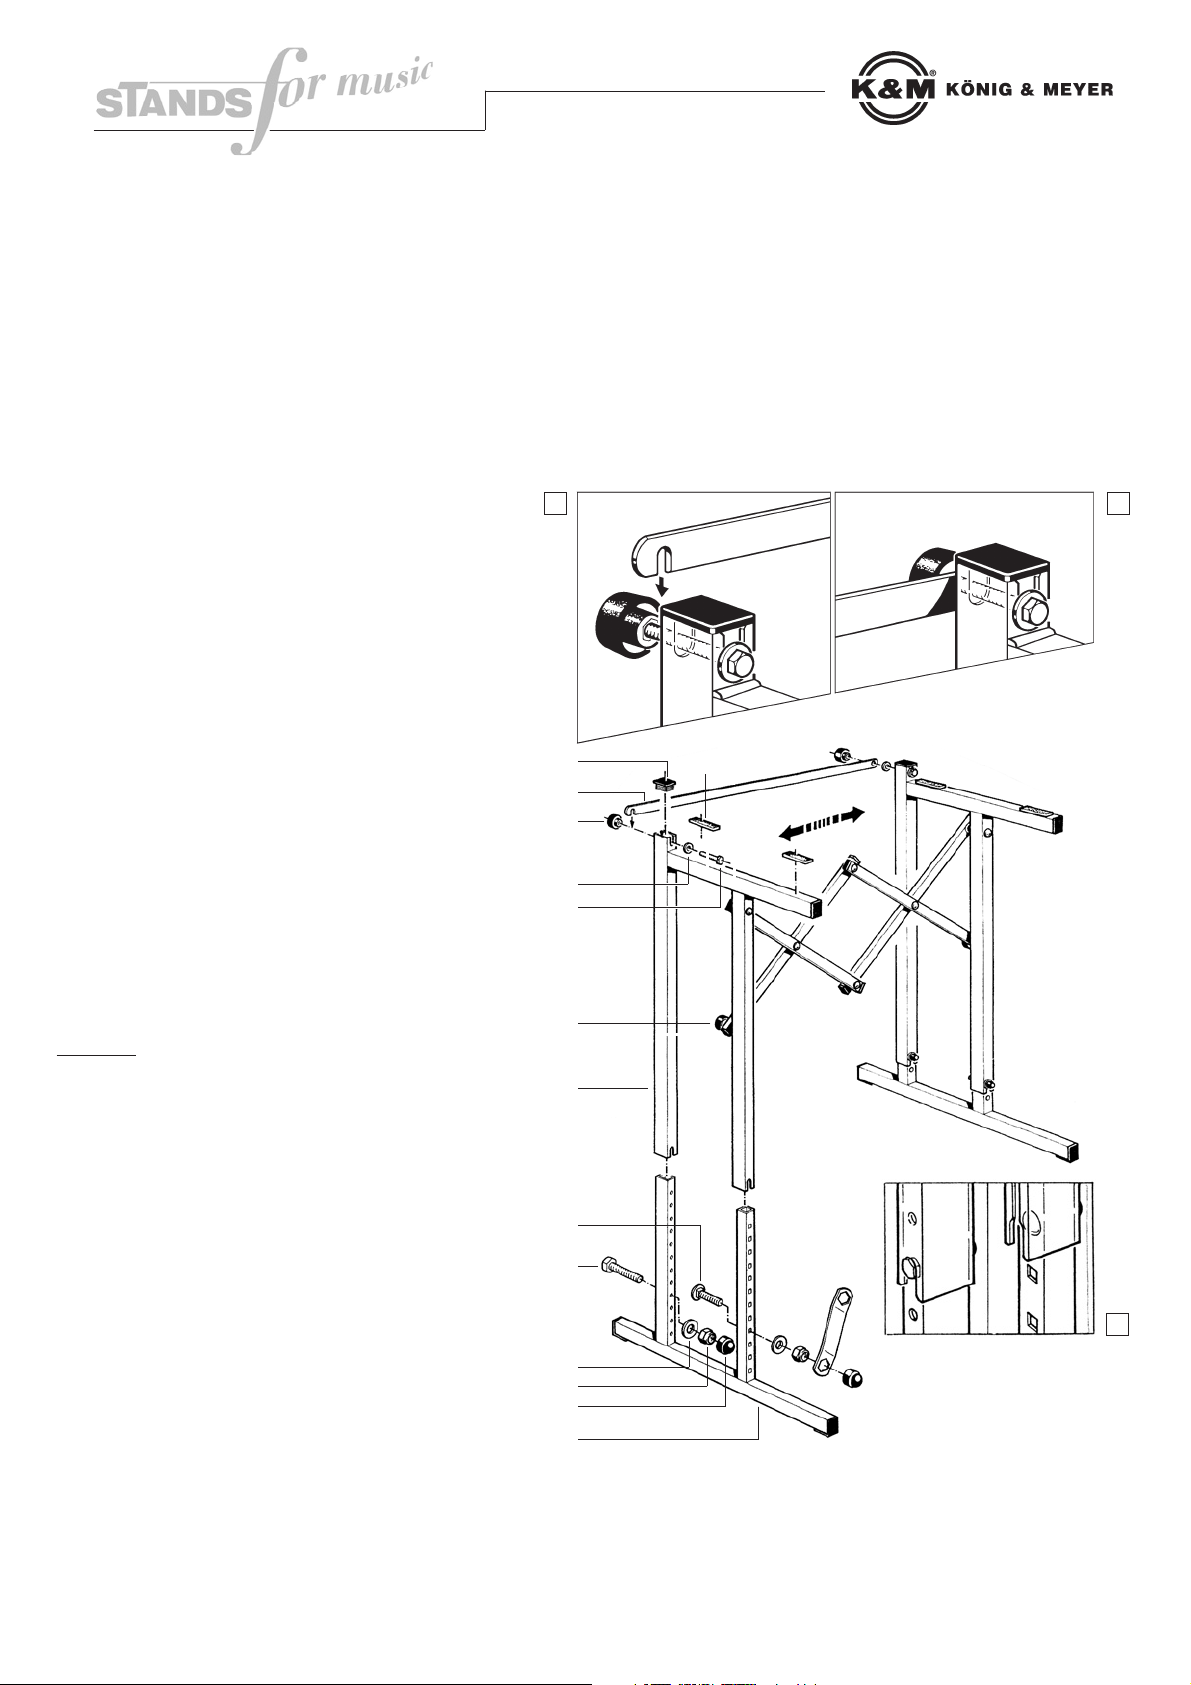
Montage:
Seitenteile 7 bis zum Anschlag auseinanderziehen
und mit Klemmschraube 8 fixieren.
Verbindungsstrebe 12 mit Schrauben M6 x 50 mm
9, U-Scheiben 10 und Klemmmutter 11 an den
Seitenteilen oben festklemmen (Abb. A) bzw.
verschrauben (Abb. B).
Kunststoffgleiter 13 eindrücken und Gummistreifen
14 an den Auflagearmen anbringen.
Höhenverstellung (12-fach):
Kappe 2 abnehmen und Schraubverbindung lösen
(Mutter 3, U-Scheibe 4 und Schrauben 5, 6).
Gewünschte Höhe wird erreicht durch Einstecken
aller vier Schrauben 5, 6 in der jeweils gleichen
Bohrung der Fußteile 1.
Beachte:
Sechskantschrauben 5 durch runde
Löcher, Schlossschrauben 6 durch quadratische
Löcher führen.
Seitenteile 7 auf die Fußteile 1 aufstecken, bis sie
an den Schrauben aufsitzen (Abb. C) und mit UScheiben 4 und Muttern 3 verschrauben. Schutzkappen 2 aufdrücken.
Zusammenlegen:
Klemmmutter 11 lösen, Verbindungsstrebe 12
wegklappen und Klemmutter 11 wieder festziehen.
Klemmschraube 8 lösen und Seitenteile 7
zusammenschieben. Mit Klemmschraube 8 wieder
anziehen.
Wichtiger Hinweis:
Falls Sie das Stativ bzw. den Ständer in Ihrer
Wohnung aufstellen, legen Sie ggf. eine
rutschfeste Unterlage unter die Kunststoff- bzw.
Gummifüße, da diese auf empfindlichen Böden
(z.B. Parkett) Spuren hinterlassen können.
-18880.000.55-
-03.80.745.00- 5/04
1
2
3
4
5
6
7
8
9
10
11
12
13 14
A
B
C
Page 2

A B
Keyboard Stand 18880
collapsible
Instructions for Use
Warning:
Mount the side parts 7 at the same height keyboard needs to be fully horizontal. Tighten all
screws securely.
How to Set Up:
Pull the side parts 7 apart as far as they go and
secure them with the locking screw 8.
Use the bolts 9 (M6 x 50 mm), washers 10 and
locking nuts 11 to fasten the connecting brace 12
to the top of the side parts (Fig. A) and tighten it
(Fig. B).
Press in the plastic end caps 13 and stick the
rubber pads 14 onto the support arms.
Height-adjustment (12-way):
Remove end caps 2 and loosen locking parts (nuts
3, washers 4, bolts 5, 6). For the desired height
insert the 4 bolts 5, 6 in the same hole on each
base part 1.
Attention:
Insert the hexagon bolts in the round
holes, the square neck carriage bolts in the square
holes.
Stick the side parts 7 onto the base parts 1 until
they hit the bolts (Fig. C) and tighten with washers
4 and nuts 3. Press in the end caps 2.
To fold up the stand:
Loosen the locking nuts 11, fold out the connecting
brace 12 and retighten the locking nuts 11. Loosen
the locking screw 8 and push the side parts 7
together. Secure with the locking screw 8.
Important Information:
If you place the stand inside your house, it may be
advisable to put a non-sliding pad under the
stand's rubber end caps as they could leave marks
on sensitive floors, for example parquet flooring.
-18880.000.55-
-03.80.745.00- 5/04
1
2
3
4
5
6
7
8
9
10
11
12
13
C
14
 Loading...