

Page 1
KÖNIG & MEYER GmbH & Co. KG
Kiesweg 2, 97877 Wertheim, www.k-m.de
18873-300-55 Rev.06 03-80-316-00 8/16
TECHNISCHE DATEN / SPEZIFIKATION
Material
Klammer, Hebel, Griffe: PA, schwarz
Haltewinkel: Stahl, gepulvert, schwarz
Verbindungselemente: Stahl, verzinkt
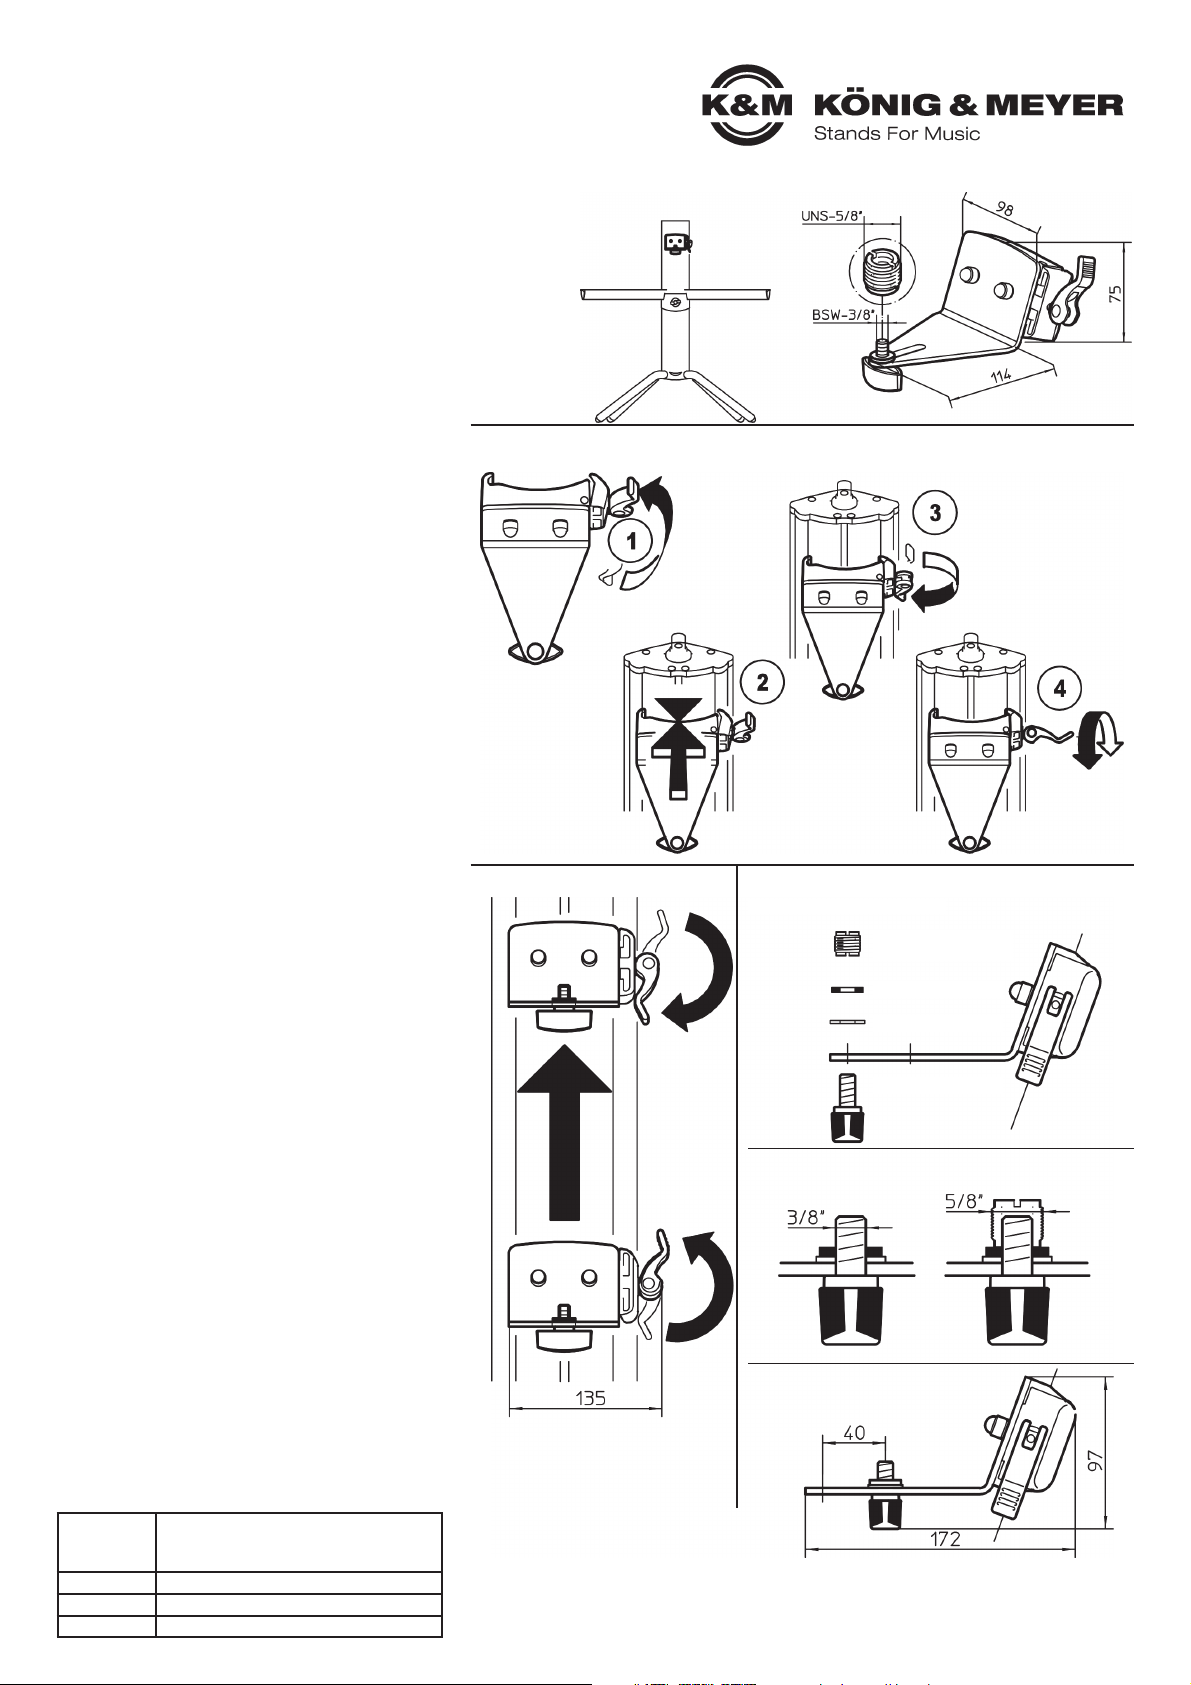
Maße Auflage: 114 x 98 mm
Verpackung PE-Beutel 400 x 260 mm
Gewicht 0,6 kg
AUFSTELLANLEITUNG
1.-4. MONTAGE
PRÜFEN, INSTANDHALTEN, REINIGEN
Universalhalter für
»Spider Pro«
- passend zum 18840 »Baby-Spider Pro« und 18860 »Spider Pro«
- Stabil, flexibel und praktisch
- stufenlos auf der Säule zu verschieben
- 3/8" und 5/8"-Gewindeanschluß
SICHERHEITSHINWEISE
Vielen Dank, dass Sie sich für dieses Produkt entschieden haben. Diese Anlei tung informiert Sie über alle wich tigen Schritte bei Aufbau und Handhabung.
Wir empfehlen, sie auch für den späteren Gebrauch aufzubewahren.
Die Montage des Universalhalters ist sehr einfach.
Sie ist komplett vormontiert und kann sofort mit dem
»Spider Pro« verbunden werden.
MONTAGE des UNIVERSALHALTERS am SPIDER
1 Klammer öffnen durch Lösen des Hebels
2 Klammer an die Säule des Spiders halten
3 Durch Umlegen des Hebels bis zum Anschlag
3 wird die Klammer nun an der Säule befestigt
4 Sollte die Klammer zu locker (oder zu stramm)
4 sitzen, den Hebel erneut lösen und ihn um 180°
4 im Uhrzeigersinn (bzw. dagegen) drehen. Danach
4 den Hebel wieder umlegen. Vorgang evtl. wieder-
4 holen bis die Klammer fest an der Standsäule sitzt.
BENUTZERHINWEISE
EINSTELLUNGEN
5 HÖHE
5 Hebel öffnen und die nun lockere Klammer
5 wie gewünscht auf der Säule verschieben.
5 Position durch umlegen des Hebels sichern.
6 ANSCHLUSSGEWINDE
6 Mit der 3/8"-Flügelschraube (bzw. dem Reduziergewinde)
6 können diverse Geräte wie Mikrofone, Schwanenhälse,
6 Mikroarme etc. anden Haltewinkel geschraubt werden.
6 a. BESTANDTEILE: Neben den Gewinden befindet sich
6 a. zwischen dem Haltewinkel und dem Mikro eine U-
6 a. Scheibe aus Stahl und eine schwingungsdämpfende
6 a. Gummischeibe.
6 b. ANORDNUNG: Gewindebolzen, Scheiben und ggf. die
6 b. Gewindereduzierung werden bis zum Anschlag
6 b. zusammengeschoben. So halten alle Teile ihre Position.
6 c. VERSCHIEBEWEG: Der Gewindebolzen kann um
6 c. 40 mm nach hinten bzw. vorne geschoben werden.
- Bitte beachten Sie die Angaben dieser Aufstellanleitung
- Ebenfalls Sicherheitsanweisungen und Aufbauanleitung
- der »Spider Pro« Modelle 18840 und 18860 beachten
- Nicht geeignet für den sogenannten Ur-Spider 18850
- Anleitungen der Anbauteile (z.B. Mikroarm) beachten
- Halterung angemessen und zentrisch beladen
- bei Wartungsarbeiten auf evtl. Gefährdungen achten
- Zur Reinigung und Pflege am besten ein leicht feuchtes
- Tuch und ein nicht scheuerndes Reinigungsmittel benutzen
FEHLER (F) & BESEITIGUNG (B)
F: Halterung wackelt
F: B: Voreinstellung der Klammer zu groß:
F: B: siehe Punkt 4 MONTAGE
F: B: BEACHTE! Halterung passt nicht an die
F: B: BEACHTE! Säule des Spiders 18850.
F: Flügelschraube 6.a klappert am Haltewinkel
F: B: Gummischeibe so weit wie möglich über den
F: B: Gewindebolzen schieben 6.b
5. HÖHE 6. ANSCHLUSSGEWINDE
Gummischeibe ø 20
215 Reduziergewinde
3/8" - 5/8"
Stahlscheibe ø 21
Flügelschraube 3/8"
a. BESTANDTEILE
b. ANORDNUNG
c. VERSCHIEBEWEG
Page 2

KÖNIG & MEYER GmbH & Co. KG
Kiesweg 2, 97877 Wertheim, www.k-m.de
18873-300-55 Rev.06 03-80-316-00 8/16
TECHNICAL DATA
Material
Clamp, lever, handle: PA, black
Bracket: steel, powder coating, black
Connecting elements: Steel, galvanized
Dimensions Support: 114 x 98 mm
Packaging PE-Bag 400 x 260 mm
Weight 0.6 kg
SETUP INSTRUCTIONS
1.-4. MOUNTING
CHECK, MAINTENANCE, CLEANING
Universal Holder for
»Spider Pro«
- compatible with the 18840 »Baby-Spider Pro« and 18860 »Spider Pro«
- stable, flexible and practical
- can be placed anywhere on the support column (variable adjustment)
- 3/8" and 5/8" threaded connector
SAFETY NOTES
Thank you for choosing this product. The instructions provide directions to all
of the important set up and handling steps. We recommend you keep these
instructions for future reference.
Assembly is very simple.
The bracket comes completely pre-assembled and can be
attached to the »Spider Pro« immediately.
MOUNTING the UNIVERSAL BRACKET to the SPIDER
1 Loosen the clamp by releasing the lever
2 Place and hold the clamp up to the Spider support column
3 Apply the lever until it is in a locked position to affix the
3 bracket onto the support column
4 Should the clamp be too loose (or too tight), release
4 the lever and turn it 180° clockwise to tighten (i.e. counter-
4 clockwise to loosen). Then apply the lever until it is in a
4 locked position. If needed, repeat the process until the
4 clamp is properly affixed to the support column
USAGE NOTES
ADJUSTMENTS
5 HEIGHT
5 Release the lever to loosen the clamp, adjust
5 the clamp to the desired position.
5 Then apply the lever until it is in a locked position.
6 THREADED CONNECTION
6 With the 3/8" finger screw various equipment (respectively
6 the thread adapter), such as microphones, goose necks,
6 micro arms etc., can be screwed onto the bracket.
6 a. COMPONENTS: In addition to the threads located
6 a. between the bracket and the microphone is a washer
6 a. made of steel and a vibration-damping rubber washer.
6 b. PLACEMENT: Tighten the threaded bolts, washers and
6 b. optionally the thread reduction - do not overtighten.
6 b. This ensures that the assembly is held in place.
6 c. SLOTTED ADJUSMENT: The threaded bolt can be
6 c. adjusted 40 mm front to back.
- in the event of workstation maintenance pay attention
- to possible risks
- to care for the product use a damp cloth and a
- non-abrasive cleaning agent
FAULT-FINDING (F) and REPAIR (R)
F: Bracket is unstable
F: R: The original clamp setting is too tight:
F: R: see setion 4 SETUP INSTRUCTIONS
F: R: NOTE! Bracket does not fit on the
F: B: NOTE! Spider 18850 support column.
F: The finger screw 6a in the bracket is loose
F: R: Ensure that the rubber disc is at the base
F: R: of the threaded bolt 6.b
5. HEIGHT 6. THREADED CONNECTION
rubber washer ø 20
washer ø 21
finger screw 3/8"
a. COMPONENTS
b. PLACEMENT
c. SLOTTED ADJUSMENT
- Please read the information provided in the setup instructions
- Please also read the safety and the assembly instructions
- for the »Spider Pro« Models 18840 and 18860
- It is not compatible with the so-called Ur-Spider 18850
- Please follow the assembly parts (e.g. micro-arm) instructions
- Please ensure that the bracket is properly assembled
- and centered
215 Thread adapter
3/8" - 5/8"
 Loading...