

Page 1

KÖNIG & MEYER GmbH & Co. KG
Kiesweg 2, 97877 Wertheim, www.k-m.de
16330-000-55 Rev.06 03-79-149-00 05/18
TECHNISCHE DATEN
GEBRAUCHSANLEITUNG
16330 Kopfhörerhalter
- Für einen perfekt aufgeräumten Kopfhörer
- Gleichermaßen geeignet für Home und Studio
- Zur Montage unter einem Tisch oder Regal
- Der Materialmix bietet echte Qualität:
- - Sicheren Halt durch robuste Metallkonstruktion
- - Schutz von Beschädigungen durch gummierte Auflagen
- Zwei Holzschrauben sind im Lieferumfang enthalten
SICHERHEITSHINWEISE
Vielen Dank, dass Sie sich für dieses Produkt entschieden haben.
Diese Anleitung informiert Sie über alle wich tigen Schritte bei Aufbau
und Handhabung.Wir empfehlen, sie auch für den späteren Gebrauch
aufzubewahren.
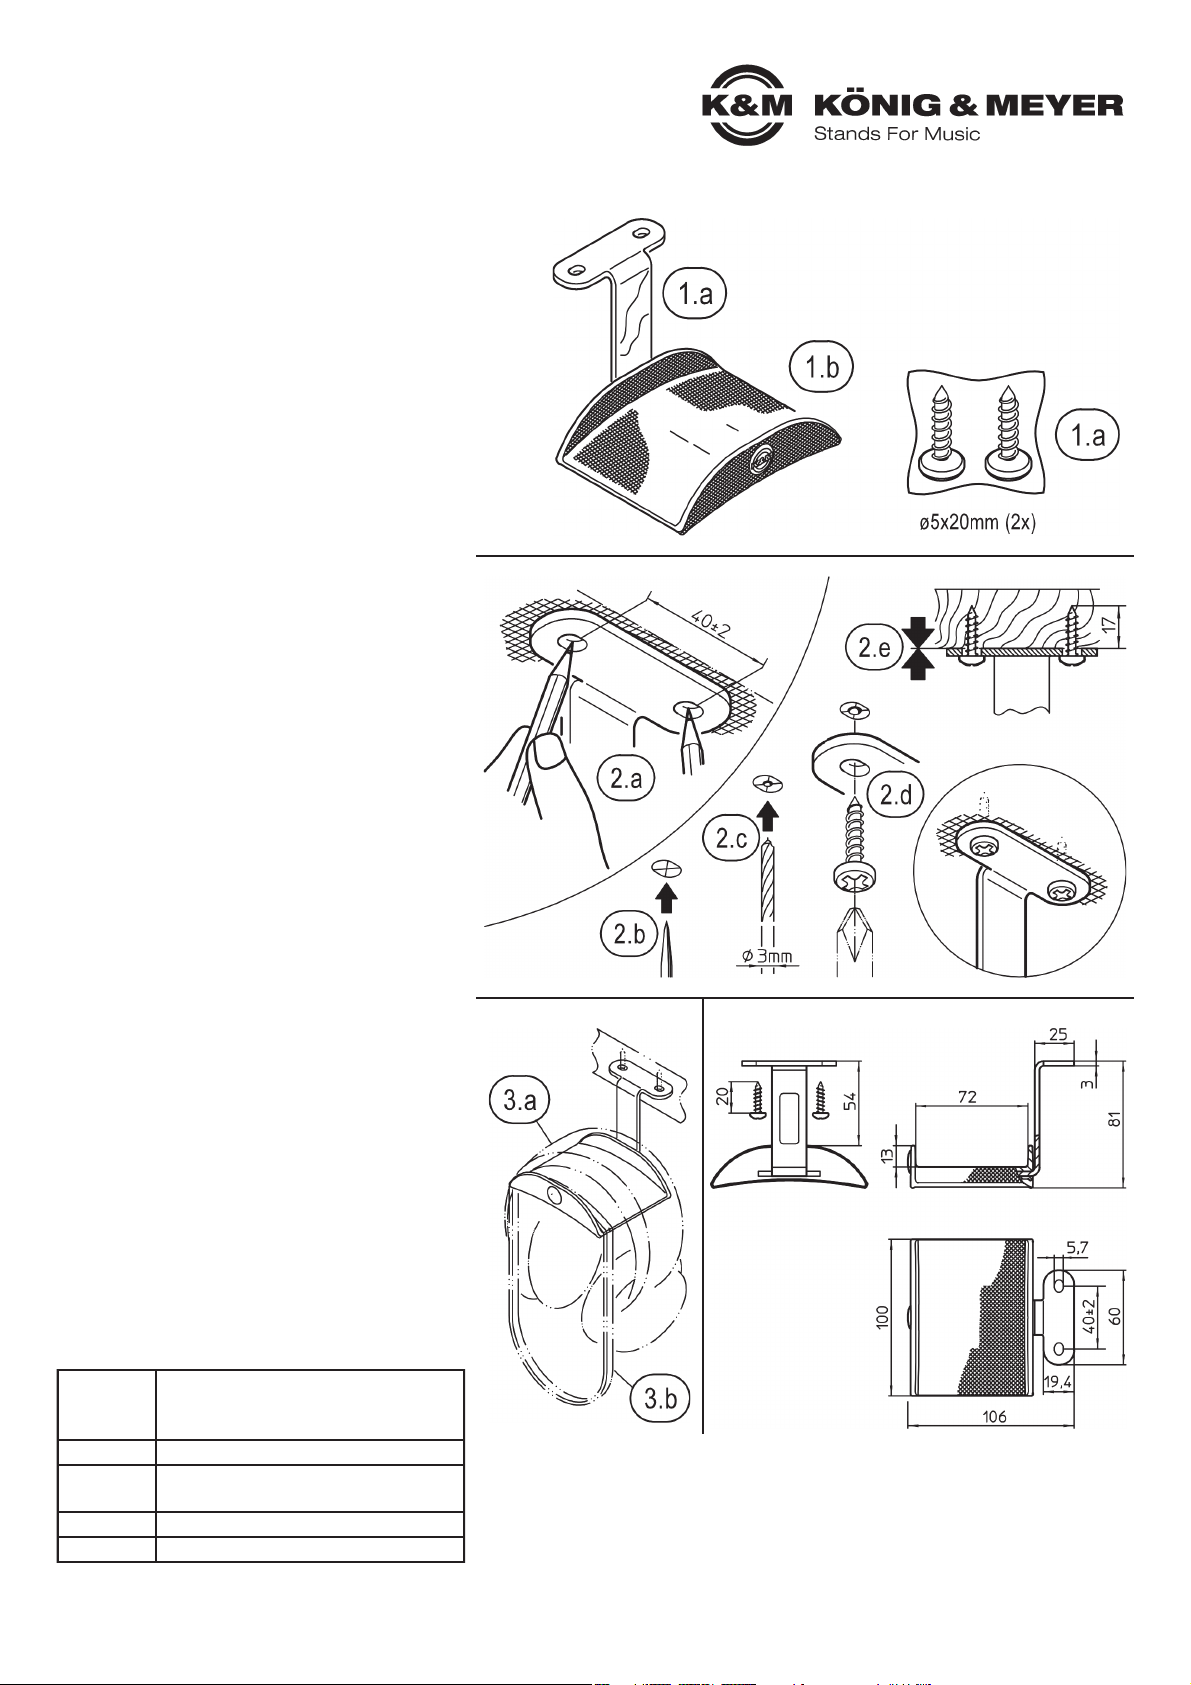
1. BESTANDTEILE
Der Kopfhörerhalter ist werkseitig bereits
komplett gebrauchsfertig. Er besteht aus:
1.a Haltewinkel (Stahl)
1.b Auflage (gummiartiger Kunststoff)
1.c Zwei Holzschrauben ø 5 x 20 mm
Der Haltewinkel muss lediglich noch an
gewünschter Stelle befestigt werden.
2. MONTAGE
- Ort und Trägermaterial bestimmen die Art
- der Befestigung (Schrauben, evtl. Dübel)
- Die beigestellten Schrauben 5 x 20 mm 1.c eignen
- sich für die Direktmontage in Holzplatten und Balken...
- 2.a Haltewinkel ausrichten und markieren.
- 2.b Bei Spanplatten und Weichhölzern empfehlen
- 2.b wir die Schraublöcher mit einer Metallspitze
- 2.b anzukörnen, damit die Schraube besser ansetzt.
- 2.c Bei Harthölzern sollte vorgebohrt werden:
- 2.c Bohrerdurchmesser 3 mm, Tiefe ca. 20 mm.
- 2.d Haltewinkel platzieren und Schraube ansetzen
- 2.e Haltewinkel spielfrei festschrauben
- Andere Trägerwerkstoffe wie Beton, Metall, etc.
- benötigen ggf. andere Schrauben und Dübel.
- Diesbezüglich bitte im Fachhandel informieren.
3. KOPFHÖRER PLATZIEREN
3.a Den Bügel des Kopfhörers nehmen und einfach
3.a über die Kunststoff-Auflage hängen.
3.b Ein evtl. vorhandenes Kabel kann ebenfalls
3.b um die Auflage gewickelt werden.
3.b Wir empfehlen eine großzügige Wicklung.
4. ABMESSUNGEN
Die Abstände ermöglichen die Aufnahme und
Präsentation auch sehr großer Kopfhörer.
- Die Halterung dient ausschließlich zur Aufnahme von Kopfhörern
- und deren Verkabelung. Andere Lasten sind unzulässig
- Nur an geeigneten, d.h. ausreichend großen und trag-
- fähigen Platten zu montieren
- Beide beigefügten Holzschrauben sind auf fach-
- männische Art und Weise zu montieren, ggf. muss
- vorgebohrt werden (ø 3 mm).
Material
Haltewinkel: Stahl, gepulvert, schwarz
Schrauben: Stahl, verzinkt
Auflage: Kunststoff PE
Traglast Kopfhörer + Kabel
Maße
Haltewinkel: B x H x T - 100 x 81 x 106 mm
Auflage: B x T-Innen - 100 x 72 mm
Karton 107 x 104 x 86 mm
Gewicht 0,175 kg
2. MONTAGE
1. BESTANDTEILE
3. KOPFHÖRER PLATZIEREN 4. ABMESSUNGEN
PRÜFEN, INSTANDHALTEN, REINIGEN
- Zur Reinigung am besten ein leicht feuchtes Tuch und ein nicht scheuerndes
- Reinigungsmittel benutzen
- Der Austausch der Kopfhörer-Auflage 1.b ist zwar nicht erwartbar, aber möglich.
- In diesem Falle empfehlen wir den Kopfhörerhalter an unseren Reparaturservice
- einzuschicken.
- Wenn Sie selbst aktiv werden, vermeiden Sie unbedingt den Kontakt mit den spitzen
- Widerhaken der Metallzunge. Diese stellen eine Gefährdung dar.
Page 2
KÖNIG & MEYER GmbH & Co. KG
Kiesweg 2, 97877 Wertheim, www.k-m.de
16330-000-55 Rev.06 03-79-149-00 05/18
TECHNICAL DATA
USAGE INSTRUCTIONS
16330 Headphone holder
- For perfectly neat headphones
- Equally suited for home and studio.
- Mounted under a table or shelf
- The material mix offers real quality:
- - Secure hold through the robust metal construction
- - Protection against damage through its rubber coating
- Two wooden screws are included with the delivery
SAFETY NOTES
Thank you for choosing this product. This instruction manual informs
you about the important steps to set up an handle the product. We
recommend to keep the manual in a separate place for a possible
later use.
1. COMPONENTS
The headphone holder comes from the factory
ready to use. It is comprised of:
1.a Holding bracket (Steel)
1.b Support Arm (rubber coated plastic)
1.c Two wood screws ø 5 x 20 mm
All that needs to be done is
is to mount the bracket to the desired position.
2. MOUNTING
- Location and substrate determine the
- type of mounting materials (screws possibly anchors)
- The included screws 5 x 20 mm 1.c are
- suited for direct mounting to wood and wood frames...
- 2.a Position and mark the bracket.
- 2.b In the case of particle board or soft woods we
- 2.b recommend that the screw holes be center-punched
- 2.b with a metal point, so that the screw has the proper sit.
- 2.c In the case of hardwoods, the holes should be pre-
- 2.c drilled: Drill diameter ø 3 mm, Depth approx. 20 mm.
- 2.d Place the bracket and screws
- 2.e Securely screw in the screws
- Other substrates like cement, metal etc. need other
- screws and anchors. Check at the hardware store for
- more detailed information.
3. PLACEMENT OF THE HEADPHONES
3.a Take the headband of the headphones and
3.a simply place it on the plastic holder.
3.b If the headphones have a cable simply wrap it
3.b around the holder.
3.b We recommend that the cable is not wrapped tightly.
4. DIMENSIONS
The distances provide for holding and the
presentation of very large headphones.
- The holder is only to be used to hold the headphones and
- headphone cables. Other equipment is not permitted.
- Only mount on suitable i.e. sufficiently large and load
- bearing plates
- The included wood screws are to be used in a
- professional manner
- The holes may need to be pre-drilled (ø 3 mm).
Material
Bracket: Steel, powder coating, black
Screws: Steel, galvanized
Support: Plastic PE
Load Headphones + Cable
Dimensions
Bracket: W x H x D - 100 x 81 x 106 mm
Support: W x D-Internal - 100 x 72 mm
Box 107 x 104 x 86 mm
Weight 0.175 kg
2. MOUNTING
1. COMPONENTS
3. PLACEMENT OF THE
HEADPHONES
4. DIMENSIONS
CHECK, MAINTENANCE, CLEANING
- To care for the product, use a damp cloth and a non-abrasive cleaning agent.
- Exchanging Headphone Holder support arm 1.b is not expected but possible.
- In this case we recommend that the headphone holder be sent in for repairs.
- If you chose to repair it yourself, be sure not to touch the sharp barbed hook
- on the metal tongue. This represents a risk.
Page 3

KÖNIG & MEYER GmbH & Co. KG
Kiesweg 2, 97877 Wertheim, www.k-m.de
16330-000-55 Rev.06 03-79-149-00 10/20
Technická data
Návod k použití
16330 Držák pro sluchátka
- Pro perfektní odkládání sluchátek
- Určeno pro domov i studio
- Připevnění pod stůl nebo polici
- Vyrobeno z vysoce kvalitních materiálů:
- - bezpečnost zajišťuje robustní kovová konstrukce
- - sluchátka jsou chráněna měkkým pogumováním držáku
- Dva vruty jsou součástí dodávky
Bezpečnostní pokyny
Děkujeme, že jste si vybrali tento produkt. Následující instrukce vás
provedou všemi důležitými úvodními kroky pro umístění a užívání.
Doporučujeme vám si tento návod uschovat pro případné využití v
budoucnu.
1. Jednotlivé části
Sluchátkový držák je dodáván z výroby kompletní
k okamžitému využití. Skládá se z:
1.a Upevňovací rameno (ocel)
1.b Odkládací rameno (pokryto měkčeným plastem)
1.c Dva vruty do dřeva ø 5 x 20 mm
Jediné, co je třeba udělat, je upevnit držák do
potřebné pozice na vhodné místo.
2. Upevnění
- Umístění a materiál podkladu určuje způsob
- uchycení (vruty jsou jednou z možností)
- Přiložené vruty 5x20 1.c jsou určeny pro přímé
- uchycení ke dřevu nebo MDF
- 2.a Umístěte držák na vhodné místo a otvory označte.
- 2.b V případě umístění na dřevotřískovou desku nebo
- 2.b měkké dřevo je vhodné vytvořit otvory pro vruty
- 2.b vyražením pomocí vhodného kovového trnu, Vrut
- 2.b snáze zavrtáte.
- 2.c V případě tvrdého dřeva je vhodné otvory předvrtat:
- 2.c vrtákem o ø 3 mm, do hloubky 20 mm.
- 2.d Umístěte držák a zašroubujte vruty
- 2.e Šrouby přiměřeně pevně dotáhněte
- V případě upevnění na jiné materiály (beton, kov atd.)
- použijte jiné upevňovací prostředky. Navštivte odbornou
- prodejnu pro získání přesných informací.
3. Umístění sluchátek
3.a Uchopte sluchátkový most a sluchátka jednoduše
3.a zavěste na odkládací rameno.
3.b Pokud jsou sluchátka vybavena kabelem, omotejte jej
3.b ve volných smyčkách okolo ramene držáku.
3.b Smyčky neutahujte.
4. Rozměry
Rozměry a vzdálenosti jednotlivých částí jsou vyhovující
pro zavěšení i extrémně rozměrných sluchátek.
- Držák je vytvořen pro sluchátka a sluchátkové kabely.
- Umisťování jiných předmětů či komponentů na tento
- držák není dovoleno.
- Ujistěte se, že umístění, které zvolíte je vhodné velikostí
- i výškou.
- Dodávané vruty musí být použity odborně
- Upevnění může vyžadovat předvrtání otvorů (ø 3 mm).
Materiál
Držáku: ocel s práškovým nátěrem,
černé barvy
Vruty: pozinkovaná ocel
Odkládací část: Plastic PE
Nosnost
Dimenzované pro hmotnost sluchátek a
kabelu
Rozměry
Upevnění Š x V x H - 100 x 81 x 106 mm
Odkládací část: Š x H uvnitř - 100 x 72 mm
Balení 107 x 104 x 86 mm
Hmotnost 0,175 kg
2. Upevnění
1. Jednotlivé části
3. Umístění sluchátek 4. Rozměry
Kontrola, údržba, čištění
- Pro péči o produkt používejte měkky hadřík a ne-abrazivní í čistící prostředky
- Výměna nebo oprava odkládacího ramene není předpokládána, ale je možná. V tomto
- případě vám doporučujeme odeslání stojanu do našeho servisu. Při balení se ujistěte,
- že ostré výčnělky jsou dobře obalené. Jsou možným místem problémů a rizik.
Page 4

KÖNIG & MEYER GmbH & Co. KG
Kiesweg 2, 97877 Wertheim, www.k-m.de
16330-000-55 Rev.06 03-79-149-00 10/20
Technické informácie
Návod na použitie
16330 Držiak na slúchadlá
- Pre perfektné odkladanie slúchadiel
- Určené pre domov i štúdio
- Pripevnenie pod stôl alebo policu
- Vyrobené z vysoko kvalitných materiálov:
- - bezpečnosť zaisťuje robustná kovová konštrukcia
- - slúchadlá sú chránené mäkkým pogumovaním držiaka
- Dve skrutky do dreva sú súčasťou dodávky
Bezpečnostné pokyny
Ďakujeme, že ste si vybrali tento produkt. Nasledovné inštrukcie vás
prevedú všetkými dôležitými úvodnými krokmi pre umiestnenie a
používanie. Odporúčame vám uschovať si tento návod pre prípadné
budúce využitie.
1. Jednotlivé časti
Slúchadlový držiak je dodávaný z výroby kompletný
k okamžitému využitiu. Skladá sa z:
1.a Upevňovacie rameno (oceľ)
1.b Odkladacie rameno (pokryté mäkčeným plastom)
1.c Dve skrutky do dreva ø 5 x 20 mm
Jediné, čo treba spraviť, je upevniť držiak do
potrebnej pozície na vhodné miesto.
2. Upevnenie
- Umiestnenie a materiál podkladu určuje spôsob
- uchytenia (skrutky do dreva sú jednou z možností)
- Priložené skrutky do dreva 5x20 1.c sú určené na
- priame uchytenie k drevu alebo MDF.
- 2.a Umiestnite držiak na vhodné miesto a otvory označte.
- 2.b V prípade umiestnenia na drevotrieskovú dosku alebo
- 2.b mäkké drevo je vhodné vytvoriť otvory na skrutky do
- 2.b dreva vyrazením pomocou kovového tŕňa. Skrutky do
- 2.b dreva ľahko zavŕtate.
- 2.c V prípade tvrdého dreva je vhodné otvory predvŕtať:
- 2.c vrtákom o ø 3 mm, do hĺbky 20 mm.
- 2.d Umiestnite držiak a zaskrutkujte skrutky do dreva
- 2.e Skrutky primerane pevne dotiahnite
- V prípade upevnenie na iné materiály (betón, kov, atď.)
- použite iné upevňovacie prostriedky. Navštívte odbornú
- predajňu za účelom získania presných informácií.
3. Umiestnenie slúchadiel
3.a Uchopte slúchadlový most a slúchadlá jednoducho
3.a zaveste na odkladacie rameno.
3.b Ak sú slúchadlá vybavené káblom, omotajte ho vo
3.b voľných slučkách okolo ramena držiaku.
3.b Slučky neuťahujte.
4. Rozmery
Rozmery a vzdialenosti jednotlivých častí sú vyhovujúce
na zavesenie aj extrémne rozmerných slúchadiel.
- Držiak je vytvorený pre slúchadlá a slúchadlové káble.
- Umiestňovanie iných predmetov či komponentov na tento
- držiak nie je dovolené.
- Uistite sa, že umiestnenie, ktoré zvolíte je vhodné svojou
- veľkosťou a výškou.
- Dodávané skrutky do dreva musia byť použité odborne.
-Upevnenie môže vyžadovať predvŕtanie otvorov (ø 3 mm).
Materiál
Držiaku: oceľ s práškovým náterom,
čiernej farby
Skrutky do dreva: pozinkovaná oceľ
Odkladacia časť: Plastic PE
Nosnosť
Dimenzované pre hmotnosť slúchadiel a
kábla
Rozmery
Upevnenia: Š x V x H - 100 x 81 x 106 mm
Odkladacia časť: ŠxH vnútri - 100 x 72 mm
Balenie 107 x 104 x 86 mm
Hmotnosť 0,175 kg
2. Upevnenie
1. Jednotlivé časti
3. Umiestnenie slúchadiel 4. Rozmery
Kontrola, údržba, čistenie
- K starostlivosti o produkt používajte mäkkú handričku a neabrazívne a čistiace prostriedky
- Výmena alebo oprava odkladacieho ramena nie je predpokladaná, ale je možná. V tomto
- prípade vám odporúčame odoslanie stojanu do nášho servisu. Pri balení sa uistite, že
- ostré výčnelky sú dobre obalené. Sú možným miestom problémov a rizík.
 Loading...