

Page 1
14085/14086 Keyboardbank
- praktische und sehr solide Sitzgelegenheit mit ansprechendem Design
- höhenverstellbar: komfortabel und schnell durch Rast/Klemmelemente
- mit Skaileder-Bezug (Modell 14085) oder mit Stoffbezug (Modell 14086)
- Abmessungen: Höhe min. 430 - max. 670 mm, Breite 660mm, Tiefe 330 mm
- Eigengewicht: 8,5 kg
SICHERHEITSHINWEISE
- Schraubverbindungen 2, 3, 8 fest anziehen
- Rastbolzen 8 müssen stets eingerastet sein
- Fußrohre 1 sind immer auf gleiche Höhe einzustellen
- Auf tragfähige und ebene Untergründe achten
- max. Höhe ist erreicht sobald am Fußrohr die
- STOP-Markierung sichtbar wird;
- siehe Kapitel HÖHENVERSTELLUNG
- Die Möglichkeit das Produkt zu verstellen, birgt
- naturgemäß Einklemmgefahren. Umsichtige
- Handhabung bei Auf- und Abbau ist erforderlich.
- BEACHTE:
- Die Keyboardbank ist ein Sitzmöbel -
- die Benutzung als Steighilfe o.ä. ist aus
- Sicherheitsgründen nicht gestattet!
AUFBAUANLEITUNG
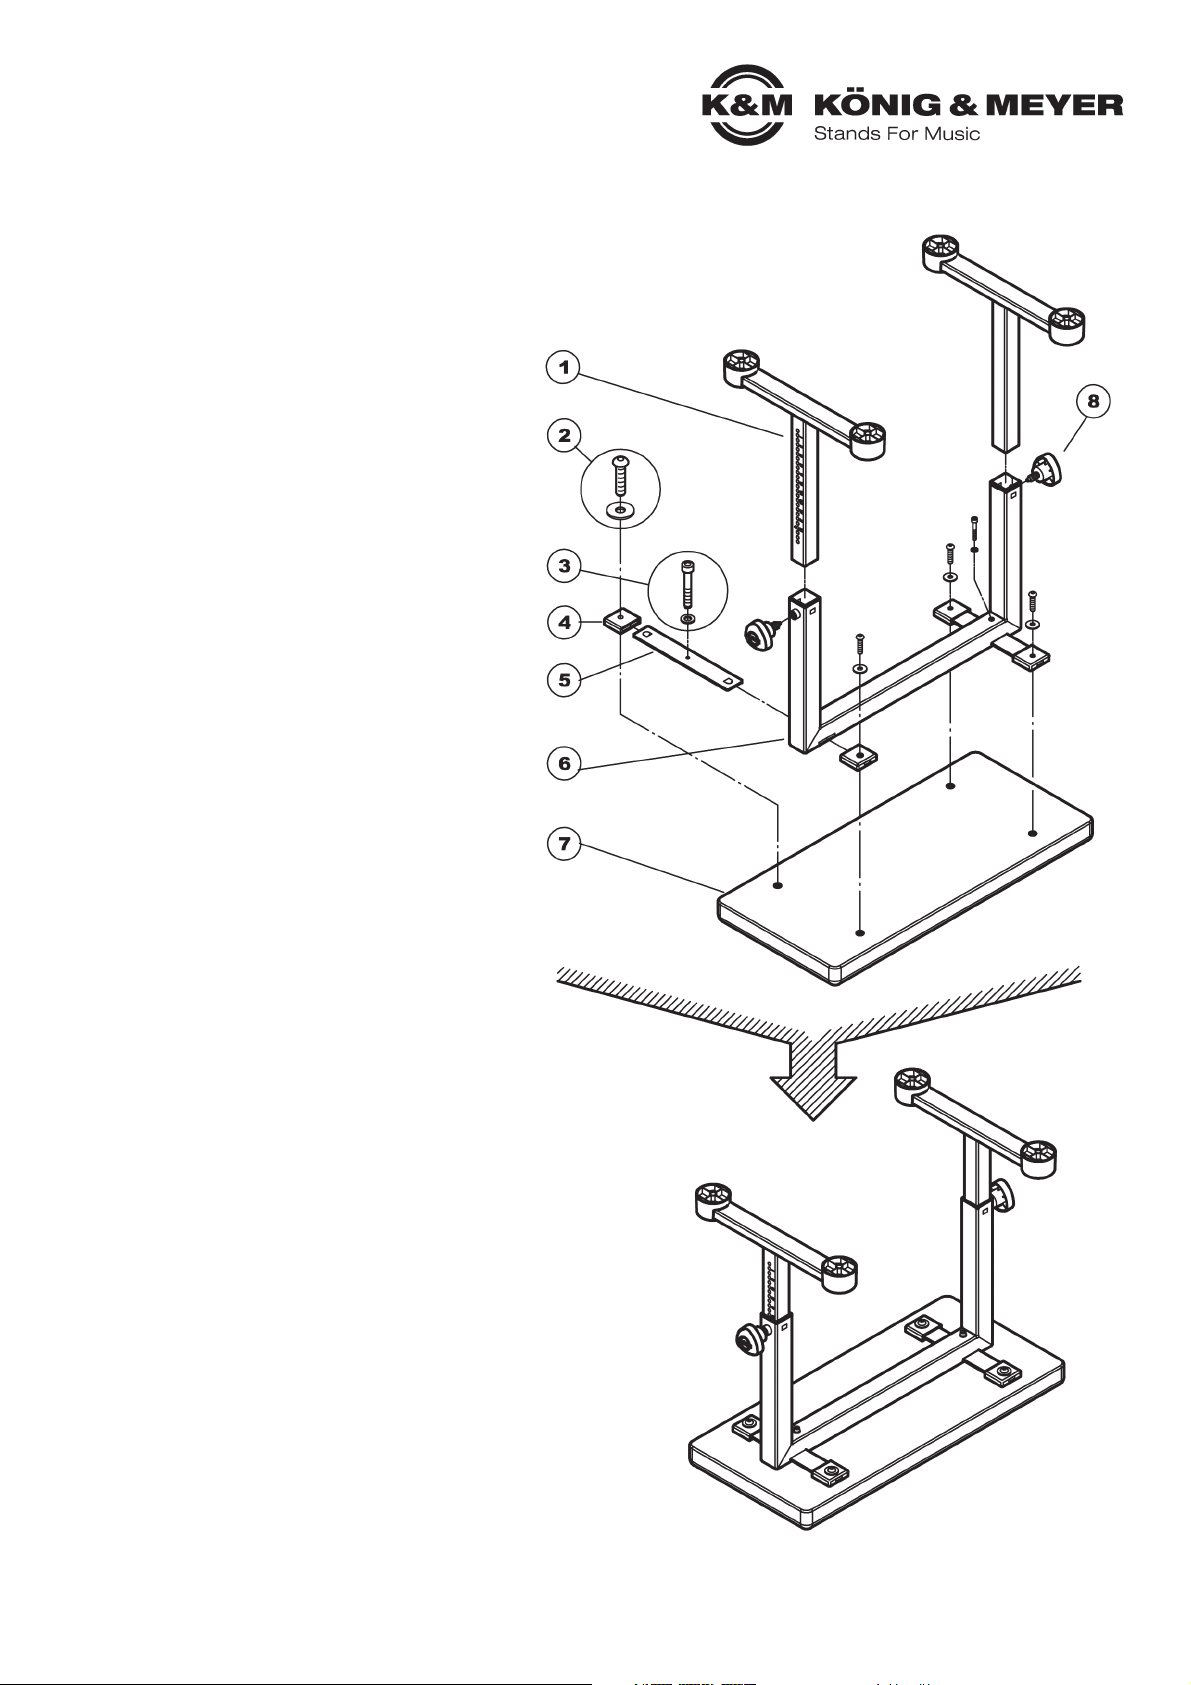
BESTANDTEILE
1 Fußgestell (2x)
2 Halbrundkopfschraube M8 x 35 mm mit U-Scheibe ø 8,4 mm (4x)
3 Zylinderschraube M6 x 40 mm mit U-Scheibe ø 6,4 mm (2x)
4 Kappen (4x)
5 Befestigungslasche (2x)
6 U-Bügel
7 Sitzbank
8 Rast/Klemmgriff M12 (2x)
MONTAGE
A. U-Bügel 6 an Sitzbank 7 schrauben.
A. - dazu jeweilige Befestigungslaschen 5 durch
A. - Schlitze des U-Bügels 6 schieben,
A. - mittig ausrichten und mittels
A. - Zylinderschraube und U-Scheibe 3 fixieren.
A. - Kappen 4 auf Befestigungslaschen 5 aufschieben.
A. - Halbrundschrauben mit U-Scheiben 2 durch
A. - Kappen 4 stecken und mit Sitzbank 7 verschrauben.
B. Fußgestell 1 (Lochbild zeigt nach aussen) in
U-Bügel-Rohr 6 einschieben und durch Eindrehen
der Rast/Klemmschraube 8 in der Höhe fixieren.
B. - BEACHTE:
B. - der Zapfen der Rast/Klemmschraube 8 muss in
B. - eine Bohrung des Fußrohres 1 eintauchen bevor
B. - sie fest angezogen werden darf.
B. - Das zweite Fußgestell in gleicher Weise montieren.
B. - Dabei auf gleiche Höheneinstellung achten (Skala).
Vielen Dank, dass Sie sich für dieses Produkt entschieden
haben. Diese Anleitung informiert Sie über alle wichtigen
Schritte bei Aufbau und Handhabung. Wir empfehlen, sie
auch für den späteren Gebrauch aufzubewahren.
KÖNIG & MEYER GmbH & Co. KG
Kiesweg 2, 97877 Wertheim, www.k-m.de
14085-000-55/14086-00-55 Rev.015 03-80-148-00 1/18
Page 2

BENUTZERHINWEISE / FUNKTIONEN
HÖHENVERSTELLUNG
VORGEHENSWEISE
- Keyboardbank umdrehen
- und auf Polster abstellen
- ein Fußgestell festhalten
- Einstellung s. Abb. 1-4
- ebenso mit zweitem
- Fußgestell verfahren
PRÜFEN, INSTANDHALTEN, REINIGEN
- bei Wartungsarbeiten auf evtl. Gefährdungen achten.
- zur Reinigung am besten ein leicht feuchtes Tuch und ein nicht scheuerndes Reinigungsmittel benutzen.
FEHLERSUCHE (F) und BESEITIGUNG (B)
F: Keyboardbank steht wackelig B: Schraubverbindungen nachziehen und Untergrund prüfen bzw. in Ordnung bringen.
F: Keyboardbank steht schief B: Fußrohre auf gleiche Höhe einstellen (gleiche Markierungen).
ABMESSUNGEN
Klemmschraube
etwas lösen
Griff ziehen bis der
Sicherungsbolzen
das Fußgestell
nicht mehr blockiert
Fußgestell
ein- bzw.
ausfahren
Sicherungsbolzen in
gewünschtes Loch
rasten lassen und
Klemmschraube
wieder fest anziehen
Die Abstecklöcher der
Fußgestelle sind markiert;
das erleichtert es sehr,
die Fußrohre stets auf
gleiche Höhe ein zustellen. STOPMarkierung
zeigt maximalen
Auszug an.
Der Sitzbank kann
in der Höhe in
25 Stufen zu
je 10 mm Abstand
eingestellt werden.
TECHNISCHE DATEN / SPEZIFIKATIONEN
Material
Unterbau: Rohre, Schrauben, Scheiben - Stahl gepulvert/verzinkt/vernickelt, schwarz
Kunststoffteile - PA, TPE, schwarz
Sitzbank: 14085 -Skaileder, 14086-Stoffbezug, schwarz
Abmessungen Außen: B x T - 660 x 375 mm; Sitzbank: 660 x 330 mm; Höhe: min. 430mm / max .670 mm
Gewicht netto: 8,5 kg
Verpackung Einzelkarton: L x B x H - 675 x 400 x 130 mm
Page 3

14085/14086 Piano Bench
- practical and very solid seating in an attractive design
- adjustable height: comfortable and quick through the use of catch/clamp elements
- with skai leather (Model 14085) or with fabric upholstery (Model 14086)
- Dimensions: Height min. 430 / max. 670 mm, width 660 mm, depth 330 mm
- Weight: 8.5 kg
SAFETY NOTES
- Tighten the screws 2, 3, 8
- Lock the locking pin/bolt 8
- The leg adjustments height for both leg tubes
- must always be the same.
- Be sure that the surface will bear the load and
- is suitable and level
- max. height has been reached as soon as the
- STOP label can be seen on the leg tube
- See HEIGHT ADJUSTMENT Section
- Adjusting the product bears
- the risk of pinching fingers. Be careful and
- attentive during setup and disassembly.
- NOTE:
- The piano bench is seating furniture, do not use it
- as a step-stool, this is prohibited for safety reasons!
SET UP INSTRUCTIONS
COMPONENTS
1 Legs (2x)
2 Half-round screw M8 x 35 mm with U-disk ø 8.4 mm (4x)
3 Cylinder screw M6 x 40 mm with U-disk ø 6.4 mm (2x)
4 Caps (4x)
5 Fastening strip (2x)
6 U arms
7 Bench
8 Catch/Clamp Handle M12 (2x)
ASSEMBLY
A. Screw the U arm 6 to the bench 7.
A.- pull the fastening strip 5 through the U arm 6 slots
A. - and ensure they are centered and fasten them
A. - using the cylinder screw and U disk 3.
A.- Place the caps 4 on the fastening strips 5.
A.- Place the half-round screws with a U disk 2 through the caps
A. - 4 and screw it onto the bench 7
B. - place legs 1 (punch holes are on the outside) in the
B. - U arm tube 6 and adjust the height
B. - by turning the catch/clamp handle
B. - NOTE:
B. - The pegs of the catch/clamp handle 8 must
B. - be placed in the leg tube drill hole 1 before
B. - it is tightened.
B. -The second leg is to be assembled in the same manner.
B. - Be sure both leg adjustments are at the same height (Scale).
Thank you for choosing this product.
The instructions provide directions to all of the important
set up and handling steps We recommend you keep these
instructions for future reference.
KÖNIG & MEYER GmbH & Co. KG
Kiesweg 2, 97877 Wertheim, www.k-m.de
14085-000-55/14086-00-55 Rev.015 03-80-148-00 1/18
Page 4

USAGE NOTES / FUNCTION
HEIGHT ADJUSTMENT
ADJUSTMENT STEPS
- turn the piano bench around and
- place the cushion on a flat surface.
- hold one leg
- Settings - see Ill. 1-4
- repeat this with the
- second leg
CHECK, MAINTENANCE, CLEANING
- In the event of workstation maintenance pay attention to possible risks.
- To care for the product use a damp cloth and a non-abrasive cleaning agent.
FAULT FINDING (F) and SOLUTION (S)
F: The piano bench is not stable B: Tighten the screws and check the surface i.e. ensure that the bench is on a level surface.
F: The piano bench is leaning to one side B: Make sure that the leg adjustments are at the same height (same markings).
DIMENSIONS
Loosen the clamp
screws a bit
Pull the handle until
the locking bolt is
no longer in the drill
hole
Pull out or
push in the
extension
arm
Place the lock
pin/bolt in the
desired position
(hole) and tighten
the clamp handle
The drill holes are marked
on each leg; this makes it
much easier to adjust the
height to the same
level.
The STOP label
indicates that the
maximum height
has been reached.
The bench height
can now be adjusted
- choosing from 25
possible adjustment
increments - each
10 mm.
TECHNICAL DATA / SPECIFICATIONS
Material
Base: Tubes, struts, screws, discs - Steel powdered / galvanized / nickel plated, black
Plastic Parts - PA, TPE, black
Bench: 14085 -imitation leather, 14086-fabric covering, black
Dimensions External: W x D - 660 x 375 mm; Bench: 660 x 330 mm; Height: min. 430mm / max .670 mm
Weight net: 8.5 kg
Packaging Single Box: L x W x H - 675 x 400 x 130 mm
 Loading...