

Page 1
AUFSTELLANLEITUNG
11930 Orchesternotenpult »Overture«
Unkompliziert in der Handhabung
Platzsparend stapelbar - Abstand nur 70 mm
Einfache Bedienung durch Exzenterspannhebel
Spannkraft der Höhenklemmung nach Wunsch einstellbar
Stufenlos höhenverstellbar von 760 bis 1300 mm
Große Auflage: 500 x 320 x 56 mm, Gewicht 3,5 kg
SICHERHEITSHINWEISE
Vielen Dank, dass Sie sich für dieses Produkt entschieden haben. Diese Anleitung informiert
Sie über alle wich tigen Schritte bei Aufbau und Handhabung.Wir empfehlen, sie auch für den
späteren Gebrauch aufzubewahren.
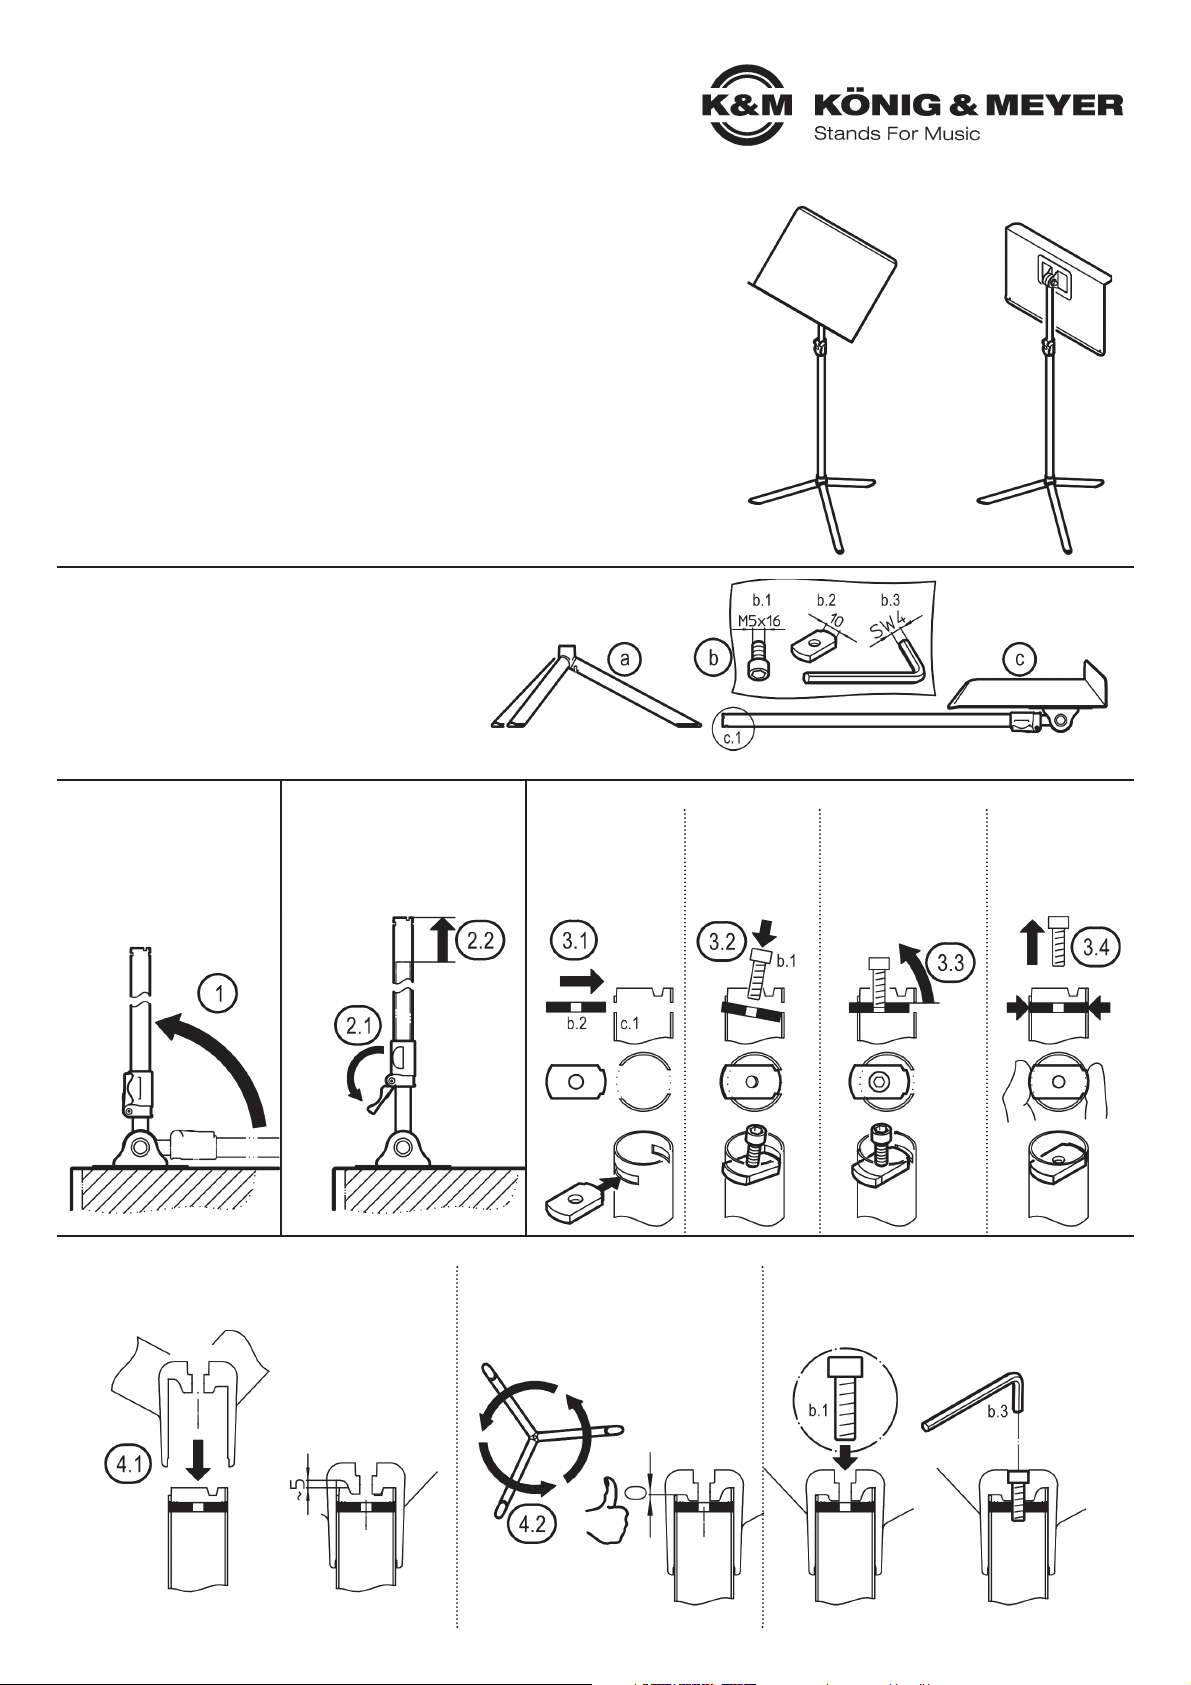
BESTANDTEILE
Sichtprüfung vornehmen, ob alle Teile vorhanden und
in Ordnung sind.
a. Dreibein mit Sockel
b. Verschraubung: b.1 - Inbusschraube M5 x 16 mm
b. Verschraubung: b.2 - Gewindeplättchen M5
b. Verschraubung: b.3 - Inbusschlüssel SW4
c. Rohrkombination mit Aufnahmeplatte
MONTAGE
- Auf geeigneten und ebenen Untergrund achten
- Traglast mittig ausrichten
- Der Festsitz bzw. die Gängigkeit des Auszugrohres und der Auflageplatte können durch Ein-
- stellung der jeweiligen Verschraubung individuell angepasst werden. Siehe 6-10 und 11-12
- Aufgrund der beweglichen Teile können naturgemäß Einklemmgefahren entstehen:
- umsichtige Handhabung bei Aufbau, Betrieb und Abbau sind daher unverzichtbar
1 Platte flach auf einen Tisch
1 legen und Rohrkombination
1 senkrecht aufstellen
4 Dreibein-Fußgestell mit dem Grundrohr verbinden
4.1 Sockel des Dreibeins bis zum Anschlag auf das
4.1 Grundrohr schieben
5 Die Demontage erfolgt in umgekehrter Reihenfolge
4.2 Den Sockel verdrehen bis die Streben
4.2 auf dem Sockelboden in die Kerben
4.2 des Grundrohres rasten (= 0 mm)
4.3 Nun den Sockel mittels Inbusschraube b.1 mit
4.3 dem Grundrohr fest verschrauben.
4.3 Dazu Schlüssel b.3 benutzen.
2.1 Klemmhebel öffnen
2.2 Grundrohr etwas heraus-
2.2 ziehen bis die Schlitze nicht
2.2 mehr durch das Innenrohr
2.2 verdeckt sind.
2.1 Klemmhebel wieder schließen
3 Gewindeplättchen b.2 im Grundrohr platzieren
3.1
Plättchen b.2 in den
Schlitz des Grundrohres c.1 stecken
3.2
Schraube b.1 ein
wenig in das Plättchen drehen
3.3
Schraubenkopf anheben und das Plättchen in den Schlitz
gegenüber einführen
bis es nicht mehr über
das Grundrohr ragt
3.4
Plättchen in Position halten und
Schraube wieder
herausdrehen
Page 2
KÖNIG & MEYER GmbH & Co. KG
Kiesweg 2, 97877 Wertheim, www.k-m.de
11930-000-55 Rev.10 03-79-179-00 07/16
TECHNISCHE DATEN / SPEZIFIKATION
BENUTZERHINWEISE / FUNKTIONEN
PRÜFEN, INSTANDHALTEN
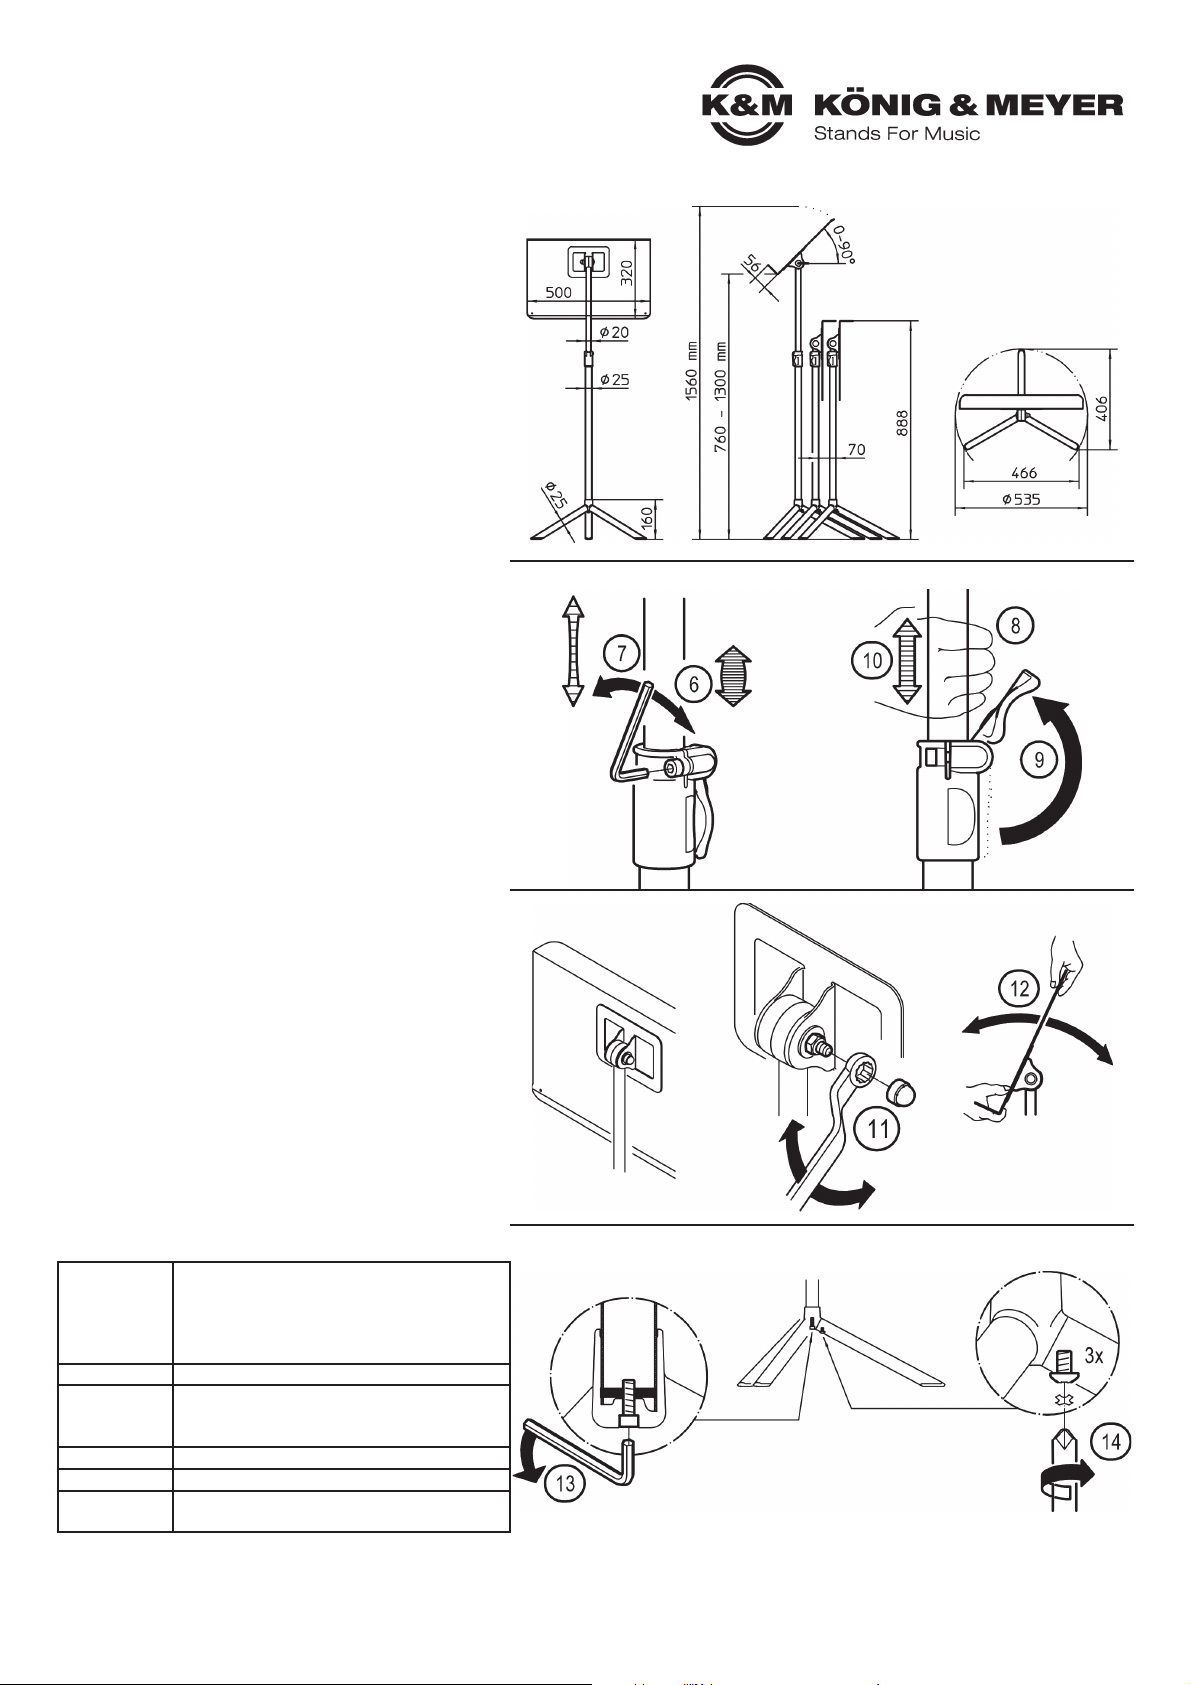
ABMESSUNGEN
Notenpultplatte: 500 x 320 x 56 mm
Rohrdurchmesser: ø 25, ø 20 mm
Höhe Gesamt: 1560 mm
Höhe Auflage (45°): 760 - 1300 mm
Neigungswinkel: 0° - 90°
Stapelabstand: 70 mm
Fußkreisdurchmesser: ø 535 mm
- Bei Wartungsarbeiten auf evtl. Gefährdungen
achten (Einklemmen...)
- Zur Reinigung am besten ein leicht feuchtes Tuch
und ein nicht scheuerndes Reinigungsmittel benutzen
FEHLERSUCHE (F) und
BESEITIGUNG (B)
F: Ganzes Fußgestell wackelt
F: B: Zentrale Inbusschraube nachziehen 13
F: Einzelner Fuß wackelt
F: B: Kreuzschlitzschraube am Fußrohr nachziehen 14
F: Spannschelle zu schwer- bzw. leichtgängig
F: B: Stellschraube lösen bzw. nachziehen 6, 7
F: Gelenk der Notenpultplatte zu schwer- bzw. leichtgängig
F: B: Mutter der Verschraubung lösen bzw. nachziehen 11
AUSZUGROHR und TRAGKRAFT
Das Auszugrohr ist stufenlos höhenverstellbar.
Die Klemmung erfolgt über eine Spannschelle,
die mittels Exzenterspannhebel bedient wird.
Die Spannschelle ist in ihrer Festigkeit voreingestellt,
kann aber vom Nutzer nachjustiert werden:
6 Durch Anziehen der Inbusschraube
6 (jeweils nur in 1/8-Umdrehungen) erhöht
6 sich die Tragkraft (z.B. für schwere Ordner)
7 Das Lockern der Inbusschraube verringert
7 zwar die Tragkraft, dafür gleitet das Rohr leichter.
HÖHENVERSTELLUNG
18 Auszugrohr fassen
19 Exzenterspannhebel öffnen
10 Auszugrohr in gewünschte Höhe fahren
10 und dort Hebel wieder schließen
NEIGUNG der PLATTE
Das Gelenk der Notenpultplatte ist mit einer
gewissen Zähgängigkeit voreingestellt,
die der Nutzer nach Wunsch verändern kann.
11 Dazu die Schutzkappe abnehmen und die
11 Sechskantmutter SW13 mit einem Schlüssel
11 ggf. lockern oder nachziehen.
12 Platte mit beiden Händen oben und
12 unten fassen und in gewünschte
12 Neigung bringen.
Material
Rohre, Platte, Gelenk: Stahl
pulverbeschichtet, schwarz
Verbindungselemente: Stahl, verzinkt
Sockel, Spannschelle, Gelenk: Polyamid (PA)
Parkettschoner: (TPE)
Traglast Blätter, Bücher, Ordner u.ä
Abmessungen
Fußkreis ø 535 mm
Höhe: 760-1300 mm
Notenplatte: 500 x 320 x 56 mm
Karton B x T x H: 805 x 535 x 165 mm
Gewicht 3,5 kg
Zubehör
(optional)
Tragetasche 11450-000-00
ABMESSUNGEN
AUSZUGROHR und TRAGKRAFT HÖHENVERSTELLUNG
NEIGUNG der PLATTE
FEHLERSUCHE und BESEITIGUNG
Page 3

SETUP INSTRUCTIONS
11930 Orchestra music stand »Overture«
Uncomplicated setup and use
Does not take up a lot of space and is stackable - distance only 70 mm
Easy to use with the excenter clamp lever
The tension of the height adjustment clamp can be set to the user's specifications
Variable height adjustment from 760 to 1300 mm
Large desk: 500 x 320 x 56 mm, Weight 3.5 kg
SAFETY NOTES
Thank you for choosing this product. The instructions provide directions to all of the important
setup and handling steps. We recommend you keep these instructions for future reference.
COMPONENTS
Conduct a visual inspection to ensure that all the parts
are included and are in working order.
a. Tripod with base
b. Screws: b.1 - Hexagon socket screw M5 x 16 mm
b. Screws: b.2 - Threaded plates M5
b. Screws: b.3 - Allen wrench /Hexagon key SW4
c. Tube combination with desk
ASSEMBLY
- Be sure that the surface is suitable and level
- Center the weight bearing load
- The tight fit i.e. the movability of the extension tube and the desk can be adjusted individually
by adjusting the respective screws. Please refer to 6-10 and 11-12
- Due to the moving parts there is a risk that the user can pinch or wedge their hands: Careful
and attentive handling during setup, operation, and disassembly is indispensable.
1 Place desk on a table so that
1 it lays flatly on the table and
1 setup the tube combination
1 vertically
4 Connect the tripod stand with the base tube
4.1 Put the base of the tripod into the base tube as far
4.1 as it will go
5 Disassembly is performed in the reverse order
4.2 Turn the base until the struts click into
4.2 the notches located on the base tube
4.2 (= 0mm)
4.3 Now connect the base with the base tube using
4.3 a hexagon socket screw b.1.
4.3 To do this use the allen wrench/Hexagon key b.3
2.1 Open a clamp lever
2.2 Pull out the base tube a bit
2.2 until the slits are no longer
2.2 covered by the internal tube.
2.1 Close the clamp lever
3 Place the plates b.2 in the base tube
3.1
Stick the plates b.2
into the slits in the
base tube c.1
3.2
Tighten screw
b.1 a bit into
the plate
3.3
Pull the head of the
screw up and place
the plate in the other
slit until it no longer
protrudes over the
base tube
3.4
Hold the plate in
position and
remove the screw
Page 4

KÖNIG & MEYER GmbH & Co. KG
Kiesweg 2, 97877 Wertheim, www.k-m.de
11930-000-55 Rev.10 03-79-179-00 07/16
TECHNISCHE DATEN / SPEZIFIKATION
USAGE NOTES / FUNCTION
CHECK, MAINTENANCE, CLEANING
DIMENSIONS
Music Desk: 500 x 320 x 56 mm
Tube Diameter: ø 25, ø 20 mm
Total Height: 1560 mm
Desk Height (45°): 760 - 1300 mm
ANGLES: 0° - 90°
Stack distance 70 mm
Base circumference: ø 535 mm
- In the event of workstation maintenance pay
- attention to possible risks (wedging or pinching of
- hands/fingers, knocking the stand over)
- To care for the product use a damp cloth and a non-
- abrasive cleaning agent.
FAULT-FINDING (F) and REPAIR (R)
F: The tripod and base are not stable
F: B: Tighten the central hexagon socket screw 13
F: Individual leg is not stable
F: B: Tighten the Phillips screw on the leg tube 14
F: Bracket clamp is too tight or loose
F: B: Loosen or tighten the adjustment screw 6, 7
F: The music desk joint is too tight or loose
F: B: Tighten or loosen the screw's nut 11
EXTENSION TUBE and WEIGHT BEARING LOAD
The extension tube can be adjusted variably.
The clamping mechanism is supported by a clamping
bracket that is operated using a excenter clamp lever.
The fit of the clamping bracket is preset,
the user can adjust this setting.
6 By tightening the hexagon socket screw (each time
6 ONLY by 1/8 increments), this increases the weight
6 bearing load (for example: heavy binders)
7 The loosening of the hexagon socket screw does
7 decrease the weight bearing load, but the tube glides easier
HEIGHT ADJUSTMENT
18 Hold the extension tube
19 Open the excenter clamp lever
10 Adjust the extension tube to the desired height
10 and close the excenter clamp lever
ANGLE of the DESK
The music desk joint's presetting is a bit stiff, the
user can adjust this setting to their individual needs.
11 To accomplish this remove the protective cap
11 and loosen or tighten the hexagon nut SW13
11 with an allen wrench/hexagon key.
12 Hold on to the top and bottom of music desk
12 with both hands and adjust the angle to the
12 desired position.
Material
Tubes, desk, joint: Steel,
powder coated, black
Connection elements: Steel, galvanized
Base, bracket clamp, joint: Polyamid (PA)
End caps: (TPE)
Load Sheet music, books, binders, etc.
Dimensions
Base circumference: ø 535 mm
Height: 760-1300 mm
Music Desk: 500 x 320 x 56 mm
Box W x D x H: 805 x 535 x 165 mm
Weight 3.5 kg
Accessories
(optional)
Carrying case 11450-000-00
DIMENSIONS
EXTENSION TUBE and WEIGHT BEARING
LOAD
HEIGHT ADJUSTMENT
ANGLE of the DESK
FAULT-FINDING and REPAIR
 Loading...