

Page 1
CMP-WNUSB32
MANUAL (p. 2)
WIRELESS LAN USB 150 MBPS
MODE D’EMPLOI (p. 14)
LAN USB SANS FIL 150 MBPS
MANUALE (p. 26)
PENNA DI RETE WIRELESS USB 150 MBPS
BRUKSANVISNING (s. 50)
TRÅDLÖS LAN USB 150 MBPS
MANUAL DE UTILIZARE (p. 62)
USB WIRELESS LAN 150 MBPS
BRUGERVEJLEDNING (p. 74)
TRÅDLØS LAN USB 150 MB/S
HASZNÁLATI ÚTMUTATÓ (o. 38.)
VEZETÉK NÉLKÜLI LAN USB 150 MBPS
KÄYTTÖOHJE (s. 44)
LANGATON LAN USB 150 MBPS
ANLEITUNG (s. 8)
WLAN USB-Adapter 150 Mbit/s
GEBRUIKSAANWIJZING (p. 20)
Draadloze LAN USB 150 MBPS
MANUAL DE USO (p. 32)
USB DE LAN INALÁMBRICA A 150 MBP/S
NÁVOD K POUŽITÍ (s. 56)
BEZDRÁTOVÁ LAN USB KARTA 150 MBPS
ΕΓΧΕΙΡΙΔΙΟ XPHΣHΣ (σελ. 68)
ΑΣΥΡΜΑΤΗ USB ΚΑΡΤΑ ΔΙΚΤΥΟΥ 150 MBPS
VEILEDNING (p. 80)
TRÅDLØS LAN USB 150 MBPS
Page 2

2
ENGLISH
Network Dongle Installation
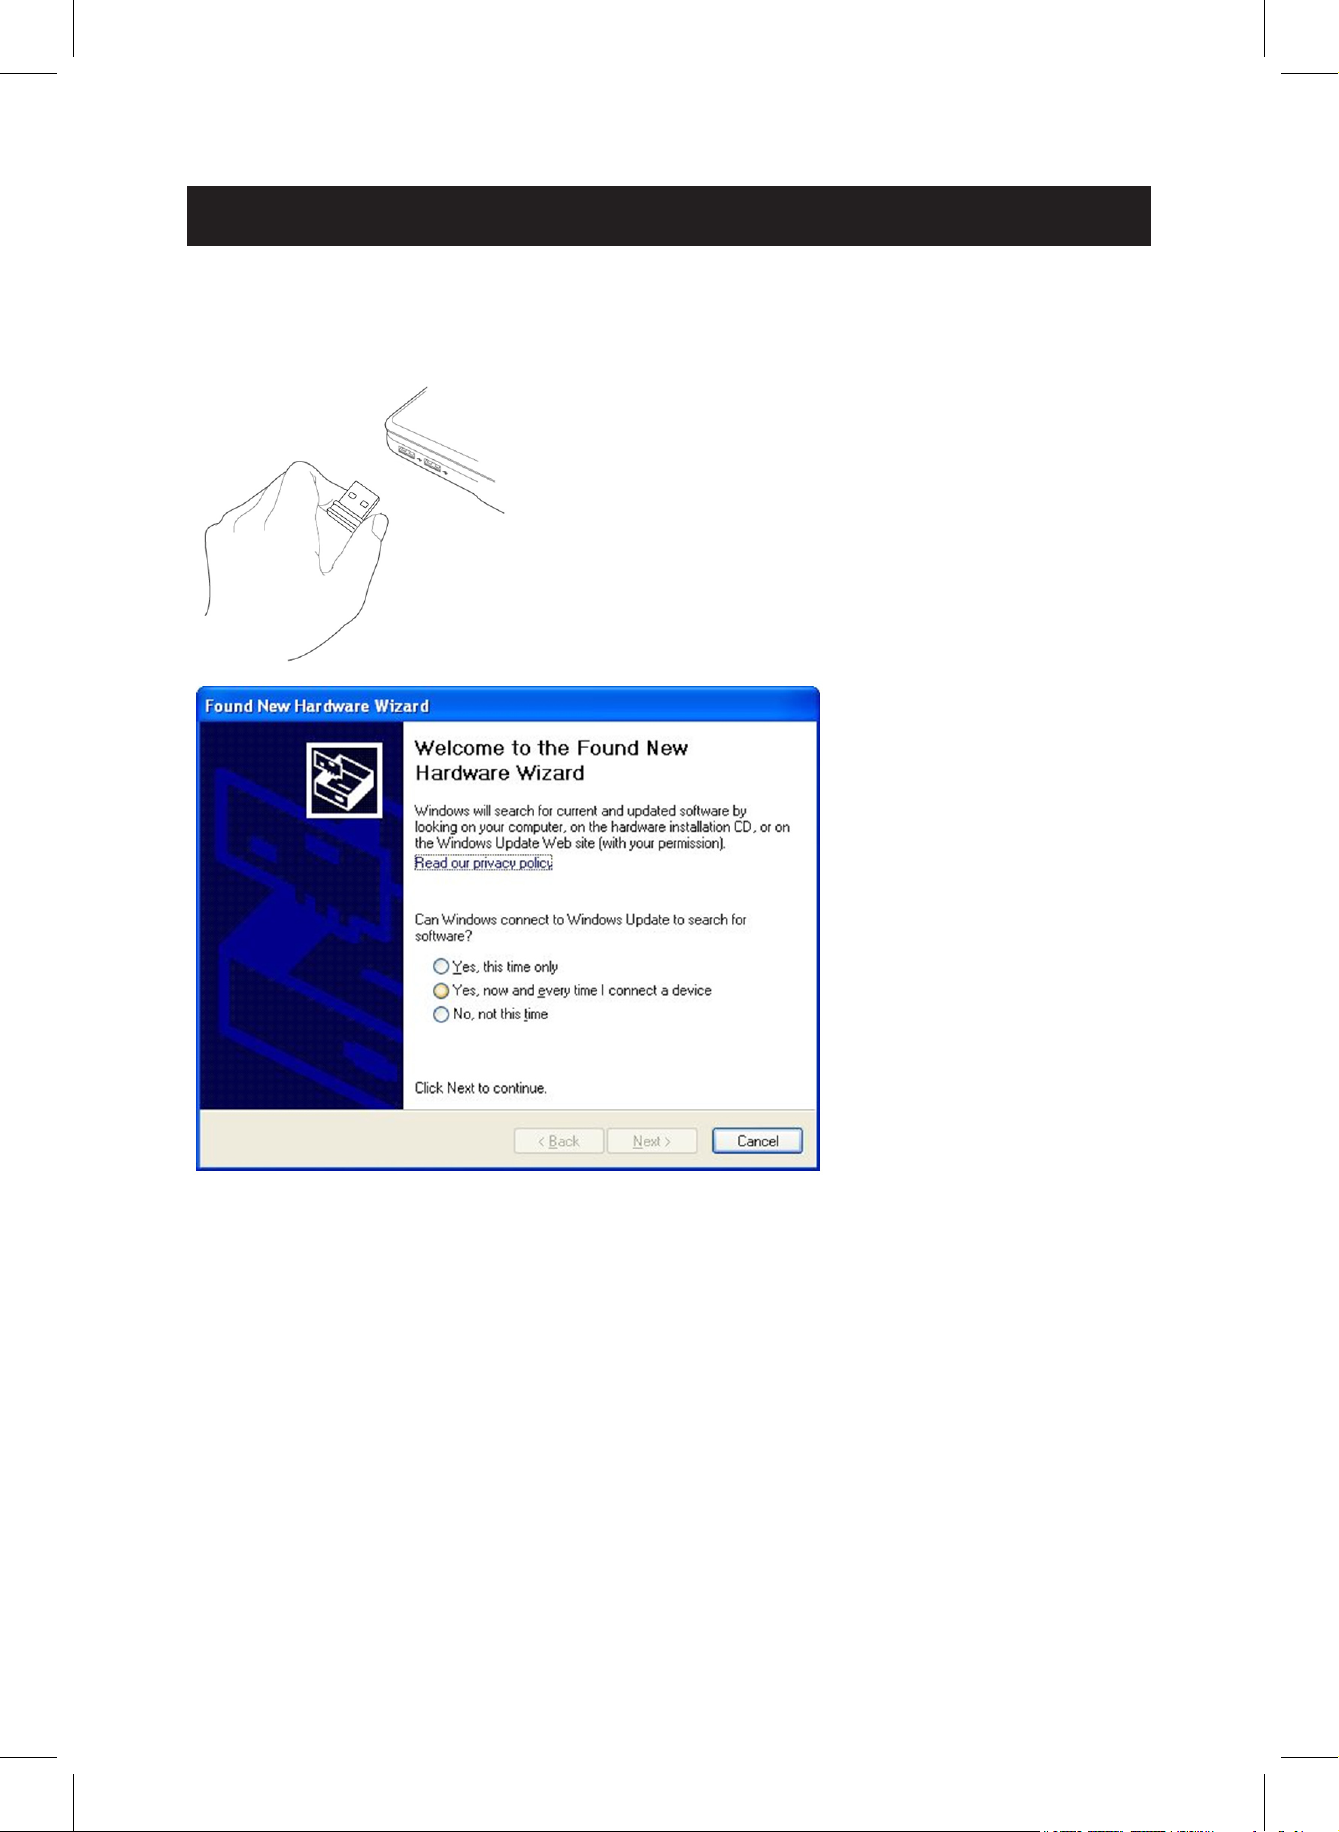
Please follow the instructions below to install your new USB wireless network dongle.
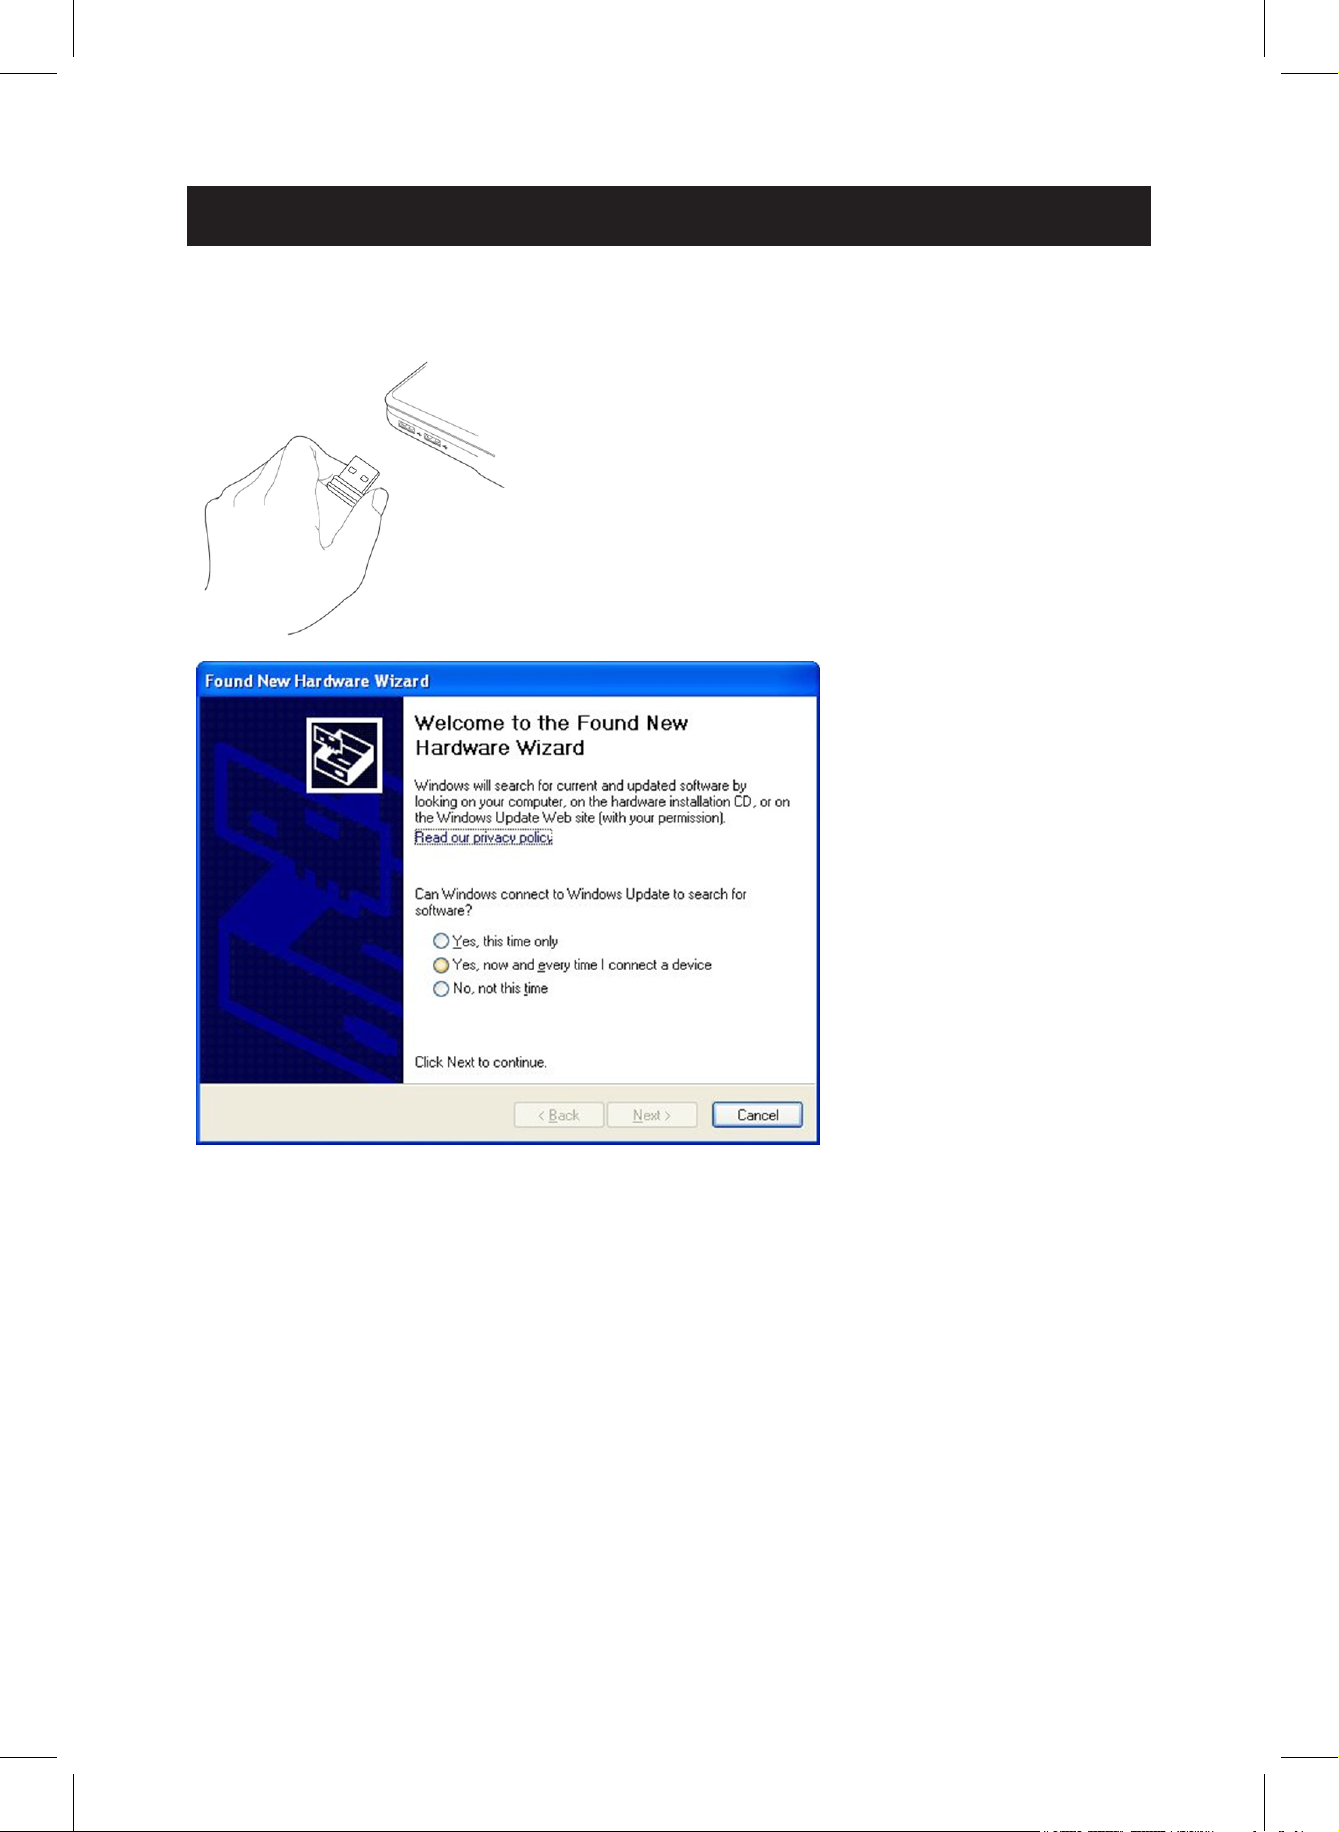
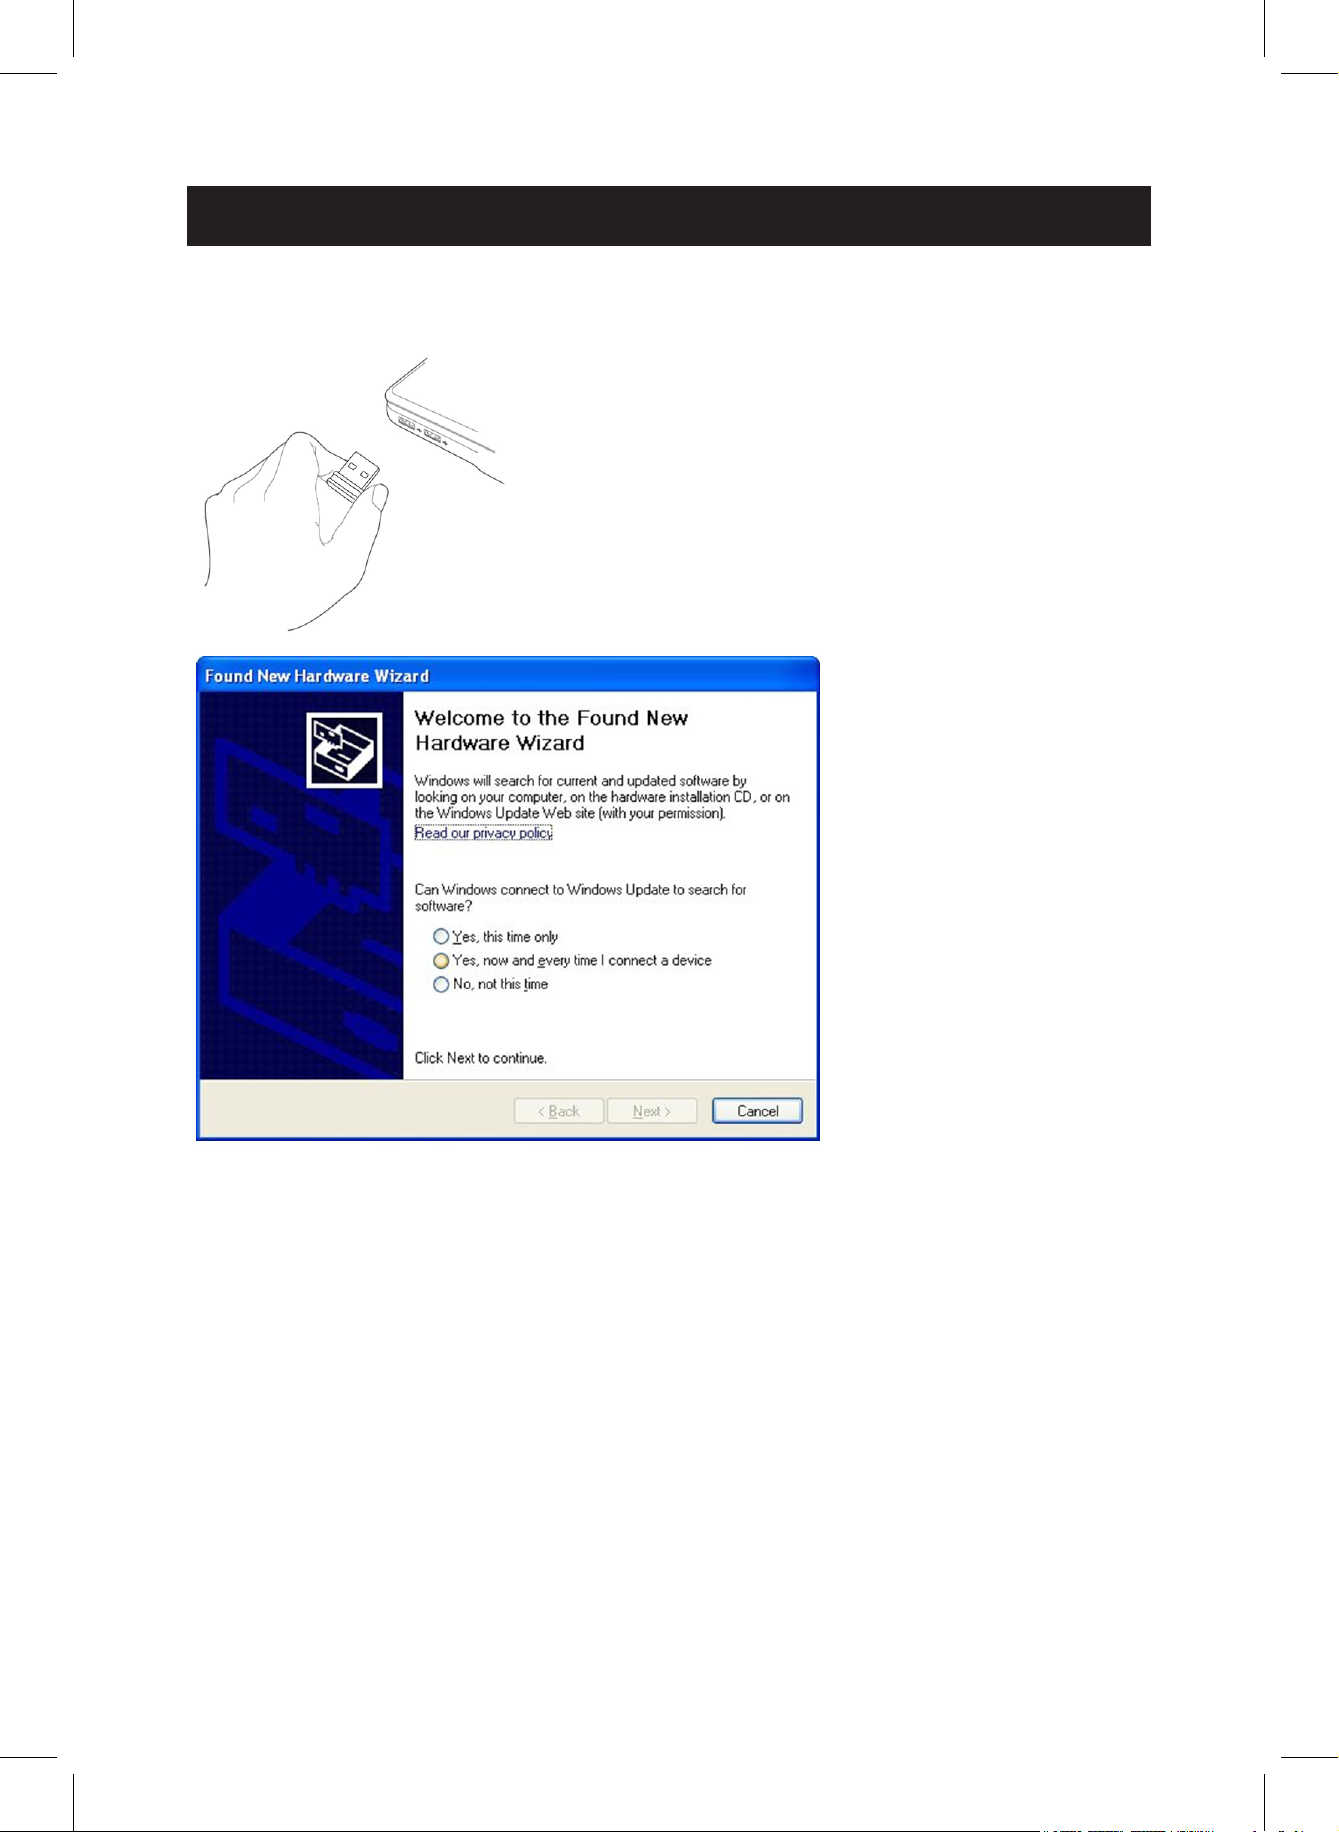
1. Insert the USB wireless
network dongle into an
empty USB 2.0 port when
your computer is switched
on.
Never use force to insert
the dongle. If it feels stuck,
flip the dongle over and try
again.
2. The following message will
appear, click ‘Cancel’.
3. Insert the device’s driver
CD-ROM into the CD/
DVD-ROM drive of your
computer. Select “Driver/
Utility Installation” to install
the software.
Page 3

3
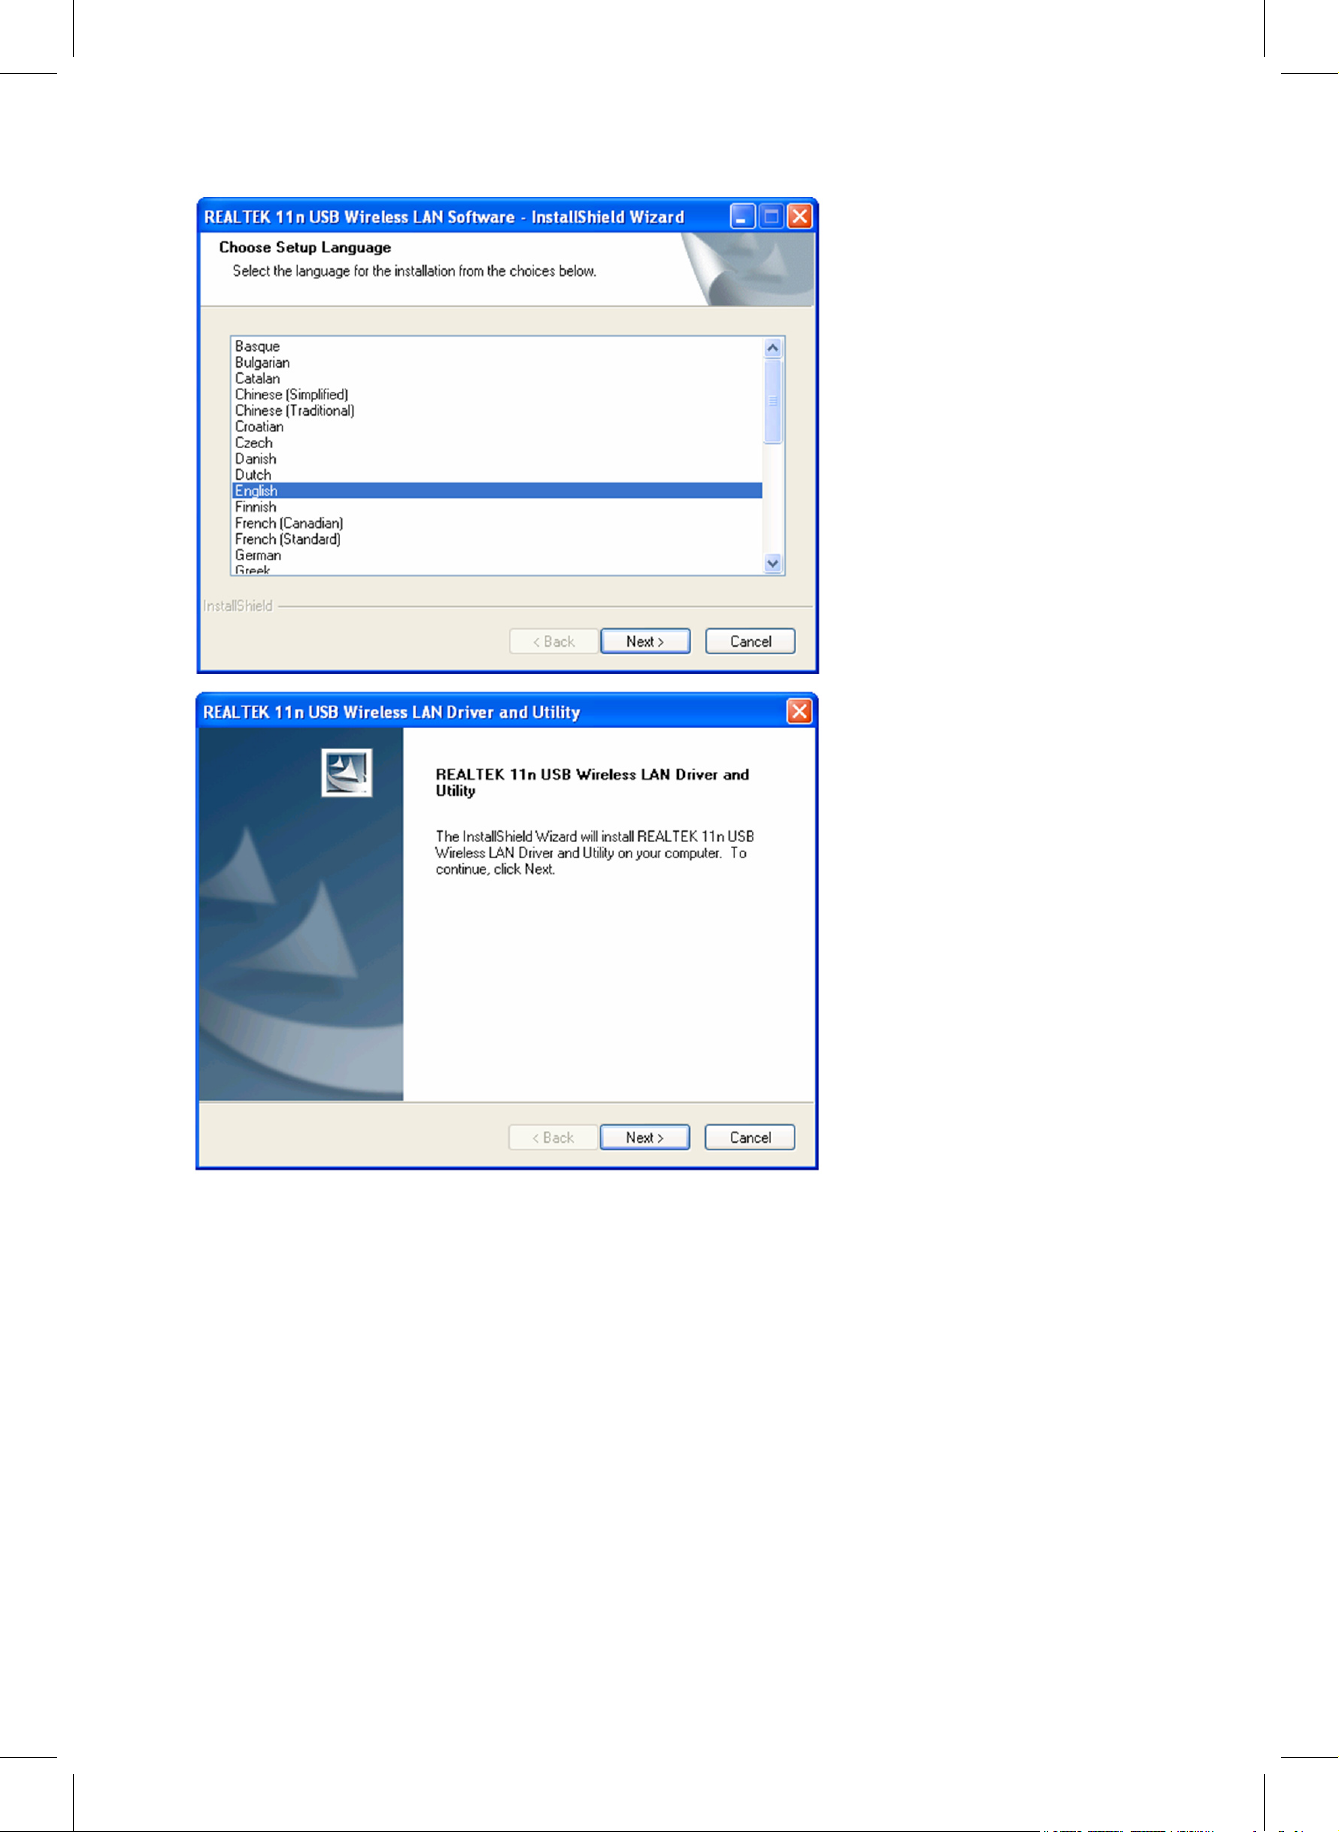
4. Please select the language
you wish to use, then click
‘Next’.
5. Click ‘Next’ to continue.
Page 4

4
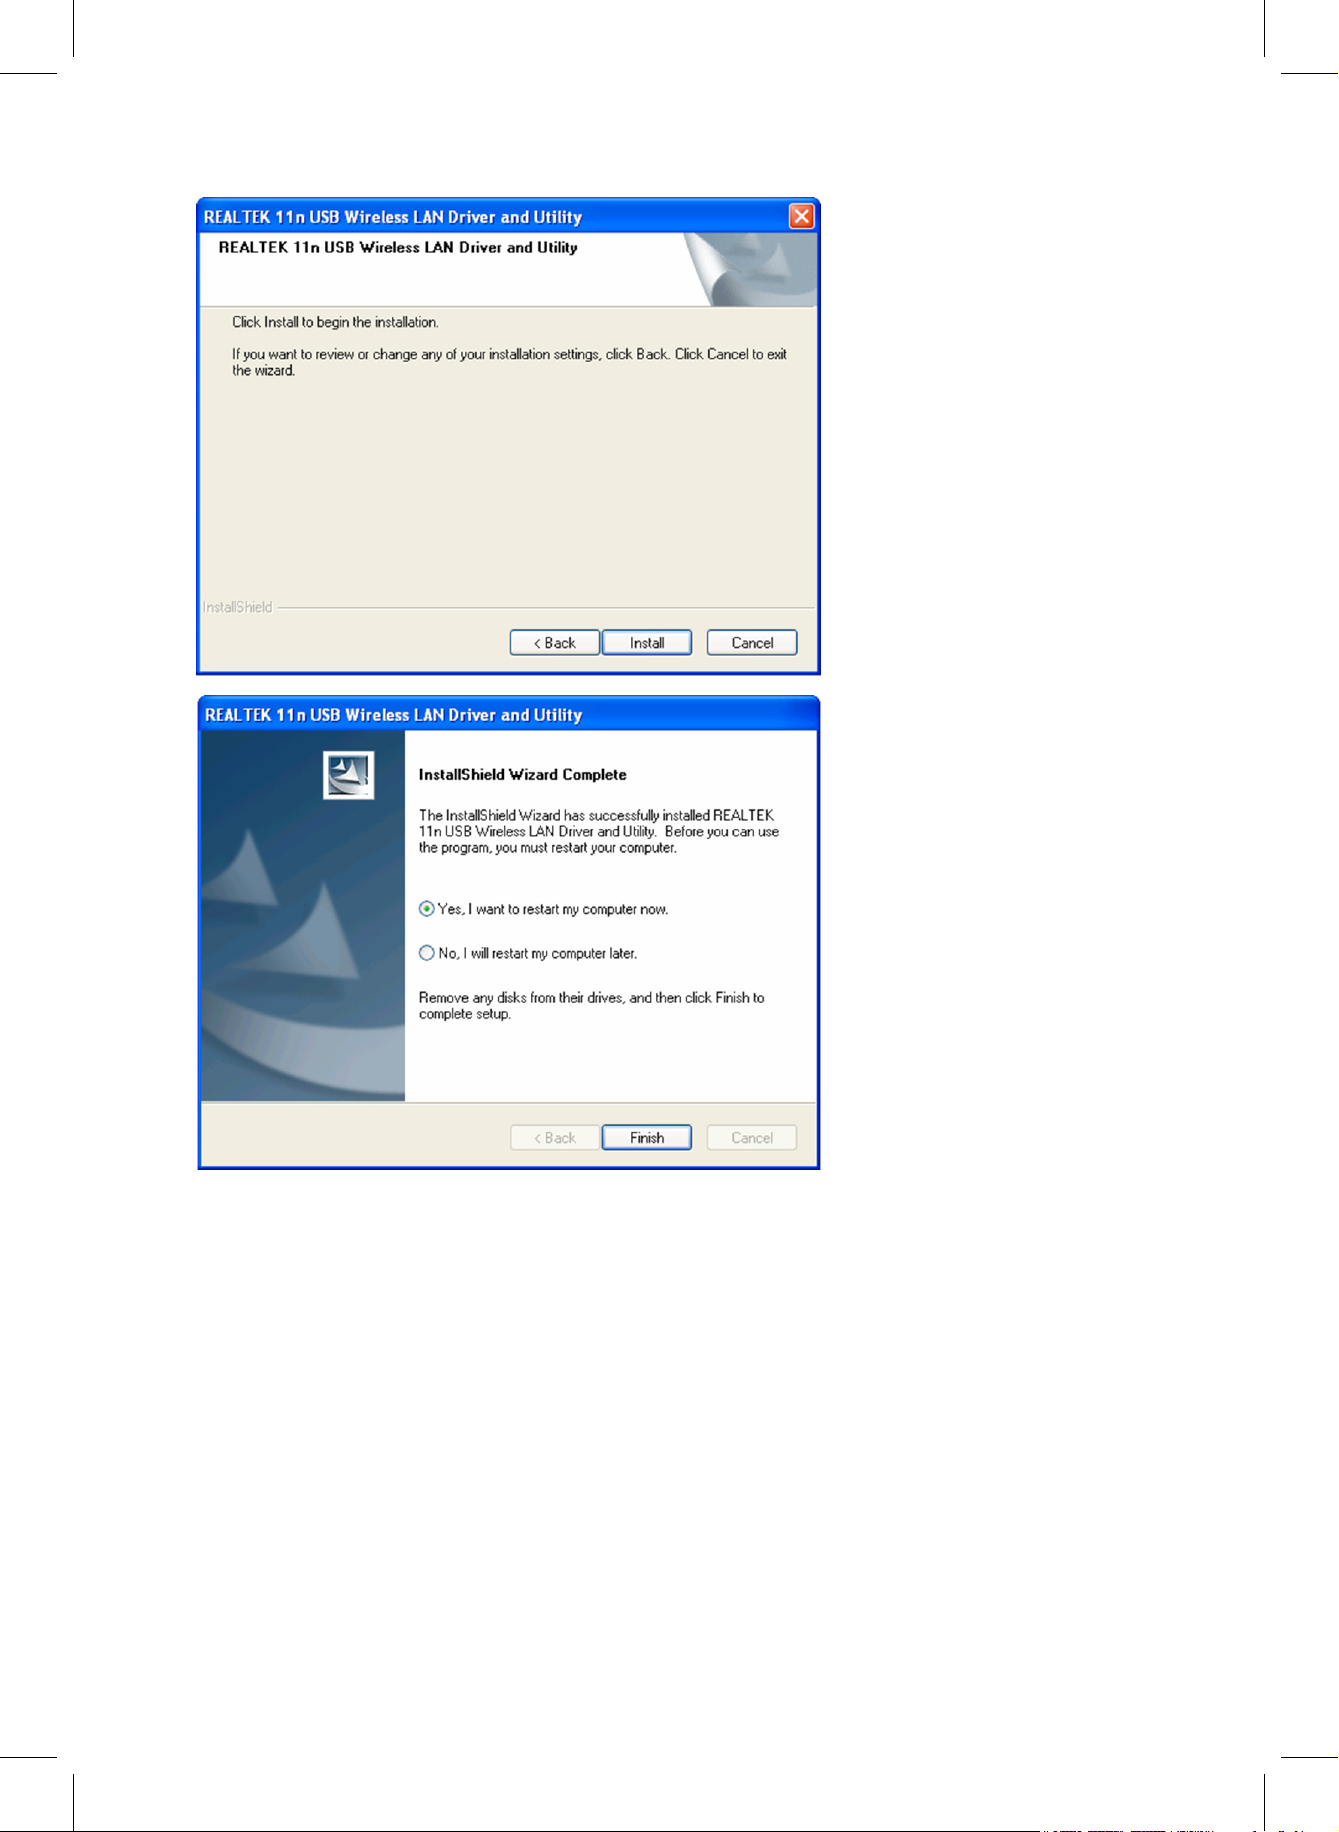
6. Click ‘Install’ to start the
installation. The installation
procedure needs a few
minutes to complete so
please be patient.
7. Click ‘Finish’ to restart your
computer and complete
the installation procedure.
If you do not want to
restart your computer
now, select ‘No, I’ll restart
my computer later’ and
click ‘Finish’. Please note
you have to restart your
computer before you
can use your new USB
wireless network dongle.
Page 5
5
Connect to Wireless Access Point
Using the Configuration Utility to Connect to Wireless Access Point:
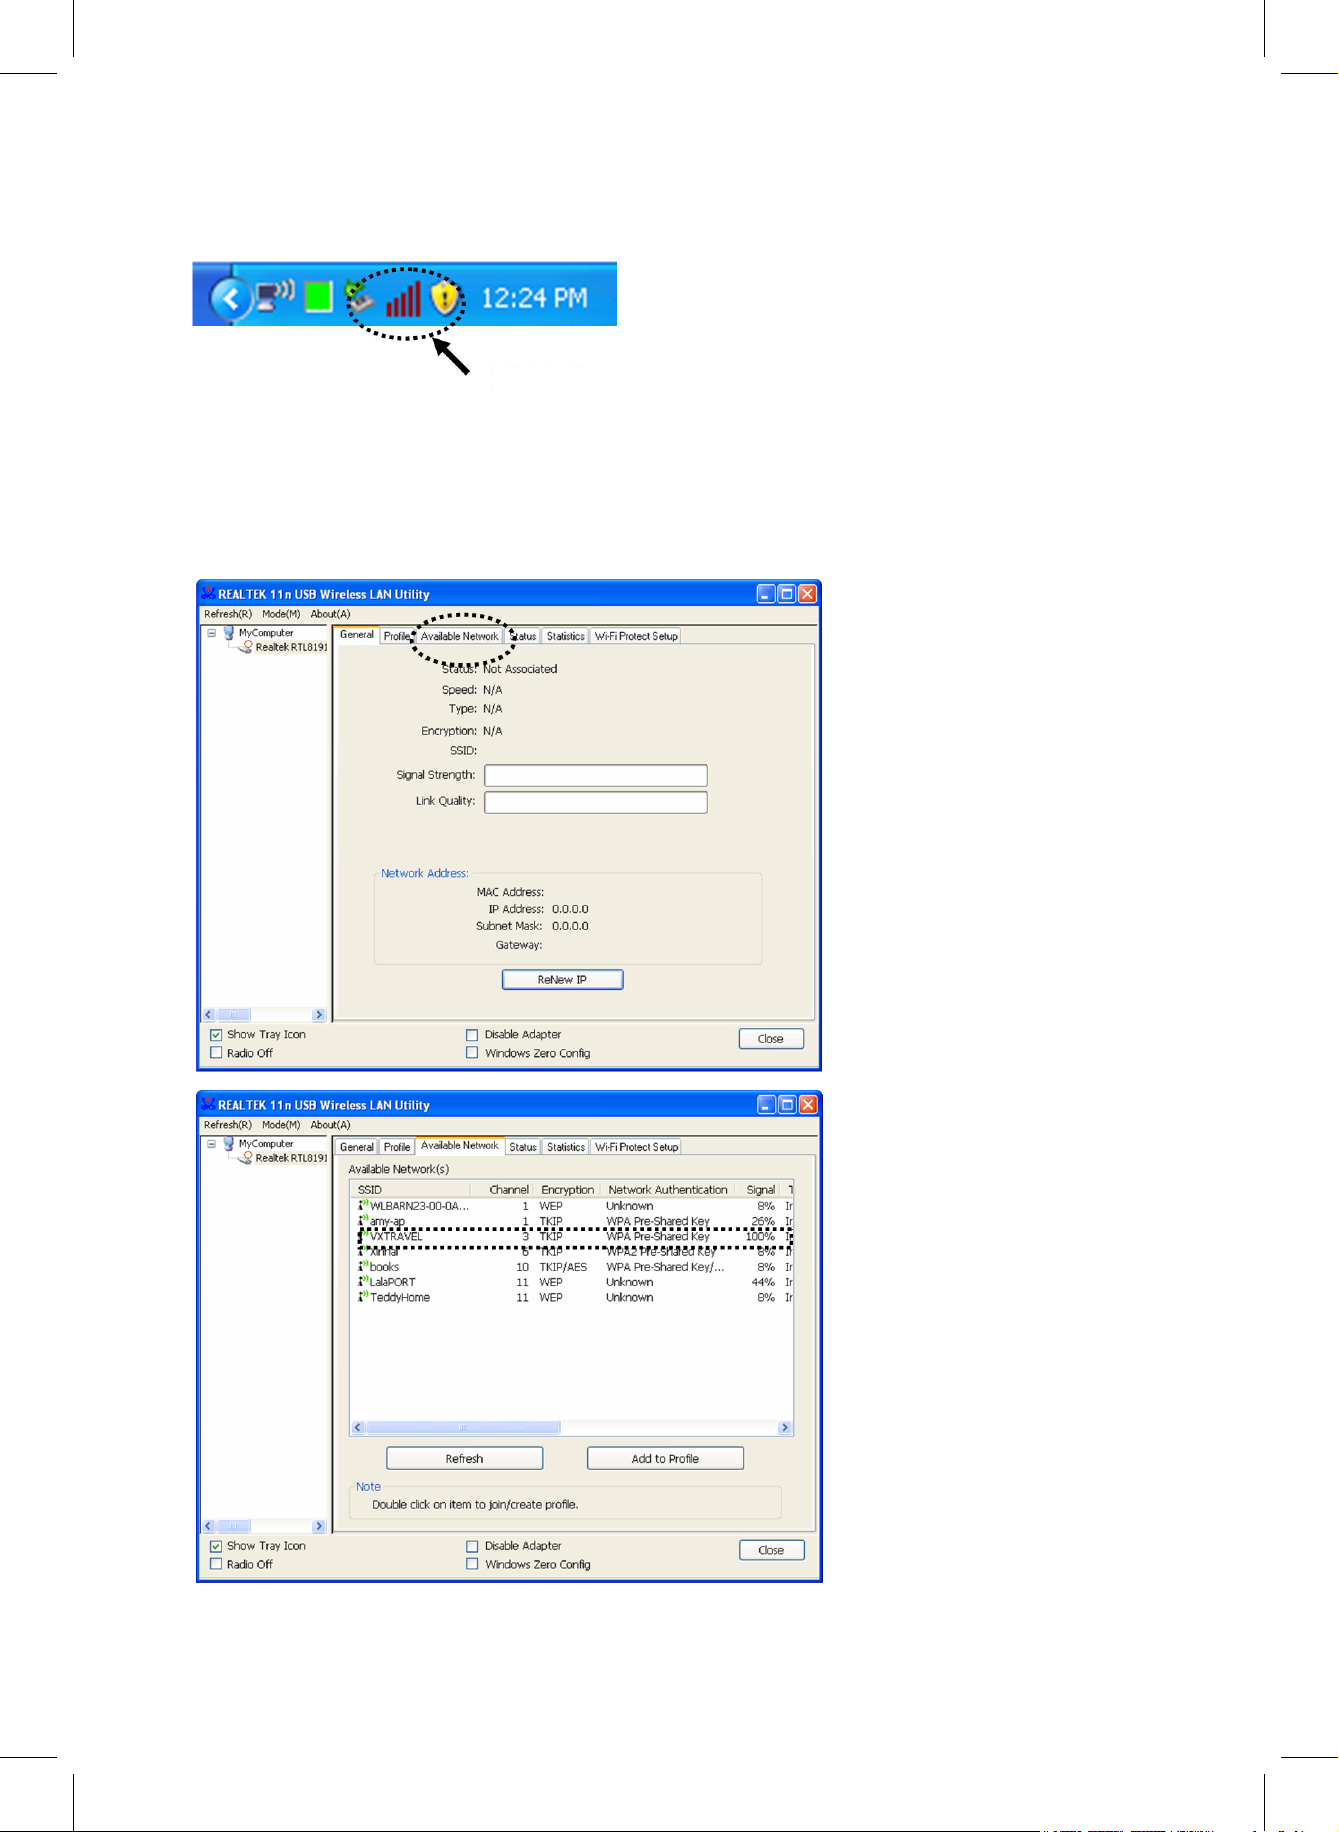
HERE!
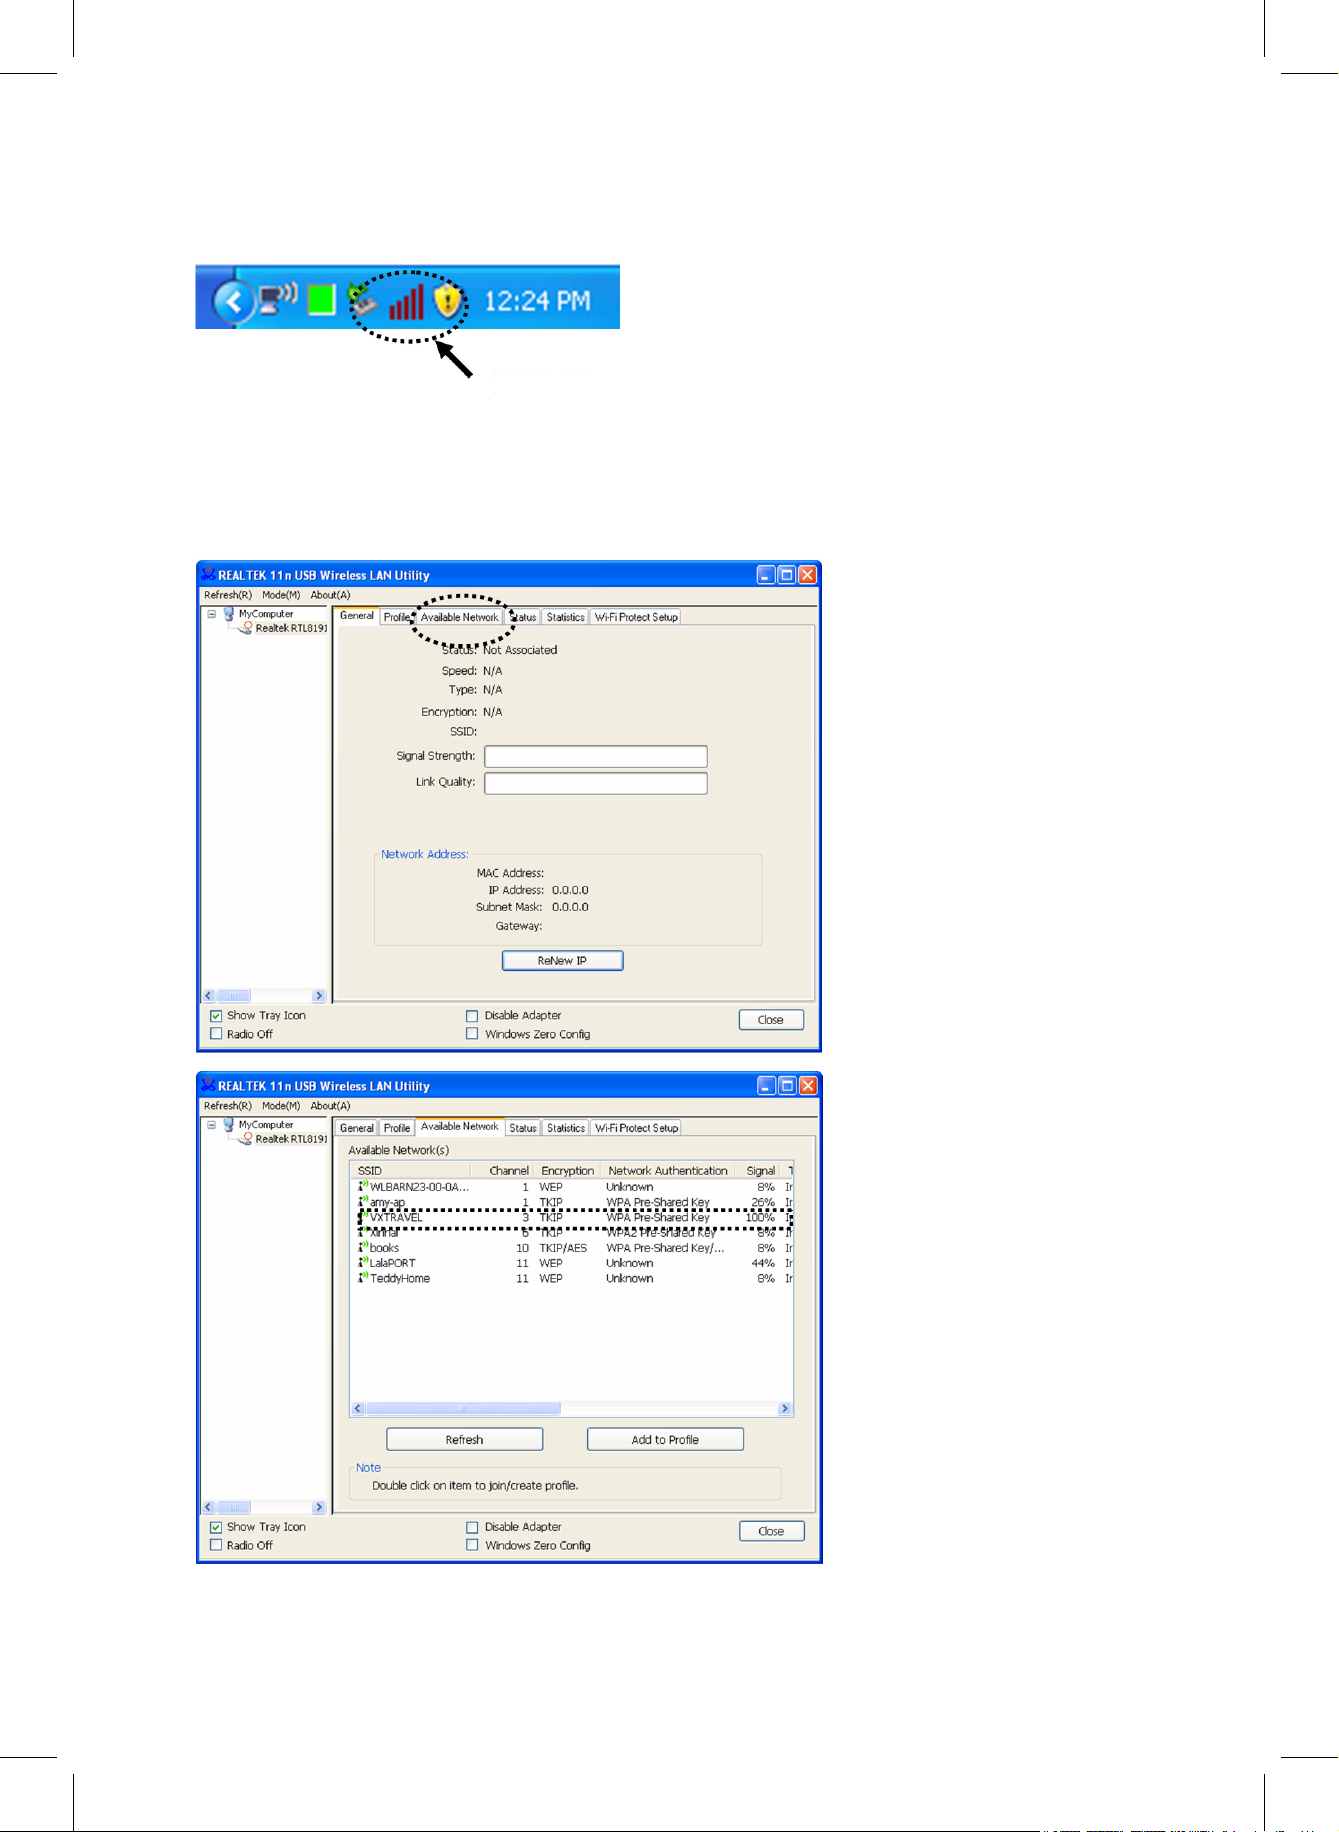
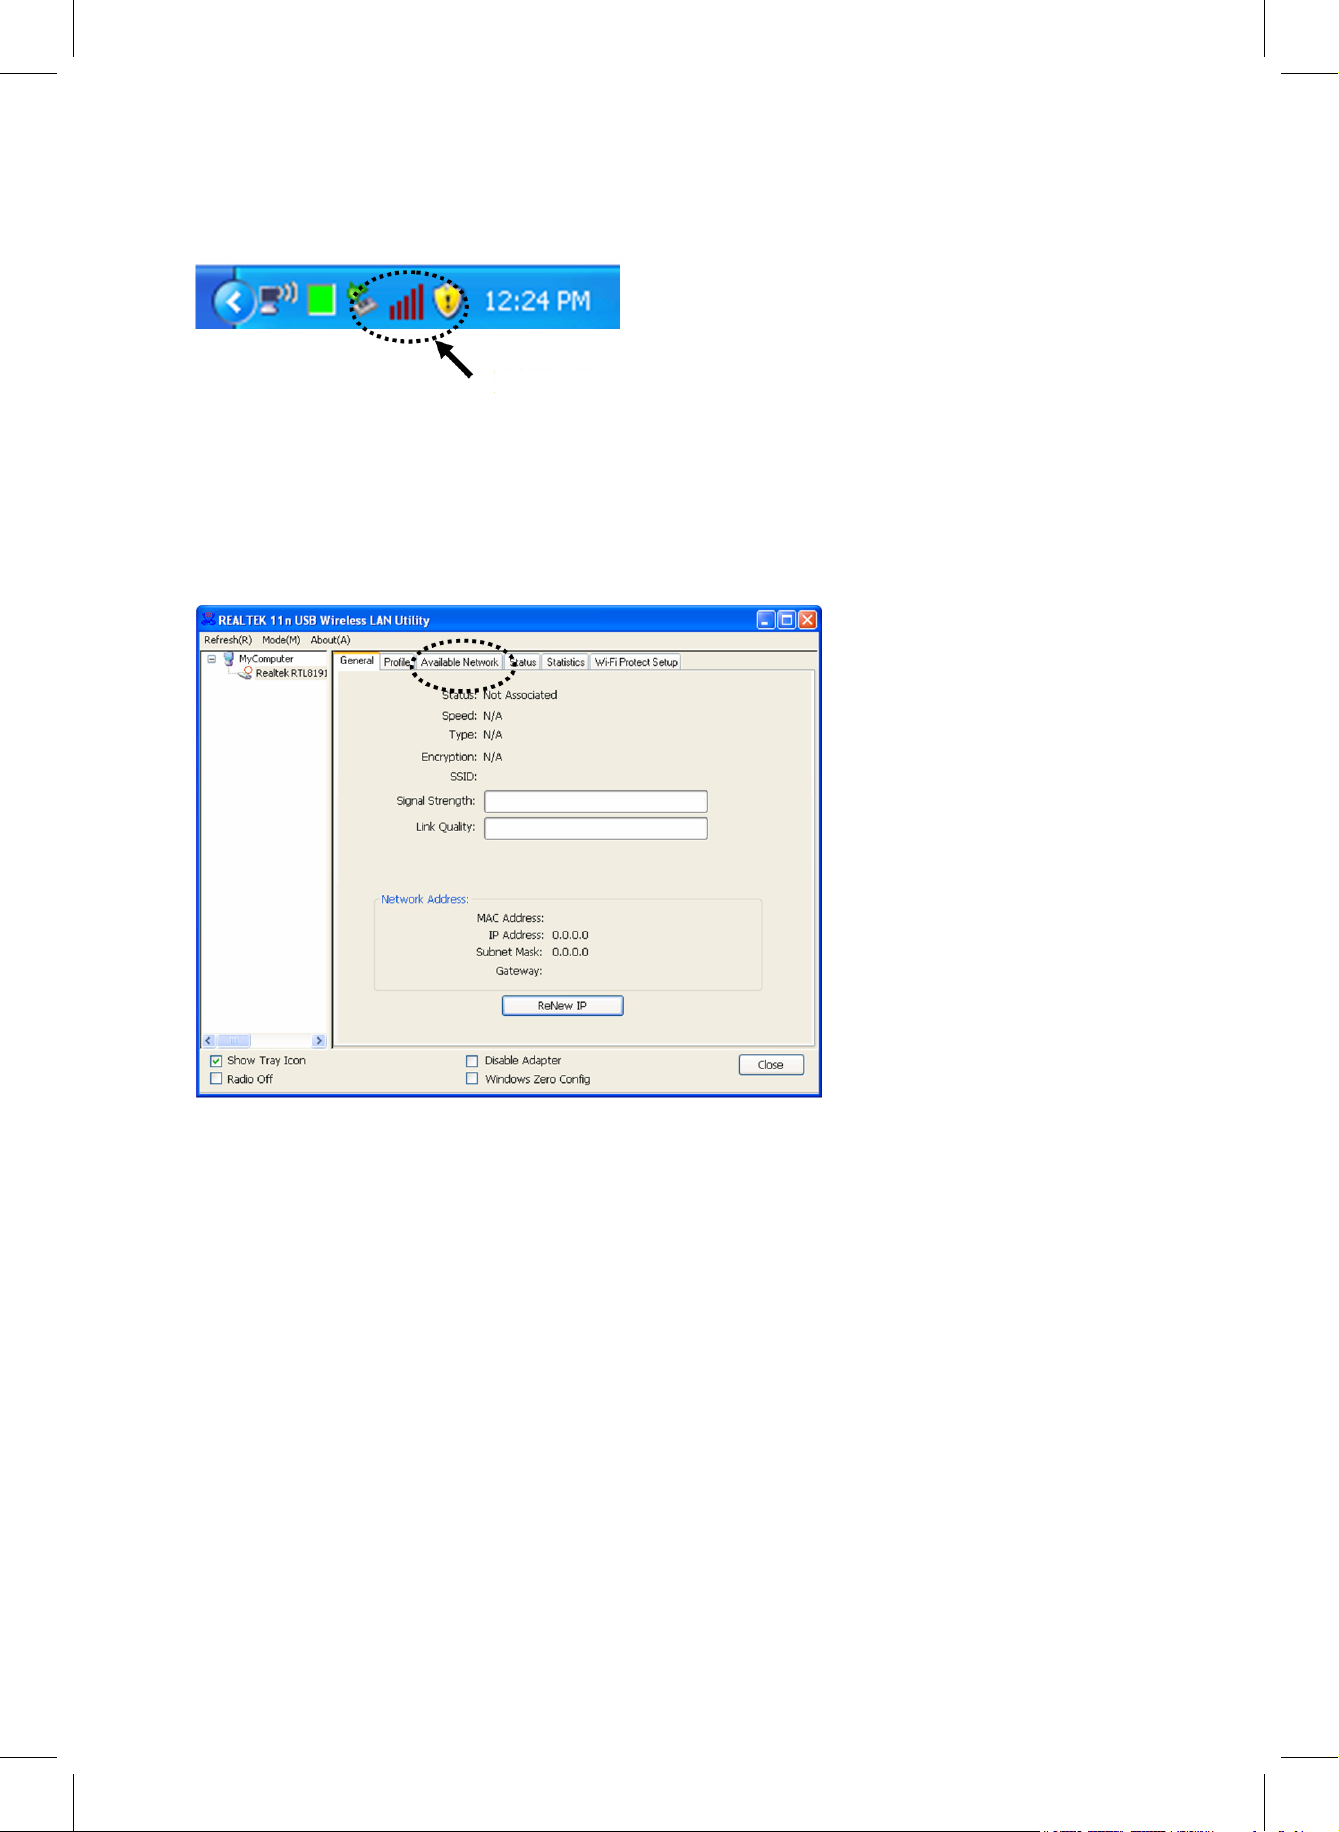
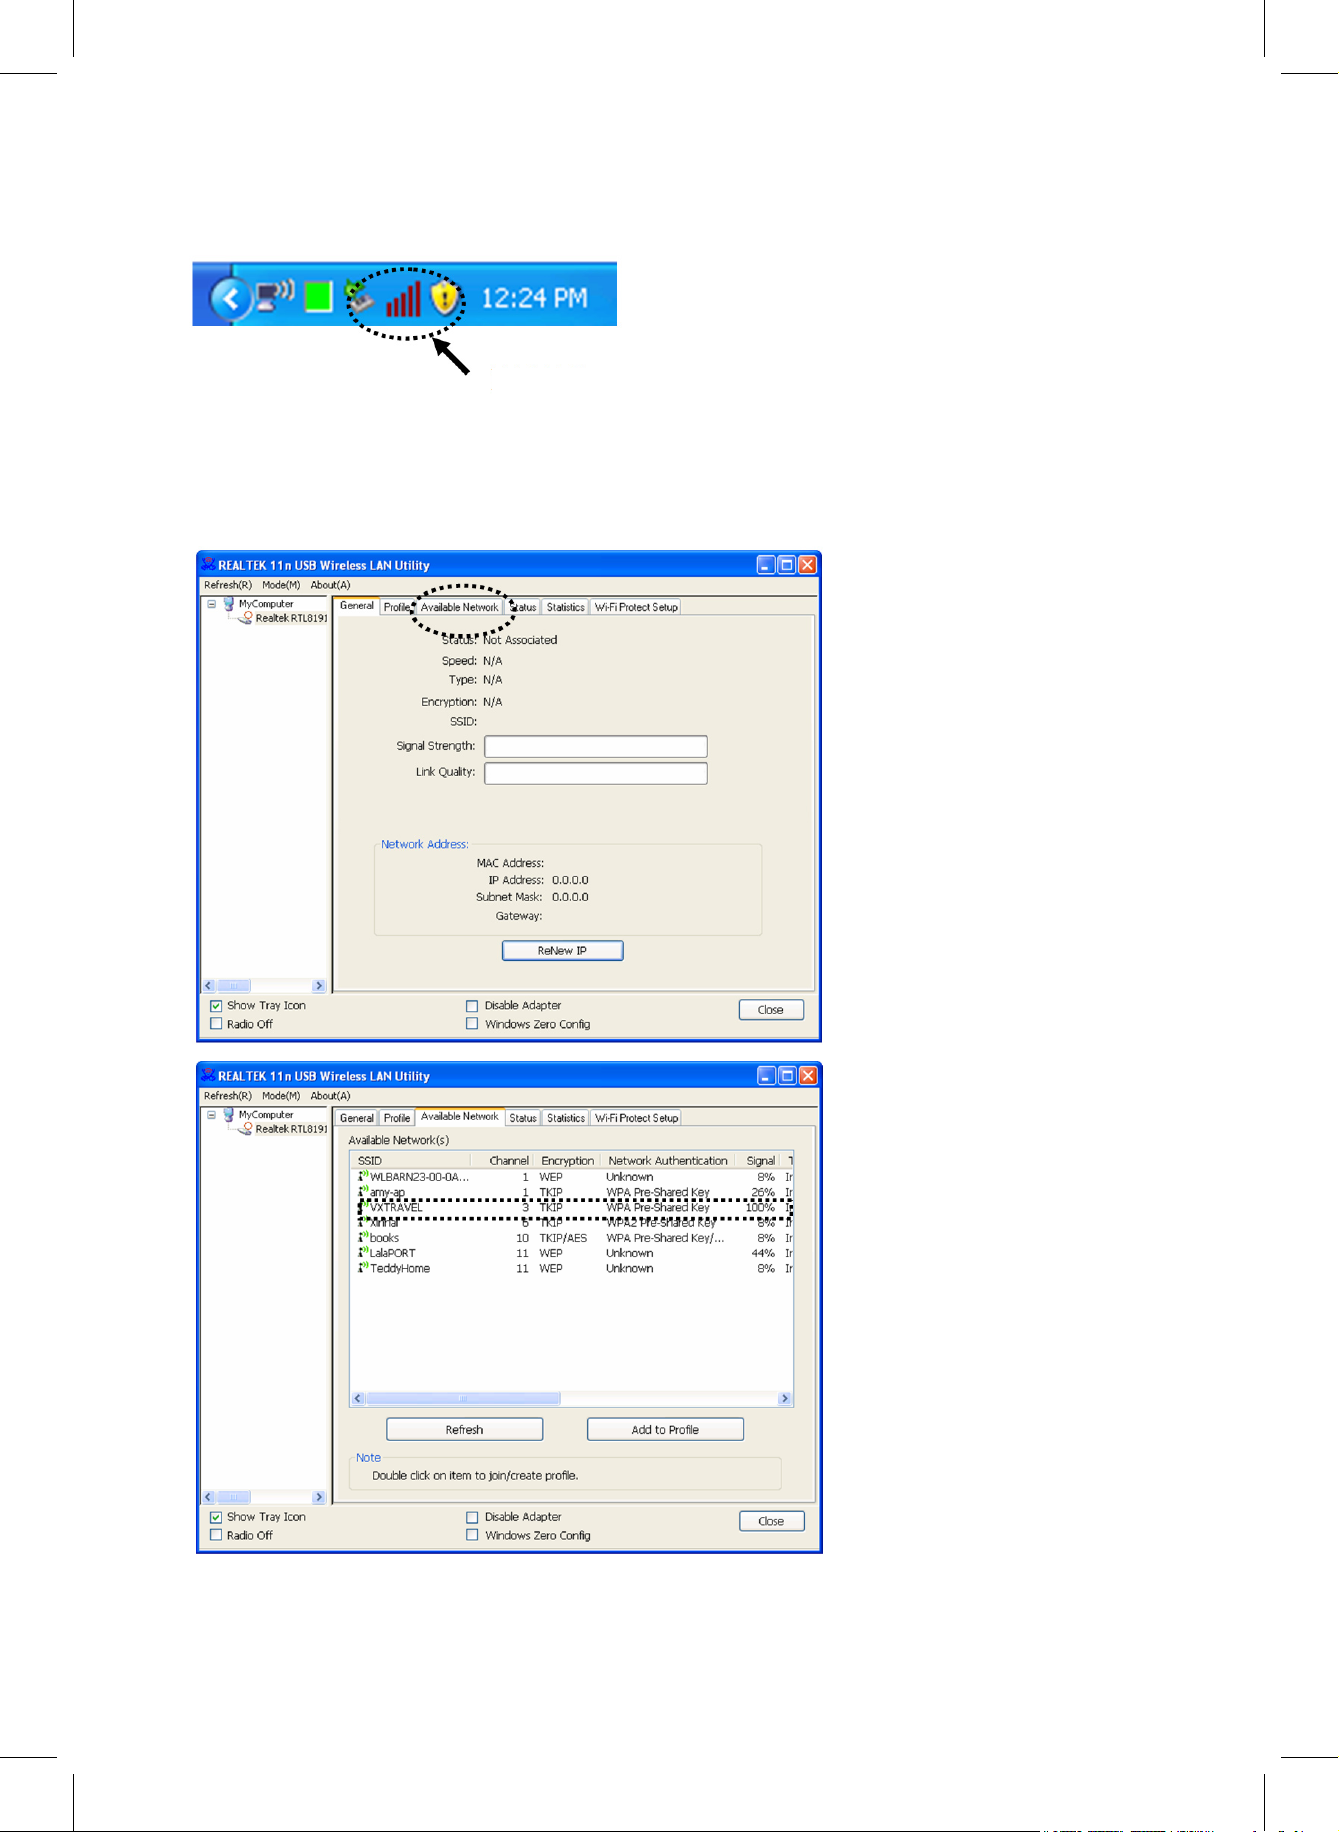
1. After installation is
complete, the wireless
configuration utility will be
shown automatically on
your computer desktop.
You will also see an icon
in the lower-right corner
of your windows system.
Right click on the icon and
select the configuration
utility you want to use.
2. The wireless utility will
appear. Click the ‘Available
Network’ tab to search for
nearby wireless access
points.
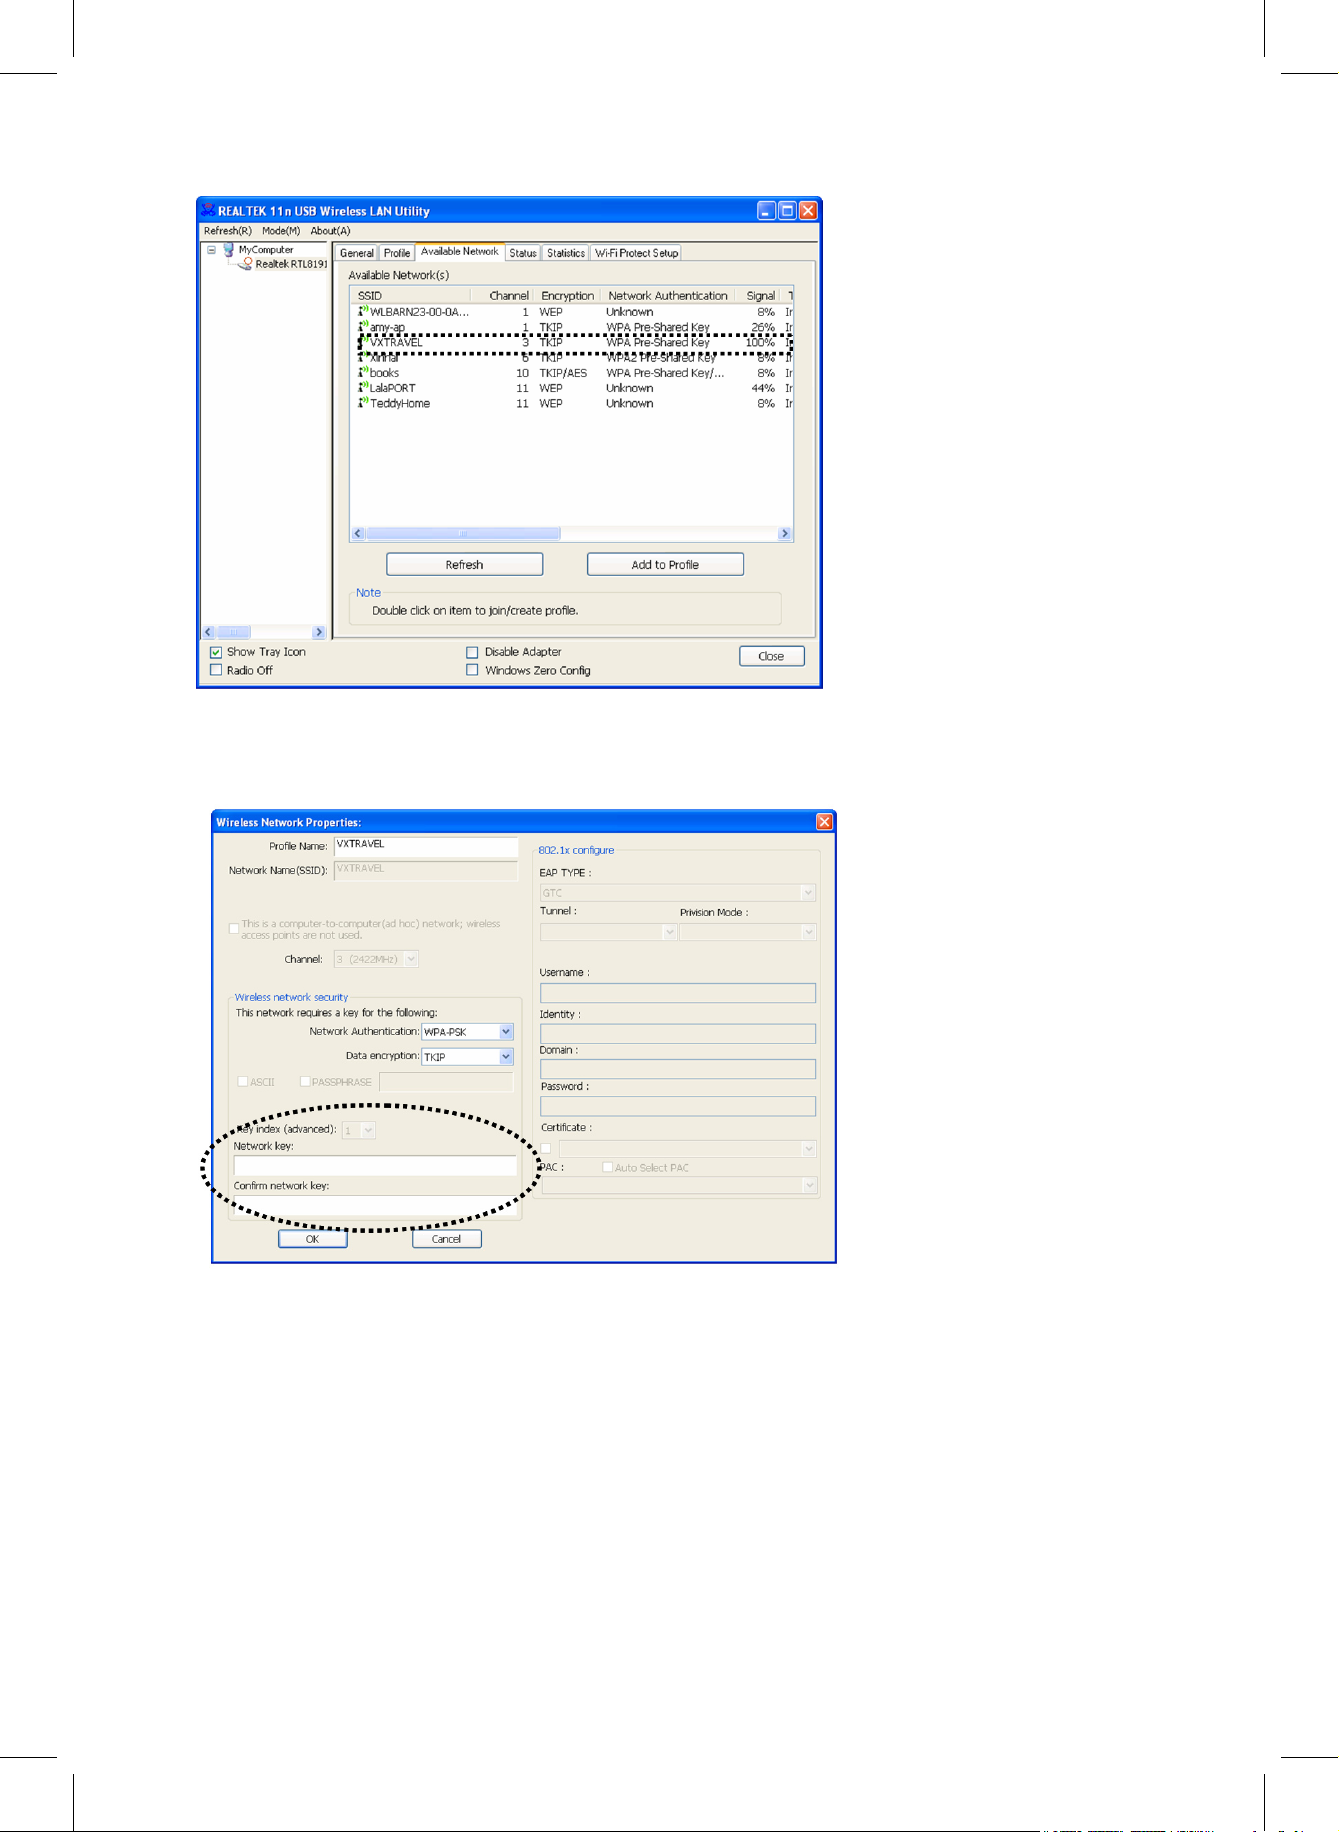
3. Please wait for a short
while and all the wireless
access points that can be
reached via this wireless
network dongle will be
displayed here.
Please select the access
point you want to connect
to and then double click or
click ‘Add to Profile’.
If the wireless access point
you want to connect to is
not displayed, please click
‘Refresh’.
Page 6
6
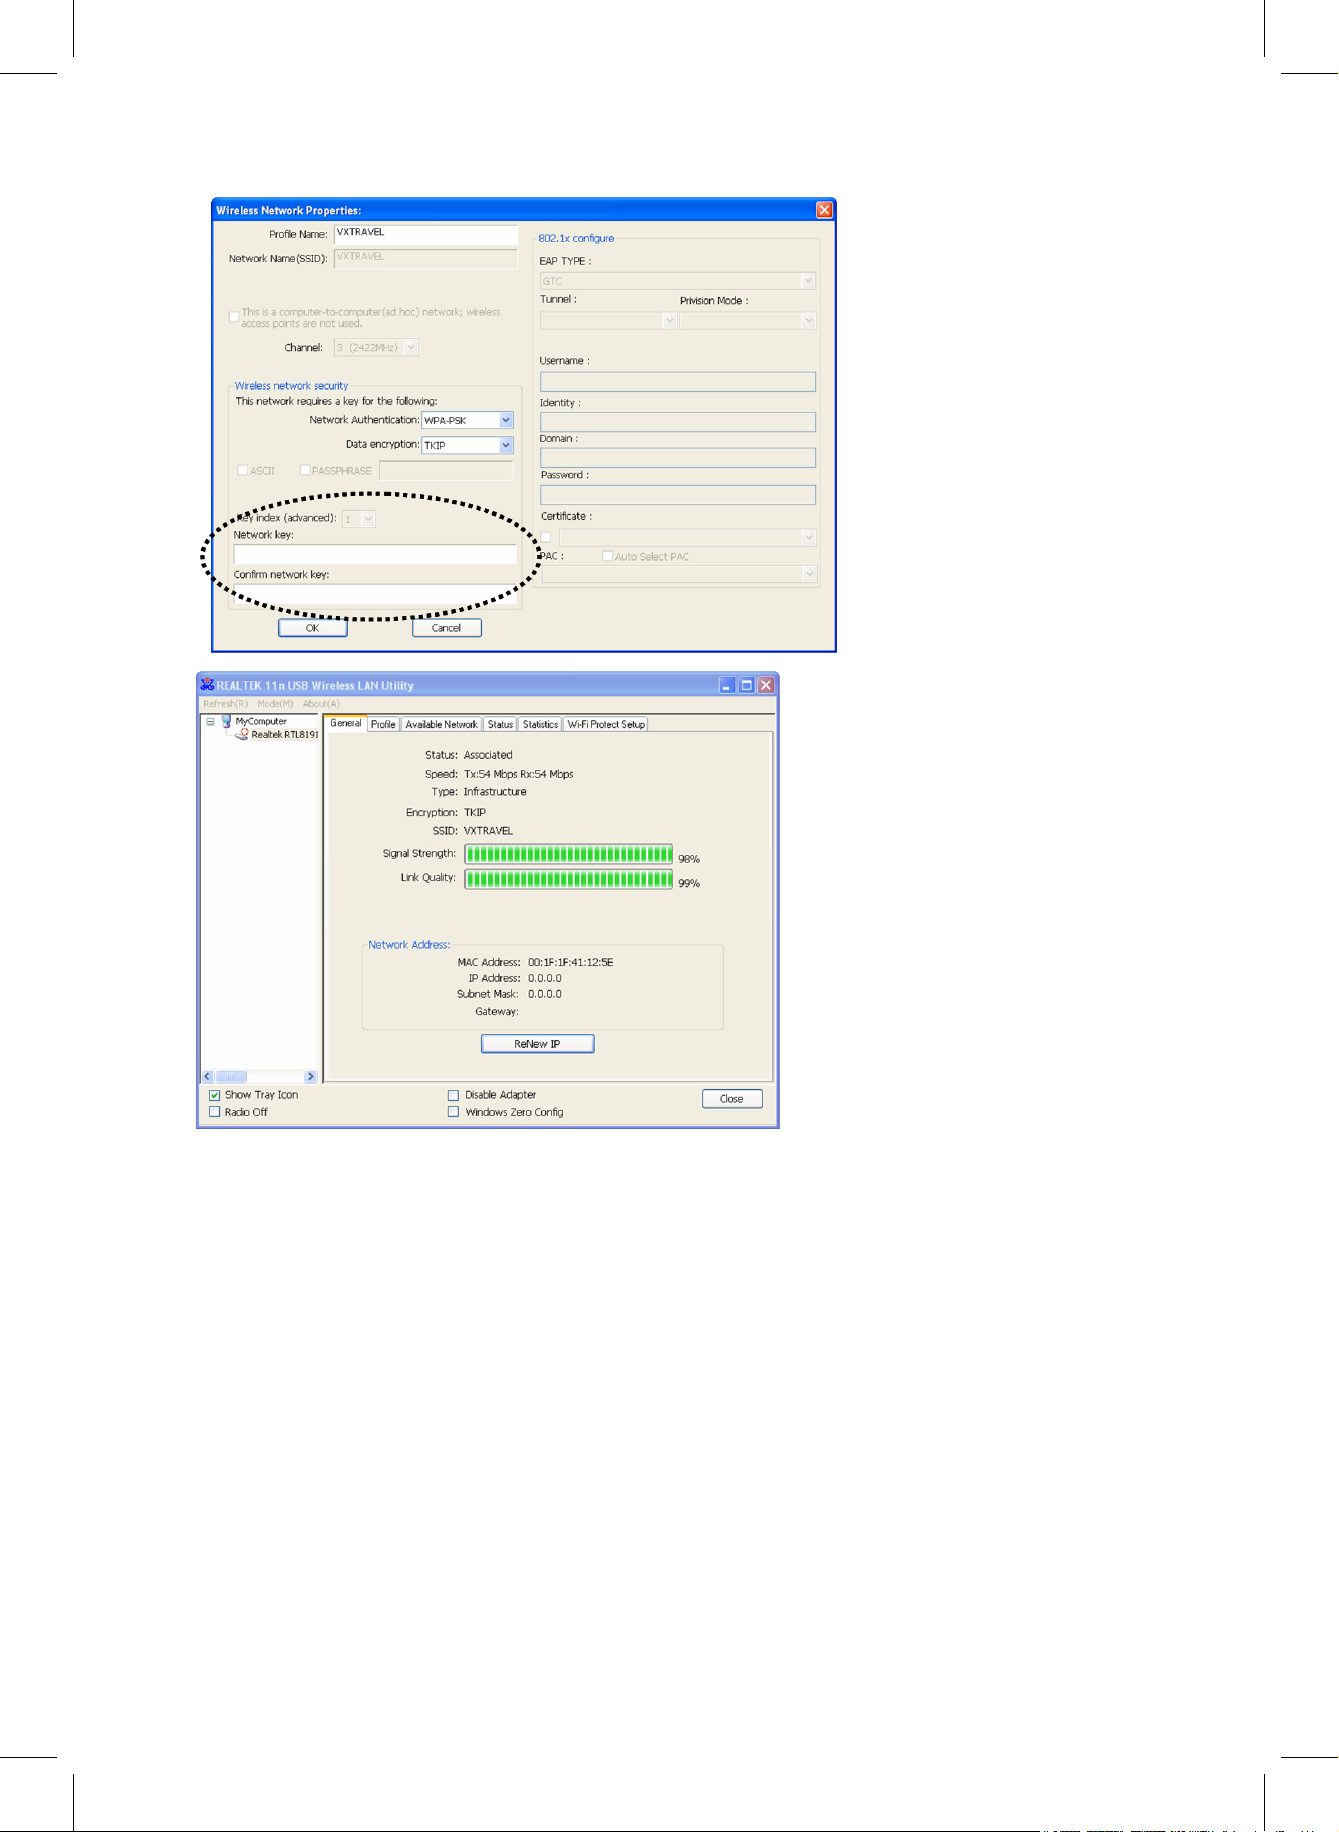
4. If a password (a.k.a.
‘Network Key’) is required
to access the wireless
access point, please enter
it in the ‘Network key’ field
(and then re-enter it in the
‘Confirm network key’ field
for confirmation). Click ‘OK’
when you have entered
the password correctly.
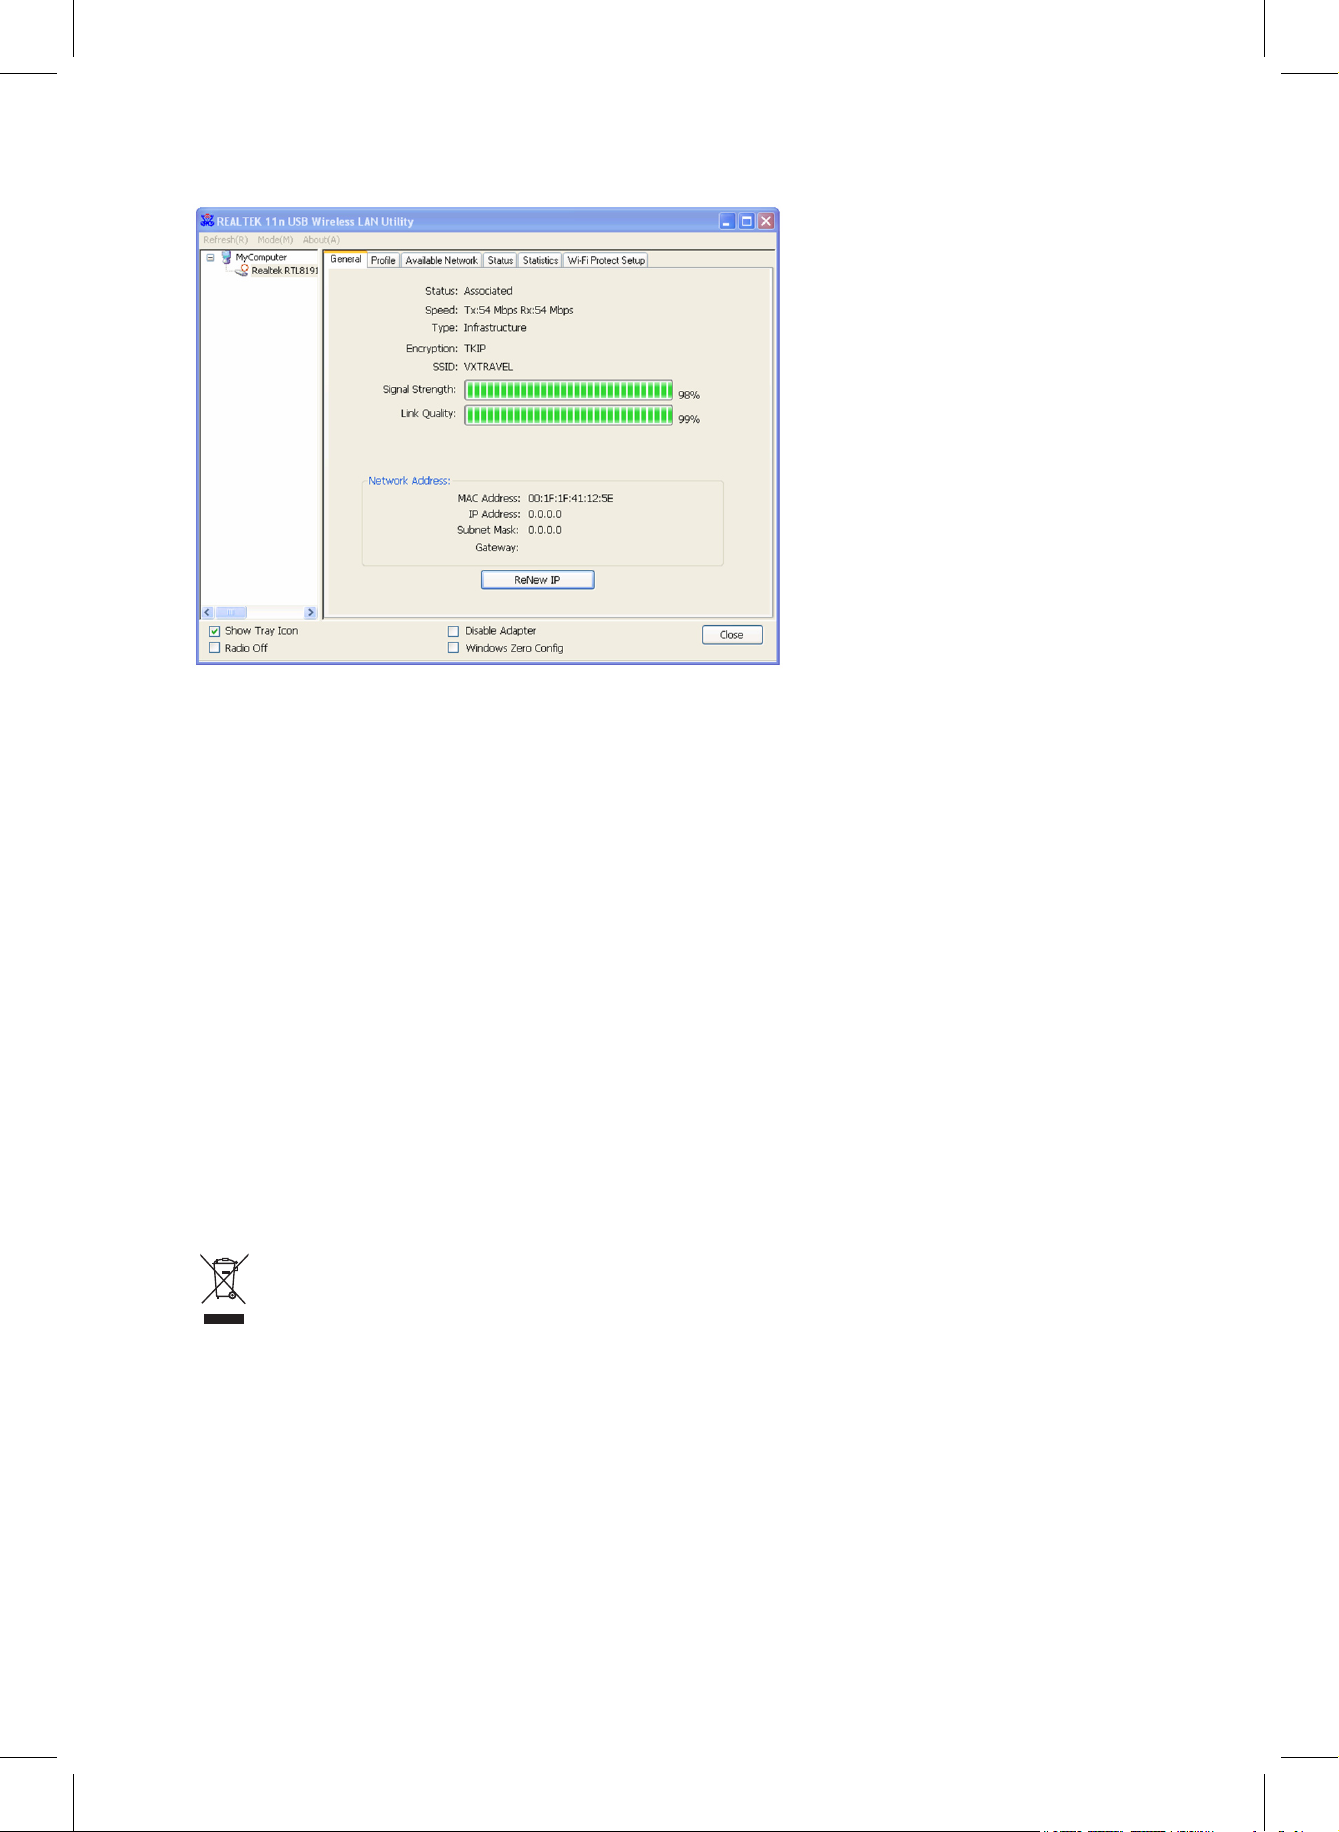
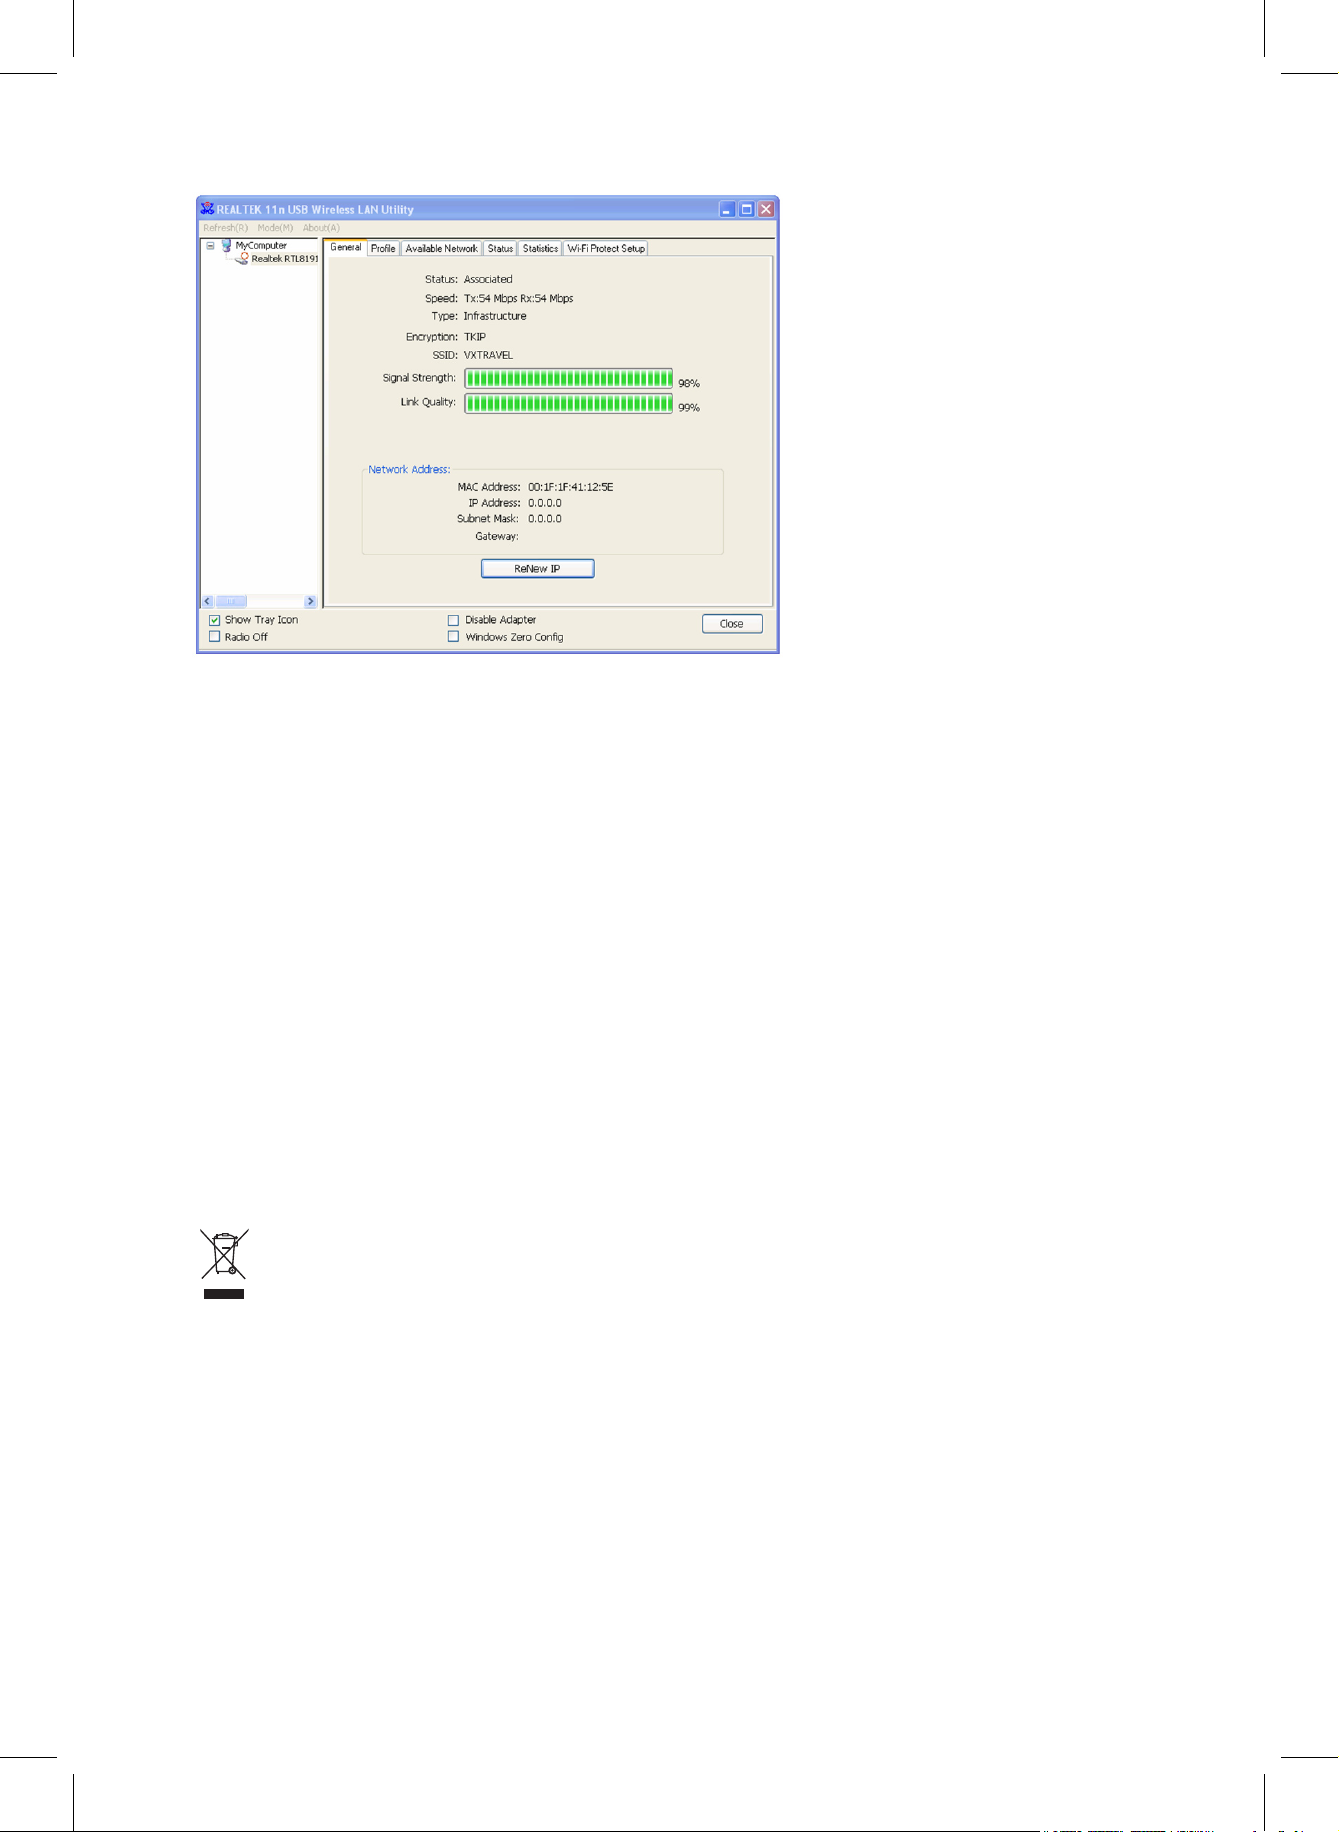
5. The network dongle will
now attempt to connect
to the access point, this
may take anything from
a few seconds to a few
minutes so please be
patient. When the ‘Status’
becomes ‘Associated’ in
the ‘General’ tab, your
computer is connected to
the selected access point.
Click ‘Close’ to close the
configuration menu.
For advanced settings and other features of this USB wireless network dongle, please refer to the user
manual enclosed on the supplied CD-ROM.
Page 7
7
Safety precautions:
Do not expose the product to water or moisture.
Maintenance:
Clean only with a dry cloth. Do not use cleaning solvents or abrasives.
Warranty:
No guarantee or liability can be accepted for any changes and modications of the product or damage
caused due to incorrect use of this product.
General:
Designs and specications are subject to change without notice.
All logos brands and product names are trademarks or registered trademarks of their respective holders and
are hereby recognized as such.
Keep this manual and packaging for future reference.
Attention:
This product is marked with this symbol. It means that used electrical and electronic products
should not be mixed with general household waste. There is a separate collections system for these
products.
Page 8

8
DEUTSCH
Installation des Netzwerkadapters
Bitte folgen Sie den untenstehenden Anweisungen, um Ihren neuen USB-WLAN-Adapter zu installieren.
1. Schließen Sie den
USB WLAN-Adapter an
einem freien USB 2.0
Port Ihres Computers
an, der Computer muss
eingeschaltet sein.
Stecken Sie den Adapter
nicht gewaltsam ein.
Klemmt der Adapter, so
drehen Sie diesen einfach
um und versuchen Sie es
nochmals.
2. Wenn die folgende
Meldung erscheint, klicken
Sie auf “Abbrechen”.
3. Legen Sie die TreiberCD in das CD/DVD-ROM
Laufwerk Ihres Computers
ein. Wählen Sie “Driver/
Utility Installation”
(“Treiber/DienstprogrammInstallation”) zum
Installieren des
Programms.
Page 9
9
4. Bitte wählen Sie die
Sprache, die Sie
verwenden möchten,
klicken Sie dann auf ‘Next’
(“Weiter”).
5. Klicken Sie auf
‘Next’ (“Weiter”), um
fortzufahren.
Page 10
10
6. Klicken Sie auf ‘Install’
(“Installieren”), um die
Installation zu starten. Die
Installation wird einige
Minuten dauern, bitte
haben Sie Geduld.
7. Klicken Sie auf ‘Finish’
(“Fertigstellen”), um Ihren
Computer zum Abschluss
der Installation neu zu
starten. Wenn Sie Ihren
Computer jetzt nicht neu
starten möchten, wählen
Sie ‘No, I’ll restart my
computer later’ (“Nein, ich
starte meinen Computer
später neu”) und klicken
auf ‘Finish’ (“Fertigstellen”).
Bitte beachten Sie, dass
Sie Ihren Computer neu
starten müssen, bevor
Sie Ihren neuen USBWLAN-Adapter verwenden
können.
Page 11
11
Verbindung mit einem WLAN-Zugangspunkt
Benutzung des Kongurationsprogramms, um eine Verbindung mit einem WLAN-Accesspoint herzustellen:
HIER!
1. Nachdem die Installation
abgeschlossen
ist, wird das
Konfigurationsprogramm
automatisch auf Ihrem
Arbeitsplatz angezeigt.
Außerdem sehen Sie ein
Symbol in der unteren
rechten Bildschirmecke
Ihres WindowsSystems. Rechtsklicken
Sie das Symbol
und wählen Sie das
Konfigurationsprogramm.
2. Das
Konfigurationsprogramm
Ihres WLAN-Sticks wird
gestartet. Klicken Sie
auf die Registerkarte
‘Available Network’
("Verfügbare Netzwerke"),
um nach WLANZugangspunkten in der
Nähe zu suchen.
Page 12
12
3. Bitte warten Sie einen
Augenblick, bis alle
von Ihrem WLAN-Stick
erreichbaren WLANZugangspunkte hier
angezeigt werden.
Bitte wählen Sie den
Zugangspunkt, mit
welchem Sie sich
verbinden möchten, aus
und doppelklicken Sie
darauf oder klicken Sie auf
‘Add to Profile’ (“Zum Profil
hinzufügen”).
Wenn der WLAN-
Zugangspunkt, zu
welchem Sie sich
verbinden möchten, nicht
aufgeführt ist, klicken
Sie bitte auf ‘Refresh’
(“Aktualisieren”).
4. Wenn ein Kennwort (ein
sog. "Netzwerkschlüssel")
erforderlich ist, um die
Verbindung mit einem
drahtlosen Netzwerk
herzustellen, dann geben
Sie ihn bitte unter 'Network
key' ("Netzwerkschlüssel")
ein (und dann erneut
unter ‘Confirm network
key’ ("Netzwerkschlüssel
bestätigen") zur Kontrolle).
Klicken Sie auf 'OK', wenn
Sie das Kennwort korrekt
eingegeben haben.
Page 13
13
5. Der WLAN-Stick versucht
dann, die Verbindung
mit dem Zugangspunkt
herzustellen. Dies kann
ein paar Minuten dauern,
bitte haben Sie etwas
Geduld. Wenn der
'Status' ("Status") auf der
Registerkarte 'General'
("Allgemein") 'Associated'
("verbunden") ist, ist
Ihr Computer mit dem
von Ihnen gewählten
Zugangspunkt verbunden.
Klicken Sie auf ‘Close’
("Schließen"), um das
Konfigurationsprogramm
zu beenden.
Bitte schauen Sie in das auf der beiliegenden CD-ROM gespeicherte Benutzerhandbuch für Erklärungen zu
erweiterten Einstellungen und anderen Funktionen des WLAN-Adapters.
Sicherheitsvorkehrungen:
Stellen Sie sicher, dass das Gerät nicht mit Wasser oder Feuchtigkeit in Berührung kommt.
Wartung:
Nur mit einem trockenen Tuch säubern. Keine Reinigungs- oder Scheuermittel verwenden.
Garantie:
Es kann keine Garantie oder Haftung für irgendwelche Änderungen oder Modikationen des Produkts oder
für Schäden übernommen werden, die aufgrund einer nicht ordnungsgemäßen Anwendung des Produkts
entstanden sind.
Allgemeines:
Design und technische Daten können ohne vorherige Ankündigung geändert werden.
Alle Logos, Marken und Produktnamen sind Marken oder eingetragene Marken ihrer jeweiligen Eigentümer
und werden hiermit als solche anerkannt.
Bitte bewahren Sie Bedienungsanleitung und Verpackung für spätere Verwendung auf.
Achtung:
Dieses Produkt ist mit diesem Symbol gekennzeichnet. Es bedeutet, dass die ausgedienten
elektrischen und elektronischen Produkte nicht mit dem allgemeinen Haushaltsmüll entsorgt werden
dürfen. Für diese Produkte stehen gesonderte Sammelsysteme zur Verfügung.
Page 14
14
FRANÇAIS
Installation de la Carte Réseau
Suivre, SVP, les instructions suivantes pour installer votre nouvelle carte réseau sans l USB.
1. Insérez la carte réseau
sans fil USB dans un
port USB 2.0 disponible
lorsque votre ordinateur
est allumé.
Ne jamais forcer pour
insérer la carte. Si elle
paraît coincée, retournez
la carte et réessayez.
2. Le message ci-contre
apparaîtra à l’écran,
cliquez sur “Annuler”.
3. Insérez le CD-ROM
contenant le pilote de la
carte dans le lecteur de
CD/DVD-ROM de votre
ordinateur. Sélectionnez
"Installer Pilote / Utilitaire"
pour installer le logiciel.
Page 15

15
4. Sélectionnez, SVP, la
langue que vous souhaitez
utiliser, puis cliquez sur
"Suivant"
5. Cliquez sur "Suivant" pour
continuer.
Page 16

16
6. Ciquez sur ‘Installer’ pour
démarrer l'installation.
L'exécution de la
procédure d'installation
peut prendre quelques
minutes, veuillez donc
patienter.
7. Cliquez sur "Terminer"
pour redémarrer votre
ordinateur et terminer la
procédure d'installation.
Si vous ne voulez
pas redémarrer votre
ordinateur maintenant,
cliquez sur "Non, je
redémarrerai mon
ordinateur plus tard" puis
cliquez sur "Terminer".
Veuillez noter, SVP, que
vous devez redémarrer
votre ordinateur avant
de pouvoir utiliser votre
nouvelle carte réseau sans
fil USB.
Page 17
17
Se connecter à un point d’accès sans l
Utilisation de l’utilitaire de conguration pour se connecter à un point d’accès sans l:
ICI!
1. Une fois l’installation terminée,
l’utilitaire de configuration sans fil
s’affichera automatiquement sur le
bureau de votre ordinateur. Vous
verrez également un icône dans le
coin inférieur droit de la barre de
tâches de votre système Windows.
Cliquez avec le bouton droit sur cet
icône et sélectionnez l’utilitaire de
configuration que vous voulez utiliser.
2. L'utilitaire de configuration
sans fil apparaîtra.
Cliquez sur l'onglet
"Réseau Disponible" pour
rechercher les points
d'accès sans fil proches.
3. Attendez, SVP, un court
laps de temps et tous les
points d'accès sans fil qui
peuvent être atteints au
moyen de cette carte de
réseau sans fil s'afficheront
ici.
Sélectionnez, SVP, le
point d'accès auquel vous
voulez vous connecter et
cliquez alors deux fois ou
cliquez sur "Ajouter au
Profil"
Si le point d'accès sans
fil auquel vous voulez
vous connecter n'est pas
affiché, cliquez, SVP sur
"Actualiser".
Page 18

18
4. Si un mot de passe (aussi
appelé "Clé Réseau")
est requis pour accéder
au point d'accès sans
fil, le saisir, SVP, dans le
champ "Clé Réseau" ( et
le saisir alors de nouveau
dans le champ "Confirmer
Clé Réseau" aux fins de
confirmation). Cliquez sur
"OK" lorsque vous avez
correctement saisi le mot
de passe.
5. La carte réseau essaiera
alors d'établir la connexion
au point d'accès, soyez
patient SVP car l'opération
peut prendre de quelques
secondes à quelques
minutes. Lorsque le
"Statut" passe à "Associé"
dans l'onglet "Général",
votre ordinateur est
connecté au point d'accès
sélectionné. Cliquez sur
"Fermer" pour fermer le
menu de configuration.
S'agissant des réglages avancés et des autres caractéristiques de cette carte réseau sans l USB référez-
vous SVP au manuel utilisateur contenu dans le CD-ROM fourni.
Page 19

19
Consignes de sécurité :
Ne pas exposer l’appareil à l’eau ni à l’humidité.
Entretien :
Ne nettoyez l’appareil qu’avec un chiffon sec. N’utilisez pas de solvants ou de produits abrasifs.
Garantie :
Aucune garantie ou responsabilité ne sera acceptée en cas de modication et/ou de transformation du
produit ou en cas de dommages provoqués par une utilisation incorrecte de l’appareil.
Généralités :
Le design et les caractéristiques techniques sont sujets à modication sans notication préalable.
Tous les logos de marques et noms de produits sont des marques déposées ou immatriculées dont leurs
détenteurs sont les propriétaires et sont donc reconnues comme telles dans ce documents.
Conservez ce manuel et l’emballage pour toute référence ultérieure.
Attention :
Ce symbole gure sur l’appareil. Il signie que les produits électriques et électroniques ne doivent
pas être jetés avec les déchets domestiques. Le système de collecte est différent pour ce genre de
produits.
Page 20
20
NEDERLANDS
Installatie van netwerkdongle
Volg onderstaande instructies op om uw nieuwe draadloze USB-netwerk dongle te installeren.
1. Steek de draadloze USBnetwerk dongle in een lege
USB 2.0 poort wanneer uw
computer is ingeschakeld.
Gebruik nooit kracht
bij het insteken van de
dongle. Als de dongle niet
eenvoudig de aansluiting
maakt, draai de dongle
om en probeer opnieuw.
2. Het volgende bericht zal
verschijnen, klikt u op
“Cancel”.
3. Plaats de CD-rom met het
stuurprogramma in de CD/
DVD-ROM-station van
uw computer. Selecteer
“Driver/Utility Installation”
om de software te
installeren.
Page 21

21
4. Selecteer de taal die u
wenst te gebruiken en klik
vervolgens op “Next”.
5. Klik op “Next” om door te
gaan.
Page 22

22
6. Klik op “Install” om de
installatie te beginnen.
De installatieprocedure
neemt een paar minuten in
beslag, dus wees geduldig.
7. Klik op “Finish” om
de computer opnieuw
op te starten en de
installatieprocedure te
voltooien. Als u op dit
moment uw computer niet
opnieuw wilt opstarten,
selecteer “No, I’ll restart
my computer later” en klik
op “Finish”. Merk op dat
u uw computer opnieuw
moet opstarten alvorens
u uw nieuwe draadloze
USB netwerk dongle kunt
gebruiken.
Page 23
23
Verbinding maken met het draadloze toegangspunt
Het conguratieprogramma gebruiken om verbinding te maken met het draadloze toegangspunt:
HIER!
1. Nadat de installatie is voltooid, zal
het configuratieprogramma voor het
draadloze netwerk automatisch op
het bureaublad van uw computer
worden weergegeven. U zult ook een
pictogram in de rechter benedenhoek
van uw Windows
®
systeem zien.
Klik met de rechtermuisknop op
het pictogram en selecteer het
configuratieprogramma dat u wilt
gebruiken.
2. Het
configuratieprogramma
voor het draadloze netwerk
zal verschijnen. Klik op de
“Available Network” tab
om naar dichtbij gelegen
draadloze toegangspunten
te zoeken.
3. Wacht een ogenblik en alle
draadloze toegangspunten
die via deze draadloze
netwerk dongle kunnen
worden bereikt, zullen hier
worden weergegeven.
Selecteer het toeganspunt
waarmee u verbinding wilt
maken en dubbelklik of
klik vervolgens op “Add to
Profile”.
Als het draadloze
toegangspunt waarmee u
verbinding wilt maken niet
wordt weergegeven, klik
op “Refresh”.
Page 24

24
4. Als een wachtwoord (ook
“Network key” genoemd)
nodig is om toegang tot het
draadloze toegangspunt
te krijgen, voer het in het
“Network key” veld in (en
bevestig het vervolgens,
door het nogmaals in het
“Confirm netwerk key” veld
in te voeren). Klik op “OK”
wanneer u het wachtwoord
correct hebt ingevoerd.
5. De netwerk dongle
zal nu proberen om
verbinding te maken met
het toegangspunt, dit
kan een paar seconden
tot een paar minuten
duren, dus wees geduldig.
Wanneer de “Status” in
het tabblad “General”,
“associated” wordt, is
uw computer verbonden
met het geselecteerde
toegangspunt. Klik
op “Close” om het
configuratiemenu te
sluiten.
Voor geavanceerde instellingen en andere kenmerken van deze draadloze USB-netwerk dongle, verwijzen
wij u naar bijgevoegde handleiding met de bijgeleverde CD-rom.
Page 25
25
Veiligheidsvoorzorgsmaatregelen:
Stel het product niet bloot aan water of vocht.
Onderhoud:
Uitsluitend reinigen met een droge doek. Gebruik geen reinigingsmiddelen of schuurmiddelen.
Garantie:
Voor wijzigingen en veranderingen aan het product of schade veroorzaakt door een verkeerd gebruik van dit
product, kan geen aansprakelijkheid worden geaccepteerd. Tevens vervalt daardoor de garantie.
Algemeen:
Wijziging van ontwerp en specicaties zonder voorafgaande mededeling onder voorbehoud.
Alle logo’s, merken en productnamen zijn handelsmerken of geregistreerde handelsmerken van de
respectievelijke eigenaren en worden hierbij als zodanig erkend.
Bewaar deze gebruiksaanwijzing voor latere raadpleging.
Let op:
Dit product is voorzien van dit symbool. Dit symbool geeft aan dat afgedankte elektrische en
elektronische producten niet met het gewone huisafval verwijderd mogen worden. Voor dit soort
producten zijn er speciale inzamelingspunten.
Page 26
26
ITALIANO
Installazione della penna di rete
Si prega di seguire le istruzioni sotto riportate per installare la vostra nuova penna USB di rete wireless.
1. Inserire la penna USB di
rete wireless in una porta
USB 2.0. libera mentre il
vostro PC è accesso.
Non applicare mai forza
nell'inserire la penna. Se
appare incastrata, sfilarla
e riprovare.
2. Il seguente messaggio
apparirà, cliccare 'Annulla'.
3. Inserire il CD-ROM con il
driver del dispositivo nel
supporto CD/DVD/CDROM del PC. Selezionare
“Installazione del Driver/
Utility” per installare il
software.
Page 27

27
4. Si prega di selezionare
la lingua che si desidera
usare, e quindi premere
‘Avanti’.
5. Cliccare su ‘Avanti’ per
continuare.
Page 28

28
6. Cliccare ‘Installa’ per
avviare l’installazione. La
procedure di installazione
necessita di qualche
minuto per essere
completata, si prega di
essere pazienti.
7. Cliccare ‘Fine’ per riavviare
il PC e completare la
procedura di installazione.
Se non si vuole riavviare
il PC ora, selezionare
‘No, riavvierò il mio PC
in seguito’ e cliccare
su ‘Fine’ Si noti che è
necessario riavviare il PC
prima di poter utilizzare la
nuova penna USB di rete
wireless.
Page 29

29
Connettersi ad un punto di accesso wireless
Utilizzare l’utility di congurazione per connettersi ad un punto di accesso wireless:
QUI!
1. Dopo che l'installazione
è completata, l'utility di
configurazione wireless
verrà visualizzata
automaticamente sul
desktop del PC. Si vedrà
inoltre un icona nell'angolo
in basso a destra della
barra di sistema di
Windows. Cliccare con
il tasto destro sull'icona
e selezionare l'utility di
configurazione che si
desidera utilizzare.
2. L’ utility wireless apparirà.
Cliccare su ‘Reti disponibili’
per ricercare i punti di
accesso presenti nell’area.
Page 30

30
3. Si prega di attendere un
breve lasso di tempo e i
punti di accesso wireless
che possono essere
raggiunti dalla penna di
rete wireless verranno
visualizzati.
Si prega di selezionare il
punto di accesso a cui ci
si vuole connettere e fare
doppio clic o cliccare su
‘Aggiungere al profilo’
Se il punto di accesso
wireless a cui ci si vuole
connettere non viene
visualizzato, cliccare su
‘Aggiorna’.
4. Se una password (‘Chiave
di rete’) è richiesta per
accedere al punto di
accesso wireless, si prega
di inserirla nel campo
‘Chiave di rete’ (e quindi
reinserirla nel campo
‘Conferma chiave di rete’
per la convalida). Cliccare
su ‘OK’ una volta inserita la
password correttamente.
Page 31

31
5. La penna di rete ora
cercherà di connettersi al
punto di accesso, questo
potrebbe richiedere un
lasso di tempo tra i pochi
secondi ai pochi minuti,
si prega di pazientare.
Quando lo ‘Stato’ diventa
‘Connesso’ nell’indicazione
‘Generale’, il vostro PC
è connesso con il punto
di accesso selezionato.
Cliccare su ‘Chiudi’
per chiudere il menu di
configurazione.
Per settaggi avanzati ed altre caratteristiche di questa penna USB di rete wireless, si prega di fare riferimento
al manuale utente incluso nel CD-ROM fornito.
Precauzioni di sicurezza:
Non esporre il prodotto ad acqua o umidità.
Manutenzione:
Pulire solo con un panno asciutto. Non utilizzare solventi detergenti o abrasivi.
Garanzia:
Non sarà accettata alcuna garanzia o responsabilità in relazione a cambiamenti e modiche del prodotto o a
danni determinati dall’uso non corretto del prodotto stesso.
Generalità:
Il design e le caratteristiche tecniche sono soggetti a modica senza necessità di preavviso.
Tutti i marchi a logo e i nomi di prodotto sono marchi commerciali o registrati dei rispettivi titolari e sono
riconosciuti come tali in questo documento.
Tenere questo manuale e la confezione per riferimento futuro.
Attenzione:
Il prodotto è contrassegnato con questo simbolo, con il quale si indica che i prodotti elettrici ed
elettronici non devono essere gettati insieme ai riuti domestici. Per questi prodotti esiste un
sistema di raccolta differenziata.
Page 32

32
ESPAÑOL
Instalación de la tarjeta de red
Por favor, siga las instrucciones siguientes para instalar su nueva tarjeta de red inalámbrica USB.
1. Inserte la tarjeta USB
de red inalámbrica a un
puerto USB 2.0 vacío
cuando la computadora
esté encendida.
Nunca se valga de su
fuerza para insertar
la tarjeta. Si la nota
atascada, voltee la tarjeta
y vuelva a intentarlo.
2. El siguiente mensaje
aparecerá; haga clic en
"Cancelar".
3. Inserte el controlador del
dispositivo de CD-ROM en
el CD / DVD-ROM de su
computadora. Selec-cione
“Controlador / Utilidad de
instalación” para instalar el
software.
Page 33

33
4. Por favor seleccione el
idioma que desee utilizar y
haga clic en “Siguiente”.
5. Haga clic en “Siguiente”
para continuar.
Page 34

34
6. Haga clic en “Instalación”
para iniciar la instalación.
El procedimiento de
instalación necesita unos
minutos para completarse,
así que por favor sea
paciente.
7. Haga clic sobre “Finalizar”
para reiniciar el equipo
y completar el proceso
de instalación. Si no
desea reiniciar el equipo
ahora, seleccione “No,
voy a reiniciar mi equipo
más tarde” y haga clic
en “Finalizar”. Tenga
en cuenta que usted
tendrá que reiniciar su
computadora para poder
utilizar su nueva tarjeta
USB de red inalámbrica.
Page 35

35
Conectar con punto de acceso inalámbrico
Sírvase de la Utilidad de Conguración para conectarse a un punto de acceso inalámbrico:
¡AQUÍ!
1. Una vez que la instalación
se haya completado, la
utilidad de configuración
inalámbrica se mostrará
automáticamente en el
escritorio del equipo.
También verá un icono
en la esquina inferior
derecha de su sistema de
Windows. Haga un clic
derecho sobre el icono y
seleccione la utilidad de
configuración que desee
utilizar.
2. La utilidad de
configuración aparecerá.
Haga clic en la pestaña
"Red disponible" para
buscar puntos de acceso
inalámbricos cercanos.
Page 36

36
3. Por favor, espere un rato
y se mostrarán todos
los puntos de acceso
inalámbrico a los que
se puede llegar a través
de esta tarjeta de red
inalámbrica.
Por favor seleccione el
punto de acceso al que
desee conectarse, y a
continuación haga doble
clic o haga clic sobre
"Añadir a perfil".
Si el punto de acceso
inalámbrico al que desee
conectarse no aparece,
por favor haga clic en
"Actualizar".
4. Si una contraseña
(también conocida como
"Clave de red") fuera
necesaria para acceder
al punto de acceso
inalámbrico, por favor
escríbala en el casillero
"Clave de red" (y luego
vuelva a entrar al casillero
"Confirmar clave de red"
para confirmarla). Haga
clic en "Aceptar" cuando
haya introducido la
contraseña correctamente.
Page 37

37
5. La tarjeta de red ahora
intentará conectarse al
punto de acceso, esto
puede tardar algo, desde
unos pocos segundos
a unos minutos así que
por favor sea paciente.
Cuando el "Estado" se
convierta en "Asociados"
en la pestaña de
"General", el equipo
estará conectado al punto
de acceso seleccionado.
Haga clic sobre "Cerrar"
para cerrar el menú de
configuración.
Para una conguración avanzada y otras características de esta tarjeta USB de red inalámbrica, consulte el
manual de usuario incluido en el CD-ROM.
Medidas de seguridad:
No exponga el producto al agua ni a la humedad.
Mantenimiento:
Límpielo sólo con un paño seco. No utilice disolventes de limpieza ni productos abrasivos.
Garantía:
No se aceptará ninguna garantía o responsabilidad derivada de cualquier cambio o modicaciones
realizadas al producto o daños provocados por un uso incorrecto del producto.
General:
Las ilustraciones y las especicaciones podrán sufrir cambios sin previo aviso.
Todas las marcas de logotipos y nombres de productos constituyen patentes o marcas registradas a nombre
de sus titulares correspondientes, reconocidos como tal.
Conserve este manual y el embalaje en caso de futura necesidad.
Atención:
Este producto está señalizado con este símbolo. Esto signica que los productos eléctricos y
electrónicos usados no deberán mezclarse con los desechos domésticos generales. Existe un
sistema de recogida individual para este tipo de productos.
Page 38

38
MAGYAR
Hálózati kártya telepítése
Kövesse az alábbi utasításokat az új USB vezeték nélküli hálózati kártya telepítéséhez.
1. Helyezze az USB
vezeték nélküli hálózati
kártyát egy üres USB
2.0 csatlakozóba, mikor
a számítógépe be van
kapcsolva
Ne erőltesse a kártya
behelyezését. Ha úgy
érzi, hogy beragadt, akkor
fordítsa át a kártyát, és
próbálja újra.
2. A következő üzenet
megjelenik, majd kattintson
a „Cancel” (mégse)
gombra.
3. Helyezze az eszköz driver
CD-ROM-ját számítógépe
CD/DVD-ROM-jába.
Válassza a „Driver/Utility
Installation” („driver/
eszköz telepítése”) opciót
a szoftver telepítéséhez.
Page 39

39
4. Válassza ki a nyelvét,
majd kattintson a „Next”
(„következő”) gombra
5. Kattintson a „Next”
(„következő”) gombra a
folytatáshoz.
Page 40

40
6. Kattintson a „Installation”
(„telepítés”) gombra a
telepítés megkezdéséhez.
A telepítés néhány percet
vehet igényben, ezért
kérem, legyen türelmes.
7. Kattintson a „Finish”
(„befejezés”) gombra
számítógépe
újraindításához, és a
telepítés befejezéséhez.
Ha most nem kívánja
újraindítani számítógépét,
akkor válassza a „No, I’ll
restart my computer later”
(„Nem, később indítom újra
a számítógépet”) opciót,
majd kattintson a „Finish”
(„befejezés”) gombra.
Kérem, vegye figyelembe,
hogy mielőtt használhatná
az USB vezeték nélküli
hálózati kártyát, újra kell
indítani a számítógépét.
Page 41

41
Csatlakozás vezeték nélküli kapcsolódási ponthoz
A konguráció segítségével csatlakozzon egy vezeték nélküli kapcsolódási ponthoz:
ITT!
1. A telepítést követően
a vezeték nélküli
konfigurációs lehetőség
automatikusan megjelenik
számítógépe tálcáján. A
Windows rendszer jobb
alsó sarkában láthat egy
ikont is. Jobb egérgombbal
az ikonra kattintva
válassza ki a használni
kívánt konfigurációt.
2. A vezeték nélküli
segédprogram
megjelenik. Kattintson
az „Available Network”
(„elérhető hálózat”) fülre
a közeli vezeték nélküli
kapcsolódási pontok
kereséséhez.
Page 42

42
3. Várjon egy kicsit, amíg
az összes vezeték nélküli
hálózattal elérhető vezeték
nélküli kapcsolódási pont
megjelenik.
Válassza ki azt a
kapcsolódási pontot,
amelyikhez csatlakozni
kíván, majd kétszeri
rákattintással vagy az „Add
to Profile” („hozzáadás a
profilhoz”) gombra való
kattintással csatlakozzon
hozzá.
Ha az a kapcsolódási pont,
amelyikhez csatlakozni
kíván, nem jelenik
meg, akkor kattintson
a „Refresh” („frissítés”)
gombra.
4. Ha jelszóra (azaz,
„Network Key” („hálózati
kulcsra”) van szükség
a vezeték nélküli
kapcsolódási ponthoz való
csatlakozáshoz, akkor
adja meg a „Network
Key” („hálózati kulcs”)
mezőben (majd adja meg
ismételten a “Confirm
network key” („hálózati
kulcs megerősítése”)
mezőben). Kattintson az
„OK” gombra, ha megadta
a helyes jelszót.
Page 43
43
5. A hálózati kártya most
megkísérli a csatlakozást
a kapcsolódási ponthoz
kérem, legyen türelmes,
mert akár több percig is
eltarthat. Amikor a „Status”
(„állapot”) „Associated”
(„társult”) lesz, a „General”
(„általános”) fülben, akkor
számítógépe csatlakozott
a kiválasztott kapcsolódási
ponthoz. Kattintson
a „Close” („bezárás”)
gombra a konfigurációs
menü bezárásához.
Az USB vezeték nélküli hálózati kártya speciális beállításaihoz és egyéb lehetőségeihez forduljon a
CD-ROM-hoz mellékelt használati útmutatóhoz.
Biztonsági óvintézkedések:
Vigyázzon, hogy ne érje a terméket víz vagy nedvesség.
Karbantartás:
Csak száraz ronggyal tisztítsa. Tisztító- és súrolószerek használatát mellőzze.
Jótállás:
Nem vállalunk jótállást és felelősséget a terméken végzett változtatás vagy módosítás vagy a termék
helytelen használata miatt bekövetkező károkért.
Általános tudnivalók:
A kivitel és a műszaki jellemzők előzetes értesítés nélkül is módosulhatnak.
Minden logó, terméknév és márkanév a tulajdonosának márkaneve vagy bejegyzett márkaneve, azokat
ennek tiszteletben tartásával említjük.
Őrizze meg ezt az útmutatót és a csomagolást.
Figyelem:
Ezt a terméket ezzel a jelölésel láttuk el. Azt jelenti, hogy az elhasznált elektromos és elektronikus
termékeket tilos az általános háztartási hulladékhoz keverni. Begyűjtésüket külön begyűjtő
létesítmények végzik.
Page 44

44
SUOMI
Verkkokortin asennus
Seuraa alla olevia ohjeita asentaaksesi uuden langattoman USB-verkkokorttisi.
1. Aseta langaton USBverkkokortti vapaaseen
USB 2.0-porttiin
tietokoneen ollessa päällä.
Älä työnnä sitä väkisin.
Jos kortti ei mene sisään
kunnolla, käännä se ja
yritä uudestaan.
2. Seuraava viesti ilmestyy
näytölle, klikkaa ‘Cancel’.
3. Aseta laitteen ajuri-CD-
ROM tietokoneesi CD/
DVD-ROM asemaan.
Valitse “Ajurin/
apuohjelman asennus”
ohjelmiston asennusta
varten.
Page 45

45
4. Valitse haluamasi kieli ja
klikkaa ‘Next’.
5. Jatka painamalla ‘Next’.
Page 46

46
6. Aloita asennus painamalla
‘Install’. Asennukseen
kuluu muutama minuutti.
7. Klikkaa ‘Finish’
käynnistääksesi
tietokoneen ja
päättääksesi
asennustoimenpiteen.
Jos et halua käynnistää
tietokonettasi uudestaan
nyt, valitse ‘No, I’ll
restart my computer
later’ ja klikkaa ‘Finish’.
Huomaa, että sinun on
käynnistettävä tietokoneesi
uudestaan ennen kuin voit
käyttää langatonta USBverkkokorttiasi.
Page 47

47
Yhteys langattomaan liitäntäpisteeseen
Kongurointiapuohjelman käyttö langattomaan liitäntäpisteeseen liittymistä varten:
TÄSSÄ!
1. Kun asennus on
valmis, langaton
konfigurointiapuohjelma
ilmestyy automaattisesti
tietokoneen näytölle.
Windows-järjestelmän
oikeaan alalaitaan ilmestyy
kuvake. Klikkaa kuvaketta
hiiren oikealla painikkeella
ja valitse haluamasi
konfigurointiapuohjelma.
2. Langaton apuohjelma
ilmestyy näytölle. Klikkaa
‘Available Network’
etsiäksesi lähistöllä olevia
langattomia liitäntäpisteitä.
3. Odota pieni hetki ja kaikki
langattomat liitäntäpisteet,
joihin voit liittyä tämän
langattoman verkkokortin
kautta ilmestyvät näkyviin.
Valitse liitäntäpiste, johon
haluat liittyä ja klikkaa
kahdesti tai klikkaa ‘Add to
Profile’.
Jos liitäntäpiste, johon
haluat liittyä ei ole
näkyvillä, klikkaa ‘Refresh’.
Page 48

48
4. Jos salasana (a.k.a.
‘Network Key’)
pyydetään langattomaan
liitäntäpisteeseen
liittymiseksi, syötä se
‘Network key’ kenttään
(ja syötä se uudestaan
‘Confirm network key’
kenttään vahvistaaksesi).
Klikkaa ‘OK’ kun olet
syöttänyt salasanan oikein.
5. Verkkokortti yrittää nyt
liittyä liitäntäpisteeseen.
Tähän voi kulua aikaa
muutamasta sekunnista
muutamaan minuuttiin.
Kun ‘Status’ ilmoittaa
‘Associated’ ‘General’
tabissa, tietokone on liitetty
valittuun liitäntäpisteeseen.
Klikkaa ‘Close’ sulkeaksesi
konfigurointivalikon.
Katso tämän langattoman USB-verkkokortin edistyneet asetukset ja muut ominaisuudet mukana tulevalla
CD-ROM:lla olevista käyttöohjeista.
Page 49

49
Turvallisuuteen liittyvät varoitukset:
Älä altista laitetta vedelle äläkä kosteudelle.
Huolto:
Puhdista ainoastaan kuivalla kankaalla. Älä käytä liuottimia tai hankausaineita.
Takuu:
Takuu ja vastuuvelvollisuus mitätöityvät, jos tuote vaurioituu siihen tehtyjen muutoksien tai sen väärinkäytön
takia.
Yleistä:
Muutoksia malliin ja teknisiin ominaisuuksiin voidaan tehdä ilmoituksetta.
Kaikki logot, merkit ja tuotenimet ovat niiden vastaavien omistajien tuotemerkkejä tai rekisteröityjä
tuotemerkkejä ja niitä on käsiteltävä sellaisina.
Säilytä käyttöohjeet ja pakkaus myöhempää käyttötarvetta varten.
Huomio:
Tuote on varustettu tällä merkillä. Se merkitsee, ettei käytettyjä sähkö- tai elektronisia tuotteita saa
hävittää kotitalousjätteen mukana. Kyseisille tuotteille on olemassa erillinen keräysjärjestelmä.
Page 50

50
SVENSKA
Installera nätverkskort
Följ instruktionerna nedanför för att installera ditt nya trådlösa USB kort.
1. Sätt i det trådlösa USB
nätverkskortet i ett ledigt
USB 2.0 port när din dator
är på.
Använd aldrig tvång för att
sätta i kortet. Om motstånd
känns, vänd kortet och
försök igen.
2. Följande meddelande
visas, klicka “Cancel”.
3. Sätt i drivenhetens
CD-ROM i CD/DVD-ROM
enheten i din dator. Välj
“Driver/Utility installation”
för att installera
programmet.
Page 51

51
4. Välj det språk du vill
använda och klicka på
“Next”.
5. Klicka “Next” för att
fortsätta.
Page 52

52
6. Klicka “Install” för att
starta installationen.
Installationen tar ett par
minuter att slutföras så ha
tålamod.
7. Klicka “Finish” för att starta
om din dator och avsluta
installationen. Om du inte
vill starta om din dator
nu, välj No, I’ll restart
my computer later’ och
klicka‘Finish’. Observera
att du måste starta om
din dator innan du kan
använda ditt nya trådlösa
USB nätverkskort.
Page 53

53
Ansluta till en Trådlös Anslutningspunkt
Användakongureringsfunktionen för att ansluta till Trådlös Anslutningspunkt:
HÄR:
1. När installationen
är avslutad, visas
den trådlösa
konfigureringsfunktionen
automatiskt på din dators
skrivbord. Du ser också
en ikon i nedre högra
hörnet av ditt windows
system. Högerklicka
på ikonen och välj
konfigureringsfunktionen
du vill använda.
2. Den trådlösa funktionen
visas. Klicka på ‘Available
Network’ fliken för att
söka närmaste trådlösa
anslutningspunkt.
3. Vänta ett ögonblick
så att alla trådlösa
anslutningspunkter som
kan nås via detta trådlösa
nätverkskort visas här.
Välj den anslutningspunkt
du vill ansluta till och
dubbelklicka eller ‘Add to
Profile’ (Lägg till profil).
Om den trådlösa
anslutningspunkt du vill
ansluta till inte visas, klicka
på ‘Refresh’.
Page 54

54
4. Om ett lösenord
(a.k.a. ‘Network Key’)
(nätverksnyckel) krävs för
åtkomst till den trådlösa
anslutningspunkten, skriv
in den i fältet för ‘Network
key’ (och skriv in det på
nytt i fältet för bekräftelse).
Klicka “OK” när du har
skrivit in lösenordet
korrekt.
5. Nätverkskortet försöker
nu etablera anslutning
till anslutningspunkten,
detta kan ta allt från ett
par sekunder till ett par
minuter så vänta. När
‘Status’ blir ‘Associated’
i den ‘General’ fliken, är
din dator ansluten till den
valda anslutningspunkten.
Klicka ‘Close’ för att stänga
konfigureringsmenyn.
För avancerad inställning och andra egenskaper för det trådlösa USB nätverkskortet, se manualen
inkluderad i levererad CD-ROM.
Page 55

55
Säkerhetsanvisningar:
Utsätt inte produkten för vatten eller fukt.
Underhåll:
Rengör endast med torr trasa. Använd inga rengöringsmedel som innehåller lösningsmedel eller slipmedel.
Garanti:
Ingen garanti gäller vid ändringar eller modieringar av produkten eller för skador som har uppstått på grund
av felaktig användning av denna produkt.
Allmänt:
Utseende och specikationer kan komma att ändras utan föregående meddelande.
Alla logotyper och produktnamn är varumärken eller registrerade varumärken som tillhör sina ägare och är
härmed erkända som sådana.
Behåll bruksanvisningen och förpackningen för eventuellt framtida behov.
Obs!
Produkten är märkt med denna symbol som betyder att använda elektriska eller elektroniska
produkter inte får slängas bland vanliga hushållssopor. Det nns särskilda återvinningssystem för
dessa produkter.
Page 56

56
ČESKY
Instalace síťové karty
Při instalaci vaší nové bezdrátové síťové USB karty prosím postupujte podle následujících pokynů.
1. Zapněte počítač a vložte
bezdrátovou síťovou USB
kartu do volného portu
USB 2.0.
Nikdy kartu nevkládejte
za použití násilí. Jestliže
se zdá, že uvízla, otočte ji
a pokuste se ji zasunout
znovu.
2. Na počítači se objeví
následující zpráva klikněte na "Cancel"
(storno).
3. Vložte do vaší diskové
mechaniky CD/DVD disk
s ovládačem zařízení. K
instalaci software zvolte
položku "Driver/Utility
instalation" (instalace
ovladače/obslužného
programu)
Page 57

57
4. Zvolte si prosím jazyk
instalace a klikněte na
"Next" (pokračovat).
5. K pokračování klikněte na
"Next" (pokračovat).
Page 58

58
6. K započetí instalace
klikněte na "Install".
Instalační proces trvá
několik minut, proto
zachovejte trpělivost.
7. K restartování počítače
a dokončení instalační
procedury klikněte na
"Finish" (dokončení).
Jestliže nechcete, aby se
počítač ihned restartoval,
označte pole "No I’ll restart
my computer later" (budu
restartovat počítač později)
a klikněte na "Finish"
(dokončení instalace).
Uvědomte si prosím, že
před použitím vaší nové
bezdrátové síťové USB
karty je nutno počítač
restartovat.
Page 59

59
Připojení k bezdrátovému přístupovému bodu
Použití konguračního obslužného programu k připojení k bezdrátovému přístupovému bodu:
ZDE!
1. Po dokončení instalace
se konfigurační obslužný
program automaticky
objeví na ploše vašeho
počítače. Také v pravém
dolním rohu obrazovky
uvidíte ikonu. Klikněte na
ni pravým tlačítkem myši
a vyberte si konfigurační
obslužný program, který
chcete použít.
2. Na obrazovce se objeví
obslužný program
bezdrátové sítě. Klikněte
na kartu "Available
Network" (dostupné sítě)
k vyhledání nejbližších
bezdrátových přístupových
bodů.
Page 60

60
3. Chvíli prosím vyčkejte a
poté dojde k zobrazení
všech bezdrátových
přístupových bodů,
ke kterým se lze touto
bezdrátovou síťovou USB
kartou připojit.
Vyberte si prosím
přístupový bod, ke kterému
se chcete připojit a 2krát
na něj klikněte nebo
klikněte 1krát na položku
"Add to Profile" (přidat k
profilu).
Jestliže není bezdrátový
přístupový bod, ke
kterému se chcete připojit
zobrazen, klikněte na
"Refresh" (obnovit).
4. Jestliže je nutno pro
připojení k bezdrátovému
přístupovému bodu vložit
heslo (síťový klíč) vložte ho
prosím do pole "Network
key" (síťový klíč) a také do
pole "Confirm network key"
(potvrzení síťového klíče).
Po správném vložení hesla
do obou polí stiskněte
"OK".
Page 61

61
5. Nyní se síťová karta pokusí
připojit k přístupovému
bodu, tento proces může
trvat od několika sekund
do několika minut, proto
prosím zachovejte
trpělivost. Je-li na kartě
"General" (obecné) vedle
stavu "Status" označení
"Associated" (přidružený),
váš počítač je připojen ke
zvolenému přístupovému
bodu. Klikněte na "Close"
(uzavřít) k uzavření
konfiguračního menu.
K pokročilému nastavení a k obeznámení s dalšími vlastnostmi bezdrátové síťové USB karty se prosím
podívejte do manuálu na CD-ROM, který je součástí výrobku.
Bezpečnostní opatření:
Výrobek nevystavujte vodě nebo vlhkosti.
Údržba:
K čištění používejte pouze suchý hadřík. Nepoužívejte čisticí rozpouštědla ani abrazivní prostředky.
Záruka:
Jakékoli změny, modikace nebo poškození zařízení v důsledku nesprávného zacházení se zařízením ruší
platnost záruční smlouvy.
Obecné upozornění:
Design a specikace výrobku mohou být změněny bez předchozího upozornění.
Všechna loga a obchodní názvy jsou registrované obchodní značky příslušných vlastníků a jsou chráněny
zákonem.
Pro budoucí použití uschovejte tento návod a obal.
Upozornění:
Tento výrobek je označen tímto symbolem. To znamená, že se s výrobkem musí zacházet jako s
nebezpečným elektrickým a elektronickým odpadem a nelze jej po skončení životnosti vyhazovat s
běžným domácím odpadem. Pro likvidaci těchto výrobků existují zvláštní sběrná střediska.
Page 62

62
ROMÂNĂ
Instalarea cardului de reţea
Vă rugăm să urmaţi instrucţiunile de mai jos pentru a instala noul dvs. card de reţea USB wireless.
1. Introduceţi cardul de reţea
USB wireless într-un port
USB 2.0 gol atunci când
computerul este pornit.
Nu utilizaţi niciodată
forţa pentru a introduce
cardul. Dacă pare blocat,
întoarceţi cardul şi
încercaţi din nou.
2. Va apărea următorul
mesaj, daţi clic pe „Cancel”
(Anulare).
3. Introduceţi CD-ROM-ul cu
driver-ul pentru dispozitiv
în unitatea CD/DVDROM a computerului dvs.
Selectaţi „Driver/Utility
Installation” (Instalare
driver/utilitar) pentru a
instala programul.
Page 63

63
4. Selectaţi limba pe care
doriţi să o utilizaţi, apoi daţi
clic pe „Next” (Continuare).
5. Daţi clic pe „Next” pentru a
continua.
Page 64

64
6. Daţi clic pe „Install”
(Instalare) pentru a începe
instalarea. Procedura de
instalare durează câteva
minute până la finalizare,
vă rugăm să aşteptaţi.
7. Daţi clic pe „Finish”
(Finalizare) pentru a
reporni computerul şi
a finaliza procedura de
instalare. Dacă nu doriţi să
reporniţi computerul acum,
selectaţi „No, I’ll restart
my computer later” (Nu,
îmi voi reporni computerul
mai târziu) şi daţi clic
pe „Finish”. Nu uitaţi
că trebuie să reporniţi
computerul înainte de a
putea utiliza noul dvs. card
de reţea USB wireless.
Page 65

65
Conectarea la Punctul de acces wireless
Utilizarea utilitarului de congurare pentru conectarea la punctul de acces wireless:
AICI!
1. După ce instalarea este
finalizată, utilitarul de
configurare wireless
va apărea automat pe
suprafaţa de lucru a
computerului dvs. Veţi
observa de asemenea o
pictogramă în colţul din
dreapta jos al sistemului
dvs. windows. Daţi clic
dreapta pe pictogramă
şi selectaţi utilitarul de
configurare pe care doriţi
să-l utilizaţi.
2. Va apărea utilitarul
wireless. Daţi clic pe fila
„Available Network" (Reţea
disponibilă) pentru a căuta
puncte de acces wireless
apropiate.
Page 66

66
3. Vă rugăm să aşteptaţi
câteva momente şi
toate punctele de acces
wireless ce pot fi accesate
prin acest card de reţea
wireless vor fi afişate aici.
Vă rugăm să selectaţi
punctul de acces la care
doriţi să vă conectaţi şi
apoi daţi dublu clic sau
clic pe „Add to Profile”
(Adăugare la profil).
Dacă punctul de acces la
care doriţi să vă conectaţi
nu este afişat, daţi clic pe
„Refresh”.
4. Dacă este nevoie de
o parolă (denumită şi
„Network Key” - Cheie de
reţea) pentru a accesa
punctul de acces wireless,
vă rugăm să o introduceţi
în câmpul „Network Key”
(apoi să o reintroduceţi
în câmpul „Confirm
network key” – Confirmare
cheie de acces – pentru
confirmare). Daţi clic pe
„OK” după ce aţi introdus
corect parola.
Page 67

67
5. Cardul de reţea va
încerca acum să se
conecteze la punctul
de acces, acest proces
poate dura de la câteva
secunde la câteva minute,
vă rugăm să aşteptaţi.
Atunci când la „Status”
(Stare) apare „Associated”
(Asociat) în fila „General”,
computerul dvs. este
conectat la punctul de
acces selectat. Daţi clic
pe „Close” (Închidere)
pentru a închide meniul de
configurare.
Pentru setări avansate şi alte funcţii ale acestui card de reţea USB wireless, vă rugăm să consultaţi manualul
utilizatorului ataşat CD-ROM-ului furnizat.
Măsuri de siguranţă:
Nu expuneţi produsul apei sau umezelii.
Întreţinere:
Curăţarea trebuie făcută cu o cârpă uscată. Nu folosiţi solvenţi sau agenţi de curăţare abrazivi.
Garanţie:
Nu oferim nicio garanţie şi nu ne asumăm niciun fel de responsabilitate în cazul schimbărilor sau modicărilor
aduse acestui produs sau în cazul deteriorării cauzate de utilizarea incorectă a produsului.
Generalităţi:
Designul şi specicaţiile produsului pot modicate fără o noticare prealabilă.
Toate siglele mărcilor şi denumirile produselor sunt mărci comerciale sau mărci comerciale înregistrate ale
proprietarilor de drept şi prin prezenta sunt recunoscute ca atare.
Păstraţi acest manual şi ambalajul pentru consultări ulterioare.
Atenţie:
Pe acest produs se aă acest marcaj. Acesta semnică faptul că produsele electrice şi electronice
nu trebuie eliminate odată cu gunoiul menajer. Aceste produse au un sistem separat de colectare.
Page 68

68
ΕΛΛΗΝΙΚA
Εγκατάσταση Κάρτας Δικτύου
Ακολουθήστε τις παρακάτω οδηγίες για να εγκαταστήσετε τη νέα ασύρματη USB κάρτα δικτύου σας.
1. Εισάγετε την USB κάρτα
ασύρματου δικτύου σε
μια κενή θύρα USB 2.0
όταν είναι ανοιχτός ο
υπολογιστής σας.
Ποτέ μην εισάγετε με
δύναμη την κάρτα. Αν
νιώθετε ότι έχει κολλήσει,
βγάλτε την κάρτα και
προσπαθήστε ξανά.
2. Το ακόλουθο μήνυμα θα
εμφανιστεί, κάντε κλικ στο
‘Cancel’.
3. Εισάγετε τον οδηγό
συσκευής CD-ROM στον
οδηγό CD/DVD-ROM του
υπολογιστή σας. Επιλέξτε
“Driver/Utility Installation”
για να εγκαταστήσετε το
λογισμικό.
Page 69

69
4. Επιλέξτε τη γλώσσα
που επιθυμείτε να
χρησιμοποιήσετε, στην
συνέχεια κάντε κλικ στο
‘Next’.
5. Κάντε κλικ στο ‘Next’ για
να συνεχίσετε.
Page 70

70
6. Κάντε κλικ στο ‘Install’
για να ξεκινήσετε την
εγκατάσταση. Η διαδικασία
εγκατάστασης χρειάζεται
λίγα λεπτά για να
ολοκληρωθεί γι’ αυτό έχετε
υπομονή.
7. Κάντε κλικ στο ‘Finish’
για να επανεκκινήσετε
τον υπολογιστή σας
και ολοκληρώστε την
διαδικασία εγκατάστασης.
Αν δεν επιθυμείτε να
επανεκκινήσετε τον
υπολογιστή σας τώρα,
επιλέξτε ‘No, I’ll restart
my computer later’’ και
κάντε κλικ στο ‘Finish’.
Σημειώστε ότι πρέπει
να επανεκκινήσετε
τον υπολογιστή σας
πριν να μπορέσετε να
χρησιμοποιήσετε την νέα
σας USB κάρτα ασύρματου
δικτύου.
Page 71

71
Σύνδεση σε Ασύρματο Σημείο Πρόσβασης
Χρήση του Βοηθητικού Προγράμματος Διαμόρφωσης για να Συνδεθείτε σε Ασύρματο Σημείο Πρόσβασης:
ΕΔΩ!
1. Αφού ολοκληρωθεί η εγκατάσταση,
το βοηθητικό πρόγραμμα ασύρματης
διαμόρφωσης θα εμφανίζεται
αυτόματα στην επιφάνεια εργασίας του
υπολογιστή σας. Θα δείτε επίσης ένα
εικονίδιο στην κάτω δεξιά γωνία του
συστήματος των windows σας. Κάντε
δεξί κλικ στο εικονίδιο και επιλέξτε το
βοηθητικό πρόγραμμα διαμόρφωσης
που επιθυμείτε να χρησιμοποιήσετε.
2. Το ασύρματο βοηθητικό
πρόγραμμα θα εμφανιστεί.
Κάντε κλικ στην καρτέλα
‘Available Network’για
να αναζητήσετε κοντινά
σημεία ασύρματης
πρόσβασης.
3. Περιμένετε λίγο και όλα
τα σημεία ασύρματης
πρόσβασης που μπορείτε
να προσεγγίσετε μέσω
αυτής της κάρτας
ασύρματου δικτύου θα
εμφανιστούν εδώ.
Επιλέξτε το σημείο
πρόσβασης με το οποίο
επιθυμείτε να συνδεθείτε
και στην συνέχεια κάντε
διπλό κλικ ή κλικ στο ‘Add
to Profile’.
Αν το σημείο ασύρματης
πρόσβασης με το οποίο
επιθυμείτε να συνδεθείτε
δεν εμφανίζεται, κάντε κλικ
στο ‘Refresh’.
Page 72

72
4. Αν χρειάζεται κωδικός
πρόσβασης (γνωστό ως
‘Network Key’) για να έχετε
πρόσβαση στο σημείο
ασύρματης πρόσβασης,
εισάγετέ το στο πεδίο
‘Network key’ (και στην
συνέχεια εισάγετέ το ξανά
στο πεδίο ‘Confirm network
key’ field for confirmation).
Κάντε κλικ στο ‘OK’ όταν
θα έχετε εισάγει σωστά τον
κωδικό πρόσβασης.
5. Η κάρτα δικτύου δεν θα
επιχειρήσει να συνδεθεί
με το σημείο ασύρματης
πρόσβασης, αυτό μπορεί
να χρειαστεί από λίγα
δευτερόλεπτα έως λίγα
λεπτά για αυτό έχετε
υπομονή. Όταν η ‘Status’
καταστεί ‘Associated’
στην καρτέλα ‘General’,
ο υπολογιστής σας
είναι συνδεδεμένος με
το σημείο ασύρματης
σύνδεσης. Κάντε κλικ στο
‘Close’ για να κλείσετε το
μενού διαμόρφωσης.
Για προχωρημένες ρυθμίσεις και άλλα χαρακτηριστικά αυτής της USB κάρτας ασύρματου δικτύου, ανατρέξτε
στο εγχειρίδιο χρήστη που εσωκλείεται με το παρεχόμενο CD-ROM.
Page 73

73
Οδηγίες ασφαλείας:
Μην εκθέτετε το προϊόν σε νερό ή υγρασία.
Συντήρηση:
Καθαρίστε μόνο με ένα στεγνό πανί. Μη χρησιμοποιείτε διαλύτες ή λειαντικά.
Εγγύηση:
Ουδεμία εγγύηση ή ευθύνη δεν είναι αποδεκτή σε περίπτωση αλλαγής ή μετατροπής του προϊόντος ή
βλάβης που προκλήθηκε λόγω εσφαλμένης χρήσης του προϊόντος.
Γενικά:
Το σχέδιο και τα χαρακτηριστικά μπορούν να αλλάξουν χωρίς καμία προειδοποίηση.
Όλα τα λογότυπα, οι επωνυμίες και οι ονομασίες προϊόντων είναι εμπορικά σήματα ή σήματα κατατεθέντα
των αντίστοιχων κατόχων και δια του παρόντος αναγνωρίζονται ως τέτοια.
Φυλάξτε το παρόν εγχειρίδιο και τη συσκευασία για μελλοντική αναφορά.
Προσοχή:
Το συγκεκριμένο προϊόν έχει επισημανθεί με αυτό το σύμβολο. Αυτό σημαίνει ότι οι μεταχειρισμένες
ηλεκτρικές και ηλεκτρονικές συσκευές δεν πρέπει να αναμειγνύονται με τα κοινά οικιακά
απορρίμματα. Υπάρχει ξεχωριστό σύστημα συλλογής για αυτά τα αντικείμενα.
Page 74

74
DANSK
Isætning af netværkskort
Følg instruktionerne herunder for at installere dit nye trådløse USB netværkskort.
1. Sæt det trådløse USB
netværkskort i en ledig
USB 2.0 terminal, mens
din PC er tændt.
Brug aldrig magt for at
indsætte kortet. Hvis det
ikke glider nemt ind, skal
du vende kortet og prøve
igen.
2. Denne meddelelse vises
på skærmen, klik på
‘Cancel’.
3. Læg driver CD-ROMMEN
i din PCs CD/DVD-ROM
drev. Vælg “Driver/Utility
Installation” for at installere
softwaren.
Page 75

75
4. Vælg det ønskede sprog
og klik på ‘Next’.
5. Klik på ‘Next’ for at
fortsætte.
Page 76

76
6. Klik på ‘Install’ for at
begynde installationen.
Installationen tager
nogle få minutter, hav
tålmodighed.
7. Klik på ‘Finish’ for at
genstarte din computer og
færdiggøre installationen.
Hvis du ikke vil genstarte
computeren nu, skal du
vælge ‘No, I’ll restart my
computer later’ og klikke på
‘Finish’. Computeren skal
genstartes, inden du kan
anvende det nye trådløse
USB netværkskort.
Page 77

77
Tilslutning til et trådløst access point
Sådan anvendes hjælpeprogrammet ved tilslutning til et trådløst access point:
HER!
1. Når installationen er
gennemført, vises
hjælpeprogrammet
Wireless LAN Utility
automatisk på
computerskærmen. Du
vil også se et ikon på
proceslinjen i nederste
højre hjørne af Windows
skærmen. Højreklik
på ikonet og vælg det
konfigurationsprogram, du
vil anvende.
2. Hjælpeprogrammet
Wireless LAN Utility vises
på skærmen. Klik på fanen
‘Available Network’ og
søg efter trådløse access
points i nærheden.
3. Vent et øjeblik, mens
systemet søger, hvorefter
en liste over tilgængelige
access points vises på
skærmen.
Vælg det access point, du
vil tilsluttes, og dobbeltklik
på det, eller klik på ‘Add to
Profile’.
Hvis det ønskede trådløse
access point ikke vises på
listen, skal du klikke på
‘Refresh’.
Page 78

78
4. Hvis der kræves password
(d.v.s. en ‘Netværksnøgle’)
for at logge på et trådløst
access point, skal du
indtaste koden i boksen
‘Network key’ (og indtaste
den igen i boksen
‘Confirm network key’ som
bekræftelse). Klik på ‘OK’,
når du har indtastet det
korrekte password.
5. Netværkskortet vil nu
forsøge at logge på
det trådløse access
point. Det kan tage alt
fra nogle få sekunder
til nogle få minutter,
så hav tålmodighed.
Når ‘Status’ skifter til
‘Associated’ på fanen
‘General’, er din computer
forbundet til det valgte
trådløse access point.
Klik på ‘Close’ for at lukke
konfigurationsmenuen.
Yderligere oplysninger om avancerede indstillinger og andre trådløse netværksfunktioner nder du i
manualen, der ligger på den medfølgende CD-ROM.
Page 79

79
Sikkerhedsforholdsregler:
Udsæt ikke produktet for vand eller fugt.
Vedligeholdelse:
Rengør kun med en tør klud. Brug ikke opløsningsmidler eller slibende rengøringsmidler.
Garanti:
Ingen garanti og ikke noget ansvar kan påtages for ændringer af produktet eller for skade på grund af forkert
brug af dette produkt.
Generelt:
Design og specikationer kan ændres uden varsel.
Alle bomærker og produktnavne er varemærker eller registrerede varemærker tilhørende deres respektive
ejere og anses herved som sådan.
Gem brugervejledningen og emballagen til senere brug.
Bemærk:
Dette produkt er mærket med dette symbol. Det betyder, at brugt elektrisk og elektronisk udstyr ikke
må bortskaffes sammen med almindeligt husholdningsaffald. Der ndes særlige indsamlingssystemer
for disse produkter.
Page 80

80
NORSK
Installasjon av nettverkskort
Vennligst følg instruksjonene under for å installere ditt nye USB trådløse nettverkskort.
1. Sett USB trådløst
nettverkskort inn i en
tom USB 2.0-port når
datamaskinen er slått på.
Bruk aldri makt for å sette
inn kortet. Hvis det føles
tregt, må du snu kortet og
prøve igjen.
2. Den følgende beskjeden
blir vist, trykk på "Cancel".
3. Sett CD-ROM med
enhetsdriveren inn i CD/
DVD-ROM-drevet på din
datamaskin. Velg "Driver/
Utility Installation" for å
installere programvaren.
Page 81

81
4. Velg det språket du ønsker
å bruke, og trykk på
"Next".
5. Klikk på "Next" for å
fortsette.
Page 82

82
6. Klikk på "Install" for å
starte installasjonen.
Installeringen trenger noen
minutter for å fullføre, så
vær tålmodig.
7. Trykk på "Finish" for å
restarte maskinen og
fullføre installeringen. Hvis
du ikke ønsker å restarte
maskinen nå, trykker
du "No, I'll restart my
computer later" og trykker
på "Finish". Vennligst
merk at du må restarte
maskinen før du kan bruke
ditt nye USB trådløse
nettverkskort.
Page 83

83
Koble til et trådløst aksesspunkt
Bruke kongurasjonsveilederen for å koble til et trådløst aksesspunkt:
Her!
1. Etter at installasjonen
er fullført vil veilederen
for trådløs konfigurasjon
vises automatisk på
ditt skrivebord. Du
vil også se et ikon i
nederste høyre hjørne på
skjermen din. Høyreklikk
på ikonet og velg den
konfigurasjonsveilederen
som ønsker å bruke.
2. Veilederen vil vises. Klikk
på "Available Network"
for å søke etter trådløse
aksesspunkt i nærheten.
3. Vennligst vent en kort
tid og alle trådløse
aksesspunkt som kan
nås via dette trådløse
nettverkskortet vil bli vist
her.
Velg det aksesspunktet
du ønsker å koble til og
dobbeltklikk eller klikk på
"Add to Profile".
Hvis det trådløse
aksesspunktet du ønsker å
koble til ikke vises, må du
trykke på "Refresh".
Page 84

84
4. Hvis et passord (Dvs.
"nettverksnøkkel")
er påkrevd for å få
tilgang til det trådløse
aksesspunktet, må du angi
den i feltet "Network key"
(og så angi det på nytt i
"Confirm network key" for
bekreftelse). Klikk på "OK"
når du har angitt passordet
korrekt.
5. Nettverkskortet vil
nå forsøke å koble til
aksesspunktet, dette kan
ta fra noen få sekunder
til noen minutter, så vær
tålmodig. Når "Status"
blir "Associated" i
fanen "General", er
datamaskinen din koblet til
det valgte aksesspunktet.
Klikk "Close" for å lukke
konfigurasjonsmenyen.
For avanserte innstillinger og andre alternativer for USB trådløst nettverkskort, må du se i brukerveiledningen
som er du nner på den medfølgende CD-ROM.
Page 85

85
Sikkerhetsforholdsregler:
Ikke utsett produktet for vann eller fuktighet.
Vedlikehold:
Rens bare med en tørr klut. Ikke bruk rensemidler eller skuremidler.
Garanti:
Ingen garanti eller erstatningsansvar aksepteres ved endringer og modiseringer av produktet eller skade
forårsaket av uriktig bruk av dette produktet.
Generelt:
Utforming og spesikasjoner kan endres uten forhåndsvarsel.
Alle logoer, merker og produktnavn er varemerker eller registrerte varemerker til de respektive eierne, og
skal behandles som dette.
Behold denne veiledningen og innpakningen for fremtidig referanse.
Forsiktig:
Dette produktet er markert med dette symbolet. Det betyr at brukte elektriske og elektroniske
produkter ikke må blandes med vanlig husholdningsavfall. Det nnes egne innsamlingssystem for
slike produkter.
Page 86

86
Declaration of conformity / Konformitätserklärung / Déclaration de conformité /
Conformiteitsverklaring / Dichiarazione di conformità / Declaración de conformidad /
Megfelelőségi nyilatkozat / Yhdenmukaisuusvakuutus / Överensstämmelseförklaring /
Prohlášení o shodě / Declaraţie de conformitate / Δήλωση συμφωνίας /
Overensstemmelseserklæring / Samsvarserklæring
We, / Wir, / Nous, / Wij, / Questa società, / La empresa infrascrita, / Mi, / Me, / Vi, / Společnost, / Noi, / Εμείς
Nedis B.V., De Tweeling 28, 5215MC, ’s-Hertogenbosch
The Netherlands / Niederlande / Pays Bas / Nederland / Paesi Bassi / Países Bajos / Hollandia / Alankomaat / Holland /
Nizozemí / Olanda / Ολλανδία / Holland
Tel. / Tél / Puh / Τηλ. : 0031 73 5991055
Email / Couriel / Sähköposti / e-post: info@nedis.com
Declare that product: / erklären, dass das Produkt: / Déclarons que le produit: / verklaren dat het product: / Dichiara che il
prodotto: / Declara que el producto: / Kijelentjük, hogy a termék, amelynek: / Vakuutamme, että: / Intygar att produkten: /
prohlašuje, že výrobek: / Declarăm că acest produs: / Δηλώνουμε ότι το προϊόν: / Erklærer, at produkt: / Erklærer at
produktet:
Brand: / Marke: / Marque: / Merknaam: / Marca: / Márkája: / Merkki: / Märke: / Značka: / Μάρκα: / Mærke: / Merke:
KÖNIG ELECTRONIC
Model: / Modell: / Modèle: / Modello: / Modelo: / Típusa: / Malli: / Μοντέλο: CMP-WNUSB32
Description: WIRELESS LAN USB 150 MBPS
Beschreibung: WLAN USB-Adapter 150 Mbit/s
Description : LAN USB SANS FIL 150 MBPS
Omschrijving: Draadloze LAN USB 150 MBPS
Descrizione: PENNA DI RETE WIRELESS USB 150 MBPS
Descripción: USB DE LAN INALÁMBRICA A 150 MBP/S
Megnevezése: VEZETÉK NÉLKÜLI LAN USB 150 MBPS
Kuvaus: LANGATON LAN USB 150 MBPS
Beskrivning: TRÅDLÖS LAN USB 150 MBPS
Popis: BEZDRÁTOVÁ LAN USB KARTA 150 MBPS
Descriere: USB WIRELESS LAN 150 MBPS
Περιγραφή: ΑΣΥΡΜΑΤΗ USB ΚΑΡΤΑ ΔΙΚΤΥΟΥ 150 MBPS
Beskrivelse: TRÅDLØS LAN USB 150 MB/S
Beskrivelse: TRÅDLØS LAN USB 150 MBPS
Is in conformity with the following standards: / den folgenden Standards entspricht: / est conforme aux normes suivantes: /
in overeenstemming met de volgende normen is: / è conforme ai seguenti standard: / es conforme a las siguientes normas: /
Megfelel az alábbi szabványoknak: / Täyttää seuraavat standardit: / Överensstämmer med följande standarder: / splňuje
následující normy: / Este în conformitate cu următoarele standarde: / Συμμορφώνεται με τις ακόλουθες προδιαγραφές: /
Overensstemmelse med følgende standarder: / Overensstemmer med følgende standarder:
EN 300 328 V1.7.1 (2006-10) EN 60950-1: 2005 (2nd edition)
EN 60950-1: 2006+A11: 2009 EN 301 489-1 V 1.8.1 (2008-04)
EN 301 489-17 V1.3.2 (2008-04)
EU Directive(s) / EG-Richtlinie(n) / Directive(s) EU / EU richtlijn(en) / Direttiva(e) EU / Directiva(s) UE / EU direktívák /
EU Toimintaohje(et) / Eu Direktiv(en) / Směrnice EU / Directiva(e) UE: / Οδηγία(ες) της ΕΕ: / EU direktiv(er) /
EU-direktiv(ene): 2006/95/EC
‘s-Hertogenbosch, 14-6-2010
Mrs. / Mme. / Mevr. / Sig.ra / D. / Fru / Paní / Κα : J. Gilad
Purchase Director / Einkaufsleiterin / Directrice des Achats / Directeur inkoop /
Direttore agli acquisti / Director de compras / értékesítési igazgató / Ostojohtaja /
Inköpsansvarig / Obchodní ředitelka / Director achiziţii / Διευθυντής αγορών /
Indkøbschef / Innkjøpssjef
Copyright ©
 Loading...