

Page 1
1
P.SUP.NBT150K1
MANUAL (p. 2)
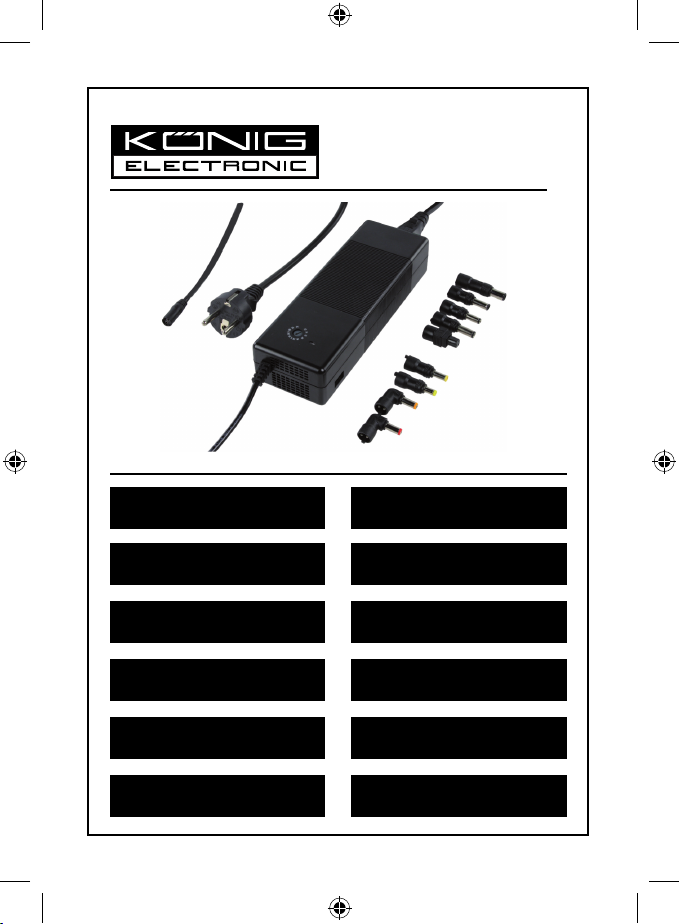
High Quality Universal Notebook
Adapter 150W
MODE D’EMPLOI (p. 4)
Adaptateur universel 150 W pour
miniportables de grande qualité
MANUALE (p. 7)
Alimentatore universale di alta
qualità per notebook 150W
BRUKSANVISNING (s. 12)
Högkvalitets universaladapter för
notebook 150W
MANUAL DE UTILIZARE (p. 15)
Adaptor notebook universal de
înaltă calitate 150W
HASZNÁLATI ÚTMUTATÓ (o. 10.)
Minőségi univerzális notebook
adapter, 150W
KÄYTTÖOHJE (s. 11)
Kannettavan tietokoneen korkealaatuinen
universaali verkkovirta-adapteri 150W
ANLEITUNG (s. 3)
Hochwertiger 150W
Universaladapter für Notebooks
GEBRUIKSAANWIJZING (p. 6)
Universele Notebookadapter van
Hoge Kwaliteit 150W
MANUAL DE USO (p. 8)
Adaptador universal 150W de alta
calidad para Notebook
NÁVOD K POUŽITÍ (s. 13)
Vysoce kvalitní univerzální adaptér
150 W pro notebook
ΕΓΧΕΙΡΙΔΙΟ XPHΣHΣ (σελ. 16)
Υψηλής Ποιότητας Universal
Notebook Προσαρμογέας 150W
Page 2
2
ENGLISH
POWER UP YOUR NOTEBOOK
1. You can connect your notebook(or any other appliance that works within the offered output voltages and
output power range) to this adapter by connecting one of the supplied detachable power tips.
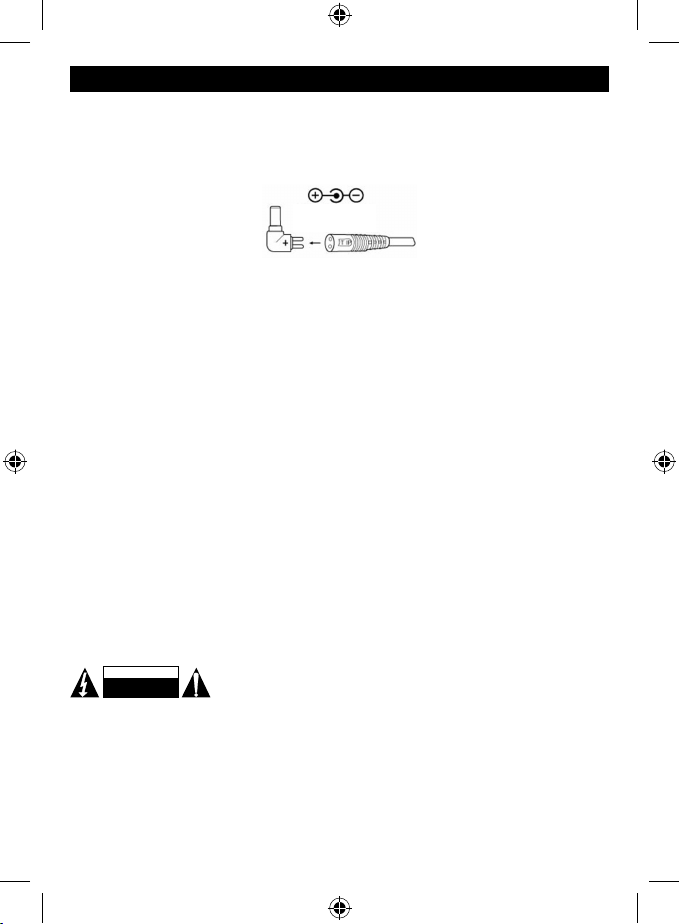
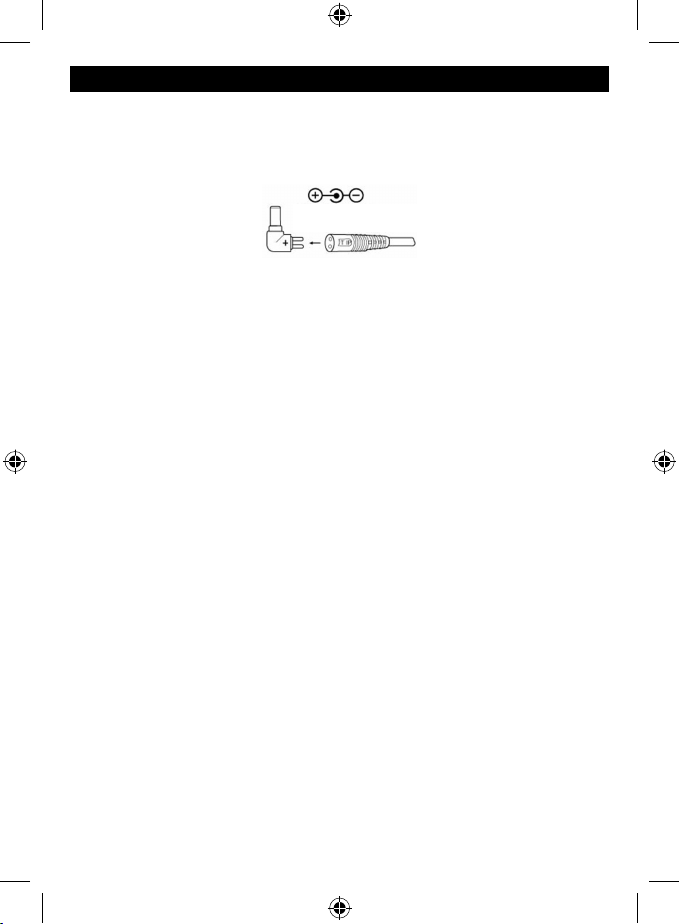
2. Determine the proper power tip. The polarity of the small connectors is pre-set with positive tip polarity.
Common symbol is shown as follows:
POSITIVE TIP
POLARITY
3. Set the DC voltage selector at the desired voltage position. (i.e. 12/14/15/16V at 8.5A, 18V at 8A,
18.5/19V at 7.5A, 19.5/20v at 7.25A, 22V at 6.5A or 24V at 6A) before you connect it to your notebook.
You may nd the required voltage setting on your original AC adaptor or in the computer user ’s manual
(PLEASE NOTE THAT AN INCORRECT VOLTAGE SETTING CAN DAMAGE YOUR COMPUTER. IF
YOU ARE UNSURE ABOUT THE REQUIRED VOLTAGE DO NOT CONNECT IT TO THIS ADAPTER
BUT CONSULT YOUR LOCAL DEALER!).
4. Make sure the total connected load does not exceed the rated output current of the power adaptor.
5. Connect the power cord to the power supply rst and then insert the AC plug into your wall socket. The
LED indicator will light instantly.
6. Switch on your computer.
7. Please note: The LED indicator will come on and stay on only when set to any voltage.
POWER UP YOUR USB DEVICE
1. You can connect your USB devices with this power supply by connecting the USB output (female) port.
2. The DC output from the USB port is 5V at 0.5A regulated. You may nd the required output current in the
USB devices’ user manual.
3. Make sure the total connected load does not exceed the rated output current of the power adaptor.
4. Connect the power cord to the power supply rst and then insert the AC plug into your wall socket.
5. Switch on your USB devices.
CAUTION
1. Do not short-circuit the output terminals.
2. Ensure the correct voltage is used as continuous excess voltage could damage your notebook.
3. For DC plug output: Do not try to use this power supply with appliance requiring more than 8.5A for
12/14/15/16V, 8A for 18V, 7.5A for 18.5/19V, 7.25A for 19.5/20V, 6.5A for 22V and 6A for 24V (150 Watts max.)
For USB output: Do not try to use this power supply with appliance requiring more than 0.5A for 5V.
4. Do not attempt to open this unit.
5. Remove from mains when not in use.
Safety precautions:
RISK OF ELECTRIC SHOCK
DO NOT OPEN
CAUTION
To reduce risk of electric shock, this product should ONLY be opened by an
authorized technician when service is required. Disconnect the product from
mains and other equipment if a problem should occur. Do not expose the
product to water or moisture.
Maintenance:
Clean only with a dry cloth. Do not use cleaning solvents or abrasives.
Warranty:
No guarantee or liability can be accepted for any changes and modications of the product or damage caused
due to incorrect use of this product.
Page 3
3
General:
Designs and specications are subject to change without notice.
All logos brands and product names are trademarks or registered trademarks of their respective holders and
are hereby recognized as such.
Keep this manual for future reference.
Attention:
This product is marked with this symbol. It means that used electrical and electronic products
should not be mixed with general household waste. There is a separate collections system for these
products.
DEUTSCH
STROMVERSORGUNG IHRES NOTEBOOKS
1. Mit diesem Netzteil können Notebooks (und andere Geräte innerhalb der angegebenen
Ausgangsleistungsspanne) betrieben werden, indem der mitgelieferte, abnehmbare Adapter
angeschlossen wird.
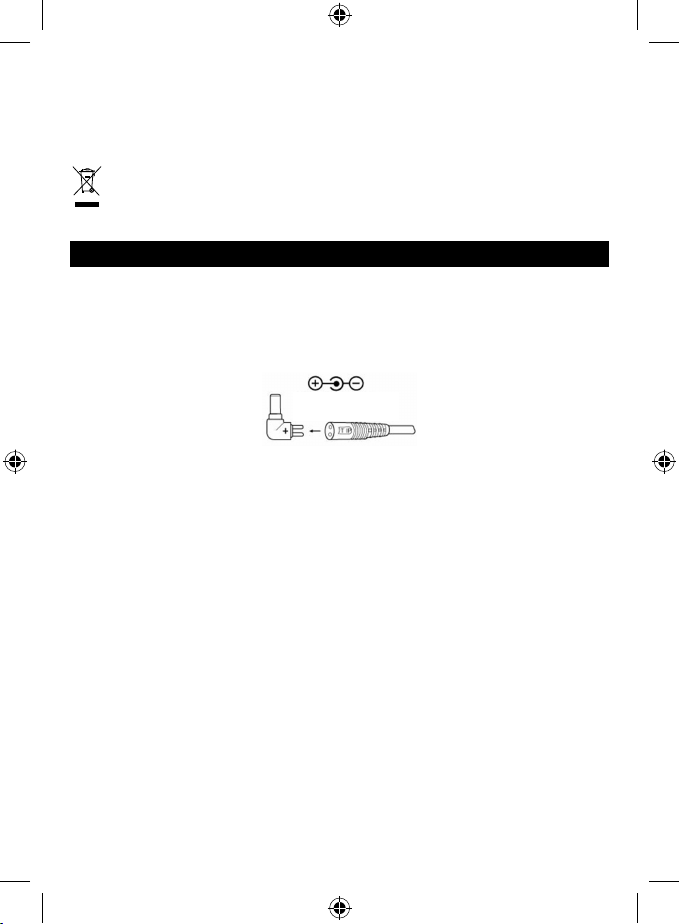
2. Bestimmung der geeigneten Steckergröße. Die Polarität der kleinen Stecker ist mit einer positiven
Ladepolarität voreingestellt. Das herkömmliche Symbol ist nachfolgend abgebildet:
POSITIVE
LADEPOLARITÄT
3. Den DC-Spannungswähler vor dem Anschluss des Notebooks auf die gewünschte Spannungsposition
(z.B. 12/14/15/16V bei 8,5A, 18V bei 8A, 18.5/19V bei 7,5A, 19,5/20v bei 7,25A, 22V bei 6,5A oder 24V
bei 6A) einstellen. Angaben zur erforderlichen Spannungseinstellung benden sich auf dem originalen
Netzadapter oder im Benutzerhandbuch des Notebooks. (BITTE BEACHTEN, DASS BEI FALSCHER
SPANNUNGSEINSTELLUNG DAS NOTEBOOK NICHT EINGESCHALTET UND UND DIESES SOGAR
BESCHÄDIGT WERDEN KANN. IM ZWEIFELSFALL NICHT AN IHR NOTEBOOK ANSCHLIESSEN.
WENDEN SIE SICH AN IHREN EINZELHÄNDLER!!!)
4. Sicherstellen, dass die gesamte Anschlussleistung nicht die Nennleistung der Stromversorgung
übersteigt.
5. Zunächst das Netzkabel mit dem Netzteil verbinden und dann den Netzstecker an eine Steckdose
anschließen. Die LED-Kontrolllampe leuchtet umgehend auf.
6. Ihr Notebook einschalten.
7. Bitte beachten: Die LED-Kontrolllampe bleibt nur eingeschaltet, wenn eine entsprechende Spannung
eingestellt wurde.
STROMVERSORGUNG IHRES USB-GERÄTS
1. Ein USB-Gerät kann über den USB-Ausgang (Buchse) an diesem Netzteil angeschlossen werden.
2. Die DC-Ausgangsleistung des USB-Ports beträgt 5V bei 0.5A. Angaben zum erforderlichen
Ausgangsstrom benden sich im Benutzerhandbuch des USB-Geräts.
3. Sicherstellen, dass die gesamte Anschlussleistung nicht die Nennleistung des Netzteils übersteigt.
4. Zunächst das Netzkabel mit dem Netzteil verbinden und dann den Netzstecker an eine Steckdose
anschließen.
5. Das USB-Gerät einschalten.
ACHTUNG
1. Die Ausgangsanschlüsse nicht kurzschließen.
2. Die Verwendung der richtigen Spannung muss sichergestellt sein, da eine kontinuierliche Überschreitung
der Spannung das Notebook beschädigen könnte.
Page 4
4
3. Anschluss des DC-Steckers: Dieses Netzteil nicht mit Geräten betreiben, die einen höheren Strom
benötigen als 8,5A für 12/14/15/16V, 8A bei 18V, 7,5A bei 18,5/19V, 7,25A bei 19,5/20V, 6,5A bei 22V und
6A bei 24V (max. 150 Watt).
Anschluss des USB-Geräts: Dieses Netzteil nicht mit Geräten betreiben, die einen höheren Strom
benötigen als 0.5A bei 5V.
4. Dieses Gerät nicht öffnen.
5. Während des Nichtgebrauchs vom Netz trennen.
Sicherheitsvorkehrungen:
Um das Risiko eines elektrischen Schlags zu verringern, sollte dieses Produkt
AUSSCHLIESSLICH von einem autorisierten Techniker geöffnet werden. Bei
Problemen trennen Sie das Gerät bitte von der Spannungsversorgung und von
anderen Geräten ab. Stellen Sie sicher, dass das Gerät nicht mit Wasser oder Feuchtigkeit in Berührung
kommt.
Wartung:
Nur mit einem trockenen Tuch säubern. Keine Reinigungs- oder Scheuermittel verwenden.
Garantie:
Es kann keine Garantie oder Haftung für irgendwelche Änderungen oder Modikationen des Produkts oder
für Schäden übernommen werden, die aufgrund einer nicht ordnungsgemäßen Anwendung des Produkts
entstanden sind.
Allgemeines:
Design und technische Daten können ohne vorherige Ankündigung geändert werden.
Alle Logos, Marken und Produktnamen sind Marken oder eingetragene Marken ihrer jeweiligen Eigentümer
und werden hiermit als solche anerkannt.
Bitte bewahren Sie Bedienungsanleitung und Verpackung für spätere Verwendung auf.
Achtung:
Dieses Produkt ist mit diesem Symbol gekennzeichnet. Es bedeutet, dass die ausgedienten
elektrischen und elektronischen Produkte nicht mit dem allgemeinen Haushaltsmüll entsorgt werden
dürfen. Für diese Produkte stehen gesonderte Sammelsysteme zur Verfügung.
FRANÇAIS
ALLUMEZ VOTRE MINIPORTABLE
1. Vous pouvez connecter votre miniportable (ou tout autre appareil qui fonctionne à la tension fournie) à
cette adaptateur d’alimentation à l’aide du cordon détachable.
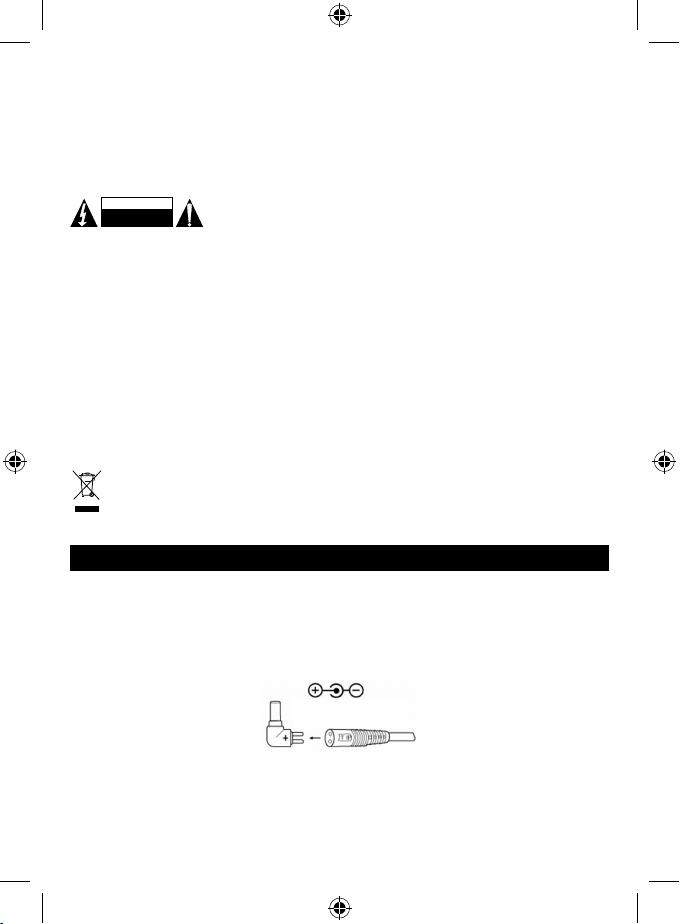
2. Trouvez la taille du connecteur approprié. Les petits connecteurs sont dotés d’une pointe de polarité
positive. Les symboles utilisés sont illustrés ci-dessous :
POINTE DE
POLARITE POSITIVE
3. Positionnez le sélecteur de tension sur la valeur appropriée. (Ex. 12/14/15/16V à 8,5A, 18V à 8A,
18,5/19V à 7.5A, 19,5/20V à 7,25A, 22V à 6,5A ou 24V à 6A) avant de le brancher à votre miniportable.
Vous pouvez trouver la tension appropriée sur l’adaptateur CA original ou dans le manuel de l’utilisateur
de l’ordinateur (NOTEZ QUE VOTRE MINIPORTABLE NE PEUT PAS FONCTIONNER AVEC UNE
TENSION NON APPROPRIEE QUI RISQUE DE L’ENDOMMAGER. SI VOUS N’ETES PAS SUR, NE
TENTEZ PAS DE CONNECTER VOTRE ORDINATEUR CONSULTEZ UN REVENDEUR LOCAL !!!).
STROMSCHLAGGEFAHR
NICHT ÖFFNEN
VORSICHT
Page 5
5
4. Assurez-vous que la charge totale ne dépasse pas l’intensité de sortie nominale de l’adaptateur.
5. Branchez le cordon à la prise d’alimentation puis insérez la prise CA dans une prise secteur. Le témoin
s’allume immédiatement.
6. Allumez votre ordinateur.
7. Veuillez noter : Le témoin s’allume et ne reste allumé que lorsqu’une tension est choisie.
ALLUMEZ VOTRE DISPOSITIF USB
1. Vous pouvez connecter vos dispositifs USB au port USB (femelle) de cet adaptateur.
2. La sortie CC du port USB est réglementée à 5 V / 0.5 A. Vous pouvez trouver l’intensité de courant
requise dans le manuel de l’utilisateur du dispositif USB.
3. Assurez-vous que la charge totale ne dépasse pas l’intensité de sortie nominale de l’adaptateur.
4. Branchez le cordon à la prise d’alimentation puis insérez la prise CA dans une prise secteur.
5. Allumez votre dispositif USB.
MISE EN GARDE
1. Ne court-circuitez pas les bornes de sortie.
2. Veillez à utiliser la bonne tension car une tension plus élevée peut endommager votre miniportable.
3. Prise de sortie CC : Ne tentez pas d’utiliser cet adaptateur avec des appareils exigeant une tension
supérieure 8,5A pour 12/14/15/16V, 8A pour 18V, 7,5A pour 18,5/19V, 7,25A pour 19,5/20V, 6,5A pour 22V
et 6A pour 24V (150 Watts max).
Sortie USB : Ne tentez pas d’utiliser cet adaptateur avec des appareils exigeant une tension supérieure
à 0.5A pour 5V.
4. Ne tentez pas d’ouvrir cet appareil.
5. A débrancher du secteur lorsqu’il n’est pas utilisé.
Consignes de sécurité :
Pour réduire le risque de choc électrique, ce produit ne doit être ouvert que par un
technicien qualié si une réparation s’impose. Débranchez l’appareil et les autres
équipements du secteur s’il y a un problème. Ne pas exposer l’appareil à l’eau ni
à l’humidité.
Entretien :
Ne nettoyez l’appareil qu’avec un chiffon sec. N’utilisez pas de solvants ou de produits abrasifs.
Garantie :
Aucune garantie ou responsabilité ne sera acceptée en cas de modication et/ou de transformation du produit
ou en cas de dommages provoqués par une utilisation incorrecte de l’appareil.
Généralités :
Le design et les caractéristiques techniques sont sujets à modication sans notication préalable.
Tous les logos de marques et noms de produits sont des marques déposées ou immatriculées dont leurs
détenteurs sont les propriétaires et sont donc reconnues comme telles dans ce documents.
Conservez ce manuel et l’emballage pour toute référence ultérieure.
Attention :
Ce symbole gure sur l’appareil. Il signie que les produits électriques et électroniques ne doivent
pas être jetés avec les déchets domestiques. Le système de collecte est différent pour ce genre de
produits.
RISQUE DE CHOC ELECTRIQUE
NE PAS OUVRIR
ATTENTION
Page 6
6
NEDERLANDS
UW NOTEBOOKCOMPUTER OPLADEN
1. U kunt uw notebookcomputer (of ieder ander apparaat dat werkt met de aangegeven voltages en
vermogen) op deze adapter aansluiten door de bijgeleverde afneembare power tips erop aan te sluiten.
2. Bepaal de juiste power tip. De polariteit van de power tips is vooraf ingesteld door het positieve uiteinde
van de polariteit. Het symbool ziet er als volgt uit:
POSITIEVE UITEINDE
VAN DE POLARITEIT
3. Zet de DC-voltageselector op de gewenste voltage vermogenspositie. (dwz. 12/14/15/16V op 8.5A, 18V
op 8A, 18.5/19V op 7.5A, 19.5/20v op 7.25A, 22V op 6.5A of 24V op 6A) alvorens het aan te sluiten op uw
notebookcomputer. U kan de vereiste vermogensinstelling terugvinden op uw originele AC-adapter of in
de gebruikershandleiding van de computer. (OPMERKING: EEN INCORRECT INGESTELD VOLTAGEE
VERMOGENSINSTELLING KAN UW NOTEBOOK BESCHADIGEN! ALS U NIET ZEKER BENT VAN
HET VOLTAGE VAN UW PC, SLUIT DE ADAPTER DAN NOOIT AAN OP UW NOTEBOOK MAAR
CONTACTEER UW LOKALE DEALER!ZAL UW NOTEBOOKCOMPUTER NIET OPLADEN EN HET
KAN ZELFS UW COMPUTER BESCHADIGEN. ALS U NIET ZEKER BENT, SLUIT HET NIET AAN OP
UW COMPUTER. CONTACTEER UW LOKALE HANDELAAR!!!).
4. Zorg ervoor dat alle aangesloten apparaten samen niet de gespeciceerde uitvoerstroom overschrijden.
5. Sluit de voedingskabel eerst aan op de voedingsbron en steek vervolgens de AC-stekker in uw
stopcontact. De LED-indicator zal onmiddellijk oplichten.
6. Zet uw computer aan.
7. Opmerking: De LED-indicator zal enkel oplichten en opgelicht blijven als het ingesteld is op een voltage.
USB APPARAAT OPLADEN
1. U kan uw USB apparaat op deze voedingsadapter aansluiten door een aansluiting te maken met de USB-
uitvoerpoort (vrouwelijke poort).
2. De DC-uitvoer van de USB-poort is 5V bij 0.5A. U kan het vereiste voltage terugvinden in de
gebruikershandleiding van het USB apparaat.
3. Zorg ervoor dat de alle aangesloten apparaten samen niet de gespeciceerde uitvoerstroom
overschrijden.
4. Sluit de voedingskabel eerst aan op de voedingsbron en steek vervolgens de AC-stekker in uw
stopcontact.
5. Zet uw USB apparaat aan.
WAARSCHUWINGEN
1. Zorg ervoor dat u de uitvoerterminals niet kortsluit.
2. Zorg ervoor dat het correcte voltage gebruikt wordt, aangezien een aanhoudend te hoog voltage uw
notebook kan beschadigen.
3. Voor de uitvoer van de DC-stekker: Gebruik deze voedingsbron niet voor toestellen die een groter
voltage vereisen dan 8.5A voor 12/14/15/16V, 8A voor 18V, 7.5A voor 18.5/19V, 7.25A voor 19.5/20V, 6.5A
voor 22V en 6A voor 24V (max. 150 Watt.)
Voor de USB-uitvoer: Gebruik deze voedingsbron niet voor toestellen die een grotere voltage vereisen
dan 0.5A voor 5V.
4. Open dit toestel niet.
5. Koppel het los van de netvoeding als het niet gebruikt wordt.
Page 7

7
Veiligheidsvoorzorgsmaatregelen:
Om het risico op elektrische schokken te voorkomen mag dit product ALLEEN
worden geopend door een erkende technicus wanneer er onderhoud nodig is.
Koppel het product los van de elektrische voeding en van andere apparatuur als
zich problemen voordoen. Stel het product niet bloot aan water of vocht.
Onderhoud:
Uitsluitend reinigen met een droge doek. Gebruik geen reinigingsmiddelen of schuurmiddelen.
Garantie:
Voor wijzigingen en veranderingen aan het product of schade veroorzaakt door een verkeerd gebruik van dit
product, kan geen aansprakelijkheid worden geaccepteerd. Tevens vervalt daardoor de garantie.
Algemeen:
Wijziging van ontwerp en specicaties zonder voorafgaande mededeling onder voorbehoud.
Alle logo’s, merken en productnamen zijn handelsmerken of geregistreerde handelsmerken van de
respectievelijke eigenaren en worden hierbij als zodanig erkend.
Bewaar deze gebruiksaanwijzing voor latere raadpleging.
Let op:
Dit product is voorzien van dit symbool. Dit symbool geeft aan dat afgedankte elektrische en
elektronische producten niet met het gewone huisafval verwijderd mogen worden. Voor dit soort
producten zijn er speciale inzamelingspunten.
ITALIANO
COME ALIMENTARE IL VOSTRO NOTEBOOK
1. Potete collegare il vostro Notebook (o qualunque altro dispositivo che funzioni con una simile gamma di
tensioni e potenze di uscita) con questo alimentatore connettendo la spina dell’adattatore rimovibile fornita
in dotazione.
2. Determinate la dimensione corretta del connettore. La polarità dei connettori piccoli è pre-impostata con la
polarità positiva. Nel disegno seguente è indicato il simbolo usato comunemente:
Polarità
positiva
3. Impostate il selettore di tensione DC nella posizione di tensione desiderata (ovvero 12/14/15/16V a 8.5A, 18V a
8A, 18.5V/19V a 7.5 ,19.5/20V a 7.25 , 22V a 6.5A o 24V a 6A) prima di connettersi al notebook. Potete trovare
la tensione richiesta sul vostro adattatore AC originale o nel manuale d’uso del computer (ATTENZIONE,
SELEZIONANDO UN VOLTAGGIO ERRATO SI PUO’ DANNEGGIARE IL NOTEBOOK. SE NON SIETE
SICURI NON PROVATE MAI A COLLEGARLO E CONSULTATE IL VOSTRO RIVENDITORE LOCALE!!!).
4. Assicuratevi che il carico totale collegato non superi la corrente nominale in uscita del sistema di alimentazione.
5. Collegate il cavo di alimentazione prima all’alimentatore e poi inserite la spina alla presa AC a muro.
L’indicatore LED si accenderà subito.
6. Accendete il computer.
7. Nota: l’indicatore LED si accende e rimane acceso solo quando è impostato su qualsiasi tensione.
ACCENSIONE DISPOSITIVO USB
1. È possibile collegare dispositivi USB con questo alimentatore collegando la porta di uscita (femmina) USB.
2. L’uscita DC dalla porta USB è di 5 V ad 0.5A regolabile. Potete trovare la necessaria corrente di uscita nel
manuale dei dispositivi USB.
3. Assicuratevi che il carico totale collegato non superi la corrente nominale in uscita del sistema di alimentazione.
GEVAAR VOOR
ELEKTRISCHE SCHOK
NIET OPENEN
LET OP:
Page 8

8
4. Collegate prima il cavo di alimentazione all’alimentatore e poi inserite la spina alla presa AC a muro.
5. Accendete il dispositivo USB.
ATTENZIONE
1. Non mettete in corto circuito i terminali di uscita.
2. Assicuratevi che venga utilizzata la tensione corretta. L’uso continuo di tensione in eccesso potrebbe
danneggiare il notebook.
3. Per l’uscita della spina DC: non provate ad usare questo alimentatore con dispositivi che richiedono più
di 8.5A per 12/14/15/16V, 8A per 18V, 7.5A per 18.5/19V, 7.25A per 19.5/20V, 6.5A per 22V e 6A per 24V
(150 Watt max.).
Per l’uscita USB: non provate a utilizzare questo alimentatore con apparecchi che richiedono più di 0.5A per 5V.
4. Non tentate di aprire questa unità.
5. Rimuovete dalla presa quando non in uso.
Precauzioni di sicurezza:
Per ridurre il rischio di shock elettrico, questo prodotto dovrebbe essere aperto
SOLO da un tecnico autorizzato quando è necessario ripararlo. Scollegare il
prodotto dall’alimentazione e da altri apparecchi se dovesse esserci un problema.
Non esporre il prodotto ad acqua o umidità.
Manutenzione:
Pulire solo con un panno asciutto. Non utilizzare solventi detergenti o abrasivi.
Garanzia:
Non sarà accettata alcuna garanzia o responsabilità in relazione a cambiamenti e modiche del prodotto o a
danni determinati dall’uso non corretto del prodotto stesso.
Generalità:
Il design e le caratteristiche tecniche sono soggetti a modica senza necessità di preavviso.
Tutti i marchi a logo e i nomi di prodotto sono marchi commerciali o registrati dei rispettivi titolari e sono
riconosciuti come tali in questo documento.
Tenere questo manuale e la confezione per riferimento futuro.
Attenzione:
Il prodotto è contrassegnato con questo simbolo, con il quale si indica che i prodotti elettrici ed
elettronici non devono essere gettati insieme ai riuti domestici. Per questi prodotti esiste un sistema
di raccolta differenziata.
ESPAÑOL
ALIMENTANDO SU PC NOTEBOOK
1. Usted puede conectar su PC Notebook (o cualquier otro aparato que funcione dentro de las tensiones de
salida ofrecidas y la potencia nominal de salida) con esta fuente de alimentación conectando el conector
adaptador desmontable suministrado.
2. Determine el tamaño del conector adecuado. La polaridad de los conectores pequeños está
preestablecida con polaridad positiva en la punta. Los símbolos comunes se muestran a continuación:
CONECTOR DE
POLARIDAD POSITIVA
RISCHIO DI SCOSSE ELETTRICHE
NON APRIRE
ATTENZIONE
Page 9

9
3. Ajuste el selector de tensión CC (corriente continua) en la posición deseada. (p.ej. 12/14/15/16V a 8.5A,
18V a 8A, 18.5/19V a 7.5A, 19.5/20v a 7.25A, 22V a 6.5A o 24V a 6A) antes de conectarlo a su Notebook.
Usted puede encontrar la tensión necesaria en su adaptador eléctrico original o en manual del usuario
de su PC (POR FAVOR, TENGA EN CUENTA QUE CON UN AJUSTE INCORRECTO DE LA TENSIÓN
NO PODRÁ ENCENDER SU NOTEBOOK Y PUEDE AVERIAR SU PC) SI NO ESTÁ SEGURO, NO LO
INTENTE CONECTAR A SU PC. ¡¡¡CONSULTE CON SU VENDEDOR LOCAL!!!)
4. Compruebe que la carga total de conexión no excede de la intensidad nominal de salida de la fuente
alimentación.
5. Primero conecte el cable de alimentación a su PC y luego conecte el enchufe CA (Corriente Alterna) a la
toma de corriente. El indicador LED se iluminará inmediatamente.
6. Encienda su PC.
7. Por favor, tenga en cuenta: El LED indicador permanecerá encendido solamente cuando esté ajustado en
cualquiera de las tensiones de salida.
ALIMENTANDO SU DISPOSITIVO USB
1. Usted puede conectar sus dispositivos USB a esta fuente de alimentación conectando el puerto de salida
USB (hembra).
2. La salida CC (Corriente Continua) desde el puerto USB es de 5V 0.5A regulados. Usted puede encontrar
la corriente de salida necesaria en el manual de usuario de su dispositivo USB.
3. Compruebe que la carga total de conexión no excede de la intensidad nominal de salida de la fuente
alimentación.
4. Primero conecte el cable de alimentación del adaptador y luego conecte el enchufe CA (Corriente Alterna)
a la toma de corriente.
5. Encienda su dispositivo USB.
PRECAUCIÓN
1. No cortocircuite los terminales de salida.
2. Compruebe que usa la tensión de salida correcta ya que un exceso de tensión continuado podría averiar
su PC Notebook.
3. Para la salida del conector CC: No intente usar esta fuente de alimentación con aparatos que necesiten
8.5A para 12/14/15/16V, 8A para 18V, 7.5A para 18.5/19V, 7.25A por 19.5/20V, 6.5A para 22V y 6A para
24V (150 Vatios máximo). No intente usar esta fuente de alimentación con aparatos que necesiten más
de 0.5A para 5V.
4. No intente abrir esta unidad.
5. Desenchúfelo de la toma de corriente cuando no lo esté usando.
Medidas de seguridad:
Para reducir el peligro de descarga eléctrica, este producto SÓLO lo debería abrir
un técnico autorizado cuando necesite reparación. Desconecte el producto de la
toma de corriente y de los otros equipos si ocurriera algún problema. No exponga
el producto al agua ni a la humedad.
Mantenimiento:
Límpielo sólo con un paño seco. No utilice disolventes de limpieza ni productos abrasivos.
Garantía:
No se aceptará ninguna garantía o responsabilidad derivada de cualquier cambio o modicaciones realizadas
al producto o daños provocados por un uso incorrecto del producto.
General:
Las ilustraciones y las especicaciones podrán sufrir cambios sin previo aviso.
Todas las marcas de logotipos y nombres de productos constituyen patentes o marcas registradas a nombre
de sus titulares correspondientes, reconocidos como tal.
Conserve este manual y el embalaje en caso de futura necesidad.
RIESGO DE ELECTROCUCIÓN
NO ABRIR
ATENCIÓN
Page 10

10
Atención:
Este producto está señalizado con este símbolo. Esto signica que los productos eléctricos y
electrónicos usados no deberán mezclarse con los desechos domésticos generales. Existe un
sistema de recogida individual para este tipo de productos.
MAGYAR
NOTEBOOK SZÁMÍTÓGÉP CSATLAKOZTATÁSA
1. Notebook számítógépét (vagy bármely más, a kínált kimenő feszültséget és teljesítményt igénylő
készüléket) csatlakoztathatja a tápegységgel a levehető adapter-csatlakozódugó használatával.
2. Határozza meg a megfelelő csatlakozóméretet. A kis csatlakozók gyárilag pozitív érintkező-polaritás
beállítással rendelkeznek. A általános jelölések az alábbiak:
POZITÍV
ÉRINTKEZŐ-POLARITÁS
3. Állítsa a DC feszültségválasztót a kívánt feszültségértékre (például 12/14/15/16V – 8,5A, 18V – 8A,
18,5/19V – 7,5A, 19,5/20V – 7,25A, 22V – 6,5A vagy 24V – 6A), mielőtt csatlakoztatná notebook
számítógépéhez. A megfelelő feszültségértéket az eredeti adapteren vagy a számítógép használati
utasításában találja (KÉRJÜK, ÜGYELJEN ARRA, HOGY A HELYTELEN FESZÜLTSÉG BEÁLLÍTÁS
NEM ALKALMAS A NOTEBOOK SZÁMÍTÓGÉP TÁPELLÁTÁSÁRA ÉS KÁROSÍTHATJA
A SZÁMÍTÓGÉPET. HA NEM BIZTOS A HELYES BEÁLLÍTÁSBAN, AKKOR SOHA NE
PRÓBÁLJA CSATLAKOZTATNI A SZÁMÍTÓGÉPET. VEGYE FEL A KAPCSOLATOT HELYI
VISZONTELADÓJÁVAL!!!).
4. Ügyeljen arra, hogy a teljes csatlakoztatott terhelés ne haladja meg a tápegység névleges kimenő áramát.
5. Először csatlakoztassa a hálózati csatlakozózsinórt a tápegységhez, és ezután az AC csatlakozódugót a
fali aljzatba. A LED-es visszajelző azonnal világítani kezd.
6. Kapcsolja be a számítógépét.
7. Kérjük, ne feledje: A LED-es visszajelző csak akkor kapcsol be és világít, ha beállított valamilyen feszültséget.
USB ESZKÖZ CSATLAKOZTATÁSA
1. USB eszközöket az USB kimeneten (aljzat) keresztül csatlakoztathat a tápegységhez.
2. Az USB aljzat DC kimenete 5 V és 0.5 A értékű szabályozott feszültség. A szükséges kimenő áramot az
USB eszköz használati útmutatójában találja.
3. Ügyeljen arra, hogy a teljes csatlakoztatott terhelés ne haladja meg a tápegység névleges kimenő áramát.
4. Először a tápegységhez csatlakoztassa a hálózati csatlakozózsinórt, és ezután az AC csatlakozódugót a
fali aljzatba.
5. Kapcsolja be az USB eszközöket.
VIGYÁZAT
1. Ne zárja rövidre a kimeneteket.
2. Ügyeljen a helyes feszültség használatára, mert a folyamatos túl nagy feszültség károsíthatja notebook
számítógépét.
3. DC csatlakozódugó esetében: Ne próbáljon a tápegységgel olyan készüléket csatlakoztatni, amelynek
tápellátási igénye meghaladja a 8,5A - 12/14/15/16V, 8A - 18V, 7,5A – 18,5/19V, 7,25A – 19,5/20V, 6,5A 22V és 6A - 24V (max. 150 Watt) értékeket.
USB kimenet esetében: Ne próbáljon a tápegységgel olyan készüléket csatlakoztatni, amelynek
tápellátási igénye meghaladja az 0.5A - 5V értékeket.
4. Ne próbálja felnyitni az egységet.
5. Ha nem használja, akkor csatlakoztassa le az elektromos hálózatról.
Page 11

11
Biztonsági óvintézkedések:
Az áramütés veszélyének csökkentése érdekében ezt a terméket KIZÁRÓLAG a
márkaszerviz képviselője nyithatja fel. Hiba esetén húzza ki a termék csatlakozóját
a konnektorból, és kösse le más berendezésekről. Vigyázzon, hogy ne érje a
terméket víz vagy nedvesség.
Karbantartás:
Csak száraz ronggyal tisztítsa. Tisztító- és súrolószerek használatát mellőzze.
Jótállás:
Nem vállalunk jótállást és felelősséget a terméken végzett változtatás vagy módosítás vagy a termék helytelen
használata miatt bekövetkező károkért.
Általános tudnivalók:
A kivitel és a műszaki jellemzők előzetes értesítés nélkül is módosulhatnak.
Minden logó, terméknév és márkanév a tulajdonosának márkaneve vagy bejegyzett márkaneve, azokat ennek
tiszteletben tartásával említjük.
Őrizze meg ezt az útmutatót és a csomagolást.
Figyelem:
Ezt a terméket ezzel a jelölésel láttuk el. Azt jelenti, hogy az elhasznált elektromos és elektronikus
termékeket tilos az általános háztartási hulladékhoz keverni. Begyűjtésüket külön begyűjtő
létesítmények végzik.
SUOMI
LATAA KANNETTAVASI
1. Voit kykeä tietokoneesi (tai minkä tahansa laitteen joka toimii tämän adapterin antojännitteellä)
verkkovirtaan paketin mukana tulleella irrotettavalla adapteripistokkeella.
2. Valtse sopiva liittimen koko. Pienten liittimien nipukoiden napaisuus on asetettu positiiviseksi. Alla
olevassa kuvassa näkyvät yleiset kytkentämerkinnät.
KESKITAPIN POSITIIVINEN
NAPAISUUS
3. Säädä jännitteenvalitsin halutulle tehotasolle (esim. 12/14/15/16V, 8.5A, 18V, 8A, 18.5/19V, 7.5A,
19.5/20v, 7.25A, 22V, 6.5A tai 24V, 6A) ennen kuin liität adapterin tietokoneeseesi. Oikean tehon
löydät alkuperäisestä verkkoadapteristasi tai tietokoneen käyttöohjeesta. (HUOMAA, ETTÄ VÄÄRÄ
JÄNNITEASETUS TOIMI TIETOKONEESI LATAAMISEEN JA VOI JOHTAA TIETOKONEESI
VAURIOITUMISEEN. JOS ET OLE VARMA LAITTEEN JÄNNITTEESTÄ, ÄLÄ LIITÄ ADAPTERIA
TIETOKONEESEESI. OTA TARVITTAESSA YHTEYS PAIKALLISEEN JÄLLEENMYYJÄÄN!!!).
4. Varmista, ettei kytketty kokonaiskuormitus ylitä virtalähteen nimellislähtövirtaa.
5. Liitä virtajohto ensin virtalähteeseen ja kytke sitten virtapistoke pistorasiaan. LED-merkkivalo syttyy
palamaan.
6. Käynnistä tietokoneesi.
7. Huomio: LED-merkkivalo syttyy ja pysyy päällä käytön aikana.
LATAA USB-LAITTEESI
1. Voit liittää tämän virtalähteen USB-laitteisiisi käyttämällä USB-liitintä (naarasliitin).
2. USB-portin lähtöteho on säädelty 5 V / 0.5 A. Voit löytää tarvittavan lähtövirran USB-laitteen
käyttöohjeesta.
3. Varmista, ettei kytketty kokonaiskuormitus ylitä virtalähteen nmellislähtövirtaa.
ÁRAMÜTÉS VESZÉLYE!
NE NYISSA FEL!
VIGYÁZAT!
Page 12

12
4. Liitä virtajohto ensin virtalähteeseen ja kytke sitten virtapistoke pistorasiaan.
5. Käynnistä tietokoneesi.
VAROITUS
1. Älä oikosulje antoliittimiä.
2. Varmista, että käytät oikeaa jännitettä. Jatkuva ylijännite voi vahingoittaa tietokonettasi.
3. Virtaliittimen teho: Älä käytä tätä virtalähdettä laitteen kanssa joka vaatii yli 8.5A/12/14/15/16V, 8A/18V,
7.5A /18.5/19V, 7.25A/19.5/20V, 6.5A /22V tai 6A /24V (150 W maksimi) jännitteen.
USB:n teho: Älä käytä virtalähdettä laitteen kanssa joka vaatii yli 0.5A/5V jännitteen.
4. Älä yritä avata tätä laitetta.
5. Irrota laite verkkovirrasta silloin kun se on pois käytöstä.
Turvallisuuteen liittyvät varoitukset:
Sähköiskun riskin pienentämiseksi, AINOASTAAN valtuutettu huoltohenkilö
saa avata tämän laitteen huoltoa varten. Jos ongelmia ilmenee, irrota laite
verkkovirrasta ja muista laitteista. Älä altista laitetta vedelle äläkä kosteudelle.
Huolto:
Puhdista ainoastaan kuivalla kankaalla. Älä käytä liuottimia tai hankausaineita.
Takuu:
Takuu ja vastuuvelvollisuus mitätöityvät, jos tuote vaurioituu siihen tehtyjen muutoksien tai sen väärinkäytön takia.
Yleistä:
Muutoksia malliin ja teknisiin ominaisuuksiin voidaan tehdä ilmoituksetta.
Kaikki logot, merkit ja tuotenimet ovat niiden vastaavien omistajien tuotemerkkejä tai rekisteröityjä
tuotemerkkejä ja niitä on käsiteltävä sellaisina.
Säilytä käyttöohjeet ja pakkaus myöhempää käyttötarvetta varten.
Huomio:
Tuote on varustettu tällä merkillä. Se merkitsee, ettei käytettyjä sähkö- tai elektronisia tuotteita saa
hävittää kotitalousjätteen mukana. Kyseisille tuotteille on olemassa erillinen keräysjärjestelmä.
SVENSKA
LADDA DIN NOTEBOOK-DATOR
1. Du kan ansluta din notebook-dator (eller någon annan apparat som drivs inom det angivna effektområdet)
till denna strömförsörjningsenhet genom den utbytbara kontakten.
2. Kontrollera för rätt kontaktstorlek. Polaritet på de små kontakterna är förinställd till positiv polaritet.
Symbolen ser ut som följer:
POSITIV POLARITET
PÅ SPETSEN
3. Ställ in likströmsspänningen i önskat läge. (t ex 12/14/15/16V vid 8,5A, 18V vid 8A, 18,5/19V vid
7,5A, 19,5/20V vid 7,25A, 22V vid 6,5A eller 24V vid 6A) innan du ansluter den till din notebookdator. Du kan ta reda på den önskade likströmsspänningen från din original-adapter eller i datorns
bruksanvisning.(OBSERVERA ATT FELAKTIG INSTÄLLNING AV SPÄNNINGEN INTE LADDAR UPP
DIN NOTEBOOK-DATOR OCH KAN SKADA DIN DATOR. OM DU ÄR OSÄKER SÅ FÖRSÖK INTE
ANSLUTA DEN TILL DATORN. TA KONTAKT MED DIN LOKALA ÅTERFÖRSÄLJARE!!!).
4. Se till att total ansluten belastning inte överskrider den klassade uteffekten på strömförsörjningsenheten.
SÄHKÖISKUVAARA
ÄLÄ AVAA
HUOMIO
Page 13

13
5. Anslut först laddarens elkabel till strömförsörjningsenheten och sedan till vägguttaget. LED-indikatorn
tänds direkt.
6. Starta din dator.
7. Observera: Indikatorlampan kommer att tändas och vara tänd enbart då spänning nns.
LADDA DIN USB-ENHET
1. Du kan ansluta din USB-enhet till denna strömförsörjningsenhet genom USB-porten (honan).
2. Uteffekten från USB-porten är 5V vid 0.5A. Du hittar information om USB-enhetens strömförsörjning i dess
bruksanvisning.
3. Se till att total ansluten belastning inte överskrider den klassade uteffekten på strömförsörjningsenheten.
4. Anslut först laddarens elkabel till strömförsörjningsenheten och sedan till vägguttaget.
5. Sätt på din USB-enhet.
VARNING
1. Kortslut inte ut-terminalerna.
2. Se till att korrekt spänning används eftersom kontinuerlig för hög spänning kan skada din notebook-dator.
3. Uteffekt för likströmskontakt: Försök inte använda strömförsörjningsenheten med apparater som kräver
mer än 8,5A för 12/14/15/16V, 8A för 18V, 7,5A för 18,5V, 7,25A för 19,5/20V, 6.,5A för 22V eller 6A för
24V (150 watt max).
For USB output: Använd inte strömförsörjningsenheten med apparater som kräver mer än 0.5A för 5V.
4. Försök inte att plocka isär enheten.
5. Koppla bort från elnätet då den inte används.
Säkerhetsanvisningar:
För att minska risken för elektriska stötar bör denna produkt ENDAST öppnas av
behörig tekniker när service behövs. Dra ut strömkabeln från eluttaget och koppla
ur all annan utrustning om något problem skulle uppstå. Utsätt inte produkten för
vatten eller fukt.
Underhåll:
Rengör endast med torr trasa. Använd inga rengöringsmedel som innehåller lösningsmedel eller slipmedel.
Garanti:
Ingen garanti gäller vid ändringar eller modieringar av produkten eller för skador som har uppstått på grund
av felaktig användning av denna produkt.
Allmänt:
Utseende och specikationer kan komma att ändras utan föregående meddelande.
Alla logotyper och produktnamn är varumärken eller registrerade varumärken som tillhör sina ägare och är
härmed erkända som sådana.
Behåll bruksanvisningen och förpackningen för eventuellt framtida behov.
Obs!
Produkten är märkt med denna symbol som betyder att använda elektriska eller elektroniska
produkter inte får slängas bland vanliga hushållssopor. Det nns särskilda återvinningssystem för
dessa produkter.
ČESKY
ZAPNĚTE SVŮJ NOTEBOOK
1. Svůj notebook (nebo jakýkoli jiný přístroj, který pracuje v nabízeném rozmezí výstupních napětí a
výstupního výkonu) můžete k tomuto zdroji napájení připojit připojením oddělitelné zástrčky adaptéru.
2. Zjistěte správnou velikost konektoru. Polarita malých konektorů je předem nastavena na kladnou polaritu
hrotu. Běžný symbol vypadá následovně:
RISK FÖR ELSTÖT
ÖPPNA INTE
VARNING
Page 14

14
KLADNÁ POLARITA
HROTU
3. Nastavte volič stejnosměrného napětí do polohy požadovaného napětí. (tj. 12/14/15/16 V při 8,5 A, 18
V při 8 A, 18,5/19 V při 7,5 A, 19,5/20 V při 7,25 A, 22 V při 6,5 A nebo 24 V při 6 A), než ho připojíte
ke svému notebooku. Požadované nastavení napětí najdete na svém originálním AC adaptéru nebo v
příručce pro uživatele k počítači (MĚJTE PROSÍM NA PAMĚTI, ŽE PŘI NESPRÁVNÉM NASTAVENÍ
NAPĚTÍ NELZE VÁŠ NOTEBOOK ZAPNOUT A MŮŽE TO VÁŠ POČÍTAČ POŠKODIT. JESTLIŽE SI
NEJSTE JISTI, NIKDY SE NEPOKOUŠEJTE SVŮJ POČÍTAČ PŘIPOJIT. PORAĎTE SE SE SVÝM
MÍSTNÍM PRODEJCEM!!!).
4. Ujistěte se, že celkové připojené zatížení nepřekročí jmenovitý výstupní proud zdroje napájení.
5. Nejdříve připojte napájecí kabel ke zdroji napájení a poté zastrčte AC zástrčku do zásuvky ve zdi.
Okamžitě se rozsvítí LED kontrolka.
6. Zapněte svůj počítač.
7. Mějte prosím na paměti: Kontrolka se rozsvítí a zůstane rozsvícená pouze tehdy, je-li nastaveno nějaké
napětí.
ZAPNĚTE SVÉ USB ZAŘÍZENÍ
1. K tomuto zdroji napájení můžete připojit svá USB zařízení připojením USB výstupního portu (samice).
2. Stejnosměrný výstup z USB portu je 5 V při regulovaném 0.5 A. Požadovaný výstupní proud naleznete v
uživatelském manuálu k USB zařízení.
3. Ujistěte se, že celkové připojené zatížení nepřekročí jmenovitý výstupní proud zdroje napájení.
4. Nejdříve připojte napájecí kabel ke zdroji napájení a poté zastrčte AC zástrčku do zásuvky ve zdi.
5. Zapněte svá USB zařízení.
VAROVÁNÍ:
1. Nezkratujte výstupní svorky.
2. Zajistěte, aby se používalo správné napětí, protože neustálé nadměrné napětí by mohlo váš notebook
poškodit.
3. Pro výstup stejnosměrného napájení: Nezkoušejte používat tento zdroj napájení pro zařízení, která
vyžadují více než 8,5 A pro 12/14/15/16 V, 8 A pro 18 V, 7,5 A pro 18,5/19 V, 7,25 A pro 19,5/20 V, 6,5A pro
22 V a 6 A pro 24 V (max. 150 Wattů)
Pro USB výstup: Nezkoušejte používat tento zdroj napájení pro zařízení, která vyžadují více než 0.5 A
pro 5V.
4. Nepokoušejte se toto zařízení otevírat.
5. Jestliže se zařízení nepoužívá, odpojte ho od sítě.
Bezpečnostní opatření:
Abyste snížili riziko úrazu elektrickým šokem, měl by být tento výrobek otevřen
POUZE autorizovaným technikem, je-li to nezbytné. V případě, že dojde k závadě,
odpojte výrobek ze sítě a od jiných zařízení. Výrobek nevystavujte vodě nebo vlhkosti.
Údržba:
K čištění používejte pouze suchý hadřík. Nepoužívejte čisticí rozpouštědla ani abrazivní prostředky.
Záruka:
Jakékoli změny, modikace nebo poškození zařízení v důsledku nesprávného zacházení se zařízením ruší
platnost záruční smlouvy.
Obecné upozornění:
Design a specikace výrobku mohou být změněny bez předchozího upozornění.
Všechna loga a obchodní názvy jsou registrované obchodní značky příslušných vlastníků a jsou chráněny
zákonem.
Pro budoucí použití uschovejte tento návod a obal.
NEBEZPEČÍ ÚRAZU
ELEKTRICKÝM PROUDEM
ÖPPNA INTE
UPOZORNĚNÍ
Page 15

15
Upozornění:
Tento výrobek je označen tímto symbolem. To znamená, že se s výrobkem musí zacházet jako s
nebezpečným elektrickým a elektronickým odpadem a nelze jej po skončení životnosti vyhazovat s
běžným domácím odpadem. Pro likvidaci těchto výrobků existují zvláštní sběrná střediska.
ROMÂNĂ
ALIMENTAREA NOTEBOOK-ULUI DVS.
1. Vă puteţi conecta notebook-ul (sau orice alt aparat care funcţionează la tensiunile de ieşire şi în domeniul
de putere de ieşire oferite) cu această sursă de alimentare prin conectarea mufei detaşabile a adaptorului
furnizate.
2. Stabiliţi dimensiunea adecvată a conectorului. Polaritatea conectorilor mici este presetată pe polaritate de
vârf pozitivă. Simbolul obişnuit este indicat după cum urmează:
POLARITATE DE
VÂRF POZITIVĂ
3. Setaţi selectorul de tensiune CC la poziţia de tensiune dorită. (mai exact, 12/14/15/16V la 8.5A, 18V la 8A,
18.5/19V la 7.5A, 19.5/20V la 7.25A, 22V la 6.5A sau 24V la 6A) înainte de a-l conecta la notebook-ul dvs.
Este posibil să găsiţi valoarea necesară a tensiunii pe adaptorul dvs. CA iniţial sau în manualul de utilizare
al calculatorului (REŢINEŢI CĂ, LA O VALOARE INCORECTĂ A TENSIUNII, NOTEBOOK-UL DVS. NU
VA FI ALIMENTAT ŞI POATE SUFERI DETERIORĂRI. DACĂ AVEŢI DUBII, NU ÎNCERCAŢI SUB NICIO
FORMĂ SĂ REALIZAŢI CONEXIUNEA LA CALCULATOR. CONSULTAŢI-VĂ DISTRIBUITORUL!!!).
4. Asiguraţi-vă că sarcina totală sub conexiune nu depăşeşte curentul de ieşire nominal al sursei de
alimentare.
5. Conectaţi mai întâi cablul de alimentare la sursa de alimentare şi apoi introduceţi mufa CA în priza de
perete. Indicatorul LED se va aprinde pe loc.
6. Porniţi-vă calculatorul.
7. Reţineţi: Indicatorul LED se va aprinde şi va rămâne aprins doar în cazul setării pe orice tensiune.
ALIMENTARE DISPOZITIVULUI DVS. USB
1. Vă puteţi conecta dispozitivele USB cu această sursă de alimentare prin conectarea portului de ieşire
USB (mamă).
2. Ieşirea CC de la portul USB este de 5 V la 0.5 A stabilizat. Puteţi găsi curentul de ieşire necesar în
manualul de utilizare al dispozitivelor USB.
3. Asiguraţi-vă că sarcina totală sub conexiune nu depăşeşte curentul de ieşire nominal al sursei de
alimentare.
4. Conectaţi mai întâi cablul de alimentare la sursa de alimentare şi apoi introduceţi mufa CA în priza de
perete.
5. Porniţi-vă dispozitivele USB.
ATENŢIE
1. Nu scurtcircuitaţi bornele de ieşire.
2. Asiguraţi-vă că se utilizează tensiunea corectă, deoarece o supratensiune continuă vă poate deteriora
notebook-ul.
3. Pentru ieşirea prin mufă CC: Nu încercaţi să utilizaţi această sursă de alimentare cu aparate ce necesită
peste 8,5A pentru 12/14/15/16V, 8A pentru 18V, 7,5A pentru 18,5/19V, 7,25A pentru 19,5/20V, 6,5A pentru
22V şi 6A pentru 24V (150 waţi max.)
Pentru ieşire USB: Nu încercaţi să utilizaţi această sursă de alimentare cu un aparat ce necesită peste
0.5A pentru 5V.
Page 16

16
4. Nu încercaţi să desfaceţi acest aparat.
5. În perioadele de neutilizare, scoateţi-l din priză.
Măsuri de siguranţă:
Pentru a se reduce pericolul de electrocutare, acest produs va desfăcut NUMAI
de către un tehnician avizat, când este necesară depanarea. Deconectaţi produsul
de la priza de reţea sau alte echipamente în cazul apariţiei unei probleme. Nu
expuneţi produsul apei sau umezelii.
Întreţinere:
Curăţarea trebuie făcută cu o cârpă uscată. Nu folosiţi solvenţi sau agenţi de curăţare abrazivi.
Garanţie:
Nu oferim nicio garanţie şi nu ne asumăm niciun fel de responsabilitate în cazul schimbărilor sau modicărilor
aduse acestui produs sau în cazul deteriorării cauzate de utilizarea incorectă a produsului.
Generalităţi:
Designul şi specicaţiile produsului pot modicate fără o noticare prealabilă.
Toate siglele mărcilor şi denumirile produselor sunt mărci comerciale sau mărci comerciale înregistrate ale
proprietarilor de drept şi prin prezenta sunt recunoscute ca atare.
Păstraţi acest manual şi ambalajul pentru consultări ulterioare.
Atenţie:
Pe acest produs se aă acest marcaj. Acesta semnică faptul că produsele electrice şi electronice nu
trebuie eliminate odată cu gunoiul menajer. Aceste produse au un sistem separat de colectare.
ΕΛΛΗΝΙΚA
ΕΝΕΡΓΟΠΟΙΗΣΤΕ ΤΟΝ ΦΟΡΗΤΟ ΥΠΟΛΟΓΙΣΤΗ ΣΑΣ
1. Μπορείτε να συνδέσετε τον φορητό υπολογιστή σας (ή οποιαδήποτε άλλη συσκευή που λειτουργεί
στο πλαίσιο της προσφερόμενων τάσεων εξόδου και του εύρους της παραγόμενης ισχύος) με αυτό το
τροφοδοτικό ισχύος συνδέοντας το παρεχόμενο αποσπώμενο βύσμα.
2. Καθορίστε το κατάλληλο μέγεθος σύνδεσης. Η πολικότητα των μικρών υποδοχών σύνδεσης είναι
προκαθορισμένη με θετική πολικότητα του άκρου. Το κοινό σύμβολο εμφανίζεται ως εξής:
ΘΕΤΙΚΗ ΠΟΛΙΚΟΤΗΤΑ
ΑΚΡΟΥ
3. Ρυθμίστε τον επιλογέα τάσης Συνεχούς Ρεύματος στην επιθυμητή θέση τάσης. (δηλαδή 12/14/15/16V
σε 8.5A, 18V σε 8A, 18.5/19V σε 7.5A, 19.5/20v σε 7.25A, 22V σε 6.5A ή 24V σε 6A) πριν τον
συνδέσετε στον φορητό υπολογιστή σας. Μπορείτε να βρείτε την απαιτούμενη ρύθμιση τάσης στο
αρχικό τροφοδοτικό Εναλλασσομένου Ρεύματος ή στο εγχειρίδιο χρήσης (ΠΑΡΑΚΑΛΩ ΠΡΟΣΕΞΤΕ
ΟΤΙ ΕΑΝ Η ΡΥΘΜΙΣΗ ΤΑΣΗΣ ΕΙΝΑΙ ΛΑΝΘΑΣΜΕΝΗ ΔΕΝ ΜΠΟΡΕΙ ΝΑ ΕΝΕΡΓΟΠΟΙΕΙΘΕΙ Ο
ΦΟΡΗΤΟΣ ΣΑΣ ΥΠΟΛΟΓΙΣΤΗΣ ΚΑΙ ΜΠΟΡΕΙ ΝΑ ΤΟΝ ΚΑΤΑΣΤΡΑΦΕΙ. ΕΑΝ ΔΕΝ ΕΙΣΤΕ ΒΕΒΑΙΟΣ,
ΜΗ ΠΡΟΣΠΑΘΗΣΕΤΕ ΝΑ ΤΟ ΣΥΝΔΕΣΕΤΕ ΣΤΟΝ ΥΠΟΛΟΓΙΣΤΗ ΣΑΣ. ΣΥΜΒΟΥΛΕΥΘΕΙΤΕ ΤΟΝ
ΑΝΤΙΠΡΟΣΩΠΟ ΤΗΣ ΠΕΡΙΟΧΗΣ ΣΑΣ !!!).
4. Βεβαιωθείτε ότι το συνολικό φορτίο που συνδέεται δεν υπερβαίνει το ονομαστικό ρεύμα εξόδου του
τροφοδοτικού.
5. Συνδέστε πρώτα το καλώδιο παροχής ισχύος στο τροφοδοτικό και στη συνέχεια τοποθετήστε το βύσμα
Εναλλασσομένου Ρεύματος σε μία πρίζα. Ο δείκτης της ΦΩΤΟΔΙΟΔΟΥ θα ανάψει αμέσως.
6. Ενεργοποιήστε τον υπολογιστή σας.
PERICOL DE ELECTROCUTARE
NU-L DESCHIDEŢI!
ATENŢIE!
Page 17

17
7. Παρακαλώ προσέξτε: Ο δείκτης ΦΩΤΟΔΙΟΔΟΥ θα ανάψει και θα παραμείνει αναμμένος μόνον εάν έχει
ρυθμιστεί σε οποιαδήποτε τάση.
ΕΝΕΡΓΟΠΟΙΕΙΣΤΕ ΤΗΝ USB ΣΥΣΚΕΥΗ ΣΑΣ
1. Μπορείτε να συνδέσετε τις USB συσκευές σας με αυτό το τροφοδοτικό ισχύος συνδέοντας την υποδοχή
εξόδου του USB (θηλυκό).
2. Η έξοδος Συνεχούς Ρεύματος από την υποδοχή USB είναι ρυθμισμένη στα 5 V - 0.5 Α. Μπορείτε να βρείτε
το απαιτούμενο ρεύμα εξόδου στο εγχειρίδιο χρήσης της συσκευής USB.
3. Βεβαιωθείτε ότι το συνολικό φορτίο που συνδέεται δεν υπερβαίνει το ονομαστικό ρεύμα εξόδου του
τροφοδοτικού.
4. Συνδέστε πρώτα το καλώδιο παροχής ισχύος στο τροφοδοτικό και στη συνέχεια τοποθετήστε το βύσμα
Εναλλασσόμενου Ρεύματος σε μία πρίζα.
5. Ενεργοποιήστε τις USB συσκευές σας.
ΠΡΟΣΟΧΗ
1. Μη βραχυκυκλώνετε τα τερματικά εξόδου.
2. Σιγουρευτείτε ότι χρησιμοποιείτε ορθή τάση καθώς υπερβολική συνεχής τάση θα μπορούσε να
καταστρέψει τον φορητό υπολογιστή σας.
3. Για πρίζα Συνεχούς Ρεύματος: Μη προσπαθήσετε να χρησιμοποιήσετε αυτό το τροφοδοτικό με συσκευή
που απαιτεί περισσότερο ρεύμα από 8.5A για 12/14/15/16V, 8A για 18V, 7.5A για 18.5/19V, 7.25A για
19.5/20V, 6.5A για 22V και 6A για 24V (150 Watts μέγ.)
Για έξοδο USB: Μην προσπαθήσετε να χρησιμοποιήσετε αυτό το τροφοδοτικό με συσκευή που απαιτεί
περισσότερο ρεύμα από 0.5A για 5V.
4. Μη επιχειρήσετε να ανοίξετε αυτή τη συσκευή.
5. Αφαιρέστε την από την πρίζα όταν δεν την χρησιμοποιείτε.
Οδηγίες ασφαλείας:
Για να μειώσετε τον κίνδυνο ηλεκτροπληξίας, το προϊόν αυτό θα πρέπει να
ανοιχθεί ΜΟΝΟ από εξουσιοδοτημένο τεχνικό όταν απαιτείται συντήρηση (σέρβις).
Αποσυνδέστε το προϊόν από την πρίζα και άλλο εξοπλισμό αν παρουσιαστεί
πρόβλημα. Μην εκθέτετε το προϊόν σε νερό ή υγρασία.
Συντήρηση:
Καθαρίστε μόνο με ένα στεγνό πανί. Μη χρησιμοποιείτε διαλύτες ή λειαντικά.
Εγγύηση:
Ουδεμία εγγύηση ή ευθύνη δεν είναι αποδεκτή σε περίπτωση αλλαγής ή μετατροπής του προϊόντος ή βλάβης
που προκλήθηκε λόγω εσφαλμένης χρήσης του προϊόντος.
Γενικά:
Το σχέδιο και τα χαρακτηριστικά μπορούν να αλλάξουν χωρίς καμία προειδοποίηση.
Όλα τα λογότυπα, οι επωνυμίες και οι ονομασίες προϊόντων είναι εμπορικά σήματα ή σήματα κατατεθέντα των
αντίστοιχων κατόχων και δια του παρόντος αναγνωρίζονται ως τέτοια.
Φυλάξτε το παρόν εγχειρίδιο και τη συσκευασία για μελλοντική αναφορά.
Προσοχή:
Το συγκεκριμένο προϊόν έχει επισημανθεί με αυτό το σύμβολο. Αυτό σημαίνει ότι οι μεταχειρισμένες
ηλεκτρικές και ηλεκτρονικές συσκευές δεν πρέπει να αναμειγνύονται με τα κοινά οικιακά απορρίμματα.
Υπάρχει ξεχωριστό σύστημα συλλογής για αυτά τα αντικείμενα.
ΚΙΝΔΥΝΟΣ ΗΛΕΚΤΡΟΠΛΗΞΙΑΣ
ΜΗΝ ΑΝΟΙΓΕΤΕ
ΠΡΟΣΟΧΗ
Page 18

18
Declaration of conformity / Konformitätserklärung / Déclaration de conformité /
Conformiteitsverklaring / Dichiarazione di conformità / Declaración de conformidad /
Megfelelőségi nyilatkozat / Yhdenmukaisuusvakuutus / Överensstämmelseförklaring /
Prohlášení o shodě / Declaraţie de conformitate
We, / Wir, / Nous, / Wij, / Questa società, / La empresa infrascrita, / Mi, / Me, / Vi, / Společnost, / Noi,
Nedis B.V., De Tweeling 28, 5215MC, ’s-Hertogenbosch
The Netherlands / Niederlande / Pays Bas / Nederland / Paesi Bassi / Países Bajos / Hollandia / Alankomaat /
Holland / Nizozemí / Olanda
Tel. / Tél / Puh: 0031 73 5991055
Email / Couriel / Sähköposti / e-post: info@nedis.com
Declare that product: / erklären, dass das Produkt: / Déclarons que le produit : / verklaren dat het product: /
Dichiara che il prodotto: / Declara que el producto: / Kijelentjük, hogy a termék, amelynek: / Vakuutamme, että: /
Intygar att produkten: / prohlašuje, že výrobek: / Declarăm că acest produs:
Brand: / Marke: / Marque : / Merknaam: / Marca: / Márkája: / Merkki: / Märke: / Značka: KONIG
Model: / Modell: / Modèle : / Modello: / Modelo: / Típusa: / Malli: P.SUP.NBT150K1
Description: High Quality Universal Notebook Adapter 150W
Beschreibung: Hochwertiger 150W Universaladapter für Notebooks
Description : Adaptateur universel 150 W pour miniportables de grande qualité
Omschrijving: Universele Notebookadapter van Hoge Kwaliteit 150W
Descrizione: Alimentatore universale di alta qualità per notebook 150W
Descripción: Adaptador universal 150W de alta calidad para Notebook
Megnevezése: Minőségi univerzális notebook adapter, 150W
Kuvaus: Kannettavan tietokoneen korkealaatuinen universaali verkkovirta-adapteri 150W
Beskrivning: Högkvalitets universaladapter för notebook 150W
Popis: Vysoce kvalitní univerzální adaptér 150 W pro notebook
Descriere: Adaptor notebook universal de înaltă calitate 150W
Description: Υψηλής Ποιότητας Universal Notebook Προσαρμογέας 150W
Is in conformity with the following standards: / den folgenden Standards entspricht: / est conforme aux
normes suivantes: / in overeenstemming met de volgende normen is: / è conforme ai seguenti standard: /
es conforme a las siguientes normas: / Megfelel az alábbi szabványoknak: / Täyttää seuraavat standardit: /
Överensstämmer med följande standarder: / splňuje následující normy: / Este în conformitate cu următoarele
standarde:
EU Directive(s) / EG-Richtlinie(n) / Directive(s) EU / EU richtlijn(en) / Direttiva(e) EU / Direc
Mr. / Hr. / M. / Dhr. / Sig. / Sr. D. / Úr / Mr. / Herr. / Pan / Dl. / Κ. / Hr. /
Herr: / Г-н: Victor Hoynck van Papendrecht
tiva(s) UE
/
EU
EMC 2004/108/EC, LVD 2006/95/EC, ERP 2009/125/EC, RoHS 2011/65/EU Directives
direktívák / EU Toimintaohje(et) / Eu Direktiv(en) / Směrnice EU / Directiva(e) UE:
‘s-Hertogenbosch, 04-02-2012
EN 55011:2009+A1; EN 55022:2006+A1; EN 61000-3-2:2006+A1+A2;
EN 61000-3-3:2008; EN 55024 (EN 61000-4-2):1998+A1+A2;
EN 55024 (EN 61000-4-3):1998+A1+A2; EN 55024 (EN 61000-4-4):1998+A1+A2;
EN 55024 (EN 61000-4-5):1998+A1+A2; EN 55024 (EN 61000-4-6):1998+A1+A2;
EN 55024 (EN 61000-4-11):1998+A1+A2; EN 61000-6-1 (61000-4-2):2007;
EN 61000-6-1 (61000-4-3):2007; EN 61000-6-1 (61000-4-4):2007;
EN 61000-6-1 (61000-4-5):2007; EN 61000-6-1 (61000-4-6):2007;
EN 61000-6-1 (61000-4-11):2007; EN 60950-1:2006+A11:2009.
Chief Operating Officer (CEO) / Geschäftsführer / Chef des operations / Operationeel Directeur /
Responsabile Operativo / Director de Operaciones / Üzemviteli Igazgató / Käyttöpäällikkö / Driftschef /
Provozní ředitel / Director principal / Γενικός Διευθυντής Επιχειρήσεων / Chief Operating Officer /
Administrerende Driftsdirektør / Директор по производству
 Loading...