

Page 1
1
TVS-KN-FSB010B + S
MANUAL (p. 2)
MODE D’EMPLOI (p. 4)
MANUALE (p. 6)
BRUKSANVISNING (s. 10)
MANUAL DE UTILIZARE (p. 12)
HASZNÁLATI ÚTMUTATÓ (o. 8.)
KÄYTTÖOHJE (s. 9)
GEBRUIKSAANWIJZING (p. 5)
ANLEITUNG (s. 3)
MANUAL DE USO (p. 7)
NÁVOD K POUŽITÍ (s. 11)
ΕΓΧΕΙΡΙΔΙΟ XPHΣHΣ (σελ. 13)
Page 2

2
ENGLISH
LCD/Plasma Wall Bracket Instruction Type TVS-KN-FSB010B and S
1. Technical parameter
Weight: 3.8kg; Size of at panel TV: 30”~64”: Maximum load: 60kg; Distance from wall: 45mm.
2. Part List
Please check the parts in the package with the following list. Make sure all of the parts are in the package. Never use defective
parts. Never replace parts with different specications.
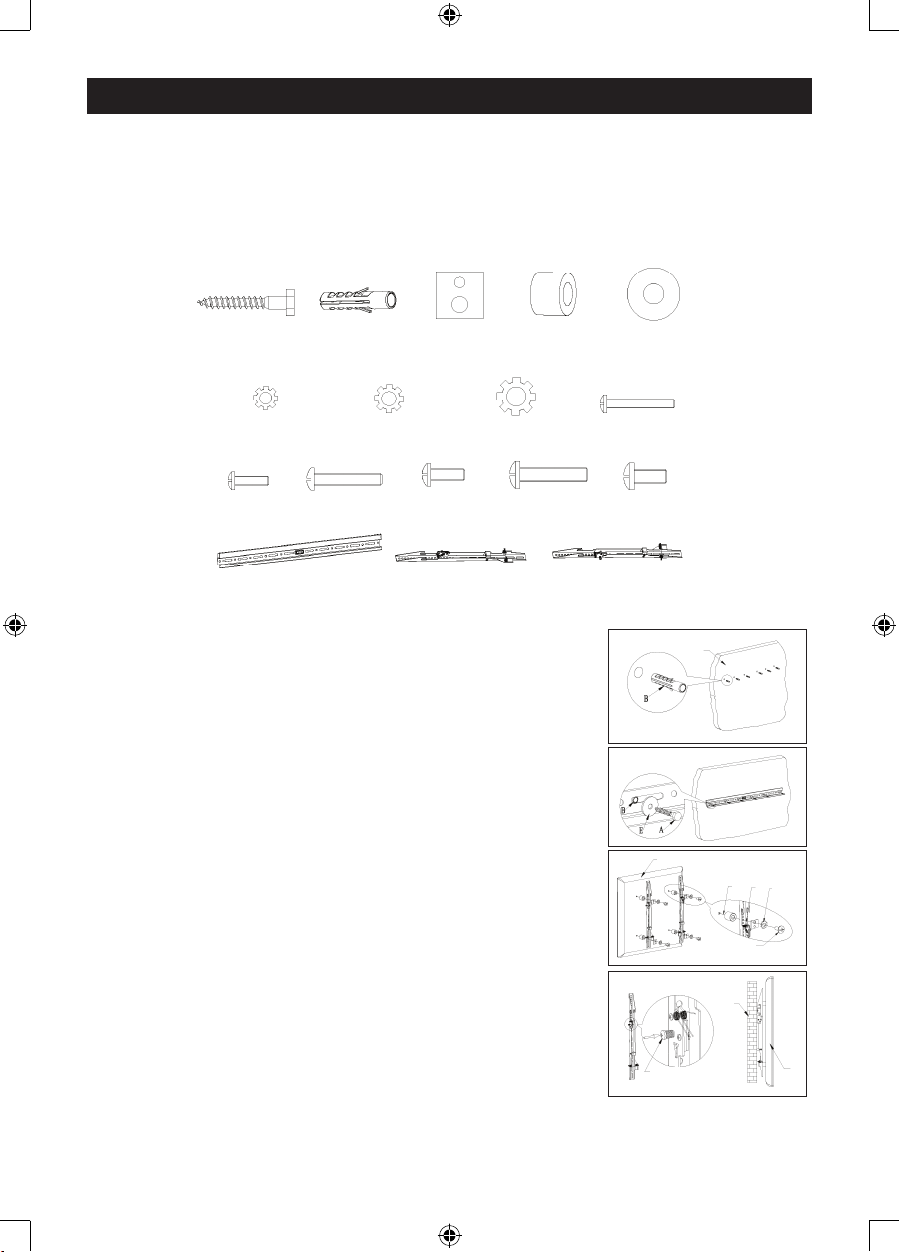
(A) Self-tapping screws (6) (B) Wall plugs (6) (C) 25x25 shim (4) (D) Plastic sleeve (4) (E) Ø 8 Flat washer (6)
(F) Ø 5 spring washer (4) (G) Ø 6 spring washer (4) (H) Ø 8 spring washer (4) (I) M5x30 (4)
(J) M5x15 (4) (K) M6x15 (4) (L) M6x15 (4) (M) M8x30 (4) (N) M8x15 (4)
Wall plate (1) Left monitor bracket (1) Right monitor bracket (1)
3. Installation and operation instructions
Note: please read the instructions carefully before installation!
Step 1:
Use the wall plate as a template to drill six holes of 10mm diameter and 50mm depth in
the wall. Then insert six wall plugs into the holes.
Step 2:
Install the wall plate. Put the wall plate on the wall, and then screw six lag bolts through a
metal washer into the wall plugs.
Step 3:
Install the monitor brackets on the back of the panel TV: screw two bolts into the holes
in the back of the panel TV to install each monitor bracket. Make sure the distance from
each bracket to the top of the panel TV is equal, and also as centered as possible. The
knob shall face outward of the panel TV. The parts shall be selected according to the
dimensions of the holes in the back of the panel TV
Step 4:
Push the circle button on the two brackets to return the lock to the ready position, then
hook the two brackets onto the top of the wall plate. Then slowly lower the bottom of the
TV until the bottom of the bracket locks onto the bottom of the wall plate.
4. Notes
(1) Choose the right place to install the wall plate. The bracket must be installed on a
solid brick wall. Make sure the wall can support 240kg weight or more.
(2) Check and maintain the product frequently according to the use status to ensure the
at panel TV works normally and safe.
Please wipe joining parts with a dry cloth frequently. Do not use in rain or in humid
environment. Please check once every two months that all bolts are secure.
Step 1
Wall
Step 2
Step 3
I/J/K/L/M/N
F/G/H
C
D
TV
Step 4
Wall
Circle button
TV
Page 3

3
DEUTSCH
LCD/Plasma Wandhalterung Anleitung Typ TVS-KN-FSB010B und S
1. Technische Parameter
Gewicht: 3,8 kg; Bildschirmdiagonale: 30” bis 64”: Max. Last: 60 kg; Wandabstand: 45 mm.
2. Teileliste
Bitte vergewissern Sie sich anhand nachstehender Liste, dass alle Teile mitgeliefert wurden. Benutzen Sie keine beschädigten
Teile. Ersetzen Sie keine Teile mit abweichenden Spezikationen.
(A) Sechskantschrauben (6) (B) Dübel (6)
(C) 25x25
Abstandscheibe (4)
(D) Kunststoffhülse (4)
(E) Ø 8 Unterlegscheibe
(6)
(F) Ø 5 Federscheibe (4) (G) Ø 6 Federscheibe (4) (H) Ø 8 Federscheibe (4) (I) Schraube M5x30 (4)
(J) Schraube M5x15 (4) (K) Schraube M6x15 (4)
(L) Schraube
M6x15 (4)
(M) Schraube M8x30 (4) (N) Schraube M8x15 (4)
Wandplatte (1) Linke Monitorhalterung (1) Rechte Monitorhalterung (1)
3. Montage- und Betriebsanleitung
Bitte beachten Sie: Lesen Sie die Anleitungen vor der Montage aufmerksam durch!
Schritt 1:
Benutzen Sie die Grundplatte als Schablone zum Bohren von sechs Löchern Ø 10 mm
und 50 mm Tiefe. Setzen Sie sechs entsprechende Wanddübel ein.
Schritt 2:
Montieren Sie die Grundplatte. Setzen Sie die Grundplatte auf der Wand an und
schrauben Sie diese mit sechs Sechskantschrauben und Unterlegscheiben an.
Schritt 3:
Montieren Sie die Monitorhalterungen auf der Rückseite Ihres Fernsehers mit jeweils zwei
Schrauben. Vergewissern Sie sich, dass der Abstand der Halterungen zur Oberkante des
Fernsehers gleich und möglichst zentriert ist. Der Knopf muss vom Fernseher weg zeigen.
Wählen Sie die Teile entsprechend der Löcher auf der Rückseite des Fernsehers.
Schritt 4:
Drücken Sie die Rundkopfschraube in die beiden Halterungen, um die Sperre in
Ausgangsposition zu bringen, dann haken Sie die beiden Halterungen oben in der
Grundplatte an der Wand ein. Senken Sie den Fernseher langsam ab, bis die Halterungen
unten in der Wandplatte unten einrasten.
4. Bitte beachten Sie:
(1) Wählen Sie den korrekten Montageort für die Wandplatte. Die Halterung muss an einer
massiven Wand installiert werden. Vergewissern Sie sich, dass die Wand mindestens
240 kg trägt.
(2) Überprüfen und warten Sie das Produkt regelmäßig entsprechend der Nutzung Ihres
Fernsehers.
Wischen Sie die Halterung trocken ab. Nicht im Freien oder in Feuchträumen benutzen.
Überprüfen Sie die Schrauben alle zwei Monate auf festen Sitz.
Schritt
1
Wand
Schritt
2
Schritt 3
I/J/K/L/M/N
F/G/H
C
D
TV
Schritt 4
Wand
Rundkopfschraube
TV
Page 4
4
FRANÇAIS
Guide d’installation murale pour écran LCD/Plasma type TVS-KN-FSB010B et S
1. Données techniques
Poids : 3,8 kg; Dimension de l’écran plat : 30”~64”: Charge maximale : 60 kg; Distance du mur: 45 mm.
2. Liste des pièces
Veuillez vérier le contenu de l’emballage avec la liste suivante. Assurez-vous que toutes les pièces se trouvent à l’intérieur.
N’utilisez jamais de pièces défectueuses. Ne remplacez pas des pièces avec d’autres pièces de caractéristiques différentes.
(A) Vis autotaraudeuses (6) (B) Tire-fond (6) (C) Cale 25x25 (4)
(D) Manchon
plastique (4)
(E) Rondelle plate Ø 8 (6)
(F) Rondelle frein Ø 5(4) (G) Rondelle frein Ø 6(4) (H) Rondelle frein Ø 8(4) (I) M5x30 (4)
(J) M5x15 (4) (K) M6x15 (4) (L) M6x15 (4) (M) M8x30 (4) (N) M8x15 (4)
Plaque murale (1) Support gauche du moniteur (1) Support droit du moniteur (1)
3. Instructions d’installation et d’utilisation
Remarque : Veuillez lire attentivement les instructions avant de procéder à l’installation !
Etape 1 :
Utilisez la plaque murale comme gabarit pour percer dans le mur six trous de 10 mm de
diamètre et 50 mm de profondeur. insérez ensuite une cheville dans chaque trou.
Etape 2 :
Installer la plaque murale. Placez la plaque murale contre le mur puis xez la plaque à
l’aide de six tire-fond en utilisant des rondelles.
Etape 3 :
Installer les supports du moniteur sur le panneau arrière de la télé : Pour chaque support du
moniteur placez deux boulons dans les trous du panneau arrière de la télé. Assurez-vous que
la distance de chaque support au bord supérieur du panneau de la télé est égale, et qu’ils
sont centrés. Le bouton doit être orienté vers l’extérieur du panneau de la télé. Les pièces
devraient être choisies selon les dimensions des trous situées sur le panneau arrière de la
télé.
Etape 4 :
Poussez le bouton circulaire dans les deux supports pour mettre le verrou sur la position
prêt puis accrochez les deux supports sur le bord supérieur de la plaque murale. Puis
laissez le moniteur descendre doucement jusqu’à ce que la partie inférieure du support
s’emboîte dans la plaque murale.
4. Remarques :
(1) Choisissez un bon endroit pour installer la plaque murale. La plaque murale doit être
installée sur un mur en brique solide. Assurez-vous que le mur peut support au moins
240 kg.
(2) Vériez souvent le produit en fonction de l’usage pour s’assurer que l’écran plat
fonctionne normalement et sans risque.
Essuyez souvent les pièces de jointure à l’aide d’un chiffon sec. Ne pas utiliser sous la
pluie ou dans un environnement humide. Vériez une fois tous les deux mois que les
boulons sont bien xés.
Etape 1
Mur
Etape
2
Etape
3
I/J/K/L/M/N
F/G/H
C
D
Télé
Etape
4
Mur
Bouton circulaire
TV
Page 5

5
NEDERLANDS
Instructies voor muurbeugel LCD/Plasma TV, Type TVS-KN-FSB010B en S
1. Technische specicaties
Gewicht: 3.8 kg; Afmetingen van TV: 30~64”: Maximale belasting: 60kg; Afstand vanaf de muur: 45mm
2. Onderdelenlijst
Controleer de onderdelen in de verpakking aan de hand van de volgende lijst. Controleer of alle onderdelen in de verpakking
zitten. Gebruik nooit kapotte onderdelen. Gebruik nooit vervangende onderdelen met andere specicaties.
(A) Zelftappende schroeven
(6)
(B) Pluggen (6)
(C) 25x25 plaatje
(4)
(D) Kunststof ring (4) (E) Ø 8 Sluitring (6)
(F) Ø 5 Veerring (4) (G) Ø 6 Veerring (4) (H) Ø 8 Veerring (4) (I) M5x30 (4)
(J) M5x15 (4) (K) M6x15 (4) (L) M6x15 (4) (M) M8x30 (4) (N) M8x15 (4)
Muurplaat (1) Linkse monitorsteun (1) Rechtse monitorsteun (1)
3. Installatie- en bedieningsinstructies
Opmerking: lees zorgvuldig de instructies voordat u de beugel monteert!
Stap 1:
Gebruik de muurplaat als mal voor het boren van zes gaten in de muur, met een diameter
van 10mm en 50mm diep. Duw dan zes pluggen in de gaten.
Stap 2:
Monteer de muurplaat. Plaats de muurplaat op de muur en schroef dan zes zelftappende
bouten door een metalen ring in de pluggen.
Stap 3:
Monteer de monitorsteunen aan de achterkant van de TV: Schroef twee bouten in de gaten
aan de achterkant van de TV om elke monitorsteun te monteren. Zorg dat de afstand van elke
steun tot de bovenkant van de TV gelijk is, en dat de steunen zoveel mogelijk in het midden
zitten. De kop van de schroef moet naar de buitenkant van de TV wijzen. De onderdelen
moeten gekozen worden op basis van de afmetingen van de gaten in de achterkant van de TV
Stap 4:
Druk de ronde knop in op de twee beugels om de vergrendeling te openen en haak dan
de twee beugels op de bovenrand van de muurplaat. Laat dan langzaam de onderkant
van de TV zakken tot de onderkant van de beugel vastklikt op de onderrand van de
muurplaat.
4. Opmerkingen
(1) Kies de juiste plaats om de muurplaat op te hangen. De beugel moet worden bevestigd
op een stevige bakstenen muur. Zorg dat de muur ten minste 240kg kan dragen.
(2) Controleer en onderhoud het product regelmatig afhankelijk van het gebruik om te
verzekeren dat de TV normaal en veilig bevestigd is.
Neem verbindingsdelen regelmatig af met een droge doek. Niet gebruiken in de regen
of in een vochtige omgeving. Controleer eens per twee maanden of alle bouten goed
vastzitten.
Stap 1
Muur
Stap
2
Stap
3
I/J/K/L/M/N
F/G/H
C
D
TV
Stap
4
Muur
Ronde knop
TV
Page 6

6
ITALIANO
Istruzioni per Supporto da Parete per LCD/Plasma, Tipo TVS-KN-FSB010B e S
1. Parametri tecnici
Peso: 3,8kg; Dimensione del pannello TV: 30”~64”: Peso massimo: 60kg; Distanza dalla parete: 45mm.
2. Lista delle parti
Si prega di controllare le parti nella confezione con la lista che segue. Assicurarsi che tutte le parti siano nella confezione. Non
usare mai parti difettose. Non sostituire mai parti con speciche diverse.
(A) Viti autoforanti (6) (B) Tasselli da parete (6)
(C) Zeppa 25x25
(4)
(D) Rivestimento di
plastica (4)
(E) Rondella piatta Ø 8
(6)
(F) Rondella elastica Ø 5 (4) (G) Rondella elastica Ø 6 (4) (H) Rondella elastica Ø 8 (4) (I) M5x30 (4)
(J) M5x15 (4) (K) M6x15 (4) (L) M6x15 (4) (M) M8x30 (4) (N) M8x15 (4)
Piastra da parete (1) Supporto sinistro per monitor (1) Supporto destro per monitor (1)
3. Istruzioni d’istallazione ed uso
Nota: si prega di leggere attentamente le istruzioni prima dell’istallazione!
Passo 1:
Usare la piastra da parete con un modello per fare i sei fori con diametro da 10mm e
50mm di profondità nella parete. Poi inserire sei tasselli da parete nei fori.
Passo 2:
Istallare la piastra da parete. Mettere la piastra da parete sulla parete, poi avvitare le sei
viti lag attraverso una rondella di metallo nei tasselli.
Passo 3:
Istallare i supporti per il monitore sul retro del pannello TV: avvitare due bulloni nei fori sul
retro del pannello TV per istallare ciascun supporto per il monitor. Assicurarsi che la distanza
tra ciascun supporto e la parte superiore del pannello TV sia uguale, e anche che sia il più
centrato possibile. La manopola dovrebbe essere rivolta verso l’esterno del pannello TV. Le
parti saranno selezionato in base alle dimensioni dei fori sul retro dal pannello TV.
Passo 4:
Premere il bottone circolare sui due supporti per riportare il blocco alla posizione pronta,
poi agganciare i due supporti sulla parte superiore della piastra per parete. Quindi
abbassare lentamente la parte inferiore del TV nché il fondo del supporto si blocca sul
fondo della piastra da parete.
4. Nota
(1) Scegliere il posto corretto per istallare la piastra da parete. Il supporto deve essere
istallato su una parete di mattoni solida. Assicurarsi che possa sopportare un peso di
240kg o più.
(2) Controllare e mantenere il prodotto in maniera frequente secondo lo stato d’uso per
assicurarsi che il pannello TV normalmente e in maniera sicura.
Si prega di pulire le parti di giuntura frequentemente con un panno asciutto. Non usare
sotto la pioggia o in ambiente umido. Si prega di controllare una volta ogni due mesi che i
dadi siamo ssati.
Passo 1
Parete
Passo
2
Passo
3
I/J/K/L/M/N
F/G/H
C
D
TV
Passo
4
Parete
Bottone circolare
TV
Page 7

7
ESPAÑOL
Instrucciones del Soporte Mural para LCD/Plasma Tipo TVS-KN-FSB010B y S
1. Parámetros técnicos
Peso: 3,8kg; Tamaño de la TV pantalla plana: 30”~64”: Máxima carga: 60kg; Distancia a la pared: 45mm.
2. Lista de componentes
Por favor, compruebe los componentes del paquete con la lista siguiente. Asegúrese de que todas se encuentran en el
paquete. Nunca use piezas defectuosas. Nunca sustituya piezas por otras con diferentes especicaciones.
(A) Tornillos rosca chapa (6) (B) Taco para tornillo (6)
(C) Chapa de
ajuste de 25x25
(D) Cilindro de plástico
(4)
(E) Arandela plana de
Ø 8 (6)
(F) Arandela de presión
Ø 5 (4)
(G) Arandela de presión Ø 6 (4) (H) Arandela de presión Ø 8 (4) (I) M5x30 (4)
(J) M5x15 (4) (K) M6x15 (4) (L) M6x15 (4) (M) M8x30 (4) (N) M8x15 (4)
Placa mural (1) Soporte izquierdo del monitor (1) Soporte derecho del monitor (1)
3. Instrucciones de instalación y funcionamiento
Nota: por favor, ¡lea detenidamente las instrucciones antes de instalarlo!
Paso 1:
Use la placa mural como plantilla para taladrar seis agujeros de 10mm de diámetro y de
50mm de profundidad en la pared. Luego introduzca los seis tacos en los agujeros.
Paso 2:
Instale la placa mural. Colóquela en la pared y fíjela usando los seis tornillos rosca chapa
a través de las arandelas planas dentro de los tacos insertados en la pared.
Paso 3:
Instale los soportes del monitor en la parte trasera de la pantalla de TV: enrosque dos
tornillos por cada uno de los soportes, en los agujeros con rosca de la parte trasera de la
pantalla de TV. Compruebe que los soportes libran la misma distancia desde la parte superior
de la pantalla TV, y que están lo más centrados posible. El botón circular debe mirar hacia
fuera de la pantalla de TV. El tamaño de los tornillos debe ser acorde con la profundidad de
los agujeros de la parte trasera de la pantalla de TV.
Paso 4:
Presione sobre el botón circular de ambos soportes para colocar el mecanismo de
bloqueo en la posición de listo, luego cuelgue los soportes de la placa mural. Después
baje lentamente la TV hasta que la parte inferior de los soportes se cierre sobre la parte
inferior de la placa mural.
4. Notas
(1) Elija el lugar correcto para colocar la placa mural. El soporte debe instalarse sobre
una pared de ladrillos sólida. Asegúrese de que puede soportar 240 Kg o más.
(2) Revise y mantenga el producto con frecuencia según su estado de uso para asegurar
que la pantalla de TV plana funciona correctamente y está segura.
Por favor, limpie frecuentemente las piezas de unión con un trapo seco. No lo use en
ambientes susceptibles a lluvia o humedad. Por favor, compruebe la rmeza de los
tornillos cada dos meses.
Paso
1
Pared
Paso
2
Paso
3
I/J/K/L/M/N
F/G/H
C
D
TV
Paso 4
Pared
Botón circular
TV
Page 8

8
MAGYAR
LCD/plazma TV falra erősítési útmutatója, TVS-KN-FSB010B és S típus
1. Műszaki adatok
Tömeg: 3,8 kg; a laposképernyős TV mérete: 30x64 hüvelyk (762x1625,6 mm); maximális terhelés: 60 kg; távolság a faltól:
45 mm.
2. Alkatrészjegyzék
Kérjük, ellenőrizze a csomagban levő alkatrészek meglétét az alábbi jegyzék szerint. Hibás alkatrészt ne használjon.
A mellékelt alkatrészek helyett ne használjon más fajtát vagy minőségűt.
(A) Önmetsző csavar (6) (B) Tipli (6)
(C) 25x25-ös
közbetét (4)
(D) Műanyag persely
(4)
(E) Ø 8 lapos alátét (6)
(F) Ø 5 rugós alátét (4) (G) Ø 6 rugós alátét (4) (H) Ø 8 rugós alátét (4) (I) M5x30 (4)
(J) M5x15 (4) (K) M6x15 (4) (L) M6x15 (4) (M) M8x30 (4) (N) M8x15 (4)
Fali tartólap (1) Bal monitorkengyel (1) Jobb monitorkengyel (1)
3. Telepítési és használati útmutató
Megjegyzés: mielőtt hozzáfogna a telepítéshez, szíveskedjék gondosan elolvasni ezt az
útmutatót!
1. lépés:
A fali tartólapot sablonként használva fúrjon hat 10 mm átmérőjű és 50 mm mély furatot a
falba. Tiplizze be a furatokat.
2. lépés:
Szerelje a falra a fali tartólapot. Emelje a helyére, majd fém alátétek közbeiktatásával
csavarja a helyére a hat tiplicsavart.
3. lépés:
Szerelje fel a laposképernyős TV hátoldalára a monitorkengyeleket, kengyelenként két-két
csavarral. Úgy állítsa be a kengyeleket, hogy egyforma távol legyenek a laposképernyős
TV tetejétől, és lehetőleg középen is legyenek. A gomb kifelé (a TV-től elfelé) nézzen. Az
alkatrészeket a laposképernyős TV hátoldalán levő furatok mérete szerint kell kiválasztani.
4. lépés:
Nyomja a kerek gombot a két kengyelre, hogy a zár visszatérjen készenléti helyzetébe,
majd illessze a két kengyelt a fali tartólap tetejére. Lassan engedje le a TV-t, amíg a
kengyel alja a fali tartólap aljába nem záródik.
4. Megjegyzések
(1) Válasszon alkalmas helyet a fali tartólapnak. A tartólapot tömör téglafalra kell erősíteni.
A fal ki kell, hogy bírjon legalább 240 kg terhelést.
(2) A laposképernyős TV zavartalan és biztonságos működése érdekében rendszeresen
ellenőrizze és tartsa karban a terméket, a használat jellege szerint.
Az illeszkedő részeket időnként száraz ronggyal törölgesse meg. Esőben vagy nedves
környezetben ne használja. Kéthavonta ellenőrizze, nem lazultak-e ki a csavarok.
1. LÉPÉS
Fal
2. LÉPÉS
3. LÉPÉS
I/J/K/L/M/N
F/G/H
C
D
TV
4. LÉPÉS
Fal
Kerek gomb
TV
Page 9

9
SUOMI
LCD/Plasma seinäkiinnitysohjeet Tyyppi TVS-KN-FSB010B ja S
1. Tekniset tiedot
Paino: 3.8kg, taulutelevision koko: 30”~64”: Maksimikuorma: 60kg, etäisyys seinästä: 45mm.
2. Osalista
Tarkista, että pakkaus sisältää seuraavat osat: Varmista, että kaikki osat ovat mukana. Älä koskaan käytä viallisia osia. Älä
koskaan vaihda osia eri tyyppisiin osiin.
(A) Itse kierrettävät ruuvit
(6)
(B) Seinäkiinnikkeet (6)
(C) 25x25
tiivistelevy (4)
(D) Muoviholkki (4) (E) Ø 8 Ohut levy (6)
(F) Ø 5 jousialuslevy (4) (G) Ø 6 jousialuslevy (4) (H) Ø 8 jousialuslevy (4) (I) M5x30 (4)
(J) M5x15 (4) (K) M6x15 (4) (L) M6x15 (4) (M) M8x30 (4) (N) M8x15 (4)
Seinälevy (1) Vasen näytön kiinnike (1) Oikea näytön kiinnike (1)
3. Asennus- ja käyttöohjeet
Huomautus: lue ohjeet huolellisesti ennen asennusta!
Kohta 1
Käytä seinälevyä mallina ja poraa kuusi 10mm:n läpimittaista ja 50mm:n syvyistä reikää
seinään. Kiinnitä sitten kuusi seinäkiinnikettä reikiin.
Kohta 2
Kiinnitä seinälevy. Kiinnitä seinälevy seinään ja ruuvaa kuusi ruuvia metallilevyn läpi
seinäkiinnittimiin.
Kohta 3
Asenna näytön kiinnikkeet taulutelevision taakse. Ruuvaa kaksi ruuvia taulutelevision takana
oleviin reikiin näytön kiinnikkeen asennusta varten. Varmista, että jokaisen kiinnikkeen
etäisyys taulutelevision yläosasta on sama ja mahdollisimman keskellä. Nuppi tulee
taulutelevision ulkopuolelle. Osat valitaan taulutelevision takana olevien reikien mittojen
mukaisesti.
Kohta 4
Paina kahden kiinnikkeen kierrepainiketta palauttaaksesi lukituksen valmistilaan. Kiinnitä
sitten kiinnikkeet seinälevyn yläosaan. Laske tämän jälkeen television alaosaa hitaasti
kunnes kiinnikkeen alaosa lukittuu seinälevyn alaosaan.
4. Huomautuksia
(1) Valitse oikea paikka seinälevyn kiinnitystä varten. Kiinnike tulee asentaa tukevaan
tiiliseinään. Varmista, että seinä kestää 240 kg:n painon tai ennemmän.
(2) Tarkista ja huolla laite säännöllisesti käyttöohjeen mukaisesti varmistaaksesi, että
taulutelevisio toimii normaalilla ja turvallisella tavalla.
Pyyhi liitoskohdat kuivalla liinalla säännöllisesti. Älä käytä sateessa tai kosteassa tilassa.
Tarkista kahden kuukauden välein, että kaikki ruuvit on kiinnitetty kunnolla.
Kohta 1
Seinä
Kohta
2
Kohta
3
I/J/K/L/M/N
F/G/H
C
D
TV
Kohta
4
Seinä
Kierrepainike
TV
Page 10

10
SVENSKA
Instruktion för väggfäste till LCD/Plasma platt-TV typ TVS-KN-FSB010B och S
1. Tekniska specikationer
Vikt: 3,8 kg; Storlek på platt-TV: 30”~64”: Max belastning: 60 kg; Avstånd från vägg: 45 mm.
2. Lista på delar
Kontrollera delarna i förpackningen utifrån följande lista. Se till att alla delar nns med i förpackningen. Använd aldrig defekta
delar. Ersätt aldrig med delar som har andra specikationer.
(A) Självdragande skruvar
(6)
(B) Väggpluggar (6)
(C) 25x25
mellanlägg (4)
(D) Plaströr (4) (E) Ø 8 bricka (6)
(F) Ø 5 fjäderbricka (4) (G) Ø 6 fjäderbricka (4) (H) Ø 8 fjäderbricka (4) (I) M5x30 (4)
(J) M5x15 (4) (K) M6x15 (4) (L) M6x15 (4) (M) M8x30 (4) (N) M8x15 (4)
Väggplatta (1) Vänster skärmfäste (1) Höger skärmfäste (1)
3. Installations- och användningsinstruktioner
OBS: läs igenom instruktionerna noga före installation!
Steg 1:
Använd väggplattan som mall för att borra sex hål med 10 mm diameter och 50 mm djup i
väggen. Sätt sedan i sex pluggar i hålen.
Steg 2:
Montera väggplattan. Sätt plattan på väggen, skruva sedan i sex fästskruvar med
metallbricka i pluggarna.
Steg 3:
Montera skärmfästena på baksidan av platt-TV:n. Skruva i två fästskruvar i hålen bak på
platt-TV:n för varje skärmfäste. Se till att avståndet från fästena till toppen på platt-TV:n är
lika och så centrerade som möjligt. Vredet ska vara utåt från platt-TV:n. Delarna ska väljas
utifrån dimension på hålen bak på platt-TV:n.
Steg 4:
Tryck på den runda knappen på de två fästena för att öppna låset, kroka sedan fast de två
fästena uppe på väggplattan. Sänk sedan försiktigt ner nedre delen på TV:n tills botten på
fästet hakar i botten på väggplattan.
4. Noteringar
(1) Välj placering för väggplattan med omsorg. Fästet måste monteras på en solid
tegelvägg. Kontrollera att väggen klarar en belastning på minst 240 kg.
(2) Kontrollera och underhåll produkten regelbundet utifrån användningen för att se till att
platt-TV:n fungerar normalt och säkert.
Delarna som håller samman bör ofta torkas av med en torr trasa. Utsätt dem inte för väta
eller fuktig omgivning. Kontrollera alla fästskruvar minst varannan månad.
Steg 1
Vägg
Steg
2
Steg
3
I/J/K/L/M/N
F/G/H
C
D
TV
Steg
4
Vägg
Rund knapp
TV
Page 11

11
ČESKY
Pokyny k nástěnné konzole pro LCD/plazmový televizor typ TVS-KN-FSB010B a S
1. Technické údaje
Hmotnost: 3,8 kg; velikost televizoru s plochou obrazovkou: 30” – 64”; nosnost: 60 kg; vzdálenost od zdi: 45 mm.
2. Seznam dílů
Zkontrolujte prosím díly v balení podle tohoto seznamu. Ujistěte se, že balení obsahuje všechny díly. Nikdy nepoužívejte
vadné díly. Nikdy nenahrazujte díly jinými s odlišnými technickými parametry.
(A) Samořezné šrouby (6) (B) Hmoždinky (6)
(C) Vložky 25 x 25
(4)
(D) Bužírky (4)
(E) Ø 8 ploché podložky
(6)
(F) Ø 5 pružné podložky (4) (G) Ø 6 pružné podložky (4) (H) Ø 8 pružné podložky (4) (I) M5 x 30 (4)
(J) M5 x 15 (4) (K) M6 x 15 (4) (L) M6 x 15 (4) (M) M8 x 30 (4) (N) M8 x 15 (4)
Deska na stěnu (1) Levý držák monitoru (1) Pravý držák monitoru (1)
3. Montáž a pokyny k provozu
Poznámka: Před montáží si důkladně pročtěte pokyny!
Krok 1:
Desku na stěnu použijte jako šablonu pro vyvrtání šesti otvorů do stěny o průměru 10 mm
a hloubce 50 mm. Do otvorů vložte šest hmoždinek.
Krok 2:
Připevněte desku na stěnu. Desku umístěte na stěnu a poté do hmoždinek zašroubujte
skrze kovové podložky šest šroubů se čtvercovou hlavou.
Krok 3:
Držáky monitoru připevněte na zadní stěnu panelu televizoru: k montáži každého držáku
zašroubujte dva šrouby do otvorů na zadní části panelu televizoru. Zkontrolujte, zda je
vzdálenost každého držáku od horní části panelu televizoru stejná a zda jsou co možná
nejlépe vycentrovány. Knoík má směřovat směrem od panelu televizoru. Jednotlivé díly
zvolte podle rozměrů otvorů na zadní části panelu televizoru.
Krok 4:
Kruhové tlačítko na obou držácích zatlačte, aby se zámek vrátil do pohotovostní polohy,
pak oba držáky zahákněte za horní část desky na stěnu. Spodní část televizoru pomalu
spouštějte, dokud se spodní část zámku držáku neuzamkne ve spodní části desky na stěnu.
4. Poznámky
(1) K montáži desky na stěnu vyberte vhodné místo. Držák musí být přimontován na
pevné zdi z cihel. Zkontrolujte, zda zeď udrží hmotnost 240 kg nebo více.
(2) Výrobek podle stavu používání pravidelně kontrolujte a provádějte údržbu, aby plochý
televizor pracoval normálně a bezpečně.
Spoje pravidelně otírejte suchým hadříkem. Nepoužívejte v dešti nebo vlhkém prostředí.
Každé dva měsíce kontrolujte, zda jsou šrouby dotaženy.
Krok 1
Stěna
Krok
2
Krok
3
I/J/K/L/M/N
F/G/H
C
D
TV
Krok
4
Stěna
Kruhové tlačítko
TV
Page 12

12
ROMÂNĂ
Instrucţiuni suport perete LCD/Plasmă Tip TVS-KN-FSB010B şi S
1. Parametri tehnici
Greutate: 3,8kg; Diagonala televizorului cu ecran plat: 30”~64”: Sarcină maximă: 60kg; Distanţă faţă de perete: 45mm.
2. Listă piese
Vericaţi piesele din pachet contra listei următoare. Asiguraţi-vă că toate piesele se aă în pachet. Nu utilizaţi niciodată piese
cu defecte. Nu înlocuiţi niciodată piese cu specicaţii diferite.
(A) Şuruburi autoletante
(6)
(B) Dibluri (6)
(C) Lamelă de
xare 25x25 (4)
(D) Manşon de plastic
(4)
(E) Şaibă plată Ø 8 (6)
(F) Şaibă elastică Ø 5 (4) (G) Şaibă elastică Ø 6 (4) (H) Şaibă elastică Ø 8 (4) (I) M5x30 (4)
(J)M5x15 (4) (K) M6x15 (4) (L) M6x15 (4) (M) M8x30 (4) (N) M8x15 (4)
Placă de perete (1) Suport monitor stânga(1) Suport monitor dreapta(1)
3. Instrucţiuni de montare şi utilizare
Observaţie: citiţi cu atenţie instrucţiunile înainte de montare!
Pasul 1:
Utilizaţi placa de perete ca şablon pentru a practica cu burghiul şase găuri cu diametrul de
10mm şi adâncimea de 50mm în perete. Apoi, introduceţi şase dibluri în găuri.
Pasul 2:
Montaţi placa de perete. Aşezaţi placa de perete pe suprafaţa peretelui, iar apoi înletaţi
şase şuruburi printr-o şaibă metalică în dibluri.
Pasul 3:
Montaţi suporturile pentru monitor pe spatele televizorului cu ecran plat: înletaţi două
şuruburi în oriciile din spatele televizorului cu ecran plat pentru a monta ecare suport
de monitor. Asiguraţi-vă că distanţa de la ecare suport până la partea superioară a
televizorului cu ecran plat este egală şi că suportul este cât mai centrat posibil. Partea
proeminentă va orientată în exteriorul televizorului cu ecran plat. Piesele se vor selecta
în funcţie de dimensiunile oriciilor din spatele televizorului cu ecran plat
Pasul 4:
Împingeţi butonul circular de pe cele două suporturi pentru a readuce zăvorârea în poziţia
gata de utilizare, apoi angrenaţi cele două suporturi pe partea superioară a plăcii de
perete. Apoi, coborâţi lent partea inferioară a televizorului până ce partea inferioară a
suportului se xează pe partea de jos a plăcii de perete.
4. Observaţii
(1) Alegeţi locul corespunzător pentru a monta placa de perete. Suportul trebuie să
e montat pe un perete solid de cărămidă. Asiguraţi-vă că peretele poate susţine o
greutate de 240kg sau mai mult.
(2) Vericaţi şi întreţineţi frecvent produsul, în funcţie de starea acestuia, pentru a vă
asigura că televizorul cu ecran plat funcţionează normal şi în condiţii de siguranţă.
Ştergeţi frecvent îmbinările cu o cârpă uscată. Nu expuneţi produsul ploii sau mediilor
umede. Vericaţi o dată la ecare două luni dacă toate şuruburile sunt prinse ferm.
Pasul 1
Perete
Pasul
2
Pasul
3
I/J/K/L/M/N
F/G/H
C
D
TV
Pasul
4
Perete
Buton circular
TV
Page 13

13
ΕΛΛΗΝΙΚA
Επιτοίχια βάση στήριξης LCD/Plasma TVS-KN-FSB010B και S
1. Τεχνική παράμετρος
Βάρος: 3.8kg; Μέγεθος επίπεδης οθόνης TV: 30”~64”: Μέγιστο φορτίο: 60kg; Απόσταση από τον τοίχο: 45mm.
2. Λίστα εξαρτημάτων
Ελέγξτε τα εξαρτήματα στην συσκευασία με την ακόλουθη λίστα. Σιγουρευτείτε ότι όλα τα εξαρτήματα βρίσκονται μέσα στη
συσκευασία. Ποτέ μην χρησιμοποιείτε ελαττωματικά εξαρτήματα. Ποτέ μην αντικαθιστάτε εξαρτήματα με διαφορετικές προδιαγραφές.
(A) Λαμαρινόβιδες (6)
(B) Βύσμα στερέωσης
τοίχου (6)
(C) 25x25 ροδέλα
(4)
(D) Πλαστικό
περίβλημα (4)
(E) Ø 8 Επίπεδη ροδέλα
(6)
(F) Ø 5 Οδοντωτή ροδέλα (4) (G) Ø 6 Οδοντωτή ροδέλα (4) (H) Ø 8 Οδοντωτή ροδέλα (4) (I) M5x30 (4)
(J) M5x15 (4) (K) M6x15 (4) (L) M6x15 (4) (M) M8x30 (4) (N) M8x15 (4)
Πλάκα στήριξης τοίχου (1) Αριστερό υποστήριγμα οθόνης (1) Δεξιό υποστήριγμα οθόνης (1)
3. Οδηγίες εγκατάστασης και λειτουργίας
Σημείωση: διαβάστε τις οδηγίες προσεκτικά πριν την εγκατάσταση!
Βήμα 1:
Χρησιμοποιήστε την πλάκα στήριξης τοίχου ως πρότυπο για να ανοίξετε έξι οπές διαμέτρου
10mm και 50mm βάθους στον τοίχο. Στην συνέχεια εισάγετε έξι βύσματα τοίχου στις οπές.
Βήμα 2:
Εγκαταστήστε την πλάκα στήριξης τοίχου. Τοποθετήστε την πλάκα στήριξης τοίχου στον
τοίχο και στην συνέχεια βιδώστε έξι μπουλόνια υστέρησης μέσα από μια μεταλλική ροδέλα
μέσα σα βύσματα τοίχου.
Βήμα 3:
Εγκαταστήστε τα υποστηρίγματα της οθόνης στο πίσω μέρος του πίνακα της TV: βιδώστε
δύο μπουλόνια στις οπές στο πίσω μέρος του πίνακα της TV για να εγκαταστήσετε κάθε
υποστήριγμα της οθόνης. Σιγουρευτείτε ότι η απόσταση από κάθε υποστήριγμα στο πάνω
μέρος του πίνακα της TV είναι ίση, και επίσης όσο το δυνατόν πιο κεντραρισμένο. Το
κουμπί θα κοιτά προς τα έξω του πίνακα της TV. Τα εξαρτήματα θα επιλέγονται σύμφωνα
με τις διαστάσεις των οπών στο πίσω μέρος του πίνακα της TV
Βήμα 4:
Πιέστε το κυκλικό κουμπί στα δύο υποστηρίγματα για να επιστρέψετε την κλειδαριά στην
θέση ετοιμότητας, στην συνέχεια γαντζώστε τα δύο υποστηρίγματα στο πάνω μέρος της
πλάκας στήριξης τοίχου. Στην συνέχεια χαμηλώστε αργά το κάτω μέρος της TV έως ότου
το κάτω μέρος του υποστηρίγματος να κλειδώσει στο κάτω μέρος της βάσης στήριξης.
4. Σημειώσεις
(1) Επιλέξτε την σωστή τοποθεσία για να εγκαταστήσετε την βάση στήριξης. Η βάση
πρέπει να εγκατασταθεί σε συμπαγή τοίχο από τούβλα. Σιγουρευτείτε ότι ο τοίχος
μπορεί να στηρίξει 240kg βάρους ή περισσότερο.
(2) Ελέγξτε και συντηρείτε το προϊόν συχνά σύμφωνα με την κατάσταση χρήσης για να
διασφαλίσετε ότι η επίπεδη οθόνη της TV λειτουργεί κανονικά και με ασφάλεια.
Σκουπίζετε συχνά τα εξαρτήματα που ενώνονται με στεγνό πανί. Μην χρησιμοποιείτε στην
βροχή ή σε υγρό περιβάλλον. Ελέγχετε κάθε δύο μήνες ότι όλα τα μπουλόνια είναι ασφαλή.
Βήμα 1
Τοίχος
Βήμα
2
Βήμα
3
I/J/K/L/M/N
F/G/H
C
D
TV
Βήμα
4
Τοίχος
Κυκλικό κουμπί
TV
 Loading...