

Konig SEC-PH380 User Manual
2012-10-09
SEC-PH380
MANUAL (p. 2)
Door Viewer Camera with DVR
ANLEITUNG (S. 11)
Türspion-Kamera mit DVR
MODE D’EMPLOI (p. 20)
Judas de porte à caméra et à enregistreur
vidéo numérique (DVR)
GEBRUIKSAANWIJZING (p. 29)
Deurbel met Camerafunctie
MANUALE (p. 38)
Visore con telecamera da porta con DVR
MANUAL DE USO (p. 47)
Vídeoportero con DVR
HASZNÁLATI ÚTMUTATÓ (o. 56.)
Képfelvevős ajtókamera
KÄYTTÖOHJE (s. 65)
Ovikamera tallennuslaitteella
BRUKSANVISNING (s. 74)
Dörrkamera med DVR
NÁVOD K POUŽITÍ (s. 83)
Kamerové dveřní kukátko s DVR
MANUAL DE UTILIZARE (p. 92)
Cameră - vizor de uşă cu DVR
ΕΓΧΕΙΡΙ∆ΙΟ XPHΣHΣ (σελ. 101)
Θυροτηλεόραση με DVR
BRUGERVEJLEDNING (s. 110)
Dørkamera med DVR
VEILEDNING (s. 119)
Kamera-dørovervåker med DVR
ИНСТРУКЦИЯ (стр. 128)
Дверная камера/глазок с цифровой
записью
2
ENGLISH
Door Viewer Camera with DVR
Table of contents:
• Introduction (p. 2)
• Product parts (p. 2)
• Technical specifications (p. 3)
• Installation instructions (p. 3)
• Product description (p. 9)
• User instructions (p. 9)
• Maintenance (p. 10)
• Warranty (p. 19)
• Disclaimer (p. 19)
• Disposal (p. 19)
Introduction:
With this wireless door viewer camera you can make sure you will not get caught by surprise when
someone is at the door. Thanks to the electronic video system you will feel more secure before
opening the door. The built-in 128 MB microSD card can store up to 1,000 pictures of people who have
rung your doorbell. The door viewer camera is easy to install and has a 2.4" LCD colour monitor for a
clear view of the visitor.
• We recommend that you read this manual before installing/using the security camera system.
• Keep this manual in a safe place for future reference.
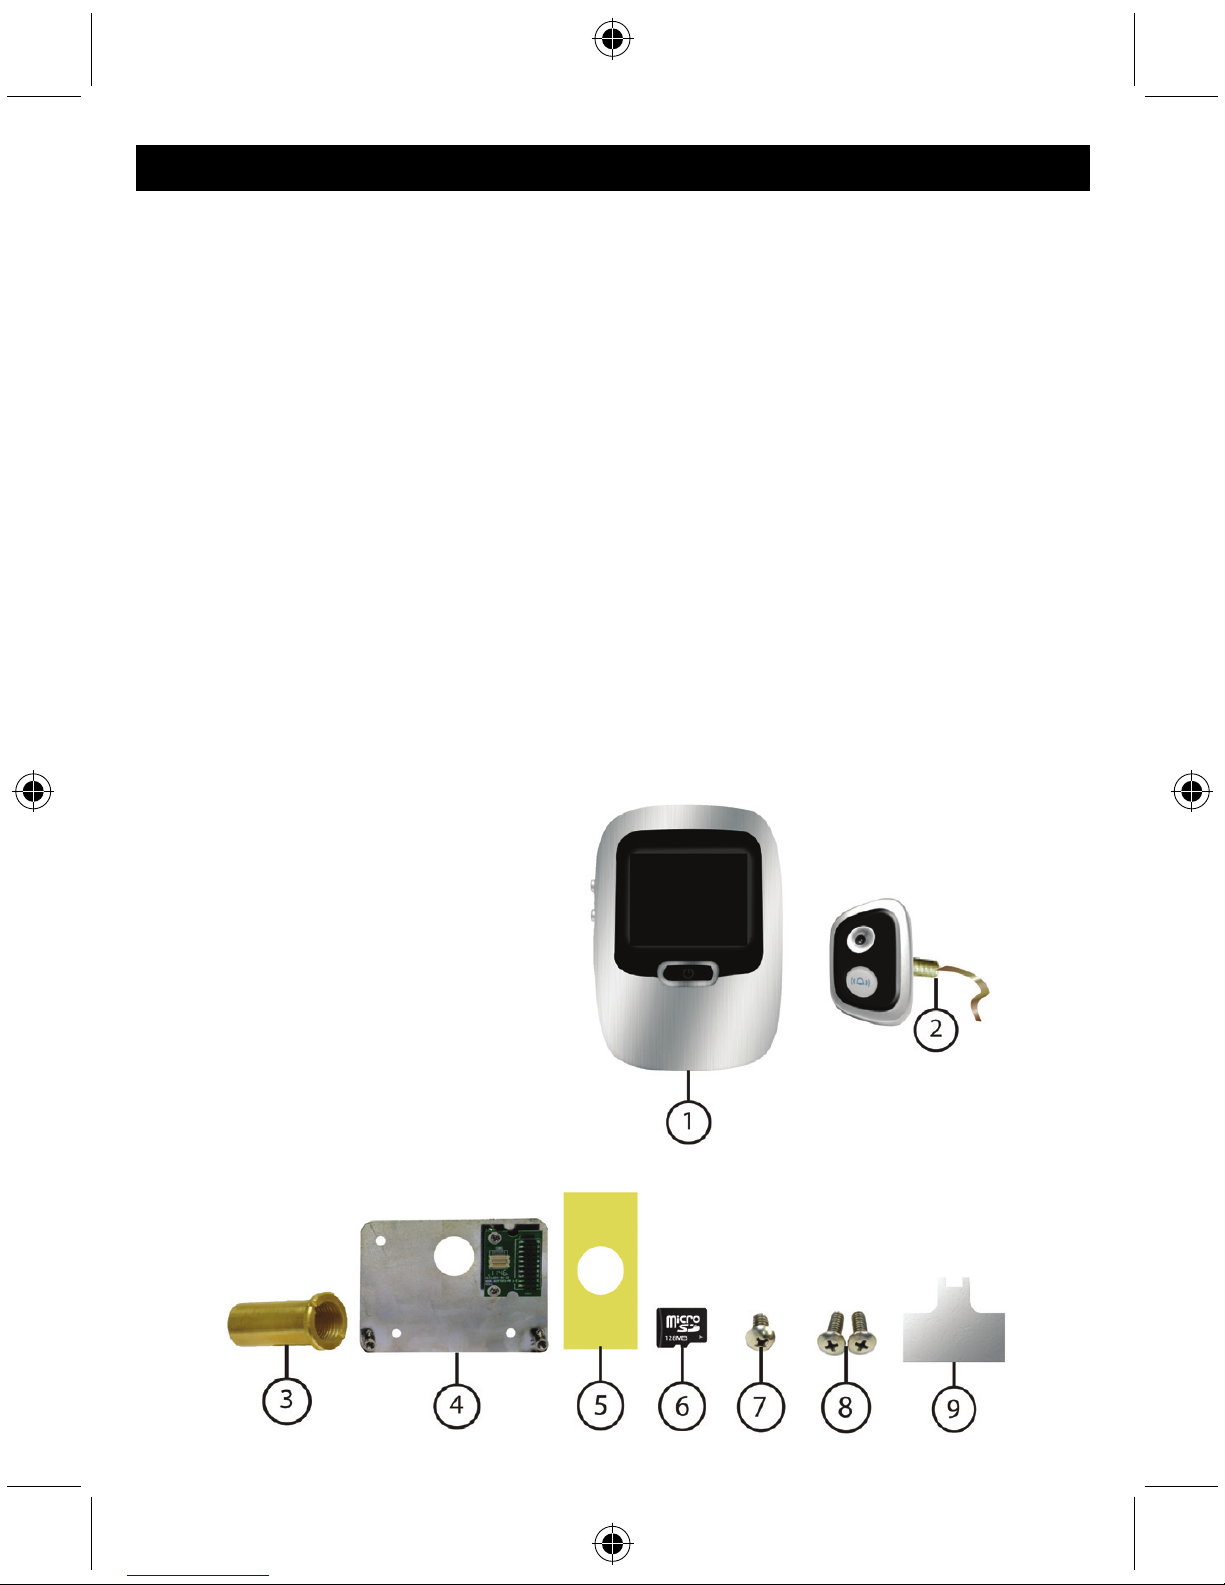
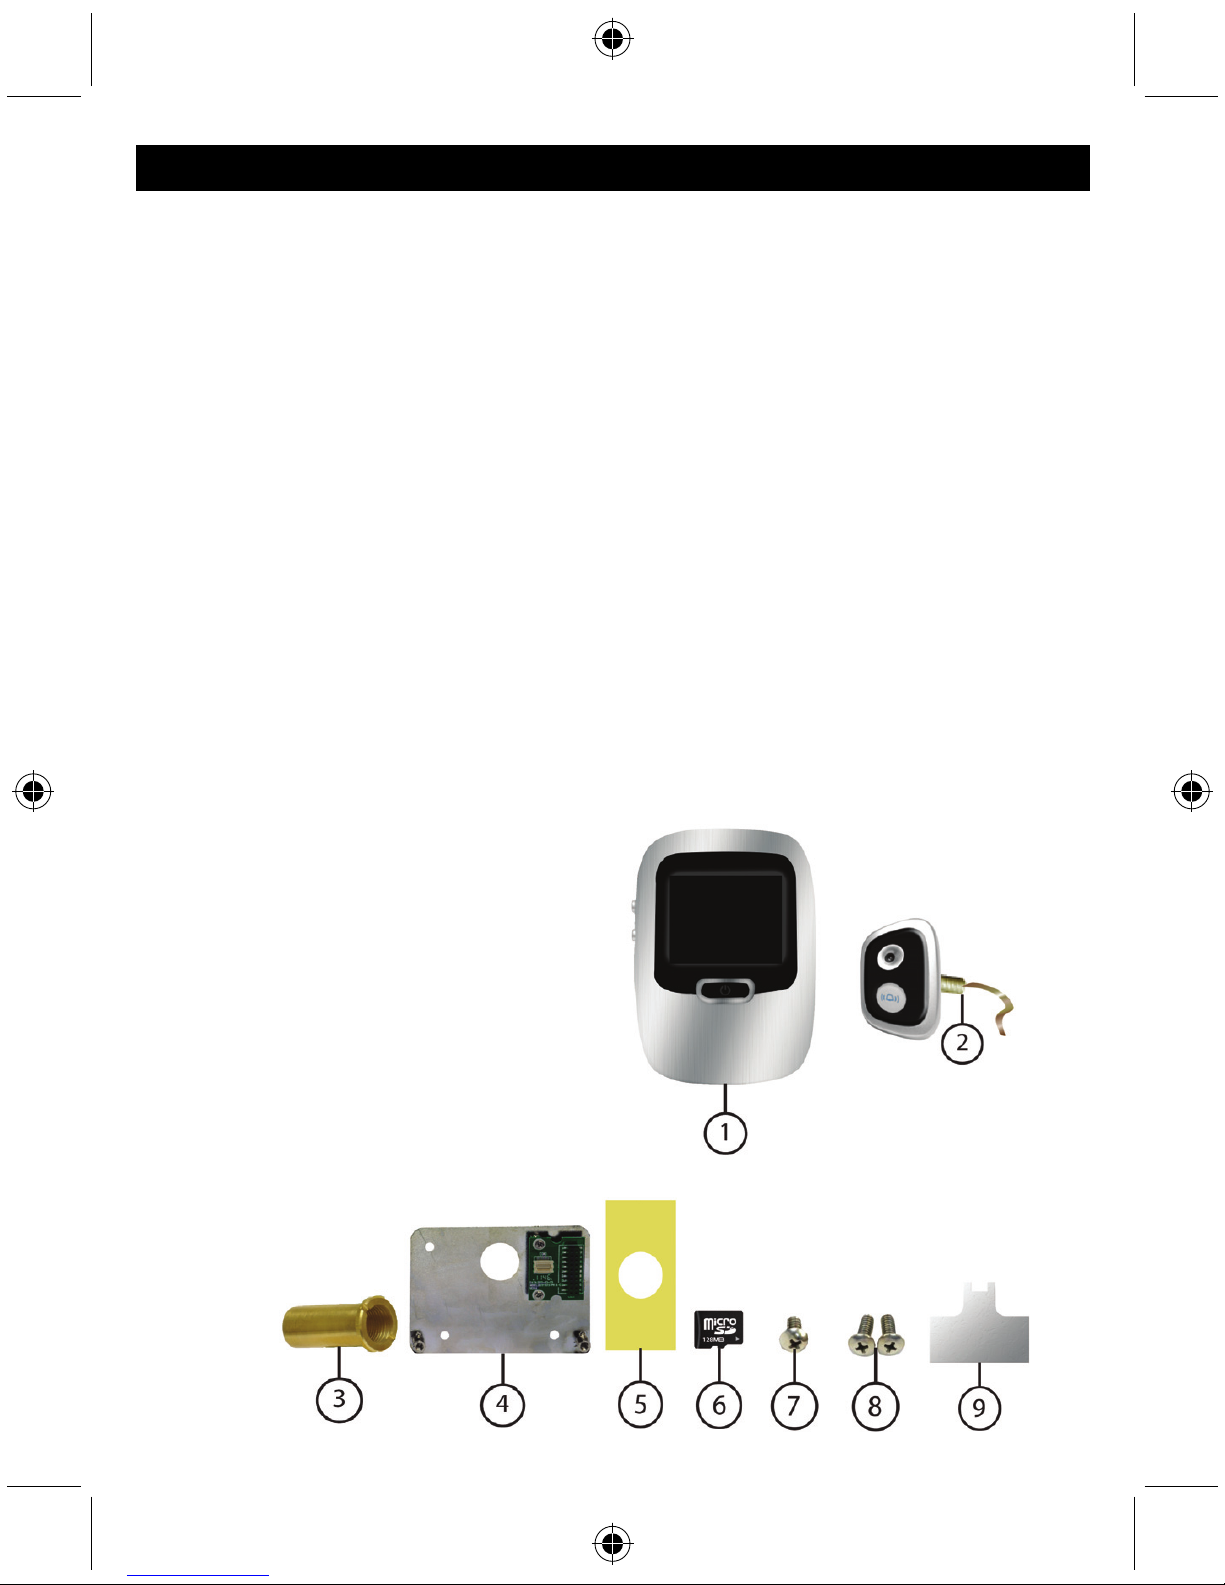
Product parts:
1. Monitor
2. Doorbell/camera
3. Metal tube
4. Back plate
5. Adhesive sticker for doorbell/camera
6. 128 MB microSD card (built-in)
7. Faceplate screw
8. Cabinet screws
9. Metal tool

3
Technical specifications:
• Monitor: 2.4" colour LCD
• Resolution: 300 K pixels
• Viewing angle: 60°
• Internal memory: 128 MB, up to 1,000 pictures
• Integrated doorbell: Yes
• Intercom: No
• Protection: IP40 (do not expose the doorbell/camera to rain/water)
• Door thickness: 40 - 70 mm
• Operating temperature: –20°C ~ 60°C
• Working humidity: 10% - 95%
• Battery: 2x AA, 1.5 V (not incl.)
• Battery life: 5 months (5 x 30 sec. /day)
• Monitor dimensions: 119 x 83 x 25 mm
• Doorbell/camera dimensions: 59 x 40 x 14 mm
Installation instructions:
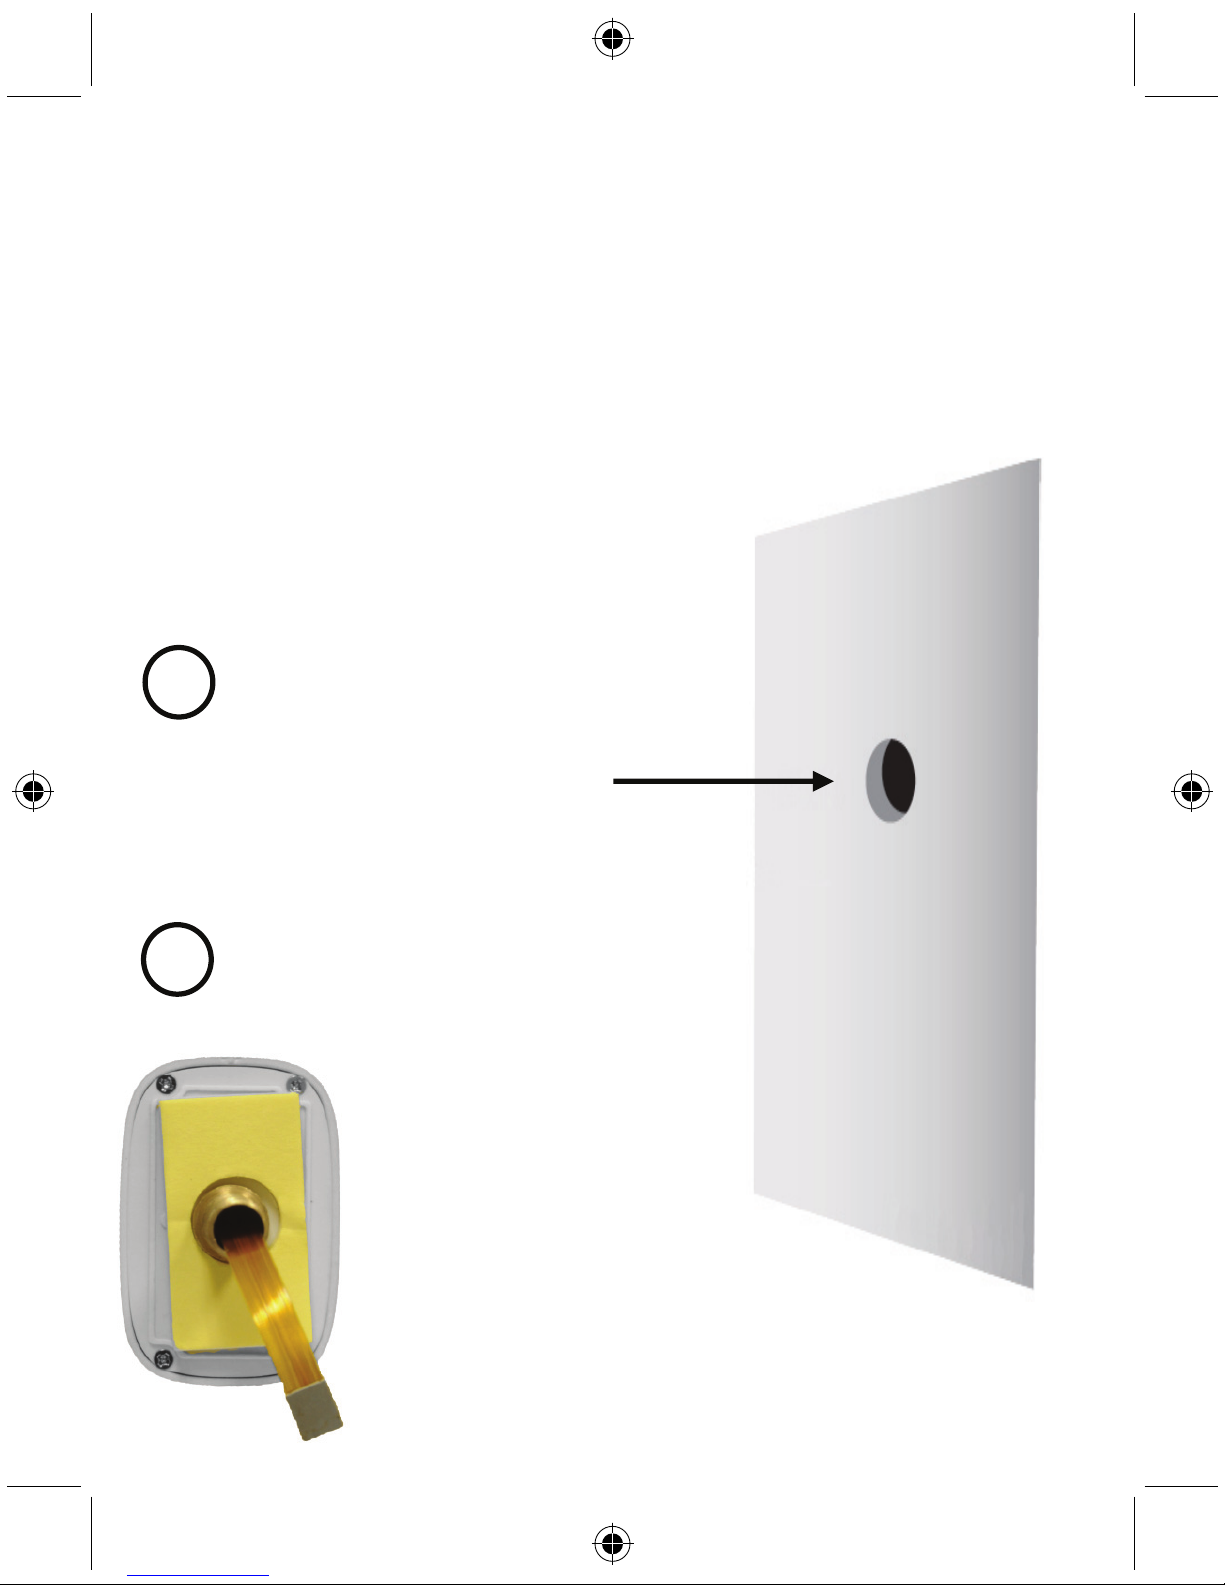
Drill a hole in the door of Ø1.50 cm.
The door viewer camera is suitable for doors with a thickness
between 4 and 7 cm.
The recommended height is between 1.60 and 1.75 m.
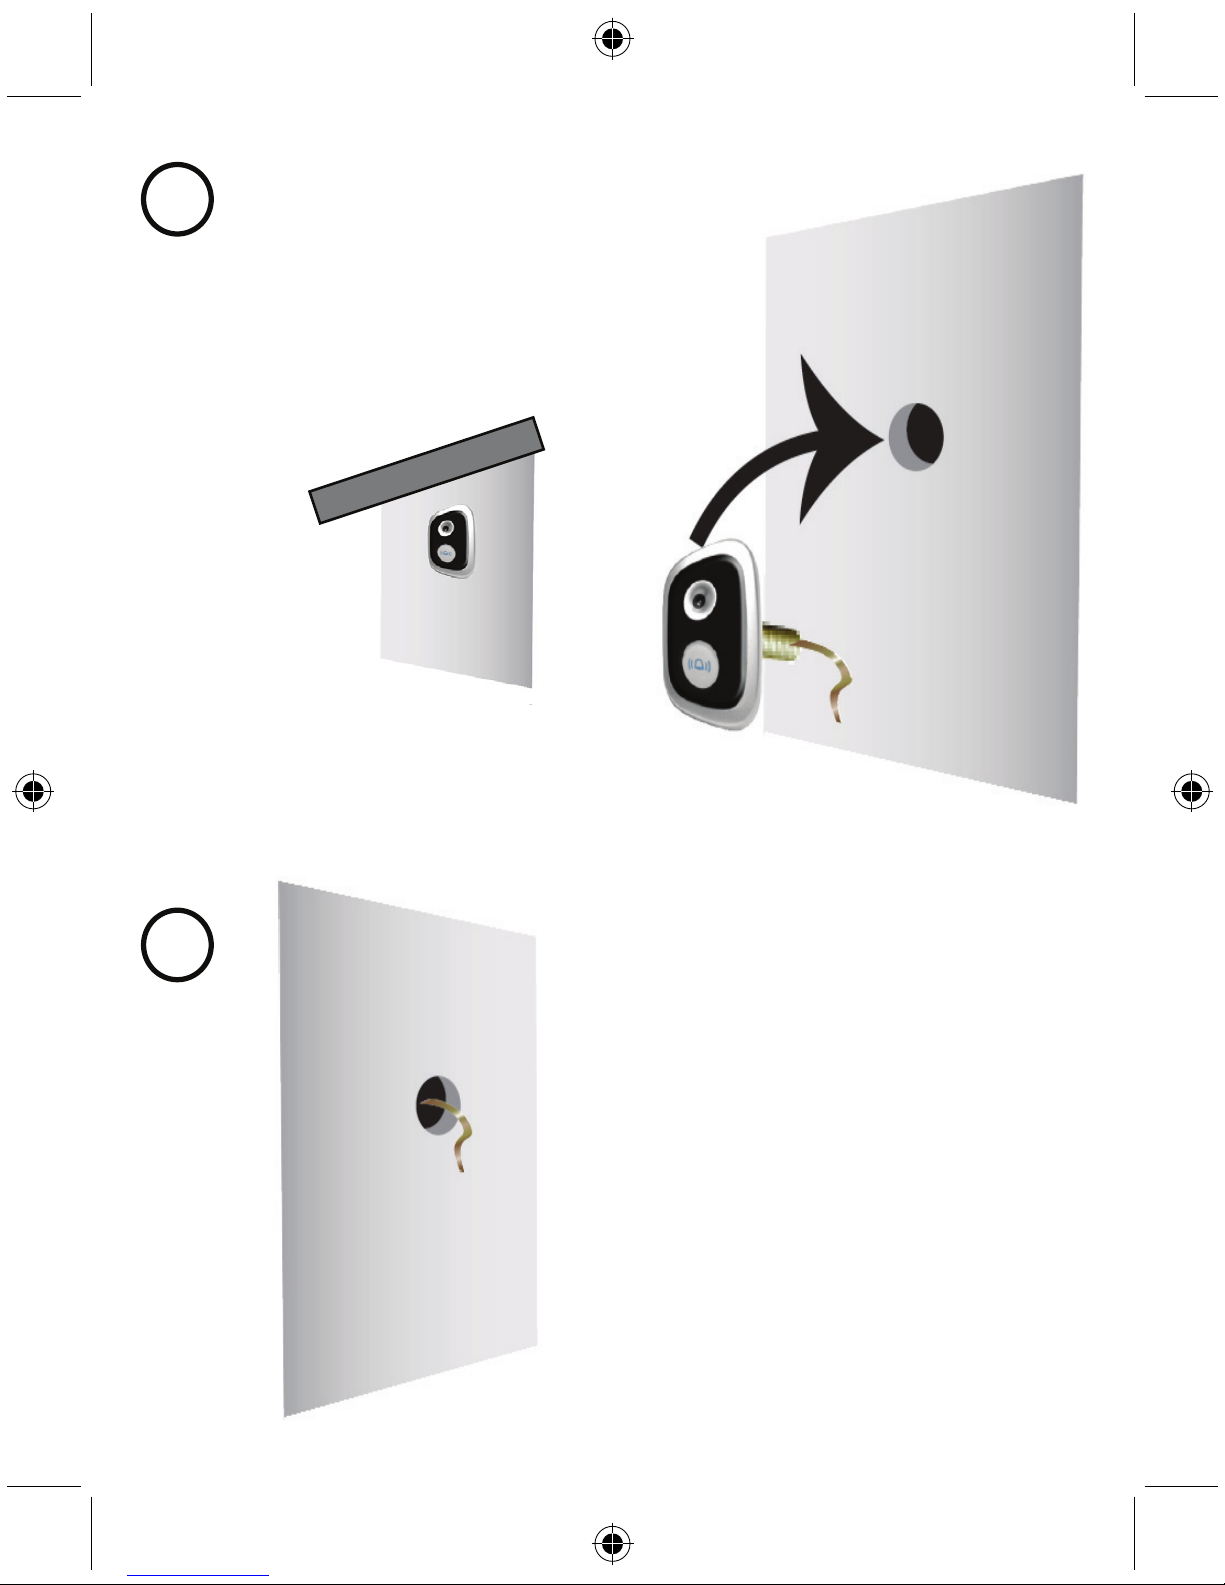
Peel off the cover of the adhesive
sticker and attach it to the backside
of the doorbell/camera.
1
2
4
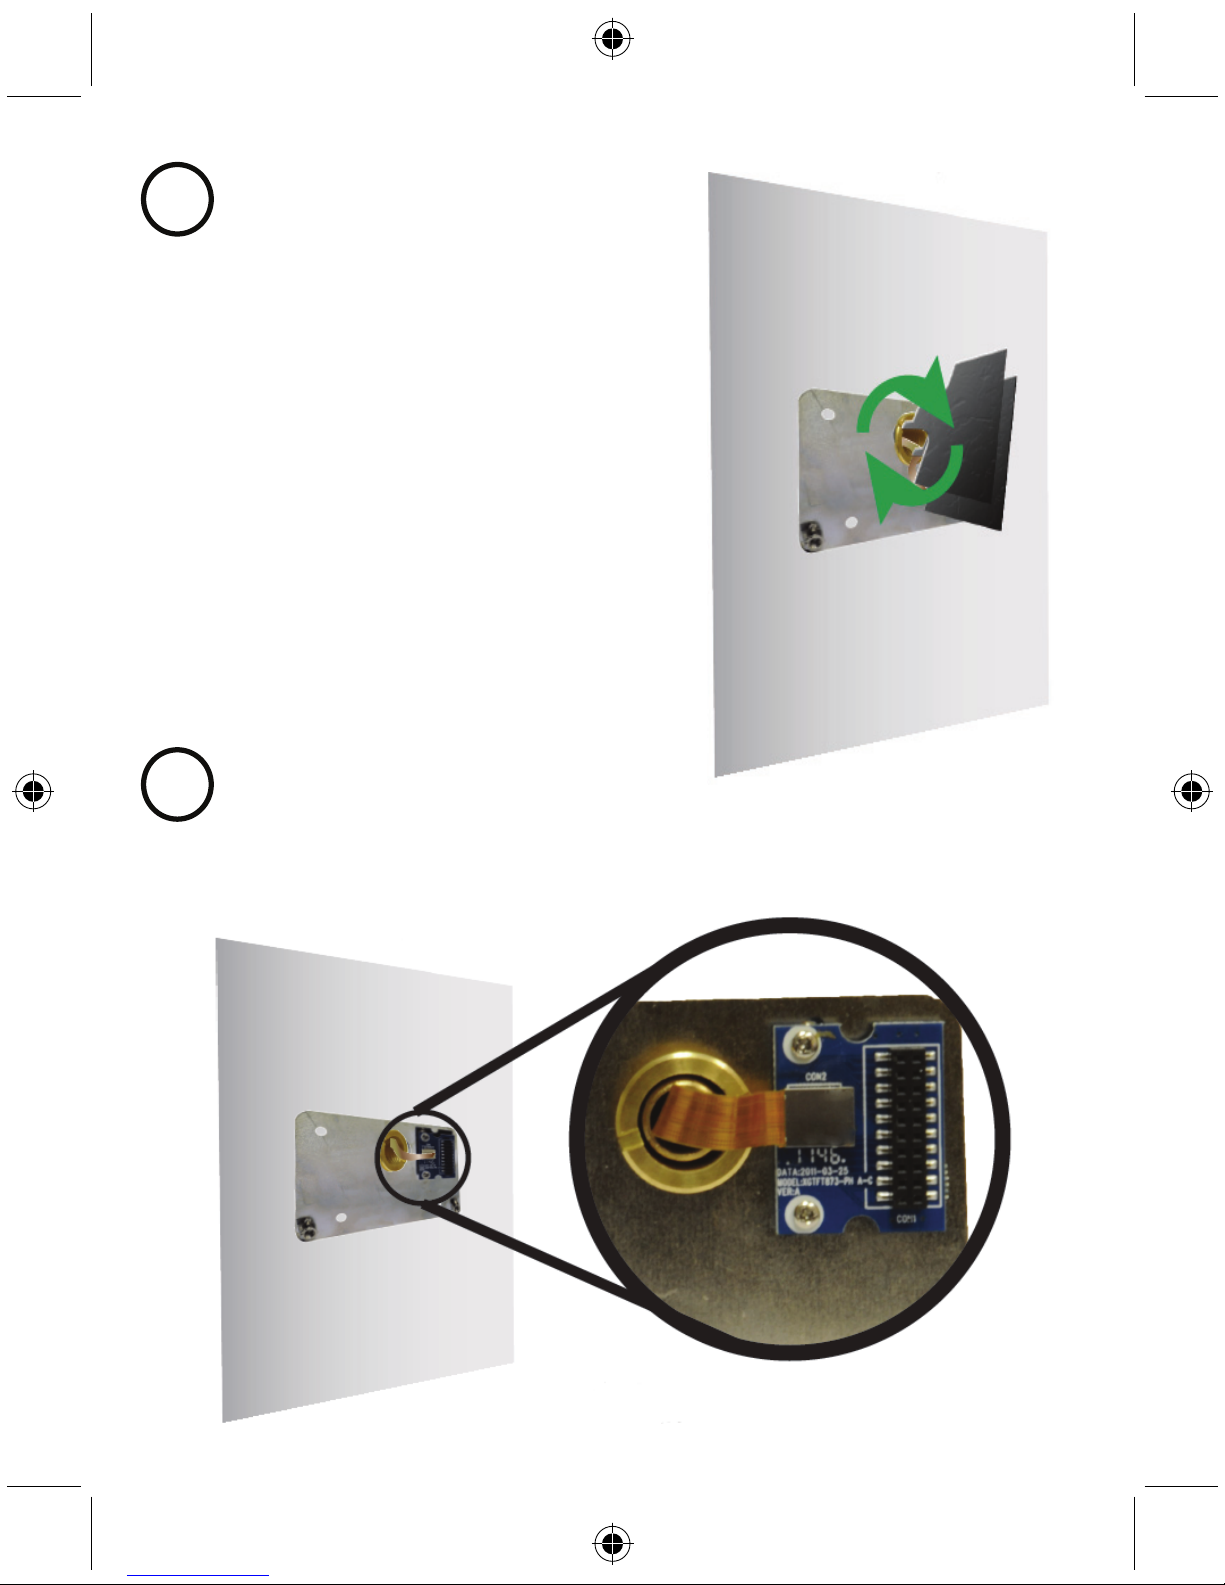
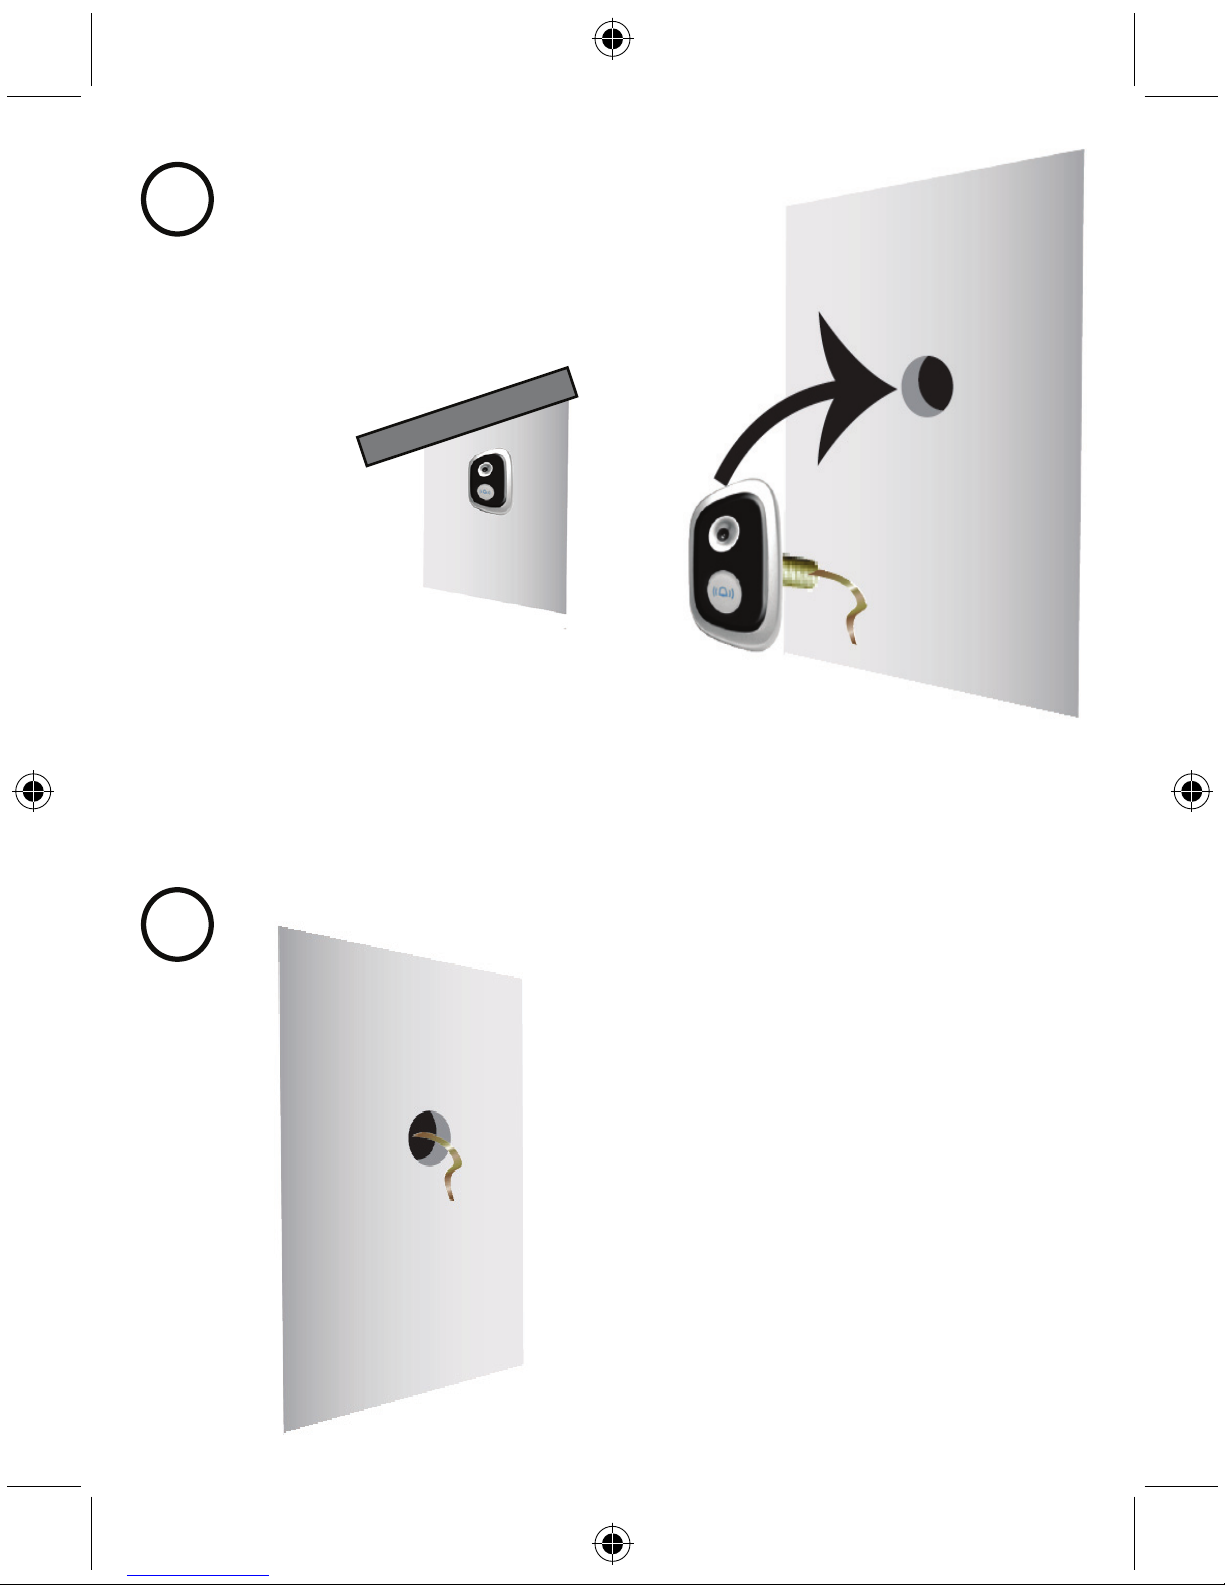
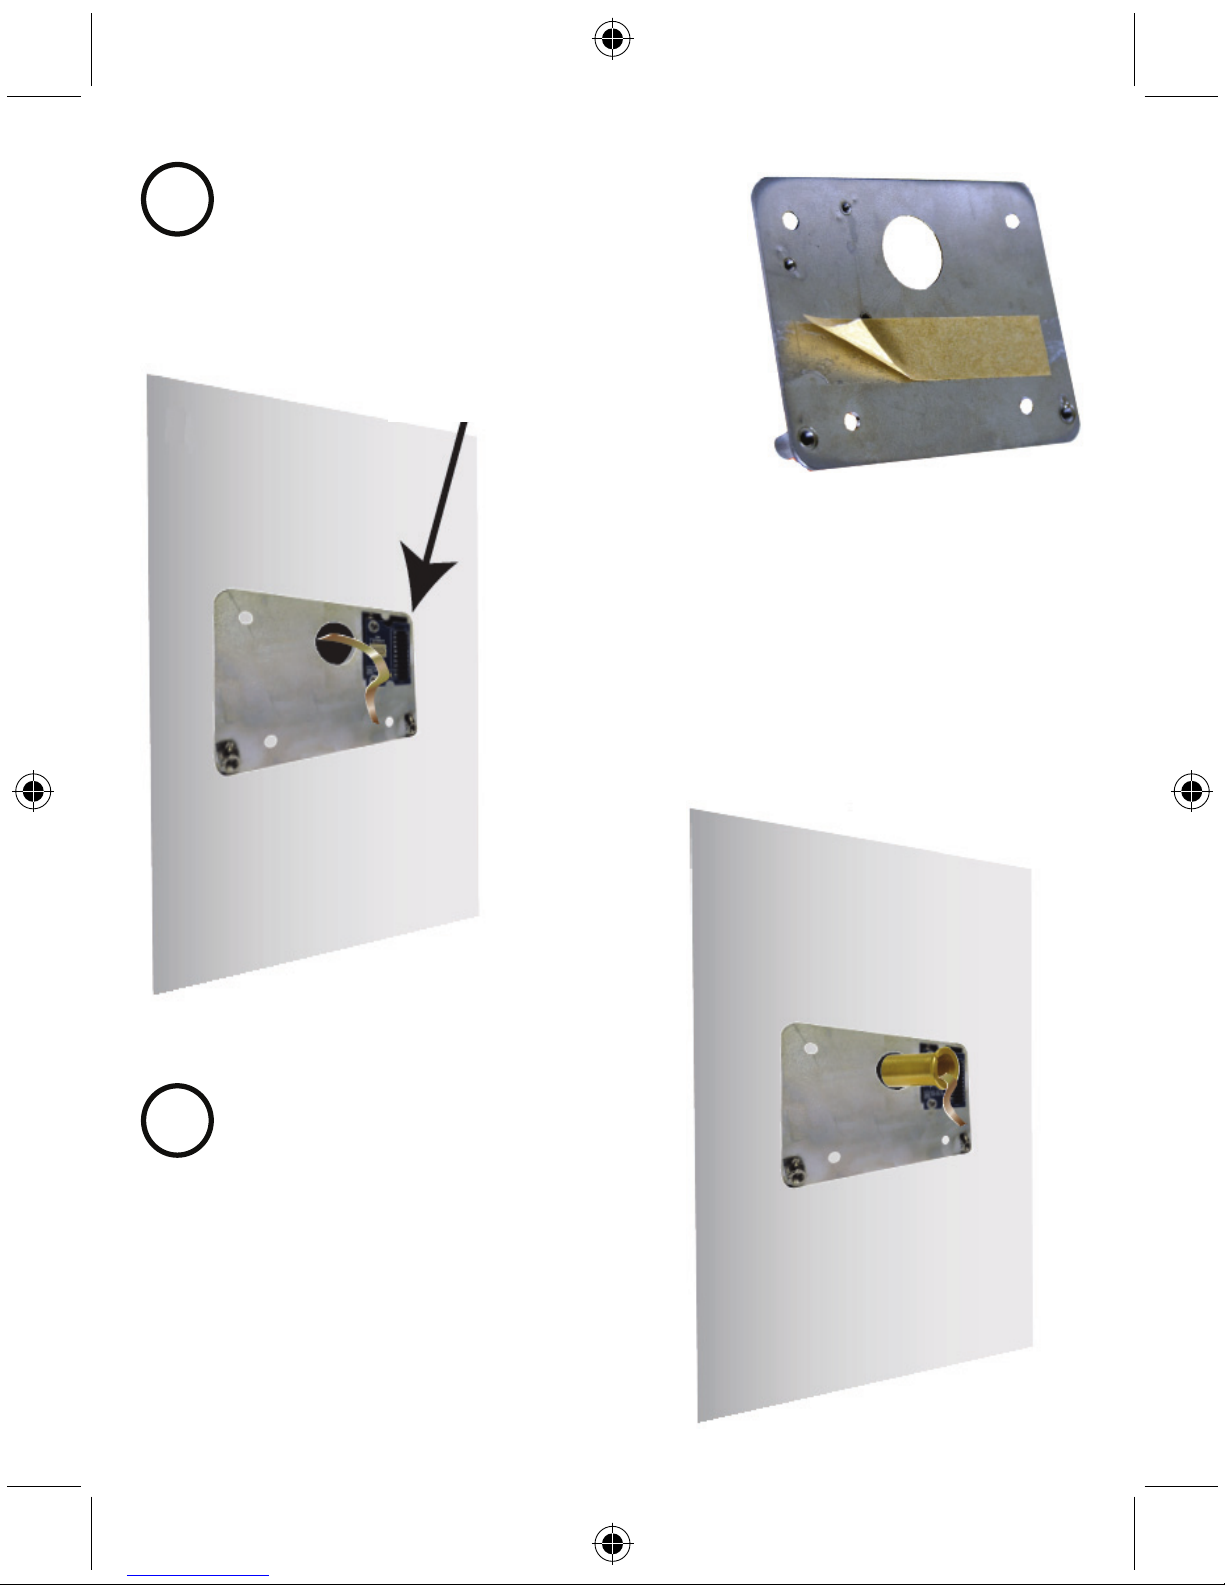
Slide the metal pipe through the hole in the door.
Peel off the other cover of the adhesive sticker and
attach the doorbell/camera to the outside of the
door with the adhesive sticker.
Note: place the doorbell/camera only on doors
with a cover. Do not expose the
doorbell/camera to rain or water
Make sure that the flat connection cable comes all the
way through the hole at the other end of the door.
4
3
5
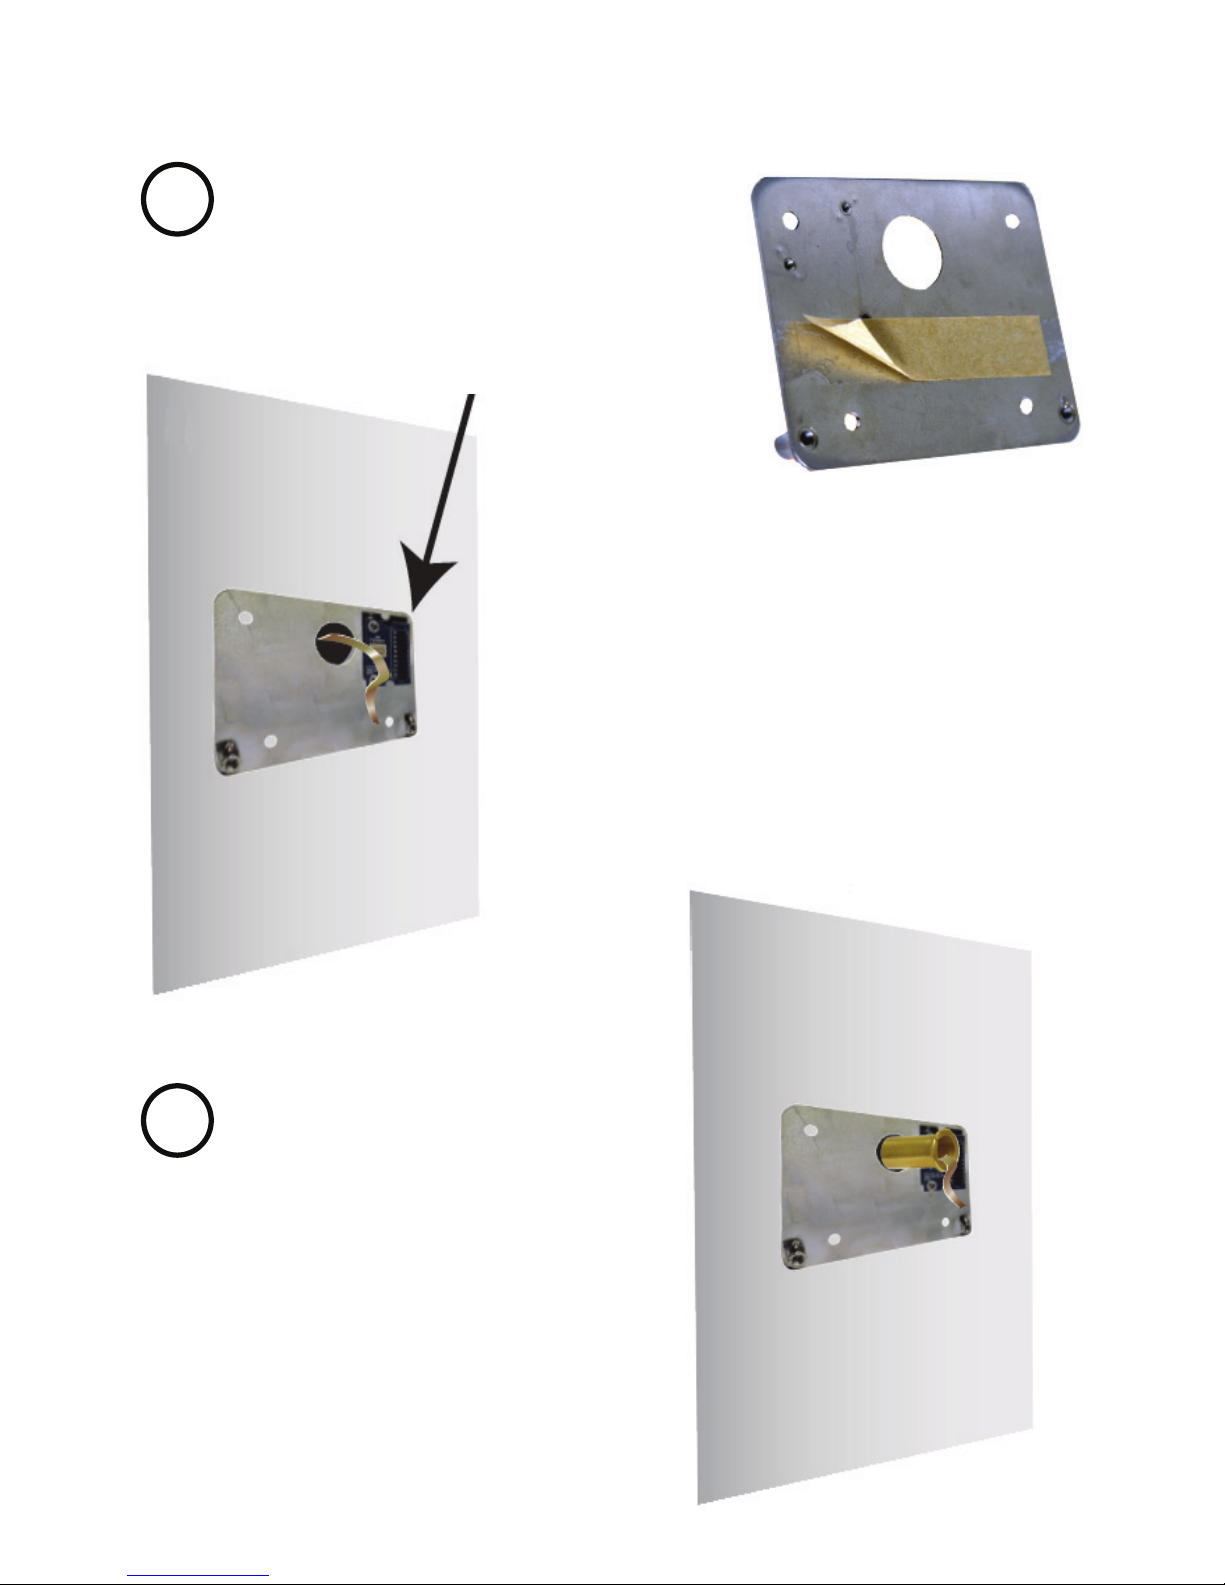
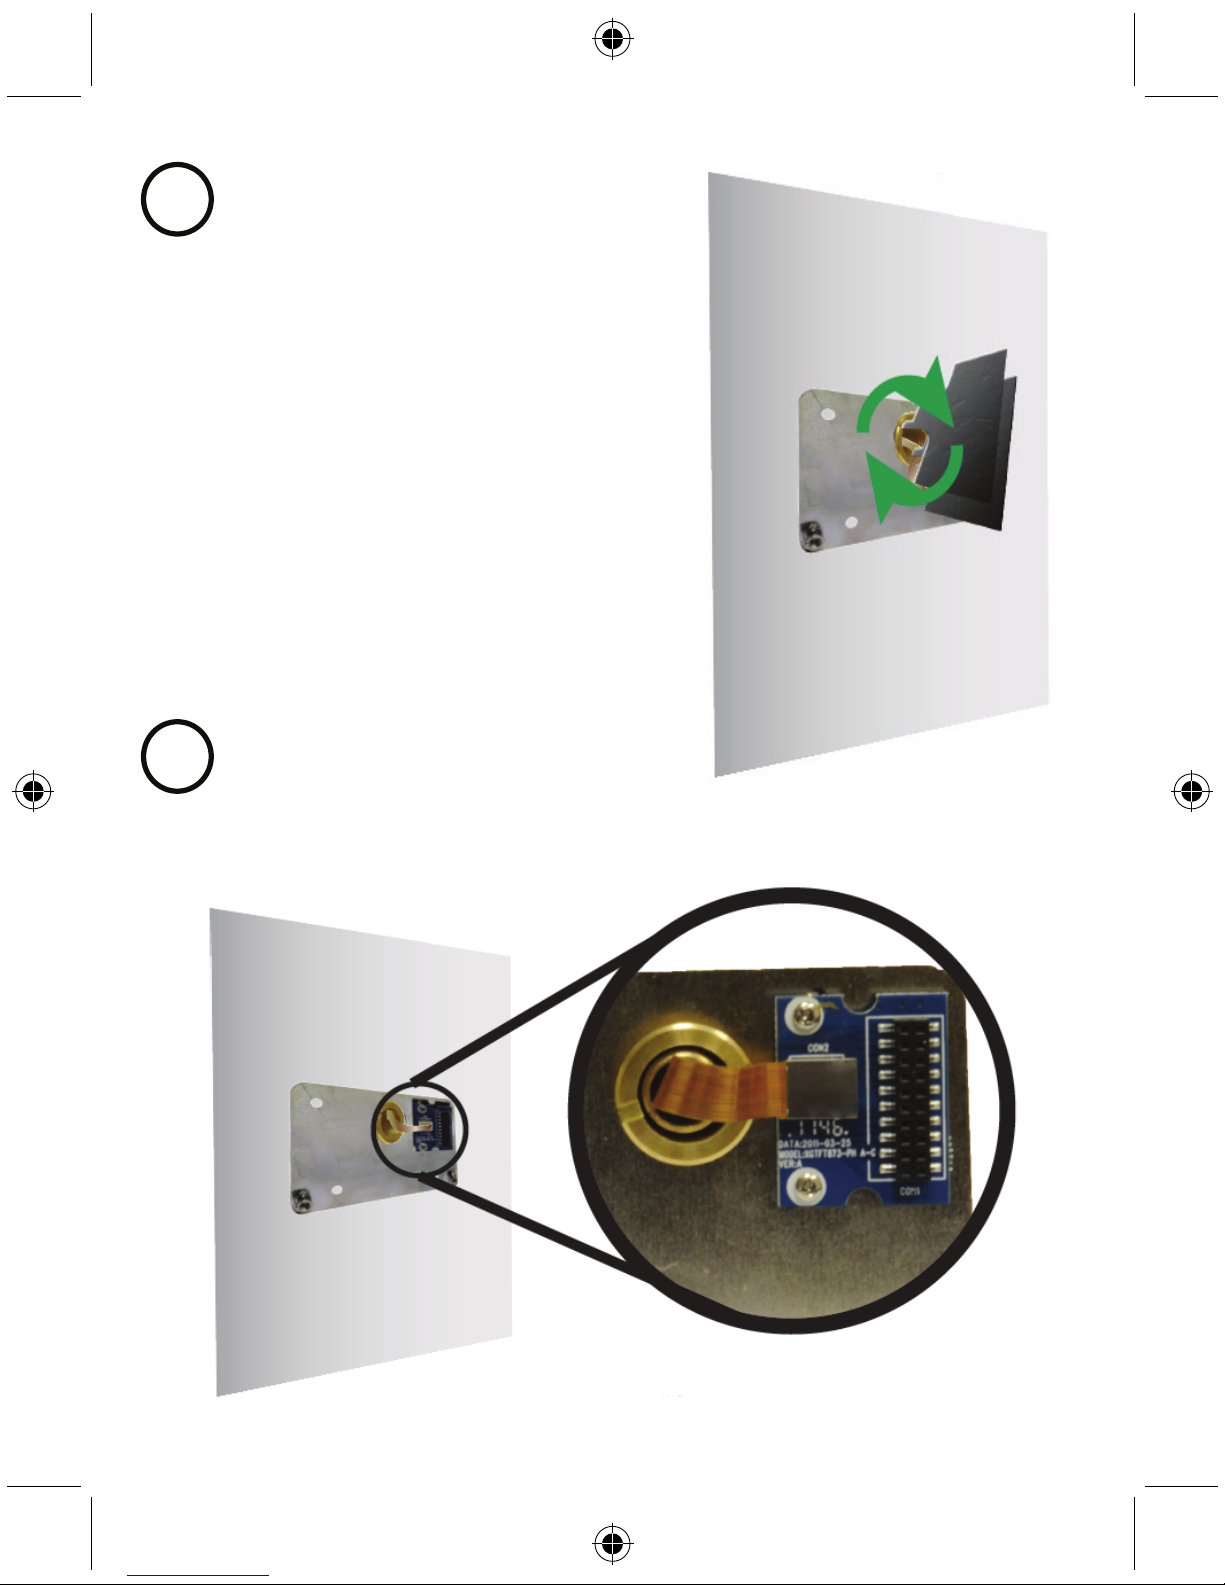
A. Peel off the tape on the backside of the metal plate. This
will help to prevent scratching the door while mounting the
metal plate and the monitor.
B. Align the hole of the metal plate over the hole in the door
and place the metal plate on the door. Make sure that the flat
connection cable is coming through the hole of the metal
plate.
Note: Make sure that the circuit board is placed in the right
top corner.
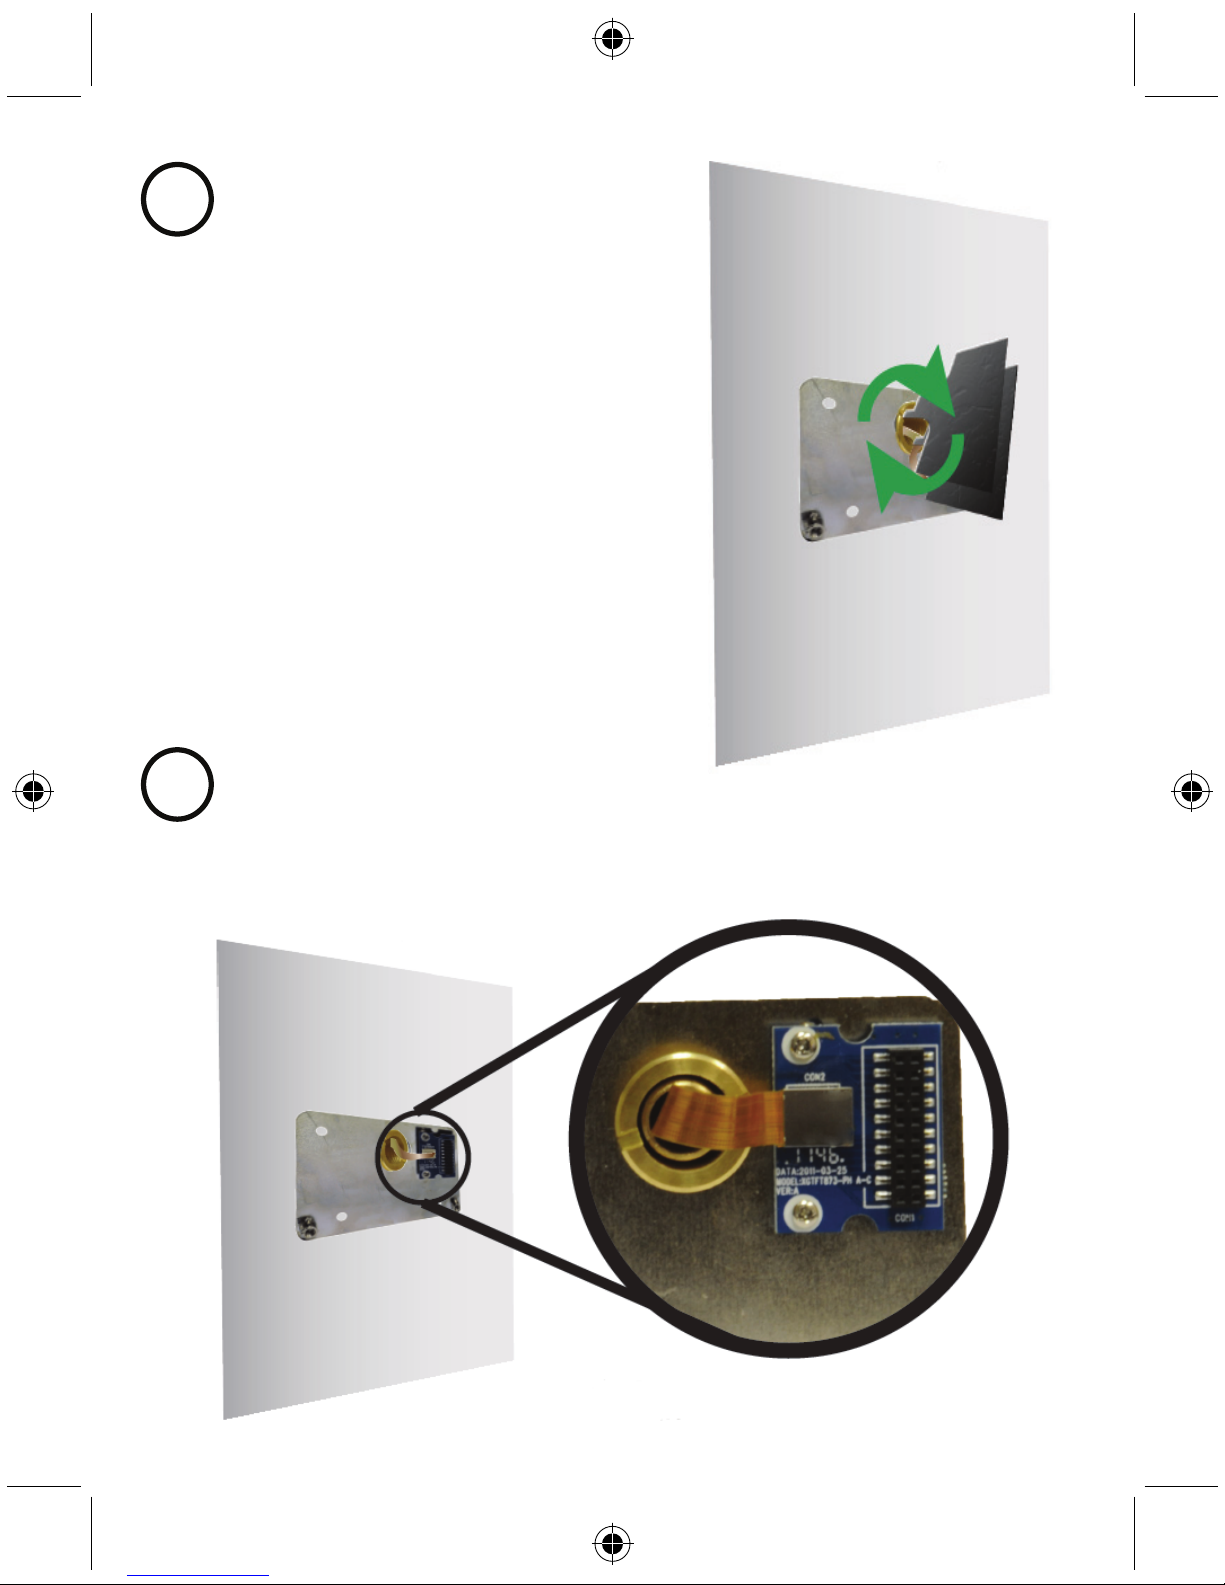
Insert the metal tube into the hole and make sure that
the flat connection cable is coming through the opening
of the metal tube.
6
5
Circuit board
6
Use the metal tool to fasten the metal tube.
Note: Be careful not to damage the flat connection cable
during this process.
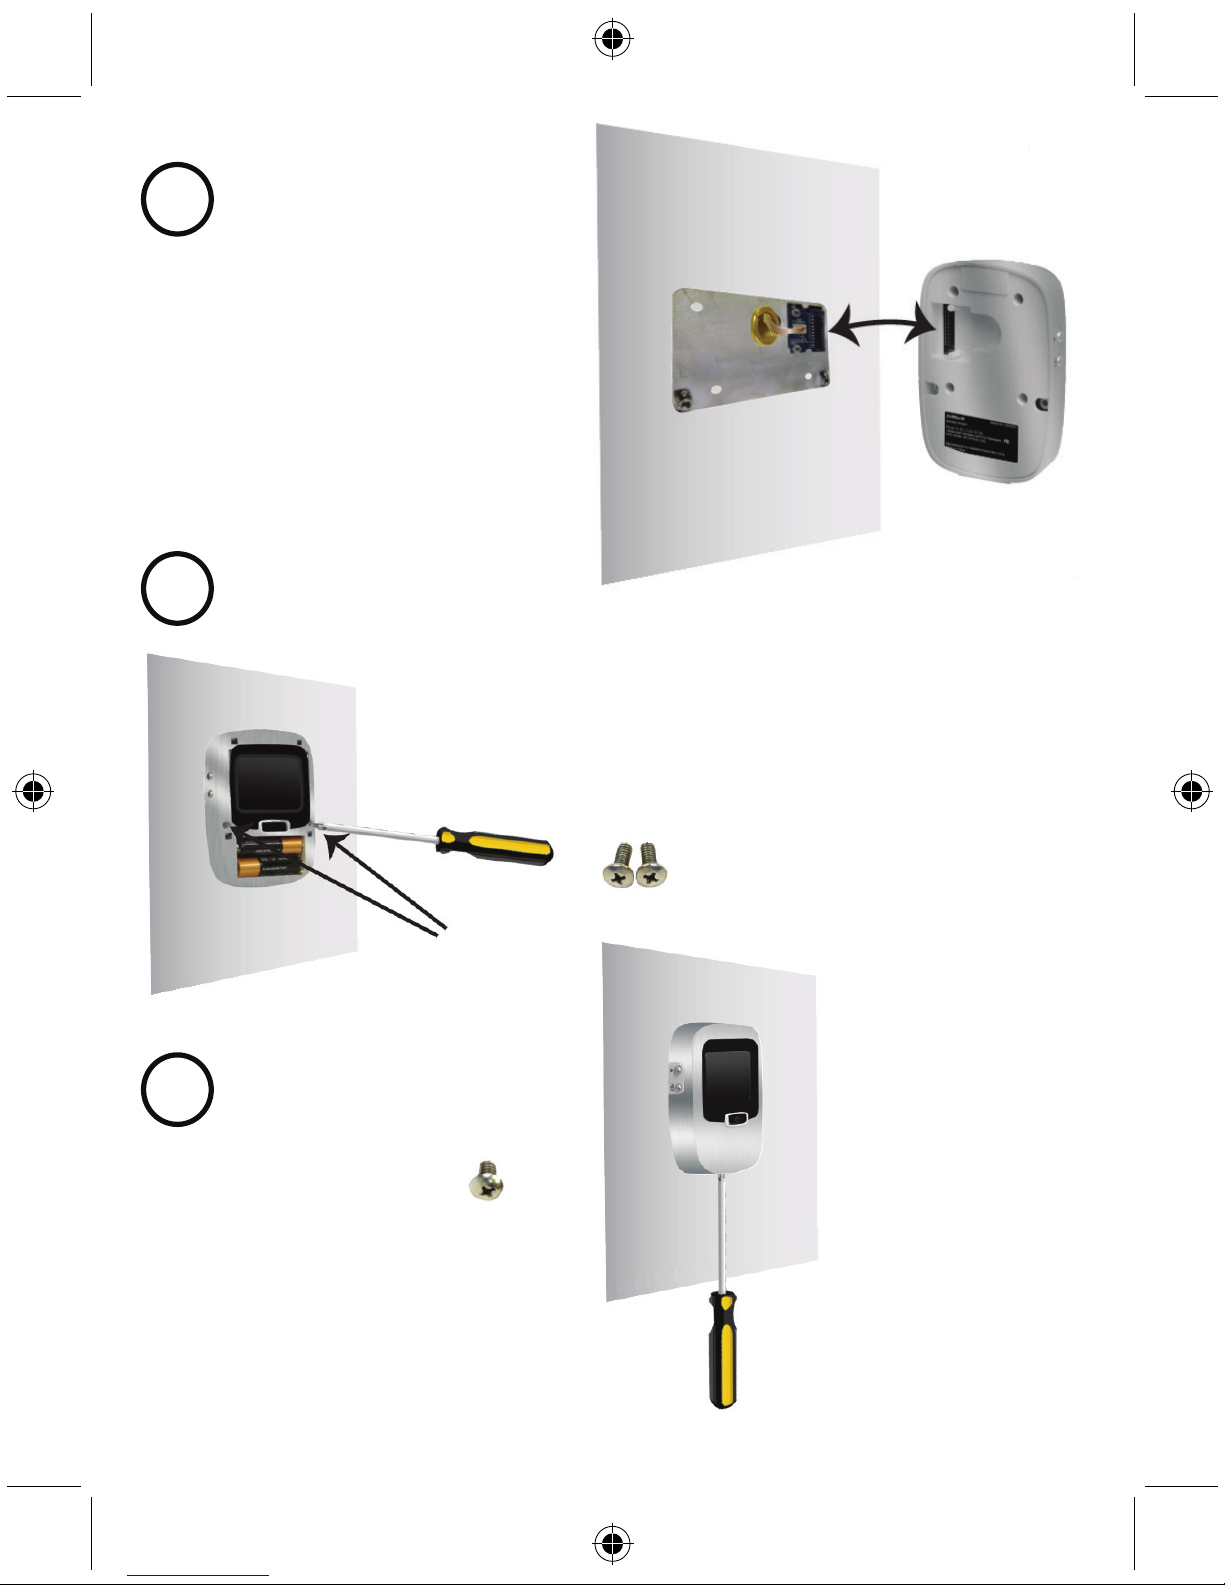
Bend (do not fold) the flat connection cable carefully. Push the connector at the end of the flat
connection cable into the connector of the circuit board.
8
7

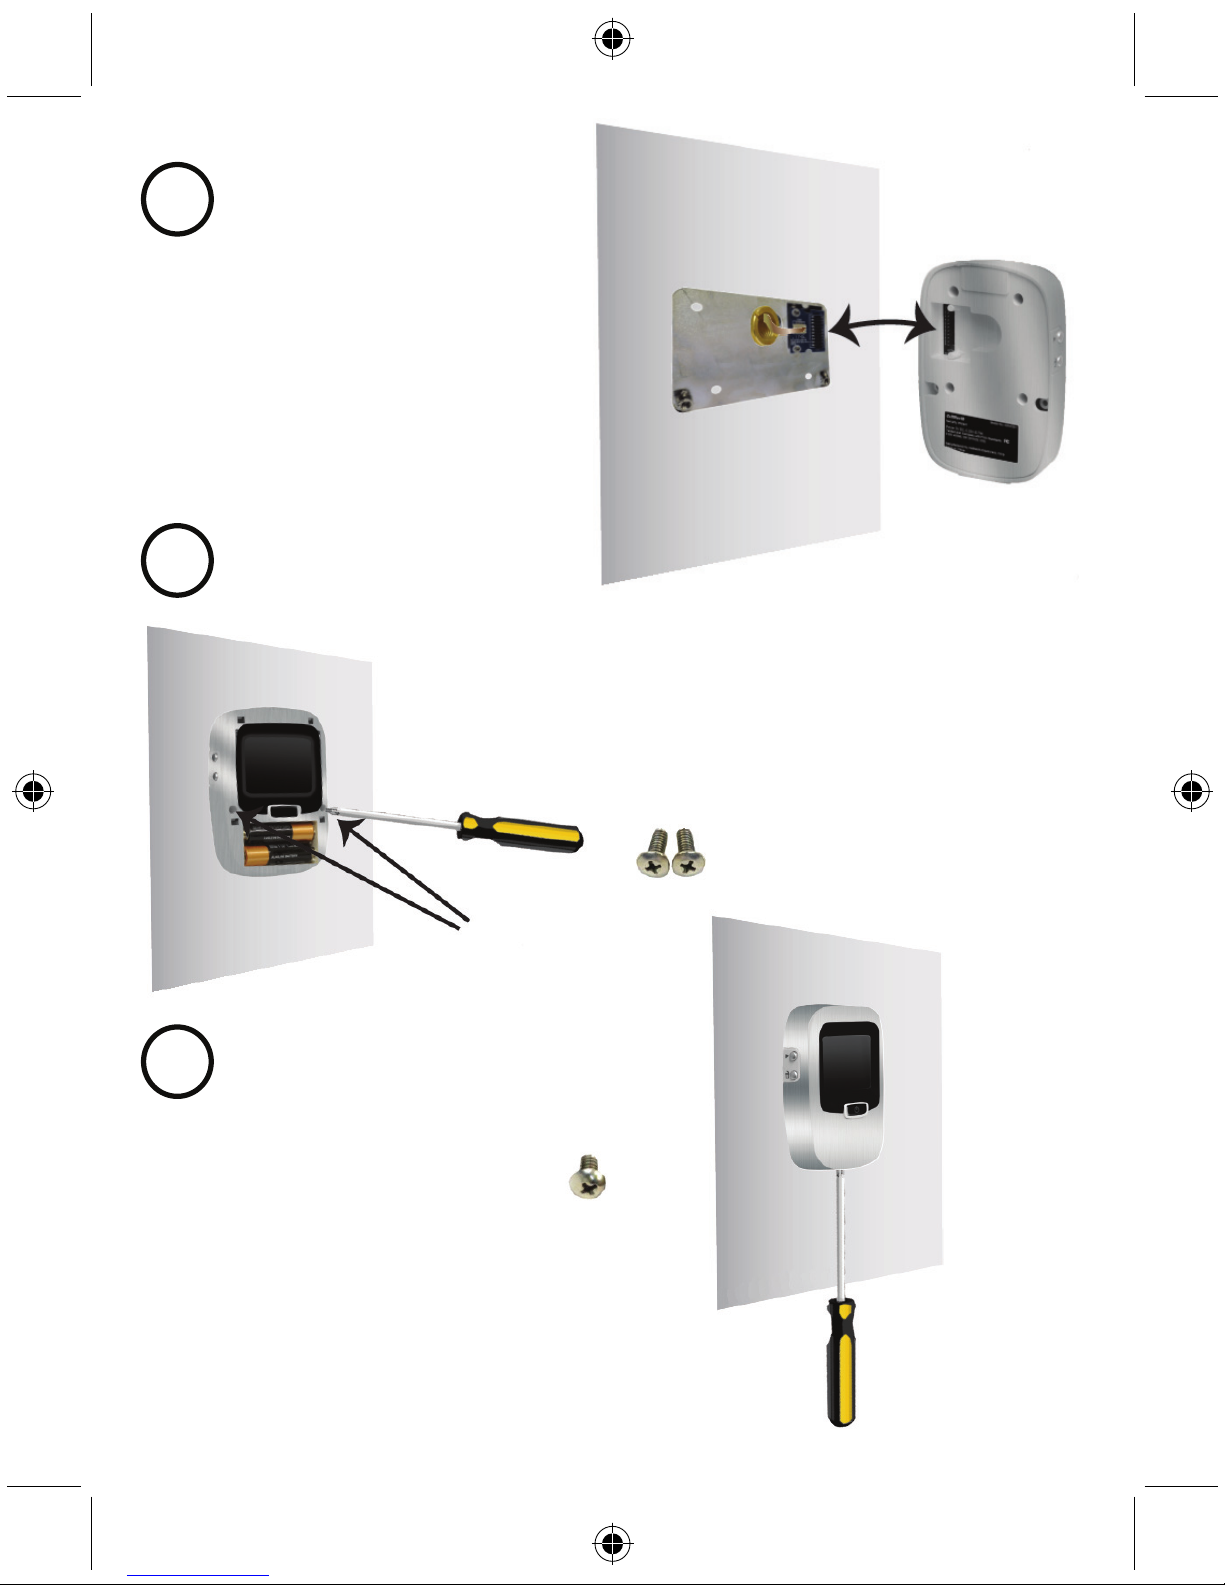
7
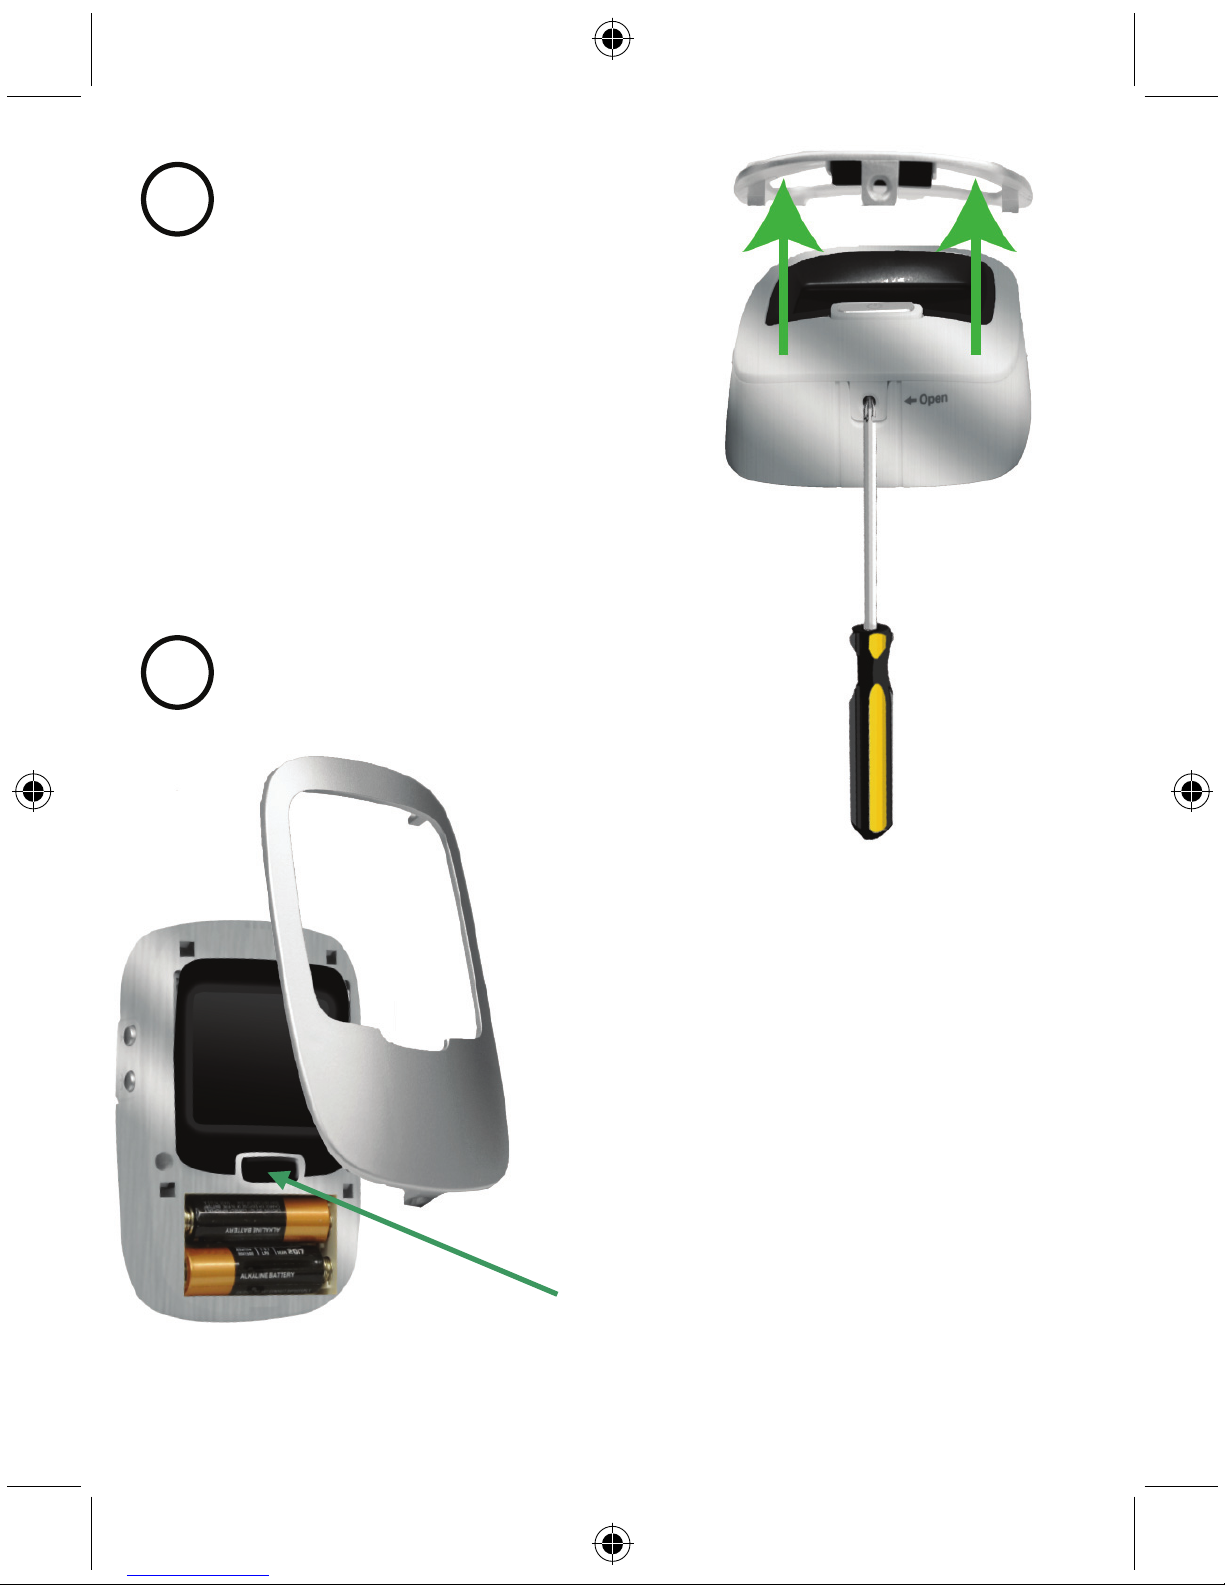
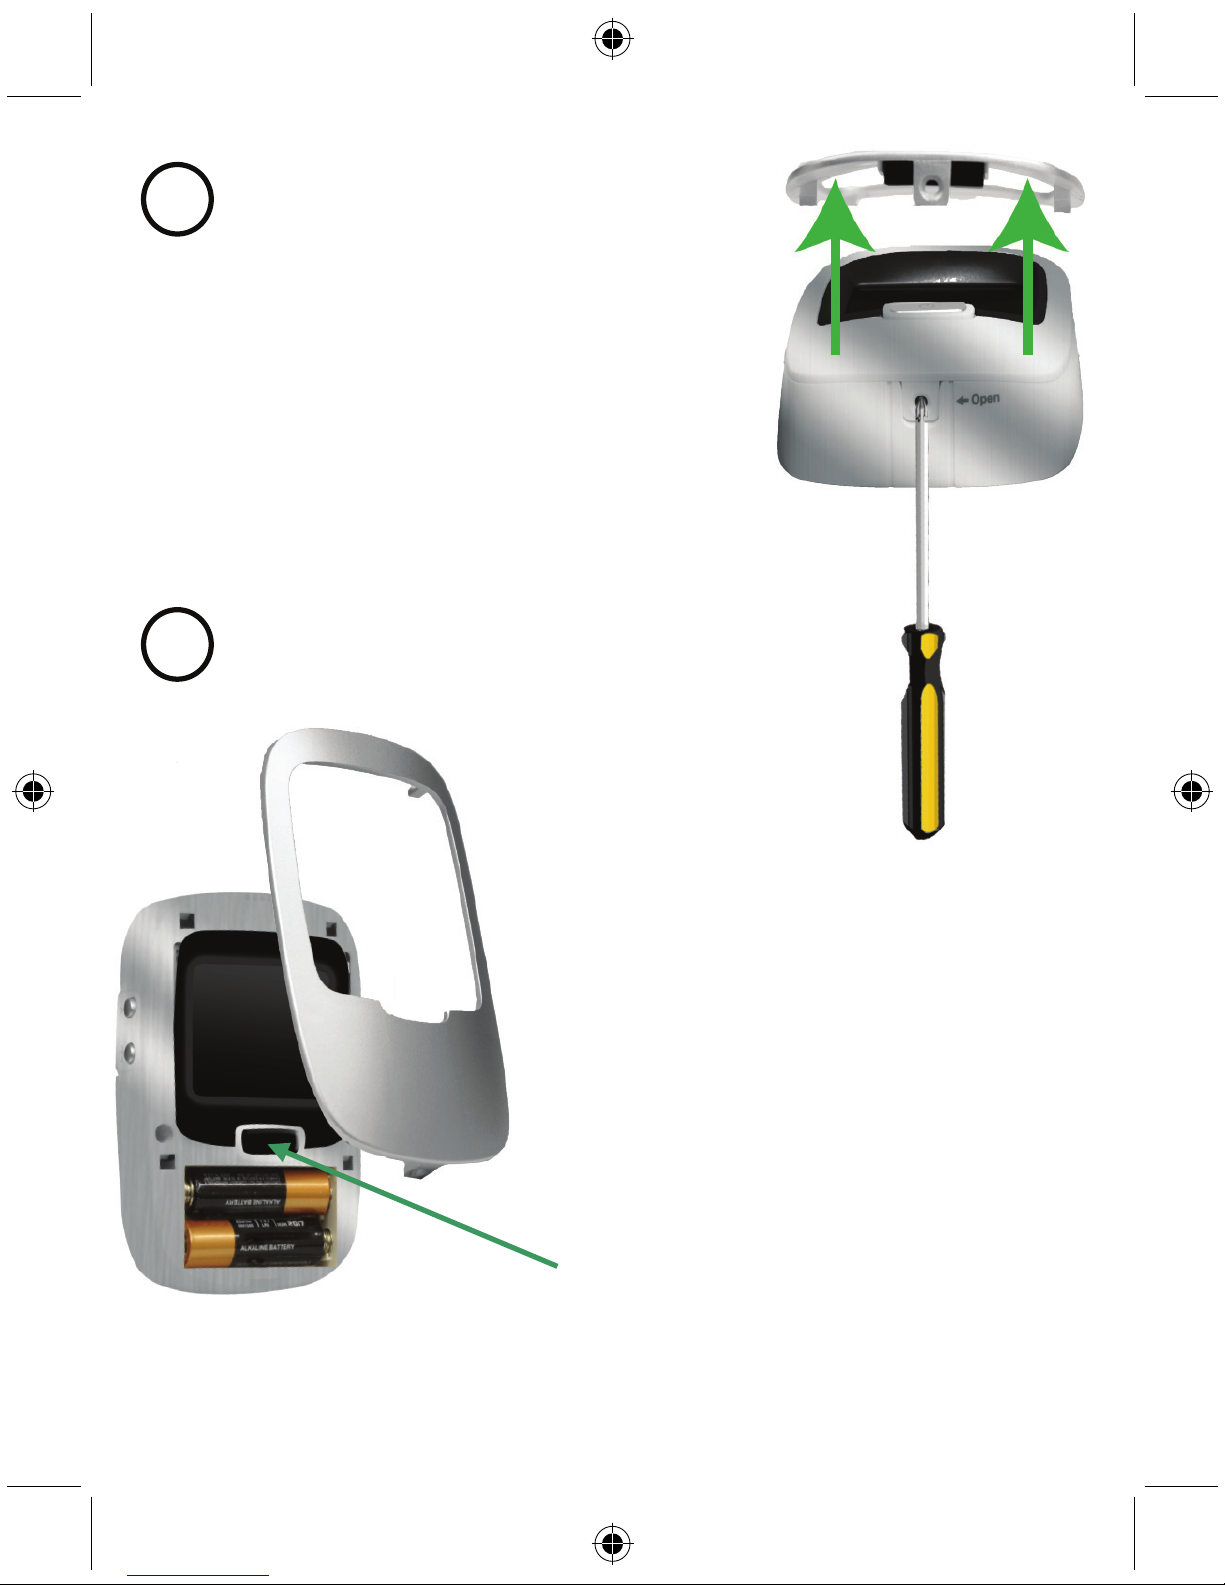
Use a screwdriver to open the housing to access the
battery compartment. You will have to unscrew the screw
on the front (displayed on the right) and the 4 other screws
on the back of the device.
Note: The microSD card slot is also placed in the battery
compartment.
Insert 2x AA 1.5 V batteries inside the battery
compartment according to the polarity markings.
Note: Do not close the housing until step 13.
Location of the microSD card slot
9
10
8
Place the monitor on the metal plate and
make sure that the connectors are properly
connected.
Use a screwdriver and the supplied
cabinet screws to mount the monitor on
the metal back plate.
Replace the cover.
13
12
11
9
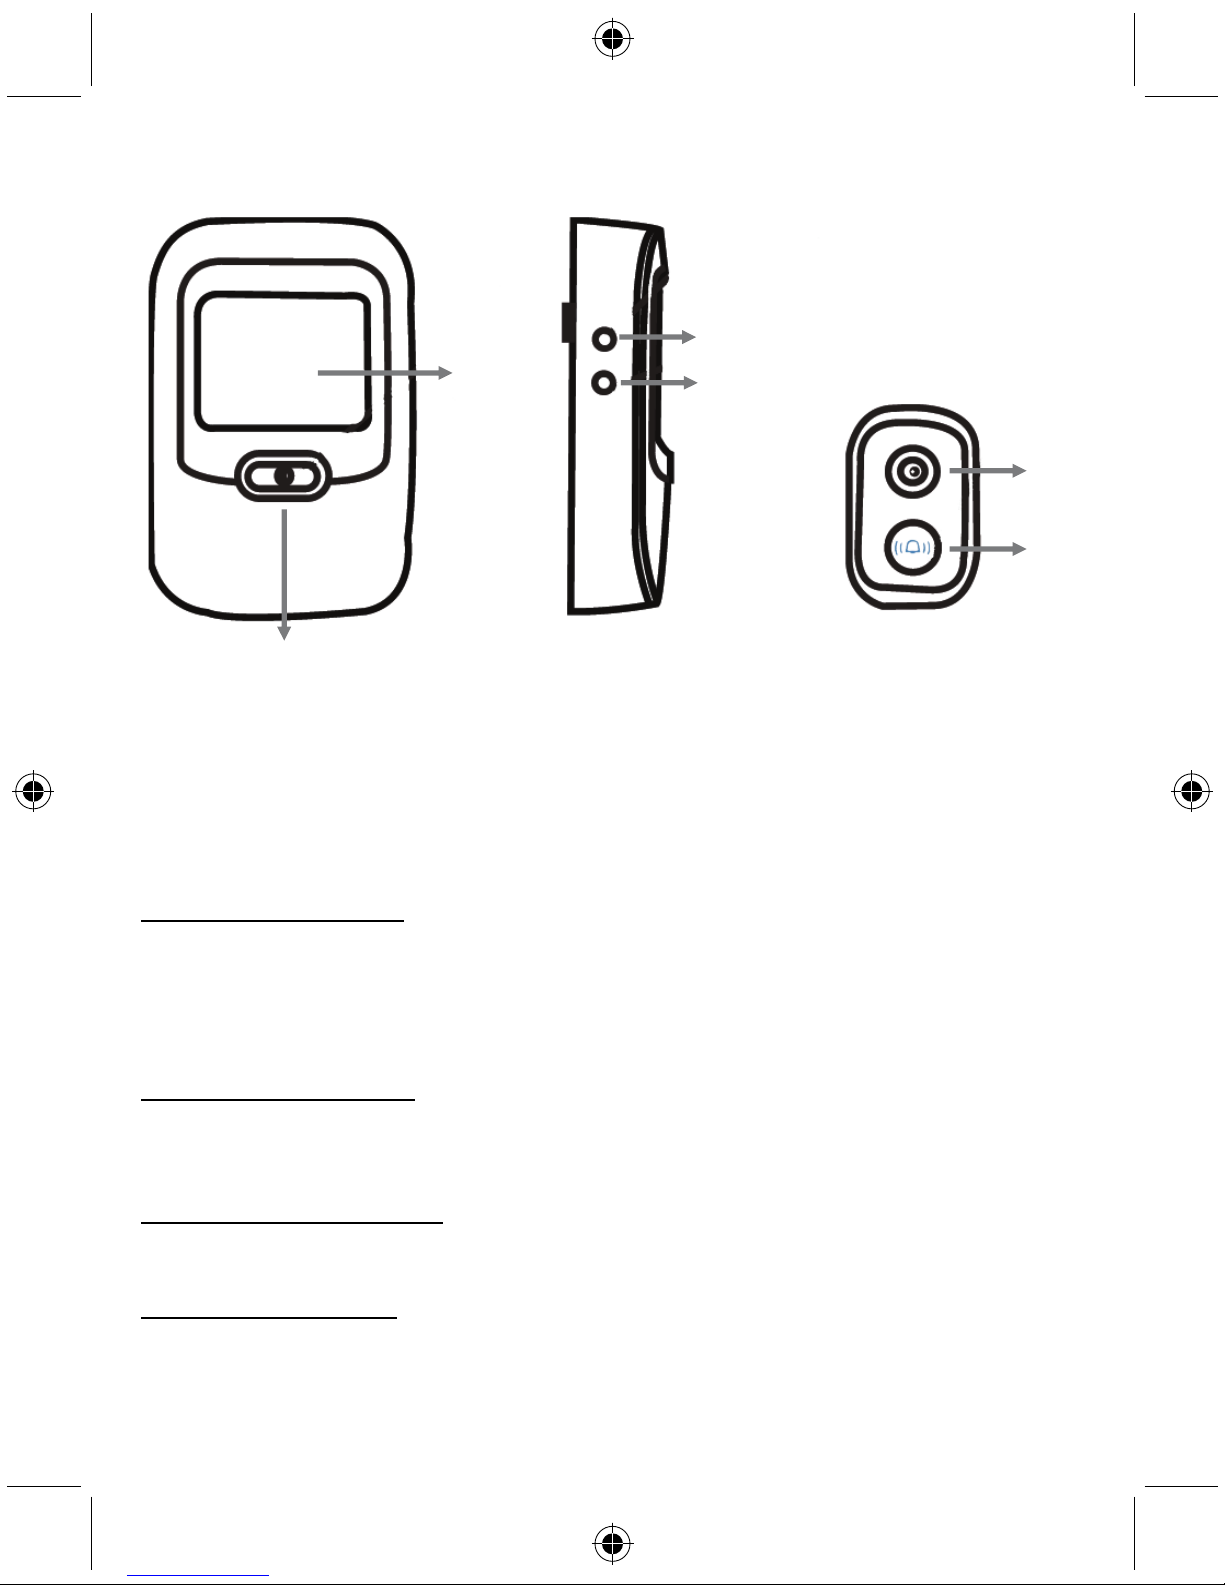
Product description:
1. Power button (A)
2. LCD screen
3. Review picture button (C)
4. Delete button (D)
5. Camera lens
6. Doorbell button (B)
User instructions:
Removing the microSD card
Remove the monitor cover by unscrewing the bottom screw and the 4 screws on the back of the
device. Remove the batteries. Gently push against the microSD card to release it. You will hear a click
once the SD card is released. You can now view the images from the card on another device and/or
reinsert the microSD card with additional data stored or data deleted. You will hear a click when the
microSD card is properly put back into place.
Take a picture from the inside
Press “A” if you want to see who is outside your door. The screen will be activated after 3 seconds.
Once the screen is activated, press “A” to take a picture. The display will be in “Live mode” for
10 seconds and will then shut down.
Take a picture using the doorbell
The visitor presses “B”. The screen will turn on after 6 seconds and the system will automatically take
one picture. The screen will stay on for 30 seconds.
Review and Delete pictures
When the screen is on, press “C” to review all pictures taken. Press the button repeatedly to see all of
the pictures. Press “D” to select the picture you wish to delete. Press “D” again to confirm that the
image must be deleted.
1 (A)
4 (D)
3 (C)
5
6 (B)
2

10
Change the Date/Time
Once the screen is activated, press “D” to adjust the date
and time. Press “C” or “D” to increase or decrease the date
and time. Press “A” to skip to the next menu. When all the
information has been entered correctly press and hold “A”
to exit.
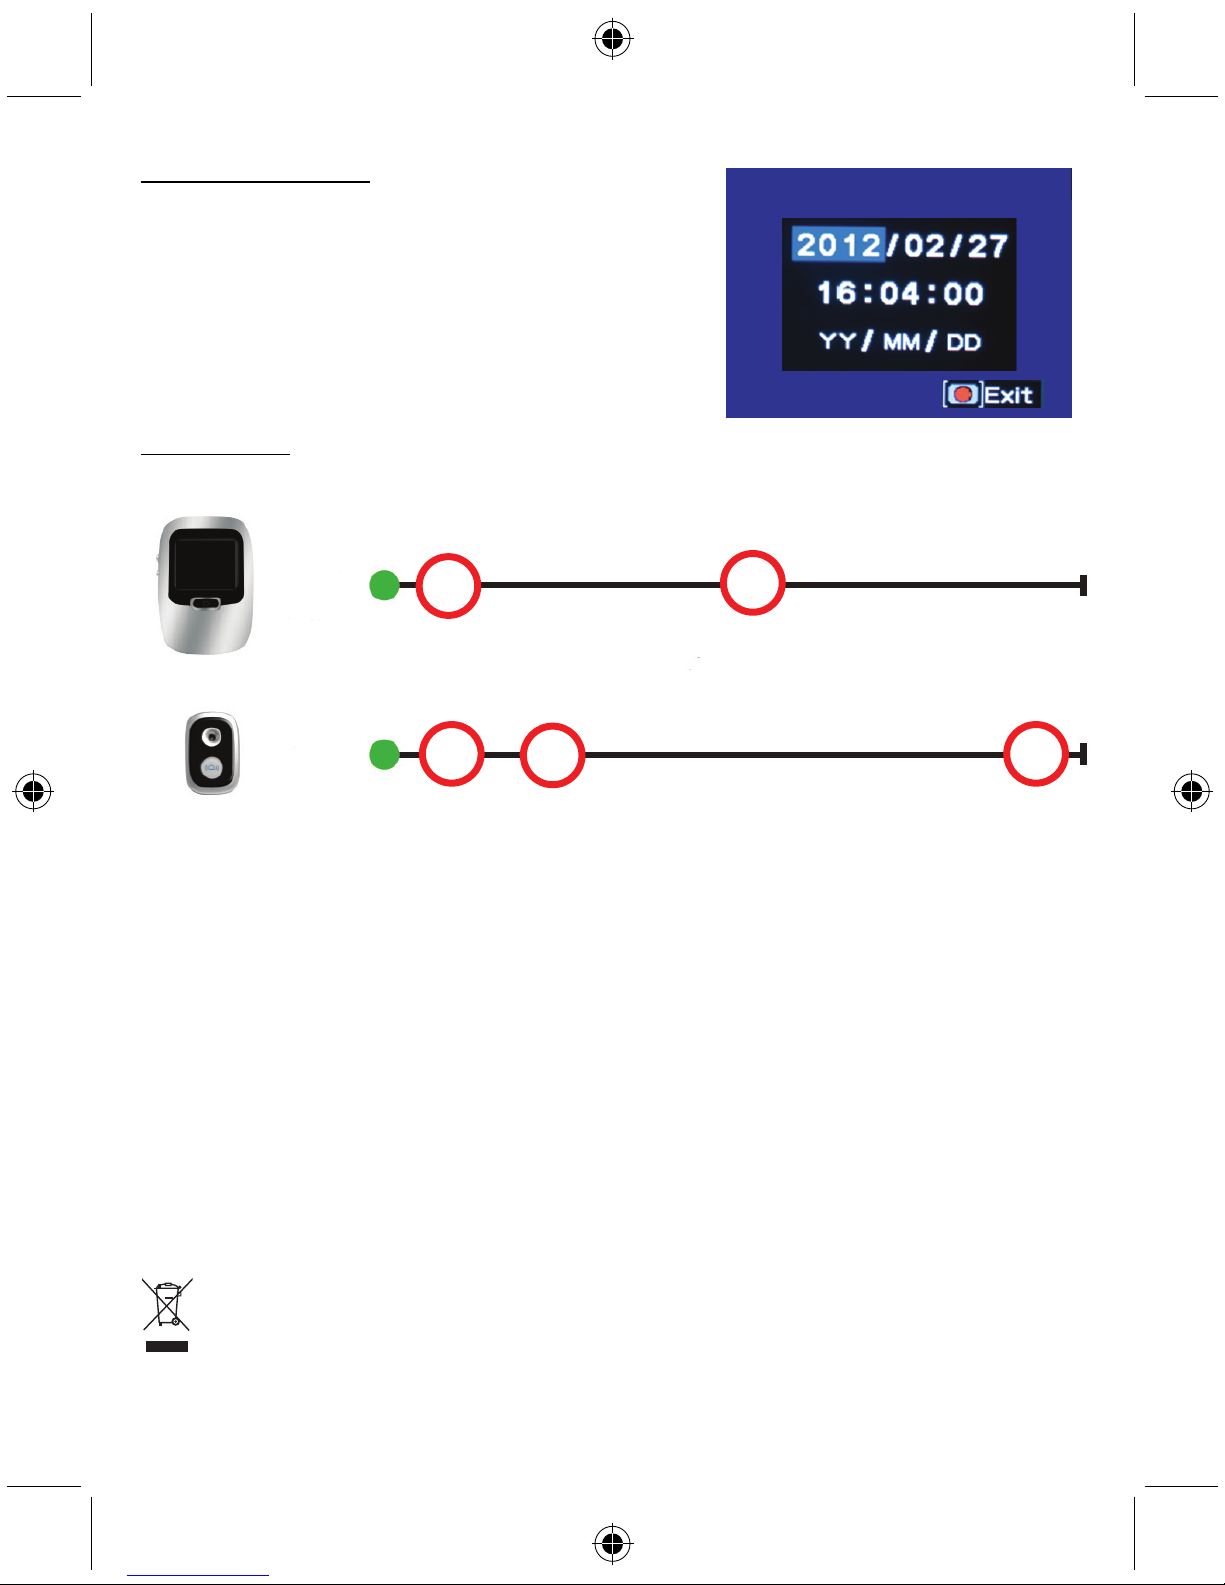
Timing operation
The diagram below shows the operation of the SEC-PH380 in seconds
Maintenance:
Clean the door viewer camera with a dry cloth.
Do not use cleaning solvents or abrasives.
Warranty:
No guarantee or liability can be accepted for any changes and modifications of the product or damage
caused due to incorrect use of this product.
Disclaimer:
Designs and specifications are subject to change without notice. All logos, brands and product names
are trademarks or registered trademarks of their respective holders and are hereby recognised as
such.
Disposal:
• This product is designated for separate collection at an appropriate collection point. Do not
dispose of this product with household waste.
• For more information, contact the retailer or the local authority responsible for waste
management.
3 6
3
14
33
Press
button 1
(A)
The screen turns on
The screen turns off
<Time in seconds>
Press
button 6
(B)
The screen turns on
The screen turns off
The picture of the
visitor is taken
11
DEUTSCH
Türspion-Kamera mit DVR
Inhaltsverzeichnis:
• Einleitung (Seite 11)
• Komponenten (Seite 11)
• Technische Spezifikationen (Seite 12)
• Installationsanleitung (Seite 12)
• Bedienelemente und Funktionen (Seite 18)
• Bedienungshinweise (Seite 18)
• Wartung (Seite 19)
• Garantie (Seite 19)
• Haftungsausschluss (Seite 19)
• Entsorgung (Seite 19)
Einführung:
Mit dieser drahtlosen Türspion-Kamera sorgen Sie dafür, dass Sie nicht überrascht werden, wenn
jemand vor der Tür steht. Dank des elektronischen Videosystems fühlen Sie sich vor dem Öffnen der
Tür sicherer. Die integrierte 128 MB microSD-Karte speichert bis zu 1.000 Bilder von Personen, die an
Ihrer Tür geklingelt haben. Die Türspion-Kamera kann einfach installiert werden und hat einen 6 cm
LCD-Farbmonitor für ein klares Bild des Besuchers.
• Lesen Sie dieses Handbuch vor der Installation / dem Gebrauch des
Kamera-Überwachungssystems.
• Bewahren Sie das Handbuch für zukünftige Verwendungszwecke gut auf.
Komponenten:
1. Monitor
2. Türklingel/Kamera
3. Metalldurchführung
4. Rückplatte
5. Klebeband für Türklingel/Kamera
6. 128 MB microSD-Karte (integriert)
7. Schraube Frontblende
8. Schrauben Gehäuse
9. Schlüssel
12
Technische Daten:
• Monitor: 2,4" LCD-Farbbildschirm
• Auflösung: 300.000 Pixel
• Betrachtungswinkel: 60°
• Interner Speicher: 128 MB, bis zu 1.000 Bilder
• Integrierte Türklingel: Ja
• Gegensprechanlage: Nein
• Schutzart: IP40 (Türklingel/Kamera nicht Regen/Feuchtigkeit aussetzen)
• Türstärke: 40 -70 mm
• Betriebstemperatur: –20 °C - 60 °C
• Betriebs-Luftfeuchtigkeit: 10 % - 95 %
• Batterie: 2 x AA, 1,5 V (nicht mitgeliefert)
• Batterielaufzeit: 5 Monate (5 x 30 Sekunden/Tag)
• Abmessungen Monitor: 119 x 83 x 25 mm
• Abmessungen Türklingel/Kamera: 59 x 40 x 14 mm
Installationsanleitung:
Bohren Sie ein Loch mit Ø1,5 cm durch die Tür.
Die Türspion-Kamera ist für Türstärken von 4 bis 7 cm
geeignet.
Die empfohlene Einbauhöhe ist zwischen 1,60 und 1,75 m.
Ziehen Sie den Schutzfilm auf der
Rückseite des Aufklebers ab und
kleben Sie ihn auf die Rückseite
der Türklingel/Kamera.
1
2
13
Schieben Sie die Metalldurchführung durch das Loch
in der Tür. Ziehen Sie den zweiten Schutzfilm des
Aufklebers ab und kleben Sie die Türklingel/Kamera
außen auf die Tür.
Hinweis: Installieren Sie die Türklingel/Kamera
nur auf wettergeschützten Türen. Setzen Sie die Türklingel/Kamera nicht Regen oder
Feuchtigkeit aus
Achten Sie darauf, dass das flache Verbindungskabel
durch das Loch zur anderen Seite der Tür geführt wird.
4
3

14
A. Ziehen Sie den Schutzfilm auf der Rückseite der
Metallplatte ab. Dies vermeidet ein Verkratzen der Tür bei der
Montage der Metallplatte und des Monitors.
B. Richten Sie das Loch auf der Metallplatte mit dem Loch in
der Tür aus und setzen Sie die Metallplatte auf die Tür.
Achten Sie darauf, dass das flache Verbindungskabel durch
das Loch der Metallplatte geführt wird.
Hinweis: Achten Sie darauf, dass die Platine in der oberen
rechten Ecke ist.
Achten Sie darauf, dass das flache Verbindungskabel
durch die Metalldurchführung zur anderen Seite der Tür
geführt wird.
6
5
Platine
15
Ziehen Sie die Metalldurchführung mit dem Schlüssel
fest.
Hinweis: Achten Sie darauf, das flache Verbindungskabel
nicht zu beschädigen.
Biegen Sie das flache Verbindungskabel vorsichtig (nicht knicken). Drücken Sie den Stecker des
flachen Verbindungskabels auf die Anschlüsse auf der Platine.
8
7
16
Öffnen Sie das Gehäuse mit einem Schraubenzieher, um
an das Batteriefach zu gelangen. Lösen Sie dazu die
Schraube der Frontblende (siehe Abbildung rechts) und die
4 anderen Schrauben auf der Geräterückseite.
Hinweis: Der Slot für die microSD-Karte befindet sich
ebenfalls im Batteriefach.
Setzen Sie 2x AA 1,5 V Batterien mit korrekter Polarität
ein, wie im Batteriefach aufgedruckt.
Hinweis: Schließen Sie das Gehäuse nicht vor Schritt 13.
Lage des Slots für die microSD-Karte
9
10

17
Setzen Sie den Monitor auf die Metallplatte
und achten Sie auf korrekten Kontakt der
Stecker.
Schrauben Sie den Monitor mit
den mitgelieferten Schrauben auf
die Rückplatte.
Bringen Sie die Frontblende wieder an.
12
12
11

18
Beschreibung des Produkts:
1. Ein-/Ausschalter (A)
2. LCD-Bildschirm
3. Bildanzeigetaste (C)
4. Löschtaste (D)
5. Kameraobjektiv
6. Klingeltaste (B)
Gebrauchsanleitung:
microSD-Karte entfernen
Nehmen Sie das Gehäuse des Monitors ab; lösen Sie die untere Schraube und die 4 Schrauben auf
der Geräterückseite. Nehmen Sie die Batterien heraus. Drücken Sie die microSD-Karte leicht an, um
sie freizugeben. Sie hören einen leisen Klickton, wenn die microSD-Karte entriegelt ist. Sie können
nun die Bilder auf der Karte auf anderen Geräten betrachten; setzen Sie die microSD-Karte mit Daten
oder gelöscht in das Gerät zurück. Sie hören einen leisen Klickton, wenn die microSD-Karte einrastet.
Bild von innen aufnehmen
Drücken Sie Taste A, um zu sehen, wer vor der Tür steht. Der Bildschirm schaltet sich nach
3 Sekunden ein. Drücken Sie nun Taste A, um ein Bild aufzunehmen. Der Bildschirm bleibt für
10 Sekunden im „Live-Modus“ und schaltet sich dann aus.
Bild mit der Türklingel aufnehmen
Der Besucher drückt Taste B. Der Bildschirm schaltet sich nach 6 Sekunden ein und das System
nimmt automatisch ein Bild auf. Der Bildschirm bleibt für 30 Sekunden eingeschaltet.
Bilder betrachten und löschen
Bei eingeschaltetem Bildschirm drücken Sie Taste C zur Anzeige der Bilder. Drücken Sie die Taste
wiederholt, um alle Bilder zu durchlaufen. Drücken Sie Taste D zur Auswahl eines zu löschenden
Bildes. Drücken Sie erneut Taste D, um das Löschen des Bildes zu bestätigen.
1 (A)
4 (D)
3 (C)
5
6 (B)
2
19
Datum/Uhrzeit einstellen
Bei eingeschaltetem Bildschirm drücken Sie Taste D, um
Uhrzeit und Datum einzustellen. Drücken Sie Taste C oder
D, um den Wert für Datum und Uhrzeit zu erhöhen bzw. zu
verringern. Drücken Sie Taste A, um zum nächsten
Menüpunkt zu springen. Nach der Eingabe aller
Informationen halten Sie Taste A zum Verlassen des
Menüs gedrückt.
Zeitlicher Ablauf
Das folgende Diagramm zeigt den Betriebsablauf des SEC-PH380 in Sekunden
Wartung:
Reinigen Sie die Türspion-Kamera mit einem trockenen Tuch.
Keine Reinigungs- oder Scheuermittel verwenden.
Garantie:
Es kann keine Garantie oder Haftung für irgendwelche Änderungen oder Modifikationen des Produkts
oder für Schäden übernommen werden, die aufgrund einer nicht ordnungsgemäßen Anwendung des
Produkts entstanden sind.
Haftungsausschluss:
Design und technische Daten können ohne vorherige Ankündigung geändert werden. Alle Logos,
Marken und Produktnamen sind Marken oder eingetragene Marken ihrer jeweiligen Eigentümer und
werden hiermit als solche anerkannt.
Entsorgung:
• Dieses Produkt muss an einem entsprechenden Sammelpunkt zur Entsorgung abgegeben
werden. Entsorgen Sie dieses Produkt nicht mit dem Haushaltsmüll.
• Weitere Informationen erhalten Sie beim Verkäufer oder der für die Abfallwirtschaft
verantwortlichen örtlichen Behörde.
3 6
3
14
33
Drücken
Sie Taste
1 (A)
Bildschirm schaltet sich ein
Bildschirm schaltet sich aus
<Zeit in Sekunden>
Drücken
Sie Taste
6 (B)
Bildschirm schaltet sich ein
Bildschirm schaltet sich aus
Bild des Besuchers wird
aufgenommen

20
FRANÇAIS
Judas de porte à caméra et à enregistreur vidéo numérique (DVR)
Table des matières :
• Introduction (p. 20)
• Éléments du produit (p. 20)
• Spécifications techniques (p. 21)
• Instructions d'installation (p. 21)
• Description du produit (p. 27)
• Mode d'emploi (p. 27)
• Maintenance (p. 28)
• Garantie (p. 28)
• Avertissement (p. 28)
• Élimination des déchets (p. 28)
Introduction :
Avec ce judas de porte à caméra sans fil, vous pouvez être sûr de ne pas être pris par surprise si
quelqu'un est derrière votre porte. Grâce à ce système vidéo électronique, vous sentirez plus en
sécurité avant d'ouvrir la porte. La carte mémoire micro-SD de 128 Mo intégrée peut enregistrer
jusqu'à 1.000 images de personnes qui sont venues sonner à votre porte. Le judas de porte à caméra
est facile d'installation et possède un moniteur couleur à cristaux liquides de 60 mm qui vous
permettra de bien voir votre visiteur.
• Nous vous recommandons de lire attentivement le présent manuel avant d'installer/utiliser le
système de caméras de surveillance.
• Conservez ce manuel dans un endroit sûr pour toute consultation future.
Éléments du produit :
1. Moniteur
2. Carillon de porte/caméra
3. Tube métallique
4. Plaque arrière
5. Autocollant pour carillon de porte/caméra
6. Carte mémoire micro-SD de 128 Mo (intégré)
7. Vis de la plaque avant
8. Vis du coffret
9. Outil en métal

21
Caractéristiques techniques :
• Moniteur : Écran de 60 mm en couleur
• Résolution : 300 Kilo-pixels
• Angle de vue : 60°
• Mémoire interne : 128 Mo, jusqu'à 1.000 images
• Carillon de porte intégré : oui
• Interphone : non
• Protection : IP40 (ne pas exposer le carillon de porte/caméra à la pluie ou à l'eau)
• Épaisseur de porte : de 40 à 70 mm
• Température de fonctionnement : de -20°C à 60°C
• Taux d'humidité supporté : de 10% à 95%
• Batterie : 2 x piles de type AA de 1,5 V (non incluses)
• Autonomie des piles : 5 mois (5 x 30 s /jour)
• Taille du moniteur : 119 x 83 x 25 mm
• Dimensions carillon de porte/caméra : 59 x 40 x 14 mm
Instructions concernant l’installation :
Percez un trou de diamètre 1,5 cm dans la porte.
Le judas de porte à caméra est adapté pour une épaisseur de
porte de 4 à 7 cm.
La hauteur d'installation recommandée est à 1,60 ou à
1,75 m.
Détachez la pellicule de protection
de l'autocollant et attachez-le à
l'arrière du carillon de
porte/caméra.
1
2

22
Faites glisser le tube métallique dans le trou de la
porte. Détachez l'autre pellicule de protection de
l'autocollant et attachez le carillon/caméra à
l'extérieur de la porte avec l'autocollant.
Remarque : placez le carillon/caméra
uniquement sur des portes avec un film de
protection. Ne pas exposer le carillon de
porte/caméra à la pluie ou à l'eau
Vérifiez que le câble de connexion plat traverse
entièrement le trou de l'autre côté de la porte.
4
3
23
A. Détachez le film à l'arrière de la plaque métallique. Vous
éviterez ainsi de rayer la porte alors que vous montez la
plaque métallique et le moniteur.
B. Alignez le trou de la plaque métallique sur le trou de la
porte et fixez la plaque métallique sur la porte. Vérifiez que le
câble de connexion plat traverse le trou de la plaque
métallique.
Remarque : Vérifiez que la carte de circuit imprimé est
placée dans le coin supérieur droit.
Insérez le tube métallique dans le trou et vérifiez que le
câble de connexion plat traverse le tube métallique.
6
5
Carte de circuit
imprimé
24
Utilisez l'outil en métal pour serrer le tube métallique.
Remarque : Veuillez prendre soin de ne pas endommager
le câble de connexion plat lors de cette opération.
Courbez soigneusement (ne pas plier) le câble de connexion plat. Poussez le connecteur à l'extrémité
du câble de connexion plat dans le connecteur de la carte du circuit imprimé.
8
7
25
Utilisez un tournevis pour ouvrir le boîtier et accéder au
compartiment des piles. Vous devez dévissez la vis sur le devant
(comme indiqué à droite) et 4 autres vis sur l'arrière de l'appareil.
Remarque : L'emplacement de la carte micro-SD se situe
également dans le compartiment des piles.
Insérez 2 x piles de 1,5 V de type AA dans le
compartiment des piles en respectant les marques de
polarité.
Remarque : Ne pas fermer le boîtier avant l'étape 13.
Position de l'emplacement de la carte micro-SD
9
10
26
Placez le moniteur sur la plaque métallique et
vérifiez que les connecteurs sont
correctement reliés.
Utilisez un tournevis et les vis du
boîtier fournies pour monter le
moniteur sur la plaque métallique
arrière.
Remontez le couvercle.
13
12
11

27
Description du produit :
1. Bouton d'alimentation (A)
2. Écran à cristaux liquides
3. Bouton de visualisation des images (C)
4. Bouton de suppression (D)
5. Objectif de la caméra
6. Bouton de carillon (B)
Mode d'emploi :
Retirer la carte micro-SD
Retirez le couvercle du moniteur en dévissant la vis du bas et les 4 vis sur l'arrière de l'appareil. Retirez
les piles. Appuyez légèrement sur la carte micro-SD pour la libérer. Vous entendrez un clic au moment où
la carte SD est libérée. Vous pouvez à présent visualiser les images de la carte sur un autre dispositif
et/ou réinsérer la carte micro-SD avec des images supplémentaires enregistrées ou avec des images
supprimées. Vous entendrez un clic lorsque la carte SD est remise correctement en place.
Capturer une image de l'intérieur
Appuyez le bouton « A » si vous souhaitez savoir qui est à l'extérieur de votre porte. L'écran
s'allumera après 3 secondes. Une fois l'écran allumé, appuyez le bouton « A » pour prendre une
photo. L'écran passe en mode « Temps réel » pendant 10 secondes et ensuite s'éteint.
Prendre une photo en utilisant le carillon de porte
Le visiteur appuie le bouton « B ». L'écran s'allumera après 6 secondes et le système prendra
automatiquement une photo. L'écran reste allumé pendant 30 secondes.
Visualiser et supprimer des images
Quand l'écran est allumé, appuyez le bouton « C » pour visualiser toutes les photos prises. Appuyez
de façon répétée le bouton pour voir toutes les images. Appuyez sur « D » pour sélectionner l'image
que vous souhaitez supprimer. Appuyez à nouveau le bouton « D » pour valider les images qui
doivent être effacées.
1 (A)
4 (D)
3 (C)
5
6 (B)
2

28
Modifier la date ou l'heure
Une fois l'écran allumé, appuyez le bouton « D » pour
régler la date et l'heure. Appuyez le bouton « C » ou « D »
pour augmenter ou diminuer les valeurs de la date et de
l'heure. Appuyez le bouton « A » pour passer au menu
suivant. Après avoir entré toutes les informations
correctement, appuyez et maintenez le bouton « A » pour
quitter.
Opération chronométrée
Le schéma ci-dessous indique les opérations du dispositif SEC-PH380 en secondes
Entretien :
Nettoyez le judas de porte à caméra avec un chiffon sec.
N’utilisez pas de solvants ou de produits abrasifs.
Garantie :
Aucune garantie ou responsabilité ne sera acceptée en cas de modification et/ou de transformation du
produit ou en cas de dommages provoqués par une utilisation incorrecte de l’appareil.
Avis de non responsabilité :
Le design et les caractéristiques techniques sont sujets à modification sans notification préalable.
Tous les logos de marques et noms de produits sont des marques déposées ou immatriculées dont
leurs détenteurs sont les propriétaires et sont donc reconnues comme telles dans ce documents.
Elimination :
• Ce produit doit être jeté séparément des ordures ménagères dans un point de collecte
approprié. Ne jetez pas ce produit avec les ordures ménagères ordinaires.
• Pour plus d'informations, contactez le distributeur ou l'autorité locale responsable de la
gestion des déchets.
3 6
3
14
33
Appuyez
le bouton
1 (A)
L'écran s'allume
L'écran s'éteint
<Temps en secondes>
Appuyez
le bouton
6 (B)
L'écran s'allume
L'écran s'éteint
La photo du visiteur est prise

29
NEDERLANDS
Deurbel met Camerafunctie
Inhoudsopgave:
• Inleiding (p. 29)
• Productonderdelen (p. 29)
• Technische specificaties (p. 30)
• Installatie-instructies (p. 30)
• Productbeschrijving (p. 36)
• Gebruiksaanwijzing (p. 36)
• Onderhoud (p. 37)
• Garantie (p. 28)
• Disclaimer (p. 37)
• Verwijdering (p. 37)
Inleiding:
Met deze draadloze deurbel met camerafunctie kunt u ervoor zorgen dat u niet wordt verrast wanneer
iemand voor de deur staat. Dankzij het elektronische videosysteem zult u zich veiliger voelen voordat
u de deur opent. De ingebouwde 128 MB microSD-kaart kan maximaal 1,000 foto's van mensen
opslaan die hebben aangebeld. De camera deurspion is eenvoudig te installeren en heeft een 2,4-inch
LCD-kleurenmonitor voor een duidelijk beeld van de bezoeker.
• We adviseren u om deze handleiding te lezen voordat u het beveiligingscamerasysteem
installeert /gebruikt.
• Bewaar deze handleiding op een veilige plek voor toekomstig gebruik.
Productonderdelen:
1. Monitor
2. Deurbel/camera
3. Metalen buis
4. Achterplaat
5. Zelfklevende sticker voor deurbel/camera
6. 128 MB microSD-kaart (ingebouwd)
7. Voorplaatschroef
8. Schroeven voor de behuizing
9. Metalen gereedschap

30
Technische specificaties:
• Monitor: 2,4" kleuren LCD
• Resolutie: 300 K pixels
• Kijkhoek: 60°
• Intern geheugen: 128 MB, tot maximaal 1,000 foto's
• Geïntegreerde deurbel: Ja
• Intercom: Nee
• Beschermingsgraad: IP40 (stel de deurbel/camera niet bloot aan regen/water)
• Dikte van de deur: 40 - 70 mm
• Bedrijfstemperatuur: -20 °C ~ +60 °C
• Bedrijfsluchtvochtigheid: 10% - 95%
• Batterij: 2x AA, 1,5 V (excl.)
• Levensduur batterij: 5 maanden (5 x 30 sec./dag)
• Afmetingen van de monitor: 119 x 83 x 25 mm
• Afmetingen van de deurbel/camera: 59 x 40 x 14 mm
Installatie-instructies:
Boor een gat van Ø1,5 cm in de deur.
De camera deurspion is geschikt voor deuren met een dikte
van 4 tot 7 cm.
De aanbevolen hoogte is tussen 1,60 en 1,75 m.
Verwijder de beschermlaag van de
zelfklevende sticker en bevestig
deze aan de achterkant van de
deurbel/camera.
1
2
 Loading...