

Konig SEC-IPCAM100B(W), SEC-IPCAM105B(W) Instruction Manual
2013-11-15
SEC-IPCAM100B(W)
SEC-IPCAM105B(W)
MANUAL (p. 2)
IP camera
ANLEITUNG (S. 13)
IP-Kamera
MODE D’EMPLOI (p. 24)
Caméra IP
GEBRUIKSAANWIJZING (p. 35)
IP-camera
MANUALE (p. 46)
Telecamera IP
MANUAL DE USO (p. 57)
Cámara IP
MANUAL (p. 68)
Câmara IP
HASZNÁLATI ÚTMUTATÓ (o. 79.)
IP kamera
KÄYTTÖOHJE (s. 90)
IP-kamera
BRUKSANVISNING (s. 101)
IP-kamera
NÁVOD K POUŽITÍ (s. 112)
IP kamera
MANUAL DE UTILIZARE (p. 123)
Cameră de supraveghere IP
ΕΓΧΕΙΡΙΔΙΟ XPHΣHΣ (σελ. 134)
Κάμερα IP
BRUGERVEJLEDNING (s. 146)
IP-kamera
VEILEDNING (s. 157)
IP-kamera
ИНСТРУКЦИЯ (стр. 168)
IP-камера
KILAVUZ (s. 180)
IP kamera
2
ENGLISH
IP camera
Introduction:
• Watch over your properties with this genuine Plug & Play IP camera. Easy and simple to install,
works without the need for any form of configuration. The free uCare Cam app allows you to watch
and listen to live footage on your Smartphone or other mobile devices, anytime and anywhere. The
free uCare Cam app is available on Google Play and the Apple App Store. Advanced features
provide you e-mail or app notification when motion is detected. Photo and/or video footage can be
played back at any moment. Also suitable for use as a baby monitor due to the 2-way audio
function.
• We recommend that you read this manual before installing/using this product.
• Keep this manual in a safe place for future reference.
System requirements:
• Device running Android 4.0 and up or iOS 5.0 and up.
• Router with Wi-Fi.
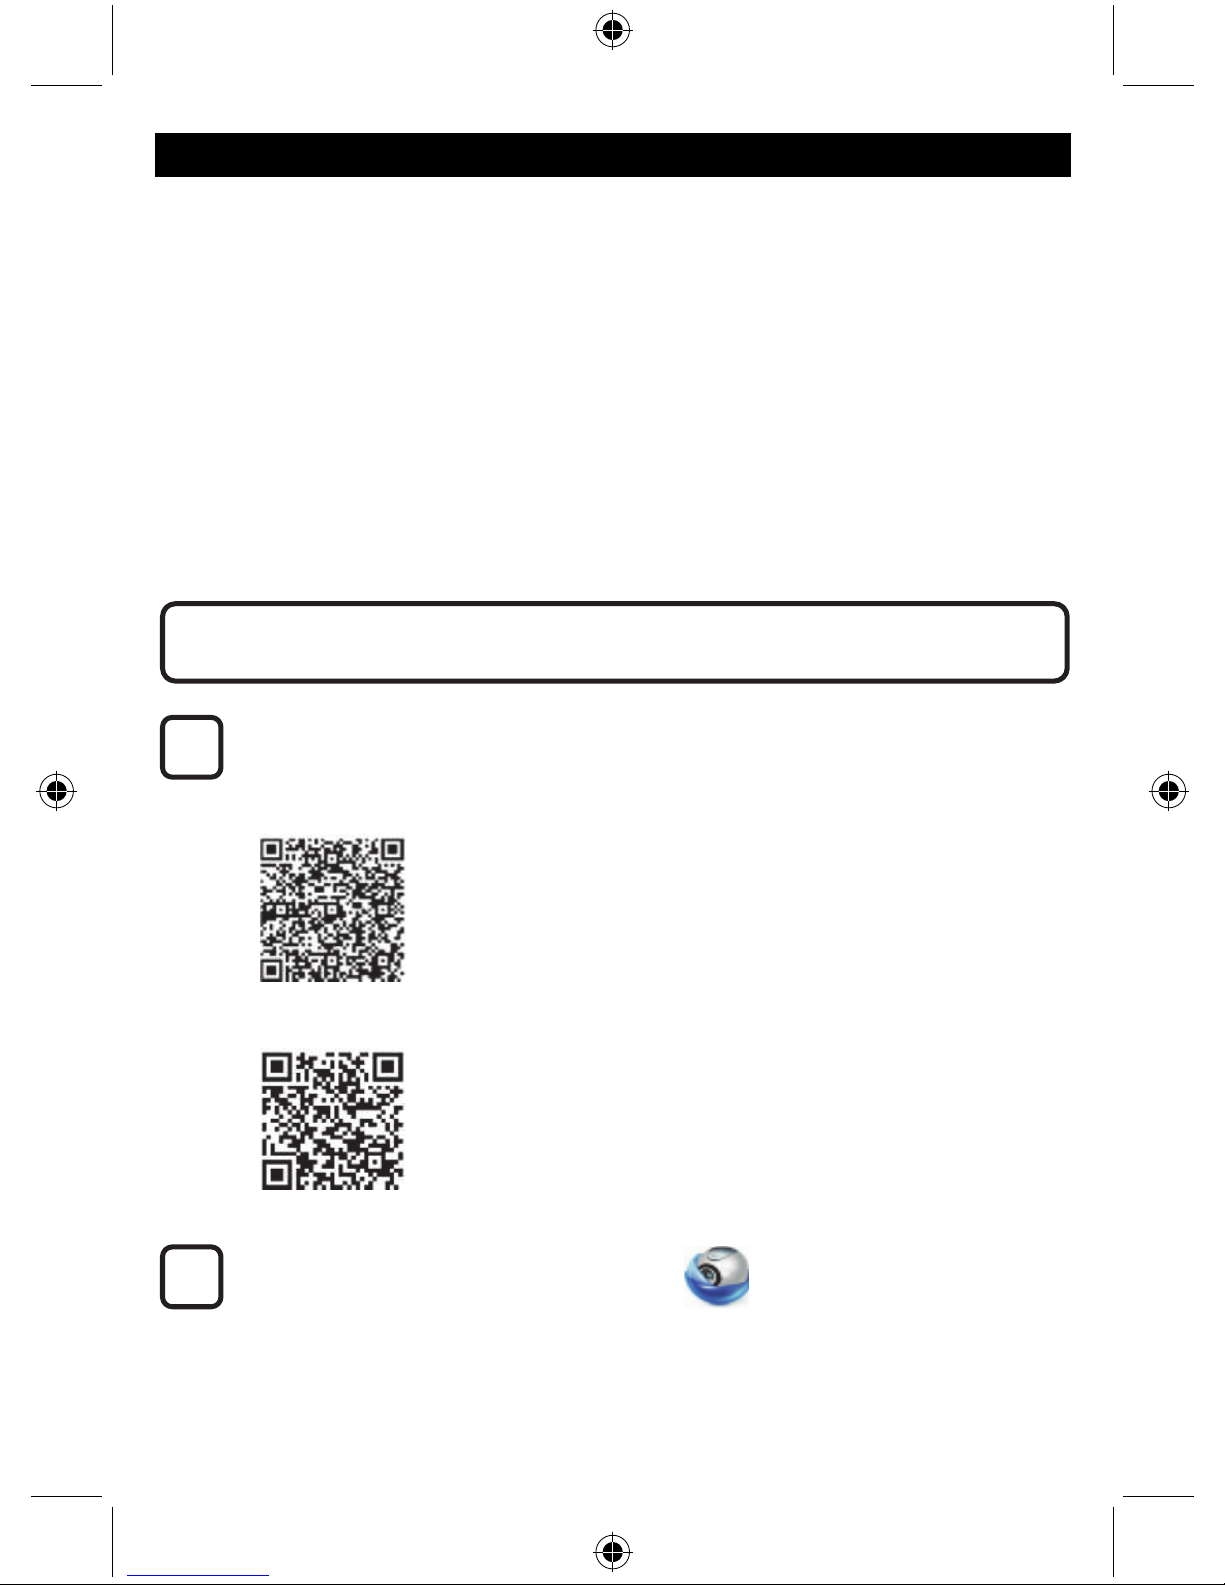
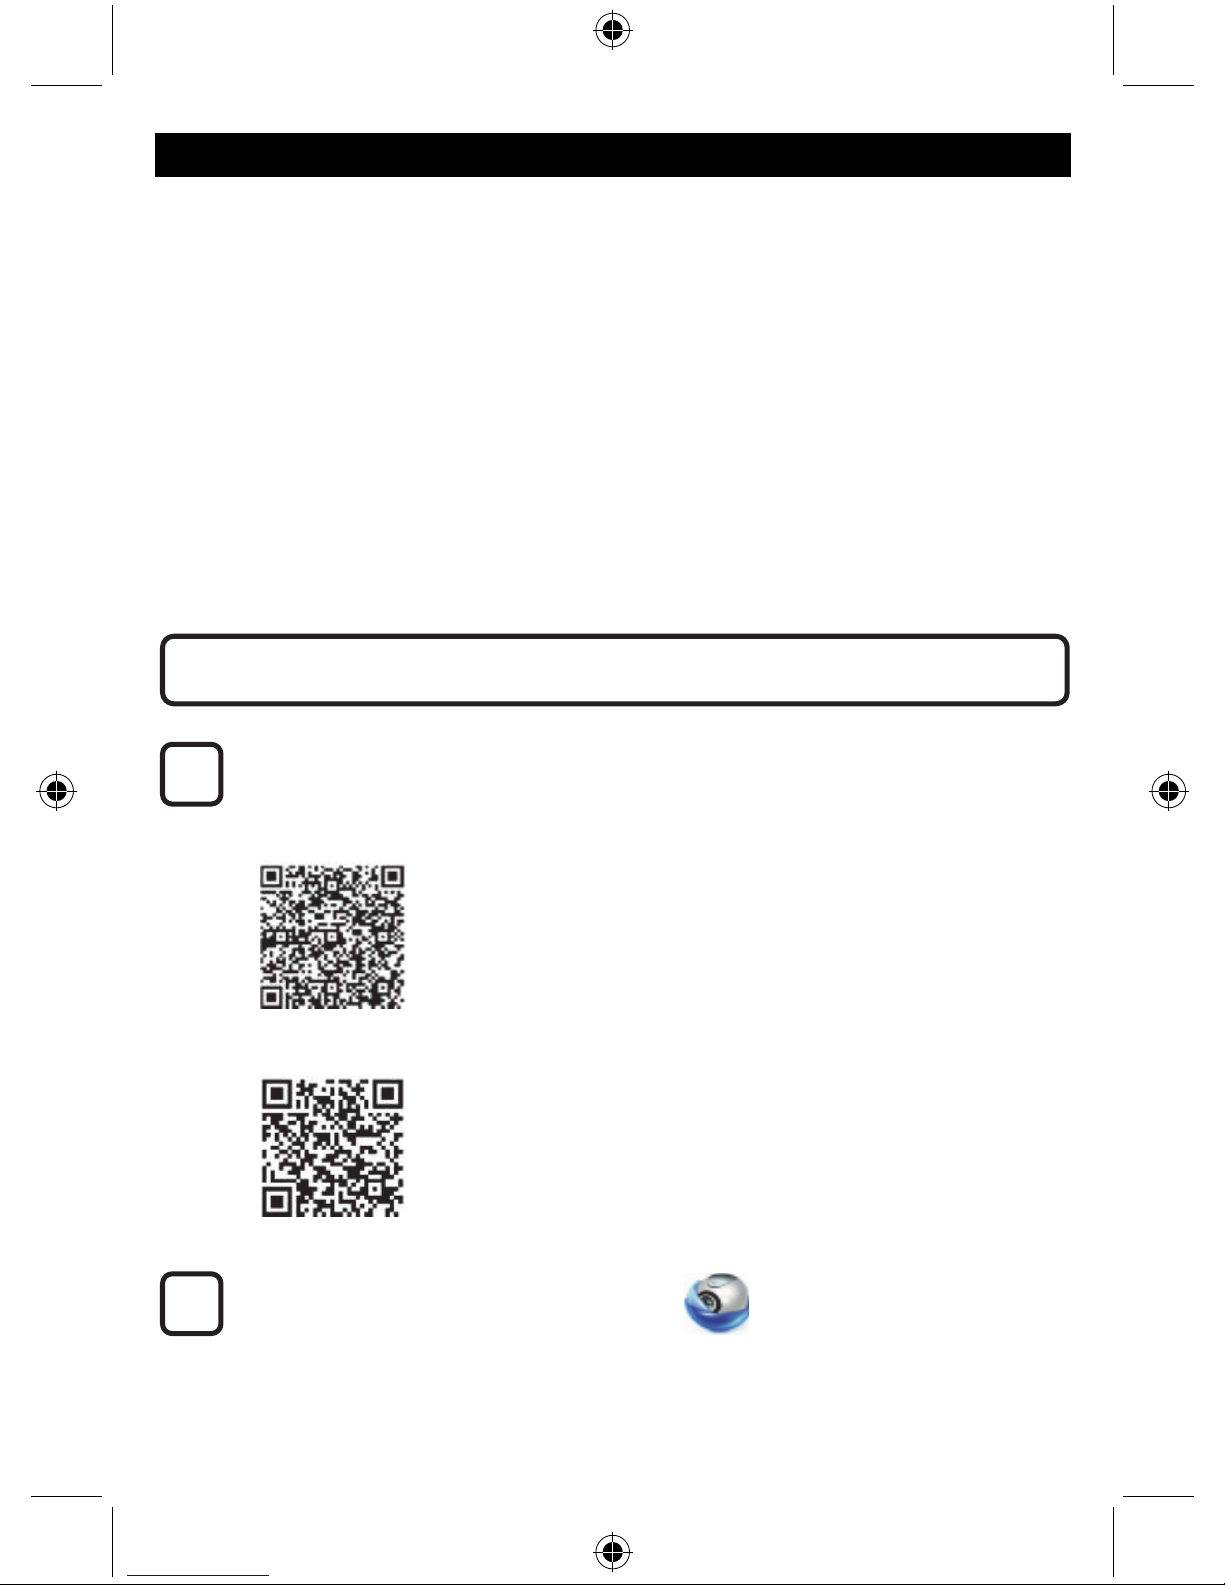
Download the “uCare Cam” app from Google Play or the Apple app store
Android Device
Google Play Store “uCare Cam” Download Link
iOS Device
App Store “uCare Cam” Download Link
After the software installation is complete,
click the icon to run the app.
Default “uCare Cam” password: 0000
Manager's Name: admin
Manager's Password: 0000
2
1
Installation of the App on your mobile device

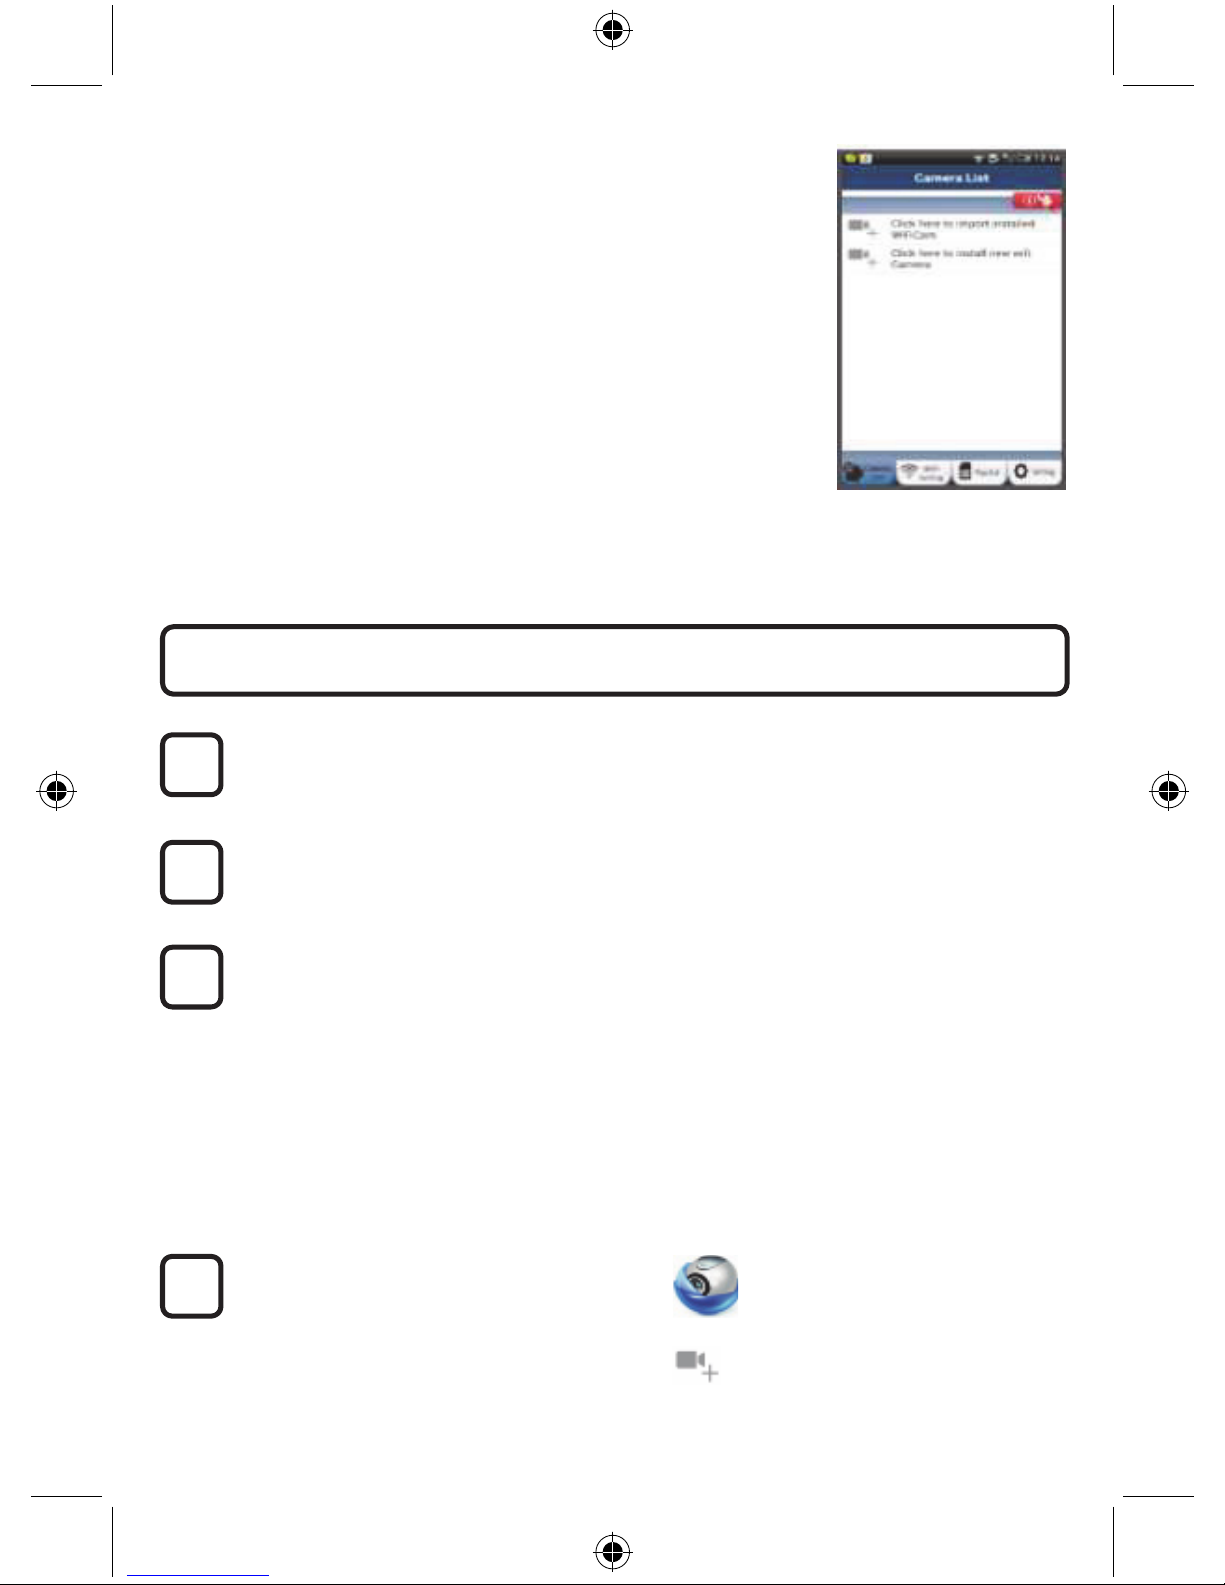
3
Figure 1
“Camera List Window”
There are two options to continue the easy set up of your IP camera.
Power On
Plug the power adapter DC connector into the DC input port of the IP camera and then plug
the power adapter into a wall outlet. The status LED on the IP camera will turn green for
about 15 seconds.
Programme Loading
The status LED will flash red for about 15 seconds.
Router Link Mode
Wait until the status LED colour alternates between red and green.
Note:
If the LED does not turn red and green, then press the WPS/Reset button for more than
10 seconds to restart the IP camera.
When the green status LED lights up and holds, and then the red status LED flashes twice,
after which it changes into green, the IP camera has entered the RESET state. At this
moment you can release the button and then wait until the status LED alternates between
red and green.
ANDROID (for Apple go to: Step 8)
Set the IP camera to connect to the Wi-Fi Router
Open the “uCare Cam” App and select:
Click here to install the new Wi-Fi Camera
In the screen of the Camera List Window (see figure 1).
4
3
2
1
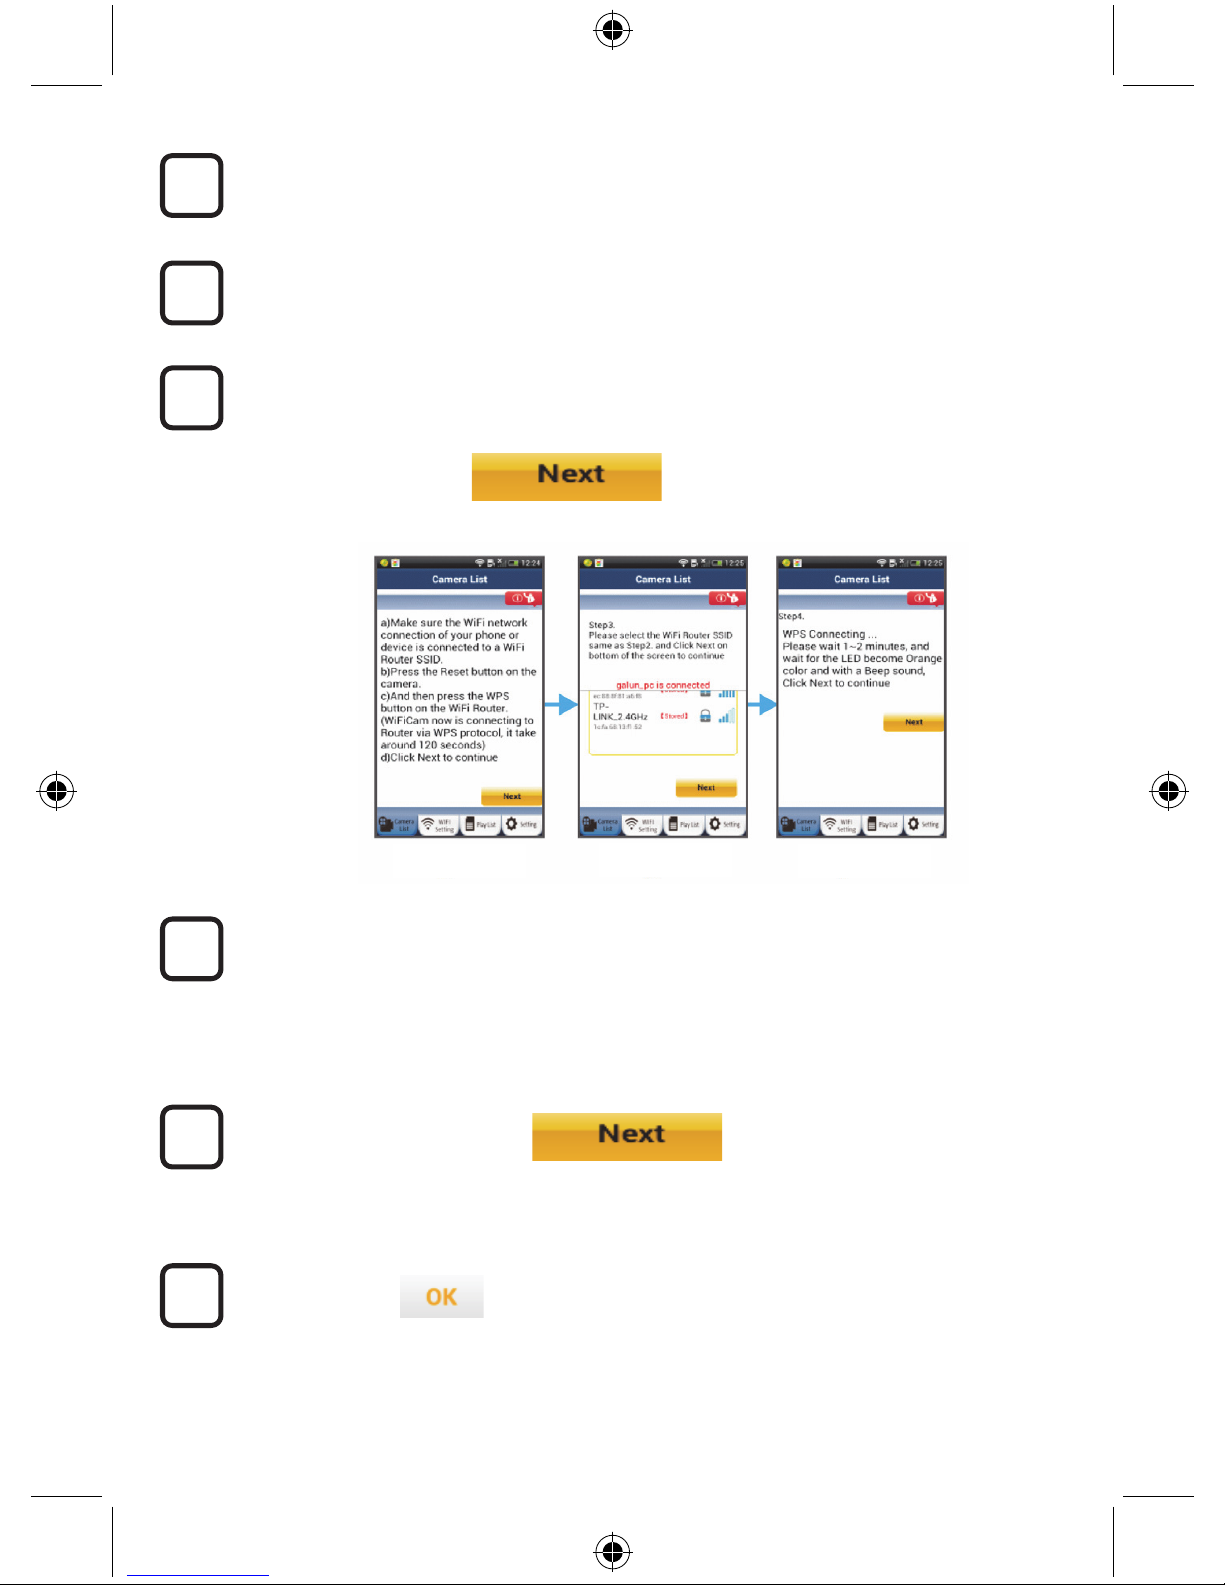
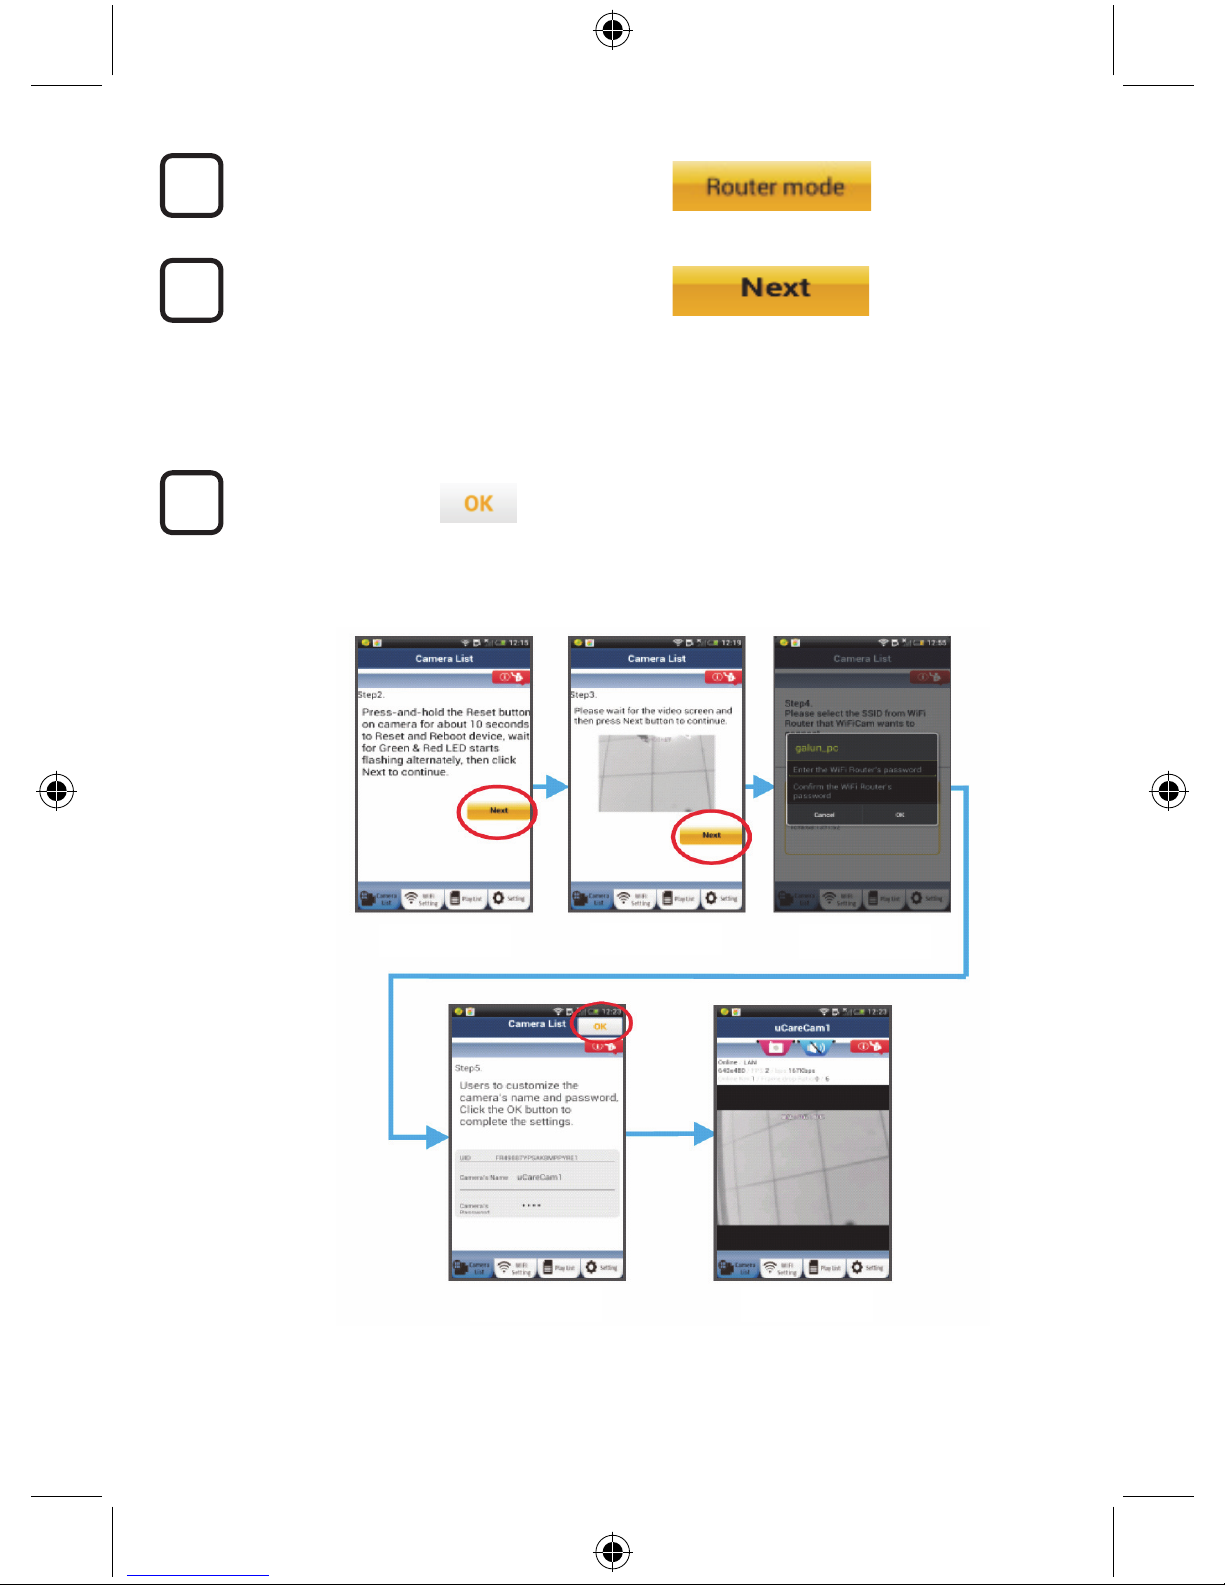
Install your IP camera by ROUTER MODE
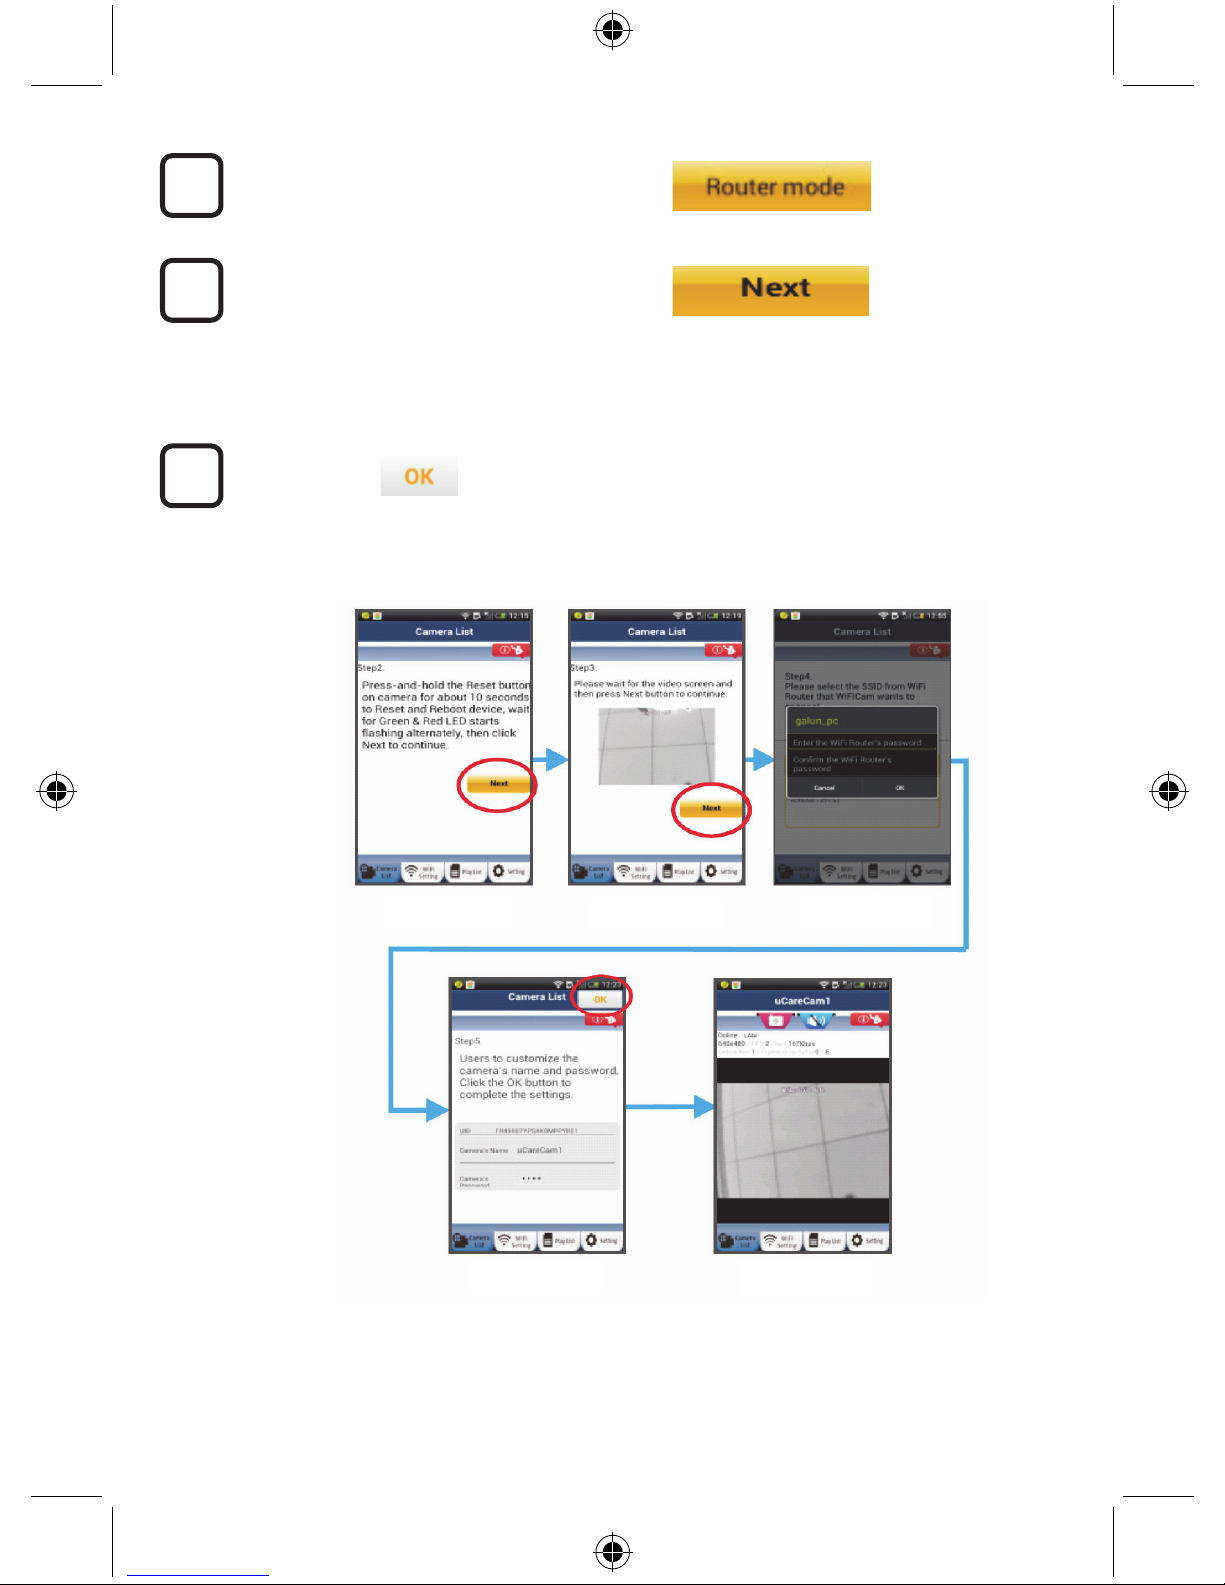
4
In the following screen select the tab:
then select the tab:
to enter the next step (see Figure 2).
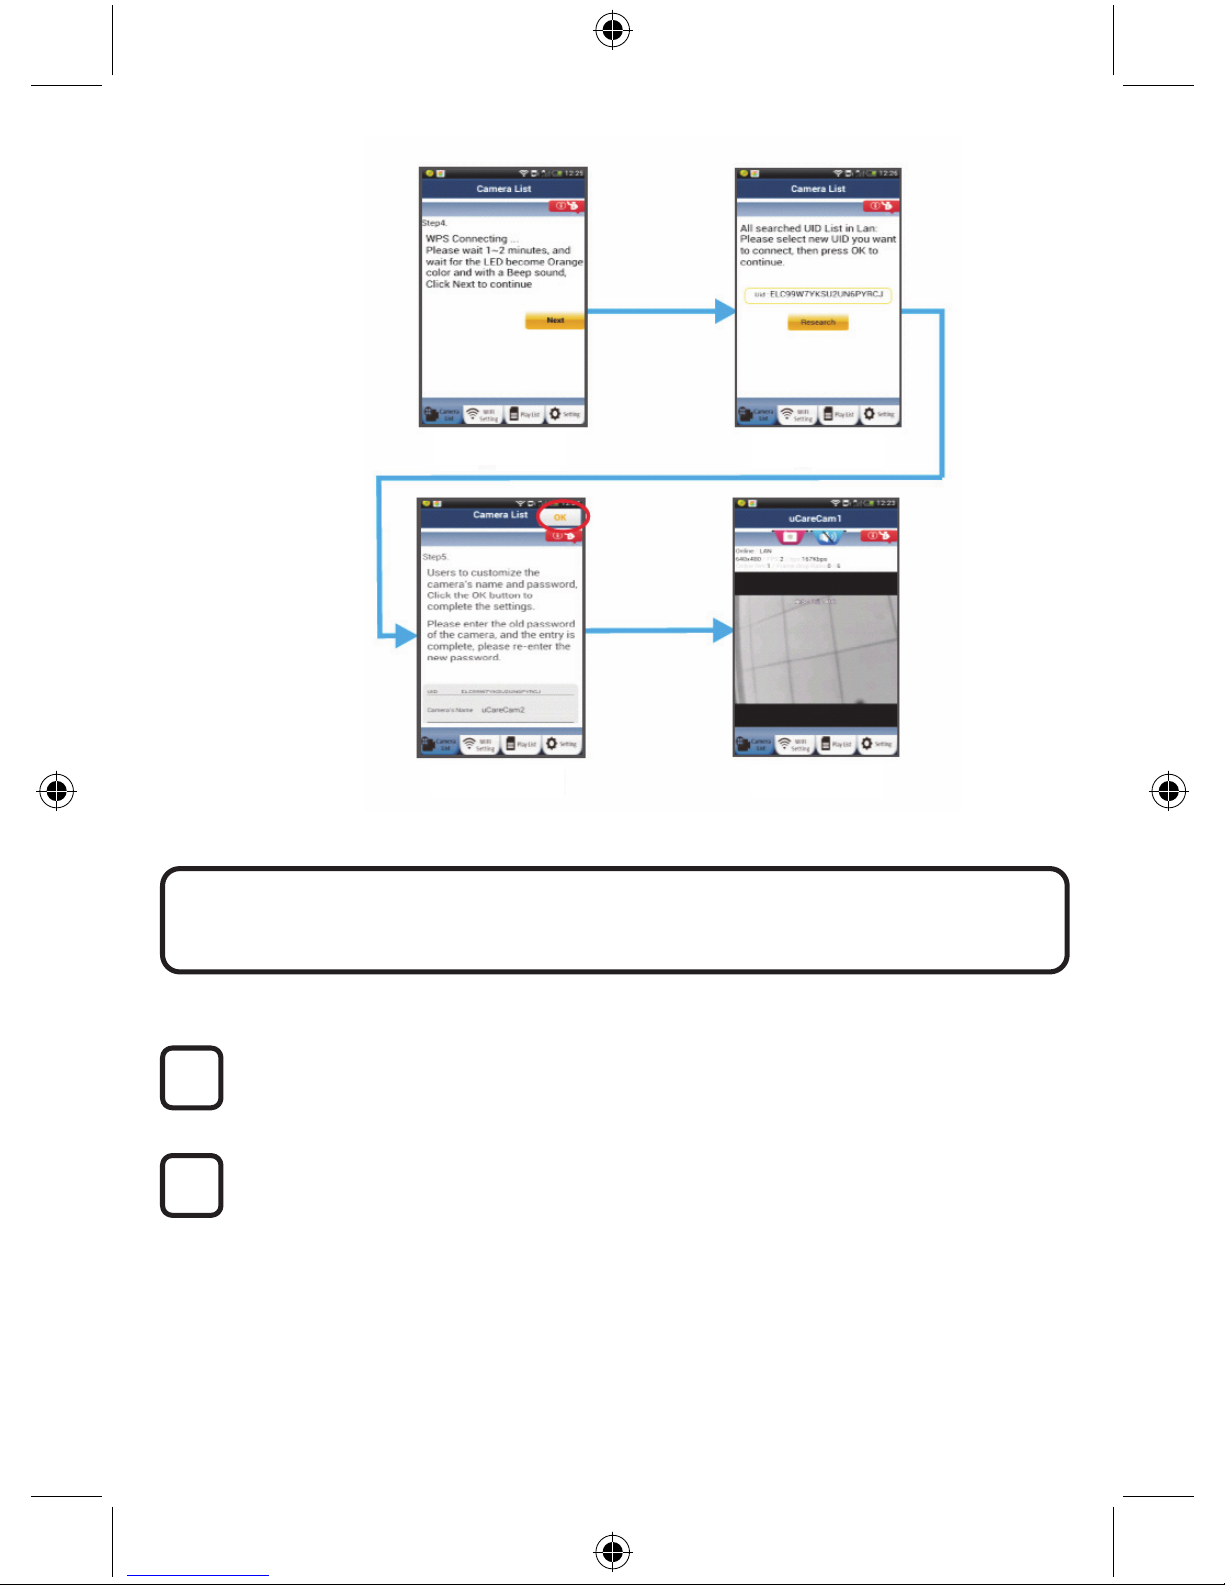
Follow the instructions in the Camera List window step by step (see Figure 3 and Figure 4).
Please enter a personal camera name and password (default 0000).
You are encouraged to change the default password after setup for security purposes.
Click the tab
(see Figure 5). The uCare Cam will automatically enter the viewing window (see Figure 6)
and the IP camera status LED will turn orange.
7
6
5
Figure3
Figure2
Figure4
Figure5 Figure6
5
APPLE
Set the IP camera to connect to the Wi-Fi router
Open up “Settings” on your iOS device and select “Wi-Fi” and let it search for a network.
The network will be “Wi-Fi-cam-p2p”. Select “Wi-Fi-cam-p2p” to connect.
Now, open the “uCare Cam” app and select the tab at the bottom of the screen that says
“Wi-Fi Connect”.
Select “Router mode”, then “Next”. Enter here the Wi-Fi network name (SSID) and
password of your home router.
After the IP camera receives this information, it will restart. Please wait for it to start up and
connect to your Wi-Fi router. When it successfully connects, the status LED colour will turn
orange. It may take up to 5 minutes.
Then select the camera name in the “uCare Cam” app to connect.
Note: If the status LED colour does not turn orange, please check your Wi-Fi router and
make sure the IP camera is within the signal area of your Wi-Fi router. Then try this setup
again.
If your Wi-Fi router has a WPS (Wi-Fi Protected Setup) button, you can use it to set up the IP camera.
(Must enable WPA/WPA2 encryption in Router). On the Wi-Fi router, you will see a button labelled
“WPS”. It may also be called “QSS” or “AOSS”
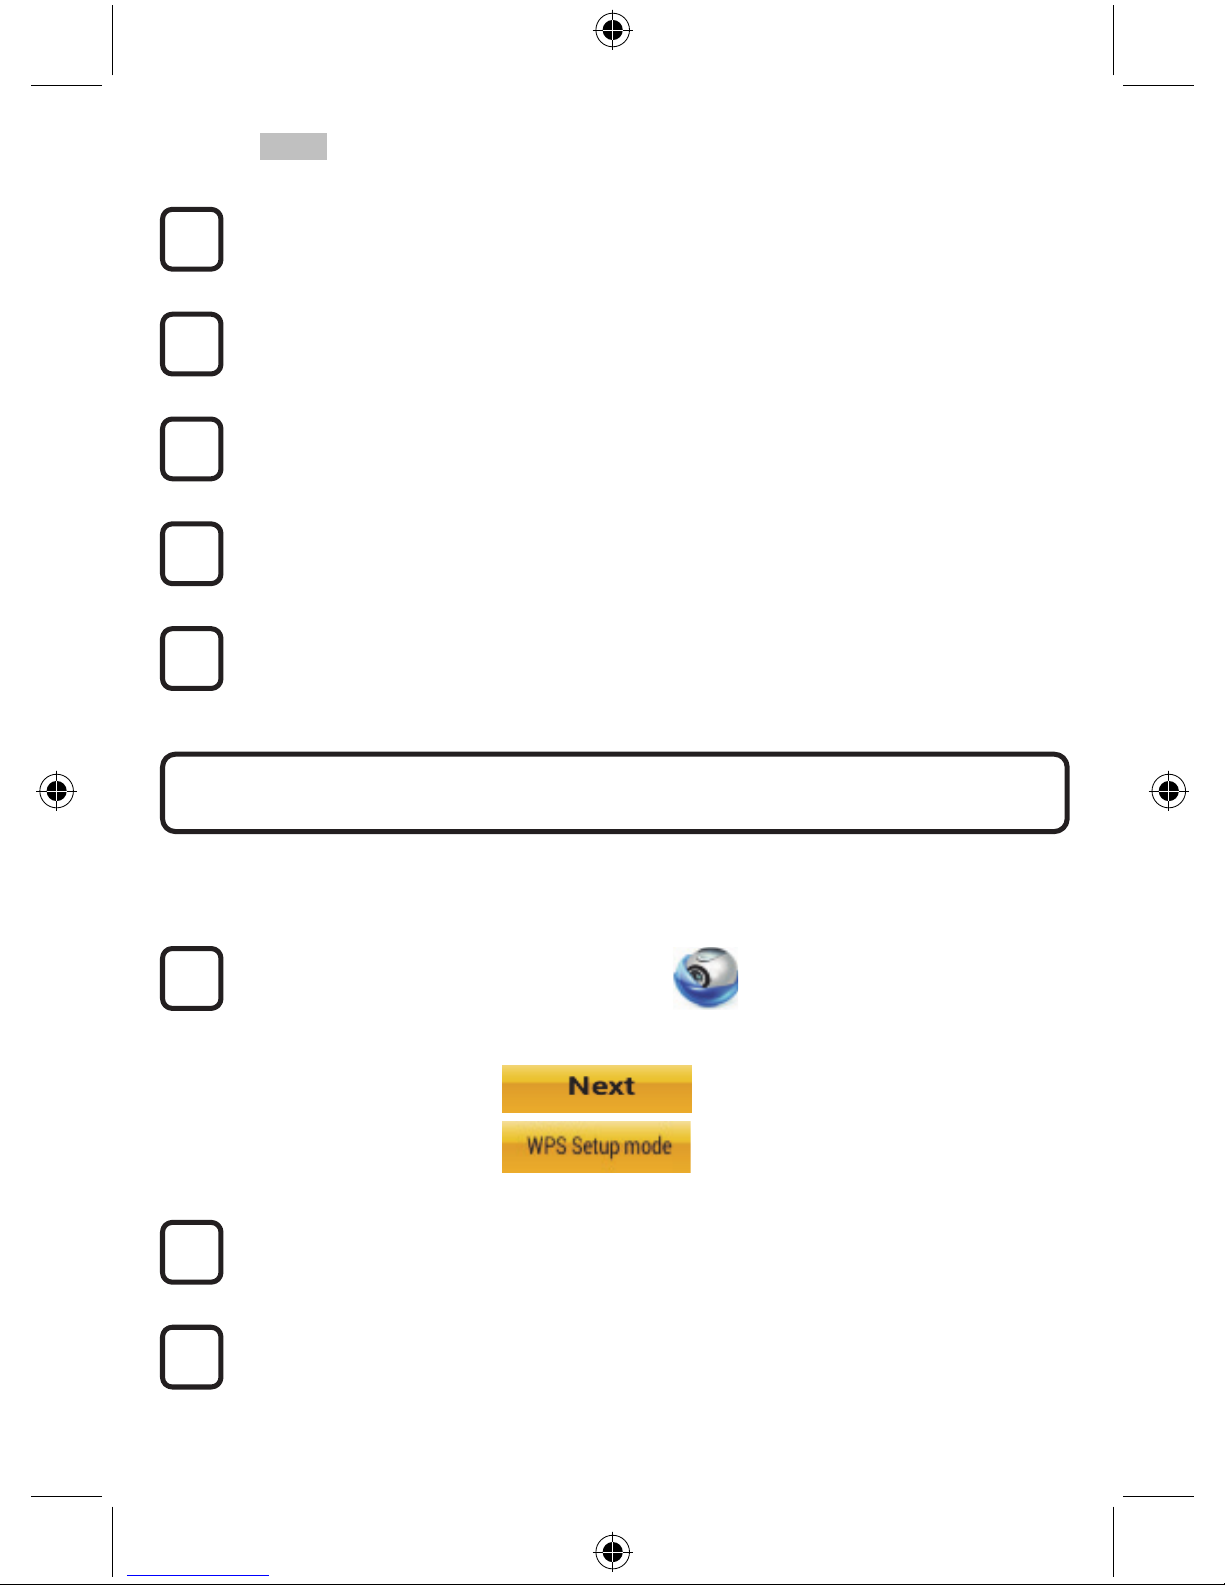
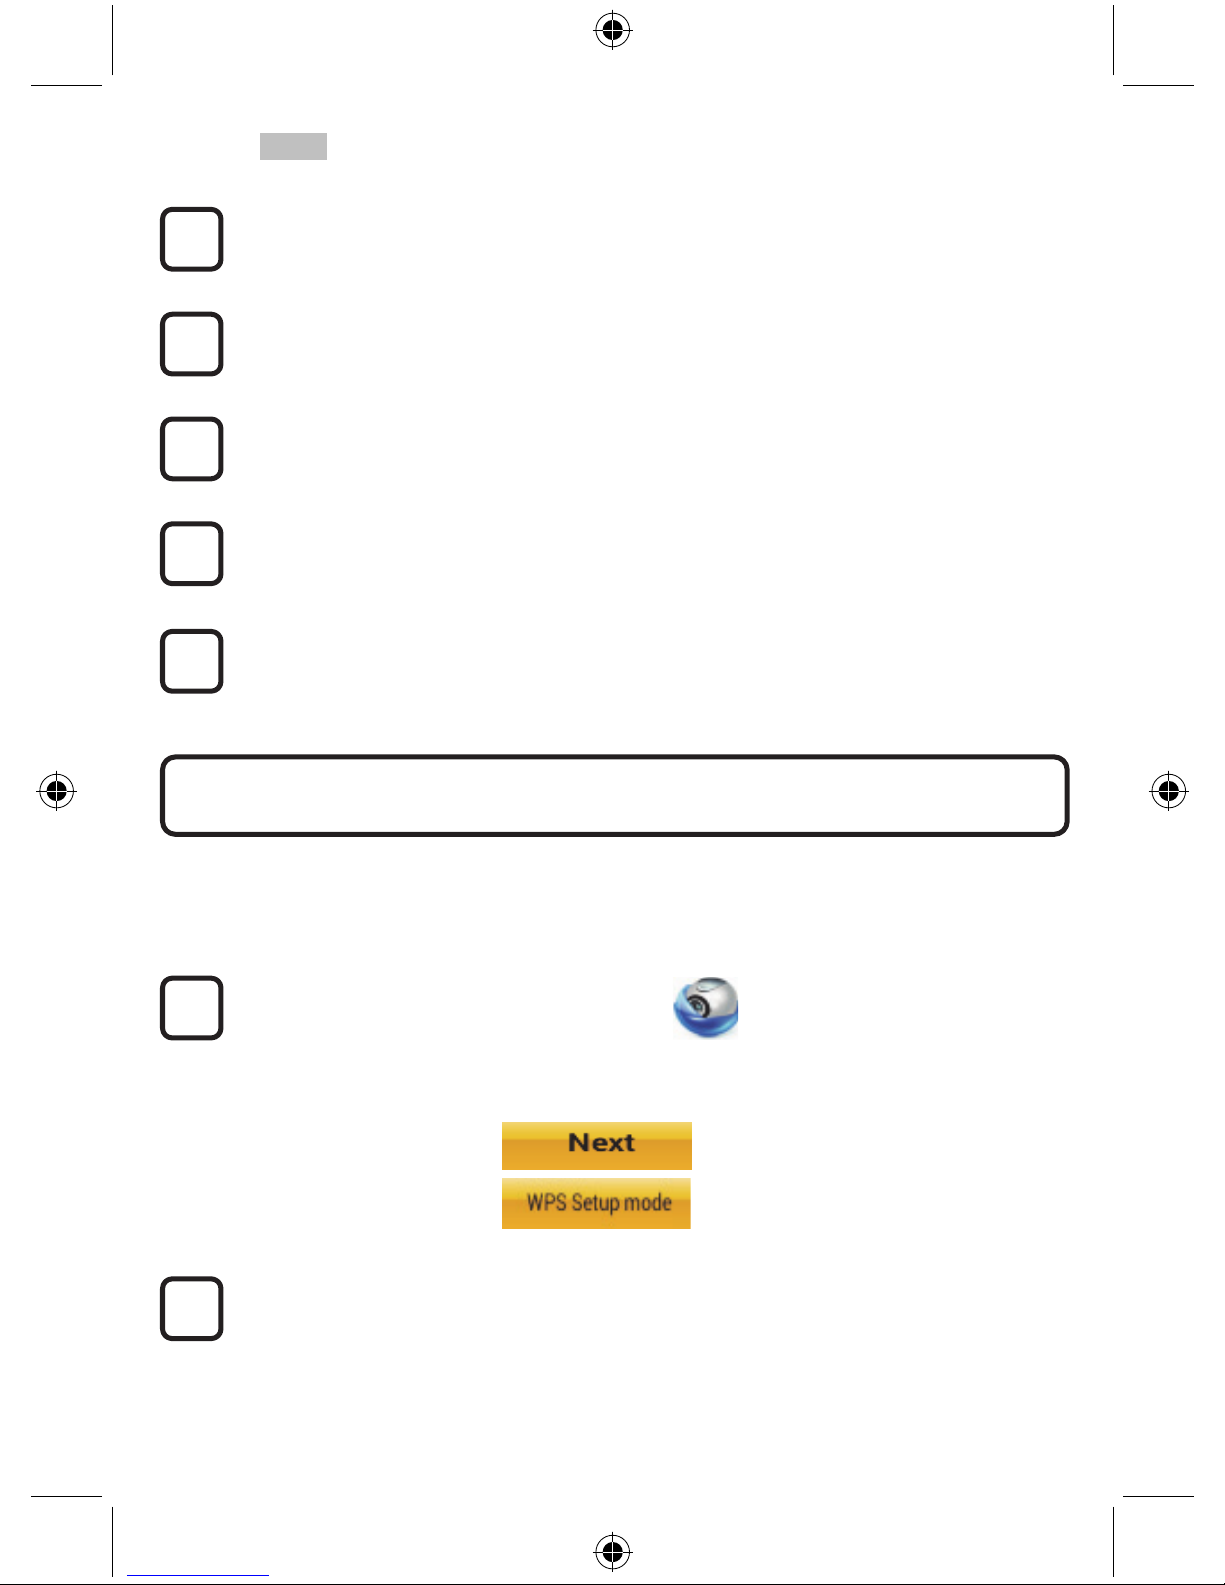
Setup Wi-Fi - WPS mode
Open the “uCare Cam” app
and select “Wi-Fi Setting” or “Wi-Fi Connect” at the bottom of the screen.
Select the tab:
then select the tab:
to enter Step 2 (see Figure 8).
Enter WPS mode
Power on your IP camera. The status LED on the IP camera will be green for about 15
seconds.
Programme Loading
The status LED will flash red for about 15 seconds.
2
3
1
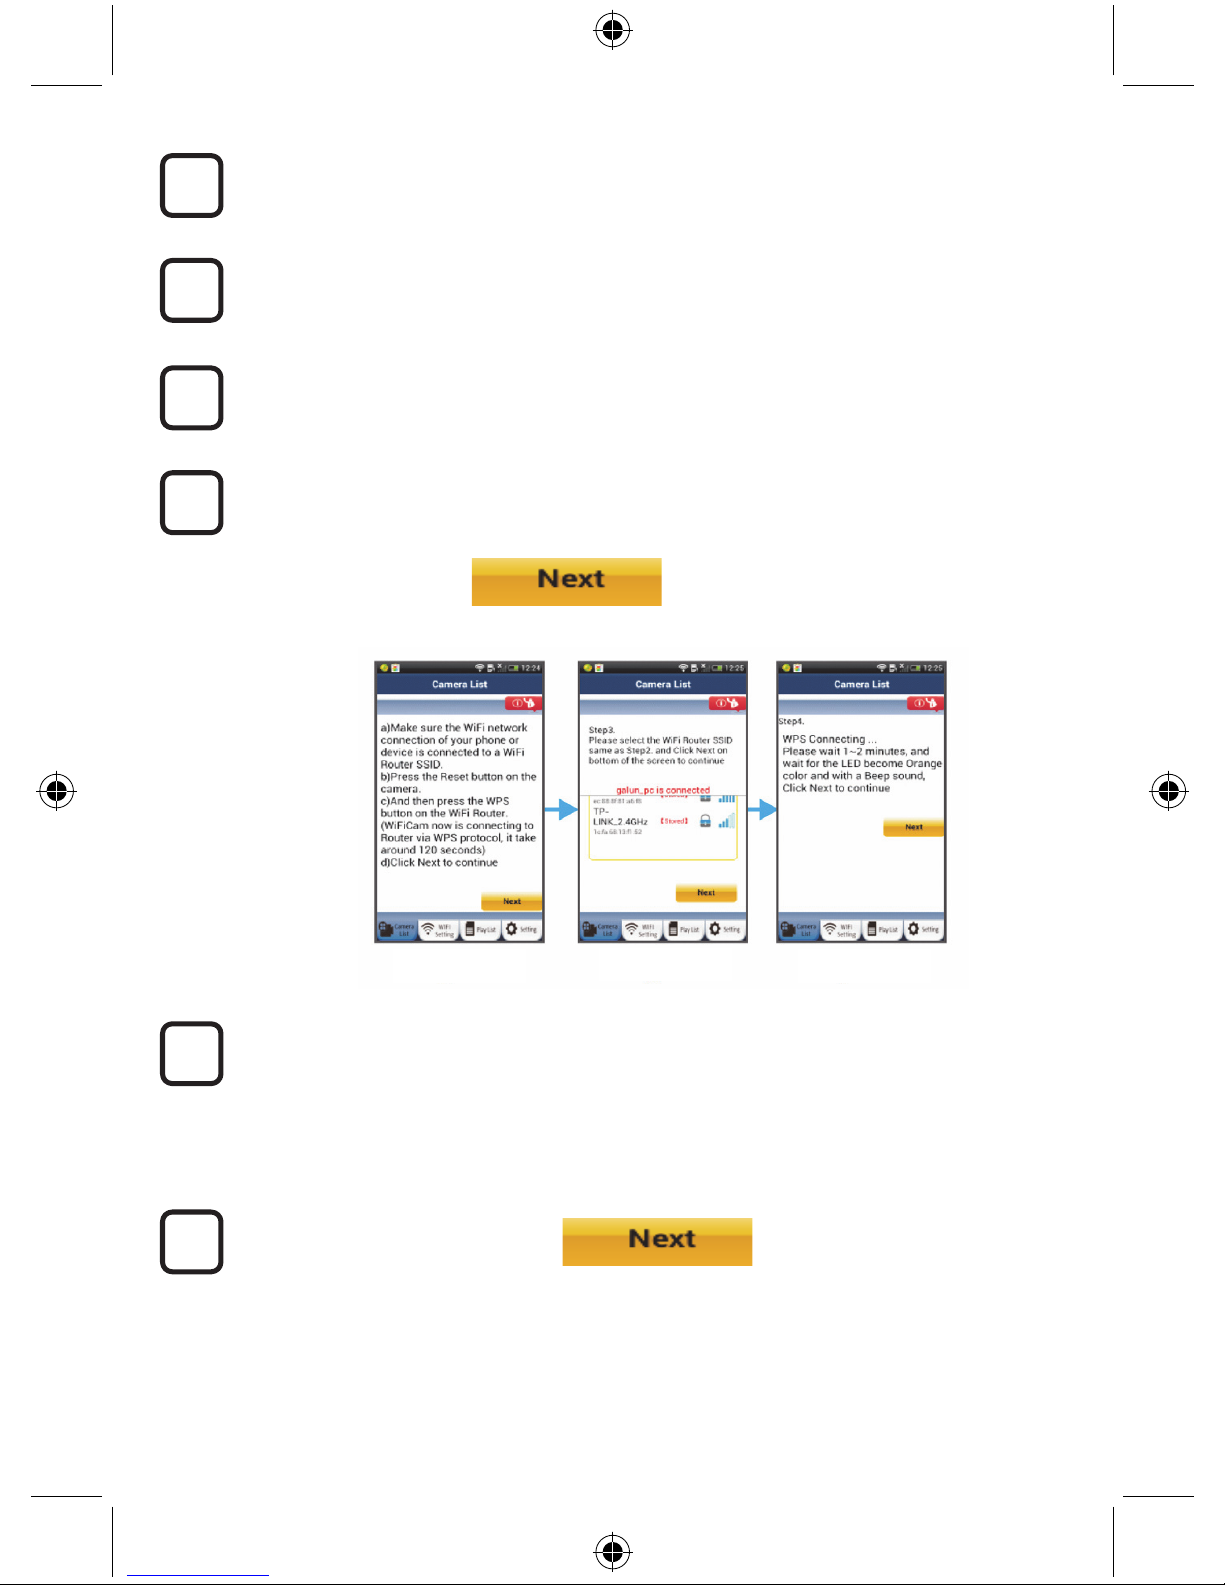
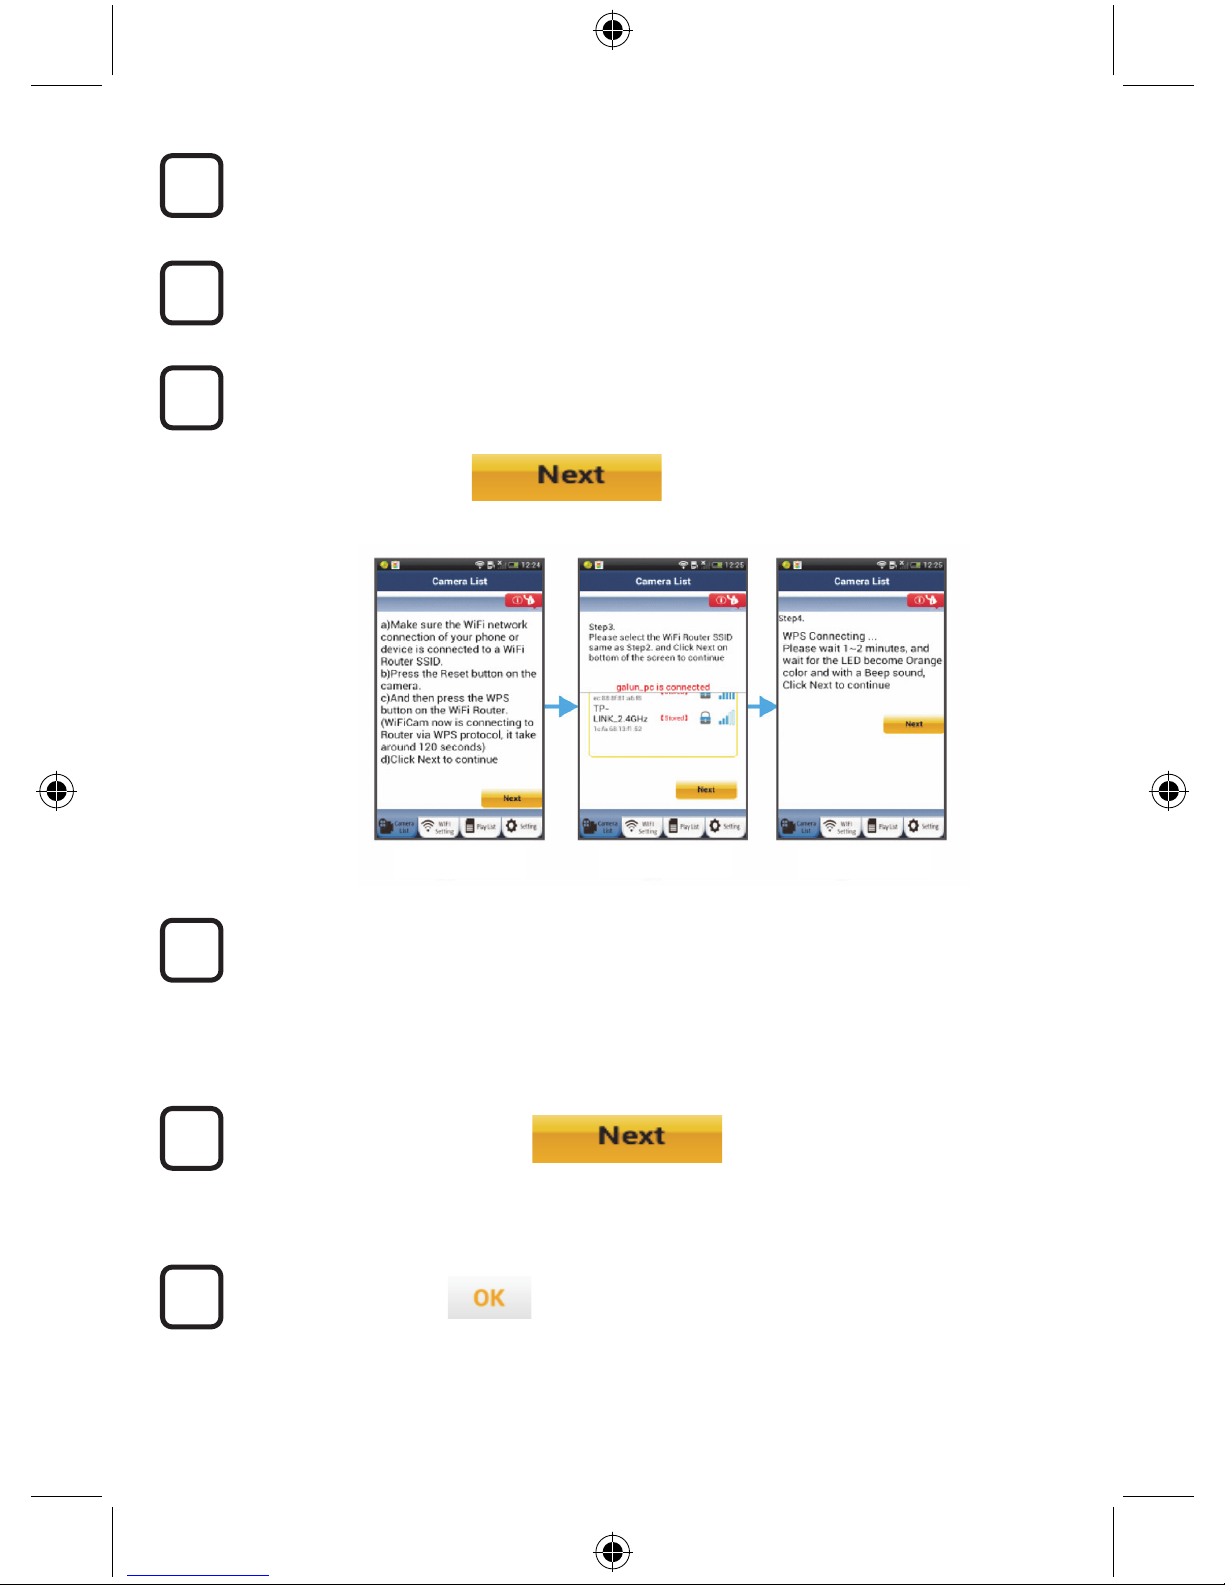
Install your IP camera by WPS connection mode
12
11
10
9
8
6
Press the WPS button on your IP camera
Wait until the status LED flashes between red and green, then press and hold the
WPS/RESET button on your IP camera for about 2 seconds to enter WPS mode. The
status LED will be flashing green.
Enter WPS mode on the Wi-Fi router
Press the WPS button on the Wi-Fi router
Selecting the Wi-Fi router
Select the Wi-Fi router of your choice in the screen (see Figure 9).
Then select the tab:
to enter next step (see Figure 10).
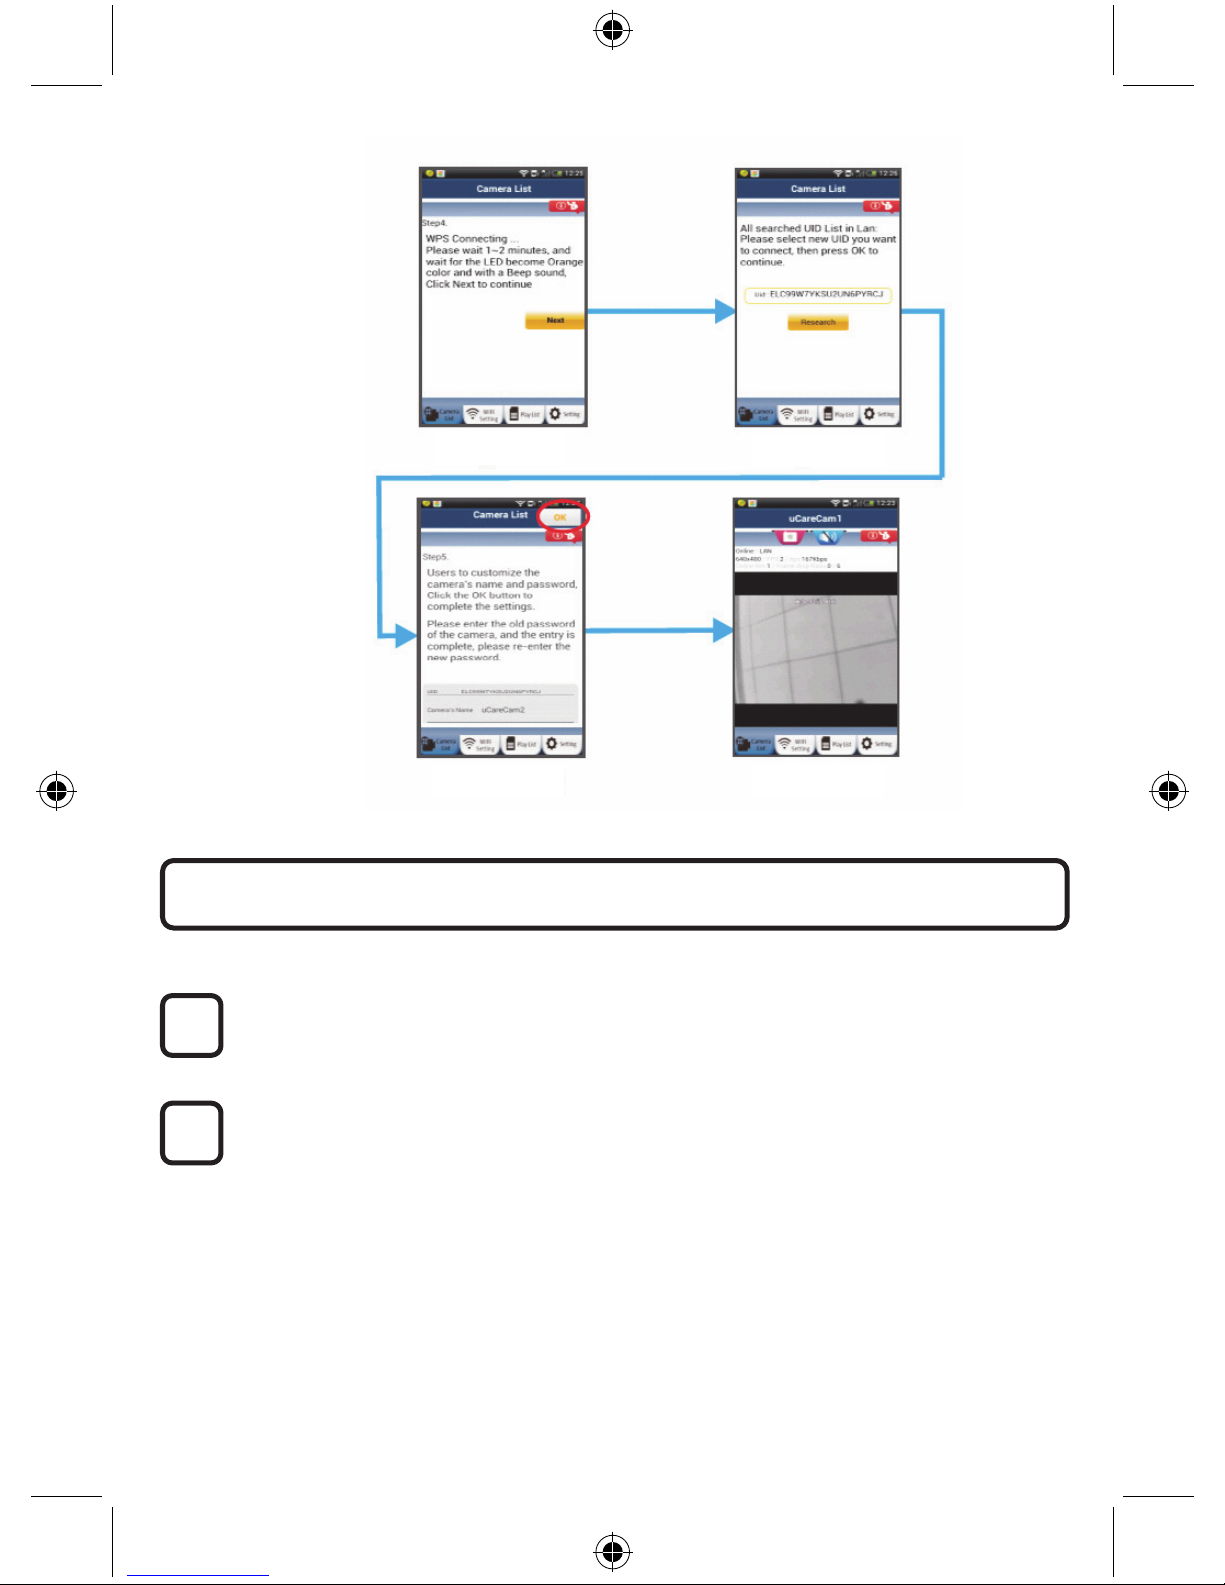
IP camera connects with Wi-Fi router
Wait about 1-2 minutes. If the IP camera is successfully connected to the Wi-Fi router, the
status LED will become orange.
Otherwise the status LED will become a flashing red light. If the setup is not successful,
please go back to Step 1 and try again.
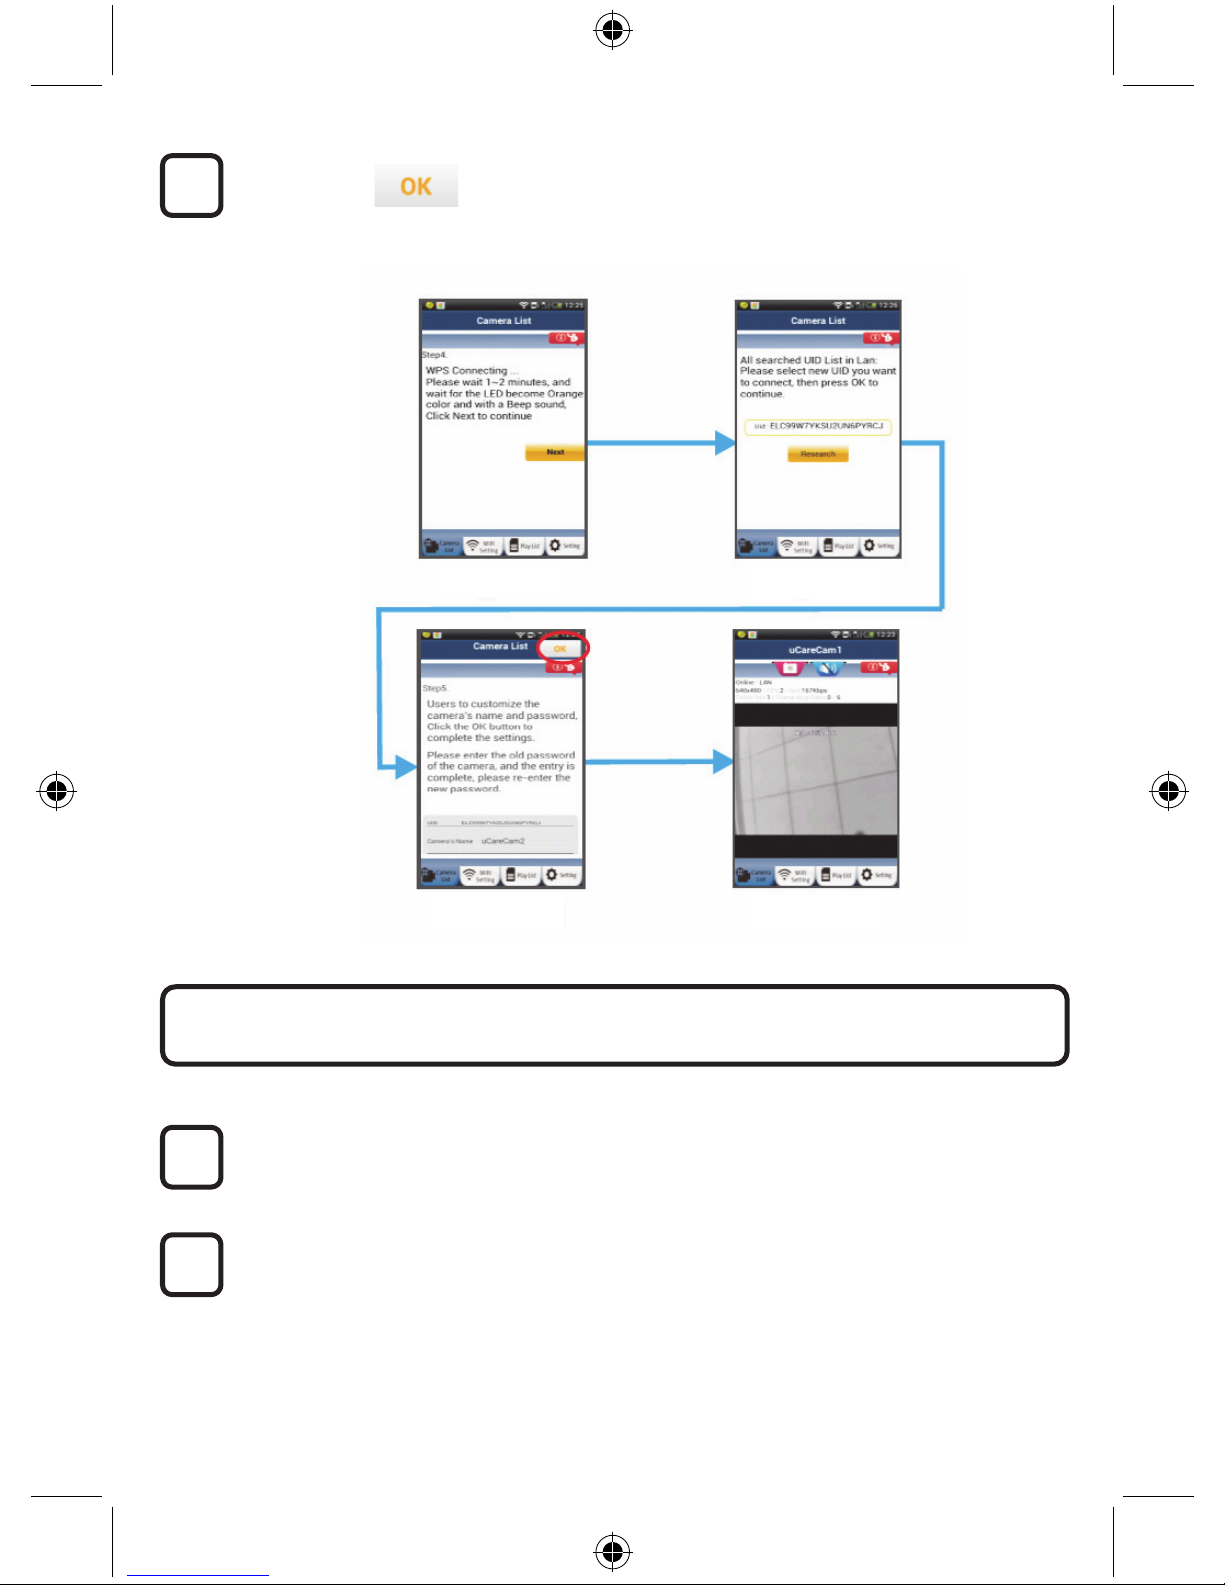
If successful, select the tab:
(see Figure 11), and follow the instructions.
Please enter a camera name and password for security and
select the Tab: (see Figure 13).
The IP camera will automatically enter the viewing screen (see Figure 14).
8
6
5
4
9
7
Figure9
Figure10 Figure8
7
Power On
Plug the power adapter DC connector into the DC input port of the IP camera and then plug
the power adapter into a wall outlet. The status LED on the IP camera will turn green for
about 15 seconds.
Programme Loading
The status LED will flash red for about 15 seconds.
2
1
Start up the IP camera after the Wi-Fi connection has been
completed
Figure11
Figure12
Figure13 Figure14
8
Searching Wi-Fi Router
The status LED will flash green until the Wi-Fi router is found (up to 5 minutes).
Once the router is found, the status LED will become orange.
If the IP camera cannot connect to the Wi-Fi router, please check the Wi-Fi router status or
re-install.
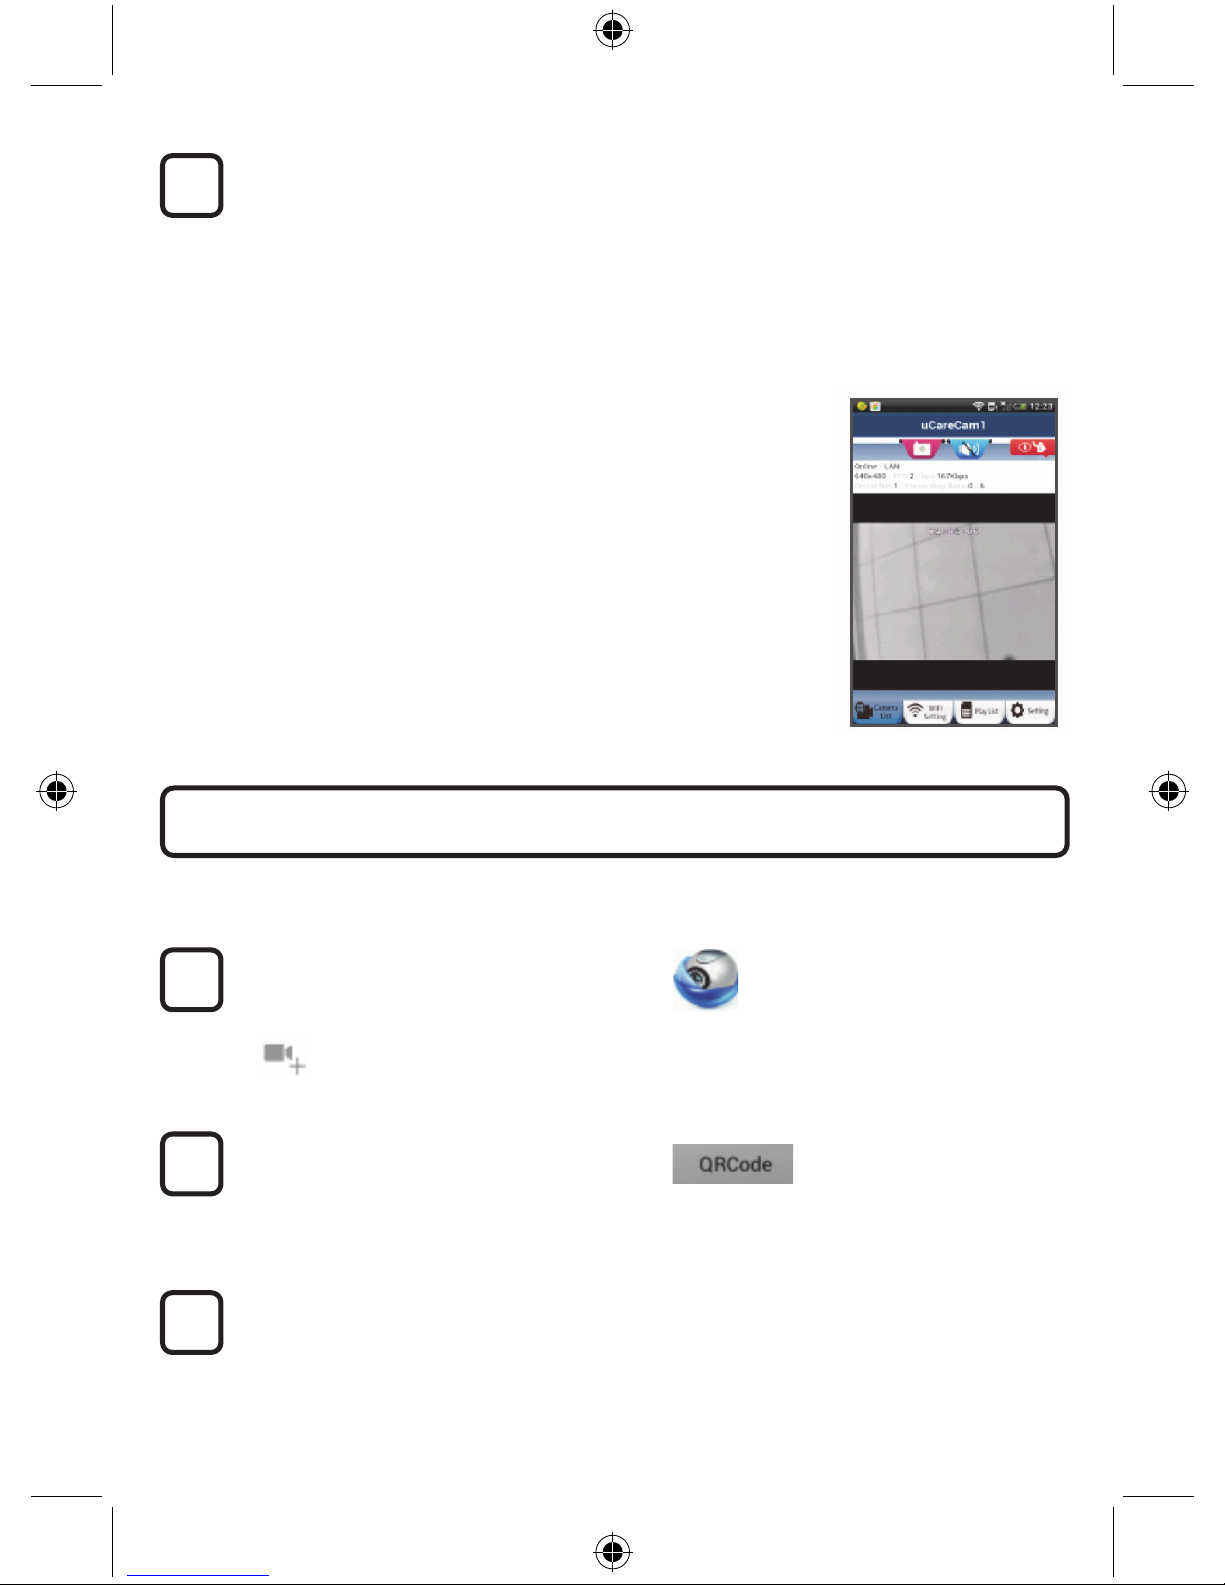
In the app, select the camera name that is shown in the Camera List, and the viewing
window will open(see Figure 15).
ANDROID (for Apple go to: Step 5)
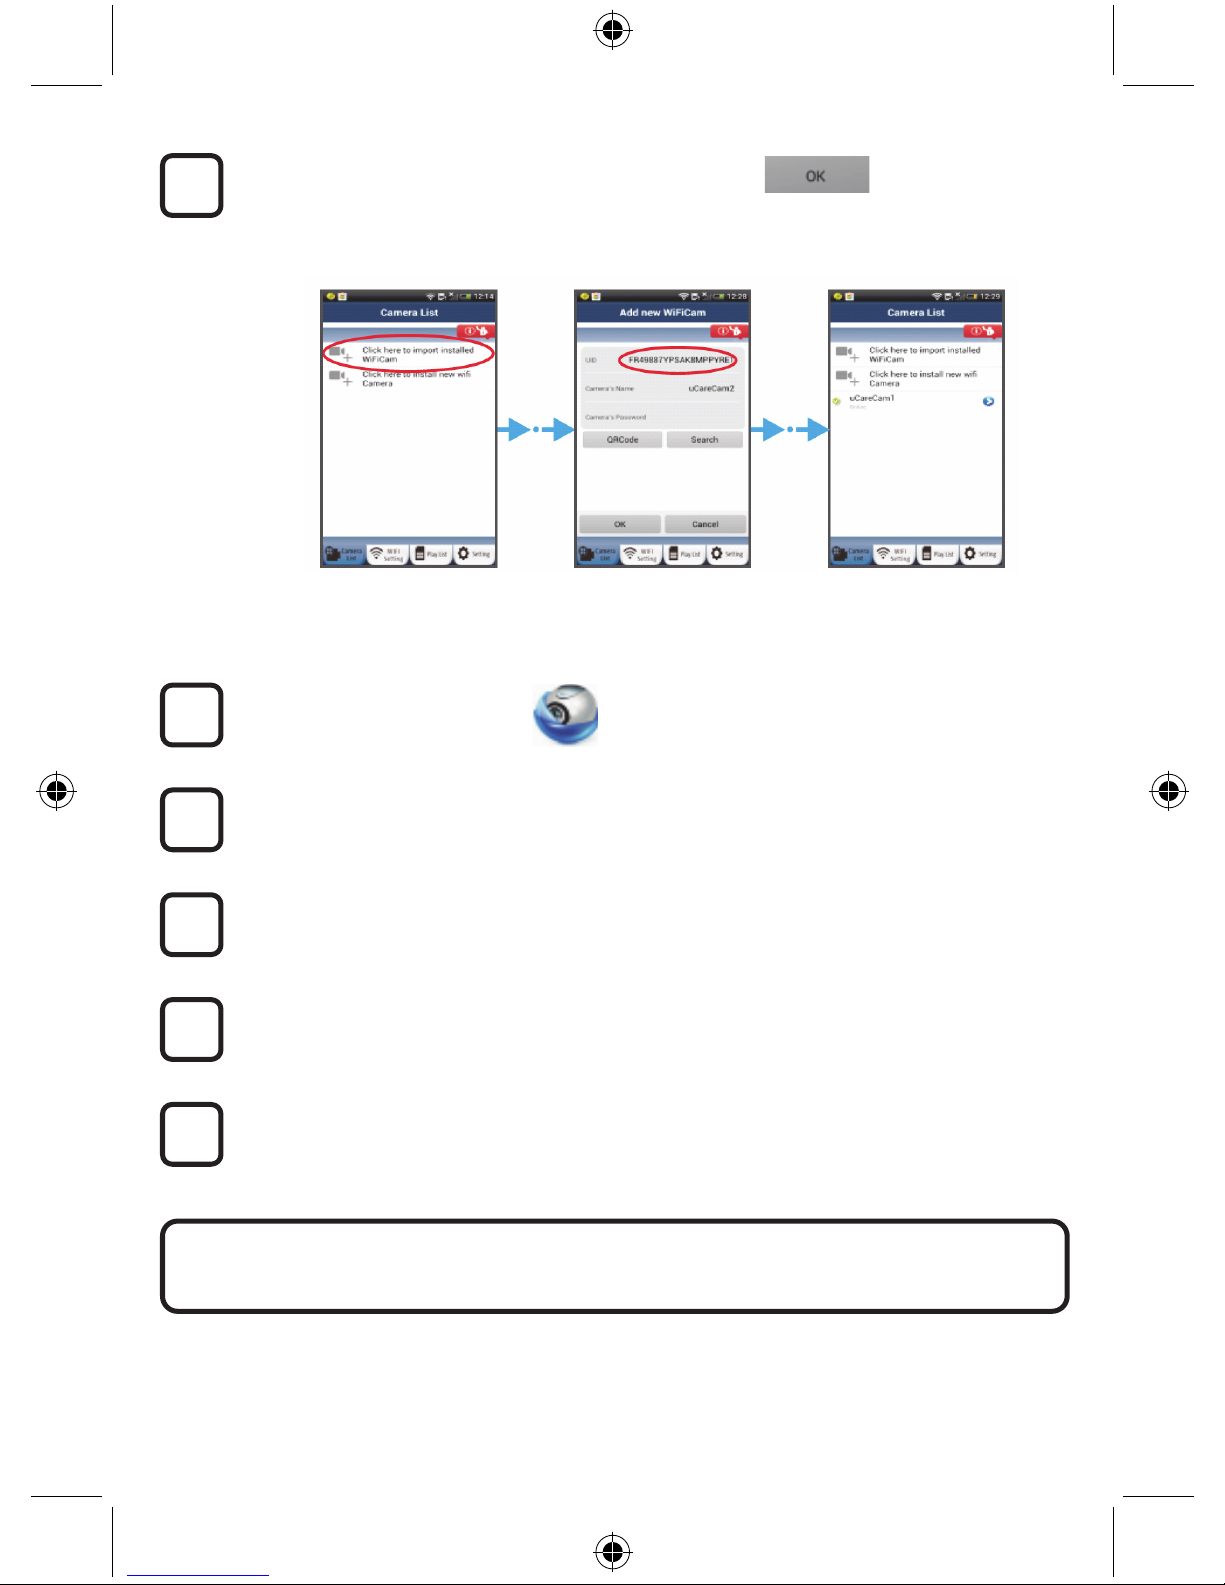
Open the “uCare Cam” app and select:
Click here to import installed Wi-Fi Camera
In the Camera List Window screen (see figure 16) for adding an IP camera.
Select the tab:
Your device will now enter the QR code mode.
Note: you need to have a QR code scanner installed on your device.
Locate the QR code on the backside of the IP camera and scan the QR code.
After scanning the QR code, the UID (Unique ID code) appears in the screen of your
device (see Figure 17).
3
2
1
Add already installed IP camera to the app
3
9
Enter a personal camera name and password and
select the tab:
(see Figure 17).
The new camera will be added to the list
(see Figure 18).
Figure16 Figure 17 Figure 18
APPLE
Open the App “uCare Cam”.
Select, in the camera list window, the “+” sign on the right top of the screen.
Select option “Scan camera QR code”.
Note: you need to have a QR code scanner installed on your device.
Locate the QR code on the backside of the IP camera and scan the QR code.
The UID (Unique ID code) will show up after scanning the QR code.
Enter a personal camera name and select “DONE” on the top right side of the screen.
4
For further explanation of the app, the IP camera and the FAQ, please check the FULL
manual (English only) on the CD supplied with this product.
9
8
7
6
5

10
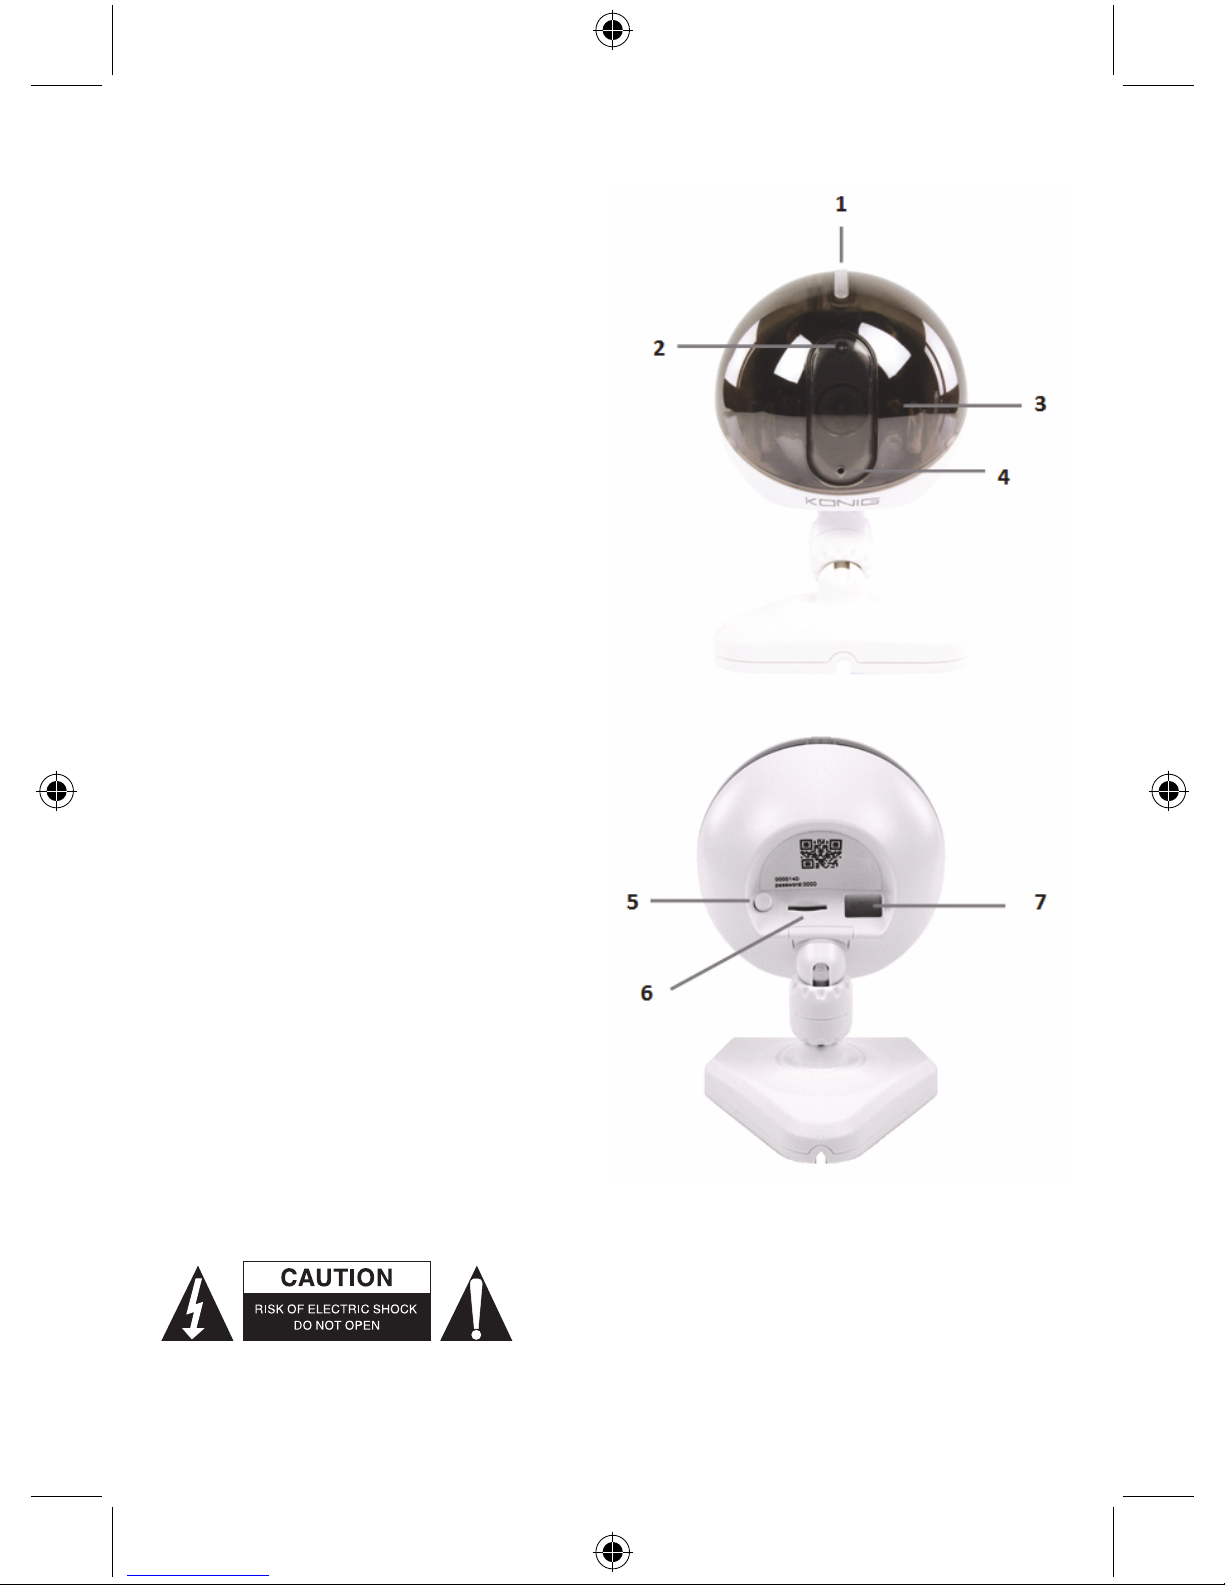
Product description:
SEC-IPCAM100B (W)
1. Wi-Fi antenna
2. Light intensity sensor
3. IR LED
4. No function
5. Microphone
6. LED indicator
7. WPS/Reset button
8. Micro SD card slot
9. Loudspeaker
10. Connection for camera mount
11. 5V DC input

11
SEC-IPCAM105B (W)
1. LED indicator
2. Light intensity sensor
3. IR LED
4. Microphone
5. WPS/Reset button
6. Micro SD card slot
7. 5V DC input
Safety precautions:
To reduce risk of electric shock, this product should ONLY be
opened by an authorised technician when service is
required. Disconnect the product from mains and other
equipment if a problem should occur. Do not expose the
product to water or moisture.
12
Maintenance:
Clean only with a dry cloth. Do not use cleaning solvents or abrasives.
Warranty:
Any changes and/or modifications to the product will void the warranty. We cannot accept any liability
for damage caused by incorrect use of this product.
Disclaimer:
Designs and specifications are subject to change without notice. All logos, brands and product names
are trademarks or registered trademarks of their respective holders and are hereby recognized as
such.
Disposal:
• This product is designated for separate collection at an appropriate collection point. Do not
dispose of this product with household waste.
• For more information, contact the retailer or the local authority responsible for waste
management.
This product has been manufactured and supplied in compliance with all relevant regulations and
directives, valid for all member states of the European Union. It also complies with all applicable
specifications and regulations in the country of sales.
Formal documentation is available upon request. This includes, but is not limited to: Declaration of
Conformity (and product identity), Material Safety Data Sheet and product test report.
Please contact our customer service desk for support:
via website: http://www.nedis.com/en-us/contact/contact-form.htm
via e-mail: service@nedis.com
via telephone: +31 (0)73-5993965 (during office hours)
NEDIS B.V., De Tweeling 28, 5215 MC ’s-Hertogenbosch, THE NETHERLANDS
13
DEUTSCH
IP-Kamera
Einführung:
• Diese authentische IP-Kamera zur Überwachung Ihres Eigentums ist nach dem Anschluss sofort
betriebsbereit. Die Installation ist sehr einfach und erfordert keine IP-Einstellungen oder
Router-Konfigurationen. Dank der kostenlosen uCare Cam App können Sie Übertragungen
jederzeit und überall auf Ihrem Smartphone oder auf anderen Mobilgeräten anschauen. Laden Sie
die uCare Cam App kostenlos von Google Play oder aus dem Apple App Store herunter. Weitere
Funktionen ermöglichen E-Mail- oder App-Benachrichtigungen für den Fall, dass Bewegungen
erkannt werden. Fotos und/oder Videoübertragungen lassen sich jederzeit anzeigen oder
abspielen. Dank 2-Wege-Audiofunktion auch als Babymonitor geeignet.
• Bitte lesen Sie diese Anleitung vor der Installation / dem Gebrauch des Geräts.
• Bewahren Sie diese Bedienungsanleitung für späteres Nachschlagen auf.
Systemanforderungen:
• Das Gerät unterstützt die Betriebssysteme Android 4.0 und höher oder iOS 5.0 und höher.
• Router mit Wi-Fi.
Sie können die „uCare Cam“ App von Google Play oder aus dem Apple App Store
herunterladen.
Android-Geräte
Download-Link zur „uCare Cam“ App im Google Play Store
iOS-Geräte
Download-Link zur „uCare Cam“ App im App Store
Klicken Sie nach der Installation der Software
auf das Icon, um die App zu starten.
Standardpasswort für „uCare Cam“: 0000
Administratorname: admin
Administratorpasswort: 0000
Installation der App auf Ihrem Mobilgerät
2
1
14
Abbildung 1
„Ansicht der Kameraliste“
Es gibt zwei Möglichkeiten, den einfachen Setup Ihrer IP-Kamera fortzusetzen.
Einschalten
Verbinden Sie den DC-Stecker des Netzteils mit der DC-Eingangsbuchse der IP-Kamera
und schließen Sie dann das Netzteil an eine Steckdose an. Die LED-Statusanzeige an der
IP-Kamera leuchtet ungefähr 15 Sekunden lang grün.
Programm wird geladen
Die LED-Statusanzeige blinkt ungefähr 15 Sekunden lang rot.
Router-Verbindungsmodus
Warten Sie, bis die LED-Statusanzeige abwechselnd rot und grün leuchtet.
Hinweis:
Falls die LED-Anzeige nicht rot und grün leuchtet, halten Sie die
WPS/RÜCKSTELLUNGS-Taste mehr als 10 Sekunden lang gedrückt, um die IP-Kamera
neu zu starten.
Leuchtet die grüne LED-Statusanzeige stetig und blinkt die rote Anzeige zweimal und
leuchtet dann grün, wurde der RÜCKSTELLUNGS-Modus aktiviert. Lassen Sie nun die
Taste los und warten Sie, bis die LED-Statusanzeige abwechseln rot und grün leuchtet.
ANDROID (für Apple, siehe Schritt 8)
Verbindung der IP-Kamera mit dem Wi-Fi-Router
Öffnen Sie die „uCare Cam“ App und
wählen Sie:
Klicken Sie hier zur Installation der neuen
Wi-Fi-Kamera
In der Ansicht der Kameraliste (siehe Abbildung 1).
4
3
2
1
Installation Ihrer IP-Kamera per ROUTER-MODUS

15
Wählen Sie in der darauffolgenden Ansicht
die Option:
Wählen Sie dann:
um zum nächsten Schritt zu gelangen
(siehe Abbildung 2).
Befolgen Sie die Anweisungen in der Ansicht der Kameraliste Schritt für Schritt (siehe
Abbildung 3 und Abbildung 4). Geben Sie einen Namen für die Kamera und das Passwort
(per Werkseinstellung 0000) ein.
Aus Sicherheitsgründen legen wir Ihnen nahe, das Passwort nach dem Setup zu ändern.
Klicken Sie auf
(siehe Abbildung 5). Die uCare Cam öffnet die Kameraübertragung automatisch (siehe
Abbildung 6) und die LED-Statusanzeige der IP-Kamera leuchtet orange.
7
6
5
Abbildung3
Abbildung2
Abbildung4
Abbildung5 Abbildung6
16
APPLE
Verbindung der IP-Kamera mit dem Wi-Fi-Router
Öffnen Sie an Ihrem iOS-Gerät die „Settings“ und wählen Sie „Wi-Fi“. Lassen Sie das
Gerät nach einem Netzwerk suchen. Das Zielnetzwerk ist „Wi-Fi-cam-p2p“. Wählen Sie
„Wi-Fi-cam-p2p“ für die Verbindung.
Öffnen Sie nun die „uCare Cam“ App und wählen Sie dann unten im Bildschirm die Taste
„Wi-Fi Connect“.
Wählen Sie „Router mode“ und anschießend „Next“. Bitte geben Sie hier den Namen des
Wi-Fi-Netzwerks (SSID) sowie das Passwort Ihres Home-Routers ein.
Nach dem Erhalt dieser Informationen wird die IP-Kamera gestartet. Warten Sie, bis die
Kamera hochgefahren ist und die Verbindung mit Ihrem Wi-Fi-Router hergestellt hat. Nach
der erfolgreichen Verbindung leuchtet die LED-Statusanzeige orange. Der Vorgang kann
bis zu 5 Minuten dauern.
Wählen Sie in der „uCare Cam“ App den Kameranamen für die Verbindung aus.
Hinweis: Falls die LED-Statusanzeige nicht orange leuchtet, überprüfen Sie Ihren
Wi-Fi-Router und vergewissern Sie sich, dass sich die IP-Kamera in der Signalreichweite
Ihres Wi-Fi-Routers befindet. Führen Sie dann den Setup erneut durch.
Falls Ihr Wi-Fi-Router über eine WPS-Taste (Wi-Fi Protected Setup) verfügt, können Sie diese für den
Setup der IP-Kamera verwenden. (WPA/WPA2-Verschlüsselung im Router muss aktiviert sein).
Suchen Sie an Ihrem Wi-Fi-Router die Taste mit der Kennzeichnung „WPS“. Einige Tasten haben
auch die Kennzeichnung „QSS“ oder „AOSS“.
Wi-Fi einrichten – WPS-Modus
Öffnen Sie die „uCare Cam“ App
und wählen Sie die Option „Wi-Fi Setting“ oder „Wi-Fi Connect“ an der Unterseite des
Bildschirms.
Wählen Sie:
Wählen Sie dann:
um zu Schritt 2 zu gelangen (siehe Abbildung 8).
WPS-Modus einschalten
Schalten Sie Ihre IP-Kamera ein. Die LED-Statusanzeige der IP-Kamera leuchtet ungefähr
15 Sekunden lang grün.
2
1
Installation der IP-Kamera per WPS-Verbindungsmodus
12
11
10
9
8
17
Programm wird geladen
Die LED-Statusanzeige blinkt ungefähr 15 Sekunden lang rot.
Drücken Sie die WPS-Taste auf Ihrer IP-Kamera
Warten Sie, bis die LED-Statusanzeige abwechselnd rot und grün blinkt. Halten Sie dann
die WPS/RÜCKSTELLUNGS-Taste an Ihrer IP-Kamera ungefähr 2 Sekunden lang
gedrückt, um den WPS-Modus zu aktivieren. Die LED-Statusanzeige blinkt grün.
WPS-Modus am Wi-Fi-Router aktivieren
Drücken Sie am Wi-Fi-Router die WPS-Taste.
Wi-Fi-Router auswählen
Wählen Sie in der Ansicht den gewünschten Wi-Fi-Router aus (siehe Abbildung 9).
Wählen Sie dann:
um zum nächsten Schritt zu gelangen (siehe Abbildung 10).
Die IP-Kamera stellt die Verbindung mit dem Wi-Fi-Router her.
Warten Sie 1-2 Minuten. Nach der erfolgreichen Verbindung der IP-Kamera mit dem
Wi-Fi-Router leuchtet die LED-Statusanzeige orange.
Anderenfalls blinkt die Anzeige rot. Falls der Setup nicht erfolgreich war, kehren Sie bitte
zu Schritt 1 zurück und versuchen es erneut.
Falls verbunden, wählen Sie:
(siehe Abbildung 11) und folgen Sie den Anweisungen.
Bitte geben Sie aus Sicherheitsgründen einen Namen und ein Passwort ein und
8
6
5
4
7
3
Abbildung9
Abbildung10Abbildung8
18
wählen Sie: (siehe Abbildung 13).
Die IP-Kamera öffnet automatisch das Übertragungsfenster (siehe Abbildung 14).
Einschalten
Verbinden Sie den DC-Stecker des Netzteils mit der DC-Eingangsbuchse der IP-Kamera
und schließen Sie dann das Netzteil an eine Steckdose an. Die LED-Statusanzeige an der
IP-Kamera leuchtet ungefähr 15 Sekunden lang grün.
Programm wird geladen
Die LED-Statusanzeige blinkt ungefähr 15 Sekunden lang rot.
2
1
IP-Kamera nach dem Aufbau der Wi-Fi-Verbindung starten
9
Abbildung11
Abbildung12
Abbildung13 Abbildung14

19
Suche nach Wi-Fi-Router
Die LED-Statusanzeige blinkt grün, bis ein Wi-Fi-Router gefunden wurde (bis zu
5 Minuten).
Nach der erfolgreichen Erkennung des Routers leuchtet die LED-Statusanzeige orange.
Falls die IP-Kamera keine Verbindung mit dem Wi-Fi-Router herstellen kann, überprüfen
Sie den Status des Wi-Fi-Routers oder führen Sie die Installation erneut durch.
Wählen Sie in der App den Kameranamen, der in der Kameraliste angezeigt wird. Das
Übertragungsfenster wird dann geöffnet (siehe Abbildung 15).
ANDROID (für Apple, siehe Schritt 5)
Öffnen Sie die „uCare Cam“ App und
wählen Sie:
Klicken Sie hier zum Importieren der
installierten Wi-Fi-Kamera
In der Ansicht der Kameraliste (siehe Abbildung 16), um eine IP-Kamera hinzuzufügen.
Wählen Sie:
Ihr Gerät aktiviert nun den QR-Code-Modus.
Hinweis: An Ihrem Gerät muss ein QR-Codescanner installiert sein.
Suchen Sie den QR-Code an der Rückseite der IP-Kamera und scannen Sie den
QR-Code.
Nach dem Scannen des QR-Codes erscheint die UID (Unique ID Code) auf dem
Bildschirm Ihres Geräts (siehe Abbildung 17).
3
2
1
Bereits installierte IP-Kamera zur App hinzufügen
3

20
Geben Sie einen Namen für die Kamera und das
Passwort ein und wählen Sie:
(siehe Abbildung 17).
Die neue Kamera wird zur Liste hinzugefügt (siehe
Abbildung 18).
Abbildung16 Abbildung17 Abbildung18
APPLE
Öffnen Sie die „uCare
Cam“ App.
Wählen Sie in der Ansicht der Kameraliste rechts oben im Bildschirm das Symbol „+“.
Wählen Sie die Option „Scan camera QR code“.
Hinweis: An Ihrem Gerät muss ein QR-Codescanner installiert sein.
Suchen Sie den QR-Code an der Rückseite der IP-Kamera und scannen Sie den
QR-Code.
Nach dem Scannen des QR-Codes wird die UID (Unique ID Code) angezeigt.
Geben Sie einen Namen für die Kamera ein und wählen Sie oben rechts im Bildschirm die
Option „DONE“.
4
Nähere Informationen zur App, zur IP-Kamera und zu FAQ finden Sie in der
AUSFÜHRLICHEN Bedienungsanleitung (nur auf Englisch) auf der mitgelieferten CD.
9
8
7
6
5

21
Beschreibung des Produkts:
SEC-IPCAM100B (W)
1. Wi-Fi-Antenne
2. Lichtstärkesensor
3. IR-LED
4. Ohne Funktion
5. Mikrofon
6. LED-Anzeige
7. WPS/Rückstellungs-Taste
8. MicroSD-Kartenschlitz
9. Lautsprecher
10. Anschluss zur Befestigung der Kamera
11. 5V DC Eingang
22
SEC-IPCAM105B (W)
1. LED-Anzeige
2. Lichtstärkesensor
3. IR-LED
4. Mikrofon
5. WPS/Rückstellungs-Taste
6. MicroSD-Kartenschlitz
7. 5V DC Eingang
Sicherheitsvorkehrungen:
Um das Risiko eines elektrischen Schlags zu verringern,
sollte dieses Produkt AUSSCHLIESSLICH von einem
autorisierten Techniker geöffnet werden. Trennen Sie das
Produkt von anderen Geräten, wenn ein Problem auftreten
sollte. Setzen Sie das Gerät nicht Wasser oder Feuchtigkeit
aus.
23
Wartung:
Nur mit einem trockenen Tuch säubern. Keine Reinigungs- oder Scheuermittel verwenden.
Garantie:
Alle Änderungen und/oder Modifizierungen an dem Produkt haben ein Erlöschen der Garantie zur
Folge. Wir übernehmen keine Haftung für Schäden durch unsachgemäße Verwendung dieses
Produkts.
Haftungsausschluss:
Design und technische Daten unterliegen unangekündigten Änderungen. Alle Logos, Marken und
Produktnamen sind Marken oder eingetragene Marken ihrer jeweiligen Eigentümer und werden
hiermit als solche anerkannt.
Entsorgung:
• Dieses Produkt muss an einem entsprechenden Sammelpunkt zur Entsorgung abgegeben
werden. Entsorgen Sie dieses Produkt nicht mit dem Haushaltsmüll.
• Weitere Informationen erhalten Sie beim Verkäufer oder der für die Abfallwirtschaft
verantwortlichen örtlichen Behörde.
Dieses Produkt wurde hergestellt und geliefert in Übereinstimmung mit allen geltenden Vorschriften
und Richtlinien, die für alle Mitgliedsstaaten der Europäischen Union gültig sind. Es entspricht allen
geltenden Vorschriften und Bestimmungen im Land des Vertriebs.
Eine formale Dokumentation ist auf Anfrage erhältlich. Diese beinhaltet unter anderem, jedoch nicht
ausschließlich: Konformitätserklärung (und Produktidentität), Sicherheitsdatenblatt, Testreport des
Produkts.
Wenden Sie sich bei Fragen bitte an unseren Kundendienst:
per Internet: http://www.nedis.de/de-de/kontakt/kontaktformular.htm
per E-Mail: service@nedis.com
per Telefon: Niederlande +31 (0)73-5993965 (während der Geschäftszeiten)
NEDIS B.V., De Tweeling 28, 5215 MC ’s-Hertogenbosch, NIEDERLANDE

24
FRANÇAIS
Caméra IP
Introduction :
• Surveillez vos biens personnels avec cette caméra IP Plug & Play authentique. Facile et simple à
installer, fonctionne sans avoir besoin d'une configuration quelconque. L'application gratuite uCare
Cam vous permet de regarder et écouter en prise directe sur votre Smartphone ou tout autre
appareil mobile, n'importe où et n'importe quand. L'application gratuite uCare Cam est disponible
sur Google Play et sur l'App Store d'Apple. Les caractéristiques avancées offrent des notifications
par courriel ou sur l'application lorsqu'un mouvement est détecté. Les prises de photo et/ou vidéo
peuvent être rejouées à tout moment. Convient également pour une utilisation comme un
interphone bébé du fait de la fonction audio bidirectionnelle.
• Nous vous conseillons de lire ce manuel avant d'installer / utiliser ce produit.
• Conservez ce manuel dans un endroit sûr, pour pouvoir le consulter ultérieurement.
Configuration requise :
• L'appareil fonctionne sous Android 4.0 et supérieur ou sous iOS 5.0 et supérieur.
• Routeur avec Wi-Fi.
Télécharger l'application « uCare Cam » sur Google Play ou sur l'App Store d'Apple
Appareil Android
Lien de téléchargement « uCare Cam » sur le Google Play Store
Appareil iOS
Lien de téléchargement « uCare Cam » sur l'App Store
Une fois l'installation du logiciel terminée, cliquez
sur l'icône pour lancer l'application.
Mot de passe « uCare Cam » par défaut : 0000
Nom d'administrateur : admin
Mot de passe administrateur : 0000
2
1
Installation de l'application sur votre appareil mobile

25
Image 1
« Fenêtre de liste de
caméra »
Il y a deux options pour continuer l'installation facile de votre caméra IP.
Allumer
Branchez le connecteur d'adaptateur CC dans le port d'entrée CC de la caméra IP, puis
branchez l'adaptateur d'alimentation sur le secteur. L'indicateur DEL de statut sur la
caméra IP s'allumera en vert pendant environ 15 secondes.
Chargement de programme
L'indicateur DEL de statut clignotera en rouge pendant environ 15 secondes.
Mode Lien routeur
Attendez que la couleur de statut de l'indicateur DEL alterne entre le rouge et le vert.
Remarque :
Si la DEL ne passe pas au rouge et vert, alors appuyez sur la touche
WPS/RÉINITIALISATION pendant plus de 10 secondes pour redémarrer la caméra IP.
Lorsque l'indicateur DEL de statut vert s'allume et se maintient, puis que l'indicateur DEL
de statut clignote deux fois en rouge, pour passer au vert par la suite, la caméra est passée
en mode RESET (réinitialisation). À ce moment, vous pouvez relâcher la touche et
attendre jusqu'à ce que l'indicateur de statut DEL alterne entre le rouge et le vert.
ANDROID (pour Apple, passez à : l'étape 8)
Configurer la caméra IP pour la connecter au routeur Wi-Fi
Ouvrez l'application « uCare Cam » et choisissez :
Cliquez ici pour installer la nouvelle caméra Wi-Fi
dans l'écran de la fenêtre de liste de caméra (voir image 1).
Installez votre caméra par MODE ROUTEUR
4
3
2
1
26
Dans l'écran suivant, choisissez l'onglet :
Puis choisissez l'onglet :
Pour passer à l'étape suivante
(voir image 2).
Suivez les instructions dans la fenêtre de liste de caméra étape par étape (voir l'image 3 et
l'image 4). Saisissez un nom et un mot de passe de caméra (par défaut : 0000).
Nous vous conseillons de changer le mot de passe par défaut après l'installation pour des
raisons de sécurité.
Cliquez sur l'onglet
(Voir image 5). L'application uCare Cam passera automatiquement à la fenêtre de
visualisation (voir image 6) et l'indicateur DEL de statut passera à l'orange.
7
6
5
Image 3
Image 2
Image 4
Image 5 Image 6

27
APPLE
Configurer la caméra IP pour la connecter au routeur Wi-Fi
Ouvrez « Settings » sur votre appareil iOS et sélectionnez « Wi-Fi » et laissez-le chercher
un réseau. Le réseau sera « Wi-Fi-cam-p2p ». Choisissez « Wi-Fi-cam-p2p » pour
connecter.
À présent, ouvrez l'application « uCare Cam » et sélectionnez l'onglet en bas de l'écran qui
indique « Wi-Fi Connect ».
Sélectionnez « Router mode », puis « Next ». Saisissez ici le nom du réseau Wi-Fi (SSID)
et le mot de passe de votre routeur domestique.
Une fois que la caméra IP reçoit des informations, elle redémarrera. Attendez qu'elle
démarre et connectez à votre routeur Wi-Fi. Lorsque la connexion a réussi, la couleur de
l'indicateur DEL de statut passera à l'orange. Cela peut prendre jusqu'à 5 minutes.
Puis sélectionnez le nom de la caméra dans l'application « uCare Cam » pour connecter.
Remarque : Si la couleur de l'indicateur DEL de statut ne passe pas à l'orange, veuillez
vérifier votre routeur Wi-Fi et assurez-vous que la caméra IP est dans la zone de signal de
votre routeur Wi-Fi. Puis essayez de nouveau la configuration.
Si votre routeur Wi-Fi dispose d'une touche WPS (Wi-Fi Protected Setup), vous pouvez l'utiliser pour
configurer la caméra IP. (Vous devez activer l'encryption WPA/WPA2 sur le routeur). Sur le routeur
Wifi, vous verrez une touche intitulée « WPS ». Elle peut également être appelée « QSS » ou « AOSS
»
Mode de configuration Wi-Fi WPS
Ouvrez l'application « uCare Cam »
et sélectionnez « Wi-Fi Setting » ou « Wi-Fi Connect » en bas de l'écran.
Choisissez l'onglet :
Puis choisissez l'onglet :
Pour passer à l'étape 2 (voir image 8).
Passez en mode WPS
Allumez votre caméra IP. L'indicateur DEL de statut sur la caméra IP s'allumera en vert
pendant environ 15 secondes.
Chargement de programme
L'indicateur DEL de statut clignotera en rouge pendant environ 15 secondes.
Installez votre caméra IP par le mode de connexion WPS
2
3
1
12
11
10
9
8
28
Appuyez sur la touche WPS sur votre caméra IP
Attendez que l'indicateur de statut DEL clignote entre le rouge et le vert, puis tenez la
touche WPS/RÉINITIALISATION appuyée sur votre caméra IP pendant 2 secondes pour
passer en mode WPS. L'indicateur de statut DEL clignotera en vert.
Passez en mode WPS sur le routeur Wi-Fi
Appuyez sur la touche WPS sur le routeur Wi-Fi
Sélectionnez le routeur Wi-Fi
Sélectionnez le routeur Wi-Fi de votre choix sur l'écran (voir l'image 9).
Puis choisissez
l'onglet :
Pour passer à l'étape suivante (voir image 10).
La caméra IP se connecte au routeur Wi-Fi
Attendez environ 1-2 minutes. Si la caméra IP est correctement connectée au routeur
Wi-Fi, l'indicateur DEL de statut deviendra orange.
Autrement l'indicateur DEL de statut se mettra à clignoter en rouge. Si la configuration n'est
pas réussie, retournez à l'étape 1 et essayez de nouveau.
Si cela fonctionne,
sélectionnez l'onglet :
(voir image 11), et suivez les instructions.
Saisissez le nom d'une caméra et le mot de passe pour la sécurité et
Choisissez l'onglet : (Voir image 13).
La caméra IP passera automatiquement à l'écran de visualisation (voir image 14).
8
6
5
4
9
7
Image 9
Image 10 Image 8
29
Allumer
Branchez le connecteur d'adaptateur CC dans le port d'entrée CC de la caméra IP, puis
branchez l'adaptateur d'alimentation sur le secteur. L'indicateur DEL de statut sur la
caméra IP s'allumera en vert pendant environ 15 secondes.
Chargement de programme
L'indicateur DEL de statut clignotera en rouge pendant environ 15 secondes.
Démarrez la caméra IP une fois que la connexion Wi-Fi a été établie
2
1
Image 11
Image 12
Image 13 Image 14

30
Rechercher un routeur Wi-Fi
L'indicateur DEL de statut clignotera en vert jusqu'à ce qu'un routeur Wi-Fi soit détecté
(jusqu'à 5 minutes).
une fois que le routeur est détecté, l'indicateur DEL de statut passera à l'orange.
Sila caméra IP ne peut pas se connecter au routeur Wi-Fi, vérifiez le statut du routeur Wi-Fi
ou réinstallez.
Dans l'application, choisissez le nom de la caméra affichée dans la liste des caméras, et la
fenêtre de visualisation s'ouvrira (voir image 15).
ANDROID (pour Apple, passez à : l'étape 5)
Ouvrez l'application « uCare Cam » et
choisissez :
Cliquez ici pour importer la caméra Wi-Fi
déjà installée
Dans la fenêtre de liste de caméra (voir image 16) pour ajouter une caméra IP.
Choisissez l'onglet :
Votre appareil passera alors en mode de code QR.
Remarque : vous devez avoir un scanner de code QR installé sur votre appareil.
Situez le code QR à l'arrière de la caméra IP et scannez le code QR.
Après avoir scanné le code QR, l'UID (Unique ID code) apparait sur l'écran de votre
appareil (voir image 17).
Ajouter une caméra IP déjà installée à l'application
3
2
1
3
 Loading...