

Konig SEC-IPCAM100B, SEC-IPCAM100W, SEC-IPCAM105B, SEC-IPCAM105W User Manual

SEC-IPCAM100B(W)
SEC-IPCAM105B(W)
MANUAL (p. 2)
IP camera
2013-07-30

ENGLISH
IP camera
FULL MANUAL
Table of contents:
• Introduction (p. 2)
• Safety precautions (p. 2)
• Packaging
content (p. 2)
• System
requirements (p. 2)
• T
echnical specifications (p. 2)
• Product
description (p. 3)
• User
instructions (p. 5)
• W
arranty (p. 22)
• Disclaimer
(p. 22)
• Dispos
al (p. 22)
Introduction:
Watch over your property with this genuine Plug & Play IP camera without the need for any IP setting or router
configuration. Easy and simple installation in just a few minutes, the free uCare Cam App allows you to watch
on your Smartphone, anytime and anywhere. Advanced features provide you with an email or App notification
when motion is detected. Photo and/or video footage can be play backed at any time you require.
• We recommend that you read this manual before installing/using this product.
• Keep this manual in a safe place for future reference.
Safety precautions:
This product should ONLY be opened by an authorised technician when service is required. Disconnect the
product from the mains and other equipment if a problem should occur. Do not expose the product to water or
moisture.
Packaging content:
1x IP camera
1x Camera mount
1x AC/DC adapter
1x Quick start guide
1x CD with complete manual
System requirements:
• Device running on iOS 5.0 or above
• Device running on Android 4.0 or above
• WiFi Router
Technical specifications:
Specifications: SEC-IPCAM100B/W SEC-IPCAM105B/W
Video codec: MJPEG
Resolution:
VGA 640x480 / QVGA 320x240 / QQVGA 160x120
Frame rate: 1~25fps
Image sensor: CMOS
Lens: 3.6mm 3.0mm
Night vision: 1 Lux, 10 meter 1 Lux, 5 meter
Flash memory: 8 MB
Card storage: up to 32 GB SDHC (not included)
Audio:
2-way
(integrated microphone + loudspeaker)
1-way
(integrated microphone)
Networking Protocol:
IPV4, ARP, TCP, UDP, ICMP, DHCP Client, NTP Client, DNS Client, SMTP
Client, P2P Transmission
Built-in network interfaces: 802.11b/g/n WLAN
2

S
pecifications: SEC-IPCAM100B/W SEC-IPCAM105B/W
Wireless security: Wireless security: WEP/WPA/WPA2 wireless encryption
Wireless transmit output
power:
Wireless transmit output power: 16.5 dBm for 11b, 13.5 dBm for 11g,
13.5 dBm for 11n (+/- 1.5dBm)
Video features: Adjustable image size and quality, Time stamp and text overlay, Flip
View Angle: H:39.3°, V:26.8°, D:46.5° H:46.4°, V:31.9°, D:54.5°
Digital zoom: Up to 4x
3A Control:
AGC (Auto Gain Control), AWB (Auto White Balance),
AES (Auto Electronic Shutter)
Power:
External AC-to-DC switching power adapter, 100 to 240 V AC, 50/60 Hz, Dc
Plug Output: 5 V DC/1 A
Dimensions (W x D x H):
88mm*46mm*116mm (excluded
camera mount)
74mm*74mm*65mm (excluded
camera mount)
Weight: 119 g (without mount) 72 g (without mount)
Max. power consumption: 2.3W 1.9W
Operating Temperature: 0 to 40 °C (32 to 104 ˚F)
Storage Temperature: -20 to 70 °C (-4 to 158 ˚F)
Humidity: Humidity: 20% to 80% RH non-condensing
Product description:
SEC-IPCAM100B/W
Front
LED indicator for st
atus
of IP camera
WPS/Reset button for
set-up and reset
Microphone
No function
IR LED for 10 metre
night view
Light intensity sensor
for IR LED
Wifi antenna
Slot for Micro SD card
3
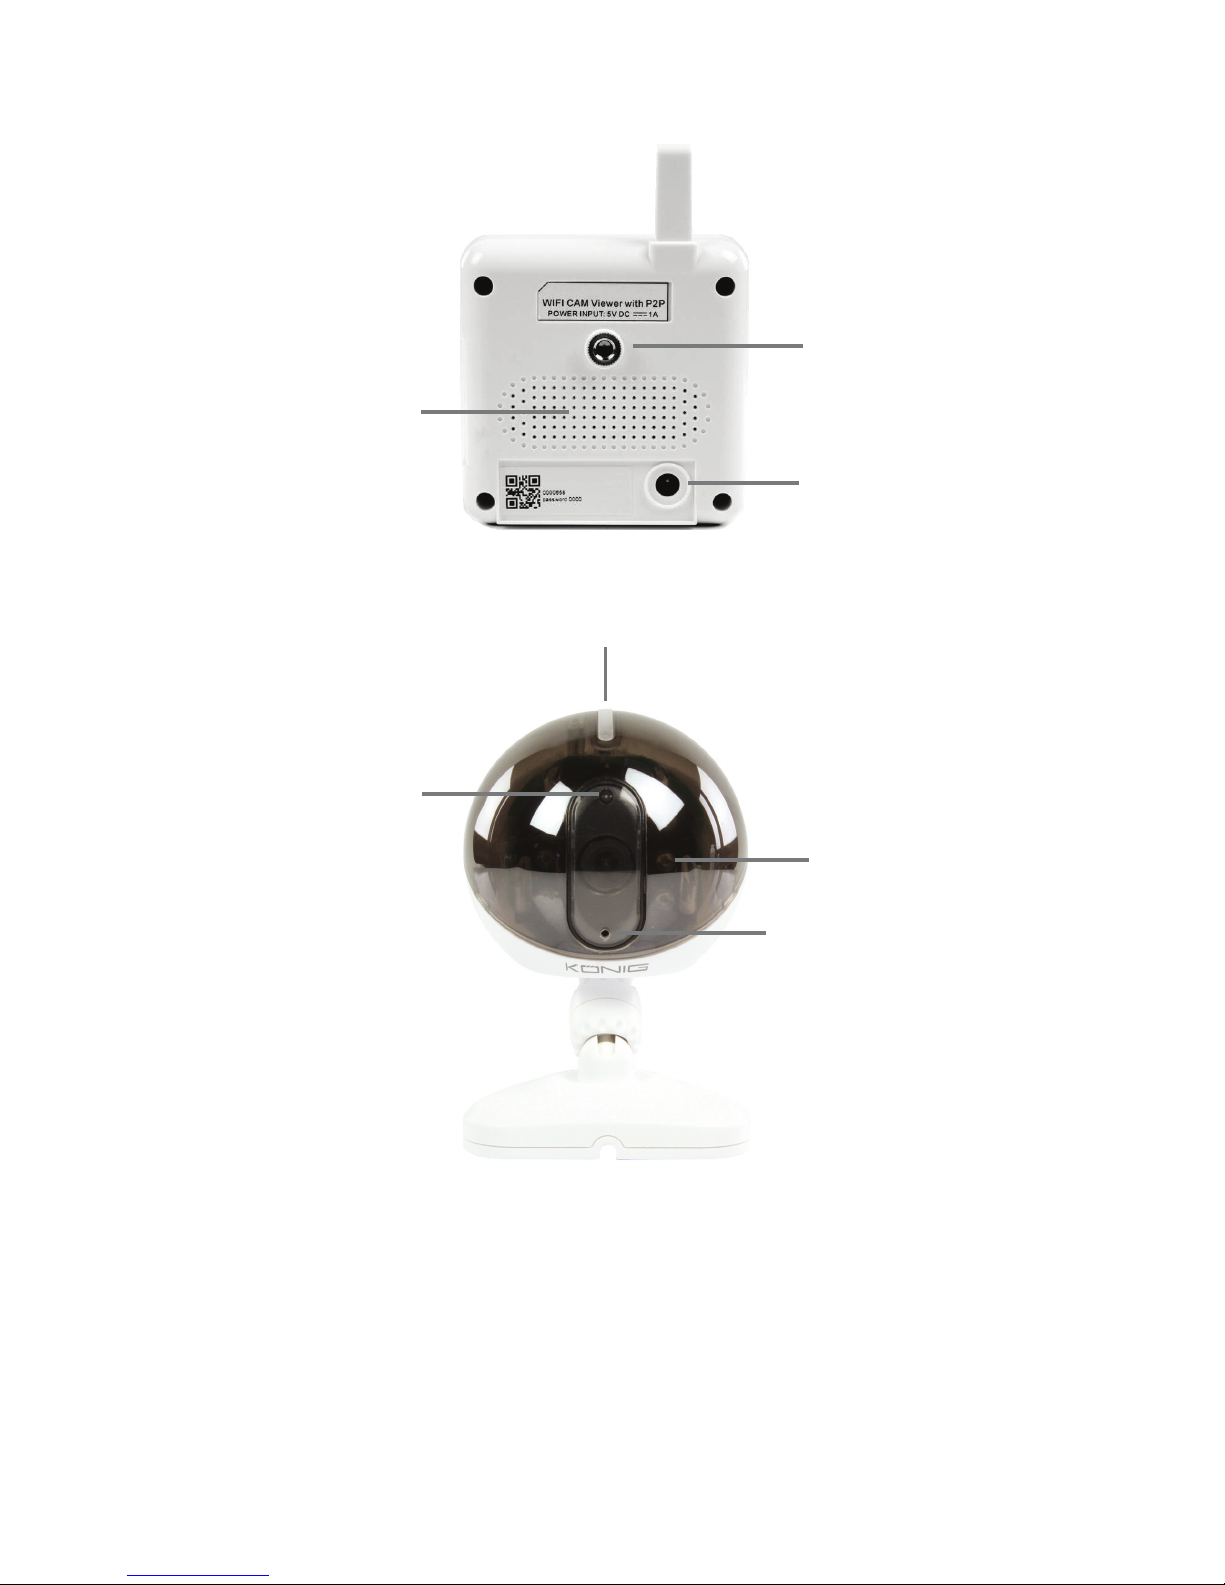
Back
5V DC input
Loudspeaker For
2-way Audio
communication
Connection for
camera mount
SEC-IPCAM105B/W
Front
LED indicator for st
atus
of IP camera
Microphone
IR LED for 5 metre
night view
Light intensity sensor
for IR LED
4
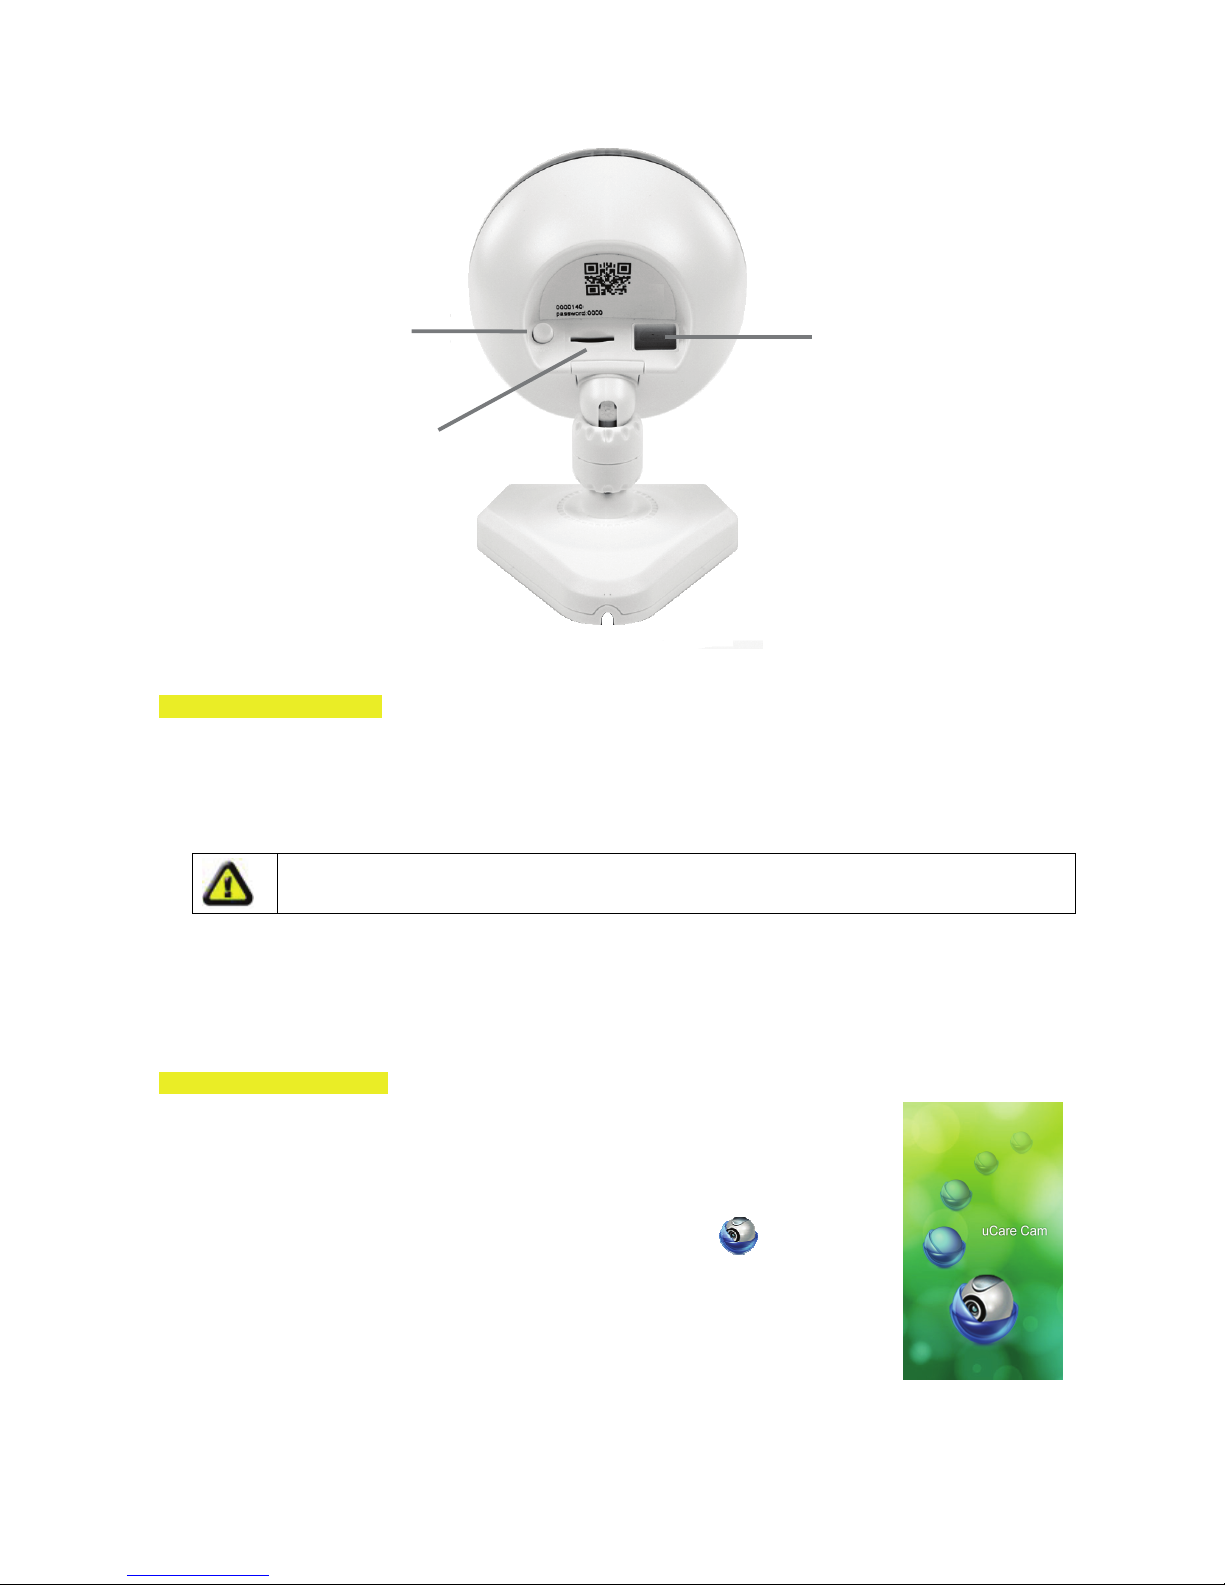
Back
WPS/Reset button for
set-up and reset
5V DC input
Slot for Micro SD card
User instructions:
A. Hardware Installation
1. Please find a location to install the uCare Cam that is within good WiFi signal reach of your home router.
2. If you plan to hang the uCare Cam, you can use the mounting kit included.
3. If the power cable included is not long enough to reach a power outlet, please purchase an extender
cable from your local electronics store.
4. Connect the camera power adapter.
Warning:
Please use the power adapter included with your camera to avoid damage to the camera.
When the camera powers up, the status LED will be green for about 15 seconds before flashing red. If
there is no red LED flashing, please unplug the power cord, wait 5 seconds, then re-connect the power. It
will take about 60 seconds for the uCare Cam to finish starting up. The status LED should alternate
between red and green. If the status LED does not flash red and green, please press and hold the
WPS/REST button at the back of the uCare Cam for 10 seconds.
B. Hardware Installation
1. Download the Smartphone App “uCare Cam” from the App store (iOS) or Play
Store (Android).
2. Search for the App named “uCare Cam”, then download and install it on your
smartphone.
3. After the software installation is complete, this icon will appear
. Click on
this to run the App.
5
C. uCare Cam APP Overview
Default camera password: 0000
Default manager name: admin
Default manager password: 0000
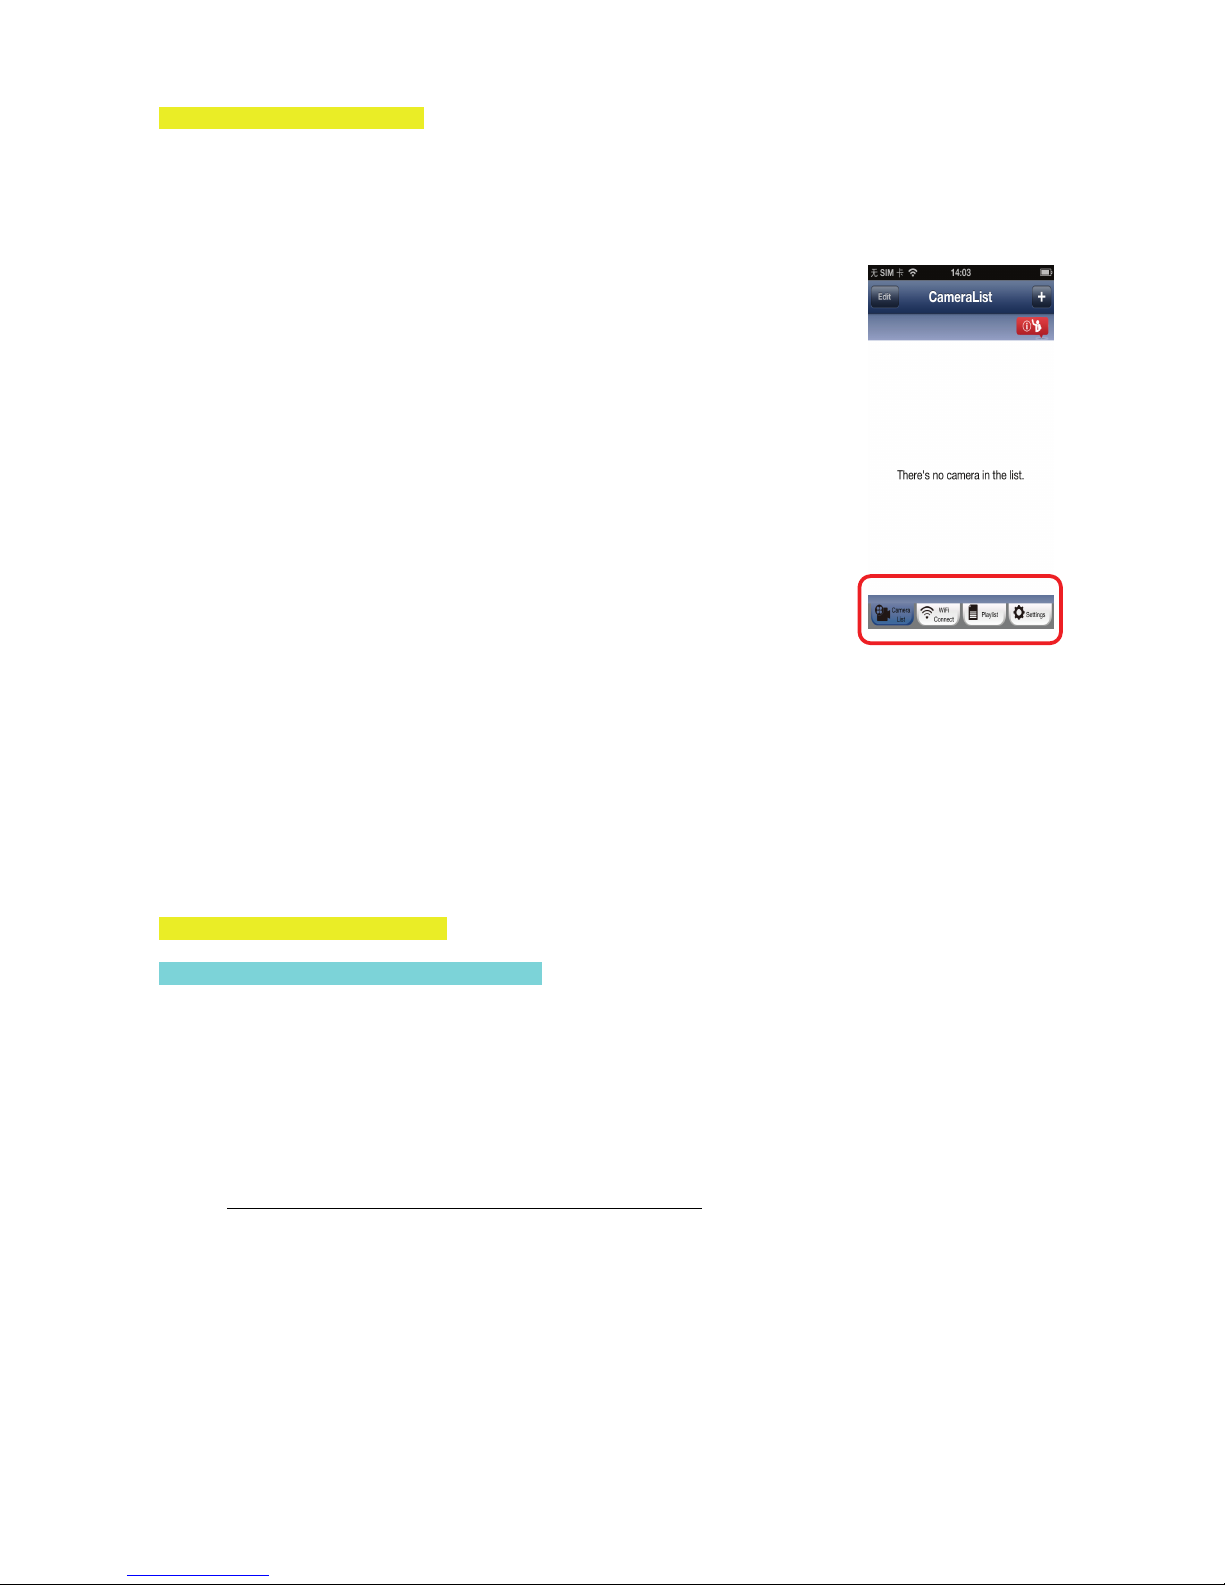
There are 4 major function tabs at the bottom of the App main screen.
Camera List Tab
This is the main App screen. In this tab, all of the cameras which have been added
will be listed.
WiFi Setting or WiFi Connect Tab
Please go to this tab to configure the uCare Cam WiFi settings.
There are two methods to install a new uCare Cam and connect it to a WiFi
Router.
1. Router Mode
2. WPS (WiFi Protect Setup) Mode
(Requires a Router with WPS function using WPA/WPA2 encryption WEP encryption will not work)
Play List T
ab
Go to this tab to view all pictures taken by the user via smartphone. The pictures will be listed by camera.
Settings Tab
Configure uCare Cam settings and remote microSD Card video playback.
User will need to input a management ID and password to enter this tab.
Default management ID: admin Default password: 0000
If you forget your password, you can reset the uCare Cam by pressing the WPS/REST button on the back of
the camera for 10 seconds. This will restore the uCare Cam to factory settings. You will need to set up the
WiFi connection again after you reset the camera.
D. iOS – Setup uCare Cam WiFi
Method 1: Use WPS (WiFi Protected Setup)
Available if your WiFi router supports WPS and it is set to use WPA or WPA2 security encryption. WEP
security encryption is not supported in WPS mode. An easy way to check if your router supports WPS is to
look for a button that says “WPS” on the router. It may also be called “AOSS” or “QSS”.
1. Press and hold the WPS/REST button for 10 seconds at the back of the camera. It will reset and restart
the uCare Cam. After about 60 seconds, the LED colour should flash green and red.
2. Press “WPS” button on the WiFi router
3. Press the WPS/REST button on the back of the uCare Cam for 2 seconds.
• If the uCare Cam has entered the WPS connection mode
, the status LED colour will turn a fast
blinking green.
4. The uCare Cam will try for up to 2 minutes to connect to the WiFi router using WPS.
5. If the LED colour changes to orange, your uCare Cam has successfully connected to your router. If the
LED does not change to orange, the setup has failed. Please make sure the uCare Cam is within WiFi
distance of your router, press the WPS/REST button for 10 seconds to reset the uCare Cam, and try the
setup again.
6. Use the smartphone App to add the uCare Cam into the Camera List. See instruction manual – “iOS - Add
uCare Cam (already connected to router) to App”.
6
Method 2: Use Router Mode
You will first need to connect to the router that is available inside the uCare Cam, configure the WiFi settings
for your home router, then the uCare Cam will restart and connect to your home router.
Write down, or have handy, the SSID of your WiFi router and your WiFi password. For example, the
SSID may be something like “TP-Link-XXXXX” or “NETGEAR”. You will need both the SSID and the
password during this process.
1. Make sure the status LED on the uCare Cam is blinking red and
green. If the status LED is not blinking red and green, please
press and hold the WPS/REST button for 10 seconds to reset the
uCare Cam. Wait for 1-2 minutes for it to restart and the LED
should turn red and green.
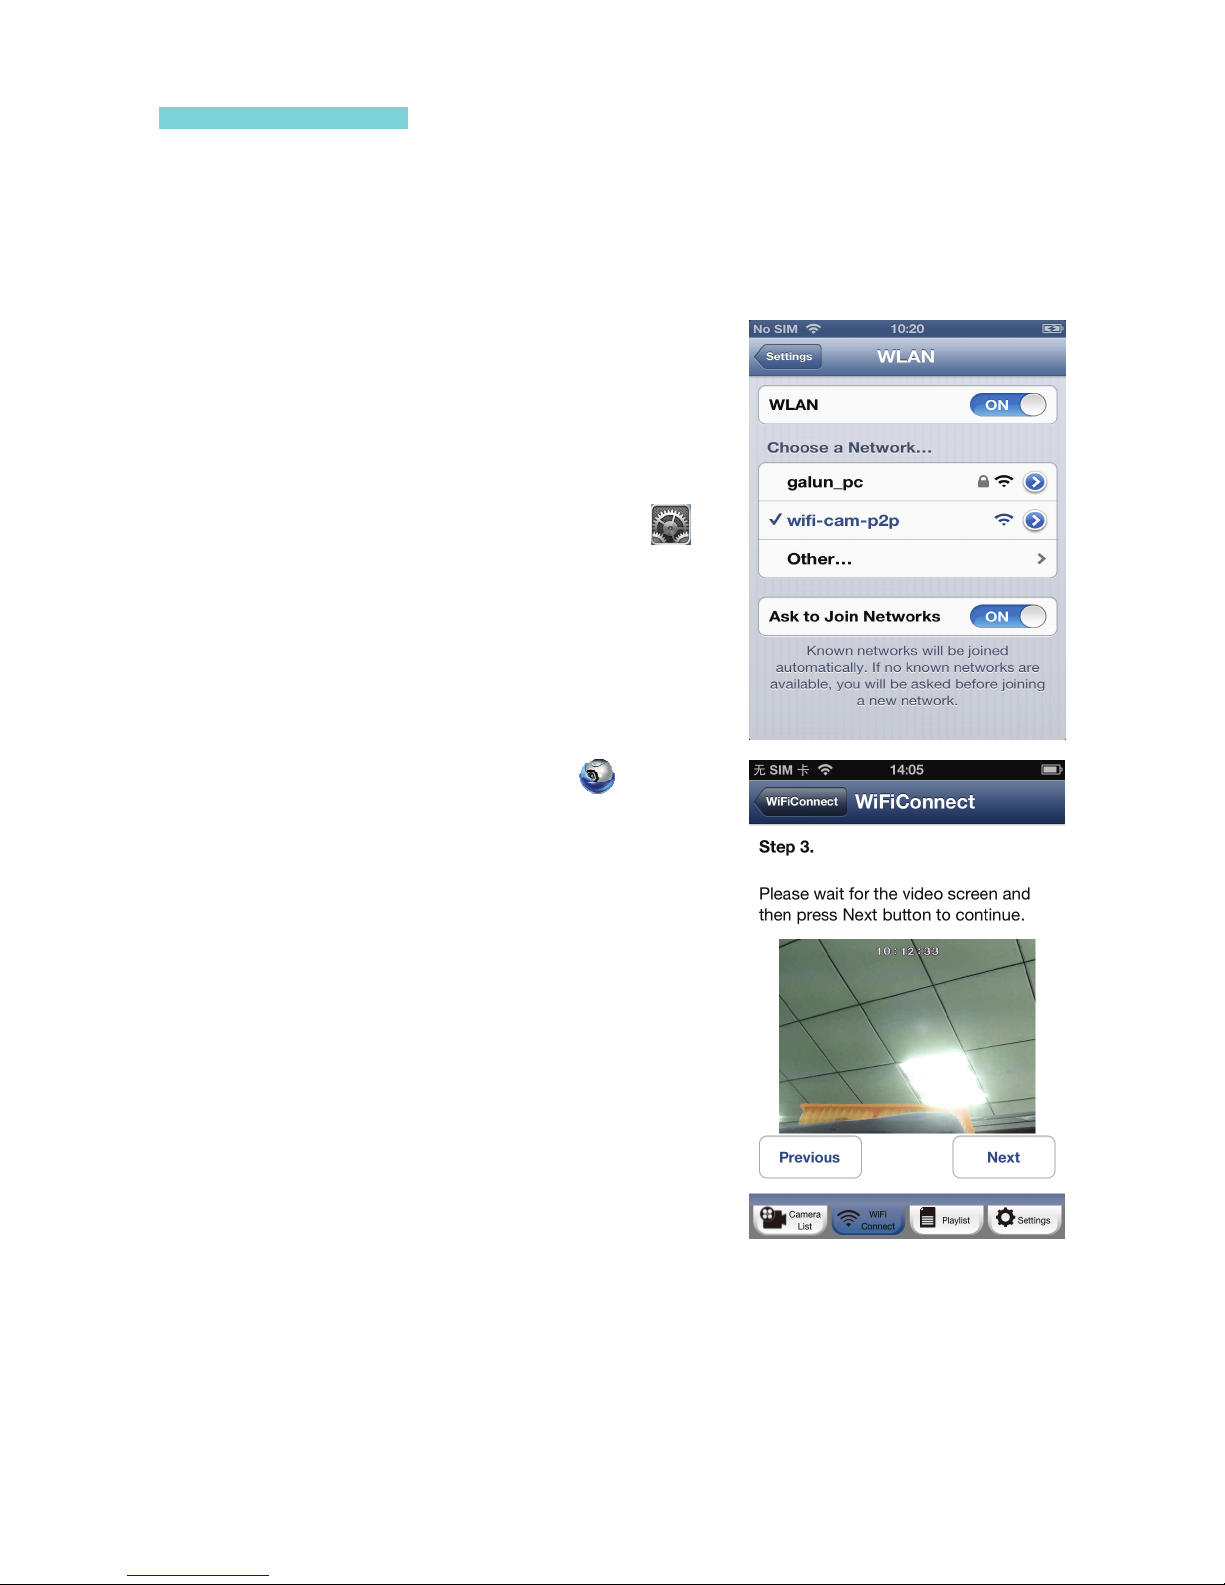
2. Connect your iOS device to the router inside the uCare Cam. To
connect to the uCare Cam router, open up “Settings”
, then
“Wi-Fi” and let it search for a network. The network will be
“wifi-cam-p2p”. Click on “wifi-cam-p2p” to connect.
3. Now, open the smartphone App “uCare Cam” and click on
the tab at the bottom of the screen that says “WiFi Connect”.
Click on “Router mode”, then “Next”. You will see live video.
4. Enter the WiFi router SSID and password for your home router.
Click on the “Next” button and again, on the next screen, the
“Next” button.
5. Please enter a Camera name (2 to 20 characters) and the default
password “0000”. You are encouraged to change the default
password after setup for security purposes. Then click “Finish”.
6. After the uCare Cam receives this information, it will restart.
Please wait for it to start up and connect to your home router.
When it successfully connects, the status LED colour will turn
orange. It may take up to 10 minutes. If the status LED colour
does not turn orange, please check your router and make sure the
uCare Cam is within the signal area of your WiFi router. Then try
setup again, starting from Step 2.
7. Your iOS device should have disconnected from “wifi-cam-p2p” and reconnected to your home router.
Please check that your iOS device has connected to your home router now, via “Settings” -> “Wi-Fi”. If
it has not, please connect your smartphone to your home router WiFi.
8. Open the “uCare Cam” smartphone App, and you can click on the camera name in the Camera List view
to connect.
7
 Loading...