

2013-11-15
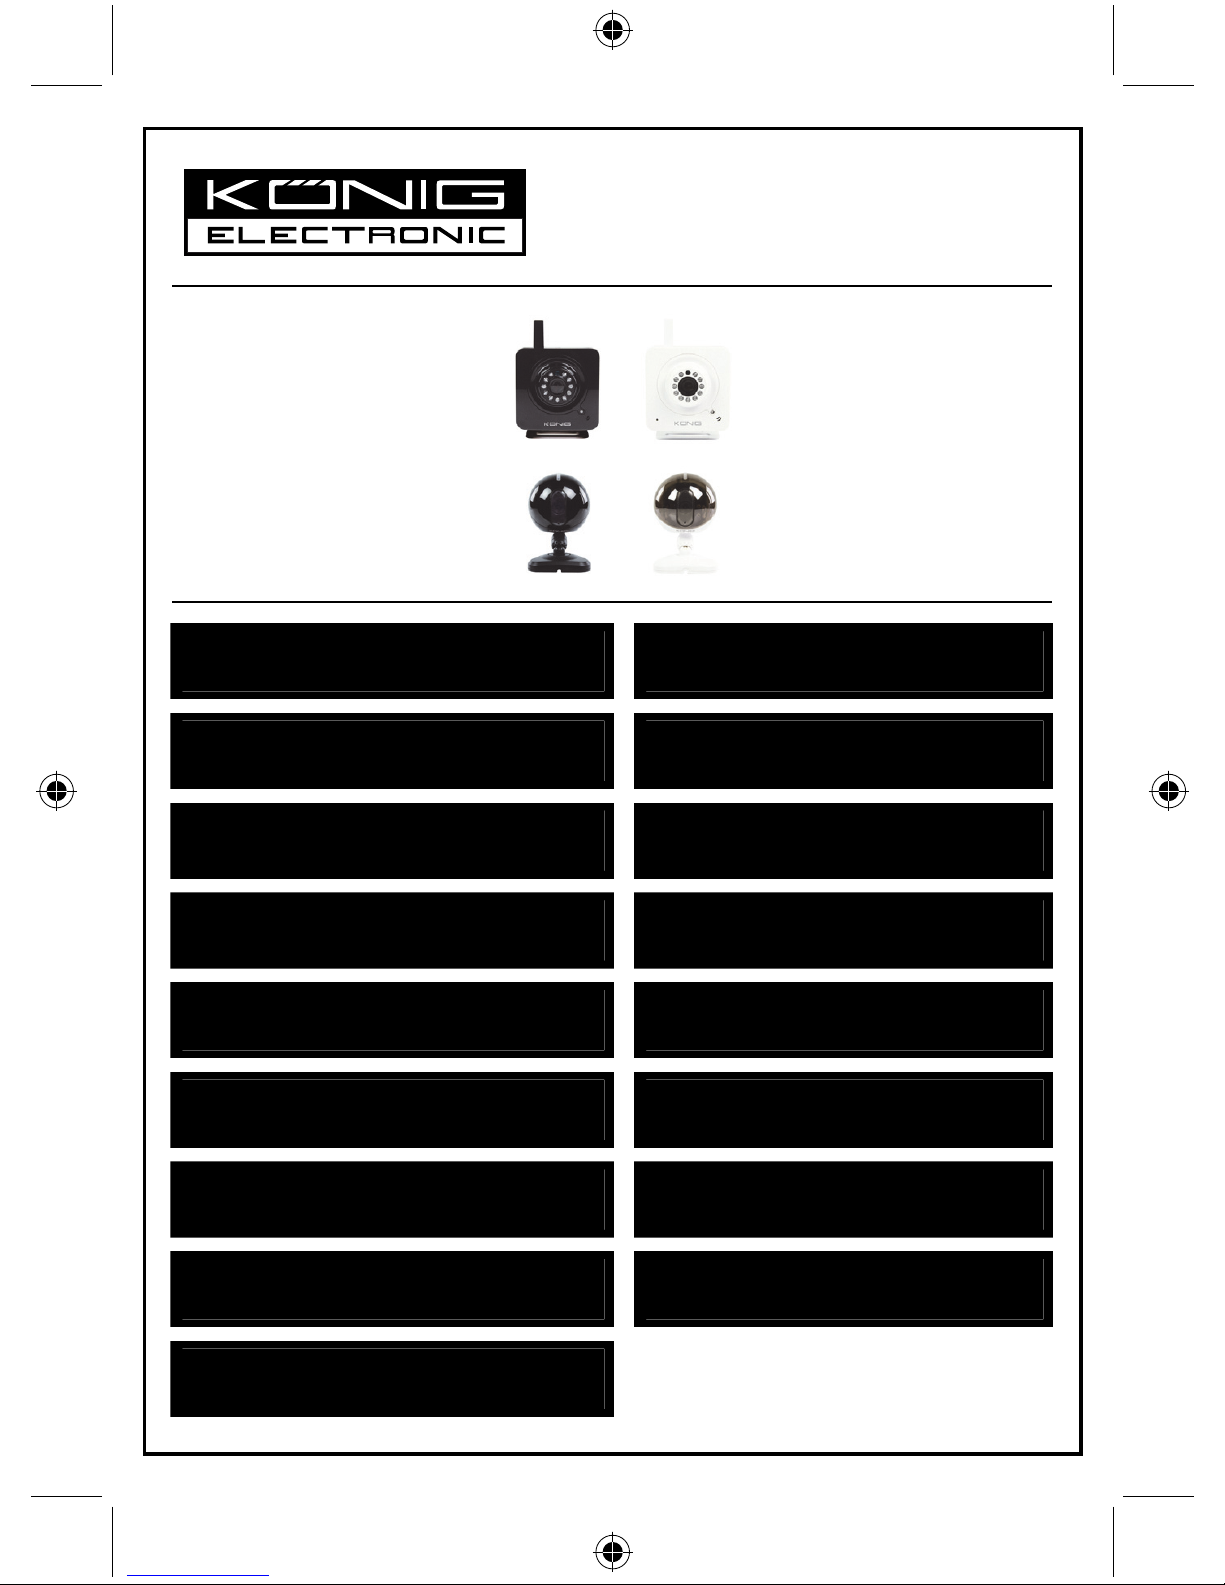
SEC-IPCAM100B(W)
SEC-IPCAM105B(W)
MANUAL (p. 2)
IP camera
ANLEITUNG (S. 13)
IP-Kamera
MODE D’EMPLOI (p. 24)
Caméra IP
GEBRUIKSAANWIJZING (p. 35)
IP-camera
MANUALE (p. 46)
Telecamera IP
MANUAL DE USO (p. 57)
Cámara IP
MANUAL (p. 68)
Câmara IP
HASZNÁLATI ÚTMUTATÓ (o. 79.)
IP kamera
KÄYTTÖOHJE (s. 90)
IP-kamera
BRUKSANVISNING (s. 101)
IP-kamera
NÁVOD K POUŽITÍ (s. 112)
IP kamera
MANUAL DE UTILIZARE (p. 123)
Cameră de supraveghere IP
ΕΓΧΕΙΡΙΔΙΟ XPHΣHΣ (σελ. 134)
Κάμερα IP
BRUGERVEJLEDNING (s. 146)
IP-kamera
VEILEDNING (s. 157)
IP-kamera
ИНСТРУКЦИЯ (стр. 168)
IP-камера
KILAVUZ (s. 180)
IP kamera
2
ENGLISH
IP camera
Introduction:
• Watch over your properties with this genuine Plug & Play IP camera. Easy and simple to install,
works without the need for any form of configuration. The free uCare Cam app allows you to watch
and listen to live footage on your Smartphone or other mobile devices, anytime and anywhere. The
free uCare Cam app is available on Google Play and the Apple App Store. Advanced features
provide you e-mail or app notification when motion is detected. Photo and/or video footage can be
played back at any moment. Also suitable for use as a baby monitor due to the 2-way audio
function.
• We recommend that you read this manual before installing/using this product.
• Keep this manual in a safe place for future reference.
System requirements:
• Device running Android 4.0 and up or iOS 5.0 and up.
• Router with Wi-Fi.
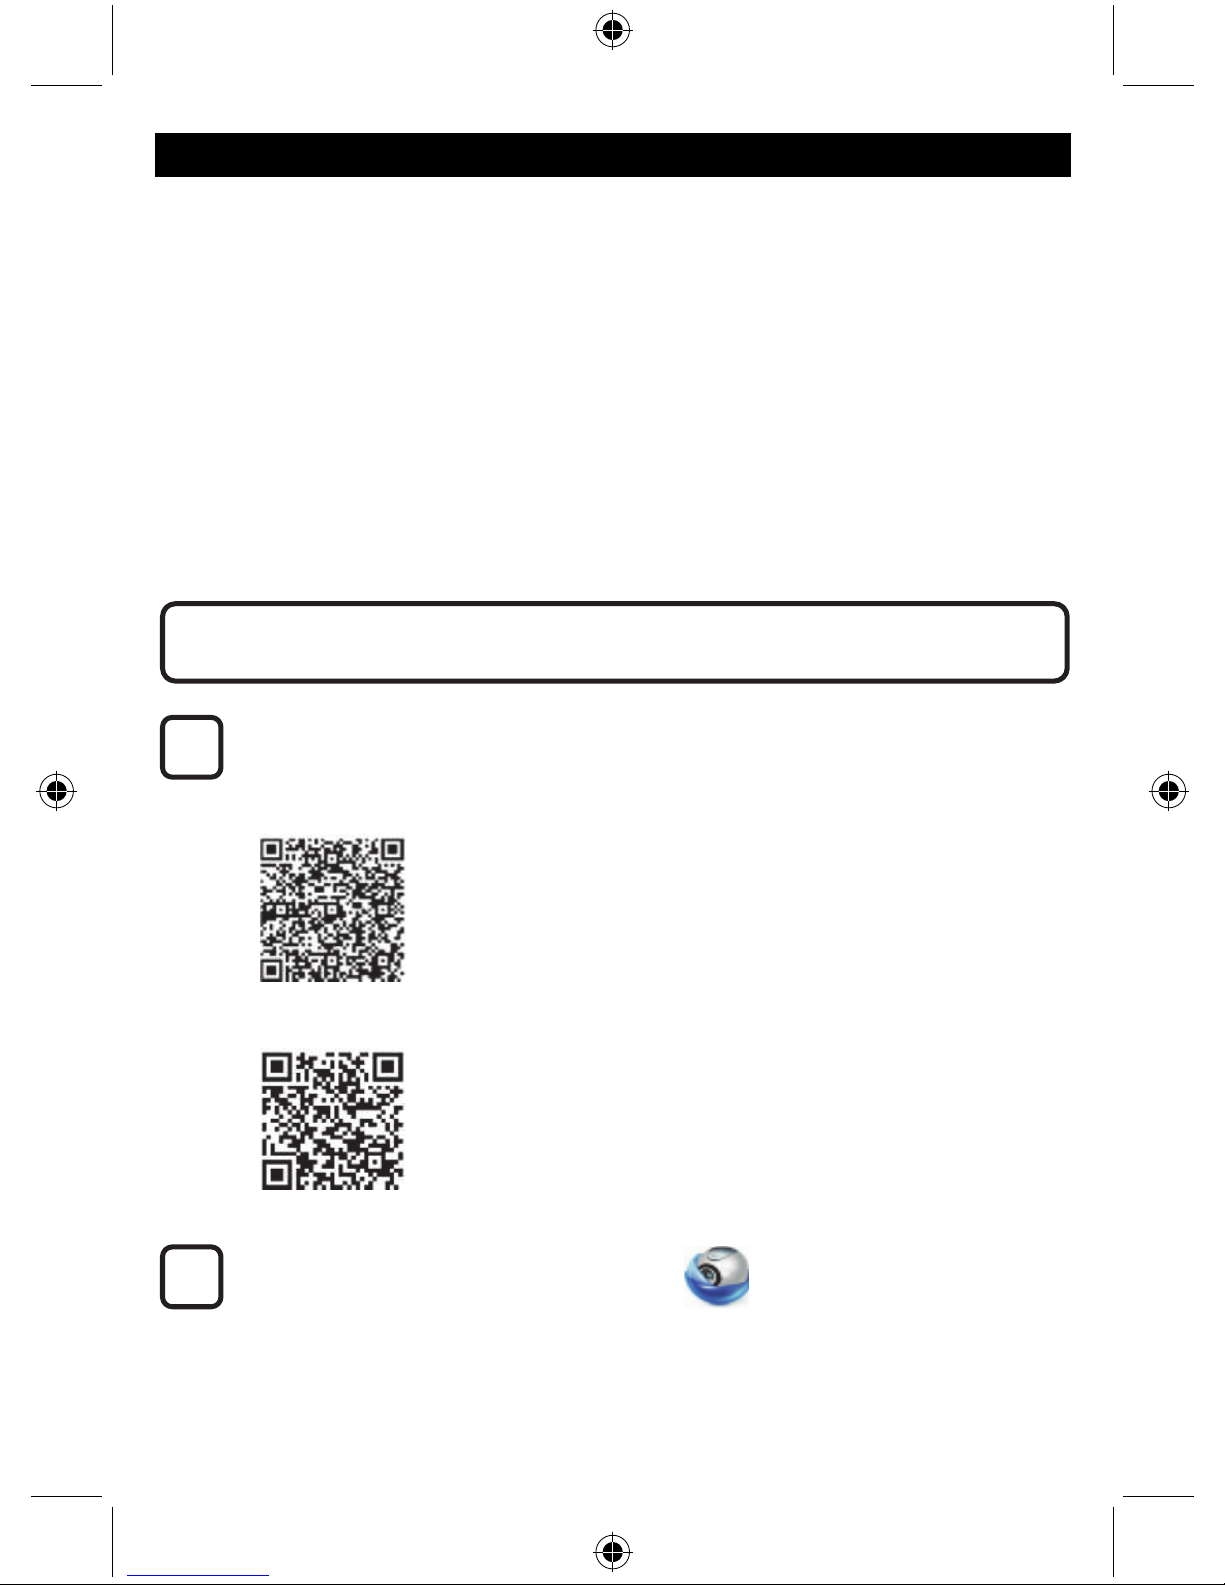
Download the “uCare Cam” app from Google Play or the Apple app store
Android Device
Google Play Store “uCare Cam” Download Link
iOS Device
App Store “uCare Cam” Download Link
After the software installation is complete,
click the icon to run the app.
Default “uCare Cam” password: 0000
Manager's Name: admin
Manager's Password: 0000
2
1
Installation of the App on your mobile device

3
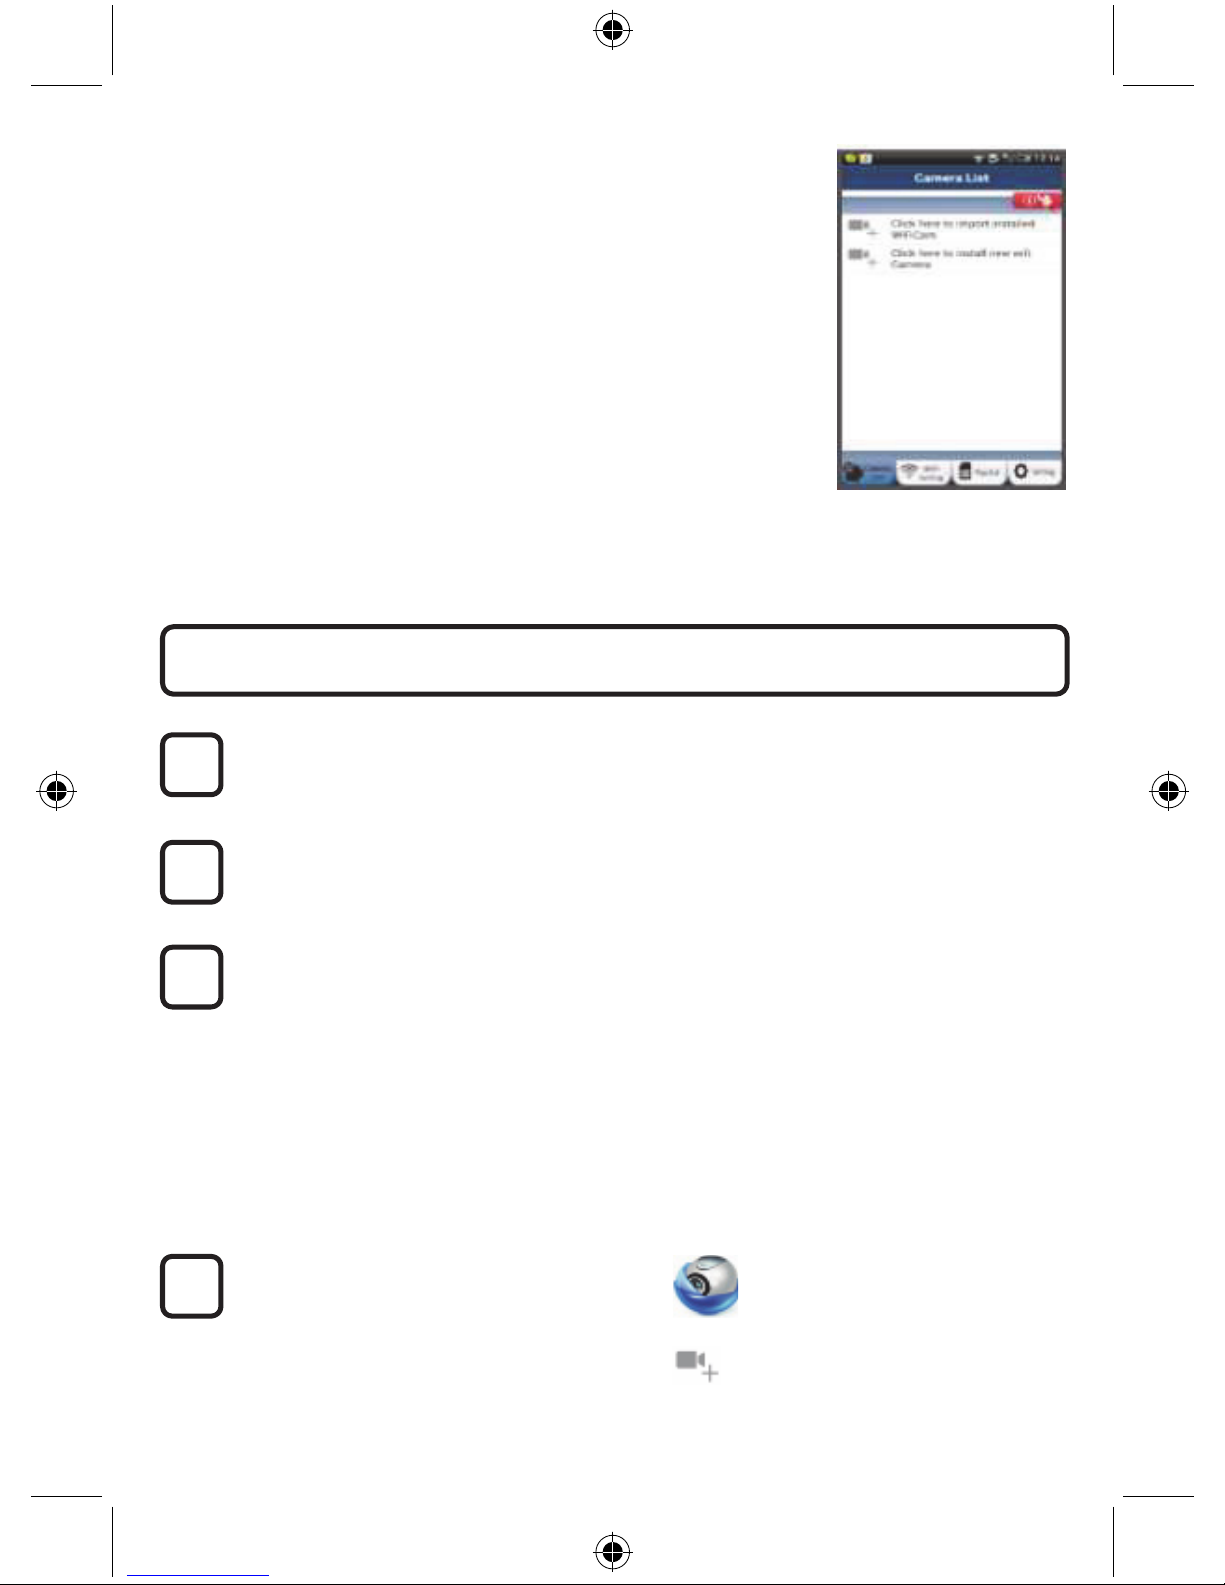
Figure 1
“Camera List Window”
There are two options to continue the easy set up of your IP camera.
Power On
Plug the power adapter DC connector into the DC input port of the IP camera and then plug
the power adapter into a wall outlet. The status LED on the IP camera will turn green for
about 15 seconds.
Programme Loading
The status LED will flash red for about 15 seconds.
Router Link Mode
Wait until the status LED colour alternates between red and green.
Note:
If the LED does not turn red and green, then press the WPS/Reset button for more than
10 seconds to restart the IP camera.
When the green status LED lights up and holds, and then the red status LED flashes twice,
after which it changes into green, the IP camera has entered the RESET state. At this
moment you can release the button and then wait until the status LED alternates between
red and green.
ANDROID (for Apple go to: Step 8)
Set the IP camera to connect to the Wi-Fi Router
Open the “uCare Cam” App and select:
Click here to install the new Wi-Fi Camera
In the screen of the Camera List Window (see figure 1).
4
3
2
1
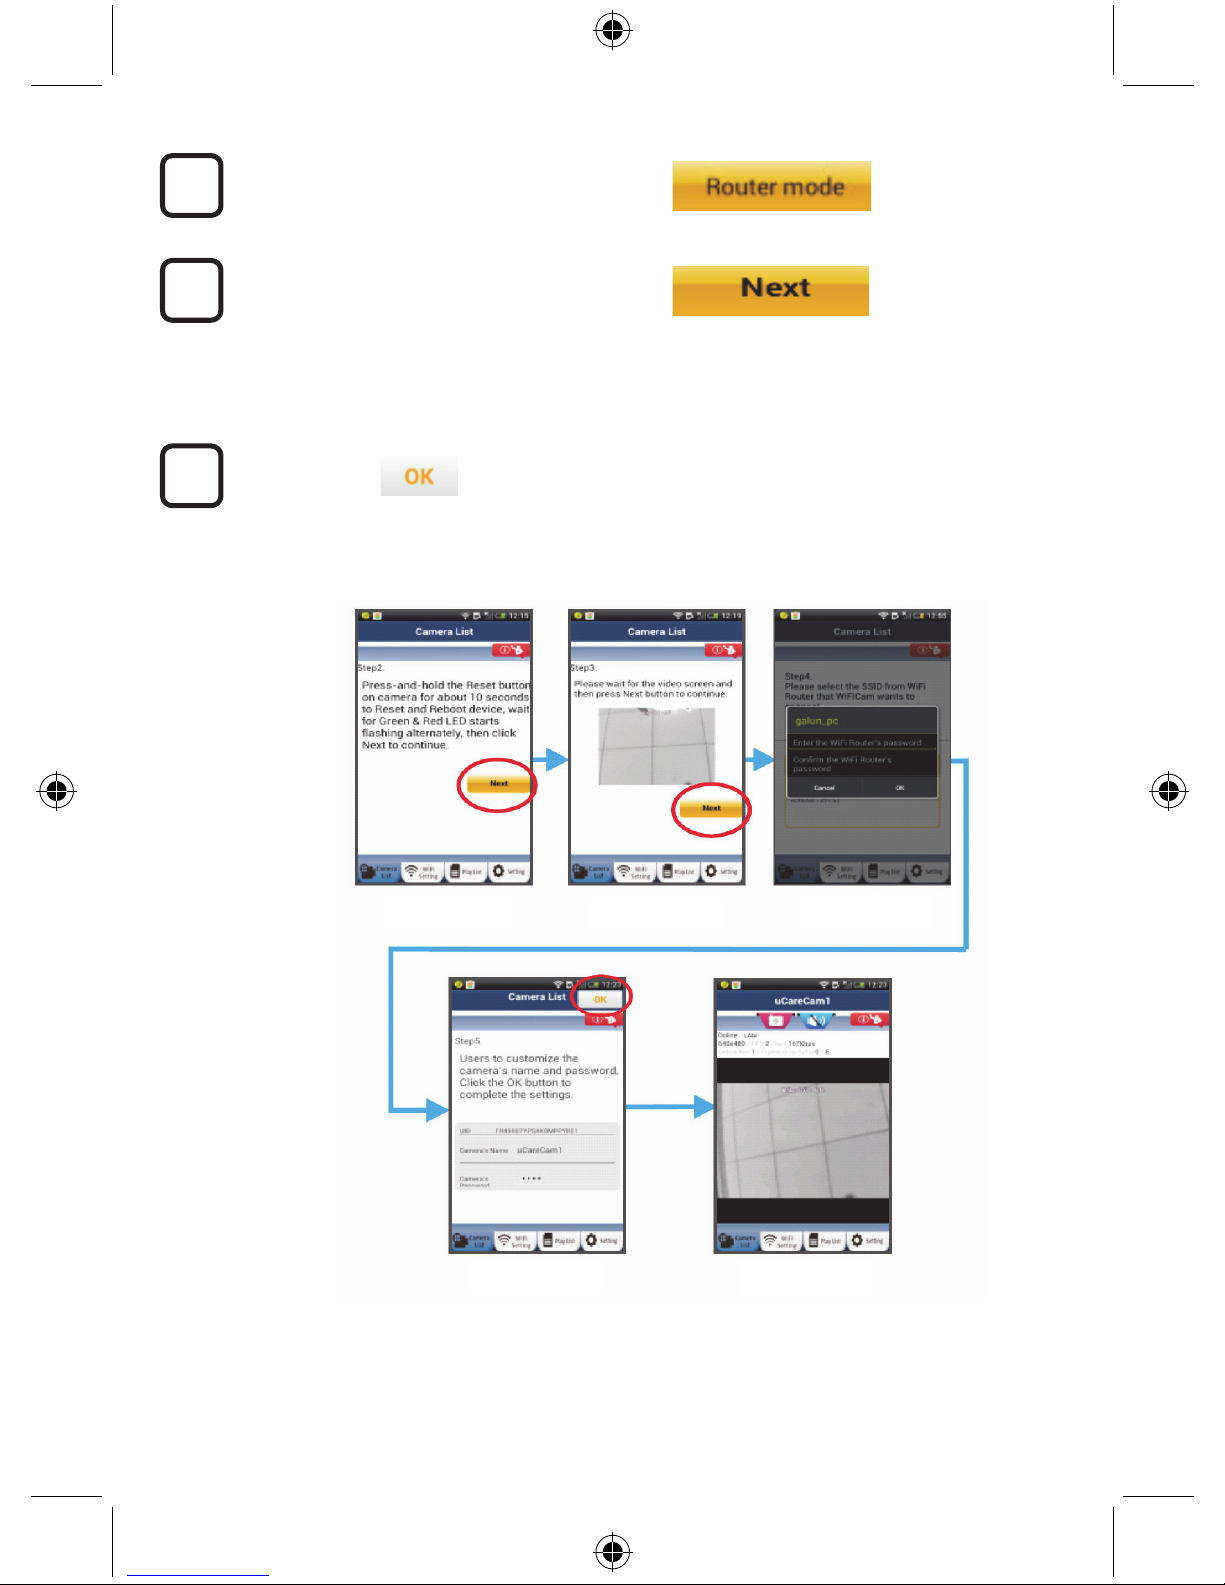
Install your IP camera by ROUTER MODE
4
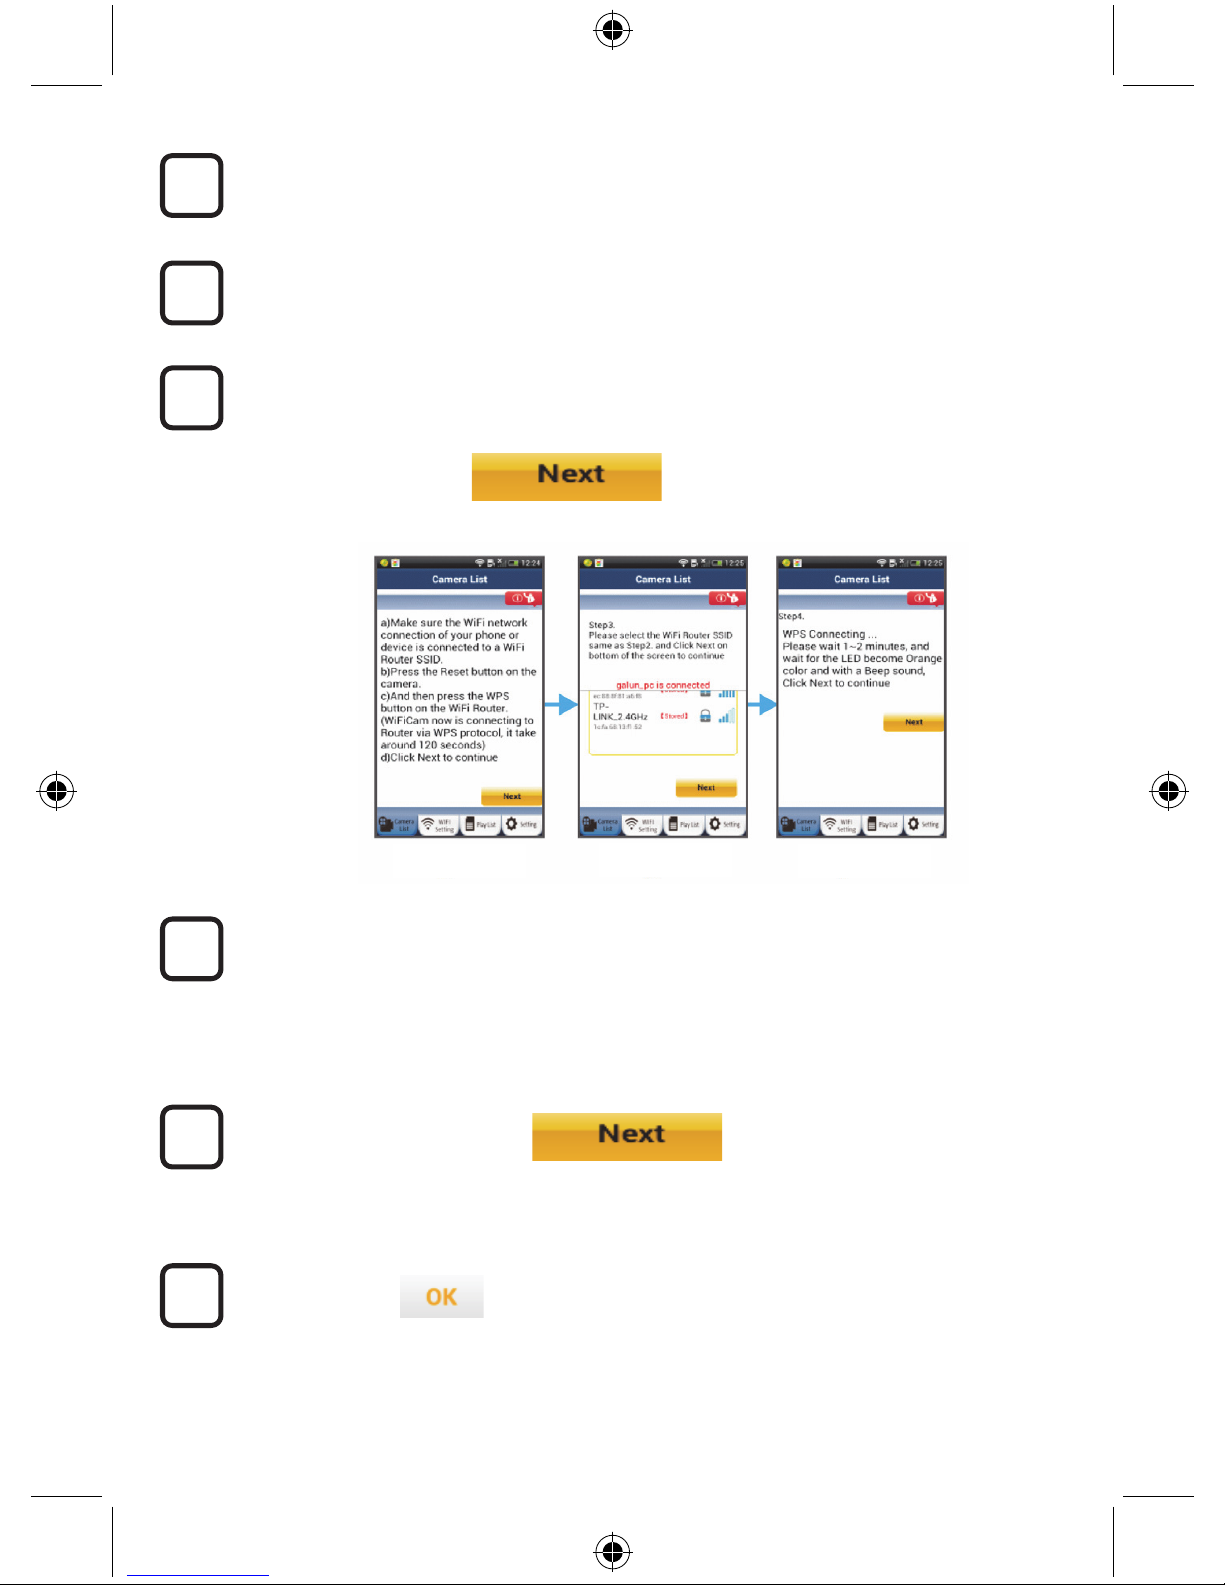
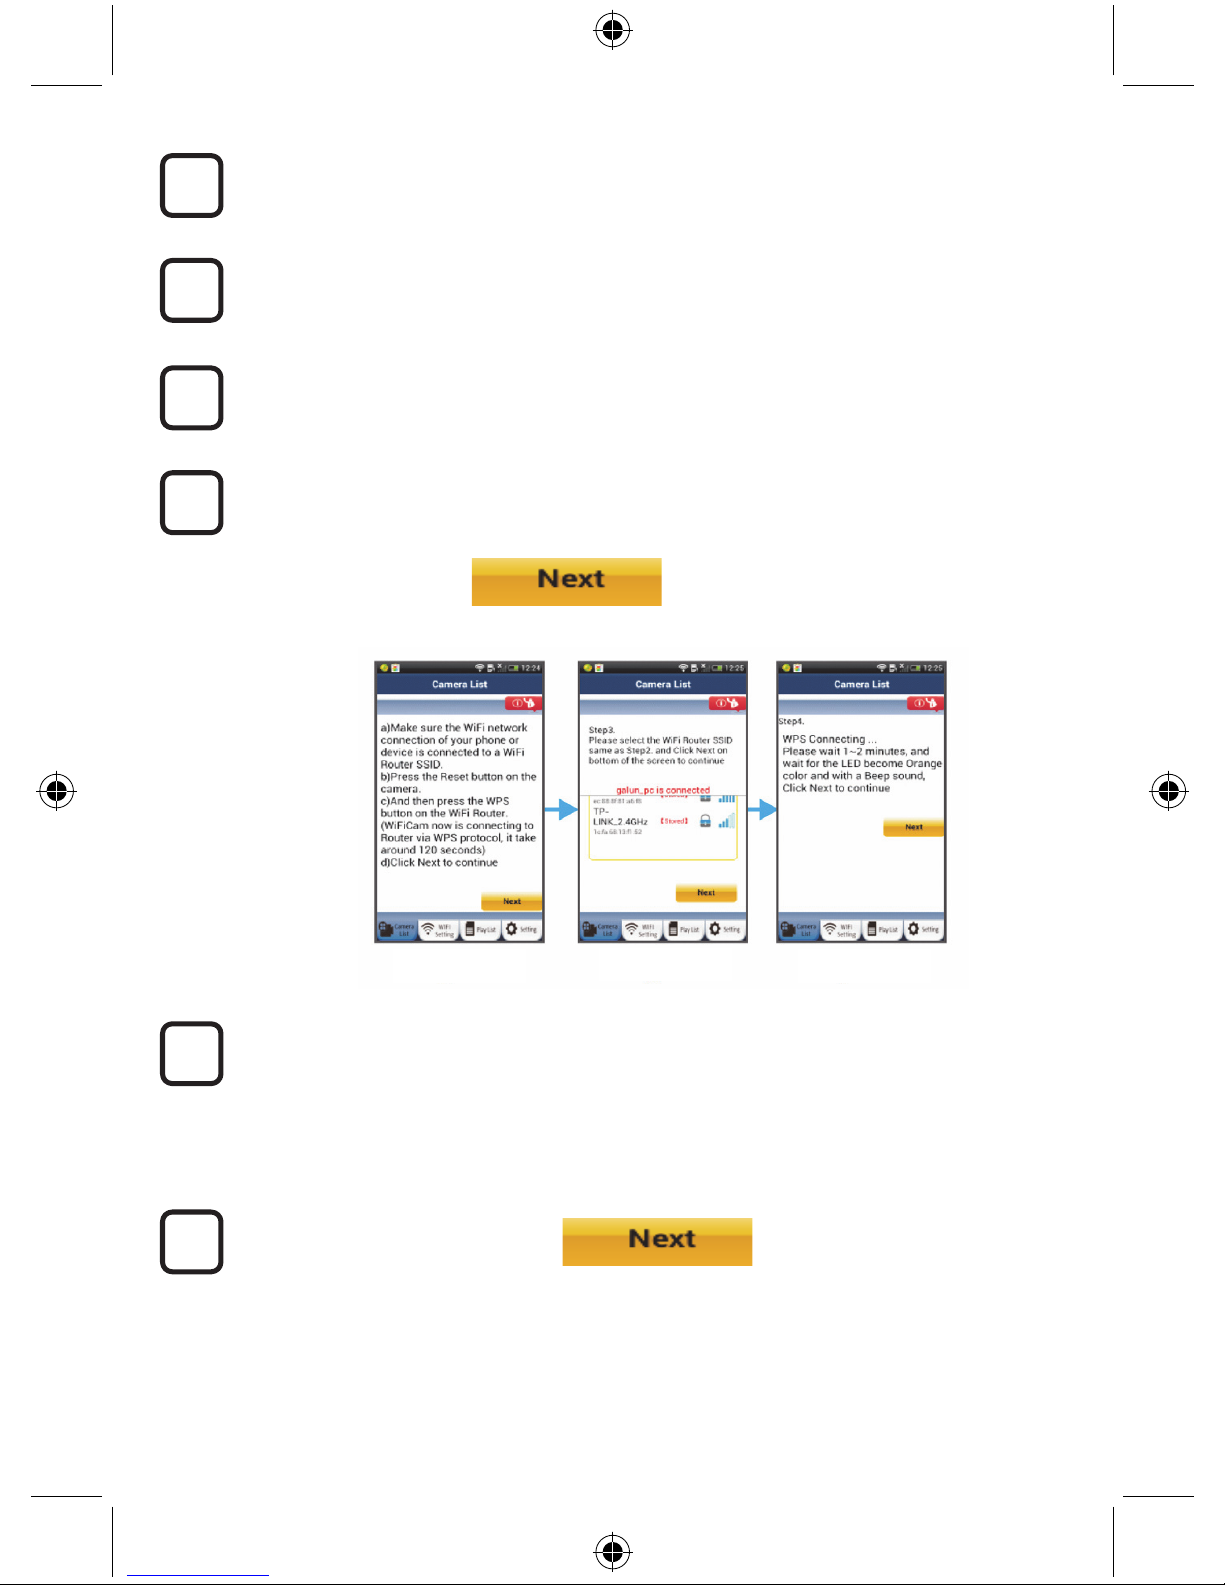
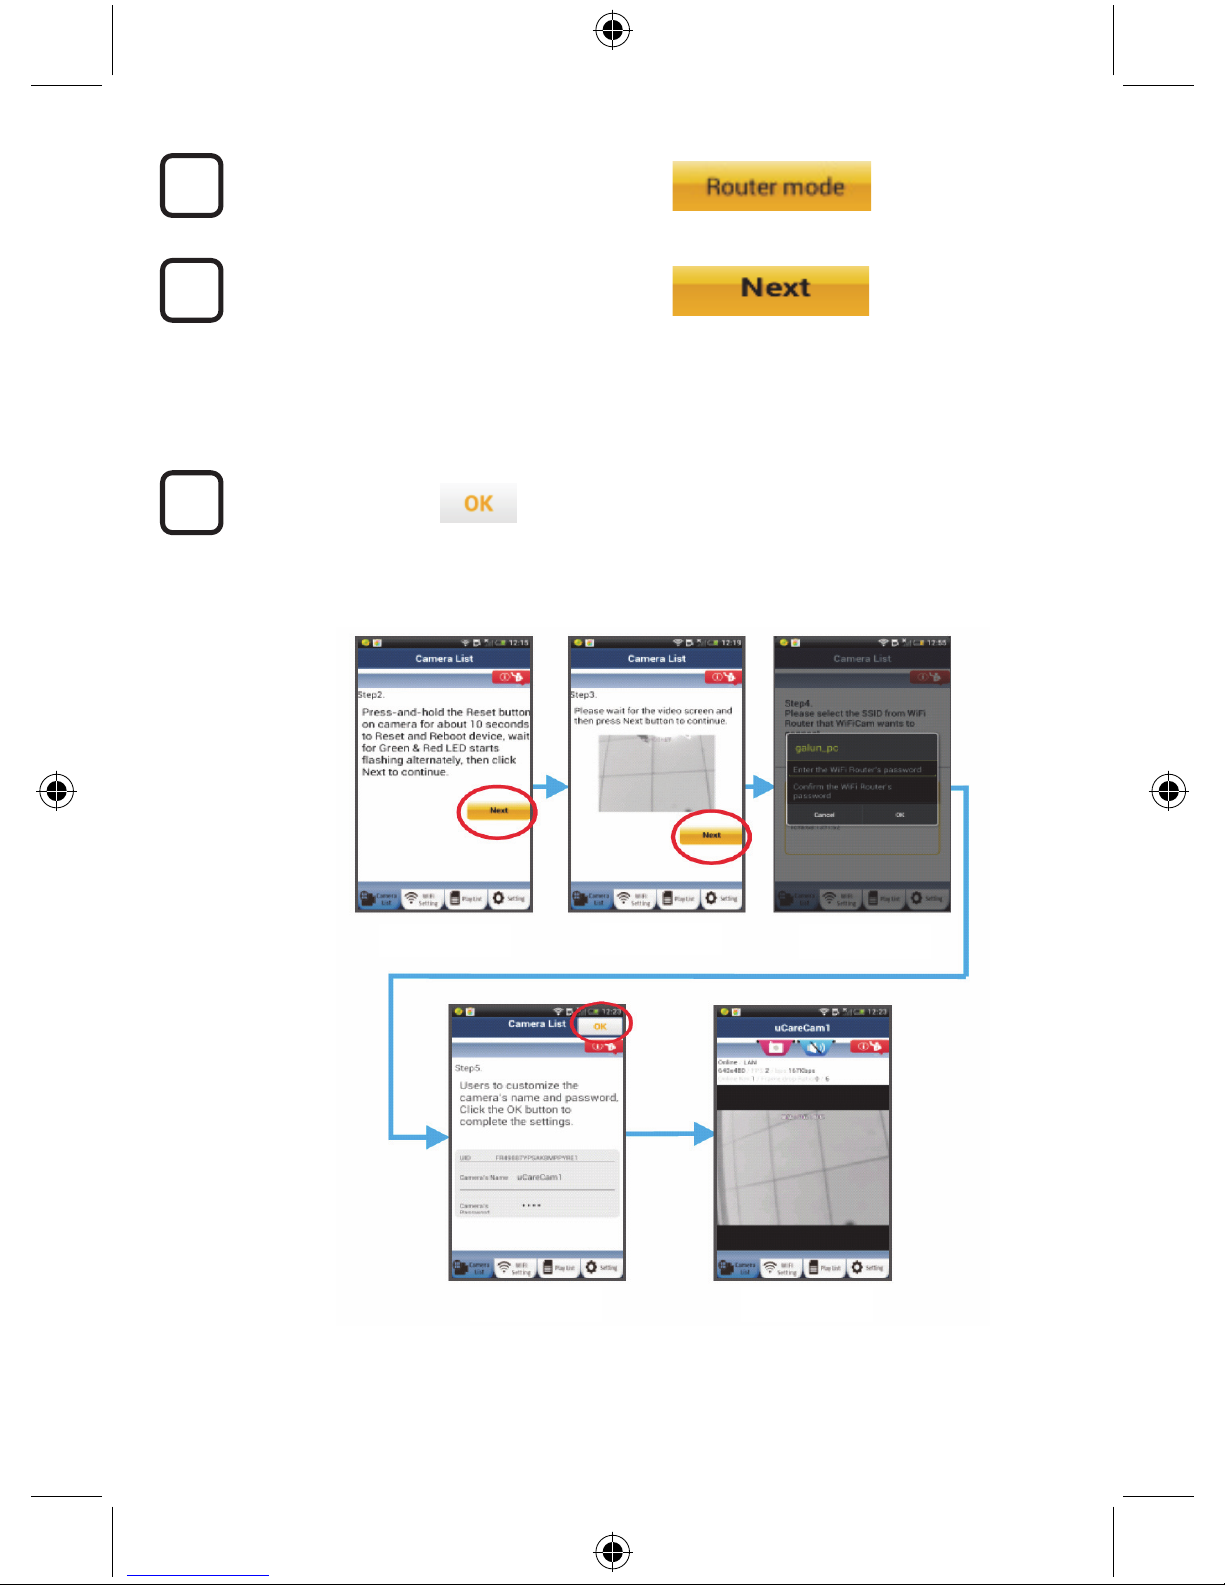
In the following screen select the tab:
then select the tab:
to enter the next step (see Figure 2).
Follow the instructions in the Camera List window step by step (see Figure 3 and Figure 4).
Please enter a personal camera name and password (default 0000).
You are encouraged to change the default password after setup for security purposes.
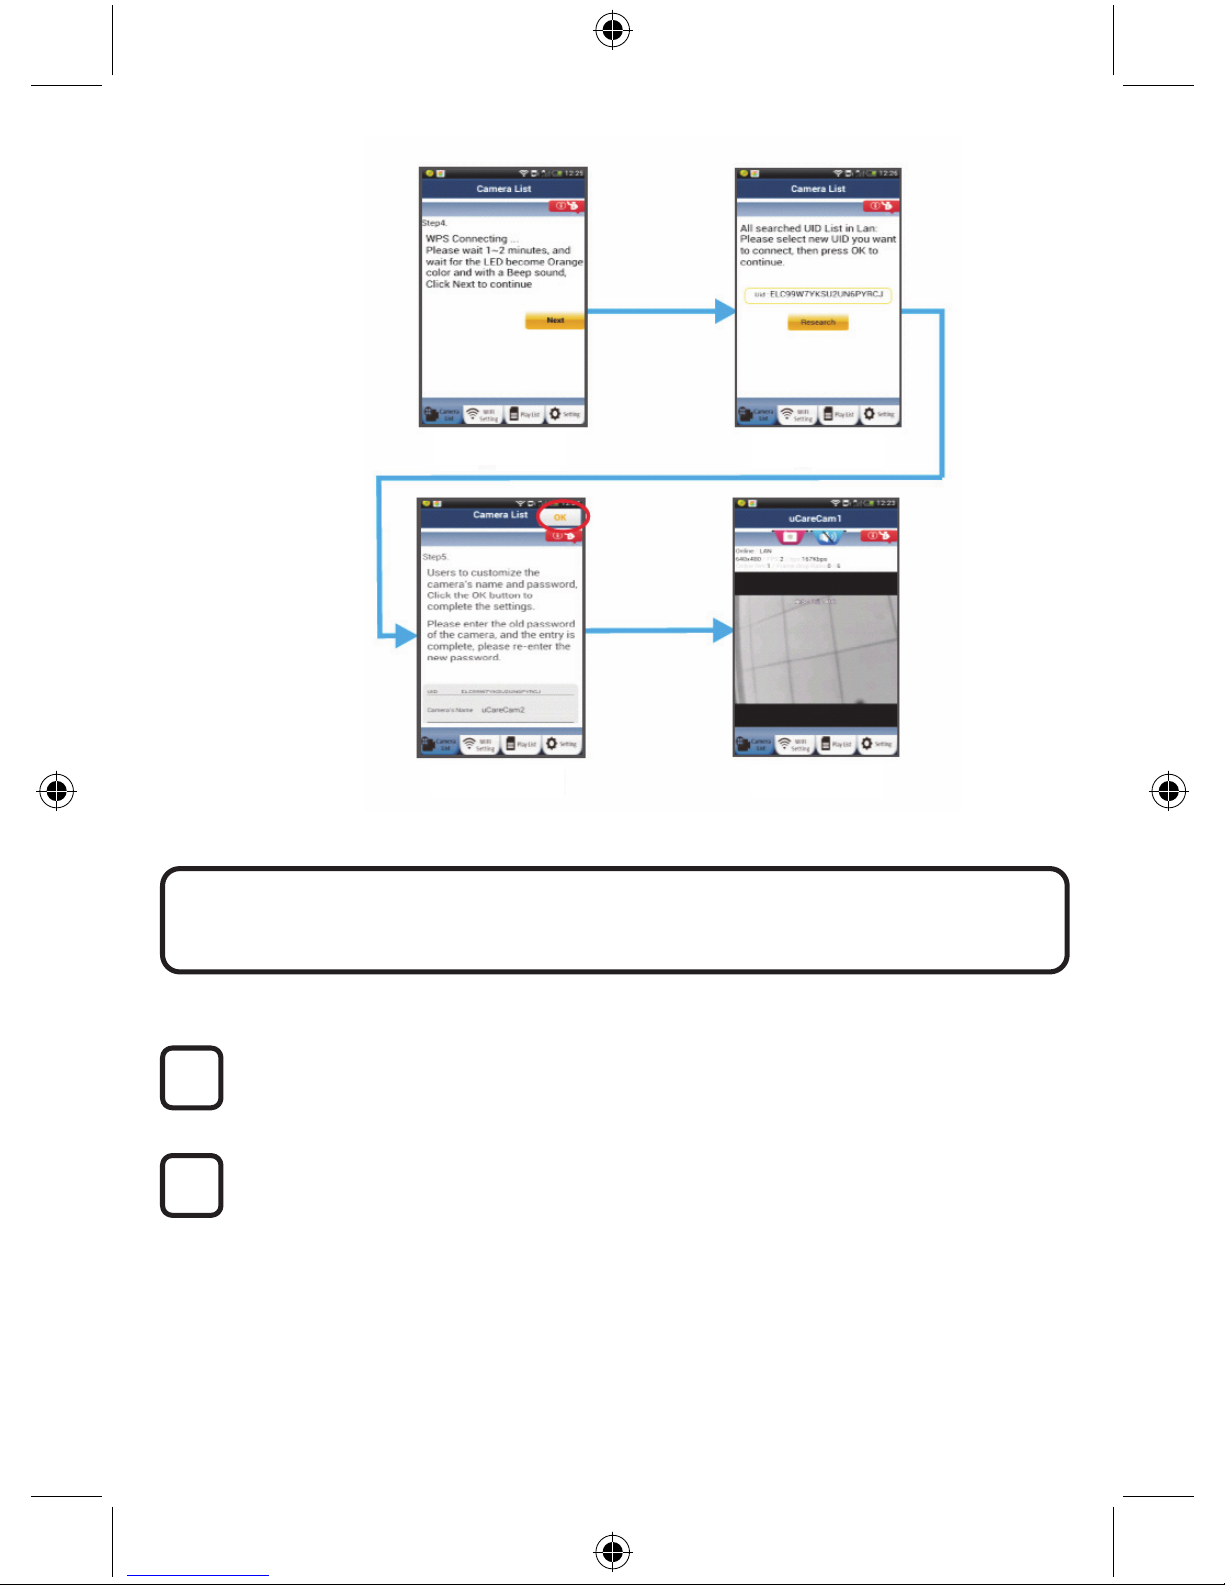
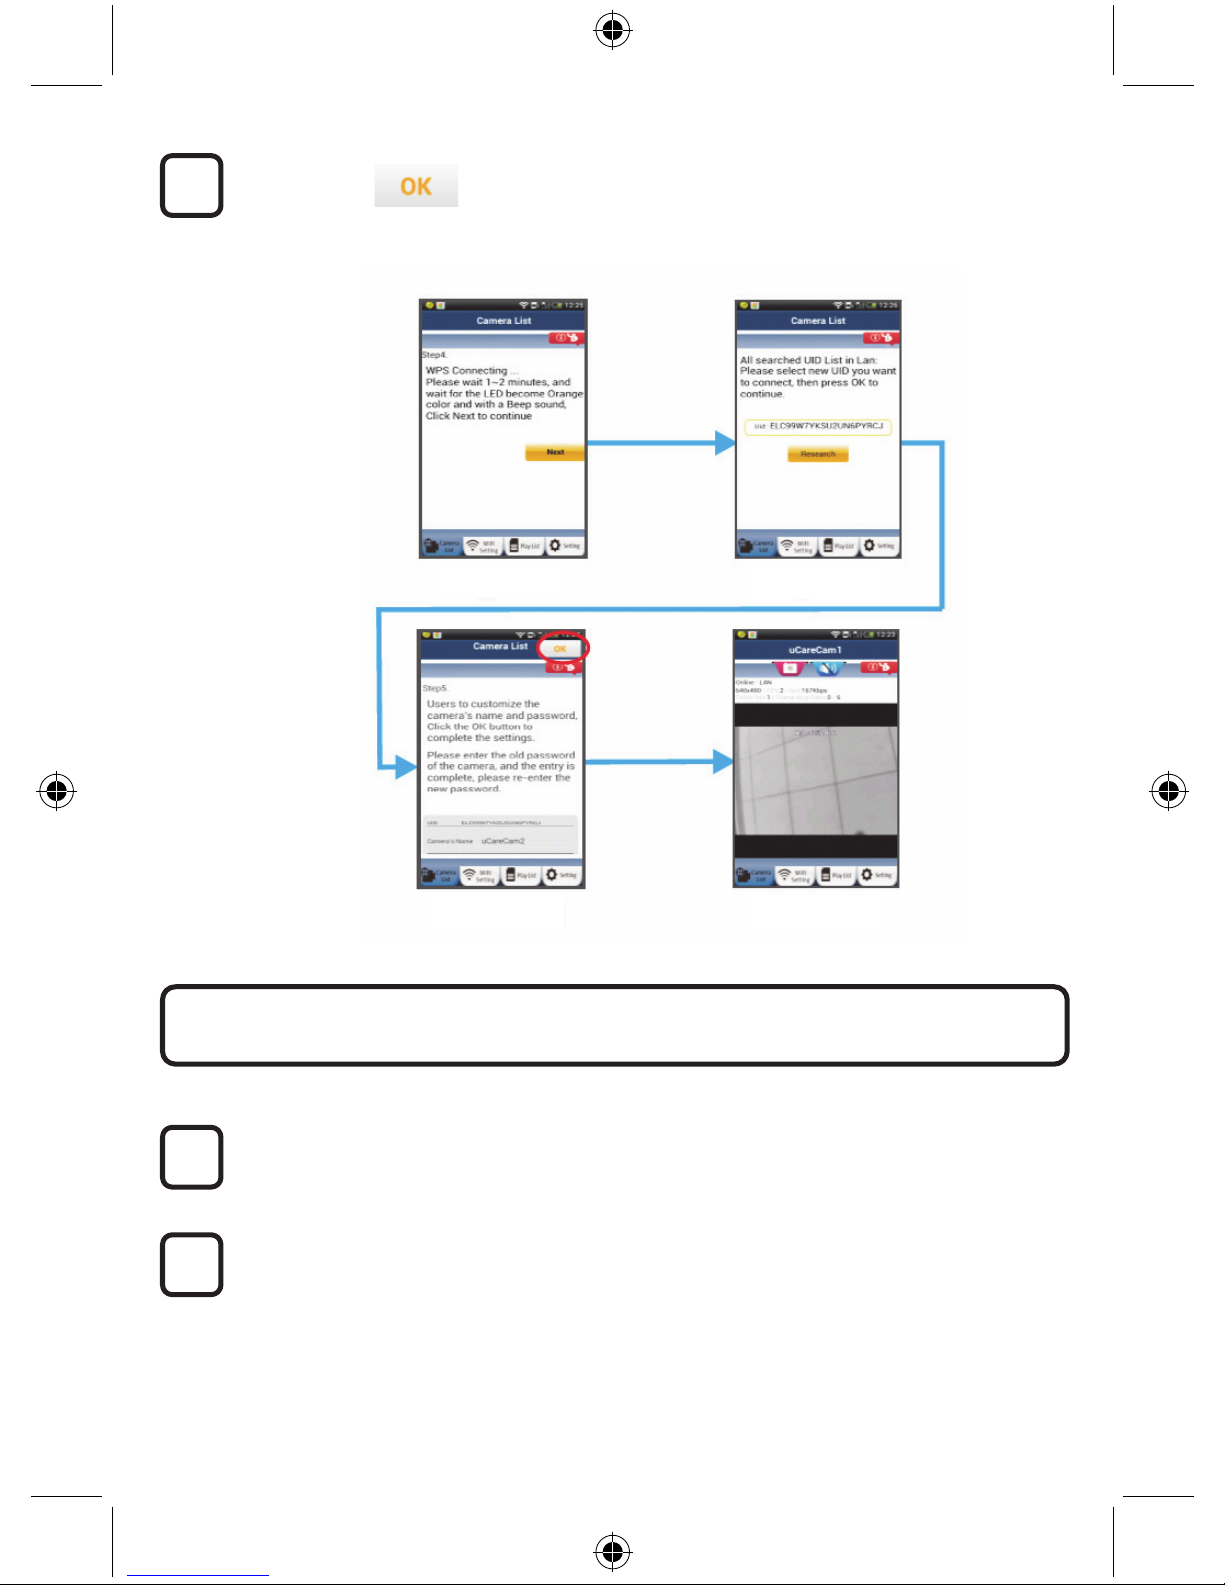
Click the tab
(see Figure 5). The uCare Cam will automatically enter the viewing window (see Figure 6)
and the IP camera status LED will turn orange.
7
6
5
Figure3
Figure2
Figure4
Figure5 Figure6
5
APPLE
Set the IP camera to connect to the Wi-Fi router
Open up “Settings” on your iOS device and select “Wi-Fi” and let it search for a network.
The network will be “Wi-Fi-cam-p2p”. Select “Wi-Fi-cam-p2p” to connect.
Now, open the “uCare Cam” app and select the tab at the bottom of the screen that says
“Wi-Fi Connect”.
Select “Router mode”, then “Next”. Enter here the Wi-Fi network name (SSID) and
password of your home router.
After the IP camera receives this information, it will restart. Please wait for it to start up and
connect to your Wi-Fi router. When it successfully connects, the status LED colour will turn
orange. It may take up to 5 minutes.
Then select the camera name in the “uCare Cam” app to connect.
Note: If the status LED colour does not turn orange, please check your Wi-Fi router and
make sure the IP camera is within the signal area of your Wi-Fi router. Then try this setup
again.
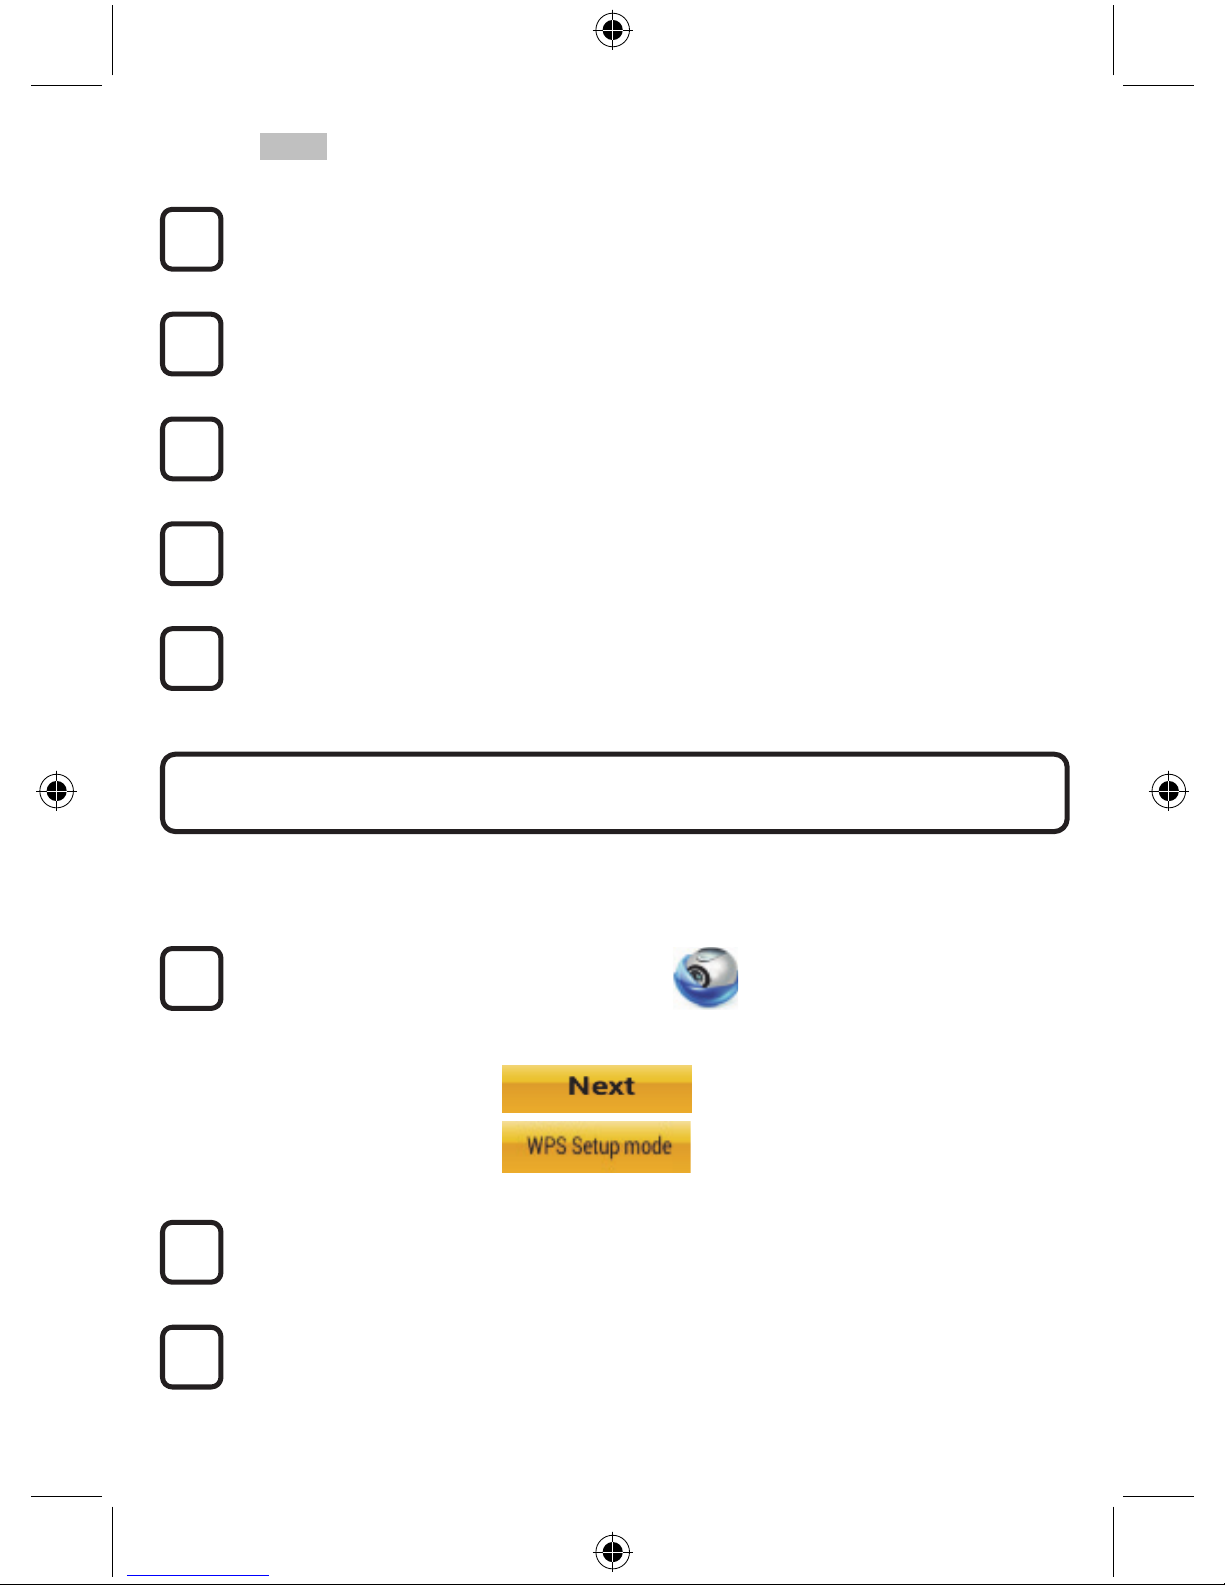
If your Wi-Fi router has a WPS (Wi-Fi Protected Setup) button, you can use it to set up the IP camera.
(Must enable WPA/WPA2 encryption in Router). On the Wi-Fi router, you will see a button labelled
“WPS”. It may also be called “QSS” or “AOSS”
Setup Wi-Fi - WPS mode
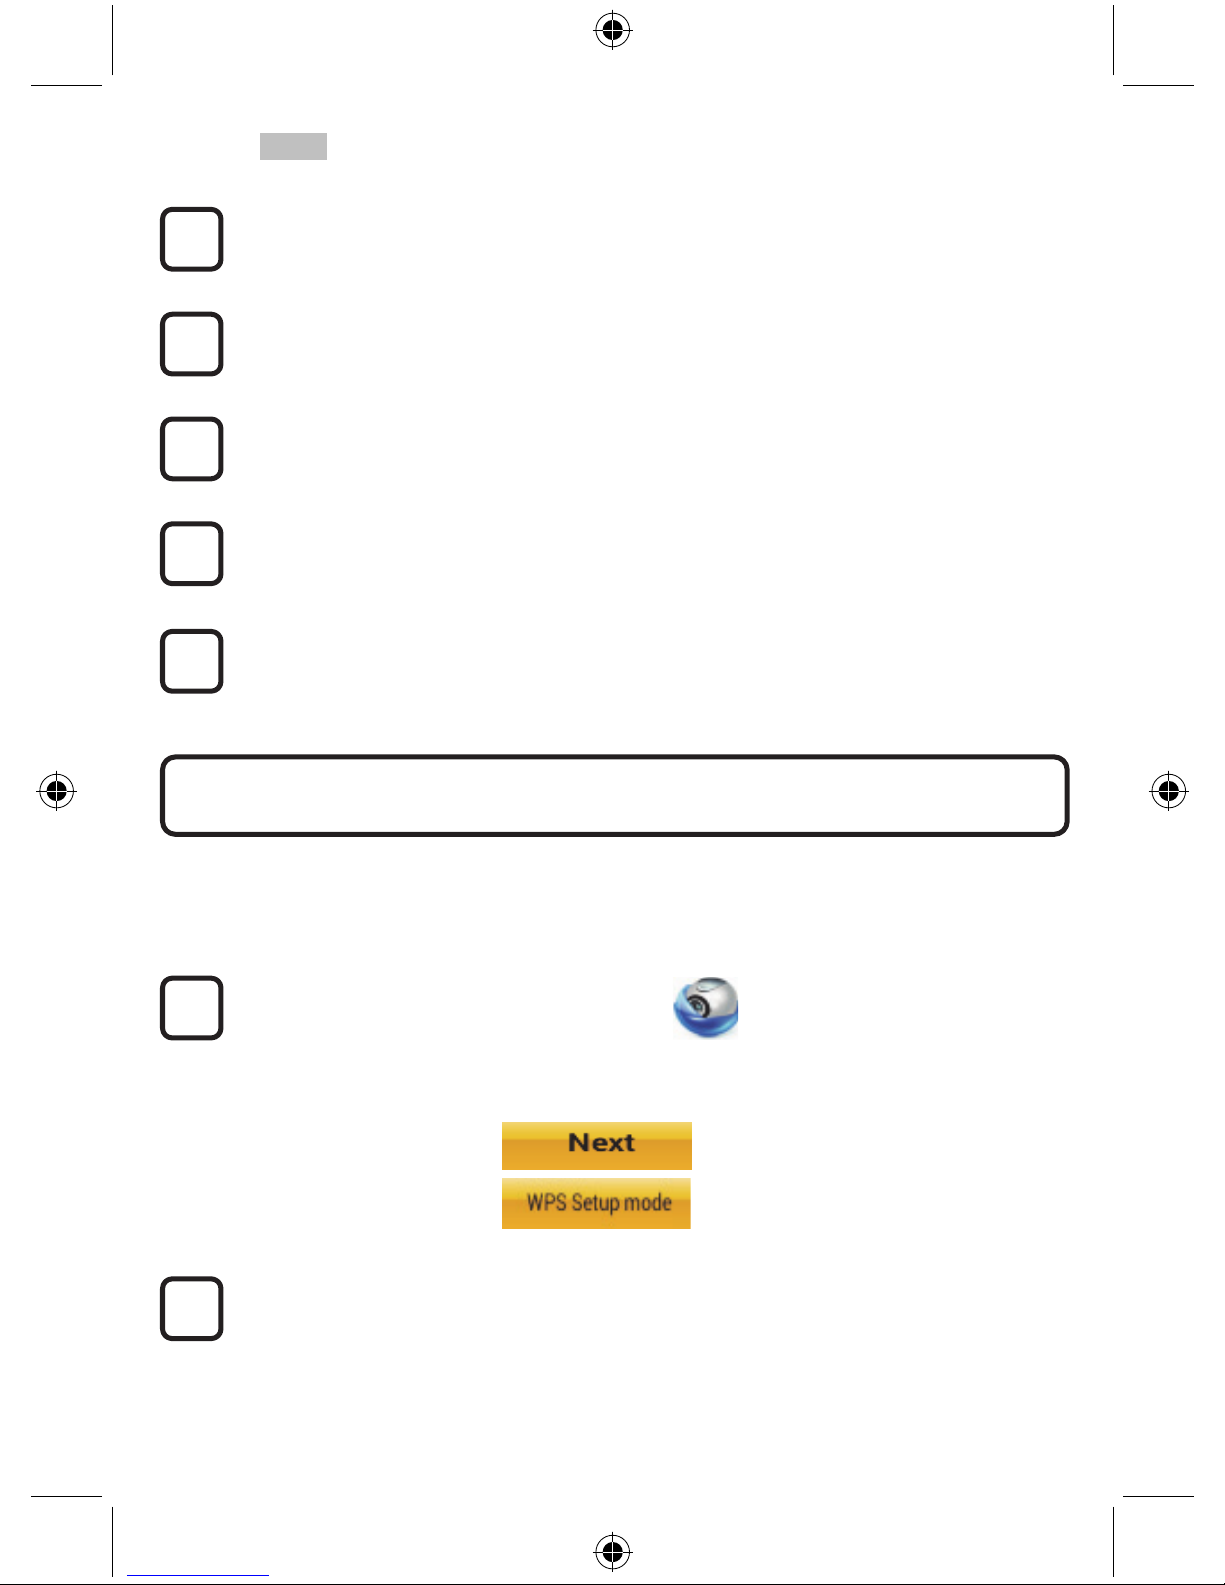
Open the “uCare Cam” app
and select “Wi-Fi Setting” or “Wi-Fi Connect” at the bottom of the screen.
Select the tab:
then select the tab:
to enter Step 2 (see Figure 8).
Enter WPS mode
Power on your IP camera. The status LED on the IP camera will be green for about 15
seconds.
Programme Loading
The status LED will flash red for about 15 seconds.
2
3
1
Install your IP camera by WPS connection mode
12
11
10
9
8
6
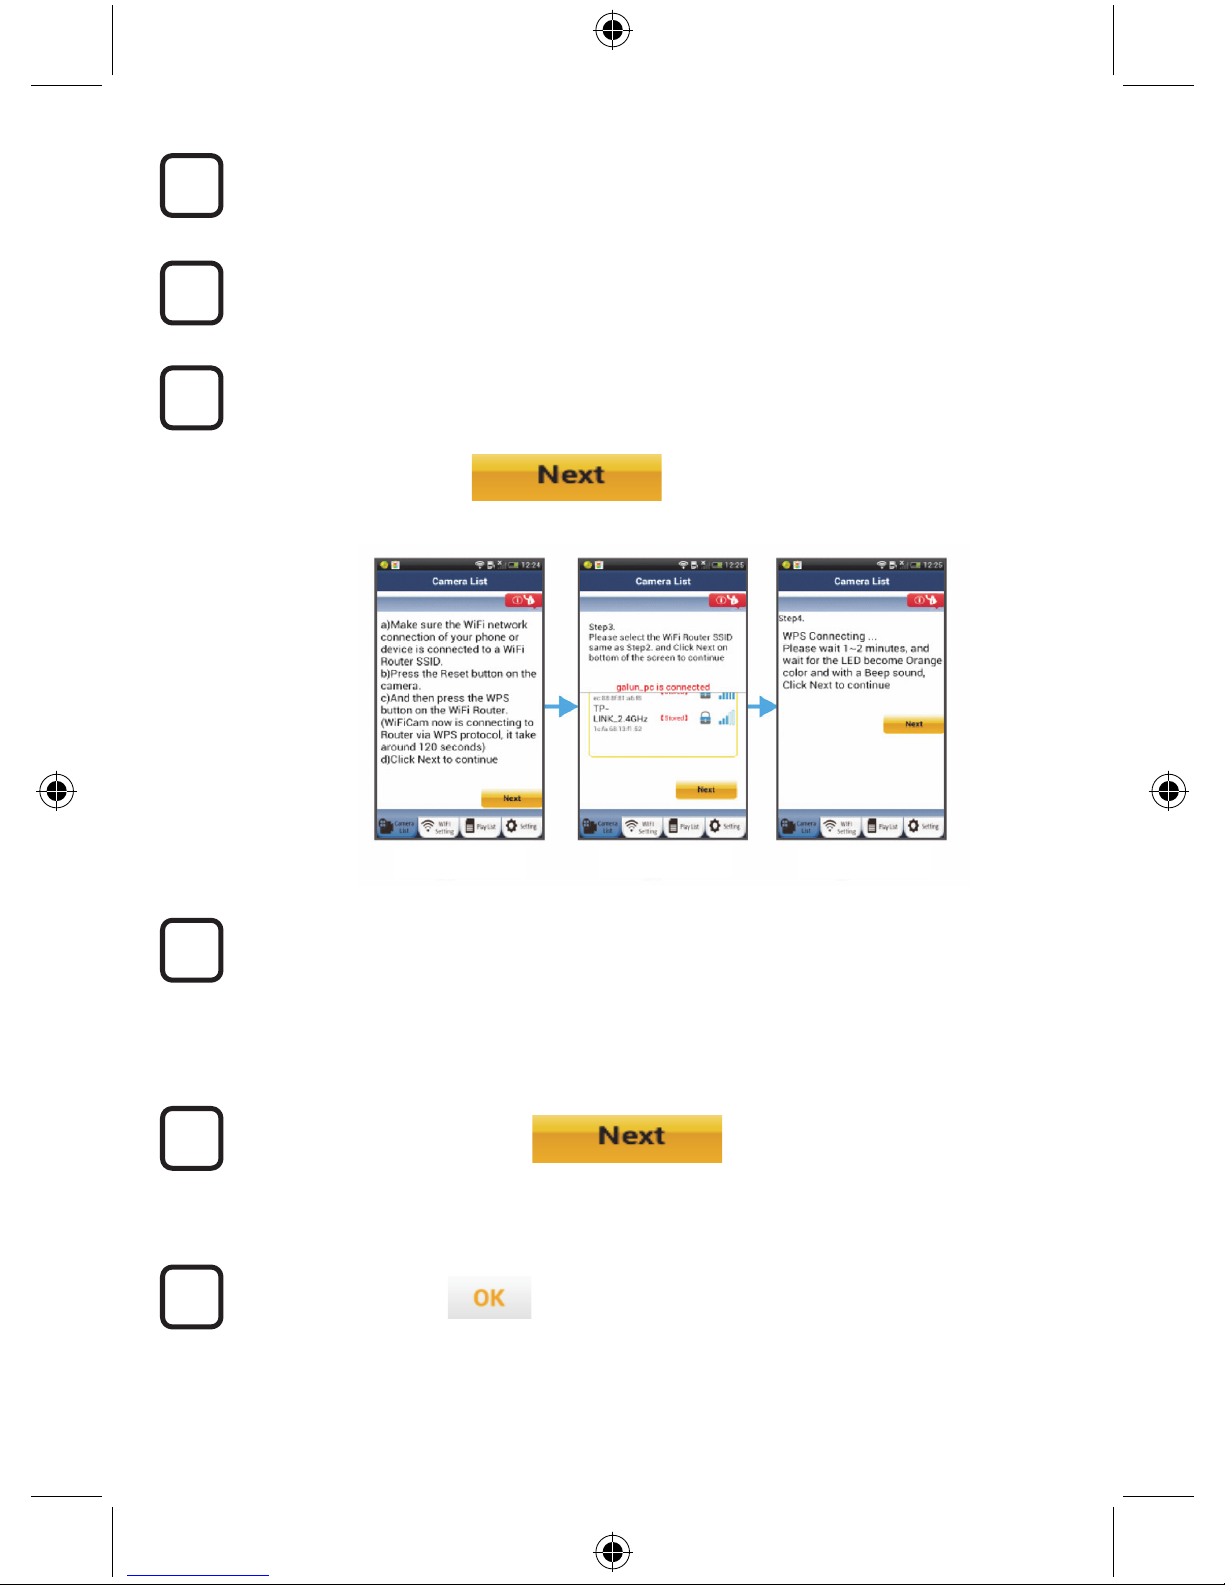
Press the WPS button on your IP camera
Wait until the status LED flashes between red and green, then press and hold the
WPS/RESET button on your IP camera for about 2 seconds to enter WPS mode. The
status LED will be flashing green.
Enter WPS mode on the Wi-Fi router
Press the WPS button on the Wi-Fi router
Selecting the Wi-Fi router
Select the Wi-Fi router of your choice in the screen (see Figure 9).
Then select the tab:
to enter next step (see Figure 10).
IP camera connects with Wi-Fi router
Wait about 1-2 minutes. If the IP camera is successfully connected to the Wi-Fi router, the
status LED will become orange.
Otherwise the status LED will become a flashing red light. If the setup is not successful,
please go back to Step 1 and try again.
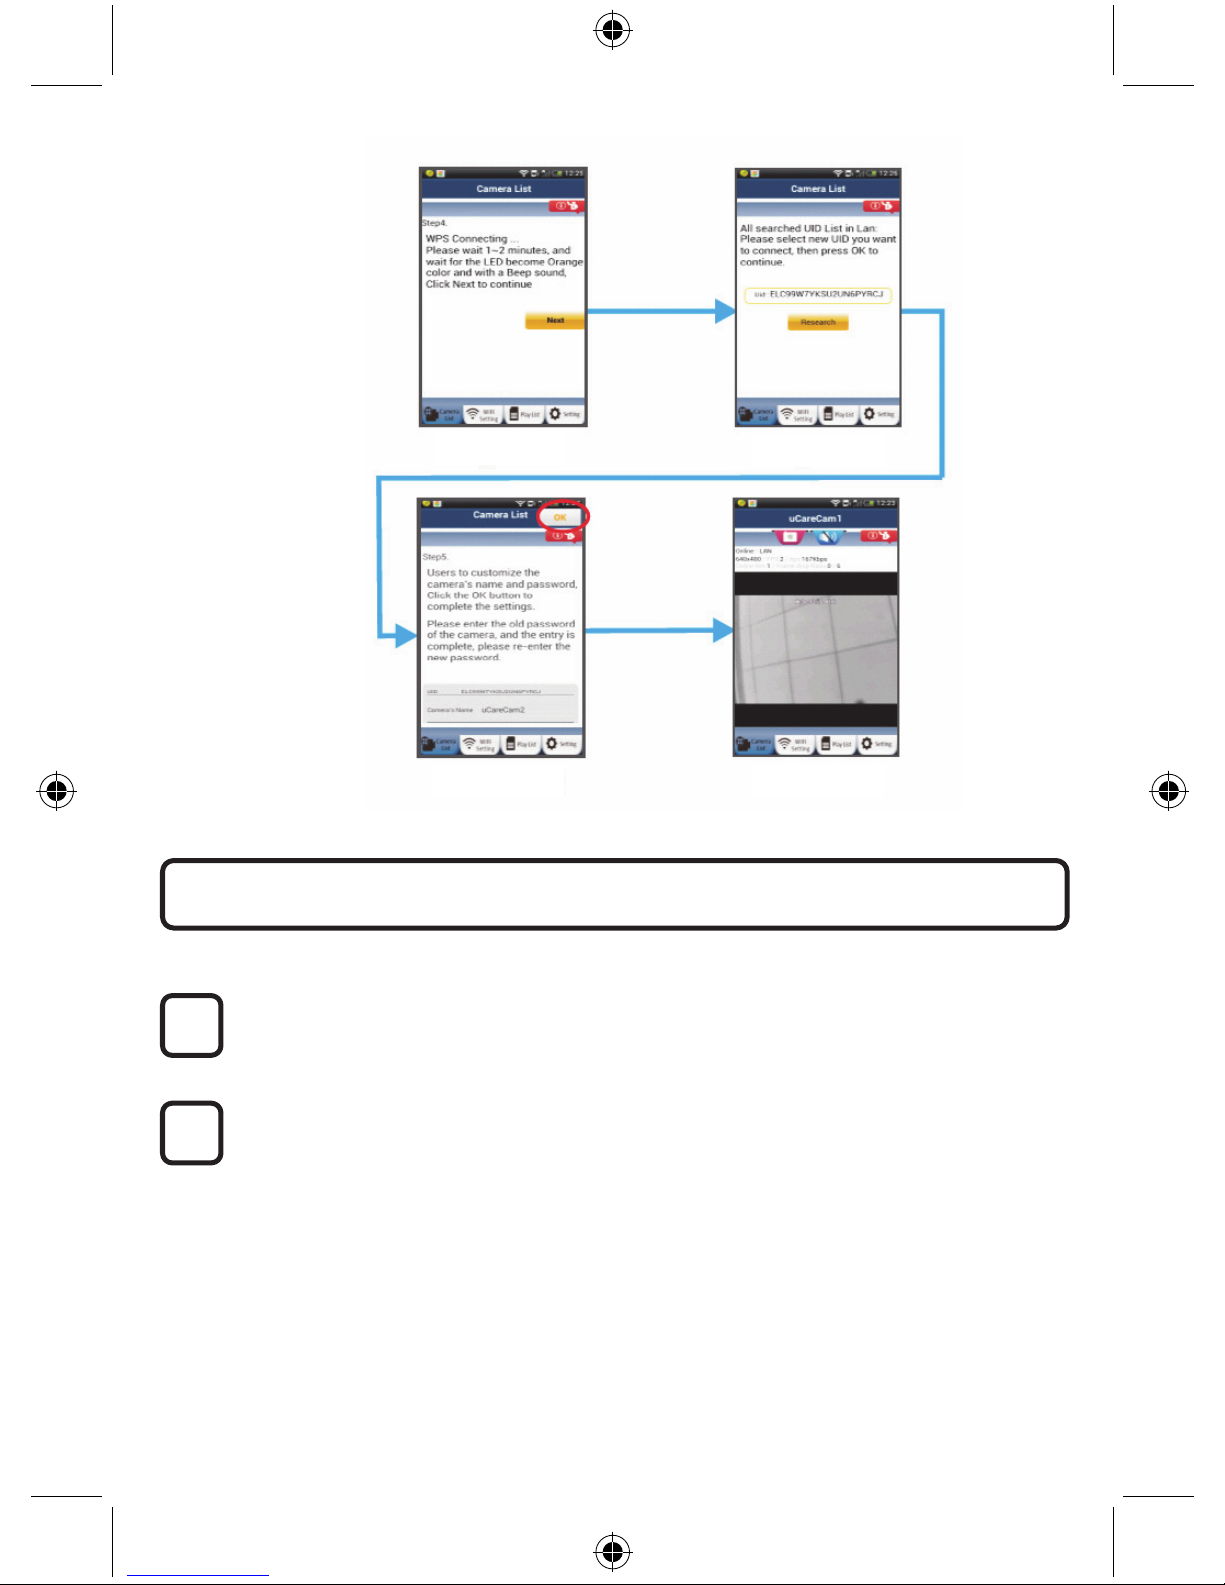
If successful, select the tab:
(see Figure 11), and follow the instructions.
Please enter a camera name and password for security and
select the Tab: (see Figure 13).
The IP camera will automatically enter the viewing screen (see Figure 14).
8
6
5
4
9
7
Figure9
Figure10 Figure8
7
Power On
Plug the power adapter DC connector into the DC input port of the IP camera and then plug
the power adapter into a wall outlet. The status LED on the IP camera will turn green for
about 15 seconds.
Programme Loading
The status LED will flash red for about 15 seconds.
2
1
Start up the IP camera after the Wi-Fi connection has been
completed
Figure11
Figure12
Figure13 Figure14
8
Searching Wi-Fi Router
The status LED will flash green until the Wi-Fi router is found (up to 5 minutes).
Once the router is found, the status LED will become orange.
If the IP camera cannot connect to the Wi-Fi router, please check the Wi-Fi router status or
re-install.
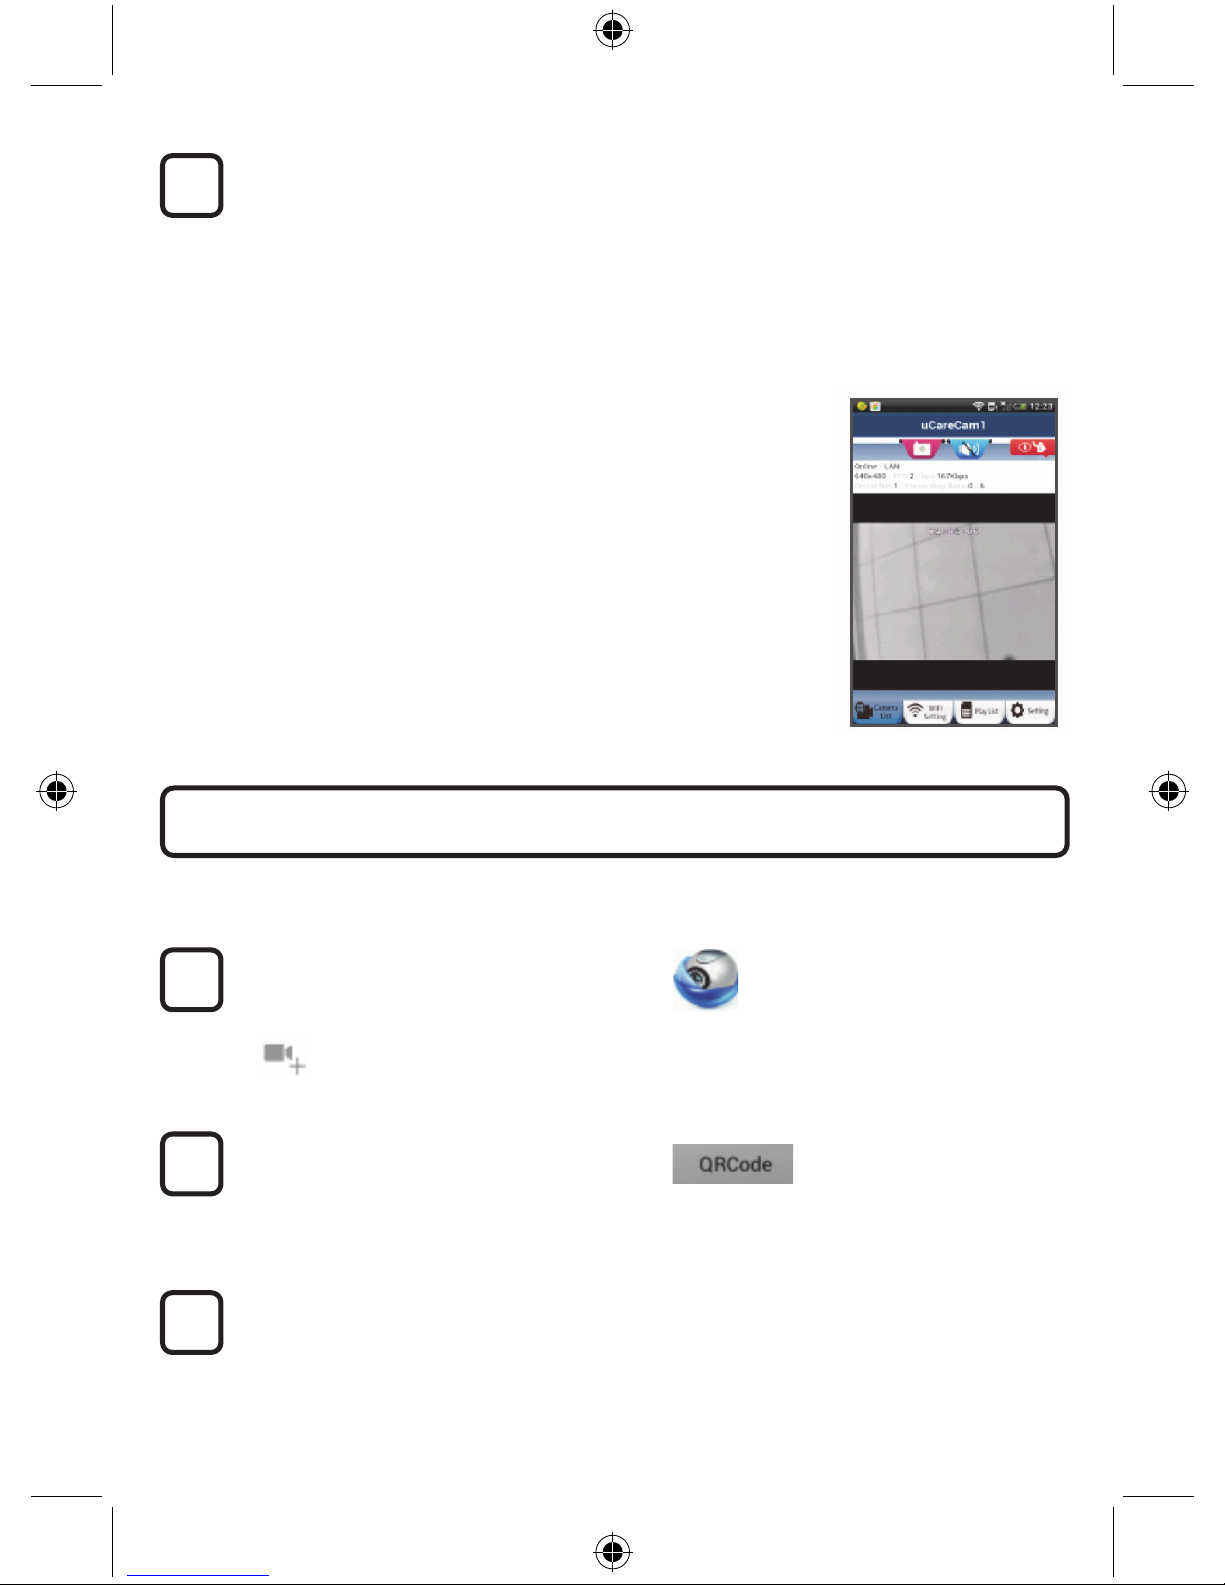
In the app, select the camera name that is shown in the Camera List, and the viewing
window will open(see Figure 15).
ANDROID (for Apple go to: Step 5)
Open the “uCare Cam” app and select:
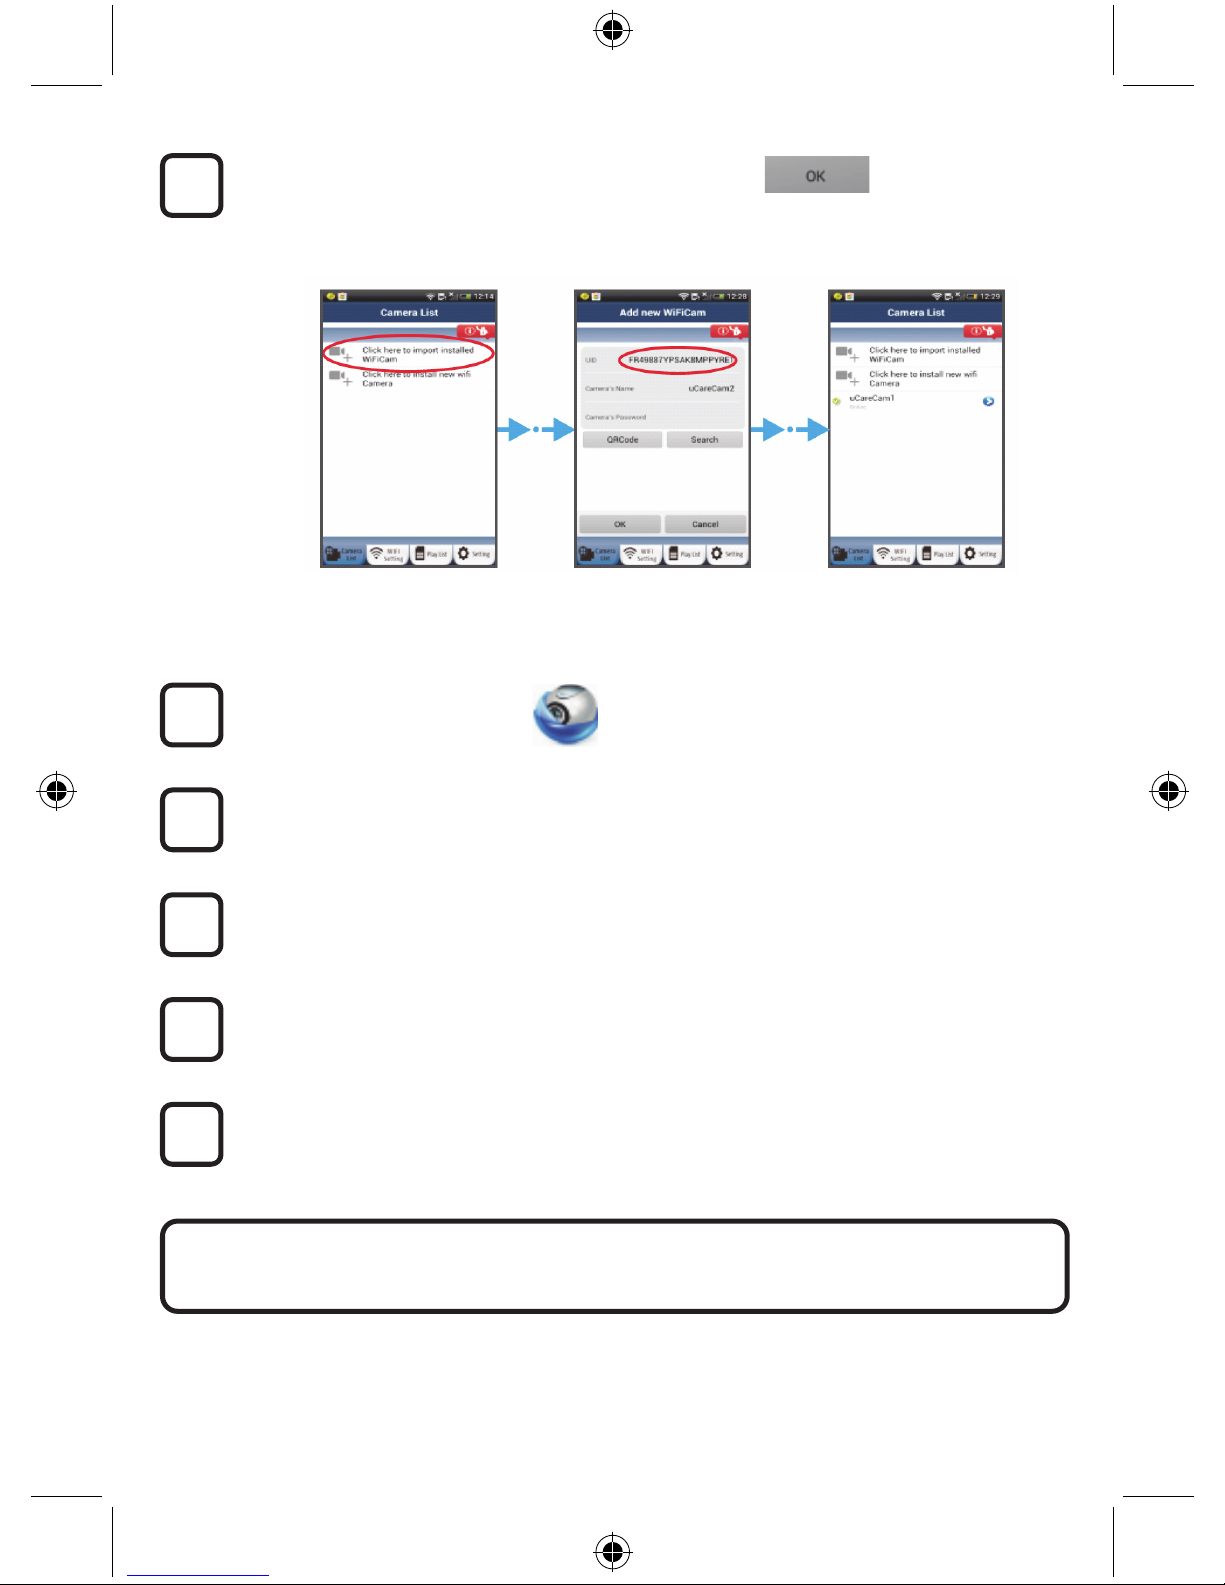
Click here to import installed Wi-Fi Camera
In the Camera List Window screen (see figure 16) for adding an IP camera.
Select the tab:
Your device will now enter the QR code mode.
Note: you need to have a QR code scanner installed on your device.
Locate the QR code on the backside of the IP camera and scan the QR code.
After scanning the QR code, the UID (Unique ID code) appears in the screen of your
device (see Figure 17).
3
2
1
Add already installed IP camera to the app
3
9
Enter a personal camera name and password and
select the tab:
(see Figure 17).
The new camera will be added to the list
(see Figure 18).
Figure16 Figure 17 Figure 18
APPLE
Open the App “uCare Cam”.
Select, in the camera list window, the “+” sign on the right top of the screen.
Select option “Scan camera QR code”.
Note: you need to have a QR code scanner installed on your device.
Locate the QR code on the backside of the IP camera and scan the QR code.
The UID (Unique ID code) will show up after scanning the QR code.
Enter a personal camera name and select “DONE” on the top right side of the screen.
4
For further explanation of the app, the IP camera and the FAQ, please check the FULL
manual (English only) on the CD supplied with this product.
9
8
7
6
5

10
Product description:
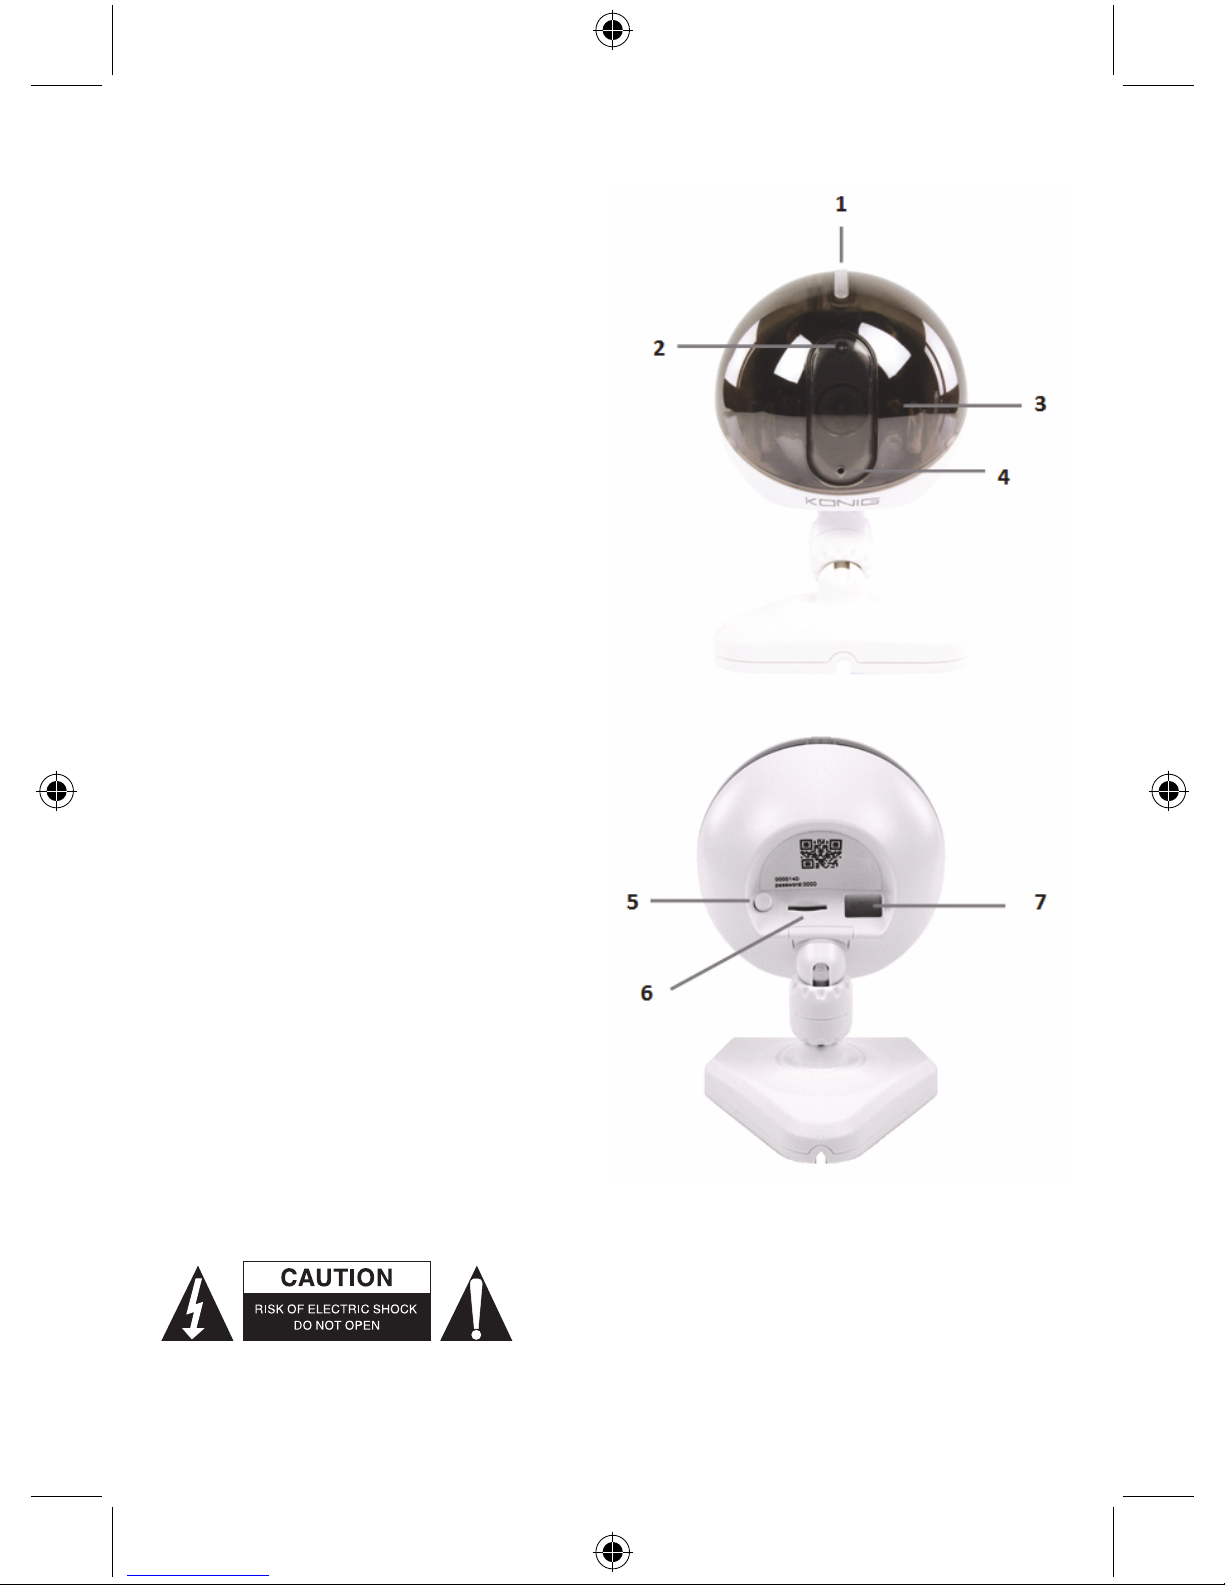
SEC-IPCAM100B (W)
1. Wi-Fi antenna
2. Light intensity sensor
3. IR LED
4. No function
5. Microphone
6. LED indicator
7. WPS/Reset button
8. Micro SD card slot
9. Loudspeaker
10. Connection for camera mount
11. 5V DC input

11
SEC-IPCAM105B (W)
1. LED indicator
2. Light intensity sensor
3. IR LED
4. Microphone
5. WPS/Reset button
6. Micro SD card slot
7. 5V DC input
Safety precautions:
To reduce risk of electric shock, this product should ONLY be
opened by an authorised technician when service is
required. Disconnect the product from mains and other
equipment if a problem should occur. Do not expose the
product to water or moisture.
12
Maintenance:
Clean only with a dry cloth. Do not use cleaning solvents or abrasives.
Warranty:
Any changes and/or modifications to the product will void the warranty. We cannot accept any liability
for damage caused by incorrect use of this product.
Disclaimer:
Designs and specifications are subject to change without notice. All logos, brands and product names
are trademarks or registered trademarks of their respective holders and are hereby recognized as
such.
Disposal:
• This product is designated for separate collection at an appropriate collection point. Do not
dispose of this product with household waste.
• For more information, contact the retailer or the local authority responsible for waste
management.
This product has been manufactured and supplied in compliance with all relevant regulations and
directives, valid for all member states of the European Union. It also complies with all applicable
specifications and regulations in the country of sales.
Formal documentation is available upon request. This includes, but is not limited to: Declaration of
Conformity (and product identity), Material Safety Data Sheet and product test report.
Please contact our customer service desk for support:
via website: http://www.nedis.com/en-us/contact/contact-form.htm
via e-mail: service@nedis.com
via telephone: +31 (0)73-5993965 (during office hours)
NEDIS B.V., De Tweeling 28, 5215 MC ’s-Hertogenbosch, THE NETHERLANDS
13
DEUTSCH
IP-Kamera
Einführung:
• Diese authentische IP-Kamera zur Überwachung Ihres Eigentums ist nach dem Anschluss sofort
betriebsbereit. Die Installation ist sehr einfach und erfordert keine IP-Einstellungen oder
Router-Konfigurationen. Dank der kostenlosen uCare Cam App können Sie Übertragungen
jederzeit und überall auf Ihrem Smartphone oder auf anderen Mobilgeräten anschauen. Laden Sie
die uCare Cam App kostenlos von Google Play oder aus dem Apple App Store herunter. Weitere
Funktionen ermöglichen E-Mail- oder App-Benachrichtigungen für den Fall, dass Bewegungen
erkannt werden. Fotos und/oder Videoübertragungen lassen sich jederzeit anzeigen oder
abspielen. Dank 2-Wege-Audiofunktion auch als Babymonitor geeignet.
• Bitte lesen Sie diese Anleitung vor der Installation / dem Gebrauch des Geräts.
• Bewahren Sie diese Bedienungsanleitung für späteres Nachschlagen auf.
Systemanforderungen:
• Das Gerät unterstützt die Betriebssysteme Android 4.0 und höher oder iOS 5.0 und höher.
• Router mit Wi-Fi.
Sie können die „uCare Cam“ App von Google Play oder aus dem Apple App Store
herunterladen.
Android-Geräte
Download-Link zur „uCare Cam“ App im Google Play Store
iOS-Geräte
Download-Link zur „uCare Cam“ App im App Store
Klicken Sie nach der Installation der Software
auf das Icon, um die App zu starten.
Standardpasswort für „uCare Cam“: 0000
Administratorname: admin
Administratorpasswort: 0000
Installation der App auf Ihrem Mobilgerät
2
1
14
Abbildung 1
„Ansicht der Kameraliste“
Es gibt zwei Möglichkeiten, den einfachen Setup Ihrer IP-Kamera fortzusetzen.
Einschalten
Verbinden Sie den DC-Stecker des Netzteils mit der DC-Eingangsbuchse der IP-Kamera
und schließen Sie dann das Netzteil an eine Steckdose an. Die LED-Statusanzeige an der
IP-Kamera leuchtet ungefähr 15 Sekunden lang grün.
Programm wird geladen
Die LED-Statusanzeige blinkt ungefähr 15 Sekunden lang rot.
Router-Verbindungsmodus
Warten Sie, bis die LED-Statusanzeige abwechselnd rot und grün leuchtet.
Hinweis:
Falls die LED-Anzeige nicht rot und grün leuchtet, halten Sie die
WPS/RÜCKSTELLUNGS-Taste mehr als 10 Sekunden lang gedrückt, um die IP-Kamera
neu zu starten.
Leuchtet die grüne LED-Statusanzeige stetig und blinkt die rote Anzeige zweimal und
leuchtet dann grün, wurde der RÜCKSTELLUNGS-Modus aktiviert. Lassen Sie nun die
Taste los und warten Sie, bis die LED-Statusanzeige abwechseln rot und grün leuchtet.
ANDROID (für Apple, siehe Schritt 8)
Verbindung der IP-Kamera mit dem Wi-Fi-Router
Öffnen Sie die „uCare Cam“ App und
wählen Sie:
Klicken Sie hier zur Installation der neuen
Wi-Fi-Kamera
In der Ansicht der Kameraliste (siehe Abbildung 1).
4
3
2
1
Installation Ihrer IP-Kamera per ROUTER-MODUS

15
Wählen Sie in der darauffolgenden Ansicht
die Option:
Wählen Sie dann:
um zum nächsten Schritt zu gelangen
(siehe Abbildung 2).
Befolgen Sie die Anweisungen in der Ansicht der Kameraliste Schritt für Schritt (siehe
Abbildung 3 und Abbildung 4). Geben Sie einen Namen für die Kamera und das Passwort
(per Werkseinstellung 0000) ein.
Aus Sicherheitsgründen legen wir Ihnen nahe, das Passwort nach dem Setup zu ändern.
Klicken Sie auf
(siehe Abbildung 5). Die uCare Cam öffnet die Kameraübertragung automatisch (siehe
Abbildung 6) und die LED-Statusanzeige der IP-Kamera leuchtet orange.
7
6
5
Abbildung3
Abbildung2
Abbildung4
Abbildung5 Abbildung6
16
APPLE
Verbindung der IP-Kamera mit dem Wi-Fi-Router
Öffnen Sie an Ihrem iOS-Gerät die „Settings“ und wählen Sie „Wi-Fi“. Lassen Sie das
Gerät nach einem Netzwerk suchen. Das Zielnetzwerk ist „Wi-Fi-cam-p2p“. Wählen Sie
„Wi-Fi-cam-p2p“ für die Verbindung.
Öffnen Sie nun die „uCare Cam“ App und wählen Sie dann unten im Bildschirm die Taste
„Wi-Fi Connect“.
Wählen Sie „Router mode“ und anschießend „Next“. Bitte geben Sie hier den Namen des
Wi-Fi-Netzwerks (SSID) sowie das Passwort Ihres Home-Routers ein.
Nach dem Erhalt dieser Informationen wird die IP-Kamera gestartet. Warten Sie, bis die
Kamera hochgefahren ist und die Verbindung mit Ihrem Wi-Fi-Router hergestellt hat. Nach
der erfolgreichen Verbindung leuchtet die LED-Statusanzeige orange. Der Vorgang kann
bis zu 5 Minuten dauern.
Wählen Sie in der „uCare Cam“ App den Kameranamen für die Verbindung aus.
Hinweis: Falls die LED-Statusanzeige nicht orange leuchtet, überprüfen Sie Ihren
Wi-Fi-Router und vergewissern Sie sich, dass sich die IP-Kamera in der Signalreichweite
Ihres Wi-Fi-Routers befindet. Führen Sie dann den Setup erneut durch.
Falls Ihr Wi-Fi-Router über eine WPS-Taste (Wi-Fi Protected Setup) verfügt, können Sie diese für den
Setup der IP-Kamera verwenden. (WPA/WPA2-Verschlüsselung im Router muss aktiviert sein).
Suchen Sie an Ihrem Wi-Fi-Router die Taste mit der Kennzeichnung „WPS“. Einige Tasten haben
auch die Kennzeichnung „QSS“ oder „AOSS“.
Wi-Fi einrichten – WPS-Modus
Öffnen Sie die „uCare Cam“ App
und wählen Sie die Option „Wi-Fi Setting“ oder „Wi-Fi Connect“ an der Unterseite des
Bildschirms.
Wählen Sie:
Wählen Sie dann:
um zu Schritt 2 zu gelangen (siehe Abbildung 8).
WPS-Modus einschalten
Schalten Sie Ihre IP-Kamera ein. Die LED-Statusanzeige der IP-Kamera leuchtet ungefähr
15 Sekunden lang grün.
2
1
Installation der IP-Kamera per WPS-Verbindungsmodus
12
11
10
9
8
17
Programm wird geladen
Die LED-Statusanzeige blinkt ungefähr 15 Sekunden lang rot.
Drücken Sie die WPS-Taste auf Ihrer IP-Kamera
Warten Sie, bis die LED-Statusanzeige abwechselnd rot und grün blinkt. Halten Sie dann
die WPS/RÜCKSTELLUNGS-Taste an Ihrer IP-Kamera ungefähr 2 Sekunden lang
gedrückt, um den WPS-Modus zu aktivieren. Die LED-Statusanzeige blinkt grün.
WPS-Modus am Wi-Fi-Router aktivieren
Drücken Sie am Wi-Fi-Router die WPS-Taste.
Wi-Fi-Router auswählen
Wählen Sie in der Ansicht den gewünschten Wi-Fi-Router aus (siehe Abbildung 9).
Wählen Sie dann:
um zum nächsten Schritt zu gelangen (siehe Abbildung 10).
Die IP-Kamera stellt die Verbindung mit dem Wi-Fi-Router her.
Warten Sie 1-2 Minuten. Nach der erfolgreichen Verbindung der IP-Kamera mit dem
Wi-Fi-Router leuchtet die LED-Statusanzeige orange.
Anderenfalls blinkt die Anzeige rot. Falls der Setup nicht erfolgreich war, kehren Sie bitte
zu Schritt 1 zurück und versuchen es erneut.
Falls verbunden, wählen Sie:
(siehe Abbildung 11) und folgen Sie den Anweisungen.
Bitte geben Sie aus Sicherheitsgründen einen Namen und ein Passwort ein und
8
6
5
4
7
3
Abbildung9
Abbildung10Abbildung8
18
wählen Sie: (siehe Abbildung 13).
Die IP-Kamera öffnet automatisch das Übertragungsfenster (siehe Abbildung 14).
Einschalten
Verbinden Sie den DC-Stecker des Netzteils mit der DC-Eingangsbuchse der IP-Kamera
und schließen Sie dann das Netzteil an eine Steckdose an. Die LED-Statusanzeige an der
IP-Kamera leuchtet ungefähr 15 Sekunden lang grün.
Programm wird geladen
Die LED-Statusanzeige blinkt ungefähr 15 Sekunden lang rot.
2
1
IP-Kamera nach dem Aufbau der Wi-Fi-Verbindung starten
9
Abbildung11
Abbildung12
Abbildung13 Abbildung14

19
Suche nach Wi-Fi-Router
Die LED-Statusanzeige blinkt grün, bis ein Wi-Fi-Router gefunden wurde (bis zu
5 Minuten).
Nach der erfolgreichen Erkennung des Routers leuchtet die LED-Statusanzeige orange.
Falls die IP-Kamera keine Verbindung mit dem Wi-Fi-Router herstellen kann, überprüfen
Sie den Status des Wi-Fi-Routers oder führen Sie die Installation erneut durch.
Wählen Sie in der App den Kameranamen, der in der Kameraliste angezeigt wird. Das
Übertragungsfenster wird dann geöffnet (siehe Abbildung 15).
ANDROID (für Apple, siehe Schritt 5)
Öffnen Sie die „uCare Cam“ App und
wählen Sie:
Klicken Sie hier zum Importieren der
installierten Wi-Fi-Kamera
In der Ansicht der Kameraliste (siehe Abbildung 16), um eine IP-Kamera hinzuzufügen.
Wählen Sie:
Ihr Gerät aktiviert nun den QR-Code-Modus.
Hinweis: An Ihrem Gerät muss ein QR-Codescanner installiert sein.
Suchen Sie den QR-Code an der Rückseite der IP-Kamera und scannen Sie den
QR-Code.
Nach dem Scannen des QR-Codes erscheint die UID (Unique ID Code) auf dem
Bildschirm Ihres Geräts (siehe Abbildung 17).
3
2
1
Bereits installierte IP-Kamera zur App hinzufügen
3

20
Geben Sie einen Namen für die Kamera und das
Passwort ein und wählen Sie:
(siehe Abbildung 17).
Die neue Kamera wird zur Liste hinzugefügt (siehe
Abbildung 18).
Abbildung16 Abbildung17 Abbildung18
APPLE
Öffnen Sie die „uCare
Cam“ App.
Wählen Sie in der Ansicht der Kameraliste rechts oben im Bildschirm das Symbol „+“.
Wählen Sie die Option „Scan camera QR code“.
Hinweis: An Ihrem Gerät muss ein QR-Codescanner installiert sein.
Suchen Sie den QR-Code an der Rückseite der IP-Kamera und scannen Sie den
QR-Code.
Nach dem Scannen des QR-Codes wird die UID (Unique ID Code) angezeigt.
Geben Sie einen Namen für die Kamera ein und wählen Sie oben rechts im Bildschirm die
Option „DONE“.
4
Nähere Informationen zur App, zur IP-Kamera und zu FAQ finden Sie in der
AUSFÜHRLICHEN Bedienungsanleitung (nur auf Englisch) auf der mitgelieferten CD.
9
8
7
6
5

21
Beschreibung des Produkts:
SEC-IPCAM100B (W)
1. Wi-Fi-Antenne
2. Lichtstärkesensor
3. IR-LED
4. Ohne Funktion
5. Mikrofon
6. LED-Anzeige
7. WPS/Rückstellungs-Taste
8. MicroSD-Kartenschlitz
9. Lautsprecher
10. Anschluss zur Befestigung der Kamera
11. 5V DC Eingang
22
SEC-IPCAM105B (W)
1. LED-Anzeige
2. Lichtstärkesensor
3. IR-LED
4. Mikrofon
5. WPS/Rückstellungs-Taste
6. MicroSD-Kartenschlitz
7. 5V DC Eingang
Sicherheitsvorkehrungen:
Um das Risiko eines elektrischen Schlags zu verringern,
sollte dieses Produkt AUSSCHLIESSLICH von einem
autorisierten Techniker geöffnet werden. Trennen Sie das
Produkt von anderen Geräten, wenn ein Problem auftreten
sollte. Setzen Sie das Gerät nicht Wasser oder Feuchtigkeit
aus.
23
Wartung:
Nur mit einem trockenen Tuch säubern. Keine Reinigungs- oder Scheuermittel verwenden.
Garantie:
Alle Änderungen und/oder Modifizierungen an dem Produkt haben ein Erlöschen der Garantie zur
Folge. Wir übernehmen keine Haftung für Schäden durch unsachgemäße Verwendung dieses
Produkts.
Haftungsausschluss:
Design und technische Daten unterliegen unangekündigten Änderungen. Alle Logos, Marken und
Produktnamen sind Marken oder eingetragene Marken ihrer jeweiligen Eigentümer und werden
hiermit als solche anerkannt.
Entsorgung:
• Dieses Produkt muss an einem entsprechenden Sammelpunkt zur Entsorgung abgegeben
werden. Entsorgen Sie dieses Produkt nicht mit dem Haushaltsmüll.
• Weitere Informationen erhalten Sie beim Verkäufer oder der für die Abfallwirtschaft
verantwortlichen örtlichen Behörde.
Dieses Produkt wurde hergestellt und geliefert in Übereinstimmung mit allen geltenden Vorschriften
und Richtlinien, die für alle Mitgliedsstaaten der Europäischen Union gültig sind. Es entspricht allen
geltenden Vorschriften und Bestimmungen im Land des Vertriebs.
Eine formale Dokumentation ist auf Anfrage erhältlich. Diese beinhaltet unter anderem, jedoch nicht
ausschließlich: Konformitätserklärung (und Produktidentität), Sicherheitsdatenblatt, Testreport des
Produkts.
Wenden Sie sich bei Fragen bitte an unseren Kundendienst:
per Internet: http://www.nedis.de/de-de/kontakt/kontaktformular.htm
per E-Mail: service@nedis.com
per Telefon: Niederlande +31 (0)73-5993965 (während der Geschäftszeiten)
NEDIS B.V., De Tweeling 28, 5215 MC ’s-Hertogenbosch, NIEDERLANDE

24
FRANÇAIS
Caméra IP
Introduction :
• Surveillez vos biens personnels avec cette caméra IP Plug & Play authentique. Facile et simple à
installer, fonctionne sans avoir besoin d'une configuration quelconque. L'application gratuite uCare
Cam vous permet de regarder et écouter en prise directe sur votre Smartphone ou tout autre
appareil mobile, n'importe où et n'importe quand. L'application gratuite uCare Cam est disponible
sur Google Play et sur l'App Store d'Apple. Les caractéristiques avancées offrent des notifications
par courriel ou sur l'application lorsqu'un mouvement est détecté. Les prises de photo et/ou vidéo
peuvent être rejouées à tout moment. Convient également pour une utilisation comme un
interphone bébé du fait de la fonction audio bidirectionnelle.
• Nous vous conseillons de lire ce manuel avant d'installer / utiliser ce produit.
• Conservez ce manuel dans un endroit sûr, pour pouvoir le consulter ultérieurement.
Configuration requise :
• L'appareil fonctionne sous Android 4.0 et supérieur ou sous iOS 5.0 et supérieur.
• Routeur avec Wi-Fi.
Télécharger l'application « uCare Cam » sur Google Play ou sur l'App Store d'Apple
Appareil Android
Lien de téléchargement « uCare Cam » sur le Google Play Store
Appareil iOS
Lien de téléchargement « uCare Cam » sur l'App Store
Une fois l'installation du logiciel terminée, cliquez
sur l'icône pour lancer l'application.
Mot de passe « uCare Cam » par défaut : 0000
Nom d'administrateur : admin
Mot de passe administrateur : 0000
2
1
Installation de l'application sur votre appareil mobile

25
Image 1
« Fenêtre de liste de
caméra »
Il y a deux options pour continuer l'installation facile de votre caméra IP.
Allumer
Branchez le connecteur d'adaptateur CC dans le port d'entrée CC de la caméra IP, puis
branchez l'adaptateur d'alimentation sur le secteur. L'indicateur DEL de statut sur la
caméra IP s'allumera en vert pendant environ 15 secondes.
Chargement de programme
L'indicateur DEL de statut clignotera en rouge pendant environ 15 secondes.
Mode Lien routeur
Attendez que la couleur de statut de l'indicateur DEL alterne entre le rouge et le vert.
Remarque :
Si la DEL ne passe pas au rouge et vert, alors appuyez sur la touche
WPS/RÉINITIALISATION pendant plus de 10 secondes pour redémarrer la caméra IP.
Lorsque l'indicateur DEL de statut vert s'allume et se maintient, puis que l'indicateur DEL
de statut clignote deux fois en rouge, pour passer au vert par la suite, la caméra est passée
en mode RESET (réinitialisation). À ce moment, vous pouvez relâcher la touche et
attendre jusqu'à ce que l'indicateur de statut DEL alterne entre le rouge et le vert.
ANDROID (pour Apple, passez à : l'étape 8)
Configurer la caméra IP pour la connecter au routeur Wi-Fi
Ouvrez l'application « uCare Cam » et choisissez :
Cliquez ici pour installer la nouvelle caméra Wi-Fi
dans l'écran de la fenêtre de liste de caméra (voir image 1).
Installez votre caméra par MODE ROUTEUR
4
3
2
1
26
Dans l'écran suivant, choisissez l'onglet :
Puis choisissez l'onglet :
Pour passer à l'étape suivante
(voir image 2).
Suivez les instructions dans la fenêtre de liste de caméra étape par étape (voir l'image 3 et
l'image 4). Saisissez un nom et un mot de passe de caméra (par défaut : 0000).
Nous vous conseillons de changer le mot de passe par défaut après l'installation pour des
raisons de sécurité.
Cliquez sur l'onglet
(Voir image 5). L'application uCare Cam passera automatiquement à la fenêtre de
visualisation (voir image 6) et l'indicateur DEL de statut passera à l'orange.
7
6
5
Image 3
Image 2
Image 4
Image 5 Image 6

27
APPLE
Configurer la caméra IP pour la connecter au routeur Wi-Fi
Ouvrez « Settings » sur votre appareil iOS et sélectionnez « Wi-Fi » et laissez-le chercher
un réseau. Le réseau sera « Wi-Fi-cam-p2p ». Choisissez « Wi-Fi-cam-p2p » pour
connecter.
À présent, ouvrez l'application « uCare Cam » et sélectionnez l'onglet en bas de l'écran qui
indique « Wi-Fi Connect ».
Sélectionnez « Router mode », puis « Next ». Saisissez ici le nom du réseau Wi-Fi (SSID)
et le mot de passe de votre routeur domestique.
Une fois que la caméra IP reçoit des informations, elle redémarrera. Attendez qu'elle
démarre et connectez à votre routeur Wi-Fi. Lorsque la connexion a réussi, la couleur de
l'indicateur DEL de statut passera à l'orange. Cela peut prendre jusqu'à 5 minutes.
Puis sélectionnez le nom de la caméra dans l'application « uCare Cam » pour connecter.
Remarque : Si la couleur de l'indicateur DEL de statut ne passe pas à l'orange, veuillez
vérifier votre routeur Wi-Fi et assurez-vous que la caméra IP est dans la zone de signal de
votre routeur Wi-Fi. Puis essayez de nouveau la configuration.
Si votre routeur Wi-Fi dispose d'une touche WPS (Wi-Fi Protected Setup), vous pouvez l'utiliser pour
configurer la caméra IP. (Vous devez activer l'encryption WPA/WPA2 sur le routeur). Sur le routeur
Wifi, vous verrez une touche intitulée « WPS ». Elle peut également être appelée « QSS » ou « AOSS
»
Mode de configuration Wi-Fi WPS
Ouvrez l'application « uCare Cam »
et sélectionnez « Wi-Fi Setting » ou « Wi-Fi Connect » en bas de l'écran.
Choisissez l'onglet :
Puis choisissez l'onglet :
Pour passer à l'étape 2 (voir image 8).
Passez en mode WPS
Allumez votre caméra IP. L'indicateur DEL de statut sur la caméra IP s'allumera en vert
pendant environ 15 secondes.
Chargement de programme
L'indicateur DEL de statut clignotera en rouge pendant environ 15 secondes.
Installez votre caméra IP par le mode de connexion WPS
2
3
1
12
11
10
9
8
28
Appuyez sur la touche WPS sur votre caméra IP
Attendez que l'indicateur de statut DEL clignote entre le rouge et le vert, puis tenez la
touche WPS/RÉINITIALISATION appuyée sur votre caméra IP pendant 2 secondes pour
passer en mode WPS. L'indicateur de statut DEL clignotera en vert.
Passez en mode WPS sur le routeur Wi-Fi
Appuyez sur la touche WPS sur le routeur Wi-Fi
Sélectionnez le routeur Wi-Fi
Sélectionnez le routeur Wi-Fi de votre choix sur l'écran (voir l'image 9).
Puis choisissez
l'onglet :
Pour passer à l'étape suivante (voir image 10).
La caméra IP se connecte au routeur Wi-Fi
Attendez environ 1-2 minutes. Si la caméra IP est correctement connectée au routeur
Wi-Fi, l'indicateur DEL de statut deviendra orange.
Autrement l'indicateur DEL de statut se mettra à clignoter en rouge. Si la configuration n'est
pas réussie, retournez à l'étape 1 et essayez de nouveau.
Si cela fonctionne,
sélectionnez l'onglet :
(voir image 11), et suivez les instructions.
Saisissez le nom d'une caméra et le mot de passe pour la sécurité et
Choisissez l'onglet : (Voir image 13).
La caméra IP passera automatiquement à l'écran de visualisation (voir image 14).
8
6
5
4
9
7
Image 9
Image 10 Image 8
29
Allumer
Branchez le connecteur d'adaptateur CC dans le port d'entrée CC de la caméra IP, puis
branchez l'adaptateur d'alimentation sur le secteur. L'indicateur DEL de statut sur la
caméra IP s'allumera en vert pendant environ 15 secondes.
Chargement de programme
L'indicateur DEL de statut clignotera en rouge pendant environ 15 secondes.
Démarrez la caméra IP une fois que la connexion Wi-Fi a été établie
2
1
Image 11
Image 12
Image 13 Image 14

30
Rechercher un routeur Wi-Fi
L'indicateur DEL de statut clignotera en vert jusqu'à ce qu'un routeur Wi-Fi soit détecté
(jusqu'à 5 minutes).
une fois que le routeur est détecté, l'indicateur DEL de statut passera à l'orange.
Sila caméra IP ne peut pas se connecter au routeur Wi-Fi, vérifiez le statut du routeur Wi-Fi
ou réinstallez.
Dans l'application, choisissez le nom de la caméra affichée dans la liste des caméras, et la
fenêtre de visualisation s'ouvrira (voir image 15).
ANDROID (pour Apple, passez à : l'étape 5)
Ouvrez l'application « uCare Cam » et
choisissez :
Cliquez ici pour importer la caméra Wi-Fi
déjà installée
Dans la fenêtre de liste de caméra (voir image 16) pour ajouter une caméra IP.
Choisissez l'onglet :
Votre appareil passera alors en mode de code QR.
Remarque : vous devez avoir un scanner de code QR installé sur votre appareil.
Situez le code QR à l'arrière de la caméra IP et scannez le code QR.
Après avoir scanné le code QR, l'UID (Unique ID code) apparait sur l'écran de votre
appareil (voir image 17).
Ajouter une caméra IP déjà installée à l'application
3
2
1
3

31
Saisissez le nom et le mot de passe d'une caméra
personnelle et sélectionnez l'onglet :
(Voir image 17).
La nouvelle caméra sera ajoutée à la liste
(voir image 18).
Image 16 Image 17 Image 18
APPLE
Ouvrez l'application « uCare
Cam ».
Choisissez, dans la fenêtre de liste de caméra, le signe « + » en haut à droite de l'écran.
Choisissez l'option « Scan camera QR code ».
Remarque : vous devez avoir un scanner de code QR installé sur votre appareil.
Situez le code QR à l'arrière de la caméra IP et scannez le code QR.
L'UID (Unique ID code) s'affichera après avoir scanné le code QR.
Saisissez le nom d'une caméra personnelle et choisissez « DONE » en haut à droite de
l'écran.
Pour plus d'explications sur l'application, la caméra IP et la FAQ, veuillez consulter le
manuel intégral (anglais seulement) sur le CD fourni avec ce produit.
4
9
8
7
6
5

32
Description du produit :
SEC-IPCAM100B (W)
1. Antenne Wi-Fi
2. Capteur d'intensité lumineuse
3. DEL IR
4. Pas de fonction
5. Microphone
6. Indicateur DEL
7. Touche WPS/Réinitialisation
8. Fente micro carte SD
9. Haut-parleur
10. Connexion pour le montage de la caméra
11. Entrée CC 5V

33
SEC-IPCAM105B (W)
1. Indicateur DEL
2. Capteur d'intensité lumineuse
3. DEL IR
4. Microphone
5. Touche WPS/Réinitialisation
6. Fente micro carte SD
7. Entrée CC 5V
Précautions de sécurité :
Pour réduire le risque de choc électrique, ce produit ne doit
être ouvert que par un technicien qualifié si une réparation
s'impose. Débranchez l'appareil et les autres équipements
du secteur s'il y a un problème. Ne pas exposer l'appareil à
l'eau ni à l'humidité.

34
Entretien :
Ne nettoyez l'appareil qu'avec un chiffon sec. N'utilisez pas de solvants ni des produits abrasifs.
Garantie :
Toutes altérations et/ou modifications du produit annuleront la garantie. Nous ne serons tenus
responsables d'aucune responsabilité pour les dommages dus à une utilisation incorrecte du produit.
Avertissement :
Le design et les caractéristiques techniques sont sujets à modification sans notification préalable.
Tous les logos de marques et noms de produits sont des marques déposées ou immatriculées dont
leurs détenteurs sont les propriétaires et sont donc reconnues comme telles dans ce document.
Élimination des déchets :
• Ce produit doit être jeté séparément des ordures ménagères dans un point de collecte
approprié. Ne jetez pas ce produit avec les ordures ménagères ordinaires.
• Pour plus d'informations, contactez le distributeur ou l'autorité locale responsable de la
gestion des déchets.
Ce produit est fabriqué et délivré en conformité avec toutes les directives et règlements applicables et
en vigueur dans tous les états membre de l'Union Européenne. Il est également conforme aux
spécifications et à la réglementation en vigueur dans le pays de vente.
La documentation officielle est disponible sur demande. Cela inclut mais ne se limite pas à : La
déclaration de conformité (et à l'identification du produit), la fiche technique concernant la sécurité des
matériaux, les rapports de test du produit.
Veuillez contacter notre centre de service à la clientèle pour plus d'assistance :
via le site Web : http://www.nedis.fr/fr-fr/contact/formulaire-de-contact.htm
via courriel : service@nedis.com
via téléphone : +31 (0)73-5993965 (aux heures de bureau)
NEDIS B.V., De Tweeling 28, 5215 MC ’s-Hertogenbosch, PAYS-BAS

35
NEDERLANDS
IP-camera
Inleiding:
• Houd uw eigendommen in de gaten met deze echte Plug & Play IP camera. Eenvoudig en simpel
te installeren, werkt zonder enige vorm van configuratie. U kunt de gratis uCare Cam app
gebruiken om op uw Smartphone of andere mobiele apparatuur naar live camerabeelden te kijken
en luisteren, altijd en overal. De gratis uCare Cam app is verkrijgbaar via Google Play en de Apple
App Shop. Geavanceerde eigenschappen bieden u app- of e-mailnotificatie wanneer beweging
wordt waargenomen. Foto- en/of videobeelden kunnen op elk gewenst moment worden
afgespeeld. Ook geschikt voor gebruik als babymonitor dankzij de 2-wegs audiofunctie.
• We adviseren u deze handleiding te lezen voordat u dit product installeert/gebruikt.
• Bewaar deze handleiding op een veilige plek voor toekomstig gebruik.
Systeemeisen:
• Apparaat met Android 4.0 of hoger en iOS 5.0 en hoger.
• Router met Wi-Fi.
Download de uCare Cam-app via Google Play of de Apple App-store
Android-apparaat
Google Play Store uCare Cam-downloadkoppeling
iOS-apparaat
Apple App Store uCare Cam-downloadkoppeling
Na het voltooien van de softwareinstallatie
klikt u op het pictogram om de app te starten.
Standaard uCare Cam-wachtwoord: 0000
Beheerdersnaam: admin
Beheerderswachtwoord: 0000
Installatie van de app op uw mobiel apparaat
2
1

36
Afbeelding 1
Venster Cameralijst
Er zijn twee opties waarmee u de eenvoudige instelling van uw IP-camera kunt voortzetten.
Inschakeling
Sluit de stroomkabel aan op de DC-ingangsaansluiting op de IP-camera, en steek de
stekker vervolgens in een stopcontact. De status-LED op de IP-camera zal groen oplichten
gedurende 15 seconden.
Programma's laden
De status-LED zal rood oplichten gedurende 15 seconden.
Routerkoppelingsmodus
Wacht totdat de kleur van de status-LED afwisselt tussen rood en groen.
Opmerking:
Wanneer de LED niet rood en groen oplicht, druk dan langer dan 10 seconden op de
WPS-/resetknop om de IP-camera te herstarten.
Als de groene status-LED groen blijft oplichten, en de rode status-LED twee keer knippert
en vervolgens wordt, betekent dit dat de IP-camera in de RESET-stand is gegaan. U kunt
nu de knop loslaten. Wacht vervolgens totdat de status-LED rood en groen afwisselt.
ANDROID (voor Apple ga naar: Stap 8)
Stel de IP-camera in om verbinding te maken met de Wi-Fi-router
Open de uCare Cam-app en selecteer:
Klik hier om de nieuwe Wi-Fi-camera te
installeren
In het venster Cameralijst (zie afbeelding 1).
Installeer uw IP-camera via ROUTERMODUS
4
3
2
1

37
Selecteer in het scherm hierna het volgende
tabblad:
selecteer vervolgens het tabblad:
om door te gaan naar de volgende stap
(zie afbeelding 2).
Volg stapsgewijs de instructies in het venster Cameralijst (zie afbeelding 3 en
afbeelding 4). Voer een persoonlijke cameranaam en wachtwoord in (standaard 0000).
Wij raden aan om het standaard wachtwoord te wijzigen na het instellen voor een
verhoogde veiligheid.
Klik op het tabblad
(zie afbeelding 5). De uCare-cam opent automatisch het venster Weergave
(zie afbeelding 6) en de status-LED van de IP-camera gaat oranje branden.
7
6
5
Afbeelding 3
Afbeelding 2
Afbeelding 4
Afbeelding 5 Afbeelding 6

38
APPLE
Stel de IP-camera in om verbinding te maken met de Wi-Fi-router
Open de 'Settings' op uw iOS-apparaat en selecteer Wi-Fi om te zoeken naar het netwerk.
De netwerknaam is 'Wi-Fi-cam-p2p'. Selecteer 'Wi-Fi-cam-p2p' en maak verbinding.
Open vervolgens de uCare Cam-app en selecteer het tabblad 'Wi-Fi Connect' aan de
onderkant van het scherm.
Selecteer 'Router mode', en kies voor 'Next'. Voer hier de Wi-Fi netwerknaam (SSID) en
het wachtwoord in van uw thuisrouter.
Wanneer de IP-camera deze informatie ontvangt, zal de camera herstarten. Wacht totdat
de camera volledig herstart is en er verbinding is gemaakt met uw Wi-Fi-router. Nadat er
succesvol verbinding gemaakt is, zal de status-LED oranje gaan branden. Dit kan tot
5 minuten duren.
Selecteer vervolgens in de uCare Cam-app de cameranaam waarmee u verbinding wilt
maken.
Opmerking: Als de status-LED niet oranje gaat branden, controleer de Wi-Fi-router en
verzeker uzelf ervan dat de IP-camera binnen het signaalbereik van uw Wi-Fi-router
geplaatst is. Probeer de installatie vervolgens opnieuw.
Indien uw Wi-Fi-router een WPS (Wi-Fi Protected Setup)-knop heeft, kunt u deze gebruiken om de
IP-camera in te stellen. (Hiervoor moet WPA-/WPA2-encryptie ingeschakeld zijn in uw router). Op de
Wi-Fi-router ziet u een knop met het label 'WPS'. Deze kan ook 'QSS' of 'AOSS' genoemd zijn
Instelling Wi-Fi - WPS-stand
Open de uCare Cam-app
selecteer 'Wi-Fi Setting' of 'Wi-Fi Connect' aan de onderkant van het scherm.
Selecteer het tabblad:
selecteer vervolgens het
tabblad:
om door te gaan naar stap 2 (zie afbeelding 8).
In WPS-stand gaan
Schakel uw IP-camera in. De status-LED op de IP-camera zal groen oplichten gedurende
15 seconden.
Programma's laden
De status-LED zal rood oplichten gedurende 15 seconden.
Installeer uw IP-camera via WPS-verbindingsmodus
2
3
1
12
11
10
9
8

39
Druk op de WPS-knop op uw IP-camera
Wacht totdat de status-LED groen en rood knippert, en houd vervolgens de
WPS-/RESET-knop op uw IP-camera gedurende 2 seconden ingedrukt om naar de
WPS-stand te gaan. De status-LED knippert nu groen.
Naar de WPS-stand gaan op uw Wi-Fi-router
Druk op de WPS-knop op uw Wi-Fi-router
De Wi-Fi-router selecteren
Selecteer de Wi-Fi-router van uw keuze in het scherm (zie afbeelding 9).
Selecteer vervolgens
het tabblad:
om door te gaan naar de volgende stap (zie afbeelding 10).
De IP-camera maakt verbinding met de Wi-Fi-router
Wacht 1-2 minuten. Wanneer de IP-camera verbinding heeft met de Wi-Fi-router, zal de
status-LED oranje gaan branden.
Wanneer dit niet zo is zal de status-LED rood gaan knipperen. Ga terug naar stap 1 en
probeer het opnieuw wanneer er iets fout gaat tijdens de installatie.
Selecteer het volgende
tabblad na het voltooien van
de installatie:
(zie afbeelding 11), en volg de instructies.
Voer een naam voor de camera in en een wachtwoord voor veiligheid en
selecteer het tabblad: (zie afbeelding 13).
De IP-camera opent nu automatisch het venster Weergave (zie afbeelding 14).
8
6
5
4
9
7
Afbeelding 9
Afbeelding 10Afbeelding 8

40
Inschakeling
Sluit de stroomkabel aan op de DC-ingangsaansluiting op de IP-camera, en steek de
stekker vervolgens in een stopcontact. De status-LED op de IP-camera zal groen oplichten
gedurende 15 seconden.
Programma's laden
De status-LED zal rood oplichten gedurende 15 seconden.
Zoeken naar Wi-Fi-router
De status-LED zal groen knipperen totdat de Wi-Fi-router is gevonden (tot 5 minuten).
Zodra de router is gevonden, gaat de status-LED oranje branden.
Controleer de status van de Wi-Fi-router of voer de installatie opnieuw uit wanneer de
IP-camera geen verbinding kan maken met de Wi-Fi-router.
Selecteer in de app de cameranaam die wordt weergegeven in de cameralijst om het
venster Weergave te openen (zie afbeelding 15).
De IP-camera opstarten na het voltooien van de Wi-Fi-verbinding
3
2
1
Afbeelding 11
Afbeelding 12
Afbeelding 13 Afbeelding 14

41
ANDROID (voor Apple ga naar: Stap 5)
Open de uCare Cam-app en selecteer:
Klik hier om de nieuwe Wi-Fi-camera te
importeren
In het venster Cameralijst (zie figuur 16) voor het toevoegen van een IP-camera.
Selecteer het tabblad:
Uw apparaat opent nu de QR-codestand.
Opmerking: u moet een QR-codescanner geïnstalleerd hebben op uw apparaat.
Scan de QR-code die u op de achterkant van de IP-camera aantreft.
Na het scannen van de QR-code verschijnt de UID (Unique ID Code) op het scherm van
uw apparaat (zie figuur 17).
Voer een persoonlijke cameranaam en wachtwoord in
en selecteer het tabblad:
(zie afbeelding 17).
De nieuwe camera wordt nu toegevoegd aan de lijst
(zie figuur 18).
Voeg de reeds geïnstalleerde IP-camera toe aan de app
4
3
2
1

42
Afbeelding 16 Afbeelding 17 Afbeelding 18
APPLE
Open de uCare Cam-app.
Selecteer in het venster Cameralijst het +-symbool aan de rechterbovenkant van het
scherm.
Selecteer de optie 'Scan camera QR code'.
Opmerking: u moet een QR-codescanner geïnstalleerd hebben op uw apparaat.
Scan de QR-code die u op de achterkant van de IP-camera aantreft.
De UID (Unique ID Code) verschijnt na het scannen van de QR-code.
Voer een persoonlijke cameranaam in en kies voor 'DONE' aan de rechterbovenkant van
het scherm.
Zie voor meer informatie over de app, de IP-camera en de FAQ de VOLLEDIGE
handleiding (alleen in het Engels), op de CD die geleverd wordt met dit product.
9
8
7
6
5

43
Productbeschrijving:
SEC-IPCAM100B (W)
1. Wi-Fi-antenne
2. Lichtgevoeligheidssensor
3. IR-LED
4. geen functie
5. Microfoon
6. LED-indicatie
7. WPS-/reset-toets
8. Sleuf voor micro-SD-kaart
9. Luidspreker
10. Verbinding voor camerasteun
11. 5V DC-ingang

44
SEC-IPCAM105B (W)
1. LED-indicatie
2. Lichtgevoeligheidssensor
3. IR-LED
4. Microfoon
5. WPS-/reset-toets
6. Sleuf voor micro-SD-kaart
7. 5V DC-ingang
Veiligheidsmaatregelen:
Om het risico op elektrische schokken te voorkomen mag dit
product ALLEEN worden geopend door een erkende
technicus wanneer er onderhoud nodig is. Koppel het
product los van de elektrische voeding en van andere
apparatuur als er zich problemen voordoen. Stel het product
niet bloot aan water of vocht.

45
Onderhoud:
Uitsluitend reinigen met een droge doek. Gebruik geen reinigingsmiddelen of schuurmiddelen.
Garantie:
Eventuele wijzigingen en/of aanpassingen aan het product zullen de garantie ongeldig maken. Wij
aanvaarden geen aansprakelijkheid voor schade veroorzaakt door onjuist gebruik van dit product.
Disclaimer:
Ontwerpen en specificaties kunnen zonder kennisgeving worden gewijzigd. Alle logo’s, merken en
productnamen zijn handelsmerken of geregistreerde handelsmerken van de respectievelijke
eigenaren en worden hierbij als zodanig erkend.
Afvoer:
• Dit product is bestemd voor gescheiden inzameling bij een daartoe aangewezen
verzamelpunt. Gooi dit product niet weg bij het huishoudelijk afval.
• Neem voor meer informatie contact op met de detailhandelaar of de lokale overheid die
verantwoordelijk is voor het afvalbeheer.
Dit product is vervaardigd en geleverd in overeenstemming met de relevante reglementen en
richtlijnen die voor alle lidstaten van de Europese Unie gelden. Het voldoet ook aan alle toepasselijke
specificaties en reglementen van het land van verkoop.
Op aanvraag is officiële documentatie verkrijgbaar. Inclusief, maar niet uitsluitend:
Conformiteitsverklaring (en productidentiteit), materiaalveiligheidsinformatie en producttestrapport.
Wend u tot onze klantenservice voor ondersteuning:
via de website: http://www.nedis.nl/nl-nl/contact/contact-formulier.htm
via e-mail: service@nedis.nl
telefonisch: +31 (0)73-5993965 (tijdens kantooruren)
NEDIS B.V., De Tweeling 28, 5215 MC ’s-Hertogenbosch, NEDERLAND

46
ITALIANO
Telecamera IP
Introduzione:
• Sorvegliate le vostre proprietà grazie a questa telecamera IP Plug & Play. È semplice da installare
e funziona senza bisogno di alcun tipo di configurazione. Grazie all’app gratuita uCare Cam
potrete vedere e ascoltare i filmati dal vivo sul vostro smartphone o su altri dispositivi mobili dove e
quando volete. L’app gratuita uCare Cam è disponibile su Google Play e sull’App Store di Apple. Le
funzionalità avanzate vi consentiranno di essere avvertiti tramite e-mail o notifiche app qualora
venga rilevato del movimento. Potrete rivedere foto e filmati in qualsiasi momento. Può essere
utilizzata anche per sorvegliare i bambini grazie all’audio bidirezionale.
• Consigliamo di leggere questo manuale prima di installare/utilizzare questo prodotto.
• Tenete questo manuale in un posto sicuro per un futuro riferimento.
Requisiti di sistema:
• Dispositivo con SO Android 4.0 o superiore, o iOS 5.0 o superiore.
• Router Wi-Fi.
Scaricate l’app “uCare Cam” dall’App Store Google Play o Apple
Dispositivo Android
Link per scaricare “uCare Cam” dallo store Google Play
Dispositivo iOS
Link per scaricare “uCare Cam” dallAapp Store Apple
Una volta completata l’installazione del
software, cliccate sull’icona per lanciare
l’app.
Password predefinita dell’“uCare Cam”: 0000
Nome del gestore: admin
Password del gestore: 0000
Installazione dell’app sul vostro dispositivo mobile
2
1

47
Figura 1
“Finestra elenco
telecamere”
Ci sono due opzioni per proseguire nella semplice impostazione della vostra telecamera IP.
Accensione
Inserite il connettore dell’alimentatore CC nella porta d’ingresso dell’alimentazione della
telecamera IP e l’alimentatore nella presa di corrente. Il LED di stato sulla telecamera IP
diventerà verde per circa 15 secondi.
Caricamento del programma
Il LED di stato diventerà rosso e lampeggerà per circa 15 secondi.
Modalità connessione router
Attendete che il LED di stato si illumini alternativamente di rosso e di verde.
Nota:
Se il LED non diventa rosso e verde, tenete premuto il pulsante WPS/RESET per più di
10 secondi per far ripartire la telecamera IP.
Quando si accende il LED di stato verde e resta fisso, e il LED di stato rosso lampeggia
due volte, diventando poi verde, la telecamera IP è entrata in modalità RESET. A questo
punto potete rilasciare il pulsante e attendere che il LED di stato si illumini alternativamente
di rosso e di verde.
ANDROID (per SO Apple passate al punto 8)
Impostate la telecamera IP affinché si colleghi al router Wi-Fi
Aprite l’app “uCare Cam” e selezionate:
Cliccate qui per installare la nuova
telecamera Wi-Fi
nella schermata della Finestra elenco telecamere (vedi figura 1).
Installazione della telecamera IP con la MODALITÀ ROUTER
4
3
2
1

48
Nella schermata successiva toccate il
pulsante:
poi toccate il pulsante:
per passare al punto successivo
(vedi figura 2).
Seguite passo dopo passo le istruzioni nella Finestra elenco telecamere (vedi figura 3 e
figura 4). Inserite un nome e una password personalizzati per la telecamera (valori
predefiniti: 0000).
Per questioni di sicurezza, vi invitiamo a modificare la password predefinita una volta
terminata la procedura di impostazione.
Cliccate sul pulsante
(vedi figura 5). La uCare Cam entrerà automaticamente nella finestra di osservazione (vedi
figura 6) e il LED di stato della telecamera IP diventerà arancione.
7
6
5
Figura 3
Figura 2
Figura 4
Figura 5 Figura 6

49
APPLE
Impostate la telecamera IP affinché si colleghi al router Wi-Fi
Aprite “Settings” sul vostro dispositivo iOS, selezionate “Wi-Fi” e attendete la ricerca di una
rete. La rete si chiamerà “Wi-Fi-cam-p2p”. Collegatevi a “Wi-Fi-cam-p2p”.
A questo punto, aprite l’app “uCare Cam” e selezionate la scheda “Wi-Fi Connect” che si
trova nella parte bassa dello schermo.
Selezionate “Router mode”, poi “Next”. Inserisca qui il nome della rete WiFi (SSID) e la
password del suo router domestico.
Una volta ricevute queste informazioni, la telecamera IP si riavvierà. Attendete che riparta
e collegatevi al router Wi-Fi. Una volta stabilito il collegamento in modo corretto, il LED di
stato diventerà arancione. L’operazione potrebbe richiedere fino a 5 minuti.
A questo punto, selezionate il nome della telecamera nell’app “uCare Cam” per collegarvi.
Nota: Se il LED di stato non diventa arancione, controllate il vostro router Wi-Fi e
assicuratevi che la telecamera IP si trovi nel raggio del segnale. Dopodiché, riprovate la
procedura di impostazione .
Se il vostro router Wi-Fi ha un pulsante WPS (Wi-Fi Protected Setup), potete utilizzarlo per impostare
la telecamera IP. (Dovete attivare la cifratura WPA/WPA2 sul router). Sul router Wi-Fi vedrete un
pulsante con scritto “WPS”. Potrebbe esserci scritto anche “QSS” o “AOSS”
Impostazione modalità Wi-Fi - WPS
Aprite l’app “uCare Cam”
e selezionate “Wi-Fi Setting” o “Wi-Fi Connect” nella parte bassa dello schermo.
Toccate il pulsante:
poi toccate il pulsante:
per passare al punto 2 (vedi figura 8).
Entrare in modalità WPS
Accendete la telecamera IP. Il LED di stato sulla telecamera IP diventerà verde per circa
15 secondi.
Caricamento del programma
Il LED di stato diventerà rosso e lampeggerà per circa 15 secondi.
Installare la telecamera IP tramite la modalità di collegamento WPS
2
3
1
12
11
10
9
8

50
Premete il pulsante WPS sulla vostra telecamera IP
Attendete che il LED di stato si illumini alternativamente di rosso e di verde, poi tenete
premuto per circa 2 secondi il pulsante WPS/RESET sulla telecamera IP per entrare in
modalità WPS. Il LED di stato diventerà verde e lampeggerà.
Mettete il router Wi-Fi in modalità WPS
Premete il pulsante WPS sul router Wi-Fi
Selezionare il router Wi-Fi
Selezionate dalla schermata il router Wi-Fi scelto (vedi figura 9).
Poi toccate il
pulsante:
per passare al punto (vedi figura 10).
Collegamento della telecamera IP al router Wi-Fi
Attendete circa 1-2 minuti. Se la telecamera IP si è collegata con successo al router Wi-Fi,
il LED di stato diventerà arancione.
Altrimenti, il LED di stato diventerà rosso e lampeggerà. Se l’impostazione non ha avuto
successo, tornate al punto 1 e riprovate.
Altrimenti, toccate il
pulsante:
(vedi figura 11) e seguite le istruzioni.
Per motivi di sicurezza, inserite un nome e una password per la telecamera e
toccate il pulsante: (vedi figura 13).
La telecamera IP entrerà automaticamente nella schermata di osservazione (vedi
figura 14).
8
6
5
4
9
7
Figura 9
Figura 10Figura 8

51
Accensione
Inserite il connettore dell’alimentatore CC nella porta d’ingresso dell’alimentazione della
telecamera IP e l’alimentatore nella presa di corrente. Il LED di stato sulla telecamera IP
diventerà verde per circa 15 secondi.
Caricamento del programma
Il LED di stato diventerà rosso e lampeggerà per circa 15 secondi.
Una volta completato il collegamento Wi-Fi, attivate la telecamera IP.
2
1
Figura 11
Figura 12
Figura 13 Figura 14

52
Ricerca del router Wi-Fi
Il LED di stato diventerà verde e lampeggerà finché non viene trovato il router Wi-Fi (la
procedura potrebbe richiedere fino a 5 minuti).
Una volta trovato il router, il LED di stato diventerà arancione.
Se la telecamera IP non riesce a collegarsi con il router Wi-Fi, controllate lo stato del router
o provate con una nuova installazione.
All’interno dell’app, selezionate il nome della telecamera che compare nell’elenco
telecamere e si aprirà la finestra di osservazione (vedi figura 15).
ANDROID (per SO Apple passate al punto 5)
Aprite l’app “uCare Cam” e selezionate:
Cliccate qui per importare la telecamera
Wi-Fi installata
nella schermata della Finestra Elenco telecamere (vedi figura 16) per aggiungere una
telecamera IP.
Toccate il pulsante:
Il vostro dispositivo entrerà in modalità codice QR.
Nota: dovete avere uno scanner per codici QR installato sul vostro dispositivo.
Individuate il codice QR sul retro della telecamera IP e scansionatelo.
Una volta scansionato il codice QR, l’UID (Unique ID code) apparirà sulla schermata del
vostro dispositivo (vedi figura 17).
Aggiungete la telecamera IP già installata alla app
3
2
1
3

53
Inserite un nome e una password personalizzati per la
telecamera e toccate il pulsante:
(vedi figura 17).
La nuova telecamera verrà aggiunta all’elenco (vedi
figura 18).
Figura 16 Figura 17 Figura 18
APPLE
Aprite l’app “uCare Cam”.
Selezionate, nella Finestra elenco telecamere, il segno “+” in alto a destra dello schermo.
Selezionate l’opzione “Scan camera QR code”.
Nota: dovete avere uno scanner per codici QR installato sul vostro dispositivo.
Individuate il codice QR sul retro della telecamera IP e scansionatelo.
Una volta scansionato il codice QR, apparirà l’UID (Unique ID code).
Inserite un nome personalizzato per la telecamera e toccate “DONE” sulla parte in alto a
destra dello schermo.
Per ulteriori spiegazioni sull’app, la telecamera IP e le FAQ, consultate il manuale
COMPLETO (solo in inglese) contenuto nel CD in dotazione con questo prodotto.
4
9
8
7
6
5

54
Descrizione prodotto:
SEC-IPCAM100B (W)
1. Antenna Wi-Fi
2. Sensore di intensità luminosa
3. LED IR
4. Nessuna funzione
5. Microfono
6. Indicatore LED
7. Pulsante WPS/RESET
8. Lettore schede Micro SD
9. Altoparlante
10. Attacco per fissaggio telecamera
11. Ingresso 5V CC

55
SEC-IPCAM105B (W)
1. Indicatore LED
2. Sensore di intensità luminosa
3. LED IR
4. Microfono
5. Pulsante WPS/RESET
6. Lettore schede Micro SD
7. Ingresso 5V CC
Precauzioni di sicurezza:
Per ridurre il rischio di scossa elettrica, questo prodotto
dovrebbe essere aperto SOLO da un tecnico autorizzato
quando è necessario ripararlo. Scollegare il prodotto
dall’alimentazione e da altri apparecchi se dovesse esserci
un problema. Non esporre il prodotto ad acqua o umidità.

56
Manutenzione:
Pulire solo con un panno asciutto. Non utilizzare solventi detergenti o abrasivi.
Garanzia:
Qualsiasi modifica e/o cambiamento al prodotto annullerà la garanzia. Non si accettano responsabilità
per danni causati da un uso non corretto di questo prodotto.
Disclaimer:
Il design e le caratteristiche tecniche sono soggetti a modifica senza necessità di preavviso. Tutti i
marchi, loghi e nomi dei prodotti sono marchi commerciali o registrati dei rispettivi titolari e sono
riconosciuti come tali in questo documento.
Smaltimento:
• Questo prodotto è soggetto a raccolta differenziata nei punti di raccolta appropriati. Non
smaltire dispositivi elettronici con i rifiuti domestici.
• Per maggiori informazioni, contattare il rivenditore o le autorità locali responsabili per la
gestione dei rifiuti.
Il presente prodotto è stato realizzato e fornito in conformità a tutte le norme e le direttive vigenti, con
validità in tutti gli stati membri della Comunità Europea. Inoltre è conforme alle specifiche e alle
normative applicabili nel paese in cui è stato venduto.
La documentazione ufficiale è disponibile su richiesta. Essa include a titolo esemplificativo ma non
limitativo: Dichiarazione di conformità (e di identità del prodotto), scheda di sicurezza dei materiali,
rapporto di prova del prodotto.
Contattare il nostro servizio clienti per assistenza:
tramite il nostro sito web: http://www.nedis.it/it-it/contatti/modulo-contatto.htm
tramite e-mail: service@nedis.com
tramite telefono: +31 (0)73-5993965 (in orario di ufficio)
NEDIS B.V., De Tweeling 28, 5215 MC ’s-Hertogenbosch, Paesi Bassi

57
ESPAÑOL
Cámara IP
Introducción:
• Cuide las propiedades con esta IP de cámara plug & play. Fácil y simple de instalar, funciona sin la
necesidad de ninguna forma de configuración. La aplicación gratuita uCare Cam le permite
escuchar y ver imágenes en directo en su smartphone u otro dispositivo móvil. La aplicación
gratuita uCare Cam está disponible en Google Play y en la Apple App Store. Las características
avanzadas le ofrecen correo electrónico o notificación de aplicaciones cuando se detecta
movimiento. Las imágenes de fotografía y vídeo pueden volver a reproducirse en cualquier
momento. Apto también para usarlo como monitor de bebés debido a su función de audio
bidireccional.
• Recomendamos que lea este manual antes de instalar / usar este producto.
• Guarde este manual en lugar seguro para futuras consultas.
Requisitos del sistema:
• El dispositivo funciona con Android 4.0 y hasta iOS 5.0 y superior.
• Router con Wi-Fi.
Descargue la aplicación “uCare Cam” desde Google Play la Apple app store
Dispositivo Android
Enlace de descarga de “uCare Cam” de Google Play Store
Dispositivo iOS
Enlace de descarga de “uCare Cam” de App Store
Una vez que se ha completado la instalación
del software, haga clic en el icono para poner
en funcionamiento la aplicación.
Contraseña por defecto de “uCare Cam”:
0000
Nombre del gestor: admin
Contraseña del gestor: 0000
Instalación de la aplicación en su dispositivo móvil
2
1

58
Figura 1
“Ventana de lista de
cámaras”
Existen dos opciones para continuar la instalación fácil de su cámara IP.
Encendido
Conecte el conector del adaptador de alimentación CC en el puerto de entrada CC de la
cámara IP y posteriormente conecte el adaptador de alimentación en la toma de pared. El
LED de estado de la cámara IP cambiará al color verde durante aproximadamente
15 segundos.
Carga de programas
El LED de estado parpadeará en rojo durante aproximadamente 15 segundos.
Modo enlace de router
Espere a que el color del LED de estado alterne entre los colores rojo y verde.
Nota:
En caso de que el LED no se encienda en los colores rojo y verde, entonces pulse el botón
WPS/REINICIO durante más de 10 segundos para reiniciar la cámara IP.
Cuando se ilumine el LED de estado en color verde y se mantenga, entonces el LED de
estado rojo parpadea dos veces, tras lo cual cambia a verde; la cámara IP ha entrado en el
estado de REINICIO. En este momento, puede soltar el botón y posteriormente, espere
hasta que el LED de estado alterne entre rojo y verde.
ANDROID (para Apple vaya a: Paso 8)
Fije la cámara IP para conectar el router Wi-Fi
Abra la aplicación “uCare Cam” y
seleccione:
4
3
2
1
Instalar su cámara IP mediante MODO ROUTER

59
Haga clic aquí para instalar la nueva
cámara Wi-Fi
En la pantalla de la ventana de lista de cámaras (véase figura 1).
En la siguiente pantalla, seleccione la
pestaña:
Posteriormente, seleccione la pestaña:
Para entrar en el siguiente paso (véase
Figura 2).
Siga las instrucciones de la ventana de lista de cámaras paso a paso (véase Figura 3 y
Figura 4). Por favor, introduzca el nombre de la cámara personal y la contraseña (por
defecto 0000).
Se le anima a que cambie la contraseña por defecto tras la configuración por motivos de
seguridad.
Haga clic en la pestaña
(véase Figura 5). La uCare Cam entrará automáticamente en la ventana de visionado
(véase Figura 6) y el LED de estado de la cámara IP se volverá de color naranja.
7
6
5
Figura 3
Figura 2
Figura 4
Figura 5 Figura 6

60
APPLE
Fije la cámara IP para conectar el router Wi-Fi
Abra “Settings” “(Ajustes)” en su dispositivo iOS y seleccione “Wi-Fi” y déjelo que busque
una red. La red será “Wi-Fi-cam-p2p”. Seleccione “Wi-Fi-cam-p2p” para conectarse.
Ahora, abra la aplicación “uCare Cam” y seleccione la pestaña situada en la parte inferior
de la pantalla que dice “Wi-Fi Connect”.
Seleccione “Router mode”, y posteriormente en “Next”. Introduzca aquí el nombre de la
red Wi-Fi (SSID) y la contraseña de su router doméstico.
Una vez que la cámara IP reciba la información, se reiniciará. Por favor, espere a que se
inicie y conéctela a su router Wi-Fi. Cuando se conecte con éxito, el color del LED de
estado cambiará a naranja. Puede tardar hasta 5 minutos.
Posteriormente, seleccione el nombre de la cámara en la aplicación “uCare Cam” para
conectarla.
Nota: Si el color del LED de estado de la cámara no cambia a naranja, por favor,
compruebe su router Wi-Fi y asegúrese que la cámara IP se encuentra dentro del área de
señal del router Wi-Fi. Posteriormente vuelva a intentar esta configuración.
Si el router Wi-Fi dispone de un botón WPS (Configuración Protegida de Wi-Fi), puede usarlo para
configurar la cámara IP. (Desde activar la encriptación WPA/WPA2 en el router). En el router Wi-Fi,
verá un botón llamado “WPS”. Asimismo puede llamarse “QSS” o “AOSS”.
Configurar el modo Wi-Fi - WPS
Abra la aplicación “uCare Cam”
y seleccione “Wi-Fi Setting” “(Configuración Wi-Fi)” o “Wi-Fi Connect” “(Conectar Wi-Fi)”
situado en la parte inferior de la pantalla.
Seleccione la pestaña:
posteriormente,
seleccione la pestaña:
Para entrar en el Paso 2 (véase Figura 8).
Entrar en modo WPS
Encienda su cámara IP. El LED de estado de la cámara IP estará de color verde durante
aproximadamente 15 segundos.
Instalar su cámara IP mediante el modo de conexión WPS
2
1
12
11
10
9
8

61
Carga de programas
El LED de estado parpadeará en rojo durante aproximadamente 15 segundos.
Pulse el botón WPS de su cámara IP
Espere a que el LED de estado parpadee entre rojo y verde; posteriormente, pulse y
mantenga pulsado el botón WPS/REINICIO de su cámara IP durante aproximadamente
2 segundos para entrar en modo WPS. El LED de estado parpadeará en verde.
Entrar en modo WPS en el router Wi-Fi
Pulse el botón WPS en el router Wi-Fi
Selección del router Wi-Fi
Seleccione el router Wi-Fi de su elección en la pantalla (véase Figura 9).
Posteriormente,
seleccione la pestaña:
para entrar en el siguiente paso (véase Figura 10).
La cámara IP se conecta con el router Wi-Fi
Espere aproximadamente durante 1-2 minutos. Si la cámara IP se conecta con éxito al
router Wi-Fi, el LED de estado cambiará a color naranja.
En caso contrario, el LED de estado se convertirá en una luz roja parpadeante. Si la
configuración no tiene éxito, rogamos vuelva al paso 1 y vuelva a intentarlo.
Si tiene éxito, seleccione la
pestaña:
(véase Figura 11), y siga las instrucciones.
Por favor, introduzca el nombre de la cámara y la contraseña por seguridad y
8
6
5
4
7
3
Figura 9
Figura 10Figura 8

62
Seleccione la pestaña: (véase Figura 13).
La cámara IP entrará de forma automática en la pantalla de visionado (véase Figura 14).
Encendido
Conecte el conector del adaptador de alimentación CC en el puerto de entrada CC de la
cámara IP y posteriormente conecte el adaptador de alimentación en la toma de pared. El
LED de estado de la cámara IP cambiará al color verde durante aproximadamente
15 segundos.
Carga de programas
El LED de estado parpadeará en rojo durante aproximadamente 15 segundos.
Inicie la cámara IP una vez que se haya completado la conexión Wi-Fi
2
1
9
Figura 11
Figura 12
Figura 13 Figura 14

63
Buscando el router Wi-Fi
El LED de estado parpadeará en verde hasta que se encuentre el router Wi-Fi (hasta
5 minutos).
Una vez que se encuentre el router, el LED de estado se convertirá en color naranja.
Si la cámara IP no puede conectarse al router Wi-Fi, rogamos compruebe el estado del
router Wi-Fi o vuelva a instalarlo.
En la aplicación, seleccione el nombre de la cámara que se muestra en la Lista de
cámaras y se abrirá la ventana de visionado (véase Figura 15).
ANDROID (para Apple vaya a: paso 5)
Abra la aplicación “uCare Cam” y
seleccione:
Haga clic aquí para importar la cámara
Wi-Fi instalada
en la pantalla de Ventana de lista de cámaras (véase figura 16) para añadir una cámara IP.
Seleccione la pestaña:
El dispositivo entrará ahora en el modo código QR.
Nota: es necesario que disponga de un escáner de códigos QR instalado en su dispositivo.
Localice el código QR situado en la parte posterior lateral de la cámara IP y escanee el
código QR.
Aparecerá el UID (Código ID único) tras escanear el código QR en la pantalla de su
dispositivo (véase Figura 17).
Añadir una cámara IP ya instalada en la aplicación
3
2
1
3

64
Introduzca el nombre personal de la cámara y la
contraseña y seleccione la pestaña:
(véase Figura 17).
La nueva cámara se añadirá a la lista (véase
Figura 18).
Figura 16 Figura 17 Figura 18
APPLE
Abra la aplicación “uCare
Cam”.
Seleccione, en la ventana de la lista de la cámara, el signo “+” en la esquina superior
derecha de la pantalla.
Seleccione la opción “Scan camera QR code”.
Nota: es necesario que disponga de un escáner de códigos QR instalado en su dispositivo.
Localice el código QR situado en la parte posterior lateral de la cámara IP y escanee el
código QR.
Aparecerá el UID (Código ID único) tras escanear el código QR.
Introduzca el nombre personal de la cámara y seleccione “DONE” situado en la esquina
superior derecha de la pantalla.
Para una mayor explicación de la aplicación, de la cámara IP y las preguntas frecuentes,
rogamos compruebe el manual COMPLETO (sólo en inglés) en el CD que se suministra
con este producto.
4
9
8
7
6
5

65
Descripción del producto:
SEC-IPCAM100B (W)
1. Antena Wi-Fi
2. Sensor de intensidad de luz
3. LED de infrarrojos
4. Sin función
5. Micrófono
6. Indicador LED
7. Botón WPS/Reinicio
8. Ranura para tarjeta Micro SD
9. Altavoz
10. Conexión para montaje de cámara
11. Entrada CC de 5V

66
SEC-IPCAM105B (W)
1. Indicador LED
2. Sensor de intensidad de luz
3. LED de infrarrojos
4. Micrófono
5. Botón WPS/Reinicio
6. Ranura para tarjeta Micro SD
7. Entrada CC de 5V
Precauciones de seguridad:
Para reducir el peligro de descarga eléctrica, este producto
SÓLO lo debería abrir un técnico autorizado cuando
necesite reparación. Desconecte el producto de la toma de
corriente y de los otros equipos si ocurriera algún problema.
No exponga el producto al agua ni a la humedad.

67
Mantenimiento:
Límpielo sólo con un paño seco. No utilice disolventes de limpieza ni productos abrasivos.
Garantía:
Cualquier cambio y/o modificación del producto anulará la garantía. No podemos asumir ninguna
responsabilidad por ningún daño debido a un uso incorrecto de este producto.
Exención de responsabilidad:
Las ilustraciones y las especificaciones podrán sufrir cambios sin previo aviso. Todas las marcas de
logotipos y nombres de productos constituyen patentes o marcas registradas a nombre de sus
titulares correspondientes, reconocidos como tal.
Eliminación:
• Este producto está diseñado para desecharlo por separado en un punto de recogida
adecuado. No se deshaga de este producto con la basura doméstica.
• Para obtener más información, póngase en contacto con el vendedor o la autoridad local
responsable de la eliminación de residuos.
Este producto se ha fabricado y distribuido de conformidad con todas las normativas y directivas
relevantes, válidas para todos los estados de la Unión Europea. También cumple con todas las
especificaciones y normativas en el país en el cual se comercializa.
Previa solicitud, podremos proporcionarle la documentación formal. Esta documentación incluye,
entre otros: Declaración de conformidad (e identidad del producto), hoja de datos de seguridad del
material, informe sobre las pruebas realizadas al producto.
Póngase en contacto con nuestro servicio de atención al cliente para obtener información adicional:
por medio de nuestro sitio web: http://www.nedis.es/es-es/contacto/formulario-de-contacto.htm
enviando un correo electrónico: service@nedis.com
o llamando por teléfono: +31 (0)73-5993965 (en horario de oficina)
NEDIS B.V., De Tweeling 28, 5215 MC ’s-Hertogenbosch, PAÍSES BAJOS

68
PORTUGUÊS
Câmara IP
Introdução:
• Vigie de suas propriedades com esta genuína câmara IP Plug Play. Fácil e simples de instalar,
funciona sem a necessidade de qualquer tipo de configuração. A aplicação uCare e Cam grátis
permitem que veja e ouça a filmagem ao vivo no seu Smartphone ou noutros dispositivos móveis,
a qualquer hora e em qualquer lugar. A aplicação free uCare Cam encontra-se dispoonível no
Google Play e na Apple App Store. Recursos avançados permitem a notificação por email ou por
aplicações quando é detectado movimento. Reprodução de fotos e vídeo em qualquer momento.
Também adequado para ser usado como intercomunicador para bébés devido à sua função áudio
bidirecional.
• Recomendamos que leia este manual antes de instalar/utilizar este produto.
• Guarde este manual num local seguro para referência futura.
Requisitos de sistema:
• Dispositivo com Android 4.0 e superior ou com iOS 5.0 e superior.
• Router com Wi-Fi.
Transfira a aplicação “uCare Cam” do Google Play ou da loja de aplicações da Apple
Dispositivo Android
Ligação para Transferência da “uCare Cam” do Google Play Store
Dispositivo iOS
Ligação para Transferência da “uCare Cam” da Loja de Aplicações
Depois da conclusão da instalação do
software, clique no ícone para executar a
aplicação.
Palavra-passe da “uCare Cam” predefinida: 0000
Nome do Administrador: admin
Palavra-passe do Administrador: 0000
2
1
Instalação da Aplicação no seu dispositivo móvel

69
Figura 1
“Janela de Lista de
Câmaras”
Existem duas opções para continuar a configuração fácil da sua câmara IP.
Ligar
Ligue o conector CC do adaptador de alimentação à porta de entrada de CC da câmara IP
e, em seguida, ligue o adaptador de alimentação a uma tomada de parede. O LED de
estado na câmara IP apresentará uma luz verde durante cerca de 15 segundos.
Programar Carregamento
O LED de estado na câmara IP acenderá uma luz vermelha durante cerca de
15 segundos.
Modo de Ligação do Router
Aguarde até a cor do LED de estado alternar entre vermelho e verde.
Nota:
Se o LED não acender uma luz vermelha nem verde, prima o botão WPS/Repôr, durante
mais de 10 segundos, para reiniciar a câmara IP.
Quando a luz verde do LED de estado acender e ficar acesa e, em seguida, a luz
vermelha do LED de estado piscar duas vezes e mudar para verde, significa que a câmara
IP entrou no estado REPÔR. Nesta altura, pode libertar o botão e, em seguida, aguardar
até o LED de estado alternar entre vermelho e verde.
ANDROID (para a Apple, vá para: Passo 8)
Defina a câmara IP para ligar ao Router Wi-Fi
Abra a Aplicação “uCare Cam” e
seleccione:
Clique aqui para instalar a nova
Câmara Wi-Fi
No ecrã da Janela de Lista de Câmaras (consulte a Figura 1).
4
3
2
1
Instalar a sua câmara IP por MODO ROUTER

70
No ecrã seguinte seleccione o separador:
Em seguida, seleccione o separador:
para entrar no passo seguinte (consulte a
Figura 2).
Siga as instruções passo-a-passo na janela Lista de Câmaras (consulte a Figura 3 e a
Figura 4). Introduza uma palavra-passe e nome de câmara pessoal (a predefinição é
0000).
Por motivos de segurança, recomendamos que altere a palavra-passe predefinida após a
configuração.
Clique no separador
(consulte a Figura 5). A uCare Cam entrará automaticamente na janela de visualização
(consulte a Figura 6) e o LED de estado da câmara IP apresentará uma cor laranja.
7
6
5
Figura 3
Figura 2
Figura 4
Figura 5 Figura 6

71
APPLE
Defina a câmara IP para ligar ao router Wi-Fi
Abra o menu “Settings” no seu dispositivo iOS, seleccione “Wi-Fi” e permita que o
dispositivo procure uma rede. A rede será “Wi-Fi-cam-p2p”. Seleccione “Wi-Fi-cam-p2p”
para ligar.
Agora, abra a aplicação “uCare Cam” e seleccione o separador, na parte inferior do ecrã,
que indica “Wi-Fi Connect”.
Seleccione “Router mode” e, em seguida, “Next”. Introduza aqui a palavra-passe e o nome
(SSID) da rede Wi-Fi do seu router de casa.
Depois de a câmara IP receber estas informações, reiniciará. Aguarde que reinicie e
ligue-a ao seu router Wi-Fi. Quando estiver ligada com êxito, a cor do LED de estado
mudará para laranja. Poderá demorar até 5 minutos.
Em seguida, seleccione o nome da câmara na aplicação “uCare Cam” para ligar.
Nota: Se a cor do LED de estado não mudar para laranja, verifique o seu router Wi-Fi e
certifique-se de que a câmara IP está dentro da área de sinal do mesmo. Em seguida,
tente executar novamente a configuração.
Se o seu router Wi-Fi possuir um botão WPS (Configuração Protegida por ), poderá utilizá-lo para
configurar a câmara IP. (Tem de activar a encriptação WPA/WPA2 no Router). No router Wi-Fi, verá
um botão com a etiqueta “WPS”. Também poderá ter a etiqueta “QSS” ou “AOSS”
Configurar modo Wi-Fi – WPS
Abra a aplicação “uCare Cam”
e seleccione “Wi-Fi Setting” ou “Wi-Fi Connect” na parte inferior do ecrã.
Seleccione o separador:
Em seguida, seleccione
o separador:
para entrar no Passo 2 (consulte a Figura 8).
Entrar no modo WPS
Ligue a sua câmara IP. O LED de estado na câmara IP apresentará uma luz verde durante
15 segundos.
Programar Carregamento
O LED de estado na câmara IP acenderá uma luz vermelha durante cerca de
15 segundos.
Instalar a sua câmara IP por modo de ligação WPS
2
3
1
12
11
10
9
8

72
Prima o botão WPS na sua câmara IP
Aguarde até o LED de estado começar a piscar entre vermelho e verde e, em seguida,
mantenha o botão WPS/REPÔR premido na sua câmara IP durante cerca de 2 segundos
para entrar no modo WPS. O LED de estado ficará a piscar uma luz verde.
Entrar no modo WPS no router Wi-Fi
Prima o botão WPS no router Wi-Fi
Seleccionar o router Wi-Fi
Seleccione o router Wi-Fi que pretende no ecrã (consulte a Figura 9).
Em seguida, seleccione o
separador:
para entrar no passo seguinte (consulte a Figura 10).
Ligação da câmara IP ao router Wi-Fi
Aguarde cerca de 1-2 minutos. Se a câmara IP estiver ligada com êxito ao router Wi-Fi, o
LED de estado apresentará uma cor laranja.
Caso contrário, o LED de estado piscará uma luz vermelha. Se a configuração não tiver
êxito, regresse ao Passo 1 e tente novamente.
Se tiver êxito, seleccione o
separador:
(consulte a Figura 11) e siga as instruções.
Introduza uma palavra-passe e nome da câmara para segurança e
seleccione o Separador: (consulte a Figura 13).
A câmara IP entrará automaticamente no ecrã de visualização (consulte a Figura 14).
8
6
5
4
9
7
Figura 9
Figura 10Figura 8

73
Ligar
Ligue o conector CC do adaptador de alimentação à porta de entrada de CC da câmara IP
e, em seguida, ligue o adaptador de alimentação a uma tomada de parede. O LED de
estado na câmara IP apresentará uma luz verde durante cerca de 15 segundos.
Programar Carregamento
O LED de estado na câmara IP acenderá uma luz vermelha durante cerca de
15 segundos.
Procurar Router Wi-Fi
O LED de estado piscará uma luz verde até o router Wi-Fi ser encontrado (até 5 minutos).
Quando o router for encontrado, o LED de estado apresentará uma cor laranja.
Se a câmara IP não conseguir ligar ao router Wi-Fi, verifique o estado do router Wi-Fi ou
instale-o novamente.
Na aplicação, seleccione o nome da câmara que é apresentado na Lista de Câmaras para
abrir a janela de visualização (consulte a Figura 15).
Ligar a câmara IP depois da conclusão da ligação Wi-Fi
3
2
1
Figura 11
Figura 12
Figura 13 Figura 14

74
ANDROID (para a Apple, vá para: Passo 5)
Abra a aplicação “uCare Cam” e seleccione:
Clique aqui para importar a Câmara Wi-Fi
instalada
No ecrã da Janela de Lista de Câmaras (consulte a Figura 16) para adicionar uma
câmara IP.
Seleccione o separador:
O seu dispositivo entrará agora no modo de código QR.
Nota: necessita de ter um digitalizador de código QR instalado no seu dispositivo.
Localize o código QR na parte posterior da câmara IP e digitalize-o.
Após a digitalização do código QR, o UID (código de ID Exclusivo) aparece no ecrã do seu
dispositivo (consulte a Figura 17).
Introduza uma palavra-passe e nome da câmara
pessoal e seleccione o separador:
(consulte a Figura 17).
A nova câmara será adicionada à lista (consulte a
Figura 18).
Adicionar a câmara IP já instalada à aplicação
4
3
2
1

75
Figura 16 Figura 17 Figura 18
APPLE
Abra a Aplicação “uCare
Cam”.
Na janela de lista de câmaras, seleccione o sinal “+” na parte superior direita do ecrã.
Seleccione a opção “Scan camera QR code”.
Nota: necessita de ter um digitalizador de código QR instalado no seu dispositivo.
Localize o código QR na parte posterior da câmara IP e digitalize-o.
O UID (código de ID Exclusivo) será apresentado depois de digitalizar o código QR.
Introduza um nome de câmara pessoal e seleccione “DONE” na parte superior direita do
ecrã.
Para obter mais explicações sobre a aplicação, a câmara IP e as Perguntas Mais
Frequentes, consulte o manual COMPLETO (Só versão em inglês)
no CD fornecido com este produto.
9
8
7
6
5

76
Descrição do produto:
SEC-IPCAM100B (W)
1. Antena Wi-Fi
2. Sensor de intensidade da luz
3. LED IV
4. Nenhuma função
5. Microfone
6. Indicador LED
7. Botão WPS/Repôr
8. Ranhura para cartões Micro SD
9. Altifalante
10. Ligação para instalação da câmara
11. Entrada CC de 5V

77
SEC-IPCAM105B (W)
1. Indicador LED
2. Sensor de intensidade da luz
3. LED IV
4. Microfone
5. Botão WPS/Repôr
6. Ranhura para cartões Micro SD
7. Entrada CC de 5V
Precauções de segurança:
RISCO DE CHOQUE ELÉCTRICO
NÃO ABRIR
CUIDADO
Quando necessitar de reparação e para reduzir o risco de
choque eléctrico, este produto deve APENAS ser aberto
por um técnico autorizado. Desligar o produto da tomada
de alimentação e outro equipamento se ocorrer um
problema. Não expor o produto à água ou humidade.

78
Manutenção:
Limpar apenas com um pano seco. Não utilizar solventes de limpeza ou produtos abrasivos.
Garantia:
Não é aceitável qualquer garantia ou responsabilidade devidas a alterações e modificações no
produto ou de danos causados pela utilização incorrecta deste produto.
Geral:
- Os designs e as especificações estão sujeitos a alteração sem aviso.
- Todas as marcas dos logotipos e nomes de produtos são marcas registadas dos respectivos
proprietários e são reconhecidos como tal no presente documento.
- Este manual foi cuidadosamente elaborado. No entanto, não podem ser derivados quaisquer
direitos. A König Electronic não se responsabiliza por quaisquer erros neste manual nem pelas
respectivas consequências.
- Guardar este manual e embalagem para consulta futura.
Atenção:
Este produto encontra-se marcado com este símbolo. Significa que os produtos eléctricos e
electrónicos usados não devem ser misturados com o lixo doméstico geral. Existe um sistema
de recolha separado para estes produtos.
Este produto foi fabricado e fornecido em conformidade com todos os regulamentos e directivas
relevantes, válidos para todos os estados membros da União Europeia. Além disso, está em
conformidade com todas as especificações e regulamentos aplicáveis no país de venda.
Mediante pedido, será disponibilizada documentação formal . Isto inclui, mas não se limita a:
Declaração de Conformidade (e identidade do produto), Ficha de Dados de Segurança de Material e
relatório de teste do produto.
Contactar o nosso centro de serviço de apoio ao cliente para obter assistência:
através da página de internet: http://www.nedis.pt/pt-pt/contacto/formulario-de-contacto.htm
através de e-mail: service@nedis.com
através do telefone: +31 (0)73-5993965 (durante o horário normal de expediente)
NEDIS B.V., De Tweeling 28, 5215 MC ’s-Hertogenbosch, HOLANDA

79
MAGYAR
IP kamera
Bevezetés:
• Szem előtt tarthatja tulajdonát és értékeit ezzel a ténylegesen Plug & Play IP kamerával. Könnyen
és egyszerűen használatba vehető, nem kell konfigurálni. Az ingyenes uCare Cam alkalmazással
élőben figyelheti okostelefonja vagy más mobil eszköze képét és hangját bármikor, bárhonnét. Az
ingyenes uCare Cam alkalmazás a Google Play webhelyről és az Apple App Store áruházból
szerezhető be. Speciális szolgáltatásként e-mail értesítést küld, ha mozgást észlel. A fotó és/vagy
videó felvételek bármikor visszajátszhatók. Kétirányú hangcsatornája révén babafigyelőként is
használható.
• Kérjük, hogy a termék üzembe állítása/használata előtt olvassa el ezt a használati útmutatót.
• A használati útmutatót tartsa biztonságos helyen, mert a jövőben még szüksége lehet rá.
Rendszerkövetelmények:
• Android 4.0 vagy újabb, vagy iOS 5.0 vagy újabb operációs rendszerű készülék.
• WiFi útválasztó.
Töltse le a „uCare Cam” alkalmazást a Google Play webhelyről vagy az App
alkalmazásáruházából
Android eszköz
„uCare Cam” letöltési hivatkozás a Google Play webáruházhoz
iOS készülék
„uCare Cam” letöltési hivatkozás az Apple alkalmazásáruházhoz
A letöltést követően kattintson az ikonra az
alkalmazás futtatásához.
A „uCare Cam” alapértelmezett jelszava: 0000
Felhasználónév: admin
Felhasználói jelszó: 0000
Az alkalmazás telepítése mobil eszközre
2
1

80
1. ábra
„Kamerajegyzék ablak”
Kétféle módon folytathatja az IP kamera egyszerű beállítását.
Bekapcsolás
Dugaszolja a hálózati tápegység csatlakozóját az IP kamera tápaljzatába, majd a
tápegységet a konnektorba. Az IP kamera állapotjelző LED-je kb. 15 másodpercig zölden
világít.
A program betöltése
Az állapotjelző LED kb. 15 másodpercig pirosan villog.
Útválasztó kapcsolat mód
Várja meg, hogy az állapotjelző LED felváltva piros és zöld színnel világítson.
Megjegyzés:
Ha ez nem történik meg, nyomja meg 10 másodpercnél hosszabb időre a
WPS/Visszaállító gombot, hogy újrainduljon az IP kamera.
Az IP kamera RESET (visszaállított) állapotba került, ha állapotjelző LED-je kigyullad és
égve marad, majd kétszer pirosat villan, majd átmegy zöldbe. Ekkor elengedheti a gombot.
Várja meg, hogy váltakozva piros és zöld fénnyel világítson a LED.
ANDROID (Apple készülék esetén: 8. lépés)
Kapcsolja össze az IP kamerát a Wi-Fi útválasztóval
Nyissa meg a „uCare Cam” alkalmazást, és
válassza ezt:
Kattintson ide az új Wi-Fi kamera
telepítéséhez
A kamerajegyzék ablak képernyőjén (lásd az 1. ábrát).
4
3
2
1
Az IP-kamera telepítése ÚTVÁLASZTÓ MÓDBAN

81
A következő képernyőn válassza ezt a fület:
Utána válassza ezt a gombot:
a következő lépésre ugráshoz (lásd a
2. ábrát).
Kövesse a kamerajegyzék ablak utasításait, lépésről lépésre (lásd a 3. és 4. ábrát). Írja be
a személyes kamera nevét és jelszavát (alapértelmezett érték: 0000).
Kérjük, hogy a beállítás után biztonsági okokból változtassa meg az alapértelmezett
jelszót.
Kattintson erre a fülre .
(lásd az 5. ábrát). A „uCare Cam” automatikusan a nézőablakba vált (lásd a 6. ábrát), az IP
kamera állapotjelző LED-je pedig narancssárga színre vált.
7
6
5
3. ábra
2. ábra
4. ábra
5. ábra 6. ábra

82
APPLE
Kapcsolja össze az IP kamerát a Wi-Fi útválasztóval
Nyissa meg a „Settings” pontot iOS készülékén, válassza ki a Wi-Fi lehetőséget, és
kerestesse meg vele a hálózatot. A hálózat neve „Wi-Fi-cam-p2p”. A felkapcsolódáshoz
válassza ki a „Wi-Fi-cam-p2p” lehetőséget.
Most nyissa meg a „uCare Cam” alkalmazást, és válassza a képernyő alján a „Wi-Fi
Connect” lehetőséget.
Válassza a „Router mode”, majd a „Next” lehetőséget. Írja be a Wi-Fi hálózat nevét (SSID)
és otthoni útválasztója jelszavát.
Az adatok beírása után az IP kamera újra indul. Várja meg, hogy ismét a Wi-Fi
útválasztóra kapcsolódjon. A felkapcsolódást az állapotjelző LED narancssárga színre
váltása jelzi. Ez akár 5 percbe is telhet.
Utána az összekapcsolódáshoz válassza ki a kamera nevét a „uCare Cam”
alkalmazásban.
Megjegyzés: Ha az állapotjelző LED nem vált narancssárga színre, ellenőrizze a Wi-Fi
útválasztót, és hogy az IP kamera az útválasztó hatókörén belülre esik-e. Utána végezze
el ismét a beállítást.
Ha van WPS (Wi-Fi Protected Setup) gomb a Wi-Fi útválasztón, azzal is telepítheti az IP kamerát. (Az
útválasztón engedélyezni kell a WPA/WPA2 titkosítást.) Keresse meg az útválasztón a „WPS” gombot.
Lehet, hogy „QSS” vagy „AOSS” a felirata
A Wi-Fi - WPS mód beállítása
Nyissa meg a „uCare Cam” alkalmazást
és a képernyő alján válassza a „Wi-Fi Setting” vagy „Wi-Fi Connect” lehetőséget.
Válassza ezt a gombot:
Utána válassza ezt a
gombot:
a 2. lépésre ugráshoz (lásd a 8. ábrát).
A WPS módba lépés
Kapcsolja be az IP kamerát. Az IP kamera állapotjelző LED-je kb. 15 másodpercig zölden
világít.
A program betöltése
Az állapotjelző LED kb. 15 másodpercig pirosan villog.
2
3
1
Az IP-kamera telepítése WPS kapcsolódási módban
12
11
10
9
8

83
Nyomja meg WPS gombot az IP kamerán
Várja meg, hogy az állapotjelző LED váltakozva piros és zöld színnel világítson, majd a
WPS módba lépéshez kb. 2 másodpercre nyomja le IP kamerája WPS/Visszaállító
gombját. Az állapotjelző LED zölden villog.
Lépjen WPS módba a Wi-Fi útválasztón
Nyomja meg a Wi-Fi útválasztó WPS gombját.
A Wi-Fi útválasztó kiválasztása
Válassza ki a megfelelő Wi-Fi útválasztót a képernyőn (9. ábra).
Utána válassza ezt a
gombot:
a következő lépésre ugráshoz (10. ábra).
Az IP kamera összekapcsolódik a Wi-Fi útválasztóval
Várjon 1-2 percet. Ha az IP kamera sikeresen összekapcsolódott a Wi-Fi útválasztóval,
állapotjelző LED-je narancssárgán világít.
Egyébként pirosan villog. Ha nem sikerült a beállítás, lépjen vissza az 1. lépésre és
ismételje meg az eljárást.
Siker esetén válassza ezt a
gombot:
(11. ábra) és kövesse az utasításokat.
A biztonságos működéshez írja be a kamera nevét és jelszavát, majd
válassza ezt a gombot: (13. ábra).
Az IP kamera automatikusan a nézőablakra vált (14. ábra).
8
6
5
4
9
7
9. ábra
10. ábra 8. ábra

84
Bekapcsolás
Dugaszolja a hálózati tápegység csatlakozóját az IP kamera tápaljzatába, majd a
tápegységet a konnektorba. Az IP kamera állapotjelző LED-je kb. 15 másodpercig zölden
világít.
A program betöltése
Az állapotjelző LED kb. 15 másodpercig pirosan villog.
A Wi-Fi útválasztó megkeresése
A Wi-Fi útválasztó megtalálásáig (akár 5 percig) zölden villog az állapotjelző LED.
Az útválasztó megtalálása után narancssárgára vált.
Ha végképp nem tud a Wi-Fi útválasztóra kapcsolódni az IP kamera, ellenőrizze a Wi-Fi
útválasztó állapotát, vagy ismételje meg a telepítést.
Az alkalmazásban válassza ki a kamera nevét a kamerajegyzéken; ekkor megnyílik a
nézőablak (15. ábra).
Az IP kamera elindítása a Wi-Fi kapcsolat létrejötte után
3
2
1
11. ábra
12. ábra
13. ábra 14. ábra

85
ANDROID (Apple készülék esetén: 5. lépés)
Nyissa meg a „uCare Cam” alkalmazást, és
válassza ezt:
Kattintson ide a telepített Wi-Fi kamera
importálásához
a kamerajegyzék ablak képernyőn (16. ábra), az IP kamera hozzáadásához.
Válassza ezt a gombot:
Készüléke ekkor a QR kód módba lép.
Megjegyzés: készülékén legyen QR kód olvasó telepítve.
Keresse meg a QR kódot az IP kamera hátoldalán, és olvassa be.
A QR kód beolvasása után megjelenik készüléke képernyőjén az UID (Unique ID) kód
(17. ábra).
Írjon be egy egyéni kameranevet és jelszót, majd
válassza a következő gombot:
(17. ábra).
Az új kamera felkerül a jegyzékbe (18. ábra).
Már telepített IP kamera hozzáadása az alkalmazáshoz
4
3
2
1

86
16. ábra 17. ábra 18. ábra
APPLE
Nyissa meg a „uCare Cam”
alkalmazást.
A kamerajegyzék ablakban válassza a képernyő jobb felső sarkában levő „+” jelet.
Válassza a „Scan camera QR code” (A kamera QR kódjának beolvasása) lehetőséget.
Megjegyzés: készülékén legyen QR kód olvasó telepítve.
Keresse meg a QR kódot az IP kamera hátoldalán, és olvassa be.
A QR kód beolvasása után megjelenik az UID (Unique ID) kód.
Írjon be egy egyéni kameranevet, majd válassza „DONE” (kész) lehetőséget a képernyő
jobb felső sarkában.
Az alkalmazás, valamint az IP kamera leírása és a gyakori kérdésekre adott válaszok a
termékhez adott CD lemezen találhatók (csak angol nyelven).
9
8
7
6
5

87
A termék leírása:
SEC-IPCAM100B (W)
1. Wi-Fi antenna
2. Fényerő-érzékelő
3. Infra LED
4. Nincs funkciója
5. Mikrofon
6. LED jelző
7. WPS/Visszaállító gomb
8. Micro SD kártyahely
9. Hangszóró
10. Kameratalp csatlakozó
11. 5 V= bemenet

88
SEC-IPCAM105B (W)
1. LED jelző
2. Fényerő-érzékelő
3. Infra LED
4. Mikrofon
5. WPS/Visszaállító gomb
6. Micro SD kártyahely
7. 5 V= bemenet
Biztonsági óvintézkedések:
Az áramütés veszélyének csökkentése érdekében ezt a
terméket KIZÁRÓLAG a márkaszerviz képviselője nyithatja
fel. Hiba esetén húzza ki a termék csatlakozóját a
konnektorból, és kösse le más berendezésekről. Vigyázzon,
hogy ne érje a terméket víz vagy nedvesség.

89
Karbantartás:
Csak száraz ronggyal tisztítsa. Tisztító- és súrolószerek használatát mellőzze.
Jótállás:
A termék illetéktelen módosítása érvényteleníti jótállását. Nem vállalunk felelősséget a termék
szakszerűtlen használata miatti károkért.
Jogi nyilatkozat:
A kivitel és a műszaki jellemzők előzetes értesítés nélkül is módosulhatnak. Minden logó, terméknév
és márkanév a tulajdonosának márkaneve vagy bejegyzett márkaneve, azokat ennek tiszteletben
tartásával említjük.
Leselejtezés:
• A terméket elkülönítve, a megfelelő gyűjtőhelyeken kell leselejtezni. Ne dobja ki a
készüléket a háztartási hulladék közé.
• További információért lépjen kapcsolatba a forgalmazóval, vagy a hulladékkezelésért felelős
helyi hatósággal.
Ez a termék az Európai Unió minden tagállamában érvényes vonatkozó rendelkezések és irányelvek
betartásával készült és került forgalomba. Megfelel az értékesítési országban rá vonatkozó minden
előírásnak és rendelkezésnek.
Kérésre hivatalos dokumentációt is rendelkezésre bocsátunk. A dokumentáció a teljesség igénye
nélkül a következőket tartalmazza: Megfelelőségi (és termékazonossági) Nyilatkozat, anyagbiztonsági
adatlap, a termék vizsgálati jegyzőkönyve.
Támogatással kapcsolatos ügyekben keresse ügyfélszolgálatunkat:
webhely: http://www.nedis.com/en-us/contact/contact-form.htm
e-mail: rendeles@hqnedis.hu
telefon: +31 (0)73-5993965 (munkaidőben)
NEDIS B.V., De Tweeling 28, 5215 MC ’s-Hertogenbosch, HOLLANDIA

90
SUOMI
IP-kamera
Johdanto:
• Voit vartioida omaisuuttasi ainutlaatuisen Plug & Play IP-kameran avulla. Helppo ja yksinkertainen
asentaa, toimii ilman mitään määritysten tekemistä. Ilmainen uCare Cam -sovellus sallii
katsomisen ja kuuntelemisen älypuhelimesta tai muusta mobiililaitteesta milloin ja missä tahansa.
Ilmainen Ucare Cam -sovellus on saatavilla Google Play -kaupasta ja Applen App Storesta.
Lisäominaisuutena tieto liikkeen tunnistamisesta sähköpostiviestinä tai sovelluksen kautta.
Valokuva ja/tai video voidaan toistaa mistä tahansa hetkestä. Soveltuu myös itkuhälyttimeksi
2-suuntaisen äänitoiminnon ansiosta.
• Suosittelemme tämän oppaan lukemista ennen tuotteen asennusta/käyttöä.
• Säilytä tämä käyttöopas myöhempää käyttöä varten.
Järjestelmävaatimukset:
• Laite vaatii Android 4.0 tai iOS 5.0 -järjestelmän tai niitä uudemman.
• Reititin, jossa Wi-Fi.
Lataa ”uCare Cam”-sovellus Google Play -kaupasta tai Applen App Storesta
Android-laite
Google Play -kauppa ”uCare Cam” latauslinkki
iOS-laite
App Store ”uCare Cam” latauslinkki
Kun ohjelmiston asennus on valmis,
napsauta kuvaketta ja suorita sovellus.
”uCare Cam”-sovelluksen oletussalasana:
0000
Käyttäjätunnus: admin
Käyttäjän salasana: 0000
Sovelluksen asennus mobiililaitteeseesi
2
1

91
Kuva 1
”Kameraikkuna”
IP-kameran helppojen asetusten tekemiseen on kaksi vaihtoehtoa.
Kytke virta
Kytke verkkolaitteen DC-liitin IP-kameran DC-tuloliitäntään ja kytke sitten verkkolaite
pistorasiaan. IP-kameran tilan LED-merkkivalo muuttuu vihreäksi noin 15 sekunnin ajaksi.
Ohjelman lataaminen
Tilan LED-merkkivalo vilkkuu punaisena noin 15 sekunnin ajan.
Reitittimen linkkitila
Odota, kunnes LED-valon väri vuorottelee punaisen ja vihreän välillä.
Huomaa:
Jos LED ei pala punaisena ja vihreänä, paina WPS/palautus-painiketta vähintään
10 sekunnin ajan käynnistääksesi IP-kameran uudelleen.
Kun vihreä tilan LED-valo syttyy ja punainen tilan LED-valo vilkkuu kahdesti, jonka jälkeen
se muuttuu vihreäksi, IP-kamera on PALAUTUS-tilassa. Nyt voit vapauttaa painikkeen ja
odottaa kunnes LED-valo on vuorotellen punainen ja vihreä.
ANDROID (Apple-laitteessa voit siirtyä: vaiheeseen 8)
IP-kameran asettaminen muodostamaan yhteyden Wi-Fi-reitittimeen
Avaa ”uCare Cam”-sovellus ja valitse:
Napsauta tätä uuden Wi-Fi-kameran
asentamiseksi
kameraikkunassa (katso kuva 1).
IP kameran asentaminen REITITINTILASSA
4
3
2
1

92
Valitse seuraavassa näytössä välilehti:
valitse sitten välilehti:
päästäksesi seuraavaan vaiheeseen (katso
kuva 2).
Noudata kameraikkunan ohjeita vaihe vaiheelta (katso kuva 3 ja kuva 4). Anna kameran
yksilöllinen nimi ja salasana (oletus 0000).
Sinun kannattaa vaihtaa oletussalasana asennuksen jälkeen turvallisuussyistä.
Napsauta välilehteä.
(katso kuva 5). uCare Cam siirtyy automaattisesti katseluikkunaan (katso kuva 6) ja
IP-kameran tilan LED-valo muuttuu oranssiksi.
7
6
5
Kuva 3
Kuva 2
Kuva 4
Kuva 5 Kuva 6

93
APPLE
IP-kameran asettaminen muodostamaan yhteyden Wi-Fi-reitittimeen
Avaa iOS-laitteesta ”Settings” ja valitse ”Wi-Fi” ja anna sen hakea verkko. Verkko
on ”Wi-Fi-cam-p2p”. Yhdistä valitsemalla ”Wi-Fi-cam-p2p”.
Avaa nyt ”uCare Cam”-sovellus ja valitse näytön alareunasta välilehti ”Wi-Fi Connect”.
Valitse ”Router mode” ja sitten ”Next”. Anna tässä Wi-Fi-verkon nimi (SSID) ja
kotireitittimesi salasana.
Kun IP-kamera vastaanottaa tämän tiedon, se käynnistyy uudelleen. Odota kunnes se
käynnistyy ja yhdistä Wi-Fi-reitittimeesi. Kun yhteyden muodostaminen onnistuu, tilan
LED-valon väri muuttuu oranssiksi. Se saattaa kestää jopa 5 minuuttia.
Yhdistä valitsemalla sitten kameran nimi ”uCare Cam”-sovelluksessa.
Huomaa: Jos tilan LED-valo ei muutu oranssiksi, tarkista Wi-Fi-reitittimesi ja varmista, että
IP-kamera on Wi-Fi-reitittimesi signaalialueella. Yritä sitten suorittaa asetus uudelleen.
Jos Wi-Fi-reitittimessä on WPS-painike (Wi-Fi suojattu asetus), voit käyttää sitä IP-kameran
asennuksessa. (Reitittimessä täytyy olla käytössä WPA/WPA2-salaus). Näet Wi-Fi-reitittimessä
painikkeen ”WPS”. Se voi olla nimeltään myös ”QSS” tai ”AOSS”.
Wi-Fi-asetus - WPS-tila
Avaa ”uCare Cam”-sovellus
ja valitse ”Wi-Fi Setting” tai ”Wi-Fi Connect” näytön alareunasta.
Valitse välilehti:
valitse sitten välilehti:
päästäksesi vaiheeseen 2 (katso kuva 8).
Siirry WPS-tilaan
Kytke virta IP-kameraan. IP-kameran LED-merkkivalo muuttuu vihreäksi noin 15 sekunnin
ajaksi.
Ohjelman lataaminen
Tilan LED-merkkivalo vilkkuu punaisena noin 15 sekunnin ajan.
IP kameran asentaminen WPS-yhteystilassa
2
3
1
12
11
10
9
8

94
Paina IP-kameran WPS-painiketta
Odota, kunnes tilan LED vilkkuu punaisen ja vihreän välillä, paina ja pidä IP-kameran
WPS/palautus-painiketta noin 2 sekunnin ajan päästäksesi WPS-tilaan. Tilan LED-valo
vilkkuu vihreänä.
Siirry Wi-Fi-reitittimen WPS-tilaan
Paina Wi-Fi-reitittimen WPS-painiketta
Wi-Fi-reitittimen valitseminen
Valitse haluamasi Wi-Fi-reititin näytöltä (katso kuva 9).
Valitse sitten välilehti:
päästäksesi seuraavaan vaiheeseen (katso kuva 10).
IP-kamera yhdistyy Wi-Fi-reitittimeen
Odota noin 1–2 minuuttia. Jos IP-kamera on saanut yhteyden Wi-Fi-reitittimeen, tilan
LED-valosta tulee oranssi.
Muussa tapauksessa LED-valo vilkkuu punaisena. Jos asennus ei onnistu, siirry takaisin
vaiheeseen 1 ja yritä uudelleen.
Jos yhdistäminen onnistui,
valitse välilehti:
(katso kuva 11) ja noudata ohjeita.
Anna kameran nimi ja salasana turvallisuuden takia ja
valitse välilehti: (katso kuva 13).
IP-kamera siirtyy automaattisesti katselunäyttöön (katso kuva 14).
8
6
5
4
9
7
Kuva 9
Kuva 10 Kuva 8

95
Kytke virta
Kytke verkkolaitteen DC-liitin IP-kameran DC-tuloliitäntään ja kytke sitten verkkolaite
pistorasiaan. IP-kameran tilan LED-merkkivalo muuttuu vihreäksi noin 15 sekunnin ajaksi.
Ohjelman lataaminen
Tilan LED-merkkivalo vilkkuu punaisena noin 15 sekunnin ajan.
Wi-Fi-reitittimen hakeminen
Tilan LED-valo vilkkuu vihreänä, kunnes Wi-Fi-reititin löytyy (voi kestää jopa 5 minuuttia).
Kun reititin löytyy, tilan LED-valosta tulee oranssi.
Jos IP-kamera ei saa muodostettua yhteyttä Wi-Fi-reitittimeen, tarkista Wi-Fi-reitittimen tila
tai tee asennus uudelleen.
Valitse kameran nimi sovelluksen kameraluettelosta, jolloin katseluikkuna avautuu (katso
kuva 15).
Käynnistä IP-kamera, kun Wi-Fi-yhteys on saatu muodostettua
3
2
1
Kuva 11
Kuva 12
Kuva 13 Kuva 14

96
ANDROID (Apple-laitteessa voit siirtyä: vaiheeseen 5)
Avaa ”uCare Cam”-sovellus ja valitse:
Napsauta tätä asennetun Wi-Fi-kameran
tuomiseksi.
IP-kameran lisääminen kameraikkunassa (katso kuva 16).
Valitse välilehti:
Laitteesi siirtyy nyt QR-kooditilaan.
Huomautus: sinulla täytyy olla QR-koodilukija asennettuna laitteeseesi.
Etsi IP-kameran takana oleva QR-koodi ja lue tämä QR-koodi.
QR-koodin lukemisen jälkeen laitteesi näyttöön ilmestyy UID (Unique ID code) (katso
kuva 17).
Anna kameran yksilöllinen nimi ja salasana, valitse
välilehti:
(katso kuva 17).
Uusi kamera lisätään luetteloon (ks. kuva 18).
Asennetun IP-kameran lisääminen sovellukseen
4
3
2
1

97
Kuva 16 Kuva 17 Kuva 18
APPLE
Avaa ”uCare Cam”-sovellus.
Valitse kameraikkunassa ”+” merkki näytön oikeasta yläkulmasta.
Valitse vaihtoehto ”Scan camera QR code”.
Huomautus: sinulla täytyy olla QR-koodilukija asennettuna laitteeseesi.
Etsi IP-kameran takana oleva QR-koodi ja lue tämä QR-koodi.
UID (Unique ID code) tulee näkyviin QR-koodin lukemisen jälkeen.
Anna kameran yksilöllinen nimi ja valitse ”DONE” näytön yläreunasta oikealta.
Saat lisätietoja sovelluksesta, IP-kamerasta ja voit lukea usein kysyttyjä kysymyksiä
tuotteen mukana tulevalla CD-levyllä olevasta TÄYDELLISESTÄ käyttöoppaasta
(
vain englanniksi).
9
8
7
6
5

98
Tuotteen kuvaus:
SEC-IPCAM100B (W)
1. Wi-Fi-antenni
2. Valon voimakkuuden tunnistin
3. IR LED
4. Ei toimintoa
5. Mikrofoni
6. LED-merkkivalo
7. WPS/palautus-painike
8. Micro-SD-korttipaikka
9. Kovaääninen
10. Liitäntä kamerajalustalle
11. 5 V DC-tulo

99
SEC-IPCAM105B (W)
1. LED-merkkivalo
2. Valon voimakkuuden tunnistin
3. IR LED
4. Mikrofoni
5. WPS/palautus-painike
6. Micro-SD-korttipaikka
7. 5 V DC-tulo
Turvallisuustoimenpiteet:
Sähköiskun riskin pienentämiseksi, AINOASTAAN
valtuutettu huoltohenkilö saa avata tämän laitteen huoltoa
varten. Jos ongelmia ilmenee, irrota laite verkkovirrasta ja
muista laitteista. Älä altista laitetta vedelle ja kosteudelle.
Huolto:
Puhdista ainoastaan kuivalla kankaalla. Älä käytä liuottimia tai hankausaineita.

100
Takuu:
Takuu mitätöityy, mikäli laitteeseen tehdään mitä tahansa muutoksia. Emme ole myöskään vastuussa
vahingoista, jotka johtuvat tämän tuotteen virheellisestä käytöstä.
Vastuuvapauslauseke:
Muutoksia malliin ja teknisiin ominaisuuksiin voidaan tehdä ilmoituksetta. Kaikki logot, merkit ja
tuotenimet ovat niiden vastaavien omistajien tuotemerkkejä tai rekisteröityjä tuotemerkkejä ja niitä on
käsiteltävä sellaisina.
Hävittäminen:
• Tämä tuote tulee toimittaa hävitettäväksi asianmukaiseen keräyspisteeseen. Tuotetta ei saa
hävittää kotitalousjätteen mukana.
• Lisätietoja antaa jälleenmyyjä tai paikallinen jätehuollosta vastaava viranomainen.
Tämä tuote on valmistettu ja toimitettu noudattaen kaikkia sitä koskevia asetuksia ja direktiivejä, jotka
ovat voimassa kaikissa Euroopan unionin jäsenvaltioissa. Se täyttää myös kaikki myyntimaassa
sovellettavat vaatimukset ja määräykset.
Viralliset asiakirjat ovat saatavilla pyynnöstä. Asiakirjoihin sisältyvät seuraavat, mutta näihin
rajoittumatta: Vaatimustenmukaisuusvakuutus (ja tuotteen tunniste), käyttöturvallisuustiedote, tuotteen
testiraportti.
Saat neuvoja ottamalla yhteyttä asiakaspalveluumme:
verkkosivun kautta: http://www.nedis.fi/fi-fi/ota-yhteytta/yhteyslomake.htm
sähköpostilla: service@nedis.com
puhelimitse: +31 (0)73-5993965 (toimistoaikoina)
NEDIS B.V., De Tweeling 28, 5215 MC ’s-Hertogenbosch, ALANKOMAAT
 Loading...