

Page 1
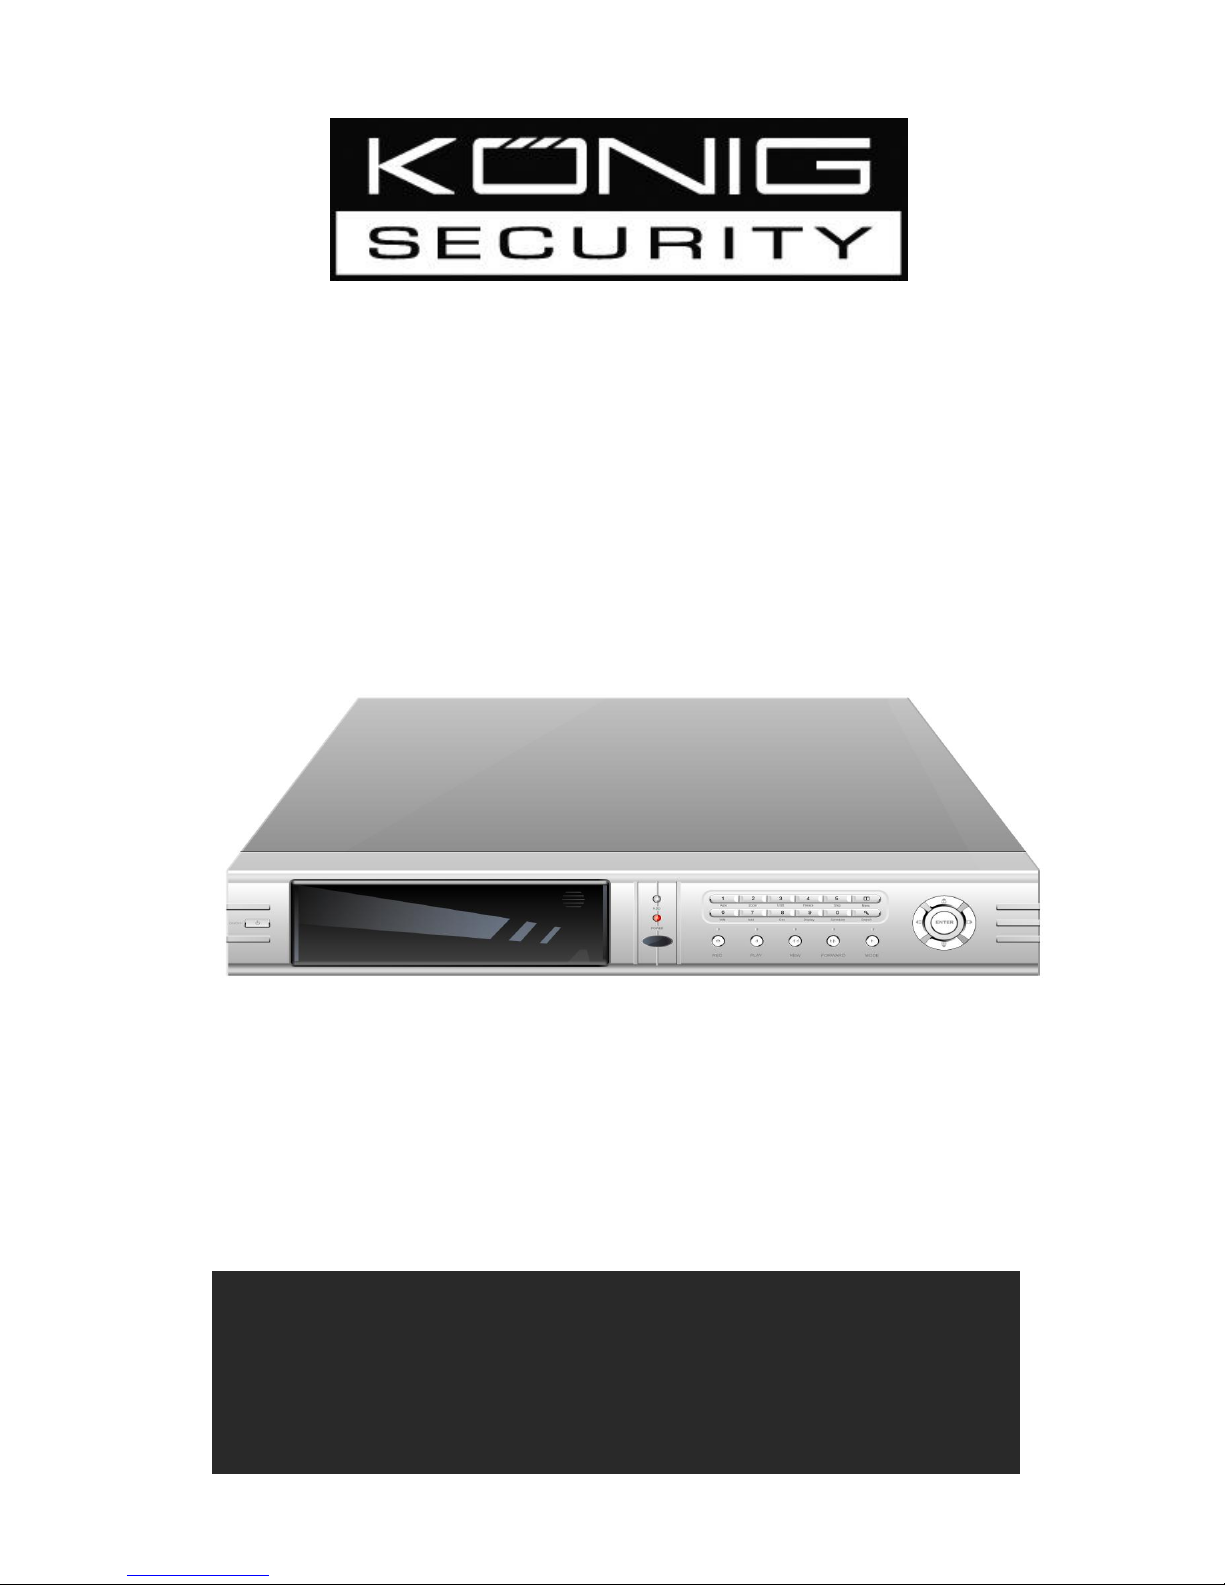
SEC-DVR210
4 CHANNEL HARDDISK RECORDER
ADVANCED
ENGLISH
MANUAL
Page 2

2
• Read this manual carefully before use
• This product is for indoor use, do not expose the product to
water or moist environment.
• To av oi d el ec tr ic al s ho ck , do n ot o pe n th is product. It may
expose high voltage and the product may be destroyed.
• Use the correct power source: DC12V/5A. Make sure everything is
correct before turn on the power.
• Refer servicing to qualified personnel only.
The default password of the DVR is “0000”. Once you change the
password, please protect it carefully, because if you forget, the DVR
can not be reset for safety reasons.
1. 4ch DVR main unit……………….
2. Remote Controller ………………..
3. Power Adapter: 12VDC/5A ……....
4. RS485 & Alarm connector …………
5. User’s manual ……………………
6. CD ……………………………….
Remarks
Package Contents of Box
X 1
X 1
X 1
X 1
X 1
X 1
Password
Page 3

3
Contents
1. Features ………………………………………………………..………..
2. Front Panel Function Description ……………………………..
3. Rear Panel Function Description ………………………………
4. Remote control ……..…………………………………………………
5. System Setup ………………………………………………………….
6. User Guideline ………………………………………………………..
1. Hard Disk Connection …………………………………………………
2. Normal Recording ……………………………………….…………….
3. Alarm Recording ……………………………………………………….
4. Time Recording ………………………………………………………..
5. Playback ………………………………………………………………..
6. Search Play …………………………………………………………….
7. USB Backup ……………………………………………………………
8. USB Update ……………………………………………………………
9. Zoom ……………………………………………………….…………..
10. Freeze ………………………………………………………………...
11. PTZ Opera tion …………………………………………….…………
12. PIP Mode …………………………………………………………..…
13. Triplex Mode ………………………………………………………….
7. Using The Network Viewer …………………………………..……
8. Trouble Shooting ………………………………….………………….
9. Reference Time to Recording ………………….……………….
10. Specification ………………………………….…………..………….
4
7
8
9
15 15 16 16 16 16 17 19 20 20
21 21 22 22
23 27 28
4
29
Page 4
4
Features:
Video input: 4ch; video output: 2ch.
Audio input: 4ch; audio output: 1ch
Compression mode: M-JPEG
Compatible with NTSC and PAL system
Support zoom, auto, PIP, triplex function
Support alarm (motion & event) recording and time recording
Multi-function searches: time, segment and event
4 alarm input and 1 relay alarm out
Equipped with remote device
Support watermark security protection
Support Network and RS485 function
Backup or Update with Flash disk through the USB
Support 2 Hard Disk and each up to 300GB (Seagate recommended)
Windows® Vista and Internet Explorer 7.0 compatible
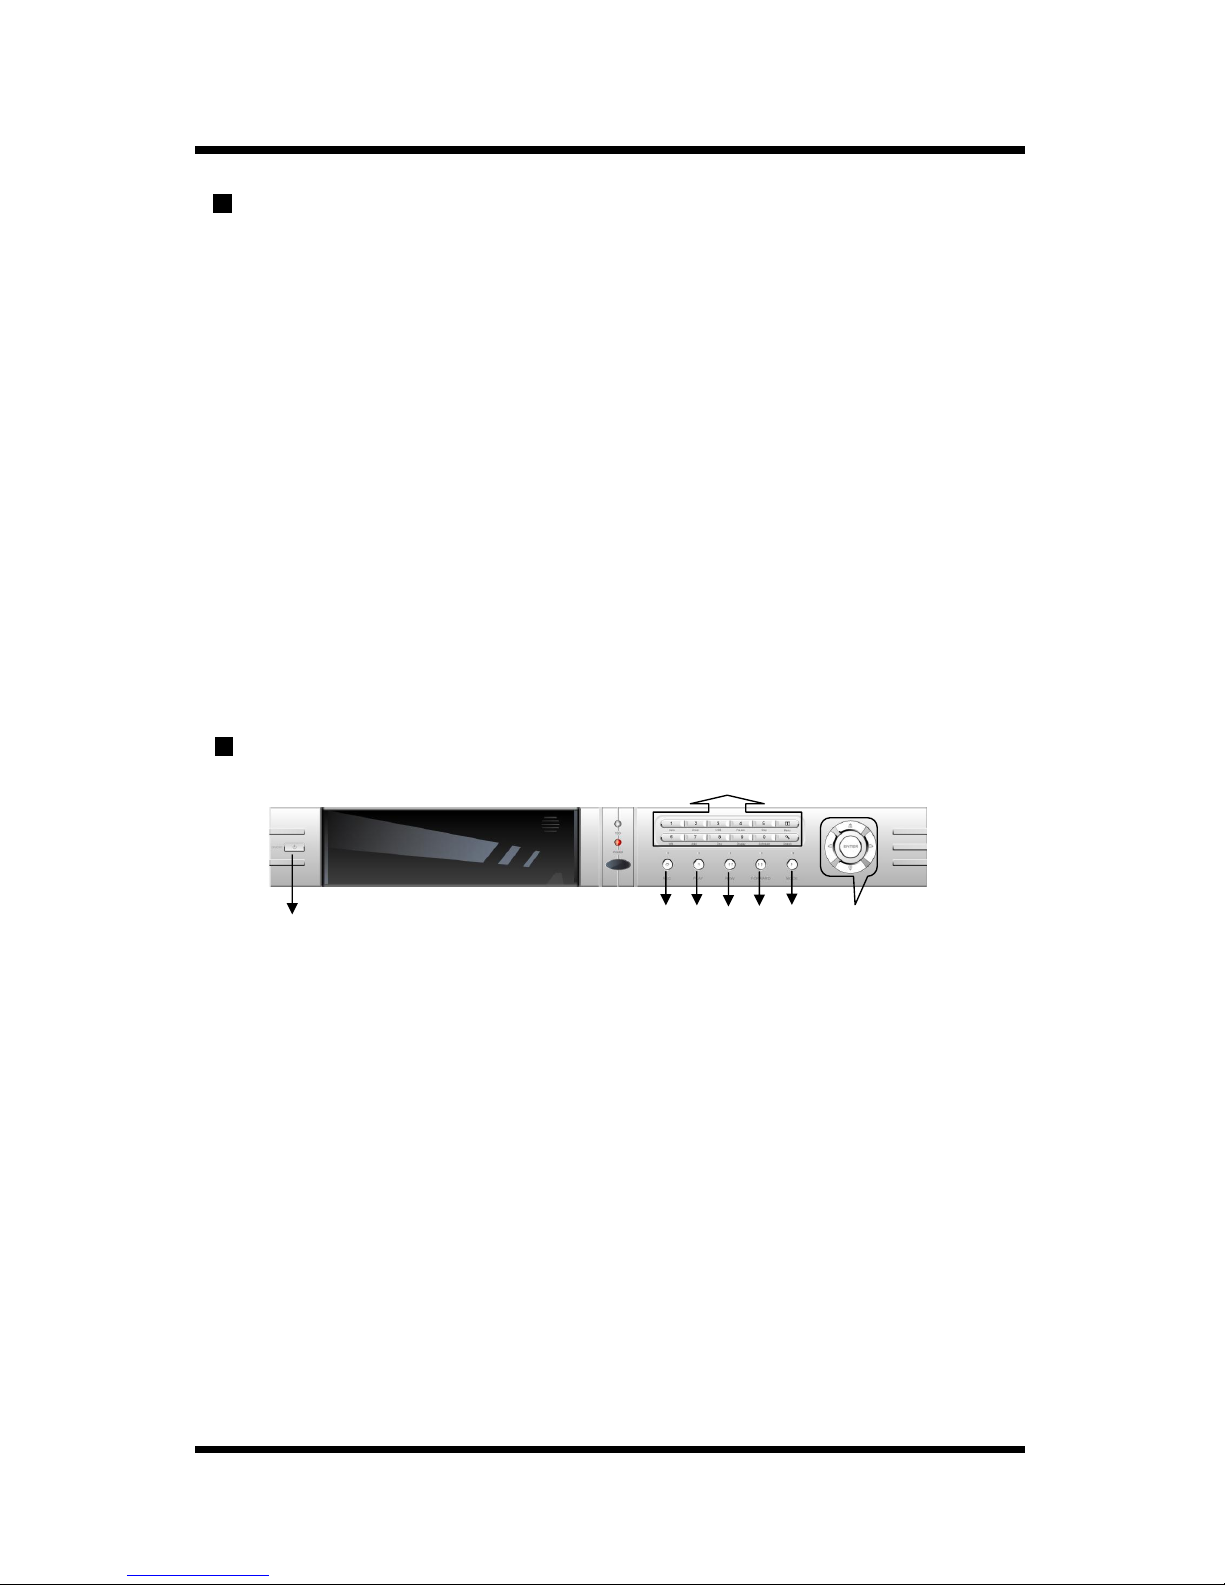
Front Panel Function Description
1. ON/OFF: Switch for DVR’s power
2. REC: for video recording; and re-push to stop recording
3. PLAY: this button to start playing the video stored in Hard Disk, Re-push this button or
push stop button to stop the video playing.
4. REW: fast backward button in video playing; or single frame rewind button in single
frame mode.
5. FWD: fast forward button in video playing; or single frame forward button in single
frame mode.
6. STOP: while playing video, push this button to stop playing.
7. Function control area:
1). AUTO: push this button, the DVR will be in auto dwell state, it dwells according to the
time set in auto sequence set menu, you can set the dwell time of each cannel. Push
channel select button to exit this mode.
1
7
2
3
4
5 6 8
Page 5
5
2). TRIP: push this button, the DVR will be in triplex mode. Both live and playback picture
can be displayed on screen simultaneously while recording. Also you can push “search”
button to choose the record events. Re-push this button to stop this mode.
3). PIP: push this button; the DVR will be in PIP mode. Re-push this button to change the
PIP mode (one picture; two or three picture). Long push “PIP” on the keyboard or push
“PIP-C” button in remote controller, you can set PIP picture. When one channel name is in
yellow, push left and right button to change selected channel, push up and down button to
change the selected channel’s picture, then push “Enter” button to confirm. Push channel
select button to exit this mode.
4). FREEZE: to freeze the entire picture on screen(quad, triplex), re-push to stop this mode.
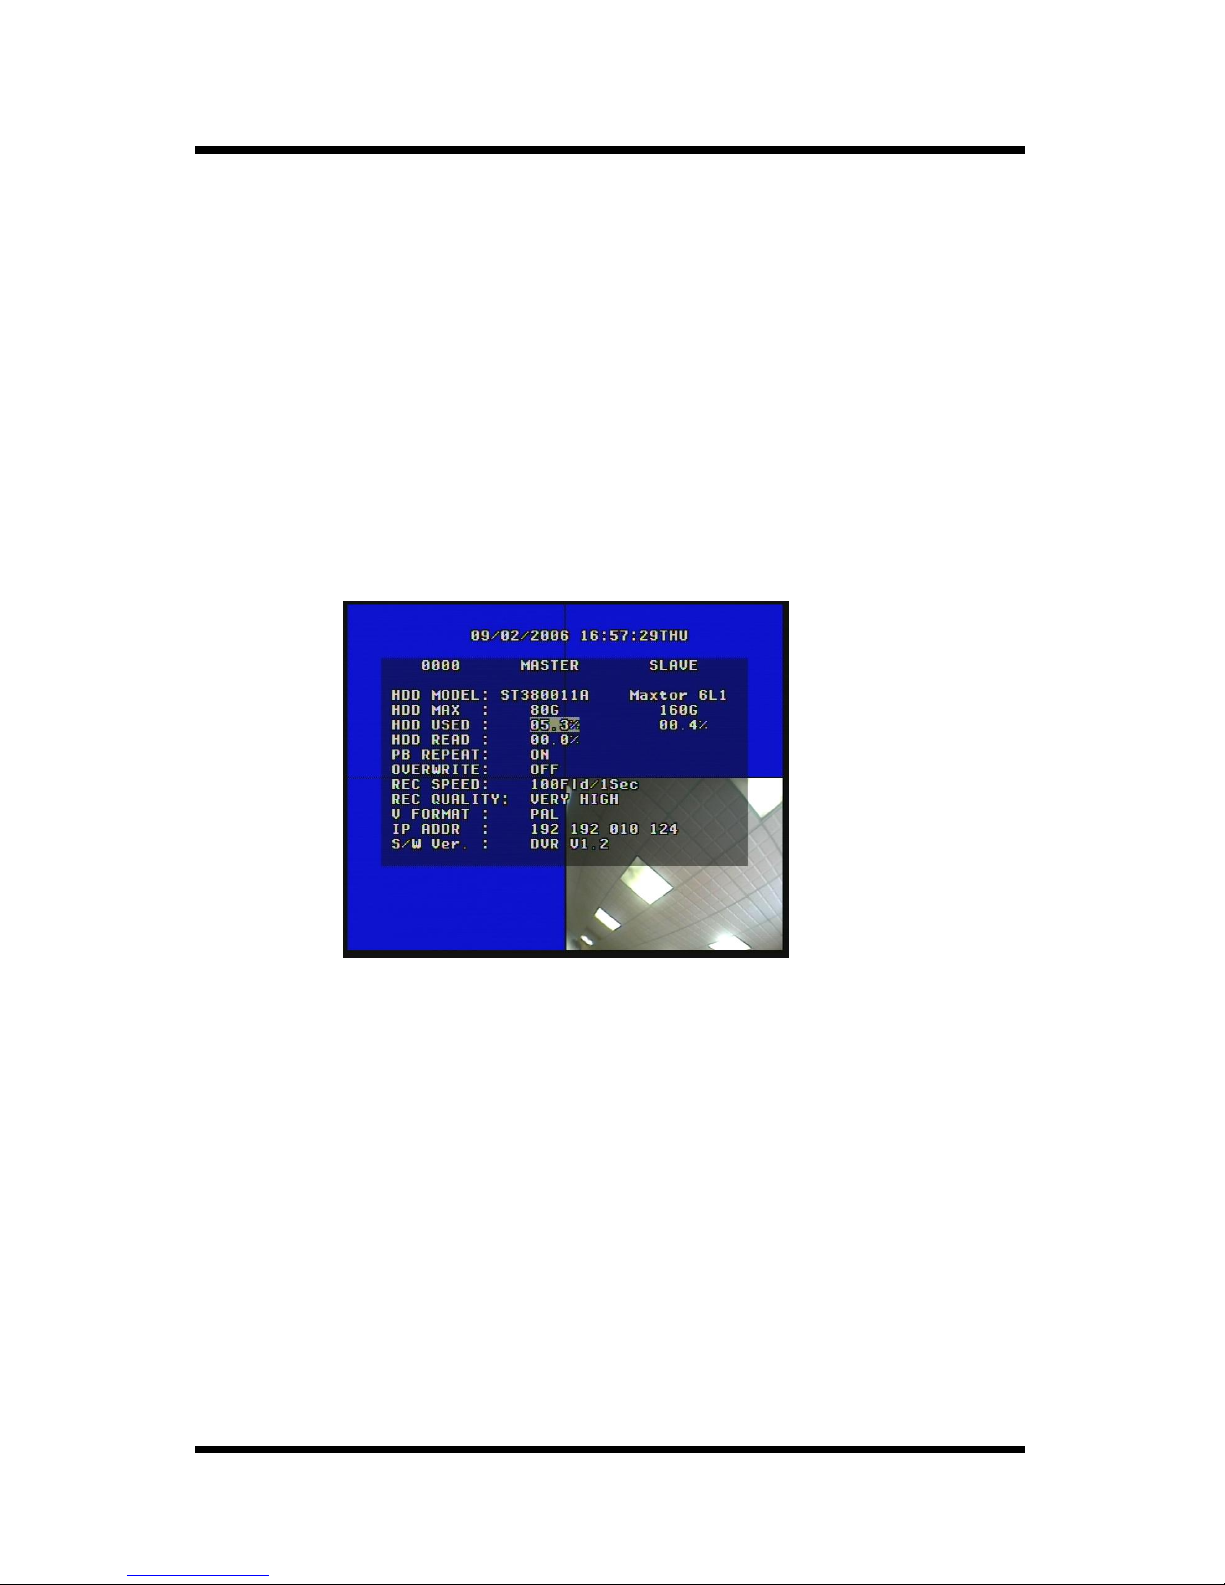
5). DISPLAY: to display the current DVR’s information on the screen, include Hard Disk, IP
information etc. push again to cancel this mode.
6). MENU: press this button to enter the system setup menu, re-press to exit. All the
function of the DVR can be found here.
7). USB: to backup the video on Flash Disk. When using this function, you have to format
your USB Flash disk in “FAT” file system on your computer, but not “FAT32” file
system. Press the key shortly to save 1 field image; long press this key on
keyboard or “USB-M” in remote controller to save active image. Press again to
stop saving image.
NOTE: if USB storage is removed during backup, a fatal error may occur.
8). W/M: watermark key. While the DVR is playing video, you can push this button to see
the watermark of the picture, if the video was recorded by this DVR and has not
be modified, there will be a watermark symbol in each channel, press again to
clear the symbol.
Page 6

6
9). ZOOM: push this button, the DVR will be in zoom mode. Use “Up, Down, Left,
Right” button to move the zoom area, then press “ENTER” to zoom up. Re-push this
button to exit.
10). PAUSE: to stop playing temporarily, and the DVR will be in single frame mode
simultaneously. Press “REW, FWD” button to backward or forward one frame of the picture.
Push “PLAY” button to exit.
11). SCHEDULE: switch for schedule mode. If the DVR is in schedule mode, there will be
“schedule mode” symbol on top of screen. Push again to exit.
12). SEARCH: in this mode there are three methods to search the evens on HDD:
①. REC START/STOP SEARCH: search play by segment.
②. EVENT LIST SEARCH: search play by event list.
③. TIME DATE SEARCH: search play by input time.
Push “MENU” button to exit this mode.
8. Channel choosing control area:
1). First channel / Up: push this button to see full screen display form channel 1. While
selecting menu items, push this button to move up the cursor.
2). Second channel / Down: push this button to see full screen display form channel 2.
while selecting menu items, push this button to move down the cursor.
3). Third channel / Left: push this button to see full screen display form channel 3. While
selecting menu items, push this button to move left the cursor.
Page 7
7
4). Forth channel / Right: push this button to see full screen display form channel 4.
While selecting menu items, push this button to move right the cursor.
5). Quad / Enter: push this button to see all pictures of 4 channels. While selecting menu
items, push this button to select the item.
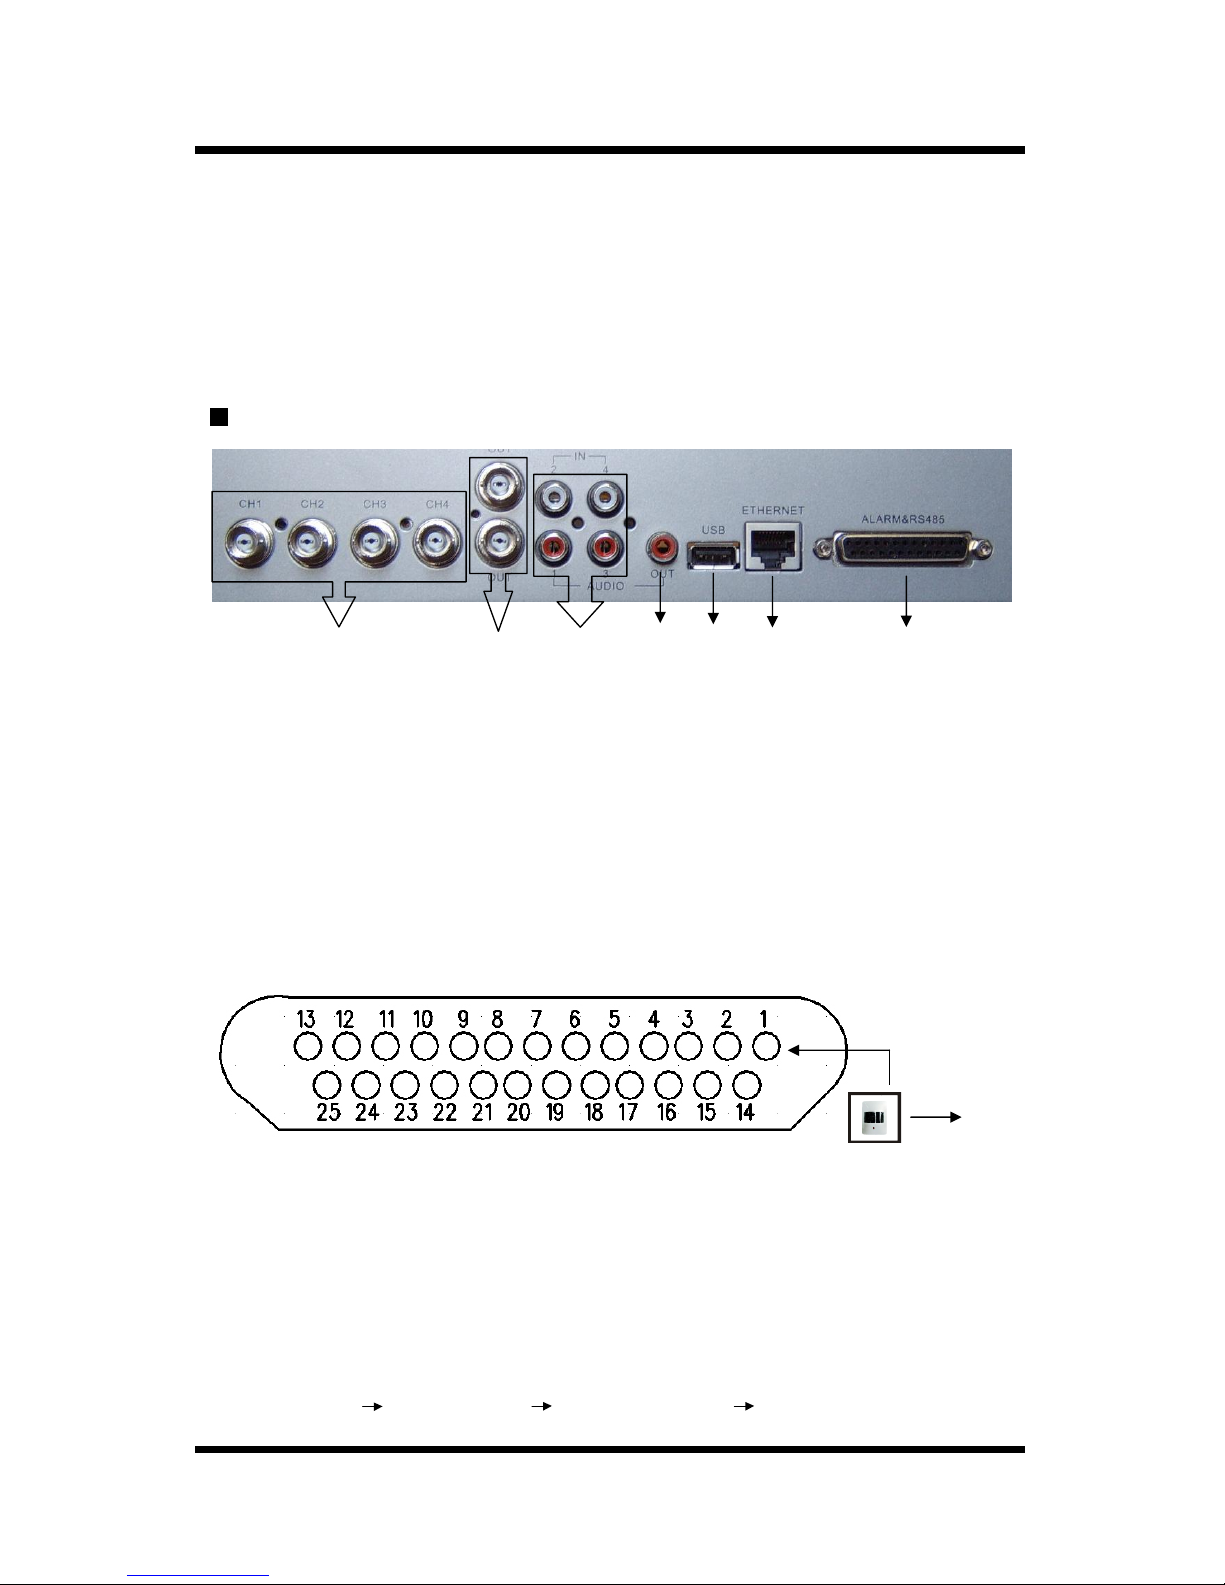
Rear Panel Function Description
1. Channel 1 to channel 4: for camera or other video signal input.
2. Two BNC connectors for video output.
3. 4 channels audio input, but just one can be output and recoded.
4. Red RCA connector for audio output.
5. USB port for record and update with Flash Disk.
6. Net interface: you can view the DVR picture from your PC through this port.
7. Alarm & RS485 connector: This DVR can support up to 4-alarm input, 1 relay alarm
output and RS485 function. You can use the adapter connecter to spread out. The detailed
setting described as followed.
①. SENSOR1~SENSOR4: One port of the sensor connected to signal input and the other to
GND. such as the figure upon.
NOTE: there are two types of alarm input.
1. Voltage output (5V and 0V)
A: If the sensor output high voltage (5V) normally and output low voltage when
triggered (0V), then users must set DVR to “N.O”. Please follow the steps:
MENU SENSOR SET ALARM ENABLE ”NO”
1 2 3
4
5
6 7
S
ensor CH1
GND
SENSOR1
Page 8

8
B: If the sensor output low voltage (0V) normally and output high voltage when
triggered (5V), then users must set DVR to “N.C”. Please follow the steps:
MENU SENSOR SET ALARM ENABLE ”NC”
N.O: Normal open, close when triggered.
N.C: Normal close, open when triggered.
②. RS485A (18); RS485B (19): RS485 output.
③. COM (21); NO (23): alarm output. You just connect these two wires to your alarm or
speaker is ok. NC (22) is useless. The status of these pins are illustrated as below:
Ala rm
5V
NC
..
COM
NO
..
④. 20,24,25: GND.
⑤. 5~17 pins: no use.
Page 9
9
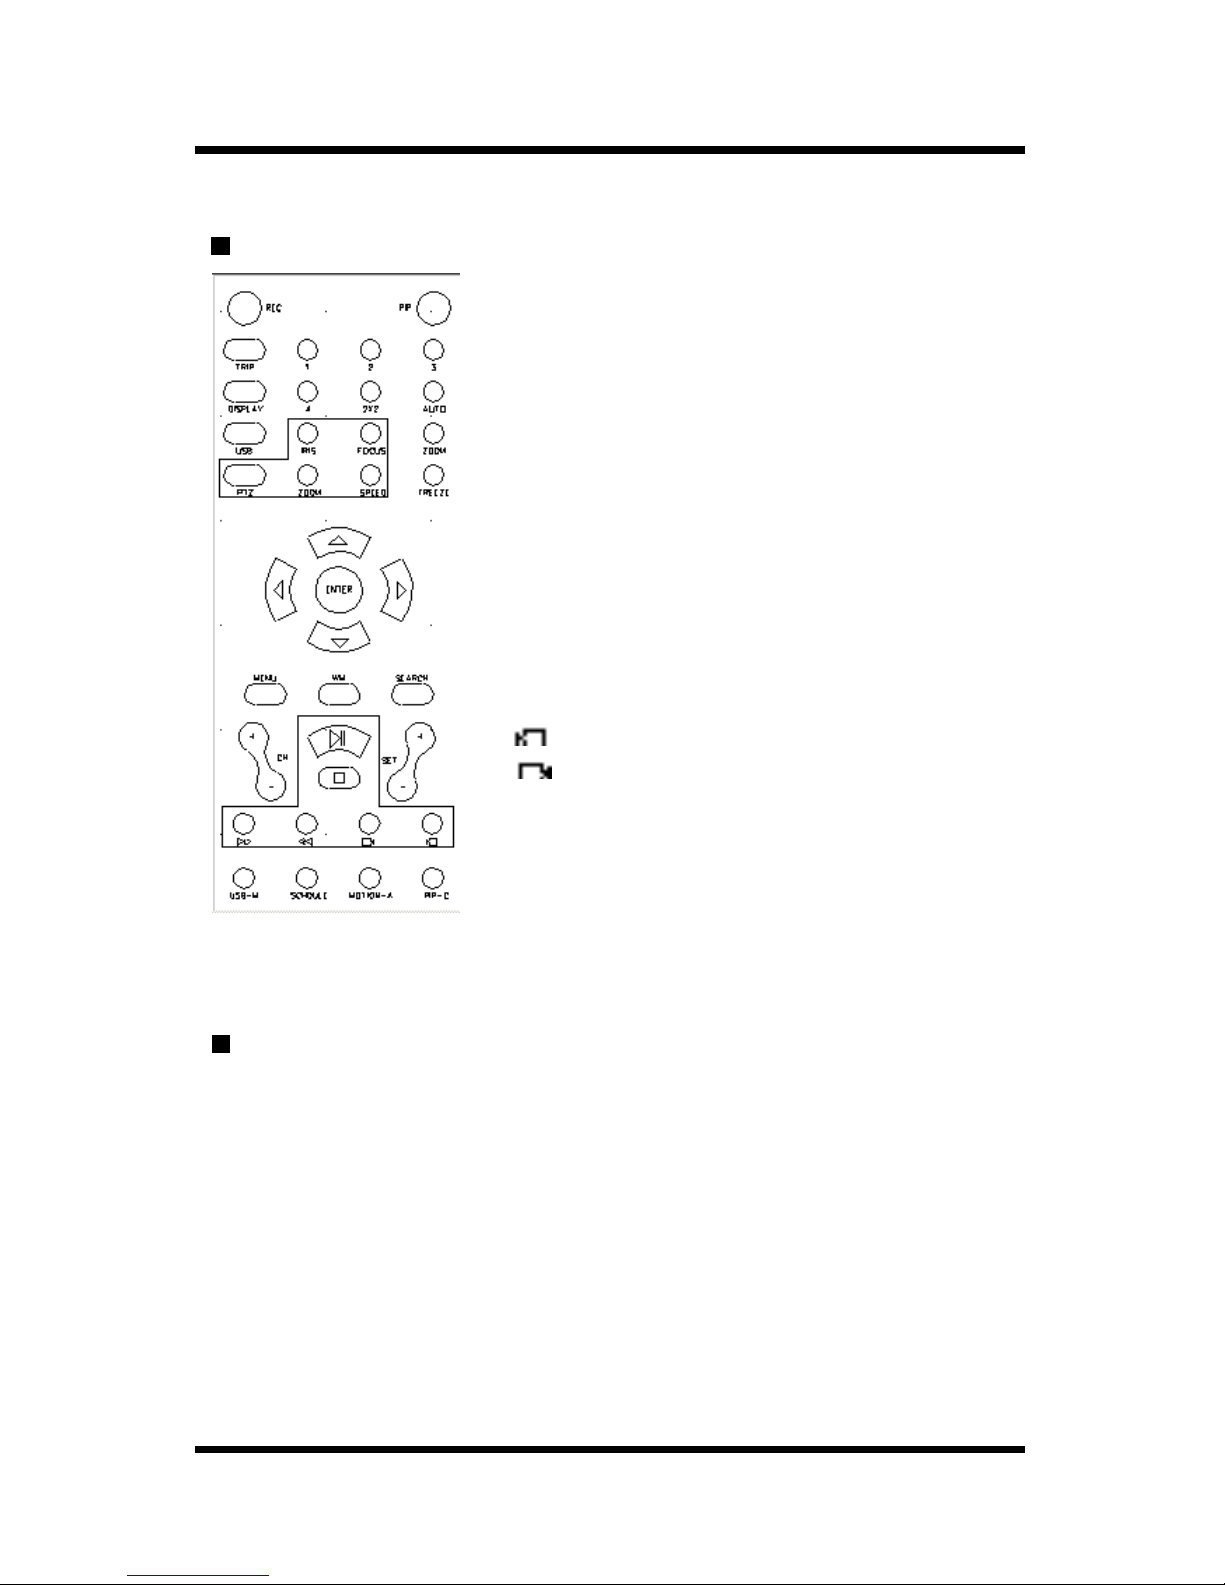
Remote control
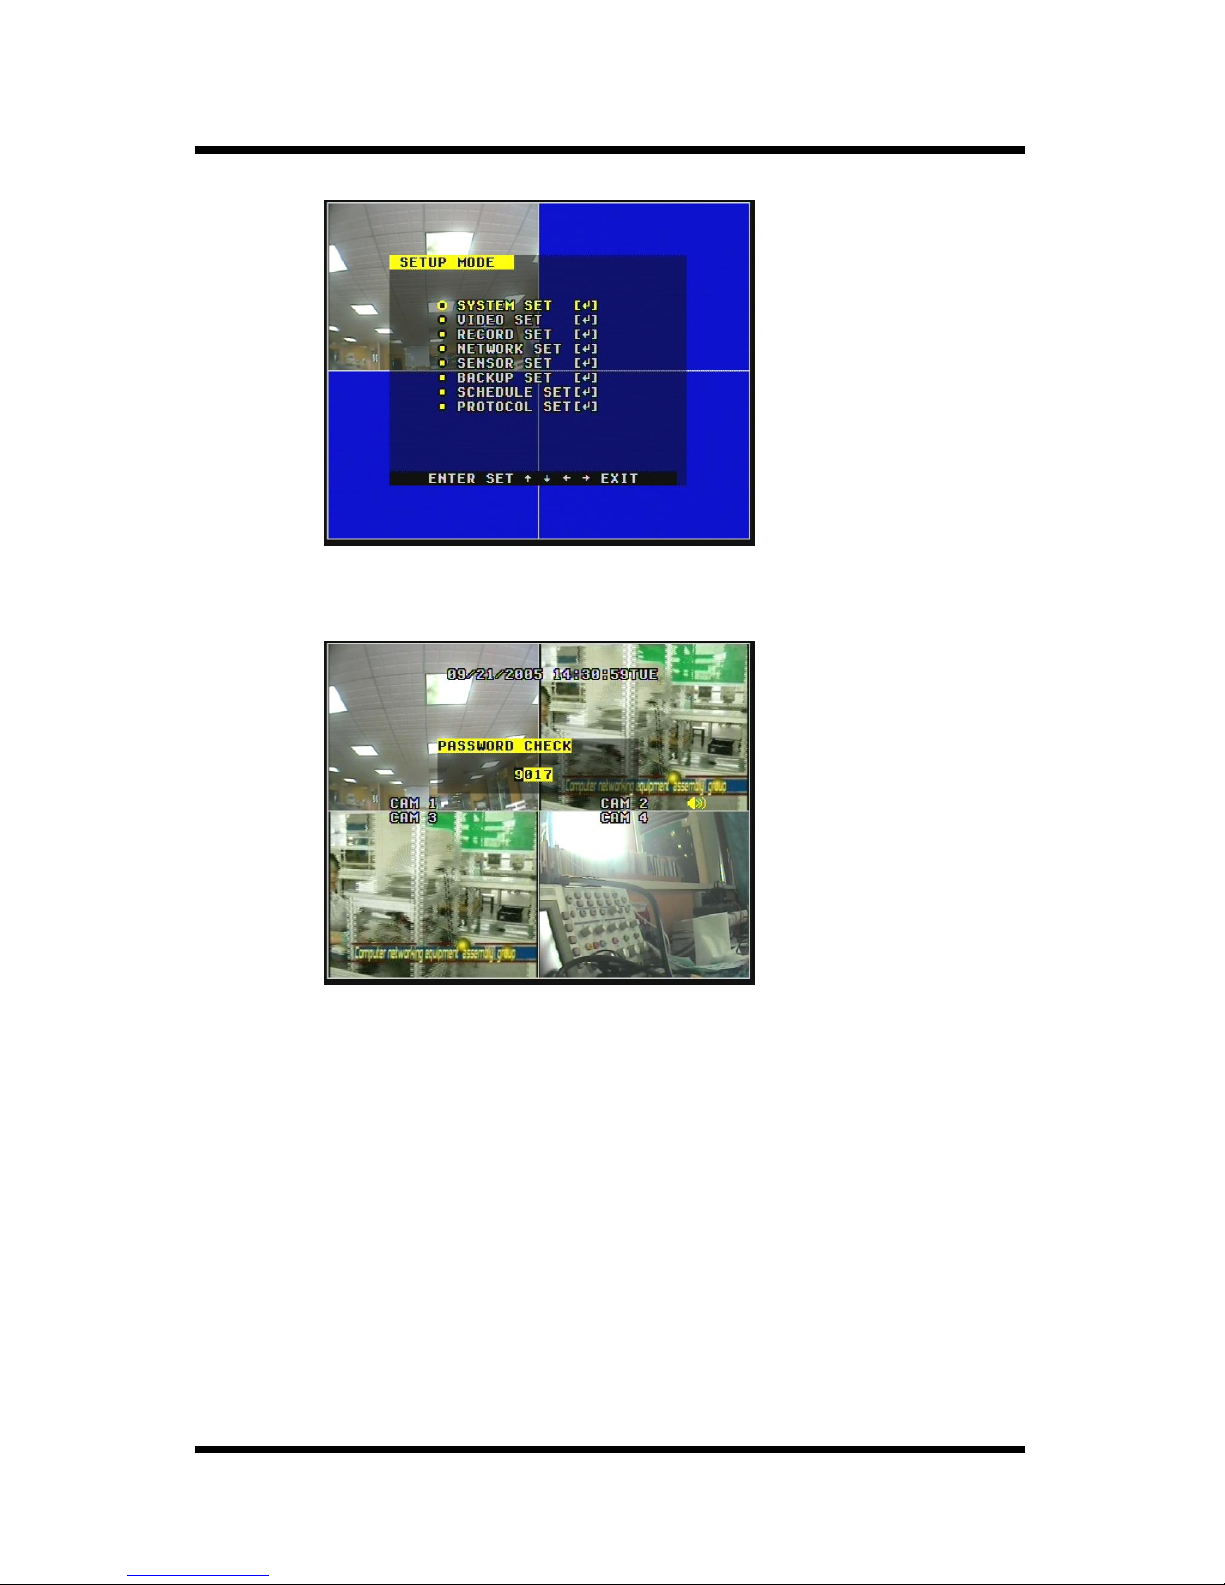
System Setup
Before using the video recorder, the first step is to set up the system according to
user’s needs; otherwise the machine will run with the default settings.
In setup mode, push upward or downward button, the cursor will move among the
menu items, continuous pushing will make the cursor move among the options one by one,
and it can recur. The selected one will display in yellow color.
While choosing digital fields, e.g. year, month, day, hour, minute, second etc, push
upward button or downward button to change the value of selected items; push leftward or
rightward button, the cursor can move leftward or rightward.
Push “ENTER” button to enter sub menu. Push menu button to return previous menu,
and make your change to take effect.
PIP: picture in picture.
0~4: select the channel to full screen.
2x2: 2x2 Screen Mode
AUTO: Auto Sequence Mode
TRIP: triplex mode.
DISPLAY: DVR Information
USB: Still Picture Backup
ZOOM: 2X zoom up
FREEZE: Freeze all the pictures.
PTZ (IRIS, FOCUS, ZOOM, SPEED, SET): control key of high-
speed domes.
W/M: watermark key
SEARCH: Time Search, Event Search and Start / Stop Search
: Forward one frame of picture.
: Backward one frame of picture.
USB-M: backup “movie” to your USB device.
SCHEDULE: switch of schedule
MOTION-A: setting motion area
PIP-C: PIP channel change
Page 10
10
1). Access Menu
Press the menu button on the keyboard or remote controller, the password input
window will be appeared. The password is a random combination of 4 digits of “0~9”. The
default password is “0000”. You can push “Up” or “Down” button to input the digit, and
“Left” or “Right” to move the cursor. You can change the password by system menu.
Note: If you forget the password, please don’t do anything about it and contact
our dealer immediately.
Page 11

11
2). System set
①
.
Time / date set: It allows user to change the system time, display on/off, position, etc.
if the DVR is in recording mode, you aren’t allowed to access to this menu unless
you stop record first.
②
. HDD format set: Hard Disk formatted. If you have two HDD, it will be formatted
together.
③
. Auto sequence set: you can set the dwell time of each channel. Then you can see the
effect in “AUTO” mode.
④
. Factory reset: it allows user to reset all the user’s setting to default.
⑤
. Play repeat: if you select “yes”, when you play the video on disk, it will be played one
by one. But if you select “no”, it will be play just one segment.
⑥
. Video source (PAL/NTSC): change the video system.
Page 12

12
⑦
. Buzzer sound: turn ON/OFF the buzzer.
⑧
. Password enable: ON/OFF.
⑨
. Password change: it allows user to change the password with “Up, Down, Left, Right”
button.
3). Video set:
①
. Name setup: set a name for each channel. (Cam1, Cam2, )
②
. BRI/CON setup: select a channel first and set the brightness or contrast.
③
. Boundary: set the boundary color for video (black /white / gray).
④
.Back ground: set the background color for loss video. (Black / blue)
Page 13

13
4). Record set:
①
. Over write: set the HDD whether to be over write. If you select “YES” , the DVR will
automatically over write the HDD from the beginning when the HDD is full.
②
. REC speed: set recording speed.
PAL: 100, 5 0, 25, 12, 1 0, 5 , 3, 2, 1 (f/s) , 1 (f /2s)
NTSC: 120, 60, 30, 20, 12, 5, 3, 2, 1 (f/s), 1 (f/2s)
③
. REC quality: set record quality. (Very high, high, low, very low)
④
. REC source: set recording size.
MULTIPLEX: 720 X 240(288)
CIF TYPE: 360 X 240(288)
⑤
. PB speed: set playback speed. If you select “AUTO”, it will be playback as same as
REC speed.
⑥
. Audio enable: audio select. You can select one in four channels to record or output.
Page 14

14
5). Network set:
If you want to view the picture on PC, please set this item first! When change the
digits, you can press ”ENTER” to change every bit.
①
. Network state: if the network condition is well, you can set “LOCAL_LAN”, and it can
transmit more quickly. But if the network condition is not very well, please set
“EXTER_LAN”.
②
. MAC set: the DVR allows user to set the MAC address just one time, if you want to
set again, please reset the DVR. Follow the steps:
”MENU SYSTEM SET FACTORY RESET”.
NOTE: If you have more than one DVR in a local area network, you have to set
each DVR to have an exclusive MAC address.
6). Sensor set:
Page 15

15
①
. Channel select: select a channel to set.
②
. Alarm enable: alarm trigger switch, can be set to off, NC or NO.
③
. Motion enable: motion alarm switch.
④
. Motion level: motion sensitivity level, (VERY HIGH, HIGH, NORMAL, LOW, VERY
LOW)
⑤
. Event REC time: set time for recording when alarm is triggered (0~99 minute).
⑤
. Buzzer sound: set time for buzzer sound when motion is on (0~99 seconds).
⑥
. Area set: set the motion block ON/OFF.
The yellow block indicates the block where motion is on and the white is off. Move the
cursor to a block, and press “ENTER” key to set the block ON/OFF.
Long push “ENTER” key on the keyboard or push the “MOTION-A” key in remote
controller to have the whole screen in the same state with the block where the cursor is
on.
7). Backup set: set the USB backup function
①
. USB firmware update: This DVR allows user to update the firmware through USB.
Page 16

16
8). Schedule set: it allows user to change a recording schedule during a week using “Up,
Down, Left, Right, enter” key.
①
. Schedule enable: switch for schedule.
Push “ENTER” to select one item, “Up / Down” to open; “Left / Right” to select start
or stop time, then “Up / Down” to change the time, push “ENTER” to confirm.
8). Protocol set: this DVR can control High Speed Domes with RS485 connector. To
control the high-speed domes, make sure all the wires are correctly connected,
and address, baud rate, protocol is same as the high-speed domes.
①. CH select: select the channel that has high-speed domes video.
②. Address: the address of this channel. Can be changed from 0X00 to 0Xff.
③. Baud rate: the transmitted speed on RS485. Can be changed from 4800bps to 921600. (Ad
vice: 9600bps)
Page 17

17
④. Protocol: there are 4 types to select: “PELCO_P”, ”PELCO_D”, ”NEON”,
”SAMSUNG”.
User Guideline
1. Hard Disk Connection
1. Push out the hard drive rack from DVR
side panel.
2. Open the top cover of the drawer.
3. Jump HDD to Master
Jump to Master
4. Connect the ribbon cable (IDE) cable &
power cable.
5. Close the top cover of the drawer and
put the hard drive drawer back into the
DVR
6. Lock the hard drive draw by turning the
key clockwise
Page 18

18
If you have another HDD, please jump that HDD to SLAVE, and open the machine, put
the HDD to the HDD shelf, then connect the power and digit cable.
2. Normal Recording
Check recording parameter setup before recording; select video quality, frame rate.
You can’t change record setting during the process of recording.
Manual recording belongs to normal recording. Under the manual mode (non-schedule
status), pushing record button to record all channels’ video and push the record button
again to stop.
During the process of recording, if the hard disk is full, and the system is set to
automatic overwrite, then the recording will not be interrupted, and it begins to overwrite the
earliest recorded area; if the system is set to overwrite disable, it will stop recording.
NOTE: if you have two hard disks, one is master; the other is slave. The DVR will be
not record on slave disk until the master disk is full.
3. Alarm Recording
● check whether the connection of alarm input equipment is correct, stable and
reliable, and the alarm set is right, please refer to “sensor set”.
● Turn on the “EVENT REC TIME” first, otherwise it doesn’t recording. If you want to
hear the alarm, please turn on the “BUZZER SOUND”. For sensor alarm, “alarm
enable” of that channel must set to “ON”; for motion alarm, “motion enable” of that
channel must set “ON”, and set the right area for motion detect.
● Check “RECORD SET” before recording; Confirm the video quality and the frame
rate; the record setting cannot change during recording process.
● As long as the alarm input signal is effective, the alarm recoding continues, When
the alarm input signal loses efficacy, the time set up by “EVENT REC TIME” becomes
effective, and when the time goes out, the alarm recording automatically stops.
4. Time Recording
● Time recording starts and stops automatically according to the pre-arranged time in
schedule timetable.
● Push down the “SCHDULE” button on the front panel or remote controller to set
schedule on. While pushing down this button, the schedule symbol “*SCHEDULE
Page 19

19
MODE*” will display on the screen top, without pushing the schedule button, the time
recording parameter setup will not work.
● The prerequisite condition of whether the time recording takes effective is system
must be set on schedule. Push “SCHEDULE” again to cancel this mode.
5. Playback
Push play button, system begins to play the images recorded
In the process of fast forward playing or fast backward playing, re-push “PLAY” button
will begin normal playing from the current place.
Continuous pushing “FWD” button will change the fast-forward mode among five levels
of speed (X2, X4, X8, X16, X32) circularly. Continuous pushing “REW” button will change
the fast backward mode among four levels of speed (X2, X4, X8, X16) circularly.
During playback mode, push “PA U SE” button to enter the single frame mode. Press
“REW” button on keyboard or single frame rewind button on remote controller will play
backward frame by frame; Press “FWD” button on keyboard or single frame forward button
on remote controller will play forward frame by frame; Push play button to pause mode.
Push play button again to play normally. Re-push play button will stop playing.
6. Search play
Push “SEARCH” button, search play window will display on the screen.
①. REC START/STOP SEARCH: search play by segment.
②. EVENT LIST SEARCH: search play by event list.
③. TIME DATE SEARCH: search play by input time.
Page 20

20
6.1 REC START/STOP SEARCH
When the cursor moves to “REC START/STOP SEARCH”, then push enter button, the
Start stop search window will appear, which is illustrated as below.
All record segments are displayed here, push “Up / Down” button to move the cursor
among the segment list, push “Left / Right” button to see previous or next page, push enter
button to play the segment that you selected. Push “MENU” button back to Search Play
menu.
If you want to change the HDD between MASTER and SLAVE, just push “SEARCH”
key, then push “ENTER” key to change and “MENU” to cancel. (all the two HDD must have
record list, or it will be ignore by your operation).
6.2 Event Search
When the cursor moves to “Event Search”, then push “ENTER” button, the event
search window will appear, which is illustrated as below.
There are four types of event list: “MOTION, ALARM, SCHED, NETWORK”. “MOTION”
means motion alarm recording, “Alarm” means sensor alarm recording, “SCHED” means
time recording. “NETWORK” means recorded by Net.
Page 21

21
Push “Up / Down” button to move the cursor among the event list, push “Left / Right”
button to see previous or next page, push “enter” button to play the segment you select.
Push “MENU” button back to Search Play menu.
6.3 Time Search
When the cursor moves to “Time Search”, then push enter button, the time search
window will appear, which is illustrated as below.
If you want to use this function, please stop recording or playing first. Then push “Left /
Right” button to move the cursor among year, month, day, hour and minute, you can push
“Up / Down” to change the digits. Push “ENTER” to play the video.
7. USB Backup
If you want to use this function, the first step is: Yo u have to format your USB device
with “FAT” system on your computer.
NOTE: the DVR doesn’t support “FAT32” file system.
Plug in the USB device, go to the menu of “Backup Set”, check that if the USB device
was detected or not, and the free space of your USB device whether enough, then exit the
menu setup.
Page 22

22
If you want to save still picture, please make the channel that you want to saved to full
screen, then push the “USB” button shortly on keyboard or in remote controller, it will be
begin to backup one frame of the video to USB device. you can plug the USB device out
and see the picture on a computer with net viewer software.
If you want to backup “MOVIE” to your USB device, push the “USB-M” button in
remote controller or long press the “USB” button on key board, it will begin to backup the
video to the USB device, there will be a ”A” blinking on the screen. Push “USB” or “USB-M”
button again to end backup, This may take a little time, and make sure the USB device has
enough free space, if blinking stops, the backup is ok, you can see the video on a computer
with net viewer software.
8. USB Update
In order to update the DVR firmware, you have to rename the file into 'update. bin’ in
the USB root directory, Plug in the USB device, go to the “Backup set” in the main menu,
check that if the USB device has detected or not, go to the “Firmware Update” menu and
press enter, update will start. When update is ok, please reboot the DVR.
Page 23

23
NOTE: do not shut down the DVR when the DVR is updating, it may cause fatal problem.
9. Zoom
Press “Zoom” button to enter into the zoom mode.
On the screen for zooming, the bright rectangle is the area to be zoomed up. Press
“Up, Down, Left or Right” to move the zoom area, then push enter button to zoom up, press
“Zoom” button again to exit zoom operation.
10. FREEZE
Use “Freeze” button on the remote controller or keyboard, you can freeze the entire
screen. In a full screen mode, Press the Freeze button to pause one channel; in other
modes, press the Freeze button to pause four channels.
Page 24

24
11. PTZ OPERATION
This DVR can control high-speed domes, which are connected to the DVR.
To co n tr ol th e high-speed dome, make sure all the wires are correctly connected, first
you must set the right protocol, baud rates, and high-speed dome’s address for each
speed dome, please refer to protocol set.
PTZ can only be operated by remote controller, press the PTZ button on the remote
controller, “PTZ” will be display on the screen, then select 1 to 4 to choose PTZ channel,
the channel number will be displayed after “PTZ”. You can press “Up, Down, Left, Right”
button to move the high-speed dome, and press the button again to stop. If you press the
IRIS button, the characters “IRIS” will be appear on the screen, then you can press the
“SET+/-” button to change the IRIS, the same to control the “Focus, Zoom, and Speed”,
also press this button again to stop.
Press the PTZ button again to exit PTZ mode.
NOTE: if all the connect are correct, but the high speed domes doesn’t work, please
change the “protocol, baud rates, and speed dome’s address” to try.
12. PIP MODE
3 Picture In Picture Mode
CAMERA 1 CAMERA 3
06/28/2002 07:25:56
CAMERA 2
CAMERA4
Push “PIP” button, the DVR will be in PIP mode. You can re-push this button to change
the PIP mode (one picture; two or three picture). Long press “PIP” key on keyboard or “PIP-C”
Page 25

25
button in remote controller you can set PIP picture. When one channel name is in yellow, push
“Left / Right” button to change selected channel, push “Up / Down” button to change the
selected channel’s picture, then push “Enter” button to confirm. Push channel select button to
exit this mode.
13. TRIPLEX MODE
In this mode, there are 8 pictures in screen. “PB CH1~CH4” are playback channels, the
other four are real time video. You can use “search” button to play video that recorded on
HDD. Also you can record in the same time.
Using The Network Viewer
Use the PC view software, you can view the DVR through Internet, also, you can view
and backup the video information on PC’s HDD through a computer. And with the right
button of your mouse, you can save a picture, show / hide the watermark.
Open the software; you will see the window below:
Page 26

26
1. Setting
Please click button, you will see the window below. enter the IP address and
click “OK” button.
IP Addre ss: Set the IP of the DVR.
Port: Set the communication port and AV port.
Local rec: setting the path of “.dvr” file which recorded on PC’s HDD.
Video size: Fullsize / Halfsize. Advise to use Fullsize, if the “avi” file that you have
recorded has some problem, it is sure to check here.
Video source: select PAL / NTSC system, please check your local video system that as
same as you have selected. If it is different, there will be some problem appear.
If you want to record the video to “.avi”, please select one item in the “avi code”. If you
don’t select the right one, it will be doesn’t record, the file size will be 0kB.
Note: Different computer has different choice, please to try.
2. Viewer connect
Press bottom, you can see the login box. Inputs the password of your DVR, then
you will be enter. Press again to disconnect the network.
Page 27

27
<Connect success> <Connect fail >
3. Live play
You can select “ ” button to see live picture. Just click this button, pictures will be
show. Any item is changed, please cli ck this bu tto n to m ake active.
4. Playback
Click “Playback” label, net searching window will be appeared. First, you have to
select the HDD of the DVR. Then click “Get record list” or “Get event list” label, if the DVR
has record list, the “select record list” and “select record list” labels will be show. Please see
the figure that followed.
Page 28

28
Double click the record list item and press “ ” button; you will be seeing the
playback video.
The event list operation is the same as record list operation
5. Scandisk
If you connect the HDD that used in the DVR directly to a PC, this function will be used.
Select Scandisk label, scandisk window will be show. Click and select the HDD that
DVR used, then you can play all the video on the HDD. If you want to drag the play label,
please pause it first (repress the play button), then press play button again to play.
<Scandisk Menu>
6. FilePlay
If you want to play the video that backup in your USB device, this function is useful. Press
“FilePlay” button, you can see the below picture, then press the “open” button to select the
video file to play.
7. Saving video from net
1
2
3
4
5
Page 29

29
1. Press this button, you can record the video to your PC’s HDD with “.avi” file system, the
“avi” button on bottom will be turning green. Re-push to stop record. Yo u can see the below
figure.
Click Save to AVI button and determine the file name, the location and channels to
save. Then AVI saving wi ll star t. C lick this button once more will stop saving. If the file you
recorded is 0KB, please disconnect the network, and press button, change another
item in “avi code” to try.
2. Press this button; you can record the video to PC’s HDD, default path is: “C:\DVR\”,
saving path please refer <1. Setting >. The “local” button on bottom will be turning green.
3. Stop to remote the DVR record to the HDD. This button used combined with “4” button.
4. Press this button; you can remote the DVR record to the HDD. Then the “DVR” button
will be turning green. The event was recorded in “Event List”. If you didn’t push this button,
but the “DVR” button turns green, it indicates that somebody control the DVR directly to
record.
5. RS485 control area. If you want to control the high-speed domes form net, please make
sure the “address, baud rate, protocol” are correct first, then double click the channel to full
screen, you can control the high-speed domes as same as remote controller.
Trouble Shooting
Q: I see noting but a blue screen after I turn on DVR?
A: Check the camera input and video output connection on DVR rear panel. If you can’t find
problem with these connections, check whether the camera power cable is firmly
connected, make sure the system format for NTSC and PAL is right.
Page 30

30
Q: Can my desktop PC read the video data on hard disk drive in DVR?
A: Yes, you can use our software to read all video data on hard disk.
Q: What happens if I install my PC hard disk drive into the DVR?
A: you can use a PC hard disk drive in the DVR. However, once it runs in DVR, it will delete
any PC operation system and files on the hard disk drive.
Q: What kind of hard disk drive should I purchase to make the DVR run?
A: Any PC compatible IDE, ATA hard disk drive will work, you have to format it in the DVR
first.
Q: Why can’t I access “Time/Date set, HDD Format set, Record Set menu ”?
A: Please stop record or playing before you access these menus.
Q: Why can’t I access network set menu?
A: Please stop the connection of the PC view soft from Internet before you access net work
set menu.
Q: I push record button, but the DVR doesn’t start recording, why?
A: push display button to see if there is a hard disk detected, also if the DVR is in schedule
mode, you can’t start recording by push record button, you have to push schedule
button again to cancel schedule mode.
Page 31

31
Q: I push stop button, but the DVR doesn’t stop recording, why?
A: If the DVR is recording in schedule mode, you can’t stop recording unless you exit
schedule mode first. Push schedule button to cancel schedule mode.
Q: There is a moment, but the DVR does not start recording?
A: Make sure the motion enable of that channel is on, the area set is ok, the Event REC
time is not set to off, that time of schedule table is enable, and the DVR is in schedule
mode. Otherwise set the motion level to HIGH ORVERY HIGH.
Q: I can control the high speed dome to “Up, Down, Left, Right”, but the “ZOOM” function
failed?
A: Please try to change the high-speed dome’s “protocol, baud rates”, advise to set the
baud rates to 9600.
Q: How did I know the audio of which channel when I playback video?
A: there will be a ”speaker” blinking on the screen, it indicates the audio of which channel.
Q: why is the play speed so slowly when I playback video?
A: please check the record speed and playback speed are same or not, if you don’t know
how to do, please select “MENU
RECORD SET
PB SPEED:(DON’T USE)”
Q: why can’t I playback the video that blue or gray (different with background)? (See the
figure blow)
Page 32

32
A: If you select overwrite the HDD, when it is full, it will be overwrite some events. These
events that have been overwritten were in blue or gray. It just indicates which event has
been overwritten.
Reference Time to Recording
HDD: 160GB (MAXTOR), PAL system. (test of recording time, just for reference!)
Frame rate Quality TIME
100 F/S Very high About 35H
100 F/S Very low About 55H
50 F/S Very high About 52H
50 F/S Very low About 81H
25 F/S Very high About 113H
25 F/S Very low About 213H
Specification:
Compression Method M-JPEG
Video Out BNC X2 (COMPOSITE)
Video Input BNC X4 (COMPOSITE)
PAL: 2 5X4= 100 fps
Display Frame Rate
NTSC: 30X4=120 fps
PAL: u p to 1 00 fps
Recording Frame Rate
NTSC: up to 120 fps
PAL: 7 20 X 288
Display Resolution
NTSC: 720 X 240
Record Resolution
PAL: 7 20 X 288 o r 360 X 288
Page 33

33
NTSC: 720 X 240 or 360 X 240
Triplex Live/PB, recording during Playback
Sensor Input 4CH Enable (NO/NC)
Alarm Out 1CH (NO/NC,2A 28VDC / 2A 125VAC)
Audio Input
RCA X 4
Audio Output
1CH (200HZ~4KHZ)
Display Mode
QUAD, PIP, Zoom, Freeze
Recording Mode
Manual / Event / Alarm / Motion / Network
Motion Detect
5 Level sensitivity control
Network interface
RJ45; TCP/IP Protocol
PTZ Control
RS485 interface
Update
Though the USB
Exterior size
430mmX295mmX65mm
Power Supply
12VDC/5A
Safety precautions:
Disconnect the product from mains and other equipment if a problem should occur. Do not
expose the product to water or moisture.
Warranty:
No guarantee or liability can be accepted for any changes and modifications of the product or
damage caused due to incorrect use of this product.
General:
Designs and specifications are subject to change without notice.
All logos brands and product names are trademarks or registered trademarks of their respective
holders and are hereby recognized as such.
Attention:
This product is marked with this symbol. It means that used electrical and electronic
products should not be mixed with general household waste. There is a separate
collections system for these products.
Copyright ©
 Loading...