

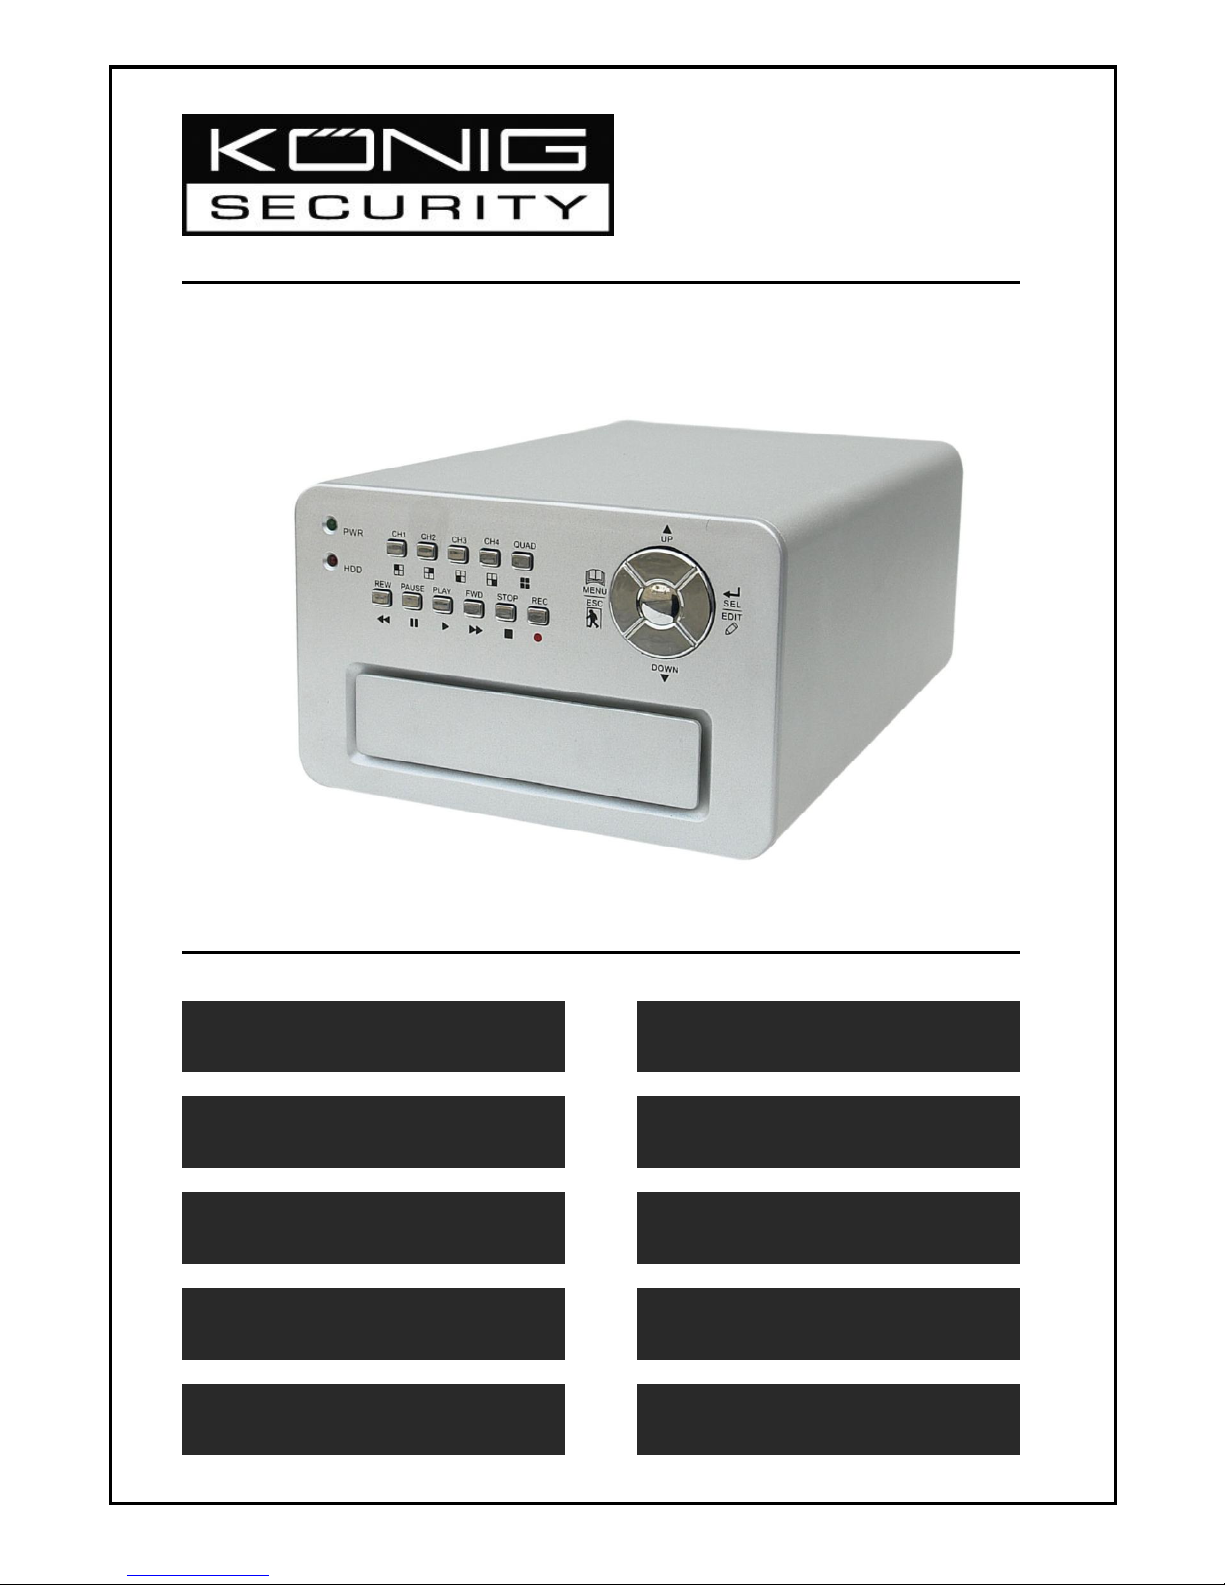
SEC-DVR200
4CH HARDDISK
RECORDER
MANUAL
ANLEITUNG
MODE D’EMPLOI
GEBRUIKSAANWIJZING
MANUALE
MANUAL DE USO
HASZNÁLATI ÚTMUTATÓ
KÄYTTÖOHJE
BRUKSANVISNING
NÁVOD K POUŽITÍ

1
Installing harddisk:
1. Remove the cover by unscrewing the 4 screws at the bottom of the
recorder.
2. Connect the power cord and data cable to harddisk. Use supplied
screws to fix the harddisk to the chassis the recorder.
3. Replace the cover.
English Deutsch Français Nederlands
Italiano Español Magyar Suomi Svenska Česky

2
Connections:
1. Connect the video output of the recorder to the input of a monitor or
TV.
2. Connect the cameras to the video input of the recorder.
3. Connect the AC/DC adapter to the 12V connection of the recorder.
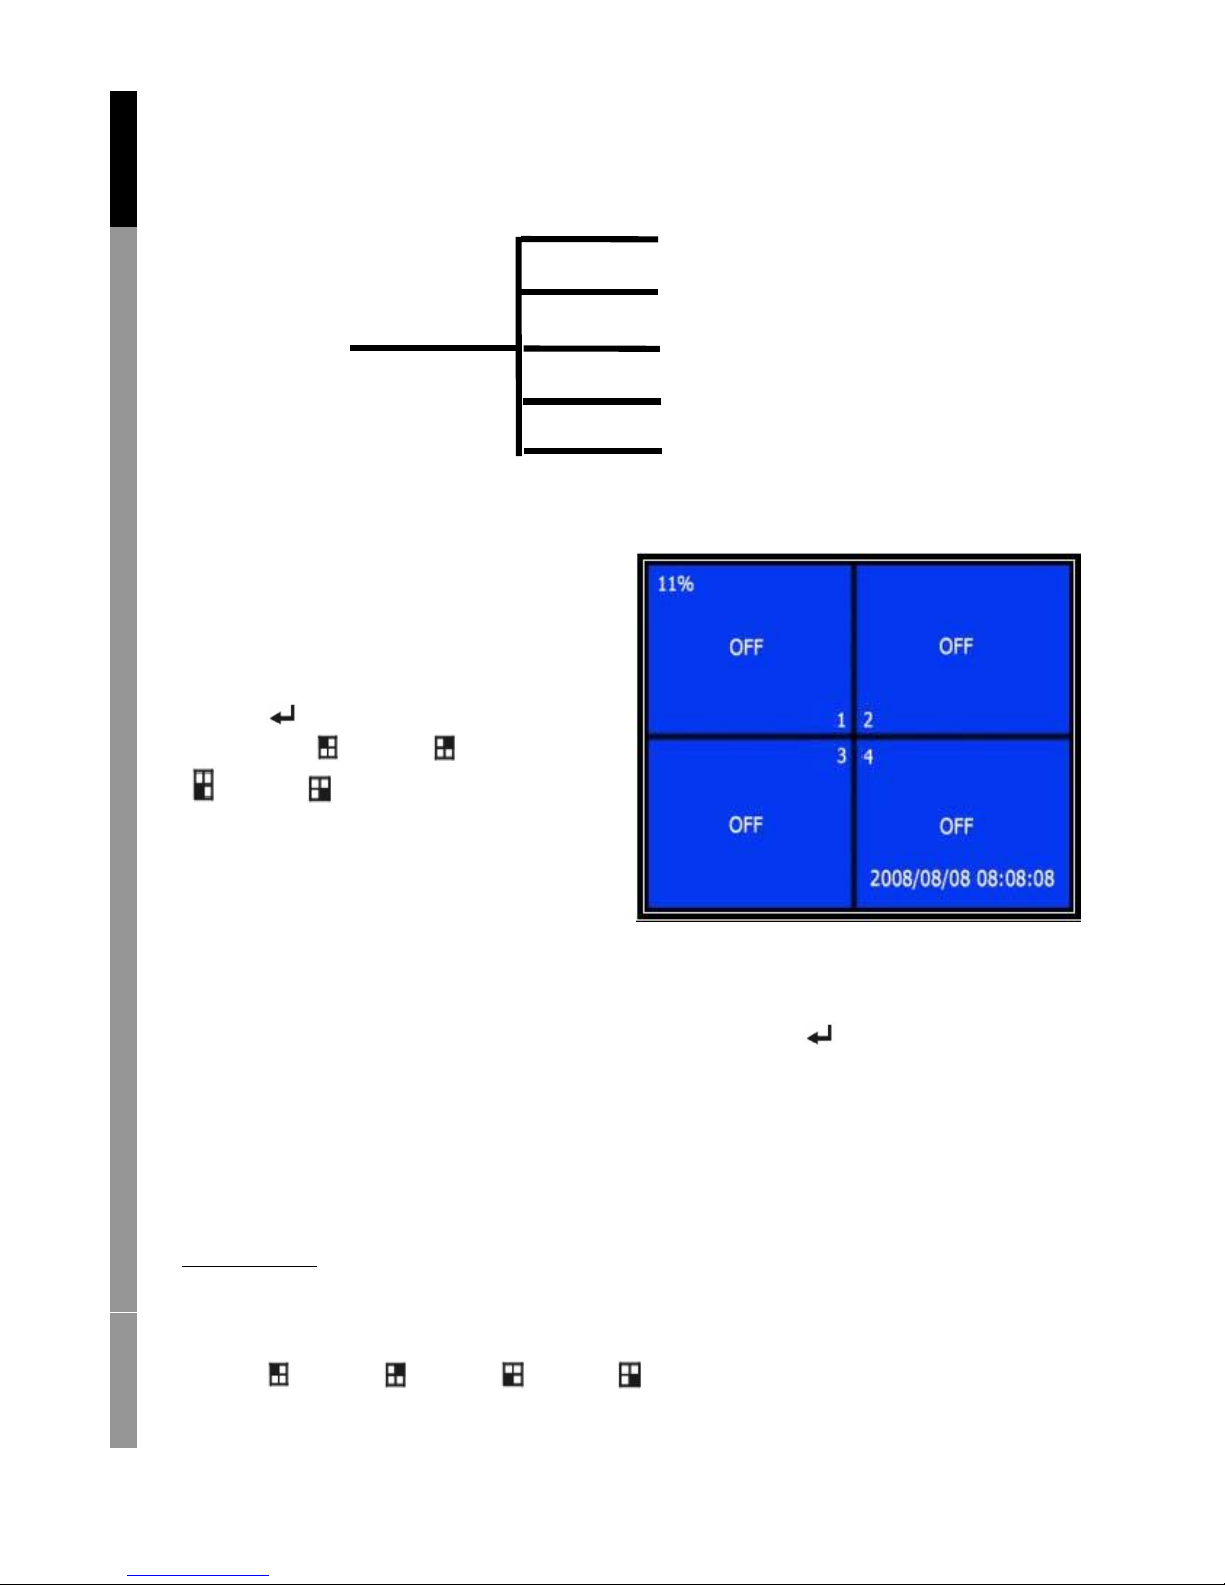
Operation:
1. After connecting the AC/DC
adapter the recorder turns on
automatically. The recorder will
boot-up and detect installed
harddisk. Monitor will show Master
and Slave harddisk information.
Refer to harddisk manual for
configuration of harddisk.
(Master or Slave)
2. After HDD checking the following
screen appears.
System information:
Upper left ratio of harddisk space used.
Middle channel name
(CH1~CH4)
Bottom right function status,
date and time
English Deutsch Français Nederlands
Italiano Español Magyar Suomi Svenska Česky
HDD Checking………..
10%

3
Recorder setup:
Press “ Menu” into setup menu, use “ Up” and “ Down” to select
item, press “ Select” to modify setting and “ Menu” to confirm and
exit.
English Deutsch Français Nederlands
Italiano Español Magyar Suomi Svenska Česky
MAIN MENU
CAMERA SELECT 1234
SUB MENU
HARD DISK SETUP
MOTION SETUP
RESTORE FACTORY DEFAULT
PRESS(UP,DOWN). THEN(SELECT)
PRESS(MENU) TO EXIT
4
Overview menu:
Camera Select
Record Select
Record Mode
Record Frame Rate
Video Quality
Record Schedule
Sub Menu
Hard Drive Setup
Motion Setup
Restore Factory Default
Camera select:
The recorder can display 4 cameras
in one picture (Quad Mode).
Configure which camera to display:
Press “ Select” to modify setting
and press “ CH1”, “ CH2”,
“ CH3”, “ CH4” to set each
channel separately. If no channel
is open, the recorder will
display “OFF”.
Record select:
Select which camera(s) need to be recorded. Press “ Select” until
desired selection is established.
Record mode:
There are two methods of recording
Each Mode
Record each channel separately, therefore it’s possible to enlarge single
channel to full screen display. For example, turn off record function of
CH-1 and CH-2 and then the recorder only record CH3 and CH4.
Press “ CH1”, “ CH2”, “ CH3”, “ CH4” to choose channel to
display when playback after recording.
English Deutsch Français Nederlands
Italiano Español Magyar Suomi Svenska Česky
Auto Record
Password Setup
Password Change
Picture Setup
Time Setup

5
In this mode, when the recorder is in watching or recording mode, press
“QUAD” button over 3 seconds to make each channel video enlarge to
full screen and then display in quad mode in sequence again and again.
The recorder will not change its status until a key is pressed.
Quad Mode
Record all 4 channel video in quad mode. Therefore it’s not possible to
enlarge single channel to full screen. The use each mode during quad
mode is not possible.
Record frame rate:
Record frame rate will affect the movement of object. More frames
means more smooth movement but needs more space on the hard disk.
System default value is 25 fps, that means system will record 25 frame
per second. The recorder can set to 25, 12, 8, 6, 4, 3, 2, 1 frames per
second.
Video quality:
There are three levels of record quality, High, Normal and Low. Higher
quality cost more harddisk space. Record frame rate, record quality and
will affect total record time of the recorder.
Estimate record time based on 120GB HDD in Quad Mode per hour
Record schedule:
The recorder can be set to recording by time schedule or by motion
detection.
Format Quality Frame Rate 25 12 6 1
HIGH 20 70 146 291 1748
NORMAL 15 93 194 388 2330
PAL
LOW 12 117 243 485 2913
English Deutsch Français Nederlands
Italiano Español Magyar Suomi Svenska Česky

6
“-” = No record
“T” = Continue (system default)
“A” = Motion triggered
Up = Move the cursor
Down = Move the cursor
Select = Select method
Sub menu/auto record:
“ON”: the recorder will start to record automatically if the recorder has
not been operated in five minutes.
“OFF”: the recorder will not record until the “RECORD” button is pressed.
Sub menu/password setup:
When password set is to “ON”, stop recording or enter menu will need
password input.
When password is set to “OFF”, all functions are direct available.
English Deutsch Français Nederlands
Italiano Español Magyar Suomi Svenska Česky
RECORD SCHEDULE
>TTTAAATTTTTTAAAATT<
│ │ │ │ │ │ │ │ │
0 3 6 9 12 15 18 21 24
PRESS(UP,DOWN). THEN(SELECT)
PRESS(MENU) TO EXIT

7
Sub menu/password change:
System default password: press six times “ CH1” button.
All keys can be used as password key except “ Menu” key, which is
used for confirming and exit.
Sub menu/picture setup:
Set every channel with the
desired settings
HUE: 0-99
SATURATION: 0-99
CONTRAST: 0-99
BRIGHTNESS: 0-99
Button function:
Up/ Down: move the cursor
FWD: reduce value
CH1-CH4, QUAD: select channel
Menu: exit
English Deutsch Français Nederlands
Italiano Español Magyar Suomi Svenska Česky
CURRENT PASSWORD :……
NEW PASSWORD :……
CONFIRM PASSWORD :……

8
Sub menu/time setup:
Press Up and Down to move the cursor and press Select to
modify. Press Menu to save and exit.
Hard drive set-up:
TIME SETUP
∨
2008/01/18 08:30:00
PRESS(UP,DOWN), THEN(SELECT)
PRESS(MENU) TO EXIT
English Deutsch Français Nederlands
Italiano Español Magyar Suomi Svenska Česky
HARD DISK SETUP
>OVERWRITE ENABLED [YES]
HDD SIZE 120042MB
HDD USED 80865MB 77%
HDD FORMAT
PRESS(UP,DOWN), THEN(SELECT)
PRESS(MENU) TO EXIT

9
OVERWRITE ENABLED:
YES, continues recording and overwrite previous recording when hard
disk is full.
NO, the recording session stops when hard disk is full.
HDD SIZE:
It shows the size of the primary hard disk installed in the recorder.
HDD USED:
It shows the space used on the first hard disk drive for recording and the
percent of the used hard disk.
HDD FORMAT:
Format the hard disk will erase all the data recorded on the hard disk.
Note: when using the hard disk for the first time in the recorder, please
use this function to format the HDD.
Motion setup:
English Deutsch Français Nederlands
Italiano Español Magyar Suomi Svenska Česky
MOTION SETUP
MOTION RECORD DURATION 5
MOTION ALARM DURATION OFF
MOTION DETECTION SETUP
PRESS(UP,DOWN), THEN(SELECT)
PRESS(MENU) TO EXIT

10
MOTION RECORD DURATION:
The number indicates how long motioned recording lasts after the
movements in front of the camera.
MOTION ALARM DURATION:
The number indicates how long motioned display on the screen
“MOTION”.
MOTION DETECTION SETUP:
First setup video record method by Motion Triggered. See record
schedule.
CHANNEL 1- 4 SENSITIVITY:
Press “ Select” to adjust sensitivity grade of motion detection.
High (1----------9, OFF), Low. When it’s off, the channel can not be
triggered by movement.
CHANNEL 1- 4 AREA SET:
Press “ Select” to enter area setting state, the picture of selected
channel is divided into 144 (12*12) blocks. Then press “REW” to move
left, press “FWD” to move right, press “UP” to move up, press
“DOWN” to move down, press “ Select” to set the block is active or not.
When the block is transparent, it’s active to record, when the block is
covered by shadow, it will not activate recording if motion is triggered.
English Deutsch Français Nederlands
Italiano Español Magyar Suomi Svenska Česky
>
MOTION DETECTION SETUP
CHANNEL 1 SENSITIVITY 4
CHANNEL 2 SENSITIVITY 4
CHANNEL 3 SENSITIVITY 4
CHANNEL 4 SENSITIVITY 4
CHANNEL 1 AREA SET
CHANNEL 2 AREA SET
CHANNEL 3 AREA SET
CHANNEL 4 AREA SET
PRESS(UP,DOWN), THEN(SELECT)
PRESS(MENU) TO EXIT

11
Restore factory default:
Press EDIT button to set factory settings.
Note: pressing the EDIT button will immediately restore all settings.
PAL/NTSC setting:
Set the jumper on the PCB to PAL or NTSC
Recording:
Press “Record” to start recording. The recorder will display information
on screen.
Note:
English Deutsch Français Nederlands
Italiano Español Magyar Suomi Svenska Česky
When the data has been overwriting, there will be a star
sign behind Date/Time.
NTSC/PAL
Select

12
On screen information:
1. Hard Disk Usage Ration
2. Recording Symbol
3. Channel Names
4. Mode: (QUAD or EACH)
5. Status: (REC, Play, FF1, FF2, FF3, REW, PAUSE)
6. Harddisk Info: ([M] Master disk [S] Slave disk)
7. Record Schedule: (T) Continuous (A) Motion (-) No Record
8. The time and date.
English Deutsch Français Nederlands
Italiano Español Magyar Suomi Svenska Česky

13
Stop recording:
Press “Stop” and the recorder will ask for the password (if password is
enabled)
Playback:
Press Play, the recorder will playback the last recorded data that
hasn’t been playback yet.
Press Menu, the recorder will list all recorded files. Last recorded file
will be at top of the list, press “ Move Up” and “ Move Down” to select
start time and press “ Play” again to start playing the file.
1. Start time
2. End time
3. Time: continued recording
4. Motion: recording by motion detection
5. Force: force record
6. * file not played yet
Another way to search video is directly input time period. Press “
Forward” and then press “ Up” and “ Down” the cursor. Press “
Select” to edit time value and press “ Play” to play video.
English Deutsch Français Nederlands
Italiano Español Magyar Suomi Svenska Česky
50%
SEARCH TIME
07/01/10 15:30:20 -07/01/10 15:30:25
01 TIME
02 TIME
03 MOTION
04 MOTION
05 MOTION
06 FORCE
07 FORCE
(UP,DOWN) MOVE (PLAY)PLAY (MENU) EXIT
(FF) SELECT MODE (SELECT) CHANGE
2007/01/10 15:30:20
1
2
3
>
2007/01/10 15:30:20
2007/01/10 15:30:19
2007/01/10 15:29:55
2007/01/10 15:28:49
2007/01/10 15:28:35
2007/01/10 15:25:55
2007/01/10 15:19:25
4
*
5
6
2007 /0 1 / 0 8 08 : 30 : 32 --- 2007/0 1 / 0 8 16 : 00 : 05
∨

14
Recover lost data:
Power error will cause data lost and the recorder will ask for ‘recover
data’ please press “ Select” to proceed.
Restore recording process:
When power error happen during recording process, system will
automatically restore recording process after power reconnected.
Specifications:
ITEM DESCRIPTION NOTE
Video Format NTSC / PAL
Operation System None STAND-ALONE
Camera Input Channel 4 channel Composite BNC
Video Output Channel 1channel Composite BNC
NTSC 120 frames/second 4 x 30 frames/second
Display Frame Rate
PAL 100 frames /second 4 x 25 frames/second
NTSC Max 30 fps (Quad) Quad Mode
Recording Frame
Rate
(Quad)
PAL Max.25 fps (Quad) Quad Mode
NTSC
Each Channel =
30 ÷ Number of Source
Max. 30 frames/s
(Each Channel)
Recording Frame
Rate
(Each Mode)
PAL
Each Channel =
25 fps ÷ Number of Source
Max. 25 frames/s
(Each Channel)
Record Mode Continuous, Time Schedule, Motion Triggered.
Display
NTSC:720 x 480
PAL :720 x 576
Resolution
Record
NTSC:320 x 112, 640 x 224
PAL :320 x 136, 640 x 272
Quad :640 x 224
(total)
Each :640 x 224
Video Compression Format
(Each Channel)
Modified Motion-JPEG
(12-20K bytes/frame)
Low : 12K Byte
Normal : 15K Byte
High : 20K Byte
HDD Support
300G Byte (Seagate recommended)
ATA -100 Interface
Estimated Record Length
120G Hard disk @ 7 fame per second @ Normal Quality
(120*1024*1024 K byte) ÷ ( 7*15*60*60 ) = 332 Hours
Method
Time、Date、Event
Search
Full
Screen
YES
Dimension ( D x W x H ) 215mm * 132mm * 80mm
English Deutsch Français Nederlands
Italiano Español Magyar Suomi Svenska Česky

15
Safety precautions:
To reduce risk of electric shock, this product should ONLY be opened by
an authorized technician when service is required. Disconnect the
product from mains and other equipment if a problem should occur. Do
not expose the product to water or moisture.
Warranty:
No guarantee or liability can be accepted for any changes and
modifications of the product or damage caused due to incorrect use of
this product.
General:
Designs and specifications are subject to change without notice.
All logos brands and product names are trademarks or registered
trademarks of their respective holders and are hereby recognized as
such.
Attention:
This product is marked with this symbol. It means that used
electrical and electronic products should not be mixed with
general household waste. There is a separate collections
system for these products.
Copyright ©
English Deutsch Français Nederlands
Italiano Español Magyar Suomi Svenska Česky
 Loading...