

Page 1
MANUAL
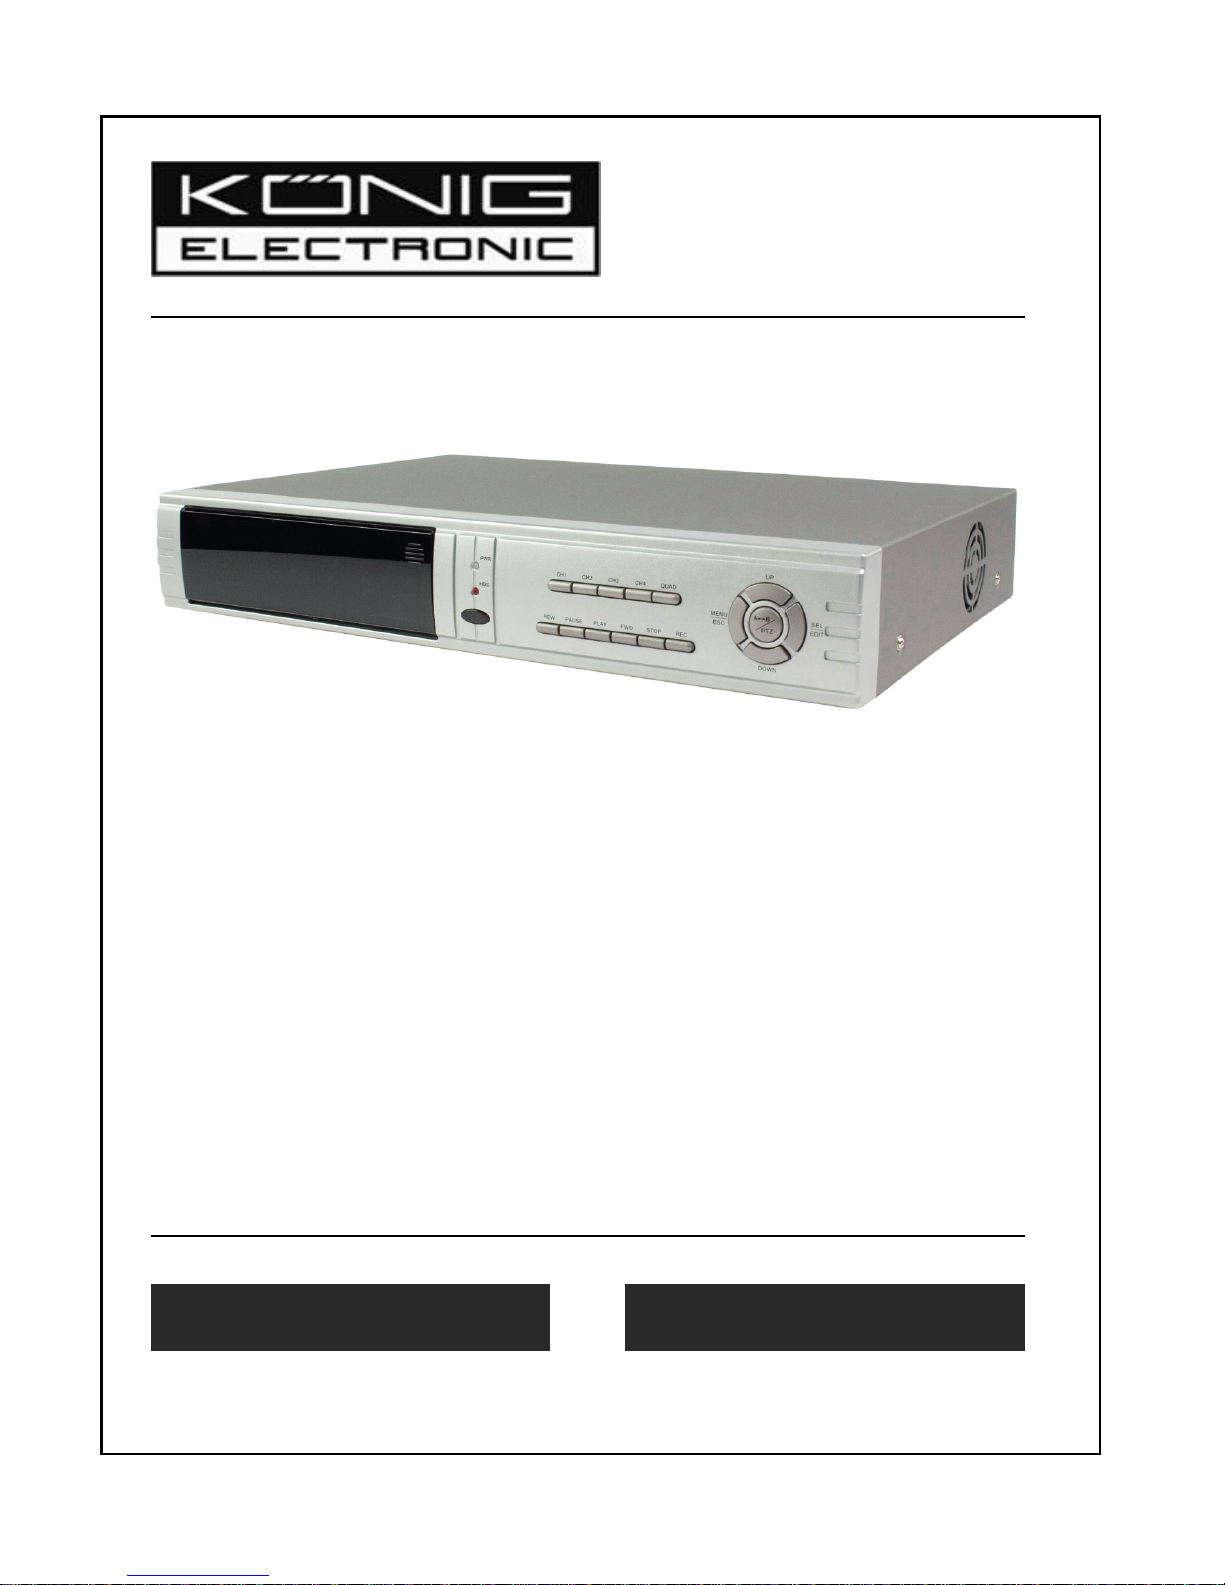
8CH (Two Page) DVR
GEBRUIKSAANWIJZING
8-Kanaals (Twee Pagina 's) DVR
SEC-DVR20
Page 2

2
ENGLISH
Directory
Ⅰ. DVR Feature............................................................................................................3
Ⅱ. Outlook....................................................................................................................3
2.1. Front Panel...................................................................................................................................3
2.2. Rear Panel....................................................................................................................................4
2.3. Remote Controller .......................................................................................................................4
2.4. Removable HDD Box Introduction.............................................................................................5
Ⅲ. DVR Installation......................................................................................................6
3.1. Install Hard Disk...........................................................................................................................6
3.2. Connect Camera and Monitor ....................................................................................................7
3.3. Connect Power Cord...................................................................................................................7
Ⅳ. DVR System Boot...................................................................................................7
4.1. Detect installed Hard Disk..........................................................................................................7
4.2. Recover Lost Data....................................... .... ........ ... .... .... .... ... .... .... .... ... ........ .... ... .... .. ..............7
4.3. Restore Recording Process ................................................................................ ... .... ........ ........8
4.4. Main Screen..................................................................................................................................9
Ⅴ. DVR Setup.............................................................................................................10
5.1. Setup Menu ................................................................................................................................10
5.2. Camera Select............................................................................................................................11
5.3. Record Select.............................................................................................................................11
5.4. Record Mode..............................................................................................................................11
5.5. Record Frame Rate....................................................................................................................11
5.6. Record Quality...........................................................................................................................11
5.7. Record Schedule .......................................................................................................................11
5.8. Sub Menu-Password Change........................... .... ... .... .... .... ... .... .... ....... .... .... .... ... .... .... .... .... ..12
5.9. Sub Menu-Ti me set................................... .... .... .... ... .... .... ....... .... .... .... ... .... .... .... .... ....... .... .... ..13
5.10. Sub Menu-Motion set........................................................................................................ ......13
5.11. Sub Menu-Password Set ..................................................... ....... .... .... ... .... .... .... .... ... ........ .... ..13
5.12. Sub Menu-Buzzer time............................................................................................................14
5.13. Hard Drive Setup........................................................................................................................14
5.14. Sensor Setup..............................................................................................................................15
5.15. NTSC/PAL Output Select...........................................................................................................16
Ⅵ. Record...................................................................................................................16
6.1. Start Recording............................................................................................................ ..............16
6.2. Stop Recording..........................................................................................................................17
6.3. Recording Length......................................................................................................................17
Ⅶ. Playback................................................................................................................18
Ⅷ. A/B Page Switch...................................................................................................19
8.1. Introduction................................................................................................................................19
8.2. Switch Function.........................................................................................................................19
IX. Specification.........................................................................................................20
Page 3
3
I.
DVR Feature
z 8 Channel BNC Camera Input
z 2 Channel BNC Monitor / VCR Output
z A / B Page Switch Function
z NTSC / PAL
z Video Loss Alarm
z Motion Detection
z 4 Sets NO / NC Sensor Input
z 1 Alarm Output (2A 28VDC / 2A 125 VAC)
z One ATA-100 Hard Disk Interface, Support Over 200G Byte
z Removable HDD Box
z Time Schedule record/Sensor Triggered Record/Motion Triggered Record
II. Outlook
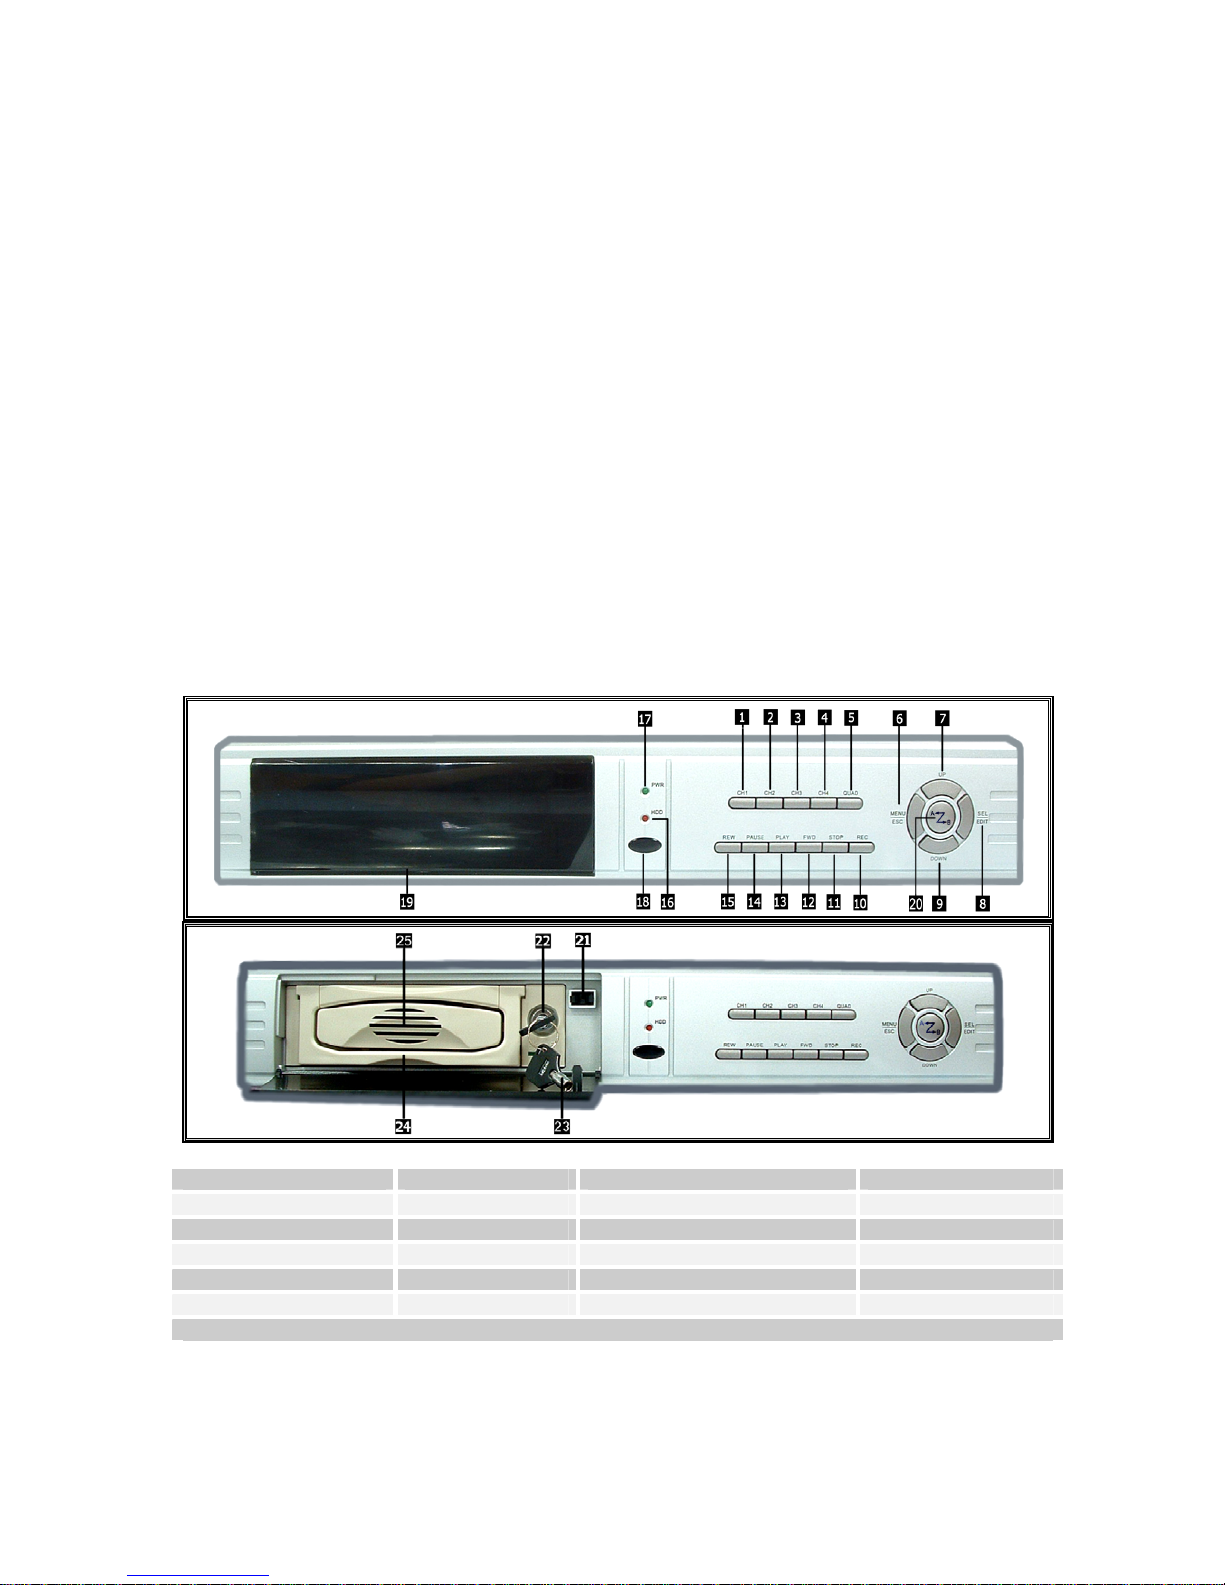
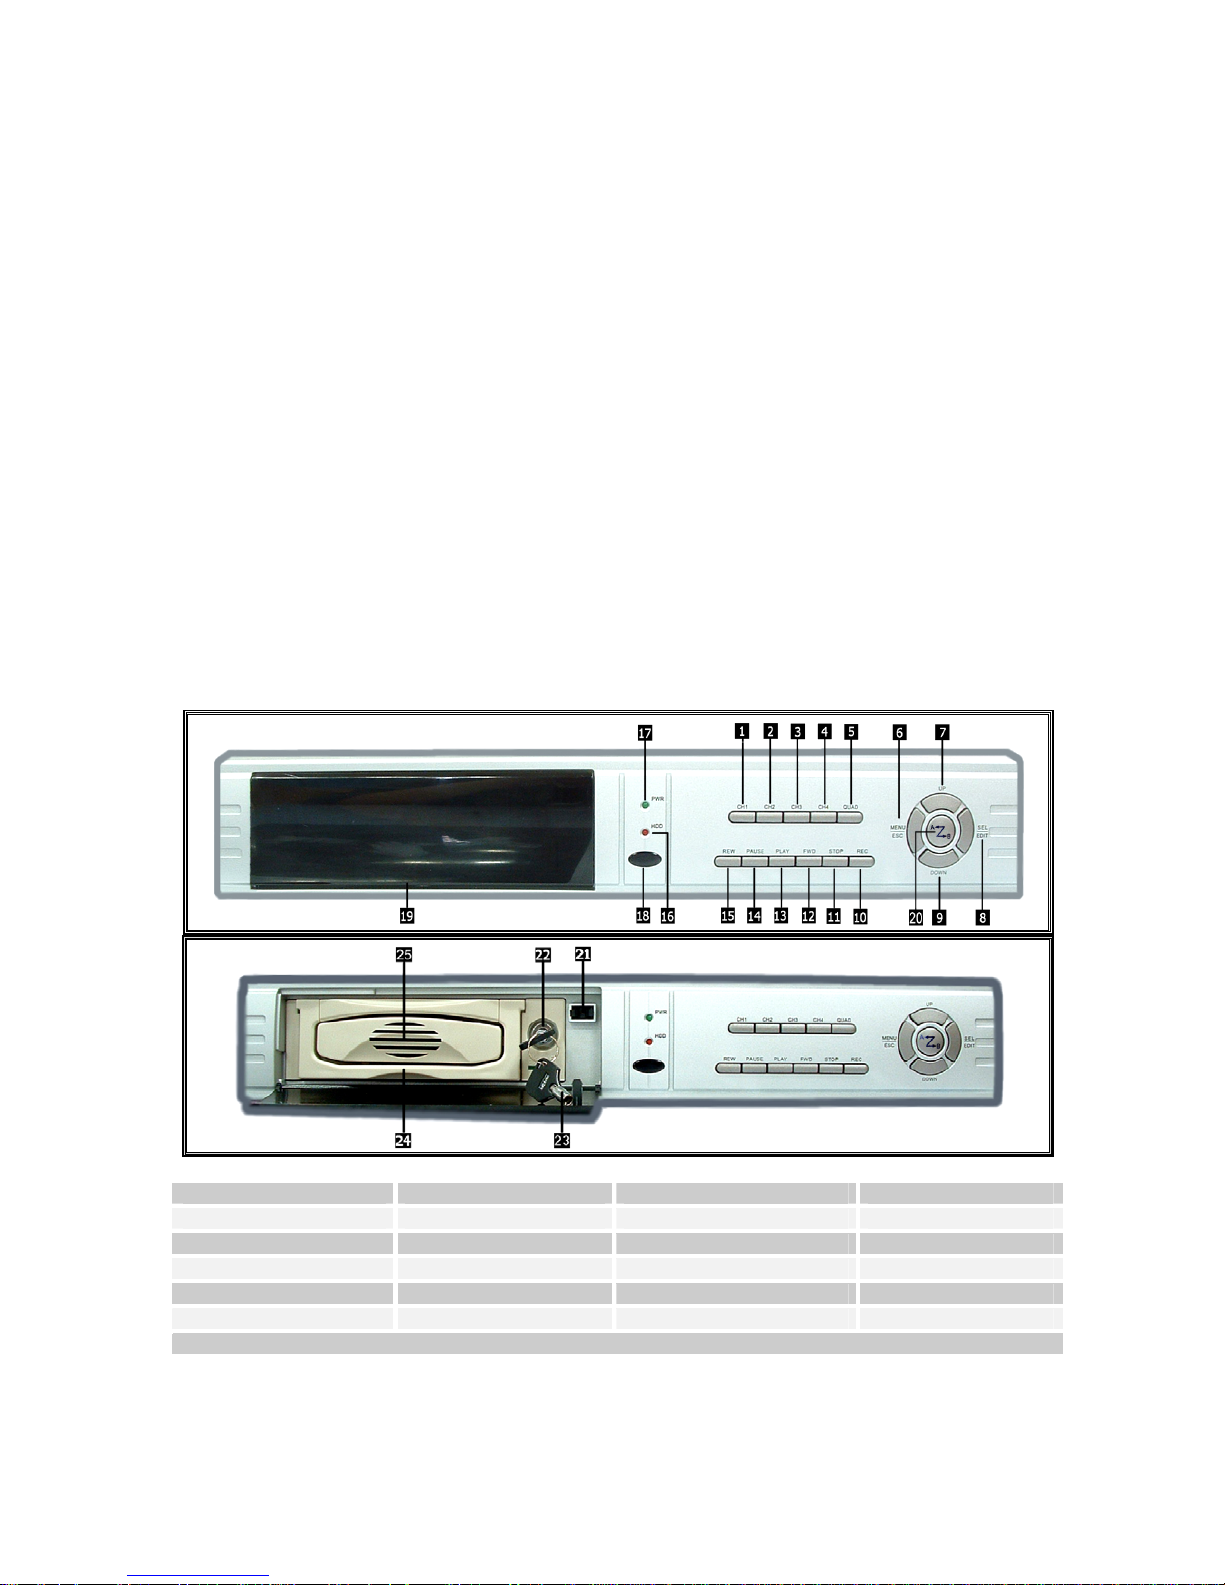
2.1 Front Panel
1 Channel 1 7 Move up 13 Play 19 Swap HDD
2 Channel 2 8 Select /Edit 14 Pause 21 Press-button
3 Channel 3 9 Move Down 15 Rewind 22 Key Locker
4 Channel 4 10 Record 16 HDD Access Indicator 23 Key
5 Quad View 11 Stop 17 Power Indicator 24 Active-handle
6 Menu /Exit 12 Forward 18 IR Window 25 Radiator
20 Enter/Exit the switchable state
Page 4
4
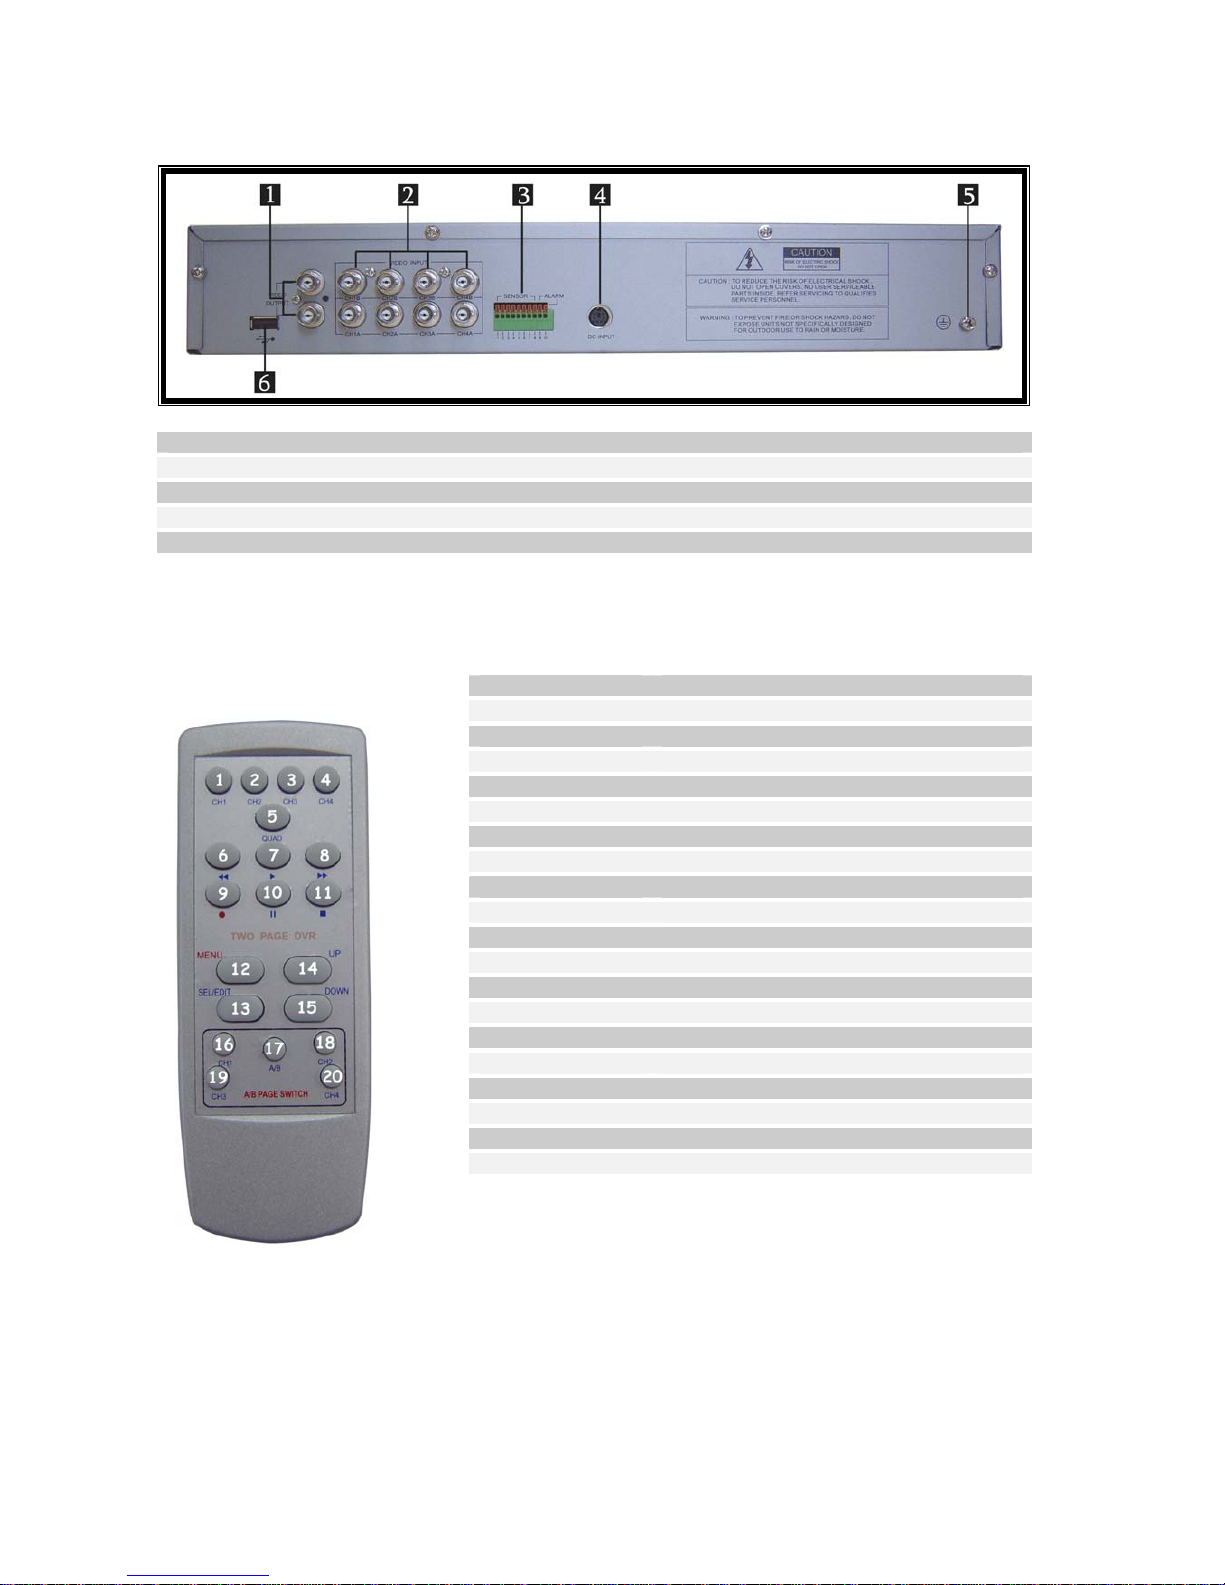
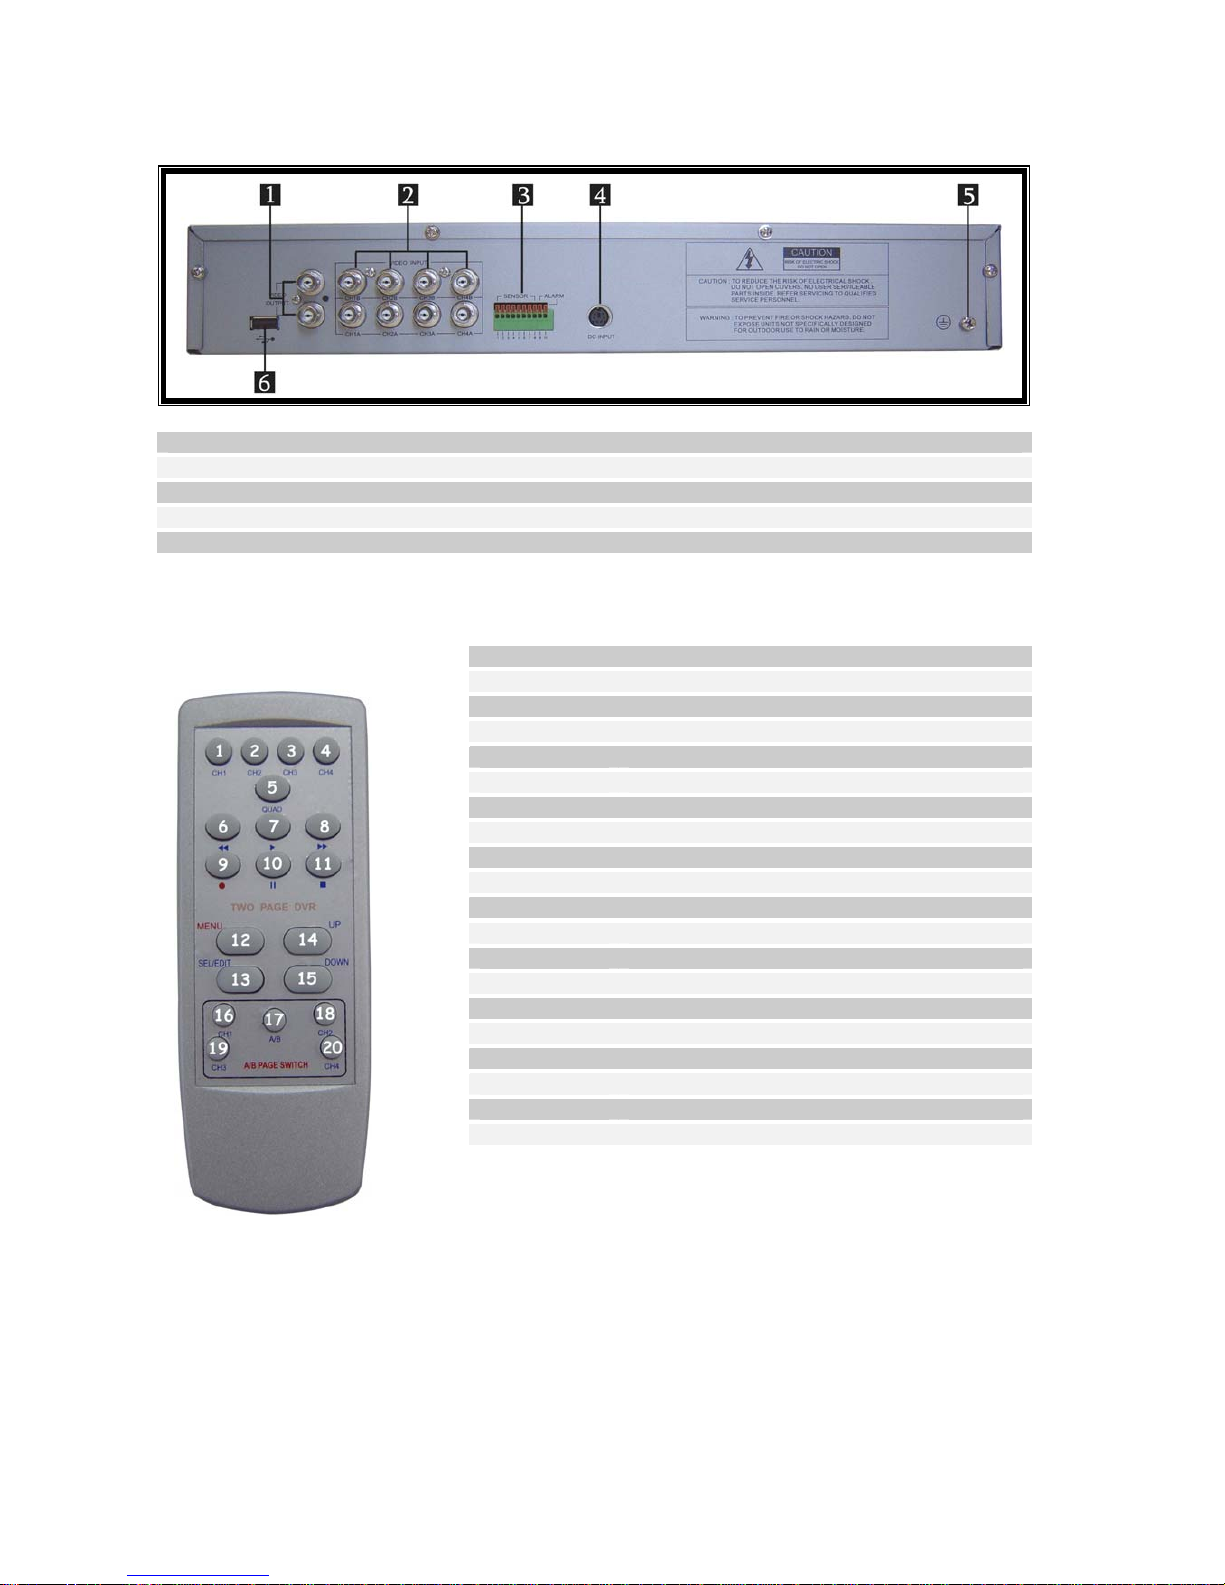
2.2 Rear Panel
1. Video Output
2. Video Input
3. Sensor Input/Alarm Output
4. DC Power
5. Grounding
2.3 Remote Controller
1.CH1 Select or enlarge CH1
2.CH2 Select or enlarge CH2
3.CH3 Select or enlarge CH3
4.CH4 Select or enlarge CH4
5.QUAD Quad View
6.REW Rewind
7.PLAY Play record list
8.FWD Forward
9.RECORD Record
10.PAUSE Pause
11.STOP Stop recording or playing
12.MENU Enter or exit setup menu
13.Sel/Edit Modify item
14.UP Move up
15.DOWN Move down
16.CH1 Switch between CH1A and CH1 B
17.A / B Switch between Quad1 and Quad2
18.CH2 Switch between CH2A and CH2 B
19.CH3 Switch between CH3A and CH3 B
20.CH4 Switch between CH4A and CH4 B
Page 5
5
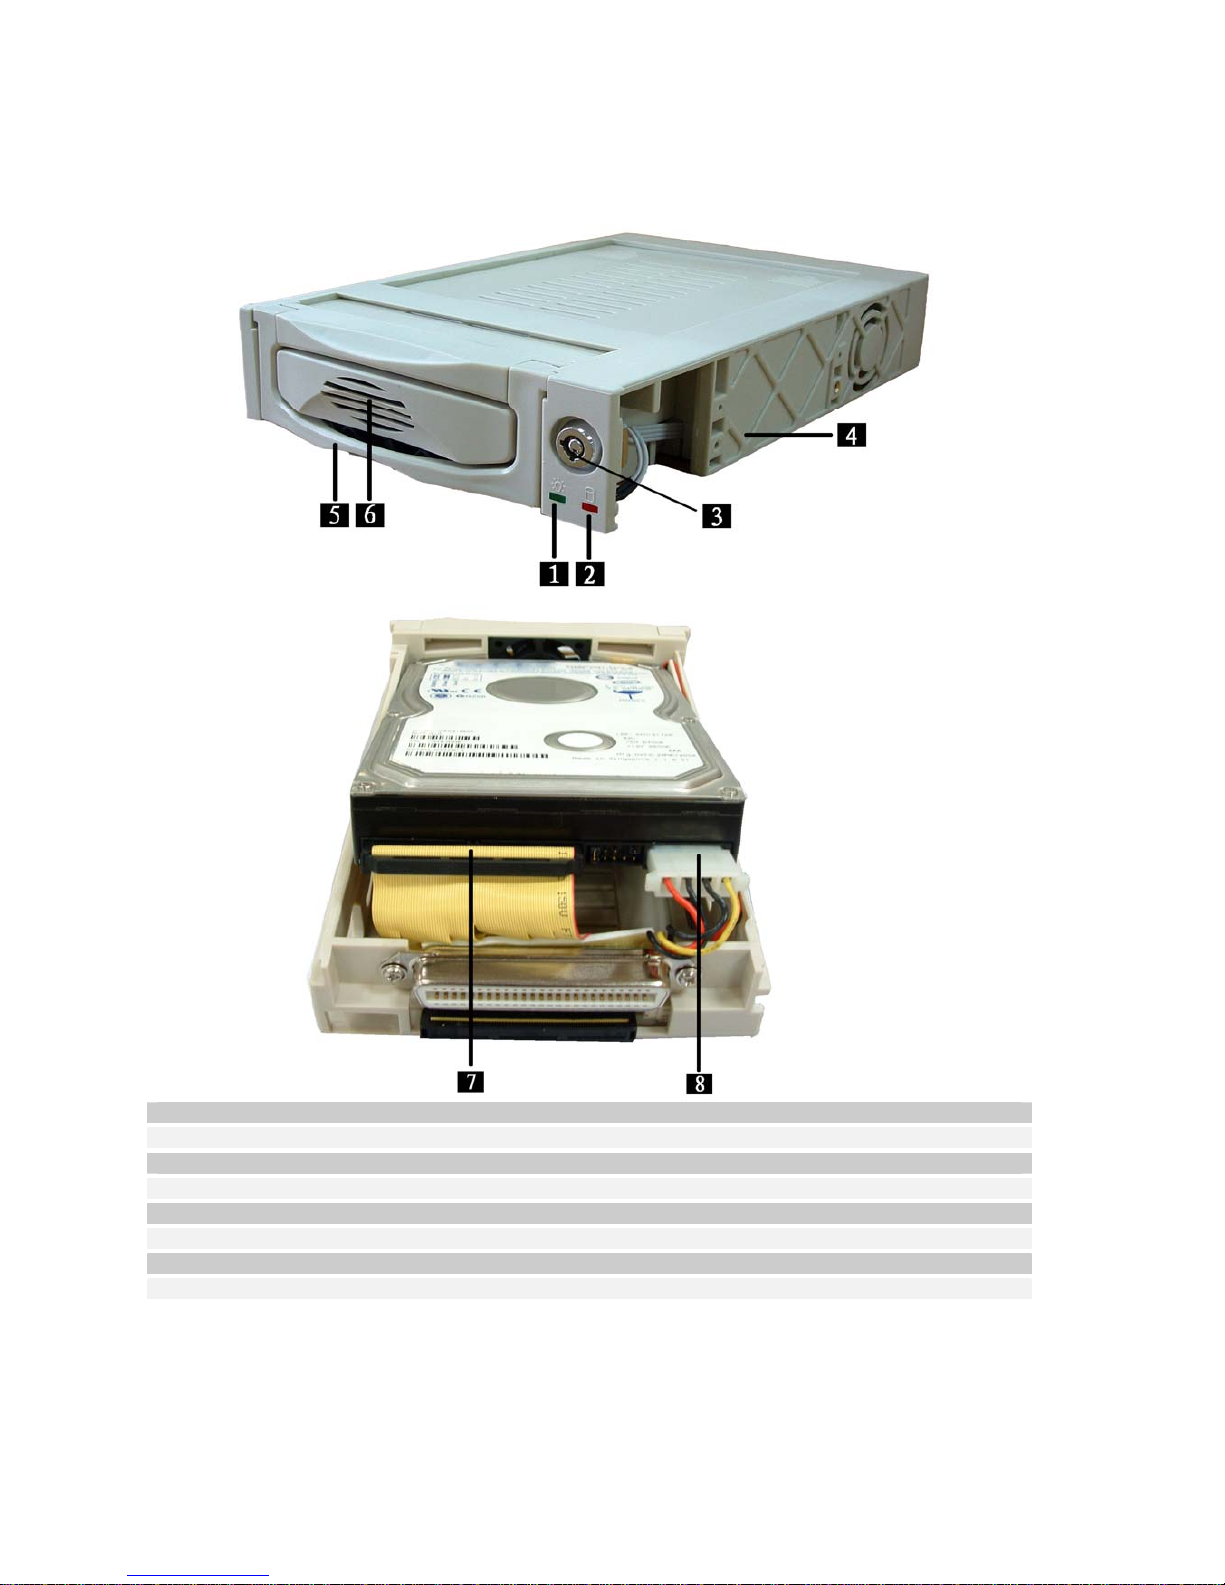
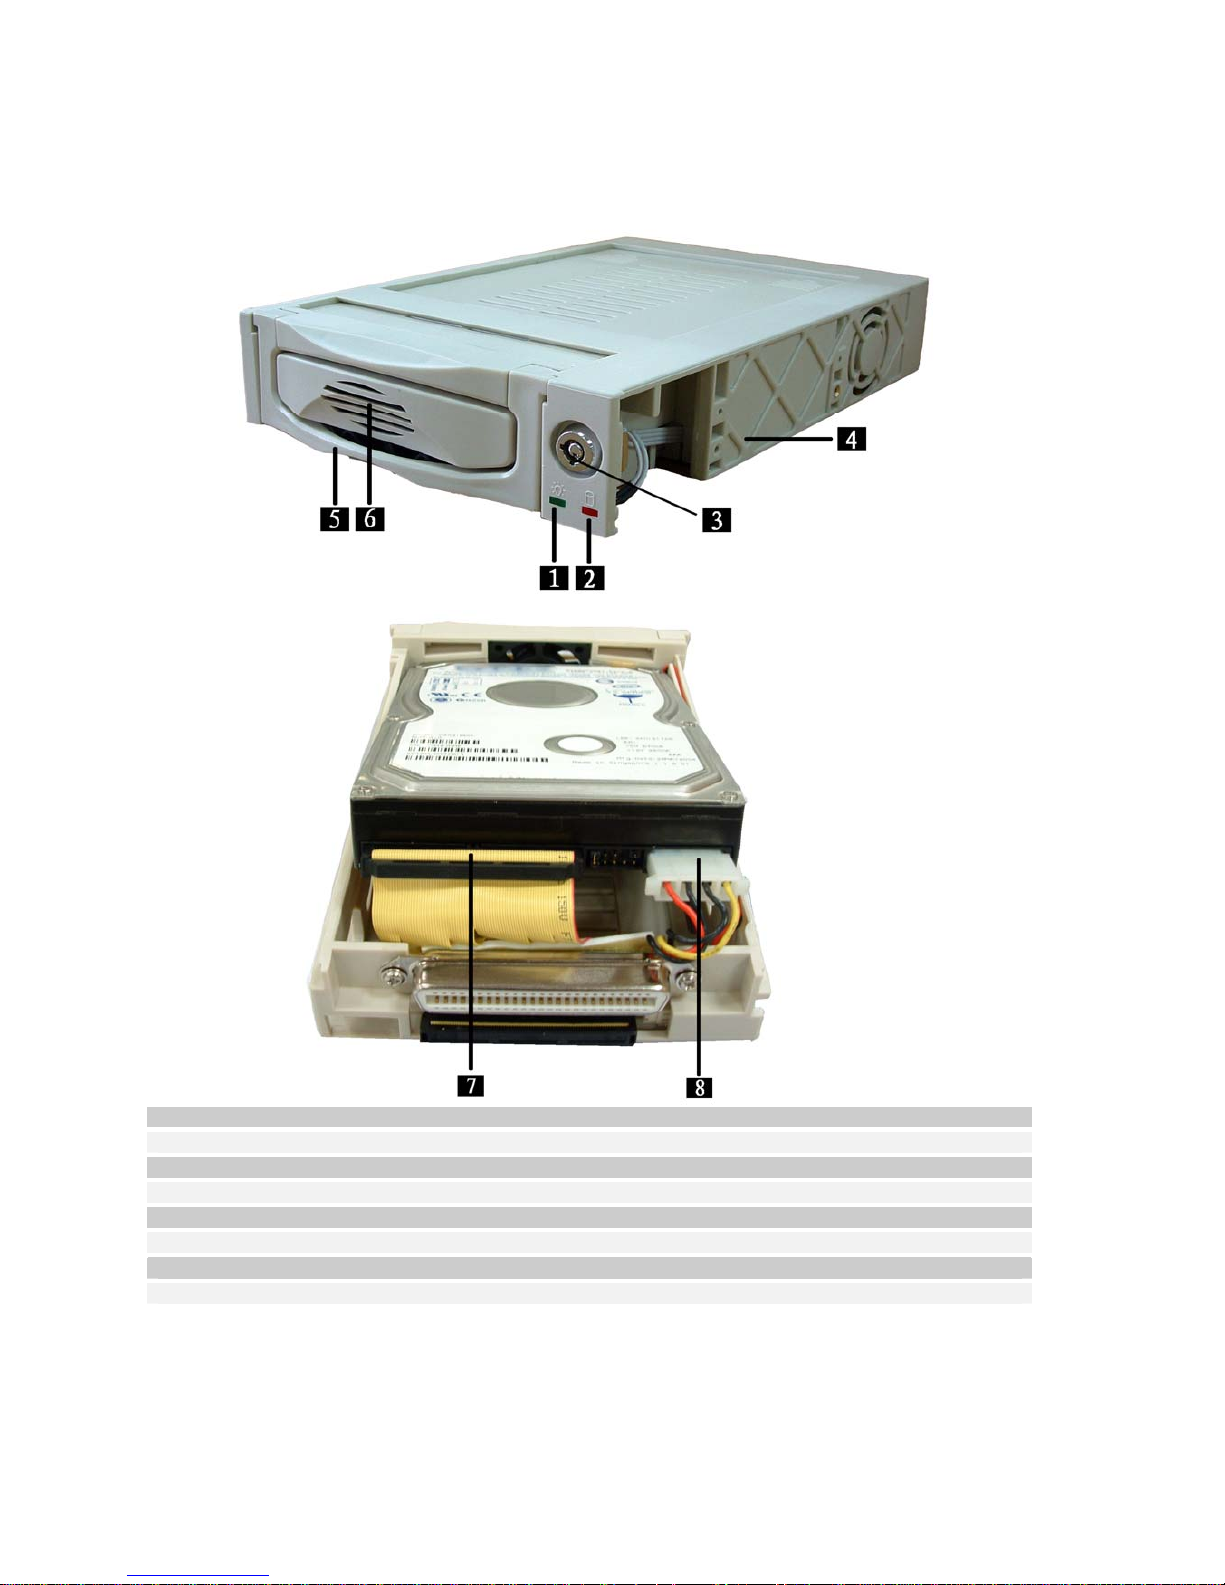
2.4 Removable HDD Box Introduction
1 .Power Indicator
2 .HDD Access Indicator
3 .Key Lock
4 .PVC Frame
5 .Active-handle
6 .Radiator
7 .HDD data cable
8 .HDD power cable
Page 6
6
III. DVR Installation
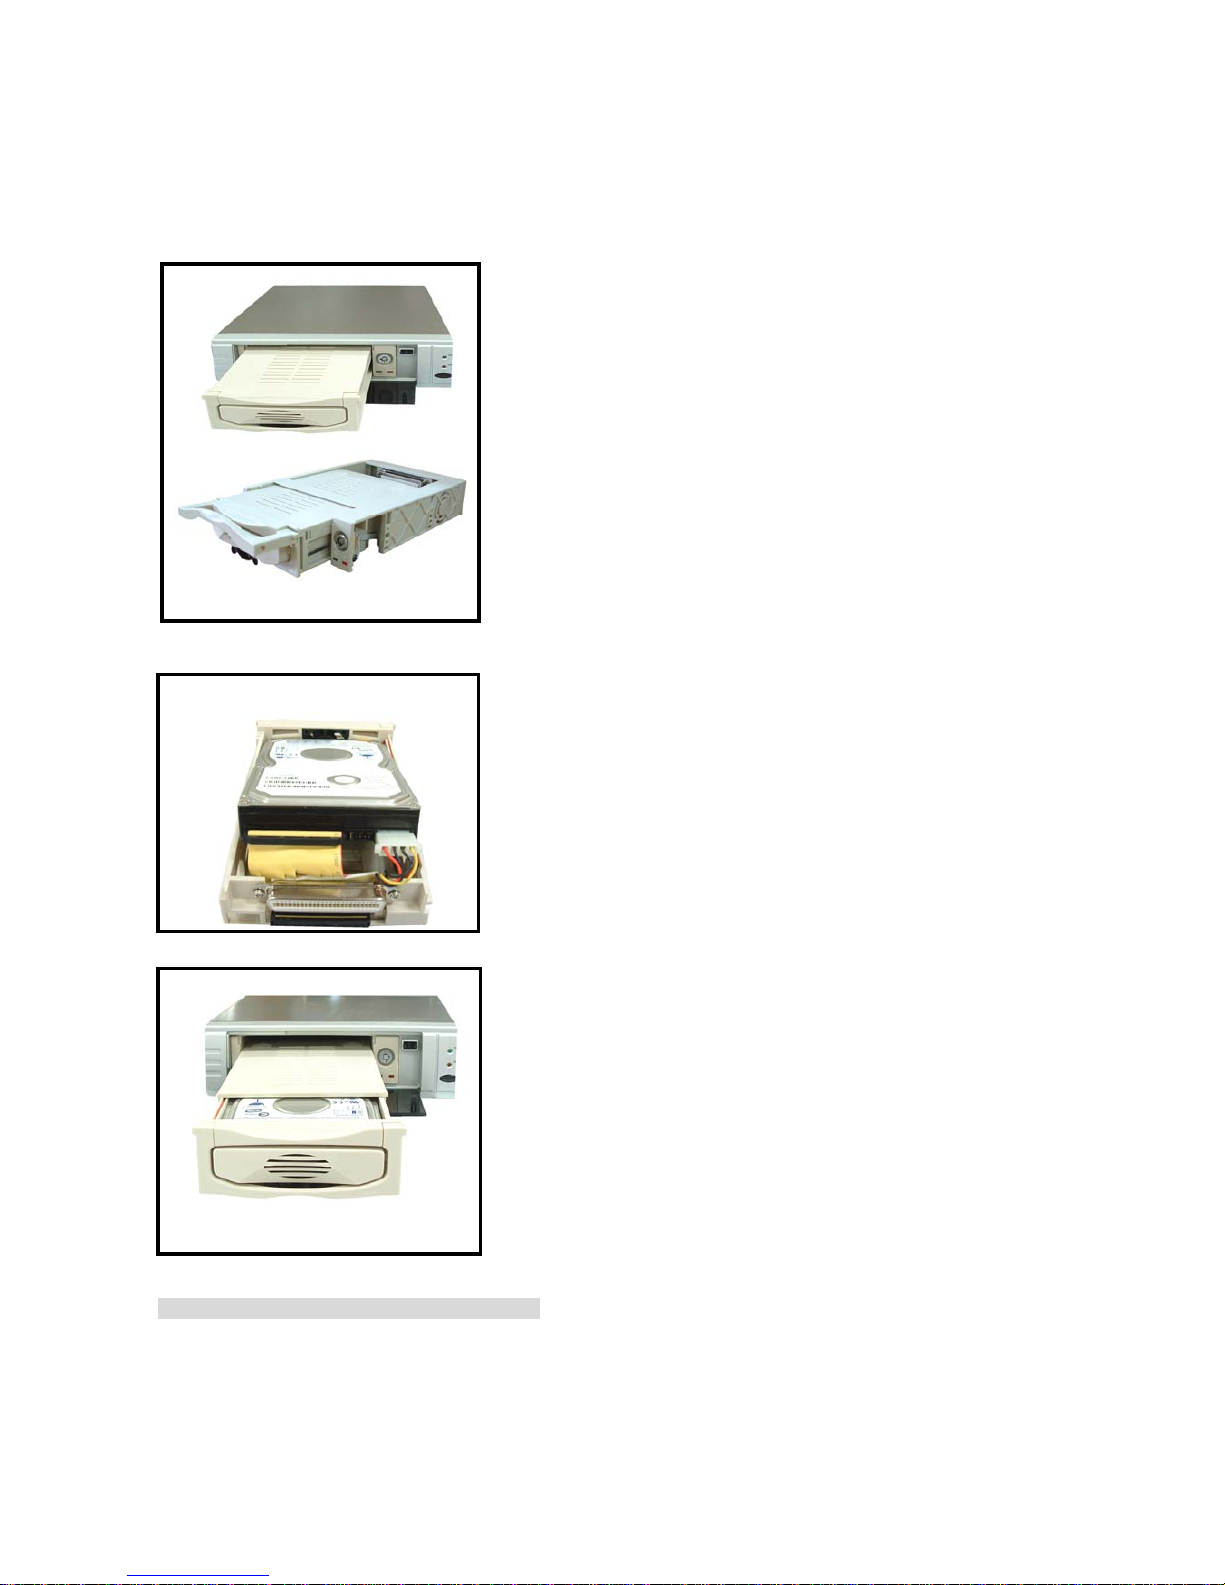
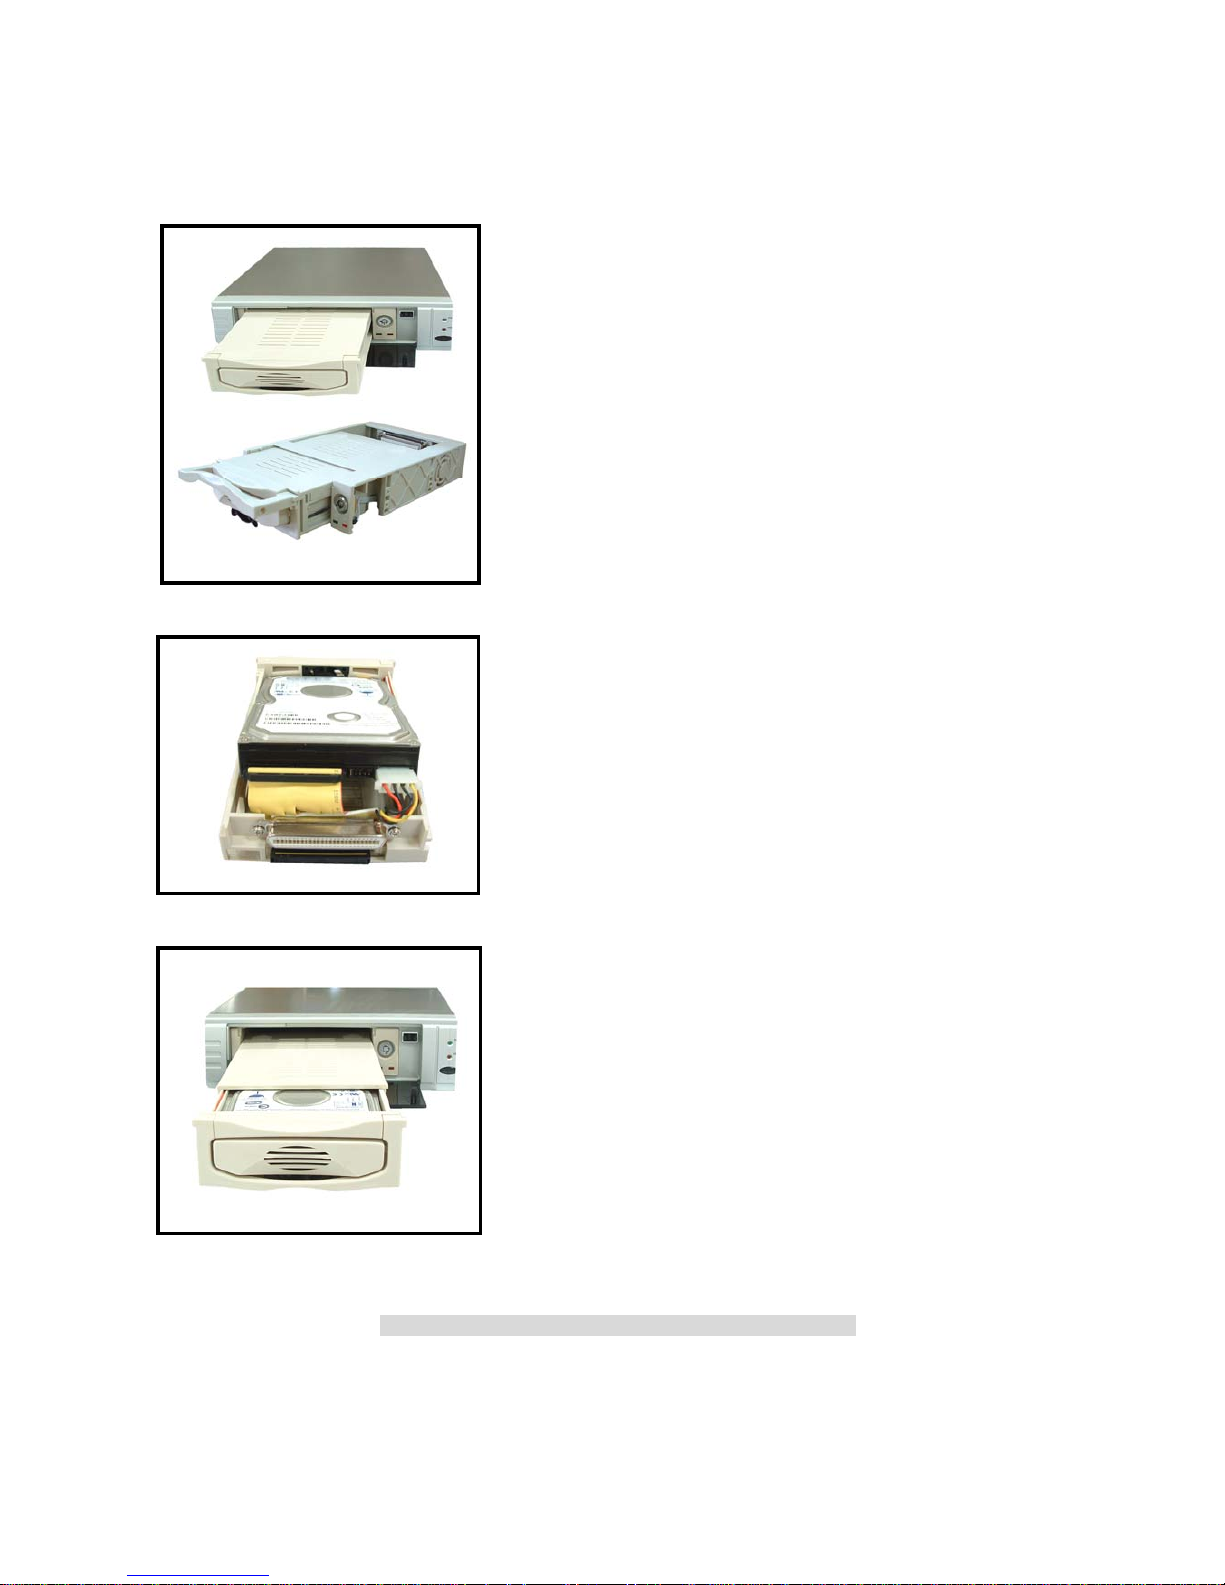
3.1 Install Hard Disk DISDisk
Fig1
Fig2
Fig3
(HDD is recommend to be provided by user)
Push the carrier body further into cartridge frame until
fully inserted (Fig3)
Slide the carrier body out of the cartridge frame (Fig1)
CAUTION
DON’T take out HDD when the DVR is running!
Connect the HDD data cable and the power cable to
the HDD(Fig2)
Page 7
7
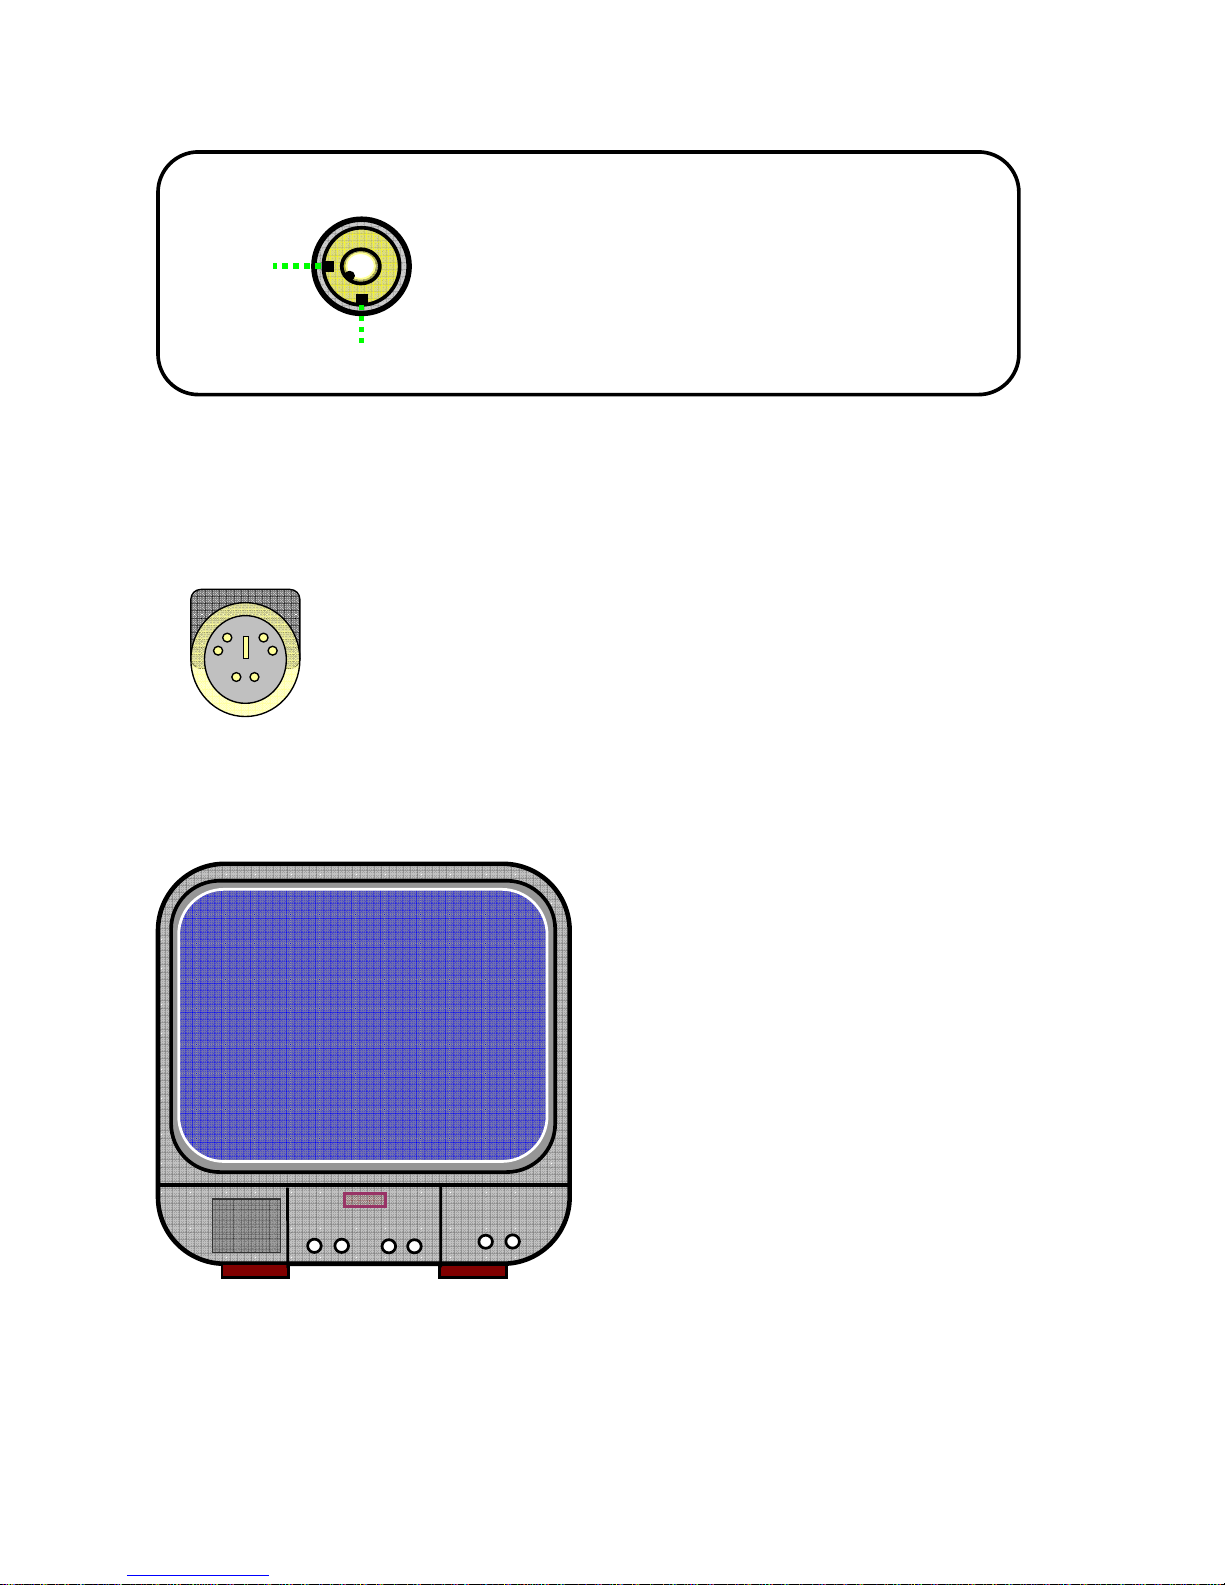
3.2 Connect Camera and Monitor
There are 8 camera inputs and 2 monitor outputs with a BNC connector.
3.3 Connect Power Cord
Please use the power adapter supplied with the DVR.
IV.
DVR System Boot
4.1 Detect Installed Hard Disk
HDD Checking………..
MASTER HARD DRIVE
IBM—DHEA—36481
SLAVE HARD DRIVE
After the power is connected, system will boot-up
and detect the installed hard disk. The monitor
will show Master and Slave hard-disk
information.
Please refer to the hard disk manual to configure
the hard disk sequence. (Master or Slave)
A: Locked (Non-removable)
B: Unlocked (Removable)
A
B
Key Locker
Page 8
8
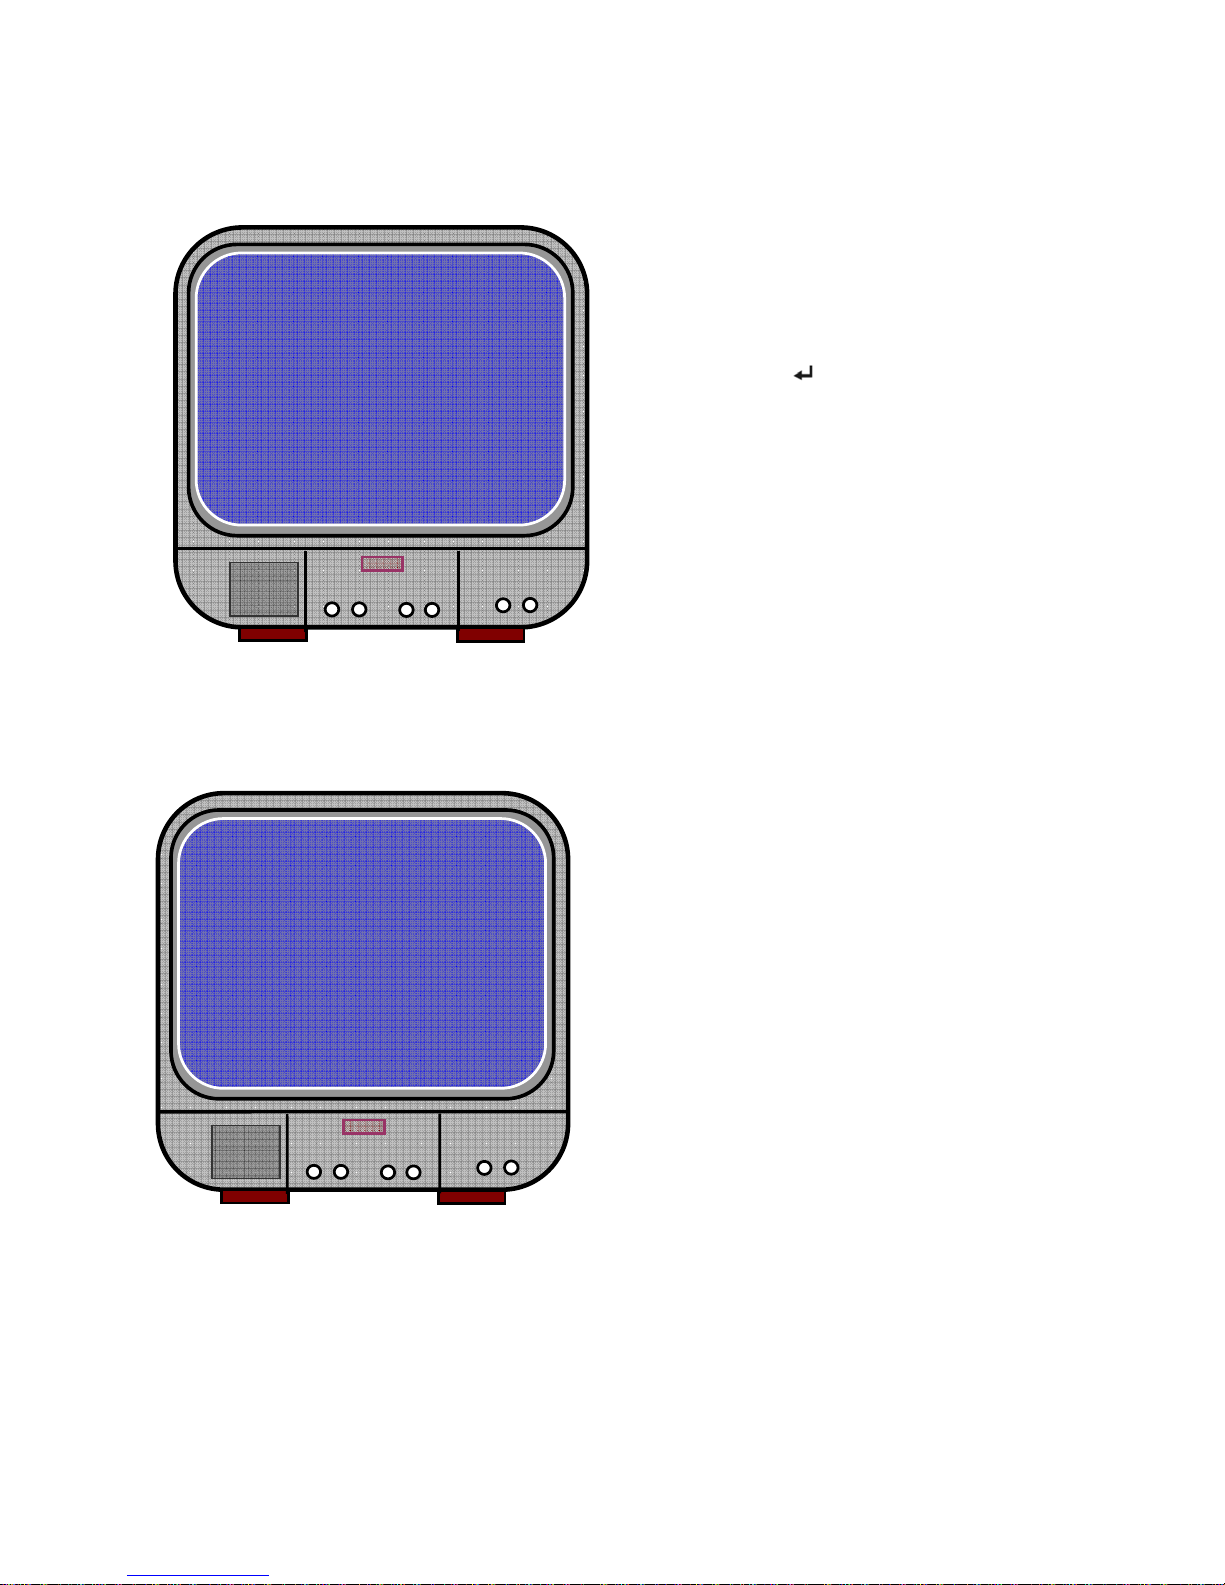
4.2 Recover Lost Data
4.3 Restore Recording Process
SLAVE: RECOVER HDD?
04811-101735
(SELECT) YES/(MENU)NO
Power-Error will cause data loss and your
system will ask for ‘recover data’ at the next
step, please press [
Select] to proceed.
POWER ERROR DETECHED
RESTO REHARD
DISK(MASTER) OK
RESTORE REC MODE… OK
When a power-error occurs during the recording
process, system will automatically restore recording
process after you reconnect the power.
Page 9
9
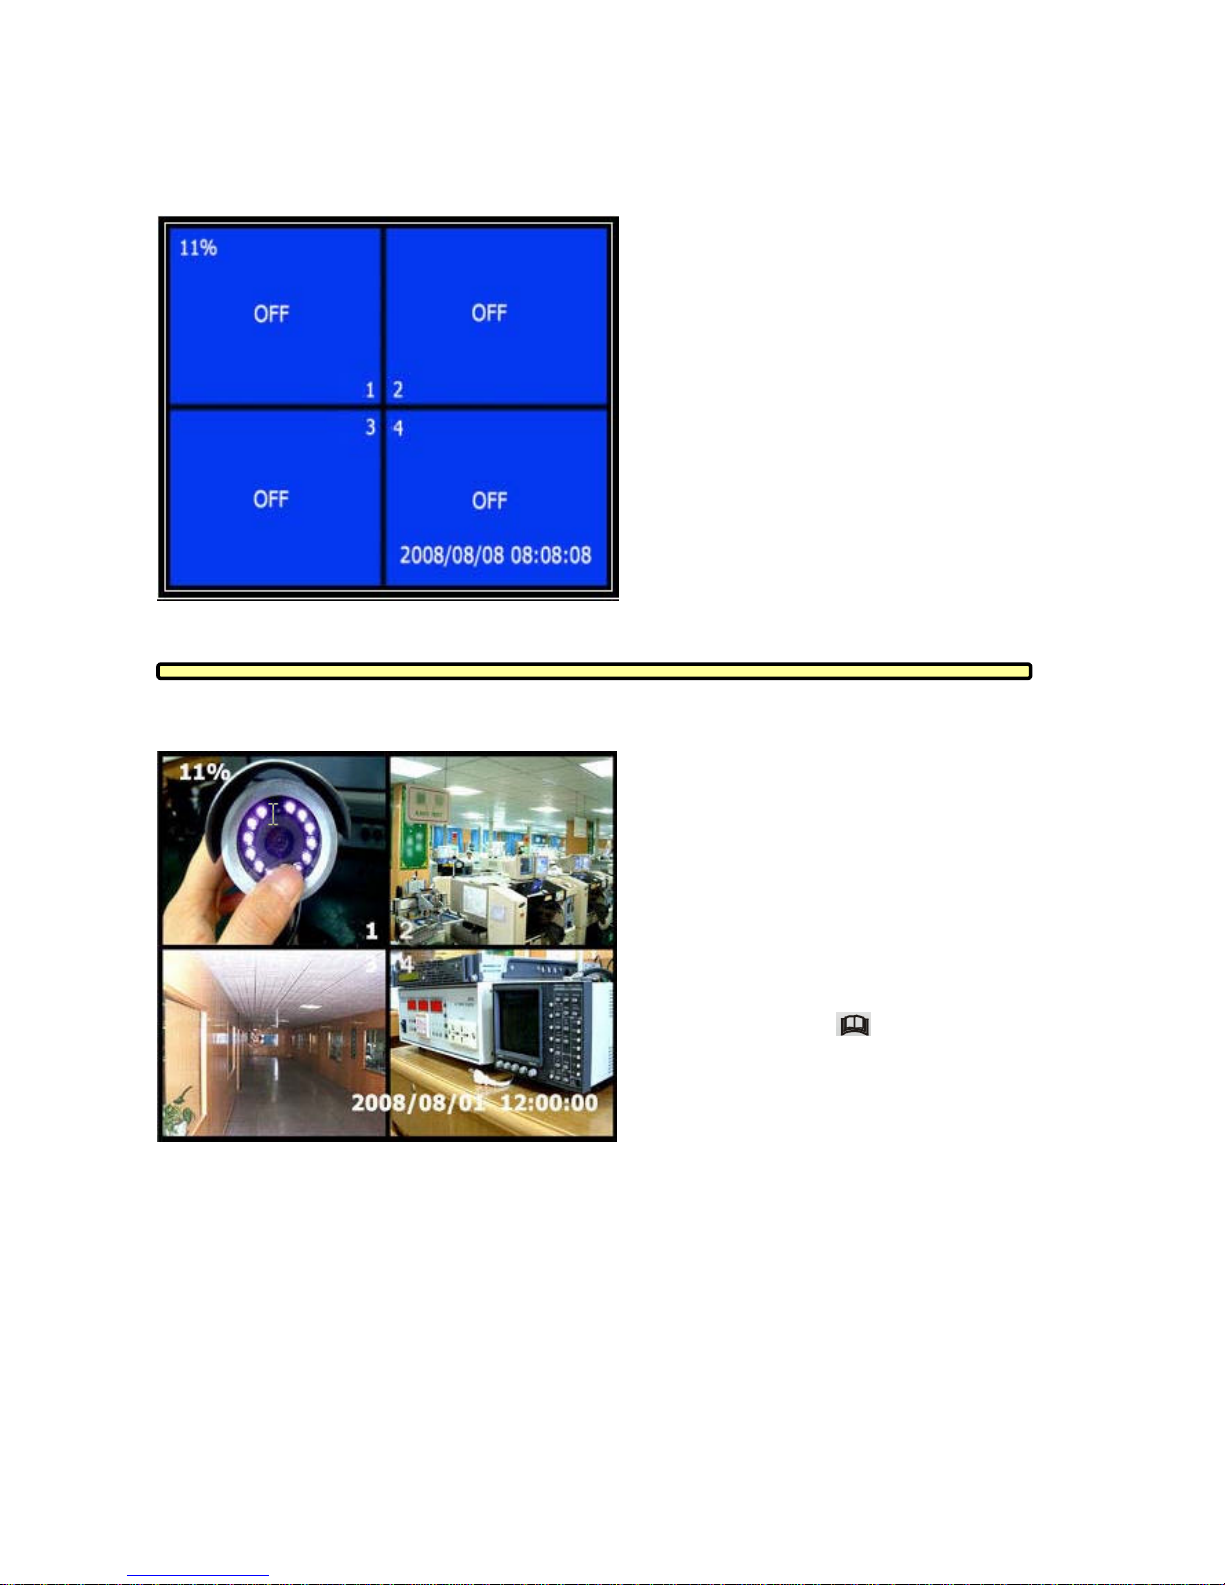
4.4 Main Screen
At first time DVR boot-up, all cameras are
OFF, please follow chapter 5-2 to switch on
all cameras.
λ Upper leftÆRatio of Hard Disk
Space Used
λ Middle ÆChannel Name( CH1 ~
CH4)
λ Bottom rightÆDate and Time At
the moment, DVR is waiting for
command, press [
Menu] into DVR
setup process.
Page 10
10
V. DVR Setup
5.1 Setup Menu
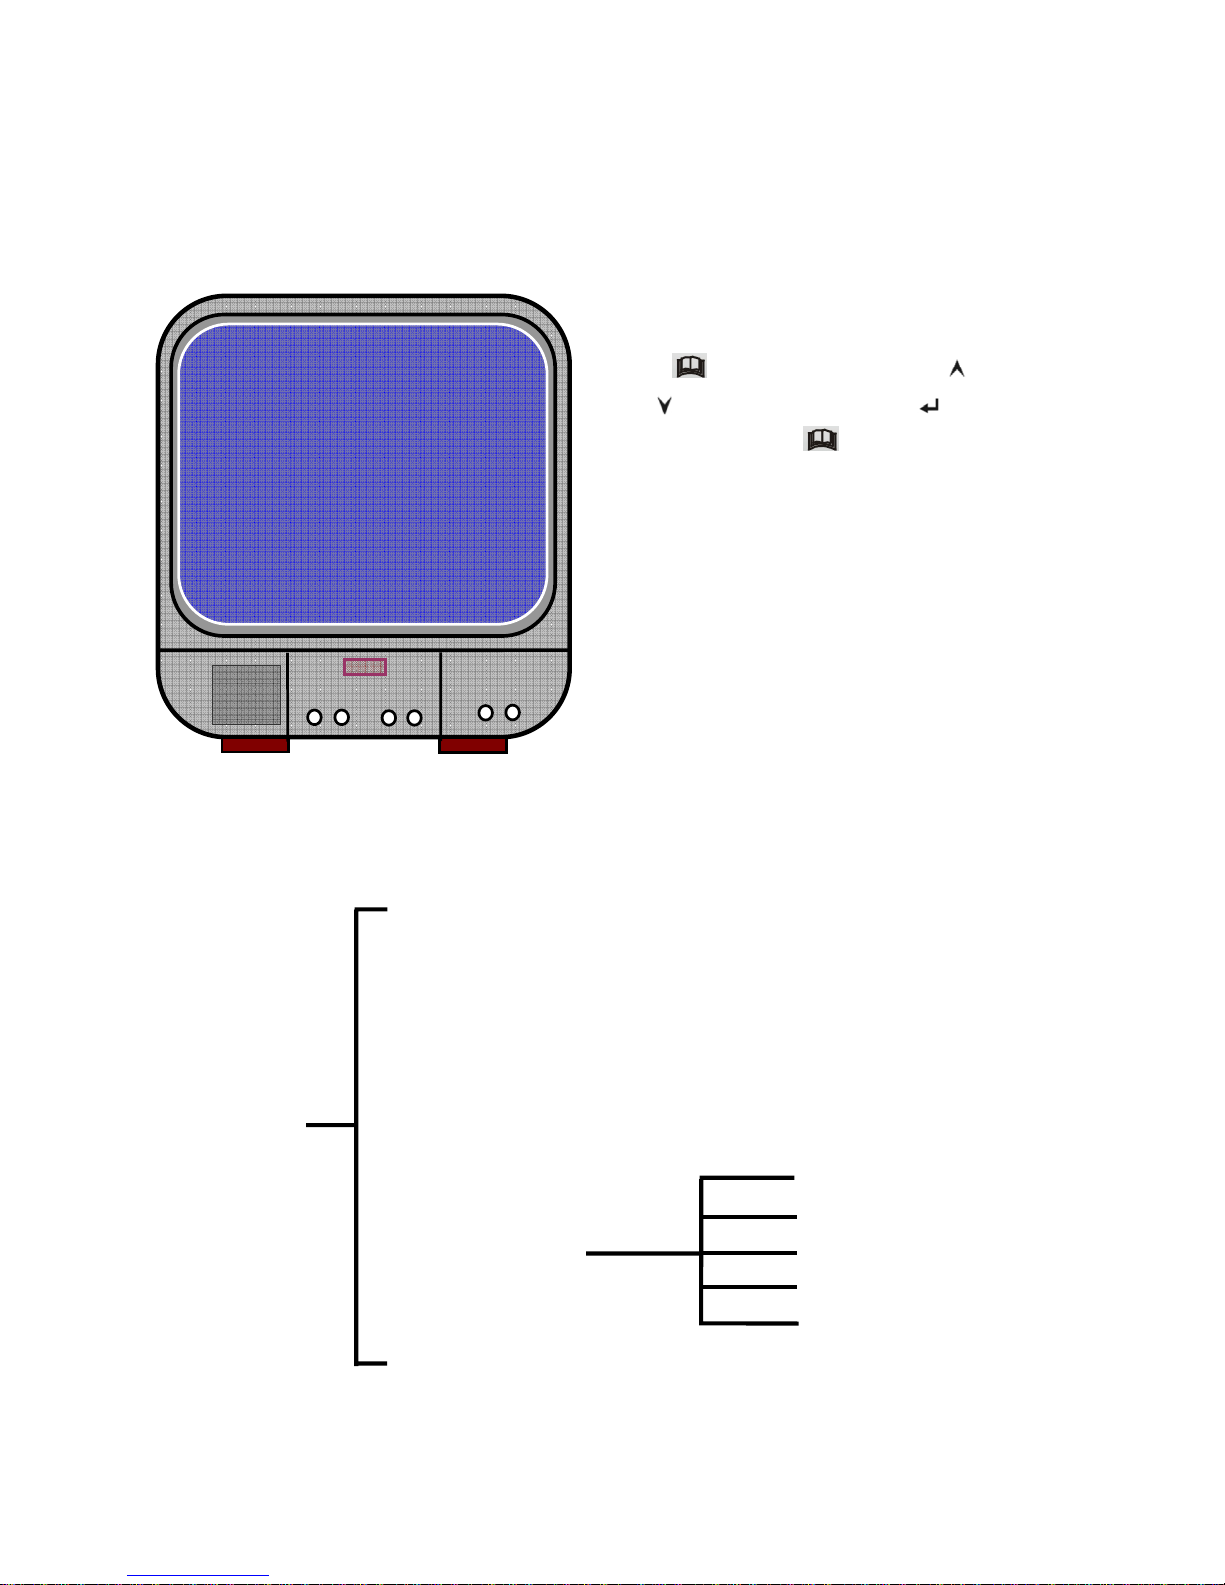
Menu Directory
Camera Select
Record Select
Record Mode
Record Frame Rate
Video Quality
Record Schedule
Sub Menu
Hard Drive Setup
Sensor Setup
0% MAIN MENU
> CAMERA SELECT 1234
RECORD SELECT 1234
RECORD MODE EACH
REXORD FRAMERATE 30
VIDEO QUALETY NORMAL
RECORD SCHEDULE
SUB MENU
HARD DRIVE SETUP
SENSOR SETUP
PRESS(<、>). THEN(SELECT)
PRESS(MENU) TO EXIT
Password Change
Time Set
Main Menu
Password Change
Time Set
Motion Set
Password Set
Buzzer Time
Press [ Menu] into setup menu, use [ Up]
and [
Down] to select item, press [ Select]
to modify settings and [
Menu] to confirm and
exit.
Page 11

11
5.2 Camera Select
The system can display 4 cameras in one screen (Quad Mode). User can configure which camera to display.
Press [
Select ] to modify setting and press [ CH1 ],[ CH2 ], [ CH3 ],[ CH4 ] to set each channel
separately. If no channel is open, system will display [OFF] on monitor.
5.3 Record Select
Configure which channel is allowed to record.
5.4 Record Mode
There are two modes for video recording,
[Each Mode]: Compress and record each channel video separately, therefore, the user can enlarge a
single channel to full screen display. For example, user can turn off record function of CH1
and CH2 and then the system only records CH3 and CH4.
Press [ CH1 ],[ CH2 ],[ CH3 ],[ CH4 ] to switch between channels during
playback of recorded video.
[Quad Mode]: Compress and record all 4 channel video into one file, therefore user can not enlarge
single channel to full screen. User can’t use the each mode record in this mode.
5.5 Record Frame Rate
Record frame rate will affect the movement of objects in the recorded video. More frames means more smooth
movement and cost more hard disk space. System default value is 25 fps, that means system will record 25
frame per second. User can set frame rate as 25, 12, 8, 6, 4, 3, 2, 1 frames per second.
5.6 Record Quality
There are three level of record quality, High, Normal and Low. Higher quality costs more hard disk space.
Record frame rate, record quality and hard disk space will affect the total record time of your DVR system.
5.7 Record Schedule
Users can setup video record method by time, sensor Triggered and Motion Triggered.
Page 12
12
5.8 Sub Menu—Password Change
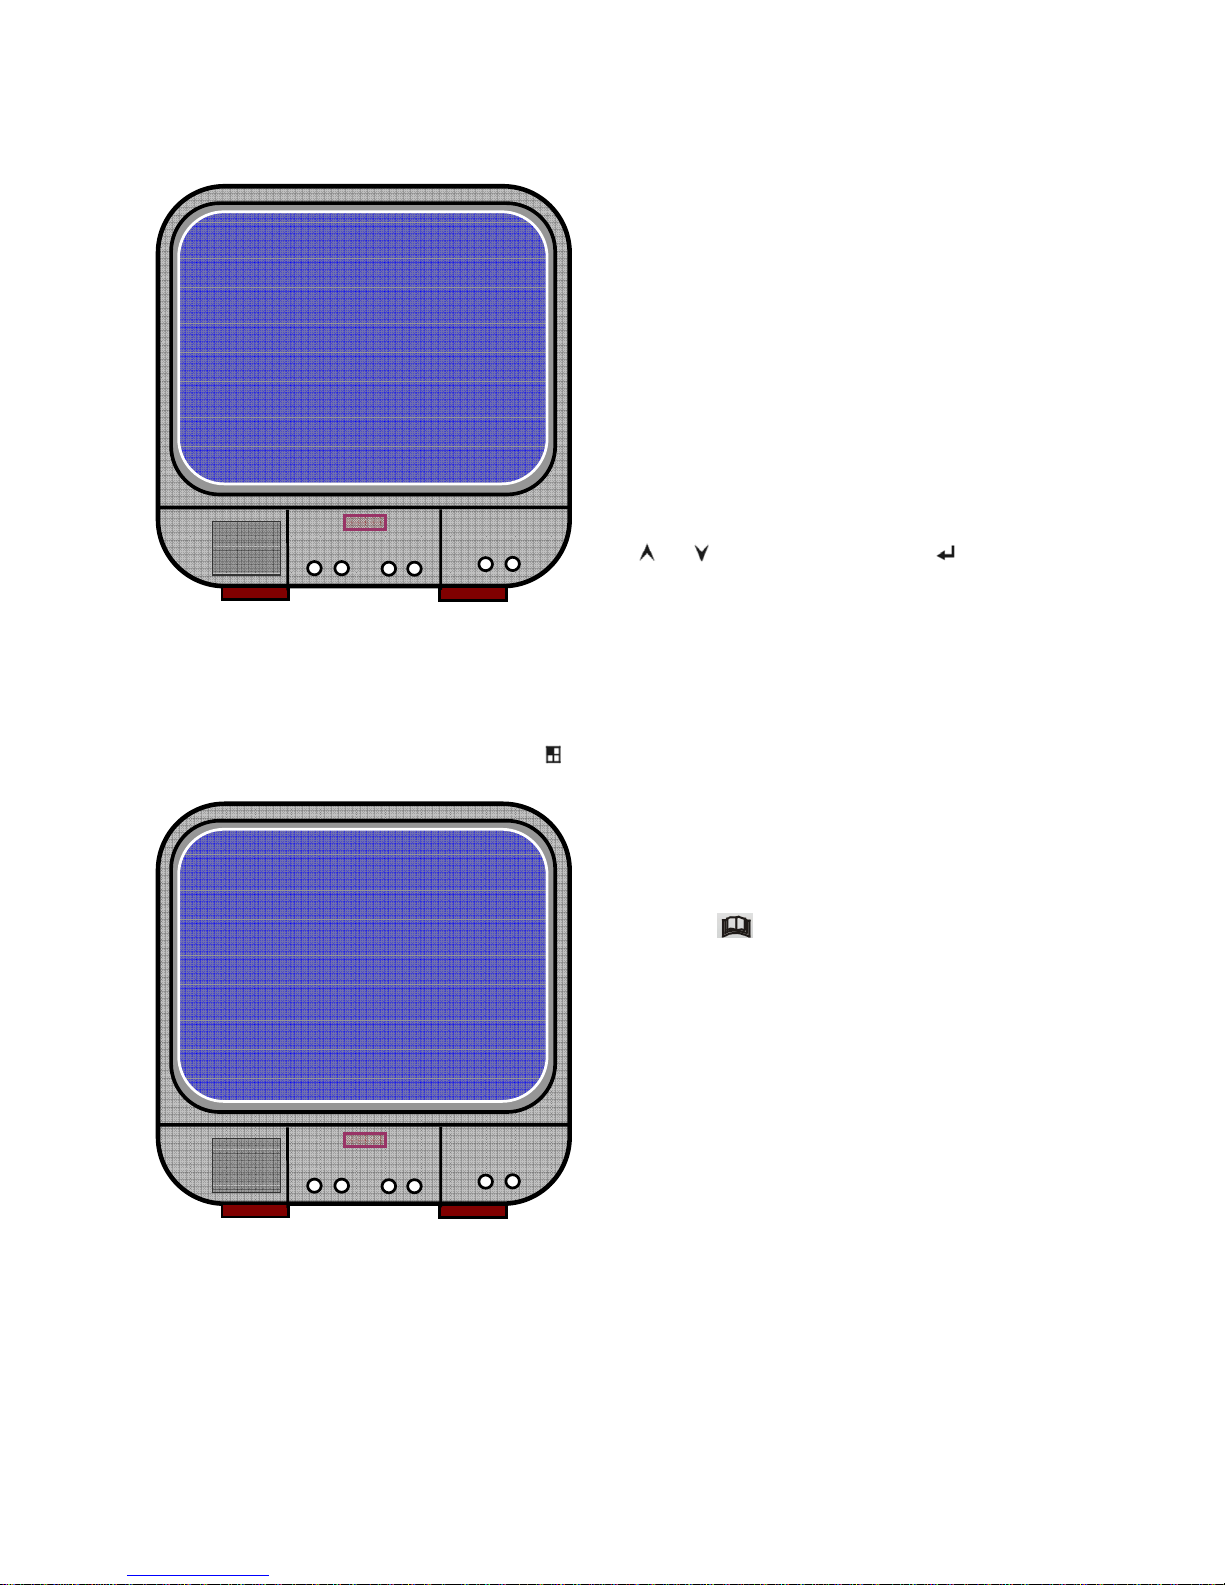
System default password: Press six times [ CH1] button
+TTTMTMMTTTMMTTSSSTTT+
│ │ │ │ │ │ │ │ │
0 3 6 9 12 15 18 21 24
CURRENT PASSWORD :……
NEW PASSWORD :……
CONFIRM PASSWORD :……
All keys can be used as password key
except [
Menu ] key, which is used
for confirming and exit.
λ “-” No Record
λ “T” Continue, (System Default)
λ “S” Sensor Triggered.
λ “M” Motion Triggered.
Cooperate with many kinds of external sensor
equipment like PIR, Gas sensor. DVR will not
record video until an external sensor was
triggered and output signal to notify the DVR
during this specified period of time.
Button function:
[
Up] [ Down]: move the prompt [ Select]:
Select Method.
Page 13
13
5.9 Sub Menu—Time Set
5.10 Sub Menu—Motion Set
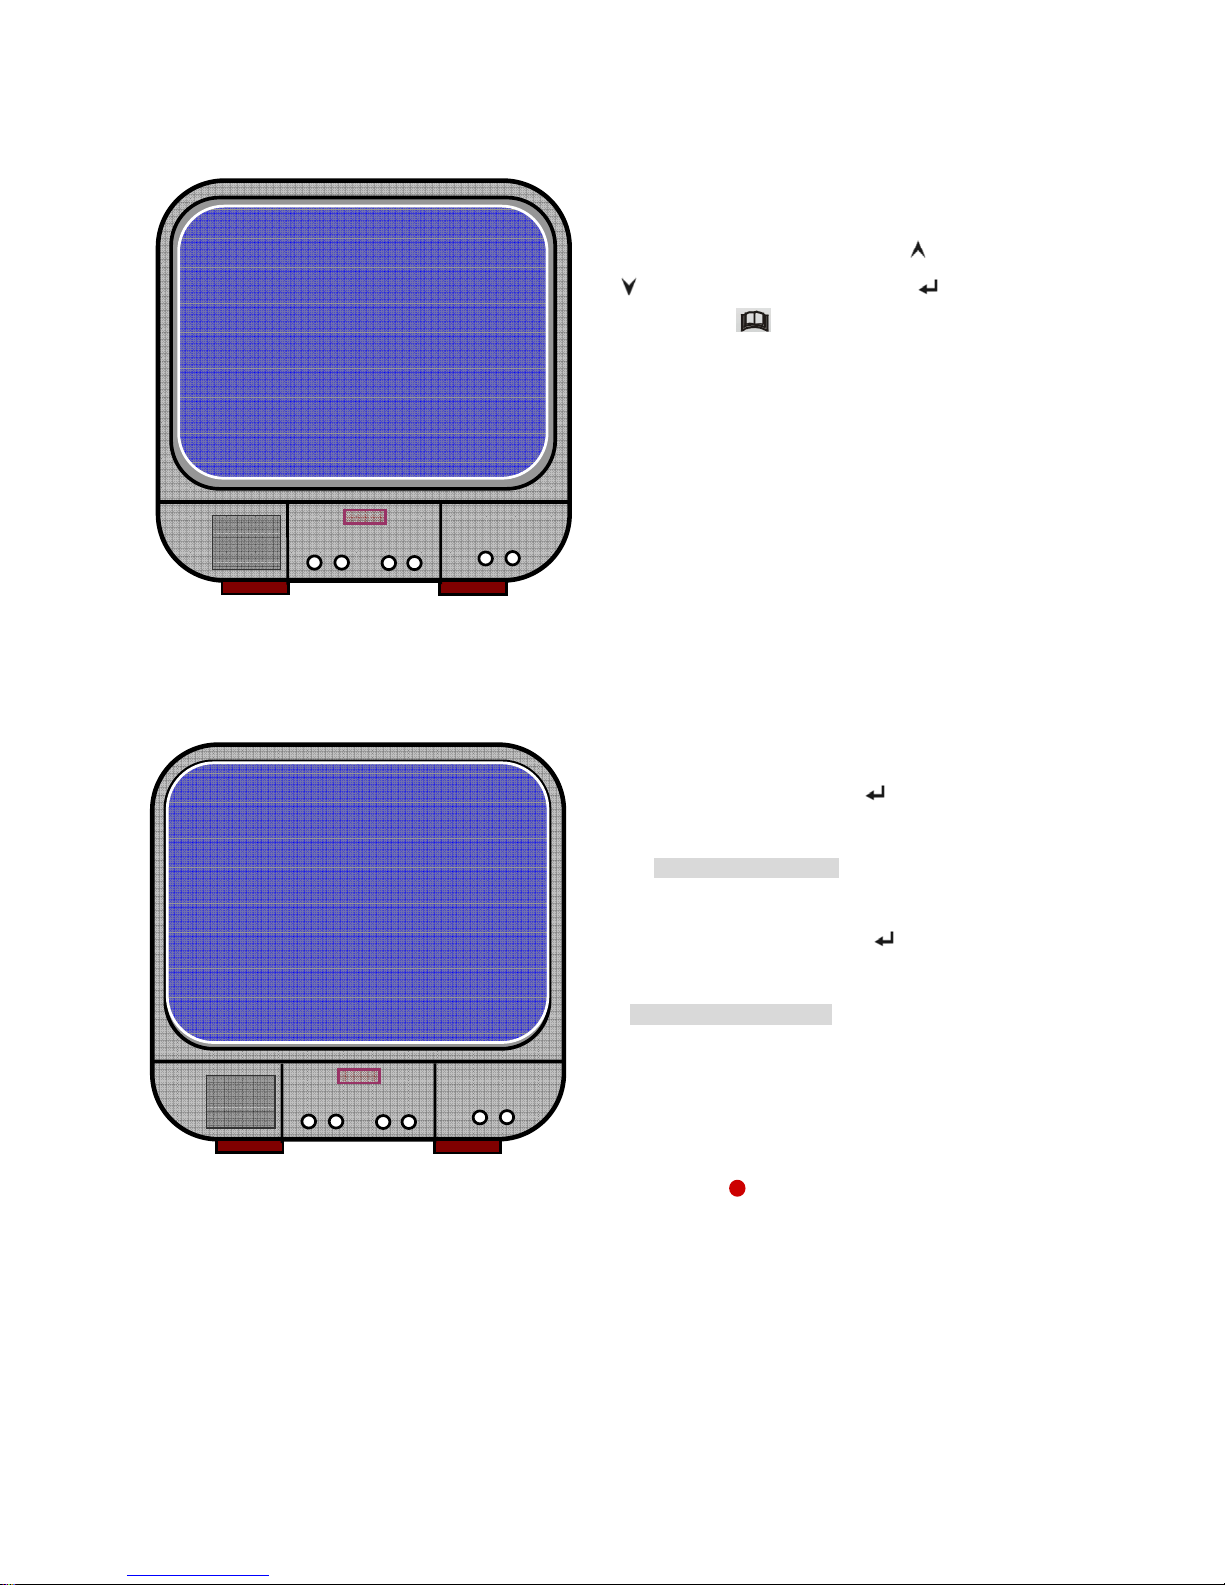
The first step, User need setup video record method by Motion Triggered. Please refer to 5.7.
After completed the “MOTION SET”, User can exit MENU, And press [ Record] to start Motion Record.
5.11 Sub Menu-Password Set
When password set is “ON”, Stop recording or entering a menu will need Password, if password set is “OFF”, no
password will be demanded.
2008/08/08 08:08:08
*
0%
MOTION SET
MOT LEVEL 5
MOT REC TIME 25
MOT LEVER: User can press [ Select] to
adjust sensitivity grade of motion detection.
High (1----------10) Low
MOT REC TIME: Recording time setup when
motion detected. User can press [
Select] to
set the time.
Time Setup: 5sec~30sec
Configure DVR system time. Press [ Up] and
[
Down] to move prompt and press [ Select] to
modify. Press [
Menu] to finish input and exit.
Page 14

14
5.12 Sub Menu-Buzzer Time
Buzzer time set (00,05,10,15,20,25,30 seconds and CONT) , Us er can press [ Select ] to set the time .When
Buzzer Time is “00”,All the buzzers will be shut off. When “Buzzers Time” is “CONT”, the buzzer will work
continuously.
5.13 Hard Drive Setup
MASTER HDD USED
It shows the space used on the first hard disk drive for recording and the percent of the used hard disk.
MASTER HDD FORMAT
If you format the hard drive, it will erase all the data recorded on the first hard disk drive.
SLAVE HDD SIZE
It shows the space available on the secondary hard disk drive installed in the DVR.
SLAVE HDD USED
It shows the space used on the primary hard disk drive available for recording.
SLAVE HDD FORMAT
If you format the hard drive, it will erase all the data recorded on the secondary hard disk drive.
HARD DRIVE SETUP
>ORERORITE ENABLE [YES]
MASTER HDD SIZE 40042MB
MASTER HDD USED 80865MB %77
MASTER HDD FORMAT
SLAVE HDD SIZE N/A
SLAVE HDD USED N/A
SLAVE HDD FORMAT
PRESS(<>) THEN (SELECT)
PRESS(MENU)TO EXIT
OVERWRITE ENABLED
If you choose YES, recording continues and
overwrite previous recording when hard disk
drive space is full.
If you choose NO, the recording session
stops when hard disk drive is full.
MASTER HDD SIZE
It shows the size of the primary hard disk
drive installed in the DVR.
Page 15
15
5.14 Sensor Setup
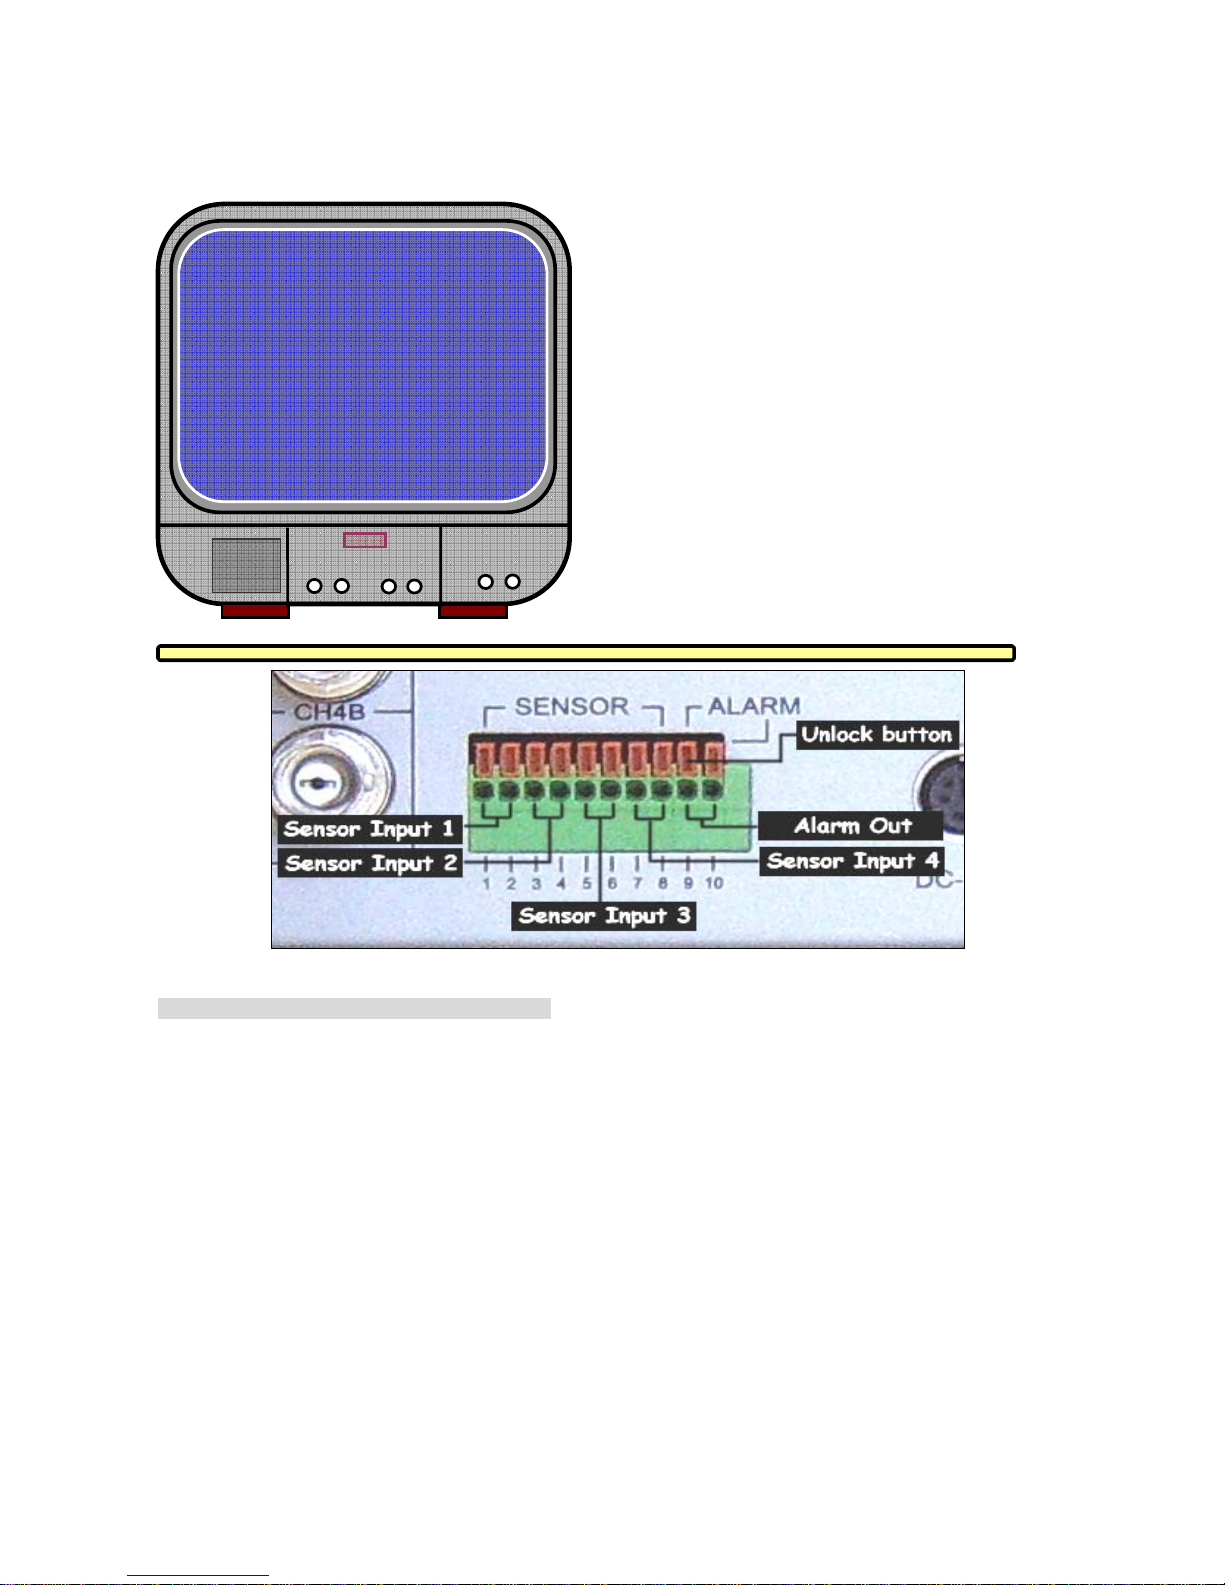
Push the UNLOCK BUTTON to insert the wire
There are 3 different modes for sensor setting:
NOT INSTALLED, NORMAL-CLOSE and NORMAL-OPEN.
It depends on what type of external sensor user use, If sensor’s output is NORMAL-OPEN then select
NORMAL-OPEN mode in DVR.
If sensor triggered by an intruder then the cable line connects to DVR input terminal will notify system to
start recording.
There are four pairs of input terminal supported by DVR.
SENSOR SETUP
>
SENSOR RECORD TIME 10
ALARM OUT TIME 05
CHANNEL-1 TYPE:NORMAL-OPEN
CHANNEL-2 TYPE:NORMAL-CLOSE
CHANNEL-3 NOT INSTALLED
CHANNEL-4 NOT INSTALLED
SENSOR RECORD TIME
The number indicates how long sensor
recording lasts when the sensor indicates the
movements in front of the camera.
ALARM OUT TIME
It controls how long (in seconds) the alarm
lasts after it sets off.
Value 0 will turn off alarm output.
Select Cont will turn on alarm output until
user press any key.
Page 16
16
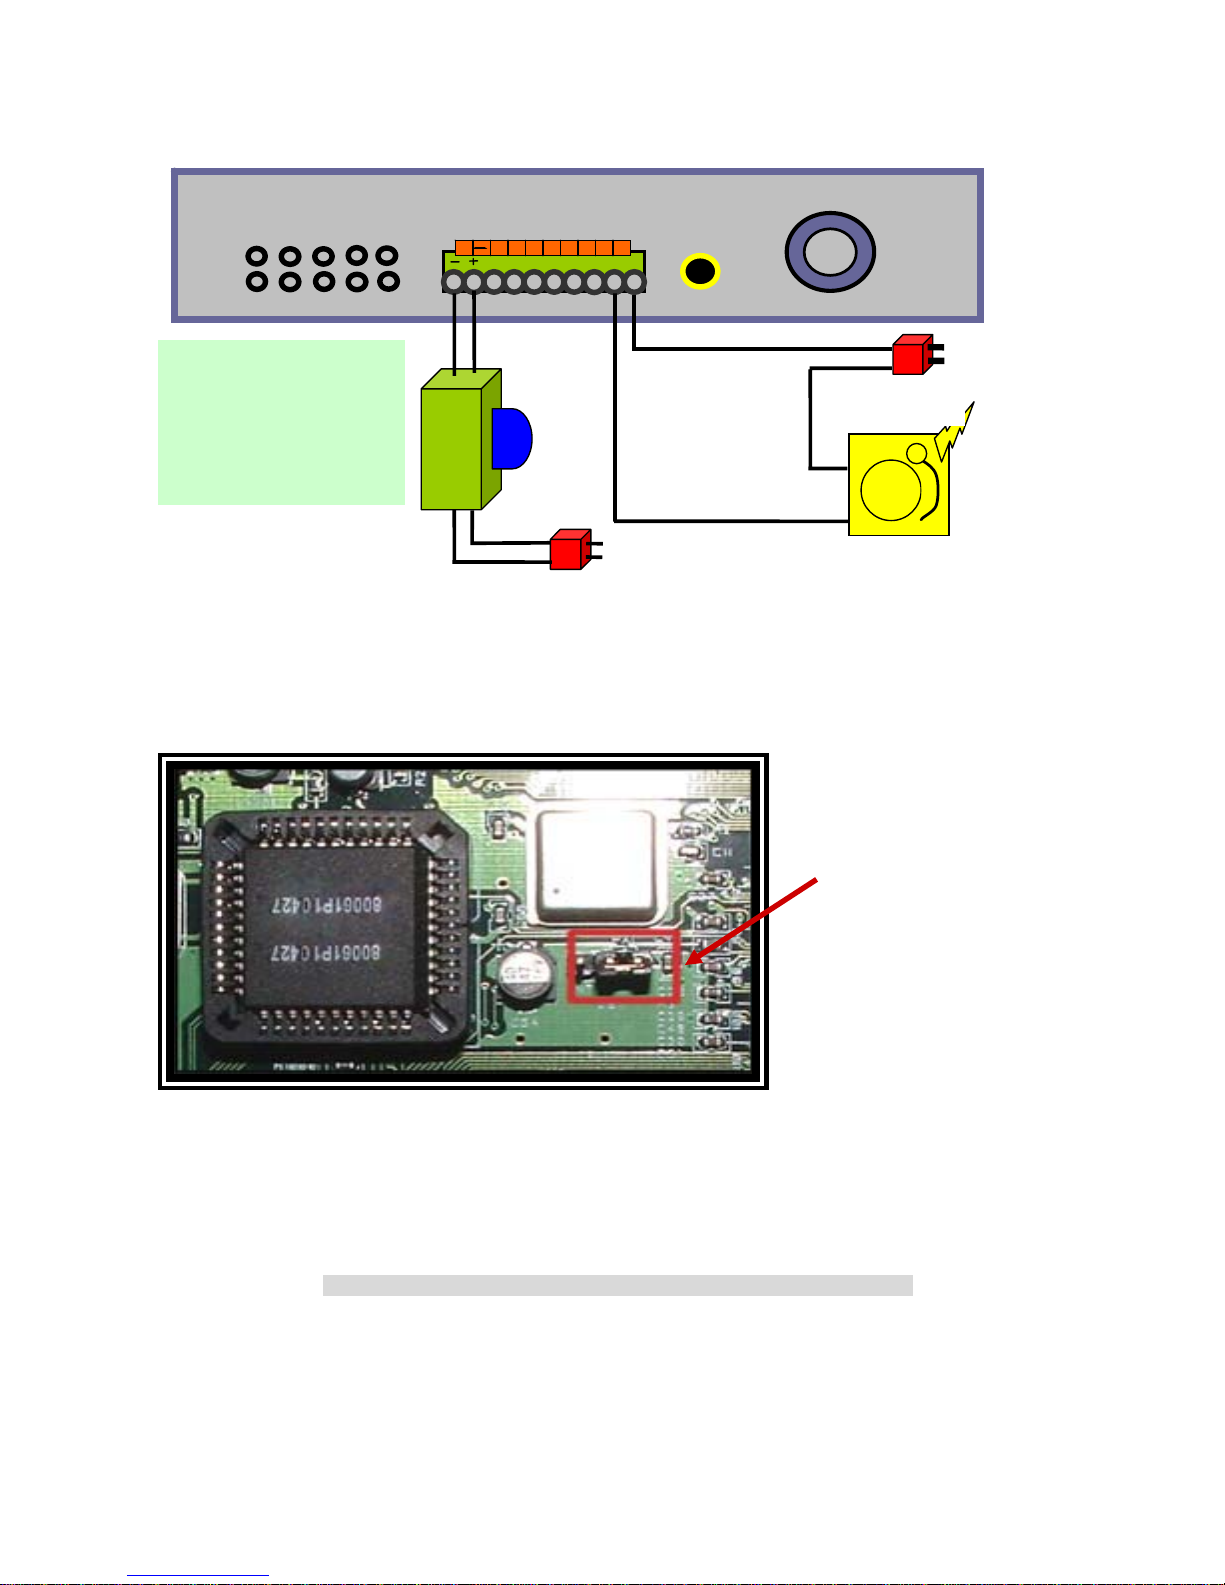
Install example diagram:
5.15 NTSC/PAL Output Select
Change jump JS1 to select NTSC or PAL video output format according to the silkscreen on the PCB.
VI. Record
6.1 Start Recording
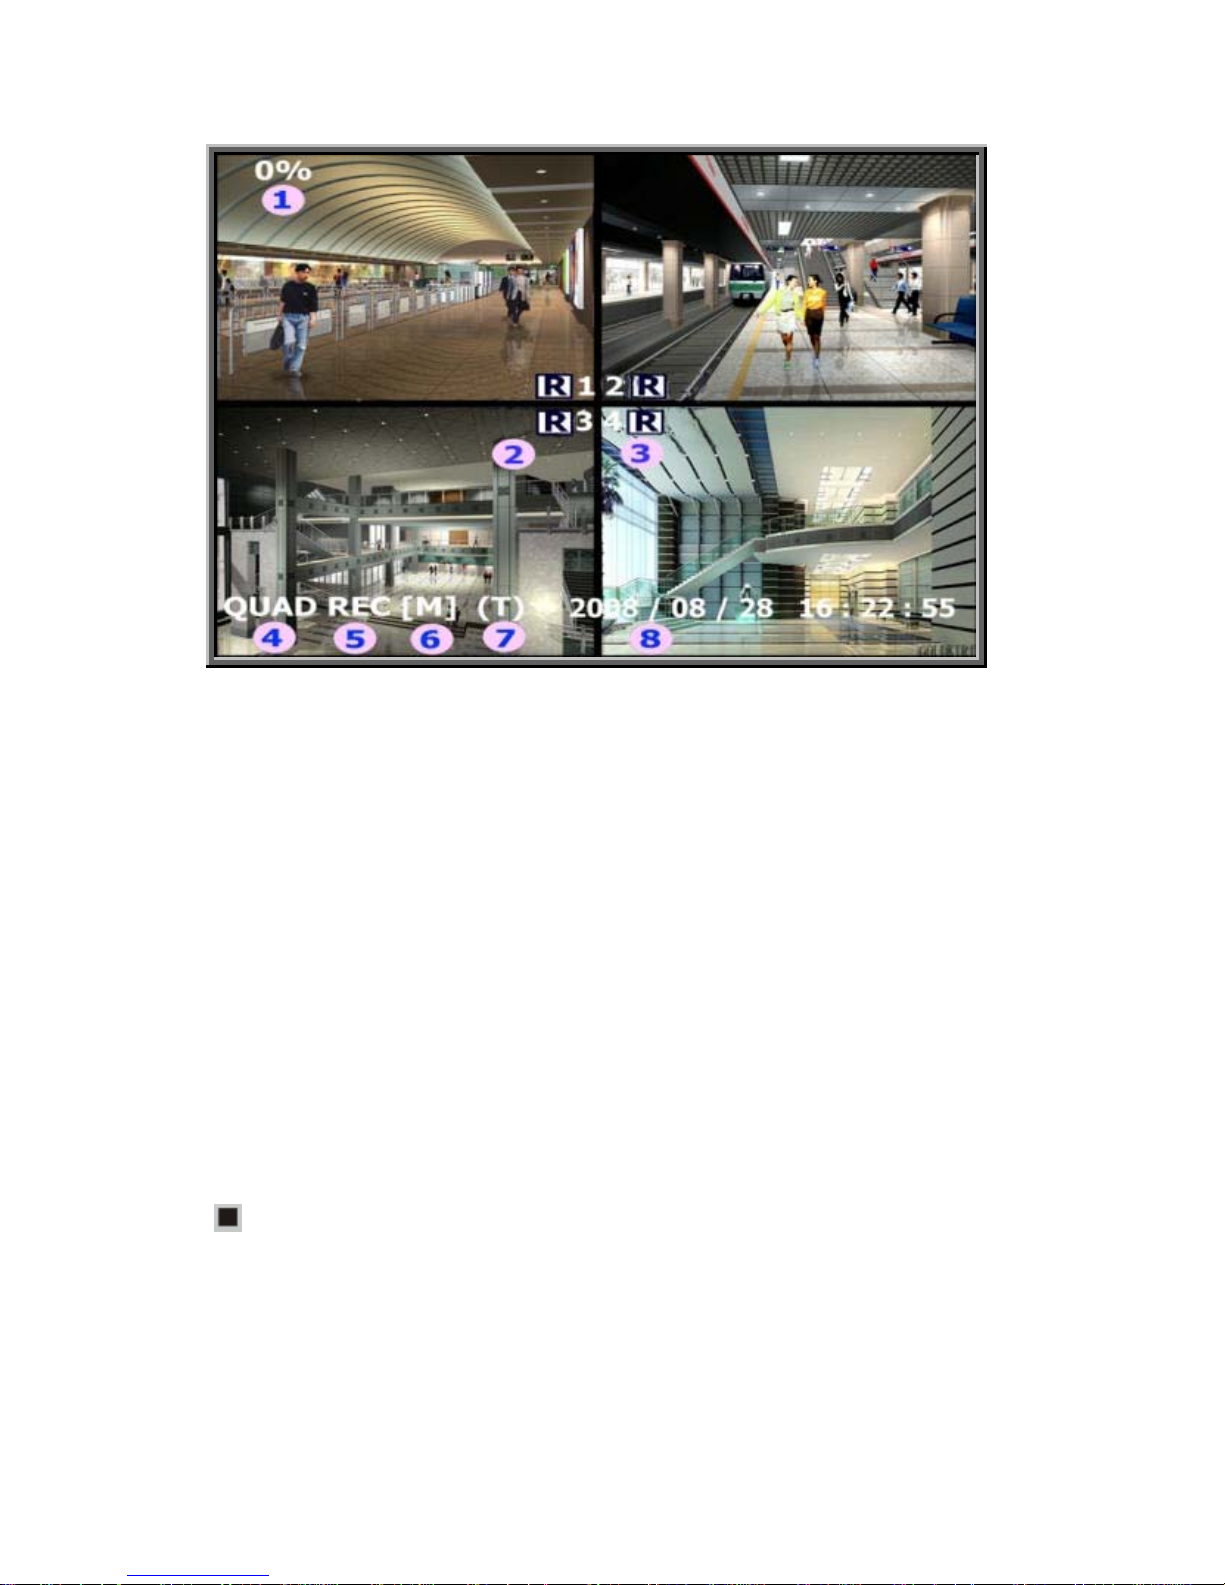
Press [Record] to start recording. System will display some information on Screen.
*Only EACH MODE can enlarge single channel to full screen display
Connect PIR sensor
NO/NC output to DVR
input terminal.
(Max. 5V DC)
DVR
Alarm
Power
PIR Sensor
Power
NTSC/PAL Select
Page 17
17
λ ①Hard Disk Usage Ration
λ ②Recording Symbol
λ ③Channel Names
λ ④Mode (QUAD or EACH)
λ ⑤Status (REC, Play, FF1, FF2, FF3, REW, PAUSE)
λ ⑥HD Info. ([M] Master disk [S] Slave disk)
λ ⑦Schedule((T) Continuous (S) Sensor (-) No Record
λ ⑧When [ * ] show up beside date & time , it indicate that system are overwrite.
6.2 Stop Recording
Press [
Stop] and system will prompt to input password. Only correct password can stop recor ding process.
6.3 Recording Length
Page 18
18
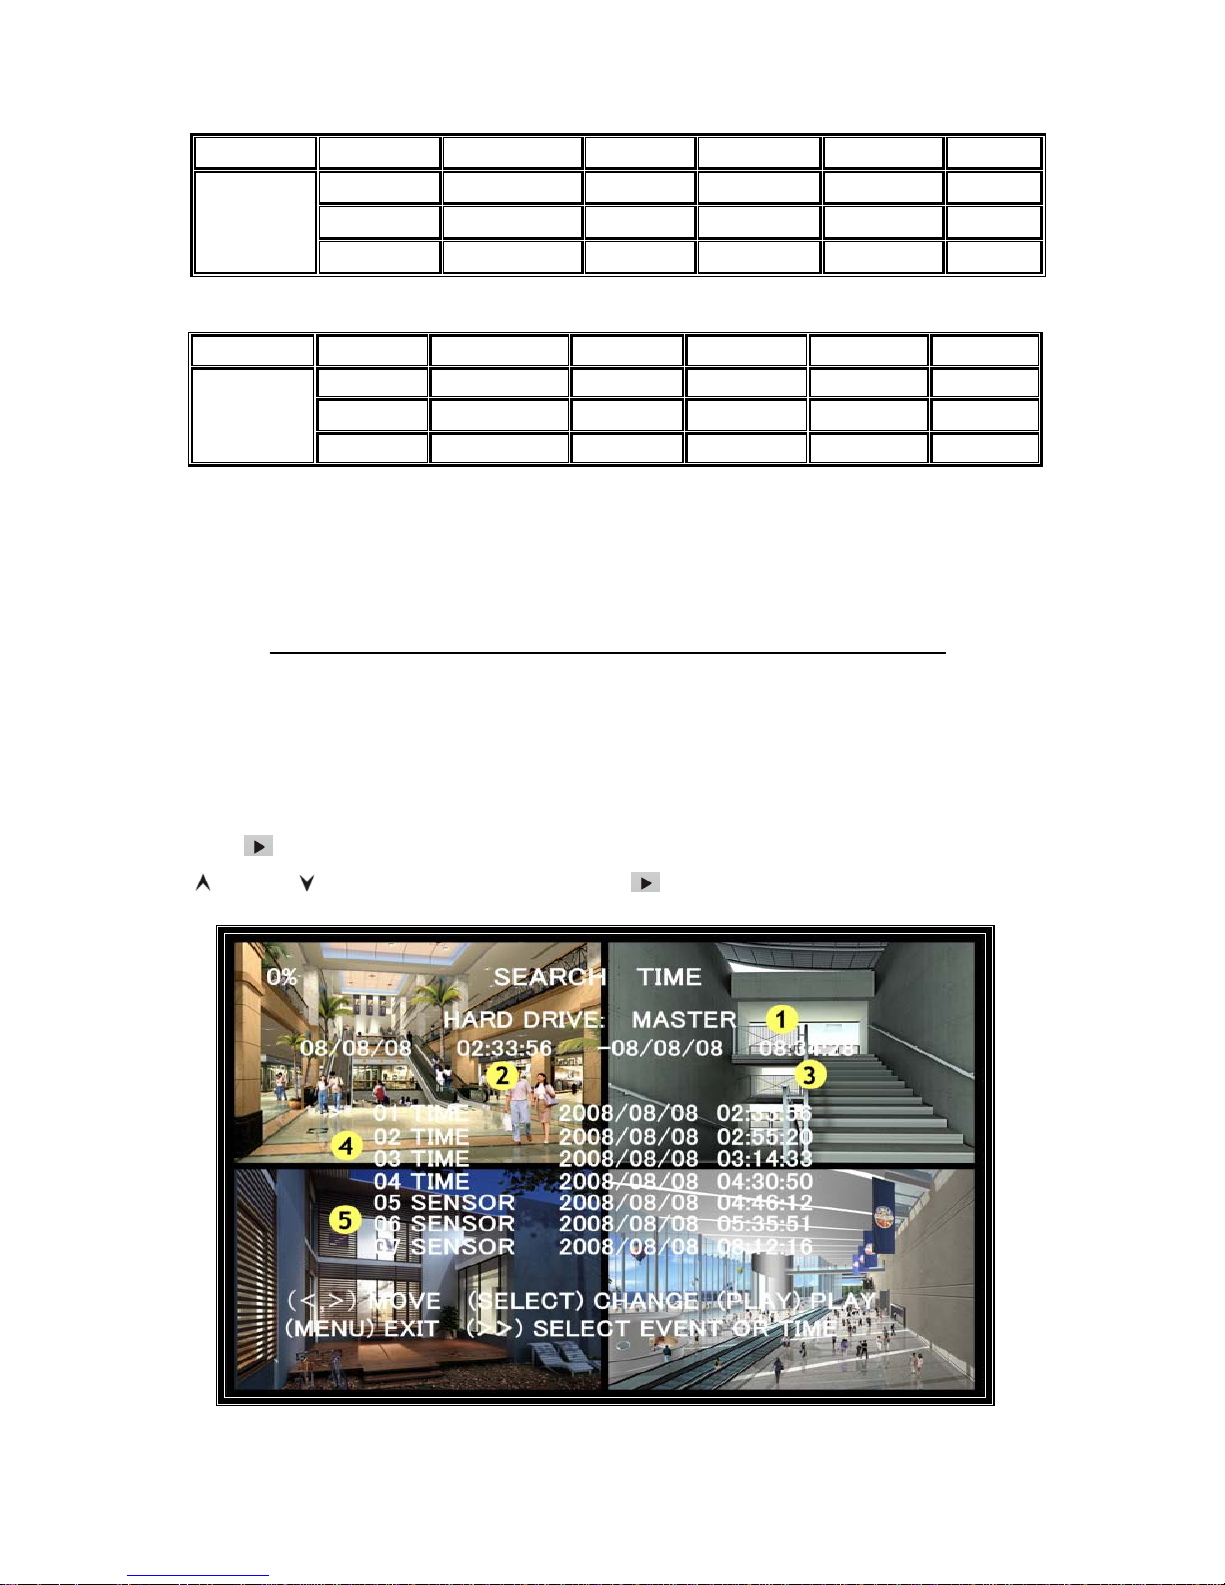
User can calculate and estimate record hours by below formula
120G Byte @ 7 frames per second @ Normal quality
120 (G byte) x 1024 (M byte) x 102 4 (K byte)
15 (Kbyte/frame) x 7 (frame/sec) x 60 (sec) x 60 (min)
Estimate hours is 332 Hours
VII. Playback
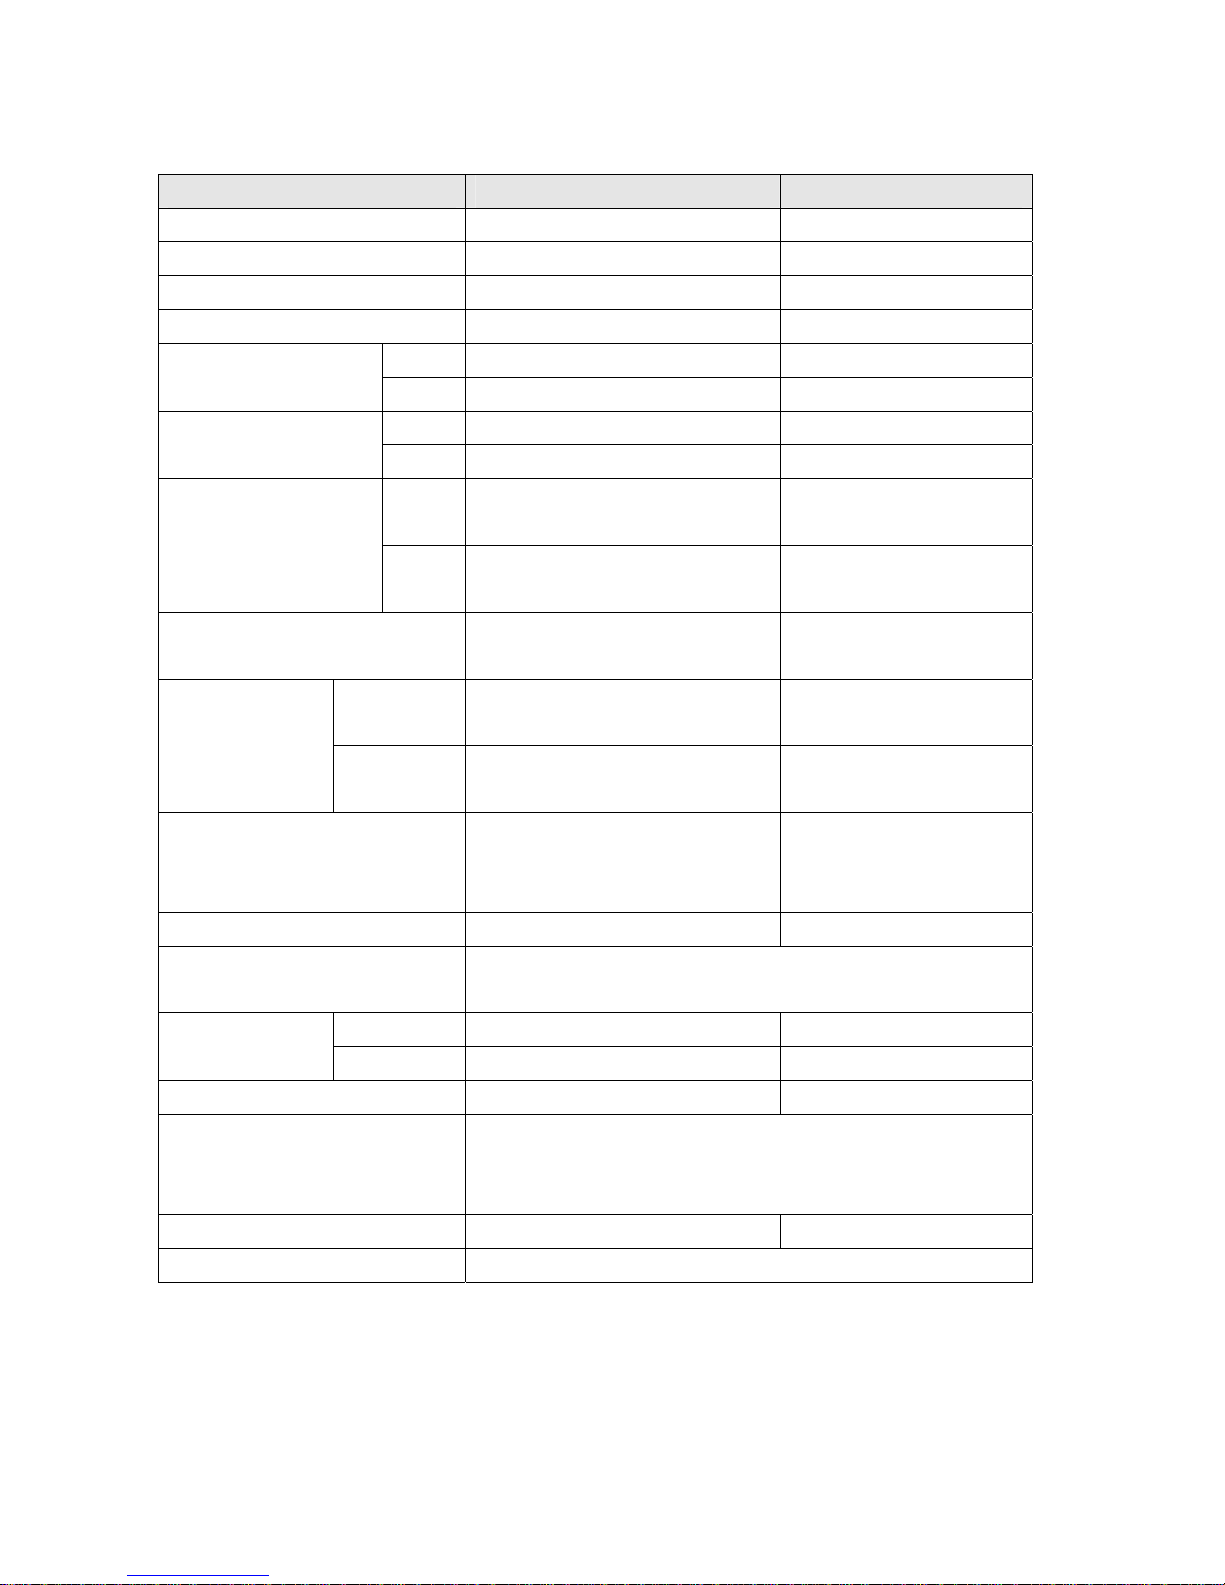
Press [ Play] then system will list all recorded video clip from HD. Newest video will at top of the list, press
[
Up ] and [ Down ] to select start time and press [ Play ] again to start play video to the end.
Format Quality Frame Rate 30 15 7 1
HIGH 20 58 117 251 1748
NORMAL 15 78 155 333 2330
NTSC
LOW 12 97 194 416 2913
Format Quality Frame Rate 25 12 6 1
HIGH 20 70 146 291 1748
NORMAL 15 93 194 388 2330
PAL
LOW 12 117 243 485 2913
Page 19

19
1. HD Information 2. Start Time
3. End Time 4. TIME: Continue record
5. SENSOR: Sensor triggered 6.Motion:Motion triggered
Another way to search video is directly input time period. Press [ Fo rward] and then press [ Up ] and [
Down ] to select digit. Press [
Select] to edit time value and press [ Play] to play video.
VIII. A/B PAGE SWITCH
8.1 Introduction
There are 8 channels for video input supplied by this product, which are CH1A, CH2A, CH3A, CH4A, CH1B,
CH2B, CH3B and CH4B. You can view 4 of these channels simultaneously in QUAD VIEW instantly. But you can
view the other channels by the means of A/B PAGE SWITCH Function.
8.2 Switch Function
There are two methods to switch channels between A and B pages:
[Use the front panel]: press [A B], the [PWR] LED turns red.
Then
Press [
CH1], switch between CH1A and CH1B channel
Press [
CH2], switch between CH2A and CH2B channel
Press [
CH3], switch between CH3A and CH3B channel
Press [
CH4], switch between CH4A and CH4B channel
Press [QUAD], switch between current 4channels an d other 4 channels
Finally, press [A B] to exit the switc hable state.
[Use the remote controller]: use the button in the [A/B PAGE SWITCH] area.
Press [CH1], switch between CH1A and CH1B channel
Press [CH2], switch between CH2A and CH2B channel
Press [CH3], switch between CH3A and CH3B channel
Press [CH4] switch between CH4A and CH4B channel
Press [A/B] switch between current 4channels and other 4 channels
0 8 /0 8 / 0 8 1 5 : 0 3 : 3 2 --0 8 / 0 8 / 0 8 1 6 : 2 8 : 1 2
*
Page 20
20
IX. Specifications
ITEM DESCRIPTION NOTE
Video Format NTSC / PAL
Operation System None STAND-ALONE
Camera Input Channel 8 channel Composite BNC
Video Output Channel 2 channel Composite BNC
NTSC 120 frames/second 4 x 30 frames/second
Display Frame Rate
PAL 100 frames /second 4 x 25 frames/second
NTSC Max 30 fps (Quad) Quad Mode Recording Frame Rate
(Quad)
PAL Max.25 fps (Quad) Quad Mode
NTSC
Each Channel =
30 ÷ Number of Source
Max. 30 frames/s
(Each Channel)
Recording Frame Rate
(Each Mode)
PAL
Each Channel =
25 fps ÷ Number of Source
Max. 25 frames/s
(Each Channel)
Record Mode
Continuous, Schedule, Motion
Triggered ,Sensor Triggered
Display
NTSC:720 x 480
PAL:720 x 576
Resolution
Record
NTSC:320 x 112, 640 x 224
PAL:320 x 136, 640 x 272
Quad:640 x 224 (total)
Each:640 x 224
Video Compression Format
(Each Channel)
Modified Motion-JPEG
(12-20K bytes/frame)
Low :12K Byte
Normal :15K Byte
High : 20K Byte
HDD Support Over 200G Byte ATA -100 Interface
Estimated Record Length
120G Hard disk @ 7 fame per second @ Normal Quality
(120*1024*1024 K byte) ÷ ( 7*15*60*60 ) = 332 Hours
Method Time、Date、Event
Search
Full Screen YES
Voice None
Sensor, Alarm
4 Input (Normal Open / Normal Close)
1 Input (Relay 2A 28VDC / 2A 125VAC)
Video Signal Loss Alarm
PTZ None
Dimension Length 315mm * Width 224mm * Height 52mm
Page 21

21
Safety precautions:
To reduce risk of electric shock, this product should ONLY be opened by an
authorized technician when servic e is required. Disconnect the product from
mains and other equipment if a problem should occur. Do not expose the
product to water or moisture.
Maintenance:
Clean only with a dry cloth. Do not use cleaning solvents or abrasives.
Warranty:
No guarantee or liability can be accepted for any changes and modifications of the product or damage caused
due to incorrect use of this product.
General:
Designs and specifications are subject to change without notice.
All logos brands and product names are trademarks or registered trademarks of their respective holders and are
hereby recognized as such.
Keep this manual and packaging for future reference.
Attention:
This product is marked with this symbol. It means that used electrical and electronic products should not
be mixed with general household waste. There is a separate collections system for these products.
Copyright
Page 22

1
NEDERLANDS
Inhoudsopgave
Ⅰ. DVR Functies..........................................................................................................2
Ⅱ. Aanzicht ..................................................................................................................
2
2.1. Voorpaneel....................................................................................................................................2
2.2. Achterpaneel................................................................................................................................3
2.3. Afstandsbediening ......................................................................................................................3
2.4. Verwijderbare HDD Box Introductie........................................................................... .... .... .... ....4
Ⅲ. DVR Installatie........................................................................................................5
3.1. Harddisk Installeren ....................................................................................................................5
3.2. Camera en Monitor Aansluiten...................................................................................................6
3.3. Voedingskabel Aansluiten..........................................................................................................6
Ⅳ. DVR Systeemstart..................................................................................................6
4.1. Geïnstalleerde Harddisk Identificeren.......................................................................................6
4.2. Verloren Gegevens Herstellen....................................................................................................7
4.3. Opnameproces Herstellen..........................................................................................................7
4.4. Hoofdscherm................................................................................................................................8
Ⅴ. DVR Instellingen.....................................................................................................9
5.1. Instellingenmenu.........................................................................................................................9
5.2. Cameraselectie ..........................................................................................................................10
5.3. Opnameselectie.........................................................................................................................10
5.4. Opnamemodus...........................................................................................................................10
5.5. Opname Framesnelheid............................................................................................................10
5.6. Opnamekwaliteit........................................................................................................................10
5.7. Opnameschema.........................................................................................................................1 1
5.8. Submenu-Wachtwoord Wijzigen............................................................................................11
5.9. Submenu-T ijdsinstelling....................................... ..................................................................12
5.10. Submenu-Bewegingsinstelling..............................................................................................12
5.11. Submenu-Wachtwoord Instellen............................................................................................13
5.12. Submenu-Zoemertijd..............................................................................................................13
5.13. Harddrive Instelling...................................................................................................................13
5.14. Sensor Instelling........................................................................................................................14
5.15. NTSC/PAL Uitgang Selecteren .................................................................................................15
Ⅵ. Opname.................................................................................................................15
6.1. Opname Starten.........................................................................................................................15
6.2. Opname Stoppen.......................................................................................................................16
6.3. Opnameduur ..............................................................................................................................16
Ⅶ. Afspelen................................................................................................................17
Ⅷ. A/B Pagina Wisselen............................................................................................18
8.1. Introductie..................................................................................................................................18
8.2. Wisselfunctie..............................................................................................................................18
IX. Specificaties .........................................................................................................19
Page 23
2
I. DVR Functies
z 8-Kanaals BNC Camera Ingang
z 2-Kanaals BNC Monitor / VCR Uitgang
z A / B Pagina Wisselfunctie
z NTSC / PAL
z Videoverlies Alarm
z Bewegingsdetectie
z 4 Sets NO / NC Sensoringangen
z 1 Alarmuitgang (2A 28VDC / 2A 125 VAC)
z Eén ATA-100 Harddiskinterface, Ondersteunt meer dan 200G Byte
z Met Verwijderbare HDD Box
z Tijdschema Opname / Sensorgeactiveerde Opname / Beweging geactiveerde Opname
Aanzicht
2.1 Voorpaneel
1 Kanaal 1 7 Omhoog 13 Afspelen 19 HDD Wisselen
2 Kanaal 2 8 Selecteren/Bewerken 14 Pauze 21 Druktoets
3 Kanaal 3 9 Omlaag 15 Terugspoelen 22 Slot
4 Kanaal 4 10 Opnemen 16 HDD Toegangindicator 23 Sleutel
5 Quad View 11 Stop 17 Aan/Uit Indicator 24 Actief-hendel
6 Menu/ Verlaten 12 Vooruitspoelen 18 IR Window 25 Koeling
20 Wisselmodus openen/verlaten
Page 24
3
2.2 Achterpaneel
1. Video Uitgang
2. Video Ingang
3. Sensoringang/Alarmuitgang
4. DC Voeding
5. Aarding
2.3 Afstandsbediening
1.CH1 CH1 selecteren of vergroten
2.CH2 CH2 selecteren of vergroten
3.CH3 CH3 selecteren of vergroten
4.CH4 CH4 selecteren of vergroten
5.QUAD Quad View
6.REW Terugspoelen
7.PLAY Opnamelijst afspelen
8.FWD Vooruitspoelen
9.RECORD Opnemen
10.PAUSE Pauze
11.STOP Opname of afspelen stoppen
12.MENU Instellingenmenu openen of verlaten
13.Sel/Edit Onderwerp aanpassen
14.UP Prompt omhoog
15.DOWN Prompt omlaag
16.CH1 Wisselen tussen CH1A en CH1B
17.A / B Wisselen tussen Quad1 en Quad2
18.CH2 Wisselen tussen CH2A en CH2B
19.CH3 Wisselen tussen CH3A en CH3B
20.CH4 Wisselen tussen CH4A en CH4B
Page 25
4
2.4 Verwijderbare HDD Box Introductie
1 .Aan/Uit Indicator
2 .HDD Toegangsindicator
3 .Slot
4 .PVC Frame
5 .Actief-hendel
6 .Koeling
7 .HDD gegevenskabel
8 .HDD voedingskabel
Page 26
5
III. DVR Installatie
3.1 Harddisk Installeren
Afb1
Afb2
Afb3
(Wij raden de gebruiker aan om zelf een HDD te kopen)
Schuif de houder uit het frame (Afb1)
OPGELET
De HDD NIET verwijderen terwijl de DVR draait!
Sluit de HDD gegevenskabel en voedingskabel aan op
de HDD (Afb2)
Druk de houder volledig terug in het frame (Afb3)
Page 27
6
3.2 Camera en Monitor Aansluiten
Er zijn 8 camera-ingangen en 2 monitoruitgangen met BNC aansluiting.
3.3 Voedingskabel Aansluiten
Gebruik de stroomadapter die meegeleverd is met de DVR.
Ⅳ DVR Installatie
4.1 Geïnstalleerde Harddisk Identificeren
HDD Checking………..
MASTER HARD DRIVE
IBM—DHEA—36481
SLAVE HARD DRIVE
Nadat de voeding is aangesloten, zal het systeem
herstarten en de geïnstalleerde harddisk identificeren.
De monitor zal informatie tonen over de Master en
Slave harddisk.
Zie de handleiding van de harddisk om de gewenste
harddiskvolgorde te configureren. (Master of Slave)
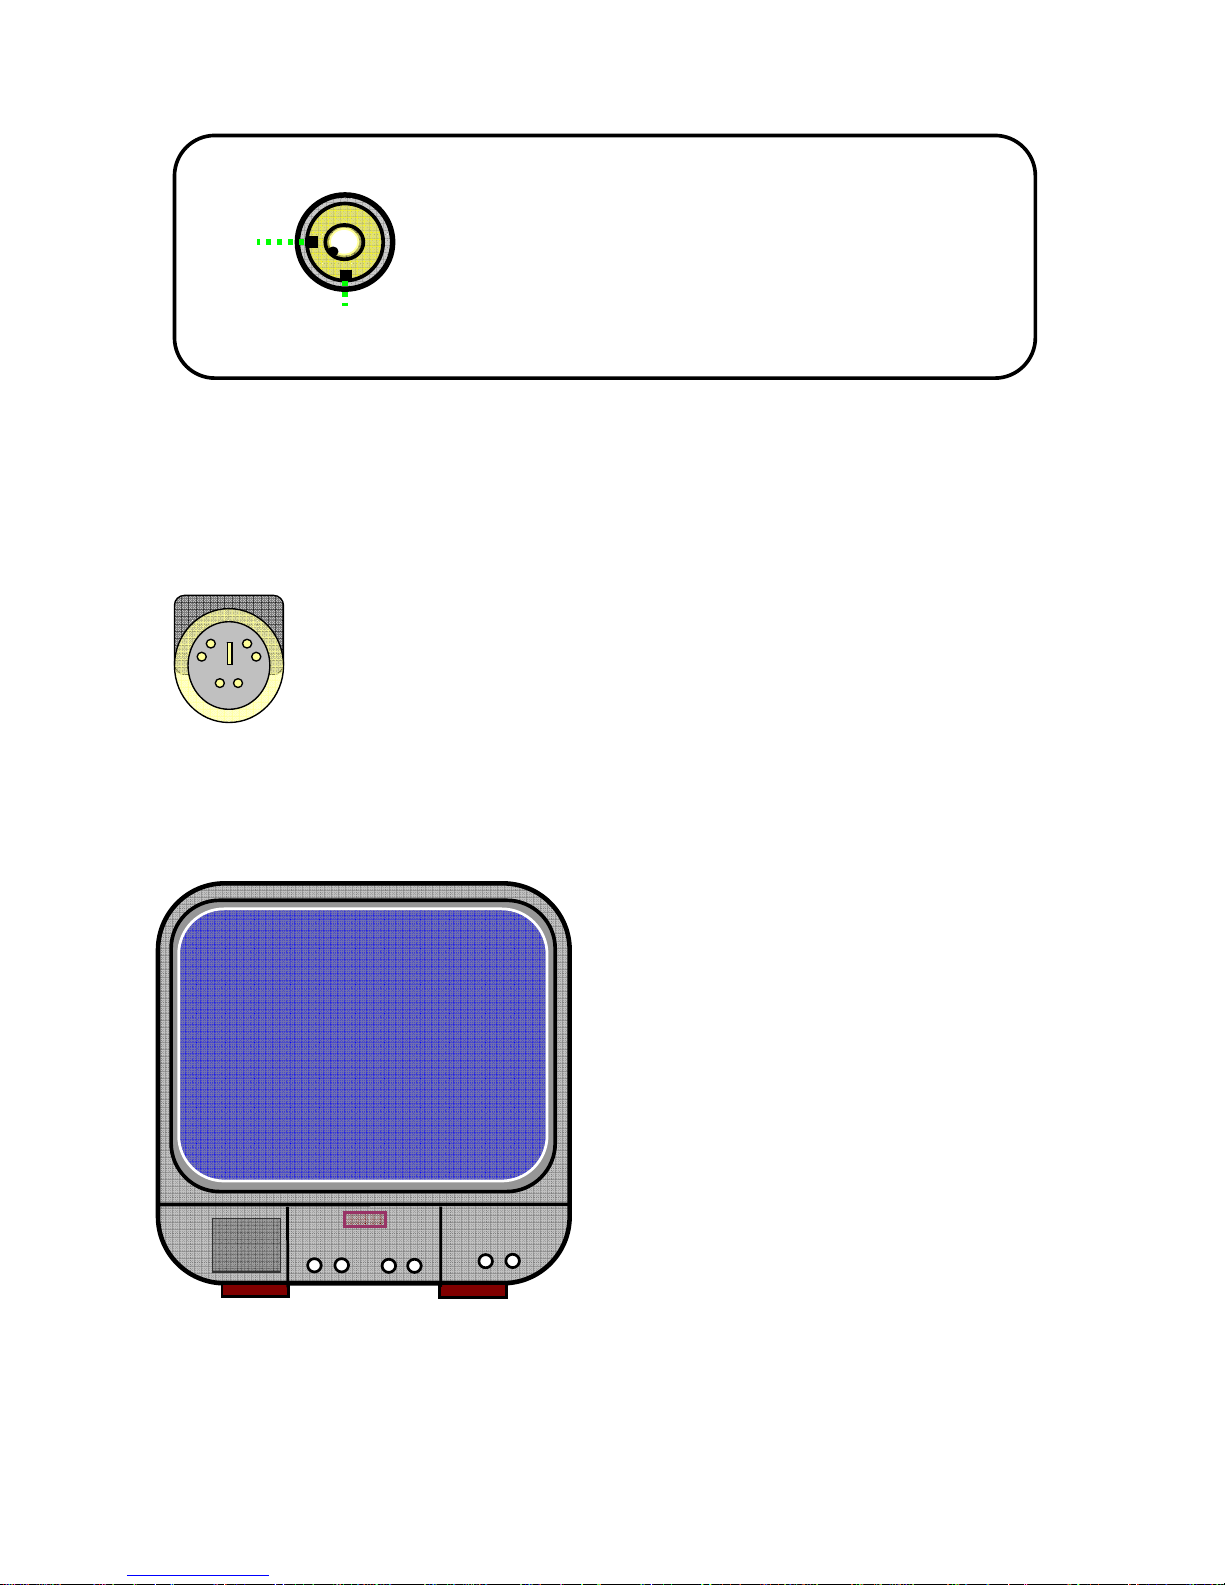
A: Vergrendeld (Niet Verwijderbaar)
B: Ontgrendeld (Verwijderbaar)
A
B
Slot
Page 28
7
4.2 Verloren Gegevens Herstellen
4.3 Opnameproces Herstellen
SLAVE: RECOVER HDD?
04811-101735
(SELECT) YES/(MENU)NO
Stroomuitval veroorzaakt gegevensverlies, in
dit geval vraagt het systeem om ‘gegevens te
herstellen’ in de volgende stap van de
procedure. Druk a.u.b. op [
Selecteren ] om
door te gaan.
POWER ERROR DETECHED
RESTO REHARD
DISK(MASTER) OK
RESTORE REC MODE… OK
In geval van stroomuitval tijdens het
opnameproces, zal het systeem automatisch het
opnameproces herstellen nadat de voeding weer is
ingeschakeld.
Page 29
8
4.4 Hoofdscherm
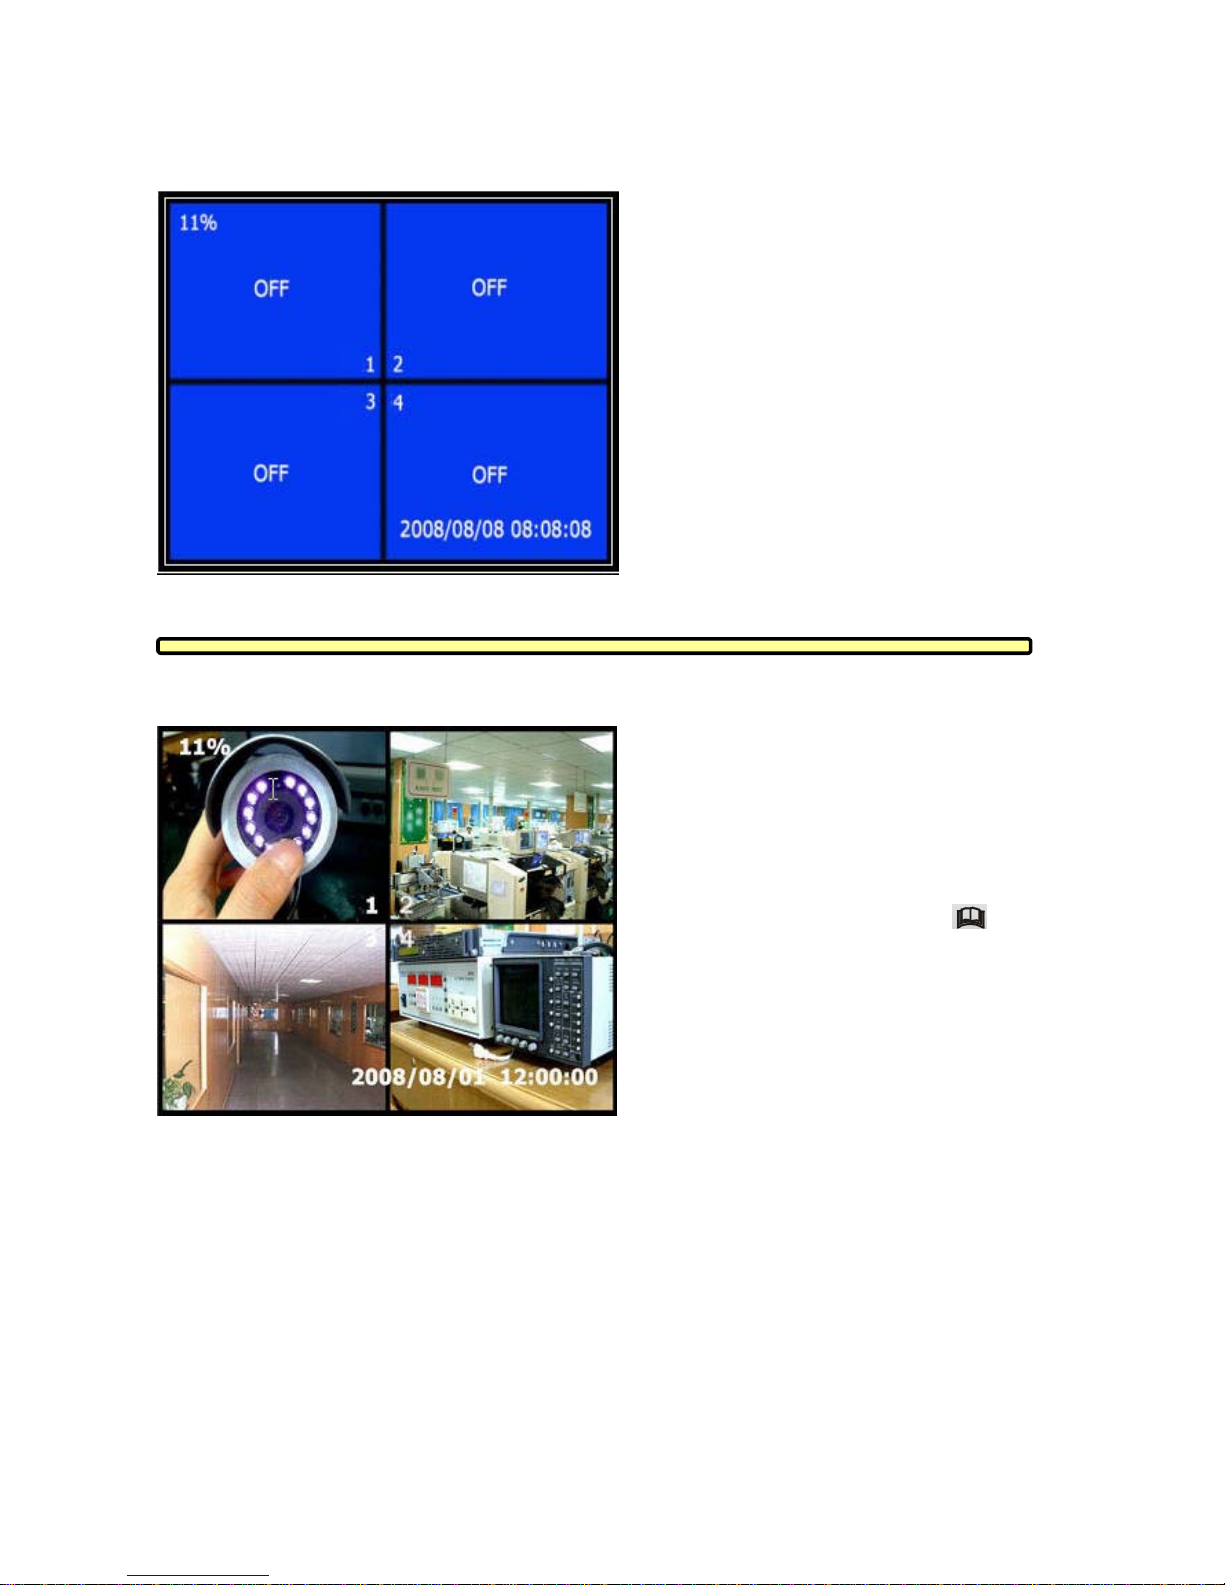
Wanneer u de DVR voor het eerst start,
staan alle camera’s UIT. Volg a.u.b.
hoofdstuk 5-2 om alle camera’s in te
schakelen.
λ Linksboven ÆPercentage Gebruikte
Harddiskruimte
λ Midden ÆKanaalnaam (CH1 ~ CH4)
λ RechtsonderÆ Huidige Datum en Tijd,
DVR wacht op commando, druk op [
Menu]
om naar het DVR-instellingenmenu te gaan.
Page 30
9
V. DVR Instellingen
5.1 Instellingenmenu
Menufolder
Cameraselectie
Opnameselectie
Opnamemodus
Opname Framesnelheid
Videokwaliteit
Opnameschema
Submenu
Harddrive Instelling
Sensor Instelling
0% MAIN MENU
> CAMERA SELECT 1234
RECORD SELECT 1234
RECORD MODE EACH
REXORD FRAMERATE 30
VIDEO QUALETY NORMAL
RECORD SCHEDULE
SUB MENU
HARD DRIVE SETUP
SENSOR SETUP
PRESS(<、>). THEN(SELECT)
PRESS(MENU) TO EXIT
Druk op [ Menu] om het instellingenmenu te
openen en gebruik [
Omhoog] en [ Omlaag]
om een onderwerp te selecteren. Gebruik [
Selecteren] om de instelling te wijzigen en druk
op [
Menu] om te bevestigen en af te sluiten.
Hoofdmenu
Wachtwoord Wijzigen
Tijdsinstelling
Bewegingsinstelling
Wachtwoord Instellen
Zoemertijd
Page 31

10
5.2 Cameraselectie
Het systeem kan 4 cameravideo’s op één scherm weergeven (Quad Modus). De gebruiker kan configureren
welke camera er weergegeven wordt.
Druk op [
Selecteren ] om instellingen te wijzigen en druk op [ CH1 ],[ CH2 ], [ CH3 ],[ CH4 ] om elk
kanaal afzonderlijk in te stellen. Wanneer er geen kanaal geopend is, zal het systeem [OFF] (Uit) op de monitor
aangeven.
5.3 Opnameselectie
Configureer welk kanaal opgenomen wordt.
5.4 Opnamemodus
Er zijn twee modi voor video-opname,
[Afzonderlijke Modus]: De video’s van elk kanaal afzonderlijk comprimeren en opnemen, zodoende kan
de gebruiker elk kanaal apart vergroten tot op de volledige schermweergave. De
gebruiker kan bijvoorbeeld de opnamefunctie van CH1 en CH2 uitschakelen,
waardoor het systeem alleen kanalen CH3 en CH4 opneemt.
Druk op [
CH1 ],[ CH2 ],[ CH3 ],[ CH4 ] om van weergegeven kanaal te
wisselen tijdens het afspelen van opgenomen video.
[Quad Modus]: De video’s van alle 4 kanalen in één bestand comprimeren en opnemen; de gebruiker
kan daardoor niet meer een enkel kanaal tot op de volledige schermweergave
vergroten. In deze modus kan de gebruiker de Afzonderlijke Modus niet gebruiken.
5.5 Opname Framesnelheid
De framesnelheid tijdens opnames beïnvloedt de beweging van het object in de opgenomen video. Meer frames
betekent een soepelere beweging maar neemt meer diskruimte in besla g. De standaard systeemwaarde is 25 fps,
wat inhoudt dat het systeem 25 frames per seconde opneemt. De gebruik kan de framesnelheid instellen op 25,
12, 8, 6, 4, 3, 2, 1 frames per seconde.
5.6 Opnamekwaliteit
De opnamekwaliteit kan op drie niveaus worden ingesteld; Hoog, Normaal en Laag. Een hogere kwaliteit neemt
meer diskruimte in beslag.
Page 32
11
De harddiskruimte en de framesnelheid en kwaliteit van de opname zullen de totale opnametijd van het DVR
systeem beïnvloeden.
5.7 Opnameschema
De gebruiker kan de video opnamemethode op tijd instellen, of zodanig dat de opname geactiveerd wordt door
de Sensor of Beweging.
5.8 Submenu—Wachtwoord Wijzigen
Standaard Systeemwachtwoord: Druk zes maal op de [
CH1] toets
+TTTMTMMTTTMMTTSSSTTT+
│ │ │ │ │ │ │ │ │
0 3 6 9 12 15 18 21 24
λ “-” Geen Opname
λ “T” Vervolgen, (Systeemstandaard)
λ “S” Sensoractivering.
λ “M” Bewegingactivering.
Te koppelen met veel verschillende externe
sensorapparatuur, zoals PIR, Gassensor, enz. De DVR zal
de opname niet starten totdat een externe sensor
geactiveerd wordt en in deze specifieke tijdsduur een
uitgangssignaal naar de DVR stuurt.
Toetsfunctie:
[
Omhoog] [ Omlaag: Prompt bewegen
[
Selecteren ]: Methode selecteren.
CURRENT PASSWORD :……
NEW PASSWORD :……
CONFIRM PASSWORD :……
Alle toetsen kunnen als wachtwoord
gebruikt worden, behalve de [
Menu ] toets, welke gebruikt wordt voor
bevestigen en afsluiten.
Page 33
12
5.9 Submenu—Tijdsinstelling
5.10 Submenu—Bewegingsinstelling
Als eerste dient de Gebruiker de video opnamemethode in te stellen op Bewegingsactivering. Zie paragraaf 5.7.
Na de “BEWEGINGSINSTELLING” te hebben voltooid, kan de Gebruiker het MENU verlaten en op [ Opnemen ]
drukken om de Beweginggeactiveerde opname te starten.
2008/08/08 08:08:08
*
0%
MOTION SET
MOT LEVEL 5
MOT REC TIME 25
MOT LEVEL(Bewegingsniveau): Druk op [
Selecteren] om de gevoeligheidsgraad voor de
bewegingsdetectie te wijzigen.
Hoog (1----------10)Laag
MOT REC TIME (Beweging Opnamet ijd ): St el de
opnametijd in na activering door
bewegingsdetectie. Druk op [
Selecteren] om
de tijd in te stellen.
Tijdsinstelling:5sec~30sec
Configureer de DVR systeemtijd. Gebruik [
Omhoog] en [
Omlaag] om de prompt te
bewegen en druk op [
Selecteren] om te
wijzigen. Druk op [
Menu ] om de invoer te
voltooien en af te sluiten.
Page 34
13
5.11 Submenu-Wachtwoord Instellen
Wanneer het wachtwoord op “AAN” is ingesteld, is het wachtwoord vereist om opnames te stoppen of menu’s te
openen. Als het wachtwoord op “UIT” is ingesteld, zijn alle wachtwoorden geannuleerd.
5.12 Submenu-Zoemertijd
Stel de Zoemertijd in (00, 05, 10, 15, 20, 25,30 seconden en CONT), de Gebruik kan op [
Selecteren] drukken
om de tijd in te stellen. Wanneer de Zoemertijd is ingesteld op “00”, zijn alle zoemers uitgeschakeld. Wanneer de
“Zoemertijd” is ingesteld op “CONT”, blijft de zoemer continu werken.
5.13 Harddrive Instellingen
MASTER HDD GEBRUIKT
Toont de gebruikte ruimte op de eerste harddisk drive voor opnames en het percentage van de gebruikte
harddiskruimte.
MASTER HDD FORMATTEREN
Door de harddrive te formatteren, worden alle opgenomen gegevens op de eerste harddisk drive gewist.
SLAVE HDD CAPACITEIT
Toont de capaciteit van de secundaire harddisk drive die geïnstalleerd is in de DVR.
SLAVE HDD GEBRUIKT
Toont de gebruikte capaciteit van de primaire harddisk drive voor opnames.
SLAVE HDD FORMATTEREN
Door de harddrive te formatteren, worden alle opgenomen gegevens op de secundaire harddisk drive gewist.
HARD DRIVE SETUP
>ORERORITE ENABLE [YES]
MASTER HDD SIZE 40042MB
MASTER HDD USED 80865MB %77
MASTER HDD FORMAT
SLAVE HDD SIZE N/A
SLAVE HDD USED N/A
SLAVE HDD FORMAT
PRESS(<>) THEN (SELECT)
PRESS(MENU)TO EXIT
OVERSCHRIJVEN GEACTIVEERD
Als u “JA” kiest, vervolgt de opname en
worden voorgaande opnames overschreven
wanneer de capaciteit van de harddisk vol is.
Als u voor “NEE” kiest, dan stopt de
opnamesessie zodra de harddisk geen
ruimte meer heeft voor opnames.
MASTER HDD CAPACITEIT
Toont de capaciteit van de primaire harddisk
drive die geïnstalleerd is in de DVR.
Page 35
14
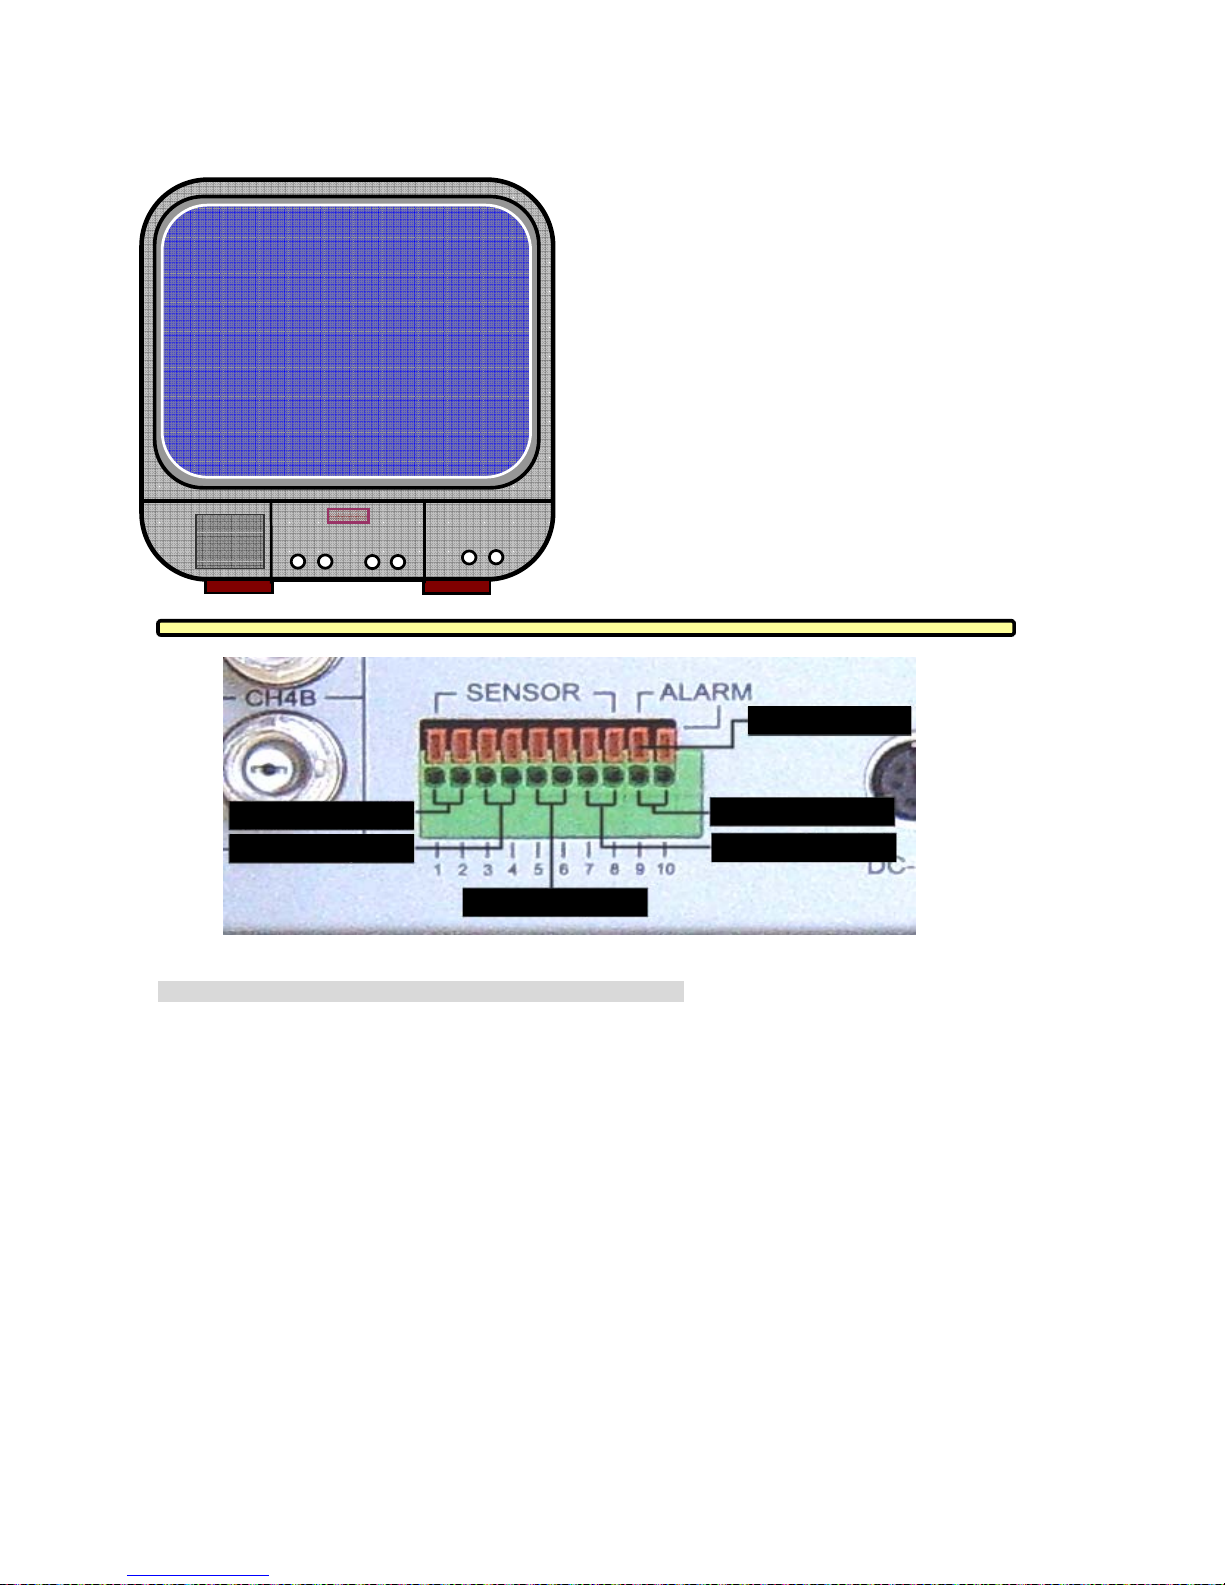
5.14 Sensor Instelling
Druk op de ONTGRENDELTOETS om de draad aan te sluiten
Er zijn 3 verschillende modi voor de sensorinstellingen:
NIET GEÏNSTALLEERD, NORMAAL-GESLOTEN en NORMAAL-OPEN.
Dit is afhankelijk van het type externe sensor dat de gebruiker gebruikt. Als de uitgang van de sensor
NORMAL-OPEN is, selecteer dan de modus NORMAL-OPEN in de DVR.
Zodra de sensor door een inbreker wordt geactiveerd, ontvangt het systeem via de kabel die aangesloten is
op de DVR ingang een melding en wordt de opname gestart.
Deze DVR ondersteunt vier paren ingangspunten.
SENSOR OPNAMETIJD
Dit nummer geeft aan hoe lang de sensoropname duurt
nadat de sensor bewegingen aangeeft binnen het
bereik van de camera.
ALARM UIT TIJD
Dit bepaalt hoe lang (in seconden) het alarm duurt
nadat het geactiveerd is.
Waarde 0 schakelt de alarmuitgang uit.
Door Cont te selecteren, wordt de alarmuitgang
ingeschakeld totdat de gebruiker een willek eu rig e toets
indrukt.
SENSOR SETUP
>
SENSOR RECORD TIME 10
ALARM OUT TIME 05
CHANNEL-1 TYPE:NORMAL-OPEN
CHANNEL-2 TYPE:NORMAL-CLOSE
CHANNEL-3 NOT INSTALLED
CHANNEL-4 NOT INSTALLED
Sensor Ingang 1
Sensor Ingang 2 Sensor Ingang 4
Alarm Uit
Ontgrendeltoets
Sensor Ingang 3
Page 36
15
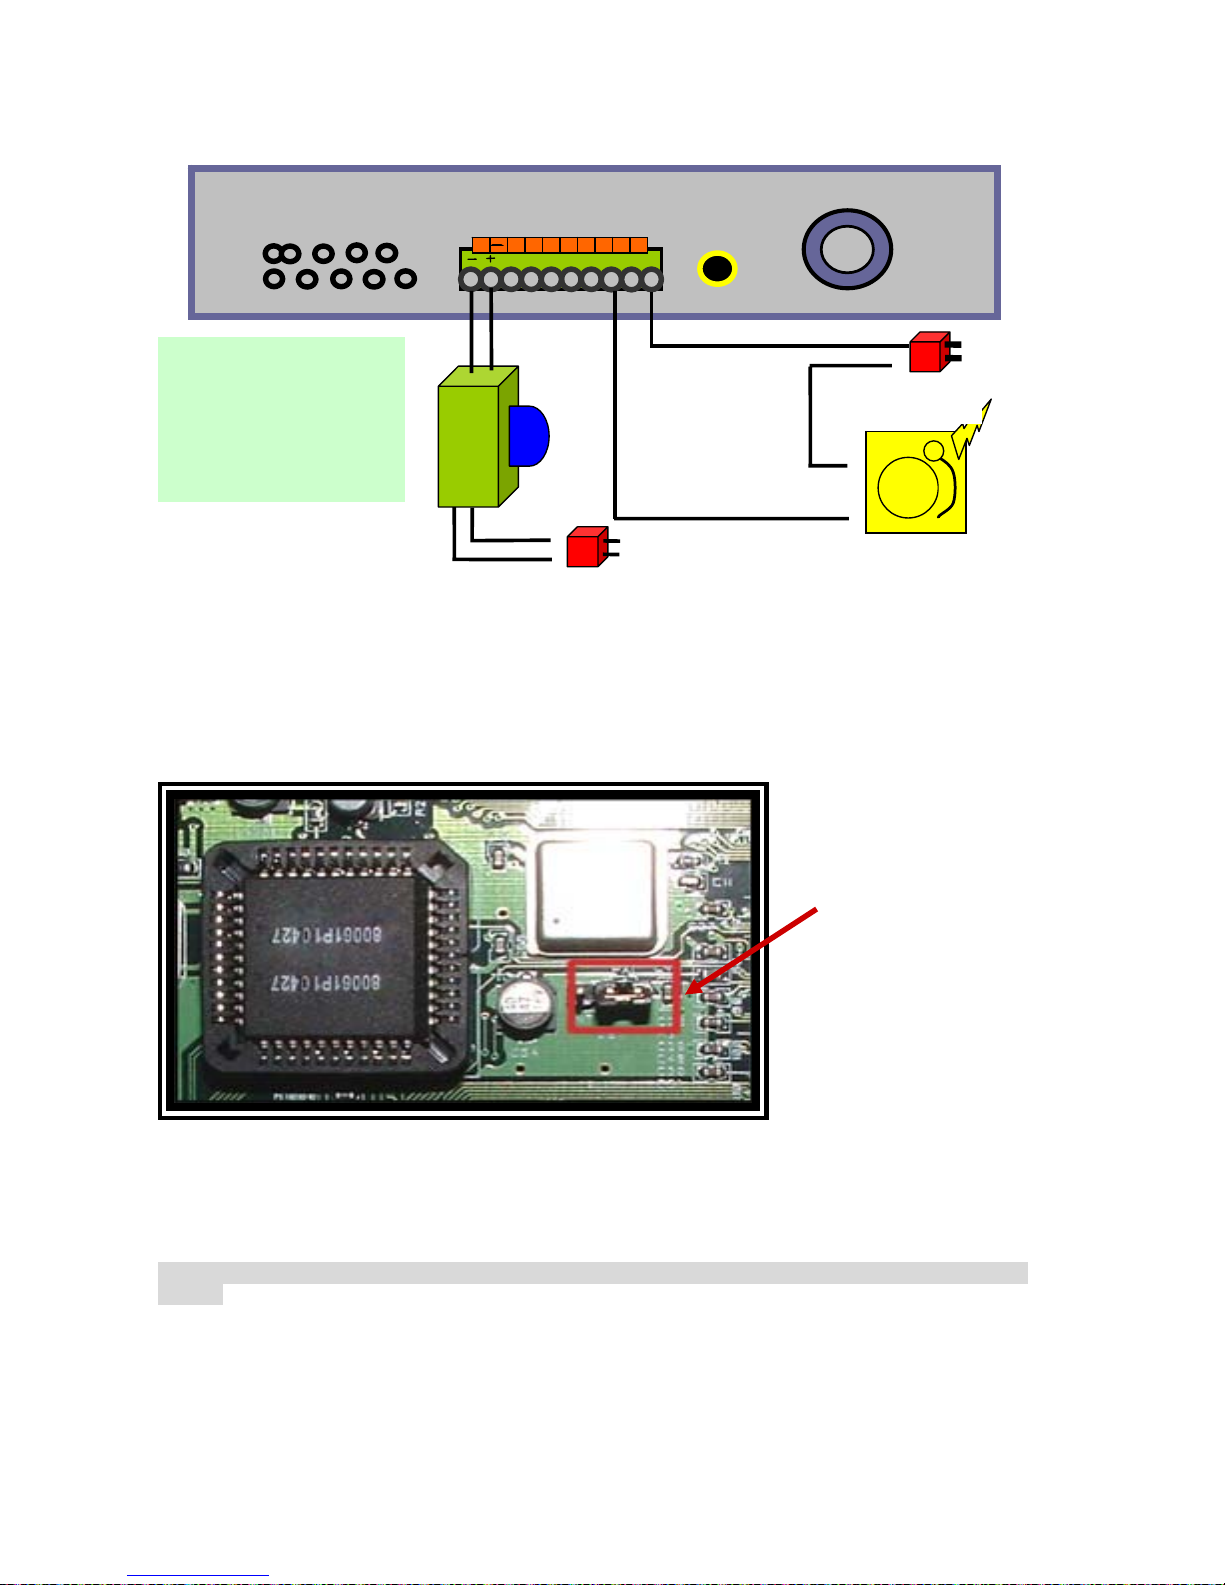
Installatieschema voorbeeld:
5.15 NTSC/PAL Uitgang Selecteren
Verander overbrugging JS1 om NTSC of PAL als video uitgangsformaat te selecteren, afhankelijk van de
printplaat op de PCB.
VI Opname
6.1 Opname Starten
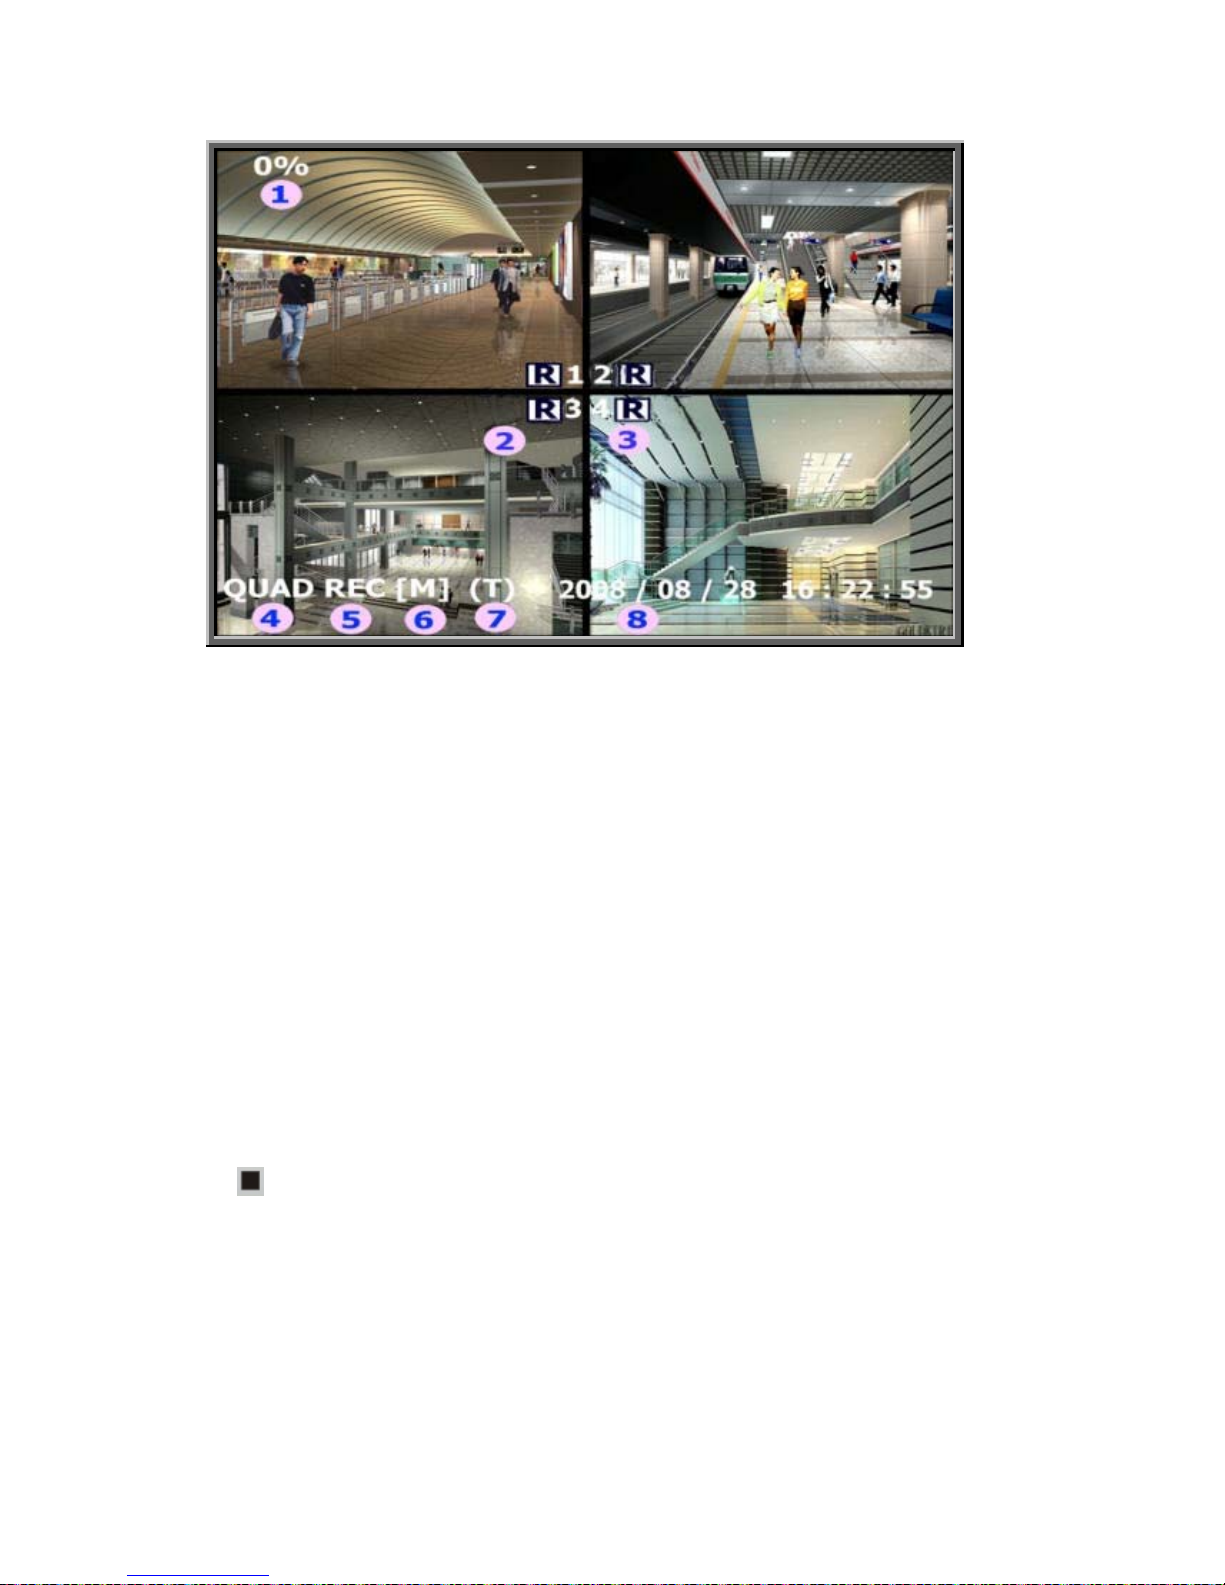
Druk op [Opnemen] om de opname te starten. Het systeem zal bepaalde informatie op het Scherm weergeven.
*Aleen in AFZONDERLIJKE MODUS kan een enkel kanaal tot op volledige schermweergave vergroot
worden
Sluit de PIR sensor
NO/NC uitgang aan op
de DVR ingang.
(Max. 5V DC)
DVR
Alarm
Voeding
PIR Sensor
Voeding
NTSC/PAL Selectie
Page 37
16
λ ① Harddisk Gebruikspercentage
λ ② Opnamesymbool
λ ③ Kanaalnamen
λ ④ Modus(QUAD of AFZONDERLIJK)
λ ⑤ Status (Opnemen, Afspelen, Vooruitspoelen 1-2-3, Terugspoelen, Pauze)
λ ⑥ HD Info. ([M] Master disk [S] Slave disk)
λ ⑦ Schema((T) Continu (S) Sensor (-) Geen Opname
λ ⑧ Wanneer [* ] naast de datum & tijd verschijnt, betekent dit dat het systeem het geheugen overschrijft.
6.2 Opname Stoppen
Druk op [
Stop ] en het systeem zal u om het wachtwoord vragen. Alleen met een correct wachtwoord kan het
opnameproces gestopt worden.
6.3 Opnameduur
Page 38
17
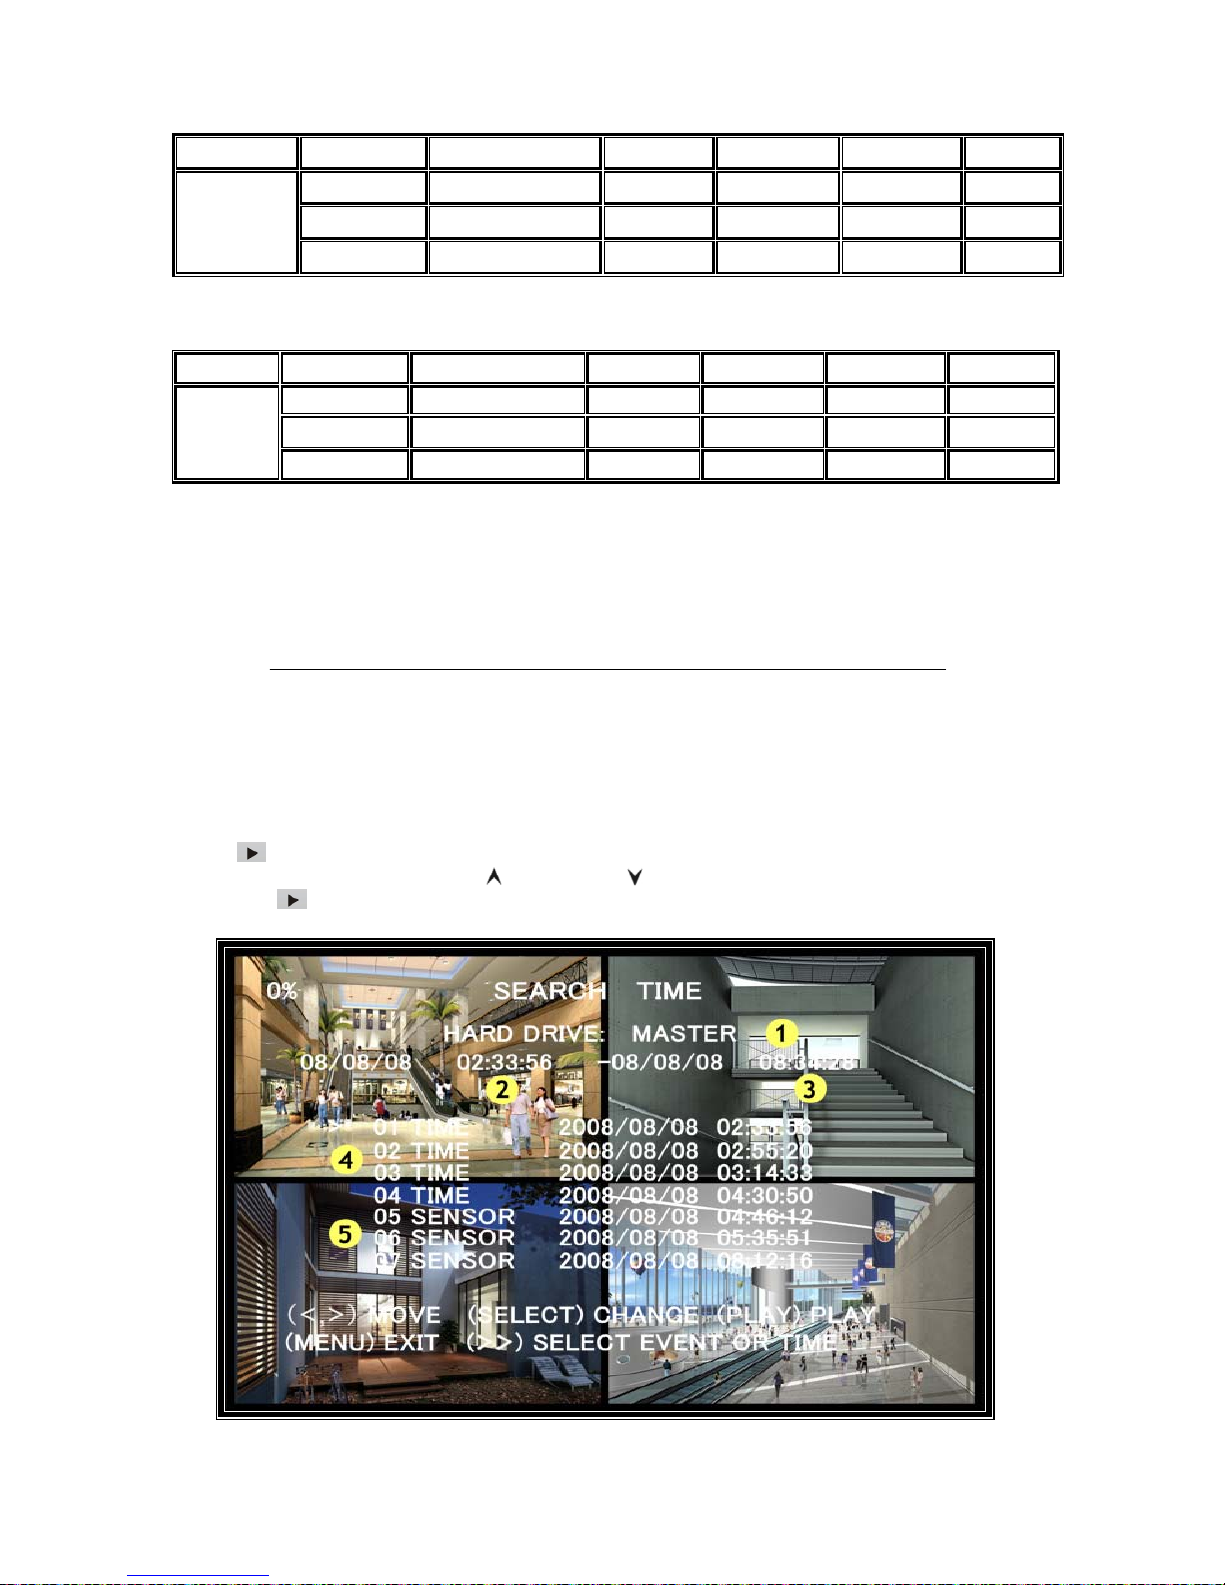
Met de onderstaande formule kan de gebruiker de opname-uren berekenen en inschatte n
120G Byte @ 7 frames per seconde @ Normala kwallteit
120 (G byte) x 1024 (M byte) x 102 4 (K byte)
15 (Kbyte/frame) x 7 (frame/sec) x 60 (sec) x 60 (min)
Schatting is 332 Uren
VII Afspelen
Druk op [ Afspelen ] en het systeem zal een lijst tonen met alle opgenomen videoclips op de HD. De lijst
begint met de nieuwste video. Gebruik [
Omhoog ] en [ Omlaag ] om de starttijd te selecteren en druk
nogmaals op [
Aspelen ] om de video tot het einde af te spelen.
Formaat Kwaliteit Framesnelheid 30 15 7 1
HOOG 20 58 117 251 1748
NORMAAL 15 78 155 333 2330
NTSC
LAAG 12 97 194 416 2913
Formaat Kwaliteit Framesnelheid 25 12 6 1
HOOG 20 70 146 291 1748
NORMAAL 15 93 194 388 2330
PAL
LAAG 12 117 243 485 2913
Page 39

18
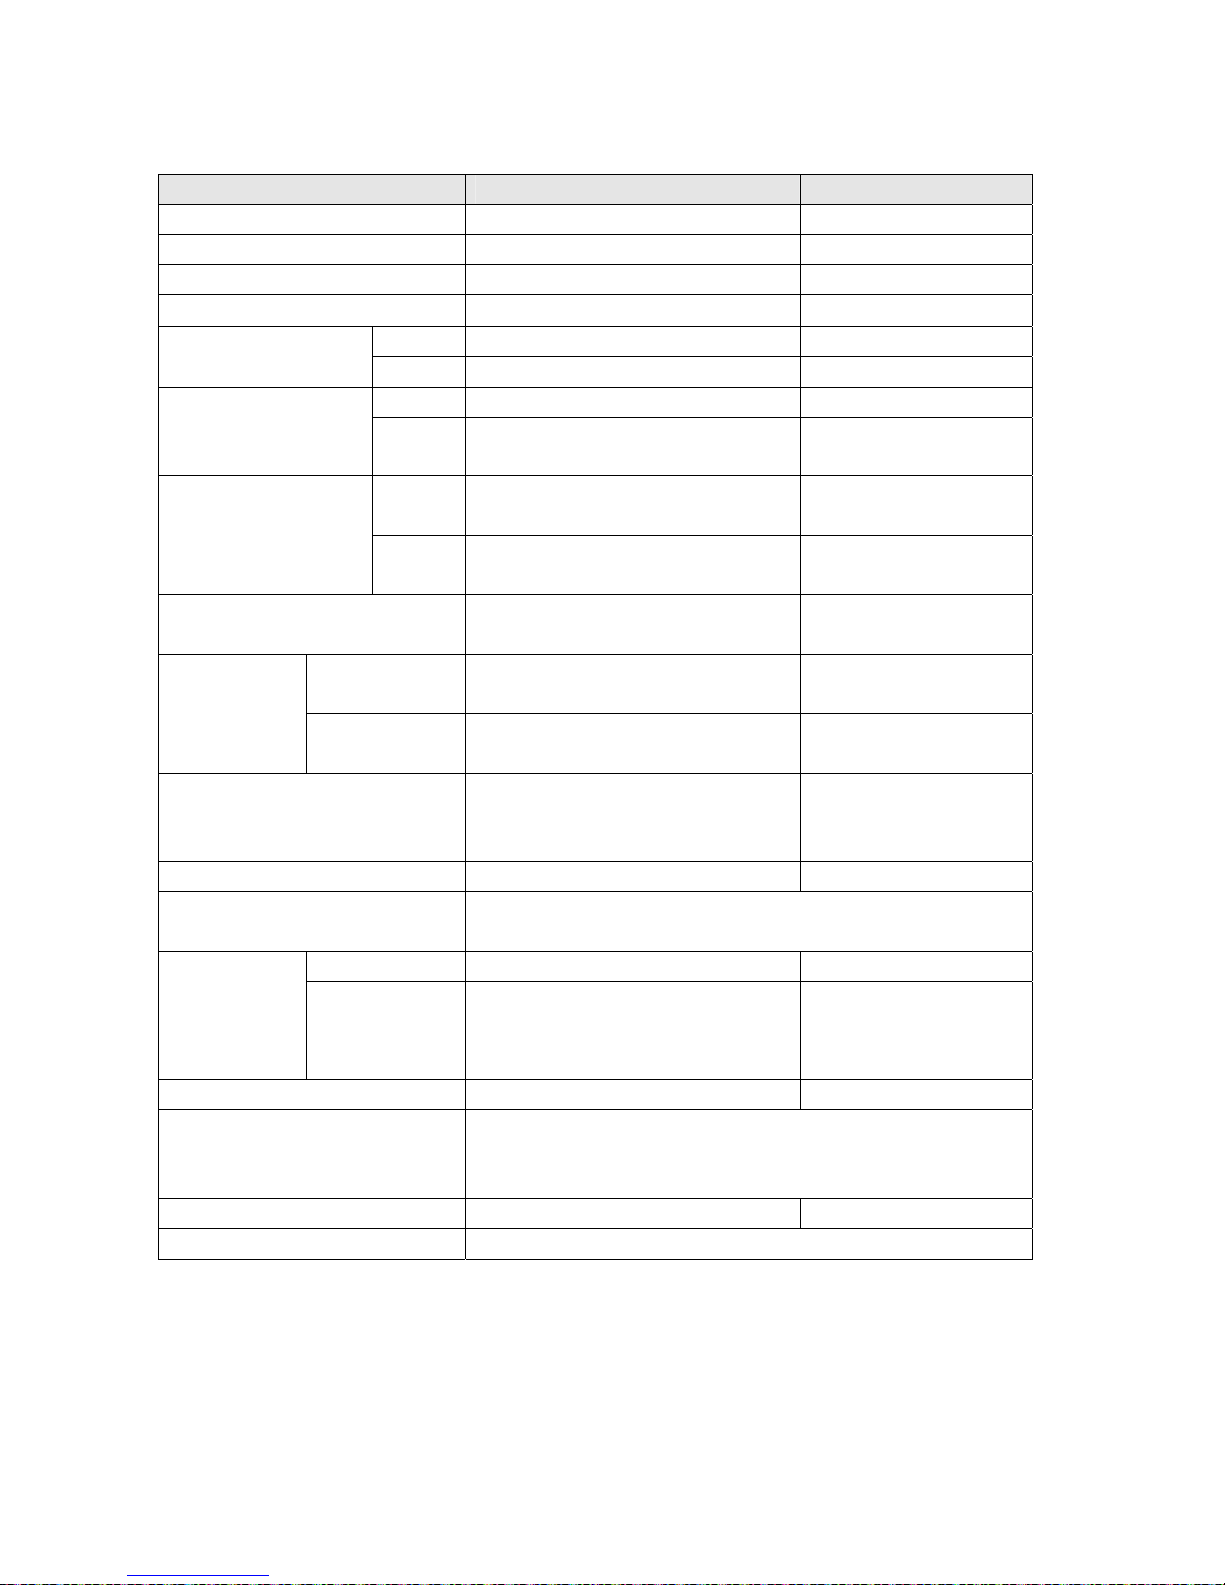
1. HD Informatie 2. Start tijd
3. Eindtijd 4. TIJD: Onafgebroken opname
5. SENSOR: Sensoractivering 6.Beweging:Bewegingsactivering
Een andere manier om naar video’s te zoeken is de tijdsperiode direct in te voeren. Druk op [
Vooruitspoelen ] en vervolgens op [
Omhoog ] en [ Omlaag ] om cijfers te selecteren. Druk op [
Selecteren ] om de tijdswaarde aan te passen en druk op [
Afspelen ] om de video af te spelen.
A/B PAGINA WISSELENⅧ
8.1 Introductie
Dit product biedt 8 kanalen voor video-invoer; CH1A, CH2A, CH3A, CH4A, CH1B, CH2B, CH3B en CH4B. U
kunt maximaal 4 van deze kanalen in real-time bekijken in modus QUAD VIEW. U kunt de andere kanalen echter
bekijken met gebruik van de A/B PAGINA WISSELFUNCTIE.
8.2 Wisselfunctie
Er zijn twee methoden om kanalen te wisselen tussen pagina’s A en B:
[ Voorpaneel gebruiken ]: druk op [ A B ], de [ PWR ] LED springt op rood.
Druk vervolgens op
[
CH1 ], wissel tussen kanaal CH1A en CH1B
[
CH2 ], wissel tussen kanaal CH2A en CH2B
[
CH3 ], wissel tussen kanaal CH3A en CH3B
[
CH4 ], wissel tussen kanaal CH4A en CH4B
[ QUAD ], wissel tussen de huidige 4 kanalen en de andere 4 kanalen
Druk uiteindelijk op [ A B ] om de wisselmodus te verlaten.
[ Afstandsbediening gebruiken ]: gebruik de toets in het venster [ A/B PAGINA WISSELEN ].
Druk op [ CH1 ], wissel tussen kanaal CH1A en CH1B
Druk op [ CH2 ], wissel tussen kanaal CH2A en CH2B
Druk op [ CH3 ], wissel tussen kanaal CH3A en CH3B
Druk op [ CH4 ], wissel tussen kanaal CH4A en CH4B
Druk op [ A/B ], wissel tussen de huidige 4 kanalen en de andere 4 kanalen
0 8 /0 8 / 0 8 1 5 : 0 3 : 3 2 --0 8 / 0 8 / 0 8 1 6 : 2 8 : 1 2
Page 40
19
IX Specificaties
ONDERWERP OMSCRHIJVING OPMERKING
Videoformaat NTSC / PAL
Besturingssysteem Geen STAND-ALONE
Camera Ingangskanaal 8-kanaals Samengestelde BNC
Video Uitgangskanaal 2-kanaals Samengestelde BNC
NTSC 120 frames/seconde 4 x 30 frames/seconde Weergave
Framesnelheid
PAL 100 frames /seconde 4 x 25 frames/seconde
NTSC Max 30 fps (Quad) Quad Modus Opname
Framesnelheid
(Quad)
PAL Max.25 fps (Quad) Quad Modus
NTSC
Elk Kanaal =
30 ÷ Nummer van Bron
Max. 30 frames/s
(Elk Kanaal)
Opname
Framesnelheid
(Afzonderlijke Modus)
PAL
Elk Kanaal =
25 fps ÷ Nummer van Bron
Max. 25 frames/s
(Elk Kanaal)
Opnamemodus
Continu, Gepland,
Bewegingsactivering, Sensoractivering
Weergave
NTSC:720 x 480
PAL:720 x 576
Resolutie
Opname
NTSC:320 x 112, 640 x 224
PAL:320 x 136, 640 x 272
Quad:640 x 224 (totaal)
Afzonderlijk:640 x 224
Video Comprimeerformaat
(Elk Kanaal)
Gemodificeerde Beweging-JPEG
(12-20K bytes/frame)
Laag :12K Byte
Normaal :15K Byte
Hoog : 20K Byte
HDD Ondersteunt Meer dan 200G Byte ATA -100 Interface
Benaderde Opnameduur
120G Harddisk @ 7 frames per seconde @ Normale Kwaliteit
(120*1024*1024 K byte) ÷ ( 7*15*60*60 ) = 332 Uur
Methode Tijd, Datum, Gebeurtenis
Zoeken
Volledig Scherm JA
Stem Geen
Sensor, Alarm
4 Ingangen (Normaal Open / Normaal Gesloten)
1 Ingang (Relais 2A 28VDC / 2A 125VAC)
Video Signaalverlies Alarm
PTZ Geen
Afmetingen Lengte 315mm * Breedte 224mm * Hoogte 52mm
Page 41
20
Veiligheidsvoorzorgsmaatregelen:
Om het risico op elektrische schokken te voorkomen mag dit product AL LEEN
worden geopend door een erkende technicus wanneer er onderhoud nodig is.
Koppel het product los van de elektrische voeding en van andere apparatuur
als zich problemen voordoen. Stel het product niet bloot aan water of vocht.
Onderhoud:
Uitsluitend reinigen met een droge doek. Gebruik geen reinigingsmiddelen of schuurmiddelen.
Garantie:
Voor wijzigingen en veranderingen aan het product of schade veroorzaakt door een verkeerd gebruik van dit
product, kan geen aansprakelijkheid worden geaccepteerd. Tevens vervalt daardoor de garantie.
Algemeen:
Wijziging van ontwerp en specificaties zonder voorafgaande mededeling onder voorbehoud.
Alle logo's, merken en productnamen zijn handelsmerken of geregistreerde handelsmerken van de
respectievelijke eigenaren en worden hierbij als zodanig erkend.
Bewaar deze gebruiksaanwijzing voor latere raadpleging.
Let op:
Dit product is voorzien van dit symbool. Dit symbool geeft aan dat afgedankte elektrische en
elektronische producten niet met het gewone huisafval verwijderd mogen worden. Voor dit soort
producten zijn er speciale inzamelingspunten.
Copyright
 Loading...