

SEC-CAMIP40
SEC-CAMIP40EC
MANUAL (p. 2 )
Powerline IP camera
ANLEITUNG (s. 11 )
Powerline IP-Kamera
MODE D’EMPLOI (p. 21 )
Caméra IP CPL (courants porteurs)
GEBRUIKSAANWIJZING (p. 31 )
Powerline beeldweergavecamera
MANUALE (p. 41 )
Telecamera IP per rete powerline
MANUAL DE USO (p. 51 )
Cámara IP Powerline
HASZNÁLATI ÚTMUTATÓ (o. 61.)
Powerline IP Kamera
KÄYTTÖOHJE (s. 71 )
Powerline IP-kamera
BRUKSANVISNING (s. 80 )
Powerline IP kamera
NÁVOD K POUŽITÍ (s. 90 )
IP kamera Powerline
MANUAL DE UTILIZARE (p. 99 )
Cameră IP conectată la sursa de electricitate
ΕΓΧΕΙΡΙ∆ΙΟ XPHΣHΣ (σελ. 109 )
IP κάμερα με Καλώδιο Ισχύος
BRUGERVEJLEDNING (p. 119 )
Powerline IP kamera
VEILEDNING (p. 128 )
Powerline IP-kamera
2
ENGLISH
Powerline IP camera
Note:
This is a short description guide for the SEC-CAMIP40 and SEC-CAMIP40EC.
For full details on how to use the software, refer to the advanced English manual.
Important notice:
Take responsibility for the security settings, such as user ID and password, to access this product.
This information should not be made available to any third party outside the user group.
Take responsibility for this product's user information, such as videos, still images and internet contents
etc. This information should not be made available to any third party outside the user group.
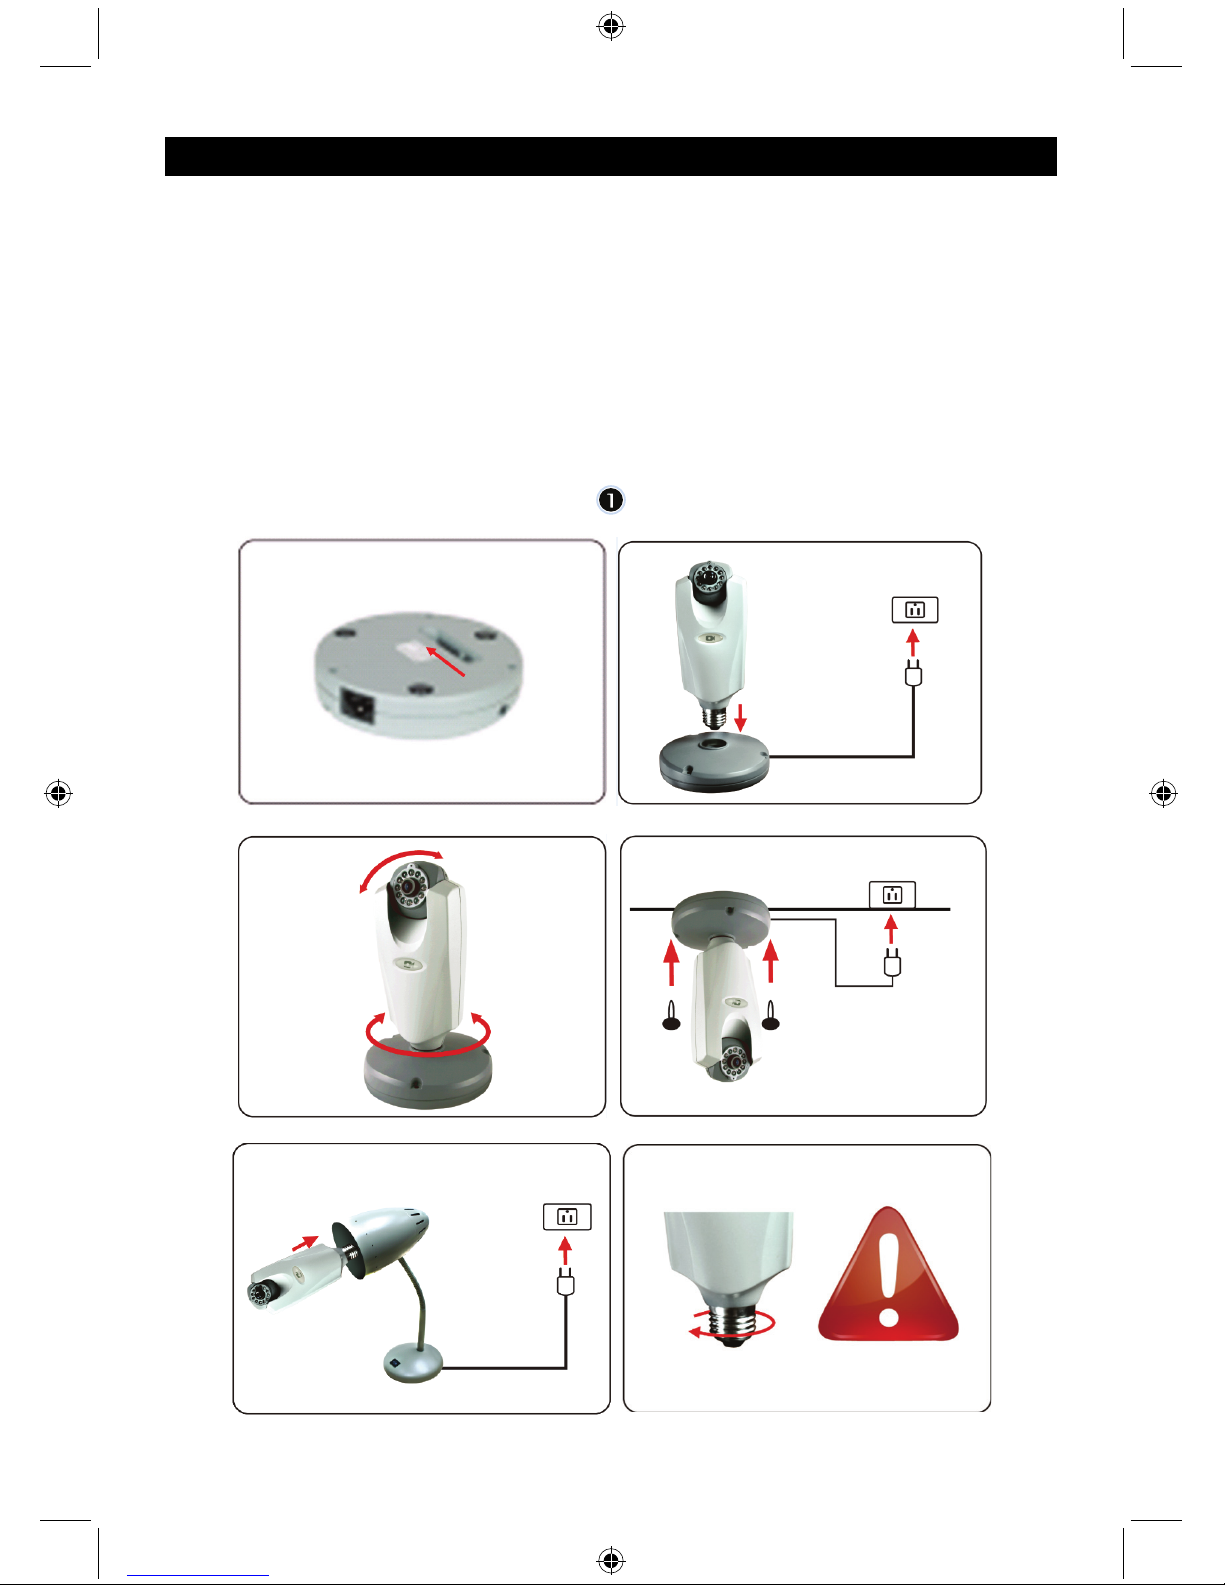
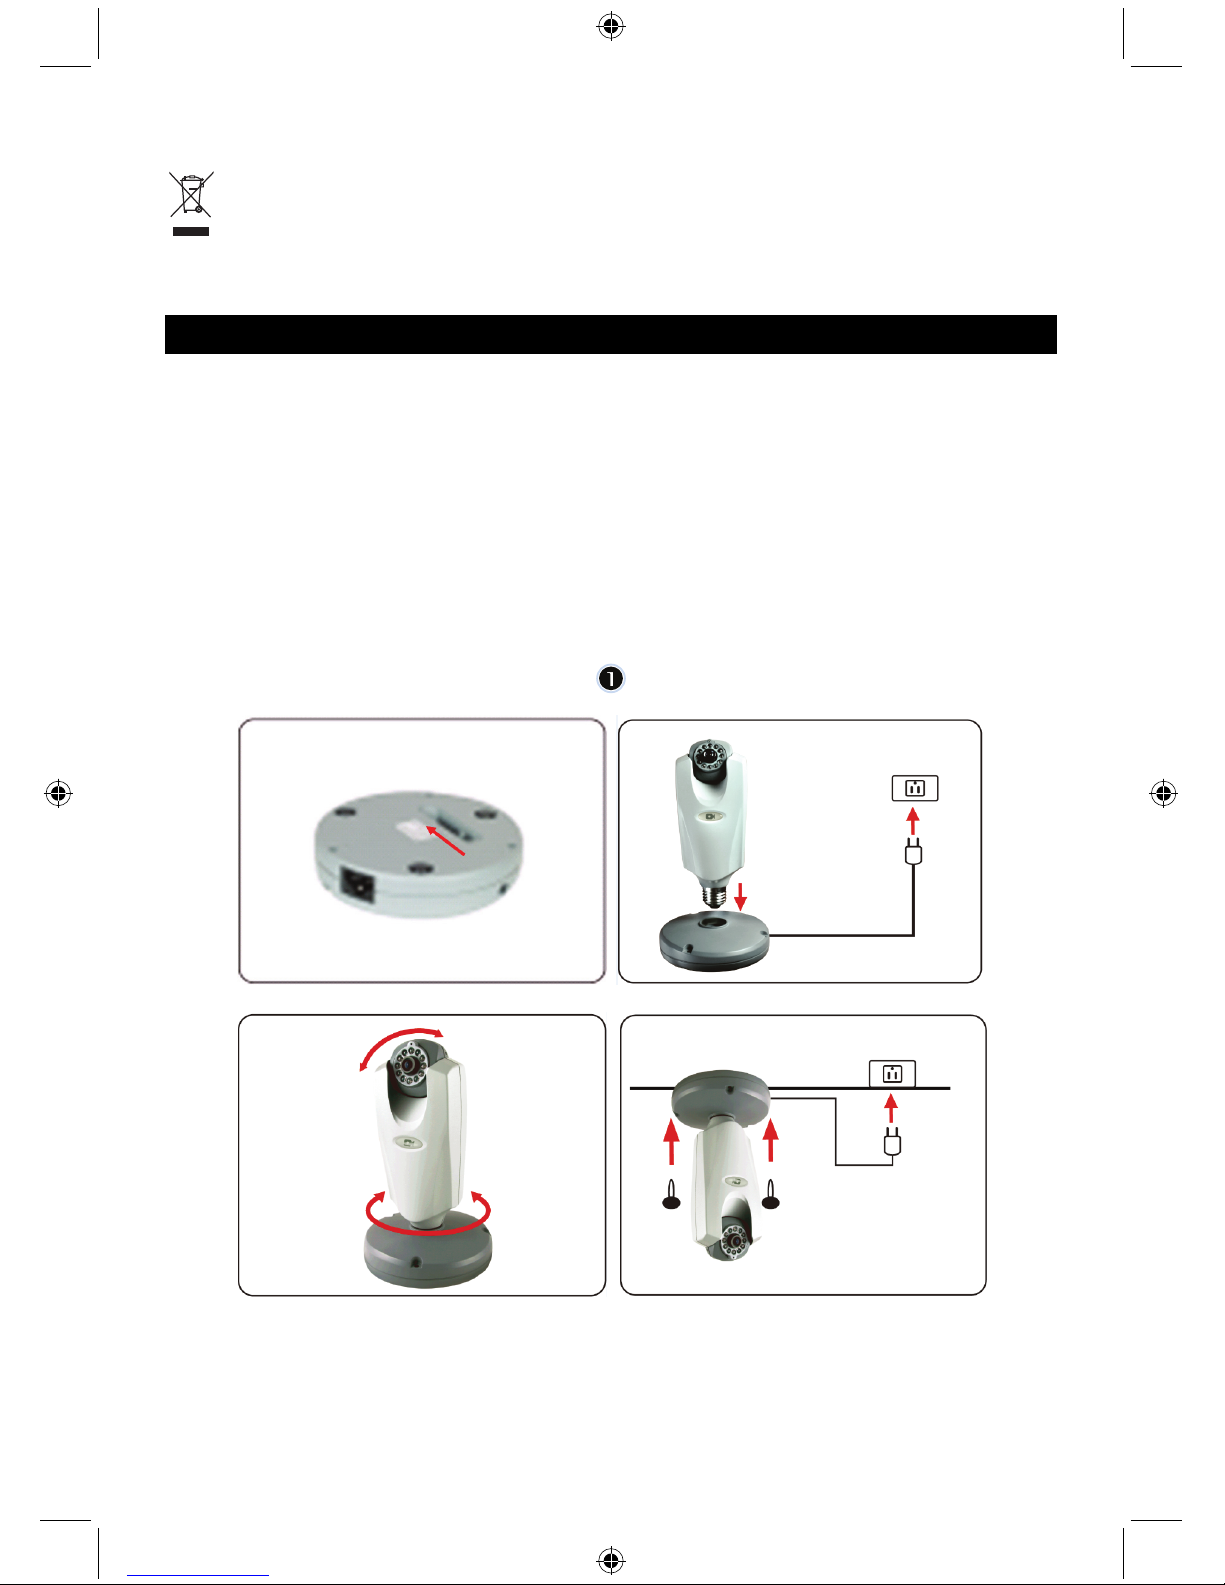
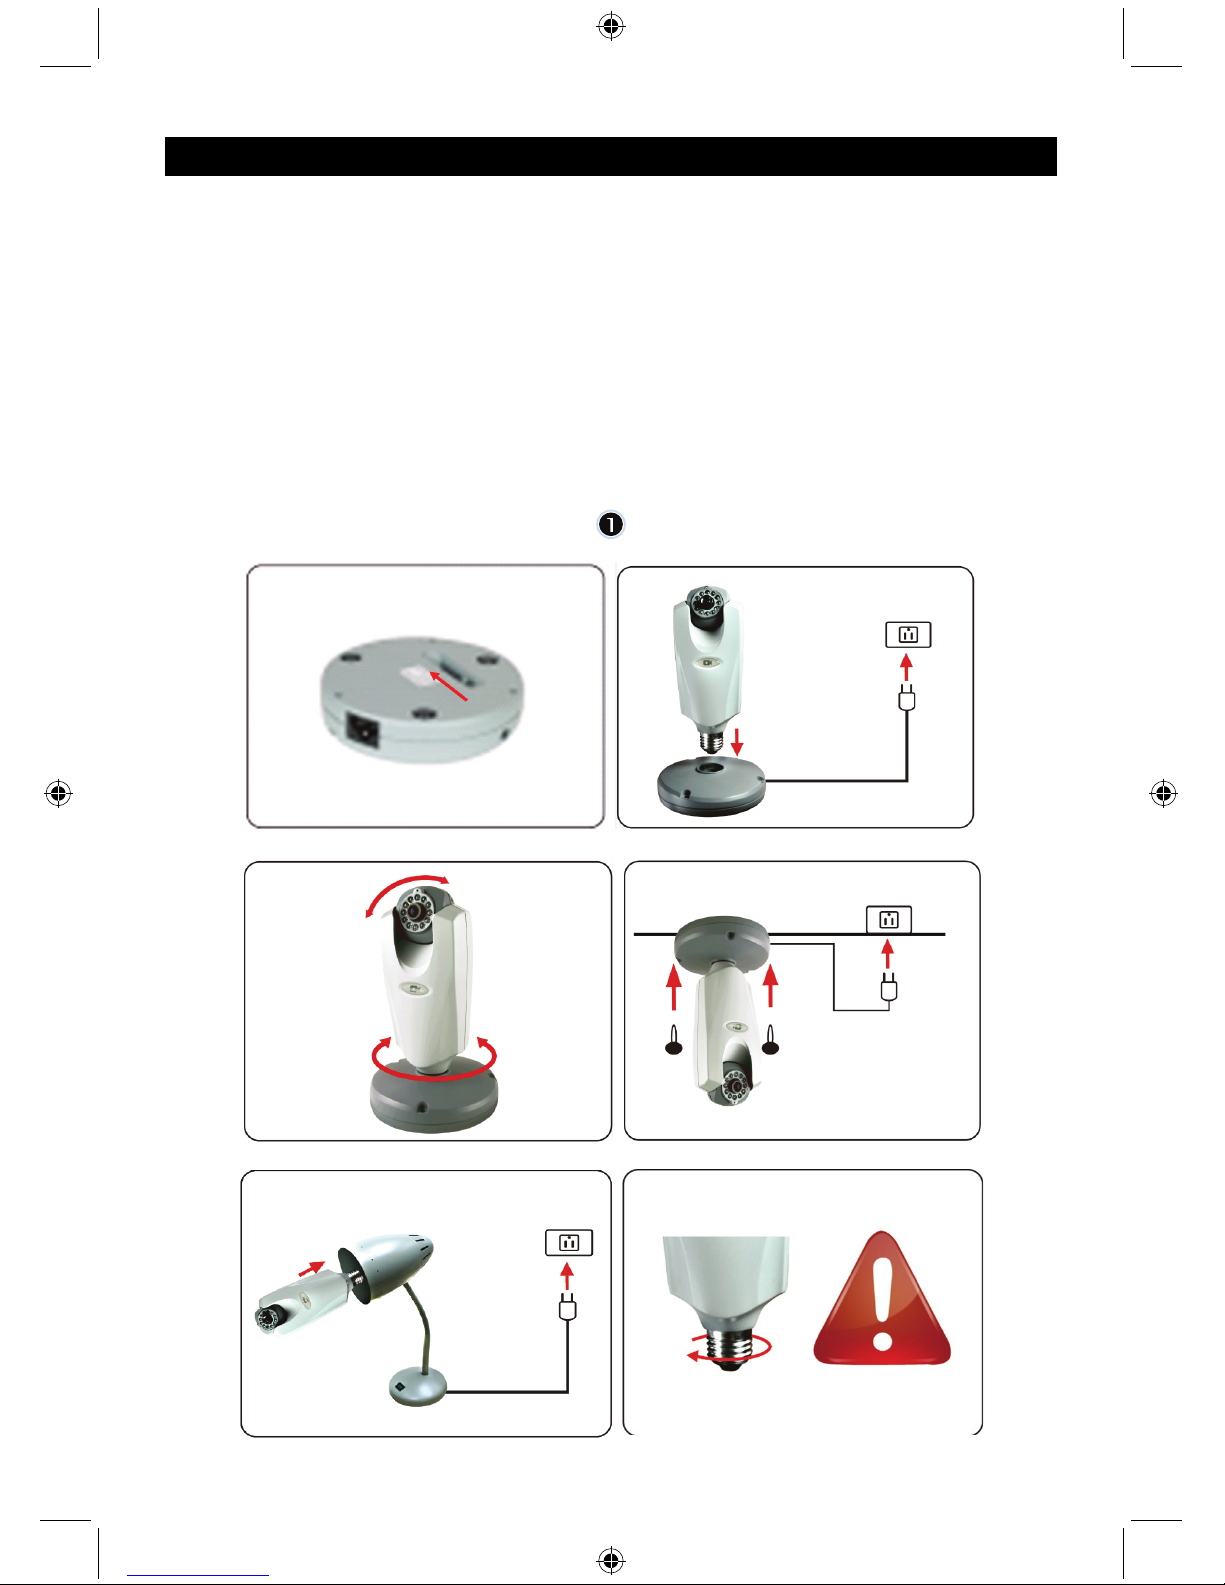
Hardware installation:
3
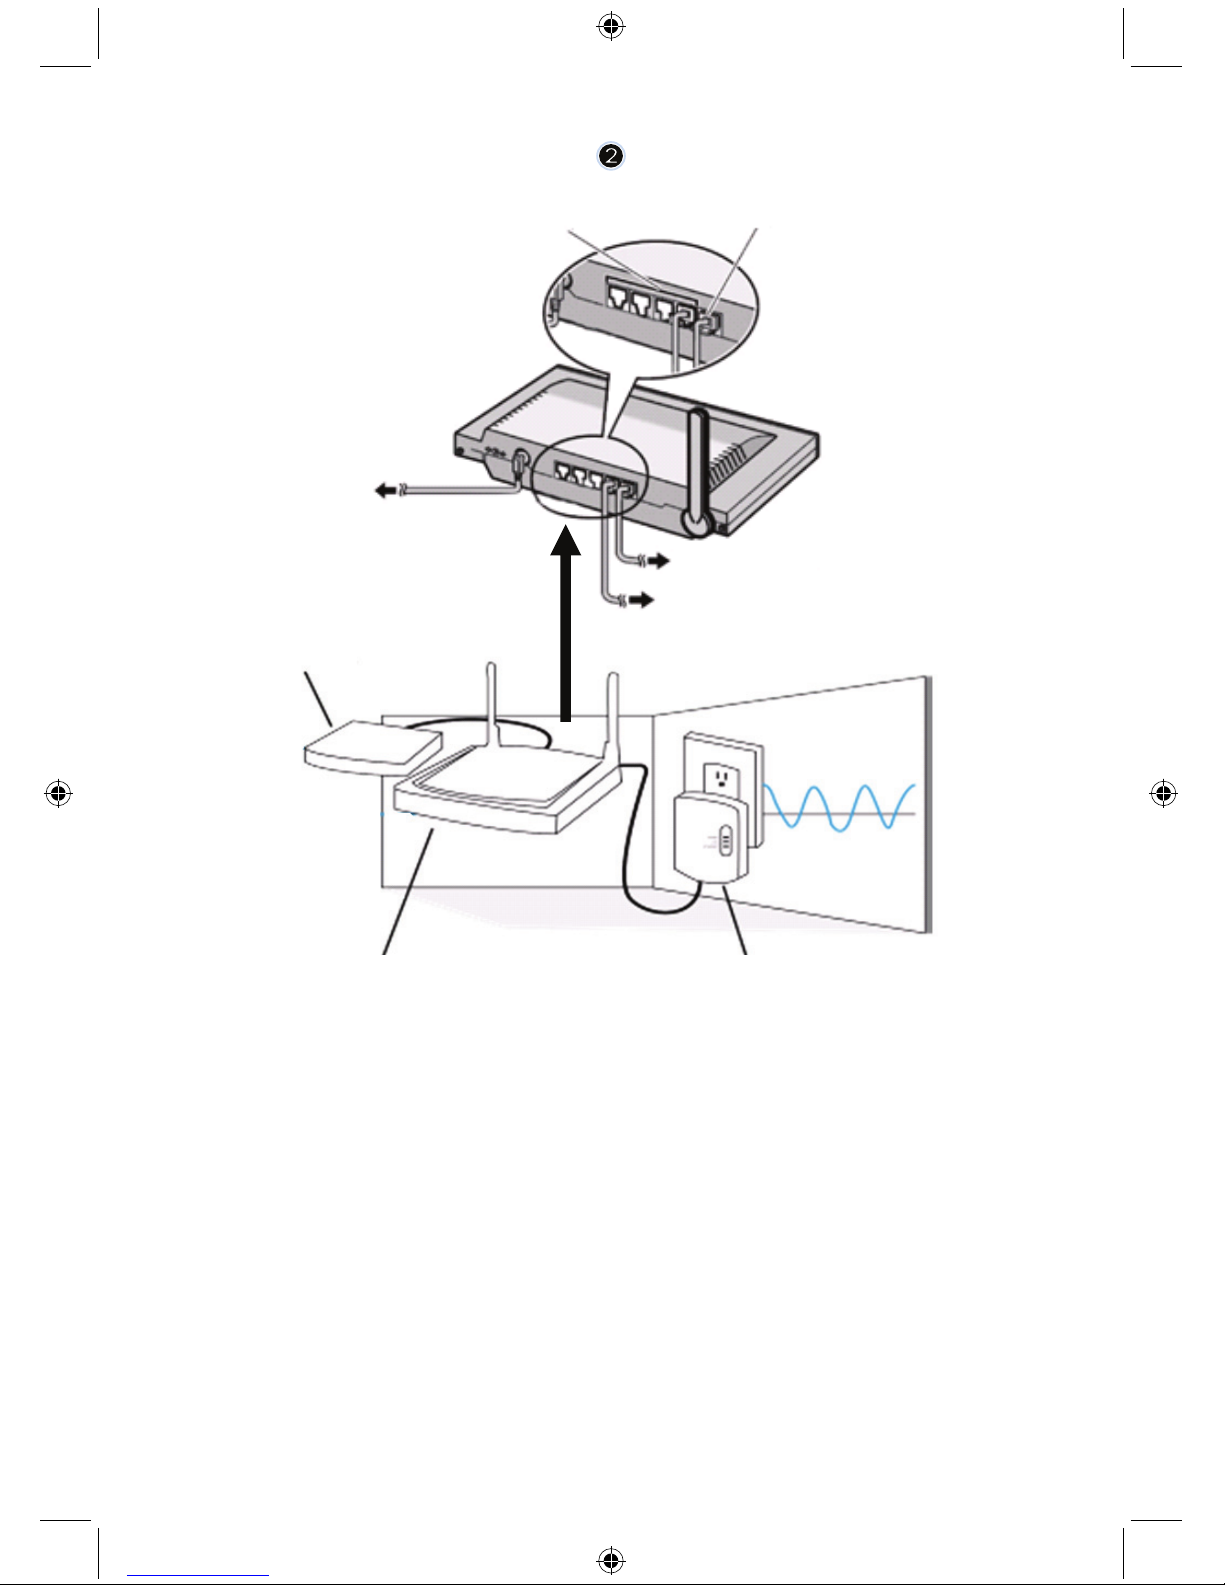
1. LAN ports
2. WAN port to MODEM
3. POWER
4. To MODEM
5. To HOMEPLUG
6. MODEM
7. ROUTER
8. HOMEPLUG
1
2
4
5
3
6
78
4
NETWORK CABLE
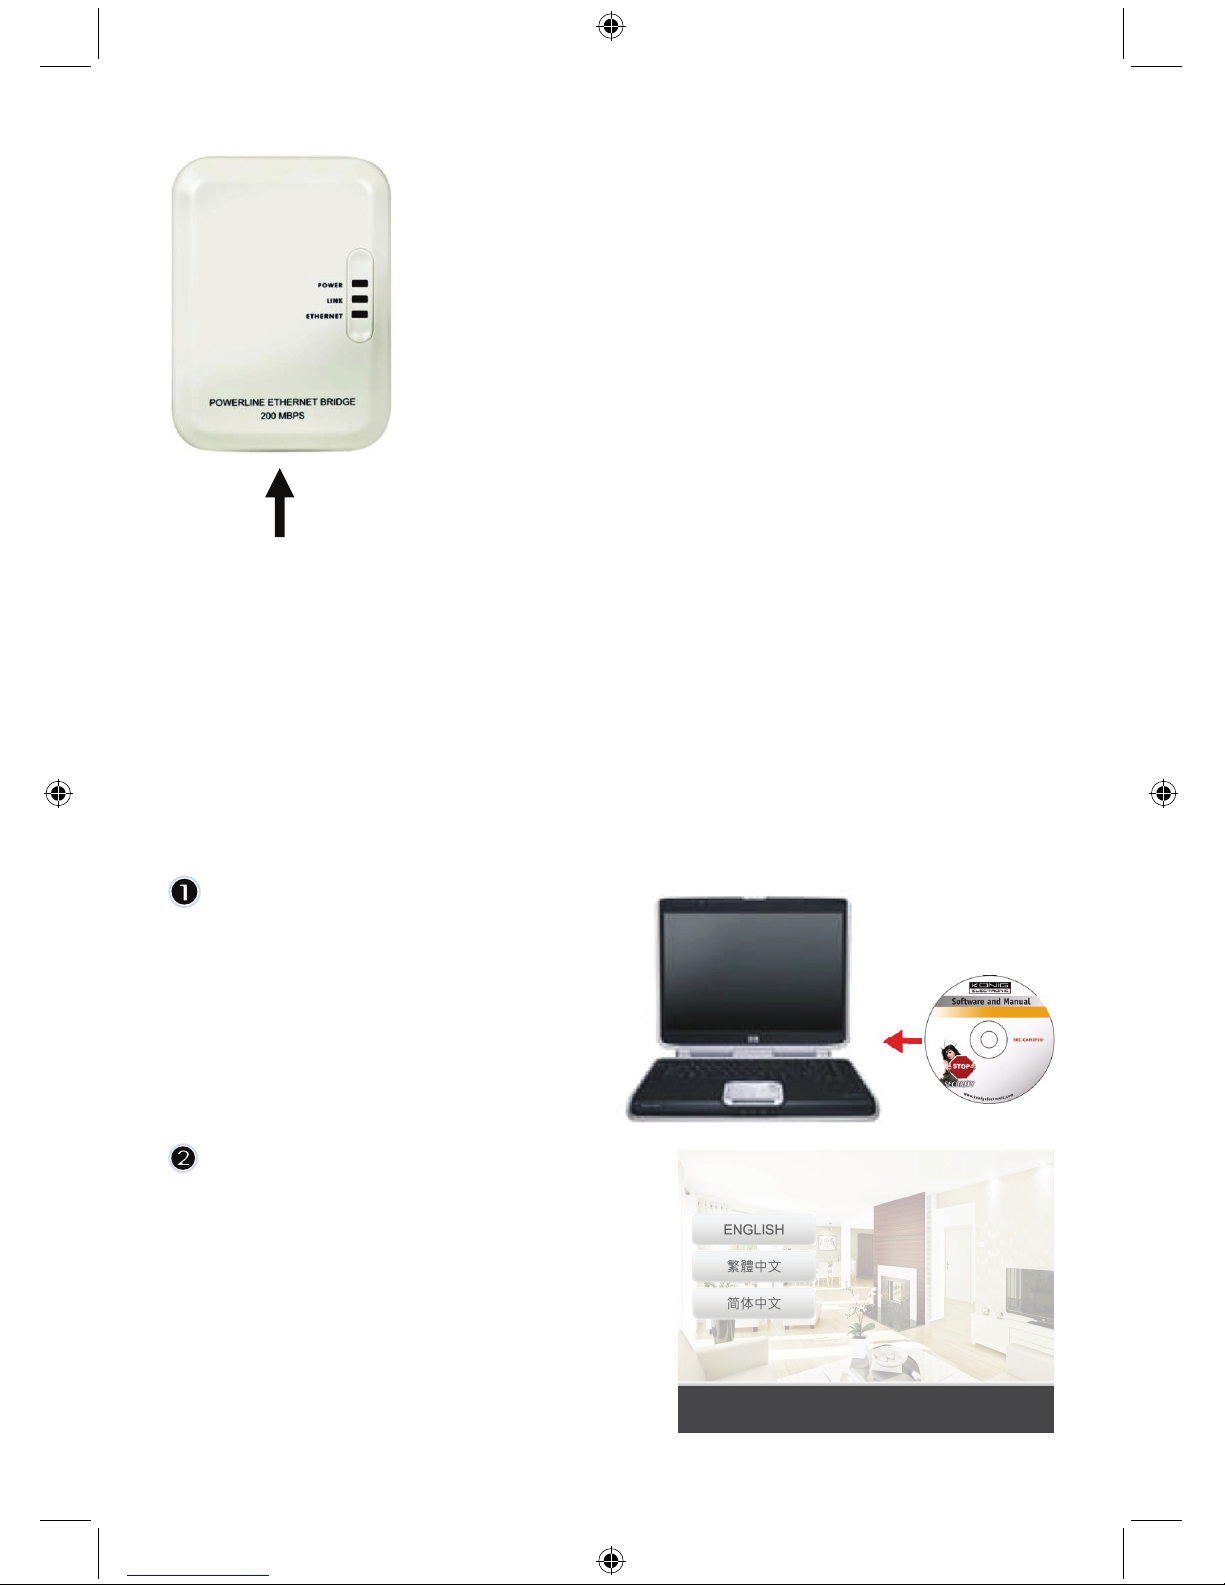
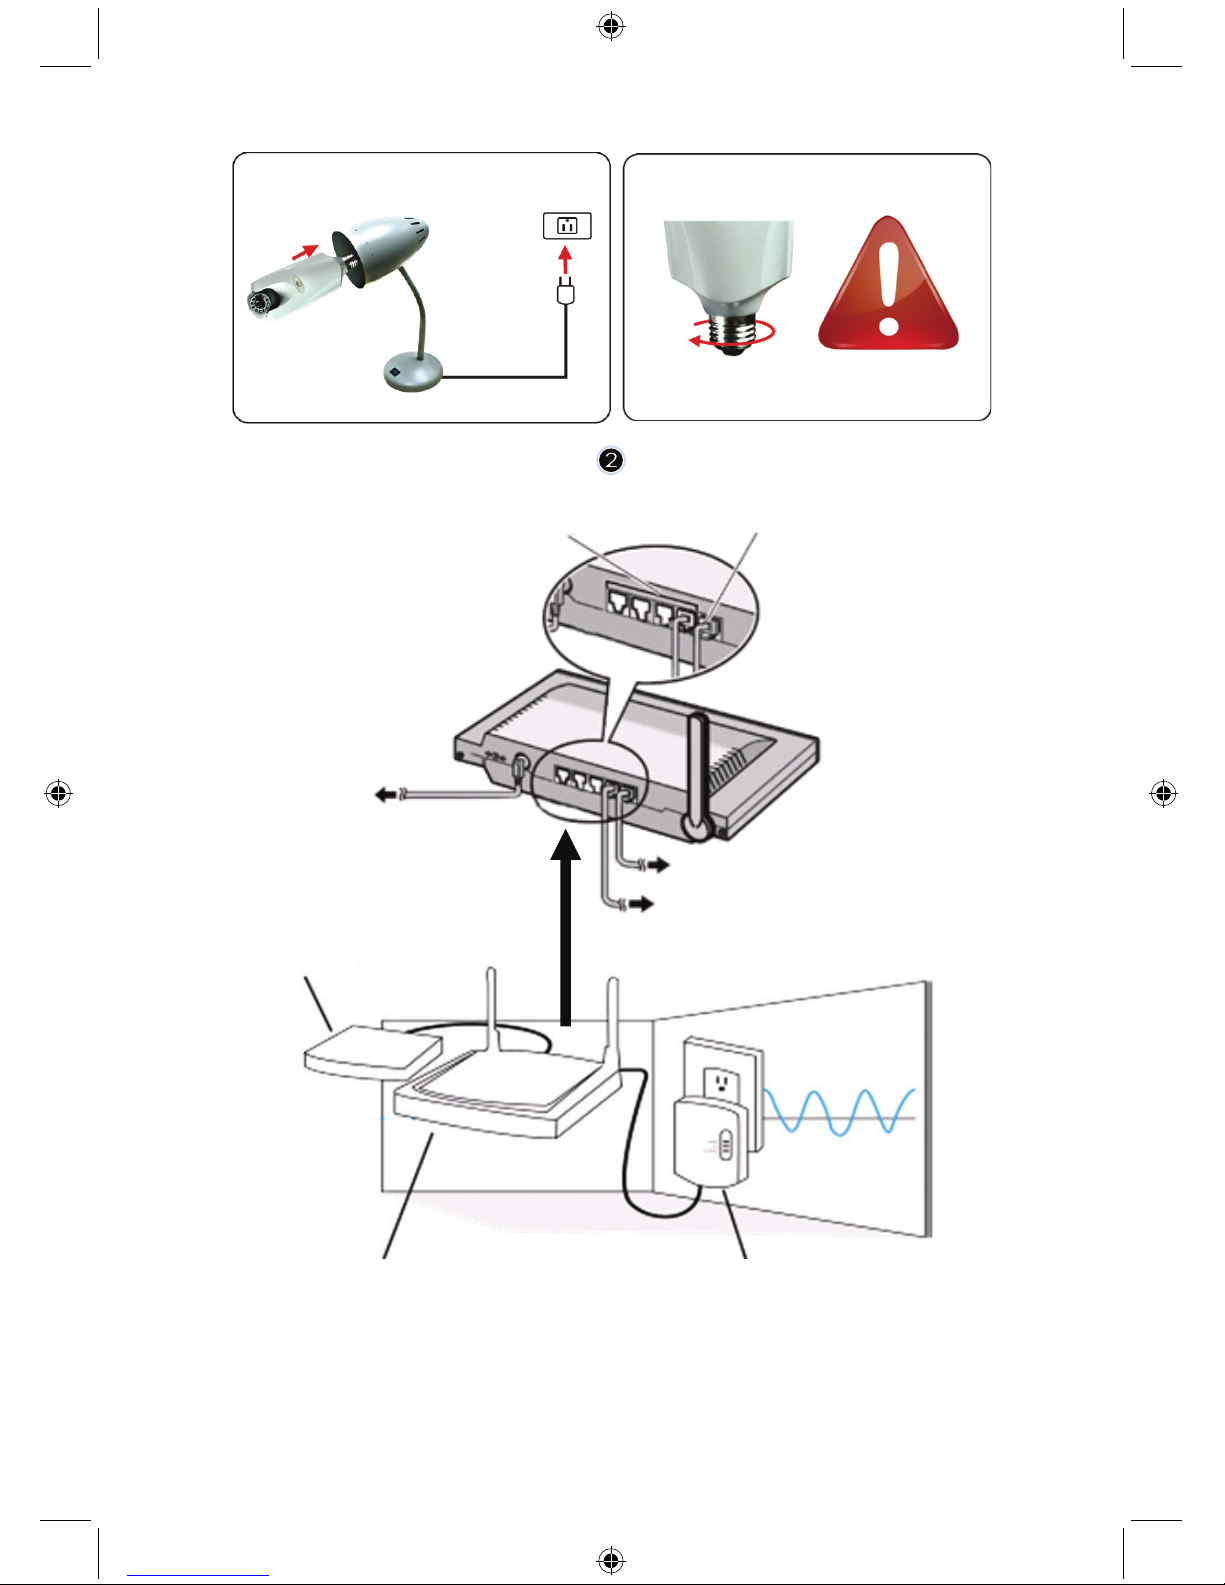
Description of the Homeplug:
POWER: RED, power ON
GREEN, connection quality is good
LINK: ORANGE, connection quality is fair
RED, connection quality is bad
ETHERNET: BLINKING, Ethernet traffic detected
What you should know about the Homeplug:
Try to avoid using a surge protector distribution board. Some surge protector distribution boards may
cause disconnection of the signal.
Three-phase power system. Please make sure that the Homeplug and the IP Camera are connected at
the same power phase; otherwise it may cause disconnection of the signal.
The system supports AC 100V~240V, but the Homeplug and IP camera must be connected in the same
voltage environment, otherwise it may cause disconnection of the signal.
One Homeplug does not support more than 16 IP cameras. It does not allow two Homeplugs to be set
up in one network in case of a mistake in network connection.
The entire system has a connection distance limited to 300 metres.
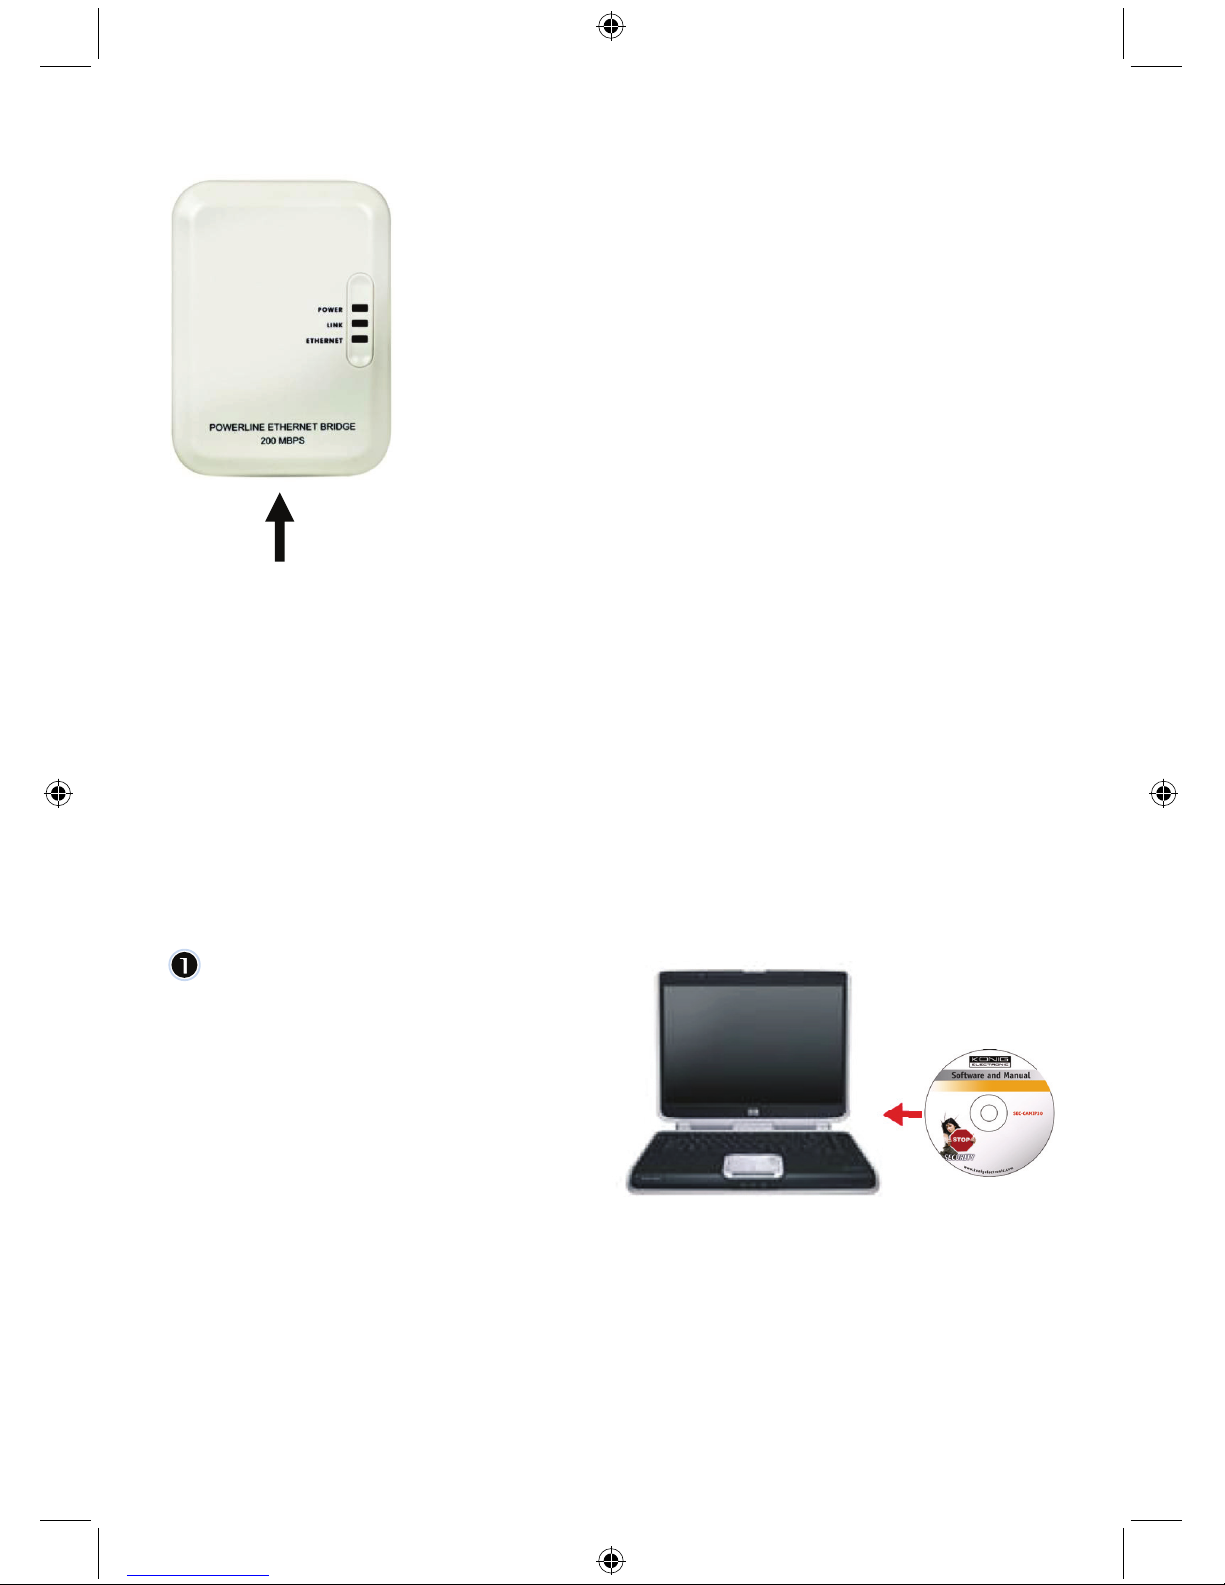
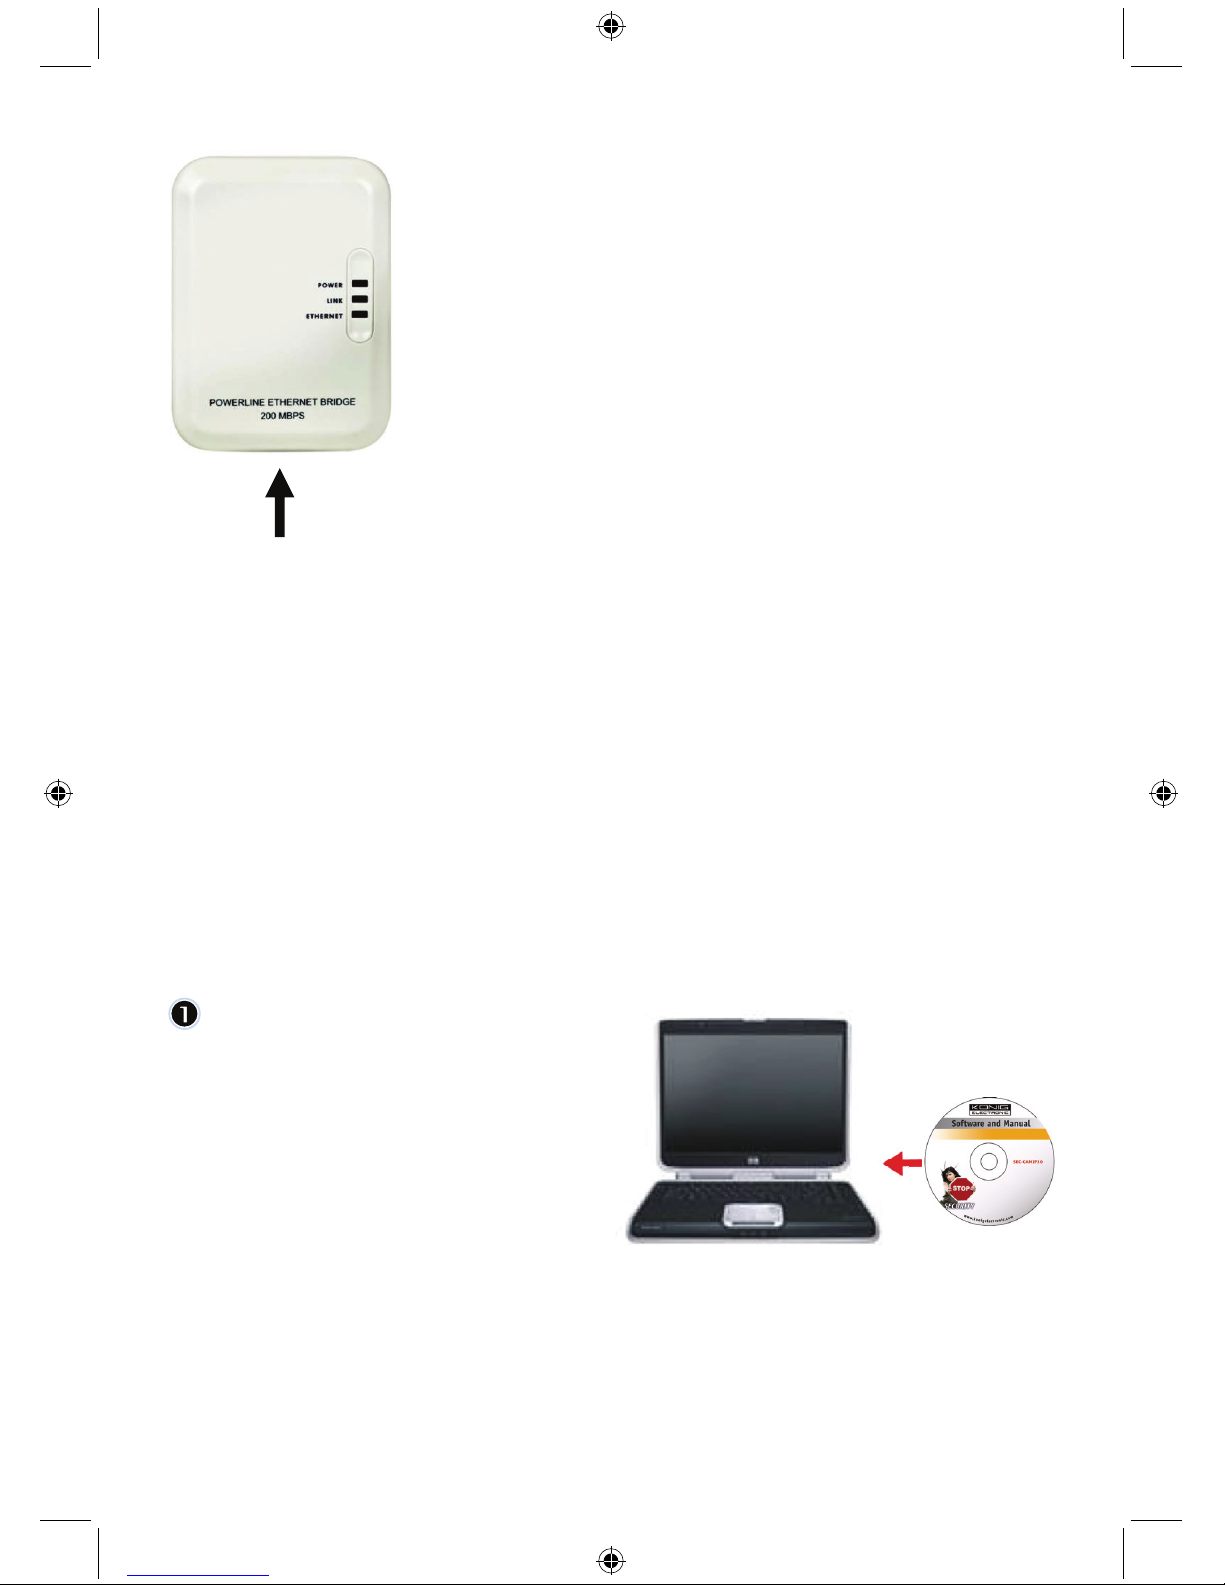
Software installation:
Insert the software CD in your CD-R
device, start the installation
Choose Shelexec.exe to start installing
the software
or
check the disc contents and click the
startup.html file to open the start up
page
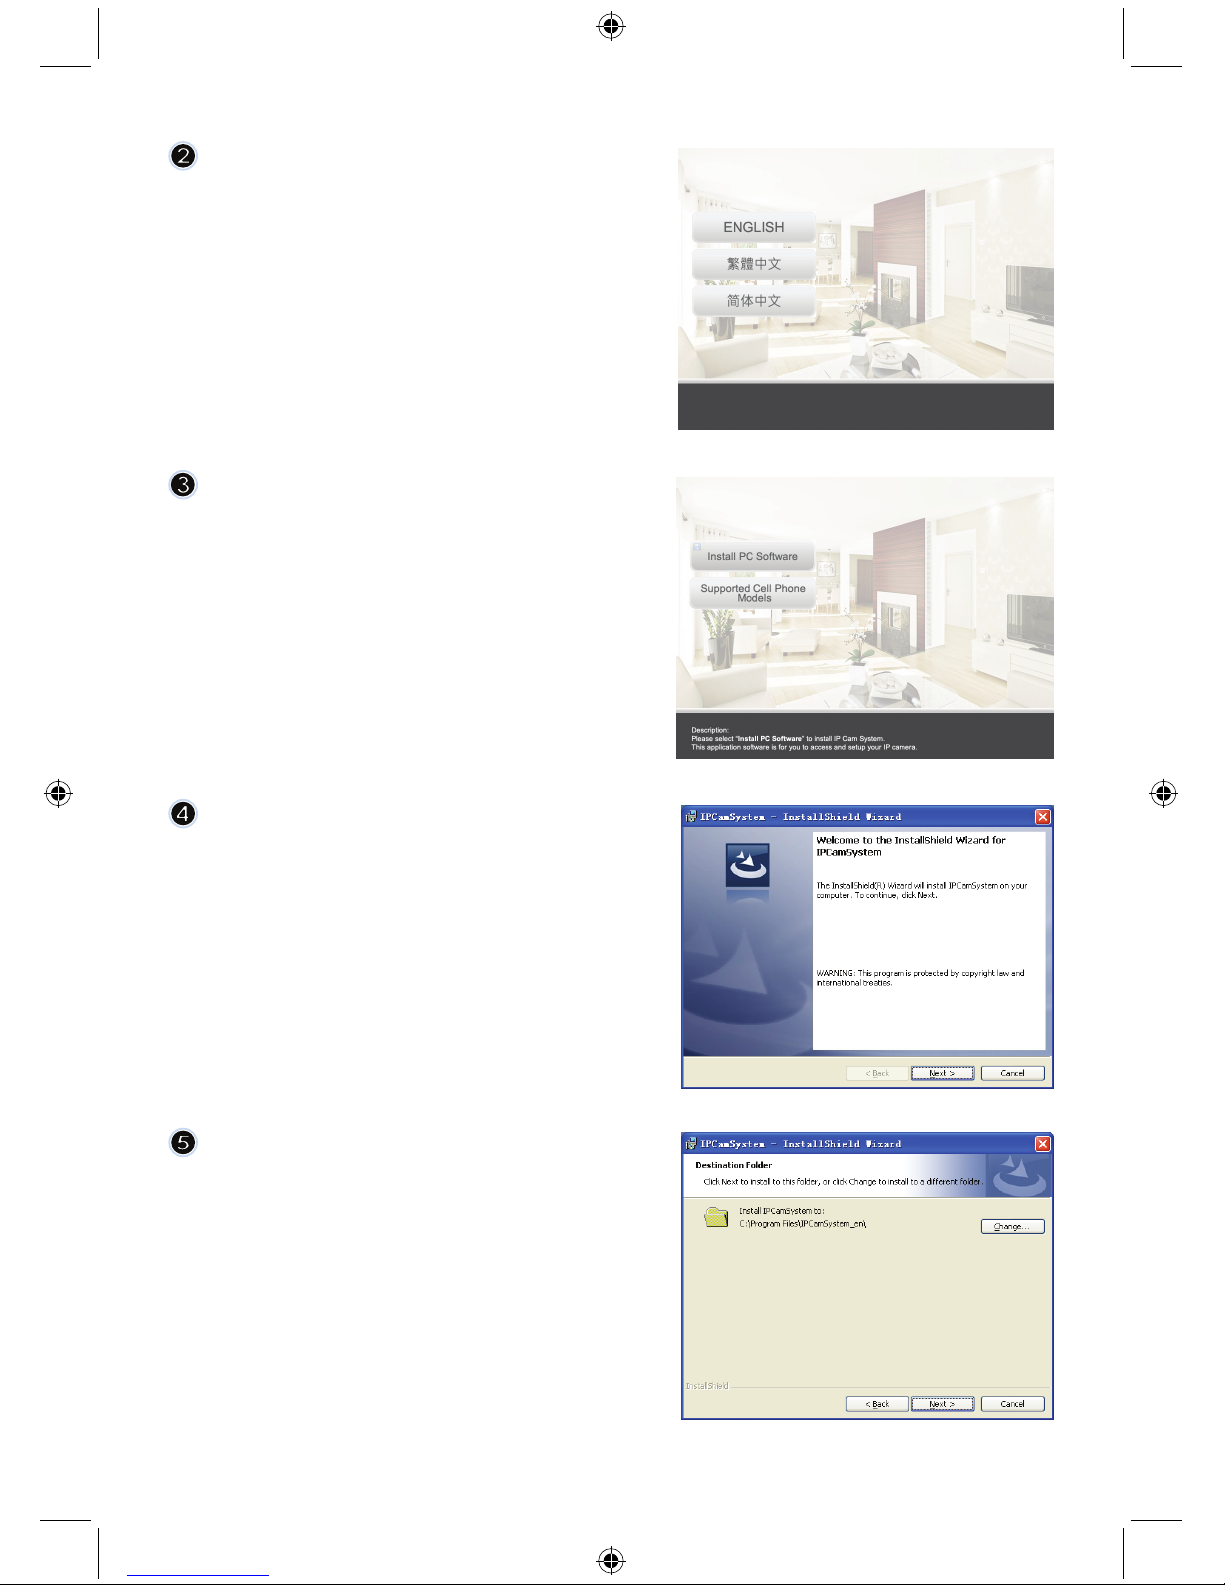
Select ENGLISH to start the installation
of the software
Note: the IP CAM SYSTEM software is
only in English

5
Click Install PC Software
Click Next to start the installation
Click Next
Click Install
6
Click Finish to complete installation
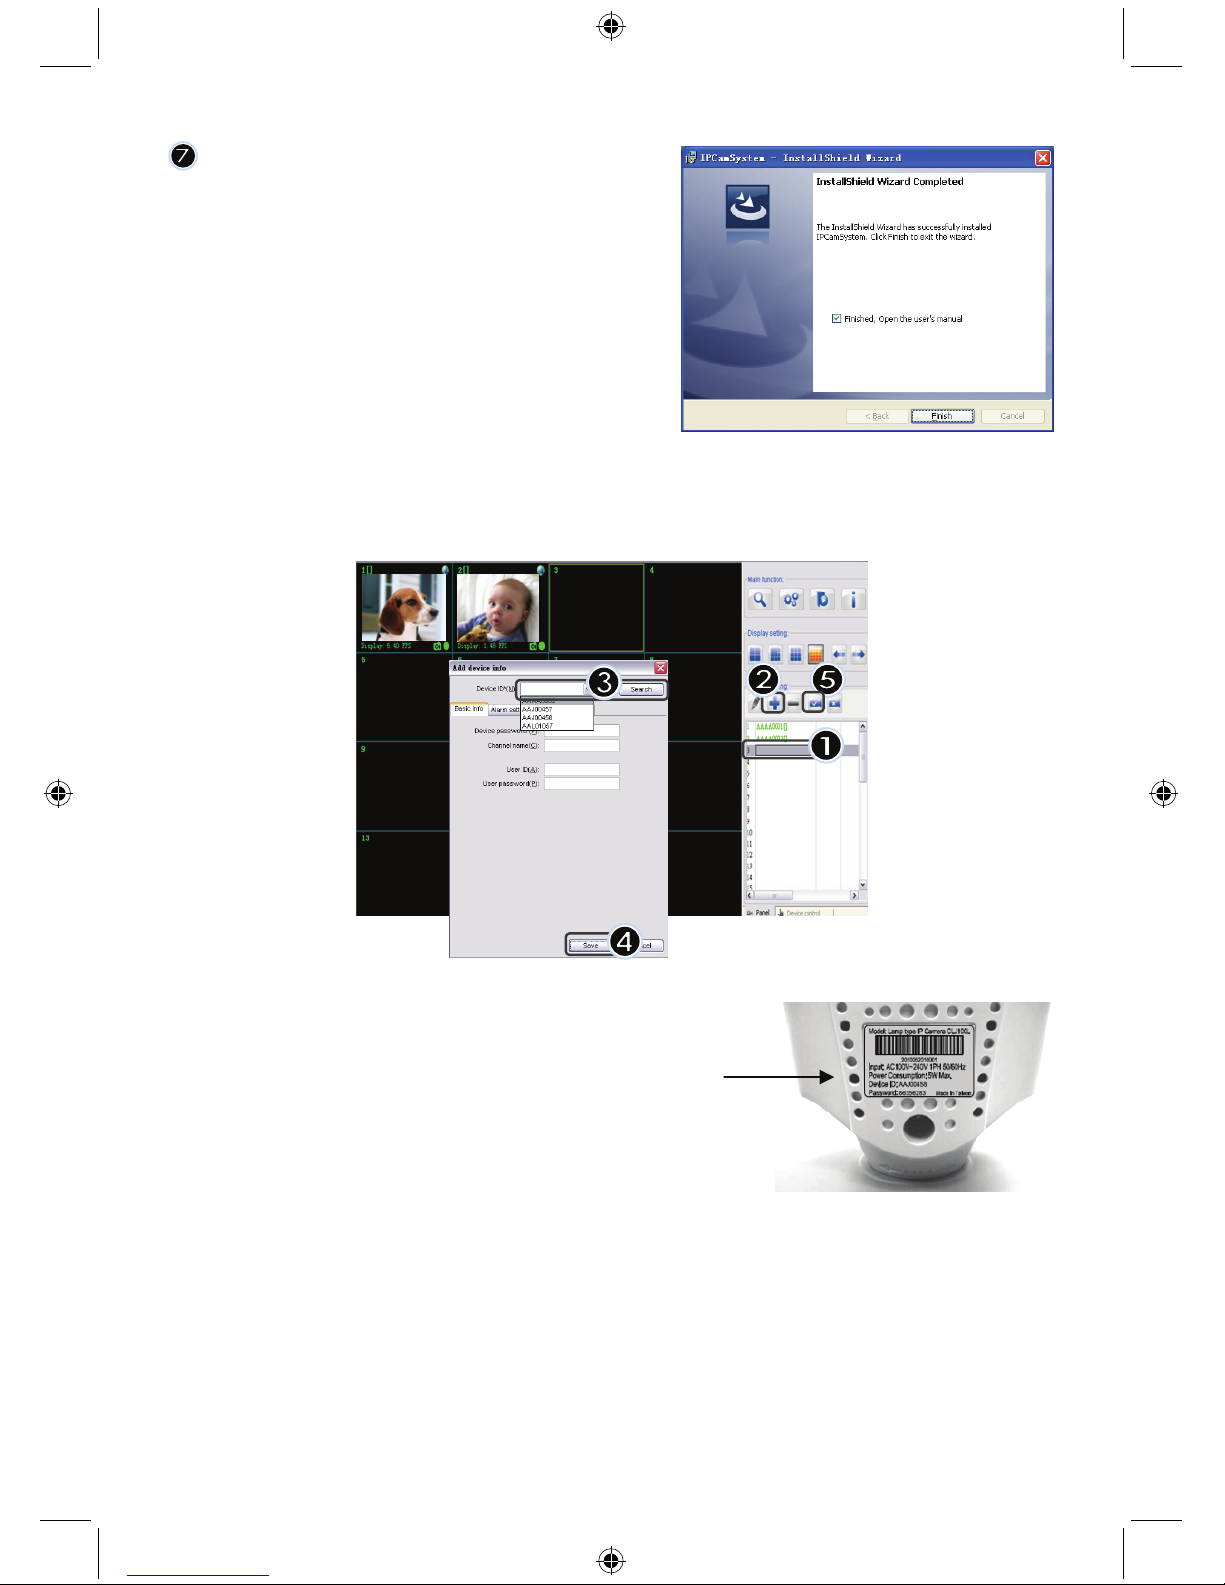
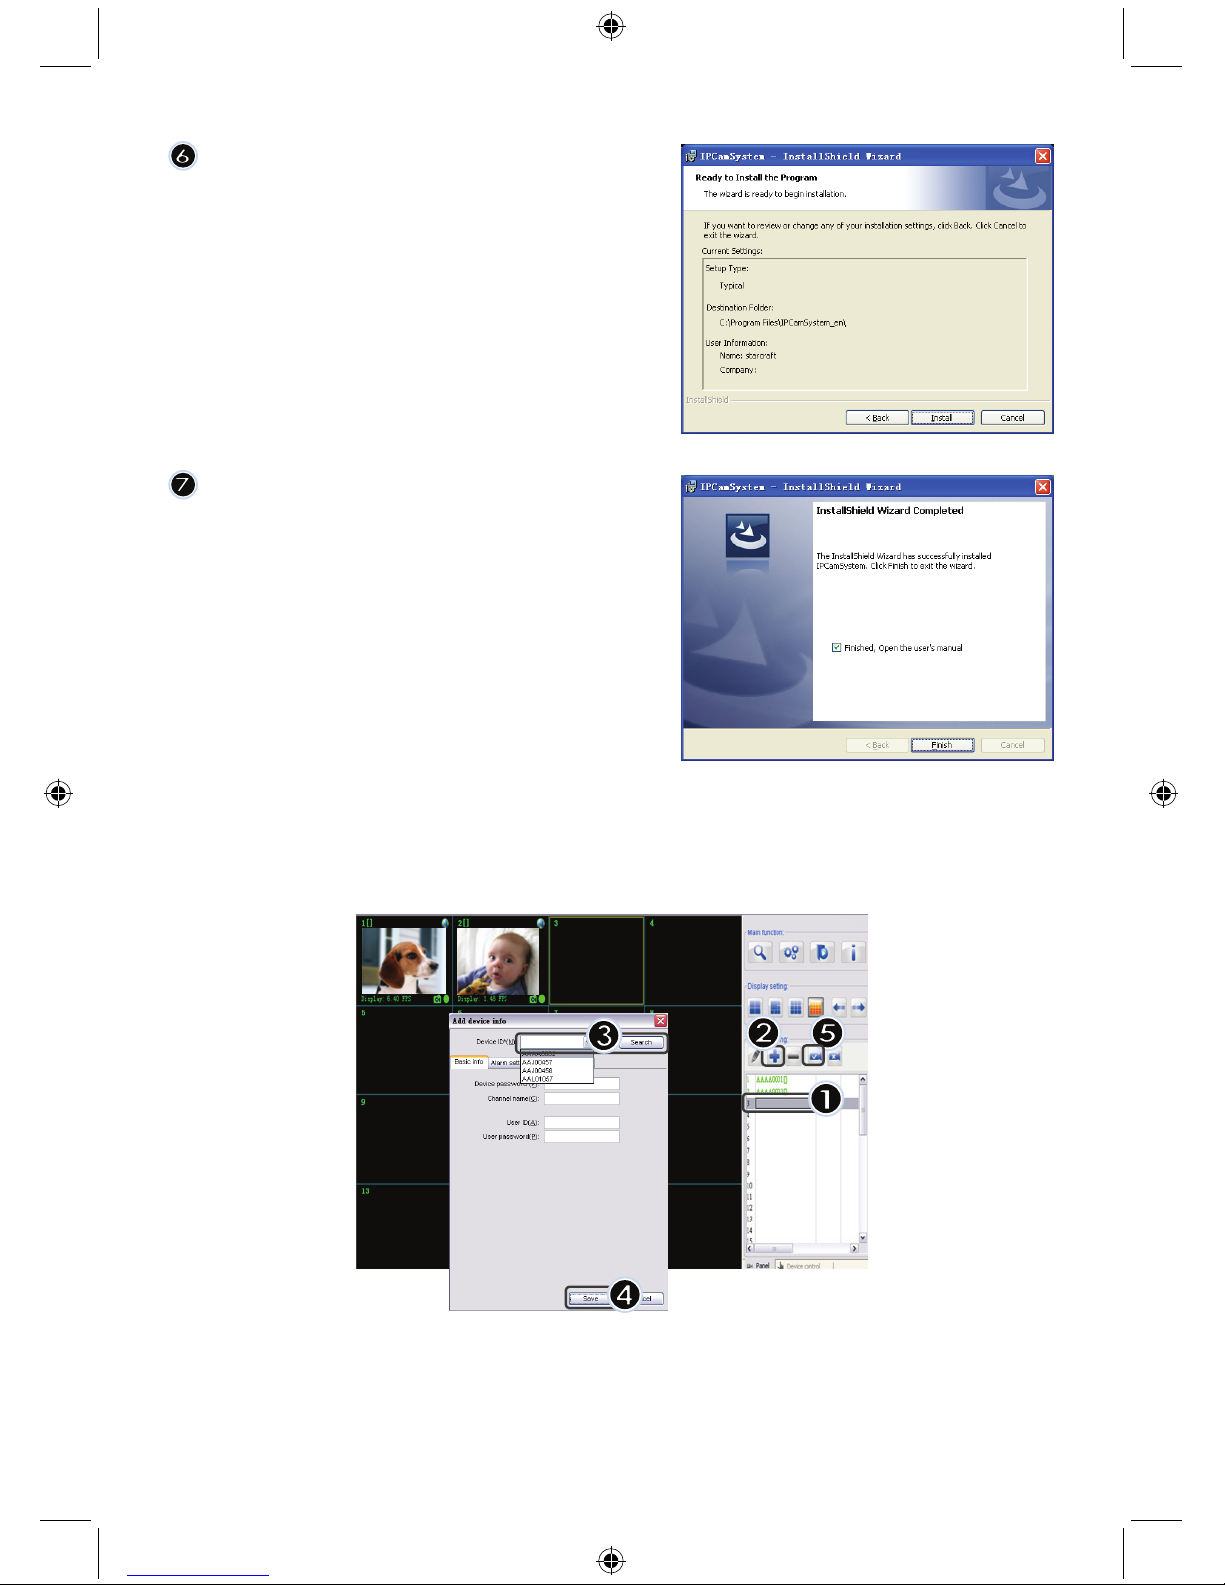
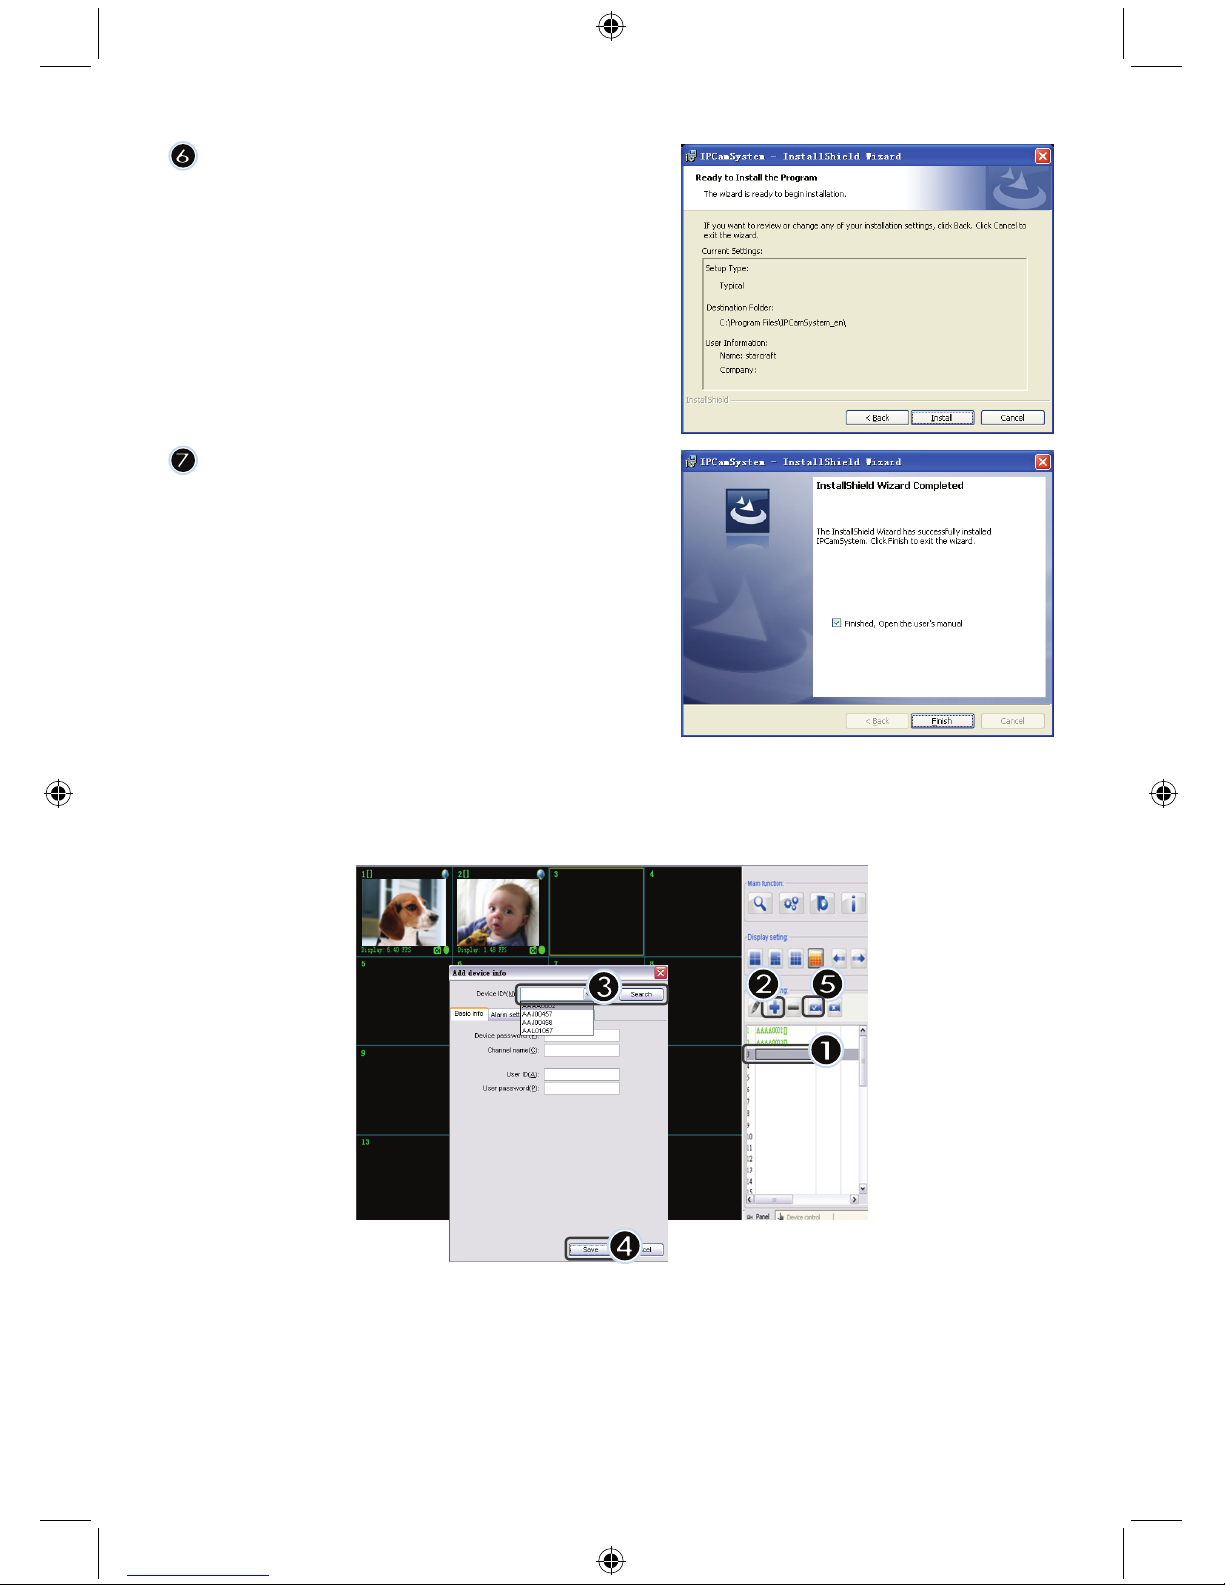
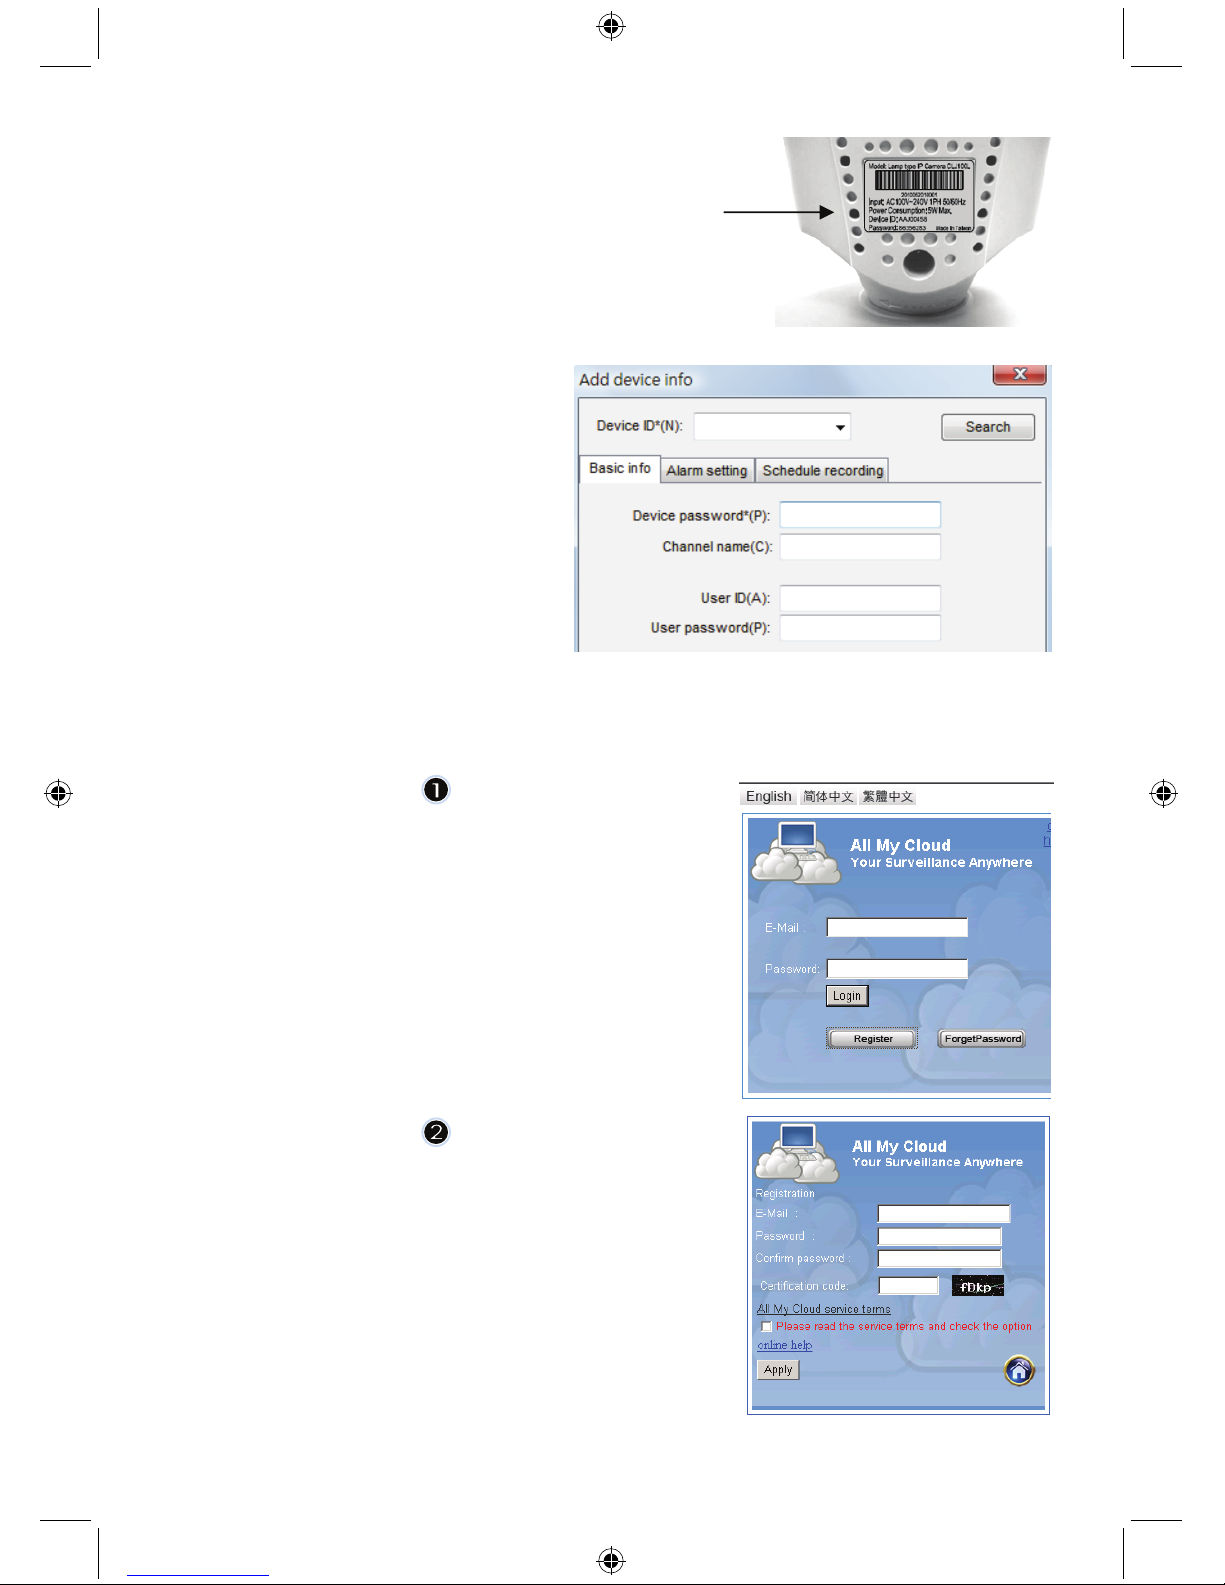
How to add a device:
The software has placed an IP CAM SYSTEM shortcut on the desktop screen. Click on this icon to
launch the software. You can add a total of 16 cameras. Follow the steps below to add more cameras.
1. Select an empty channel
2. Click Add a device
3. Press Search or type in the ID and Password of your
device
Note: The Search function can only be used in the local
network
4. Press Save
5. Click Start all cameras
7
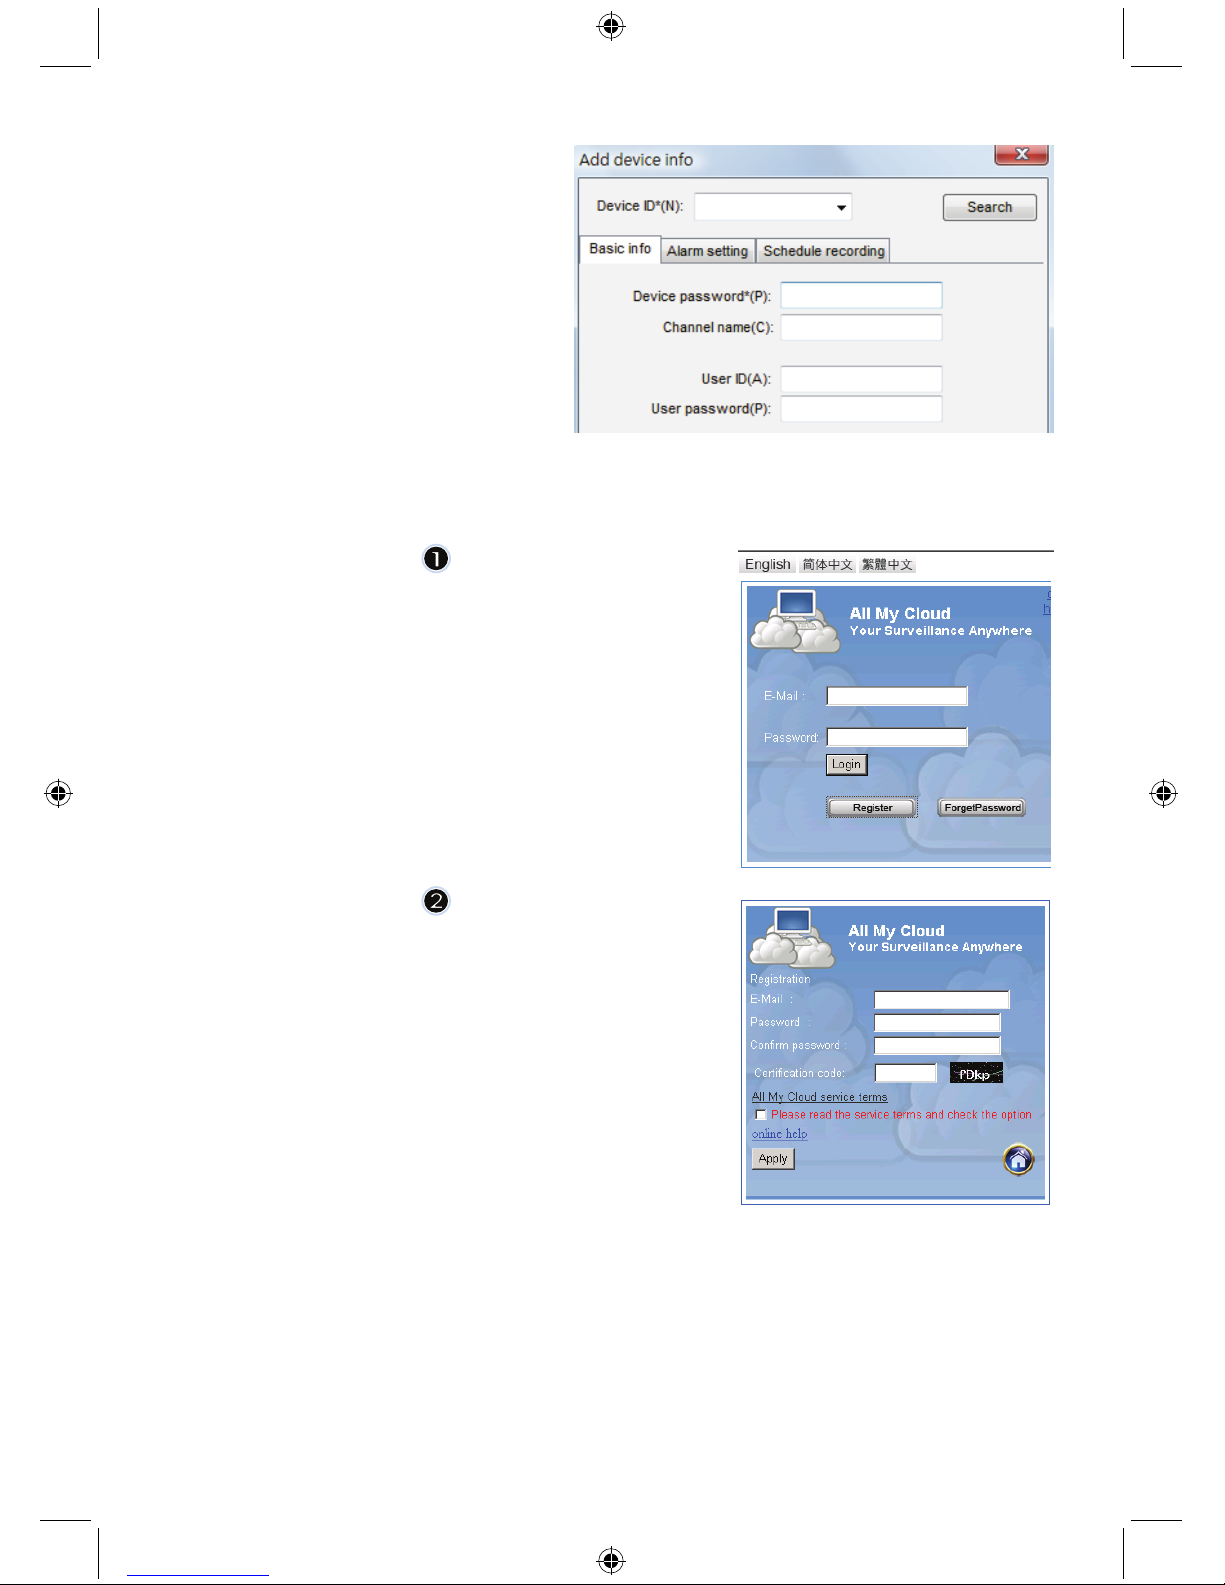
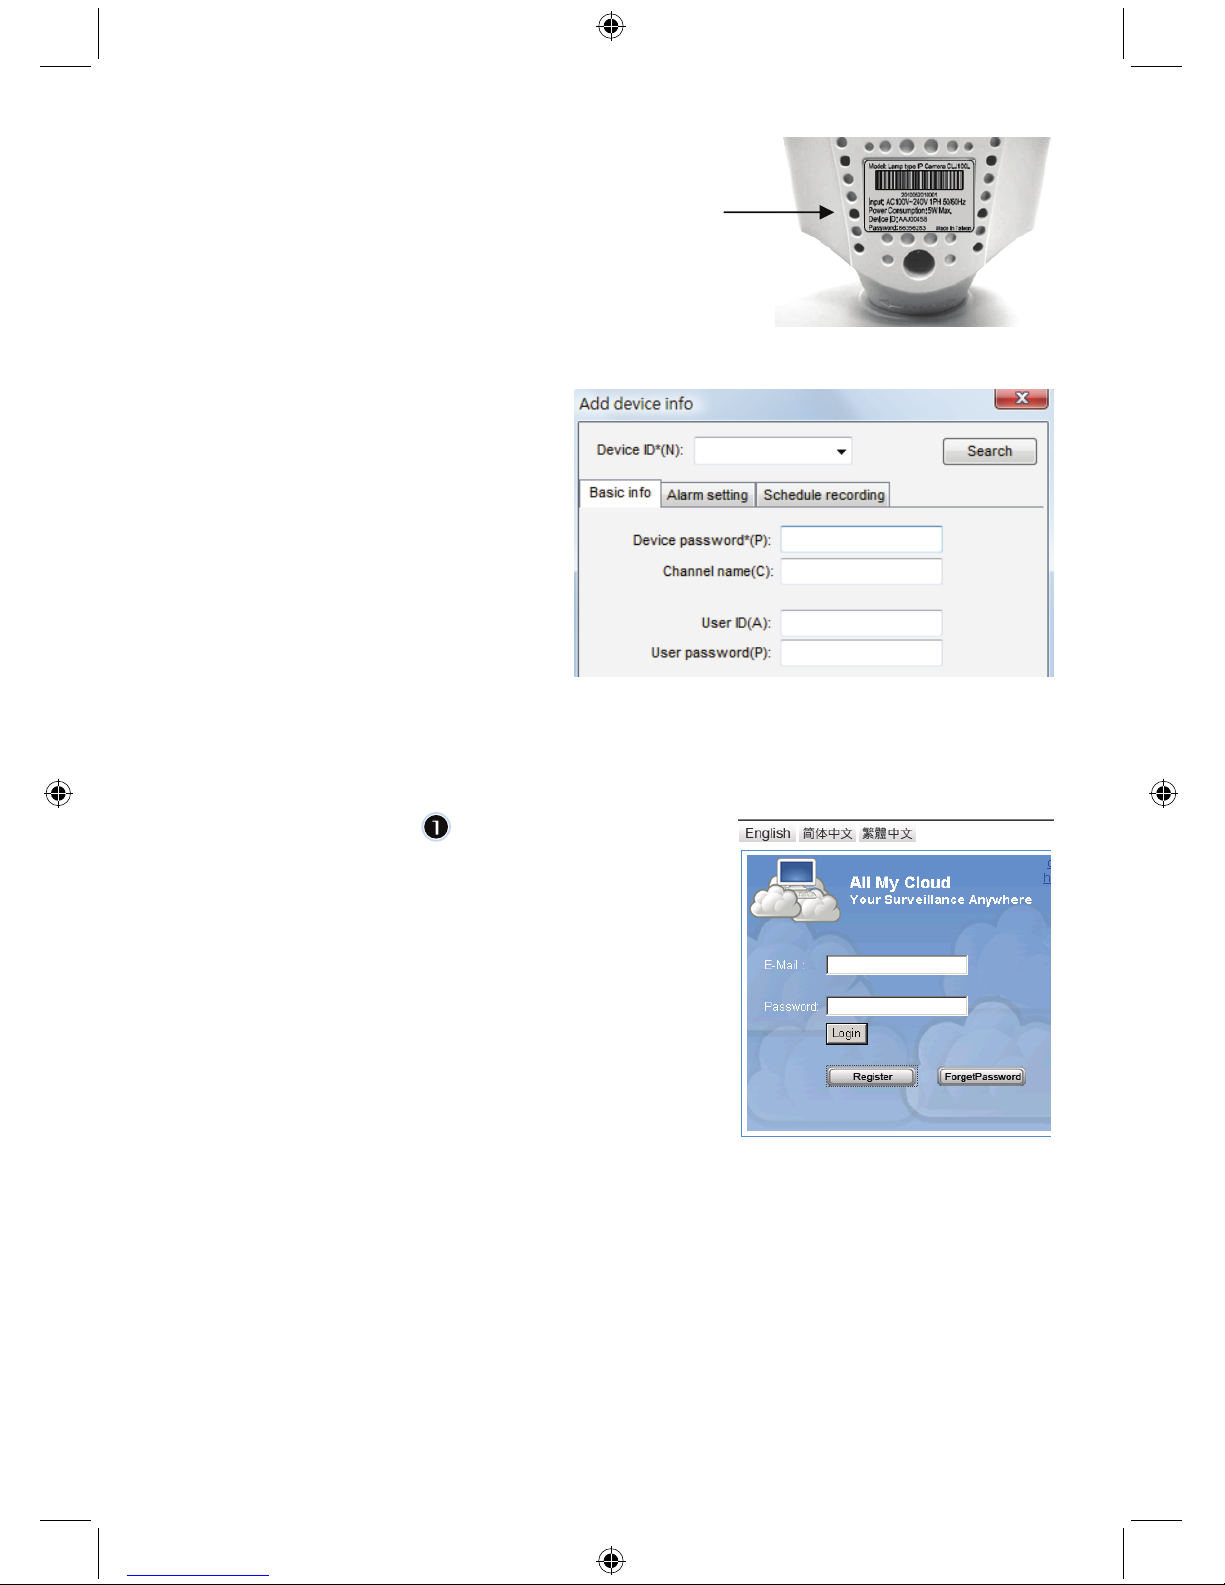
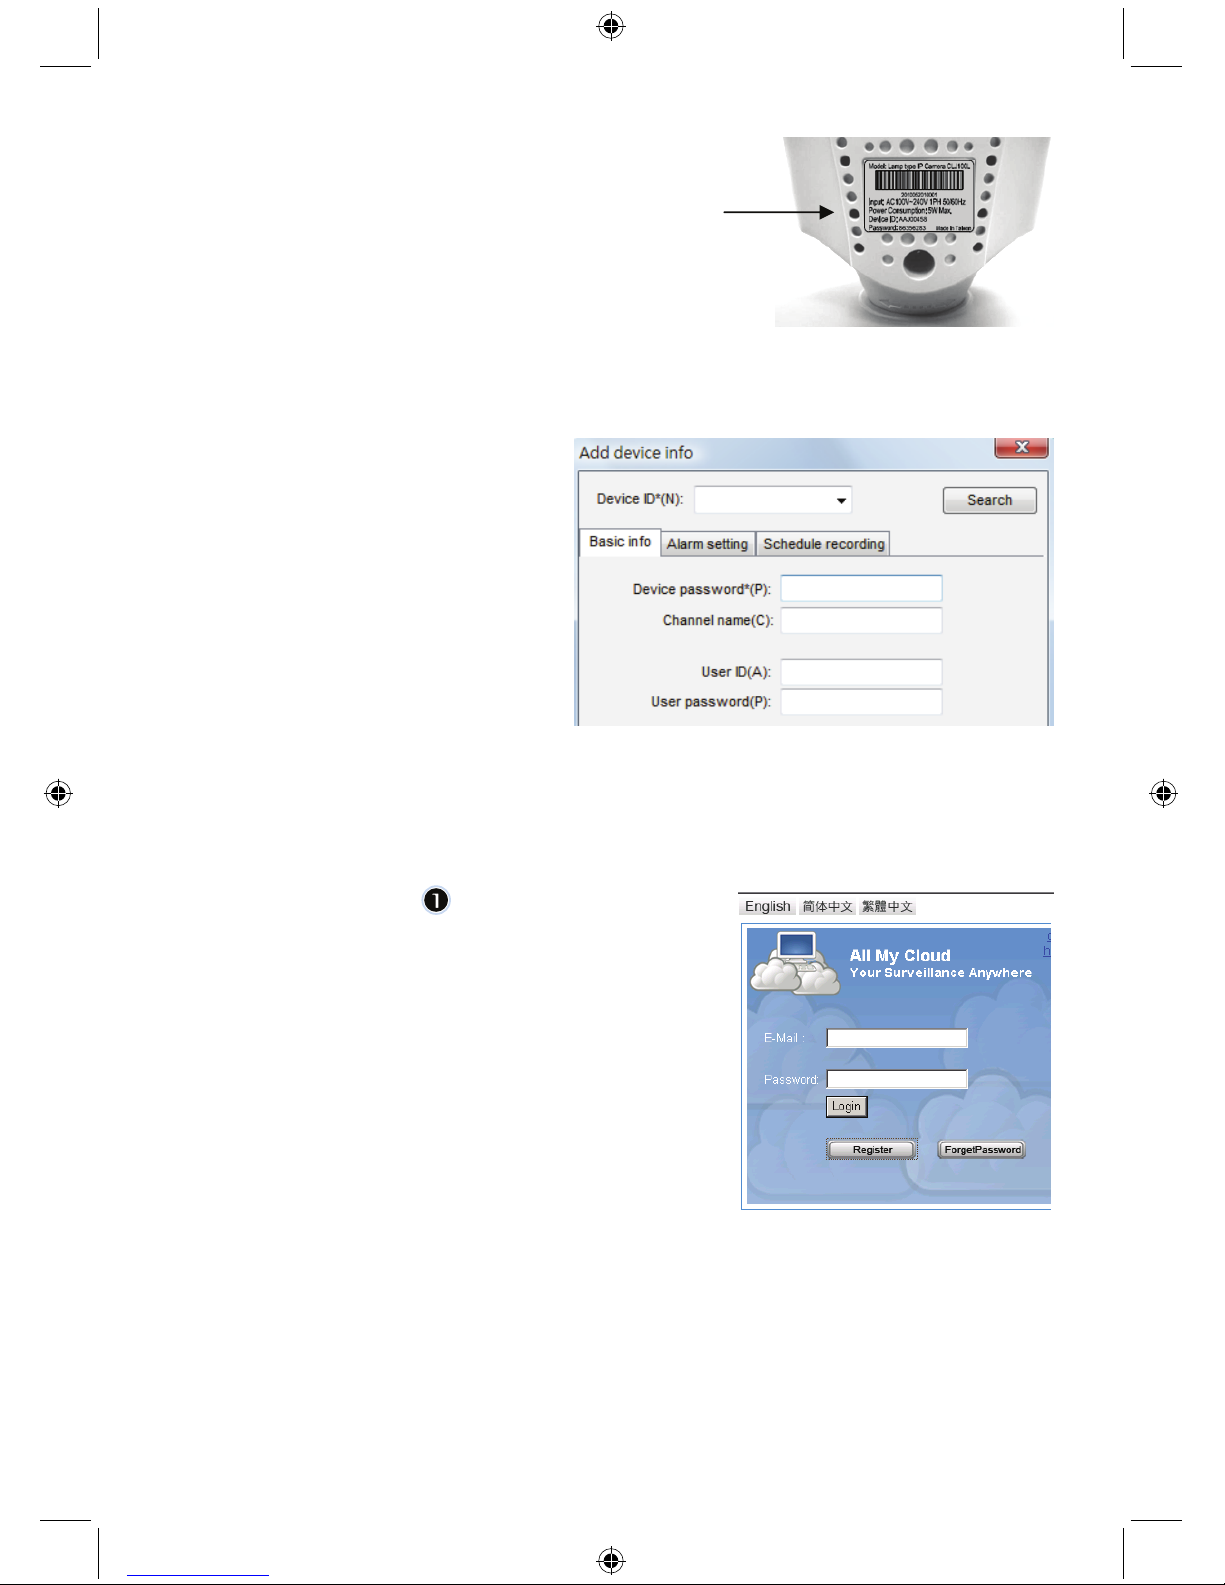
Additional information about
Add device info:
Channel Name:
Edit camera name
(e.g. office)
User ID:
Personal ID
User Password:
Personal password
Note: for security and privacy matters it is recommended to set a personal ID and password.
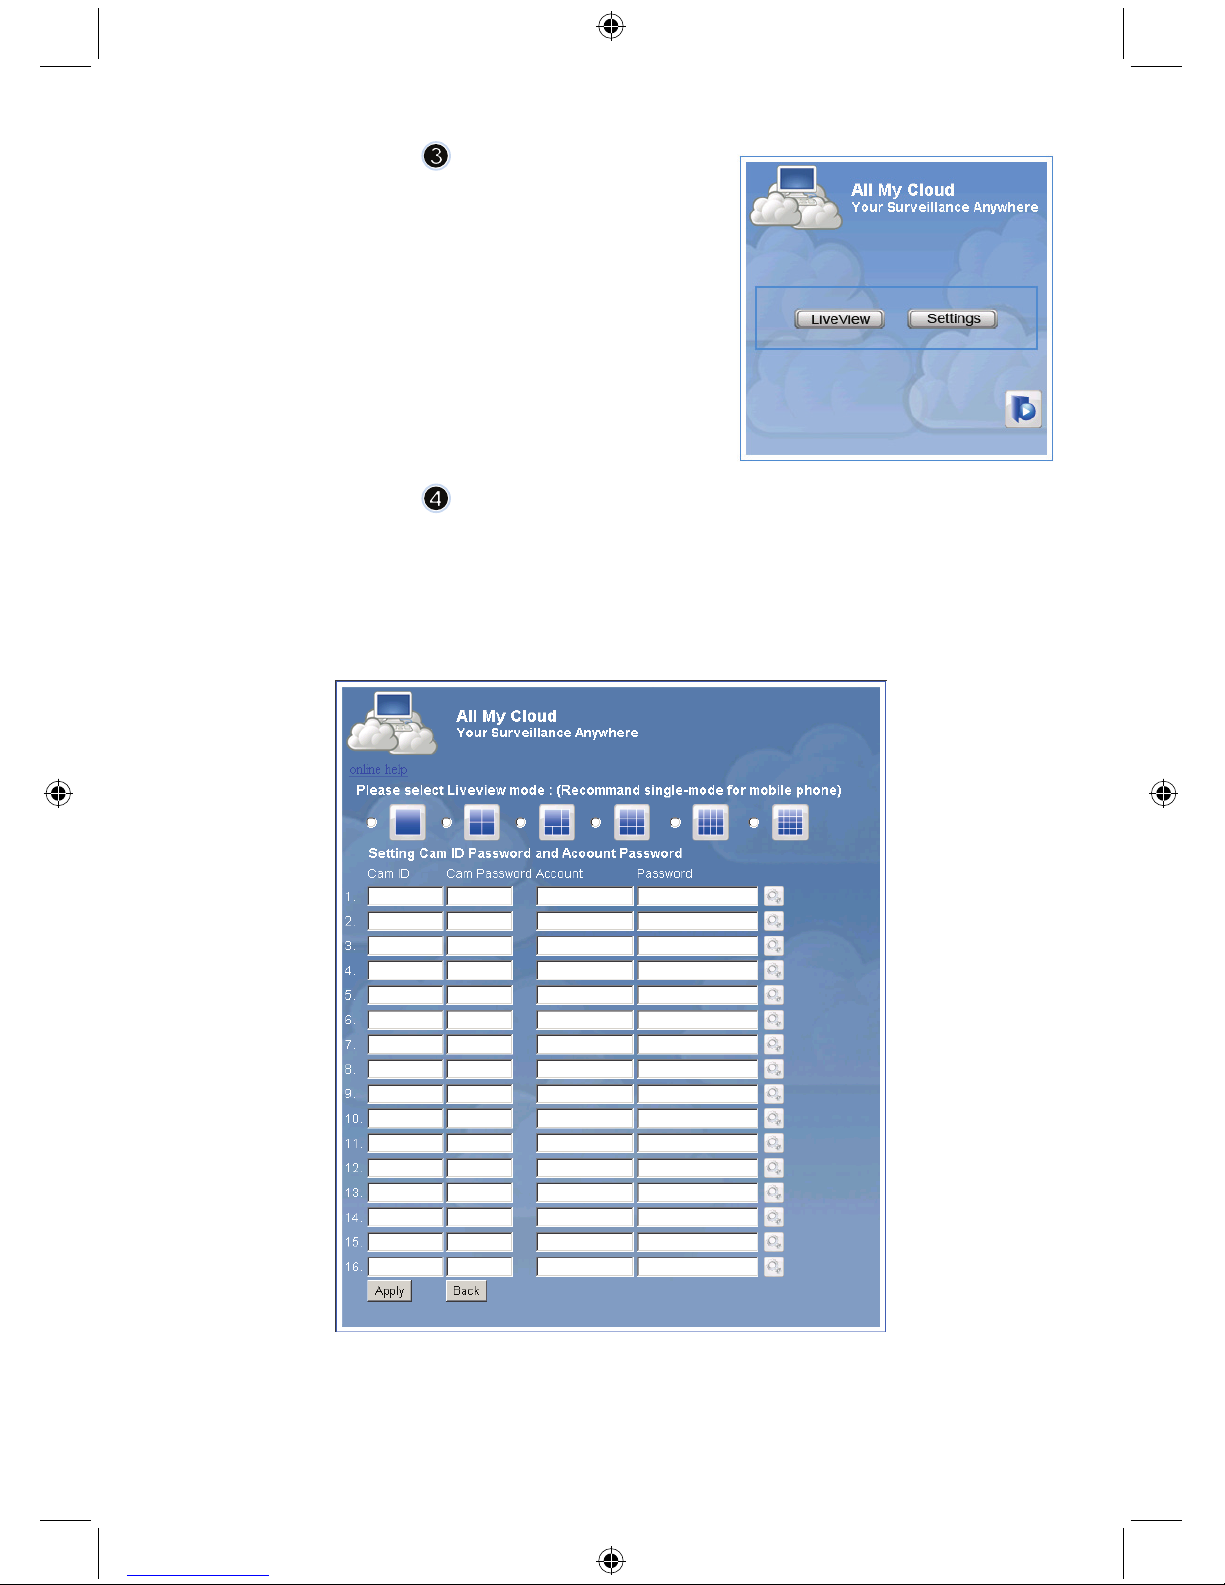
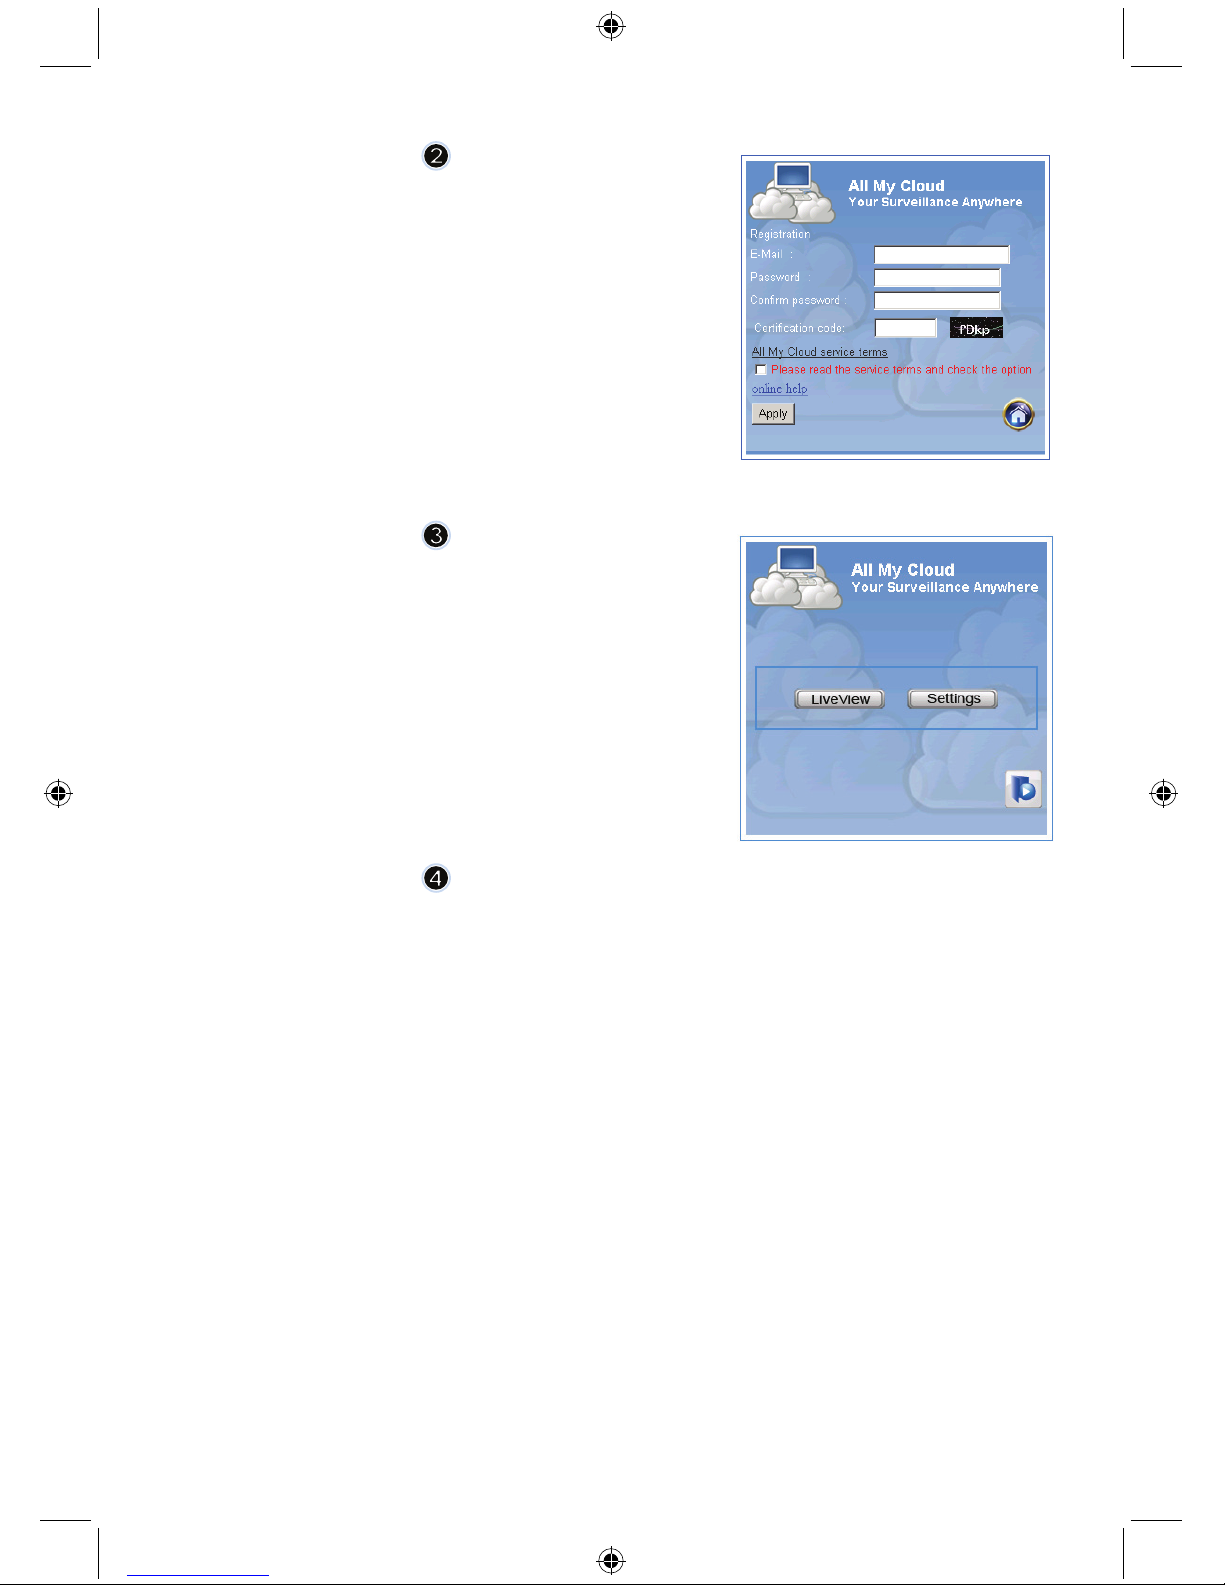
Viewing your IP camera via Internet Explorer:
To view your IP camera anywhere, anyplace without any
difficult settings, you can go to the free website:
http://www.allmycloud.com
During the first visit it is necessary to register first.
Click Register (see step 2).
During the next visit you can Login directly with your
E-Mail and Password.
Fill out your E-Mail and Password.
Confirm password and fill out the unique certification code
provided by the website.
Read All my Cloud service terms and click on the tick box.
Click on Apply.
You will receive a confirmation e-mail. Click on OK and the
website returns to the Login screen as described in step 1.
8
With the first login you first need to set the Settings of your IP
camera.
If settings are OK you can go directly to Live View
Cam ID: The ID code of the camera (on the label on the back of the camera)
Cam Password: The password of the camera (on the label on the back of the camera)
Account: The e-mail address you used to register
Password: The password you used to register
Apply: Confirm settings and return to step 3 and click on Live View
Note: If your PC has no ActiveX, you need to download it to have Live View. The download is free and
can be done via this website.
9
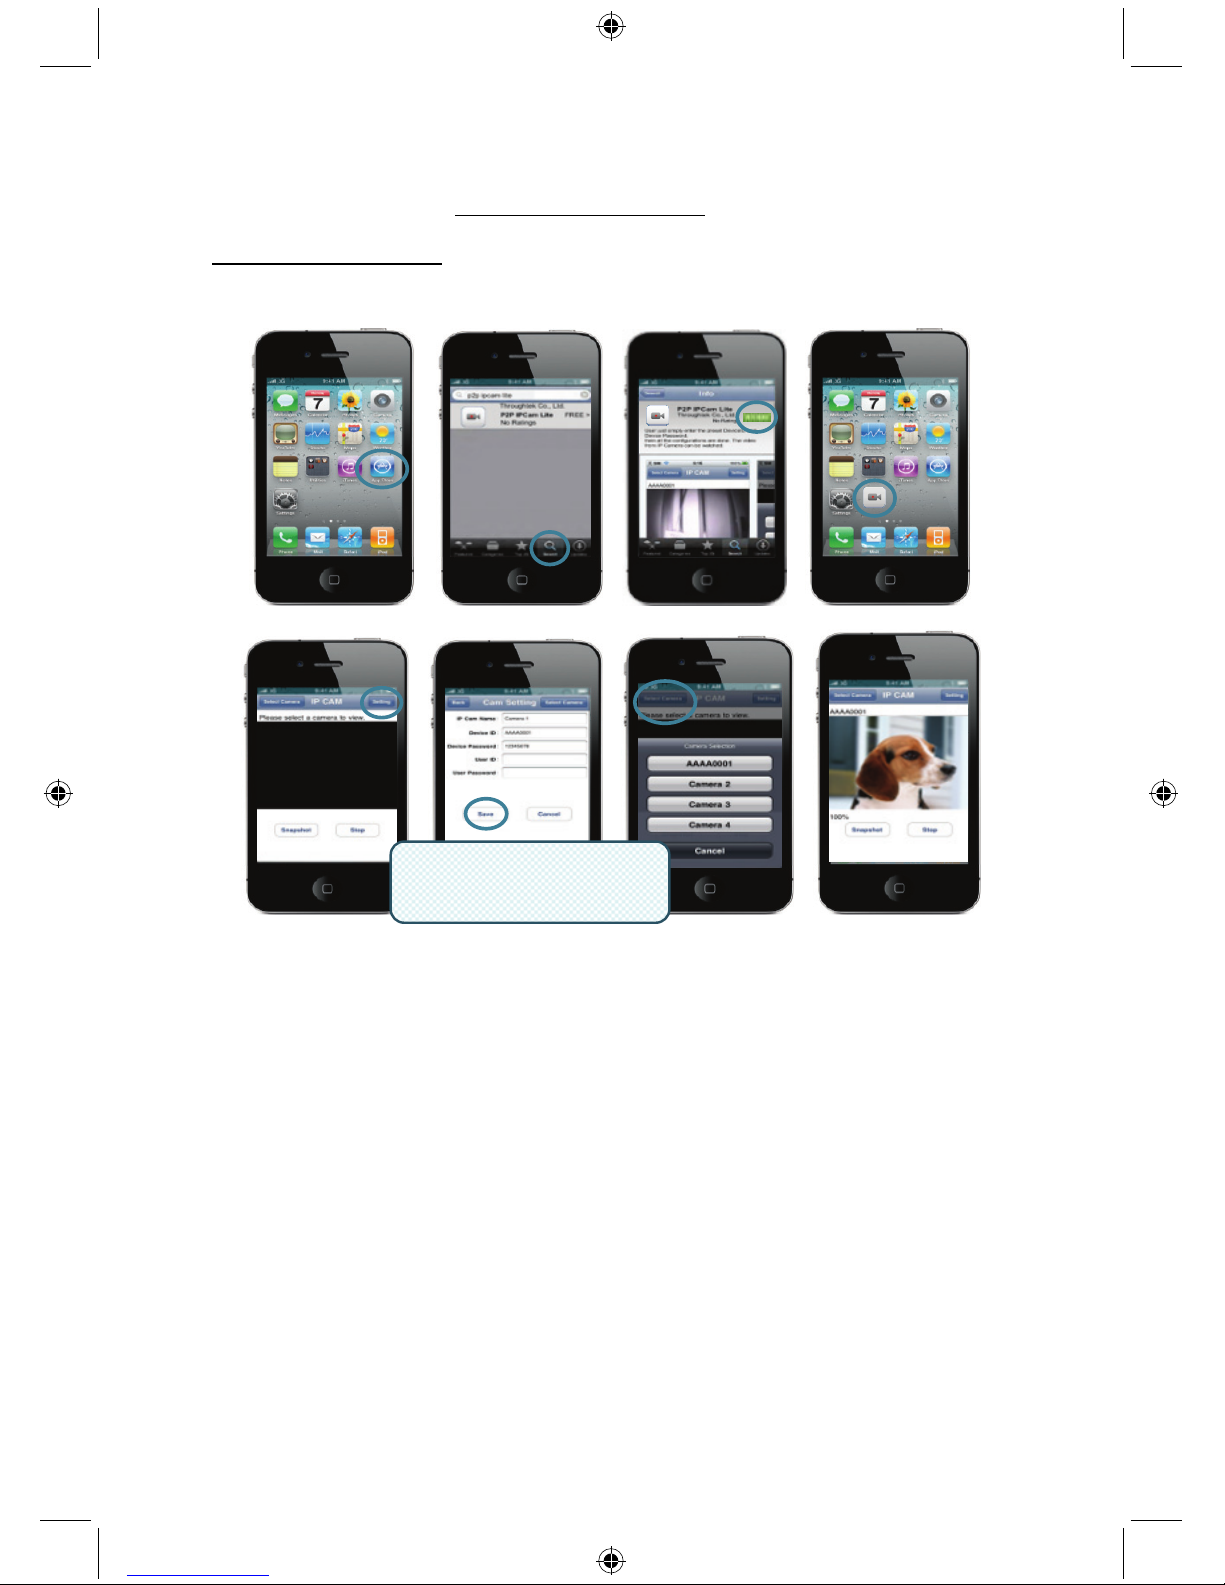
IP Cam via iPhone/Smart Phone:
1. Please download the dedicated video monitoring software for Apple OS4 and Android operating
system from this web page: http://www.p2pipcam.com/3g
2. For other 3G mobile phones with internet access, please use the built-in internet browser to visit
http://www.allmycloud.com
server for live videos
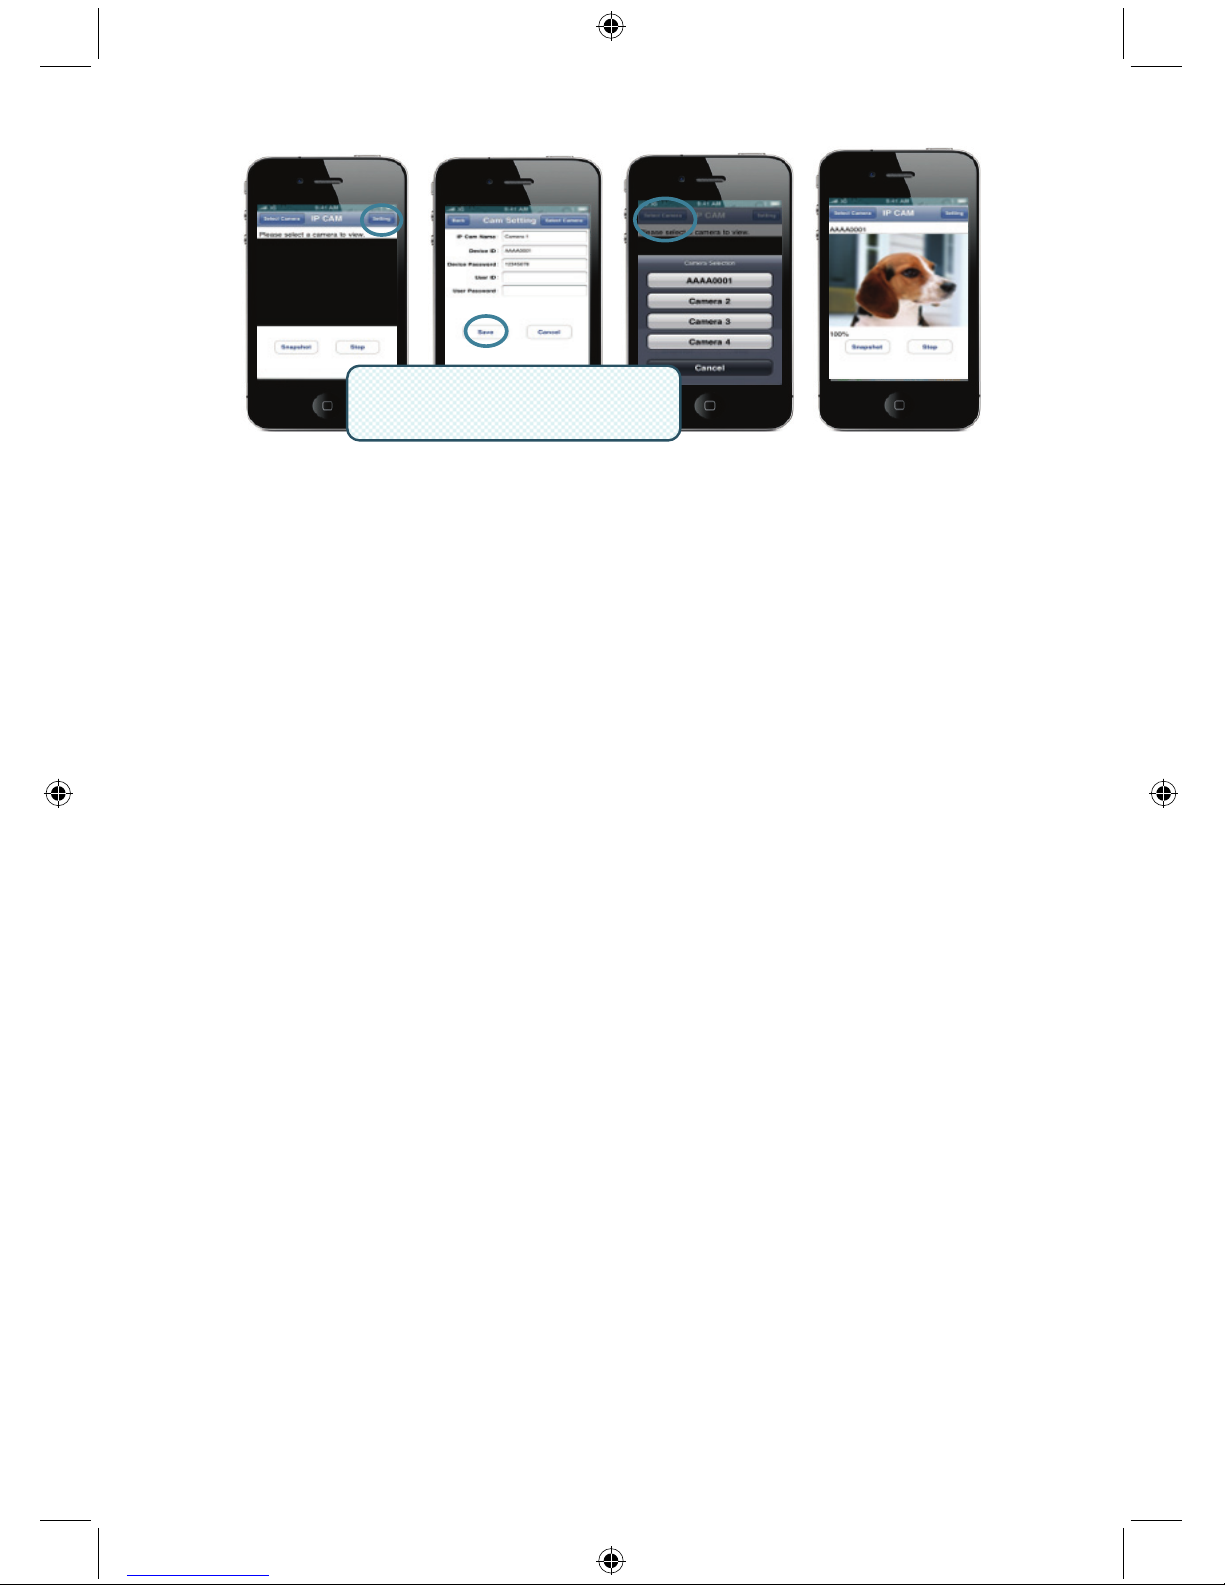
3. Please refer to the example for iPhone as shown below and refer to the users manual of your
phone for more details on how to operate it.
The following instructions are based on iPhone.
STEP 1: Launch “App Store”
STEP 2: Search for “p2p ipcam lite”
STEP 3: Install the application
STEP 4: Launch “p2p ipcam lite”
STEP 5: Select Settings
STEP 6: Input Device ID/Password
STEP 7: Select a Camera
Specifications:
Image sensor: 1/4.5” VGA sensor
Resolution: 640 x 480, 320 x 240
Display fps: 30 fps max.
View angle (manual): Pan 0°~350°, Tilt 0°~135°
Video compression: MJPEG
IR distance (night vision): 5 m max.
Dimensions: 205mm(L) x 123mm (W) x 123mm (H)
Weight: 405g (including base)
Power source: 100~240 VAC
U
ser
ID/P
asswor
d
(Set on Search Tool)
10
Homeplug:
PLC Signal: Frequency band 2 - 28 MHz (with mask)
Modulation OFDM (QAM 8/16/64/256/1024, DBPSK, DQPSK, ROBO)
PHY Rate: 200Mbps
TCP: Up to 65-70Mbps effective throughput
UDP: Up to 85-90Mbps effective throughput
Access Methods: CSMA/CA channel-access schemes
QoS: 4 levels priority based contention access and multi-segment bursting 8 levels
VLAN priority field
Nodes: 16 bridged devices per station
4 managed streams per station
IGMP: IGMP snooping with multicast to multiple unicast support in CSMA
Maximum 8 multicast groups per power line STA
Maximum 4 STAs per group
Security Encryption: 128 bit AES link encryption with key management
Standards: IEEE 802.3, IEEE 802.3U, HomePlug AV
Port: One 10/100 Ethernet RJ45 port
Electrical: Power Supply: 100-240 VAC 50/60Hz
Power Consumption: < 6W
Operating System: Windows 98 SE, Me, NT, 2000, XP, MAC, Linux, Vista
Environmental: Temperature: Operating: 0~40°
Relative Humidity: Operating: 10~85%
Non-Condensing
Physical: Weight: 160 g
System requirements for best results:
CPU: Pentium® Dual-Core or above
RAM: 1G or above
Display: 1024 x 768 / 96DPI
OS: Windows
®
XP/Vista/7
Internet Explorer: ActiveX needed (free download)
Free HD Space: 100 GB or above
Network: Ethernet 100 base T or above
Safety precautions:
To reduce risk of electric shock, this product should ONLY be
opened by an authorized technician when service is required.
Disconnect the product from mains and other equipment if a
problem should occur. Do not expose the product to water or
moisture.
Maintenance:
Clean only with a dry cloth. Do not use cleaning solvents or abrasives.
Warranty:
No guarantee or liability can be accepted for any changes and modifications of the product or damage
caused due to incorrect use of this product.
General:
Designs and specifications are subject to change without notice.
All logos brands and product names are trademarks or registered trademarks of their respective
holders and are hereby recognized as such.
Keep this manual and packaging for future reference.
11
Attention:
This product is marked with this symbol. It means that used electrical and electronic products
should not be mixed with general household waste. There is a separate collections system for
these products.
DEUTSCH
Powerline IP-Kamera
Bitte beachten Sie:
Dies ist eine Kurzanleitung für SEC-CAMIP40 und SEC-CAMIP40EC.
Für weitere Einzelheiten und zur Anwendung der Software siehe englische Bedienungsanleitung.
Wichtiger Hinweis:
Achten Sie auf die Sicherheitseinstellungen wie Benutzer-ID und Passwort, um auf dieses Produkt
zugreifen zu können. Diese Informationen sind ausschließlich für Mitglieder der Benutzergruppe
bestimmt.
Achten Sie auf die Benutzerinformationen des Produkts wie Videos, Standbilder und Internetinhalte.
Diese Informationen sind ausschließlich für Mitglieder der Benutzergruppe bestimmt.
Hardwareinstallation:
12
1. LAN-Ports
2. WAN-Port an MODEM
3. NETZTEIL
4. An MODEM
5. An HOMEPLUG
6. MODEM
7. ROUTER
8. HOMEPLUG
1
2
4
5
3
6
78
13
NETZWERKKABEL
Beschreibung Homeplug:
POWER: ROT: eingeschaltet
GRÜN: Verbindungsqualität gut
LINK: ORANGE: Verbindungsqualität ausreichend
ROT: Verbindungsqualität schlecht
ETHERNET: BLINKT: Ethernet Betrieb erkannt
Wissenswertes zu Homeplug:
Benutzen Sie möglichst keinen Überspannungsschutz. Einige dieser Geräte können das Signal
unterbrechen.
Drehstrom. Achten Sie darauf, dass Homeplug und IP-Kamera auf der gleichen Phase angeschlossen
sind, anderenfalls kann das Signal unterbrochen werden.
Das System unterstützt AC 100 V~240 V, aber Homeplug und IP-Kamera müssen auf dem gleichen
Stromnetz angeschlossen sein, anderenfalls kann das Signal unterbrochen werden.
Ein Homeplug unterstützt nicht mehr als 16 IP-Kameras. Es können keine zwei Homeplugs in einem
Netzwerk benutzt werden.
Das System kann über 300 m eingesetzt werden.
Softwareinstallation:
Legen Sie die Software-CD in das
CD-Laufwerk ein und starten Sie die
Installation.
Wählen Sie Shelexec.exe, um die
Installation der Software zu starten.
Alternativ klicken Sie startup.html zum
Öffnen der Startseite.

14
Wählen Sie ENGLISH, um die
Installation der Software zu starten.
Bitte beachten Sie: Die Software des
IP-KAMERASYSTEMS ist nur in
englischer Sprache.
Klicken Sie Install PC Software.
Klicken Sie Next, um die Installation zu
starten.
Klicken Sie Next.
15
Klicken Sie Install.
Klicken Sie Finish, um die Installation zu
beenden.
Gerät hinzufügen:
Die Software setzt ein IP CAM SYSTEM Symbol auf den Desktopbildschirm. Klicken Sie das Symbol,
um die Software zu starten. Sie können bis zu 16 Kameras hinzufügen. Folgen Sie den nachstehenden
Schritten zum Hinzufügen weiterer Kameras.
16
1. Wählen Sie einen leeren Kanal.
2. Klicken Sie Add a device.
3. Drücken Sie Search oder geben Sie die ID und das
Passwort Ihres Geräts ein.
Bitte beachten Sie: Die Funktion Search steht nur auf
dem lokalen Netzwerk zur Verfügung.
4. Drücken Sie Save.
5. Klicken Sie Start all cameras.
Zusätzliche Informationen zu
Add device info:
Channel Name:
Kameraname bearbeiten
(z.B. Büro)
User ID:
Benutzer-ID
User password:
Passwort des Benutzers
Bitte beachten Sie: Aus Sicherheits- und Datenschutzgründen empfehlen wir dringend eine
Benutzer-ID und ein Passwort einzutragen.
Anzeige Ihrer IP-Kamera über Internet Explorer:
Zur Anzeige Ihrer IP-Kamera überall und jederzeit ohne
schwierige Einstellungen besuchen Sie die kostenlose
Website: http://www.allmycloud.com
Bei Erstbesuch müssen Sie sich anmelden.
Klicken Sie Register (siehe Schritt 2).
Ab dem nächsten Besuch melden Sie sich mit der
Schaltfläche Login direkt mit Ihrer E-Mail und Ihrem
Passwort an.

17
Geben Sie E-Mail und Passwort ein.
Bestätigen Sie das Passwort und geben Sie den
Zertifizierungscode der Website ein.
Lesen Sie die Cloud service terms und klicken Sie das
Abhakkästchen.
Klicken Sie Apply.
Sie erhalten eine E-Mail zur Bestätigung. Klicken Sie OK,
damit kehrt die Website auf den Anmeldebildschirm zurück,
wie in Schritt 1 beschrieben.
Bei Erstanmeldung müssen Sie zunächst die Einstellungen
unter Settings für Ihre IP-Kamera vornehmen.
Nachdem die Einstellungen vorgenommen wurden, gehen Sie
direkt zu Live View.
Cam ID: ID-Code der Kamera (auf dem Typenschild auf der Rückseite der Kamera)
Cam Passwort: Passwort der Kamera (auf dem Typenschild auf der Rückseite der Kamera)
Account: E-Mail-Adresse wie in Ihrer Anmeldung
Passwort: Passwort wie in Ihrer Anmeldung
Apply: Bestätigen Sie die Einstellungen, kehren Sie zu Schritt 3 zurück und klicken
Sie Live View

18
Bitte beachten Sie: Hat Ihr PC kein ActiveX, so müssen Sie das Programm herunterladen, um Live
View zu haben. Der Download ist kostenlos und erfolgt über diese Website.
IP-Kamera über iPhone/Smart Phone:
1. Laden Sie die entsprechende Videoüberwachungssoftware für Apple OS4 und Android von dieser
Webseite herunter: http://www.p2pipcam.com/3g
.
2. Für andere 3G-Handys mit Internetzugang benutzen Sie bitte den eingebauten Browser und
besuchen Sie den Server http://www.allmycloud.com
für Live Videos.
3. Siehe Beispiel für iPhone unten und entnehmen Sie weitere Informationen der
Bedienungsanleitung Ihres Handys.

19
Nachstehende Anleitungen basierend auf iPhone.
SCHRITT 1: Starten Sie den „App Store“.
SCHRITT 2: Suchen Sie „p2p ipcam lite“.
SCHRITT 3: Installieren Sie das Programm.
SCHRITT 4: Starten Sie „p2p ipcam lite“.
SCHRITT 5: Wählen Sie Einstellungen.
SCHRITT 6: Geben Sie Geräte-ID/Passwort ein.
SCHRITT 7: Wählen Sie eine Kamera.
Spezifikationen:
Bildsensor: 1/4,5” VGA-Sensor
Auflösung: 640x480, 320x240
Bildrate: 30 fps max.
Blickwinkel (manuell): Schwenk 0°~350°, Neigung 0°~135°
Videokompression: MJPEG
IR-Reichweite (Nachtsicht): 5 m max.
Abmessungen: 205 mm (L) x 123 mm (B) x 123 mm (H)
Gewicht: 405 g (einschließlich Halterung)
Spannungsversorgung: 100~240 V AC
Homeplug:
PLC-Signal: Frequenzband 2 - 28 MHz (mit Maske)
Modulation OFDM (QAM 8/16/64/256/1024, DBPSK, DQPSK, ROBO)
PHY Rate: 200 Mbit/s
TCP: Bis zu 65-70Mbit/s effektiver Durchsatz
UDP: Bis zu 85-90Mbit/s effektiver Durchsatz
Zugriffsmethoden: CSMA/CA Kanalzugriff
QoS: 4 Ebenen prioritätsbasierter Zugriff und Multisegment-Bursting 8 Ebenen VLAN
Prioritätsfeld
Knoten: 16 überbrückte Geräte je Station
4 verwaltete Streams je Station
IGMP: IGMP-Snooping mit Multicast zu mehreren Unicast Unterstützung in CSMA
Max. 8 Multicastgruppen je Powerline STA
Max. 4 STAs je Gruppe
Verschlüsselung: 128-Bit AES Linkverschlüsselung mit Schlüsselverwaltung
Standards: IEEE 802.3, IEEE 802.3U, HomePlug AV
Port: 1 x 10/100 Ethernet RJ45 Port
Elektrik: Spannungsversorgung: 100-240 V AC 50/60 Hz
Leistungsaufnahme: < 6 W
Betriebssystem: Windows 98 SE, Me, NT, 2000, XP, MAC, Linux, Vista
Umwelt: Betriebstemperatur: 0~40 °C
Relative Luftfeuchtigkeit Betrieb: 10~85 %
Nicht kondensierend
Physikalisch: Gewicht: 160 g
Benutzer-ID/Passwort
(Einstellung auf
Suchwerkzeug)
20
Systemanforderungen:
CPU: Pentium® Dual-Core oder höher
RAM: 1 GB oder höher
Display: 1024x768 / 96 DPI
Betriebssystem: Windows XP/Vista/7
Internet Explorer: ActiveX (kostenloser Download)
Freie Kapazität Festplatte: 100 GB oder höher
Netzwerk: Ethernet 100 base T oder höher
Sicherheitsvorkehrungen:
Um das Risiko eines elektrischen Schlags zu verringern, sollte
dieses Produkt AUSSCHLIESSLICH von einem autorisierten
Techniker geöffnet werden. Bei Problemen trennen Sie das
Gerät bitte von der Spannungsversorgung und von anderen
Geräten ab. Stellen Sie sicher, dass das Gerät nicht mit
Wasser oder Feuchtigkeit in Berührung kommt.
Wartung:
Nur mit einem trockenen Tuch säubern. Keine Reinigungs- oder Scheuermittel verwenden.
Garantie:
Es kann keine Garantie oder Haftung für irgendwelche Änderungen oder Modifikationen des Produkts
oder für Schäden übernommen werden, die aufgrund einer nicht ordnungsgemäßen Anwendung des
Produkts entstanden sind.
Allgemeines:
Design und technische Daten können ohne vorherige Ankündigung geändert werden.
Alle Logos, Marken und Produktnamen sind Marken oder eingetragene Marken ihrer jeweiligen
Eigentümer und werden hiermit als solche anerkannt.
Bitte bewahren Sie Bedienungsanleitung und Verpackung für spätere Verwendung auf.
Achtung:
Dieses Produkt ist mit diesem Symbol gekennzeichnet. Es bedeutet, dass die ausgedienten
elektrischen und elektronischen Produkte nicht mit dem allgemeinen Haushaltsmüll entsorgt
werden dürfen. Für diese Produkte stehen gesonderte Sammelsysteme zur Verfügung.

21
FRANÇAIS
Caméra IP CPL (courants porteurs)
Remarque :
Ceci est une brève notice descriptive pour la SEC-CAMIP40 et la SEC-CAMIP40EC.
Pour un descriptif complet de l'utilisation du logiciel, référez-vous au manuel en français.
Remarque importante :
Les informations de sécurité requises pour utiliser ce produit, comme le nom d'utilisateur et le mot de
passe, doivent rester confidentielles. Elles ne doivent pas être accessibles à une tierce personne en
dehors du groupe d'utilisateurs.
Les données spécifiques à chaque utilisateur de ce produit (vidéos, photos, contenus internet etc.)
doivent rester confidentielles. Elles ne doivent pas être accessibles à une tierce personne en dehors du
groupe de ces utilisateurs.
Installation du matériel :

22
1. Ports LAN
2. Port WAN vers MODEM
3. ALIMENTATION
4. Vers MODEM
5. Vers la PRISE MAISON
6. MODEM
7. ROUTEUR
8. PRISE MAISON
1
2
4
5
3
6
78
23
câble réseau
Description de la prise maison:
POWER: ROUGE, sous-tension
VERT, excellente qualité de connexion
LINK: ORANGE, bonne qualité de connexion
ROUGE, mauvaise qualité de connexion
ETHERNET: CLIGNOTE, traffic Ethernet détecté
Ce que vous devez savoir à propos de la prise maison:
Essayez d'éviter d'utiliser une multiprise anti-surtension. Certaines multiprises anti-surtension peuvent
causer des déconnexions du signal.
Système de courant triphasé. Veuillez vous assurer que la Prise maison et la caméra IP sont
connectées à la même phase de courant; sous risque de causer des déconnexions du signal.
Le système supporte un voltage AC 100V~240V, mais la Prise maison et la caméra IP doivent être
connectées au même voltage, sous risque de causer des déconnexions du signal.
Une Prise maison ne supporte pas plus de 16 caméras IP. Elle n'autorise pas deux Prises Maisons à
être connectées à un réseau afin d'eviter les erreurs dans la connexion réseau.
La totalité du système a une distance de connexion limitée à 300 metres.
Installation du logiciel:
Insérez le CD du logiciel dans votre
lecteur CD-R et démarrez l'installation.
Cliquez deux fois sur Shelexec.exe pour
installer le logiciel.
Ou accédez au contenu du disque et
cliquez sur le fichier startup.html pour
ouvrir la page de démarrage.
24
Sélectionnez ENGLISH (ANGLAIS)
comme langue pour l'installation.
Remarque : le logiciel IP CAM SYSTEM
est uniquement en anglais.
Cliquez sur Install PC software
(Installer le logiciel PC)
Cliquez sur Next (Suivant) pour
commencer l'installation.
Cliquez sur next (Suivant).
25
Cliquez sur Install (Installer).
Cliquez sur Finish (Terminer) pour
terminer l'installation.
Ajout d'un périphérique :
Le logiciel a ajouté un raccourci IP CAM SYSTEM sur le Bureau. Cliquez sur ce raccourci pour
démarrer le logiciel. Vous pouvez ajouter jusqu'à 16 caméras, selon la procédure indiquée ci-dessous.
26
1. Sélectionnez un canal disponible.
2. Cliquez sur Add a device (Ajouter un périphérique).
3. Cliquez sur Search (Rechercher) ou entrez le nom
d'utilisateur (ID) et le mot de passe (Password) de
votre périphérique.
Remarque : la fonction Search (Recherche) ne peut
être utilisée que sur le réseau local.
4. Cliquez sur Save (Enregistrer).
5. Cliquez sur Start all cameras (Démarrer toutes les
caméras).
Informations supplémentaires sur Add
device Info (informations sur l'ajout de
périphériques) :
Channel Name (Nom du canal) :
Modifiez le nom de la caméra
(par exemple: bureau)
User ID (Nom d'utilisateur) :
Nom personnel
User Password (Mot de passe utilisateur)
Mot de passe personnel
Remarque : pour des questions de sécurité et de confidentialité, vous avez intérêt à définir un nom
d'utilisateur et un mot de passe personnels.
Affichage de votre caméra IP via Internet Explorer :
Pour visualiser votre caméra n'importe où, de n'importe quel
endroit sans aucune configuration complexe, visitez le site
gratuit : http://www.allmycloud.com
L'accès aux fonctions de ce site requiert une inscription.
Cliquez sur Register (S'inscrire) (voir étape 2)
Cette inscription n'est requise que pour le premier accès.
Par la suite, il vous suffit de vous connecter directement en
indiquant votre adresse courriel (E-mail) et votre mot de
passe (Password).
27
Tapez votre adresse courriel et un mot de passe
Retapez votre mot de passe et tapez le code de certification
fourni par le site.
Lisez les Conditions d'utilisation des services cloud
(cloud service terms) et cochez l'option correspondante.
Cliquez sur Apply (Appliquer).
Vous recevrez un message de confirmation par courriel.
Cliquez sur OK pour retourner à l'écran de connexion illustré à
l'étape 1.
Lors de la première connexion, définissez les paramètres
(settings) de votre caméra IP.
Ces paramètres spécifiés, rendez-vous directement sur Live
View (Vue en direct)
Cam ID (ID caméra) :
Code d'identification de la caméra (sur l'étiquette au dos de la caméra)
Cam Password (Mot de passe caméra) :
Mot de passe de la caméra (sur l'étiquette au dos de la caméra)
Account (Compte) :
Adresse courriel que vous avez spécifiée lors de votre inscription
Password (mot de passe) :
Mot de passe que vous avez spécifiée lors de votre inscription
Apply (appliquer) :
Confirmez les informations, retournez à l'étape 3 et cliquez sur Live view (Vue en direct)

28
Remarque : si ActiveX n'est pas installé sur votre PC, téléchargez-le pour pouvoir utiliser la fonction
Live View (Vue en direct). Le téléchargement est gratuit et peut être effectué depuis ce site.
IP CAM via un iPhone ou un téléphone Smart :
1. Téléchargez le logiciel de surveillance vidéo pour les systèmes d'exploitation Apple OS4 et
Android depuis cette page : http://www.p2pipcam.com/3g
2. Pour les autres téléphones portables 3G accédant à Internet, utilisez votre navigateur pour
accéder au serveur http://www.allmycloud.com
et aux vidéos en direct.
3. L'exemple ci-dessous illustre la procédure pour un iPhone Pour plus de détails quand aux modes
d'opération, reportez-vous au manuel d'utilisation de votre téléphone.
29
Les instructions suivantes valent uniquement pour l'iPhone.
Étape 1 : lancez “App Store”
Étape 2 : recherchez “p2p ipcam lite”
Étape 3 : installez l'application
Étape 4 : lancez “p2p ipcam lite”
Étape 5 : sélectionnez Settings (Paramètres)
Étape 6 : tapez l'ID du périphérique et son mot de passe
Étape 7 : sélectionnez une caméra
Caractéristiques:
Capteur d'image: Capteur1/4.5” VGA
Résolution: 640*480, 320*240
Affichage FPS: 30fps max.
Angle de vue (manuel): Panoramique 0°~350°, Inclinaison 0°~135°
Compression vidéo: MJPEG
Distance IR (vision nocturne): 5 m max.
Dimensions: 205mm(Longueur) x 123mm (Largeur) x 123mm (Hauteur)
Poids: 405g (support compris)
Source d'alimentation: 100~240 VAC
Prise maison:
Signal PLC: Bande de fréquence 2 - 28 MHz (avec masque)
Modulation OFDM (QAM 8/16/64/256/1024, DBPSK, DQPSK, ROBO)
Taux PHY: 200Mbps
TCP: Jusqu' à 65-70Mbps de débit effectif
UDP: Jusqu' à 85-90Mbps de débit effectif
Méthodes d'accès: plans cannaux d'accès CSMA/CA
Qualité de service: Conflits d'accès basés sur 4 niveaux de priorités et éclatement
multi-segments 8 niveaux, champ de priorité VLAN
Neuds: 16 appareils pontés par station
4 flux gérés par station
Protocole IGMP: IGMP snooping (Surveillance de traffic IGMP) avec support multicast
(multidiffusion) ou multiple unicast (plusieurs supports point à point) CSMA
8 groupe multicast (multidiffusion) maximum par ligne électrique STA
4 STA par groupe maximum
Cryptage de sécurité: Lien crypté 128 bitAES avec gestion des clefs
Standards: IEEE 802.3, IEEE 802.3U, Prise Maison AV
Port: Un port 10/100 Ethernet RJ45
Alimentation: Alimentation électrique: 100-240 VAC 50/60Hz
Consommation électrique: < 6W
Système d'exploitation: Windows 98 SE, Me, NT, 2000, XP, MAC, Linux, Vista
Nom d'utilisateur/mot de passe
(réglé sur la fonction recherche)

30
Environement: Température: en exploitation: 0~40°
Humidité relative: en exploitation: 10~85%
Sans condensation
Physique: Poids: 160 g
Configuration requise pour un résultat optimal:
Processeur : Pentium
®
Dual-Core ou supérieur
Mémoire vive : 1G ou supérieure
Affichage : 1024*768 / 96DPI
Système d'exploitation : Windows XP/Vista/7
Internet Explorer : ActiveX nécessaire (téléchargement gratuit)
Espace libre sur le disque dur : 100 Go ou supérieur
Réseau : Ethernet 100 base T ou supérieur
Consignes de sécurité :
Pour réduire le risque de choc électrique, ce produit ne doit être
ouvert que par un technicien qualifié si une réparation s’impose.
Débranchez l’appareil et les autres équipements du secteur s’il
y a un problème. Ne pas exposer l’appareil à l’eau ni à
l’humidité.
Entretien :
Ne nettoyez l’appareil qu’avec un chiffon sec. N’utilisez pas de solvants ou de produits abrasifs.
Garantie :
Aucune garantie ou responsabilité ne sera acceptée en cas de modification et/ou de transformation du
produit ou en cas de dommages provoqués par une utilisation incorrecte de l’appareil.
Généralités :
Le design et les caractéristiques techniques sont sujets à modification sans notification préalable.
Tous les logos de marques et noms de produits sont des marques déposées ou immatriculées dont
leurs détenteurs sont les propriétaires et sont donc reconnues comme telles dans ce documents.
Conservez ce manuel et l’emballage pour toute référence ultérieure.
Attention :
Ce symbole figure sur l’appareil. Il signifie que les produits électriques et électroniques ne
doivent pas être jetés avec les déchets domestiques. Le système de collecte est différent pour
ce genre de produits.

31
NEDERLANDS
Powerline beeldweergavecamera
Opmerking:
Dit is een verkorte handleiding voor de SEC-CAMIP40 en SEC-CAMIP40EC.
Voor de volledige bijzonderheden hoe de software te gebruiken is, refereren wij naar de geavanceerde
Engelse gebruiksaanwijzing.
Belangrijke mededeling:
Wees verantwoordelijk met het gebruik van dit product, de beveiligingsinstellingen zoals
gebruikersidentiteit en wachtwoord. Deze informatie mag niet ter beschikking gesteld worden aan
derden buiten de gebruikersgroep.
Wees verantwoordelijk voor de gebruikersinformatie van dit product zoals video’s, stilstaande beelden
en internetinhoud enz. Deze informatie mag niet ter beschikking gesteld worden aan derden buiten de
gebruikersgroep.
Installatie van de hardware:

32
1. LAN-poorten
2. WAN-poort naar MODEM
3. Vermogen
4. Naar modem
5. Naar thuisaansluiting
6. Modem
7. Router
8. Thuisaansluiting
1
2
4
5
3
6
78

33
NETWERKKABEL
Beschrijving van de thuisaansluiting:
VERMOGEN: ROOD, vermogen AAN
GROEN, kwaliteit van de verbinding is goed
LINK: ORANJE, kwaliteit van de verbinding is redelijk
ROOD, kwaliteit van de verbinding is slecht
ETHERNET: KNIPPERT, ethernetverkeer aangetroffen
Wat u dient te weten over de thuisaansluiting:
Probeer de overbeveiliging van de verdeelkast niet te gebruiken. Sommige onderverdelers van de
overbeveiliging kunnen het signaal onderbreken.
Drie-fasen systeemvermogen. Zorgt u ervoor dat de thuisaansluiting en de beeldweergavecamera op
dezelfde stroomgroep worden aangesloten omdat dit anders eventueel een onderbreking van het
signaal kan veroorzaken.
Het systeem ondersteunt stroom van 100V~240V maar de thuisaansluiting en beeldweergavecamera
moeten op dezelfde stroomgroep worden aangesloten omdat dit anders eventueel een onderbreking
van het signaal kan veroorzaken.
Eén thuisaansluiting biedt ondersteuning tot 16 beeldweergavecamera’s aan. Het staat niet toe dat
twee thuisaansluitingen worden opgezet op één netwerk voor het geval er een fout ontstaat in de
netwerkverbinding.
Het hele systeem heeft een aansluiting die beperkt is tot een afstand tot 300 meter.
Installatie van de software:
Plaats de software-cd in uw CD-R
apparaat en start de installatie.
Kies Shelexec.exe om te beginnen met
het installeren van de software
of
controleer de inhoud van de disc en klik
op de startup.html-file om de
startpagina te openen en te starten.

34
Selecteer ENGELS (ENGLISH) om de
installatie van de software te starten.
Opmerking: de software voor het
beeldverwerkings-camerasysteem wordt
alleen in het Engels geleverd.
Klik op Installeer pc-software.
Klik op Volgende om de installatie te
starten.
Klik op Volgende.

35
Klik op Installeren.
Klik op Afsluiten om de installatie te
voltooien.
Een apparaat toevoegen:
De software heeft een snelkoppeling op het bureaublad gemaakt voor het systeem van de
beeldverwerkingscamera. Klik op dit icoon om de software te starten. U kunt een totaal van
16 camera’s toevoegen. Volg de onderstaande stappen om meer camera’s toe te voegen.

36
1.
Selecteer een leeg kanaal.
2. Klik op Apparaat toevoegen.
3. Druk op Zoeken of typ de Identiteit en Wachtwoord
van uw apparaat in.
Opmerking: de Zoek-functie kan alleen in een lokaal
network gebruikt worden.
4. Druk op Opslaan.
5. Klik op Start alle camera’s.
Aanvullende informatie over het
Toevoegen van een apparaat:
Kanaalnaam:
Bewerk cameranaam
(bijv. kantoor)
Gebruikersidentiteit:
Persoonlijke identiteit
Gebruikerswachtwoord:
Persoonlijk wachtwoord
Opmerking: voor veiligheid- en privékwesties is het aan te raden om een persoonlijke identiteit en
wachtwoord in te stellen.
Het bekijken van uw beeldverwerkingscamera via Internet Explorer:
Om uw beeldverwerkingscamera overal en altijd zonder
moeilijke instellingen te bekijken, kunt u surfen naar de gratis
website: http://www.allmycloud.com
Tijdens uw eerste bezoek is het noodzakelijk om uzelf eerst te
Registeren. Klik op Registeren (zie stap 2).
Tijdens uw volgende bezoek kunt u direct Inloggen met uw
E-mailadres en Wachtwoord.

37
Vul uw e-mailadres en wachtwoord in.
Bevestig het wachtwoord en vul de unieke certificatiecode in
die door de website geleverd wordt.
Lees mijn Kostenbesparende bedieningsvoorwaarden en
kruis het hokje aan.
Klik op Toepassen.
U zult een bevestiging per e-mail ontvangen. Klik op “OK” en
de website zal teruggaan naar het inlogscherm zoals
beschreven staat in stap 1.
Zodra u de eerste keer inlogt, dient u de Instellingen van uw
beeldverwerkingscamera in te stellen.
Indien de instellingen in orde zijn, kunt u direct naar Levende
beelden bekijken gaan.
Camera-identiteit: De identiteitscode van de camera
(op het label aan de achterzijde van de camera).
Camerawachtwoord: Het wachtwoord van de camera
(op het label aan de achterzijde van de camera)
Rekening: Het e-mailadres dat u gebruikt heeft om te registeren.
Wachtwoord: Het wachtwoord dat u gebruikt heeft om te registeren.
Toepassing: Bevestig de instellingen en ga terug naar stap 3 en klik op
Levende beelden bekijken.

38
Opmerking: Indien uw pc geen ActiveX heeft, dient u dit programma te downloaden om “levende
beelden” te ontvangen. De download is gratis en kan via deze website gedowload worden.
Beeldverwerking-camera via iPhone/Smart phone:
1. Download u de speciale video-monitor-software voor de Apple OS4 en het
Android-besturingssysteem van deze webpagina: http://www.p2pipcam.com/3g
2. Voor andere 3G mobiele telefoons die toegang hebben tot internet, bezoekt u de website
http://www.allmycloud.com
, server voor levende beelden.
3. Wij verwijzen u naar het voorbeeld voor de iPhone zoals hieronder is weergegeven, en naar de
gebruiksaanwijzing van uw telefoon voor meer informatie hoe deze gebruikt dient te worden.

39
De volgende instructies zijn voor de iPhone.
STAP 1: Start “App Store”
STAP 2: Zoek naar “p2p ipcam lite”
STAP 3: Installeer de applicatie
STAP 4: Start “p2p ipcam lite”
STAP 5: Selecteer instellingen
STAP 6: Geef identiteit van het apparaat/wachtwoord aan
STAP 7: Selecteer een camera
Specificaties:
Afbeeldingsensor: 1/4.5” VGA sensor
Resolutie: 640x480, 320x240
Weergave FPS: 30fps max.
Panoramahoek (handmatig): Pan 0°~350°, hoek 0°~135°
Video compression: MJPEG
Infrafrode afstand (nachtvisie): 5 m max.
Afmetingen: 20,5 cm (L) x 12,3 cm (B) x 12,3 cm (H)
Gewicht: 405 gram (inclusief voetstuk)
Energiebron: 100~240 VAC
Thuisaansluiting:
PLC-signaal: Frequentieband 2 - 28 MHz (met maskering)
Modulatie OFDM (QAM 8/16/64/256/1024, DBPSK, DQPSK, ROBO)
PHY-snelheid: 200Mbps
TCP: tot 65-70Mbps effectieve doorvoersnelheid
UDP: tot 85-90Mbps effectieve doorvoersnelheid
Toegangsmethoden: Regelingen voor CSMA/CA-kanaaltoegang
QoS: 4 prioriteit-niveaus op basis van een toegangsstelling en 8 VLAN
prioriteitsgebieden met multi-segmentniveaus
Knooppunten: 16 overbruggende apparaten per station
4 beheerste stromingen per station
IGMP: IGMP-spionage met multi-cast naar multiple uni-cast ondersteuning in CSMA
Maximaal 8 multi-cast groepen per vermogenslijn STA
Maximaal 4 STA’s per groep
Veiligheidsencryptie: 128 bit AES encryptielink met sleutelbeheer
Standaarden: IEEE 802.3, IEEE 802.3U, thuisaansluiting AV
Poort: Eén 10/100 ethernet RJ45-poort
Elektrisch: Voeding: 100-240 VAC 50/60Hz
Stroomverbruik: < 6W
Besturingsysteem: Windows 98 SE, ME, NT, 2000, XP, MAC, Linux, Vista
Gebruikersidentiteit/wachtwoord
Weergegeven op het
zoekwerktuig

40
Milieu: Temperatuur: in bedrijf: 0~40°
Relatieve vochtigheid: in bedrijf: 10~85%
Niet-condenserend
Fysiek: Gewicht: 160 gram
Systeemvereisten voor het beste resultaat:
CPU: Pentium® Dual-Core of hoger
RAM: 1 G of hoger
Weergave: 1024x768/96DPI
Besturingsysteem: Windows® XP/Vista/7
Internet Explorer: ActiveX benodigd (gratis download)
Vrije HD Space: 100GB of hoger
Netwerk: Ethernet 100 basis T of hoger
Veiligheidsvoorzorgsmaatregelen:
Om het risico op elektrische schokken te voorkomen mag dit
product ALLEEN worden geopend door een erkende technicus
wanneer er onderhoud nodig is. Koppel het product los van de
elektrische voeding en van andere apparatuur als zich
problemen voordoen. Stel het product niet bloot aan water of
vocht.
Onderhoud:
Uitsluitend reinigen met een droge doek. Gebruik geen reinigingsmiddelen of schuurmiddelen.
Garantie:
Voor wijzigingen en veranderingen aan het product of schade veroorzaakt door een verkeerd gebruik
van dit product, kan geen aansprakelijkheid worden geaccepteerd. Tevens vervalt daardoor de
garantie.
Algemeen:
Wijziging van ontwerp en specificaties zonder voorafgaande mededeling onder voorbehoud.
Alle logo’s, merken en productnamen zijn handelsmerken of geregistreerde handelsmerken van de
respectievelijke eigenaren en worden hierbij als zodanig erkend.
Bewaar deze gebruiksaanwijzing voor latere raadpleging.
Let op:
Dit product is voorzien van dit symbool. Dit symbool geeft aan dat afgedankte elektrische en
elektronische producten niet met het gewone huisafval verwijderd mogen worden. Voor dit soort
producten zijn er speciale inzamelingspunten.

41
ITALIANO
Telecamera IP per rete powerline
Nota:
Questa guida contiene una breve descrizione delle telecamere SEC-CAMIP40 e SEC-CAMIP40EC.
Per istruzioni dettagliate su come utilizzare il software, si prega di consultare il manuale avanzato in
lingua inglese.
Avviso importante:
L'utente è responsabile per le impostazioni di sicurezza, quali l'identificativo utente e la password, per
accedere a questo prodotto. Tali informazioni non devono essere rese disponibili a terzi al di fuori del
gruppo di utenti.
L'utente è responsabile per le informazioni sugli utenti di questo prodotto, quali video, fermo-immagini,
contenuti internet, ecc. Queste informazioni non devono essere rese disponibili a terzi al di fuori del
gruppo di utenti.
Installazione hardware:

42
1. Porte LAN
2. Porta WAN da collegare al MODEM
3. ALIMENTAZIONE
4. Collegare al MODEM
5. Collegare all'adattatore HOMEPLUG
6. MODEM
7. ROUTER
8. ADATTATORE HOMEPLUG
1
2
4
5
3
6
78

43
CAVO DI RETE
Descrizione dell'adattatore Homeplug
POWER: ROSSO, Acceso
VERDE, la qualità della connessione è buona
LINK: ARANCIONE, la qualità della connessione è discreta
ROSSO, la qualità della connessione è cattiva
ETHERNET: LAMPEGGIANTE, traffico Ethernet rilevato
Informazioni importanti sull'adattatore Homeplug:
Se possibile, evitare un quadro salvavita con protezione dalle sovratensioni, in quanto tali dispositivi
possono causare l'interruzione del segnale.
Sistemi trifase. Si prega di assicurarsi che l'adattatore Homeplug e la telecamera IP siano connessi alla
stessa fase di alimentazione; in caso contrario potrebbe verificarsi un'interruzione del segnale.
Il sistema supporta 100 V~240 V CA, ma l'adattatore powerline e la telecamera IP devono essere
alimentati dallo stesso valore di tensione; in caso contrario potrebbe verificarsi un'interruzione del
segnale.
Un adattatore Homeplug non supporta più di 16 telecamere IP. Non è consentito installare due
adattatori Homeplug in una rete in caso di errore nella connessione di rete.
L'intero sistema ha una distanza di connessione limitata a 300 metri.
Installazione del software:
Inserire il CD contenente il software
nell'unità CD-ROM e avviare
l'installazione
Selezionare Shelexec.exe per avviare
l'installazione del software
In alternativa, controllare il contenuto del
disco e fare clic sul file startup.html per
aprire la pagina di avvio

44
Selezionare ENGLISH per avviare
l'installazione del software
Nota: il software IP CAM SYSTEM è
disponibile solo in inglese
Fare clic su Install PC Software
Fare clic su Next per avviare
l'installazione
Fare clic su Next

45
Fare clic su Install
Fare clic su Finish per completare
l'installazione
Come aggiungere un dispositivo:
Il programma crea un collegamento per IP CAM SYSTEM sul desktop. Fare clic sull'icona di questo
collegamento per avviare il software. È possibile aggiungere fino a 16 telecamere. Seguire la seguente
procedura per aggiungere altre telecamere.

46
1. Selezionare un canale vuoto
2. Fare clic su Add a device
3. Premere Search o digitare ID e Password del proprio
dispositivo
Nota: La funzione di ricerca Search può essere
utilizzata solo nella rete locale
4. Premere Save
5. Fare clic su Start all cameras
Ulteriori informazioni sulla finestra
Add device info:
Channel Name:
Modifica il nome della telecamera
(p. es. ufficio)
User ID:
Identificativo personale dell'utente
User Password:
Password dell'utente
Nota: per motivi di sicurezza e di privacy, si consiglia di impostare un identificativo dell'utente e una
password.
Visualizzazione della telecamera IP tramite Internet Explorer:
Per visualizzare la telecamera IP dovunque e senza
impostazioni complicate, si può visitare il sito web gratuito:
http://www.allmycloud.com
Durante il primo accesso, è necessario registrarsi.
Fare clic su Register (vedi punto 2).
Dopo la registrazione, si può accedere direttamente al sito
utilizzando la propria e-mail e password.

47
Immettere la propria e-mail e la propria password.
Confermare la password e immettere il codice univoco di
certificazione fornito dal sito.
Leggere All my cloud service terms e fare click sulla casella
di spunta.
Fare clic su Apply.
Sarà inviata un’e-mail di conferma. Dopo aver fatto clic su OK,
il sito ritornerà alla schermata di accesso descritta al punto 1.
Con il primo accesso, è necessario configurare le impostazioni
(Settings) della propria telecamera IP.
Se le impostazioni sono corrette, si può andare direttamente
alla Live View
Cam ID: Il codice di identificazione della telecamera
(sull'etichetta posta sul retro della telecamera)
Cam Password: La password della telecamera (sull'etichetta posta sul retro della telecamera)
Account: L'indirizzo e-mail utilizzato per la registrazione
Password: La password utilizzata per la registrazione
Apply: Confermare le impostazioni per tornare alla schermata del punto 3 e fare clic su
Live View

48
Nota: Se il computer non ha ActiveX, sarà necessario scaricarlo per visualizzare Live View. Il download
è gratuito e può essere eseguito tramite questo sito.
Telecamera IP via iPhone/Smart Phone:
1. Si prega di scaricare l'apposito software di monitoraggio video per i sistemi operativi Apple OS4 e
Android da questa pagina web: http://www.p2pipcam.com/3g
2. Per gli altri cellulari 3G con accesso a Internet, si prega di utilizzare il web browser integrato e
accedere al server http://www.allmycloud.com
per visualizzare i video in diretta.
3. Si prega di fare riferimento all'esempio per iPhone illustrato qui di seguito e di consultare il
manuale per l'utente del proprio telefono cellulare per ulteriori dettagli sul funzionamento.

49
Le seguenti istruzioni sono basate su iPhone.
1: Avviare "App Store"
2: Cercare "p2p ipcam lite"
3: Installare l'applicazione
4: Avviare "p2p ipcam lite"
5: Selezionare Settings (Impostazioni)
6: Digitare ID/Password del dispositivo
7: Selezionare una telecamera
Specifiche:
Sensore di immagine: Sensore VGA 1/4,5"
Risoluzione: 640x480, 320x240
Display FPS: Max 30 fps (fotogrammi al secondo)
Angolo di campo (manuale): Panoramica 0°~350°, Inclinazione 0°~135°
Compressione video: MJPEG
Portata infrarosso (visione notturna): 5 m max
Dimensioni: 205mm (L) x 123mm (P) x 123mm (A)
Peso 405g (con base)
Alimentazione: 100~240 V CA
Adattatore powerline:
Segnale PLC: Banda di frequenza 2-28 MHz (con maschera)
Modulazione OFDM (QAM 8/16/64/256/1024, DBPSK, DQPSK, ROBO)
Velocità teorica: 200 Mbps
TCP: Fino a 65-70 Mbps throughput effettivo
UDP: Fino a 85-70 Mbps throughput effettivo
Metodi di accesso: Schemi accesso al canale CSMA/CA
QoS: Accesso a contesa basato su quattro livelli di priorità e otto livelli di priorità
VLAN multi-segment bursting
Nodi: 16 dispositivi collegati in parallelo per stazione
4 flussi gestiti per stazione
IGMP: IGMP Snooping con supporto da multicast a unicast multiplo in CSMA
Max 8 gruppi multicast per powerline STA
Max 4 STA per gruppo
Crittografia di sicurezza: Crittografia AES a 128 bit con gestione delle chiavi
Standard: IEEE 802.3, IEEE 802.3U, HomePlug AV
Porte: Una porta Ethernet 10/100 RJ45
Requisiti elettrici: Alimentazione: 100-240 V CA 50/60 Hz
Consumo: < 6 W
Sistema operativo: Windows 98 SE, Me, NT, 2000, XP, MAC, Linux, Vista
User ID/Password
(Impostato sullo
strumento di ricerca)

50
Requisiti ambientali: Temperatura Operativa: 0~40°
Umidità relativa: Operativa: 10~85%
Senza condensa
Caratteristiche fisiche: Peso 160 g
Requisiti di sistema per i migliori risultati possibili:
CPU: Pentium® Dual-Core o superiore
RAM: Almeno 1 GB
Schermo: 1024x768 / 96 DPI
Sistema operativo: Windows XP/Vista/7
Internet Explorer: Richiede ActiveX (download gratuito)
Spazio libero su disco rigido: Almeno 100 GB
Connettività: Ethernet 100 base T o superiore
Precauzioni di sicurezza:
Per ridurre il rischio di shock elettrico, questo prodotto
dovrebbe essere aperto SOLO da un tecnico autorizzato
quando è necessario ripararlo. Scollegare il prodotto
dall’alimentazione e da altri apparecchi se dovesse esserci un
problema. Non esporre il prodotto ad acqua o umidità.
Manutenzione:
Pulire solo con un panno asciutto. Non utilizzare solventi detergenti o abrasivi.
Garanzia:
Non sarà accettata alcuna garanzia o responsabilità in relazione a cambiamenti e modifiche del
prodotto o a danni determinati dall’uso non corretto del prodotto stesso.
Generalità:
Il design e le caratteristiche tecniche sono soggetti a modifica senza necessità di preavviso.
Tutti i marchi a logo e i nomi di prodotto sono marchi commerciali o registrati dei rispettivi titolari e sono
riconosciuti come tali in questo documento.
Tenere questo manuale e la confezione per riferimento futuro.
Attenzione:
Il prodotto è contrassegnato con questo simbolo, con il quale si indica che i prodotti elettrici ed
elettronici non devono essere gettati insieme ai rifiuti domestici. Per questi prodotti esiste un
sistema di raccolta differenziata.
51
ESPAÑOL
Cámara IP Powerline
Nota:
Esta es una breve guía descriptiva para las cámaras SEC-CAMIP40 y SEC-CAMIP40EC.
Para obtener información detallada sobre cómo utilizar el software, consulte el manual avanzado en
inglés.
Aviso importante:
Configure los parámetros de seguridad, como la ID de usuario y la contraseña para acceder a este
producto. Esta información no debería ser desvelada a terceras partes que no pertenezcan al grupo de
usuarios.
Mantenga bajo su cuidado la información del usuario de este producto, como vídeos, imágenes y
contenidos de Internet, etc. Esta información no debería ser desvelada a terceras partes no
pertenecientes al grupo de usuarios.
Instalación del hardware:

52
1. Puertos LAN
2. Puerto WAM al MÓDEM
3. ALIMENTACIÓN
4. Al MÓDEM
5. A HOMEPLUG
6. MÓDEM
7. RÚTER
8. HOMEPLUG
1
2
4
5
3
6
78

53
CABLE DE RED
Descripción de Homeplug:
ALIMENTACIÓN: ROJO, alimentación CONECTADA
VERDE, la calidad de la conexión es buena
CONEXIÓN: NARANJA, la calidad de la conexión es buena
ROJO, la calidad de la conexión es mala
ETHERNET: PARPADEANDO, tráfico Ethernet detectado
Qué debería de saber acerca de Homeplug:
Intente evitar una placa de distribución de protección contra las subidas de tensión. Algunas de estas
placas protectoras pueden causar una desconexión de la señal.
Sistema de alimentación trifásico. Por favor, asegúrese de que el Homeplug y la Cámara IP estén
conectadas en la misma fase, de lo contrario se pude causar una desconexión de la señal.
El sistema soporta 100V~240V CA, pero el Homeplug y la Cámara IP deben estar conectadas en el
mismo entorno de voltaje, de lo contrario se podría causar una desconexión de la señal.
Un Homeplug no soporta más de 16 cámaras IP. No permite que se configuren dos Homeplugs en una
red en caso de error en la conexión de red.
El sistema completo tiene una distancia de conexión limitada a los 300 metros.
Instalación del software:
Introduzca el CD del software en su
dispositivo CD-R, comience la
instalación
Seleccione Shelexec.exe para
comenzar a instalar el software
O revise los contenidos del disco y haga
clic en el archivo startup.html para abrir
la página de configuración

54
Seleccione INGLÉS para iniciar la
instalación del software
Nota: El software del SISTEMA DE LA
CÁMARA IP solamente está en inglés
Haga clic en IInstalar software PC
Haga clic en Siguiente para iniciar la
instalación
Haga clic en Siguiente

55
Haga clic en Instalar
Haga clic en Finalizar para finalizar la
instalación
Cómo añadir un dispositivo:
El software ha añadido un acceso directo al sistema de cámara IP (IP CAM SYSTEM) en la pantalla del
escritorio. Haga clic en este icono para ejecutar el software. Puede añadir un total de 16 cámaras. Siga
los pasos que se le indican a continuación para añadir más cámaras.

56
1. Seleccione un canal vacío
2. Haga clic en Añadir un dispositivo
3. Presione Buscar e escriba la ID y Contraseña de su
dispositivo
Nota: La función Buscar solamente se puede utilizar
en la red local
4. Presione Guardar
5. Haga clic en Iniciar todas las cámaras
Información adicional sobre cómo
Añadir información del dispositivo:
Nombre del canal:
Editar nombre de la cámara
(por ejemplo, oficina)
ID de usuario:
ID personal
Contraseña del usuario:
Contraseña personal
Nota: por temas de seguridad y privacidad, se recomienda establecer un ID personal y una contraseña
personal
Cómo ver su cámara IP por medio de Internet Explorer:
Para ver desde cualquier lugar su cámara IP, en cualquier
momento y sin tener que realizar ninguna configuración difícil,
puede acceder al sitio web gratuito:
http://www.allmycloud.com
Durante la primera visita, es necesario registrarse.
Haga clic en Registrar (ver paso 2).
Durante la siguiente visita, puede Iniciar sesión directamente
con su correo electrónico y contraseña.

57
Introduzca su dirección de correo electrónico y su
contraseña.
Confirme la contraseña y el código de certificación único
proporcionado por el sitio web.
Lea los términos de servicio en la nube y marque la casilla
de verificación.
Haga clic en Aplicar.
Recibirá un correo electrónico de confirmación. Haga clic en
OK y el sitio web volverá a la pantalla de Inicio de sesión que
se describe en el paso 1.
La primera vez que inicie sesión, necesitará configurar los
Parámetros de su cámara IP.
Si la configuración es correcta, puede ir directamente a
Visión en vivo
ID de la cámara: El código de ID de la cámara
(en la etiqueta en la parte trasera de la cámara)
Contraseña de la cámara: La contraseña de la cámara
(en la etiqueta en la parte trasera de la cámara)
Cuenta: La dirección de correo electrónico utilizada para registrarse.
Contraseña: La contraseña que utilizó para registrarse.
Aplicar: Confirma la configuración y vuelve al paso 3, a continuación hacer clic en
Visión en vivo

58
Nota: Si su PC no tiene ActiveX, tendrá que descargarlo para poder tener Visión en vivo. La descarga
es gratuita y se puede hacer por medio de este sitio web.
Cámara IP por medio de iPhone/Smart Phone:
1. Por favor, descargue el software de monitorización de vídeo específico para Apple OS4 y el
sistema operativo Android desde este sitio Web: http://www.p2pipcam.com/3g
2. Para otros teléfonos móviles con acceso a Internet, por favor, utilice el navegador Web
incorporado para visitar el servidor http://www.allmycloud.com
para ver los vídeos en directo.
3. Por favor, consulte el ejemplo para iPhone que se muestra a continuación y el manual del usuario
de su teléfono para obtener más información sobre cómo manejarlo.

59
Las siguientes instrucciones son basadas en iPhone:
PASO 1: Lanzar “Tienda de aplicaciones”
PASO 2: Buscar “p2p ipcam lite”
PASO 3: Instalar la aplicación
PASO 4: Lanzar “p2p ipcam lite”
PASO 5: Seleccionar Configuración
PASO 6: Introducir ID dispositivo/Contraseña
PASO 7: Seleccionar una cámara
Especificaciones:
Sensor de imagen: Sensor VGA de ¼,5 plg.
Resolución: 640*480, 320*240
FPS Pantalla:
30fps máx.
Ángulo de visualización (manual): Pan 0°~350°, Incl. 0°~135°
Compresión de vídeo: MJPEG
Distancia IR (visión nocturna):
5 m máx.
Medidas: 205mm(Largo) x 123mm (Ancho) x 123mm (Alto)
Peso:
405g (incluyendo la base)
Alimentación: 100~240 VCA
Homeplug:
Señal PLC: Banda de frecuencia 2-28 MHz (con máscara)
Modulación OFDM (QAM 8/16/64/256/1024, DBPSK, DQPSK, ROBO)
Tasa PHY: 200Mbps
TCP: Hasta 65-70Mbps de rendimiento efectivo
UDP: Hasta 85-90Mbps de rendimiento efectivo
Métodos de acceso: Esquemas de acceso por canal CSMA/CA
QoS: 4 niveles de prioridad en case al acceso al contenido y 8 niveles de acceso
a recursos multi-segmento con campo de prioridad VLAN
Nódulos: 16 dispositivos puenteados por estación
4 retransmisiones gestionadas por estación
IGMP: Seguimiento IGMP con retransmisión múltiple para soporte de una sóla
reproducción en CSMA
Máximo de 8 grupos de retransmisión por línea de potencia STA
Máximo de 4 STAs por grupo
Codificación de seguridad: Codificación de enlace AES de 128 bits con gestión de clave.
Certificaciones: IEEE 802.3, IEEE 802.3U, HomePlug AV
Puerto: Un puerto Ethernet 10/100 RJ45
Eléctrico: Fuente de alimentación: 100-240 VCA 50/60Hz
Consumo de energía: < 6W
Sistema operativo: Windows 98 SE, Me, NT, 2000, XP, MAC, Linux, Vista
ID de usuario/Contraseña
(Configurar en la
Herramienta de búsqueda)
60
Entorno:
Temperatura: En funcionamiento: 0~40°
Humedad relativa: En funcionamiento: 10~85%
Sin condensación
Características físicas: Peso: 160 g
Requisitos del sistema para obtener mejores resultados:
CPU: Pentium® Dual-Core o superior
RAM: 1G o superior
Pantalla: 1024*768 / 96DPI
SO: Windows XP/Vista/7
Internet Explorer: ActiveX necesario (descarga gratuita)
Espacio libre en el disco duro: 100GB o más
Red: Ethernet 100 base T o superior
Medidas de seguridad:
Para reducir el peligro de descarga eléctrica, este producto
SÓLO lo debería abrir un técnico autorizado cuando necesite
reparación. Desconecte el producto de la toma de corriente y
de los otros equipos si ocurriera algún problema. No exponga
el producto al agua ni a la humedad.
Mantenimiento:
Límpielo sólo con un paño seco. No utilice disolventes de limpieza ni productos abrasivos.
Garantía:
No se aceptará ninguna garantía o responsabilidad derivada de cualquier cambio o modificaciones
realizadas al producto o daños provocados por un uso incorrecto del producto.
General:
Las ilustraciones y las especificaciones podrán sufrir cambios sin previo aviso.
Todas las marcas de logotipos y nombres de productos constituyen patentes o marcas registradas a
nombre de sus titulares correspondientes, reconocidos como tal.
Conserve este manual y el embalaje en caso de futura necesidad.
Atención:
Este producto está señalizado con este símbolo. Esto significa que los productos eléctricos y
electrónicos usados no deberán mezclarse con los desechos domésticos generales. Existe un
sistema de recogida individual para este tipo de productos.

61
MAGYAR
Powerline IP Kamera
Megjegyzés:
A SEC-CAMIP40 és SEC-CAMIP40EC típusú készülékek rövid leírását tartja kezében.
A szoftver teljes használati leírásáért, forduljon a részletes angol nyelvű használati utasításért.
Fontos megjegyzés:
A jelen termék használatához szükséges biztonsági beállítások, mint pl. felhasználói azonosító és
jelszó, az Ön felelőssége. Ezen információkat ne ossza meg a felhasználói csoporton kívüli harmadik
féllel.
Jelen termék felhasználói információi, mint pl. videók, képek és internettartalmak stb. az Ön
felelőssége. Ezen információkat ne ossza meg a felhasználói csoporton kívüli harmadik féllel.
Hardver installáció:

62
1. LAN csatlakozók
2. WAN csatlakozó a MODEMhez
3. Áramellátó kábel
4. MODEMhez tartozó kábel
5. HOMEPLUGhoz/ fali csatlakozóhoz tartozó kábel
6. MODEM
7. ROUTER
8. Fali csatlakozó (HOMEPLUG)
1
2
4
5
3
6
78

63
HÁLÓZATI KÁBEL
A Homeplug/fali csatlakozó leírása:
POWER: PIROS, áram bekapcsolva
ZÖLD, a kapcsolódás minősége jó
LINK: NARANCSSÁRGA, a kapcsolódás minősége megfelelő
PIROS, a kapcsolódás minősége rossz
ETHERNET: PISLÁKOLÓ, észlelt hálózati forgalom
Amit a Homeplugról/fali csatlakozóról tudnia érdemes:
Próbálja meg elkerülni a túlfeszültségvédő elosztó használatát. Néhány túlfeszültségvédő elosztó a jel
szétkacsolását okozza.
Háromfázisú áramellátási rendszer. Kérjük, győződjön meg arról, hogy a Homeplug/fali csatlakozó és
az IP Camera ugyanabba a áramellátó fázisba lett csatlakoztatva; ellenkező esetben a jel
szétkacsolását okozhatja.
A támogató rendszer AC 100V~240V, azonban a Homeplug/fali csatlakozót és az IP Kamerát
ugyanahhoz az elektromos feszültséghez kell csatlakoztatni; ellenkező esetben a jel szétkacsolását
okozhatja.
Egy Homeplug/fali csatlakozó maximum 16 IP kamera ellátását segítheti elő. Nem megengedett két fali
csatlakozót kapcsolni egy hálózatra hálózati csatlakozási hiba esetén.
A teljes rendszer kapcsolódási távolságát 300 méterben korlátozták.
Szoftverinstallálás:
Helyezze a szoftvert tartalmazó CD-t a
CD-R meghajtóba az installáció
elkezdéséhez
Válassza a Shelexec.exe-t a szoftver
installálásának elindításához
Vagy ellenőrizze a lemez tartalmát és
kattintson a startup.html fájlra a
kezdőoldal megnyitásához

64
Válassza az ENGLISH (ANGOL)
nyelvet a szoftver installálásának
elkezdéséhez
Megjegyzés: az IP CAM SYSTEM
kizárólag angol nyelven érhető el
Kattintson az Install PC Software
gombra
Kattintson a Next (TOVÁBB) gombra az
installáció elkezdéséhez
Kattintson a Next (Tovább) gombra

65
Kattintson az Install (Telepítés) gombra
Kattintson a Finish (Befejezés) gombra
az installálás befejezéséhez
Eszköz hozzáadása:
A szoftver egy IP CAM SYSTEM nevű parancsikont hozott létre az Asztalon. Kattintson az ikonra a
szoftver elindításához. Összesen 16 kamerát tud hozzáadni. Kövesse a lenti lépéseket a többi kamera
hozzáadásához.

66
1. Válasszon egy üres csatornát
2. Kattintson az Add a device (Eszköz hozzáadása)
gombra
3. Nyomja meg a Search (Keresés) gombot vagy gépelje
be ID belépési azonosítóját és Jelszavát a Password
mezőbe
Megjegyzés: A Search (Keresés) funkció kizárólag helyi
hálózatban alkalmazható
4. Kattintson a Save (Mentés) gombra
5. Kattintson a Start all cameras (Minden kamera
indítása) gombra
Kiegészítő információk az Add device
info-hoz (Eszköz hozzáadása infóhoz):
Channel Name (Csatorna neve):
Kameranév szerkesztése (pl. iroda)
User ID (Felhasználó azonosító):
Személyes ID azonosító
User Password (Felhasználói jelszó):
Személyes jelszó
Megjegyzés: biztonsági és titkossági okokból ajánlott személyes ID-t és jelszavat megadni.
Az IP kamera megjelenítése az Internet Exploreren:
Az IP kamera bármely helyen való, bonyolult beállítások
nélküli megjelenítéséhez az alábbi ingyenes weboldalra
látogathat el: http://www.allmycloud.com
Az első látogatás során előzetesen regisztrálni szükséges.
Kattintson a Register (Regisztrálok) gombra (ld. 2. lépés).
A következő látogatás alkalmával be tud lépni (Login)
közvetlenül az Ön e-mailcímével és jelszavával (Password).

67
Írja be E-Mail címét és jelszavát (Password).
Erősítse meg jelszavát és írja be egyedi tanusítványkódját,
amelyet a weboldal adott meg Önnek.
Olvassa el a cloud service terms feltételeket és kattintson a
jelölőnégyzetre.
Kattintson az Apply (Alkalmaz) gombra.
Egy megerősítést tartalmazó levelet fog kapni. Kattintson az
OK gombra és a weboldal visszatér a LOGIN (Belépés)
képernyőre az 1. lépésnek megfelelően.
Az első belépéskor először be kell állítania az IP kamerájának
beállításait (Settings).
Amennyiben a beállítások készen vannak, közvetlenül az
élőképre léphet (Live View).
Cam ID (Kamera ID):
A kamera ID azonosító kódja (a kamera hátoldalán levő címkén)
Cam Password (Kamera jelszó):
A kamera jelszava (a kamera hátoldalán levő címkén)
Fiók:
A regisztráció során használt email cím.
Jelszó:
A regisztráció során használt jelszó.
Alkalmazás:
Erősítse meg a beállításokat és a térjen vissza a 3. lépéshez, majd kattintson a Live View (élőkép)
gombra.

68
Megjegyzés: Amennyiben a számítógépére nincs ActiveX telepítve, le kell töltenie a Live View
élőképhez. A letöltés ingyenes és elérhető jelen weboldalról.
IP Kamera iPhone-on/Smart Phone-on, okostelefonon keresztül:
1. Kérem, töltse le a megadott videomegjelenítő Apple OS4 és Android operációs rendszert az
alábbi weboldalról: http://www.p2pipcam.com/3g
2. Egyéb internetkapcsolattal rendelkező 3G mobiltelefonok esetén, kérjük, hogy használja a
beépített internet böngészőt az élővideók http://www.allmycloud.com
oldalon való
megtekintéséhez.
3. Kérjük, tekintse meg a lenti iPhone példát, és telefonjának további működésének részleteiért
forduljon a felhasználói kézikönyvhöz.

69
A következő instrukciók iPhone-ra vonatkoznak.
1. lépés: “App Store” elindítása
2. lépés: A “p2p ipcam lite” kamera keresése
3. lépés: Az alkalmazás installációja
4. lépés: A “p2p ipcam lite” elindítása
5. lépés: Beállítások kiválasztása
6. lépés: Eszköz ID/Jelszó megadása
7. lépés: Kamera kiválasztása
Műszaki leírás:
Képérzékelő: 1/4.5” VGA szenzor
Felbontás: 640*480, 320*240
Képernyőméret FPS: maximum 30fps
Látószög (kézi): Pan 0°~350°, Tilt 0°~135°
Videó tömörítés: MJPEG
IR Távolság (éjszakai mód): maximum 5 m
Méret: 205mm (hosszúság) x 123mm (szélesség) x 123mm (magasság)
Súly: 405g (talpat beleszámolva)
Áramforrás: 100~240 VAC
Homeplug/fali csatlakozó:
PLC jel: 2 - 28 MHz (sablonnal) frekvenciasáv
Moduláció OFDM (QAM 8/16/64/256/1024, DBPSK, DQPSK, ROBO)
PHY mérték: 200Mbps
TCP: 65-70Mbps-ig hatékony átmenet
UDP: 85-90Mbps-ig hatékony átmenet
Hozzáférési mód: CSMA/CA csatorna-hozzáférési rendszer
QoS: 4 szint elsőbbségi alapú hozzáférés és többszegmensű bursting 8 szint VLAN
elsőbbségi terület
Csomópontok: állomásonként 16 áthidalt eszköz
állomásonként 4 irányított áram
IGMP: IGMP snooping technika többes üzenetküldéssel a CSMA-ban az üzenetek
sokszorozására
Maximum 8 többes üzenetküldési csoport STA távvezetékenként
Csoportonként maximum 4 STA
Biztonsági titkosítás: 128 bit AES link titkosítás kulcsmenedzsmenttel
Szabványok: IEEE 802.3, IEEE 802.3U, HomePlug fali csatlakozó AV
Csatlakozó: Egy 10/100 Ethernet RJ45 port
Villamosság: Tápegység: 100-240 VAC 50/60Hz
Áramfelvétel: < 6W
Operációs rendszer: Windows 98 SE, Me, NT, 2000, XP, MAC, Linux, Vista
Felhasználói azonosító
ID/Jelszó
(Keresés elindítása)

70
Környezet: Hőmérséklet: működés közben: 0~40°
Relatív páratartalom: Működés közben: 10~85%
Nem kondenzálódó
Fizikai leírásl: Súly: 160 g
Rendszerkövetelmény az optimális működésért:
CPU: Pentium® Dual-Core vagy afelett
RAM: 1G vagy felette
Display: 1024*768 / 96DPI
Operációs rendszer: Windows XP/Vista/7
Internet Explorer: ActiveX szükséges (letöltése ingyenes)
Szabad HD hely: 100GB vagy afelett
Hálózat: Ethernet 100 base T vagy felette
Biztonsági óvintézkedések:
Az áramütés veszélyének csökkentése érdekében ezt a
terméket KIZÁRÓLAG a márkaszerviz képviselője nyithatja fel.
Hiba esetén húzza ki a termék csatlakozóját a konnektorból,
és kösse le más berendezésekről. Vigyázzon, hogy ne érje a
terméket víz vagy nedvesség.
Karbantartás:
Csak száraz ronggyal tisztítsa. Tisztító- és súrolószerek használatát mellőzze.
Jótállás:
Nem vállalunk jótállást és felelősséget a terméken végzett változtatás vagy módosítás vagy a termék
helytelen használata miatt bekövetkező károkért.
Általános tudnivalók:
A kivitel és a műszaki jellemzők előzetes értesítés nélkül is módosulhatnak.
Minden logó, terméknév és márkanév a tulajdonosának márkaneve vagy bejegyzett márkaneve,
azokat ennek tiszteletben tartásával említjük.
Őrizze meg ezt az útmutatót és a csomagolást.
Figyelem:
Ezt a terméket ezzel a jelölésel láttuk el. Azt jelenti, hogy az elhasznált elektromos és
elektronikus termékeket tilos az általános háztartási hulladékhoz keverni. Begyűjtésüket külön
begyűjtő létesítmények végzik.

71
SUOMI
Powerline IP-kamera
Huomautus:
Tämä on lyhyt esittely ja ohje SEC-CAMIP40 and SEC-CAMIP40EC-laitteelle.
Yksityiskohtaiset tiedot ovat luettavissa englanninkielisestä ohjekirjasta.
Tärkeä ilmoitus:
Olet vastuussa laitteen käyttöönottoon tarvittavista turvallisuusasetuksista, kuten käyttäjätunnuksista ja
salasanoista. Näitä tietoja ei saa antaa käyttäjäryhmän ulkopuolisten käsiin.
Olet vastuussa tuotteen käyttäjätiedoista, kuten videoista, still-kuvista ja internet-sisällöstä jne. Näitä
tietoja ei saa antaa käyttäjäryhmän ulkopuolisten käsiin.
Laitteen asennus:

72
1. LAN-portit
2. WAN-portti MODEEMIIN
3. VIRTA
4. MODEEMIIN
5. HOMEPLUGIIN
6. MODEEMI
7. REITITTIN
8. HOMEPLUG
1
2
4
5
3
6
78

73
VERKKOKAAPELI
Homeplug-sovittimen kuvaus:
VIRTA: PUNAINEN, virta PÄÄLLÄ
VIHREÄ, yhteyden laatu on hyvä
LINK: ORASSI, yhteyden laatu on heikko
PUNAINEN, yhteyden laatu on huono
ETHERNET: VILKKUU, Ethernet-liikenne havaittu
Mitä sinun tulisi tietää Homeplug-sovittimesta:
Vältä käyttämästä ylijännitesuojattua ryhmäkeskusta. Jotkut ylijännitesuojatut ryhmäkeskukset voivat
aiheuttaa signaalin katkeamista.
Kolmivaihevirta Varmista, että Homeplug ja IP-kamera ovat kytkettynä samaan virtavaiheeseen,
muuten signaali saattaa katketa.
Järjestelmä toimii AC 100V~240V jännitteellä, mutta Homeplug ja IP-kamera tulee olla kytkettyinä
samaan jännitealueeseen, muuten signaali saattaa katketa.
Yksi Homeplug ei voi tukea useampaa kuin 16 IP-kameraa. Välttääkseen virheitä verkkoyhteydessä se
ei anna asentaa kahta Homeplugia yhteen verkkoon.
Koko järjestelmän yhteysetäisyys on maksimissaan 300m.
Ohjelmiston asennus:
Aseta ohjelmistolevy CD-R-laitteeseen,
aloita asennus
Valitse Shelexec.exe aloittaaksesi
ohjelmiston asennus
Tai tarkista levyn sisältö ja napsauta
tiedostoa startup.html avataksesi
käynnistyssivu

74
Valitse ENGLISH aloittaaksesi
ohjelmiston asentaminen
Huomautus: IP CAM SYSTEM
–ohjelmisto on vain englannin kielellä
Napsauta Install PC Software
Aloita asennus napsauttamalla Next
Napsauta Next

75
Napsauta Install
Napsauta Finish suorittaaksesi asennus
loppuun.
Laitteen lisääminen:
Ohjelmisto on tehnyt IP CAM SYSTEM -oikopolun tietokoneen työpöydälle. Napsauta kuvaketta
käynnistääksesi ohjelmisto. Voit lisätä yhteensä 16 kameraa. Seuraa alla olevia vaiheita, kun lisäät
kameroita.
76
1. Valitse tyhjä kanava
2. Napsauta Add a device
3. Paina Search tai näppäile laitteesi ID ja Password.
Huomautus: Toimintoa Search voi käyttää paikallisessa
verkossa.
4. Paina Save
5. Napsauta Start all cameras
Lisätietoa laitteiden lisäämisestä:
Add device info:
Kanavan nimi:
Muokkaa kameran nimeä
(esim. toimisto)
Käyttäjätunnus:
Henkilökohtainen tunnus
Käyttäjän salasana:
Henkilökohtainen salasana
Huomautus: turvallisuuden ja yksityisyyden kannalta suosittelemme henkilökohtaisen
käyttäjätunnuksen ja salasanan asettamista
IP-kamerasi katselu Internet Explorerin avulla:
Katsoaksesi IP-kameraasi missä tahansa ilman hankalia
asennustoimenpiteitä, voit mennä ilmaiselle internetsivulle:
http://www.allmycloud.com
Ensimmäisellä käyntikerralla on ensin rekisteröidyttävä.
Napsauta Register (katso vaihe 2).
Seuraavalla kerralla voit kirjautua sisään (login) suoraan
sähköpostisi (E-Mail) ja salasanan (Password) avulla.
Syötä kenttään sähköpostiosoitteesi ja salasanasi,
Vahvista salasana ja syötä varmistuskoodi (certification code),
jonka olet saanut internetsivulta.
Lue palvelun ehdot kohdasta cloud service terms ja
napsauta ruutua.
Napsauta Apply.
Saat vahvistussähköpostin. Napsauta OK ja internetsivu palaa
sisäänkirjautumissivulle, joka esiteltiin kohdassa 1.

77
Ensimmäisellä sisäänkirjautumiskerralla sinun täytyy
määritellä IP-kamerasi asetukset (Settings).
Jos asetukset ovat kunnossa, voit mennä suoraan kohtaan
Live View
Cam ID: Kameran tunniste (merkitty kameran takapuolella olevaan tarraan)
Cam Password: Kameran tunnussana (merkitty kameran takapuolella olevaan tarraan)
Account: Rekisteröitymiseen käytetty sähköpostiosoite
Password: Rekisteröitymiseen käytetty salasana
Apply: Vahvista asetukset ja palaa kohtaan 3 ja napsauta Live View
Huomautus: Jos tietokoneessasi ei ole ActiveX-sovellusta, sinun tulee ladata se, jotta Live View toimii.
Lataaminen on ilmaista ja sen voi tehdä tällä internet-sivulla.

78
IP-kamera iPhonen/älypuhelimen kautta:
1. Lataa videon seuraamisen tarkoitettu ohjelmisto Apple OS4 ja Android –käyttöjärjestelmille tältä
internet-sivulta: http://www.p2pipcam.com/3g
2. Muiden internetillä varustettujen 3G-puhelimien osalta käytä sisäänrakennettua internetselainta ja
katso live-videokuvaa http://www.allmycloud.com
palvelimella.
3. Katso alla oleva iPhonelle tarkoitettu käyttöohje esimerkkinä ja tarkista oman puhelimesi
käyttöohjeesta lisätietoja sen käytöstä.
Seuraavat ohjeet perustuvat iPhonen käyttöön.
VAIHE 1: Käynnistä “App Store”
VAIHE 2: Etsi “p2p ipcam lite”
VAIHE 3: Asenna sovellus
VAIHE 4: Käynnistä “p2p ipcam lite”
VAIHE 5: Valitse asetukset
VAIHE 6: Syötä laitteen tunniste/salasana
VAIHE 7: Valitse kamera
Tekniset tiedot:
Kuvasensori: 1/4,5” VGA-sensori
Resoluutio: 640*480, 320*240
Näytön FPS: 30fps maks.
Kuvakulma (manuaalinen): Pan 0°~350°, Tilt 0°~135°
Videon kompressio: MJPEG
IR-etäisyys (yönäkö) 5 m maks.
Mitat: 205mm(P) x 123mm (L) x 123mm (K)
Paino: 405g (alustan kanssa)
Virtalähde: 100~240 VAC
Käyttäjätunnus/Salasana
(Käynnistä
Search/etsintätominto)

79
Homeplug:
PLC-signaali: Taajuuskaista 2 - 28 MHz (maskin kanssa)
OFDM - modulaatio (QAM 8/16/64/256/1024, DBPSK, DQPSK, ROBO)
PHY nopeus: 200Mbps
TCP: maks. 65-70Mbps suoritusteho
UDP: maks. 85-70Mbps suoritusteho
Saantimenetelmä: CSMA/CA kanavanvarausmenetelmä
QoS: 4-tasoinen prioriteettiperustainen kilpavarausperiaate ja monisegmentin purske. 8-
tasoinen VLAN prioriteettikenttä.
Solmut: 16 silloitettua laitetta asemaa kohti
4 hallittua datavirtaa asemaa kohti
IGMP: IGMP Snooping-ominaisuus multicastin ja usean unicastin tuella CSMA:ssa
Maks. 8 ryhmälähetysryhmää linjaa kohti (STA)
Maks. 4 STA per ryhmä
Salaus: 128 bittinen AES-salaus ja avaintenhallinta
Standardit: IEEE 802.3, IEEE 802.3U, HomePlug AV
Portti: Yksi 10/100 Ethernet RJ45 portti
Sähkövirta: Virransyöttö: 100-240 VAC 50/60Hz
Virrankulutus: < 6W
Käyttöjärjestelmä: Windows 98 SE, Me, NT, 2000, XP, MAC, Linux, Vista
Käyttöympäristö Lämpötila: Käyttölämpötila: 0~40°
Suhteellinen kosteus: Käyttökosteus: 10~85%
Ei kondensoituva
Mitat: Paino: 160 g
Parhaaseen tulokseen vaadittavat järjestelmän ominaisuudet:
CPU: Pentium® Dual-Core tai tehokkaampi
RAM: 1 G tai enemmän
Näyttö: 1024*768 / 96DPI
OS: Windows
®
XP/ Vista/ 7
Internet Explorer: ActiveX tarvitaan (ilmainen lataaminen)
Ilmainen HD-tila: 100GB tai enemmän
Verkko: vähintään Ethernet 100 base T
Turvallisuuteen liittyvät varoitukset:
Sähköiskun riskin pienentämiseksi, AINOASTAAN valtuutettu
huoltohenkilö saa avata tämän laitteen huoltoa varten. Jos
ongelmia ilmenee, irrota laite verkkovirrasta ja muista laitteista.
Älä altista laitetta vedelle äläkä kosteudelle.
Huolto:
Puhdista ainoastaan kuivalla kankaalla. Älä käytä liuottimia tai hankausaineita.
Takuu:
Takuu ja vastuuvelvollisuus mitätöityvät, jos tuote vaurioituu siihen tehtyjen muutoksien tai sen
väärinkäytön takia.
Yleistä:
Muutoksia malliin ja teknisiin ominaisuuksiin voidaan tehdä ilmoituksetta.
Kaikki logot, merkit ja tuotenimet ovat niiden vastaavien omistajien tuotemerkkejä tai rekisteröityjä
tuotemerkkejä ja niitä on käsiteltävä sellaisina.
Säilytä käyttöohjeet ja pakkaus myöhempää käyttötarvetta varten.

80
Huomio:
Tuote on varustettu tällä merkillä. Se merkitsee, ettei käytettyjä sähkö- tai elektronisia tuotteita
saa hävittää kotitalousjätteen mukana. Kyseisille tuotteille on olemassa erillinen
keräysjärjestelmä.
SVENSKA
Powerline IP kamera
Obs:
Detta är en kort manual för beskrivning av SEC-CAMIP40 och SEC-CAMIP40EC.
För fullständig information om hur du använder programvaran, är du hänvisad till den avancerade
engelska manualen.
Viktigt meddelande:
Ta ansvar för säkerhetsinställningarna, såsom användarnamn och lösenord för att komma åt denna
produkt. Denna information får inte göras tillgänglig för någon tredje part utanför användargruppen.
Ta ditt ansvar för denna produkts användarinformation, som till exempel video, stillbilder och internet
innehåll etc. Denna information får inte göras tillgänglig för någon tredje part utanför användargruppen.
Installation av maskinvara:

81
1. LAN portar
2. WAN port till MODEM
3. STRÖMKONTAKT
4. TILL MODEM
5. TILL HOMEPLUG
6. MODEM
7. ROUTER
8. HOMEPLUG
1
2
4
5
3
6
78

82
NÄTVERKSKABEL
Beskrivning av Homeplug:
STRÖM: RÖTT, ström ON (PÅ)
GRÖNT, kvaliteten på anslutningen är bra
LÄNK: ORANGE, kvaliteten på anslutningen är hyfsad
RÖTT, kvaliteten på anslutningen är dålig
ETHERNET: BLINKANDE, Ethernet trafik har upptäckts
Vad du bör veta om Homeplug:
Försök att undvika användandet av överspänningsskyddad fördelningscentral. Vissa
överspänningsskyddade fördelningscentraler kan orsaka frånkoppling av signal.
Trefas kraftsystem. Försäkra dig om att Homeplug och IP Kameran är anslutna till samma effekt fas;
annars kan den orsaka frånkoppling av signal.
Systemet stöder AC 100V~240V, men Homeplug och IP kameran måste anslutas i samma
spänningsmiljö, annars kan det leda till frånkoppling av signalen.
En Homeplug stöder inte fler än 16 IP kameror. Den tillåter inte två Homeplug installeras i ett nätverk i
händelse av ett fel i nätverksanslutningen.
Hela systemet har ett anslutningsavstånd begränsat till 300 meter
.
Installation av programvara:
Sätt in cd programvaran i CD-R-enheten,
starta installationen
Välj Shelexec.exe för att påbörja
installationen av mjukvaran
Eller kontrollera skivans innehåll och
klicka på startup.html fil för att öppna
startsidan

83
Välj ENGLISH för att starta installationen
av programvaran
Notera: IP CAM SYSTEMET
programvara finns endast på engelska
Klicka Install PC Software
Klicka Next för att starta installationen
Klicka Next

84
Klicka Install
Klicka Finish för att slutföra
installationen
Lägga till en enhet:
Programvaran har lagt en IP CAM SYSTEM genväg på skrivbordets skärm. Klicka på ikonen för att
starta programmet. Du kan lägga till 16 kameror totalt. Följ stegen nedanför för att lägga till fler
kameror.

85
1. Välj en tom kanal
2. Klicka Add a Device
3. Tryck Search eller skriv in ID och Password till enheten
Notera: Search funktionen kan bara användas i det
lokala nätverket
4. Tryck Save
5. Klicka Start all cameras
Ytterligare information om Add Device info:
Namn på kanalen:
Redigera namnet till kameran
(e. g. kontor)
User ID:
Personlig ID
User Password:
Personligt lösenord
Notera: för säkerhets- och sekretessfrågor rekommenderas att ett personligt användarnamn (ID) och
lösenord.
Visa din IP-kamera via Internet Explorer:
För att kunna se din IP-kamera någonstans, var som helst
utan några krångliga inställningar, kan du gå till hemsidan:
http://www.allmycloud.com
Vid det första besöket är det nödvändigt att först registrera
dig.
Klicka Register (se steg 2).
Under ditt nästa besök kan du Login direkt med ditt
E-Mail och Password.

86
Fyll i din e-postadress och lösenord.
Bekräfta lösenordet och fyll i den unika koden för certifiering
som tillhandahållits av webbplatsen.
Läs villkoren för molntjänster och klicka på kryssrutan.
Klicka på Apply.
Du får en bekräftelse via e-post. Klicka på OK och
webbplatsen återgår till Login skärmen som beskrevs i steg 1.
Med den första inloggningen måste du först ställa in Settings
till din IP kamera.
Om inställningarna är OK kan di gå direkt till Live View
Cam ID: ID-koden på kameran (på etiketten på baksidan av kameran)
Cam Password: Lösenordet till kameran (på etiketten på baksidan av kameran)
Account (konto): Den e-postadress du använde för att registrera dig med
Password: Det lösenordet du använde för att registrera dig med
Apply: Bekräfta inställningarna och återgå till steg 3 och klicka på Live View

87
Notera: Om din dator inte har någon ActiveX, behöver du ladda ner den för att ha Live View.
Nedladdningen är gratis och kan göras via denna webbplats.
IP Cam via iPhone/Smarttelefon:
1. Ladda ner dedicerad programvara videoövervakning för Apple OS4 och Android operativsystem
från denna webbsida: http://www.p2pipcam.com/3g
2. För andra 3G-mobiler med internetuppkoppling, använd den inbyggda webbläsaren för att besöka
http://www.allmycloud.com
server för live video
3. Se exemplet för iPhone som visas nedanför och hänvisar till bruksanvisningen för din telefon, för
mer information om hur den fungerar.

88
Följande anvisningar är baserade på iPhone.
STEG 1: Starta upp “App Store”
STEG 2: Sök efter “p2p ipcam lite”
STEG 3: Installera programmet
STEG 4: Starta “p2p ipcam lite”
STEG 5: Välj Inställningar
STEG 6: Inmatningsenhet ID/lösenord
STEG 7: Välj en kamera
Specifikationer:
Bildsensor: 1/4.5” VGA sensor
Upplösning: 640*480, 320*240
Display FPS: 30fps max.
Visa vinkel (manuellt): Pan 0°~350°, lutning 0°~135°
Video kompression: MJPEG
IR avstånd mörkerseende: 5 m max.
Mått: 205mm(L) x 123mm (W) x 123mm (H)
Vikt: 405g (inklusive bas)
Kraftkälla: 100~240 VAC
Homeplug:
PLC Signal: Frekvensband 2 - 28 MHz (med mask)
Modulation OFDM (QAM 8/16/64/256/1024, DBPSK, DQPSK, ROBO)
PHY Rate: 200Mbps
TCP: Upp till 65-70Mbps effektiv genomströmning
UDP: Up to 85-90Mbps effektiv genomströmning
Åtkomstmetoder: CSMA/CA system för kanalåtkomst
QoS: 4 nivåer av prioritetsbaserade anropskollisioner och multisegment av
framrusande 8 nivåer VLAN prioriterats fält
Noder: 16 överbryggande enheter per station
4 hanterade flöden per station
IGMP: IGMP avkänning med fleranvändarkoppling till fler enkelkoppling för stöd i
CSMA
Max 8 fleranvändarkoppling av grupper per kraftledning STA
Maximum 4 STA per group
Säkerhetskryptering: 128 bit AES länkkryptering med viktigt underhåll
Standarder: IEEE 802.3, IEEE 802.3U, HomePlug AV
Port: En 10/100 Ethernet RJ45 port
Elektriska: Strömförsörjning: 100-240 VAC 50/60Hz
Energiförbrukning: < 6W
Operativsystem: Windows 98 SE, Me, NT, 2000, XP, MAC, Linux, Vista
Användar-ID/lösenord
(Ställ om sökverktyget)

89
Miljö: Temperatur: Drift: 0~40°
Relativ fuktighet: Operativ: 10~85%
Icke-kondenserande
Fysisk: Vikt: 160 g
Systemkrav för bästa resultat:
CPU: Pentium® Dual Core eller högre
RAM: 1G eller större
Display: 1024*768 / 96DPI
OS: Windows XP/Vista/7
Internet Explorer: ActiveX behövs (gratis nedladdning)
Ledig HD utrymme: 100GB eller större
Nätverk: Ethernet 100 bas T eller snabbare
Säkerhetsanvisningar:
För att minska risken för elektriska stötar bör denna produkt
ENDAST öppnas av behörig tekniker när service behövs.
Dra ut strömkabeln från eluttaget och koppla ur all annan
utrustning om något problem skulle uppstå. Utsätt inte
produkten för vatten eller fukt.
Underhåll:
Rengör endast med torr trasa. Använd inga rengöringsmedel som innehåller lösningsmedel eller
slipmedel.
Garanti:
Ingen garanti gäller vid ändringar eller modifieringar av produkten eller för skador som har uppstått på
grund av felaktig användning av denna produkt.
Allmänt:
Utseende och specifikationer kan komma att ändras utan föregående meddelande.
Alla logotyper och produktnamn är varumärken eller registrerade varumärken som tillhör sina ägare
och är härmed erkända som sådana.
Behåll bruksanvisningen och förpackningen för eventuellt framtida behov.
Obs!
Produkten är märkt med denna symbol som betyder att använda elektriska eller elektroniska
produkter inte får slängas bland vanliga hushållssopor. Det finns särskilda återvinningssystem
för dessa produkter.

90
ČESKY
IP kamera Powerline
Poznámka:
Toto je stručný popis kamery SEC-CAMIP40 a SEC-CAMIP40EC.
Pro kompletní informace, jak používat software, prosím nahlédněte do podrobné příručky v angličtině.
Důležitá poznámka:
Přebíráte odpovědnost za bezpečnostní nastavení pro přístup k tomuto výrobku, jako např. ID uživatele
a hesla. Tyto informace by neměly být přístupné jakékoliv třetí osobě mimo skupinu uživatelů.
Přebíráte odpovědnost za informace uživatele tohoto výrobku, jako např. videa, statické obrazy,
internetový obsah atd. Tyto informace by neměly být přístupné jakékoliv třetí osobě mimo skupinu
uživatelů.
Instalace hardwaru:

91
1. Porty LAN
2. Port WAN k MODEMU
3. NAPÁJENÍ
4. K MODEMU
5. K DOMOVNÍMU ZÁSUVKOVÉMU ADAPTÉRU
6. MODEM
7. ROUTER
8. DOMOVNÍ ZÁSUVKOVÝ ADAPTÉR
1
2
4
5
3
6
78

92
SÍŤOVÝ KABEL
Popis domovního zásuvkového adaptéru:
POWER (Napájení): ČERVENÁ, napájení ZAPNUTÉ
ZELENÁ, kvalita spojení je dobrá
LINK (Spojení): ORANŽOVÁ, kvalita spojení je uspokojivá
ČERVENÁ, kvalita spojení je špatná
ETHERNET: BLIKAJÍCÍ, detekován provoz Ethernetu
Co byste měli vědět o domovním zásuvkovém adaptéru:
Pokuste se vyhnout použití rozvodné desky s přepěťovou ochranou. Některé rozvodné desky s
přepěťovou ochranou mohou způsobit odpojení signálu.
Třífázový systém napájení. Ujistěte se, že jsou domovní zásuvkový adaptér a IP kamery připojeny na
stejné fázi; jinak může dojít k odpojení signálu.
Systém podporuje AC 100 V~240 V, avšak domovní zásuvkový adaptér a IP kamera musí být připojeny
ve stejném prostředí napětí; jinak může dojít k odpojení signálu.
Jeden domovní zásuvkový adaptér nepodporuje více než 16 IP kamer. V případě chyby v připojení k
síti nelze nainstalovat dva domovní zásuvkové adaptéry v jedné síti.
Celý systém má omezenou vzdálenost připojení do 300 metrů.
Instalace softwaru:
Vložte CD se softwarem do mechaniky
CD-R a spusťte instalaci
Vyberte Shelexec.exe pro spuštění
instalace softwaru
Případně zkontrolujte obsah disku a
klikněte na soubor startup.html pro
otevření výchozí stránky

93
Vyberte ENGLISH pro spuštění instalace
softwaru
Poznámka: software IP CAM SYSTEM je
pouze v angličtině
Klikněte na Install PC Software
Klikněte na Next pro spuštění instalace
Klikněte na Next

94
Klikněte na Install
Klikněte na Finish pro dokončení
instalace
Jak přidat zařízení:
Software umístil zástupce IP CAM SYSTEM na plochu obrazovky. Klikněte na tohoto zástupce pro
spuštění softwaru. Můžete přidat celkem 16 kamer. Pro přidání více kamer se řiďte následujícími kroky.

95
1. Vyberte prázdný kanál
2. Klikněte na Add a device
3. Stiskněte Search nebo zadejte ID a Password vašeho
přístroje
Poznámka: Funkci Search lze použít pouze v lokální síti
4. Stiskněte Save
5. Klikněte na Start all cameras
Doplňující informace o Add device info:
Channel Name:
Zadejte název kanálu
(např. kancelář)
User ID:
Osobní identifikátor
User Password:
Osobní heslo
Poznámka:
z důvodů bezpečnosti a zachování soukromí se doporučuje nastavit osobní identifikátor a heslo.
Prohlížení záběrů IP kamery prostřednictvím internetového prohlížeče:
Pro zobrazení záběrů IP kamery kdekoliv a bez jakýchkoliv
složitých nastavení můžete přejít na volně dostupnou
webovou stránku: http://www.allmycloud.com
Při první návštěvě je nutné se nejprve zaregistrovat.
Klikněte na Register (viz krok 2).
Při příští návštěvě se můžete přímo přihlásit pod svým
e-mailem a heslem.
Vyplňte e-mail a heslo.
Potvrďte heslo a vyplňte jedinečný certifikační kód poskytnutý
webovou stránkou.
Přečtěte si podmínky služby my cloud service a klikněte na
zaškrtávací rámeček.
Klikněte na Apply.
Obdržíte potvrzovací e-mail. Klikněte na OK a webová stránka
přejde zpět na přihlašovací obrazovku, jak je popsáno v
kroku 1.

96
Při prvním přihlášení musíte nejprve upravit Settings své
IP kamery.
Jsou-li nastavení v pořádku, můžete jít přímo na Live View
Cam ID: ID kód kamery (na štítku na zadní straně kamery)
Cam Password: Heslo kamery (na štítku na zadní straně kamery)
Account: E-mailová adresa, kterou jste použili pro registraci
Password: Heslo, které jste použili pro registraci
Apply: Potvrďte nastavení a vraťte se na krok 3 a klikněte na Live View
Poznámka: Nemá-li PC žádné prvky ActiveX, pro živé zobrazení je musíte stáhnout. Stažení je zdarma
a lze jej provést z této webové stránky.

97
IP kamera přes iPhone/Smart phone:
1. Stáhněte si prosím určený software pro monitorování obrazu pro operační systém Apple OS4 a
Android z této webové stránky: http://www.p2pipcam.com/3g
2. Pro ostatní mobilní telefony 3G s přístupem na internet prosím použijte integrovaný internetový
prohlížeč a navštivte server http://www.allmycloud.com
pro sledování živého videa
3. Prohlédněte si prosím níže zobrazený příklad pro iPhone a nahlédněte do uživatelské příručky
svého telefonu pro více informací o jeho obsluze.
Následující pokyny se týkají iPhonu.
KROK 1: Spusťte “App Store”
KROK 2: Vyhledejte “p2p ipcam lite”
KROK 3: Nainstalujte aplikaci
KROK 4: Spusťte “p2p ipcam lite”
KROK 5: Vyberte Nastavení
KROK 6: Zadejte ID uživatele/heslo
KROK 7: Vyberte kameru
Specifikace:
Obrazový snímač: Snímač 1/4,5” VGA
Rozlišení: 640*480, 320*240
FPS displeje: 30 fps max.
Zorný úhel (ručně): Pan. 0°~350°, Skl. 0°~135°
Komprese videa MJPEG
Dosah IR (noční vidění): 5 m max.
Rozměry: 205 mm (D) x 123 mm (Š) x 123 mm (V)
Hmotnost: 405 g (včetně základny)
Zdroj napájení: 100~240 V AC
ID uživatele/heslo
(Zapnutí nástroje
pro vyhledávání)

98
Domovní zásuvkový adaptér:
Signál PLC: Frekvenční pásmo 2 - 28 MHz (s maskou)
Modulace OFDM (QAM 8/16/64/256/1024, DBPSK, DQPSK, ROBO)
Rychlost PHY: 200 Mbps
TCP: Až 65-70 Mbps efektivní výkon
UDP: Až 85-90 Mbps efektivní výkon
Metody přístupu: Schémata přístupu kanálu CSMA/CA
QoS: 4 úrovně přístupu spojení založené na prioritě a multi-segment bursting
8 úrovní pole priority VLAN
Uzly: 16 přemostěných zařízení na jednu stanici
4 řízené streamy na jednu stanici
IGMP: IGMP snooping s podoprou multicast to multiple unicast v CSMA
Maximálně 8 skupin multicast na power line STA
Maximálně 4 STA na skupinu
Bezpečnostní šifrování: 128bitové šifrování AES se správou klíčů
Standardy: IEEE 802.3, IEEE 802.3U, HomePlug AV
Port: Jeden port 10/100 Ethernet RJ45
Elektrické údaje: Napájení: 100-240 V AC 50/60 Hz
Příkon: < 6 W
Operační systém: Windows 98 SE, Me, NT, 2000, XP, MAC, Linux, Vista
Prostředí: Teplota: Provozní: 0~40°
Relativní vlhkost: Provozní: 10~85%
Bez kondenzace
Fyzikální vl.: Hmotnost: 160 g
Systémové požadavky pro nejlepší výsledky:
CPU: Pentium® Dual-Core nebo vyšší
RAM: 1 G nebo více
Displej: 1024*768 / 96 DPI
OS: Windows XP/Vista/7
Internet Explorer: ActiveX nutné (volně ke stažení)
Volné místo na HD: 100 GB nebo více
Síť: Ethernet 100 base T nebo vyšší
Bezpečnostní opatření:
Abyste snížili riziko úrazu elektrickým šokem, měl by být tento
výrobek otevřen POUZE autorizovaným technikem, je-li to
nezbytné. V případě, že dojde k závadě, odpojte výrobek ze
sítě a od jiných zařízení. Výrobek nevystavujte vodě nebo
vlhkosti.
Údržba:
K čištění používejte pouze suchý hadřík. Nepoužívejte čisticí rozpouštědla ani abrazivní prostředky.
Záruka:
Jakékoli změny, modifikace nebo poškození zařízení v důsledku nesprávného zacházení se zařízením
ruší platnost záruční smlouvy.
Obecné upozornění:
Design a specifikace výrobku mohou být změněny bez předchozího upozornění.
Všechna loga a obchodní názvy jsou registrované obchodní značky příslušných vlastníků a jsou
chráněny zákonem.
Pro budoucí použití uschovejte tento návod a obal.

99
Upozornění:
Tento výrobek je označen tímto symbolem. To znamená, že se s výrobkem musí zacházet jako s
nebezpečným elektrickým a elektronickým odpadem a nelze jej po skončení životnosti
vyhazovat s běžným domácím odpadem. Pro likvidaci těchto výrobků existují zvláštní sběrná
střediska.
ROMÂNĂ
Cameră IP conectată la sursa de electricitate
Notă:
Prezentul document este un ghid descriptiv scurt pentru SEC-CAMIP40 şi SEC-CAMIP40EC.
Pentru informaţii complete referitoare la modul de utilizare a software-ului, consultaţi manualul detaliat
în limba engleză.
Avertizare importantă:
Asumaţi-vă responsabilitatea pentru setările de securitate cum ar fi ID-ul utilizatorului şi parola
necesare în vederea accesării acestui produs. Aceste informaţii nu trebuie puse la dispoziţia niciunei
terţe părţi în afara grupului de utilizatori.
Asumaţi-vă responsabilitatea pentru informaţiile de utilizare ale acestui produs cum ar fi filme, capturi şi
conţinuturile de pe Internet, etc. Aceste informaţii nu trebuie puse la dispoziţia niciunei terţe părţi în
afara grupului de utilizatori.
Instalarea hardware-ului:

100
1. Porturi LAN
2. Port WAN la MODEM
3. Alimentare cu ELECTRICITATE
4. La MODEM
5. La HOMEPLUG
6. MODEM
7. ROUTER
8. Dispozitivul HOMEPLUG
1
2
4
5
3
6
78
 Loading...