

Konig SEC-APC10 User Manual

SEC-APC10
UK - CEILING ALARM With Remote Control
DE - DECKENALARM mit Fernbedienung
FR - ALARME DE PLAFOND Avec télécommande
NL - PLAFONDALARM Met afstandsbediening
IT - ALLARME DA SOFFITTO Con telecomando
ES - ALARMA DE TECHO con mando a distancia
PT - ALARME PARA TECTO com comando
HU - MENNYEZETI RIASZTÓ távirányítással
FI - kaukosäätimellä varustettu KATTOHÄLYTIN
SW - TAK LARM Med fjärrkontroll
CZ - STROPNÍ ALARM s dálkovým ovládáním
RO - ALARMĂ DE TAVAN cu telecomandă
GR - ΣΥΝΑΓΕΡΜΟΣ ΟΡΟΦΗΣ με τηλεχειριστήριο
DK - LOFTSALARM med fjernbetjening
NO - Takalarm Med Fjernkontroll
RU - ПОТОЛОЧНАЯ СИГНАЛИЗАЦИЯ с пультом
дистанционного управления
TR - Uzaktan Kumandalı TAVAN ALARMI
ENGLISH
Description:
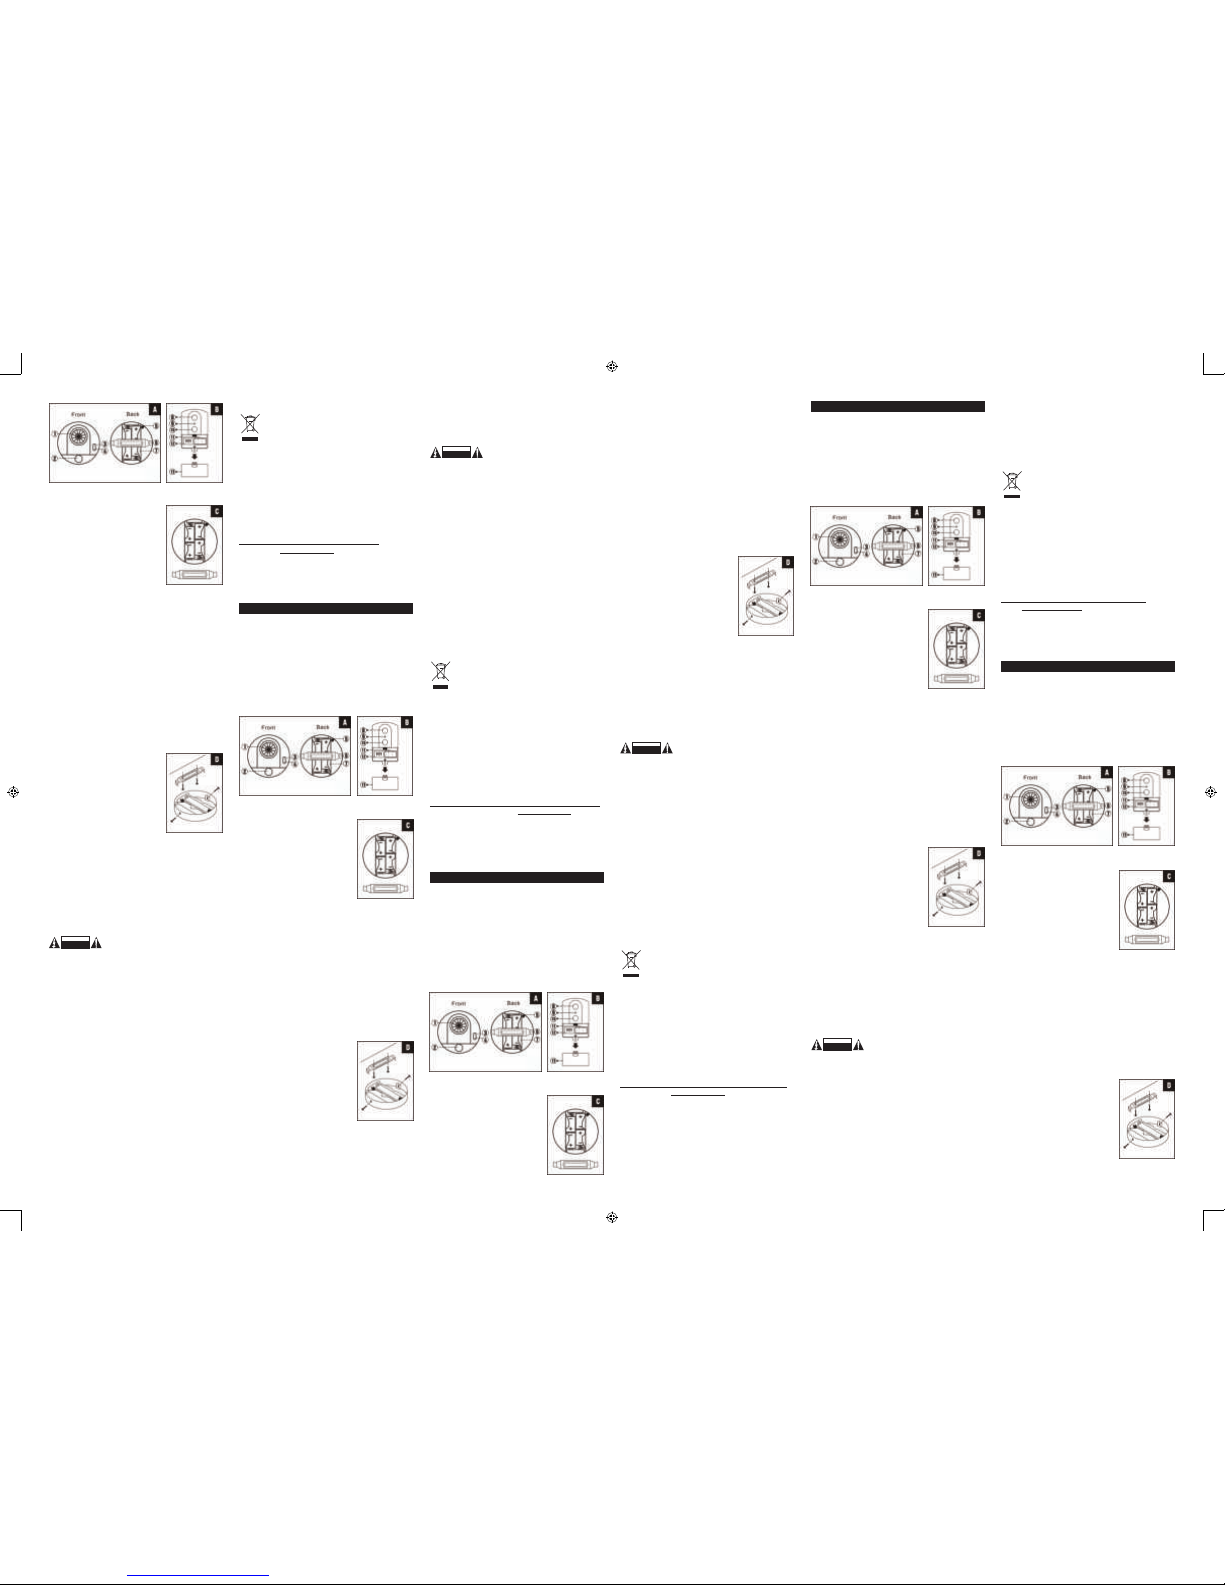
Figure A
Alarm
1. PIR sensor
2. Siren
3. Infrared sensor
4. Battery LED indicator
5. External power connection
6. Mounting bracket
7. Battery compartment
Figure B
Remote control
8. Arm button
9. LED indicator
10. Disarm button
11. Battery compartment
12. Program switches
13. Battery cover
Battery installation:
Alarm:
1. The battery compartment is accessed
from the rear of the alarm by
removing the screws of the mounting
bracket.
2. Insert 4x C size batteries (not
included) according the correct
polarity (see gure C)
3. When the batteries are inserted the
alarm will beep very loud to indicate
that the batteries are properly
installed.
4. Replace the mounting bracket and x it with the screws.
The battery LED indicator will light when the batteries are
LOW and need to be replaced.
Remote control:
The remote control uses 3x LR44 batteries (included). If the
red LED indicator on the remote control does not light up when
the ‘ARM’ or ‘DISARM’ buttons are pressed, then the batteries
need to be replaced.
Program alarm:
1. Set the switches (12) of the remote control to the desired
code and remove the batteries from the alarm. Then wait at
least 30 seconds for the alarm to reset.
2. Aim, immediately after inserting the batteries, the remote
control at the alarm and press the ‘ARM’ button. The Alarm
LED will ash once to indicate that it has learnt the code of
the remote control.
NOTE: the alarm must be programmed again with the remote
control each time the batteries are replaced.
Installation:
1. Locate the desired location for the
alarm on the ceiling in the center of
the area that needs to be secured.
2. Remove the mounting bracket and x
this to the ceiling with screws. Then
x the alarm to the mounting bracket
and secure this with the screws at the
sides.
Operation:
Aim, when leaving the protected area, the remote control at
the alarm and press the ‘ARM’ button. A conrmation tone will
indicate that the alarm is armed and you have 30 seconds to
leave the area. After this time, if motion is detected, the alarm
will sound.
Aim, when entering the protected area, the remote control at
the alarm and press the ‘DISARM’ button. There is a short
beep, when entering the area, to indicate that motion has been
detected. You have 4 seconds delay to disarm the alarm.
Remark: if the LED indicator is constantly on, it means that the
batteries need to be replaced.
Safety precautions:
To reduce risk of electric shock, this
product should ONLY be opened by an
authorized technician when service is required. Disconnect the
product from mains and other equipment if a problem should
occur. Do not expose the product to water or moisture.
Maintenance:
Clean only with a dry cloth. Do not use cleaning solvents or
abrasives.
Warranty:
No guarantee or liability can be accepted for any changes and
modications of the product or damage caused due to incorrect
use of this product.
General:
- Designs and specications are subject to change without
notice.
- All logos brands and product names are trademarks or
registered trademarks of their respective holders and are
hereby recognized as such.
- This manual was produced with care. However, no rights
can be derived. König Electronic can not accept liability for
any errors in this manual or their consequences.
- Keep this manual and packaging for future reference.
Attention:
This product is marked with this symbol. It means that
used electrical and electronic products should not
be mixed with general household waste. There is a
separate collections system for these products.
This product has been manufactured and supplied in
compliance with all relevant regulations and directives, valid
for all member states of the European Union. It also complies
with all applicable specications and regulations in the country
of sales.
Formal documentation is available upon request. This includes,
but is not limited to: Declaration of Conformity (and product
identity), Material Safety Data Sheet and product test report.
Please contact our customer service desk for support:
via website:
http://www.nedis.com/en-us/contact/contact-form.htm
via e-mail: service@nedis.com
via telephone: +31 (0)73-5993965 (during ofce hours)
NEDIS B.V., De Tweeling 28, 5215 MC ’s-Hertogenbosch, THE
NETHERLANDS
DEUTSCH
Beschreibung:
Bild A
Alarm
1. PIR-Sensor
2. Sirene
3. Sensor-infrarot
4. LED-Batterienanzeige
5. Externer
Einspeisungsanschluss
6. Montagekonsole
7. Raum für Betterien
Bild B
Fernbedienung
8. Aktivierungstaste
9. LED-Anzeige
10. Deaktivierungstaste
11 Raum für Batterien
12. Programmumschaltung
13. Batteriendeckel
Batterieninstallation:
Alarm:
1. Der Raum für Batterien ist von der
hinteren Alarmseite zugänglich – die
Schrauben von der hinteren Seite der
Montagekonsole.
2. 4x C Batterien einlegen (werden
nicht mitgeliefert) und auf die richtige
Polarität achten - siehe Bild C.
3. Ist die letzte Batterie eingelegt,
ertönt der Alarm sehr laut. Somit wird
deutlich, dass die Batterien richtig
eingelegt sind.
4. Die Montagekonsole zurückschrauben. Die LEDAnzeige
leuchtet auf, falls die Batterien leer sind und ausgetauscht
werden müssen.
Fernbedienung:
Die Fernbedienung braucht 3x LR44 Batterien (werden
mitgeliefert). Falls die rote LED-Anzeige an der Fernbedienung
beim Drücken von ARM- oder DISARM-Tasten nicht
aueuchtet, ist es nötig, die Batterien auszutauschen.
Alarmprogrammierung:
1. Stellen Sie die Programmumschaltung (12) der
Fernbedienung auf den gewünschten Kode ein und
entnehmen Sie die Batterien dem Alarm. Warten Sie
zumindest 30 Sekunden, sobald es zum Alarmreset kommt.
2. Zielen Sie unverzüglich nach dem Einlegen von Batterien
mit der Fernbedienung auf den Alarm und drücken Sie die
Aktivierungstaste ‘ARM’.
Die LED-Alarmanzeige leuchtet einmal auf und zeigt an, dass
es zur Kodeannahme der Fernbedienung gekommen ist.
HINWEIS: Der Alarm muss erneut mit Hilfe von der
Fernbedienung bei jedem Batterienaustausch programmiert
werden.
Installation:
1. Stellen Sie den Alarm in die
gewünschte Position an der Decke
ein.
2. Beseitigen Sie die Montagekonsole
und befestigen Sie sie an die
Decke mit Hilfe von Schrauben.
Anschließend befestigen Sie
den Alarm zur Montagekonsole
schrauben Sie ihn fest.
Inbetriebnahme:
Zielen Sie mit der Fernbedienung auf den Alarm und drücken
Sie die Aktivierungstaste ‘ARM’.
Der bestätigende Ton wird die Alarmaktivierung anzeigen
und der Raum ist innerhalb von 30 Sekunden zu verlassen.
Nach Ablauf dieser Zeit wird der Alarm gelöst, falls es in dem
überwachten Raum zur Bewegung kommt.
Zielen Sie mit der Fernbedienung auf den Alarm und drücken
Sie die Deaktivierungstaste ‘DISARM’. Nach dem Betreten des
Raumes ertönt ein leises Signal, das die Bewegung anzeigt.
Sie haben 4 Sekunden, um den Alarm zu deaktivieren.
Hinweis: Falls die LED-Anzeige weiter aueuchtet, bedeutet
es, dass es nötig ist, die Batterien auszutauschen.
Sicherheitsvorkehrungen:
Um das Risiko eines elektrischen Schlags
zu verringern, sollte dieses Produkt
AUSSCHLIESSLICH von einem autorisierten Techniker
geöffnet werden. Bei Problemen trennen Sie das Gerät bitte
von der Spannungsversorgung und von anderen Geräten
ab. Stellen Sie sicher, dass das Gerät nicht mit Wasser oder
Feuchtigkeit in Berührung kommt.
Wartung:
Nur mit einem trockenen Tuch säubern. Keine Reinigungsoder Scheuermittel verwenden.
Garantie:
Es kann keine Garantie oder Haftung für irgendwelche
Änderungen oder Modikationen des Produkts oder für
Schäden übernommen werden, die aufgrund einer nicht
ordnungsgemäßen Anwendung des Produkts entstanden sind.
Allgemeines:
- Design und technische Daten können ohne vorherige
Ankündigung geändert werden.
- Alle Logos, Marken und Produktnamen sind Marken oder
eingetragene Marken ihrer jeweiligen Eigentümer und
werden hiermit als solche anerkannt.
- Diese Bedienungsanleitung wurde sorgfältig verfasst.
Dennoch können daraus keine Rechte und Pichten
hergeleitet werden. König Electronic haftet nicht für
mögliche Fehler in dieser Bedienungsanleitung oder deren
Folgen.
- Bitte bewahren Sie Bedienungsanleitung und Verpackung
für spätere Verwendung auf.
Achtung:
Dieses Produkt ist mit diesem Symbol gekennzeichnet.
Es bedeutet, dass die ausgedienten elektrischen und
elektronischen Produkte nicht mit dem allgemeinen
Haushaltsmüll entsorgt werden dürfen. Für diese
Produkte stehen gesonderte Sammelsysteme zur
Verfügung.
Dieses Produkt wurde hergestellt und geliefert in
Übereinstimmung mit allen geltenden Vorschriften und
Richtlinien, die für alle Mitgliedsstaaten der Europäischen
Union gültig sind. Es entspricht allen geltenden Vorschriften
und Bestimmungen im Land des Vertriebs.
Eine formale Dokumentation ist auf Anfrage erhältlich.
Diese beinhaltet unter anderem, jedoch nicht ausschließlich:
Konformitätserklärung (und Produktidentität),
Sicherheitsdatenblatt, Testreport des Produkts.
Wenden Sie sich bei Fragen bitte an unseren Kundendienst:
per Internet:
http://www.nedis.de/de-de/kontakt/kontaktformular.htm
per E-Mail: service@nedis.com
per Telefon: Niederlande +31 (0)73-5993965 (während der
Geschäftszeiten)
NEDIS B.V., De Tweeling 28, 5215 MC ’s-Hertogenbosch,
NIEDERLANDE
FRANÇAIS
Description :
Fig. A
Alarme
1. Capteur PIR
2. Sirène
3. Capteur à IR
4. Indicateur de piles LED
5. Raccordement externe de
l’alimentation
6. Console de montage
7. Compartiment à piles
Fig. B
Télécommande
8. Touche d‘activation
9. Indicateur LED
10. Touche désactivation
11. Compartiment à piles
12. Commutation de
programmes
13. Cache des piles
Installation des piles :
Alarme :
1. Pour accéder au compartiment à
piles, dévissez les vis situées à
l’arrière de la console de montage.
2. Insérez 4 piles C (non incluses) en
respectant la polarité (voir l‘image C).
3. Après l’insertion de la dernière
pile, l’alarme émet un bip fort
pour indiquer que les piles sont
correctement installées.
4. Remettez la console de montage et
xez-la solidement à l’aide des vis. Si
les piles sont déchargées, l’indicateur LED restera allumé
en continu, il est donc nécessaire de les remplacer.
Télécommande :
Utilisez pour la télécommande 3 piles LR44 (incluses). Si
le témoin rouge LED sur la télécommande ne s’allume pas
lorsque vous pressez le bouton ‘ARM’ ou ‘DISARM’, il est
nécessaire de remplacer les piles.
Programmation de l’alarme :
1. Réglez les commutateurs de la télécommande (12) sur le
code demandé et retirez les piles de l’alarme. Attendez
au minimum 30 secondes pour que l’alarme puisse se
réinitialiser.
2. Immédiatement après l’insertion des piles, dirigez
la télécommande vers l’alarme et pressez le bouton
d’activation ‘ARM’. Le témoin LED de l’alarme clignote
une fois pour indiquer la réception du code de la
télécommande.
NOTE : après chaque remplacement des piles, il est nécessaire
de reprogrammer l’alarme à l’aide de la télécommande.
Installation :
1. Déterminez la position souhaitée de
l’alarme au plafond, au centre de la
pièce à sécuriser.
2. Retirez la console de montage et
vissez-la fermement au plafond à
l’aide des vis. Ensuite, xez l’alarme
à la console de montage et bloquezla sur les côtés par des vis.
Fonctionnement :
Lorsque vous quittez le lieu sécurisé,
dirigez la télécommande vers l’alarme et
pressez le bouton d’activation ‘ARM’. Un son de conrmation
indique l’activation de l’alarme. Vous disposez de 30 secondes
pour quitter la pièce. Passé ce laps de temps, l’alarme se
déclenche en cas de détection d’un mouvement.
Lorsque vous entrez dans le lieu sécurisé, dirigez la
télécommande vers l’alarme et pressez le bouton de
désactivation ‘DISARM’.
Lorsque vous entrez dans la pièce, l’alarme émet un bip court
indiquant qu’elle a détecté un mouvement. Vous disposez de 4
secondes pour désactiver l’alarme.
Note : Si le témoin LED reste allumé, il est nécessaire de
remplacer les piles.
Consignes de sécurité :
Pour réduire le risque de choc électrique,
ce produit ne doit être ouvert que par un
technicien qualié si une réparation s’impose. Débranchez
l’appareil et les autres équipements du secteur s’il y a un
problème. Ne pas exposer l’appareil à l’eau ni à l’humidité.
Entretien :
Ne nettoyez l’appareil qu’avec un chiffon sec. N’utilisez pas de
solvants ou de produits abrasifs.
Garantie :
Aucune garantie ou responsabilité ne sera acceptée en cas
de modication et/ou de transformation du produit ou en cas de
dommages provoqués par une utilisation incorrecte de l’appareil.
Généralités :
- Le design et les caractéristiques techniques sont sujets à
modication sans notication préalable.
- Tous les logos de marques et noms de produits sont des
marques déposées ou immatriculées dont leurs détenteurs
sont les propriétaires et sont donc reconnues comme telles
dans ce documents.
- Ce manuel a été produit avec soin. Toutefois, aucun droit
ne peut en dériver. König Electronic ne peut être tenu
responsable pour des erreurs de ce manuel ou de leurs
conséquences.
- Conservez ce manuel et l’emballage pour toute référence
ultérieure.
Attention :
Ce symbole gure sur l’appareil. Il signie que les
produits électriques et électroniques ne doivent pas
être jetés avec les déchets domestiques. Le système
de collecte est différent pour ce genre de produits.
Ce produit est fabriqué et délivré en conformité avec toutes les
directives et règlements applicables et en vigueur dans tous
les états membre de l’Union Européenne. Il est également
conforme aux spécications et à la réglementation en vigueur
dans le pays de vente.
La documentation ofcielle est disponible sur demande. Cela
inclut mais ne se limite pas à : La déclaration de conformité (et
à l’identication du produit), la che technique concernant la
sécurité des matériaux, les rapports de test du produit.
Veuillez contacter notre centre de service à la clientèle pour
plus d’assistance :
via le site Web :
http://www.nedis.fr/fr-fr/contact/formulaire-de-contact.htm
via courriel : service@nedis.com
via téléphone : +31 (0)73-5993965 (aux heures de bureau)
NEDIS B.V., De Tweeling 28, 5215 MC ’s-Hertogenbosch,
PAYS-BAS
NEDERLANDS
Omschrijving:
Afbeelding A
Alarm
1. Bewegingsmelder
2. Sirene
3. Infraroodsensor
4. Batterij LED indicator
5. Externe stroomaansluiting
6. Bevestigingsbeugel
7. Batterijcompartiment
Afbeelding B
Afstandsbediening
8. Alarm inschakelen
9. LED indicator
10. Alarm uitschakelen
11. Batterijcompartiment
12. Programmaschakelaar
13. Batterijklepje
Installatie van de batterij:
Alarm:
1. Het batterijcompartiment bevindt zich
aan de achterzijde van het alarm.
Verwijder, om toegang te krijgen, de
schroeven van de bevestigingsbeugel.
2. Plaats 4x batterij type C (niet
meegeleverd) volgens de correcte
polariteit (zie afbeelding C).
3. Als de batterijen geplaatst zijn is een
luide pieptoon hoorbaar. Dit geeft aan
dat de batterijen correct geplaatst zijn.
4. Plaats de bevestigingsbeugel terug en
bevestig deze met de schroeven. De batterij LED indicator
licht op als de batterijen zwak zijn en vervangen dienen te
worden.
Afstandsbediening:
De afstandsbediening maakt gebruik van 3x batterij type
LR44 (meegeleverd). Als de rode LED indicator niet oplicht
bij het indrukken van de “ARM” en “DISARM” toets, dienen de
batterijen vervangen te worden.
Programmeren van het alarm:
1. Stel met de programmaschakelaars (12) van de
afstandsbediening een gewenste code in en verwijder de
batterijen van het alarm. Wacht tenminste 30 seconden
zodat het alarm gereset wordt.
2. Richt, direct na het terugplaatsten van de batterijen, de
afstandsbediening op het alarm en druk op de “ARM” toets.
De alarm LED licht op om aan te geven dat de code van de
afstandsbediening is overgenomen.
OPMERKING: als de batterijen vervangen worden dient het
alarm opnieuw geprogrammeerd te worden.
Installatie:
1. Bepaal een gewenste locatie voor de
installatie van het alarm. Plaats het
alarm in het midden van de ruimte die
beveiligd dient te worden.
2. Verwijder de bevestigingsbeugel en
bevestig deze met schroeven aan
het plafond. Bevestig vervolgens het
alarm aan de bevestigingsbeugel met
behulp van de schroeven aan beide
zijdes.
Bediening:
Richt, bij het verlaten van de beveiligde ruimte, met de
afstandsbediening op het alarm en druk op de “ARM” toets.
Een pieptoon is ter bevestiging hoorbaar om aan te geven
dat het alarm is ingeschakeld. U heeft nu 30 seconden om de
ruimte te verlaten. Na het verstrijken van deze tijd zal de sirene
bij het detecteren van beweging klinken.
Richt, bij het betreden van de beveiligde ruimte, met de
afstandsbediening op het alarm en druk op de “DISARM” toets.
Bij het binnentreden is een korte pieptoon hoorbaar om aan te
geven dat er beweging is gedetecteerd. U heeft 4 seconden om
het alarm uit te schakelen.
Opmerking: als de LED indicator constant oplicht, geeft dit aan
de batterijen vervangen dienen te worden.
Veiligheidsvoorzorgsmaatregelen:
Om het risico op elektrische schokken
te voorkomen mag dit product ALLEEN
worden geopend door een erkende technicus wanneer er
onderhoud nodig is. Koppel het product los van de elektrische
voeding en van andere apparatuur als zich problemen
voordoen. Stel het product niet bloot aan water of vocht.
Onderhoud:
Uitsluitend reinigen met een droge doek. Gebruik geen
reinigingsmiddelen of schuurmiddelen.
Garantie:
Voor wijzigingen en veranderingen aan het product of schade
veroorzaakt door een verkeerd gebruik van dit product, kan
geen aansprakelijkheid worden geaccepteerd. Tevens vervalt
daardoor de garantie.
Algemeen:
- Wijziging van ontwerp en specicaties zonder
voorafgaande mededeling onder voorbehoud.
- Alle logo’s, merken en productnamen zijn handelsmerken
of geregistreerde handelsmerken van de respectievelijke
eigenaren en worden hierbij als zodanig erkend.
- Deze handleiding is met zorg samengesteld. Er kunnen
echter geen rechten aan worden ontleend. König Electronic
kan geen aansprakelijkheid aanvaarden voor eventuele
fouten in deze handleiding of de gevolgen daarvan.
- Bewaar deze gebruiksaanwijzing voor latere raadpleging.
Let op:
Dit product is voorzien van dit symbool. Dit symbool
geeft aan dat afgedankte elektrische en elektronische
producten niet met het gewone huisafval verwijderd
mogen worden. Voor dit soort producten zijn er
speciale inzamelingspunten.
Dit product is vervaardigd en geleverd in overeenstemming
met de relevante reglementen en richtlijnen die voor alle
lidstaten van de Europese Unie gelden. Het voldoet ook aan
alle toepasselijke specicaties en reglementen van het land
van verkoop.
Op aanvraag is ofciële documentatie verkrijgbaar.
Inclusief, maar niet uitsluitend: Conformiteitsverklaring
(en productidentiteit), materiaalveiligheidsinformatie en
producttestrapport.
Wend u tot onze klantenservice voor ondersteuning:
via de website:
http://www.nedis.nl/nl-nl/contact/contact-formulier.htm
via e-mail: service@nedis.nl
telefonisch: +31 (0)73-5993965 (tijdens kantooruren)
NEDIS B.V., De Tweeling 28, 5215 MC ’s-Hertogenbosch,
NEDERLAND
ITALIANO
Descrizione:
Figura A
Allarme
1. Sensore PIR
2. Sirena
3. Sensore infrarosso
4. Indicatore LED batterie
5. Collegamento alimentaz.
esterna
6. Staffa di montaggio
7. Scomparto delle batterie
Figura B
Telecomando
8. Tasto di attivazione
9. indicatore LED
10. Tasto di disattivazione
11. Scomparto batterie
12. Commut. programm
13. Coperchio batterie
RISK OF ELECTRIC SHOCK
DO NOT OPEN
CAUTION
STROMSCHLAGGEFAHR
NICHT ÖFFNEN
VORSICHT
RISQUE DE CHOC ELECTRIQUE
NE PAS OUVRIR
ATTENTION
GEVAAR VOOR
ELEKTRISCHE SCHOK
NIET OPENEN
LET OP:
Installazione delle batterie:
Allarme:
1. Si accede allo scomparto delle
batterie dal retro dell’allarme,
rimuovendo le viti della staffa di
montaggio.
2. Inserire 4 batterie misura C (non
incluse) rispettando la polarità
corretta (vedere gura C)
3. Quando le batterie sono state
inserite, l’allarme emetterà un breve
segnale molto forte ad indicare
che le batterie sono state installate
correttamente.
4. Rimettere a posto la staffa di montaggio e ssarla con le
viti. L’indicatore LED delle batterie si accenderà quando le
batterie sono quasi scariche e vanno sostituite.
Telecomando:
Il telecomando utilizza 3 batterie misura LR44 batterie (incluse).
Se l’indicatore LED rosso del telecomando non si accende
quando si premono i tasti di attivazione o disattivazione (‘ARM’
o ‘DISARM’), allora le batterie devono essere sostituite.
Programmazione dell’allarme:
1. Impostare i commutatori (12) del telecomando secondo il
codice desiderato e rimuovere le batterie dall’allarme. Poi
attendere almeno 30 secondi perchè l’allarme si resetti.
2. Immediatamente dopo aver reinserito le batterie, puntare
il telecomando in direzione dell’allarme e premere il tasto
di attivazione (‘ARM’). Il LED dell’allarme lampeggerà
una volta, ad indicare che ha memorizzato il codice del
telecomando.
NOTA: l’allarme deve venir programmato di nuovo con il
telecomando ogni volta che le batterie vengono sostituite.
Installazione:
1. Individuare la posizione desiderata
per l’allarme sul softto, al centro
dell’area da rendere sicura.
2. Rimuovere la staffa di montaggio
e ssarla al softto con le viti. Poi
installare l’allarme sulla staffa di
montaggio e ssarlo con le viti sui lati.
Funzionamento:
Quando si sta per lasciare l’area protetta,
puntare il telecomando all’allarme e
premere il tasto di attivazione (‘ARM’). Un segnale acustico
di conferma indicherà che l’allarme è attivato; si dispone di
30 secondi per lasciare l’area. Dopo questo intervallo, ogni
movimento rilevato farà suonare l’allarme.
Rientrando nell’area protetta, puntare il telecomando all’allarme
e premere il tasto di disattivazione (‘DISARM’). Quando si entra
nell’area, si udirà un breve segnale acustico, che indica che il
movimento è stato rilevato. Si dispone di 4 secondi di tempo
per disattivare l’allarme.
Nota: se l’indicatore LED resta sempre acceso, questo signica
che la batteria deve essere sostituita.
Precauzioni di sicurezza:
Per ridurre il rischio di shock elettrico,
questo prodotto dovrebbe essere aperto
SOLO da un tecnico autorizzato quando è necessario ripararlo.
Scollegare il prodotto dall’alimentazione e da altri apparecchi
se dovesse esserci un problema. Non esporre il prodotto ad
acqua o umidità.
Manutenzione:
Pulire solo con un panno asciutto. Non utilizzare solventi
detergenti o abrasivi.
Garanzia:
Non sarà accettata alcuna garanzia o responsabilità in
relazione a cambiamenti e modiche del prodotto o a danni
determinati dall’uso non corretto del prodotto stesso.
Generalità:
- Il design e le caratteristiche tecniche sono soggetti a
modica senza necessità di preavviso.
- Tutti i marchi a logo e i nomi di prodotto sono marchi
commerciali o registrati dei rispettivi titolari e sono
riconosciuti come tali in questo documento.
- Questo manuale è stato redatto con cura. Tuttavia da esse
non possono essere avanzati diritti. König Electronic non
può accettare responsabilità per errori in questo manuale
nè per eventuali conseguenze.
- Tenere questo manuale e la confezione per riferimento
futuro.
Attenzione:
Il prodotto è contrassegnato con questo simbolo, con
il quale si indica che i prodotti elettrici ed elettronici
non devono essere gettati insieme ai riuti domestici.
Per questi prodotti esiste un sistema di raccolta
differenziata.
Il presente prodotto è stato realizzato e fornito in conformità
a tutte le norme e le direttive vigenti, con validità in tutti gli
stati membri della Comunità Europea. Inoltre è conforme alle
speciche e alle normative applicabili nel paese in cui è stato
venduto.
La documentazione ufciale è disponibile su richiesta. Essa
include a titolo esemplicativo ma non limitativo: Dichiarazione
di conformità (e di identità del prodotto), scheda di sicurezza
dei materiali, rapporto di prova del prodotto.
Contattare il nostro servizio clienti per assistenza:
tramite il nostro sito web:
http://www.nedis.it/it-it/contatti/modulo-contatto.htm
tramite e-mail: service@nedis.com
tramite telefono: +31 (0)73-5993965 (in orario di ufcio)
NEDIS B.V., De Tweeling 28, 5215 MC ’s-Hertogenbosch,
Paesi Bassi
ESPAÑOL
Descripción:
Fig. A
Alarma
1. Sensor PIR
2. Sirena de alarma
3. Sensor infrarrojos
4. Indicador LED de pilas
5. Conexión de alimentación
externa
6. Soporte de montaje
7. Compartimento de pilas
Fig. B
Mando a distancia
8. Botón ARM (Armar)
9. Indicador LED
10. Botón DISARM
(Desarmar)
11. Compartimento de pilas
12. Interruptores de programa
13. Tapa de pilas
Colocación de las pilas:
Alarma:
1. Se accede al compartimento de pilas
desde la parte posterior de la alarma
quitando los tornillos del soporte de
montaje.
2. Coloque 4 pilas C (no incluidas)
teniendo en cuenta la polaridad (Ver
Fig. C)
3. Después de colocar las pilas la
alarma sonará muy fuerte para
indicar que las pilas se han colocado
correctamente.
4. Vuelva a poner la tapa y fíjela con los tornillos. El indicador
LED de pilas se enciende cuando las pilas están LOW
(bajas) y necesitan ser cambiadas.
Mando a distancia:
El mando a distancia utiliza 3 pilas LR44 (incluidas). Si el
indicador LED rojo del mando no se enciende cuando se pulsa
el botón ‘ARM’ o ‘DISARM’ es necesario cambiar las pilas.
Programación de la alarma:
1. Ajuste los interruptores (12) del mando a distancia con el
código deseado y saque las pilas de la alarma. Espere
como mínimo 30 segundos antes de reajustar la alarma.
2. Inmediatamente después de colocar las pilas dirija el
mando a distancia hacia la alarma y pulse el botón ‘ARM’.
El LED de la alarma parpadeará una vez para indicar que
el código del mando ha sido aceptado.
NOTA: Cada vez que se cambian las pilas debe programarse
de nuevo la alarma con el mando a distancia.
Instalación:
1. Marque el lugar deseado en el techo
para la alarma, en el centro de la
zona a asegurar.
2. Quite el soporte y fíjelo al techo con
tornillos. A continuación je la alarma
al soporte y después los tornillos en
los lados.
Funcionamiento:
Al abandonar la zona protegida dirija el
mando a distancia hacia la alarma y pulse el botón ‘ARM’. Un
tono de conrmación indicará que la alarma está activada y
dispondrá de 30 segundos para abandonar el área. Después
de este lapso de tiempo sonará la alarma.
Al entrar en el área protegida dirija el mando a distancia hacia
la alarma y pulse el botón ‘DISARM’. Al entrar en el área
protegida se oye un pitido de corta duración para indicar que
se ha detectado un movimiento. Se dispone de 4 segundos
para desactivar la alarma.
Observación: Si el indicador LED está siempre encendido,
signica que hay que cambiar las pilas.
Medidas de seguridad:
Para reducir el peligro de descarga
eléctrica, este producto SÓLO lo debería
abrir un técnico autorizado cuando necesite reparación.
Desconecte el producto de la toma de corriente y de los otros
equipos si ocurriera algún problema. No exponga el producto al
agua ni a la humedad.
Mantenimiento:
Límpielo sólo con un paño seco. No utilice disolventes de
limpieza ni productos abrasivos.
Garantía:
No se aceptará ninguna garantía o responsabilidad derivada
de cualquier cambio o modicaciones realizadas al producto o
daños provocados por un uso incorrecto del producto.
General:
- Las ilustraciones y las especicaciones podrán sufrir
cambios sin previo aviso.
- Todas las marcas de logotipos y nombres de productos
constituyen patentes o marcas registradas a nombre de
sus titulares correspondientes, reconocidos como tal.
- Este manual se ha redactado con sumo cuidado. Aún
así, no se ofrece ninguna garantía. König Electronic no
será responsable de los errores de este manual o de las
consecuencias derivadas de los mismos.
- Conserve este manual y el embalaje en caso de futura
necesidad.
Atención:
Este producto está señalizado con este símbolo. Esto
signica que los productos eléctricos y electrónicos
usados no deberán mezclarse con los desechos
domésticos generales. Existe un sistema de recogida
individual para este tipo de productos.
Este producto se ha fabricado y distribuido de conformidad
con todas las normativas y directivas relevantes, válidas para
todos los estados de la Unión Europea. También cumple con
todas las especicaciones y normativas en el país en el cual se
comercializa.
Previa solicitud, podremos proporcionarle la documentación
formal. Esta documentación incluye, entre otros: Declaración
de conformidad (e identidad del producto), hoja de datos de
seguridad del material, informe sobre las pruebas realizadas
al producto.
Póngase en contacto con nuestro servicio de atención al
cliente para obtener información adicional:
por medio de nuestro sitio web:
http://www.nedis.es/es-es/contacto/formulario-de-contacto.htm
enviando un correo electrónico: service@nedis.com
o llamando por teléfono: +31 (0)73-5993965 (en horario de
ocina)
NEDIS B.V., De Tweeling 28, 5215 MC ’s-Hertogenbosch,
PAÍSES BAJOS
PORTUGUÊS
Descrição:
Figura A
Alarme
1. Sensor PIR
2. Sirene
3. Sensor infra-vermelhos
4. Indicador LED da carga
das pilhas
5. Ligação de fonte de
alimentação externa
6. Suporte de montagem
7. Compartimento da bateria
Figura B
Comando
8. Botão para armar
9. Indicador LED
10. Botão para desarmar
11. Compartimento da bateria
12. Comutadores do
programa
13. Tampa da bateria
Instalação da bateria:
Alarme:
1. O compartimento das pilhas é acedido
a partir da parte de trás do alarme,
removendo os parafusos do suporte de
montagem.
2. Inserir 4x pilhas tamanho C (não
incluídas) respeitando a polaridade
correcta (ver gura C)
3. Quando as pilhas estiverem inseridas
o alarme produzirá um bip muito
alto para indicar que as pilhas estão
correctamente instaladas.
4. Voltar a colocar o suporte de montagem e xá-lo com os
parafusos. O indicador LED da carga das pilhas acenderá
quando as pilhas estiverem FRACAS e a necessitar de
serem substituídas.
Comando:
O comando usa 3x pilhas LR44 (não incluídas). Se o indicador
LED no comando não acender quando os botões “ARM
(ARMAR)” ou “DISARM (DESARMAR)” forem premidos, então
as pilhas necessitam de ser substituídas.
Programar o alarme:
1. Denir os comutadores (12) do comando no código
pretendido e remover as pilhas do alarme. Depois,
aguardar pelo menos 30 segundos para o alarme reiniciar.
2. Direccionar, imediatamente depois de inserir as pilhas, o
comando para o alarme e premir o botão “ARM (ARMAR)”.
O LED do alarme piscará uma vez para indicar que o
código do comando foi reconhecido.
NOTA: o alarme tem de ser programado de novo com o
comando sempre que as pilhas são substituídas.
Instalação:
1. Localizar o local pretendido no tecto
para o alarme, no centro de uma
área que necessite de ser protegida.
2. Retirar o suporte de montagem
e xar o mesmo ao tecto com
parafusos. Depois, xar o alarme no
suporte de montagem e xar este
com os parafusos nas partes laterais.
Funcionamento:
Direccionar, quando abandona a área protegida, o comando
para o alarme e premir o botão “ARM (ARMAR)”. Um toque
de conrmação indicará que o alarme está armado e que tem
30 segundos para abandonar a área. Após este tempo, se for
detectado movimento, o alarme tocará.
Direccionar, quando entra na área protegida, o comando
para o alarme e premir o botão “DISARM (DESARMAR)”. É
produzido um bip curto, quando entra na área, para indicar que
o movimento foi detectado. Tem um período de 4 segundos
para desarmar o alarme.
Observação: Se o indicador LED estiver sempre aceso, isso
signica que as pilhas necessitam de ser substituídas.
Precauções de segurança:
Quando necessitar de reparação e para
reduzir o risco de choque eléctrico, este
produto deve APENAS ser aberto por um técnico autorizado.
Desligar o produto da tomada de alimentação e outro
equipamento se ocorrer um problema. Não expor o produto à
água ou humidade.
Manutenção:
Limpar apenas com um pano seco. Não utilizar solventes de
limpeza ou produtos abrasivos.
Garantia:
Não é aceitável qualquer garantia ou responsabilidade devidas
a alterações e modicações no produto ou de danos causados
pela utilização incorrecta deste produto.
Geral:
- Os designs e as especicações estão sujeitos a alteração
sem aviso.
- Todas as marcas dos logotipos e nomes de produtos são
marcas registadas dos respectivos proprietários e são
reconhecidos como tal no presente documento.
- Este manual foi cuidadosamente elaborado. No entanto,
não podem ser derivados quaisquer direitos. A König
Electronic não se responsabiliza por quaisquer erros neste
manual nem pelas respectivas consequências.
- Guardar este manual e embalagem para consulta futura.
Atenção:
Este produto encontra-se marcado com este símbolo.
Signica que os produtos eléctricos e electrónicos
usados não devem ser misturados com o lixo
doméstico geral. Existe um sistema de recolha
separado para estes produtos.
Este produto foi fabricado e fornecido em conformidade
com todos os regulamentos e directivas relevantes, válidos
para todos os estados membros da União Europeia. Além
disso, está em conformidade com todas as especicações e
regulamentos aplicáveis no país de venda.
Mediante pedido, será disponibilizada documentação formal .
Isto inclui, mas não se limita a: Declaração de Conformidade
(e identidade do produto), Ficha de Dados de Segurança de
Material e relatório de teste do produto.
Contactar o nosso centro de serviço de apoio ao cliente para
obter assistência:
através da página de internet:
http://www.nedis.pt/pt-pt/contacto/formulario-de-contacto.htm
através de e-mail: service@nedis.com
através do telefone: +31 (0)73-5993965 (durante o horário
normal de expediente)
NEDIS B.V., De Tweeling 28, 5215 MC ’s-Hertogenbosch,
HOLANDA
MAGYAR
Leírás:
A. ábra
Riasztó
1. PIR-érzékelő
2. Sziréna
3. Infravörös érzékelő
4. Elemek LED-jelzőfénye
5. Külső táplálás csatlakozó
6. Szerelőkonzol
7. Elemrekesz
B. ábra
Távirányító
8. Aktiválás gombja
9. LED-jelzőfény
10. Deaktiválás gombja
11. Elemrekesz
12. Programváltás
13. Elemrekesz fedele
Elemek behelyezése:
Riasztó:
1. Az elemrekesz a riasztó hátoldaláról
érhető el úgy, hogy lecsavarozza a
csavarokat a szerelőkonzol hátsó
részéről.
2. Tegyen be 4 db C elemet (nem része
a csomagolásnak), ügyeljen a helyes
polaritásra (lásd a C. ábrát).
3. Az elemek behelyezése után a
riasztó nagyon hangosan sípol
egyet, ezzel jelezve, hogy az elemek
telepítése helyes.
4. Tegye vissza a szerelőkonzolt és csavarokkal rögzítse.
A LED-jelzőfény folyamatosan világít, ha az elemek
kimerültek, cserélje ki az elemeket.
Távirányító:
A távirányító 3 db LR44-es elemmel működik (része a
csomagolásnak). Ha a piros LED-jelzőfény a távirányítón az
nem gyullad ki, az ‘ARM’ vagy ‘DISARM’ gombok megnyomása
után nem gyullad ki, ki kell cserélni az elemeket.
A riasztó programozása:
1. A távirányítón a kapcsolót (12) állítsa a kívánt kódra és
a riasztóból vegye ki az elemeket. Utána várjon legalább
30 másodpercet, amíg a riasztó nem áll vissza gyári
beállításába.
2. Az elemcsere után a távirányító haladéktalanul irányítsa
a riasztóra és nyomja meg az ‘ARM’ gombot. A LEDjelzőfény egyszer felvillan, ezzel jelezve, hogy a távirányító
kódját a riasztó elfogadta.
MEGJEGYZÉS: Az elemek kivétele vagy cseréje után a riasztót
mindig újra kell programozni a távirányító segítségével.
Telepítés:
1. Jelölje ki a riasztó helyét a
mennyezeten a védelemre szánt
helyiség közepén.
2. Távolítsa el a szerelőkonzolt és
erősítse fel a mennyezetre csavarok
segítségével. Utána rögzítse a
riasztó a szerelőkonzolra és oldalt
csavarokkal rögzítse.
Üzemelés:
A védett helyiségből való távozáskor a
távirányítót irányítsa a riasztóra és aktiváláshoz nyomja meg
az ‘ARM’ gombot. A hangjelzés a riasztó aktiválását jelzi. 30
másodperc áll rendelkezésére a helyiség elhagyásához. Ennek
az időnek eltelte után mozgás érzékelésekor megszólal a
sziréna.
A védett helyiségbe lépés után irányítsa a távirányítót a
riasztóra és deaktiváláshoz nyomja meg a ‘DISARM’ gombot.
A helyiségbe lépés után egy rövid sípolás hallatszik, mely a
mozgás érzékelését jelzi. Ekkor még 4 másodperce van a
riasztó deaktiválására.
Megjegyzés: Ha a LED-jelzőfény folyamatosan világít, ki kell
cserélni az elemeket.
Biztonsági óvintézkedések:
Az áramütés veszélyének csökkentése
érdekében ezt a terméket KIZÁRÓLAG
a márkaszerviz képviselője nyithatja fel. Hiba esetén húzza
ki a termék csatlakozóját a konnektorból, és kösse le más
berendezésekről. Vigyázzon, hogy ne érje a terméket víz vagy
nedvesség.
Karbantartás:
Csak száraz ronggyal tisztítsa. Tisztító- és súrolószerek
használatát mellőzze.
Jótállás:
Nem vállalunk jótállást és felelősséget a terméken végzett
változtatás vagy módosítás vagy a termék helytelen használata
miatt bekövetkező károkért.
Általános tudnivalók:
- A kivitel és a műszaki jellemzők előzetes értesítés nélkül is
módosulhatnak.
- Minden logó, terméknév és márkanév a tulajdonosának
márkaneve vagy bejegyzett márkaneve, azokat ennek
tiszteletben tartásával említjük.
- Jelen útmutató nagy gonddal készült. Ennek ellenére abból
jogok nem származnak. A König Electronic nem felelős az
útmutató hibáiért, vagy azok következményeiért.
- Őrizze meg ezt az útmutatót és a csomagolást.
Figyelem:
Ezt a terméket ezzel a jelölésel láttuk el. Azt jelenti,
hogy az elhasznált elektromos és elektronikus
termékeket tilos az általános háztartási hulladékhoz
keverni. Begyűjtésüket külön begyűjtő létesítmények
végzik.
Ez a termék az Európai Unió minden tagállamában érvényes
vonatkozó rendelkezések és irányelvek betartásával készült
és került forgalomba. Megfelel az értékesítési országban rá
vonatkozó minden előírásnak és rendelkezésnek.
Kérésre hivatalos dokumentációt is rendelkezésre bocsátunk.
A dokumentáció a teljesség igénye nélkül a következőket
tartalmazza: Megfelelőségi (és termékazonossági) Nyilatkozat,
anyagbiztonsági adatlap, a termék vizsgálati jegyzőkönyve.
Támogatással kapcsolatos ügyekben keresse
ügyfélszolgálatunkat:
webhely:
http://www.nedis.com/en-us/contact/contact-form.htm
e-mail: rendeles@hqnedis.hu
telefon: +31 (0)73-5993965 (munkaidőben)
NEDIS B.V., De Tweeling 28, 5215 MC ’s-Hertogenbosch,
HOLLANDIA
SUOMI
Kuvaus:
Kuva A
Hälytin
1. PIR sensori
2. Sireeni
3. Infrapunasensori
4. Paristojen merkkivalo
5. Ulkoisen virransyötön liitin
6. Kiinnityskonsoli
7. Paristotila
Kuva B
Kaukosäädin
8. Aktivointipainike
9. Merkkivalo
10. Deaktivointipainike
11. Paristotila
12. Ohjelmointikytkimet
13. Paristotilan kansi
Paristojen asennus:
Hälytin:
1. Paristotilaan päästään hälyttimen
takaa irrottamalla kiinnityskonsolin
takaosassa olevat ruuvit.
2. Asenna 4x C paristoa (eivät kuulu
toimitukseen) oikeinpäin (ks. kuva C).
3. Paristojen asennuksen jälkeen kuuluu
voimakas piippaus, joka ilmoittaa
paristojen olevan oikein asennetut.
4. Asenna kiinnityskonsoli takaisin
ja kiinnitä se ruuveilla. Paristojen
jännitteen ollessa liian alhainen palaa
merkkivalo ilmoittaen paristojen vaihdon tarpeesta.
Kaukosäädin:
Kaukosäätimessä käytetään 3x LR44 paristoja (kuuluvat
toimitukseen). Jos kaukosäätimen punainen merkkivalo ei
syty painettaessa painiketta ‘ARM’ tai ‘DISARM’, on paristot
vaihdettava.
Hälyttimen ohjelmointi:
1. Aseta kaukosäätimen kytkimet (12) haluamasi koodin
asentoon ja poista paristot hälyttimestä. Odota sitten
vähintään 30 sekuntia, jotta hälytin ehtii resetoitua.
2. Suuntaa kaukosäädin heti paristojen asennuksen jälkeen
hälyttimeen ja paina aktivointipainiketta ‘ARM’. Hälyttimen
merkkivalo välähtää yhden kerran ilmoittaen niin
kaukosäätimen koodin vastaanottamisesta.
HUOM.: hälytin on ohjelmoitava uudestaan kaukosäätimen
avulla aina paristojen vaihdon yhteydessä.
Asennus:
1. Valitse hälyttimelle sopiva paikka
keskellä valvottavan huoneen kattoa.
2. Irrota kiinnityskonsoli ja kiinnitä se
ruuveilla kattoon. Kiinnitä sitten
hälytin kiinnityskonsoliin ja varmista
se reunoilta ruuveilla.
Käyttö:
Poistuessasi valvotusta tilasta suuntaa
kaukosäädin hälyttimeen ja paina
aktivointipainiketta ‘ARM’. Vahvistusääni ilmoittaa hälyttimen
aktivoitumisen ja sinulla on 30 sekuntia aikaa huoneesta
RISCHIO DI SCOSSE ELETTRICHE
NON APRIRE
ATTENZIONE
RIESGO DE ELECTROCUCIÓN
NO ABRIR
ATENCIÓN
RISCO DE CHOQUE ELÉCTRICO
NÃO ABRIR
CUIDADO
ÁRAMÜTÉS VESZÉLYE!
NE NYISSA FEL!
VIGYÁZAT!
 Loading...