

Konig SAS-TRANS30 User Manual
SAS-TRANS30
MANUAL (p. 2)
ANLEITUNG (S. 8)
MODE D’EMPLOI (p. 15)
GEBRUIKSAANWIJZING (p. 22)
MANUALE (p. 29)
MANUAL DE USO (p. 36)
MANUAL (p. 43)
HASZNÁLATI ÚTMUTATÓ (o. 50)
KÄYTTÖOHJE (s. 57)
BRUKSANVISNING (s. 63)
NÁVOD K POUŽITÍ (s. 69)
MANUAL DE UTILIZARE (p. 76)
ΕΓΧΕΙΡΙΔΙΟ XPHΣHΣ (σελ. 83)
BRUGERVEJLEDNING (s. 90)
VEILEDNING (s. 96)
ИНСТРУКЦИЯ (102 стр.)
KILAVUZ (s. 109)
NÁVOD (s. 115)
INSTRUKCJA OBSŁUGI (str. 121)
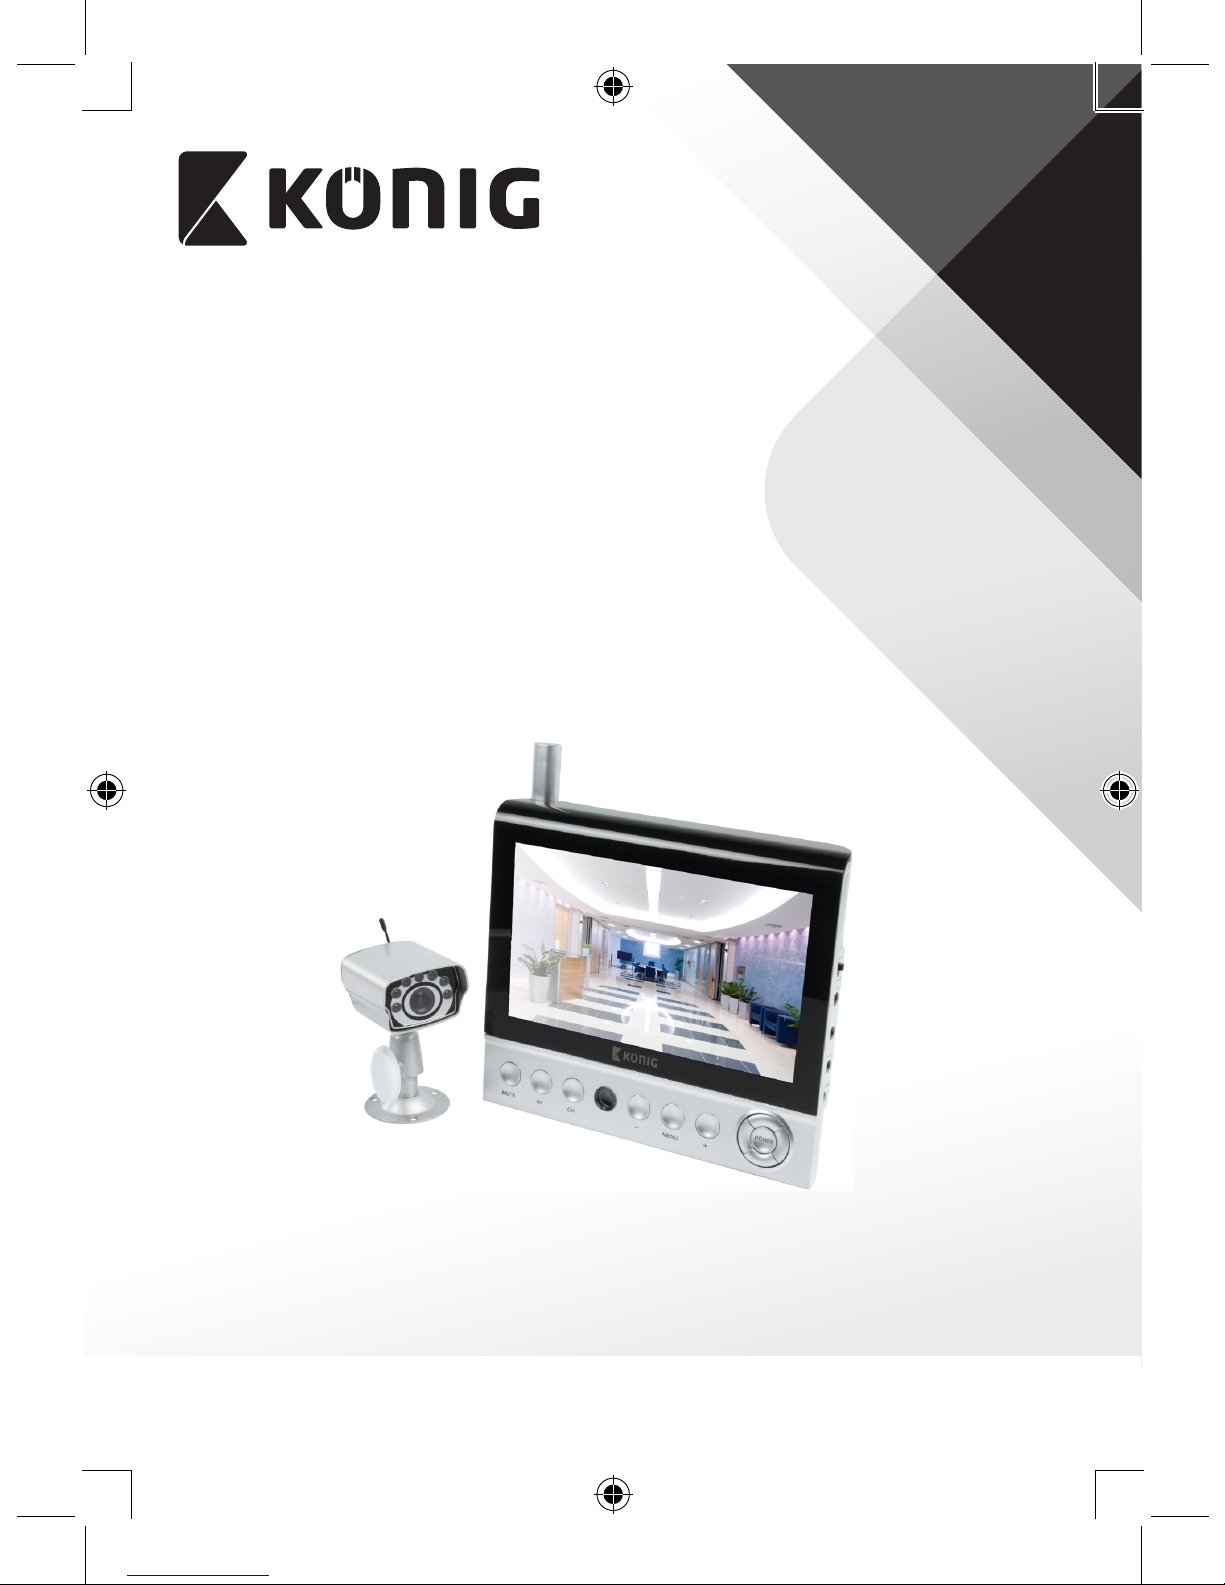
Wireless Camera System

ENGLISH
2
Introduction
This camera system is an easy-to-use electronic system designed for
monitoring in all kinds of situations. This product is especially suited to small
shops, oces or homes. The camera can be mounted to a horizontal or vertical
surface. The camera position can be easily adjusted by hand. Because of the
camera’s infrared, it is possible to use this camera in low light conditions. By
setting a small switch on the plug, you can also transmit sound together with
the images. The rain cover ensures that the camera is weatherproof.
The monitor can be placed on a horizontal surface or can be mounted on an
adjustable support (order separately with art. nr. SAS-BRACK40) which can be
mounted at the bottom of the monitor and tted with 3 screws on a horizontal
or vertical surface. The monitor can receive sound and images from 4 dierent
cameras. You can easily select dierent camera views with the remote control.
The images can also be displayed one by one in automatic mode.
• We recommend that you read this manual before installing/using the
camera system.
• Keep this manual in a safe place for future reference.
The monitor package contains the following items:
1. 1x 7” LCD monitor
2. 1x Camera
3. 2x AC/DC Adapter
4. 1x Remote control
5. 1x AV-output cable
Technical specications
Camera
Transmitting frequency: 2.4–2.4835 GHz
Modulation: FM
Channels: 4
Range: indoor – approx. 30m
open area – approx. 100m
(all depending on local conditions)
Image chip: CMOS
Lens: 14 mm

ENGLISH
3
View angle: 50°
Infrared illumination (LED): 5 m
Light sensitivity: 0.8 Lux/F1.2
Protection: IP44
Microphone: Mono
Working temperature: -10°C to +50°C
Video output: 1 Vp-p
Voltage: 8 V DC/500mA
Dimensions: 55 x 45 x 80mm
Weight: 143 g (incl. cable)
LCD monitor
Operating voltage: 12 V DC
Receiving frequency: 2.4–2.4835 GHz
Channels: 4
Size: 7” LCD
Max. resolution: 480 RGB (H) x 234 (V) pixels
Video output level: 1 Vp-p/75Ohm
Audio output level: 1 Vp-p/600Ohm, mono
Video input level: 1 Vp-p
Audio input level: 1 Vp-p
Audio/video connector: 3.5mm jack
Range to camera: indoor – approx. 30m
open area – approx. 100m
(all depending on local conditions)
Operating temperature: -10°C to +50°C
Voltage: 12 V DC/1 A
Dimensions: 180 x 155 x 25mm
Weight: 478g
Safety precautions
• Do not open the camera or monitor in the event of a malfunction. These
products should only be opened by a qualied engineer.
• Do not expose the monitor to water or humidity.
• Do not expose the monitor or camera to high temperatures.
• Do not submerge the camera in liquid.
• Do not install the system close to strong magnetic elds, such as a TV or
speaker. This may aect the monitor’s quality.

ENGLISH
4
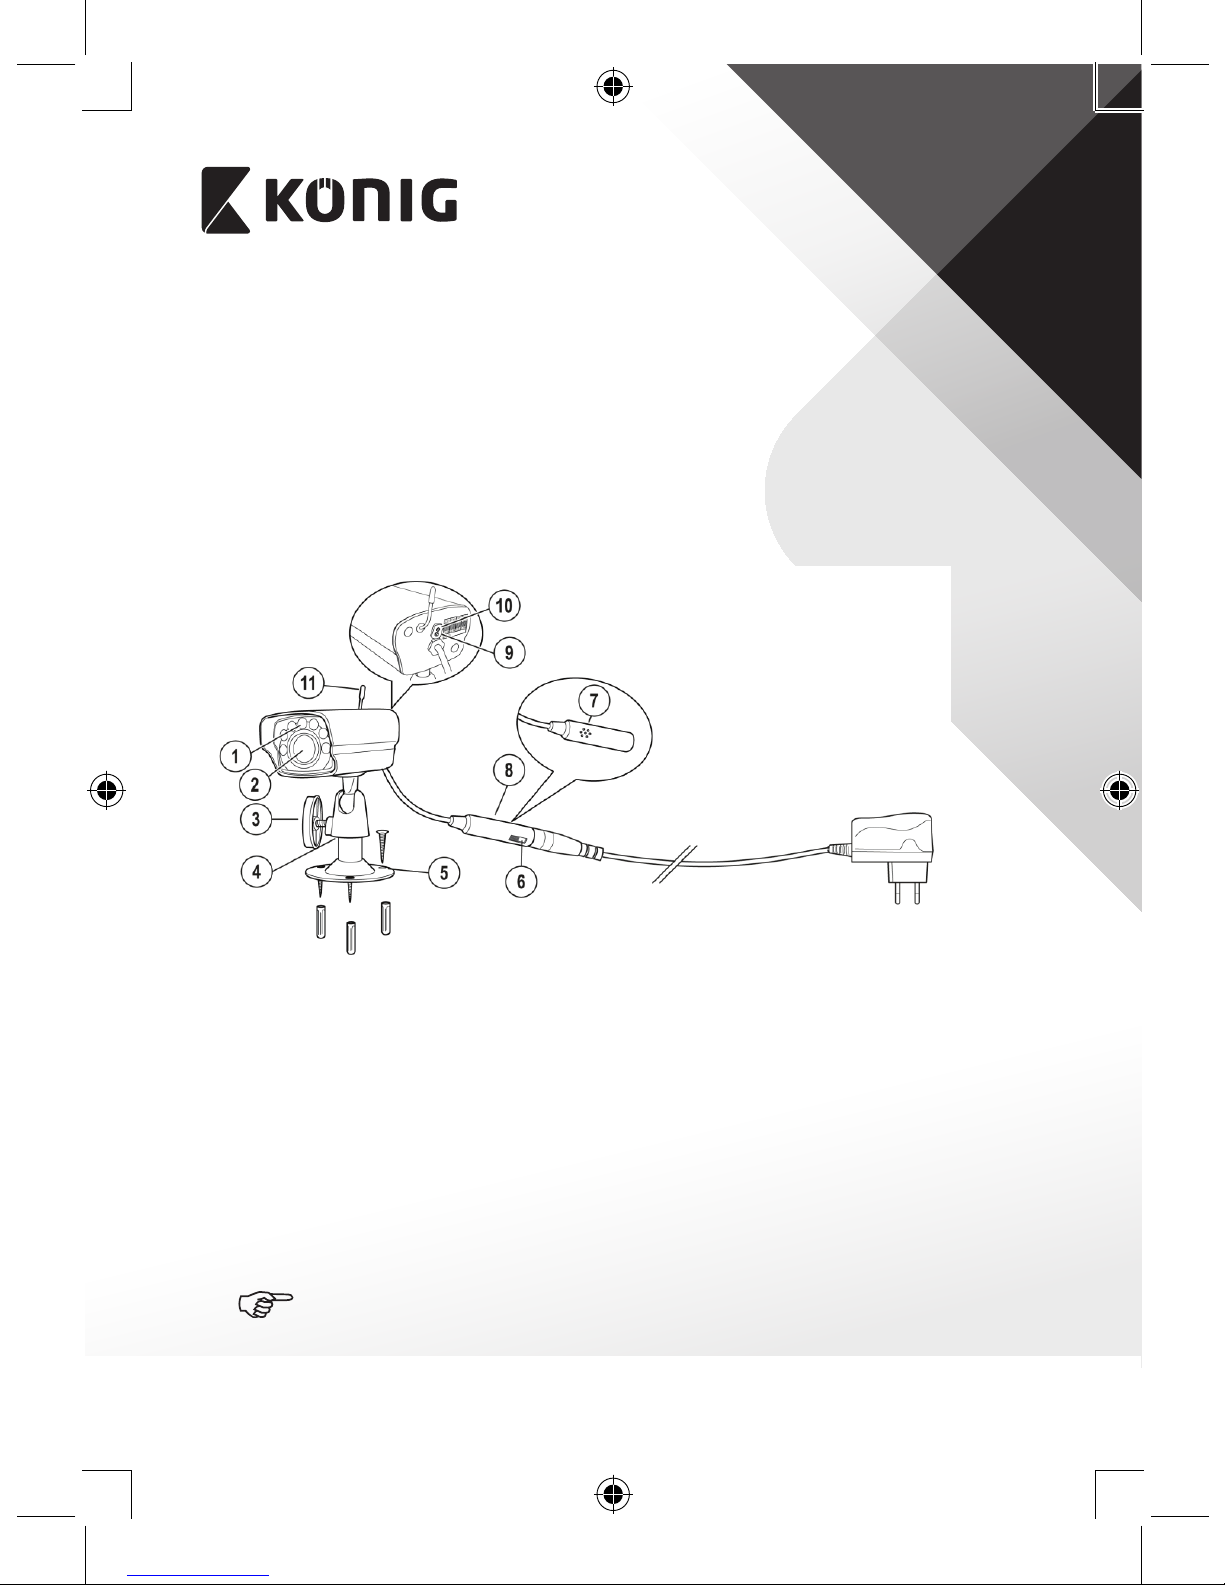
Installation instructions
1. Infrared light
2. Camera image sensor
3. Adjusting screw
4. Bracket
5. Screw hole
6. Audio switch
7. Microphone
8. Power input plug
9. Rubber cover
10. Channel select switches
11. Flat transmitting antenna
1. Open the rubber cover to expose the channel select switches.
2. Use tweezers or a sharp tool to select the switching position, according to
the desired channel.
The receiver and the camera must be on exactly the same channel.
On the rear of the camera you can see how to position the switches
inside of the camera.
3. Close the rubber cover.
4. Fit the camera unit with the support with 3 screws on a horizontal or
vertical surface.
5. Loosen the adjusting screw (3).
6. Rotate the camera to the desired position.
7. Tighten the adjusting screw.
8. Connect the AC/DC adapter with the camera’s power input plug.
9. Turn the microphone on or o with the audio switch (6) on the plug.
ENGLISH
5
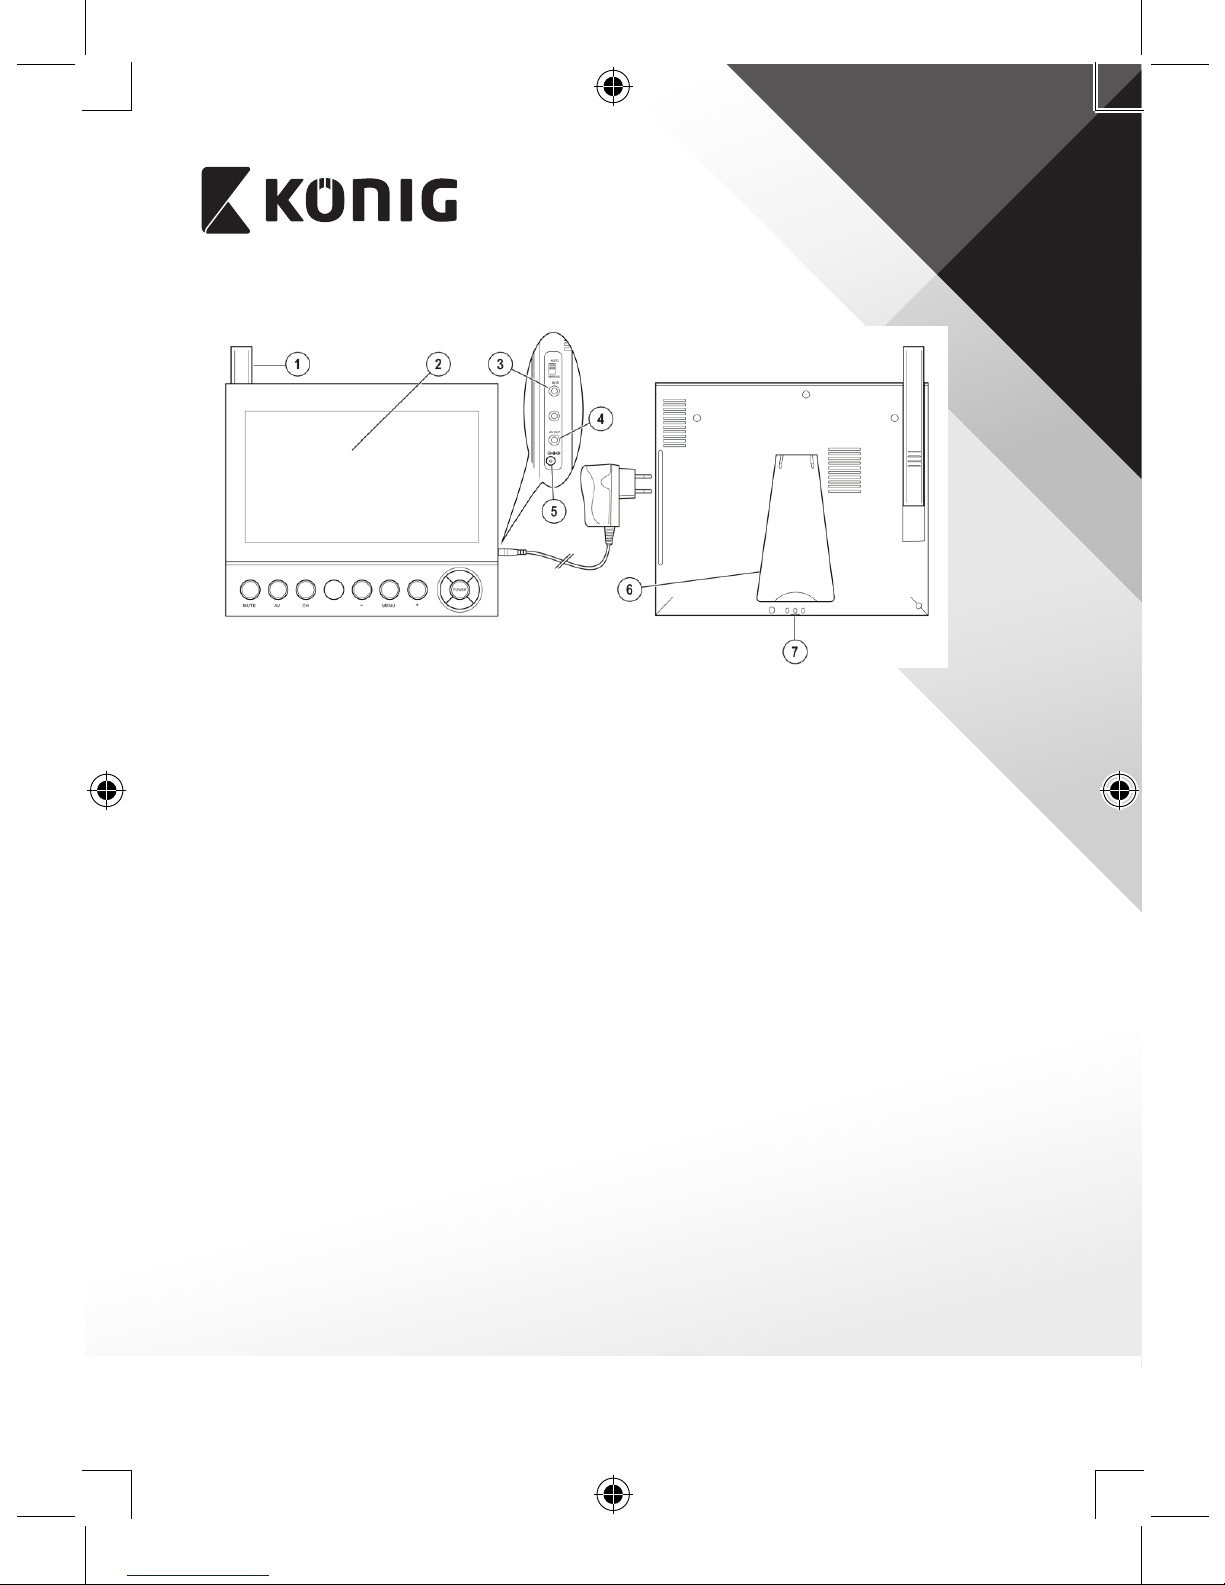
Monitor
1. Pull-out antenna
2. Monitor
3. AV input jack connector
4. AV output jack connector
5. DC 12 V input jack connector
6. Support
7. Fitting point for adjustable support
1. Slide the antenna (1) upwards from the rear of the monitor.
2. Place the monitor on its support (6) on a stable surface.
The monitor can also be mounted on an adjustable support (order
separately with art. nr. SAS-BRACK40) which can be mounted at the bottom
of the monitor and tted with 3 screws on a horizontal or vertical surface.
3. Insert the DC plug into the DC 12 V input jack connector (5).
4. Insert the AC/DC adapter into the wall socket.
5. You can connect an extra monitor to the AV output connector (4).
ENGLISH
6
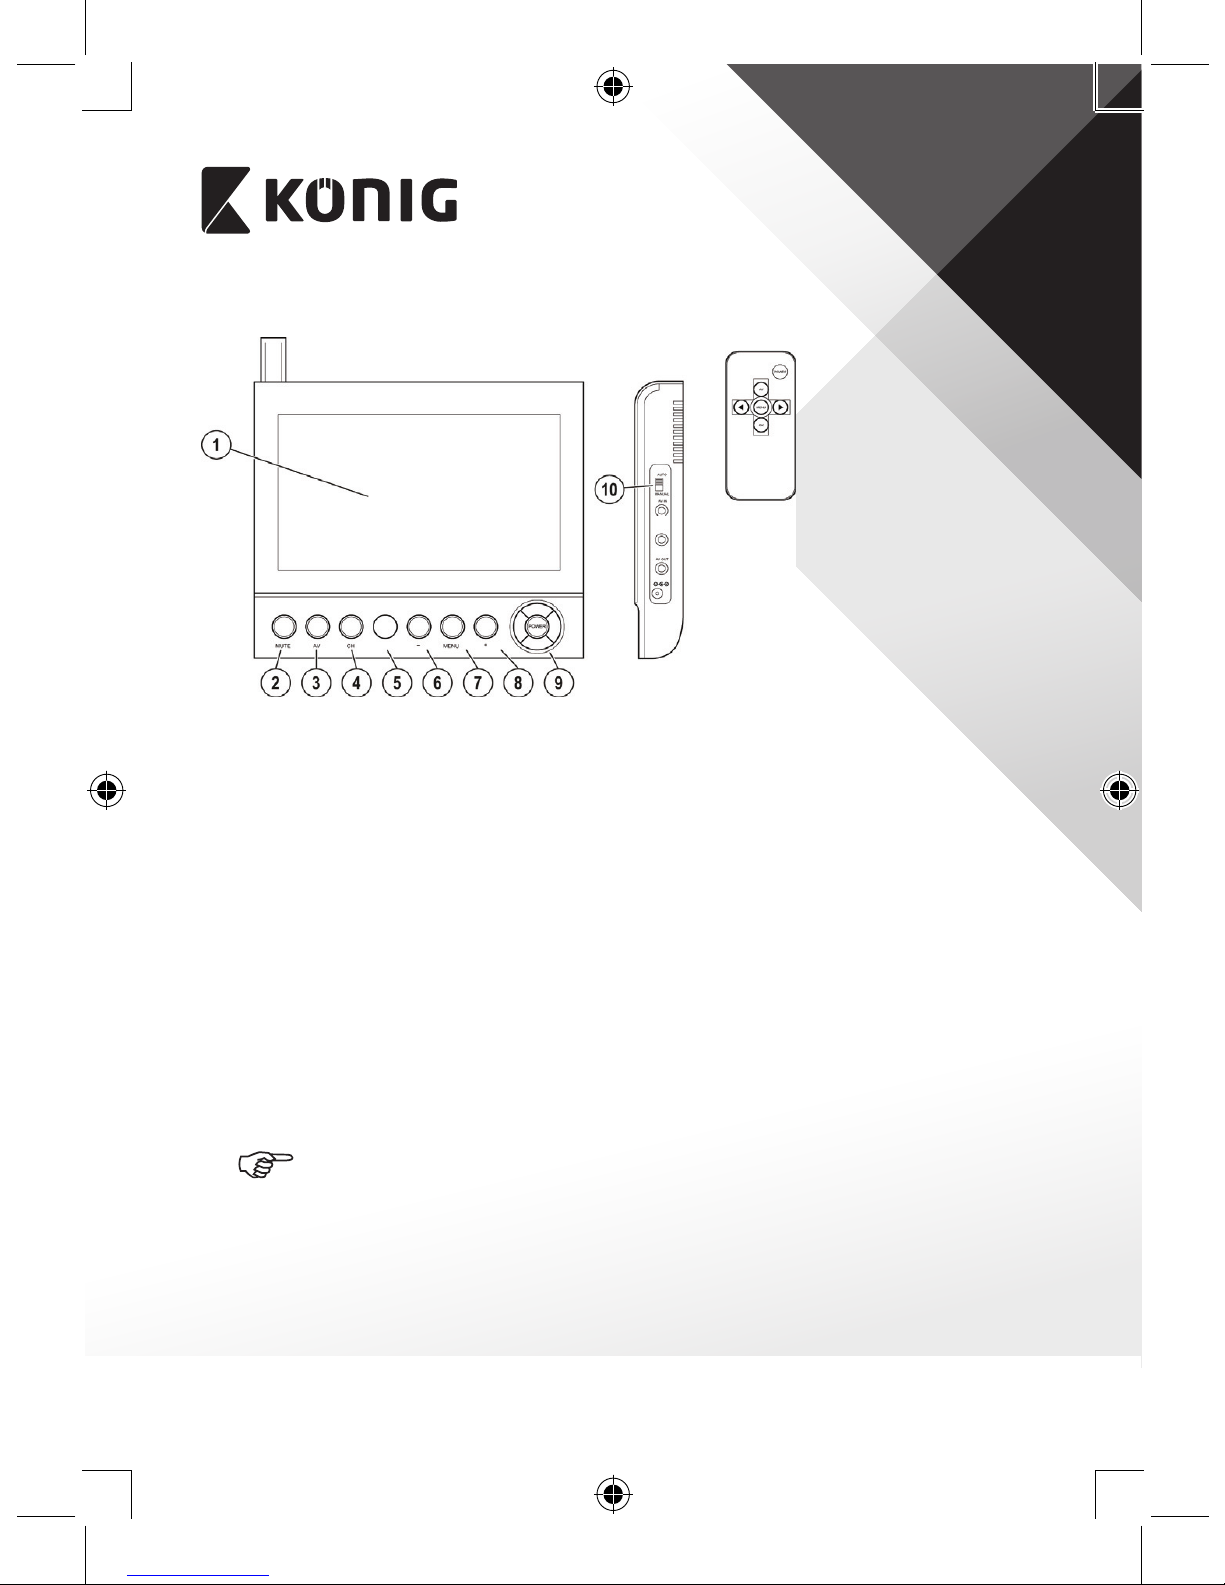
User instructions
1. LCD monitor
2. Mute button
3. AV button
4. CH button
5. IR control sensor
6. – button
7. Menu button
8. + button
9. Power button
10. Auto/Manual switch
1. Press the Power button (9) to switch on the monitor.
2. Press the CH button (4) to set the correct channel.
3. Press the Menu button (7) to navigate to the sub-menus.
The following sub-menus are displayed:
• Display settings: “Bright”, “Contrast”, “Colour” or “Hue”. Adjust the
display settings with the + (8) or – (6) button.
• “AV switched set”
Select the cameras, which will be shown subsequently in automatic
mode. Press the + or – button to switch between channels and the
Menu button to select or deselect a channel.
“√” indicates that this channel has been selected.
“o” indicates that this channel has not been selected.
• “Time switched”
Increase or decrease the time interval for automatic mode with the +
or – button.
4. Set the Auto/Manual switch (10) to “AUTO” to switch between the selected
channels automatically.

ENGLISH
7
When pressing the AV button, manual switching mode shows all
camera images, including cameras, set to “o”.
5. Press the Mute button (2) to switch the sound o or on.
For this feature to work, the microphone on the camera needs to
be switched on.
Troubleshooting
Carry out the following checks if the camera is not working properly:
• Make sure that the monitor is set to the corresponding AV channel (AV1-4)
as set on the camera.
• Make sure that the camera and the monitor are not damaged.
• Make sure that the power adapters are not damaged.
• Make sure, when automatic switching mode is on, that the cameras in the
AV switched set are not set to “”.
• Make sure that the display settings are all set properly.
Maintenance:
Clean the camera with a damp cloth.
Do not use cleaning solvents or abrasives.
Warranty:
Any changes and/or modications to the product will void the warranty. We cannot accept any liability for damage
caused by incorrect use of this product.
Disclaimer:
Designs and specications are subject to change without notice. All logos, brands and product names are trademarks or
registered trademarks of their respective holders and are hereby recognised as such.
Disposal:
• This product is designated for separate collection at an appropriate collection point. Do not dispose of this
product with household waste.
• For more information, contact the retailer or the local authority responsible for waste management.
This product has been manufactured and supplied in compliance with all relevant regulations and directives, valid for all
member states of the European Union. It also complies to all applicable specications and regulations in the country of
sales.
Formal documentation is available upon request. This includes, but is not limited to: Declaration of Conformity (and
product identity), Material Safety Data Sheet, product test report.
Please contact our customer service desk for support:
via website: http://www.nedis.com/en-us/contact/contact-form.htm
via e-mail: service@nedis.com
via telephone: +31 (0)73-5993965 (during oce hours)
NEDIS B.V., De Tweeling 28, 5215 MC ’s-Hertogenbosch, THE NETHERLANDS

DEUTSCH
8
Einleitung
Dieses Kamerasystem ist ein einfach zu verwendendes elektronisches System,
das zur Überwachung aller Arten von Situationen entwickelt wurde. Diese
Produkt ist speziell geeigent für kleine Geschäfte, Büros und zu Hause. Die
Kamera kann auf einer horizontalen und vertikalen Fläche montiert werden.
Die Camerasposition kann einfach manuell eingestellt werden. Auf Grund
des Infrarot der Kamera ist es möglich, diese Kamera auch bei geringen
Beleuchtungsbedigungen zu verwenden. Durch Einstellen eines kleinen
Schalters am Stecker können Sie auch Ton zusammen mit den Bildern
übertragen. Die Regenabdeckung der Kamera ist wasserdicht.
Der Bildschirm kann auf einer horizontalen Fläche oder auf einem einstellbaren
Träger (separat bestellen mit der Artikel-Nr. SAS-BRACK40) montiert werden,
der an der Unterseite des Bildschirms montiert wird und mit 3 Schrauben an
einer horizontalen oder vertikalen Fläche befestigt wird. Der Bildschirm kann
Bild und Ton von 4 verschiedenen Kameras empfangen. Sie können problemlos
verschiedene Kameraeinstellungen mit der Fernbedienung auswählen. Die
Bilder können auch einzeln im Automatikmodus angezeigt werden.
• Wir empfehlen Ihnen, dieses Handbuch zu lesen, bevor Sie das
Kamerasystem installieren/verwenden.
• Bewahren Sie diese Anleitung für ein späteres Nachschlagen gut auf.
Das Bildschrimpaket enthält die folgenden Positionen:
1. 1x 7” LCD Bildschirm
2. 1x Kamera
3. 2x AC/DC Adapter
4. 1x Fernbedienung
5. 1x AV-Ausgangkabel
Technische Spezikationen
Kamera
Übertragungsfrequenz: 2,4–2,4835 GHz
Modulation: FM
Kanäle: 4

DEUTSCH
9
Reichweite: Innenräume – ca. 30m
Freiäche – ca. 100 m (jeweils abhängig von den
örtlichen Bedingungen)
Bildchip: CMOS
Linse: 14 mm
Blickwinkel: 50°
Infrarotbeleuchtung (LED): 5 m
Lichtempndlichkeit: 0,8 Lux/F1.2
Schutzklasse: IP44
Mikrofon: Mono
Betriebstemperatur: -10°C bis +50°C
Videoausgang: 1 Vp-p
Spannung: 8 V DC/500mA
Abmessungen: 55 x 45 x 80mm
Gewicht: 143 g (Inkl. Kabel)
LCD Bildschirm
Betriebsspannung: 12 V DC
Eingangsfrequenz: 2,4–2,4835 GHz
Kanäle: 4
Größe: 7” LCD
Max. Auösung: 480 RGB (H) x 234 (V) Pixel
Videoausgangsebene: 1 Vp-p/75 Ohm
Audio-Ausgangsebene: 1 Vp-p/600 Ohm, mono
Videoeingangsebene: 1 Vp-p
Audio-Eingangsebene: 1 Vp-p
Audio/Video-Stecker: 3,5mm Buchse
Bereich zur Kamera: Innenräume – ca. 30m
Freiäche – ca. 100 m (jeweils abhängig von den
örtlichen Bedingungen)
Betriebstemperatur: -10°C bis +50°C
Spannung: 12 V DC/1 A
Abmessungen: 180 x 155 x 25mm
Gewicht: 478g

DEUTSCH
10
Sicherheitsvorkehrungen
• Önen Sie die Kamera oder den Bildschirm im Falle einer Fehlfunktion
nicht. Diese Produkte sollte nur von einem qualizierten Techniker geönet
werden.
• Setzen Sie den Bildschirm keinem Wasser oder Feuchte aus.
• Setzen Sie den Bildschirm oder die Kamera keinen hohen Temperaturen
aus.
• Tauchen Sie die Kamera nicht in Flüssigkeit ein.
• Installieren Sie das System nicht in der Nähe magnetischer Felder, wie
einem Fernsehgerät oder Lautsprechern. Dies kann die Qualität der
Bildschirmdarstellung beeinträchtigen.
Einbauanweisung
1. Infrarotlicht
2. Kamerabildsensor
3. Einstellschraube
4. Halterung
5. Schraubenbohrung
6. Audioschalter
7. Mikrofon
8. Stromeingangsstecker
9. Gummiabdeckung
10. Kanalwahlschalter
11. Flache Übertragungsantenne
1. Önen Sie die Gummiabdeckung, um die Kanalwahlschalter freizulegen.
2. Verwenden Sie eine Pinzette oder ein scharfes Werkzeug, um die
Schaltposition des gewünschten Kanals auszuwählen.

DEUTSCH
11
Der Empfänger und die Kamera müssen auf genau den gleichen
Kanal eingestellt werden.
Auf der Rückseite der Kamera können Sie sehen, wie die Schalter in
der Kamera eingestellt werden müssen.
3. Schleißen Sie die Gummiabdeckung.
4. Befestigen Sie die Kameraeinheit mit der Halterung mit 3 Schrauben an
einer horizontalen oder vertikalen Fläche.
5. Lösen Sie die Einstellschraube (3).
6. Drehen Sie die Kamera auf die gewünschte Position.
7. Ziehen Sie die Einstellschraube fest an.
8. Schließen Sie den AD/DC Adapter mit dem Kamera-Stromeingangsstecker an.
9. Drehen Sie das Mikrofon mit dem Audio Schalter (6) am Stecker ein
oderaus.
Monitor
1. Ausziehantenne
2. Monitor
3. AV Eingangsbuchse
4. AV Ausgangsbuchse
5. DC 12 V Eingangsbuchse
6. Träger
7. Befestigungspunkt für einstellbaren
Träger
1. Schieben Sie die Antenne (1) an der Rückseite des Bildschirms nach oben .
2. Stellen Sie den Bildschirm auf dessen Träger (6) auf einer stabilen
Oberäche.
Der Bildschirm kann auch auf einem einstellbaren Träger (separat bestellen
unter Artikel Nr. SAS-BRACK40) montiert werden, der an der Unterseite des

DEUTSCH
12
Bildschirms montiert wird und mit 3 Schrauben an einer horizontalen oder
vertikalen Fläche befestigt wird.
3. Stecken Sie den DC in die DC 12 V Eingangsbuchse (5).
4. Stecken Sie den AC/DC Adapter in die Wandsteckdose.
5. Sie können einen zusätzlichen Bildschirm an den AV Ausgangsstecker (4)
anschließen.
Benutzerhandbuch
1. LCD Bildschirm
2. Stummtaste
3. AV Taste
4. CH-Taste
5. IR Steuerungssensor
6. – Taste
7. Menütaste
8. + Taste
9. EIN-/AUS-Taste
10. Taste Auto/manuell
1. Drücken Sie die EIN-/AUS-Taste (9), um den Bildschrim einzuschalten.
2. Drücken Sie die CH-Taste (4), um den richtigen Kanal einzustellen.
3. Drücken Sie die Menütaste (7), um zu den Untermenüs zu navigieren.
Die folgenden Untermenüs werden angezeigt:
• Anzeigeeinstellungen: „Bright“ (Helligkeit), „Contrast“ (Kontrast),
„Colour“ (Farbe) oder „Hue“ (Farbton). Stellen Sie die Anzeige
Einstellungen mit der Taste + (8) oder – (6) ein.
• „AV switched set“ (AV-Quelle umgestellt)
Wählen Sie die Kameras aus, die dann im Folgenden im
Automatikmodus angezeigt werden. Drücken Sie die + oder – Taste,

DEUTSCH
13
um zwischen den Kanälen umzuschalten und die Menütaste, um einen
Kanal aus- bzw. abzuwählen.
„√“ zeigt an, dass dieser Kanal ausgewählt wurde.
„o“ zeigt an, dass dieser Kanal nicht ausgewählt wurde.
• „Time switched“ (Zeit umgestellt)
Zeitintervall des Automatikmodus mit der + oder – Taste erhöhen oder
verringern.
4. Stellen Sie den Schalter Auto/manuell (10) auf „AUTO“ ein, um automatisch
zwischen den Kanälen umzuschalten.
Wenn Sie die AV Taste drücken, zeigt der manuelle Schaltmodus
alle Bilder an inklusive der Kameras, die auf „o“ eingestellt sind.
5. Drücken Sie die Stummtaste (2), um den Ton aus- oder einzuschalten.
Damit diese Funktion funktioniert, muss das Mikrofon an der
Kamera eingeschaltet werden.
Fehlerbehebung
Führen Sie die folgenden Überprüfungen duch, falls die Kamera nicht
ordnungsgemäß funktioniert:
• Stellen Sie sicher, dass der Bildschirm auf den entsprechenden AV Kanal
(AV1-4), wie an der Kamera vorgegeben, eingestellt ist.
• Prüfen Sie, dass die Kamera und der Bildschirm nicht beschädigt sind.
• Prüfen Sie, dass die Stromadapter nicht beschädigt sind.
• Stellen Sie sicher, dass die Kameras, die auf die AV Schaltung eingestellt
sind, nicht auf „o“ eingestellt sind, wenn der automatische Schaltmodus
eingeschaltet ist.
• Stellen Sie sicher, dass die Anzeigeeinstellungen alle ordnungsgemäß
eingestellt sind.

DEUTSCH
14
Wartung:
Reinigen Sie die Kamera nur mit einem feuchten Tuch.
Keine Reinigungs- oder Scheuermittel verwenden.
Garantie:
Alle Änderungen und/oder Modizierungen an dem Produkt haben ein Erlöschen der Garantie zur Folge. Wir
übernehmen keine Haftung für Schäden durch unsachgemäße Verwendung dieses Produkts.
Haftungsausschluss:
Design und technische Daten unterliegen unangekündigten Änderungen. Alle Logos, Marken und Produktnamen sind
Marken oder eingetragene Marken ihrer jeweiligen Eigentümer und werden hiermit als solche anerkannt.
Entsorgung:
• Dieses Produkt muss an einem entsprechenden Sammelpunkt zur Entsorgung abgegeben werden.
Entsorgen Sie dieses Produkt nicht zusammen mit dem Hausmüll.
• Weitere Informationen erhalten Sie beim Verkäufer oder der für die Abfallwirtschaft verantwortlichen
örtlichen Behörde.
Dieses Produkt wurde hergestellt und geliefert in Übereinstimmung mit allen geltenden Vorschriften und Richtlinien,
die für alle Mitgliedsstaaten der Europäischen Union gültig sind. Es entspricht allen geltenden Vorschriften und
Bestimmungen im Land des Vertriebs.
Eine formale Dokumentation ist auf Anfrage erhältlich. Diese beinhaltet unter anderem, jedoch nicht ausschließlich:
Konformitätserklärung (und Produktidentität), Sicherheitsdatenblatt, Testreport des Produkts.
Wenden Sie sich bei Fragen bitte an unseren Kundendienst:
per Internet: http://www.nedis.de/de-de/kontakt/kontaktformular.htm
per E-Mail: service@nedis.com
per Telefon: Niederlande +31 (0)73-5993965 (während der Geschäftszeiten)
NEDIS B.V., De Tweeling 28, 5215 MC’s-Hertogenbosch, NIEDERLANDE

FRANÇAIS
15
Introduction
Ce système de caméras est un appareil électronique facile à utiliser destiné à
la surveillance dans toute situation. Ce produit est particulièrement adapté
aux petits magasins, bureaux et résidences. Il peut être installé sur une surface
horizontale ou verticale. Sa position peut être facilement réglée à la main.
L'éclairage infrarouge de la caméra permet son utilisation dans des conditions
de faible luminosité. Vous pouvez également transmettre du son et des images
en incorporant un petit commutateur à la prise. Elle est étanche à l’eau grâce à
son chapeau protecteur.
Le moniteur peut être placé sur une surface horizontale ou peut être
monté sur un support réglable (commandé séparément avec le code article
SAS-BRACK40) qui peut être monté en bas du moniteur et xé avec 3 vis
sur une surface horizontale ou verticale. Le moniteur peut recevoir du son
et des images à partir de 4 caméras diérentes. La télécommande permet
de sélectionner facilement diérentes vues de caméra. Les images peuvent
également être achées une par une de façon automatique.
• Nous vous recommandons de lire attentivement ce manuel avant d'installer
le système de caméras.
• Conservez ce manuel dans un endroit sûr, pour pouvoir le consulter
ultérieurement.
Le coret du moniteur contient les articles suivants :
1. 1 Moniteur à écran LCD 7”
2. 1 Caméra
3. 2 Adaptateurs secteur
4. 1 Télécommande
5. 1 Câble de sortie AV
Spécications techniques
Caméra
Fréquence de transmission : 2,4–2,4835 GHz
Modulation : FM
Canaux : 4

FRANÇAIS
16
Portée : Intérieur – environ 30m
Extérieur – environ 100m
(Tout dépend des conditions locales)
Puce image : CMOS
Objectif : 14 mm
Angle de visualisation : 50°
Eclairage infrarouge (LED) : 5 m
Sensibilité à la lumière : 0,8 Lux/F1.2
Protection : IP44
Microphone : Mono
Température de fonctionnement: -10°C à +50°C
Sortie vidéo : 1 Vp-p
Tension: 8 V CC/500mA
Dimensions : 55 x 45 x 80mm
Poids : 143 g (câble inclus)
Écran LCD
Tension de fonctionnement : 12 V CC
Fréquence de réception : 2,4–2,4835 GHz
Canaux : 4
Dimensions : 7” LCD
Résolution max. : 480 RGB (H) x 234 (V) pixels
Niveau de sortie vidéo : 1 Vp-p/75 Ohm
Niveau de sortie audio : 1 Vp-p/600 Ohm, mono
Niveau d'entrée vidéo : 1 Vp-p
Niveau d'entrée audio : 1 Vp-p
Connecteurs audio/vidéo : Connecteur 3,5mm
Portée de la caméra: Intérieur – environ 30m
Extérieur – environ 100m
(Tout dépend des conditions locales)
Température de fonctionnement : -10°C à +50°C
Tension: 12 V CC/1 A
Dimensions : 180 x 155 x 25mm
Poids : 478g

FRANÇAIS
17
Consignes de sécurité
• N’ouvrez pas la caméra ou le moniteur en cas de dysfonctionnement. Ces
appareils ne doivent être ouverts que par un technicien qualié.
• N’exposez pas le moniteur à l'eau ou à l'humidité.
• N’exposez pas le moniteur ou les caméras à des températures élevées.
• Ne plongez pas la caméra dans un liquide.
• N’installez pas le système à proximité de forts champs magnétiques, tels
que téléviseurs, haut-parleurs etc. Cela peut aecter la qualité du moniteur.
Notice de montage
1. Lumière infrarouge
2. Capteur d'image de la caméra
3. Vis de réglage
4. Support
5. Trou de vis
6. Commutateur audio
7. Microphone
8. Prise d'alimentation
9. Couvercle en caoutchouc
10. Sélecteur de canaux
11. Antenne plate de transmission
1. Ouvrez le couvercle en caoutchouc pour accéder aux sélecteurs de canaux.
2. Utilisez une pince à épiler ou un outil pointu pour sélectionner la position
de commutation, selon le canal souhaité.
Le récepteur et la caméra doivent être accordés sur le même canal.

FRANÇAIS
18
Reportez-vous aux indications situées à l'arrière de la caméra pour
savoir comment positionner les commutateurs.
3. Refermez le couvercle en caoutchouc.
4. Montez la caméra et le support à l’aide de 3 vis sur une surface horizontale
ou verticale.
5. Desserrez la vis de réglage (3).
6. Tournez la caméra dans la position souhaitée.
7. Serrez la vis de réglage.
8. Branchez le connecteur d’alimentation de l'appareil dans l'adaptateur
secteur.
9. Vous pouvez activer/désactiver le microphone à l’aide de l'interrupteur
audio (6) situé sur la prise.
Moniteur
1. Antenne télescopique
2. Ecran
3. Connecteur d'entrée AV
4. Connecteur de sortie AV
5. Prise d’alimentation 12 V CC
6. Support
7. Points de réglage du support
1. Déployez l'antenne (1) située à l'arrière du moniteur.
2. Placez le moniteur sur son support (6) sur une surface stable.
Le moniteur peut également être placé sur un support réglable (commandé
séparément avec le code article SAS-BRACK40) qui peut être monté en bas
du moniteur et xé avec 3 vis sur une surface horizontale ou verticale.
3. Insérez la che CC dans la prise d'entrée 12 V CC (5).

FRANÇAIS
19
4. Branchez l'adaptateur secteur dans une prise murale.
5. Vous pouvez connecter un moniteur supplémentaire au connecteur de
sortie AV (4).
Mode d'emploi
1. Écran LCD
2. Touche Mute (couper le son)
3. Touche AV
4. Touche CH
5. Touche de contrôle du capteur IR
6. Touche –
7. Touche Menu
8. Touche +
9. Touche Power (marche/arrêt)
10. Commutateur automatique/manuel
1. Appuyez sur la touche Power (9) pour allumer le moniteur.
2. Appuyez sur la touche CH (4) pour choisir le bon canal.
3. Appuyez sur la touche Menu (7) pour parcourir les sous-menus.
Les sous-menus suivants sont disponibles :
• Paramètres d'achage : « Bright » (luminosité), « Contrast » (Contraste),
« Colour » (Couleur) ou « Hue » (teinte). Vous pouvez régler les
paramètres d'achage avec les touches + (8) ou – (6).
• « AV switched set » (AV activé)
Sélection des caméras qui seront achées ultérieurement en mode
automatique. Appuyez sur la touche +/– pour basculer entre les canaux
et sur la touche Menu pour sélectionner/désélectionner un canal.
« √ » indique que ce canal est sélectionné.
« o » indique que ce canal n’est pas sélectionné.

FRANÇAIS
20
• « Time switched » (Temps activé)
Augmentez ou diminuez l'intervalle de temps pour le mode
automatique avec la touche + ou –.
4. Réglez le commutateur Auto/Manuel (10) sur « AUTO » pour basculer
automatiquement entre les canaux sélectionnés.
Lorsque vous appuyez sur la touche AV, le mode de commutation
manuelle montre toutes les images des caméras, y compris les
caméras marquées « o ».
5. Appuyez sur la touche Mute (2) pour couper/rétablir le son.
Pour utiliser cette fonction il faut que le microphone de la caméra
soit activé.
Dépannage
Eectuez les contrôles suivants si la caméra ne fonctionne pas correctement :
• Assurez-vous que le moniteur est réglé sur le même canal AV que celui de
la caméra (AV1-4).
• Assurez-vous que les caméras et le moniteur ne sont pas endommagés.
• Assurez-vous que l'adaptateur n'est pas endommagé.
• Assurez-vous que lorsque le mode de commutation automatique est activé,
les caméras AV activé ne sont pas réglées sur « o ».
• Assurez-vous que les paramètres d'achage sont tous réglés correctement.

FRANÇAIS
21
Entretien:
Nettoyez la caméra avec un chion humidié.
N'utilisez pas de solvants ni des produits abrasifs.
Garantie:
Toutes altérations et/ou modications du produit annuleront la garantie. Nous ne serons tenus responsables d'aucune
responsabilité pour les dommages dus à une utilisation incorrecte du produit.
Avertissement:
Le design et les caractéristiques techniques sont sujets à modication sans notication préalable. Tous les logos de
marques et noms de produits sont des marques déposées ou immatriculées dont leurs détenteurs sont les propriétaires
et sont donc reconnues comme telles dans ce documents.
Élimination des déchets:
• Ce produit doit être jeté séparément des ordures ménagères dans un point de collecte approprié. Ne jetez
pas ce produit avec les ordures ménagères ordinaires.
• Pour plus d’informations, contactez le distributeur ou l’autorité locale responsable de la gestion des
déchets.
Ce produit est fabriqué et délivré en conformité avec toutes les directives et règlements applicables et en vigueur dans
tous les états membre de l'Union Européenne. Il est également conforme aux spécications et à la réglementation en
vigueur dans le pays de vente.
La documentation ocielle est disponible sur demande. Cela inclut mais ne se limite pas à: La déclaration de conformité
(et à l'identication du produit), la che technique concernant la sécurité des matériaux, les rapports de test du produit.
Veuillez contacter notre centre de service à la clientèle pour plus d'assistance:
via le site Web: http://www.nedis.fr/fr-fr/contact/formulaire-de-contact.htm
via courriel: service@nedis.com
via téléphone: +31 (0)73-5993965 (aux heures de bureau)
NEDIS B.V., De Tweeling 28, 5215 MC’s-Hertogenbosch, PAYS-BAS

NEDERLANDS
22
Inleiding
Dit camerasysteem is een gemakkelijk te gebruiken elektronisch systeem,
dat is ontworpen voor het bewaken van allerlei situaties. Dit product is in het
bijzonder geschikt voor kleine winkels, kantoren of huizen. De camera kan op
een horizontaal of verticaal oppervlak gemonteerd worden. De stand van de
camera kan gemakkelijk met de hand worden aangepast. Door het infrarood
van de camera kan deze camera ook in omstandigheden met weinig licht
worden gebruikt. Door het instellen van een kleine schakelaar op de plug, kan
er ook geluid bij de beelden worden uitgezonden. De regenkap zorgt ervoor
dat de camera weerbestendig is.
De monitor kan op een horizontaal oppervlak worden gezet of kan aan
een verstelbare steun (apart te bestellen als art.nr. SAS-BRACK40) worden
bevestigd. Die wordt aan de onderkant van de monitor gemonteerd en kan
met 3 schroeven aan een horizontaal of verticaal oppervlak worden bevestigd.
De monitor kan beeld en geluid van 4 verschillende camera's ontvangen.
Met de afstandsbediening kunt u gemakkelijk verschillende camerabeelden
selecteren. De beelden kunnen in de automatische stand ook één voor één
worden weergegeven.
• Wij bevelen aan om deze gebruiksaanwijzing door te lezen voordat u het
camerasysteem installeert/gebruikt.
• Bewaar deze handleiding op een veilige plek voor toekomstig gebruik.
Het monitorpakket bevat de volgende onderdelen:
1. 1x 17,8 cm (7”) LCD-monitor
2. 1x Camera
3. 2x Lichtnetadapter
4. 1x Afstandsbediening
5. 1x AV uitgangskabel
Technische specicaties
Camera
Zendfrequentie: 2,4–2,4835 GHz
Modulatie: FM
Kanalen: 4

NEDERLANDS
23
Bereik: Binnenshuis – ong. 30m
Open ruimte – ong. 100m
(afhankelijk van lokale omstandigheden)
Beeldchip: CMOS
Lens: 14 mm
Opnamehoek: 50°
Infraroodverlichting (LED): 5 m
Lichtgevoeligheid: 0,8 Lux/F1.2
Bescherming: IP44
Microfoon: Mono
Bedrijfstemperatuur: -10°C tot +50°C
Video-uitgang: 1 Vp-p
Spanning: 8 V DC/500mA
Afmetingen: 55 x 45 x 80mm
Gewicht: 143 g (incl. kabel)
LCD-monitor
Bedrijfsspanning: 12 V DC
Ontvangstfrequentie: 2,4–2,4835 GHz
Kanalen: 4
Afmetingen: 17,8 cm (7”) LCD
Max. resolutie: 480 RGB (H) x 234 (V) pixels
Video-uitgangsniveau: 1 Vp-p/75 Ohm
Audio-uitgangsniveau: 1 Vp-p/600 Ohm, mono
Video-ingangsniveau: 1 Vp-p
Audio-ingangsniveau: 1 Vp-p
Audio-/videoconnector: 3,5mm jack
Bereik naar camera: Binnenshuis – ong. 30m
Open ruimte – ong. 100m
(afhankelijk van lokale omstandigheden)
Bedrijfstemperatuur: -10°C tot +50°C
Spanning: 12 V DC/1 A
Afmetingen: 180 x 155 x 25mm
Gewicht: 478g
NEDERLANDS
24
Veiligheidsvoorschriften
• Maak bij een storing de camera of monitor niet open. Deze producten
mogen uitsluitend worden geopend door een bevoegde monteur.
• Stel de monitor niet bloot aan water of vocht.
• Stel de monitor of camera niet bloot aan hoge temperaturen.
• Dompel de camera niet onder in vloeistoen.
• Installeer het systeem niet in de buurt van sterke magnetische velden, zoals
TV's of luidsprekers. Dit kan de beeldkwaliteit van de monitor beïnvloeden.
Installatieaanwijzingen
1. Infraroodlamp
2. Beeldsensor camera
3. Stelschroef
4. Beugel
5. Schroefgat
6. Audioschakelaar
7. Microfoon
8. Voedingsaansluiting
9. Rubberen afdekking
10. Kanaalkeuzeschakelaars
11. Platte uitzendantenne
1. Open de rubberen afdekking om toegang te krijgen tot de
kanaalkeuzeschakelaars.
2. Gebruik een pincet of een scherp voorwerp om de schakelaar in de stand
voor het gewenste kanaal te zetten.
De ontvanger en de camera moeten exact op hetzelfde kanaal
staan.

NEDERLANDS
25
Aan de achterkant van de camera kunt u zien hoe u de schakelaars
in de camera in kunt stellen.
3. Sluit de rubberen afdekking.
4. Bevestig de camera met de steun en de 3 schroeven op een horizontaal of
verticaal oppervlak.
5. Draai de stelschroef (3) los.
6. Draai de camera in de gewenste stand.
7. Draai de stelschroef vast.
8. Sluit de lichtnetadapter aan op de voedingsaansluiting van de camera.
9. Schakel de microfoon in of uit met de audioschakelaar (6) op de connector.
Monitor
1. Telescoopantenne
2. Monitor
3. Aansluiting AV-ingang
4. Aansluiting AV-uitgang
5. Ingangsaansluiting 12 V gelijkspanning
6. Standaard
7. Bevestigingspunt voor verstelbare steun
1. Schuif de antenne (1) naar boven toe uit, vanuit de achterkant van de
monitor.
2. Zet de monitor op de standaard (6) op een stabiele ondergrond.
De monitor kan ook aan een verstelbare steun (apart te bestellen als art.
nr. SAS-BRACK40) worden bevestigd. Die wordt aan de onderkant van de
monitor gemonteerd en wordt met 3 schroeven aan een horizontaal of
verticaal oppervlak bevestigd.

NEDERLANDS
26
3. Steek de voedingsconnector in de voedingsaansluiting voor 12 V
gelijkspanning (5).
4. Steek de lichtnetadapter in een stopcontact.
5. U kunt een extra monitor aansluiten op de AV-uitgangsaansluiting (4).
Gebruiksaanwijzing
1. LCD-monitor
2. Demptoets
3. AV-toets
4. Kanalentoets
5. Sensor IR-bediening
6. – toets
7. Menutoets
8. + toets
9. Aan-/uittoets
10. Schakelaar Auto/handmatig
1. Druk de Aan-/uittoets (9) om de monitor in the schakelen.
2. Druk de Kanalentoets (4) om het juiste kanaal in te stellen.
3. Druk de Menutoets (7) om naar de submenu's te navigeren.
De volgende submenu's worden weergegeven:
• Scherminstellingen: “Bright” (Helderheid), “Contrast” (Contrast),
“Colour” (Kleur) of “Hue” (Kleurtoon). Stel de scherminstellingen in met
de + (8) of – (6) toets.
• “AV switched set” (Wisselende AV stand)
Selecteer de camera's die in de automatische stand achtereenvolgens
worden getoond. Druk de + of – toets om te wisselen tussen kanalen
en de Menutoets om een kanaal te selecteren of de selectie ongedaan
te maken.

NEDERLANDS
27
“√” geeft aan dat dit kanaal is geselecteerd.
“o” geeft aan dat dit kanaal niet is geselecteerd.
• “Time switched” (Tijdgeschakeld)
Verleng of verkort het tijdsinterval voor de automatische stand met
de+ of – toets.
4. Zet de schakelaar voor Auto/Handmatig (10) op “AUTO” om automatisch te
wisselen tussen de geselecteerde kanalen.
Als de AV toets wordt gedrukt, toont de handmatige wisselstand de
beelden van alle camera's, inclusief camera's die zijn ingesteld op “o”.
5. Druk de Demptoets (2) om het geluid in of uit te schakelen.
Om deze functie te kunnen gebruiken dient de microfoon op de
camera ingeschakeld te zijn.
Probleemoplossing
Voer de volgende controles uit als de camera niet goed werkt:
• Zorg ervoor dat de monitor is ingesteld op het overeenkomstige AV kanaal
(AV1-4), zoals is ingesteld op de camera.
• Controleer dat de camera en de monitor niet zijn beschadigd.
• Controleer dat de netasapters niet zijn beschadigd.
• Controleer dat wanneer de automatische wisselstand actief is, dat de
camera's in the wisselende AV stand niet zijn ingesteld op “o”.
• Controleer of alle scherminstellingen juist zijn ingesteld.

NEDERLANDS
28
Onderhoud:
Reinig de camera met een droog doekje.
Gebruik geen reinigingsmiddelen of schuurmiddelen.
Garantie:
Eventuele wijzigingen en/of aanpassingen aan het product zullen de garantie ongeldig maken. Wij aanvaarden geen
aansprakelijkheid voor schade veroorzaakt door onjuist gebruik van dit product.
Disclaimer:
Ontwerpen en specicaties kunnen zonder kennisgeving worden gewijzigd. Alle logo’s, merken en productnamen zijn
handelsmerken of geregistreerde handelsmerken van de respectievelijke eigenaren en worden hierbij als zodanig erkend.
Afvoer:
• Dit product is bestemd voor gescheiden inzameling bij een daartoe aangewezen verzamelpunt. Gooi dit
product niet weg bij het huishoudelijk afval.
• Neem voor meer informatie contact op met de detailhandelaar of de lokale overheid die verantwoordelijk
is voor het afvalbeheer.
Dit product is vervaardigd en geleverd in overeenstemming met de relevante reglementen en richtlijnen die voor alle
lidstaten van de Europese Unie gelden. Het voldoet ook aan alle toepasselijke specicaties en reglementen van het land
van verkoop.
Op aanvraag is ociële documentatie verkrijgbaar. Inclusief, maar niet uitsluitend: Conformiteitsverklaring (en
productidentiteit), materiaalveiligheidsinformatie en producttestrapport.
Wend u tot onze klantenservice voor ondersteuning:
via de website: http://www.nedis.nl/nl-nl/contact/contact-formulier.htm
via e-mail: service@nedis.nl
telefonisch: +31 (0)73-5993965 (tijdens kantooruren)
NEDIS B.V., De Tweeling 28, 5215 MC ’s-Hertogenbosch, NEDERLAND

ITALIANO
29
Introduzione
Questo sistema di videocamere è un dispositivo elettronico per la
videosorveglianza facile da usare in ogni tipo di situazione. Il prodotto è
appositamente adatto per piccoli negozi, uci o abitazioni. La videocamera
può essere montata su superci verticali o orizzontali. La posizione della
videocamera può essere facilmente regolata a mano. Grazie all'illuminazione
ad infrarossi è possibile utilizzare la videocamera in condizioni di scarsa
illuminazione. Impostando un piccolo interruttore sulla presa, potrete anche
trasmettere l'audio assieme alle immagini. La copertura antipioggia garantisce
l'impermeabilità della videocamera.
Il monitor può essere posizionato su una supercie orizzontale o può essere
montato su un supporto regolabile (ordinatelo separatamente con codice
articolo SAS-BRACK40) che può essere ssato sul retro del monitor e ssato con
tre viti su una supercie orizzontale o verticale. Il monitor può ricevere audio e
video da 4 telecamere diverse. Potete selezionare facilmente visuali da diverse
telecamere con il telecomando. Le immagini possono anche essere visualizzate
una ad una in modo automatico.
• Vi raccomandiamo di leggere questo manuale prima di installare/Utilizzare
il sistema di videosorveglianza.
• Tenete questo manuale in un posto sicuro per un futuro riferimento.
La confezione contiene i seguenti oggetti:
1. 1x Monitor LCD da 7”
2. 1x videocamera
3. 2x Alimentatore AC/DC
4. 1x Telecomando
5. 1x Cavo uscita AV
Speciche Tecniche
Videocamera
Frequenza di trasmissione: 2,4–2,4835 GHz
Modulazione: FM
Canali: 4

ITALIANO
30
Portata: All'interno – approssimativamente 30m
All'aperto – approssimativamente 100m
(tutto dipende dalle condizioni del posto)
Chip immagine: CMOS
Obiettivo: 14 mm
Angolo di visuale: 50°
Illuminazione infrarosso (LED): 5 m
Sensibilità alla luce: 0,8 Lux/F1.2
Protezione: IP44
Microfono: Mono
Temperatura di funzionamento: -10°C a +50°C
Uscita video: 1 Vp-p
Voltaggio: 8 V CC/500mA
Dimensioni: 55 x 45 x 80mm
Peso: 143 g (cavo incl.)
Monitor LCD
Tensione di lavoro: 12 V DC
Frequenza di ricezione: 2,4–2,4835 GHz
Canali: 4
Dimensioni: LCD 7”
Risuluzione massima: 480 RGB (H) x 234 (V) pixel
Livelli di uscita video: 1 Vp-p/75 Ohm
Livelli di uscita Audio: 1 Vp-p/600 Ohm, mono
Livelli in ingresso video: 1 Vp-p
Livelli in ingresso audio: 1 Vp-p
Connettore Audio/video: jack da 3,5mm
Range verso la videocamera All'interno – approssimativamente 30m
All'aperto – approssimativamente 100m
(tutto dipende dalle condizioni del posto)
Temperatura di funzionamento: -10°C a +50°C
Voltaggio: 12 V CC/1 A
Dimensioni: 180 x 155 x 25mm
Peso: 478g
 Loading...