

Page 1

SAS-IPCAM2xx
USER MANUAL (EN)
GEBRUIKSAANWIJZING (NL)
BEDIENUNGSANLEITUNG (DE)
MANUAL DE USUARIO (ES)
MANUEL DE L’UTILISATEUR (FR)
MANUALE PER L’UTENTE (IT)
MANUAL DO UTILIZADOR (PT)
BRUGSVEJLEDNING (DA)
BRUKERVEILEDNING (NO)
IP Camera
BRUKSANVISNING (SV)
KÄYTTÖOPAS (FI)
ΕΓΧΕΙΡΙΔΙΟ XPHΣHΣ (EL)
INSTRUKCJA OBSŁUGI (PL)
NÁVOD K POUŽITÍ (CS)
HASZNÁLATI ÚTMUTATÓ (HU)
MANUAL DE UTILIZARE (RO)
РУКОВОДСТВО ПОЛЬЗОВАТЕЛЯ (RU)
KULLANIM KILAVUZU (TR)
Page 2
SAS-IPCAM200
4
9
1
2
8
7
5
6
SAS-IPCAM210
9
1
8
4
5
3
2
12
7
6
2
10
Page 3
SAS-IPCAM220
1
9
11
8
12
2
10
7
6
Page 4
SAS-IPCAM2xx
IP camera
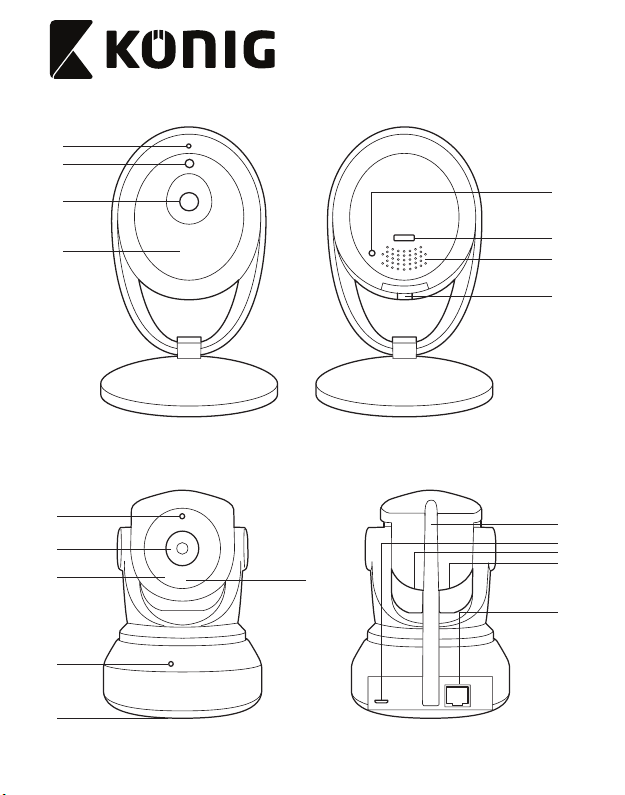
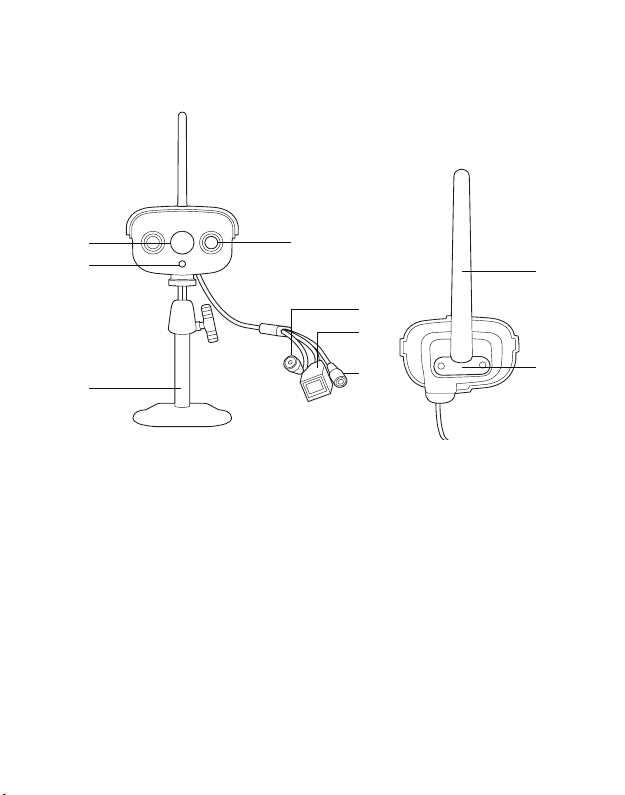
Description
1. Lens
2. Reset button
3. LED indicators
4. Microphone
5. Speaker
6. Memory card slot (microSD / TransFlash)
7. DC input / USB port (Micro USB)
8. IR light
9. Light sensor
10. LAN socket
11. Camera stand
12. Wi-Fi antenna
Use
1. Download and install the app from Apple App Store or Google
Play Store on your mobile device by searching “EyeCloud“.
2. Insert the memory card in the memory card slot.
3. Power the camera using the USB port and charger.
4. Launch the “EyeCloud” app.
5. Create a new account.
Indoor
1. Connect your smartphone to the preferred Wi-Fi network.
2. Power the camera using the USB port and charger.
3. Select “Quick Setup” and follow the instructions.
4. Enter the Wi-Fi password.
5. Hold your smartphone close to the device to send Wi-Fi
instructions to the device.
6. When the device completes receiving the instructions, the
camera icon appears. Add this camera to the account.
7. If the camera is not added sucessfully, select “Manually add a
camera“. Scan the 2D barcode on the device. Enter the default
password: 888888.
Outdoor
1. Connect your smartphone to the preferred Wi-Fi network.
2. Power the camera using the charger.
3. Connect the camera to the same network using the Ethernet
cable.
4. Select “Search in LAN network” and conrm the connection.
5. When the camera icon appears, add it to your account.
6. To use this camera without an Ethernet cable, go to “Device
Management”. Enter the network name and password.
Disconnect the Ethernet cable and the camera will
automatically reboot and connect to the selected Wi-Fi network.
Note: When accessing the camera for the rst time, you will be
asked to change the password. The default password is
“888888”.
User interface
1. Live feed
2. Photos (stored locally)
3. Record (stored locally)
4. Microphone on/o
5. Audio on/o
6. Preset position*
7. Vertical cruise*
8. Horizontal cruise*
9. Preset cruise*
Note: * = available only for the SAS-IPCAM210.
Other settings
• Device status
1. Camera overview
2. Wi-Fi settings
3. SD recording settings
4. Password settings
5. Sensors settings
6. Firmware
7. Brightness and
contrast settings
8. IR light settings • On / O
9. Image mirroring • Horizontal / Vertical
10. Frequency settings • 50 Hz / 60 Hz
• UID code
• MAC address
• Activation date
• Change camera name
• Storage status
• Format SD card
• Recording mode: 24/7 recording / Motion
recording / Scheduled recording
• Audio: On / O
• Camera notications: On / O
• Motion detection schedule: On / O
• Motion detection sensitivity: Low / Middle / High
• Current rmware information
• Update rmware
4
Page 5
Technical data
SAS-IPCAM200 SAS-IPCAM210 SAS-IPCAM220
Image sensor
SNR ≥ 39 dB ≥ 41 dB ≥ 39 dB
Lens angle 3.6 mm, F1.4/56.14
IR LEDs 1 12 2 (array LEDs)
Frequency
(IR LED)
Night vision 5 m 10 m 15 m
Resolution 720p / VGA / QVGA
Frame rate 30 fps / 24 fps 25 fps 25 fps
Memory card Maximum 128 GB Maximum 128 GB Maximum 128 GB
Power 5 V ± 0.3 V 5 V ± 0.3 V 12 V ± 0.3 V / 2 A
Consumption 3.2 W 3 W 3.5 W
Temperature -10 °C ~ 50 °C - 20 °C ~ 70 °C -20 °C ~ 70 °C
Humidity < 90% 90% 100%
Weight 135 g 625 g 340 g
1/4” 720p
progressive scan
CMOS
850 nm 850 nm 850 nm
1/4” 720p
progressive scan
CMOS
3.6 mm,
F1.4/56.14
720p / VGA /
QVGA
1/4” 720p
progressive scan
CMOS
3.6 mm,
F1.4/56.14
720p / VGA /
QVGA
Safety
• To reduce risk of electric shock, this product should only be
opened by an authorized technician when service is required.
• Disconnect the product from the mains and other equipment if
a problem should occur.
• Read the manual carefully before use. Keep the manual for
future reference.
• Only use the device for its intended purposes. Do not use the
device for other purposes than described in the manual.
• Do not use the device if any part is damaged or defective. If the
device is damaged or defective, replace the device immediately.
• The device is suitable for indoor use only. Do not use the device
outdoors.
• Do not expose the product to water or moisture.
Cleaning and maintenance
Warning!
• Do not use cleaning solvents or abrasives.
• Do not clean the inside of the device.
• Do not attempt to repair the device. If the device does not
operate correctly, replace it with a new device.
• Clean the outside of the device using a soft, damp cloth.
English
Warranty
Any changes and/or modications to the product will void the
warranty. We cannot accept any liability for damage caused by
incorrect use of the product.
Disposal
• The product is designated for separate collection at an
appropriate collection point. Do not dispose of the product with
household waste.
• For more information, contact the retailer or the local authority
responsible for waste management.
Documents
The product has been manufactured and supplied in compliance
with all relevant regulations and directives, valid for all member
states of the European Union. The product complies with all
applicable specications and regulations in the country of sales.
Formal documentation is available upon request. The formal
documentation includes, but is not limited to the Declaration of
Conformity, the Material Safety Data Sheet and the product test
report.
Disclaimer
Designs and specications are subject to change without notice. All
logos, brands and product names are trademarks or registered
trademarks of their respective holders and are hereby recognized as
such.
5
Page 6

SAS-IPCAM2xx
IP-camera
Beschrijving
1. Lens
2. Resetknop
3. LED-indicatoren
4. Microfoon
5. Speaker
6. Geheugenkaartsleuf (microSD / TransFlash)
7. DC-ingang / USB-poort (Micro-USB)
8. IR-lamp
9. Lichtsensor
10. LAN-aansluiting
11. Camerastatief
12. Wi-antenne
Gebruik
1. Download en installeer de app uit de Apple App Store of Google
Play Store op uw mobiele apparaat door naar "EyeCloud" te
zoeken.
2. Plaats de geheugenkaart in de geheugenkaartsleuf.
3. Voorzie de camera via de USB-poort en de oplader van stroom.
4. Activeer de “EyeCloud” app.
5. Maak een nieuw account aan.
Binnenshuis
1. Sluit uw smartphone op het wi-netwerk van uw keuze aan.
2. Voorzie de camera via de USB-poort en de oplader van stroom.
3. Selecteer “Quick Setup” en volg de instructies.
4. Voer het wi-wachtwoord in.
5. Houd uw smartphone dicht bij het apparaat om wi-instructies
naar het apparaat te sturen.
6. Als het apparaat de instructies heeft ontvangen, verschijnt het
pictogram van de camera. Voeg deze camera aan het account
toe.
7. Selecteer als het toevoegen van de camera niet is gelukt
“Manually add a camera“. Scan de 2D barcode op het apparaat.
Voer het standaard wachtwoord in: 888888.
Buitenshuis
1. Sluit uw smartphone op het wi-netwerk van uw keuze aan.
2. Voorzie de camera via de oplader van stroom.
3. Sluit de camera met behulp van de Ethernet-kabel op hetzelfde
netwerk aan.
4. Selecteer “Search in LAN network” en bevestig de verbinding.
5. Voeg als het pictogram van de camera verschijnt dit aan uw
account toe.
6. Ga voor gebruik van deze camera zonder Ethernet-kabel naar
“Device Management”. Voer de naam van het netwerk en het
wachtwoord in. Koppel de Ethernet-kabel af. De camera start
automatisch opnieuw op en maakt verbinding met het
geselecteerde wi-netwerk.
Opmerking: Bij het eerste gebruik van de camera wordt u
gevraagd het wachtwoord te wijzigen. Het standaard
wachtwoord is “888888”.
Gebruikersinterface
1. Directe beelden
2. Foto's (lokaal opgeslagen)
3. Opnemen (lokaal opgeslagen)
4. Microfoon aan/uit
5. Audio aan/uit
6. Vooraf ingestelde positie*
7. Verticaal zoeken*
8. Horizontaal zoeken*
9. Vooraf ingesteld zoeken*
Opmerking: * = uitsluitend beschikbaar bij de SAS-IPCAM210.
Overige instellingen
• Status van het apparaat
1. Overzicht van de camera
2. Wi-instellingen
3. Instellingen voor
SD-opname
4. Wachtwoordinstellingen
5. Sensorinstellingen
6. Firmware
7. Instellingen voor
helderheid en contrast
8. Instellingen IR-lamp • Aan / Uit
9. Beeld spiegelen • Horizontaal / Verticaal
10. Frequentie-instellingen • 50 Hz / 60 Hz
6
• UID-code
• MAC-adres
• Activeringsdatum
• Naam camera wijzigen
• Opslagstatus
• SD-kaart formatteren
• Opnamemodus: 24/7 opname /
Bewegingsopname / Geplande opname
• Audio: Aan / Uit
• Camerameldingen: Aan / Uit
• Bewegingsdetectieschema: Aan / Uit
• Gevoeligheid bewegingsdetectie: Laag /
Gemiddeld / Hoog
• Informatie over de huidige rmware
• Firmware updaten
Page 7

Technische gegevens
SAS-IPCAM200 SAS-IPCAM210 SAS-IPCAM220
Beeldsensor
SNR ≥ 39 dB ≥ 41 dB ≥ 39 dB
Lenshoek
IR-LED's 1 12 2 (reeks van LED's)
Frequentie
(IR-LED)
Nachtzicht 5 m 10 m 15 m
Resolutie
Framesnelheid 30 fps / 24 fps 25 fps 25 fps
Geheugenkaart Maximum 128 GB Maximum 128 GB Maximum 128 GB
Voeding 5 V ± 0,3 V 5 V ± 0,3 V 12 V ± 0,3 V / 2 A
Verbruik 3,2 W 3 W 3,5 W
Temperatuur -10 °C ~ 50 °C - 20 °C ~ 70 °C -20 °C ~ 70 °C
Vochtigheid < 90% + 90% + 100%
Gewicht 135 g 625 g 340 g
1/4” 720p
progressieve scan
CMOS
3,6 mm,
F1.4/56.14
850 nm 850 nm 850 nm
720p / VGA /
QVGA
1/4” 720p
progressieve scan
CMOS
3,6 mm,
F1.4/56.14
720p / VGA /
QVGA
1/4” 720p
progressieve scan
CMOS
3,6 mm,
F1.4/56.14
720p / VGA /
QVGA
Veiligheid
• Dit product mag voor onderhoud alleen worden geopend door
een erkend technicus om het risico op elektrische schokken te
verkleinen.
• Koppel het product los van het stopcontact en van andere
apparatuur als er zich problemen voordoen.
• Lees voor gebruik de handleiding zorgvuldig door. Bewaar de
handleiding voor latere raadpleging.
• Gebruik het apparaat uitsluitend voor de beoogde doeleinden.
Gebruik het apparaat niet voor andere doeleinden dan
beschreven in de handleiding.
• Gebruik het apparaat niet als een onderdeel beschadigd of defect
is. Vervang een beschadigd of defect apparaat onmiddellijk.
• Het apparaat is uitsluitend geschikt voor gebruik binnenshuis.
Gebruik het apparaat niet buitenshuis.
• Stel het product niet bloot aan water of vocht.
Reiniging en onderhoud
Waarschuwing!
• Gebruik geen reinigingsmiddelen of schuurmiddelen.
• Reinig niet de binnenzijde van het apparaat.
• Probeer het apparaat niet te repareren. Indien het apparaat niet
juist werkt, vervang het dan door een nieuw apparaat.
• Reinig de buitenzijde van het apparaat met een zachte, vochtige
doek.
Nederlands
Garantie
Eventuele wijzigingen en/of aanpassingen aan het product zullen
de garantie ongeldig maken. Wij aanvaarden geen aansprakelijkheid
voor schade veroorzaakt door onjuist gebruik van het product.
Afvoeren
• Het product is bestemd voor gescheiden inzameling bij een
hiertoe aangewezen verzamelpunt. Werp het product niet weg
bij het huishoudelijk afval.
• Neem voor meer informatie contact op met de detailhandelaar
of de lokale overheid die verantwoordelijk is voor het
afvalbeheer.
Documenten
Het product is vervaardigd en geleverd in overeenstemming met de
relevante reglementen en richtlijnen die voor alle lidstaten van de
Europese Unie gelden. Het product voldoet aan alle van toepassing
zijnde specicaties en reglementen in het land van verkoop.
Ociële documentatie is op aanvraag verkrijgbaar. De ociële
documentatie omvat, maar is niet beperkt tot de Verklaring van
Overeenstemming, de Material Safety Data Sheet en het
producttestrapport.
Disclaimer
Ontwerpen en specicaties kunnen zonder kennisgeving worden
gewijzigd. Alle logo’s, merken en productnamen zijn handelsmerken
of geregistreerde handelsmerken van de respectievelijke eigenaren
en worden hierbij als zodanig erkend.
7
Page 8
SAS-IPCAM2xx
IP-Kamera
Beschreibung
1. Objektiv
2. Reset-Taste
3. LED-Anzeigen
4. Mikrofon
5. Lautsprecher
6. Speicherkartenschlitz (microSD / TransFlash)
7. DC-Eingang / USB-Anschluss (Micro USB)
8. IR-Lampe
9. Lichtsensor
10. LAN-Buchse
11. Kamerahalter
12. Wi-Fi-Antenne
Gebrauch
1. Laden Sie die App aus dem App-Store von Apple oder aus dem
Google Play Store (Schlüsselwörter "EyeCloud") und installieren
Sie sie auf Ihrem Mobilgerät.
2. Setzen Sie die Speicherkarte in den Speicherkartenschlitz ein.
3. Betreiben Sie die Kamera über den USB-Port und ein Ladegerät.
4. Önen Sie die App “EyeCloud”.
5. Erstellen Sie ein neues Konto.
In Räumen
1. Verbinden Sie Ihr Smartphone mit dem bevorzugten
Wi-Fi-Netzwerk.
2. Betreiben Sie die Kamera über den USB-Port und ein Ladegerät.
3. Wählen Sie “Quick Setup” und folgen Sie den Anweisungen.
4. Geben Sie das Wi-Fi-Passwort ein.
5. Halten Sie ihr Smartphone nahe an das Gerät, um die
Wi-Fi-Anweisungen zu übermitteln.
6. Sobald die Anweisungen vollständig an das Gerät übertragen
wurden, erscheint das Kamera-Icon. Fügen Sie die Kamera zu
Ihrem Konto hinzu.
7. Kann der Vorgang nicht erfolgreich abgeschlossen werden,
wählen Sie “Manually add a camera“. Scannen Sie den
2D-Barcode des Geräts ein. Geben Sie folgendes
voreingestelltes Passwort ein: 888888.
Im Freien
1. Verbinden Sie Ihr Smartphone mit dem bevorzugten
Wi-Fi-Netzwerk.
2. Nutzen Sie das Ladegerät für die Stromversorgung des Geräts.
3. Binden Sie die Kamera per Ethernet-Kabel in dasselbe Netzwerk
ein.
4. Wählen Sie “Search in LAN network” und bestätigen Sie die
Verbindung.
5. Fügen Sie die Kamera ihrem Konto hinzu, sobald das
Kamera-Icon erscheint.
6. Um die Kamera ohne Ethernet-Kabel zu betreiben, önen Sie
das Menü “Device Management”. Geben Sie den
Netzwerknamen und ein gültiges Passwort ein. Entfernen Sie
das Ethernet-Kabel. Die Kamera startet automatisch neu und
stellt eine Verbindung zum festgelegten Wi-Fi-Netz her.
Hinweis: Beim ersten Zugri auf die Kamera werden Sie
aufgefordert, das Passwort zu ändern. Das voreingestellte
Passwort lautet "888888".
Benutzerschnittstelle
1. Live Feed
2. Fotos (lokal gespeichert)
3. Aufnahme (lokal gespeichert)
4. Mikrofon ein/aus
5. Audio ein/aus
6. Voreingestellte Position*
7. Vertikalbewegung*
8. Horizontalbewegung*
9. Voreingestellte Bewegung*
Hinweis: * = nur SAS-IPCAM210.
Weitere Einstellungen
• Gerätestatus
1. Übersicht Kamera
2. Wi-Fi-Einstellungen
3. SDAufnahmeeinstellungen
4. Passwort-Einstellungen
5. Sensor-Einstellungen
6. Firmware
7. Helligkeit und Kontrast
8. Einstellungen IR-Lampe • Ein / Aus
9. Bildspiegelung • Horizontal / Vertikal
10. Frequenz-Einstellungen • 50 Hz / 60 Hz
• UID-Code
• MAC-Adresse
• Datum der Aktivierung
• Kamera-Name ändern
• Speicherstatus
• SD-Karte formatieren
• Aufnahmemodus: 24/7-Aufnahme / Aufnahme
bei Bewegung / Zeitgesteuerte Aufnahme
• Audio: Ein / Aus
• Kamera-Nachrichten: Ein / Aus
• Zeitgesteuerte Bewegungserkennung: Ein / Aus
• Empndlichkeit Bewegungserkennung: Gering /
Mittel / Hoch
• Anzeige der aktuellen Firmware-Version
• Firmware aktualisieren
8
Page 9
Technische Daten
SAS-IPCAM200 SAS-IPCAM210 SAS-IPCAM220
Bildsensor
SNR ≥ 39 dB ≥ 41 dB ≥ 39 dB
Optik, Blende
IR-LEDs 1 12 2 (LED-Kette)
Frequenz
(IR-LED)
Nachtsicht 5 m 10 m 15 m
Auösung
Bildfrequenz 30 fps / 24 fps 25 fps 25 fps
Speicherkarte Maximum 128 GB Maximum 128 GB Maximum 128 GB
Betrieb 5 V ± 0,3 V 5 V ± 0,3 V 12 V ± 0,3 V / 2 A
Verbrauch 3,2 W 3 W 3,5 W
Temperatur -10 °C ~ 50 °C - 20 °C ~ 70 °C -20 °C ~ 70 °C
Luftfeuchtigkeit < 90% 90% 100%
Gewicht 135 g 625 g 340 g
1/4” 720p
progressive scan
CMOS
3,6 mm,
F1.4/56.14
850 nm 850 nm 850 nm
720p / VGA /
QVGA
1/4” 720p
progressive scan
CMOS
3,6 mm,
F1.4/56.14
720p / VGA /
QVGA
1/4” 720p
progressive scan
CMOS
3,6 mm,
F1.4/56.14
720p / VGA /
QVGA
Sicherheit
• Um die Gefahr eines elektrischen Schlags zu verringern, sollte
dieses Produkt bei erforderlichen Servicearbeiten ausschließlich
von einem autorisierten Techniker geönet werden.
• Bei Problemen trennen Sie das Gerät bitte von der
Spannungsversorgung und von anderen Geräten.
• Lesen Sie die Bedienungsanleitung vor dem Gebrauch genau
durch. Bitte bewahren Sie die Bedienungsanleitung zur späteren
Bezugnahme auf.
• Verwenden Sie das Gerät nur bestimmungsgemäß. Verwenden
Sie das Gerät nur für den in dieser Bedienungsanleitung
beschriebenen Zweck.
• Verwenden Sie das Gerät nicht, falls ein Teil beschädigt oder
defekt ist. Ist das Gerät beschädigt oder defekt, erneuern Sie es
unverzüglich.
• Das Gerät eignet sich nur zur Verwendung in Innenräumen.
Verwenden Sie das Gerät nicht im Freien.
• Setzen Sie das Gerät keinem Wasser und keiner Feuchtigkeit aus.
Deutsch
Reinigung und Pege
Warnung!
• Verwenden Sie keine Lösungs- oder Scheuermittel.
• Reinigen Sie das Gerät nicht von innen.
• Versuchen Sie nicht, das Gerät zu reparieren. Falls das Gerät
nicht einwandfrei arbeitet, tauschen Sie es gegen ein neues aus.
• Reinigen Sie das Äußere des Geräts mit einem weichen feuchten
Tuch.
Garantie
Alle Änderungen und/oder Modizierungen an dem Produkt haben
ein Erlöschen der Garantie zur Folge. Wir übernehmen keine
Haftung für Schäden durch unsachgemäße Verwendung des
Produkts.
Entsorgung
• Dieses Produkt muss an einer entsprechenden Sammelstelle zur
Entsorgung abgegeben werden. Entsorgen Sie das Produkt
nicht mit dem Haushaltsabfall.
• Weitere Informationen erhalten Sie beim Verkäufer oder der für
die Abfallwirtschaft verantwortlichen örtlichen Behörde.
Dokumente
Dieses Produkt wurde in Übereinstimmung mit allen geltenden
Vorschriften und Richtlinien hergestellt und geliefert, die für alle
Mitgliedsstaaten der Europäischen Union gültig sind. Das Produkt
entspricht allen geltenden Spezikationen und Bestimmungen im
Land des Vertriebs.
Eine formale Dokumentation ist auf Anfrage erhältlich. Die formale
Dokumentation beinhaltet die Konformitätserklärung, das
Datenblatt zur Materialsicherheit und den Produktprüfbericht, ohne
jedoch darauf beschränkt zu sein.
Haftungsausschluss
Design und technische Daten unterliegen unangekündigten
Änderungen. Alle Logos, Marken und Produktnamen sind Marken
oder eingetragene Marken ihrer jeweiligen Eigentümer und werden
hiermit als solche anerkannt.
9
Page 10

SAS-IPCAM2xx
Cámara IP
Descripción
1. Lente
2. Botón de reinicio
3. Indicadores LED
4. Micrófono
5. Altavoz
6. Ranura de tarjeta de memoria (microSD / TransFlash)
7. Entrada CC / Puerto USB (Micro USB)
8. Luz IR
9. Sensor de luz
10. Toma LAN
11. Soporte de cámara
12. Antena Wi-Fi
Uso
1. Descargue e instale la aplicación de Apple App Store o Google
Play Store en su dispositivo móvil buscando "EyeCloud".
2. Inserte la tarjeta de memoria en la ranura de tarjeta de
memoria.
3. Alimente la cámara con el puerto USB y el cargador.
4. Inicie la aplicación "EyeCloud".
5. Cree una nueva cuenta.
Interior
1. Conecte su smartphone a la red Wi-Fi de su preferencia.
2. Alimente la cámara con el puerto USB y el cargador.
3. Seleccione "Quick Setup" y siga las instrucciones.
4. Introduzca la contraseña Wi-Fi.
5. Mantenga su smartphone cerca del dispositivo para enviar
instrucciones Wi-Fi al dispositivo.
6. Cuando el dispositivo deja de recibir instrucciones, aparece el
icono de la cámara. Agregue esta cámara a la cuenta.
7. Si la cámara no se agrega correctamente, seleccione “Manually
add a camera“. Escanee el código de barras 2D del dispositivo.
Introduzca la contraseña predeterminada: 888888.
Exterior
1. Conecte su smartphone a la red Wi-Fi de su preferencia.
2. Alimente la cámara con el cargador.
3. Conecte la cámara a la misma red con el cable Ethernet.
4. Seleccione “Search in LAN network” y conrme la conexión.
5. Cuando aparezca el icono de la cámara, agréguelo a su cuenta.
6. Para utilizar esta cámara sin un cable Ethernet, vaya a “Device
Management”. Introduzca el nombre y la contraseña de red.
Desconecte el cable Ethernet y la cámara se reiniciará
automáticamente y se conectará a la red Wi-Fi seleccionada.
Nota: Al acceder a la cámara por primera vez, se le pedirá que
cambie la contraseña. La contraseña por defecto es “888888”.
Interfaz del usuario
1. Imágenes en directo
2. Fotos (almacenadas localmente)
3. Grabación (almacenada localmente)
4. Activar/desactivar micrófono
5. Activar/desactivar audio
6. Posición predenida*
7. Travesía vertical*
8. Travesía horizontal*
9. Travesía predenida*
Nota: * = disponible solo para SAS-IPCAM210.
Otros ajustes
• Estado del dispositivo
1. Vista general de
cámara
2. Ajustes Wi-Fi
3. Ajustes de grabación
SD
4. Ajustes de contraseña
5. Ajustes de sensores
6. Firmware
7. Ajustes de brillo y
contraste
8. Ajustes de luz IR • Encender / Apagar
9. Imagen espejo • Horizontal / Vertical
10. Ajustes de frecuencia • 50 Hz / 60 Hz
• Código UID
• Dirección MAC
• Fecha de activación
• Cambiar nombre de cámara
• Estado de almacenamiento
• Formatear tarjeta SD
• Modo de grabación: Grabación 24/7 / Grabación
de movimiento / Grabación programada
• Audio: Encender / Apagar
• Noticaciones de la cámara: Encender / Apagar
• Programación de detección de movimiento:
Encender / Apagar
• Sensibilidad de detección de movimiento: Baja /
Media / Alta
• Información de rmware actual
• Actualizar rmware
10
Page 11
Datos técnicos
SAS-IPCAM200 SAS-IPCAM210 SAS-IPCAM220
Sensor de
imagen
SNR ≥ 39 dB ≥ 41 dB ≥ 39 dB
Ángulo de
lente
LEDs IR 1 12 2 (LEDs en serie)
Frecuencia
(IR LED)
Visión
nocturna
Resolución 720p / VGA / QVGA
Velocidad de
fotogramas
Tarjeta de
memoria
Alimentación 5 V ± 0,3 V 5 V ± 0,3 V 12 V ± 0,3 V / 2 A
Consumo 3,2 W 3 W 3,5 W
Temperatura -10 °C ~ 50 °C - 20 °C ~ 70 °C -20 °C ~ 70 °C
Humedad < 90% 90% 100%
Peso 135 g 625 g 340 g
1/4” 720p de
barrido progresivo
CMOS
3,6 mm, F1.4/56.14
850 nm 850 nm 850 nm
5 m 10 m 15 m
30 fps / 24 fps 25 fps 25 fps
Máximo 128 GB Máximo 128 GB Máximo 128 GB
1/4” 720p de
barrido progresivo
CMOS
3,6 mm,
F1.4/56.14
720p / VGA /
QVGA
1/4” 720p de
barrido
progresivo CMOS
3,6 mm,
F1.4/56.14
720p / VGA /
QVGA
Seguridad
• Para reducir el peligro de descarga eléctrica, este producto sólo
debería abrirlo un técnico autorizado cuando necesite
reparación.
• Desconecte el producto de la toma de corriente y de los otros
equipos si ocurriera algún problema.
• Lea el manual detenidamente antes del uso. Conserve el manual
en caso de futura necesidad.
• Utilice el dispositivo únicamente para su uso previsto. No utilice
el dispositivo con una nalidad distinta a la descrita en el
manual.
• No utilice el dispositivo si alguna pieza ha sufrido daños o tiene
un defecto. Si el dispositivo ha sufrido daños o tiene un defecto,
sustitúyalo inmediatamente.
• El dispositivo sólo es apto para uso en interiores. No utilice el
dispositivo en exteriores.
• No exponga el producto al agua ni a la humedad.
Español
Limpieza y mantenimiento
¡Advertencia!
• No utilice disolventes de limpieza ni productos abrasivos.
• No limpie el interior del dispositivo.
• No intente reparar el dispositivo. Si el dispositivo no funciona
correctamente, sustitúyalo por uno nuevo.
• Limpie el exterior del dispositivo con un paño suave
humedecido.
Garantía
Cualquier cambio y/o modicación del producto anulará la garantía.
No podemos asumir ninguna responsabilidad por ningún daño
debido a un uso incorrecto del producto.
Eliminación
• El producto está diseñado para desecharlo por separado en un
punto de recogida adecuado. No se deshaga del producto con
la basura doméstica.
• Para obtener más información, póngase en contacto con el
vendedor o la autoridad local responsable de la eliminación de
residuos.
Documentos
El producto se ha fabricado y distribuido de conformidad con todas
las normativas y directivas relevantes, válidas para todos los estados
de la Unión Europea. El producto también cumple con todas las
especicaciones y normativas en el país en el cual se comercializa.
Previa solicitud, podremos proporcionarle la documentación formal.
La documentación formal incluye, sin limitación, la declaración de
conformidad, la hoja de datos de seguridad del material y el informe
sobre las pruebas realizadas al producto.
Renuncia de responsabilidad legal
Las ilustraciones y las especicaciones podrán sufrir cambios sin
previo aviso. Todas las marcas de logotipos y nombres de productos
constituyen patentes o marcas registradas a nombre de sus titulares
correspondientes, reconocidos como tal.
11
Page 12
SAS-IPCAM2xx
Caméra IP
Description
1. Objectif
2. Bouton de réinitialisation
3. Indicateurs LED
4. Microphone
5. Haut-parleur
6. Logement de carte mémoire (microSD / TransFlash)
7. Entrée CC / Port USB (Micro-USB)
8. Lampe infrarouge
9. Capteur lumineux
10. Prise LAN
11. Support de caméra
12. Antenne Wi-Fi
Usage
1. Téléchargez et installez l'app depuis l'Apple App Store ou
Google Play Store sur votre dispositif mobile en cherchant
"EyeCloud".
2. Insérez la carte mémoire dans le logement prévu.
3. Alimentez la caméra avec le port et le chargeur USB.
4. Lancez l'app "EyeCloud".
5. Créez un nouveau compte.
Intérieur
1. Connectez votre smartphone à votre réseau Wi-Fi préféré.
2. Alimentez la caméra avec le port et le chargeur USB.
3. Sélectionnez "Quick Setup" et suivez les instructions.
4. Saisissez le mot de passeWi-Fi.
5. Tenez votre smartphone à proximité de l'appareil pour l'envoi
des instructions Wi-Fi à l'appareil.
6. Dès que l'appareil a terminé de recevoir les instructions, l'icône
de caméra s'ache. Ajoutez cette caméra au compte.
7. Si l'ajout de la caméra a échoué, sélectionnez "Manually add a
camera". Scannez le code-barres 2D de l'appareil. Saisissez le
mot de passepar défaut : 888888.
Extérieur
1. Connectez votre smartphone à votre réseau Wi-Fi préféré.
2. Alimentez la caméra avec le chargeur.
3. Connectez la caméra au même réseau avec le câble Ethernet.
4. Sélectionnez "Search in LAN network" et conrmez la
connexion.
5. Si l'icône de caméra est déjà achée, ajoutez-la à votre compte.
6. Pour utiliser la caméra sans câble Ethernet, allez à "Device
Management". Saisissez le nom du réseau et le mot de passe.
Déconnectez le câble Ethernet. La caméra redémarre alors
automatiquement puis se connecte au réseau Wi-Fi sélectionné.
Remarque: Pour un premier accès à la caméra, il vous est
demandé de changer de mot de passe. Le mot de passe par
défaut est “888888”.
Interface utilisateur
1. Flux en direct
2. Photos (stockage local)
3. Enregistrement (stockage local)
4. Microphone marche/arrêt
5. Audio marche/arrêt
6. Position préréglée*
7. Passage vertical*
8. Passage horizontal*
9. Passage préréglé*
Remarque: * = uniquement disponible pour la SAS-IPCAM210.
Autres réglages
• État d'appareil
1. Aperçu de caméra
2. Réglages Wi-Fi
3. Réglages
d'enregistrement SD
4. Réglages de mot de
passe
5. Réglages de capteur
6. Micrologiciel
7. Réglages de
luminosité et de
contraste
8. Réglages de lampe IR • Marche / Arrêt
9. Miroir d'image • Horizontal / Vertical
10. Réglages de fréquence • 50 Hz / 60 Hz
• Code UID
• Adresse MAC
• Date d'activation
• Changer nom de caméra
• État de stockage
• Formater carte SD
• Mode d'enregistrement : Enregistrement 24/7 /
Enregistrement de mouvement /Enregistrement
programmé
• Audio : Marche / Arrêt
• Notications de caméra : Marche / Arrêt
• Programme de détection de mouvement : Marche
/ Arrêt
• Sensibilité de détection de mouvement : Bas /
Moyen / Haut
• Information de micrologiciel actuel
• Mise à jour de micrologiciel
12
Page 13

Caractéristiques techniques
SAS-IPCAM200 SAS-IPCAM210 SAS-IPCAM220
Capteur
d’image
SNR ≥ 39 dB ≥ 41 dB ≥ 39 dB
Angle d'objectif
LED IR 1 12 2 (matrice LED)
Fréquence
(LED IR)
Vision nocturne 5 m 10 m 15 m
Résolution
Fréquence
d'images
Carte mémoire Maximum 128 Go Maximum 128 Go Maximum 128 Go
Alimentation 5 V ± 0,3 V 5 V ± 0,3 V 12 V ± 0,3 V / 2 A
Consommation 3,2 W 3 W 3,5 W
Température -10 °C ~ 50 °C - 20 °C ~ 70 °C -20 °C ~ 70 °C
Humidité < 90% 90% 100%
Poids 135 g 625 g 340 g
CMOS 1/4” 720p à
balayage
progressif
3,6 mm,
F1.4/56.14
850 nm 850 nm 850 nm
720p / VGA /
QVGA
30 fps / 24 fps 25 fps 25 fps
CMOS 1/4” 720p à
balayage
progressif
3,6 mm,
F1.4/56.14
720p / VGA /
QVGA
CMOS 1/4” 720p à
balayage
progressif
3,6 mm,
F1.4/56.14
720p / VGA /
QVGA
Sécurité
• Pour réduire le risque de choc électrique, ce produit doit être
ouvert uniquement par un technicien qualié si une réparation
s'impose.
• Débranchez l'appareil et les autres équipements du secteur s'il y
a un problème.
• Lisez attentivement le manuel avant usage. Conservez le
manuel pour toute référence ultérieure.
• Utilisez l'appareil uniquement pour son usage prévu. N'utilisez
pas l'appareil à d'autres ns que celles décrites dans le manuel.
• N'utilisez pas l'appareil si une pièce quelconque est
endommagée ou défectueuse. Si l'appareil est endommagé ou
défectueux, remplacez-le immédiatement.
• L'appareil est conçu exclusivement pour une utilisation en
intérieur. N'utilisez pas l'appareil à l'extérieur.
• N'exposez pas l'appareil à l'eau ou à l'humidité.
Nettoyage et entretien
Avertissement!
• N'utilisez pas de solvants ni de produits abrasifs.
• Ne nettoyez pas l'intérieur de l'appareil.
• Ne tentez pas de réparer l'appareil. Si l'appareil fonctionne mal,
remplacez-le par un neuf.
• Nettoyez l'extérieur de l'appareil avec un chion doux et humide.
Français
Garantie
Toute altération ou modication du produit annule la garantie. Nous
déclinons toute responsabilité envers les dommages dus à une
utilisation incorrecte du produit.
Mise au rebut
• Le produit doit être jeté séparément des ordures ménagères
dans un point de collecte approprié. Ne jetez pas le produit avec
les ordures ménagères ordinaires.
• Pour plus d'informations, contactez le distributeur ou l'autorité
locale responsable de la gestion des déchets.
Documents
Le produit a été fabriqué et fourni en conformité avec toutes les
directives et règlements applicables et en vigueur dans tous les
États membres de l'Union Européenne. Le produit est conforme aux
spécications et à la réglementation en vigueur dans le pays de
vente.
La documentation ocielle est disponible sur demande. La
documentation ocielle inclut notamment la Déclaration de
conformité, la che technique de sécurité et le rapport de test de
produit.
Dégagement de responsabilité
Le design et les caractéristiques techniques sont sujets à
modication sans notication préalable. Tous les logos de marques
et noms de produits sont des marques déposées ou immatriculées
dont leurs détenteurs sont les propriétaires et sont donc reconnues
comme telles dans ce document.
13
Page 14

SAS-IPCAM2xx
Videocamera IP
Descrizione
1. Obiettivo
2. Pulsante di reset
3. Indicatori LED
4. Microfono
5. Altoparlante
6. Slot della scheda di memoria (microSD / TransFlash)
7. Ingresso CC / Porta USB (Micro USB)
8. Luce a infrarossi
9. Sensore luminoso
10. Socket LAN
11. Supporto per videocamera
12. Antenna Wi-Fi
Uso
1. Scaricare e installare l'app da Apple App Store o Google Play
Store sul dispositivo mobile cercando “EyeCloud“.
2. Inserire una scheda di memoria nell'apposito slot.
3. Alimentare la videocamera utilizzando la porta USB e un
caricabatterie.
4. Avviare l’app “EyeCloud”.
5. Creare un nuovo account.
Interno
1. Collegare lo smartphone alla rete Wi-Fi preferita.
2. Alimentare la videocamera utilizzando la porta USB e un
caricabatterie.
3. Selezionare “Quick Setup” e seguire le istruzioni.
4. Immettere la password Wi-Fi:
5. Mantenere lo smartphone vicino al dispositivo per inviare le
istruzioni al dispositivo tramite Wi-Fi.
6. Quando il dispositivo ha completato la ricezione delle istruzioni,
compare l’icona della videocamera. Aggiungere questa
videocamera all’account.
7. Se la videocamera non viene aggiunta correttamente,
selezionare “Manually add a camera”. Eseguire la scansione del
codice a barre 2D del dispositivo. Immettere la password
predenita: 888888.
Esterno
1. Collegare lo smartphone alla rete Wi-Fi preferita.
2. Alimentare la videocamera utilizzando il caricabatterie.
3. Collegare la videocamera alla stessa rete usando il cavo Ethernet.
4. Selezionare “Search in LAN network” e confermare la connessione.
5. Quando compare l’icona della videocamera, aggiungerla
all’account.
6. Per usare questa videocamera senza un cavo Ethernet, entrare
in “Device Management”. Immettere il nome della rete e la
password. Scollegando il cavo Ethernet, la videocamera si
riavvia automaticamente e si collega alla rete Wi-Fi selezionata.
Nota: Quando si accede alla videocamera per la prima volta,
all’utente viene richiesto di cambiare la password. La password
pre-impostata è "888888".
Interfaccia utente
1. Feed in tempo reale
2. Foto (archiviate in locale)
3. Record (archiviati in locale)
4. Attivazione/Disattivazione del microfono
5. Attivazione/Disattivazione dell’audio
6. Posizione predenita*
7. Movimento verticale*
8. Movimento orizzontale*
9. Movimento preimpostato*
Nota: * = disponibile solo per SAS-IPCAM210.
Altre impostazioni
• Stato del dispositivo
1. Panoramica della
videocamera
2. Impostazioni Wi-Fi
3. Impostazioni di
registrazione su SD
4. Impostazione della
password
5. Impostazione dei
sensori
6. Firmware
7. Impostazioni di
luminosità e contrasto
8. Impostazione della
luce a infrarossi
9. Immagine speculare • Orizzontale / Verticale
10. Impostazioni di
frequenza
14
• Codice UID
• MAC Address
• Data di attivazione
• Cambio del nome della videocamera
• Stato dello storage
• Formattazione scheda SD
• Modalità di registrazione: Registrazione 24/7 /
Registrazione del movimento / Registrazione
pianicata
• Audio: On / O
• Notiche della videocamera: On / O
• Pianicazione del rilevamento di movimento: On /
O
• Sensibilità del rilevamento di movimento: Bassa /
Media / Alta
• Informazioni sul rmware corrente
• Aggiornamento del rmware
• On / O
• 50 Hz / 60 Hz
Page 15

Dati tecnici
SAS-IPCAM200 SAS-IPCAM210 SAS-IPCAM220
Sensore
immagine
SNR ≥ 39 dB ≥ 41 dB ≥ 39 dB
Apertura
dell’obiettivo
LED IR 1 12 2 (LED array)
Frequenza
(LED IR)
Visione
notturna
Risoluzione 720p / VGA / QVGA
Frequenza
fotogrammi
Scheda di
memoria
Alimentazione 5 V ± 0,3 V 5 V ± 0,3 V 12 V ± 0,3 V / 2 A
Consumo 3,2 W 3 W 3,5 W
Temperatura -10 °C ~ 50 °C - 20 °C ~ 70 °C -20 °C ~ 70 °C
Umidità < 90% 90% 100%
Peso 135 g 625 g 340 g
Scansione
progressiva CMOS
1/4” 720p
3,6 mm, F1.4/56.14
850 nm 850 nm 850 nm
5 m 10 m 15 m
30 fps / 24 fps 25 fps 25 fps
Massimo 128 GB Massimo 128 GB Massimo 128 GB
Scansione
progressiva CMOS
1/4” 720p
3,6 mm,
F1.4/56.14
720p / VGA /
QVGA
Scansione
progressiva CMOS
1/4” 720p
3,6 mm,
F1.4/56.14
720p / VGA /
QVGA
Sicurezza
• Per ridurre il rischio di scosse elettriche, il presente prodotto
deve essere aperto solo da un tecnico autorizzato, nel caso sia
necessario ripararlo.
• Scollegare il prodotto dall’alimentazione e da altri apparecchi se
dovesse esserci un problema.
• Leggere il manuale con attenzione prima dell'uso. Conservare il
manuale per riferimenti futuri.
• Utilizzare il dispositivo solo per gli scopi previsti. Non utilizzare il
dispositivo per scopi diversi da quelli descritti nel manuale.
• Non utilizzare il dispositivo se presenta parti difettose. Se il
dispositivo è danneggiato o difettoso, sostituirlo immediatamente.
• Questo dispositivo è adatto solo per uso in ambienti interni.
Non utilizzare il dispositivo all'aperto.
• Non esporre il prodotto ad acqua o umidità.
Italiano
Pulizia e manutenzione
Attenzione!
• Non utilizzare solventi detergenti o abrasivi.
• Non pulire l'interno del dispositivo.
• Non cercare di riparare il dispositivo. Se il dispositivo non
funziona correttamente, sostituirlo con uno nuovo.
• Pulire l'esterno del dispositivo con un panno morbido e umido.
Garanzia
Qualsiasi modica e/o cambiamento al prodotto annullerà la
garanzia. Si declina ogni responsabilità per danni causati da un uso
non corretto di questo prodotto.
Smaltimento
• Questo prodotto è soggetto a raccolta dierenziata nei punti di
raccolta appropriati. Non smaltire il prodotto con i riuti
domestici.
• Per maggiori informazioni, contattare il rivenditore o le autorità
locali responsabili per la gestione dei riuti.
Documenti
Il presente prodotto è stato realizzato e fornito in conformità a tutte
le norme e le direttive vigenti, con validità in tutti gli stati membri
della Comunità Europea. Il presente prodotto è conforme alle
speciche e alle normative applicabili nel paese in cui è stato
venduto.
La documentazione uciale è disponibile su richiesta. Detta
documentazione uciale comprende, a titolo esemplicativo, la
Dichiarazione di conformità, la scheda tecnica di sicurezza dei
materiali e il rapporto dei collaudi del prodotto.
Clausola esonerativa di responsabilità
Il design e le caratteristiche tecniche sono soggetti a modica senza
necessità di preavviso. Tutti i marchi, loghi e nomi dei prodotti sono
marchi commerciali o registrati dei rispettivi titolari e sono
riconosciuti come tali in questo documento.
15
Page 16

SAS-IPCAM2xx
Câmara IP
Descrição
1. Objetiva
2. Botão de repor
3. Indicadores LED
4. Microfone
5. Altifalante
6. Ranhura para cartão de memória (microSD / TransFlash)
7. Entrada CC / porta USB (Micro USB)
8. Luz de IV
9. Sensor de luz
10. Tomada LAN
11. Suporte da câmara
12. Antena Wi-Fi
Utilização
1. Transra e instale a aplicação a partir da Apple App Store ou da
Google Play Store no seu dispositivo móvel procurando
“EyeCloud”.
2. Insira o cartão de memória na respetiva ranhura.
3. Ligue a câmara utilizando a porta USB e o carregador.
4. Inicie a aplicação “EyeCloud”.
5. Crie uma nova conta.
Interior
1. Ligue o seu smartphone à rede Wi-Fi da sua preferência.
2. Ligue a câmara utilizando a porta USB e o carregador.
3. Selecione “Quick Setup” e siga as instruções.
4. Introduza a palavra-passe da rede Wi-Fi.
5. Mantenha o seu smartphone próximo do dispositivo para enviar
instruções Wi-Fi para o dispositivo.
6. Assim que o dispositivo terminar de receber instruções, aparece
o ícone da câmara. Adicione esta câmara à conta.
7. Se a câmara não for adicionada com êxito, selecione “Manually
add a camera”. Digitalize o código de barras 2D do dispositivo.
Introduza a palavra-passe predenida: 888888.
Exterior
1. Ligue o seu smartphone à rede Wi-Fi da sua preferência.
2. Ligue a câmara utilizando o carregador.
3. Ligue a câmara à mesma rede utilizando o cabo Ethernet.
4. Selecione “Search in LAN network” e conrme a ligação.
5. Assim que aparecer o ícone da câmara, adicione-o à sua conta.
6. Para utilizar esta câmara sem um cabo Ethernet, aceda a “Device
Management”. Introduza o nome e a palavra-passe da rede.
Desligue o cabo Ethernet e a câmara reiniciar-se-á
automaticamente e ligar-se-á à rede Wi-Fi selecionada.
Nota: Ao aceder à câmara pela primeira vez, ser-lhe-á pedido
que altere a palavra-passe. A palavra-passe predenida é
“888888”.
Interface do utilizador
1. Transmissão direta
2. Fotograas (armazenadas localmente)
3. Gravação (armazenada localmente)
4. Ligar/desligar microfone
5. Ligar/desligar áudio
6. Posição predenida*
7. Navegação vertical*
8. Navegação horizontal*
9. Navegação predenida*
Nota: * = disponível apenas para a SAS-IPCAM210.
Outras denições
• Estado do dispositivo
1. Descrição geral da
câmara
2. Denições de Wi-Fi
3. Predenições de
gravação em SD
4. Denições de
palavra-passe
5. Denições do sensor
6. Firmware
7. Denições de brilho e
contraste
8. Denições de luz de IV • Ligado / Desligado
9. Espelhamento de
imagem
10. Denições de
frequência
• Código UID
• Endereço MAC
• Data de ativação
• Alterar nome da câmara
• Estado de armazenamento
• Formatar cartão SD
• Modo de gravação: Gravação 24/7 / Gravação por
movimento / Gravação agendada
• Áudio: Ligado / Desligado
• Noticações da câmara: Ligado / Desligado
• Agendar deteção de movimento: Ligado /
Desligado
• Sensibilidade de deteção de movimento: Baixa /
Média / Alta
• Informações atuais do rmware
• Atualizar rmware
• Horizontal / Vertical
• 50 Hz / 60 Hz
16
Page 17

Dados técnicos
SAS-IPCAM200 SAS-IPCAM210 SAS-IPCAM220
Sensor de
imagem
SNR ≥ 39 dB ≥ 41 dB ≥ 39 dB
Ângulo da
lente
LEDs IV 1 12 2 (LEDs de matriz)
Frequência
(LED IV)
Visão noturna 5 m 10 m 15 m
Resolução 720p / VGA / QVGA
Taxa de
fotogramas
Cartão de
memória
Alimentação 5 V ± 0,3 V 5 V ± 0,3 V 12 V ± 0,3 V / 2 A
Consumo 3,2 W 3 W 3,5 W
Temperatura -10 °C ~ 50 °C - 20 °C ~ 70 °C -20 °C ~ 70 °C
Humidade < 90% 90% 100%
Peso 135 g 625 g 340 g
CMOS de varredura
progressiva, 1/4”
720p
3,6 mm, F1.4/56.14
850 nm 850 nm 850 nm
30 fps / 24 fps 25 fps 25 fps
Máximo 128 GB Máximo 128 GB Máximo 128 GB
CMOS de
varredura
progressiva, 1/4”
720p
3,6 mm,
F1.4/56.14
720p / VGA /
QVGA
CMOS de
varredura
progressiva, 1/4”
720p
3,6 mm,
F1.4/56.14
720p / VGA /
QVGA
Segurança
• Quando necessitar de reparação e para reduzir o risco de
choque elétrico, este produto deve apenas ser aberto por um
técnico autorizado.
• Desligue o produto da tomada de alimentação e outro
equipamento se ocorrer um problema.
• Leia atentamente o manual de instruções antes de utilizar.
Guarde o manual para consulta futura.
• Utilize o dispositivo apenas para a nalidade a que se destina.
Não utilize o dispositivo para outras nalidades além das
descritas no manual.
• Não utilize o dispositivo caso tenha alguma peça danicada ou
com defeito. Se o dispositivo estiver danicado ou tenha
defeito, substitua imediatamente o dispositivo.
• O dispositivo destina-se apenas a utilização no interior. Não
utilize o dispositivo no exterior.
• Não exponha o produto à água ou humidade.
Português
Limpeza e manutenção
Aviso!
• Não utilize solventes de limpeza ou produtos abrasivos.
• Não limpe o interior do dispositivo.
• Não tente reparar o dispositivo. Se o dispositivo não funcionar
corretamente, substitua-o por um dispositivo novo.
• Limpe o exterior do dispositivo utilizando um pano húmido
macio.
Garantia
Quaisquer alterações e/ou modicações no produto anularão a
garantia. Não nos podemos responsabilizar por qualquer dano
causado pelo uso incorrecto do produto.
Eliminação
• O produto deve ser eliminado separadamente num ponto de
recolha apropriado. Não elimine este produto juntamente com
o lixo doméstico.
• Para obter mais informações, contacte o revendedor ou o
organismo local responsável pela gestão de resíduos.
Documentos
O produto foi fabricado e fornecido em conformidade com todos os
regulamentos e directivas relevantes, válidos para todos os
Estados-Membros da União Europeia. Além disso, está em
conformidade com todas as especicações e regulamentos
aplicáveis no país de venda.
Mediante pedido, será disponibilizada documentação formal. A
documentação formal inclui, entre outros, a Declaração de
Conformidade, a Ficha de Dados de Segurança e o relatório de teste
do produto.
Limitação de responsabilidade
Os designs e as especicações estão sujeitos a alteração sem aviso.
Todos os logótipos, marcas e nomes de produtos são marcas
comerciais ou marcas comerciais registadas dos respetivos
proprietários e são reconhecidas como tal neste documento.
17
Page 18

SAS-IPCAM2xx
IP-kamera
Beskrivelse
1. Linse
2. Nulstillingsknap
3. LED-indikatorer
4. Mikrofon
5. Højttaler
6. Sprække til hukommelseskort (microSD / TransFlash)
7. DC-indgang / USB-port (Mikro-USB)
8. Infrarødt lys
9. Lyssensor
10. LAN-stikkontakt
11. Kamerastativ
12. Wi--antenne
Anvendelse
1. Hent og installer app'en fra Apple App Store eller Google Play
Store på din mobilenhed ved at søge på ”EyeCloud”.
2. Sæt hukommelseskortet i sprækken til hukommelseskort.
3. Strømfør kameraet vha. en USB-forbindelse og en biloplader.
4. Start app'en ”EyeCloud”.
5. Opret en ny konto.
Indendørs
1. Forbind din smarttelefon til det foretrukne wi--netværk.
2. Strømfør kameraet vha. en USB-forbindelse og en biloplader.
3. Vælg ”Quick Setup”, og følg instruktionerne.
4. Indtast wi--kodeordet.
5. Hold din smarttelefon tæt ind mod enheden for at sende
wi--instruktionerne til enheden.
6. Når enheden er færdig med at modtage instruktionerne, vises
kameraikonet. Tilføj dette kamera til kontoen.
7. Hvis det ikke lykkes at tilføje kameraet, vælges ”Manually add a
camera” for manuel tilføjelse af kameraet. Scan 2D-stregkoden
på enheden. Indtast standardkodeord: 888888.
Udendørs
1. Forbind din smarttelefon til det foretrukne wi--netværk.
2. Strømfør kameraet med opladeren.
3. Tilslut kameraet til det samme netværk med ethernetkablet.
4. Vælg ”Search in LAN network”, og bekræft forbindelsen.
5. Når kamera ikonet viser sig, tilføjer du det til din konto.
6. For at bruge kameraet uden ethernetkabel skal man gå til
”Device Management”. Indtast netværksnavnet og
adgangskoden. Tag ethernetkablet ud, og kameraet vil
automatisk genstarte og forbinde sig til det valgte
wi--netværk.
Bemærk: Når man tilgår kameraet første gang, bliver man bedt
om at ændre adgangskoden. Standard adgangskode er
“888888”.
Brugergrænseade
1. Direkte billede
2. Billeder (lagret lokalt)
3. Optagelse (lagret lokalt)
4. Mikrofon til/fra
5. Lyd til/fra
6. Forudindstillet position*
7. Lodret bevægelse*
8. Vandret bevægelse*
9. Forudindstillet bevægelse*
Bemærk: * = kun tilgængelig for SAS-IPCAM210.
Andre indstillinger
• Enhedsstatus
1. Oversigt over
kameraet
2. Wi--indstillinger
3. SDoptagelsesindstillinger
4. Indstillinger for
adgangskode
5. Indstillinger for
sensorer
6. Firmware
7. Indstillinger for
lysstyrke og kontrast
8. Indstillinger for
infrarødt lys
9. Spejling af billede • Vandret / lodret
10. Frekvensindstillinger • 50 Hz / 60 Hz
• UID-kode
• MAC-adresse
• Aktiveringsdato
• Skift kameraets navn
• Lagerstatus
• Formatering af SD-kortet
• Optage-tilstand: Optagelse 24/7 / Optagelse af
bevægelse / Planlagt optagelse
• Lyd: Tænd / sluk
• Kamera-beskeder: Tænd / sluk
• Tidsplan for bevægelsesdetektion: Tænd / sluk
• Følsomheden af bevægelsesdetektion: Lav /
middel / høj
• Aktuelle rmware-oplysninger
• Opdater rmware
• Tænd / sluk
18
Page 19

Tekniske data
SAS-IPCAM200 SAS-IPCAM210 SAS-IPCAM220
Billedsensor
SNR ≥ 39 dB ≥ 41 dB ≥ 39 dB
Linsevinkel
Infrarøde LED-lys 1 12 2 (række-LED-lys)
Frekvens
(Infrarød LED)
Nattesyn 5 m 10 m 15 m
Opløsning
Rammehastighed 30 fps / 24 fps 25 fps 25 fps
Hukommelseskort
Strømforsyning 5 V ± 0,3 V 5 V ± 0,3 V 12 V ± 0,3 V / 2 A
Forbrug 3,2 W 3 W 3,5 W
Temperatur -10 °C ~ 50 °C -20 °C ~ 70 °C -20 °C ~ 70 °C
Luftfugtighed < 90 % 90 % 100 %
Vægt 135 g 625 g 340 g
1/4” 720p
progressiv scan
CMOS
3,6 mm,
F1.4/56.14
850 nm 850 nm 850 nm
720p / VGA /
QVGA
Maksimum 128 GBMaksimum 128 GBMaksimum 128
1/4” 720p
progressiv scan
CMOS
3,6 mm,
F1.4/56.14
720p / VGA /
QVGA
1/4” 720p
progressiv scan
CMOS
3,6 mm,
F1.4/56.14
720p / VGA /
QVGA
GB
Sikkerhed
• For at nedsætte risikoen for elektrisk stød, må dette produkt kun
åbnes af en autoriseret tekniker, når service er nødvendig.
• Tag produktet ud af stikkontakten og andet udstyr, hvis der
opstår et problem.
• Læs vejledningen omhyggeligt før brug. Gem vejledningen til
fremtidig brug.
• Brug kun enheden til de tilsigtede formål. Brug ikke enheden til
andre formål end dem, som er beskrevet i vejledningen.
• Brug ikke enheden, hvis den har beskadigede eller defekte dele.
Hvis enheden er beskadiget eller defekt, skal den omgående
udskiftes.
• Enheden er kun beregnet til indendørs brug. Brug ikke enheden
udendørs.
• Udsæt ikke produktet for vand eller fugt.
Rengøring og vedligeholdelse
Advarsel!
• Brug ikke opløsningsmidler eller slibende rengøringsmidler.
• Rengør ikke enheden indvendigt.
• Forsøg ikke at reparere enheden. Hvis enheden ikke fungerer
korrekt, skal den udskiftes med en ny enhed.
• Rengør enheden udvendigt med en blød, fugtig klud.
Dansk
Garanti
Ændringer og/eller modikationer af produktet vil medføre bortfald
af garantien. Vi fralægger os ethvert ansvar for skader forårsaget på
grund af forkert brug af produktet.
Bortskaelse
• Produktet skal aeveres på et passende indsamlingspunkt.
Bortskaf ikke produktet sammen med husholdningsaald.
• For mere information, kontakt forhandleren eller den lokale
myndighed der er ansvarlig for kontrol af aald.
Dokumenter
Produktet er fremstillet og leveres i overensstemmelse med alle
relevante forordninger og direktiver, der er gældende for alle EUs
medlemsstater. Produktet overholder alle gældende specikationer
og forskrifter i de lande, hvor produktet sælges.
Formel dokumentation kan fremlægges på forlangende. Den
formelle dokumentation omfatter, men er ikke begrænset til,
konformitetserklæringen, sikkerhedsdatablad for materialet og
rapporten fra produkttesten.
Ansvarsfraskrivelse
Design og specikationer kan ændres uden varsel. Alle bomærker,
mærker og produktnavne er varemærker eller registrerede
varemærker tilhørende deres respektive ejere og anses herved som
sådan.
19
Page 20

SAS-IPCAM2xx
IP-kamera
Beskrivelse
1. Linse
2. Nullstillingsknapp
3. LED-indikatorer
4. Mikrofon
5. Høyttaler
6. Minnekortspor (microSD / TransFlash)
7. Strøminngang / USB port (Micro USB)
8. Infrarødt lys
9. Lyssensor
10. LAN-kontakt
11. Kamerastativ
12. Wi--antenne
Bruk
1. Last ned og installer appen fra Apple App Store eller Google
Play Store på din mobile enhet, ved å søke etter "EyeCloud".
2. Sett inn et minnekort i minnekortsporet.
3. Sett strøm på kameraet med en USB-kontakt og billader.
4. Start "EyeCloud"-appen.
5. Opprett en ny konto.
Innendørs
1. Koble smarttelefonen til ønsket Wi-Fi-nettverk.
2. Sett strøm på kameraet med en USB-kontakt og billader.
3. Velg "Quick Setup" og følg instruksjonene.
4. Tast inn Wi-Fi-passordet.
5. Hold smarttelefonen i nærheten av enheten for å overføre
Wi-Fi-instruksjonene.
6. Når enheten har mottatt instruksjonene, vil kameraikonet vises.
Legg til dette kameraet til i kontoen.
7. Hvis kameraet ikke kan legges til, velg "Manually add a camera".
Scan 2D-strekkoden på enheten. Tast inn standard passord:
888888.
Utendørs
1. Koble smarttelefonen til ønsket Wi-Fi-nettverk.
2. Sett strøm på kameraet med laderen.
3. Koble kameraet til det samme nettverket med en
nettverkskabel.
4. Velg "Search in LAN network" og bekreft tilkoblingen.
5. Når kameraikonet vises, legg det til i kontoen din.
6. For å bruke dette kameraet uten en nettverkskabel, gå til
"Device Management". Tats inn nettverksnavn og passord. Koble
fra nettverkskabelen, og kameraet starter automatisk og kobler
seg til det valgte trådløse nettverket.
Merk: Når du bruker kameraet for første gang, blir du bedt om å
endre passordet. Standardpassordet er “888888”.
Brukergrensesnitt
1. Direktebilder
2. Bilder (lagret lokalt)
3. Opptak (lagret lokalt)
4. Mikrofon på/av
5. Lyd på/av
6. Forhåndsinnstilt posisjon*
7. Vertikal bevegelse*
8. Horisontal bevegelse*
9. Forhåndsinnstilt bevegelse*
Merk: *kun tilgjengelig på SAS-IPCAM210.
Andre innstillinger
• Enhetsstatus
1. Kameraoversikt
2. Wi-Fi-innstillinger
3. SDopptaksinnstillinger
4. Passordinnstillinger
5. Sensorinnstillinger
6. Firmware
7. Lysstyrke og kontrast
8. Innstillinger for
infrarødt lys
9. Bildespeiling • Horisontal/vertik al
10. Frekvensinnstillinger • 50 Hz / 60 Hz
• UID-kode
• MAC-adresse
• Aktiveringsdato
• Endre kameranavn
• Lagringsstatus
• Formatere minnekort
• Opptaksmodus: 24/7-opptak / bevegelsesopptak
/ planlagt opptak
• Lyd: På/Av
• Kameravarsler: På/Av
• Planlagt bevegelsesdeteksjon: På/Av
• Følsomhet for bevegelsesdeteksjon: Lav / Middels
/ Høy
• Gjeldende rmware-informasjon
• Oppdatere rmware
• På/Av
20
Page 21

Tekniske data
SAS-IPCAM200 SAS-IPCAM210 SAS-IPCAM220
Bildesensor
SNR ≥ 39 dB ≥ 41 dB ≥ 39 dB
Linsevinkel 3,6 mm, F1.4/56.14
IR-lamper 1 12 2 (LED-grupper)
Frekvens
(IR-LED)
Night vision 5 m 10 m 15 m
Oppløsning 720p / VGA / QVGA
Bildefrekvens 30 bps / 24 bps 25 bps 25 bps
Minnekort Maksimalt 128 GB Maksimalt 128 GB Maksimalt 128 GB
Strøm 5 V ± 0,3 V 5 V ± 0,3 V 12 V ± 0,3 V / 2 A
Forbruk 3,2 W 3 W 3,5 W
Temperatur -10 °C ~ 50 °C - 20 °C ~ 70 °C -20 °C ~ 70 °C
Luftfuktighet < 90% 90% 100%
Vekt 135 g 625 g 340 g
1/4" 720p
progressiv scan
CMOS
850 nm 850 nm 850 nm
1/4" 720p
progressiv scan
CMOS
3,6 mm,
F1.4/56.14
720p / VGA /
QVGA
1/4" 720p
progressiv scan
CMOS
3,6 mm,
F1.4/56.14
720p / VGA /
QVGA
Sikkerhet
• For å redusere faren for strømstøt, skal dette produktet bare
åpnes av en autorisert tekniker når vedlikehold er nødvendig.
• Koble produktet fra strømmen og annet utstyr dersom et
problem oppstår.
• Les bruksanvisningen nøye før bruk. Oppbevar
bruksanvisningen for fremtidig bruk.
• Bruk bare enheten for det tiltenkte formålet. Ikke bruk enheten
til andre formål enn det som er beskrevet i bruksanvisningen.
• Ikke bruk enheten hvis noen del er skadet eller defekt. Enheten
må erstattes umiddelbart hvis den er skadet eller defekt.
• Enheten er kun ment for innendørs bruk. Ikke bruk enheten
utendørs.
• Ikke utsett produktet for vann eller fuktighet.
Rengjøring og vedlikehold
Advarsel!
• Ikke bruk rensemidler eller skuremidler.
• Ikke rengjør innsiden av enheten.
• Ikke prøv å reparere enheten. Hvis enheten ikke fungerer som
den skal, erstatt den med en ny enhet.
• Rengjør utsiden av enheten med en myk, fuktig klut.
Norsk
Garanti
Eventuelle endringer og/eller modikasjoner av produkter
opphever garantien. Vi tar ikke ansvar for skade som forårsakes av
ukorrekt bruk av produktet.
Avhending
• Produktet må avhendes på egnede oppsamlingssteder. Du må
ikke avhende produktet som husholdningsavfall.
• Ta kontakt med leverandøren eller lokale myndigheter hvis du
ønsker mer informasjon om avhending.
Dokumenter
Produktet har blitt produsert og levert i henhold til alle relevante
bestemmelser og direktiver, gyldig for alle medlemsstater i EU.
Produktet overholder også alle gjeldende spesikasjoner og
bestemmelser i landet det selges i.
Formell dokumentasjon er tilgjengelig på forespørsel. Den formelle
dokumentasjon inkluderer, men er ikke begrenset til
samsvarserklæringen, HMS-databladet og produkttestrapporten.
Ansvarsfraskrivelse
Utforming og spesikasjoner kan endres uten ytterligere varsel. Alle
logoer, merker og produktnavn er varemerker eller registrerte
varemerker til de respektive eierne, og skal behandles som dette.
21
Page 22

SAS-IPCAM2xx
IP-kamera
Beskrivning
1. Lins
2. Återställningsknapp
3. LED-indikator
4. Mikrofon
5. Högtalare
6. Minneskortsplats (microSD / TransFlash)
7. DC-ingång / USB-port (Micro USB)
8. IR-lampa
9. Ljussensor
10. Nätverksuttag
11. Kamerastativ
12. Wi-Fi-antenn
Användning
1. Ladda ner och installera appen från Apple App Store eller
Google Play Store på din mobila enhet genom att söka efter
“EyeCloud”.
2. Sätt minneskortet i minneskortsplatsen.
3. Driv enheten via USB-porten och laddaren.
4. Starta appen “EyeCloud”.
5. Skapa ett nytt konto.
Inomhus
1. Anslut din smartphone till önskat Wi-Fi-nätverk.
2. Driv enheten via USB-porten och laddaren.
3. Välj “Quick Setup” och följ instruktionerna.
4. Mata in Wi-Fi-lösenordet.
5. Håll din smartphone i närheten av enheten för att skicka
Wi-Fi-instruktioner till enheten.
6. När enheten har tagit emot instruktionerna, kommer
kamerasymbolen att visas. Lägg till kameran i kontot.
7. Om kameran inte läggs till korrekt, väljer du “Manually add a
camera”. Skanna streckkoden på enheten. Mata in
standardlösenordet: 888888.
Utomhus
1. Anslut din smartphone till önskat Wi-Fi-nätverk.
2. Strömförsörj kameran med hjälp av laddaren.
3. Anslut kameran till samma nätverk med hjälp av
nätverkskabeln.
4. Välj ”Search in LAN network” och bekräfta anslutningen.
5. När kamerasymbolen visas lägger du till den i ditt konto.
6. För att använda kameran utan en nätverkskabel, går du till
“Device Management”. Ange nätverksnamnet och lösenordet.
Koppla ur nätverkskabeln så kommer kameran att startas om
automatiskt och ansluta till det angivna Wi-Fi-nätverket.
OBS: När du begär åtkomst till kameran för första gången,
kommer du att få en fråga om att byta lösenordet. Förinställt
lösenord är "888888".
Användargränssnitt
1. Livebild
2. Foton (lagras lokalt)
3. Inspelning (lagras lokalt)
4. Mikrofon på/av
5. Ljud på/av
6. Förinställd position*
7. Vertikal färd*
8. Horisontell färd*
9. Förinställd färd*
OBS: * = endast tillgängligt för SAS-IPCAM210.
Andra inställningar
• Enhetsstatus
1. Kameraöversikt
2. Wi-Fi-inställningar
3. Inställningar för
inspelning till SD-kort
4. Lösenordsinställningar
5. Sensorinställningar
6. Firmware
7. Inställningar för
ljusstyrka och kontrast
8. Inställningar för
IR-lampa
9. Spegelvändning av
bild
10. Inställningar för
frekvens
• UID-kod
• MAC-Adress
• Aktiveringsdatum
• Ändra kameranamn
• Lagringsstatus
• Formatera SD-kort
• Inspelningsläge: Inspelning dygnet runt /
Rörelseinspelning / Schemalagd inspelning
• Ljud: På / Av
• Kamerameddelanden: På / Av
• Schema för rörelsedetektering: På / Av
• Känslighet för rörelsedetektering: Låg / Medel /
Hög
• Aktuell rmwareinformation
• Uppdatera rmware
• På / Av
• Horisontellt / Vertikalt
• 50 Hz / 60 Hz
22
Page 23

Tekniska data
SAS-IPCAM200 SAS-IPCAM210 SAS-IPCAM220
Bildsensor
SNR ≥ 39 dB ≥ 41 dB ≥ 39 dB
Linsvinkel 3,6 mm, F1.4/56.14
IR-lysdioder 1 12 2 (matris LED)
Frekvens
(IR-LED)
Mörkervisning 5 m 10 m 15 m
Upplösning 720p / VGA / QVGA
Bildfrekvens 30 fps / 24 fps 25 fps 25 fps
Minneskort Max 128 GB Max 128 GB Max 128 GB
Ström 5 V ± 0,3 V 5 V ± 0,3 V 12 V ± 0,3 V / 2 A
Förbrukning 3,2 W 3 W 3,5 W
Temperatur -10 °C ~ 50 °C - 20 °C ~ 70 °C -20 °C ~ 70 °C
Fuktighet < 90% 90% 100%
Vikt 135 g 625 g 340 g
1/4” 720p
progressiv
skanning CMOS
850 nm 850 nm 850 nm
1/4” 720p
progressiv
skanning CMOS
3,6 mm,
F1.4/56.14
720p / VGA /
QVGA
1/4” 720p
progressiv
skanning CMOS
3,6 mm,
F1.4/56.14
720p / VGA /
QVGA
Säkerhet
• För att minska risken för elektriska stötar bör denna produkt
endast öppnas av behörig tekniker när service behövs.
• Dra ut nätkabeln från vägguttaget och koppla ur all annan
utrustning om något problem skulle uppstå.
• Läs bruksanvisningen noga innan användning. Behåll
bruksanvisningen för att kunna använda den igen.
• Använd endast enheten för dess avsedda syfte. Använd inte
enheten till andra ändamål än dem som beskrivs i denna
bruksanvisning.
• Använd inte enheten om någon del är skadad eller felaktig. Om
enheten är skadad eller felaktig ska den bytas ut omedelbart.
• Enheten är bara avsedd för inomhusanvändning. Använd inte
enheten utomhus.
• Utsätt inte produkten för vatten eller fukt.
Rengöring och underhåll
Varning!
• Använd inga rengöringsmedel som innehåller lösningsmedel
eller slipmedel.
• Rengör inte enhetens insida.
• Försök inte att reparera enheten. Byt ut enheten mot en ny om
den inte fungerar som den ska.
• Rengör enhetens utsida med en mjuk fuktad trasa.
Svenska
Garanti
Alla ändringar och/eller modieringar på produkten gör garantin
ogiltig. Vi kan inte ta något ansvar för skador som orsakats av
felaktig användning av denna produkt.
Kassering
• Produkten är avsedd för separat insamling vid en lämplig
återvinningscentral. Släng inte denna produkt bland vanligt
hushållsavfall.
• För mer information, kontakta återförsäljaren eller lokal
myndighet med ansvar för avfallshantering.
Dokument
Produkten har tillverkats och levereras i enlighet med alla relevanta
regler och direktiv som gäller för alla medlemsstater inom
Europeiska unionen. Den uppfyller även alla tillämpliga
specikationer och regler i försäljningslandet.
Formell dokumentation nns att beställa på begäran. Den formella
dokumentationen inbegriper, men är inte begränsad till, försäkran
om överensstämmelse, säkerhetsdatablad och testrapporten.
Friskrivningsklausul
Utseende och specikationer kan komma att ändras utan
föregående meddelande. Alla logotyper och produktnamn är
varumärken eller registrerade varumärken som tillhör sina ägare och
är härmed erkända som sådana.
23
Page 24

SAS-IPCAM2xx
IP-kamera
Kuvaus
1. Objektiivi
2. Nollauspainike
3. LED-merkkivalot
4. Mikrofoni
5. Kovaääninen
6. Muistikorttipaikka (mikroSD / TransFlash)
7. DC-tulo / USB-liitin (mikro-USB)
8. Infrapunavalo
9. Valoanturi
10. LAN-liitin
11. Kamerajalusta
12. Wi-Fi-antenni
Käyttö
1. Lataa ja asenna sovellus Apple App Storesta tai Google Play
Storesta mobiililaitteeseesi etsimällä hakusanalla "EyeCloud".
2. Työnnä muistikortti muistikorttipaikkaan.
3. Käynnistä kamera käyttämällä USB-liitintä ja latauslaitetta.
4. Käynnistä “EyeCloud".-sovellus.
5. Luo uusi tili.
Sisätiloissa
1. Liitä älypuhelimesi haluttuun Wi-Fi-verkkoon.
2. Käynnistä kamera käyttämällä USB-liitintä ja latauslaitetta.
3. Valitse “Quick Setup” ja noudata ohjeita.
4. Anna Wi-Fi-salasana.
5. Pidä älypuhelintasi lähellä laitetta Wi-Fi-ohjeiden lähettämiseksi
laitteeseen.
6. Laitteen vastaanotettua ohjeet näkyviin tulee kamerakuvake.
Lisää tämä kamera tiliin.
7. Jos kameran lisäys ei onnistu, paina “Manually add a camera“.
Skannaa laitteessa oleva 2D-viivakoodi. Anna oletussalasana:
888888.
Ulkona
1. Liitä älypuhelimesi haluttuun Wi-Fi-verkkoon.
2. Käynnistä kamera käyttämällä latauslaitetta.
3. Liitä kamera samaan verkkoon Ethernet-kaapelilla.
4. Paina “Search in LAN network” ja vahvista yhteys.
5. Kamerakuvakkeen tullessa näkyviin, lisää se tiliisi.
6. Katso kameran käyttö ilman Ethernet-kaapelia “Device
Management” kohdasta. Anna verkon nimi ja salasana. Irrota
Ethernet-kaapeli ja kamera käynnistyy automaattisesti ja
yhdistyy valittuun Wi-Fi-verkkoon.
Huomaa: Kun menet ensimmäisen kerran kameraan, sinua
pyydetään vaihtamaan salasana. Oletussalasana on “888888”.
Käyttäjäliitäntä
1. Live-syöttö
2. Valokuvat (tallennettu paikallisesti)
3. Tallennus (tallennettu paikallisesti)
4. Mikrofoni päällä/pois
5. Ääni päällä/pois
6. Esiasetettu asento*
7. Pystysuora liikkuminen*
8. Vaakasuora liikkuminen*
9. Esiasetettu liikkuminen*
Huomaa: * = saatavilla vain SAS-IPCAM210-mallilla.
Muut asetukset
• Laitteen tila
1. Kamerakatsaus
2. Wi-Fi-asetukset
3. SD-tallennusasetukset
4. Salasana-asetukset
5. Anturiasetukset
6. Laiteohjelma
7. Kirkkaus- ja
kontrastiasetukset
8. Infrapunavaloasetukset • Päällä / Pois
9. Peilikuva • Vaakasuora / pystysuora
10. Taajuusasetukset • 50 Hz / 60 Hz
• UID-koodi
• MAC-osoite
• Aktivointipvm
• Vaihda kameran nimi
• Muistin tila
• Alusta SD-kortti
• Tallennustila: 24/7 tallennus / liikkeen tallennus /
aikataulutettu tallennus
• Ääni: Päällä / Pois
• Kamerailmoitukset: Päällä / Pois
• Liikkeentunnistuksen aikataulu: Päällä / Pois
• Liikkeentunnistuksen herkkyys: Alhainen /
keskitaso / korkea
• Nykyisen laiteohjelman tiedot
• Päivitä laiteohjelma
24
Page 25

Tekniset tiedot
SAS-IPCAM200 SAS-IPCAM210 SAS-IPCAM220
Kuva-anturi
SNR ≥ 39 dB ≥ 41 dB ≥ 39 dB
Linssikulma 3,6 mm, F1.4/56.14
InfrapunaLEDmerkkivalot
Taajuus
(InfrapunaLED)
Yönäkymä 5 m 10 m 15 m
Resoluutio 720p / VGA / QVGA
Kuvanopeus 30 fps / 24 fps 25 fps 25 fps
Muistikortti Maksimi 128 GB Maksimi 128 GB Maksimi 128 GB
Virtalähde 5 V ± 0,3 V 5 V ± 0,3 V 12 V ± 0,3 V / 2 A
Kulutus 3,2 W 3 W 3,5 W
Lämpötila -10 °C ~ 50 °C -20 °C ~ 70 °C -20 °C ~ 70 °C
Kosteus ≤ 90 % 90% 100%
Paino 135 g 625 g 340 g
1/4” 720p
progressiivisesti
skannaava CMOS
1 12
850 nm 850 nm 850 nm
1/4” 720p
progressiivisesti
skannaava
CMOS
3,6 mm,
F1.4/56.14
720p / VGA /
QVGA
1/4” 720p
progressiivisesti
skannaava CMOS
3,6 mm, F1.4/56.14
2
(LEDmerkkivaloryhmää)
720p / VGA / QVGA
Turvallisuus
• Sähköiskun riskin pienentämiseksi, ainoastaan valtuutettu
huoltohenkilö saa avata tämän laitteen huoltoa varten.
• Jos ongelmia ilmenee, irrota laite verkkovirrasta ja muista laitteista.
• Lue käyttöopas huolella ennen käyttöä. Säilytä käyttöopas
tulevaa käyttöä varten.
• Käytä laitetta vain sille tarkoitettuun käyttötarkoitukseen. Älä käytä
laitetta muuhun kuin käyttöoppaassa kuvattuun tarkoitukseen.
• Älä käytä laitetta, jos jokin sen osa on vioittunut tai viallinen. Jos
laite on vioittunut tai viallinen, vaihda laite välittömästi.
• Laite sopii vain sisäkäyttöön. Älä käytä laitetta ulkona.
• Älä altista laitetta vedelle ja kosteudelle.
Puhdistus ja huolto
Varoitus!
• Älä käytä liuottimia tai hankausaineita.
• Älä puhdista laitteen sisäpuolta.
• Älä yritä korjata laitetta. Jos laite ei toimi asianmukaisesti, vaihda
se uuteen.
• Puhdista laite ulkopuolelta pehmeällä, kostealla liinalla.
Suomi
Takuu
Takuu mitätöityy, mikäli laitteeseen tehdään mitä tahansa
muutoksia. Emme ole myöskään vastuussa vahingoista, jotka
johtuvat tämän tuotteen virheellisestä käytöstä.
Hävittäminen
• Tämä tuote tulee toimittaa hävitettäväksi asianmukaiseen
keräyspisteeseen. Tuotetta ei saa hävittää kotitalousjätteen
mukana.
• Lisätietoja antaa jälleenmyyjä tai paikallinen jätehuollosta
vastaava viranomainen.
Asiakirjat
Tämä tuote on valmistettu ja toimitettu noudattaen kaikkia sitä
koskevia asetuksia ja direktiivejä, jotka ovat voimassa kaikissa
Euroopan unionin jäsenvaltioissa. Se täyttää kaikki myyntimaassa
sovellettavat vaatimukset ja määräykset.
Viralliset asiakirjat ovat saatavilla pyynnöstä. Viralliset asiakirjat
sisältävät mm. yhdenmukaisuusvakuutuksen,
käyttöturvallisuustiedotteen ja tuotteen testausraportin.
Vastuuvapauslauseke
Muutoksia malliin ja teknisiin ominaisuuksiin voidaan tehdä
ilmoituksetta. Kaikki logot, merkit ja tuotenimet ovat niiden
vastaavien omistajien tuotemerkkejä tai rekisteröityjä
tuotemerkkejä ja niitä on käsiteltävä sellaisina.
25
Page 26

SAS-IPCAM2xx
Κάμερα IP
Περιγραφή
1. Φακός
2. Κουμπί επανεκκίνησης
3. Ενδείξεις LED
4. Μικρόφωνο
5. Ηχείο
6. Υποδοχή κάρτας μνήμης (microSD / TransFlash)
7. Είσοδος DC / Θύρα USB (Micro USB)
8. Φως IR
9. Αισθητήρας φωτός
10. Υποδοχή LAN
11. Βάση κεραίας
12. Κεραία Wi-Fi
Χρήση
1. Κατεβάστε και εγκαταστήστε την εφαρμογή από το Apple App
Store ή το Google Play Store στην κινητή σας συσκευή
αναζητώντας το “EyeCloud“.
2. Εισάγετε την κάρτα μνήμης στην υποδοχή κάρτας μνήμης.
3. Τροφοδοτείτε την κάμερα χρησιμοποιώντας τη θύρα USB και
τον φορτιστή.
4. Ξεκινήστε την εφαρμογή “EyeCloud”.
5. Δημιουργήστε ένα νέο λογαριασμό.
Εσωτερικά
1. Συνδέστε το smartphone σας στο επιθυμητό δίκτυο Wi-Fi.
2. Τροφοδοτείτε την κάμερα χρησιμοποιώντας τη θύρα USB και
τον φορτιστή.
3. Επιλέξτε “Quick Setup” και ακολουθήστε τις οδηγίες.
4. Εισάγετε τον κωδικό του Wi-Fi.
5. Κρατήστε το smartphone σας κοντά στη συσκευή για να
στείλετε τις οδηγίες του Wi-Fi στη συσκευή.
6. Όταν η συσκευή ολοκληρώσει τη λήψη των οδηγιών,
εμφανίζεται το εικονίδιο της κάμερας. Προσθέστε αυτή την
κάμερα στον λογαριασμό.
7. Εάν η κάμερα δεν προστεθεί με επιτυχία, επιλέξτε “Manually add
a camera“. Σαρώστε τον 2Δ γραμμικό κώδικα στη συσκευή.
Εισάγετε τον προεπιλεγμένο κωδικό πρόσβασης: 888888.
Εξωτερικά
1. Συνδέστε το smartphone σας στο επιθυμητό δίκτυο Wi-Fi.
2. Τροφοδοτείτε την κάμερα χρησιμοποιώντας τον φορτιστή.
3. Συνδέστε την κάμερα στο ίδιο δίκτυο χρησιμοποιώντας το
καλώδιο Ethernet.
4. Επιλέξτε “Search in LAN network” και επιβεβαιώστε τη σύνδεση.
5. Όταν εμφανιστεί το εικονίδιο της κάμερας, προσθέστε το στον
λογαριασμό σας.
6. Για να χρησιμοποιήσετε αυτή την κάμερα χωρίς ένα καλώδιο
Ethernet, μεταβείτε στη “Device Management”. Πληκτρολογήστε
το όνομα δικτύου και τον κωδικό πρόσβασης. Αποσυνδέστε το
καλώδιο Ethernet και η κάμερα θα κάνει αυτόματα
επανεκκίνηση και συνδεθείτε στο επιλεγμένο δίκτυο Wi-Fi.
Σημείωση: Κατά την προσπέλαση στην κάμερα για πρώτη φορά,
θα σας ζητηθεί να αλλάξετε τον κωδικό πρόσβασης. Ο
προεπιλεγμένος κωδικός πρόσβασης είναι «888888».
Διεπαφή χρήστη
1. Ζωντανή ροή
2. Φωτογραφίες (αποθηκευμένες κατά τόπους)
3. Εγγραφή (αποθηκευμένη κατά τόπους)
4. Ενεργοποίηση/απενεργοποίηση μικροφώνου
5. Ενεργοποίηση/απενεργοποίηση ήχου
6. Προκαθορισμένη θέση*
7. Κατακόρυφη πλοήγηση*
8. Οριζόντια πλοήγηση*
9. Προκαθορισμένη πλοήγηση*
Σημείωση: * = διατίθεται μόνον για το SAS-IPCAM210.
Άλλες ρυθμίσεις
• Κατάσταση συσκευής
1. Προεπισκόπηση
κάμερας
2. Ρυθμίσεις Wi-Fi
3. Ρυθμίσεις εγγραφής
SD
4. Ρυθμίσεις κωδικού
πρόσβασης
5. Ρυθμίσεις αισθητήρων
6. Υλικολογισμικό
7. Ρυθμίσεις
φωτεινότητας και
αντίθεσης
8. Ρυθμίσεις φωτός IR • Ενεργοποίηση / Απενεργοποίηση
9. Κατοπτρισμός εικόνας • Οριζόντιος/ Κάθετος
10. Ρυθμίσεις συχνότητας • 50 Hz / 60 Hz
• Κωδικός UID
• Διεύθυνση MAC
• Ημερομηνία ενεργοποίησης
• Αλλαγή ονόματος κάμερας
• Κατάσταση αποθήκευσης
• Διαμόρφωση της κάρτας SD
• Τρόπος λειτουργίας εγγραφής: Εγγραφή 24/7 /
Εγγραφή κίνησης / Προγραμματισμένη εγγραφή
• Ήχος: Ενεργοποίηση / Απενεργοποίηση
• Ειδοποιήσεις κάμερας: Ενεργοποίηση /
Απενεργοποίηση
• Πρόγραμμα ανίχνευσης κίνησης: Ενεργοποίηση /
Απενεργοποίηση
• Ευαισθησία ανίχνευσης κίνησης: Χαμηλή / Μεσαία
/ Υψηλή
• Πληροφορίες τρέχοντος υλικολογισμικού
• Ενημέρωση υλικολογισμικού
26
Page 27

Τεχνικά χαρακτηριστικά
SAS-IPCAM200 SAS-IPCAM210 SAS-IPCAM220
Αισθητήρας
εικόνας
SNR ≥ 39 dB ≥ 41 dB ≥ 39 dB
Γωνία φακού 3,6 mm, F1.4/56.14
IR LED 1 12
Συχνότητα
(IR LED)
Νυκτερινή
όραση
Ανάλυση 720p / VGA / QVGA
Ρυθμός καρέ 30 fps / 24 fps 25 fps 25 fps
Κάρτα μνήμης Μέγιστο 128 GB Μέγιστο 128 GB Μέγιστο 128 GB
Ισχύς 5 V ± 0,3 V 5 V ± 0,3 V 12 V ± 0,3 V / 2 A
Κατανάλωση 3,2 W 3 W 3,5 W
Θερμοκρασία -10 °C ~ 50 °C - 20 °C ~ 70 °C -20 °C ~ 70 °C
Υγρασία < 90% 90% 100%
Βάρος 135 g 625 g 340 g
1/4” 720p
προοδευτική
σάρωση CMOS
850 nm 850 nm 850 nm
5 m 10 m 15 m
1/4” 720p
προοδευτική
σάρωση CMOS
3,6 mm,
F1.4/56.14
720p / VGA /
QVGA
1/4” 720p
προοδευτική
σάρωση CMOS
3,6 mm,
F1.4/56.14
2 (LED σε
συστοιχία)
720p / VGA /
QVGA
Ασφάλεια
• Για να μειώσετε τον κίνδυνο ηλεκτροπληξίας, το προϊόν αυτό θα
πρέπει να ανοιχθεί μόνο από εξουσιοδοτημένο τεχνικό όταν
απαιτείται συντήρηση (σέρβις).
• Αποσυνδέστε το προϊόν από την πρίζα και άλλο εξοπλισμό αν
παρουσιαστεί πρόβλημα.
• Διαβάστε το εγχειρίδιο προσεκτικά πριν από τη χρήση. Φυλάξτε
το εγχειρίδιο για μελλοντική αναφορά.
• Χρησιμοποιείτε τη συσκευή μόνο για τους προοριζόμενους
σκοπούς. Μη χρησιμοποιείτε τη συσκευή για διαφορετικούς
σκοπούς από τους περιγραφόμενους στο εγχειρίδιο.
• Μη χρησιμοποιείτε τη συσκευή, εάν οποιοδήποτε τμήμα της
έχει ζημιά ή ελάττωμα. Εάν η συσκευή έχει ζημιά ή ελάττωμα,
αντικαταστήστε την αμέσως.
• Η συσκευή ενδείκνυται μόνο για εσωτερική χρήση. Μη
χρησιμοποιείτε τη συσκευή σε εξωτερικό χώρο.
• Μην εκθέτετε το προϊόν σε νερό ή υγρασία.
Ελληνικά
Καθαρισμός και συντήρηση
Προειδοποίηση!
• Μη χρησιμοποιείτε διαλύτες ή λειαντικά.
• Μην καθαρίσετε το εσωτερικό της συσκευής.
• Μην επιχειρήσετε να επισκευάσετε τη συσκευή. Εάν η συσκευή
δεν λειτουργεί σωστά, αντικαταστήστε την με μια νέα.
• Καθαρίζετε το εξωτερικό της συσκευής χρησιμοποιώντας ένα
μαλακό, νωπό πανί.
Εγγύηση
Η εφαρμογή αλλαγών ή/και τροποποιήσεων στο προϊόν
συνεπάγεται ακύρωση της εγγύησης. Δεν φέρουμε καμία ευθύνη για
πιθανές βλάβες που ενδέχεται να προκληθούν από την ακατάλληλη
χρήση του προϊόντος.
Απόρριψη
• Το προϊόν προορίζεται για ξεχωριστή συλλογή σε κατάλληλο
σημείο συλλογής. Μην απορρίπτετε το προϊόν μαζί με τα
οικιακά απόβλητα.
• Για περισσότερες πληροφορίες επικοινωνήστε με τον
αντιπρόσωπό σας ή τις τοπικές αρχές διαχείρισης αποβλήτων.
Τεκμηρίωση
Το προϊόν αυτό κατασκευάστηκε και παρέχεται σε συμμόρφωση με
το σύνολο των αντίστοιχων κανονισμών και οδηγιών που ισχύουν
για τα κράτη μέλη της Ευρωπαϊκής Ένωσης. Επίσης, συμμορφώνεται
με το σύνολο των ισχυουσών προδιαγραφών και κανονισμών της
χώρας διάθεσης.
Επίσημη τεκμηρίωση διατίθεται κατόπιν αιτήματος. Η επίσημη
τεκμηρίωση περιλαμβάνει, χωρίς περιορισμό, τη Δήλωση
Συμμόρφωσης, το Δελτίο Δεδομένων Ασφάλειας Υλικού και την
έκθεση δοκιμής προϊόντος.
Δήλωση αποποίησης ευθύνης
Το σχέδιο και τα χαρακτηριστικά μπορούν να αλλάξουν χωρίς καμία
προειδοποίηση. Όλα τα λογότυπα, οι επωνυμίες και οι ονομασίες
προϊόντων είναι εμπορικά σήματα ή σήματα κατατεθέντα των
αντίστοιχων κατόχων και δια του παρόντος αναγνωρίζονται ως
τέτοια.
27
Page 28

SAS-IPCAM2xx
Kamera IP
Opis
1. Obiektyw
2. Przycisk resetowania
3. Wskaźniki LED
4. Mikrofon
5. Głośnik
6. Gniazdo karty pamięci (microSD / TransFlash)
7. Wejście DC / Port USB (Micro USB)
8. Lampka podczerwieni
9. Czujnik światła
10. Gniazdo LAN
11. Statyw kamery
12. Antena Wi-Fi
Użytkowanie
1. Pobrać i zainstalować aplikację z serwisu Apple App Store lub
Google Play Store na urządzeniu mobilnym, wyszukując
„EyeCloud”.
2. Włóż kartę pamięci do gniazda karty pamięci.
3. Podłączyć zasilanie kamery przy pomocy portu USB i ładowarki.
4. Uruchomić aplikację „EyeCloud”.
5. Utworzyć nowe konto.
Wewnątrz
1. Podłączyć smartfona, aby nawiązać połączenie z siecią Wi-Fi.
2. Podłączyć zasilanie kamery przy pomocy portu USB i ładowarki.
3. Wybrać „Quick Setup” i postępować zgodnie z instrukcjami.
4. Wprowadzić hasło Wi-Fi.
5. Przytrzymać smartfon blisko urządzenia, aby wysłać instrukcje
Wi-Fi do urządzenia.
6. Gdy urządzenie zakończy odbiór instrukcji, pojawi się ikona
kamery. Dodać tę kamerę do konta.
7. Jeśli kamera nie została dodana z powodzeniem, wybrać
„Manually add a camera”. Zeskanować kod kreskowy 2D na
urządzeniu. Wprowadzić domyślne hasło: 888888.
Na zewnątrz
1. Podłączyć smartfona, aby nawiązać połączenie z siecią Wi-Fi.
2. Podłączyć zasilanie kamery przy pomocy ładowarki.
3. Podłączyć kamerę do tej samej sieci za pomocą kabla Ethernet.
4. Wybrać „Search in LAN network” i potwierdzić połączenie.
5. Gdy pojawi się ikona kamery, dodać ją do konta.
6. Aby użyć kamery bez kabla Ethernet, przejść do „Device
Management”. Wprowadzić nazwę sieci i hasło. Odłączyć kabel
Ethernet i kamera automatycznie ponownie się uruchomi i
połączy z siecią Wi-Fi.
Uwaga: Uzyskując dostęp do kamery po raz pierwszy, pojawi się
prośba o zmianę hasła. Domyślne hasło to „888888”.
Interfejs użytkownika
1. Obraz na żywo
2. Zdjęcia (przechowywane lokalnie)
3. Nagranie (przechowywane lokalnie)
4. Mikrofon wł./wył.
5. Dźwięk wł./wył.
6. Zaprogramowana pozycja*
7. Ustawienie pionowe*
8. Ustawienie poziome*
9. Zaprogramowane ustawienie*
Uwaga: * = dostępne tylko dla SAS-IPCAM210.
Inne ustawienia
• Stan urządzenia
1. Przegląd kamery
2. Ustawienia Wi-Fi
3. Ustawienia
nagrywania SD
4. Ustawienia hasła
5. Ustawienia czujników
6. Oprogramowanie
sprzętowe
7. Ustawienia jasności i
kontrastu
8. Ustawienia lampki
podczerwieni
9. Lustrzane odbicie
obrazu
10. Ustawienie
częstotliwości
• Kod UID
• Adres MAC
• Data uruchomienia
• Zmiana nazwy kamery
• Stan przechowywania
• Formatowanie karty SD
• Tryb nagrywania: Nagrywanie 24 godz./7 dni /
Nagrywanie po wykryciu ruchu / Nagrywanie
zaplanowane
• Audio: Wł. / Wył.
• Powiadomienia kamery: Wł. / Wył.
• Harmonogram nagrywania po wykryciu ruchu:
Wł. / Wył.
• Czułość nagrywanie po wykryciu ruchu: Mała/
Średnia/Duża
• Aktualne informacje o oprogramowaniu
sprzętowym
• Aktualizacja oprogramowania sprzętowego
• Wł. / Wył.
• Poziome / Pionowe
• 50 Hz / 60 Hz
28
Page 29

Dane techniczne
SAS-IPCAM200 SAS-IPCAM210 SAS-IPCAM220
Czujnik obrazu
SNR ≥ 39 dB ≥ 41 dB ≥ 39 dB
Kąt obiektywu 3,6 mm, F1.4/56.14
IR-LEDy 1 12
Częstotliwość
(IR LED)
Praca w
słabym
oświetleniu
Rozdzielczość 720p / VGA / QVGA
Prędkość
klatek
Karta pamięci
Zasilanie 5 V ± 0,3 V 5 V ± 0,3 V 12 V ± 0,3 V / 2 A
Zużycie 3,2 W 3 W 3,5 W
Temperatura -10 °C ~ 50 °C -20 °C ~ 70°C -20 °C ~ 70 °C
Wilgotność < 90% 90% 100%
Ciężar 135 g 625 g 340 g
CMOS, 1/4” 720p
skanowanie
progresywne
850 nm 850 nm 850 nm
5 m 10 m 15 m
30 fps / 24 fps 25 fps 25 fps
Maksymalnie 128 GBMaksymalnie 128 GBMaksymalnie 128
CMOS, 1/4” 720p
skanowanie
progresywne
3,6 mm,
F1.4/56.14
720p / VGA /
QVGA
CMOS, 1/4” 720p
skanowanie
progresywne
3,6 mm,
F1.4/56.14
2 (połączone
LEDy)
720p / VGA /
QVGA
GB
Bezpieczeństwo
• W celu zmniejszenia ryzyka porażenia prądem elektrycznym,
niniejsze urządzenie powinno być otwierane wyłącznie przez
osobę z odpowiednimi uprawnieniami, kiedy wymagane jest
przeprowadzenie przeglądu.
• W przypadku wystąpienia problemu odłączyć urządzenie od
sieci i innego sprzętu.
• Przed rozpoczęciem korzystania z urządzenia należy dokładnie
przeczytać instrukcję. Zachowaj instrukcję do wykorzystania w
przyszłości.
• Urządzenie powinno być używane zgodnie ze swoim
przeznaczeniem. Nie należy używać urządzenia w celach innych
niż określono w instrukcji.
• Nie wolno korzystać z urządzenia, jeśli jakakolwiek część jest
uszkodzona lub wadliwa. Jeśli urządzenie jest uszkodzone lub
wadliwe, należy niezwłocznie wymienić urządzenie.
• Urządzenie nadaje się wyłącznie do użytku wewnętrznego. Nie
używać urządzenia na zewnątrz.
• Nie wystawiać urządzenia na działanie wody lub wilgoci.
Polski
Czyszczenie i konserwacja
Ostrzeżenie!
• Nie używać do czyszczenia rozpuszczalników ani materiałów
ściernych.
• Nie czyścić wewnętrznej strony urządzenia.
• Nie podejmować prób naprawy urządzenia. Jeśli urządzenie nie
działa poprawnie, należy wymienić je na nowe urządzenie.
• Zewnętrzną stronę urządzenia czyścić miękką, wilgotną
szmatką.
Gwarancja
Wszelkie zmiany i/lub modykacje produktu spowodują
unieważnienie gwarancji. Nie możemy ponosić odpowiedzialności
za uszkodzenia spowodowane przez nieprawidłowe korzystanie z
produktu.
Utylizacja
• Produkt jest przeznaczony do oddzielnej zbiórki w
odpowiednim punkcie odbioru. Nie należy pozbywać się
produktu razem z odpadami gospodarstwa domowego.
• Aby uzyskać więcej informacji, należy skontaktować się ze
sprzedawcą lub lokalnym urzędem odpowiedzialnym za
gospodarkę odpadami.
Dokumenty
Produkt został wyprodukowany i dostarczony zgodnie z wszelkimi
odpowiednimi przepisami i wytycznymi, obowiązującymi wszystkie
państwa członkowskie Unii Europejskiej. Produkt jest zgodny z
wszystkimi specykacjami i przepisami obowiązującymi w kraju
sprzedaży.
Formalna dokumentacja jest dostępna na życzenie. Formalna
dokumentacja zawiera między innymi deklarację zgodności, kartę
charakterystyki i raport z badań produktu.
Zastrzeżenia
Wzory i specykacje mogą ulec zmianie bez powiadomienia.
Wszystkie logo, marki i nazwy produktów są znakami towarowymi
lub zarejestrowanymi znakami towarowymi ich właścicieli i
niniejszym są uznane za takie.
29
Page 30

SAS-IPCAM2xx
IP kamera
Popis
1. Objektiv
2. Tlačítko reset
3. LED ukazatele
4. Mikrofon
5. Reproduktor
6. Slot paměťové karty (microSD / TransFlash)
7. Vstup DC/ port USB (micro USB)
8. IR světlo
9. Světelné čidlo
10. Zásuvka LAN
11. Stojan kamery
12. Wi-Fi anténa
Použití
1. Stáhněte si anainstalujte do svého mobilního telefonu aplikaci
zobchodu App Store společnosti Apple nebo Google Play tak,
že vyhledáte výraz „EyeCloud“.
2. Paměťovou kartu zasuňte do slotu paměťové karty.
3. K napájení kamery použijte port USB a nabíječku.
4. Spusťte aplikaci „EyeCloud“.
5. Vytvořte si nový účet.
Uvnitř
1. Připojte svůj chytrý telefon k preferované Wi-Fi síti.
2. K napájení kamery použijte port USB a nabíječku.
3. Zvolte položku „Quick Setup“ apostupujte podle pokynů.
4. Zadejte heslo pro Wi-Fi.
5. Přidržte svůj chytrý telefon vblízkosti zařízení, abyste do
zařízení odeslali pokyny pro Wi-Fi.
6. Když je příjem pokynů vzařízení dokončen, objeví se ikona
kamery. Přidejte tuto kameru na účet.
7. Pokud přidání kamery neproběhne úspěšně, vyberte položku
„Manually add a camera“. Naskenujte 2D čárový kód na zařízení.
Zadejte výchozí heslo: 888888.
Venku
1. Připojte svůj chytrý telefon k preferované Wi-Fi síti.
2. Knapájení kamery použijte nabíječku.
3. Připojte kameru ke stejné síti pomocí ethernetového kabelu.
4. Zvolte položku „Search in LAN network“ apotvrďte připojení.
5. Když se objeví ikona kamery, přidejte ji ke svému účtu.
6. Chcete-li používat tuto kameru bez ethernetového kabelu,
přejděte do části „Device Management“. Zadejte název sítě
aheslo. Odpojte ethernetový kabel akamera se automaticky
restartuje apřipojí kvybrané Wi-Fi síti.
Poznámka: Při prvním přístupu ke kameře budete požádáni
ozměnu hesla. Standardní heslo je „888888”.
Uživatelské rozhraní
1. Živý přenos
2. Fotograe (ukládané lokálně)
3. Nahrávka (ukládané lokálně)
4. Zapnutí avypnutí mikrofonu
5. Zapnutí avypnutí zvuku
6. Předem nastavená poloha*
7. Vertikální posun*
8. Horizontální posun*
9. Předem nastavený posun*
Poznámka: * = kdispozici jen umodelu SAS-IPCAM210.
Jiná nastavení
• Stav zařízení
1. Přehled kamery
2. Nastavení Wi-Fi
3. Nastavení nahrávání
na SD kartu
4. Nastavení hesla
5. Nastavení čidel
6. Firmware
7. Nastavení jasu
akontrastu
8. Nastavení IR světla • Zap./Vyp.
9. Zrcadlení snímku • Horizontální/vertikální
10. Nastavení frekvence • 50 Hz / 60 Hz
• Kód UID
• Adresa MAC
• Datum aktivace
• Změna jména kamery
• Stav úložiště
• Formátování SD karty
• Režim nahrávání: Nepřetržité nahrávání/
Nahrávání pohybu/ Plánované nahrávání
• Zvuk: Zap./Vyp.
• Oznámení kamery: Zap./Vyp.
• Plánování detekce pohybu: Zap./Vyp.
• Citlivost detekce pohybu: Nízká/ střední/ vysoká
• Informace osoučasném rmwaru
• Aktualizace rmwaru
30
Page 31

Technické údaje
SAS-IPCAM200 SAS-IPCAM210 SAS-IPCAM220
Snímač obrazu
SNR ≥ 39 dB ≥ 41 dB ≥ 39 dB
Úhel čočky 3,6 mm, F1.4/56.14
IR LED 1 12 2 (LED typu array)
Frekvence
(IR LED)
Noční snímání 5m 10 m 15 m
Rozlišení 720p/ VGA/ QVGA
Obnovovací
kmitočet
Paměťová
karta
Napájení 5V ± 0,3V 5V ± 0,3V 12V ± 0,3V/ 2A
Spotřeba 3,2 W 3 W 3,5 W
Teplota -10 °C ~ 50 °C -20 °C ~ 70 °C -20 °C ~ 70 °C
Vlhkost < 90% 90% 100%
Hmotnost 135 g 625 g 340 g
1/4” 720p
progresivní
snímání CMOS
850nm 850nm 850nm
30fps/ 24fps 25 fps 25 fps
Max. 128 GB Max. 128 GB Max. 128 GB
1/4” 720p
progresivní
snímání CMOS
3,6 mm,
F1.4/56.14
720p/ VGA/
QVGA
1/4” 720p
progresivní
snímání CMOS
3,6 mm,
F1.4/56.14
720p/ VGA/
QVGA
Bezpečnost
• Abyste snížili riziko úrazu elektrickým proudem, měl by být
vpřípadě potřeby tento výrobek otevřen pouze autorizovaným
technikem.
• Dojde-li k závadě, odpojte výrobek ze sítě a od jiných zařízení.
• Před použitím si pozorně přečtěte příručku. Příručku uschovejte
pro pozdější použití.
• Zařízení používejte pouze k jeho zamýšleným účelům.
Nepoužívejte zařízení k jiným účelům, než je popsáno v příručce.
• Nepoužívejte zařízení, pokud je jakákoli část poškozená nebo
vadná. Pokud je zařízení poškozené nebo vadné, okamžitě jej
vyměňte.
• Toto zařízení je určeno pouze pro použití v místnosti.
Nepoužívejte zařízení v exteriérech.
• Nevystavujte zařízení působení vody nebo vlhkosti.
Čištění a údržba
Upozornění!
• Nepoužívejte čisticí rozpouštědla ani abrazivní čisticí prostředky.
• Nečistěte vnitřek zařízení.
• Nepokoušejte se zařízení opravovat. Pokud zařízení nepracuje
správně, vyměňte jej za nové zařízení.
• Venek zařízení očistěte měkkým, suchým hadříkem.
Česky
Záruka
Provedením jakýchkoli změn a/nebo modikací výrobku záruka
zaniká. Při nesprávném používání tohoto výrobku výrobce nenese
odpovědnost za vzniklé škody.
Likvidace
• Likvidaci tohoto produktu provádějte v příslušné sběrně.
Nevyhazujte tento výrobek s komunálním odpadem.
• Pro více informací se obraťte na prodejce nebo místní orgány
odpovědné za nakládání s odpady.
Dokumenty
Tento produkt byl vyroben a je dodáván v souladu se všemi
příslušnými nařízeními a směrnicemi platnými ve všech členských
státech Evropské Unie. Splňuje také veškeré relevantní specikace a
předpisy v zemi prodeje.
Ociální dokumentaci lze získat na vyžádání. Ociální dokumentace
zahrnuje také (avšak nejenom) Prohlášení o shodě, Bezpečnostní
technické listy materiálu a správu o testování produktu.
Vyloučení zodpovědnosti
Design a specikace výrobku mohou být změněny bez předchozího
upozornění. Všechna loga a obchodní názvy jsou registrované
obchodní značky příslušných vlastníků a jsou chráněny zákonem.
31
Page 32

SAS-IPCAM2xx
IP kamera
Megnevezés
1. Lencse
2. Visszaállító gomb
3. LED jelzők
4. Mikrofon
5. Hangszóró
6. Memóriakártya-foglalat (microSD / TransFlash)
7. DC bemenet / USB csatlakozó (Mikro USB)
8. IR fényforrás
9. Fényérzékelő
10. LAN aljzat
11. Kameraállvány
12. Wi-Fi antenna
Használat
1. Töltse le, majd telepítse az alkalmazást az Apple App Store vagy
Google Play Store áruházból mobil eszközére: keressen rá a
„EyeCloud” kifejezésre.
2. Helyezzen egy memóriakártyát a memóriakártya-foglalatba.
3. Biztosítsa a kamera tápellátását az USB csatlakozóval és töltővel.
4. Indítsa el a „EyeCloud” alkalmazást.
5. Hozzon létre egy új felhasználói ókot.
Beltéren
1. Csatlakoztassa okostelefonját az előnyben részesített Wi-Fi
hálózathoz.
2. Biztosítsa a kamera tápellátását az USB csatlakozóval és töltővel.
3. Válassza a „Quick Setup” lehetőséget, és kövesse az utasításokat.
4. Adja meg a Wi-Fi jelszót.
5. Vegye a kezébe az okostelefont, és tartsa közel az eszközhöz,
hogy elküldhesse a Wi-Fi utasításokat az eszköznek.
6. Ha az eszköz már nem fogad további utasításokat, megjelenik a
kamera ikon. Adja hozzá a kamerát a ókhoz.
7. Ha a kamera hozzáadása sikertelen, válassza a „Manually add a
camera” lehetőséget. Olvassa be az eszközön található, kétdimenziós
vonalkódot. Adja meg az alapértelmezett jelszót: 888888.
Kültéren
1. Csatlakoztassa okostelefonját az előnyben részesített Wi-Fi
hálózathoz.
2. Biztosítsa a kamera tápellátását a töltővel.
3. Csatlakoztassa a kamerát az Ethernet kábellel ugyanahhoz a
hálózathoz.
4. Válassza a „Search in LAN network” lehetőséget, és erősítse meg
a kapcsolatot.
5. Ha megjelenik a kamera ikon, adja azt hozzá a ókhoz.
6. A kamera Ethernet kábel nélküli használatához lépjen be a „Device
Management” menübe. Adja meg a hálózat nevét és a jelszót.
Válassza le az Ethernet kábelt, hogy a kamera újraindulhasson, és
hozzácsatlakozhasson a kiválasztott Wi-Fi hálózathoz.
Megjegyzés: A kamera első alkalommal történő elérésekor a
készülék a jelszó megváltoztatására kéri a felhasználót. Az
alapértelmezett jelszó „888888”.
Felhasználói felület
1. Élő felvétel
2. Fotók (helyileg tárolva)
3. Felvétel (helyileg tárolva)
4. Mikrofon be- és kikapcsolása
5. Hang be- és kikapcsolása
6. Előre beállított pozíció*
7. Függőleges pásztázás*
8. Vízszintes pásztázás*
9. Előre beállított pásztázás*
Megjegyzés: * = kizárólag a SAS-IPCAM210 típus esetén érhető el.
Egyéb beállítások
• Készülékállapot
1. A kamera áttekintése
2. Wi-Fi beállítások
3. SD felvételi beállítások
4. Jelszóbeállítások
5. Érzékelők beállításai
6. Készülékszoftver
7. Fényerő és kontraszt
beállítások
8. Infravörös fényforrás
beállításai
9. Képek tükrözése • Vízszintes / Függőleges
10. Frekvencia beállítások • 50 Hz / 60 Hz
32
• UID-kód
• MAC-cím
• Aktiválás dátuma
• A kamera nevének megváltoztatása
• Tárolási állapot
• SD-kártya formázása
• Rögzítési mód: 24/7 felvételkészítés /
Mozgásérzékeléses felvételkészítés / Ütemezett
felvételkészítés
• Hang: Be / Ki
• Kamera értesítések: Be / Ki
• Mozgásérzékelés ütemezése: Be / Ki
• Mozgásérzékelés érzékenysége: Alacsony /
Közepes / Magas
• Aktuális készülékszoftver adatai
• A készülékszoftver frissítése
• Be / Ki
Page 33

Műszaki adatok
SAS-IPCAM200 SAS-IPCAM210 SAS-IPCAM220
1/4” 720p
Képérzékelő
SNR ≥ 39 dB ≥ 41 dB ≥ 39 dB
Objektív látószöge
Infravörös LED-ek 1 12
Frekvencia
(Infravörös LED)
Éjszakai
látótávolság
Felbontás
Képkockasebesség 30 fps / 24 fps 25 fps 25 fps
Memóriakártya Maximum 128 GB Maximum 128 GB
Táplálás 5 V ± 0,3 V 5 V ± 0,3 V 12 V ± 0,3 V / 2 A
Fogyasztás 3,2 W 3 W 3,5 W
Hőmérséklet -10 °C ~ 50 °C -20 °C ~ 70 °C -20 °C ~ 70 °C
Páratartalom < 90% 90% 100%
Tömeg 135 g 625 g 340 g
progresszív
letapogatású
CMOS
3,6 mm,
F1.4/56.14
850 nm 850 nm 850 nm
5 m 10 m 15 m
720p / VGA /
QVGA
1/4” 720p
progresszív
letapogatású
CMOS
3,6 mm,
F1.4/56.14
720p / VGA /
QVGA
1/4” 720p
progresszív
letapogatású
CMOS
3,6 mm,
F1.4/56.14
2 (array
technológiájú
LED)
720p / VGA /
QVGA
Maximum 128
GB
Biztonság
• Az áramütés veszélyének csökkentése érdekében ezt a terméket
kizárólag a márkaszerviz képviselője nyithatja fel.
• Hiba esetén húzza ki a termék csatlakozóját a konnektorból, és
kösse le más berendezésekről.
• A használat előtt gyelmesen olvassa el a kézikönyvet. Tegye el
a kézikönyvet, hogy szükség esetén belenézhessen.
• Csak rendeltetése szerint használja a készüléket. Ne használja a
készüléket a kézikönyvben feltüntetettől eltérő célra.
• Ne használja a készüléket, ha valamely része sérült vagy
meghibásodott. A sérült vagy meghibásodott készüléket
azonnal javíttassa meg, vagy cseréltesse ki.
• A termék csak beltéri használatra készült. Ne használja a
terméket kültérben.
• Vigyázzon, hogy ne érje a terméket víz vagy nedvesség.
Magyar
Tisztítás és karbantartás
Figyelmeztetés!
• Tisztító- és súrolószerek használatát mellőzze.
• Ne tisztítsa a készülék belsejét.
• Ne próbálja megjavítani a készüléket. Ha a készülék nem
működik megfelelően, cserélje le egy új készülékre.
• Törölje át a készülék külső felületeit egy puha, nedves
törlőkendővel.
Jótállás
A termék illetéktelen módosítása érvényteleníti jótállását. Nem
vállalunk felelősséget a termék szakszerűtlen használata miatti
károkért.
Leselejtezés
• A terméket elkülönítve, a megfelelő gyűjtőhelyeken kell
leselejtezni. Ne dobja ki a terméket a háztartási hulladék közé.
• További információért lépjen kapcsolatba a forgalmazóval, vagy
a hulladékkezelésért felelős helyi hatósággal.
Dokumentumok
A termék az Európai Unió minden tagállamában érvényes vonatkozó
rendelkezések és irányelvek betartásával készült és került
forgalomba. A termék megfelel az értékesítési országban rá
vonatkozó minden előírásnak és rendelkezésnek.
Kérésre hivatalos dokumentációt is rendelkezésre bocsátunk. A
formális dokumentáció a teljesség igénye nélkül a következőket
tartalmazza: megfelelőségi nyilatkozat, anyagbiztonsági adatlap, a
termék vizsgálati jegyzőkönyve.
Felelősségelhárító nyilatkozat
A kivitel és a műszaki jellemzők előzetes értesítés nélkül is
módosulhatnak. Minden logó, terméknév és márkanév a
tulajdonosának márkaneve vagy bejegyzett márkaneve, azokat
ennek tiszteletben tartásával említjük.
33
Page 34

SAS-IPCAM2xx
Cameră IP
Descrierea
1. Obiectiv
2. Buton resetare
3. Indicatoare cu led
4. Microfon
5. Difuzor
6. Slot card memorie (microSD / TransFlash)
7. Intrare c.c. / port USB (Micro USB)
8. Lampă IR
9. Senzor de lumină
10. Mufă LAN
11. Suport cameră
12. Antenă Wi-Fi
Utilizarea
1. Descărcaţi şi instalaţi aplicaţia din Apple App Store sau Google
Play Store pe telefonul mobil, căutând „EyeCloud”.
2. Introduceţi cardul de memorie în slotul cardului de memorie.
3. Alimentaţi camera cu prin portul USB şi încărcător.
4. Lansaţi aplicaţia „EyeCloud”.
5. Creaţi un nou cont.
Interior
1. Conectaţi smartphone-ul la reţeaua Wi-Fi preferată.
2. Alimentaţi camera cu prin portul USB şi încărcător.
3. Selectaţi „Quick Setup” şi urmaţi instrucţiunile.
4. Introduceţi parola Wi-Fi.
5. Ţineţi smartphone-ul aproape de dispozitiv pentru a trimite
instrucţiuni Wi-Fi către dispozitiv.
6. Când dispozitivul a primit instrucţiunile, apare pictograma
camerei. Adăugaţi această cameră în cont.
7. Dacă nu se reuşeşte adăugarea camerei, selectaţi „Manually add
a camera”. Scanaţi codul de bare 2D de pe dispozitiv. Introduceţi
parola implicită: 888888.
Exterior
1. Conectaţi smartphone-ul la reţeaua Wi-Fi preferată.
2. Alimentaţi camera prin încărcător.
3. Conectaţi camera la aceeaşi reţea cu ajutorul cablului de reţea.
4. Selectaţi „Search in LAN network” şi conrmaţi selecţia.
5. Când apare pictograma camerei şi adăugaţi-o în cont.
6. Pentru a utiliza această cameră fără un cablu de reţea, mergeţi la
„Device Management”. Introduceţi numele reţelei şi parola.
Deconectaţi cablul de reţea, iar camera va reporni automat şi se
va conecta la reţeaua Wi-Fi selectată.
Notă: Când accesaţi camera pentru prima dată, vi se va cere să
schimbaţi parola. Parola implicită este “888888”.
Interfaţa cu utilizatorul
1. Flux live
2. Fotograi (stocate local)
3. Înregistrare (stocate local)
4. Pornire/oprire microfon
5. Pornire/oprire audio
6. Poziţie presetată*
7. Cursă verticală*
8. Cursă orizontală*
9. Cursă presetată*
Notă: * = disponibil doar pentru SAS-IPCAM210.
Alte setări
• Starea dispozitivului
1. Prezentare generală a
camerei
2. Setări Wi-Fi
3. Setări de înregistrare
SD
4. Setări parolă
5. Setări senzori
6. Firmware
7. Setări luminozitate şi
contrast
8. Setări lampă IR • Pornit / Oprit
9. Imagine în oglindă • Orizontal / Vertical
10. Setări frecvenţă • 50 Hz / 60 Hz
• Cod UID
• Adresă MAC
• Data activării
• Modicare denumire cameră
• Starea stocării
• Formatare card SD
• Mod înregistrare: Înregistrare 24/7 / Înregistrarea
mişcării / Înregistrarea programată
• Audio: Pornit / Oprit
• Noticări cameră: Pornit / Oprit
• Program de detectare a mişcării: Pornit / Oprit
• Sensibilitate de detectare a mişcării: Scăzută /
Medie / Înaltă
• Informaţii privind rmware-ul curent
• Actualizare rmware
34
Page 35

Specicaţii tehnice
Senzor
imagine
SNR ≥ 39 dB ≥ 41 dB ≥ 39 dB
Unghi lentilă 3,6 mm, F1.4/56.14
LED-uri IR 1 12
Frecvenţă
(LED-uri IR)
Vedere
nocturnă
Rezoluţie 720p / VGA / QVGA
Frecvenţă
cadre
Card memorie Maximum 128 GB Maximum 128 GB Maximum 128 GB
Alimentare 5 V ± 0,3 V 5 V ± 0,3 V 12 V ± 0,3 V / 2 A
Consum 3,2 W 3 W 3,5 W
Temperatură -10 °C ~ 50 °C - 20 °C ~ 70 °C -20 °C ~ 70 °C
Umiditate < 90% 90% 100%
Greutate 135 g 625 g 340 g
SAS-IPCAM200 SAS-IPCAM210 SAS-IPCAM220
1/4” 720p scanare
progresivă CMOS
850 nm 850 nm 850 nm
5 m 10 m 15 m
30 fps / 24 fps 25 cps 25 cps
1/4” 720p scanare
progresivă CMOS
3,6 mm,
F1.4/56.14
720p / VGA /
QVGA
1/4” 720p scanare
progresivă CMOS
3,6 mm,
F1.4/56.14
2 (LED-uri
ansamblu)
720p / VGA /
QVGA
Siguranţă
• Pentru a se reduce pericolul de electrocutare, acest produs va
desfăcut numai de către un tehnician avizat, când este necesară
depanarea.
• Deconectaţi produsul de la priza de reţea sau alte echipamente
în cazul apariţiei unei probleme.
• Citiţi manualul cu atenţie înainte de utilizare. Păstraţi manualul
pentru consultări ulterioare.
• Utilizaţi dispozitivul numai în scopurile prevăzute. Nu utilizaţi
dispozitivul în alte scopuri decât cele descrise în manual.
• Nu utilizaţi dispozitivul dacă are piese deteriorate sau defecte. Dacă
dispozitivul este deteriorat sau defect, înlocuiţi imediat dispozitivul.
• Dispozitivul este potrivit doar pentru utilizare în interior. Nu
utilizaţi dispozitivul în spaţii exterioare.
• Nu expuneţi produsul apei sau umezelii.
Curăţarea şi întreţinerea
Avertisment!
• Nu folosiţi solvenţi sau agenţi de curăţare abrazivi.
• Nu curăţaţi interiorul dispozitivului.
• Nu încercaţi să reparaţi dispozitivul. Dacă dispozitivul nu
funcţionează corect, înlocuiţi-l cu unul nou.
• Curăţaţi exteriorul dispozitivul cu o cârpă umedă şi moale.
Română
Garanţie
Orice schimbări şi/sau modicări ale produsului vor anula garanţia.
Nu putem accepta responsabilitatea pentru daunele provocate de
utilizarea incorectă a produsului.
Eliminarea
• Produsul a fost creat pentru colectare separată la un punct de
colectare adecvat. Nu eliminaţi produsul odată cu deşeurile
menajere.
• Pentru mai multe informaţii, contactaţi magazinul sau
autoritatea locală responsabilă pentru gestionarea deşeurilor.
Documentaţie
Produsul a fost fabricat şi furnizat în conformitate cu toate
reglementările şi directivele relevante, valabile în toate statele
membre ale Uniunii Europene. Produsul este conform cu toate
specicaţiile şi reglementările aplicabile în toate ţările în care se
vinde.
Documentaţia ocială este disponibilă la cerere. Documentaţia
ocială include, fără limitare, Declaraţia de Conformitate, Fişa cu
Date de Securitate şi raportul de testare a produsului.
Renunţarea la răspundere
Designul şi specicaţiile produsului pot modicate fără o noticare
prealabilă. Toate siglele mărcilor şi denumirile produselor sunt mărci
comerciale sau mărci comerciale înregistrate ale proprietarilor de
drept şi prin prezenta sunt recunoscute ca atare.
35
Page 36

SAS-IPCAM2xx
IP-камера
Описание
1. Объектив
2. Кнопка сброса
3. Светодиодные индикаторы
4. Микрофон
5. Динамик
6. Слот карты памяти (microSD / TransFlash)
7. Вход пост. тока / USB-порт (Micro USB)
8. ИК-подсветка
9. Светочувствительный датчик
10. Розетка LAN
11. Штатив камеры
12. Антенна Wi-Fi
Использование
1. Скачайте приложение «EyeCloud» из Apple App Store или
Google Play Store и установите его на свое мобильное
устройство.
2. Вставьте карту памяти в слот карты памяти.
3. Подключите камеру к источнику питания через USB-порт и
зарядное устройство.
4. Запустите приложение «EyeCloud».
5. Создайте новую учетную запись.
В помещении
1. Подключите ваш смартфон к предпочтительной сети Wi-Fi.
2. Подключите камеру к источнику питания через USB-порт и
зарядное устройство.
3. Выберите «Quick Setup» и следуйте указаниям.
4. Введите пароль Wi-Fi.
5. Поднесите смартфон к устройству, чтобы отправить на
устройство инструкции по установке Wi-Fi.
6. По завершении получения инструкций на дисплее отобразится
значок камеры. Добавьте камеру в учетную запись.
7. Если камера не добавилась, выберите «Manually add a
camera». Считайте двухмерный штрихкод с устройства.
Введите пароль, заданный по умолчанию: 888888.
Вне помещений
1. Подключите ваш смартфон к предпочтительной сети Wi-Fi.
2. Подключите камеру к источнику питания через зарядное
устройство.
3. Подключите камеру к одноименной сети через
Ethernet-кабель.
4. Выбрать опцию «Search in LAN network» и подтвердить
подключение.
5. Добавьте появившийся значок камеры в свою учетную запись.
6. Для использования камеры без Ethernet-кабеля перейдите в
пункт меню «Device Management». Введите имя сети и
пароль. Отключите кабель Ethernet — камера автоматически
перезагрузится и подключится к выбранной сети Wi-Fi.
Примечание: При первичном доступе к камере вас попросят
изменить пароль. Пароль по умолчанию— «888888».
Интерфейс пользователя
1. Прямой эфир
2. Фото (локальные)
3. Записи (локальные)
4. Вкл./выкл. микрофона
5. Вкл./выкл. аудио
6. Заданное положение*
7. Вертикальное перемещение*
8. Горизонтальное перемещение*
9. Предустановка перемещения*
Примечание: * = доступно только для SAS-IPCAM210.
Другие настройки
• Состояние устройства
1. Обзор камеры
2. Параметры Wi-Fi
3. Параметры записи на
SD
4. Параметры пароля
5. Параметры датчика
6. Программное
обеспечение
7. Параметры
настройки яркости и
контрастности
8. Параметры
настройки
ИК-подсветки
9. Зеркальное
отображение
объекта
10. Параметры
настройки частоты
36
• UID-код
• MAC-адрес
• Дата активации
• Изменить название камеры
• Состояние хранилища
• Форматировать SD-карту
• Режим записи: Запись в режиме 24/7 / Запись
движения / Запись по графику
• Аудио: Вкл. / выкл.
• Уведомления камеры: Вкл. / выкл.
• Режим записи при обнаружении движения:
Вкл. / выкл.
• Чувствительность обнаружения движения:
Низкая / средняя / высокая
• Сведения о текущем ПО
• Обновить ПО
• Вкл. / выкл.
• Горизонтальное / вертикальное
• 50 Гц / 60 Гц
Page 37

Технические данные
SAS-IPCAM200 SAS-IPCAM210 SAS-IPCAM220
1/4” 720p,
Датчик изображения
SNR ≥ 39 дБ ≥ 41 дБ ≥ 39 дБ
Угол поля
изображения
объектива
ИК-светодиоды 1 12
Частота
(ИК-светодиоды)
Ночное видение 5 м 10 м 15 м
Разрешение
Кадровая частота
Карта памяти
Питание 5 В ± 0,3 В 5 В ± 0,3 В
Энергопотребление 3,2 Вт 3 Вт 3,5 Вт
Температура -10 °C ~ 50 °C - 20 °C ~ 70 °C -20 °C ~ 70 °C
Влажность < 90% 90% 100%
Вес 135 г 625 г 340 г
прогрессивная
развертка
CMOS
3,6 мм,
F1.4/56.14
850 нм 850 нм 850 нм
720p / VGA /
QVGA
30 фт/с ± 24
фт/с
Максимум 128 ГбМаксимум 128 ГбМаксимум 128
1/4” 720p,
прогрессивная
развертка
CMOS
3,6 мм,
F1.4/56.14
720p / VGA /
QVGA
25 кадров в
секунду
1/4” 720p,
прогрессивная
развертка
CMOS
3,6 мм,
F1.4/56.14
2 (ряда
светодиодов)
720p / VGA /
QVGA
25 кадров в
секунду
Гб
12 В ± 0,3 В / 2
A
Требования безопасности
• В целях предотвращения поражения электрическим током
следует открывать устройство только для проведения
обслуживания и только силами авторизованного персонала.
• При возникновении неполадок отключите устройство от
сети и другого устройства.
• Перед началом работы внимательно прочитайте
руководство. Сохраните руководство для будущего
использования.
• Используйте устройство строго по назначению. Устройство
должно использоваться только по прямому назначению в
соответствии с руководством по эксплуатации.
• Запрещается использовать устройство с поврежденными
или неисправными компонентами. Немедленно замените
поврежденное или неисправное устройство.
• Устройство предназначено только для использования
внутри помещений. Запрещается использовать устройство
вне помещения.
• Не допускайте воздействия воды или влаги.
Русский
Очистка и обслуживание
Предупреждение!
• Не производите очистку растворителями или абразивами.
• Не выполняйте очистку внутренних поверхностей
устройства.
• Не пытайтесь самостоятельно ремонтировать устройство.
Неправильно работающее устройство следует заменить
новым.
• Очистите корпус устройства при помощи мягкой влажной
ткани.
Гарантия
Любые изменения и / или модификации устройства приведут к
аннулированию прав пользователя на гарантийное
обслуживание. Мы не несем ответственности за ущерб,
понесенный вследствие неправильного использования этого
продукта.
Утилизация
• Это устройство предназначено для раздельного сбора в
соответствующем пункте сбора отходов. Не выбрасывайте
это устройство вместе с бытовыми отходами.
• Для получения дополнительной информации обратитесь к
продавцу или в местный орган власти, ответственный за
утилизацию отходов.
Документы
Устройство изготовлено и поставлено в соответствии со всеми
применимыми положениями и директивами, действующими для
всех стран-членов Европейского Союза. Оно также
соответствует всем нормами и правилами, действующим в
стране продажи.
Официальная документация предоставляется по запросу.
Официальная документация включает декларацию
соответствия, паспорт безопасности и отчет по проверке
продукта, но не ограничивается данным перечнем.
Оговорки
Дизайн и технические характеристики могут быть изменены без
предварительного уведомления. Все логотипы брендов и
названия продуктов являются товарными знаками или
зарегистрированными торговыми марками их соответствующих
владельцев и следовательно признаются таковыми.
37
Page 38

SAS-IPCAM2xx
IP kamera
Açıklama
1. Lens
2. Sıfırlama düğmesi
3. LED göstergeleri
4. Mikrofon
5. Hoparlör
6. Bellek kart yuvası (microSD / TransFlash)
7. DC girişi / USB portu (Mikro USB)
8. IR ışık
9. Işık sensörü
10. LAN soketi
11. Kamera standı
12. Wi-Fi anteni
Kullanım
1. Mobil cihazınızda Apple App Store veya Google Play Store’ dan
“EyeCloud” anahtar kelimesini aratarak uygulamayı indirin ve
yükleyin.
2. Bellek kartını bellek kartı yuvasına takın.
3. Kameraya USB portunu ve şarj cihazını kullanarak güç verin.
4. “EyeCloud” uygulamasını başlatın.
5. Yeni bir hesap oluşturun.
İç mekan
1. Akıllı telefonunuzu tercih edilen Wi-Fi ağına bağlayın.
2. Kameraya USB portunu ve şarj cihazını kullanarak güç verin.
3. “Quick Setup” seçeneğini seçin ve talimatları takip edin.
4. Wi-Fi şifresini girin.
5. Cihaza Wi-Fi talimatlarını göndermek için akıllı telefonunuzu
cihaza yakın tutun.
6. Cihaz talimatları almayı tamamladığında kamera simgesi
görüntülenir. Bu kamerayı hesaba ekleyin.
7. Kamera başarıyla eklenmezse “Manually add a camera“
seçeneğini seçin. Cihazdaki 2D barkodu taratın. Varsayılan şifreyi
girin: 888888.
Dış mekan
1. Akıllı telefonunuzu tercih edilen Wi-Fi ağına bağlayın.
2. Kameraya şarj cihazını kullanarak güç verin.
3. Kamerayı Ethernet kablosunu kullanarak aynı ağa bağlayın.
4. “Search in LAN network” seçeneğini seçin ve bağlantıyı
doğrulayın.
5. Kamera simgesi görüntülendiğinde hesabınıza ekleyin.
6. Kamerayı Ethernet kablosu olmadan kullanmak için “Device
Management” menüsüne gidin. Ağ adını ve parolasını girin.
Ethernet kablosunu çıkardığınızda kamera otomatik olarak
yeniden başlatılacak ve seçilen Wi-Fi ağına bağlanacaktır.
Not: Kameraya ilk defa erişirken sizden şifreyi değiştirmeniz
istenecektir. Varsayılan şifre "888888"'dır.
Kullanıcı ara yüzü
1. Canlı yayın
2. Fotoğraar (yerel olarak depolanan)
3. Kayıt (yerel olarak depolanan)
4. Mikrofon açık/kapalı
5. Ses açık/kapalı
6. Önceden ayarlanmış pozisyon*
7. Dikey gezinti*
8. Yatay gezinti*
9. Önceden ayarlanmış gezinti*
Not: * = yalnızca SAS-IPCAM210 için kullanılabilir.
Diğer ayarlar
• Cihaz durumu
1. Kameraya genel bakış
2. Wi-Fi ayarları
3. SD kayıt ayarları
4. Şifre ayarları
5. Sensör ayarları
6. İşletim kodu
7. Parlaklık ve kontrast
ayarları
8. IR ışığı ayarları • Açık / K apalı
9. Görüntü yansıtma • Yatay / Dikey
10. Frekans ayarları • 50 Hz / 60 Hz
• UID kodu
• MAC adresi
• Etkinleştirme tarihi
• Kamera adını değiştir
• Depolama durumu
• SD kartı biçimlendir
• Kayıt modu: 7/24 kayıt / Hareket kaydı / Planlı
kayıt
• Ses: Açık / Kapalı
• Kamera bildirimleri: Açık / Kapalı
• Hareket algılama planı: Açık / Kapalı
• Hareket algılama hassasiyeti: Düşük / Orta /
Yüksek
• Mevcut işletim kodu bilgileri
• İşletim kodunu güncelle
38
Page 39

Teknik bilgiler
Görüntü
sensörü
SNR ≥ 39 dB ≥ 41 dB ≥ 39 dB
Lens açısı 3,6 mm, F1.4/56.14
IR LED’ler 1 12 2 (sıralı LED'ler)
Frekans
(IR LED)
Gece görüşü 5 m 10 m 15 m
Çözünürlük 720p / VGA / QVGA
Kare hızı 30 fps / 24 fps 25 fps 25 fps
Bellek kartı Maksimum 128 GB Maksimum 128 GB
Güç 5 V ± 0,3 V 5 V ± 0,3 V 12 V ± 0,3 V / 2 A
Tüketim 3,2 W 3 W 3,5 W
Sıcaklık -10 °C ~ 50 °C -20 °C ~ 70 °C -20 °C ~ 70 °C
Nem < %90 %90 %100
Ağırlık 135 g 625 g 340 g
SAS-IPCAM200 SAS-IPCAM210 SAS-IPCAM220
1/4” 720p aşamalı
tarama CMOS
850 nm 850 nm 850 nm
1/4” 720p aşamalı
tarama CMOS
3,6 mm,
F1.4/56.14
720p / VGA /
QVGA
1/4” 720p aşamalı
tarama CMOS
3,6 mm,
F1.4/56.14
720p / VGA /
QVGA
Maksimum 128
GB
Güvenlik
• Elektrik çarpma riskini azaltmak için servis gerekli olduğunda bu
ürün sadece yetkili bir teknisyen tarafından açılmalıdır.
• Bir sorun meydana geldiğinde ürünün elektrikle ve diğer
aygıtlarla olan bağlantısını kesin.
• Kullanmadan önce kılavuzu dikkatli bir şekilde okuyun. Kılavuzu
daha sonra başvurmak için saklayın.
• Cihazı sadece tasarlanan amacı için kullanın. Cihazı kılavuzda
açıklanan amaçların dışındaki amaçlar için kullanmayın.
• Herhangi bir parçası hasarlı veya kusurlu ise cihazı kullanmayın.
Cihaz hasarlı veya kusurlu ise cihazı derhal değiştirin.
• Cihaz sadece iç mekan kullanımı için uygundur. Cihazı dış
mekanda kullanmayın.
• Ürünü suya veya rutubete maruz bırakmayın.
Temizlik ve bakım
Uyarı!
• Temizlik solventleri veya aşındırıcılar kullanmayın.
• Cihazın içini temizlemeyin.
• Cihazı onarmaya çalışmayın. Cihaz doğru şekilde çalışmıyorsa,
yeni bir cihazla değiştirin.
• Cihazın dış tarafını yumuşak, nemli bir bezle silin.
Türkçe
Garanti
Ürün üzerindeki tüm değişikliler ve/veya modikasyonlar garantiyi
geçersiz kılar. Ürünün hatalı kullanımından kaynaklanan hasarlar için
şirketimiz tarafından hiçbir sorumluluk kabul edilmemektedir.
Elden çıkarma
• Ürün, uygun bir toplama noktasında ayrı olarak toplanmak
üzere belirlenmiştir. Ürünü evsel artıklarla birlikte atmayın.
• Daha fazla bilgi için satıcınızla veya atık yönetiminden sorumlu
yerel makamlarla iletişime geçin.
Belgeler
Ürün tüm Avrupa Birliği üye ülkeleri için geçerli olan ilgili tüm
yönetmelikler ve yönergelere uygun olarak üretilmiş ve tedarik
edilmiştir. Ürün satıldığı ülkedeki tüm geçerli şartnameler ve
yönetmeliklere uygundur.
Talep edilmesi durumunda resmi belgeler sunulabilir. Resmi belgeler
arasında örneğin Uygunluk Beyanı, Malzeme Güvenliği Veri Sayfası
ve ürün test raporu yer almaktadır.
Feragatname
Tasarımlar ve özellikler önceden bildirimde bulunulmaksızın
değiştirilebilir. Tüm logolar, markalar ve ürün adları ticari markalardır
veya ilgili sahiplerinin kayıtlı ticari markalarıdır ve bu şekilde ele
alınmaktadır.
39
Page 40

T: +31 (0)73-5993965
E: service@nedis.com
W: http://www.nedis.com/en-us/contact/contact-form.htm
NEDIS B.V.
De Tweeling 28
5215 MC ’s-Hertogenbosch
THE NETHERLANDS
 Loading...