

Konig SAS-IPCAM180W1, SAS-IPCAM360W1 User Manual

SAS-IPCAM180W1
SAS-IPCAM360W1
IP Camera
USER MANUAL (EN)
GEBRUIKSAANWIJZING (NL)
BEDIENUNGSANLEITUNG (DE)
MANUAL DE USUARIO (ES)
MANUEL DE L’UTILISATEUR (FR)
MANUALE PER L’UTENTE (IT)
MANUAL DO UTILIZADOR (PT)
BRUGSVEJLEDNING (DA)
BRUKERVEILEDNING (NO)
BRUKSANVISNING (SV)
KÄYTTÖOPAS (FI)
ΕΓΧΕΙΡΙΔΙΟ XPHΣHΣ (EL)
INSTRUKCJA OBSŁUGI (PL)
NÁVOD K POUŽITÍ (CS)
HASZNÁLATI ÚTMUTATÓ (HU)
MANUAL DE UTILIZARE (RO)
РУКОВОДСТВО ПОЛЬЗОВАТЕЛЯ (RU)
KULLANIM KILAVUZU (TR)
2
5
7
2
3
4
1
6
8
2
4
7
3
10
TOP
Reset
9
1
5
8
6
9
8
7
6
2
1
3
4
5
2
3
5
4
6
1
A
B
C D


4
SAS-IPCAM180W1 / SAS-IPCAM360W1
IP camera
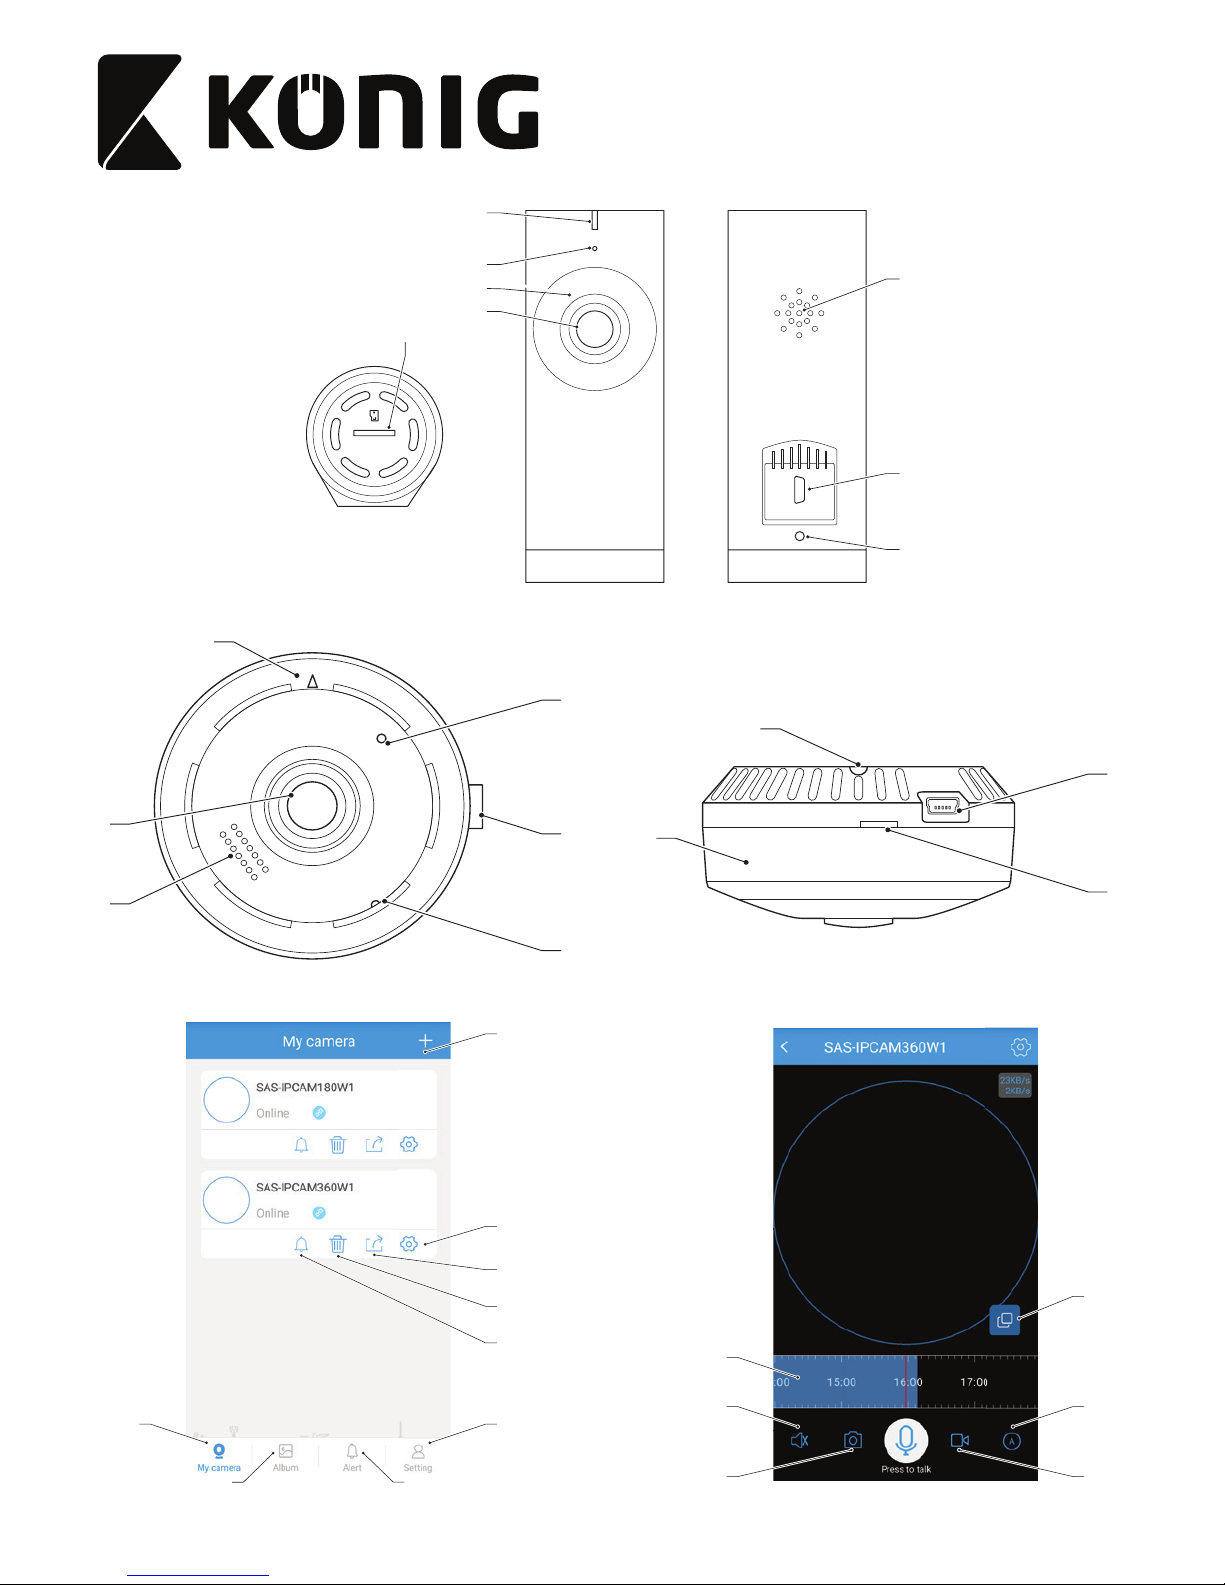
Description (g. A and B)
1. Lens
2. Reset button
• Use a paper clip to press and hold the button for 5
seconds to reset the device to the default settings.
3. LED indicators
(red and green)
• The device is on: The red LED indicator stays on.
• Waiting for Wi-Fi password: The red LED indicator
ashes.
• Connecting to the internet: The green LED
indicator stays on.
• The device is in standby mode: The green LED
indicator ashes.
4. Microphone
5. Speaker
6. Memory card slot
(microSD / TransFlash)
• Insert the memory card in the memory card slot
(storage).
7. USB port
(Micro USB)
• Connect the device to the USB port using the USB
charger to power the device.
8. IR light
• The IR light switches on automatically to record
videos in the dark.
9. Magnet
• The magnet and the metal plate (included)
enables easy installation.
10. Direction indicator
• When installing vertically, use the “TOP“ mark to
install the device in the correct direction.
Use
1. Download and install the app from Apple App Store or Google
Play Store on your mobile device by searching “360Eyes“.
2. Insert the memory card in the memory card slot.
3. Power the camera using the USB port and charger.
4. Launch the “360Eyes” app.
5. Create a new account.
6. Connect your smartphone to the preferred Wi-Fi network.
Note: The DHCP in the router must be enabled.
7. Tap the “+“ button to add a camera. Wait until the red LED
indicator starts ashing.
8. Enter the Wi-Fi password.
9. Increase the volume of your smartphone and hold it close to the
device to send Wi-Fi instructions to the device.
10. When the device completes receiving the instructions, select
“Next“.
11. Wait until the green LED indicator on the device starts ashing
and the device is ready.
Main interface (g. C)
1. Add camera
2. Camera settings
3. Share camera
4. Delete camera
5. Enable/disable alerts
6. Account and app settings
7. Alerts and alerts settings
8. Local album
9. Cameras
Camera interface (g. D)
1. Change layout
2. Quality settings
3. Record videos on phone
4. Take photos on phone
5. Mute button
6. Timeline with highlighted recorded history
Technical data
SAS-IPCAM180W1 SAS-IPCAM360W1
Image sensor
1/4” progressive scan
CMOS
1/3” progressive scan
CMOS
CPU GM8135S + SC1045 GM8135 + SC1035
Video resolution 1280 x 720 1280 x 960
Video frame rate 25 fps 25 fps
Video format H.264 H.264
Audio input Built-in microphone Built-in microphone
Audio format G.766 G.711
Remote control Supported Supported
Lens 1.44 mm;185°; sheye lens 1.44 mm; 185°; sheye lens
Angle Horizontal 185° Pan 360° top view
IR-CUT Night vision 10 m Night vision 10 m
Memory card Maximum 128 GB Maximum 128 GB
Protocol
TCP/UDP / IP / SMTP / FTP /
DHCP / UPNP / NTP
TCP/UDP / IP / SMTP / FTP /
DHCP / UPNP / NTP
Power 5 V / 1 A 5 V / 1 A
Consumption < 5 W < 5 W
Temperature 0 °C ~ 60 °C 0 °C ~ 60 °C
5
English
Safety
• To reduce risk of electric shock, this product should only be
opened by an authorized technician when service is required.
• Disconnect the product from the mains and other equipment if
a problem should occur.
• Read the manual carefully before use. Keep the manual for
future reference.
• Only use the device for its intended purposes. Do not use the
device for other purposes than described in the manual.
• Do not use the device if any part is damaged or defective. If the
device is damaged or defective, replace the device immediately.
• The device is suitable for indoor use only. Do not use the device
outdoors.
• Do not expose the product to water or moisture.
Cleaning and maintenance
Warning!
• Do not use cleaning solvents or abrasives.
• Do not clean the inside of the device.
• Do not attempt to repair the device. If the device does not
operate correctly, replace it with a new device.
• Clean the outside of the device using a soft, damp cloth.
Warranty
Any changes and/or modications to the product will void the
warranty. We cannot accept any liability for damage caused by
incorrect use of the product.
Disposal
• The product is designated for separate collection at an
appropriate collection point. Do not dispose of the product with
household waste.
• For more information, contact the retailer or the local authority
responsible for waste management.
Documents
The product has been manufactured and supplied in compliance
with all relevant regulations and directives, valid for all member
states of the European Union. The product complies with all
applicable specications and regulations in the country of sales.
Formal documentation is available upon request. The formal
documentation includes, but is not limited to the Declaration of
Conformity, the Material Safety Data Sheet and the product test
report.
Disclaimer
Designs and specications are subject to change without notice. All
logos, brands and product names are trademarks or registered
trademarks of their respective holders and are hereby recognized as
such.

6
SAS-IPCAM180W1 / SAS-IPCAM360W1
IP-camera
Beschrijving (g. A en B)
1. Lens
2. Resetknop
• Druk de knop met een paperclip in en houd deze
5 seconden ingedrukt om het apparaat naar de
standaardinstellingen te resetten.
3. LED-indicatoren
(rood en groen)
• Het apparaat is ingeschakeld: De rode
LED-indicator blijft branden.
• Wacht op het wi-wachtwoord: De rode
LED-indicator knippert.
• Verbinding maken met internet: De groene
LED-indicator blijft branden.
• Het apparaat staat in de stand-by-modus: De
groene LED-indicator knippert.
4. Microfoon
5. Speaker
6. Geheugenkaartsleuf
(microSD / TransFlash)
• Plaats de geheugenkaart in de
geheugenkaartsleuf (opslag).
7. USB-poort
(Micro-USB)
• Sluit het apparaat op de USB-poort aan en voorzie
het apparaat via de USB-oplader van stroom.
8. IR-lamp
• De IR-lamp schakelt automatisch in voor het
maken van video-opnames in het donker.
9. Magneet
• De magneet en de metalen plaat (inbegrepen)
maken eenvoudige installatie mogelijk.
10. Richtingindicator
• Gebruik bij verticale installatie de markering “TOP“
om het apparaat in de juiste richting te installeren.
Gebruik
1. Download en installeer de app uit de Apple App Store of Google
Play Store op uw mobiele apparaat door naar “360Eyes” te
zoeken.
2. Plaats de geheugenkaart in de geheugenkaartsleuf.
3. Voorzie de camera via de USB-poort en de oplader van stroom.
4. Start de “360Eyes” app op.
5. Maak een nieuw account aan.
6. Sluit uw smartphone op het wi-netwerk van uw keuze aan.
Opmerking: De DHCP in de router moet zijn ingeschakeld.
7. Tip de knop “+“ aan om een camera toe te voegen. Wacht tot de
rode LED-indicator begint te knipperen.
8. Voer het wi-wachtwoord in.
9. Verhoog het volume van uw smartphone en houd deze dicht in
de buurt van het apparaat om wi-instructies naar het apparaat
te sturen.
10. Selecteer nadat het apparaat de instructies heeft ontvangen
“Next“.
11. Wacht tot de groene LED-indicator op het apparaat gaat
knipperen en het apparaat gereed is.
Hoofdinterface (g. C)
1. Camera toevoegen
2. Camera-instellingen
3. Camera delen
4. Camera wissen
5. Alarmen inschakelen/uitschakelen
6. Instellingen voor account en app
7. Alarmen en alarminstellingen
8. Lokaal album
9. Camera’s
Camera-interface (g. D)
1. Lay-out wijzigen
2. Kwaliteitsinstellingen
3. Op de telefoon video opnemen
4. Op de telefoon foto’s maken
5. Dempknop
6. Tijdlijn met gemarkeerde opnamegeschiedenis
Technische gegevens
SAS-IPCAM180W1 SAS-IPCAM360W1
Beeldsensor
1/4” progressieve scan
CMOS
1/3” progressieve scan
CMOS
CPU GM8135S + SC1045 GM8135 + SC1035
Beeldresolutie 1280 x 720 1280 x 960
Beeldframesnelheid 25 fps 25 fps
Videoformat H.264 H.264
Audio-ingang Ingebouwde microfoon Ingebouwde microfoon
Audioformat G.766 G.711
Afstandsbediening Ondersteund Ondersteund
Lens 1,44 mm;185°; visooglens 1,44 mm; 185°; visooglens
Hoek Horizontaal 185° Pan 360° bovenaanzicht
IR-CUT Nachtzicht 10 m Nachtzicht 10 m
Geheugenkaart Maximum 128 GB Maximum 128 GB
Protocol
TCP/UDP / IP / SMTP / FTP /
DHCP / UPNP / NTP
TCP/UDP / IP / SMTP / FTP /
DHCP / UPNP / NTP
Voeding 5 V / 1 A 5 V / 1 A
Verbruik < 5 W < 5 W
Temperatuur 0 °C ~ 60 °C 0 °C ~ 60 °C

7
Nederlands
Veiligheid
• Om het risico op elektrische schokken te verkleinen, mag dit
product voor onderhoud uitsluitend door een erkend technicus
worden geopend.
• Koppel het product los van het stopcontact en van andere
apparatuur als er zich problemen voordoen.
• Lees voor gebruik de handleiding zorgvuldig door. Bewaar de
handleiding voor latere raadpleging.
• Gebruik het apparaat uitsluitend voor de beoogde doeleinden.
Gebruik het apparaat niet voor andere doeleinden dan
beschreven in de handleiding.
• Gebruik het apparaat niet als een onderdeel beschadigd of
defect is. Vervang een beschadigd of defect apparaat
onmiddellijk.
• Het apparaat is uitsluitend geschikt voor gebruik binnenshuis.
Gebruik het apparaat niet buitenshuis.
• Stel het product niet bloot aan water of vocht.
Reiniging en onderhoud
Waarschuwing!
• Gebruik geen reinigingsmiddelen of schuurmiddelen.
• Reinig niet de binnenzijde van het apparaat.
• Probeer het apparaat niet te repareren. Indien het apparaat niet
juist werkt, vervang het dan door een nieuw apparaat.
• Reinig de buitenzijde van het apparaat met een zachte, vochtige
doek.
Garantie
Eventuele wijzigingen en/of aanpassingen aan het product zullen
de garantie ongeldig maken. Wij aanvaarden geen aansprakelijkheid
voor schade veroorzaakt door onjuist gebruik van het product.
Afvoeren
• Het product is bestemd voor gescheiden inzameling bij een
hiertoe aangewezen verzamelpunt. Werp het product niet weg
bij het huishoudelijk afval.
• Neem voor meer informatie contact op met de detailhandelaar
of de lokale overheid die verantwoordelijk is voor het
afvalbeheer.
Documenten
Het product is vervaardigd en geleverd in overeenstemming met de
relevante reglementen en richtlijnen die voor alle lidstaten van de
Europese Unie gelden. Het product voldoet aan alle van toepassing
zijnde specicaties en reglementen in het land van verkoop.
Ociële documentatie is op aanvraag verkrijgbaar. De ociële
documentatie omvat, maar is niet beperkt tot de Verklaring van
Overeenstemming, de Material Safety Data Sheet en het
producttestrapport.
Disclaimer
Ontwerpen en specicaties kunnen zonder kennisgeving worden
gewijzigd. Alle logo’s, merken en productnamen zijn handelsmerken
of geregistreerde handelsmerken van de respectievelijke eigenaren
en worden hierbij als zodanig erkend.

8
SAS-IPCAM180W1 / SAS-IPCAM360W1
IP-Kamera
Beschreibung (Abb. A und B)
1. Objektiv
2. Reset-Taste
• Drücken Sie die Taste 5 Sekunden lang mit einer
Büroklammer, um das Gerät auf die
Werkeinstellungen zurückzusetzen.
3. LED-Anzeigen
(rot und grün)
• Das Gerät ist eingeschaltet: Die rote LED-Anzeige
leuchtet.
• Warten auf das Wi-Fi-Passwort: Die rote
LED-Anzeige blinkt.
• Verbindung mit dem Internet: Die grüne
LED-Anzeige leuchtet.
• Das Gerät bendet sich im Standby-Modus: Die
grüne LED-Anzeige blinkt.
4. Mikrofon
5. Lautsprecher
6. Speicherkartenschlitz
(MikroSD / TransFlash)
• Setzen Sie die Speicherkarte in den
Speicherkartenschlitz ein (zum Speichern).
7. USB-Anschluss
(Micro USB)
• Verbinden Sie das Gerät über ein USB-Ladegerät
mit dem USB-Port, um das Gerät zu betreiben.
8. IR-Lampe
• Mit der IR-Lampe ist es möglich, Videos im
Dunkeln automatisch aufzunehmen.
9. Magnet
• Der Magnet und die Metallplatte (beiliegend)
machen die Installation leicht.
10. Richtungsanzeige
• Bei der vertikalen Installation verwenden Sie die
Markierung "OBEN", um das Gerät in der richtigen
Richtung zu installieren.
Gebrauch
1. Laden Sie die App vom Apple App Store oder Google Play Store
auf Ihr Mobilgerät herunter und installieren Sie sie, indem Sie
“360Eyes” suchen.
2. Setzen Sie die Speicherkarte in den Speicherkartenschlitz ein.
3. Betreiben Sie die Kamera über den USB-Port und ein Ladegerät.
4. Starten Sie die App “360Eyes”.
5. Erstellen Sie ein neues Konto.
6. Verbinden Sie Ihr Smartphone mit dem bevorzugten
Wi-Fi-Netzwerk.
Hinweis: DHCP muss in Ihrem Router aktiviert sein.
7. Tippen Sie auf die Taste “+“, um eine Kamera hinzuzufügen.
Warten Sie, bis die rote LED-Anzeige anfängt, zu blinken.
8. Geben Sie das Wi-Fi-Passwort ein.
9. Erhöhen Sie die Lautstärke Ihres Smartphones und halten Sie es
nahe an das Gerät, um die Wi-Fi-Anweisungen an das gerät zu
übermitteln.
10. Wenn das Gerät die Anweisungen vollständig erhalten hat,
wählen Sie “Next“.
11. Warten Sie, bis die grüne LED-Anzeige an dem Gerät zu blinken
beginnt und das Gerät bereit ist.
Hauptoberäche (Abb. C)
1. Kamera hinzufügen
2. Kameraeinstellungen
3. Kamera teilen
4. Kamera löschen
5. Alarme aktivieren/deaktivieren
6. Konto- und App-Einstellungen
7. Alarme und Alarmeinstellungen
8. Lokales Album
9. Kameras
Kameraoberäche (Abb. D)
1. Layout ändern
2. Qualitätseinstellungen
3. Videos auf dem Handy aufnehmen
4. Fotos auf dem Handy machen
5. Stummschalttaste
6. Timeline mit markiertem aufgezeichnetem Verlauf
Technische Daten
SAS-IPCAM180W1 SAS-IPCAM360W1
Bildsensor
1/4” progressiver Scan
CMOS
1/3” progressiver Scan
CMOS
CPU GM8135S + SC1045 GM8135 + SC1035
Video-Auösung 1280 x 720 1280 x 960
Videobildfrequenz 25 fps 25 fps
Videoformat H.264 H.264
Audioeingang Eingebautes Mikrofon Eingebautes Mikrofon
Audioformat G.766 G.711
Fernbedienung Unterstützt Unterstützt
Objektiv
1,44 mm;185°;
Fischaugenlinse
1,44 mm; 185°;
Fischaugenlinse
Winkel Horizontal 185° Schwenken 360° Draufsicht
IR-CUT Nachtsicht 10 m Nachtsicht 10 m
Speicherkarte Maximum 128 GB Maximum 128 GB
Protokoll
TCP/UDP / IP / SMTP / FTP /
DHCP / UPNP / NTP
TCP/UDP / IP / SMTP / FTP /
DHCP / UPNP / NTP
Betrieb 5 V / 1 A 5 V / 1 A
Verbrauch < 5 W < 5 W
Temperatur 0 °C ~ 60 °C 0 °C ~ 60 °C
9
Deutsch
Sicherheit
• Um die Gefahr eines elektrischen Schlags zu verringern, sollte
dieses Produkt bei erforderlichen Servicearbeiten ausschließlich
von einem autorisierten Techniker geönet werden.
• Bei Problemen trennen Sie das Gerät bitte von der
Spannungsversorgung und von anderen Geräten.
• Lesen Sie die Bedienungsanleitung vor dem Gebrauch genau
durch. Bitte bewahren Sie die Bedienungsanleitung zur späteren
Bezugnahme auf.
• Verwenden Sie das Gerät nur bestimmungsgemäß. Verwenden
Sie das Gerät nur für den in dieser Bedienungsanleitung
beschriebenen Zweck.
• Verwenden Sie das Gerät nicht, falls ein Teil beschädigt oder
defekt ist. Ist das Gerät beschädigt oder defekt, erneuern Sie es
unverzüglich.
• Das Gerät eignet sich nur zur Verwendung in Innenräumen.
Verwenden Sie das Gerät nicht im Freien.
• Setzen Sie das Gerät keinem Wasser und keiner Feuchtigkeit aus.
Reinigung und Pege
Warnung!
• Verwenden Sie keine Lösungs- oder Scheuermittel.
• Reinigen Sie das Gerät nicht von innen.
• Versuchen Sie nicht, das Gerät zu reparieren. Falls das Gerät
nicht einwandfrei arbeitet, tauschen Sie es gegen ein neues aus.
• Reinigen Sie das Äußere des Geräts mit einem weichen feuchten
Tuch.
Garantie
Alle Änderungen und/oder Modizierungen an dem Produkt haben
ein Erlöschen der Garantie zur Folge. Wir übernehmen keine
Haftung für Schäden durch unsachgemäße Verwendung des
Produkts.
Entsorgung
• Dieses Produkt muss an einer entsprechenden Sammelstelle zur
Entsorgung abgegeben werden. Entsorgen Sie das Produkt
nicht mit dem Haushaltsabfall.
• Weitere Informationen erhalten Sie beim Verkäufer oder der für
die Abfallwirtschaft verantwortlichen örtlichen Behörde.
Dokumente
Dieses Produkt wurde in Übereinstimmung mit allen geltenden
Vorschriften und Richtlinien hergestellt und geliefert, die für alle
Mitgliedsstaaten der Europäischen Union gültig sind. Das Produkt
entspricht allen geltenden Spezikationen und Bestimmungen im
Land des Vertriebs.
Eine formale Dokumentation ist auf Anfrage erhältlich. Die formale
Dokumentation beinhaltet die Konformitätserklärung, das
Datenblatt zur Materialsicherheit und den Produktprüfbericht, ohne
jedoch darauf beschränkt zu sein.
Haftungsausschluss
Design und technische Daten unterliegen unangekündigten
Änderungen. Alle Logos, Marken und Produktnamen sind Marken
oder eingetragene Marken ihrer jeweiligen Eigentümer und werden
hiermit als solche anerkannt.

10
SAS-IPCAM180W1 / SAS-IPCAM360W1
Cámara IP
Descripción (g. A y B)
1. Lente
2. Botón de reinicio
• Utilice un clip de papel para presionar y mantener
presionado el botón durante 5 segundos para
restablecer el dispositivo a la conguración
predeterminada.
3. Indicadores LED
(rojo y verde)
• El dispositivo está encendido: El indicador LED
rojo permanece encendido.
• Esperando contraseña Wi-Fi: El indicador LED rojo
parpadea.
• Conectando a Internet: El indicador LED verde
permanece encendido.
• El dispositivo se encuentra en modo de espera: El
indicador LED verde parpadea.
4. Micrófono
5. Altavoz
6. Ranura de tarjeta de
memoria
(microSD / TransFlash)
• Inserte la tarjeta de memoria en la ranura de
tarjeta de memoria (almacenamiento).
7. Puerto USB
(Micro USB)
• Conecte el dispositivo al puerto USB utilizando el
cargador USB para alimentar el dispositivo.
8. Luz IR
• La luz IR se enciende automáticamente y permite
grabar vídeo en la oscuridad.
9. Imán
• El imán y la placa metálica (se incluye) facilitan la
instalación.
10. Indicador de dirección
• Cuando se instala en vertical, utilice la marca
“TOP“ para instalar el dispositivo en la dirección
correcta.
Uso
1. Descargue e instale la aplicación de Apple App Store o Google
Play Store en su dispositivo móvil buscando las palabras clave
“360Eyes“.
2. Inserte la tarjeta de memoria en la ranura de tarjeta de memoria
(almacenamiento).
3. Alimente la cámara con el puerto USB y el cargador.
4. Lance la aplicación “360Eyes”.
5. Cree una nueva cuenta.
6. Conecte su smartphone a la red Wi-Fi de su preferencia.
Nota: El DHCP en el router debe deshabilitarse.
7. Toque el botón “+“ para agregar una cámara. Espere hasta que
el indicador LED rojo empiece a parpadear.
8. Introduzca la contraseña Wi-Fi.
9. Aumente el volumen de su smartphone y acérquelo al
dispositivo para enviar instrucciones Wi-Fi al dispositivo.
10. Cuando el dispositivo deje de recibir instrucciones, seleccione
“Next“.
11. Espere hasta que el indicador LED verde del dispositivo empiece
a parpadear y el dispositivo esté listo.
Interfaz principal (g. C)
1. Agregar cámara
2. Ajustes de cámara
3. Compartir cámara
4. Eliminar cámara
5. Activar/desactivar alertas
6. Ajustes de cuenta y aplicación
7. Alertas y ajustes de alertas
8. Álbum local
9. Cámaras
Interfaz de cámara (g. D)
1. Cambiar diseño
2. Ajustes de calidad
3. Grabar vídeos en teléfono
4. Tomar fotos en teléfono
5. Botón Silencio
6. Línea de tiempo con historial de grabación resaltado
Datos técnicos
SAS-IPCAM180W1 SAS-IPCAM360W1
Sensor de imagen
1/4” de barrido progresivo
CMOS
1/3” de barrido progresivo
CMOS
CPU GM8135S + SC1045 GM8135 + SC1035
Resolución de vídeo 1280 x 720 1280 x 960
Velocidad de
fotogramas
25 fps 25 fps
Formato de vídeo H.264 H.264
Entrada de audio Micrófono integrado Micrófono integrado
Formato de audio G.766 G.711
Mando a distancia Compatible Compatible
Lente
1,44 mm; 185°; objetivo de
ojo de pez
1,44 mm; 185°; objetivo de
ojo de pez
Ángulo Horizontal 185°
Vista superior panorámica
de 360°
IR-CUT Visión nocturna 10 m Visión nocturna 10 m
Tarjeta de memoria Máximo 128 GB Máximo 128 GB
Protocolo
TCP/UDP / IP / SMTP / FTP /
DHCP / UPNP / NTP
TCP/UDP / IP / SMTP / FTP /
DHCP / UPNP / NTP
Alimentación 5 V / 1 A 5 V / 1 A
Consumo < 5 W < 5 W
Temperatura: 0 °C ~ 60 °C 0 °C ~ 60 °C
11
Español
Seguridad
• Para reducir el peligro de descarga eléctrica, este producto sólo
debería abrirlo un técnico autorizado cuando necesite
reparación.
• Desconecte el producto de la toma de corriente y de los otros
equipos si ocurriera algún problema.
• Lea el manual detenidamente antes del uso. Conserve el manual
en caso de futura necesidad.
• Utilice el dispositivo únicamente para su uso previsto. No utilice
el dispositivo con una nalidad distinta a la descrita en el
manual.
• No utilice el dispositivo si alguna pieza ha sufrido daños o tiene
un defecto. Si el dispositivo ha sufrido daños o tiene un defecto,
sustitúyalo inmediatamente.
• El dispositivo sólo es apto para uso en interiores. No utilice el
dispositivo en exteriores.
• No exponga el producto al agua ni a la humedad.
Limpieza y mantenimiento
¡Advertencia!
• No utilice disolventes de limpieza ni productos abrasivos.
• No limpie el interior del dispositivo.
• No intente reparar el dispositivo. Si el dispositivo no funciona
correctamente, sustitúyalo por uno nuevo.
• Limpie el exterior del dispositivo con un paño suave
humedecido.
Garantía
Cualquier cambio y/o modicación del producto anulará la garantía.
No podemos asumir ninguna responsabilidad por ningún daño
debido a un uso incorrecto del producto.
Eliminación
• El producto está diseñado para desecharlo por separado en un
punto de recogida adecuado. No se deshaga del producto con
la basura doméstica.
• Para obtener más información, póngase en contacto con el
vendedor o la autoridad local responsable de la eliminación de
residuos.
Documentos
El producto se ha fabricado y distribuido de conformidad con todas
las normativas y directivas relevantes, válidas para todos los estados
de la Unión Europea. El producto también cumple con todas las
especicaciones y normativas en el país en el cual se comercializa.
Previa solicitud, podremos proporcionarle la documentación formal.
La documentación formal incluye, sin limitación, la declaración de
conformidad, la hoja de datos de seguridad del material y el informe
sobre las pruebas realizadas al producto.
Renuncia de responsabilidad legal
Las ilustraciones y las especicaciones podrán sufrir cambios sin
previo aviso. Todas las marcas de logotipos y nombres de productos
constituyen patentes o marcas registradas a nombre de sus titulares
correspondientes, reconocidos como tal.

12
SAS-IPCAM180W1 / SAS-IPCAM360W1
Caméra IP
Description (g. A et B)
1. Objectif
2. Bouton de
réinitialisation
• Utilisez un trombone pour appuyer sur le bouton
sans le relâcher pendant 5 secondes an de
restaurer les réglages par défaut de l'appareil.
3. Indicateurs DEL
(rouge et vert)
• L'appareil est allumé : L'indicateur DEL rouge reste
allumé.
• Attente de mot de passe Wi-Fi : L'indicateur DEL
rouge clignote.
• Connexion à Internet L'indicateur DEL vert reste
allumé.
• L'appareil est en mode veille : L'indicateur DEL vert
clignote.
4. Microphone
5. Haut-parleur
6. Logement de carte
mémoire
(microSD / TransFlash)
• Insérez la carte mémoire dans le logement prévu
(stockage).
7. Port USB
(Micro USB)
• Connectez l'appareil au port USB avec le chargeur
USB pour alimenter l'appareil.
8. Lampe infrarouge
• La lampe infrarouge s'allume automatiquement
pour les enregistrements vidéo dans l'obscurité.
9. Aimant
• L'aimant et la plaque métallique (inclus) facilitent
l'installation.
10. Indicateur de sens
• Pour une installation à la verticale, utilisez la
marque "HAUT" pour installer l'appareil dans le
bon sens.
Usage
1. Téléchargez et installez l’app depuis l’Apple App Store ou
Google Play Store sur votre dispositif mobile en cherchant
“360Eyes”.
2. Insérez la carte mémoire dans le logement prévu.
3. Alimentez la caméra avec le port et le chargeur USB.
4. Lancez l’app “360Eyes”.
5. Créez un nouveau compte.
6. Connectez votre smartphone à votre réseau Wi-Fi préféré.
Remarque: Le DHCP du routeur doit être activé.
7. Touchez le bouton ‘+’ pour ajouter une caméra. Attendez que
l’indicateur LED rouge commence à clignoter.
8. Saisissez le mot de passeWi-Fi.
9. Augmentez le volume de votre smartphone et tenez-le à
proximité de l’appareil pour l’envoi des instructions Wi-Fi à
l’appareil.
10. Dès que l’appareil a terminé de recevoir les instructions,
sélectionnez “Next”.
11. Attendez que l’indicateur LED vert sur l’appareil commence à
clignoter. L’appareil est alors prêt.
Interface principale (g. C)
1. Ajouter une caméra
2. Réglages de caméra
3. Partager une caméra
4. Supprimer une caméra
5. Activer /désactiver les alertes
6. Réglages de compte et d’app
7. Alertes et réglages d’alertes
8. Album local
9. Caméras
Interface de caméra (g. D)
1. Changer la mise en page
2. Réglages de qualité
3. Enregistrer vidéos sur téléphone
4. Prendre photos sur téléphone
5. Bouton silence
6. Chronologie avec historique d’enregistrement surligné
Caractéristiques techniques
SAS-IPCAM180W1 SAS-IPCAM360W1
Capteur d’image
CMOS 1/4” à balayage
progressif
CMOS 1/3” à balayage
progressif
Processeur GM8135S + SC1045 GM8135 + SC1035
Résolution vidéo 1280 x 720 1280 x 960
Vitesse
d'enregistrement
vidéo
25 fps 25 fps
Format vidéo H.264 H.264
Entrée audio Microphone intégré Microphone intégré
Format audio G.766 G.711
Télécommande Compatible Compatible
Objectif
1,44 mm ;185° ; objectif
sh-eye
1,44 mm ;185° ; objectif
sh-eye
Angle Horizontal 185° Pano 360° vue du dessus
IR-CUT Vision nocturne 10 m Vision nocturne 10 m
Carte mémoire Maximum 128 Go Maximum 128 Go
Protocole
TCP/UDP / IP / SMTP / FTP /
DHCP / UPNP / NTP
TCP/UDP / IP / SMTP / FTP /
DHCP / UPNP / NTP
Alimentation 5 V / 1 A 5 V / 1 A
Consommation < 5 W < 5 W
Température 0 °C ~ 60 °C 0 °C ~ 60 °C
 Loading...