

Page 1

SAS-HA100
Heat alarm
USER MANUAL
GEBRUIKSAANWIJZING
BEDIENUNGSANLEITUNG
MANUAL DE USUARIO
MANUEL DE L’UTILISATEUR
MANUALE PER L’UTENTE
MANUAL DO UTILIZADOR
BRUGSVEJLEDNING
BRUKERVEILEDNING
BRUKSANVISNING
KÄYTTÖOPAS
ΕΓΧΕΙΡΙΔΙΟ XPHΣHΣ
INSTRUKCJA OBSŁUGI
NÁVOD K POUŽITÍ
NÁVOD NA POUŽITIE
HASZNÁLATI ÚTMUTATÓ
MANUAL DE UTILIZARE
РУКОВОДСТВО ПОЛЬЗОВАТЕЛЯ
KULLANIM KILAVUZU
Page 2

2
English
SAS-HA100
Heat alarm
Description
The heat alarm was designed to detect heat. The heat alarm does not detect smoke or gas. Heat
alarms are intended to be supplementary to smoke alarms, located in areas where smoke alarms
cannot be used. The device is suitable for indoor use only.
If the device detects heat, the alarm will sound and the indicator will ash red continuously until the
heat is eliminated.
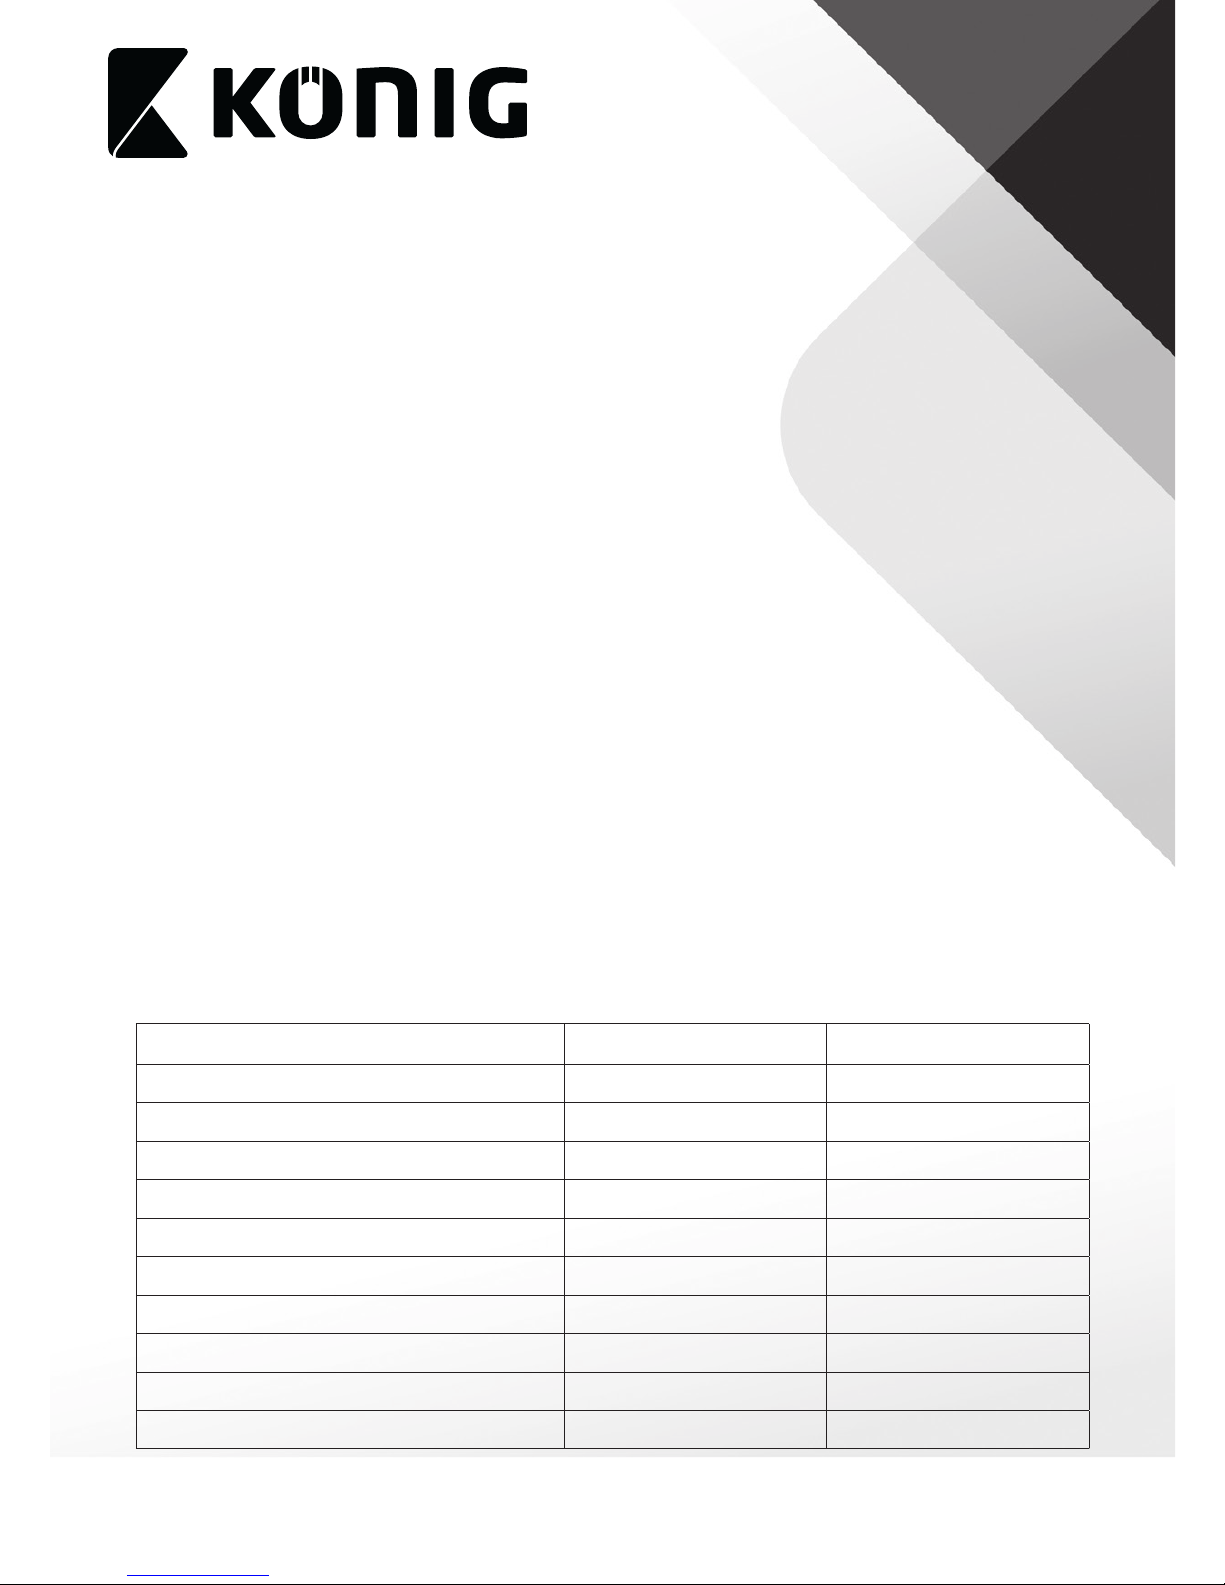
8
6
7
5
21 3
4
1. Heat alarm
2. Heat indicator
3. Test button
4. Ventilation openings
5. Battery compartment
6. Mounting plate
7. Screw
8. Plug
Page 3

3
English
Safety
• Read the manual carefully before use. Keep the manual for future reference.
• Only use the device for its intended purposes. Do not use the device for other purposes than
described in the manual.
• Do not use the device if any part is damaged or defective. If the device is damaged or defective,
replace the device immediately.
Installation
Warning!
• Do not use the device outdoors.
• Do not expose the device to water or moisture.
• Install the device out of the reach of children.
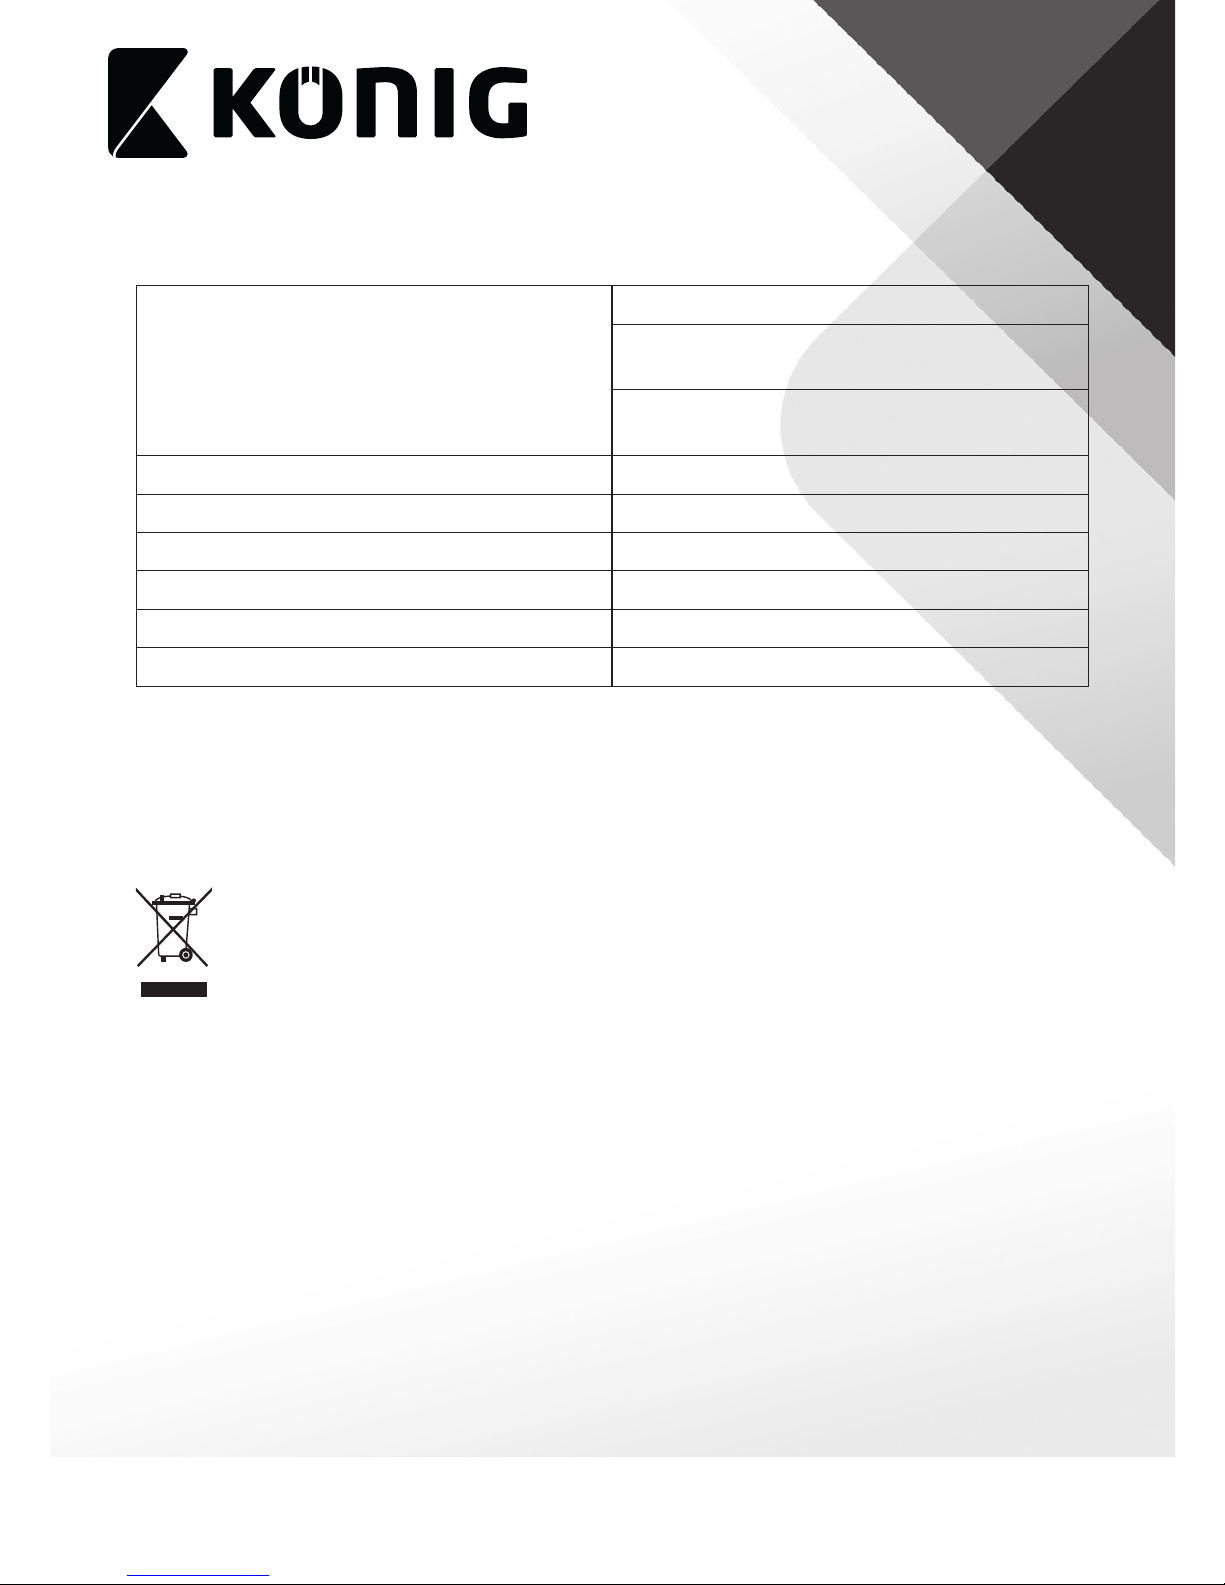
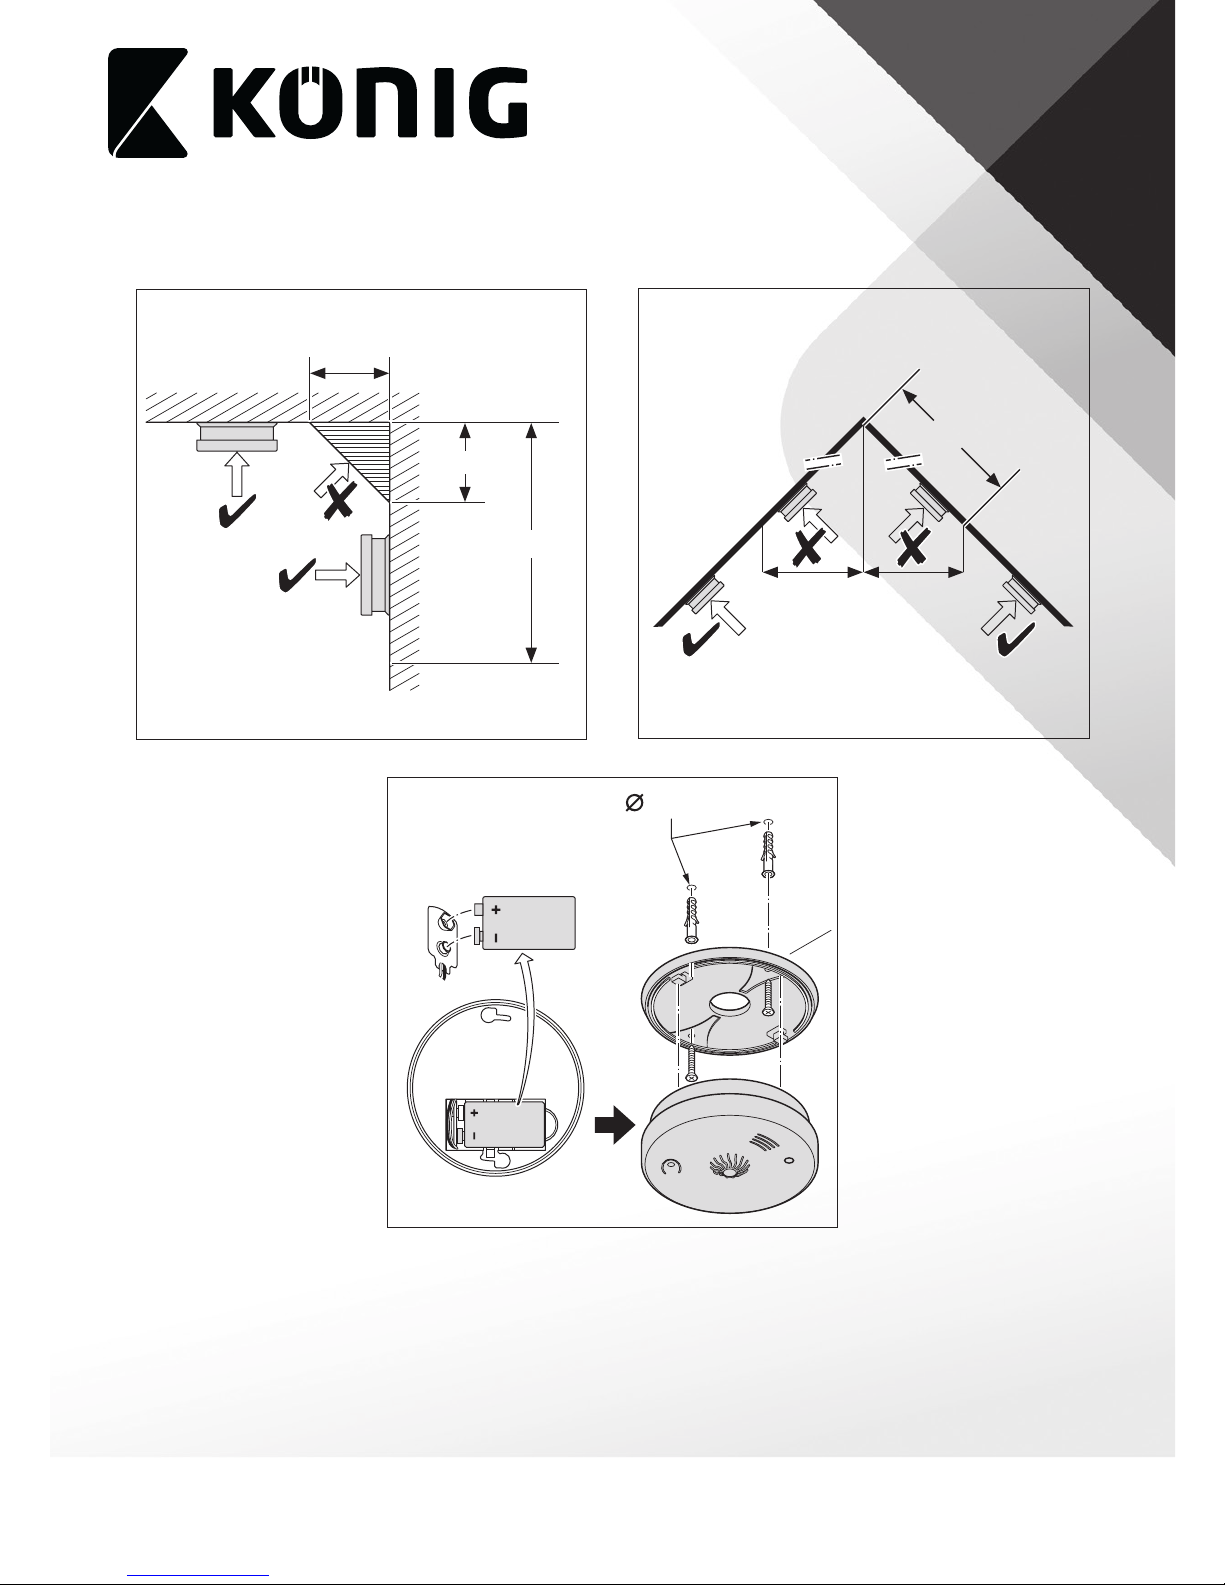
• Install at least one device at each oor level. Preferably install one device in each recommended area.
• Install the device in the bedroom or in the hallway adjacent to the bedroom. Make sure that you
can hear the alarm in all bedrooms. Install devices at both ends of the hallway or room if the
hallway or room is longer than 9 metres.
• Do not install the device in bathrooms, toilets or other rooms where the device can be triggered
by steam or condensation.
• Do not install the device in dusty or dirty environments.
• Do not install the device near radiators or air vents in walls or ceilings.
• Do not install the device near doors and windows.
• Do not install the device behind curtains or furniture.
• Do not block the ventilation openings.
• Do not paint the device.
Area Yes No
Living room X
Dining room X
Kitchen X
Bathroom / Toilet X
Bedroom X
Hallway X
Attic X
Basement X
Garage X
Boiler room X
Page 4

4
English
min.10 cm
min.10 cm
max. 30 cm
122 cm
90 cm 90 cm
5 mm
Page 5

5
English
Use
Heat indicator
1 Normal operation
The indicator will ash red once every
60seconds.
Action: ---
2 Heat detection
The alarm will sound and the indicator
will ash red continuously until the heat is
eliminated.
Action: Eliminate
the heat.
3 Low-battery warning
The alarm will beep and the indicator will ash
red once every 60seconds.
Action: Replace the
battery.
Testing the alarm
The alarm must be tested weekly to ensure correct operation.
1. Press and hold the test button for 3 seconds.
The alarm will sound and the indicator will ash red continuously until the test button is released.
Alarm sound: 3 short beeps, 2 seconds pause (repeated).
2. Release the test button.
Cleaning and maintenance
Warning!
• Do not use cleaning solvents or abrasives.
• Do not clean the inside of the device.
• Do not attempt to repair the device. If the device does not operate correctly, replace it with a new
device.
1. Replace the battery at least once a year or immediately when the device gives a low-battery
warning.
2. Clean the outside of the device at least once a month. Use a vacuum cleaner with brush nozzle to
clean the outside of the device.
Page 6

6
English
Technical data
Battery type
9V battery (PP3)
Alkaline battery:
6LR61 (IEC) / 1604A (ANSI/NEDA)
Zinc-carbon battery:
6F22 (IEC) / 1604D (ANSI/NEDA)
Battery life 1 year
Standby current < 30 μA
Alarm current < 30 mA
Alarm volume > 85 dB(A) (3 m)
Ambient temperature 4~44 °C
Relative humidity 25~85%
Warranty
Any changes and/or modications to the product will void the warranty. We cannot accept any
liability for damage caused by incorrect use of the product.
Disposal
• The product is designated for separate collection at an appropriate collection point. Do not
dispose of the product with household waste.
• For more information, contact the retailer or the local authority responsible for waste
management.
Page 7

7
English
Documentation
The product has been manufactured and supplied in compliance with all relevant regulations
and directives, valid for all member states of the European Union. The product complies with all
applicable specications and regulations in the country of sales.
Formal documentation is available upon request. The formal documentation includes, but is not
limited to the Declaration of Conformity, the Material Safety Data Sheet and the product test report.
Disclaimer
Designs and specications are subject to change without notice. All logos, brands and product
names are trademarks or registered trademarks of their respective holders and are hereby recognized
as such.
Page 8

8
Nederlands
SAS-HA100
Hittemelder
Omschrijving
De hittemelder is ontworpen om rook te detecteren. De hittemelder detecteert geen rook of gas.
Hittemelders zijn bedoeld als aanvulling op rookmelders, in ruimten waar rookmelders niet kunnen
worden gebruikt. Het apparaat is uitsluitend geschikt voor gebruik binnenshuis.
Indien het apparaat hitte detecteert, gaat het alarm af en knippert de indicator continu rood totdat
de hitte wordt geëlimineerd.
8
6
7
5
21 3
4
1. Hittemelder
2. Hitte-indicator
3. Testknop
4. Ventilatieopeningen
5. Batterijvak
6. Montageplaat
7. Schroef
8. Plug
Page 9
9
Nederlands
Veiligheid
• Lees de handleiding voor gebruik aandachtig door. Bewaar de handleiding voor latere
raadpleging.
• Gebruik het apparaat uitsluitend voor het beoogde doel. Gebruik het apparaat niet voor andere
doeleinden dan beschreven in de handleiding.
• Gebruik het apparaat niet als een onderdeel beschadigd of defect is. Indien een onderdeel
beschadigd of defect is, vervang het apparaat dan onmiddellijk.
Installatie
Waarschuwing!
• Gebruik het apparaat niet buitenshuis.
• Stel het apparaat niet bloot aan water of vocht.
• Installeer het apparaat buiten bereik van kinderen.
• Installeer minstens één apparaat op iedere verdieping. Installeer bij voorkeur één apparaat in
iedere aanbevolen ruimte.
• Installeer het apparaat in de slaapkamer of in de gang die aan de slaapkamer grenst. Zorg ervoor
dat u het alarm in alle slaapkamers kan horen. Installeer apparaten aan beide uiteinden van de
gang of kamer als de gang of kamer langer is dan 9 meter.
• Installeer het apparaat niet in badkamers, toiletten of andere ruimtes waar het apparaat kan
worden geactiveerd door stoom of condens.
• Installeer het apparaat niet in stoge of vieze omgevingen.
• Installeer het apparaat niet in de buurt van radiatoren of ventilatieroosters in muren of plafonds.
• Installeer het apparaat niet in de buurt van deuren en ramen.
• Installeer het apparaat niet achter gordijnen of meubels.
• Blokkeer de ventilatieopeningen niet.
• Schilder het apparaat niet.
Ruimte Ja Nee
Woonkamer X
Eetkamer X
Keuken X
Badkamer / Toilet X
Slaapkamer X
Gang X
Zolder X
Kelder X
Garage X
Boilerruimte X
Page 10

10
Nederlands
min.10 cm
min.10 cm
max. 30 cm
122 cm
90 cm 90 cm
5 mm
Page 11

11
Nederlands
Gebruik
Hitte-indicator
1 Normaal bedrijf
De indicator knippert iedere 60seconden
rood.
Actie: ---
2 Hittedetectie
Het alarm gaat af en de indicator knippert
continu rood totdat de hitte wordt
geëlimineerd.
Actie: Elimineer de
hitte.
3
Waarschuwing batterij
bijna leeg
Het alarm piept en de indicator knippert
iedere 60seconden rood.
Actie: Vervang de
batterij.
Het alarm testen
Het alarm moet wekelijks worden getest om de juiste werking te garanderen.
1. Houd de testknop gedurende 3 seconden ingedrukt.
Het alarm gaat af en de indicator knippert continu rood totdat het water wordt geëlimineerd.
Alarmgeluid: 3 korte piepjes, 2 seconden pauze (herhaald).
2. Laat de testknop los.
Reiniging en onderhoud
Waarschuwing!
• Gebruik geen reinigingsmiddelen of schuurmiddelen.
• Reinig niet de binnenzijde van het apparaat.
• Probeer het apparaat niet te repareren. Indien het apparaat niet juist werkt, vervang het dan door
een nieuw apparaat.
1. Vervang de batterij minstens één keer per jaar of onmiddellijk wanneer het apparaat aangeeft dat
de batterij bijna leeg is.
2. Reinig de buitenzijde van het apparaat minstens één keer per maand. Gebruik een stofzuiger met
borstelmondstuk om de buitenzijde van het apparaat te reinigen.
Page 12

12
Nederlands
Technische gegevens
Type batterij
9V-batterij (PP3)
Alkalinebatterij:
6LR61 (IEC) / 1604A (ANSI/NEDA)
Zink-koolstofbatterij:
6F22 (IEC) / 1604D (ANSI/NEDA)
Levensduur batterij 1 jaar
Stand-by-stroom < 30 μA
Alarmstroom < 30 mA
Alarmvolume > 85 dB(A) (3 m)
Omgevingstemperatuur 4~44 °C
Relatieve vochtigheid 25~85%
Garantie
Eventuele wijzigingen en/of aanpassingen aan het product zullen de garantie ongeldig maken. Wij
aanvaarden geen aansprakelijkheid voor schade veroorzaakt door onjuist gebruik van het product.
Afdanken
• Het product is bestemd voor gescheiden inzameling bij een hiertoe aangewezen verzamelpunt.
Werp het product niet weg bij het huishoudelijk afval.
• Neem voor meer informatie contact op met de detailhandelaar of de lokale overheid die
verantwoordelijk is voor het afvalbeheer.
Page 13

13
Nederlands
Documentatie
Het product is vervaardigd en geleverd in overeenstemming met de relevante reglementen en
richtlijnen die voor alle lidstaten van de Europese Unie gelden. Het product voldoet aan alle van
toepassing zijnde specicaties en reglementen in het land van verkoop.
Op aanvraag is ociële documentatie verkrijgbaar. De ociële documentatie omvat, maar
is niet beperkt tot de Verklaring van Overeenstemming, de Material Safety Data Sheet en het
producttestrapport.
Disclaimer
Ontwerpen en specicaties kunnen zonder kennisgeving worden gewijzigd. Alle logo’s, merken
en productnamen zijn handelsmerken of geregistreerde handelsmerken van de respectievelijke
eigenaren en worden hierbij als zodanig erkend.
Page 14
14
Deutsch
SAS-HA100
Hitzemelder
Beschreibung
Der Hitzemelder wurde zur Erkennung von Hitze konstruiert. Der Hitzemelder erkennt keinen
Rauch und kein Gas. Hitzemelder sind als Ergänzung zu Rauchmeldern gedacht und benden sich
in Bereichen, in denen Rauchmelder nicht verwendet werden können. Das Gerät eignet sich nur zur
Verwendung in Innenräumen.
Wenn das Gerät Hitze erkennt, ertönt der Alarm und die Anzeige blinkt kontinuierlich rot, bis die
Hitze beseitigt ist.
8
6
7
5
21 3
4
1. Hitzemelder
2. Hitzeanzeige
3. Prüftaste
4. Belüftungsönungen
5. Batteriefach
6. Montageplatte
7. Schraube
8. Dübel
Page 15

15
Deutsch
Sicherheit
• Lesen Sie die Bedienungsanleitung vor dem Gebrauch genau durch. Bitte bewahren Sie die
Bedienungsanleitung zur späteren Bezugnahme auf.
• Verwenden Sie das Gerät nur bestimmungsgemäß. Verwenden Sie das Gerät nur für den in dieser
Bedienungsanleitung beschriebenen Zweck.
• Verwenden Sie das Gerät nicht, falls ein Teil beschädigt oder defekt ist. Ist das Gerät beschädigt
oder defekt, erneuern Sie es unverzüglich.
Installation
Warnung!
• Verwenden Sie das Gerät nicht im Freien.
• Setzen Sie das Gerät keinem Wasser und keiner Feuchtigkeit aus.
• Installieren Sie das Gerät so, dass es für Kinder unzugänglich ist.
• Installieren Sie mindestens ein Gerät auf jedem Stockwerk. Installieren Sie möglichst ein Gerät in
jedem empfohlenen Bereich.
• Installieren Sie das Gerät im Schlafzimmer oder im Flur, der an das Schlafzimmer angrenzt. Stellen
Sie sicher, dass Sie den Alarm in allen Schlafzimmern hören können. Installieren Sie Geräte an
beiden Enden des Flurs oder Raums, falls der Flur oder Raum länger als 9 Meter ist.
• Installieren Sie das Gerät nicht in Badezimmern, Toiletten oder anderen Räumen, in denen es
durch Dampf oder Kondensation ausgelöst werden kann.
• Installieren Sie das Gerät nicht in staubigen oder schmutzigen Umgebungen.
• Installieren Sie das Gerät nicht in der Nähe von Radiatoren oder Be-/Entlüftungsönungen in
Wänden oder Decken.
• Installieren Sie das Gerät nicht in der Nähe von Türen oder Fenstern.
• Installieren Sie das Gerät nicht hinter Gardinen oder Möbeln.
• Blockieren Sie nicht die Lüftungsönungen.
• Lackieren Sie das Gerät nicht.
Bereich Ja Nein
Wohnzimmer X
Esszimmer X
Küche X
Badezimmer/Toilette X
Schlafzimmer X
Flur X
Dachgeschoss X
Keller X
Garage X
Heizungsraum X
Page 16

16
Deutsch
min.10 cm
min.10 cm
max. 30 cm
122 cm
90 cm 90 cm
5 mm
Page 17

17
Deutsch
Gebrauch
Hitzeanzeige
1 Normalbetrieb
Die Anzeige blinkt alle 60 Sekunden ein Mal
rot.
Handlung: ---
2 Hitzeerkennung
Der Alarm ertönt und die Anzeige blinkt
kontinuierlich rot, bis die Hitze beseitigt ist.
Handlung:
Beseitigen Sie die
Hitze.
3
Warnung - Batterie
schwach
Der Alarm ertönt und die Anzeige blinkt alle
60 Sekunden ein Mal rot.
Handlung: Erneuern
Sie die Batterie.
Prüfen des Alarms
Der Alarm muss wöchentlich geprüft werden, um die einwandfreie Funktion des Geräts
sicherzustellen.
1. Drücken und halten Sie die Prüftaste 3 Sekunden lang.
Der Alarm ertönt und die Anzeige blinkt kontinuierlich rot, bis die Prüftaste losgelassen wird.
Alarmton: 3 kurze Signaltöne, 2 Sekunden Pause (wiederholend).
2. Lassen Sie die Prüftaste los.
Reinigung und Pege
Warnung!
• Verwenden Sie keine Lösungs- oder Scheuermittel.
• Reinigen Sie das Gerät nicht von innen.
• Versuchen Sie nicht, das Gerät zu reparieren. Falls das Gerät nicht einwandfrei arbeitet, tauschen
Sie es gegen ein neues aus.
1. Erneuern Sie die Batterie mindestens einmal im Jahr oder dann, wenn signalisiert wird, dass die
Batterie schwach ist.
2. Reinigen Sie das Äußere des Geräts mindestens ein Mal im Monat. Verwenden Sie einen
Staubsauger mit einer Bürstendüse, um das Äußere des Geräts zu reinigen.
Page 18

18
Deutsch
Technische Daten
Batterietyp
9V Batterie (PP3)
Alkalische Batterie:
6LR61 (IEC) / 1604A (ANSI/NEDA)
Zink-Kohle-Batterie:
6F22 (IEC) / 1604D (ANSI/NEDA)
Batterielaufzeit 1 Jahr
Standby-Stromaufnahme < 30 μA
Alarm-Stromaufnahme < 30 mA
Alarm-Lautstärke > 85 dB(A) (3 m)
Umgebungstemperatur 4~44 °C
Relative Feuchtigkeit 25~85%
Garantie
Alle Änderungen und/oder Modizierungen an dem Produkt haben ein Erlöschen der Garantie zur
Folge. Wir übernehmen keine Haftung für Schäden durch unsachgemäße Verwendung des Produkts.
Entsorgung
• Dieses Produkt muss an einer entsprechenden Sammelstelle zur Entsorgung abgegeben werden.
Entsorgen Sie das Produkt nicht mit dem Haushaltsabfall.
• Weitere Informationen erhalten Sie beim Verkäufer oder der für die Abfallwirtschaft
verantwortlichen örtlichen Behörde.
Page 19

19
Deutsch
Dokumentation
Dieses Produkt wurde in Übereinstimmung mit allen geltenden Vorschriften und Richtlinien
hergestellt und geliefert, die für alle Mitgliedsstaaten der Europäischen Union gültig sind. Das
Produkt entspricht allen geltenden Spezikationen und Bestimmungen im Land des Vertriebs.
Eine formale Dokumentation ist auf Anfrage erhältlich. Die formale Dokumentation beinhaltet die
Konformitätserklärung, das Datenblatt zur Materialsicherheit und den Produktprüfbericht, ohne
jedoch darauf beschränkt zu sein.
Haftungsausschluss
Design und technische Daten unterliegen unangekündigten Änderungen. Alle Logos, Marken und
Produktnamen sind Marken oder eingetragene Marken ihrer jeweiligen Eigentümer und werden
hiermit als solche anerkannt.
Page 20

20
Español
SAS-HA100
Alarma de calor
Descripción
La alarma de calor se ha diseñado para detectar calor. La alarma de calor no detecta humo ni gas.
Las alarmas de calor son un complemento de las alarmas de humo y se sitúan en zonas donde no
pueden utilizarse las alarmas de humo. El dispositivo sólo es apto para uso en interiores.
Si el dispositivo detecta calor, la alarma sonará y el indicador parpadeará en rojo de forma continua
hasta que se elimine el calor.
8
6
7
5
21 3
4
1. Alarma de calor
2. Indicador de calor
3. Botón de prueba
4. Aberturas de ventilación
5. Compartimento de la batería
6. Placa de montaje
7. Tornillo
8. Enchufe
Page 21

21
Español
Seguridad
• Lea el manual detenidamente antes del uso. Conserve el manual en caso de futura necesidad.
• Utilice el dispositivo únicamente para su uso previsto. No utilice el dispositivo con una nalidad
distinta a la descrita en el manual.
• No utilice el dispositivo si alguna pieza ha sufrido daños o tiene un defecto. Si el dispositivo ha
sufrido daños o tiene un defecto, sustitúyalo inmediatamente.
Instalación
¡Advertencia!
• No utilice el dispositivo en exteriores.
• No exponga el dispositivo al agua ni a la humedad.
• Instale el dispositivo fuera del alcance de los niños.
• Instale al menos un dispositivo en cada planta. Preferiblemente, instale un dispositivo en cada
zona recomendada.
• Instale el dispositivo en el dormitorio o en el pasillo adyacente al dormitorio. Asegúrese de que
puede oír la alarma en todos los dormitorios. Instale dispositivos en ambos extremos del pasillo o
la habitación si mide más de 9 metros de longitud.
• No instale el dispositivo en baños, aseos u otras habitaciones donde el dispositivo pueda activarse
debido al vapor o a la condensación.
• No instale el dispositivo en entornos sucios o con polvo.
• No instale el dispositivo cerca de radiadores o ventilaciones de aire en paredes o techos.
• No instale el dispositivo cerca de puertas y ventanas.
• No instale el dispositivo detrás de cortinas o muebles.
• No bloquee las aberturas de ventilación.
• No pinte el dispositivo.
Zona Sí No
Salón X
Comedor X
Cocina X
Baño / aseo X
Dormitorio X
Pasillo X
Ático X
Planta baja X
Garaje X
Cuarto de calderas X
Page 22

22
Español
min.10 cm
min.10 cm
max. 30 cm
122 cm
90 cm 90 cm
5 mm
Page 23

23
Español
Uso
Indicador de calor
1
Funcionamiento
normal
El indicador parpadeará en rojo una vez cada
60 segundos.
Acción: ---
2 Detección de calor
La alarma sonará y el indicador parpadeará en
rojo de forma continua hasta que se elimine
el calor.
Acción: Elimine el
calor.
3
Advertencia de batería
baja
La alarma pitará y el indicador parpadeará en
rojo una vez cada 60segundos.
Acción: Cambie la
batería.
Pruebas de la alarma
La alarma debe probarse una vez a la semana para garantizar su correcto funcionamiento.
1. Pulse y mantenga pulsado el botón de prueba durante 3 segundos.
La alarma sonará y el indicador parpadeará en rojo de forma continua hasta que se suelte el botón
de prueba.
Sonido de alarma: 3 pitidos cortos, pausa de 2 segundos (se repite).
2. Suelte el botón de prueba.
Limpieza y mantenimiento
¡Advertencia!
• No utilice disolventes de limpieza ni productos abrasivos.
• No limpie el interior del dispositivo.
• No intente reparar el dispositivo. Si el dispositivo no funciona correctamente, sustitúyalo por uno
nuevo.
1. Sustituya la batería al menos una vez al año o inmediatamente cuando el dispositivo dé una
advertencia de batería baja.
2. Limpie el exterior del dispositivo al menos una vez al mes. Utilice un aspirador con una boquilla
con cepillo para limpiar el exterior del dispositivo.
Page 24
24
Español
Datos técnicos
Tipo de batería
Batería de 9V (PP3)
Batería alcalina:
6LR61 (IEC) / 1604A (ANSI/NEDA)
Batería de zinc-carbono:
6F22 (IEC) / 1604D (ANSI/NEDA)
Vida útil de las baterías 1 año
Corriente en espera < 30 μA
Corriente de alarma < 30 mA
Volumen de alarma > 85 dB(A) (3 m)
Temperatura ambiente 4~44 °C
Humedad relativa 25~85%
Garantía
Cualquier cambio y/o modicación del producto anulará la garantía. No podemos asumir ninguna
responsabilidad por ningún daño debido a un uso incorrecto del producto.
Eliminación
• El producto está diseñado para desecharlo por separado en un punto de recogida adecuado. No
se deshaga del producto con la basura doméstica.
• Para obtener más información, póngase en contacto con el vendedor o la autoridad local
responsable de la eliminación de residuos.
Page 25

25
Español
Documentación
El producto se ha fabricado y distribuido de conformidad con todas las normativas y directivas
relevantes, válidas para todos los estados de la Unión Europea. El producto también cumple con
todas las especicaciones y normativas en el país en el cual se comercializa.
Previa solicitud, podremos proporcionarle la documentación formal. La documentación formal
incluye, sin limitación, la declaración de conformidad, la hoja de datos de seguridad del material y el
informe sobre las pruebas realizadas al producto.
Renuncia de responsabilidad legal
Las ilustraciones y las especicaciones podrán sufrir cambios sin previo aviso. Todas las marcas de
logotipos y nombres de productos constituyen patentes o marcas registradas a nombre de sus
titulares correspondientes, reconocidos como tal.
Page 26

26
Français
SAS-HA100
Détecteur de chaleur
Description
Le détecteur de chaleur a été conçu pour détecter la chaleur. Le détecteur de chaleur ne détecte ni la
fumée ni le gaz. Les détecteurs de chaleur sont conçus pour remplacer les détecteurs de fumée dans
les zones où ces derniers sont inutilisables. L’appareil est conçu exclusivement pour une utilisation
en intérieur.
Si l’appareil détecte de la chaleur, l’alarme retentit et l’indicateur clignote en rouge sans arrêt jusqu’à
l’élimination de la chaleur.
8
6
7
5
21 3
4
1. Détecteur de chaleur
2. Indicateur de chaleur
3. Bouton d’essai
4. Ouvertures de ventilation
5. Compartiment de la pile
6. Plaque de xation
7. Vis
8. Cordon d’allume-cigare
Page 27

27
Français
Sécurité Lisez attentivement le manuel avant usage. Conservez le manuel pour toute référence
ultérieure.
• Utilisez l’appareil uniquement pour son usage prévu. N’utilisez pas l’appareil à d’autres ns que
celles décrites dans le manuel.
• N’utilisez pas l’appareil si une pièce quelconque est endommagée ou défectueuse. Si l’appareil est
endommagé ou défectueux, remplacez-le immédiatement.
Installation
Avertissement !
• N’utilisez pas l’appareil à l’extérieur.
• N’exposez pas l’appareil à l’eau ni à l’humidité.
• Installez l’appareil hors de la portée des enfants.
• Installez au moins un appareil à chaque étage. De préférence, installez un appareil dans chaque
zone recommandée.
• Installez l’appareil dans la chambre ou le couloir qui lui est adjacent. Assurez-vous de pouvoir
entendre l’alarme dans toutes les chambres. Installez des appareils à chaque extrémité du couloir
ou de la chambre si sa longueur dépasse 9 mètres.
• N’installez pas l’appareil dans les salles de bains, toilettes ou autres où il pourrait se déclencher du
fait de la vapeur ou la condensation.
• N’installez pas l’appareil dans un environnement sale ou poussiéreux.
• N’installez pas l’appareil à proximité des radiateurs ou des ventilations aux murs ou au plafond.
• N’installez pas l’appareil à proximité des portes et fenêtres.
• N’installez pas l’appareil derrière des rideaux ou des meubles.
• Ne bloquez aucune des ouvertures de ventilation.
• Ne peignez pas l’appareil.
Zone Oui Non
Salon X
Salle à manger X
Cuisine X
Salle de bains /Toilettes X
Chambre à coucher X
Couloir X
Grenier X
Sous-sol X
Garage X
Salle de chaudière X
Page 28
28
Français
min.10 cm
min.10 cm
max. 30 cm
122 cm
90 cm 90 cm
5 mm
Page 29

29
Français
Usage
Indicateur de chaleur
1
Fonctionnement
normal
L'indicateur clignote en rouge toutes les 60
secondes.
Action : ---
2 Détection de chaleur
L'alarme retentit et l'indicateur clignote en
rouge sans arrêt jusqu'à l'élimination de la
chaleur.
Action : Éliminez la
chaleur.
3
Avertissement de pile
faible
L'alarme retentit et l'indicateur clignote en
rouge toutes les 60secondes.
Action : Remplacez
la pile.
Test d’alarme
L’alarme doit être testée chaque semaine pour s’assurer de son fonctionnement correct.
1. Appuyez et maintenez le bouton de test pendant 3 secondes.
L’alarme retentit et l’indicateur clignote en rouge sans arrêt jusqu’à la libération du bouton de test.
Son d’alarme : 3 bips courts, pause 2 secondes (répété).
2. Relâchez le bouton de test.
Nettoyage et maintenance
Avertissement !
• N’utilisez pas de solvants ni de produits abrasifs.
• Ne nettoyez pas l’intérieur de l’appareil.
• Ne tentez pas de réparer l’appareil. Si l’appareil fonctionne mal, remplacez-le par un neuf.
1. Remplacez la pile au moins une fois par an ou immédiatement dès que l’appareil émet un
avertissement de pile faible.
2. Nettoyez l’extérieur de l’appareil au moins une fois par mois. Utilisez un aspirateur avec un
embout à brosse pour nettoyer l’extérieur de l’appareil.
Page 30

30
Français
Caractéristiques techniques
Type de pile
Pile 9V (PP3)
Pile alcaline :
6LR61 (IEC) / 1604A (ANSI/NEDA)
Pile zinc-carbone :
6F22 (IEC) / 1604D (ANSI/NEDA)
Autonomie de pile 1 an
Courant de veille < 30 μA
Courant d'alarme < 30 mA
Volume d'alarme > 85 dB(A) (3 m)
Température ambiante 4~44 °C
Humidité relative 25~85%
Garantie
Toute altération ou modication du produit annule la garantie. Nous déclinons toute responsabilité
envers les dommages dus à une utilisation incorrecte du produit.
Mise au rebut
• Le produit doit être jeté séparément des ordures ménagères dans un point de collecte approprié.
Ne jetez pas le produit avec les ordures ménagères ordinaires.
• Pour plus d’informations, contactez le distributeur ou l’autorité locale responsable de la gestion
des déchets.
Page 31

31
Français
Documentation
Le produit a été fabriqué et fourni en conformité avec toutes les directives et règlements applicables
et en vigueur dans tous les États membres de l’Union Européenne. Le produit est conforme aux
spécications et à la réglementation en vigueur dans le pays de vente.
La documentation ocielle est disponible sur demande. La documentation ocielle inclut
notamment la Déclaration de conformité, la che technique de sécurité et le rapport de test de
produit.
Avertissement
Le design et les caractéristiques techniques sont sujets à modication sans notication préalable.
Tous les logos de marques et noms de produits sont des marques déposées ou immatriculées dont
leurs détenteurs sont les propriétaires et sont donc reconnues comme telles dans ce document.
Page 32

32
Italiano
SAS-HA100
Allarme termico
Descrizione
L’allarme termico è stato progettato per rilevare il calore. L’allarme termico non rileva fumo o gas. Gli
allarmi termici sono progettati come complemento per gli allarmi fumo, posizionandoli in aree in cui
gli allarmi fumo non possono essere utilizzati. Questo dispositivo è adatto solo per uso in ambienti
interni.
Se il dispositivo rileva calore, l’allarme suona e l’indicatore lampeggia in rosso costantemente nché il
calore non è stato eliminato.
8
6
7
5
21 3
4
1. Allarme termico
2. Indicatore di calore
3. Pulsante di test
4. Aperture di ventilazione
5. Compartimento batteria
6. Piastra di montaggio
7. Vite
8. Tassello
Page 33

33
Italiano
Sicurezza
• Leggere il manuale con attenzione prima dell’uso. Conservare il manuale per riferimenti futuri.
• Utilizzare il dispositivo solo per gli scopi previsti. Non utilizzare il dispositivo per scopi diversi da
quelli descritti nel manuale.
• Non utilizzare il dispositivo se presenta parti difettose. Se il dispositivo è danneggiato o difettoso,
sostituirlo immediatamente.
Installazione
Attenzione!
• Non utilizzare il dispositivo all’aperto.
• Non esporre il dispositivo ad acqua o umidità.
• Installare il dispositivo fuori della portata dei bambini.
• Installare almeno un dispositivo ad ogni piano. Installare preferibilmente un dispositivo in ogni
area raccomandata.
• Installare il dispositivo nella camera da letto o nel corridoio adiacente alla camera. Controllare di
poter udire l’allarme da tutte le camere da letto, Installare i dispositivi da entrambe le estremità
del corridoio o della sala in caso di locali più lunghi di 9 metri.
• Non installare il dispositivo in bagni, toilette o altre stanze dove potrebbe essere attivato dal
vapore o dalla condensa.
• Non installare il dispositivo in ambienti polverosi o sporchi.
• Non installare il dispositivo vicino a radiatori o prese d’aria nelle pareti o sui sotti.
• Non installare il dispositivo vicino a porte o nestre.
• Non installare il dispositivo dietro tende o mobili.
• Non ostruire i fori per la ventilazione.
• Non pitturare il dispositivo.
Area Si No
Soggiorno x
Stanza da pranzo x
Cucina x
Bagno / toilette x
Stanza da letto x
Corridoio x
Attico x
Seminterrato x
Garage x
Sala caldaia x
Page 34

34
Italiano
min.10 cm
min.10 cm
max. 30 cm
122 cm
90 cm 90 cm
5 mm
Page 35

35
Italiano
Uso
Indicatore di calore
1
Funzionamento
normale
L'indicatore lampeggerà in rosso per circa 60
secondi.
Azione: ---
2
Rilevamento del
calore
L'allarme suona e l'indicatore lampeggia in
rosso costantemente nché il calore non è
stato eliminato.
Azione: Eliminare il
calore.
3
Avviso di batteria
scarica
L'allarme emetterà un bip e l'indicatore
lampeggerà in rosso ogni 60 secondi.
Azione: Sostituire la
batteria.
Test dell’allarme
L’allarme deve essere testato ogni settimana per garantirne il corretto funzionamento.
1. Premere e tenere premuto il pulsante di test per tre secondi.
L’allarme suona e l’indicatore lampeggia in rosso continuamente nché il pulsante di test non
viene rilasciato.
Suono dell’allarme: 3 bip brevi, pausa di 2 secondi (ripetuto).
2. Rilasciare il pulsante di test.
Pulizia e manutenzione
Attenzione!
• Non utilizzare solventi detergenti o abrasivi.
• Non pulire l’interno del dispositivo.
• Non cercare di riparare il dispositivo. Se il dispositivo non funziona correttamente, sostituirlo con
uno nuovo.
1. Sostituire la batteria almeno una volta all’anno o immediatamente quando il dispositivo segnala
batteria scarica.
2. Pulire l’esterno del dispositivo almeno una volta al mese. Utilizzare un aspirapolvere con la
bocchetta a spazzola per pulire l’esterno del dispositivo.
Page 36

36
Italiano
Dati tecnici
Tipo di batteria
Batteria da 9 V (PP3)
Batteria alcalina:
6LR61 (IEC) / 1604A (ANSI/NEDA)
Batteria zinco-carbonio:
6F22 (IEC) / 1604D (ANSI/NEDA)
Durata batterie 1 anno
Corrente in standby < 30 μA
Corrente d'allarme < 30 mA
Volume allarme > 85 dB(A) (3 m)
Temperatura ambiente 4~44 °C
Umidità relativa 25~85%
Garanzia
Qualsiasi modica e/o cambiamento al prodotto annullerà la garanzia. Si declina ogni responsabilità
per danni causati da un uso non corretto di questo prodotto.
Smaltimento
• Questo prodotto è soggetto a raccolta dierenziata nei punti di raccolta appropriati. Non smaltire
il prodotto con i riuti domestici.
• Per maggiori informazioni, contattare il rivenditore o le autorità locali responsabili per la gestione
dei riuti.
Page 37

37
Italiano
Documentazione
Il presente prodotto è stato realizzato e fornito in conformità a tutte le norme e le direttive vigenti,
con validità in tutti gli stati membri della Comunità Europea. Il presente prodotto è conforme alle
speciche e alle normative applicabili nel paese in cui è stato venduto.
La documentazione uciale è disponibile su richiesta. Detta documentazione uciale comprende,
a titolo esemplicativo, la Dichiarazione di conformità, la scheda tecnica di sicurezza dei materiali e il
rapporto dei collaudi del prodotto.
Clausola esonerativa di responsabilità
Il design e le caratteristiche tecniche sono soggetti a modica senza necessità di preavviso. Tutti i
marchi, loghi e nomi dei prodotti sono marchi commerciali o registrati dei rispettivi titolari e sono
riconosciuti come tali in questo documento.
Page 38

38
Português
SAS-HA100
Detector de calor
Descrição
O detector de calor foi concebido para detectar calor. O detector de calor não detecta fumo nem gases.
Os detectores de calor destinam-se a ser utilizados como complemento para os detectores de fumos,
situados em áreas onde não se possam utilizar detectores de fumos. O dispositivo destina-se apenas
a utilização no interior.
Se o dispositivo detectar calor, o alarme soará e o indicador piscará continuamente a vermelho até
que o calor seja eliminado.
8
6
7
5
21 3
4
1. Detector de calor
2. Indicador de calor
3. Botão de teste
4. Aberturas de ventilação
5. Compartimento das pilhas
6. Placa de xação
7. Parafuso
8. Ficha
Page 39

39
Português
Segurança
• Leia atentamente o manual de instruções antes de utilizar. Guarde o manual para consulta futura.
• Utilize o dispositivo apenas para a nalidade a que se destina. Não utilize o dispositivo para outras
nalidades além das descritas no manual.
• Não utilize o dispositivo caso tenha alguma peça danicada ou com defeito. Se o dispositivo
estiver danicado ou tenha defeito, substitua imediatamente o dispositivo.
Instalação
Aviso!
• Não utilize o dispositivo no exterior.
• Não exponha o dispositivo a água ou humidade.
• Instale o dispositivo longe do alcance das crianças.
• Instale pelo menos um dispositivo por andar. De preferência, instale um dispositivo em cada área
recomendada.
• Instale o dispositivo no quarto ou no corredor adjacente ao quarto. Certique-se de que o alarme
é escutado em todos os quartos. Instale dispositivos em ambas as extremidades do corredor ou
da divisão se o corredor ou a divisão tiver um comprimento superior a 9 metros.
• Não instale o dispositivo em casas de banho ou outras divisões em que este possa ser accionado
por vapor ou condensação.
• Não instale o dispositivo em ambientes onde exista poeira ou sujidade.
• Não instale o dispositivo próximo de radiadores ou respiradouros em paredes ou tectos.
• Não instale o dispositivo próximo de portas e janelas.
• Não instale o dispositivo por trás de cortinas ou mobília.
• Não bloqueie as aberturas de ventilação.
• Não pinte o dispositivo.
Área Sim Não
Sala de estar X
Sala de jantar X
Cozinha X
Casa de banho X
Quarto X
Corredor X
Sótão X
Cave X
Garagem X
Sala das caldeiras X
Page 40

40
Português
min.10 cm
min.10 cm
max. 30 cm
122 cm
90 cm 90 cm
5 mm
Page 41

41
Português
Utilização
Indicador de calor
1
Funcionamento
normal
O indicador piscará a vermelho, uma vez a
cada 60 segundos.
Acção: ---
2 Detecção de calor
O alarme soará e o indicador piscará
continuamente a vermelho até que o calor
seja eliminado.
Acção: Elimine o
calor.
3 Aviso de pilha fraca
O alarme soará e o indicador irá piscar a
vermelho uma vez a cada 60 segundos.
Acção: Substitua
a pilha.
Testar o detector
O detector tem de ser testado semanalmente para garantir um correcto funcionamento.
1. Prima e mantenha o botão de teste premido durante 3 segundos.
O alarme soará e o indicador piscará continuamente a vermelho até que liberte o botão de teste.
Som de alarme: 3 bipes curtos, 2 segundos de pausa (repetidos).
2. Liberte o botão de teste.
Limpeza e manutenção
Aviso!
• Não utilize solventes de limpeza ou produtos abrasivos.
• Não limpe o interior do dispositivo.
• Não tente reparar o dispositivo. Se o dispositivo não funcionar correctamente, substitua-o por um
dispositivo novo.
1. Substitua a pilha pelo menos uma vez por ano ou imediatamente, assim que o dispositivo
apresentar um aviso de pilha fraca.
2. Limpe o exterior do dispositivo pelo menos uma vez por mês. Utilize um aspirador com uma
escova para limpar o exterior do dispositivo.
Page 42

42
Português
Dados técnicos
Tipo de pilha
Pilha de 9V (PP3)
Pilha alcalina:
6LR61 (IEC) / 1604A (ANSI/NEDA)
Pilha de zinco-carbono:
6F22 (IEC) / 1604D (ANSI/NEDA)
Duração da pilha 1 ano
Corrente em espera < 30 μA
Corrente do alarme < 30 mA
Volume do alarme > 85 dB(A) (3 m)
Temperatura ambiente 4~44 °C
Humidade relativa 25~85%
Garantia
Quaisquer alterações e/ou modicações no produto anularão a garantia. Não nos podemos
responsabilizar por qualquer dano causado pelo uso incorrecto do produto.
Eliminação
• O produto deve ser eliminado separadamente num ponto de recolha apropriado. Não elimine
este produto juntamente com o lixo doméstico.
• Para obter mais informações, contacte o revendedor ou o organismo local responsável pela
gestão de resíduos.
Page 43

43
Português
Documentação
O produto foi fabricado e fornecido em conformidade com todos os regulamentos e directivas
relevantes, válidos para todos os Estados-Membros da União Europeia. Além disso, está em
conformidade com todas as especicações e regulamentos aplicáveis no país de venda.
Mediante pedido, será disponibilizada documentação formal . A documentação formal inclui, entre
outros, a Declaração de Conformidade, a Ficha de Dados de Segurança e o relatório de teste do
produto.
Limitação de responsabilidade
Os designs e as especicações estão sujeitos a alteração sem aviso. Todos os logótipos, marcas ou
logótipos de marcas e nomes de produtos são marcas registadas dos respectivos proprietários e são
reconhecidas como tal neste documento.
Page 44

44
Dansk
SAS-HA100
Varmealarm
Beskrivelse
Varmealarmen er beregnet til at opfange varme. Varmealarmen opfanger ikke røg eller gas.
Varmealarmer er beregnet som supplement til røgalarmer og skal placeres på områder, hvor
røgalarmer ikke kan bruges. Apparatet er kun beregnet til indendørs brug.
Hvis apparatet opfanger varme lyder en alarm, og indikatoren blinker rødt uafbrudt indtil varmen
ernes.
8
6
7
5
21 3
4
1. Varmealarm
2. Varmeindikator
3. Testknap
4. Ventilationsåbninger
5. Batterirum
6. Monteringsplade
7. Skrue
8. Ravplug
Page 45

45
Dansk
Sikkerhed
• Læs vejledningen omhyggeligt inden apparatet tages i brug. Gem vejledningen til fremtidig brug.
• Brug kun apparatet til de tilsigtede formål. Brug ikke apparatet til andre formål end dem, som er
beskrevet i vejledningen.
• Brug ikke apparatet, hvis det har beskadigede eller defekte dele. Hvis apparatet er beskadiget
eller defekt, skal det omgående udskiftes.
Klargøring
Advarsel!
• Brug ikke apparatet udendørs.
• Udsæt ikke apparatet for vand eller fugt.
• Monter apparatet utilgængeligt for børn.
• Monter mindst et apparat på hver etage. Det anbefales at montere et apparat i hvert af de
anbefalede områder.
• Monter apparatet i soveværelset eller i gangarealet uden for soveværelset. Kontroller, at alarmen
kan høres i alle soveværelser. Monter apparaterne i begge ender af gangarealet eller værelset, hvis
gang eller værelse er længere end 9 meter.
• Monter ikke apparatet i badeværelser, toiletter eller andre rum, hvor det kan udløses af damp eller
kondens.
• Monter ikke apparatet i støvede eller snavsede omgivelser.
• Monter ikke apparatet nær radiatorer eller luftblæsere på vægge eller lofter.
• Monter ikke apparatet nær døre og vinduer.
• Monter ikke apparatet bag gardiner eller møbler.
• Bloker ikke ventilationshullerne.
• Mal ikke over apparatet.
Areal Ja Nej
Stue X
Spisestue X
Køkken X
Badeværelse/toilet X
Soveværelse X
Korridor X
Loftsrum X
Kælder X
Garage X
Fyrrum X
Page 46

46
Dansk
min.10 cm
min.10 cm
max. 30 cm
122 cm
90 cm 90 cm
5 mm
Page 47

47
Dansk
Anvendelse
Varmeindikator
1 Normal drift
Status LED-indikatoren blinker rødt en gang
hver 60 sekunder.
Handling: ---
2 Varmeopsporing
Der lyder en alarm, og indikatoren blinker rødt
uafbrudt indtil varmen ernes.
Handling: Fjern
varmen.
3
Advarsel om lavt
batteri
Alarmen bipper og indikatoren blinker rødt en
gang hver 60 sekunder.
Handling:
Udskiftning af
batteri.
Afprøvning af alarmen
Alarmen skal afprøves hver uge for at sikre, at den fungerer korrekt.
1. Tryk og hold testknappen inde i 3 sekunder.
Der lyder en alarm, og indikatoren blinker rødt uafbrudt indtil testknappen slippes.
Lydalarm: 3 korte bip, 2 sekunders pause (gentages)
2. Slip testknappen.
Rengøring og vedligeholdelse
Advarsel!
• Brug ikke opløsningsmidler eller slibende rengøringsmidler.
• Gør ikke apparatet rent indvendigt.
• Forsøg aldrig at reparere apparatet. Hvis apparatet ikke fungerer korrekt, skal det udskiftes med
et nyt.
1. Udskift batteriet mindst en gang årligt eller straks, hvis apparatet udsender lydalarmen for lavt
batteri.
2. Gør apparatet rent udvendigt mindst en gang om måneden. Brug en støvsuger med børste til at
gøre apparatet rent udvendigt.
Page 48

48
Dansk
Tekniske data
Batteritype
9 V batteri (PP3)
Alkalinebatteri:
6LR61 (IEC) / 1604A (ANSI/NEDA)
Zink-kul batteri:
6F22 (IEC) / 1604D (ANSI/NEDA)
Batteriets levetid 1 år
Standbystrøm < 30 μA
Alarmstrøm < 30 mA
Alarmens lydstyrke > 85 dB(A) (3 m)
Omgivelsestemperatur 4~44 °C
Relativ fugtighed 25~85 %
Garanti
Ændringer og/eller modikationer af produktet vil medføre bortfald af garantien. Vi fralægger os
ethvert ansvar for skader forårsaget på grund af forkert brug af produktet.
Bortskaelse
• Produktet skal aeveres på et passende indsamlingspunkt. Bortskaf ikke produktet sammen med
husholdningsaald.
• For mere information, kontakt forhandleren eller den lokale myndighed der er ansvarlig for
kontrol af aald.
Page 49

49
Dansk
Dokumentation
Produktet er fremstillet og leveres i overensstemmelse med alle relevante forordninger og direktiver,
der er gældende for alle EUs medlemsstater. Produktet overholder alle gældende specikationer og
forskrifter i de lande, hvor produktet sælges.
Formel dokumentation kan fremlægges på forlangende. Den formelle dokumentation omfatter, men
er ikke begrænset til, konformitetserklæringen, sikkerhedsdatablad for materialet og rapporten fra
produkttesten.
Ansvarsfraskrivelse
Design og specikationer kan ændres uden varsel. Alle bomærker og produktnavne er varemærker
eller registrerede varemærker tilhørende deres respektive ejere og anses herved som sådan.
Page 50

50
Norsk
SAS-HA100
Varmealarm
Beskrivelse
Varmealarmen er utviklet for å registrere varme. Varmealarmen registrerer ikke røyk eller gass.
Varmealarmer er ment som et supplement til røykvarslere, som ligger i områder hvor røykvarslere
ikke kan brukes. Enheten er kun ment for innendørs bruk.
Hvis enheten registrerer varme, vil røykvarsleren lyde og indikatoren blinke rødt kontinuerlig til
varmen elimineres.
8
6
7
5
21 3
4
1. Varmealarm
2. Varmeindikator
3. Testknapp
4. Ventilasjonsåpninger
5. Batterirom
6. Monteringsplate
7. Skrue
8. Plugg
Page 51

51
Norsk
Sikkerhet
• Les bruksanvisningen nøye før bruk. Oppbevar bruksanvisningen for fremtidig bruk.
• Bruk bare enheten for det tiltenkte formålet. Ikke bruk enheten til andre formål enn det som er
beskrevet i bruksanvisningen.
• Ikke bruk enheten hvis noen del er skadet eller defekt. Enheten må erstattes umiddelbart hvis den
er skadet eller defekt.
Installasjon
Advarsel!
• Ikke bruk enheten utendørs.
• Ikke utsett enheten for vann eller fuktighet.
• Installer enheten utilgjengelig for barn.
• Installer minst en enhet på hver etasje. En enhet bør helst installeres på hvert anbefalte område.
• Installere enheten på soverommet eller i gangen ved siden av soverommet. Sørg for at du kan
høre alarmen i alle soverommene. Installer enheter i begge ender av gangen eller rommet hvis
gangen eller rommet er lengre enn 9 meter.
• Ikke installer enheten i bad, toaletter eller andre rom der enheten kan utløses av damp eller
kondens.
• Ikke installer enheten i støvete eller skitne omivelser.
• Ikke installer enheten nær radiatorer eller luftventiler i vegger eller tak.
• Ikke installer enheten i nærheten av dører eller vinduer.
• Ikke installer enheten bak gardiner eller møbler.
• Ikke blokker ventilasjonsåpningene.
• Ikke mal enheten.
Område Ja Nei
Stue X
Spisestue X
Kjøkken X
Bad/toalett X
Soverom X
Gang X
Loft X
Kjeller X
Garasje X
Fyrrom X
Page 52

52
Norsk
min.10 cm
min.10 cm
max. 30 cm
122 cm
90 cm 90 cm
5 mm
Page 53

53
Norsk
Bruk
Varmeindikator
1 Vanlig drift Indikatoren vil blinke rødt i hvert 60. sekund. Handling: ---
2 Varmedeteksjon
Alarmen høres og indikatoren blinker rødt
kontinuerlig til varmen elimineres.
Handling: Eliminer
varmen.
3
Advarsel om lavt
batteri
Alarmen vil pipe og indikatoren blinker rødt
én gang hvert 60. sekund.
Handling: Skift
batteriet.
Teste alarmen
Alarmen må testes hver uke for sikre riktig drift.
1. Trykk og hold inne testknappen i 3 sekunder.
Alarmen høres og indikatoren blinker rødt kontinuerlig til testknappen slippes.
Alarmlyder: 3 korte piper, 2 sekunder med pause (gjentatt).
2. Slipp fri testknappen.
Rengjøring og vedlikehold
Advarsel!
• Ikke bruk rensemidler eller skuremidler.
• Ikke rengjør innsiden av enheten.
• Ikke prøv å reparere enheten. Hvis enheten ikke fungerer som den skal, erstatt den med en ny
enhet.
1. Bytt ut batteriet minst én gang i året eller oftere når enheten gir en advarsel om lavt batteri.
2. Rengjør utsiden av enheten minst én gang i måneden. Bruk en støvsuger med børstemunnstykke
for å rengjøre utsiden av enheten.
Page 54

54
Norsk
Tekniske data
Batteritype
9V batteri (PP3)
Alkalisk batteri
6LR61 (IEC) / 1604A (ANSI/NEDA)
Brunstensbatteriet:
6F22 (IEC) / 1604D (ANSI/NEDA)
Batterilevetid 1 år
Standbyspenning < 30 μA
Alarmspenning < 30 mA
Alarmvolum: > 85 dB(A) (3 m)
Omgivelsestemperatur 4~44 °C
Luftfuktighet 25~85 %
Garanti
Eventuelle endringer og/eller modikasjoner av produkter opphever garantien. Vi tar ikke ansvar for
skade som forårsakes av ukorrekt bruk av produktet.
Avhending
• Produktet må avhendes på egnede oppsamlingssteder. Du må ikke avhende produktet som
husholdningsavfall.
• Ta kontakt med leverandøren eller lokale myndigheter hvis du ønsker mer informasjon om
avhending.
Page 55

55
Norsk
Dokumentasjon
Produktet har blitt produsert og levert i henhold til alle relevante bestemmelser og direktiver,
gyldig for alle medlemsstater i EU. Produktet overholder også alle gjeldende spesikasjoner og
bestemmelser i landet det selges i.
Formell dokumentasjon er tilgjengelig på forespørsel. Den formelle dokumentasjon inkluderer, men
er ikke begrenset til samsvarserklæringen, HMS-databladet og produkttestrapporten.
Ansvarsfraskrivelse
Utforming og spesikasjoner kan endres uten forhåndsvarsel. Alle logoer, merker og produktnavn er
varemerker eller registrerte varemerker til de respektive eierne, og skal behandles som dette.
Page 56

56
Svenska
SAS-HA100
Värmelarm
Beskrivning
Värmelarmet är utformat för att upptäcka värme. Värmelarmet känner inte av rök eller gas. Värmelarm
är avsedda att användas som komplement till rökdetektorer i utrymmen där sådana inte kan
användas. Enheten är bara avsedd för inomhusanvändning.
Om enheten upptäcker värme börjar larmet att låta och lampan kommer att blinka rött tills värmen
försvunnit.
8
6
7
5
21 3
4
1. Värmelarm
2. Värmeindikator
3. Testknapp
4. Ventilationsöppningar
5. Batterifack
6. Monteringsplatta
7. Skruv
8. Plugg
Page 57

57
Svenska
Säkerhet
• Läs bruksanvisningen noga innan användning. Behåll bruksanvisningen för att kunna använda
den igen.
• Använd endast enheten för dess avsedda syfte. Använd inte enheten till andra ändamål än dem
som beskrivs i denna bruksanvisning.
• Använd inte enheten om någon del är skadad eller felaktig. Om enheten är skadad eller felaktig
ska den bytas ut omedelbart.
Installation
Varning!
• Använd inte enheten utomhus.
• Utsätt inte enheten för vatten eller fukt.
• Förvara enheten oåtkomlig för barn.
• Montera minst en enhet per våning. Montera helst en enhet i varje rekommenderat utrymme.
• Montera enheten i sovrummet eller i hallen vid sovrummet. Kontrollera att du hör larmet i alla
sovrum. Montera enheten i båda ändar av hallen eller rummet om hallen eller rummet är längre
än 9 meter.
• Montera inte enheten i badrum, på toaletter eller i andra rum där enheten kan aktiveras av ånga
eller kondens,
• Montera inte enheten i dammiga eller smutsiga miljöer.
• Montera inte enheten nära element eller luftventiler i väggar eller innertak.
• Montera inte denna enhet i närheten av dörrar eller fönster.
• Montera inte denna enhet bakom gardiner eller möbler.
• Blockera inte ventilationsöppningarna.
• Måla inte enheten.
Utrymme Ja Nej
Vardagsrum X
Matsalsrum X
Kök X
Badrum/toalett X
Sovrum X
Hall X
Vind X
Källare X
Garage X
Rum för varmvattenberedare X
Page 58

58
Svenska
min.10 cm
min.10 cm
max. 30 cm
122 cm
90 cm 90 cm
5 mm
Page 59

59
Svenska
Användning
Värmeindikator
1 Normal drift Lampan blinkar rött var 60:e sekund. Åtgärd: ---
2 När värme upptäcks
Larmet börjar låta och lampan kommer att
blinka rött tills värmen försvunnit.
Åtgärd: Avlägsna
värmen.
3
Varning för svagt
batteri
Larmet piper och lampan blinkar rött var 60:e
sekund.
Åtgärd: Byt ut
batteriet.
Testa larmet
Larmet måste testas en gång i veckan för att kontrollera att det fungerar som det ska.
1. Tryck och håll ned testknappen i 3 sekunder.
Larmet börjar låta och lampan kommer att blinka rött tills testknappen släpps.
Larmljud: 3 korta pip, 2 sekunders paus (upprepat).
2. Släpp testknappen.
Rengöring och underhåll
Varning!
• Använd inga rengöringsmedel som innehåller lösningsmedel eller slipmedel.
• Rengör inte enhetens insida.
• Försök inte att reparera enheten. Byt ut enheten mot en ny om den inte fungerar som den ska.
1. Byt ut batteriet minst en gång om året, eller direkt när enheten varnar för svagt batteri.
2. Rengör enhetens utsida minst en gång i månaden. Använd en dammsugare med ett
borstmunstycke för att rengöra enhetens utsida.
Page 60

60
Svenska
Tekniska data
Typ av batteri
9V-batteri (PP3)
Alkaliskt batteri:
6LR61 (IEC) / 1604A (ANSI/NEDA)
Zink-kolbatteri:
6F22 (IEC) / 1604D (ANSI/NEDA)
Batterilivslängd 1 år
Viloström < 30 μA
Larmström < 30 mA
Larmvolym > 85 dB(A) (3 m)
Omgivningens temperatur 4~44 °C
Relativ luftfuktighet 25~85%
Garanti
Alla ändringar och/eller modieringar på produkten gör garantin ogiltig. Vi kan inte ta något ansvar
för skador som orsakats av felaktig användning av denna produkt.
Kassering
• Produkten är avsedd för separat insamling vid en lämplig återvinningscentral. Släng inte denna
produkt bland vanligt hushållsavfall.
• För mer information, kontakta återförsäljaren eller lokal myndighet med ansvar för
avfallshantering.
Page 61

61
Svenska
Dokumentation
Produkten har tillverkats och levereras i enlighet med alla relevanta regler och direktiv som gäller för
alla medlemsstater inom Europeiska unionen. Den uppfyller även alla tillämpliga specikationer och
regler i försäljningslandet.
Formell dokumentation nns att beställa på begäran. Den formella dokumentationen inbegriper,
men är inte begränsad till, försäkran om överensstämmelse, säkerhetsdatablad och testrapporten.
Friskrivningsklausul
Utseende och specikationer kan komma att ändras utan föregående meddelande. Alla logotyper
och produktnamn är varumärken eller registrerade varumärken som tillhör sina ägare och är härmed
erkända som sådana.
Page 62

62
Suomi
SAS-HA100
Lämpövaroitin
Kuvaus
Lämpövaroitin on suunniteltu ilmoittamaan kuumuudesta. Lämpövaroitin ei tunnista savua eikä
kaasua. Lämpövaroittimet on suunniteltu täydentämään palovaroittimia, ja ne sijoitetaan alueille,
joissa palovaroitinta ei voi käyttää. Laite sopii vain sisäkäyttöön.
Jos laite tunnistaa kuumuutta, se antaa äänimerkin ja merkkivalo vilkkuu punaisena, kunnes
kuumuus poistetaan.
8
6
7
5
21 3
4
1. Lämpövaroitin
2. Lämpöilmaisin
3. Testauspainike
4. Tuuletusaukot
5. Akkutila
6. Asennuslevy
7. Ruuvi
8. Tulppa
Page 63

63
Suomi
Turvallisuus
• Lue käyttöopas huolella ennen käyttöä. Säilytä käyttöopas tulevaa käyttöä varten.
• Käytä laitetta vain sille tarkoitettuun käyttötarkoitukseen. Älä käytä laitetta muuhun kuin
käyttöoppaassa kuvattuun tarkoitukseen.
• Älä käytä laitetta, jos jokin sen osa on vioittunut tai viallinen. Jos laite on vioittunut tai viallinen,
vaihda laite välittömästi.
Asennus
Varoitus!
• Älä käytä laitetta ulkona.
• Älä altista laitetta vedelle ja kosteudelle.
• Asennettava lasten ulottumattomiin.
• Asenna vähintään yksi laite kuhunkin kerrokseen. Asenna mieluiten yksi laite kullekin suositellulle
alueelle.
• Asenna laite makuuhuoneeseen tai makuuhuoneen vieressä olevaan käytävään. Varmista, että
varoitin kuuluu makuuhuoneeseen. Asenna varoitin käytävän molempiin päihin tai huoneeseen,
jos huone on pitempi kuin 9 metriä.
• Älä asenna laitetta kylpyhuoneeseen, WC:hen tai muuhun huoneeseen, missä höyry tai tiivistynyt
vesi voi laukaista sen.
• Älä asenna laitetta pölyiseen tai likaiseen ympäristöön.
• Älä asenna laitetta seinälle tia kattoon lähelle lämpöpatteria tai tuuletusaukkoa.
• Älä asenna laitetta ovien tai ikkunoiden läheisyyteen.
• Älä asenna laitetta verhojen tai huonekalujen taakse.
• Älä tuki tuuletusaukkoja.
• Älä maalaa laitetta.
Alue Kyllä Ei
Olohuone X
Ruokasali X
Keittiö X
Kylpyhuone/WC X
Makuuhuone X
Käytävä X
Ullakko X
Kellari X
Autotalli X
Pannuhuone X
Page 64

64
Suomi
min.10 cm
min.10 cm
max. 30 cm
122 cm
90 cm 90 cm
5 mm
Page 65

65
Suomi
Käyttö
Lämpöilmaisin
1 Normaali käyttö
Merkkivalo vilkkuu punaisena 60 sekunnin
välein.
Toiminto: ---
2 Lämmön tunnistus
Hälytin antaa äänimerkin ja merkkivalo vilkkuu
punaisena, kunnes kuumuus poistetaan.
Toiminto: Poista
kuumuus.
3
Paristo vähissä
-varoitus.
Hälytysääni kuuluu ja merkkivalo vilkkuu
punaisena 60 sekunnin välein.
Toiminto: Vaihda
paristo.
Hälyttimen testaus
Hälytin on testattava kerran viikossa asianmukaisen toiminnan takaamiseksi.
1. Paina testipainiketta kolme sekuntia.
Hälytin antaa äänimerkin ja merkkivalo vilkkuu punaisena, kunnes testipainike vapautetaan.
Hälytysääni: 3 lyhyttä piippausta, 2 sekunnin tauko (toistuu).
2. Vapauta testipainike.
Puhdistus ja huolto
Varoitus!
• Älä käytä liuottimia tai hankausaineita.
• Älä puhdista laitteen sisäpuolta.
• Älä yritä korjata laitetta. Jos laite ei toimi asianmukaisesti, vaihda se uuteen.
1. Vaihda paristo vähintään kerran vuodessa tai heti kun laite antaa varoituksen paristosta.
2. Puhdista laitteen ulkopuoli vähintään kerran kuussa. Puhdista laitteen ulkopuoli harjasuuttimella
varustetulla pölynimurilla.
Page 66

66
Suomi
Tekniset tiedot
Paristotyyppi
9 V paristo (PP3)
Alkaliparisto:
6LR61 (IEC) / 1604A (ANSI/NEDA)
Sinkkihiiliparisto:
6F22 (IEC) / 1604D (ANSI/NEDA)
Pariston kesto 1 vuosi
Valmiusvirta < 30 μA
Hälytysvirta < 30 mA
Hälytysäänen voimakkuus > 85 dB(A) (3 m)
Ympäristölämpötila 4~44 °C
Suhteellinen kosteus 25~85 %
Takuu
Takuu mitätöityy, mikäli laitteeseen tehdään mitä tahansa muutoksia. Emme ole myöskään vastuussa
vahingoista, jotka johtuvat tämän tuotteen virheellisestä käytöstä.
Hävittäminen
• Tämä tuote tulee toimittaa hävitettäväksi asianmukaiseen keräyspisteeseen. Tuotetta ei saa
hävittää kotitalousjätteen mukana.
• Lisätietoja antaa jälleenmyyjä tai paikallinen jätehuollosta vastaava viranomainen.
Page 67

67
Suomi
Asiakirjat
Tämä tuote on valmistettu ja toimitettu noudattaen kaikkia sitä koskevia asetuksia ja direktiivejä,
jotka ovat voimassa kaikissa Euroopan unionin jäsenvaltioissa. Se täyttää kaikki myyntimaassa
sovellettavat vaatimukset ja määräykset.
Viralliset asiakirjat ovat saatavilla pyynnöstä. Viralliset asiakirjat sisältävät mm.
yhdenmukaisuusvakuutuksen, käyttöturvallisuustiedotteen ja tuotteen testausraportin.
Vastuuvapauslauseke
Muutoksia malliin ja teknisiin ominaisuuksiin voidaan tehdä ilmoituksetta. Kaikki logot, merkit ja
tuotenimet ovat niiden vastaavien omistajien tuotemerkkejä tai rekisteröityjä tuotemerkkejä ja niitä
on käsiteltävä sellaisina.
Page 68

68
Ελληνικά
SAS-HA100
Συναγερμός θερμότητας
Περιγραφή
Ο συναγερμός θερμότητας έχει σχεδιαστεί για να ανιχνεύει θερμότητα. Ο συναγερμός θερμότητας
δεν ανιχνεύει καπνό ή αέριο. Οι συναγερμοί θερμότητας προορίζονται ως συμπληρωματικοί
εξοπλισμοί για συναγερμούς καπνού και τοποθετούνται σε τομείς όπου δεν μπορούν να
χρησιμοποιούνται οι συναγερμοί καπνού. Η συσκευή ενδείκνυται μόνο για εσωτερική χρήση.
Εάν η συσκευή ανιχνεύσει θερμότητα, ο συναγερμός θα ηχήσει και η ένδειξη θα αναβοσβήνει
κόκκινη συνεχώς, έως ότου εξαλειφθεί η θερμότητα.
8
6
7
5
21 3
4
1. Συναγερμός θερμότητας
2. Ένδειξη θερμότητας
3. Κουμπί δοκιμής
4. Ανοίγματα εξαερισμού
5. Θήκη μπαταριών
6. Πλακέτα στήριξης
7. Βίδα
8. Φις
Page 69

69
Ελληνικά
Ασφάλεια
• Διαβάστε το εγχειρίδιο προσεκτικά πριν από τη χρήση. Φυλάξτε το εγχειρίδιο για μελλοντική
αναφορά.
• Χρησιμοποιείτε τη συσκευή μόνο για τους προοριζόμενους σκοπούς. Μη χρησιμοποιείτε τη
συσκευή για διαφορετικούς σκοπούς από τους περιγραφόμενους στο εγχειρίδιο.
• Μη χρησιμοποιείτε τη συσκευή, εάν οποιοδήποτε τμήμα της έχει ζημιά ή ελάττωμα. Εάν η
συσκευή έχει ζημιά ή ελάττωμα, αντικαταστήστε την αμέσως.
Εγκατάσταση
Προειδοποίηση!
• Μη χρησιμοποιείτε τη συσκευή σε εξωτερικό χώρο.
• Μην εκθέτετε τη συσκευή σε νερό ή υγρασία.
• Εγκαταστήστε τη συσκευή μακριά από παιδιά.
• Εγκαταστήστε τουλάχιστο μια συσκευή σε κάθε όροφο. Κατά προτίμηση εγκαταστήστε μια
συσκευή σε κάθε προτεινόμενο τομέα.
• Εγκαταστήστε τη συσκευή στο υπνοδωμάτιο ή στο διάδρομο δίπλα στο υπνοδωμάτιο. Εξασφαλίστε
ότι μπορείτε να ακούσετε το συναγερμό σε όλα τα υπνοδωμάτια. Εγκαταστήστε συσκευές και στα δύο
άκρα του διαδρόμου ή του δωματίου, εάν ο διάδρομος ή το δωμάτιο είναι μακρύτερα των 9 μέτρων.
• Μην εγκαθιστάτε τη συσκευή σε μπάνια, τουαλέτες ή άλλα δωμάτια όπου η συσκευή μπορεί να
ενεργοποιηθεί από ατμό ή υγροποίηση αυτού.
• Μην εγκαθιστάτε τη συσκευή σε περιβάλλον με σκόνη ή ρύπους.
• Μην εγκαθιστάτε τη συσκευή κοντά σε θερμαντικά σώματα ή εξαεριστήρες σε τοίχους ή οροφές.
• Μην εγκαθιστάτε τη συσκευή κοντά σε πόρτες και παράθυρα.
• Μην εγκαθιστάτε τη συσκευή πίσω από κουρτίνες ή έπιπλα.
• Μην φράζετε τις οπές αερισμού.
• Μην βάφετε τη συσκευή.
Τομέας Ναι Όχι
Καθιστικό X
Τραπεζαρία X
Κουζίνα X
Μπάνιο/Τουαλέτα X
Υπνοδωμάτιο X
Διάδρομος X
Σοφίτα X
Υπόγειο X
Γκαράζ X
Χώρος μπόιλερ X
Page 70

70
Ελληνικά
min.10 cm
min.10 cm
max. 30 cm
122 cm
90 cm 90 cm
5 mm
Page 71

71
Ελληνικά
Χρήση
Ένδειξη θερμότητας
1 Κανονική λειτουργία
Η ένδειξη θα αναβοσβήνει κόκκινη μια φορά
κάθε 60 δευτερόλεπτα.
Ενέργεια: ---
2 Ανίχνευση θερμότητας
Ο συναγερμός θα ηχήσει και η ένδειξη θα
αναβοσβήνει κόκκινη συνεχώς, έως ότου
εξαλειφθεί η θερμότητα.
Ενέργεια: Εξαλείψτε
τη θερμότητα.
3
Προειδοποίηση
χαμηλής μπαταρίας
Ο συναγερμός θα ηχήσει και η ένδειξη θα
αναβοσβήνει κόκκινη μια φορά κάθε 60
δευτερόλεπτα.
Ενέργεια:
Αντικαταστήστε τη
μπαταρία.
Έλεγχος του συναγερμού
Ο συναγερμός πρέπει να ελέγχεται κάθε εβδομάδα, ώστε να εξασφαλίζεται η σωστή λειτουργία.
1. Πιέστε και κρατήστε πατημένο το κουμπί δοκιμής για 3 δευτερόλεπτα.
Ο συναγερμός θα ηχήσει και η ένδειξη θα αναβοσβήνει κόκκινη συνεχώς, έως ότου αποδεσμευτεί
το κουμπί δοκιμής.
Ήχος συναγερμού: 3 σύντομα ηχητικά σήματα (μπιπ), 2 δευτερόλεπτα παύση (σε επανάληψη).
2. Αποδεσμεύστε το κουμπί δοκιμής.
Καθαρισμός και συντήρηση
Προειδοποίηση!
• Μη χρησιμοποιείτε διαλύτες ή λειαντικά.
• Μην καθαρίσετε το εσωτερικό της συσκευής.
• Μην επιχειρήσετε να επισκευάσετε τη συσκευή. Εάν η συσκευή δεν λειτουργεί σωστά,
αντικαταστήστε την με μια νέα.
1. Αντικαθιστάτε τη μπαταρία τουλάχιστο μια φορά το χρόνο ή αμέσως μόλις η συσκευή προβάλει
προειδοποίηση χαμηλής μπαταρίας.
2. Καθαρίζετε το εξωτερικό της συσκευής τουλάχιστο μια φορά το μήνα. Χρησιμοποιείτε ηλεκτρική
σκούπα με ακροφύσιο-βούρτσα για να καθαρίζετε το εξωτερικό της συσκευής.
Page 72

72
Ελληνικά
Τεχνικά χαρακτηριστικά
Τύπος μπαταρίας
Μπαταρία 9V (PP3)
Αλκαλική μπαταρία:
6LR61 (IEC) / 1604A (ANSI/NEDA)
Μπαταρία ψευδαργύρου-άνθρακα:
6F22 (IEC) / 1604D (ANSI/NEDA)
Χρόνος ζωής μπαταρίας 1 χρόνος
Ρεύμα ετοιμότητας < 30 μA
Ρεύμα συναγερμού < 30 mA
Ένταση συναγερμού > 85 dB(A) (3 m)
Θερμοκρασία περιβάλλοντος 4~44 °C
Σχετική υγρασία 25~85%
Εγγύηση
Η εφαρμογή αλλαγών ή/και τροποποιήσεων στο προϊόν συνεπάγεται ακύρωση της εγγύησης. Δεν
φέρουμε καμία ευθύνη για πιθανές βλάβες που ενδέχεται να προκληθούν από την ακατάλληλη χρήση
του προϊόντος.
Απόρριψη
• Το προϊόν προορίζεται για ξεχωριστή συλλογή σε κατάλληλο σημείο συλλογής. Μην απορρίπτετε
το προϊόν μαζί με τα οικιακά απόβλητα.
• Για περισσότερες πληροφορίες επικοινωνήστε με τον αντιπρόσωπό σας ή τις τοπικές αρχές
διαχείρισης αποβλήτων.
Page 73

73
Ελληνικά
Τεκμηρίωση
Το προϊόν αυτό κατασκευάστηκε και παρέχεται σε συμμόρφωση με το σύνολο των αντίστοιχων
κανονισμών και οδηγιών που ισχύουν για τα κράτη μέλη της Ευρωπαϊκής Ένωσης. Επίσης,
συμμορφώνεται με το σύνολο των ισχυουσών προδιαγραφών και κανονισμών της χώρας διάθεσης.
Επίσημη τεκμηρίωση διατίθεται κατόπιν αιτήματος. Η επίσημη τεκμηρίωση περιλαμβάνει, χωρίς
περιορισμό, τη Δήλωση Συμμόρφωσης, το Δελτίο Δεδομένων Ασφάλειας Υλικού και την έκθεση
δοκιμής προϊόντος.
Δήλωση αποποίησης ευθύνης
Το σχέδιο και τα χαρακτηριστικά μπορούν να αλλάξουν χωρίς καμία προειδοποίηση. Όλα τα
λογότυπα, οι επωνυμίες και οι ονομασίες προϊόντων είναι εμπορικά σήματα ή σήματα κατατεθέντα
των αντίστοιχων κατόχων και δια του παρόντος αναγνωρίζονται ως τέτοια.
Page 74

74
Polski
SAS-HA100
Czujnik temperatury
Opis
Czujnik temperatury został zaprojektowany w celu wykrywania ciepła. Czujnik temperatury
nie wykrywa dymu ani gazu. Czujniki temperatury stanowią uzupełnienie czujników dymu i są
przeznaczone do miejsc, w których nie można używać czujników dymu. Urządzenie nadaje się
wyłącznie do użytku wewnętrznego.
Jeśli urządzenie wykryje ciepło, zostanie uruchomiony alarm, a wskaźnik będzie migać na czerwono
nieprzerwanie aż do usunięcia źródła ciepła.
8
6
7
5
21 3
4
1. Czujnik temperatury
2. Wskaźnik ciepła
3. Przycisk testu
4. Otwory wentylacyjne
5. Gniazdo baterii
6. Płytka montażowa
7. Wkręt
8. Wtyk
Page 75

75
Polski
Bezpieczeństwo
• Przed rozpoczęciem korzystania z urządzenia należy dokładnie przeczytać instrukcję.
Zachowaj instrukcję do wykorzystania w przyszłości.
• Urządzenie powinno być używane zgodnie ze swoim przeznaczeniem. Nie należy używać
urządzenia w celach innych niż określono w instrukcji.
• Nie wolno korzystać z urządzenia, jeśli jakakolwiek część jest uszkodzona lub wadliwa. Jeśli
urządzenie jest uszkodzone lub wadliwe, należy niezwłocznie wymienić urządzenie.
Instalacja
Ostrzeżenie!
• Nie używać urządzenia na zewnątrz.
• Nie wystawiać urządzenia na działanie wody lub wilgoci.
• Urządzenie należy zainstalować w miejscu niedostępnym dla dzieci.
• Zainstalować co najmniej jedno urządzenie na każdym piętrze. Najlepiej zainstalować jedno
urządzenie w każdym zalecanym miejscu.
• Zainstalować urządzenie w sypialni lub w korytarzu przylegającym do sypialni. Sprawdzić, czy
alarm można usłyszeć we wszystkich sypialniach. Zainstalować urządzenia na obu końcach
korytarza lub pomieszczenia, jeśli korytarz lub pomieszczenie ma więcej niż 9 metrów długości.
• Nie instalować urządzenia w łazienkach, toaletach lub innych pomieszczeniach, w których
urządzenie może zostać uruchomione przez parę lub wilgoć.
• Nie instalować urządzenia w zakurzonych lub brudnych środowiskach.
• Nie instalować urządzenia w pobliżu kaloryferów lub otworów odpowietrzających w ścianach lub
sutach.
• Nie instalować urządzenia w pobliżu drzwi i okien.
• Nie instalować urządzenia za zasłonami lub meblami.
• Nie blokować otworów wentylacyjnych.
• Nie malować urządzenia.
Miejsce Tak Nie
Salon X
Jadalnia X
Kuchnia X
Łazienka / Toaleta X
Sypialnia X
Korytarz X
Strych X
Piwnica X
Garaż X
Kotłownia X
Page 76

76
Polski
min.10 cm
min.10 cm
max. 30 cm
122 cm
90 cm 90 cm
5 mm
Page 77

77
Polski
Użytkowanie
Wskaźnik ciepła
1 Zwykła praca
Wskaźnik zaświeci się na czerwono raz na
każde 60 sekund.
Działanie: ---
2 Wykrywanie ciepła
Zostanie uruchomiony alarm, a wskaźnik
będzie migać na czerwono nieprzerwanie aż
do wyeliminowania ciepła.
Działanie:
Wyeliminuj źródło
ciepła.
3
Ostrzeżenie o niskim
poziomie baterii
Alarm zabrzęczy, a wskaźnik zaświeci się na
czerwono raz na każde 60 sekund.
Działanie: Wymień
baterię.
Testowanie alarmu
Alarm musi być testowany co tydzień, aby zapewnić jego prawidłowe działanie.
1. Naciśnij i przytrzymaj przycisk testu przez 3 sekundy.
Zostanie uruchomiony alarm, a wskaźnik będzie migać na czerwono nieprzerwanie aż do
zwolnienia przycisku testu.
Dźwięk alarmu: 3 krótkie sygnały akustyczne, 2 sekundy przerwy (powtórzenie).
2. Zwolnij przycisk testu.
Czyszczenie i konserwacja
Ostrzeżenie!
• Nie używać do czyszczenia rozpuszczalników ani materiałów ściernych.
• Nie czyścić wewnętrznej strony urządzenia.
• Nie podejmować prób naprawy urządzenia. Jeśli urządzenie nie działa poprawnie, należy
wymienić je na nowe urządzenie.
1. Baterię należy wymieniać co najmniej raz na rok lub niezwłocznie, gdy urządzenie wysyła
ostrzeżenie o niskim poziomie baterii.
2. Zewnętrzną stronę urządzenia należy czyścić co najmniej raz na miesiąc. Do czyszczenia
zewnętrznej strony urządzenia należy używać odkurzacza z dyszą szczotkową.
Page 78

78
Polski
Dane techniczne
Typ baterii
Bateria 9V (PP3)
Bateria alkaliczna:
6LR61 (IEC) / 1604A (ANSI/NEDA)
Bateria cynkowo-węglowa:
6F22 (IEC) / 1604D (ANSI/NEDA)
Czas życia baterii 1 rok
Prąd trybu czuwania < 30 μA
Prąd alarmu < 30 mA
Głośność alarmu > 85 dB(A) (3 m)
Temperatura otoczenia 4~44 °C
Wilgotność względna 25~85%
Gwarancja
Wszelkie zmiany i/lub modykacje produktu spowodują unieważnienie gwarancji. Nie możemy
ponosić odpowiedzialności za uszkodzenia spowodowane przez nieprawidłowe korzystanie z
produktu.
Utylizacja
• Produkt jest przeznaczony do oddzielnej zbiórki w odpowiednim punkcie odbioru. Nie należy
pozbywać się produktu razem z odpadami gospodarstwa domowego.
• Aby uzyskać więcej informacji, należy skontaktować się ze sprzedawcą lub lokalnym urzędem
odpowiedzialnym za gospodarkę odpadami.
Page 79

79
Polski
Dokumentacja
Produkt został wyprodukowany i dostarczony zgodnie z wszelkimi odpowiednimi przepisami i
wytycznymi, obowiązującymi wszystkie państwa członkowskie Unii Europejskiej. Produkt jest zgodny
z wszystkimi specykacjami i przepisami obowiązującymi w kraju sprzedaży.
Formalna dokumentacja jest dostępna na życzenie. Formalna dokumentacja zawiera między innymi
deklarację zgodności, kartę charakterystyki i raport z badań produktu.
Zastrzeżenia
Wzory i specykacje mogą ulec zmianie bez powiadomienia. Wszystkie logo, marki i nazwy
produktów są znakami towarowymi lub zarejestrowanymi znakami towarowymi ich właścicieli i
niniejszym są uznane za takie.
Page 80

80
Čeština
SAS-HA100
Tepelný alarm
Popis
Tepelný alarm byl navržen na detekci tepla. Tepelný alarm nedetekuje kouř ani plyn. Tepelné alarmy
slouží k doplnění kouřových alarmů v místech, kde nelze použít kouřové alarmy. Toto zařízení je
určeno pouze pro použití v místnosti.
Pokud zařízení detekuje teplo, spustí se zvukový alarm a indikátor bude nepřetržitě blikat červeným
světlem, dokud nebude zdroj tepla zneškodněn.
8
6
7
5
21 3
4
1. Tepelný alarm
2. Tepelný indikátor
3. Testovací tlačítko
4. Ventilační otvory
5. Prostor pro baterie
6. Montážní deska
7. Šroub
8. Zástrčka
Page 81

81
Čeština
Bezpečnost
• Před použitím si pozorně přečtěte příručku. Příručku uschovejte pro pozdější použití.
• Zařízení používejte pouze k jeho zamýšleným účelům. Nepoužívejte zařízení k jiným účelům, než
je popsáno v příručce.
• Nepoužívejte zařízení, pokud je jakákoli část poškozená nebo vadná. Pokud je zařízení poškozené
nebo vadné, okamžitě jej vyměňte.
Instalace
Upozornění!
• Nepoužívejte zařízení v exteriérech.
• Nevystavujte zařízení působení vody ani vlhkosti.
• Nainstalujte zařízení mimo dosah dětí.
• Nainstalujte nejméně jedno zařízení na úrovni podlahy. Doporučujeme nainstalovat jedno
zařízení v každé doporučované oblasti.
• Nainstalujte zařízení do ložnice nebo do chodby vedle ložnice. Ujistěte se, že je alarm slyšitelný
ve všech ložnicích. Nainstalujte zařízení do obou konců chodby nebo místnosti, pokud je chodba
nebo místnost delší, než 9 metrů.
• Neinstalujte zařízení do koupelen, na WC ani do jiných místností, kde by mohlo být zařízení
spuštěno parou nebo vysráženou vodou.
• Neinstalujte zařízení do prašných nebo nečistých prostředí.
• Neinstalujte zařízení do blízkosti radiátorů ani ventilačních otvorů ve zdech nebo stropech.
• Neinstalujte zařízení do blízkosti dveří ani oken.
• Neinstalujte zařízení za záclony nebo nábytek.
• Nezakrývejte ventilační otvory.
• Nemalujte zařízení.
Oblast Ano Ne
Obývák X
Jídelna X
Kuchyně X
Koupelna / WC X
Ložnice X
Chodba X
Podkroví X
Sklep X
Garáž X
Kotelna X
Page 82

82
Čeština
min.10 cm
min.10 cm
max. 30 cm
122 cm
90 cm 90 cm
5 mm
Page 83

83
Čeština
Použití
Tepelný indikátor
1 Běžný provoz Indikátor blikne červeně jednou za 60 sekund. Akce: ---
2 Detekce tepla
Spustí se zvukový alarm a indikátor bude
nepřetržitě blikat červeným světlem, dokud
nebude zdroj tepla zneškodněn.
Akce: Zneškodněte
zdroj tepla.
3
Upozornění na nízký
stav baterie
Alarm jednou za 60 sekund pípne a indikátor
blikne červeně.
Akce: Vyměňte
baterie.
Testování alarmu
Alarm je nutno týdně testovat, pokud chcete zajistit správný provoz.
1. Stiskněte a podržte stisknuté tlačítko testu po dobu 3sekund.
Spustí se zvukový alarm a indikátor bude nepřetržitě blikat červeným světlem, dokud tlačítko
neuvolníte.
Zvuk alarmu: 3 krátká pípnutí, přestávka 2 sekundy (opakovaně)
2. Uvolněte tlačítko testu.
Čištění a údržba
Upozornění!
• Nepoužívejte čisticí rozpouštědla ani abrazivní čisticí prostředky.
• Nečistěte vnitřek zařízení.
• Nepokoušejte se zařízení opravovat. Pokud zařízení nepracuje správně, vyměňte jej za nové
zařízení.
1. Baterii vyměňte nejméně jednou ročně nebo okamžitě, když zařízení upozorní na její nízký stav.
2. Nejméně jednou měsíčně vyčistěte vnější povrch zařízení. K čištění vnějšího povrchu zařízení
použijte vysavač s kartáčovým nástavcem.
Page 84

84
Čeština
Technické údaje
Typ baterie
9V baterie (PP3)
Alkalická baterie:
6LR61 (IEC) / 1604A (ANSI/NEDA)
Zinko-uhlíková baterie:
6F22 (IEC) / 1604D (ANSI/NEDA)
Životnost baterie 1 rok
Proud v pohotovostním režimu < 30 μA
Proud při alarmu < 30 mA
Hlasitost alarmu > 85 dB(A) (3 m)
Okolní teplota 4~44 °C
Relativní vlhkost 25~85 %
Záruka
Při změnách a/nebo modikacích výrobku zanikne záruka. Při nesprávném používání tohoto výrobku
výrobce nenese odpovědnost za vzniklé škody.
Likvidace
• Likvidaci tohoto produktu provádějte v příslušné sběrně. Nevyhazujte tento výrobek s
komunálním odpadem.
• Pro více informací se obraťte na prodejce nebo místní orgány odpovědné za nakládání s odpady.
Page 85

85
Čeština
Dokumentace
Tento produkt byl vyroben a je dodáván v souladu se všemi příslušnými nařízeními a směrnicemi
platnými ve všech členských státech Evropské Unie. Splňuje také veškeré relevantní specikace a
předpisy v zemi prodeje.
Ociální dokumentaci lze získat na vyžádání. Ociální dokumentace zahrnuje také (avšak nejenom)
Prohlášení o shodě, Bezpečnostní technické listy materiálu a správu o testování produktu.
Vyloučení zodpovědnosti
Design a specikace výrobku mohou být změněny bez předchozího upozornění. Všechna loga a
obchodní názvy jsou registrované obchodní značky příslušných vlastníků a jsou chráněny zákonem.
Page 86

86
Slovenčina
SAS-HA100
Tepelný alarm
Opis
Tepelný alarm bol navrhnutý na detekciu tepla. Tepelný alarm nedetekuje dym ani plyn. Tepelné
alarmy slúžia na doplnenie dymových alarmov v miestach, kde nie je možné použiť dymové alarmy.
Toto zariadenie je určené len na použitie v miestnosti.
Ak zariadenie detekuje teplo, spustí sa zvukový alarm a indikátor bude nepretržite blikať červeným
svetlom, kým nebude zdroj tepla zneškodnený.
8
6
7
5
21 3
4
1. Tepelný alarm
2. Tepelný indikátor
3. Testovacie tlačidlo
4. Ventilačné otvory
5. Priestor na batérie
6. Montážna doska
7. Skrutka
8. Zástrčka
Page 87

87
Slovenčina
Bezpečnosť
• Pred použitím si pozorne prečítajte príručku. Príručku uschovajte pre neskoršie použitie.
• Zariadenie používajte len na účely, na ktoré je určené. Nepoužívajte zariadenie na iné účely, než je
opísané v príručke.
• Nepoužívajte zariadenie, ak je akákoľvek časť poškodená alebo chybná. Ak je zariadenie
poškodené alebo chybné, ihneď ho vymeňte.
Inštalácia
Upozornenie!
• Nepoužívajte zariadenie v exteriéroch.
• Nevystavujte zariadenie pôsobeniu vody ani vlhkosti.
• Nainštalujte zariadenie mimo dosahu detí.
• Nainštalujte najmenej jedno zariadenie na úrovni podlahy. Odporúčame nainštalovať jedno
zariadenie v každej odporúčanej oblasti.
• Nainštalujte zariadenie do spálne alebo do chodby vedľa spálne. Uistite sa, že je alarm počuteľný
vo všetkých spálňach. Nainštalujte zariadenie do oboch koncov chodby alebo miestnosti, ak je
chodba alebo miestnosť dlhšia, než 9 metrov.
• Neinštalujte zariadenie do kúpeľní, na WC ani do iných miestností, kde by mohlo byť zariadenie
spustené parou alebo vyzrážanou vodou.
• Neinštalujte zariadenie do prašných alebo nečistých prostredí.
• Neinštalujte zariadenie do blízkosti radiátorov ani ventilačných otvorov v stenách alebo stropoch.
• Neinštalujte zariadenie do blízkosti dverí ani okien.
• Neinštalujte zariadenie za záclony alebo nábytok.
• Nezakrývajte ventilačné otvory.
• Nemaľujte zariadenie.
Oblasť Áno Nie
Obývačka X
Jedáleň X
Kuchyňa X
Kúpeľňa/WC X
Spálňa X
Chodba X
Podkrovie X
Pivnica X
Garáž X
Kotolňa X
Page 88

88
Slovenčina
min.10 cm
min.10 cm
max. 30 cm
122 cm
90 cm 90 cm
5 mm
Page 89

89
Slovenčina
Použitie
Tepelný indikátor
1 Bežná prevádzka Indikátor blikne červeno raz za 60 sekúnd. Akcia: ---
2 Detekcia tepla
Spustí sa zvukový alarm a indikátor bude
nepretržite blikať červeným svetlom, kým
nebude zdroj tepla zneškodnený.
Akcia: Zneškodnite
zdroj tepla.
3
Upozornenie na nízky
stav batérie
Alarm raz za 60 sekúnd pípne a indikátor
blikne na červeno.
Akcia: Vymeňte
batérie.
Testovanie alarmu
Alarm je nutné týždenne testovať, ak chcete zabezpečiť správnu prevádzku.
1. Stlačte a podržte stlačené tlačidlo testu na 3 sekundy.
Spustí sa zvukový alarm a indikátor bude nepretržite blikať červeným svetlom, kým tlačidlo
neuvoľníte.
Zvuk alarmu: 3 krátke pípnutia, prestávka 2 sekundy (opakovane)
2. Uvoľnite tlačidlo testu.
ČISTENIE A ÚDRŽBA
Upozornenie!
• Nepoužívajte čistiace rozpúšťadlá ani abrazívne čistiace prostriedky.
• Nečistite vnútro zariadenia.
• Nepokúšajte sa zariadenie opravovať. Ak zariadenie nepracuje správne, vymeňte ho za nové
zariadenie.
1. Batériu vymeňte aspoň raz ročne alebo ihneď, ako zariadenie upozorní na jej nízky stav.
2. Najmenej raz mesačne vyčistite vonkajší povrch zariadenia. Na čistenie vonkajšieho povrchu
zariadenia použite vysávač s kefovým nástavcom.
Page 90

90
Slovenčina
Technické údaje
Typ batérie
9-V batéria (PP3)
Alkalická batéria:
6LR61 (IEC) / 1604A (ANSI/NEDA)
Zinkovo-uhlíková batéria:
6F22 (IEC) / 1604D (ANSI/NEDA)
Životnosť batérie 1 rok
Prúd v pohotovostnom režime < 30 μA
Prúd pri alarme < 30 mA
Hlasitosť alarmu > 85 dB(A) (3 m)
Okolitá teplota 4~44 °C
Relatívna vlhkosť 25~85 %
Záruka
Pri zmenách a/alebo modikáciách výrobku zanikne záruka. Pri nesprávnom používaní tohto výrobku
výrobca nenesie zodpovednosť za vzniknuté škody.
Likvidácia
• Likvidáciu tohto produktu zverte príslušnej zberni. Nevyhadzujte tento výrobok s komunálnym
odpadom.
• Ďalšie informácie získate od predajcu alebo miestnych orgánov zodpovedných za nakladanie s
odpadmi.
Page 91

91
Slovenčina
Dokumentácia
Tento produkt bol vyrobený a je dodávaný v súlade so všetkými príslušnými nariadeniami a
smernicami platnými vo všetkých členských krajinách Európskej únie. Spĺňa tiež všetky relevantné
špecikácie a predpisy v krajine predaja.
Ociálna dokumentácia je k dispozícii na požiadanie. Ociálna dokumentácia zahŕňa aj (ale nielen)
Vyhlásenie o zhode, Bezpečnostný technický list materiálu a správu o testovaní produktu.
Vylúčenie zodpovednosti
Dizajn a špecikácia výrobku sa môžu zmeniť bez predchádzajúceho upozornenia. Všetky logá a
obchodné názvy sú registrované obchodné značky príslušných vlastníkov a sú chránené zákonom.
Page 92

92
Magyar
SAS-HA100
Hőérzékelő riasztó
Megnevezése
A hőérzékelő riasztó hő érzékelésére szolgál. A hőérzékelő riasztó nem érzékeli a füstöt és a gázt.
A hőérzékelő riasztó a füstriasztók helyettesítésére szolgál azokon a helyeken, ahol a füstriasztók nem
használhatók. A készülék csak beltéri használatra készült.
Ha a készülék hőt észlel, a riasztó megszólal, és a jelzőlámpa mindaddig folyamatosan pirosan fog
villogni, amíg a hő meg nem szűnik.
8
6
7
5
21 3
4
1. Hőérzékelő riasztó
2. Hőjelző
3. Próbagomb
4. Szellőzőnyílások
5. Elemtartó
6. Szerelőlap
7. Csavar
8. Dugó
Page 93

93
Magyar
Biztonság
• A használat előtt gyelmesen olvassa el a kézikönyvet. Tegye el a kézikönyvet, hogy szükség
esetén belenézhessen.
• Csak rendeltetése szerint használja a készüléket. Ne használja a készüléket a kézikönyvben
feltüntetettől eltérő célra.
• Ne használja a készüléket, ha valamely része sérült vagy meghibásodott. A sérült vagy
meghibásodott készüléket azonnal javíttassa meg, vagy cseréltesse ki.
Üzembe helyezés
Figyelmeztetés!
• Ne használja a készüléket kültérben.
• Vigyázzon, hogy ne érje a készüléket víz vagy nedvesség.
• Úgy szerelje fel a készüléket, hogy gyermekek ne férhessenek hozzá.
• Minden emeleten legalább egy készüléket szereljen fel. Lehetőleg minden javasolt helyiségbe
szereljen fel egy készüléket.
• Szerelje fel a készüléket a hálószobában, vagy a hálószoba melletti folyosóban. Győződjön meg
arról, hogy a riasztó minden hálószobából hallható. Szereljen fel készülékeket a folyosó vagy
helyiség mindkét végére, ha az 9méternél hosszabb.
• Ne szerelje fel a készüléket fürdőszobában, vécében vagy egyéb olyan helyiségben, ahol a
készülék a gőz vagy párásodás miatt működésbe léphet.
• Ne szerelje fel a készüléket poros, illetve koszos környezetben.
• Ne szerelje fel a készüléket fűtőtest vagy fali, illetve mennyezeti szellőző közelébe.
• Ne szerelje fel a készüléket ajtó és ablak közelébe.
• Ne szerelje fel a készüléket függöny vagy bútor mögé.
• Ne takarja el a szellőzőnyílásokat.
• Ne fesse le a készüléket.
Terület Igen Nincs
Nappali szoba X
Étkező X
Konyha X
Fürdőszoba / vécé X
Hálószoba X
Folyosó X
Tetőtér X
Pince X
Garázs X
Vízmelegítős helyiség X
Page 94

94
Magyar
min.10 cm
min.10 cm
max. 30 cm
122 cm
90 cm 90 cm
5 mm
Page 95

95
Magyar
Használat
Hőjelző
1 Normál használat
A jelzőlámpa 60másodpercenként egyszer
pirosan felvillan.
Teendő: ---
2 Hőérzékelés
A riasztó megszólal, és a jelzőlámpa
mindaddig folyamatosan pirosan fog villogni,
amíg a hő meg nem szűnik.
Teendő: Szüntesse
meg a hőt.
3
Alacsony
akkufeszültségre való
gyelmeztetés
A riasztó sípolni kezd, a jelzőlámpa pedig
60másodpercenként egyszer pirosan felvillan.
Teendő: Cserélje le
az akkumulátort.
A riasztó tesztelése
A riasztó helyes működését hetente tesztelni kell.
1. Nyomja meg és tartsa 3másodpercig nyomva a próbagombot.
A riasztó megszólal, és a jelzőlámpa mindaddig folyamatosan pirosan fog villogni, amíg a
próbagombot fel nem engedi.
Riasztási hangjelzés: 3rövid sípszó, 2másodperc szünet (ismétlődően).
2. Engedje fel a próbagombot.
Tisztítás és karbantartás
Figyelmeztetés!
• Tisztító- és súrolószerek használatát mellőzze.
• Ne tisztítsa ki a készülék belsejét.
• Ne próbálja megjavítani a készüléket. Ha a készülék nem működik megfelelően, cserélje le egy új
készülékre.
1. Legalább évente egyszer – illetve az alacsony akkufeszültségre való gyelmeztetés felhangzása
esetén azonnal – cserélje ki az akkumulátort.
2. Legalább havonta egyszer tisztítsa ki a készülék belsejét. A készülék külsejének a letisztításához
használjon kefés szívófejjel ellátott porszívót.
Page 96

96
Magyar
Műszaki adatok
Akkumulátor típusa
9V-os telep (PP3)
Alkáli akkumulátor:
6LR61 (IEC) / 1604A (ANSI/NEDA)
Cink–szén akkumulátor:
6F22 (IEC) / 1604D (ANSI/NEDA)
Az akkumulátor élettartama 1év
Készenléti áram <30μA
Riasztási áram <30mA
Riasztási hangerő >85dB(A) (3m)
Környezeti hőmérséklet 4...44°C
Relatív páratartalom 25...85%
Jótállás
A termék illetéktelen módosítása érvényteleníti jótállását. Nem vállalunk felelősséget a termék
szakszerűtlen használata miatti károkért.
Leselejtezés
• A terméket elkülönítve, a megfelelő gyűjtőhelyeken kell leselejtezni. Ne dobja ki a készüléket a
háztartási hulladék közé.
• További információért lépjen kapcsolatba a forgalmazóval, vagy a hulladékkezelésért felelős helyi
hatósággal.
Page 97

97
Magyar
Dokumentáció
A termék az Európai Unió minden tagállamában érvényes vonatkozó rendelkezések és irányelvek
betartásával készült és került forgalomba. A termék megfelel az értékesítési országban rá vonatkozó
minden előírásnak és rendelkezésnek.
Kérésre hivatalos dokumentációt is rendelkezésre bocsátunk. A formális dokumentáció a teljesség
igénye nélkül a következőket tartalmazza: megfelelőségi nyilatkozat, anyagbiztonsági adatlap, a
termék vizsgálati jegyzőkönyve.
Felelősségelhárító nyilatkozat
A kivitel és a műszaki jellemzők előzetes értesítés nélkül is módosulhatnak. Minden logó, terméknév
és márkanév a tulajdonosának márkaneve vagy bejegyzett márkaneve, azokat ennek tiszteletben
tartásával említjük.
Page 98

98
Română
SAS-HA100
Alarmă termică
Descriere
Alarma termică a fost creată pentru a detecta căldura. Alarma termică nu detectează fumul sau
gazele. Alarmele termice sunt destinate să suplimenteze alarmele de fum, ind amplasate în zone în
care nu se pot amplasa alarme de fum. Dispozitivul este potrivit doar pentru utilizare în interior.
Dacă dispozitivul detectează căldură, se va declanşa alarma, iar indicatorul va clipi în roşu încontinuu
până când se elimină căldura.
8
6
7
5
21 3
4
1. Alarmă termică
2. Indicator căldură
3. Buton Testare
4. Guri de ventilaţie
5. Compartiment baterii
6. Placă de montare
7. Şurub
8. Ştecăr
Page 99

99
Română
Siguranţă
• Citiţi manualul cu atenţie înainte de utilizare. Păstraţi manualul pentru consultări ulterioare.
• Utilizaţi dispozitivul numai în scopurile prevăzute. Nu utilizaţi dispozitivul în alte scopuri decât
cele descrise în manual.
• Nu utilizaţi dispozitivul dacă are piese deteriorate sau defecte. Dacă dispozitivul este deteriorat
sau defect, înlocuiţi imediat dispozitivul.
Instalare
Avertisment!
• Nu utilizaţi dispozitivul în spaţii exterioare.
• Nu expuneţi dispozitivul apei sau umezelii.
• Nu instalaţi dispozitivul la îndemâna copiilor.
• Instalaţi cel puţin un dispozitiv pe ecare etaj. Este de preferat să instalaţi un dispozitiv în ecare
zonă recomandată.
• Instalaţi dispozitivul în dormitor sau pe holul de lângă dormitor. Asiguraţi-vă că puteţi auzi alarma
în toate dormitoarele. Instalaţi dispozitivele la ambele capete ale holului sau camerei dacă holul
sau camera are o lungime mai mare de 9 metri.
• Nu instalaţi dispozitivul în dormitoare, toalete sau alte încăperi unde acesta să poată declanşat
de abur sau condens.
• Nu instalaţi dispozitivul în zone cu praf sau impurităţi.
• Nu instalaţi dispozitivul lângă calorifere sau guri de aerisire din pereţi sau tavane.
• Nu instalaţi dispozitivul în apropierea uşilor sau geamurilor.
• Nu instalaţi dispozitivul în spatele perdelelor sau mobilei.
• Nu blocaţi gurile de aerisire.
• Nu vopsiţi dispozitivul.
Zonă Da Nu
Living X
Sufragerie X
Bucătărie X
Baie/toaletă X
Dormitor X
Hol X
Mansardă X
Subsol X
Garaj X
Camera cu centrala termică X
Page 100

100
Română
min.10 cm
min.10 cm
max. 30 cm
122 cm
90 cm 90 cm
5 mm
 Loading...