

Page 1

SAS-ALARM240
Alarm system
USER MANUAL (EN)
GEBRUIKSAANWIJZING (NL)
BEDIENUNGSANLEITUNG (DE)
MANUAL DE USUARIO (ES)
MANUEL DE L’UTILISATEUR (FR)
MANUALE PER L’UTENTE (IT)
MANUAL DO UTILIZADOR (PT)
BRUGSVEJLEDNING (DA)
BRUKERVEILEDNING (NO)
BRUKSANVISNING (SV)
KÄYTTÖOPAS (FI)
ΕΓΧΕΙΡΙΔΙΟ XPHΣHΣ (EL)
INSTRUKCJA OBSŁUGI (PL)
NÁVOD K POUŽITÍ (CS)
HASZNÁLATI ÚTMUTATÓ (HU)
MANUAL DE UTILIZARE (RO)
РУКОВОДСТВО ПОЛЬЗОВАТЕЛЯ (RU)
KULLANIM KILAVUZU (TR)
Page 2
2
1
43
2
A
5
76
11
8910
15
12
13
14
16
17
20 19 1821
B1
B2
Page 3

33
English
SAS-ALARM240
Alarm system
Description
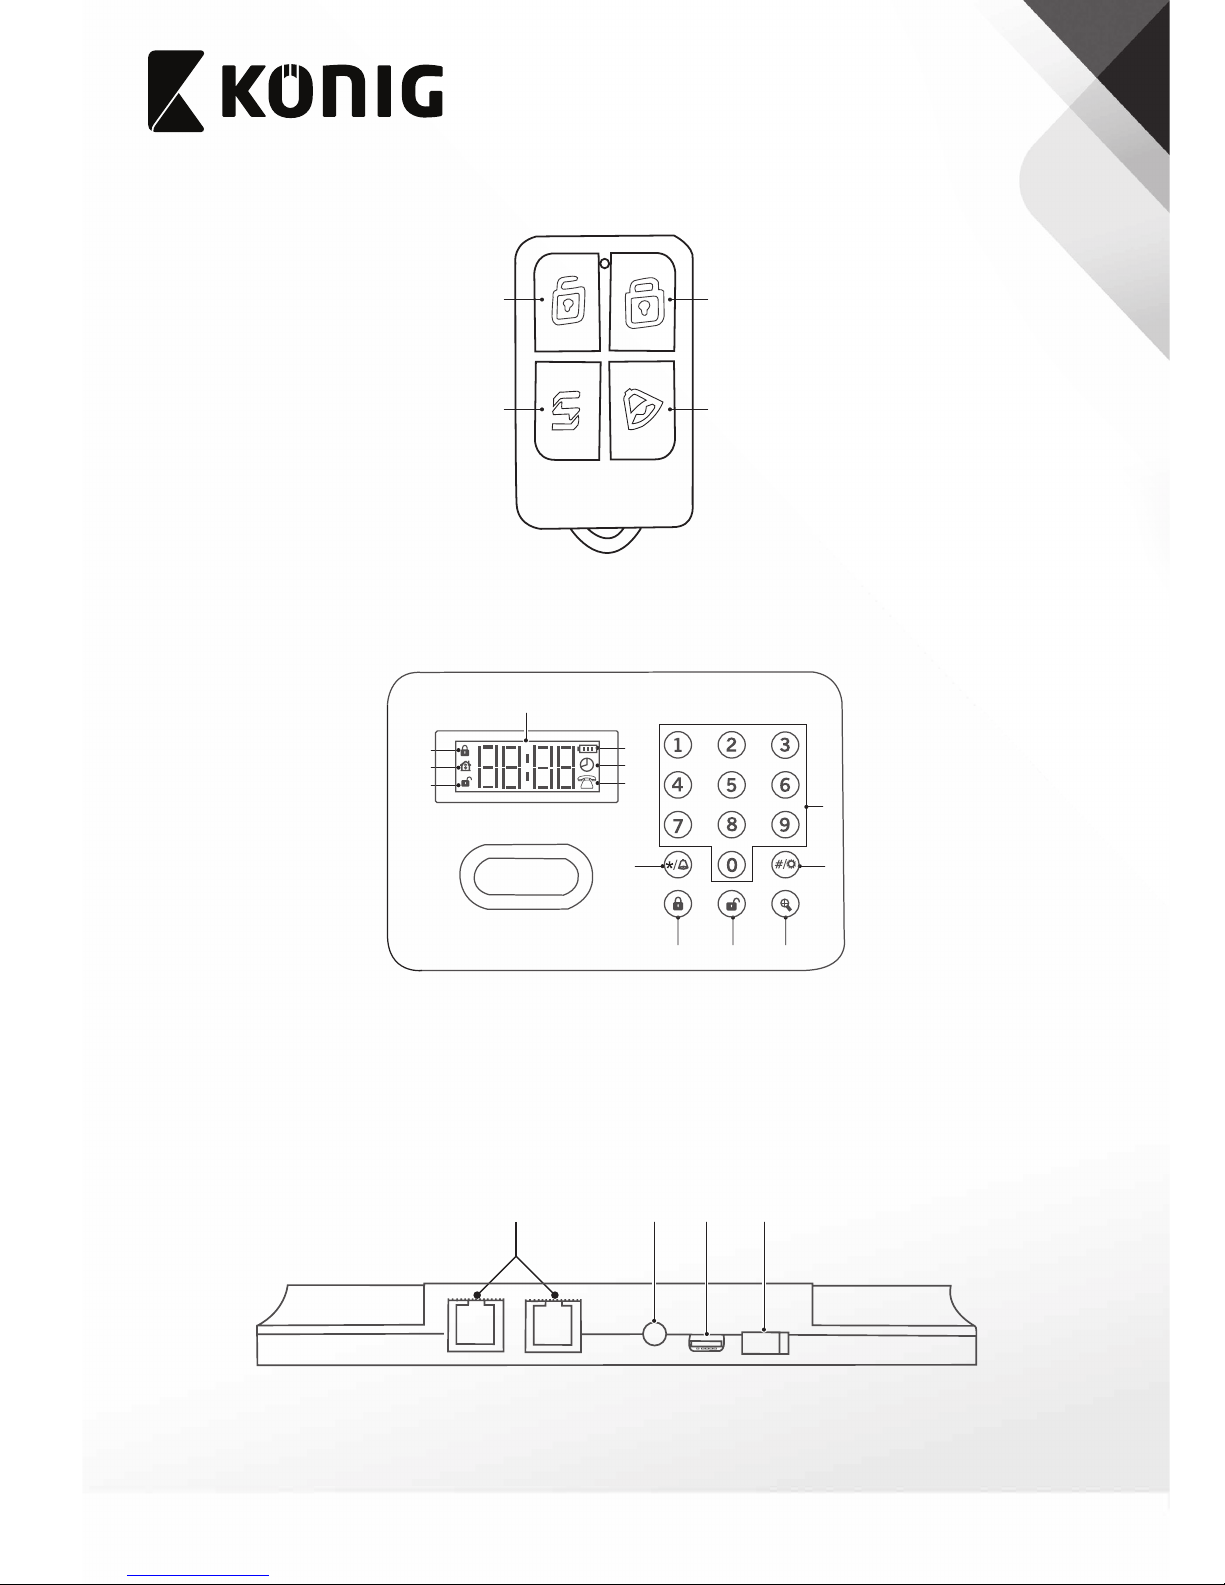
Remote control (g. A)
1. button
• Arming button
2.
button
• Disarming button
3.
button
• Partial-arming button
4.
button
• Emergency button
Control panel (front) (g. B1)
If the control panel is protected with a password, rst enter the
password.
5. Digit buttons
6.
button
• * button / Emergency button
7.
button
• # button / Setup button
8.
button
• Arming button
9.
button
• Disarming button
10.
button
• Query button
11. Time display
12.
indicator
• Arming indicator
13.
indicator
• Partial-arming indicator
14.
indicator
• Disarming indicator
15.
indicator
• Battery indicator
16.
indicator
• Scheduled arming/disarming indicator
17.
indicator
• Built-in siren indicator
Control panel (top) (g. B2)
18. Battery power switch
19. DC input (5V)
20. Siren
21. Telephone line
Extension line
Installation
• Install the alarm system at a central location, away from metal
objects or household appliances.
• Connect the telephone line, the extension line, the siren and
other cables.
• Power up the control panel.
• Set the battery power switch to the “ON” position.
Use
Arming
All detectors are activated. If an event occurs, the alarm system will
operate immediately.
• Remote control: Press the arming button.
• Control panel: Press the arming button.
The arming indicator appears on the display.
Partial arming
User-selected detectors are activated. If an event occurs, the alarm
system will operate immediately.
• Remote control: Press the partial-arming button.
• Control panel: Press the arming button twice.
The partial-arming indicator appears on the display.
Disarming
All detectors are deactivated. If an event occurs, the alarm system
will not operate.
• Remote control: Press the disarming button.
• Control panel: Press the disarming button.
The disarming indicator appears on the display.
Emergency alarm
The alarm system will operate immediately, whether armed or
disarmed.
• Remote control: Press the emergency button.
• Control panel: Press the emergency button.
Using the telephone
After receiving a call from the alarm system in case of an event, you
can also use the telephone to control the alarm panel remotely.
[1]: Arming [2]: Disarming
[3]: Monitoring on [4]: Monitoring o
[5]: Voice prompt on [6]: Voice prompt o
[7]: Siren on [8]: Siren o
Page 4

44
English
Settings and queries
The settings and queries can be carried out using the remote control or the control panel.
Settings
• To enter the setting mode, press the setup button on the control panel.
• To change the settings, press [#] + [code] + parameters + [#].
• To exit the setting mode, press [*] + [#].
Setting Command Remarks
Record voice message [#] + [19] + message + [#] Voice message duration: max. 10 seconds.
Add remote control [#] + [07] + [xxx] + [#]
[xxx] = remote control ID (001-120). After adding, press a button on the remote control.
2beeps = remote control added succesfully. 1beep = remote control already congured.
Max. number of remote controls: 120.
Delete remote control [#] + [08] + [xxx] + [#] [xxx] = value of remote control to be removed.
Delete all remote controls [#] + [08] + [***] + [#] [***] = all connected remote controls.
Add detector [#] + [09] + [xxx] + [#] [xxx] = detector ID (001-120). Max. number of detectors: 120.
Delete detector [#] + [10] + [xxx] + [#] [xxx] = value of detector to be removed.
Delete all detectors [#] + [10] + [***] + [#] [***] = all connected detectors.
Set up phone number(s) [#] + [3] + [y] + phone number + [*#]
[y] = phone number ID (1-9).
ID 1-6 = regular phone numbers. ID 7-9 = emergency phone numbers.
Delete phone number(s) [#] + [3] + [y] + [#] [y] = phone number ID (1-9).
Setup password [#] + [50] + password + [#] The password has a maximum of 4 digits. Default password: 1234.
Setup arming delay time [#] + [51] + seconds + [#] Seconds from 00 to 99. Default = 00.
Setup alarm delay time [#] + [52] + seconds + [#] Seconds from 00 to 99. Default = 60.
Setup siren time [#] + [53] + minutes + [#] Minutes from 00 to 20. Default = 01.
Setup date and time
[#] + [56] + year + month + day +
hour + minutes + seconds + [#]
Example: “20141025183500” = October 25, 2014 18:35:00.
Setup alarm clock
[#] + [57] + [yy] + start time + end
time + day(s) + [#]
[yy] = 05 / 06 (max. 2 alarms).
Example 1: “050900090112345” = siren sounds for 1 minute on weekdays at 09.00.
Example 2: “051030103167” = siren sounds for 1 minute during weekends at 10:30.
Delete alarm clock [#] + [57] + [yy] + [0] + [#] [yy] = 05 / 06.
Setup remote control by
telephone
[#] + [62] + [y] + [#] [y] = 0 (o) or 1 (on). Default = 1 (on).
Setup number of rings for
remote control by telephone
[#] + [18] + [yy] + [#] [yy] = 00 (o ) - 99. Default = 8.
Setup audible feedback [#] + [11] + [y] + [#] [y] = 0 (o) or 1 (on). Default = 1 (on).
Volume audible feedback [#] + [79] + [y] + [#] [y] = 0 (o) - 7 (loud).
Display brightness control [#] + [83] + [y] + [#] [y] = 0 (dark) - 7 (bright).
Set up power-saving mode [#] + [84] + [y] + [#] [y] = 0 (o) or 1 (on). Default = 1 (on).
Volume built-in siren [#] + [87] + [y] + [#] [y] = 0 (o) - 7 (loud).
Setup display light ashing [#] + [88] + [y] + [#] [y] = 0 (o) or 1 (on). Default = 0 (o ).
Setup telephone line connection
detection
[#] + [13] + [y] + [#] [y] = 0 (o) or 1 (on). Default = 0 (o).
Disable use of remote control for
arming/disarming
[#] + [15] + [y] + [#] [y] = 0 (o) or 1 (on). Default = 0 (o).
Setup interference prompts [#] + [16] + [y] + [#]
If other devices try to connect to the alarm system, the siren will sound for 5 seconds.
[y] = 0 (o) or 1 (on). Default = 0 (o).
Setup control panel lock [#] + [17] + [y] + [#] [y] = 0 (o) or 1 (on). Default = 0 (o ).
Add wireless strobe siren
(option)
Press the “SET” button on the strobe
siren to enter start code learning.
Press the disarm button on the
control panel. The strobe siren beeps
once to indicate that the learning
process is completed successfully.
Contact your local reseller for availability.
Volume external siren
(option)
[#] + [14] + [yy] + [#] [yy] = 00 (o ) - 99 (loud).
Restore factory settings for
control panel
[#] + [9898] + [#]
System reset [#] + [989801] + [#]+ [#]+ [#] Caution: The entire alarm system is restored to the factory settings.
Page 5
55
English
Setup zone types [#] + [60] + [xxx] + [y] + [z] + [#]
[xxx] = detector ID (001-120). [y] = zone type (1-8). [z] = 0 (siren o) or 1 (siren on).
Zone types:
1. Normal zone
2. Partial-arm zone: Detectors in the zone can be deactivated by remote control. The
system is partially armed.
3. Intelligent zone: A second trigger within 30 seconds after the rst trigger will cause
an alarm.
4. Emergency zone: Any trigger will result in an alarm, regardless of arming mode.
5. Closed zone: A trigger will not result in an alarm, regardless of arming mode.
6. Chime zone: Any trigger will result in a sound of the doorbell, regardless of arming
mode.
7. Welcome zone: When armed, any trigger will result in an alarm. When disarmed, any
trigger will result in an audible welcome message.
8. Help zone: Any trigger will result in an alarm and dialling of the three emergency
numbers with pre-recorded need-help message, regardless of arming mode.
Setup specic phone numbers
per alarm zone
[#] + [63] + start device ID + end
device ID + [y] + [#]
[y] = phone number ID (1-9).
Example 1: “630010061234” = auto-dial phones 1-4 when zones 001-006 are triggered.
Example 2: “630200206” = auto-dial phone 6 when zone 020 is triggered.
Setup arming schedule
[#] + [57] + [yy] + start time + end
time + day number + [#]
[yy] = arming schedule (01-04).
Example 1: “58010700173012345” = arm on weekdays between 07:00 and 17:30.
Example 2: “5802180006005671” = arm from Friday to Monday between 18:00 and 06:00.
Delete arming schedule [#] + [57] + [yy] + [0] + [#] [yy] = arming schedule (01-04).
Setup arming schedule with
defense zones
[#] + [58] + [yy] + start device ID +
end device ID + [#]
[yy] = arming schedule (01-04).
Example: “5801001003” = devices 001-003 follow arming schedule 01.
Setup control range for remote
control/control panel
[#] + [54] + [xxx] + start device ID +
end device ID + [#]
Default: Remote control and control panel control all zones.
[xxx] = [***] for control panel / [001-120] for remote control.
Example: “54001000010” = remote control 001 controls zones 0 to 10.
Setup audible feedback for
remote control/control panel
[#] + [55] + [xxx] + [y] + [#]
[y] = 0 (o) or 1 (on).
[xxx] = [***] for control panel / [001-120] for remote control.
Example: “55***0” = no audible feedback when arming by control panel.
Query
• To enter the query mode, press the query button on the control panel.
• To carry out queries, press [#] + code + (parameters) + [#].
• To exit the query mode, press [*] + [#].
Query Command Remarks
Stored phone number [#] + [3] + [y] + [#] [y] = phone number ID (1-9).
Password [#] + [50] + [#]
Arming delay time [#] + [51] + [#]
Alarm delay time [#] + [52] + [#]
Alarm sound duration [#] + [53] + [#]
Control range for remote control/control
panel
[#] + [54] + [xxx] + [#] [xxx] = [***] for control panel / [001-120] for remote control.
Audible feedback for remote control/
control panel
[#] + [55] + [xxx] + [#] [xxx] = [***] for control panel / [001-120] for remote control.
Date and time [#] + [56] + [#]
Arming schedule [#] + [57] + [yy] + [#] [yy] = arming schedule (01-04) / alarm clock status (05-06).
Zone/device per arming schedule [#] + [58] + [yy] + [#] [yy] = arming schedule (01-04).
Zone type and siren per zone/device [#] + [60] + [xxx] + [y] + [z] + [#] [xxx] = device ID (001-120). [y] = zone type (1-8). [z] = 0 (siren o) or 1 (siren on).
Status remote control by telephone [#] + [62] + [#]
Phone numbers per zone/device [#] + [63] + [xxx] + [#] [xxx] = device ID (001-120).
Volume audible feedback [#] + [79] + [#]
Power-saving mode [#] + [84] + [#]
Volume built-in siren [#] + [87] + [#]
Display light ashing [#] + [88] + [#]
Voice prompt on/o [#] + [11] + [#]
Use of remote control for arming/disarming [#] + [15] + [#]
Interference prompts [#] + [16] + [#]
Control panel lock [#] + [17] + [#]
Access log arming [#] + [9901] + [#] The result will be a sequence of codes:
[aa]: record number (max. 72 records). [bbbb]: month/day. [cccc]: hour/minute.
[dd]: YC = remote control / JP = control panel / DS = arming schedule.
[ee]: YK = remote control / CF = disarm / BF = arm / 01 = rst remote control.
Access log alarm [#] + [9900] + [#]
Page 6

66
English
Cleaning and maintenance
Warning!
• Before cleaning or maintenance, switch o the device, remove
the mains plug from the wall socket and wait until the device
has cooled down.
• Do not use cleaning solvents or abrasives.
• Do not attempt to repair the device. If the device does not
operate correctly, replace it with a new device.
• Clean the outside of the device using a soft, damp cloth.
Thoroughly dry the outside of the device with a clean, dry cloth.
Safety
General safety
• Read the manual carefully before use. Keep the manual for
future reference.
• Only use the device for its intended purposes. Do not use the
device for other purposes than described in the manual.
• Do not use the device if any part is damaged or defective. If the
device is damaged or defective, replace the device immediately.
• The device shall not be used by children without the supervision
of an adult. Children shall not play with the device.
• Do not modify the device in any way.
• Do not expose the device to water or moisture.
• Do not expose the device to direct sunlight.
• Keep the device away from heat sources.
Electrical safety
• To reduce risk of electric shock, this product should only be
opened by an authorized technician when service is required.
• Disconnect the product from the mains and other equipment if
a problem should occur.
• Do not use the device if the mains cable or mains plug is
damaged or defective. If the mains cable or mains plug is
damaged or defective, it must be replaced by the manufacturer
or an authorised repair agent.
• Before use, always check that the mains voltage is the same as
the voltage on the rating plate of the device.
• Make sure that the mains cable cannot become entangled.
• Make sure that the mains cable does not hang over the edge of
a worktop and cannot be caught accidentally or tripped over.
Warranty
Any changes and/or modications to the product will void the
warranty. We cannot accept any liability for damage caused by
incorrect use of the product.
Disposal
• The product is designated for separate collection at an
appropriate collection point.
Do not dispose of the product with household waste.
• For more information, contact the retailer or the local authority
responsible for waste management.
Documentation
The product has been manufactured and supplied in compliance
with all relevant regulations and directives, valid for all member
states of the European Union. The product complies with all
applicable specications and regulations in the country of sales.
Formal documentation is available upon request. The formal
documentation includes, but is not limited to the Declaration of
Conformity.
Disclaimer
Designs and specications are subject to change without notice. All
logos, brands and product names are trademarks or registered
trademarks of their respective holders and are hereby recognized as
such.
Page 7

77
Nederlands
SAS-ALARM240
Alarmsysteem
Beschrijving
Afstandsbediening (g. A)
1. -knop
• Knop voor inschakelen
2.
-knop
• Knop voor uitschakelen
3.
-knop
• Knop voor deels inschakelen
4.
-knop
• Noodknop
Bedieningspaneel (voorzijde) (g. B1)
Indien het bedieningspaneel is beveiligd met een wachtwoord,
voer dan eerst het wachtwoord in.
5. Cijferknoppen
6.
-knop
• *-knop / Noodknop
7.
-knop
• #-knop / Instelknop
8.
-knop
• Knop voor inschakelen
9.
-knop
• Knop voor uitschakelen
10.
-knop
• Query-knop
11. Tijddisplay
12.
-indicator
• Indicator voor inschakelen
13.
-indicator
• Indicator voor deels inschakelen
14.
-indicator
• Indicator voor uitschakelen
15.
-indicator
• Batterij-indicator
16.
-indicator
• Indicator voor gepland inschakelen/
uitschakelen
17.
-indicator
• Indicator voor ingebouwde sirene
Bedieningspaneel (bovenzijde) (g. B2)
18. Batterijstroomschakelaar
19. DC-ingang (5V)
20. Sirene
21. Telefoonlijn
Verlenglijn
Installation
• Installeer het alarmsysteem op een centrale locatie, uit de buurt
van metalen voorwerpen of huishoudelijke apparaten.
• Sluit de telefoonlijn, de verlenglijnl, de sirene en andere kabels aan.
• Voorzie het bedieningspaneel van stroom.
• Zet de batterijstroomschakelaar in de "ON"-stand.
Gebruik
Inschakelen
Alle detectoren worden geactiveerd. In geval van een gebeurtenis
zal het alarmsysteem onmiddellijk in werking treden.
• Afstandsbediening: Druk op de knop voor inschakelen.
• Bedieningspaneel: Druk op de knop voor inschakelen.
De indicator voor inschakelen verschijnt op de display.
Deels inschakelen
Door de gebruiker geselecteerde detectoren worden geactiveerd.
In geval van een gebeurtenis zal het alarmsysteem onmiddellijk in
werking treden.
• Afstandsbediening: Druk op de knop voor deels inschakelen.
• Bedieningspaneel: Druk twee keer op de knop voor inschakelen.
De indicator voor deels inschakelen verschijnt op de display.
Uitschakelen
Alle detectoren worden gedeactiveerd. In geval van een gebeurtenis
zal het alarmsysteem niet in werking treden.
• Afstandsbediening: Druk op de knop voor uitschakelen.
• Bedieningspaneel: Druk op de knop voor uitschakelen.
De indicator voor uitschakelen verschijnt op de display.
Noodalarm
Het alarmsysteem zal, ingeschakeld dan wel uitgeschakeld,
onmiddellijk in werking treden.
• Afstandsbediening: Druk op de noodknop.
• Bedieningspaneel: Druk op de noodknop.
De telefoon gebruiken
Nadat u in geval van een gebeurtenis een oproep van het
alarmsysteem heeft ontvangen, kunt u tevens de telefoon gebruiken
om het alarm op afstand te bedienen.
[1]: Inschakelen [2]: Uitschakelen
[3]: Bewaking aan [4]: Bewaking uit
[5]: Spraakberichten aan [6]: Spraakberichten uit
[7]: Sirene aan [8]: Sirene uit
Page 8

88
Nederlands
Instellingen en query's
De instellingen en query's kunnen worden uitgevoerd met behulp van de afstandsbediening of het bedieningspaneel.
Instellingen
• Druk op de instelknop op het bedieningspaneel om de instelmodus te activeren.
• Druk op [#] + [code] + parameters + [#] om de instellingen te wijzigen.
• Druk op [*] en [#] om de instelmodus te deactiveren.
Instelling Opdracht Opmerkingen
Spraakbericht opnemen [#] + [19] + bericht + [#] Duur spraakbericht: max. 10 seconds.
Afstandsbediening toevoegen [#] + [07] + [xxx] + [#]
[xxx] = ID afstandsbediening (001-120). Druk na het toevoegen op een knop op de
afstandsbediening. 2pieptonen = afstandsbediening succesvol toegevoegd. 1pieptoon =
afstandsbediening reeds gecongureerd. Max. aantal afstandsbedieningen: 120.
Afstandsbediening verwijderen [#] + [08] + [xxx] + [#] [xxx] = waarde van te verwijderen afstandsbediening.
Alle afstandsbedieningen
verwijderen
[#] + [08] + [***] + [#] [***] = alle aangesloten afstandsbedieningen.
Detector toevoegen [#] + [09] + [xxx] + [#] [xxx] = ID detector (001-120). Max. aantal detectoren: 120.
Detector verwijderen [#] + [10] + [xxx] + [#] [xxx] = waarde van te verwijderen detector.
Alle detectoren verwijderen [#] + [10] + [***] + [#] [***] = alle aangesloten detectoren.
Telefoonnummer(s) instellen
[#] + [3] + [y] + telefoonnummer + [*#]
[y] = ID telefoonnummer (1-9).
ID 1-6 = normale telefoonnummers. ID 7-9 = alarmnummers.
Telefoonnummer(s) verwijderen
[#] + [3] + [y] + [#]
[y] = ID telefoonnummer (1-9).
Wachtwoord instellen [#] + [50] + wachtwoord + [#] Het wachtwoord heeft maximaal 4 cijfers. Standaard wachtwoord: 1234.
Vertragingstijd activeren instellen [#] + [51] + seconden + [#] Seconden van 00 tot 99. Standaard = 00.
Vertragingstijd alarm instellen [#] + [52] + seconden + [#] Seconden van 00 tot 99. Standaard = 60.
Sirenetijd instellen [#] + [53] + minuten + [#] Minuten van 00 tot 20. Standaard = 01.
Datum en tijd instellen
[#] + [56] + jaar + maand + dag + uur
+ minuten + seconden + [#]
Voorbeeld: “20141025183500” = 25 oktober 2014, 18:35:00.
Wekker instellen
[#] + [57] + [yy] + begintijd + eindtijd
+ dag(en) + [#]
[yy] = 05 / 06 (max. 2 alarmen).
Voorbeeld 1: “050900090112345” = sirene klinkt doordeweeks 1 minuut om 09.00.
Voorbeeld 2: “051030103167” = sirene klinkt in het weekend 1 minuut om 10:30.
Wekker verwijderen [#] + [57] + [yy] + [0] + [#] [yy] = 05 / 06.
Afstandsbediening via telefoon
instellen
[#] + [62] + [y] + [#] [y] = 0 (uit) of 1 (aan). Standaard = 1 (aan).
Aantal beltonen voor
afstandsbediening via telefoon
instellen
[#] + [18] + [yy] + [#] [yy] = 00 (uit) - 99. Standaard = 8.
Hoorbare feedback instellen [#] + [11] + [y] + [#] [y] = 0 (uit) of 1 (aan). Standaard = 1 (aan).
Volume hoorbare feedback [#] + [79] + [y] + [#] [y] = 0 (uit) - 7 (luid).
Displayhelderheid regelen [#] + [83] + [y] + [#] [y] = 0 (donker) of 7 (helder).
Energiebesparende modus
instellen
[#] + [84] + [y] + [#] [y] = 0 (uit) of 1 (aan). Standaard = 1 (aan).
Volume ingebouwde sirene [#] + [87] + [y] + [#] [y] = 0 (uit) - 7 (luid).
Displayverlichting knipperen
instellen
[#] + [88] + [y] + [#] [y] = 0 (uit) of 1 (aan). Standaard = 0 (uit).
Detectie telefoonaansluiting
instellen
[#] + [13] + [y] + [#] [y] = 0 (uit) of 1 (aan). Standaard = 0 (uit).
Gebruik van afstandsbediening
voor inschakelen/uitschakelen
deactiveren
[#] + [15] + [y] + [#] [y] = 0 (uit) of 1 (aan). Standaard = 0 (uit).
Storingsberichten instellen [#] + [16] + [y] + [#]
Indien andere apparaten verbinding proberen te maken met het alarmsysteem, zal de
sirene 5 seconden klinken.
[y] = 0 (uit) of 1 (aan). Standaard = 0 (uit).
Bedieningspaneelvergrendeling
instellen
[#] + [17] + [y] + [#] [y] = 0 (uit) of 1 (aan). Standaard = 0 (uit).
Draadloze stroboscopische sirene
toevoegen (optie)
Druk op de "SET"-knop op de
stroboscopische sirene om het leren
van codes te starten.
Druk op de knop voor uitschakelen
op het bedieningspaneel. De
stroboscopische sirene piept
eenmaal om aan te geven dat het
leerproces succesvol is voltooid.
Neem contact op met uw plaatselijke dealer voor de beschikbaarheid.
Volume externe sirene (optie) [#] + [14] + [yy] + [#] [yy] = 00 (uit) - 99 (luid).
Bedrijfsinstellingen voor
bedieningspaneel herstellen
[#] + [9898] + [#]
Systeem resetten [#] + [989801] + [#]+ [#]+ [#] Voorzichtig: Het gehele alarmsysteem wordt teruggezet naar de fabrieksinstellingen.
Page 9

99
Nederlands
Zonetypen instellen [#] + [60] + [xxx] + [y] + [z] + [#]
[xxx] = ID detector (001-120). [y] = zonetype (1-8). [z] = 0 (sirene uit) of 1 (sirene aan).
Zonetypen:
1. Normale zone
2. Deels ingeschakelde zone: Detectoren in de zone kunnen worden gedeactiveerd met
de afstandsbediening. Het systeem wordt deels uitgeschakeld.
3. Intelligente zone: Een tweede trigger binnen 30 seconden na de eerste trigger zal een
alarm veroorzaken.
4. Noodzone: Iedere trigger zal een alarm veroorzaken, ongeacht inschakelmodus.
5. Gesloten zone: Een trigger zal geen alarm veroorzaken, ongeacht inschakelmodus.
6. Belzone: Iedere trigger zal het geluid van de deurbel veroorzaken, ongeacht
inschakelmodus.
7. Welkomzone: Bij een ingeschakeld systeem zal iedere trigger een alarm veroorzaken. Bij een
uitgeschakeld systeem zal iedere trigger een hoorbaar welkomstbericht veroorzaken.
8. Hulpzone: Iedere trigger zal een alarm veroorzaken en ervoor zorgen dat de drie
alarmnummers met vooraf opgenomen bericht met vraag om hulp worden gebeld,
ongeacht inschakelmodus.
Specieke telefoonnummers per
alarmzone instellen
[#] + [63] + ID eerste apparaat + ID
laatste apparaat + [y] + [#]
[y] = ID telefoonnummer (1-9).
Voorbeeld 1: “630010061234” = telefoons 1-4 automatisch bellen wanneer zones 001-006
worden getriggerd.
Voorbeeld 2: “630200206” = telefoon 6 automatisch bellen wanneer zone 020 wordt getriggerd.
Inschakelingsschema instellen
[#] + [57] + [yy] + begintijd + eindtijd
+ dagnummer + [#]
[yy] = inschakelingsschema (01-04).
Voorbeeld 1: “58010700173012345” = doordeweeks inschakelen tussen 07:00 en 17:30.
Voorbeeld 2: “5802180006005671” = van vrijdag t/m maandag inschakelen tussen 18:00 en 6:00.
Inschakelingsschema verwijderen [#] + [57] + [yy] + [0] + [#] [yy] = inschakelingsschema (01-04).
Inschakelingsschema met
verdedigingszones instellen
[#] + [58] + [yy] + ID eerste apparaat +
ID laatste apparaat + [#]
[yy] = inschakelingsschema (01-04).
Voorbeeld: “5801001003” = apparaten 001-003 volgen inschakelingsschema 01.
Bedienbereik voor
afstandsbediening/
bedieningspaneel instellen
[#] + [54] + [xxx] + ID eerste apparaat
+ ID laatste apparaat + [#]
Standaard: Afstandsbediening en bedieningspaneel bedienen alle zones.
[xxx] = [***] voor bedieningspaneel / [001-120] voor afstandsbediening.
Voorbeeld: “54001000010” = afstandsbediening 001 bedient zones 0 t/m 10.
Hoorbare feedback voor
afstandsbediening/
bedieningspaneel instellen
[#] + [55] + [xxx] + [y] + [#]
[y] = 0 (uit) of 1 (aan).
[xxx] = [***] voor bedieningspaneel / [001-120] voor afstandsbediening.
Voorbeeld: “55***0” = geen hoorbare feedback wanneer het systeem met het
bedieningspaneel wordt ingeschakeld.
Query
• Druk op de query-knop op het bedieningspaneel om de query-modus te activeren.
• Druk op [#] + [code] + (parameters) + [#] om query's uit te voeren.
• Druk op [*] en [#] om de query-modus te deactiveren.
Query Opdracht Opmerkingen
Opgeslagen telefoonnummer [#] + [3] + [y] + [#] [y] = ID telefoonnummer (1-9).
Wachtwoord [#] + [50] + [#]
Vertragingstijd activeren [#] + [51] + [#]
Vertragingstijd alarm [#] + [52] + [#]
Duur alarmgeluid [#] + [53] + [#]
Bedienbereik voor afstandsbediening/
bedieningspaneel
[#] + [54] + [xxx] + [#] [xxx] = [***] voor bedieningspaneel / [001-120] voor afstandsbediening.
Hoorbare feedback voor afstandsbediening/
bedieningspaneel
[#] + [55] + [xxx] + [#] [xxx] = [***] voor bedieningspaneel / [001-120] voor afstandsbediening.
Datum en tijd [#] + [56] + [#]
Inschakelingsschema [#] + [57] + [yy] + [#] [yy] = inschakelingsschema (01-04) / wekkerstatus (05-06).
Zone/apparaat per inschakelingsschema [#] + [58] + [yy] + [#] [yy] = inschakelingsschema (01-04).
Zonetype en sirene per zone/apparaat [#] + [60] + [xxx] + [y] + [z] + [#] [xxx] = ID apparaat (001-120). [y] = zonetype (1-8). [z] = 0 (sirene uit) of 1 (sirene aan).
Status afstandsbediening via telefoon [#] + [62] + [#]
Telefoonnummers per zone/apparaat [#] + [63] + [xxx] + [#] [xxx] = ID apparaat (001-120).
Volume hoorbare feedback [#] + [79] + [#]
Energiebesparende modus [#] + [84] + [#]
Volume ingebouwde sirene [#] + [87] + [#]
Displayverlichting knipperen [#] + [88] + [#]
Spraakberichten aan/uit [#] + [11] + [#]
Gebruik van afstandsbediening voor
inschakelen/uitschakelen
[#] + [15] + [#]
Storingsberichten [#] + [16] + [#]
Bedieningspaneelvergrendeling [#] + [17] + [#]
Toegang logboek inschakeling [#] + [9901] + [#] Het resultaat is een reeks codes:
[aa]: meldingsnummer (max. 72 meldingen). [bbbb]: maand/dag. [cccc]: uur/minuut.
[dd]: YC = afstandsbediening / JP = bedieningspaneel / DS = inschakelingsschema.
[ee]: YK = afstandsbediening / CF = uitschakelen / BF = inschakelen / 01 = eerste
afstandsbediening.
Toegang logboek alarm [#] + [9900] + [#]
Page 10

1010
Nederlands
Reiniging en onderhoud
Waarschuwing!
• Schakel voor reiniging en onderhoud het apparaat uit, verwijder
de netstekker uit het stopcontact en wacht totdat het apparaat
is afgekoeld.
• Gebruik geen reinigingsmiddelen of schuurmiddelen.
• Probeer het apparaat niet te repareren. Indien het apparaat niet
juist werkt, vervang het dan door een nieuw apparaat.
• Reinig de buitenzijde van het apparaat met een zachte, vochtige
doek. Droog de buitenzijde van het apparaat grondig af met een
schone, droge doek.
Veiligheid
Algemene veiligheid
• Lees voor gebruik de handleiding aandachtig door. Bewaar de
handleiding voor latere raadpleging.
• Gebruik het apparaat uitsluitend voor de beoogde doeleinden.
Gebruik het apparaat niet voor andere doeleinden dan
beschreven in de handleiding.
• Gebruik het apparaat niet als een onderdeel beschadigd of
defect is. Vervang een beschadigd of defect apparaat onmiddellijk.
• Het apparaat mag niet door kinderen worden gebruikt zonder
toezicht van een volwassene. Kinderen mogen niet met het
apparaat spelen.
• Breng niet op enigerlei wijze wijzigingen aan aan het apparaat.
• Stel het apparaat niet bloot aan water of vocht.
• Stel het apparaat niet bloot aan direct zonlicht.
• Houd het apparaat uit de buurt van warmtebronnen.
Elektrische veiligheid
• Dit product mag voor onderhoud alleen worden geopend door
een erkend technicus om het risico op elektrische schokken te
verkleinen.
• Koppel het product los van het stopcontact en van andere
apparatuur als er zich problemen voordoen.
• Gebruik het apparaat niet als het netsnoer of de netstekker
beschadigd of defect is. Indien het netsnoer of de netstekker
beschadigd of defect is, moet het onderdeel door de fabrikant of
een erkend servicecentrum worden vervangen.
• Controleer voor gebruik altijd of de netspanning overeenkomt
met de spanning op het typeplaatje van het apparaat.
• Zorg ervoor dat het netsnoer niet in de war kan geraken.
• Zorg ervoor dat het netsnoer niet over de rand van een werkblad
hangt, dat het niet per ongeluk verstrengeld kan raken en dat
niemand erover kan struikelen.
Garantie
Eventuele wijzigingen en/of aanpassingen aan het product zullen
de garantie ongeldig maken. Wij aanvaarden geen aansprakelijkheid
voor schade veroorzaakt door onjuist gebruik van het product.
Afvoeren
• Het product is bestemd voor gescheiden inzameling bij een
hiertoe aangewezen verzamelpunt. Werp het product niet weg
bij het huishoudelijk afval.
• Neem voor meer informatie contact op met de detailhandelaar of
de lokale overheid die verantwoordelijk is voor het afvalbeheer.
Documentatie
Het product is vervaardigd en geleverd in overeenstemming met de
relevante reglementen en richtlijnen die voor alle lidstaten van de
Europese Unie gelden. Het product voldoet aan alle van toepassing
zijnde specicaties en reglementen in het land van verkoop.
Ociële documentatie is op aanvraag verkrijgbaar. De ociële
documentatie omvat, maar is niet beperkt tot de Verklaring van
Overeenstemming.
Disclaimer
Ontwerpen en specicaties kunnen zonder kennisgeving worden
gewijzigd. Alle logo’s, merken en productnamen zijn handelsmerken
of geregistreerde handelsmerken van de respectievelijke eigenaren
en worden hierbij als zodanig erkend.
Page 11

1111
Deutsch
SAS-ALARM240
Alarmanlage
Beschreibung
Fernbedienung (Abb. A)
1. Taste
• Scharfstelltaste
2.
Taste
• Entschärfungstaste
3.
Taste
• Teil-Scharfstelltaste
4.
Taste
• Nottaste
Bedienfeld (vorne) (Abb. B1)
Falls das Bedienfeld durch ein Passwort geschützt ist, geben Sie
zunächst das Passwort ein.
5. Zierntasten
6.
Taste
• * Taste / Nottaste
7.
Taste
• # Taste / Setup-Taste
8.
Taste
• Scharfstelltaste
9.
Taste
• Entschärfungstaste
10.
Taste
• Abfragetaste
11. Zeitanzeige
12.
Anzeige
• Scharfstellanzeige
13.
Anzeige
• Teil-Scharfstellanzeige
14.
Anzeige
• Entschärfungsanzeige
15.
Anzeige
• Batterieanzeige
16.
Anzeige
• Anzeige für geplante Scharfstellung/
Entschärfung
17.
Anzeige
• Anzeige für eingebaute Sirene
Bedienfeld (oben) (Abb. B2)
18. Batteriestromschalter
19. DC-Eingang (5V)
20. Sirene
21. Telefonleitung
Nebenstellenleitung
Installation
• Installieren Sie die Alarmanlage an einem zentralen Ort und weg
von Metallgegenständen oder Haushaltsgeräten.
• Verbinden Sie die Telefonleitung, die Nebenstellenleitung,
dieSirene und sonstigen Kabel.
• Schalten Sie das Bedienfeld ein.
• Schalten Sie den Batteriestromschalter auf Position "ON".
Gebrauch
Scharfstellen
Alle Detektoren werden aktiviert. Bei einem Vorfall wird die
Alarmanlage sofort ausgelöst.
• Fernbedienung: Drücken Sie auf Scharfstelltaste.
• Bedienfeld: Drücken Sie auf Scharfstelltaste.
Auf dem Display erscheint die Scharfstellanzeige.
Teil-Scharfstellung
Die vom Benutzer gewählten Detektoren werden aktiviert.
Beieinem Vorfall wird die Alarmanlage sofort ausgelöst.
• Fernbedienung: Drücken Sie auf die Teil-Scharfstelltaste.
• Bedienfeld: Drücken Sie zwei Mal auf die Scharfstelltaste.
Auf dem Display erscheint die Teil-Scharfstellanzeige.
Entschärfen
Alle Detektoren werden deaktiviert. Bei einem Vorfall wird die
Alarmanlage nicht ausgelöst.
• Fernbedienung: Drücken Sie auf die Entschärfungstaste.
• Bedienfeld: Drücken Sie auf die Entschärfungstaste.
Auf dem Display erscheint die Entschärfungsanzeige.
Notalarm
Die Alarmanlage wird sofort ausgelöst, ob scharfgestellt oder entschärft.
• Fernbedienung: Drücken Sie auf die Nottaste.
• Bedienfeld: Drücken Sie auf die Nottaste.
Verwendung des Telefons
Nach Empfang eines Anrufs von der Alarmanlage bei einem Vorfall
können Sie auch das Telefon zur Fernbedienung des AlarmanlagenBedienfeldes verwenden.
[1]: Scharfstellen [2]: Entschärfen
[3]: Überwachung an [4]: Überwachung aus
[5]: Sprachbenachrichtigung an [6]: Sprachbenachrichtigung aus
[7]: Sirene an [8]: Sirene aus
Page 12

1212
Deutsch
Einstellungen und Abfragen
Die Einstellungen und Abfragen können unter Verwendung der Fernbedienung oder mit dem Bedienfeld durchgeführt werden.
Einstellungen
• Um den Einstellungsmodus aufzurufen, drücken Sie auf die Setup-Taste auf dem Bedienfeld.
• Um die Einstellungen zu ändern, drücken Sie auf [#] + [Code] + Parameter + [#].
• Um den Einstellungsmodus zu beenden, drücken Sie auf [*] und [#].
Einstellung Befehl Anmerkungen
Sprachnachricht aufzeichnen [#] + [19] + Nachricht + [#] Dauer der Sprachnachricht: max. 10 Sekunden.
Fernbedienung hinzufügen [#] + [07] + [xxx] + [#]
[xxx] = Fernbedienungs-ID (001-120). Drücken Sie nach dem Hinzufügen eine Taste auf
der Fernbedienung. 2Signaltöne = Fernbedienung erfolgreich hinzugefügt. 1Signalton =
Fernbedienung bereits konguriert. Max. Anzahl an Fernbedienungen: 120.
Fernbedienung löschen [#] + [08] + [xxx] + [#] [xxx] = Wert der zu entfernenden Fernbedienung.
Alle Fernbedienungen löschen [#] + [08] + [***] + [#] [***] = alle verbundenen Fernbedienungen.
Detektor hinzufügen [#] + [09] + [xxx] + [#] [xxx] = Detektor-ID (001-120). Max. Anzahl an Detektoren: 120.
Detektor löschen [#] + [10] + [xxx] + [#] [xxx] = Wert des zu entfernenden Detektors.
Alle Detektoren löschen [#] + [10] + [***] + [#] [***] = alle verbundenen Detektoren.
Einrichtung der Telefonnummer(n)
[#] + [3] + [y] + Telefonnummer + [*#]
[y] = Telefonnummer-ID (1-9).
ID 1-6 = normale Telefonnummern. ID 7-9 = Nottelefonnummern.
Telefonnummer(n) löschen
[#] + [3] + [y] + [#]
[y] = Telefonnummer-ID (1-9).
Passwort einrichten [#] + [50] + Passwort + [#] Das Passwort hat maximal 4 Ziern. Voreingestelltes Passwort: 1234.
Einrichtung der
Scharfstellverzögerungszeit
[#] + [51] + Sekunden + [#] Sekunden von 00 bis 99. Voreinstellung = 00.
Einrichtung der
Alarmverzögerungszeit
[#] + [52] + Sekunden + [#] Sekunden von 00 bis 99. Voreinstellung = 60.
Einrichtung der Sirenenzeit [#] + [53] + Minuten + [#] Minuten von 00 bis 20. Voreinstellung = 01.
Einrichtung von Datum und
Uhrzeit
[#] + [56] + Jahr + Monat + Tag +
Stunde + Minuten + Sekunden + [#]
Beispiel: “20141025183500” = 25. Oktober 2014 18:35:00.
Einrichtung des Weckers
[#] + [57] + [yy] + Startzeit + Endzeit +
Tag(e) + [#]
[yy] = 05 / 06 (max. 2 Alarme).
Beispiel 1: “050900090112345” = Sirene ertönt 1 Minute an Wochentagen um 09.00.
Beispiel 2: “051030103167” = Sirene ertönt 1 Minute an Wochenenden um 10:30.
Wecker löschen [#] + [57] + [yy] + [0] + [#] [yy] = 05 / 06.
Fernbedienung mittels Telefon
einrichten
[#] + [62] + [y] + [#] [y] = 0 (aus) oder 1 (an). Voreinstellung = 1 (an).
Einrichtung der Klingelanzahl für
Fernbedienung mittels Telefon
[#] + [18] + [yy] + [#] [yy] = 00 (aus) - 99. Voreinstellung = 8.
Einrichtung der akustischen
Rückmeldung
[#] + [11] + [y] + [#] [y] = 0 (aus) oder 1 (an). Voreinstellung = 1 (an).
Lautstärke der akustischen
Rückmeldung
[#] + [79] + [y] + [#] [y] = 0 (aus) - 7 (laut).
Helligkeitsregelung des Displays [#] + [83] + [y] + [#] [y] = 0 (dunkel) - 7 (hell).
Einrichtung des Energiesparmodus [#] + [84] + [y] + [#] [y] = 0 (aus) oder 1 (an). Voreinstellung = 1 (an).
Lautstärke der eingebauten Sirene [#] + [87] + [y] + [#] [y] = 0 (aus) - 7 (laut).
Einrichtung des Blinkens der
Displaylampe
[#] + [88] + [y] + [#] [y] = 0 (aus) oder 1 (an). Voreinstellung = 0 (aus).
Einrichtung der Verbindungserkennung der Telefonleitung
[#] + [13] + [y] + [#] [y] = 0 (aus) oder 1 (an). Voreinstellung = 0 (aus).
Deaktivierung der Benutzung der
Fernbedienung für das
Scharfstellen/Entschärfen
[#] + [15] + [y] + [#] [y] = 0 (aus) oder 1 (an). Voreinstellung = 0 (aus).
Einrichtung der
Störungsbenachrichtigungen
[#] + [16] + [y] + [#]
Falls andere Geräte versuchen, eine Verbindung mit der Alarmanlage herzustellen,
ertöntdie Sirene 5 Sekunden lang.
[y] = 0 (aus) oder 1 (an). Voreinstellung = 0 (aus).
Einrichtung der Bedienfeldsperre [#] + [17] + [y] + [#] [y] = 0 (aus) oder 1 (an). Voreinstellung = 0 (aus).
Hinzufügen der drahtlosen
Stroboskopsirene (Option)
Drücken Sie auf die “SET”-Taste an der
Stroboskopsirene, um das Einlernen
des Startcodes aufzurufen.
Drücken Sie auf die Entschärfungstaste
auf dem Bedienfeld. Die
Stroboskopsirene gibt ein Signal ab,
um darauf hinzuweisen, dass der
Einlernvorgang erfolgreich
abgeschlossen wurde.
Wenden Sie sich an Ihren regionalen Händler, um die Verfügbarkeit feststellen zu lassen.
Lautstärke der externen Sirene
(Option)
[#] + [14] + [yy] + [#] [yy] = 00 (aus) - 99 (laut).
Wiederherstellung der
Werkseinstellungen für das
Bedienfeld
[#] + [9898] + [#]
Systemrückstellung [#] + [989801] + [#]+ [#]+ [#] Achtung: Die gesamte Alarmanlage wird auf die Werkseinstellungen zurückgesetzt.
Page 13
1313
Deutsch
Einrichtung von Zonentypen [#] + [60] + [xxx] + [y] + [z] + [#]
[xxx] = Detektor-ID (001-120). [y] = Zonentyp (1-8). [z] = 0 (Sirene aus) oder 1 (Sirene an).
Zonentypen:
1. Normale Zone
2. Teilweise scharfgestellte Zone: Detektoren in der Zone können mit der Fernbedienung
deaktiviert werden. Das System ist teilweise scharfgestellt.
3. Intelligente Zone: Ein zweiter Auslöser innerhalb von 30 Sekunden des ersten
Auslösers löst einen Alarm aus.
4. Notzone: Jeder Auslöser führt zu einem Alarm, ungeachtet, welcher Scharfstellmodus
eingestellt ist.
5. Geschlossene Zone: Ein Auslöser führt nicht zu einem Alarm, ungeachtet, welcher
Scharfstellmodus eingestellt ist.
6. Klingeltonzone: Jeder Auslöser führt zu einem Türklingelton, ungeachtet, welcher
Scharfstellmodus eingestellt ist.
7. Willkommen-Zone: Im scharfgestellten Zustand führt jeder Auslöser zu einem Alarm.
Imentschärften Zustand führt jeder Auslöser zu einer akustischen Willkommen-Meldung.
8. Hilfezone: Jeder Auslöser führt zu einem Alarm und einem Wählen der drei
Notrufnummern mit der zuvor aufgezeichneten Meldung, dass Hilfe benötigt wird,
ungeachtet des Scharfstellmodus.
Einrichtung spezischer
Telefonnummern pro Alarmzone
[#] + [63] + Start Geräte-ID + Ende
Geräte-ID + [y] + [#]
[y] = Telefonnummer-ID (1-9).
Beispiel 1: “630010061234” = automatisch Telefone 1-4 wählen, wenn die Zonen 001-006
ausgelöst werden.
Beispiel 2: “630200206” = automatisch Telefon 6 wählen, wenn Zone 020 ausgelöst wird.
Einrichtung eines Scharfstellplans
[#] + [57] + [yy] + Startzeit + Endzeit +
Tagesnummer + [#]
[yy] = Scharfstellplan (01-04).
Beispiel 1: “58010700173012345” = an Wochenenden zwischen 07:00 und 17:30 scharfstellen.
Beispiel 2: “5802180006005671” = von Freitag bis Montag zwischen 18:00 und 06:00 scharfstellen.
Scharfstellplan löschen [#] + [57] + [yy] + [0] + [#] [yy] = Scharfstellplan (01-04).
Einrichtung eines Scharfstellplans
mit Verteidigungszonen
[#] + [58] + [yy] + Start Geräte-ID +
Ende Geräte-ID + [#]
[yy] = Scharfstellplan (01-04).
Beispiel: “5801001003” = Geräte 001-003 folgen dem Scharfstellplan 01.
Einrichtung des Steuerbereichs
für die Fernbedienung/das
Bedienfeld
[#] + [54] + [xxx] + Start Geräte-ID +
Ende Geräte-ID + [#]
Voreinstellung: Fernbedienung und Bedienfeld steuern alle Zonen.
[xxx] = [***] für Bedienfeld / [001-120] für Fernbedienung.
Beispiel: “54001000010” = Fernbedienung 001 steuert die Zonen 0 bis 10.
Einrichtung der akustischen
Rückmeldung für die
Fernbedienung/das Bedienfeld
[#] + [55] + [xxx] + [y] + [#]
[y] = 0 (aus) oder 1 (an).
[xxx] = [***] für Bedienfeld / [001-120] für Fernbedienung.
Beispiel: “55***0” = keine akustische Rückmeldung, wenn Scharfstellen durch
Fernbedienung erfolgt.
Abfragen
• Um den Abfragemodus aufzurufen, drücken Sie auf die Abfragetaste auf dem Bedienfeld.
• Um Abfragen zu tätigen, drücken Sie auf [#] + Code + (Parameter) + [#].
• Um den Abfragemodus zu verlassen, drücken Sie auf [*] und [#].
Abfragen Befehl Anmerkungen
Gespeicherte Telefonnummer [#] + [3] + [y] + [#] [y] = Telefonnummer-ID (1-9).
Passwort [#] + [50] + [#]
Scharfstellverzögerungszeit [#] + [51] + [#]
Alarmverzögerungszeit [#] + [52] + [#]
Alarmtondauer [#] + [53] + [#]
Steuerbereich für Fernbedienung/Bedienfeld [#] + [54] + [xxx] + [#] [xxx] = [***] für Bedienfeld / [001-120] für Fernbedienung.
Akustische Rückmeldung für
Fernbedienung/Bedienfeld
[#] + [55] + [xxx] + [#] [xxx] = [***] für Bedienfeld / [001-120] für Fernbedienung.
Datum und Uhrzeit [#] + [56] + [#]
Scharfstellplan [#] + [57] + [yy] + [#] [yy] = Scharfstellplan (01-04) / Weckerstatus (05-06).
Zone/Gerät pro Scharfstellplan [#] + [58] + [yy] + [#] [yy] = Scharfstellplan (01-04).
Zonentyp und Sirene pro Zone/Gerät [#] + [60] + [xxx] + [y] + [z] + [#]
[xxx] = Geräte-ID (001-120). [y] = Zonentyp (1-8). [z] = 0 (Sirene aus) oder 1 (Sirene
an).
Status der Fernbedienung mittels Telefon [#] + [62] + [#]
Telefonnummern pro Zone/Gerät [#] + [63] + [xxx] + [#] [xxx] = Geräte-ID (001-120).
Lautstärke der akustischen Rückmeldung [#] + [79] + [#]
Energiesparmodus [#] + [84] + [#]
Lautstärke der eingebauten Sirene [#] + [87] + [#]
Blinken der Displaylampe [#] + [88] + [#]
Sprachbenachrichtigung an/aus [#] + [11] + [#]
Benutzung der Fernbedienung für das
Scharfstellen/Entschärfen
[#] + [15] + [#]
Störungsbenachrichtigungen [#] + [16] + [#]
Bedienfeldsperre [#] + [17] + [#]
Zugri Protokollierung Scharfstellung [#] + [9901] + [#] Das Ergebnis ist eine Code-Abfolge:
[aa]: Aufzeichnungsnummer (max. 72 Aufzeichnungen). [bbbb]: Monat/Tag.
[cccc]: Stunde/Minute.
[dd]: YC = Fernbedienung / JP = Bedienfeld / DS = Scharfstellplan.
[ee]: YK = Fernbedienung / CF = Entschärfen / BF = Scharfstellen / 01 = erste Fernbedienung.
Zugri Protokollierung Alarm [#] + [9900] + [#]
Page 14

1414
Deutsch
Reinigung und Pege
Warnung!
• Schalten Sie das Gerät vor der Reinigung oder Pege aus, ziehen
Sie den Netzstecker aus der Wandsteckdose und warten Sie, bis
sich das Gerät abgekühlt hat.
• Verwenden Sie keine Lösungs- oder Scheuermittel.
• Versuchen Sie nicht, das Gerät zu reparieren. Falls das Gerät
nicht einwandfrei arbeitet, tauschen Sie es gegen ein neues aus.
• Reinigen Sie das Äußere des Geräts mit einem weichen feuchten
Tuch. Trocknen Sie das Äußere des Geräts gründlich mit einem
sauberen trockenen Tuch ab.
Sicherheit
Allgemeine Sicherheit
• Lesen Sie die Bedienungsanleitung vor dem Gebrauch genau durch.
Bitte bewahren Sie die Bedienungsanleitung zur späteren
Bezugnahme auf.
• Verwenden Sie das Gerät nur bestimmungsgemäß. Verwenden
Sie das Gerät nur für den in dieser Bedienungsanleitung
beschriebenen Zweck.
• Verwenden Sie das Gerät nicht, falls ein Teil beschädigt oder
defekt ist. Ist das Gerät beschädigt oder defekt, erneuern Sie es
unverzüglich.
• Dieses Gerät darf ohne die Aufsicht eines Erwachsenen nicht von
Kindern benutzt werden. Kinder dürfen nicht mit dem Gerät spielen.
• Das Gerät darf in keiner Weise verändert werden.
• Setzen Sie das Gerät keinem Wasser und keiner Feuchtigkeit aus.
• Setzen Sie das Gerät keiner direkten Sonneneinstrahlung aus.
• Halten Sie das Gerät von Hitzequellen fern.
Elektrische Sicherheit
• Um die Gefahr eines elektrischen Schlags zu verringern, sollte
dieses Produkt bei erforderlichen Servicearbeiten ausschließlich
von einem autorisierten Techniker geönet werden.
• Bei Problemen trennen Sie das Gerät bitte von der
Spannungsversorgung und von anderen Geräten.
• Verwenden Sie das Gerät nicht, falls das Netzkabel oder der
Netzstecker beschädigt oder defekt ist. Ist das Netzkabel oder
der Netzstecker beschädigt oder defekt, muss das Netzkabel
oder der Netzstecker vom Hersteller oder einem autorisierten
Service-Partner erneuert werden.
• Vergewissern Sie sich stets vor dem Gebrauch, dass die Netzspannung
mit der Spannung auf dem Typenschild des Geräts übereinstimmt.
• Achten Sie darauf, dass sich das Netzkabel nicht verwickeln kann.
• Vergewissern Sie sich, dass das Netzkabel nicht über die Kante
einer Arbeitsplatte hängt und sich niemand darin verfangen
oder darüber stolpern kann.
Garantie
Alle Änderungen und/oder Modizierungen an dem Produkt haben
ein Erlöschen der Garantie zur Folge. Wir übernehmen keine Haftung
für Schäden durch unsachgemäße Verwendung des Produkts.
Entsorgung
• Dieses Produkt muss an einer entsprechenden Sammelstelle zur
Entsorgung abgegeben werden. Entsorgen Sie das Produkt nicht
mit dem Haushaltsabfall.
• Weitere Informationen erhalten Sie beim Verkäufer oder der für
die Abfallwirtschaft verantwortlichen örtlichen Behörde.
Dokumentation
Dieses Produkt wurde in Übereinstimmung mit allen geltenden
Vorschriften und Richtlinien hergestellt und geliefert, die für alle
Mitgliedsstaaten der Europäischen Union gültig sind. Das Produkt
entspricht allen geltenden Spezikationen und Bestimmungen im
Land des Vertriebs.
Eine formale Dokumentation ist auf Anfrage erhältlich. Die formale
Dokumentation beinhaltet die Konformitätserklärung, ohne jedoch
hierauf beschränkt zu sein.
Haftungsausschluss
Design und technische Daten unterliegen unangekündigten
Änderungen. Alle Logos, Marken und Produktnamen sind Marken
oder eingetragene Marken ihrer jeweiligen Eigentümer und werden
hiermit als solche anerkannt.
Page 15

1515
Español
SAS-ALARM240
Sistema de alarma
Descripción
Mando a distancia (g. A)
1. Botón
• Botón de armado
2. Botón
• Botón de desarmado
3. Botón
• Botón de armado parcial
4. Botón
• Botón de emergencia
Panel de control (frontal) (g. B1)
Si el panel de control está protegido por contraseña, introduzca
primero la contraseña.
5. Botones numéricos
6. Botón
• Botón * / Botón de emergencia
7. Botón
• Botón # / Botón de conguración
8. Botón
• Botón de armado
9. Botón
• Botón de desarmado
10. Botón
• Botón de consulta
11. Indicación de hora
12. Indicador
• Indicador de armado
13. Indicador
• Indicador de armado parcial
14. Indicador
• Indicador de desarmado
15. Indicador
• Indicador de batería
16. Indicador
• Indicador de armado/desarmado
programado
17. Indicador
• Indicador de sirena integrada
Panel de control (superior) (g. B2)
18. Interruptor de alimentación
de batería
19. Entrada CC (5V)
20. Sirena
21. Línea telefónica
Línea de extensión
Instalación
• Instale el sistema de alarma en un lugar central, lejos de objetos
metálicos o aparatos domésticos.
• Conecte la línea telefónica, la línea de extensión, la sirena y otros
cables.
• Encienda el panel de control.
• Sitúe el interruptor de alimentación de batería en la posición “ON”.
Uso
Armado
Se activan todos los detectores. Si se produce un evento, el sistema
de alarma funcionará inmediatamente.
• Mando a distancia: Pulse el botón de armado.
• Panel de control: Pulse el botón de armado.
El indicador de armado aparece en la pantalla.
Armado parcial
Se activan los detectores seleccionados por el usuario. Si se produce
un evento, el sistema de alarma funcionará inmediatamente.
• Mando a distancia: Pulse el botón de armado parcial.
• Panel de control: Pulse el botón de armado dos veces.
El indicador de armado parcial aparece en la pantalla.
Desarmado
Se desactivan todos los detectores. Si se produce un evento, el sistema
de alarma no funcionará.
• Mando a distancia: Pulse el botón de desarmado.
• Panel de control: Pulse el botón de desarmado.
El indicador de desarmado aparece en la pantalla.
Alarma de emergencia
El sistema de alarma funcionará inmediatamente, tanto si está
armado como desarmado.
• Mando a distancia: Pulse el botón de emergencia.
• Panel de control: Pulse el botón de emergencia.
Uso del teléfono
Tras recibir una llamada del sistema de alarma en caso de un evento,
también puede usar el teléfono para controlar el panel de alarma de
forma remota.
[1]: Armado [2]: Desarmado
[3]: Supervisión activada [4]: Supervisión desactivada
[5]: Aviso de voz activado [6]: Aviso de voz desactivado
[7]: Sirena activada [8]: Sirena desactivada
Page 16

1616
Español
Conguración y consultas
La conguración y las consultas pueden realizarse utilizando el mando a distancia o el panel de control.
Conguración
• Para acceder al modo de conguración, pulse el botón de conguración en el panel de control.
• Para cambiar la conguración, pulse [#] + [código] + parámetros + [#].
• Para salir del modo de conguración, pulse [*] y [#].
Ajuste Comando Observaciones
Grabar mensaje de voz [#] + [19] + mensaje + [#] Duración del mensaje de voz: máx. 10 segundos.
Agregar mando a distancia [#] + [07] + [xxx] + [#]
[xxx] = ID de mando a distancia (001-120). Tras agregar, pulse un botón en el mando a distancia.
2pitidos = mando a distancia agregado correctamente. 1pitido = mando a distancia ya
congurado. Número máx. de mandos a distancia: 120.
Eliminar mando a distancia [#] + [08] + [xxx] + [#] [xxx] = valor del mando a distancia que va a eliminarse.
Eliminar todos los mandos
adistancia
[#] + [08] + [***] + [#] [***] = todos los mandos a distancia conectados.
Agregar detector [#] + [09] + [xxx] + [#] [xxx] = ID de detector (001-120). Número máx. de detectores: 120.
Eliminar detector [#] + [10] + [xxx] + [#] [xxx] = valor del detector que va a eliminarse.
Eliminar todos los detectores [#] + [10] + [***] + [#] [***] = todos los detectores conectados.
Congurar número(s) de teléfono
[#] + [3] + [y] + número de teléfono
+ [*#]
[y] = ID de número de teléfono (1-9).
ID 1-6 = números de teléfono habituales. ID 7-9 = números de teléfono de emergencia.
Eliminar número(s) de teléfono
[#] + [3] + [y] + [#]
[y] = ID de número de teléfono (1-9).
Congurar contraseña [#] + [50] + contraseña + [#] La contraseña tiene un máximo de 4 dígitos. Contraseña predeterminada: 1234.
Congurar tiempo de retardo
dearmado
[#] + [51] + segundos + [#] Segundos de 00 a 99. Predeterminado = 00.
Congurar tiempo de retardo
dealarma
[#] + [52] + segundos + [#] Segundos de 00 a 99. Predeterminado = 60.
Congurar tiempo de sirena [#] + [53] + minutos + [#] Minutos de 00 a 20. Predeterminado = 01.
Congurar fecha y hora
[#] + [56] + año + mes + día + hora +
minutos + segundos + [#]
Ejemplo: “20141025183500” = 25 de octubre, 2014 18:35:00.
Congurar despertador
[#] + [57] + [yy] + hora de inicio +
hora de n + día(s) + [#]
[yy] = 05 / 06 (máx. 2 alarmas).
Ejemplo 1: “050900090112345” = la sirena suena durante 1 minuto los días laborables a las 09.00.
Ejemplo 2: “051030103167” = la sirena suena durante 1 minuto los nes de semana a las 10:30.
Eliminar despertador [#] + [57] + [yy] + [0] + [#] [yy] = 05 / 06.
Congurar mando a distancia por
teléfono
[#] + [62] + [y] + [#] [y] = 0 (desactivado) o 1 (activado). Predeterminado = 1 (activado).
Congurar número de timbres para
mando a distancia por teléfono
[#] + [18] + [yy] + [#] [yy] = 00 (desactivado) - 99. Predeterminado = 8.
Congurar conrmación acústica [#] + [11] + [y] + [#] [y] = 0 (desactivado) o 1 (activado). Predeterminado = 1 (activado).
Volumen de conrmación acústica [#] + [79] + [y] + [#] [y] = 0 (desactivado) - 7 (fuerte).
Control de brillo de pantalla [#] + [83] + [y] + [#] [y] = 0 (oscuro) - 7 (claro).
Congurar modo de ahorro de
energía
[#] + [84] + [y] + [#] [y] = 0 (desactivado) o 1 (activado). Predeterminado = 1 (activado).
Volumen de sirena integrada [#] + [87] + [y] + [#] [y] = 0 (desactivado) - 7 (fuerte).
Congurar intermitencia de luz
de pantalla
[#] + [88] + [y] + [#] [y] = 0 (desactivado) o 1 (activado). Predeterminado = 0 (desactivado).
Congurar detección de
conexión de línea telefónica
[#] + [13] + [y] + [#] [y] = 0 (desactivado) o 1 (activado). Predeterminado = 0 (desactivado).
Deshabilitar el uso del mando a
distancia para armado/desarmado
[#] + [15] + [y] + [#] [y] = 0 (desactivado) o 1 (activado). Predeterminado = 0 (desactivado).
Congurar avisos de interferencia [#] + [16] + [y] + [#]
Si otros dispositivos intentan conectarse al sistema de alarma, la sirena sonará durante
5segundos.
[y] = 0 (desactivado) o 1 (activado). Predeterminado = 0 (desactivado).
Congurar bloqueo de panel
decontrol
[#] + [17] + [y] + [#] [y] = 0 (desactivado) o 1 (activado). Predeterminado = 0 (desactivado).
Agregar sirena estroboscópica
inalámbrica (opción)
Pulse el botón “AJUSTAR” en la sirena
estroboscópica para acceder al
aprendizaje del código de inicio.
Pulse el botón de desarmado en el
panel de control. La sirena
estroboscópica pita una vez para
indicar que el proceso de aprendizaje
se ha realizado correctamente.
Contacte con el vendedor local para conocer la disponibilidad.
Volumen de sirena externa
(opción)
[#] + [14] + [yy] + [#] [yy] = 00 (desactivado) - 99 (fuerte).
Restaurar la conguración de
fábrica para el panel de control
[#] + [9898] + [#]
Reinicio del sistema [#] + [989801] + [#]+ [#]+ [#] Precaución: Se restablece todo el sistema de alarma a la conguración de fábrica.
Page 17
1717
Español
Congurar tipos de zona [#] + [60] + [xxx] + [y] + [z] + [#]
[xxx] = ID de detector (001-120). [y] = tipo de zona (1-8). [z] = 0 (sirena desactivada) o 1
(sirena activada).
Tipos de zona:
1. Zona normal
2. Zona de armado parcial: Los detectores de la zona pueden desactivarse mediante el
mando a distancia. El sistema está armado parcialmente.
3. Zona inteligente: Un segundo activador 30 segundos después del primer activador
producirá una alarma.
4. Zona de emergencia: Cualquier activador producirá una alarma, independientemente
del modo de armado.
5. Zona cerrada: Un activador no producirá una alarma, independientemente del modo
de armado.
6. Zona de campana: Cualquier activador producirá un sonido de la campana,
independientemente del modo de armado.
7. Zona de bienvenida: Cuando está armado, cualquier activador producirá una alarma.
Cuando está desarmado, cualquier activador producirá un mensaje de bienvenida audible.
8. Zona de ayuda: Cualquier activador producirá una alarma y el marcado de los tres
números de emergencia con el mensaje de necesidad de ayuda pregrabado,
independientemente del modo de armado.
Congurar números de teléfono
especícos por zona de alarma
[#] + [63] + ID dispositivo inicio + ID
dispositivo n + [y] + [#]
[y] = ID de número de teléfono (1-9).
Ejemplo 1: “630010061234” = automarcado de teléfonos 1-4 cuando se activan las zonas
001-006.
Ejemplo 2: “630200206” = automarcado de teléfono 6 cuando se activa la zona 020.
Congurar programa de armado
[#] + [57] + [yy] + hora de inicio +
hora de n + número de día + [#]
[yy] = programa de armado (01-04).
Ejemplo 1: “58010700173012345” = armar en días laborables entre 07:00 y 17:30.
Ejemplo 2: “5802180006005671” = armar de viernes a lunes entre 18:00 y 06:00.
Eliminar programa de armado [#] + [57] + [yy] + [0] + [#] [yy] = programa de armado (01-04).
Congurar programa de armado
con zonas de defensa
[#] + [58] + [yy] + ID dispositivo inicio
+ ID dispositivo n + [#]
[yy] = programa de armado (01-04).
Ejemplo: “5801001003” = los dispositivos 001-003 siguen el programa de armado 01.
Congurar alcance de control
para mando a distancia/panel de
control
[#] + [54] + [xxx] + ID dispositivo
inicio + ID dispositivo n + [#]
Predeterminado: El mando a distancia y el panel de control controlan todas las zonas.
[xxx] = [***] para panel de control / [001-120] para mando a distancia.
Ejemplo: “54001000010” = el mando a distancia 001 controla las zonas 0 a 10.
Congurar conrmación acústica
para mando a distancia/panel de
control
[#] + [55] + [xxx] + [y] + [#]
[y] = 0 (desactivado) o 1 (activado).
[xxx] = [***] para panel de control / [001-120] para mando a distancia.
Ejemplo: “55***0” = no hay conrmación acústica durante el armado con el panel de control.
Consulta
• Para acceder al modo de consulta, pulse el botón de consulta en el panel de control.
• Para realizar consultas, pulse [#] + código + (parámetros) + [#].
• Para salir del modo de consulta, pulse [*] y [#].
Consulta Comando Observaciones
Número de teléfono almacenado [#] + [3] + [y] + [#] [y] = ID de número de teléfono (1-9).
Contraseña [#] + [50] + [#]
Tiempo de retardo de armado [#] + [51] + [#]
Tiempo de retardo de alarma [#] + [52] + [#]
Duración de sonido de alarma [#] + [53] + [#]
Alcance de control para mando a distancia/
panel de control
[#] + [54] + [xxx] + [#] [xxx] = [***] para panel de control / [001-120] para mando a distancia.
Conrmación acústica para mando a
distancia/panel de control
[#] + [55] + [xxx] + [#] [xxx] = [***] para panel de control / [001-120] para mando a distancia.
Fecha y hora [#] + [56] + [#]
Programa de armado [#] + [57] + [yy] + [#] [yy] = programa de armado (01-04) / estado de despertador (05-06).
Zona/dispositivo por programa de armado [#] + [58] + [yy] + [#] [yy] = programa de armado (01-04).
Tipo de zona y sirena por zona/dispositivo [#] + [60] + [xxx] + [y] + [z] + [#]
[xxx] = ID de dispositivo (001-120). [y] = tipo de zona (1-8). [z] = 0 (sirena desactivada)
o 1 (sirena activada).
Estado de mando a distancia por teléfono [#] + [62] + [#]
Números de teléfono por zona/dispositivo [#] + [63] + [xxx] + [#] [xxx] = ID de dispositivo (001-120).
Volumen de conrmación acústica [#] + [79] + [#]
Modo de ahorro de energía [#] + [84] + [#]
Volumen de sirena integrada [#] + [87] + [#]
Intermitencia de luz de pantalla [#] + [88] + [#]
Aviso de voz activado/desactivado [#] + [11] + [#]
Uso del mando a distancia para armado/
desarmado
[#] + [15] + [#]
Avisos de interferencia [#] + [16] + [#]
Bloqueo de panel de control [#] + [17] + [#]
Registro de acceso de armado [#] + [9901] + [#] El resultado será una secuencia de códigos:
[aa]: número de registro (máx. 72 registros). [bbbb]: mes/día. [cccc]: hora/minuto.
[dd]: YC = mando a distancia / JP = panel de control / DS = programa de armado.
[ee]: YK = mando a distancia / CF = desarmar / BF = armar / 01 = primero mando a distancia.
Registro de acceso de alarma [#] + [9900] + [#]
Page 18

1818
Español
Limpieza y mantenimiento
¡Advertencia!
• Antes de la limpieza o el mantenimiento, apague el dispositivo,
retire el enchufe de red de la toma de pared y espere hasta que
el dispositivo se haya enfriado.
• No utilice disolventes de limpieza ni productos abrasivos.
• No intente reparar el dispositivo. Si el dispositivo no funciona
correctamente, sustitúyalo por uno nuevo.
• Limpie el exterior del dispositivo con un paño suave humedecido.
Seque bien el exterior del dispositivo con un paño limpio y seco.
Seguridad
Seguridad general
• Lea el manual detenidamente antes del uso. Conserve el manual
en caso de futura necesidad.
• Utilice el dispositivo únicamente para su uso previsto. No utilice
el dispositivo con una nalidad distinta a la descrita en el manual.
• No utilice el dispositivo si alguna pieza ha sufrido daños o tiene
un defecto. Si el dispositivo ha sufrido daños o tiene un defecto,
sustitúyalo inmediatamente.
• El dispositivo no debe ser utilizado por niños sin la supervisión
de un adulto. Los niños no pueden jugar con el dispositivo.
• No modique el dispositivo en modo alguno.
• No exponga el dispositivo al agua ni a la humedad.
• No exponga el dispositivo a la luz solar directa.
• Mantenga el dispositivo alejado de fuentes de calor.
Seguridad eléctrica
• Para reducir el peligro de descarga eléctrica, este producto sólo
debería abrirlo un técnico autorizado cuando necesite reparación.
• Desconecte el producto de la toma de corriente y de los otros
equipos si ocurriera algún problema.
• No utilice el dispositivo si el cable de red o el enchufe de red está
dañado o es defectuoso. Si el cable de red o el enchufe de red
está dañado o es defectuoso, éste debe ser sustituido por el
fabricante o un servicio técnico autorizado.
• Antes del uso, compruebe siempre que la tensión de red sea la
misma que se indica en la placa de características del dispositivo.
• Asegúrese de que el cable de red no se enrede.
• Asegúrese de que el cable de red no cuelgue del borde de una
encimera y no pueda engancharse accidentalmente o tropezarse
con él.
Garantía
Cualquier cambio y/o modicación del producto anulará la garantía.
No podemos asumir ninguna responsabilidad por ningún daño
debido a un uso incorrecto del producto.
Eliminación
• El producto está diseñado para desecharlo por separado en un
punto de recogida adecuado. No se deshaga del producto con la
basura doméstica.
• Para obtener más información, póngase en contacto con el
vendedor o la autoridad local responsable de la eliminación de
residuos.
Documentación
El producto se ha fabricado y distribuido de conformidad con todas
las normativas y directivas relevantes, válidas para todos los estados
de la Unión Europea. El producto también cumple con todas las
especicaciones y normativas en el país en el cual se comercializa.
Previa solicitud, podremos proporcionarle la documentación formal.
La documentación formal incluye, sin limitación, la Declaración de
Conformidad.
Renuncia de responsabilidad legal
Las ilustraciones y las especicaciones podrán sufrir cambios sin
previo aviso. Todas las marcas de logotipos y nombres de productos
constituyen patentes o marcas registradas a nombre de sus titulares
correspondientes, reconocidos como tal.
Page 19

1919
Français
SAS-ALARM240
Système d'alarme
Description
Télécommande (g. A)
1. Bouton
• Bouton d'armement
2. Bouton
• Bouton de désarmement
3. Bouton
• Bouton d'armement partiel
4. Bouton
• Bouton d'urgence
Panneau de commande (avant) (g. B1)
Si le panneau de commande est protégé par un mot de passe,
saisissez d'abord le mot de passe.
5. Boutons de chires
6. Bouton
• Bouton * / Bouton d'urgence
7. Bouton
• Bouton # / Bouton de conguration
8. Bouton
• Bouton d'armement
9. Bouton
• Bouton de désarmement
10. Bouton
• Bouton de requête
11. Achage de l'heure
12. Indicateur
• Indicateur d'armement
13. Indicateur
• Indicateur d'armement partiel
14. Indicateur
• Indicateur de désarmement
15. Indicateur
• Indicateur de niveau de batterie
16. Indicateur
• Indicateur d'armement /désarmement
programmé
17. Indicateur
• Indicateur de sirène intégrée
Panneau de commande (haut) (g. B2)
18. Interrupteur d'alimentation
de batterie
19. Entrée CC (5V)
20. Sirène
21. Ligne téléphonique
Ligne de rallonge
Installation
• Installez le système d'alarme en un endroit central, à l'écart des
objets métalliques et des appareils électroménagers.
• Connectez la ligne téléphonique, la ligne de rallonge, la sirène et
les autres câbles.
• Mettez le panneau de commande sous tension.
• Positionnez l'interrupteur d'alimentation de batterie sur “ON”.
Usage
Armement
Tous les détecteurs sont activés. En cas d'événement, le système
d'alarme fonctionne immédiatement.
• Télécommande : Appuyez sur le bouton d'armement.
• Panneau de commande : Appuyez sur le bouton d'armement.
L'indicateur d'armement s'ache.
Armement partiel
Les détecteurs sélectionnés par l'utilisateur sont activés. En cas
d'événement, le système d'alarme fonctionne immédiatement.
• Télécommande : Appuyez sur le bouton d'armement partiel.
• Panneau de commande : Appuyez deux fois sur le bouton
d'armement.
L'indicateur d'armement partiel s'ache.
Désarmement
Tous les détecteurs sont désactivés. En cas d'événement, le système
d'alarme ne fonctionne pas.
• Télécommande : Appuyez sur le bouton de désarmement.
• Panneau de commande : Appuyez sur le bouton de désarmement.
L'indicateur de désarmement s'ache.
Alarme d'urgence
Le système d'alarme fonctionne immédiatement, qu'il soit armé ou
désarmé.
• Télécommande : Appuyez sur le bouton d'urgence.
• Panneau de commande : Appuyez sur le bouton d'urgence.
Usage du téléphone
Après réception d'un appel du système d'alarme en cas d'événement,
vous pouvez aussi utiliser le téléphone pour télécommander le
panneau d'alarme.
[1]: Armement [2]: Désarmement
[3]: Surveillance activée [4]: Surveillance désactivée
[5]: Demande vocale activée [6]: Demande vocale désactivée
[7]: Sirène activée [8]: Sirène désactivée
Page 20

2020
Français
Réglages et requêtes
Les réglages et requêtes peuvent être exécutés avec la télécommande ou le panneau de commande.
Réglages
• Pour accéder au mode réglage, appuyez sur le bouton de conguration du panneau de commande.
• Pour changer les réglages, appuyez sur [#] + [code] + paramètres + [#].
• Pour sortir du mode réglage, appuyez sur [*] et [#].
Réglage Commande Remarques
Message vocale enregistré [#] + [19] + message + [#] Durée de message vocal : maxi. 10 secondes.
Ajout de télécommande [#] + [07] + [xxx] + [#]
[xxx] = ID de télécommande (001-120). Après l'ajout, appuyez sur un bouton de la
télécommande. 2bips = ajout réussi de la télécommande. 1bip = télécommande déjà
congurée. Nombre maxi. de télécommandes : 120.
Suppression de télécommande [#] + [08] + [xxx] + [#] [xxx] = valeur de télécommande à supprimer.
Suppression de toutes les
télécommandes
[#] + [08] + [***] + [#] [***] = toutes les télécommandes connectées.
Ajout de détecteur [#] + [09] + [xxx] + [#] [xxx] = ID de détecteur (001-120). Nombre maxi. de détecteurs : 120.
Suppression de détecteur [#] + [10] + [xxx] + [#] [xxx] = valeur de détecteur à supprimer.
Suppression de tous les détecteurs [#] + [10] + [***] + [#] [***] = tous les détecteurs connectés.
Conguration du ou des numéros
de téléphone
[#] + [3] + [y] + numéro de téléphone
+ [*#]
[y] = ID de numéro de téléphone (1-9).
ID 1-6 = numéros de téléphone habituels. ID 7-9 = numéros de téléphone d'urgence.
Suppression du ou des numéros
de téléphone
[#] + [3] + [y] + [#]
[y] = ID de numéro de téléphone (1-9).
Conguration de mot de passe [#] + [50] + mot de passe + [#] Le mot de passe comporte un maximum de 4 chires. Mot de passe par défaut : 1234.
Conguration de délai d'armement [#] + [51] + secondes + [#] Secondes de 00 à 99. Par défaut = 00.
Conguration de délai d'alarme [#] + [52] + secondes + [#] Secondes de 00 à 99. Par défaut = 60.
Conguration de durée de sirène [#] + [53] + minutes + [#] Minutes de 00 à 20. Par défaut = 01.
Conguration de date et heure
[#] + [56] + année + mois + jour +
heure + minutes + secondes + [#]
Exemple: “20141025183500” = 25 octobre 2014 18:35:00.
Conguration d'horloge d'alarme
[#] + [57] + [yy] + heure de début +
heure de n + jour(s) + [#]
[yy] = 05 / 06 (maxi. 2 alarmes).
Exemple 1: “050900090112345” = la sirène retentit 1 minute les jours de semaine à 9h00.
Exemple 2: “051030103167” = la sirène retentit 1 minute le week-end à 10h30.
Suppression d'horloge d'alarme [#] + [57] + [yy] + [0] + [#] [yy] = 05 / 06.
Conguration de télécommande
par téléphone
[#] + [62] + [y] + [#] [y] = 0 (arrêt) ou 1 (marche). Par défaut = 1 (marche).
Conguration du nombre de
sonneries pour la télécommande
par téléphone
[#] + [18] + [yy] + [#] [yy] = 00 (arrêt) - 99. Par défaut = 8.
Conguration de conrmation
audible
[#] + [11] + [y] + [#] [y] = 0 (arrêt) ou 1 (marche). Par défaut = 1 (marche).
Volume de conrmation audible [#] + [79] + [y] + [#] [y] = 0 (arrêt) - 7 (fort).
Commande luminosité d'achage [#] + [83] + [y] + [#] [y] = 0 (sombre) - 7 (lumineux).
Conguration de mode économie
d'énergie
[#] + [84] + [y] + [#] [y] = 0 (arrêt) ou 1 (marche). Par défaut = 1 (marche).
Volume de sirène intégrée [#] + [87] + [y] + [#] [y] = 0 (arrêt) - 7 (fort).
Conguration de clignotement
d'achage
[#] + [88] + [y] + [#] [y] = 0 (arrêt) ou 1 (marche). Par défaut = 0 (arrêt).
Conguration de détection de
connexion de ligne téléphonique
[#] + [13] + [y] + [#] [y] = 0 (arrêt) ou 1 (marche). Par défaut = 0 (arrêt).
Désactivation d'usage de
télécommande pour armement /
désarmement
[#] + [15] + [y] + [#] [y] = 0 (arrêt) ou 1 (marche). Par défaut = 0 (arrêt).
Conguration de demandes
d'interférence
[#] + [16] + [y] + [#]
Si d'autres appareils tentent de se connecter au système d'alarme, la sirène retentit 5 secondes.
[y] = 0 (arrêt) ou 1 (marche). Par défaut = 0 (arrêt).
Conguration de verrou de
panneau de commande
[#] + [17] + [y] + [#] [y] = 0 (arrêt) ou 1 (marche). Par défaut = 0 (arrêt).
Ajout de sirène stroboscopique
sans l (option)
Appuyez sur le bouton “SET” de la
sirène stroboscopique pour accéder
au mode d'apprentissage de code de
démarrage.
Appuyez sur le bouton désarmement
du panneau de commande. La sirène
stroboscopique émet un bip pour
indiquer la réussite du processus
d'apprentissage.
Contactez votre revendeur local pour la disponibilité.
Volume de sirène externe (option) [#] + [14] + [yy] + [#] y[y] = 00 (arrêt) - 99 (fort).
Restauration des réglages d'usine
du panneau de commande
[#] + [9898] + [#]
Réinitialisation système [#] + [989801] + [#]+ [#]+ [#] Avertissement : Les réglages d'usine de tout le système d'alarme sont restaurés.
Page 21

2121
Français
Conguration de types de zone [#] + [60] + [xxx] + [y] + [z] + [#]
[xxx] = ID de détecteur (001-120). [y] = type de zone (1-8). [z] = 0 (sirène arrêt) ou 1 (sirène
marche).
Types de zone :
1. Zone normale
2. Zone d'armement partiel Les détecteurs de la zone peuvent être désactivés par la
télécommande. Le système est partiellement armé.
3. Zone intelligente : Un second déclencheur dans les 30 secondes suivant le premier
déclencheur génère une alarme.
4. Zone d'urgence : Tout déclencheur génère une alarme, indépendamment du mode
d'armement.
5. Zone fermée : Un déclencheur ne génère pas d'alarme, indépendamment du mode
d'armement.
6. Zone de carillon : Tout déclencheur génère un son de carillon, indépendamment du
mode d'armement.
7. Zone d'accueil : En cas d'armement, tout déclencheur génère une alarme. En cas de
désarmement, tout déclencheur génère un message d'accueil audible.
8. Zone d'assistance : Tout déclencheur génère une alarme et la composition de trois
numéros d'urgence avec des messages de demande d'assistance préenregistrés,
indépendamment du mode d'armement.
Conguration de numéros de
téléphone spéciques par zone
d'alarme
[#] + [63] + ID appareil début + ID
appareil n + [y] + [#]
[y] = ID de numéro de téléphone (1-9).
Exemple 1: “630010061234” = téléphones de composition auto 1-4 si les zones 001-006
sont déclenchées.
Exemple 2: “630200206” = téléphone de composition auto 6 si la zone 020 est déclenchée.
Conguration de planning
d'armement
[#] + [57] + [yy] + heure de début +
heure de n + numéro de jour + [#]
[yy] = planning d'armement (01-04).
Exemple 1: “58010700173012345” = armement en semaine entre 07h00 et 17h30.
Exemple 2: “5802180006005671” = armement de vendredi à lundi entre 18h00 et 06h00.
Suppression de planning
d'armement
[#] + [57] + [yy] + [0] + [#] [yy] = planning d'armement (01-04).
Conguration de planning
d'armement avec zones de défense
[#] + [58] + [yy] + ID appareil de
début + ID appareil de n + [#]
[yy] = planning d'armement (01-04).
Exemple: “5801001003” = les appareils 001-003 suivent le planning d'armement 01.
Conguration de portée de
commande de télécommande /
panneau de commande
[#] + [54] + [xxx] + ID appareil de
début + ID appareil de n+ [#]
Par défaut : La télécommande et le panneau de commande gèrent toutes les zones.
[xxx] = [***] pour panneau de commande / [001-120] pour télécommande.
Exemple: “54001000010” = la télécommande 001 commande les zones 0 à 10.
Conguration de retour audio de
télécommande /panneau de
commande
[#] + [55] + [xxx] + [y] + [#]
[y] = 0 (arrêt) ou 1 (marche).
[xxx] = [***] pour panneau de commande / [001-120] pour télécommande.
Exemple: “55***0” = aucun retour audio en cas d'armement par le panneau de commande.
Requête
• Pour accéder au mode requête, appuyez sur le bouton de requête du panneau de commande.
• Pour exécuter des requêtes, appuyez sur [#] + code + (paramètres) + [#].
• Pour sortir du mode requête, appuyez sur [*] et [#].
Requête Commande Remarques
Numéro de téléphone enregistré [#] + [3] + [y] + [#] [y] = ID de numéro de téléphone (1-9).
Mot de passe [#] + [50] + [#]
Délai d'armement [#] + [51] + [#]
Délai d'alarme [#] + [52] + [#]
Durée de son d'alarme [#] + [53] + [#]
Portée de commande de télécommande /
panneau de commande
[#] + [54] + [xxx] + [#] [xxx] = [***] pour panneau de commande / [001-120] pour télécommande.
Retour audio de télécommande /panneau
de commande
[#] + [55] + [xxx] + [#] [xxx] = [***] pour panneau de commande / [001-120] pour télécommande.
Date et heure : [#] + [56] + [#]
Planning d'armement [#] + [57] + [yy] + [#] [yy] = planning d'armement (01-04) / état d'horloge d'alarme (05-06).
Zone/appareil par planning d'armement [#] + [58] + [yy] + [#] [yy] = planning d'armement (01-04).
Type de zone et sirène par zone/appareil [#] + [60] + [xxx] + [y] + [z] + [#]
[xxx] = ID d'appareil (001-120). [y] = type de zone (1-8). [z] = 0 (sirène arrêt) ou 1
(sirène marche).
État de télécommande par téléphone [#] + [62] + [#]
Numéros de téléphone par zone/appareil [#] + [63] + [xxx] + [#] [xxx] = ID d'appareil (001-120).
Volume de conrmation audible [#] + [79] + [#]
Mode économie d'énergie [#] + [84] + [#]
Volume de sirène intégrée [#] + [87] + [#]
Clignotement d'achage [#] + [88] + [#]
Demande vocale activée/désactivée [#] + [11] + [#]
Usage de télécommande pour armement /
désarmement
[#] + [15] + [#]
Demandes d'interférence [#] + [16] + [#]
Verrou de panneau de commande [#] + [17] + [#]
Journal d'accès d'armement [#] + [9901] + [#] Le résultat est une séquence de codes :
[aa]: nombre enregistrements (maxi. 72 enregistrements). [bbbb]: mois/jour. [cccc]:
heure/minute.
[dd]: YC = télécommande / JP = panneau de commande / DS = planning d'armement.
[ee]: YK = télécommande / CF = désarmer / BF = armer / 01 = première télécommande.
Journal d'accès d'alarme [#] + [9900] + [#]
Page 22

2222
Français
Nettoyage et entretien
Avertissement !
• Avant le nettoyage ou l'entretien, arrêtez l'appareil, débranchez
la che secteur de la prise murale et attendez que l'appareil
refroidisse.
• N'utilisez pas de solvants ni de produits abrasifs.
• Ne tentez pas de réparer l'appareil. Si l'appareil fonctionne mal,
remplacez-le par un neuf.
• Nettoyez l'extérieur de l'appareil avec un chion doux et humide.
Séchez soigneusement l'extérieur de l'appareil à l'aide d'un
chion propre et sec.
Sécurité
Sécurité générale
• Lisez attentivement le manuel avant usage. Conservez le manuel
pour toute référence ultérieure.
• Utilisez l'appareil uniquement pour son usage prévu. N'utilisez
pas l'appareil à d'autres ns que celles décrites dans le manuel.
• N'utilisez pas l'appareil si une pièce quelconque est
endommagée ou défectueuse. Si l'appareil est endommagé ou
défectueux, remplacez-le immédiatement.
• L'appareil ne doit pas être utilisé par des enfants sans la supervision
d'un adulte. Les enfants ne doivent pas jouer avec l'appareil.
• Ne modiez l'appareil d'aucune manière.
• N'exposez pas l'appareil à l'eau ou à l'humidité.
• N’exposez pas l’appareil à la lumière solaire directe.
• Maintenez l'appareil à l'écart des sources de chaleur.
Sécurité électrique
• Pour réduire le risque de choc électrique, ce produit doit être
ouvert uniquement par un technicien qualié si une réparation
s’impose.
• Débranchez l'appareil et les autres équipements du secteur s'il y
a un problème.
• N'utilisez pas l'appareil si le cordon d'alimentation ou la che secteur
est endommagé ou défectueux. Si le cordon d'alimentation ou la
che secteur est endommagé ou défectueux, il doit être remplacé
par le fabricant ou par un réparateur agréé.
• Avant toute utilisation, vériez que la tension du secteur correspond
à celle indiquée sur la plaque signalétique de l'appareil.
• Assurez-vous que le cordon d'alimentation ne s'enchevêtre pas.
• Assurez-vous que le cordon d'alimentation ne pend pas sur le
bord d'un plan de travail et ne peut pas être happé ou faire
trébucher quelqu'un accidentellement.
Garantie
Toute altération ou modication du produit annule la garantie.
Nous déclinons toute responsabilité envers les dommages dus
àune utilisation incorrecte du produit.
Mise au rebut
• Le produit doit être jeté séparément des ordures ménagères
dans un point de collecte approprié. Ne jetez pas le produit avec
les ordures ménagères ordinaires.
• Pour plus d'informations, contactez le distributeur ou l'autorité
locale responsable de la gestion des déchets.
Documentation
Le produit a été fabriqué et fourni en conformité avec toutes les
directives et règlements applicables et en vigueur dans tous les
États membres de l'Union Européenne. Le produit est conforme aux
spécications et à la réglementation en vigueur dans le pays de vente.
La documentation ocielle est disponible sur demande. La
documentation ocielle inclut notamment la Déclaration de conformité.
Avertissement
Le design et les caractéristiques techniques sont sujets à modication
sans notication préalable. Tous les logos de marques et noms de
produits sont des marques déposées ou immatriculées dont leurs
détenteurs sont les propriétaires et sont donc reconnues comme
telles dans ce document.
Page 23
2323
Italiano
SAS-ALARM240
Sistema d'allarme
Descrizione
Telecomando (g. A)
1. Pulsante
• Pulsante di attivazione
2. Pulsante
• Pulsante di disattivazione
3. Pulsante
• Pulsante di attivazione parziale
4. Pulsante
• Pulsante di emergenza
Pannello di controllo (anteriore) (g. B1)
Se il pannello di controllo è protetto da una password, prima
inserire la password.
5. Pulsanti numerici
6. Pulsante
• Pulsante * / Pulsante di emergenza
7. Pulsante
• Pulsante # / Pulsante Congura
8. Pulsante
• Pulsante di attivazione
9. Pulsante
• Pulsante di disattivazione
10. Pulsante
• Pulsante di interrogazione
11. Visualizzazione ora
12. Indicatore
• Indicatore di attivazione
13. Indicatore
• Indicatore di attivazione parziale
14. Indicatore
• Indicatore di disattivazione
15. Indicatore
• Indicatore di batteria
16. Indicatore
• Indicatore di attivazione/disattivazione
pianicata
17. Indicatore
• Indicatore della sirena integrata
Pannello di controllo (superiore) (g. B2)
18. Interruttore alimentazione
a batteria
19. Ingresso CC (5V)
20. Sirena
21. Linea telefonica
Linea dell'interno
Installazione
• Installare il sistema di allarme in una posizione centrale, distante
da oggetti metallici o elettrodomestici.
• Collegare la linea telefonica, la linea dell'interno, la sirena e gli
altri cavi.
• Attivare l'alimentazione del pannello di controllo.
• Impostare l'interruttore di alimentazione a batteria sulla
posizione "ON".
Uso
Attivazione
Tutti i rilevatori sono attivati. Se si verica un evento, il sistema di
allarme si aziona immediatamente.
• Telecomando: Premere il pulsante di attivazione.
• Pannello di controllo: Premere il pulsante di attivazione.
Sul display compare l'indicatore di attivazione.
Attivazione parziale
I rilevatori selezionati dall'utente sono attivati. Se si verica un
evento, il sistema di allarme si aziona immediatamente.
• Telecomando: Premere il pulsante di attivazione parziale.
• Pannello di controllo: Premere due volte il pulsante di attivazione.
Sul display compare l'indicatore di attivazione parziale.
Disattivazione
Tutti i rilevatori sono disattivati. Se si verica un evento, il sistema di
allarme non si aziona.
• Telecomando: Premere il pulsante di disattivazione.
• Pannello di controllo: Premere il pulsante di disattivazione.
Sul display compare l'indicatore di disattivazione.
Allarme di emergenza
Il sistema di allarme si aziona immediatamente, sia in stato di
attivazione sia in stato di disattivazione.
• Telecomando: Premere il pulsante di emergenza.
• Pannello di controllo: Premere il pulsante di emergenza.
Uso del telefono
Dopo aver ricevuto una chiamata dal sistema di allarme in caso di
evento, è possibile utilizzare il telefono per controllare il pannello
d'allarme in remoto.
[1]: Attivazione [2]: Disattivazione
[3]: Monitoraggio attivo [4]: Monitoraggio disattivato
[5]: Prompt vocale attivo [6]: Prompt vocale disattivato
[7]: Sirena attiva [8]: Sirena disattivata
Page 24

2424
Italiano
Impostazioni e interrogazioni
È possibile eettuare impostazioni e interrogazioni con il telecomando o con il pannello di controllo.
Impostazioni
• Per entrare in modalità di congurazione, premere il pulsante Congura sul pannello di controllo.
• Per modicare le impostazioni, premere [#] + [codice] + parametri + [#].
• Per uscire dalla modalità di impostazione, premere [*] e [#].
Impostazioni Comando Osservazioni
Registrazione messaggio vocale [#] + [19] + messaggio + [#] Durata messaggio vocale: massimo 10 secondi.
Aggiunta telecomando [#] + [07] + [xxx] + [#]
[xxx] = ID telecomando (001-120). Dopo l'aggiunta, premere un pulsante sul telecomando. 2
bip = telecomando aggiunto con successo. 1 bip = telecomando già congurato. Numero
massimo di telecomandi: 120.
Eliminazione telecomando [#] + [08] + [xxx] + [#] [xxx] = numero del telecomando da eliminare.
Eliminazione di tutti i telecomandi [#] + [08] + [***] + [#] [***] = tutti i telecomandi collegati.
Aggiunta rilevatore [#] + [09] + [xxx] + [#] [xxx] = ID rilevatore (001-120). Numero massimo di rilevatori: 120.
Elimina rilevatore [#] + [10] + [xxx] + [#] [xxx] = numero del rilevatore da eliminare.
Eliminazione di tutti i rilevatori [#] + [10] + [***] + [#] [***] = tutti i rilevatori connessi.
Congurazione numeri di telefono
[#] + [3] + [y] + numero di telefono + [*#]
[y] = ID numero di telefono (1-9).
ID 1-6 = numeri di telefono normali. ID 7-9 = numeri di telefono di emergenza.
Eliminazione numeri di telefono
[#] + [3] + [y] + [#]
[y] = ID numero di telefono (1-9).
Impostazione password [#] + [50] + password + [#] La password è composta da un massimo di 4 cifre. Password predenita: 1234.
Impostazione del tempo di
ritardo attivazione
[#] + [51] + secondi + [#] Secondi da 00 a 99. Valore predenito = 00.
Impostazione del tempo di
ritardo allarme
[#] + [52] + secondi + [#] Secondi da 00 a 99. Valore predenito = 60.
Impostazione durata sirena [#] + [53] + minuti + [#] Minuti da 00 a 20. Valore predenito = 01.
Impostazione data e ora
[#] + [56] + anno + mese + giorno +
ora + minuti + secondi + [#]
Esempio: "20141025183500" = Ottobre 25, 2014 18:35:00.
Impostazione sveglia
[#] + [57] + [yy] + ora avvio + ora ne
+ giorni + [#]
[yy] = 05 / 06 (max. 2 allarmi).
Esempio 1: "050900090112345" = la sirena si attiva per 1 minuto nei giorni feriali alle 09.00.
Esempio 2: "051030103167" = la sirena si attiva per 1 minuto nei weekend alle 10:30.
Eliminazione sveglia [#] + [57] + [yy] + [0] + [#] [yy] = 05 / 06.
Impostazione telecomando per
telefono
[#] + [62] + [y] + [#] [y] = 0 (o) o 1 (on). Valore predenito = 1 (on).
Impostazione del numero di
squilli per il controllo a distanza
via telefono
[#] + [18] + [yy] + [#] [yy] = 00 (o ) - 99. Valore predenito = 8.
Impostazione feedback udibile [#] + [11] + [y] + [#] [y] = 0 (o) o 1 (on). Valore predenito = 1 (on).
Volume feedback udibile [#] + [79] + [y] + [#] [y] = 0 (o) - 7 (alto).
Regolazione luminosità display [#] + [83] + [y] + [#] [y] = 0 (scuro) - 7 (luminoso).
Impostazione modalità risparmio
energetico
[#] + [84] + [y] + [#] [y] = 0 (o) o 1 (on). Valore predenito = 1 (on).
Volume sirena integrata [#] + [87] + [y] + [#] [y] = 0 (o ) - 7 (alto).
Impostazione luce display
lampeggiante
[#] + [88] + [y] + [#] [y] = 0 (o) o 1 (on). Valore predenito = 0 (o).
Impostazione rilevamento
connessione su linea telefonica
[#] + [13] + [y] + [#] [y] = 0 (o) o 1 (on). Valore predenito = 0 (o).
Disabilitazione dell'uso del
telecomando per attivazione/
disattivazione
[#] + [15] + [y] + [#] [y] = 0 (o) o 1 (on). Valore predenito = 0 (o).
Impostazione dei prompt delle
interferenze
[#] + [16] + [y] + [#]
Se altri dispositivi cercano di collegarsi al sistema d'allarme, la sirena suona per 5 secondi.
[y] = 0 (o) o 1 (on). Valore predenito = 0 (o).
Impostazione del blocco del
pannello di controllo
[#] + [17] + [y] + [#] [y] = 0 (o) o 1 (on). Valore predenito = 0 (o).
Aggiunta sirena stroboscopica
wireless (optional)
Premere il pulsante "SET" sulla sirena
stroboscopica per entrare nella modalità
di apprendimento del codice di avvio.
Premere il pulsante di disattivazione
sul pannello di controllo. La sirena
stroboscopica emette un bip una
volta per indicare che il processo di
apprendimento è stato completato
con successo.
Contattare il rivenditore locale per conoscere la disponibilità.
Volume sirena esterna (optional) [#] + [14] + [yy] + [#] [y] = 00 (o ) - 99 (alto).
Ripristino delle impostazioni di
fabbrica per il pannello di controllo
[#] + [9898] + [#]
Resettare il sistema [#] + [989801] + [#]+ [#]+ [#]
Precauzioni: Tutte le impostazioni del sistema di allarme sono ripristinate ai valori di
fabbrica.
Page 25

2525
Italiano
Impostazione dei tipi di zone [#] + [60] + [xxx] + [y] + [z] + [#]
[xxx] = ID rilevatore (001-120). [y] = tipo zona (1-8). [z] = 0 (sirena o) o 1 (sirena on).
Tipi di zone:
1. Zona normale
2. Zona di attivazione parziale: I rilevatori nella zona possono essere disattivati con il
telecomando. Il sistema viene parzialmente attivato.
3. Zona intelligente: Un secondo trigger entro 30 secondi dal primo trigger attiva un allarme.
4. Zona di emergenza: Qualunque trigger genera un allarme a prescindere dalla
modalità di attivazione.
5. Zona chiusa: Un trigger non genera un allarme, a prescindere dalla modalità di attivazione.
6. Zona del suono: Qualunque trigger genera un suono di campanello a prescindere
dalla modalità di attivazione.
7. Zona di benvenuto: Quando il sistema è attivato, qualunque trigger genera un
allarme. Quando il sistema è disattivato, qualunque trigger genera un messaggio di
benvenuto udibile.
8. Zona di aiuto: Qualsiasi trigger attiva un allarme e la composizione dei tre numeri di
emergenza con messaggi di richiesta d'aiuto preregistrati, a prescindere dalla
modalità di attivazione.
Impostazione di specici numeri
di telefono per zona di allarme
[#] + [63] + ID dispositivo di avvio +
ID dispositivo di ne + [y] + [#]
[y] = ID numero di telefono (1-9).
Esempio 1: "630010061234" = autocomposizione numeri telefonici 1-4 quando le zone
001-006 sono attivate.
Esempio 2: "630200206" = autocomposizione numero telefonico 6 quando la zona 020 è attivata.
Impostazione del programma di
attivazione
[#] + [57] + [yy] + ora di avvio + ora di
ne + numero del giorno + [#]
[yy] = programma di attivazione (01-04).
Esempio 1: "58010700173012345" = attivazione nei giorni feriali fra le 07.00 e le 17.30.
Esempio 2: "5802180006005671" = attivazione dal venerdì al lunedì fra le 18.00 e le 6.00.
Eliminazione del programma di
attivazione
[#] + [57] + [yy] + [0] + [#] [yy] = programma di attivazione (01-04).
Impostazione del programma di
attivazione con zone di difesa
[#] + [58] + [yy] + ID dispositivo di
avvio + ID dispositivo di ne + [#]
[yy] = programma di attivazione (01-04).
Esempio: "5801001003" = i dispositivi 001-003 seguono il programma di attivazione 01.
Impostazione della gamma di
controllo per telecomando/
pannello di controllo
[#] + [54] + [xxx] + ID dispositivo di
avvio + ID dispositivo di ne + [#]
Valore predenito: Telecomando e pannello di controllo controllano tutte le zone.
[xxx] = [***] per pannello di controllo / [001-120] per telecomando.
Esempio: "54001000010" = il telecomando 001 controlla le zone da 0 a 10.
Impostazione del feedback
udibile per telecomando/
pannello di controllo
[#] + [55] + [xxx] + [y] + [#]
[y] = 0 (o) o 1 (on).
[xxx] = [***] per pannello di controllo / [001-120] per telecomando.
Esempio: "55***0" = nessun feedback udibile in caso di attivazione tramite il pannello di controllo.
Query
• Per entrare in modalità di interrogazione, premere il pulsante di interrogazione sul pannello di controllo.
• Per eseguire interrogazioni, premere [#] + [codice] + (parametri) + [#].
• Per uscire dalla modalità di interrogazione, premere [*] e [#].
Query Comando Osservazioni
Numero di telefono memorizzato [#] + [3] + [y] + [#] [y] = ID numero di telefono (1-9).
Password [#] + [50] + [#]
Tempo di ritardo attivazione [#] + [51] + [#]
Tempo di ritardo allarme [#] + [52] + [#]
Durata del suono d'allarme [#] + [53] + [#]
Gamma di controllo per telecomando/
pannello di controllo
[#] + [54] + [xxx] + [#] [xxx] = [***] per pannello di controllo / [001-120] per telecomando.
Feedback udibile per telecomando/pannello
di controllo
[#] + [55] + [xxx] + [#] [xxx] = [***] per pannello di controllo / [001-120] per telecomando.
Formato data e ora [#] + [56] + [#]
Programma di attivazione [#] + [57] + [yy] + [#] [yy] = programma di attivazione (01-04) / stato sveglia (05-06).
Zona/dispositivo per programma di attivazione [#] + [58] + [yy] + [#] [yy] = programma di attivazione (01-04).
Tipo zona e sirena per zona/dispositivo [#] + [60] + [xxx] + [y] + [z] + [#] [xxx] = ID dispositivo (001-120). [y] = tipo zona (1-8). [z] = 0 (sirena o) o 1 (sirena on).
Stato telecomando per telefono [#] + [62] + [#]
Numeri di telefono per zona/dispositivo [#] + [63] + [xxx] + [#] [xxx] = ID dispositivo (001-120).
Volume feedback udibile [#] + [79] + [#]
Modalità risparmio energetico [#] + [84] + [#]
Volume sirena integrata [#] + [87] + [#]
Luce display lampeggiante [#] + [88] + [#]
Prompt vocale on/o [#] + [11] + [#]
Uso del telecomando per attivazione/
disattivazione
[#] + [15] + [#]
Prompt di interferenza [#] + [16] + [#]
Blocco del pannello di controllo [#] + [17] + [#]
Attivazione registro degli accessi [#] + [9901] + [#] Il risultato è una sequenza di codici:
[aa]: numero di record (max. 72 record). [bbbb]: mese/giorno. [cccc]: ora/minuto.
[dd]: YC = telecomando / JP = pannello di controllo / DS = programma di attivazione.
[ee]: YK = telecomando / CF = disattivazione / BF = attivazione / 01 = primo telecomando.
Allarme registro accessi [#] + [9900] + [#]
Page 26

2626
Italiano
Pulizia e manutenzione
Attenzione!
• Prima di qualsiasi intervento di pulizia o manutenzione,
spegnere il dispositivo, rimuovere la spina dalla presa a parete
eattendere che il dispositivo si sia rareddato.
• Non utilizzare solventi detergenti o abrasivi.
• Non cercare di riparare il dispositivo. Se il dispositivo non
funziona correttamente, sostituirlo con uno nuovo.
• Pulire l'esterno del dispositivo con un panno morbido e umido.
Asciugare a fondo l'esterno del dispositivo con un panno pulito
e asciutto.
Sicurezza
Istruzioni generali
• Leggere il manuale con attenzione prima dell'uso. Conservare il
manuale per riferimenti futuri.
• Utilizzare il dispositivo solo per gli scopi previsti. Non utilizzare il
dispositivo per scopi diversi da quelli descritti nel manuale.
• Non utilizzare il dispositivo se presenta parti difettose. Se il
dispositivo è danneggiato o difettoso, sostituirlo immediatamente.
• Il dispositivo non deve essere utilizzato dai bambini senza la
supervisione di un adulto. I bambini non devono giocare con il
dispositivo.
• Non modicare il dispositivo in alcun modo.
• Non esporre il dispositivo ad acqua o umidità.
• Non esporre il dispositivo alla luce diretta del sole.
• Tenere il dispositivo a distanza da fonti di calore.
Sicurezza elettrica
• Per ridurre il rischio di scosse elettriche, il presente prodotto
deve essere aperto solo da un tecnico autorizzato, nel caso sia
necessario ripararlo.
• Scollegare il prodotto dall’alimentazione e da altri apparecchi se
dovesse esserci un problema.
• Non utilizzare il dispositivo in presenza di danni o difetti al cavo
o alla spina di alimentazione. Se il cavo o la spina di
alimentazione è danneggiato o difettoso, deve essere sostituito
dal fabbricante o da un centro riparazioni autorizzato.
• Prima dell'uso vericare sempre che la tensione di alimentazione
corrisponda a quella indicata sulla targhetta nominale del dispositivo.
• Vericare che il cavo non possa aggrovigliarsi.
• Vericare che il cavo di alimentazione non rimanga impigliato
nel bordo di sporgenze o ripiani e non possa costituire fonte di
rischio di incidenti o cadute.
Garanzia
Qualsiasi modica e/o cambiamento al prodotto annullerà la garanzia.
Si declina ogni responsabilità per danni causati da un uso non
corretto di questo prodotto.
Smaltimento
• Questo prodotto è soggetto a raccolta dierenziata nei punti di
raccolta appropriati. Non smaltire il prodotto con i riuti domestici.
• Per maggiori informazioni, contattare il rivenditore o le autorità
locali responsabili per la gestione dei riuti.
Documentazione
Il presente prodotto è stato realizzato e fornito in conformità a tutte
le norme e le direttive vigenti, con validità in tutti gli stati membri
della Comunità Europea. Il presente prodotto è conforme alle
speciche e alle normative applicabili nel paese in cui è stato venduto.
La documentazione uciale è disponibile su richiesta.
Ladocumentazione uciale comprende, a titolo esemplicativo,
laDichiarazione di conformità.
Clausola esonerativa di responsabilità
Il design e le caratteristiche tecniche sono soggetti a modica senza
necessità di preavviso. Tutti i marchi, loghi e nomi dei prodotti sono
marchi commerciali o registrati dei rispettivi titolari e sono riconosciuti
come tali in questo documento.
Page 27

2727
Português
SAS-ALARM240
Sistema de alarme
Descrição
Controlo remoto (g. A)
1. Botão
• Botão para armar
2. Botão
• Botão para desarmar
3. Botão
• Botão para armar parcialmente
4. Botão
• Botão de emergência
Painel de controlo (frente) (g. B1)
Se o painel de controlo estiver protegido com palavra-passe,
introduza primeiro a palavra-passe.
5. Botões dos dígitos
6. Botão
• Botão * / botão de emergência
7. Botão
• Botão # / botão de conguração
8. Botão
• Botão para armar
9. Botão
• Botão para desarmar
10. Botão
• Botão de procura
11. Visor das horas
12. Indicador
• Indicador de armar
13. Indicador
• Indicador de armar parcialmente
14. Indicador
• Indicador de desarmar
15. Indicador
• Indicador de bateria
16. Indicador
• Indicador de armar/desarmar
programado
17. Indicador
• Indicador de sirene incorporada
Painel de controlo (cimo) (g. B2)
18. Interruptor de alimentação
por bateria
19. Entrada CC (5V)
20. Sirene
21. Linha telefónica
Linha de extensão
Instalação
• Instale o sistema de alarme num local central, afastado de
objectos metálicos ou aparelhos domésticos.
• Ligue a linha telefónica, a linha de extensão, a sirene e outros cabos.
• Ligue a alimentação do painel de controlo.
• Coloque o interruptor de alimentação por bateria na posição “ON”.
Utilização
Armar
Todos os detectores são activados. Se ocorrer um evento, o sistema
de alarme irá funcionar imediatamente.
• Controlo remoto: Prima o botão para armar.
• Painel de controlo: Prima o botão para armar.
O indicador de armar aparece no visor.
Armar parcialmente
Todos os detectores seleccionados pelo utilizador são activados.
Seocorrer um evento, o sistema de alarme irá funcionar imediatamente.
• Controlo remoto: Prima o botão para armar parcialmente.
• Painel de controlo: Prima o botão para armar duas vezes.
O indicador de armar parcialmente aparece no visor.
Desarmar
Todos os detectores são desactivados. Se ocorrer um evento, o sistema
de alarme não irá funcionar.
• Controlo remoto: Prima o botão para desarmar.
• Painel de controlo: Prima o botão para desarmar.
O indicador de desarmar aparece no visor.
Alarme de emergência
O sistema de alarme irá funcionar imediatamente, quer esteja
armado ou não.
• Controlo remoto: Prima o botão de emergência.
• Painel de controlo: Prima o botão de emergência.
Utilizar o telefone
Após receber uma chamada do sistema de alarme no caso de um
evento, poderá também utilizar o telefone para controlar o painel
do alarme remotamente.
[1]: Armar [2]: Desarmar
[3]: Monitorização activada [4]: Monitorização desactivada
[5]: Alerta de voz activado [6]: Alerta de voz desactivado
[7]: Sirene activada [8]: Sirene desactivada
Page 28

2828
Português
Denições e procuras
As denições e procuras podem ser realizadas utilizando o controlo remoto ou o painel de controlo.
Denições
• Para aceder ao modo de denição, prima o botão de conguração no painel de controlo.
• Para alterar as denições, prima [#] + [código] + parâmetros + [#].
• Para sair do modo de denição, prima [*] e [#].
Denição Controlo remoto Observações
Gravar mensagem de voz [#] + [19] + mensagem + [#] Duração da mensagem de voz: máx. 10 segundos.
Adicionar controlo remoto [#] + [07] + [xxx] + [#]
[xxx] = ID do controlo remoto (001-120). Depois de adicionar, prima um botão no controlo
remoto. 2sinais sonoros = controlo remoto adicionado com sucesso. 1sinal sonoro =
controlo remoto já congurado. Número máx. de controlos remotos: 120.
Eliminar controlo remoto [#] + [08] + [xxx] + [#] [xxx] = valor do controlo remoto a remover.
Eliminar todos os controlos remotos [#] + [08] + [***] + [#] [***] = todos os controlos remotos ligados.
Adicionar detector [#] + [09] + [xxx] + [#] [xxx] = ID do detector (001-120). Número máx. de detectores: 120.
Eliminar detector [#] + [10] + [xxx] + [#] [xxx] = valor do detector a remover.
Eliminar todos os detectores [#] + [10] + [***] + [#] [***] = todos os detectores ligados.
Congurar número(s) de telefone
[#] + [3] + [y] + número de telefone
+ [*#]
[y] = ID do número de telefone (1-9).
ID 1-6 = números de telefone normais. ID 7-9 = números de telefone de emergência.
Eliminar número(s) de telefone
[#] + [3] + [y] + [#]
[y] = ID do número de telefone (1-9).
Palavra-passe de conguração [#] + [50] + palavra-passe + [#] A palavra-passe possui no máximo 4 dígitos. Palavra-passe predenida: 1234.
Congurar o tempo de atraso
para armar
[#] + [51] + segundos + [#] Segundos de 00 a 99. Predenição = 00.
Congurar o tempo de atraso
doalarme
[#] + [52] + segundos + [#] Segundos de 00 a 99. Predenição = 60.
Congurar o tempo da sirene [#] + [53] + minutos + [#] Minutos de 00 a 20. Predenição = 01.
Congurar a data e a hora
[#] + [56] + ano + mês + dia + hora +
minutos + segundos + [#]
Exemplo: “20141025183500” = 25 de Outubro de 2014 18:35:00.
Congurar o despertador
[#] + [57] + [yy] + hora de início +
hora de m + dia(s) + [#]
[yy] = 05 / 06 (máx. 2 alarmes).
Exemplo 1: “050900090112345” = a sirene soa durante 1 minuto em dias úteis às 09:00.
Exemplo 2: “051030103167” = a sirene soa durante 1 minuto aos ns-de-semana às 10:30.
Eliminar o despertador [#] + [57] + [yy] + [0] + [#] [yy] = 05 / 06.
Congurar o controlo remoto por
telefone
[#] + [62] + [y] + [#] [y] = 0 (desligado) ou 1 (ligado). Predenição = 1 (ligado).
Congurar o número de anéis para
o controlo remoto por telefone
[#] + [18] + [yy] + [#] [yy] = 00 (desligado) - 99. Predenição = 8.
Congurar o retorno sonoro [#] + [11] + [y] + [#] [y] = 0 (desligado) ou 1 (ligado). Predenição = 1 (ligado).
Volume do retorno sonoro [#] + [79] + [y] + [#] [y] = 0 (desligado) - 7 (alto).
Controlo da luminosidade do visor [#] + [83] + [y] + [#] [y] = 0 (escuro) - 7 (claro).
Congurar o modo de poupança
de energia
[#] + [84] + [y] + [#] [y] = 0 (desligado) ou 1 (ligado). Predenição = 1 (ligado).
Volume da sirene incorporada [#] + [87] + [y] + [#] [y] = 0 (desligado) - 7 (alto).
Congurar a intermitência da luz
do visor
[#] + [88] + [y] + [#] [y] = 0 (desligado) ou 1 (ligado). Predenição = 0 (desligado).
Congurar a detecção da ligação
da linha telefónica
[#] + [13] + [y] + [#] [y] = 0 (desligado) ou 1 (ligado). Predenição = 0 (desligado).
Desactivar o uso do controlo
remoto para armar/desarmar
[#] + [15] + [y] + [#] [y] = 0 (desligado) ou 1 (ligado). Predenição = 0 (desligado).
Congurar alertas de interferência [#] + [16] + [y] + [#]
Se outros dispositivos tentarem a ligação ao sistema de alarme, a sirene irá soar durante
5segundos.
[y] = 0 (desligado) ou 1 (ligado). Predenição = 0 (desligado).
Congurar o bloqueio do painel
de controlo
[#] + [17] + [y] + [#] [y] = 0 (desligado) ou 1 (ligado). Predenição = 0 (desligado).
Adicionar sirene estroboscópica
sem os (opção)
Prima o botão “SET” na sirene
estroboscópica para introduzir a
programação de código inicial.
Prima o botão para desarmar no painel
de controlo. A sirene estroboscópica
emite um sinal sonoro para indicar
que o processo de programação foi
concluído com sucesso.
Contacte o seu revendedor local para informações quanto à disponibilidade.
Volume da sirene externa (opção) [#] + [14] + [yy] + [#] [y y] = 00 (desligado) - 99 (alto).
Restaurar as denições de fábrica
do painel de controlo
[#] + [9898] + [#]
Repor o sistema [#] + [989801] + [#]+ [#]+ [#] Cuidado: Todo o sistema é restaurado para as denições de fábrica.
Page 29

2929
Português
Congurar tipos de zonas [#] + [60] + [xxx] + [y] + [z] + [#]
[xxx] = ID do detector (001-120). [y] = tipo de zona (1-8). [z] = 0 (sirene desligada) ou 1
(sirene ligada).
Tipos de zonas:
1. Zona normal
2. Zona de armar parcialmente: Os detectores na zona podem ser desactivados por
controlo remoto. O sistema está parcialmente armado.
3. Zona inteligente: Um segundo disparo 30 segundos após o primeiro disparo irá
originar o alarme.
4. Zona de emergência: Qualquer disparo irá resultar num alarme, independentemente
do modo de armar.
5. Zona fechada: Um disparo não irá resultar num alarme, independentemente do modo
de armar.
6. Zona do relógio: Qualquer disparo irá resultar num som de campainha, independentemente
do modo de armar.
7. Zona de boas vindas: Quando armado, qualquer disparo irá resultar num alarme. Quando
desarmado, qualquer disparo irá resultar numa mensagem de boas vindas sonora.
8. Zona de ajuda: Qualquer disparo irá resultar num alarme e na marcação dos três números
de emergência com mensagem de pedido de ajuda pré-gravada, independentemente
do modo de armar.
Congurar números de telefone
especícos por zona de alarme
[#] + [63] + ID do dispositivo inicial +
ID do dispositivo nal + [y] + [#]
[y] = ID do número de telefone (1-9).
Exemplo 1: “630010061234” = telefones de marcação automática 1-4 quando disparam as
zonas 001-006.
Exemplo 2: “630200206” = telefone de marcação automática 6 quando dispara a zona 020.
Congurar o programa para armar
[#] + [57] + [yy] + hora de início +
hora de m + número do dia + [#]
[yy] = programa para armar (01-04).
Exemplo 1: “58010700173012345” = armar em dias úteis entre as 07:00 e as 17:30.
Exemplo 2: “5802180006005671” = armar de Sexta a Segunda entre as 18:00 e as 06:00.
Eliminar o programa para armar [#] + [57] + [yy] + [0] + [#] [yy] = programa para armar (01-04).
Congurar o programa para
armar com zonas defensivas
[#] + [58] + [yy] + ID do dispositivo
inicial + ID do dispositivo nal + [#]
[yy] = programa para armar (01-04).
Exemplo: “5801001003” = os dispositivos 001-003 cumprem o programa para armar 01.
Congurar o alcance de controlo
para o controlo remoto/painel de
controlo
[#] + [54] + [xxx] + ID do dispositivo
inicial + ID do dispositivo nal + [#]
Predenição: O controlo remoto e painel de controlo controlam todas as zonas.
[xxx] = [***] para o painel de controlo / [001-120] para o controlo remoto.
Exemplo: “54001000010” = o controlo remoto 001 controla as zonas 0 a 10.
Congurar o retorno sonoro para
o controlo remoto/painel de
controlo
[#] + [55] + [xxx] + [y] + [#]
[y] = 0 (desligado) ou 1 (ligado).
[xxx] = [***] para o painel de controlo / [001-120] para o controlo remoto.
Exemplo: “55***0” = ausência de retorno sonoro ao armar com o painel de controlo.
Procura
• Para aceder ao modo de procura, prima o botão de procura no painel de controlo.
• Para realizar procuras, prima [#] + código + (parâmetros) + [#].
• Para sair do modo de procura, prima [*] e [#].
Procura Controlo remoto Observações
Número de telefone guardado [#] + [3] + [y] + [#] [y] = ID do número de telefone (1-9).
Palavra-passe [#] + [50] + [#]
Tempo de atraso para armar [#] + [51] + [#]
Tempo de atraso do alarme [#] + [52] + [#]
Duração do som do alarme [#] + [53] + [#]
Alcance de controlo para o controlo remoto/
painel de controlo
[#] + [54] + [xxx] + [#] [xxx] = [***] para o painel de controlo / [001-120] para o controlo remoto.
Retorno sonoro para o controlo remoto/
painel de controlo
[#] + [55] + [xxx] + [#] [xxx] = [***] para o painel de controlo / [001-120] para o controlo remoto.
Data e hora [#] + [56] + [#]
Programa para armar [#] + [57] + [yy] + [#] [yy] = programa para armar (01-04) / estado do despertador (05-06).
Zona/dispositivo por programa para armar [#] + [58] + [yy] + [#] [yy] = programa para armar (01-04).
Tipo de zona e sirene por zona/dispositivo [#] + [60] + [xxx] + [y] + [z] + [#]
[xxx] = ID do dispositivo (001-120). [y] = tipo de zona (1-8). [z] = 0 (sirene desligada)
ou 1 (sirene ligada).
Controlo remoto do estado por telefone [#] + [62] + [#]
Números de telefone por zona/dispositivo [#] + [63] + [xxx] + [#] [xxx] = ID do dispositivo (001-120).
Volume do retorno sonoro [#] + [79] + [#]
Modo de poupança de energia [#] + [84] + [#]
Volume da sirene incorporada [#] + [87] + [#]
Intermitência da luz do visor [#] + [88] + [#]
Alerta de voz activado/desactivado [#] + [11] + [#]
Uso do controlo remoto para armar/desarmar [#] + [15] + [#]
Alertas de interferência [#] + [16] + [#]
Bloqueio do painel de controlo [#] + [17] + [#]
Aceder ao registo de armar [#] + [9901] + [#] O resultado será uma sequência de códigos:
[aa]: número de gravações (máx. 72 gravações). [bbbb]: mês/dia. [cccc]: hora/minuto.
[dd]: YC = controlo remoto / JP = painel de controlo / DS = programa para armar.
[ee]: YK = controlo remoto / CF = desarmar / BF = armar / 01 = primeiro controlo remoto.
Aceder ao registo de alarmes [#] + [9900] + [#]
Page 30

3030
Português
Limpeza e manutenção
Aviso!
• Antes da limpeza ou manutenção, desligue o dispositivo, retire
acha da tomada de parede e aguarde até que o dispositivo
tenha arrefecido.
• Não utilize solventes de limpeza ou produtos abrasivos.
• Não tente reparar o dispositivo. Se o dispositivo não funcionar
correctamente, substitua-o por um dispositivo novo.
• Limpe o exterior do dispositivo utilizando um pano húmido macio.
Segue minuciosamente o exterior do dispositivo com um pano
limpo e seco.
Segurança
Segurança geral
• Leia atentamente o manual de instruções antes de utilizar.
Guarde o manual para consulta futura.
• Utilize o dispositivo apenas para a nalidade a que se destina.
Não utilize o dispositivo para outras nalidades além das descritas
no manual.
• Não utilize o dispositivo caso tenha alguma peça danicada ou
com defeito. Se o dispositivo estiver danicado ou tenha defeito,
substitua imediatamente o dispositivo.
• O dispositivo não deve ser utilizado por crianças sem a supervisão
de um adulto. As crianças não deverão brincar com o dispositivo.
• Não modique este dispositivo de forma alguma.
• Não exponha o dispositivo a água ou humidade.
• Não exponha o dispositivo a luz solar directa.
• Mantenha o dispositivo afastado de fontes de calor.
Segurança eléctrica
• Quando necessitar de reparação e para reduzir o risco de choque
eléctrico, este produto deve apenas ser aberto por um técnico
autorizado.
• Desligue o produto da tomada de alimentação e outro equipamento
se ocorrer um problema.
• Não utilize o dispositivo se o cabo de alimentação ou a cha
estiverem danicados ou com defeito. Se o cabo de alimentação
ou a cha estiverem danicados ou com defeito, têm de ser
substituídos pelo fabricante ou um agente reparador autorizado.
• Antes de utilizar, verique sempre se a tensão da rede é igual à
tensão indicada na placa de classicação do dispositivo.
• Certique-se de que o cabo de alimentação não ca emaranhado.
• Certique-se de que o cabo de alimentação não ca pendurado
na extremidade de uma bancada e de que ninguém poderá
tropeçar ou pisá-lo acidentalmente.
Garantia
Quaisquer alterações e/ou modicações no produto anularão a
garantia. Não nos podemos responsabilizar por qualquer dano
causado pelo uso incorrecto do produto.
Eliminação
• O produto deve ser eliminado separadamente num ponto de
recolha apropriado. Não elimine este produto juntamente com
olixo doméstico.
• Para obter mais informações, contacte o revendedor ou o organismo
local responsável pela gestão de resíduos.
Documentação
O produto foi fabricado e fornecido em conformidade com todos os
regulamentos e directivas relevantes, válidos para todos os
Estados-Membros da União Europeia. Além disso, está em
conformidade com todas as especicações e regulamentos
aplicáveis no país de venda.
Mediante pedido, será disponibilizada documentação formal.
Adocumentação formal inclui, entre outros, a Declaração de
Conformidade.
Limitação de responsabilidade
Os designs e as especicações estão sujeitos a alteração sem aviso.
Todos os logótipos, marcas ou logótipos de marcas e nomes de
produtos são marcas registadas dos respectivos proprietários e são
reconhecidas como tal neste documento.
Page 31

3131
Dansk
SAS-ALARM240
Alarmsystem
Beskrivelse
Fjernbetjening (g. A)
1. knap
• Aktiveringsknap
2.
knap
• Deaktiveringsknap
3.
knap
• Delvis aktiveringsknap
4.
knap
• Alarmknap
Betjeningspanel (front) (g. B1)
Hvis betjeningspanelet er beskyttet med adgangskode, skal den
først indtastes.
5. Talknapper
6.
knap
• *-knap/ alarmknap
7.
knap
• #-knap/ Kongureringsknap
8.
knap
• Aktiveringsknap
9.
knap
• Deaktiveringsknap
10.
knap
• Forespørgsel
11. Visning af klokkeslæt
12.
indikator
• Aktiveret tilstandsindikator
13.
indikator
• Delvis aktiveret tilstandsindikator
14.
indikator
• Dekativeret tilstandsindikator
15.
indikator
• Batteriindikator
16.
indikator
• Programmeret aktivering-/
deaktiveringsindikator
17.
indikator
• Indbygget sireneindikator
Betjeningspanel (top) (g. B2)
18. Batteristrømkontakt
19. DC-indgang (5V)
20. Sirene
21. Telefonledning
Forlængerledning
Montering
• Montér alarmsystemet på et centralt sted; hold afstand til
metalgenstande eller husholdningsapparater.
• Tilslut telefonledningen, forlængerledningen, sirenen og andre
ledninger.
• Sæt strøm til betjeningspanelet.
• Stil batteristrømkontakten i position "ON".
Anvendelse
Aktivering
Alle detektorer er aktiverede. Hvis en begivenhed indtræder, starter
alarmsystemet omgående.
• Fjernbetjening: Tryk på aktiveringsknappen.
• Betjeningspanel: Tryk på aktiveringsknappen.
Indikatoren for aktiveret system vises på skærmen.
Delvis aktivering
Brugeren vælger, hvilke detektorer, som skal aktiveres. Hvis en
begivenhed indtræder, går alarmsystemet omgående i funktion.
• Fjernbetjening: Tryk på delvis aktiveringsknappen.
• Betjeningspanel: Tryk to gange på aktiveringsknappen.
Indikatoren for delvist aktiveret system vises på skærmen.
Deaktivering
Alle detektorer er deaktiverede. Hvis en begivenhed indtræder,
gåralarmsystemet ikke i funktion.
• Fjernbetjening: Tryk på deaktiveringsknappen.
• Betjeningspanel: Tryk på deaktiveringsknappen.
Indikatoren for deaktiveret system vises på skærmen.
Alarm
Alarmsystemet træder omgående i funktion, uanset om det er
aktiveret eller deaktiveret.
• Fjernbetjening: Tryk på alarmknappen.
• Betjeningspanel: Tryk på alarmknappen.
Brug af telefonen
Efter modtagelsen af et opkald fra alarmsystemet i tilfælde af en
begivenhed, kan ud også bruge telefonen til at ernbetjene
alarmsystemet.
[1]: Aktivering [2]: Deaktivering
[3]: Overvågning til [4]: Overvågning fra
[5]: Talemeddelelse til [6]: Talemeddelelse fra
[7]: Sirene til [8]: Sirene fra
Page 32

3232
Dansk
Indstillinger og forespørgsler
Indstillingerne og forespørgslerne kan udføres både med ernbetjeningen eller betjeningspanelet.
Indstillinger
• Kongurationsfunktionen åbnes ved at trykke på kongurationsknappen på betjeningspanelet.
• Indstillingerne ændres ved at trykke på [#] + [kode] + parametre + [#].
• Kongurationsfunktionen forlades ved at trykke på [*] og [#].
Indstilling Kommando Bemærkninger
Optag talemeddelelse [#] + [19] + meddelelse + [#] Varighed for talemeddelelse: maks. 10 sekunder.
Tilføj ernbetjening [#] + [07] + [xxx] + [#]
[xxx] = ernbetjening ID (001-120). Efter tilføjelsen trykkes på en vilkårlig knap på ernbetjeningen.
2 bip = ernbetjening tilføjet. 1 bip = ernbetjening allerede kongureret. Maks. ant al
ernbetjeninger: 120.
Slet ernbetjening [#] + [08] + [xxx] + [#] [xxx] = værdien for ernbetjeningen som skal slettes.
Slet alle ernbetjeninger [#] + [08] + [***] + [#] [***] = alle tilsluttede ernbetjeninger.
Tilføj detektor [#] + [09] + [xxx] + [#] [xxx] = detektor-ID (001-120). Maks. antal detektorer: 120.
Slet detektor [#] + [10] + [xxx] + [#] [xxx] = værdien for detektoren, som skal ernes.
Slet alle detektorer [#] + [10] + [***] + [#] [***] = alle tilsluttede detektorer.
Konguration af
telefonnummer/-numre
[#] + [3] + [y] + telefonnummer + [*#]
[y] = telefonnummer-ID (1-9).
ID 1-6 = almindelige telefonnumre. ID 7-9 = nødtelefonnumre.
Slet telefonnummer/-numre
[#] + [3] + [y] + [#]
[y] = telefonnummer-ID (1-9).
Konguration af adgangskode [#] + [50] + adgangskode + [#] Adgangskoden har maks. 4 cifre. Standardadgangskode: 1234.
Konguration af
aktiveringsforsinkelse
[#] + [51] + sekunder + [#] Sekunder fra 00 til 99. Standard = 00
Konguration af alarmforsinkelse [#] + [52] + sekunder + [#] Sekunder fra 00 til 99. Standard = 60
Konguration af siretid [#] + [53] + minutter + [#] Minutter fra 00 til 20. Standard = 01
Konguration af dato og klokkeslæt
[#] + [56] + år + måned + dag + time
+ minutter + sekunder + [#]
Eksempel: “20141025183500” = 25. oktober 2014 18:35:00.
Konguration af tidspunkt for
alarmsignal
[#] + [57] + [yy] + starttid + sluttid +
dag(e) + [#]
[yy] = 05 / 06 (maks. 2 alarmer).
Eksempel 1: “050900090112345” = sirenen lyder i 1 minute på hverdage kl. 09.00.
Eksempel 2: “051030103167” = sirenen lyder i 1 minut i weekender kl. 10:30.
Slet af klokkeslæt for alarmsignal [#] + [57] + [yy] + [0] + [#] [yy] = 05 / 06.
Konguration af ernbetjening
via telefon
[#] + [62] + [y] + [#] [y] = 0 (fra) eller 1 (til). Standard = 1 (til)
Konguration af antallet af
opringninger for ernbetjening
via telefon
[#] + [18] + [yy] + [#] [yy] = 00 (fra) - 99. Standard = 8
Konguration af lydstyrke for
feedback
[#] + [11] + [y] + [#] [y] = 0 (fra) eller 1 (til). Standard = 1 (til)
Lydstyrke for feedback [#] + [79] + [y] + [#] [y] = 0 (fra) - 7 (høj).
Regulering af skærmens lysstyrke [#] + [83] + [y] + [#] [y] = 0 (mørk) - 7 (lys).
Konguration af energisparetilstand [#] + [84] + [y] + [#] [y] = 0 (fra) eller 1 (til). Standard = 1 (til)
Lydstyrke for indbygget sirene [#] + [87] + [y] + [#] [y] = 0 (fra) - 7 (høj).
Konguration af blinkende skærm [#] + [88] + [y] + [#] [y] = 0 (fra) eller 1 (til). Standard = 0 (fra)
Konguration af
telefonlinjedetektion
[#] + [13] + [y] + [#] [y] = 0 (fra) eller 1 (til). Standard = 0 (fra)
Deaktivering af ernbetjening til
aktivering/deaktivering
[#] + [15] + [y] + [#] [y] = 0 (fra) eller 1 (til). Standard = 0 (fra)
Konguration af
interferensmeddelelser
[#] + [16] + [y] + [#]
Hvis andre apparater forsøger til koble sig til alarmsystemet, lyder sirenen i 5 sekunder.
[y] = 0 (fra) eller 1 (til). Standard = 0 (fra)
Konguration af
betjeningspanellås
[#] + [17] + [y] + [#] [y] = 0 (fra) eller 1 (til). Standard = 0 (fra)
Tilføj trådløs strobealarm
(ekstraudstyr)
Tryk på knappen "SET" på strobesirenen
for at starte kodeindlæring.
Tryk på deaktiveringsknappen på
betjeningspanelet. Strobesirenen
bipper én gang for at angive, at
indlæringsprocessen er gennemført.
Kontakt din lokale forhandler for oplysninger om tilgængelighed.
Lydstyrke for udvendig sirene
(ekstraudstyr)
[#] + [14] + [yy] + [#] [yy] = 00 (fra) - 99 (høj).
Genopret fabriksindstillinger for
betjeningspanel
[#] + [9898] + [#]
Nulstilling af systemet [#] + [989801] + [#]+ [#]+ [#] Forsigtig: Alle fabriksindstillinger genoprettes for hele alarmsystemet.
Page 33

3333
Dansk
Konguration af zonetyper [#] + [60] + [xxx] + [y] + [z] + [#]
[xxx] = detektor-ID (001-120). [y] = zonetype (1-8). [z] = 0 (sirene slukket) eller 1 (sirene tændt).
Zonetyper:
1. Normal zone
2. Delvist aktiveret zone: Detektorerne i zonen kan deaktiveres med ernbetjeningen.
Systemet er delvist aktiveret.
3. Intelligent zone: Efter den første udløsning vil en udløsning nummer 2 inden for
30sekunder forårsage en alarm.
4. Alarmzone: Alle udløsninger forårsager en alarm uanset aktiveringstilstanden.
5. Lukke zone: En udløsning forårsager ikke en alarm uanset aktiveringstilstanden.
6. Ringezone: Alle udløsninger forårsager lyden af dørklokke uanset aktiveringstilstanden.
7. Velkomstzone: Når den er aktiveret, vil alle udløsninger forårsage en alarm. Når den er
deaktiveret, vil alle udløsninger forårsage en hørbar velkomstmeddelelse.
8. Hjælpezone: Alle udløsninger vil forårsage en alarm og opringning til de tre
nødtelefonnumre med en forudoptaget tilkaldemeddelelse uanset aktiveringstilstanden.
Konguration af specikke
telefonnumre for hver alarmzone
[#] + [63] + start apparat-ID + slut
apparat-ID + [y] + [#]
[y] = telefonnummer-ID (1-9).
Eksempel 1: “630010061234” = automatisk opringning til telefonerne 1-4 når zonerne 001-006
udløses.
Eksempel 2: “630200206” = automatisk opringning til telefonen 6 når zone 020 udløses.
Konguration af programmeret
aktivering
[#] + [57] + [yy] + starttid + sluttid +
dagsnummer + [#]
[yy] = aktiveringsprogram (01-04).
Eksempel 1: “58010700173012345” = aktivér på weekender mellem 07:00 og 17:30.
Eksempel 2: “5802180006005671” = aktivér fra fredag til mandag mellem 18:00 og 06:00.
Slet konguration af
programmeret aktivering
[#] + [57] + [yy] + [0] + [#] [yy] = aktiveringsprogram (01-04).
Konguration af programmeret
aktivering med forsvarszoner
[#] + [58] + [yy] + start apparat-ID +
slut apparat-ID + [#]
[yy] = aktiveringsprogram (01-04).
Eksempel: “5801001003” = apparaterne 001-003 følger aktiveringsprogram 01.
Konguration af
betjeningsafstand for
ernbetjening/betjeningspanel
[#] + [54] + [xxx] + start apparat-ID +
slut apparat-ID + [#]
Standard: Fjernbetjening og betjeningspanel styrer alle zoner.
[xxx] = [***] for betjeningspanel / [001-120] for ernbetjening.
Eksempel: “54001000010” = ernbetjening 001 styrer zonerne 0 til 10.
Konguration af hørbar feedback
for ernbetjening/
betjeningspanel
[#] + [55] + [xxx] + [y] + [#]
[y] = 0 (fra) eller 1 (til).
[xxx] = [***] for betjeningspanel / [001-120] for ernbetjening.
Eksempel: “55***0” = ingen hørbar feedback når aktivering sker gennem betjeningspanel.
Forespørgsel
• Forespørgselsfunktionen åbnes ved at trykke på forespørgselsknappen på betjeningspanelet.
• Forespørgsler gennemføres ved at trykke på [#] + kode + (parametre) + [#].
• Forespørgselsfunktionen forlades ved at trykke på [*] og [#].
Forespørgsel Kommando Bemærkninger
Gemt telefonnummer [#] + [3] + [y] + [#] [y] = telefonnummer-ID (1-9).
Adgangskode [#] + [50] + [#]
Aktiveringsforsinkelse: [#] + [51] + [#]
Alarmforsinkelse: [#] + [52] + [#]
Alarmens varighed [#] + [53] + [#]
Betjeningsinverval for ernbetjening/
betjeningspanel
[#] + [54] + [xxx] + [#] [xxx] = [***] for betjeningspanel / [001-120] for ernbetjening.
Hørbar feedback for ernbetjening/
betjeningspanel
[#] + [55] + [xxx] + [#] [xxx] = [***] for betjeningspanel / [001-120] for ernbetjening.
Data- og klokkeslæt [#] + [56] + [#]
Aktiveringsprogram [#] + [57] + [yy] + [#] [yy] = aktiveringsprogram (01-04) / status for klokkeslæt for vækkeur (05-06).
Zone/apparat pr. aktiveringsprogram [#] + [58] + [yy] + [#] [yy] = aktiveringsprogram (01-04).
Zonetype og sirene pr. zone/apparat [#] + [60] + [xxx] + [y] + [z] + [#] [xxx] = apparat-ID (001-120). [y] = zonetype (1-8). [z] = 0 (sirene slukket) eller 1 (sirene tændt).
Status for ernbetjening via telefon [#] + [62] + [#]
Telefonnumre pr. zone/apparat [#] + [63] + [xxx] + [#] [xxx] = apparat-ID (001-120).
Lydstyrke for feedback [#] + [79] + [#]
Energisparetilstand [#] + [84] + [#]
Lydstyrke for indbygget sirene [#] + [87] + [#]
Blinkende skærm [#] + [88] + [#]
Talemeddelelse til/fra [#] + [11] + [#]
Brug af ernbetjening til aktivering/deaktivering [#] + [15] + [#]
Interferensmeddelelser [#] + [16] + [#]
Betjeningspanellås [#] + [17] + [#]
Adgang til aktiveringslog [#] + [9901] + [#] Resultatet er en kodesekvens:
[aa]: post nummer (maks. 72 poster). [bbbb]: måned/dag. [cccc]: time/minut.
[dd]: YC = ernbetjening / JP = betjeningspanel / DS = programmeret aktivering.
[ee]: YK = ernbetjening / CF = deaktivér / BF = aktivér / 01 = rste ernbetjening.
Adgang til alarmlog [#] + [9900] + [#]
Page 34

3434
Dansk
Rengøring og vedligeholdelse
Advarsel!
• Før rengøring eller vedligeholdelse skal du slukke apparatet,
tage netstikket ud af stikkontakten og vente, indtil apparatet er
kølet ned.
• Brug ikke opløsningsmidler eller slibende rengøringsmidler.
• Forsøg aldrig at reparere apparatet. Hvis apparatet ikke fungerer
korrekt, skal det udskiftes med et nyt.
• Rengør apparatet udvendigt med en blød, fugtig klud. Tør
apparatet grundigt af udvendigt med en ren, tør klud.
Sikkerhed
Generel sikkerhed
• Læs vejledningen omhyggeligt inden apparatet tages i brug.
Gem vejledningen til fremtidig brug.
• Brug kun apparatet til de tilsigtede formål. Brug ikke apparatet
til andre formål end dem, som er beskrevet i vejledningen.
• Brug ikke apparatet, hvis det har beskadigede eller defekte dele.
Hvis apparatet er beskadiget eller defekt, skal det omgående
udskiftes.
• Enheden må ikke anvendes af børn når de ikke holdes under
opsyn af en voksen. Børn må ikke lege med apparatet.
• Der må ikke laves nogen form for ændringer til enheden.
• Udsæt ikke apparatet for vand eller fugt.
• Undlad at udsætte apparatet for direkte sollys.
• Hold apparatet væk fra varmekilder.
Elektrisk sikkerhed
• For at nedsætte risikoen for elektrisk stød, må dette produkt kun
åbnes af en autoriseret tekniker, når service er nødvendig.
• Tag produktet ud af stikkontakten og andet udstyr, hvis der
opstår et problem.
• Brug ikke apparatet, hvis netledningen eller netstikket er beskadiget
eller defekt. Hvis netledningen eller netstikket er beskadiget
eller defekt, skal den udskiftes af fabrikanten, eller en autoriseret
tekniker.
• Kontroller altid, at netspændingen er den samme som
spændingen angivet på ydelsesskiltet før brug.
• Kontroller at netledningen ikke kan blive ltret sammen.
• Sørg for, at netledningen ikke hænger ud over kanten på bordet
eller ved et uheld kan hænge fast eller faldes over.
Garanti
Ændringer og/eller modikationer af produktet vil medføre bortfald
af garantien. Vi fralægger os ethvert ansvar for skader forårsaget på
grund af forkert brug af produktet.
Bortskaelse
• Produktet skal aeveres på et passende indsamlingspunkt.
Bortskaf ikke produktet sammen med husholdningsaald.
• For mere information, kontakt forhandleren eller den lokale
myndighed der er ansvarlig for kontrol af aald.
Dokumentation
Produktet er fremstillet og leveres i overensstemmelse med alle
relevante forordninger og direktiver, der er gældende for alle EUs
medlemsstater. Produktet overholder alle gældende specikationer
og forskrifter i de lande, hvor produktet sælges.
Formel dokumentation kan fremlægges på forlangende. Den
formelle dokumentation indeholder men er ikke begrænset til
overensstemmelseserklæringen.
Ansvarsfraskrivelse
Design og specikationer kan ændres uden varsel. Alle bomærker,
mærker og produktnavne er varemærker eller registrerede varemærker
tilhørende deres respektive ejere og anses herved som sådan.
Page 35

3535
Norsk
SAS-ALARM240
Alarmsystem
Beskrivelse
Fjernkontroll (g. A)
1. -knapp
• Knapp for aktivering
2.
-knapp
• Knapp for deaktivering
3.
-knapp
• Knapp for delvis aktivering
4.
-knapp
• Nødknapp
Betjeningspanel (front) (g. B2)
Hvis betjeningspanelet er passordbeskyttet, må du først taste inn
passordet.
5. Numeriske taster
6.
-knapp
• *-knapp / Nødknapp
7.
-knapp
• #-knapp / Menyknapp
8.
-knapp
• Knapp for aktivering
9.
-knapp
• Knapp for deaktivering
10.
-knapp
• Spørringsknapp
11. Display
12.
-indikator
• Indikator for aktivert
13.
-indikator
• Indikator for delvis aktivert
14.
-indikator
• Indikator for deaktivert
15.
-indikator
• Batteriindikator
16.
-indikator
• Indikator for planlagt aktivering/
deaktivering
17.
-indikator
• Indikator for innebygd sirene
Betjeningspanel (topp) (g. B2)
18. Batteristrømbryter
19. DC-inngang (5V)
20. Sirene
21. Telefonlinje
Forlengelseslinje
Installasjon
• Installer alarmsystemet på et sentralt sted, borte fra metallgjenstander
eller husholdningsapparater.
• Koble til telefonlinjen, forlengelseslinjen, sirenen og andre ledninger.
• Slå på betjeningspanelet.
• Sett batteristrømbryteren til "ON".
Bruk
Aktivering
Alle detektorene er aktivert. Dersom en hendelse inntreer,
vilalarmsystemet aktiveres umiddelbart.
• Fjernkontroll: Trykk på aktiveringsknappen.
• Betjeningspanel: Trykk på aktiveringsknappen.
Indikator for aktivering vises i displayet.
Delvis aktivering
Egendenerte detektorer er aktivert. Dersom en hendelse inntreer,
vil alarmsystemet aktiveres umiddelbart.
• Fjernkontroll: Trykk på knapp for delvis aktivering.
• Betjeningspanel: Trykk på aktiveringsknappen to ganger.
Indikator for delvis aktivering vises i displayet.
Deaktivering
Alle detektorene er deaktivert. Dersom en hendelse inntreer,
vilalarmsystemet ikke aktiveres.
• Fjernkontroll: Trykk på deaktiveringsknappen.
• Betjeningspanel: Trykk på deaktiveringsknappen.
Indikator for deaktivering vises i displayet.
Nødalarm
Alarmsystemet skal slå inn umiddelbart, enten systemet er aktivert
eller deaktivert.
• Fjernkontroll: Trykk på nødknappen.
• Betjeningspanel: Trykk på nødknappen.
Bruk av telefon
Etter å ha mottatt et oppkall fra alarmsystemet når det har inntruet
en hendelse, kan du også bruke telefonen til å ernstyre
alarmsystemet.
[1]: Aktivering [2]: Deaktivering
[3]: Overvåking på [4]: Overvåking av
[5]: Talebeskjed på [6]: Talebeskjed av
[7]: Sirene på [8]: Sirene av
Page 36

3636
Norsk
Innstillinger og spørringer
Innstillinger og spørringer kan gjøres via ernkontrollen eller betjeningspanelet.
Innstillinger
• For å gå til innstillingsmodus, trykk på på korresponderende knapp på betjeningspanelet.
• For å endre innstillinger, trykk [#] + [kode] + parametere + [#].
• For å gå ut av innstillingsmodus, trykk [*] og [#].
Innstilling Kommando Merknader
Spille inn talemelding [#] + [19] + melding + [#] Lengde på talemelding: maks 10 sekunder.
Legg til ernkontroll [#] + [07] + [xxx] + [#]
[xxx] = ernkontroll-ID (001-120). Trykk på en knapp på ernkontrollen etter å ha lagt den til.
2pip = ernkontroll lagt til. 1 pip = ernkontroll allerede kongurert.
Maks antall ernkontroller: 120.
Slette ernkontroll [#] + [08] + [xxx] + [#] [xxx] = verdi for ernkontroll som skal ernes.
Slette alle ernkontroller [#] + [08] + [***] + [#] [***] = alle tilkoblede ernkontroller.
Legg til detektor [#] + [09] + [xxx] + [#] [xxx] = detektor-ID (001-120). Maks antall detektorer: 120.
Slette detektor [#] + [10] + [xxx] + [#] [xxx] = verdi for detektor som skal ernes.
Slette alle detektorer [#] + [10] + [***] + [#] [***] = alle tilkoblede detektorer.
Sette opp telefonnummer
[#] + [3] + [y] + telefonnummer + [*#]
[y] = telefonnummer-ID (1-9).
ID 1-6 = vanlige telefonnumre. ID 7-9 = nødnumre.
Slette telefonnummer
[#] + [3] + [y] + [#]
[y] = telefonnummer-ID (1-9).
Angi passord [#] + [50] + passord + [#] Passordet kan ha maks re sifre. Standard passord: 1234.
Angi aktiveringsforsinkelse [#] + [51] + sekunder + [#] Sekunder fra 00 til 99. Standard = 00.
Angi forsinkelsestid for alarm [#] + [52] + sekunder + [#] Sekunder fra 00 til 99. Standard = 60.
Angi sirenetid [#] + [53] + minutter + [#] Minutter fra 00 til 20. Standard = 01.
Angi dato og tid
[#] + [56] + år + måned + dag + time
+ minutter + sekunder + [#]
Eksempel: "20141025183500" = 25. oktober 2014 18:35:00.
Stille inn alarmklokke
[#] + [57] + [yy] + starttid + sluttid +
dag(er) + [#]
[yy] = 05 / 06 (maks 2 alarmer).
Eksempel 1: "050900090112345" = sirenen lyder i 1 minutt på hverdager klokken 09:00.
Eksempel 2: "051030103167" = sirenen lyder i 1 minutt i helger klokken 10:30.
Slette alarmklokke [#] + [57] + [yy] + [0] + [#] [yy] = 05 / 06.
Oppsett av ernkontroll via telefon [#] + [62] + [y] + [#] [y] = 0 (av) eller 1 (på). Standard = 1 (på).
Oppsett av antall ring for
ernstyring via telefon
[#] + [18] + [yy] + [#] [yy] = 00 (av) - 99. Standard = 8.
Oppsett av hørbare returmeldinger [#] + [11] + [y] + [#] [y] = 0 (av) eller 1 (på). Standard = 1 (på).
Volum for hørbare returmeldinger [#] + [79] + [y] + [#] [y] = 0 (av) - 7 (høyt).
Lysstyrke i display. [#] + [83] + [y] + [#] [y] = 0 (mørk) - 7 (lys).
Oppsett av strømsparemodus [#] + [84] + [y] + [#] [y] = 0 (av) eller 1 (på). Standard = 1 (på).
Volum for innebygd sirene [#] + [87] + [y] + [#] [y] = 0 (av) - 7 (høyt).
Oppsett av blinkende displaylys [#] + [88] + [y] + [#] [y] = 0 (av) eller 1 (på). Standard = 0 (av).
Oppsett av deteksjon av
telefonlinjeforbindelse
[#] + [13] + [y] + [#] [y] = 0 (av) eller 1 (på). Standard = 0 (av).
Deaktivere bruk av ernkontroll
for aktivering/deaktivering
[#] + [15] + [y] + [#] [y] = 0 (av) eller 1 (på). Standard = 0 (av).
Oppsett av interferensmeldinger [#] + [16] + [y] + [#]
Dersom andre enheter prøver å koble seg til alarmsystemet, vil alarmen lyde i 5 sekunder.
[y] = 0 (av) eller 1 (på). Standard = 0 (av).
Oppsett av lås på betjeningspanelet [#] + [17] + [y] + [#] [y] = 0 (av) eller 1 (på). Standard = 0 (av).
Legge til trådløs strobesirene
(valgfritt)
Trykk på "SET"-knappen på strobesirene
for å angi startkodelæring.
Trykk på deaktiveringsknappen på
betjeningspanelet. Strobesirene
piper én gang for å indikere at
læringsprosessen er fullført.
Kontakt forhandler for tilgjengelighet.
Volum for ekstern sirene (valgfritt) [#] + [14] + [yy] + [#] [yy] = 00 (o ) - 99 (høyt).
Gjenopprette fabrikkinnstillinger
for betjeningspanelet
[#] + [9898] + [#]
Nullstilling av systemet [#] + [989801] + [#]+ [#]+ [#] Forsiktig: Hele alarmsystemet blir gjenopprettet til fabrikkinnstillinger.
Page 37

3737
Norsk
Oppsett av sonetyper [#] + [60] + [xxx] + [y] + [z] + [#]
[xxx] = detektor-ID (001-120). [y] = sonetype (1-8). [z] = 0 (sirene av) eller 1 (sirene på).
Sonetyper:
1. Normal sone
2. Delvis aktiv sone: Detektorer i sonen kan deaktiveres med ernkontrollen. Systemet er
delvis aktivert.
3. Intelligent sone: En andre trigger innen 30 sekunder etter den første triggeren vil
utløse en alarm.
4. Nødalarmsone: Alle triggere vil utløse alarm, uavhengig av aktivert/deaktivert status.
5. Lukket sone: En trigger vil ikke utløse noen alarm, uavhengig av aktivert/deaktivert status.
6. Ringeklok kesone: En trigger vil utløse ringeklokken, uavhengig av aktivert/deaktivert status.
7. Velkomstsone: Når den er aktivert, vil alle triggere utløse alarmen. Når den er deaktivert,
vil alle triggere utløse en hørbar velkomstmelding.
8. Hjelpesone: Alle triggere vil utløse en alarm og ringe opp de tre nødnumrene med en
forhåndsinnspilt nødmelding, uavhengig av aktivert/deaktivert status.
Oppsett av spesikke
telefonnumre per alarmsone
[#] + [63] + første enhets-ID + siste
enhets-ID + [y] + [#]
[y] = telefonnummer-ID (1-9).
Eksempel 1: "630010061234" = automatisk oppkall tlf. 1-4 når sone 001-006 er trigget.
Eksempel 2: "630200206" = automatisk oppkall tlf. 6 når sone 020 er trigget.
Oppsett av aktiveringsplan
[#] + [57] + [yy] + starttid + sluttid +
dagnummer + [#]
[yy] = aktiveringsplan (01-04).
Eksempel 1: "58010700173012345" = aktiveres hverdager 07:00 til 17:30.
Eksempel 2: "5802180006005671" = aktiveres fra fredag til mandag 18:00 til 06:00.
Slette aktiveringsplan [#] + [57] + [yy] + [0] + [#] [yy] = aktiveringsplan (01-04).
Oppsett av aktiveringsplan med
forsvarssoner
[#] + [58] + [yy] + første enhets-ID +
siste enhets-ID + [#]
[yy] = aktiveringsplan (01-04).
Eksempel: "5801001003" = enhetene 001-003 følger aktiveringsplan 01.
Oppsett av kontrollområde for
ernkontroll/betjeningspanel
[#] + [54] + [xxx] + første enhets-ID +
siste enhets-ID + [#]
Standard: Fjernkontroll og betjeningspanel kontrollerer alle soner.
[xxx] = [***] for betjeningspanel / [001-120] for ernkontroll.
Eksempel: "54001000010" = ernkontroll 001 kontrollerer sonene 0-10.
Oppsett av hørbar returmelding
for ernkontroll/betjeningspanel
[#] + [55] + [xxx] + [y] + [#]
[y] = 0 (av) eller 1 (på).
[xxx] = [***] for betjeningspanel / [001-120] for ernkontroll.
Eksempel: "55***0" = ingen hørbar returmelding ved aktivering via betjeningspanelet.
Spørring
• For å gå til spørringsmodus, trykk på på korresponderende knapp på betjeningspanelet.
• For å gjøre spørringer, trykk [#] + [kode] + (parametere) + [#].
• For å gå ut av spørringsmodus, trykk [*] og [#].
Spørring Kommando Merknader
Lagret telefonnummer [#] + [3] + [y] + [#] [y] = telefonnummer-ID (1-9).
Passord [#] + [50] + [#]
Aktiveringsforsinkelse [#] + [51] + [#]
Alarmforsinkelse [#] + [52] + [#]
Alarmvarighet [#] + [53] + [#]
Kontrollområde for ernkontroll/
betjeningspanel
[#] + [54] + [xxx] + [#] [xxx] = [***] for betjeningspanel / [001-120] for ernkontroll.
Hørbar returmelding for ernkontroll/
betjeningspanel
[#] + [55] + [xxx] + [#] [xxx] = [***] for betjeningspanel / [001-120] for ernkontroll.
Dato og tid [#] + [56] + [#]
Aktiveringsplan [#] + [57] + [yy] + [#] [yy] = aktiveringsplan (01-04) / alarmklokkestatus (05-06).
Sone/enhet per aktiveringsplan [#] + [58] + [yy] + [#] [yy] = aktiveringsplan (01-04).
Sonetype og sirene per sone/enhet [#] + [60] + [xxx] + [y] + [z] + [#] [xxx] = enhets-ID (001-120). [y] = sonetype (1-8). [z] = 0 (sirene av) eller 1 (sirene på).
Status ernkontroll via telefon [#] + [62] + [#]
Telefonnumre per sone/enhet [#] + [63] + [xxx] + [#] [xxx] = enhets-ID (001-120).
Volum for hørbare returmeldinger [#] + [79] + [#]
Strømsparemodus [#] + [84] + [#]
Volum for innebygd sirene [#] + [87] + [#]
Displaylys blinker [#] + [88] + [#]
Talebeskjed på/av [#] + [11] + [#]
Bruk av ernkontroll for aktivering/
deaktivering
[#] + [15] + [#]
Interferensmeldinger [#] + [16] + [#]
Lås på betjeningspanel [#] + [17] + [#]
Aktiveringslogg [#] + [9901] + [#] Resultatet vil være en kodesekvens:
[aa]: nummer på oppføring (maks 72 oppføringer). [bbbb]: måned/dag. [cccc]: time/minutt.
[dd]: YC = ernkontroll / JP = betjeningspanel / DS = aktiveringsplan.
[ee]: YK = ernkontroll / CF = deaktivere / BF = aktivere / 01 = første ernkontroll.
Alarmlogg [#] + [9900] + [#]
Page 38

3838
Norsk
Rengjøring og vedlikehold
Advarsel!
• Før rengjøring eller vedlikehold må enheten slås av og støpselet
må tas ut fra stikkontakten, og enheten må kjøles ned.
• Ikke bruk rensemidler eller skuremidler.
• Ikke prøv å reparere enheten. Hvis enheten ikke fungerer som
den skal, erstatt den med en ny enhet.
• Rengjør utsiden av enheten med en myk, fuktig klut. Tørk utsiden
av enheten grundig med en tørr, ren klut.
Sikkerhet
Generell sikkerhet
• Les bruksanvisningen nøye før bruk. Oppbevar bruksanvisningen
for fremtidig bruk.
• Bruk bare enheten for det tiltenkte formålet. Ikke bruk enheten
til andre formål enn det som er beskrevet i bruksanvisningen.
• Ikke bruk enheten hvis noen del er skadet eller defekt. Enheten
må erstattes umiddelbart hvis den er skadet eller defekt.
• Enheten skal ikke brukes av barn uten tilsyn av fra voksne.
Barnskal ikke leke med enheten.
• Ikke modiser enheten på noen som helst måte.
• Ikke utsett enheten for vann eller fuktighet.
• Ikke utsett enheten for direkte sollys.
• Hold enheten unna varmekilder.
Elektrisk sikkerhet
• For å redusere faren for strømstøt, skal dette produktet bare
åpnes av en autorisert tekniker når vedlikehold er nødvendig.
• Koble produktet fra strømmen og annet utstyr dersom et
problem oppstår.
• Ikke bruk enheten hvis strømkabelen eller støpselet er skadet
eller på andre måter defekt. Hvis strømkabelen eller støpselet er
skadet eller defekt, må disse byttes ut av produsenten eller et
autorisert serviceverksted.
• Før bruk må det alltid sjekkes at nettspenningen er den samme
som spenningen som er merket på enheten.
• Pass på at strømkabelen ikke blir viklet inn i noe.
• Påse at strømkabelen ikke henger over kanten på en arbeidsbenk
og at den ikke kan bli utilsiktet trukket i eller snublet over.
Garanti
Eventuelle endringer og/eller modikasjoner av produkter opphever
garantien. Vi tar ikke ansvar for skade som forårsakes av ukorrekt
bruk av produktet.
Avhending
• Produktet må avhendes på egnede oppsamlingssteder.
Du må ikke avhende produktet som husholdningsavfall.
• Ta kontakt med leverandøren eller lokale myndigheter hvis du
ønsker mer informasjon om avhending.
Dokumentasjon
Produktet har blitt produsert og levert i henhold til alle relevante
bestemmelser og direktiver, gyldig for alle medlemsstater i EU.
Produktet overholder også alle gjeldende spesikasjoner og
bestemmelser i landet det selges i.
Formell dokumentasjon er tilgjengelig på forespørsel. Den formelle
dokumentasjon inkluderer, men er ikke begrenset til samsvarserklæringen.
Ansvarsfraskrivelse
Utforming og spesikasjoner kan endres uten forhåndsvarsel. Alle
logoer, merker og produktnavn er varemerker eller registrerte
varemerker til de respektive eierne, og skal behandles som dette.
Page 39

3939
Svenska
SAS-ALARM240
Larmsystem
Beskrivning
Fjärrkontroll (g. A)
1. -knapp
• Påkopplingsknapp
2.
-knapp
• Frånkopplingsknapp
3.
-knapp
• Knapp för delvis påkoppling
4.
-knapp
• Nödknapp
Kontrollpanel (framsida) (g. B1)
Om kontrollpanelen är skyddat med ett lösenord, mata in lösenordet
först.
5. Sierknappar
6.
-knapp
• *-knapp / Nödknapp
7.
-knapp
• #-knapp / Inställningsknapp
8.
-knapp
• Påkopplingsknapp
9.
-knapp
• Frånkopplingsknapp
10.
-knapp
• Förfrågan-knapp
11. Visa tid
12.
-indikator
• Påkopplingsindikator
13.
-indikator
• Indikator för delvis påkoppling
14.
-indikator
• Frånkopplingsindikator
15.
-indikator
• Batteriindikator
16.
-indikator
• Schemalagd på-/avkopplingsindikator
17.
-indikator
• Indikator för inbyggd siren
Kontrollpanel (överst) (g. B2)
18. Batteriströmbrytare
19. DC-ingång (5V)
20. Siren
21. Telefonkabel
Förläningskabel
Installation
• Installera larmsystemet på en central plats, på avstånd från
metallföremål och hushållsapparater.
• Anslut telefonkabeln, förläningskabeln, sirenen och andra kablar.
• Sätt på kontrollpanelen.
• Ställ batteribrytaren till "ON"-läget.
Användning
Påkoppling
Alla detektorer aktiveras. Om något händer, reagerar larmsystemet direkt.
• Fjärrkontroll: Tryck på påkopplingsknappen.
• Kontrollpanel: Tryck på påkopplingsknappen.
Påkopplingsindikatorn visas på displayen.
Delvis påkoppling
Användar-valda detektorer aktiveras. Om något händer, reagerar
larmsystemet direkt.
• Fjärrkontroll: Tryck på knappen för delvis påkoppling.
• Kontrollpanel: Tryck på påkopplingsknappen två gånger.
Indikatorn för delvis påkoppling visas på displayen.
Frånkoppling
Alla detektorer avaktiveras. Om något händer, reagerar inte
larmsystemet alls.
• Fjärrkontroll: Tryck på frånkopplingsknappen.
• Kontrollpanel: Tryck på frånkopplingsknappen.
Indikatorn för frånkoppling visas på displayen.
Nödalarm
Alarmsystemet aktiveras direkt, oavsett om det är på- eller frånkopplat.
• Fjärrkontroll: Tryck på nödknappen.
• Kontrollpanel: Tryck på nödknappen.
Använda telefonen
Efter att du mottagit ett samtal från larmsystemet vid en händelse,
kan du även använda telefonen för att kontrollera alarmpanelen.
[1]: Påkoppling [2]: Frånkoppling
[3]: Övervakning på [4]: Ö vervakning av
[5]: Röstprompt på [6]: Röstprompt av
[7]: Siren på [8]: Siren av
Page 40

4040
Svenska
Inställningar och förfrågningar
Inställningar och förfrågningar kan utföras via ärrkontrollen eller kontrollpanelen.
Inställningar
• För att gå till inställningsläget, tryck på inställningsknappen på kontrollpanelen.
• För att ändra inställningarna, tryck på [#] + [kod] + parametrar + [#].
• För att avsluta inställningsläget, tryck på [*] och [#].
Inställning Kommando Anmärkningar
Spela in röstmeddelande [#] + [19] + meddelande + [#] Röstmeddelande varaktighet: max 10 sekunder
Lägg till ärrkontroll [#] + [07] + [xxx] + [#]
[xxx] = ärrkontrolls-ID (001-120). Efter du har lagt till, tryck på valfri knapp på ärrkontrollen. 2
pip = ärrkontrollen tillagd. 1 pip = ärrkontrollen redan kongurerad. Max antal
ärrkontroller: 120.
Ta bort ärrkontroll [#] + [08] + [xxx] + [#] [xxx] = värde för den ärrkontroll som ska tas bort.
Ta bort alla ärrkontroller [#] + [08] + [***] + [#] [***] = alla anslutna ärrkontroller.
Lägg till detektor [#] + [09] + [xxx] + [#] [xxx] = detektor-ID (001-120). Max antal detektorer: 120.
Ta bort detektor [#] + [10] + [xxx] + [#] [xxx] = värde för den detektor som ska tas bort.
Ta bort alla detektorer [#] + [10] + [***] + [#] [***] = alla anslutna detektorer.
Ställa in telefonnummer
[#] + [3] + [y] + telefonenummer +
[*#]
[y] = -telefonnummer-ID (1-9).
ID 1-6 = vanliga telefonnummer. ID 7-9 = nödtelefonnummer.
Ta bort telefonnummer
[#] + [3] + [y] + [#]
[y] = -telefonnummer-ID (1-9).
Ställ in lösenord [#] + [50] + lösenord + [#] Lösenordet är max 4 siror långt. Standardlösenord: 1234.
Ställ in fördörjning på påkoppling [#] + [51] + sekunder + [#] Sekunder från 00 till 99. Standard = 00.
Ställ in fördörjning på alarm [#] + [52] + sekunder + [#] Sekunder från 00 till 99. Standard = 60.
Ställ in sirentid [#] + [53] + minuter + [#] Minuter från 00 till 20. Standard = 01.
Ställ in datum och tid
[#] + [56] + år + månad + dag +
timme + minuter + sekunder + [#]
Exempel: “20141025183500” = Oktober 25, 2014 18:35:00.
Ställ in alarmklocka
[#] + [57] + [yy] + starttid + sluttid +
dag(ar) + [#]
[yy] = 05 / 06 (max 2 alarm).
Exempel 1: “050900090112345” = sirenen ljuder i 1 minut på vardagar klockan 09.00.
Exempel 2: “051030103167” = sirenen ljuder i 1 minut på vardagar klockan 10:30.
Ta bort alarmklocka [#] + [57] + [yy] + [0] + [#] [yy] = 05 / 06.
Ställa in ärrkontroll via telefon [#] + [62] + [y] + [#] [y] = 0 (av) eller 1 (på). Standard = 1 (på).
Ställ in antal singlar för ärrkontroll
via telefon
[#] + [18] + [yy] + [#] [yy] = 00 (av) - 99. Standard = 8.
Ställ in hörbar återkoppling [#] + [11] + [y] + [#] [y] = 0 (av) eller 1 (på). Standard = 1 (på).
Volym hörbar återkoppling [#] + [79] + [y] + [#] [y] = 0 (av) eller 7 (hög).
Display ljusstyrka [#] + [83] + [y] + [#] [y] = 0 (mörk) - 7 (ljus).
Ställ in strömsparläge [#] + [84] + [y] + [#] [y] = 0 (av) eller 1 (på). Standard = 1 (på).
Volym inbyggd siren [#] + [87] + [y] + [#] [y] = 0 (av) eller 7 (hög).
Ställ in display blinkning [#] + [88] + [y] + [#] [y] = 0 (av) eller 1 (på). Standard = 0 (av).
Ställ in telefonanslutning detektion [#] + [13] + [y] + [#] [y] = 0 (av) eller 1 (på). Standard = 0 (av).
Stäng av användning av
ärrkontroll för på-/frånkoppling
[#] + [15] + [y] + [#] [y] = 0 (av) eller 1 (på). Standard = 0 (av).
Ställ in störningsprompter [#] + [16] + [y] + [#]
Om andra enheter försöker ansluta till larmsystemt kommer sirenen att ljud i 5 sekunder.
[y] = 0 (av) eller 1 (på). Standard = 0 (av).
Ställ in lås kontrollpanel [#] + [17] + [y] + [#] [y] = 0 (av) eller 1 (på). Standard = 0 (av).
Lägg till trådljus strobbsiren
(tillval)
Tryck på "SET"-knappen på strobbsirenen
för att gå till kodinlärning.
Tryck på frånkopplingsknappen på
kontrollpanelen. Strobbsirenen ljuder
en gång för att ange att
inlärningsprocessen är slutförd.
Kontakta din lokala återförsäljare för tillgänglighet.
Volym extern siren (tillval) [#] + [14] + [yy] + [#] [yy] = 00 (av) - 99 (hög).
Återställ in fabrikinställniingar för
kontrollpanel
[#] + [9898] + [#]
Systemåterställning [#] + [989801] + [#]+ [#]+ [#] Varning: Hela larmsystemet återställs till fabriksinställningar.
Ställ in zontyper [#] + [60] + [xxx] + [y] + [z] + [#]
[xxx] = detektor-ID (001-120). [y] = zontyp (1-8). [z] = 0 (siren av) or 1 (siren på).
Zontyper:
1. Normal zon
2. Delvis påkopplad zon: Detektorer i zonen kan avaktiveras via ärrkontroll. Systemt är
delvis påkopplat.
3. Smartzon: En andra utlösare inom 30 sekunder från den första utlösningen utlöser larm.
4. Nödzon: Alla utlösningar leder till larm, oavsett påkopplingsläge.
5. Stängd zon: Inga utlösningar leder till larm, oavsett påkopplingsläge.
6. Klockzon: Alla utlösningar leder till ett dörrklocksljud, oavsett påkopplingsläge.
7. Väkommen-zon: Vid påkoppling, leder alla utlösningar till larm. Vid frånkoppling,
leder alla utlösningar till en hörbar välkomstsignal.
8. Hjälpzon: Alla utlösningar resulterat i ett alarm och uppringning av de tre nödnummer
med förinspelade hjälp-meddelanden, oavsett påkopplingsläge.
Page 41

4141
Svenska
Ställ in specikt telefonnummer
per larmzon.
[#] + [63] + startenhet ID + slutenhet
ID + [y] + [#]
[y] = -telefonnummer-ID (1-9).
Exempel 1: “630010061234” = uppringning telefon 1-4 när zon 001-006 löses ut.
Exempel 2: “630200206” = uppringning telefon 6 när zon 020 löses ut.
Ställ in påkopplingsschema
[#] + [57] + [yy] + starttid + sluttid +
dagnummer + [#]
[yy] = påkopplingsschema (01-04).
Exempel 1: “58010700173012345” = koppla på på veckodagar mellan 07:00 och 17:30.
Exempel 2: “5802180006005671” = koppla på på fredag till måndag mellan 18:00 och 06:00.
Ta bort påkopplingsschema [#] + [57] + [yy] + [0] + [#] [yy] = påkopplingsschema (01-04).
Ställ in påkopplingsschema med
defensiva zoner
[#] + [58] + [yy] + startenhet ID +
slutenhet ID + [#]
[yy] = påkopplingsschema (01-04).
Exempel: “5801001003” = enheter 001-003 följer påkopplingsschema 01.
Ställ in kontrollvidd för
ärrkontroll/kontrollpanel
[#] + [54] + [xxx] + startenhet ID +
slutenhet ID + [#]
Standard: Fjärrkontroll och kontrollpanel kontrollerar alla zoner.
[xxx] = [***] för kontrollpanel / [001-120] för ärrkontroll.
Exempel: “54001000010” = ärrkontroll 001 kontrollerar zoner 0 till 10.
Ställ in hörbar återkoppling för
ärrkontrol/kontrollpanel
[#] + [55] + [xxx] + [y] + [#]
[y] = 0 (av) eller 1 (på).
[xxx] = [***] för kontrollpanel / [001-120] för ärrkontroll.
Exempel: “55***0” = ingen hörbar återkoppling vid påkoppling från kontrollpanelen.
Förfrågan
• För att gå till förfrågningsläget, tryck på förfrågningsknappen på kontrollpanelen.
• För att göra förfrågningar, tryck på [#] + kod + (parametrar) + [#].
• För att avsluta förfrågningsläget, tryck på [*] och [#].
Förfrågan Kommando Anmärkningar
Sparat telefonnummer [#] + [3] + [y] + [#] [y] = -telefonnummer-ID (1-9).
Lösenord [#] + [50] + [#]
Fördörjning på påkoppling [#] + [51] + [#]
Fördörjning på larm [#] + [52] + [#]
Larmljud varaktighet [#] + [53] + [#]
Kontrollvidd för ärrkontroll/kontrollpanel [#] + [54] + [xxx] + [#] [xxx] = [***] för kontrollpanel / [001-120] för ärrkontroll.
Hörbar återkoppling för ärrkontrol/
kontrollpanel
[#] + [55] + [xxx] + [#] [xxx] = [***] för kontrollpanel / [001-120] för ärrkontroll.
Datum och tid [#] + [56] + [#]
Påkopplingsschema [#] + [57] + [yy] + [#] [yy] = påkopplingsschema (01-04) / alarmklocka status (05-06).
Zone/enhet per påkopplingsschema [#] + [58] + [yy] + [#] [yy] = påkopplingsschema (01-04).
Zontyp och siren per zon/enhet [#] + [60] + [xxx] + [y] + [z] + [#] [xxx] = enhets-ID (001-120). [y] = zontyp (1-8). [z] = 0 (siren av) or 1 (siren på).
Status ärrkontroll via telefon [#] + [62] + [#]
Telefonnummer per zon/enhet [#] + [63] + [xxx] + [#] [xxx] = enhets-ID (001-120).
Volym hörbar återkoppling [#] + [79] + [#]
Strömsparläge [#] + [84] + [#]
Volym inbyggd siren [#] + [87] + [#]
Display blinkning [#] + [88] + [#]
Röstprompt på/av [#] + [11] + [#]
Användning av ärrkontroll för på-/
frånkoppling
[#] + [15] + [#]
Störningspromptar [#] + [16] + [#]
Kontrollpanel lås [#] + [17] + [#]
Åtkomst logg påkoppling [#] + [9901] + [#] Resultat blir en sekvens av koder:
[aa]: registernummer (max 72 register). [bbbb]: månad/dag. [cccc]: timme/minut.
[dd]: YC = ärrkontroll / JP = kontrollpanel / DS = påkopplingsschema.
[ee]: YK = ärrkontroll / CF = frånkoppling / BF = påkoppling / 01 = första ärrkontroll.
Åtkomst logg larm [#] + [9900] + [#]
Page 42

4242
Svenska
Rengöring och underhåll
Varning!
• Innan rengöring och underhåll, stäng av enheten, ta ur nätkontakten
ur vägguttaget och vänta tills enheten har kylts av.
• Använd inga rengöringsmedel som innehåller lösningsmedel
eller slipmedel.
• Försök inte att reparera enheten. Byt ut enheten mot en ny om
den inte fungerar som den ska.
• Rengör enhetens utsida med en mjuk fuktad trasa. Torka noggrant
enhetens utsida med en ren, torr trasa.
Säkerhet
Allmän säkerhet
• Läs bruksanvisningen noga innan användning. Behåll bruksanvisningen
för att kunna använda den igen.
• Använd endast enheten för dess avsedda syfte. Använd inte enheten
till andra ändamål än dem som beskrivs i denna bruksanvisning.
• Använd inte enheten om någon del är skadad eller felaktig. Om
enheten är skadad eller felaktig ska den bytas ut omedelbart.
• Enheten bör ej användas av barn utan vuxens översikt. Barn ska
ej leka med enheten.
• Ändra inte enheten på något vis.
• Utsätt inte enheten för vatten eller fukt.
• Utsätt inte apparaten för direkt solljus.
• Håll enheten borta från värmekällor.
Elsäkerhet
• För att minska risken för elektriska stötar bör denna produkt
endast öppnas av behörig tekniker när service behövs.
• Dra ut nätkabeln från vägguttaget och koppla ur all annan
utrustning om något problem skulle uppstå.
• Används inte enheten om nätkabeln eller nätkontakten är skadad
eller defekt. Om nätkabeln eller nätkontakten är skadad eller defekt,
måste den bytas ut av tillverkaren eller en auktoriserad reparatör.
• Kolla alltid om nätströmmen är den samma som strömgraderingen
på enheten innan användning.
• Se till att nätkabeln inte kan trassla in sig.
• Se till att nätkabeln inte hänger över arbetsytans kant så att den
inte råkar fasta eller välta.
Garanti
Alla ändringar och/eller modieringar på produkten gör garantin
ogiltig. Vi kan inte ta något ansvar för skador som orsakats av felaktig
användning av denna produkt.
Kassering
• Produkten är avsedd för separat insamling vid en lämplig
återvinningscentral. Släng inte denna produkt bland vanligt
hushållsavfall.
• För mer information, kontakta återförsäljaren eller lokal myndighet
med ansvar för avfallshantering.
Dokumentation
Produkten har tillverkats och levereras i enlighet med alla relevanta
regler och direktiv som gäller för alla medlemsstater inom Europeiska
unionen. Den uppfyller även alla tillämpliga specikationer och
regler i försäljningslandet.
Formell dokumentation nns att beställa på begäran. Den formella
dokumentationen omfattar, men är inte begränsat till försäkran om
överensstämmelse.
Friskrivningsklausul
Utseende och specikationer kan komma att ändras utan föregående
meddelande. Alla logotyper och produktnamn är varumärken eller
registrerade varumärken som tillhör sina ägare och är härmed
erkända som sådana.
Page 43

4343
Suomi
SAS-ALARM240
Hälytysjärjestelmä
Kuvaus
Kaukosäädin (kuva A)
1. -painike
• Viritys-painike
2.
-painike
• Virityksen poisto -painike
3.
-painike
• Osittainen viritys-painike
4.
-painike
• Hätätila-painike
Ohjauspaneeli (etu) (kuva B1)
Jos ohjauspaneeli on suojattu salasanalla, anna ensin salasana.
5. Numeropainikkeet
6.
-painike
• * painike / Hätätila-painike
7.
-painike
• # painike / Asetus-painike
8.
-painike
• Viritys-painike
9.
-painike
• Virityksen poisto -painike
10.
-painike
• Kysely-painike
11. Ajan näyttö
12.
-merkkivalo
• Viritys-painike
13.
-merkkivalo
• Osittainen viritys-painike
14.
-merkkivalo
• Virityksen poisto -painike
15.
-merkkivalo
• Akun virtatason merkkivalo
16.
-merkkivalo
• Ajoitetun virityksen/virityksen poiston
merkkivalo
17.
-merkkivalo
• Sisäänrakennetun sireenin merkkivalo
Ohjauspaneeli (ylä) (kuva B2)
18. Akkuvirtakytkin
19. DC-tulo (5V)
20. Sireeni
21. Puhelinlinja
Alalinja
Asennus
• Asenna hälytysjärjestelmä keskeiseen paikkaan, pois metalliesineiden
tai kotitalouslaitteiden läheisyydestä.
• Liitä puhelinlinja, alalinja, sireeni ja muut kaapelit.
• Sähköistä ohjauspaneeli
• Aseta akkuvirtakytkin "ON"-asentoon.
Käyttö
Viritys
Kaikki ilmaisimet on aktivoitu Jos tapahtuu tapahtuma,
hälytysjärjestelmä toimii välittömästi.
• Kaukosäädin: Paina viritys-painiketta.
• Ohjauspaneeli: Paina viritys-painiketta.
Viritys-merkkivalo tulee näkyviin näyttöön.
Osittainen viritys
Käyttäjän valitsemat ilmaisimet on aktivoitu Jos tapahtuu tapahtuma,
hälytysjärjestelmä toimii välittömästi.
• Kaukosäädin: Paina osittainen viritys -painiketta.
• Ohjauspaneeli: Paina viritys-painiketta kahdesti.
Osittainen viritys -merkkivalo tulee näkyviin näyttöön.
Virityksen poisto
Kaikki ilmaisimet on deaktivoitu. Jos tapahtuu tapahtuma,
hälytysjärjestelmä ei toimi.
• Kaukosäädin: Paina virityksen poisto -painiketta.
• Ohjauspaneeli: Paina virityksen poisto -painiketta.
Virityksen poisto -merkkivalo tulee näkyviin näyttöön.
Hätätila-painike
Hälytysjärjestelmä toimii välittömästi riippumatta virityksen tai
virityksen poiston tilasta.
• Kaukosäädin: Paina hätätila-painiketta.
• Ohjauspaneeli: Paina hätätila-painiketta.
Puhelimen käyttö
Saatuasi soiton hälytysjärjestelmästä tapahtumatilanteessa, voit
käyttää puhelinta myös etäohjaamaan hälytyspaneelia.
[1]: Viritys [2]: Virityksen poisto
[3]: Valvonta päällä [4]: Valvonta pois
[5]: Äänikehote päällä [6]: Äänikehote pois
[7]: Sireeni päällä [8]: Sireeni pois
Page 44

4444
Suomi
Asetukset ja kyselyt
Asetukset ja kyselyt voidaan suorittaa käyttämällä etäohjausta tai ohjauspaneelia.
Asetukset
• Mene asetukset-tilaan painamalla asetukset-painiketta ohjauspaneelissa
• Muuta asetuksia painamalla [#] + [code] + parametrit + [#].
• Poistu asetukset-tilasta painamalla [*] ja [#].
Asetus Käsky Huomautukset
Tallenna ääniviesti [#] + [19] + viesti + [#] Ääniviestin kesto: maks 10 sekuntia.
Lisää kaukosäädin [#] + [07] + [xxx] + [#]
[xxx] = kaukosäädin ID (001-120). Paina lisäyksen jälkeen painiketta kaukosäätimessä.
2piippausta = kaukosäädin lisätty onnistuneesti. 1 piippaus = kaukosäädin on jo konguroitu.
Kaukosäätimien maks. lukumäärä 120.
Poista kaukosäädin [#] + [08] + [xxx] + [#] [xxx] = poistettavan kaukosäätimen arvo.
Poista kaikki kaukosäätimet [#] + [08] + [***] + [#] [***] = kaik ki liitetyt kaukosäätimet.
Lisää ilmaisin [#] + [09] + [xxx] + [#] [xxx] = ilmaisimen tunnus (001-120). Ilmaisimien maks. lukumäärä 120.
Poista ilmaisin [#] + [10] + [xxx] + [#] [xxx] = poistettavan ilmaisimen arvo.
Poista kaikki ilmaisimet [#] + [10] + [***] + [#] [***] = kaikki liitetyt ilmaisimet.
Aseta puhelinnumerot
[#] + [3] + [y] + puhelinnumero +
[*#]
[y] = puhelinnumero ID (1-9).
ID 1-6 = säännölliset puhelinnumerot. ID 7-9 = hätäpuhelinnumerot.
Poista puhelinnumerot
[#] + [3] + [y] + [#]
[y] = puhelinnumero ID (1-9).
Asetuksen salasana [#] + [50] + salasana + [#] Salasanan maks. pituus on 4 numeroa. Oletussalasana: 1234.
Virityksen viiveajan asetus [#] + [51] + sekuntia + [#] Sekunnit 00 - 99 Oletus = 00.
Hälytyksen viiveajan asetus [#] + [52] + sekuntia + [#] Sekunnit 00 - 99 Oletus = 60.
Aseta sireenin aika [#] + [53] + minuuttia + [#] Minuutit 00 - 20 Oletus = 01.
Päivän ja ajan asetus
[#] + [56] + vuosi + kuukausi +
päivä + tunnit + minuutit +
sekunnit + [#]
Esimerkiksi: “20141025183500” = lok akuu 25, 2014 18:35:00.
Aseta hälytyskello
[#] + [57] + [yy] + aloitusaika +
lopetusaika + päivä(ä) + [#]
[yy] = 05 / 06 (maks. 2 hälytystä).
Esimerkki 1: “050900090112345” = sireeni soi 1 minuutinviikonpäivinä klo. 09.00.
Esimerkki 2: “051030103167” = sireeni soi 1 minuutinviikonpäivinä klo. 010.30.
Poista hälytyskello [#] + [57] + [yy] + [0] + [#] [yy] = 05 / 06.
Aseta etäohjaus puhelimitse [#] + [62] + [y] + [#] [y] = 0 (pois) tai 1 (päällä). Oletus = 1 (päällä).
Aseta soittojen lukumäärä
etäohjaukselle puhelimitse
[#] + [18] + [yy] + [#] [yy] = 00 (pois) - 99. Oletus = 8.
Aseta äänipalaute [#] + [11] + [y] + [#] [y] = 0 (pois) tai 1 (päällä). Oletus = 1 (päällä).
Äänipalautteen äänenvoimakkuus [#] + [79] + [y] + [#] [y] = 0 (pois) - 7 (äänekäs).
Näytön kirkkauden ohjaus [#] + [83] + [y] + [#] [y] = 0 (tumma) - 7 (kirkas).
Aseta virransäästötila [#] + [84] + [y] + [#] [y] = 0 (pois) tai 1 (päällä). Oletus = 1 (päällä).
Sisäänrakennetun sireenin
äänenvoimakkuus
[#] + [87] + [y] + [#] [y] = 0 (pois) - 7 (äänek äs).
Näyttövalon vilkkumisen asetus [#] + [88] + [y] + [#] [y] = 0 (pois) tai 1 (päällä). Oletus = 0 (pois).
Puhelinlinjaliitännän
havaitsemisen asetus
[#] + [13] + [y] + [#] [y] = 0 (pois) tai 1 (päällä). Oletus = 0 (pois).
Virityksen/virityksen poiston
etäohjauksen poisto käytöstä
[#] + [15] + [y] + [#] [y] = 0 (pois) tai 1 (päällä). Oletus = 0 (pois).
Häiriökehotteiden asetus [#] + [16] + [y] + [#]
Jos muut laitteet yrittävät kytkeytyä hälytysjärjestelmään, sireeni soi 5 sekuntia.
[y] = 0 (pois) tai 1 (päällä). Oletus = 0 (pois).
Ohjauspaneelin lukon asetus [#] + [17] + [y] + [#] [y] = 0 (pois) tai 1 (päällä). Oletus = 0 (pois).
Lisää langaton tutkainsireeni
(valinnainen)
Aseta "SET"-painike
tutkainsireeni-asentoon
käynnistyskoodin antamiseksi.
Paina ohjauspaneelin virityksen
poisto -painiketta. Tutkainsireeni
piippaa kerran osoittaen, että
oppimisprosessi on suor itettu
onnistuneesti.
Kysy saatavuus paikalliselta jälleenmyyjältäsi.
Ulkoisen sireenin äänenvoimakkuus
(valinnainen)
[#] + [14] + [yy] + [#] [yy] = 00 (pois) - 99 (äänekäs).
Ohjauspaneelin tehdasasetusten
palautus
[#] + [9898] + [#]
Järjestelmän nollaus [#] + [989801] + [#]+ [#]+ [#] Varoitus: Koko järjestelmä palautetaan tehdasasetuksin.
Page 45

4545
Suomi
Vyöhyketyyppien asetus [#] + [60] + [xxx] + [y] + [z] + [#]
[xxx] = ilmaisimen tunnus (001-120). [y] = vyöhyketyyppi (1-8). [y] = 0 (sireeni pois) tai 1 (päällä).
Vyöhyketyypit:
1. Normaali vyöhyke
2. Osittaisen virityksen vyöhyke: Vyöhykkeen ilmaisimet voidaan deaktivoida etäohjauksella.
Järjestelmä on osittain viritetty.
3. Älykäs vyöhyke: Toinen liipaisu 30 sekunnin aikana ensimmäisestä liipaisusta aiheuttaa
hälytyksen.
4. Hätävyöhyke: Mikä tahansa liipaisu aiheuttaa hälytyksen viritystilasta riippumatta.
5. Suljettu vyöhyke: Liipaisu ei aiheuta hälytystä viritystilasta riippumatta.
6. Ovikello-vyöhyke: Mikä tahansa liipaisu aiheuttaa ovikelloäänen viritystilasta riippumatta.
7. Tervetuloa-vyöhyke: Viritettynä mikä tahansa liipaisu aiheuttaa hälytyksen.
Virittämättömänä mikä tahansa liipaisu aiheuttaa tervetuloa-ääniviestin.
8. Ohje-vyöhyke: Mikä tahansa liipaisu aiheuttaa hälytyksen ja kolmen hätänumeron
valinnan, joihin on esiäänitetty avuntarveviesti, viritystilasta riippumatta.
Erityisten vyöhykekohtaisten
puhelinnumeroiden asetus
[#] + [63] + käynnistä laite tunnus
+ lopeta laite tunnus + [y] + [#]
[y] = puhelinnumero ID (1-9).
Esimerkki 1: “630010061234” = automaattivalitsee puhelimet 1 - 4, kun vyöhykkeet 001 - 006
onliipaistu.
Esimerkki 2: “630200206” = automaattivalitsee puhelimen 6, kun vyöhyke 020 on liipaistu.
Viritysaikataulun asetus
[#] + [57] + [yy] + aloitusaika +
lopetusaika + päivän numero + [#]
[yy] = viritysaikataulu (01-04).
Esimerkki 1: “58010700173012345” = virittää viikonpäivinä 07:00 - 17:30 väliseksi ajaksi.
Esimerkki 2: “5802180006005671” = virittää perjantaista maanantaihin 18:00 - 6:00 väliseksi ajaksi.
Viritysaikataulun poisto [#] + [57] + [yy] + [0] + [#] [yy] = viritysaikataulu (01-04).
Viritysaikataulun asetus
puolustusvyöhykkein
[#] + [58] + [yy] + käynnistä laite
tunnus + lopeta laite tunnus + [#]
[yy] = viritysaikataulu (01-04).
Esimerkiksi: “5801001003” = laitteet 001 - 003 noudattavat viritysaikataulua 01.
Etäohjauksen/ohjauspaneelin
ohjausalueen asetus
[#] + [54] + [xxx] + käynnistä laite
tunnus + lopeta laite tunnus + [#]
Oletus: Etäohjaus ja ohjauspaneeli hallitsee kaikkia vyöhykkeitä.
[xxx] = [***] ohjauspaneelille / [001-120] kaukosäätimelle.
Esimerkiksi: “54001000010” = k aukosäädin 001 ohjaa vyöhykkeitä 0 - 10.
Etäohjauksen/ohjauspaneelin
äänipalautteen asetus
[#] + [55] + [xxx] + [y] + [#]
[y] = 0 (pois) tai 1 (päällä).
[xxx] = [***] ohjauspaneelille / [001-120] kaukosäätimelle.
Esimerkiksi: “55***0” = ei äänipalautetta viritettäessä ohjauspaneeli.
Kysely
• Mene kysely-tilaan painamalla kysely-painiketta ohjauspaneelissa
• Suorita kyselyt painamalla [#] + koodi+ (parameters) + [#].
• Poistu kysely-tilasta painamalla [*] ja [#].
Kysely Käsky Huomautukset
Tallennettu puhelinnumero [#] + [3] + [y] + [#] [y] = puhelinnumero ID (1-9).
Salasana [#] + [50] + [#]
Virityksen viiveaika [#] + [51] + [#]
Hälytyksen viiveaika [#] + [52] + [#]
Hälytysäänen kestoaika [#] + [53] + [#]
Etäohjauksen/ohjauspaneelin ohjausalue [#] + [54] + [xxx] + [#] [xxx] = [***] ohjauspaneelille / [001-120] kaukosäätimelle.
Etäohjauksen/ohjauspaneelin äänipalaute [#] + [55] + [xxx] + [#] [xxx] = [***] ohjauspaneelille / [001-120] kaukosäätimelle.
Päivä ja aika [#] + [56] + [#]
Viritysaikataulu [#] + [57] + [yy] + [#] [yy] = viritysaikataulu (01 - 04) / hälytyskellon tila (05 - 06).
Viritysaikataulukohtainen vyöhyke/ laite [#] + [58] + [yy] + [#] [yy] = viritysaikataulu (01-04).
Vyöhyketyyppi ja sireeni / vyöhyke/laite [#] + [60] + [xxx] + [y] + [z] + [#]
[xxx] = laitteen tunnus (001 - 120). [y] = vyöhyketyyppi (1 - 8). [y] = 0 (sireeni pois) tai
1 (päällä).
Etäohjauksen tila puhelimitse [#] + [62] + [#]
Puhelinnumerot / vyöhyke/laite [#] + [63] + [xxx] + [#] [xxx] = laitteen tunnus (001 - 120).
Äänipalautteen äänenvoimakkuus [#] + [79] + [#]
Virransäästötila [#] + [84] + [#]
Sisäänrakennetun sireenin
äänenvoimakkuus
[#] + [87] + [#]
Näyttövalon vilkkuminen [#] + [88] + [#]
Äänikehote päällä/pois [#] + [11] + [#]
Virityksen/virityksen hallinta etäohjauksella [#] + [15] + [#]
Häiriökehotteet [#] + [16] + [#]
Ohjauspaneelin lukko [#] + [17] + [#]
Virityslokiin meno [#] + [9901] + [#] Tulos on koodien sekvenssi:
[aa]: tietuenumero (maks. 72 tietuetta). [bbbb]: kuukausi/päivä. [cccc]: tunnit/minuutit.
[dd]: YC = etäohjaus / JP = ohjauspaneeli / DS = viritysaikataulu.
[ee]: YK = etäohjaus / CF = poista viritys / BF = viritä / 01 = ensimmäinen etäohjaus.
Hälytyslokiin meno [#] + [9900] + [#]
Page 46

4646
Suomi
Puhdistus ja huolto
Varoitus!
• Sammuta laite, irrota pistoke pistorasiasta ja odota, että laite on
jäähtynyt, ennen kuin puhdistat ja huollat sitä.
• Älä käytä liuottimia tai hankausaineita.
• Älä yritä korjata laitetta. Jos laite ei toimi asianmukaisesti, vaihda
se uuteen.
• Puhdista laite ulkopuolelta pehmeällä, kostealla liinalla. Kuivaa
laitteen ulkopuoli läpikotaisin puhtaalla kuivalla liinalla.
Turvallisuus
Yleinen turvallisuus
• Lue käyttöopas huolella ennen käyttöä. Säilytä käyttöopas
tulevaa käyttöä varten.
• Käytä laitetta vain sille tarkoitettuun käyttötarkoitukseen. Älä
käytä laitetta muuhun kuin käyttöoppaassa kuvattuun tarkoitukseen.
• Älä käytä laitetta, jos jokin sen osa on vioittunut tai viallinen.
Joslaite on vioittunut tai viallinen, vaihda laite välittömästi.
• Lapset eivät saa käyttää laitetta ilman aikuisen valvontaa.
Lastenei saa leikkiä laitteella.
• Älä muunna laitetta millään tavoin.
• Älä altista laitetta vedelle ja kosteudelle.
• Älä altista laitetta suoralle auringonvalolle.
• Pidä laite pois lämmönlähteistä.
Sähköturvallisuus
• Sähköiskun riskin pienentämiseksi, ainoastaan valtuutettu
huoltohenkilö saa avata tämän laitteen huoltoa varten.
• Jos ongelmia ilmenee, irrota laite verkkovirrasta ja muista laitteista.
• Älä käytä laitetta, jos sen virtajohto tai pistoke on vioittunut tai
viallinen. Jos virtajohto tai pistoke on vioittunut tai viallinen,
valmistajan tia valtuutetun huollon on vaihdettava se.
• Tarkista aina ennen käyttöä, että sähköverkon jännite vastaa
laitteen luokituskylttiin merkittyä jännitettä.
• Varmista, että virtajohto ei pääse takertumaan.
• Varmista, ettei virtajohto roiku työpinnan reunan yli, jossa siihen
voidaan jäädä vahingossa kiinni tai kompastua.
Takuu
Takuu mitätöityy, mikäli laitteeseen tehdään mitä tahansa muutoksia.
Emme ole myöskään vastuussa vahingoista, jotka johtuvat tämän
tuotteen virheellisestä käytöstä.
Hävittäminen
• Tämä tuote tulee toimittaa hävitettäväksi asianmukaiseen
keräyspisteeseen. Tuotetta ei saa hävittää kotitalousjätteen mukana.
• Lisätietoja antaa jälleenmyyjä tai paikallinen jätehuollosta
vastaava viranomainen.
Asiakirjat
Tämä tuote on valmistettu ja toimitettu noudattaen kaikkia sitä
koskevia asetuksia ja direktiivejä, jotka ovat voimassa kaikissa
Euroopan unionin jäsenvaltioissa. Se täyttää kaikki myyntimaassa
sovellettavat vaatimukset ja määräykset.
Viralliset asiakirjat ovat saatavilla pyynnöstä. Viralliset asiakirjat sisältävät
vaatimustenmukaisuusvakuutuksen, mutta eivät rajoitu siihen.
Vastuuvapauslauseke
Muutoksia malliin ja teknisiin ominaisuuksiin voidaan tehdä
ilmoituksetta. Kaikki logot, merkit ja tuotenimet ovat niiden vastaavien
omistajien tuotemerkkejä tai rekisteröityjä tuotemerkkejä ja niitä on
käsiteltävä sellaisina.
Page 47

4747
Ελληνικά
SAS-ALARM240
Σύστημα συναγερμού
Περιγραφή
Τηλεχειριστήριο (εικ. Α)
1. Κουμπί
• Κουμπί όπλισης
2. Κουμπί
• Κουμπί αφόπλισης
3. Κουμπί
• Κουμπί μερικής όπλισης
4. Κουμπί
• Κουμπί έκτακτης ανάγκης
Πίνακας ελέγχου (μπροστινή πλευρά) (εικ. Β1)
Εάν ο πίνακας ελέγχου προστατεύεται με κωδικό πρόσβασης,
καταχωρίστε πρώτα τον κωδικό πρόσβασης.
5. Ψηφιακά κουμπιά
6. Κουμπί
• Κουμπί * / Κουμπί έκτακτης ανάγκης
7. Κουμπί
• Κουμπί # / Κουμπί ρύθμισης
8. Κουμπί
• Κουμπί όπλισης
9. Κουμπί
• Κουμπί αφόπλισης
10. Κουμπί
• Κουμπί ερώτησης
11. Ένδειξη ώρας
12. Ένδειξη
• Ένδειξη όπλισης
13. Ένδειξη
• Ένδειξη μερικής όπλισης
14. Ένδειξη
• Ένδειξη αφόπλισης
15. Ένδειξη
• Ένδειξη μπαταρίας
16. Ένδειξη
• Ένδειξη προγραμματισμένης όπλισης/
αφόπλισης
17. Ένδειξη
• Ένδειξη ενσωματωμένης σειρήνας
Πίνακας ελέγχου (άνω πλευρά) (εικ. Β2)
18. Διακόπτης ισχύος
μπαταρίας
19. Είσοδος DC (5V)
20. Σειρήνα
21. Γραμμή τηλεφώνου
Γραμμή επέκτασης
Εγκατάσταση
• Εγκαταστήστε το σύστημα συναγερμού σε ένα κεντρικό σημείο,
μακριά από μεταλλικά αντικείμενα ή οικιακές συσκευές.
• Συνδέστε την τηλεφωνική γραμμή, την γραμμή επέκτασης, την
σειρήνα και άλλα καλώδια.
• Ενεργοποιήστε τον πίνακα ελέγχου.
• Θέστε τον διακόπτη ισχύος μπαταρίας στη θέση “ON”.
Χρήση
Όπλιση
Όλοι οι ανιχνευτές ενεργοποιούνται. Εάν λάβει χώρα συμβάν,
τοσύστημα συναγερμού θα τεθεί αμέσως σε λειτουργία.
• Τηλεχειριστήριο: Πιέστε το κουμπί όπλισης.
• Πίνακας ελέγχου: Πιέστε το κουμπί όπλισης.
Η ένδειξη όπλισης εμφανίζεται στην οθόνη.
Μερική όπλιση
Οι επιλεγμένοι ανιχνευτές από τον χρήστη ενεργοποιούνται. Εάν λάβει
χώρα συμβάν, το σύστημα συναγερμού θα τεθεί αμέσως σε λειτουργία.
• Τηλεχειριστήριο: Πιέστε το κουμπί μερικής όπλισης.
• Πίνακας ελέγχου: Πιέστε δύο φορές το κουμπί όπλισης.
Η ένδειξη μερικής όπλισης εμφανίζεται στην οθόνη.
Αφόπλιση
Όλοι οι ανιχνευτές απενεργοποιούνται. Εάν λάβει χώρα συμβάν,
τοσύστημα συναγερμού δεν θα τεθεί σε λειτουργία.
• Τηλεχειριστήριο: Πιέστε το κουμπί αφόπλισης.
• Πίνακας ελέγχου: Πιέστε το κουμπί αφόπλισης.
Η ένδειξη αφόπλισης εμφανίζεται στην οθόνη.
Συναγερμός έκτακτης ανάγκης
Το σύστημα συναγερμού θα τεθεί αμέσως σε λειτουργία, είτε είναι
οπλισμένο είτε αφοπλισμένο.
• Τηλεχειριστήριο: Πιέστε το κουμπί έκτακτης ανάγκης.
• Πίνακας ελέγχου: Πιέστε το κουμπί έκτακτης ανάγκης.
Χρήση του τηλεφώνου
Αφού λάβετε μια κλήση από το σύστημα συναγερμού σε περίπτωση
συμβάντος, μπορείτε επίσης να χρησιμοποιήσετε το τηλέφωνο για
να ελέγξετε εξ αποστάσεως τον πίνακα συναγερμού.
[1]: Όπλιση [2]: Αφόπλιση
[3]: Παρακολούθηση ενεργή [4]: Παρακολούθηση ανενεργή
[5]: Φωνητικό μήνυμα ενεργό [6]: Φωνητικό μήνυμα ανενεργό
[7]: Σειρήνα ενεργή [8]: Σειρήνα ανενεργή
Page 48

4848
Ελληνικά
Ρυθμίσεις και ερωτήσεις
Οι ρυθμίσεις και οι ερωτήσεις μπορούν να διεξαχθούν με τη χρήση του τηλεχειριστηρίου ή του πίνακα ελέγχου.
Ρυθμίσεις
• Για να εισέλθετε στην λειτουργία ρύθμισης, πατήστε το κουμπί εγκατάστασης στον πίνακα ελέγχου.
• Για να αλλάξετε τις ρυθμίσεις, πατήστε [#] + [κωδικός] + παράμετροι + [#].
• Για να εξέλθετε από την λειτουργία ρύθμισης, πατήστε [*] και [#].
Ρύθμιση Εντολή Παρατηρήσεις
Εγγραφή φωνητικού μηνύματος [#] + [19] + μήνυμα + [#] Διάρκεια φωνητικού μηνύματος: μέγ. 10 δευτερόλεπτα.
Προσθήκη τηλεχειριστηρίου [#] + [07] + [xxx] + [#]
[xxx] = αναγνωριστικό τηλεχειριστηρίου (001-120). Μετά την προσθήκη, πατήστε ένα
κουμπί στο τηλεχειριστήριο. 2 μπιπ = το τηλεχειριστήριο προστέθηκε επιτυχώς. 1 μπιπ =
το τηλεχειριστήριο έχει ήδη διαμορφωθεί. Μέγ. αριθμός τηλεχειριστηρίων: 120.
Διαγραφή τηλεχειριστηρίου [#] + [08] + [xxx] + [#] [xxx] = τιμή τηλεχειριστηρίου που θα αφαιρεθεί.
Διαγραφή όλων των
τηλεχειριστηρίων
[#] + [08] + [***] + [#] [***] = όλα τα συνδεδεμένα τηλεχειριστήρια.
Προσθήκη ανιχνευτή [#] + [09] + [xxx] + [#] [xxx] = αναγνωριστικό ανιχνευτή (001-120). Μέγ. αριθμός ανιχνευτών: 120.
Διαγραφή ανιχνευτή [#] + [10] + [xxx] + [#] [xxx] = τιμή ανιχνευτή που θα αφαιρεθεί.
Διαγραφή όλων των ανιχνευτών [#] + [10] + [***] + [#] [***] = όλοι οι συνδεδεμένοι ανιχνευτές.
Ρύθμιση τηλεφωνικού(ών)
αριθμού(ών)
[#] + [3] + [y] + τηλεφωνικός
αριθμός + [*#]
[y] = αναγνωριστικό τηλεφωνικού αριθμού (1-9).
ID 1-6 = τακτικοί τηλεφωνικοί αριθμοί. ID 7-9 = τηλεφωνικοί αριθμοί έκτακτης ανάγκης.
Διαγραφή τηλεφωνικού(ών)
αριθμού(ών)
[#] + [3] + [y] + [#] [y] = αναγνωρισ τικό τηλεφωνικού αριθμού (1-9).
Ρύθμιση κωδικού πρόσβασης [#] + [50] + κωδικός πρόσβασης + [#]
Ο κωδικός πρόσβασης έχει το μέγιστο 4 ψηφία. Προεπιλεγμένος κωδικός πρόσβασης:
1234.
Ρύθμιση χρόνου καθυστέρησης
όπλισης
[#] + [51] + δευτερόλεπτα + [#] Δευτερόλεπτα από 00 έως 99. Προεπιλογή = 00.
Ρύθμιση χρόνου καθυστέρησης
συναγερμού
[#] + [52] + δευτερόλεπτα + [#] Δευτερόλεπτα από 00 έως 99. Προεπιλογή = 60.
Ρύθμιση χρόνου σειρήνας [#] + [53] + λεπτά + [#] Λεπτά από 00 έως 20. Προεπιλογή = 01.
Ρύθμιση ημερομηνίας και ώρας
[#] + [56] + έτος + μήνας + ημέρα +
ώρα + λεπτά + δευτερόλεπτα + [#]
Παράδειγμα: “20141025183500” = 25 Οκτωβρίου, 2014 18:35:00.
Ρύθμιση ρολογιού συναγερμού
[#] + [57] + [yy] + ώρα έναρξης +
ώρα λήξης + ημέρα(ες) + [#]
[yy] = 05 / 06 (μέγ. 2 συναγερμοί).
Παράδειγμα 1: “050900090112345” = η σειρήνα ακούγεται για 1 λεπτό τις ημέρες της
εβδομάδας στις 09.00.
Παράδειγμα 2: “051030103167” = η σειρήνα ακούγεται για 1 λεπτό κατά τη διάρκεια των
Σαββατοκύριακων στις 10:30.
Διαγραφή ρολογιού συναγερμού [#] + [57] + [yy] + [0] + [#] [yy] = 05 / 06.
Ρύθμιση τηλεχειριστηρίου μέσω
τηλεφώνου
[#] + [62] + [y] + [#] [y] = 0 (ανενεργό) ή 1 (ενεργό). Προεπιλογή = 1 (ενεργό).
Ρύθμιση αριθμού κουδουνισμάτων
για το τηλεχειριστήριο μέσω
τηλεφώνου
[#] + [18] + [yy] + [#] [yy] = 00 (ανενεργό) - 99. Προεπιλογή = 8.
Ρύθμιση ηχητικής απάντησης [#] + [11] + [y] + [#] [y] = 0 (ανενεργό) ή 1 (ενεργό). Προεπιλογή = 1 (ενεργό).
Ένταση ηχητικής απάντησης [#] + [79] + [y] + [#] [y] = 0 (ανενεργό) - 7 (δυνατό).
Έλεγχος φωτεινότητας οθόνης [#] + [83] + [y] + [#] [y] = 0 (σκοτεινό) - 7 (φωτεινό).
Ρύθμιση λειτουργίας
εξοικονόμησης ενέργειας
[#] + [84] + [y] + [#] [y] = 0 (ανενεργό) ή 1 (ενεργό). Προεπιλογή = 1 (ενεργό).
Ένταση ενσωματωμένης
σειρήνας
[#] + [87] + [y] + [#] [y] = 0 (ανενεργό) - 7 (δυνατό).
Ρύθμιση αναβοσβήσματος
λυχνίας οθόνης
[#] + [88] + [y] + [#] [y] = 0 (ανενεργό) ή 1 (ενεργό). Προεπιλογή = 0 (ανενεργό).
Ρύθμιση ανίχνευσης σύνδεσης
τηλεφωνικής γραμμής
[#] + [13] + [y] + [#] [y] = 0 (ανενεργό) ή 1 (ενεργό). Προεπιλογή = 0 (ανενεργό).
Απενεργοποίηση χρήσης
τηλεχειριστηρίου για οπλισμό/
αφοπλισμό
[#] + [15] + [y] + [#] [y] = 0 (ανενεργό) ή 1 (ενεργό). Προεπιλογή = 0 (ανενεργό).
Ρύθμιση μηνυμάτων παρεμβολών [#] + [16] + [y] + [#]
Εάν άλλες συσκευές δοκιμάσουν να συνδεθούν στο σύστημα συναγερμού, η σειρήνα θα
ηχήσει για 5 δευτερόλεπτα.
[y] = 0 (ανενεργό) ή 1 (ενεργό). Προεπιλογή = 0 (ανενεργό).
Ρύθμιση κλειδώματος πίνακα
ελέγχου
[#] + [17] + [y] + [#] [y] = 0 (ανενεργό) ή 1 (ενεργό). Προεπιλογή = 0 (ανενεργό).
Page 49

4949
Ελληνικά
Προσθήκη ασύρματης
στροβοσκοπικής σειρήνας
(επιλογή)
Πατήστε το κουμπί “SET” στην
στροβοσκοπική σειρήνα για να
εισέλθετε στον προγραμματισμό
κωδικού έναρξης.
Πιέστε το κουμπί αφοπλισμού στον
πίνακα ελέγχου. Η στροβοσκοπική
σειρήνα κάνει μπιπ μια φορά για να
υποδηλώσει ότι η διαδικασία
προγραμματισμού έχει ολοκληρωθεί
επιτυχώς.
Επικοινωνήστε με τον μεταπωλητή για διαθεσιμότητα.
Ένταση εξωτερικής σειρήνας
(επιλογή)
[#] + [14] + [yy] + [#] [yy] = 00 (ανενεργό) - 99 (δυνατό).
Επαναφορά εργοστασιακών
ρυθμίσεων για τον πίνακα ελέγχου
[#] + [9898] + [#]
Επαναφορά συστήματος [#] + [989801] + [#]+ [#]+ [#] Προσοχή: Το σύνολο του συστήματος συναγερμού επανέρχεται στις εργοστασιακές ρυθμίσεις.
Τύποι ζώνης ρύθμισης [#] + [60] + [xxx] + [y] + [z] + [#]
[xxx] = αναγνωριστικό ανιχνευτή (001-120). [y] = τύπος ζώνης (1-8). [z] = 0 (σειρήνα ανενεργή)
ή 1 (σειρήνα ενεργή).
Τύποι ζώνης:
1. Κανονική ζώνη
2. Ζώνη μερικής όπλισης: Οι ανιχνευτές στην ζώνη μπορούν να απενεργοποιηθούν με
τηλεχειριστήριο. Το σύστημα οπλίζεται μερικώς.
3. Έξυπνη ζώνη: Μια δεύτερη ενεργοποίηση εντός 30 δευτερολέπτων από την πρώτη
ενεργοποίηση θα προκαλέσει συναγερμό.
4. Ζώνη έκτακτης ανάγκης: Οποιαδήποτε ενεργοποίηση θα επιφέρει συναγερμό,
ανεξάρτητα από την λειτουργία όπλισης.
5. Κλειστή ζώνη: Μια ενεργοποίηση δεν θα επιφέρει συναγερμό, ανεξάρτητα από την
λειτουργία όπλισης.
6. Ζώνη κουδουνίσματος: Οποιαδήποτε ενεργοποίηση θα επιφέρει έναν ήχο
κουδουνιού, ανεξάρτητα από την λειτουργία όπλισης.
7. Ζώνη καλωσορίσματος: Σε κατάσταση όπλισης, οποιαδήποτε ενεργοποίηση θα επιφέρει
συναγερμό. Σε κατάσταση αφόπλισης, οποιαδήποτε ενεργοποίηση θα επιφέρει ένα
ηχητικό μήνυμα καλωσορίσματος.
8. Ζώνη βοήθειας: Οποιαδήποτε ενεργοποίηση θα επιφέρει συναγερμό και κλήση των
τριών αριθμών έκτακτης ανάγκης με προ-εγγεγραμμένο μήνυμα ζήτησης βοήθειας,
ανεξάρτητα από την λειτουργία όπλισης.
Ρύθμιση συγκεκριμένων
τηλεφωνικών αριθμών ανά ζώνη
συναγερμού
[#] + [63] + αναγνωριστικό έναρξης
συσκευής + αναγνωριστικό λήξης
συσκευής + [y] + [#]
[y] = αναγνωριστικό τηλεφωνικού αριθμού (1-9).
Παράδειγμα 1: “630010061234” = τηλέφωνα αυτόματης κλήσης 1-4 όταν έχουν ενεργοποιηθεί
οι ζώνες 001-006.
Παράδειγμα 2: “630200206” = τηλέφωνο αυτόματης κλήσης 6 όταν έχει ενεργοποιηθεί η
ζώνη 020.
Ρύθμιση προγράμματος όπλισης
[#] + [57] + [yy] + χρόνος έναρξης +
χρόνος λήξης + αριθμός ημέρας + [#]
[yy] = πρόγραμμα όπλισης (01-04).
Παράδειγμα 1: “58010700173012345” = όπλιση τις ημέρες της εβδομάδας μεταξύ 07:00 και 17:30.
Παράδειγμα 2: “5802180006005671” = όπλιση από την Παρασκευή έως τη Δευτέρα μεταξύ
18:00 και 06:00.
Διαγραφή προγράμματος όπλισης [#] + [57] + [yy] + [0] + [#] [yy] = πρόγραμμα όπλισης (01-04).
Ρύθμιση προγράμματος όπλισης
με ζώνες άμυνας
[#] + [58] + [yy] + αναγνωριστικό
έναρξης συσκευής + αναγνωριστικό
λήξης συσκευής + [#]
[yy] = πρόγραμμα όπλισης (01-04).
Παράδειγμα: “5801001003” = οι συσκευές 001-003 ακολουθούν το πρόγραμμα όπλισης 01.
Ρύθμιση εύρους ελέγχου για
τηλεχειριστήριο/πίνακα ελέγχου
[#] + [54] + [xxx] + αναγνωριστικό
έναρξης συσκευής + αναγνωριστικό
λήξης συσκευής + [#]
Προεπιλογή: Απομακρυσμένος έλεγχος και έλεγχος πίνακα ελέγχου σε όλες τις ζώνες.
[xxx] = [***] για πίνακα ελέγχου / [001-120] για τηλεχειριστήριο.
Παράδειγμα: “54001000010” = το τηλεχειριστήριο 001 ελέγχει τις ζώνες 0 έως 10.
Ρύθμιση ηχητικής απάντησης για
τηλεχειριστήριο/πίνακα ελέγχου
[#] + [55] + [xxx] + [y] + [#]
[y] = 0 (ανενεργό) ή 1 (ενεργό).
[xxx] = [***] για πίνακα ελέγχου / [001-120] για τηλεχειριστήριο.
Παράδειγμα: “55***0” = καμία ηχητική απάντηση κατά την όπλιση από τον πίνακα ελέγχου.
Page 50

5050
Ελληνικά
Ερώτηση
• Για να εισέλθετε στην λειτουργία ερώτησης, πατήστε το κουμπί ερώτησης στον πίνακα ελέγχου.
• Για να διεξάγετε ερωτήματα, πατήστε [#] + κωδικό + (παράμετροι) + [#].
• Για να εξέλθετε από την λειτουργία ερώτησης, πατήστε [*] και [#].
Ερώτηση Εντολή Παρατηρήσεις
Αποθηκευμένος τηλεφωνικός αριθμός [#] + [3] + [y] + [#] [y] = αναγνωριστικό τηλεφωνικού αριθμού (1-9).
Κωδικός πρόσβασης [#] + [50] + [#]
Χρόνος καθυστέρησης όπλισης [#] + [51] + [#]
Χρόνος καθυστέρησης συναγερμού [#] + [52] + [#]
Διάρκεια ήχου συναγερμού [#] + [53] + [#]
Εύρος ελέγχου για τηλεχειριστήριο/πίνακα
ελέγχου
[#] + [54] + [xxx] + [#] [xxx] = [***] για πίνακα ελέγχου / [001-120] για τηλεχειριστήριο.
Ηχητική απάντηση για τηλεχειριστήριο/
πίνακα ελέγχου
[#] + [55] + [xxx] + [#] [xxx] = [***] για πίνακα ελέγχου / [001-120] για τηλεχειριστήριο.
Ημερομηνία και ώρα [#] + [56] + [#]
Πρόγραμμα όπλισης [#] + [57] + [yy] + [#] [yy] = πρόγραμμα όπλισης (01-04) / κατάσταση ρολογιού συναγερμού (05-06).
Ζώνη/Συσκευή ανά πρόγραμμα όπλισης [#] + [58] + [yy] + [#] [yy] = πρόγραμμα όπλισης (01-04).
Τύπος ζώνης και σειρήνα ανά ζώνη/συσκευή [#] + [60] + [xxx] + [y] + [z] + [#]
[xxx] = αναγνωριστικό συσκευής (001-120). [y] = τύπος ζώνης (1-8).
[z] = 0 (σειρήνα ανενεργή) ή 1 (σειρήνα ενεργή).
Τηλεχειριστήριο κατάστασης μέσω τηλεφώνου [#] + [62] + [#]
Τηλεφωνικοί αριθμοί ανά ζώνη/συσκευή [#] + [63] + [xxx] + [#] [xxx] = αναγνωριστικό συσκευής (001-120).
Ένταση ηχητικής απάντησης [#] + [79] + [#]
Λειτουργία εξοικονόμησης ενέργειας [#] + [84] + [#]
Ένταση ενσωματωμένης σειρήνας [#] + [87] + [#]
Λυχνία οθόνης αναβοσβήνει [#] + [88] + [#]
Φωνητικό μήνυμα ενεργό/ανενεργό [#] + [11] + [#]
Χρήση τηλεχειριστηρίου για οπλισμό/
αφοπλισμό
[#] + [15] + [#]
Μηνύματα παρεμβολής [#] + [16] + [#]
Κλείδωμα πίνακα ελέγχου [#] + [17] + [#]
Αρχείο καταγραφής πρόσβασης όπλισης [#] + [9901] + [#] Το αποτέλεσμα θα είναι μια αλληλουχία κωδικών:
[aa]: αριθμός εγγραφής (μέγ. 72 εγγραφές). [bbbb]: μήνας/ημέρα. [cccc]: ώρα/λεπτό.
[dd]: YC = τηλεχειριστήριο / JP = πίνακας ελέγχου / DS = πρόγραμμα όπλισης.
[ee]: YK = τηλεχειριστήριο / CF = αφόπλιση / BF = όπλιση / 01 = πρώτο τηλεχειριστήριο.
Αρχείο καταγραφής πρόσβασης συναγερμού [#] + [9900] + [#]
Page 51

5151
Ελληνικά
Καθαρισμός και συντήρηση
Προειδοποίηση!
• Πριν από τον καθαρισμό ή τη συντήρηση, απενεργοποιείτε τη
συσκευή, αφαιρείτε το φις από την υποδοχή τοίχου και περιμένετε
έως ότου η συσκευή κρυώσει.
• Μην χρησιμοποιείτε διαλύτες ή λειαντικά.
• Μην επιχειρήσετε να επισκευάσετε τη συσκευή. Εάν η συσκευή
δεν λειτουργεί σωστά, αντικαταστήστε την με μια νέα.
• Καθαρίζετε το εξωτερικό της συσκευής χρησιμοποιώντας ένα
μαλακό, νωπό πανί. Στεγνώνετε προσεκτικά το εξωτερικό της
συσκευής με ένα καθαρό, στεγνό πανί.
Ασφάλεια
Γενική ασφάλεια
• Διαβάστε το εγχειρίδιο προσεκτικά πριν από τη χρήση. Φυλάξτε
το εγχειρίδιο για μελλοντική αναφορά.
• Χρησιμοποιείτε τη συσκευή μόνο για τους προοριζόμενους
σκοπούς. Μη χρησιμοποιείτε τη συσκευή για διαφορετικούς
σκοπούς από τους περιγραφόμενους στο εγχειρίδιο.
• Μη χρησιμοποιείτε τη συσκευή, εάν οποιοδήποτε τμήμα της έχει
ζημιά ή ελάττωμα. Εάν η συσκευή έχει ζημιά ή ελάττωμα,
αντικαταστήστε την αμέσως.
• Η συσκευή δεν πρέπει να χρησιμοποιείται από παιδιά χωρίς την
επιτήρηση ενός ενήλικα. Τα παιδιά δεν πρέπει να παίζουν με τη
συσκευή.
• Μην τροποποιείτε τη συσκευή με κανέναν τρόπο.
• Μην εκθέτετε τη συσκευή σε νερό ή υγρασία.
• Μην εκθέτετε τη συσκευή σε απευθείας ηλιακή ακτινοβολία.
• Διατηρείτε τη συσκευή μακριά από πηγές θερμότητας.
Ηλεκτρική ασφάλεια
• Για να μειώσετε τον κίνδυνο ηλεκτροπληξίας, το προϊόν αυτό θα
πρέπει να ανοιχθεί μόνο από εξουσιοδοτημένο τεχνικό όταν
απαιτείται συντήρηση (σέρβις).
• Αποσυνδέστε το προϊόν από την πρίζα και άλλο εξοπλισμό αν
παρουσιαστεί πρόβλημα.
• Μην χρησιμοποιείτε τη συσκευή, εάν το καλώδιο ρεύματος ή το
φις έχουν φθαρεί ή είναι ελαττωματικά. Εάν το καλώδιο
ρεύματος ή το φις έχουν φθορές ή είναι ελαττωματικά, πρέπει να
αντικατασταθούν από τον κατασκευαστή ή από έναν
εξουσιοδοτημένο αντιπρόσωπο επισκευών.
• Πριν από τη χρήση ελέγχετε πάντα εάν η τάση ρεύματος είναι η
ίδια με την τάση στην πινακίδα τύπου της συσκευής.
• Εξασφαλίζετε ότι το καλώδιο ρεύματος δεν μπορεί να μπερδευτεί.
• Εξασφαλίζετε ότι το καλώδιο ρεύματος δεν κρέμεται σε άκρες
πάγκων εργασίας και δεν μπορεί να μαγκωθεί τυχαία ή να
σκοντάψει κάποιος σε αυτό.
Εγγύηση
Η εφαρμογή αλλαγών ή/και τροποποιήσεων στο προϊόν συνεπάγεται
ακύρωση της εγγύησης. Δεν φέρουμε καμία ευθύνη για πιθανές
βλάβες που ενδέχεται να προκληθούν από την ακατάλληλη χρήση
του προϊόντος.
Απόρριψη
• Το προϊόν προορίζεται για ξεχωριστή συλλογή σε κατάλληλο
σημείο συλλογής. Μην απορρίπτετε το προϊόν μαζί με τα οικιακά
απόβλητα.
• Για περισσότερες πληροφορίες επικοινωνήστε με τον αντιπρόσωπό
σας ή τις τοπικές αρχές διαχείρισης αποβλήτων.
Τεκμηρίωση
Το προϊόν αυτό κατασκευάστηκε και παρέχεται σε συμμόρφωση με
το σύνολο των αντίστοιχων κανονισμών και οδηγιών που ισχύουν
για τα κράτη μέλη της Ευρωπαϊκής Ένωσης. Επίσης, συμμορφώνεται
με το σύνολο των ισχυουσών προδιαγραφών και κανονισμών της
χώρας διάθεσης.
Επίσημη τεκμηρίωση διατίθεται κατόπιν αιτήματος. Η επίσημη
τεκμηρίωση περιλαμβάνει, μεταξύ άλλων, την Δήλωση Συμμόρφωσης.
Δήλωση αποποίησης ευθύνης
Το σχέδιο και τα χαρακτηριστικά μπορούν να αλλάξουν χωρίς καμία
προειδοποίηση. Όλα τα λογότυπα, οι επωνυμίες και οι ονομασίες
προϊόντων είναι εμπορικά σήματα ή σήματα κατατεθέντα των
αντίστοιχων κατόχων και δια του παρόντος αναγνωρίζονται ως τέτοια.
Page 52

5252
Polski
SAS-ALARM240
System alarmowy
Opis
Pilot (rys. A)
1. Przycisk
• Przycisk uzbrojenia systemu alarmowego
2. Przycisk
• Przycisk rozbrojenia systemu alarmowego
3. Przycisk
• Przycisk częściowego uzbrojenia
systemu alarmowego
4. Przycisk
• Przycisk włączenia wsytuacji zagrożenia
Panel sterowania (przód) (rys. B1)
Jeżeli panel sterowania jest chroniony hasłem, należy je najpierw
wprowadzić.
5. Przyciski z cyframi
6. Przycisk
• Przycisk * / Przycisk włączenia wsytuacji
zagrożenia
7. Przycisk
• Przycisk # / Przycisk ustawień
8. Przycisk
• Przycisk uzbrojenia systemu alarmowego
9. Przycisk
• Przycisk rozbrojenia systemu alarmowego
10. Przycisk
• Przycisk trybu informacyjnego
11. Zegar
12. Wskaźnik
• Wskaźnik uzbrojenia systemu alarmowego
13. Wskaźnik
• Wskaźnik częściowego uzbrojenia
systemu alarmowego
14. Wskaźnik
• Wskaźnik rozbrojenia systemu
alarmowego
15. Wskaźnik
• Wskaźnik baterii
16. Wskaźnik
• Wskaźnik harmonogramu uzbrojenia/
rozbrojenia systemu alarmowego
17. Wskaźnik
• Wskaźnik aktywacji wbudowanej syreny
Panel sterowania (góra) (rys. B2)
18. Włącznik/Wyłącznik zasilania
bateryjnego
19. Wejście zasilacza DC (5V)
20. Syrena
21. Linia telefoniczna
Linia akcesoriów
Instalacja
• System alarmowy należy instalować wcentralnym miejscu
wdomu, z dala od metalowych przedmiotów bądź urządzeń
gospodarstwa domowego.
• Podłącz przewód linii telefonicznej, przewód akcesoriów, syrenę
iinne przewody.
• Włącz panel sterowania.
• Ustaw włącznik/wyłącznik zasilania bateryjnego wpołożeniu „ON”.
Użytkowanie
Uzbrojenie
Funkcja aktywuje wszystkie czujniki. W razie wystąpienia zdarzenia
system alarmowy zadziała natychmiastowo.
• Pilot: Naciśnij przycisk uzbrojenia systemu alarmowego.
• Panel sterowania: Naciśnij przycisk uzbrojenia systemu alarmowego.
Na wyświetlaczu pojawi się wskaźnik uzbrojenia systemu alarmowego.
Częściowe uzbrojenie
Funkcja aktywuje czujniki wybrane przez użytkownika. W razie
wystąpienia zdarzenia system alarmowy zadziała natychmiastowo.
• Pilot: Naciśnij przycisk częściowego uzbrojenia systemu alarmowego.
• Panel sterowania: Dwukrotnie naciśnij przycisk uzbrojenia
systemu alarmowego.
Na wyświetlaczu pojawi się wskaźnik częściowego uzbrojenia
systemu alarmowego.
Rozbrojenie
Funkcja dezaktywuje wszystkie czujniki. W razie wystąpienia
zdarzenia system alarmowy nie zadziała.
• Pilot: Naciśnij przycisk rozbrojenia systemu alarmowego.
• Panel sterowania: Naciśnij przycisk rozbrojenia systemu alarmowego.
Na wyświetlaczu pojawi się wskaźnik rozbrojenia systemu alarmowego.
Alarm wsytuacji zagrożenia
System alarmowy zadziała natychmiastowo — niezależnie od tego,
czy jest uzbrojony czy rozbrojony.
• Pilot: Naciśnij przycisk włączenia systemu alarmowego wsytuacji
zagrożenia.
• Panel sterowania: Naciśnij przycisk włączenia systemu alarmowego
wsytuacji zagrożenia.
Możliwości wykorzystania telefonu
W przypadku odebrania połączenia od systemu alarmowego wsytuacji
wystąpienia zdarzenia istnieje dodatkowo możliwość wykorzystania
telefonu do zdalnego sterowania panelem systemu alarmowego.
[1]: Uzbrojenie [2]: Rozbrojenie
[3]: Monitorowanie wł. [4]: Monitorowanie wył.
[5]: Podpowiedzi głosowe wł. [6]: Podpowiedzi głosowe wył.
[7]: Syrena wł. [8]: Syrena wył.
Page 53

5353
Polski
Ustawienia itryb informacyjny
Ustawienia można skongurować, a komendy wykonać za pomocą pilota lub panelu sterowania.
Ustawienia
• Aby wejść do trybu ustawień, naciśnij przycisk ustawień ma panelu sterowania.
• Aby modykować ustawienia, użyj kombinacji [#] + [kod] + parametry + [#].
• Aby wyjść ztrybu ustawień, naciśnij przyciski [*] i [#].
Ustawienie Stosowana kombinacja Uwagi
Nagrywanie wiadomości głosowej [#] + [19] + wiadomość + [#] Długość wiadomości głosowej: maks. 10sekund.
Dodawanie pilota [#] + [07] + [xxx] + [#]
[xxx] = identykator pilota (001-120). Po dodaniu pilota naciśnij dowolny jego przycisk.
2sygnały dźwiękowe = pilot został pomyślnie dodany. 1sygnał dźwiękowy = pilot już
wcześniej został dodany. Maks. liczba obsługiwanych pilotów: 120.
Usuwanie pilota [#] + [08] + [xxx] + [#] [xxx] = identykator pilota do usunięcia.
Usuwanie wszystkich pilotów [#] + [08] + [***] + [#] [***] = wszystkie podłączone piloty.
Dodawanie czujnika [#] + [09] + [xxx] + [#] [xxx] = identykator czujnika (001-120). Maks. liczba obsługiwanych czujników: 120.
Usuwanie czujnika [#] + [10] + [xxx] + [#] [xxx] = identykator czujnika do usunięcia.
Usuwanie wszystkich czujników [#] + [10] + [***] + [#] [***] = wszystkie podłączone czujniki.
Ustawienie numeru(ów) telefonu [#] + [3] + [y] + numer telefonu + [*#]
[y] = identykator numeru telefonu (1-9).
Identykatory 1-6 = numery zwyk łych telefonów. Identykatory 7-9 = numery telefonów
alarmowych.
Usuwanie numeru(ów) telefonu [#] + [3] + [y] + [#] [y] = identykator numeru telefonu (1-9).
Ustawienie hasła [#] + [50] + hasło + [#] Hasło może się składać maksymalnie z 4 cyfr. Domyślne hasło: 1234.
Ustawienie opóźnienia
uzbrojenia
[#] + [51] + sekundy + [#] Sekundy zprzedziału 00 do 99. Wartość domyślna = 00.
Ustawienie opóźnienia
włączenia alarmu
[#] + [52] + sekundy + [#] Sekundy zprzedziału 00 do 99. Wartość domyślna = 60.
Czas działania syreny [#] + [53] + minuty + [#] Minuty zprzedziału 00 do 20. Wartość domyślna = 01.
Ustawienie daty igodziny
[#] + [56] + rok + miesiąc + dzień +
godzina + minuta + sekunda + [#]
Na przykład: „20141025183500” = 25 październik a 2014 r. 18:35:00.
Ustawienie czasu alarmu
dźwiękowego
[#] + [57] + [yy] + czas rozpoczęcia +
czas zakończenia + dzień(dni) + [#]
[yy] = 05 / 06 (maks. 2 alarmy dźwiękowe).
Przykład 1: “050900090112345” = syrena emituje sygnał alarmowy przez 1minutę wdni
robocze ogodzinie 09.00.
Przykład 2: “051030103167” = syrena emituje sygnał alarmowy przez 1minutę wdni
weekendowe ogodzinie 10:30.
Usunięcie ustawienia czasu
alarmu dźwiękowego
[#] + [57] + [yy] + [0] + [#] [yy] = 05 / 06.
Ustawienie zdalnego sterowania
za pomocą telefonu
[#] + [62] + [y] + [#] [y] = 0 (wył.) lub 1 (wł.). Wartość domyślna = 1 (wł.).
Ustawienie liczby dzwonków
zdalnego sterowania za pomocą
telefonu
[#] + [18] + [yy] + [#] [yy] = 00 (wył.) - 99. Wartość domyślna = 8.
Włączenie/wyłączenie dźwięku
przycisków systemu alarmowego
[#] + [11] + [y] + [#] [y] = 0 (wył.) lub 1 (wł.). Wartość domyślna = 1 (wł.).
Głośność dźwięku przycisków
systemu alarmowego
[#] + [79] + [y] + [#] [y] = 0 (wył.) - 7 (głośno).
Jasność wyświetlacza [#] + [83] + [y] + [#] [y] = 0 (ciemno) - 7 (jasno).
Tryb oszczędzania energii [#] + [84] + [y] + [#] [y] = 0 (wył.) lub 1 (wł.). Wartość domyślna = 1 (wł.).
Głośność wbudowanej syreny [#] + [87] + [y] + [#] [y] = 0 (wył.) - 7 (głośno).
Podświetlenie wyświetlacza [#] + [88] + [y] + [#] [y] = 0 (wył.) lub 1 (wł.). Wartość domyślna = 0 (wył.).
Wykrywanie podłączenia linii
telefonicznej
[#] + [13] + [y] + [#] [y] = 0 (wył.) lub 1 (wł.). Wartość domyślna = 0 (wył.).
Wyłączenie możliwości zdalnego
sterowania uzbrajaniem/
rozbrajaniem
[#] + [15] + [y] + [#] [y] = 0 (wył.) lub 1 (wł.). Wartość domyślna = 0 (wył.).
Powiadomienie oinnym urządzeniu [#] + [16] + [y] + [#]
Jeżeli inne urządzenia usiłują się połączyć zsystemem alarmowym, syrena wyemituje
5-sekundowy sygnał dźwiękowy.
[y] = 0 (wył.) lub 1 (wł.). Wartość domyślna = 0 (wył.).
Blokada panelu sterowania [#] + [17] + [y] + [#] [y] = 0 (wył.) lub 1 (wł.). Wartość domyślna = 0 (wył.).
Page 54

5454
Polski
Dodawanie bezprzewodowej
syreny zsygnalizatorem
migającym (opcja)
Aby wejść do trybu zapamiętania przez
syrenę kodu pierwszej konguracji,
naciśnij na niej przycisk „SET”.
Na panelu sterowania naciśnij przycisk
rozbrajania systemu alarmowego.
Gdy zapamiętywanie kodu zakończy
się pomyślnie, syrena wyemituje
pojedynczy sygnał dźwiękowy.
Informacje odostępności akcesoriów dodatkowych można uzyskać ulokalnego
sprzedawcy.
Głośna syrena zewnętrzna (opcja) [#] + [14] + [yy] + [#] [y] = 00 (wył.) - 99 (głośno).
Przywracanie ustawień
fabrycznych panelu sterowania
[#] + [9898] + [#]
Resetowanie systemu [#] + [989801] + [#]+ [#]+ [#] Ostrzeżenie: Zostaną przywrócone ustawienia fabryczne całego systemu alarmowego.
Ustawienie rodzajów stref [#] + [60] + [xxx] + [y] + [z] + [#]
[xxx] = identykator czujnika (001-120). [y] = rodzaj strefy (1-8). [z] = 0 (syrena wył.) lub 1
(syrena wł.).
Rodzaje stref:
1. Strefa normalna
2. Strefa częściowo uzbrojona: Czujniki wtej stree mogą być wyłączane za pomocą pilota.
System jest częściowo uzbrojony.
3. Strefa inteligentna: Drugie zdarzenie mające miejsce wczasie krótszym niż 30sekund
od pierwszego zdarzenia spowoduje włączenie alarmu.
4. Strefa zagrożenia: Każde zdarzenie spowoduje włączenie alarmu — niezależnie od
trybu uzbrajania.
5. Strefa zamknięta: Żadne zdarzenie nie spowoduje włączenia alarmu — niezależnie
od trybu uzbrajania.
6. Strefa dzwonka udrzwi: Każde zdarzenie spowoduje wydanie dźwięku dzwonka
udrzwi — niezależnie od trybu uzbrajania.
7. Strefa powitania: W przypadku uzbrojenia, każde zdarzenie spowoduje włączenie alarmu.
W przypadku rozbrojenia, każde zdarzenie spowoduje wyemitowanie wiadomości
powitalnej.
8. Strefa wezwania pomocy: Każde zdarzenie spowoduje włączenie alarmu orazwybranie
trzech numerów alarmowych iodtworzenie uodbiorców wcześniej nagranej
wiadomości wezwania pomocy — niezależnie od trybu uzbrajania.
Ustawienie specjalnych numerów
telefonu dla danych stref
[#] + [63] + identykator czujnika
początkowego + identykator
czujnika końcowego + [y] + [#]
[y] = identykator numeru telefonu (1-9).
Przykład 1: „630010061234” = automatyczne wybieranie numerów telefonu 1-4 wprzypadku
wystąpienia zdarzenia iaktywacji alarmu wstrefach 001-006.
Przykład 2: „630200206” = automatyczne wybieranie numeru telefonu 6 wprzypadku
wystąpienia zdarzenia iaktywacji alarmu wstree 020.
Ustawianie harmonogramu
uzbrajania
[#] + [57] + [yy] + godzina uzbrojenia
+ godzina rozbrojenia + numer dnia
+ [#]
[yy] = identykator harmonogramu uzbrajania (01-04).
Przykład 1: „58010700173012345” = system alarmowy uzbrojony wdni robocze pomiędzy
godziną 07:00 a 17:30.
Przykład 2: „5802180006005671” = system alarmowy uzbrojony od piątku do poniedziałku
pomiędzy godziną 18:00 a 06:00.
Usuwanie harmonogramu
uzbrojenia
[#] + [57] + [yy] + [0] + [#] [yy] = identykator harmonogramu uzbrajania (01-04).
Harmonogram uzbrajania dla
poszczególnych stref
[#] + [58] + [yy] + identykator czujnika
początkowego + identykator
czujnika końcowego + [#]
[yy] = identykator harmonogramu uzbrajania (01-04).
Na przykład: „5801001003” = czujnik i 001-003 są uzbrajane/rozbrajane zgodnie z
harmonogramem 01.
Ustawienie zakresu sterowania
czujnikami przez pilot/panel
sterowania
[#] + [54] + [xxx] + identykator
czujnika początkowego + identykator
czujnika końcowego + [#]
Ustawienie domyślne: Pilot ipanel sterowania mogą sterować czujnikami we wszystkich strefach.
[xxx] = [***] w przypadku panelu sterowania / [001-120] w przypadku pilota.
Na przykład: „54001000010” = pilot oidentykatorze 001 steruje strefami od 0 do 10.
Włączenie/wyłączenie dźwięku
przycisków pilota/panelu
sterowania
[#] + [55] + [xxx] + [y] + [#]
[y] = 0 (wył.) lub 1 (wł.).
[xxx] = [***] w przypadku panelu sterowania / [001-120] w przypadku pilota.
Na przykład: „55***0” = dź więk przycisków panelu sterowania wyłączony.
Page 55

5555
Polski
Tryb informacyjny
• Aby wejść do trybu informacyjnego, naciśnij przycisk trybu
informacyjnego na panelu sterowania.
• Aby wykonywać zapytania oinformacje, użyj kombinacji [#] +
kod + (parametr) + [#].
• Aby wyjść ztrybu informacyjnego, naciśnij przyciski [*] i [#].
Tryb informacyjny Stosowana kombinacja Uwagi
Zapisany numer telefonu [#] + [3] + [y] + [#] [y] = identykator numeru telefonu (1-9).
Hasło [#] + [50] + [#]
Czas opóźnienia uzbrojenia [#] + [51] + [#]
Czas opóźnienia włączenia alarmu [#] + [52] + [#]
Czas działania syreny alarmowej [#] + [53] + [#]
Zakres sterowania czujnikami przez pilot/
panel sterowania
[#] + [54] + [xxx] + [#] [xxx] = [***] w prz ypadku panelu sterowania / [001-120] w przypadku pilota.
Włączenie/wyłączenie dźwięku przycisków
pilota/panelu sterowania
[#] + [55] + [xxx] + [#] [xxx] = [***] w prz ypadku panelu sterowania / [001-120] w przypadku pilota.
Data igodzina [#] + [56] + [#]
Harmonogram uzbrajania [#] + [57] + [yy] + [#]
[yy] = identykator harmonogramu uzbrajania (01-04) / status czasu alarmu
dźwiękowego (05-06).
Strefa/czujnik harmonogramu uzbrajania [#] + [58] + [yy] + [#] [yy] = identykator harmonogramu uzbrajania (01-04).
Typ strefy i status syreny [#] + [60] + [xxx] + [y] + [z] + [#]
[xxx] = identykator czujnika (001-120). [y] = rodzaj strefy (1-8). [z] = 0 (syrena wył.)
lub 1 (syrena wł.).
Status funkcji zdalnego sterowania za
pomocą telefonu
[#] + [62] + [#]
Numery telefonu strefy/czujnika [#] + [63] + [xxx] + [#] [xxx] = identykator czujnika (001-120).
Głośność dźwięku przycisków systemu
alarmowego
[#] + [79] + [#]
Tryb oszczędzania energii [#] + [84] + [#]
Głośność wbudowanej syreny [#] + [87] + [#]
Podświetlenie wyświetlacza [#] + [88] + [#]
Podpowiedzi głosowe wł./wył. [#] + [11] + [#]
Możliwość zdalnego sterowania
uzbrajaniem/rozbrajaniem
[#] + [15] + [#]
Powiadomienie oinnym urządzeniu [#] + [16] + [#]
Blokada panelu sterowania [#] + [17] + [#]
Dziennik korzystania zfunkcji uzbrajania [#] + [9901] + [#] Wyświetlona zostanie sekwencja kodów:
[aa]: numer wpisu dziennika (maks. 72 wpisy). [bbbb]: miesiąc/dzień. [cccc]: godzina/minuta.
[dd]: YC = pilot / JP = panel sterowania / DS = harmonogram uzbrajania.
[ee]: YK = pilot / CF = rozbrojenie / BF = uzbrojenie / 01 = pierwszy pilot.
Alarm korzystania zdziennika [#] + [9900] + [#]
Page 56

5656
Polski
Czyszczenie i konserwacja
Ostrzeżenie!
• Przed przystąpieniem do czyszczenia lub konserwacji należy
wyłączyć urządzenie, wyjąć wtyczkę zasilającą zgniazdka
elektrycznego ipoczekać aż urządzenie ostygnie.
• Nie używać do czyszczenia rozpuszczalników ani materiałów
ściernych.
• Nie podejmować prób naprawy urządzenia. Jeśli urządzenie nie
działa poprawnie, należy wymienić je na nowe urządzenie.
• Zewnętrzną stronę urządzenia czyścić miękką, wilgotną
szmatką. Zewnętrzną stronę urządzenia dokładnie wycierać do
sucha przy użyciu czystej, suchej szmatki.
Bezpieczeństwo
Ogólne zasady bezpieczeństwa
• Przed rozpoczęciem korzystania z urządzenia należy dokładnie
przeczytać instrukcję. Zachowaj instrukcję do wykorzystania
wprzyszłości.
• Urządzenie powinno być używane zgodnie ze swoim
przeznaczeniem. Nie należy używać urządzenia w celach innych
niż określono w instrukcji.
• Nie wolno korzystać z urządzenia, jeśli jakakolwiek część jest
uszkodzona lub wadliwa. Jeśli urządzenie jest uszkodzone lub
wadliwe, należy niezwłocznie wymienić urządzenie.
• Dzieci mogą korzystać z urządzenia jedynie pod nadzorem
osoby dorosłej. Dzieciom nie wolno bawić się urządzeniem.
• W żaden sposób nie modykować urządzenia.
• Nie wystawiać urządzenia na działanie wody lub wilgoci.
• Nie wystawiać urządzenia na bezpośrednie działanie słońca.
• Urządzenie należy przechowywać z dala od źródeł ciepła.
Bezpieczeństwo elektryczne
• W celu zmniejszenia ryzyka porażenia prądem elektrycznym,
niniejsze urządzenie powinno być otwierane wyłącznie przez
osobę z odpowiednimi uprawnieniami, kiedy wymagane jest
przeprowadzenie przeglądu.
• W przypadku wystąpienia problemu odłączyć urządzenie od
sieci i innego sprzętu.
• Nie wolno korzystać zurządzenia, jeśli kabel zasilający lub
wtyczka zasilająca są uszkodzone lub nie działają poprawnie.
Jeśli kabel zasilający lub wtyczka zasilająca są uszkodzone lub
nie działają poprawnie, muszą zostać wymienione przez
producenta lub autoryzowanego serwisanta.
• Przed rozpoczęciem użytkowania zawsze należy sprawdzać, czy
napięcie sieci zasilającej odpowiada wartości podanej na
tabliczce znamionowej urządzenia.
• Nie dopuszczać do zaplątania kabla.
• Należy dopilnować, aby przewód sieciowy nie zwisał nad
krawędzią blatu i żeby nie było możliwości przypadkowego
zaczepienia się lub potknięcia o niego.
Gwarancja
Wszelkie zmiany i/lub modykacje produktu spowodują
unieważnienie gwarancji. Nie możemy ponosić odpowiedzialności
za uszkodzenia spowodowane przez nieprawidłowe korzystanie z
produktu.
Utylizacja
• Produkt jest przeznaczony do oddzielnej zbiórki w odpowiednim
punkcie odbioru. Nie należy pozbywać się produktu razem
zodpadami gospodarstwa domowego.
• Aby uzyskać więcej informacji, należy skontaktować się ze
sprzedawcą lub lokalnym urzędem odpowiedzialnym za gospodarkę
odpadami.
Dokumentacja
Produkt został wyprodukowany i dostarczony zgodnie z wszelkimi
odpowiednimi przepisami i wytycznymi, obowiązującymi wszystkie
państwa członkowskie Unii Europejskiej. Produkt jest zgodny
zwszystkimi specykacjami i przepisami obowiązującymi w kraju
sprzedaży.
Formalna dokumentacja jest dostępna na życzenie. Formalna
dokumentacja obejmuje, między innymi, deklarację zgodności.
Zastrzeżenia
Wzory i specykacje mogą ulec zmianie bez powiadomienia.
Wszystkie logo, marki i nazwy produktów są znakami towarowymi
lub zarejestrowanymi znakami towarowymi ich właścicieli i niniejszym
są uznane za takie.
Page 57

5757
Česky
SAS-ALARM240
Poplachový systém
Popis
Dálkový ovladač (obr. A)
1. Tlačítko
• Tlačítko aktivace
2. Tlačítko
• Tlačítko deaktivace
3. Tlačítko
• Tlačítko částečné aktivace
4. Tlačítko
• Nouzové tlačítko
Ovládací panel (čelní) (obr. B1)
Je-li ovládací panel chráněný heslem, nejprve zadejte heslo.
5. Číselná tlačítka
6. Tlačítko
• Tlačítko * / Nouzové tlačítko
7. Tlačítko
• Tlačítko # / Tlačítko nastavení
8. Tlačítko
• Tlačítko aktivace
9. Tlačítko
• Tlačítko deaktivace
10. Tlačítko
• Tlačítko dotazu
11. Displej času
12. Indikátor
• Indikátor aktivace
13. Indikátor
• Indikátor částečné aktivace
14. Indikátor
• Indikátor deaktivace
15. Indikátor
• Indikátor stavu baterie
16. Indikátor
• Indikátor plánované aktivace/deaktivace
17. Indikátor
• Zabudovaný sirénový indikátor
Ovládací panel (horní) (obr. B2)
18. Spínač bateriového napájení
19. Vstupní konektor DC (5 V)
20. Siréna
21. Telefonní linka
Prodlužovací linka
Instalace
• Nainstalujte poplachový systém uprostřed, daleko od kovových
předmětů a domácích zařízení.
• Připojte telefonní linku, prodlužovací linku, sirénu a další kabely.
• Zapněte ovládací panel.
• Nastavte spínač bateriového napájení do polohy „ON“.
Použití
Aktivace
Všechny detektory jsou aktivovány. Vyskytne-li se událost, poplachový
systém bude ihned spuštěn.
• Dálkový ovladač: Stiskněte tlačítko aktivace.
• Ovládací panel: Stiskněte tlačítko aktivace.
Indikátor aktivace se zobrazí na displeji.
Částečná aktivace
Detektory vybrané uživatelem jsou aktivovány. Vyskytne-li se událost,
poplachový systém bude ihned spuštěn.
• Dálkový ovladač: Stiskněte tlačítko částečné aktivace.
• Ovládací panel: Dvakrát stiskněte tlačítko aktivace.
Indikátor částečné aktivace se zobrazí na displeji.
Deaktivace
Všechny detektory jsou deaktivovány. Vyskytne-li se událost, poplachový
systém nebude spuštěn.
• Dálkový ovladač: Stiskněte tlačítko deaktivace.
• Ovládací panel: Stiskněte tlačítko deaktivace.
Indikátor deaktivace se zobrazí na displeji.
Poplachová signalizace
Poplachový systém bude spuštěn okamžitě, ať je aktivován či nikoliv.
• Dálkový ovladač: Stiskněte nouzové tlačítko.
• Ovládací panel: Stiskněte nouzové tlačítko.
Použití telefonu
Po přijetí volání z poplachového systému v případě události můžete
použít také telefon k dálkovému ovládání poplachového panelu.
[1]: Aktivace [2]: Deaktivace
[3]: Monitorování zapnuté [4]: Monitorování vypnuté
[5]: Hlasová výzva zapnutá [6]: Hlasová výzva vypnutá
[7]: Siréna zapnutá [8]: Siréna vypnutá
Page 58

5858
Česky
Nastavení a dotazy
Nastavení a dotazy lze uskutečnit pomocí dálkového ovladače nebo ovládacího panelu.
Nastavení
• Chcete-li vstoupit do režimu nastavení, stiskněte tlačítko nastavení na ovládacím panelu.
• Chcete-li nastavení změnit, stiskněte [#] + [kód] + parametry + [#].
• Chcete-li režim nastavení ukončit, stiskněte [*] a [#].
Nastavení Příkaz Poznámky
Zaznamenat hlasovou zprávu [#] + [19] + zpráva+ [#] Trvání hlasové zprávy: max 10 sekund.
Přidat dálkový ovladač [#] + [07] + [xxx] + [#]
[xxx] = identikátor dálkového ovladače (001-120). Po přidání stiskněte tlačítko na dálkovém
ovladači. 2pípnutí = dálkový ovladač přidán úspěšně. 1pípnutí = dálkový ovladač již
kongurován. Max. počet dálkových ovladačů: 120.
Odebrat dálkový ovladač [#] + [08] + [xxx] + [#] [xxx] = hodnota dálkového ovladače, který má být odebrán.
Odebrat všechny dálkové ovladače [#] + [08] + [***] + [#] [***] = všechny připojené dálkové ovladače.
Přidat detektor [#] + [09] + [xxx] + [#] [xxx] = identikátor detektoru (001-120). Max. počet detektorů: 120.
Odebrat detektor [#] + [10] + [xxx] + [#] [xxx] = hodnota detektoru, který má být odebrán.
Odebrat všechny detektory [#] + [10] + [***] + [#] [***] = všechny připojené detektory.
Nastavit telefonní číslo/čísla
[#] + [3] + [y] + telefonní číslo + [*#]
[y] = identikátor telefonního čísla (1-9).
Identikátor 1-6 = běžná telefonní čísla. Identikátor 7-9 = nouzová telefonní čísla.
Odstranit telefonní číslo/čísla
[#] + [3] + [y] + [#]
[y] = identikátor telefonního čísla (1-9).
Nastavit heslo [#] + [50] + heslo + [#] Heslo má max. 4 číslice. Výchozí heslo: 1234.
Nastavit dobu prodlevy aktivace [#] + [51] + sekundy+ [#] Sekundy 00 až 99. Výchozí = 00.
Nastavit dobu prodlevy alarmu [#] + [52] + sekundy+ [#] Sekundy 00 až 99. Výchozí = 60.
Nastavit dobu činnosti sirény [#] + [53] + minuty + [#] Minuty 00 až 20. Výchozí = 01.
Nastavit datum a čas
[#] + [56] + rok+ měsíc+ den+
hodina+ minuty+ sekundy+ [#]
Příklad: „20141025183500” = 25. října 2014 18.35:00.
Nastavit budík
[#] + [57] + [yy] + čas začátku + čas
konce + den/dny + [#]
[yy] = 05 / 06 (max. 2 alarmy).
Příklad 1: „050900090112345“ = o víkendech je siréna zapnuta v 09.00 a zní po dobu 1 minuty.
Příklad 2: „051030103167“ = o víkendech je siréna zapnuta v 10.30 a zní po dobu 1 minuty.
Zrušit budík [#] + [57] + [yy] + [0] + [#] [yy] = 05 / 06.
Nastavit dálkové ovládání po
telefonu
[#] + [62] + [y] + [#] [y] = 0 (vypnuto) nebo 1 (zapnuto). Výchozí = 1 (zapnuto).
Nastavit počet zvonění pro
dálkového ovládání po telefonu
[#] + [18] + [yy] + [#] [yy] = 00 (vypnuto) - 99. Výchozí = 8.
Nastavit akustickou zpětnou vazbu [#] + [11] + [y] + [#] [y] = 0 (vypnuto) nebo 1 (zapnuto). Výchozí = 1 (zapnuto).
Nastavit hlasitost akustické
zpětné vazby
[#] + [79] + [y] + [#] [y] = 0 (vypnuto) - 7 (nahlas).
Ovládání jasu displeje [#] + [83] + [y] + [#] [y] = 0 (tmavý) - 7 (jasný).
Nastavit režim úspory energie [#] + [84] + [y] + [#] [y] = 0 (vypnuto) nebo 1 (zapnuto). Výchozí = 1 (zapnuto).
Nastavit hlasitost zabudované
sirény
[#] + [87] + [y] + [#] [y] = 0 (vypnuto) - 7 (nahlas).
Nastavit blikání osvětlení displeje [#] + [88] + [y] + [#] [y] = 0 (vypnuto) nebo 1 (zapnuto). Výchozí = 0 (vypnuto).
Nastavit detekci připojení
telefonní linky
[#] + [13] + [y] + [#] [y] = 0 (vypnuto) nebo 1 (zapnuto). Výchozí = 0 (vypnuto).
Deaktivovat použití dálkového
ovladače k aktivaci/deaktivaci
[#] + [15] + [y] + [#] [y] = 0 (vypnuto) nebo 1 (zapnuto). Výchozí = 0 (vypnuto).
Nastavit interferenční výzvy [#] + [16] + [y] + [#]
V případě pokusu o připojení dalších zařízení k poplachovému systému se na 5 sekund
spustí siréna.
[y] = 0 (vypnuto) nebo 1 (zapnuto). Výchozí = 0 (vypnuto).
Nastavit zámek ovládacího panelu [#] + [17] + [y] + [#] [y] = 0 (vypnuto) nebo 1 (zapnuto). Výchozí = 0 (vypnuto).
Přidat bezdrátovou
stroboskopickou sirénu
(volba)
Stisknutím tlačítka „SET“ na
stroboskopické siréně vstoupíte do
režimu učení se spouštěcímu kódu.
Stiskněte tlačítko deaktivace na
ovládacím panelu. Stroboskopická
siréna jednou pípne na znamení
úspěšného ukončení režimu učení se.
Informace o dostupnosti vám sdělí místní prodejce.
Nastavení hlasitosti vnější sirény
(volba)
[#] + [14] + [yy] + [#] [yy] = 00 (vypnuto) - 99 (nahlas).
Obnovit tovární nastavení
ovládacího panelu
[#] + [9898] + [#]
Resetování systému [#] + [989801] + [#]+ [#]+ [#] Upozornění: Celý poplachový systém je resetován do továrního nastavení.
Page 59

5959
Česky
Nastavit typy zón [#] + [60] + [xxx] + [y] + [z] + [#]
[xxx] = identikátor detektoru (001-120). [y] = typ zóny (1-8). [z] = 0 (siréna vypnutá) nebo
1 (siréna zapnutá).
Typy zón:
1. Normální zóna
2. Zóna částečné aktivace: Detektory v zóně lze aktivovat dálkovým ovladačem. Systém
je částečně aktivován.
3. Inteligentní zóna: Druhé spuštění během 30 sekund od prvního spuštění aktivuje alarm.
4. Nouzová zóna: Jakékoli spuštění aktivuje alarm bez ohledu na režim aktivace.
5. Uzavřená zóna: Spuštění neaktivuje alarm bez ohledu na režim aktivace.
6. Zóna vyzvánění: Jakékoli spuštění aktivuje zvuk dveřního zvonku bez ohledu na režim
aktivace.
7. Uvítací zóna: V případě aktivace jakékoli spuštění vyvolá alarm. V případě deaktivace
jakékoli spuštění vyvolá zvukovou uvítací zprávu.
8. Zóna pomoci: Jakékoli spuštění aktivuje alarm a vytáčení tří nouzových čísel s předem
nahranou zprávou se žádostí o pomoc bez ohledu na režim aktivace.
Nastavit specická telefonní čísla
pro poplachovou zónu
[#] + [63] + počáteční identikátor
zařízení + koncový identikátor
zařízení + [y] + [#]
[y] = identikátor telefonního čísla (1-9).
Příklad 1: „630010061234“ = čísla automatického vytáčení 1-4 při spuštění zón 001–006.
Příklad 2: „630200206“ = číslo automatického vytáčení 6 při spuštění zóny 020.
Nastavit harmonogram aktivace
[#] + [57] + [yy] + čas začátku + čas
konce + číslo dne + [#]
[yy] = harmonogram aktivace (01-04).
Příklad 1: „58010700173012345“ = aktivace o víkendech mezi 07.00 a 17.30.
Příklad 2: „5802180006005671“ = aktivace od pátku do pondělí mezi 18.00 a 6.00.
Odstranit harmonogram aktivace [#] + [57] + [yy] + [0] + [#] [yy] = harmonogram aktivace (01-04).
Nastavit harmonogram aktivace s
ochrannými zónami
[#] + [58] + [yy] + počáteční
identikátor zařízení + koncový
identikátor zařízení + [#]
[yy] = harmonogram aktivace (01-04).
Příklad: „5801001003“ = zařízení 001-003 dodržují harmonogram aktivace 01.
Nastavit rozsah ovládání pro
dálkový ovladač/ovládací panel
[#] + [54] + [xxx] + počáteční
identikátor zařízení + koncový
identikátor zařízení + [#]
Výchozí: Dálkový ovladač a ovládací panel ovládají všechny zóny.
[xxx] = [***] pro ovládací panel / [001-120] pro dálkový ovladač.
Příklad: „54001000010“ = dálkový ovladač 001 ovládá zóny 0 až 10.
Nastavit akustickou zpětnou
vazbu pro dálkový ovladač/
ovládací panel
[#] + [55] + [xxx] + [y] + [#]
[y] = 0 (vypnuto) nebo 1 (zapnuto).
[xxx] = [***] pro ovládací panel / [001-120] pro dálkový ovladač.
Příklad: „55***0“ = žádná akustická zpětná vazba při aktivaci prostřednictvím ovládacího panelu.
Dotaz
• Chcete-li vstoupit do režimu dotazování, stiskněte tlačítko dotazování na ovládacím panelu.
• Chcete-li vznést dotazy, stiskněte [#] + kód + (parametry) + [#].
• Chcete-li režim dotazování ukončit, stiskněte [*] a [#].
Dotaz Příkaz Poznámky
Uložené telefonní číslo [#] + [3] + [y] + [#] [y] = identikátor telefonního čísla (1-9).
Heslo [#] + [50] + [#]
Doba prodlevy aktivace [#] + [51] + [#]
Doba prodlevy alarmu [#] + [52] + [#]
Trvání akustického alarmu [#] + [53] + [#]
Rozsah ovládání pro dálkový ovladač/
ovládací panel
[#] + [54] + [xxx] + [#] [xxx] = [***] pro ovládací panel / [001-120] pro dálkový ovladač.
Akustická zpětná vazba pro dálkový
ovladač/ovládací panel
[#] + [55] + [xxx] + [#] [xxx] = [***] pro ovládací panel / [001-120] pro dálkový ovladač.
Datum a čas [#] + [56] + [#]
Harmonogram aktivace [#] + [57] + [yy] + [#] [yy] = harmonogram aktivace (01-04) / stav budíku (05-06).
Zóna/zařízení pro harmonogram aktivace [#] + [58] + [yy] + [#] [yy] = harmonogram aktivace (01-04).
Typ zóny a siréna pro zónu/zařízení [#] + [60] + [xxx] + [y] + [z] + [#]
[xxx] = identikátor zařízení (001-120). [y] = typ zóny (1-8). [z] = 0 (siréna vypnutá)
nebo 1 (siréna zapnutá).
Stav dálkového ovládání po telefonu [#] + [62] + [#]
Telefonní čísla pro zónu/zařízení [#] + [63] + [xxx] + [#] [xxx] = identikátor zařízení (001-120).
Nastavit hlasitost akustické zpětné vazby [#] + [79] + [#]
Režim úspory energie [#] + [84] + [#]
Nastavit hlasitost zabudované sirény [#] + [87] + [#]
Blikání osvětlení displeje [#] + [88] + [#]
Hlasová výzva zapnutá/vypnutá [#] + [11] + [#]
Použít dálkový ovladač k aktivaci/deaktivaci [#] + [15] + [#]
Interferenční výzvy [#] + [16] + [#]
Zámek ovládacího panelu [#] + [17] + [#]
Aktivace přístupového protokolu [#] + [9901] + [#] Výsledkem bude posloupnost kódů:
[aa]: číslo záznamu (max. 72 záznamů). [bbbb]: měsíc/den. [cccc]: hodina/minuta.
[dd]: YC = dálkový ovladač / JP = ovládací panel / DS = harmonogram aktivace.
[ee]: YK = dálkový ovladač / CF = deaktivovat / BF = aktivovat / 01 = první dálkový ovladač.
Alarm přístupového protokolu [#] + [9900] + [#]
Page 60

6060
Česky
Čištění a údržba
Upozornění!
• Před čištěním nebo údržbou zařízení vypněte, vytáhněte napájecí
zástrčku ze zásuvky ve zdi a vyčkejte, dokud zařízení nevychladne.
• Nepoužívejte čisticí rozpouštědla ani abrazivní čisticí prostředky.
• Nepokoušejte se zařízení opravovat. Pokud zařízení nepracuje
správně, vyměňte jej za nové zařízení.
• Venek zařízení očistěte měkkým, suchým hadříkem. Vnějšek
zařízení pečlivě osušte čistým suchým hadříkem.
Bezpečnost
Všeobecné bezpečnostní pokyny
• Před použitím si pozorně přečtěte příručku. Příručku uschovejte
pro pozdější použití.
• Zařízení používejte pouze k jeho zamýšleným účelům. Nepoužívejte
zařízení k jiným účelům, než je popsáno v příručce.
• Nepoužívejte zařízení, pokud je jakákoli část poškozená nebo vadná.
Pokud je zařízení poškozené nebo vadné, okamžitě jej vyměňte.
• Děti nesmí zařízení používat bez dozoru dospělého. Děti by si se
zařízením neměly hrát.
• Zařízení žádným způsobem neupravujte.
• Nevystavujte zařízení působení vody ani vlhkosti.
• Nevystavujte toto zařízení přímému slunečnímu záření.
• Zařízení udržujte mimo dosah zdrojů tepla.
Elektrická bezpečnost
• Abyste snížili riziko úrazu elektrickým proudem, měl by být
vpřípadě potřeby tento výrobek otevřen pouze autorizovaným
technikem.
• Dojde-li k závadě, odpojte výrobek ze sítě a od jiných zařízení.
• Nepoužívejte zařízení, pokud jsou napájecí kabel či napájecí
zástrčka poškozeny nebo vadné. Pokud jsou napájecí kabel či
napájecí zástrčka poškozeny nebo vadné, musí je vyměnit
výrobce nebo oprávněný servisní zástupce.
• Před použitím vždy zkontrolujte, zda napětí napájení odpovídá
napětí uvedenému na typovém štítku zařízení.
• Zkontrolujte, zda se napájecí kabel nemůže nikde zachytit.
• Zajistěte, aby napájecí kabely nevisely před hranu pracovní
desky a aby se nemohly náhodně zachytit nebo převrátit.
Záruka
Provedením jakýchkoli změn a/nebo modikací výrobku záruka
zaniká. Při nesprávném používání tohoto výrobku výrobce nenese
odpovědnost za vzniklé škody.
Likvidace
• Likvidaci tohoto produktu provádějte v příslušné sběrně.
Nevyhazujte tento výrobek s komunálním odpadem.
• Pro více informací se obraťte na prodejce nebo místní orgány
odpovědné za nakládání s odpady.
Dokumentace
Tento produkt byl vyroben a je dodáván v souladu se všemi
příslušnými nařízeními a směrnicemi platnými ve všech členských
státech Evropské Unie. Splňuje také veškeré relevantní specikace
apředpisy v zemi prodeje.
Ociální dokumentaci lze získat na vyžádání. Formální dokumentace
zahrnuje zejména prohlášení o shodě.
Vyloučení zodpovědnosti
Design a specikace výrobku mohou být změněny bez předchozího
upozornění. Všechna loga a obchodní názvy jsou registrované
obchodní značky příslušných vlastníků a jsou chráněny zákonem.
Page 61

6161
Magyar
SAS-ALARM240
Riasztórendszer
Megnevezés
Távirányító (A ábra)
1. gomb
• Élesítő gomb
2.
gomb
• Hatástalanító gomb
3.
gomb
• Egyes zónákat élesítő gomb
4.
gomb
• Vészjelző gomb
Vezérlőpanel (elülső) (B1 ábra)
Ha a vezérlőpanel jelszóval védett, először adja meg a jelszót.
5. Digitális gombok
6.
gomb
• * gomb / Vészjelző gomb
7.
gomb
• # gomb / Beállítás gomb
8.
gomb
• Élesítő gomb
9.
gomb
• Hatástalanító gomb
10.
gomb
• Lekérdezés gomb
11. Időkijelző
12.
visszajelző
• Élesítés-visszajelző
13.
visszajelző
• Egyes zónák élesítési visszajelzője
14.
visszajelző
• Hatástalanítás-visszajelző
15.
visszajelző
• Elemállapot jelző
16.
visszajelző
• Ütemezett élesítés-/hatástalanításvisszajelző
17.
visszajelző
• Beépített sziréna visszajelzője
Vezérlőpanel (felső) (B2 ábra)
18. A tápfeszültség kapcsolója
19. Egyenáramú bemenet (5V)
20. Sziréna
21. Telefonvonal
Mellékvonal
Felszerelés
• A riasztórendszert központi, fémtárgyaktól és háztartási gépektől
távol eső helyre telepítse.
• Csatlakoztassa a telefonvonalat, a mellékvonalat, a szirénát és a
többi kábelt.
• Kapcsolja be a vezérlőpanelt.
• A tápfeszültség kapcsolóját állítsa „ON” állásba.
Használat
Élesítés
Minden érzékelő aktiválva van. Ha riasztási esemény következik be,
a riasztórendszer azonnal működésbe lép.
• A távirányító: Nyomja meg az élesítő gombot.
• Vezérlőpanel: Nyomja meg az élesítő gombot.
Az élesítés-visszajelző megjelenik a kijelzőn.
Egyes zónák élesítése
A felhasználó által kiválasztott érzékelők vannak aktiválva. Ha riasztási
esemény következik be, a riasztórendszer azonnal működésbe lép.
• A távirányító: Nyomja meg az egyes zónák élesítése gombot.
• Vezérlőpanel: Nyomja meg kétszer az élesítő gombot.
Az egyes zónák élesítés-visszajelzője megjelenik a kijelzőn.
Hatástalanítás
Az összes érzékelő ki van kapcsolva. Ha riasztási esemény következik be,
a riasztórendszer nem lép működésbe.
• A távirányító: Nyomja meg a hatástalanító gombot.
• Vezérlőpanel: Nyomja meg a hatástalanító gombot.
A hatástalanítás-visszajelző megjelenik a kijelzőn.
Vészriasztás
A riasztórendszer azonnal működésbe lép, akár élesítve, akár
hatástalanítva van a rendszer.
• A távirányító: Nyomja meg a vészjelző gombot.
• Vezérlőpanel: Nyomja meg a vészjelző gombot.
Telefon használata
Ha egy riasztási esemény után értesítést kap, telefonja segítségével
távolról vezérelheti a riasztó paneljét.
[1]: Élesítés [2]: Hatástalanítás
[3]: Meggyelés bekapcsolva [4]: Meggyelés kikapcsolva
[5]: Hangvisszajelzés bekapcsolva [6]: Hangvisszajelzés kikapcsolva
[7]: Sziréna bekapcsolva [8]: Sziréna kikapcsolva
Page 62

6262
Magyar
Beállítások és lekérdezések
A beállításokat és lekérdezéseket elvégezheti a távirányító vagy a vezérlőpanel használatával.
Beállítások
• A beállítási mód megadásához nyomja meg a beállítás gombot a vezérlőpanelen.
• A beállítások módosításához nyomja meg [#] + [code] + paraméterek + [#] gombokat.
• A beállítási módból való kilépéshez nyomja meg a [*] és [#] gombokat.
Beállítás Parancs Megjegyzések
Hangüzenet rögzítése [#] + [19] + üzenet + [#] A hangüzenet időtartama: max. 10 másodperc
Távirányító hozzáadása [#] + [07] + [xxx] + [#]
[xxx] = a távirányító azonosítója (001-120). A hozzáadás után nyomjon meg egy gombot a
távirányítón. 2 sípszó = a távirányító hozzáadása sikeres. 1 sípszó = a távirányító már be
van állítva. A távirányítók maximális száma: 120.
Távirányító törlése [#] + [08] + [xxx] + [#] [xxx] = a törölni kívánt távirányító értéke.
Összes távirányító törlése [#] + [08] + [***] + [#] [***] = az összes hozzáadott távirányító.
Érzékelő hozzáadása [#] + [09] + [xxx] + [#] [xxx] = az érzékelő azonosítója (001-120). Az érzékelők maximális száma: 120.
Érzékelő törlése [#] + [10] + [xxx] + [#] [xxx] = a törölni kívánt érzékelő értéke.
Az összes érzékelő törlése [#] + [10] + [***] + [#] [***] = az összes hozzáadott érzékelő.
Telefonszám(ok) beállítása
[#] + [3] + [y] + telefonszám + [*#]
[y] = telefonszám azonosítója (1-9).
1-6. azonosító = Rendes telefonszámok. 7-9. azonosító = Vészhelyzeti telefonszámok.
Telefonszám(ok) törlése
[#] + [3] + [y] + [#]
[y] = telefonszám azonosítója (1-9).
Jelszó beállítása [#] + [50] + jelszó + [#] A jelszó legfeljebb 4 számjegyből állhat. Alapértelmezett jelszó: 1234.
Élesítés késleltetési idejének
beállítása
[#] + [51] + másodperc + [#] A beállítható idő 00-99 másodperc Az alapértelmezett = 00 mp.
Riasztás késleltetési idejének
beállítása
[#] + [52] + másodperc + [#] A beállítható idő 00-99 másodperc Az alapértelmezett = 60 mp.
Sziréna működési idejének
beállítása
[#] + [53] + perc + [#] 00 és 20 perc közötti érték adható meg. Az alapértelmezett = 01 p.
Dátum és idő beállítása
[#] + [56] + év + hónap + nap + óra +
perc + másodperc + [#]
Példa: „20141025183500” = 2014. október 25. 18:35:00.
Ébresztőóra beállítása
[#] + [57] + [yy] + kezdési idő +
befejezési idő + nap(ok) + [#]
[yy] = 05 / 06 (max. 2 riasztás).
1. Példa: „050900090112345” = a sziréna 1 percig szól hétköznapokon 09.00-kor.
2. Példa: „051030103167” = a sziréna 1 percig szól hétvégéken 10.30-kor.
Ébresztőóra törlése [#] + [57] + [yy] + [0] + [#] [yy] = 05 / 06.
Távirányító beállítása telefon
segítségével
[#] + [62] + [y] + [#] [y] = 0 (ki) vagy 1 (be). Az alapértelmezett = 1 (be).
Csengetésszám beállítása a
távirányítóhoz telefonon keresztül
[#] + [18] + [yy] + [#] [yy] = 00 (ki) - 99. Az alapértelmezett = 8.
Hangos visszajelzés beállítása [#] + [11] + [y] + [#] [y] = 0 (ki) vagy 1 (be). Az alapértelmezett = 1 (be).
Hangos visszajelzés hangereje [#] + [79] + [y] + [#] [y] = 0 (ki) - 7 (hangos).
Kijelző fényerő szabályozása [#] + [83] + [y] + [#] [y] = 0 (ki) - 7 (világos).
Energiakarékos üzemmód beállítása [#] + [84] + [y] + [#] [y] = 0 (ki) vagy 1 (be). Az alapér telmezett = 1 (be).
Beépített sziréna hangereje [#] + [87] + [y] + [#] [y] = 0 (ki) - 7 (hangos).
Kijelző villogásának beállítása [#] + [88] + [y] + [#] [y] = 0 (ki) vagy 1 (be). Az alapértelmezett = 0 (ki).
Telefonvonal-csatlakozás
érzékelésének beállítása
[#] + [13] + [y] + [#] [y] = 0 (ki) vagy 1 (be). Az alapértelmezett = 0 (ki).
A távirányító használatának
kikapcsolása élesítéshez/
hatástalanításhoz
[#] + [15] + [y] + [#] [y] = 0 (ki) vagy 1 (be). Az alapértelmezett = 0 (ki).
Interferencia-üzenetek beállítása [#] + [16] + [y] + [#]
Ha más eszköz próbál kapcsolódni a riasztórendszerhez, a sziréna 5 másodpercre megszólal.
[y] = 0 (ki) vagy 1 (be). Az alapértelmezett = 0 (ki).
A vezérlőpanel zárolásának
beállítása
[#] + [17] + [y] + [#] [y] = 0 (ki) vagy 1 (be). Az alapértelmezett = 0 (ki).
Vezeték nélküli villogó sziréna
hozzáadása (opcionális)
Nyomja meg a „SET” gombot avillogó
szirénán, az indítási kód
megjegyzéséhez.
Nyomja meg a hatástalanító gombot
a vezérlőpanelen. A villogó sziréna egyet
sípol, ezzel jelezve, hogy a megjegyzés
sikeres volt.
Vegye fel a kapcsolatot a helyi viszonteladóval a termék elérhetőségével kapcsolatban.
A külső sziréna hangereje
(opcionális)
[#] + [14] + [yy] + [#] [y] = 00 (ki) - 99 (hangos).
Vezérlőpanel gyári beállításainak
visszaállítása
[#] + [9898] + [#]
Rendszer visszaállítása [#] + [989801] + [#]+ [#]+ [#] Figyelmeztetés: A teljes riasztórendszer visszaállt a gyári beállításokra.
Page 63

6363
Magyar
Zónatípusok beállítása [#] + [60] + [xxx] + [y] + [z] + [#]
[xxx] = az érzékelő azonosítója (001-120). [y] = zónatípus (1-8). [z] = 0 (sziréna ki) vagy 1
(sziréna be).
Zónatípusok:
1. Normál zóna
2. Egyes zónák élesítési zónái: A zónában lévő érzékelőket a távirányítóval ki lehet
kapcsolni. A rendszer egyes zónái be vannak riasztva.
3. Intelligens zóna: Az első indítás után 30 másodpercen belül bekövetkező második
indítás esetén a rendszer riaszt.
4. Vészhelyzeti zóna: Minden indítás riasztást okoz, az élesítési módtól függetlenül.
5. Lezárt zóna: Az indítás nem okoz riasztást, az élesítési módtól függetlenül.
6. Hangjelzéses zóna: Minden indítás esetén ajtócsengő hangja hallható, az élesítési
módtól függetlenül.
7. Üdvözlő zóna: Élesítés esetén minden indítás riasztást eredményez. Hatástalanítás
esetén minden indításkor üdvözlő üzenet hallható.
8. Segítség zóna: Minden indítás riasztást eredményez és a három vészhelyzeti telefon
feltárcsázásra kerül és az előre rögzített segítségkérő üzenetet elküldi a rendszer, ez
élesítés módjától függetlenül.
Adott telefonszámok beállítása
riasztási zónákra
[#] + [63] + indító eszköz azonosítója +
befejező eszköz azonosítója + [y] + [#]
[y] = telefonszám azonosítója (1-9).
1. Példa: “630010061234” = 1-4. számok automatikusan tárcsázása a 001-006. zónák
megsértése esetén.
2. Példa: “630200206” = 6. szám automatikusan tárcsázása a 020. zóna megsértése esetén.
Riasztás-ütemezés beállítása
[#] + [57] + [yy] + kezdési idő +
befejezési idő + nap száma + [#]
[yy] = élesítés ütemezése (01-04).
1. Példa: “58010700173012345” = élesítés hétköznap 07:00 és 17:30 között.
2. Példa: “5802180006005671” = élesítés hétfőtől péntekig 18:00 és 06:00 között.
Riasztás-ütemezés törlése [#] + [57] + [yy] + [0] + [#] [yy] = élesítés ütemezése (01-04).
Riasztás-ütemezés beállítása
védelmi zónákkal
[#] + [58] + [yy] + indító eszköz
azonosítója + befejező eszköz
azonosítója + [#]
[yy] = élesítés ütemezése (01-04).
Példa: “5801001003” = 001-003. eszközök a 01. riasztási ütemezést követik.
Távirányító/vezérlőpanel vezérlési
tartományának beállítása
[#] + [54] + [xxx] + indító eszköz
azonosítója + befejező eszköz
azonosítója + [#]
Alapértelmezett: A távirányító és a vezérlőpanel az összes zónát vezérli.
[xxx] = [***] a vezérlőpanelhez / [001-120] a távirányítóhoz.
Példa: “54001000010” = 001. távirányító a 0-10. zónákat vezérli
Távirányító/vezérlőpanel hangos
visszajelzésének beállítása
[#] + [55] + [xxx] + [y] + [#]
[y] = 0 (ki) vagy 1 (be).
[xxx] = [***] a vezérlőpanelhez / [001-120] a távirányítóhoz.
Példa: “55***0” = vezérlőpanelen történő riasztás esetén nincs hallható visszajelzés.
Lekérdezés
• A lekérdezési mód megadásához nyomja meg a lekérdezés gombot a vezérlőpanelen.
• A lekérdezések módosításához nyomja meg [#] + [code] + paraméterek + [#] gombokat.
• A lekérdezési módból való kilépéshez nyomja meg a [*] és [#] gombokat.
Lekérdezés Parancs Megjegyzések
Tárolt telefonszám [#] + [3] + [y] + [#] [y] = telefonszám azonosítója (1-9).
Jelszó [#] + [50] + [#]
Élesítés késleltetési ideje [#] + [51] + [#]
Riasztás késleltetési ideje [#] + [52] + [#]
Riasztási hangjelzés időtartama [#] + [53] + [#]
Távirányító/vezérlőpanel vezérlési tartománya [#] + [54] + [xxx] + [#] [xxx] = [***] a vezérlőpanelhez / [001-120] a távirányítóhoz.
Távirányító/vezérlőpanel hangos visszajelzése [#] + [55] + [xxx] + [#] [xxx] = [***] a vezérlőpanelhez / [001-120] a távirányítóhoz.
Dátum és idő [#] + [56] + [#]
Riasztási ütemezés [#] + [57] + [yy] + [#] [yy] = riasztási ütemezés (01-04) / ébresztőóra státusza (05-06).
Zóna/eszköz a riasztási ütemezéshez [#] + [58] + [yy] + [#] [yy] = élesítés ütemezése (01-04).
Zónatípus és sziréna zónához/eszközhöz [#] + [60] + [xxx] + [y] + [z] + [#]
[xxx] = az eszköz azonosítója (001-120). [y] = zónatípus (1-8). [z] = 0 (sziréna ki) vagy 1
(sziréna be).
Távirányító státusza telefonon keresztül [#] + [62] + [#]
Telefonszámok zónához/eszközhöz [#] + [63] + [xxx] + [#] [xxx] = az eszköz azonosítója (001-120).
Hangos visszajelzés hangereje [#] + [79] + [#]
Energiatakarékos mód [#] + [84] + [#]
Beépített sziréna hangereje [#] + [87] + [#]
Kijelző villogása [#] + [88] + [#]
Hangvisszajelzés be/kikapcsolása [#] + [11] + [#]
A távirányító használata élesítéshez/
hatástalanításhoz
[#] + [15] + [#]
Interferencia-üzenetek [#] + [16] + [#]
A vezérlőpanel zárolása [#] + [17] + [#]
Hozzáférési napló élesítése [#] + [9901] + [#] Az eredmény egy kódsor lesz.
[aa]: rögzítési szám (max. 72 szám). [bbbb]: hónap/nap. [cccc]: óra/perc.
[dd]: YC = távirányító / JP = vezérlőpanel / DS = riasztási ütemezés.
[ee]: YK = távirányító / CF = hatástalanítás / BF = élesítés / 01 = első távirányító.
Hozzáférési napló riasztása [#] + [9900] + [#]
Page 64

6464
Magyar
Tisztítás és karbantartás
Figyelmeztetés!
• Tisztítás vagy karbantartás előtt kapcsolja ki a készüléket, húzza
ki a tápkábelt az aljzatból és várja meg, amíg a készülék lehűl.
• Tisztító- és súrolószerek használatát mellőzze.
• Ne próbálja megjavítani a készüléket. Ha a készülék nem működik
megfelelően, cserélje le egy új készülékre.
• Törölje át a készülék külső felületeit egy puha, nedves törlőkendővel.
Alaposan törölje szárazra az eszköz külső felületeit egy tiszta,
száraz törlőkendővel.
Biztonság
Általános biztonsági tudnivalók
• A használat előtt gyelmesen olvassa el a kézikönyvet. Tegye el
akézikönyvet, hogy szükség esetén belenézhessen.
• Csak rendeltetése szerint használja a készüléket. Ne használja
akészüléket a kézikönyvben feltüntetettől eltérő célra.
• Ne használja a készüléket, ha valamely része sérült vagy
meghibásodott. A sérült vagy meghibásodott készüléket azonnal
javíttassa meg, vagy cseréltesse ki.
• Az eszköz gyermek csak szülői felügyelettel használhatja. Az eszköz
nem játékszer.
• Ne végezzen semmilyen módosítást az eszközön.
• Vigyázzon, hogy ne érje a készüléket víz vagy nedvesség.
• Óvja a terméket a közvetlen napfénytől.
• Tartsa a terméket hőforrásoktól távol.
Elektromos biztonság
• Az áramütés veszélyének csökkentése érdekében ezt a terméket
kizárólag a márkaszerviz képviselője nyithatja fel.
• Hiba esetén húzza ki a termék csatlakozóját a konnektorból,
éskösse le más berendezésekről.
• Ne használja a készüléket, ha a tápkábel vagy a csatlakozódugó
sérült vagy meghibásodott. Ha a tápkábel vagy a csatlakozódugó
sérült vagy meghibásodott, azt ki kell cseréltetni a gyártóval
vagy a hivatalos márkaszervizzel.
• Használat előtt mindig ellenőrizze, hogy a hálózati feszültség
megegyezik-e a készülék adattábláján található feszültséggel.
• Győződjön meg róla, hogy a tápkábel nem csavarodott meg.
• Győződjön meg róla, hogy a tápkábel nem lóg rá semmilyen
munkalap szélére és még véletlenül sem lehet belekapni vagy
megbotlani benne.
Jótállás
A termék illetéktelen módosítása érvényteleníti jótállását. Nem vállalunk
felelősséget a termék szakszerűtlen használata miatti károkért.
Leselejtezés
• A terméket elkülönítve, a megfelelő gyűjtőhelyeken kell leselejtezni.
Ne dobja ki a készüléket a háztartási hulladék közé.
• További információért lépjen kapcsolatba a forgalmazóval, vagy
a hulladékkezelésért felelős helyi hatósággal.
Dokumentáció
A termék az Európai Unió minden tagállamában érvényes vonatkozó
rendelkezések és irányelvek betartásával készült és került forgalomba.
A termék megfelel az értékesítési országban rá vonatkozó minden
előírásnak és rendelkezésnek.
Kérésre hivatalos dokumentációt is rendelkezésre bocsátunk.
Ahivatalos dokumentáció tartalmazza, de nem korlátozódik kizárólag
a Megfelelőségi nyilatkozatra.
Felelősségelhárító nyilatkozat
A kivitel és a műszaki jellemzők előzetes értesítés nélkül is módosulhatnak.
Minden logó, terméknév és márkanév a tulajdonosának márkaneve
vagy bejegyzett márkaneve, azokat ennek tiszteletben tartásával
említjük.
Page 65

6565
Română
SAS-ALARM240
Sistem de alarmă
Descrierea
Telecomandă (g. A)
1. Butonul
• Buton de armare
2. Butonul
• Buton de dezarmare
3. Butonul
• Buton de armare parţială
4. Butonul
• Buton de urgenţă
Panou comandă (faţă) (g. B1)
Dacă panoul de comandă este protejat prin parolă, introduceţi mai
întâi parola.
5. Butoane numerice
6. Butonul
• Buton * / Buton urgenţă
7. Butonul
• Buton # / Buton congurare
8. Butonul
• Buton de armare
9. Butonul
• Buton de dezarmare
10. Butonul
• Buton interogare
11. Aşaj orar
12. Indicatorul
• Indicator de armare
13. Indicatorul
• Indicator de armare parţială
14. Indicatorul
• Indicatorul de dezarmare
15. Indicatorul
• Indicatorul bateriei
16. Indicatorul
• Indicatorul de armare/dezarmare
programată
17. Indicatorul
• Indicatorul sirenei încorporate
Panou comandă (superior) (g. B2)
18. Buton de alimentare de la
baterie
19. Intrare c.c. (5 V)
20. Sirenă
21. Linie telefonică
Linie secundară
Instalare
• Instalaţi sistemul de alarmă într-un loc central, departe de
obiecte metalice sau aparate electrocasnice.
• Conectaţi linia telefonică, linia secundară, sirena şi alte cabluri.
• Porniţi panoul de comandă.
• Aduceţi întrerupătorul de alimentare de la baterie în poziţia „ON”.
Utilizarea
Armarea
Toate detectoarele sunt activate. Dacă survine un eveniment,
sistemul de alarmă se sesizează imediat.
• Telecomandă: Apăsaţi butonul de armare.
• Panoul de comandă: Apăsaţi butonul de armare.
Indicatorul de armare apare pe aşaj.
Armare parţială
Detectoarele selectate de utilizator sunt activate. Dacă survine un
eveniment, sistemul de alarmă se sesizează imediat.
• Telecomandă: Apăsaţi butonul de armare parţială.
• Panoul de comandă: Apăsaţi butonul de armare de două ori.
Indicatorul de armare parţială apare pe aşaj.
Dezarmarea
Toate detectoarele sunt dezactivate. Dacă survine un eveniment,
sistemul de alarmă nu se va sesiza.
• Telecomandă: Apăsaţi butonul de dezarmare.
• Panoul de comandă: Apăsaţi butonul de dezarmare.
Indicatorul de dezarmare apare pe aşaj.
Alarma de urgenţă
Sistemul de alarmă se va sesiza imediat, indiferent dacă este armat
sau dezarmat.
• Telecomandă: Apăsaţi butonul de urgenţă.
• Panoul de comandă: Apăsaţi butonul de urgenţă.
Utilizarea telefonului
După ce aţi primit un apel de la sistemul de urgenţă în cazul unui
eveniment, puteţi utiliza şi telefonul pentru a controla panoul de
alarmă de la distanţă.
[1]: Armare [2]: Dezarmare
[3]: Monitorizare activată [4]: Monitorizare dezactivată
[5]: Mesaj vocal activat [6]: Mesaj vocal dezactivat
[7]: Sirenă activată [8]: Sirenă dezactivată
Page 66

6666
Română
Setări şi interogări
Setările şi interogările pot efectuate cu telecomanda sau cu panoul de comandă.
Setări
• Pentru a accesa modul de setare, apăsaţi butonul de congurare de pe panoul de comandă.
• Pentru a modica setările, apăsaţi [#] + [cod] + parametri + [#].
• Pentru a ieşi din modul de setare, apăsaţi [*] şi [#].
Setare Comandă Obser vaţii
Înregistrare mesaj vocal [#] + [19] + mesaj + [#] Durată mesaj vocal: max. 10 secunde.
Adăugare telecomandă [#] + [07] + [xxx] + [#]
[xxx] = ID telecomandă (001-120). După adăugare, apăsaţi un buton de pe telecomandă. 2
bipuri = telecomanda a fost adăugată. 1 bip = telecomanda a fost congurată deja. Număr
max. de telecomenzi: 120.
Ştergere telecomandă [#] + [08] + [xxx] + [#] [xxx] = valoarea telecomenzii care se va elimina.
Şterge toate telecomenzile [#] + [08] + [***] + [#] [***] = toate telecomenzile conectate.
Adăugare detector [#] + [09] + [xxx] + [#] [xxx] = ID detector (001-120). Număr max. de detectoare: 120.
Ştergere detector [#] + [10] + [xxx] + [#] [xxx] = valoarea detectorului care se va elimina.
Şterge toate detectoarele [#] + [10] + [***] + [#] [***] = toate detectoarele conectate.
Congurare număr(ere) telefonic(e)
[#] + [3] + [y] + număr telefonic + [*#]
[y] = ID număr telefonic (1-9).
ID 1-6 = numere telefonice standard. ID 7-9 = numere telefonice de urgenţă.
Ştergere număr(ere) telefonic(e)
[#] + [3] + [y] + [#]
[y] = ID număr telefonic (1-9).
Congurare parolă [#] + [50] + parolă + [#] Parola are maximum 4 cifre. Parolă implicită: 1234.
Congurare temporizare armare [#] + [51] + secunde + [#] Secunde, de la 00 la 99. Implicit = 00.
Congurare temporizare alarmă [#] + [52] + secunde + [#] Secunde, de la 00 la 99. Implicit = 60.
Congurare durată sirenă [#] + [53] + minute + [#] Minute, de la 00 la 20. Implicit = 01.
Congurare dată şi oră
[#] + [56] + an + lună + zi + oră +
minute + secunde + [#]
Exemplu: „20141025183500” = 25 octombrie 2014 18:35:00.
Congurare ceas alarmă
[#] + [57] + [yy] + oră pornire + oră
încheiere + zi(le) + [#]
[yy] = 05 / 06 (max. 2 alarme).
Exemplul 1: „050900090112345” = sirena este activă timp de 1 minut în zilele săptămânii,
la 09:00.
Exemplul 2: „051030103167” = sirena este activă timp de 1 minut în weekenduri, la 10:30.
Ştergere ceas alarmă [#] + [57] + [yy] + [0] + [#] [yy] = 05 / 06.
Congurare telecomandă prin
telefon
[#] + [62] + [y] + [#] [y] = 0 (oprit) sau 1 (pornit). Implicit = 1 (pornit).
Congurare număr de sonerii
pentru telecomandă prin telefon
[#] + [18] + [yy] + [#] [yy] = 00 (oprit) - 99. Implicit = 8.
Congurare feedback sonor [#] + [11] + [y] + [#] [y] = 0 (oprit) sau 1 (pornit). Implicit = 1 (pornit).
Volum feedback sonor [#] + [79] + [y] + [#] [y] = 0 (oprit) - 7 (tare).
Control luminozitate aşaj [#] + [83] + [y] + [#] [y] = 0 (întunecat) - 7 (luminos).
Congurare mod economisire
energie
[#] + [84] + [y] + [#] [y] = 0 (oprit) sau 1 (pornit). Implicit = 1 (pornit).
Volum sirenă încorporată [#] + [87] + [y] + [#] [y] = 0 (oprit) - 7 (tare).
Congurare aprindere
intermitentă aşaj
[#] + [88] + [y] + [#] [y] = 0 (oprit) sau 1 (pornit). Implicit = 0 (oprit).
Congurare detectare conexiune
linie telefonică
[#] + [13] + [y] + [#] [y] = 0 (oprit) sau 1 (pornit). Implicit = 0 (oprit).
Dezactivare utilizare telecomandă
pentru armare/dezarmare
[#] + [15] + [y] + [#] [y] = 0 (oprit) sau 1 (pornit). Implicit = 0 (oprit).
Congurare mesaje interferenţă [#] + [16] + [y] + [#]
Dacă alte dispozitive încearcă să se conecteze la sistemul de alarmă, sirena va suna timp
de 5 secunde.
[y] = 0 (oprit) sau 1 (pornit). Implicit = 0 (oprit).
Congurare blocare panou
comandă
[#] + [17] + [y] + [#] [y] = 0 (oprit) sau 1 (pornit). Implicit = 0 (oprit).
Adăugare sirenă stroboscopică
fără r (opţional)
Apăsaţi butonul „SET” de pe sirena
stroboscopică pentru a începe
învăţarea codurilor.
Apăsaţi butonul de dezarmare de pe
panoul de comandă. Sirena
stroboscopică emite un singur semnal
pentru a indica faptul că procesul de
învăţare a fost nalizat corespunzător.
Luaţi legătura cu distribuitorul local pentru disponibilitate.
Volum sirenă externă (opţional) [#] + [14] + [yy] + [#] [yy] = 00 (oprit) - 99 (tare).
Restabilire setări din fabrică
pentru panoul de comandă
[#] + [9898] + [#]
Resetare sistem [#] + [989801] + [#]+ [#]+ [#] Măsuri de precauţie: Întregul sistem de alarmă este readus la setările din fabrică.
Page 67

6767
Română
Congurare tipuri zonă [#] + [60] + [xxx] + [y] + [z] + [#]
[xxx] = ID detector (001-120). [y] = tip zonă (1-8). [z] = 0 (sirenă oprită) sau 1 (sirenă pornită).
Tipuri zonă:
1. Zonă normală
2. Zonă armare parţială. Detectoarele din zonă pot dezactivate cu telecomanda.
Sistemul este parţial armat.
3. Zonă inteligentă: O a doua declanşare în decurs de 30 de secunde de la prima
declanşare va genera o alarmă.
4. Zonă de urgenţă: Orice declanşare va rezulta într-o alarmă, indiferent de modul de
armare.
5. Zonă închisă. O declanşare nu va rezulta într-o alarmă, indiferent de modul de armare.
6. Zonă de avertizare: Orice declanşare va rezulta în activarea soneriei, indiferent de
modul de armare.
7. Zonă de bun-venit. Când este armată, orice declanşare va rezulta într-o alarmă. Când
este dezarmată, orice declanşare va rezulta într-un mesaj de bun-venit sonor.
8. Zonă de ajutor: Orice declanşare va rezulta într-o alarmă şi formarea a trei numere de
urgenţă cu mesaje de cerere a ajutorului preînregistrate, indiferent de modul de armare.
Congurarea unor numere
telefonice specice, în funcţie de
zona de alarmă
[#] + [63] + ID dispozitiv iniţial + ID
dispozitiv capăt + [y] + [#]
[y] = ID număr telefonic (1-9).
Exemplul 1: „630010061234” = apelează automat telefoanele 1-4 când se declanşează
zonele 001-006.
Exemplul 2: „630200206” = apelează automat telefonul 6 când se declanşează zona 020.
Congurare program armare
[#] + [57] + [yy] + oră pornire + oră
încheiere + număr zi + [#]
[yy] = program armare (01-04).
Exemplul 1: „58010700173012345” = armare în zilele săptămânii la 07:00 şi 17:30.
Exemplul 2: „5802180006005671” = armare între vineri şi luni, între 18:00 şi 06:00.
Ştergere program armare [#] + [57] + [yy] + [0] + [#] [yy] = program armare (01-04).
Congurare program armare cu
zone de apărare
[#] + [58] + [yy] + ID dispozitiv iniţial
+ ID dispozitiv capăt + [#]
[yy] = program armare (01-04).
Exemplu: „5801001003” = dispozitivele 001-003 urmează programul de armare 01.
Congurare interval comandă
pentru telecomandă/panou
comandă
[#] + [54] + [xxx] + ID dispozitiv iniţial
+ ID dispozitiv capăt + [#]
Implicit: Telecomanda şi panoul de comandă controlează toate zonele.
[xxx] = [***] pentru panoul de comandă / [001-120] pentru telecomandă.
Exemplu: „54001000010” = telecomanda 001 controlează zonele de la 0 la 10.
Congurare feedback sonor pentru
telecomandă/panou comandă
[#] + [55] + [xxx] + [y] + [#]
[y] = 0 (oprit) sau 1 (pornit).
[xxx] = [***] pentru panoul de comandă / [001-120] pentru telecomandă.
Exemplu: „55***0” = fără feedback sonor când se armează prin panoul de comandă.
Interogare
• Pentru a accesa modul de interogare, apăsaţi butonul de interogare de pe panoul de comandă.
• Pentru a efectua interogări, apăsaţi [#] + cod + (parametri) + [#].
• Pentru a ieşi din modul de interogare, apăsaţi [*] şi [#].
Interogare Comandă Observaţii
Număr telefonic stocat [#] + [3] + [y] + [#] [y] = ID număr telefonic (1-9).
Parolă [#] + [50] + [#]
Durată temporizare armare [#] + [51] + [#]
Durată temporizare alarmă [#] + [52] + [#]
Durată sunet alarmă [#] + [53] + [#]
Interval comandă pentru telecomandă/
panou comandă
[#] + [54] + [xxx] + [#] [xxx] = [***] pentru panoul de comandă / [001-120] pentru telecomandă.
Feedback sonor pentru telecomandă/panou
comandă
[#] + [55] + [xxx] + [#] [xxx] = [***] pentru panoul de comandă / [001-120] pentru telecomandă.
Dată şi oră [#] + [56] + [#]
Program armare [#] + [57] + [yy] + [#] [yy] = program armare (01-04) / stare ceas alarmă (05-06).
Zonă/dispozitiv per program armare [#] + [58] + [yy] + [#] [yy] = program armare (01-04).
Tip zonă şi sirenă per zonă/dispozitiv [#] + [60] + [xxx] + [y] + [z] + [#]
[xxx] = ID dispozitiv (001-120). [y] = tip zonă (1-8). [z] = 0 (sirenă oprită) sau 1 (sirenă
pornită).
Stare telecomandă prin telefon [#] + [62] + [#]
Numere telefon per zonă/dispozitiv [#] + [63] + [xxx] + [#] [xxx] = ID dispozitiv (001-120).
Volum feedback sonor [#] + [79] + [#]
Mod economisire energie [#] + [84] + [#]
Volum sirenă încorporată [#] + [87] + [#]
Aprindere intermitentă aşaj [#] + [88] + [#]
Mesaj vocal activat/dezactivat [#] + [11] + [#]
Utilizare telecomandă pentru armare/
dezarmare
[#] + [15] + [#]
Mesaje interferenţă [#] + [16] + [#]
Blocare panou comandă [#] + [17] + [#]
Jurnal acces armare [#] + [9901] + [#] Rezultatul va o secvenţă de coduri:
[aa]: număr înregistrare (max. 72 înregistrări). [bbbb]: lună/zi. [cccc]: oră/minut.
[dd]: YC = telecomandă / JP = panou comandă / DS = program armare.
[ee]: YK = telecomandă / CF = dezarmare / BF = armare / 01 = prima telecomandă.
Jurnal acces alarmă [#] + [9900] + [#]
Page 68

6868
Română
Curăţarea şi întreţinerea
Avertisment!
• Înainte de curăţare sau întreţinere, opriţi dispozitivul, scoateţi
ştecărul din priză şi aşteptaţi să se răcească dispozitivul.
• Nu folosiţi solvenţi sau agenţi de curăţare abrazivi.
• Nu încercaţi să reparaţi dispozitivul. Dacă dispozitivul nu
funcţionează corect, înlocuiţi-l cu unul nou.
• Curăţaţi exteriorul dispozitivul cu o cârpă umedă şi moale. Uscaţi
bine exteriorul dispozitivului cu o cârpă curată şi uscată.
Siguranţă
Instrucţiuni generale de siguranţă
• Citiţi manualul cu atenţie înainte de utilizare. Păstraţi manualul
pentru consultări ulterioare.
• Utilizaţi dispozitivul numai în scopurile prevăzute. Nu utilizaţi
dispozitivul în alte scopuri decât cele descrise în manual.
• Nu utilizaţi dispozitivul dacă are piese deteriorate sau defecte.
Dacă dispozitivul este deteriorat sau defect, înlocuiţi imediat
dispozitivul.
• Copiii nu trebuie să utilizeze dispozitivul fără supravegherea
unui adult. Copiii nu trebuie să se joace cu dispozitivul.
• Nu modicaţi dispozitivul în niciun mod.
• Nu expuneţi dispozitivul apei sau umezelii.
• Nu expuneţi dispozitivul la lumina solară directă.
• Ţineţi dispozitivul la distanţă de surse de căldură.
Instrucţiuni de siguranţă electrică
• Pentru a se reduce pericolul de electrocutare, acest produs va
desfăcut numai de către un tehnician avizat, când este necesară
depanarea.
• Deconectaţi produsul de la priza de reţea sau alte echipamente
în cazul apariţiei unei probleme.
• Nu utilizaţi dispozitivul dacă cablul electric sau ştecărul sunt
deteriorate sau defecte. În cazul în care cablul sau ştecărul sunt
deteriorate sau defecte, trebuie să e înlocuite de producător
sau de către un agent de reparaţii autorizat.
• Înainte de utilizare, vericaţi întotdeauna dacă tensiunea de
reţea coincide cu tensiunea de pe plăcuţa tehnică a dispozitivului.
• Asiguraţi-vă că nu se poate încâlci cablul electric.
• Asiguraţi-vă că cablul de reţea nu este suspendat deasupra
marginii blatului şi că nu vă puteţi prinde sau împiedica accidental
în acesta.
Garanţie
Orice schimbări şi/sau modicări ale produsului vor anula garanţia.
Nu putem accepta responsabilitatea pentru daunele provocate de
utilizarea incorectă a produsului.
Eliminarea
• Produsul a fost creat pentru colectare separată la un punct de
colectare adecvat. Nu eliminaţi produsul odată cu deşeurile
menajere.
• Pentru mai multe informaţii, contactaţi magazinul sau
autoritatea locală responsabilă pentru gestionarea deşeurilor.
Documentaţie
Produsul a fost fabricat şi furnizat în conformitate cu toate
reglementările şi directivele relevante, valabile în toate statele membre
ale Uniunii Europene. Produsul este conform cu toate specicaţiile şi
reglementările aplicabile în toate ţările în care se vinde.
Documentaţia ocială este disponibilă la cerere. Documentaţia
formală include, însă nu se limitează la, Declaraţia de conformitate.
Renunţarea la răspundere
Designul şi specicaţiile produsului pot modicate fără o noticare
prealabilă. Toate siglele mărcilor şi denumirile produselor sunt mărci
comerciale sau mărci comerciale înregistrate ale proprietarilor de
drept şi prin prezenta sunt recunoscute ca atare.
Page 69

6969
Русский
SAS-ALARM240
Сигнализация
Описание
Пульт дистанционного управления (рис. А)
1. кнопка
• Кнопка постановки на сигнализацию
2.
кнопка
• Кнопка снятия с сигнализации
3.
кнопка
• Кнопка частичной постановки
насигнализацию
4.
кнопка
• Кнопка тревоги
Панель управления (перед) (рис. B1)
Если панель управления защищена паролем, то сначала следует
ввести пароль.
5. Цифровые клавиши
6.
кнопка
• Кнопка */ Кнопка тревоги
7.
кнопка
• Кнопка # / Кнопка Установка
8.
кнопка
• Кнопка постановки на сигнализацию
9.
кнопка
• Кнопка снятия с сигнализации
10.
кнопка
• Кнопка Запрос
11. Экран отображения
времени
12.
индикатор
• Индикатор постановки на
сигнализацию
13.
индикатор
• Индикатор частичной постановки на
сигнализацию
14.
индикатор
• Индикатор снятия с сигнализации
15.
индикатор
• Индикатор аккумулятора
16.
индикатор
• Индикатор расписания постановки/
снятия с сигнализации
17.
индикатор
• Встроенный индикатор сирены
Панель управления (верх) (рис. B2)
18. Переключатель питания
батарей
19. Вход питания пост. ток (5В)
20. Сирена
21. Телефонная линия
Линия расширений
Установка
• Установите сигнализацию в центре помещения на удалении
от металлических объектов и бытовых приборов.
• Подключите телефонную линию, линию расширений, сирену
и другие кабели.
• Включите питание панели управления.
• Переведите выключатель питания от батарей в положение
«ON».
Использование
Постановка на сигнализацию
Все датчики активированы. При возникновении этого события
сигнализация сработает немедленно.
• Пульт дистанционного управления: Нажмите кнопку
постановки на сигнализацию.
• Панель управления: Нажмите кнопку постановки на
сигнализацию.
На дисплее появится индикатор постановки на сигнализацию.
Частичная постановка на сигнализацию
Активированы выбранные пользователем датчики. При
возникновении этого события сигнализация сработает немедленно.
• Пульт дистанционного управления: Нажмите кнопку
частичной постановки на сигнализацию.
• Панель управления: Дважды нажмите кнопку постановки на
сигнализацию.
На дисплее появится индикатор частичной постановки на
сигнализацию.
Снятие с сигнализации
Все датчики деактивированы. После возникновении этого
события сигнализация не будет работать.
• Пульт дистанционного управления: Нажмите кнопку снятия
ссигнализации.
• Панель управления: Нажмите кнопку снятия с сигнализации.
На дисплее появится индикатор снятия с сигнализации.
Тревожный сигнал
Сигнализация сработает немедленно, вне зависимости от того
активирована она или нет.
• Пульт дистанционного управления: Нажмите кнопку тревоги.
• Панель управления: Нажмите кнопку тревоги.
Использование телефона
После получения вызова от сигнализации при возникновении
события можно воспользоваться телефоном для удаленного
управления панелью сигнализации.
[1]: Постановка на сигнализацию [2]: Снятие с сигнализации
[3]: Мониторинг вкл. [4]: Мониторинг выкл.
[5]: Голосовое сообщение вкл. [6]: Голосовое сообщение выкл.
[7]: Сирена вкл. [8]: Сирена выкл.
Page 70

7070
Русский
Настройки и запросы
Установки и запросы выполняются при помощи пульта ДУ или панели управления.
Настройки
• Чтобы войти в режим настройки нажмите кнопку установки на панели управления.
• Чтобы изменить настройки нажмите [#] + [Код] + параметры + [#].
• Для выхода из режима настройки нажмите [*] и [#].
Настройка Команда Примечание
Запись голосового сообщения [#] + [19] + сообщение + [#] Д лительность голосового сообщения: макс. 10 сек.
Добавить пульт ДУ [#] + [07] + [xxx] + [#]
[xxx] = идентификатор пульта ДУ (001-120). После добавления нажмите кнопку на
пульте ДУ. 2звуковых сигнала = пульт ДУ успешно добавлен. 1звуковой сигнал =
пульт ДУ уже настроен. Макс. количество пультов ДУ: 120.
Удалить пульт ДУ [#] + [08] + [xxx] + [#] [xxx] = значение пульта ДУ для удаления.
Удалить все пульты ДУ [#] + [08] + [***] + [#] [***] = все подключенные пульты ДУ.
Добавить датчик [#] + [09] + [xxx] + [#] [xxx] = идентификатор датчика (001-120). Макс. количество датчиков: 120.
Удалить датчик [#] + [10] + [xxx] + [#] [xxx] = значение датчика для удаления.
Удалить все датчики [#] + [10] + [***] + [#] [***] = все подключенные датчики.
Установка телефонных номеров
[#] + [3] + [y] + номер телефона + [*#]
[y] = идентификатор номера телефона (1-9).
Идентификаторы 1-6 = обычные телефонные номера.
Идентификаторы 7-9 = экстренные телефонные номера.
Удалить номер(а) телефона
[#] + [3] + [y] + [#]
[y] = идентификатор номера телефона (1-9).
Установка пароля [#] + [50] + пароль + [#] Максимальная длина 4 цифры. Пароль по умолчанию: 1234.
Установка задержки постановки
на сигнализацию
[#] + [51] + секунды + [#] Секунды от 00 до 99. По умолчанию = 00.
Установка задержки
сигнализации
[#] + [52] + секунды + [#] Секунды от 00 до 99. По умолчанию = 60.
Установка времени звучания
сирены
[#] + [53] + минуты + [#] Минуты от 00 до 20. По умолчанию = 01.
Установка даты и времени
[#] + [56] + год + месяц + день +
час + минуты + секунды + [#]
Пример: “20141025183500” = Октябрь 25, 2014 18:35:00.
Установка будильника
[#] + [57] + [yy] + время начала +
время окончания + дни + [#]
[yy] = 05 / 06 (макс. 2 тревоги).
Пример 1: “050900090112345” = сирена звучит в 09.00 в течении 1 минуты (по будням).
Пример 2: “051030103167” = сирена звучит в 10.30 в течении 1 минуты (по будням).
Удалить будильник [#] + [57] + [yy] + [0] + [#] [yy] = 05 / 06.
Настройка пульта ДУ по телефону [#] + [62] + [y] + [#] [y] = 0 (вык л.) или 1 (вкл.). По умолчанию = 1 (вкл.).
Установите количество звонков
для пульта ДУ по телефону
[#] + [18] + [yy] + [#] [yy] = 00 (выкл.) - 99. По умолчанию = 8.
Установка слышимой обратной
связи
[#] + [11] + [y] + [#] [y] = 0 (выкл.) или 1 (вкл.). По умолчанию = 1 (вкл.).
Громкость слышимой обратной
связи
[#] + [79] + [y] + [#] [y] = 0 (выкл.) - 7 (громкий).
Управление яркостью дисплея [#] + [83] + [y] + [#] [y] = 0 (темный) - 7 (яркий).
Установка энергосберегающего
режима
[#] + [84] + [y] + [#] [y] = 0 (выкл.) или 1 (вкл.). По умолчанию = 1 (вкл.).
Громкость встроенной сирены [#] + [87] + [y] + [#] [y] = 0 (выкл.) - 7 (громкий).
Настройка мерцания экрана [#] + [88] + [y] + [#] [y] = 0 (выкл.) или 1 (вкл.). По умолчанию = 0 (выкл.).
Установка определения
подключения телефонной линии
[#] + [13] + [y] + [#] [y] = 0 (выкл.) или 1 (вкл.). По умолчанию = 0 (выкл.).
Отключить использование пульта
ДУ для постановки/снятия
ссигнализации
[#] + [15] + [y] + [#] [y] = 0 (выкл.) или 1 (вкл.). По умолчанию = 0 (выкл.).
Установка сообщений о помехах [#] + [16] + [y] + [#]
Если другие устройства попытаются подключиться к сигнализации, то на 5 секунд
включится сигнал сирены.
[y] = 0 (выкл.) или 1 (вкл.). По умолчанию = 0 (выкл.).
Установка замка панели
управления
[#] + [17] + [y] + [#] [y] = 0 (выкл.) или 1 (вкл.). По умолчанию = 0 (выкл.).
Page 71

7171
Русский
Добавить беспроводную
сигнальную сирену (опция)
Нажмите кнопку «SET» на сигнальной
сирене и войдите в режим обучения
коду пуска.
Нажмите кнопку снятия с
сигнализации на панели управления.
Сигнальная сирена выдаст один
звуковой сигнал. Это означает что
процесс обучения успешно завершен.
Проконсультируйтесь с местным продавцом по доступным вариантам.
Громкость внешней сирены
(опционально)
[#] + [14] + [yy] + [#] [yy] = 00 (выкл.) - 99 (громкий).
Восстановить заводские
установки панели управления
[#] + [9898] + [#]
Перезагрузка системы [#] + [989801] + [#]+ [#]+ [#] Осторожно: Вся система сигнализации возвращена к заводским установкам.
Установка типов зон [#] + [60] + [xxx] + [y] + [z] + [#]
[xxx] = идентификатор датчика (001-120). [y] = тип зоны (1-8). [z] = 0 (сирена выкл.)
или 1 (сирена вкл.).
Типы зон:
1. Обычная зона
2. Зона частичной сигнализации: Датчики в зоне могут деактивироваться при
помощи пульта ДУ. Система поставлена на сигнализацию частично.
3. Интеллектуальная зона Второе срабатывание в период 30 секунд после первого
приводит к сигналу тревоги.
4. Зона тревоги: Любое срабатывание приводит к тревоге, вне зависимости от
режима постановки на сигнализацию.
5. Закрытая зона: Срабатывание не приводит к тревоге, вне зависимости от
режима постановки на сигнализацию.
6. Зона звукового оповещения: Любое срабатывание приводит к выдаче сигнала
дверного звонка, вне зависимости от режима постановки на сигнализацию.
7. Гостевая зона: Любое срабатывание приводит к тревоге при работе в режиме
постановки на сигнализацию. Любое срабатывание приводит к слышимому
сообщению приветствия при работе в режиме снятия с сигнализации.
8. Зона помощи: Любое срабатывание приводит к тревоге и звонку на три
предварительно указанных экстренных номера с предварительно записанным
требованием о помощи. Срабатывает вне зависимости от режима постановки на
сигнализацию.
Установка телефонных
номеров по зонам
[#] + [63] + Идентификатор нач.
устройства + Идентификатор
конечн. устройства + [y] + [#]
[y] = идентификатор номера телефона (1-9).
Пример 1: “630010061234” = автонабор номеров 1-4 при срабатывании зон 001-006.
Пример 2: “630200206” = автонабор номера 6 при срабатывании зоны 020.
Установка расписания
постановки на сигнализацию
[#] + [57] + [yy] + время начала +
время окончания + номер дня + [#]
[yy] = Расписание постановки на сигнализацию (01-04).
Пример 1: “58010700173012345” = постановка по будням между 07:00 и 17:30.
Пример 2: “5802180006005671” = постановка с пятницы до понедельника меж ду
18:00 и 06:00.
Удалить расписание
постановки на сигнализацию
[#] + [57] + [yy] + [0] + [#] [yy] = Расписание постановки на сигнализацию (01-04).
Установка расписания
постановки на сигнализацию
по защитным зонам
[#] + [58] + [yy] + Идентификатор
нач. устройства + Идентификатор
конечн. устройства + [#]
[yy] = Расписание постановки на сигнализацию (01-04).
Пример: “5801001003” = устройства 001-003 следуют расписанию 01.
Установка радиуса действия
для пульта ДУ/панели
управления
[#] + [54] + [xxx] + Идентификатор
нач. устройства + Идентификатор
конечн. устройства + [#]
По умолчанию: Пульт дистанционного управления и панель управления управляют
всеми зонами.
[xxx] = [***] для панели управления / [001-120] для пульта дистанционного управления.
Пример: “54001000010” = пульт дистанционного управления 001 отвечает за зоны 0 - 10.
Установка слышимой обратной
связи для пульта ДУ/панели
управления
[#] + [55] + [xxx] + [y] + [#]
[y] = 0 (выкл.) или 1 (вкл.).
[xxx] = [***] для панели управления / [001-120] для пульта дистанционного управления.
Пример: “55***0” = без слышимой обратной связи при постановке на сигнализацию
спанели управления.
Page 72

7272
Русский
Запрос
• Чтобы войти в режим работы с запросами нажмите кнопку
Запрос на панели управления.
• Чтобы выполнить запрос нажмите [#] + код + (параметры) + [#].
• Для выхода из запросов нажмите [*] и [#].
Запрос Команда Примечание
Хранимый номер телефона [#] + [3] + [y] + [#] [y] = идентификатор номера телефона (1-9).
Пароль [#] + [50] + [#]
Задержка постановки на сигнализацию [#] + [51] + [#]
Время задержки сигнализации [#] + [52] + [#]
Длительность звук сигнализации [#] + [53] + [#]
Радиус действия для пульта ДУ/панели
управления
[#] + [54] + [xxx] + [#]
[xxx] = [***] для панели управления / [001-120] для пульта дистанционного
управления.
Слышимая обратная связь для пульта
ДУ/панели управления
[#] + [55] + [xxx] + [#]
[xxx] = [***] для панели управления / [001-120] для пульта дистанционного
управления.
Дата и время [#] + [56] + [#]
Расписание постановки на сигнализацию [#] + [57] + [yy] + [#]
[yy] = Расписание постановки на сигнализацию (01-04)/ состояние будильника
(05-06).
Зона/устройство по расписанию
постановки на сигнализацию
[#] + [58] + [yy] + [#] [yy] = Расписание постановки на сигнализацию (01-04).
Тип зоны и сирена по зоне/устройству [#] + [60] + [xxx] + [y] + [z] + [#]
[xxx] = идентификатор датчика (001-120). [y] = тип зоны (1-8). [z] = 0 (сирена выкл.)
или 1 (сирена вкл.).
Состояние пульта ДУ по телефону [#] + [62] + [#]
Телефонные номера по зонам/устройству [#] + [63] + [xxx] + [#] [xxx] = идентификатор датчика (001-120).
Громкость слышимой обратной связи [#] + [79] + [#]
Энергосберегающий режим [#] + [84] + [#]
Громкость встроенной сирены [#] + [87] + [#]
Мерцание экрана [#] + [88] + [#]
Голосовое сообщение вкл./выкл. [#] + [11] + [#]
Использование пульта ДУ для
постановки/снятия с сигнализации
[#] + [15] + [#]
Сообщения о помехах [#] + [16] + [#]
Замок панели управления [#] + [17] + [#]
Доступ к логу постановки на
сигнализацию
[#] + [9901] + [#]
Результатом будет последовательность кодов:
[aa]: номер записи (макс. 72 записи). [bbbb]: месяц/день. [cccc]: часы/минуты.
[dd]: YC = пульт дистанционного управления / JP = панель управления /
DS = расписание постановки на сигнализацию.
[ee]: YK = Пульт дистанционного управления / CF = снятие с сигнализации /
BF = постановка / 01 = первый пульт дистанционного управления.
Доступ к логу тревог [#] + [9900] + [#]
Page 73

7373
Русский
Очистка и обслуживание
Предупреждение!
• Перед очисткой или обслуживанием устройства выключите
его и отсоедините сетевой кабель от настенной розетки.
Устройство должно остыть.
• Не производите очистку растворителями или абразивами.
• Не пытайтесь самостоятельно ремонтировать устройство.
Неправильно работающее устройство следует заменить новым.
• Очистите корпус устройства при помощи мягкой влажной ткани.
Тщательно просушите внешнюю поверхность устройства
чистой сухой тканью.
Требования безопасности
Общие требования
• Перед началом работы внимательно прочитайте руководство.
Сохраните руководство для будущего использования.
• Используйте устройство строго по назначению. Устройство
должно использоваться только по прямому назначению
всоответствии с руководством по эксплуатации.
• Запрещается использовать устройство с поврежденными
или неисправными компонентами. Немедленно замените
поврежденное или неисправное устройство.
• Не допускайте к устройству детей без присмотра взрослых.
Не позволяйте детям играть с устройством.
• Запрещается модифицировать устройство.
• Не допускайте воздействия на устройство воды или влаги.
• Не подвергайте устройство воздействию прямого
солнечного света.
• Не подвергайте устройство воздействию источников тепла.
Требования электробезопасности
• В целях предотвращения поражения электрическим током
следует открывать устройство только для проведения
обслуживания и только силами авторизованного персонала.
• При возникновении неполадок отключите устройство от
сети и другого.
• Запрещается использовать устройство с поврежденным или
неисправным сетевым кабелем или штепселем. Если сетевой
кабель или штепсель повреждены или неисправны, из замену
должен проводить изготовитель или уполномоченный
технический специалист.
• Перед подключением устройства убедитесь, что указанное
на нем номинальное напряжение соответствует напряжению
местной электросети.
• Убедитесь, что сетевой кабель не может запутаться.
• Убедитесь, что кабель питания не свисает со столешницы,
таккак в противном случае за него можно зацепиться или
запнуться.
Гарантия
Любые изменения и / или модификации устройства приведут
каннулированию прав пользователя на гарантийное
обслуживание. Мы не несем ответственности за ущерб, понесенный
вследствие неправильного использования этого продукта.
Утилизация
• Это устройство предназначено для раздельного сбора
всоответствующем пункте сбора отходов. Не выбрасывайте
это устройство вместе с бытовыми отходами.
• Для получения дополнительной информации обратитесь
кпродавцу или в местный орган власти, ответственный за
утилизацию отходов.
Документация
Устройство изготовлено и поставлено в соответствии со всеми
применимыми положениями и директивами, действующими для
всех стран-членов Европейского Союза. Оно также соответствует
всем нормами и правилами, действующим в стране продажи.
Официальная документация предоставляется по запросу.
Официальная документация включает, но не ограничивается
декларацией соответствия.
Ограничение ответственности
Дизайн и технические характеристики могут быть изменены без
предварительного уведомления. Все логотипы брендов
иназвания продуктов являются товарными знаками или
зарегистрированными торговыми марками их соответствующих
владельцев и следовательно признаются таковыми.
Page 74

7474
Türkçe
SAS-ALARM240
Alarm sistemi
Açıklama
Uzaktan kumanda (şek. A)
1. düğmesi
• Etkinleştirme düğmesi
2.
düğmesi
• Devre dışı bırakma düğmesi
3.
düğmesi
• Kısmi etkinleştirme düğmesi
4.
düğmesi
• Acil durum düğmesi
Kontrol paneli (ön) (şek. B1)
Kontrol paneli şifreyle korunuyorsa, önce şifreyi girin.
5. Rakam düğmeleri
6.
düğmesi
• * düğmesi / Acil durum düğmesi
7.
düğmesi
• # düğmesi / Ayar düğmesi
8.
düğmesi
• Etkinleştirme düğmesi
9.
düğmesi
• Devre dışı bırakma düğmesi
10.
düğmesi
• Sorgu düğmesi
11. Saat ekranı
12.
göstergesi
• Etkinleştirme göstergesi
13.
göstergesi
• Kısmi etkinleştirme göstergesi
14.
göstergesi
• Devre dışı bırakma göstergesi
15.
göstergesi
• Pil göstergesi
16.
göstergesi
• Zaman ayarlı etkinleştirme/devre dışı
bırakma göstergesi
17.
göstergesi
• Tümleşik siren göstergesi
Kontrol paneli (üst) (şek. B2)
18. Pil güç anahtarı
19. DC girişi (5V)
20. Siren
21. Telefon hattı
Uzatma hattı
Kurulum
• Alarm sistemini metal cisimlerden veya ev aletlerinden uzak ve
merkezi bir yerde kurun.
• Telefon hattını, uzatma hattını, sireni ve diğer kabloları bağlayın.
• Kontrol panelinin güç kaynağını açın.
• Pil güç anahtarını "ON" konumuna getirin.
Kullanım
Etkinleştirme
Tüm dedektörler etkinleştirilir. Bir olay meydana gelirse, alarm
sistemi derhal çalışır.
• Uzaktan kumanda: Etkinleştirme düğmesine basın.
• Kontrol paneli: Etkinleştirme düğmesine basın.
Etkinleştirme göstergesi ekranda görüntülenir.
Kısmi etkinleştirme
Kullanıcı seçimli dedektörler etkinleştirilir. Bir olay meydana gelirse,
alarm sistemi derhal çalışır.
• Uzaktan kumanda: Kısmi etkinleştirme düğmesine basın.
• Kontrol paneli: Etkinleştirme düğmesine iki kere basın.
Kısmi etkinleştirme göstergesi ekranda görüntülenir.
Devre dışı bırakma
Tüm dedektörler devre dışı bırakılır. Bir olay meydana gelirse, alarm
sistemi çalışmaz.
• Uzaktan kumanda: Devre dışı bırakma düğmesine basın.
• Kontrol paneli: Devre dışı bırakma düğmesine basın.
Devre dışı bırakma göstergesi ekranda görüntülenir.
Acil durum alarmı
Etkinleştirilmiş olsun veya olmasın, alarm sistemi derhal çalışır.
• Uzaktan kumanda: Acil durum düğmesine basın.
• Kontrol paneli: Acil durum düğmesine basın.
Telefonun kullanılması
Bir olay halinde alarm sisteminden çağrı aldıktan sonra, alarm
panelini uzaktan kontrol etmek için telefonu da kullanabilirsiniz.
[1]: Etkinleştirme [2]: Devre dışı bırakma
[3]: İzleme açık [4]: İzleme kapalı
[5]: Ses istemi açık [6]: Ses istemi kapalı
[7]: Siren açık [8]: Siren kapalı
Page 75

7575
Türkçe
Ayarlar ve sorgular
Ayarlar ve sorgular, uzaktan kumanda veya kontrol paneli kullanılarak uygulanabilir.
Ayarlar
• Ayar moduna girmek için, kontrol panelindeki ayar düğmesine basın.
• Ayarları değiştirmek için, [#] + [code] + parameters + [#] düğmelerine basın.
• Ayar modundan çıkmak için, [*] ve [#] düğmelerine basın.
Ayar Komut Açıklamalar
Sesli mesaj kaydet [#] + [19] + mesaj + [#] Sesli mesaj süresi: maks. 10 saniye.
Uzaktan kumanda ekle [#] + [07] + [xxx] + [#]
[xxx] = uzaktan kumanda kodu (001-120). Ekledikten sonra, uzaktan kumandada bir
düğmeye basın. 2bip sesi = uzaktan kumanda başarıyla eklendi. 1bip sesi = uzaktan
kumanda zaten yapılandırılmış. Maks. uzaktan kumanda sayısı: 120.
Uzaktan kumandayı sil [#] + [08] + [xxx] + [#] [xxx] = kaldırılacak uzaktan kumandanın değeri.
Tüm uzaktan kumandaları sil [#] + [08] + [***] + [#] [***] = tüm bağlı uzaktan kumandalar.
Dedektör ekle [#] + [09] + [xxx] + [#] [xxx] = dedektör kodu (001-120). Maks. dedektör sayısı: 120.
Dedektörü sil [#] + [10] + [xxx] + [#] [xxx] = kaldırılacak dedektörün değeri.
Tüm dedektörleri sil [#] + [10] + [***] + [#] [***] = tüm bağlı dedektörler.
Telefon numarasını ayarla
[#] + [3] + [y] + telefon numarası + [*#]
[y] = telefon numarası kodu (1-9).
Kod 1-6 = normal telefon numarası. Kod 7-9 = acil durum telefon numarası.
Telefon numarasını sil
[#] + [3] + [y] + [#]
[y] = telefon numarası kodu (1-9).
Şifreyi ayarla [#] + [50] + şifre + [#] Şifre en fazla 4 rakamlıdır. Varsayılan şifre: 1234.
Etkinleştirmeyi erteleme süresini
ayarla
[#] + [51] + saniye + [#] 00 - 99 arası saniye. Varsayılan = 00.
Alarmı erteleme süresini ayarla [#] + [52] + saniye + [#] 00 - 99 arası saniye. Varsayılan = 60.
Siren süresini ayarla [#] + [53] + dakika + [#] 00 - 20 arası dakika. Varsayılan = 01.
Tarih ve saati ayarla
[#] + [56] + yıl + ay + gün + saat +
dakika + saniye + [#]
Örnek: “20141025183500” = Ekim 25, 2014 18:35:00.
Çalar saati ayarla
[#] + [57] + [yy] + başlangıç saati +
bitiş saati + gün(ler) + [#]
[yy] = 05 / 06 (maks. 2 alarm).
Örnek 1: “050900090112345” = siren, hafta içi her gün saat 09.00'da 1 dakik a boyunca çalar.
Örnek 2: “051030103167” = siren, haftasonları saat 10.30'da 1 dakika boyunca çalar.
Çalar saati sil [#] + [57] + [yy] + [0] + [#] [yy] = 05 / 06.
Telefonla uzaktan kumandayı ayarla [#] + [62] + [y] + [#] [y] = 0 (kapalı) veya 1 (açık). Varsayılan = 1 (açık).
Telefonla uzaktan kumanda için
çalma sayısını ayarla
[#] + [18] + [yy] + [#] [yy] = 00 (kapalı) - 99. Varsayılan = 8.
Sesli geribildirimi ayarla [#] + [11] + [y] + [#] [y] = 0 (kapalı) veya 1 (açık). Varsayılan = 1 (açık).
Sesli geribildirimin ses düzeyi [#] + [79] + [y] + [#] [y] = 0 (kapalı) - 7 (yüksek).
Ekran parlaklık kontrolü [#] + [83] + [y] + [#] [y] = 0 (karanlık) - 7 (parlak).
Güç tasarrufu modunu ayarla [#] + [84] + [y] + [#] [y] = 0 (k apalı) veya 1 (açık). Varsayılan = 1 (açık).
Tümleşik sirenin ses düzeyi [#] + [87] + [y] + [#] [y] = 0 (kapalı) - 7 (yüksek).
Yan ıp sönen ekran ışığını ayarla [#] + [88] + [y] + [#] [y] = 0 (kapalı) veya 1 (açık). Varsayılan = 0 (kapalı).
Telefon hattı bağlantı algılamayı
ayarla
[#] + [13] + [y] + [#] [y] = 0 (kapalı) veya 1 (açık). Varsayılan = 0 (kapalı).
Etkinleştirme/devre dışı bırakma
için uzaktan kumanda kullanımını
devre dışı bırak
[#] + [15] + [y] + [#] [y] = 0 (kapalı) veya 1 (açık). Varsayılan = 0 (kapalı).
Müdahale istemlerini ayarla [#] + [16] + [y] + [#]
Diğer cihazlar alarm sistemine bağlanmaya çalışırsa, siren 5 saniye boyunca çalacaktır.
[y] = 0 (kapalı) veya 1 (açık). Varsayılan = 0 (kapalı).
Kontrol paneli kilidini ayarla [#] + [17] + [y] + [#] [y] = 0 (kapalı) veya 1 (açık). Varsayılan = 0 (kapalı).
Kablosuz aş siren ekle
(isteğe bağlı)
Başlangıç kodu öğrenimine girmek için,
aş sirendeki “SET” düğmesine basın.
Kontrol panelindeki devre dışı bırakma
düğmesine basın. Flaş siren, öğrenim
sürecinin başarıyla tamamlandığını
göstermek için bir kez bip sesi çıkarır.
Bulunabilirliği hakkında yerel bayinizle görüşün.
Harici sirenin ses düzeyi
(isteğe bağlı)
[#] + [14] + [yy] + [#] [yy] = 00 (kapalı) - 99 (yüksek).
Kontrol paneli için fabrika
ayarlarına geri dön
[#] + [9898] + [#]
Sistem sıfırlama [#] + [989801] + [#]+ [#]+ [#] Dikkat: Tüm alarm sistemi, fabrika ayarlarına geri döner.
Page 76

7676
Türkçe
Bölge türlerini ayarla [#] + [60] + [xxx] + [y] + [z] + [#]
[xxx] = dedektör kodu (001-120). [y] = bölge türü (1-8). [z] = 0 (siren kapalı) veya 1 (siren açık).
Bölge türleri:
1. Normal bölge
2. Kısmi etkinleştirme bölgesi: Bölgedeki dedektörler, uzaktan kumandayla devre dışı
bırakılabilir. Sistem kısmen etkinleştirilir.
3. Akıllı bölge: İlk tetiklemenin ardından 30 saniye içinde ikinci bir tetikleme alarma
sebep olur.
4. Acil durum bölgesi: Etkinleştirme modu ne olursa olsun, herhangi bir tetikleme
alarmla sonuçlanır.
5. Kapalı bölge: Etkinleştirme modu ne olursa olsun, herhangi bir tetikleme alarmla
sonuçlanmaz.
6. Zil bölgesi: Etkinleştirme modu ne olursa olsun, herhangi bir tetikleme, kapı zili sesi verir.
7. Karşılama bölgesi: Etkinleştirildiğinde, herhangi bir tetikleme alarmla sonuçlanır.
Devre dışı bırakıldığında, herhangi bir tetikleme, sesli karşılama mesajıyla sonuçlanır.
8. Yar dım bölgesi: Etkinleştirme modu ne olursa olsun, herhangi bir tetikleme, alarm ve
önceden kaydedilmiş yardım mesajıyla üç acil durum numarasının çevrilmesi ile sonuçlanır.
Alarm bölgesine göre belirli
telefon numaralarını ayarla
[#] + [63] + başlangıç cihazı kodu +
bitiş cihazı kodu + [y] + [#]
[y] = telefon numarası kodu (1-9).
Örnek 1: “630010061234” = bölge 001-006 tetiklendiğinde telefon 1-4'ü otomatik çevir.
Örnek 2: “630200206” = bölge 020 tetiklendiğinde telefon 6'yı otomatik çevir.
Etkinleştirme planını ayarla
[#] + [57] + [yy] + başlangıç saati +
bitiş saati + gün sayısı + [#]
[yy] = etkinleştirme planı (01-04).
Örnek 1: “58010700173012345” = hafta içi 07:00 ile 17:30 saatleri arasında etkinleştir.
Örnek 2: “5802180006005671” = Cuma'dan Pazartesi'ye 18:00 ile 06:00 saatleri arasında
etkinleştir.
Etkinleştirme planını sil [#] + [57] + [yy] + [0] + [#] [yy] = etkinleştirme planı (01-04).
Savunma bölgeriyle etkinleştirme
planı ayarla
[#] + [58] + [yy] + başlangıç cihazı
kodu + bitiş cihazı kodu + [#]
[yy] = etkinleştirme planı (01-04).
Örnek: “5801001003” = cihazlar 001-003, etkinleştirme planı 01'i izler.
Uzaktan kumanda/kontrol paneli
için kontrol menzilini ayarla
[#] + [54] + [xxx] + başlangıç cihazı
kodu + bitiş cihazı kodu + [#]
Varsayılan: Uzaktan kumanda ve kontrol paneli tüm bölgeleri kontrol eder.
[xxx] = kontrol paneli için [***] / uzaktan kumanda için [001-120].
Örnek: “54001000010” = uzaktan kumanda 001, 0 ile 10 arasındaki bölgeleri kontrol eder.
Uzaktan kumanda/kontrol paneli
için sesli geribildirimi ayarla
[#] + [55] + [xxx] + [y] + [#]
[y] = 0 (kapalı) veya 1 (açık).
[xxx] = kontrol paneli için [***] / uzaktan kumanda için [001-120].
Örnek: “55***0” = kontrol paneli etkinleştirilirken sesli geribildirim yok.
Sorgu
• Sorgu moduna girmek için, kontrol panelindeki sorgu düğmesine basın.
• Sorguları uygulamak için, [#] + [code] + (parameters) + [#] düğmelerine basın.
• Sorgu modundan çıkmak için, [*] ve [#] düğmelerine basın.
Sorgu Komut Açıklamalar
Kayıtlı telefon numarası [#] + [3] + [y] + [#] [y] = telefon numarası kodu (1-9).
Şifre [#] + [50] + [#]
Etkinleştirmeyi erteleme süresi [#] + [51] + [#]
Alarmı erteleme süresi [#] + [52] + [#]
Alarm sesi süresi [#] + [53] + [#]
Uzaktan kumanda/kontrol paneli için
kontrol menzili
[#] + [54] + [xxx] + [#] [xxx] = kontrol paneli için [***] / uzaktan kumanda için [001-120].
Uzaktan kumanda/kontrol paneli için sesli
geribildirim
[#] + [55] + [xxx] + [#] [xxx] = kontrol paneli için [***] / uzaktan kumanda için [001-120].
Tarih ve saat [#] + [56] + [#]
Etkinleştirme planı [#] + [57] + [yy] + [#] [yy] = etkinleştirme planı (01-04) / çalar saat durumu (05-06).
Etkinleştirme planına göre bölge/cihaz [#] + [58] + [yy] + [#] [yy] = etkinleştirme planı (01-04).
Bölge türü ve bölgeye/cihaza göre siren [#] + [60] + [xxx] + [y] + [z] + [#] [xxx] = cihaz kodu (001-120). [y] = bölge türü (1-8). [z] = 0 (siren kapalı) veya 1 (siren açık).
Telefonla uzaktan kumanda durumu [#] + [62] + [#]
Bölgeye/cihaza göre telefon numaraları [#] + [63] + [xxx] + [#] [xxx] = cihaz kodu (001-120).
Sesli geribildirimin ses düzeyi [#] + [79] + [#]
Güç tasarrufu modu [#] + [84] + [#]
Tümleşik sirenin ses düzeyi [#] + [87] + [#]
Yan ıp sönen ekran ışığı [#] + [88] + [#]
Ses istemi açık/kapalı [#] + [11] + [#]
Etkinleştirme/devre dışı bırakma için
uzaktan kumanda kullanımı
[#] + [15] + [#]
Müdahale istemleri [#] + [16] + [#]
Kontrol paneli kilidi [#] + [17] + [#]
Erişim günlüğü etkinleştirme [#] + [9901] + [#] Sonuç, bir komut dizisi olacaktır:
[aa]: kayıt sayısı (maks. 72 kayıt). [bbbb]: ay/gün. [cccc]: saat/dakika.
[dd]: YC = uzaktan kumanda / JP = kontrol paneli / DS = etkinleştirme planı.
[ee]: YK = uzaktan kumanda / CF = devre dışı bırakma / BF = etkinleştirme /
01 = ilk uzaktan kumanda.
Erişim günlüğü alarmı [#] + [9900] + [#]
Page 77

7777
Türkçe
Temizlik ve bakım
Uyarı!
• Temizlik veya bakım öncesinde, cihazı kapatın, şebeke şini
prizden çekin ve cihaz soğuyuncaya kadar bekleyin.
• Temizlik solventleri veya aşındırıcılar kullanmayın.
• Cihazı onarmaya çalışmayın. Cihaz doğru şekilde çalışmıyorsa,
yeni bir cihazla değiştirin.
• Cihazın dış tarafını yumuşak, nemli bir bezle silin. Cihazın dış
yüzeyini temiz, kuru bir bezle tam olarak kurutun.
Güvenlik
Genel güvenlik
• Kullanmadan önce kılavuzu dikkatli bir şekilde okuyun. Kılavuzu
daha sonra başvurmak için saklayın.
• Cihazı sadece tasarlanan amacı için kullanın. Cihazı kılavuzda
açıklanan amaçların dışındaki amaçlar için kullanmayın.
• Herhangi bir parçası hasarlı veya kusurlu ise cihazı kullanmayın.
Cihaz hasarlı veya kusurlu ise cihazı derhal değiştirin.
• Cihaz bir yetişkin gözetimi olmadan çocuklar tarafından
kullanılmamalıdır. Çocuklar, cihazla oynamamalıdır.
• Cihazda herhangi bir şekilde değişiklik yapmayın.
• Cihazı su veya neme maruz bırakmayın.
• Cihazı doğrudan güneş ışığına maruz bırakmayın.
• Cihazı ısı kaynaklarından uzak tutun.
Elektrik güvenliği
• Elektrik çarpma riskini azaltmak için servis gerekli olduğunda bu
ürün sadece yetkili bir teknisyen tarafından açılmalıdır.
• Bir sorun meydana geldiğinde ürünün elektrikle ve diğer
aygıtlarla olan bağlantısını kesin.
• Şebeke kablosu veya şebeke şi hasarlı veya kusurlu ise, cihazı
kullanmayın. Şebeke kablosu veya şi hasarlı veya kusurlu ise,
üretici veya yetkili bir tamirci tarafından mutlaka değiştirilmelidir.
• Kullanmadan önce, şebeke voltajının cihazın anma değerleri
plakasında belirtilen voltaj ile aynı olduğunu daima kontrol edin.
• Şebeke kablosunun dolanmaya elverişli olmadığından emin
olun.
• Şebeke kablosunun mutfak tezgahının kenarına takılmadığından
ve kazara takılıp düşülecek bir konumda olmadığından emin olun.
Garanti
Ürün üzerindeki tüm değişikliler ve/veya modikasyonlar garantiyi
geçersiz kılar. Ürünün hatalı kullanımından kaynaklanan hasarlar
için şirketimiz tarafından hiçbir sorumluluk kabul edilmemektedir.
Elden çıkarma
• Ürün, uygun bir toplama noktasında ayrı olarak toplanmak üzere
belirlenmiştir. Ürünü evsel artıklarla birlikte atmayın.
• Daha fazla bilgi için satıcınızla veya atık yönetiminden sorumlu
yerel makamlarla iletişime geçin.
Belgeler
Ürün tüm Avrupa Birliği üye ülkeleri için geçerli olan ilgili tüm
yönetmelikler ve yönergelere uygun olarak üretilmiş ve tedarik
edilmiştir. Ürün satıldığı ülkedeki tüm geçerli şartnameler ve
yönetmeliklere uygundur.
Talep edilmesi durumunda resmi belgeler sunulabilir. Resmi
belgeler Uygunluk Beyanını içerir, ancak bununla sınırlı değildir.
Feragatname
Tasarımlar ve özellikler önceden bildirimde bulunulmaksızın
değiştirilebilir. Tüm logolar, markalar ve ürün adları ticari markalardır
veya ilgili sahiplerinin kayıtlı ticari markalarıdır ve bu şekilde ele
alınmaktadır.
Page 78

78
Page 79

79
Page 80

T: +31 (0)73-5993965
E: service@nedis.com
W: http://www.nedis.com/en-us/contact/contact-form.htm
NEDIS B.V.
De Tweeling 28
5215 MC ’s-Hertogenbosch
THE NETHERLANDS
 Loading...