

Page 1

ENGLISH
USER MANUAL
P.SUP.NBT130KN
UNIVERSAL 130W NOTEBOOK ADAPTER
WITH USB PORT
READ INSTRUCTION BEFORE USE!
Page 2
2
POWER UP YOUR NOTEBOOK COMPUTER
1. You can connect your notebook computer (or any other appliance
that work within the offered output voltages and output power range)
with this power supply by connecting the supplied detachable
adaptor plug.
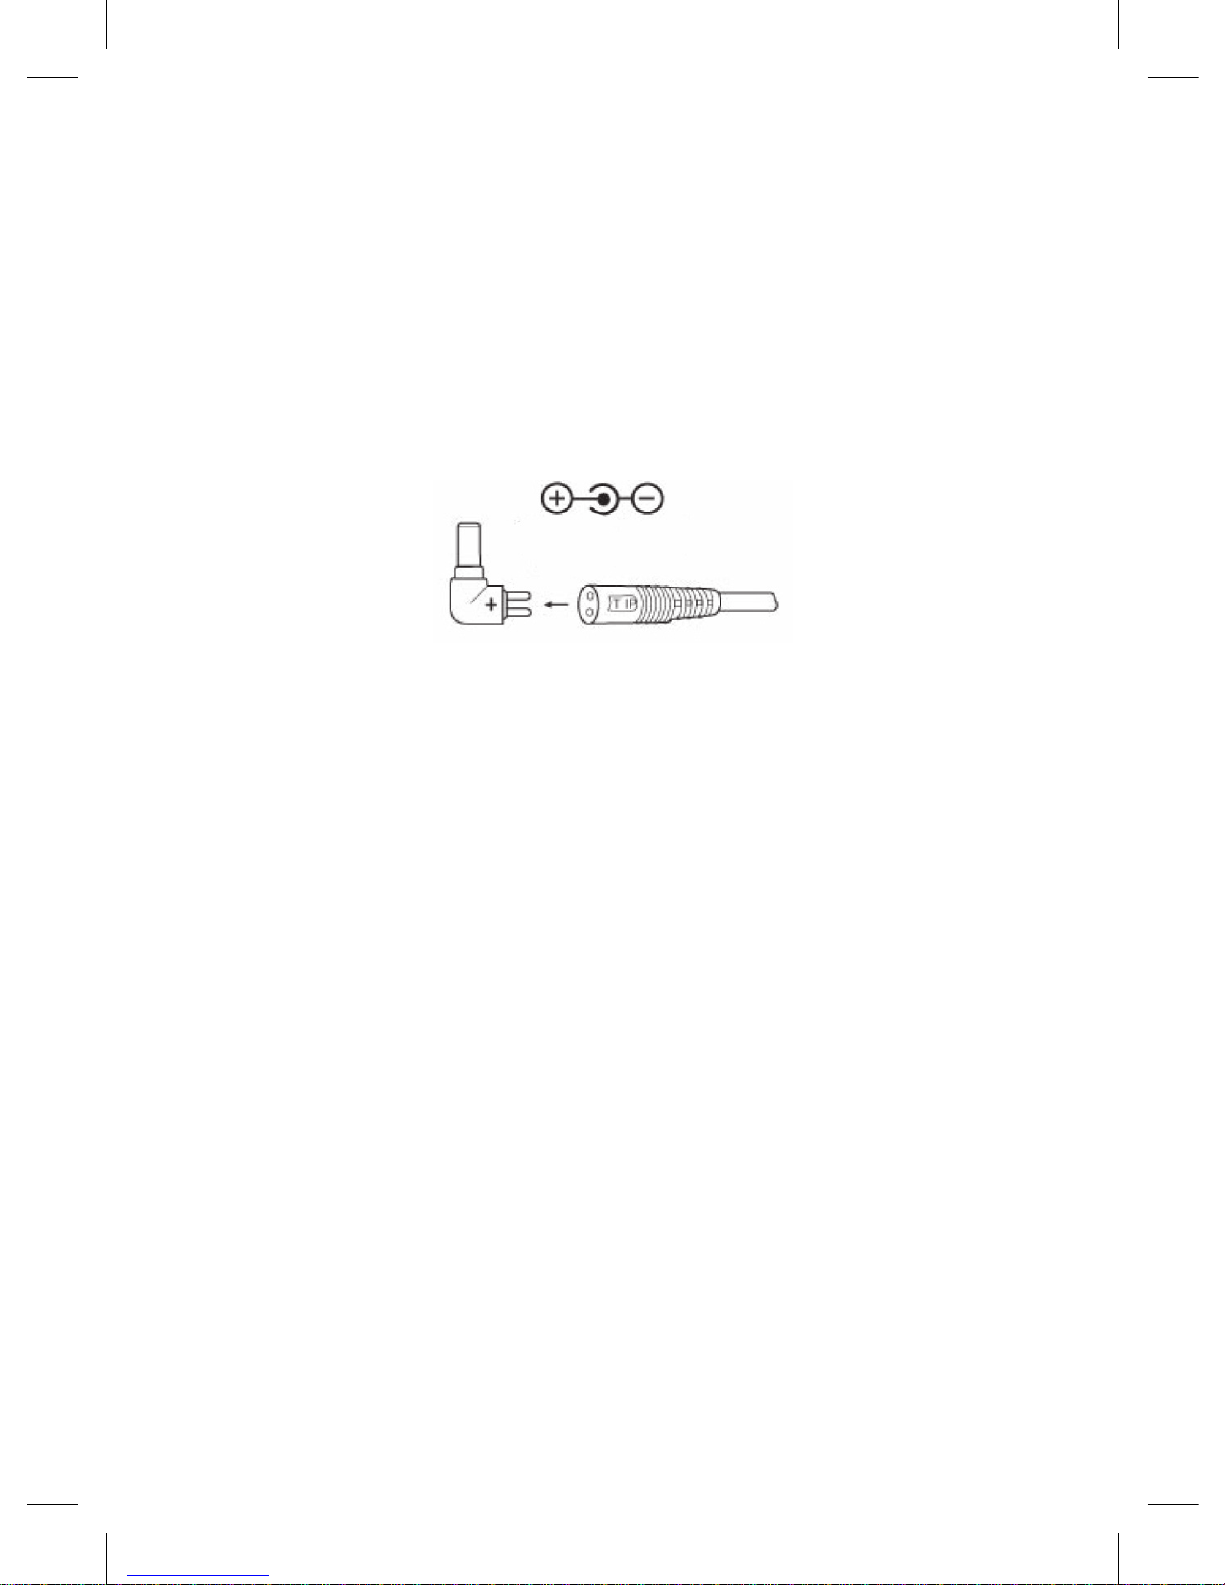
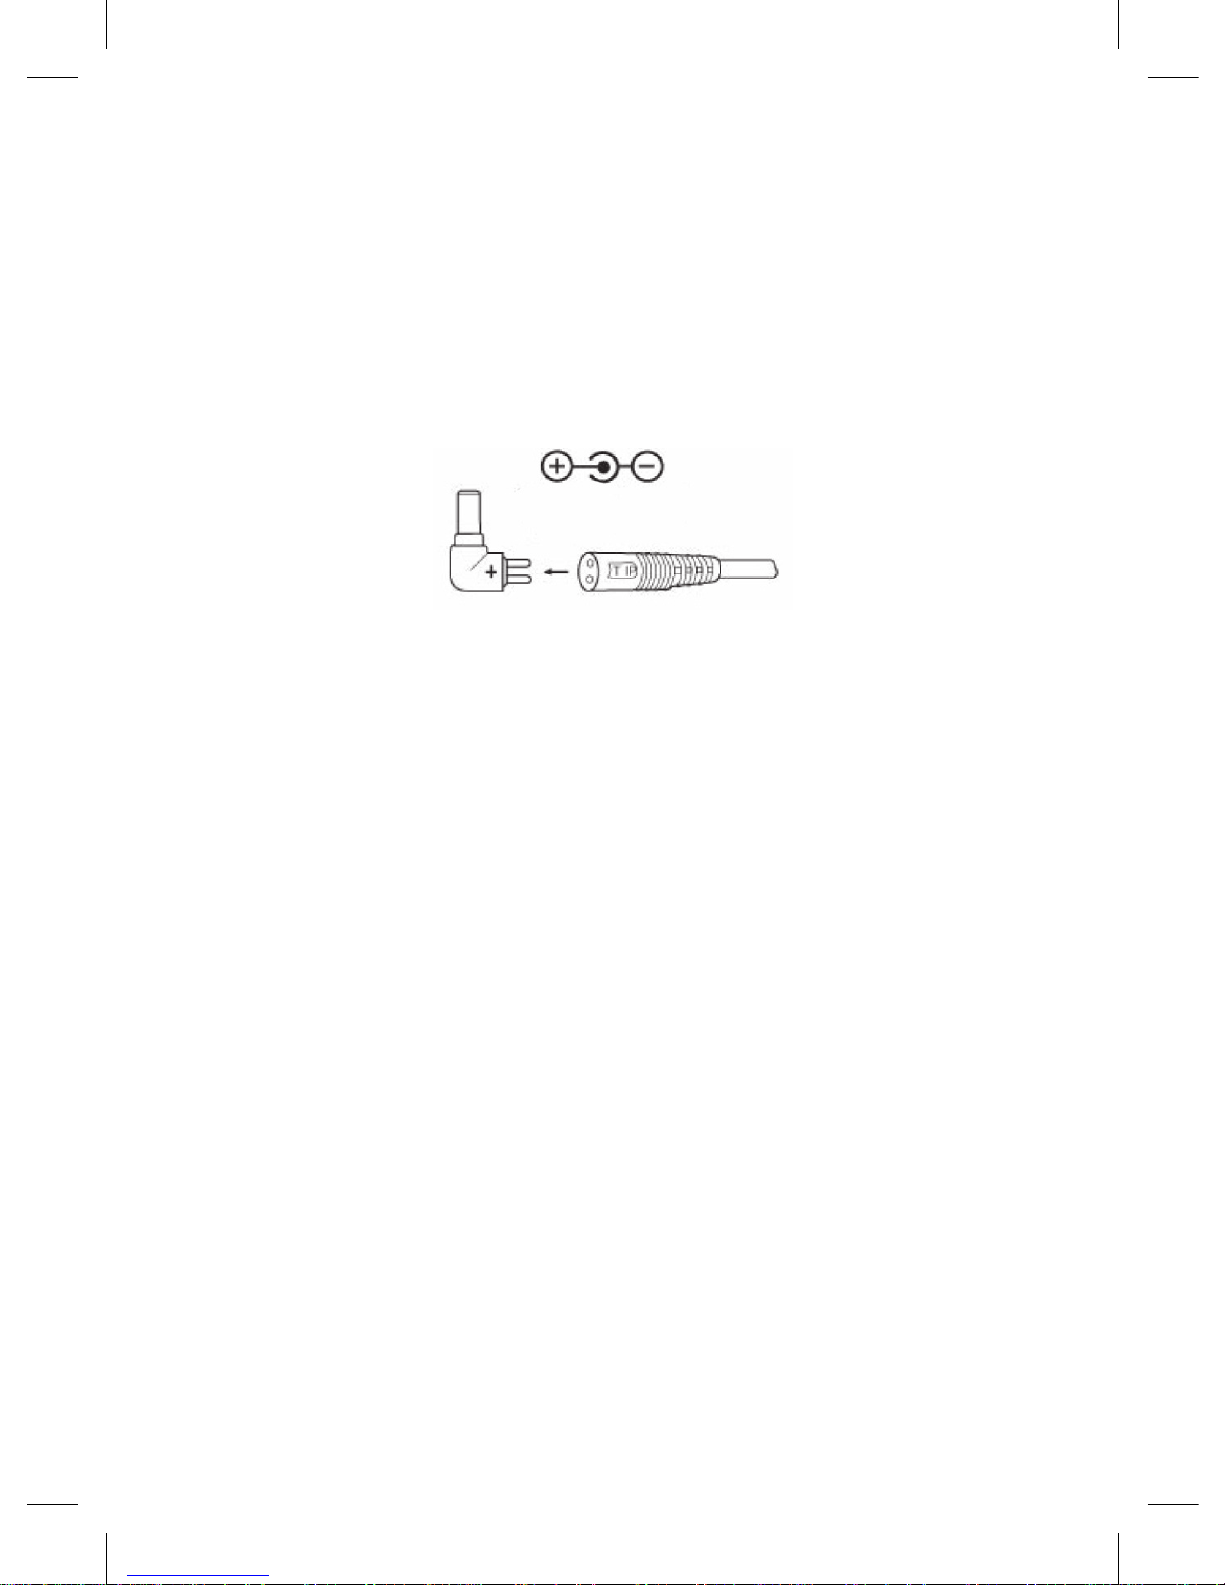
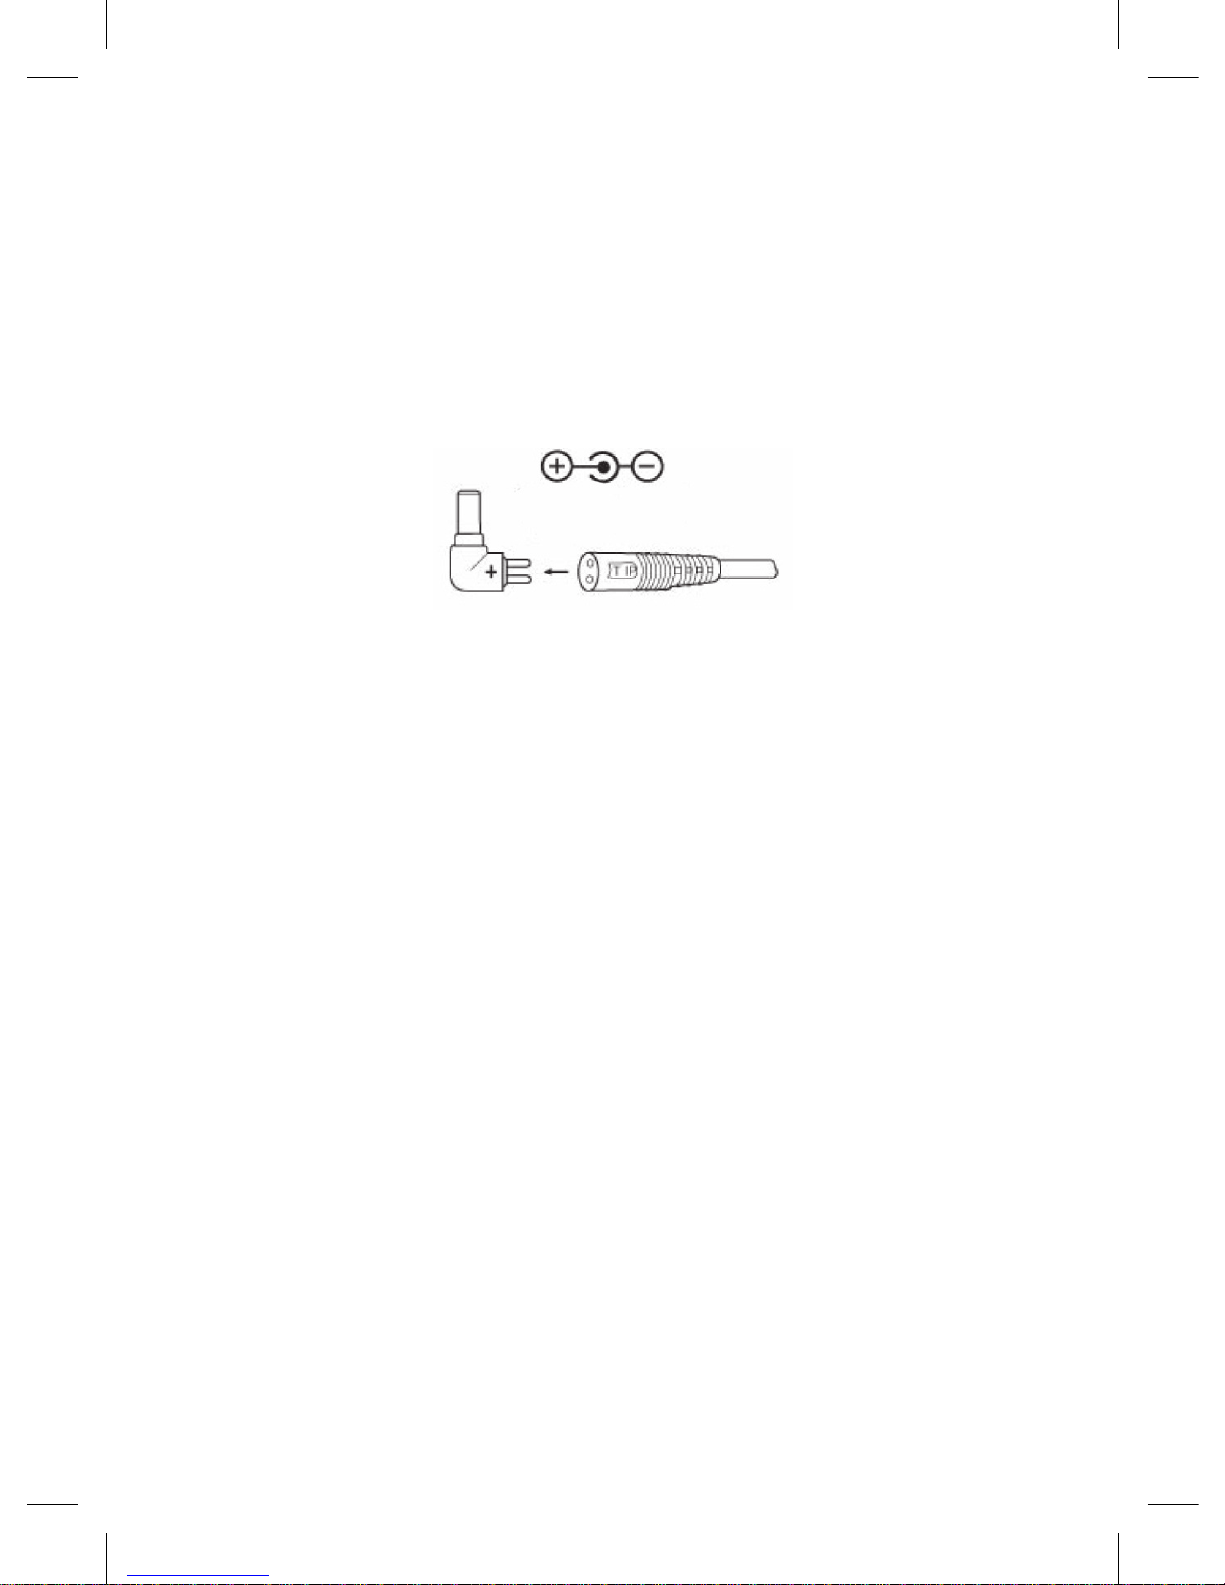
2. Determine proper connector size. The polarity of the small
connectors is pre-set with positive tip polarity. Common symbol is
shown as follows:
3. Set the DC voltage selector at the desired voltage position. (ie. 12V
at 8A or 15V/16V/18V/19V/20V at 6A or 22V at 5A) before you
connect it to your notebook computer. You may fi nd the required
voltage setting in your original AC adaptor or in the computer
user’s manual (PLEASE NOTE THAT AN INCORRECT VOLTAGE
SETTING CANNOT POWER UP YOUR NOTEBOOK COMPUTER
AND CAN DAMAGE YOUR COMPUTER. IF YOU ARE UNSURE,
NEVER TRY TO CONNECT IT WITH YOUR COMPUTER.
CONSULT WITH YOUR LOCAL DEALER!!!).
4. Make sure the total connected load does not exceed the rated
output current of the power supply.
5. Connect the power cord to the power supply fi rst and then insert AC
plug into your wall socket. The LED indicator will light instantly.
6. Switch on your computer.
7. Please note: The LED indicator will come on and stay on only when
set on any voltage.
POSITIVE TIP
POLARITY
Page 3

3
POWER UP YOUR USB DEVICE
1. You can connect your USB devices with this power supply by
connecting the USB output (female) port.
2. The DC output from the USB port is 5V at 1A regulated. You may
fi nd the required output current in the USB devices’ user manual.
3. Make sure the total connected load does not exceed the rated
output current of the power supply.
4. Connect the power cord to the power supply fi rst and then insert AC
plug into your wall socket.
5. Switch on your USB devices.
CAUTION
1. Do not short circuit the output terminals.
2. Ensure correct voltage is used as continuous excess voltage could
damage your notebook computer.
3. For DC plug output: Do not try to use this power supply with
appliance requiring more than 8Amp for 12V and 6Amp for 15-20V
and 5Amp for 22V (120 watts max.)
For USB ouput: Do not try to use this power supply with appliance
requiring more than 1Amp for 5V.
4. Do not attempt to open this unit.
5. Remove from mains when not in use.
6. If the supply cord of this power supply is damaged, the power supply
should be returned to the manufacturer or his agent for the cord to
be replaced. This power supply must be earthed.
Page 4

Page 5

DEUTSCHES
BENUTZERHANDBUCH
P.SUP.NBT130KN
UNIVERSALER 130 W-NOTEBOOKADAPTER
MIT USB-PORT
LESEN SIE VOR DER ANWENDUNG DIE
ANWEISUNGEN DURCH!
1
Page 6
2
VERSORGEN SIE IHR NOTEBOOK MIT STROM
1. Sie können Ihr Notebook (oder ein anderes Gerät, das im
angebotenen Ausgangsspannungs- oder -leistungsbereich
arbeitet) mit dem mitgelieferten abziehbaren Adapterstecker an
diese Stromversorgung anschließen.
2. Ermitteln Sie die richtige Steckergröße. Die Polarität der kleinen
Stecker ist auf positiv voreingestellt. Das übliche Symbol sieht so aus:
3. Stellen Sie den Gleichspannungswahlschalter auf die gewünschte
Spannung (d.h. 12 V bei 8 A oder 15 V/16 V/18 V/19 V/20 V bei
6 A oder 22 V bei 5 A), bevor Sie Ihr Notebook anschließen.
Sie fi nden die erforderliche Spannungseinstellung an Ihrem
Original-Netzadapter oder im Benutzerhandbuch des Notebooksl
(BEACHTEN SIE BITTE, DASS IHR NOTEBOOK BEI EINER
FALSCHEN SPANNUNGSEINSTELLUNG NICHT GESPEIST
WERDEN KANN UND BESCHÄDIGT WERDEN KANN. WENN
SIE SICH NICHT SICHER SIND, VERSUCHEBN SIE NIE, DAS
NOTEBOOK ANZUSCHLIESSEN. SPRECHEN SIE MIT IHREM
LOKALEN HÄNDLER!!!).
4. Überzeugen Sie sich davon, dass die Gesamtbelastung den
Nennausgangsstrom der Stromversorgung nicht übersteigt.
5. Schließen Sie das Netzkabel zuerst an die Stromversorgung an,
und stecken Sie dann den Netzstecker in die Wandsteckdose. Die
LED-Anzeige geht sofort an.
6. Schalten Sie Ihr Notebook an.
7. Bitte beachten Sie: Die LED-Anzeige wird angeschaltet und bleibt
an, nur wenn eine beliebige Spannung eingestellt ist.
POSITIVE
POLARITÄT
Page 7

VERSORGEN SIE IHR USB-GERÄT MIT STROM
1. Sie können Ihre USB-Geräte über den USB-Ausgangsport
(Steckdose) an die Stromversorgung anschließen.
2. Der GS-Ausgang vom USB-Port beträgt 5 V bei geregelten 1 A. Sie
fi nden den erforderlichen Ausgangsstrom im Benutzerhandbuch
des USB-Geräts.
3. Überzeugen Sie sich davon, dass die Gesamtbelastung den
Nennausgangsstrom der Stromversorgung nicht übersteigt.
4. Schließen Sie das Netzkabel zuerst an die Stromversorgung an,
und stecken Sie dann den Netzstecker in die Wandsteckdose.
5. Schalten Sie Ihre USB-Geräte an.
VORSICHT
1. Schließen Sie die Ausgangsklemmen nicht kurz.
2. Stellen Sie sicher, dass die richtige Spannung benutzt wird, da eine
ständige zu große Spannung Ihr Notebook beschädigen könnte.
3. Für GS-Steckerausgang: Versuchen Sie nicht, diese
Stromversorgung an einem Gerät zu benutzen, das mehr als 8 A für
12V oder 6 A für 15-20 V und 5 A für 22 V (max. 120 W) verlangt.
Für USB-Ausgang: Versuchen Sie nicht, diese Stromversorgung
an einem Gerät zu verwenden, das mehr als 1 A für 5 V verlangt.
4. Versuchen Sie nicht, dieses Gerät zu öffnen.
5. Entfernen Sie das Gerät vom Stromnetz, wenn es nicht verwendet
wird.
6. Wenn das Netzkabel dieser Stromversorgung beschädigt ist,
sollte die Stromversorgung an den Hersteller oder seinen Vertreter
zurückgeschickt werden, damit das Kabel gewechselt wird. Diese
Stromversorgung muss geerdet werden.
3
Page 8

Page 9

FRANCAIS
MANUEL UTILISATEUR
P.SUP.NBT130KN
ADAPTATEUR UNIVERSEL 130W POUR
NOTEBOOK AVEC PORT USB
A LIRE AVANT UTILISATION !
1
Page 10
2
ALIMENTER VOTRE NOTEBOOK (CALEPIN ELECTRONIQUE)
1. Vous pouvez raccorder votre notebook (ou tout autre appareil
fonctionnant à la tension et à la puissance de sortie défi nies) à ce
bloc d'alimentation en branchant la prise amovible de l'adaptateur.
2. Vérifi ez que la taille du connecteur soit la bonne. La polarité des
petits connecteurs est positive. Le symbole usuel est montré cidessous :
3. Positionnez le sélecteur de tension c.c à la position voulue. (Ex : 12V
à 8A ou 15V/16V/18V/19V/20V à 6A ou 22V à 5A) avant d'effectuer
le raccordement avec votre notebook. Vous trouverez la tension
nécessaire appropriée dans le manuel de votre adaptateur d'origine ou
dans celui du notebook (NOTEZ QU'UNE TENSION INCORRECTE
PEUT SOIT NE PAS PERMETTRE L'ALLUMAGE DE VOTRE
APPAREIL, SOIT L'ENDOMMAGER. SI VOUS N'ETES PAS SUR
DE VOUS, N'EFFECTUEZ PAS LE BRANCHEMENT. PRENEZ
CONTACT AVEC VOTRE REVENDEUR !!!).
4. Assurez-vous que la charge totale des éléments raccordés n'excède
pas la valeur du courant nominal de sortie du bloc d'alimentation.
5. Raccordez d'abord le cordon d'alimentation au bloc d'alimentation
puis insérez la prise c.a dans votre prise murale. Le voyant s'allume
immédiatement.
6. Allumez votre ordinateur.
7. A noter : Le voyant s'allume et reste allumé qu'il soit positionné sur
n'importe quelle tension.
POLARITE
POSITIVE DE
L'EMBOUT
Page 11

3
ALIMENTER UN PERIPHERIQUE USB
1. Vous pouvez raccorder vos périphériques USB à ce bloc
d'alimentation en branchant le port de sortie USB (prise femelle).
2. La sortie c.c de ce port USB est régulée à 5V à 1A. Vous trouverez
la valeur de la puissance de sortie exigée dans le manuel de votre
périphérique USB.
3. Assurez-vous que la charge totale des éléments raccordés n'excède
pas la valeur du courant nominal de sortie du bloc d'alimentation.
4. Raccordez d'abord le cordon d'alimentation au bloc d'alimentation
puis insérez la prise c.a dans votre prise murale.
5. Allumez vos périphériques USB.
ATTENTION
1. Ne mettez pas les terminaisons de sortie en court-circuit.
2. Assurez-vous d'utiliser la bonne tension. Une tension excessive en
continu peut endommager votre notebook.
3. Prise de sortie c.c : N'essayez pas d'utiliser ce bloc d'alimentation
avec des équipements nécessitant plus de 8Amp pour 12V, 6Amp
pour 15-20V et 5Amp pour 22V (120 watts max.)
Sortie USB : N'essayez pas d'utiliser ce bloc d'alimentation avec
des équipements nécessitant plus de 1Amp pour 5V.
4. Ne tentez jamais d'ouvrir cet appareil.
5. Débranchez le chargeur lorsqu'il n'est pas utilisé.
6. Si le cordon d'alimentation de ce bloc d'alimentation est endommagé,
renvoyez l'appareil au fabricant ou à son représentant agréé pour
faire remplacer le cordon. Ce bloc d'alimentation doit être relié à la
terre.
Page 12

Page 13

NEDERLANDSE
GEBRUIKSAANWIJZING
P.SUP.NBT130KN
UNIVERSELE 130 WATT NOTEBOOKADAPTER
MET USB POORT
LEES VÓÓR GEBRUIK DE INSTRUCTIES!
1
Page 14

2
LAAD UW NOTEBOOKCOMPUTER OP
1. U kunt uw notebookcomputer (of ieder ander apparaat dat werkt
op een spanning en een vermogen afneemt dat binnen het bereik
van deze voeding ligt) op deze voeding aansluiten middels de
meegeleverde demonteerbare adapterplug.
2. Kies de juiste connectorafmeting. De polariteit van de kleine
connector is standaard ingesteld op een positieve punt (tip)
polariteit. En dat ziet er als volgt uit:
3. Stel de DC spanningskeuzeschakelaar in op de gewenste
spanning (bijv. 12V bij 8A of 15V/16V/18V/19V/20V bij 6A of
22V bij 5A) voordat u de voeding met uw notebookcomputer
verbindt. De vereiste spanning staat vermeld op de originele met
uw notebook meegeleverde AC-adapter of in de bijbehorende
gebruiksaanwijzing. (LET ER A.U.B. OP DAT EEN VERKEERD
INGESTELDE SPANNING UW NOTEBOOKCOMPUTER NIET
KAN OPLADEN EN ZELFS SCHADE AAN UW NOTEBOOK KAN
VEROORZAKEN. ALS U NIET ZEKER BENT VAN UW ZAAK,
SLUIT DE VOEDING DAN NIET AAN OP UW COMPUTER. NEEM
CONTACT OP MET UW PLAATSELIJKE DEALER!!!).
4. Zorg ervoor dat de totale vermogensopname van uw apparaat niet
hoger is dan het afgegeven vermogen van de voeding.
5. Verbind eerst het netsnoer met de voeding en steek dan de stekker
in het stopcontact. Het LED-lampje gaat nu branden.
6. Schakel uw computer in.
7. NB: het LED-lampje zal alleen gaan branden en blijven branden
wanneer een bepaalde spanning ingesteld is.
POSITIEVE
PUNT (TIP)
POLARITEIT
Page 15

3
LAAD UW USB-APPARAAT OP
1. U kunt uw USB-apparaten met deze voeding verbinden middels de
USB-uitgangspoort (contrastekker).
2. De DC-uitgang van de USB-poort is ingesteld op 5 volt bij
1 A. De vereiste uitgangsstroomsterkte kunt u vinden in de
gebruiksaanwijzing van het USB-apparaat.
3. Zorg ervoor dat de totale vermogensopname van uw apparaat niet
hoger is dan het afgegeven vermogen van de voeding.
4. Verbind eerst het netsnoer met de voeding en steek dan de stekker
in het stopcontact.
5. Schakel uw USB-apparaten in.
LET OP:
1. Sluit de uitgangspolen van de voeding niet kort.
2. Zorg dat u de juiste spanning ingesteld heeft. Een te hoge spanning
kan uw notebookcomputer beschadigen.
3. Voor de DC plug uitgang: gebruik deze voeding niet wanneer uw
apparaat meer dan 8 A bij 12 volt of 6 A bij 15-20 volt of 5 A bij 22
volt (120 watt max.) vereist.
Voor de USB-uitgang: gebruik deze voeding niet wanneer uw
apparaat meer dan 1 A bij 5 volt vereist.
4. Probeer dit apparaat niet te openen.
5. Haal de stekker uit het stopcontact wanneer u het apparaat niet
gebruikt.
6. Als het netsnoer van deze voeding beschadigd is, moet de voeding
naar de fabrikant of zijn agent opgestuurd worden om het netsnoer
te vervangen. Deze voeding moet geaard worden.
Page 16

Page 17

ITALIANO
MANUALE PER
L'UTENTE
P.SUP.NBT130KN
ADATTATORE UNIVERSALE 130W PER NOTEBOOK
CON PORTA USB
LEGGERE LE ISTRUZIONI PRIMA DELL'USO!
1
Page 18

2
ACCENDETE IL VOSTRO COMPUTER PORTATILE
1. Potete collegare il vostro computer portatile (o qualsiasi altro
apparecchio che funziona entro le tensioni in uscita offerte e gamma
di alimentazione in uscita) con questa alimentazione collegando la
spina dell'adattatore rimovibile in dotazione.
2. Determinate la dimensione corretta del connettore. La polarità
dei connettori piccoli è pre-impostata con la polarità della punta
positiva. Il simbolo comune viene indicato come segue:
3. Impostate il selettore di tensione DC nella posizione di tensione
desiderata. (es. 12V a 8A o 15V/16V/18V/19V/20V a 6A o 22V a 5A)
prima di collegarlo al computer por tatile. Potete trovare l'impostazione
della tensione richiesta nel vostro adattatore AC originale o nel
manuale per l'uso del computer (SI PREGA DI NOTARE CHE
UN'IMPOSTAZIONE SCORRETTA DELLA TENSIONE NON
CONSENTIRA' L'ACCENSIONE DEL COMPUTER PORTATILE E
PUO' DANNEGGIARE IL COMPUTER. SE NON SIETE SICURI,
NON TENTATE MAI DI COLLEGARLO AL VOSTRO COMPUTER.
CONSULTATE IL VOSTRO RIVENDITORE LOCALE!!!).
4. Assicuratevi che il carico totale non ecceda la corrente di uscita
nominale dell'alimentazione.
5. Collegate il cavo di alimentazione prima alla corrente e poi inserite
la spina AC nella presa a muro. L'indicatore LED si illuminerà
istantaneamente.
6. Accendete il computer.
7. Si osservi che: L'indicatore LED si accenderà e rimarrà acceso solo
quando impostato su qualsiasi tensione.
POLARITA'
PUNTA
POSITIVA
Page 19

3
ACCENDETE IL VOSTRO DISPOSITIVO USB
1. Non potete collegare i vostri dispositivi USB a questa alimentazione
collegando la porta dell'uscita USB (femmina).
2. L'uscita DC dalla porta USB port è 5V a 1A regolato. Potete trovare
la corrente di uscita richiesta nel manuale d'uso del dispositivo
USB.
3. Assicuratevi che il carico totale non ecceda la corrente di uscita
nominale dell'alimentazione.
4. Collegate il cavo di alimentazione prima alla corrente e poi inserite
la spina AC nella presa a muro.
5. Accendete i vostri dispositivi USB.
ATTENZIONE
1. Non cortocircuitare i terminali di uscita.
2. Assicurarsi di usare la tensione corretta siccome una tensione
continua in eccesso potrebbe danneggiare il vostro computer
portatile.
3. Per l'uscita della spina DC: Non cercate di usare questa
alimentazione con apparecchi che richiedono più di 8Amp per 12V
e 6Amp per 15-20V e 5Amp per 22V(120 watt max.)
Per l'uscita USB: Non tentate di usare questa alimentazione con
apparecchi che richiedono più di 1Amp per 5V.
4. Non tentate di aprire questa unità.
5. Quando non viene utilizzato, disinserire il caricabatterie dalla presa
di corrente.
6. Se il cavo di alimentazione di questa alimentazione è danneggiato,
è necessario riportare l'alimentazione al produttore o suo agente
affi nché il cavo venga sostituito. Questa alimentazione deve essere
messa a terra.
Page 20

Page 21

ESPAÑOL
MANUAL DE USUARIO
P.SUP.NBT130KN
ADAPTADOR UNIVERSAL PARA PORTÁTIL DE
130W CON PUERTO USB
¡LEA LAS INSTRUCCIONES ANTES DE UTILIZAR
EL APARATO!
1
Page 22

2
ENCIENDA SU ORDENADOR PORTÁTIL
1. Puede conectar su ordenador portátil (u otra aplicación que
funcione dentro del rango de voltaje de salida y de alimentación de
salida ofrecido) a esta fuente de alimentación conectando la toma
del adaptador móvil suministrada.
2. Determine el tamaño adecuado del conector. La polaridad de
los conectores pequeños está preconfi gurada por defecto con la
polaridad positiva. El símbolo habitual será el siguiente:
3. Fije el selector de voltaje de CC en la posición de voltaje deseada.
(por ej. 12V en 8A o 15V/16V/18V/19V/20V en 6A o 22V en 5A)
antes de conectarlo a su ordenador portátil. Podrá encontrar los
parámetros del voltaje necesarios en su adaptador de CA o en
el manual de usuario del ordenador (POR FAVOR, TENGA EN
CUENTA QUE CON LA CONFIGURACIÓN DE UN VOLTAJE
INCORRECTO NO PODRÁ ENCENDER SU ORDENADOR Y
PODRÁ DAÑARLO. SI NO ESTÁ SEGURO, NUNCA INTENTE
CONECTARLO A SU ORDENADOR. CONSULTE CON SU
VENDEDOR LOCAL).
4. Compruebe que la carga conectada no supere la corriente de
salida indicada del suministro de energía.
5. Conecte el cable de alimentación al suministro de energía primero y
después, introduzca la toma de CA en su toma de red. El indicador
LED se encenderá de inmediato.
6. Encienda su ordenador.
7. Por favor, tenga en cuenta que: e indicador LED se encenderá y se
mantendrá encendido sólo cuando fi je algún voltaje.
POLARIDAD
POSITIVA
Page 23

3
CONECTE SU DISPOSITIVO USB
1. Puede conectar sus dispositivos USB a esta fuente de alimentación
conectando el puerto de salida USB (hembra).
2. La salida de CC del puerto USB es de 5V a 1A regulado. Podrá
encontrar la corriente de salida exigida en el manual de usuario de
sus dispositivos USB.
3. Compruebe que la carga conectada no supere la corriente de
salida indicada del suministro de energía.
4. Conecte el cable de alimentación al suministro de energía primero
y después, introduzca la toma de CA en su toma de red.
5. Encienda sus dispositivos USB.
ATENCIÓN
1. No realice un cortocircuito de las terminales de salida.
2. Compruebe que se utiliza el voltaje correcto ya que un voltaje
continuo excesivo podría dañar su ordenador portátil.
3. Para la salida de la toma de CC: No intente utilizar esta fuente de
alimentación con un aparato que exija más de 8Amp para 12V y
6Amp para 15-20V y 5Amp para 22V (120 vatios como máximo.).
Para la salida USB: No intente utilizar esta fuente de alimentación
con un aparato que exija más de 1Amp para 5V.
4. No intente abrir esta unidad.
5. Desenchúfelo de la red cuando no esté utilizándolo.
6. Si el cable de alimentación de la fuente de alimentación está
dañado, la fuente de alimentación deberá devolverse al fabricante o
a su agente habilitado para que pueda reparar el cable. Esta fuente
de alimentación deberá estar puesta a tierra.
Page 24

Page 25

MAGYAR NYELVŰ
FELHASZNÁLÓI
KÉZIKÖNYV
P.SUP.NBT130KN
UNIVERZÁLIS, 130 W-OS NOTEBOOK ADAPTER
USB PORTTAL
HASZNÁLAT ELŐTT OLVASSA EL!
1
Page 26

2
INDÍTSA EL NOTEBOOK SZÁMÍTÓGÉPÉT
1. Notebook számítógépét (vagy bármely más készüléket, amelyik
a megadott kimeneti feszültségeken vagy kimeneti teljesítménytartományban működik) csatlakoztathatja ehhez a tápegységhez
a mellékelt leválasztható adapterdugasz segítségével.
2. A megfelelő csatlakozóméret meghatározása. A kisebb csatlakozók
pozitív érintkező-polaritásra vannak beprogramozva. A szimbólum
a következő:
3. A DC (egyenáramú) feszültségválasztót állítsa a kívánt
feszültségnek megfelelő állásba (azaz, 12 V 8 A-nél vagy 15 V/16
V/18 V/19 V/20 V 6 A-nél vagy 22 V 5 A-nél), mielőtt notebook
számítógépére csatlakoztatná. Az eredeti feszültség-beállítást
megtalálja az eredeti AC (váltakozóáramú) adapteren vagy
a számítógép felhasználói kézikönyvében (KÉRJÜK, TARTSA
SZEM ELŐTT, HOGY NEM MEGFELELŐEN MEGVÁLASZTOTT
FESZÜLTSÉGEN A NOTEBOOK SZÁMÍTÓGÉPE NEM FOG
MŰKÖDNI, SŐT KÁROSODHAT IS. HA BIZONYTALAN, NE
CSATLAKOZTASSA A SZÁMÍTÓGÉPÉHEZ. KÉRJEN TANÁCSOT
HELYI FORGALMAZÓJÁTÓL!!!).
4. Ügyeljen arra, hogy a teljes csatlakoztatott terhelés ne haladja meg
a tápegység névleges kimeneti áramerősségét.
5. Először kapcsolja a hálózati kábelt a tápegységre, majd illessze
az AC (váltakozóáramú) dugaszt a fali aljzatba. A visszajelző LED
azonnal világítani fog.
6. Kapcsolja be a számítógépét.
7. Kérjük, tartsa szem előtt: A visszajelző LED kigyullad, és csak akkor
marad égve, ha a készüléket valamilyen feszültségre állítják.
POZITÍV
ÉRINTKEZŐ-
POLARITÁS
Page 27

3
INDÍTSA BE USB ESZKÖZÉT
1. USB eszközeit ezzel a tápegységgel az USB kimenet (belső
érintkezős) portján keresztül kapcsolhatja össze.
2. Az USB port DC (egyenáramú) kimenete 5 V, 1 A-ra szabályozott.
A szükséges kimeneti áramerősséget az USB eszköz felhasználói
kézikönyvében találja.
3. Ügyeljen arra, hogy a teljes csatlakoztatott terhelés ne haladja meg
a tápegység névleges kimeneti áramerősségét.
4. Először kapcsolja a hálózati kábelt a tápegységre, majd illessze az
AC (váltakozóáramú) dugaszt a fali aljzatba.
5. Kapcsolja be az USB eszközöket.
VIGYÁZAT!
1. Ne zárja rövidre a kimeneti terminálokat.
2. Gondoskodjon a megfelelő feszültségről, mert a tartósan túl magas
feszültség károsíthatja a notebook számítógépet.
3. A DC dugasz kimenetéhez: Ne használja ezt a tápegységet
olyan készülékkel, amelyik 8 ampernál többet igényel 12 volthoz,
6 ampernál többet 15–20 volthoz és 5 ampernál többet 22 volthoz
(maximum 120 watt).
USB kimenethez: Ne használja ezt a tápegységet olyan
készülékkel, amelyik 1 Ampernál többet igényel 5 Volthoz.
4. Ne nyissa szét a készüléket.
5. Amikor nem használja, kapcsolja le az elektromos hálózatról.
6. Ha a tápegység hálózati kábele sérült, a tápegységet a kábel
kicserélése végett juttassa vissza a forgalmazóhoz vagy
ügynökéhez. Ezt a tápegységet földelni kell.
Page 28

Page 29

SUOMI
KÄYTTÖOPAS
P.SUP.NBT130KN
YLEINEN 130W KANNETTAVAN SOVITIN
USB-PORTILLA
LUE OHJEET ENNEN KÄYTTÖÄ!
1
Page 30

2
TEHON SYÖTTÖ KANNETTAVAAN TIETOKONEESEEN
1. Voit liittää kannettavan tietokoneen (tai jonkin muun laitteen,
joka toimii annettujen lähtöjännitteiden ja -tehojen välillä) tähän
teholähteeseen kytkemällä pakkauksen irrotettava sovitin.
2. Määritä sopiva liitinkoko. Pienien liittimien napaisuus on
esiasetettu positiivisen kärjen napaisuuteen. Yleiset merkit ovat
seuraavanlaiset:
3. Aseta DC-jännitteen valitsin haluttuun asentoon (ts. 12V arvossa
8A tai 15V/16V/18V/19V/20V arvossa 6A tai 22V arvossa 5A)
ennen kuin liität sen kannettavaan tietokoneeseen. Voit löytää
vaaditun jänniteasetuksen alkuperäisestä AC-sovittimesta tai
tietokoneen käyttöoppaasta (HUOMAA, ETTÄ VIRHEELLINEN
JÄNNITEASETUS EI VOI SYÖTTÄÄ TEHOA KANNETTAVAAN
TIETOKONEESEEN JA VOI AIHEUTTAA SIIHEN VAURIOITA.
JOS OLET EPÄVARMA ARVOISTA, ÄLÄ KOSKAAN YRITÄ
KYTKEÄ SOVITINTA TIETOKONEESEEN. OTA YHTEYTTÄ
PAIKALLISEEN JÄLLEENMYYJÄÄN!!!).
4. Varmista, ettei liitetty kokonaiskuormitus ylitä teholähteen annettua
tehoa.
5. Liitä virtajohto ensin jännitelähteeseen ja kytke sitten AC-pistoke
verkkovirtalähteeseen. LED-merkkivalo alkaa välittömästi
vilkkumaan.
6. Kytke tietokone päälle.
7. Huomautus: LED-merkkivalo syttyy ja jää palamaan vain silloin, kun
se on asetettu tiettyyn jännitteeseen.
POSITIIVISEN
KÄRJEN
NAPAISUUS
Page 31

3
TEHON SYÖTTÖ USB-LAITTEESEEN
1. Voit liittää USB-laitteita tähän teholähteeseen kytkemällä ne USBlähtöporttiin (naaras).
2. USB-portin DC-lähtöteho on säädetty 5V arvossa 1A. Voit löytää
vaaditun lähtötehon USB-laitteiden käyttöoppaista.
3. Varmista, ettei liitetty kokonaiskuormitus ylitä teholähteen annettua
tehoa.
4. Liitä virtajohto ensin jännitelähteeseen ja kytke sitten AC-pistoke
verkkovirtalähteeseen.
5. Kytke USB-laitteet päälle.
HUOMIO
1. Älä aiheuta oikosulkua tehopäätteisiin.
2. Varmista, että oikeaa jännitearvoa käytetään, sillä jatkuva liikajännite
voi aiheuttaa vaurioita kannettavaan tietokoneeseen.
3. DC-pistokkeiden lähdöt: Älä yritä käyttää tätä teholähdettä
laitteistojen kanssa, jotka vaativat yli 8Amp arvolle 12V tai 6Amp
arvolle 15-20V ja 5Amp arvolle 225V (enintään 120 wattia).
USB-lähdöt: Älä yritä käyttää tätä teholähdettä laitteiden kanssa,
jotka vaativat yli 1Amp arvolle 5V.
4. Älä yritä avata yksikköä.
5. Irrota laturi verkkovirrasta silloin, kun sitä ei käytetä.
6. Jos teholähteen virtajohto on vaurioitunut, teholähde tulee palauttaa
valmistajalle tai valmistajan edustajalle johdon vaihtamiseksi. Tämä
teholähde on maadoitettava.
Page 32

Page 33

BRUKSANVISNING
SVENSKA
P.SUP.NBT130KN
UNIVERSELL 130W NOTEBOOK-ADAPTER
MED USB-UTTAG
LÄS ANVISNINGARNA FÖRE ANVÄNDNING!
1
Page 34

2
SÄTT PÅ STRÖMMEN TILL DIN BÄRBARA DATOR
1. Du kan ansluta din bärbara dator (eller någon annan apparat som
arbetar inom det erbjudna utspänningstalet och utspänningsområdet)
med denna strömförsörjning genom att ansluta den medföljande
avtagbara adapterkontakten.
2. Bestäm rätt storlek på kontakten. Polariteten hos de små
anslutningsdonen är förinställda med pluspolaritet. Symbolen ser ut
på följande sätt:
3. Ställ in spänningsväljaren vid önskad spänningsposition,
(t.ex. 12V vid 8A eller 15V/16V/18V/19V/20V vid 6A eller 22V
vid 5A) innan du ansluter den till din bärbara dator. Du hittar
spänningstalet som krävs på din växelströmsadapter eller i datorns
bruksanvisning (OBSERVERA ATT DU INTE KAN LADDA DIN
BÄRBARA DATOR MED FEL SPÄNNINGSTAL, DESSUTOM
KAN DU SKADA DATORN. OM DU ÄR OSÄKER SKA DU INTE
ANSLUTA ADAPTERN TILL DATORN. RÅDFRÅGA FÖRST DIN
ÅTERFÖRSÄLJARE!).
4. Se till att den totala belastningen inte överskrider strömkällans
märkström.
5. Anslut strömkabeln till strömkällan först och sätt sedan in
strömkontakten i vägguttaget. Lysdioden tänds då upp med en
gång.
6. Nu kan du sätta på datorn.
7. Obs! Lysdioden tänds och fortsätter att lysa endast vid inställning
av spänningstal.
PLUSPOL
Page 35

3
LADDA UPP DIN USB-ENHET
1. Du kan ansluta din USB-enhet med denna strömförsörjare genom
att ansluta den till USB-utgången (hona).
2. Strömutgången från USB-uttaget är 5V vid reglerad 1A. Du hittar
vilken utström som krävs i USB-enhetens bruksanvisning.
3. Se till att den totala belastningen inte överskrider strömförsörjningens
märkström.
4. Anslut strömkabeln till strömkällan först och sätt sedan in
strömkontakten i vägguttaget.
5. Sätt på dina USB-enheter.
Obs!
1. Kortslut inte polerna.
2. Se till att rätt spänningstal används eftersom för höga spänningstal
kan skada din dator.
3. För strömkontakt (likström): Försök inte använda denna
strömförsörjning med apparater som kräver mer än 8Amp för 12V
eller 6Amp för 15-20V och 522V (max 120 watt.).
För USB-utström: Försök inte att använda denna strömförsörjare
tillsammans med apparater som kräver mer än 1Amp för 5V.
4. Försök inte att öppna denna apparat.
5. Koppla bort apparaten från nätuttaget när den inte används.
6. Om elkabeln är skadad ska den switchade strömförsörjningen
återlämnas till tillverkaren eller återförsäljaren så att sladden kan
bytas ut. Denna strömförsörjning måsta jordas.
Page 36

Page 37

ČESKY
NÁVOD K POUŽITÍ
P.SUP.NBT130KN
UNIVERZÁLNÍ 130 W NAPÁJECÍ ADAPTÉR PRO
PŘENOSNÉ POČÍTAČE S USB PORTEM
PŘED POUŽITÍM SI PŘEČTĚTE NÁVOD K POUŽITÍ!
1
Page 38

2
ZAPNĚTE PŘENOSNÝ POČÍTAČ
1. K napájecímu adaptéru lze připojit přenosný počítač nebo jakékoli
jiné zařízení, jehož napájecí napětí a proud nepřesahuje maximální
napájecí napětí/proud dodávaný adaptérem.
2. Ujistěte se, že používáte správný konektor. Polarita napájecího
konektoru je nastavena tak, že na střední kolík je přiváděno pozitivní
(+) napětí. Běžně používané symboly:
3. Před zapojením počítače, nastavte přepínačem napětí požadované
hodnoty: (12 V při 8 A nebo 15 V/16 V/18 V/19 V/20 V při 6 A
nebo 22 V při 5 A). Napájecí parametry přenosného počítače jsou
uvedeny na originálním adaptéru, který je dodáván s počítačem
nebo v návodu k obsluze počítače. (POZOR! NESNAŽTE SE
POUŽÍT NESPRÁVNÉ NAPÁJECÍ NAPĚTÍ/PROUD K NAPÁJENÍ
PŘENOSNÉHO POČÍTAČE. MŮŽETE VÁŽNĚ POŠKODIT
POČÍTAČ. POKUD SI NEJSTE JISTI ZDA JSTE NASTAVILI
SPRÁVNÉ NAPÁJECÍ PARAMETRY, NEZAPOJUJTE ADAPTÉR
DO POČÍTAČE. OBRAŤTE SE NA NEJBLIŽŠÍ AUTORIZOVANÝ
SERVIS!!!).
4. Ujistěte se, že příkon zapojeného zařízení nepřesahuje výkon
zdroje.
5. Nejdříve zapojte napájecí kabel do přístroje a potom teprve zapojte
hlavní napájecí kabel zdroje do síťové zásuvky. Po zapojení do
zásuvky se rozsvítí LED dioda na zdroji.
6. Zapněte počítač.
7. Poznámka: LED dioda trvale svítí pouze pokud je přepínač napětí
přepnut do jedné z poloh dostupných napětí.
POZITIVNÍ
(+) STŘEDNÍ
KOLÍK
Page 39

3
ZAPOJENÍ ZAŘÍZENÍ USB
1. K adaptéru lze také zapojit zařízení, které je vybaveno portem
USB.
2. Výstupní napájecí napětí USB je 5 V při proudu 1 A a je regulováno.
Požadované napájecí parametry připojeného zařízení / počítače
naleznete v návodu, který je dodáván s vaším zařízením nebo
počítačem.
3. Ujistěte se, že příkon zapojeného zařízení nepřesahuje výkon
zdroje.
4. Nejdříve zapojte napájecí kabel do přístroje, a potom teprve zapojte
hlavní napájecí kabel zdroje do síťové zásuvky.
5. Zapněte USB zařízení.
UPOZORNĚNÍ
1. Nikdy nezkratujte výstupní napájecí kontakty konektoru.
2. Ujistěte se že napájíte zdroj s příkonem a napětím, které je zdroj
schopen dodávat. Příliš velký a neustálý odběr velkého napětí/
proudu, může trvale poškodit váš počítač.
3. Napájení stejnosměrným proudem: Nesnažte se používat zdroj
pro napájení zařízení vyžadující napětí/příkon více než 8 Amp při
12 V nebo 6 Amp při 15-20 V a 22 V (120 wattů maximálně).
Napájení přes USB port: Nesnažte se používat napájecí zdroj se
zařízením, které vyžaduje větší napájecí proud než 1 Amp při 5 V.
4. Zařízení nedemontujte.
5. Pokud nabíječku/zdroj nepoužíváte, odpojte napájecí kabel se
síťové zásuvky.
6. Pokud je napájecí kabel zdroje poškozen, zdroj nepoužívejte.
Nechte vadný kabel vyměnit nebo opravit v autorizovaném servisu.
Zdroj musí být řádně uzemněn.
Page 40

 Loading...