

Page 1
MINI
MINI
MINI
MINI DV
Thank you for purchasing MINI DV. MINI DV has the unique, ultra-small and delicate design.
It can be used in many recording situations. MINI DV brings more convenience, safety and
funs to your daily life.
DV
DV
DV MANUAL
MANUAL
MANUAL
MANUAL
FEATURES
FEATURES
FEATURES
FEATURES
>Thumb size alloy housing
>Manually and sound activated recording
>Web camera for online video chat
>Support AVI video format
>Low illumination, high resolution image with 2 Mega pixels
>High speed recording and quick light response
>30 frames per second for 640*480 video output
>Support USB1 .1/2.0
>Support 8G Micro SD card (Max)
>Built-in Li rechargeable battery lasting for 2 hours
>Easy operation with LED indicator
>Flexible installation with clip and bracket
Page 2

OPERATION
OPERATION
OPERATION
OPERATION GUIDE
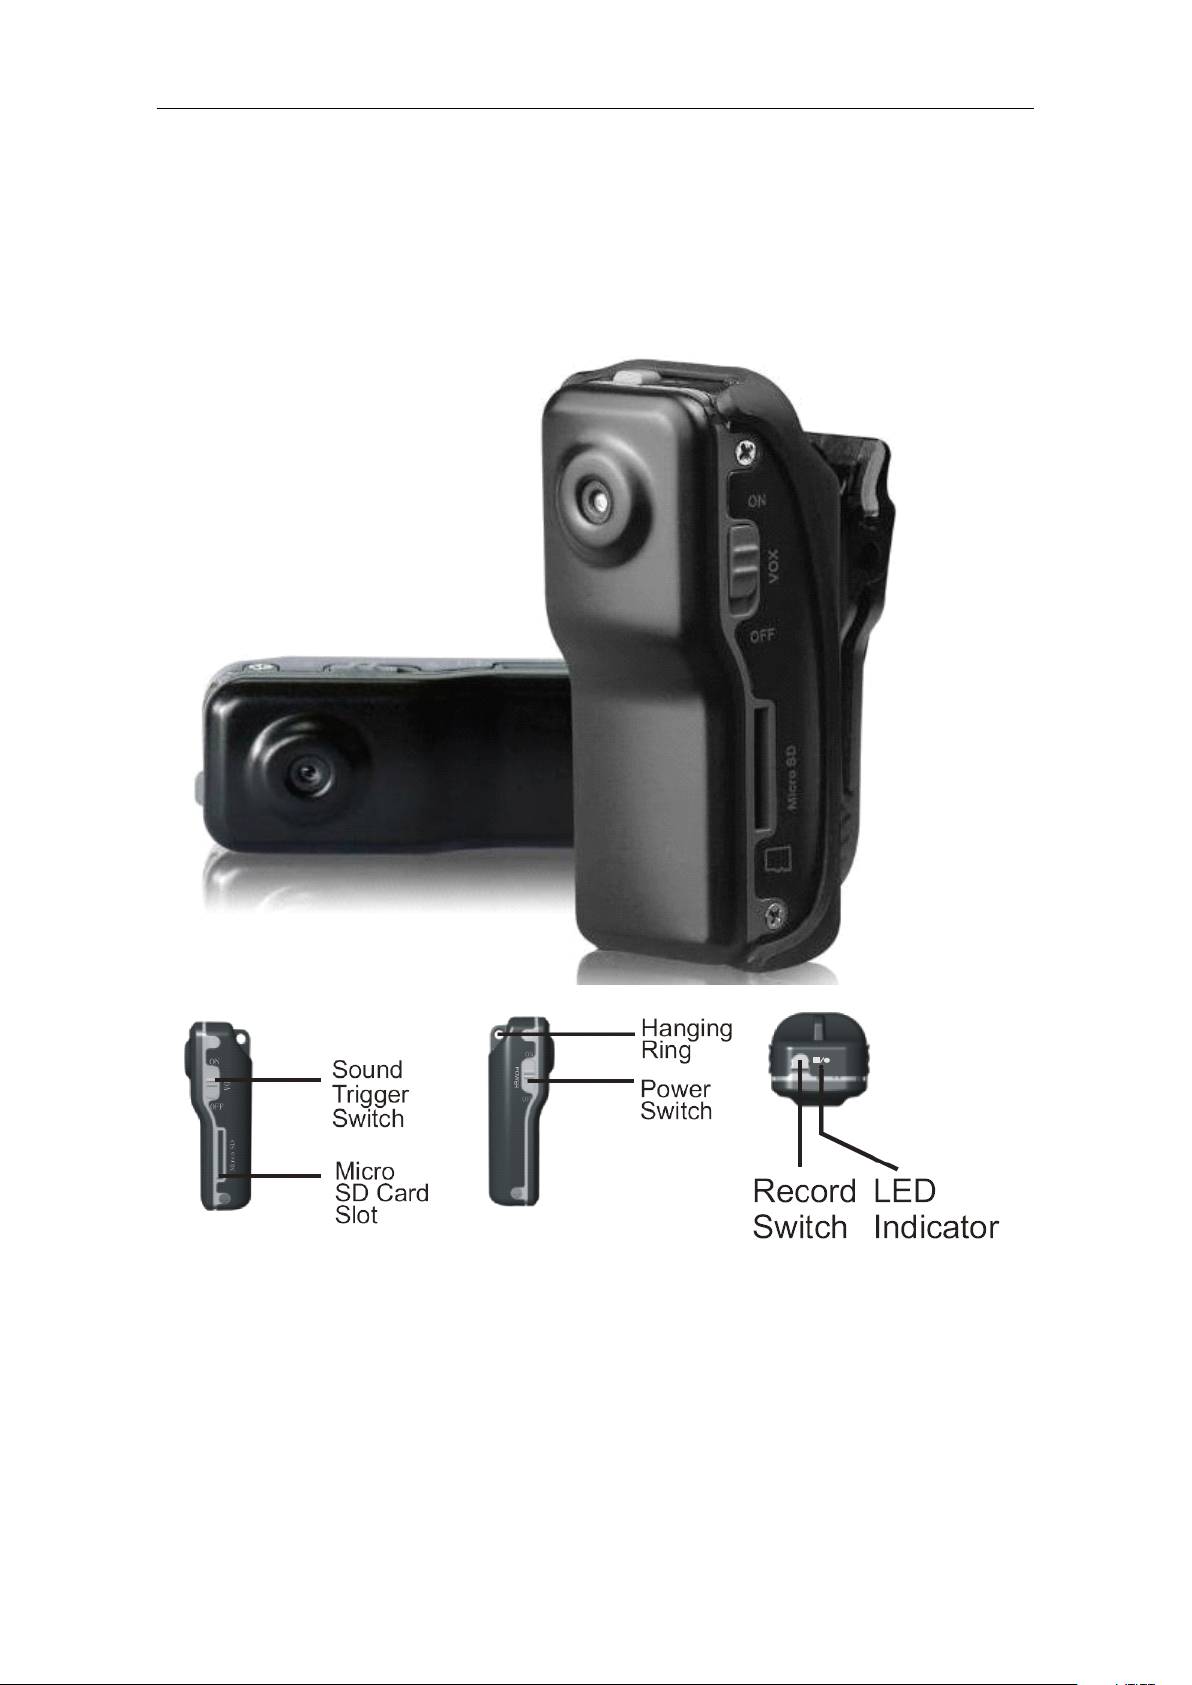
1
Insert Micro SD car d .
2
The indicator will be green when power is on
NOTICE
NOTICE
NOTICE
NOTICE :
A.
The indicator turns green and flash quickly when there is no Micro SD card.
B.
The blue indicator
GUIDE
GUIDE
GUIDE
will
flash slowly when the battery is
low,
after 2
minutes,
power off automatically.
3. Recording
A . Recording manually: When the sound trigger switch is off. Press “ Record S witch
start recording when power on, meanwhile the blue indicator flashes slowly , Press
“ Record Switch ” again to stop recording and the files
will
be saved as “ *.AVI”format.
B . Sound trigger recording: when the sound trigger switch is on.
a)
Turn
on the
power ,
MINI
DV
will enter recording mode if the sound outside is up
to 65 decibel.
b)
MINI
DV
will automatically enter standb y mode when the sound outside is
lower than 65 decibel standing for 2 minutes.
c)
In the standby mode, if the sound outside is up to 65 decibel, MINI DV will
enter recording mode again.
MINI
DV will
”
to
4 . After recording, the files will be saved automatically .
NOTICE:
NOTICE:
NOTICE:
NOTICE:
A.
Turn
off the power during recording, recording stream will not be saved as file.
B.
Please do not press any button while saving files.
5. PC CAMERA MODE
Please install the camera driver before using PC camera. After connecting MINI
with USB cable, turn on the power and sound trigger switch, then a video device
on the PC which indicates MINI DV can be used as a PC camera no
NOTICE:
NOTICE:
NOTICE:
NOTICE:
Y
ou can only copy data from MINI DV when the sound trigger switch is off and power is
w.
will
DV
appear
on.
6. SAVING FILES
Connect MINI DV to PC by USB cable after recording, then copy data from MINI DV to PC.
You
can also use card reader directly .
NOTICE:
NOTICE:
NOTICE:
NOTICE: : Pay attention to the following conditions after connecting MINI DV to PC with
USB cable:
A. When the power is off, MINI DV can be charged and the indicator turns red.
B.
You
can only copy the data from MINI DV when the power is on and the sound trigger
switch is off.
to PC
Page 3

C. MINI
LED color
Status
Motion
Green
Always bright
S tand by
F lash slowly
Battery low
Flash quickly
USB writing or reading
Blue
Always bright
TF card full
F lash quickly
TF card not ready
F lash slowly
R ecording
R ed
A lways bright
C harging
G o out
B attery full
DV
can be used as a PC camera when the power is on and the sound trigger switch is
on.
D.
Turn off the power before plug and pull the USB cable.
7 . CHARGING
Connect MINI DV to PC or adaptor to charge battery, meanwhile the red LED will be on.
Red LED will be off after battery is fully charged.
8 . LED INDICATOR STATUS CHART
Page 4

SPECIFICATIONS
Pixel
2M pixels color CMOS
View Angle
62 °
Minimum Illumination
1Lux. (min)
Battery Capacity
260mAH
Consumption Current
120mA / 3.7V (Max.)
Store T emperature
-20 ° C - 80 ° C
Operation
Temperature
-10 ° C - 50 ° C
Operation Humidity
15 - 85%RH
Memory media
Micro SD card(TF Card)
SD Capability
Max 8GB Micro SD Card
Video Function and Format
Video
decode use
motion
JPEG,
recordin
g
VGA(640 x 4 80@30frame/second AVI format
USB Jack
USB1.1/2.0
Weight
50g(approx.)
Dimension
55x28x20mm(approx.)
Operation System
2000/XP/Vista 32
Store Consumption
1 GB per 40 min
Charge Time
2 h ours
SPECIFICATIONS
SPECIFICATIONS
SPECIFICATIONS
 Loading...