

Page 1
47
USB ADAPTÉR PRO
AUDIO/PHONO
37
AUDIO/PHONO USB-SOVITIN
27
ADAPTADOR USB DE
AUDIO/MICRÓFONO
17
AUDIO USB-OMZETTER
7
AUDIO/PHONO-USB-ADAPTER
52
CONVERTOR AUDIO/
PHONO CU USB
42
AUDIO/PHONO
USB-OMVANDLARE
32
AUDIO/PHONO ADAPTER, USB
22
ADATTATORE USB AUDIO/PHONO
12
ADAPTATEUR AUDIO/PHONO USB
AUDIO/PHONO USB ADAPTER
KN-TTUSB100
Page 2
2
ENGLISH
Introduction:
The KN-TTUSB100 is an ultra compact bidirectional USB/AUDIO adapter.
Convert your vinyl, CDs, audio cassettes or any other analogue audio source to MP3 or
WAV on your PC. Switchable audio input: line or phono and it can be used as PC-sound
card: USB/audio line output.
Features:
• RIAA pre-amplifier circuit for PHONO IN
• Line in / Pre-Amp out switch
• MM/MC selection for different phonograph cartridges
• Compatible with Windows® or Mac® OS default drivers
• USB bus powered
• Audio sampling rates can be set up to 48 KHz for 2 channel recording
• Compatible with Windows® 2000/XP/Vista and Mac® OSX
System Requirements:
Turntable
Phonograph disk
Computer with USB ports and 500 mA powering capacity
Recording software
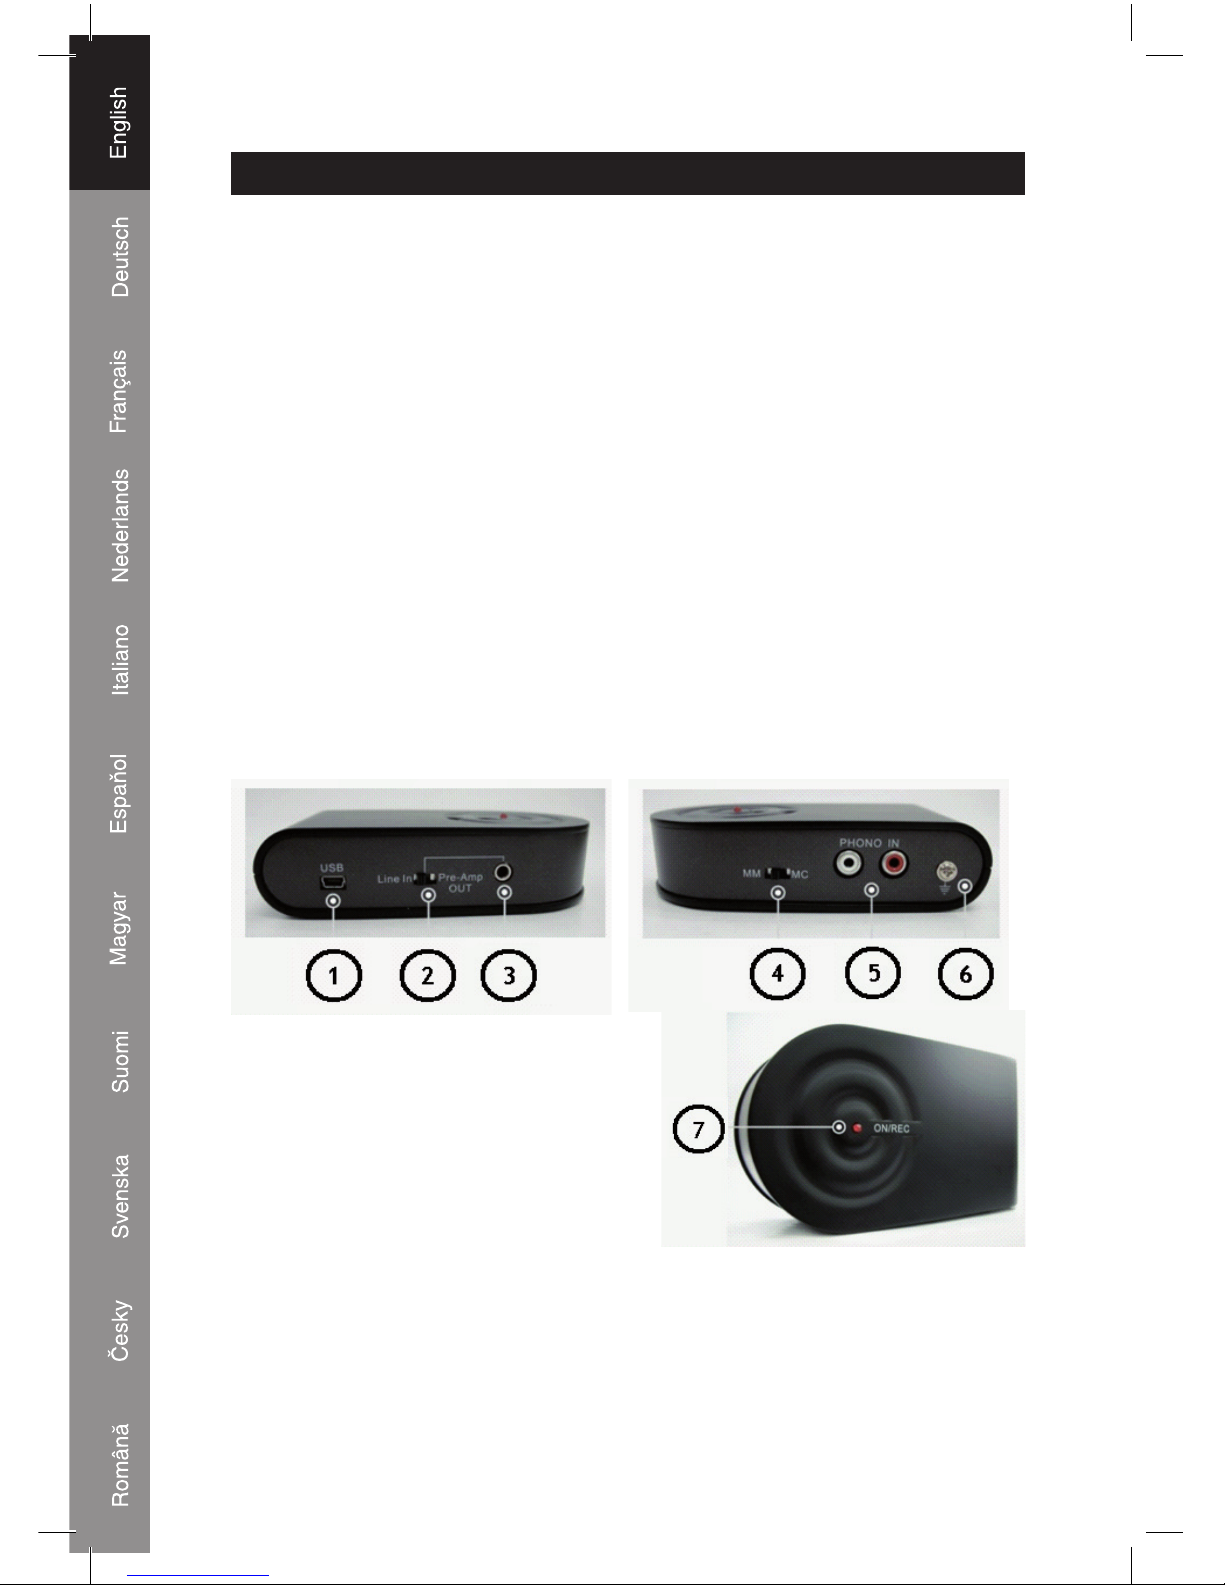
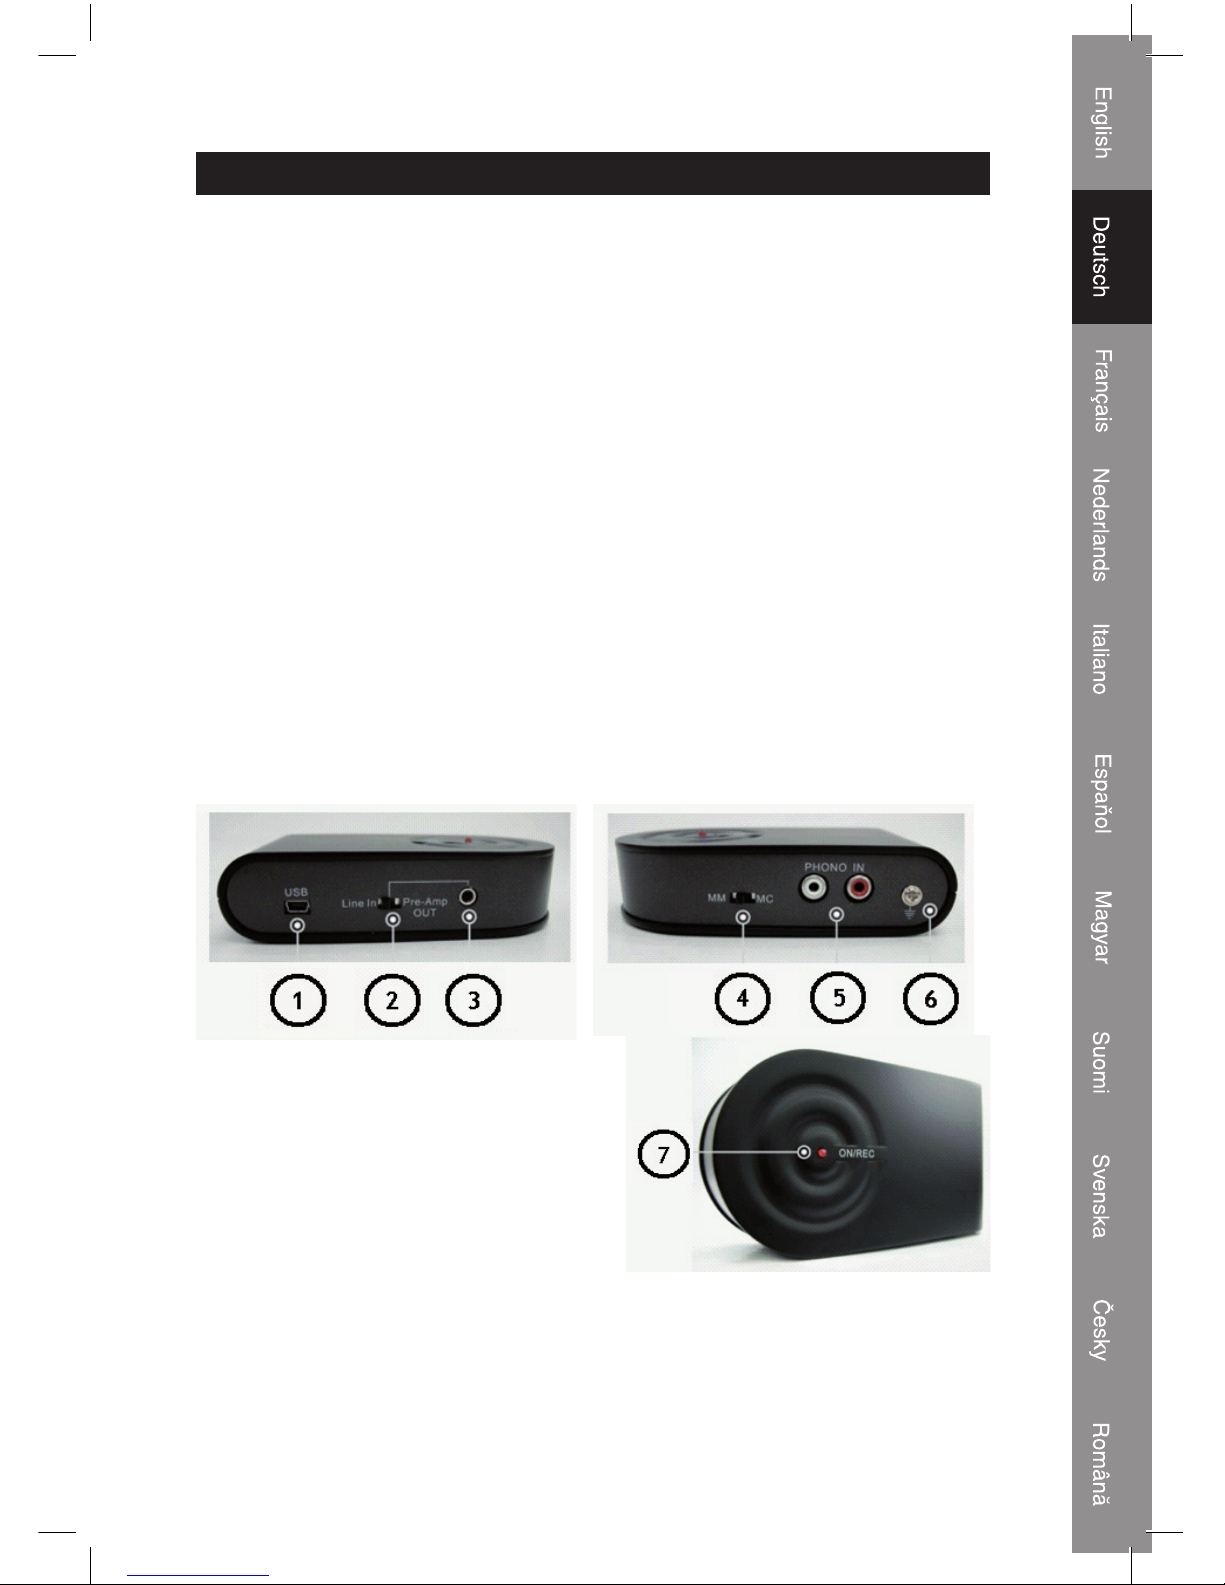
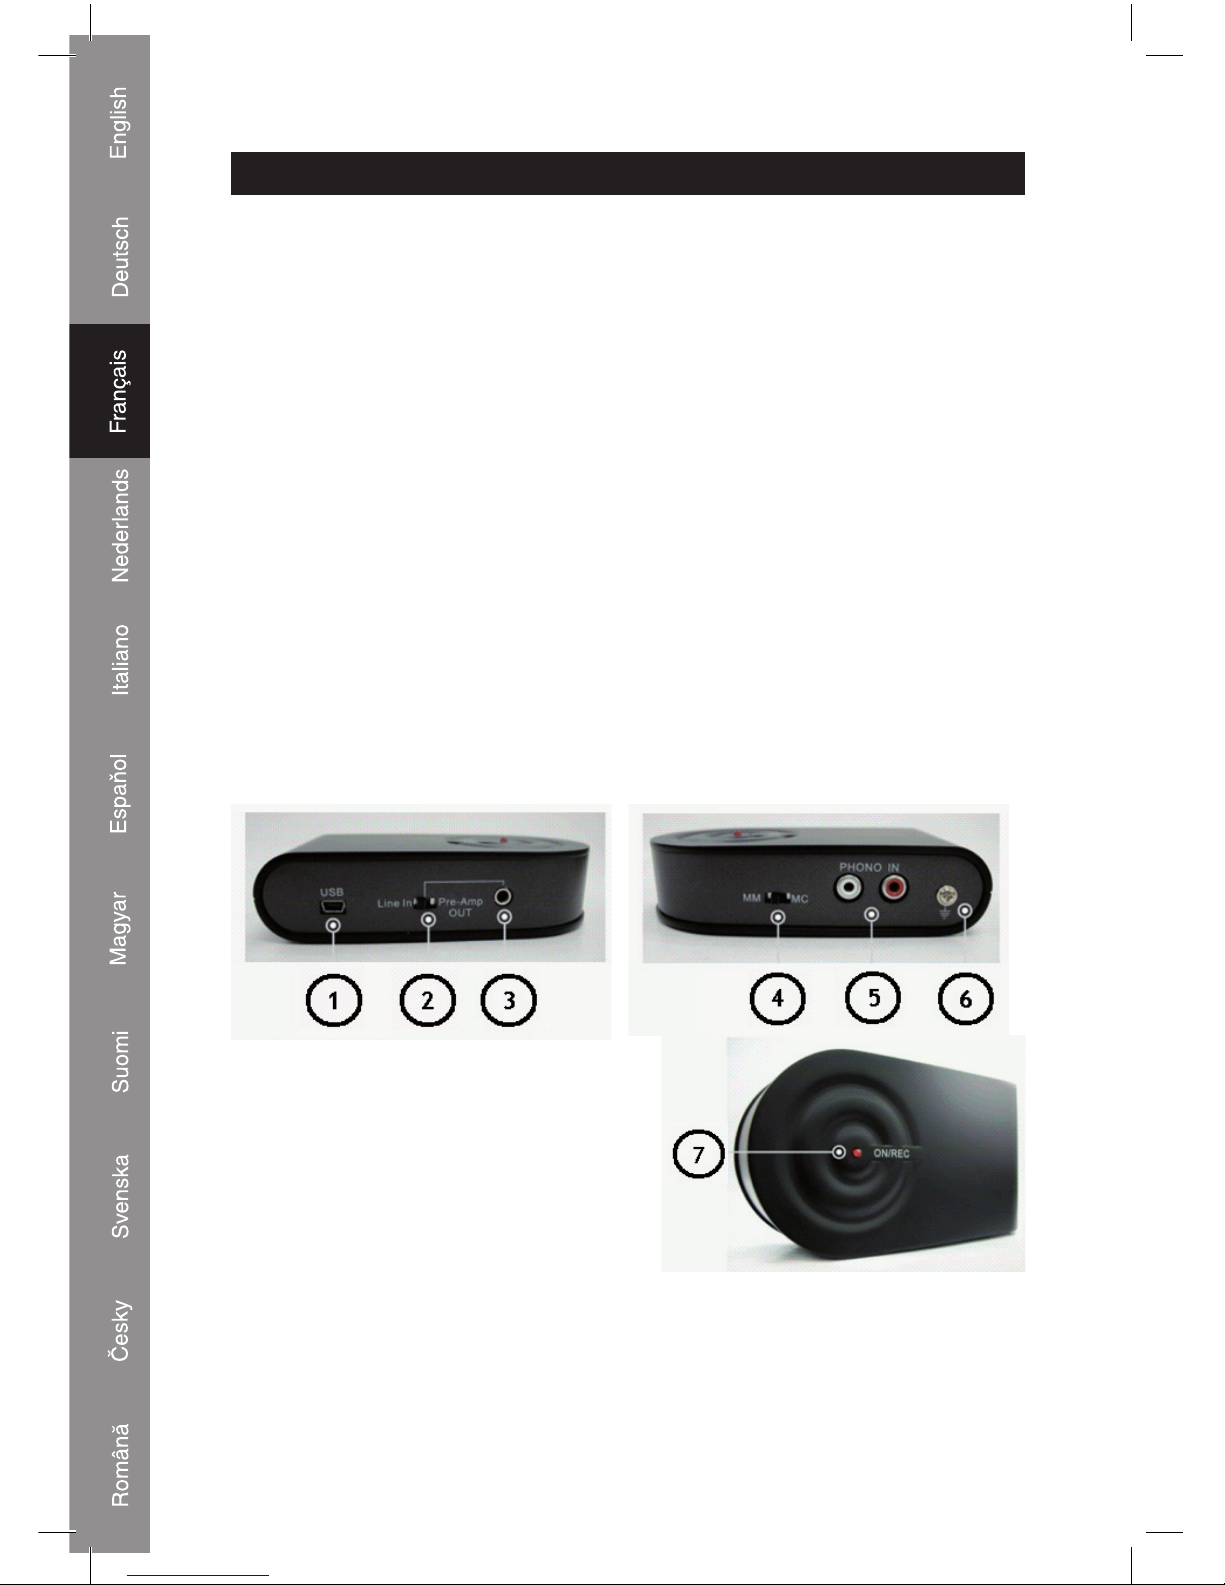
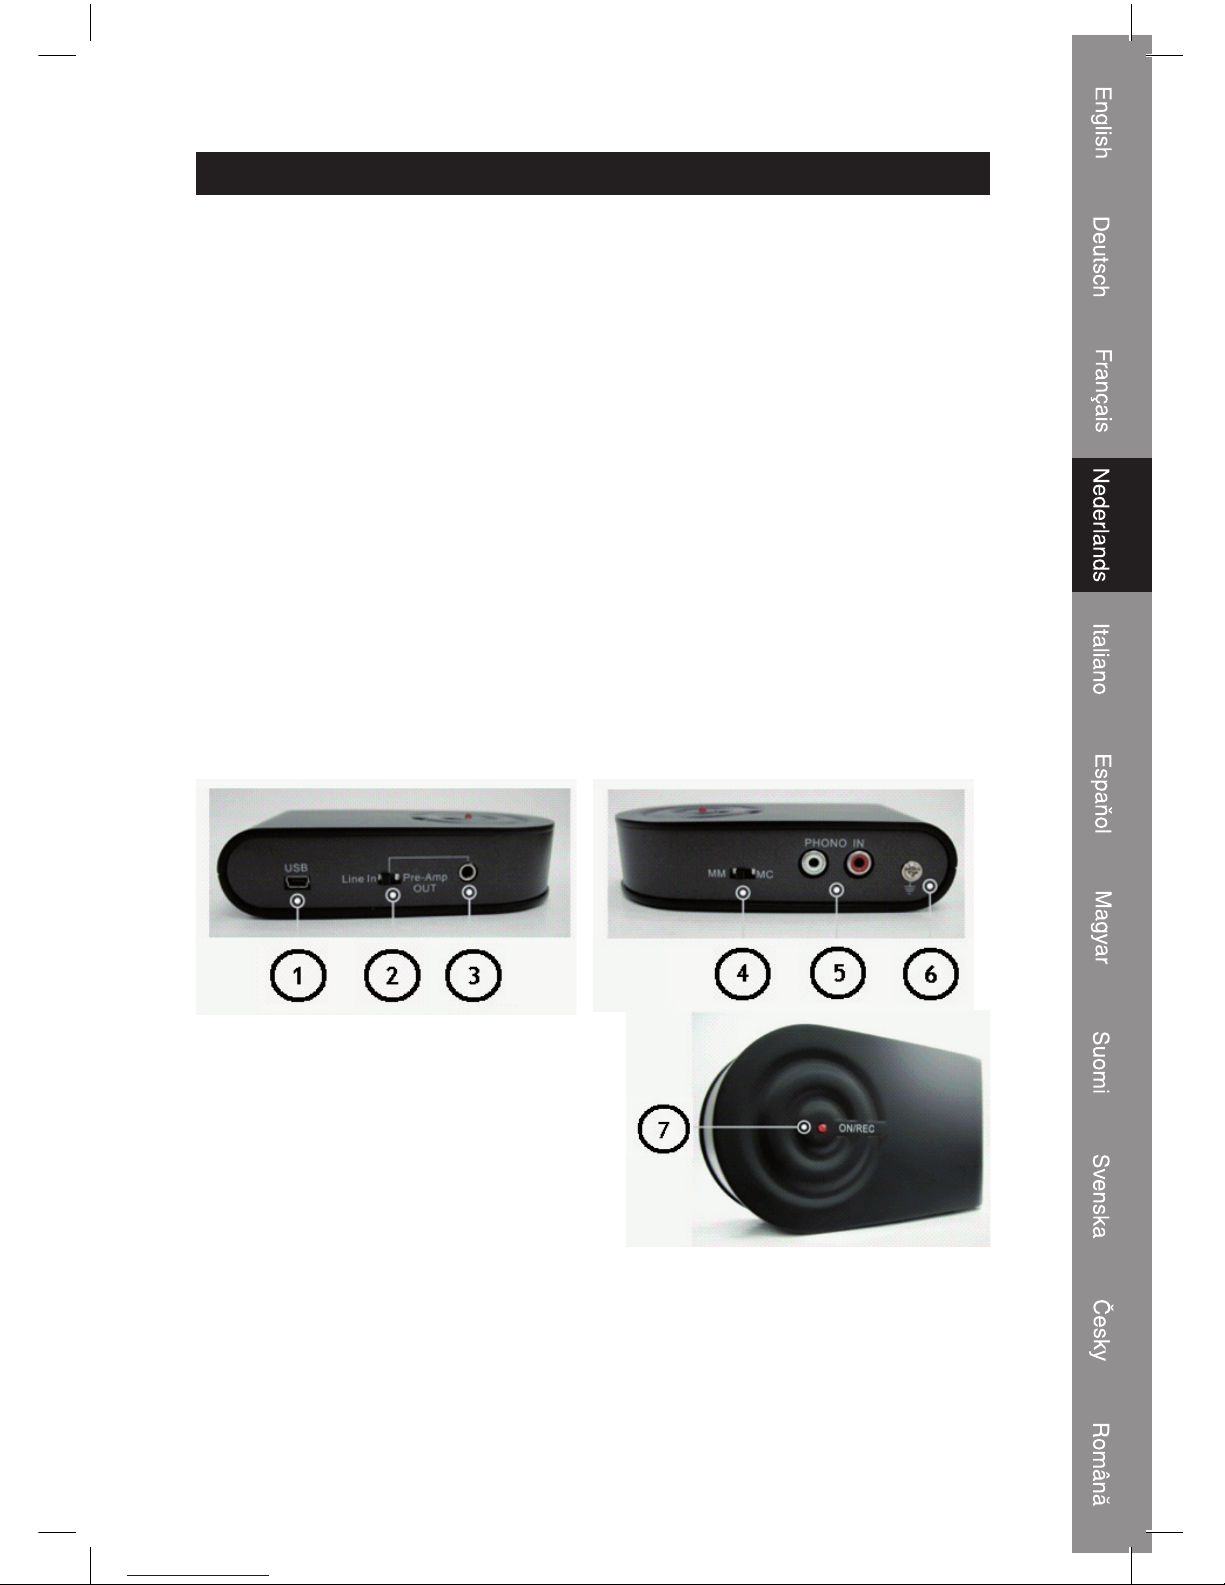
Connections:
1) USB mini 5pin Out connection
2) Switch (Line in - Pre-Amp Out)
3) 3.5mm jack connection
4) MM/MC switch
5) Phono in (2xRCA)
6) Grounding
7) LED indication.
Page 3
3
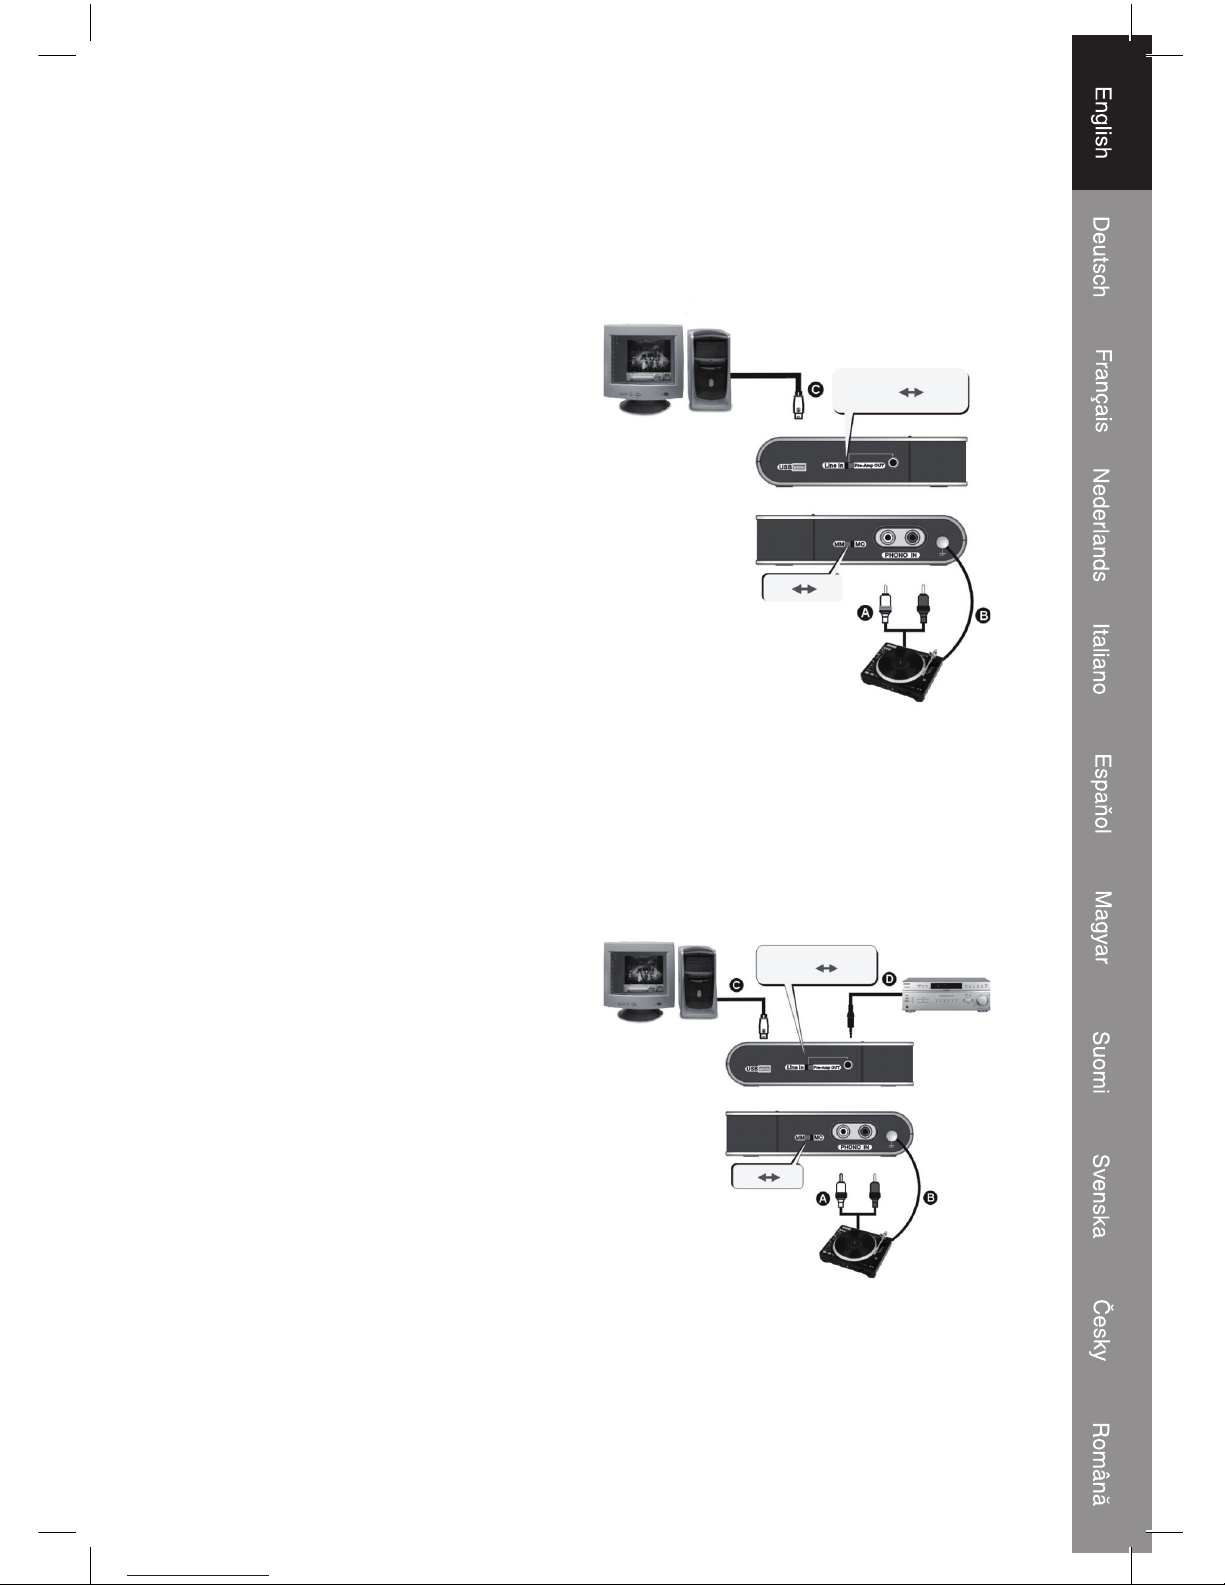
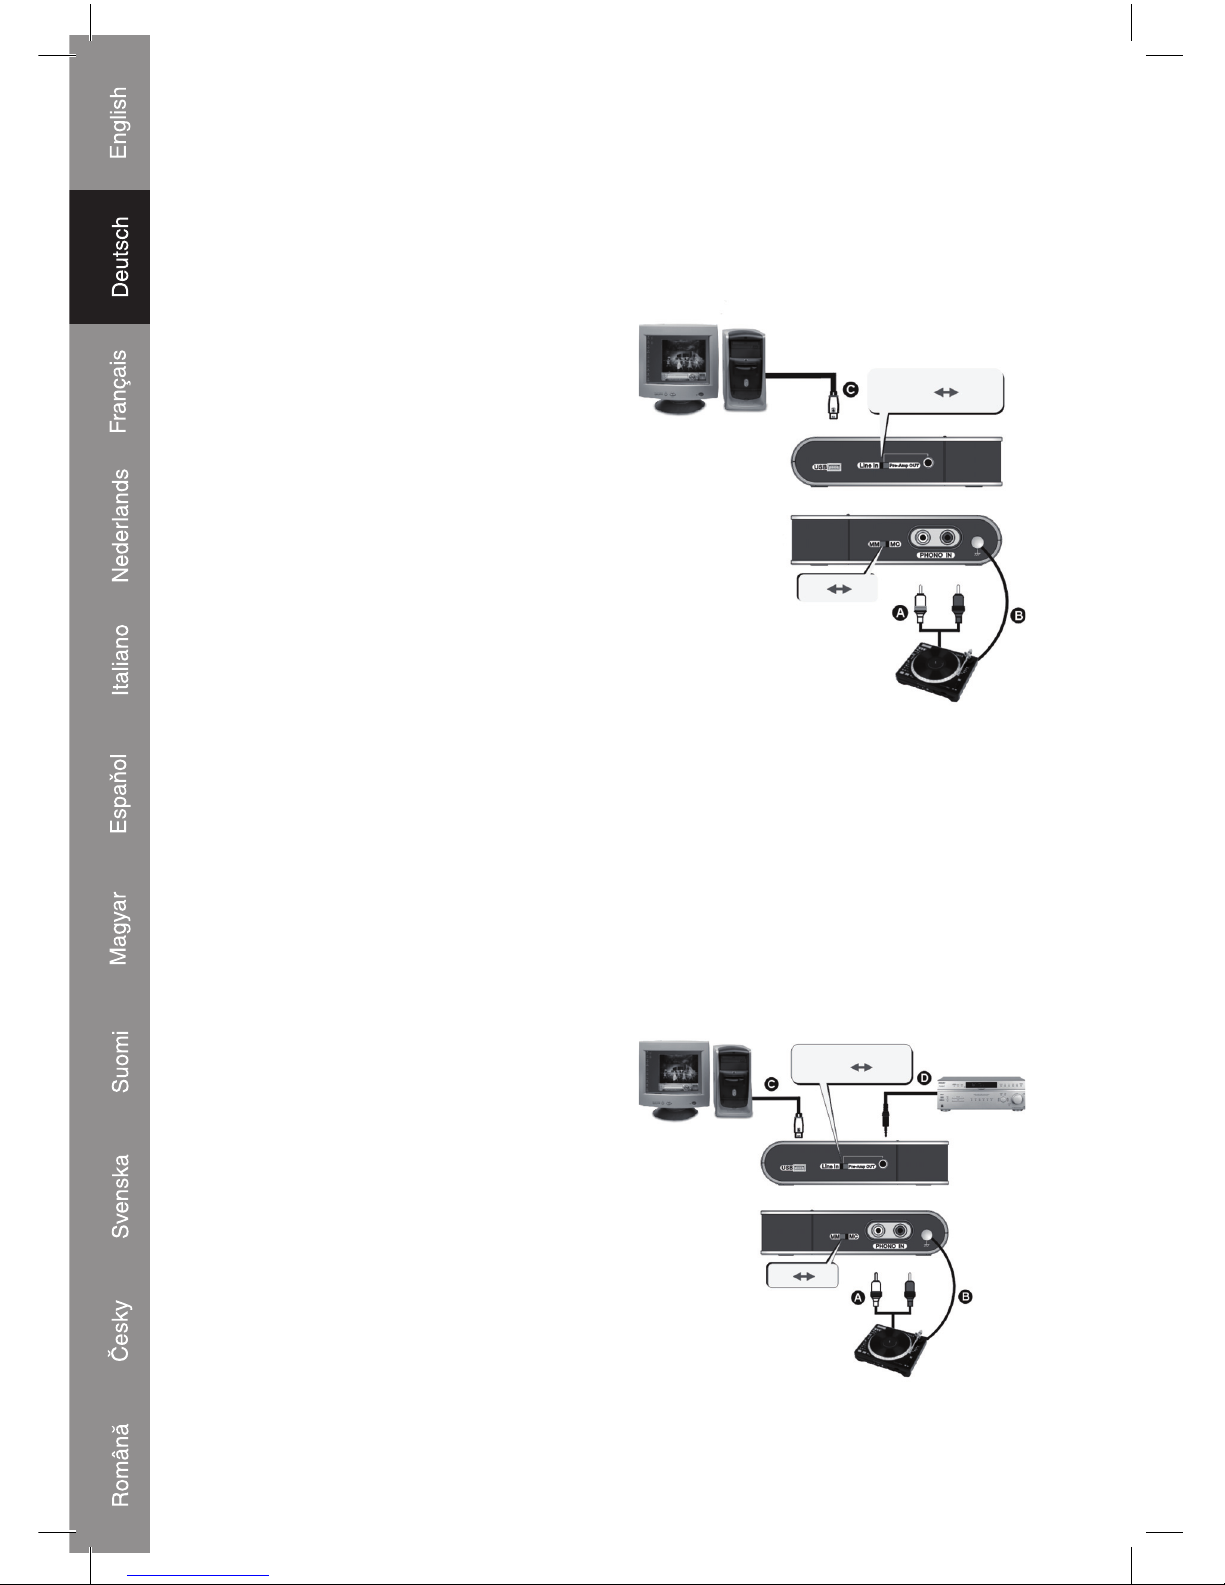
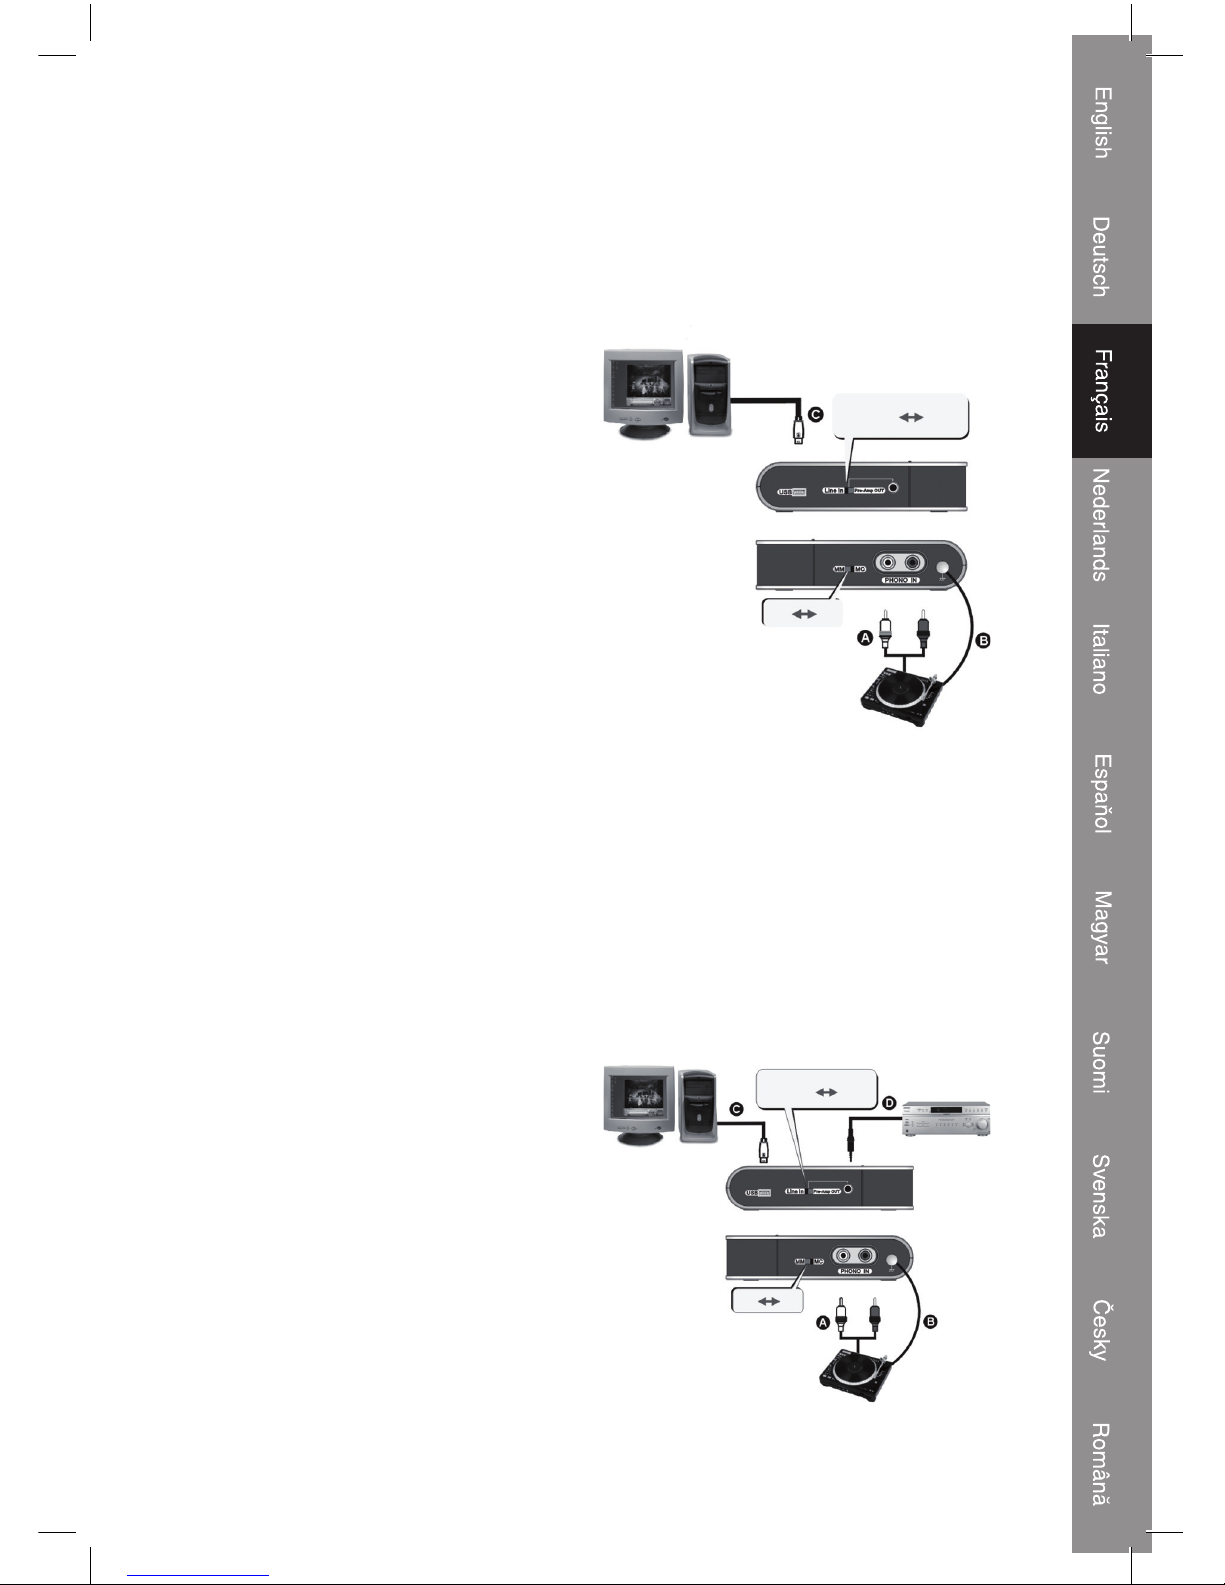
Application:
• Convert analogue music on phonographic disk to digital format.
Follow the description to record music from a vinyl record.
PC
Pre-Amp
Out
Line
In
USB
Front
BACK
Phono In
Phonograph player
MM MC
A. Connect the R,L → R,L cable to the
turntable and USB preamplifier.
B. In order to prevent a HUM noise caused
by mismatching of the turntable and
USB preamplifier, it is recommended that
the user connects the grounding cable
between the 2 devices.
C. Connect the USB cable to the PC (or
notebook) and USB Pre-Amp as the
illustration shows.
When the USB connection is ok, the PC
will auto-detect this unit as “USB
PREAMP”. You can then start to use this
device on your computer
Operation:
A. Connect the turntable to the USB preamplifier
B. Play the vinyl record
C. Select the MM/MC position for the different types of pickup heads for turntables
D. Now you can start recording with your audio grabbing software on a PC /notebook
• PHONO preamplifier (Stand Alone or operated with PC at the same time):
PC
Pre-Amp
Out
Line
In
USB
Front
BACK
Phono In
Phonograph player
MM MC
Amplifier
A. Connect the audio cable R,L → R,L to
the turntable and USB Pre-Amp.
B. In order to prevent a HUM noise caused
by mismatching of the turntable and
USB preamplifier, it is recommended that
the user connects the grounding cable
between the 2 devices.
C. Get the USB → mini USB cable and
connect your PC and the USB Pre-Amp.
Please make sure the connection is
good because the USB preamplifier is
powered via the USB port.
D. Connect the 3.5mm → Audio R, L cable,
and connect the “Line In/Pre-Amp Out”
port and the Audio R,L end to your stereo
amplifier.
E. Set the slide on the USB preamplifier to the “Pre-Amp Out” position
Page 4
4
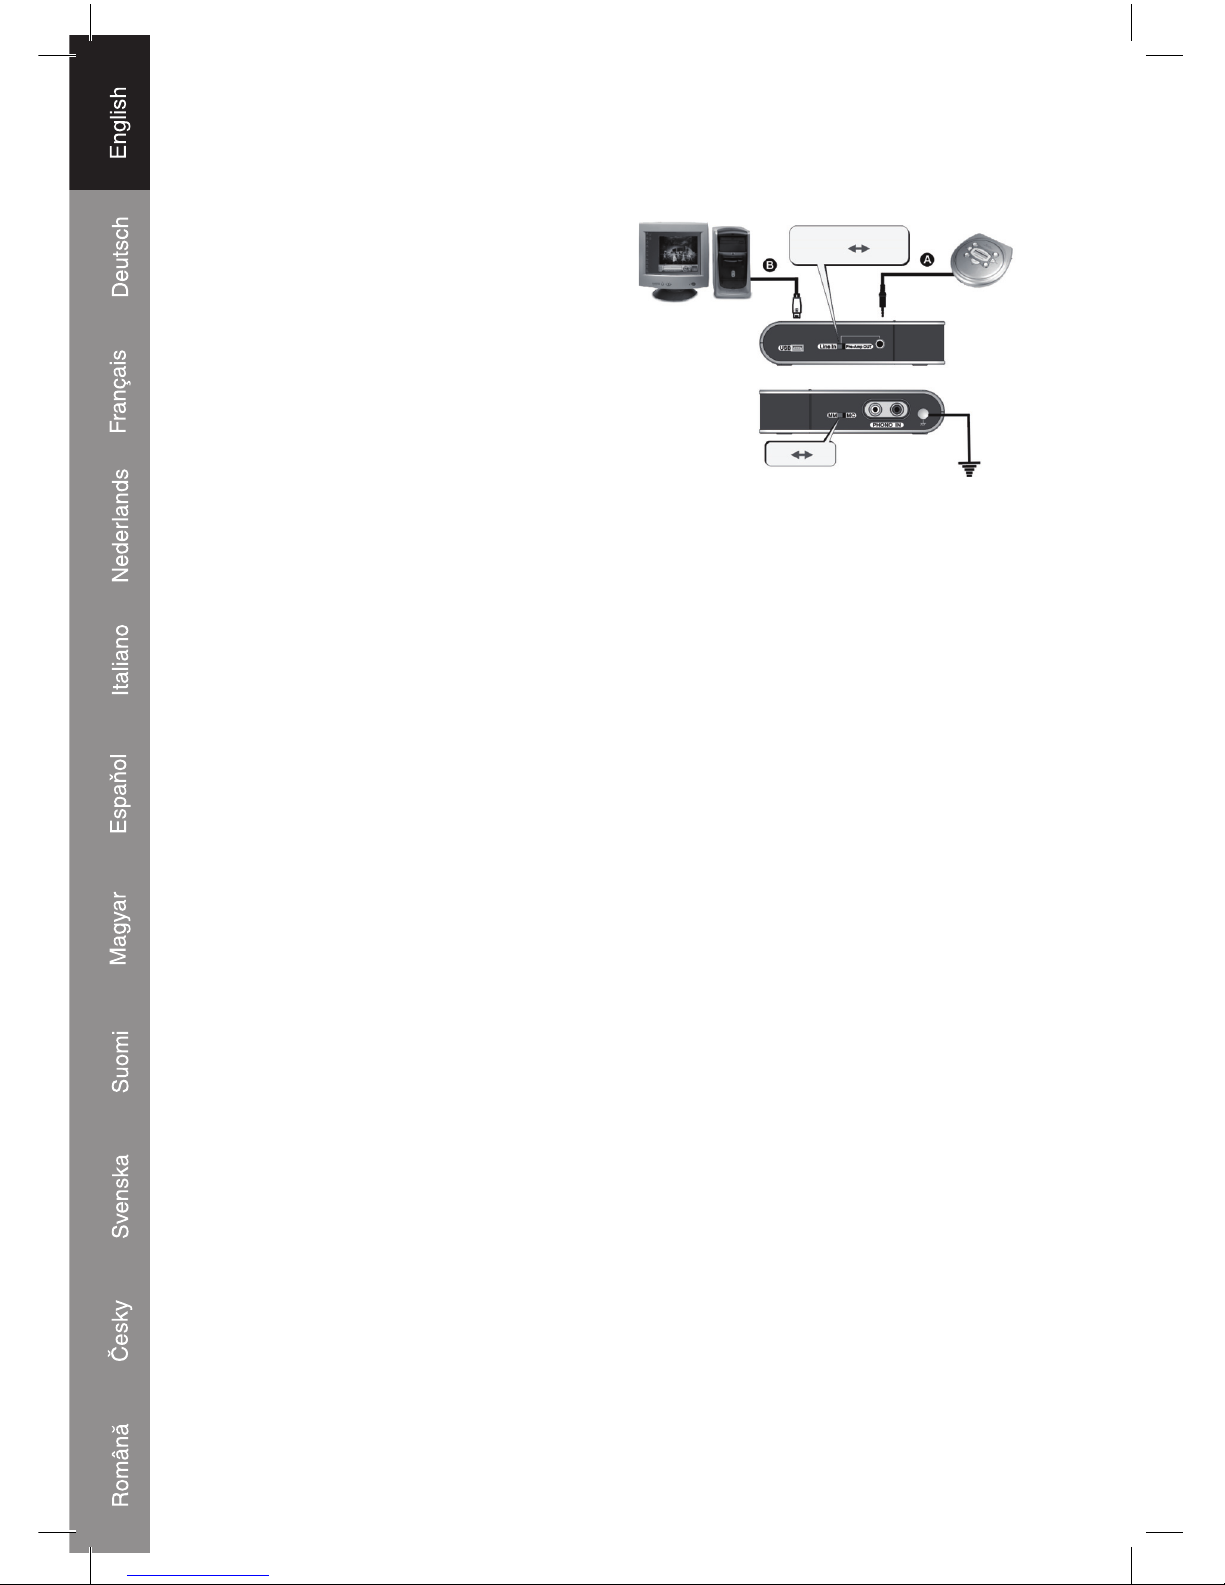
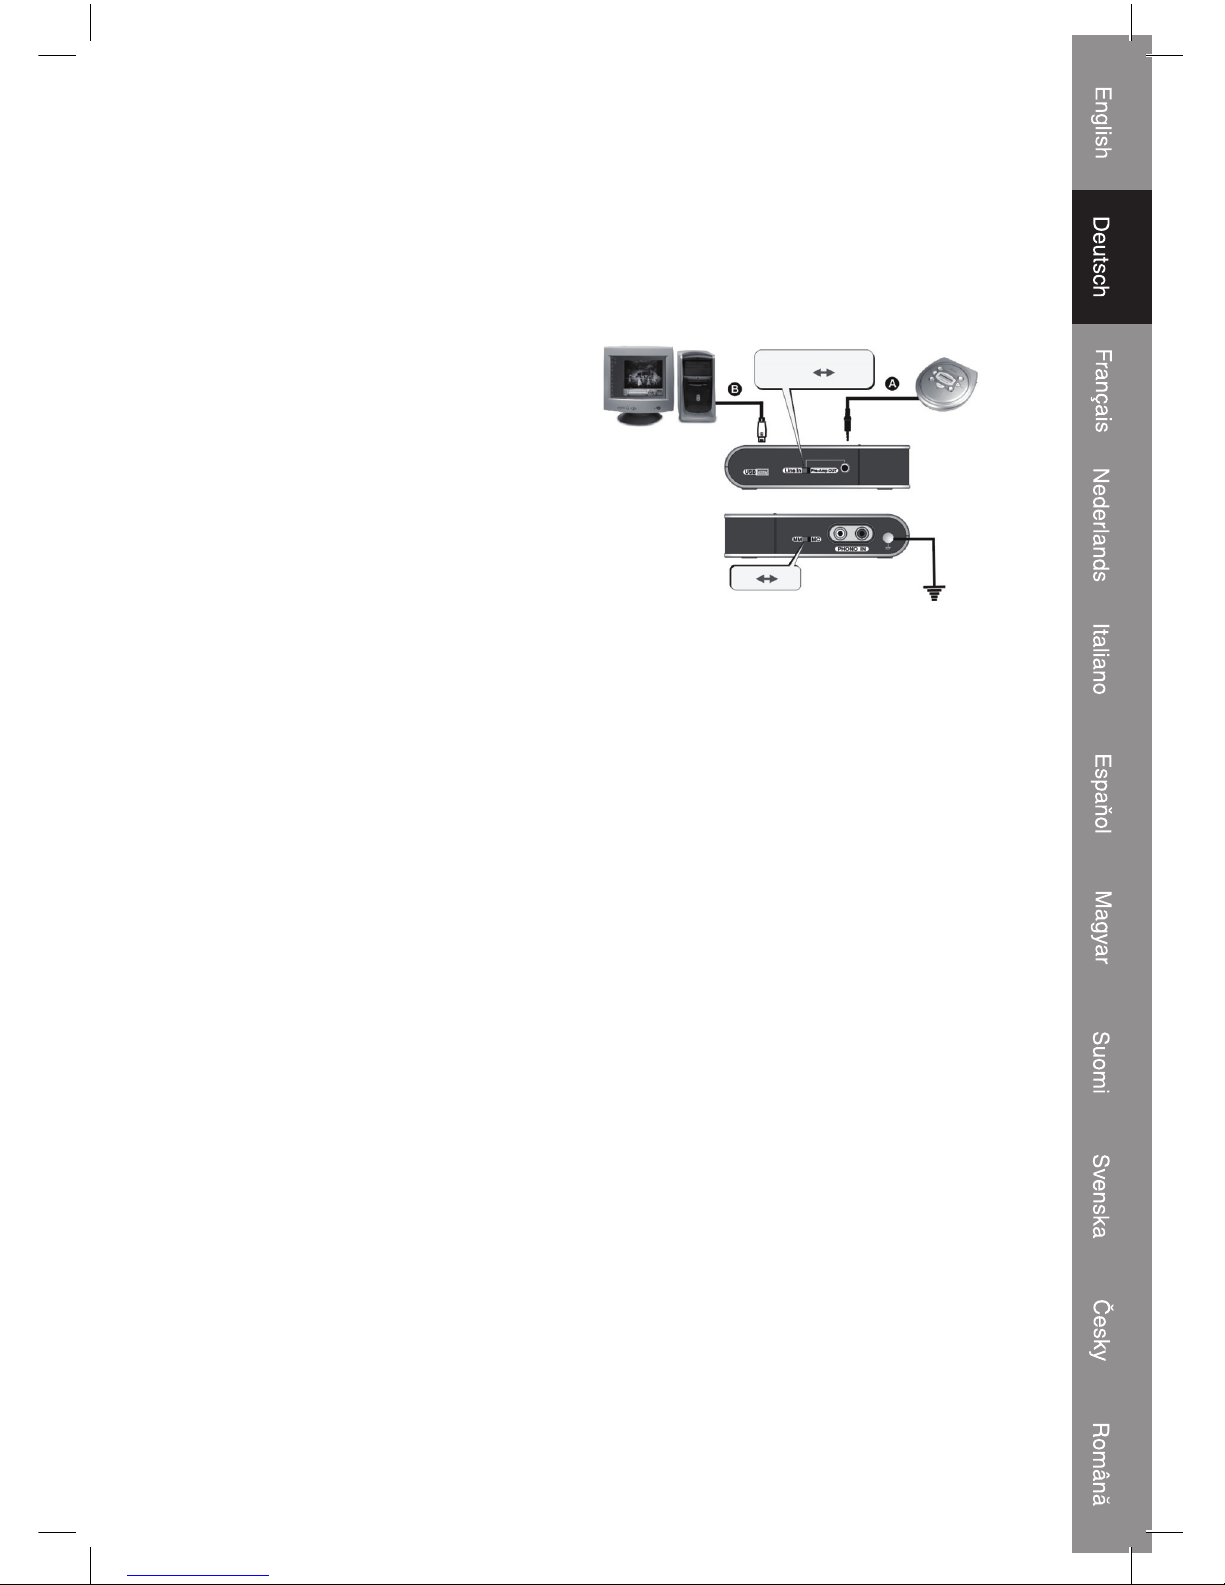
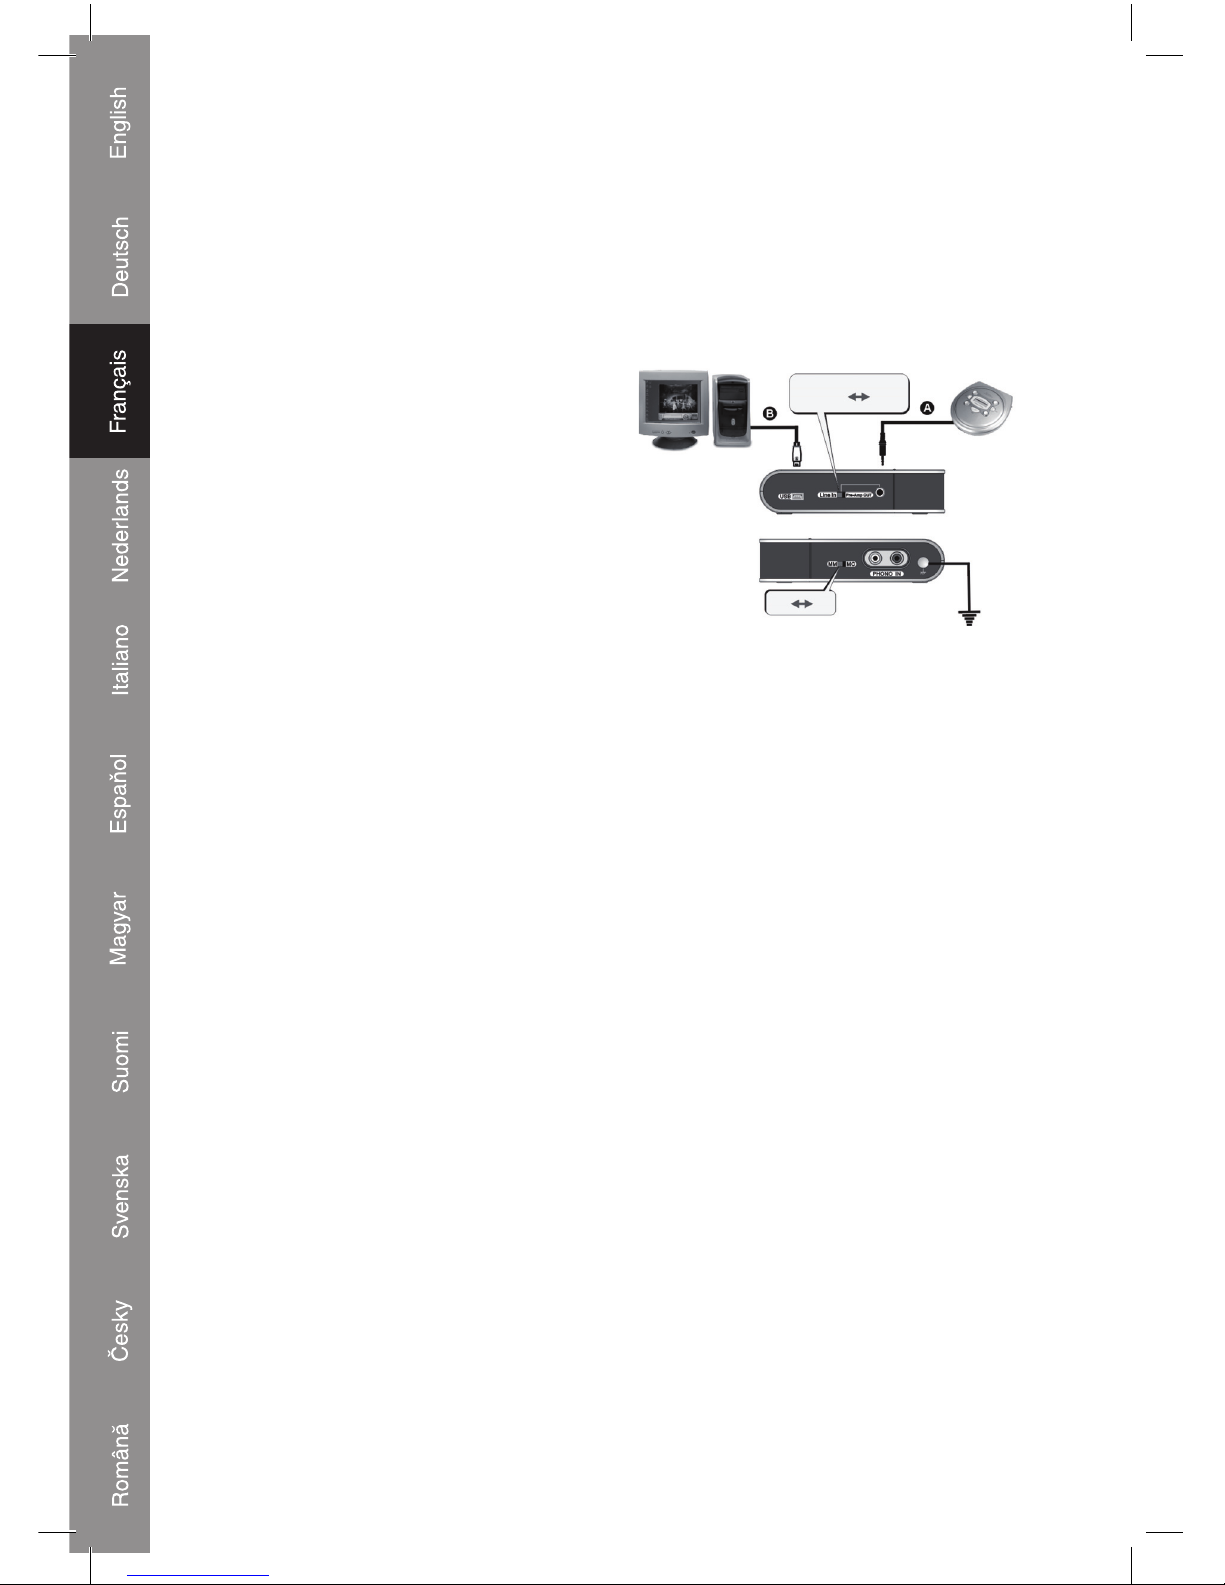
• Line-in grabbing:
PC
Pre-Amp
Out
Line
In
USB
Front
BACK
MM MC
CD Player
You can use this USB Pre Amp to rip a
Line-in signal from an audio device such
as CD
A. Connect the audio cable R,L → 3.5mm
to your CD player and USB preamplifier
as the illustration shows.
B. Take the USB A → mini 5 cable. Connect
your PC or notebook to the USB
preamplifier as the illustration shows.
• If your audio device only supports 3.5mm stereo output:
A. Buy a 3.5mm → 3.5mm cable (not included), connect one end to the “Line In/Pre-Amp
Out” port on the USB preamplifier and the other to the 3.5mm output of your audio
device.
B. Set the slide position on the USB preamplifier to “Line In”
Operation:
A. Power on and play your audio device
B. You can now start to rip the audio to your PC or notebook
Trouble shooting:
1. If the computer does not detect the USB preamplifier
a. Please make sure the connection is correct.
b. Please re-connect the USB preamplifier to your USB port, and then check the auto-
detection function. (When the unit is detected, the LED light should be on)
2. What are the minimum system requirements?
A computer with an USB port and with 500mA powering capacity is sufficient.
3. Why is the Pre-Amp OUT not working?
a. Please make sure the connection is correct.
b. Please make sure the slide position is set to “Pre-Amp OUT”.
4. What kind of recording program can I use?
Please use the existing recording program in your OS or try to download free audio
programs from the Internet.
Page 5

5
Declaration of conformity
We,
Nedis B.V.
De Tweeling 28
5215MC ’s-Hertogenbosch
The Netherlands
Tel.: 0031 73 599 1055
Email: info@nedis.com
Declare that product:
Brand: König Electronic
Model: KN-TTUSB100
Description: AUDIO/PHONO USB ADAPTER
Is in conformity with the following standards
EN 55022, EN 55024, EN 61000-3-2, EN 61000-3-3
IEC 61000-4-2, IEC 61000-4-3, IEC 61000-4-4, IEC 61000-4-5
IEC 61000-4-6, IEC 61000-4-8, IEC 61000-4-11
And complies with the requirements of the European Union Directives 89/336/EEC,
92/31/EEC and 93/68/EEC.
‘s-Hertogenbosch, 01 October 2008
Mrs. J. Gilad
Purchase Director
Page 6
6
Safety precautions:
Do not expose the product to water or moisture.
Maintenance:
Clean only with a dry cloth. Do not use cleaning solvents or abrasives.
Warranty:
No guarantee or liability can be accepted for any changes and modifications of the
product or damage caused due to incorrect use of this product.
General:
Designs and specifications are subject to change without notice.
All logos brands and product names are trademarks or registered trademarks of their
respective holders and are hereby recognized as such.
Attention:
This product is marked with this symbol. It means that used electrical and
electronic products should not be mixed with general household waste. There
is a separate collections system for these products.
Copyright ©
Page 7
7
DEUTSCH
Einführung:
Der KN-TTUSB100 ist ein sehr kompakter bidirektionaler USB/AUDIO-Vorverstärker.
Wandeln Sie Ihre Schallplatten, CDs, Audiokassetten oder anderen analogen
Audioquellen in MP3 oder WAV auf Ihrem PC um. Umschaltbarer Audioeingang: Line
oder Phono, und er kann als PC-Soundkarte benutzt werden: USB/Audio-Line-Ausgang.
Merkmale:
• RIAA-Vorverstärkerschaltung PHONO IN
• Umschaltung zwischen Line in / Pre-Amp out
• MM/MC-Auswahl für verschiedene Plattenspieler-Tonabnehmer
• Kompatibel mit Windows®- oder Mac® OS-Standardtreibern
• Vom USB-Bus gespeist
• Die Audiosamplingraten können auf bis zu 48 kHz für 2-Kanal-Aufnahme eingestellt
werden.
• Kompatibel mit Windows® 2000/XP/Vista und Mac® OSX
Systemanforderungen
Plattenspieler
Schallplatte
Computer mit USB-Anschlüssen mit 500 mA Speisevermögen
Aufnahme-Software
Anschlüsse:
1) USB mini 5pin Ausgang
2) Schalter (Line in - Pre-Amp Out)
3) 3,5 mm-Klinkenanschluss
4) MM/MC-Schalter
5) Phono Eingang (2xRCA)
6) Erdung
7) LED-Anzeige
Page 8
8
Anwendung:
• Wandeln Sie analoge Musik auf Schallplatten ins digitale Format um.
Befolgen Sie die Beschreibung, um Musik von der Schallplatte aufzunehmen.
PC
Pre-Amp
Out
Line
In
USB
Vorderseite
Rückseite
Phono In
Plattenspieler
MM MC
A. Schließen Sie das R,L → R,L-Kabel an
den Schallplattenspieler und den USBVorverstärker an.
B. Um ein BRUMM-Geräusch zu
vermeiden, das durch schlechte
Anpassung des Plattenspielers an den
USB-Vorverstärker entstehen kann, wird
empfohlen, den Erdungspunkt zwischen
den beiden Geräten anzuschließen.
C. Schließen Sie das USB-Kabel an
den PC (oder das Notebook) und
USB-Vorverstärker an, wie es in der
Abbildung gezeigt ist.
Wenn der USB-Anschluss in Ordnung
ist, erkennt der PC es automatisch als
"USB PREAMP". Dann können Sie
beginnen, das Gerät an Ihrem Computer
zu benutzen.
Bedienung:
A. Schließen Sie den Plattenspieler an den USB-Vorverstärker an.
B. Spielen Sie die Schallplatte ab.
C. Wählen Sie die MM/MC-Position für die verschiedenen Typen von Tonabnehmern für
Plattenspieler.
D. Nun können Sie die Aufnahme mit Ihrer Audio-Grabbing-Software auf einem PC/
Notebook beginnen.
• PHONO-Vorverstärker (Unabhängig oder gleichzeitig mit PC betrieben):
PC
Pre-Amp
Out
Line
In
USB
Vorderseite
Rückseite
Phono In
Plattenspieler
MM MC
Verstärker
A. Schließen Sie das R,L → R,L-Kabel an
den Schallplattenspieler und an USB
Pre-Amp an.
B. Um ein BRUMM-Geräusch zu
vermeiden, das durch schlechte
Anpassung des Plattenspielers an den
USB-Vorverstärker entstehen kann, wird
empfohlen, den Erdungspunkt zwischen
den beiden Geräten anzuschließen.
C. Schließen Sie mit dem USB → mini USB-
Kabel Ihren PC an USB-Vorverstärker
an. Überzeugen Sie sich davon, dass der
Anschluss in Ordnung ist, da der USBVorverstärker über den USB-Anschluss
gespeist wird.
Page 9
9
D. Schließen Sie das 3,5 mm → Audio R, L-Kabel an, und schließen Sie den “Line In/Pre-
Amp Out”-Anschluss und die Audio-R,L-Seite an Ihren Stereoverstärker an.
E. Stellen Sie den Schiebeschalter am USB-Vorverstärker auf “Pre-Amp Out”.
• Line-in Grabbing:
PC
Pre-Amp
Out
Line
In
USB
Vorderseite
Rückseite
MM MC
CD-Player
Sie können diesen USB-Vorverstärker
benutzen, um ein Line-in-Signal aus einem
Audiogerät wie z.B. CD zu rippen.
A. Schließen Sie das Audiokabel R,L → 3,5
mm an Ihren CD-Player und den USBVorverstärker an, wie es im Bild gezeigt
wird.
B. Schließen Sie Ihren PC oder Ihr
Notebook mit dem USB A → mini 5Kabel an den USB-Vorverstärker an, wie
es im Bild gezeigt wird.
• Wenn Ihr Audiogerät nur den 3,5 mm-Stereoausgang unterstützt:
A. Kaufen Sie ein 3,5 mm → 3,5 mm-Kabel (nicht beigefügt), und schließen Sie ein Ende
an “Line In/Pre-Amp Out” am USB-Vorverstärker und das andere Ende an den 3,5 mmAusgang Ihres Audiogeräts an.
B. Schieben Sie den Schiebeschalter am USB-Vorverstärker auf "Line In".
Bedienung:
A. Schalten Sie Ihr Audiogerät an und lassen es spielen.
B. Jetzt können Sie beginnen, die Audioquelle auf Ihren PC oder Ihr Notebook zu rippen.
Fehlersuche:
1. Wenn der Computer keinen USB-Vorverstärker erkennt.
a. Sehen Sie bitte nach, ob der Anschluss richtig ist.
b. Schließen Sie bitte den USB-Vorverstärker erneut an den USB-Anschluss an, und
überprüfen Sie dann die Funktion der automatischen Erkennung. (Wenn das Gerät
erkannt wird, sollte die LED-Lampe an sein.)
2. Welche Minimalanforderungen gibt es an den PC?
Ein Computer mit einem USB-Anschluss und einer Stromversorgung von 500 mA reicht
aus.
3. Warum funktioniert der Pre-Amp OUT nicht?
a. Sehen Sie bitte nach, ob der Anschluss richtig ist.
b. Sehen Sie bitte nach, ob der Schiebeschalter auf “Pre-Amp OUT” gestellt ist.
Page 10
10
4. Welches Aufnahmeprogramm kann ich benutzen?
Benutzen Sie bitte das vorhandene Aufnahmeprogramm in Ihrem Betriebssystem, oder
versuchen Sie, freie Audioprogramme aus dem Internet herunterzuladen.
KONFORMITÄTSERKLÄRUNG
Wir,
Nedis B.V.
De Tweeling 28
5215MC ’s-Hertogenbosch
Niederlande
Tel.: 0031 73 599 1055
Email: info@nedis.com
erklären, dass das Produkt:
Marke: König Electronic
Modell: KN-TTUSB100
Beschreibung: AUDIO/PHONO USB ADAPTER
den folgenden Standards entspricht:
EN 55022, EN 55024, EN 61000-3-2, EN 61000-3-3
IEC 61000-4-2, IEC 61000-4-3, IEC 61000-4-4, IEC 61000-4-5
IEC 61000-4-6, IEC 61000-4-8, IEC 61000-4-11
Das Produkt erfüllt die Bestimmungen der EG-Richtlinien 89/336/EEC, 92/31/EEC und
93/68/EEC.
‘s-Hertogenbosch, 1. Oktober 2008
J. Gilad
Einkaufsleiterin
Page 11

11
Sicherheitsvorkehrungen:
Sorgen Sie dafür, dass das Gerät nicht mit Wasser oder Feuchtigkeit in Berührung
kommt.
Wartung:
Nur mit einem trockenen Tuch säubern. Keine Reinigungs- oder Scheuermittel
verwenden.
Garantie:
Es kann keine Garantie oder Haftung für irgendwelche Änderungen oder Modifikationen
des Produkts oder für Schäden übernommen werden, die aufgrund einer nicht
ordnungsgemäßen Anwendung des Produkts entstanden sind.
Allgemeines:
Konstruktionen und technische Daten können ohne vorherige Ankündigung geändert
werden.
Alle Logos, Marken und Produktnamen sind Warenzeichen oder registrierte Warenzeichen
ihrer jeweiligen Eigentümer und werden hiermit als solche anerkannt.
Achtung:
Dieses Produkt ist mit diesem Symbol gekennzeichnet. Es bedeutet, dass die
verwendeten elektrischen und elektronischen Produkte nicht im allgemeinen
Haushaltsmüll entsorgt werden dürfen. Für diese Produkte stehen gesonderte
Sammelsysteme zur Verfügung.
Copyright ©
Page 12
12
FRANÇAIS
Introduction :
Le KN-TTUSB100 est un adaptateur bidirectionnel USB/AUDIO ultra compact.
Adaptez vos vinyles, vos CD, vos cassettes audio ou tout autre source audio analogique
en MP3 ou WAV sur votre PC. Entrée audio commutable : ligne ou phono pouvant être
utilisée comme carte son PC : Sortie de ligne USB/audio.
Caractéristiques :
• Circuit préamplifié RIAA pour l'entrée PHONO IN
• Commutateur entrée de ligne/sortie Pré-Amp
• Sélecteur MM/MC pour différentes cellules de lecture d'électrophones
• Compatible avec les lecteurs par défaut Windows® ou Mac® OS
• USB alimenté par bus
• La fréquence d'échantillonage audio peut être paramétrée jusqu'à 48 KHz pour
l'enregistrement 2 voies
• Compatible Windows® 2000/XP/Vista et Mac® OSX
Système pré-requis:
Platine
Disque pour électrophone
Ordinateur avec port UBS d'une puissance de 500 mA
Logiciel d'enregistrement
Raccordements :
1) Sortie mini-USB 5 broches
2) Commutateur (entrée de ligne/sortie Pré-Amp)
3) Prise jack 3.5mm
4) Commutateur MM/MC
5) Entrée Phono (2xRCA)
6) Mise à la terre
7) Voyant
Page 13
13
Application :
• Adapter de la musique analogique ou un disque de type phonographique au
format numérique.
Suivez ces instructions pour enregistrer la musique provenant d'un disque vinyle.
PC
Sortie
pré-amp
Entrée
de
ligne
USB
Avant
RETOUR
Entrée Phono
Electrophone
MM MC
A. Raccordez le câble R,L → R,L entre la
platine et le préamplificateur USB.
B. Afin d'éviter les bourdonnements
provoqués par Ia mauvaise adaptation
entre la platine et le préamplificateur
USB, il est recommandé de raccorder le
point de mise à la terre entre les deux
appareils.
C. Raccordez le câble USB entre le PC (ou
l'ordinateur portable) et le pré-amp USB
comme le montre l'illustration.
Une fois le raccordement USB
correctement effectué, le PC détecte
automatiquement cet appareil en tant
que “USB PREAMP”. Vous pouvez alors
utiliser l'appareil sur votre ordinateur.
Fonctionnement :
A. Raccordez la platine au préamplificateur USB
B. Lancez la lecture du disque vinyle
C. Choisissez la position du sélecteur MM/MC en fonction des différents types de têtes de
lecture des platines
D. Vous pouvez alors enregistrer à l'aide de votre logiciel d'enregistrement audio sur votre
PC/ordinateur portable.
• Préamplificateur PHONO (autonome ou en combinaison avec le PC) :
PC
Sortie
pré-amp
Entrée
de ligne
USB
Avant
RETOUR
Entrée Phono
Electrophone
MM MC
Amplificateur
A. Raccordez le câble audio R,L → R,L
entre la platine et le pré-amp USB.
B. Afin d'éviter les bourdonnements
provoqués par Ia mauvaise adaptation
entre la platine et le préamplificateur
USB, il est recommandé de raccorder le
point de mise à la terre entre les deux
appareils.
C. Prenez le câble USB → mini USB et
raccordez votre PC au pré-amp USB.
Assurez-vous d'effectuer correctement
le raccordement car le préamplificateur
USB est alimenté grâce au port USB.
Page 14
14
D. A l'aide du câble audio 3.5mm → Audio R, L , raccordez le port “Line In/Pre-Amp Out”
(Entrée de ligne/sortie pré-amp) et l'extrémité Audio R,L à votre ampli stéréo.
E. Placez le curseur du préamplificateur USB sur la position "Pre-Amp Out” (Sortie Pré-
amp)
• Capture entrée de ligne :
PC
Sortie
pré-amp
Entrée
de ligne
USB
Avant
RETOUR
MM MC
Lecteur CD
Vous pouvez utiliser ce préamplificateur
USB pour rastériser le signal d'entrée de
ligne d'un périphérique audio tel qu'un CD.
A. Raccordez le câble audio R,L →
3.5mm entre votre lecteur CD et le
préamplificateur USB comme le montre
l'illustration.
B. Prenez le câble USB A → mini câble
5. Raccordez votre PC ou ordinateur
portable à l'amplificateur USB comme le
montre l'illustration.
• Si votre périphérique audio ne dispose que d'une prise de sortie stéréo 3.5mm :
A. Achetez un câble 3.5mm → 3.5mm (non fourni), raccordez une extrémité au port “Line
In/Pre-Amp Out” (Entrée de ligne/Sortie Pré-Amp) et l'autre à la sortie 3.5mm de votre
périphérique audio.
B. Placez le curseur du préamplificateur USB sur “Line In” (Entrée de ligne)
Fonctionnement :
A. Allumez et lancez la lecture de votre périphérique audio.
B. Vous pouvez alors commencer la rastérisation audio vers votre PC ou ordinateur
portable.
Dépannage :
1. Si l'ordinateur ne détecte pas le préamplificateur USB
A. Assurez-vous que les raccordements soient correctement effectués.
B. Rébranchez le préamplificateur USB à votre port USB puis testez la fonction de
détection automatique. (Le voyant doit s'allumer lorsque l'appareil est détecté)
2. Quel est le système minimum prérequis pour le PC ?
Un ordinateur avec un port USB et une capacité de puissance de 500mA.
3. Pourquoi la sortie du pré-amp ne fonctionne-t-elle pas ?
A. Assurez-vous que les raccordements soient correctement effectués.
B. Assurez-vous que le curseur soit bien positionné sur “Pre-Amp OUT”.
Page 15
15
4. Quel sorte de programme d'enregistrement puis-je utiliser ?
Utilisez le programme existant sur votre système d'exploitation ou essayez de télécharger
des programmes audio gratuits sur Internet.
Déclaration de conformité :
Nous,
Nedis B.V.
De Tweeling 28
5215MC ’s-Hertogenbosch
Pays Bas
Tél : 0031 73 599 1055
E-mail : info@nedis.com
Déclarons que le produit :
Marque : König Electronic
Modèle : KN-TTUSB100
Désignation : ADAPTATEUR AUDIO/PHONO USB
est conforme aux prescriptions des normes suivantes :
EN 55022, EN 55024, EN 61000-3-2, EN 61000-3-3
IEC 61000-4-2, IEC 61000-4-3, IEC 61000-4-4, IEC 61000-4-5
IEC 61000-4-6, IEC 61000-4-8, IEC 61000-4-11
Et qu'il est conforme aux prescriptions des Directives de l'Union Europénne 89/336/CEE,
92/31/CEE et 93/68/CEE.
‘s-Hertogenbosch, 01 Octobre 2008
Mme. J. Gilad
Directrice des Achats
Page 16
16
Consignes de sécurité :
N'exposez jamais l'appareil à l'eau ou à l'humidité.
Entretien :
Ne nettoyez qu'avec un chiffon sec. N'utilisez pas de solvants ou de produits abrasifs.
Garantie :
Aucune garantie ou responsabilité ne sera acceptée en cas de modification et/ou
de transformation du produit ou en cas de dommages provoqués par une utilisation
incorrecte de l'appareil.
Généralités :
Le design et les caractéristiques techniques sont sujets à modification sans notification
préalable.
Tous les logos de marques et noms de produits sont des marques déposées ou
immatriculées dont leurs détenteurs sont titulaires et sont donc reconnus comme telles
dans ce document.
Attention :
Ce symbole figure sur l'appareil. Il signifie que les produits électriques et
électroniques usagés ne doivent pas être jetés avec les ordures ménagères.
Le système de collecte est différent pour ce genre de produits.
Copyright ©
Page 17
17
NEDERLANDS
Introductie:
De KN-TTUSB100 is een ultracompacte bidirectionele USB/AUDIO adapter.
Zet uw vinyl, CDs, audiocassettes of elke analoge audiobron om naar MP3 of WAV op uw
PC. Twee audio-ingangen: line of phono en het kan worden gebruikt als PC-geluidskaart:
USB/audio line uitgang.
Eigenschappen:
• RIAA voorversterker voor PHONO IN
• Line in / Pre-Amp uit schakelaar
• MM/MC selectie voor verschillende platenspelerelementen
• Compatibel met standaard stuurprogramma's van Windows® of Mac® OS
• USB-bus voeding
• Audio sampling rates kunnen worden ingesteld tot 48 KHz voor 2 kanaalopnamen
• Compatibel met Windows® 2000/XP/Vista en Mac® OSX
Systeemvereisten:
Platenspeler
Langspeelplaat of single
Computer met USB-poorten met mA voeding capaciteit
Opnamesoftware
Verbindingen:
1) USB mini 5pin Out
2) Line in / Pre-Amp uit schakelaar
3) 3.5mm aansluiting
4) MM/MC schakelaar
5) Phono in (2xRCA)
6) Aarding
7) LED-aanduiding
Page 18

18
Toepassing:
• Zet analoge muziek op langspeelplaten om naar digitaal formaat.
Volg deze instructies om muziek van een langspeelplaat op te nemen.
PC
Pre-Amp
Out
Line
In
USB
Voorkant
Achterkant
Phono In
Platenspeler
MM MC
A. Sluit de R,L → R,L kabels aan op de
platenspeler en de USB-voorversterker.
B. Om een bromtoon te voorkomen dat
wordt veroorzaakt door een verkeerde
aansluiting van de platenspeler en
de USB-voorversterker, wordt het
aanbevolen dat u de aarding van de
2 apparaten aansluit.
C. Sluit de USB-kabel aan op uw PC (of
notebook) en de USB-voorversterker
zoals hiernaast staat afgebeeld.
Wanneer de USB-aansluiting in orde
is, zal de PC automatisch dit apparaat
herkennen als “USB PREAMP”. U kunt
het apparaat nu gebruiken op uw
computer.
Bediening:
A. Sluit de platenspeler aan op de USB-voorversterker.
B. Speel de plaat af.
C. Selecteer de MM/MC positie voor het type element van uw platenspeler.
D. Nu kunt u starten met uw opnamesoftware op uw PC /notebook.
• PHONO voorversterker (zelfstandig of in combinatie met uw PC):
PC
Pre-Amp
Out
Line
In
USB
Voorkant
Achterkant
Phono In
Platenspeler
MM MC
Versterker
A. Sluit de audiokabels aan op de
platenspeler en de USB-voorversterker.
B. Om een bromtoon te voorkomen dat
wordt veroorzaakt door een verkeerde
aansluiting van de platenspeler en
de USB-voorversterker, wordt het
aanbevolen dat u de aarding van de 2
apparaten aansluit.
C. Gebruik de USB → mini USB-kabel en
sluit uw PC en de USB-voorversterker
aan. Controleer of de verbinding goed
is want de USB-voorversterker wordt
gevoed door de USB-poort.
D. Sluit de 3.5mm → audiokabel aan op
de “Line In/Pre-Amp Out” poort en uw
versterker.
E. Stel de schuif op de USB-voorversterker op de “Pre-Amp Out” positie.
Page 19

19
• Line-in opname:
PC
Pre-Amp
Out
Line
In
USB
Voorkant
Achterkant
MM MC
CD-speler
U kunt deze USB-voorversterker gebruiken
om een Line-in signaal van een audioapparaat zoals een CD-speler op te
nemen.
A. Sluit de audiokabel R,L → 3.5mm aan op
uw CD-speler en de USB-voorversterker
zoals hiernaast staat afgebeeld.
B. Gebruik de USB A → mini 5 kabel
om uw PC of notebook op de USBvoorversterker aan te sluiten zoals
hiernaast staat afgebeeld.
• Indien uw audio-apparaat alleen een 3.5mm stereo-uitgang heeft:
A. Koop een 3.5mm → 3.5mm kabel (niet bijgesloten), sluit deze aan op de “Line In/
Pre-Amp Out” poort op de USB-voorversterker en de 3.5mm uitgang van uw audioapparaat.
B. Stel de schuif op de USB-voorversterker op de “Line In” positie.
Bediening:
A. Schakel uw audio-apparaat in.
B. U kunt nu de audio op uw PC of notebook opnemen.
Het oplossen van problemen:
1. Wanneer uw computer de USB-voorversterker niet herkend
a. Controleer de aansluiting.
b. Sluit de USB-voorversterker opnieuw aan op uw USB-poort en controleer de auto-
detection functie. (Wanneer het apparaat herkend is gaat de LED branden.)
2. Wat is de minimale vereiste van uw PC?
Een computer met een USB-poort en met 500mA voeding voldoet.
3. Waarom werkt de Pre-Amp OUT niet?
a. Controleer de aansluiting.
b. Controleer of de schuif is ingesteld op “Pre-Amp OUT”.
4. Welk opnameprogramma kan ik gebruiken?
Gebruik het bestaande opnameprogramma in uw besturingssysteem of probeer een
gratis programma te downloaden van internet.
Page 20

20
CONFORMITEITVERKLARING
Wij,
Nedis BV
De Tweeling 28
5215 MC ’s-Hertogenbosch
Nederland
Tel.: 0031 73 599 1055
E-mail: info@nedis.com
verklaren dat het product:
Merknaam: König Electronic
Model: KN-TTUSB100
Omschrijving: AUDIO USB-OMZETTER
in overeenstemming is met de volgende normen::
EN 55022, EN 55024, EN 61000-3-2, EN 61000-3-3
IEC 61000-4-2, IEC 61000-4-3, IEC 61000-4-4, IEC 61000-4-5
IEC 61000-4-6, IEC 61000-4-8, IEC 61000-4-11
en voldoet aan de vereiste richtlijnen 89/336/EEG, 92/31/EEG en 93/68/EEG van de
Europese Unie.
‘s-Hertogenbosch, 01 oktober 2008
Mevr. J. Gilad
Directeur inkoop
Page 21

21
Veiligheidsvoorzorgsmaatregelen:
Stel het product niet bloot aan water of vocht.
Onderhoud:
Uitsluitend reinigen met een droge doek. Gebruik geen reinigingsmiddelen of
schuurmiddelen.
Garantie:
Voor wijzigingen en veranderingen aan het product of schade veroorzaakt door een
verkeerd gebruik van dit product, kan geen aansprakelijkheid worden geaccepteerd.
Tevens vervalt daardoor de garantie.
Algemeen:
Wijziging van ontwerp en specificaties zonder voorafgaande mededeling onder
voorbehoud.
Alle logo's, merken en productnamen zijn handelsmerken of geregistreerde handelsmerken
van de respectievelijke eigenaren en worden hierbij als zodanig erkend.
Let op:
Dit product is voorzien van dit symbool. Dit symbool geeft aan dat afgedankte
elektrische en elektronische producten niet met het gewone huisafval
verwijderd mogen worden. Voor dit soort producten zijn er speciale
inzamelingspunten.
Copyright ©
Page 22

22
ITALIANO
Introduzione:
Il KN-TTUSB100 è un adattatore USB/AUDIO bidirezionale ultracompatto
Consente di adattare dischi in vinile, cd, audiocassette o qualsiasi altra sorgente audio
analogica in MP3 o WAV sul PC. Ingresso audio commutabile tra line o phono e utilizzabile
come scheda audio PC: uscita USB/linea audio
Caratteristiche:
• Circuito pre-amplificatore RIAA per ingresso PHONO
• Commutatore ingresso linea / uscita pre-amp
• Selezione MM/MC per diversa cartuccia di fonografo
• Compatibile con driver predefiniti sistemi operativi Windows® o Mac®
• Alimentato con bus USB
• I tassi di campionamento audio sono impostabili fino a 48 KHz per la registrazione a
2 canali
• Compatibile con Windows® 2000/XP/Vista e Mac® OSX
Requisiti di sistema:
Giradischi
Disco fonografico
Computer con porte USB a capacità di alimentazione da 500 mA
Software di registrazione
Collegamenti:
1) Uscita USB mini a 5 pin
2) Commutatore (Ingresso linea / Uscita pre-amp)
3) Collegamento jack da 3,5 mm
4) Commutatore MM/MC
5) Ingresso phono (2xRCA)
6) Messa a terra
7) Spia LED.
Page 23

23
Applicazione:
• Adattare musica analogica su disco fonografico in formato digitale.
Attenersi alla descrizione per registrare musica da un disco in vinile.
PC
Pre-Amp O ut
(Uscita
preamplificatore)
Line In
(Ingress o
linea)
USB
Parte
anteriore
INDIETRO
Phono In
(Ingresso fonografo)
Lettore fonografico
MM MC
A. Collegare il cavo R,L → R,L al giradischi
e al preamplificatore USB.
B. Per evitare disturbi HUM determinati
dallo sfasamento del giradischi e del
preamplificatore USB, si consiglia di
collegare il punto di messa a terra tra i
due dispositivi.
C. Collegare il cavo USB al PC (o al
computer portatile) e al Pre-amp USB
attenendosi a quanto mostrato in figura.
Se il collegamento USB è corretto, il
PC rileverà automaticamente l'unità
come “USB PREAMP”. A questo punto
si può iniziare a usare il dispositivo sul
computer.
Funzionamento:
A. Collegare il giradischi al preamplificatore USB
B. Riprodurre il disco in vinile
C. Selezionare la posizione MM/MC in relazione ai vari tipi di puntina del giradischi
D. A questo punto, è possibile iniziare e registrare con il software di acquisizione audio su
un PC/computer portatile
• Preamplificatore PHONO (indipendente o funzionante contemporaneamente con
PC):
PC
Pre-Amp O ut
(Uscita
preamplificatore)
Line In
(Ingresso
linea)
USB
Parte
anteriore
INDIETRO
Phono In
(Ingresso fonografo)
Lettore fonografico
MM MC
Amplificatore
A. Collegare il cavo audio R,L → R,L al
giradischi e al preamplificatore USB.
B. Per evitare disturbi HUM determinati
dallo sfasamento del giradischi e del
preamplificatore USB, si consiglia di
collegare il punto di messa a terra tra i
due dispositivi.
C. Prendere il cavo USB → mini USB e
collegare il PC e il preamplificatore
USB. Verificare la correttezza del
collegamento, tenuto conto del fatto
che il preamplificatore viene alimentato
attraverso la porta USB.
D. Collegare il cavo da 3,5 mm → Audio R,
L e collegare la porta "Ingresso linea /
Uscita pre-amp e l'estremità audio R, L
all'amplificatore stereo.
Page 24

24
E. Impostare il cursore sull'amplificatore USB sulla posizione “Pre-Amp Out” (Uscita Pre-
Amp)
• Acquisizione ingresso linea:
PC
Pre-Amp
Out (Uscita
preamplificatore)
Line In
(Ingresso
linea)
USB
Parte
anteriore
INDIETRO
MM MC
Lettore CD
È possibile utilizzare il preamplificatore
USB per estrarre il segnale di ingresso
linea da un dispositivo audio, ad esempio
un CD
A. Collegare il cavo audio R,L → da 3,5
mm al lettore CD e all'amplificatore USB
attenendosi a quanto mostrato in figura.
B. Prendere il cavo USB A → mini 5.
Collegare il PC o il computer portati al
preamplificatore USB come mostrato in
figura.
• Se il dispositivo audio supporta solo un'uscita stereo da 3,5mm:
A. Acquistare un cavo da 3,5 mm → 3,5 mm (non in dotazione) collegare un'estremità alla
porta “Line In/Pre-Amp Out” sul preamplificatore USB e l'altra estremità all'uscita da 3,5
mm del dispositivo audio.
B. Impostare la posizione del cursore sul preamplificatore USB su "Line In" (Ingresso
linea)
Funzionamento:
A. Inserire l'energia e riprodurre il dispositivo audio
B. A questo punto si può iniziare ad estrarre l'audio nel PC o nel computer portatile
Risoluzione dei problemi:
1. Se il computer non rileva il preamplificatore USB
a. Verificare la correttezza del collegamento.
b. Ricollegare il preamplificatore USB alla porta USB e quindi controllare la funzione di
rilevazione automatica. (Quando l'unità viene rilevata, la spia LED deve essere accesa)
2. Quali sono i requisiti minimi in relazione al PC?
È sufficiente un computer con una porta USB e una capacità di alimentazione di 500
mA.
3. Perchè Pre-amp OUT non funziona?
a. Verificare la correttezza del collegamento.
b. Verificare che il cursore sia impostato su “Pre-Amp OUT”.
Page 25

25
4. Quali tipi di programmi di registrazione si possono utilizzare?
Utilizzare il programma di registrazione presente nel proprio sistema operativo o
eventualmente scaricare programmi audio gratuiti da Internet.
DICHIARAZIONE DI CONFORMITÀ
Questa società,
Nedis B.V.
De Tweeling 28
5215MC ’s-Hertogenbosch
Paesi Bassi
Tel.: 0031 73 599 1055
Email: info@nedis.com
Dichiara che il prodotto:
Marca: König Electronic
Modello: KN-TTUSB100
Descrizione: ADATTATORE USB AUDIO/PHONO
è conforme ai seguenti standard:
EN 55022, EN 55024, EN 61000-3-2, EN 61000-3-3
IEC 61000-4-2, IEC 61000-4-3, IEC 61000-4-4, IEC 61000-4-5
IEC 61000-4-6, IEC 61000-4-8, IEC 61000-4-11
e rispetta i requisiti delle Direttive dell'Unione Europea 89/336/CEE, 92/31/CEE e 93/68/
CEE.
‘s-Hertogenbosch, 1° ottobre 2008
Sig.ra J. Gilad
Direttore agli acquisti
Page 26

26
Precauzioni di sicurezza:
Non esporre il prodotto ad acqua o umidità.
Manutenzione:
Pulire solo con un panno asciutto. Non utilizzare solventi detergenti o abrasivi.
Garanzia:
Non sarà accettata alcuna garanzia o responsabilità in relazione a cambiamenti e
modifiche del prodotto o a danni determinati dall'uso non corretto del prodotto stesso.
Generalità:
Il design e le caratteristiche tecniche sono soggetti a modifica senza necessità di
preavviso.
Tutti i marchi a logo e i nomi di prodotto sono marchi commerciali o registrati dei rispettivi
titolari e sono in questo documento riconosciuti come tali.
Attenzione:
Il prodotto è contrassegnato con questo simbolo, con il quale si indica che i
prodotti elettrici ed elettronici usati non devono essere gettati insieme ai rifiuti
domestici. Per questi prodotti esiste un sistema di raccolta differenziata.
Copyright ©
Page 27

27
ESPAÑOL
Introducción:
El KN-TTUSB100 es un adaptador ultra compacto bidireccional de USB/AUDIO.
Adapte sus discos de vinilo, CD, cintas de audio, o cualquier otra fuente de audio
analógica a MP3 o WAV en su PC. Entrada de vídeo conmutable: línea o micrófono y
puede utilizarse como tarjeta de sonido de PC: salida de línea USB/audio.
Características:
• Circuito preamplificador RIAA para ENTRADA DE MICRÓFONO
• Interruptor de Entrada de línea / Salida del Preamplificador
• Selección MM/MC para los distintos cartuchos fonográficos
• Compatible con los pilotos predefinidos de Windows® o Mac®
• Alimentado por puerto de USB
• Los índices de muestra de audio pueden fijarse en hasta 48 KHz para el registro de 2
canales
• Compatible con los Sistemas Operativos de Windows® 2000/XP/Vista y Mac®
Requisitos del sistema:
Plato
Disco fonográfico
Ordenador con puertos USB con capacidad de alimentación 500 mA
Programa de grabación
Conexiones:
1) Mini salida de 5 clavijas USB
2) Interruptor (Entrada de línea / Salida del Preamplificador)
3) Conexión de toma de 3.5mm
4) Interruptor MM/MC
5) Entrada de micrófono (2xRCA)
6) Puesta a tierra
7) Indicación LED.
Page 28

28
Aplicación:
• Adapte la música analógica en disco fonográfico a formato digital.
Siga la descripción para grabar música a partir de una grabación en vinilo.
PC
Salida del
preamplificador
Entrada
de línea
USB
Panel frontal
Panel trasero
Entrada de micrófono
Reproductor de
fonografía
MM MC
A. Conecte el cable R,L → R,L al plato
giratorio y al preamplificador USB.
B. Para evitar ruidos anormales provocados
por la falta de correspondencia del
plato giratorio y el preamplificador
USB, le recomendamos que el usuario
conecte el punto de tierra entre los dos
dispositivos.
C. Conecte el cable USB al PC (o portátil) y
al preamplificador por USB tal y como lo
indica la ilustración.
Cuando la conexión USB sea
la adecuada. El PC detectará
automáticamente esta unidad como
“USB PREAMP”. Podrá a continuación
empezar a utilizar este dispositivo en su
ordenador
Funcionamiento:
A. Conecte el plato giratorio al preamplificador por USB
B. Reproduzca la grabación de vinilo
C. Seleccione la posición MM/MC para los distintos tipos de cabezales de recogida para
los platos giratorios
D. Ahora podrá empezar a grabar con su programa de grabación de audio en un PC fijo o
portátil
• Preamplificador del MICRÓFONO (individual u operado con el PC al mismo
tiempo):
PC
Salida d el
preamplificador
Entrada
de línea
USB
Panel frontal
Panel trasero
Entrada de micrófono
Reproductor de fonografía
MM MC
Amplificador
A. Conecte el cable de audio R,L → R,L al
plato giratorio y al preamplificador USB.
B. Para evitar ruidos anormales provocados
por la falta de correspondencia del
plato giratorio y el preamplificador
USB, le recomendamos que el usuario
conecte el punto de tierra entre los dos
dispositivos.
C. Obtenga el minicable USB y conecte
su PC y el preamplificador USB→. Por
favor, compruebe que la conexión es
adecuada ya que el preamplificador USB
se alimenta mediante el puerto USB.
Page 29

29
D. Conecte el cable de 3.5mm → de Audio R, L y conecte el puerto de “Entrada de línea/
Salida del preamplificador y el extremo de audio R,L a su amplificador estéreo.
E. Fije el lado del preamplificador USB en la posición “Salida del preamplificador”
• Grabación de entrada de línea:
PC
Salida del
preamplificador
Entrada
de línea
USB
Panel frontal
Panel trasero
MM MC
Reproductor
de CD
Podrá utilizar este preamplificador USB
para obtener una señal de entrada de línea
de un dispositivo de audio como el CD
A. Conecte el cable de audio R,L → de
3.5mm a su reproductor de CD y al
preamplificador USB tal y como lo indica
la ilustración.
B. Coja el minicable USB A → 5. Conecte
su PC o su portátil al preamplificador
USB tal y como lo indica la ilustración.
• Si su dispositivo de audio sólo acepta la salida estéreo de 3.5mm:
A. Compre un cable de 3.5mm → 3.5mm (no incluido), conecte un extremo al puerto
“Entrada de línea/Salida del preamplificador" en el preamplificador USB y el otro
extremo en la salida de 3.5mm de su dispositivo de audio.
B. Fije la posición del preamplificador USB en “Entrada de línea”
Funcionamiento:
A. Encienda y reproduzca su dispositivo de audio
B. Ahora podrá empezar a disfrutar de su audio en su PC o portátil
Resolución de problemas:
1. Si el ordenador no detecta el preamplificador USB
A. Compruebe que la conexión es adecuada.
B. Por favor, vuelva a conectar el preamplificador USB en su puerto USB, y a continuación,
compruebe la función de auto-detección. (Cuando la unidad sea detectada, la luz LED
se encenderá)
2. ¿Cuáles son los requisitos mínimos para el PC?
Un ordenador con un puerto USB y una capacidad de alimentación de 500mA es
suficiente.
3. ¿Por qué no funciona la salida del preamplificador?
A. Compruebe que la conexión es adecuada.
B. Por favor, compruebe que la posición indicada es “SALIDA del preamplificador”.
Page 30

30
4. ¿Qué tipo de programa de grabación puedo utilizar?
Por favor, utilice el programa de grabación existente en su SO o intente descargar
programas de audio gratuitos por Internet.
DECLARACIÓN DE CONFORMIDAD
La empresa infraescrita,
Nedis B.V.
De Tweeling 28
5215MC ’s-Hertogenbosch
Países Bajos
Tel.: 0031 73 599 1055
Email: info@nedis.com
Declara que el producto:
Marca: König Electronic
Modelo: KN-TTUSB100
Descripción: ADAPTADOR USB DE AUDIO/MICRÓFONO
se encuentra conforme a las siguientes normas:
EN 55022, EN 55024, EN 61000-3-2, EN 61000-3-3
IEC 61000-4-2, IEC 61000-4-3, IEC 61000-4-4, IEC 61000-4-5
IEC 61000-4-6, IEC 61000-4-8, IEC 61000-4-11
Y cumple con todos los requisitos de las directivas de la Unión Europea 89/336/EEC,
92/31/EEC y 93/68/EEC.
‘s-Hertogenbosch, 01 de septiembre de 2008
D. J. Gilad
Director de compras
Page 31

31
Medidas de seguridad:
No exponga el producto al agua ni a la humedad.
Mantenimiento:
Limpie sólo con un paño seco. No utilice disolventes ni productos de limpieza abrasivos.
Garantía:
No se aceptará ninguna garantía o responsabilidad derivada de cualquier cambio o
modificaciones realizadas al producto o daños provocados por un uso incorrecto del
presente producto.
General:
Las ilustraciones y las especificaciones podrán sufrir cambios sin previo aviso.
Todas las marcas de los logotipos y los nombres de productos constituyen patentes o
marcas registradas de sus titulares correspondientes, reconocidos como tal.
Cuidado:
Este producto está señalizado con este símbolo. Esto significa que los
productos eléctricos y electrónicos gastados no deberán mezclarse con los
desechos domésticos generales. Existen distintos sistemas de recogida
individuales para este tipo de productos.
Copyright ©
Page 32

32
MAGYAR NYELVŰ
A termék bemutatása:
A KN-TTUSB100 egy ultra-kompakt kétirányú USB/AUDIO adapter.
Ezzel a készülékkel számítógépen átalakíthatja gramofonlemezen, CD-n, hangkazettán
vagy egyéb analóg audioforráson tárolt felvételeit MP3 vagy WAV formátumúvá.
Választható audiobemenet: line (vonal) vagy phono, és számítógépes hangkártyaként
használható: USB/audio line (vonal) kimenet.
Jellemzők:
• RIAA előerősítő áramkör a PHONO IN bemenethez
• Line in (Vonalbemenet) / Pre-Amp out (Előerősítő kimenet) kapcsoló
• MM/MC választókapcsoló a különféle hangszedőkhöz
• Windows® vagy Mac® OS alapértelmezett programjaival kompatibilis
• USB busz táplálású
• Az audio mintavételi sebesség akár 48 KHz-ig is állítható kétcsatornás felvételhez
• Windows® 2000/XP/Vista és Mac® OSX operációs rendszerekkel kompatibilis
Rendszerkövetelmények:
Lemezjátszó
Gramofonlemez
Számítógép 500 mA tápkapacitású USB portokkal
Rögzítő szoftver
Csatlakozások:
1) USB mini 5-érintkezős kimenet
2) Kapcsoló (Line in (Vonalbemenet) –
Pre-Amp Out (Előerősítő kimenet)
3) 3,5 mm-es jack-csatlakozó
4) MM/MC kapcsoló
5) Phono bemenet (2 db RCA)
6) Földelés
7) LED kijelzés.
Page 33

33
Felhasználási területe:
• Gramofonlemezek analóg zenei felvételeinek átalakítása digitális formátumúvá
Az alábbi útmutatást követve készítsen felvételt hanglemezről:
PC (Számítógép)
Pre-Amp O ut
(Előerősítő-
kimenet)
Line in
(Vonalbe-
menet)
USB
Előlap
Hátlap
Phono In
(Phono beme net)
Lemezlejátszó
MM MC
A. Az R, L → 3,5 mm-es audiokábellel
csatlakoztassa a lemezjátszóhoz és az
USB előerősítőhöz.
B. A lemezjátszó és az USB előerősítő
illesztetlensége miatti búgás elkerülése
érdekében ajánlatos a két készülék
földelési pontjának összekapcsolása.
C. Dugaszolja az USB kábelt a
számítógépre (vagy notebookra) és az
USB előerősítőre, ahogyan az ábrán
bemutatjuk.
Amint az USB kapcsolatot létrehozta, a
számítógép az eszközt “USB PREAMP”
néven automatikusan érzékeli. Ettől
kezdve használhatja a készüléket a
számítógéppel.
Kezelése:
A. Csatlakoztassa a lemezjátszót az USB előerősítőhöz.
B. Játssza le a hanglemezt.
C. Állítsa be az MM/MC kapcsolót a különböző típusú hangszedőknek megfelelően.
D. A hangfelvevő szoftverrel indítsa el a felvételt a számítógépre/notebookra.
• PHONO előerősítő (önállóan vagy számítógéppel működtetve):
PC (Számítógép)
Pre-Amp O ut
(Előerősítő-
kimenet)
Line in
(Vonalbe-
menet)
USB
Előlap
Hátlap
Phono In
(Phono beme net)
Lemezlejátszó
MM MC
Amplifier
(Erősítő)
A. Az R,L → R,L hangkábelt csatlakoztassa
a lemezjátszóhoz és az USB
előerősítőhöz.
B. A lemezjátszó és az USB előerősítő
illesztetlensége miatti búgás elkerülése
érdekében ajánlatos a két készülék
földelési pontjának összekapcsolása.
C. Az USB → mini USB kábellel kapcsolja
össze a számítógépet és az USB
előerősítőt. Ügyeljen arra, hogy a
csatlakoztatás megfelelő legyen, mert az
USB előerősítő az USB porton keresztül
kap áramot.
D. A 3,5 mm-es → audio R, L kábellel
kapcsolja össze a “Line In/Pre-Amp Out”
(Vonalbemenet/Előerősítő-kimenet)
portot és a sztereó erősítő audio R, L végét.
Page 34

34
E. Az USB előerősítő csúszkáját helyezze “Pre-Amp Out” (Előerősítő-kimenet) állásba.
• Vonalbemenet-felvétel:
PC (Számítógép)
Pre-Amp O ut
(Előerősítő -
kimenet)
Line in
(Vonalbe-
menet)
USB
Előlap
Hátlap
MM MC
CD lejátszó
Ezzel az USB előerősítővel vonalbemeneti
jelet vehet audioforrásról (pl. CD-ről).
A. A 3,5 mm-es → audio R, L kábellel
kapcsolja össze a CD lejátszót és az
USB előerősítőt, ahogyan az ábrán
bemutatjuk.
B. Vegye az USB A → mini 5 kábelt.
Kapcsolja össze vele a számítógépet
vagy notebookot és az USB előerősítőt,
ahogyan az ábrán bemutatjuk.
• Ha az audio készüléke csak a 3,5 mm-es sztereó kimenetet támogatja:
A. Szerezzen be egy 3,5 mm → 3,5 mm-es kábelt (nincs tartozékként mellékelve), egyik
végét dugaszolja az USB előerősítő “Line In/Pre-Amp Out” (Vonalbemenet/Előerősítőkimenet) portjára, másik végét pedig az audio készülék 3,5 mm-es kimenetére.
B. Az USB előerősítő csúszkáját helyezze “Line In” (Vonalbemenet) állásba.
Kezelése:
A. Kapcsolja lejátszásra az audio készüléket.
B. Most már indíthatja az audiojel felvételét a számítógépre vagy notebookra.
Hibaelhárítás:
1. Ha a számítógép nem találja az USB előerősítőt:
a. Ellenőrizze, megfelelő-e a kapcsolat.
b. Kapcsolja az USB előerősítőt ismét az USB portra, majd ellenőrizze az automatikus
érzékelési funkciót. (Amint a számítógép érzékeli a készüléket, a LED-nek világítania
kell.)
2. A számítógépre milyen minimális követelmény vonatkozik?
USB porttal és 500 mA tápkapacitással ellátott számítógép elegendő.
3. Miért nem működik a Pre-Amp OUT (Előerősítő-kimenet)?
a. Ellenőrizze, megfelelő-e a kapcsolat.
b. Ellenőrizze, “Pre-Amp OUT” (Előerősítő-kimenet) állásba van-e helyezve a csúszka.
4. Milyen felvevő programot használhatok?
Használja az operációs rendszerén már meglévő felvevő programot, vagy töltsön le az
internetről ingyenes audio programokat.
Page 35

35
Megfelelőségi nyilatkozat
Mi,
a Nedis B.V. vállalat, címünk:
De Tweeling 28
5215MC ’s-Hertogenbosch
Hollandia
Tel.: 0031 73 599 1055
E-mail: info@nedis.com
Kijelentjük, hogy a termék, amelynek:
Gyártmánya: König Electronic
Típusa: KN-TTUSB100
Megnevezése: AUDIO/PHONO ADAPTER, USB
Megfelel az alábbi szabványoknak:
EN 55022, EN 55024, EN 61000-3-2, EN 61000-3-3
IEC 61000-4-2, IEC 61000-4-3, IEC 61000-4-4, IEC 61000-4-5
IEC 61000-4-6, IEC 61000-4-8, IEC 61000-4-11
Megfelel továbbá az Európai Unió 89/336/EGK, 92/31/EGK és 93/68/EGK irányelveinek.
‘s-Hertogenbosch, 2008. október 01.
Mrs. J. Gilad
értékesítési igazgató
Megfelelőségi nyilatkozat.
Egyetértek és elfogadom a Nedis B.V. Hollandia által adott nyilakozatot.
Jacob Gilad
HQ-Nedis kft.
ügyvezető igazgató
Page 36

36
Biztonsági óvintézkedések:
A terméket víztől és párától védje.
Karbantartás:
Csak száraz ronggyal tisztítsa. Ne használjon tisztító- és súrolószereket.
Jótállás:
Nem vállalunk jótállást és felelősséget a terméken végzett változtatás vagy módosítás
miatt vagy a termék helytelen használata miatt bekövetkező károkért.
Általános tudnivalók:
A kivitel és a műszaki jellemzők előzetes értesítés nélkül is változhatnak.
Minden logó, terméknév és márkanév a tulajdonosának márkaneve vagy bejegyzett
márkaneve, és azokat ennek tiszteletben tartásával említjük.
Figyelem:
Ezt a terméket ezzel a jelöléssel láttuk el. Azt jelenti, hogy az elhasznált
elektromos és elektronikus termékeket tilos az általános háztartási hulladékhoz
keverni. Erre a célra különálló gyűjtőrendszerek állnak rendelkezésre.
Copyright ©
Page 37

37
SUOMI
Johdanto:
KN-TTUSB100 on erittäin kompakti kaksisuuntainen USB/AUDIO-sovitin.
Mukauta vinyylilevyt, CD-levyt, audiokasetit tai muut vastaavat audiolähteet MP3- tai
WAV-muotoon tietokoneellesi. Kytkettävä audiosyöttö: "line" tai "phono" ja sitä voidaan
käyttää tietokoneen äänikorttina: USB-/audiolinjalähtö.
Ominaisuudet:
• RIAA esivahvistinpiiri kohtelle PHONO IN
• Line in / Pre-Amp -kytkin
• MM/MC valinta eri äänirasioille
• Sopii Windows® tai Mac® OS -käyttöjärjestelmien oletusajureihin
• toimii USB-väylällä
• Audion näytteenottotiheys voidaan asettaa arvoon 48 KHz kahdelle
kanavanauhoitukselle
• Sopii käyttöjärjestelmiin Windows® 2000/XP/Vista ja Mac® OSX
Järjestelmävaatimukset:
Levysoitin
Äänilevy
Tietokone USB-porteilla 500 mA kapasiteetilla
Nauhoitusohjelma
Kytkennät:
1) USB-mini 5-piikin lähdöllä
2) Kytkin (Line in - Pre-Amp Out)
3) 3,5 mm liitin
4) MM/MC-kytkin
5) Phono-tulo (2xRCA)
6) Maadoitus
7) LED-merkkivalo.
Page 38

38
Käyttötarkoitus:
• Mukauta analogista musiikkia äänilevylle digitaaliseen muotoon.
Lue musiikin nauhoitusohjeet vinyylilevyltä.
PC
Esivahvistimen
lähtö
Line
In
USB
Edestä
BACK
(TAKAISIN)
Phono In
Levysoitin
MM MC
A. Liitä R,L → R,L -kaapeli levysoittimeen
ja USB-esivahvistimeen.
B. Jotta levysoittimen ja USB-esivahvistimen
virheellisestä liittämisestä aiheutuvat
HURINAÄÄNET vältettäisiin, käyttäjän
on suositeltavaa liittää maadoituspiste
kyseisten 2 laitteen väliin.
C. Liitä USB-kaapeli tietokoneeseen (tai
kannettavaan) ja USB-esivahvistimeen
kuvan mukaisesti.
Kun USB-liitäntä on suoritettu
oikein, tietokone havaitsee laitteen
automaattisesti kohteena “USB
PREAMP”. Voi tällöin käyttää laitetta
tietokoneellasi.
Käyttö:
A. Liitä levysoitin USB-esivahvistimeen.
B. Käynnistä vinyylilevyn nauhoitus.
C. Valitse MM/MC-asema levysoittimien erilaisille soittopäille.
D. Voit nyt aloittaa nauhoituksen tietokoneen/kannettavan audion tallennusohjelmalla.
• PHONO-esivahvistin (yksin käytettynä tai tietokoneella samaan aikaan):
PC
Esivahvistimen
lähtö
Line
In
USB
Edestä
BACK
(TAKAISIN)
Phono In
Levysoitin
MM MC
VAHVISTIN
A. Liitä R,L → R,L -audiokaapeli
levysoittimeen ja USB-esivahvistimeen.
B. Jotta levysoittimen ja USB-esivahvistimen
virheellisestä liittämisestä aiheutuvat
HURINAÄÄNET vältettäisiin, käyttäjän
on suositeltavaa liittää maadoituspiste
kyseisten 2 laitteen väliin.
C. Liitä tietokone ja USB-esivahvistin USB
→ mini USB -kaapelilla. Varmista, että
yhteys on hyvä, koska USB-esivahvistin
saa virtaa USB-portin kautta.
D. Liitä 3,5 mm → Audio R, L -kaapeli ja liitä
“Line In/Pre-Amp Out” -portti ja Audio
R,L -pää stereovahvistimeen.
E. Aseta USB-esivahvistimen kytkin “Pre-
Amp Out” -asemaan.
Page 39

39
• Line-in -tallennus:
PC
Esivahvistimen
lähtö
Line
In
USB
Edestä
BACK
(TAKAISIN)
MM MC
CD-soitin
Voit käyttää tätä USB-esivahvistinta Linein -signaalin erottamiseksi audiolaitteesta
kuten CD-levystä.
A. Liitä audiokaapeli R,L → 3,5 mm CD-
soittimeen ja USB-esivahvistimeen
kuvan mukaisesti.
B. Ota USB A → mini 5 -kaapeli käyttöön.
Liitä tietokone tai kannettava USBesivahvistimeen kuvan mukaisesti.
• Jos audiolaitteesi tukee vain 3,5 mm stereolähtöä:
A. Hanki 3,5 mm → 3,5 mm -kaapeli (ei kuulu pakkaukseen), liitä toinen pää USB-
esivahvistimen “Line In/Pre-Amp Out” -porttiin ja toinen audiolaitteen 3,5 mm lähtöön.
B. Aseta USB-esivahvistimen kytkin asentoon “Line In”.
Käyttö:
A. Kytke virta päälle ja käynnistä audiolaite.
B. Voit nyt aloittaa audion tallennuksen tietokoneelle tai kannettavalle.
Vianetsintä:
1. Jos tietokone ei havaitse USB-esivahvistinta:
a. Varmista kytkennän virheettömyys.
b. Kytke USB-esivahvistin uudelleen USB-porttiin ja tarkista sen jälkeen automaattinen
tunnistustoiminto. (Kun laite on havaittu, LED-merkkivalo palaa).
2. Mitkä ovat tietokoneen vähimmäisvaatimukset?
USB-portilla varustettu ja 500mA tehokapasiteetin omaava tietokone on riittävä.
3. Miksi esivahvistimen OUT ei toimi?
a. Varmista kytkennän virheettömyys.
b. Varmista, että kytkin on asetettu asentoon “Pre-Amp OUT”.
4. Millaisia nauhoitusohjelmia voin käyttää?
Käytä OS:n olemassa olevaa tallennusohjelmaa tai lataa ilmainen audio-ohjelma
Internetistä.
Page 40

40
VAATIMUSTENMUKAISUUSVAKUUTUS
Me,
Nedis B.V.
De Tweeling 28
5215MC ’s-Hertogenbosch
Alankomaat
Puh: 0031 73 599 1055
Sähköposti: info@nedis.com
Vakuuttaa, että tuote:
Merkki: König Electronic
Malli: KN-TTUSB100
Kuvaus: AUDIO/PHONO USB-SOVITIN
Täyttää seuraavat standardit:
EN 55022, EN 55024, EN 61000-3-2, EN 61000-3-3
IEC 61000-4-2, IEC 61000-4-3, IEC 61000-4-4, IEC 61000-4-5
IEC 61000-4-6, IEC 61000-4-8, IEC 61000-4-11
Täyttää EU-direktiivien 89/336/EY, 92/31/EY, 93/68/EY vaatimukset.
‘s-Hertogenbosch, 1. lokakuuta 2008
Mrs. J. Gilad
Toimitusjohtaja
Page 41

41
Turvallisuuteen liittyvät varoitukset:
Älä altista tuotetta vedelle tai kosteudelle.
Huolto:
Puhdista ainoastaan kuivalla kankaalla. Älä käytä liuottimia tai hioma-aineita.
Takuu:
Takuu ja vastuuvelvollisuus mitätöityy, jos tuote vaurioituu siihen tehtyjen muutoksien tai
sen väärinkäytön takia.
Yleistä:
Muutoksia malliin ja teknisiin ominaisuuksiin voidaan tehdä ilmoituksetta.
Kaikki logot, merkit ja tuotenimet ovat niiden vastaavien omistajien tuotemerkkejä tai
rekisteröityjä tuotemerkkejä ja niitä on käsiteltävä sellaisina.
Huomio:
Tuote on varustettu tällä merkillä. Se merkitsee, ettei käytettyjä sähkö- tai
elektronisia tuotteita saa hävittää kotitalousjätteen mukana. Kyseisille tuotteille
on olemassa erillinen keräysjärjestelmä.
Copyright ©
Page 42

42
SVENSKA
Inledning:
KN-TTUSB100 är en mycket kompakt tvåvägs-USB/AUDIO omvandlare.
Omvandlar dina grammofonskivor, CD-skivor, kassetter eller andra analoga audiokällor
till MP3 eller WAV på din PC. Omkopplingsbar ljudingång: line eller phono och den kan
användas som PC-ljudkort: USB/audio line utgång.
Funktioner:
• RIAA förförstärkare för Phono In (grammofon in)
• Line in / Pre-Amp out omkopplare
• MM/MC val för olika typer av pickuper
• Kompatibel med Windows® eller Mac® OS standarddrivrutiner
• Strömförsörjning via USB-uttaget
• Ljudsamplingsfrekvensen kan ställas in på upp till 48 KHz för 2-kanalsinspelning
• Kompatibel med Windows® 2000/XP/Vista och Mac® OSX
Systemkrav:
Skivspelare
Grammofonskiva
Dator vars USB-uttag har 500 mA uteffekt
Inspelningsmjukvara
Anslutningar:
1) USB mini 5-stift ut
2) Omkopplare (Line in - Pre-Amp Out
(linje in - förförstärkare ut))
3) 3.5mm uttag
4) MM/MC omkopplare
5) Phono In (grammofon in) (2xRCA)
6) Jord
7) LED indikator.
Page 43

43
Användning:
• Omvandlar analog musik på grammofonskivor till digitalt format.
Följ beskrivningen för att spela in musik från en grammofonskiva.
PC
Pre-Amp O ut
(förförstärka -
rutgång)
Line
In
USB
FRONT
BAKSIDA
Phono In
(grammofon in)
Grammofon
MM MC
A. Koppla R,L → R,L till skivspelaren och
USB-förförstärkaren.
B. För att undvika brummande ljud som
beror på felanpassning mellan USBförförstärkaren och skivspelaren,
rekommenderas det att användaren
tillkopplar jordningspunkten mellan de
båda apparaterna.
C. Koppla USB-kabeln till PC:n (även bärbar
dito) och USB-förförstärkaren som bilden
visar.
Om anslutningen är riktig, kommer PC:
n automatiskt att identifiera enheten
som “USB PREAMP”. Nu kan du starta
enheten på din dator.
Användning:
A. Anslut skivspelaren till USB-förförstärkaren
B. Spela grammofonskivan
C. Välj MM/MC position för olika pickuper
D. Nu kan du på din PC/bärbara dator starta inspelningen med ett inspelningsprogram
• PHONO förförstärkare (för sig själv eller tillsammans med en PC):
PC
Pre-Amp O ut
(förförstärka -
rutgång)
Line
In
USB
FRONT
BAKSIDA
Phono In
(grammofon in)
Grammofon
MM MC
Förstärkare
A. Koppla audiokabeln R,L → R,L till
skivspelaren och USB-förförstärkaren.
B. För att undvika brummljud som beror
på felanpassaning mellan USBförförstärkaren och skivspelaren,
rekomenderas det att användaren
tillkopplar jordningspunkten mellan de
båda apparaterna.
C. Koppla mini-USB-kabeln till din PC och till
USB-förförstärkaren. Se till att kontakten
är god eftersom USB-förförstärkaren får
sin strömförsörjning via USB-uttaget.
D. Koppla 3.5mm → Audio R, L kabeln till
“Line In/Pre-Amp Out” uttaget och Audio
R,L änden till din stereoförstärkare.
E. Ställ skjutkontakten på USB-
förförstärkaren i läget“Pre-Amp Out”
Page 44

44
• Line-in inspelning:
PC
Pre-Amp O ut
(förfö rstärka-
rutgång)
Line
In
USB
FRONT
BAKSIDA
MM MC
CD-spelare
Du kan använda denna USB-förförstärkare
för att överföra (rippa) en Line-in-signal från
audiokällor som t.ex. CD.
A. Koppla audiokabeln R,L → 3.5mm till din
CD-spelare och till USB-förförstärkaren
på det sätt som bilden visar.
B. Använd USB A → mini 5-kabeln. Koppla
din PC:n eller bärbar dito till USBförförstärkaren som bilden visar.
• Om din apparat bara har en 3.5mm stereo utgång:
A. Köp en 3.5mm → 3.5mm kabel (ingår ej), koppla ena änden till “Line In/Pre-Amp Out”
uttaget på USB-förförstärkaren och den andra änden till 3.5mm uttaget på din ljudkälla.
B. Ställ skjutkontakten på USB-förförstärkaren i läget“Line In”
Användning:
A. Koppla på och spela upp din ljudkälla.
B. Nu kan du börja överföra (rippa) ljudet till din PC eller bärbara dator.
Felsökning:
1. Om datorn inte detekterar USB-förförstärkaren
a. Kontrollera att anslutningen är korrekt.
b. Koppla USB- förförstärkaren till USB-uttaget på nytt och kontrollera sedan om den
automatiska detekteringen fungerar. (När enheten är detekterad, skall LED-indikatorn
lysa)
2. Vilka är de minsta kraven din PC måste uppfylla?
En dator med ett USB-uttag som ger ut 500mA effekt räcker till.
3. Varför fungerar inte förförstärkarens utgång (Pre-Amp OUT)?
a. Se till att anslutningen är korrekt.
b. Se till att skjutkontakten är ställd på “Pre-Amp OUT”.
4. Vilka slags inspelningsprogram kan jag använda?
Använd det inspelningsprogram som finns i ditt operativsystem eller försök ladda ner ett
gratisprogram från internet.
Page 45

45
ÖVERENSSTÄMMELSEFÖRKLARING
Vi,
Nedis B.V.
De Tweeling 28
5215MC ’s-Hertogenbosch
Holland
Tel.: 0031 73 599 1055
Email: info@nedis.com
Deklarerar att produkten:
Märke: König Electronic
Modell: KN-TTUSB100
Beskrivning: AUDIO/PHONO USB-OMVANDLARE
överensstämmer med följande standarder:
EN 55022, EN 55024, EN 61000-3-2, EN 61000-3-3
IEC 61000-4-2, IEC 61000-4-3, IEC 61000-4-4, IEC 61000-4-5
IEC 61000-4-6, IEC 61000-4-8, IEC 61000-4-11
Och uppfyller kraven i den Europeiska unionens direktiv 89/336/EEC, 92/31/EEC and
93/68/EEC .
‘s-Hertogenbosch, den 1 oktober 2008
Fru J. Gilad
Inköpsdirektör
Page 46

46
Säkerhetsanvisningar:
Utsätt inte produkten för vatten eller fukt.
Underhåll:
Rengör endast med torr trasa. Använd inga rengöringsmedel eller frätande medel.
Garanti:
Ingen garanti gäller vid några ändringar eller modifieringar av produkten eller för skador
som har uppstått på grund av felaktig användning av denna produkt.
Allmänt:
Utseende och specifikationer kan komma att ändras utan föregående meddelande.
Alla logotyper och produktnamn är varumärken eller registrerade varumärken som tillhör
sina ägare och är härmed erkända som sådana.
Obs!
Produkten är märkt med denna symbol. Det innebär att använda elektriska
eller elektroniska produkter inte får slängas bland vanliga hushållssopor. Det
finns särskilda återvinningssystem för dessa produkter.
Copyright ©
Page 47

47
ČESKY
Úvod:
KN-TTUSB100 je mimořádně kompaktní obousměrný adaptér USB/AUDIO.
Převeďte vaše vinylové LP, disky CD, zvukové kompaktní kazety nebo jiné analogové
zvukové zdroje na soubory ve formátu MP3 nebo WAV na váš PC. Přepínatelný zvukový
vstup: line nebo „phono (gramofon)“, lze použít jako zvukovou kartu PC: linkový výstup.
Funkce a popis:
• Vstup pro připojení gramofonu „Phono In“ má korekční předzesilovač s charakteristikou
RIAA
• Přepínač „In/Pre-Amp Out (Linkový vstup/Výstup předzesilovače)“
• Volba typu přenoskové vložky MM/MC
• Kompatibilita se standardními ovladači pro operační systémy Windows® nebo Mac®
• Napájení ze sběrnice USB
• Vzorkovací kmitočet lze nastavit až na hodnotu 48 KHz pro 2 kanálový záznam
• Kompatibilita s OS Windows® 2000/XP/Vista a Mac® OSX
Požadavky na váš systém / počítač
Gramofonové chassis
Gramofonová deska
Počítač s USB porty, které umožňují dodávat 500 mA
Záznamový software
Zapojení:
1) Výstup USB mini s 5 kontakty
2) Přepínač „In/Pre-Amp Out
(Linkový vstup/Výstup předzesilovače)“
3) Konektor 3,5 mm jack
4) Přepínač typu přenosky MM/MC
5) Vstup pro gramofon „Phono In“ (2xRCA)
6) Zemnění
7) LED indikátor
Page 48

48
Použití:
• Úprava analogové hudby z gramofonové desky do digitálního formátu:
Postup nahrávání hudby z gramofonové desky:
PC
„Pre-Amp
Out (Výstup
předzesilovače)“
„Line In
(linkový
vstup)“
USB
Přední
strana
Zadní strana
„Phono In (Vstup
gramofonu)“
„Phonograph player
(Gramofonové
chassis)“
MM MC
A. Připojte výstup gramofonu do
předzesilovače USB pomocí kabelu
audio „R,L → R,L (Pravý, Levý → Pravý,
Levý)“.
B. Abyste zabránili zvýšení BRUMU
generovaného nedokonalým propojením,
doporučujeme obě zařízení uzemnit do
společného bodu.
C. USB kabel do PC (nebo notebooku)
a USB předzesilovač zapojte podle
obrázku.
Je-li USB připojení v pořádku, PC
automaticky rozezná jednotku jako „USB
PREAMP“. Nyní můžete toto zařízení
používat na vašem počítači.
Činnost a obsluha:
A. Připojte gramofonové chassis do předzesilovače USB.
B. Spusťte přehrávání gramofonové desky.
C. Podle typu použité přenoskové vložky na gramofonu nastavte přepínač MM/MC na USB
konvertoru do odpovídající pozice.
D. Nyní můžete zahájit nahrávání s pomocí softwarové aplikace ke stahování zvuku na
vašem PC/notebooku.
• Gramofonový předzesilovač (samostatný nebo fungující společně s PC):
PC
„Pre-Amp
Out (Výstup
předzesilovače)“
„Line In
(linkový
vstup)“
USB
Přední
strana
Zadní strana
„Phono In (Vst up gramofonu)“
„Phonograph player
(Gramofonové chassis)“
MM MC
ZESILOVAČ
A. Připojte výstup gramofonu do USB
předzesilovače pomocí kabelu audio „R,L
→ R,L (Pravý, Levý → Pravý, Levý)“.
B. Abyste zabránili zvýšení BRUMU
generovaného nedokonalým propojením,
doporučujeme obě zařízení uzemnit do
společného bodu.
C. Vezměte USB → mini USB kabel a
propojte váš PC s USB předzesilovačem.
Ověřte si, zda je propojení spolehlivé,
protože USB předzesilovač je nyní
napájen z USB portu.
D. Zapojte 3,5 mm → zvukový stereofonní
(R, L) kabel a propojte „In/Pre-Amp Out
(Linkový vstup/Výstup předzesilovače)“
a druhý konec zvukového kabelu R,L do
vašeho stereofonního zesilovače.
Page 49

49
E. Přepněte posuvný přepínač na USB předzesilovači do polohy „Pre-Amp Out“.
• Nahrávání prostřednictvím linkového vstupu „Line In“:
PC
„Pre-Amp
Out (Výstup
předzesilovače)“
„Line In
(linkový
vstup)“
USB
Přední
strana
Zadní strana
MM MC
„CD Player (CD
přehrávač)“
Tento USB předzesilovač můžete použít
také k nahrávání linkového signálu z jiných
zvukových zdrojů, např. CD.
A. Zapojte zvukový stereofonní (R,L) kabel
→ 3,5 mm do vašeho CD přehrávače a
USB předzesilovače podle obrázku.
B. Vezměte USB A → mini 5 USB kabel.
Připojte váš PC nebo notebook do USB
předzesilovače podle obrázku.
• Jestliže vaše zvukové zařízení podporuje pouze stereofonní výstup na konektoru
3,5 mm:
A. Zakupte kabel 3,5 mm → 3,5 mm (není v dodávce konvertoru), připojte jeden konec
do portu „Line In/Pre-Amp Out“ na USB předzesilovači a jeho druhý konec do audio
výstupu 3,5 mm vašeho zvukového zdroje.
B. Přepněte posuvný přepínač na USB předzesilovači do polohy „Line In“.
Činnost a obsluha:
A. Zapněte napájení a spusťte přehrávání na vašem zvukovém zařízení.
B. Nyní můžete zahájit nahrávání s pomocí softwarové aplikace ke stahování zvuku na
vašem PC/notebooku.
Problémy a odstranění:
1. Počítač nenalezl USB předzesilovač.
a. Ověřte správnost a spolehlivost všech propojení.
b. Odpojte a znovu zapojte USB předzesilovač a zkontrolujte funkci automatického
vyhledávání nového hardware. (Jakmile počítač jednotku najde, rozsvítí se LED dioda.)
2. Jaké jsou minimální požadavky na PC?
Stačí, aby měl počítač USB port, který umožňuje dodávat proud 500 mA.
3. Proč nefunguje výstup předzesilovače „Pre-Amp Out“ ?
a. Ověřte správnost a spolehlivost všech propojení.
b. Ověřte, je-li posuvný přepínač v poloze „Pre-Amp Out.“
4. Jaký nahrávací program mohu použít?
Vyzkoušejte prosím pomocí existujícího nahrávacího programu v OS vašeho PC
stahování volných audio programů z internetu.
Page 50

50
PROHLÁŠENÍ O SHODĚ
Společnost
Nedis B.V.
De Tweeling 28
5215MC ’s-Hertogenbosch
Nizozemí
Tel.: 0031 73 599 1055
E-mail: info@nedis.com
prohlašuje, že výrobek:
Značka: König Electronic
Model: KN-TTUSB100
Popis: USB adaptér pro audio/phono
splňuje následující normy:
EN 55022, EN 55024, EN 61000-3-2, EN 61000-3-3
IEC 61000-4-2, IEC 61000-4-3, IEC 61000-4-4, IEC 61000-4-5
IEC 61000-4-6, IEC 61000-4-8, IEC 61000-4-11
a je v souladu s požadavky směrnic EU 89/336/EEC, 92/31/EEC a 93/68/EEC.
‘s-Hertogenbosch, 1. října 2008
Mrs. J. Gilad
Obchodní ředitel
Page 51

51
Bezpečnostní opatření:
Nevystavujte zařízení nadměrné vlhkosti nebo vodě.
Údržba:
K čištění používejte pouze suchý hadřík. Nepoužívejte k čistění žádná ředidla ani
abrazivní materiály.
Záruka:
Jakékoli změny, modifikace nebo poškození zařízení v důsledku nesprávného zacházení
se zařízením ruší platnost záruční smlouvy.
Obecné upozornění:
Design, provedení a parametry výrobku se mohou měnit, bez předchozího upozornění
uživatele výrobcem.
Všechna loga a názvy výrobků jsou obchodní značky nebo registrované obchodní značky
příslušných vlastníků a jsou chráněny příslušnými zákony.
Upozornění:
Tento výrobek je označen následujícím symbolem. To znamená, že s výrobkem
je nutné zacházet jako s nebezpečným elektrickým a elektronickým odpadem
a nelze jej po skončení životnosti vhazovat do běžného domácího odpadu. Pro
tyto odložené výrobky existují zvláštní sběrná střediska.
Copyright © (Autorská práva)
Page 52

52
ROMÂNĂ
Introducere:
Produsul KN-TTUSB100 este un adaptor USB/AUDIO bidirecţional ultra compact.
Adaptează plăci audio, CD-uri, casete audio sau orice altă sursă în format MP3 sau WAV
pe PC-ul Dvs. Intrare audio comutabilă: linie sau phono, putând fi utilizată ca şi card de
sunet PC: ieşire USB/de linie audio.
Caracteristici:
• Circuit de preamplificare RIAA pt. PHONO IN (Intrare phono)
• Comutator intrare de linie/ieşire preamplificator
• Selectare MM/MC pentru diferite doze de redare de pick-up
• Compatibil cu driverele implicite de la Windows® sau Mac® OS
• Alimentat de la bus USB
• Frecvenţa de comutare audio poate fi setată la 48 kHz, înregistrare pe 2 canale
• Compatibil cu Windows® 2000/XP/Vista şi Mac® OSX.
Cerinţe de sistem:
Pick-up
Disc de pick-up
Calculator având porturi USB cu o capacitate de alimentare de 500 mA
Software pentru înregistrare
Conexiuni:
1) Ieşire mini USB cu 5 pini
2) Comutator (Intrare de linie - Ieşire preamplificator)
3) Priză jack 3,5 mm
4) Comutator MM/MC
5) Intrare phono (2 x RCA)
6) Pământare
7) Indicator cu LED-uri.
Page 53

53
Domeniul de utilizare:
• Adaptează muzicii înregistrate în format analog pe discuri de pick-up într-un
format digital.
Urmaţi instrucţiunile de mai jos pentru a înregistra muzică de pe un disc de vinil.
PC
Ieşire
preamplificator
Intrare
de linie
USB
Faţă
Spate
Intrare phono
Pickup
MM MC
A. Conectaţi cablul R,L → R,L la pick-up şi
la preamplificatorul cu USB.
B. Pentru a preveni bâzâitul cauzat
de conectarea greşită a pickupului
şi a preamplificatorului cu USB, se
recomandă ca utilizatorul să conecteze
punctul de împământare între aceste 2
aparate.
C. Conectaţi cablul USB la PC (sau la
notebook) şi la preamplificatorul cu USB,
conform figurii alăturate.
Dacă conectarea USB este în regulă.
PC-ul va detecta în mod automat
această unitate ca “USB PREAMP”. Din
acest moment aparatul poate fi utilizat.
Utilizare
A. Conectaţi pickupul la preamplificatorul cu USB.
B. Porniţi redarea discului de vinil.
C. Selectaţi poziţia comutatorului MM/MC în funcţie de diferitele tipuri de vârfuri de pickup.
D. Din acest moment puteţi începe înregistrarea celor aflate pe discul de vinil pe un PC/
notebook cu ajutorul softului de captură audio.
• Preamplificator PHONO (separat sau pus în funcţiune în acelaşi timp cu PC-ul):
PC
Ieşire
preamplificator
Intrare
de linie
USB
Faţă
Spate
Intrare phono
Pickup
MM MC
Amplificator
A. Conectaţi cablul audio R,L → R,L la
pick-up şi la preamplificatorul cu USB.
B. Pentru a preveni bâzâitul cauzat
de conectarea greşită a pickupului
şi a preamplificatorului cu USB, se
recomandă ca utilizatorul să conecteze
punctul de împământare între aceste
2 aparate.
C. Luaţi cablul USB → mini USB şi
conectaţi PC-ul Dvs. la preamplificatorul
cu USB. Vă rugăm să vă asiguraţi de
corectitudinea conectării, deoarece
preamplificatorul cu USB este alimentat
prin portul USB.
Page 54

54
D. Conectaţi unul dintre capetele cablului de 3,5 mm → audio R,L la portul “Line In/Pre-
Amp Out” (Intrare de linie/Ieşire preamplificator), iar capătul celălalt, respectiv cel audio
R,L, la amplificatorul Dvs. stereo.
E. Setaţi comutatorul culisant al preamplificatorului cu USB în poziţia “Pre-Amp Out” (Ieşire
preamplificator).
• Captura line-in (intrare de linie):
PC
Ieşire
preamplificator
Intrare
de linie
USB
Faţă
Spate
MM MC
CD player
Acest preamplificator cu USB se poate
utiliza şi la multiplicarea unui semnal de
intrare de linie, care provine de la un aparat
audio, cum ar fi un CD player.
A. Conectaţi cablul audio R,L → 3,5 mm la
CD playerul Dvs. şi la preamplificatorul
cu USB, conform figurii alăturate.
B. Luaţi cablul mini USB A → 5 pini.
Conectaţi PC-ul sau notebookul Dvs. la
preamplificatorul cu USB, conform figurii
alăturate.
• Dacă dispozitivul Dvs. audio sprijină doar ieşirea stereo de 3,5 mm:
A. Cumpăraţi un cablu de 3,5 → 3,5 mm (nefurnizat). Conectaţi unul dintre capete la portul
“Line In/Pre-Amp Out” (Intrare de linie/Ieşire preamplificator), iar capătul celălalt la
ieşirea de 3,5 mm al dispozitivului Dvs. audio.
B. Setaţi comutatorul culisant de pe preamplificatorul cu USB în poziţia “Line In” (Intrare de
linie).
Utilizare
A. Porniţi dispozitivul Dvs. audio şi începeţi redarea.
B. Din acest moment puteţi începe multiplicarea pe PC-ul sau notebookul Dvs.
Depanare:
1. Dacă calculatorul nu detectează prezenţa preamplificatorului cu USB.
a. Vă rugăm să vă asiguraţi de corectitudinea conectării.
b. Vă rugăm să conectaţi din nou preamplificatorul cu USB la portul USB, după care
verificaţi din nou funcţia de autodetectare. (Dacă unitatea este detectată, LED-ul trebuie
să fie aprins).
2. Care sunt cerinţele minime pentru un PC?
Este suficient un calculator cu port USB, cu capacitatea de alimentare de 500 mA.
3. De ce nu funcţionează ieşirea preamplificatorului?
a. Vă rugăm să vă asiguraţi de corectitudinea conectării.
Page 55

55
b. Vă rugăm să verificaţi dacă comutatorul culisant se află în poziţia “Pre-Amp OUT” (Ieşire
preamplificator).
4. Ce fel de program de înregistrare pot să utilizez?
Vă rugăm să utilizaţi programul de înregistrare audio pus la dispoziţie de sistemul de
operare sau încercaţi să descărcaţi de pe Internet programe audio gratuite.
Declaraţie de conformitate
Noi,
Nedis B.V.
De Tweeling 28
5215MC ’s-Hertogenbosch
Olanda
Tel.: 0031 73 599 1055
Email: info@nedis.com
Declarăm că acest produs:
Marca: König Electronic
Model: KN-TTUSB100
Descriere: CONVERTOR AUDIO/PHONO CU USB
Este în conformitate cu următoarele standarde:
EN 55022, EN 55024, EN 61000-3-2, EN 61000-3-3
IEC 61000-4-2, IEC 61000-4-3, IEC 61000-4-4, IEC 61000-4-5
IEC 61000-4-6, IEC 61000-4-8, IEC 61000-4-11
Şi corespunde cerinţelor expuse în directivele 89/336/EEC, 92/31/EEC şi 93/68/EEC ale
Uniunii Europene.
‘s-Hertogenbosch, 1. 10. 2008.
J. Gilad
Director achiziţii
Page 56

56
Măsuri de siguranţă:
Feriţi aparatul de apă şi de umezeală.
Întreţinere:
Curăţarea trebuie făcută cu o cârpă uscată. Nu folosiţi solvenţi sau agenţi de curăţare
abrazivi.
Garanţie:
Nu oferim nicio garanţie şi nu ne asumăm niciun fel de responsabilitate în cazul
schimbărilor sau modificărilor aduse acestui produs sau în cazul deteriorării cauzate de
utilizarea incorectă a produsului.
Generalităţi:
Designul şi specificaţiile produsului pot fi modificate fără o notificare prealabilă.
Toate siglele mărcilor şi denumirile produselor sunt mărci comerciale sau mărci comerciale
înregistrate ale proprietarilor de drept şi prin prezenta sunt recunoscute ca atare.
Atenţie:
Pe acest produs se află acest simbol. Acest lucru înseamnă că produsele
electrice şi electronice uzate nu trebuie aruncate în gunoiul menajer. Pentru
aceste produse există un sistem separat de colectare.
Copyright ©
 Loading...