

Page 1
KN-DIGICON20
DJ MIDI DIGITAL
CONTROLLER
Page 2

1
A. MIDI CONTROL
ME701 is designed for playing computer based music tracks, and to work with devices that either
support MIDI feedback or not.
This is accomplished by the implementation of several different control modes within ME701.
The control modes are:
1. Special Midi Mode:
Once engaged, ME701 will respond to incoming MIDI message according to its assignment.
LEDs will not do anything unless controlled by an specifi c application (E-MIX,PCDJ) via MIDI.
2. General Midi Mode:
In this mode, all MIDI feedback messages are ignored. A button‘s LED will light then fade away
when pressed.
The buttons, knobs, and sliders will transmit its assigned events to external device through USB
cable.
3. General Midi Mode with Response
Some DJ softwares are able to convey message to this unit to light up the LEDs, and allow this
unit to control the PC software.
PS. Please refer to the function description.
B. PC SOFTWARE SELECT
You can switch this unit to control different PC software.
1) Connect this unit to PC or laptop by USB cable, and then keep pressing the button ”LOAD
DECK A“ until the KILL LED in DECK A stands for the desired PC program mode is light.
• HI: This LED lights for SPECIAL MIDI MODE
• MID: This LED lights for GENERAL MIDI MODE
• LOW: This LED lights for GENERAL MIDI MODE WITH RESPONSE.
2) Press the corresponding knob which LED is light, until the LED is extinguished
3) Unplug the USB cable, and plug it again, then you can use this unit to control the selected
MIDI mode.
4) once the ME-701 is connected to computer, the LEDs are sparking in turn between Search ->
Scratch -> Sync.
• In “SPECIAL MIDI MODE”, it keep sparking to remind the user that PC software is not
activated.
• In General Midi Mode and General Midi Mode with Response, the sparking is keeping few
minutes only, then stop, and all LED lights up slightly.
Page 3
2
Introduction:
The KN-DIGICON20 is a highly professional MIDI controller with two jog wheels. Together with
the crossfader controls it gives the amateur DJ as well as the professional DJer true professional
mixer features on this MIDI controller. The controller is suited for MP3/WAV/OGG-fi les from a PC
or laptop. The scratch-function, seamless looping, the kill-functions and different effects gives
the creative DJ complete control. The KN-DIGICON20 works plug & play with Mac OS X and
Windows® XP SP2 and Vista™. Power is attained from a USB 2.0.
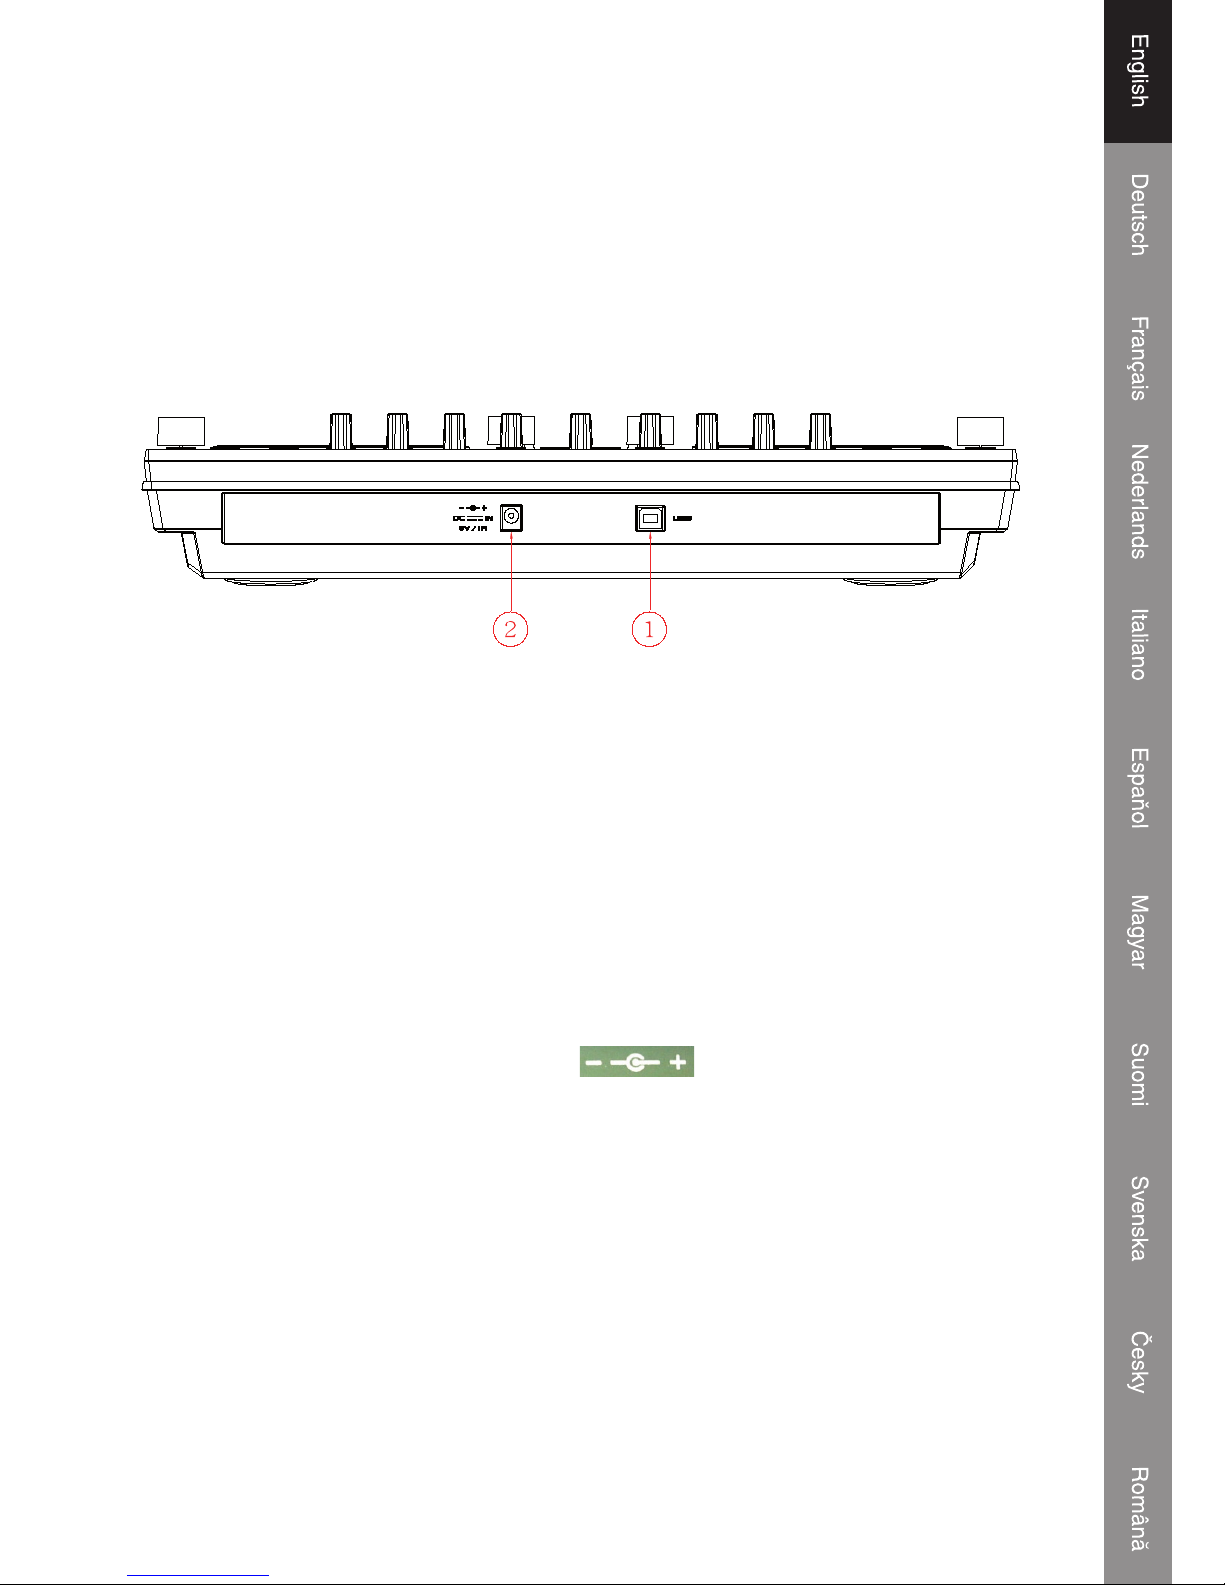
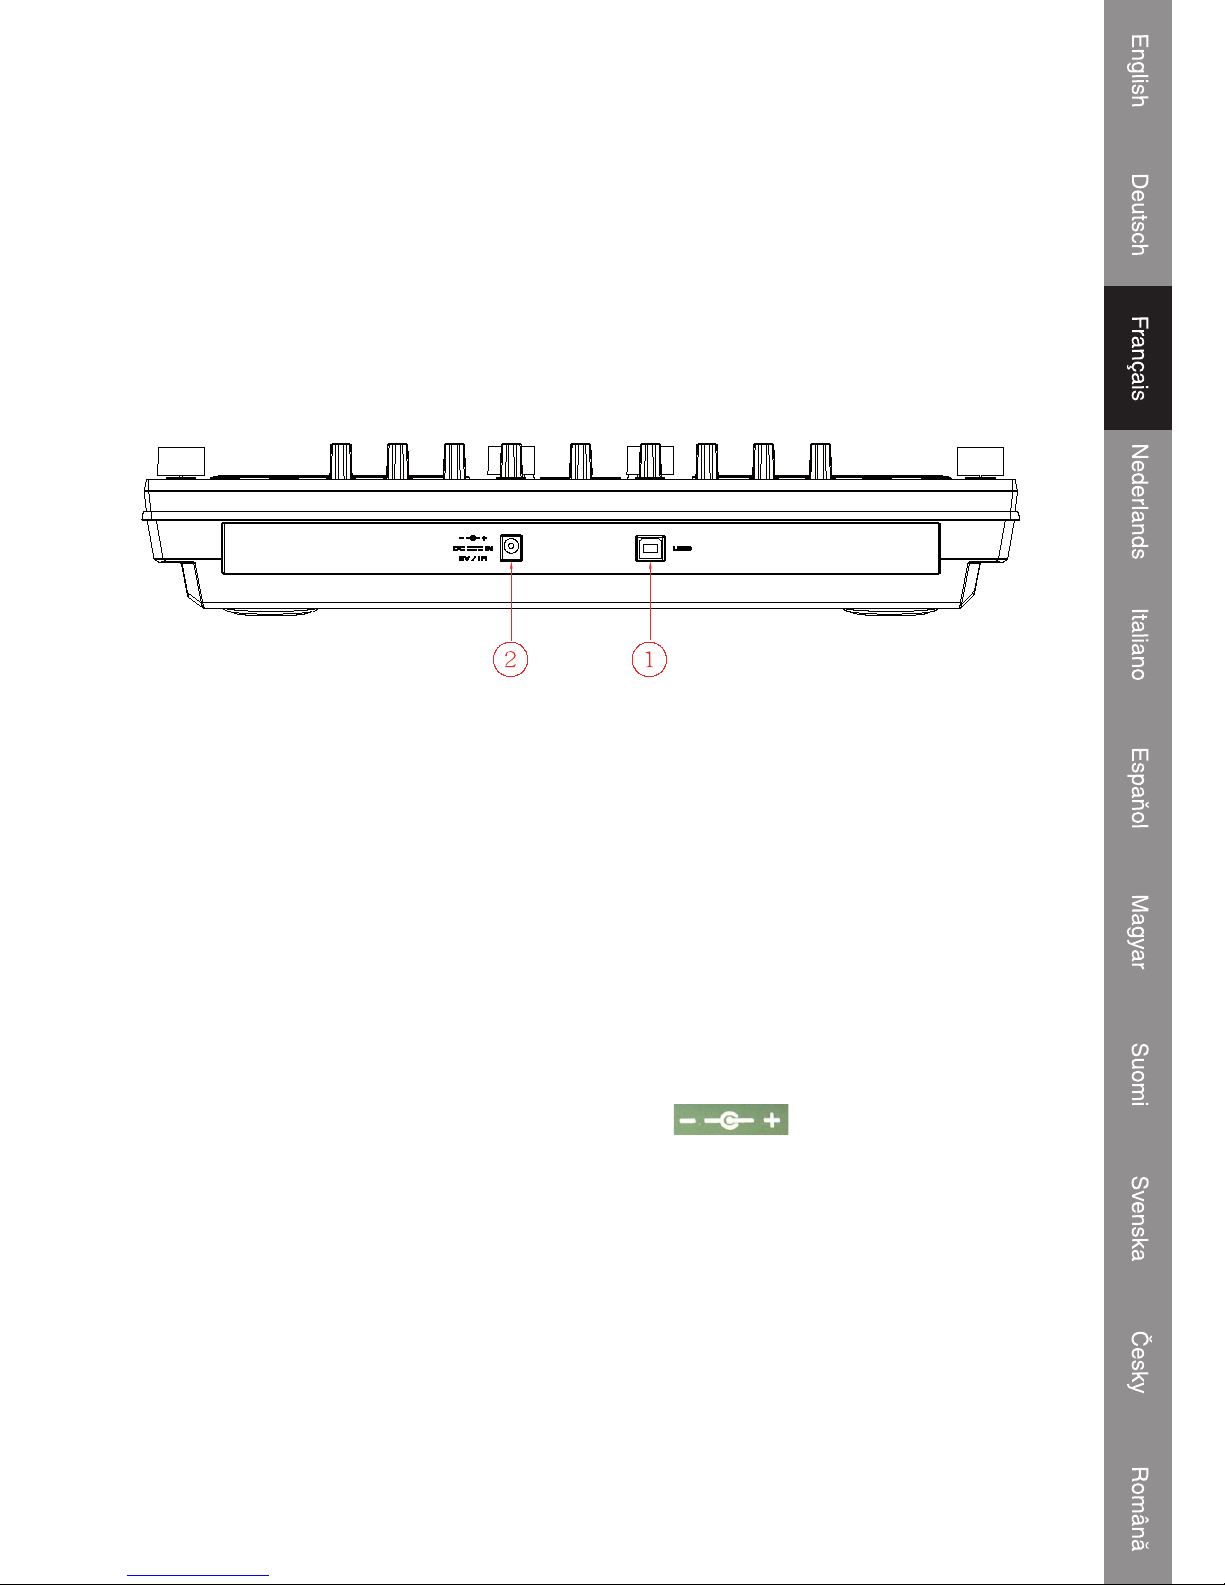
Description back view :
1. USB port:
• Connecting to PC for playing control
• Get power supply from PC or laptop
Before connecting this unit to PC or Laptop, please install the Demo software (Emix) from the
attached disc, and upload your music to the program. Test the program from computer, and check
if the controller unit gets reaction accordingly (EX The relative LEDs light up).
NOTE: The unit can not be power-on before the computer software (Emix) is activated
2. DC- in power for controller
If the unit can not get enough power from USB bus, power it with extra adaptor (DC type, 6V/1A)
via this socket.
Please note the polarity of
the adaptor must be .
Page 4
3
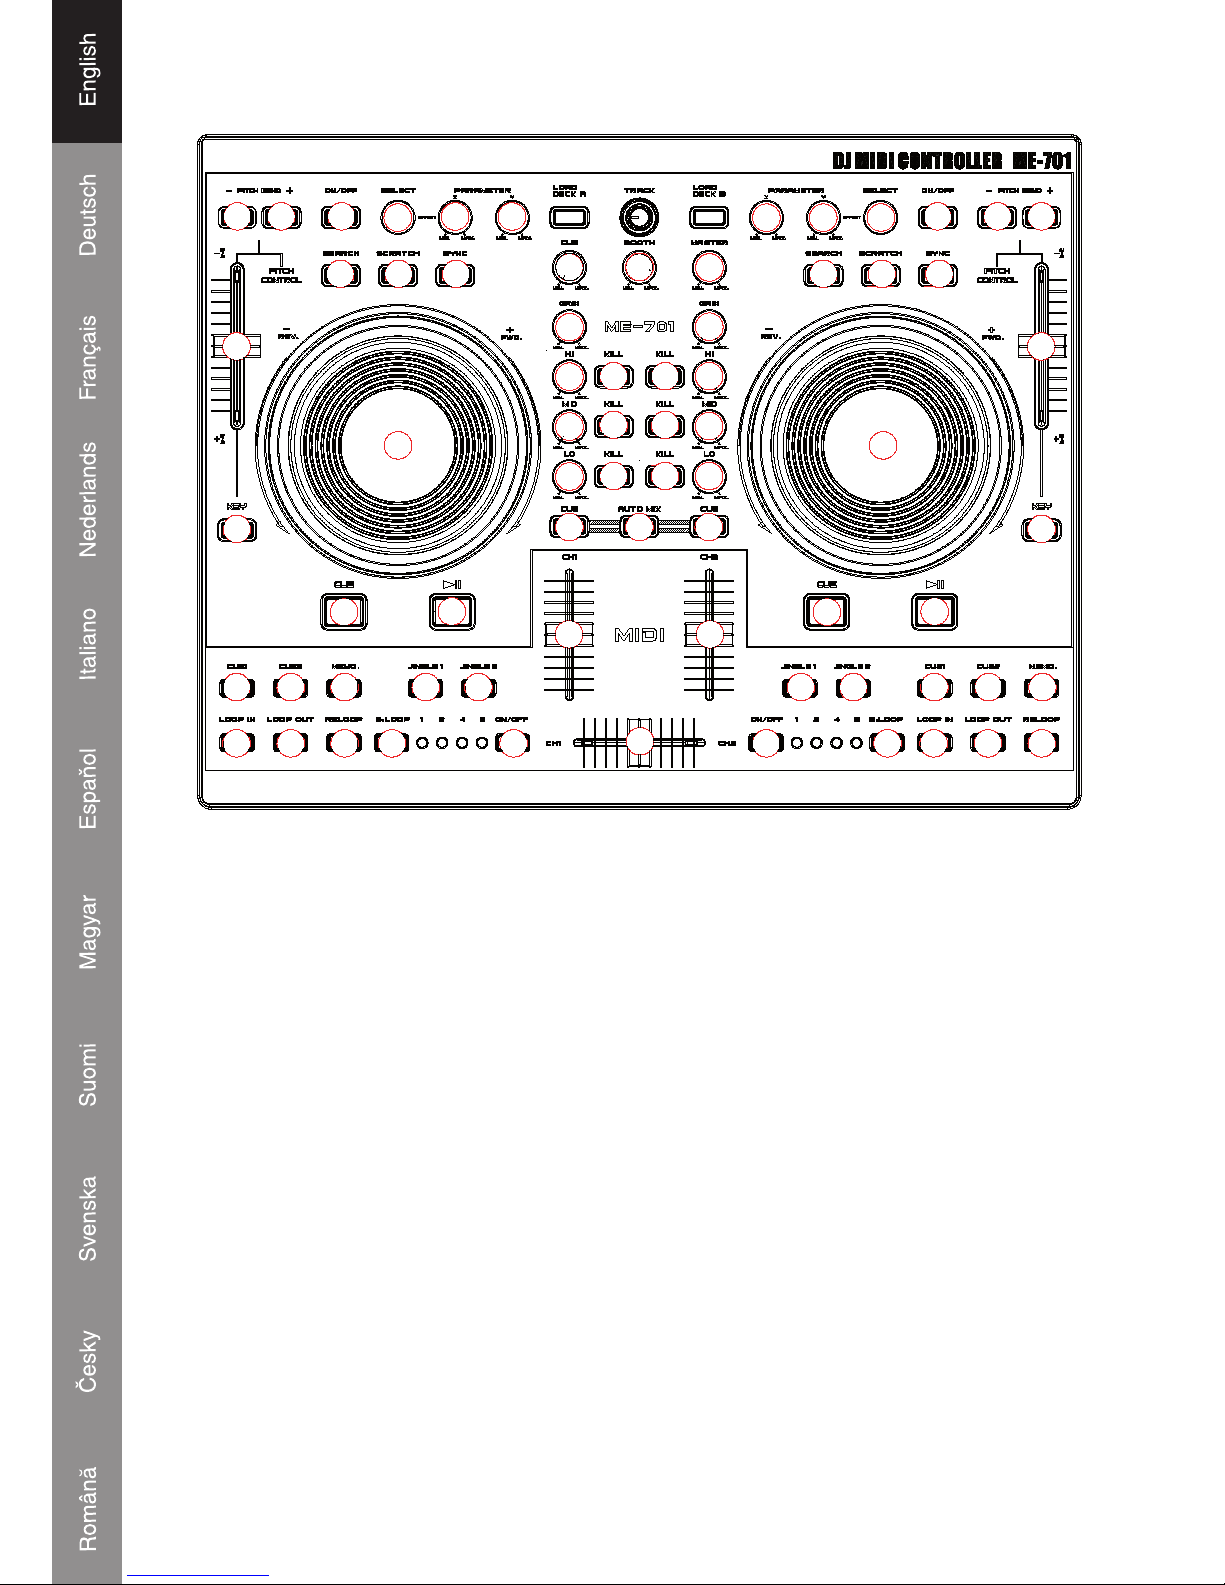
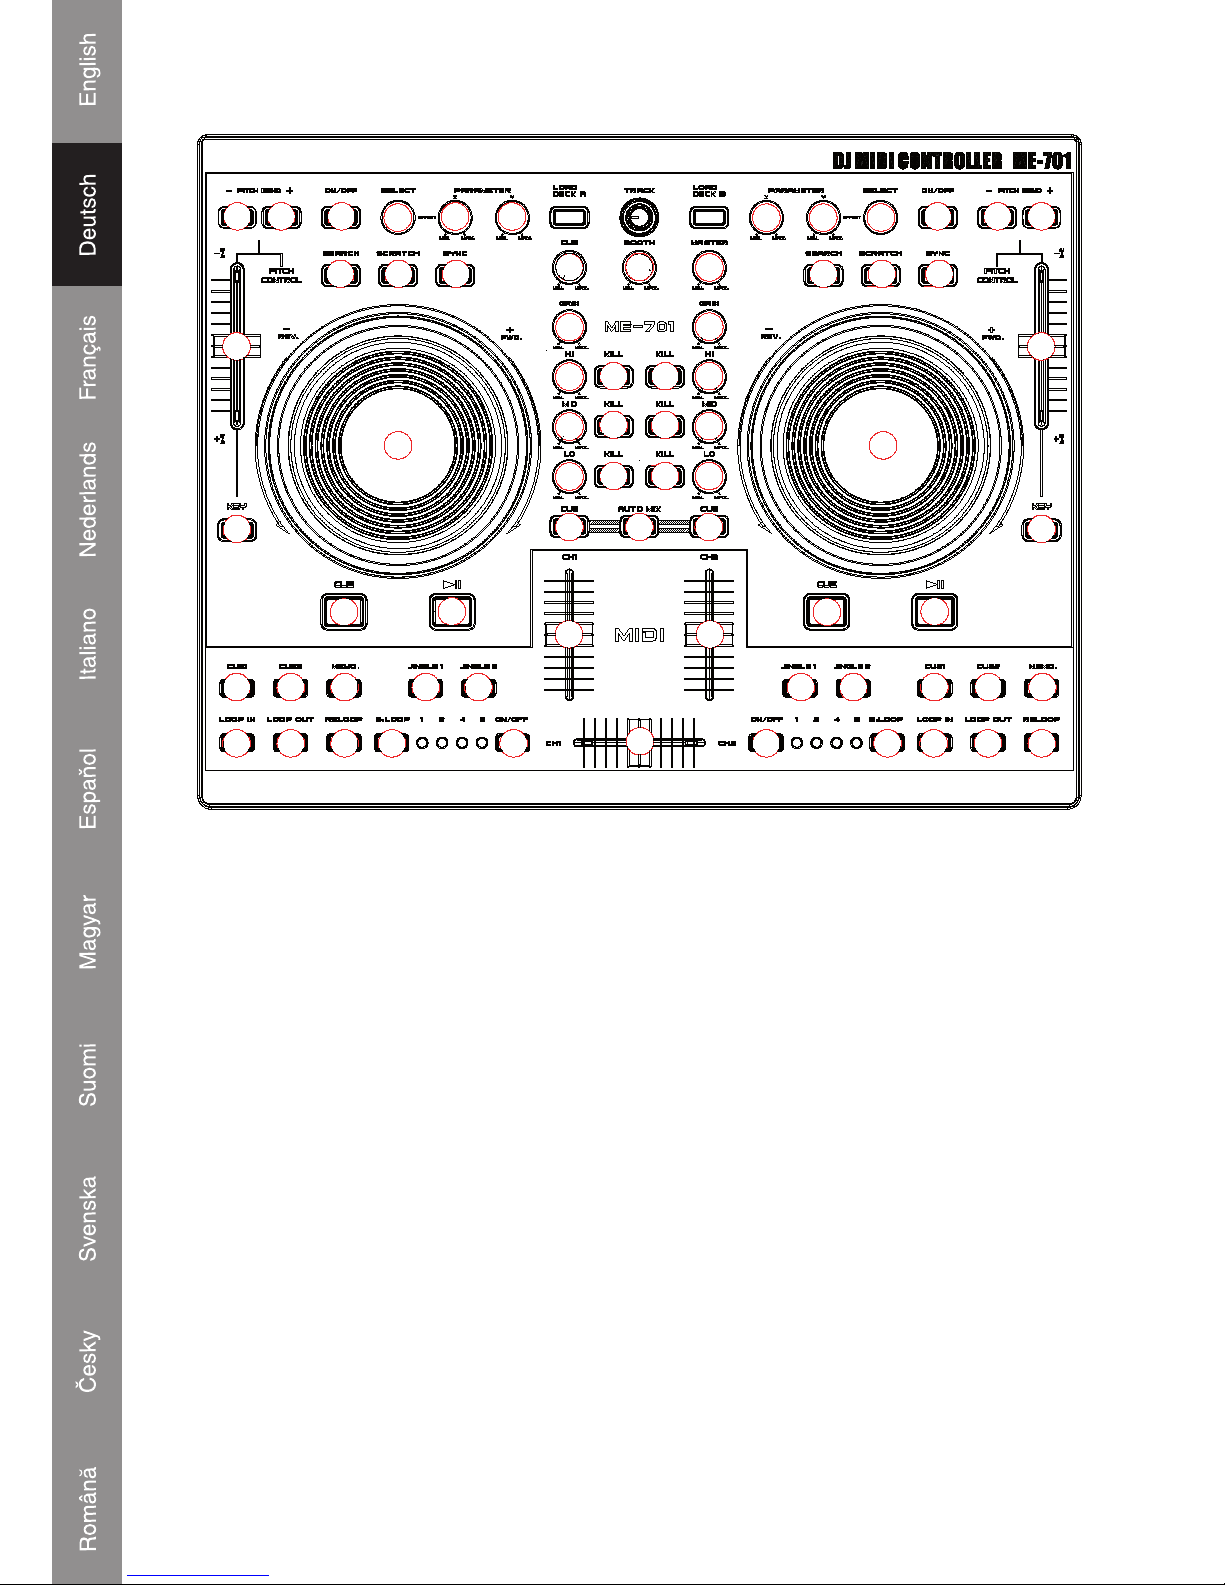
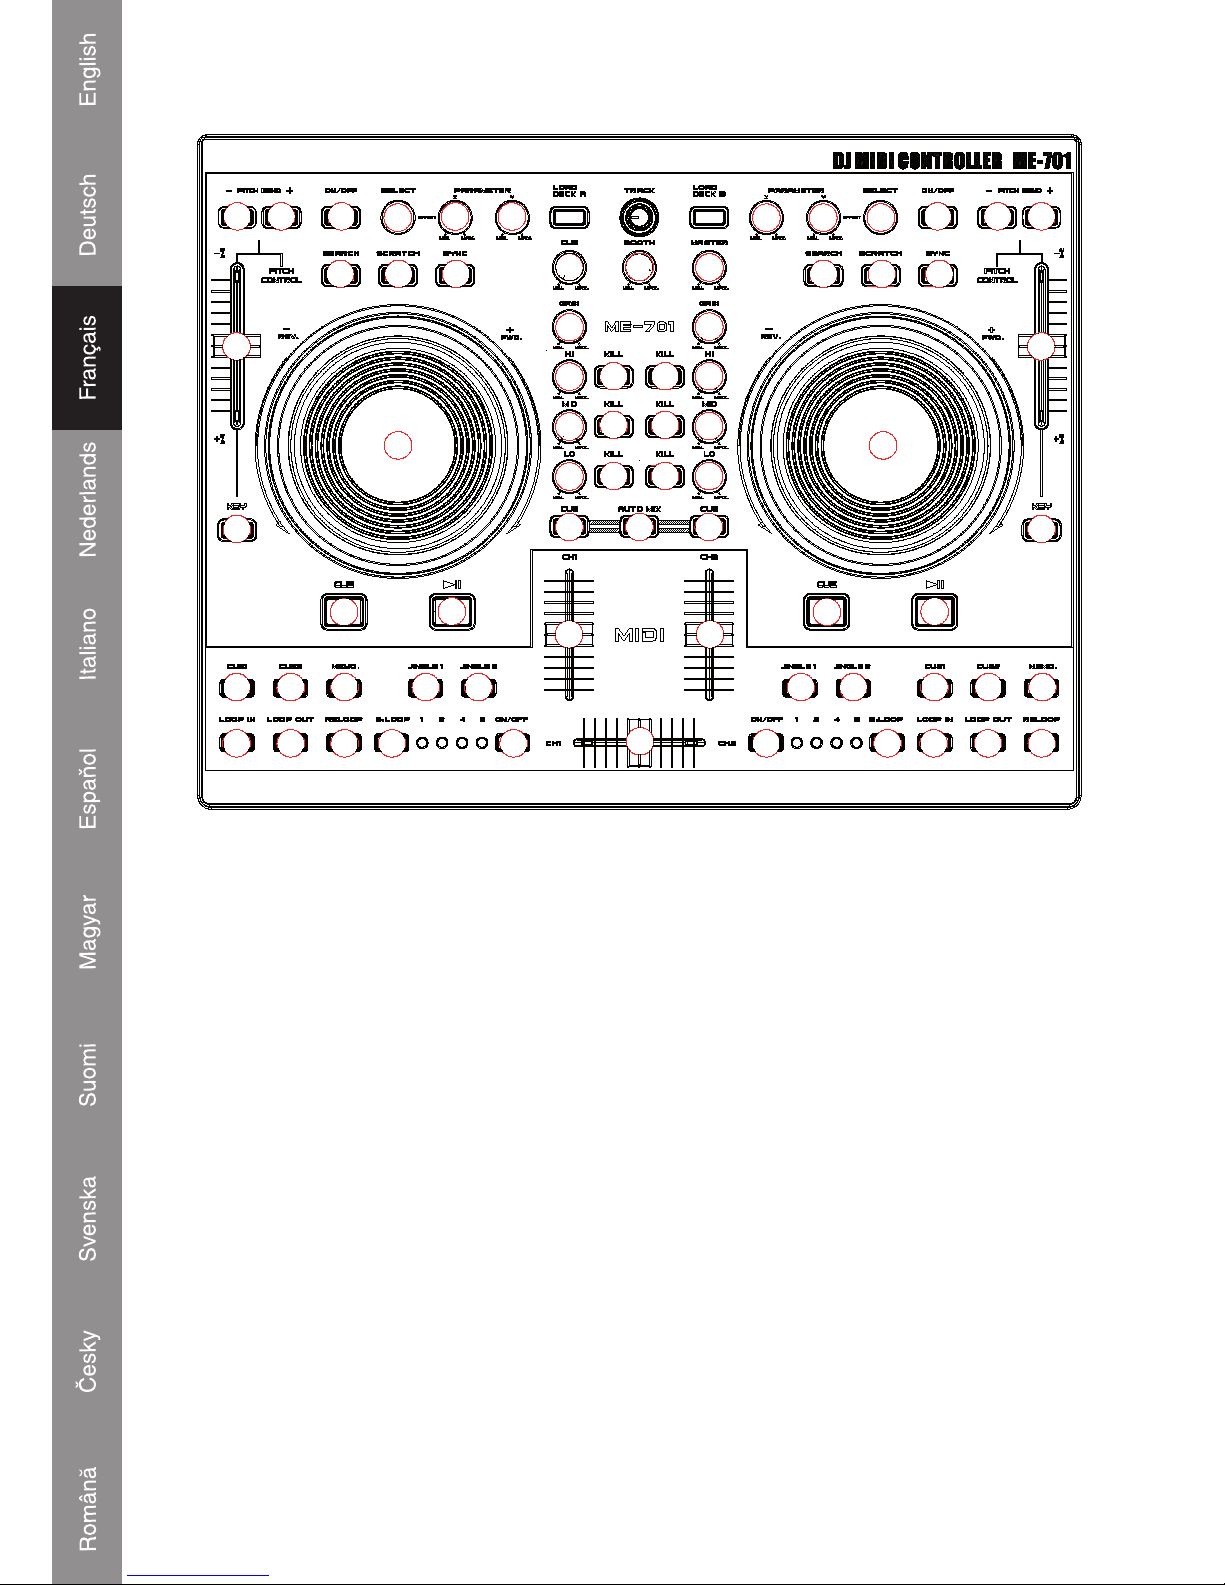
Function of the Control Unit
11
4
4
9
11 11
10
23
25
23
25
25
28
1 2
4 535
6
7
8
26
24
28
3
29
2
5 5
27
26
25
24
7
8
25
16
15
15
17
14
12 13
21
22
20
15
15
16
21
25 22
19
18
12 13
111
444
9
6
17 1111
10
14
1. SEAMLESS LOOP
a. Loop-in
The Loop in point is able to be recorded during PLAY and PAUSE mode. If Loop-out point is
recorded, and Loop-in point is re-set behind Loop-out point, Loop-out point will be cleared
b. Loop out / Exit
i. After Loop-in point is set, press this button to memorize the end point of the LOOP interval,
and start looping.
ii. Press this button again to exit Looping.
iii. Reset Loop-out point: Press the button again to reset the Loop-out point and looping starts
again
iv. Loop out point must be after the Loop-in Point, or the Loop-out point will be canceled.
c. Reloop
i. Press it to Re-start seamless loop.
ii. No function if Loop-in point is not recorded.
iii. If Loop-out point is not set, will back to Loop-in point and start playing.
(similar to hotcue function)
Page 5

4
2. SMART LOOP (RANGE SELECT)
User is able to select the Looping interval between: 1/2/4/8 beat
3. SMART LOOP ON/OFF
LED ON: The Loop is playing at the interval as selected beats.
LED OFF: The Loop is playing at the interval between the Loop-in and Loop-out.
4. HOT-CUE
This unit will allow you to play from 2 cue points instantly.
a. Set CUE memory: Press the MEMO button fi rst, and then press the CUE button to complete
the CUE setting, then this CUE button will light up.
b. Play” CUE” memory: Upon pressing specifi c CUE button, it will fl ash about 5 seconds.
Note: This function is not available during perform REVERSE sound effect.
5. JINGLE/SAMPLER
User can preset the Effects or Songs for Jingle on a computer.
a. Press Memo button and then press Jingle, a “Sampler track” will be created to the “Jingle list”.
User can set the recorded sampler to the Jingle from computer.
b. Maximum length of sampler time: 12 seconds.
6. PLAY/PAUSE
Each press of this button causes the operation to change between PLAY and PAUSE modes.
LED indicator:
i. When track is playing, the LED indicator ON.
ii. When track is paused, the LED indicator fl ashes.
7. CUE
The cue function allows the CD returning to the memorized point. In PAUSE mode, pressing the
CUE button to set the cue point, and the CUE button blinks; in PLAY mode, press this button to
pause the unit at the memorized point.
8. JOGWHEEL
• Speed Control (SEARCH indicator off)
Rotating the wheel, in play mode, will change the playback speed accordingly. While rotating
clockwise, the player speed increases; rotating counterclockwise, the speed decreases.
• Search (SEARCH indicator lights)
Rotating the wheel, the player will forward or backward quickly. The searching speed changes
according to the dialing speed. It can be carried out by one frame increment.
9. KEY ON/OFF SWITCH (MT)
Press the button to switch KEY mode on or off.
If it is ON, unit maintains constant tempo this will not change while the pitch slider is moving.
10. PITCH CONTROL SLIDER
To match the choices of playback speed (8%, 16%, 32%, 100%), you can choose what range you
want between minimum (top) and maximum (bottom) by moving the pitch control slider.
Page 6
5
11. PITCH BEND + / - BUTTON
When each of the two CD players is playing, the pitch bend function allows the position of the
bass beat to be matched after the pitch has been adjusted. The pitch will automatically rise up to
+ 16% from the current setting while pressing the “ + “button. While pressing the “ – “ button, the
pitch will automatically drop to - 16 % from current setting. By the way of changing the pitch the
position of the beats can be matched.
12. SEARCH BUTTON
Pressed the button to switch the function of Jog Dial between SEARCH and PITCH BEND.
• When the indicator LED is light, dial the jog for quick search forward and backward.
• When the indicator LED is off, dial the jog for pitch bend function.
• If the jog is unmoved for 8 seconds, the indicator is off, and the jog is for pitch bend function.
13. SCRATCH EFFECT
LED ON: Scratch ON
LED Off: Scratch Off
14. SYNC:
This function is to synchronize the BPM of Unit 1 & 2 automatically.
15. EFFECT PARAMETER
Adjust the parameter of the effect by turning adjust knobs. X for Strength control, Y for Length
control
16. EFFECT SELECTOR
To select the effects from PC software
17. EFFECT ON/OFF
Effect On/off Switch
Mixer section
18. Master Volume control
Adjusts the master output sound level.
19. BOOTH Volume control
Used to adjust the level of the BOOTH MONITOR output. Level is not affected by the master
volume and master balance.
20. CUE LEVEL (Cue level adjustment knob):
Adjusts headphone monitor sound. When CH-1 to CH-2 has been selected, the level is not affected
by master volume or master balance adjustment
21. GAIN:
Adjust the input signal level LCD Display shows [ Sam Forward ] or [ Sam Reverse ] for 2 Sec.
Page 7

6
22. CHANNEL EQ COINTROL
HI:
Adjusts high-tone input sounds. At the center position, sound will be fl at.
23. MID:
Adjusts mid-tone input sound. At the center position, sound will be fl at.
24. LOW:
Adjusts low-tone input sound. At the center position, sound is fl at.
25. KILL
Press the buttons to mute the selected band (Hi/Mid/Low) of the track
26. CUE:
Used to select the source (CH-1 & CH-2, MASTER) to be monitored with headphones.
Press it again to cancel the selection. Pressing multiple buttons to derive mixed sound from the
selected sources.
27. AUTO MIX:
Press the Auto Mix Button to mix unit 1 & unit 2 automatically (with fade in/out effect)
28. CHANNEL (CH-1 TO CH-4) FADER
Adjusts the channel output sound levels.
29. CROSS FADER
Used to adjust the sound mix volume of the sources set to Ch1 or Ch2.
Page 8

7
Declaration of conformity
We,
Ned is B.V.
De Tweeling 28
5215MC ’s-Hertogenbosch
The Netherlands
Tel.: 0031 73 599 1055
Email: info@nedis.com
Declare that product:
Name: König Electronic
Model: KN-DIGICON20
Description: Digital Controller
Is in conformity with the following standards
EMC: EN 55022:2006
EN 55024:1998+A1:2001+A2:2003
EN 61000-3-2:2000+A1:2005
EN 61000-3-3:1995+A1:2001+A2:2005
Following the provisions of the 89/336/EEC directive.
‘s-Hertogenbosch, 2008, March 04
Mrs. J. Gilad
Purchase Director
Page 9
8
Safety precautions:
To reduce risk of electric shock, this product should ONLY be opened by an authorized technician
when service is required. Disconnect the product from mains and other equipment if a problem
should occur. Do not expose the product to water or moisture.
Maintenance:
Clean only with a dry cloth. Do not use cleaning solvents or abrasives.
Warranty:
No guarantee or liability can be accepted for any changes and modifi cations of the product or
damage caused due to incorrect use of this product.
General:
Designs and specifi cations are subject to change without notice.
All logos brands and product names are trademarks or registered trademarks of their respective
holders and are hereby recognized as such.
Attention:
This product is marked with this symbol. It means that used electrical and electronic
products should not be mixed with general household waste. There is a separate
collections system for these products.
Copyright ©
Page 10

9
Page 11
KN-DIGICON20
DJ MIDI DIGITAL
CONTROLLER
Page 12

1
A. MIDI-STEUERUNG
Der ME701 ist zur Wiedergabe von Musiktracks auf Computerbasis und zur Zusammenarbeit mit
Geräten, die MIDI-Feedback unterstützen oder nicht unterstützen, geschaffen.
Dies wird durch die Implementation mehrerer verschiedener Steuermodi im ME701 erreicht.
Die Steuermodi sind:
1. Spezieller MIDI-Modus:
Wenn der ME701 einmal eingebunden ist, reagiert er auf die ankommende MIDI-Meldung
entsprechend seiner Zuordnung.
Die LEDs haben keine Aufgabe, wenn sie nicht von einer speziellen Anwendung (E-MIX, PCDJ)
über MIDI angesteuert werden.
2. Allgemeiner MIDI-Modus
In diesem Modus werden alle MIDI-Feedbackmeldungen ignoriert. Die LED einer Taste leuchtet
auf und erlischt, wenn sie gedrückt wird.
Die Tasten, Knöpfe und Schieber senden ihre zugeordneten Ereignisse über das USB-Kabel an
das externe Gerät.
3. Allgemeiner MIDI-Modus mit Antwort
Es gibt einige DJ-Software, die Meldungen an dieses Gerät senden kann, um die LEDs aufl euchten
zu lassen, und dem Gerät ermöglicht, die PC-Software zu steuern.
PS. Sehen Sie bitte die Funktionsbeschreibung.
B. AUSWAHL DER PC-SOFTWARE
Sie können dieses Gerät so schalten, dass es verschiedene PC-Software steuert.
1) Schließen Sie dieses Gerät mit dem USB-Kabel an einen PC oder Laptop an, und halten
Sie dann die Taste "LOAD DECK A" gedrückt, bis die KILL-LED in Laufwerk A, die für den
gewünschten PC-Programmmodus steht, leuchtet.
• HI: Diese LED leuchtet für den SPEZIELLEN MIDI-MODUS
• MID: Diese LED leuchtet für den ALLGEMEINEN MIDI-MODUS
• LOW: Diese LED leuchtet für den ALLGEMEINEN MIDI-MODUS MIT ANTWORT
2) Drücken Sie die entsprechende Taste, bei der die LED leuchtet, bis die LED erlischt.
3) Ziehen Sie das USB-Kabel ab und stecken es wieder ein, dann können Sie dieses Gerät
benutzen, um den ausgewählten MIDI-Modus zu steuern.
4) Wenn der ME-701 an den Computer angeschlossen ist, blinken die LEDs abwechselnd
zwischen Search -> Scratch -> Sync.
• Im “SPEZIELLEN MIDI-MODUS” blinken sie weiter, woran der Benutzer des PC erkennen
kann, dass keine PC-Software aktiv ist.
• Im "ALLGEMEINEN MIDI-MODUS" und im "ALLGEMEINEN MIDI-MODUS MIT ANTWORT"
hält das Blinken nur ein paar Minuten an, dann hört es auf, und alle LEDs leuchten etwas
auf.
Page 13

2
Einleitung:
Der KN-DIGICON20 ist ein hochprofessioneller MIDI-Controller mit zwei Jog-Wheels. Zusammen
mit den Überblendreglern bietet dieser MIDI-Controller sowohl dem Amateur-DJ als auch dem ProfiDJ echte professionelle Mischpultfunktionen. Der Controller ist für MP3/WAV/OGG-Dateien von
einem PC oder Laptop geeignet. Die Scratch-Funktion, das nahtlose Looping, die Kill-Funktionen
und die verschiedenen Effekte bieten dem kreativen DJ alle erdenklichen Regelmöglichkeiten.
Der KN-DIGICON20 arbeitet mit Plug & Play unter Mac OS X und Windows® XP SP2 und Vista™.
Der Strom wird aus einem USB 2.0 gewonnen.
Beschreibung der Rückseite:
1. USB-Anschluss:
• Anschluss an den PC zur Wiedergabesteuerung
• Liefert Strom aus PC oder Laptop
Bevor dieses Gerät an den PC oder Laptop angeschlossen wird, installieren Sie bitte die DemoSoftware (Emix) von der beigefügten CD und laden Ihre Musik ins Programm hoch. Prüfen Sie
das Programm auf dem Computer, und überprüfen Sie, ob der Controller richtig reagiert (Die
entsprechenden LEDs leuchten auf).
ANMERKUNG: Das Gerät kann nicht gespeist werden, bevor die Computersoftware (Emix)
aktiviert ist.
2. DC-IN-Versorgung für Controller
Wenn das Gerät aus dem USB-Bus nicht genug Strom bekommt, ist es mit einem zusätzlichen
Ad
apter (DC 6 V/1 A) über diese Buchse zu speisen.
Beachten Sie bitte, dass die Polarität des Adapters sein muss.
Page 14
3
Funktion der Steuereinheit
11
4
4
9
11 11
10
23
25
23
25
25
28
1 2
4 535
6
7
8
26
24
28
3
29
2
5 5
27
26
25
24
7
8
25
16
15
15
17
14
12 13
21
22
20
15
15
16
21
25 22
19
18
12 13
111
444
9
6
17 1111
10
14
1. SEAMLESS LOOP (NAHTLOSE SCHLEIFE)
A. Loop-in
Der Loop-in-Punkt kann im PLAY- und PAUSE-Modus aufgenommen werden. Wenn der Loopout-Punkt aufgenommen wird und der Loop-in-Punkt hinter den Loop-out-Punkt zurückgesetzt
wird, wird der Loop-out-Punkt gelöscht.
B. Loop out / Exit
i. Nachdem der Loop-in-Punkt eingestellt wurde, drücken Sie diese Taste, um den Endpunkt
des LOOP-Intervalls zu speichern und das Looping zu starten.
ii. Drücken Sie diese Taste noch einmal, um das Looping zu beenden.
iii. Loop-out-Punkt zurücksetzen: Drücken Sie die Taste noch einmal, um den Loop-out-Punkt
zurückzusetzen, und das Looping beginnt erneut.
iv. Der Loop-out-Punkt muss sich hinter dem Loop-in-Punkt befi nden, sonst wird der Loop-
out-Punkt gelöscht.
Page 15

4
c. Reloop
i. Drücken Sie die Taste, um das nahtlose Looping erneut zu beginnen.
ii. Ohne Funktion, wenn der Loop-in-Punkt nicht aufgenommen wurde.
iii. Wenn der Loop-out-Punkt nicht eingestellt ist, wird zum Loop-in-Punkt zurückgekehrt und
die Wiedergabe begonnen (ähnlich der Funktion Hotcue)
2. SMART LOOP (BEREICHSAUSWAHL)
Der Benutzer kann das Looping-Intervall aussuchen zwischen: 1/2/4/8 Takt
3. SMART LOOP ON/OFF
LED AN: Die Schleife wird im Intervall mit den ausgewählten Takt wiedergegeben.
LED AUS: Die Schleife wird im Intervall zwischen Loop-in und Loop-out wiedergegeben.
4. HOT-CUE
Mit diesem Gerät können Sie sofort von 2 Cue-Punkten aus wiedergeben.
a. Stellt den CUE-Speicher ein: Drücken Sie zunächst die MEMO-Taste und dann die CUE-
Taste, um die CUE-Einstellung durchzuführen. Danach leuchtet diese CUE-Taste auf.
b. Wiedergabe des CUE-Speichers: Beim Drücken der jeweiligen CUE-Taste blinkt sie
5 Sekunden lang.
Anmerkung: Diese Funktion ist nicht verfügbar, während der REVERSE-Soundeffekt
ausgeführt wird.
5. JINGLE/SAMPLER
Der Benutzer kann die Effekte oder Lieder für die Erkennungsmelodie voreinstellen.
a. Drücken Sie die MEMO-Taste und dann die JINGLE-Taste, und es wird ein Samplertrack in
der "Jingle list" erzeugt. Der Benutzer kann den aufgenommenen Sampler aus dem Computer
zur "Jingle list" hinzufügen.
b. Maximale Länge der Samplerzeit: 12 Sekunden
6. PLAY/PAUSE (Wiedergabe/Pause)
Jedes Mal, wenn diese Taste gedrückt wird, wird zwischen den Modi PLAY (Wiedergabe) und
PAUSE umgeschaltet.
LED-Anzeige
i. Wenn der Track wiedergegeben wird, ist der LED-Anzeiger an.
ii. Wenn der Track unterbrochen wird, blinkt der LED-Anzeiger.
7. CUE (Suchlauf)
Die Suchlauf-Funktion macht es möglich, dass die CD an die gespeicherte Stelle zurückkehrt.
Wenn Sie im PAUSE-Modus die CUE-Taste drücken, um die Merkstelle einzustellen, blinkt die
CUE-Taste. Wenn Sie diese Taste im PLAY-Modus drücken, macht das Gerät an der gespeicherten
Stelle eine Pause.
8. JOGWHEEL (Jog-Scheibe)
• Geschwindigkeitsreglung (SEARCH-Anzeiger aus)
Wenn Sie die Scheibe im Wiedergabe-Modus drehen, wird die Wiedergabegeschwindigkeit
entsprechend geändert. Wenn Sie im Uhrzeigersinn drehen, wird die Geschwindigkeit des
Page 16

5
Players erhöht; wenn Sie im entgegengesetzten Uhrzeigersinn drehen, wird die Geschwindigkeit
vermindert.
• Suchen (SEARCH-Anzeige leuchtet)
Wenn Sie die Scheibe drehen, wird der Player schnell vorwärts oder rückwärts durchsucht. Die
Suchgeschwindigkeit ändert sich entsprechend der Wählgeschwindigkeit. Sie kann in Schritten
von Einzelbild erfolgen.
9. KEY ON/OFF-SCHALTER (MT) (Tastatur an/aus)
Drücken Sie den Knopf, um den Tastatur-Modus an- oder auszuschalten.
Wenn eingeschaltet, behält das Gerät ein konstantes Tempo bei und wird nicht verändert, wenn
der Tonhöhenschieber verschoben wird.
10. PITCH REGLER
Um die Auswahlen der Wiedergabegeschwindigkeit (8%, 16%, 32%, 100%) anzupassen, können
Sie durch Verschieben des Pitch Reglers auswählen, welchen Bereich Sie zwischen Minimum
(obere Seite) und Maximum (untere Seite) haben wollen.
11. PITCH BEND + / - Taste (Tonhöhenbeugung)
Wenn beide CD-Player spielen, ist es mit der Pitch Bend-Funktion möglich, den Basstakt
anzupassen, nachdem die Tonhöhe eingestellt worden ist. Die Tonhöhe wird automatisch
um bis zu +16% der aktuellen Einstellung erhöht, wenn Sie die "+"-Taste drücken. Wenn Sie
die "-"-Taste drücken, wird die aktuelle Einstellung automatisch um bis zu -16% vermindert. Durch
die Veränderung der Tonhöhe kann die Position der Takte angepasst werden.
12. SEARCH-Taste (Suchen)
Drücken Sie die Taste, um die Funktion des Jog-Wheels zwischen SEARCH (Suchen) und PITCH
BEND (Tonhöhenbeugung) umzuschalten.
• Wenn die LED leuchtet, können Sie mit dem Jog-Wheel schnell vorwärts oder rückwärts
suchen.
• Wenn die LED aus ist, können Sie mit dem Jog-Wheel die Pitch Bend Funktion nutzen.
• Wenn das Jog-Wheel 8 Sekunden lang nicht bewegt wird, geht die Anzeige aus, und Sie
können das Jog-Wheel für die Pitch Bend Funktion benutzen.
13. SCRATCH-EFFEKT
LED An: Scratch An
LED Aus: Scratch Aus
14. SYNC:
Mit dieser Funktion werden die Takte pro Minute (BPM) von Gerät 1 & 2 automatisch
synchronisiert.
15. EFFEKT-PARAMETER
Stellt den Parameter des Effekts durch Drehen der Einstellknöpfe ein. X für Reglung der Stärke,
Y für Reglung der Länge.
Page 17

6
16. EFFEKT-WAHLSCHALTER
Um die Effekte aus der PC-Software auszuwählen.
17. EFFECT ON/OFF
Schalter zum An-/Ausschalten des Effekts
Mischpultauswahl
18. Master Volume Regler
Stellt die Gesamtlautstärke ein.
19. Reglung der BOOTH-Lautstärke
Wird benutzt, um die Lautstärke des BOOTH MONITORS einzustellen. Die Lautstärke wird nicht
von der Gesamtlautstärke und der Gesamtbalance beeinfl usst.
20. CUE LEVEL (Einstellknopf für Lautstärke beim Suchlauf):
Stellt den Kopfhörermonitorton ein. Wenn CH-1 und CH-2 ausgewählt worden ist, wird die
Lautstärke nicht von der Einstellung der Gesamtlautstärke oder Gesamtbalance beeinfl usst.
21. GAIN (Verstärkung):
Stellt die Stärke des Eingangssignals ein. Auf dem LCD-Display wird 2 Sekunden lang [ Sam
Forward ] oder [ Sam Reverse ] angezeigt.
22. CHANNEL EQ CONTROL (EQUALIZER KANÄLE REGLER)
HI:
Stellt hohe Eingangstöne ein. In der Mitte ist der Klang fl ach.
23. MID:
Stellt mittlere Eingangstöne ein. In der Mitte ist der Klang fl ach.
24. LOW:
Stellt tiefe Eingangstöne ein. In der Mitte ist der Klang fl ach.
25. KILL:
Wenn Sie die Tasten drücken, wird das ausgewählte Band (Hi/Mid/Low) des Tracks
stummgeschaltet.
26. CUE:
Wird benutzt, um die Quelle (CH-1 & CH-2, MASTER), die mit den Kopfhörern überwacht werden
soll, auszuwählen.
Noch einmal drücken, um die Auswahl zu beenden. Mehrere Knöpfe drücken, um einen gemischten
Klang aus den ausgewählten Quellen zu erhalten.
27. AUTO MIX:
Drücken Sie die AUTO MIX-Taste, um Gerät 1 und Gerät 2 automatisch zu mischen (mit Ein/Ausblendeffekt).
Page 18
7
28. KANAL (CH-1 BIS CH4) FADER
Stellt die Ausgangslautstärken der Kanäle ein.
29. CROSS FADER (ÜBERBLENDER)
Wird benutzt, um die Lautstärke des Tongemischs der Quellen, die auf CH1 oder CH2 eingestellt
sind, einzustellen.
KONFORMITÄTSERKLÄRUNG
Wir,
Ned is B.V.
De Tweeling 28
5215MC ’s-Hertogenbosch
Niederlande
Tel.: 0031 73 599 1055
Email: info@nedis.com
erklären, dass das Produkt:
Name: König Electronic
Modell: KN-DIGICON20
Beschreibung: Digital Controller
den folgenden Standards entspricht:
EMV: EN 55022:2006
EN 55024:1998+A1:2001+A2:2003
EN 61000-3-2:2000+A1:2005
EN 61000-3-3:1995+A1:2001+A2:2005
Befolgt die Vorschriften der Richtlinie 89/336/EEC.
‘s-Hertogenbosch, 04. März 2008
J. Gilad
Einkaufsleiterin
Page 19
8
Sicherheitsvorkehrungen:
Um das Risiko eines elektrischen Schlags zu verringern, sollte dieses Produkt AUSSCHLIESSLICH
von einem autorisierten Techniker geöffnet werden, wenn eine Wartung erforderlich ist. Trennen
Sie das Produkt vom Stromnetz und anderen Geräten, wenn ein Problem auftreten sollte. Sorgen
Sie dafür, dass das Gerät nicht mit Wasser oder Feuchtigkeit in Berührung kommt.
Wartung:
Nur mit einem trockenen Tuch säubern. Keine Lösungsmittel oder Schleifmittel verwenden.
Garantie:
Es kann keine Garantie oder Haftung für irgendwelche Änderungen oder Modifi kationen des
Produkts oder für Schäden übernommen werden, die aufgrund einer nicht ordnungsgemäßen
Anwendung des Produkts entstanden sind.
Allgemeines:
Konstruktionen und technische Daten können ohne vorherige Ankündigung geändert werden.
Alle Logos, Marken und Produktnamen sind Warenzeichen oder registrierte Warenzeichen ihrer
jeweiligen Eigentümer und werden hiermit als solche anerkannt.
Achtung:
Dieses Produkt ist mit diesem Symbol gekennzeichnet. Es bedeutet, dass die verwendeten
elektrischen und elektronischen Produkte nicht im allgemeinen Haushaltsmüll entsorgt
werden dürfen. Für diese Produkte stehen gesonderte Sammelsysteme zur Verfügung.
Copyright ©
Page 20

9
Page 21
KN-DIGICON20
CONTROLEUR MIDI
NUMERIQUE DJ
Page 22
1
A. CONTROLEUR MIDI
Le ME701 est conçu pour lire les pistes musicales sur ordinateur et pour fonctionner avec des
périphériques qui prennent en charge ou non le feedback MIDI.
Cela est obtenu par l'implémentation de plusieurs modes de commande dans le ME701.
Les modes de commande sont :
1. Mode Spécial Midi :
Une fois activé, le ME701 répond au message MIDI entrant, en fonction de son affectation.
Les voyants ne bougent pas tant qu'ils ne sont pas commandés par une application spécifi que
(E-MIX,PCDJ) via l'interface MIDI.
2. Mode Général Midi :
Dans ce mode, tous les messages de feedback MIDI s ont i gnorés. Le voyant d'une touche s'allume
puis s'éteint une fois la touche enfoncée.
Les touches, boutons et curseurs transmettent les événements qui leur sont assignés au
périphérique externe grâce à un câble USB.
3. Mode Général Midi avec Réponse
Certains logiciels DJ sont capables de convoyer un message vers cet appareil pour faire allumer
les voyants et permettre que cet appareil commande le logiciel PC.
PS : Merci de vous référer à la description fonctionnelle.
B. SELECTION LOGICIEL PC
Vous pouvez commuter cet appareil afi n qu'il commande différents logiciels PC.
1) Raccordez cet appareil au PC ou à l'ordinateur portable grâce à un câble USB puis appuyez
sur la touche "LOAD DECK A" (CHARGEMENT PLATE FORME A) jusqu'à ce que le voyant
KILL de la plate-forme A désigné pour le mode du programme PC voulu s'allume.
• HI : Ce voyant s'allume pour le MODE SPECIAL MIDI
• MID : Ce voyant s'allume pour le MODE GENERAL MIDI
• LOW : Ce voyant s'allume pour le MODE GENERAL MIDI AVEC REPONSE.
2) Enfoncez le bouton correspondant au voyant allumé jusqu'à ce que ce dernier soit reconnu
3) Débranchez le câble USB et rebranchez-le. Vous pouvez ensuite utiliser la commande pour le
mode MIDI choisi.
4) Une fois le ME-701 raccordé à l'ordinateur, les voyants Search (Recherche) -> Scratch ->
Sync. s'allument tour à tour.
• En MODE SPECIAL MIDI, le voyant reste allumé pour rappeler à l'utilisateur que le logiciel PC
n'est pas activé.
• En Mode Général Midi et Général Midi avec Réponse, le voyant reste allumé quelques minutes
seulement avant de s'éteindre puis tous les voyants s'allument légèrement.
Page 23
2
Introduction :
Le KN-DIGICON20 est un contrôleur MIDI hautement professionnel disposant de deux molettes
jog wheels. Associées aux commandes Crossfader, elles donnent aux DJ amateurs tout comme
aux professionnels de vraies possibilités de mixage professionnel. Le contrôleur convient
parfaitement pour les fi chiers MP3/WAV/OGG à partir d'un PC ou d'un ordinateur portable. La
fonction Scratch, Seamless Looping (boucle parfaite), les fonctions Kill et les différents effets
possibles offrent toutes les options aux DJ créatifs. Le KN-DIGICON20 fonctionne en Plug & Play
avec Mac OS X et Windows® XP SP2 et Vista™. L'alimentation peut s'effectuer par USB 2.0.
Description de la vue arri�re :
1. Port USB :
• Connexion à un PC pour commander la lecture
• Alimentation électrique provenant du PC ou de l'ordinateur portable
Avant de raccorder l'appareil à un PC ou un ordinateur portable, installez le logiciel de Démo
(Emix) contenu sur le disque fourni et chargez les morceaux musicaux dans le programme. Testez
le programme à partir de l'ordinateur et vérifi ez si l'unité de commande réagit en conséquence
(Ex : allumage des bons voyants).
NOTE : L'appareil ne peut pas �tre allumé avant que le logiciel (Emix) soit activé
2. Alimentation CC pour le contrôleur
Si l'appareil ne parvient pas à obtenir suffisamment de puissance par le bus USB, alimentez-le
grâce à un adaptateur (type CC, 6V/1A) branché dans cette prise.
Notez que la polarité de l'adaptateur doit être la suivante
.
Page 24
3
Fonctionnement de l'unité de commande
11
4
4
9
11 11
10
23
25
23
25
25
28
1 2
4 535
6
7
8
26
24
28
3
29
2
5 5
27
26
25
24
7
8
25
16
15
15
17
14
12 13
21
22
20
15
15
16
21
25 22
19
18
12 13
111
444
9
6
17 1111
10
14
1. SEAMLESS LOOP (BOUCLE PARFAITE)
A. Loop-in
Le point de Loop-in (démarrage de boucle) peut être enregistré en mode LECTURE et en mode
PAUSE. Si le point de Loop-out (sortie de boucle) est enregistré et que le point de Loop-in est
rédéfi ni derrière le point de Loop-out, le point de Loop-out est effacé
B. Loop out / Quitter
i. Après avoir paramétré le point de Loop-in, appuyez sur cette touche pour mémoriser le
point de fi n de l'intervalle LOOP puis lancer la boucle (LOOPING).
ii. Appuyez à nouveau sur cette touche pour quitter la boucle.
iii. Réinitialiser le point de Loop-out : appuyez à nouveau sur cette touche pour réinitialiser le
point de Loop-out et pour que le looping redémarre.
iv. Le point de Loop out doit se trouver après le point de Loop-in pour ne pas que le point de
Loop-out soit annulé.
Page 25

4
C. Reloop
i. Appuyez sur cette touche pour activer la fonction Seamless Loop (Boucle continue).
ii. Cette touche n'a aucun impact si le point de Loop-in n'a pas été enregistré.
iii. Si le point de Loop-out n'est pas défi ni, retour au point de Loop-in et démarrage de la
lecture.
(similaire à la fonction Hotcue)
2. SMART LOOP (SELECTION D'INTERVALLE)
L'utilisateur peut sélectionner l'intervalle de boucle entre : 1/2/4/8 beat
3. SMART LOOP ACTIVATION/DESACTIVATION
VOYANT ALLUME : la boucle est jouée dans l'intervalle de beats sélectionné.
VOYANT ETEINT : la boucle est jouée dans l'intervalle compris entre le point de Loop-in et le
point de Loop-out.
4. HOTCUE
Cet appareil vous permet de lire à partir de 2 points de repère instantanément.
A. Défi nissez la mémoire Repère (CUE) : appuyez d'abord sur la touche MEMO, puis appuyez
sur la touche CUE pour terminer le réglage du repère ; la touche CUE s'allume alors.
B. Lire la mémoire ”CUE” : appuyez sur la touche CUE spécifi que, elle clignote pendant 5
secondes environ.
Note : cette fonction n'est pas disponible lorsque l'effet sonore REVERSE est actif.
5. JINGLE/SAMPLER
L'utilisateur peut prédéfi nir les effets et les chansons de Jingle sur l'ordinateur.
A. Appuyez sur la touche Memo puis sur Jingle, une piste “Sampler” (échantillon) est créée
dans la liste “Jingle”. L'utilisateur peut défi nir l'échantillon enregistré comme Jingle depuis
l'ordinateur.
B. La durée maximale de l'échantillon est de 12 secondes.
6. LECTURE/PAUSE
Chaque pression sur cette touche permet de naviguer entre les modes LECTURE et PAUSE.
Voyant :
i. Lorsque la piste est en cours de lecture, le voyant est allumé.
ii. Lorsque la piste est en pause, le voyant clignote.
7. CUE (REPERE)
La fonction CUE permet au CD de retourner au point mémorisé. En mode PAUSE, appuyez sur
la touche CUE pour défi nir le point de repère ; la touche CUE clignote ; en mode LECTURE,
appuyez sur cette touche pour mettre l'appareil en pause au niveau du point mémorisé.
8. JOGWHEEL
• Contrôle de la vitesse (voyant SEARCH éteint)
Tournez la molette en mode lecture pour modifi er la vitesse de lecture. Tournez dans le sens des
aiguilles d'une montre pour augmenter la vitesse de lecture ; tournez-la dans l'autre sens pour
diminuer la vitesse.
Page 26

5
• SEARCH (RECHERCHE) (voyant SEARCH allumé)
Tournez la molette pour effectuer une avance ou un retour rapide avec le lecteur. La vitesse de
recherche varie en fonction de la vitesse de rotation. Elle peut être effectuée par incrémentation
de trame.
9. INTERRUPTEUR MARCHE/ARRET KEY (MT)
Appuyez sur la touche pour activer ou désactiver le mode KEY.
Lorsque que le mode est actif, l'unité garde un tempo constant qui reste inchangé même si le
curseur de Pitch est déplacé.
10. CURSEUR DE COMMANDE DE PITCH
Pour adapter la vitesse de lecture (8%, 16%, 32%, 100%), vous pouvez choisir la plage désirée
entre le minimum (en haut) et le maximum (en bas) en déplaçant le curseur PITCH.
11. TOUCHE PITCH BEND + / -
Lorsque les deux lecteurs de CD sont en cours de lecture, la fonction Pitch Bend permet de faire
correspondre le rythme des basses une fois que la vitesse a été ajustée. La vitesse augmente
automatiquement jusqu'à + 16% du réglage en cours lorsque vous appuyez sur la touche "+".
Lorsque vous appuyez sur la touche "–", la vitesse diminue automatiquement à - 16% du réglage
en cours. Il est possible de faire correspondre les rythmes en modifi ant la position du Pitch.
12. TOUCHE SEARCH
Appuyez sur la touche pour choisir la fonction de la molette entre RECHERCHE et PITCH
BEND.
• Lorsque le voyant est allumé, tournez la molette pour effectuer une recherche rapide vers
l'avant ou l'arrière.
• Lorsque le voyant est éteint, tournez la molette pour la fonction Pitch Bend.
• Si la molette n'est pas déplacée pendant 8 secondes, le voyant s'éteint et la molette retourne
à la fonction Pitch Bend.
13. EFFET SCRATCH
VOYANT ALLUME : Scratch activé
VOYANT ETEINT : Scratch désactivé
14. SYNC :
Cette fonction permet de synchroniser le BPM des unités 1 & 2 automatiquement.
15. PARAMETRE D'EFFET
Réglez le paramètre de l'effet en tournant les boutons de réglage. X pour contrôler la force, Y pour
contrôler la longueur.
16. SELECTEUR D'EFFET
Pour sélectionner les effets à partir du logiciel PC
17. ACTIVATION/DESACTIVATION DE L'EFFET
Commutateur d'effet
Page 27

6
Section Mixage
18. Contrôleur du Volume principal
Permet de régler le niveau sonore de la sortie principale.
19. Contrôleur du Volume BOOTH
Utilisé pour régler le niveau de la sortie BOOTH MONITOR. Le niveau n'est pas impacté par le
volume principal ou la balance principale.
20. CUE LEVEL (Bouton de réglage du niveau Cue) :
Permet de régler le son de la surveillance au casque. Lorsque CH-1 vers CH-2 a été sélectionné,
le niveau n'est pas affecté par le réglage du volume principal et la balance principale.
21. GAIN :
Permet de régler le niveau du signal d'entrée. L'affi chage LCD indique [ Sam Forward ] ou [ Sam
Reverse ] pendant 2 Sec.
22. Contrôleur CANAL EQ
HI :
Permet de régler les sons élevés. Au milieu, le son est plat.
23. MID :
Permet de régler les sons moyens. Au milieu, le son est plat.
24. LOW :
Permet de régler les sons bas. Au milieu, le son est plat.
25. KILL
La pression de ces touches rend muette la bande sélectionnée (Hi/Mid/Low) de la piste.
26. CUE :
Utilisé pour sélectionner la source (CH-1 & CH-2, MASTER) devant être surveillée au casque.
Appuyez à nouveau sur cette touche pour annuler la sélection. La pression de plusieurs touches
permet de dévier le son mixé des sources sélectionnées.
27. AUTO MIX :
Appuyez sur la touche Auto Mix pour mixer l'unité 1 & l'unité 2 automatiquement (avec effet fade
in/out - fondu)
28. FADER CANAL (CH-1 A CH-4)
Permet de régler les niveaux sonores des sorties de canaux.
29. CROSS FADER
Utilisé pour régler le volume du son mixé des sources paramétrées en Ch1 ou Ch2.
Page 28

7
DECLARATION DE CONFORMITE
Nous,
Ned is B.V.
De Tweeling 28
5215MC ’s-Hertogenbosch
Pays-Bas
Tél : 0031 73 599 1055
Email : info@nedis.com
Déclarons que le produit :
Nom : König Electronic
Modèle : KN-DIGICON20
Description : Contrôleur numérique
est conforme aux prescriptions des normes suivantes :
CEM : EN 55022:2006
EN 55024:1998+A1:2001+A2:2003
EN 61000-3-2:2000+A1:2005
EN 61000-3-3:1995+A1:2001+A2:2005
suivant la directive 89/336/CEE.
‘s-Hertogenbosch, 04 mars 2008
Mme. J. Gilad
Directeur des Achats
Page 29
8
Consignes de sécurité :
Afi n de réduire les risques de chocs électriques, ce produit ne doit être ouvert QUE par un
technicien qualifi é agréé en cas de réparation. Débranchez l'appareil du secteur et des autres
équipements en cas de problème. N'exposez jamais l'appareil à l'eau ni à l'humidité.
Entretien :
Nettoyez uniquement avec un chiffon sec. N'utilisez pas de solvants ni de produits abrasifs.
Garantie :
Au cu ne g ara nt ie o u re sp on sa bil it é ne ser a a cc ep té e en cas de m odi fi c ati on e t/o u d e tr ans fo rma ti on
du produit ou en cas de dommages provoqués par une utilisation incorrecte de l'appareil.
Généralités :
Le design et les caractéristiques techniques sont sujets à modifi cation sans notifi cation
préalable.
Tous les logos de marques et noms de produits sont des marques déposées ou immatriculées dont
les détenteurs sont les propriétaires et sont donc reconnus comme telles dans ce document.
Attention :
Ce symbole fi gure sur l'appareil. Il signifi e que les produits électriques et électroniques
ne doivent pas être jetés avec les déchets domestiques. Le système de collecte est
différent pour ce genre de produits.
Copyright ©
Page 30

9
Page 31

KN-DIGICON20
DJ MIDI DIGITALE
CONTROLLER
Page 32

1
A. MIDI CONTROLE
ME701 is ontworpen om computer based muziekbestanden af te spelen en om te werken met
apparaten die MIDI-feedback wel of niet ondersteunen.
Dit is tot stand gebracht door de implementatie van diverse verschillende bedieningsmodi in
ME701.
Deze bedieningsmodi zijn:
1. Speciale Midi Modus:
Eenmaal geselecteerd, zal ME701 de opdrachten van binnenkomende MIDI-berichten opvolgen.
De LED's zullen niet branden tenzij zij door een specifi eke toepassing worden aangestuurd (EMIX,PCDJ) via MIDI.
2. Algemene Midi Modus:
In deze modus zullen alle MIDI-feedback berichten worden genegeerd. De LED van de A-toets zal
oplichten en langzaam uitgaan wanneer deze wordt ingedrukt.
De toetsen, knoppen en schuiven zullen hun signalen doorsturen aan een extern apparaat via
een USB-kabel.
3. Algemene Midi Modus met reactie.
Sommige DJ-software zijn in staat om berichten naar dit apparaat over te brengen, zodat de LED's
gaan branden en maken het tevens mogelijk om de PC-software te bedienen vanaf dit apparaat.
NB. Raadpleeg het volgende hoofdstuk.
B. PC-SOFTWARE SELECT
U kunt dit apparaat gebruiken om verschillende PC-software mee te bedienen.
1) Sluit dit apparaat met de USB-kabel aan op uw PC of laptop en blijf dan op de knop "LOAD
DECK A" drukken totdat de KILL LED in DECK A brandt en het gewenste PC-programma
weergeeft.
• HI: Deze LED brandt voor SPECIALE MIDI MODUS
• MID: Deze LED brandt voor ALGEMENE MIDI MODUS
• LOW: Deze LED brandt voor ALGEMENE MIDI MODUS MET REACTIE
2) Druk op de knop waarvan de bijbehorende LED oplicht, totdat de LED uitgaat.
3) Verwijder de USB-kabel en sluit deze opnieuw aan, nu kunt u dit apparaat gebruiken en de
geselecteerde MIDI-modus bedienen.
4) Wanneer de ME-701 is aangesloten op een computer zullen de LED's afwisselend branden
tussen Search -> Scratch -> Sync.
• In “SPECIAL MIDI MODUS”, blijven de LED’s branden om de gebruiker er aan te herinneren
dat de PC-software niet is geactiveerd.
• In General Midi Modus en General Midi Modus met reactie zullen de LED's slechts enkele
minuten volop oplichten, dan stoppen, vervolgens zullen alle LED's op halfvolle sterkte gaan
branden.
Page 33

2
Introductie:
De KN-DIGICON20 is een zeer professionele MIDI-controller met twee jog wielen. Tezamen
met de crossfader geeft het de amateur DJ net als de professionele DJ echte professionele
mixermogelijkheden op deze MIDI-controller. De controller is geschikt voor MP3/WAV/OGGbestanden op een PC of laptop. De scratchfunctie, naadloze looping, de kill-functies en
verschillende effecten geven de creatieve DJ volledige controle. De KN-DIGICON20 werkt plug &
play met Mac OS X en Windows® XP SP2 en Vista™. Voeding wordt aangeleverd via USB 2.0.
Beschrijving achterkant:
1. USB-aansluiting:
• Aansluiting voor uw PC om het afspelen te bedienen
• Verkrijgt voeding via uw PC of laptop
Installeer de Demo software (Emix) op de bijgeleverde CD voordat u dit apparaat aansluit op uw
PC of laptop en upload uw muziek naar het programma. Test het programma vanaf uw computer
en controleer of de bedieningseenheid de juiste reactie krijgt (de corresponderende LED's lichten
op).
NB: Deze eenheid mag niet worden ingeschakeld voordat de computersoftware (Emix) is
gestart
2. Transformatoraansluiting
Wanneer dit apparaat niet voldoende voeding kan krijgen via de USB-kabel, dan kunt u de
transformator (gelijkstroom type, 6V/1A)
hier op aan sluiten.
Denk er om dat de polariteit van de transformator moet zijn.
Page 34

3
Functie van de controle-eenheid
11
4
4
9
11 11
10
23
25
23
25
25
28
1 2
4 535
6
7
8
26
24
28
3
29
2
5 5
27
26
25
24
7
8
25
16
15
15
17
14
12 13
21
22
20
15
15
16
21
25 22
19
18
12 13
111
444
9
6
17 1111
10
14
1. SEAMLESS LOOP
a. Loop-in
Het Loop-in punt kan worden opgenomen gedurende PLAY en PAUSE. Wanneer het Loop-out
punt is opgenomen en het Loop-in punt is ingesteld achter het Loop-out punt zal het Loop-out
punt worden gewist.
b. Loop-out / Exit
i. Nadat het Loop-in punt is ingesteld, drukt u op deze toets om het eindpunt van de LOOP
interval te bewaren, en start LOOPING.
ii. Druk opnieuw op deze toets om uit Looping te gaan.
iii. Reset het Loop-out punt: Druk opnieuw op deze toets om het Loop-out punt opnieuw in te
stellen en looping zal opnieuw starten.
iv. Het Loop-out punt moet na het Loop-in Punt komen of het Loop-out punt zal worden
gewist.
Page 35

4
c. Reloop
i. Druk hierop om de naadloze loop te herstarten.
ii. Geen functie wanneer er geen Loop-in punt is opgenomen.
iii. Wanneer het Loop-out punt niet is ingesteld zal het Loop-in punt opnieuw worden
afgespeeld.
(vergelijkbaar met de hotcue functie)
2. SMART LOOP (SELECTEER REEKS)
U kunt de Looping interval kiezen tussen: 1/2/4/8 beat.
3. SMART LOOP AAN/UIT
LED AAN: De Loop wordt gespeeld met de gekozen interval.
LED UIT: De Loop wordt gespeeld met de interval tussen de Loop-in en Loop-out.
4. HOT-CUE
Dit onderdeel maakt het mogelijk om onmiddellijk van 2 cue punten af te spelen.
a. Stel CUE geheugen in: Druk eerst op de MEMO toets en druk dan op de CUE toets om de
CUE instelling af te ronden, nu zal de CUE toets gaan branden.
b. Speel ”CUE” geheugen: Door op een specifi eke CUE toets te drukken, zal deze ongeveer 5
seconden knipperen.
NB:Deze functie is niet beschikbaar gedurende het REVERSE geluidseffect.
5. JINGLE/SAMPLER
U kunt de Effecten of Songs voor Jingle instellen op uw computer.
a. Druk op de Memo toets en dan op Jingle, een “Sampler track” zal worden gecreëerd in de
“Jingle list”. U kunt de opgenomen sampler toevoegen aan de Jingle op uw computer.
b. Maximale lengte van de sampler tijd: 12 seconden
6. WEERGAVE / PAUZE
Door op deze toets te drukken schakelt u tussen PLAY en PAUSE modi.
LED-lampje:
i. Wanneer het nummer speelt is de LED-indicator AAN.
ii. Wanneer het nummer pauzeert knippert de LED-indicator.
7. CUE
De cuefunctie maakt het mogelijk om de CD terug te laten gaan naar het in het geheugen
opgeslagen punt. In de PAUSE modus, drukt u op de CUE toets om het cuepunt in te stellen, de
CUE toets zal gaan knipperen; in PLAY modus, drukt u op deze toets om te pauzeren op het in
het geheugen opgeslagen punt.
8. JOGWIEL
• Snelheidscontrole (SEARCH aanduiding uit)
Door tijdens het afspelen aan het wiel te draaien zal de afspeelsnelheid veranderen. Door met de
klok mee te draaien zal de afspeelsnelheid toenemen; de snelheid neemt af door tegen de klok
in te draaien.
Page 36

5
• Zoek (SEARCH aanduiding brand)
Door het wiel te draaien, zal de speler snel voorwaarts of achterwaarts zoeken. De zoeksnelheid
zal veranderen met de draaisnelheid. Het kan worden uitgevoerd met een toename van één
frame.
9. KEY ON/OFF SCHAKELAAR (MT)
Druk op de toets KEY om deze functie aan of uit te schakelen.
Indien het AAN is, behoud de eenheid een constant tempo en dit zal niet wijzigen wanneer de
pitch schuif wordt bewogen.
10. PITCH CONTROL SCHUIF
Om de geselecteerde afspeelsnelheid te evenaren (8%, 16%, 32%, 100%), kunt u elke reeks
kiezen tussen minimum (bovenkant) en maximum (onderkant) door de pitch control schuif te
bewegen.
11. PITCH BEND + / - TOETS
Wanneer beide CD-spelers spelen, maakt de pitch bend functie het mogelijk om de positie van
de bass beat overeen te stemmen nadat de pitch is aangepast. De pitch zal automatisch omhoog
gaan tot + 16% vanaf de huidige instelling wanneer u de “ + “toets indrukt. Wanneer u de „–“ toets
indrukt, zal de pitch automatisch omlaag gaan tot - 16 % vanaf de huidige instelling. Door het
veranderen van de pitch kan de positie van de beats overeen worden gestemd.
12. SEARCH TOETS
Druk op deze toets om de Jog Dial functie te schakelen tussen SEARCH en PITCH BEND.
• Wanneer de LED aan is, draai de jog om snel voor- en achterwaarts te zoeken.
• Wanneer de LED uit is, draai de jog voor de pitch bend functie.
• Indien de jog gedurende 8 seconden niet heeft bewogen, zal de indicator uit gaan en de jog
is klaar voor de voor pitch bend functie.
13. SCRATCH EFFECT
LED AAN: Scratch AAN.
LED UIT: Scratch UIT.
14. SYNC:
Deze functie dient om automatisch de BPM van eenheden 1 & 2 te synchroniseren.
15. EFFECT PARAMETER
Pas de parameter van het effect aan door de knoppen te draaien. X voor sterkte , Y voor lengte.
16. EFFECT KIEZER
Om de effecten van uw PC software te selecteren.
17. EFFECT AAN/UIT
Effect aan-/uitschakelaar.
Page 37

6
Mixeronderdeel
18. Hoofd volumeaanpassing
Past de hoofduitgang van het geluidsniveau aan.
19. BOOTH Volume aanpassing
Wordt gebruikt om het niveau van de BOOTH MONITOR uitgang aan te passen. Dit niveau wordt
niet beïnvloed door het hoofdvolume en hoofdbalans.
20. CUE NIVEAU (Cueniveau aanpasknop):
Past het hoofdtelefoongeluid aan. Wanneer CH-1 of CH-2 is geselecteerd wordt het niveau niet
beïnvloed door het aanpassen van het hoofdvolume en hoofdbalans.
21. Gain:
Pas het ingangssignaal aan, het LCD-scherm toont [ Sam Forward ] of [ Sam Reverse ] gedurende
2 seconden.
22. KANAAL EQ CONTROL
HI:
Past de hoge tooningang aan. In de centrale positie zal het geluid neutraal zijn.
23. Mid:
Past de midden tooningang aan. In de centrale positie zal het geluid neutraal zijn.
24. Laag:
Past de lage tooningang aan. In de centrale positie zal het geluid neutraal zijn.
25. KILL
Druk op de toetsen om de geselecteerde band (Hi/Mid/Low) van het nummer te dempen.
26. CUE:
Gebruik dit om de bron (CH-1 & CH-2, MASTER) te selecteren, zodat deze kan worden beluisterd
met een hoofdtelefoon.
Druk opnieuw om de keuze ongedaan te maken. Druk op diverse toetsen om gemixt geluid te
verkrijgen van de geselecteerde bronnen.
27. AUTO MIX:
Druk op de Auto Mix toets om eenheid 1 & eenheid 2 automatisch te mixen (met fade in/uit
effect)
28. KANAAL (CH-1 TO CH-4) FADER
Past de kanaal uitgangsniveaus aan.
29. CROSS FADER
Wordt gebruikt om het gemixte geluidsvolume van de bronnen Ch1 of Ch2 aan te passen.
Page 38

7
CONFORMITEITVERKLARING
Wij,
Nedis BV
De Tweeling 28
5215 MC ’s-Hertogenbosch
Nederland
Tel.: 0031 73 599 1055
E-mail: info@nedis.com
Verklaren dat het product:
Merknaam: König Electronic
Model: KN-DIGICON20
Description: Digitaal bedieningspaneel
in overeenstemming met de volgende normen is:
EMC: EN 55022:2006
EN 55024:1998+A1:2001+A2:2003
EN 61000-3-2:2000+A1:2005
EN 61000-3-3:1995+A1:2001+A2:2005
Conform de bepalingen van richtlijn 89/336/EEG.
‘s-Hertogenbosch, 04 maart 2008
Mevr. J. Gilad
Directeur inkoop
Page 39

8
Veiligheidsvoorzorgsmaatregelen:
Wanneer service of reparatie noodzakelijk is, mag dit product UITSLUITEND door een
geautoriseerde technicus geopend worden; dit om de kans op het krijgen van een elektrische
schok te voorkomen. Als er een probleem optreedt, koppel het product dan los van het lichtnet en
van andere apparatuur. Stel het product niet bloot aan water of vocht.
Onderhoud:
Uitsluitend reinigen met een droge doek. Gebruik geen reinigingsmiddelen of schuurmiddelen.
Garantie:
Voor wijzigingen en veranderingen aan het product of schade veroorzaakt door een verkeerd
gebruik van dit product, kan geen aansprakelijkheid worden geaccepteerd. Tevens vervalt
daardoor de garantie.
Algemeen:
Wijziging van ontwerp en specifi caties zonder voorafgaande mededeling onder voorbehoud.
Alle logo's, merken en productnamen zijn handelsmerken of geregistreerde handelsmerken van
de respectievelijke eigenaren en worden hierbij als zodanig erkend.
Let op:
Dit product is voorzien van dit symbool. Dit symbool geeft aan dat afgedankte elektrische
en elektronische producten niet met het gewone huisafval verwijderd mogen worden.
Voor dit soort producten zijn er speciale inzamelingspunten.
Copyright ©
Page 40

9
Page 41

KN-DIGICON20
CONTROLLER
DIGITALE DJ MIDI
Page 42

1
A. CONTROLLER MIDI
ME701 è progettato per riprodurre brani musicali basati su computer e per lavorare con dispositivi
che supportino o meno il feedback MIDI.
Tali operazioni sono effettuate utilizzando varie modalità di controllo all'interno ME701.
Le modalità di controllo sono le seguenti:
1. Modalità Midi speciale:
Una volta inserita, ME701 risponderà al messaggio MIDI in ingresso secondo quanto
assegnatogli.
I LED non effettueranno alcuna operazione se non controllati da un'applicazione specifi ca (EMIX,PCDJ) tramite MIDI.
2. Modalità Midi generale:
In questa modalità, tutti i messaggi di feedback MIDI saranno ignorati. Un LED del tasto si
illuminerà e si spegnerà al momento della pressione.
I tasti, le manopole e i cursori trasmetteranno i rispettivi eventi assegnati a un dispositivo esterno
attraverso un cavo USB.
3. Modalità Midi generale con risposta
Alcuni software per DJ sono in grado di trasmettere il messaggio a questa unità per far illuminare
i LED e consentono all'unità di controllare il software del PC.
P.S. Consultare la descrizione di funzionamento.
B. SELEZIONE SOFTWARE PC
È possibile commutare questa unità in modo che controlli un software PC diverso.
1) Collegare l'unità al PC o al portatile con il cavo USB, quindi tenere premuto il tasto "LOAD
DECK A" (CARICA PIASTRA A) fi no a quando si illuminerà il LED KILL nella PIASTRA A
relativo alla modalità di programma del PC desiderata.
• HI: Questo LED si illumina per la MODALITÀ MIDI SPECIALE
• MID: Questo LED si illumina per la MODALITÀ MIDI GENERALE
• LOW: Questo LED si illumina per la MODALITÀ MIDI GENERALE CON RISPOSTA
2) Premere la manopola corrispondente al LED acceso, fi no allo spegnimento di quest‘ultimo.
3) Disinserire il cavo USB e inserirlo di nuovo. A questo punto è possibile utilizzare l'unità per
controllare la modalità MIDI selezionata.
4) dopo aver collegato ME-701 al computer, i LED lampeggeranno alternativamente tra Search
(Ricerca) -> Scratch -> Sync (Sincr.).
• In “MODALITÀ MIDI SPECIAL”, continuerà ad evidenziarsi per ricordare all'utente che il
software PC non è stato attivato.
• Nella Modalità Midi generale e nella Modalità Midi generale con risposta, il lampeggiamento
continuerà solo per pochi minuti, quindi si arresterà e tutti i LED saranno leggermente
illuminati.
Page 43

2
Introduzione:
KN-DIGICON20 è un controller MIDI altamente professionale con due rotelle a scatti. Insieme
ai controlli crossfader, dà ai DJ amatoriali così come ai DJ professionisti funzioni di mixaggio
veramente professionali su questo controller MIDI. Il controller è adatto per file MP3/WAV/OGG
da PC o portatile. Le funzioni di scratch, loop continuo, kill e i diversi effetti danno un controllo
completo ai DJ più creativi. KN-DIGICON20 funziona in modalità plug & play con Mac OS X e
Windows® XP SP2 e Vista™. L'alimentazione viene fornita da USB 2.0.
Descrizione parte posteriore:
1. Porta USB:
• Collegamento al PC per il controllo della riproduzione
• Ottenere l'alimentazione dal PC o dal computer portatile
Prima di collegare questa unità al PC o al computer portatile, installare il software dimostrativo
(Emix) presente sul disco in dotazione e caricare la propria musica sul programma. Eseguire il
test sul programma dal computer e verificare se l'unità controller reagisce in modo conseguente
(Es. i LED relativi si accendono).
NOTA: L'unit� non pu� essere accesa prima dell'attivazione del software del computer
(Emix)
2. Alimentazione in ingresso CC per il controller
Se l'unità non ottiene energia sufficiente dal bus USB, alimentare con un adattatore supplementare
(tipo CC, 6V/1A) tramite questa presa.
Si ricordi che la polarità dell'adattatore deve essere .
Page 44

3
Funzione dell'unità di controllo
11
4
4
9
11 11
10
23
25
23
25
25
28
1 2
4 535
6
7
8
26
24
28
3
29
2
5 5
27
26
25
24
7
8
25
16
15
15
17
14
12 13
21
22
20
15
15
16
21
25 22
19
18
12 13
111
444
9
6
17 1111
10
14
1. Loop continuo
A. Loop-in
E' possibile registrare il punto Loop in durante la modalità RIPRODUZIONE e PAUSA. Se viene
registrato il punto Loop-out e il punto Loop-in viene reimpostato dietro il punto Loop-out, il punto
Loop-out verrà annullato
B. Loop out / Exit
i. Dopo l'impostazione del punto Loop-in, premere questo tasto per memorizzare il punto
fi nale dell'intervallo LOOP e avviare il LOOPING.
ii. Premere nuovamente questo tasto per uscire dal Looping.
iii. Reimpostare il punto di Loop-out: Premere nuovamente il tasto per reimpostare il punto
Loop-out e il looping viene nuovamente avviato
iv. Il punto di Loop out deve essere dopo il Punto di Loop-in, altrimenti il punto di Loop-out
verrà annullato.
Page 45

4
C. Reloop
i. Premere per riavviare il loop continuo.
ii. Non funziona se il punto di Loop-in non viene registrato.
iii. Se il punto di Loop-out non viene impostato, tornerà al punto di Loop-in e avvierà la
riproduzione.
(simile alla funzione hotcue)
2. SMART LOOP (SELEZIONE INTERVALLO)
L'utente è in grado di selezionare l'intervallo di Looping tra: 1/2/4/8 beat
3. SMART LOOP ON/OFF
LED ON: Il Loop viene riprodotto all'intervallo secondo i ritmi selezionati.
LED OFF: Il Loop viene riprodotto all'intervallo tra il Loop-in e il Loop-out.
4. HOT-CUE
Questa unità consente di riprodurre istantaneamente da 2 punti cue.
a. Impostare memoria CUE: Premere innanzitutto il pulsante MEMO, quindi il pulsante CUE per
inserire l'impostazione CUE. Il pulsante CUE si accenderà.
b. Riprodurre memoria "CUE": Se premuto, lo specifi co pulsante CUE lampeggerà per 5 secondi
circa.
Nota: Questa funzione non è disponibile quando si esegue l'effetto sonoro REVERSE.
5. MOTIVO MUSICALE/CAMPIONATORE
L'utente può preimpostare gli Effetti o Canzoni per il Motivo Musicale sul computer.
a. Premere il tasto Memo e quindi premere Motivo Musicale, verrà creata una "Traccia del
campionatore" nell'elenco dei Motivi Musicali. L'utente è in grado di impostare il campionatore
registrato al Motivo Musicale dal computer.
b. Lunghezza massima del tempo del campionatore: 12 secondi.
6. RIPRODUZIONE/PAUSA
Ogni pressione del pulsante determina il passaggio dalla modalità RIPRODUZIONE a PAUSA e
viceversa.
Spia LED.
i. Quando si riproduce un brano, la spia LED è accesa.
ii. Quando un brano è in pausa, la spia LED lampeggia.
7. CUE
La funzione Cue consente al CD di tornare al punto memorizzato. In modalità PAUSA, premendo
il pulsante CUE si imposta il punto cue. Il pulsante CUE lampeggia. In modalità RIPRODUZIONE,
premere il pulsante per mettere in pausa l'unità al punto memorizzato.
8. ROTELLA
• Controllo velocità (spia RICERCA spenta)
Se si ruota la rotella in modalità RIPRODUZIONE, si determinerà un corrispondente cambiamento
nella velocità. Ruotando in senso orario, la velocità del lettore aumenta, mentre si riduce ruotando
in senso antiorario.
Page 46

5
• Ricerca (spia RICERCA accesa)
Ruotando la rotella, il lettore avanzerà o tornerà indietro rapidamente. La velocità di ricerca
cambia in base alla velocità di graduazione Si può eseguire attraverso incrementi successivi di
un frame.
9. INTERRUTTORE ACCENSIONE CHIAVE (MT)
Premere il pulsante per commutare tra la modalità CHIAVE attiva o inattiva.
Se è attiva, l'unità conserva il tempo costante senza cambiarlo mentre viene spostato il cursore
di pitch.
10. CURSORE DI CONTROLLO PITCH
Per abbinare le scelte di velocità di riproduzione (8%, 16%, 32%, 100%), è possibile scegliere
l'intervallo desiderato tra minimo (in alto) e massimo (in basso), spostando il cursore di controllo
del pitch.
11. PULSANTE PITCH BEND + / -
Quando ciascuno dei due lettori CD è in fase di riproduzione, la funzione pitch bend consente
di far corrispondere la posizione bass beat dopo la regolazione del pitch. Il pitch aumenterà
automaticamente a + 16% rispetto all'impostazione corrente, con la pressione del pulsante "+".
Premendo il pulsante "-", il pitch diminuirà automaticamente a - 16% rispetto all'impostazione
corrente. Attraverso il cambiamento del pitch, è possibile far corrispondere la posizione dei beat
contenuti.
12. PULSANTE RICERCA
Premere il pulsante per commutare la funzione di Jog Dial tra RICERCA e PITCH BEND.
• Quando la spia LED è illuminata, utilizzare il jog per effettuare una ricerca rapida in avanti e
indietro.
• Se la spia LED è spenta, utilizzare il jog per la funzione pitch bend.
• Se non si muove il jog per 8 secondi, la spia si spegne e il jog servirà per la funzione pitch
bend.
13. EFFETTO SCRATCH
LED ON: Scratch ON
LED OFF: Scratch Off
14. SYNC:
Questa funzione serve a sincronizzare il BPM dell'Unità 1 & 2 automaticamente.
15. PARAMETRO DEGLI EFFETTI
Regolare il parametro degli effetti ruotando le manopole di regolazione. X per il controllo della
Forza, Y per il controllo della Lunghezza
16. SELETTORE DEGLI EFFETTI
Per selezionare gli effetti dal software del PC
17. EFFETTI ON/OFF
Interruttore Effetti On/off
Page 47

6
Sezione mixer
18. Controllo Volume Principale
Regola il livello di uscita audio principale.
19. Controllo Volume CABINA
Usato per regolare il livello di uscita del MONITOR DELLA CABINA. Il livello non viene infl uenzato
dal volume principale e dal bilanciamento principale.
20. LIVELLO DI ATTACCO (Manopola di regolazione del livello di attacco):
Regola il suono del monitor delle cuffi e. Quando è stata effettuata la selezione da CH-1 a CH2, il livello non viene infl uenzato dal volume principale o dalla regolazione del bilanciamento
principale
21. GUADAGNO:
Regola il livello del segnale di ingresso. Il display LCD visualizza [ Sam Forward ] oppure [ Sam
Reverse ] per 2 Sec.
22. CONTROLLO EQ DEI CANALI
HI:
Regola i suoni in ingresso a tonalità alte. Nella posizione centrale, il suono sarà basso.
23. MID:
Regola i suoni in ingresso a tonalità medie. Nella posizione centrale, il suono sarà basso.
24. LOW:
Regola i suoni in ingresso a tonalità basse. Nella posizione centrale, il suono sarà basso.
25. KILL
La pressione dei tasti silenzierà la banda selezionata (Hi/Mid/Low) della traccia
26. CUE:
Usato per selezionare la sorgente (CH-1 & CH-2, MASTER) da monitorare con le cuffi e.
Premere nuovamente per annullare la selezione. Premere tasti multipli per derivare un suono
misto dalle sorgenti selezionate.
27. AUTO MIX:
Premere il Tasto Auto Mix per mixare l'unità 1 & l'unità 2 automaticamente (con effetto fade in/
out)
28. FADER DI CANALI (DA CH-1 A CH-4)
Regola i livelli di uscita audio dei canali.
29. CROSS FADER
Usato per regolare il volume di mixaggio audio delle sorgenti impostate su Ch1 o Ch2.
Page 48

7
DICHIARAZIONE DI CONFORMITÀ
Questa società,
Ned is B.V.
De Tweeling 28
5215MC ’s-Hertogenbosch
Paesi Bassi
Tel.: 0031 73 599 1055
Email: info@nedis.com
Dichiara che il prodotto:
Nome: König Electronic
Modello: KN-DIGICON20
Descrizione: Controller digitale
è conforme ai seguenti standard:
EMC: EN 55022:2006
EN 55024:1998+A1:2001+A2:2003
EN 61000-3-2:2000+A1:2005
EN 61000-3-3:1995+A1:2001+A2:2005
Secondo le disposizioni della direttiva 89/336/EEC.
‘s-Hertogenbosch, 04 marzo 2008
Sig.ra J. Gilad
Direttore agli acquisti
Page 49

8
Precauzioni di sicurezza:
Per ridurre il rischio di scosse elettriche, questo prodotto deve essere aperto ESCLUSIVAMENTE
da personale tecnico specializzato, se occorre assistenza. Se si dovessero verifi care dei problemi,
scollegare il prodotto dall'alimentazione di rete e da ogni altra apparecchiatura. Non esporre il
prodotto ad acqua o umidità.
Manutenzione:
Pulire solo con un panno asciutto. Non utilizzare solventi detergenti o abrasivi.
Garanzia:
Non sarà accettata alcuna garanzia o responsabilità in relazione a cambiamenti e modifi che del
prodotto o a danni determinati dall'uso non corretto del prodotto stesso.
Generalità:
Il design e le caratteristiche tecniche sono soggetti a modifi ca senza necessità di preavviso.
Tutti i marchi, logo e i nomi di prodotto sono marchi commerciali o registrati dei rispettivi titolari e
sono in questo documento riconosciuti come tali.
Attenzione:
Il prodotto è contrassegnato con questo simbolo, con il quale si indica che i prodotti
elettrici ed elettronici usati non devono essere gettati insieme ai rifi uti domestici. Per
questi prodotti esiste un sistema di raccolta differenziata.
Copyright ©
Page 50

9
Page 51

KN-DIGICON20
MINI-CONTROLADOR
DIGITAL DJ
Page 52

1
A. CONTROL MIDI
ME701 ha sido diseñado para reproducir pistas de música basadas en el ordenador, y trabajar
con los dispositivos que aceptan respuesta MIDI o no.
Esto se logra mediante la implementación de varios modos de control distintos en el ME701.
Los modos de control son:
1. El modo especial Midi:
Una vez lanzado, el ME701 responderá a los mensajes MIDI entrantes de conformidad con su
atribución.
Las LED no harán nada a menos que sean controladas por una aplicación específi ca (EMIX,PCDJ) mediante MIDI.
2. Modo general Midi:
En este modo, todos los mensajes de respuesta de MIDI son ignorados. Una LED de botón se
encenderá y a continuación, se apagará cuando sea pulsada.
Los botones, tuercas y barras de desplazamiento transmitirán sus acontecimientos atribuidos al
dispositivo externo mediante el cable USB.
3. Modo general Midi con respuesta
Algunos programas para DJ pueden transmitir mensajes a esta unidad para encender las LED, y
permitir que esta unidad pueda controlar el programa de PC.
PS: Por favor, véase la descripción de funciones.
B. SELECCIÓN DEL PROGRAMA DE PC
Podrá activar esta unidad par controlar distintos programas del PC.
1) Conecte esta unidad al PC o al portátil mediante un cable USB, y mantenga pulsada la tecla
de "RECARGA DEL PISO A" hasta que la LED DE MATAR del PISO A que corresponde al
modo de programa de PC deseado se encienda.
• HI: Esta LED se enciende para el MODO MIDI ESPECIAL
• MID: Esta LED se enciende para el MODO MIDI GENERAL
• BAJA: Esta LED se enciende para el MODO MIDI GENERAL CON RESPUESTA.
2) Pulse la tuerca correspondiente cuya LED esté encendida, hasta que la LED se apague.
3) Desconecte el cable USB, y vuelva a conectarlo de nuevo, a continuación, podrá utilizar esta
unidad para controlar el modo MIDI seleccionado.
4) una vez que el ME-701 se conecta al ordenador, la LED parpadea entre Búsqueda -> Aplastar
-> Sinc.
• En el “MODO MIDI ESPECIAL", seguirá parpadeando para recordar al usuario que el programa
del PC no está activado.
• En el modo Midi General, y en el modo Midi general con respuesta, el parpadeo tan sólo dura
unos minutos, y a continuación, se para y todas las LED se encienden suavemente.
Page 53

2
Introducción:
El KN-DIGICON20 es un MIDI controlador que tiene dos ruedas pequeñas. Junto con los mandos
transversales, ofrece al DJ aficionado así como al DJ profesional funciones de mezcla realmente
profesionales en este MIDI controlador. El controlador es ideal para los archivos MP3/WAV/OGG
desde un PC o un portátil. La función de aplastado, ciclo uniforme, las funciones de matar y
otros efectos distintos ofrece al DJ creativo un control completo. El KN-DIGICON20 funciona
con una conexión y reproducción inmediata con Mac OS X y Windows® XP SP2 y Vista™. La
alimentación llega desde un USB 2.0.
Descripción de la vista trasera:
1. Ppuerto USB:
• Conexión al PC para la reproducción del control
• Obtenga la alimentación a partir del PC o de un portátil
Antes de conectar esta unidad al PC o a un portátil, por favor, instale el programa de prueba
(Emix) del disco adjunto, y cargue su música al programa. Pruebe el programa a partir del
ordenador, y compruebe si la unidad del controlador obtiene una respuesta correspondiente (EX
La correspondiente LED se enciende).
NOTA: La unidad no puede encenderse antes de que se active el programa del ordenador
(Emix)
2. Encendido de CC para el controlador
Si la unidad no obtiene suficiente alimentación del bus USB, aliméntela con un adaptador adicional
(de tipo CC, 6V/1A) mediante su ranura.
Por
favor, tenga en cuenta que las polaridades del adaptador deben estar .
Page 54

3
Función de la unidad de control
11
4
4
9
11 11
10
23
25
23
25
25
28
1 2
4 535
6
7
8
26
24
28
3
29
2
5 5
27
26
25
24
7
8
25
16
15
15
17
14
12 13
21
22
20
15
15
16
21
25 22
19
18
12 13
111
444
9
6
17 1111
10
14
1. Ciclo continuo
A. Ciclo interior
El Ciclo en punto puede registrarse durante el modo de REPRODUCCIÓN y PAUSA. Si el punto
de salida de ciclo se graba, y el punto de entrada de ciclo se reinicia tras el punto de salida de
ciclo, el punto de salida de ciclo se eliminará.
B. Salida de ciclo /Salida
i. Tras fi jar el punto de entrada de ciclo, pulse este botón para grabar el punto fi nal del
intervalo de CICLO, y empezar el RECORRIDO DE CICLO.
ii. Pulse este botón de nuevo para salir del ciclo
iii. Reiniciar el punto de salida de ciclo: Pulse el botón de nuevo para reiniciar el punto de
salida de ciclo y volver al recorrido de ciclo de nuevo.
iv. El punto de salida de ciclo debe ubicarse tras el punto de entrada de ciclo, o el punto de
salida de ciclo se cancelará.
Page 55

4
C. Nuevo ciclo
i. Pulse para reiniciar un ciclo uniforme.
ii. No habrá ninguna función si el punto de entrada de ciclo no se ha grabado.
iii. Si el punto de salida de ciclo no está confi gurado, regresará al punto de entrada de ciclo y
empezará la reproducción. (igual que la función de acceso directo)
2. CICLO ELEGANTE (SELECCIÓN DE SERIE)
El usuario podrá seleccionar el intervalo de ciclo entre: 1/2/4/8 sonidos
3. ENCENDIDO/APAGADO DE CICLO ELEGANTE
ENCENDIDO DE LED: El ciclo se reproduce en el intervalo como sonidos seleccionados.
APAGADO DE LED: El ciclo se reproduce en el intervalo entre la entrada y la salida de ciclo.
4. INDICACIÓN RÁPIDA
Esta unidad le permite reproducir a partir de 2 puntos de indicación a la vez.
A. Fijar la memoria de INDICACIÓN: Pulse primeramente el botón de MEMORIA, y a continuación,
pulse el botón de INDICACIÓN para completar la confi guración de INDICACIÓN y el botón de
INDICACIÓN se encenderá.
B. Reproducir memoria de "INDICACIÓN": Tras pulsar el botón de INDICACIÓN específi co,
pestañeará durante unos 5 segundos.
Nota: Esta función no se encuentra disponible durante la realización del efecto de
sonido INVERSO.
5. CASCABEL/MUESTRA
El usuario puede confi gurar los efectos o las canciones para el cascabel en el ordenador.
A. Pulse el botón de memoria y a continuación pulse el cascabel, una "pista de muestra" se
creará en la "lista de muestra". El usuario podrá confi gurar la muestra registrada en el cascabel
desde el ordenador.
B. Largo máximo del tiempo de muestra: 12 segundos
6. REPRODUCIR/PAUSA
Cada pulsación de este botón provoca el funcionamiento para cambiar entres los modos de
REPRODUCCIÓN y PAUSA.
Indicador LED:
i. Cuando la pista se está reproduciendo, el indicador LED se enciende.
ii. Cuando la pista está pausada, el indicador LED pestañea.
7. INDICACIÓN
La función de indicación permite que el CD regrese al punto memorizado. En el modo de
PAUSA, si pulsa el botón de INDICACIÓN para seleccionar el punto de indicación, y el botón
de INDICACIÓN pestañea; En el modo de REPRODUCCIÓN, pulse este botón para pausar la
unidad en el punto memorizado.
Page 56

5
8. RUEDA PEQUEÑA
• Control de velocidades (Apagado del indicador de BÚSQUEDA)
Girando la rueda, en modo de reproducción, cambiará la velocidad de la reproducción de forma
acorde. Mientras gira la rueda, el reproductor aumentará la velocidad; si lo gira en el sentido de
las agujas del reloj, la velocidad disminuirá.
• Buscar (se enciende el indicador de BÚSQUEDA)
Al girar la rueda, el reproductor avanzará o retrocederá rápidamente. La velocidad de búsqueda
cambia según la velocidad de marcado. Puede llevarse a cabo por incrementos de un marco.
9. INTERRUPTOR DE ACTIVACIÓN/DESACTIVACIÓN DE LA TECLA (MT)
Pulse el botón para activar o desactivar el modo de TECLA.
Si está activada, la unidad, sigue un ritmo constante y no cambia mientras se desplaza la barra
de lanzamiento
10. BARRA DE CONTROL DEL LANZAMIENTO
Para cumplir con las elecciones de la velocidad de la reproducción (8%, 16%, 32%, 100%), podrá
elegir la gama que desea entre el mínimo (parte superior) y el máximo (parte inferior) desplazando
la barra de control del lanzamiento.
11. BOTÓN DE CONTROL DE TONO + / -
Cuando los dos reproductores de CD se están reproduciendo, la función de control de tono
permite la posición del resonador de bajos a coincidir una vez que se haya ajustado el tono.
El tono se elevará automáticamente hasta el + 16% desde el parámetro actual mientras que
se pulsa el botón "+". El tono se reducirá automáticamente hasta el 16% desde el parámetro
actual mientras que se pulsa el botón "-“. Al cambiar el tono, la posición de los sonidos pueden
coincidir.
12. BOTÓN DE BÚSQUEDA
Pulse el botón para cambiar la función de Jog Dial entre BÚSQUEDA y CONTROL DE TONO.
• Cuando el indicador LED está encendido, marque el selector para realizar una búsqueda
rápida hacia delante y hacia atrás.
• Cuando el indicador LED está apagado, marque el selector para pasar a la función de control
de tono.
• Si no mueve la rueda durante 8 segundos, el indicador se apagará y la rueda pasará a la
función de control de tono.
13. EFECTO DE APLASTADO
ENCENDIDO DE LED: Activación del aplastado
APAGADO DE LED: Desactivación del aplastado
14. SINC:
Esta función sirve para sincronizar el BPM de la unidad 1 y 2 automáticamente.
15. PARÁMETRO DEL EFECTO
Ajuste el parámetro del efecto girando las tuercas de ajuste. X para el control de la fuerza, Y para
el control de la longitud
Page 57

6
16. SELECTOR DEL EFECTO
Para seleccionar los efectos procedentes del programa PC
17. ENCENDIDO/APAGADO DEL EFECTO
Interruptor de activación/ desactivación del efecto
Sección del mezclador
18. Control del volumen principal
Ajusta el nivel de sonido de salida principal
19. Control del volumen de CABINA
Se utiliza para ajustar el nivel de la salida del MONITOR DE LA CABINA. El nivel no está afectado
por el volumen principal y el equilibrio principal.
20. NIVEL DE PISTA (tuerca de ajuste del nivel de pista):
Ajusta el sonido de la pantalla del auricular. Cuando se ha seleccionado el canal 1 o 2, el nivel no
está afectado por el volumen principal o el ajuste de equilibrio del volumen
21. Ganancia:
Ajuste el nivel de señal de entrada y la pantalla LCD mostrará [Avance de muestra ] o [Retroceso
de muestra] durante 2 segundos.
22. CONTROL DEL ECUALIZADOR DE CANAL
ALTA:
Ajusta los sonidos de entrada de alta tonalidad. En la posición central, el sonido será plano.
23. MEDIA:
Ajusta el sonido de entrada de media tonalidad. En la posición central, el sonido será plano.
24. BAJA:
Ajusta el sonido de entrada de baja tonalidad. En la posición central, el sonido es plano.
25. MATAR
Pulse los botones para silenciar la banda seleccionada (Alta/media/baja) de la pista
26. NDICACIÓN:
Utilizada para seleccionar la fuente (CANAL 1, CANAL 2 Y PRINCIPAL) a controlar con
auriculares.
Pulse de nuevo para cancelar la selección. Pulse varios botones para derivar el sonido mezclado
procedente de las fuentes seleccionadas.
27. MEZCLA AUTOMÁTICA:
Pulse el botón de mezcla automática para mezclar la unidad 1 y 2 automáticamente (con el efecto
de activación/desactivación de sombra)
28. BALANCE DE CANAL (CANAL 1 AL CANAL 4)
Ajusta los niveles de sonido de la salida del canal.
Page 58

7
29. BALANCE TRANSVERSAL
Se utiliza para ajustar el volumen de mezcla de sonido de las fuentes fi jadas en CANAL 1 y 2.
Declaración de conformidad
La empresa infrascrita,
Ned is B.V.
De Tweeling 28
5215MC ’s-Hertogenbosch
Países Bajos
Tel.: 0031 73 599 1055
Email: info@nedis.com
Declara que el producto:
Nombre: König Electronic
Modelo: KN-DIGICON20
Descripción: Controlador digital
se encuentra conforme a las siguientes normas:
EMC: EN 55022:2006
EN 55024:1998+A1:2001+A2:2003
EN 61000-3-2:2000+A1:2005
EN 61000-3-3:1995+A1:2001+A2:2005
Conforme a las disposiciones de la directiva 89/336/EEC.
‘s-Hertogenbosch, 04 de marzo de 2008
D. J. Gilad
Director de compras
Page 59

8
Medidas de seguridad:
Para reducir los riesgos de electrocución, este producto deberá ser abierto EXCLUSIVAMENTE
por un técnico habilitado cuando necesite ser reparado. Desconecte el producto de la red y
de cualquier otro equipo si se registra algún problema. No exponga el producto al agua ni a la
humedad.
Mantenimiento:
Limpie sólo con un paño seco. No utilice solventes de limpieza ni abrasivos.
Garantía:
No se aceptará ninguna garantía o responsabilidad derivada de cualquier cambio o modifi caciones
realizadas al producto o daños provocados por un uso incorrecto del presente producto.
General:
Las ilustraciones y las especifi caciones podrán sufrir cambios sin previo aviso.
Todas las marcas de los logotipos y los nombres de productos constituyen patentes o marcas
registradas de sus titulares correspondientes, reconocidos como tal.
Cuidado:
Este producto está señalizado con este símbolo. Esto signifi ca que los productos eléctricos
y electrónicos gastados no deberán mezclarse con los desechos domésticos generales.
Existen distintos sistemas de recogida individuales para este tipo de productos.
Copyright ©
Page 60

9
Page 61

KN-DIGICON20
MIDI DIGITÁLIS VEZÉRLŐ
LEMEZLOVASOKNAK
Page 62

1
A. MIDI VEZÉRLŐ
Az ME701 modellt számítógépes alapú zenei felvételek lejátszására valamint arra tervezték, hogy
a MIDI-visszacsatolást támogató vagy nem támogató készülékekkel is használható legyen.
Ez azért lehetséges, mert az ME701 modellbe több különböző vezérlési mód van beépítve.
A vezérlési módok a következők:
1. Speciális midi mód:
Amint be van kapcsolva, az ME701 a saját beállításának megfelelően fog reagálni a bejövő MIDIüzenetre.
A LED-ek nem világítanak, kivéve, ha egy speciális alkalmazás (E-MIX,PCDJ) vezérli őket MIDI
által.
2. Általános midi mód:
Ebben a módban a készülék fi gyelmen kívül hagy minden MIDI-visszacsatolási üzenetet. A gomb
megnyomására a hozzá tartozó LED kigyullad majd elhalványul.
A nyomógombokkal, és csúszkákkal beállított parancsokat USB kábel továbbítja a külső
készülékre.
3. Általános reagáló midi mód
Néhány DJ szoftver képes arra, hogy üzenetet vigyen át erre a készülékre, amitől a LED-ek
kigyulladnak, és lehetővé teszi, hogy ez a készülék vezérelje a számítógépes szoftvert.
UI.: Kérjük, nézze át a funkció ismertetését.
B. SZÁMÍTÓGÉPES SZOFTVER KIVÁLASZTÁSA
Ez a készülék átkapcsolható más számítógépes szoftver vezérlésére is.
1) Csatlakoztassa a készüléket USB kábellel asztali vagy laptop számítógéphez, majd tartsa
lenyomva a "LOAD DECK A" gombot addig, amíg az A decken a "KILL LED" megjelenik a
kívánt számítógépes programmódnál.
• HI: Ez a LED a SPECIAL MIDI MODE (SPECIÁLIS MIDI MÓD) jelzője
• MID: Ez a LED a GENERAL MIDI MODE (ÁLTALÁNOS MIDI MÓD) jelzője
• LOW: Ez a LED a GENERAL MIDI MODE WITH RESPONSE (ÁLTALÁNOS REAGÁLÓ MIDI
MÓD) jelzője
2) Nyomja a világító LED-hez tartozó gombot addig, amíg a LED ki nem alszik.
3) Húzza ki és dugaszolja be újra az USB kábelt, majd azután már vezérelheti ezzel a készülékkel
a kiválasztott MIDI módot.
4) Ha az ME-701 készülék számítógéphez van kapcsolva, a LED-ek felváltva villognak a Search
-> Scratch -> Sync (Keresés, Scratch, Szinkron) opciók között.
• SPECIÁLIS MIDI MÓDBAN tovább villogva fi gyelmeztetik a felhasználót, hogy a számítógépes
szoftver nincs aktiválva.
• Általános midi módban és Általános reagáló midi módban a villogás csak néhány percig tart,
majd megszűnik, és minden LED világít.
Page 63

2
Bemutatása:
A KN-DIGICON20 rendkívül professzionális MIDI vezérlő két jog tárcsával. Crossfeder
szabályzójával ez a MIDI vezérlő mind az amatőr mind a profi lemezlovasoknak igazi professzionális
keverési lehetőségeket kínál. Számítógépről vagy laptopról származó MP3/WAV/OGG fájlok
kezelésére alkalmas. A scratch funkciónak, az átmenet nélküli ismétlésnek, a kill funkciónak és a
különböző effekteknek köszönhetően kreatív lemezlovasok teljes mértékben élhetnek a vezérlés
lehetőségeivel. A KN-DIGICON20 készülék plug and play-ként működik Mac OS X és Windows®
XP SP2 és Vista™ operációs rendszereken. USB 2.0. táplálású.
A készülék hátoldala:
1. USB port:
• Csatlakoztatás számítógéphez lejátszásvezérlés céljából
• Táplálás asztali vagy laptop számítógépről
Mielőtt ezt a készüléket asztali vagy laptop számítógéphez csatlakoztatja, telepítse a demó
szoftvert (Emix) a mellékelt lemezről, és töltse fel zenei felvételeit a programba. Tesztelje a
programot a számítógépről, és ellenőrizze, kap-e a vezérlő megfelelő reagálást (pl. a megfelelő
LED-ek kigyulladnak-e).
MEGJEGYZÉS: A készülék csak a számítógépes szoftver (Emix) aktiválása után
táplálható.
2. A vezérlő táplálása a DC in (bemeneti) aljzaton keresztül
Ha a készülék nem kap elég áramot az USB buszról, táplálja külön adapterrel (egyenáramú,
6 V / 1
A) ezen az aljzaton keresztül.
Vegye fi gyelembe, hogy az adapter polaritásának ilyennek kell lennie: .
Page 64

3
A vezérlő funkciója
11
4
4
9
11 11
10
23
25
23
25
25
28
1 2
4 535
6
7
8
26
24
28
3
29
2
5 5
27
26
25
24
7
8
25
16
15
15
17
14
12 13
21
22
20
15
15
16
21
25 22
19
18
12 13
111
444
9
6
17 1111
10
14
1. SEAMLESS LOOP (ÁTMENET NÉLKÜLI ISMÉTLÉS)
a. Loop-in (Belépő pont)
A loop-in pont PLAY (LEJÁTSZÁS) és PAUSE (SZÜNET) módban állítható be. Ha van beállítva
loop-out pont, és a loop-in a loop-out pont mögé kerül, a loop-out pont törlődik.
b. Loop-out / Exit (Kilépő pont / Kilépés)
i. A loop-in pont beállítása után ezzel a gombbal viheti a memóriába a LOOP (ISMÉTLÉS)
szakasz befejezési pontját, és indíthatja az ismétlést.
ii. Az ismétlésből ezzel a gombbal léphet ki.
iii. Loop-out pont visszaállítása: A gomb újbóli lenyomásával visszaállítja a loop-out pontot, és
az ismétlés újraindul.
iv. A loop-out pontnak a loop-in pont után kell lennie, különben a loop-out pont törlődik.
c. Reloop (Újraismétlés)
i. Nyomja le az átmenet nélküli ismétlés újraindításához.
ii. Ha nincs loop-in pont beállítva, ez a funkció nem működik.
iii. Ha loop-out pont nincs beállítva, visszaáll a loop-in pontra, és kezdi a lejátszást.
(a hot-cue funkcióhoz hasonló)
Page 65

4
2. SMART LOOP (RANGE SELECT) INTELLIGENS ISMÉTLÉS (TARTOMÁNY KIVÁLASZTÁSA)
A felhasználó választhat az ismétlési szakaszok közt: 1/2/4/8 ütem
3. SMART LOOP ( INTELLIGENS ISMÉTLÉS) BE/KI
LED VILÁGÍT: Az ismétlés a választott ütemek szerinti intervallumban történik.
LED NEM VILÁGÍT: Az ismétlés a loop-in és a loop-out pont közt történik.
4. HOT-CUE
Ennél a készüléknél 2 cue ponttól indíthat azonnali lejátszást.
a. A CUE memória beállítása: Nyomja le először a MEMO gombot, majd a CUE gombot a CUE
beállításához, és a CUE gomb világítani fog.
b. Játssza le a ”CUE” memóriát: Specifi kus CUE gomb lenyomására kb. 5 másodpercig villog.
Megjegyzés: REVERSE (VISSZA) hangeffektusnál ez a funkció nem elérhető.
5. JINGLE/SAMPLER
A felhasználó beállíthat jingle effekteket vagy dalokat a számítógépen.
a. Nyomja meg a Memo majd a Jingle gombot, és a "Jingle listához" egy “Sampler-sáv” jön létre.
A felhasználó beállíthatja a felvett samplert a számítógépről jövő jingle-hez.
b. A sampler maximális hossza: 12 másodperc.
6. PLAY/PAUSE (LEJÁTSZÁS/SZÜNET)
A gomb megnyomásával kapcsolhat át a PLAY (LEJÁTSZÁS) és PAUSE (SZÜNET) módok
között.
LED jelző
i. A zeneszám lejátszása közben a LED jelző világít.
ii. A zeneszám szüneteltetése közben a LED jelző villog.
7. CUE
A CUE funkció lehetővé teszi, hogy a CD visszatérjen a memóriában rögzített pontra. PAUSE
(SZÜNET) módban a CUE gombbal állítható be a CUE pont, és ekkor a CUE gomb villog. PLAY
(lejátszás) üzemmódban nyomja meg ezt a gombot, hogy szüneteltesse a lejátszást a memóriában
rögzített pontnál.
8. JOG TÁRCSA
• Sebesség-szabályozás (SEARCH [KERESÉS] visszajelzője nem világít)
Lejátszás módban a tárcsa forgatásának megfelelően változik a lejátszási sebesség. Az óramutató
járásával megegyező irányban forgatva a lejátszás sebessége növekszik; az óramutató járásával
ellentétes irányban forgatva, a sebesség csökken.
• Keresés (SEARCH [KERESÉS] visszajelzője világít)
A kerék forgatásával a lejátszás gyorsan halad előre vagy vissza. A keresési sebesség a kerék
forgatási sebességének megfelelően változik. Ezt egy keretenkénti előre léptetéssel lehet elérni.
9. KEY ON/OFF (HANGNEM MÓD BE- ÉS KIKAPCSOLÓJA)
Ezzel a gombbal a KEY (HANGNEM) módot be- és kikapcsolhatja.
Amikor ez bekapcsolt állapotban van, a készülék állandó ritmust tart, és nem változtat, miközben
a hangmagasság szabályozó csúszkát mozgatjuk.
Page 66

5
10. HANGMAGASSÁG SZABÁLYOZÓ CSÚSZKA
A lejátszási sebességek illesztéséhez (8%, 16%, 32%, 100%) a hangmagasság szabályozó
csúszkával megválaszthatja, mekkora tartományra van szüksége a minimum (felső oldal) és
maximum (alsó oldal) között.
11. PITCH BEND + / – (HANGMAGASSÁG MÓDOSÍTÁS +/–) GOMB
Amikor mindkét CD lejátszó lejátszás közben van, a pitch bend (hangmagasság módosító)
funkció lehetővé teszi a basszusütem helyzetének illesztését a hangmagasság beállítása után. A
hangmagasság automatikusan akár 16%-kal is megemelkedik az aktuális beállításhoz képest, ha
a "+" gombot lenyomva tartja. A hangmagasság automatikusan akár 16%-kal is csökken, ha a "–"
gombot lenyomva tartja. A hangmagasság módosításával az ütemek helyzete illeszthető.
12. SEARCH (KERESÉS) GOMB
Nyomja meg a gombot, hogy a jog tárcsa funkcióját a SEARCH (KERESÉS) és PITCH BEND
(HANGMAGASSÁG MÓDOSÍTÁS) között átkapcsolja.
• Ha a LED világít, forgassa a jog tárcsát a gyors előre és vissza kereséshez.
• Ha a LED nem világít, állítsa a jog tárcsát pitch bend (hangmagasság módosítás) funkcióra.
• Ha a jog tárcsát 8 másodpercig nem mozgatja, a jelző kialszik.
13. SCRATCH EFFEKT
LED VILÁGÍT: Scratch bekapcsolva
LED NEM VILÁGÍT: Scratch kikapcsolva
14. SZINKRON:
Ez a funkció automatikusan szinkronizálja az 1. és 2. készülék percenkénti ütemeinek számát.
15. EFFEKT PARAMÉTER-ÉRTÉKEI
Az effekt paraméter-értékeit az állítógombok forgatásával állíthatja. Az X gombbal az erősséget,
az Y gombbal a hosszúságot szabályozhatja.
16. EFFEKT KIVÁLASZTÓ
Kiválasztja az effekteket a számítógép szoftveréről.
17. EFFEKT BE/KI
Effekt be- és kikapcsolója
Keverő rész
18. Master hangerőszabályzó
A master kimeneti hangerőt szabályozza.
19. BOOTH hangerőszabályzó
A BOOTH MONITOR kimenetének hangerejét állítja. A hangerőt a master hangerő és a master
balansz nem befolyásolják.
20. CUE LEVEL (CUE SZINTET ÁLLÍTÓ GOMB):
A fejhallgató és monitor hangját állítja. Ha a CH-1 – CH-2 csatorna van kiválasztva, a szintet a
master hangerő és a master balansz nem befolyásolják.
Page 67

6
21. ERŐSÍTÉS:
Állítsa az LCD kijelzőn mutatott bemeneti jelszintet [ Sam előre ] vagy [ Sam vissza ] 2 másodpercig.
22. CSATORNA HANGSZÍNSZABÁLYZÁSA
HI (MAGAS):
A magas tónusú bemeneti hangokat állítja. Középállásban a hang egyenletes lesz.
23. MID (KÖZEPES):
A közepes tónusú bemeneti hangot állítja. Középállásban a hang egyenletes lesz.
24. LOW (ALACSONY):
Az alacsony tónusú bemeneti hangot állítja. Középállásban a hang egyenletes lesz.
25. KILL (LEÁLLÍTÁS)
A gombok megnyomása a zeneszámon a kiválasztott sávot (Magas/Közepes/Alacsony)
elnémítja.
26. CUE:
A fejhallgatóval hallgatott forrás (CH-1 és CH-2, MASTER) kiválasztásához használatos.
Újbóli megnyomásával törli a kiválasztást. Több gomb megnyomására kevert hangot kap a
kiválasztott forrásokból.
27. AUTO MIX (AUTOMATIKUS KEVERÉS):
Az Auto Mix gombbal az 1. és 2. készülék hangját automatikusan keverheti (fade in/out effekttel)
28. CSATORNA (CH-1 – CH-4) FADER (SZINTSZABÁLYZÓ)
A csatornakimenetek hangerejét állítja.
29. CROSS FADER (KERESZT-FADER)
A Ch1 vagy Ch2 csatornára állított források hangerejének keverésére használatos.
Page 68

7
Megfelelőségi nyilatkozat
Mi,
a Nedis B.V.,
De Tweeling 28
5215MC ’s-Hertogenbosch
Hollandia
Tel.: 0031 73 599 1055
Email: info@nedis.com
Kijelentjük, hogy a termék, amelynek:
Neve: König Electronic
Típusa: KN-DIGICON20
Megnevezése: Digitális vezérlő
Megfelel az alábbi szabványoknak:
EMC (Elektromágneses összeférhetőség): EN 55022:2006
EN 55024:1998+A1:2001+A2:2003
EN 61000-3-2:2000+A1:2005
EN 61000-3-3:1995+A1:2001+A2:2005
A 89/336/EGK irányelv előírásaival összhangban van.
‘s-Hertogenbosch, 2008. március 04.
Mrs. J. Gilad
Értékesítési igazgató
Megfelelőségi nyilatkozat.
Egyetértek és elfogadom a Nedis B.V. Hollandia által adott nyilakozatot.
Jacob Gilad
HQ-Nedis kft.
ügyvezető igazgató
Page 69

8
Biztonsági óvintézkedések:
Az áramütés veszélyének csökkentése érdekében ezt a készüléket KIZÁRÓLAG megbízott
szakember nyithatja fel, szervizelés céljából. Probléma esetén kapcsolja le az elektromos
hálózatról és más készülékről. Víztől és nedvességtől védje.
Karbantartás:
Csak száraz ronggyal tisztítsa. Tisztító- és súrolószerek használatát mellőzze.
Jótállás:
Nem vállalunk felelősséget és jótállást, ha a meghibásodás a készüléken végzett változtatás vagy
módosítás következménye, vagy helytelen használat miatt a készülék megrongálódott.
Általános tudnivalók:
A kivitel és a műszaki jellemzők előzetes értesítés nélkül is módosulhatnak.
Minden logó, terméknév és márkanév a saját tulajdonosának márkaneve vagy bejegyzett
márkaneve, és azokat ennek tiszteletben tartásával említjük.
Figyelem!
Ezt a terméket ezzel a jelzéssel láttuk el. Azt jelenti, hogy az elhasznált elektromos és
elektronikus termékeket tilos az általános háztartási hulladékhoz keverni. Begyűjtésüket
külön begyűjtő létesítmény végzi.
Copyright © (Szerzői jog)
Page 70

9
Page 71

KN-DIGICON20
DIGITAALINEN DJ
MIDI-OHJAIN
Page 72

1
A. MIDI-SÄÄTÖ
ME701 on suunniteltu tietokoneeseen pohjautuvien musiiikkikappaleiden soittamiseen ja MIDIpalautetta tukevien tai sitä tukemattomien laitteiden käyttöön.
Tämä toteutetaan suorittamalla useita eri säätötiloja ME701:ssa.
Säätötilat ovat:
1. Erityinen Midi-tila:
Päälle kytkettynä ME701 vastaa tuleviin MIDI-viesteihin tarkoituksen mukaan.
LED-merkkivalot eivät toimi, ellei niitä säädetä erityisellä sovelluksella (E-MIX,PCDJ) MIDI:n
kautta.
2. Yleinen Midi-tila:
Tässä tilassa kaikki MIDI-palauteviestit ohitetaan. Painikkeen LED-merkkivalo syttyy ja sammuu
sitä painaessa.
Painikkeet, nupit ja säätimet välittävät signaalit ulkoiseen laitteeseen USB-kaapelin kautta.
3. Yleinen Midi-tila vasteella
Jotkin DJ-ohjelmat voivat välittää viestin tähän yksikköön LED-merkkivalojen sytyttämiseksi ja ne
mahdollistavat tietokoneohjelman hallinnan tällä yksiköllä.
P.S. Katso toiminnan kuvausta.
B. TIETOKONEOHJELMAN VALINTA
Voit kytkeä tämän yksikön hallitsemaan eri tietokoneohjelmia.
1) Liitä tämä yksikkö tietokoneeseen tai kannettavaan USB-kaapelilla ja paina painiketta “LATAA
KANSI A”, kunnes KANNEN A "KILL LED" palaa halutun tietokoneohjelman tilan mukaan.
• HI: Tämä LED syttyy ERITYISESSÄ MIDI-TILASSA
• MID: Tämä LED syttyy YLEISESSÄ MIDI-TILASSA
• LOW: Tämä LED syttyy YLEISESSÄ MIDI-TILASSA VASTEELLA
2) Paina vastaavaa nuppia, jonka LED palaa, kunnes LED-valo sammuu
3) Irrota USB-kaapeli ja kytke se uudelleen, voit tällöin käyttää yksikköä valitun MIDI-tilan
säätämiseen.
4) Kun ME-701 on liitetty tietokoneeseen, LED-valot vilkkuvat tilojen Search -> Scratch -> Sync.
välillä
• “ERITYISESSÄ MIDI-TILASSA” se muistuttaa käyttäjää, ettei tietokoneohjelmaa ole
käynnistetty.
• Yleisessä Midi-tilassa ja yleisessä Midi-tilassa vasteella valo vilkkuu vain muutaman minuutin,
sammuu, ja kaikki LED-valot syttyvät himmeästi
Page 73

2
Johdanto:
KN-DIGICON20 on ammattilaiskäyttöön tarkoitettu MIDI-ohjain, jossa on kaksi säätöpyörää.
Yhdessä ristivaihtosäätimien kanssa MIDI-ohjain tarjoaa sekä amatööri-DJ:lle että ammattilais-DJ:
lle ammattilaisten miksausominaisuudet. Ohjain sopii tietokoneen MP3/WAV/OGG-tiedostoihin.
Scratch-toiminto, katkeamaton luuppi, kill-toiminnot ja eri tehosteet antavat luovalle DJ:lle
täyden hallinnan. KN-DIGICON20 toimii plug & play -laitteena käyttöjärjestelmissä Mac OS X ja
Windows® XP SP2 sekä Vista™. Tehon välitys toimii USB 2.0. :lla.
Takaosan kuvaus:
1. USB-portti:
• Tietokoneeseen kytkentä soiton hallintaa varten
• Käytä tietokoneen tai kannettavan teholähdettä
Ennen yksikön liittämistä tietokoneeseen tai kannettavaan on asennettava Demo-ohjelma (Emix)
pakkauksen levyltä ja musiikki on ladattava ohjelmaan. Testaa ohjelma tietokoneelta ja tarkista
toimiiko ohjausyksikkö vastaavasti (EX vastaava LED syttyy).
HUOM: Yksikköä ei voida kytkeä päälle ennen kuin tietokoneohjelma (Emix) on
käynnistetty
2. DC-virran syöttö ohjaimeen
Jos yksikkö ei saa riittävästi virtaa USB-väylästä, syötä siihen virtaa ylimääräisellä sovittimella
(DC-tyyppinen, 6V/1A) tätä pistoketta käyttäen.
Huomaa, että sovittimen napaisuus on oltava
.
Page 74

3
Ohjausyksikön toiminnot
11
4
4
9
11 11
10
23
25
23
25
25
28
1 2
4 535
6
7
8
26
24
28
3
29
2
5 5
27
26
25
24
7
8
25
16
15
15
17
14
12 13
21
22
20
15
15
16
21
25 22
19
18
12 13
111
444
9
6
17 1111
10
14
1. Seamless Loop (Katkeamaton luuppi)
a. Luupin lähtöpiste
Luupin lähtöpiste voidaan tallentaa PLAY- ja PAUSE-tiloissa. Jos luupin päätöspiste on tallennettu,
ja lähtöpiste asetetaan päätöspisteen taakse, päätöspiste poistetaan.
b. Luupin päätöspiste / poistuminen
i. Kun luupin lähtöpiste on asetettu, paina tätä painiketta LUUPIN päätöspisteen tallentamiseksi,
ja käynnistä LUUPPI.
ii. Paina painiketta uudelleen poistuaksesi toiminnosta.
iii. Resetoi luupin päätöspiste: paina painiketta uudelleen resetoidaksei luupin päätöspisteen
ja toiminto käynnistyy uudelleen.
iv. Luupin päätöspisteen on oltava lähtöpisteen takana, muutoin päätöspiste poistetaan.
c. Luupin uudelleen suoritus
i. Paina käynnistääksesi uudelleen katkeamattoman luupin.
ii. Ei toimintoa, jos luupin lähtöpistettä ei ole tallennettu.
iii. Jos luupin päätöspistettä ei aseteta, laite palaa lähtöpisteeseen ja käynnistää soiton.
(muistuttaa hotcue-toimintoa)
Page 75

4
2. SMART LOOP (VÄLIN VALINTA)
Käyttäjä voi valita luuppitoiminnon välin, valinnat ovat: 1/2/4/8 isku
3. SMART LOOP ON/OFF
LED-merkkivalo palaa: Luuppitoiminto päällä valitulla iskuvalinnalla.
LED-merkkivalo pois päältä: Luuppitoiminto päällä lähtö- ja päätöspisteen välillä.
4. HOT-CUE
Soitin mahdollistaa 2:sta Cue-pisteestä soittamisen.
a. CUE-muistin asetus: paina ensin MEMO-painiketta ja sen jälkeen CUE-painiketta CUE-
asetuksen suorittamiseksi, tämän jälkeen CUE-painike syttyy.
b. CUE-muistin soittaminen: Erityistä CUE-painiketta painaessa painike syttyy noin 5
sekunniksi.
Huom: Toimintoa ei voida käyttää REVERSE-äänitehosteen käytön aikana.
5. TUNNUSKAPPALE/NÄYTTEENOTTAJA
Käyttäjä voi esiasettaa tehosteet tai kappaleet tunnuskappaletoiminnolle tietokoneesta.
a. Paina Memo-painiketta ja sen jälkeen Jingle-painiketta, “tunnuskappaleluetteloon” luodaan
“näytekappale”. Käyttäjä voi asettaa tallennetun näytteenottajan tunnuskappaleeseen
tietokoneesta.
b. Näytteen maksimiaika: 12 sekuntia
6. PLAY/PAUSE (SOITTO/KESKEYTYS)
Jokaisella painikkeen painalluksella toiminto siirtyy SOITTO- ja KESKEYTYS-tilojen välillä.
LED-merkkivalo:
i. Kun kappaletta soitetaan, LED-merkkivalo palaa.
ii. Kun kappale on pysäytetty, LED-merkkivalo välkkyy.
7. CUE
Cue-toiminto mahdollistaa CD:n soiton palautuksen muistiin tallennettuun kohtaan. CUEpainikkeen painaminen keskeytystilassa asettaa CUE-pisteen, jolloin CUE-painike vilkkuu;
soittotilassa painikkeen painaminen keskeyttää muistiin tallennettuun kohtaan.
8. SÄÄDIN
• Nopeuden säätö (HAUN merkkivalo sammunut)
Valitsinta pyörittämällä vaihdetaan soittonopeutta. Myötäpäivään pyörittämällä soittonopeus
lisääntyy, vastapäivään pyörittämällä nopeus laskee.
• Haku (HAUN merkkivalo palaa)
Valitsinta pyörittämällä soiton siirtyy eteen ja taaksepäin nopeasti. Hakunopeus muuttuu
pyöritysnopeuden mukaan. Se voidaan suorittaa yhden kehyksen asteikolla.
9. KEY ON/OFF-.KYTKIN (MT)
Aseta painikkeella KEY-tila päälle tai pois päältä.
Sen ollessa päällä yksikkö säilyttää nykyisen tempon eikä muuta sitä pitch-liukukytkintä
siirrettäessä.
Page 76

5
10. PITCH CONTROL -VALITSIN
Jotta soittonopeusvalinnat (8%, 16%, 32%, 100%) täsmäisivät, voit valita välin asettamalla
minimiarvon (yläpuoli) ja maksimiarvon (alapuoli) liikuttamalla Pitch Control -valitsinta.
11. PITCH BEND + / - -PAINIKE
Kun kummatkin CD-soittimet ovat päällä, Pitch bend -toiminto mahdollistaa bassoiskun
aseman kohdistuksen sen jälkeen, kun korkeus on säädetty. Korkeus nousee automaattisesti
+ 16 % nykyisestä asetuksesta painamalla painiketta „+“. Korkeus laskee automaattisesti - 16%
nykyisestä asetuksesta painamalla painiketta „–“. Korkeuden muuttotavalla iskujen kohdat voidaan
kohdistaa.
12. SEARCH (HAKU) -PAINIKE
Painikkeella siirrytään Jog Dial -toiminnon asetuksien SEARCH ja PITCH BEND välillä.
• Kun LED-merkkivalo palaa, säädä valitsinta eteen ja taaksepäin suuntautuvaa pikahakua
varten.
• Kun LED-merkkivalo ei pala, säädä valitsinta pitch bend -toimintoa varten.
• Jos säädintä ei käytetä 8 sekuntiin, merkkivalo sammuu ja säätimellä käytetään pitch bend-
toimintoa.
13. SCRATCH-TEHOSTE
LED-merkkivalo palaa: Scratch-toiminto päällä
LED-merkkivalo pois päältä: Scratch-toiminto pois päältä
14. SYNC:
Toiminnolla synkronisoidaan automaattisesti yksikön 1 ja 2 BPM.
15. TEHOSTEPARAMETRI
Säädä tehosteen parametri säätönupeilla. X voimakkuuden säädölle, Y pituuden säädölle.
16. TEHOSTEEN VALITSIN
Tietokoneen ohjelmiston tehosteiden valinta.
17. TEHOSTE PÄÄLLÄ/POIS PÄÄLTÄ
Tehosteen päälle/pois päältä kytkin.
Mikseriosio
18. Äänenvoimakkuuden säätö
Äänenvoimakkuuden säätö.
19. BOOTH-voimakkuuden säätö
BOOTH-MONITORIN tason säätö. Tasoon ei vaikuta äänenvoimakkuuden tai balanssin säätö.
20. CUE-TASO (Cue-tason säätönuppi):
Säätää kuulokkeiden monitorisoundia. Kun CH-1 - CH-2 on valittu, tasoon ei vaikuta
äänenvoimakkuus tai balanssi.
Page 77

6
21. Vahvistus:
Säätää syöttösignaalin tasoa, LCD-näytössä näkyy [ Sam Forward ] tai [ Sam Reverse ] 2 s
ajan.
22. KANAVAN EQ-SÄÄTÖ
HI:
Säätää korkeita syöttöääniä. Keskiasennossa ääni on tasaista.
23. MID:
Säätää keskikorkeita syöttöääniä. Keskiasennossa ääni on tasaista.
24. LOW:
Säätää alhaisia syöttöääniä. Keskiasennossa ääni on tasaista.
25. KILL
Painikkeiden painaminen vaimentaa valitun kappaleen kaistan (Hi/Mid/Low).
26. CUE:
Lähteen (CH-1 & CH-2, MASTER) valinta, jota tarkkaillaan kuulokkeilla.
Paina uudelleen peruuttaaksesi valinnan. Monia painikkeita painaessa johtaa valittujen lähteiden
miksattuun ääneen.
27. AUTO MIX:
Paina Auto Mix -painiketta miksataksesi automaattisesti yksikköä 1 ja 2 (selkeystehoste in/out)
28. KANAVAN (CH-1 TO CH-4) SELKEYTTÄJÄ
Säätää kanavan lähtöäänien tasoa.
29. RISTISELKEYTTÄJÄ
Säätää lähteen Ch1 tai Ch2 äänimiksauksen voimakkuutta.
Page 78

7
VAATIMUSTENMUKAISUUSVAKUUTUS
Me,
Ned is B.V.
De Tweeling 28
5215MC ’s-Hertogenbosch
Alankomaat
Puh: 0031 73 599 1055
Sähköposti: info@nedis.com
Vakuutamme, että tuote:
Nimi: König Electronic
Malli: KN-DIGICON20
Kuvaus: Digitaalinen säädin
Täyttää seuraavat standardit:
EMC: EN 55022:2006
EN 55024:1998+A1:2001+A2:2003
EN 61000-3-2:2000+A1:2005
EN 61000-3-3:1995+A1:2001+A2:2005
Direktiivin 89/336/EY mukainen.
‘s-Hertogenbosch, 04. maaliskuuta, 2008.
Mrs. J. Gilad
Hankintajohtaja
Page 79

8
Turvallisuuteen liittyvät varoitukset:
Sähköiskuvaaran välttämiseksi tämän laitteen saa avata huollon yhteydessä VAIN valtuutettu
teknikko. Kytke laite pois verkkovirrasta ja muista laitteista, jos ongelmia esiintyy. Älä altista
tuotetta vedelle tai kosteudelle.
Huolto:
Puhdista ainoastaan kuivalla kankaalla. Älä käytä liuottimia tai hioma-aineita.
Takuu:
Takuu ja vastuuvelvollisuus mitätöityvät, jos tuote vaurioituu siihen tehtyjen muutoksien tai sen
väärinkäytön takia.
Yleistä:
Muutoksia malliin ja teknisiin ominaisuuksiin voidaan tehdä ilmoituksetta.
Kaikki logot, merkit ja tuotenimet ovat niiden vastaavien omistajien tuotemerkkejä tai rekisteröityjä
tuotemerkkejä ja niitä on käsiteltävä sellaisina.
Huomio:
Tuote on varustettu tällä merkillä. Se merkitsee, ettei käytettyjä sähkö- tai elektronisia
tuotteita saa hävittää kotitalousjätteen mukana. Kyseisille tuotteille on olemassa erillinen
keräysjärjestelmä.
Copyright ©
Page 80

9
Page 81

KN-DIGICON20
DJ MIDI DIGITAL
CONTROLLER
Page 82

1
A. MIDI KONTROLL
ME701 är utformad för att spela datorbaserade musikspår och att arbeta med produkter som
antingen stöder MIDI feedback eller inte.
Detta åstadkoms genom implementionen av fl era olika kontrollägen inom ME701.
Kontrollägena är:
1. Speciellt Midi läge:
En gång inkopplad, kommer ME701 att svara på inkommande MIDI-meddelande enligt sin
tilldelning.
LEDen gör inget förutom att de är kontrollerade av en specifi k användning (E-MIX,PCDJ) via
MIDI.
2. Allmänt Midi läge:
I det här läget ignoreras alla MIDI feedbackmeddelanden. En knapps LED tänds och tonas ner
när den trycks.
Knapparna, knopparna och reglage kommer att sända sitt tilldelade evenemang till externa
enheter via USB-kabeln.
3. Allmänt Midi läge med svar
Vissa DJ programvaror är i stånd att leda meddelande till denna enhet och tända LEDen, och
tillåta denna enhet styra datorns programvara.
PS. Vänligen se funktionsbeskrivningen.
B. VÄLJ DATOR PROGRAMVARA
Du kan växla den här enheten till att kontrollera olika datorers programvara.
1) Anslut den här enheten till en dator eller laptop med USB-kabeln, och håll sedan nere knappen
"LOAD DECK A" tills SLÄCK LED på DECK A står för det önskade datorprogramläget som
tänds.
• HI: Detta LED tänds för SPECIELLT MIDI LÄGE
• MID: Detta LED tänds för ALLMÄNT MIDI LÄGE
• LOW: Detta LED tänds för ALLMÄNT MIDI LÄGE MED SVAR.
2) Tryck motsvarande knapp vars LED är tänt, tills LEDet släcks
3) Koppla bort USB-kabeln och anslut den igen, då kan du använda denna enhet för att styra det
valda MIDI-läget.
4) när en gång ME-701 är ansluten till datorn, gnistrar LEDen i sin tur mellan Sök -> Repa ->
Synk.
• I "SPECIELLT MIDI LÄGE", bibehålls det för att påminna användaren om att mjukvaran inte är
aktiverad
• I Allmänt Midi läge och Allmänt Midi läge med svar, håller det enbart på i några minuter, sedan
stannar det, och alla LED tänds svagt.
Page 83

2
Inledning:
KN-DIGICON20 är en mycket proffsig MIDI controller med två jog wheel. Tillsammans
med crossfader-kontrollerna får både amatör-DJ:n och den professionella DJ:n ordentliga
mixerfunktioner med denna MIDI controller. Controllern passar MP3/WAV/OGG-fi ler från din
dator. Scratch-funktion, sömlös looping, kill-funktioner och olika effekter ger den kreativa DJ:n full
kontroll. KN-DIGICON20 fungerar med plug & play med Mac OS X och Windows® XP SP2 och
Vista™. Strömmen fås från USB 2.0.
Beskrivning baksida:
1. USB-port
• Anslutning till dator för att spelkontroll
• Få strömförsörjning från dator eller laptop
Innan du ansluter denna enhet till dator eller Laptop, installera Demomjukvaran (Emix) från den
bifogade skivan, och ladda upp din musik till programmet. Testa programmet från datorn, och
kontrollera om kontrollenheten erhåller motsvarande reaktion (t.ex. tillhörande LED tänds).
Obs! Enheten kan inte strömförsörjas förrän datorprogramvaran (Emix) har aktiverats
2. Likström - inström för kontroller
Om enheten inte kan få tillräckligt med ström från USB-busen, strömförse den med extra adapter
(DC typ, 6V/1A) via det här uttaget.
Vänligen notera
hur adapterns polaritet ska vara .
Page 84

3
Funktion kontrollenhet
11
4
4
9
11 11
10
23
25
23
25
25
28
1 2
4 535
6
7
8
26
24
28
3
29
2
5 5
27
26
25
24
7
8
25
16
15
15
17
14
12 13
21
22
20
15
15
16
21
25 22
19
18
12 13
111
444
9
6
17 1111
10
14
1. SÖMLÖS LOOP
A. Loop-in
Loop in -punkten kan spelas in under uppspelning och paus. Om loop-out-punkten spelas in och
loop-in-punkten ställs in igen bakom loop-outpunkten kommer loop-outpunkten att rensas
B. Loop-out / Avbrytt
i. När Loop in -punkten är inställd trycker du på denna knapp för att spara slutpunkten för
LOOP-intervallet och starta LOOPING.
ii. Tryck på denna knapp igen för att avbryta looping.
iii. Återställ loop-outpunkten: Tryck på denna knapp igen för att återställ loop-outpunkten så
börjar loopingen igen
iv. Loop out-punkten måste vara efter loop-in-punkten, annars avbryts loop-out-punkten.
C. Reloop
i. Tryck för att återstarta sömlös loop.
ii. Ingen funktion om loop-in-punkten inte är inspelad.
iii. Om loop-outpunkten inte är inställd återgår inställningen till loop-in-punkten och börjar
spela.
(ungefär som hotcue-funktion)
Page 85

4
2. SMART LOOP (INTERVALL)
Du kan välja loopingintervall mellan: 1/2/4/8 takt
3. SMART LOOP TILL/FRÅN
LYSDIOD PÅ: Loopen spelas i intervall som valda takter.
LYSDIOD AV: Loopen spelas i intervall mellan Loop-in och Loop-out.
4. HOT-CUE
Här kan du spela från två cue-punkter direkt.
a. Inställning av CUE-minne: Tryck på MEMO-knappen först och tryck sedan på CUE-knappen
för att slutföra. Nu tänds CUE-knappen.
b. Spela ”CUE”-minne: När du trycker på en viss CUE-knapp blinkar den i ca 5 sekunder.
Obs! Denna funktion är inte tillgänglig under användning av REVERSE ljudeffekt.
5. JINGLE/SAMPLER
Du kan förinställa effekter eller låtar för Jingle i datorn.
a. Tryck på Memo och sedan Jingle, nu skapas ett “Sampler track” i din “Jingle list”. Du kan ställa
in inspelad sampler till Jingle från datorn.
b. Maximal samplertid: 12 sekunder
6. UPPSPELNING/PAUS
Varje gång du trycker på denna knapp växlar du mellan PLAY (uppspelning) och PAUSE.
Lysdiod
i. När spåret spelas, är LED-indikatorn PÅ.
ii. När spåret pausas, blinkar LED-indikatorn.
7. CUE
Cue-funktionen gör att CD:n kan återgå till en viss punkt som sparats i minnet. I PAUSE-läget
trycker du på CUE-knappen för att ställa in cue-punkten så blinkar CUE-knappen. I PLAY-läget
trycker du på denna knapp för att pausa spelaren vid den punkt som lagts på minnet.
8. JOGWHEEL
• Hastighetskontroll (SEARCH-indikatorn avstängd)
Roteras hjulet i uppspelningsläge ändras spelhastigheten. Roteras hjulet medurs ökar
spelhastigheten, roteras hjulet moturs minskar hastigheten.
• Sök (SEARCH-indikatorlampor)
Vrids hjulet spelar apparaten framåt eller bakåt snabbt. Sökhastigheten ändras utifrån
vridhastigheten. Den kan utföras med ram.
9. KEY ON/OFF SWITCH (MT)(KEY PÅ/AV BRYTARE)
Tryck på denna knapp för att sätta på eller stänga av KEY-funktionen.
Om den är PÅ, bibehåller enheten konstant tempo och byter inte medan pitch-reglaget rörs.
Page 86

5
10. PITCH CONTROL
För att anpassa alternativen för spelhastighet (8 %, 16 %, 32 %, 100 %), kan du välja vilket
intervall du vill ha mellan det minsta (uppåt) och det maximala (neråt) genom att fl ytta reglaget för
pitch control.
11. PITCH BEND + / -
När en av de två CD-spelarna är igång, gör pitch bend-funktionen att läget för bastakten kan
anpassas efter att pitch (ton) har justerats. Tonen höjs automatiskt upp till + 16 % från den aktuella
inställningen när "+"-knappen trycks ner. Tonen sänks automatiskt ner till -16% från den aktuella
inställningen när "-“ -knappen trycks ner. Genom sättet tonen ändras kan taktlägena matchas.
12. SEARCH
Tryck på denna knapp för att växla Jog Dial-funktionen mellan SEARCH och PITCH BEND.
• När lysdioden är tänd använd jog dial-hjulet för snabbsökning framåt och bakåt.
• När lysdioden är av använd jog dial-hjulet för pitch bend-funktion.
• Om jog inte rör sig inom 8 sekunder, är indikatorn av, och jog är för pitch bend funktion.
13. SCRATCH-EFFEKT
LYSDIOD PÅ: Scratch på
LYSDIOD AV: Scratch av
14. SYNC:
Denna funktion används för att synkronisera BPM för enhet 1 & 2 automatiskt.
15. EFFEKTPARAMETER
Justera effektparametern genom att vida på reglagen. X för styrkekontroll, Y för längdkontroll
16. EFFEKTVÄLJARE
Välj effekter från datorns programvara
17. EFFEKT TILL/FRÅN
Strombrytare effekt
Mixersektion
18. Reglage för huvudvolym
Justerar ljudnivån för huvudvolymen
19. Reglage för BOOTH-volym
Används för att justera nivån på BOOTH MONITOR. Nivån påverkas inte av huvudvolymen och
huvudbalansen.
20. CUE-NIVÅ:
Justerar hörlurarnas monitorljud. När CH-1 till CH-2 har valts, påvekas inte nivån av huvudvolymen
och huvudbalansen.
Page 87

6
21. Gain:
Justerar den ingående signalnivån, displayen visar [ Sam Forward ] eller [ Sam Reverse ] i två
sekunder.
22. EQ KONTROLLKANAL
HI:
Justerar ingående ljud med höga toner. I mittpositionen blir ljudet platt.
23. MID:
Justerar ingående ljud med mellanliggande toner. I mittpositionen blir ljudet platt.
24. LOW:
Justerar ingående ljud med låga toner. I mittpositionen blir ljudet platt.
25. KILL
Trycker du på knapparna tystnar det valda bandet (Hi/Mid/Low) för spåret
26. CUE:
Används för att välja källa (CH-1 & CH-2, MASTER) som kan övervakas med hörlurar.
Tryck igen om du vill avbryta. Tryck på fl era knappar för att få ut mixat ljud från valda källor.
27. AUTO MIX:
Tryck på Auto Mix om du vill mixa enhet 1 & enhet 2 automatiskt (med fade in/ut)
28. KANAL (CH-1 TO CH-4) FADER
Justerar ljudnivån för kanalerna
29. CROSS FADER
Används för att justera ljudmixens volym för inställda källor i Ch1 eller Ch2.
Page 88

7
ÖVERENSSTÄMMELSEFÖRKLARING
Vi,
Ned is B.V.
De Tweeling 28
5215MC ’s-Hertogenbosch
Holland
Tel.: 0031 73 599 1055
Email: info@nedis.com
Intygar att produkten:
Namn: König Electronic
Modell: KN-DIGICON20
Beskrivning: Digital controller
överensstämmer med följande standarder:
EMC: EN 55022:2006
EN 55024:1998+A1:2001+A2:2003
EN 61000-3-2:2000+A1:2005
EN 61000-3-3:1995+A1:2001+A2:2005
Uppfyller villkoren för direktiv 89/336/EEC.
‘s-Hertogenbosch, 2008 mars 04
Mrs. J. Gilad
Inköpschef
Page 89

8
Säkerhetsanvisningar:
För att undvika elstötar får produkten endast öppnas av behörig tekniker när service behövs.
Koppla bort apparaten från nätuttaget och från annan utrustning om problem uppstår. Utsätt inte
produkten för vatten eller fukt.
Underhåll:
Rengör endast med torr trasa. Använd inga rengöringsmedel eller frätande medel.
Garanti:
Ingen garanti gäller vid några ändringar eller modifi eringar av produkten eller skador som har
uppstått på grund av felaktig användning av denna produkt.
Allmänt:
Utseende och specifi kationer kan komma att ändras utan föregående meddelande.
Alla logotyper och produktnamn är varumärken eller registrerade varumärken som tillhör sina
ägare och är härmed erkända som sådana.
Obs!
Produkten är märkt med denna symbol. Det innebär att använda elektriska eller
elektroniska produkter inte får slängas bland vanliga hushållssopor. Det fi nns särskilda
återvinningssystem för dessa produkter.
Copyright ©
Page 90

9
Page 91

KN-DIGICON20
DIGITÁLNÍ MIXÁŽNÍ
PULT MIDI
Page 92

1
A. OVLÁDÁNÍ MIDI
ME701 je navržen pro přehrávání hudebních stop, vytvořených na počítači a déle pro práci se
zařízeními, které podporují nebo i nepodporují zpětnou odezvu MIDI.
Jednotka ME701 má zabudovanou celou řadu různých ovládacích režimů.
Jsou to následující ovládací režimy::
1. Speciální mód Midi:
Po zapojení jednotka ME701 reaguje na příchozí zprávy MIDI v souladu s jejich přiřazeným
významem.
LED diody jsou nečinné, dokud je nezačne řídit prostřednictvím MIDI některá specifi cká aplikace
(E-MIX,PCDJ) .
2. Běžný režim MIDI:
V tomto módu jsou všechny zpětné odezvy MIDI ignorovány. LED dioda v tlačítku se rozsvítí a po
jeho stisknutí pohasne.
Tlačítka, knofl íku a posuvné regulátory vysílají své přiřazené události (akce) do externích zařízení
prostřednictvím kabelu USB.
3. Běžný režim MIDI s odezvou:
Některé softwarové aplikace pro DJ jsou schopny přenést příkazy do této jednotky a rozsvítit LED
diody a umožnit tak této jednotce ovládat software v PC.
PS. Podrobnosti naleznete v popisu funkce.
B. VOLBA PC SOFTWARE
Tuto jednotku můžete přepnout tak, aby mohla řídit ovládání různého PC software.
1. Pomocí kabelu USB připojte jednotku k PC nebo laptopu, přidržte stisknuté tlačítko „LOAD
DECK A (Načti šasi A)“ až se na šasi DECK A rozsvítí dioda KILL LED, odpovídající
požadovanému programu PC.
• HI: Tato LED dioda svítí pro SPECIÁLNÍ MÓD MIDI
• MID: Tato LED dioda svítí pro BĚŽNÝ REŽIM MIDI
• LOW: Tato LED dioda svítí pro BĚŽNÝ REŽIM MIDI S ODEZVOU.
2) Tiskněte odpovídající knofl ík se svítící LED diodou, až se jas LED diody výrazně změní.
3) Odpojte kabel USB, opět jej připojte a pak můžete pomocí jednotky ovládat zvolený mód
MIDI.
4) Jakmile jednotku ME-701 připojíte k počítači, LED diody začnou postupně jasně problikávat v
pořadí „Search (Vyhledat)“ -> „Scratch (Škrabat)“ -> „Sync (
• Ve “SPECIÁLNÍM MÓDU MIDI” LED diody stále jasně problikávají, aby uživatele upozornily,
že počítačový software není aktivován.
• V Běžném režimu Midi a Běžném režimu Midi s odezvou problikávání trvá pouze několik
minut, pak se zastaví a všechny LED diody jen slabě žhnou.
Page 93

2
Úvod:
Digitální pult KN-DIGICON20 je vysoce profesionální mixážní pult se dvěma krokovacími koly
pro nastavení rychlosti. Společně s funkcí „crossfader“ nabízí amatérským a profesionálním
diskžokejům mixážní pult s možností využití profesionálních funkcí. Pult je schopen zpracovávat
soubory MP3/WAV/OGG z počítače nebo notebooku. Funkce „scratch“, nenásilné spojování
skladeb, funkce „ kill“ a další efekty nabízí tvořivým diskžokejům velké množství možností. Pult
KN-DIGICON20 je kompatibilní se systémem plug & play a s operačními systémy Mac OS X,
Windows® XP SP2 a Vista™. Přístroj je napájen je přes USB 2.0. kabel.
Popis zadní části:
1. USB Port
• Připojení k PC za účelem přehrávání
• Přiveďte napájení z PC nebo laptopu.
Před připojením této jednotky k PC nebo laptopu si nejdříve z dodaného disku nainstalujte Demo
software (Emix) a následně do programu stáhněte svoji hudbu. Vyzkoušejte program v PC a ověřte,
zda dostává řídící jednotka odpovídající odezvu (Např.: odpovídající LED dioda se rozsvítí).
POZNÁMKA: Na jednotce se nesmí zapnout napájení, dokud není v PC aktivován software
(Emix).
2. Stejnosměrné napájení řídící jednotky (řadiče)
Pokud jednotka nedostává dostatečné napětí ze sběrnice USB, zajistěte napájení pomocí
samostatného adaptéru (typ DC,
6V/1A) připojeného do tohoto vstupního konektoru.
Při zapojování adaptéru dodržujte tuto správnou polaritu .
Page 94

3
Ovládání a funkce
11
4
4
9
11 11
10
23
25
23
25
25
28
1 2
4 535
6
7
8
26
24
28
3
29
2
5 5
27
26
25
24
7
8
25
16
15
15
17
14
12 13
21
22
20
15
15
16
21
25 22
19
18
12 13
111
444
9
6
17 1111
10
14
1. SEAMLESS LOOP (NEKONEČNÁ SMYČKA)
A. Funkce Loop-in
Tato funkce umožňuje záznam / nahrávání od určitého bodu během přehrávání (funkce Play) a
dočasného zastavení přehrávání (funkce PAUSE). Pokud je bod Loop-out nastaven a bod Loop-in
je resetován a nastaven do polohy, která leží až za bodem Loop-out, je bod Loop-out vymazán.
B. Funkce Loop-out/Exit (Konec)
i. Po nastavení bodu Loop-in stiskněte toto tlačítko pro uložení konečného bodu intervalu
LOOP a můžete začít s „LOOPING“ nahráváním.
ii. Opětovným stiskem tohoto tlačítka ukončíte Looping.
iii. Resetování bodu Loop-out: Opětovným stiskem tohoto tlačítka resetujete bod Loop-out a
Looping bude opět spuštěno.
iv. Bod Loop-out musí ležet až za bodem Loop-in. V opačném případě je bod Loop-out
smazán.
C. Funkce Reloop (Opakování)
i. Stisknutím tohoto tlačítka opět spustíte funkci „seamless loop“ (nekonečná smyčka).
ii. Tato funkce není dostupná, pokud není zaznamenán bod Loop-in.
iii. Pokud není nastaven bod Loop-out, přehrávání se automaticky spustí od bodu Loop-in.
(podobná funkce jako Hot-cue)
Page 95

4
2. SMART LOOP (RANGE SELECT) - „CHYTRÁ SMYČKA“ (NASTAVENÍ ROZSAHU)
Uživatel může nastavit tzv. Looping interval mezi 1/2/4/8 úhozy.
3. SMART LOOP ON/OFF - CHYTRÁ SMYČKA ZAPNUTO/VYPNUTO
LED diody on - zapnuty - svítí: Smyčka je přehrávána v daném intervalu a podle zvolených
úhozů.
LED diody off - vypnuty - nesvítí: Smyčka je přehrávána v daném intervalu mezi body Loop-in a
Loop-out.
4. HOT-CUE
Přístroj umožňuje okamžité spuštění přehrávání od 2 bodů Cue.
A. Nastavení paměti pro CUE: Nejdříve stiskněte tlačítko MEMO (Paměť) a potom tlačítko CUE
(Index). Tlačítko CUE (Index) se rozsvítí.
B. Přehrávání paměti „CUE”: Po stisknutí příslušného tlačítka CUE (Index) bude toto tlačítko asi
5 sekund blikat.
Poznámka: Tato funkce není dostupná při použití zvukového efektu REVERSE
(Přehrávání v opačném směru).
5. Funkce JINGLE/SAMPLER
Uživatel může nastavit efekty nebo skladby pro funkci Jingle v počítači.
A. Stiskněte tlačítko Memo a potom Jingle. Systém vytvoří „vzorovou skladbu“ a přidá ji do
seznamu „Jingle list“. Uživatel může nastavit nahranou vzorovou skladbu do funkce Jingle z
počítače.
B. Maximální délka vzorové skladby: 12 sekund
6. TLAČÍTKO PŘEHRÁVÁNÍ PLAY/PAUSE
Po každém stisknutí tohoto tlačítka se aktivuje režim PLAY (Přehrávání) nebo PAUSE
(Pozastavení).
LED indikátor:
i. Při přehrávání skladby svítí LED indikátor.
ii. Je-li přehrávání pozastaveno funkcí Pauza, LED indikátor bliká.
7. CUE (Indexování)
Funkce Cue umožňuje návrat k místu na CD uloženému v paměti (bod Cue). Bod Cue nastavíte
stisknutím tlačítka CUE (Index) v režimu PAUSE (Pozastavení). Tlačítko CUE (Index) bude blikat.
V režimu PLAY (Přehrávání) stiskněte tlačítko CUE, jednotka se vrátí na uložený bod Cue a přejde
do pauzy.
8. JOGWHEEL (Kolečko nastavení rychlosti)
• Ovládání rychlosti (indikátor SEARCH (Vyhledávání) nesvítí)
Otáčením ovladače v režimu PLAY (Přehrávání) můžete měnit rychlost přehrávání. Otáčením
po směru hodinových ručiček se rychlost zvyšuje; otáčením proti směru hodinových ručiček se
rychlost snižuje.
• Vyhledávání (indikátor SEARCH (Vyhledávání) svítí)
Otáčením ovladače spustíte rychlé vyhledávání vpřed nebo vzad. Rychlost vyhledávání se řídí
rychlostí otáčení kolečka ovladače. Vyhledávat lze s přesností jednoho „políčka“ (frame).
Page 96

5
9. TLAČÍTKO SPÍNAČE ON/OFF (MT) (ZAP/VYP)
Stiskněte toto tlačítko pro zapnutí nebo vypnutí režimu KEY (Uzamknutí tempa).
Po dobu přepnutí tohoto spínače do polohy ON udržuje přístroj konstantní tempo a nemění se ani
při přesouvání rozlaďovacího jezdce (pitch slader).
10. Potenciometr PITCH CONTROL (Ovládač rychlosti přehrávání)
Posouváním potenciometru se rychlost přehrávání mění v nastaveném rozsahu (8 %, 16 %, 32 %,
100 %) od minimální hodnoty (horní poloha) po maximální hodnotu (dolní poloha).
11. Tlačítko PITCH BEND + / - (Srovnání rytmů)
Při současném přehrávání ze dvou CD přehrávačů umožňuje funkce Pitch Bend (Srovnání
rytmů) po nastavení rychlosti přehrávání posunout basové úhozy (beaty) tak, aby byly vzájemně
synchronizovány. Při stisknutí tlačítka „+“ se rychlost přehrávání automaticky zvýší až o 16 %
oproti aktuální rychlosti. Po stisknutí tlačítka „–“ se změna rychlosti (pitch) automaticky snižuje
až o možných minus 16 % aktuálně nastavené rychlosti přehrávání. Příslušnou změnou rychlosti
přehrávání lze sladit beaty.
12. Tlačítko SEARCH (Vyhledávání)
Pro přepnutí funkce ovladače Jog mezi funkcemi SEARCH (Vyhledávání) a PITCH BEND
(Srovnání rytmů) stiskněte tlačítko SEARCH.
• Pokud LED indikátor svítí, otáčejte jog ovladačem pro rychlé vyhledávání vpřed a vzad.
• Pokud LED indikátor nesvítí, otáčejte ovladačem pro nastavení funkce PITCH BEND (Ohýbání
tónu).
• Pokud se ovladačem nepohybuje déle než 8 sekund, pak se ovladač JOG přepne do funkce
Pitch bend (Srovnání rytmů).
13. Funkce SCRATCH EFFECT
LED diody on - zapnuty - svítí Funkce Scratch ON (Zapnuta).
LED diody off - vypnuty - nesvítí Funkce Scratch Off (Vypnuta).
14. Funkce SYNC
Tato funkce umožňuje automatickou synchronizaci BPM (úhozů za minutu) z přehrávače 1 a 2.
15. EFFECT PARAMETER
Otáčením nastavíte parametry efektu. X je pro ovládání intenzity a Y slouží pro ovládání doby
trvání efektu.
16. EFFECT SELECTOR (Výběr efektu)
Umožňuje zvolit požadovaný efekt z počítače.
17. EFFECT ON/OFF (Zapnutí a vypnutí efektu)
Effect On/off - Spínač efektu - zapnuto/vypnuto
Mixer section (Sekce směšovač)
18. Master Volume control (Hlavní nastavení hlasitosti)
Nastavuje úroveň výstupní hlasitosti.
Page 97

6
19. BOOTH Volume control (Nastavení hlasitosti BOOTH)
Nastavuje výstupní úroveň BOOTH MONITOR. Tato nastavená úroveň není ovlivněna nastavením
hlavní hlasitosti a stereováhy.
20. CUE LEVEL (Cue level adjustment knob) - Funkce CUE LEVEL
Nastavuje zvuk sluchátek sledovacího monitoru. Pokud zvolíte kanál CH-1 nebo CH-2, není
nastavená úroveň ovlivněna nastavením hlavní hlasitosti nebo stereováhy.
21. Gain (Zisk)
Nastavuje úroveň vstupního signálu zobrazeného na LCD displeji [Sam Forward - (vpřed)] nebo
[Sam Reverse - (vzad)] na dobu 2 sekund.
22. CHANNEL EQ COINTROL (Nastavení ekvalizéru)
HI (vysoké):
Nastavuje vysoké kmitočty. Ve střední poloze je zvuk bez modifi kace a zní „prázdně“.
23. MID (střední):
Nastavuje střední kmitočty. Ve střední poloze je zvuk bez modifi kace a zní „prázdně“.
24. LOW (nízké):
Nastavuje nízké kmitočty. Ve střední poloze je zvuk bez modifi kace a zní „prázdně“.
25. Funkce KILL
Stisknutím tohoto tlačítka dočasně ztlumíte zvolený frekvenční rozsah (Hi/Mid/Low) skladby.
26. CUE (Odposlech)
Tato funkce umožňuje monitorovací odposlech sluchátky na zvolených kanálech (CH-1 a CH-2,
MASTER).
Opětovným stisknutím tohoto tlačítka odposlech ukončíte. Stisknutím několika tlačítek najednou
získáte sloučený zvuk z několika zvolených audio zdrojů.
27. Funkce AUTO MIX
Stisknutím tohoto tlačítka dojde k automatickému sloučení signálů z přehrávače 1 a 2 (funkce
postupného zeslabení a zesílení - fade in/out je také dostupná).
28. Funkce postupného zeslabení/zesílení pro kanály (CH-1 až CH-4)
Nastavuje výstupní úroveň pro dané kanály.
29. Funkce CROSS FADER
Nastavuje hlasitost mixovaného zvuku ze zdrojů pro kanály CH-1 nebo CH-2.
Page 98

7
Prohlášení o shodě
Společnost
Ned is B.V.
De Tweeling 28
5215MC ’s-Hertogenbosch
Nizozemí
Tel.: 0031 73 599 1055
Email: info@nedis.com
prohlašuje, že výrobek;
Značka: König Electronic
Model: KN-DIGICON20
Popis: Digitální mixážní zařízení
splňuje následující normy:
Elektromagnetická kompatibilita: EN 55022:2006
EN 55024:1998+A1:2001+A2:2003
EN 61000-3-2:2000+A1:2005
EN 61000-3-3:1995+A1:2001+A2:2005
a odpovídá ustanovením směrnice 89/336/EEC.
‘s-Hertogenbosch, 4. března 2008
J. Gilad
Vedoucí nákupního oddělení
Page 99

8
Bezpečnostní opatření:
Abyste zabránili riziku poranění elektrickým proudem, svěřte opravu zařízení POUZE
kvalifi kovanému servisnímu technikovi/středisku. Před prováděním údržby nebo při poruše
odpojte zařízení od přívodu elektrické energie. Odpojte také zařízení, která jsou připojena
k přístroji. Nevystavujte zařízení nadměrné vlhkosti nebo vodě.
Údržba:
K čištění používejte pouze suchý hadřík. Nepoužívejte rozpouštědla ani abrazivní materiály.
Záruka:
Jakékoli změny, modifi kace nebo poškození zařízení v důsledku nesprávného zacházení se
zařízením ruší platnost záruční smlouvy.
Obecné upozornění:
Design, provedení a parametry výrobku se mohou měnit bez předchozího upozornění uživatele
výrobcem.
Všechna loga a názvy výrobků jsou obchodní značky nebo registrované obchodní značky
příslušných vlastníků a jsou chráněny příslušnými zákony.
Upozornění:
Tento výrobek je označen následujícím symbolem. To znamená, že je nutné s výrobkem
zacházet jako s nebezpečným elektrickým a elektronickým odpadem a nelze jej po
skončení životnosti vhazovat do běžného domácího odpadu. Výrobek je třeba odnést do
příslušného sběrného dvora, kde bude provedena jeho recyklace.
Copyright © (Autorská práva)
Page 100

9
 Loading...