

Page 1
HAV-TT10USB
(p. 2)
TURNTABLE
(S. 8)
PLATTENSPIELER
(p. 14)
PLATINE
(p. 20)
PLATENSPELER
(p. 26)
PIATTO
(p.32)
PLATO
(38. o.)
LEMEZJÁTSZÓ
(s. 44)
LEVYSOITIN
(s. 50)
SKIVTALLRIK
(s. 56)
GRAMOFONOVÉ CHASSIS
(p. 62)
TURNTABLE
Page 2

2
ENGLISH
Location of parts
1. POWER Switch
2. TONE ARM
3. SPEED CONTROL SWITCH
4. SECURITY HOOK
5. TONE ARM REST
6. TURNTABLE
7. LARGE CHROME SCREW
8. PLAY Button
9. Eject Button
10. STOP Button
11. USB Jack
12. Line Out
Preparation for Use to the mains
The silver screw protects the phonograph chassis during transportation. If the speed of your
phonograph seems slow or you hear a rubbing sound, adjust the screw with a coin to correct
the balance of the turntable.
Page 3

3
How To Replace The Stylus
Removing old stylus
1. Set a screwdriver at the tip of the stylus and push down to the
direction "A".
2. Remove the stylus by pulling it down and forward.
Installing a new stylus
1. Hold the tip of the stylus and insert the other edge by pressing in the
direction "B".
2. Push up in the direction "C" until it locks at the tip.
Guide Pinx (inside)
Line Out
USB Jack
Listening to a Record
1. Connect the AC power cord to the mains,
the standard is 230V-50HZ.
2. Plug the other ends of the RCA Cable into
the auxiliary input (Aux) on your TV, home
entertainment receiver or other music
system, be sure that the red RCA Cable is
inserted into the red jack and the white RCA
Cable is inserted into the white jack.
3. Switch on the turntable.
4. Put a record onto the turntable, when
playing the 45rpm record, remember to use
the adapter which is packed in the poly bag
along with the manual.
5. Select player speed according to the record
you playing.
6. Remove the tone arm-rest holder, lift the
que-lever and move the tone arm gently to
the desired position over the record, lower
the que-lever slowly, then the record is
playing.
7. Turn on the unit which you connected with
this USB turntable by using the On/off knob
or Volume knob, adjust the volume knob to
control the volume of the music.
8. Press STOP button to stop playing.
9. Press the PLAY button to continue playing.
10. When the music has fi nished, the tone-arm
will slide back to the arm rest automatically.
Or you can press the eject button when
playing the record, the tone arm will depart
from the record and then back to the armrest.
11. Remember to unplug the plug when not
using the unit.
Page 4
4
Audacity and USB Connection
Installing the Audacity Software
Install the Audacity software in your computer, the disc is matches with the USB turntable.
Insert the Audacity disc into the CD drive of your computer. Click on My Computer on the
desktop. Double click CD drive to view the contents of the Audacity disc. Double click Audacity
Set Up to install the Audacity software according to the instruction.
Install the USB Driver
Make sure the Audacity disc is still in your CD drive. Using the included USB cable to connect
the turntable to your computer. Follow screen instruction to install the USB driver.
Running the Software
1. Doubleclick the Audacity software showing red and orange "balls" wearing blue headphones,
and come into the following interface;
2. Using the attribute controls button at the top of the screen, go to beginning, Play, Record,
Pause, Stop and go to end. Use the File, Edit, View, Project, Generate, Effect and Analyze
menus to Save, Export, and edit the music.
3. Select preferences at the bottom of the menu which will open up Audacity Preferences. You
can set the Audio I/O, Quality, File Formats, Spectrograms, Directories, Interface, Keyboard
and Mouse in the Audacity preference Interface.
4. Adjust the output and input volume.
5. Select the record button to record the disc, the left and right tracks will show on the interface;
If you do not have the fl uctuant wave on the interface when recording, please adjust the line
in volume as follows:
1. Click the "start" in the left corner of the computer, Select "Programs", "Accessories",
"Entertainment", "Sound Recorder" and come into the sound record interface.
2. Sound Recorder Interface
3. Select Edit and click "Audio Properties" in the bottom of the menu to come into "Audio
Properties" interface;
A. Click the previous button to skip to start;
B. Click the forward button to skip to end;
C. Click the play button to play;
D. Click the pause button to pause the record play;
E. Click the stop button to stop the Record.
4. Select sound recording volume and come into "Recording Control" interface; Adjust the line
in volume to most or middle, the fl uctuant wave will show on the interface when recording.
Page 5
5
Export For WAV,MP3 or Ogg formats
1. Please make sure that the Audacity disc is still inserted in your computer. Double click on the
My Computer icon on your desktop.
2. Double click on the CD ROM drive.
3. Copy the lame_enc.dll fi le and paste it to your Desktop.
4. After copying the fi le, open the Audacity Software. Click on the Record Button to start the
recording. Make sure that a turntable record is playing and the USB cable is connected on
the main unit.
5. You may press the Stop Button at any desired time. Once you have the recorded fi le that will
be converted, press the Edit Tab and go to Preferences.
6. Locate the File Form Tab and click on the Find Library Button.
7. Click the Yes button and go to your Desktop and highlight the lame_enc.dll. Now click on the
Open Button.
8. Click on the OK Button and go back to the default window of the Audacity Software.
9. Click on the File Tab and you have the option to export the recorded fi le to "WAV", "MP3" or
"Ogg" fi le formats.
10. Once you have chosen on which fi le format should be exported, just provide the fi le name and
the location on where it will be saved. Once fi nished, click on the Save Button.
11. Input the Title, Artist and other information about the MP3 fi le that you have created and click
on the OK Button.
Specifi cations
RECORD PLAYER section
Motor DC servo motor
Drive System Belt Drive
Speeds 33-1/3 rpm, 45 rpm and 78 rpm
Wow & Flutter Less than 0.25%(WTD)
S/N Ratio More than 50 dB
Cartridge Type Ceramic Stereo Cartridge
Stylus 402-M208-165
Output Level 160-380 mV (5 cm/sec at 1 KHz)
GENERAL
Power Requirements AC 230V~ 50 Hz
Power Consumption 5 W
Dimensions(WxHxD 37X16.5X33 cm
Weight 4.96 kg
45 rpm Adapter
Page 6
6
Declaration of conformity
We,
Nedis B.V.
De Tweeling 28
5215MC ’s-Hertogenbosch
The Netherlands
Tel.: 0031 73 599 1055
Email: info@nedis.com
Declare that product:
Name: KONIG
Model: HAV-TT10USB
Description: USB Turntable
Is in conformity with the following standards
EMC: EN 55013 : 2001 + A1 + A2
EN 55022 : 2006
EN 61000 - 3 2 : 2000 + A2
EN 61000 - 3 - 3 : 1995 + A1 A2
EN 55020 : 2002 + A1 + A2
EN 55024 : 1998 + A1 + A2
LVD: EN 60065 : 2002 + A1 : 2006
Following the provisions of the 2004/108/EC an 2006/95/EC directive.
‘s-Hertogenbosch, 2008, March 21
Mrs. J. Gilad
Purchase Director
Page 7
7
Safety precautions:
CAUTION
RISK OF EL ECTRIC SHOCK
DO NOT OPEN
To reduce risk of electric shock, this product should ONLY
be opened by an authorized technician when service is
required. Disconnect the product from mains and other
equipment if a problem should occur. Do not expose the product to water or moisture.
Maintenance:
Clean only with a dry cloth. Do not use cleaning solvents or abrasives.
Warranty:
No guarantee or liability can be accepted for any changes and modifi cations of the product or
damage caused due to incorrect use of this product.
General:
Designs and specifi cations are subject to change without notice.
All logos brands and product names are trademarks or registered trademarks of their respective
holders and are hereby recognized as such.
Attention:
This product is marked with this symbol. It means that used electrical and electronic
products should not be mixed with general household waste. There is a separate
collections system for these products.
Copyright ©
Page 8
8
DEUTSCH
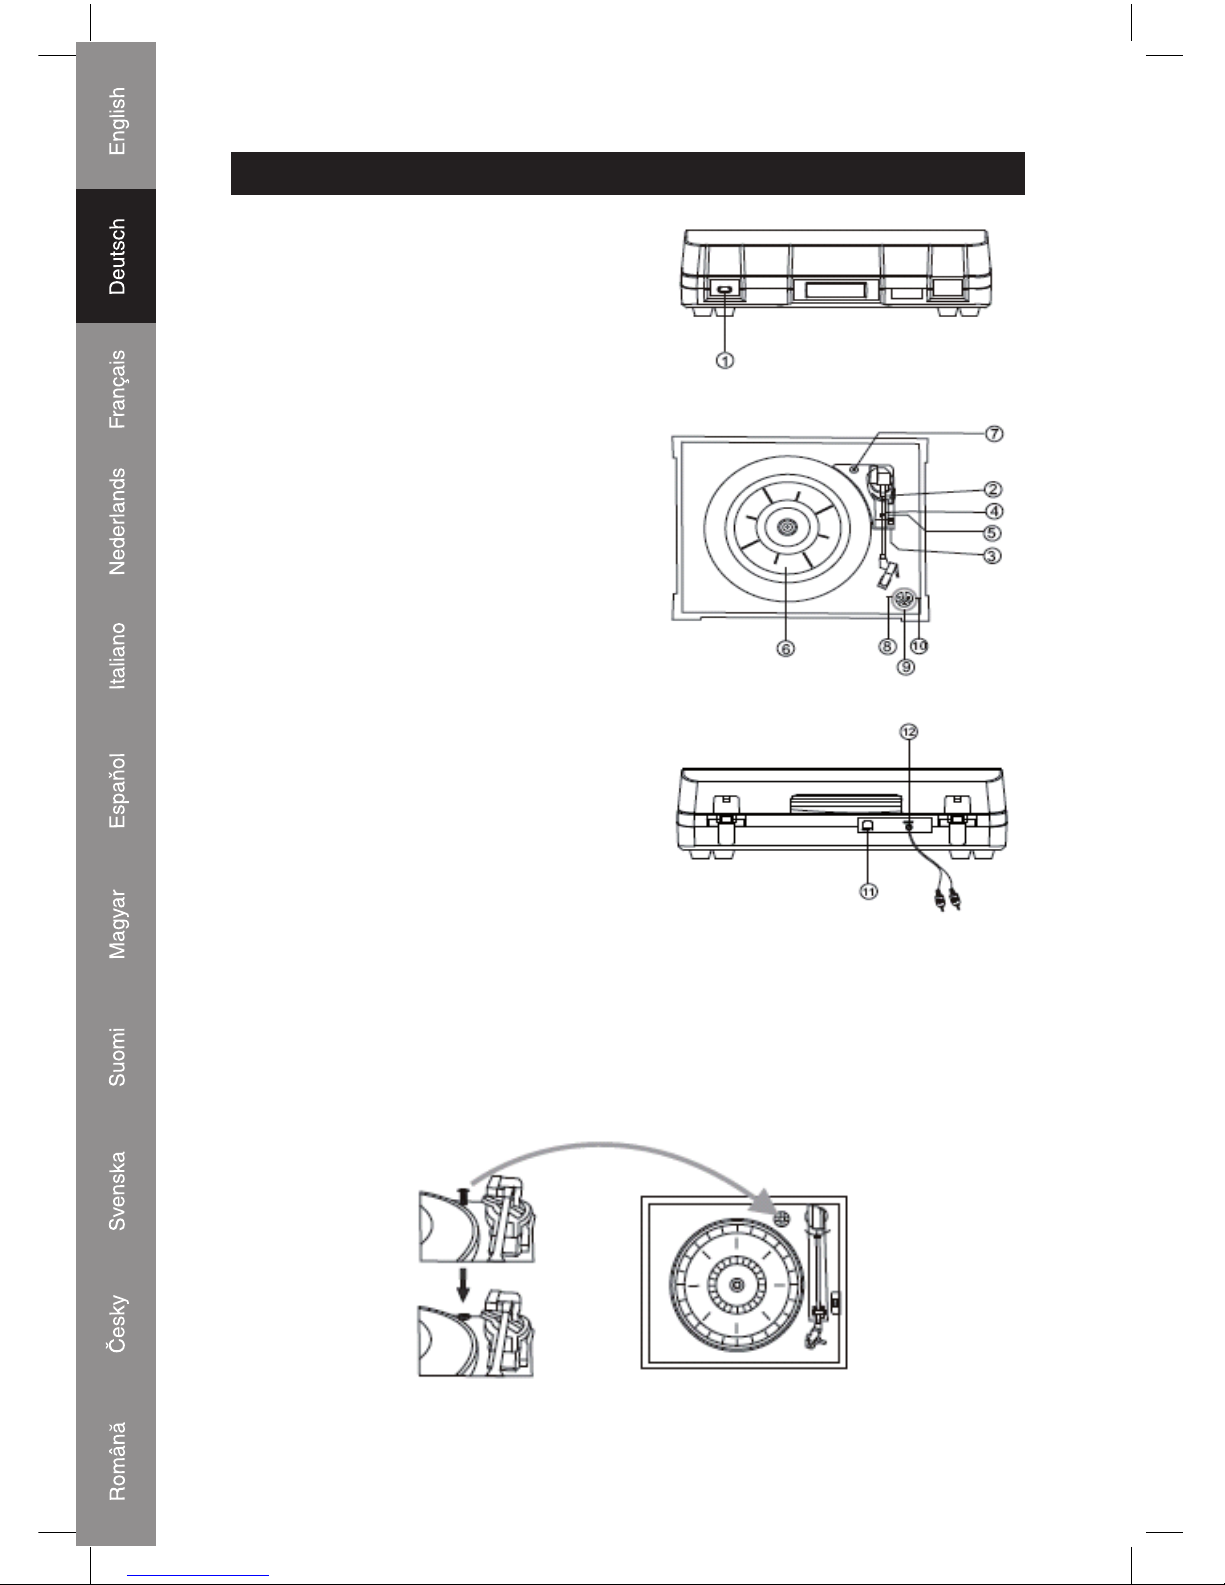
Bedienelemente
1. NETZSCHALTER
2. TONARM
3. GESCHWINDIGKEITSSCHALTER
4. SICHERHEITSHAKEN
5. TONARM-AUFLAGE
6. PLATTENTELLER
7. GROSSE CHROMSCHRAUBE
8. PLAY-Taste
9. Lift-off Taste
10. STOP-Taste
11. USB-Buchse
12. Line Out
Vorbereitung zum Anschluss an das Stromnetz
Die silberne Schraube schützt das Gehäuse des Plattenspielers beim Transport. Wenn die
Geschwindigkeit des Plattenspielers zu niedrig erscheint oder Sie ein Rubbelgeräusch hören,
justieren Sie die Schraube mit einer Münze, um das Gleichgewicht des Plattentellers zu
korrigieren.
Page 9

9
Austausch der Nadel
Entfernen der alten Nadel
1. Setzen Sie einen Schraubendreher an der Nadelspitze an und
drücken Sie diese nach unten in Richtung "A".
2. Entfernen Sie die Nadel, indem Sie sie nach unten und vorn
ziehen.
Einbau einer neuen Nadel
1. Halten Sie die Nadel an der Spitze und setzen Sie die andere Kante
durch Drücken in Richtung "B" ein.
2. Drücken Sie sie nach oben in Richtung "C", bis diese an der Spitze
eingerastet.
Führungsstift (innnen)
Line Out
USB-Buchse
Eine Schallplatte anhören
1. Schließen Sie das Netzkabel an die
Stromversorgung an, standardmäßig 230 V bei
50 Hz.
2. Stecken Sie das andere Ende des Cinch Kabels
in den Aux-Eingang Ihres TV-Geräts, Home
Entertainment-Empfängers oder anderen
Musiksystemen. Stellen Sie sicher, dass das rote
Cinch Kabel in die rote Buchse und das weiße
Cinch Kabel in die weiße Buchse eingesteckt
wird.
3. Schalten Sie den Plattenspieler ein.
4. Legen Sie eine Schallplatte auf den Plattenteller.
Denken Sie bei einer Wiedergabe mit 45 U/min
daran, den beiliegenden Adapter zu verwenden,
der zusammen mit dem Handbuch in einer
Plastiktüte verpackt ist.
5. Wählen Sie die Geschwindigkeit entsprechend
der Schallplatte aus, die Sie anhören möchten.
6. Entfernen Sie die Halterung der Tonarm-Aufl age,
heben Sie den Hebel an, bewegen Sie den
Tonarm behutsam in die gewünschte Position
über der Schallplatte und senken Sie den Arm
langsam ab, bis die Wiedergabe der Schallplatte
beginnt.
7. Schalten Sie das Gerät, das Sie mit diesem
USB-Plattenspieler verbunden haben, mithilfe
des Ein-/Aus-Knopfes oder dem LautstärkeKnopf ein und justieren Sie den LautstärkeKnopf, um die Lautstärke der Musik zu regeln.
8. Drücken Sie die STOP-Taste, um die Wiedergabe
zu beenden.
9. Drücken Sie die PLAY-Taste, um die Wiedergabe
fortzusetzen.
10. Wenn die Wiedergabe der Musik beendet ist
und der Tonarm das Ende der Schallplatte
erreicht, wird der Tonarm automatisch zurück zur
Armaufl age bewegt. Oder Sie können während
der Wiedergabe der Schallplatte die Lift-off
Taste drücken, so dass sich der Tonarm von der
Schallplatte hebt und zurück zur Armaufl age
bewegt.
11. Denken Sie daran, den Stecker herauszuziehen,
wenn das Gerät nicht verwendet wird.
Page 10
10
Audacity und USB-Verbindung
Installation der Audacity-Software
Installieren Sie die Audacity-Software auf Ihrem Computer, die CD ist auf den USBPlattenspieler abgestimmt. Legen Sie die Audacity-CD in das CD-Laufwerk Ihres Computers.
Klicken Sie auf Ihrem Desktop auf Arbeitsplatz. Doppelklicken Sie auf das CD-Laufwerk, um
den Inhalt der Audacity-CD zu betrachten. Doppelklicken Sie auf Audacity Set Up, um die
Audacity Software entsprechend der Anweisungen zu installieren.
Installation des USB-Treibers
Stellen Sie sicher, dass sich die Audacity-CD noch immer in Ihrem CD-Laufwerk befi ndet.
Verwenden Sie das beiliegende USB-Kabel zum Anschluss des Plattenspielers an Ihren
Computer. Befolgen Sie die Anweisungen auf dem Bildschirm, um den USB-Treiber zu
installieren.
Aufrufen der Software
1. Doppelklicken Sie auf die Audacity Software, bei der rote und orangefarbene "Kugelköpfe"
blaue Kopfhörer tragen. Die folgende Benutzeroberfl äche wird aufgerufen;
2. Mithilfe der Steuerungs-Schaltfl ächen im oberen Bereich des Bildschirms können Sie zum
Anfang gehen, die Wiedergabe starten, eine Aufzeichnung starten, pausieren, stoppen und
zum Ende gehen. Nutzen Sie die Menüs Datei, Bearbeiten, Ansicht, Projekt, Generieren,
Effekt und Analyse zum Speichern, Exportieren und Bearbeiten der Musik.
3. Durch Auswahl von "Eigenschaften" im unteren Bereich des Menüs "Datei" werden die
Eigenschaften von Audacity geöffnet. Sie können Audio E/A, Qualität, Dateiformate,
Spektogramme, Verzeichnisse, Interface, Tastatur und Maus in der Benutzeroberfl äche von
Audacity einstellen.
4. Stellen Sie die Ausgangs- und Eingangs-Lautstärke ein.
5. Wählen Sie die Aufnahme-Taste, um die Platte aufzunehmen; die linken und rechten
Tonspuren werden in der Benutzeroberfl äche angezeigt; Wenn Sie bei der Aufnahme die
Frequenzwelle nicht in der Benutzeroberfl äche sehen, justieren Sie bitte die EingangsLautstärke wie folgt:
1. Klicken Sie auf "Start" in der linken unteren Ecke Ihres Computers, wählen Sie "Programme",
"Zubehör", "Unterhaltungsmedien", "Audiorecorder". Die Benutzeroberfl äche des
Audiorecorders wird gestartet.
2. Audiorecorder Benutzeroberfl äche
3. Wählen Sie "Bearbeiten" und klicken Sie auf "Audioeigenschaften" im unteren Bereich des
Menüs, um das gleichnamige Fenster zu öffnen;
A. Klicken Sie auf die Zurück-Schaltfl äche, um zum Anfang zu springen;
B. Klicken Sie auf die Vorwärts-Schaltfl äche, um zum Ende zu springen;
C. Klicken Sie auf die Wiedergabe-Schaltfl äche, um die Wiedergabe zu starten;
D. Klicken Sie auf die Pause-Schaltfl äche, um die Wiedergabe zu pausieren;
E. Klicken Sie auf die Stopp-Schaltfl äche, um die Aufzeichnung zu stoppen.
4. Wählen Sie Audioaufzeichnungs-Lautstärke, das Fenster "Aufnahmesteuerung" öffnet sich;
Stellen Sie die Line In-Lautstärke auf den maximalen oder einen mittleren Wert ein, damit
die Frequenzwelle bei der Aufnahme in der Benutzeroberfl äche angezeigt wird.
Page 11

11
Export in WAV-, MP3- oder Ogg-Formate
1. Bitte stellen Sie sicher, dass sich die Audacity-CD noch immer in Ihrem Computer befi ndet.
Doppelklicken Sie auf das Symbol Arbeitsplatz auf Ihrem Desktop.
2. Doppelklicken Sie auf das CD-ROM-Laufwerk .
3. Kopieren Sie die Datei "lame_enc.dll" und fügen Sie diese auf Ihrem Desktop ein.
4. Nachdem Sie die Datei kopiert haben, öffnen Sie die Audacity Software. Klicken Sie auf
die Aufnahme-Schaltfl äche, um die Aufnahme zu starten. Stellen Sie sicher, dass eine
Schallplatte abgespielt wird und das USB-Kabel mit dem Hauptgerät verbunden ist.
5. Sie können jederzeit die Stopp-Schaltfl äche drücken. Wenn die aufgezeichnete Datei
vorliegt, die konvertiert werden soll, klicken Sie in das Menü "Bearbeiten" und öffnen Sie
"Einstellungen".
6. Öffnen Sie das Register "Dateiformate" und klicken Sie auf die Schaltfl äche "Suche
Bibliothek".
7. Klicken Sie auf die Schaltfl äche "Ja", gehen Sie zu Ihrem Desktop und markieren Sie die
Datei lame_enc.dll. Klicken Sie nun auf die Schaltfl äche "Öffnen".
8. Klicken Sie auf die Schaltfl äche OK und gehen Sie zurück zum Standardfenster der Audacity
Software.
9. Klicken Sie nun auf das Menü "Datei", in dem Sie die Möglichkeit haben, die aufgenommene
Datei in das "WAV", "MP3" oder "Ogg" Dateiformat zu exportieren.
10. Wenn Sie das gewünschte Dateiformat für den Export ausgewählt haben, geben Sie einfach
den Dateinamen und das Verzeichnis ein, in dem die Datei gespeichert wird. Wenn Sie fertig
sind, klicken Sie auf die Schaltfl äche "Speichern".
11. Geben Sie Titel, Künstler und weitere Informationen über die von Ihnen erstellte MP3-Datei
ein und klicken Sie auf die Schaltfl äche OK.
Technische Daten
PLATTENSPIELER Ebene
Motor Gleichstrom-Servo-Motor
Antriebssystem Riemenantrieb
Geschwindigkeiten 33-1/3 U/min, 45 U/min und 78 U/min
Gleichlaufschwankungen Weniger als 0,25% (WTD)
Signal/Rausch-Verhältnis Mehr als 50 dB
Nadelträgertyp Keramik Stereo Nadelträger
Nadel 402-M208-165
Ausgangspegel 160-380 mV (5 cm/s bei 1 KHz)
ALLGEMEIN
Stromversorgung AC 230 V ~ 50 Hz
Stromverbrauch 5 W
Abmessungen (BxHxT) 37 X 16,5 X 33 cm
Gewicht 4,96 kg
45 U/min Adapter
Page 12

12
KONFORMITÄTSERKLÄRUNG
Wir,
Nedis B.V.
De Tweeling 28
5215MC ’s-Hertogenbosch
Niederlande
Tel.: 0031 73 599 1055
Email: info@nedis.com
erklären, dass das Produkt:
Name: KÖNIG
Modell: HAV-TT10USB
Beschreibung: USB-Plattenspieler
den folgenden Standards entspricht:
EMV: EN 55013: 2001 + A1 + A2
EN 55022: 2006
EN 61000 - 3 2 : 2000 + A2
EN 61000 - 3 - 3 : 1995 + A1 A2
EN 55020: 2002 + A1 + A2
EN 55024: 1998 + A1 + A2
NSR: EN 60065: 2002 + A1 : 2006
Befolgt die Bestimmungen der Richtlinien 2004/108/EC und 2006/95/EC.
‘s-Hertogenbosch, 21. März 2008
J. Gilad
Einkaufsleiterin
Page 13
13
Sicherheitsvorkehrungen:
VORSICHT
STROMSCHLAGGEFAHR
NICHT ÖFFNEN
Um das Risiko eines elektrischen Schlags zu verringern,
sollte dieses Produkt AUSSCHLIESSLICH von einem
autorisierten Techniker geöffnet werden, wenn eine Wartung
erforderlich ist. Trennen Sie das Produkt vom Stromnetz und anderen Geräten, wenn ein
Problem auftreten sollte. Sorgen Sie dafür, dass das Gerät nicht mit Wasser oder Feuchtigkeit
in Berührung kommt.
Wartung:
Nur mit einem trockenen Tuch säubern. Keine Lösungsmittel oder Schleifmittel verwenden.
Garantie:
Es wird keine Garantie oder Gewährleistung bei Veränderungen und Modifi kationen des
Produkts oder Schäden durch unsachgemäße Behandlung dieses Produkts gewährt.
Allgemein:
Konstruktionen und technische Daten können ohne vorherige Ankündigung geändert werden.
Alle Logos, Marken und Produktnamen sind Warenzeichen oder registrierte Warenzeichen
ihrer jeweiligen Eigentümer und werden hiermit als solche anerkannt.
Achtung:
Dieses Produkt ist mit diesem Symbol gekennzeichnet. Es bedeutet, dass die
verwendeten elektrischen und elektronischen Produkte nicht im allgemeinen
Haushaltsmüll entsorgt werden dürfen. Für diese Produkte stehen gesonderte
Sammelsysteme zur Verfügung.
Copyright ©
Page 14
14
FRANCAIS
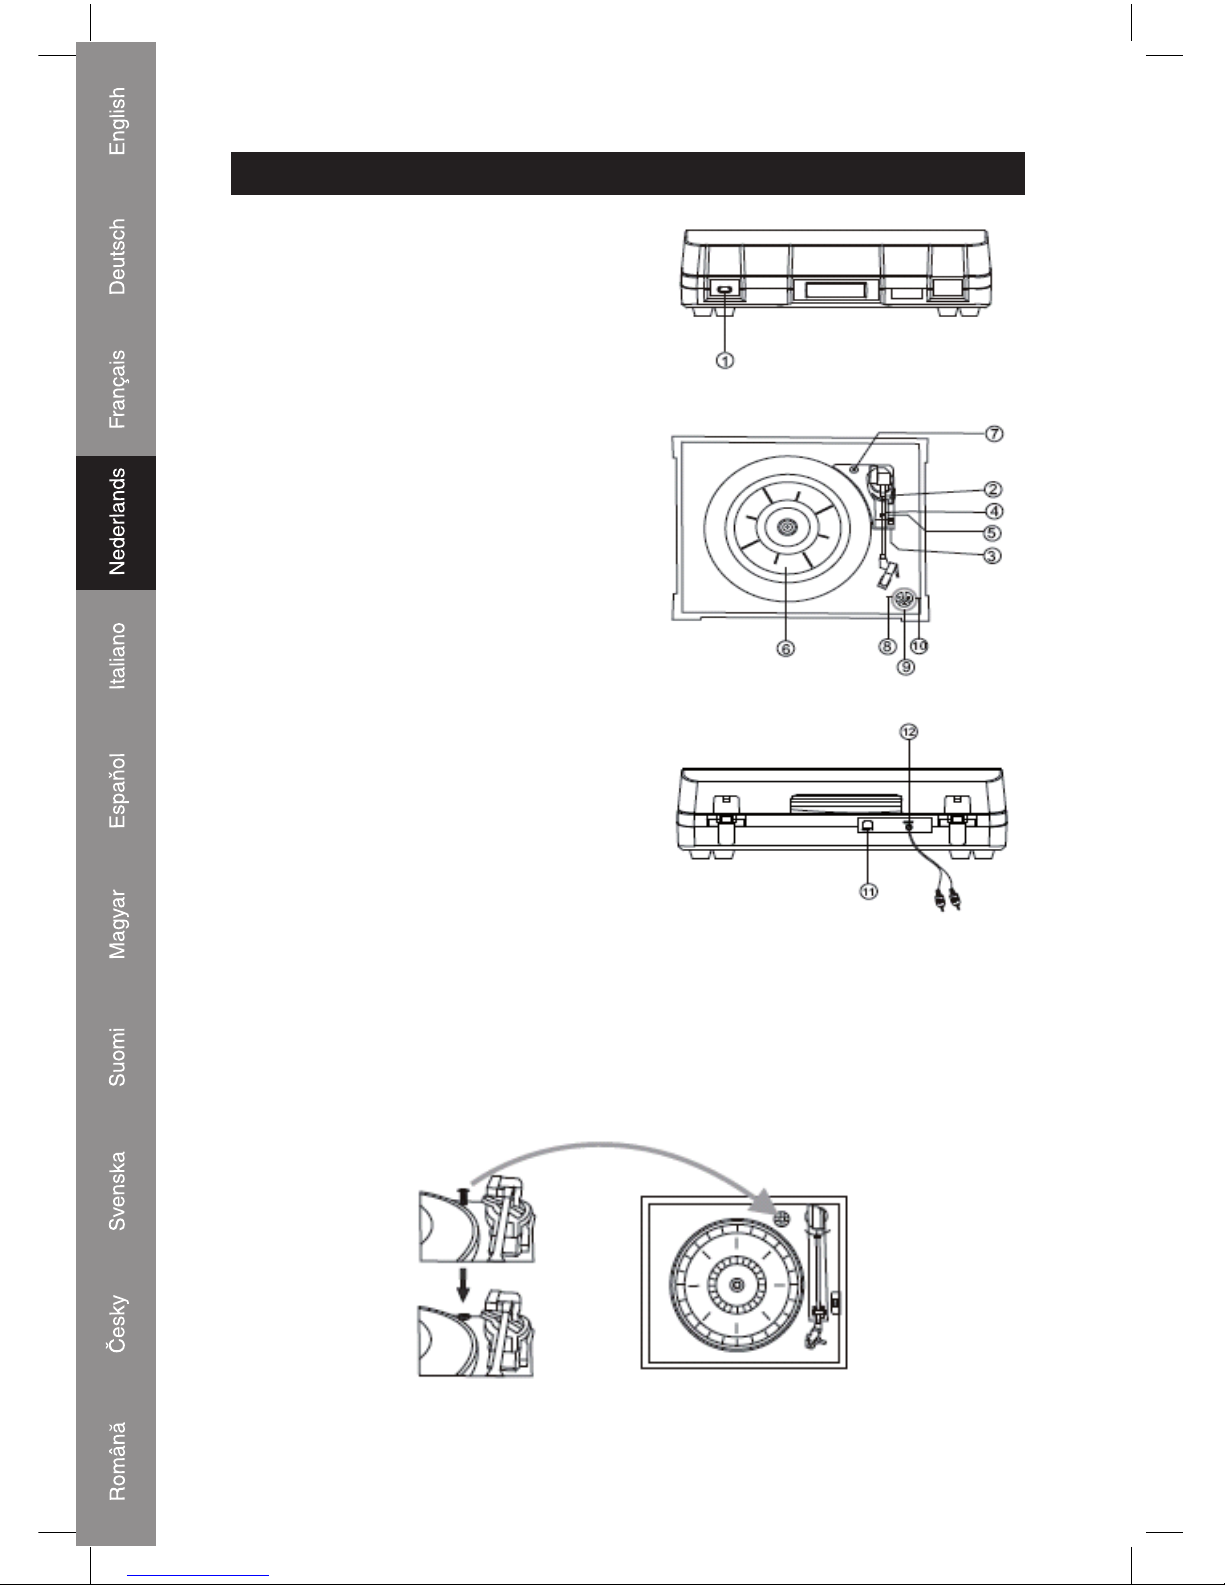
Emplacement des pièces
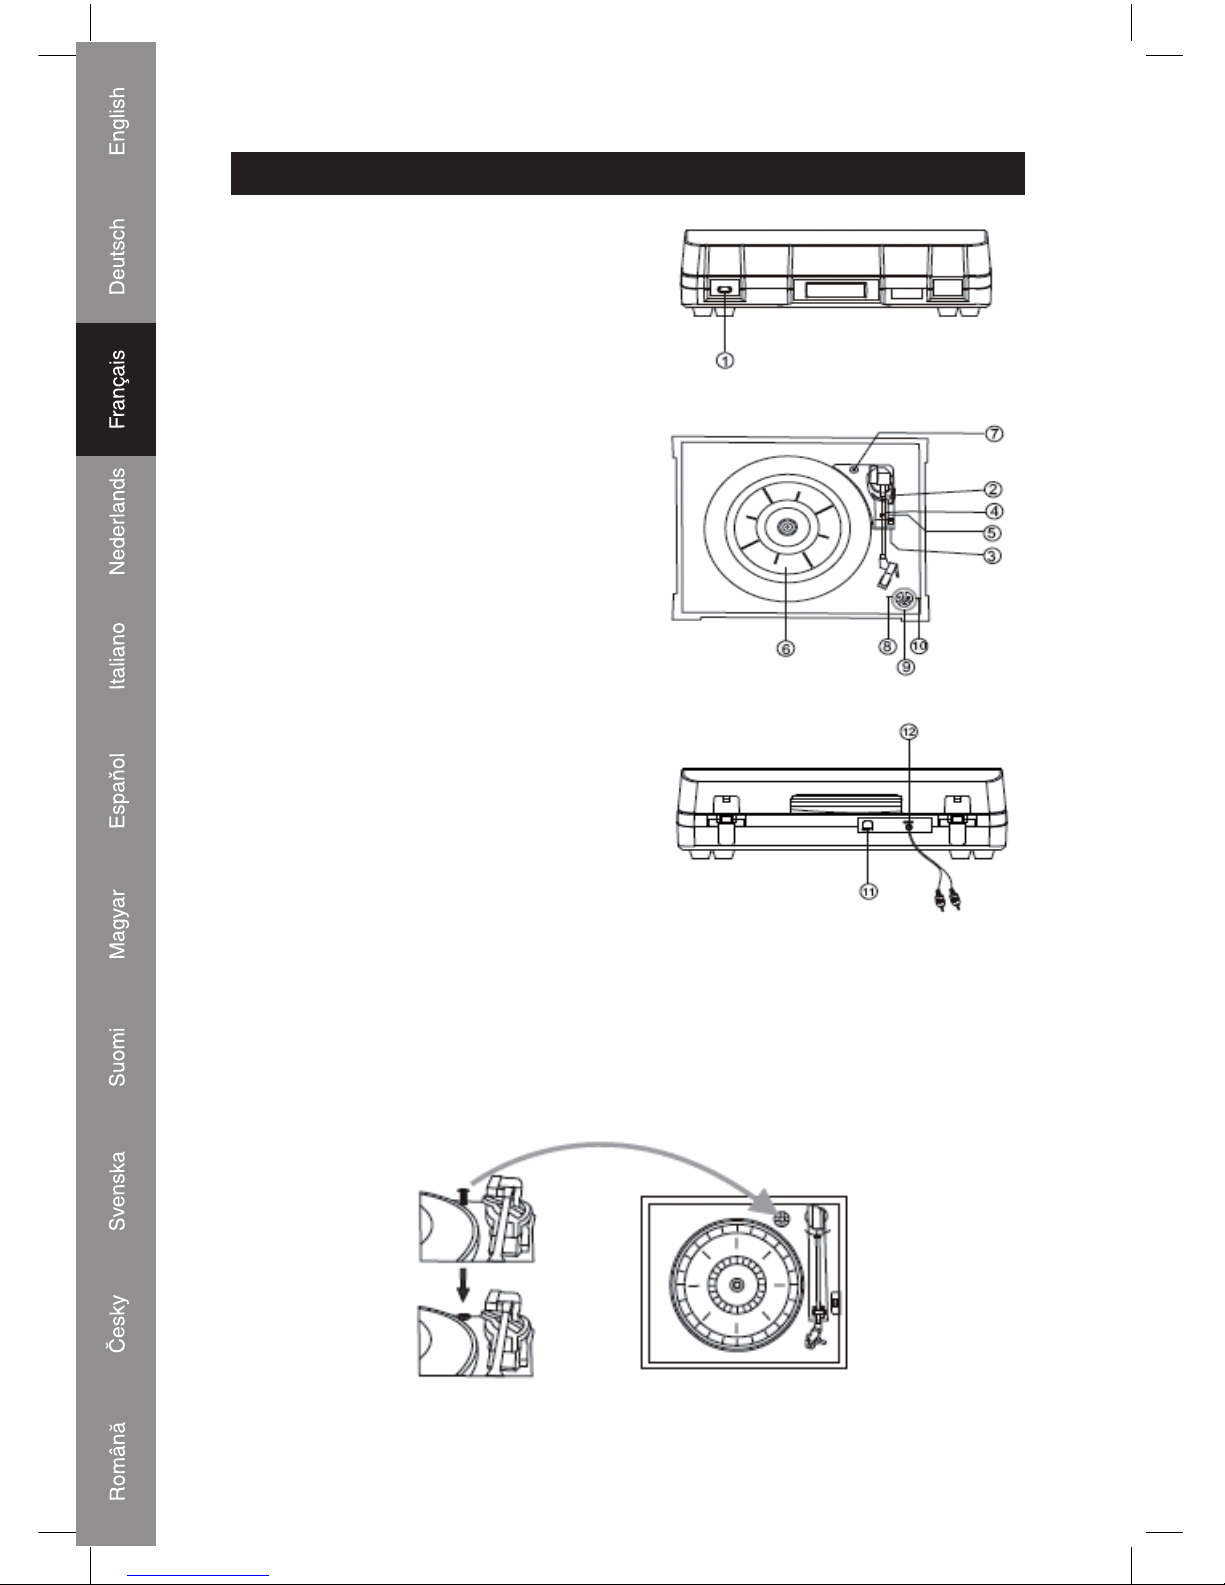
1. INTERRUPTEUR
2. BRAS DE LECTURE
3. COMMUTATEUR DE CONTROLE DE
VITESSE
4. CROCHET DE SECURITE
5. SUPPORT BRAS DE LECTURE
6. PLATINE
7. GRANDE VIS EN CHROME
8. Touche LECTURE
9. Touche Eject
10. Touche STOP
11. Prise USB
12. Sortie Haut-Niveau
Préparation pour une utilisation sur secteur
La vis en argent protège le châssis du phonographe pendant le transport.Si la vitesse de votre
phonographe vous semble lente ou que vous entendez un frottement, réglez la vis à l'aide
d'une pièce de monnaie afi n de corriger l'équilibre de la platine.
Page 15
15
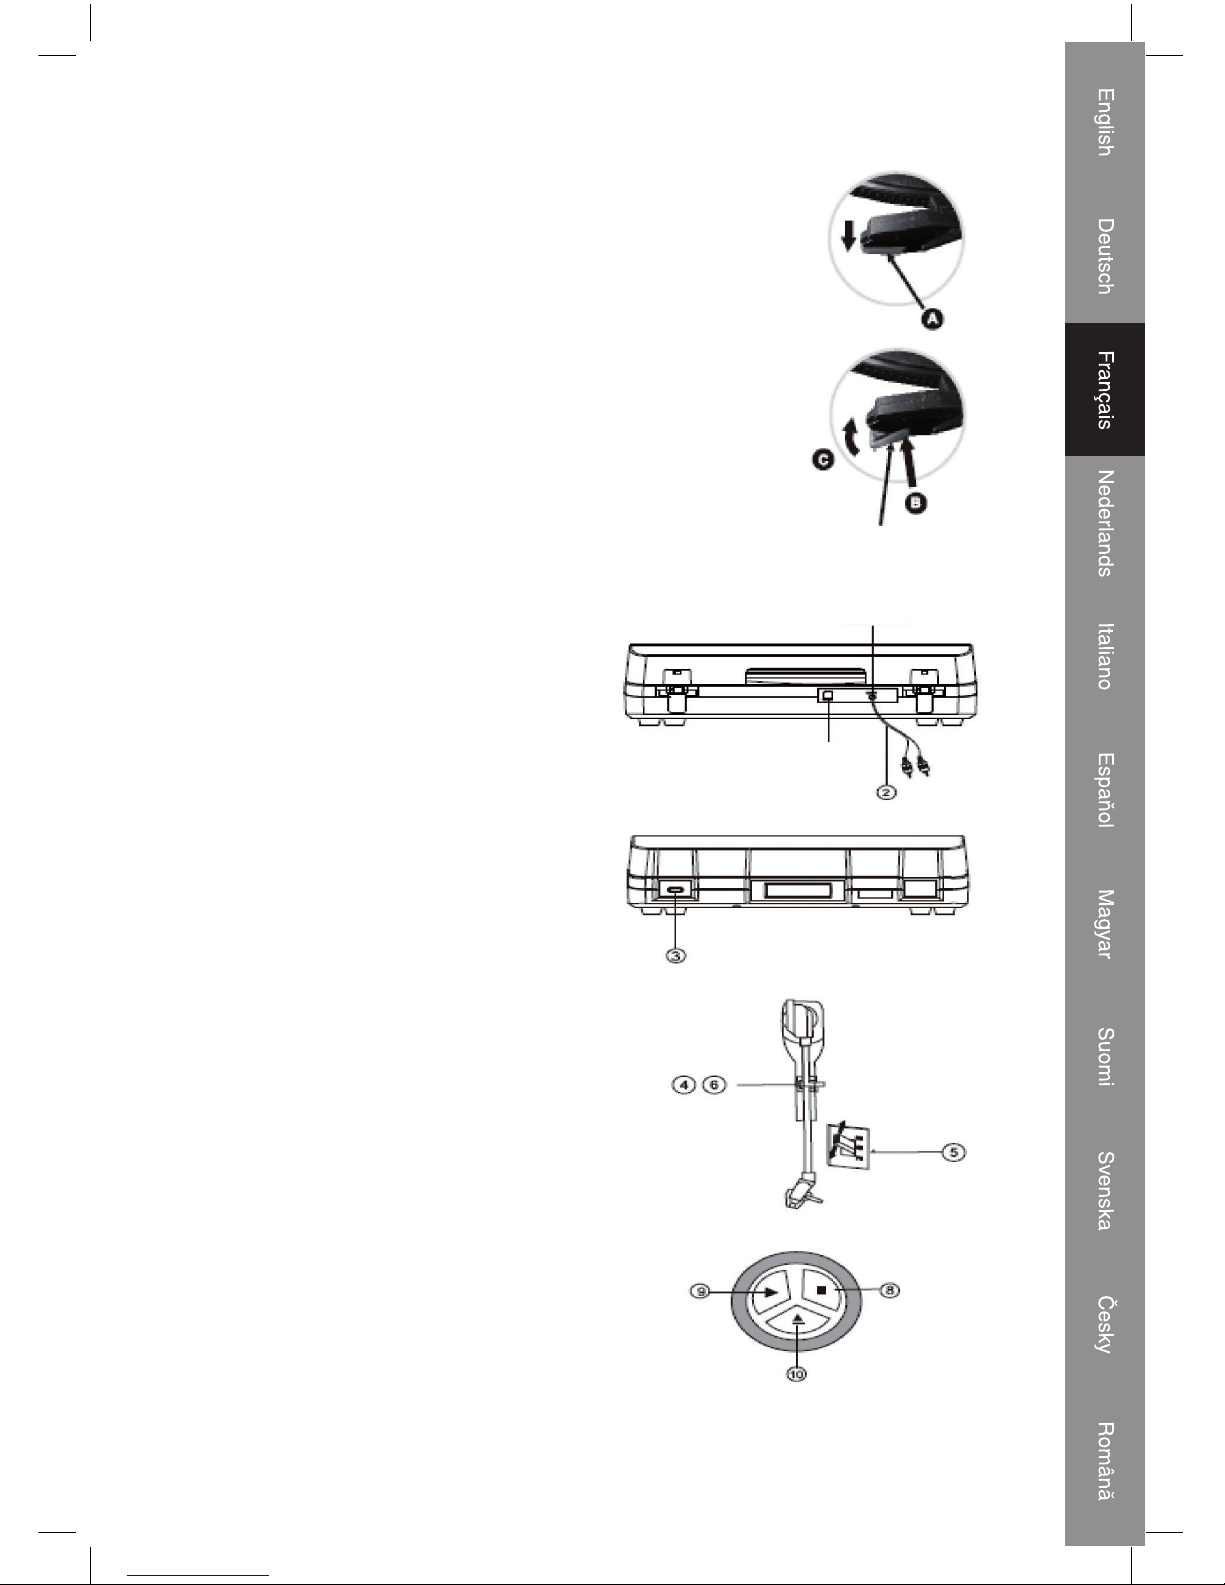
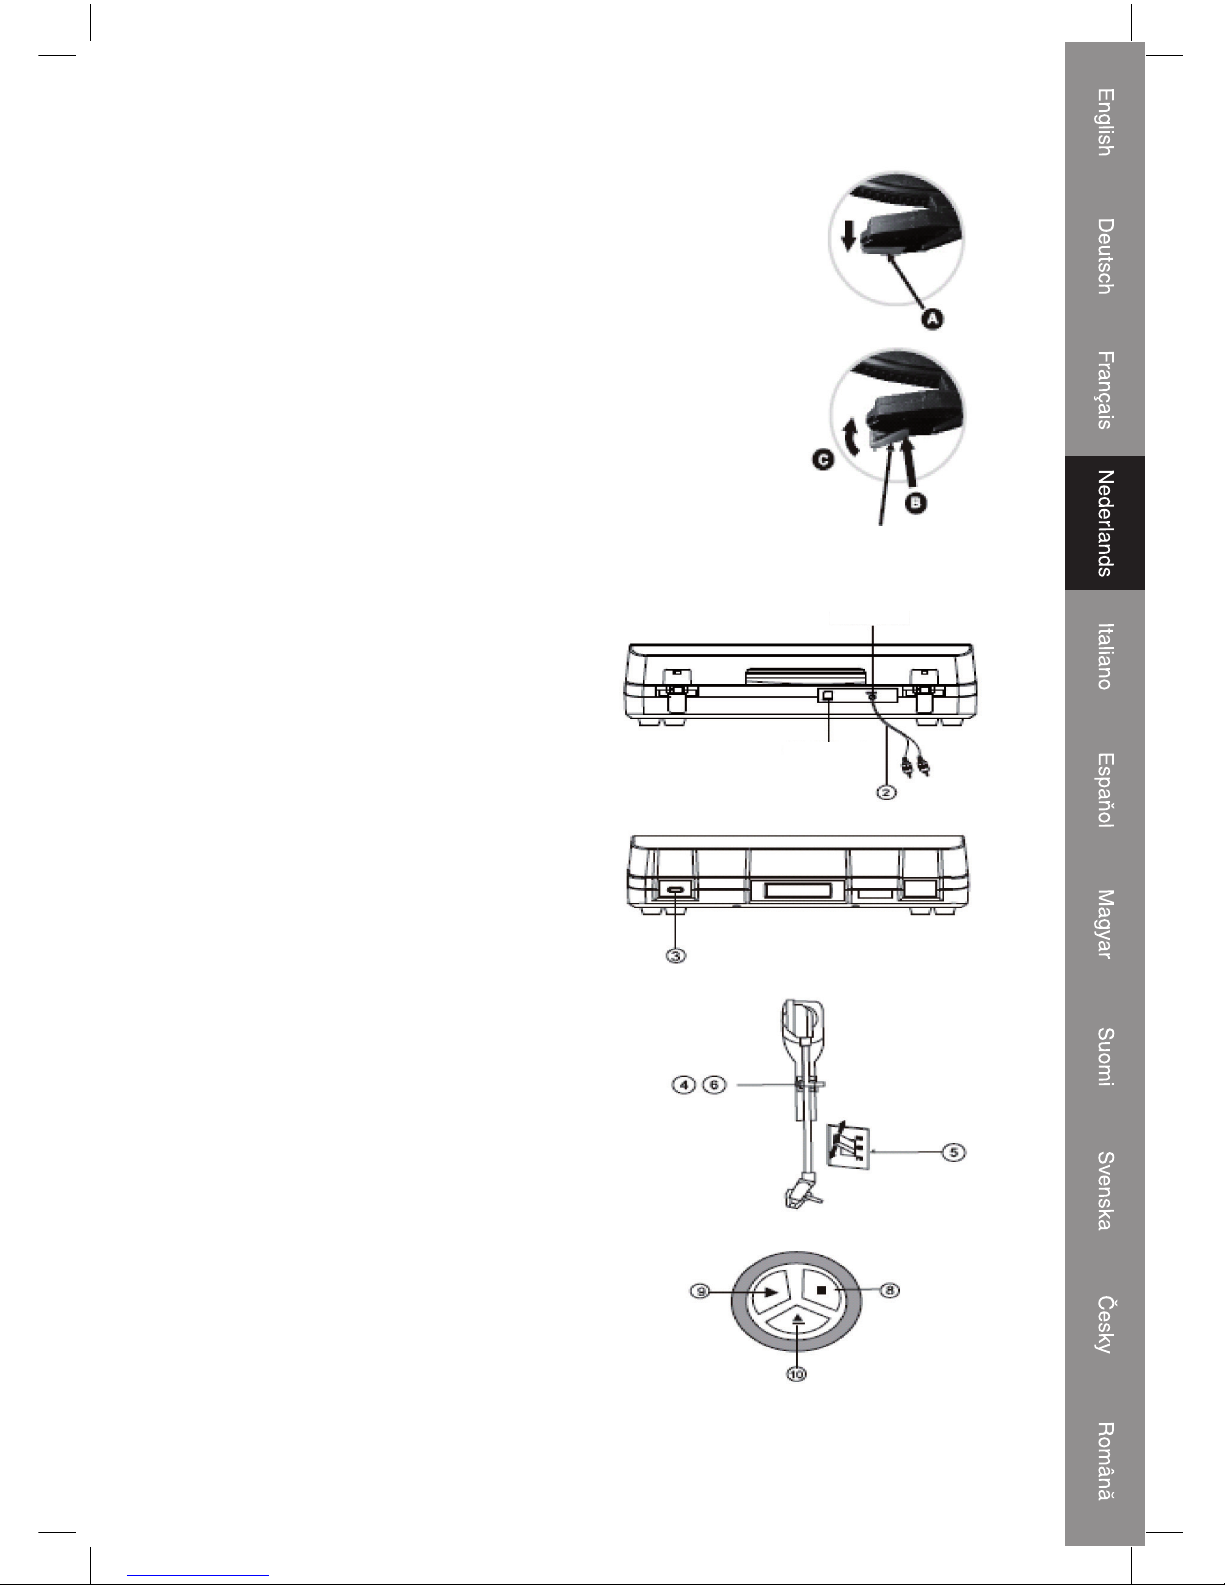
Comment remplacer la pointe de lecture
Retirer l'ancienne pointe de lecture
1. Placez un tournevis au bout de la pointe de lecture et appuyez vers
le bas dans la direction "A".
2. Retirez la pointe de lecture en la faisant basculer vers le bas et vers
l'avant.
Installer une nouvelle pointe de lecture
1. Maintenez le bout de la pointe de lecture et insérez l'autre bord en
appuyant dans la direction "B".
2. Relevez dans la direction "C" jusqu'à ce que la pointe soit
verrouillée.
Guide Pinx (à l'intérieur)
Sortie Haut-Niveau
Prise USB
Ecouter un disque
1. Raccordez le cordon d'alimentation électrique
au secteur (230V-50HZ).
2. Branchez l'autre extrémité du câble RCA dans
l'entrée auxiliaire (Aux) de votre téléviseur,
récepteur audiovisuel domestique ou tout
autre système audio en vous assurant de bien
brancher le câble RCA rouge dans la prise rouge
et le câble RCA blanc dans la prise blanche.
3. Allumez la platine.
4. Placez un disque sur la platine. S'il s'agit d'un
45 tours, rappelez-vous d'utiliser l'adaptateur qui
se trouve dans le sac plastique dans lequel se
trouvait également ce manuel.
5. Choisissez la vitesse de lecture en fonction du
disque que vous allez écouter.
6. Retirez doucement la sécurité du suppor t du bras
de lecture, relevez le levier et dirigez doucement
le bras de lecture au dessus de la position voulue
sur le disque, abaissez doucement le levier, la
lecture du disque commence.
7. Allumez l'appareil que vous avez raccordé à
cette platine USB en utilisant le bouton On/Off
ou le bouton de volume, réglez le bouton de
volume pour contrôler le volume de la musique.
8. Appuyez sur la touche STOP pour arrêter la
lecture.
9. Pour poursuivre la lecture, appuyez sur la touche
LECTURE.
10. Une fois que le disque est terminé et que le bras
de lecture à atteint la fi n du disque, il retourne
automatiquement sur son support. Vous pouvez
également appuyer sur la touche Eject en cours
de lecture pour que le bras de lecture quitte le
disque et retourne sur son support.
11. N'oubliez pas de débrancher la prise lorsque
vous n'utilisez pas l'appareil.
Page 16
16
Audacity et connexion USB
Installer le logiciel Audacity
Installez le logiciel Audacity sur votre ordinateur, grâce au disque livré avec la platine USB.
Insérez le disque Audacity dans le lecteur CD de votre ordinateur. Cliquez sur Poste de Travail
sur le bureau. Effectuez un double-clic sur la lettre correspondant au lecteur CD pour visualiser
le contenu du disque Audacity. Effectuez un double-clic sur Audacity Set Up afi n d'installer le
logiciel Audacity conformément aux instructions.
Installer le pilote USB
Assurez-vous que le disque Audacity se trouve toujours dans le lecteur CD. Utilisez le câble
USB fourni pour raccorder la platine à votre ordinateur. Suivez les instructions qui apparaissent
à l'écran pour installer le pilote USB.
Lancer le logiciel
1. Effectuez un double-clic sur l'icône du logiciel Audacity montrant des "balles" rouges et
oranges portant des écouteurs bleus. Vous accédez alors à l'interface suivante ;
2. A l'aide de la touche de commande des attributs en haut de l'écran, vous pouvez accéder
aux fonctions Beginning (Début), Play (Lecture), Record (Enregistrer), Pause, Stop et End
(Fin). Utilisez les menus File (Fichier), Edit (Editer), View (Vue), Project (Projet), Generate
(Générer), Effect (Effet) et Analyze (Analyse) pour Sauvegarder, Exporter et Editer la
musique.
3. Sélectionnez Preferences (Préférences) au bas du menu pour ouvrir les Préférences
Audacity. Vous pouvez y paramétrer l'E/S Audio, la Qualité, les Formats de Fichiers, les
Spectrogrammes, Répertoires, Interface, Clavier et Souris.
4. Réglez le volume de sortie et d'entrée.
5. Sélectionnez la touche Record (Enregistrer) pour enregistrer le disque, les pistes de gauche
et de droite apparaissent sur l'interface ; Si vous n'obtenez pas l'onde de fl uctuation sur
l'interface en cours d'enregistrement, réglez le volume de la ligne comme suit :
1. Cliquez sur Démarrer dans le coin gauche de l'écran de l'ordinateur, sélectionnez "Tous les
Programmes", "Accessoires", "Divertissement", "Enregistreur sonore" et accédez à l'interface
Enregistreur sonore.
2. Interface Enregistreur sonore
3. Sélectionnez Editer et cliquez sur "Propriétés Audio" au bas du menu pour accéder à
l'interface "Propriétés Audio" ;
A. Cliquez sur la touche Précédent pour aller au début ;
B. Cliquez sur la touche Suivant pour aller à la fi n ;
C. Cliquez sur la touche Lecture pour lire ;
D. Cliquez sur la touche Pause pour effectuer une pause dans la lecture ;
E. Cliquez sur la touche Stop pour arrêter le disque.
4. Sélectionnez le volume du son de l'enregistrement et accédez à l'interface "Contrôle
d'Enregistrement" ; Réglez le volume de la ligne au plus haut ou au milieu, l'onde de
fl uctuation apparaîtra sur l'interface en cours d'enregistrement.
Page 17
17
Exporter au format WAV,MP3 ou Ogg
1. Assurez-vous que le disque Audacity se trouve toujours dans votre ordinateur. Effectuez un
double-clic sur l'icône Poste de Travail de votre bureau.
2. Effectuez un double-clic sur le lecteur CD ROM.
3. Copiez le fi chier lame_enc.dll et collez-le sur votre bureau.
4. Après avoir copié le fi chier, lancez le logiciel Audacity. Cliquez sur la touche Record
(Enregistrer) pour démarrer l'enregistrement. Assurez-vous que le disque soit en cours de
lecture sur la platine et que le câble USB soit bien raccordé à l'unité principale.
5. Vous pouvez appuyer sur la touche Stop quand bon vous semble. Une fois que vous disposez
du fi chier enregistré qui doit être converti, appuyez sur l'onglet Edit (Editer) et accédez aux
Préférences.
6. Localisez l'onglet File Form (Format Fichier) et cliquez sur la touche Find Library (Trouver
Bibliothèque).
7. Cliquez sur la touche Yes (Oui) et retournez sur le bureau pour mettre le fi chier lame_enc.dll
en surbrillance. Cliquez ensuite sur la touche Open (Ouvrir).
8. Cliquez sur la touche OK et retournez dans la fenêtre par défaut du logiciel Audacity.
9. Cliquez sur l'onglet File (Fichier) où vous trouverez l'option permettant d'exporter le fi chier
enregistré au format "WAV", "MP3" ou "Ogg".
10. Une fois que vous avez choisi le format de fi chier, saisissez un nom de fi chier et l'emplacement
où vous souhaitez le sauvegarder. Cliquez ensuite sur la touche Save (Sauvegarder).
11. Entrez le Titre, le nom de l'Artiste et les autres informations relatives au fi chier MP3 que vous
avez créé puis cliquez sur OK.
Caractéristiques techniques
Section LECTEUR DE DISQUE
Moteur Servomoteur c.c
Système d'entraînement Courroie d'entraînement
Vitesses 33-1/3 tours, 45 tours et 78 tours/minutes
Scintillation & Pleurage Moins de 0.25%(WTD)
Rapport signal/bruit Plus de 50 dB
Type de cartouche Cartouche stéréo céramique
Pointe de lecture 402-M208-165
Niveau de sortie 160-380 mV (5 cm/sec at 1 KHz)
GENERALITES :
Exigences électriques 230 V c.a~50 Hz
Consommation électrique : 5W
Dimensions (lxHxP) 37X16.5X33 cm
Poids 4.96 kg.
Adaptateur 45 tours
Page 18
18
DECLARATION DE CONFORMITE
Nous,
Nedis B.V.
De Tweeling 28
5215MC ’s-Hertogenbosch
Pays-Bas
Tél : 0031 73 599 1055
e-mail : info@nedis.com
Déclarons que le produit :
Nom : KONIG
Modèle : HAV-TT10USB
Description : Platine USB
est conforme aux normes suivantes :
CEM : EN 55013: 2001+A1+A2,
EN 55022: 2006
EN 61000:3 2 :2000 + A2 :
EN 6100033: 1995+A1A2
EN 55020: 2002+A1+A2
EN 55024: 1998+A1+A2
DBT: EN 60065: 2002 + A1 : 2006
conformément aux prescriptions des directives 2004/108/CE et 2006/95/CE.
‘s-Hertogenbosch, 21 mars 2008
Mme. J. Gilad
Directeur des Achats
Page 19
19
Consignes de sécurité :
ATTENTIO N
RISQUE DE CHOC ELECTRIQUE
NE PAS OUVRI R
Afi n de réduire les risques de chocs électriques, ce produit
ne doit être ouvert QUE par un technicien qualifi é agréé en
cas de réparation. Débranchez l'appareil du secteur et des
autres équipements en cas de problème. N'exposez jamais l'appareil à l'eau ou à l'humidité.
Entretien :
Nettoyez uniquement avec un chiffon sec. N'utilisez pas de solvants ou de produits abrasifs.
Garantie :
Aucune garantie ou responsabilité ne sera acceptée en cas de modifi cation et/ou de
transformation du produit ou en cas de dommages provoqués par une utilisation incorrecte
de l'appareil.
Généralités :
Le design et les caractéristiques techniques sont sujets à modifi cation sans notifi cation
préalable.
Tous les logos de marques et noms de produits sont des marques déposées ou immatriculées
dont leurs détenteurs sont les propriétaires et sont donc reconnus comme telles dans ce
document.
Attention :
Ce symbole fi gure sur l'appareil. Il signifi e que les produits électriques et électroniques
ne doivent pas être jetés avec les déchets domestiques. Le système de collecte est
différent pour ce genre de produits.
Copyright ©
Page 20
20
NEDERLANDS
Locatie van de onderdelen
1. Aan/uit schakelaar
2. TOONARM
3. SNELHEIDSCONTROLEKNOP
4. VEILIGHEIDSHAAK
5. TOONARMSTEUN
6. PLATEAU
7. GROTE VERCHROOMDE SCHROEF
8. AFSPEELTOETS (PLAY)
9. ARMLIFTTOETS (EJECT)
10. STOPTOETS
11. USB-AANSLUITING
12. LINE OUT (uitgang)
Voorbereiding voor aansluiting op het elektriciteitsnet
De verchroomde schroef beschermt het chassis van de platenspeler gedurende het transport.
Indien de snelheid van uw platenspeler te traag lijkt, of wanneer u een wrijvend geluid hoort,
pas dan deze schroef aan met behulp van een munt.
Page 21
21
Het vervangen van de naald
Verwijder de oude naald
1. Plaats een schroevendraaier tegen de punt van het element en duw
in de richting "A".
2. Verwijder de naald door deze omlaag en naar voren te trekken.
Installeer een nieuwe naald
1. Houd de punt van de naald vast en steek het andere eind in het
element door het in de richting "B" te drukken.
2. Druk nu in de richting "C" totdat de punt vast zit.
Geleider (binnenin)
Line Out (uitgang)
USB-aansluiting
Luister naar een plaat
1. Sluit het apparaat aan op het stopcontact, dit is
standaard 230V-50HZ.
2. Steek het andere eind van de RCA-kabel
in de auxiliary ingang (Aux) van uw TV,
home entertainment versterker of een ander
muzieksysteem, Controleer dat de rode RCAkabel in de rode contactbus is gestoken en de
witte RCA-kabel in de witte contactbus.
3. Zet het apparaat AAN.
4. Plaats een plaat op het plateau. Wanneer u een
45 toerenplaat wilt draaien dient u de adapter te
gebruiken, deze is verpakt in de plastic zak met
de handleiding.
5. Selecteer de afspeelsnelheid, deze is afhankelijk
van de plaat die u wilt gaan draaien.
6. Verwijder de arm van de armsteun, breng de
armsteun omhoog en plaats de arm rustig boven
de gewenste positie boven de plaat, beweeg de
armsteunhendel rustig zodat de naald de plaat
raakt, nu wordt de plaat afgespeeld.
7. Schakel het apparaat in waarmee u deze USBplatenspeler heeft verbonden door de aan/uit
knop of de Volume knop te gebruiken, pas het
volume aan met behulp van de volumeknop.
8. Druk op de STOP toets om het afspelen te
stoppen.
9. Druk op de AFSPEEL toets om door te gaan
met het afspelen.
10. Wanneer de muziek beëindigd is en de naald
het eind van de plaat heeft bereikt, zal de
toonarm automatisch terug gaan naar de
armsteun. U kunt tijdens het afspelen op de
eject toets drukken zodat de arm zal worden
opgetild en terug gaan naar de armsteun.
11. Denk erom om dat u de stekker uit het
stopcontact haalt wanneer u het apparaat niet
gebruikt.
Page 22

22
Audacity en de USB-aansluiting
Installeer de Audacity software
Installeer de Audacity software op uw computer, de CD is meegeleverd met de USBplatenspeler. Plaats de Audacity cd in de CD-speler van uw computer. Klik op My Computer
(mijn computer) op uw bureaublad. Dubbelklik op CD-speler om de inhoud van de Audacity
cd te kunnen bekijken. Dubbelklik op Audacity Set Up om de Audacity software volgens de
instructie te installeren.
Installeer de USB-driver
Controleer of de Audacity c d nog steed s in uw CD -speler zit. Gebruik de bijgesloten USB -kabel
om de platenspeler mee aan te sluiten op uw computer. Volg de scherminstructie om de USBdriver te installeren.
De software gebruiken
1. Dubbelklik op de Audacity software met rode en oranje "ballen" die blauwe hoofdtelefoons
dragen om in het volgende programma te komen;
2. Gebruik de attribute controls (bedienings) knoppen bovenaan het scherm, om te beginnen,
Play (afspelen), Record (opnemen), Pause (pauze), Stop en go to end (ga naar het einde).
Gebruik File (Bestand), Edit (bewerken), View (bekijken), Project, Generate (produceren),
Effect en Analyze (analiseren) menu's, om de muziek op te slaan (Save), te exporteren
(Export) en te bewerken (edit).
3. Selecteer preferences aan de onderkant van het menu, dit zal de Audacity Preferences
(voorkeuren) tonen. U kunt de Audio I/O (in-/uitgang), Quality (kwaliteit), File Formats
(bestandformaten), Spectrograms, Directories (mappen), Interface (verbinding), Keyboard
(toetsenbord) en Mouse (muis) in het Audacity preference (voorkeur) menu instellen.
4. Pas het output (uitgang) en input (ingang) volume aan.
5. Selecteer de record toets om de plaat op te nemen, de linker en rechter kanalen zullen worden
weergegeven in het programma. Indien u geen grafi sche weergave ziet in het programma
tijdens het opnemen pas dan het ingangsvolume als volgt aan:
1. Klik op "start" in de linker hoek van het beeld, selecteer "Programs" (Programma's),
"Accessories" (Bureau-accesoires), "Entertainment", "Sound Recorder" (Geluidsrecorder)
en u bent in het opnameprogramma.
2. Geluidsrecorder
3. Selecteer Edit (bewerk) en klik op "Audio Properties" (eigenschappen) aan de onderkant van
het menu om in "Audio Properties" te komen;
A. Klik op de previous (vorige) toets om direct naar het begin te gaan;
B. Klik op de forward (volgende) toets om direct naar het einde te gaan;
C. Klik op de play (afspeel) toets om af te spelen;
D. Klik op de pause toets om de opname te pauzeren;
E. Klik op de stop toets om de opname te stoppen.
4. Selecteer sound recording volume en u bent in het "Recording Control" programma; Pas het
lijn in volume aan op most of middle, de fl uctuerende golf zal worden getoond gedurende
de opname.
Page 23

23
Exporteren in WAV-,MP3- of Ogg-formaten
1. Controleer of de Audacity cd nog in uw computer zit. Dubbelklik op het Mijn Computer icoon
op uw bureaublad.
2. Dubbelklik op de CD-speler.
3. Kopieer het lame_enc.dll bestand naar uw bureaublad.
4. Open de Audacity Software, nadat u het bestand heeft gekopieerd. Klik op de Record toets om
te starten met de opname. Controleer of de platenspeler speelt en de USB-kabel verbonden
is met de computer.
5. U kunt op elk gewenst moment op de Stop toets drukken. Wanneer u een opname wilt
converteren, klik dan op het Edit Tab en ga naar Preferences (voorkeuren).
6. Zoek het File Form Tab en klik op de Find Library toets.
7. Klik op de Yes toets en ga naar uw bureaublad, selecteer lame_enc.dll. Klik nu op de Open
toets.
8. Klik op de OK toets en ga naar het standaardscherm van Audacity Software.
9. Klik op het File Tab, u heeft de mogelijkheid om de opname te exporteren naar "WAV", "MP3"
of "Ogg" bestandsformaten.
10. Nadat u het bestandsformaat heeft gekozen kunt u de bestandsnaam en de locatie waar u
het bestand wilt opslaan kiezen. Wanneer u klaar bent kunt u op de Save toets klikken.
11. Voer de Title, Artist en andere informatie over het MP3-bestand in dat u heeft gecreëerd en
klik op de OK toets.
Specifi caties
PLATENSPELER
Motor Gelijkstroom servomotor
Aandrijfsysteem Snaaraandrijving
Snelheden 33-1/3 toeren, 45 toeren en 78 toeren
Wow & Flutter Minder dan 0.25%(WTD)
Signaal/ruis verhouding Meer dan 50 dB
Elementtype Keramisch stereo-element
Naald 402-M208-165
Uitgangniveau 160-380 mV (5 cm/sec bij 1 KHz)
ALGEMEEN
Ingang 230V~ wisselstroom 50 Hz
Energieverbruik: 5 W
Afmetingen (WxHxD 37X16.5X33 cm
Gewicht 4,96 kg
45-toeren adapter
Page 24

24
CONFORMITEITVERKLARING
Wij,
Nedis BV
De Tweeling 28
5215 MC ’s-Hertogenbosch
Nederland
Tel.: 0031 73 599 1055
E-mail: info@nedis.com
Verklaren dat het product:
Merknaam: KONIG
Model: HAV-TT10USB
Omschrijving: USB-platenspeler
conform de volgende standaarden is:
EMC: EN 55013 : 2001 + A1 + A2
EN 55022 : 2006
EN 61000 - 3 2 : 2000 + A2
EN 61000 - 3 - 3 : 1995 + A1 A2
EN 55020 : 2002 + A1 + A2
EN 55024 : 1998 + A1 + A2
LVD: EN 60065 : 2002 + A1 : 2006
Conform de bepalingen van de richtlijnen 2004/108/EC en 2006/95/EC.
‘s-Hertogenbosch, 21 maart 2008
Mevr. J. Gilad
Directeur inkoop
Page 25

25
Veiligheidsvoorzorgsmaatregelen:
LET OP:
GEVAAR VOOR E LEKTRISCH E SCHOK
NIET OPENEN
Wanneer service of reparatie noodzakelijk is, mag dit product
UITSLUITEND door een geautoriseerde technicus geopend
worden; dit om de kans op het krijgen van een elektrische
schok te voorkomen. Als er een probleem optreedt, koppel het product dan los van het lichtnet
en van andere apparatuur. Stel het product niet bloot aan water of vocht.
Onderhoud:
Uitsluitend reinigen met een droge doek. Gebruik geen reinigingsmiddelen of
schuurmiddelen.
Garantie:
Voor wijzigingen en veranderingen aan het product of schade veroorzaakt door een verkeerd
gebruik van dit product, kan geen aansprakelijkheid worden geaccepteerd. Tevens vervalt
daardoor de garantie.
Algemeen:
Wijziging van ontwerp en specifi caties zonder voorafgaande mededeling onder voorbehoud.
Alle logo's, merken en productnamen zijn handelsmerken of geregistreerde handelsmerken
van de respectievelijke eigenaren en worden hierbij als zodanig erkend.
Let op:
Dit product is voorzien van dit symbool. Dit symbool geeft aan dat afgedankte
elektrische en elektronische producten niet met het gewone huisafval verwijderd
mogen worden. Voor dit soort producten zijn er speciale inzamelingspunten.
Copyright ©
Page 26

26
ITALIANO
Posizione delle parti
1. Interruttore di ALIMENTAZIONE
2. BRACCIO
3. INTERRUTTORE DI CONTROLLO VELOCITÀ
4. GANCIO SICUREZZA
5. APPOGGIO BRACCIO
6. PIATTO
7. VITE CROMO GRANDE
8. Pulsante RIPRODUZIONE
9. Pulsante ESPULSIONE
10. Pulsante STOP
11. Jack USB
12. Line Out
Preparazione all'uso con l'alimentazione di rete
La vite argento protegge il telaio del fonografo durante il trasporto. Se la velocità del fonografo
sembra limitata o se si avverte un rumore di sfregamento, regolare la vite con una moneta per
correggere l'equilibrio del piatto.
Page 27

27
Modalità per sostituire la puntina
Rimozione della puntina
1. Posizionare un cacciavite all'estremità della puntina e spingere in
basso verso la direzione "A".
2. Rimuovere la puntina spingendo verso il basso e in avanti.
Installazione di una nuova puntina
1. Tenendo l'estremità della puntina inserire l'altro bordo premendo
nella direzione "B".
2. Spingere verso l'alto in direzione "C" fi no a quando si blocca
all'estremità.
Guide Pinx (interno)
Line Out
Jack USB
Ascolto di un disco
1. Collegare un cavo di alimentazione CA
all'alimentazione di rete, lo standard è 230 V - 50
HZ.
2. Inserire le altre estremità del cavo RCA
nell'ingresso ausiliario (Aux) della TV, del
ricevitore home entertainment o di altro impianto
musicale, verifi cando che il cavo RCA rosso sia
inserito nel jack rosso e il cavo RCA bianco sia
inserito nel jack bianco.
3. Accendere il piatto.
4. Porre un disco sul piatto. Se si riproduce un
disco a 45 giri, occorre utilizzare un adattatore
imballato in un sacchetto il polietilene insieme al
manuale.
5. Selezionare la velocità del lettore in base al
disco da riprodurre.
6. Togliere il supporto dell'appoggio del braccio,
sollevare la leva e spostare con delicatezza il
braccio nella posizione desiderata sul disco,
abbassare lentamente la leva. Il disco verrà
riprodotto.
7. Accendere l'unità collegata con questo piatto
USB utilizzando la manopola On/off o la
manopola del volume. Regolare la manopola del
volume per controllare il volume della musica.
8. Premere il pulsante STOP per arrestare la
riproduzione.
9. Per riprendere la riproduzione, premere il
pulsante RIPRODUZIONE.
10. Quando la riproduzione della musica è terminata
e il braccio ha raggiunto la fi ne del disco, il braccio
tornerà automaticamente al suo appoggio. In
alternativa, è possibile premere il pulsante di
espulsione durante la riproduzione del disco: il
braccio si allontanerà dal disco e tornerà al suo
appoggio.
11. Ricordare di scollegare la spina quando l'unità
non funziona.
Page 28

28
Audacity e connessione USB
Installazione del software Audacity
Installare sul computer il software Audacity, presente nel disco a corredo del piatto USB.
Inserire il disco Audacity nell'unità CD del computer. Fare clic su Risorse del Computer sul
Desktop. Fare doppio clic sull'unità CD per visualizzare il contenuto del disco Audacity. Fare
doppio clic su Audacity Set Up per installare il software Audacity seguendo le istruzioni.
Installazione del driver USB
Verifi care che il disco Audacity sia sempre nell'unità CD. Utilizzando il cavo USB incluso,
collegare il piatto al computer. Seguire le istruzioni su schermo per installare il driver USB.
Esecuzione del software
1. Fare doppio clic sul software Audacity che visualizza le "sfere" rosso e arancio che indossano
cuffi e blu ed entrare nella seguente interfaccia;
2. Utilizzando il pulsante di controllo degli attributi nella parte superiore della schermata, andare
all'inizio, Play (riproduzione), Record (registrazione), Pause (pausa), Stop e andare alla
fi ne.Utilizzare i menu File, Edit (modifi ca), View (visualizza), Project (progetta), Generate
(genera), Effect (effetti) e Analyze (analizza) per salvare, esportare e modifi care la musica.
3. Selezionando Preferences (preferiti) al fondo del menu, si apriranno i preferiti di Audacity. È
possibile impostare Audio I/O, Quality (qualità), File Formats (formati di fi le), Spectrograms
(spettrogrammi), Directories, Interface (interfaccia), Keyboard (tastiera) e Mouse
nell'interfaccia dei preferiti di Audacity.
4. Regolare il volume di uscita e di ingresso.
5. Selezionare il pulsante registrazione per registrare il disco; sull'interfaccia appariranno
le tracce sinistra e destra. Se durante la registrazione non si presenta un'onda fl uttuante
sull'interfaccia, regolare la linea nel volume attenendosi alle seguenti istruzioni:
1. Fare clic su "start" nell'angolo a sinistra del computer, selezionare "Programs" (programmi),
"Accessories" (accessori), "Entertainment" (intrattenimento), "Sound Recorder" (registratore
suono) ed entrare nell'interfaccia di registrazione suono.
2. Interfaccia registratore suono
3. Selezionare Edit (modifi care) e fare clic su "Audio Properties" (proprietà audio) nella parte
inferiore del menu, per aprire l'interfaccia "Audio Properties";
A. Fare clic sul pulsante indietro per saltare all'avvio;
B. Fare clic sul pulsante avanti per saltare alla fi ne;
C. Fare clic sul pulsante di riproduzione per riprodurre;
D. Fare clic sul pulsante di pausa per mettere in pausa la riproduzione del disco;
E. Fare clic sul pulsante sto per arrestare il disco.
4. Selezionare il volume di registrazione del suono ed entrare nell'interfaccia "Recording
Control" (controllo registrazione). Regolare la linea nel volume verso il massimo o il centro.
Durante la registrazione l'onda fl uttuante apparirà sull'interfaccia.
Page 29

29
Esportazione per i formati WAV,MP3 o Ogg
1. Verifi care che il disco Audacity sia sempre inserito nel computer. Fare doppio clic sull'icona
Risorsa del computer sul desktop.
2. Fare doppio clic sull'unità CD ROM .
3. Copiare il fi le lame_enc.dll e incollare sul desktop.
4. Dopo aver copiato il fi le, aprire il software Audacity. Fare clic sul pulsante Registrazione per
avviare la registrazione. Verifi care che un disco sia in riproduzione sul piatto e che il cavo
USB sia collegato all'unità principale.
5. È possibile premere il pulsante Stop in qualunque momento. Dopo aver registrato il fi le che
sarà convertito, premere la scheda Edit e aprire Preferences.
6. Individuare la scheda File Form e fare clic sul pulsante Find Library (trova libreria).
7. Fare clic sul pulsante Sì, andare sul desktop ed evidenziare lame_enc.dll. Ora fare clic sul
pulsante Open (apri).
8. Fare clic sul pulsante OK e tornare alla fi nestra di default del software Audacity.
9. Fare clic sulla scheda File. Si dispone della possibilità di esportare i fi le registrati nei formati
di fi le "WAV", "MP3" o "Ogg".
10. Dopo aver scelto il formato di fi le di esportazione, è suffi ciente assegnare al fi le il nome e
l'ubicazione di salvataggio. Al termine, fare clic sul pulsante Save (salva).
11. Inserire il titolo, l'artista e altre informazioni sul fi le MP3 creato e fare clic sul pulsante OK.
Specifi che
Sezione REGISTRATORE LETTORE
Motore Servo motore DC
Sistema di trasmissione Trasmissione a cinghia
Velocità 33-1/3 giri/min 45 giri/min e 78 giri/min
Wow e Flutter Meno dello 0,25%(WTD)
Rapporto S/N Oltre 50 dB
Tipo di cartuccia Cartuccia stereo in ceramica
Puntina 402-M208-165
Livello uscita 160-380 mV (5 cm/sec a 1 KHz)
GENERALITÀ:
Requisiti di alimentazione 230 V AC~50Hz
Consumo di corrente 5 W
Dimensioni (AxHxP 37X16,5X33 cm
Peso 4,96kg
Adattatore 45 giri
Page 30

30
DICHIARAZIONE DI CONFORMITÀ
Questa società,
Nedis B.V.
De Tweeling 28
5215MC ’s-Hertogenbosch
Paesi Bassi
Tel.: 0031 73 599 1055
Email: info@nedis.com
Dichiara che il prodotto:
Nome: KONIG
Modello: HAV-TT10USB
Descrizione: Piatto USB
È conforme ai seguenti standard
EMC: EN 55013: 2001 + A1 + A2
EN 55022: 2006
EN 61000 - 3 2 : 2000 + A2
EN 61000 - 3 - 3 : 1995 + A1 A2
EN 55020: 2002 + A1 + A2
EN 55024: 1998 + A1 + A2
LVD: EN 60065: 2002 + A1 : 2006
Secondo le disposizioni della direttiva 2004/108/EC e 2006/95/EC.
‘s-Hertogenbosch, 21 marzo 2008
Sig.ra J. Gilad
Direttore agli acquisti
Page 31

31
Precauzioni di sicurezza:
ATTENZIONE
RISCH IO DI SCOSSE ELE TTRICHE
NON APRIRE
Per ridurre il rischio di scosse elettriche, questo prodotto
deve essere aperto ESCLUSIVAMENTE da personale
tecnico specializzato, se occorre assistenza. Se si dovessero
verifi care dei problemi, scollegare il prodotto dall'alimentazione di rete e da ogni altra
apparecchiatura. Non esporre il prodotto ad acqua o umidità.
Manutenzione:
Pulire solo con un panno asciutto. Non utilizzare solventi detergenti o abrasivi.
Garanzia:
Non sarà accettata alcuna garanzia o responsabilità in relazione a cambiamenti e modifi che
del prodotto o a danni determinati dall'uso non corretto del prodotto stesso.
Generalità:
Il design e le caratteristiche tecniche sono soggetti a modifi ca senza necessità di preavviso.
Tutti i marchi a logo e i nomi di prodotto sono marchi commerciali o marchi registrati appartenenti
ai rispettivi titolari e sono in questo documento riconosciuti come tali.
Attenzione:
Il prodotto è contrassegnato con questo simbolo, con il quale si indica che i prodotti
elettrici ed elettronici usati non devono essere gettati insieme ai rifi uti domestici. Per
questi prodotti esiste un sistema di raccolta differenziata.
Copyright ©
Page 32

32
ESPAÑOL
Ubicación de las partes
1. INTERRUPTOR DE ALIMENTACIÓN
2. BRAZO DE FONOCAPTOR
3. INTERRUPTOR DEL CONTROL DE
VELOCIDAD
4. GANCHO DE SEGURIDAD
5. REINICIO DEL BRAZO DEL FONOCAPTOR
6. PLATO
7. GRAN TUERCA DE CROMO
8. BOTÓN DE REPRODUCCIÓN
9. BOTÓN DE EXPULSIÓN
10. BOTÓN DE INTERRUPCIÓN
11. TOMA USB
12. SALIDA DE LÍNEA
Preparación al uso con la red
La tuerca de plata protege el chasis del tocadiscos durante el transporte. Si la velocidad de
su tocadiscos parece lenta o si oye un ruido molesto, ajuste la tuerca con una moneda para
corregir el equilibrio del plato.
Page 33

33
Cómo cambiar la aguja
Cambio de la antigua aguja
1. FIje un destornillador en la punta de la aguja y empuje hacia la
dirección "A".
2. Saque la aguja tirándola hacia abajo y hacia atrás.
Instalación de una nueva aguja
1. Mantenga la punta de la aguja e introduzca el otro borde pulsando
en dirección "B".
2. Empuje hacia arriba en dirección "C" hasta que se bloquee en la
punta.
Pin de guía (interior)
Salida de línea
Tom a US B
Oír una grabación
1. Conecte el cable de alimentación de CA a la red,
la norma es 230V-50HZ.
2. Conecte los otros extremos del cable RCA a
una entrada auxiliar (Aux) en su TV, receptor
de entretenimiento en casa, u otro sistema de
música, compruebe que el cable rojo de RCA
está introducido en la toma roja y que el cable
blanco RCA está introducido en la toma blanca.
3. Encienda el plato.
4. Ponga una grabación en el plato, cuando
reproduzca la grabación de 45 rpm, no olvide
utilizar el adaptador que se incluye en el paquete
junto con el manual.
5. Seleccione la velocidad del reproductor en
función de la grabación que esté reproduciendo.
6. Saque el sostén del brazo del fonocaptor, levante
la palanca y mueva el brazo del fonocaptor
suavemente hasta la posición deseada en la
grabación, baje la palanca suavemente, y a
continuación se reproducirá la grabación.
7. Encienda la unidad que conectó con este
plato USB utilizando la rueda de encendido/
apagado o la rueda del volumen, ajuste la rueda
del volumen para controlar el volumen de la
música.
8. Pulse el botón "STOP" (INTERRUMPIR) para
interrumpir la reproducción.
9. Para continuar con la reproducción, pulse el
botón PLAY (reproducción).
10. Cuando la reproducción de la música haya
acabado, y el brazo del fonodetector alcance el
fi nal de la grabación, el brazo del fonodetector
regresará al apoyo del brazo automáticamente.
Del mismo modo, podrá pulsar el botón de
expulsión cuando reproduzca la grabación, y el
brazo del fonodetector saldrá de la grabación y
regresará al apoyo del brazo.
11. No olvide desconectar la toma cuando no
reproduzca la unidad.
Page 34

34
Audacity y conexión USB
Instalación del programa Audacity
Instale el programa Audacity en su ordenador, el disco corresponderá al plato USB. Introduzca
el disco de Audacity en la unidad de CD de su ordenador. Pulse en Mi PC de su escritorio.
Haga doble clic en la unidad de CD para ver los contenidos del disco de Audacity. Haga
doble clic en el archivo de instalación de Audacity para instalar el programa de Audacity de
conformidad con la instrucción.
Instalar la unidad USB
Compruebe que el disco de Audacity aún se encuentra en la unidad de CD. Utilizando el cable
USB incluido para conectar el plato a su ordenador, siga las instrucciones que aparecerán en
pantalla para instalar el piloto USB.
Ejecución del programa
1. Haga doble clic en el programa de Audacity que indica "pelotas" rojas y naranjas con
auriculares azules, y acudirá a la siguiente interfaz;
2. Utilizando el botón de control de atributos ubicado en la parte superior de la pantalla, vaya al
principio, Reproducir, Grabar, Pausar, Parar y Finalizar. Utilice los menús de Archivo, Edición,
Vista, Proyecto, Generar, Efecto y Análisis para guardar, exportar y editar la música.
3. Seleccione las preferencias ubicadas en la parte inferior del menú que abrirá las Preferencias
de Audacity. Podrá confi gurar la Entrada/Salida de audio, la calidad, los formatos de
archivo, los espectogramas, los directorios, la interfaz, el teclado y el ratón en la interfaz de
preferencias de Audacity.
4. Ajuste el volumen de entrada y salida.
5. Seleccione el botón de grabar para grabar el disco, las pistas derecha e izquierda se
mostrarán en la interfaz; si no tiene la ola fl uctuante en la interfaz cuando esté grabando, por
favor, ajuste la línea en el volumen tal y como se indica a continuación:
1. Pulse en "inicio" en la esquina izquierda del ordenador, seleccione "Programas", "Accesorios",
"Entretenimiento", "Grabadora de sonido" y acceda a la interfaz de grabación de sonido.
2. Interfaz de grabación de sonido
3. Seleccione Editar y pulse en "Propiedades de audio" en la parte inferior del menú y acceda
a la interfaz de las "Propiedades de audio";
A. Pulse en el botón anterior para saltar al inicio;
B. Pulse en el botón posterior para saltar al fi nal;
C. Pulse en el botón de reproducción para reproducir;
D. Pulse en el botón de pausa para pausar la reproducción de la grabación;
E. Pulse en el botón de interrupción para parar la grabación.
4. Seleccione el volumen de grabación y acceda a la interfaz de "Control de grabación"; Ajuste
la línea en el volumen al máximo o a la mitad, la ola fl uctuante aparecerá en la interfaz
cuando grabe.
Page 35

35
Exportar a WAV,MP3 o a formatos Ogg
1. Por favor, compruebe que el disco de Audacity sigue estando introducido en su ordenador.
Haga doble clic en el icono de Mi PC de su escritorio.
2. Haga doble clic en la unidad de CD ROM.
3. Copie el archivo lame_enc.dll y péguelo en su escritorio.
4. Una vez que haya copiado el archivo, abra el programa de Audacity. Pulse el botón de
Grabación para empezar la grabación. Compruebe que se está reproduciendo una grabación
de plato y que el cable USB está conectado a la unidad principal.
5. Podrá pulsar el botón de Interrupción en cualquier momento que lo desee. Una vez que haya
grabado el archivo que va a convertir, pulse la pestaña de Edición y vaya a Preferencias.
6. Localice la pestaña de Archivo desde y pulse en el botón de Encontrar biblioteca.
7. Pulse el botón Sí y acceda a su Escritorio y subraye el archivo lame_enc.dll. Ahora, pulse el
botón de Abrir.
8. Pulse en el botón OK y regrese a la ventana por defecto en el programa de Audacity.
9. Pulse en la pestaña del archivo y podrá exportar el archivo registrado en formato"WAV",
"MP3" o "Ogg".
10. Una vez que haya elegido el formato de archivo que deberá exportar, tan sólo deberá ofrecer
el nombre del archivo y la ubicación en la que lo guardará. Una vez que haya acabado, pulse
en el botón de guardar.
11. Indique el título, el artista y otra información sobre el archivo MP3 que ha creado y pulse en
el botón OK.
Especifi caciones
Sección del REPRODUCTOR DE GRABACIÓN
Motor servo-motor de CC
Sistema de dirección Dirección por correa
Velocidades 33-1/3 rpm, 45 rpm y 78 rpm
Trémolo y Vibración Menos de 0.25%(WTD)
Ratio S/N Más de 50 dB
Tipo de cartucho Cartucho estéreo de cerámica
Aguja 402-M208-165
Nivel de salida 160-380 mV (5 cm/seg a 1 KHz)
GENERAL
Requisitos de alimentación AC 230V~ 50 Hz
Consumo de energía 5 W
Dimensiones (AxLxA 37X16.5X33 cm
Peso 4.96kg
Adaptador de 45 RPM
Page 36

36
DECLARACIÓN DE CONFORMIDAD
La empresa infraescrita,
Nedis B.V.
De Tweeling 28
5215MC ’s-Hertogenbosch
Países Bajos
Tel.: 0031 73 599 1055
Email: info@nedis.com
Declara que el producto:
Nombre: KONIG
Modelo: HAV-TT10USB
Descripción: Plato USB
se encuentra conforme a las siguientes normas:
EMC: EN 55013: 2001+A1+A2,
EN 55022: 2006
EN 61000 - 3 2 : 2000 + A2
EN 61000 - 3 - 3 : 1995 + A1 A2
EN 55020: 2002 + A1 + A2
EN 55024: 1998+A1+A2,
LVD: EN 60065: 2002 + A1 : 2006
Conforme a las provisiones de la directiva 2004/108/CE y 2006/95/CE.
‘s-Hertogenbosch, 21 de marzo de 2008
Sra. J. Gilad
Director de compras
Page 37

37
Medidas de seguridad:
ATENCIÓ N
RIESGO D E ELECTROCUCI ÓN
NO ABRIR
Para reducir los riesgos de electrocución, este producto
deberá ser abierto EXCLUSIVAMENTE por un técnico
habilitado cuando necesite ser reparado. Desconecte el
producto de la red y de cualquier otro equipo si se registra algún problema. No exponga el
producto al agua ni a la humedad.
Mantenimiento:
Limpie sólo con un paño seco. No utilice disolventes de limpieza ni abrasivos.
Garantía:
No se aceptará ninguna garantía o responsabilidad derivada de cualquier cambio o
modifi caciones realizadas al producto o daños provocados por un uso incorrecto del presente
producto.
General:
Las ilustraciones y las especifi caciones podrán sufrir cambios sin previo aviso.
Todas las marcas de los logotipos y los nombres de productos constituyen patentes o marcas
registradas de sus titulares correspondientes, reconocidos como tal.
Cuidado:
Este producto está señalizado con este símbolo. Esto signifi ca que los productos
eléctricos y electrónicos gastados no deberán mezclarse con los desechos
domésticos generales. Existen distintos sistemas de recogida individuales para este
tipo de productos.
Copyright ©
Page 38

38
MAGYAR NYELVŰ
A szerkezeti részek elhelyezkedése
1. BE- ÉS KIKAPCSOLÓ
2. HANGSZEDŐKAR
3. FORDULATSZÁM-SZABÁLYZÓ
4. BIZTOSÍTÓHOROG
5. HANGSZEDŐKAR TÁMASZA
6. LEMEZTÁNYÉR
7. NAGY KRÓMCSAVAR
8. LEJÁTSZÁS gomb
9. Lemezkiadó gomb
10. LEÁLLÍTÓ gomb
11. USB jack-csatlakozó
12. Vonalkimenet
Előkészítés a használathoz
Az ezüst csavar szállítás közben védi a lemezjátszó készülékházát. Ha a lemezjátszó
fordulatszáma lassúnak tűnik, vagy dörzsölésszerű hangot hall, a csavart egy pénzérmével
forgatva egyensúlyozza ki a készüléket.
Page 39

39
A tű cseréje
A régi tű kivétele
1. Illesszen egy csavarhúzót a tű hegyére, és nyomja lefelé, az "A"
irányban.
2. Lefelé és előre húzva vegye ki a tűt.
Új tű behelyezése
1. Tartsa a tű hegyét, és a másik végét nyomja a "B" irányban.
2. Tolja felfelé a "C" irányban, amíg a hegye a helyére nem kerül.
X jelzésű vezetőpecek (belül)
Vonalkimenet
USB jack-csatlakozó
Lemez hallgatása
1. Dugaszolja a tápkábelt az elektromos
hálózatra. A készülék 230 V / 50 Hz
tápfeszültséget igényel.
2. Az RCA kábel másik végét dugaszolja
a tévékészülék, házimozi rendszer vagy
zenerendszer segéd (AUX) bemenetére,
ügyelve arra, hogy a piros RCA kábelt a piros
csatlakozóba, a fehér RCA kábelt pedig a
fehér csatlakozóba dugaszolja.
3. Kapcsolja be a lemezjátszót.
4. Tegyen egy lemezt a lemeztányérra; 45-ös
percenkénti fordulatszámú lemez lejátszásához
használja a műanyagzacskóban a használati
útmutatóval együtt mellékelt adaptert.
5. Válassza ki a lemezhez illő fordulatszámot.
6. Vegye le a hangszedőkar támaszának
tartóját, emelje fel az emelőfület, és vigye a
hangszedőkart fi noman a lemez fölé a kívánt
helyre, engedje le lassan az emelőfület, és a
lejátszás elkezdődik.
7. Kapcsolja be a be- és kikapcsoló gombbal vagy
a hangerő gombbal a készüléket, amelyikhez
ezt az USB lemezjátszót csatlakoztatta, és
állítsa be a hangerőt.
8. A lejátszást a STOP (LEÁLLÍTÁS) gombbal
állíthatja le.
9. A lejátszás gomb újbóli megnyomására a
lejátszás folytatódik.
10. Amint a zene lejátszása befejeződik, és
a hangszedőkar elérte a lemez végét,
automatikusan visszahelyeződik a támaszára.
Ha lejátszás közben megnyomja a lemezkiadó
gombot, a hangszedőkar eltávolodik a
lemeztől, és visszahelyeződik a támaszára.
11. Ne felejtse el kihúzni a dugaszt, amikor nem
használja a készüléket.
Page 40

40
Audacity szoftver és USB csatlakozás
Az Audacity szoftver telepítése
Telepítse az Audacity szoftvert a számítógépére, a lemez illik az USB lemezjátszóhoz. Tegye
az Audacity lemezét a számítógép CD meghajtójába. Kattintson az asztalon a My Computer
(Sajátgép) ikonra. A CD meghajtóra duplán kattintva láthatja az Audacity lemez tartalmát. Az
Audacity Set Up fájlra duplán kattintva telepítse a szoftvert az útmutatás szerint.
Az USB illesztőprogram telepítése
Ellenőrizze, benn van-e még az Audacity lemez a CD meghajtóban. A mellékelt USB kábellal
kapcsolja a lemezjátszót a számítógéphez. A képernyőn megjelenő utasítások szerint telepítse
az USB illesztőprogramot.
A szoftver futtatása
1. Kattintson duplán az Audacity szoftveren a fejhallgatót viselő piros és narancssárga
"gömbökre", majd lépjen a következő felületre.
2. A képernyő tetején lévő attribútum vezérlő gombokkal lépjen a kezdéshez, a Play
(Lejátszás), Record (Hangrögzítés), Pause (Szünet), Stop (Leállítás) elemekhez, majd lépjen
a befejezéshez. A File (Fájl), Edit (Szerkesztés), View (Nézet), Project (Projekt), Generate
(Létrehozás), Effect (Effekt) és Analyze (Elemzés) menük segítségével mentse, exportálja és
szerkessze a zenei felvételeket.
3. Válasszon ki egyéni beállításokat, a menü alján nyissa meg az Audacity Preferences
(Audacity egyéni beállításai) menüelemet. A következőket állíthatja be: Audio I/O (Audio be- és
kimenet), Quality (Minőség), File Formats (Fájlformátumok), Spectrograms (Spektrogramok),
Directories (Könyvtárak), Interface (Illesztőfelület), Keyboard (Billentyűzet) és Mouse (Egér).
4. Állítsa be a kimeneti és bemeneti hangerőt.
5. Válassza a hangrögzítés gombot a lemez felvételéhez, a bal és jobb oldali sávok a felületen
megjelennek. Ha felvétel közben nem látja a hullám fl uktuálását a felületen, állítson a
vonalbemenet hangerején az alábbi módon:
1. Kattintson a számítógép bal sarkában a "Start" gombra, válassza a "Programs" (Minden
program), "Accessories" (Kellékek), "Entertainment" (Szórakozás), "Sound Recorder"
(Hangrögzítő) elemet, és lépjen a hangrögzítési felületre.
2. Hangrögzítési felület
3. Válassza az Edit (Szerkesztés) opciót, és a menü alján az "Audio Properties" (Audio
tulajdonságok) elemre kattintva lépjen be az "Audio Properties" (Audio tulajdonságok)
felületre.
A. Az előző gombra kattintva ugorjon a kezdésre.
B. A tovább gombra kattintva ugorjon a végéhez.
C. Lejátszáshoz nyomja meg a lejátszás gombot.
D. Kattintson a szünet gombra a lejátszás szüneteltetéséhez.
E. Kattintson a leállító gombra a lejátszás leállításához.
4. Válassza ki a hangrögzítés hangerejét, és lépjen a "Recording Control" (Hangrögzítés
vezérlése) felületre. Állítsa a vonalbemenet hangerejét a legnagyobbra vagy közepesre, és
a felületen meg fog jelenni a fl uktuáló hullám.
Page 41

41
WAV,MP3 vagy Ogg formátumok exportálása
1. Ellenőrizze, hogy az Audacity lemez még benne van-e a számítógépben. Kattintson duplán
a My Computer (Sajátgép) ikonra az asztalon.
2. Kattintson duplán a CD ROM meghajtóra.
3. Másolja át a lame_enc.dll fájlt az asztalra.
4. A másolás után nyissa meg az Audacity szoftvert. A Record (Hangrögzítés) gombra kattintva
indítsa el a hangrögzítést. Ellenőrizze, játszik-e a lemezjátszó, és az USB kábel csatlakoztatva
van-e a főegységhez.
5. A Stop (Leállítás) gombot bármikor megnyomhatja. Amint rögzítette az átalakítandó fájlt,
kattintson rá az Edit (Szerkesztés) fülre, és lépjen a Preferences (Egyéni beállítások)
elemre.
6. Keresse meg a File Form (Fájlformátum) fület, és kattintson a Find Library (Könyvtár
keresése) gombra.
7. Kattintson a Yes (Igen) gombra, és lépjen az asztalra, majd jelölje ki a lame_enc.dll nevű fájlt.
Ezután kattintson az Open (Megnyitás) gombra.
8. Kattintson az OK gombra, és térjen vissza az Audacity szoftver kezdőablakához.
9. Kattintson a File (Fájl) fülre, és abban exportálhatja a rögzített fájlt "WAV", "MP3" vagy "Ogg"
formátumba.
10. Amint eldöntötte, milyen fájlformátumba akar exportálni, csak adja meg a a fájl nevét és a
helyet, ahová el akarja menteni. Amint ezzel végzett, kattintson a Save (Mentés) gombra.
11. Vigye be az MP3 fájl címét, előadóját és az Ön által létrehozott egyéb információkat, majd
mentse el az OK gombbal.
Műszaki jellemzők
LEMEZJÁTSZÓ rész
Motor Egyenáramú szervómotor
Meghajtó rendszer Szíjhajtás
Fordulatszám 33-1/3, 45 és 78 fordulat percenként
Hangmagasság ingadozás 0,25% (WTD) alatt
Jel/zaj viszony 50 dB felett
Lejátszófej típusa Kerámia sztereó lejátszófej
Tű 402-M208-165
Kimeneti szint 160–380 mV (5 cm/mp 1 KHz-nél)
ÁLTALÁNOS TUDNIVALÓK:
Tápfeszültség AC 230V/ 50 Hz
Energiafogyasztás 5 W
Méretek
(szélesség x magasság x mélység) 37 x 16,5 x 33 cm
Súly: 4,96 kg
45 (ford/perc) adapter
Page 42

42
Megfelelőségi nyilatkozat
Mi,
a Nedis B.V.
De Tweeling 28
5215MC ’s-Hertogenbosch
Hollandia
Tel.: 0031 73 599 1055
E-mail: info@nedis.com
Kijelentjük, hogy a termék:
Neve: KONIG
Típusa: HAV-TT10USB
Megnevezése: USB lemezjátszó
Megfelel az alábbi szabványoknak:
EMC (Elektromágneses összeférhetőség): EN 55013 : 2001 + A1 + A2
EN 55022 : 2006
EN 61000 - 3 2 : 2000 + A2
EN 61000 - 3 - 3 : 1995 + A1 A2
EN 55020 : 2002 + A1 + A2
EN 55024 : 1998 + A1 + A2
LVD (Kisfeszültségű elektromos termékekre vonatkozó irányelv): EN 60065 : 2002 + A1 : 2006
A 2004/108/EK és 2006/95/EK irányelvekkel összhangban van.
‘s-Hertogenbosch, 2008. március 21.
Mrs. J. Gilad
Értékesítési igazgató
Megfelelőségi nyilatkozat.
Egyetértek, és elfogadom a Nedis B.V. Hollandia által adott nyilakozatot.
Jacob Gilad
HQ-Nedis kft.
ügyvezető igazgató
Page 43

43
Biztonsági óvintézkedések:
VIGYÁZAT!
ÁRAMÜTÉS VESZÉLYE!
NE NYIS SA KI!
Az áramütés veszélyének csökkentése érdekében ezt a
készüléket CSAK képzett szakember nyithatja fel, szervizelés
céljából. Ha gond adódik a készülékkel, kapcsolja le az
elektromos hálózatról és más készülékről. Víztől és nedvességtől védje.
Karbantartás:
Csak száraz ronggyal tisztítsa. Tisztító- és súrolószerek használatát mellőzze.
Jótállás:
Nem váll alunk felelő sséget és jót állást, ha a me ghibásod ás a készüléken vé gzett változt atás vagy
módosítás következménye, vagy ha helytelen használat miatt a készülék megrongálódott.
Általános tudnivalók:
A kivitel és a műszaki jellemzők előzetes értesítés nélkül is változhatnak.
Minden logó, terméknév és márkanév a saját tulajdonosának márkaneve vagy bejegyzett
márkaneve, és azokat ennek tiszteletben tartásával említjük.
Figyelem!
A terméket ezzel a szimbólummal jelöljük. Azt jelenti, hogy az elhasznált elektromos
és elektronikus termékek nem keverhetők az általános háztartási hulladék közé.
Begyűjtésüket külön begyűjtő létesítmények végzik.
Copyright ©
Page 44

44
SUOMI
Osien sijainti
1. VIRTAKYTKIN
2. ÄÄNIVARSI
3. NOPEUDEN SÄÄTÖKYTKIN
4. VARMISTINKOUKKU
5. ÄÄNIVARREN TUKI
6. LEVYSOITIN
7. SUURI KROMIRUUVI
8. SOITTO-painike
9. Poistopainike
10. STOP-painike
11. USB-liitäntä
12. Johdon lähtö
Laitteen valmistelu kytkentää varten
Hopearuuvi suojaa levysoittimen kehystä kuljetuksen aikana. Jos levysoittimen nopeus
vaikuttaa hitaalta tai jos siitä kuuluu hankausääni, säädä ruuvia kolikolla levysoittimen
tasapainon korjaamiseksi.
Page 45

45
Neulan vaihto
Vanhan neulan poistaminen
1. Aseta ruuvimeisseli neulan kärkeen ja paina sitä suuntaan "A".
2. Poista neula vetämällä sitä alas- ja eteenpäin.
Uuden neulan asennus
1. Pidä neulan kärjestä ja aseta toinen pää paikoilleen painamalla sitä
suuntaan "B".
2. Paina neulaa suuntaan "C", kunnes kärki lukittuu paikoilleen.
Guide Pinx (sisällä)
Johdon lähtö
USB-liitäntä
Levyn soittaminen
1. Liitä vaihtovirtajohto verkkovirtalähteeseen,
standardi tehoarvo on 230V-50HZ.
2. Kytke RCA-kaapelin toiset päät TV:n,
kotikatsomo- tai muun musiikkijärjestelmän
lisäsyöttöön (Aux) ja varmista, että punainen
RCA-kaapeli asetetaan punaiseen liittimeen ja
valkoinen RCA-kaapeli valkoiseen liittimeen.
3. Kytke laite päälle.
4. Aseta levy levysoittimeen, 45rpm-levyä
soittaessa on muistettava käyttää sovitinta,
joka sisältyy tuotepakkaukseen käyttöoppaan
tavoin.
5. Valitse soittonopeus soitettavan levyn
mukaan.
6. Poista äänivarren pidike, nosta vipu ja siirrä
äänivarsi varoen levyn haluttuun kohtaan,
laske vipu hitaasti ja levyn soitto alkaa.
7. Kytke tähän USB-levysoittimeen kytketty
laite päälle käyttäen virtakytkintä tai
äänenvoimakkuuden säädintä, säädä musiikin
äänenvoimakkuutta vastaavalla säätimellä.
8. Paina STOP-painiketta pysäyttääksesi soiton.
9. Soittoa voi jatkaa painamalla PLAYsoittopainiketta.
10. Kun musiikin soitto loppuu ja äänivarsi
saavuttaa levyn päätöspisteen, äänivarsi
siirtyy automaattisesti takaisin varren tukeen.
Vaihtoehtoisesti voit painaa poistopainiketta
levyn soiton aikana, äänivarsi siirtyy tällöin
levystä varren tukeen.
11. Muista irrottaa pistoke verkkovirtalähteestä
silloin, kun laitetta ei käytetä.
Page 46

46
Audio-ohjelmisto ja USB-liitäntä
Audio-ohjelmiston asennus
Asenna audio-ohjelma tietokoneeseen, levy sisältyy USB-levysoittimen pakkaukseen. Aseta
ohjelmistolevy tietokoneen CD-asemaan. Napsauta työpöydän kuvaketta "My Computer"
(Oma tietokone). Kaksoisnapsauta CD-asemaa nähdäksesi ohjelmistolevyn sisällön.
Kaksoisnapsauta ohjelmistoasetuksia "Audacity Set Up" asentaaksesi ohjelmiston ohjeiden
mukaisesti.
USB-ajurin asennus
Varmista, että ohjelmistolevy on edelleen asennettu CD-asemaan. Kytke levysoitin
tietokoneeseen USB-kaapelilla. Seuraa näyttöön tulevia ohjeita USB-ajurin asentamiseksi.
Ohjelmiston suoritus
1. Kaksoisnapsauta audio-ohjelmistoa, jossa on punaisia ja oransseja "palloja" ja siniset
kuulokkeet, ja siirryt seuraavaan liittymään;
2. Siirry näytön yläreunassa olevalla ohjaimella alkuun, soita levyä (Play), nauhoita (Record),
keskeytä (Pause), pysäytä (Stop) tai siirry loppuun. Tiedosto- (File), muokkaus- (Edit), katselu(View), projekti- (Project), luomis- (Generate), tehoste- (Effect) ja analysointivalikoissa
(Analyze) voidaan tallentaa, eksportoida ja muokata musiikkia.
3. Avaa audio-ohjelmiston asetukset valitsemalla valikon alareunasta Asetukset. Asetusvalikossa
voidaan asettaa Audio I/O, laatu (Quality), tiedostoformaatit (File Formats), spektogrammit
(Spectrograms), hakemistot (Directories), liittymä (Interface), näppäimistö (Keyboard) ja hiiri
(Mouse).
4. Säädä lähtö- ja syöttövoimakkuutta.
5. Valitse nauhoituspainike levyn nauhoittamiseksi, liittymässä näkyvät tällöin vasemman- ja
oikeanpuoleiset raidat. Jos liittymässä ei ole vaihteluaaltoa nauhoituksen aikana, säädä
äänenvoimakkuuden linjaa seuraavasti:
1. Napsauta tietokoneen vasemmassa kulmassa olevaa kuvaketta "Käynnistä", valitse
"Ohjelmat", "Apuohjelmat", "Viihde", "Nauhoitin" ja näkyviin tulee nauhoitusliittymä.
2. Nauhoitusliittymä
3. Valitse Muokkaa (Edit) ja napsauta valikon alareunassa olevaa painiketta Audion ominaisuudet
(Audio Properties) siirtyäksesi audion ominaisuusliittymään.
A. Napsauta Edellinen-painiketta siirtyäksesi alkuun.
B. Napsauta Seuraava-painiketta siirtyäksesi loppuun.
C. Napsauta soittopainiketta käynnistääksesi soiton.
D. Napsauta keskeytyspainiketta keskeyttääksesi soiton.
E. Napsauta pysäytyspainiketta pysäyttääksesi soiton.
4. Valitse nauhoituksen äänenvoimakkuus siirtyäksesi liittymään "Nauhoituksen hallinta"
(Recording Control). Säädä äänenvoimakkuuden arvo korkeimpaan arvoon tai asteikon
keskelle, vaihteluaalto näkyy tällöin liittymässä nauhoituksen aikana.
Page 47

47
Eksportointi WAV-,MP3- tai Ogg-formaatteihin
1. Varmista, että audio-ohjelmistolevy on edelleen asennettu tietokoneeseen. Kaksoisnapsauta
työpöydän kuvaketta Oma tietokone (My Computer).
2. Kaksoisnapsauta CD ROM-asemaa.
3. Kopioi tiedosto lame_enc.dll ja liimaa se työpöydälle.
4. Avaa tiedoston kopioimisen jälkeen audio-ohjelmisto. Napsauta nauhoituspainiketta (Record)
käynnistääksesi nauhoituksen. Varmista, että levysoittimen levy soi ja että USB-kaapeli on
liitetty pääyksikköön.
5. Pysäytyspainiketta (Stop) voidaan painaa minä hetkenä tahansa. Kun muunnettava tiedosto
on nauhoitettu, paina Muokkaa (Edit) -palkkia siirtyäksesi Asetuksiin (Preferences).
6. Määritä tiedoston muoto (File Form) -palkki ja napsauta Hae hakemisto (Find Library).
7. Napsauta Kyllä (Yes) -painiketta ja siirry työpöydälle ja korosta tiedosto lame_enc.dll.
Napsauta sen jälkeen Avaa (Open) -painiketta.
8. Napsauta OK-painiketta ja siirry takaisin audio-ohjelmiston oletusikkunaan.
9. Napsauta tiedostopalkkia ja voi eksportoida nauhoitetun tiedoston "WAV", "MP3" tai "Ogg"
-tiedostoformaatteihin.
10. Kun olet valinnut eksportoitavan tiedostoformaatin, määritä tiedostonimi ja tallennuksen
kohde. Napsauta lopuksi Tallenna (Save) -painiketta.
11. Syötä Otsikko (Title), tekijä (Artist) ja muut MP3-tiedoston tiedot ja napsauta OK-painiketta.
Tekniset tiedot
NAUHOITIN-osio
Moottori: DC-servomoottori
Käyttöjärjestelmä: Hihnakäyttö
Nopeudet: 33-1/3 rpm, 45 rpm ja 78 rpm
Huojunta ja värinä: Alle 0,25%(WTD)
S/N-suhde Yli 50 dB
Patruunatyyppi: Keraaminen stereopatruuna
Kärki: 402-M208-165
Tehotaso: 160-380 mV (5 cm/s arvossa 1 KHz)
YLEISTÄ:
Tehovaatimukset: AC 230V~ 50 Hz
Tehon kulutus: 5 W
Mitat (LxKxH): 37 X 16,5 X 33 cm
Paino 4.96 kg
45 RPM-sovitin
Page 48

48
VAATIMUSTENMUKAISUUSVAKUUTUS
Me,
Nedis B.V.
De Tweeling 28
5215MC ’s-Hertogenbosch
Alankomaat
Puh: 0031 73 599 1055
Sähköposti: info@nedis.com
Vakuutamme, että tuote:
Nimi: KONIG
Malli: HAV-TT10USB
Kuvaus: USB-levysoitin
Täyttää seuraavat standardit:
EMC: EN 55013 : 2001 + A1 + A2
EN 55022 : 2006
EN 61000 - 3 2 : 2000 + A2
EN 61000 - 3 - 3 : 1995 + A1 A2
EN 55020 : 2002 + A1 + A2
EN 55024 : 1998 + A1 + A2
LVD: EN 60065 : 2002 + A1 : 2006
Direktiivien 2004/108/EY ja 2006/95/EY mukainen.
‘s-Hertogenbosch, 21. maaliskuuta, 2008.
Mrs. J. Gilad
Toimit usjo htaja
Page 49

49
Turvallisuuteen liittyvät varoitukset:
HUOMIO
SÄHKÖISKUVAARA
ÄLÄ AVAA
Sähköiskuvaaran välttämiseksi tämän laitteen saa avata
huollon yhteydessä VAIN valtuutettu teknikko. Kytke laite
pois verkkovirrasta ja muista laitteista, jos ongelmia esiintyy.
Älä altista tuotetta vedelle tai kosteudelle.
Huolto:
Puhdista ainoastaan kuivalla kankaalla. Älä käytä liuottimia tai hioma-aineita.
Takuu:
Takuu ja vastuuvelvollisuus mitätöityvät, jos tuote vaurioituu siihen tehtyjen muutoksien tai sen
väärinkäytön takia.
Yleistä:
Muutoksia malliin ja teknisiin ominaisuuksiin voidaan tehdä ilmoituksetta.
Kaikki logot, merkit ja tuotenimet ovat niiden vastaavien omistajien tuotemerkkejä tai
rekisteröityjä tuotemerkkejä ja niitä on käsiteltävä sellaisina.
Huomio:
Tuote on varustettu tällä merkillä. Se merkitsee, ettei käytettyjä sähkö- tai elektronisia
tuotteita saa hävittää kotitalousjätteen mukana. Kyseisille tuotteille on olemassa
erillinen keräysjärjestelmä.
Copyright ©
Page 50

50
SVENSKA
Placering av delar
1. STRÖMBRYTARE
2. TONARM
3. BRYTARE FÖR HASTIGHETSKONTROLL
4. SÄKERHETSHAKE
5. STÖD FÖR TONARM
6. SKIVTALLRIK
7. STOR KROMSKRUV
8. SPELKNAPP
9. Eject-knapp
10. STOPPKNAPP
11. USB-uttag
12. Utlinje
Förberedning för användning av elnätet
Silverskruven skyddar grammofonens chassi under transporten. Om hastigheten på din
grammofon verkar för långsam eller om du hör ett gnidande ljud, justera skruven med ett mynt
för att korrigera skivtallrikens balans.
Page 51

51
Hur byta grammofonnålen
Avlägsnande av gammal grammofonnål
1. Sätt en skruvmejsel vid grammofonnålens spets och tryck ner i
riktningen "A".
2. Avlägsna grammofonnålen genom att dra den nedåt och framåt.
Installering av ny grammofonnål
1. Håll grammofonnålens spets och sätt i den andra kanten genom att
trycka den i riktningen "B".
2. Tryck upp i riktningen "C" tills den låser sig vid spetsen.
Pinx Guide (invändigt)
Utlinje
USB-uttag
Lyssna på en skiva
1. Anslut elkabeln till elnätet, standarden är
230V-50HZ.
2. Sätt i den andra ändan av RCA-kabeln i
extraingången (Aux) på din TV, hemmaunder
hållningsmottagare eller annat musiksystem,
se till att den röda RCA-kabeln är isatt i det
röda jacket och den vita RCA-kabeln i det vita
jacket.
3. Sätt på skivspelaren.
4. Lägg på en skiva på skivtallriken, när du
spelar 45-varvs skivor, kom ihåg att använda
adaptern som är i plastpåsen tillsammans
med manualen.
5. Välj spelhastighet i överensstämmelse med
skivan du spelar.
6. Avlägsna tonarmshållaren, lyft och fl ytta
tonarmen mjukt till det önskade läget på
skivan, sänk försiktigt ner tonarmen och sedan
spelas skivan upp.
7. Slå på enheten som du anslutet till denna
USB-skivspelare med På/av-knappen eller
Volymknappen, justera volymknappen för att
kontrollera volymen på musiken.
8. Tryck på STOP-knappen för att sluta spela.
9. Fortsätt uppspelningen genom att trycka på
knappen PLAY.
10. När musikuppspelningen avslutats, och
tonarmen nått skivans slut, går tonarmen
automatiskt tillbaka till tonarmstödet. Eller så
kan du trycka på eject-knappen när du spelar
en skiva, tonarmen lämnar då skivan och går
tillbaka till tonarmstödet.
11. Kom ihåg att dra ut stickkontakten när du inte
använder enheten.
Page 52

52
Audacity och USB-anslutning
Installering av Audacity programvara
Inst all era A uda cit y pr ogr amva ran p å din d ato r, s kiva n övere ns stä mme r med U SB -s kiv spe lar en.
Sätt i Audacity skivan i CD-driven på din dator. Klicka på My Computer (Den här datorn).
Dubbelklicka på CD-driven för att se innehållet på Audacity skivan. Dubbelklicka på Audacity
Set Up för att installera programvaran enligt anvisningen.
Installera USB-drivern
Se till att Audacity-skivan fortfarande är i CD-drivern. Använd den medföljande USB-kabeln
för att ansluta skivspelaren till din dator. Följ anvisningarna på skärmen för att installera USBdrivern.
Körning av programvaran
1. Dubbelklicka på Audacity programvaran som visar röda och orangea "bollar" som bär hörlurar,
och du kommer till följande gränssnitt;
2. Genom att använda kontrollknapparna i den övre delen av skärmen, kan du gå till början,
Uppspelning, Inspelning, Paus , Stopp och till slut. Använd File, Edit, View, Project, Generate,
Effect och Analyze menyerna för att spara, exportera och redigera musiken.
3. Välj preferenser vid botten av menyn som öppnar Audacity Preferences. Du kan ställa in audio
I/O, kvalitet, fi lformat, spektogram, kataloger, gränssnitt, tangentbord och mus i Audacity
preferens gränssnittet.
4. Justerar utgångs- och ingångsvolymen.
5. Välj knappen inspelning för att spela in skivan, det vänstra och högra spåret visas på
gränssnittet; Om du inte har en fl uktuerande våg på gränssnittet under inspelningen, justera
volymen på inlinjen som följer:
1. Klicka på "start" i det vänstra hörnet på datorn, välj "Programs" (program), "Accessories"
(tillbehör), "Entertainment" (underhållning), "Sound Recorder"(ljudinspelning) och du kommer
till gränssnittet för ljudinspelning.
2. Gränssnitt för ljudinspelning
3. Välj Edit (redigera) och klicka på "Audio Properties" (audioegenskaper) vid botten av menyn
och du kommer till gränssnittet "Audio Properties";
A. Klicka på den tidigare knappen för att hoppa över till start;
B. Klicka på knappen framåt för att hoppa till slutet;
C. Klicka på knappen spela för att spela upp;
D. Klicka på pausknappen för att pausa uppspelningen av inspelningen;
E. Klicka på stoppknappen för att stoppa inspelningen.
4. Välj sound recording volume (ljudinspelningsvolym) och du kommer till gränssnittet "Recording
Control" ; Justera volymen på inlinjen till den högsta eller mellersta, den fl uktuerande vågen
visas på gränssnittet när du spelar in.
Page 53

53
Export av WAV,MP3 eller Ogg-format
1. Se till att Audacity skivan fortfarande sitter i datorn. Dubbelklicka på ikonen den här datorn på
skrivbordet.
2. Dubbelklicka på CD-ROM drivern .
3. Kopiera fi len lame_enc.dll och klistra in den på skrivbordet.
4. Efter att ha kopierat fi len, öppna Audacity programvaran. Klicka på knappen Record
för att starta inspelningen. Se till att en skiva spelas och att USB-kabeln är ansluten till
huvudenheten.
5. Du kan trycka på stoppknappen när du vill. När du en gång har spelat in fi len som ska
konverteras, tryck på knappen Edit och gå till Preferences.
6. Lokalisera knappen File Form och klicka på knappen Find Library.
7. Klicka på knappen Yes och gå till skrivbordet och markera fi len lame_enc.dll. Klicka nu på
knappen Open.
8. Klicka på knappen OK och gå tillbaka till standardfönstret för Audacity programvaran.
9. Klicka på knappen File och du har valmöjligheten att exportera den inspelade fi len i "WAV",
"MP3" eller "Ogg" fi lformat.
10. När du en gång har valt fi lformatet som ska exporteras, mata in fi lnamnet och platsen där den
ska sparas. När du har avslutat det, klicka på knappen Save.
11. Mata in titel, artist och annan information om MP3-fi len som du har skapat och klicka på
knappen OK.
Specifi kationer
SKIVSPELAREsektion
Motor DC servomotor
Drivsystem Remdrift
Hastigheter 33-1/3 varv, 45 varv och 78 varv
Wow & Flutter Mindre än 0.25%(WTD)
S/N Ratio Mer än 50 dB
Pickuptyp Keramisk stereo pickup
Nål 402-M208-165
Utgångsnivå (160-380 mV (5 cm/sek vid 1 KHz)
ALLMÄNT
Effektbehov AC 230V~ 50 Hz
Strömförbrukning 5 W
Dimensioner (BxHxD 37X16.5X33 cm
Vikt 4,96 kg
45 RPM (varv) adapter
Page 54

54
ÖVERENSSTÄMMELSEFÖRKLARING
Vi,
Nedis B.V.
De Tweeling 28
5215MC ’s-Hertogenbosch
Holland
Tel.: 0031 73 599 1055
Email: info@nedis.com
Intygar att produkten:
Namn: KONIG
Modell: HAV-TT10USB
Beskrivning: USB skivtallrik
överensstämmer med följande standarder
EMC: EN 55013: 2001 + A1 + A2
EN 55022: 2006
EN 61000 - 3 2 : 2000 + A2
EN 61000 - 3 - 3 : 1995 + A1 A2
EN 55020: 2002 + A1 + A2
EN 55024: 1998 + A1 + A2
LVD: EN 60065: 2002 + A1 : 2006
Följer villkoren för direktiven 2004/108/EEG och 2006/95/EG.
‘s-Hertogenbosch, 2008 mars 21
Fru J. Gilad
Inköpsdirektör
Page 55

55
Säkerhetsanvisningar:
OBS!
RISK FÖR E LSTÖT
ÖPPNA INTE
För att undvika elstötar får produkten endast öppnas av
behörig tekniker när service behövs. Koppla ur produkten ur
nätuttaget om ett problem skulle uppstå. Utsätt inte produkten
för vatten eller fukt.
Underhåll:
Rengör endast med torr trasa. Använd inga rengöringsmedel eller frätande medel.
Garanti:
Ingen garanti kan accepteras för ändringar som har utförts på produkten eller skador som har
uppstått som en följd av felaktig användning av produkten.
Allmänt:
Utseende och specifi kationer kan komma att ändras utan föregående meddelande.
Alla logotyper och produktnamn är varumärken eller registrerade varumärken som tillhör sina
ägare och är härmed erkända som sådana.
Obs!
Produkten är märkt med denna symbol. Det innebär att använda elektriska eller
elektroniska produkter inte får slängas bland vanliga hushållssopor. Det fi nns
särskilda återvinningssystem för dessa produkter.
Copyright ©
Page 56

56
ČESKY
Rozložení součástí
1. HLAVNÍ VYPÍNAČ
2. PŘENOSKOVÉ RAMÉNKO
3. PŘEPÍNAČ RYCHLOSTÍ
4. ZAJIŠŤOVACÍ HÁČEK RAMÉNKA
5. ODKLÁDACÍ OPĚRKA RAMÉNKA
6. TALÍŘ GRAMOFONU
7. VELKÝ ARETAČNÍ ŠROUB
8. Tlačítko PLAY (přehrávání)
9. Tlačítko „Eject“ pro zvednutí raménka
10. Tlačítko Stop
11. Konektor USB
12. Linkový výstup
Příprava pro napájení ze síťě
Stříbrný aretační šroub slouží k ochraně mechaniky gramofonu při přepravě. Pokud se vám
zdá, že rychlost gramofonu je nízká nebo cítíte drhnutí talíře, nastavte pomocí mince aretační
šroub s velkou chromovanou hlavou tak, až se rychlost otáčení talíře stabilizuje.
Page 57

57
Výměna snímací vložky
Vyjmutí staré vložky
1. Vložte šroubovák do výstupku a vyklopte přenosku ze skořepiny
dolu ve směru „A“.
2. Vytáhněte snímací hrot směrem dolů a dopředu.
Instalace nové přenoskové vložky
1. Přidržujte výstupek přenosky, zasuňte hrot do skořepiny a lehce
zatlačte ve směru „B“.
2. Zatlačte vložku nahoru ve směru „C“ až zaklapne.
Vodící ko lík (uvnit ř)
Linkový výstup
Konektor USB
Poslech gramofonové desky
1. Připojte napájecí šňůru síťové zásuvky,
standardně s napětím 220V-50Hz.
2. Druhý konec propojovacího kabelu RCA
zapojte do pomocného vstupu (AUX IN) na
vašem TV přístroji, rozhlasovém přijímači se
zesilovačem nebo jiném zvukovém systému;
dodržujte přitom barevné označení (červená
a bílá) konektorů a jacků propojovacího
stíněného kabelu RCA.
3. Zapněte gramofon.
4. Položte gramofonovou desku na talíř a při
přehrávání malých desek s rychlostí 45 ot./min
nezapomeňte použít středový adaptér, který je
přibalen v PE sáčku spolu s tímto návodem.
5. Zvolte rychlost přehrávání podle typu
přehrávané desky.
6. Odklopte zajišťovací háček raménka,
pomocí ovládací páčky zvedněte přenoskové
raménko, lehce jej přesuňte nad požadované
místo gramofonové desky a ovládací páčkou
spusťte raménko na desku. Po dosednutí
hrotu přenosky začne přehrávání.
7. Zapněte napájení jednotky, ke které je USB
gramofon připojen, a pomocí regulátoru
hlasitosti (VOLUME) na zesilovací jednotce
nastavte úroveň poslechu hudby.
8. Stisknutím tlačítka STOP ukončíte přehrávání.
9. Stisknutím tlačítka PLAY pokračujte
v přehrávání.
10. Po dosažení konce záznamu na gramofonové
desce se přenoskové raménko automaticky
vrátí do klidové polohy na odkládací opěrku
raménka. Nebo můžete v průběhu přehrávání
stisknout tlačítko Eject, přehrávání se tím
ukončí, přenoskové raménko se zvedne a vrátí
se do klidové polohy na odkládací opěrku.
11. Nezapomeňte po ukončení poslechu odpojit
síťovou šňůru ze zásuvky.
Page 58

58
Audacity a připojení USB
Instalace softwaru
Nainstalijte softwarovou aplikaci Audacity do vašeho počítače pomocí instalačního CD,
přibaleného k USB gramofonu. Vložte CD s programem Audacity do diskové mechaniky
na vašem PC. Klepněte na ikonu My Computer (Tento počítač) na pracovní ploše vašeho
počítače. Dvojitým kliknutím na CD mechaniku zobrazte obsah CD s programem Audacity.
Dvakrát klikněte na Audacity Set Up (Nastavení Audacity) a podle instrukcí nainstalujte
software Audacity.
Instalace ovladače USB
Zkontrolujte, zda CD s programem Audacity zůstává stále v CD mechanice. Pomocí přibaleného
USB kabelu propojte gramofonové chassis s vaším počítačem. Při instalaci ovladače USB
postupujte podle instrukcí na obrazovce.
Používání softwaru
1. Dvakrát klikněte na ikonu Audacity s červenou a oranžovou „koulí“ s modrými sluchátky a
vstupte do následujícího rozhraní;
2. Pomocí ovládacích tlačítek s odpovídajícími symboly v horní části obrazovky přejděte na
začátek, použijte funkci Play (Přehrávání), Record (Záznam), Pause (Pauza), Stop a přejděte
na konec. Použijte nabídky File (Soubor), Edit (Úprava), View (Náhled), Project (Projekt),
Generate (Vytvořit), Effect (Efekt) a Analyze (Analýza), k uložení (Save), exportu (Export) a
editování (úpravám) hudby.
3. Ve spodní části menu nastavte preference, se kterými se bude otevírat Audacity. Můžete
nastavit Audio I/O (Audio Vsut/Výstup), Quality (Kvalita), File Formats (Formát souboru),
Spectrograms (Rozložení spektra), Directories (Adresáře), Interface (Rozhraní), Keyboard
(klávesnici) a Mouse (Myš) v rozhraní Audacity preferencí.
4. Nastavte vstupní a výstupní úrovně hlasitosti.
5. K pořízení záznamu na disk zvolte záznamové tlačítko, na rozhraní se zobrazuje úroveň levé
a pravé stopy. Pokud se při nahrávání indikátory stop nepohybují, nastavte linkové úrovně dle
následujícího postupu:
1. V levém rohu PC monitoru klikněte na „Start“, zvolte "Programs" (Programy), "Accessories"
(Příslušenství), "Entertainment" (Zábava), "Sound Recorder" (Záznamník zvuku) a tím
otevřete okno nahrávání.
2. Rozhraní zvukového rekordéru
3. Zvolte Edit (Úpravy) a klikněte ve spodní části menu na "Audio Properties" (Vlastnosti
zvuku);
A. Kliknutím na tlačítko „rychle zpět“ přeskočte na začátek;
B. Kliknutím na tlačítko „rychle vpřed“ přeskočte na konec;
C. Kliknutím na tlačítko „play“ začne přehrávání;
D. Kliknutím na tlačítko „pause“ přerušíte přehrávání;
E. Kliknutím na tlačítko „stop“ ukončíte záznam.
4. Zvolte úroveň záznamu zvuku a vstupte do rozhraní "Recording Control" (Ovládání
nahrávání); Nastavte vstupní linkovou úroveň záznamu, při nahrávání se v rozraní objeví
pohybující křivka průběhu signálu.
Page 59

59
Exportování formátů WAV,MP3 nebo Ogg
1. Disk s aplikací Audacity ponechávejte stále vložený do PC. Na pracovní ploše dvakrát klikněte
na ikonu My Computer (Můj počítač).
2. Dvakrát klikněte na mechaniku CD ROM.
3. Zkopírujte soubor lame_enc.dll a vložte jej na pracovní plochu.
4. Po zkopírování souboru otevřete software Audacity. Kliknutím na tlačítko Record (Záznam)
spusťte nahrávání.. Ověřte si, že je gramofon připojen pomocí USB kabelu k hlavní jednotce
PC a je spuštěno přehrávání gramofonové desky.
5. Tlačítkem Stop můžete kdykoliv nahrávání ukončit. Jakmile máte přepisovaný soubor nahraný,
stiskněte tlačítko Edit (Úpravy) a přejděte do Preferencí.
6. Najděte záložku File Form (Řazení souborů) a klikněte na tlačítko Find Library (Hledej
knihovnu).
7. Klikněte na tlačítko Yes (Ano), přejděte na pracovní plochu a zvýrazněte soubor lame_enc.
dll. Nyní klikněte na tlačítko Open (Otevři).
8. Klikněte na tlačítko OK a vraťte se do základního okna aplikace Audacity.
9. Klikněte na záložku File Tab, tím jste získáte možnost volby exportu nahraného souboru do
formátu "WAV", "MP3" nebo "Ogg".
10. Jakmile si zvolíte formát exportovaného souboru, zadejte název souboru a místo jeho uložení.
Pak klikněte na tlačítko Save (Uložit).
11. Vložte Titul, Interpreta a další informace o vytvořeném souboru MP3 a klikněte na tlačítko
OK .
Specifi kace
GRAMOFONOVÉ CHASSIS
Motor Stejnosměrný servo motor
Systém pohonu Řemínkový pohon
Rychlosti 33-1/3 ot/min, 45 ot/min a 78 ot/min
Pomalé a rychlé kolísání rychlosti Menší než 0.25%(WTD)
Odstup signál/šum Více než 50 dB
Typ přenosky keramická stereofonní vložka
Snímací hrot 402-M208-165
Výstupní úroveň 160-380 mV (5 cm/sec při 1 kHz)
Všeobecné parametry:
Napájecí napětí AC 230V~ / 50 Hz
Příkon 5 W
Rozměry: 37 x 16.5 x 33 cm
Hmotnost 4.96 kg
Adaptér pro rychlost 45 ot./min
Page 60

60
PROHLÁŠENÍ O SHODĚ
Společnost
Nedis B.V.
De Tweeling 28
5215MC ’s-Hertogenbosch
Nizozemí
Tel.: 0031 73 599 1055
Email: info@nedis.com
prohlašuje, že výrobek:
Značka: KONIG
Model: HAV-TT10USB
Popis: Gramofonové chassis USB
splňuje následující normy:
Elektromagnetická kompatibilita: EN 55013 : 2001+A1+A2
EN 55022 : 2006
EN 61000:3 2 2000 + A2 :
EN 6100033: 1995+A1A2
EN 55020 : 2002+A1+A2
EN 55024 : 1998+A1+A2
Elektronická zařízení napájená ze sítě: EN 60065 : 2002+A1 : 2006
a následující nařízení směrnic 2004/108/EC a 2006/95/EC.
‘s-Hertogenbosch, 21. března 2008
Mrs. J. Gilad
Obchodní ředitel
Page 61

61
Bezpečnostní opatření:
UPOZORNĚNÍ
NEBEZP EČÍ ÚRAZU
ELEKTRICKÝM PROUDEM.
NEOTVÍREJTE
Abyste zabránili nebezpečí úrazu elektrickým proudem,
svěřte opravu zařízení POUZE kvalifi kovanému servisnímu
technikovi/středisku. Před prováděním opravy vždy odpojte
zařízení od přívodu elektrické energie a od dalších zařízení, která mohou být s vaším zařízením
propojena. Nevystavujte zařízení nadměrné vlhkosti nebo vodě.
Údržba:
K čištění používejte pouze suchý hadřík. Nepoužívejte rozpouštědla ani abrazivní materiály.
Záruka:
Všeobecné parametry:
Design, provedení a parametry výrobku se mohou měnit i bez předchozího upozornění
uživatele výrobcem.
Všechna loga a názvy výrobků jsou obchodní značky nebo registrované obchodní značky
příslušných vlastníků a jsou chráněny příslušnými zákony.
Upozornění:
Tento výrobek je označen následujícím symbolem. To znamená, že s výrobkem je
nutné zacházet jako s nebezpečným elektrickým a elektronickým odpadem a nelze
jej po skončení životnosti vhazovat do běžného domácího odpadu. Pro tyto výrobky
existuje zvláštní síť sběrných středisek.
Copyright © (Autorská práva)
Page 62

62
ROMÂNĂ
Localizarea părţilor componente
1. BUTON DE ALIMENTARE ELECTRICĂ
2. BRAŢ
3. COMUTATOR PENTRU CONTROLUL VITEZEI
4. PRINDERE PENTRU ASIGURARE
5. SUPORT PENTRU BRAŢ
6. TURNTABLE
7. ŞURUB MARE CROMAT
8. Buton de REDARE
9. Buton de ejectare
10. BUTON STOP
11. Mufa USB
12. Linie de ieşire
Pregătirea înaintea utilizării
Şurubul argintiu protejează fonograful în timpul transportului. Dacă viteza fonografului pare să
fi e prea mică sau dacă auziţi un zgomot de frecare, reglaţi şurubul cu o monedă pentru a regla
balansul dispozitivului turntable.
Page 63

63
Cum se reglează acul
Demontarea acului vechi
1. Puneţi o şurubelniţă pe vârful acului şi împingeţi în jos în direcţia
„A”.
2. Scoateţi acul prin tragerea sa în jos şi înainte.
Instalarea unui ac nou
1. Ţineţi vârful acului şi introduceţi celălalt capăt prin apăsarea în
direcţia „B”.
2. Împingeţi în sus în direcţia „C”, până când se blochează în vârf.
Guide Pinx (interior)
Linie de ieşire
Mufă USB
Redarea unei înregistrări
1. Conectaţi cablul de alimentare de la reţeaua
electrică, tensiunea standard este de 230V50HZ.
2. Conectaţi celelalte terminale ale cablului
RCA în intrarea auxiliară (Aux) a televizorului
dumneavoastră, a receiverului home
entertainment sau a altui sistem audio,
asiguraţi-vă că cablul RCA roşu este introdus
mufa roşie şi cablul RCA alb este introdus în
mufa albă.
3. Porniţi aparatul turntable.
4. Puneţi o înregistrare pe turntable, la redarea
unei înregistrări de 45rpm, amintiţi-vă că
trebuie să folosiţi adaptorul care este ambalat
în punga de plastic, alături de manual.
5. Selectaţi viteza de redare în acord cu
înregistrarea.
6. Îndepărtaţi suportul pentru braţ, ridicaţi
mânerul şi deplasaţi uşor braţul la poziţia
dorită a înregistrării, coborâţi uşor mânerul,
apoi, înregistrarea este redată.
7. Porniţi unitatea pe care aţi conectat-o prin
USB la acest turntable, prin folosirea butonului
Pornit/Oprit sau a butonului Volum, reglaţi
butonul de volum, pentru a controla volumul
sunetului.
8. Apăsaţi butonul STOP pentru a opri redarea.
9. Apăsaţi butonul REDARE pentru a continua
redarea.
10. Când redarea muzicii s-a terminat şi braţul
ajunge la capătul înregistrării, braţul va reveni
automat pe suportul său. Sau puteţi apăsa
butonul de ejectare în timpul redării, braţul de
ton se va îndepărta faţă de înregistrare şi se
va aşeza pe suportul său.
11. Amintiţi-vă să decuplaţi cablul de alimentare
din priză când nu folosiţi unitatea.
Page 64

64
Audacity şi conectarea prin USB
Instalarea programului Audacity
Instalaţi programul Audacity în calculatorul dumneavoastră, discul fi ind adecvat pentru
turntable pe USB. Introduceţi discul Audacity în unitatea CD a calculatorului. În spaţiul de
lucru, faceţi clic pe My Computer. Faceţi dublu clic pe unitatea CD, pentru a vedea conţinutul
discului Audacity. Faceţi dublu clic pe Audacity Set Up (Instalare Audacity), pentru a instala
programul Audacity, în acord cu instrucţiunile.
Instalarea driverului USB
Asiguraţi-vă că discul Audacity este încă în unitatea CD. Folosiţi cablul USB inclus, pentru a
conecta unitatea turntable la calculator. Respectaţi instrucţiunile de pe ecran, pentru a instala
driverul USB.
Rularea programului
1. Faceţi dublu clic pe programul Audacity, a cărui pictogramă ilustrează „sfere” roşii şi portocalii
care poartă nişte căşti albastre şi veţi intra în interfaţa programului;
2. Folosind butonul de control al atributelor, din partea de sus a ecranului, mergeţi la început,
Play (Redare), Record (Înregistrare), Pause (Pauză), Stop şi la fi nal. Folosiţi meniurile File
(Fişier), Edit (Editare), View (Vizualizare), Project (Proiect), Generate (Generare), Effect
(Efect) şi Analyze (Analiză) pentru Save (Salvare), Export (Exportare) şi pentru editarea
muzicii.
3. Selectaţi preferinţele din partea de jos a meniului, care va deschide Audacity Preferences
(Preferinţele Audacity). Puteţi seta Audio I/O, Quality (Calitate), File Formats (Formatele
fi şierelor), Spectrograms (Spectrograme), Directories (Directoare), Interface (Interfaţă),
Keyboard (Tastatură) şi Mouse în interfaţa de preferinţe Audacity.
4. Reglaţi volumul de intrare şi de ieşire.
5. Selectaţi butonul de înregistrare pentru înregistrarea unui disc, pistele din partea stângă
şi dreaptă vor fi afi şate pe interfaţă; Dacă nu aveţi o undă fl uctuantă pe interfaţă în timpul
înregistrării, vă rugăm să reglaţi volumul după cum urmează:
1. Faceţi clic pe „start” în colţul din partea stângă a calculatorului, selectaţi „Programs”
(Programe), „Accessories” (Accesorii), „Entertainment” (Divertisment), „Sound Recorder”
(Înregistrarea sunetului) şi intraţi în interfaţa de înregistrare.
2. Interfaţa de înregistrare a sunetului
3. Selectaţi Edit (Editare) şi faceţi clic pe „Audio Properties” (Proprietăţi audio) în partea de jos
a meniului, pentru a intra în interfaţa „Audio Properties” (Proprietăţi audio);
A. Faceţi clic pe butonul previous (anterior), pentru a sări la start;
B. Faceţi clic pe butonul forward (următor), pentru a sări la fi nal;
C. Faceţi clic pe butonul play (redare), pentru a începe înregistrarea;
D. Faceţi clic pe butonul pause (pauză), pentru a pune înregistrarea pe pauză;
E. Faceţi clic pe butonul stop, pentru a opri înregistrarea.
4. Selectaţi volumul de înregistrare a sunetului ţi mergeţi la interfaţa „Recording Control”
(Controlul înregistrării); Reglaţi linia de volum la maxim sau la mijloc, unda fl uctuantă va fi
afi şată pe interfaţă în timpul înregistrării.
Page 65

65
Exportul în formatele WAV,MP3 sau Ogg
1. Asiguraţi-vă că discul Audacity este încă în calculator. Faceţi dublu clic pe pictograma My
Computer de pe spaţiul de lucru.
2. Faceţi dublu clic pe unitatea CD ROM.
3. Copiaţi fi şierul lame_enc.dll fi le şi puneţi-l pe spaţiul de lucru.
4. După copierea fi şierului, deschideţi programul Audacity. Faceţi clic pe butonul Record
(Înregistrare), pentru a începe înregistrarea. Asiguraţi-vă că o înregistrare turntable este
redată şi că cablul USB este conectat la unitatea principală.
5. Puteţi apăsa butonul Stop în orice moment doriţi. Odată ce aţi înregistrat fi şierul pe care doriţi
să-l convertiţi, apăsaţi butonul Edit (Editare) şi mergeţi la Preferences (Preferinţe).
6. Localizaţi fi şierul şi faceţi clic pe butonul Find Library (Găseşte colecţie).
7. Faceţi clic pe butonul Yes (Da) şi mergeţi în spaţiul de lucru pentru a evidenţia lame_enc.dll.
Acum, faceţi clic pe butonul Open (Deschidere).
8. Faceţi clic pe butonul OK şi mergeţi înapoi în fereastra iniţială a programului Audacity.
9. FAcţi clic pe butonul File (Fişier) şi veţi avea opţiunea de a exporta fi şierul înregistrat în
formatele „WAV”, „MP3” sau „Ogg”.
10. Odată ce aţi ales ce format doriţi să fi e exportat, oferiţi un nume al fi şierului şi locaţia unde
doriţi să-l salvaţi. Odată ce aţi terminat, faceţi clic pe butonul Save (Salvare).
11. Introduceţi Title (Titlul), Artist (Artistul) şi alte informaţii legate de fi şierul MP3 pe care l-aţi
creat şi faceţi clic pe butonul OK.
Specifi caţii tehnice
Secţiunea RECORD PLAYER
Motor Motor DC servo
Sistemul de acţionare Curea de transmisie
Viteze 33-1/3 rpm, 45 rpm şi 78 rpm
Distorsiune şi oscilaţii Mai puţin de 0,25%(WTD)
Raportul S/Z: Peste 50 dB
Tipul dozei Doza Ceramic Stereo
Ac 402-M208-165
Nivelul de ieşire 160-380 mV (5 cm/sec la 1 KHz)
GENERALITĂŢI:
Alimentare CA 230V~ 50 Hz
Consumul de curent: 5 W
Dimensiuni (LxÎxG 37X16,5X33 cm
Greutate 4.96 kg
Adaptor pentru 45 rpm
Page 66

66
Declaraţie de conformitate
Noi,
Nedis B.V.
De Tweeling 28
5215MC ’s-Hertogenbosch
Olanda
Tel.: 0031 73 599 1055
Email: info@nedis.com
Declarăm că acest produs:
Denumire: KONIG
Model: HAV-TT10USB
Descriere: USB Turntable
Este în conformitate cu următoarele standarde
EMC: EN 55013: 2001 + A1 + A2
EN 55022: 2006
EN 61000 - 3 2 : 2000 + A2
EN 61000 - 3 - 3 : 1995 + A1 A2
EN 55020: 2002 + A1 + A2
EN 55024: 1998 +A1+A2
LVD: EN 60065: 2002 + A1 : 2006
Conform directivei 2004/108/EC şi 2006/95/EC.
‘s-Hertogenbosch, 2008, 21 martie
J. Gilad
Director achiziţii
Page 67

67
Prevederi de siguranţă:
ATENŢIE!
RISC DE ELECTROCUTARE!
NU DESCHIDEŢI
Dacă apare necesitatea servisării, pentru a evita riscul de
electrocutare, acest produs trebuie deschis DOAR de un
tehnician autorizat. Dacă în timpul funcţionării a apărut o
problemă, deconectaţi produsul de la reţea şi de la celelalte aparate. Feriţi produsul de apă şi
de umezeală.
Întreţinere:
Curăţarea trebuie făcută cu o cârpă uscată. Nu folosiţi solvenţi sau agenţi de curăţare
abrazivi.
Garanţie:
Nu oferim nicio garanţie şi nu ne asumăm niciun fel de responsabilitate în cazul schimbărilor
sau modifi cărilor aduse acestui produs sau în cazul deteriorării cauzate de utilizarea incorectă
a produsului.
Generalităţi:
Designul şi specifi caţiile produsului pot fi modifi cate fără o notifi care prealabilă.
Toate siglele mărcilor şi numele produselor sunt mărci comerciale sau mărci comerciale
înregistrate ale proprietarilor de drept şi aici sunt recunoscute ca atare.
Atenţie:
Acest produs a fost marcat cu această siglă. Acesta indică faptul că produsele
electrice şi electronice uzate nu trebuie aruncate în gunoiul menajer. Aceste produse
au un sistem separat de colectare.
Copyright ©
Page 68

68
 Loading...