

Page 1

B6
B7
B5
B4
B2
B1
B3
HAV-TRH
P10KN
WIRELESS
HEADPHONE
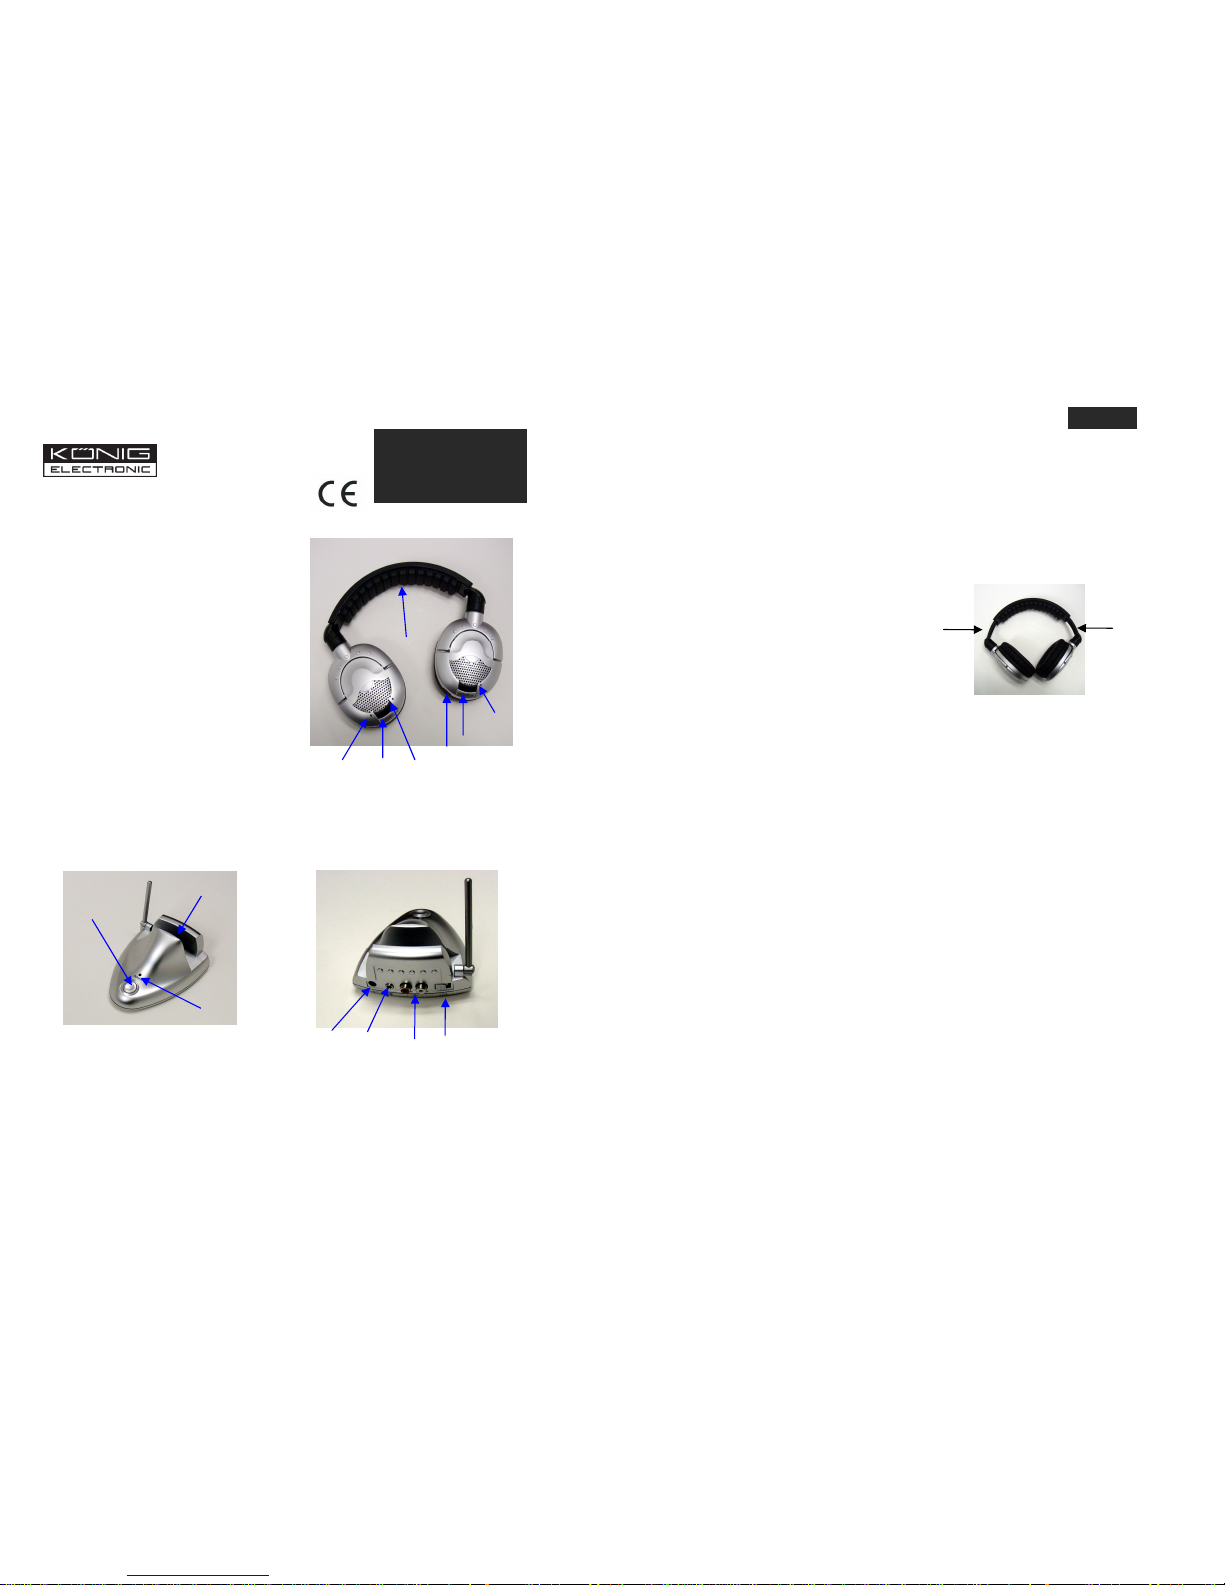
Headphone description:
A1: Charge indicator
A2: Power on/off button
A3: Power on indicator
A4: Volume control
A5: Autoscan button
A6: Autoscan indicator
A7: Charge contact points
Transmi tter description:
B1: Power on/off button B4:12v dc socket for power adapter
B2: Power on indicator B5: 3.5mm audio input
B3: Charge contact points B6: RCA audio input
B7: Channel select switch
Operation transmitter:
1) Connect the RCA/3.5mm cable to the audio input (B5 or B6).
2) Connect the RCA/3.5mm cable to the audio output of the external audio source.
3) Select channel 1, 2 or 3. Select another channel in case of interference of distortion.
4) Connect the AC/DC adapter to the DC input (B4) and the outlet.
5) Turn on the transmitter with power button (B1). The LED indicator (B2) lights up.
Note: the use of audio input B5 or B6 is depending on the connection possibility of the external
audio source.
Operation headphone:
1) Open the battery compartment by turning the left cushion of the headphone anti-clockwise (if
the cushion is in your left hand).
2) Insert the 2 "AAA" rechargeable batteries and ensure the polarities are correct.
3) Replace the cushion to the original position and turn clock-wise until the cushion is locked.
4) After charging the batteries (see following chapter) turn on the headphone with the power
button (A2). The LED indicator (A 1) lights up.
5) Push the auto scan button (A5). Automatic channel search will start. The auto scan indicator
(A6) will flash during search and light up when a stereo signal is detected.
6) Adjust the headphone to a desired volume level (A4).
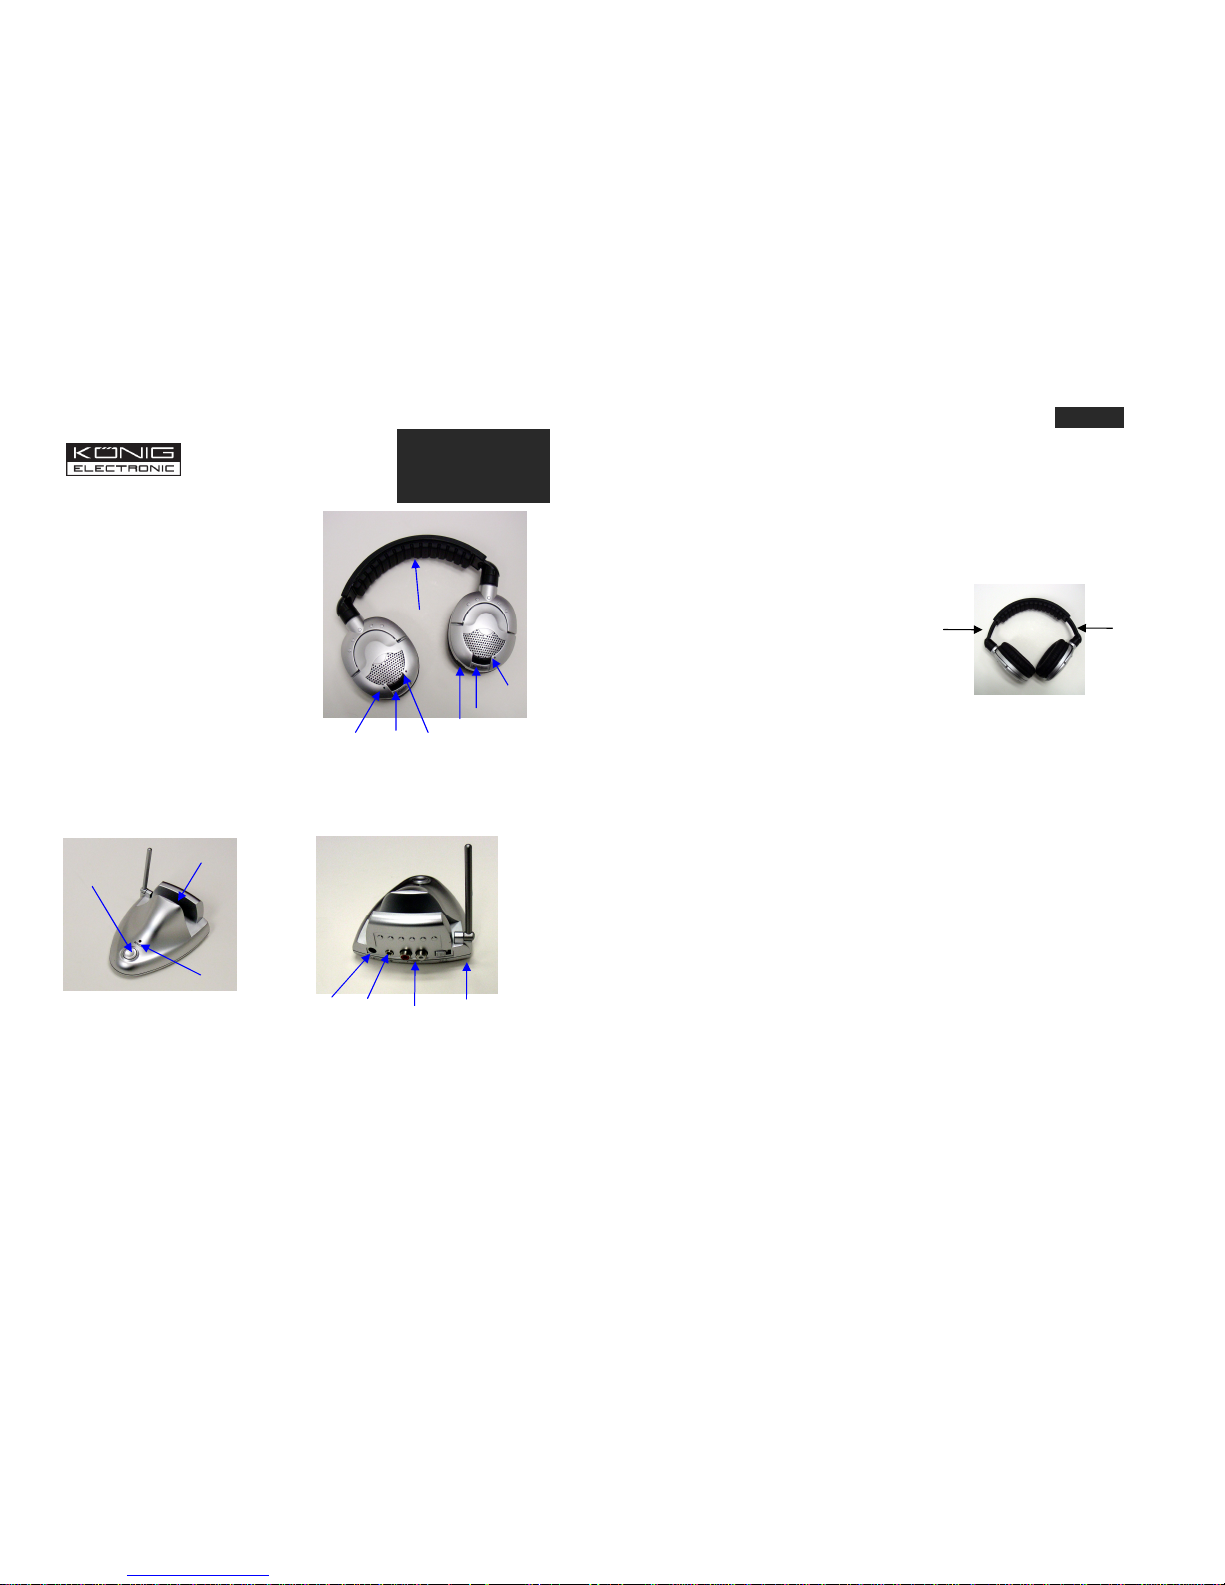
7) Adjust the head strap for a comfortable fit (see figure).
Note: Only use rechargeable batteries to avoid risk of
electric shock or explosion by charging batteries that are
not rechargeable.
Charging:
1) Turn off the headphone and insert the headphone into the slot with the charge contact points
(A7 and B3) on the transmitter.
2) When the contact points connect, the charge indicator (A1) will light up.
3) Duration for charging is about 8 to 12 hours. The charge process will stop automatically. The
recharge indicator will go off when recharging is complete. The headphone is ready to use for
about 15 hours.
Specifications:
Transmission frequency: 864MHz
Frequency response: 50Hz - 18.000Hz
S/N ratio: 55dB
Power supply: 12V DC, 200mA
Range: 100m open area, 30m indoor (reception depending on conditions)
Batteries: 2x AAA, NiMH, 650mAh (included)
Safety precautions:
To reduce risk of electric shock, this produc t should ONLY be opened by an authorized
technician if service is required. Disconnect the product from mains and other equipment if a
problem should occur.
Warranty:
No guarantee or liability can be accepted for any changes and modifications of the product or
damage caused due to incorrect use of this product.
General:
Designs and specifications are subject to change without notice.
DECLARATION OF CONFIRMITY:
This product is in conformity with the Radio, EMC and LVD standards.
Following the provisions of the 1999/5/EC R&TTE Directive.
Conform this regulation it’s allowed to use this product in all European Community & EFTA
countries. We are not responsible for use outside the EU & EFTA.
ENG
LISH
INSTRUCTIONS
A3
A2
A6
A5
A1
A4
A7
EN
Page 2
B6
B7
B5
B4
B2
B1
B3
HA
V-TRH
P10KN
DRAHTLOSER
KOPHÖRER
Kopfhörer Beschreibung:
A1: Ladeanzeige
A2: Ein/Aus Taste
A3: Betriebsanzeige
A4: Lautstärkeregler
A5: Autoscan Taste
A6: Autoscan Anzeige
A7: Ladekontakte
Sender Beschreibung:
B1: Ein/Aus Taste B4: 12V/DC Anschluss für Netzadapter
B2: Betriebsanzeige B5: 3,5mm Audio Eingang
B3: Ladekontakte B6: Cinch Audio Eingang
B7: Kanalwahl Schalter
Betrieb Sender:
1) Stecken Sie das 3,5mm/Cinch Kabel in den Audio Eingang (B5 oder B6) ein.
2) Stecken Sie das 3,5mm/Cinch Kabel in den Audio Ausgang der externen Audio-Quelle.
3) Wählen Sie Kanal 1, 2 oder 3 aus. Falls Störungen auftreten wählen Sie eine anderen Kanal.
4) Verbinden Sie den Netzadapter mit dem DC-Eingang (B4) und danach mit der Netzsteckdose.
5) Schalten Sie den Sender mit der Ein/Aus Taste (B1) ein. Die LED Anzeige (B2) leuchtet auf.
Anmerkung: der Gebrauch der Audio-Eingänge B5 oder B6 ist abhängig von den
Anschlussmöglichkeiten der externen Audioquelle.
Betrieb Kopfhörer:
1) Öffnen Sie das Batteriefach durch eine Linksdrehung des linken Ohrpolsters am Kopfhörer
(wenn das Polster sich in Ihrer linken Hand befindet).
2) Legen Sie 2 "AAA" aufladbare Akkus ein und achten Sie auf die korrekte Polarität.
3) Setzen Sie das Polster in die Ausgangsstellung und drehen es nach rechts, bis das Polster
verschlossen ist.
4) Nach Aufladen der Akkus (siehe folgenden Abschnitt) schalten Sie den Kopfhörer mit der
Ein/Aus Taste (A2) ein. Die LED Anzeige (A1) leuchtet auf.
5) Drücken Sie die Autoscan Taste (A5). Die automatische Kanalsuche startet. Die Autoscan
Anzeige (A6) blinkt während der Suche und leuchtet auf, wenn ein Stereosignal erkannt wird.
6) Regeln Sie am Kopfhörer die gewünschte Lautstärke
(A4).
7) Passen Sie das Kopfband für einen komfortablen Sitz
an (siehe Bild rechts).
Anmerkung: Verwenden Sie nur wiederaufladbare
Batterien (Akkus) um die Gefahr eines elektrischen
Schlages oder einer Explosion zu vermeiden, indem Sie
Batterien aufladen, die nicht aufladbar sind.
Laden:
1) Schalten Sie den Kopfhörer aus und setzen Sie den Kopfhörer in den Schlitz mit den
Ladekontakt-Punkten (A7 und B3) am Sender.
2) Sind die Kontaktpunkte verbunden, leuchtet die Ladeanzeige (A1).
3) Dauer für die Aufladung ist ungefähr 8 bis 12 Stunden. Der Ladeprozess stoppt automatisch.
Die Ladeanzeige erlischt, wenn der Ladevorgang komplett ist. Der Kopfhörer ist dann für
ungefähr 15 Stunden verwendbar.
Technische Daten:
Sendefrequenz: 864 MHz
Übertragungsbereich: 50 Hz - 18.000 Hz
S/R Verhältnis: 55 dB
Betriebsspannung: 12V DC, 200 mA
Reichweite: 100 m im Freien, 30 m in geschlossenen Räumen (umgebungsabhäng)
Akkus: 2x AAA, NiMH, 650 mAh (inklusive)
Vorsichtsmassnahmen:
Um die Gefahr eines Stromschlages zu vermeiden, sollte dieses Produkt im Falle eines Defektes
NUR von einem autorisierten Techniker geöffnet werden. Trennen Sie das Produkt vom
Stromkreis und von anderen Geräten, sobald ein Problem auftritt. Vermeiden Sie Kontakt zu
Wasser oder hoher Feuchtigkeit.
Gewährleistung:
Es kann keine Gewährleistung oder Haftung für Schäden übernommen werden, die auf
eigenmächtige Änderungen oder falscher Handhabung dieses Gerätes zurückzuführen sind.
Allgemein:
Design und Spezifikationen können ohne vorherige Information geändert werden.
KONFORMITÄTSERKLÄRUNG
Das Produkt ist mit den europäischen Standards für Funk, EMC und LVD und den
Bestimmungen der 1999/5/EC R&TTE Richtlinie konform. Entsprechend diesen Bestimmungen
ist die Verwendung dieses Produktes in allen Ländern der EU & EFTA erlaubt. Wir übernehmen
keine Verantwortung für den Gebrauch außerhalb der EU & EFTA.
DEU
TSCH
ANLEITUNG
DE
A3
A2
A6
A5
A1
A4
A7
Page 3
B6
B7
B5
B4
B2
B1
B3
HAV-TRH
P10KN
CASQUE SANS FIL
Description du casque :
A1: Indicateur de charge
A2: Bouton on / off
A3: Indicateur de marche
A4: Contrôle du volume
A5: Bouton autoscan
A6: Indicateur autoscan
A7: Contacts pour la charge
Description du transmetteur :
B1: Bouton on / off B4 :Brise 12v dc pour daptateur l’alimentation
B2: Indicateur de marche B5: Entrée audio 3.5mm
B3: Contacts pour la charge B6: Entrée audio RCA
B7: Commutateur de sélection des canaux
Mise en fonctionnement du transmetteur :
1) Connectez le câble RCA/3.5mm à l’entrée audio correspondante (B5 ou B6).
2) Connectez le câble RCA/3.5mm à la sortie audio de la source audio externe.
3) Sélectionnez le canal 1, 2 ou 3. Sélectionnez un autre canal au cas où il y aurait des
interférences de distorsion.
4) Connectez l’adaptateur AC/DC à l’entrée DC (B4) et à la prise de courant.
5) Allumez le transmetteur avec le bouton d’alimentation (B1). L’indicateur LED (B2) s’allume.
Note: L’utilisation de l’entrée audio B5 ou B6 dépend des possibilités de connexion de la source
audio externe.
Mise en fonctionnement du casque :
1) Ouvrez le compartiment à piles en tournant le coussinet gauche du casque dans le sens des
aiguilles d’une montre (si le coussinet est dans votre main gauche)
2) Insérez 2 piles rechargeables "AAA" et assurez vous que les polarités (+/-) soient correctes.
3) Replacez le coussinet en position d’origine en tournant dans le sens inverse des aiguilles
d’une montre jusqu’à ce que le coussinet soit bloqué.
4) Après avoir recharger les piles (voir chapitre suivant) allumez le casque avec le bouton
d’alimentation (A2). La LED (A1) s’allume.
5) Appuyez sur le bouton auto scan (A5). La recherche automatique des canaux commencera.
L’indicateur auto scan (A6) clignotera pendant la recherche et restera allumé quand un signal
stéréo sera détecté.
6) Réglez le casque au volume désiré (A4).
7) Réglez le bandeau du casque pour un meilleur confort
(voir schéma ci-contre).
Note: Utilisez uniquement des piles rechargeables pour
éviter les risques de chocs électriques ou explosions en
rechargeant des piles qui ne sont pas rechargeables.
Recharge :
1) Eteignez le casque et insérez le sur le slot avec les contacts de charge (A7 et B3) sur le
transmetteur.
2) Quand les points de contacts sont connectés, l’indicateur de charge (A1) s’allumera.
3) La durée de charge est d’environ 8 à 12 heures. Le processus de recharge s’arrêtera
automatiquement. L’indicateur de recharge s’éteindra quand la charge sera terminée. Le casque
est prêt à l’emploi pour environ 15 heures.
Caractéristiques :
Fréquence de transm ission :864MHz
Réponse en Fréquence: 50Hz - 18.000Hz
Ratio S/N: 55dB
Alimentation: 12V DC, 200mA
Portée : 100m sur champ ouvert, 30m en intérieur (la réception dépend de conditions)
Piles: 2x AAA, NiMH, 650mAh (incluses)
Précautions de sécurité :
Pour réduire les risques de chocs électriques, ce produit devra être UNIQUEMENT ouvert par un
technicien autorisé si cela est nécessaire. Débranchez le produit des principaux équipements si
un problème se présentait.
Garantie :
Aucune garantie ou responsabilité ne pourra être prise en compte en cas de modifications ou
d’interventions sur le produit ou en cas de dommages causés par une utilisation incorrecte de ce
produit.
Généralités:
Les designs et caractéristiques sont sujets aux modifications sans avertissement préalable
DECLARATION DE CONFORMITE:
Ce produit est conforme aux normes Radio, EMC et LVD.
Selon les dispositions de la directive 1999/5/EC R&TTE.
En vertu de la directive indiquée, l’utilisation de cet appareil est autorisée dans tous les pays de
l’Union européenne ainsi que dans les pays de l’EFTA (Association européenne du commerce
équitable).Nous ne répondons pas de l’utilisation de cet article en dehors des pays de l’Union
européenne et des pays EFTA.
IN
ST
RUCTIONS
EN FRANCAIS
FR
A3
A2
A6
A5
A1
A4
A7
Page 4

B6
B7
B5
B4
B2
B1
B3
HAV-TRH
P10KN
DRAADLOZE
HOOFDTELEFOON
Omschrijving hoofdtelefoon:
A1: Laadindicator
A2: Aan/uit toets
A3: Aan/uit indicator
A4: Volumeregeling
A5: Autoscan toets
A6: Autoscan indicator
A7: Contactpunten voor het laden
Omschrijving zender:
B1: Aan/uit toets B4: 12V aansluiting voor de AC/DC adapter
B2: Aan/uit indicator B5: 3.5mm audio ingang
B3: Contactpunten voor het laden B6: RCA audio ingang
B7: Schakelaar voor kanaalkeuze
Werking zender:
1) Sluit de RCA/3.5mm kabel aan op de audio ingang (B5 of B6).
2) Sluit de RCA/3.5mm kabel aan op de audio uitgang van een externe audiobron.
3) Selecteer kanaal 1, 2 of 3. Selecteer een ander kanaal in geval van interferentie of storing.
4) Sluit de AC/DC adapter aan op de DC ingang (B4) en het stopcontact.
5) Schakel de zender in met de aan/uit toets (B1). De LED indicator (B2) licht op.
Opmerking: het gebruik van de audio ingang B5 of B6 is afhankelijk van de
aansluitmogelijkheden van de externe audiobron.
Werking hoofdtelefoon:
1) Open het batterijcompartiment door de linkse oorschelp tegen de klok in te draaien (indien de
oorschelp in uw linkerhand is).
2) Plaats 2 “AAA” oplaadbare batterijen en zorg ervoor dat deze correct volgens de polariteit
geplaatst zijn.
3) Plaats de oorschelp terug door deze met de klok mee te draaien. Draai totdat de oorschelp
vergrendeld is.
4) Schakel, na het laden van de batterijen (zie volgend hoofdstuk), de hoofdtelefoon in met de
aan/uit toets (A2). De LED indicator (A1) licht op.
5) Druk op de auto scan toets (A5). Automatisch kanalen zoeken begint. De auto scan indicator
(A6) knippert tijdens het zoeken en licht blijvend op als een stereo signaal gevonden is.
6) Stel de hoofdtelefoon in op een gewenst volumeniveau
(A4).
7) Stel de hoofdband in zodat de hoofdtelefoon
comfortabel zit. (zie afbeelding).
Opmerking: gebruik uitsluitend oplaadbare batterijen om
het gevaar van elektrische schokken of explosies te
voorkomen. (bij het laden van batterijen die niet
herlaadbaar zijn).
Laden:
1) Schakel de hoofdtelefoon uit en plaats de hoofdtelefoon in de daarvoor bestemde opening
met de contactpunten (A7 en B3) van de zender.
2) Als de contactpunten c ontact maken, zal de laadindicator (A1 ) oplichten.
3) De laadtijd is ongeveer 8 tot 12 uur. Het laadproces stopt automatisch. De laadindicator gaat
uit en het laden is voltooid. De hoofdtelefoon is klaar voor een gebruik van ongeveer 15 uur.
Specificaties:
Zendfrequentie: 864MHz
Frequentiebereik: 50Hz - 18.000Hz
S/R verhouding: 55dB
Voeding: 12V DC, 200mA
Bereik: 100m open veld, 30m binnen (afhankelijk van omgevingsfactoren)
Batteriijen: 2x AAA, NiMH, 650mAh (bijgeleverd)
WAARSCHUWING:
Om het risico van een elektrische schok te voorkomen, mag dit apparaat alleen, indien nodig,
geopend worden door een geautoriseerd servicebedrijf. Ontkoppel het apparaat van stroom en
randapparatuur, wanneer zich een probleem voordoet.
GARANTIE:
Garantie of aansprakelijkheid word t ni et aanvaardt als er veran deringen en/of modificaties zijn
aangebracht of bij onjuist gebruik van het product.
ALGEMEEN:
Wijzigingen in uitvoering en specificaties voorbehouden.
VERKLARING VAN CONFORMITEIT:
Dit product is in overeenstemming is met de Radio, EMC en LVD normen en voldoet aan de
essentiële eisen en overige bepalingen van de richtlijn R&TTE 1999/5/EC. Conform deze richtlijn
kan dit product in de EU & EFTA landen gebruikt worden. Wij zijn niet verantwoordelijk voor het
gebruik van dit product buiten de EU & EFTA landen.
NEDE
RLANDSE
INSTRUCTIES
NL
A3
A2
A6
A5
A1
A4
A7
Page 5

B6
B7
B5
B4
B2
B1
B3
HAV-TRH
P10KN
CUFFIE
WIRELESS
Descrizione:
A1: Indicatore di carica
A2: Tasto on/off
A3: Indicatore d’alimentazione
A4: Controllo del volume
A5: Tasto A utoscan
A6: Indicatore Autoscan
A7: Punti di contatto per la carica
Descrizione del trasmettitore:
B1: Tasto on/off B4: Presa 12v DC per adattatore
B2: Indicatore d’alimentazione B5: Ingresso audio 3.5mm
B3: Punti di contatto per la carica B6: Ingresso RCA audio
B7: Switch di selezione canali
Utilizzo del trasmettitore:
1) Collegare il cavo RCA/3.5mm all’ingresso audio (B5 o B6).
2) Collegare il cavo RCA/3.5mm all’ uscita audio o ad un’altra fonte esterna.
3) Selezionare canale 1, 2 o 3. Selezionare un canale diverso in caso di interferenza e
distorsione.
4) Collegare l’adattatore AC/DC all’ingresso DC (B4) e all’esterno.
5) Ruotare il trasmettitore con tasto d’alimentazione (B1). Il LED di indicazione (B2) si accende.
Nota: l’uso dell’ingresso audio B5 o B6 dipende dalla possibile connessione di fonti esterne
audio.
Utilizzo della cuffia:
1) Aprire il vano batterie ruotando il padiglione di sinistra della cuffia (se il padiglione è sulla
vostra sinistra).
2) Inserire 2 batterie ricaricabili “AAA” e verificare che la polarità sia corretta.
3) Riposizionare il padiglione nella posizione originale e ruotare fino a bloccare il padiglione.
4) Dopo aver ricaricato le batterie (vedi capitolo seguente) ruotare la cuffia con il tasto
d’alimentazione (A2). Il LED di indicazione (A1) si accende.
5) Premere il tasto Autoscan (A5). Il canale parte automaticamente. L’indicatore Autoscan (A6)
lampeggerà durante la ricerca e rimane fisso quando viene rilevato il segnale stereo.
6) Regolare la cuffia al livello di volume desiderato (A4).
7) Regolare il cerchietto per un comfort unico (vedi
figura).
Nota: Utilizzare solo batterie ricaricabili per evitare
pericolose scariche elettriche o esplosioni.
Ricarica:
1) Spegnere la cuffia e inserirla nel vano della ricarica del trasmettitore (A7 e B3).
2) Quando i punti di contatto sono collegati, l’indicatore di carica (A1) si accende.
3) Il tempo di ricarica va dalle 8 alle 12 ore. Il processo di carica si fermerà automaticamente.
L’indicatore di carica si spegnerà quando la ricarica è terminata. La cuffia è pronta all’uso per
circa 15 ore.
Specifiche:
Frequenza: 864MHz
Frequenza di risposta: 50Hz - 18.000Hz
S/N ratio: 55dB
Alimentatore: 12V DC, 200mA
Range: 100m esterno, 30m interno (la ricezione dipende dalle conseguenze)
Batterie: 2x A AA, NiMH, 650mAh (incluse)
Precauzioni:
Per ridurre i rischi di pericolose scariche elettriche, questo prodotto dovrebbe essere aperto solo
dal tecnico autorizzato. Disconnettere il prodotto, dall’alimentazione e da altri apparecchi se
dovesse presentarsi qualche problema.
Garanzia:
Nessuna garanzia o responsabilità può essere riconosciuta per modifiche del prodotto o per
guasti causati da un cattivo uso del prodotto.
Generale:
Design e specifiche sono soggetti a modifiche senza preavviso.
DICHIARAZIONE DI CONFORMITA’:
Questo prodotto è conforme agli standard Radio, EMC e LVD.
Segue le direttive 1999/5/EC R &TTE.
Conforme a questo regolamento permette l’utilizzo di questo prodotto in tutta la Comunità
Europea e i paesi EFTA. Nessuna responsabilità per l’utilizzo fuori da EU & EFTA.
ISTR
UZIONI IN
ITALIANO
IT
A3
A2
A6
A5
A1
A4
A7
Page 6

B6
B7
B5
B4
B2
B1
B3
HA
V-TRHP
10
HAV-TRHP10KN
We
zeték nélküli
fejhallgató
Jellemzők:
A1: Töltés kijelzés
A2: Ki/be kapcsoló
A3: Tápellátás kijelzés
A4: Hangerőszabályzás
A5: Auto keresés
A6: Auto keresés kijelzés
A7: Töltési kontakt pontok
A továbbító leírása:
B1: Ki/be kapcsoló B4: 12v dc aljzat adapter
B2: Tápellátás kijelzés B5: 3.5mm audió bemenet
B3: Töltési kontakt pontok B6: RCA audió et
B7: Csatornaválasztás
Operation transmitter:
1) Csatlakoztassa az RCA/3.5mm kábelt az audió bemenethez (B5, B6).
2) Csatlakoztassa az RCA/3.5mm a küls ő audió készülék kimenetéhez.
3) Válasszon csatornát, 1, 2 vagy 3. Interferencia esetén válasszon másik csatornát.
4) Csatlakoztassa az AC/DC adaptert a 9V DC bemenethez (B4).
5) Kapcs olja be a továbbító t (B1). A LED kije lző (B2) felgyullad .
A B5 vagy B6 audió bemenetek használata a külső készüléktől függ.
A fejhallgató üzemelése:
1) Nyissa ki az elemtartót amely a bal oldali fülpárna mögött rejlik és a párna lecsavarásával
nyitható fel.
2) Helyezze be a 2 db "AAA" akkut a polaritásokra figyelvén.
3) Replace the cushion to the original position and turn clock-wise until the cus hion is locked.
4) Az akkuk feltöltése után kapcsolja be a fejhallgatót, a LED kijelző kigyullad.
5) Nyomja meg az auto kereső gombot (A5). Megkezdődik az automata csatornakeresés. Az
auto kereső visszajelző (A6) villog, jel találása esetén folytonosan ég.
6) Állítsa be a fejhallgatón a kívánt hangszintet (A4).
7) Állítsa be a fejpántot.
Kizárólag akkumulátort használjon, így elkerülheti az
elektromos sokkot ami az elemek töltése esetén
léphet fel.
Töltés:
1) Kapcsolja ki a fejhallgatót és helyezze be az akkukat, majd csatlakoztassa a kapcsolódási
pontokon a továbbítóhoz a fejhallgatót.
2) A tölt és visszaj elző felgyullad.
3) A töltés 8 – 12 órát vesz igénybe. A töltési folyamat automatikusan leál l, ezt kijelző is mutatja.
A fejhallgató 15 órán át üzemel.
Specifikáció:
Jeltovábbítási frekvencia: 864MHz
Frekvencia érzékenység: 50Hz - 18.000Hz
S/N arány: 55dB
Adapter: 12V DC, 200mA
Hatótáv: 100m nyilt téren, 30m beltéren
Akkuk: 2x AAA, NiMH, 650mAh (tartalmaz)
Biztonsági előírások:
Az elektromos ütés elkerülése végett a készüléket kizárólag szakavatott személy nyithatja fel.
Probléma esetén szüntesse meg a készülék tápellátását.
Garancia:
A termék modosítása illetve megváltoztatása esetén a garancia érvényét veszti.
Általános:
A külső forma és a műszaki tartalom a gyártó által megváltoztatható.
Termékbesorolás:
A termék megfelel a Radio, EMC and LVD sztandardoknak.
Eleget tesz a 1999/5/EC R&TTE direktíváknak.
A termék minden Európai Úniós és EFTA országban használható. Ezen kívüli országokbani
üzembehelyezésért nem vállalunk felelősséget.
MAGYAR
LEÍRÁS
HU
A3
A2
A6
A5
A1
A4
A7
Page 7

B6
B7
B5
B4
B2
B1
B3
HA
V-TR
H
P10KN
TRÅDLÖSA
HÖRLURAR
Beskrivning av hörlurar:
A1: Laddningsindikator
A2: Ström av/på, knapp
A3: Ström på, indikering
A4: Volymkontroll
A5: Autoscan, knapp
A6: Autoscan, indikator
A7: Laddningskontakt
Beskrivning av sändare:
B1: Ström av/på, knapp B4: 12V DC-kontakt för strömadapter
B2: Ström av/på, indikering B5: 3.5mm audio-ingång
B3: Laddningskontakt B6: RCA audio-ingång
B7: Kanalväljare
Handhavande av sändare:
1) Anslut RCA/3.5mm-kabeln till audio-ingången (B5 eller B6).
2) Anslut RCA/3.5mm-kabeln till audio-utgången hos den externa ljudkällan.
3) Välj kanal 1, 2 eller 3. Välj en annan kanal om störningar eller distortion uppstår.
4) Anslut AC/DC-adaptern till DC-ingången (B4) och vägguttaget.
5) Tryck på sändaren med strömknappen (B1). LE D-indikatorn (B2) lyser då upp.
Notera: Användande av audio-ingång B5 eller B6 beror på anslutningsmöjligheten hos den
externa ljudkällan.
Handhavande av hörlurar:
1) Öppna batterifacket genom att vrida hörlurarnas vänstra kudde moturs (om du håller kudden i
din vänstra hand).
2) Sätt i de 2 uppladdningsbara "AAA"-batterierna och försäkra dig om att polariteten är korrekt.
3) Sätt tillbaka kudden till dess ursprungliga position och vrid medurs tills dess att kudden låses.
4) Sätt efter laddning av batterierna (se följande kapitel) på hörlurarna med strömknappen (A2).
LED-indikatorn (A1) lyser då upp.
5) Tryck på autoscan-knappen (A5). Automatisk kanalsökning påbörjas. Autoscan-indikatorn
(A6) blinkar und er sökning oc h lyser upp n är en st ereosignal är funnen.
6) Ställ in önskad volym i hörlurarna (A4).
7) Justera huvudbandet till en komfortabel passform (se
figur).
Notera: Använd endast uppladdningsbara batterier för
att på så sätt undvika risk för elektrisk stöt eller explosion
genom laddning av batterier som ej är uppladdningsbara.
Laddning:
1) Stäng av hörlurarna och sätt dem i spåret med laddningspunkterna (A7 och B3) i sändaren.
2) När laddningskontakterna är anslutna lyser laddningsindikatorn (A1) upp.
3) Laddningen tar ca 8 till 12 timmar. Laddningsprocessen stannar automatiskt . När laddningen
är klar slocknar laddningsindikatorn. Hörlurarna är nu redo att användas i ca 15 timmar.
Specifikationer:
Sändningsfrekvens: 864MHz
Frekvensrespons: 50Hz - 18.000Hz
S/N förhållande: 55dB
Strömförsörjning: 12V DC, 200mA
Räckvidd: 100m i öppna förhållande, 30m inomhus (beroende på yttre omständigheter)
Batterier: 2x AAA, NiMH, 650mAh (ingår)
Säkerhetsföreskrifter:
För att minska risken för elektriska stötar, bör denna produkt ENDAST öppnas av en
auktoriserad tekniker om service skulle behövas. Koppla bort produkten från vägguttaget om
problem skulle uppstå.
Garanti:
Ingen garanti eller skadestånd kan åberopas om produkten har ändrats eller modifierats eller om
produkten använts felaktigt.
General:
Design och specifikationer kan ändras utan förvarning.
DECLARATION OF CONFIRMITY:
This product is in conformity with the Radio, EMC and LVD standards.
Following the provisions of the 1999/5/EC R&TTE Directive.
Conform this regulation it’s allowed to use this product in all European Community & EFTA
countries. We are not responsible for use outside the EU & EFTA.
SVE
NSK
INSTRUKTION
SE
A3
A2
A6
A5
A1
A4
A7
Page 8

B6
B7
B5
B4
B2
B1
B3
HAV-TRH
P10KN
LANGATTOMAT
KUULOKKEET
Kuulokkeiden kuvaus:
A1: Latauksen merkkivalo
A2: Painike on/off
A3: Virran merkkivalo
A4: Äänenvoimakkuuden säätö
A5: Painike autoscan
A6: Merkkivalo autoscan
A7: Latauksen kontaktipisteet
Lähettimen kuvaus:
B1: Painike on/off B4: 12v dc liitin verkkomuuntajaa varten
B2: Virran merkkivalo B5: 3.5mm audiosisääntulo
B3: Latauksen kontaktipisteet B6: RCA audiosisääntulo
B7: Kanavien valintakytkin
Lähettimen käyttö:
1) Liitä RCA/3.5mm kaapeli audiosisääntuloon (B5 tai B6).
2) Liitä RCA/3.5mm kaapeli ulkoisen audiolähteen audioulostuloon.
3) Valitse kanava 1, 2 tai 3. Jos häiriöitä tai äänen vääristymiä ilmenee, valitse toinen kanava.
4) Liitä AC/DC muuntaja DC sisääntuloon (B4) ja pistorasiaan.
5) Kytke lähetin päälle painikkeella (B1). LED merkkivalo (B2) syttyy.
Huomautus: Audiosisääntulon B5 tai B6 käyttö riippuu ulkoisen audiolähteen
liittämismahdollisuuksista.
Kuulokkeiden käyttö:
1) Avaa paristotila kääntämällä kuulokkeiden vasenta korvapehmustetta vastapäivään (mikäli
pidät pehmustetta vasemmassa kädessäsi).
2) Aseta tilaan 2 ladattavaa "AAA" paristoa ja varmista, että niiden polariteetti on oikeinpäin.
3) Laita korvapehmuste takaisin ja käännä sitä myötäpäivään, kunnes se lukittuu paikalleen.
4) Paristojen latauksen jälkeen (ks. seuraava luku) kytke kuulokkeet päälle painikkeella (A2).
LED merkkivalo (A1) syttyy.
5) Paina painiketta auto scan (A5). Niin alkaa automaattinen kanavan etsintä. Etsinnän aikana
merkkivalo auto scan (A6) vilkkuu ja alkaa palaa jatkuvasti stereosignaalin löytyessä.
6) Säädä kuulokkeiden äänenvoimakkuus sopivaksi (A4).
7) Säädä kuulokkeiden varsi niin, että kuulokkeet sopivat
mukavasti päähän (ks. kuva).
Huomautus: Käytä vain ladattavia paristoja välttääksesi
sähköisku- tai räjähdysvaaran, joka uhkaa ladattaessa
paristoja, jotka eivät ole ladattavaksi tarkoitettuja.
Lataus:
1) Kytke kuulokkeet pois päältä ja aseta ne lähettimessä olevaan latauksen kontaktipisteet
sisältävään kiinnityspaikkaan (A7 ja B3).
2) Kytkettäessä kontaktipisteet syttyy latauksen merkkivalo (A1).
3) Latauksen kestoaika on noin 8 - 12 tuntia. Latausprosessi loppuu automaattisesti. Latauksen
loputtua latauksen merkkivalo sammuu. Kuulokkeet ovat nyt valmiina käyttöön noin 15 tunnin
ajan.
Erittely:
Lähetystaajuus: 864MHz
Taajuusalue: 50Hz - 18.000Hz
Kohinasuhde: 55dB
Virransyöttö: 12V DC, 200mA
Toimintasäde: 100 m avoimessa tilassa, 30 m sisätil oissa (olosuhteista riippuen)
Paristot: 2x AAA, NiMH, 650mAh (pakkauksen mukana)
Turvallisuuteen liittyviä huomautuksia:
Sähköiskuvaaran vuoksi saa tämän laitteen avata sen tarvitessa huoltoa VAIN valtuutettu
asentaja. Irrota laite ongelmatilanteessa verkkovirrasta ja muista laitteista.
Takuu:
Tuotteen takuu ei koske minkäänlaisia vahinkoja, jotka ovat aiheutuneet tuotteeseen tehdyistä
muutoksista tai tuotteen ohjeen vastaisesta käytöstä.
Yleistä:
Valmistaja varaa oikeuden mallin ja teknisten tietojen muutoksiin ilman edeltävää ilmoitusta.
TODISTUS STANDARDINMUKAISUUDESTA:
Tämä tuote vastaa Radio-, EMC- ja LVD-standardeja
direktiivin 1999/5/EC R&TTE asetusten mukaisesti.
Tämän direktiivin nojalla voidaan tätä tuotetta käyttää kaikissa Euroopan yhteisöjen ja EFTA:n
jäsenmaissa. Valmistaja ei vastaa laitteen käytöstä EU ja EFTA maiden ulkopuolella.
OHJE
ET -
SUOMI
FI
A3
A2
A6
A5
A1
A4
A7
Page 9

B6
B7
B5
B4
B2
B1
B3
HA
V-TR
HP10KN
BEZDRÁTOVÁ
NÁHLAVNÍ
SOUPRAVA
Náhlavní souprava:
A1: Indikace nabíjení
A2: Přepínač ON/OFF
A3: Indikace zapnutí
A4: Ovládání hlasitosti
A5: Tlačítko Autoscan
A6: Indikace “Autoscan”
A7: Kontaktní nabíjecí body
Vysílač:
B1: Tlačítko ON/OFF B4: 12V DC napájecí vstupní konektor
B2: Indikace zapnutí B5: 3.5mm audio vstup
B3: Kontaktní nabíjecí body B6: RCA audio vstup
B7: Přepínač pro výběr kanálu
Provoz vysílače:
1) Připoj te RCA/3.5mm k audio vstupu (B5 nebo B6).
2) Propojte RCA/3. 5mm s audio výstup em externí ho audio zařízení.
3) Zvolte kanál 1, 2 nebo 3. V případě interf erencí a r uení kanál přelaďt e.
4) Připoj te AC/DC zdroj k DC vstupu ( B4) a zdr oji el. energie.
5) Vysíla č zapněte přesunutím přepínače (B1) d o polohy O N. Rozsvítí se LED indikace (B2).
Poznámka: použití audio vstupu (B5 a B6) dle propojovacích moností externího audio zařízení.
Provoz náhlavní soupravy:
1) Otevřete bateriový kryt otočením levé molitanové poduky sluchátka proti směru hodinových
ručiček (z pohledu náuníku v levé ruce).
2) Vložte 2 ks "AAA" nabíjecích akumulátorů a ujistěte se o správnosti polarity.
3) Poté molitanovou poduku opět usaďte na sluchátko a otočte jí po směru hodinových ručiček
až do lehkého zacvaknutí.
4) Nabíjení akumulátorů (viz odstavec níe). Zapněte sluchátka přesunutím přepínače (A2) do
polohy ON. Rozsvítí se LED indikace (A1).
5) Pro sputění automatického vyhledávání stereo signálu stlačte tlačítko Autoscan (A5).
Během vyhledávání bude LED indikace (A6) blikat. Po detekování signálu svítí indikace trvale.
6) Přizpůsbte hlasitost pomocí tlačítka (A4).
7) Nastavitelnou pásku upravte dle potřeby pro pohodlné
nošení (viz obrázek).
Poznámka: Nabíjejte výhradně akumulátory k tomu
určené. Nezaměňujte staré s novými nebo akumulátory
různých typů a značek. V případě, e nebudete sluchátka
delí dobu pouívat akumulátory z nich vyjměte –
předejdete tak monému vytečení elek trolytu a jejich
následnému pokození. Akumulátory ani sluchátka nevystavujte příliným teplotám ani přímému
slunečnímu svitu.
Nabíjení:
1) Před nabíjením nejprve sluchátka vypněte. Nabíjecími kontakty (A7) usaďte sluchátka do
prostoru vysílače (B3).
2) Po prop ojení nab íjecích k ontaktů s e rozsvítí LED indik ace.
3) Doba nabíjení je cca 8 - 12 hod. Proces nabíjení je ukončen automaticky – LED indikace
zhasne. Provozuschopnost po plném dobití je cca 15 hod.
Specifikace:
Přenos. frekvence: 864MHz
Frekv enční r ozsah: 50Hz - 18.000Hz
Poměr signál/um: 55dB
Napájení (vysílač): 12V DC, 200mA
Dosah: 100m (přímá vidit elnost), 30m (v budovách s ohledem na překáky a přenos. podmínky)
Napájení (sluchátka): 2ks AAA, NiMH, 650mAh (součás tí balení)
BEZPEČNOSTNÍ OPATŘENÍ
Zařízení nikdy sami neotvírej te, nepokozujte ani jinak neuprav ujte - pro servis se obraťte na
kvalifikovaného technika. V případě jakýchkoliv potíí odpojte nejprve zařízení od přívodu el.
proudu. Nevystavujte vlhkosti, zabraňte styku s vodou.
ZÁRUKA
Na jakékoliv změny či úpravy v ýrobku ani na kody způsobené nesprávným pouitím vý robku se
nevztahuje záruka ani odpovědnost.
VEOBECNĚ
Provedení a specifikace mohou být změn ěny bez upozo rnění.
V případě opotřebování a následné likvidaci výrobku postupujte v souladu se zákonem č.
185/2001 Sb.
PROHLÁENÍ O SHODĚ:
Tento výrobek je v soula du s norma mi Radio, EMC a LVD s ohledem na usta novení směrnic e
1999/5/EC R&TTE.Na základě těc hto ustanovení je povoleno provozov at tento výrobek na
území EU & zemí EFTA. Za provozování produktu mimo výe uvedených oblastí nepřebírá
dodavatel žádnou záruku.
NÁV
OD K
POUŽITÍ
CZE
A3
A2
A6
A5
A1
A4
A7
 Loading...