

Page 1
HAV-SDC10
Portable
Micro System
Page 2
1
Packaging contents
1x HAV-SDC10 Digital Music Box
1x USB cable
1x USB Driver CD for Windows® 98SE
1x Manual
(Power adapter optional, article number P.SUP.USB400)
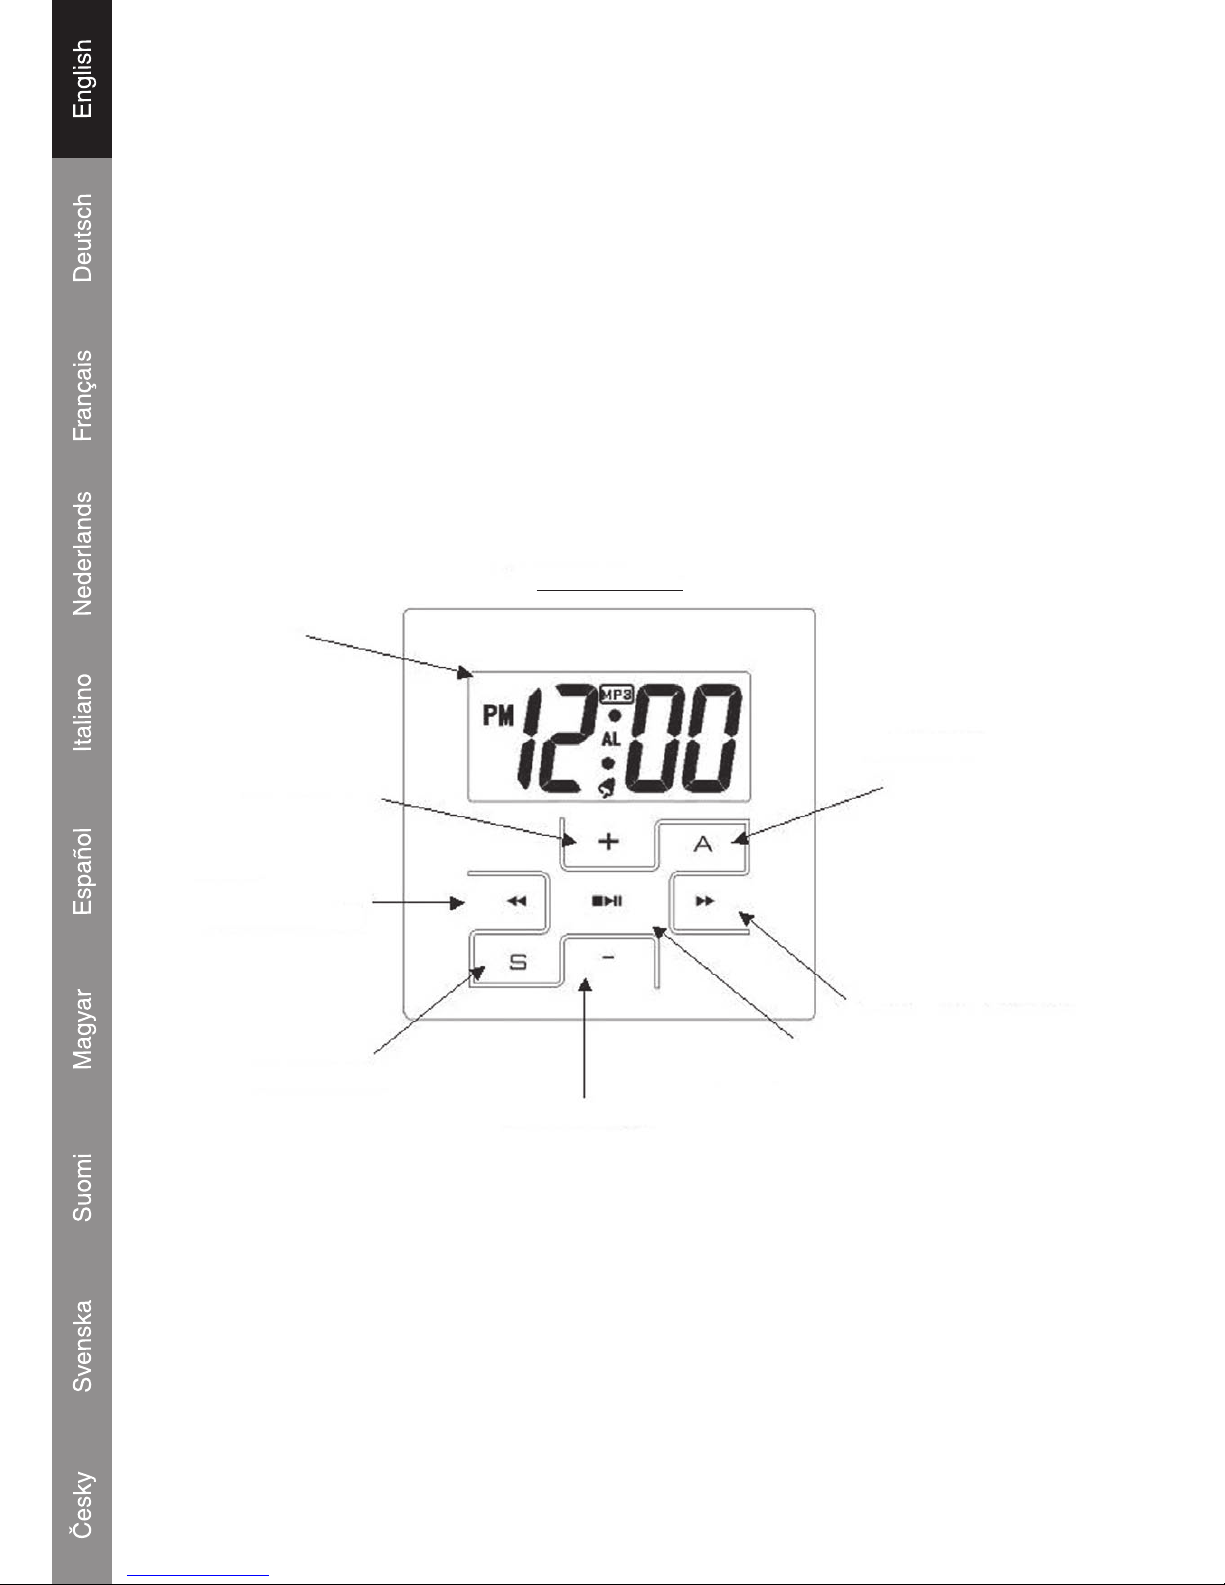
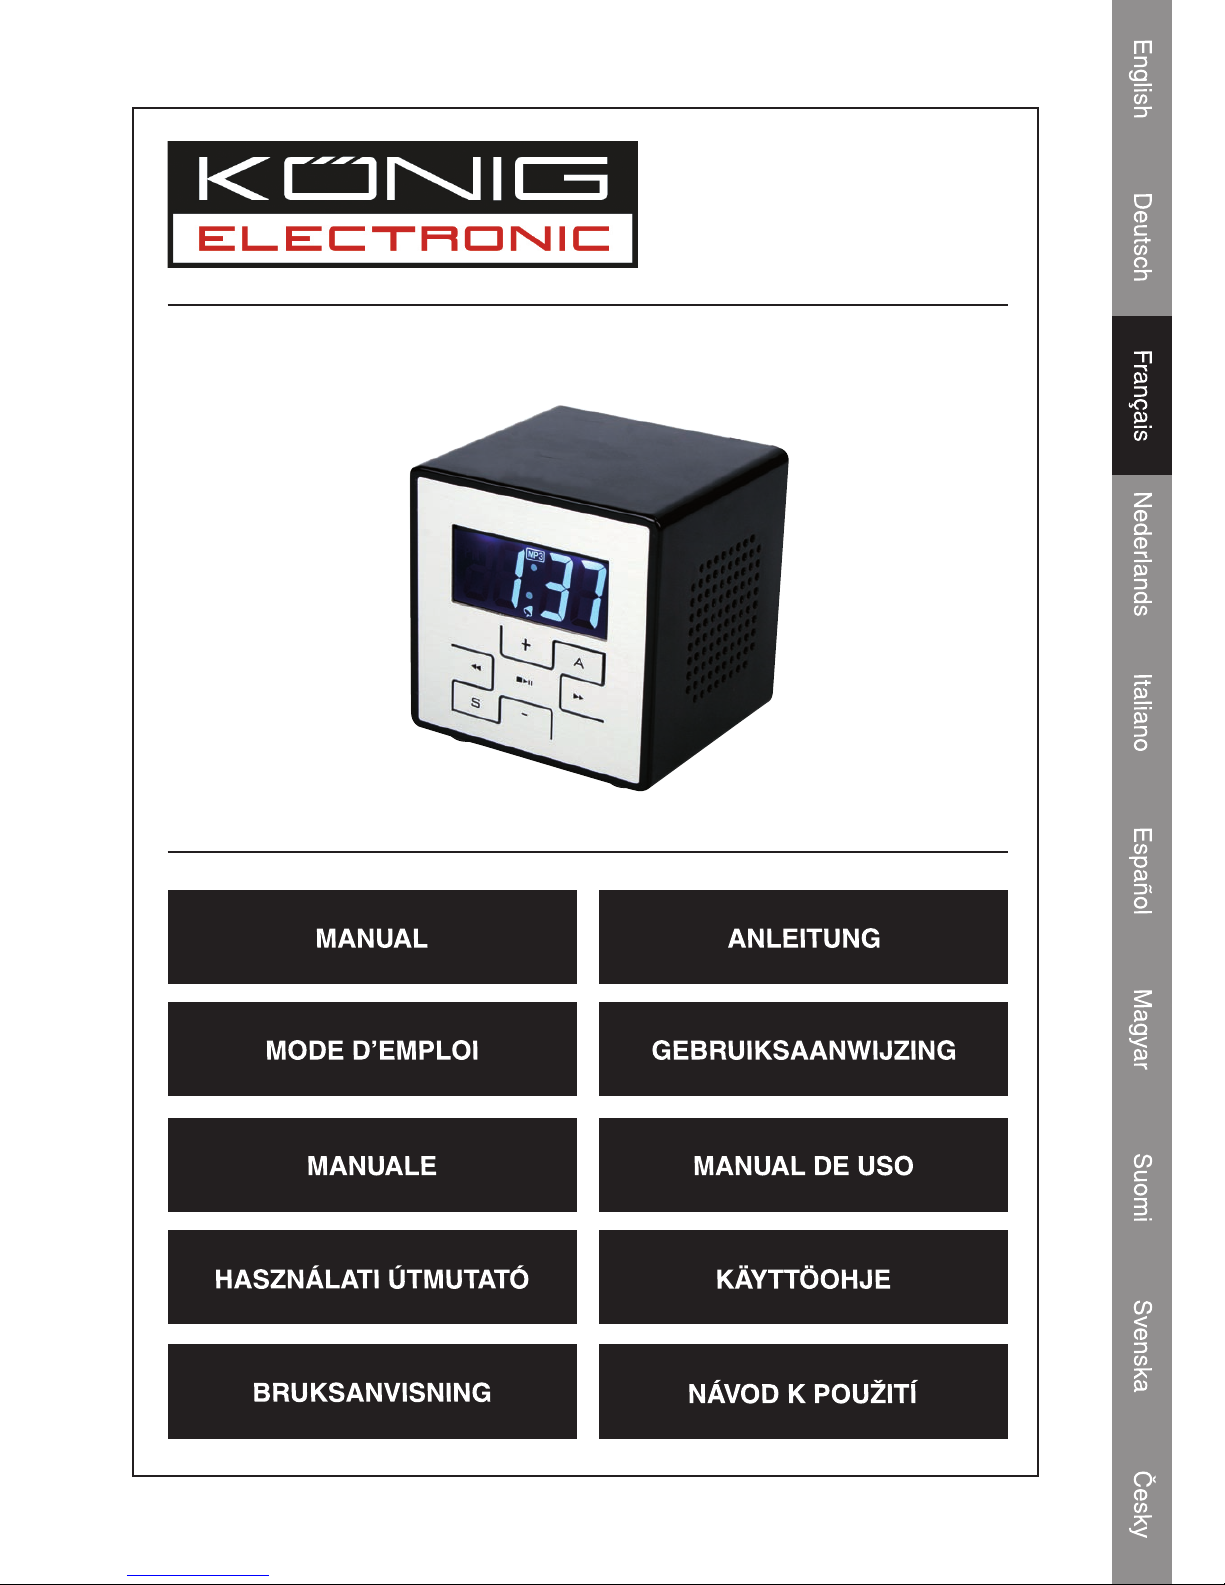
Location of controls
FRONT PANEL
LCD DISPLAY
VOLUME_UP
BACK/
FASTBACKWARD
SETTING KEY
VOLUME_DOWN
PLAY/PAUSE
NEXT/FASTFORWARD
ALARM KEY
Page 3
2
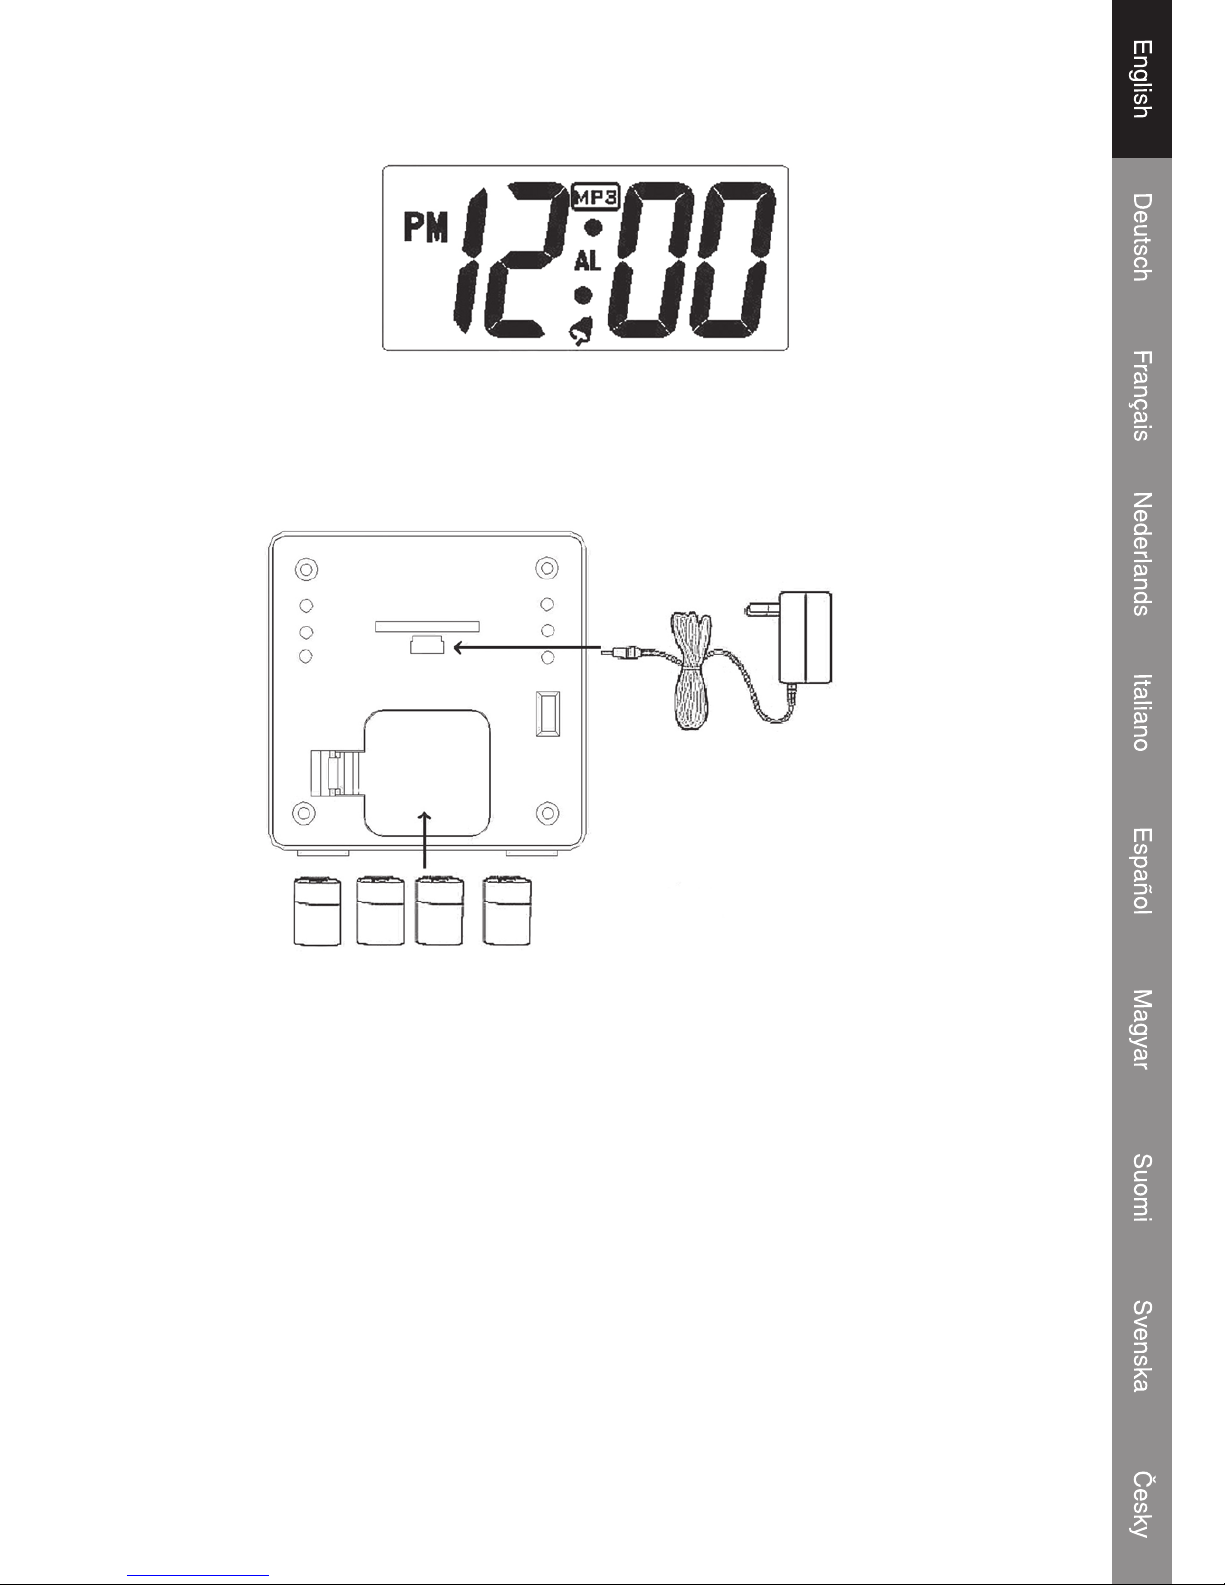
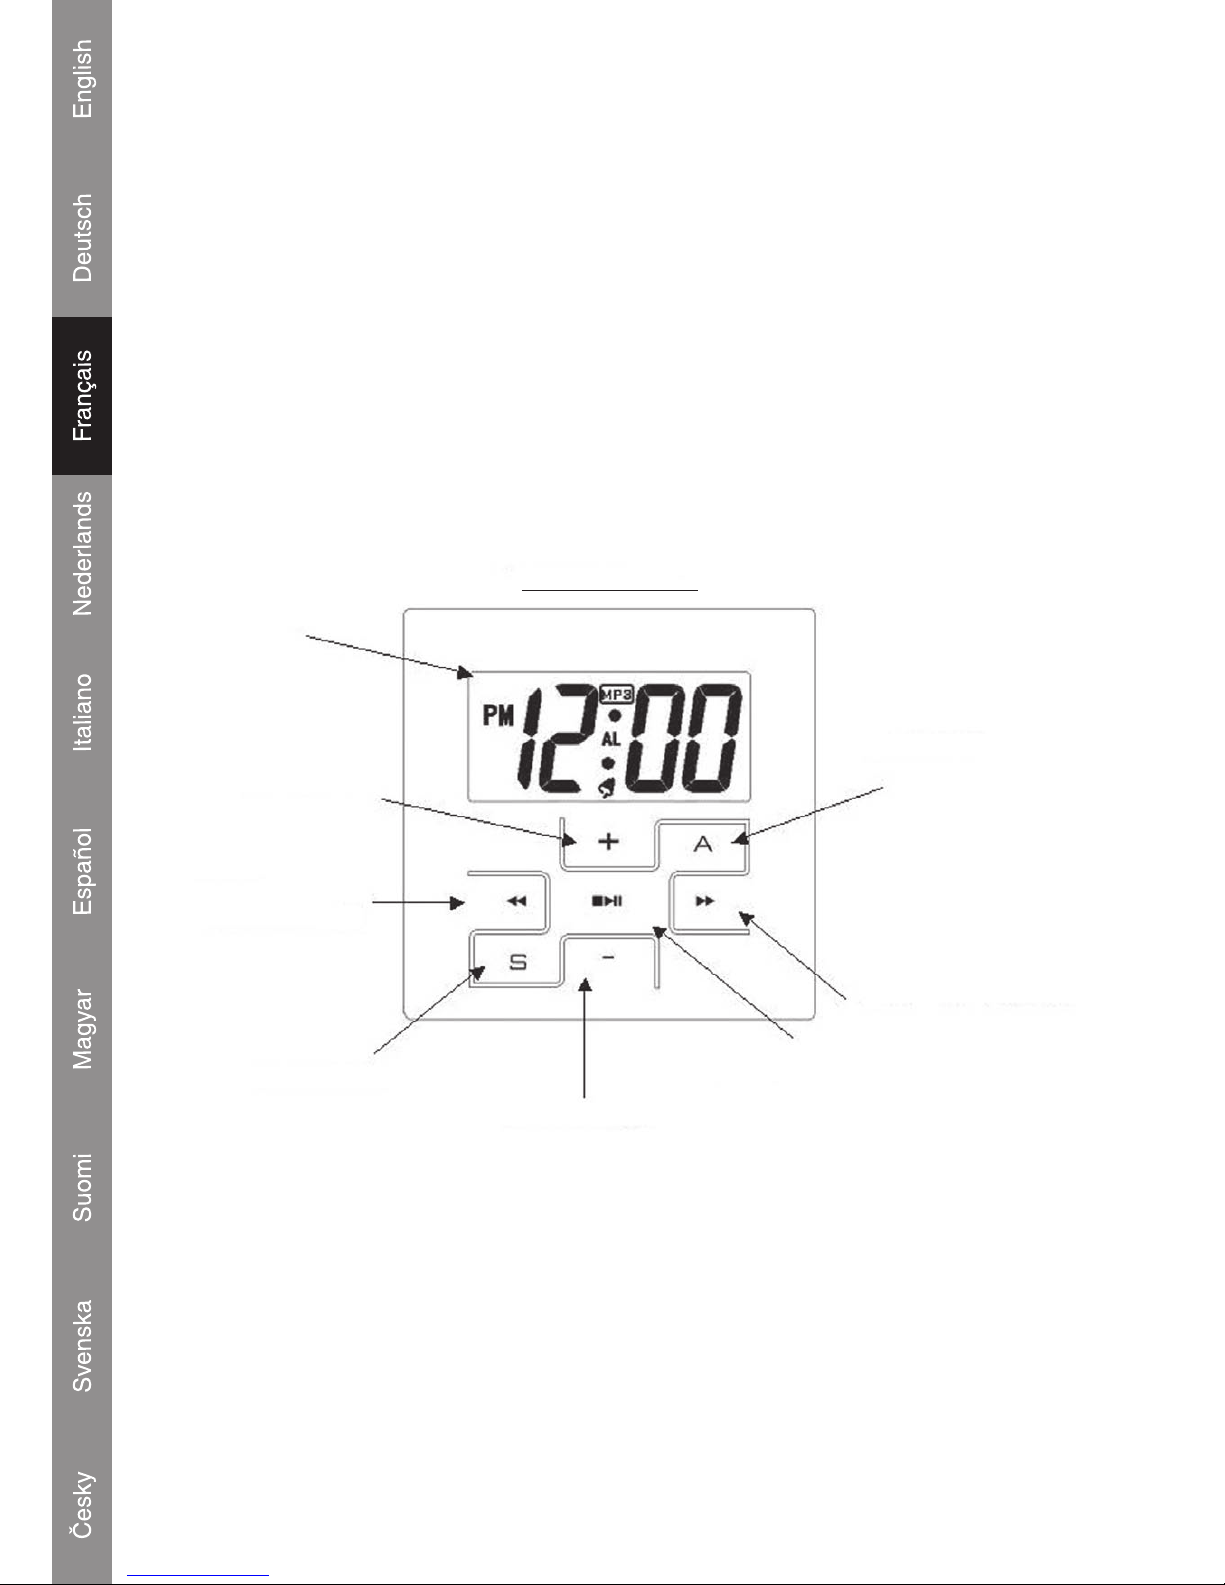
LCD display
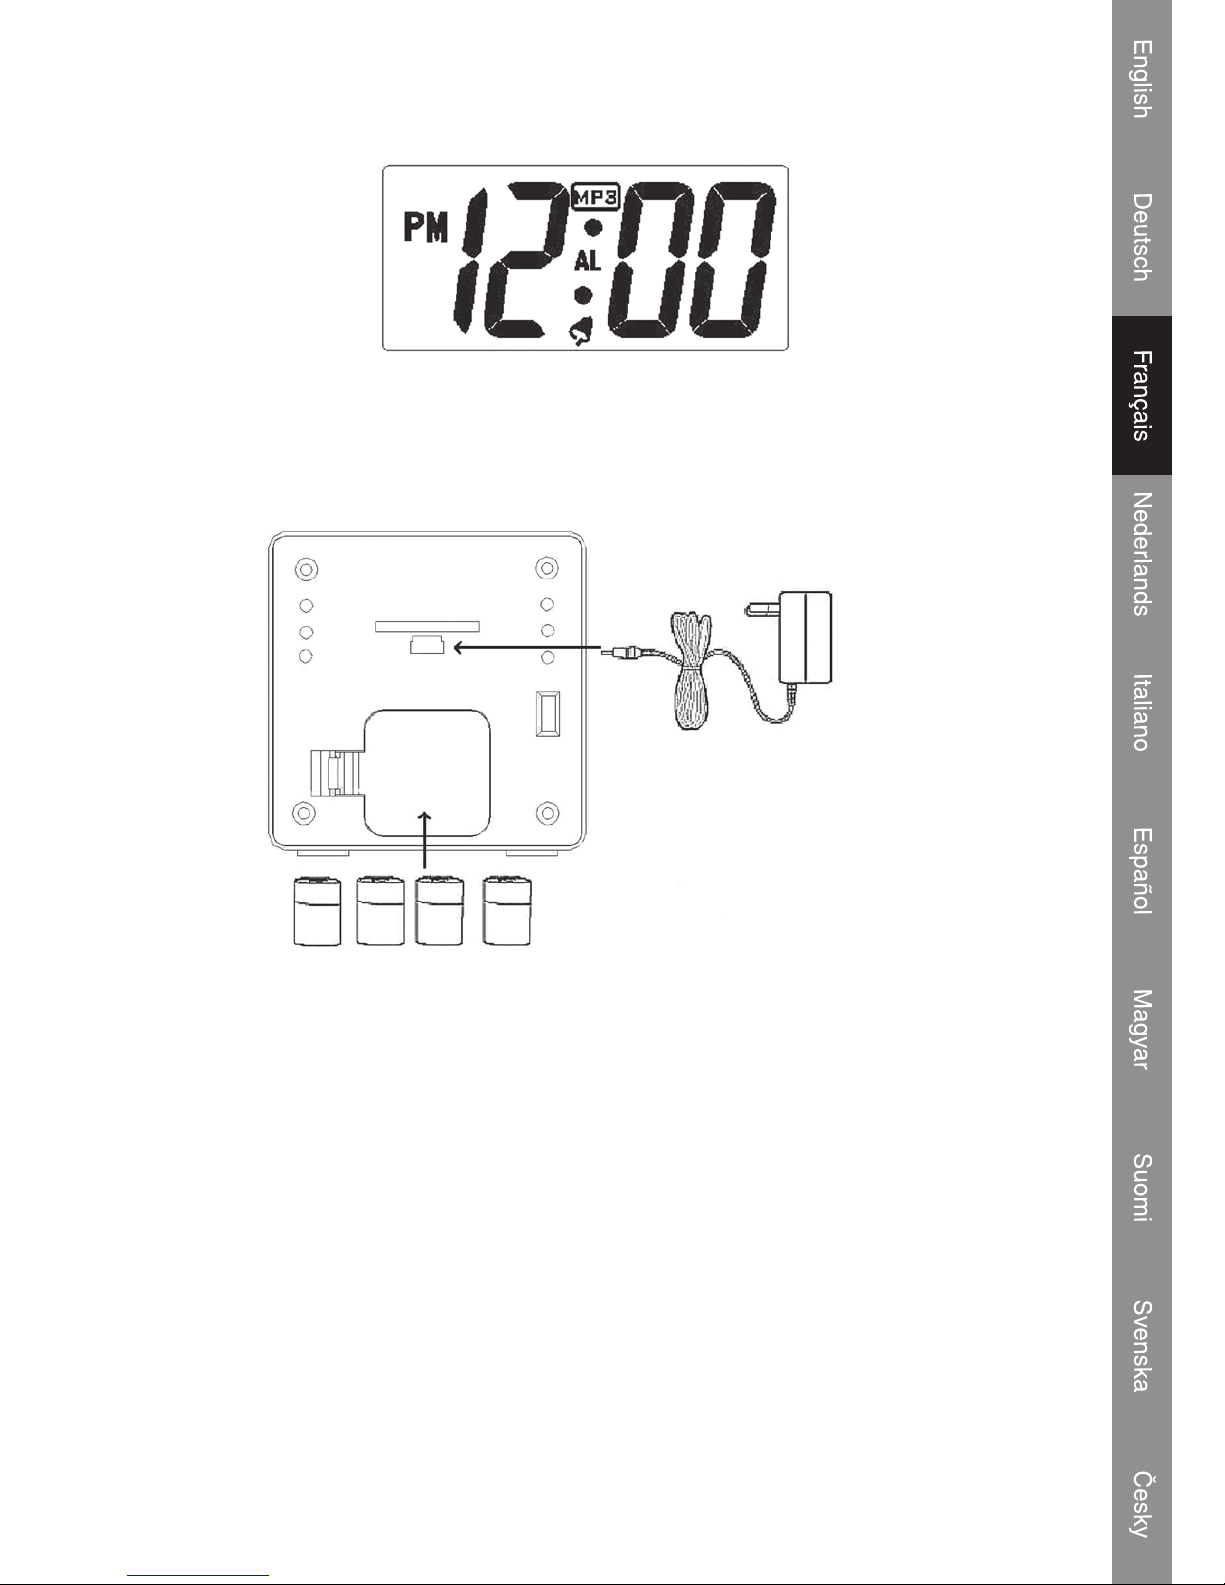
Battery operation
Open the battery compartment and insert 4x AA batteries (Alkaline batteries are recommended) as
shown in the diagram inside the battery compartment.
4 x AA Baterry
Power
Adapter
Power adapter operation
The connection for the power adapter is the same as the USB connection. Connect the mini plug to
the USB (5V) connection and the power plug to a 220~230V wall outlet.
Note: When the power adapter is connected the LCD backlight will turn on and remain lit until the
power adapter is unplugged.
Low battery indication
When the battery is almost nish and the red LED will blink to show a nal warning.
Page 4

3
Power from USB port
The system can get power from the PC USB port for play mode if the “mass storage” icon is removed
from PC.
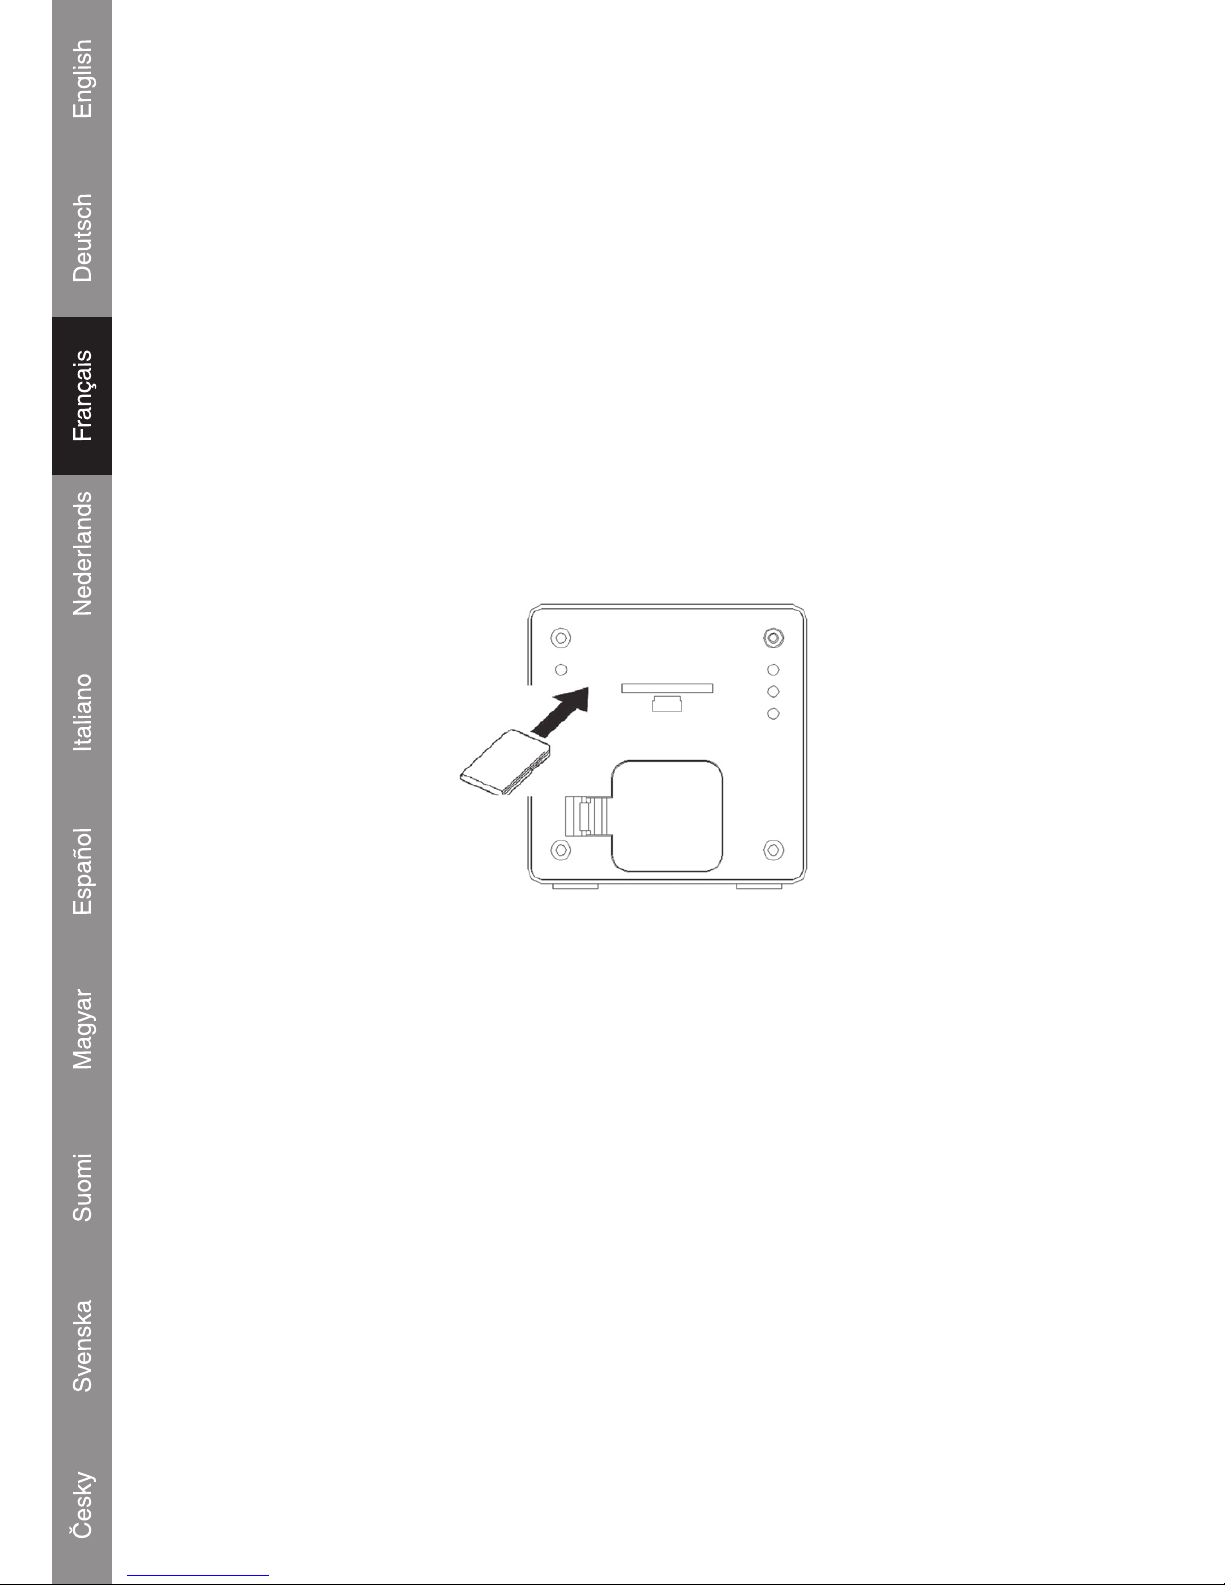
SD/MMC card installation
The integrated SD/MMC card slot lets you upgrade the player’s memory capacity easily with additional
SD/MMC cards.
To install an SD/MMC card:
1. Insert the card of the rear of the system in the direction of the arrow.
2. Press the card in until a click is heard.
3. To remove the SD/MMC card, press the card in and it will jump out.
Important notice: Press the card in the slot exactly conforms below gure. Trying in another way
will damage the slot.
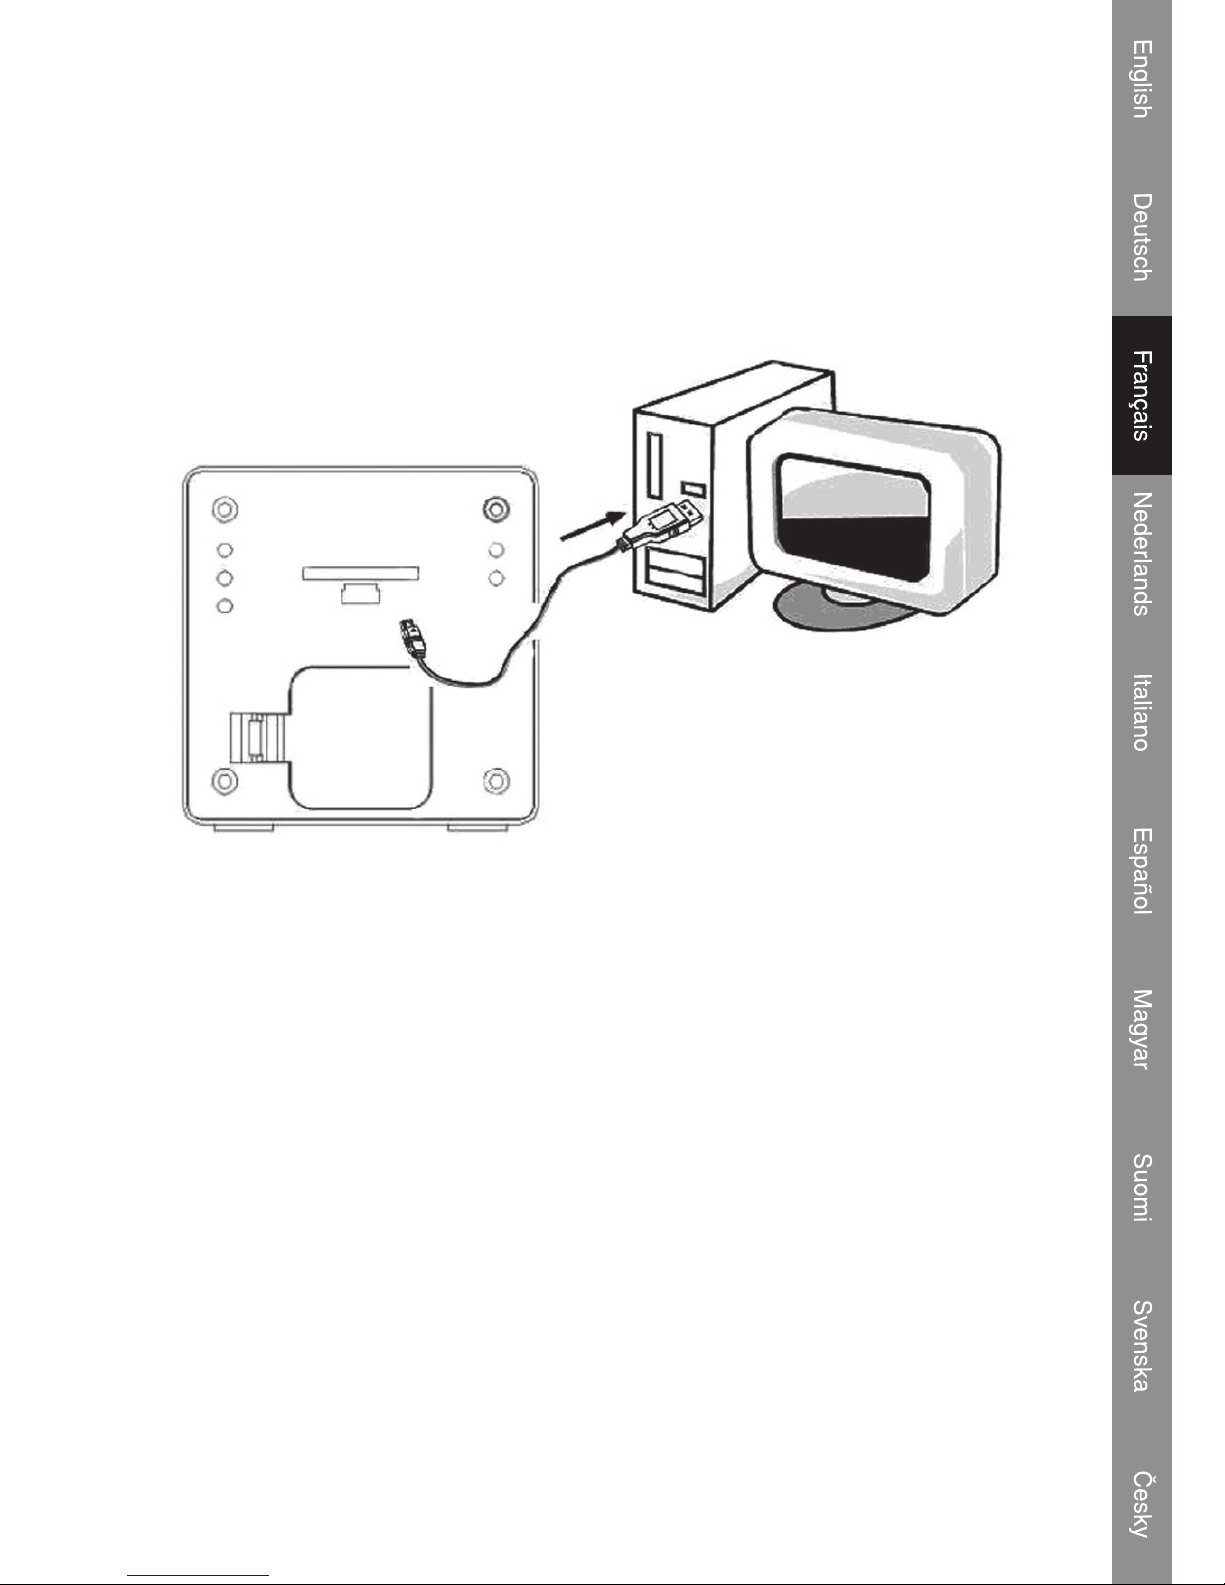
Connect to a computer
USB Driver Installation
It is not necessary to install the USB driver if your computer is running Microsoft Windows ME/2000/
XP or newer. Computers running these operating systems will recognize the system automatically
when the USB cable is connected.
Microsoft Windows 98 SE
For Windows 98 SE it’s necessary to install the USB driver.
1. Navigate to MY COMPUTER and double-click on the CD drive icon.
2. Double-click on the le “iSetup98” to start the USB driver installation program.
3. Follow the on-screen instructions to complete the installation and then restart the computer.
Page 5

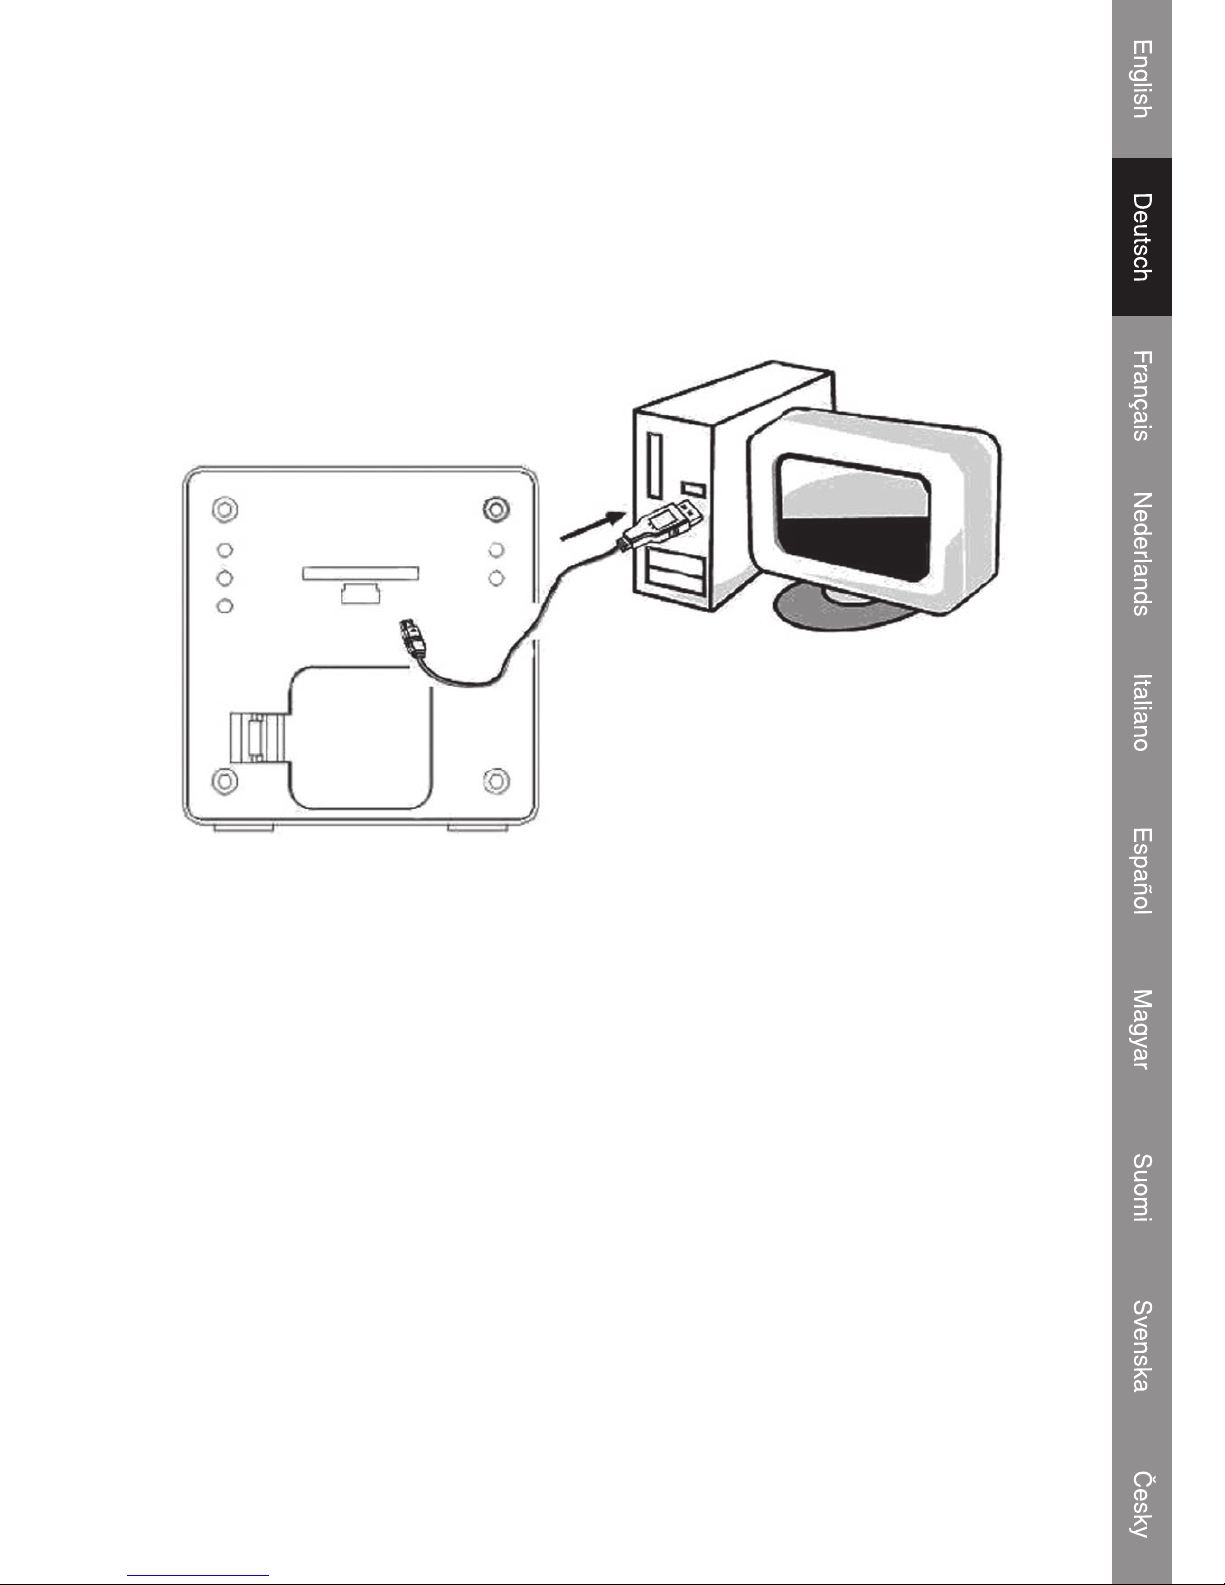
Connecting the USB cable to a computer
Connect the USB cable to the system and a computer.
Turn the system and press the “Play” s/II button to wake-up the system.
The red LED will turn on and wink.
The computer will recognize the system as a Removable Disk.
If a SD/MMC card is installed in the system. The computer will recognize the card as a Removable
Disk.
Transferring les
The USB connection makes it easy to transfer music les (MP3/WMA) between the system
and a computer. Do not disconnect or interrupt the system.
Transferring les with Microsoft Windows
1. Locate the les or folders you would like to transfer from the computer.
2. Select the les or folders with the mouse and press CTRL-C (copy) on the keyboard.
3. Navigate to MY COMPUTER and double-click on the Removable Disk icon. The computer will
display all les and folders currently stored in the player.
4. Press CTRL-V (paste) on the keyboard to transfer the les you selected to the system.
Note: It’s also possible to use the mouse to drag-and-drop les between the system and the
computer.
4
Page 6

Disconnecting from a computer and get the USB power from PC
Microsoft Windows
1. Double-click the green arrow icon in the taskbar of the computer screen (Safely Remove
Hardware).
2. Select “USB Mass Storage Device” from the list that appears and then click on “Stop”.
3. Select “USB Mass Storage Device” from the list that appears and then click on “OK”.
4. The system will direct get the power from the USB of PC and automatically play the music.
Basic operations
Standby mode
The system will enter Standby mode automatically when it is connected to a power source. The LCD
will display the time.
Power On/Off
To turn the system on and play music, press s/II key while in Standby mode. Once the music is
playing the blue LED will turn on and wink. When there is no songs or music in the memory content
the system will automatically escape back to standby mode.
To turn the system off, press and hold s/II key (Red & Blue LED will wink).
Keys denition
Press Is s/s sI for fastforward / fastbackward / next song/previous song
Press +/- for volume up/down
Press play/pause s/II to play and stop music.
Press S and A to adjust clock and alarm.
5
Page 7
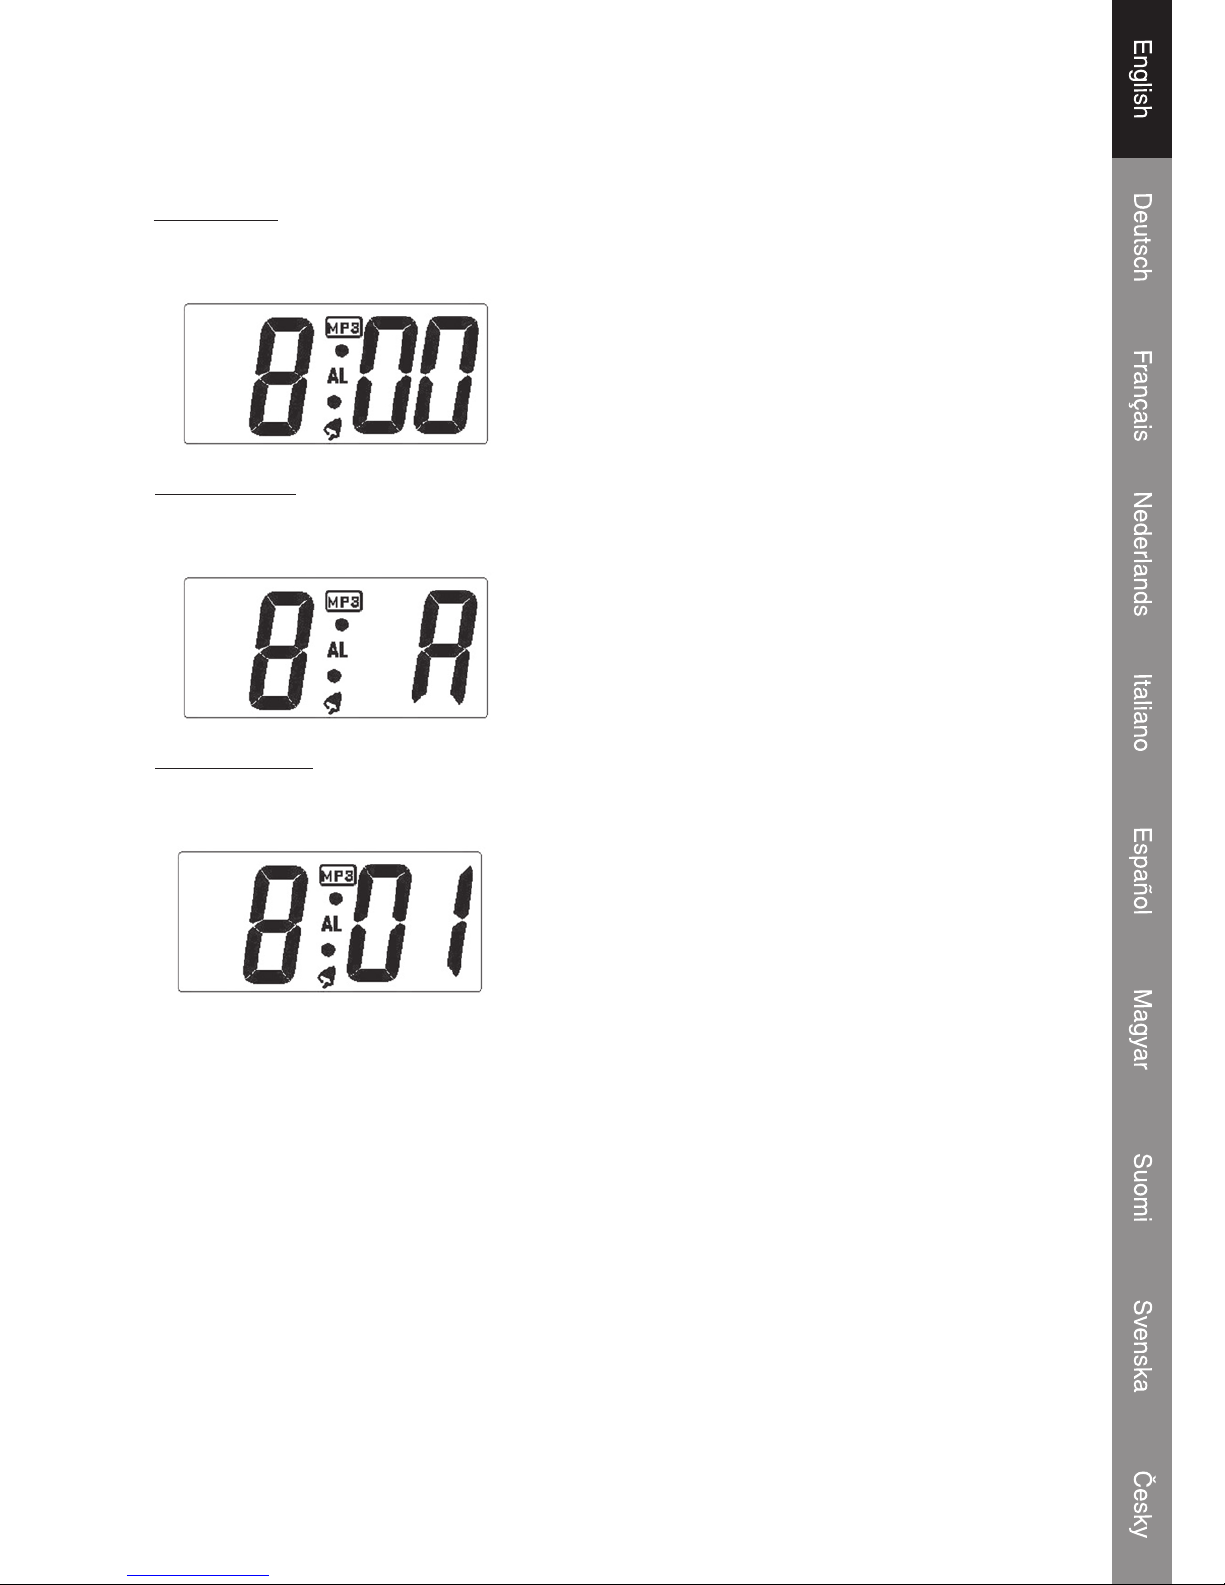
Clock and Alarm Setting
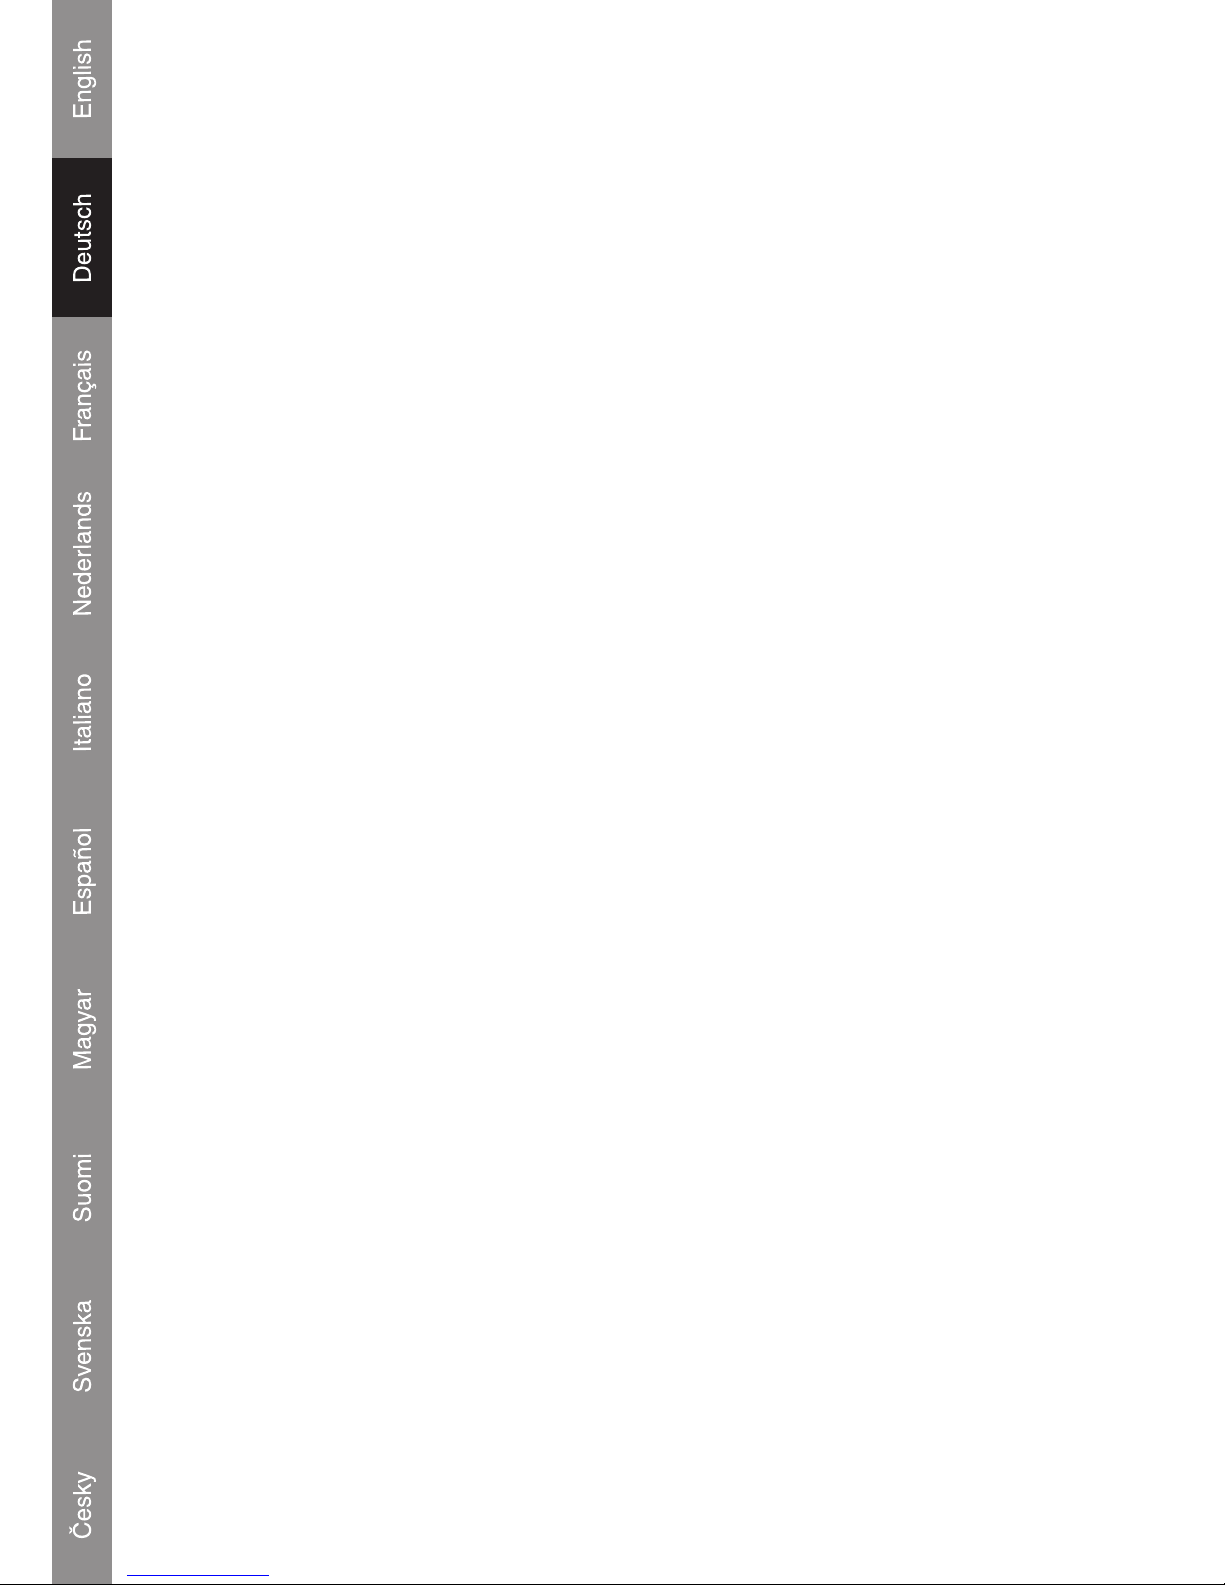
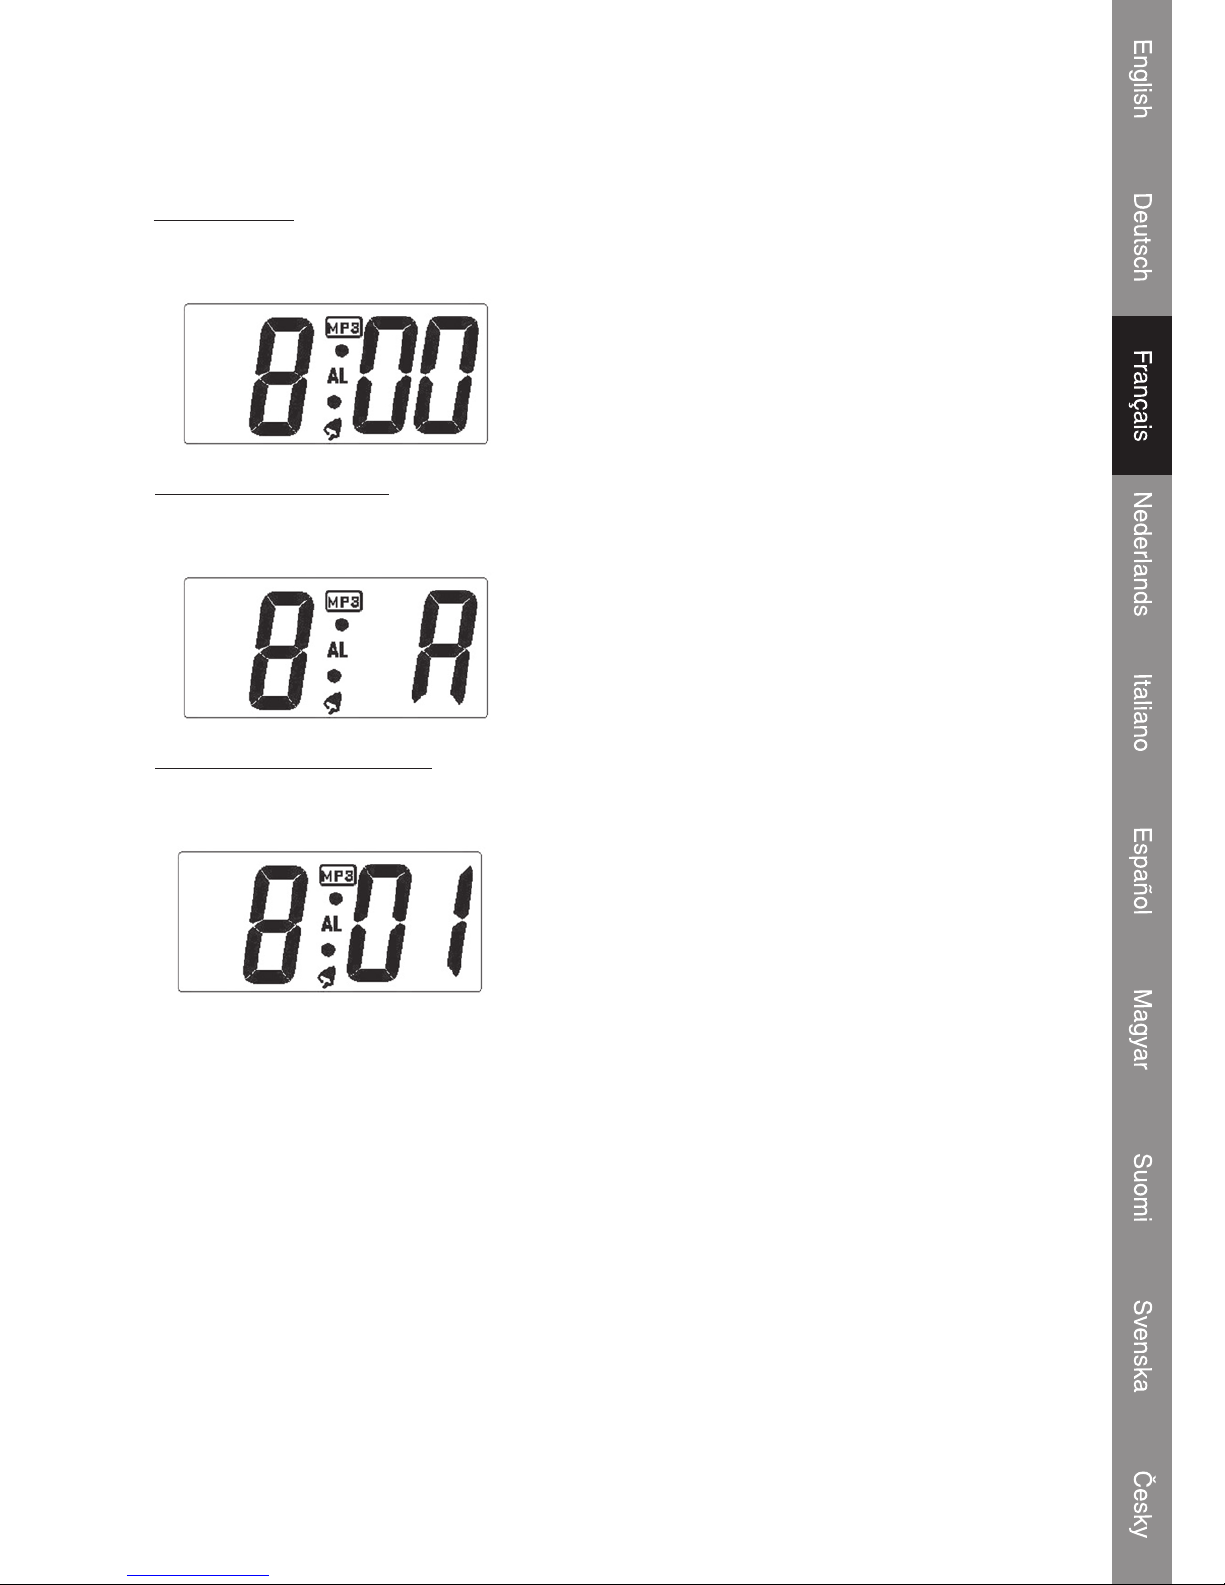
Alarm Section (4 Steps)
1. Enable Alarm
Press S key
-------
s
Press A key (2times)
(All digits will wink) (Alarm icon MP3 appears)
2. Set Alarm Hour
Press S key
-------
s
Press A key
(Hour digit will wink) (Set the hour value)
3. Set Alarm Minute
Press S key -------
s
Press A key
(Minute digit will wink) (Set the minute value)
Alarm time is 8:01 am and alarm sound is mp3 music. The alarm song will be the last song you listen
in the music box.
4. Press S key (Finish the Alarm setting)
Clock Section (8 Steps)
* Don’t press A key
1. Press S key -------s * View alarm time and setting
2. Press S key
-------
s
* View alarm time and hour digit is winking
3. Press S key
-------
s
* View alarm time and minute digit is winking
6
Page 8
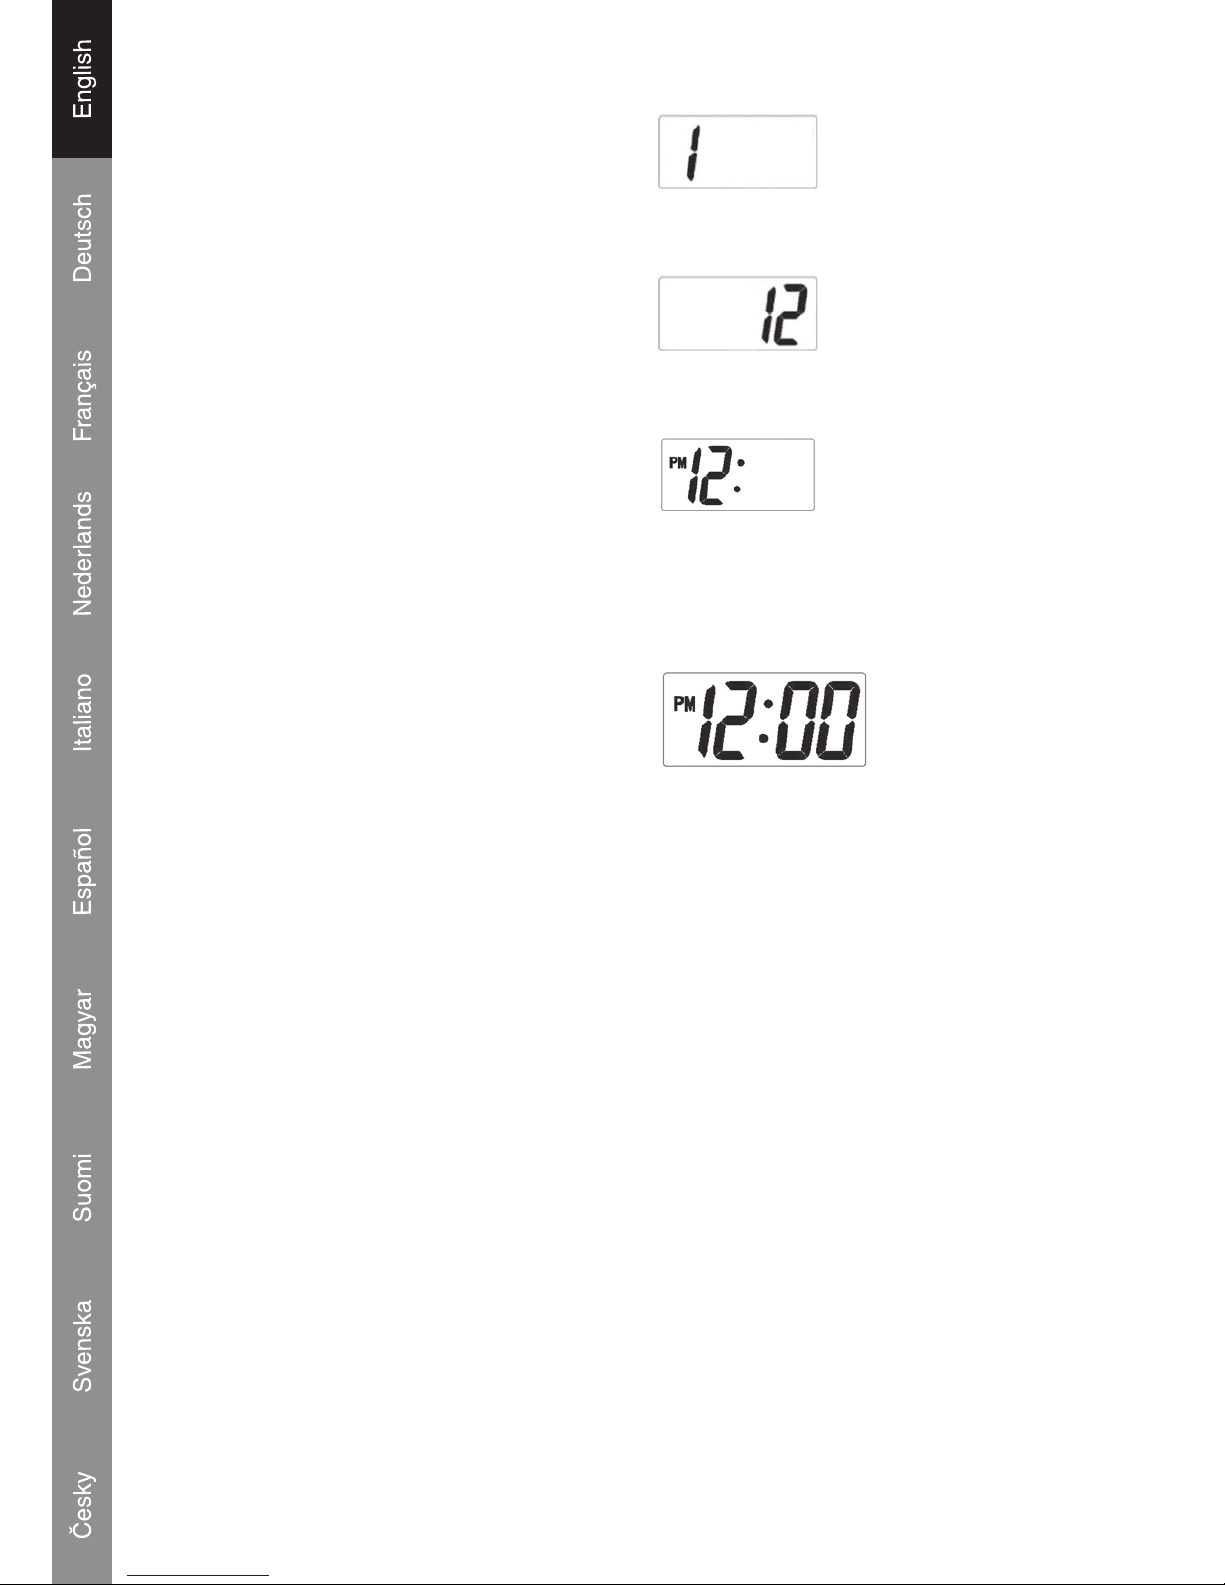
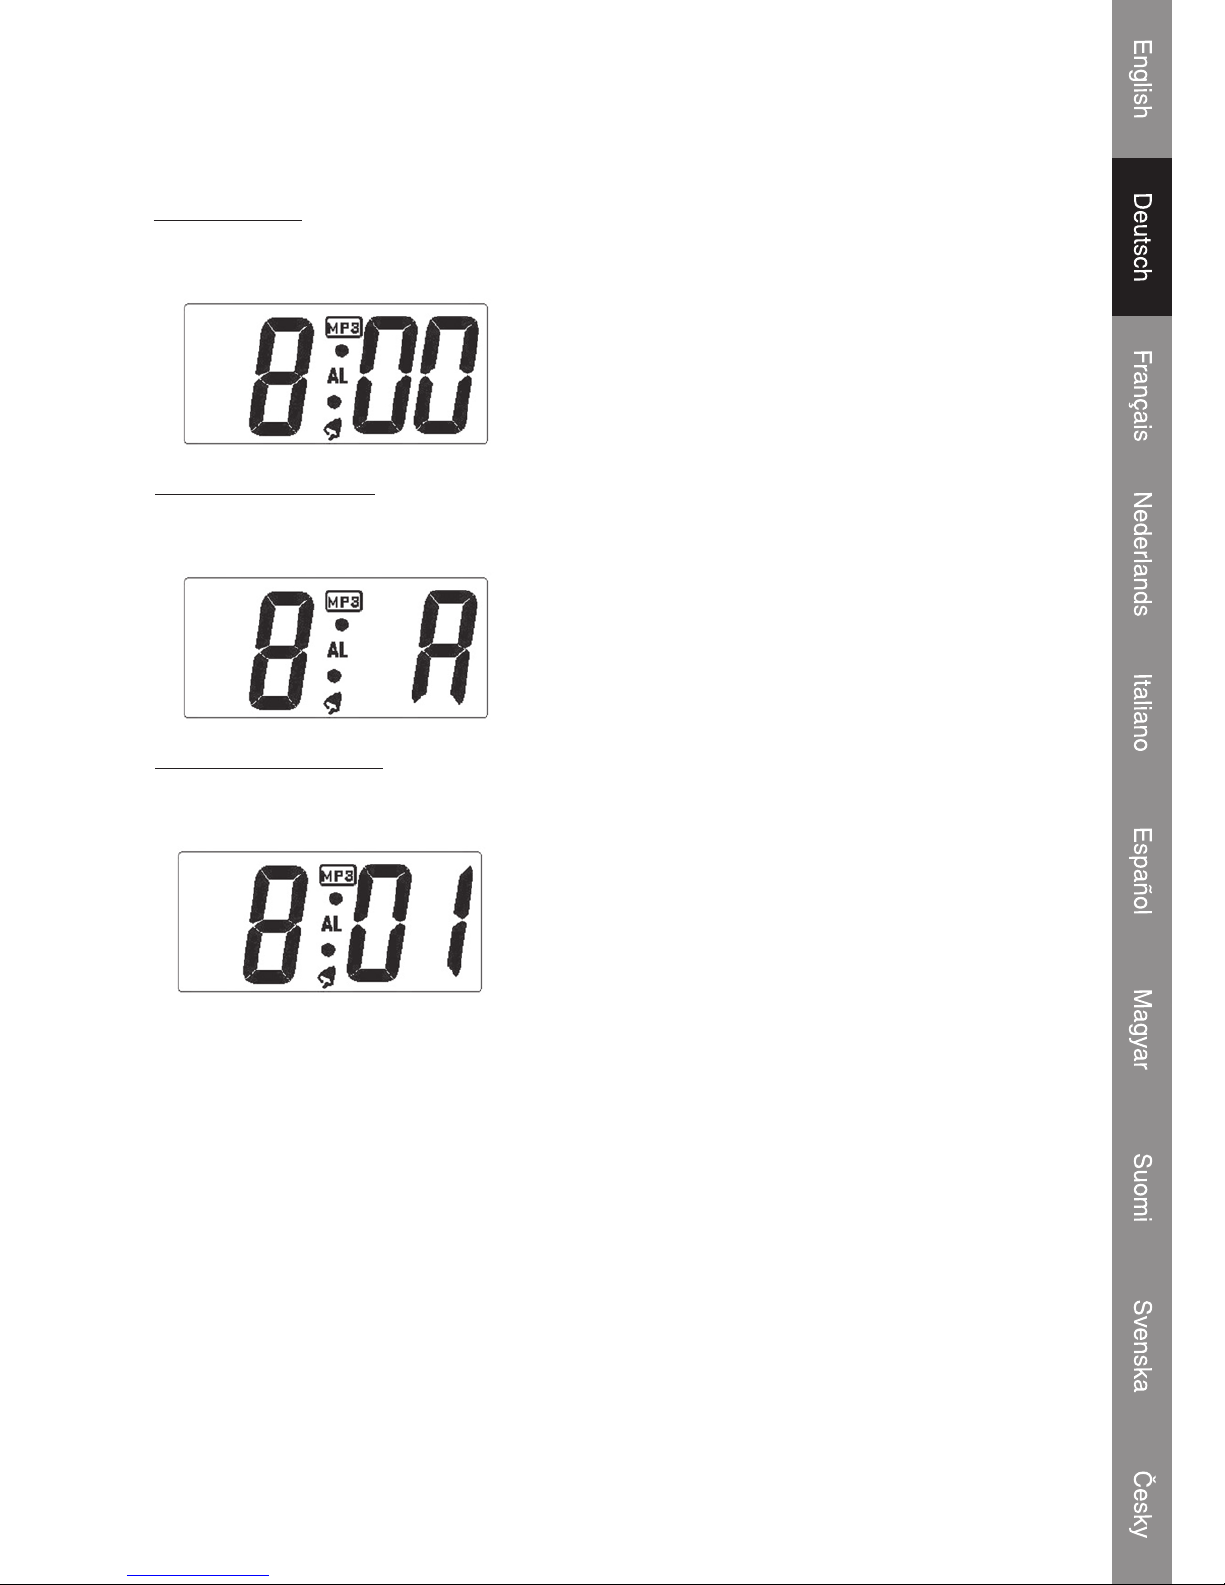
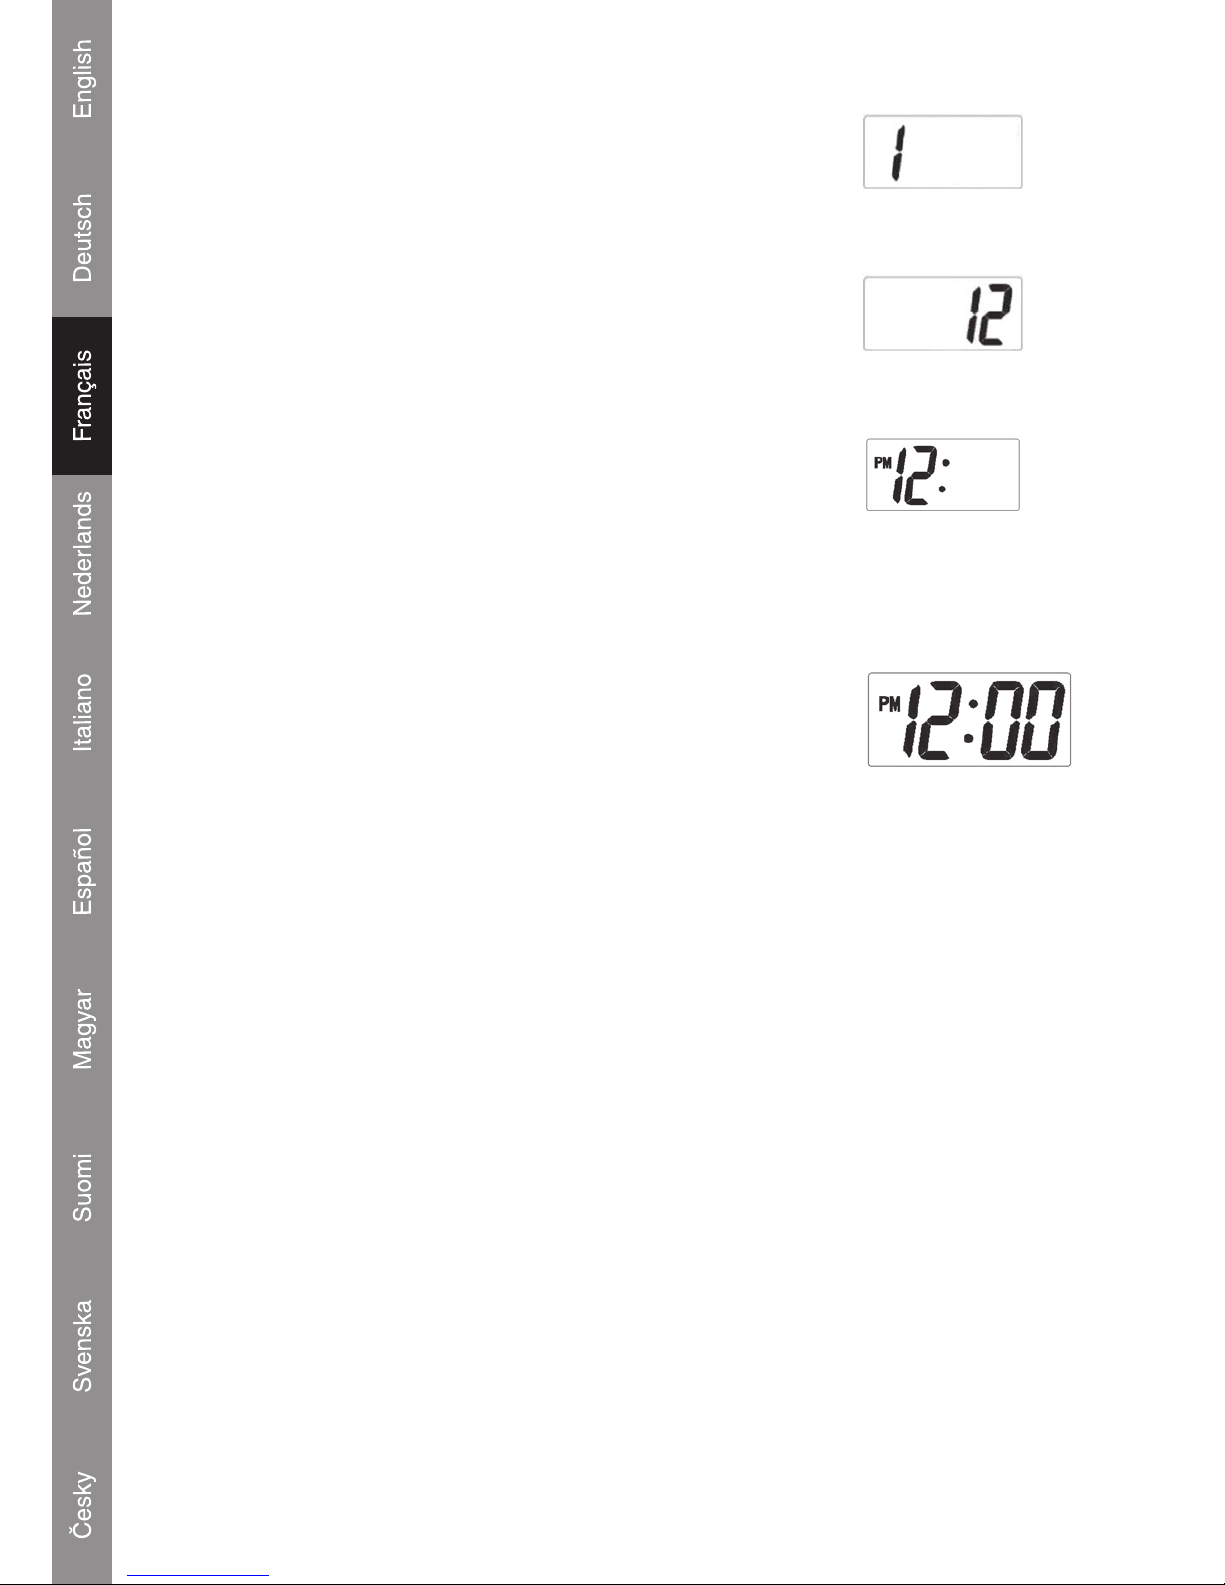
4. Set Clock Month
Press S key
-------
s
Press A key -------s
Set month to January
5. Set Clock Date
Press S key
-------
s
Press A key -------
s
Set date to twelfth
6. Set Clock Hour
Press S key
-------
s
Press A key -------
s
Set hour to twelve PM
Note: For the 24 hours setting and user need to press A key one cycle until the 24 hours setting
appear.
7. Set Clock Minute
Press S key
-------
s
Press A key -------
s
Set minute to zero
Now the clock setting is twelve PM.
8. Press S key (Finish the clock setting)
7
Page 9

Specications:
Power Supply: Adaptor: 100-240V
DC: 5V (Battery: 4 x AA, Alkaline)
Interface Port: USB 2.0
Supported Audio MP3: 96-320kbps, Variable Bit Rate
Formats: WMA: 32-192kbps
Speaker Output: 2W
Signal-to-Noise Ratio: ≥ 90dB
Frequency Response: 20-20,000Hz
PC Format: FAT16
Safety precautions:
To reduce risk of electric shock, this product should ONLY be
opened by an authorized technician when service is required.
Disconnect the product from mains and other equipment if a problem should occur. Do not expose
the product to water or moisture.
Maintenance:
Clean only with a dry cloth. Do not use cleaning solvents or abrasives.
Warranty:
No guarantee or liability can be accepted for any changes and modications of the product or damage
caused due to incorrect use of this product.
General:
Designs and specications are subject to change without notice.
All logos brands and product names are trademarks or registered trademarks of their respective
holders and are hereby recognized as such.
Attention:
This product is marked with this symbol. It means that used electrical and electronic
products should not be mixed with general household waste. There is a separate
collections system for these products.
Copyright ©
CAUTION
RISK OF E LECTRIC SHOCK
DO NOT OPE N
8
Page 10

9
Page 11
HAV-SDC10
Tragbares
Mikrosystem
Page 12
1
Verpackungsinhalt
1x HAV-SDC10 Digital Music Box
1x USB-Kabel
1x USB Treiber-CD für Windows® 98SE
1x Handbuch
(Netzteil optional, Artikelnummer P.SUP.USB400)
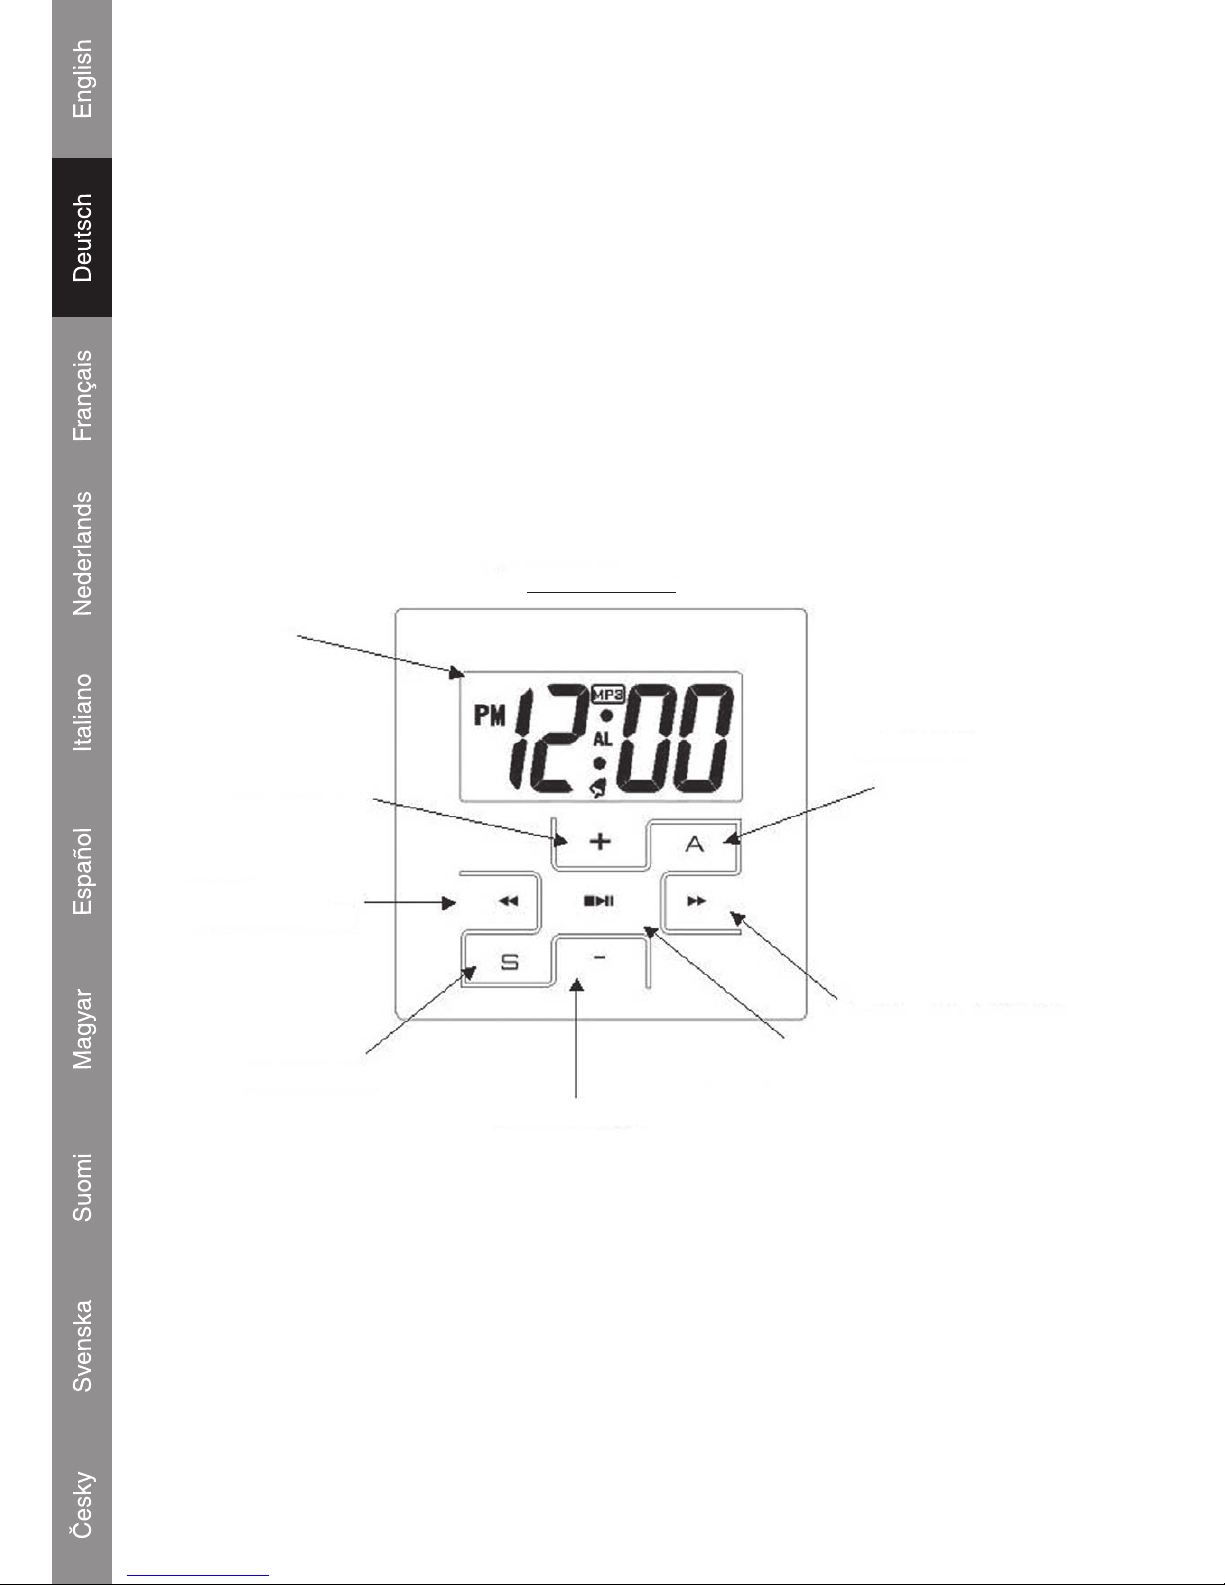
Position der Regler
VORDERSEITE
LCD-Display
LAUTSTÄRKE
ERHÖHEN
ZURÜCK/
SCHNELLER
RÜCKLAUF
EINSTELLTASTE
LAUTSTÄRKE VERRINGERN
WIEDERGABE/PAUSE
VOR/SCHNELLER
VORLAUF
ALARMTASTE
Page 13

2
LCD-Display
Batteriebetrieb
Öffnen Sie das Batteriefach und legen Sie 4x AA Batterien (Alkaline Batterien empfohlen) wie in der
Abbildung dargestellt in das Batteriefach ein.
4 x AA Batterie
Netzteil
Netzteilbetrieb
Der Anschluss für das Netzteil ist der gleiche wie für die USB-Verbindung. Schließen Sie den
Ministecker am USB (5 V)-Anschluss an und stecken Sie den Netzstecker in eine 220~230V
Wandsteckdose.
Hinweis: Wenn das Netzteil angeschlossen wird, leuchtet die LCD-Hintergrundbeleuchtung auf und
bleibt in Betrieb, bis das Netzteil wieder abgezogen wird.
Anzeige für niedrigen Batteriestand
Wenn die Batterie fast leer ist, blinkt die rote LED und deutet somit eine Warnung an.
Page 14
3
Strom aus dem USB-Anschluss
Das System kann vom PC USB-Anschluss im Wiedergabemodus mit Strom versorgt werden, wenn
das Symbol “Massenspeicher” vom PC entfernt wird.
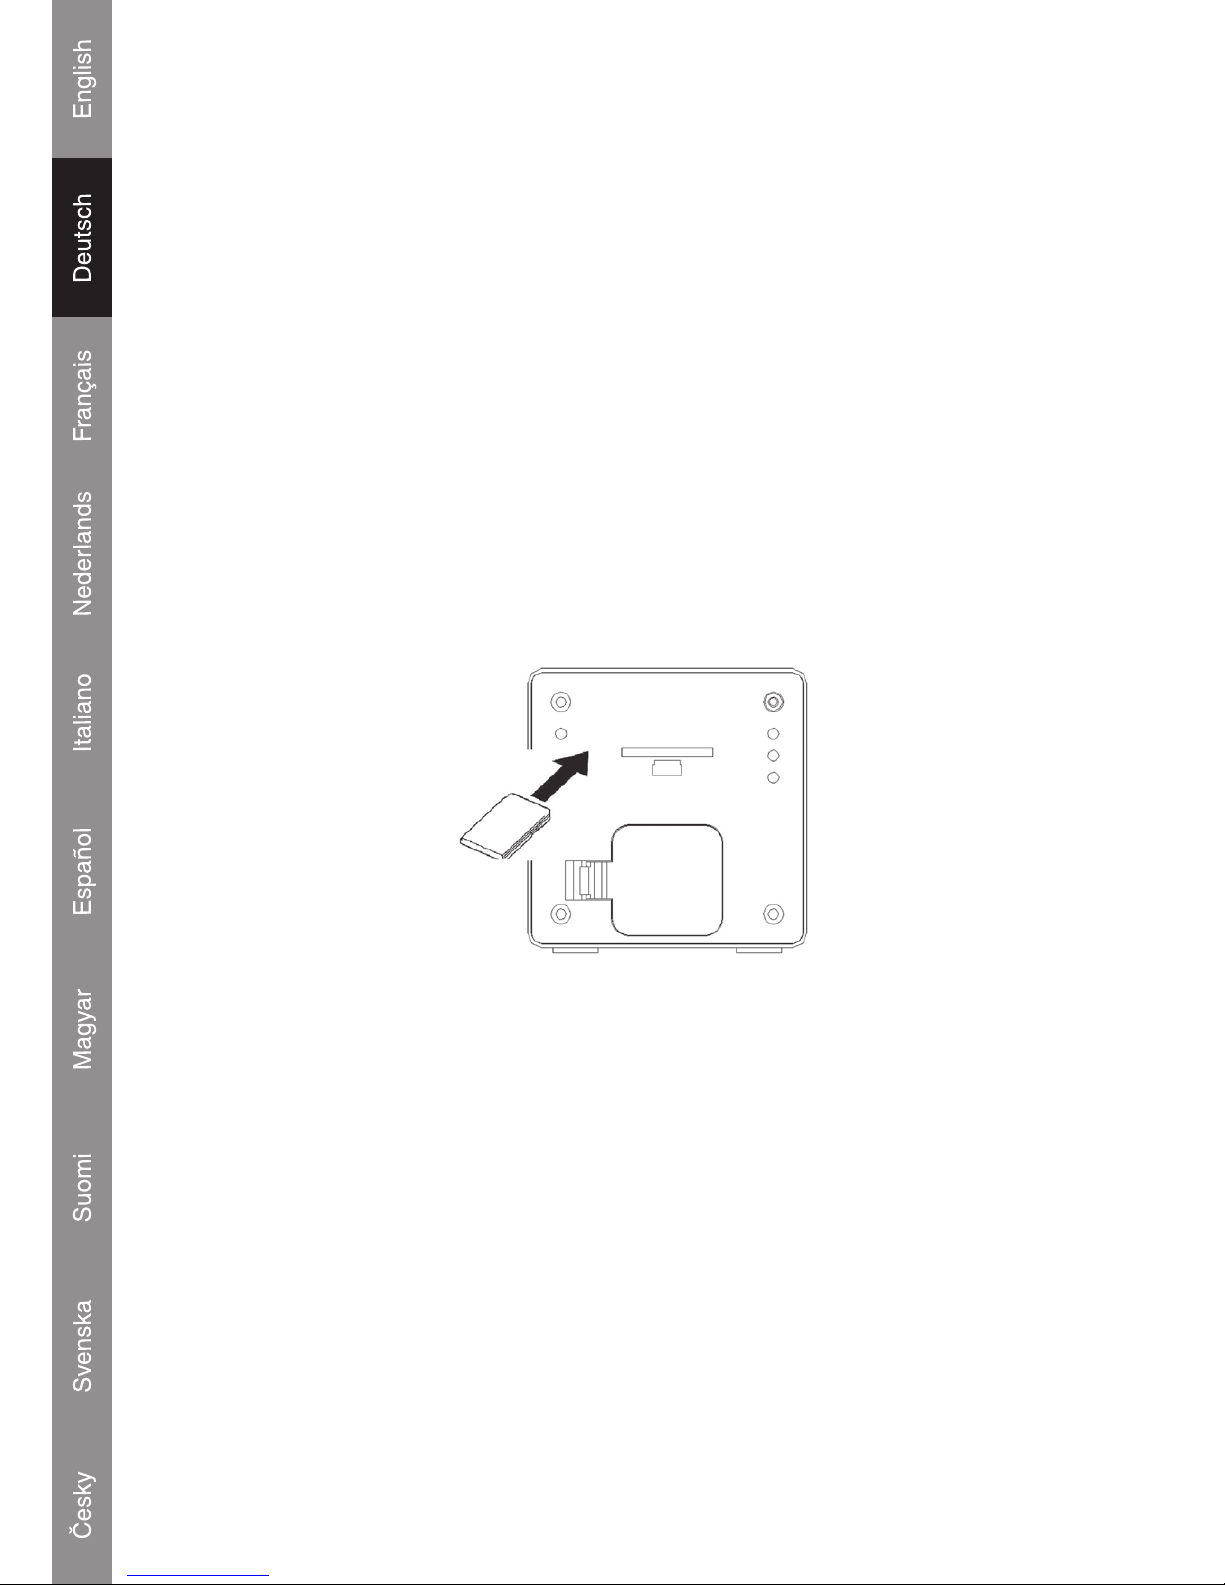
Installation der SD/MMC-Karte
Mit dem integrierten SD/MMC-Kartensteckplatz können Sie die Speicherkapazität leicht mit
zusätzlichen SD/MMC-Karten erweitern.
Um eine SD/MMC-Karte zu installieren:
1. Stecken Sie die Karte auf der Rückseite des Systems (durch den Pfeil dargestellt) hinein.
2. Drücken Sie die Karte hinein, bis Sie ein Klickgeräusch wahrnehmen.
3. Um die SD/MMC-Karte zu entfernen, drücken Sie auf die Karte. Die Karte wird anschließend
ausgegeben.
Wichtiger Hinweis: Drücken Sie die Karte genau so in den Steckplatz, wie es in der folgenden
Abbildung dargestellt ist. Wenn Sie es auf einem anderen Weg versuchen, wird der Steckplatz
beschädigt.
Anschluss an einen Computer
USB-Treiberinstallation
Es ist nicht notwendig, den USB-Treiber zu installieren, wenn Sie Microsoft Windows ME/2000/XP oder
ein aktuelleres Betriebssystem installiert haben. Computer, auf denen eines dieser Betriebssysteme
läuft, erkennen das System automatisch, wenn das USB-Kabel angeschlossen wird.
Microsoft Windows 98 SE
Bei Windows 98 SE ist es notwendig, den USB-Treiber zu installieren.
1. Öffnen Sie den ARBEITSPLATZ und doppelklicken Sie auf das Symbol des CD-Laufwerks.
2. Doppelklicken Sie auf die Datei “iSetup98”, um das Installationsprogramm des USB-Treibers
aufzurufen.
3. Befolgen Sie die Anweisungen auf dem Bildschirm, um die Installation abzuschließen und
starten Sie den Computer anschließend neu.
Page 15
Anschluss des USB-Kabels an den Computer
Schließen Sie das USB-Kabel an das System und den Computer an.
Schalten Sie das System ein und drücken Sie die Taste “Play” s/II, um das System zu starten.
Die rote LED wird eingeschaltet und blinkt.
Der Computer wird das System als einen Wechseldatenträger erkennen.
Wenn eine SD/MMC-Karte im System installiert ist, wird der Computer die Karte als einen
Wechseldatenträger erkennen.
Dateien übertragen
Durch den USB-Anschluss können Musikdateien (MP3/WMA) einfach zwischen dem System und
dem Computer übertragen werden. Trennen Sie die Verbindung nicht und schalten Sie das System
nicht aus.
Dateien mit Microsoft Windows übertragen
1. Lokalisieren Sie die Dateien oder Order, die Sie vom Computer übertragen möchten.
2. Wählen Sie die Dateien oder Ordner mit der Maus aus und drücken Sie STRG-C (Kopieren)
auf der Tastatur.
3. Öffnen Sie den ARBEITSPLATZ und doppelklicken Sie auf das Symbol Wechseldatenträger.
Der Computer wird alle Dateien und Ordner anzeigen, die sich gegenwärtig auf dem Player
benden.
4. Drücken Sie STRG-V (Einfügen) auf der Tastatur, um die von Ihnen ausgewählten Dateien auf
das System zu übertragen.
Hinweis: Es ist auch möglich, die Dateien mit der Maus per Drag-and-drop zwischen dem System
und dem Computer zu übertragen.
4
Page 16
Verbindung zum Computer trennen und die USB-Stromversorgung vom PC aufrechterhalten
Microsoft Windows
1. Doppelklicken Sie auf das grüne Pfeilsymbol in der Taskleiste des Computerbildschirms
(Hardware sicher entfernen).
2. Wählen Sie in der erscheinenden Liste “USB-Massenspeichergerät” aus und klicken Sie
anschließend auf “Beenden”.
3. Wählen Sie in der erscheinenden Liste “USB-Massenspeichergerät” aus und klicken Sie
anschließend auf “OK”.
4. Das System wird die Stromversorgung vom USB-Anschluss des PCs erhalten und die Musik
automatisch abspielen.
Grundfunktionen
Standby-Modus
Das System wird automatisch in den Standby-Modus übergehen, wenn es an eine Stromquelle
angeschlossen ist. Das LCD wird die Uhrzeit anzeigen.
Stromversorgung Ein/Aus
Um das System einzuschalten und die Musik abzuspielen, drücken Sie die Taste s/II im StandbyModus. Wenn die Musik wiedergegeben wird, ist die blaue LED eingeschaltet und blinkt. Wenn sich
keine Lieder oder Musik im Speicher benden, geht das System automatisch wieder in den StandbyModus über.
Um das System auszuschalten, drücken Sie die Taste s/II und halten Sie sie gedrückt (die rote &
blaue LED blinken).
Tastendenitionen
Drücken Sie Is s/s sI für schnellen Vorlauf / schnellen Rücklauf / nächsten Song / vorherigen
Song
Drücken Sie +/- für Lautstärke auf/ab
Drücken Sie play/pause s/II, um die Musik abzuspielen bzw. anzuhalten.
Drücken Sie S und A, um die Uhr und den Alarm einzustellen.
5
Page 17
Einstellung der Uhrzeit und des Alarms
Alarm-Auswahl (4 Schritte)
1. Alarm aktivieren
Drücken Sie die S-Taste
-------
s
Drücken Sie die A-Taste (2 Mal)
(alle Ziffern blinken) (Alarm-Symbol MP3 erscheint)
2. Alarm-Stunde einstellen
Drücken Sie die S-Taste
-------
s
Drücken Sie die A-Taste
(die Stunden-Ziffern blinken) (Stellen Sie die Stunden ein)
3. Alarm-Minuten einstellen
Drücken Sie die S-Taste -------
s
Drücken Sie die A-Taste
(die Minuten-Ziffern blinken) (Stellen Sie die Minuten ein)
Die Alarmzeit ist 8.01 Uhr und der Alarmton ist eine MP3-Musikdatei. Das Lied für den Alarm ist das
letzte Lied, das Sie mit der Music Box angehört haben.
4. Drücken Sie die S-Taste (Alarm-Einstellung abschließen)
Uhrzeit-Auswahl (8 Schritte)
* Drücken Sie nicht die A-Taste
1. Drücken Sie die S-Taste -------s * Anzeige der Alarmzeit und der Einstellung
2. Drücken Sie die S-Taste
-------
s
* Anzeige der Alarmzeit und Stunden-Ziffer blinkt
3. Drücken Sie die S-Taste
-------
s
* Anzeige der Alarmzeit und Minuten-Ziffer blinkt
6
Page 18
4. Uhrzeit Monat einstellen
Drücken Sie die S-Taste
-------
s
Drücken Sie die A-Taste -------s
Monat auf Januar einstellen
5. Uhrzeit Datum einstellen
Drücken Sie die S-Taste
-------
s
Drücken Sie die A-Taste -------
s
Datum auf zwölf stellen
6. Uhrzeit Stunde einstellen
Drücken Sie die S-Taste
-------
s
Drücken Sie die A-Taste -------s
Uhrzeit auf 12 Uhr Mitternacht (12 PM) einstellen
Hinweis: Für die 24 Stunden-Einstellung müssen Sie die A-Taste einen Durchlauf drücken, bis die
7. Uhrzeit Minute einstellen
Drücken Sie die S-Taste
-------
s
Drücken Sie die A-Taste -------
s
Minuten auf Null stellen
Nun ist die Uhrzeit-Einstellung 12 PM.
8. Drücken Sie die S-Taste (Uhrzeit-Einstellung abschließen)
7
Page 19
Technische Daten:
Stromversorgung: Adapter: 100-240 V
DC: 5 V (Batterie: 4 x AA, Alkaline)
Schnittstelle: USB 2.0
Unterstützte MP3: 96-320 KBit/s, variable Bitrate (VBR)
Audioformate: WMA: 32-192 KBit/s
Lautsprecherausgang: 2 W
Signal-Rausch-Verhältnis: ≥ 90 dB
Frequenzgang: 20-20.000 Hz
PC-Format: FAT16
Sicherheitsvorkehrungen:
Um das Risiko eines elektrischen Schlags zu verringern, sollte
dieses Produkt AUSSCHLIESSLICH von einem autorisierten
Techniker geöffnet werden, wenn eine Reparatur erforderlich ist.
Trennen Sie das Produkt vom Stromnetz und anderen Geräten, wenn ein Problem auftreten sollte.
Sorgen Sie dafür, dass das Gerät nicht mit Wasser oder Feuchtigkeit in Berührung kommt.
Pege:
Nur mit einem trockenen Tuch säubern. Keine Lösungsmittel oder Schleifmittel verwenden.
Garantie:
Es kann keine Garantie oder Haftung bei eigenmächtigen Änderungen oder Modikationen des
Produktes oder für Schäden, die aufgrund einer nicht ordnungsgemäßen Anwendung des Produktes
entstanden sind, übernommen werden.
Allgemein:
Konstruktionen und technische Daten können ohne vorherige Ankündigung geändert werden.
Alle Logos, Marken und Produktnamen sind Warenzeichen oder registrierte Warenzeichen ihrer
jeweiligen Eigentümer und werden hiermit als solche anerkannt.
Achtung:
Dieses Produkt ist mit diesem Symbol gekennzeichnet. Es bedeutet, dass die verwendeten
elektrischen und elektronischen Produkte nicht im allgemeinen Haushaltsmüll entsorgt
werden dürfen. Für diese Produkte stehen gesonderte Sammelsysteme zur Verfügung.
Copyright ©
VORSICHT
STROMS CHLAGGEFAHR
NICHT Ö FFNEN
8
Page 20

9
Page 21
HAV-SDC10
Micro-système
portable
Page 22
1
Contenu de l'emballage
1x HAV-SDC10 Digital Music Box (Boîte à musique numérique)
1x Câble USB
1x CD de pilote USB pour Windows® 98SE
1x Manuel
(Adaptateur secteur en option, numéro d'article P.SUP.USB400)
Emplacement des commandes
PANNEAU AVANT
ECRAN LCD
VOLUME_HAUT
PRECEDENT/
RETOUR RAPIDE
TOUCHE DE PARAMETRAGE
VOLUME_BAS
LECTURE/PAUSE
SUIVANT/AVANCE
RAPIDE
TOUCHE ALARME
Page 23
2
Ecran LCD
Fonctionnement avec des piles
Ouvrez le compartiment à piles et insérez 4 piles AA (les piles Alcalines sont préférables) comme
indiqué sur le schéma se trouvant à l'intérieur du compartiment à piles.
4 x piles AA
Adaptateur
secteur
Fonctionnement avec un adaptateur secteur
Le point de raccordement pour l'adaptateur secteur est le même que celui d'un raccordement USB.
Raccordez la mini-prise à la prise USB (5V) et la prise électrique à une prise secteur murale 220230V.
Note : Une fois l'adaptateur secteur raccordé, le rétro-éclairage de l'écran LCD s'allume et reste
allumé jusqu'à ce que l'adaptateur soit débranché.
Indication piles déchargées
Lorsque les piles sont presque déchargées le voyant rouge clignote pour donner un avertissement
nal.
Page 24
3
Alimentation à partir du port USB
Le système peut s'alimenter à partir du port USB du PC pour la lecture lorsque vous retirez l'icône
"stockage de masse" du PC
Installation d'une carte SD/MMC
La fente pour cartes SD/MMC intégrée vous permet d'augmenter facilement la capacité de mémoire
du lecteur avec des cartes SD/MMC supplémentaires.
Pour installer une carte SD/MMC :
1. Insérez la carte à l'arrière de l'appareil dans le sens indiqué par la èche.
2. Enfoncez la carte jusqu'à ce que vous entendiez un clic.
3. Pour retirer la carte SD/MMC, enfoncez la carte vers l'intérieur pour qu'elle soit éjectée.
Information importante : Insérez la carte dans le slot exactement comme indiqué sur le schéma
ci-dessous. Vous risqueriez d'endommager la fente en tentant un autre moyen.
Raccordement à un ordinateur
Installation du pilote USB
Il n'est pas nécessaire d'installer le pilote USB si votre ordinateur fonctionne sous Microsoft
Windows ME/2000/XP ou une version plus récente. Les ordinateurs fonctionnant sous ces systèmes
d'exploitation reconnaissent automatiquement l'appareil une fois le câble USB raccordé.
Microsoft Windows 98 SE
Sous Windows 98 SE, il est nécessaire d'installer le pilote USB.
1. Accédez au POSTE DE TRAVAIL et double-cliquez sur l'icône du lecteur CD.
2. Double-cliquez sur le chier “iSetup98” pour lancer le programme d'installation du pilote USB.
3. Suivez les instructions à l'écran pour achever l'installation puis redémarrez l'ordinateur.
Page 25
Raccordement du câble USB à un ordinateur
Raccordez le câble USB entre l'appareil et l'ordinateur.
Allumez l'appareil et appuyez sur la touche “Play” s/II pour le sortir de veille.
Le voyant rouge s'allume et clignote.
L'ordinateur reconnaît le système en tant que disque amovible.
Si une carte SD/MMC est installée dans l'appareil, l'ordinateur reconnaît cette carte en tant que
disque amovible.
Transfert de chiers
La connexion USB facilite le transfert de chiers musicaux (MP3/WMA) entre le système et un
ordinateur. Ne débranchez ni n'interrompez pas l'appareil.
Transfert de chiers avec Microsoft Windows
1. Localisez les chiers ou les dossiers que vous souhaitez transférer à partir de l'ordinateur.
2. Sélectionnez les chiers ou les dossiers avec la souris et appuyez sur CTRL-C (copier) sur le
clavier.
3. Accédez au POSTE DE TRAVAIL et double-cliquez sur l'icône représentant le disque amovible.
L'ordinateur afche alors tous les chiers et tous les dossiers présents dans le lecteur.
4. Appuyez sur CTRL-V (coller) sur le clavier pour transférer vers l'appareil les chiers que vous
avez sélectionnés.
Note : Il est aussi possible d'utiliser la souris pour glisser-déposer les chiers entre le système et
l'ordinateur.
4
Page 26

Déconnexion d'un ordinateur et alimentation USB à partir d'un PC
Microsoft Windows
1. Double-cliquez sur l'icône de la èche verte dans la barre de tâches de l'écran de l'ordinateur
(Retirer le périphérique en toute sécurité).
2. Sélectionnez “Périphérique de stockage de masse USB” à partir de la liste qui apparaît puis
cliquez sur “Arrêter”.
3. Sélectionnez “Périphérique de stockage de masse USB” à partir de la liste qui apparaît puis
cliquez sur “OK”.
4. Le système est alors directement alimenté à partir du port USB du PC et il lance la lecture.
Fonctionnement de base
Mode veille
Le système passe automatiquement en Mode veille lorsqu'il est connecté à une source d'alimentation.
L'écran LCD afche l'heure.
Marche/Arrêt
Pour allumer l'appareil et écouter de la musique, appuyer sur la touche s/II en Mode veille. Une
fois que la musique démarre, le voyant bleu s'allume et clignote. Lorsqu'il n'y a plus de chansons ou
de musique en mémoire, le système revient automatiquement en mode veille.
Pour arrêter l'appareil, appuyez et maintenez enfoncée la touche s/II (les voyants rouge et bleu
clignotent).
Dénition des touches
Appuyez sur Is s/s sI pour l'avance rapide/ retour rapide / piste suivante/piste précédente
Appuyez sur +/- pour augmenter/réduire volume
Appuyez sur play/pause s/II pour lire ou stopper les morceaux.
Appuyez sur S et A pour régler l'horloge et l'alarme.
5
Page 27
Réglage horloge et alarme
Section alarme (4 Etapes)
1. Activer l'alarme
Appuyez sur la touche S
-------
s
Appuyez sur la touche A (2 fois)
(Tous les chiffres clignotent) (L'icône de l'alarme MP3 apparaît)
2. Régler l'heure de l'alarme
Appuyez sur la touche S -------
s
Appuyez sur la touche A
(Les chiffres de l'heure clignotent) (Réglez la valeur de l'heure)
3. Régler les minutes de l'alarme
Appuyez sur la touche S -------
s
Appuyez sur la touche A
(Les chiffres des minutes clignotent) (Réglez la valeur des minutes)
L'heure de l'alarme est 8:01 et la sonnerie est une musique mp3. Le morceau joué pour l'alarme est
le dernier morceau que vous avez écouté.
4. Appuyez sur la touche S (Terminer le réglage de l'alarme)
Section horloge (8 Etapes)
* N'appuyez pas sur la touche A
1. Appuyez sur la touche S -------s * Permet d'afcher l'heure de l'alarme et les paramètres.
2. Appuyez sur la touche S -------
s
* Permet d'afcher l'heure de l'alarme. Les chiffres de l'heure
clignotent.
3. Appuyez sur la touche S -------
s
* Permet d'afcher l'heure de l'alarme. Les chiffres des minutes
clignotent.
6
Page 28
4. Régler le mois de l'horloge
Appuyez sur la touche S -------
s
Appuyez sur la touche A -------
s
Réglez le mois sur Janvier
5. Régler la date de l'horloge
Appuyez sur la touche S -------
s
Appuyez sur la touche A -------
s
Réglez la date sur le 12
6. Régler l'heure de l'horloge
Appuyez sur la touche S -------
s
Appuyez sur la touche A -------
s
Régler l'heure à 24 heures
Note : Pour le paramétrage en mode 24 heures, l'utilisateur doit appuyer sur la touche A en cycle
jusqu'à voir apparaître le mode 24 heures
7. Régler les minutes de l'horloge
Appuyez sur la touche S -------
s
Appuyez sur la touche A -------
s
Réglez les minutes à zéro
A présent, l'horloge marque 24 heures.
8. Appuyez sur la touche S (Terminer le réglage de l'horloge)
7
Page 29
Caractéristiques techniques :
Alimentation électrique : Adaptateur : 100-240V
CC: 5V (Piles : 4 x AA, Alcaline)
Port d'interface : USB 2.0
Audio compatible MP3: 96-320kops, Débit binaire variable
Formats : WMA: 32-192kops
Sortie haut-parleur : 2W
Rapport signal/bruit : ≥ 90dB
Réponse en fréquence : 20-20 000Hz
Format PC : FAT16
Consignes de sécurité :
An de réduire les risques de chocs électriques, ce produit ne
doit être ouvert QUE par un technicien qualié agréé en cas de
réparation.
Débranchez l'appareil du secteur et des autres équipements en cas de problème. N'exposez jamais
l'appareil à l'eau ou à l'humidité.
Entretien:
Nettoyez uniquement avec un chiffon sec. N'utilisez pas de solvants ou de produits abrasifs.
Garantie :
Aucune garantie ou responsabilité ne sera acceptée en cas de modication et/ou de transformation
du produit ou en cas de dommages provoqués par une utilisation incorrecte de l'appareil.
Généralités :
Le design et les caractéristiques techniques sont sujets à modication sans notication préalable.
Tous les logos de marques et noms de produits sont des marques déposées ou immatriculées dont
leurs détenteurs sont titulaires et sont donc reconnus comme telles dans ce document.
Attention :
Ce symbole gure sur l'appareil. Il signie que les produits électriques et électroniques ne
doivent pas être jetés avec les déchets domestiques. Le système de collecte est différent
pour ce genre de produits.
Copyright ©
ATTENTION
RISQU E DE CHOC ELECTRI QUE
NE PAS OUVRI R
8
Page 30
9
Page 31

HAV-SDC10
Portable
Microsysteem
Page 32

1
Inhoud van de verpakking
1x HAV-SDC10 Digital Music Box
1x USB kabel
1x USB driver-cd voor Windows® 98SE
1x Gebruiksaanwijzing
(Netvoedingsadapter optioneel, artikelnummer P.SUP.USB400)
Bedieningselementen
VOORZIJDE
LCD DISPLAY
VOLUME_HOGER
VORIGE/
SNEL ACHTERUIT
INSTELLINGEN TOETS
VOLUME_LAGER
WEERGAVE / PAUZE
VOLGENDE / SNEL
VOORUIT
ALARM TOETS
Page 33

2
LCD display
Gebruik op batterijen
Open het batterijvak en plaats, zoals aangegeven in de afbeelding, vier type AA batterijen in het
batterijvak (geadviseerd wordt het gebruik van alkaline batterijen).
4 x AA batterijen
Netvoeding
Adapter
Gebruik met de netvoedingadapter
De USB-aansluiting is tevens de aansluiting voor de netvoedingsadapter. Steek de mini-stekker in
de USB (5 Volt) aansluiting en steek de netvoedingadapter in het stopcontact (220~230 volt).
NB: Wanneer de netvoedingsadapter aangesloten is gaat de achtergrondverlichting van het LCD
scherm branden en deze blijft branden totdat de netvoedingsadapter losgekoppeld wordt.
Indicatie lege batterijen
Wanneer de batterijen bijna leeg zijn, zal de rode LED als waarschuwing gaan knipperen.
Page 34

3
Voedingsspanning via de USB poort
Voor de weergave van muziek kan het apparaat van spanning worden voorzien via de USB poort van
de PC. Hiertoe moet u op uw PC het "USB-apparaat voor massaopslag" verwijderen (zie icoontje
rechtsonder op de taakbalk).
Installatie van SD/MMC kaart
Dankzij het geïntegreerde slot voor SD/MMC kaarten kunt u middels extra SD/MMC kaarten de
geheugencapaciteit van uw speler gemakkelijk uitbreiden.
Het installeren van een SD/MMC kaart:
1. Steek de kaart in de sleuf aan de achterzijde van het apparaat in de richting van het pijltje.
2. Druk de kaart in de sleuf totdat u een 'klik' hoort.
3. Om de SD/MMC kaart te verwijderen, drukt u op de kaart waarna deze naar buiten zal
komen.
Belangrijke opmerking: druk de kaart in het slot precies zoals aangegeven in de onderstaande
afbeelding. Als u de kaart op een andere manier in het slot steekt, zal het slot beschadigen.
Aansluiten op een computer
Installatie van de USB driver
Als het besturingssysteem van uw computer Microsoft Windows ME/2000/XP of hoger is, hoeft u
de USB driver niet te installeren. Computers die met deze besturingssystemen werken, zullen het
apparaat automatisch herkennen zodra de USB-kabel aangesloten wordt.
Microsoft Windows 98 SE
Als uw computer het besturingssysteem Windows 98 SE heeft, dan moet u de USB driver
installeren.
1. Ga naar MY COMPUTER (Mijn computer) en dubbelklik op het cd-station icoontje.
2. Dubbelklik op het bestand “iSetup98” om het USB driver installatieprogramma te starten.
3. Volg de instructies op het scherm om de installatie te voltooien en start vervolgens de computer
opnieuw.
Page 35

Aansluiten van de USB kabel op een computer
Sluit de USB kabel aan op het apparaat en op een computer.
Druk op de “Weergave” s/II toets om het systeem aan te zetten.
De rode LED zal gaan branden en knipperen.
De computer zal het apparaat als een verwijderbare schijf herkennen.
Als er een SD/MMC kaart in het apparaat geplaatst is, dan zal de computer de kaart als een
verwijderbare schijf herkennen.
Overbrengen van bestanden
Door de USB aansluiting is het eenvoudig om muziekbestanden (MP3/WMA) tussen het apparaat
en een computer uit te wisselen. Onderbreek de overdracht van bestanden niet door bijvoorbeeld de
verbinding te verbreken.
Overbrengen van bestanden met Microsoft Windows
1. Zoek de bestanden of mappen die u vanuit de computer wilt overbrengen.
2. Selecteer de bestanden of mappen met de muis en druk op Ctrl-C (kopiëren) op het
toetsenbord.
3. Ga naar MY COMPUTER (Mijn computer) en dubbelklik op het Removable Disk (Verwijderbare
schijf) icoontje. De computer zal alle bestanden en mappen weergeven die actueel in de speler
opgeslagen zijn.
4. Druk op Ctrl-V (plakken) op het keyboard om de door u geselecteerde bestanden naar de
speler over te brengen.
NB: het is ook mogelijk om de bestanden tussen het apparaat en de computer met de muis te slepen
en neer te zetten (drag & drop).
4
Page 36

"Loskoppelen" van de computer en voedingsspanning via de USB poort van de PC
Microsoft Windows
1. Dubbelklik in de taakbalk van het beeldscherm op het icoontje met de groene pijl (Hardware
veilig verwijderen).
2. Selecteer in het overzicht dat verschijnt “USB apparaat voor massaopslag” en klik vervolgens
op “Stoppen”.
3. Selecteer in het overzicht dat verschijnt “USB apparaat voor massaopslag” en klik vervolgens
op “OK”.
4. Het apparaat zal nu door de USB poort van de PC van spanning worden voorzien en zal de
muziek automatisch afspelen.
Basisbediening
Stand-by modus
Zodra het apparaat met een spanningsbron verbonden wordt zal deze automatisch in de stand-by
modus terechtkomen. De LCD-display zal de tijd weergeven.
Apparaat in/uitschakelen
Wanneer het apparaat in de stand-by modus staat, kunt u het inschakelen en muziek afspelen, door
op de s/II toets te drukken. Zodra de muziek weergegeven wordt zal de blauwe LED gaan branden
en knipperen. Wanneer er geen muziek in het geheugen aanwezig is zal het apparaat automatisch
teruggaan naar de stand-by modus.
Om het apparaat uit te schakelen, dient u de s/II toets (rode & blauwe LED zullen knipperen) in te
drukken en ingedrukt te houden.
Beschrijving van de toetsen
Druk op Is s/s sI voor snel vooruit / snel achteruit / volgende nummer / vorige nummer
Druk op +/- om het geluidsvolume harder of zachter te zetten
Druk op weergave/pauze s/II voor de weergave van muziek of om de muziek te stoppen.
Druk op S en A om de klok en het alarm in te stellen.
5
Page 37

Instellen van klok en alarm
Alarm sectie (4 stappen)
1. Alarm activeren
Druk op de S toets
-------
s
Druk op de A toets (2 keer)
(Alle cijfers zullen knipperen) (Alarm icoontje MP3 verschijnt)
2. Alarm uren instellen
Druk op de S toets
-------
s
Druk op de A toets
(De cijfers van de uren zullen knipperen) (Stel het juiste tijdstip van de uren in)
3. Alarm minuten instellen
Druk op de S toets -------
s
Druk op de A toets
(De cijfers van de minuten zullen knipperen) (Stel het juiste tijdstip van de minuten in)
De alarmtijd is 8:01am en het alarmgeluid is mp3 muziek. Het nummer dat u het laatst op uw speler
afgespeeld heeft, wordt als alarm gebruikt.
4. Druk op de S toets (Instellen van het alarm beëindigen)
Klok sectie (8 stappen)
* Druk de A toets niet in
1. Druk op de S toets -------s * De ingestelde alarmtijd verschijnt
2. Druk op de S toets
-------s * Weergave alarmtijd waarbij de uren knipperen
3. Druk op de S toets
-------s * Weergave alarmtijd waarbij de minuten knipperen
6
Page 38

4. Instellen van de maand
Druk op de S toets
-------
s
Druk op de A toets -------s
De maand is op januari ingesteld
5. Instellen van de datum
Druk op de S toets
-------
s
Druk op de A toets -------
s
De datum is op 12 ingesteld
6. Instellen van de uren
Druk op de S toets
-------
s
Druk op de A toets -------
s
De uren zijn op 12 PM ingesteld
NB: indien gewenst kunt u ook de 24-uurs notatie instellen; druk hiertoe nogmaals op de A toets
totdat
7. Instellen van de minuten
Druk op de S toets
-------
s
Druk op de A toets -------
s
De minuten zijn op 00 ingesteld
Nu staat de klok op 12:00 PM.
8. Druk op de S toets (Instellen van de klok beëindigen)
7
Page 39

Specicaties:
Voeding: netvoedingsadapter: 100 - 240 Volt
DC: 5 Volt (batterij: 4 x AA, alkaline )
Interfacepoort: USB 2.0
Ondersteunde audio MP3: 96 - 320 kbps, variabele bit-rate
Formats: WMA: 32 - 192 kbps
Uitgangsvermogen luidspreker: 2 Watt
Signaal/ruis verhouding: ≥ 90 dB
Frequentiebereik: 20 - 20.000 Hz
PC format: FAT16
Veiligheidsvoorzorgsmaatregelen:
Wanneer service of reparatie noodzakelijk is, mag dit product
UITSLUITEND door een geautoriseerde technicus geopend
worden; dit om de kans op het krijgen van een elektrische
schok te voorkomen.
Als er een probleem optreedt, koppel het product dan los van het lichtnet en van andere apparatuur.
Stel het product niet bloot aan water of vocht.
Onderhoud:
Uitsluitend reinigen met een droge doek. Gebruik geen reinigingsmiddelen of schuurmiddelen.
Garantie:
Voor wijzigingen en veranderingen aan het product of schade veroorzaakt door een verkeerd
gebruik van dit product, kan geen aansprakelijkheid worden geaccepteerd. Tevens vervalt daardoor
de garantie.
Algemeen:
Wijziging van ontwerp en specicaties zonder voorafgaande mededeling onder voorbehoud.
Alle logo's, merken en productnamen zijn handelsmerken of geregistreerde handelsmerken van de
respectievelijke eigenaren en worden hierbij als zodanig erkend.
Let op:
Dit product is voorzien van dit symbool. Dit symbool geeft aan dat afgedankte elektrische
en elektronische producten niet met het gewone huisafval verwijderd mogen worden.
Voor dit soort producten zijn er speciale inzamelingspunten.
Copyright ©
8
LET OP:
GEVAAR VOO R ELEKTRISC HE
SCHOK NI ET OPENEN
Page 40

9
Page 41

HAV-SDC10
Microsistema
portatile
Page 42

1
Contenuto della confezione
1x Music box digitale HAV-SDC10
1x cavo USB
1x CD driver USB per Windows® 98SE
1x Manuale
(Adattatore di corrente opzionale, codice articolo P.SUP.USB400)
Ubicazione dei comandi
PANNELLO ANTERIORE
DISPLAY LCD
VOLUME_AUMENTO
INDIETRO/
RIAVVOLGIMENTO
TASTO IMPOSTAZIONI
VOLUME_RIDUZIONE
RIPRODUCI/PAUSA
AVANTI/AVANZAMENTO
VELOCE
TASTO SVEGLIA
Page 43

2
Display LCD
Funzionamento batteria
Aprire il vano batteria e inserire 4 batterie AA (si consigliano le batterie alcaline) seguendo lo schema
presente all'interno del vano.
4 batterie AA
Adattatore
di corrente
Funzionamento dell'adattatore di corrente
Il collegamento dell'adattatore di corrente è lo stesso della connessione USB. Collegare la minipresa
al collegamento a USB (5 v) e la spina dell'alimentazione alla presa a parete da 220~230 V.
Nota: Quando l'adattatore di corrente sarà collegato, la retroilluminazione LCD si accenderà e resterà
accesa no a quando non verrà disinserita la spina dell'adattatore di corrente.
Spia batteria in esaurimento
Se la batteria si sta esaurendo, il LED rosso lampeggerà per emettere un avvertimento nale.
Page 44

3
Alimentazione tramite la porta USB
Il sistema può essere alimentato per la modalità riproduzione tramite la porta USB del PC, se l'icona
"archiviazione di massa" è stata rimossa dal PC stesso.
Installazione scheda SD/MMC
Lo slot della scheda SD/MMC integrata consente di ampliare facilmente la capacità di memoria del
lettore con altre schede SD/MMC.
Per installare una scheda SD/MMC:
1. Inserire la scheda nel retro del sistema seguendo la direzione della freccia.
2. Spingere la scheda no a quando non si sente uno scatto.
3. Per rimuovere la scheda SD/MMC, spingere all'interno la scheda, la quale scatterà fuori.
Avviso importante: Spingere la scheda all'interno dello slot seguendo esattamente le indicazioni
della gura seguente. Se si tentano operazioni diverse, si danneggerà lo slot.
Collegamento ad un computer
Installazione del driver USB
Se il computer esegue Microsoft Windows ME/2000/XP o una versione successiva, non è
necessario installare il driver USB. I computer che eseguono questi sistemi operativi riconosceranno
automaticamente il dispositivo al momento della connessione del cavo USB.
Microsoft Windows 98 SE
Per Windows 98 SE è necessario installare il driver USB.
1. Aprire Risorse del computer e fare doppio clic sull'icona dell'unità del CD.
2. Fare doppio clic sul le “iSetup98” per avviare il programma di installazione del driver USB.
3. Seguire le istruzioni che compaiono sullo schermo per effettuare l'installazione e quindi riavviare
il computer.
Page 45

Collegamento del cavo USB al computer
Collegare il cavo USB al sistema e a un computer.
Accendere il sistema e premere il pulsante “Play” s/II (Riproduzione) per avviare il sistema.
Il LED rosso si accenderà e lampeggerà.
Il computer riconoscerà il sistema come Disco rimovibile.
Se nel sistema è installata una scheda SD/MMC, il computer riconoscerà la scheda come Disco
rimovibile.
Trasferimento di le
Il collegamento USB semplica il trasferimento di le musicali (MP3/WMA) tra il sistema e il computer.
Non scollegare o interrompere il funzionamento del sistema.
Trasferimento di le con Microsoft Windows
1. Individuare i le o le cartelle che si desidera trasferire dal computer.
2. Selezionare i le o le cartelle con il mouse e premere CTRL-C (Copia) sulla tastiera.
3. Aprire Risorse del computer e fare doppio clic sull'icona Disco rimovibile. Il computer visualizzerà
tutti i le e le cartelle attualmente memorizzate nel lettore.
4. Premere CTRL-V (Incolla) sulla tastiera per trasferire i le prescelti nel sistema.
Nota: È possibile anche utilizzare il mouse per trascinare i le tra il sistema e il computer.
4
Page 46

Scollegamento dal computer e usare l'alimentazione USB del PC
Microsoft Windows
1. Fare doppio clic sull'icona con la freccia verde nella barra delle applicazioni sullo schermo del
computer (Rimozione sicura dell'hardware).
2. Selezionare "Dispositivo di archiviazione di massa USB" nell'elenco che appare e fare clic su
"Stop".
3. Selezionare "Dispositivo di archiviazione di massa USB" nell'elenco che appare e fare clic su
"OK".
4. Il sistema trarrà direttamente l'alimentazione dall'USB del PC e riprodurrà automaticamente la
musica.
Operazioni di base
Modalità standby
Il sistema entra automaticamente in modalità standby quando viene collegato a una sorgente di
energia. Il LCD visualizzerà l'ora.
Accensione/Spegnimento
Per accendere il sistema e riprodurre la musica, premere il tasto s/II in modalità standby. Durante
la riproduzione, il LED blu si accenderà e lampeggerà. Se nel contenuto della memoria non sono
presenti canzoni o musica, il sistema ritornerà automaticamente in modalità standby.
Per spegnere il sistema, tenere premuto il tasto s/II (il LED rosso e blu lampeggerà).
Denizione dei tasti
Premere Is s/s sI per avanzamento veloce / riavvolgimento veloce / brano successivo /
brano precedente
Premere +/- per aumentare/ridurre il volume
Premere play/pause s/II per riprodurre o arrestare la musica.
Premere S e A per regolare l'orologio e la sveglia.
5
Page 47

Impostazioni orologio e sveglia
Sezione sveglia (4 passaggi)
1. Attivare la sveglia
Premere il tasto S
-------
s
Premere il tasto A (2 volte)
(Tutte le cifre lampeggeranno) (Appare l'icona sveglia MP3)
2. Impostare l'ora della sveglia
Premere il tasto S
-------
s
Premere il tasto A
(Lampeggerà la cifra dell'ora) (Impostare la cifra dell'ora)
3. Impostare i minuti della sveglia
Premere il tasto S
-------
s
Premere il tasto A
(Lampeggerà la cifra dei minuti) (Impostare la cifra dei minuti)
L'ora della sveglia è 8:01 am (del mattino) e il suono della sveglia corrisponderà alla musica dell'mp3.
Il brano della sveglia corrisponderà all'ultimo brano ascoltato nel music box.
4. Premere il tasto S (Impostazione sveglia completata)
Sezione orologio (8 passaggi)
* Non premere il tasto A
1. Premere il tasto S -------s * Visualizzare l'ora e l'impostazione della sveglia
2. Premere il tasto S
-------
s
* Visualizzare l'ora della sveglia; la cifra dell'ora lampeggia
3. Premere il tasto S
-------
s
* Visualizzare l'ora della sveglia; la cifra dei minuti lampeggia
6
Page 48

4. Impostare il mese dell'orologio
Premere il tasto S
-------
s
Premere il tasto A -------s
Impostare il mese su gennaio
5. Impostare la data dell'orologio
Premere il tasto S
-------
s
Premere il tasto A -------
s
Impostare la data su dodici
6. Impostare l'ora dell'orologio
Premere il tasto S
-------
s
Premere il tasto A -------
s
Impostare l'ora su 12 pm (pomeriggio)
Nota: Per l'impostazione su 24 ore, l'utente deve premere il tasto A per un ciclo no a quando
7. Impostare i minuti dell'orologio
Premere il tasto S
-------
s
Premere il tasto A -------
s
Impostare i minuti su zero
Ora l'orologio è impostato su mezzogiorno.
8. Premere il tasto S (Impostazione orologio completata)
7
Page 49

Caratteristiche tecniche:
Alimentazione: Adattatore: 100-240 V
CC: 5 V (Batteria: 4 alcaline AA )
Porta interfaccia: USB 2.0
Audio supportato MP3: 96-320 kbps, bit rate variabile
Formati: WMA: 32-192 kbps
Uscita altoparlante: 2W
Rapporto segnale - rumore: ≥ 90 dB
Risposta frequenza: 20-20.000 kbps
Formato PC: FAT16
Precauzioni di sicurezza:
Per ridurre il rischio di scosse elettriche, questo prodotto
deve essere aperto ESCLUSIVAMENTE da personale tecnico
specializzato, se occorre assistenza.
Se si dovessero vericare dei problemi, scollegare il prodotto dall'alimentazione di rete e da ogni
altra apparecchiatura. Non esporre il prodotto ad acqua o umidità.
Manutenzione:
Pulire solo con un panno asciutto. Non utilizzare solventi detergenti o abrasivi.
Garanzia:
Non sarà accettata alcuna garanzia o responsabilità in relazione a cambiamenti e modiche del
prodotto o a danni determinati dall'uso non corretto del prodotto stesso.
Generalità:
Il design e le caratteristiche tecniche sono soggetti a modica senza necessità di preavviso.
Tutti i marchi a logo e i nomi di prodotto sono marchi commerciali o marchi registrati appartenenti ai
rispettivi titolari e sono in questo documento riconosciuti come tali.
Attenzione:
Il prodotto è contrassegnato con questo simbolo, con il quale si indica che i prodotti
elettrici ed elettronici usati non devono essere gettati insieme ai riuti domestici. Per
questi prodotti esiste un sistema di raccolta differenziata.
Copyright ©
ATTENZIONE
RISCH IO DI SCOSSE ELE TTRICHE
NON APRI RE
8
Page 50

9
Page 51

HAV-SDC10
Portátil
Micro-sistema
Page 52

1
Contenidos del paquete
1 Caja de música digital HAV-SDC10
1 cable USB
1 CD con el piloto USB para Windows® 98SE
1 Manual
(adaptador de alimentación opcional, número de artículo P.SUP.USB400)
Ubicación de los mandos
PANEL FRONTAL
Pantalla LCD
SUBIR VOLUMEN
ANTERIOR/
RETROCESO
RÁPIDO
TECLA DE CONFIGURACIÓN
BAJAR VOLUMEN
REPRODUCIR/PAUSA
SIGUIENTE/AVANCE
RÁPIDO
TECLA DE LA ALARMA
Page 53

2
Pantalla LCD
Funcionamiento de la batería
Abra el compartimento de pilas e introduzca 4 pilas AA (se recomiendan las pilas alcalinas) tal y
como aparece indicado en el diagrama ubicado dentro del compartimento de pilas.
4 pilas AA
Alimentación
Adaptador
Funcionamiento del adaptador de alimentación
La conexión del adaptador de alimentación es la misma que la conexión USB. Conecte la minitoma
a la conexión USB de 5V y la toma de alimentación a un enchufe de red de 220~230V.
Nota: Cuando el adaptador de alimentación esté conectado, la luz de fondo LCD se encenderá y
permanecerá encendida hasta que el adaptador de alimentación se desconecte.
Indicación de baja batería
Cuando la batería casi se haya terminado y la LED roja pestañea para mostrar una advertencia
nal.
Page 54

3
Obtención de alimentación a partir del puerto USB
El sistema puede alimentarse a partir de un puerto USB para el modo de reproducción cuando el
icono del "dispositivo de masa" se elimine del PC.
Instalación de la tarjeta SD/MMC
La ranura de la tarjeta integrada SD/MMC le permite actualizar la capacidad de memoria del
reproductor fácilmente con tarjetas SD/MMC adicionales.
Para instalar una tarjeta SD/MMC:
1. Introduzca la tarjeta de la parte trasera del sistema en la dirección de la echa.
2. Empuje la tarjeta hasta que oiga un clic.
3. Para sacar la tarjeta SD/MMC, pulse la tarjeta hacia dentro y sáquela.
Nota importante: Empuje la tarjeta dentro de la ranura exactamente como aparece en la siguiente
gura. Si intenta hacerlo de otro modo, podrá dañar la ranura.
Conexión a un ordenador
Instalación del piloto USB
No es necesario instalar el piloto USB si su ordenador funciona bajo Microsoft Windows ME/2000/XP
o una versión posterior. Los ordenadores que funcionen con dichos sistemas operativos reconocerán
el sistema automáticamente cuando el cable USB esté conectado.
Microsoft Windows 98 SE
Para Windows 98 SE, es necesario instalar el piloto USB.
1. Navegue hasta MI PC y haga doble clic en el icono de la unidad de CD.
2. Haga doble clic en el archivo “iSetup98” para lanzar el programa de instalación del piloto
USB.
3. Siga las instrucciones que aparecen en pantalla para completar la instalación y a continuación,
reinicie el ordenador.
Page 55

Conexión del cable USB a un ordenador
Conecte el cable USB al sistema y a un ordenador.
Encienda el sistema y pulse el botón “Play” s/II (Reproducción) para despertar el sistema.
La LED roja se encenderá y parpadeará.
El ordenador reconocerá el sistema como disco extraíble.
Si se ha instalado una tarjeta SD/MMC. El ordenador reconocerá la tarjeta como disco extraíble.
Transmisión de archivos
La conexión USB facilita la transmisión de archivos de música (MP3/WMA) entre el sistema y un
ordenador. No desconecte ni interrumpa el sistema.
Transmisión de archivos con Microsoft Windows
1. Ubique los archivos o las carpetas que desee transferir desde su ordenador.
2. Seleccione los archivos o las carpetas con el ratón y pulse CTRL-C (copiar) con el teclado.
3. Navegue hasta MI PC y haga doble clic en el icono del disco extraíble. El ordenador
mostrará todos los archivos y carpetas que se encuentren actualmente almacenadas en el
reproductor.
4. Pulse CTRL-V (pegar) en el teclado para transferir los archivos seleccionados hacia el
sistema.
Nota: También podrá utilizar el ratón para arrastrar y pegar los archivos entre el sistema y el
ordenador.
4
Page 56

Desconexión desde un ordenador y alimentar el USB a partir de un PC.
Microsoft Windows
1. Haga doble clic en el icono de la echa verde de la barra de tareas de la pantalla del ordenador
(quitar dispositivo con seguridad).
2. Seleccione el “Dispositivo de almacenamiento USB” a partir de la lista que aparece en pantalla
y a continuación, pulse “Interrumpir”.
3. Seleccione el “Dispositivo de almacenamiento USB” a partir de la lista que aparece en pantalla
y a continuación, pulse “OK”.
4. El sistema tomará la alimentación del USB del PC y reproducirá automáticamente la música.
Operaciones básicas
Modo en espera
El sistema pasará al modo en espera automáticamente cuando se conecte a una fuente de
alimentación. La pantalla LCD mostrará la hora.
Encendido/apagado
Para encender el sistema y reproducir la música, pulse la tecla s/II mientras está en modo en espera.
Una vez que la música se esté reproduciendo, la LED azul se encenderá y pestañeará. Cuando no
existan canciones ni música en el contenido de la memoria, el sistema volverá automáticamente al
modo en espera.
Para apagar el sistema, pulse y mantenga pulsada la tecla s/II (la LED azul & roja pestañeará).
Denición de las teclas
Pulse Is s/s sI para avanzar/volver a la canción anterior/siguiente.
Pulse +/- para subir o bajar el volumen.
Pulse play/pause s/II (reproducir/pausa) para reproducir e interrumpir la música.
Pulse S y A para ajustar el reloj y la alarma.
5
Page 57

Conguración del reloj y la alarma
Sección de la alarma (4 etapas)
1. Activar la alarma
Pulse la tecla S
-------
s
Pulse la tecla A (2 veces)
(Todos los dígitos parpadearán) (Aparece el icono de la alarma MP3)
2. Congurar la hora de la alarma
Pulse la tecla S
-------
s
Pulse la tecla A
(Los dígitos de la hora pestañearán) (Congurar el valor de la hora)
3. Congurar los minutos de la alarma
Pulse la tecla S -------
s
Pulse la tecla A
(Los dígitos de los minutos pestañearán) (Congurar el valor de los minutos)
La hora de la alarma es 8:01 am y el sonido de la alarma es música en mp3. La canción de la alarma
será la última canción que haya escuchado en su caja de música.
4. Pulse la tecla S (Finalizar la conguración de la alarma)
Sección del reloj (8 etapas)
* No pulse la tecla A
1. Pulse la tecla S -------s * Ver la hora de la alarma y su conguración
2. Pulse la tecla S -------
s
* Ver la hora de alarma y los dígitos de la hora pestañearán
3. Pulse la tecla S -------
s
* Ver la hora de alarma y los dígitos de los minutos pestañearán
6
Page 58

4. Congurar el mes del reloj
Pulse la tecla S -------
s
Pulse la tecla A -------s
Fije el mes en enero
5. Congurar la fecha del reloj
Pulse la tecla S -------
s
Pulse la tecla A -------s
Fije la fecha en doce
6. Congurar la hora del reloj
Pulse la tecla S -------
s
Pulse la tecla A -------s
Fija la hora a las doce PM
Nota: Para la conguración de 24 horas, y el usuario deberá pulsar la tecla A una vez hasta que
7. Congurar los minutos del reloj
Pulse la tecla S -------
s
Pulse la tecla A -------s
Fije los minutos en cero
Ahora la conguración del reloj indicará las doce PM.
8. Pulse la tecla S (Finalizar la conguración del reloj)
7
Page 59

Especicaciones:
Alimentación: Adaptador: 100-240V
CC: 5V (Batería: 4 pilas AA alcalinas)
Puerto de la interfaz: USB 2.0
Audio aceptada MP3: 96-320kbps, velocidad de bits variable
Formatos: WMA: 32-192kbps
Salida del altavoz: 2W
Ratio de señal de ruido: ≥ 90dB
Respuesta de frecuencia: 20-20,000Hz
Formato del PC: FAT16
Medidas de seguridad:
Para reducir los riesgos de electrocución, este producto deberá
ser abierto EXCLUSIVAMENTE por un técnico habilitado
cuando necesite ser reparado.
Desconecte el producto de la red y de cualquier otro equipo si se registra algún problema. No
exponga el producto al agua ni a la humedad.
Mantenimiento:
Limpie sólo con un paño seco. No utilice solventes de limpieza ni abrasivos.
Garantía:
No se aceptará ninguna garantía o responsabilidad derivada de cualquier cambio o modicaciones
realizadas al producto o daños provocados por un uso incorrecto del presente producto.
General:
Las ilustraciones y las especicaciones podrán sufrir cambios sin previo aviso.
Todas las marcas de los logotipos y los nombres de productos constituyen patentes o marcas
registradas de sus titulares correspondientes, reconocidos como tal.
Cuidado:
Este producto está señalizado con este símbolo. Esto signica que los productos eléctricos
y electrónicos gastados no deberán mezclarse con los desechos domésticos generales.
Existen distintos sistemas de recogida individuales para este tipo de productos.
Copyright ©
ATENCIÓN
RIESGO D E ELECTROCUCI ÓN
NO ABRI R
8
Page 60

9
Page 61

HAV-SDC10
Hordozható
mikrorendszer
Page 62

1
A csomag tartalma
1db HAV-SDC10 digitális zenelejátszó
1db USB kábel
1db, USB illesztőprogramot tartalmazó CD a Windows® 98SE operációs rendszerhez
1 db Felhasználói kézikönyv
(Hálózati adapter külön rendelhető, cikkszáma: P.SUP.USB400)
A kezelőgombok elhelyezkedése
ELŐLAP
LCD KIJELZŐ
VOLUME_UP
(HANGERŐ FEL)
ELŐZŐ/GYORS
VISSZAFELÉ
JÁTSZÁS
SETTING KEY (BEÁLLÍTÓ GOMB)
HANGERŐ LE
PLAY/PAUSE (LEJÁTSZÁS/SZÜNET)
KÖVETKEZŐ/GYORS
ELŐREJÁTSZÁS
ALARM KEY
(ÉBRESZTŐ
GOMBJA)
Page 63

2
LCD kijelző
Az elemek kezelése
Nyissa ki az elemtartó fedelét, és tegyen be 4 db AA elemet (alkáli elemek használatát javasoljuk) a
teleptartó rekesz belsejében lévő ábra szerint.
4 db AA elem
Hálózati
adapter
Hálózati adapter kezelése
A hálózati adapter csatlakozása ugyanúgy történik, mint az USB eszköz csatlakoztatása. A
minidugaszt csatlakoztassa az USB (5 V-os) csatlakozóra, a hálózati dugaszt pedig a 220–230 V-os
fali aljzatra.
Megjegyzés: A hálózati adapter bekapcsolásakor az LCD kijelző háttérvilágítása kigyullad, és
mindaddig folyamatosan világít, amíg a hálózati adaptert le nem választják.
Alacsony telepfeszültség jelzése
Amikor már alig van telepfeszültség, a piros LED végső gyelmeztető jelzésként villog.
Page 64

3
Áramfelvétel USB portról
A rendszer akkor kaphat áramot a számítógép lejátszásra alkalmas USB portjáról, ha a "háttértároló
eszköz" ikonját a számítógépről eltávolítják.
SD/MMC kártya behelyezése
Az integrált SD/MMC kártya aljzaton keresztül további SD/MMC kártyákkal kibővítheti a lejátszó
memóriakapacitását.
SD/MMC kártya behelyezése:
1. Illessze be a kártyát a rendszer hátlapján, a nyíl irányában.
2. Nyomja a kártyát addig, amíg kattanást nem hall.
3. Ha ki akarja venni az SD/MMC kártyát, nyomja le, és az magától kiugrik.
Fontos tudnivaló: A kártyát pontosan az alábbi ábrának megfelelően nyomja be az aljzatba. Ha
nem így teszi, megsérülhet a kártya aljzat.
Csatlakoztatás számítógéphez
USB illesztőprogram telepítése
Nincs szükség USB illesztőprogram telepítésére, ha a számítógépen Microsoft Windows ME/2000/
XP vagy újabb operációs rendszer fut. Az előbbi operációs rendszereket futtató számítógépek a
rendszert az USB kábel csatlakoztatása után automatikusan felismerik.
Microsoft Windows 98 SE
Windows 98 SE operációs rendszer esetén kell telepíteni az USB illesztőprogramot.
1. Lépjen be a MY COMPUTER (SAJÁTGÉP) menübe, és kattintson duplán a CD meghajtó
ikonjára.
2. Az “iSetup98” fájlra duplán kattintva indítsa el az USB illesztőprogram telepítését.
3. A képernyőn megjelenő utasításokat követve fejezze be a telepítést, majd indítsa újra a
számítógépet.
Page 65

Az USB kábel csatlakoztatása számítógéphez
Csatlakoztassa az USB kábelt a rendszerhez és egy számítógéphez.
Kapcsolja be a rendszert, és nyomja meg a “Play” s/II (Lejátszás) gombot a rendszer
"felébresztéséhez".
A piros LED bekapcsol és villog.
A számítógép cserélhető lemezként (Removable Disk) fogja a rendszert felismerni.
Ha SD/MMC kártya van a rendszerben, a számítógép cserélhető lemezként (Removable Disk) fogja
a kártyát felismerni.
Fájlok átvitele
Az USB kapcsolat megkönnyíti a zenei fájlok (MP3/WMA) átvitelét a rendszer és a számítógép
között. Ne válassza le és ne szakítsa meg a rendszert.
Fájlok átvitele Microsoft Windows operációs rendszerrel
1. Keresse meg a számítógépre átvinni kívánt fájlokat vagy mappákat.
2. Jelölje ki a fájlokat vagy mappákat az egérrel, és nyomja meg a billentyűzet CTRL és C
(másolás) gombját.
3. Lépjen be a MY COMPUTER (SAJÁTGÉP) menübe, és kattintson duplán a Removable Disk
(Cserélhető lemez) ikonra. A számítógép ki fogja jelezni a lejátszón tárolt összes fájlt és
mappát.
4. A billentyűzet CTRL és V (beillesztés) gombjával vigye át a kijelölt fájlokat a rendszerbe.
Megjegyzés: A rendszer és a számítógép közt egérrel (drag-and-drop, húzd és engedd el) is át lehet
vinni fájlokat.
4
Page 66

Lekapcsolás a számítógépről és áramfelvétel a számítógép USB portjáról
Microsoft Windows
1. Kattintson duplán a tálcán a zöld nyíl ikonra (Hardver biztonságos eltávolítása).
2. A megjelenő listából jelölje ki a “USB Mass Storage Device” (USB háttértároló eszköz) elemet,
majd kattintson a “Stop” (Leállítás) gombra.
3. A megjelenő listából jelölje ki a “USB Mass Storage Device” (USB háttértároló eszköz) elemet
majd kattintson az “OK” gombra.
4. A rendszer ettől kezdve a számítógép USB portjáról kap áramot, és automatikusan játszik le
zenét.
Alapműveletek
Készenléti mód
A rendszer automatikusan készenléti módba lép, amint áramforrásra kapcsolják. Az LCD kijelzi az
időt.
Be- és kikapcsolás
A rendszer bekapcsolásához és zene lejátszásához készenléti módban nyomja meg a s/II billentyűt.
Zene lejátszása közben a kék LED bekapcsol és villog. Ha a memóriában nincs zenei felvétel, a
rendszer automatikusan visszalép készenléti módba.
A rendszer kikapcsolásához nyomja le és tartsa lenyomva a s/II billentyűt (a piros és kék LED
villogni fognak).
Billentyűkijelölés
A Is s/s sI billentyű: gyors előre játszás/gyors visszafelé játszás/következő zeneszám/előző
zeneszám
A +/- billentyű: hangerő növelése/csökkentése
A play/pause s/II (Lejátszás/Szünet) billentyűvel indíthatja és leállíthatja a zene lejátszását.
Az S és A billentyűvel beállíthatja az órát és az ébresztőt.
5
Page 67

Az óra és az ébresztő beállítása
Az ébresztő beállítása (4 lépés)
1. Az ébresztő bekapcsolása
Nyomja meg az S billentyűt
-------
s
Nyomja meg (kétszer) az A billentyűt
(Mindegyik számjegy villog) (Az MP3 ébresztő ikon megjelenik)
2. Az ébresztés órájának beállítása
Nyomja meg az S billentyűt -------
s
Nyomja meg az A billentyűt
(Az órát jelző számjegy villog) (Állítsa be a kívánt órát)
3. Az ébresztés percének beállítása
Nyomja meg az S billentyűt -------
s
Nyomja meg az A billentyűt
(A percet jelző számjegy villog) (Állítsa be a kívánt percet)
Az ébresztési idő reggel 8:01, az ébresztő hang mp3 zene. Ébresztő zeneként a legutóbb játszott
zeneszám fog megszólalni.
4. Nyomja meg az S billentyűt (Fejezze be az ébresztő beállítását)
Az óra beállítása (8 lépés)
* Ne nyomja meg az A billentyűt
1. Az S billentyű megnyomására -------s * az ébresztési idő és beállítása jelenik meg
2. Az S billentyű megnyomására -------
s
*
az ébresztési idő jelenik meg, az órát jelző számjegy villog
3. Az S billentyű megnyomására -------s *
az ébresztési idő jelenik meg, a percet jelző számjegy villog
6
Page 68

4. A hónap beállítása az órán
Nyomja meg az F billentyűt-------
s
Nyomja meg az A billentyűt------- s
Állítsa a hónapot januárra
5. A dátum beállítása az órán
Nyomja meg az S billentyűt-------
s
Nyomja meg az A billentyűt------- s
Állítsa a dátumot tizenkettedikére
6. Az óra beállítása az órán
Nyomja meg az S billentyűt-------
s
Nyomja meg az A billentyűt------- s
Állítsa az órát éjjel (PM) tizenkettőre
Megjegyzés: Ha 24 órás időformátumot kíván beállítani, nyomjon egyet az A billentyűn, amíg a 24
órás formátum meg nem jelenik.
7. A perc beállítása az órán
Nyomja meg az S billentyűt-------
s
Nyomja meg az A billentyűt
------- s
Állítsa a percet nullára
Az óra most éjjel (PM) tizenkettőre van állítva.
8. Nyomja meg az S billentyűt (Fejezze be az óra beállítását)
7
Page 69

Műszaki jellemzők:
Tápfeszültség: Adapter: 100–240V
DC (egyenáramú): 5 V (telep: 4 db AA, alkáli elem)
Interfész port: USB 2.0
Támogatott audio MP3: 96–320 kb/mp, változó bitsebesség
Formátumok: WMA: 32–192kbps
Hangszóró kimeneti teljesítménye:
2 W
Jel-zaj viszony: ≥ 90 dB
Frekvenciafelvétel: 20–20 000 Hz
PC formátum: FAT16
Biztonsági óvintézkedések:
Az áramütés megelőzése érdekében ezt a készüléket CSAK
képzett szakember nyithatja fel.
Ha gond adódik a készülékkel, kapcsolja le az elektromos hálózatról és más készülékről. A terméket
víztől és nedességtől védje.
Karbantartás:
Csak száraz ronggyal tisztítsa. Tisztító- és súrolószereket ne használjon.
Jótállás:
Nem vállalunk felelősséget és jótállást, ha a meghibásodás a készüléken végzett változtatás vagy
módosítás következménye, vagy helytelen használat miatt a készülék megrongálódott.
Általános tudnivalók:
A formatervezésen és a műszaki jellemzőkön előzetes értesítés nélkül is végezhetünk
módosításokat.
Minden logó, terméknév és márkanév a tulajdonosának márkaneve vagy bejegyzett márkaneve, és
itt ilyen értelemben említjük.
Figyelem:
Ezt a terméket ezzel a szimbólummal jelöljük. Ami annyit jelent, hogy ezek az elektromos
és elektronikus termékek nem keverhetők az általános háztartási hulladék közé.
Begyűjtésüket külön begyűjtő létesítmény végzi.
Copyright ©
VIGYÁZAT!
ÁRAMÜ TÉS VESZÉLYE!
NE NYIS SA FEL!
8
Page 70

9
Page 71

HAV-SDC10
Kannettava
Mikrojärjestelmä
Page 72

1
Pakkauksen sisältö
1x HAV-SDC10 Digitaalinen Music Box
1x USB-kaapeli
1x USB-ajuri-CD käyttöjärjestelmälle Windows® 98SE
1x Käyttöopas
(Valinnainen verkkovirtasovitin, tuotenumero P.SUP.USB400)
Ohjainten sijainti
ETUPANEELI
LCD-näyttö
ÄÄNENVOIMAKKUUA
YLÖS
TAKAISIN/
TAAKSEPÄIN
KELAUS
ASETUSNÄPPÄIN
ÄÄNENVOIMAKKUUS ALAS
SOITTO/KESKEYTYS
SEURAAVA/
ETEENPÄINKELAUS
HERÄTYSKELLOPAINIKE
Page 73

2
LCD-näyttö
Pariston toiminta
Avaa paristokotelo ja aseta 4x AA -paristoa (alkaliparistot ovat suositeltavia) paristokotelon sisällä
olevan kaavion mukaisesti.
4 x AA paristo
Verkkovirtasovitin
Verkkovirtasovittimen käyttö
Verkkovirtasovittimen liitäntä on sama kuin USB-liitäntä. Liitä minipistoke USD-liitäntään (5V) ja
virtapistoke 220~230V verkkovirtalähteeseen.
Huom: Kun verkkovirtasovitin on kytketty, LCD-näytön taustavalo syttyy ja jää palamaan kunnes
verkkovirtasovitin irrotetaan.
Alhaisen paristovirran hälytys
Kun pariston virta on loppumaisillaan punainen LED-merkkivalo vilkkuu ja varoittaa virran
loppumisesta.
Page 74

3
Virran saanti USB-portista
Järjestelmä voi ottaa vastaan virtaa tietokoneen USB-portista soittoa varten silloin, kun
“massavaraajan” kuvake poistetaan tietokoneesta.
SD/MMC-kortin asennus
Integroitu SD/MMC-korttiaukon ansiosta soittimen muistikapasiteettia voidaan parantaa ylimääräisillä
SD/MMC-korteilla.
SD/MMC-kortin asennus:
1. Aseta kortti järjestelmän takaosaan nuolen suuntaisesti.
2. Paina korttia kunnes se napsahtaa paikoilleen.
3. SD/MMC-kortti voidaan poistaa painamalla korttia sisään, jolloin kortti tulee ulos.
Tärkeä huomautus: Paina kortti korttiaukkoon tarkalleen alla olevan kuvan mukaisesti. Muutoin
korttiaukko voi vaurioitua.
Tietokoneeseen kytkentä
USB-ajurin asennus
USB-ajurin asennus ei ole tarpeen, jos tietokoneen käyttöjärjestelmä on Microsoft Windows ME/2000/
XP tai sitä uudempi. Kyseisiä käyttöjärjestelmiä käyttävät tietokoneet tunnistavat järjestelmän
automaattisesti silloin, kun USB-kaapeli kytketään.
Microsoft Windows 98 SE
Windows 98 SE käyttöjärjestelmää käytettäessä USB-jurin asennus on tarpeen.
1. Avaa OMA TIETOKONE ja kaksoisnapsauta CD-aseman kuvaketta.
2. Kaksoisnapsauta tiedostoa “iSetup98” käynnistääksesi USB-ajurin asennusohjelman.
3. Seuraa näytölle tulevia ohjeita suorittaaksesi asennuksen loppuun ja käynnistä tietokone sen
jälkeen uudelleen.
Page 75

USB-kaapelin kytkentä tietokoneeseen
Liitä USB-kaapeli järjestelmään ja tietokoneeseen.
Käynnistä järjestelmä ja paina painiketta “Play” s/II järjestelmän aktivoimiseksi.
Punainen LED-merkkivalo syttyy ja vilkkuu.
Tietokone tunnistaa järjestelmän Poistettavana levynä.
Jos SD/MMC-kortti asennetaan järjestelmään, tietokone tunnistaa kortin Poistettavana levynä.
Tiedostojen siirto
USB-liitännän ansiosta musiikkitiedostojen (MP3/WMA) siirto järjestelmän ja tietokoneen välillä on
helppoa. Älä kytke järjestelmää pois tai keskeytä sitä.
Tiedostojen siirto Microsoft Windows -järjestelmällä
1. Määritä siirrettävien tiedostojen tai kansioiden sijainti tietokoneella.
2. Valitse tiedostot tai kansiot hiirellä ja paina näppäimistön painikkeita CTRL-C (kopioi).
3. Avaa OMA TIETOKONE ja kaksoisnapsauta Poistettavan levyn kuvaketta. Tietokone näyttää
kaikki soittimeen tallennetut tiedostot ja kansiot.
4. Paina näppäimistön painikkeita CTRL-V (liimaa) siirtääksesi valitsemasi tiedostot
järjestelmään.
Huom: Siirto voidaan suorittaa myös hiirellä vetäen ja pudottaen tiedostot järjestelmän ja tietokoneen
välillä.
4
Page 76

Tietokoneesta poiskytkentä ja USB-virran saanti tietokoneesta
Microsoft Windows
1. Kaksoisnapsauta tietokoneen tehtäväpalkin vihreää nuolikuvaketta (Laitteiston turvallinen
poisto).
2. Valitse “USB Mass Storage Device” (massavaraaja) näkyviin tulevasta luettelosta ja napsauta
“Stop” (Pysäytä).
3. Valitse “USB Mass Storage Device” (massavaraaja) näkyviin tulevasta luettelosta ja napsauta
“OK”.
4. Järjestelmä ottaa virtaa suoraan tietokoneen USB-portista ja musikin soitto alkaa
automaattisesti.
Perustoiminnot
Valmiustila
Järjestelmä siirtyy valmiustilaan automaattisesti silloin, kun se kytketään virtalähteeseen. LCDnäytössä näkyy aika.
Virran kytkentä päälle/pois päältä
Kytke järjestelmä päälle ja soita musiikkia painamalla painiketta s/II valmiustilassa. Musiikin
soidessa sininen LED-merkkivalo syttyy ja vilkkuu. Kun muistissa ei ole musiikkia, järjestelmä siirtyy
automaattisesti takaisin valmiustilaan.
Sammuta järjestelmä painamalla ja pitämällä alhaalla painiketta s/II (Punainen & sininen LEDmerkkivalo vilkkuu).
Näppäinten merkitys
Paina Is s/s sI aktivoidaksesi nopean eteenpäin kelauksen / taaksepäin kelauksen /
siirtyäksesi seuraavaan/edelliseen kappaleeseen
Paina +/- lisätäksesi/vähentääksesi äänenvoimakkuutta
Paina play/pause s/II soittaaksesi ja pysäyttääksesi musiikin.
Paina S ja A säätääksesi kellon ja hälytyksen asetuksia.
5
Page 77

Kellon ja häkytyksen asetus
Hälytysosio (4 vaihetta)
1. Hälytyksen aktivointi
Paina painiketta S
-------
s
Paina painiketta A (2 kertaa)
(Kaikki luvut vilkkuvat) (Hälytyskuvake MP3 tulee näkyviin)
2. Hälytyksen tuntien asetus
Paina painiketta S
-------
s
Paina painiketta A
(Tunnit vilkkuvat) (Aseta tunnit)
3. Hälytyksen minuuttien asetus
Paina painiketta S -------
s
Paina painiketta A
(Minuutit vilkkuvat) (Aseta minuutit)
Hälytysaika on 8:01 am ja hälytysääni on mp3-musiikki. Hälytyskappale on viimeeksi laitteen
kuunneltu kappale.
4. Paina painiketta S (lopeta hälytyksen asetus)
Kello-osio (8 vaihetta)
* Älä paina painiketta A
1. Paina painiketta S -------s * Hälytysaika ja asetukset näkyvät
2. Paina painiketta S -------
s
* Hälytysaika näkyy ja tunnit vilkkuvat
3. Paina painiketta S -------
s
* Hälytysaika näkyy ja minuutit vilkkuvat
6
Page 78

4. Aseta kellon kuukausi
Paina painiketta S -------
s
Paina painiketta A -------s
Aseta kuukaudeksi tammikuu
5. Aseta kellon päivämäärä
Paina painiketta S -------
s
Paina painiketta A -------s
Aseta päivämääräksi kaksitoista
6. Aseta kellon tunnit
Paina painiketta S -------
s
Paina painiketta A -------s
Aseta tunneiksi kaksitoista PM
Huom: 24-tunnin asetuksessa käyttäjän on painettava painiketta A yhden jakson ajan, kunnes
7. Aseta kellon minuutit
Paina painiketta S -------
s
Paina painiketta A -------s
Aseta minuuttiarvoksi nolla
Kellon asetus on nyt kaksitoista PM.
8. Paina painiketta S (lopeta kellon asetus)
7
Page 79

Tekniset tiedot:
Virtalähde: Sovitin: 100-240V
DC: 5V (Paristo: 4 x AA, alkali)
Liitäntäportti: USB 2.0
Tuettu audio MP3: 96-320kbps, vaihteleva bittinopeus
Formaatit: WMA: 32-192kbps
Kaiuttimen teho: 2W
Signaalikohinasuhde: ≥ 90dB
Taajuusvaste: 20-20,000Hz
PC-formaatti: FAT16
Turvallisuuteen liittyvät varoitukset:
Sähköiskuvaaran välttämiseksi tämän laitteen saa avata huollon
yhteydessä VAIN valtuutettu teknikko.
Kytke laite pois verkkovirrasta ja muista laitteista, jos ongelmia esiintyy. Älä altista tuotetta vedelle
tai kosteudelle.
Huolto:
Puhdista ainoastaan kuivalla kankaalla. Älä käytä liuottimia tai hioma-aineita.
Takuu:
Takuu ja vastuuvelvollisuus mitätöityy, jos tuote vaurioituu siihen tehtyjen muutoksien tai sen
väärinkäytön takia.
Yleistä:
Muutoksia malliin ja teknisiin ominaisuuksiin voidaan tehdä ilmoituksetta.
Kaikki logot, merkit ja tuotenimet ovat niiden vastaavien omistajien tuotemerkkejä tai rekisteröityjä
tuotemerkkejä ja niitä on käsiteltävä sellaisina.
Huomio:
Tuote on varustettu tällä merkillä. Se merkitsee, ettei käytettyjä sähkö- tai elektronisia
tuotteita saa hävittää kotitalousjätteen mukana. Kyseisille tuotteille on olemassa erillinen
keräysjärjestelmä.
Copyright ©
HUOMIO
SÄHKÖIS KUVAARA
ÄLÄ AVAA
8
Page 80

9
Page 81

HAV-SDC10
Bärbart Mikrosystem
(musikspelare)
Page 82

1
Förpackningen innehåller
1x HAV-SDC10 Digital Music Box
1x USB-kabel
1x USB drivrutin för Windows® 98SE
1x bruksanvisning
(strömadapter som tillval, artikelnummer P.SUP.USB400)
Beskrivning av knappar
Frontpanel
LCD-display
VOLYM_UPP
TILLBAKA/
SNABBSPOLNING
BAKÅT
INSTÄLLNING
VOLYM NER
UPPSPELNING/PAUS
NÄSTA/
SNABBSPOLNING
FRAMÅT
ALARM
Page 83

2
LCD-display
Användning med batteri
Öppna batterifacket och sätt in 4x AA-batterier (Alkaliska batterier rekommenderas) enligt diagrammet
inne i batterifacket.
4 x AA-batterier
Ström
adapter
Användning av strömadapter
Strömadaptern ansluts på i USB-uttaget. Anslut minikontakten till USB(5V)-anslutningen och
strömkontakten till ett vägguttag på 220~230V.
Obs! När strömadaptern är ansluten tänds bakgrundsbelysningen och förblir tänd tills dess att
strömadaptern kopplas ur.
Låg batterinivå
När batteriet nästan är tomt blinkar den röda lysdioden som en sista varning.
Page 84

3
Strömförsörjning från USB-porten
Systemet kan få ström från PC:ns USB-port när “mass storage” tas bort från PC:n.
Installering av SD/MMC-kort
Den inbyggda kortplatsen SD/MMC låter dig enkelt uppgradera spelarens minneskapacitet med
extra SD/MMC-kort.
Installation av SD/MMC-kort:
1. Sätt in kortet i systemets bakre ände i pilens riktning.
2. Pressa in kortet tills ett klickljud hörs.
3. Vill du ta bort SD/MMC-kortet trycker du in det så det hoppar upp.
Viktigt! Tryck in kortet i kortplatsen exakt på det sätt som visas i guren nedan. Om du gör på något
annat sätt skadas kortplatsen.
Anslutning till en dator
Installation av drivrutin för USB
Om du har Microsoft Windows ME/2000/XP eller en senare version behöver du inte installera
drivrutinen. Datorer med dessa operativsystem känner automatiskt igen systemet när USB-kontakten
ansluts.
Microsoft Windows 98 SE
För Windows 98 SE måste man installera USB-drivrutinen.
1. Navigera till MY COMPUTER (Den här datorn) och dubbelklicka på symbolen CD drive .
2. Dubbelklicka på len “iSetup98” för att starta installationsprogrammet för USB-drivenheten .
3. Följ instruktionerna på skärmen för att slutföra installationen och starta sedan om datorn.
Page 85

Anslutning av USB-kabeln till en dator
Anslut USB-kabeln till systemet och till en dator.
Vänd på apparaten och tryck på knappen “Play” s/II för att väcka systemet.
Den röda lysdioden tänds och börjar blinka.
Datorn känner igen systemet som Removable Disk (yttbar disk).
Om ett SD/MMC-kort är installerat i systemet kommer datorn känna igen systemet som Removable
Disk (yttbar disk).
Överföring av ler
USB-anslutningen gör det enkelt att överföra musikler (MP3/WMA) mellan spelaren och en dator.
Koppla inte ur eller avbryt systemet.
Överföring av ler med Microsoft Windows
1. Lokalisera de ler eller mappar du vill överföra från datorn.
2. Välj lerna eller mapparna med musen och tryck på CTRL-C (kopiera) på tangentbordet.
3. Navigera till MY COMPUTER (Den här datorn) och dubbelklicka på symbolen Removable Disk
(yttbar disk). Datorn visar nu alla ler och mappar som för nuvarande är lagrade i spelaren.
4. Tryck på CTRL-V (klistra in) på tangentbordet för att överföra de ler du har valt till spelaren.
Obs! Det går även att använda musen för att dra och släppa ler mellan spelaren och datorn.
4
Page 86

Koppla bort och få USB-ström från PC
Microsoft Windows
1. Dubbelklicka på den gröna pilsymbolen i verktygsfältet (Safely Remove Hardware).
2. Välj “USB Mass Storage Device” från listan som nu visas och tryck sedan på “Stop”.
3. Välj “USB Mass Storage Device” från listan som nu visas och tryck sedan på “OK”.
4. Systemet får nu sin ström direkt från PC:ns USB och spelar automatiskt upp musiken.
Grundfunktioner
Standbyläge
Spelarens system går automatiskt in i standbyläge när det ansluts till en strömkälla. Displayen visar
tiden.
Ström till/från
Sätt på spelaren och spela musik genom att trycka på knappen s/II i standbyläge. När väl musiken
spelas tänds den blå lysdioden och börjar blinka. Om det inte nns någon musik i minnet kommer
systemet automatiskt att återgå till standbyläge.
Stäng av spelaren genom att trycka ner och hålla kvar knappen s/II (den röda och den blå lysdioden
blinkar).
Beskrivning av knappar
Tryck på Is s/s sI för snabbspolning framåt/bakåt/nästa spår/föregående spår
Tryck på +/- för justering av volym upp/ner
Tryck på play/pause s/II för att spela upp och stoppa musiken.
Tryck på S och A för att justera klocka och alarm.
5
Page 87

Inställning av klocka och alarm
Alarm (4 steg)
1. Aktivera alarm
Tryck på knapp S
-------
s
Tryck på knapp A (2 gånger)
(Alla siffror blinkar) (Alarmsymbolen MP3 visas)
2. Ställ in timme för alarm
Tryck på knapp S
-------
s
Tryck på knapp A
(Timsiffrorna blinkar) (Ställ in timme)
3. Ställ in minut för alarm
Tryck på knapp S -------
s
Tryck på knapp A
(Minutsiffrorna blinkar) (Ställ in minut)
Alarmtiden är 8:01am och alarmsignalen är mp3-musik. Låten som alarmet spelar är den senaste
låten du lyssnade på.
4. Tryck på knapp S (Slutför alarminställning)
Klocka (8 steg)
* Tryck inte på A-knappen!
1. Tryck på knapp S -------s * Se tid, och inställning för alarm
2. Tryck på knapp S -------
s
* Se tid, och timme för alarm blinkar
3. Tryck på knapp S -------
s
* Se tid, och minut för alarm blinkar
6
Page 88

4. Ställ in klockans månad
Tryck på knapp S -------
s
Tryck på knapp A -------s
Ställ in månad på januari
5. Ställ in klockans datum
Tryck på knapp S -------
s
Tryck på knapp A -------s
Ställ in datumet på den tolfte
6. Ställ in klockans timmar
Tryck på knapp S -------
s
Tryck på knapp A -------s
Ställ in timmarna på tolv PM (eftermiddag)
Obs! För 24-timmarsvisning behöver du hålla knapp A nertryckt ett varv tills
7. Ställ in klockans minuter
Tryck på knapp S -------
s
Tryck på knapp A -------s
Ställ in minuterna på noll
Nu är klockan ställd på tolv PM.
8. Tryck på knapp S (Slutför klockinställning)
7
Page 89

Specikationer:
Strömförsörjning: Adapter: 100-240V
Likström: 5V (Batteri: 4 x AA, Alkaline )
Gränssnittsport: USB 2.0
Stödjer ljudformat MP3: 96-320kbps, Variable Bit Rate
Format: WMA: 32-192kbps
Högtalareffekt: 2W
Signalbrusförhållande: ≥ 90dB
Frekvensåtergivning: 20-20,000Hz
PC Format: FAT16
Säkerhetsanvisningar:
För att minska risken för elstötar får denna produkt endast
öppnas av behörig tekniker när service behövs.
Koppla bort produkten från nätuttaget och från annan utrustning om problem uppstår. Utsätt inte
produkten för vatten eller fukt.
Underhåll:
Rengör endast med torr trasa. Använd inga rengöringsmedel eller frätande medel.
Garanti:
Ingen garanti gäller vid några ändringar eller modieringar av produkten eller för skador som har
uppstått på grund av felaktig användning av denna produkt.
Allmänt:
Utseende och specikationer kan komma att ändras utan föregående meddelande.
Alla logotyper och produktnamn är varumärken eller registrerade varumärken som tillhör sina ägare
och är härmed erkända som sådana.
Obs!
Denna produkt är märkt med denna symbol. Det innebär att använda elektriska eller
elektroniska produkter inte får slängas bland vanliga hushållssopor. Det nns särskilda
återvinningssystem för dessa produkter.
Copyright ©
Obs!
RISK FÖR E LSTÖT
ÖPPNA IN TE
8
Page 90

9
Page 91

HAV-SDC10
Přenosný
Mikro systém
Page 92

1
Balení obsahuje
1x HAV-SDC10 Digital Music Box
1x kabel USB
1x CD disk s USB ovladači pro operační systémy Windows® 98SE
1x Návod k obsluze
(Napájecí adaptér - volitelné příslušenství. Objednací číslo P.SUP.USB400)
Rozmístění ovládacích prvků
PŘEDNÍ STRANA
LCD displej
ZVÝŠENÍ
HLASITOSTI
RYCHLÉ
PŘEHRÁVÁNÍ
ZPĚT NEBO SKOK
NA PŘEDCHOZÍ
SKLADBU
TLAČÍTKO NASTAVENÍ
SNÍŽENÍ HLASITOSTI
TLAČÍTKO PŘEHRÁVÁNÍ PLAY/PAUSE
RYCHLÉ PŘEHRÁVÁNÍ
DOPŘEDU NEBO SKOK
NA NÁSLEDUJÍCÍ
SKLADBU
TLAČÍTKO BUDÍKU/
ALARMU
Page 93

2
LCD displej
Instalace baterie
Otevřete prostor pro baterie a vložte čtyři baterie typu AA (doporučujeme alkalické baterie). Postupujte
podle obrázku.
4 baterie AA
POWER (Napájení)
Napájecí adaptér
Použití s napájecím adaptérem
Zapojení adaptéru je shodné se zapojením USB kabelu. Zapojte napájecí mini konektor (5 V) do
přehrávače a zapojte adaptér do síťové zásuvky 220~230 V.
Poznámka: Po zapojení napájecího adaptéru do síťové zásuvky se LCD displej rozsvítí a zůstane
rozsvícen dokud adaptér neodpojíte.
Indikace nízké kapacity baterií
Pokud jsou baterie téměř vybité, červená LED dioda začne blikat.
Page 94

3
Přístroj lze napájet z klasického USB portu
Zapojte přístroj do volného portu USB na vašem počítači. Pokud jste bezpečně odpojili přehrávač
od počítače způsobem popsaným výše, ale USB kabel je stále zapojen do počítače, je přehrávač
napájen z USB portu počítače.
Instalace karty SD/MMC
Integrovaný slot SD/MMC vám umožňuje rozšířit kapacitu paměti přehrávače. Použijte paměťovou
kartu SD nebo MMC.
Instalace karty SD nebo MMC:
1. Zasuňte paměťovou kartu do slotu na zadní straně přehrávače. Viz šipka.
2. Zasuňte a zatlačte na kartu dokud neuslyšíte „kliknutí".
3. Pokud chcete kartu vyjmout, stiskněte kartu ještě jednou a karta povyskočí ven.
Důležité upozornění: Ujistěte se, že vkládáte kartu správnou stranou a směrem. Viz obr. níže.
Násilné vložení karty nesprávnou stranou může poškodit slot.
Zapojení přístroje do počítače
Instalace ovladačů USB
USB ovladače není nutné instalovat, pokud používáte operační systém Microsoft Windows ME/2000/
XP nebo novější verzi. Počítače, které používají tyto operační systémy automaticky rozpoznají
přehrávač ihned po zapojení USB kabele do USB portu.
Operační systém Windows 98SE
Pokud používáte operační systém Windows 98 SE, musíte nainstalovat USB ovladače.
1. Klepněte na ikonu TENTO POČÍTAČ. Po otevření okna dvakrát klepněte na ikonu disku CD.
2. Dvakrát klepněte na soubor „iSetup98” a spusťte instalační program.
3. Řiďte se pokyny na displeji/obrazovce. Po dokončení instalace restartujte počítač.
Page 95

Zapojení USB kabelu do počítače
Zapojte USB kabel do počítače a potom do vašeho přístroje.
Zapněte přístroj stisknutím tlačítka „Play” s/II (Přehrát).
Červená LED dioda začne blikat.
Počítač rozpozná přístroj jako nové úložné zařízení USB.
Pokud je v přístroji instalovaná karta SD nebo MMC. Počítač rozpozná přístroj jako nový externí
disk.
Transferování a sdílení souborů.
Sdílení hudebních souborů (MP3/WMA) mezi počítačem a přístrojem je díky technologii USB velice
jednoduché. Během přenosu neodpojujte kabel a neprovádějte žádné nastavení.
Transferování souborů - operační systém Microsoft Windows
1. Vyhledejte soubory nebo složky, které si přejete přenést od počítače.
2. Označte soubor nebo složku myší a stiskněte tlačítka CTRL-C na klávesnici počítače.
3. Klepněte na ikonu TENTO POČÍTAČ. Po otevření okna dvakrát klepněte na ikonu externího
disku. Počítač zobrazí všechny složky / soubory, které jsou nahrány v přehrávači.
4. Stiskněte tlačítka CTRL-V (vložit) na klávesnici počítače a označené soubory se přenesou do
počítače.
Poznámka: K přenosu souborů lze také použít myš a funkci drag-and-drop. Tato funkce vám
umožňuje „přetáhnout" zvolené soubory do počítače nebo do přístroje.
4
Page 96

Odpojení od počítače. Napájení přístroje z USB portu vašeho počítače.
Operační systém Microsoft Windows
1. Dvakrát klepněte na ikonu zelené šipky na liště pracovní plochy. Šipka umožňuje bezpečné
odpojení připojeného USB zařízení.
2. Označte „Externí úložné zařízení USB" a klepněte na „Stop”.
3. Po otevření okénka potvrďte odpojení USB zařízení klepnutím na tlačítko „OK".
4. Počítač začne napájet přístroj přes USB port a přístroj začne přehrávat hudební soubor.
Základní funkce
Standby (Vyčkávací režim)
Přístroj automaticky přepne do režimu standby, je-li zapojen ke zdroji napájení. Na LCD displeji se
zobrazí správný čas.
Zapnutí/vypnutí
Pokud chcete přístroj zapnout s a spustit přehrávání, stiskněte tlačítko /II v režimu standby. Po
spuštění přehrávání začne blikat modrá LED dioda. Pokud jsou hudební soubory přehrány a není
více souborů v paměti, přehrávač se automaticky přepne do režimu standby.
Pokud chcete přístroj vypnout, stiskněte a podržte tlačítko s/II key. Červená a modrá LED začnou
blikat. (Platí pro režim standby).
Popis tlačítek
Stiskněte tlačítka Is s/s sI pokud chcete rychle přehrát soubor dopředu nebo dozadu nebo
pokud chcete přeskočit na následující/předchozí soubor.
Stiskněte tlačítko +/- pokud chcete zvýšit/snížit úroveň hlasitosti.
Stiskněte tlačítko play/pause s/II pokud chcete přehrát soubor nebo přehrávání pozastavit
(pauza).
Stiskněte tlačítka S nebo A pokud chcete nastavit budík (alarm) hodin.
5
Page 97

Nastavení budíku a času hodin
Nastavení budíku - 4 kroky
1. Aktivujte budík/alarm
Stiskněte tlačítko S
-------
s
Dvakrát stiskněte tlačítko A
(Všechna čísla začnou blikat) (Na displeji se zobrazí ikona alarmu MP3)
2. Nastavte hodinu vyzvánění budíku/alarmu
Stiskněte tlačítko S
-------
s
Stiskněte tlačítko A
(Číslice nastavení hodiny začne blikat) (Zadejte hodinu)
3. Nastavte minutu vyzvánění budíku/alarmu
Stiskněte tlačítko S -------
s
Stiskněte tlačítko A
(Číslice nastavení minut začne blikat) (Zadejte minuty)
Čas vyzvánění je nastaven na 8 : 01 ráno a během vyzvánění je přehrávána hudba MP3. Po spuštění
alarmu je přehrávána skladba, kterou jste poslouchali naposled.
4. Stiskněte tlačítko S (Ukončení nastavení budíku/alarmu)
Nastavení správného času - 8 kroků
* Tlačítko A nestis
kejte
1. Stiskněte tlačítko S -----
s
* Zobrazí se nastavený čas budíku a nastavení budíku
2. Stiskněte tlačítko S -------
s
* Zobrazí se čas budíku/alarmu a číslice nastavení hodin bliká.
3. Stiskněte tlačítko S -------
s
* Zobrazí se čas budíku/alarmu a číslice nastavení minut bliká.
6
Page 98

4. Nastavení datumu - měsíc
Stiskněte tlačítko S -------
s
Stiskněte tlačítko A -------
s
Nastavte měsíc na leden
5. Nastavení datumu
Stiskněte tlačítko S -------
s
Stiskněte tlačítko A -------
s
Nastavte hodnotu na 12
6. Nastavení času hodin
Stiskněte tlačítko S -------
s
Stiskněte tlačítko A -------
s
Nastavte hodiny na 12 hodin večer
Poznámka: Pokud chcete aby se čas zobrazoval ve 24 hodinovém formátu, stiskněte opakovaně
tlačítko A,
7. Nastavení minut
Stiskněte tlačítko S -------
s
Stiskněte tlačítko A -------
s
Nastavte minuty na nulu
Nyní je čas nastaven na 12 hodin večer.
8. Stiskněte tlačítko S (Ukončení nastavení hodin)
7
Page 99

Technické údaje:
Napájení: Adaptér: 100-240 V
DC - bateriemi: 5 V (Baterie: 4 x AA, Alkaline)
Rozhraní: USB 2.0
Podporované audio soubory MP3: 96-320kbps, Proměnný datový tok
Formáty: WMA: 32-192kbps
Výkon reproduktoru: 2W
Odstup signálu: ≥ 90dB
Frekvence: 20-20,000Hz
Formát PC: FAT16
Bezpečnostní opatření:
Abyste zabránili riziku poranění elektrickým proudem, svěřte
opravu zařízení POUZE kvalikovanému servisnímu techniku/
středisku.
Před prováděním opravy, vždy odpojte zařízení od přívodu elektrické energie a od dalších zařízení,
které mohou být s vaším zařízením propojeny. Nevystavujte vypínač nadměrné vlhkosti nebo vodě.
Údržba:
K čištění používejte pouze suchý hadřík. Nepoužívejte rozpouštědla ani abrazivní materiály.
Záruka:
Jakékoli změny, modikace nebo poškození zařízení v důsledku nesprávného zacházení se zařízením,
ruší platnost záruční smlouvy.
Obecné upozornění:
Design, provedení a parametry výrobku se mohou měnit, bez předchozího upozornění uživatele
výrobcem.
Všechna loga a obchodní značky jsou registrované značky příslušných vlastníků a jsou chráněny
příslušnými zákony.
Upozornění:
Tento výrobek je označen následujícím symbolem. To znamená, že s výrobkem je
nutné zacházet jako s nebezpečným elektrickým a elektronickým odpadem a nelze
jej po skončení životnosti vhazovat do běžného domácího odpadu. Výrobek je nutné
odevzdat sběrným surovinám nebo recyklačnímu středisku, zabývající se zpracováním
nebezpečných odpadů.
Copyright © (Autorská práva)
UPOZORNĚNÍ
NEBEZ PEČÍ ÚRAZU ELEK TRICKÝM
PROUDE M - NEOTEVÍRAT
8
Page 100

9
 Loading...