

Page 1
HAV-IR20/21/22/23
MANUAL (p. 2)
Internet radio
MODE D’EMPLOI (p. 26)
Radio Internet
MANUALE (p. 50)
Internet radio
BRUKSANVISNING (s. 100)
Internetradio
MANUAL DE UTILIZARE (p. 124)
Radio prin internet
HASZNÁLATI ÚTMUTATÓ (o. 75.)
Internetrádió
KÄYTTÖOHJE (s. 88)
Internetradio
GEBRUIKSAANWIJZING (p. 38)
Internet Radio
ANLEITUNG (s. 14)
Internetradio
MANUAL DE USO (p. 62)
Radio Internet
NÁVOD K POUŽITÍ (s. 112)
Internetové rádio
ΕΓΧΕΙΡΙΔΙΟ XPHΣHΣ (σελ. 136)
Ραδιόφωνο Ίντερνετ
Page 2
2
ENGLISH
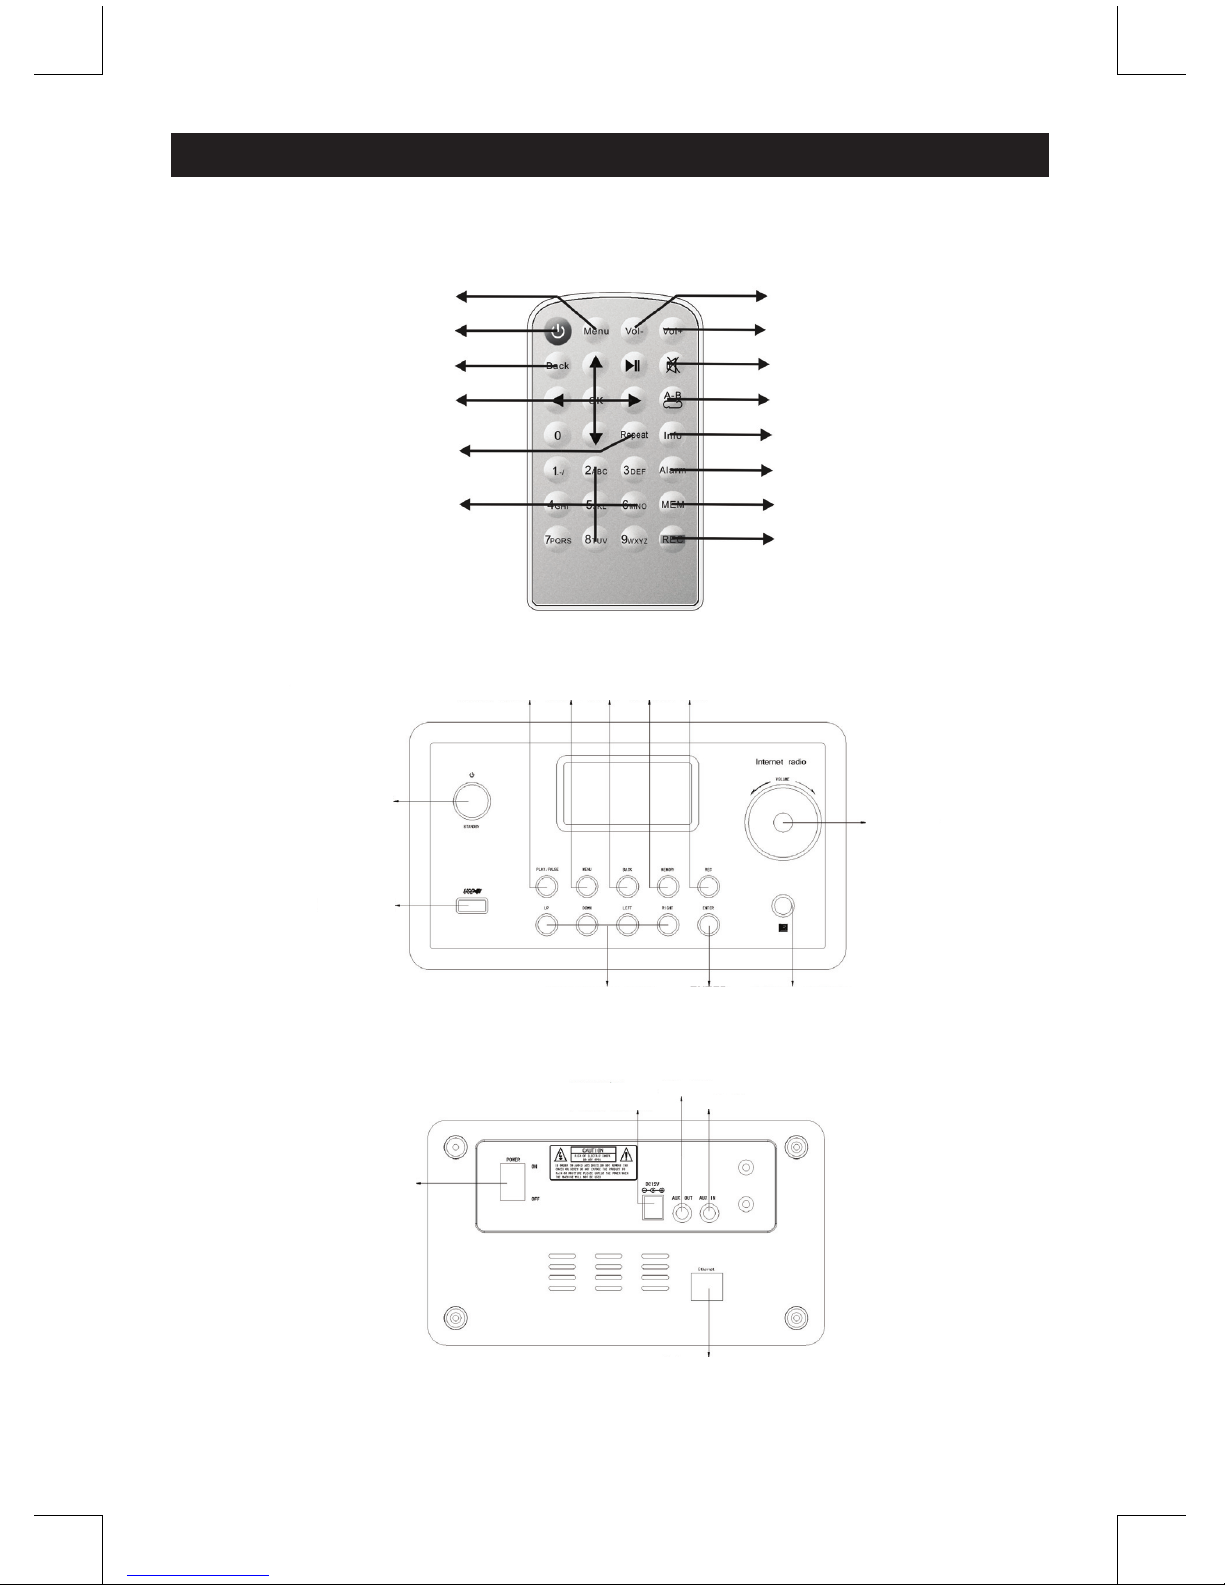
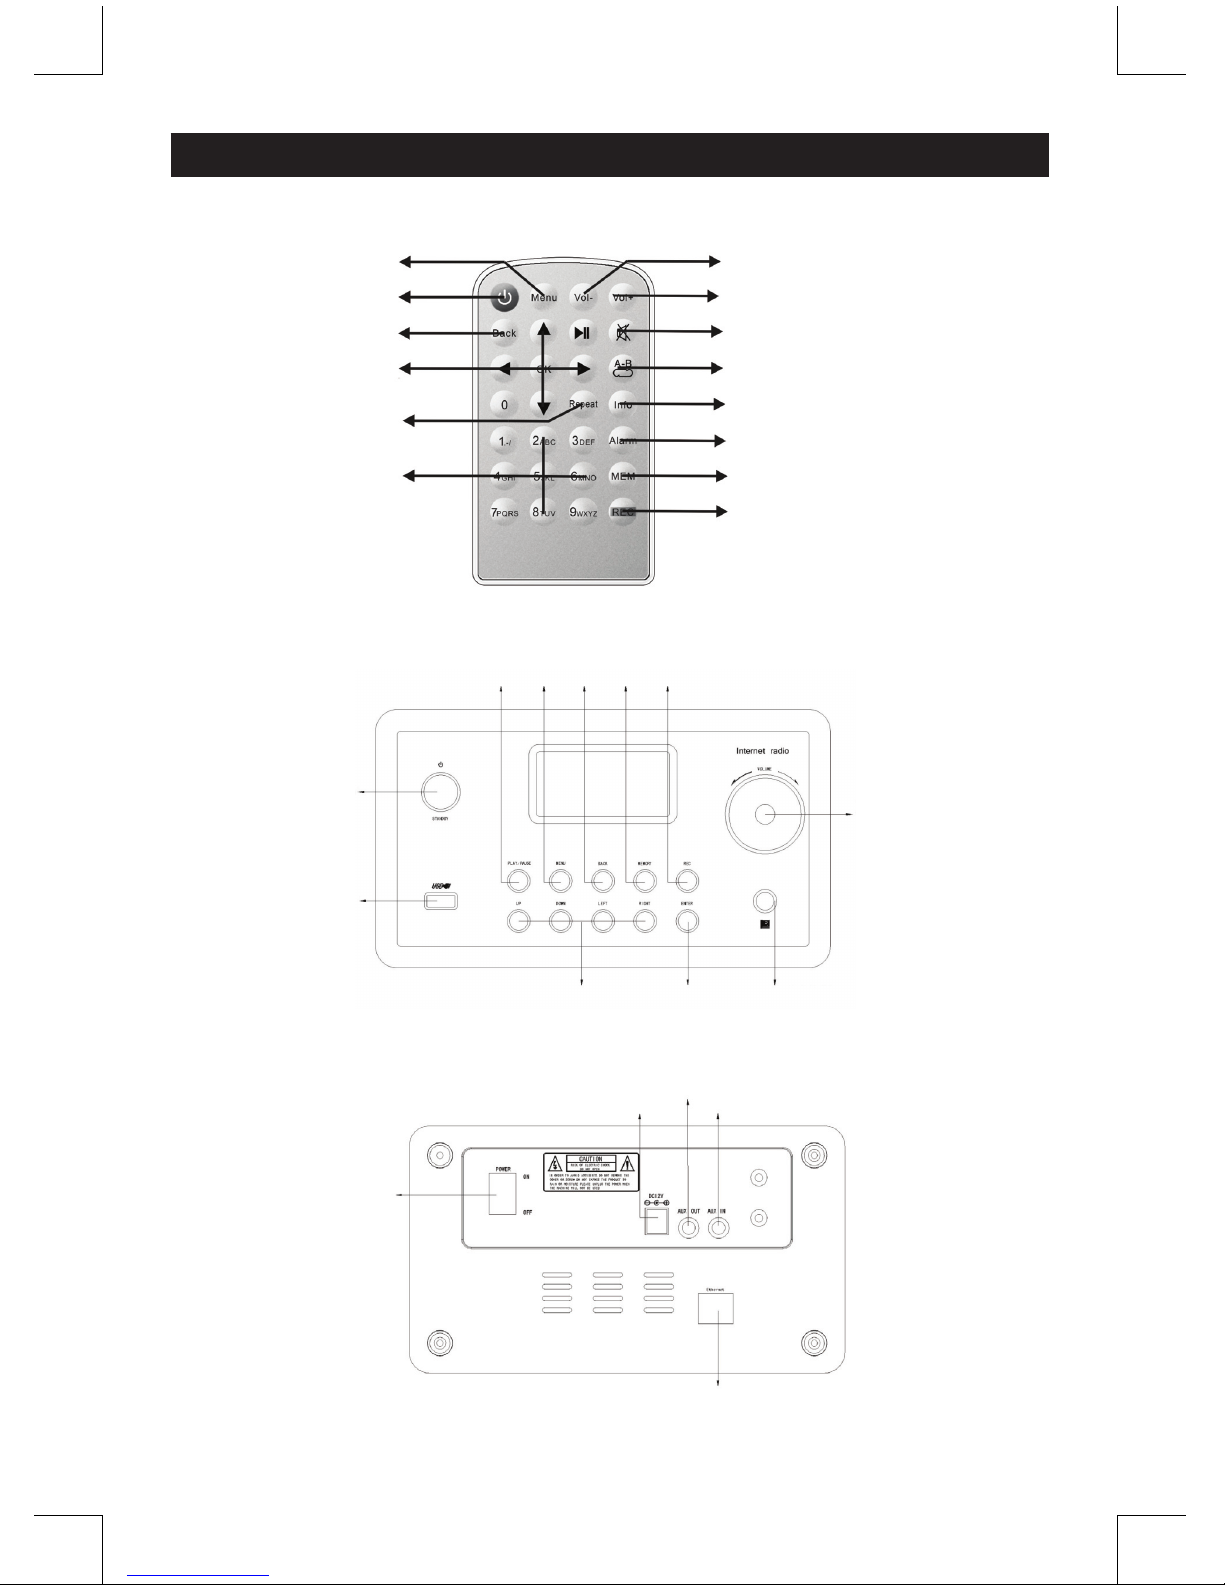
Remote control
MENU
BACK
REPEAT
DIRECTION KEYS
(UP/DOWN/LEFT/RIGHT)
STAND BY
NUMERIC KEYS
VOLUME “+”
VOLUME “-”
MUTE/SNOOZE
A-B LOOP
INFO
ALARM
MEMORY
RECORD
Front view
PLAY/PAUSE
STANDBY
USB SOCKET
DIRECTION KEYS
ENTER
REMOTE SENSOR
VOLUME +/-
MENU
BACK
MEMORY
REC
Rear view
POWER ON/OFF
Ethernet port
AUX IN
AUX OUTDC12V/2A
POWER SUPPLY
Page 3

3
Page 4

4
Chapter 1 Overview
1.1 Introduction
Internet Radio is a radio system integrated digital audio playback that functions with network
connectivity. The system can play MP3/WMA audio les, USB devices and internet radio services such
as World Station and SHOUTCast which provide above 15,000 internet radio stations. Internet Radio
also supports audio streaming via UPnP Media Server.
1.2 Audio Sources
• Support MP3/ Windows Media® audio les (known as WMA)(Included ID3V1 ,2)
• Support static lyrics and synced lyrics (.txt /.lrc /.smi)
• Support USB Flash drive
• SHOUTCast Internet Radio (http://www.shoutcast.com)
• Support Podcast
• Support AUX
1.3 Storage
• Support standard USB Mass Storage device (FAT16/32).
1.4 Recording
• Be able to record audio data from internet radio stations (World Station / SHOUTCast) and transfer
audio data into 128K MP3 format.
1.5 Networking
• Support Ethernet 10/100 Mbps
• Support Wireless LAN IEEE 802.11 b/g dongle
• Support Infrastructure / Ad-hoc
• Support WEP64/128 and WPA-TKIP-PSK, WPA2-AES-PSK encryption
• Support Proxy Setting
• The system provides a wireless setting wizard to make wireless network setup easier.
1.6 Others
• Support two alarm clock settings
• Support time sync technology (* network available)
• Support rmware upgrade
Chapter 2 Installation
2.1 Installation
NOTE: The proper voltage for Internet Radio is AC 110V~240V/50-60Hz. Be sure to the voltage in
your area before plugging in the unit.
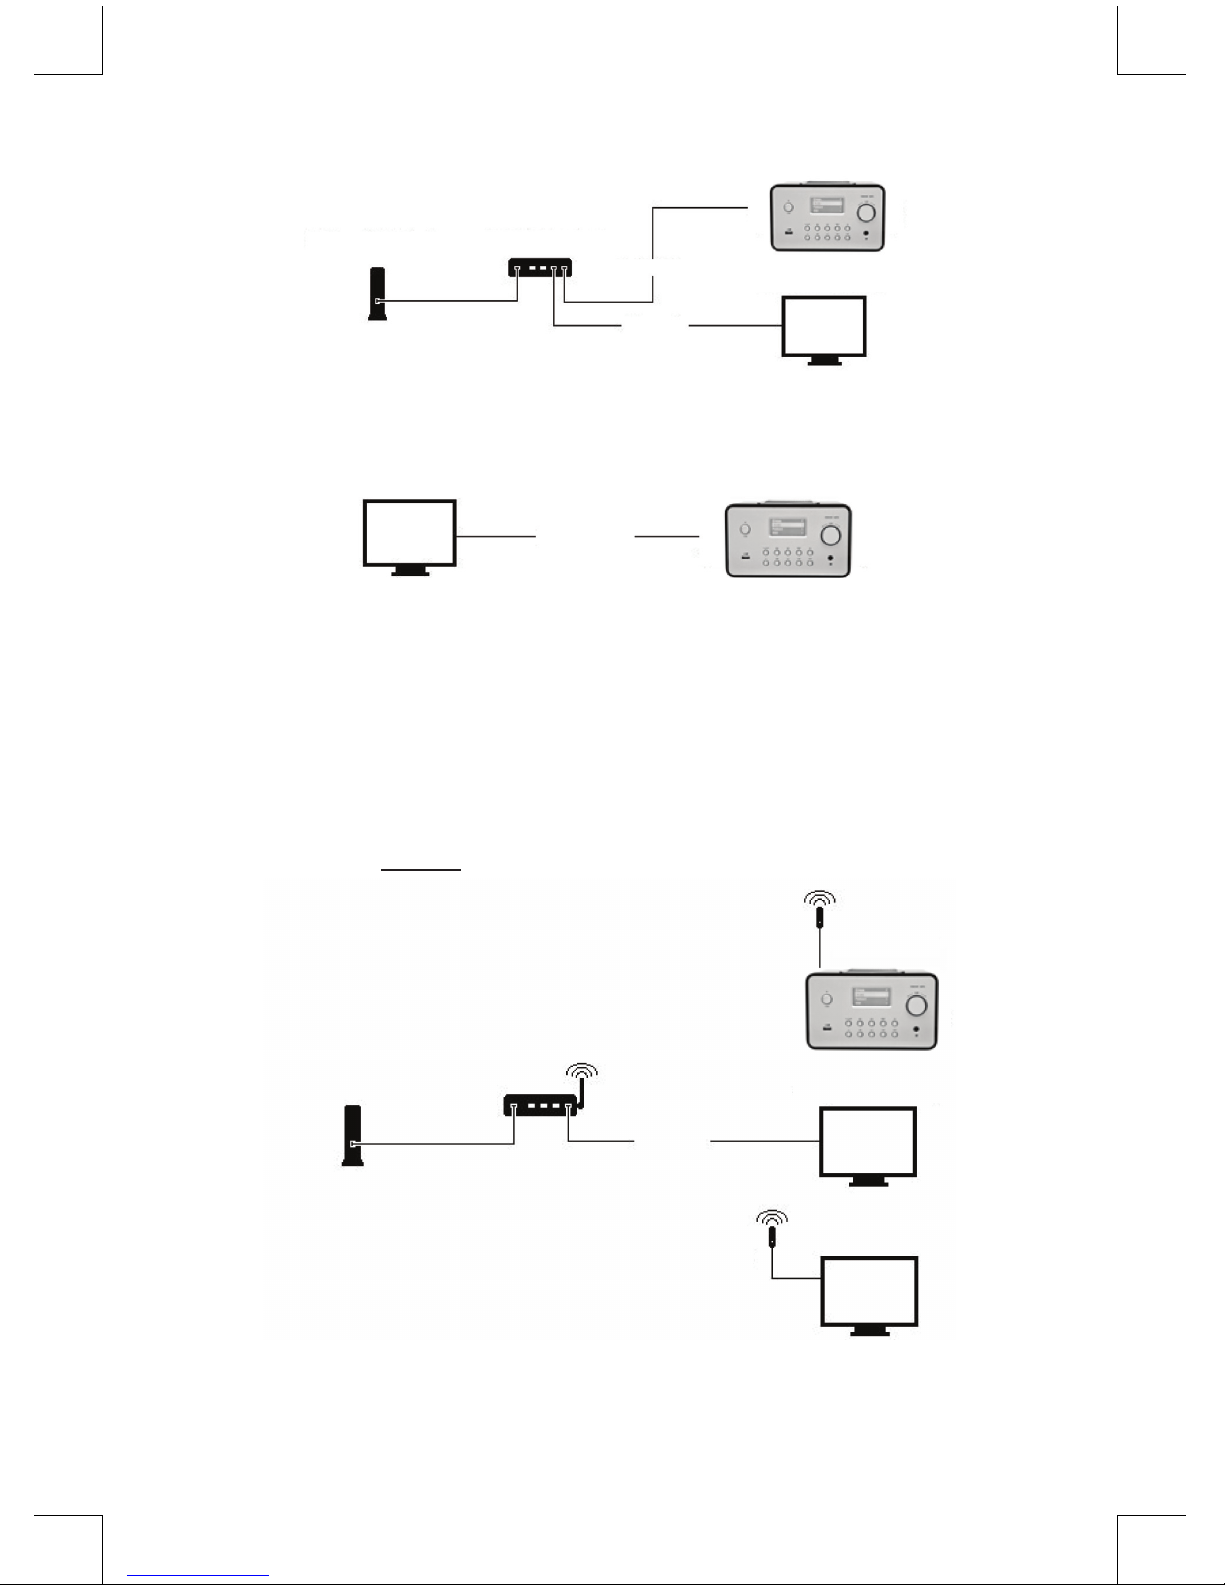
2.1.1 Installing onto network (LAN)
• Make sure the internet environment is ready and the network setting is available (ADSL or Cable
Modems is highly recommended).
• The default setting of network in your Internet Radio is DHCP. (more network setting please check
11.6 Network)
Page 5
5
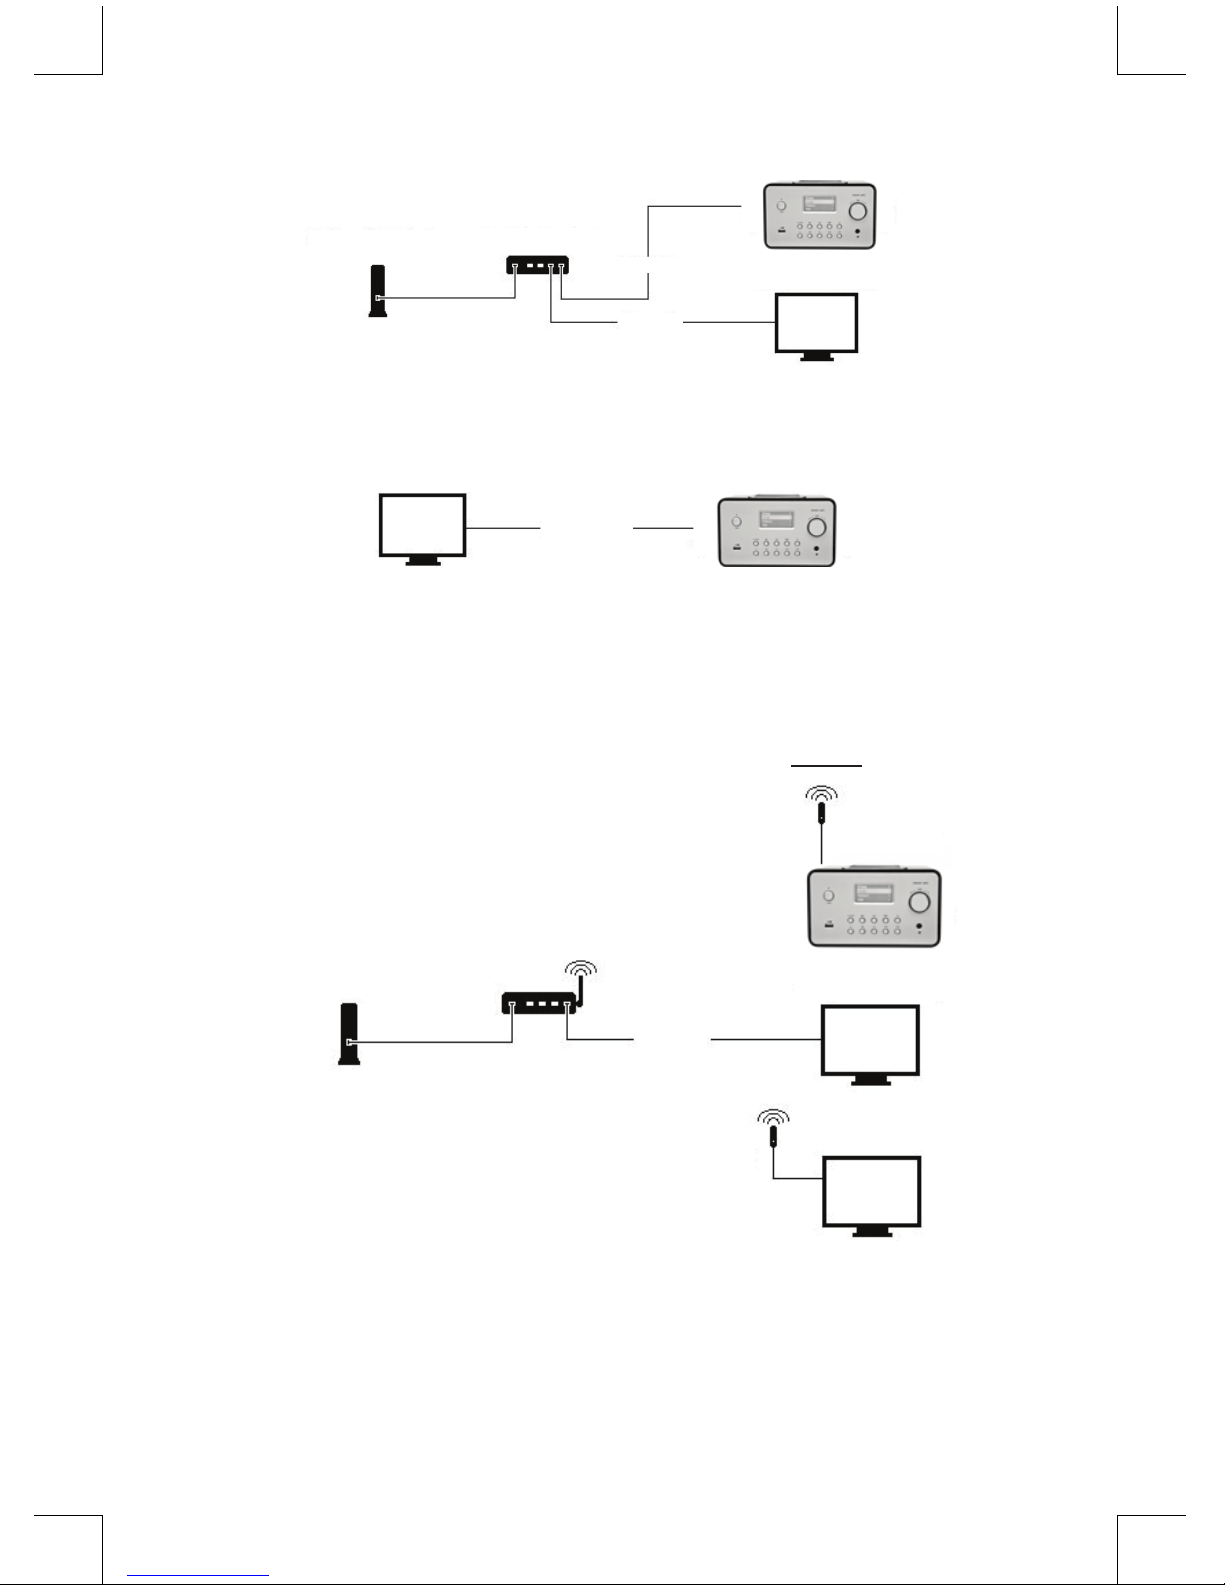
ADSL or Cable Modem
Broadband Router
Ethernet
Ethernet
PC (Media Server)
Internet Radio
- Connect the device to an Internet connected router according to the picture. Use a standard network
cable.
PC (Media Server)
Cross-Over
Internet Radio
- Connect the device to a PC according to the picture if it is only going to be used for listening to
music that is stored in the computer. Use a crossed network cable.
- When the device is connected like this you can only listen to music which is stored in the
computer. The computer must have special software installed. See section Media Server.
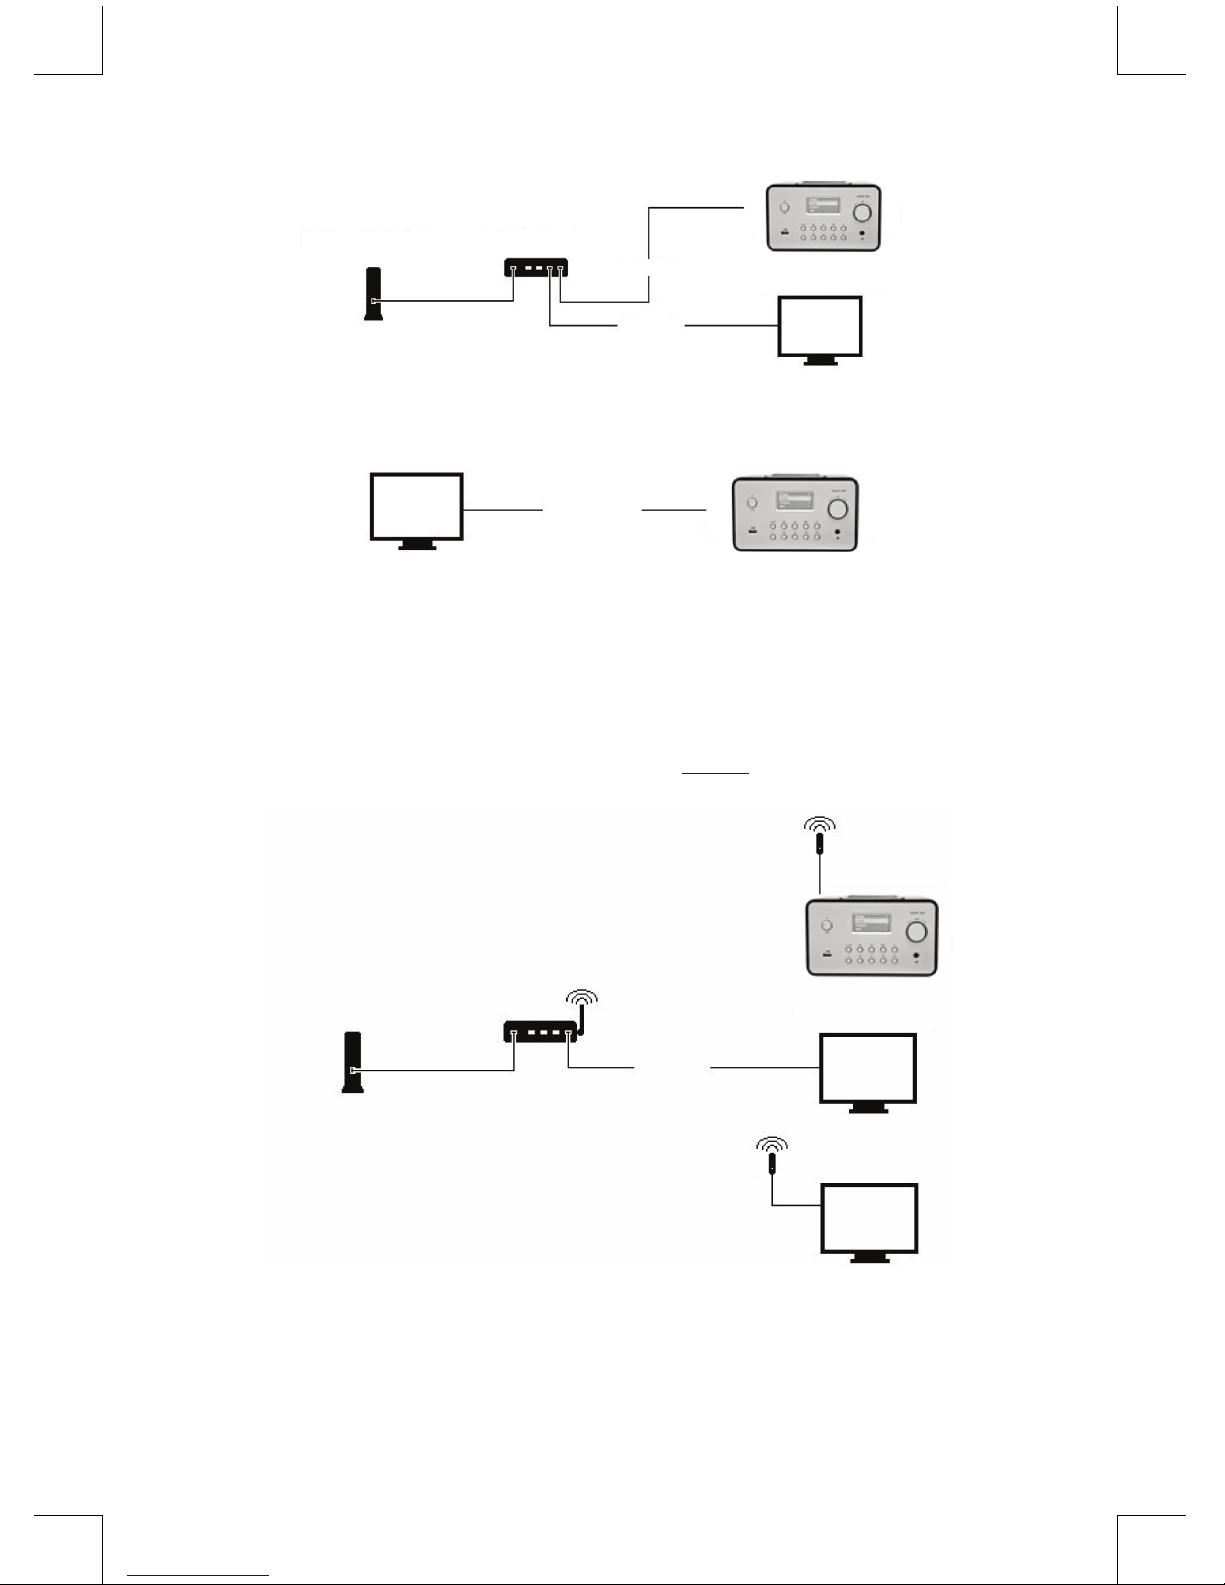
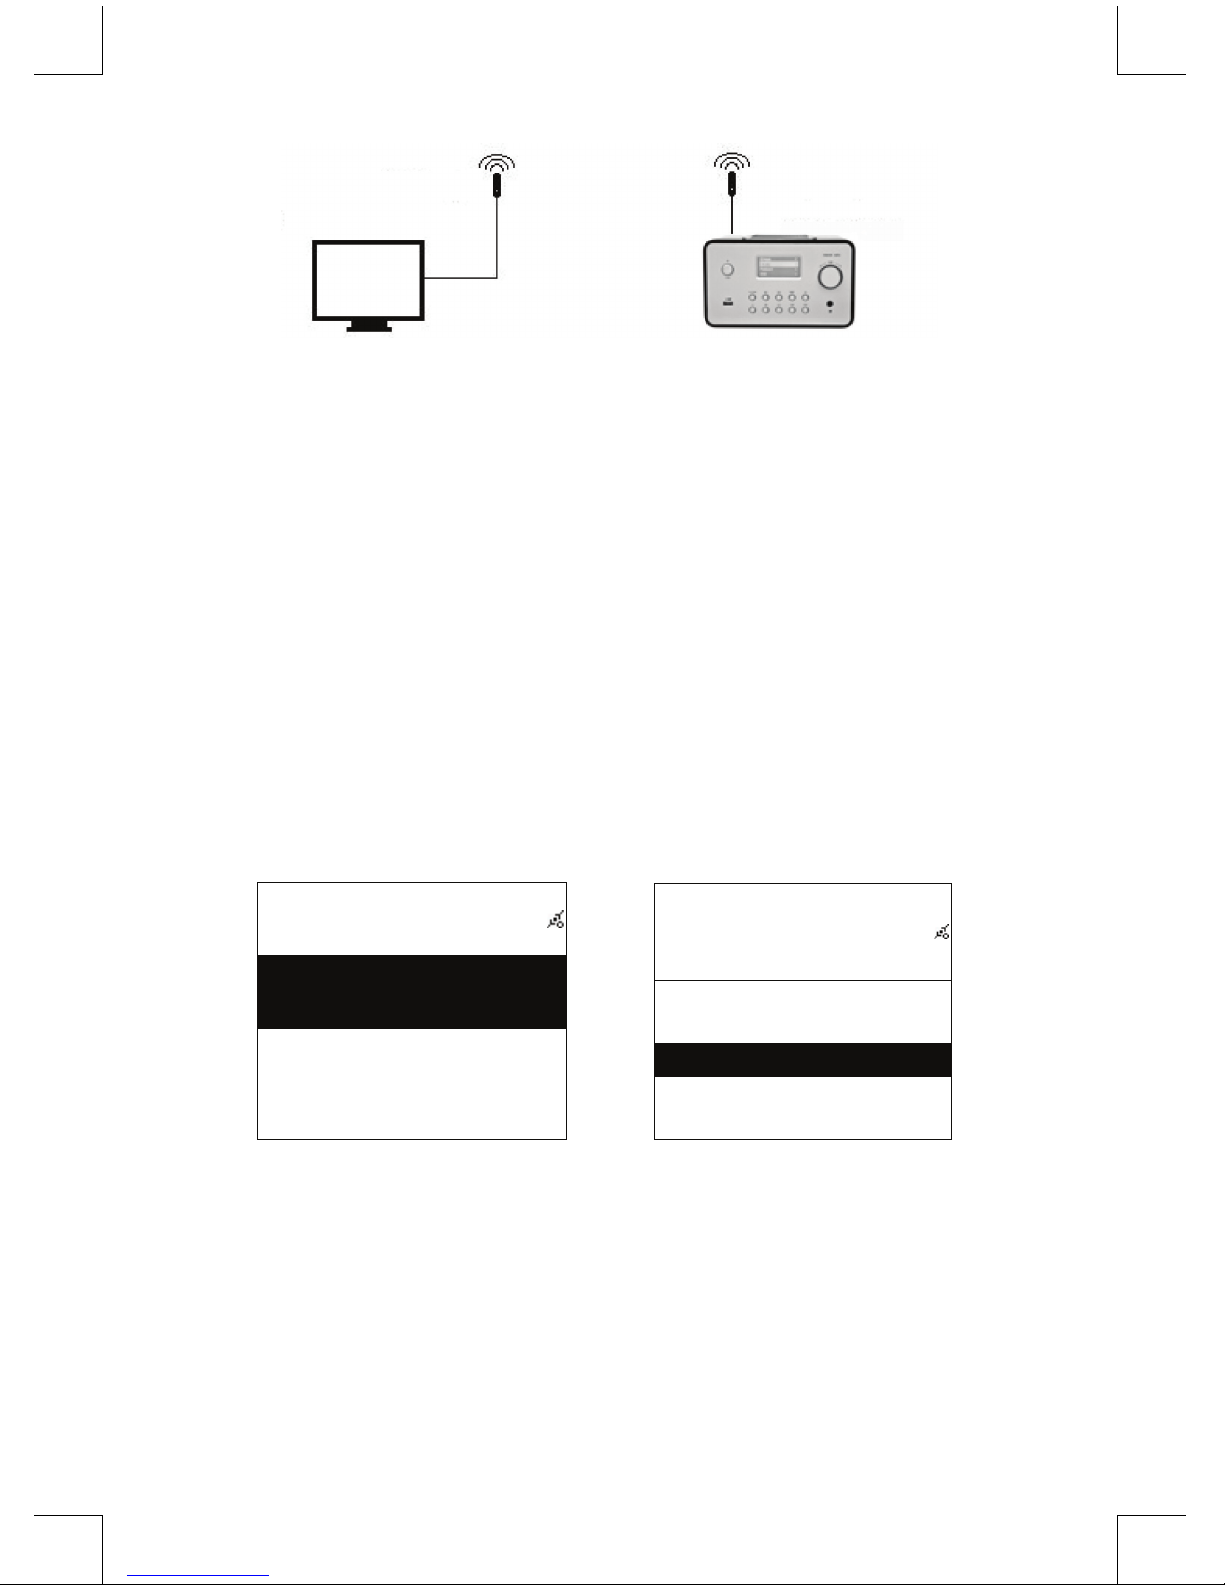
2.1.2 Installation of a wireless network (WLAN)
• Make sure the internet environment is ready and the network setting is available.
• Plug-in Wi Dongle into Internet Radio (More setting please see 11.6 Network)
Wifi Dongle
Wifi Dongle
Internet Radio
PC (Media Server)
PC (Media Server)
Ethernet
ADSL or Cable Modem
802.11 b/g Wireless
broadband Router
- Connect the wireless network dongle to the socket.
Page 6

6
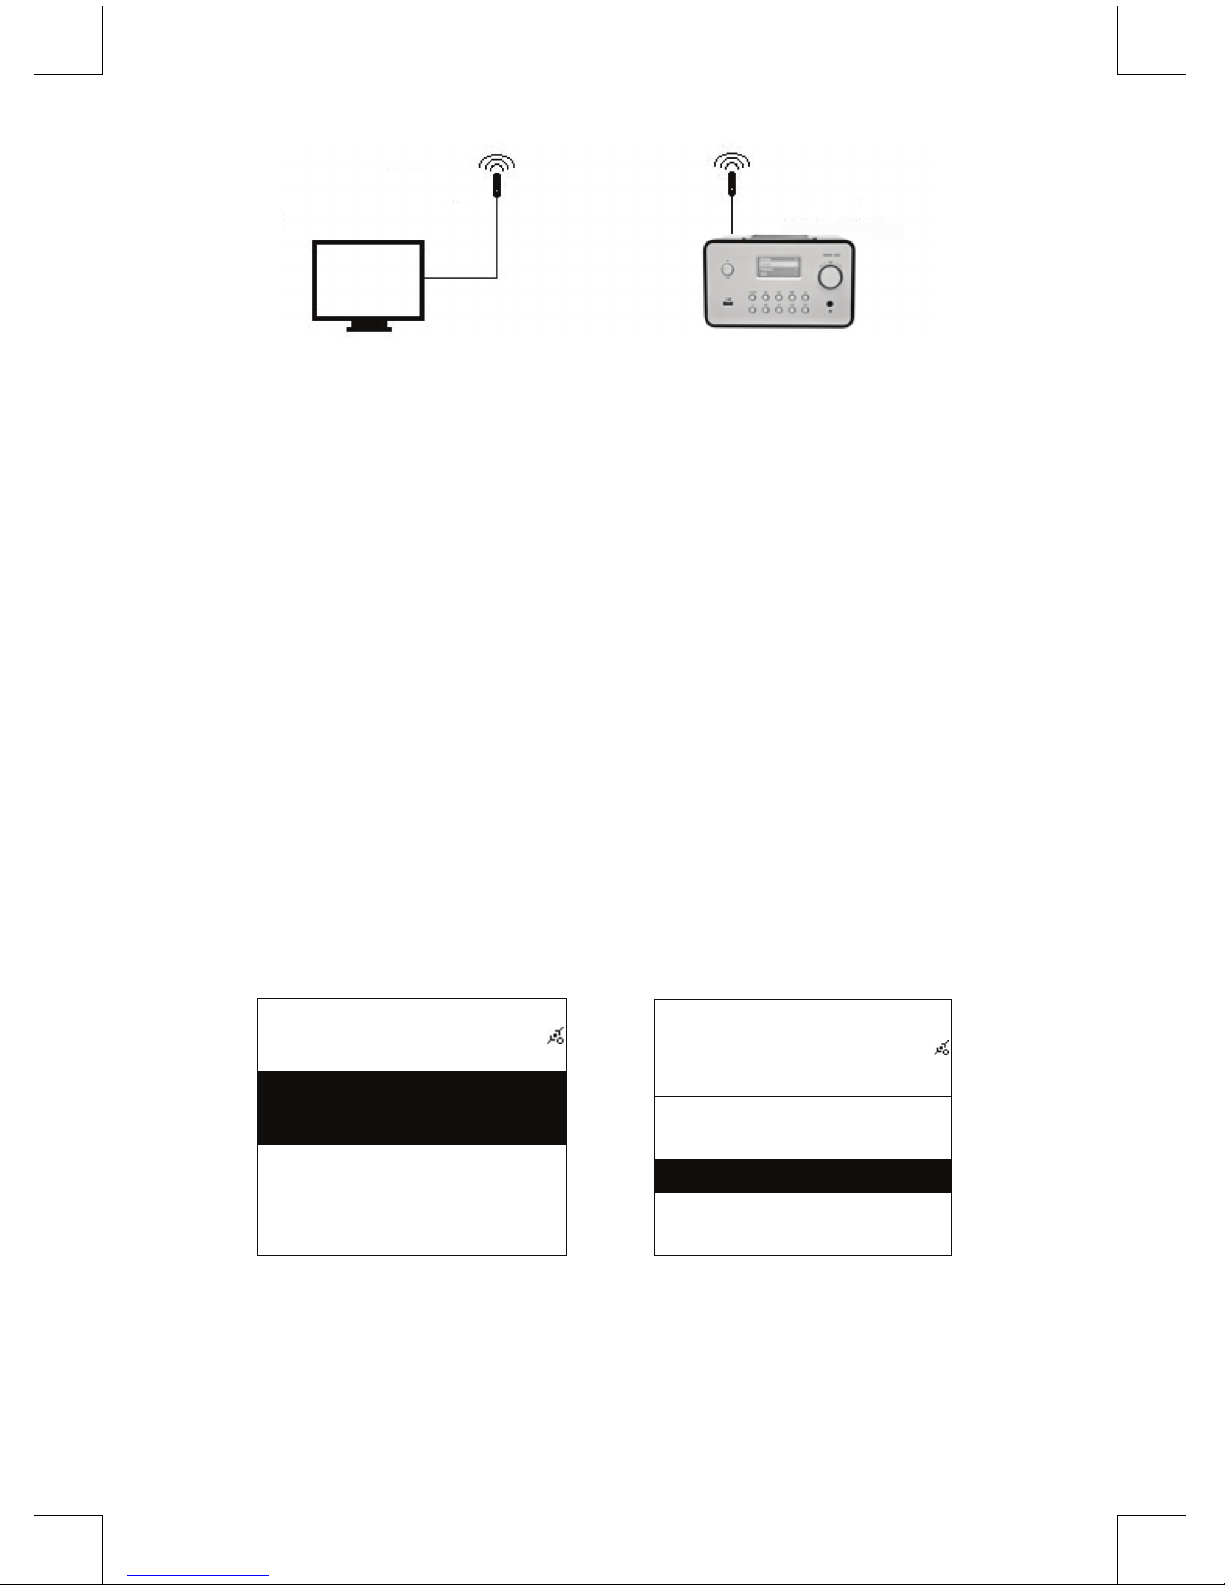
PC (Media Server)
Wifi Dongle
Wifi Dongle
Internet Radio
- You can connect the device wireless to a computer with a wireless network card.
- When the device is connected like this you can only listen to music which is stored in the
computer. The computer must have special software installed. See section Media Server.
2.2 Starting The Equipment for The First Time
When you turn on the equipment for the rst time the stereo will try to automatically search for an IP
address. If the network is connected to the Internet, the equipment will also synchronize the time with
the time server and then goes to standby mode. Usually it will take 6-30 seconds to nish the whole
process.
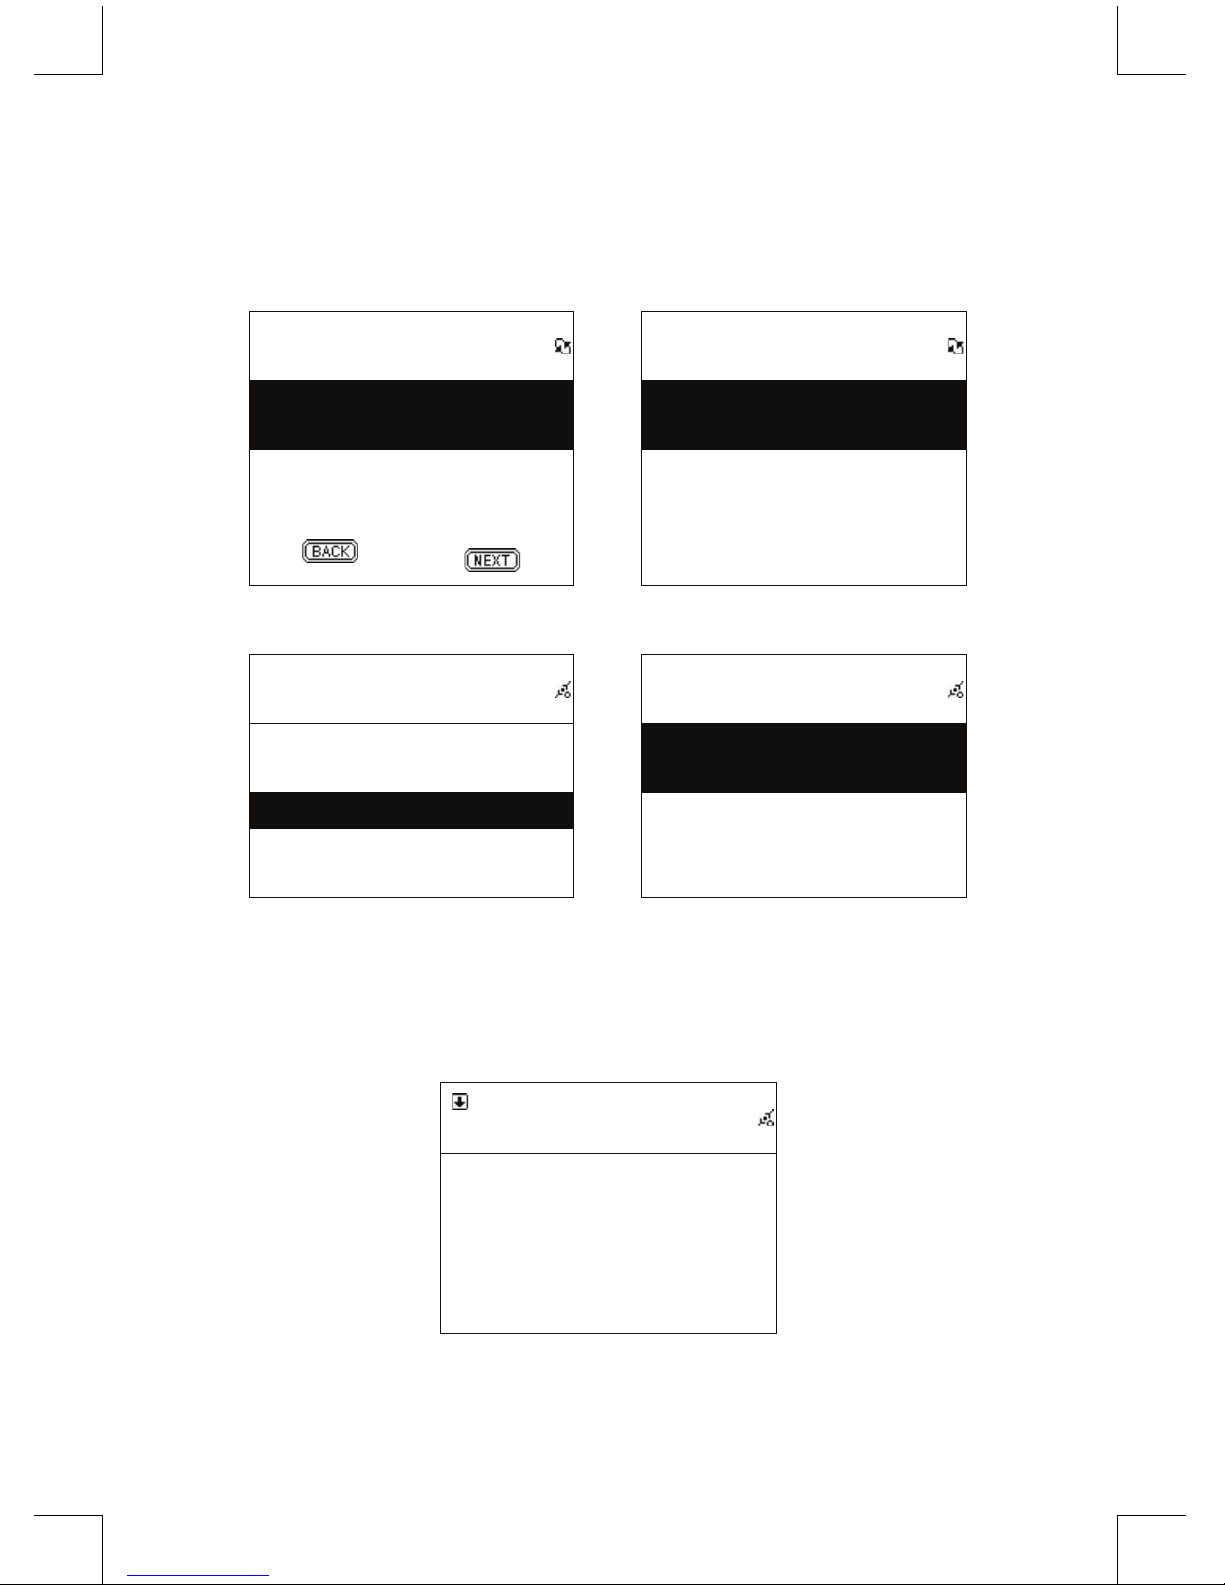
2.3 World Station
2.3.1 Listen to World Station
• Go to [Main] menu, choose [i.Radio] and press ENTER/OK button.
• Choose [World Station] and then press ENTER/OK button.
• Scroll up/down to a station and then press ENTER/OK button to play.
• You will hear music after buffering reaches to 100%.
Note: For fast search for an internet radio station, press Right button to jump from radio stations
started with alphabet A to alphabet B, alphabet B to alphabet C, and so on. Press Left button to jump
backward.
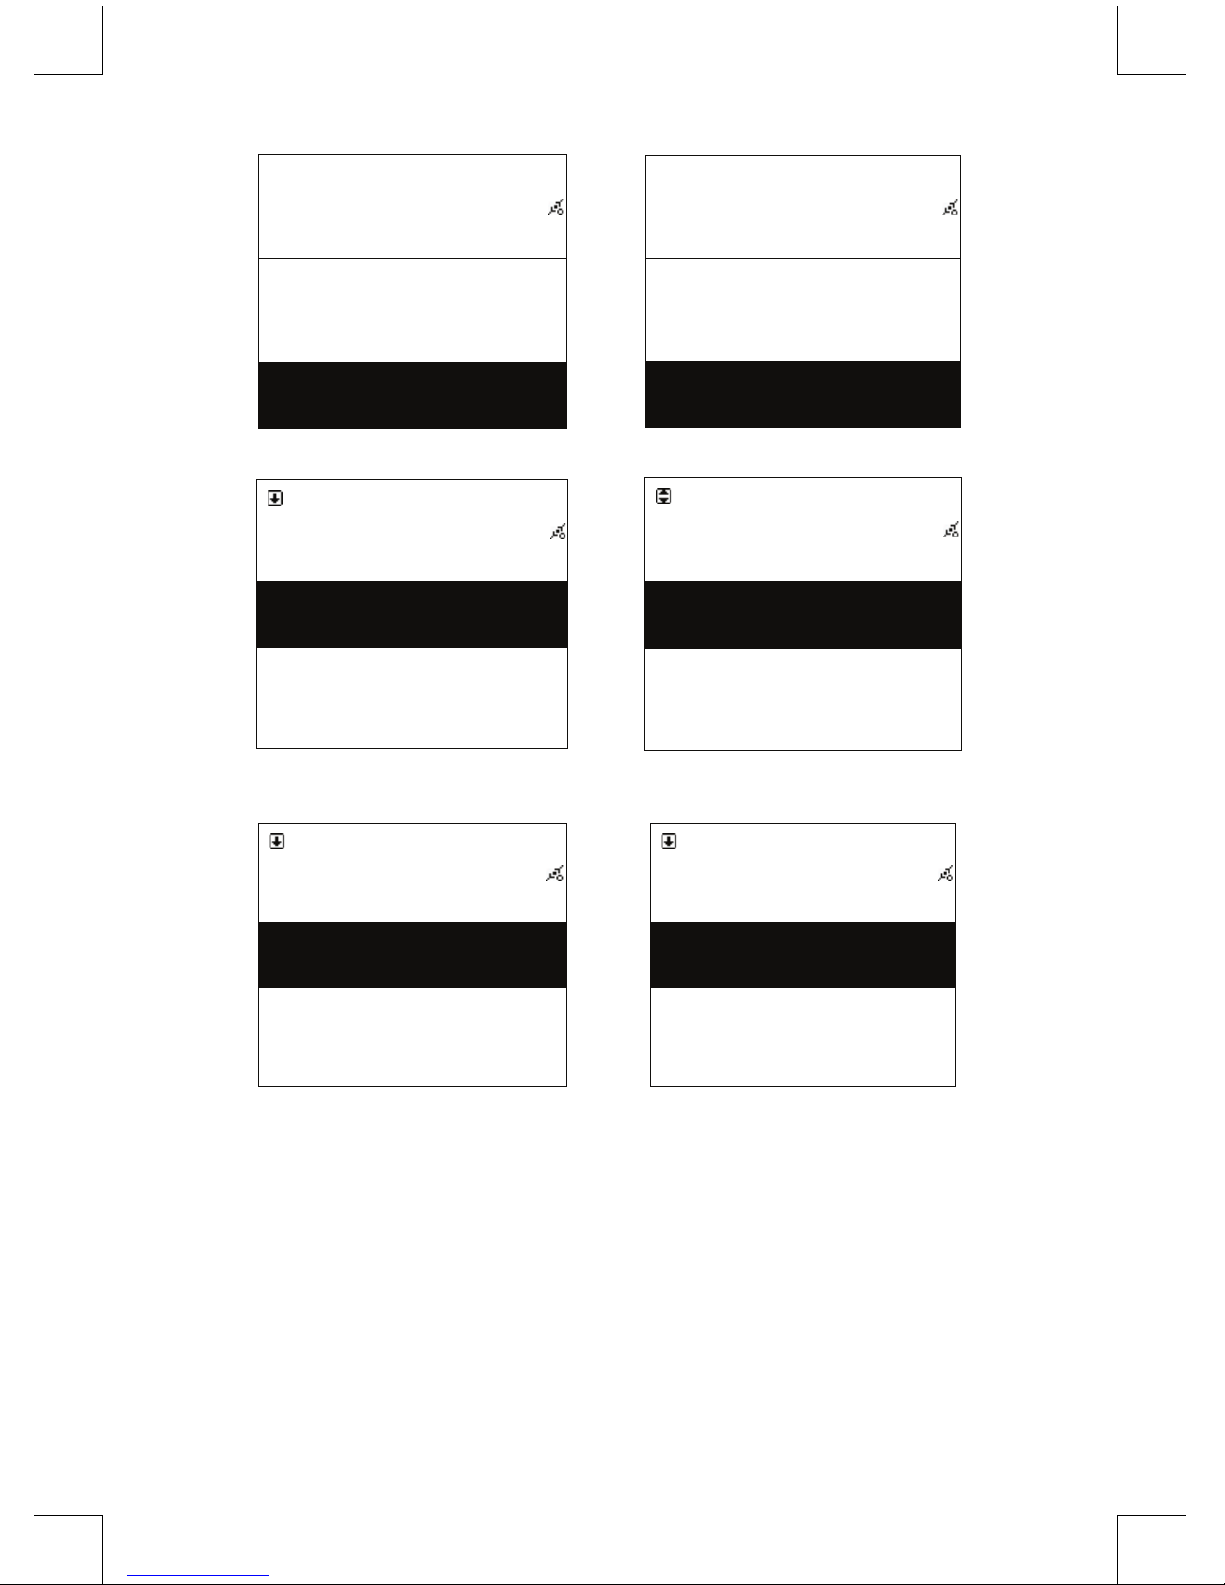
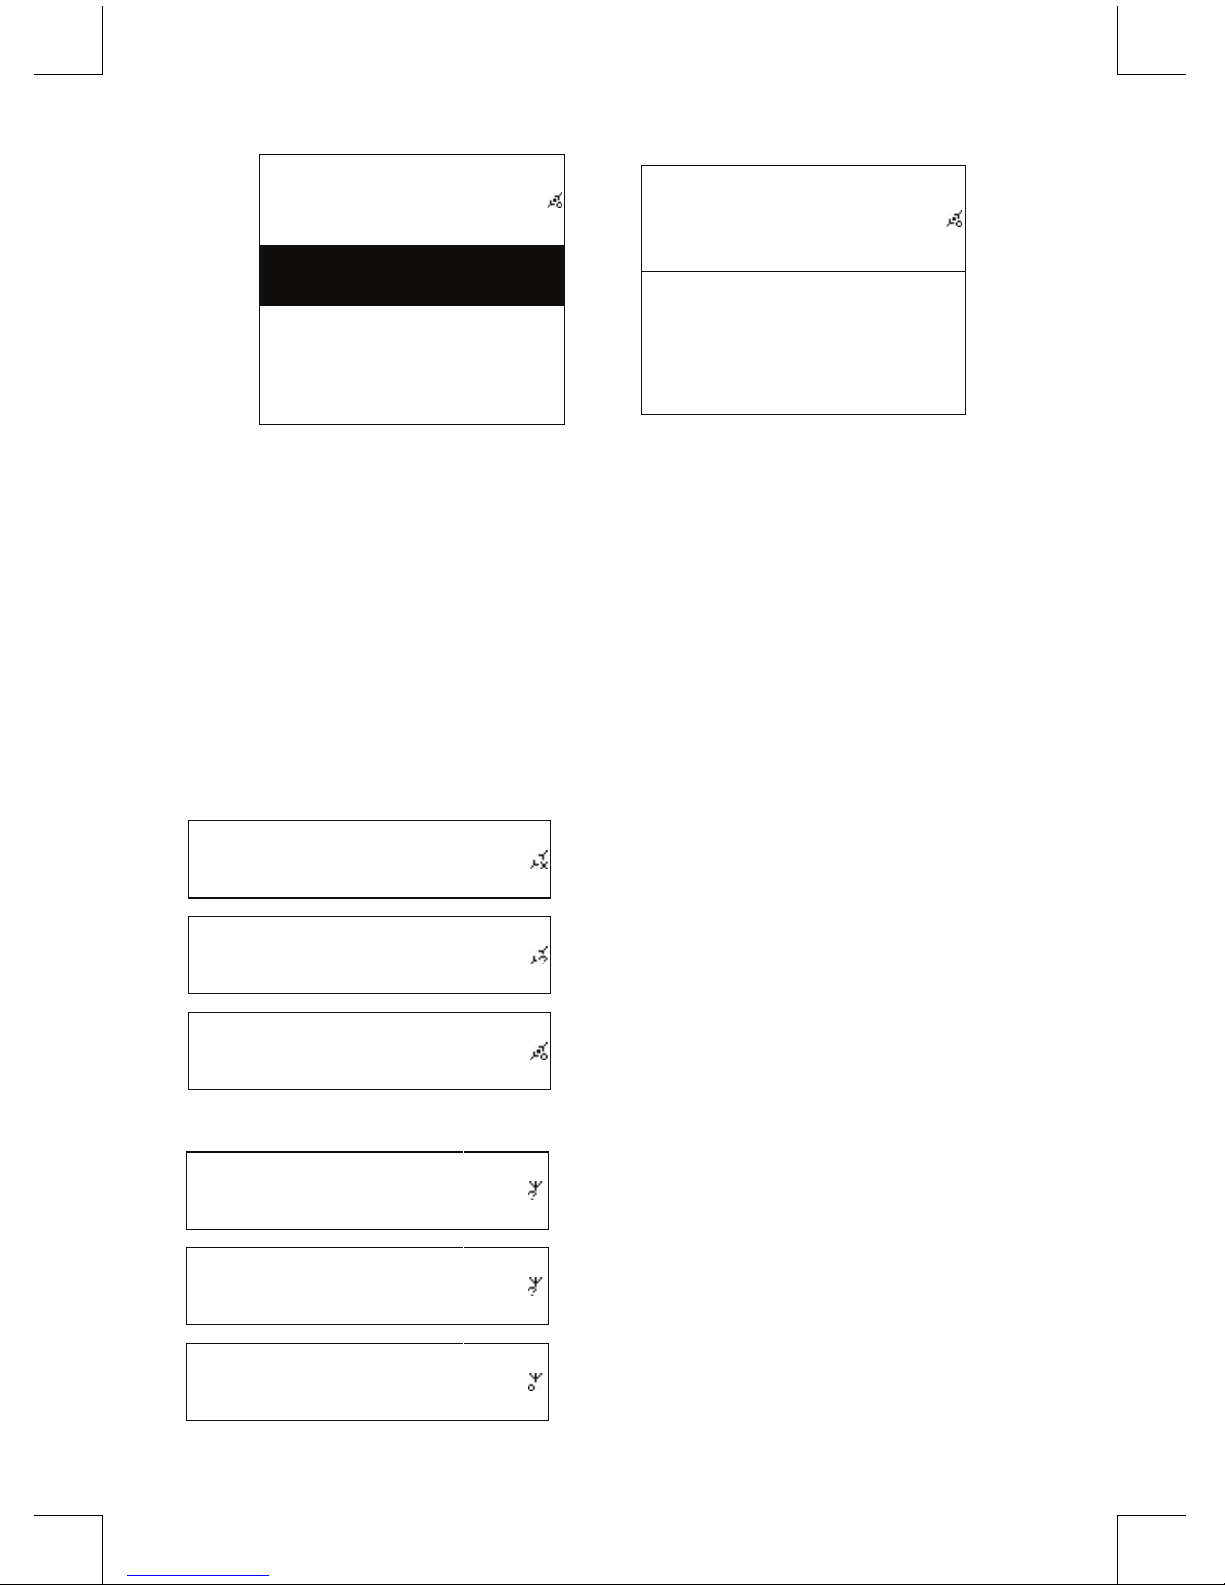
Table 2.3.1
Main
i.Radio >
USB >
>
→
i.Radio
Favorite >
World Station >
SHOUTCast
>
Select i.Radio Choose World Station
Page 7
7
i.Radio
Africa >
Americas >
Asia
>
→
World Station
South Korea >
SriLanka >
Taiwan
>
Categorized by Area Categorized by Country
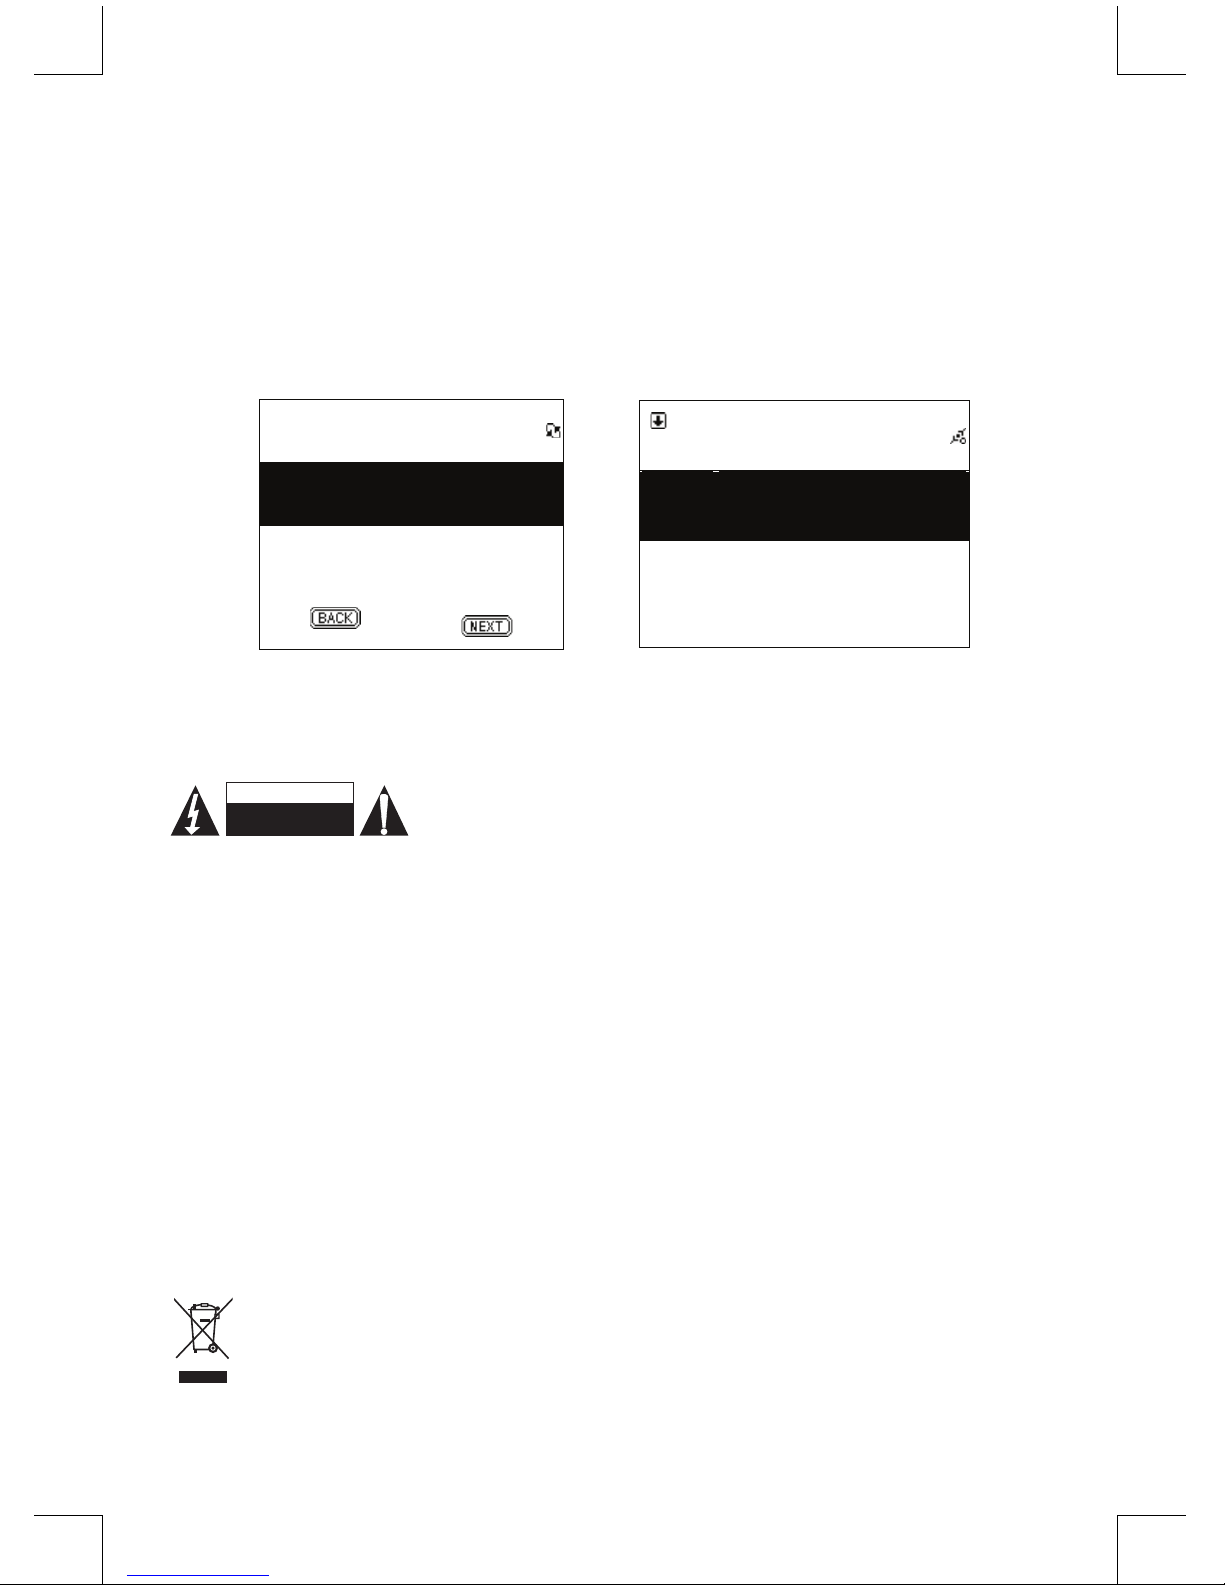
World Station
Africa >
Americas >
Asia
>
→
World Station
Caribbean >
Europe >
Middle East
>
Press◄ / ► button for fast search
The name of stations change
alphabetically
1/1637
‘A’ NET STATION
.977 The Oldies Channel
007 Audio - #1 For The
→
1/999
‘A’ NET STATION
.977 The Oldies Channel
007 Audio - #1 For The
Press INFO button
The amount of stations will show on
the screen
Page 8

8
World Station
HitFM 90.1 Taiwan
National Education Radio 1
National Education
Radio 2
→
i.Radio
HitFM 90.1 Taiwan
WMA ,48 Kbps
Categorized by alphanumeric order Playing
2.4 Network
• Support LAN (Ethernet) and WLAN (802.11b/g wi Dongle is optional)
• Support Wi-Fi Encryption WEP64/128, WPA-TKIP-PSK, and WPA2-AES-PSK.
• Support dynamic IP via DHCP (Dynamic Host Conguration Protocol) and static IP. Default setting
is Ethernet and DHCP.
• Support Infrastruct mode and Ad-hoc mode.
• Support Upnp.
• Auto-detect and auto-run LAN or WLAN(wireless LAN) environment.
2.4.1 Understanding the Networking States on The System
• The network connectivity status icon will show on the top side of the screen.
Table2.4.1.1 - LAN Status
Title
→
• It is failed to detect the Ethernet cable.
Title
→
• It is successful to detect the Ethernet cable.
• It is failed to get available DHCP information.
Title
→
• It is successful to detect the Ethernet cable.
• It is successful to get available DHCP
information
Table 2.4.1.2 - WLAN Status
Title
→
• It is failed to detect the USB Wi-Fi adapter.
Title
→
• It is successful to detect the USB Wi-Fi
adapter.
• It is failed to get available DHCP information.
Title
→
• It is successful to detect the USB Wi-Fi
adapter.
• It is successful to get available DHCP
information.
Page 9
9
2.4.2 Setting the Wi-Fi Connectivity in infrastruct mode
1. Insert a Wi-Fi USB adapter into the USB connector. (The Wi-Fi USB adapter is optional)
2. then scroll up/down to [Network] and press ENTER/OK button.
3. Select [Manual Setup] and press ENTER/OK button
4. Select [Connect] and press ENTER/OK button
5. Then please follow the steps below:
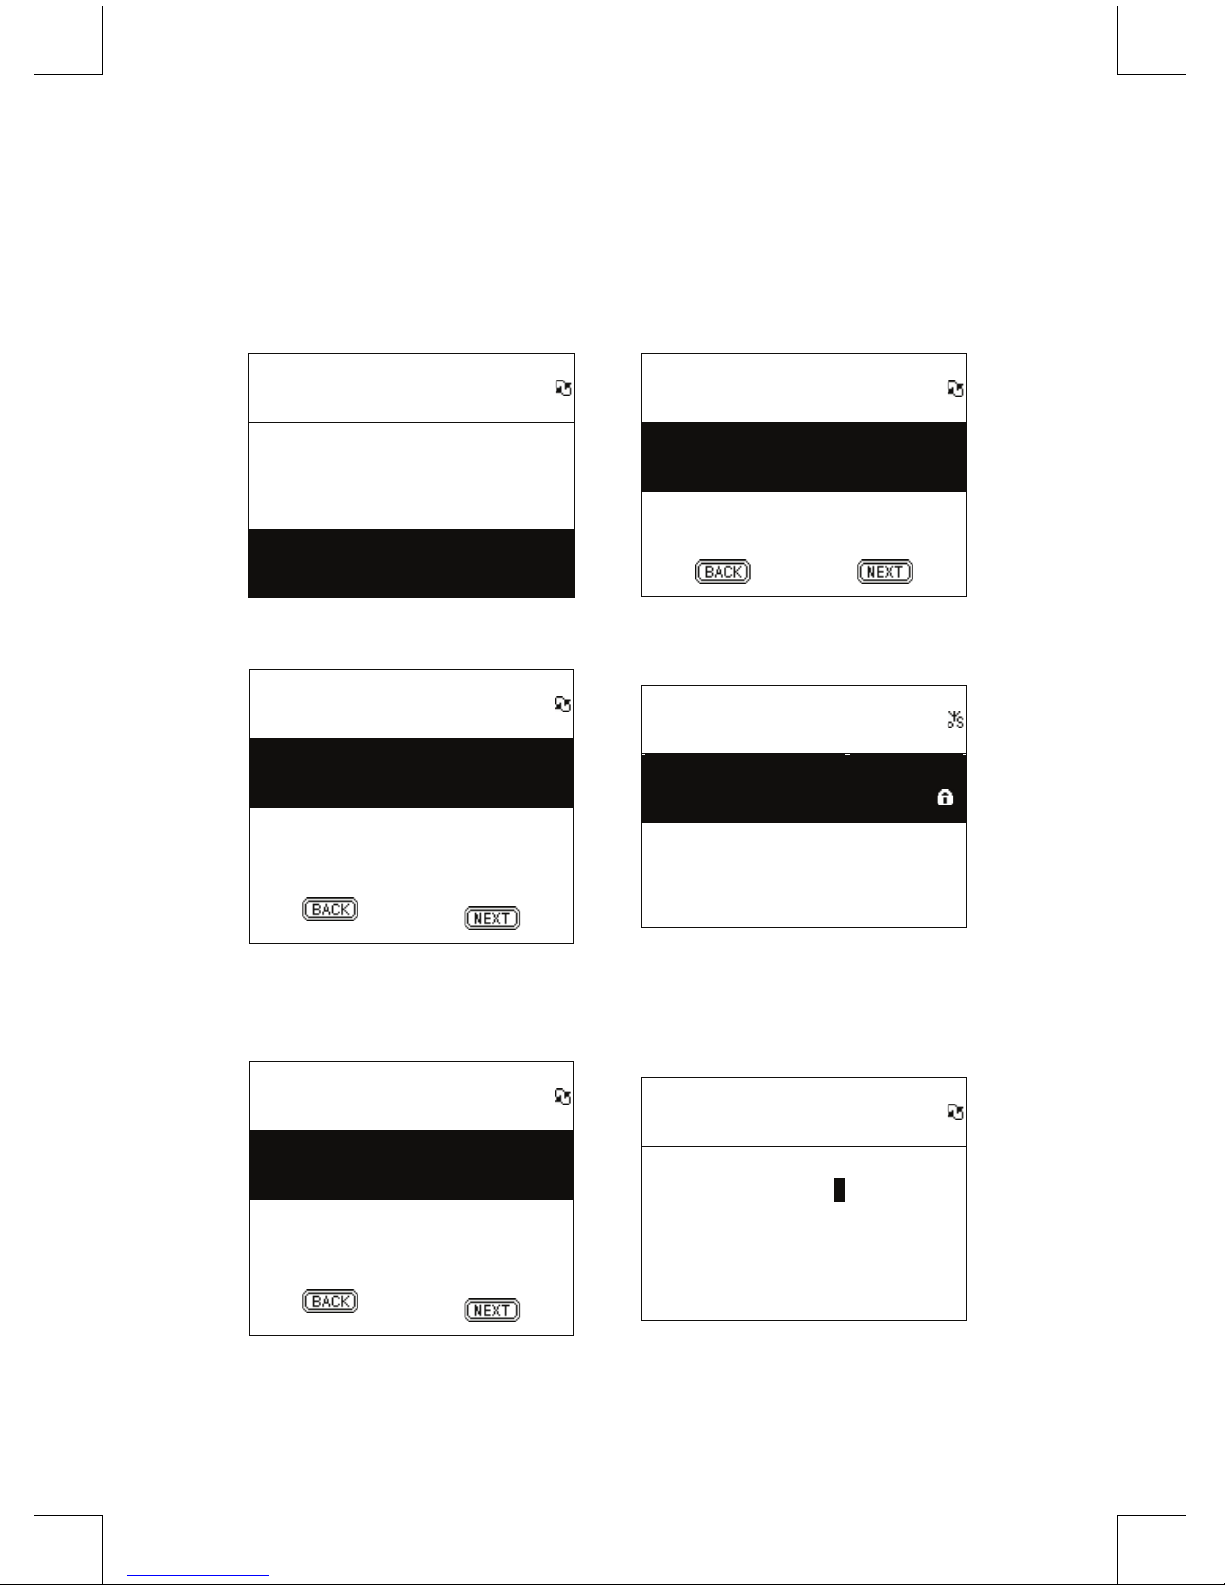
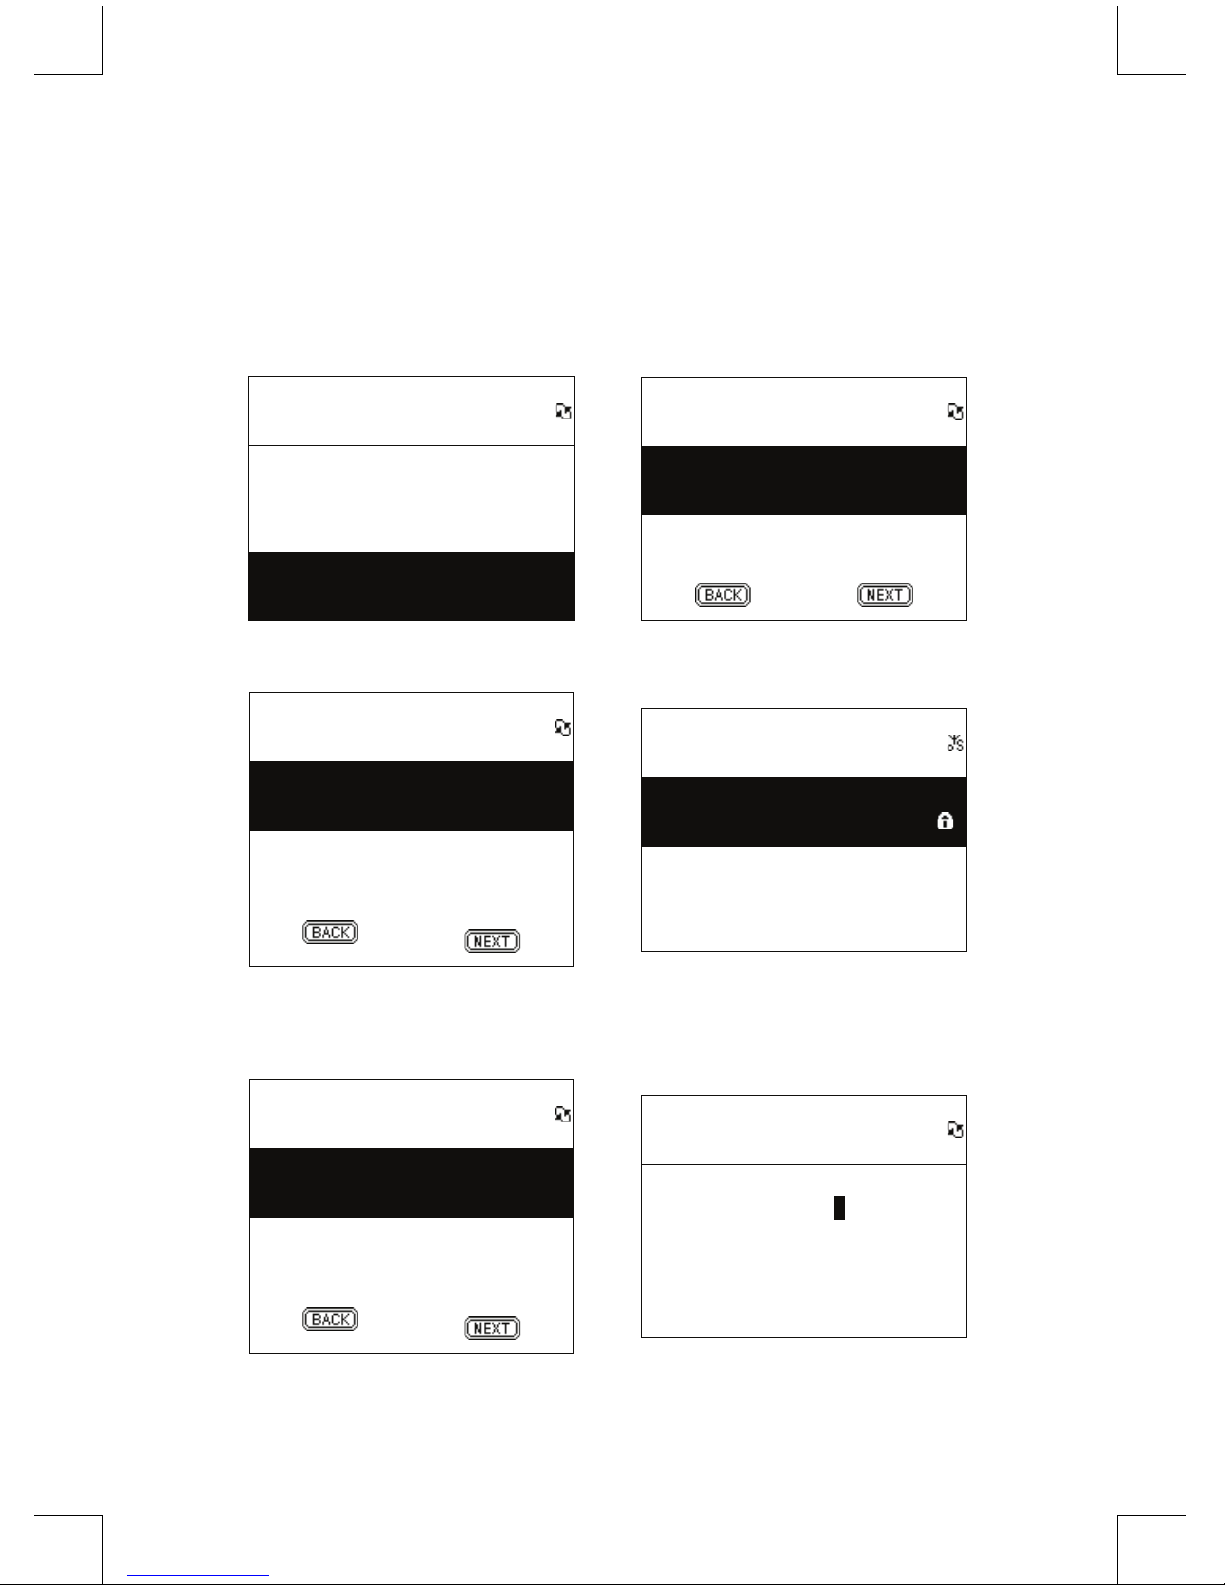
Table 2.4.2
Network
Connect LAN
Wizard >
Manual Setup >
→
Network
Connect WLAN
Select [Manual Setup] and press
[ENTER/OK] button
Select [WLAN] mode, for example,
then choose [NEXT]
SSID
SSID Auto Search
→
Site Survey
AP01 75%
wireless 100%
Choose [NEXT] to search any AP
available
Available APs listed by signal
strength. If an AP is required
encryption, it will be marked with a
symbol of lock.
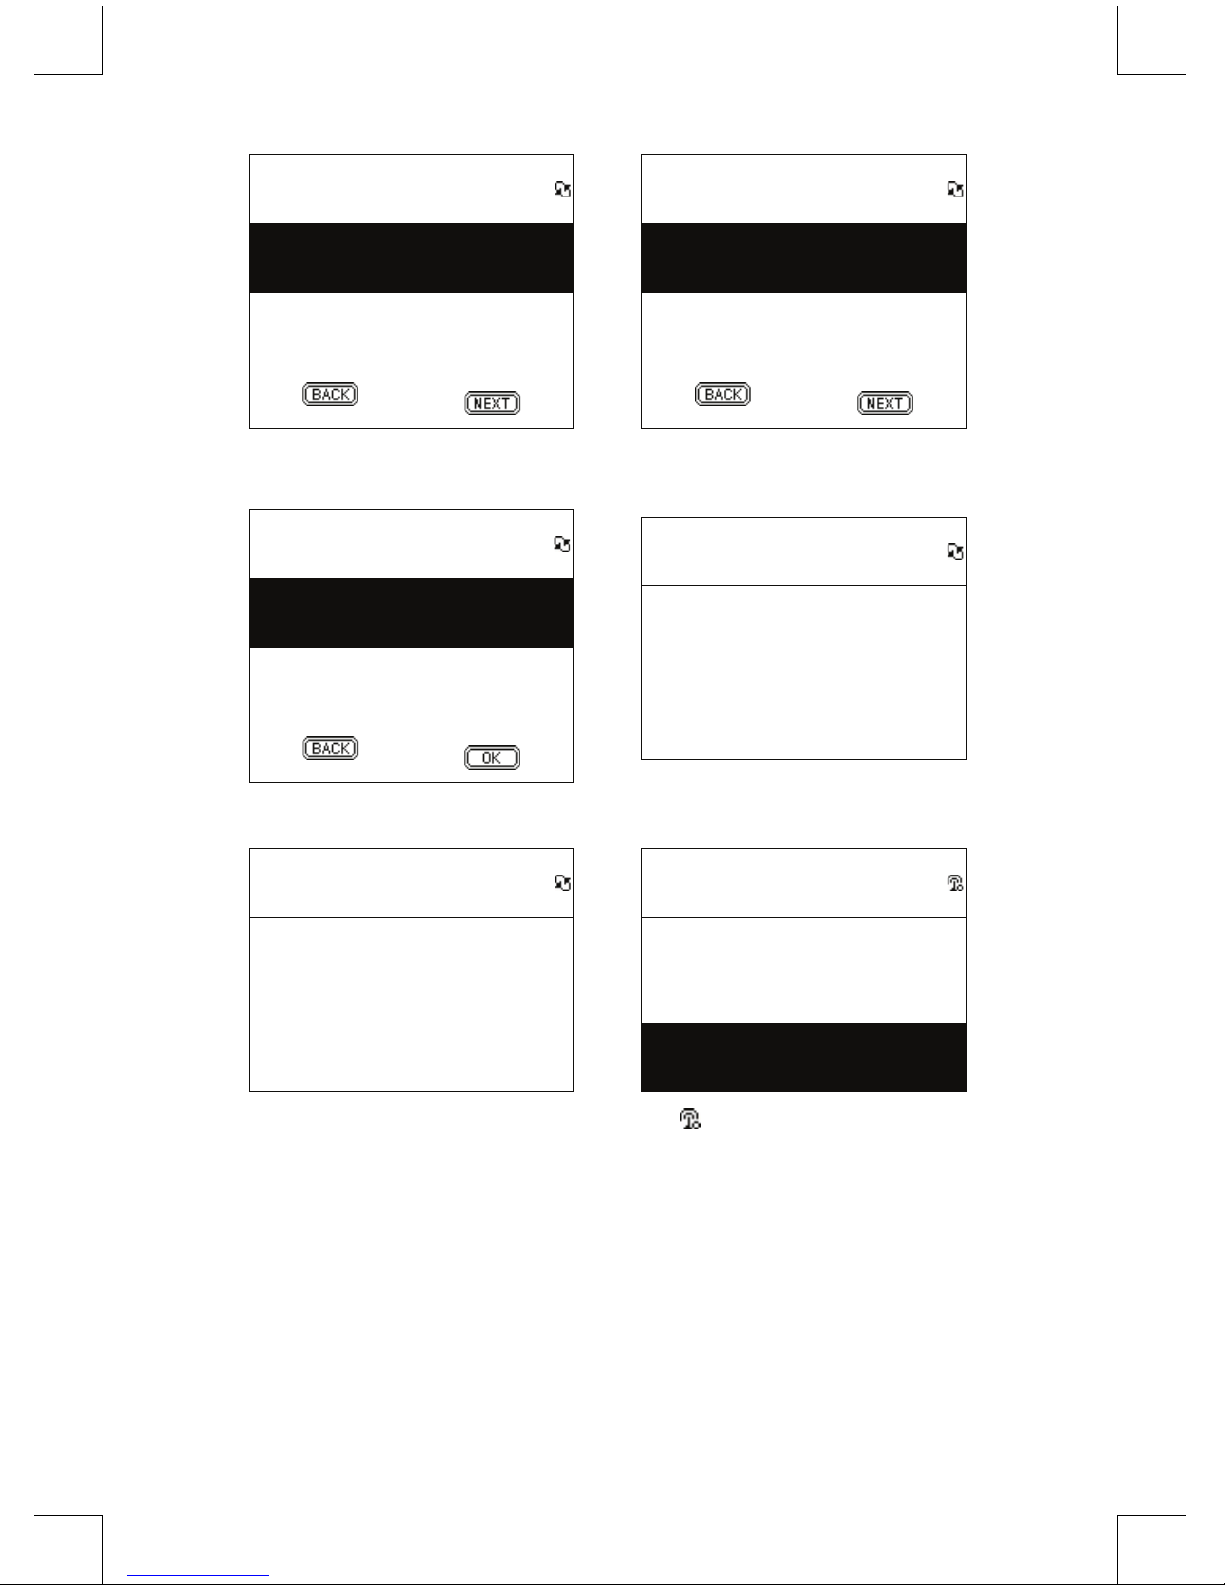
Encryption
Encryption Mode WPA2
Passphrase
>
→
Passphease
> 0 0 0 0 0 0 0 0 0 0 0
ENTER/OK: Next
Select [Encrytion] mode and then
choose [NEXT]
Key in the encryption code and then
press [ENTER/OK]
Page 10
10
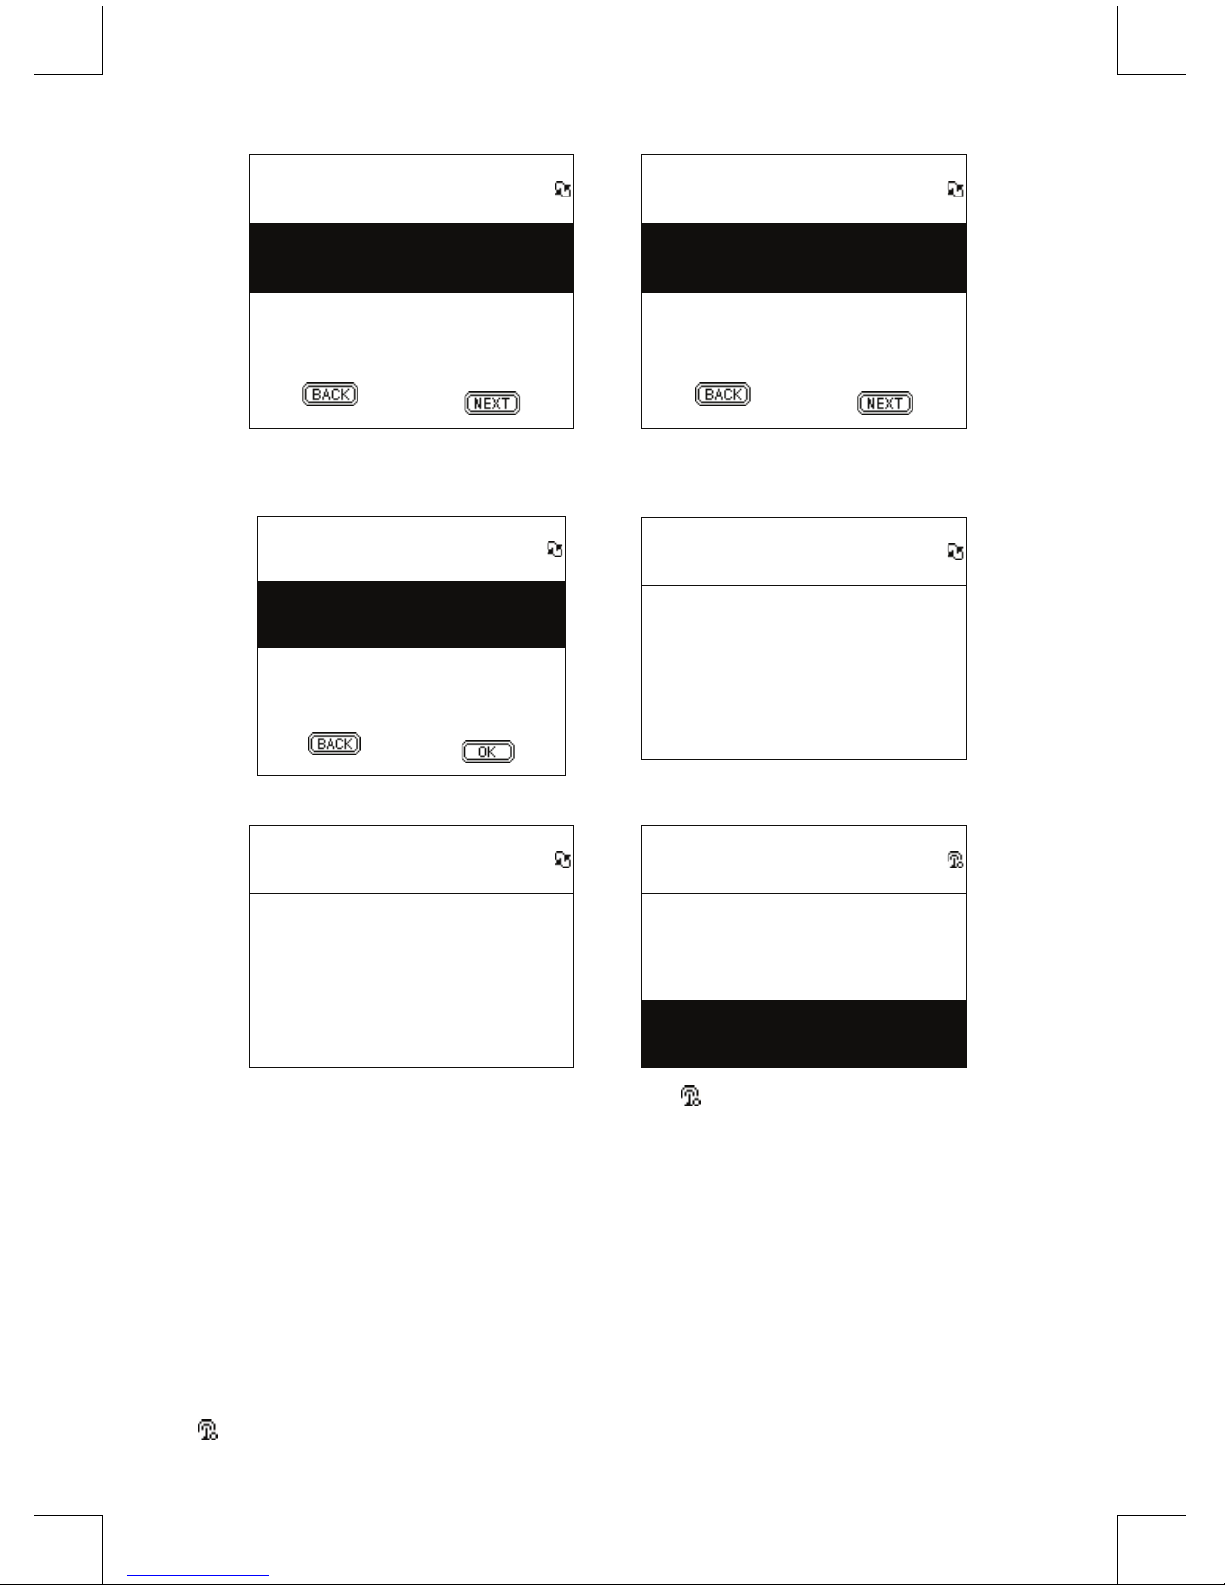
Connect Mode
Connect Mode Infra
→
IP Setting
IP Source Dynamic
Select [Connect] mode and then
choose [NEXT]
Select [IP Source] and then choose
[NEXT]
Proxy
Use Proxy No
→
Network Status
Config Wifi Module /
Select [Use Proxy] then choose [OK] The system will save all conguration
Network Status
Getting IP Address …
→
Network
Connect LAN
Wizard >
Manual Setup >
Start connecting to the AP
will show up if connection is
successful
2.4.3 Setting the Wi-Fi Connectivity by Wi-Fi Wizard
1. Insert a Wi-Fi USB adapter into the USB connector. (The Wi-Fi USB adapter is optional).
2. Then scroll up/down to [Network] and press ENTER/OK button.
3. Select [Connect] and switch [LAN] to [WLAN].
4. Select [Wizard] and then press ENTER/OK button.
5. Scroll up/down to an access point you want to connect, and then press ENTER/OK button.
6. If the access point that you are selecting is protected, press ENTER/OK button to select the
protected AP.
7. To input the encryption key, press UP/DOWN (or numbered key) button to change characters and
press LEFT/RIGHT button to shift.
8. Press ENTER/OK after you nish setting.
9. icon will show on the topside of the screen if the wireless setting is successful.
Page 11
11
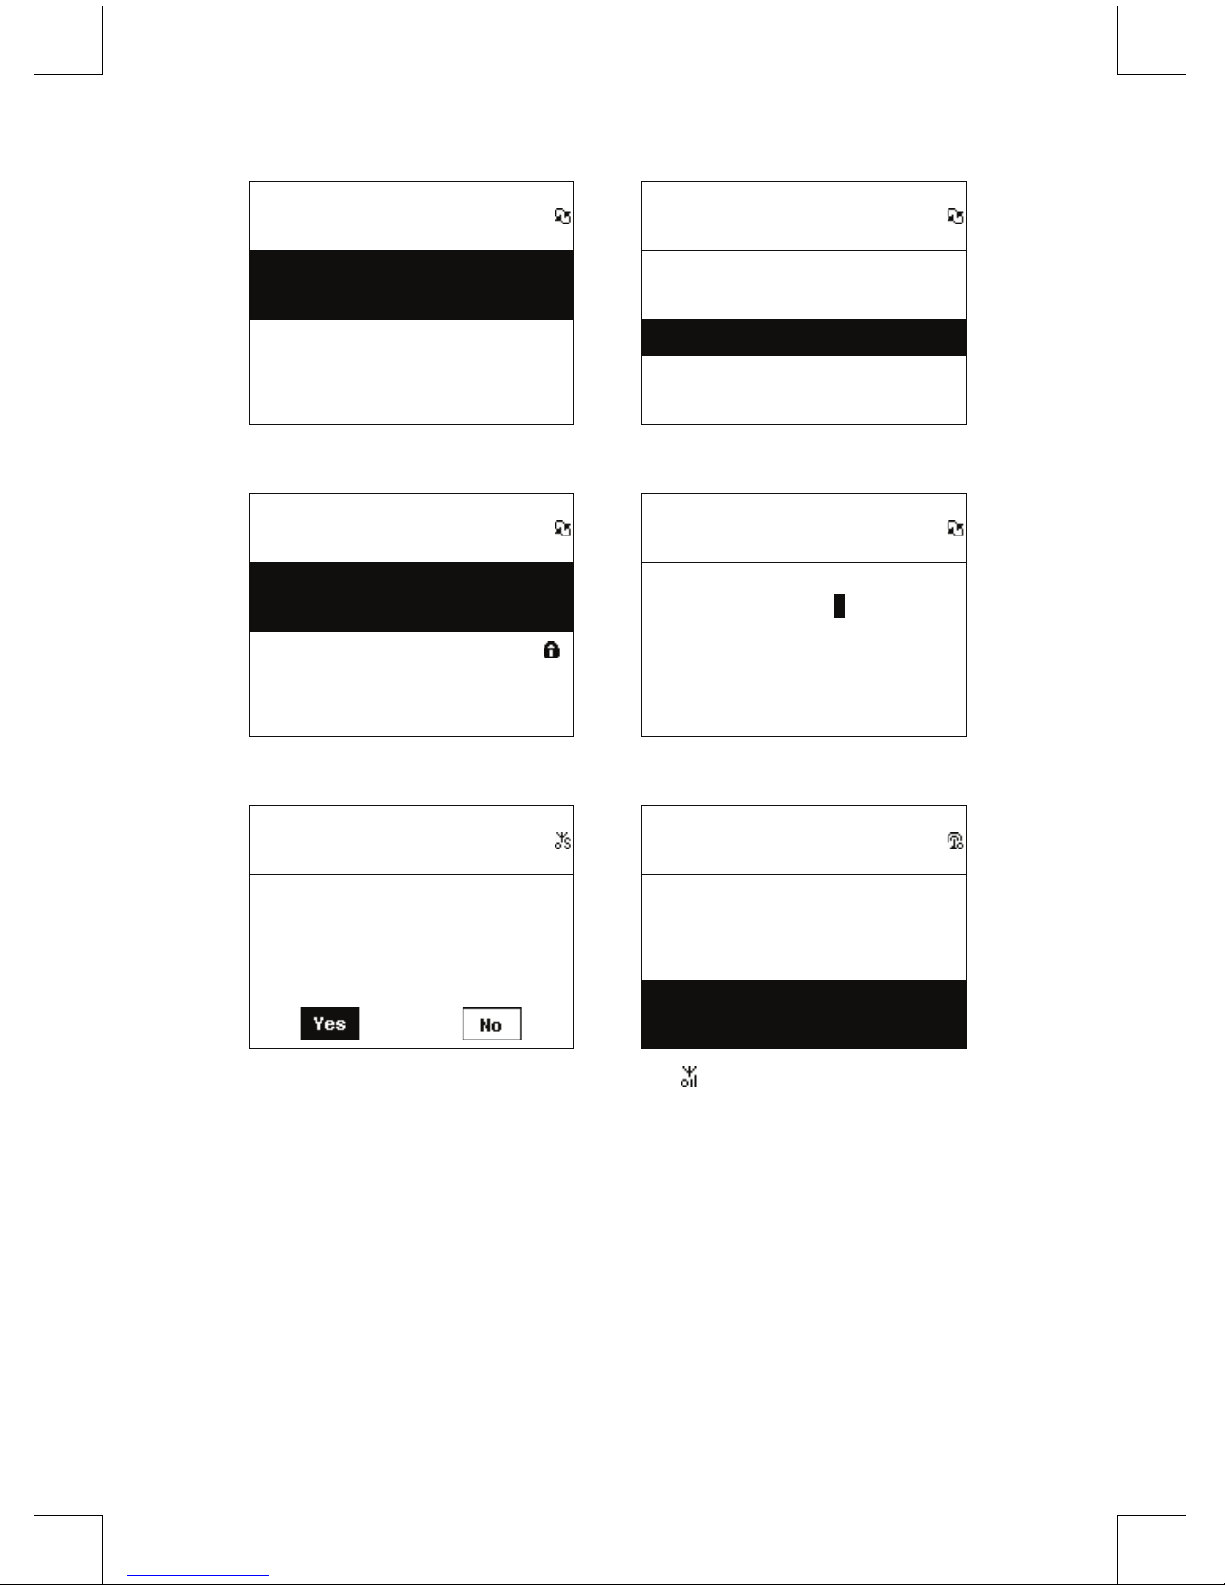
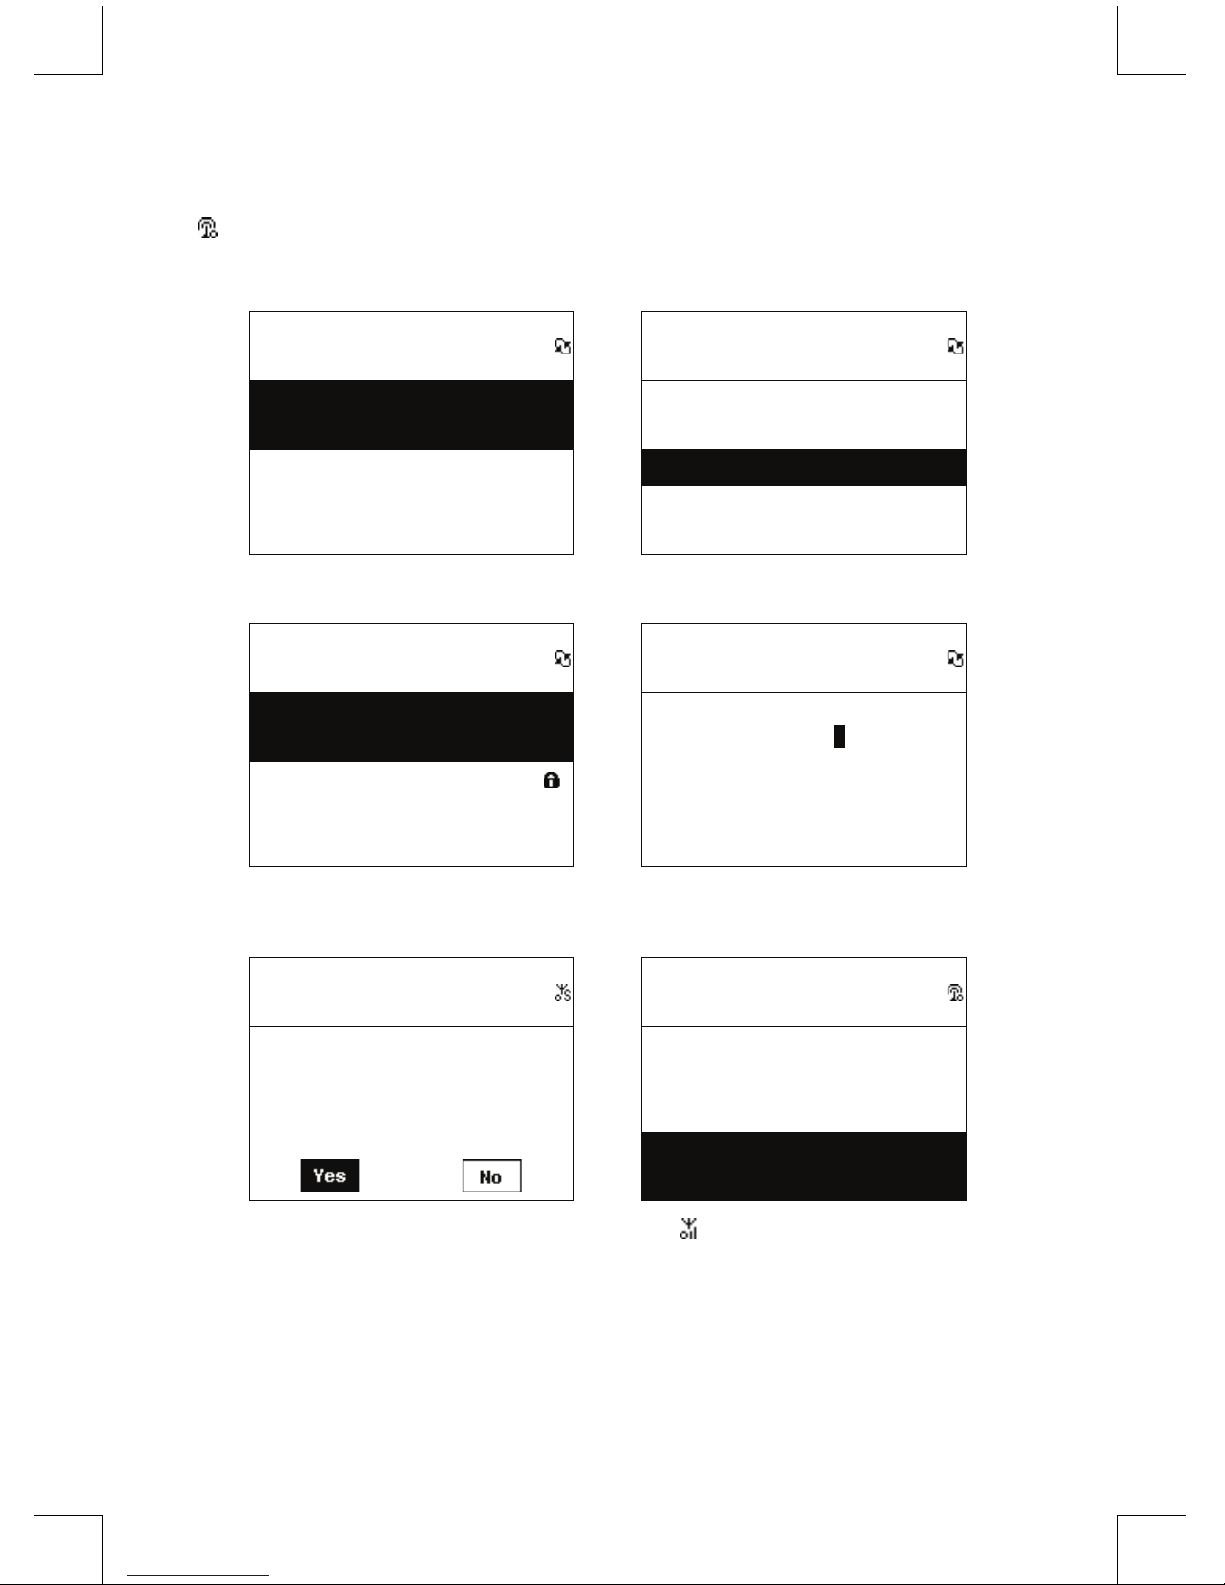
Table 2.4.3
Network
Connect LAN
Wizard >
Manual Setup >
→
Network
Connect WLAN
Wizard >
Manual Setup >
Select [Connect] and switch [LAN] to
[WLAN].
Select [Wizard] and press [ENTER/OK]
button
Wizard
Apo1 65%
D-LINK 71%
Default 88%
→
Passphease
> 0 0 0 0 0 0 0 0 0 0 0
ENTER/OK: Next
All available AP and its signal strength
will be shown on the screen.
Key in the encryption code and then
press [ENTER/OK]
Apply ?
SSID: Penbex-MIS
Key:0000000000
→
Network
Connect LAN
Wizard >
Manual Setup >
Conrm
will show up if connection is
successful
2.4.4 Inputting Static IP
1. Then scroll up/down to [Network] and press ENTER/OK button.
2. Scroll up/down to [IP Setting] and then press ENTER/OK button to enter.
3. Select [IP Source] and press ENTER/OK button to switch [Dynamic] to [Static].
4. Scroll up/down to [TCP/IP] and press ENTER/OK button to start editing.
5. Press UP/DOWN to change characters and press LEFT/RIGHT button to shift.
6. After nishing, press REC button to conrm.
Page 12
12
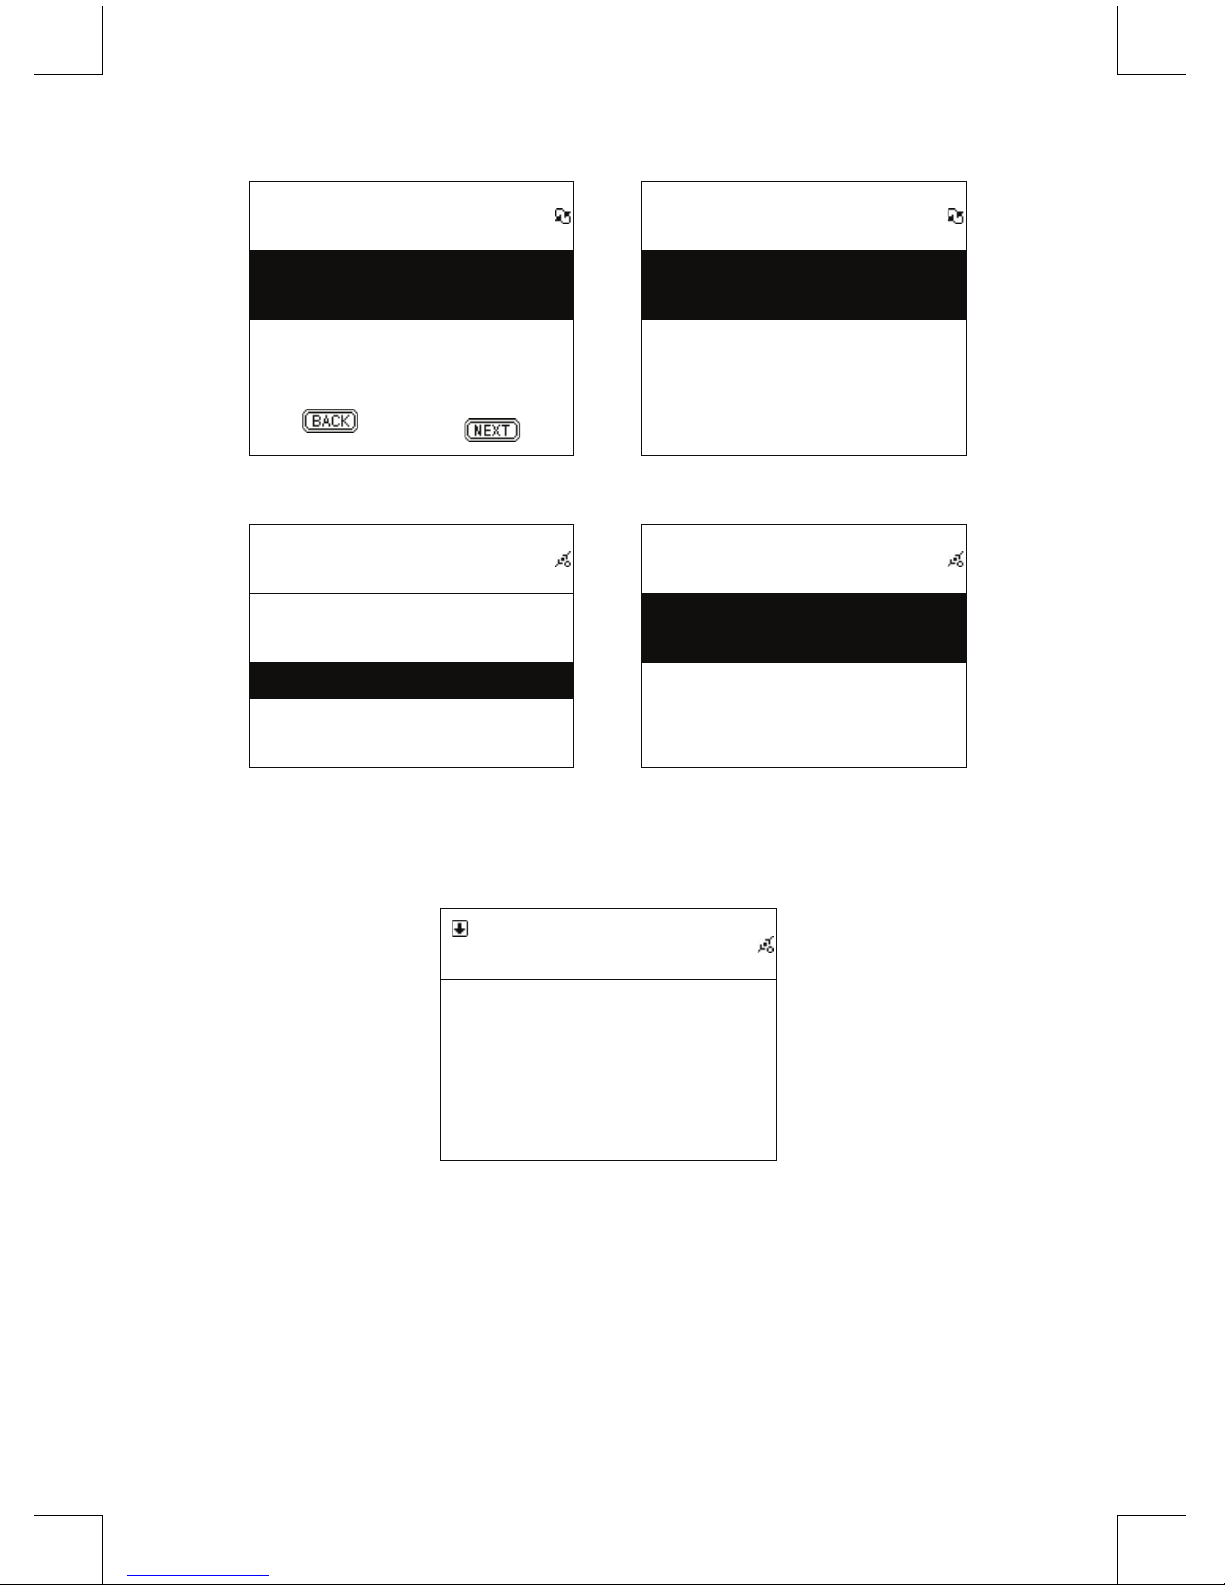
Table 2.4.4
IP Setting
IP Source Dynamic
→
IP Setting
IP Source Manual
TCP/IP
>
DNS
>
Select [IP Source] and then press
[ENTER/OK]
Switch to [Manual]
IP Setting
IP Source Static
TCP/IP >
DNS >
→
TCP/IP
IP 192.169.001.100
Mask 255.255.255.000
GW 192.169.001.254
Select [TCP/IP] and press [ENTER/OK]
button
Press [ENTER/OK] button to start key in.
Use UP/DOWN (or numbered key) then
LEFT/RIGHT to input IP.
NOTE: When IP setting value (including IP, Subnet Mask, or Gateway) is illegal, IP setting will change
to default value.
TCP/IP
The IP Setting Value is
illegal ! Setting is
Changed to Default !
2.4.5 Inputting DNS
1. Then scroll up/down to [Network] and press ENTER/OK button.
2. Scroll up/down to [IP Setting] and then press ENTER/OK button to enter.
3. Select [DNS] and then press ENTER/OK button.
4. Press UP/DOWN button to change characters, then press LEFT/RIGHT button to shift.
5. After nishing, press ENTER/OK button to conrm.
Page 13
13
Table 2.4.5
IP Setting
IP Source Dynamic
→
DNS
DNS1 168.095.001.001
DNS2 000.000.000.000
Select [TCP/IP] and press [ENTER/OK]
button
Press UP/DOWN (or numbered key)
then LEFT/RIGHT to input IP
Safety precautions:
To reduce risk of electric shock, this product should ONLY be opened by
an authorized technician when service is required. Disconnect the product
from mains and other equipment if a problem should occur. Do not expose
the product to water or moisture.
Maintenance:
Clean only with a dry cloth. Do not use cleaning solvents or abrasives.
Warranty:
No guarantee or liability can be accepted for any changes and modications of the product or damage
caused due to incorrect use of this product.
General:
Designs and specications are subject to change without notice.
All logos brands and product names are trademarks or registered trademarks of their respective
holders and are hereby recognized as such.
Keep this manual and packaging for future reference.
Attention:
This product is marked with this symbol. It means that used electrical and electronic products
should not be mixed with general household waste. There is a separate collections system
for these products.
RISK OF ELECTRIC SHOCK
DO NOT OPEN
CAUTION
Page 14
14
DEUTSCH
Fernbedienung
LAUTSTÄRKE “+”
LAUTSTÄRKE “-“
STUMM/SCHLUMMERFUNKTION
A-B WIEDERHOLEN
INFO
ALARM
SPEICHER
AUFNAHME
MENÜ
BEREITSCHAFT
WIEDERHOLEN
ZIFFERNTASTEN
ZURÜCK
NAVIGATIONSTASTEN
(HOCH/RUNTER/LINKS/RECHTS)
Vorderseite
WIEDERGABE/
PAUSE
MENÜ
BEREITSCHAFT
NAVIGATIONSTASTEN
ENTER
FERNBEDIENUNGSSENSOR
LAUTSTÄRKE +/-
USB-PORT
ZURÜCK
AUFNAHME
SPEICHER
Rückseite
DC12V/2A
STROMVERSORGUNG
AUX-AUSGANG
BETRIEB EIN/AUS
Ethernet-Anschluss
AUX-EINGANG
Page 15

15
Page 16

16
Kapitel 1 Übersicht
1.1 Einführung
Das Internetradio ist ein Radiosystem mit integrierter digitaler Audiowiedergabe, dass eine
Internetverbindung benötigt. Das System unterstützt MP3/WMA Audiodateien, USB-Geräte und
Internet-Radiodienste, wie zum Beispiel World Station and SHOUTCast, die mehr als 15.000
Internetradiosender anbieten. Das Internetradio ermöglicht außerdem Audio-Streaming via UpnP-
Mediaserver.
1.2 Audioquellen
• Unterstützt MP3/ Windows Media® Audiodateien (bekannt als WMA), (einschließlich ID3V1, 2)
• Unterstützt statische Liedtexte und synchronisierte Liedtexte (.txt /.lrc /.smi)
• Unterstützt USB Flash Geräte
• SHOUTCast Internetradio (http://www.shoutcast.com)
• Unterstützt Podcast
• Unterstützt AUX
1.3 Speicher
• Unterstützt herkömmliche USB-Massenspeichergeräte (FAT16/32).
1.4 Aufnahme
• Audiodaten von Internetradiosendern (World Station / SHOUTCast) aufnehmen und Audiodaten in
128K MP3 Format umwandeln.
1.5 Netzwerk
• Unterstützt Ethernet 10/100 Mbps
• Unterstützt WLAN IEEE 802.11 b/g Dongle
• Unterstützt Infrastruktur / Ad-hoc
• Unterstützt WEP64/128 und WPA-TKIP-PSK, WPA2-AES-PSK Verschlüsselung
• Unterstützt Proxy-Einstellungen
• Das System bietet einen Einstellungs-Wizard für ein einfaches Setup eines drahtlosen Netzwerks
1.6 Verschiedenes
• Unterstützt zwei Weckrufeinstellungen
• Unterstützt Zeitsynchronisierung (* wenn Netzwerk verfügbar)
• Unterstützt Firmware-Aktualisierung
Kapitel 2 Installation
2.1 Installation
HINWEIS: Die ordnungsgemäße Spannung für das Internetradio ist AC 110V~240V/50-60Hz.
Vergewissern Sie sich vor dem Anschluss des Geräts an ein Netz, dass Ihre örtliche Spannung
entsprechend geeignet ist.
2.1.1 Installation im Netzwerk (LAN)
• Vergewissern Sie sich, dass die Internetumgebung betriebsbereit ist und die Netzwerkeinstellungen
verfügbar sind (DSL oder Kabelmodem sind insbesondere empfohlen).
• Die Werkseinstellung zum Netzwerk Ihres Internetradios ist DHCP. (Weitere Informationen zu den
Netzwerkeinstellungen nden Sie unter 11.6 Netzwerk.)
Page 17
17
DSL oder Kabelmodem
Breitband-Router
Internetradio
PC (Mediaserver)
Ethernet
Ethernet
- Schließen Sie das Gerät anhand der Abbildung an einen mit dem Internet verbundenen Router
an. Verwenden Sie ein herkömmliches Netzwerkkabel.
Crossover Kabel
Internetradio
PC (Mediaserver)
- Schließen Sie das Gerät anhand der Abbildung an einen PC an, wenn Sie nur auf dem Computer
gespeicherte Musik anhören möchten. Verwenden Sie dafür ein gekreuztes (Crossover)
Netzwerkkabel.
- Mit solch einer Verbindung des Geräts können Sie nur Musik anhören, die auf dem Computer
gespeichert ist. Der Computer benötigt eine besondere Software. Siehe Abschnitt zum
Mediaserver.
2.1.2 Installation eines drahtlosen Netzwerks (WLAN)
• Vergewissern Sie sich, dass die Internetumgebung betriebsbereit ist und die Netzwerkeinstellungen
verfügbar sind.
• Stecken Sie den WLAN-Adapter an das Internetradio an. (Weitere Informationen zur Einstellung
nden Sie unter 11.6 Netzwerk.)
WLAN-Adapter Internetradio
PC (Mediaserver)
PC (Mediaserver)
Ethernet
DSL oder Kabelmodem
Schnurloser 802.11 b/g
Broadband-Router
- Schließen Sie den WLAN-Adapter an die Buchse an.
Page 18
18
WLAN-Adapter
PC (Mediaserver)
Internetradio
WLAN-Adapter
- Sie können das Gerät auch schnurlos an einen Computer mit schnurloser Netzwerkkarte
anschließen.
- Mit solch einer Verbindung des Geräts können Sie nur Musik anhören, die auf dem Computer
gespeichert ist. Der Computer benötigt eine spezielle Software. Siehe Abschnitt zum
Mediaserver.
2.2 Erstmaliger Gebrauch des Geräts
Wenn Sie das Gerät das erste Mal einschalten, wird das Gerät automatisch nach einer IP-Adresse
suchen. Wenn das Netzwerk mit dem Internet verbunden ist, wird das Gerät außerdem die Uhrzeit mit
dem Zeitserver synchronisieren und dann in den Standby-Modus umschalten. Dieser Vorgang dauert
normalerweise 6-30 Sekunden.
2.3 World Station
2.3.1 World Station anhören
• Öffnen Sie das [Haupt]-Menü, wählen Sie [i.Radio] und drücken Sie anschließend die Taste
ENTER/OK.
• Wählen Sie [World Station] und drücken Sie dann die Taste ENTER/OK.
• Suchen Sie aufwärts/abwärts nach einem Sender und drücken Sie anschließend für die
Wiedergabe die Taste ENTER/OK.
• Wenn die Pufferung 100% erreicht hat, beginnt die Wiedergabe der Musik.
Hinweis: Drücken Sie für die Schnellsuche nach Internetradiosendern die rechte Taste, um von
Radiosendern mit dem Anfangsbuchstaben A zu den Sendern mit B, oder von Sendern mit dem
Anfangsbuchstaben B zu den Sendern mit C zu springen, usw. Mit der linken Taste können Sie die
Suche rückwärts vornehmen.
Tabelle 2.3.1
Main
i.Radio >
USB >
>
→
i.Radio
Favorite >
World Station >
SHOUTCast
>
Wählen Sie i.Radio Wählen Sie World Station
Page 19

19
i.Radio
Africa >
Americas >
Asia
>
→
World Station
South Korea >
SriLanka >
Taiwan
>
Auistung nach Regionen Auistung nach Ländern
World Station
Africa >
Americas >
Asia
>
→
World Station
Caribbean >
Europe >
Middle East
>
Drücken Sie◄ / ► für die
Schnellsuche
Die Namen der Sender ändern sich
alphabetisch
1/1637
‘A’ NET STATION
.977 The Oldies Channel
007 Audio - #1 For The
→
1/999
‘A’ NET STATION
.977 The Oldies Channel
007 Audio - #1 For The
Drücken Sie die INFO-Taste
Die Gesamtzahl der Sender erscheint
auf dem Bildschirm
Page 20
20
World Station
HitFM 90.1 Taiwan
National Education Radio 1
National Education
Radio 2
→
i.Radio
HitFM 90.1 Taiwan
WMA ,48 Kbps
Auistung alphabetisch geordnet Wiedergabe
2.4 Netzwerk
• Unterstützt LAN (Ethernet) und WLAN (802.11b/g WiFi-Adapter ist optional)
• Unterstützt WiFi-Verschlüsselung WEP64/128, WPA-TKIP-PSK, und WPA2-AES-PSK.
• Unterstützt dynamische IP via DHCP (Dynamic Host Conguration Protocol) und statische IP.
Ethernet und DHCP sind die Standardeinstellungen.
• Unterstützt Infrastruktur-Modus und Ad-hoc-Modus.
• Unterstützt UPnP.
• Erkennt und startet LAN oder WLAN (Wireless LAN) automatisch.
2.4.1 Übersicht zu den Netzwerkzuständen des Systems
• Das Symbol zum Status der Netzwerkverbindung wird an der Oberseite des Bildschirms angezeigt.
Tabelle 2.4.1.1 - LAN-Status
Title
→
• Ethernetkabel konnte nicht gefunden
werden.
Title
→
• Ethernetkabel erfolgreich gefunden.
• Verfügbare DHCP-Daten konnten nicht
gefunden werden.
Title
→
• Ethernetkabel erfolgreich gefunden.
• Verfügbare DHCP-Daten erfolgreich
gefunden.
Tabelle 2.4.1.2 - WLAN-Status
Title
→
• USB WiFi-Adapter konnte nicht gefunden
werden.
Title
→
• USB WiFi-Adapter erfolgreich gefunden.
• Verfügbare DHCP-Daten konnten nicht
gefunden werden.
Title
→
• USB WiFi-Adapter erfolgreich gefunden.
• Verfügbare DHCP-Daten erfolgreich
gefunden.
Page 21
21
2.4.2 WiFi-Konnektivität im Infrastruktur-Modus einrichten
1. Stecken Sie den WiFi USB-Adapter an den USB-Port an (der WiFi USB-Adapter ist optional).
2. Suchen Sie dann aufwärts/abwärts die Einstellung [Netzwerk] und drücken Sie die Taste ENTER/
OK.
3. Wählen Sie [Manueller Setup] und drücken Sie die Taste ENTER/OK.
4. Wählen Sie [Verbinden] und bestätigen Sie mit der Taste ENTER/OK.
5. Gehen Sie dann wie folgt vor:
Tabelle 2.4.2
Network
Connect LAN
Wizard >
Manual Setup >
→
Network
Connect WLAN
Wählen Sie [Manual Setup] und
drücken Sie die Taste [ENTER/OK]
Wählen Sie z.B. [WLAN], gefolgt von
[NEXT]
SSID
SSID Auto Search
→
Site Survey
AP01 75%
wireless 100%
Wählen Sie [NEXT], um nach
verfügbaren IPs zu suchen
Verfügbare IPs nach Signalstärke
angeordnet. Falls eine IP
Verschlüsselung erfordert, ist sie mit
einem Schlosssymbol markiert.
Encryption
Encryption Mode WPA2
Passphrase
>
→
Passphease
> 0 0 0 0 0 0 0 0 0 0 0
ENTER/OK: Next
Wählen Sie [Encrytion], gefolgt von
[NEXT]
Geben Sie den Verschlüsselungscode
ein und drücken Sie dann [ENTER/
OK]
Page 22
22
Connect Mode
Connect Mode Infra
→
IP Setting
IP Source Dynamic
Wälen Sie [Connect] und
anschließend [NEXT]
Wählen Sie [IP Source] und
anschließend [NEXT]
Proxy
Use Proxy No
→
Network Status
Config Wifi Module /
Wählen Sie [Use Proxy] und
anschließend [OK]
Das System speichert alle
Kongurationen
Network Status
Getting IP Address …
→
Network
Connect LAN
Wizard >
Manual Setup >
Verbindung mit IP wird hergestellt…
erscheint nach erfolgreicher
Verbindung
2.4.3 WiFi-Konnektivität mithilfe des WiFi-Wizards einrichten
1. Stecken Sie einen WiFi USB-Adapter an den USB-Port an (der WiFi USB-Adapter ist optional).
2. Suchen Sie dann aufwärts/abwärts nach der Einstellung [Netzerk] und drücken Sie die Taste
ENTER/OK.
3. Wählen Sie [Verbinden] und wechseln Sie von [LAN] auf [WLAN].
4. Wählen Sie den [Wizard] und drücken Sie dann die Taste ENTER/OK.
5. Suchen Sie aufwärts/abwärts nach einem Zugangspunkt, den Sie verbinden möchten, und
bestätigen Sie mit ENTER/OK.
6. Wenn der von Ihnen gewählte Zugangspunkt geschützt ist, drücken Sie die Taste ENTER/OK, um
die geschützte IP auszuwählen.
Page 23
23
7. Um den Verschlüsselungscode einzugeben, verwenden Sie die Tasten HOCH/RUNTER (oder die
Nummerntasten) zum Ändern der Zeichen; drücken Sie LINKS/RECHTS zum Umschalten.
8. Drücken Sie nach der Beendigung der Einstellung ENTER/OK.
9. erscheint an der Oberseite des Bildschirms, wenn die schnurlose Verbindung erfolgreich
hergestellt wurde.
Tabelle 2.4.3
Network
Connect LAN
Wizard >
Manual Setup >
→
Network
Connect WLAN
Wizard >
Manual Setup >
Wählen Sie [Connect] und wechseln Sie
von [LAN] auf [WLAN].
Wählen Sie den [Wizard] und drücken
Sie [ENTER/OK]
Wizard
Apo1 65%
D-LINK 71%
Default 88%
→
Passphease
> 0 0 0 0 0 0 0 0 0 0 0
ENTER/OK: Next
Alle verfügbaren IPs und deren
Signalstärke werden auf dem Bildschirm
angezeigt.
Geben Sie den Verschlüsselungscode
ein und drücken Sie dann [ENTER/OK]
Apply ?
SSID: Penbex-MIS
Key:0000000000
→
Network
Connect LAN
Wizard >
Manual Setup >
Bestätigen
erscheint nach erfolgreicher
Verbindung
2.4.4 Statische IP eingeben
1. Suchen Sie aufwärts/abwärts nach der Einstellung [Netzwerk] und drücken Sie ENTER/OK.
2. Suchen Sie aufwärts/abwärts nach der Einstellung [IP-Einstellung] und drücken Sie ENTER/OK,
um das Menü zu öffnen.
3. Wählen Sie [IP-Quelle] und drücken Sie ENTER/OK, um von [Dynamisch] auf [Statisch]
umzuschalten.
Page 24
24
4. Suchen Sie aufwärts/abwärts nach der Einstellung [TCP/IP] und drücken Sie ENTER/OK, um die
Einstellungen zu bearbeiten.
5. Mit den Tasten HOCH/RUNTER können Sie Zeichen ändern; drücken Sie LINKS/RECHTS zum
Umschalten.
6. Bestätigen Sie nach dem Abschluss alle Einstellungen mit der AUFNAHME-Taste.
Tabelle 2.4.4
IP Setting
IP Source Dynamic
→
IP Setting
IP Source Manual
TCP/IP
>
DNS
>
Wählen Sie [IP Source] und drücken Sie
anschließend [ENTER/OK]
Wechseln Sie zu [Manual]
IP Setting
IP Source Static
TCP/IP >
DNS >
→
TCP/IP
IP 192.169.001.100
Mask 255.255.255.000
GW 192.169.001.254
Wählen Sie [TCP/IP] und drücken Sie
anschließend [ENTER/OK]
Drücken Sie [ENTER/OK] zum Starten
der Eingabe. Verwenden Sie die Tasten
HOCH/RUNTER (oder Nummerntasten)
und anschließend die Tasten LINKS/
RECHTS zur Eingabe der IP.
HINWEIS: Wenn die IP-Werte (einschließlich IP, Subnet-Maske oder Gateway) ungültig sind, wechselt
das Gerät zurück zu den IP-Werkseinstellungen.
TCP/IP
The IP Setting Value is
illegal ! Setting is
Changed to Default !
Page 25
25
2.4.5 DNS eingeben
1. Suchen Sie aufwärts/abwärts nach der Einstellung [Netzwerk] und drücken Sie ENTER/OK.
2. Suchen Sie aufwärts/abwärts nach der Einstellung [IP-Einstellung] und drücken Sie dann ENTER/
OK, um das Menü zu öffnen.
3. Wählen Sie [DNS] und bestätigen Sie mit ENTER/OK.
4. Mit den Tasten HOCH/RUNTER ändern Sie Zeichen; drücken Sie LINKS/RECHTS zum
Umschalten.
5. Bestätigen Sie die Einstellungen nach Abschluss mit ENTER/OK.
Tabelle 2.4.5
IP Setting
IP Source Dynamic
→
DNS
DNS1 168.095.001.001
DNS2 000.000.000.000
Wählen Sie [TCP/IP] und drücken Sie
anschließend [ENTER/OK]
Drücken Sie HOCH/RUNTER (oder die
Nummerntasten), und anschließend
LINKS/RECHTS zur Eingabe der IP
Sicherheitsvorkehrungen:
Um das Risiko eines elektrischen Schlags zu verringern, sollte dieses
Produkt AUSSCHLIESSLICH von einem autorisierten Techniker geöffnet
werden. Bei Problemen trennen Sie das Gerät bitte von der Spannungsversorgung und von anderen
Geräten ab. Stellen Sie sicher, dass das Gerät nicht mit Wasser oder Feuchtigkeit in Berührung
kommt.
Wartung:
Nur mit einem trockenen Tuch säubern. Keine Reinigungs- oder Scheuermittel verwenden.
Garantie:
Es kann keine Garantie oder Haftung für irgendwelche Änderungen oder Modikationen des Produkts
oder für Schäden übernommen werden, die aufgrund einer nicht ordnungsgemäßen Anwendung des
Produkts entstanden sind.
Allgemeines:
Designs and specications are subject to change without notice.
All logos brands and product names are trademarks or registered trademarks of their respective
holders and are hereby recognized as such.
Keep this manual and packaging for future reference.
Achtung:
Dieses Produkt ist mit diesem Symbol gekennzeichnet. Es bedeutet, dass die ausgedienten
elektrischen und elektronischen Produkte nicht mit dem allgemeinen Haushaltsmüll entsorgt
werden dürfen. Für diese Produkte stehen gesonderte Sammelsysteme zur Verfügung.
STROMSCHLAGGEFAHR
NICHT ÖFFNEN
VORSICHT
Page 26

26
FRANÇAIS
Télécommande
Volume “+”
Volume “-”
Muet/Rappel d’alarme
Répétition A-B
Info
Alarme
Mémoire
Enregistrer
Menu
Veille
Répéter
Touches numériques
Précédent
Touches de déplacement
(haut/bas/gauche/droite)
Vue de face
Lecture/Pause
Menu
Veille
Touches de déplacement
Entrer
Capteur de la télécommande
Volume +/-
Port USB
Précédent
Enregistrer
Mémoire
Vue arrière
12V CC/2A Alimentation
Sortie auxiliaire
Interrupteur Marche/arrêt
Port Ethernet
Entrée auxiliaire
Page 27
27
Page 28

28
Chapitre 1 Vue d’ensemble
1.1 Introduction
La radio Internet est un système de radio numérique qui utilise une connexion Internet pour
fonctionner. Le système peut lire des chiers audio MP3/WMA, des dispositifs USB et des services
radio Internet tels que la radio World Station et SHOUTCast qui offrent plus de 15 000 stations radio
Internet. La Radio Internet supporte également le streaming audio via le serveur UPnP multimédia
(universal plug & play).
1.2 Sources audio
• Supporte les chiers audio MP3/ Windows Media® (connus sous WMA) (y compris ID3 V1, 2)
• Supporte les paroles statiques et les paroles synchrones (.txt /.lrc /.smi)
• Supporte les lecteurs de disques USB
• Radio Internet SHOUTCast (http://www.shoutcast.com)
• Supporte les Podcasts (diffusion pour baladeur)
• Supporte des dispositifs auxiliaires
1.3 Stockage
• Supporte les unités de stockage de masse USB standard (FAT16/32).
1.4 Enregistrement
• Capable d’enregistrer des données audio à partir de stations radio Internet (World Station /
SHOUTCast) et de convertir les données audio en format MP3 128K.
1.5 Mise en réseau
• Supporte Ethernet 10/100 Mb/s
• Supporte la clé électronique sans l LAN IEEE 802.11 b/g
• Supporte les modes Infrastructure et Ad-hoc
• Supporte le cryptage WEP64/128 et WPA-TKIP-PSK, WPA2-AES-PSK
• Supporte les paramètres Proxy
• Le système fournit un assistant de conguration sans l pour faciliter la mise en réseau sans l.
1.6 Autres
• Support deux réveils paramétrables
• Support la synchronisation temporelle (* disponible via le réseau)
• Support la mise à niveau du micrologiciel
Chapitre 2 Installation
2.1 Installation
Remarque : La tension de fonctionnement appropriée est 110 V~240 V CA/50-60 Hz Assurez-vous de
la tension de votre secteur avant de brancher l’appareil.
2.1.1 Connexion au réseau (LAN)
• Assurez-vous que l’environnement Internet est prêt et que les paramètres du réseau sont réglés
pour prendre en charge un réseau local (ADSL ou câble modem sont fortement recommandés).
• DHCP est le réglage réseau par défaut de votre Radio Internet. (Voir 11.6 Réseau, pour plus
d’informations sur les paramètres réseau)
Page 29
29
ADSL ou modem câblé
Routeur large bande
Radio Internet
PC (Serveur multimédia)
Ethernet
Ethernet
- Connectez l’appareil au routeur connecté à Internet comme illustré. Utilisez un câble réseau
standard.
Crossover
Radio Internet
PC (Serveur multimédia)
- Connectez l’appareil à un PC comme illustré s’il ne va être utilisé que pour écouter de la
musique stockée dans l’ordinateur. Utilisez un câble réseau croisé.
- Lorsque l’appareil est connecté de cette façon, vous ne pouvez qu’écouter de la musique
stockée dans l’ordinateur. Il faut qu’un logiciel spécialisé soit installé sur l’ordinateur. Voir la
section Serveur multimédia.
2.1.2 Installation d’un réseau sans l (WLAN) (réseau local sans l)
• Assurez-vous que l’environnement Internet est prêt et que les paramètres du réseau sont réglés.
• Insérez une clé sans l dans la Radio Internet (Voir 11.6 Réseau, pour plus d’informations sur les
paramètres réseau)
Clé sans l Radio Internet
PC (Serveur multimédia)
PC (Serveur multimédia)
Ethernet
ADSL ou modem câblé
Routeur large bande
sans l 802.11 b/g
- Branchez la clé sans l dans la prise réseau.
Page 30
30
Clé sans l
PC (Serveur multimédia)
Radio Internet
Clé sans l
- Vous pouvez connecter l’appareil sans l à l’ordinateur doté d’une carte réseau sans l.
- Lorsque l’appareil est connecté de cette façon, vous ne pouvez qu’écouter de la musique
stockée dans l’ordinateur. Il faut qu’un logiciel spécialisé soit installé sur l’ordinateur. Voir la
section Serveur multimédia.
2.2 Mise en marche de l’appareil pour la première fois
Lorsque vous allumez l’appareil pour la première fois il essaie immédiatement de rechercher l’adresse
IP. Si le réseau est connecté à Internet, l’appareil va se synchroniser avec l’heure du serveur puis
passe en mode veille. Généralement ce processus prend de 6 à 30 secondes.
2.3 World Station (Station Mondiale)
2.3.1 Ecouter la World Station
• Aller au menu [Main], choisissez [i.Radio] et appuyez sur ENTER/OK.
• Choisissez [World Station] et appuyez sur ENTER/OK.
• Faites déler les stations vers le haut ou le bas puis appuyez sur ENTER/OK pour écouter.
• La musique sera entendue lorsque la mise en tampon atteint 100%.
Remarque : Pour une recherche rapide des stations radio Internet, appuyez sur la touche Droite pour
passer des stations commençant par A aux stations commençant par B, C et ainsi de suite. Appuyez
sur la touche Gauche pour passer dans le sens inverse.
Tableau 2.3.1
Main
i.Radio >
USB >
>
→
i.Radio
Favorite >
World Station >
SHOUTCast
>
Sélectionnez i.Radio Choisissez World Station
Page 31

31
i.Radio
Africa >
Americas >
Asia
>
→
World Station
South Korea >
SriLanka >
Taiwan
>
Classées par zone Classées par pays
World Station
Africa >
Americas >
Asia
>
→
World Station
Caribbean >
Europe >
Middle East
>
Utilisez ◄ / ► pour rechercher
rapidement.
Les noms des stations changent dans
l’ordre alphabétique
1/1637
‘A’ NET STATION
.977 The Oldies Channel
007 Audio - #1 For The
→
1/999
‘A’ NET STATION
.977 The Oldies Channel
007 Audio - #1 For The
Appuyez sur la touche INFO Le nombre de stations sera afché
World Station
HitFM 90.1 Taiwan
National Education Radio 1
National Education
Radio 2
→
i.Radio
HitFM 90.1 Taiwan
WMA ,48 Kbps
Classées par ordre alphabétique Lecture
Page 32

32
2.4 Réseau
• Supporte LAN (Ethernet) et WLAN (clé sans l réseau 802.11b/g facultative)
• Supporte le cryptage sans l WEP64/128 et WPA-TKIP-PSK, WPA2-AES-PSK.
• Supporte l’adressage IP dynamique via DHCP (Dynamic Host Conguration Protocol) et l’adressage
IP statique. Ethernet et DHCP sont les paramètres par défaut.
• Supportes le mode Infrastructure et le mode Ad-hoc.
• Supporte UPnP.
• Détecte et fonctionne automatiquement dans un environnement LAN ou WLAN (LAN sans l).
2.4.1 Comprendre les états réseau du système
• L’icône de l’état de connexion réseau sera afché en haut de l’écran.
Table 2.4.1.1 Etat du LAN
Title
→
• Impossible de détecter le câble Ethernet.
Title
→
• Câble Ethernet détecté avec succès.
• Impossible d’obtenir des informations DHCP.
Title
→
• Câble Ethernet détecté avec succès.
• Obtention d’informations DHCP avec
succès.
Table 2.4.1.2 Etat WLAN
Title
→
• Impossible de détecter l’adaptateur USB
sans l.
Title
→
• Détection de l’adaptateur USB sans l avec
succès.
• Impossible d’obtenir des informations DHCP.
Title
→
• Détection de l’adaptateur USB sans l avec
succès.
• Obtention d’informations DHCP avec succès.
2.4.2 Conguration de la connexion sans l en mode infrastructure
1. Insérez l’adaptateur USB sans l dans le connecteur USB. (l’adaptateur USB sans l est facultatif)
2. Puis atteignez [Network] et appuyez sur la touche ENTER/OK.
3. Sélectionnez [Manual Setup] (conguration manuelle) et appuyez sur ENTER/OK.
4. Sélectionnez [Connect] puis appuyez sur ENTER/OK.
5. Suivez les étapes ci-dessous :
Page 33

33
Tableau 2.4.2
Network
Connect LAN
Wizard >
Manual Setup >
→
Network
Connect WLAN
Sélectionnez [Manual Setup]
(conguration manuelle) et appuyez
sur ENTER/OK.
Sélectionnez le mode [WLAN], par
exemple, puis choisissez [NEXT]
(suivant)
SSID
SSID Auto Search
→
Site Survey
AP01 75%
wireless 100%
Choisissez [NEXT] (suivant)
pour rechercher un point d’accès
disponible
Les points d’accès disponibles sont
listés en fonction de la puissance
de signal. Si un point d’accès est
protégé, il y aura le symbole d’un
verrou en face.
Encryption
Encryption Mode WPA2
Passphrase
>
→
Passphease
> 0 0 0 0 0 0 0 0 0 0 0
ENTER/OK: Next
Sélectionnez le mode [Encryption],
puis choisissez [NEXT] (suivant)
Entrez le mot de passe et appuyez
sur [ENTER/OK]
Page 34

34
Connect Mode
Connect Mode Infra
→
IP Setting
IP Source Dynamic
Sélectionnez le mode [Connect], puis
choisissez [NEXT] (suivant)
Sélectionnez [IP Source], puis
choisissez [NEXT] (suivant)
Proxy
Use Proxy No
→
Network Status
Config Wifi Module /
Sélectionnez [Use Proxy] puis
choisissez [OK]
Le système mémorisera tous les
paramètres de conguration
Network Status
Getting IP Address …
→
Network
Connect LAN
Wizard >
Manual Setup >
Connexion au point d’accès
sera afché si la connexion est
réussie
2.4.3 Conguration de la connexion sans l à l’aide de l’assistant sans l
1. insérez l’adaptateur USB sans l dans le connecteur USB. (l’adaptateur USB sans l est facultatif)
2. Puis atteignez [Network] et appuyez sur la touche ENTER/OK.
3. Sélectionnez [Connect] et changez [LAN] en [WLAN].
4. Sélectionnez [Wizard] puis appuyez sur ENTER/OK.
5. Atteignez un point d’accès auquel vous voulez vous connecter, puis appuyez sur ENTER/OK.
6. Si le point d’accès sélectionné est protégé, appuyez sur ENTER/OK pour sélectionner le point
d’accès protégé.
7. Pour entrer le mot de passe, utilisez les touches Haut/bas (ou touches numériques) pour changer
les caractères et utilisez les touches Gauche/Droite pour le majuscule.
Page 35

35
8. Une fois terminé, appuyez sur ENTER/OK.
9. L’icône sera afché en haut de l’écran si la conguration sans l est réussie.
Tableau 2.4.3
Network
Connect LAN
Wizard >
Manual Setup >
→
Network
Connect WLAN
Wizard >
Manual Setup >
Sélectionnez [Connect] et changez
[LAN] en [WLAN].
Sélectionnez [Wizard] puis appuyez sur
[ENTER/OK].
Wizard
Apo1 65%
D-LINK 71%
Default 88%
→
Passphease
> 0 0 0 0 0 0 0 0 0 0 0
ENTER/OK: Next
Les points d’accès disponibles et la
puissance de leur signal seront listés à
l’écran.
Entrez le mot de passe et appuyez sur
[ENTER/OK]
Apply ?
SSID: Penbex-MIS
Key:0000000000
→
Network
Connect LAN
Wizard >
Manual Setup >
Conrmer
sera afché si la connexion est
réussie
2.4.4 Entrée d’IP statique
1. Puis atteignez [Network] et appuyez sur la touche ENTER/OK.
2. Atteignez [IP Setting] puis appuyez sur ENTER/OK pour entrer.
3. Sélectionnez [IP Source] puis appuyez sur ENTER/OK pour changer [Dynamic] en [Static].
4. Atteignez [TCP/IP] puis appuyez sur ENTER/OK pour commencer à modier.
5. Utilisez les touches Haut/bas pour changer les caractères et utilisez les touches Gauche/Droite
pour le majuscule.
6. Une fois terminé, appuyez sur REC pour conrmer.
Page 36

36
Tableau 2.4.4
IP Setting
IP Source Dynamic
→
IP Setting
IP Source Manual
TCP/IP
>
DNS
>
Sélectionnez [IP Source] puis appuyez
sur [ENTER/OK]
Passez à [Manual]
IP Setting
IP Source Static
TCP/IP >
DNS >
→
TCP/IP
IP 192.169.001.100
Mask 255.255.255.000
GW 192.169.001.254
Sélectionnez [TCP/IP] puis appuyez sur
[ENTER/OK]
Appuyez sur [ENTER/OK] pour
commencer à taper.
Utilisez les touches Haut/bas (ou
touches numériques) et les touches
Gauche/Droite pour entrer l’IP.
Remarque : Si les valeurs IP (c’est-à-dire adresse IP, Subnet Mask (Masque de sous-réseau) ou
Gateway (Passerelle)) sont incorrectes, elles prennent automatiquement les valeurs par défaut.
TCP/IP
The IP Setting Value is
illegal ! Setting is
Changed to Default !
2.4.5 Entrée du DNS
1. Puis atteignez [Network] et appuyez sur la touche ENTER/OK.
2. Atteignez [IP Setting] puis appuyez sur ENTER/OK pour entrer.
3. Sélectionnez [DNS] puis appuyez sur [DNS].
4. Utilisez les touches Haut/bas pour changer les caractères et utilisez les touches Gauche/Droite
pour le majuscule.
5. Une fois terminé, appuyez sur ENTER/OK pour conrmer.
Page 37

37
Tableau 2.4.5
IP Setting
IP Source Dynamic
→
DNS
DNS1 168.095.001.001
DNS2 000.000.000.000
Sélectionnez [TCP/IP] puis appuyez sur
[ENTER/OK]
Utilisez les touches Haut/bas (ou
touches numériques) et les touches
Gauche/Droite pour entrer l’IP.
Consignes de sécurité :
Pour réduire le risque de choc électrique, ce produit ne doit être ouvert
que par un technicien qualié si une réparation s’impose. Débranchez
l’appareil et les autres équipements du secteur s’il y a un problème. Ne
pas exposer l’appareil à l’eau ni à l’humidité.
Entretien :
Ne nettoyez l’appareil qu’avec un chiffon sec. N’utilisez pas de solvants ou de produits abrasifs.
Garantie :
Aucune garantie ou responsabilité ne sera acceptée en cas de modication et/ou de transformation du
produit ou en cas de dommages provoqués par une utilisation incorrecte de l’appareil.
Généralités :
Le design et les caractéristiques techniques sont sujets à modication sans notication préalable.
Tous les logos de marques et noms de produits sont des marques déposées ou immatriculées dont
leurs détenteurs sont les propriétaires et sont donc reconnues comme telles dans ce documents.
Conservez ce manuel et l’emballage pour toute référence ultérieure.
Attention :
Ce symbole gure sur l’appareil. Il signie que les produits électriques et électroniques ne
doivent pas être jetés avec les déchets domestiques. Le système de collecte est différent
pour ce genre de produits.
RISQUE DE CHOC ELECTRIQUE
NE PAS OUVRIR
ATTENTION
Page 38

38
NEDERLANDS
Afstandsbediening
VOLUME “+”
VOLUME “-”
DEMP/SNOOZE
A-B HERHAAL
INFO
ALARM
GEHEUGEN
OPNAME
MENU
STAND-BY
HERHAAL
CIJFERTOETSEN
TERUG
NAVIGATIETOETSEN
(OMHOOG/OMLAAG/
LINKS/RECHTS)
Vooraanzicht
START/PAUZE
MENU
STAND-BY
NAVIGATIETOETSEN
ENTER
AFSTANDSSENSOR
VOLUME +/-
USB INGANG
TERUG
REC
GEHEUGEN
Achteraanzicht
DC12V/2A
VOEDING
AUX UIT
AAN/UITSCHAKELAAR
Ethernet poort
AUX IN
Page 39

39
Page 40

40
Hoofdstuk 1 Overzicht
1.1 Inleiding
Deze internet radio is een digitaal audio afspeelapparaat met geïntegreerd radiosysteem dat
functioneert via een netwerkverbinding. Het systeem kan MP3/WMA audiobestanden, USB apparatuur
en internet radioservices afspelen, zoals World Station en SHOUTCast welke meer dan 15.000
internet radiostations aanbieden. De internet radio ondersteunt tevens audio streaming via UPnP
Media Servers.
1.2 Audiobronnen
• Ondersteunt MP3/ Windows Media® audiobestanden (bekend als WMA)(Inclusief ID3V1 ,2)
• Ondersteunt statische en gesynchroniseerde songteksten (.txt /.lrc /.smi)
• Ondersteunt USB Flash drive
• SHOUTCast Internet Radio (http://www.shoutcast.com)
• Ondersteunt Podcasts
• Ondersteunt AUX
1.3 Geheugen
• Ondersteunt standaard USB Massa Opslagapparatuur (FAT16/32).
1.4 Opname
• Ondersteunt opname van audiogegevens van internet radiostations (World Station / SHOUTCast)
en overdracht van audiogegevens in 128K MP3 formaat.
1.5 Netwerkinrichting
• Ondersteunt Ethernet 10/100 Mbps
• Ondersteunt Draadloze LAN IEEE 802.11 b/g dongle
• Ondersteunt Infrastructuur/Ad-hoc
• Ondersteunt WEP64/128 en WPA-TKIP-PSK, WPA2-AES-PSK encryptie
• Ondersteunt Proxy Instellingen
• Het systeem heeft een draadloze installatie wizard voor het eenvoudig opzetten van een netwerk.
1.6 Overige
• Ondersteunt instellingen voor twee alarmklokken
• Ondersteunt technologie voor tijdsynchronisatie (* indien netwerk beschikbaar)
• Ondersteunt rmware upgrades
Hoofdstuk 2 Installatie
2.1 Installatie
OPMERKING: De juiste spanning voor de Internet Radio is AC 110V~240V/50-60Hz. Controleer of dit
overeenkomt met uw plaatselijke spanning voordat u het apparaat aansluit.
2.1.1 Installatie op een netwerk (LAN)
• Controleer of de internetomgeving gereed is en de netwerkinstellingen beschikbaar zijn (ADSL of
kabel modems worden sterk aangeraden).
• De standaard netwerkinstelling van uw Internet Radio is DHCP (zie voor meer netwerkinstellingen
a.u.b. 11.6 Netwerk).
Page 41

41
ADSL of Kabel Modem
Breedband Router
Internet Radio
PC (Media Server)
Ethernet
Ethernet
- Sluit het apparaat aan op een router met internetverbinding aan de hand van de afbeelding. Gebruik
hiervoor een standaard netwerkkabel.
Link
Internet Radio
PC (Media Server)
- Sluit het apparaat aan op een PC volgens de afbeelding als u het alleen wilt gebruiken om
naar muziek te luisteren die is opgeslagen op de computer. Gebruik hiervoor een gekruiste
netwerkkabel.
- - When the device is connected like this you can only listen to music which is stored on the
computer. The computer must have special software installed. See section Media Server.
2.1.2 Installatie op een draadloos netwerk (WLAN)
• Controleer of de internetomgeving gereed is en de netwerkinstellingen beschikbaar zijn.
• Steek de Wi Dongle in de Internet Radio (zie voor meer instellingen a.u.b. 11.6 Netwerk).
Wi Dongle Internet Radio
PC (Media Server)
PC (Media Server)
Ethernet
ADSL of Kabel Modem
802.11 b/g Draadloze
Breedband Router
- Sluit de draadloze netwerkdongle aan op de ingang.
Page 42

42
Wi Dongle
PC (Media Server)
Internet Radio
Wi Dongle
- U kunt het apparaat draadloos met een computer verbinden m.b.v. een draadloze netwerkkaart.
- Wanneer het apparaat op deze manier is verbonden, kunt u alleen naar muziek luisteren die is
opgeslagen in de computer. Speciale software moet hiervoor op de computer geïnstalleerd zijn
(zie paragraaf Media Server).
2.2 De apparatuur voor het eerst starten
Wanneer u de apparatuur voor het eerst inschakelt, zal de stereo automatisch proberen een IP
adres te vinden. Als het netwerk verbonden is met het Internet, zal de apparatuur tevens de tijd
synchroniseren met een tijdserver en vervolgens in stand-by modus schakelen. Het neemt gewoonlijk
6-30 seconden in beslag om dit proces geheel af te ronden.
2.3 World Station
2.3.1 Naar World Station luisteren
• Ga naar [Hoofd] menu, selecteer [i.Radio] en druk op de ENTER/OK toets.
• Selecteer [World Station] en druk vervolgens op de ENTER/OK toets.
• Scroll omhoog/omlaag naar een station en druk vervolgens op de ENTER/OK toets om af te spelen.
• U zult de muziek horen nadat het bufferproces 100% bereikt.
Opmerking: Om snel te zoeken naar een internet radiostation, kunt u op de Rechts toets drukken om
van radiostations beginnend met letter A naar letter B te springen, letter B naar letter C, enz. Druk op
de Links toets om terug te springen.
Tabel 2.3.1
Main
i.Radio >
USB >
>
→
i.Radio
Favorite >
World Station >
SHOUTCast
>
Selecteer i.Radio Selecteer World Station
Page 43

43
i.Radio
Africa >
Americas >
Asia
>
→
World Station
South Korea >
SriLanka >
Taiwan
>
Ingedeeld op Gebied Ingedeeld op Land
World Station
Africa >
Americas >
Asia
>
→
World Station
Caribbean >
Europe >
Middle East
>
Druk op de◄ / ► toets om snel te
zoeken
De stationsnaam verandert
alfabetisch
1/1637
‘A’ NET STATION
.977 The Oldies Channel
007 Audio - #1 For The
→
1/999
‘A’ NET STATION
.977 The Oldies Channel
007 Audio - #1 For The
Druk op de INFO toets
Het aantal stations wordt op het
scherm weergegeven
Page 44

44
World Station
HitFM 90.1 Taiwan
National Education Radio 1
National Education
Radio 2
→
i.Radio
HitFM 90.1 Taiwan
WMA ,48 Kbps
Ingedeeld op alfabetische volgorde Afspelen
2.4 Netwerk
• Ondersteunt LAN (Ethernet) en WLAN (802.11b/g wi dongle is optioneel)
• Ondersteunt WiFi Encryptie WEP64/128, WPA-TKIP-PSK, en WPA2-AES-PSK.
• Ondersteunt dynamische IP via DHCP (Dynamische Host Conguratie Protocol) en statische IP.
Standaard instelling is Ethernet en DHCP.
• Ondersteunt Infrastructuurmodus en Ad-hoc modus.
• Ondersteunt Upnp.
• Auto-detectie en auto-start LAN of WLAN (draadloze LAN) omgeving.
2.4.1 Uitleg over netwerkstatussen op het systeem
• Het statusicoontje van de netwerkverbinding wordt bovenin het scherm weergegeven.
Tabel 2.4.1.1 - LAN Status
Title
→
• Herkenning van de Ethernet kabel is mislukt.
Title
→
• Herkenning van de Ethernet kabel is gelukt.
• Oproepen van beschikbare DHCP informatie
is mislukt.
Title
→
• Herkenning van de Ethernet kabel is gelukt.
• Oproepen van beschikbare DHCP informatie
is gelukt.
Tabel 2.4.1.2 - WLAN Status
Title
→
• Herkenning van de USB WiFi adapter is
mislukt.
Title
→
• Herkenning van de USB WiFi adapter is gelukt.
• Oproepen van beschikbare DHCP informatie
is mislukt.
Title
→
• Herkenning van de USB WiFi adapter is
gelukt.
• Oproepen van beschikbare DHCP informatie
is gelukt.
Page 45

45
2.4.2 De WiFi verbinding instellen in infrastructuurmodus
1. Steek een WiFi USB adapter in de USB aansluiting (de WiFi USB adapter is optioneel).
2. Scroll vervolgens omhoog/omlaag naar [Netwerk] en druk op de ENTER/OK toets.
3. Selecteer [Handmatige Instelling] en druk op de ENTER/OK knop.
4. Selecteer [Verbinden]. en druk op de ENTER/OK knop.
5. Volg hierna a.u.b. de onderstaande stappen:
Tabel 2.4.2
Network
Connect LAN
Wizard >
Manual Setup >
→
Network
Connect WLAN
Selecteer [Handmatige Instelling] en
druk op de [ENTER/OK] toets
Selecteer bijv. [WLAN] modus en kies
vervolgens [VOLGENDE]
SSID
SSID Auto Search
→
Site Survey
AP01 75%
wireless 100%
Selecteer [VOLGENDE] om naar een
beschikbaar TP te zoeken
Beschikbare TP’s staan op volgorde
van signaalsterkte. Als een TP
voorzien is van encryptie, wordt het
gemarkeerd met een slotsymbooltje.
Encryption
Encryption Mode WPA2
Passphrase
>
→
Passphease
> 0 0 0 0 0 0 0 0 0 0 0
ENTER/OK: Next
Selecteer [Encrytie] modus en kies
vervolgens [VOLGENDE]
Voer de encryptiecode in en druk
vervolgens op [ENTER/OK]
Page 46

46
Connect Mode
Connect Mode Infra
→
IP Setting
IP Source Dynamic
Selecteer [Verbinden] modus en kies
vervolgens [VOLGENDE]
Selecteer [IP Bron] en kies vervolgens
[VOLGENDE]
Proxy
Use Proxy No
→
Network Status
Config Wifi Module /
Selecteer [Gebruik Proxy] en
selecteer vervolgens [OK]
Het systeem zal alle conguraties
opslaan
Network Status
Getting IP Address …
→
Network
Connect LAN
Wizard >
Manual Setup >
Start verbinding met het TP
zal verschijnen na een geslaagde
verbinding
2.4.3 De WiFi verbinding instellen via WiFi wizard
1. Steek een WiFi USB adapter in de USB aansluiting (de WiFi USB adapter is optioneel).
2. Scroll vervolgens omhoog/omlaag naar [Netwerk] en druk op de ENTER/OK toets.
3. Selecteer [Verbinden] en wissel [LAN] naar [WLAN].
4. Selecteer [Wizard] en druk vervolgens op de ENTER/OK toets.
5. Scroll omhoog/omlaag naar het gewenste toegangspunt waarmee u wilt verbinden en druk
vervolgens op de ENTER/OK toets.
6. Als het door u geselecteerde toegangspunt beveiligd is, kunt u op de ENTER/OK toets drukken om
het beveiligde TP te selecteren.
Page 47

47
7. U kunt het encryptiewachtwoord invoeren door op de OMHOOG/OMLAAG toets (of cijfertoetsen)
te drukken om van karakter te wisselen en de LINKS/RECHTS toets gebruiken om de cursor te
verplaatsen.
8. Druk op ENTER/OK na de instellingen te voltooien.
9. Het icoontje zal bovenin het scherm verschijnen na een geslaagde draadloze instelling.
Tabel 2.4.3
Network
Connect LAN
Wizard >
Manual Setup >
→
Network
Connect WLAN
Wizard >
Manual Setup >
Selecteer [Verbinden] en wissel [LAN]
naar [WLAN].
Selecteer [Wizard] en druk op de
[ENTER/OK] toets
Wizard
Apo1 65%
D-LINK 71%
Default 88%
→
Passphease
> 0 0 0 0 0 0 0 0 0 0 0
ENTER/OK: Next
Alle beschikbare TP’s met
signaalsterkte worden op het scherm
getoond.
Voer de encryptiecode in en druk
vervolgens op [ENTER/OK]
Apply ?
SSID: Penbex-MIS
Key:0000000000
→
Network
Connect LAN
Wizard >
Manual Setup >
Bevestiging
zal verschijnen na een geslaagde
verbinding
2.4.4 Statische IP invoeren
1. Scroll omhoog/omlaag naar [Netwerk] en druk op de ENTER/OK toets.
2. Scroll omhoog/omlaag naar [IP Instellingen] en druk vervolgens op de ENTER/OK toets om te
openen.
3. Selecteer [IP Bron] en druk op de ENTER/OK toets om [Dynamisch] te veranderen in [Statisch].
4. Scroll omhoog/omlaag naar [TCP/IP] en druk op de ENTER/OK toets om te beginnen met bewerken.
Page 48

48
5. Druk op OMHOOG/OMLAAG om van karakter te wisselen en op LINKS/RECHTS om de cursor te
verplaatsen.
6. Druk om alles af te ronden, ter bevestiging op de REC toets.
Tabel 2.4.4
IP Setting
IP Source Dynamic
→
IP Setting
IP Source Manual
TCP/IP
>
DNS
>
Selecteer [IP Bron] en druk vervolgens
op [ENTER/OK]
Wissel naar [Handmatig]
IP Setting
IP Source Static
TCP/IP >
DNS >
→
TCP/IP
IP 192.169.001.100
Mask 255.255.255.000
GW 192.169.001.254
Selecteer [TCP/IP] en druk op de
[ENTER/OK] toets
Druk op de [ENTER/OK] toets om het
invoeren te starten. Gebruik OMHOOG/
OMLAAG (of de cijfertoetsen) en
vervolgens LINKS/RECHTS om de IP in
te voeren.
OPMERKING: Indien de IP instelwaarde (inclusief IP, Subnet Mask of Gateway) illegaal is, zal de IP
instelling veranderen in de standaard waarde.
TCP/IP
The IP Setting Value is
illegal ! Setting is
Changed to Default !
2.4.5 DNS invoeren
1. Scroll omhoog/omlaag naar [Netwerk] en druk op de ENTER/OK toets.
2. Scroll omhoog/omlaag naar [IP Instellingen] en druk vervolgens op de ENTER/OK toets om te
openen.
3. Selecteer [DNS] en druk vervolgens op de ENTER/OK toets.
Page 49

49
4. Gebruik de OMHOOG/OMLAAG toets om van karakter te wisselen en gebruik vervolgens de
LINKS/RECHTS toets om de cursor te verplaatsen.
5. Druk om alles af te ronden, ter bevestiging op de ENTER/OK toets.
Tabel 2.4.5
IP Setting
IP Source Dynamic
→
DNS
DNS1 168.095.001.001
DNS2 000.000.000.000
Selecteer [TCP/IP] en druk op de
[ENTER/OK] toets
Druk op OMHOOG/OMLAAG (of de
cijfertoetsen) en vervolgens op LINKS/
RECHTS om de IP in te voeren
Veiligheidsvoorzorgsmaatregelen:
Om het risico op elektrische schokken te voorkomen mag dit product
ALLEEN worden geopend door een erkende technicus wanneer er
onderhoud nodig is. Koppel het product los van de elektrische voeding en van andere apparatuur als
zich problemen voordoen. Stel het product niet bloot aan water of vocht.
Onderhoud:
Uitsluitend reinigen met een droge doek. Gebruik geen reinigingsmiddelen of schuurmiddelen.
Garantie:
Voor wijzigingen en veranderingen aan het product of schade veroorzaakt door een verkeerd gebruik
van dit product, kan geen aansprakelijkheid worden geaccepteerd. Tevens vervalt daardoor de
garantie.
Algemeen:
Wijziging van ontwerp en specicaties zonder voorafgaande mededeling onder voorbehoud.
Alle logo’s, merken en productnamen zijn handelsmerken of geregistreerde handelsmerken van de
respectievelijke eigenaren en worden hierbij als zodanig erkend.
Bewaar deze gebruiksaanwijzing voor latere raadpleging.
Let op:
Dit product is voorzien van dit symbool. Dit symbool geeft aan dat afgedankte elektrische en
elektronische producten niet met het gewone huisafval verwijderd mogen worden. Voor dit
soort producten zijn er speciale inzamelingspunten.
GEVAAR VOOR
ELEKTRISCHE SCHOK
NIET OPENEN
LET OP:
Page 50

50
ITALIANO
Telecomando
AUMENTA IL VOLUME
ABBASSA IL VOLUME
MUTO – SNOOZE
RIPETI DA A a B
INFORMAZIONI
SVEGLIA
MEMORIA
REGISTRA
MENÙ
STAND BY
RIPETI
TASTI NUMERICI
INDIETRO
TASTI DIREZIONE
(SU/GIÙ/DESTRA/SINISTRA)
Visa frontale
PLAY/PAUSA
MENÙ
STANDBY
TASTI DIREZIONE
INVIO
SENSORE DEL TELECOMANDO
ALZA/ABBASSA VOLUME
PRESA USB
INDIETRO
REGISTRA
MEMORIA
Vista posteriore
PRESA ALIMENTATORE 12V/2A
USCITA AUX
ACCENSIONE/SPEGNIMENTO
Porta ethernet
ENTRATA AUX
Page 51

51
Page 52

52
Capitolo 1 Panoramica
1.1 Introduzione
La Internet Radio è un sistema radio integrato con la riproduzione di audio digitale che lavora con la
connessione internet.. Il sistema è in grado di riprodurre les audio MP3/WMA, le da dispositivi USB
e servizi di radio on line come World Station e SHOUTCast che forniscono oltre 15,000 stazioni radio
on line.La Internet Radio supporta anche l’audio in streaming UPnP Media Server.
1.2 Sorgenti Audio
• Supporta i le audio MP3/ Windows Media® (conosciuti come WMA)(incluso ID3V1 ,2)
• Supporta testi statici e testi sincronizzati (.txt /.lrc /.smi)
• Supporta le memorie ash USB
• SHOUTCast Internet Radio (http://www.shoutcast.com)
• Supporta Podcast
• Supporta AUX
1.3 Archiviazione
• Supporta dispositivi di archiviazione di massa USB (FAT16/32).
1.4 Registrazione
• Possibilità di registrare dati audio da stazioni radio on line (World Station / SHOUTCast) e di
trasferire i dati audio in formato MP3 a 128K
1.5 Collegamenti
• Supporta Ethernet 10/100 Mbps
• Supporta la Wireless LAN IEEE 802.11 b/g dongle
• Supporta le modalità Infrastructure e Ad-Hoc
• Supporta cifratura WEP64/128 e WPA-TKIP-PSK, WPA2-AES-PSK encryption
• Supporta congurazione Proxy
• Il sistema fornisce un programma di aiuto all’installazione wireless per semplicare la
congurazione WI-FI.
1.6 Altro
• Supporta due congurazioni di sveglia
• Supporta tecnologia di sincronia fuso orario (* Con rete disponibile)
• Supporta aggiornamenti del rmware
Capitolo 2 Installazione
2.1 Installazione
NOTA: Il voltaggio corretto per la Internet Radio è AC 110V~240V/50-60Hz. Assicuratevi che
corrisponda al voltaggio della vostra zona prima di collegare l’unità alla rete elettrica
2.1.1 Installare la rete (LAN)
• Assicuratevi che internet sia acceso e la congurazione di rete sia disponibile. (è caldamente
raccomandato l’uso dell’ADSL o di un modem via cavo).
• La congurazione di base della rete della vostra Internet Radio è DHCP. (Per maggiori informazioni
sulle congurazioni delle connessioni, controllate il capitolo 11.6 Reti)
Page 53

53
ADSL o Modem via cavo
Router di banda larga
Internet Radio
PC (Media Server)
Ethernet
Ethernet
- Connettete il dispositivo ad un router connesso ad internet come da gura. Usate un cavo rete
standard.
Cavo rete Incrociato
Internet Radio
PC (Media Server)
- Connettete il dispositivo ad un PC come da gura se avete intenzione di usarlo solo per
ascoltare la musica archiviata nel PC. Usate un cavo di rete incrociato.
- Quando il dispositivo è connesso in questo modo potrete ascoltare solo musica archiviata nel
computer. Il computer deve avere installato un software apposito. Vedi sezione Media Server.
2.1.2 Installazione di una rete Wi.FI (WLAN)
• Assicuratevi che internet sia acceso e la congurazione di rete sia disponibile.
• Collegate l’antenna Wi-Fi alla Internet Radio (Per maggiori informazioni e congurazione, vedete
sezione 11.6 Reti)
Antenna WiFI Internet Radio
PC (Media Server)
PC (Media Server)
Ethernet
ADSL o modem via cavo
Router a banda larga
wireless 802.11b/g
- Connettete l’antenna wireless alla presa.
Page 54

54
Antenna WiFI
PC (Media Server)
Internet Radio
Antenna WiFI
- Potete connettere il dispositivo wireless ad un computer tramite una scheda di rete Wi.Fi
- Quando il dispositivo è connesso in questo modo potrete ascoltare solo musica archiviata nel
computer. Il computer deve avere installato un software apposito. Vedi sezione Media Server.
2.2 Avviare il dispositivo per la prima volta.
Quando accenderete per la prima volta l’apparecchio, lo stereo cercherà automaticamente un indirizzo
IP. Se la rete è connessa ad internet, il dispositivo sincronizzerà il fuso orario con quello del server e
quindi passerà alla modalità stand-by. Di solito impiega dai 6 ai 30 secondi per nalizzare il processo.
2.3 World Station
2.3.1 Ascoltare World Station
• Passate al [Main] menù, scegliete [i.Radio] e premete il tasto ENTER/OK.
• Selezionate [World Station] quindi premete il tasto ENTER/OK.
• Scorrete in alto o in basso no a selezionare una stazione, quindi premete ENTER/OK per
ascoltare.
• Sentirete la musica dopo che la memoria di buffer avrà raggiunto il 100%.
Nota: Per una ricerca rapida di una stazione radio on line, premete il pulsante Destro per saltare dalle
stazioni radio che iniziano con A a quelle che iniziano con B. a quelle che iniziano con C e così via.
Premete il pulsante sinistro per tornare indietro.
Tavola 2.3.1
Main
i.Radio >
USB >
>
→
i.Radio
Favorite >
World Station >
SHOUTCast
>
Selezionate i.Radio Scegliete World Station
Page 55

55
i.Radio
Africa >
Americas >
Asia
>
→
World Station
South Korea >
SriLanka >
Taiwan
>
Categorizzato per Area Categorizzato per nazione
World Station
Africa >
Americas >
Asia
>
→
World Station
Caribbean >
Europe >
Middle East
>
Premete i tasti ◄ / ► per fare la
ricerca veloce
I nomi delle stazioni sono ordinati
alfabeticamente.
1/1637
‘A’ NET STATION
.977 The Oldies Channel
007 Audio - #1 For The
→
1/999
‘A’ NET STATION
.977 The Oldies Channel
007 Audio - #1 For The
Premete il tasto INFO
Il numero totale delle stazioni verrà
visualizzato sullo schermo.
Page 56

56
World Station
HitFM 90.1 Taiwan
National Education Radio 1
National Education
Radio 2
→
i.Radio
HitFM 90.1 Taiwan
WMA ,48 Kbps
Riorganizzaro in ordine alfabetico In Riproduzione
2.4 Rete
• Supporta la rete LAN (Ethernet) and e Wi-Fi. (l’antenna wi. 802.11b/g è opzionale)
• Supporta la crittograa Wi-Fi WEP64/128, WPA-TKIP-PSK, e WPA2-AES-PSK.
• Supporta gli IP dinamici via DHCP (Dynamic Host Conguration Protocol) and gli IP statici. La
congurazione di base è via Ethernet e DHCP.
• Supporta modalità Infrastructure e modalità Ad-hoc.
• Supporta Upnp.
• Riconoscimento e avvio automatico degli ambienti LAN e Wi-Fi (wireless LAN) .
2.4.1 Comprendere gli stati di rete del sistema
• L’icona di status della connettività di rete apparirà nella parte alta dello schermo.
Tavola 2.4.1.1 - Status della LAN
Title
→
• Riconoscimento cavo ethernet fallito.
Title
→
• Riconoscimento del cavo ethernet avvenuto
con successo
• Informazioni DHCP non disponibili.
Title
→
• Riconoscimento del cavo ethernet avvenuto
con successo
• Informazioni DHCP disponibili
Tavola 2.4.1.2 - Status WI-Fi
Title
→
• Non è stato in grado di rilevare l’adattatore
Wi-Fi USB.
Title
→
• È stato in grado di rilevare l’adattatore Wi-Fi
USB.
• Non ha reso disponibili le informazioni DHCP.
Title
→
• È stato in grado di rilevare l’adattatore Wi-Fi
USB.
• Ha reso disponibili le informazioni DHCP.
Page 57

57
2.4.2 Connettività wi- in modalità infrastruttura
1. Inserite un adattatore USB Wi-FI nella presa USB (l’adattatore Wi-Fi USB è opzionale).
2. Quindi scorrete in alto o in basso no a visualizzare [Network] (Rete) e premete ENTER/OK.
3. Selezionate [Manual Setup] (congurazione manuale) e premete ENTER/OK
4. Selezionate [Connect](connetti) e premete ENTER/OK
5. Seguite dunque i seguenti passi:
Tavola 2.4.2
Network
Connect LAN
Wizard >
Manual Setup >
→
Network
Connect WLAN
Selezionate [Manual Setup] e
premete [ENTER/OK]
Selezionate la modalità [WLAN]
(Wi-Fi), per esempio, quindi scegliete
[NEXT] (prossimo)
SSID
SSID Auto Search
→
Site Survey
AP01 75%
wireless 100%
Scegliete [NEXT] per cercare
qualunque AP disponibile
Gli Access Point disponibili sono
elencate per forza di segnale. Se un
Access Point richiede la crittograa
dei dati, sarà segnalato dal simbolo
del lucchetto.
Encryption
Encryption Mode WPA2
Passphrase
>
→
Passphease
> 0 0 0 0 0 0 0 0 0 0 0
ENTER/OK: Next
Selezionate la modalità [Encryption]
(crittograa) e scegliete [NEXT]
Digitate la password e quindi premete
[ENTER/OK]
Page 58

58
Connect Mode
Connect Mode Infra
→
IP Setting
IP Source Dynamic
Selezionate la modalità [Connect]
(connessione) e scegliete [NEXT]
Selezionate la sorgente IP [IP Source]
e scegliete [NEXT]
Proxy
Use Proxy No
→
Network Status
Config Wifi Module /
Selezionate [Use Proxy] (usa Proxy)
quindi premete [OK]
Il sistema salverà tutte le
congurazioni
Network Status
Getting IP Address …
→
Network
Connect LAN
Wizard >
Manual Setup >
Connessione all’Access Point in corso
comparirà se la connessione è
avvenuta con successo.
2.4.3 Congurare la connettività Wi-FI con il Wi-Fi Wizard
1. Inserite un adattatore Wi-FI USB nel connettore USB. l’adattatore Wi-Fi USB è opzionale).
2. Quindi scorrete in alto o in basso no a visualizzare [Network] (Rete) e premete ENTER/OK
3. Selezionate [Connect] e passate da [LAN] a [WLAN] (Wi-).
4. Selezionate [Wizard] e quindi premete ENTER/OK.
5. Scorrete in alto o in basso no all’access point a cui volete connettervi, e quindi premete il tasto
ENTER/OK.
6. Se l’access point a cui volete connettervi è protetto, premete ENTER/OK per selezionare l’Access
Point protetto.
Page 59

59
7. Per inserire la password, premete il tasto UP/DOWN (o i tasti numerici) per cambiare i caratteri e
premete il tasto LEFT/RIGHT per passare al carattere successivo.
8. Premete ENTER/OK dopo aver completata la congurazione.
9. l’icona visualizzata sulla parte alta dello schermo se la congurazione W-Fi è avvenuta con
successo.
Tavola 2.4.3
Network
Connect LAN
Wizard >
Manual Setup >
→
Network
Connect WLAN
Wizard >
Manual Setup >
Selezionate [Connect] e passate da
[LAN] a [WLAN] (Wi-Fi).
Selezionate [Wizard] e premete
[ENTER/OK]
Wizard
Apo1 65%
D-LINK 71%
Default 88%
→
Passphease
> 0 0 0 0 0 0 0 0 0 0 0
ENTER/OK: Next
Tutti gli Access Point disponibili e la
forza del segnale saranno visualizzati
sullo schermo.
Inserite la password e premete [ENTER/
OK]
Apply ?
SSID: Penbex-MIS
Key:0000000000
→
Network
Connect LAN
Wizard >
Manual Setup >
Confermare
l’icona sarà visualizzata se la
connessione avviene con successo
2.4.4 Inserire un IP Statico
1. Scorrete sino a [Network] (rete) e premete il tasto ENTER/OK.
2. Scorrete su o giù no a [IP Setting] e quindi premete ENTER/OK per accedere al menù.
3. Selezionate [IP Source] (sorgente IP) e premete ENTER/OK per passare da [Dynamic] (dinamico)
a [Static] (statico).
4. Scorrete su o giù no a [TCP/IP] e premete ENTER/OK per iniziare la congurazione.
Page 60

60
5. Premete i tasti UP/DOWN per cambiare i caratteri e premete LEFT/RIGHT per passare allo slot
successivo..
6. Dopo aver nito, premete il tasto REC per confermare.
Tavola 2.4.4
IP Setting
IP Source Dynamic
→
IP Setting
IP Source Manual
TCP/IP
>
DNS
>
Selezionate [IP Source] e quindi
premete [ENTER/OK]
Passate a [Manual] (manuale)
IP Setting
IP Source Static
TCP/IP >
DNS >
→
TCP/IP
IP 192.169.001.100
Mask 255.255.255.000
GW 192.169.001.254
Selezionate [TCP/IP] e premete
[ENTER/OK]
Premete [ENTER/OK] per iniziare a
digitare. Usate i tasti UP/DOWN (o i
tasti numerati) quindi LEFT/RIGHT per
inserire l’ IP.
NOTA: Quando il valore della congurazione IP (inclusi IP, Subnet Mask, o il Gateway) non è valido,
La congurazione IP passerà automaticamente al valore di partenza.
TCP/IP
The IP Setting Value is
illegal ! Setting is
Changed to Default !
Page 61

61
2.4.5 Inserire il DNS
1. Scorrete su o giù no a [Network] e premete ENTER/OK.
2. Scorrete su o giù no a [IP Setting] e premete ENTER/OK per accedere al menù.
3. Selezionate [DNS] e premete ENTER/OK.
4. Premete il pulsante UP/DOWN per cambiare i caratteri, quindi premete il pulsante LEFT/RIGHT per
passare allo slot successivo.
5. Dopo aver nito, premete il pulsante ENTER/OK per confermare.
Tavola 2.4.5
IP Setting
IP Source Dynamic
→
DNS
DNS1 168.095.001.001
DNS2 000.000.000.000
Selezionate [TCP/IP] e premete
[ENTER/OK]
Premete i tasti UP/DOWN (o i tasti
numerici) e quindi i tasti LEFT/RIGHT
per inserire il DNS
Precauzioni di sicurezza:
Per ridurre il rischio di shock elettrico, questo prodotto dovrebbe essere
aperto SOLO da un tecnico autorizzato quando è necessario ripararlo.
Scollegare il prodotto dall’alimentazione e da altri apparecchi se dovesse esserci un problema. Non
esporre il prodotto ad acqua o umidità.
Manutenzione:
Pulire solo con un panno asciutto. Non utilizzare solventi detergenti o abrasivi.
Garanzia:
Non sarà accettata alcuna garanzia o responsabilità in relazione a cambiamenti e modiche del
prodotto o a danni determinati dall’uso non corretto del prodotto stesso.
Generalità:
Il design e le caratteristiche tecniche sono soggetti a modica senza necessità di preavviso.
Tutti i marchi a logo e i nomi di prodotto sono marchi commerciali o registrati dei rispettivi titolari e
sono riconosciuti come tali in questo documento.
Tenere questo manuale e la confezione per riferimento futuro.
Attenzione:
Il prodotto è contrassegnato con questo simbolo, con il quale si indica che i prodotti elettrici
ed elettronici non devono essere gettati insieme ai riuti domestici. Per questi prodotti esiste
un sistema di raccolta differenziata.
RISCHIO DI SCOSSE ELETTRICHE
NON APRIRE
ATTENZIONE
Page 62

62
ESPAÑOL
Mando a distancia
VOLUMEN “+”
VOLUMEN “-”
SILENCIO/REACTIVAR ALARMA
LAZO A-B
INFO
ALARMA
MEMORIA
GRABAR
MENÚ
EN ESPERA
REPETIR
TECLAS NUMÉRICAS
ATRÁS
TECLAS DE DIRECCIÓN
(ARRIBA/ABAJO/
IZQUIERDA/DERECHA)
Vista Frontal
REPRODUCIR/
PAUSA
MENÚ
EN ESPERA
TECLAS DE DIRECCIÓN
ACEPTAR
SENSOR REMOTO
LAUTSTÄRKE +/-
TOMA USB
ATRÁS
GRABAR
MEMORIA
Vista trasera
ALIMENTACIÓN ELÉCTRICA
12V CC/2A
SALIDA AUX
ENCENDIDO/APAGADO
Puerto Ehernet
ENTRADA AUX
Page 63

63
Page 64

64
Capítulo 1 Vista general
1.1 Introducción
La Radio Internet es un sistema radio integrado con reproducción de audio digital que funciona con
conectividad de red. El sistema pude reproducir archivos de audio MP3/WMA, dispositivos USB y
servicios de radio por Internet tales como World Station y SHOUTCast que proporcionan más de
15.000 estaciones radio por Internet. La Radio Internet también soporta la reproducción de audio
(streaming) a través de un servidor multimedia UPnP.
1.2 Fuentes de audio
• Soporta archivos de audio MP3/ Windows Media® (conocidos como WMA) (ID3V1 ,2 incluidos)
• Soporta letras de música estáticas y sincronizadas (.txt /.lrc /.smi)
• Soporta unidades Flash USB
• Radio Internet SHOUTCast (http://www.shoutcast.com)
• Soporta Podcast
• Soporta AUX
1.3 Almacenamiento
• Soporta dispositivos de almacenamiento masivo USB estándar (FAT 16/32).
1.4 Grabación
• Sea capaz de grabar datos de audio desde estaciones radio en Internet (World Station /
SHOUTCast) y transferir datos de audio en formato MP3 de 128K.
1.5 Funcionamiento en Red
• Soporta Ethernet 10/100 Mbps
• Soporta llave electrónica inalámbrica LAN IEE 802.11 b/g
• Soporta infraestructura / Ad-hoc
• Soporta codicación WEP64/128 y WPA-TKIP-PSK, WPA2-AES-PSK
• Soporta conguración Proxy
• El sistema proporciona un asistente de conguración inalámbrica para facilitar la conguración de
red inalámbrica.
1.6 Otros
• Soporta dos ajustes de hora de alarma (despertador)
• Soporta tecnología de sincronización de hora (*disponible por la Red)
• Soporta actualización de Firmware
Capítulo 2 Instalación
2.1 Instalación
NOTA: La tensión adecuada para la Radio Internet es de 110V~240V CA/50-60Hz. Compruebe la
tensión de la corriente en su área antes de conectar la unidad.
2.1.1 Instalación en la Red (LAN)
• Compruebe que el ambiente de Internet está preparado y que tiene acceso a la conguración de
Red (Se recomienda tener Modem ADLS o por Cable)
• La conguración por defecto de la Red de su Radio Internet es DHCP. (Más ajustes de Red, por
favor vea el apartado 11.6 Red)
Page 65

65
Modem ADSL o por Cable
Router de banda ancha
Radio Internet
PC (Servidor Multimedia)
Ethernet
Ethernet
- Conecte el dispositivo a un router conectado a Internet como se indica en la imagen. Utilice un cable
de Red estándar.
Traspaso
Radio Internet
PC (Servidor multimedia)
- Conecte el aparato al PC como muestra la imagen si únicamente lo va a usar para oír la música
que tenga almacenada en el PC. Utilice un cable de interconexión estándar.
- Cuando tenga el equipo conectado así sólo puede oír la música que tenga almacenado en el
PC. EL PC debe tener un software especial instalado. Vea la sección del Servidor multimedia.
2.1.2 Instalación de un Red inalámbrica (WLAN)
• Compruebe que el ambiente de Internet está preparado y que tiene acceso a la conguración de
Red.
• Conecte la Llave electrónica Wi en la Radio Internet (más ajustes de Red, por favor vea el
apartado 11.6 Red)
Llave electrónica
Radio Internet
PC (Servidor multimedia)
PC (Servidor multimedia)
Ethernet
Modem ADSL o por Cable
Router inalámbrico de
banda ancha 802.11 b/g
- Conecte la llave electrónica inalámbrica en su conector.
Page 66

66
Llave electrónica
PC (Servidor multimedia)
Radio Internet
Llave electrónica
- Usted puede conectar el dispositivo inalámbrico en un PC con tarjeta de Red Inalámbrica
- Cuando tenga el equipo conectado así sólo puede oír la música que tenga almacenado en el
PC. EL PC debe tener un software especial instalado. Vea la sección del Servidor multimedia.
2.2 Utilizar el equipo por primera vez
Cuando encienda la unidad por primera vez, el equipo estéreo intentará buscar automáticamente
una dirección IP. Si su Red está conectada a Internet, el equipo también sincronizará la hora con el
servidor de la hora y luego entrará en modo en espera. Normalmente tarda entre 6 y 30 segundos en
nalizar el proceso completo.
2.3 World Station
2.3.1 Escuchar ‘World Station’
• Entre en el menú principal [Main], elija la opción [i.Radio] y pulse el botón ENTER/OK.
• Elija [World Station] y luego pulse el botón ENTER/OK.
• Desplácese hacia arriba/abajo hasta una estación y luego pulse el botón ENTER/OK para oírla.
• Oirá la música una vez que se alcance el 100% en el almacenamiento secundario.
Nota: Para una búsqueda rápida de una estación de Internet, pulse el botón Derecha para saltar
desde las estaciones que empiezan por la letra A a las que empiezan por la B, de la B a la C, y así
consecuentemente. Pulse el botón Izquierda para saltar hacia atrás.
Tabla 2.3.1
Main
i.Radio >
USB >
>
→
i.Radio
Favorite >
World Station >
SHOUTCast
>
Seleccionar i.Radio Elegir ‘World Station’
Page 67

67
i.Radio
Africa >
Americas >
Asia
>
→
World Station
South Korea >
SriLanka >
Taiwan
>
Clasicación por Áreas Clasicación por Países
World Station
Africa >
Americas >
Asia
>
→
World Station
Caribbean >
Europe >
Middle East
>
Use los botones◄ / ► en búsqueda
rápida
Los nombres de las estaciones
cambian alfabéticamente
1/1637
‘A’ NET STATION
.977 The Oldies Channel
007 Audio - #1 For The
→
1/999
‘A’ NET STATION
.977 The Oldies Channel
007 Audio - #1 For The
Pulsar el botón INFO
El número de estaciones aparecerá
en pantalla
Page 68

68
World Station
HitFM 90.1 Taiwan
National Education Radio 1
National Education
Radio 2
→
i.Radio
HitFM 90.1 Taiwan
WMA ,48 Kbps
Clasicación por orden alfanumérico Reproduciendo
2.3 Red
• Soporta LAN (Ethernet) y WLAN (la llave electrónica WiFi 802.11b/g es opcional)
• Soporta codicación Wi-Fi WEP64/128, WPA-TKIP-PSK y WPA2-AES-PSK.
• Soporta IP dinámica por DHCP (Protocolo de Conguración de Huésped Dinámico) e IP estática.
La conguración por defecto es Ethernet y DHCP.
• Soporta modo de infraestructura y modo Ad-hoc.
• Soporta Upnp.
• Detección y ejecución automática de conexión LAN o WLAN (LAN inalámbrica).
2.4.1 Explicación de los estados de conexión a Red del Sistema
• El icono del estado de conectividad de Red se mostrará en la parte superior de la pantalla.
Tabla 2.4.1.1 - Estado LAN
Title
→
• Hay un fallo al detectar el cable Ethernet.
Title
→
• Se ha detectado el cable Ethernet
satisfactoriamente.
• Hay un fallo al obtener la información DHCP
disponible.
Title
→
• Se ha detectado el cable Ethernet
satisfactoriamente.
• Se ha obtenido la información DHCP
satisfactoriamente.
Tabla 2.4.1.2 - Estado WLAN
Title
→
• Hay un fallo al detectar el adaptador WiFi
USB.
Title
→
• El adaptador WiFi USB se detectó
satisfactoriamente.
• Hay un fallo al obtener la información DHCP
disponible.
Page 69

69
Title
→
• El adaptador WiFi USB se detectó
satisfactoriamente.
• Se ha obtenido la información DHCP
satisfactoriamente.
2.4.2 Ajustando la Conectividad Wi-Fi en modo infraestructura
1. Coloque el adaptador Wi-Fi USB en el conector USB. (El adaptador Wi-Fi USB es opcional)
2. Luego desplácese arriba/abajo hasta [Network] y pulse el botón ENTER/OK.
3. Seleccione [Manual Setup] y pulse el botón ENTER/OK
4. Seleccione [Connect] y pulse el botón ENTER/OK
5. Entonces siga los pasos siguientes:
Tabla 2.4.2
Network
Connect LAN
Wizard >
Manual Setup >
→
Network
Connect WLAN
Seleccione [Manual Setup] y pulse
[ENTER/OK]
Seleccione el modo [WLAN], por
ejemplo, luego seleccione [NEXT]
SSID
SSID Auto Search
→
Site Survey
AP01 75%
wireless 100%
Seleccione [NEXT] para buscar
cualquier AP disponible
Las APs disponibles se ordenan por
fuerza de la señal. Si una AP necesita
codicación, quedará marcada con el
símbolo del candado.
Page 70

70
Encryption
Encryption Mode WPA2
Passphrase
>
→
Passphease
> 0 0 0 0 0 0 0 0 0 0 0
ENTER/OK: Next
Seleccione modo [Encrytion] y luego
elija [NEXT]
Intruduzca el código y luego pulse
[ENTER/OK]
Connect Mode
Connect Mode Infra
→
IP Setting
IP Source Dynamic
Seleccione el modo [Connect] y luego
elija [NEXT]
Seleccione [IP Source] y luego elija
[NEXT]
Proxy
Use Proxy No
→
Network Status
Config Wifi Module /
Seleccione [Use Proxy] y luego elija
[OK]
El sistema guardará toda la
conguración
Page 71

71
Network Status
Getting IP Address …
→
Network
Connect LAN
Wizard >
Manual Setup >
Inicie la conexión con la AP
indica que la conexión es correcta
2.4.3 Congurando la Conectividad Wi-Fi con el Asistente Wi-Fi
1. Coloque el adaptador Wi-Fi USB en el conector USB. (El adaptador Wi-Fi USB es opcional)
2. Luego desplácese arriba/abajo hasta [Network] y pulse el botón ENTER/OK.
3. Seleccione [Connect] y cambie de [LAN] a [WLAN].
4. Seleccione [Wizard] y pulse el botón ENTER/OK
5. Desplácese hacia arriba/abajo hasta el punto de acceso al que quiera conectarse, y luego pulse el
botón ENTER/OK.
6. Si el punto de acceso que ha selecciona está protegido, pulse el botón ENTER/OK para
seleccionar la AP protegida.
7. Para introducir la clave de codicación, use los botones ARRIBA/ABAJO (o el teclado numérico)
para cambiar los caracteres y pulse los botones IZQUIERDA/DERECHA para desplazarse.
8. Pulse ENTER/OK después de terminar con los cambios.
9. El icono aparecerá en la parte superior de la pantalla si la conguración inalámbrica es
correcta.
Tabla 2.4.3
Network
Connect LAN
Wizard >
Manual Setup >
→
Network
Connect WLAN
Wizard >
Manual Setup >
Seleccione [Connect] y cambie de [LAN]
a [WLAN].
Seleccione [Wizard] y pulse el botón
[ENTER/OK]
Page 72

72
Wizard
Apo1 65%
D-LINK 71%
Default 88%
→
Passphease
> 0 0 0 0 0 0 0 0 0 0 0
ENTER/OK: Next
Todas las APs disponibles y su fuerza
de señal aparecerán en la pantalla.
Introduzca el código y luego pulse
[ENTER/OK]
Apply ?
SSID: Penbex-MIS
Key:0000000000
→
Network
Connect LAN
Wizard >
Manual Setup >
Conrme
indica que la conexión es correcta
2.4.4 Introducir una IP estática
1. Entonces desplácese arriba/abajo hasta [Network] y pulse el botón ENTER/OK.
2. Desplácese hacia arriba/abajo hasta [IP Setting] y luego pulse el botón ENTER/OK para oirla.
3. Seleccione [IP Source] y luego pulse el botón ENTER/OK para cambiar de [Dynamic] a [Static].
4. Desplácese hacia arriba/abajo hasta [TCP/IP] y luego pulse el botón ENTER/OK para iniciar la
edición.
5. Use los botones ARRIBA/ABAJO para cambiar los caracteres e IZQUIERDA/DERECHA para
desplazarse.
6. Después de terminar, pulse el botón REC para conrmar.
Tabla 2.4.4
IP Setting
IP Source Dynamic
→
IP Setting
IP Source Manual
TCP/IP
>
DNS
>
Seleccione [IP Source] y luego pulse
[ENTER/OK]
Cambie a [Manual]
Page 73

73
IP Setting
IP Source Static
TCP/IP >
DNS >
→
TCP/IP
IP 192.169.001.100
Mask 255.255.255.000
GW 192.169.001.254
Seleccione [TCP/IP] y pulse el botón
[ENTER/OK]
Pulse el botón [ENTER/OK] para
introducir la clave. Use ARRIBA/
ABAJO (o el tecaldo numérico) y luego
IZQUIERDA/DERECHA para introducir
la IP.
NOTA: Cuando el valor de la IP (incluyendo IP, Máscara subred o Puerta de acceso) es ilegal,
cambiará a su valor por defecto.
TCP/IP
The IP Setting Value is
illegal ! Setting is
Changed to Default !
2.4.5 Introduciendo la DNS
1. Entonces desplácese arriba/abajo hasta [Network] y pulse el botón ENTER/OK.
2. Desplácese hacia arriba/abajo hasta [IP Setting] y luego pulse el botón ENTER/OK para oírla.
3. Seleccione [DNS] y pulse el botón ENTER/OK
4. Use los botones ARRIBA/ABAJO para cambiar los caracteres e IZQUIERDA/DERECHA para
desplazarse.
5. Después de terminar, pulse el botón ENTER/OK para conrmar.
Tabla 2.4.5
IP Setting
IP Source Dynamic
→
DNS
DNS1 168.095.001.001
DNS2 000.000.000.000
Seleccione [TCP/IP] y pulse el botón
[ENTER/OK]
Pulse ARRIBA/ABAJO (o el teclado
numérico) y luego IZQUIERDA/
DERECHA para introducir la IP
Page 74

74
Medidas de seguridad:
Para reducir el peligro de descarga eléctrica, este producto SÓLO
lo debería abrir un técnico autorizado cuando necesite reparación.
Desconecte el producto de la toma de corriente y de los otros equipos si
ocurriera algún problema.
No exponga el producto al agua ni a la humedad.
Mantenimiento:
Límpielo sólo con un paño seco. No utilice disolventes de limpieza ni productos abrasivos.
Garantía:
No se aceptará ninguna garantía o responsabilidad derivada de cualquier cambio o modicaciones
realizadas al producto o daños provocados por un uso incorrecto del producto.
General:
Las ilustraciones y las especicaciones podrán sufrir cambios sin previo aviso.
Todas las marcas de logotipos y nombres de productos constituyen patentes o marcas registradas a
nombre de sus titulares correspondientes, reconocidos como tal.
Conserve este manual y el embalaje en caso de futura necesidad.
Atención:
Este producto está señalizado con este símbolo. Esto signica que los productos eléctricos
y electrónicos usados no deberán mezclarse con los desechos domésticos generales. Existe
un sistema de recogida individual para este tipo de productos.
RIESGO DE ELECTROCUCIÓN
NO ABRIR
ATENCIÓN
Page 75

75
MAGYAR
Távirányító
HANGERŐ “+”
HANGERŐ “-“
ELHALKÍTÁS/ALVÁS
A-B HUROK
INFO
RIASZTÁS
MEMÓRIA
FELVÉTEL
MENÜ
KÉSZENLÉT
ISMÉTLÉS
SZÁM GOMBOK
VISSZA
NYÍL GOMBOK
(FEL/LE/BALRA/JOBBRA)
Elölnézet
LEJÁTSZÁS/
SZÜNET
MENÜ
KÉSZENLÉT
IRÁNYGOMBOK
BEVITEL
TÁVIRÁNYÍTÓ ÉRZÉKELŐ
HANGERŐ +/-
USB CSATLAKOZÓ
VISSZA
FELVÉTEL
MEMÓRIA
Hátulnézet
DC12V/2A
TÁPELLÁTÁS
KIMENET
TÁPELLÁTÁS BE/KI
Ethernet csatlakozó
BEMENET
Page 76

76
Page 77

77
1. fejezet, Áttekintés
1.1 Bevezetés
Az internetrádió egy integrált digitális rádiórendszer, amely hálózati csatlakozással rendelkezik. A
rendszer képes az MP3/WMA hangfájlok lejátszására. Az USB eszközök és rádiószolgáltatók, mint
amilyen a World Station és a SHOUTCast több mint 15 000 internetes rádióállomást kínálnak. Az
internetrádió az UPnP Media Server-en keresztül történő hanglejátszást is támogatja.
1.2 Audio források
• MP3/ Windows Media® (WMA-ként is ismert) hangfájlok támogatása (beleértve az ID3V1 ,2-t)
• Statikus és szinkronizált szövegek támogatása (.txt /.lrc /.smi)
• USB Flash adathordozó támogatása
• SHOUTCast internetrádió (http://www.shoutcast.com)
• Podcast támogatás
• AUX támogatás
1.3 Tárolás
• Szabványos USB tárolóeszközök támogatása (FAT16/32).
1.4 Felvétel
• Képes az internetes rádióállomások (World Station / SHOUTCast) hangadatainak rögzítésére és
hangadatok 128K MP3 formátumban történő továbbítására.
1.5 Hálózati csatlakozás
• Ethernet 10/100 Mbps támogatás
• Vezeték nélküli LAN IEEE 802.11 b/g dongle támogatás
• Infrastructure / Ad-hoc mód támogatás
• WEP64/128 és WPA-TKIP-PSK, WPA2-AES-PSK titkosítás támogatása
• Proxy beállítások támogatása
• A rendszer egy vezeték nélküli beállítás varázslót tartalmaz a vezeték nélküli hálózat könnyebb
beállításához.
1.6 Egyebek
• Két ébresztőóra beállítás
• Időszinkronizálási technológia támogatása (* hálózat elérhetősége esetén)
• Firmware frissítések támogatása
2. fejezet, Üzembe helyezés
2.1 Üzembe helyezés
MEGJEGYZÉS: Az internetrádióhoz szükséges feszültség AC 110V~240V/50-60Hz. Ellenőrizze a
rendelkezésre álló feszültséget, mielőtt csatlakoztatná a készüléket.
2.1.1 Csatlakoztatás hálózathoz (LAN)
• Ellenőrizze, hogy az internetes környezet rendelkezésre áll és a hálózati beállítások rendelkezésre
állnak (ADSL vagy kábelmodem erősen ajánlott).
• Az internetrádió alapértelmezett hálózati beállítása a DHCP. (további hálózati beállítások
tekintetében tanulmányozza a 11.6 Hálózat bekezdést)
Page 78

78
ADSL vagy kábelmodem
Széles sávú router
Internetrádió
Személyi számítógép (Media Server)
Ethernet
Ethernet
- Csatlakoztassa a készüléket egy, az internethez csatlakoztatott routerhez a képen látható módon.
Használjon szabványos hálózati kábelt.
Keresztkötésű
(Cross-Over) kábel
Internetrádió
Személyi számítógép
(Media Server)
- Csatlakoztassa a készüléket a számítógéphez a képen látható módon, ha csak a számítógépen
tárolt zenék hallgatására szeretné használni. Használjon keresztbe kötött (crossover) hálózati
kábelt.
- Ha a készülék így van csatlakoztatva, akkor csak a számítógépen tárolt zenék lejátszására
képes. A számítógépre speciális szoftvert kell telepíteni. Lásd a Media Server című részt.
2.1.2 Vezeték nélküli hálózat (WLAN) kialakítása
• Ellenőrizze, hogy az internetes környezet készen áll és a hálózati beállítások rendelkezésre állnak.
• Csatlakoztassa a Wi Dongle-t az internetrádióhoz (a további beállításokkal kapcsolatban
tanulmányozza a 11.6 Hálózat bekezdést)
WIFI Dongle Internetrádió
Személyi számítógép
(Media Server)
Személyi számítógép
(Media Server)
Ethernet
ADSL vagy kábelmodem
802.11 b/g vezeték nélküli
széles sávú router
- Csatlakoztassa a vezeték nélküli dongle-t az aljzatba.
Page 79

79
WIFI Dongle
Személyi számítógép
(Media Server)
Internetrádió
WIFI Dongle
- Vezeték nélkül is a számítógéphez csatlakoztathatja a készüléket egy vezeték nélküli hálózati
kártyán keresztül.
- Ha a készülék így van csatlakoztatva, akkor csak a számítógépen tárolt zenék meghallgatására
alkalmas. A számítógépre speciális szoftvert kell telepíteni. Lásd a Media Server című részt.
2.2 A berendezés első használata
Amikor először kapcsolja be a készüléket, akkor automatikusan egy IP-címet fog keresni. Ha a hálózat
az internethez van csatlakoztatva, akkor a berendezés az időt is szinkronizálja az időkiszolgálóval,
majd készenléti üzemmódba kapcsol. A teljes folyamat általában 6-30 másodpercet vesz igénybe.
2.3 World Station
2.3.1 A World Station hallgatása
• Menjen a [Main] menübe, válassza az [i.Radio] menüpontot, majd nyomja meg az ENTER/OK
gombot.
• Válassza a [World Station] lehetőséget, majd nyomja meg az ENTER/OK gombot.
• Görgessen fel/le egy állomáshoz, majd nyomja meg az ENTER/OK gombot a lejátszáshoz.
• Amint a pufferelés eléri a 100% értéket, hallgathatja a zenét.
Megjegyzés: Egy internetes rádióállomás gyors megkereséséhez, nyomja meg a Job gombot, hogy
az A betűvel a B betűig kezdődő, a B betűtől a C betűig kezdődő stb. rádióállomásokhoz ugorjon.
Nyomja meg a Bal gombot a visszafelé ugráshoz.
2.3.1. táblázat
Main
i.Radio >
USB >
>
→
i.Radio
Favorite >
World Station >
SHOUTCast
>
Válassza az i.Radio menüpontot Válassza a World Station lehetőséget
Page 80

80
i.Radio
Africa >
Americas >
Asia
>
→
World Station
South Korea >
SriLanka >
Taiwan
>
Területenkénti felosztás Országonkénti felosztás
World Station
Africa >
Americas >
Asia
>
→
World Station
Caribbean >
Europe >
Middle East
>
Nyomja meg◄ / ► gombot a
gyorskereséshez
Az állomások neve betűnként változik
1/1637
‘A’ NET STATION
.977 The Oldies Channel
007 Audio - #1 For The
→
1/999
‘A’ NET STATION
.977 The Oldies Channel
007 Audio - #1 For The
Nyomja meg az INFO gombot
Az állomások mennyisége megjelenik
a képernyőn
Page 81

81
World Station
HitFM 90.1 Taiwan
National Education Radio 1
National Education
Radio 2
→
i.Radio
HitFM 90.1 Taiwan
WMA ,48 Kbps
Betűrendes felosztás Lejátszás
2.4 Hálózat
• LAN (Ethernet) és WLAN (a 802.11b/g wi Dongle opcionális) támogatás
• WEP64/128, WPA-TKIP-PSK és WPA2-AES-PSK Wi-Fi titkosítás támogatása.
• Dinamikus IP támogatása DHCP-n keresztül (dinamikus állomáskonguráló protokoll) és statikus IP
támogatása. Az alapértelmezett beállítás az Ethernet és DHCP.
• Infrastruct és Ad-hoc mód támogatása.
• Upnp támogatás.
• LAN vagy WLAN (vezeték nélküli LAN) környezet automatikus észlelése és futtatása.
2.4.1 A rendszer hálózati állapotainak leírása
• A hálózati kapcsolati állapot ikon a képernyő felső részén jelenik meg.
2.4.1.1. táblázat - LAN állapot
Title
→
• Nem észlelhető az Ethernet kábel.
Title
→
• Az Ethernet kábel észlelése sikeresen
megtörtént.
• Nem sikeres az elérhető DHCP információk
lekérdezése.
Title
→
• Az Ethernet kábel észlelése sikeresen
megtörtént.
• Az elérhető DHCP információk lekérdezése
sikeres
Page 82

82
2.4.1.2. táblázat - WLAN állapot
Title
→
• Nem észlelhető az USB Wi-Fi adapter.
Title
→
• Az USB Wi-Fi adapter észlelése sikeresen
megtörtént.
• Nem sikeres az elérhető DHCP információk
lekérdezése.
Title
→
• Az USB Wi-Fi adapter észlelése sikeresen
megtörtént.
• Az elérhető DHCP információk lekérdezése
sikeres.
2.4.2 A Wi-Fi kapcsolat beállítása infrastructure módban
1. Csatlakoztassa a Wi-Fi USB adapter az USB csatlakozóhoz. (A Wi-Fi USB adapter opcionális)
2. Ezután görgessen fel/le a [Network] menüpontig, majd nyomja meg az ENTER/OK gombot.
3. Válassza a [Manual Setup] lehetőséget, majd nyomja meg az ENTER/OK gombot
4. Válassza a [Connect] lehetőséget, majd nyomja meg az ENTER/OK gombot
5. Ezután kérjük, kövesse az alábbi lépéseket:
2.4.2. táblázat
Network
Connect LAN
Wizard >
Manual Setup >
→
Network
Connect WLAN
Válassza a [Manual Setup]
lehetőséget, majd nyomja meg az
[ENTER/OK] gombot
Válassza a [WLAN] módot, például,
majd nyomja meg a [NEXT] gombot
SSID
SSID Auto Search
→
Site Survey
AP01 75%
wireless 100%
Válassza a [NEXT] gombot az
elérhető AP-k kereséséhez
Az elérhető AP-k jelerősség szerinti
sorrendben vannak felsorolva. Ha egy
AP titkosítást igényel, akkor egy lakat
jel látható mellette.
Page 83

83
Encryption
Encryption Mode WPA2
Passphrase
>
→
Passphease
> 0 0 0 0 0 0 0 0 0 0 0
ENTER/OK: Next
Válassza az [Encryption] módot, majd
nyomja meg a [NEXT] gombot
Vigye be a titkosítási kódot, majd
nyomja meg az [ENTER/OK] gombot
Connect Mode
Connect Mode Infra
→
IP Setting
IP Source Dynamic
Válassza a [Connect] módot, majd a
[NEXT] gombot
Válassza az [IP Source] lehetőséget,
majd a [NEXT] gombot
Proxy
Use Proxy No
→
Network Status
Config Wifi Module /
Válassza a [Use Proxy] lehetőséget,
majd az [OK] gombot
A rendszer elmenti az összes
kongurációt
Page 84

84
Network Status
Getting IP Address …
→
Network
Connect LAN
Wizard >
Manual Setup >
Csatlakozás kezdete az AP-hez
A jel jelenik meg, ha a kapcsolódás
sikeres
2.4.3 A Wi-Fi kapcsolat beállítása Wi-Fi varázslóval
1. Csatlakoztasson egy Wi-Fi USB adapter az USB csatlakozóhoz. (A Wi-Fi USB adapter opcionális).
2. Ezután görgessen fel/le a [Network] menüponthoz, majd nyomja meg az ENTER/OK gombot.
3. Válassza a [Connect] lehetőséget, majd váltson a [LAN] –ról a [WLAN]-ra.
4. Válassza a [Wizard] menüpontot, majd nyomja meg az ENTER/OK gombot.
5. Görgessen fel/le egy hozzáférési pontig, amelyhez csatlakozni szeretne, majd nyomja meg az
ENTER/OK gombot.
6. Ha a hozzáférési pont, amelyet kiválaszt védett, akkor nyomja meg az ENTER/OK gombot, hogy
kiválassza a védett AP-t.
7. A titkosítási kulcs beviteléhez, nyomja meg a fel/le (vagy számozott) gombot a karakterek
kiválasztásához, majd nyomja meg a BAL/JOBB gombot a váltáshoz.
8. A beállítás elvégzését követően, nyomja meg az ENTER/OK gombot.
9. A vezeték nélküli beállítások sikeres végrehajtását követően a ikon jelenik meg a képernyő felső
részén.
2.4.3. táblázat
Network
Connect LAN
Wizard >
Manual Setup >
→
Network
Connect WLAN
Wizard >
Manual Setup >
Válassza a [Connect] pontot és váltson
[LAN]-ról [WLAN]-ra.
Válassza a [Wizard] menüpontot, majd
nyomja meg az [ENTER/OK] gombot
Page 85

85
Wizard
Apo1 65%
D-LINK 71%
Default 88%
→
Passphease
> 0 0 0 0 0 0 0 0 0 0 0
ENTER/OK: Next
A képernyőn megjelenik az összes
elérhető AP és azok jelerőssége
Vigye be a titkosítási kódot, majd nyomja
meg az [ENTER/OK] gombot
Apply ?
SSID: Penbex-MIS
Key:0000000000
→
Network
Connect LAN
Wizard >
Manual Setup >
Jóváhagyás
A jel jelenik meg, ha a csatlakozás
sikeres
2.4.4 Statikus IP bevitele
1. Ezután görgessen fel/le a [Network] menüpontig, majd nyomja meg az ENTER/OK gombot.
2. Görgessen fel/le az [IP Setting] menüpontig, majd nyomja meg az ENTER/OK gombot a
belépéshez.
3. Válassza ki az [IP Source] lehetőséget, majd nyomja meg az ENTER/OK gombot a [Dynamic]-ról
a [Static]-ra váltáshoz.
4. Görgessen fel/le a [TCP/IP] pontig, majd nyomja meg az ENTER/OK gombot a szerkesztés
megkezdéséhez.
5. Nyomja meg a FEL/LE gombot a karakterek váltásához, majd nyomja meg a BAL/JOBB gombot a
váltáshoz.
6. Ha végzett a bevitellel, nyomja meg a REC gombot a megerősítéshez.
Page 86

86
2.4.4. táblázat
IP Setting
IP Source Dynamic
→
IP Setting
IP Source Manual
TCP/IP
>
DNS
>
Válassza az [IP Source] lehetőséget,
majd nyomja meg az [ENTER/OK]
gombot
Váltson [Manual] módba
IP Setting
IP Source Static
TCP/IP >
DNS >
→
TCP/IP
IP 192.169.001.100
Mask 255.255.255.000
GW 192.169.001.254
Válassza a [TCP/IP] pontot, majd
nyomja meg az [ENTER/OK] gombot
A bevitel megkezdéséhez, nyomja meg
az [ENTER/OK] gombot. Használja a
FEL/LE (vagy számozott) gombokat,
majd a BAL/JOBB gombot az IP
beviteléhez.
MEGJEGYZÉS: Amikor az IP beállítási érték (ideértve az IP, Subnet Mask vagy Gateway értékeket)
érvénytelen, akkor az IP beállítás az alapértelmezett értékre vált.
TCP/IP
The IP Setting Value is
illegal ! Setting is
Changed to Default !
2.4.5 A DNS bevitele
1. Ezután görgessen fel/le a [Network] menüpontig, majd nyomja meg az ENTER/OK gombot.
2. Görgessen fel/le az [IP Setting] menüpontig, majd nyomja meg az ENTER/OK gombot a
belépéshez.
3. Válassza a [DNS] lehetőséget, majd nyomja meg az ENTER/OK gombot.
4. Nyomja meg a FEL/LE gombot a karakterek váltásához, majd nyomja meg a BAL/JOBB gombot a
léptetéshez.
5. Ha végzett, akkor nyomja meg az ENTER/OK gombot a megerősítéshez.
Page 87

87
2.4.5. táblázat
IP Setting
IP Source Dynamic
→
DNS
DNS1 168.095.001.001
DNS2 000.000.000.000
Válassza a [TCP/IP] lehetőséget, majd
nyomja meg az [ENTER/OK] gombot
Nyomja meg a FEL/LE (vagy számozott)
gombokat, majd a BAL/JOBB gombokat
az IP beviteléhez
Biztonsági óvintézkedések:
Az áramütés veszélyének csökkentése érdekében ezt a terméket
KIZÁRÓLAG a márkaszerviz képviselője nyithatja fel. Hiba esetén
húzza ki a termék csatlakozóját a konnektorból, és kösse le más
berendezésekről. Vigyázzon, hogy ne érje a terméket víz vagy nedvesség.
Karbantartás:
Csak száraz ronggyal tisztítsa. Tisztító- és súrolószerek használatát mellőzze.
Jótállás:
Nem vállalunk jótállást és felelősséget a terméken végzett változtatás vagy módosítás vagy a termék
helytelen használata miatt bekövetkező károkért.
Általános tudnivalók:
A kivitel és a műszaki jellemzők előzetes értesítés nélkül is módosulhatnak.
Minden logó, terméknév és márkanév a tulajdonosának márkaneve vagy bejegyzett márkaneve,
azokat ennek tiszteletben tartásával említjük.
Őrizze meg ezt az útmutatót és a csomagolást.
Figyelem:
Ezt a terméket ezzel a jelölésel láttuk el. Azt jelenti, hogy az elhasznált elektromos és
elektronikus termékeket tilos az általános háztartási hulladékhoz keverni. Begyűjtésüket
külön begyűjtő létesítmények végzik.
ÁRAMÜTÉS VESZÉLYE!
NE NYISSA FEL!
VIGYÁZAT!
Page 88

88
SUOMI
Kaukosäädin
ÄÄNI “+”
ÄÄNI “-”
MYKISTYS/TORKKU
A-B-SILMUKKA
INFO
HÄLYTYS
MUISTI
NAUHOITUS
VALIKKO
VALMIUSTILA
TOISTAMINEN
NUMEROPAINIKKEET
TAKAISIN
SUUNTAPAINIKKEET
(YLÖS/ALAS/VASEN/OIKEA)
Etuosa
TOISTO/TAUKO
VALIKKO
VALMIUSTILA
SUUNTAPAINIKKEET
SYÖTTÖ
KAUKOSÄÄDINSENSORI
ÄÄNI +/-
USB-LIITÄNTÄ
TAKAISIN
REC
MUISTI
Takaosa
DC12V/2A
VIRRAN SYÖTTÖ
AUX OUT
VIRTA PÄÄLLÄ/POIS
Ethernet-portti
AUX IN
Page 89

89
Page 90

90
Kappale 1 Esittely
1.1 Esittely
Internet Radio on radiojärjestelmä digitaalisella audiotoistolla, joka toimii verkkoyhteydellä. Järjestelmä
voi toistaa MP3/WMA-audiotiedostoja, USB-laitteita ja internet-radiopalveluita, kuten esimerkiksi World
Station ja SHOUTCast, jotka tarjoavat yli 15,000 internet-radioasemaa. Internet-radio tukee myös
audiovirtaa UPnP-mediapalvelimen kautta.
1.2 Audiolähteet
• Tukee MP3/ Windows Media® audiotiedostoja (tunnetaan nimellä WMA)(mukana ID3V1 ,2)
• Tukee staattisia sanoituksia ja tahdistettuja sanoituksia (.txt /.lrc /.smi)
• Tukee USB Flash-asemaa
• SHOUTCast Internet-radio (http://www.shoutcast.com)
• Tukee Podcastia
• Tukee AUXia
1.3 Tallennus
• Tukee tavanomaista USB-massamuistilaitetta (FAT16/32).
1.4 Nauhoittaminen
• Mahdollisuus nauhoittaa audiodataa internet-radiokanavilta (World Station / SHOUTCast) ja siirtää
audiodata 128K MP3-formaattiin.
1.5 Netin käyttö
• Tukee Ethernet 10/100 Mbps
• Tukee langatonta LAN IEEE 802.11 b/g dongle
• Tukee Infrastructure / Ad-hoc
• Tukee WEP64/128 and WPA-TKIP-PSK, WPA2-AES-PSK-salausta
• Tukee Proxy-asetuksia
• Järjestelmä tarjoaa langattoman asetusvelhon, jotta langattoman verkon asetus olisi helpompaa.
1.6 Muuta
• Tukee kahta herätysasetusta
• Tukee ajan synkronisointiteknologiaa (* verkko saatavilla)
• Tukee laitteistopäivityksiä
Kappale 2 Asennus
2.1 Asennus
HUOMAUTUS: Internet-radion oikea jännite on AC 110V~240V/50-60Hz. Varmista alueesi jännite
ennen kuin kytket laitteen.
2.1.1 Asentaminen verkkoon (LAN)
• Varmista, että Internet-ympäristö on valmis, ja että verkon asetus on saatavilla (ADSL:n tai
kaapelimodeemin käyttö on erittäin suositeltavaa).
• Internet-radiosi oletusasetus verkolle on DHCP. (katso lisätietoja verkkoasetuksista kohdasta 11.6
Verkosto)
Page 91

91
ADSL tai kaapelimodeemi
Laajakaistareititin
Internetradio
PC (mediapalvelin)
Ethernet
Ethernet
- Liitä laite Internettiin liitettyyn reitittimeen kuvan esittämällä tavalla. Käytä standardiverkkojohtoa.
Cross-Over
Internetradio
PC (mediapalvelin)
- Kytke laite tietokoneeseen kuvan esittämällä tavalla, jos sitä käytetään ainoastaan tietokoneelle
tallennetun musiikin kuunteluun. Käytä risteytettyä verkkojohtoa.
- Kun laite on liitetty näin, voit kuunnella ainoastaan tietokoneelle tallennettua musiikkia.
Tietokoneessa on oltava erityiset ohjelmat asennettuna. Katso osio mediapalvelin.
2.1.2 Langattoman verkon asentaminen (WLAN)
• Varmista, että Internet-ympäristö on valmis, ja että verkon asetus on saatavilla.
• Liitä Wi Dongle internetradioon (katso lisätietoja asetuksesta osiosta 11.6 Verkko)
Wi Dongle Internetradio
PC (mediapalvelin)
PC (mediapalvelin)
Ethernet
ADSL tai kaapelimodeemi
802.11 b/g langaton
laajakaistareititin
- Kiinnitä langattoman verkon wi-dongle liitäntään.
Wi Dongle
PC (mediapalvelin)
Internetradio
Wi Dongle
Page 92

92
- Voit liittää laitteen langattomasti tietokoneeseen langattomalla verkkokortilla.
- Kun laite on liitetty näin, voit kuunnella ainoastaan tietokoneelle tallennettua musiikkia.
Tietokoneessa on oltava erityiset ohjelmat asennettuna. Katso osio mediapalvelin.
2.2 Laitteen ensimmäinen käynnistäminen
Kun käännät laitteen päälle ensimmäistä kertaa, stereo yrittää etsiä automaattisesti IP-osoitteen.
Jos verkko on liitetty Internettiin, laite pyrkii myös synkronoimaan ajan palvelimen ajan kanssa, jonka
jälkeen se menee valmiustilaan. Tähän prosessiin kuluu yleensä noin 6-30 sekuntia.
2.3 World Station
2.3.1 World-aseman kuunteleminen
• Mene [Pää] valikkoon, valitse [i.Radio] ja paina ENTER/OK-painiketta.
• Valitse [World Station] ja paina sitten ENTER/OK-painiketta.
• Selaa asemia ylös/alas haluamallesi asemalle ja aloita toisto painamalla ENTER/OK-painiketta.
• Musiikki alkaa kuulua, kun tiedonsiirto on saavuttanut 100%.
Huomautus: Voit etsiä internetradioaseman nopeasti painamalla oikeaa painiketta hypätäksesi
radioasemista, jotka alkavat kirjaimella A kirjaimeen B, kirjaimesta B kirjaimeen C, jne. Paina vasenta
painiketta siirtyäksesi taaksepäin.
Taulukko 2.3.1
Main
i.Radio >
USB >
>
→
i.Radio
Favorite >
World Station >
SHOUTCast
>
Valitse i.Radio Valitse World Station
i.Radio
Africa >
Americas >
Asia
>
→
World Station
South Korea >
SriLanka >
Taiwan
>
Lajiteltu alueittain Luokiteltu maittain
Page 93

93
World Station
Africa >
Americas >
Asia
>
→
World Station
Caribbean >
Europe >
Middle East
>
Paina◄ / ► pikaetsintään
Asemien nimet muuttuvat
aakkosjärjestyksessä
1/1637
‘A’ NET STATION
.977 The Oldies Channel
007 Audio - #1 For The
→
1/999
‘A’ NET STATION
.977 The Oldies Channel
007 Audio - #1 For The
Paina INFO-painiketta Asemien määrä näkyy ruudulla
World Station
HitFM 90.1 Taiwan
National Education Radio 1
National Education
Radio 2
→
i.Radio
HitFM 90.1 Taiwan
WMA ,48 Kbps
Luokiteltu aakkosjärjestyksessä Toistaa
2.4 Verkko
• Tukee LAN (Ethernet) ja WLAN (802.11b/g wi Dongle vaihtoehtoinen)
• Tukee Wi-Fi salaus WEP64/128, WPA-TKIP-PSK, ja WPA2-AES-PSK.
• Tukee dynaamista IP:tä DHCP:n kautta (Dynamic Host Conguration Protocol) ja staattista IP:tä.
Oletusasetuksena on Ethernet ja DHCP.
• Tukee Infrastruct-tilaa ja Ad-hoc-tilaa.
• Tukee Upnp:tä.
• Havaitsee ja suorittaa automaattisesti LAN tai WLAN(langaton LAN) ympäristössä.
2.4.1 Järjestelmän verkkotilat
• Verkkoyhteystilan kuvake näkyy ruudun ylälaidassa.
Page 94

94
Taulukko2.4.1.1 - LAN-tila
Title
→
• Ethernet-johdon havaitseminen epäonnistui.
Title
→
• Ethernet-johdon havaitseminen onnistui.
• DHCP-tietojen saaminen epäonnistui.
Title
→
• Ethernet-johdon havaitseminen onnistui.
• DHCP-tietojen saaminen onnistui.
Taulukko 2.4.1.2 - WLAN-tila
Title
→
• USB Wi-Fi –sovittimen havaitseminen
epäonnistui.
Title
→
• USB Wi-Fi –sovittimen havaitseminen
onnistui.
• DHCP-tietojen saaminen epäonnistui.
Title
→
• USB Wi-Fi –sovittimen havaitseminen
onnistui.
• DHCP-tietojen saaminen onnistui.
2.4.2 Wi-Fi-yhteyden asettaminen infrastruct-tilaan
1. Liitä Wi-Fi USB-sovitin USB-liitäntään. (Wi-Fi USB-sovitin on vaihtoehtoinen)
2. selaa sitten ylös/alas [Network] ja paina ENTER/OK-painiketta.
3. Valitse [Manual Setup] ja paina ENTER/OK-painiketta
4. Valitse [Connect] ja paina ENTER/OK-painiketta
5. Seuraa sitten alla annettuja ohjeita:
Taulukko 2.4.2
Network
Connect LAN
Wizard >
Manual Setup >
→
Network
Connect WLAN
Valitse [Manuaalinen asetus] ja paina
[ENTER/OK] painiketta
Valitse [WLAN] tila, esimerkiksi, ja
valitse [NEXT]
Page 95

95
SSID
SSID Auto Search
→
Site Survey
AP01 75%
wireless 100%
Valitse [NEXT] etsiäksesi saatavilla
oleva AP
Saatavilla oleva AP listataan
signaalin vahvuuden mukaan. Jos
AP vaatii salauksen, se on merkitty
lukkokuvakkeella.
Encryption
Encryption Mode WPA2
Passphrase
>
→
Passphease
> 0 0 0 0 0 0 0 0 0 0 0
ENTER/OK: Next
Valitse [Encrytion] tila ja valitse
[NEXT]
Syötä salauskoodi ja paina [ENTER/
OK]
Connect Mode
Connect Mode Infra
→
IP Setting
IP Source Dynamic
Valitse [Connect] tila ja valitse [NEXT] Valitse [IP Source] ja valitse [NEXT]
Page 96

96
Proxy
Use Proxy No
→
Network Status
Config Wifi Module /
Valitse [Use Proxy] ja valitse [OK] Järjestelmä tallentaa konguraatiot
Network Status
Getting IP Address …
→
Network
Connect LAN
Wizard >
Manual Setup >
Aloita AP yhdistäminen
näkyy, jos yhteys onnistui
2.4.3 Wi-Fi-yhteyden asettaminen Wi-Fi-velholla
1. Liitä Wi-Fi USB-sovitin USB-liitäntään. (Wi-Fi USB-sovitin on vaihtoehtoinen)
2. Selaa sitten ylös/alas [Network] ja paina ENTER/OK-painiketta.
3. Valitse [Connect] ja vaihda [LAN] - [WLAN].
4. Valitse [Wizard] ja paina ENTER/OK-painiketta
5. Selaa ylös/alas haluamaasi liitäntäkohtaan ja paina ENTER/OK-painiketta.
6. Jos valitsemasi liitäntäkohta on suojattu, paina ENTER/OK painiketta valitaksesi suojatun AP:n.
7. Syötä salaustunnus painamalla YLÖS/ALAS (tai numeropainiketta) muuttaaksesi merkkejä ja paina
LEFT/RIGHT painiketta siirtyäksesi.
8. Paina ENTER/OK lopetettuasi asetuksen.
9. kuvake ilmestyy ruudun yläreunaan, jos langaton asetus onnistui.
Taulukko 2.4.3
Network
Connect LAN
Wizard >
Manual Setup >
→
Network
Connect WLAN
Wizard >
Manual Setup >
Valitse [Connect] ja vaihda [LAN] -
[WLAN].
Valitse [Wizard] ja paina [ENTER/OK]
-painiketta
Page 97

97
Wizard
Apo1 65%
D-LINK 71%
Default 88%
→
Passphease
> 0 0 0 0 0 0 0 0 0 0 0
ENTER/OK: Next
Kaikki saatavilla olevat AP:t ja signaalin
vahvuus näkyvät ruudulla.
Syötä salauskoodi ja paina [ENTER/OK]
Apply ?
SSID: Penbex-MIS
Key:0000000000
→
Network
Connect LAN
Wizard >
Manual Setup >
Vahvista
näkyy, jos yhteys onnistui
2.4.4 Staattisen IP:n syöttäminen
1. Selaa sitten ylös/alas [Network] ja paina ENTER/OK-painiketta.
2. Selaa ylös/alas [IP Setting] ja vahvista painamalla ENTER/OK.
3. Valitse [IP Source] ja paina ENTER/OK painiketta vaihtaaksesi [Dynamic] - [Static].
4. Selaa ylös/alas [TCP/IP] ja paina ENTER/OK aloittaaksesi muokkauksen.
5. Paina YLÖS/ALAS muuttaaksesi merkkejä ja siirry painamalla VASEN/OIKEA painiketta.
6. Vahvista lopetettuasi REC-painikkeella.
Taulukko 2.4.4
IP Setting
IP Source Dynamic
→
IP Setting
IP Source Manual
TCP/IP
>
DNS
>
Valitse [IP Source] ja paina sitten
[ENTER/OK]
Siirry [Manual]
Page 98

98
IP Setting
IP Source Static
TCP/IP >
DNS >
→
TCP/IP
IP 192.169.001.100
Mask 255.255.255.000
GW 192.169.001.254
Valitse [TCP/IP] ja paina [ENTER/OK]
painiketta
Paina [ENTER/OK] painiketta
aloittaaksesi. Käytä YLÖS/ALAS (tai
numeropainikkeita) ja sitten VASEN/
OIKEA IP:n syöttämiseen.
HUOMAUTUS: Jos IP:n asetusarvo (mukaan lukien IP, Subnet Mask, tai Gateway) ei ole hyväksyttävä,
IP-asetus siirtyy oletusarvoksi.
TCP/IP
The IP Setting Value is
illegal ! Setting is
Changed to Default !
2.4.5 DNS:n syöttäminen
1. Selaa sitten ylös/alas [Network] ja paina ENTER/OK-painiketta.
2. Selaa ylös/alas [IP Setting] ja vahvista painamalla ENTER/OK.
3. Valitse [DNS] ja paina ENTER/OK-painiketta
4. Paina YLÖS/ALAS muuttaaksesi merkkejä ja siirry painamalla VASEN/OIKEA painiketta.
5. Vahvista lopetettuasi ENTER/OK -painikkeella.
Taulukko 2.4.5
IP Setting
IP Source Dynamic
→
DNS
DNS1 168.095.001.001
DNS2 000.000.000.000
Valitse [TCP/IP] ja paina [ENTER/OK]
painiketta
Paina YLÖS/ALAS (tai
numeropainiketta) ja syötä IP painamalla
VASEN/OIKEA
Page 99

99
Turvallisuuteen liittyvät varoitukset:
Sähköiskun riskin pienentämiseksi, AINOASTAAN valtuutettu
huoltohenkilö saa avata tämän laitteen huoltoa varten. Jos ongelmia
ilmenee, irrota laite verkkovirrasta ja muista laitteista. Älä altista laitetta vedelle äläkä kosteudelle.
Huolto:
Puhdista ainoastaan kuivalla kankaalla. Älä käytä liuottimia tai hankausaineita.
Takuu:
Takuu ja vastuuvelvollisuus mitätöityvät, jos tuote vaurioituu siihen tehtyjen muutoksien tai sen
väärinkäytön takia.
Yleistä:
Muutoksia malliin ja teknisiin ominaisuuksiin voidaan tehdä ilmoituksetta.
Kaikki logot, merkit ja tuotenimet ovat niiden vastaavien omistajien tuotemerkkejä tai rekisteröityjä
tuotemerkkejä ja niitä on käsiteltävä sellaisina.
Säilytä käyttöohjeet ja pakkaus myöhempää käyttötarvetta varten.
Huomio:
Tuote on varustettu tällä merkillä. Se merkitsee, ettei käytettyjä sähkö- tai elektronisia
tuotteita saa hävittää kotitalousjätteen mukana. Kyseisille tuotteille on olemassa erillinen
keräysjärjestelmä.
SÄHKÖISKUVAARA
ÄLÄ AVAA
HUOMIO
Page 100

100
SVENSKA
Fjärrkontroll
VOLYM: “+”
VOLYM: “-”
MUTE/SNOOZE
A – B SLINGA
INFO
LARM
MINNE
SPELA IN
MENY
STAND BY
REPETERA
SIFFERTANGENTER
TILLBAKA
RIKTNINGSTANGENTER
(UPP/NER/VÄNSTER/HÖGER)
FRAMSIDA
SPELA UPP/
PAUS
MENY
STAND BY
RIKTNINGSTANGENTER
ENTER
FJÄRRSENSOR
VOLYM +/-
USB-PORT
TILLBAKA
INSPELNING
MINNE
BAKSIDA
LIKSTRÖM 12V/2A
ELINGÅNG
AUX UT
POWER PÅ/AV
Ethernet-port
AUX IN
 Loading...