

Page 1
HAV-IR10 -11
Wi-Fi Internet Radio
Page 2

1
TABLE OF CONTENTS
1 Introduction ..............................................................................................................................3
1.1 Conventions used in this guide .......................................................................................3
1.2 Infrastructure requirements .............................................................................................3
2 Menu structure .........................................................................................................................4
2.1 Menu names ...................................................................................................................4
2.2 Auxiliary Input Function ...................................................................................................4
2.3 Key functions ..................................................................................................................4
3 Setting up the Wi-Fi radio .........................................................................................................7
3.1 Setting the time and date ................................................................................................8
3.2 Setting alarms ................................................................................................................. 9
3.3 Setting up the Internet radio .......................................................................................... 11
3.4 Setting up the music player ........................................................................................... 15
3.4.1. Shared folders (CIFS) ..........................................................................................15
3.4.2. Shared media (UPnP) .......................................................................................... 16
4 Using the Wi-Fi radio .............................................................................................................. 19
4.1 Changing modes ........................................................................................................... 19
4.2 Internet radio ................................................................................................................. 19
4.3 Music player ..................................................................................................................21
4.3.1. Shared folders .................................................................................................. 22
4.3.2. Shared media ................................................................................................... 23
4.4 FM radio ........................................................................................................................24
4.5 Presets .......................................................................................................................... 25
5 Software Upgrade ..................................................................................................................26
6 Confi guring the internet portal on a PC .................................................................................. 28
7 Info and Error Messages ........................................................................................................30
8 Troubleshooting – connecting to an internet station ............................................................... 31
9 Service Information ................................................................................................................33
Page 3

2
TABLE OF FIGURES
Figure 1: Wi-Fi radio infrastructure ................................................................................................... 3
Figure 2: Control Panel ..................................................................................................................... 4
Figure 3: Menu Structure of the HAV-IR10 -11 .................................................................................. 6
Figure 4: Navigating to the Time Menu ............................................................................................. 8
Figure 5: Navigating to the Alarm menu ........................................................................................... 9
Figure 6: Notifi cation of alarm settings not saved ............................................................................10
Figure 7: Alarm menu Tree ..............................................................................................................10
Figure 8: System Setup Menu Structure ..........................................................................................12
Figure 9: Manual Internet Setup Flow Chart ...................................................................................13
Figure 10: Navigating to PC Settings Menu .....................................................................................16
Figure 11: Internet Radio Menu .......................................................................................................19
Figure 12: Information types available for Internet Radio and podcasts .........................................20
Figure 13: Music Player startup fl ow ............................................................................................... 22
Figure 14: Connection fl ow sequence in Shared Media Mode ........................................................23
Figure 15: FM Mode Menu Structure ...............................................................................................24
Figure 16: Navigating to the Software Upgrade Menu .....................................................................26
Figure 17: Internet Software Upgrade Process ................................................................................27
Figure 18: Frontier Silicon Internet Portal .......................................................................................28
Page 4
3
1 Introduction
This guide instructs the user to set up and use the HAV-IR10 -11 based Wi-Fi radio user interface to
access the different features available on the radio.
Its main functions are to:
• Stream radio stations content via the Internet,
• Stream the Podcast Stations via the Internet
• Play the DAB and FM stations,
• Play fi les from a local server via Wi-Fi or Ethernet.
1.1 Conventions used in this guide
The following conventions are used in this guide:
• <back> - the name of a button / key
• [playing screen] – the name of a displayed screen,
• mode – the name of a menu or sub-menu.
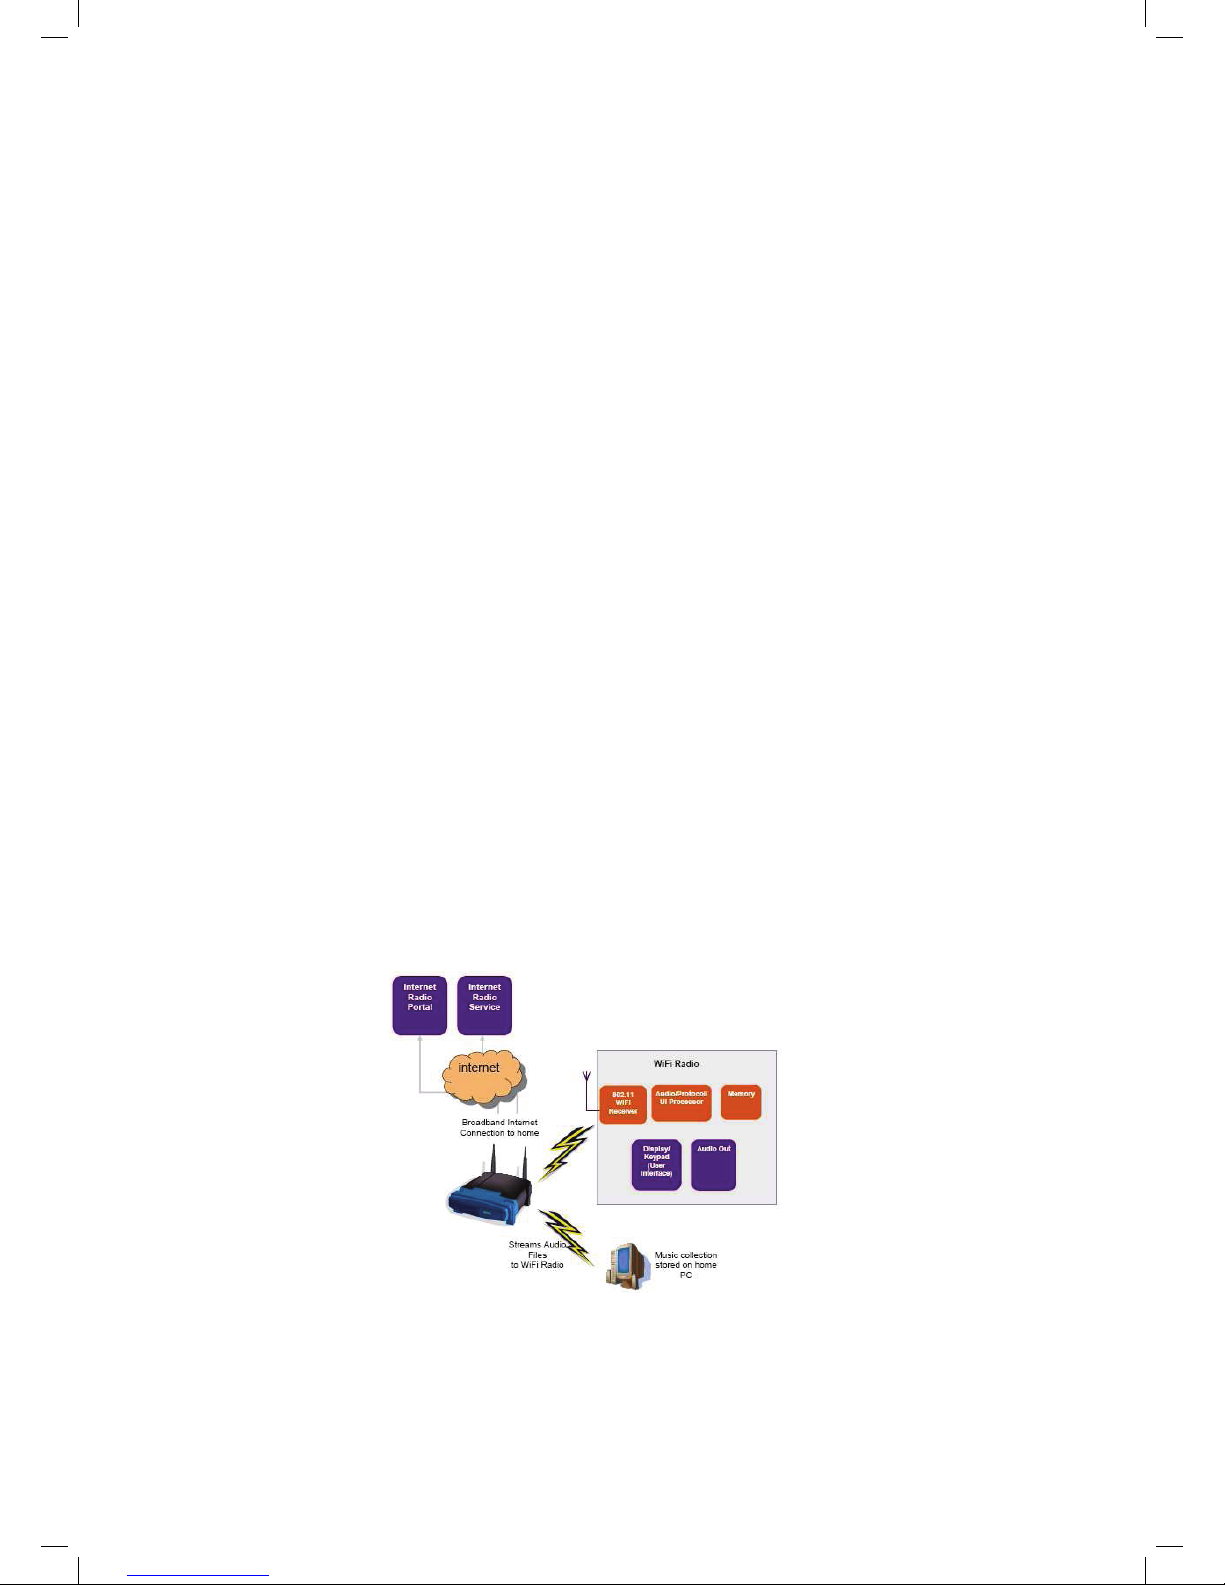
1.2 Infrastructure requirements
The following infrastructure must be ready to fully utilise the functionality available on HAV-IR10 -11
(as shown in Figure 1).
1. Broadband internet connection
2. Wi-Fi router (or optionally, a wired Ethernet connection)
3. PC
• Windows Media Player (WMP) 11 can be set up to enable streaming music fi les from the PC
to the radio.
• The shared folder on the network of the PC. (Please unlock the fi le by clicking the option
“Allow network users to change my fi les”).
• The PC can also be used to customise the radio’s favourites via the Frontier Silicon internet
radio portal.
Figure 1: Wi-Fi radio infrastructure
Page 5
4
2 Menu structure
2.1 Menu names
The Wi-Fi radio features three types of menu. These are:
• The Main menu
This is the menu which allows users to enter into different modes, setup the radio, and check
the information in the radio (for example software version, product ID).
• The Internet Radio Station List menu
This is the sub-menu in the “Internet Radio” option in the main menu that allows users to access
the different internet radio services. This menu comes direct from the Internet Radio portal.
• The Mode menus for the various modes
The mode menus are so called because they show the functions available within the context of
each of the modes. Pressing the <menu> button anytime will take you the mode menu of the
relevant mode the radio is currently in. Each context menu provides an entry called main menu
which takes you back to the MAIN menu.
2.2 Auxiliary Input Function (Aux-in function)
The unit is capable of aux-in speaker function.
1. Select the “Auxiliary Input” in the Main Menu.
2. Using the included audio cable, connect one end to the “Aux in jack” at the unit back and
another end to your electronic device “audio out” or “earphone jack”, the speaker will export
the connected audio source.
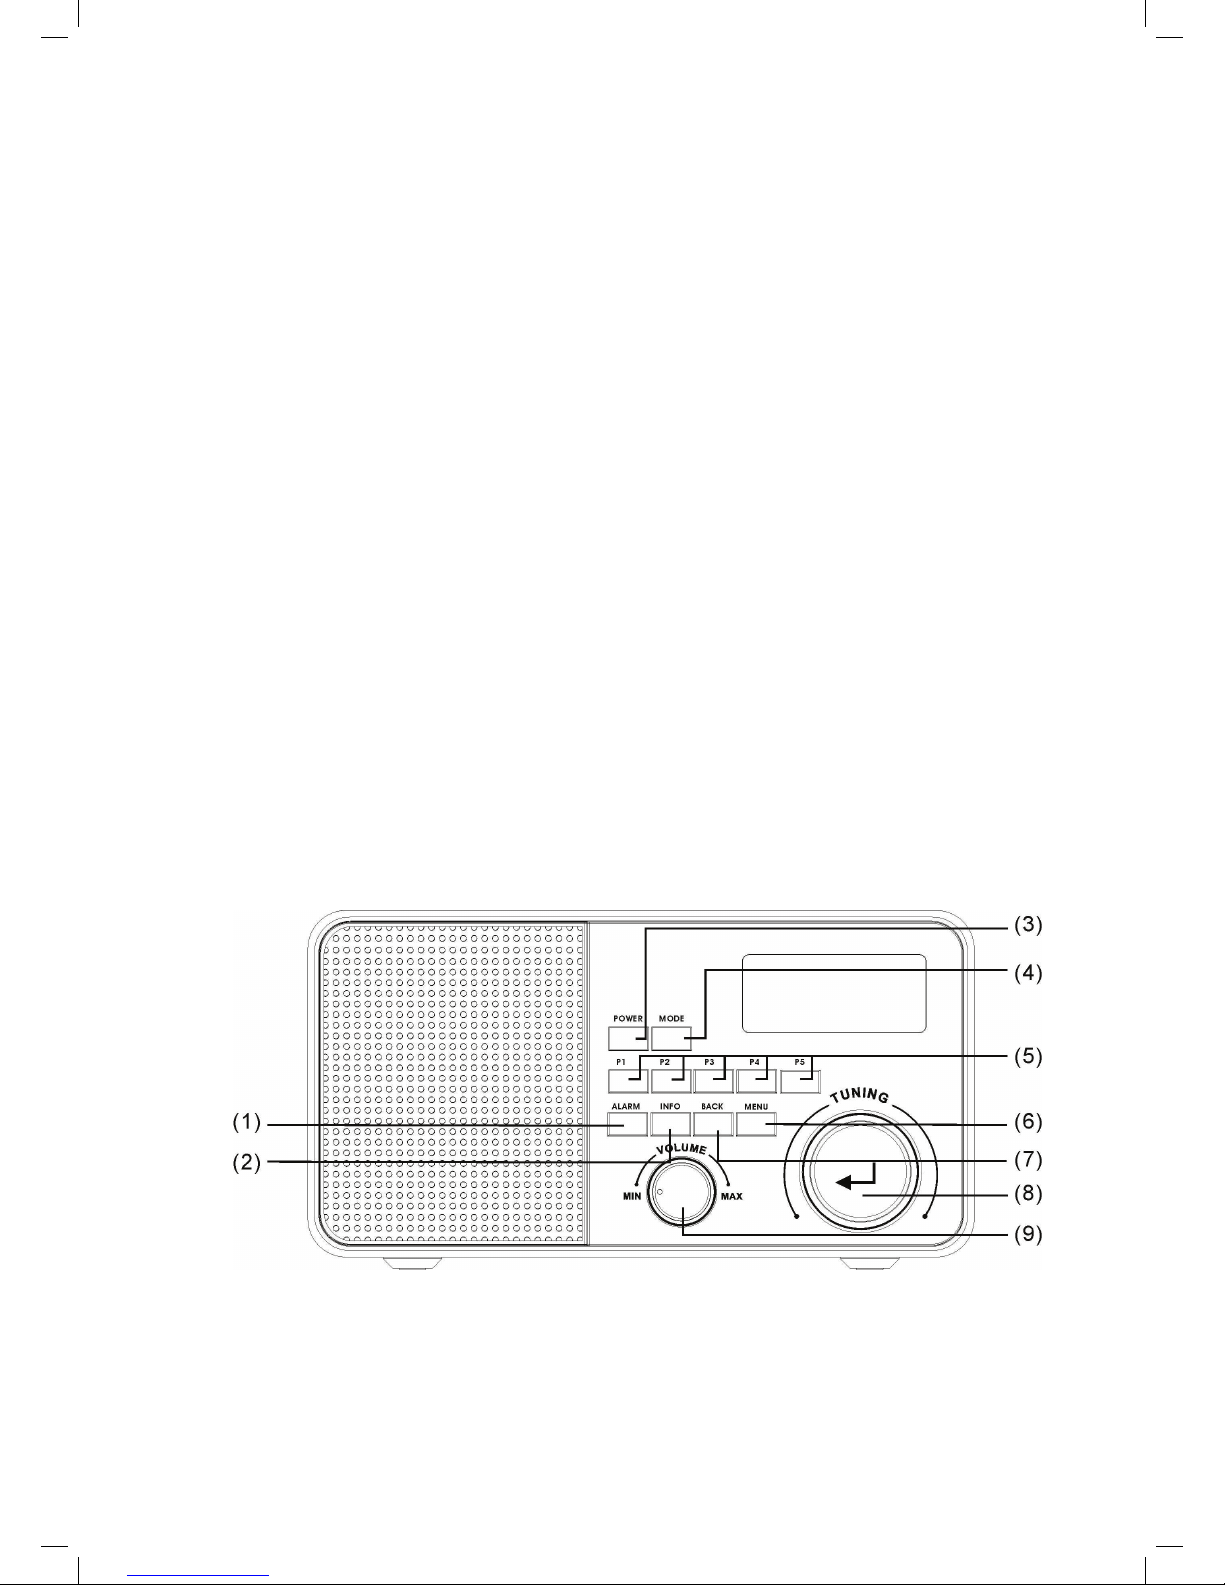
2.3 Key functions
Figure 2 shows a typical confi guration of keys available on the HAV-IR10 -11.
Figure 2: Control Panel
Page 6

5
The keys shown in Figure 2 have the following functions:
(1) Alarm Button Press to set the alarm.
(2) Info Button Press to see information about the service currently playing
(3) Power Button Press to control the power source of the radio.
(4) Mode Button Press to select the different mode immediately in the broadcast
(5) Preset Button
P1 – P5
Press and hold the Preset Button for saving the preset. Press it shortly to
load the preset station. Preset is not available in the Music Player Mode.
(6) Menu Button Press to enter the mode menu for the selected mode. Press again to
cancel and return to the [playing screen].
(7) Back Button Press to go back to the upward menu.
(8) Rotary Tuning
Controls
Rotate the control to scroll up or down a menu and press the control to act
as the Forward function to select the entry.
(9) Rotary Volume
Control
Adjust the volume level in the playback. Turn the knob in the clockwise
direction to increase the volume level and anti-clockwise direction to
decrease the volume level.
Figure 3 shows the site-map of all the menu and sub-menu in the HAV-IR10 -11.
Page 7

6
Figure 3: Menu Structure of the HAV-IR10 -11
Page 8
7
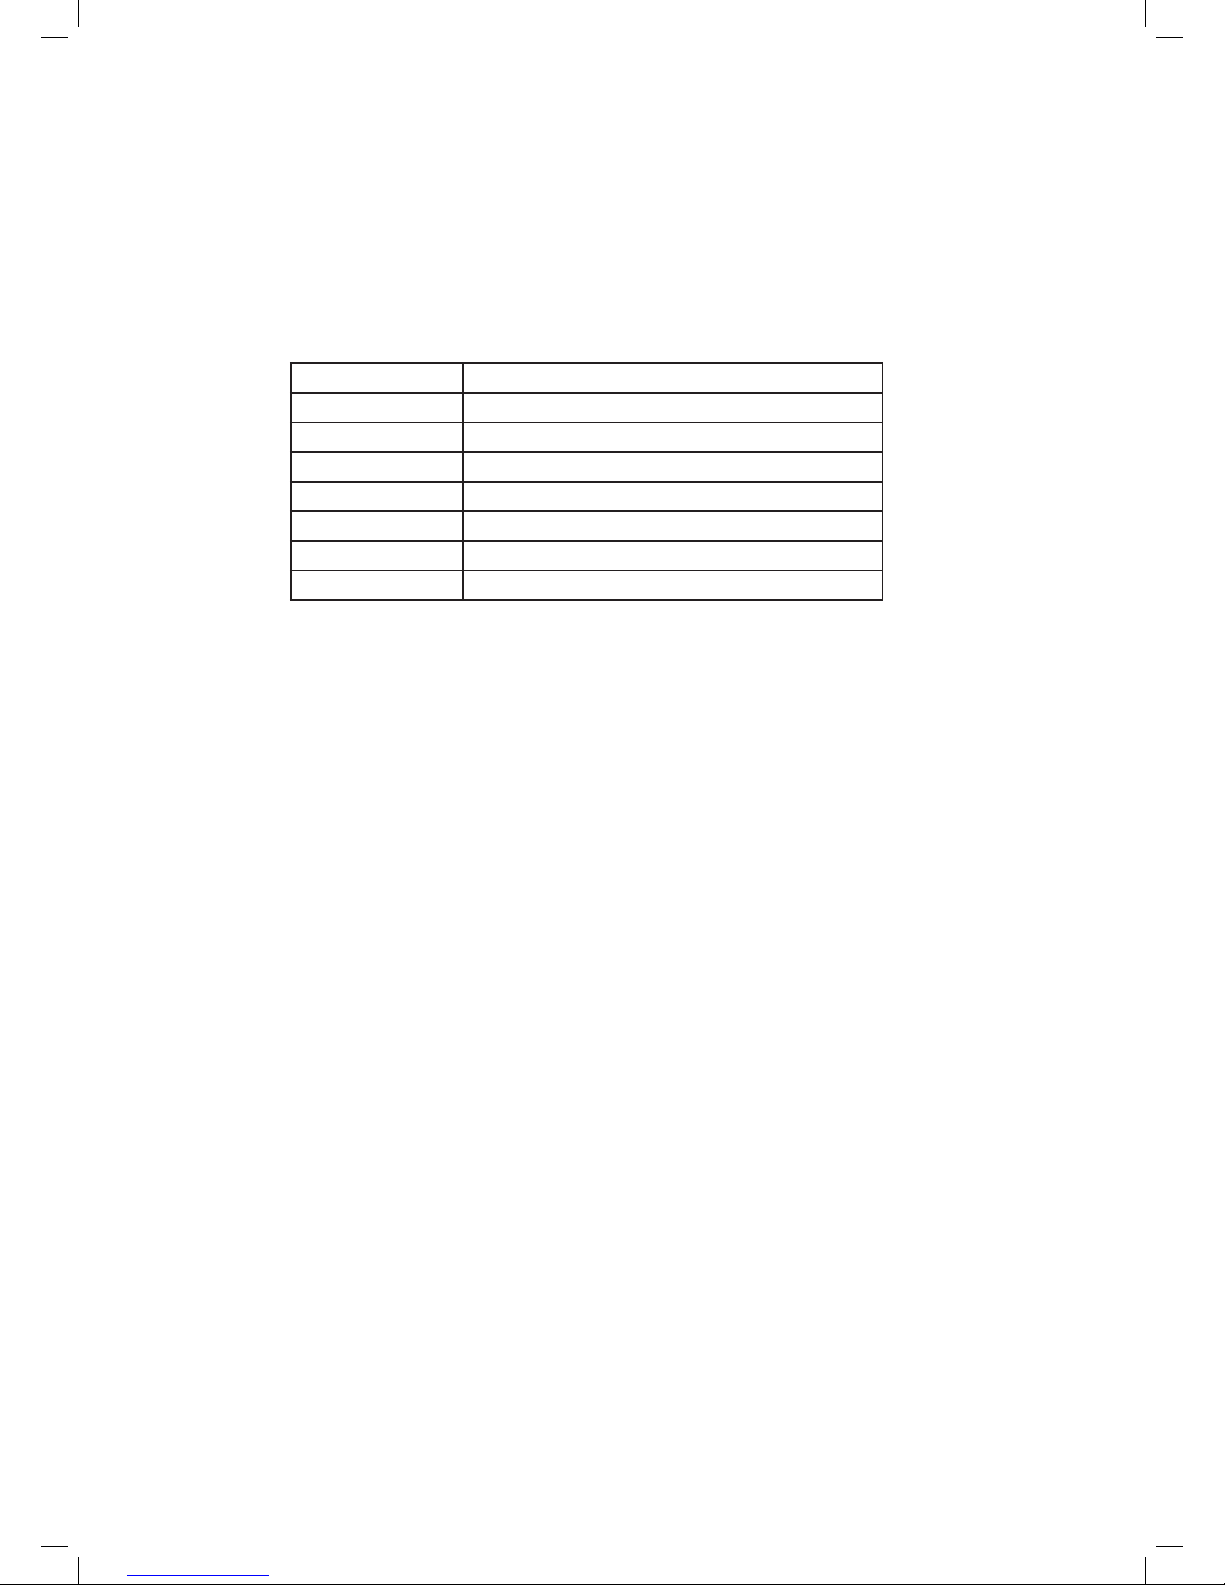
3 Setting up the Wi-Fi radio
To fully utilise all the functions available in the HAV-IR10 -11, please setup the radio by selecting the
“System Setup” in the main menu. The Main menu System setup menu has a series of options
that allows system-wide settings to be altered.
These settings are:
Option Setting
Internet setup Setting the Internet connection
Time setup Setting the date and time
Sleep Setting the sleep time of the HAV-IR10 -11
Alarms Setting the 2 alarms in the HAV-IR10 -11
Language Selects the user interface language
Factory reset To reset the system back to the factory default
Software upgrade Update the operating software
Page 9
8
3.1 Setting the time and date
The time has to be reset whenever the HAV-IR10 -11 is unplugged. Or, the time could be updated by
the DAB radio system when using in the DAB-supported region. The clock set must be completed
before the alarm setting.
To set the time:
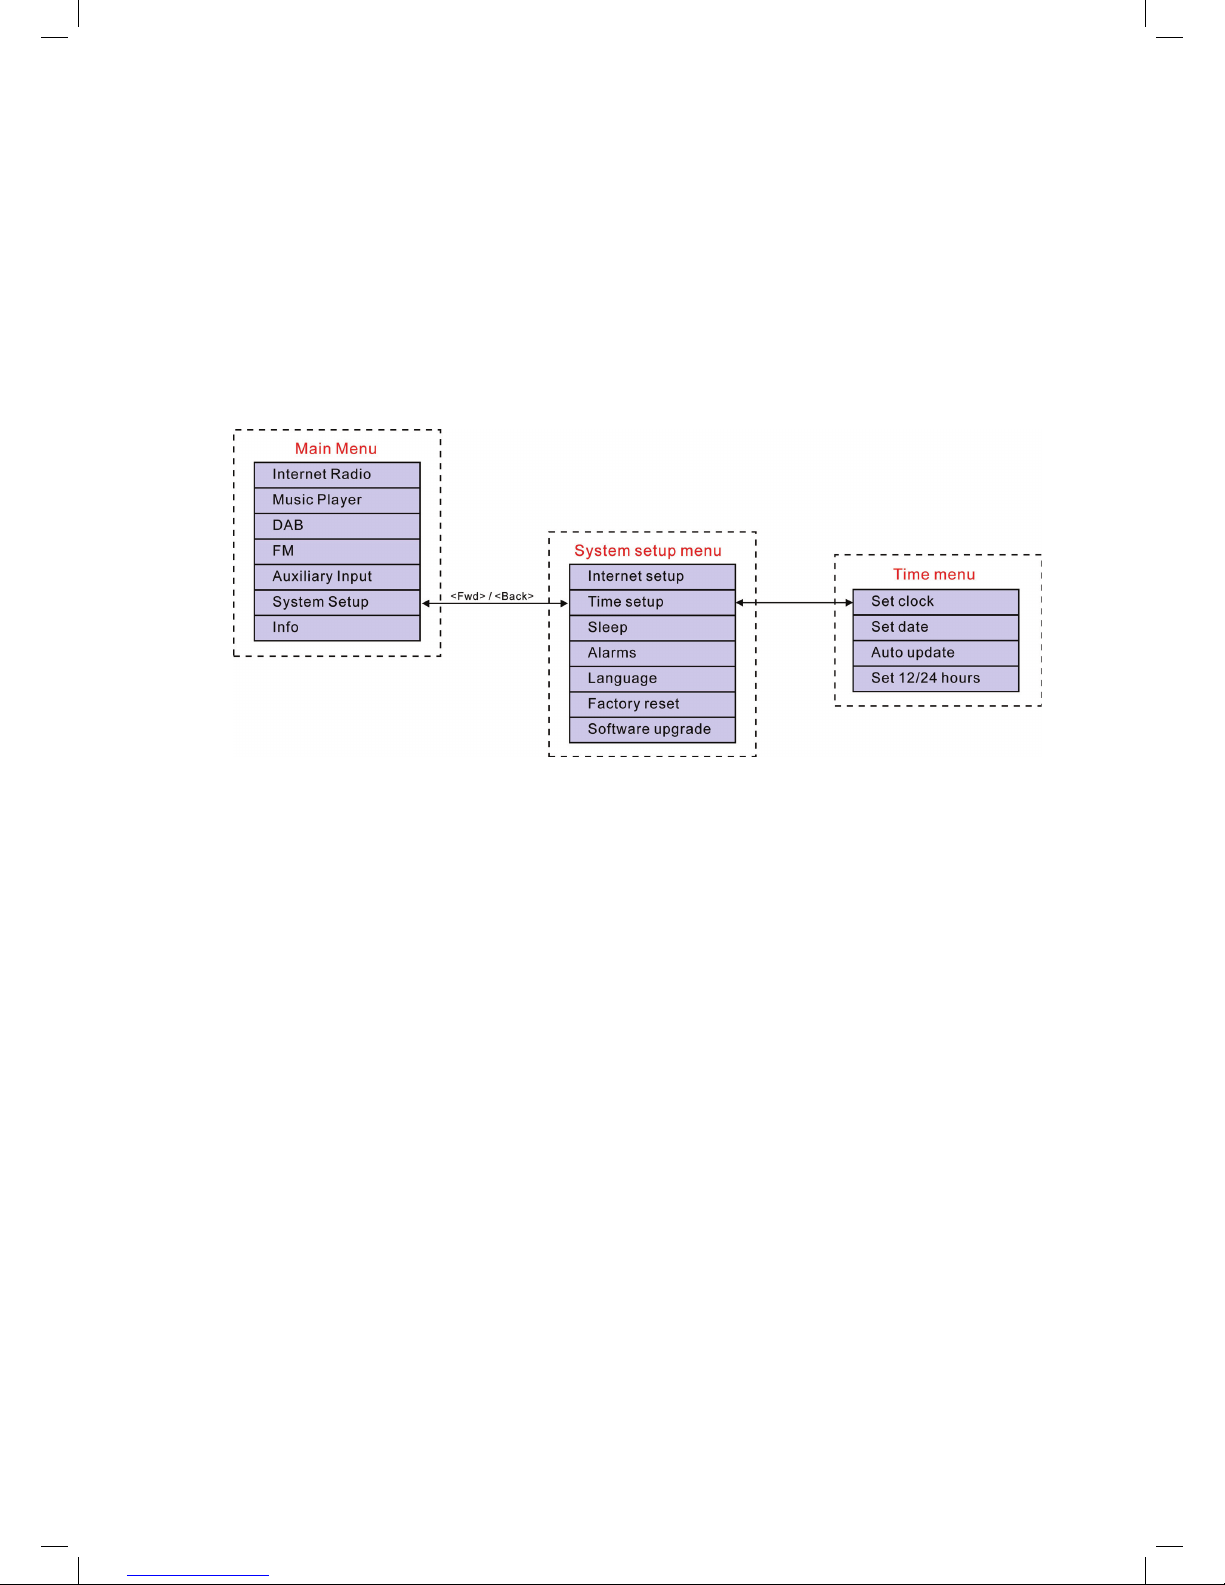
1. Go into the System Setup from Main menu Time setup
Figure 4: Navigating to the Time Menu
2. The Time Setup option was to setup the time and the date.
3. Auto update option allows the user to synchronise with the DAB broadcaster clock. Please note
that this function will be activated only when using in the DAB-supported region.
4. In the region without DAB-supported, you could choose to auto update the clock system from
the NET. However, the clock system was fi xed at GMT+1.
5. The Set 12/24 hour menu allows selection of clock display format for either 12 or 24 hour.
Page 10
9
3.2 Setting alarms
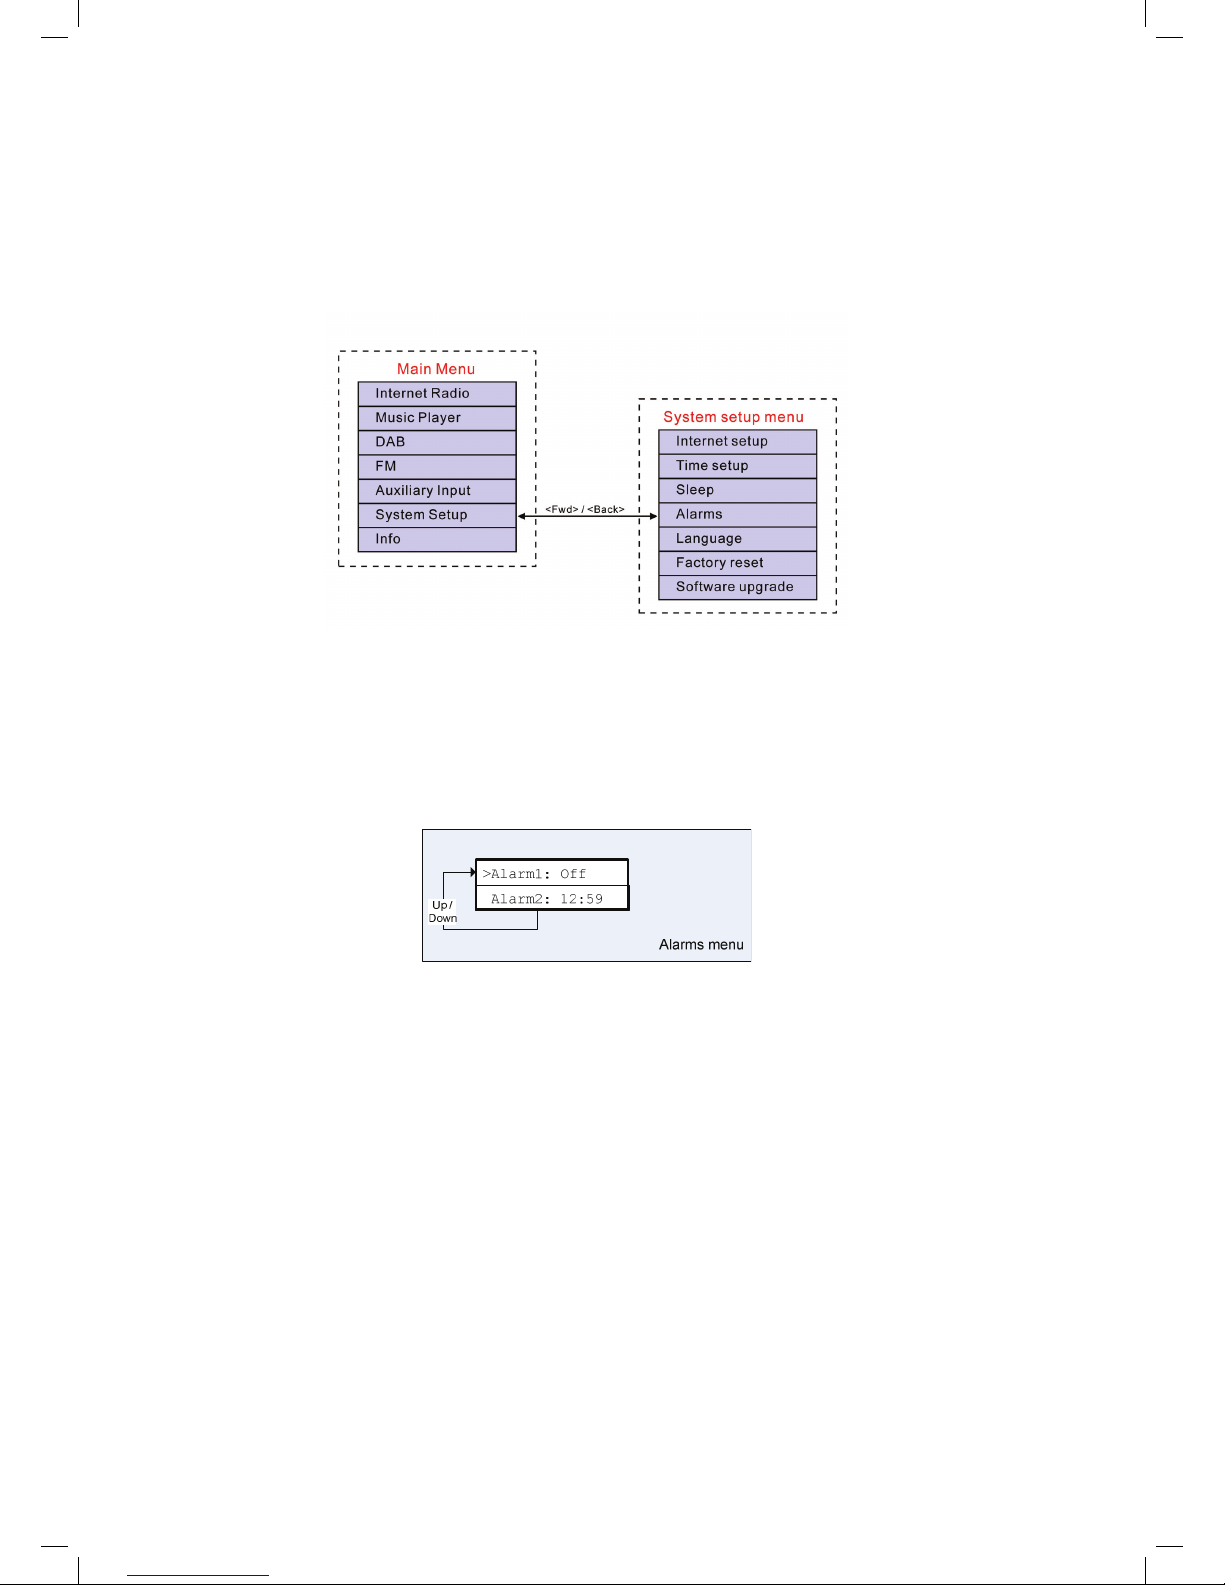
The alarms menu can be accessed in two ways:
i. Select the submenu in the Time Setup option (Main menu > System setup > Time setup >
Alarms)
ii. Press the <ALARM> button on the HAV-IR10 -11
Figure 5: Navigating to the Alarm menu
• The fi ve alarms are preset to be activated daily after setting.
• The Internet Radio Station, Buzzer, DAB and FM could be set as the alarm form.
When entered, the Alarms menu shows the following display:
Please select the Alarm 1 – 5 by rolling the Rotary Tuning Control. The set alarm time will be displayed
on the optioned; or “Off” will be displayed for the unused alarm.
Setup the alarm:
1. Select the alarm from 1 – 5 by rotating the rotary control to left or right. Choose the “Forward”
option by pressing the rotary control. (Refer to fi gure 7 below).
2. After setting the alarm time, select the alarm type:
• Buzzer
• Internet Radio
• DAB
• FM
Note: it is not possible to set the alarm to wake up by Music Player mode.
Page 11
10
3. The “Last Listened” Option: When setting this option as the alarm type, the alarm will be
activated by the previous station you were listening to. However, when there is no any memory
in the radio, the setting will be defaulted to “buzzer” mode
4. The “Volume” Option: This is to adjust the alarm volume from 0 - 16. The volume 0 is mute and
the volume 16 is the loudest. The alarm volume was default at volume 16.
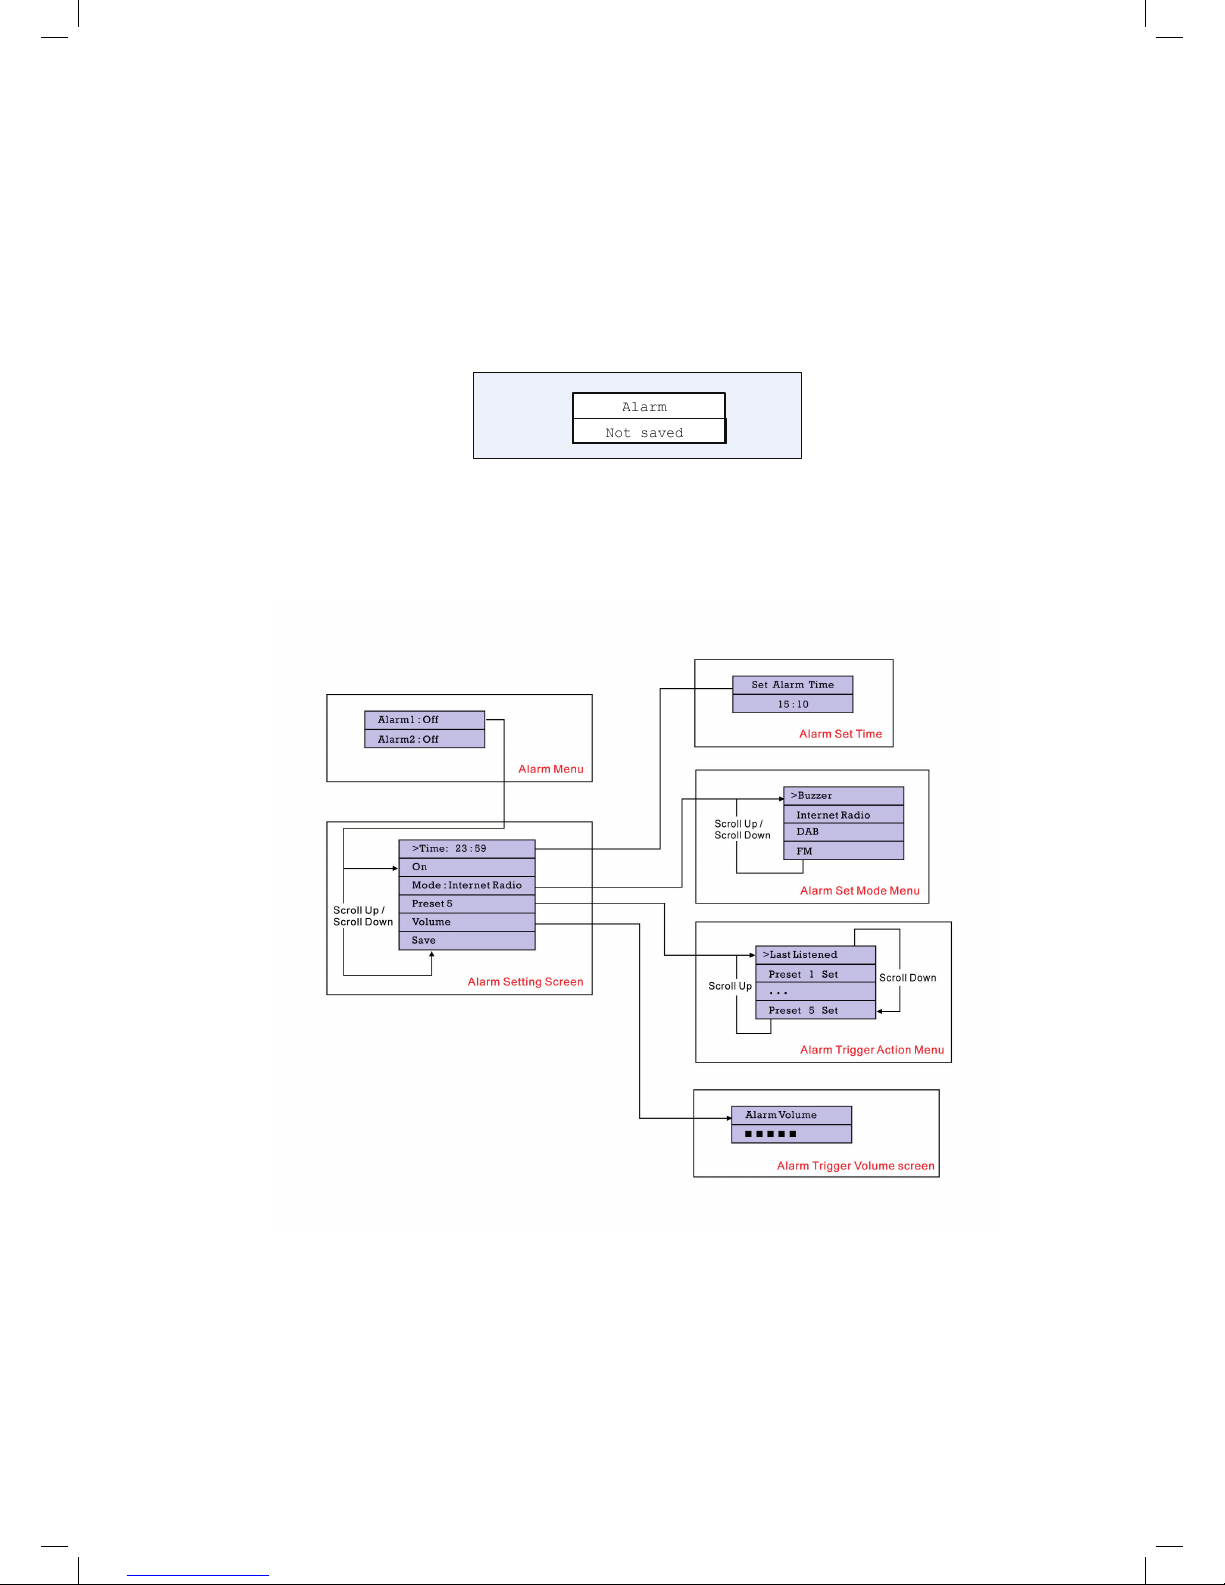
5. The settings will not be saved and activated until the ‘Save’ option item was been selected. If
the setting is exited without setting, a splash screen will notify the user as below.
Figure 6: Notifi cation of alarm without Saving
Please fi nd the fi gure 7 below for the summarized menu tree for setting alarm.
Figure 7: Alarm Menu Tree
Page 12

11
3.3. Setting up the Internet radio
In the fi rst time using the HAV-IR10 -11, the Internet connection must be setup to access the Internet.
Please follow the below 2 procedures to setup the access point:
• Select the WLAN region. Choose your region in the list, even if you are not using the Wi-Fi to
access the Internet. (Using the Ethernet connection instead, for example).
• The Internet Wizard will guide the user to setup of the network after choosing the region. The
radio has been confi gured to run the Internet Wizard automatically when entering the Internet
Radio mode if a connection is not made.
Alternatively, you could run the Internet Wizard to connect to a different Wi-Fi network by choosing
the Internet Setup in the “System Setup” option in the main menu.
The Internet setup menu allows selecting either:
• Help you setup the Wi-Fi access point or;
• View and edit the current Wi-Fi settings.
Page 13

12
Figure 8 System Setup Menu Flow Chart
Page 14

13
Figure 9 Manual Internet Setup Flow Chart
Page 15

14
To setup the internet radio by using the Internet Wizard:
1. Select the “Wizard” in the Internet Setup.
2. Select the WLAN region in which the radio is located.
3. The Wizard will automatically scan for all available Wi-Fi and wired (Ethernet) networks.
4. Select your desired network by the rotary control key. There are three special options:
· [Rescan] Rescan for all possible network;
· [Wired] Available when the wired Ethernet is available.
· [Manual confi g] Set up the wireless confi guration manually.
5. If the only one unlocked network is available, the radio will connect to the network itself.
“Connected” will be shown on the screen after the radio is successfully access to the Internet.
6. If the network is with security, please input the password of the access point to connect the
network.
Please refer to the below:
Choose the ‘<’ symbol = back space
the ‘↵’ symbol = enter
the ‘C’ symbol = cancel
7. Users can edit their Wi-Fi settings by selecting the System setup Internet setup Manual
settings.
8. Selecting View settings allows you to access other Wi-Fi connected settings. These are:
• Active adapter, which displays the current connection being used to connect to the Internet
(WLAN or Wired),
• MAC address,
• DHCP status
• PC settings
• SSID
• IP settings, which displays the IP address, the subnet mask and the gateway address.
Use the Rotary Control by turning left or right to choose the
different sets of characters along the row of characters. Press
the Rotary Control to select the fl ashing cursor.
Page 16

15
3.4. Setting up the music player
There are two Music Player modes available. Each of them requires different settings, and either one
can be used to playback music from a media server.
3.4.1 Shared folders (CIFS)
In order to set up the device to playback music stored on shared network drives, user name, password
and domain settings must be confi gured to work with the PC share settings. This is only required if
the user has set a password on his/her shared folders.
PC: Domain/Workgroup confi guration
The Domain confi guration item can be found on a Windows XP machine as follows:
1. From the start menu, select Control Panel > System then select the “Computer Name Tab”.
2. The Domain or Workgroup that this Computer is a member of is displayed in this tab.
3. Please set the PC to a Domain or Workgroup. To do this click on the change button on the
computer name tab. Please set the Domain name as “MSHOME” (This is the default setting of
Window XP).
4. A reboot of the PC may be prompted if the Domain or Workgroup has been changed.
PC: Setting up a new user account (Windows XP)
The Wi-Fi Radio requires a user account to be set up on each PC that you wish to browse. By
default most PCs have at least one user account associated with it. The user name and password
(optional) needs to be the same on each PC as the Internet Radio only stores one user name and
one password. For windows XP this can be set up as follows:
1. From the start menu, select Control Panel -> User accounts
2. From this screen left click the ‘Add …’, and enter the new user name and the Domain/Workgroup
setting noted above. Select the type of user (restricted) and then select fi nish.
3. Select the user just created, select ‘Reset Password …’ and enter a password for this user.
4. Note the User Name and Password.
Note for Windows VISTA: Users have to turn on the Guest account via manage user accounts in the
control panel in VISTA, then add access to either ‘Everyone’ or ‘Guest’ on the shared drive. They
could create a new account for the internet radio, with a password, if they are concerned about
security. The Guest account has no password by default, so the Wi-Fi radio will connect to it from its
factory default settings.
PC: Confi guring a shared drive
From the Start menu select My Computer and navigate to the directory you wish to share. Right
click on the directory and select Sharing and Security. Confi gure the shared drive as read only, and
ensure that the User Name created above has read access to the share.
Wi-Fi Radio: Storing the username and password
Before the radio can stream music from a PC, you need to ensure you have shared folder available
on the PC, and set up the radio so that it knows the username and password (if one has been set)
for the shared folder on the PC.
Page 17

16
This can be set up using the PC settings menu shown below in Figure 10:
Figure 10: Navigating to PC Settings menu
3.4.2 Shared media (UPnP)
Media sharing uses Windows Media Player (WMP) 11 and above as media server. This mode does
not require any setting in the radio, but the PC needs to be confi gured to allow the radio access to
the media. This is the procedure to run uPnP.
1) Put the *.mp3 and *.wma that you are going to share in C:\Documents and Settings\All
Users\Documents\My Music\Sample Music (\\palm\dropbox\ylam\Music\)
2) Install Windows Media Player 11
(http://www.microsoft.com/windows/windowsmedia/player/download/download.aspx)
3) Click Library “Media Sharing”
Page 18

17
4) Check the “Share my media to” box, then click settings
5) Follows the settings below:
Page 19

18
6) In Windows XP Start Menu Run Type “services.msc”, and please make sure
a. Universal Plug and Play Device Host
b. Windows Media Player Network Sharing Service is “started”.
7) Make sure you laptop / PC and the HAV-IR10 -11 is connected to the same wireless
network. If you are in Frontier Silicon offi ce, make sure your PC and V6 are connected to
Frontier-Visitor
8) Start HAV-IR10 -11 board. Go to Music Player Mode Shared media, and then you
should be able to fi nd your shared music in there.
(I think Shared Media is for UPnP and Share folder is for samba)
Page 20

19
4 Using the Wi-Fi radio
4.1 Changing modes
When you turn on the radio again, the radio will automatically run the last listened programme. To
select another mode:
1. Press the <menu> key to display the mode menu of the mode you are in.
2. Use the rotary control to go to the Main menu.
3. In the main menu, select the different mode.
The unit accesses the last service played in that mode.
Alternatively, press the <mode> button on the radio to select the different modes.
4.2 Internet radio
The Internet Radio mode allows the user to select services (which can be live radio stations or
Podcasts) to listen to from the internet radio portal.
When the user connects to Internet Radio, a Station list menu is provided. This is built up after
the initial logon from the internet radio portal server. The Station List menu and the two submenus
that lead off (for items relating to Internet Radio and Podcasts, respectively) are shown below in
Figure 11.
Figure 11: Internet Radio menu
The Internet Radio Stations List menu provides the following functionality:
Name Description
My
Favourites
Navigating to stations stored within Favourites. The Favourites list can be built up by
accessing the internet radio portal over the PC and creating favourites lists.
Stations Navigates to sub-menu which allows users to navigate to stations by location, genre,
most popular, new stations, or by doing a search by alphabets.
Podcast Navigates to sub-menu which allows users to navigate to Podcast and listen-again
services by location, genre, or by doing a search by alphabets. On or Off
My added
stations
Shows the stations which were added by the user through the vTuner portal (although
the Internet portal has access to over 8000 stations, you can still input new stations,
which will then be displayed under the My added streams menu.
Page 21

20
Help Use Get access code during the radio registration on the Internet radio portal, see
section 6 for details. The FAQ offers help for common problems with Internet radio.
The Internet Radio Playing screen displays information on the currently-selected service, and is the
default behaviour when a service is selected and playing.
The top line always displays the station name, whilst the information displayed in the bottom line can
be scrolled through by pressing the ‘Info’ button. The different information types displayed are shown
below;
Figure12: Information types available for Internet radio and podcasts
Page 22

21
4.3 Music player
The Music Player allows accessing music fi les stored on a PC connected to the same network and
playback through the radio. The Music Player can be accessed direct from the Main menu.
The connection process is different depending on the Music Player mode selected.
Page 23

22
4.3.1. Shared folders
The startup fl ow when entering Music Player Shared folders mode is shown in Figure 13:
Figure 13: Music Player start up fl ow
1. Ensure that the user name and password have been confi gured as described in section 3.4.
2. Enter the music player menu
3. Once the user selects the “MSHOME” domain, a list of PCs on the domain is displayed:
4. Once the Domain and PC have been chosen, a list of all of the shared folders in the system is
displayed.
Page 24

23
5. Select a folder and a fi le to play within the folder.
6. Press Menu invokes the Music player mode menu, and then back to the Main menu; select
Browse to enter the last selected shared folder.
4.3.2. Shared media
The shared media mode uses UPnP technology to make easier both setting up and navigating the
Music playback mode. Unless the Upnp network has been setup in the PC, for example by Window
Media Player 11, or this will not be functioned. In this mode, the connection sequence is as detailed
in Figure.
Figure 14: Connection fl ow sequence in Shared media mode
Page 25

24
4.4 FM radio
Figure 15: FM mode menu structure
The FM mode menu allows setting up the following:
Name Description
Scan setting The Scan settings menu allows the user to set how an FM search started by pressing
the rotary control.
‘Strong stations only’ will only stop under strong signal strengths. This means that
the audio quality of services that it stops on should be good, there is also the
chance that desired services may be missed.
‘All stations’ will stop under many more circumstances, including Carrier Wave and
other non-broadcast interference. Whilst this means that there will be more stops, it
will be more likely for the user to scan a desired service.
Audio setting The Audio settings menu allows the user to set whether to always play stereo
stations in mono mode, or whether to switch stereo stations to mono when the
signal quality gets below a certain threshold.
Manual
Tuning
Users could also tune the FM frequency by turning the rotary control
Page 26

25
4.5 Presets
Presets are a system that allows the user to store a build-confi gurable number of preset stations in
each mode. The behaviour of presets is different in each individual mode because of the way that
the preset is stored within the system.
Presets are available in the following modes:
• Internet Radio
• DAB
• FM
A short press of a preset is used to recall a preset; a long hold of a key is used to store a preset.
When a DAB or FM preset is stored after a long-press, a splash screen is displayed for a set time,
with the information on the bottom line replaced by a ‘Preset stored’ string. The example below is for
DAB:
Any key press will cancel this splash screen and perform a relevant action; for instance, pressing
‘Info’ will close the splash screen and alter the Information fi eld on the bottom line. Likewise, pressing
‘Up’ closes the splash screen and goes to the service list.
A short press of a preset key recalls a preset; if the preset has already been set then the radio
attempts to tune to the relevant service. Any failure to tune is reported in the normal way.
If the preset is currently unset, then another splash screen is displayed with ‘Preset empty’ on the
bottom line:
In the case of DAB, FM and Internet radio, presets point to a defi ned service. This is not possible in
Music Player mode, which consequently has no presets.
Page 27

26
5 Software Upgrade through the Internet
The user could update the operation software to improve the performance. Please select the “Software
Upgrade” in the “System Setup” menu. To access this feature, please refer to the fi gure 19 below.
Figure 16 Navigating to the Software upgrade menu
The radio could search for updated software automatically when the connection was established
(either wired or wireless). This may take a few second. If the radio is not connected to the network, or a
connection has not yet been set up, please follow the section 3.3 to setup your Internet connection.
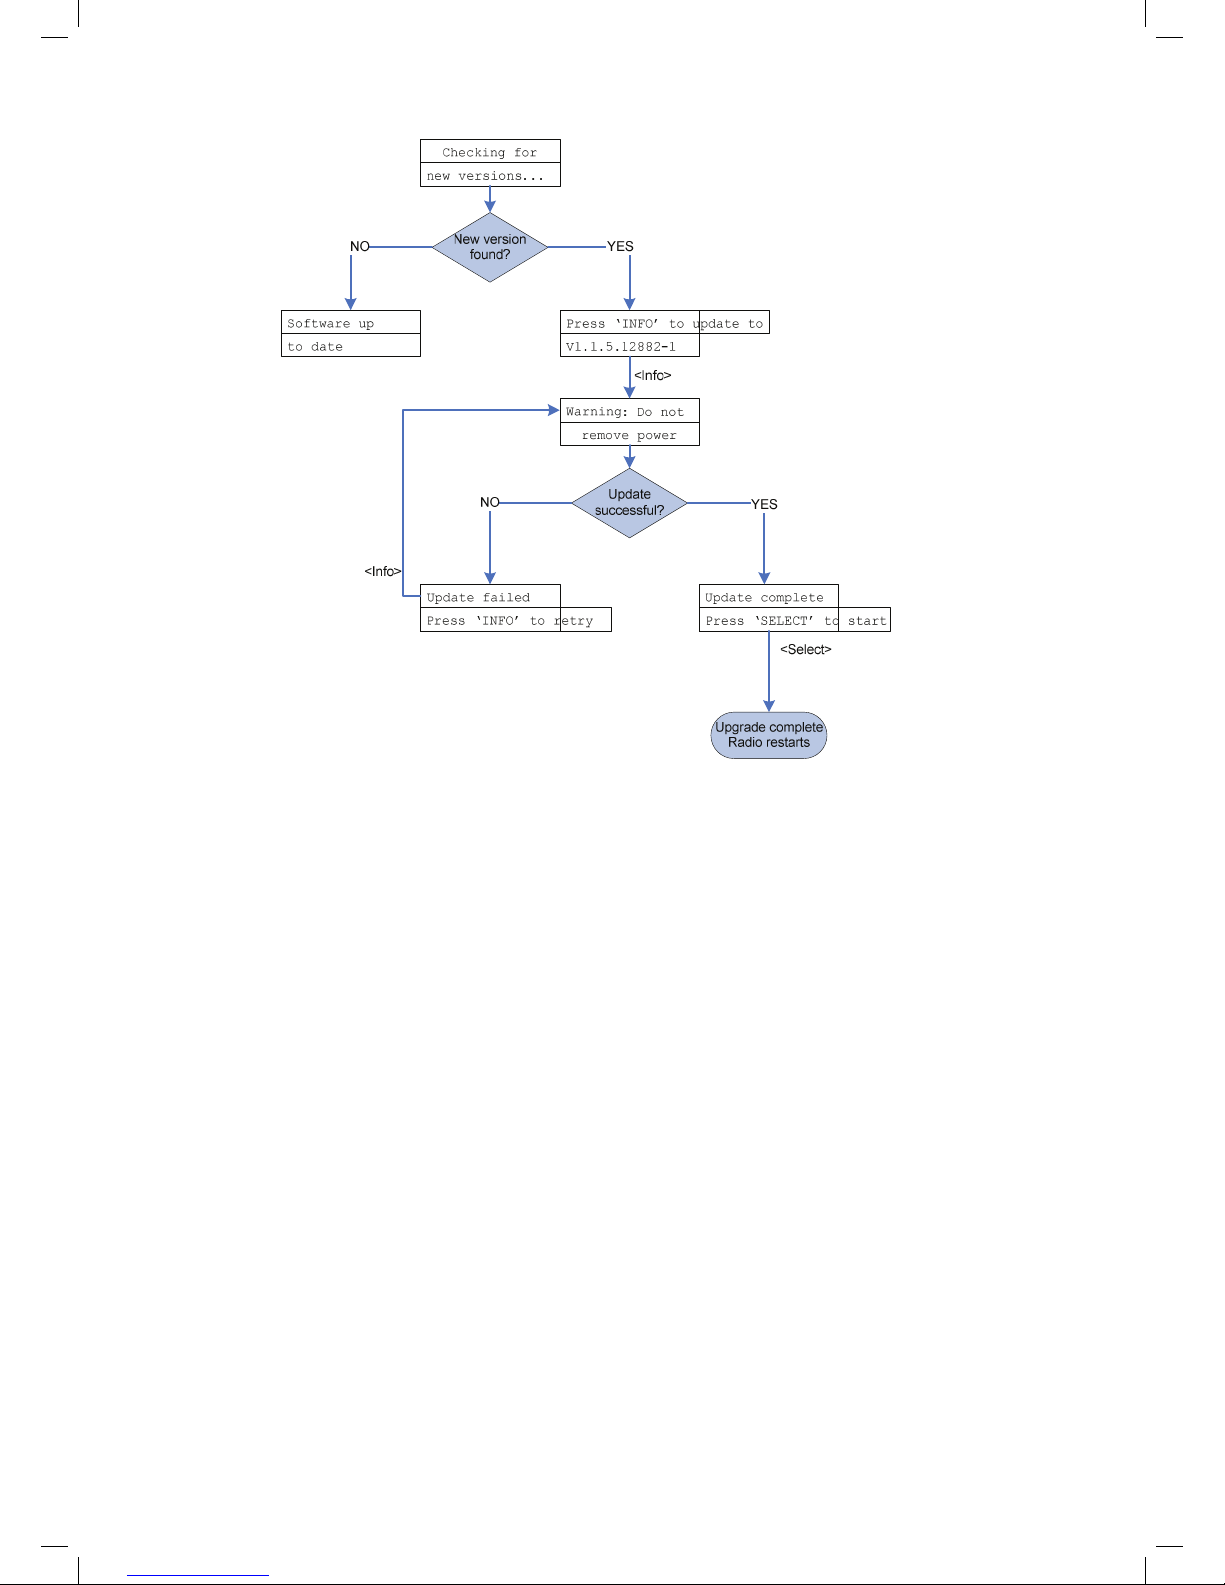
If the more updated version of software is available, the user will be asked to confi rm the upgrade.
Once the process is initiated, a progress bar will show in the display and the warning “not to remove
power” will be fl ashing in the screen periodically. This is very important in order to keep the radio
operational. If the power of the radio was cut during the upgrade, the user setting or information in
the radio may be lost.
Once the update is completed, either “upgrade successful” or “failure” will be informed to the user. If
successful, pressing <select> to restart the radio with the new software.
Note: After a software upgrade all user settings are preserved.
The whole process is summarised in Figure 19.
Page 28
27
Figure 17: Internet software upgrade process
Page 29

28
6 Confi guring the internet portal on a PC
Log onto the Frontier Silicon internet radio portal to confi gure your radio (for example to add favourites
or add stations).
Figure 18 Frontier Silicon Internet Portal
To access the Frontier Silicon internet radio portal:
1. Open a web browser and go to: http://www.wifi radio-frontier.com.
2. If not yet a member, click on Register here link. It will ask for the Access Code from the Wi-Fi
radio.
3. To get the Access Code, go to Internet Radio mode, then press <back> > Help > Get access
code. The radio displays an entry that states the access code of the unit in the form: "Access
code ABCD123". Enter the code into the entry fi eld on the website.
4. Fill in the rest of fi elds, including username, password and radio model
5. Click Register, after which you should now be taken back to the confi guration page.
6. You should now be on a page used for confi guring the favourites and added stations for your
own HAV-IR10 -11.
Page 30

29
To add stations to the “Favourites” group for your specifi c Wi-Fi radio, simply browser through the list
of stations genres until you fi nd something you want to add, then click on the heart symbol to the left
of the station name. The fi rst time you add a station, you‘ll be asked to create a new group for that
station. This group will appear as a sub-menu item under the “Favourites” entry in the root vTuner
menu. You can add as many stations to favourites groups as you like.
When you have added what you want, simply restart your Wi-Fi radio. You should now fi nd that the
groups and added stations appear under the “Favourites” list.
To reset the favourites and added stations, register the radio in the website under a new user account
and request a new access code for the radio.
Page 31

30
7 Info and Error Messages
The following is a description of the info and error messages that the Wi-Fi radio could possibly
display.
Message Type Description
Failed to
connect
Error Seen when a Wi-Fi network related error occurs. Some examples of
circumstances which will trigger a ‘failed to connect’ are:
- radio fails to connect to Wi-Fi network
- wrong network security key entered
Network error Error Seen when a server/connection related error occurs. Some examples of
circumstances which will trigger a ‘network error’ are:
- radio fails to connect to Wi-Fi network
- radio fails to connect to internet radio portal
- radio fails to connect to a radio station
- radio’s was streaming a station and connection fails midway
through the streaming
- radio fails to connect to a PC for streaming music
Format error Error Seen when the radio has problem playing the media due to
unsupported format type. Some examples of circumstances which will
trigger a ‘format error’ are:
- radio tunes to a internet radio station which is being transmitted
using an audio codec not supported by the radio (i.e. AAC+).
- Radio tries to play a music fi le from a PC which is in a format not
supported
Not available Info Seen when the radio tries to tune to a DAB station without suffi cient
signal reception.
Connecting… Info Seen when the radio tries to establish connection with a network,
server, portal,
station.
Loading… Info Seen once the radio has established connection, and starts buffering
the station/stream.
Playing Info Seen once the radio has completed connecting, and loading, and starts
playing the stream. This is the point when the station becomes audible.
Page 32

31
8 Troubleshooting – connecting to an internet station
Page 33

32
9 Service Information
Disposal of electrical and electronic equipment
This symbol on the product or in the instructions means that your electrical and electronic
equipment should be disposed at the end of its life separately from your household waste.
There are separate collection systems for recycling in the EU.
For more information, please contact the local authority or your retailer where you
purchased the product.
Specifi cations:
Model: HAV-IR10 -11
Type: Wi-Fi Internet Radio with PLL FM Radio
Dimension: 250 x 130 x 135 mm
Weight: 2 KG (approx.)
Power Source: Powered by mains socket DC 12V ~ 1.5A
Page 34

33
Page 35

34
Page 36

35
 Loading...