

Page 1
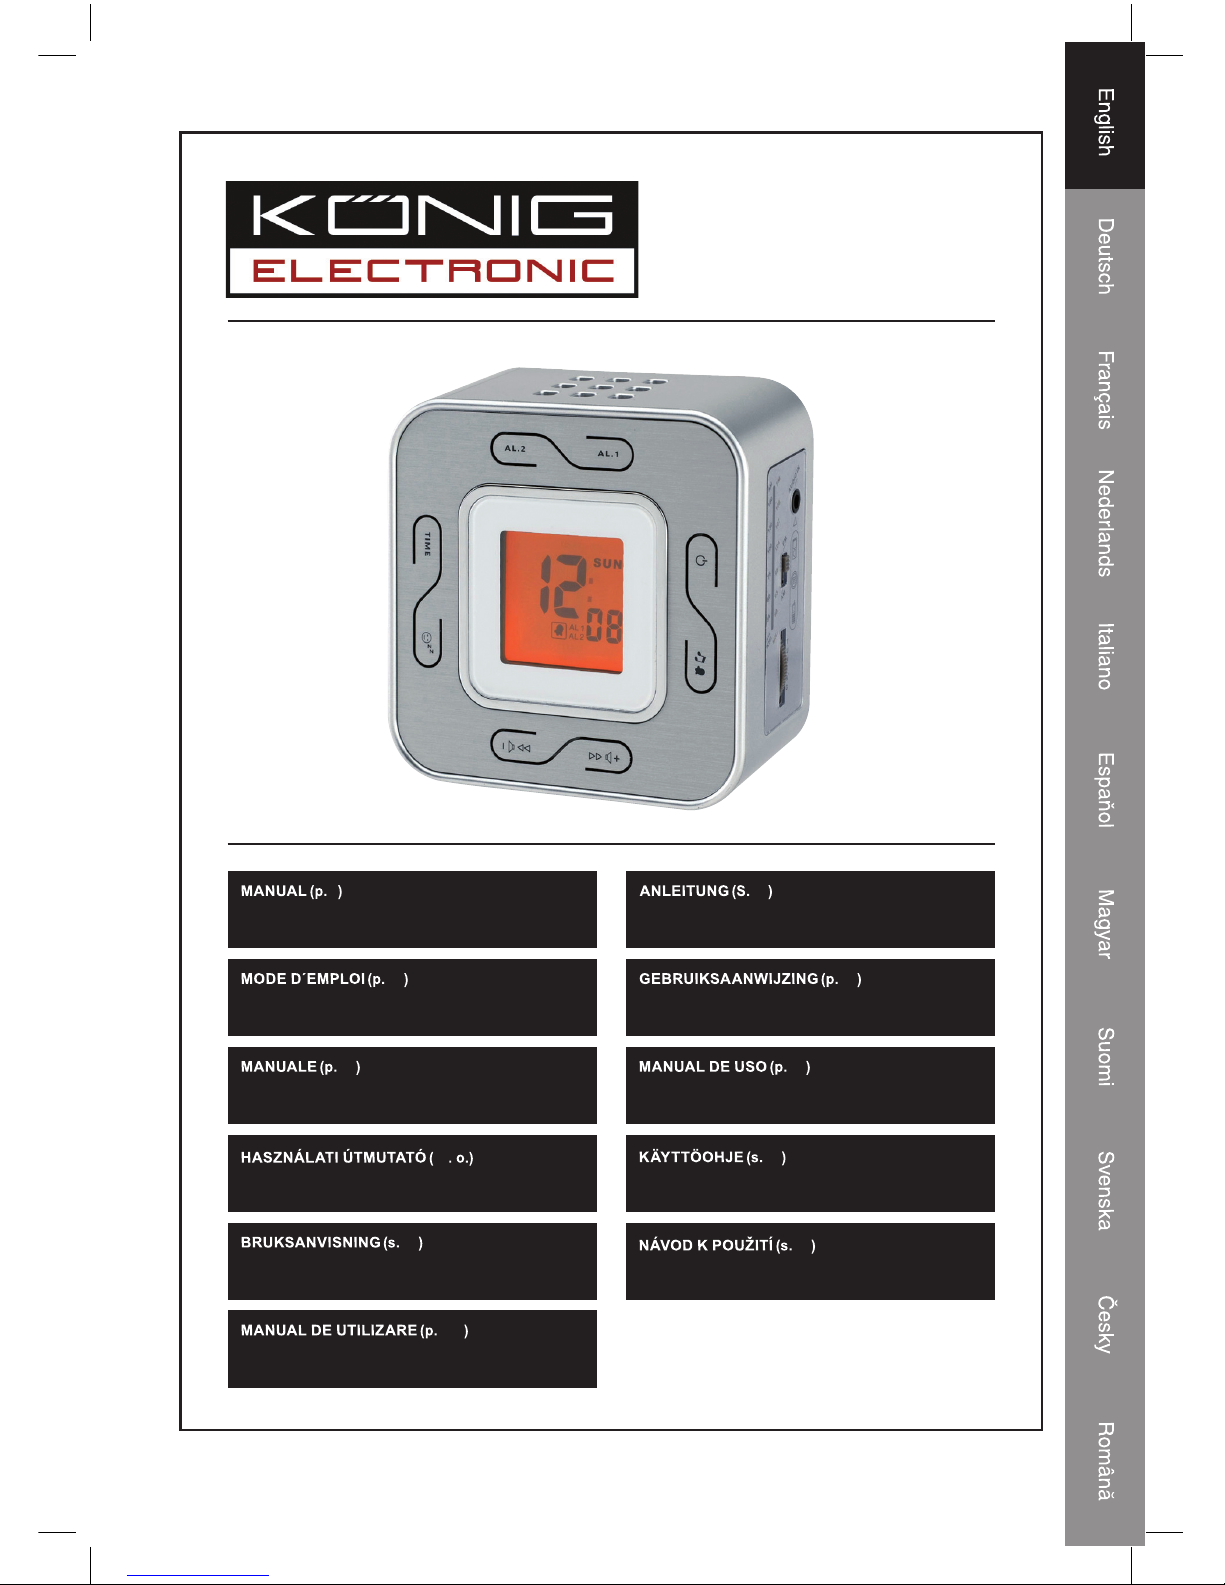
HAV-CR70
2
CLOCK RADIO
12
RADIOWECKER
22
RADIO-RÉVEIL
32
KLOKRADIO
42
RADIOSVEGLIA
52
RADIO RELOJ
62
RÁDIÓS ÓRA
72
KELLORADIO
82
KLOCKRADIO
92
RÁDIO S BUDÍKEM
102
RADIO CU CEAS
Page 2
2
ENGLISH
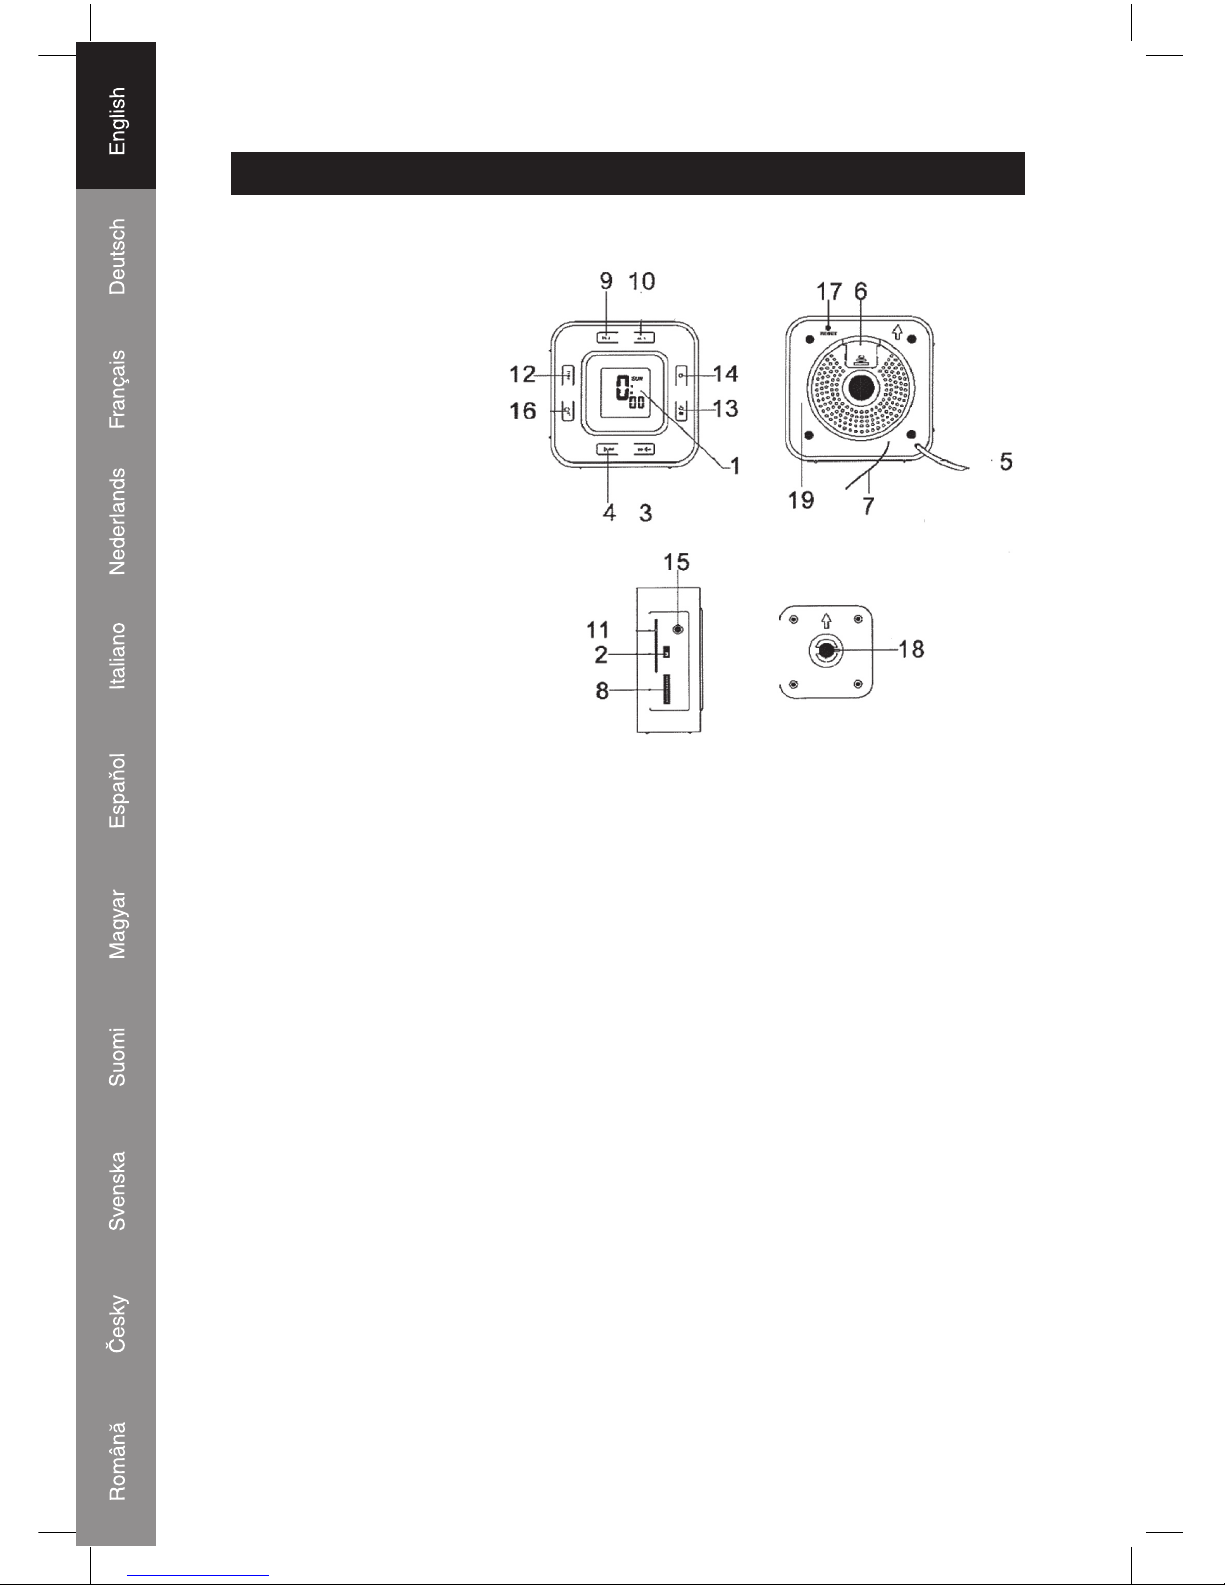
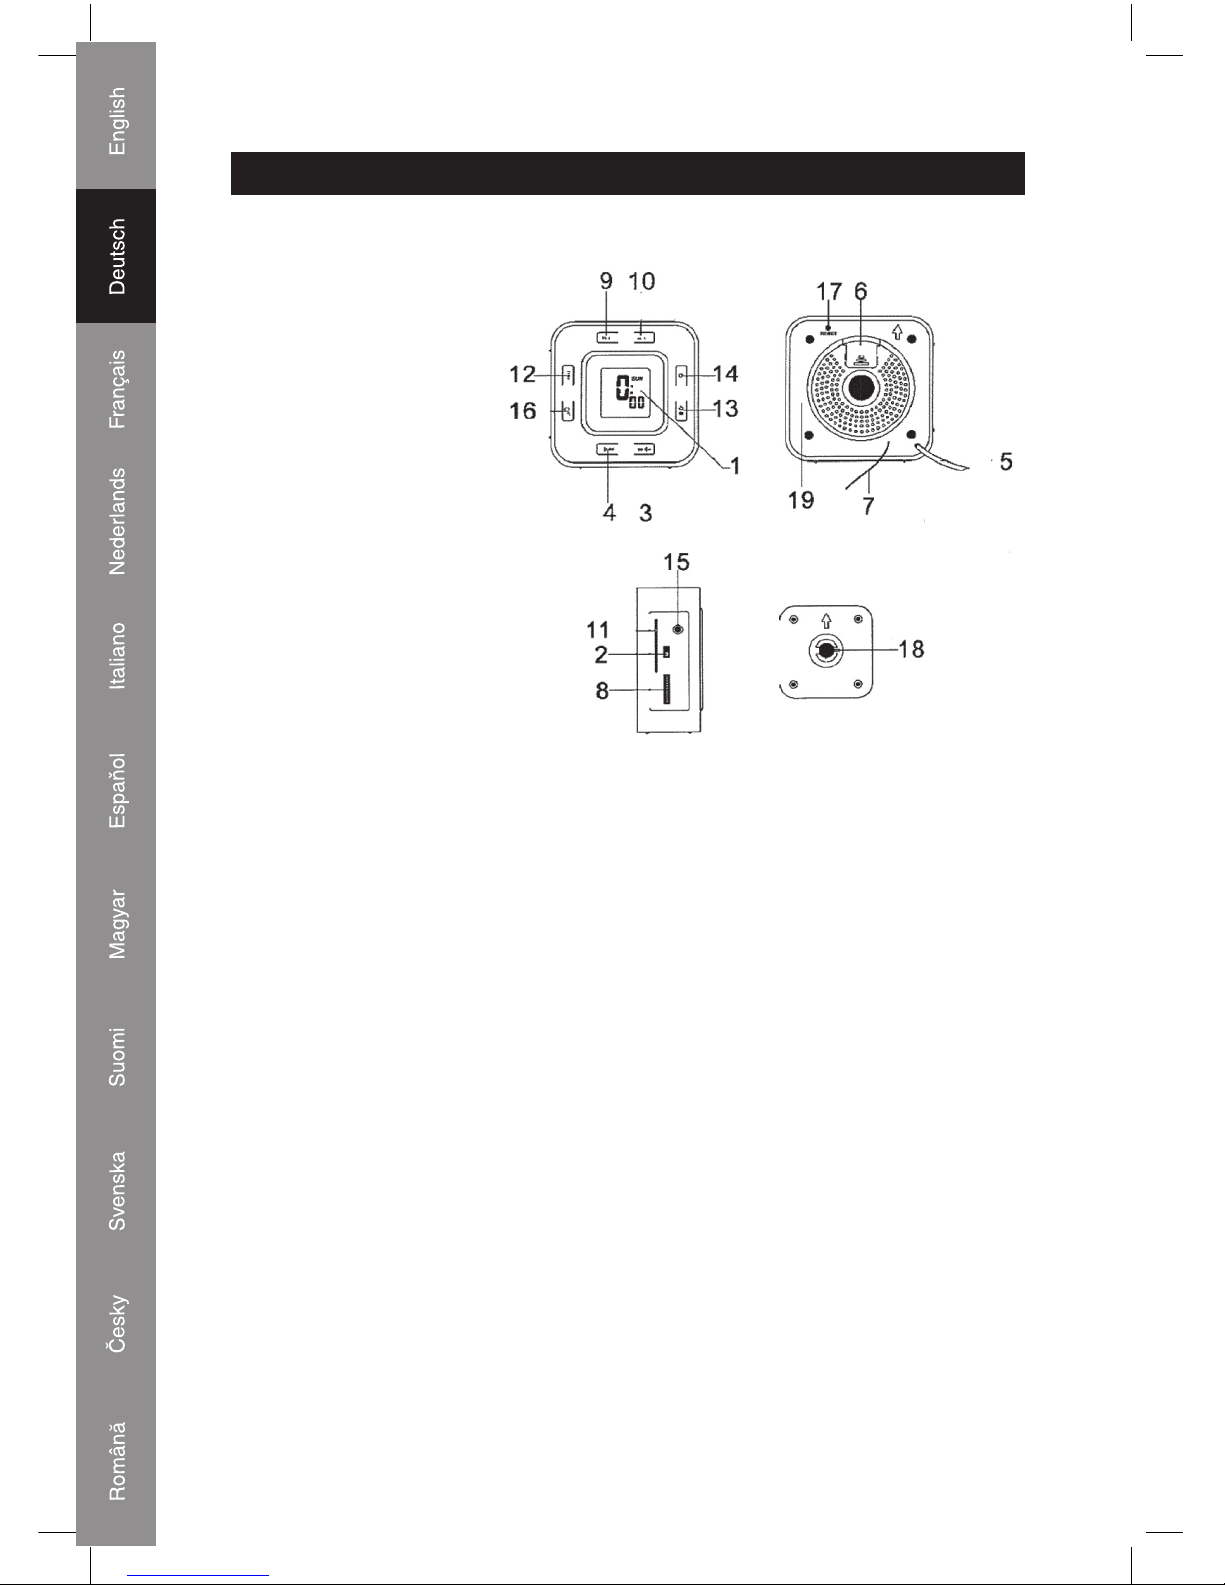
OPERATION INSTRUCTIONS
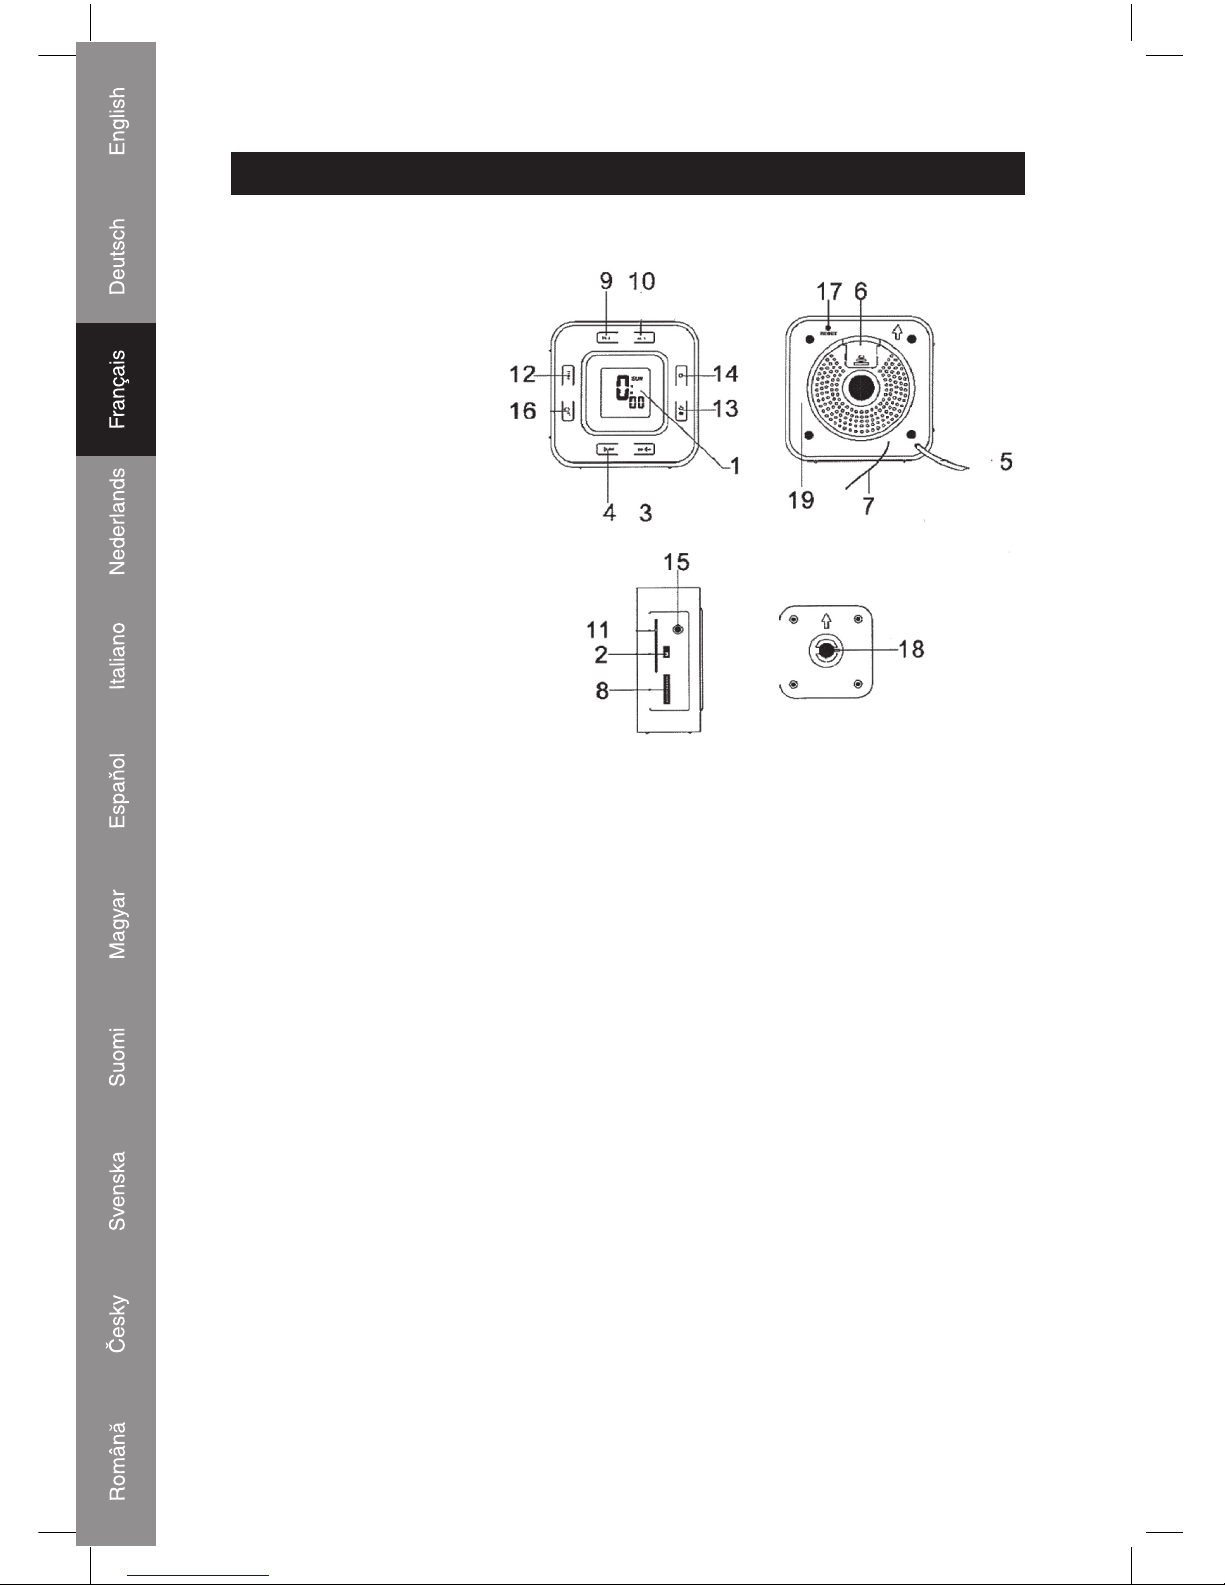
1. LCD display
2. Band (FM/AM) switch
3. Volume up control
4. Volume down control
5. AC cord
6. Battery compartment
7. FM antenna wire
8. Tuning control
9. Alarm 2 set button
10. Alarm 1 set button
11. Dial scale and pointer
12. Time set button
13. Alarm 1 / alarm 2 /
alarm 1 + 2 select button
14. Power ON/OFF alarm
OFF button
15. Audio in Jack
16. Snooze / sleep button
17. Reset button
18. Unit bracket
19. Rating label (affi xed on the back of unit)
POWER CONNECTION
Plug the AC power cord to a household outlet AC source. Then press the reset button (17) with
a ballpoint pen. This unit is equipped with a battery back up system, it requires a 3 V fl at lithium
battery. Insert the battery in the battery compartment, making certain that the positive and
negative (+ and -) battery terminals are attached to the corresponding terminals on the plate in
the battery compartment.
NOTE: If an AC power failure occurs, the clock automatically switches to the battery power
supply and the clock and time memory continue running. When the AC power resumes, the
clock switches back to AC again.
ESD remark: In case of malfunction due to electrostatic discharge just reset the product
(reconnect of power source may be required) to resume normal operation.
Page 3
3
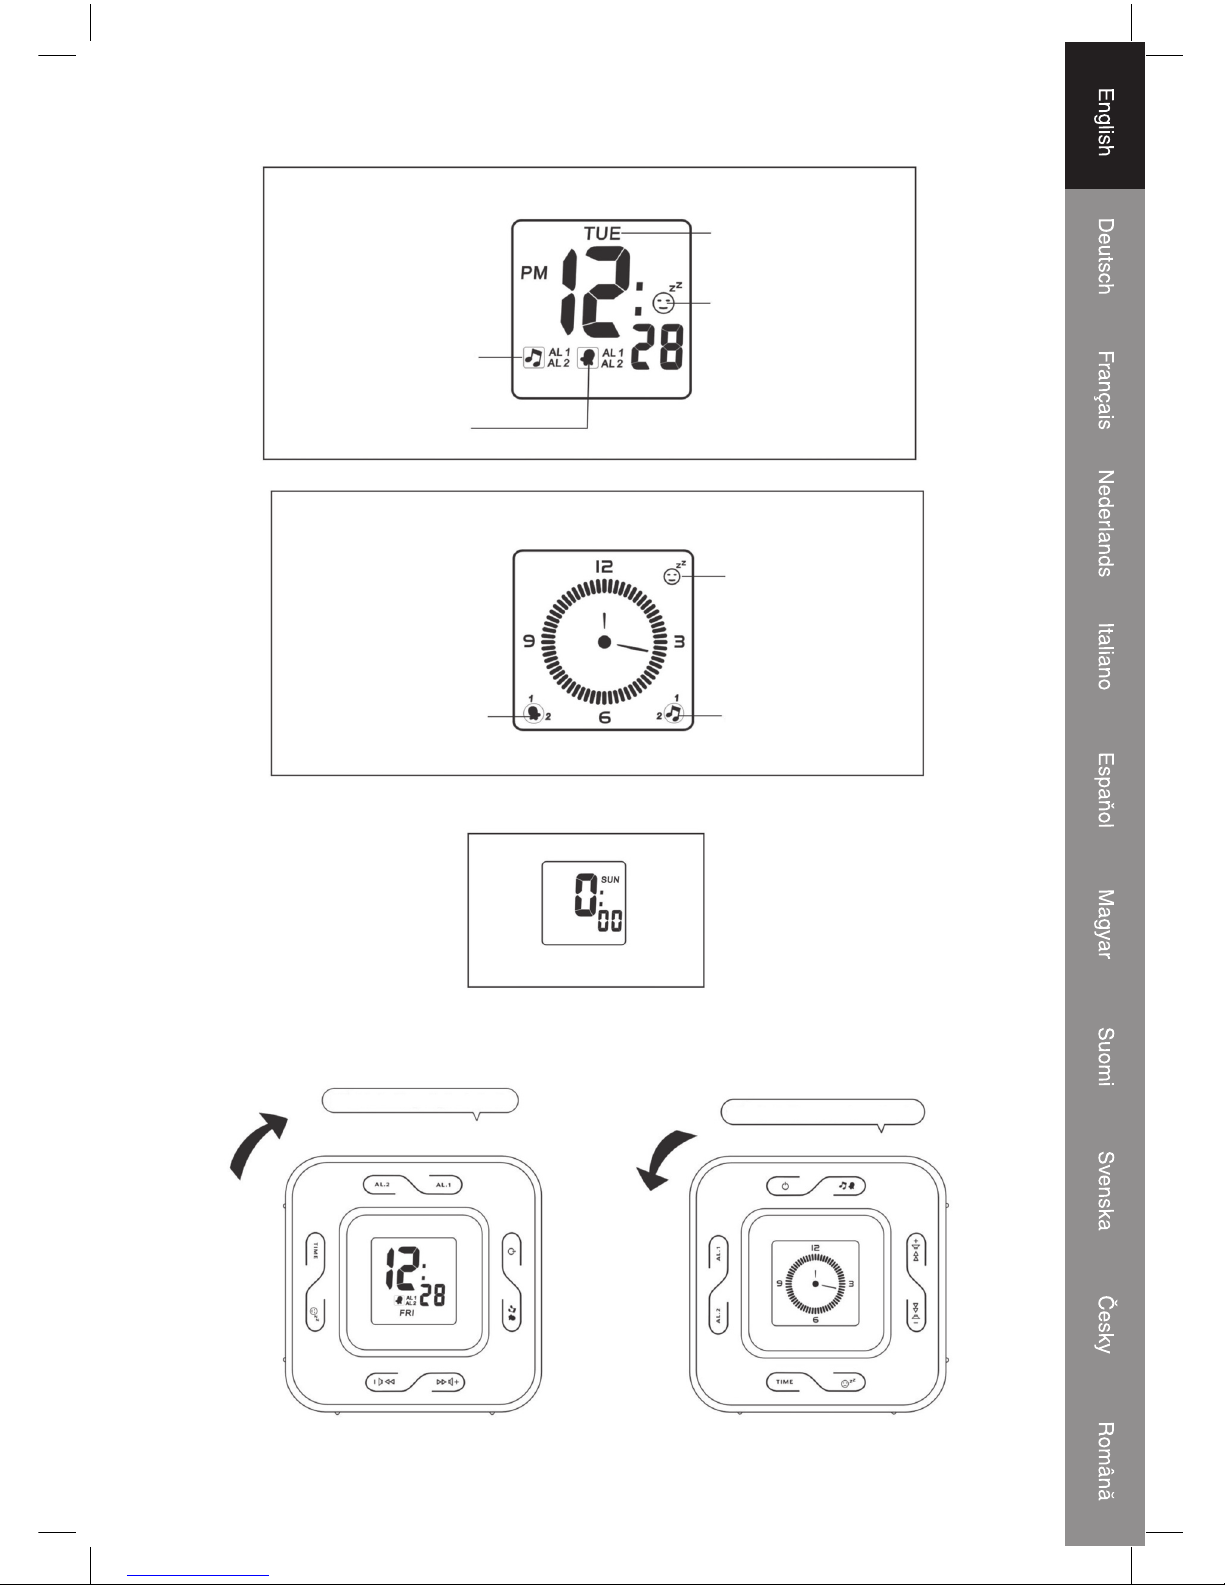
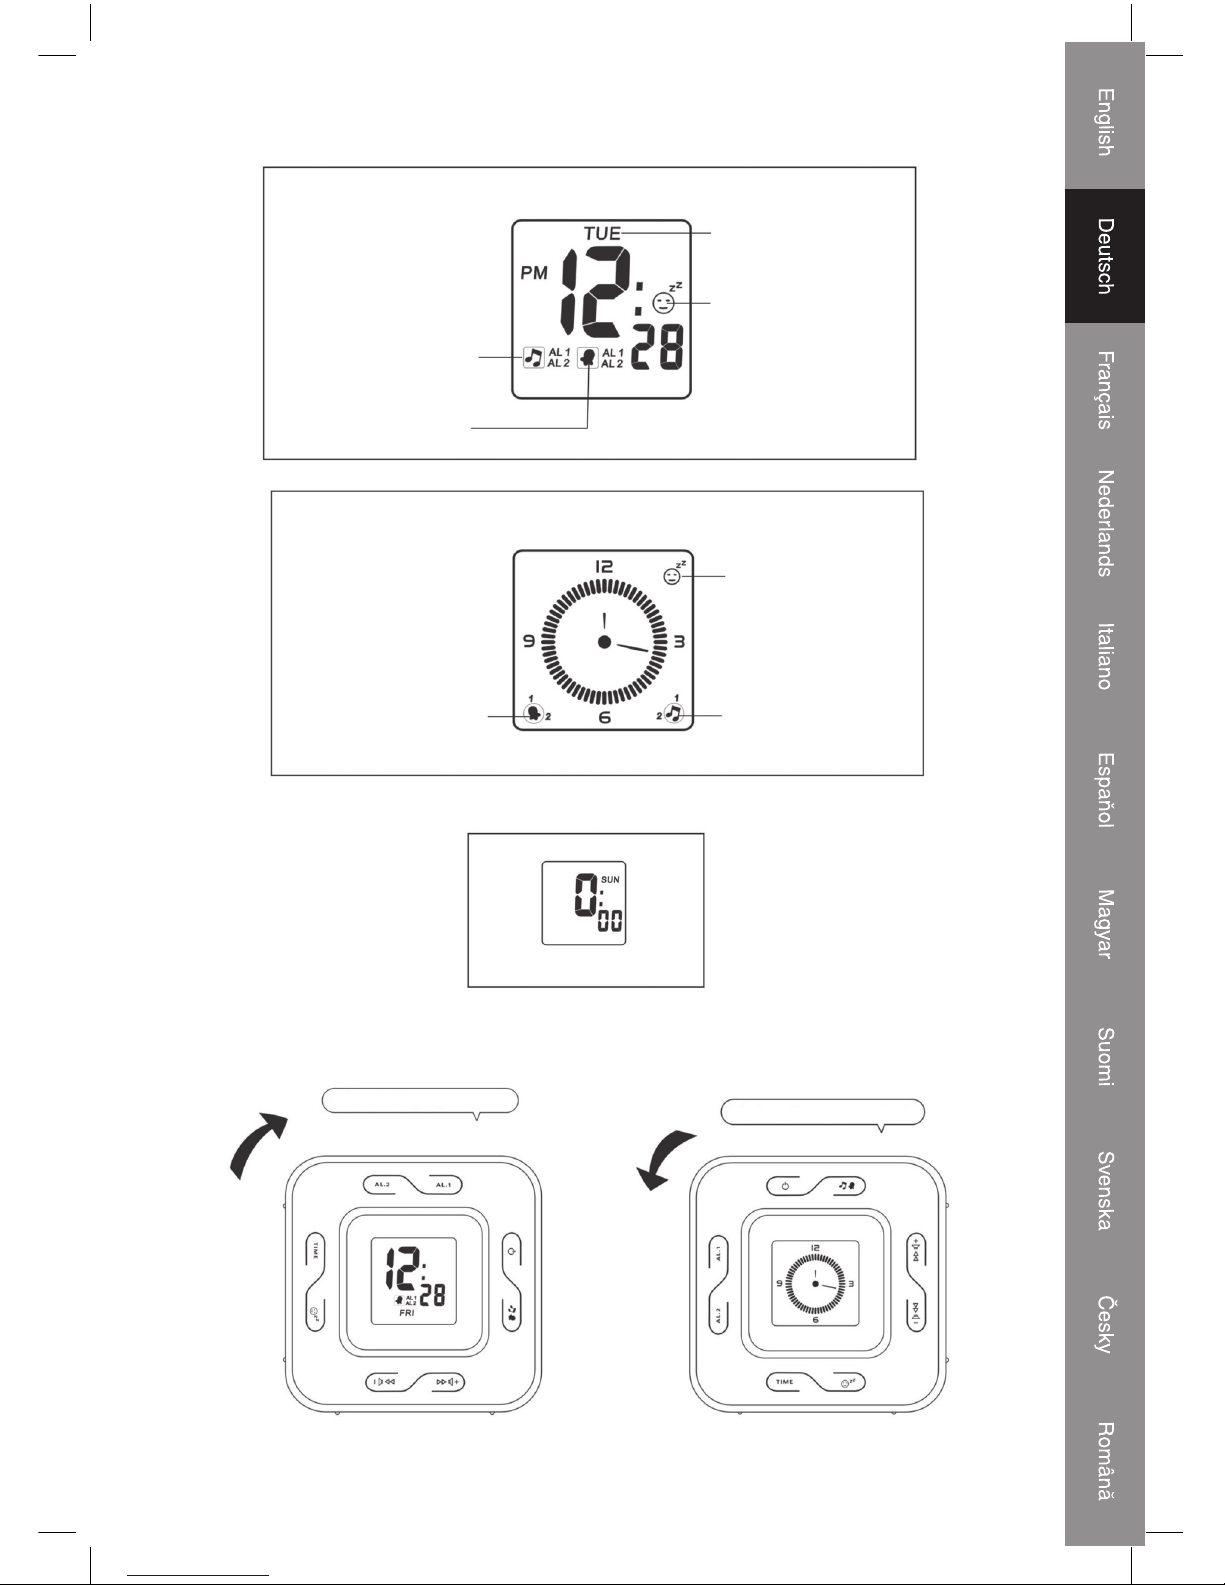
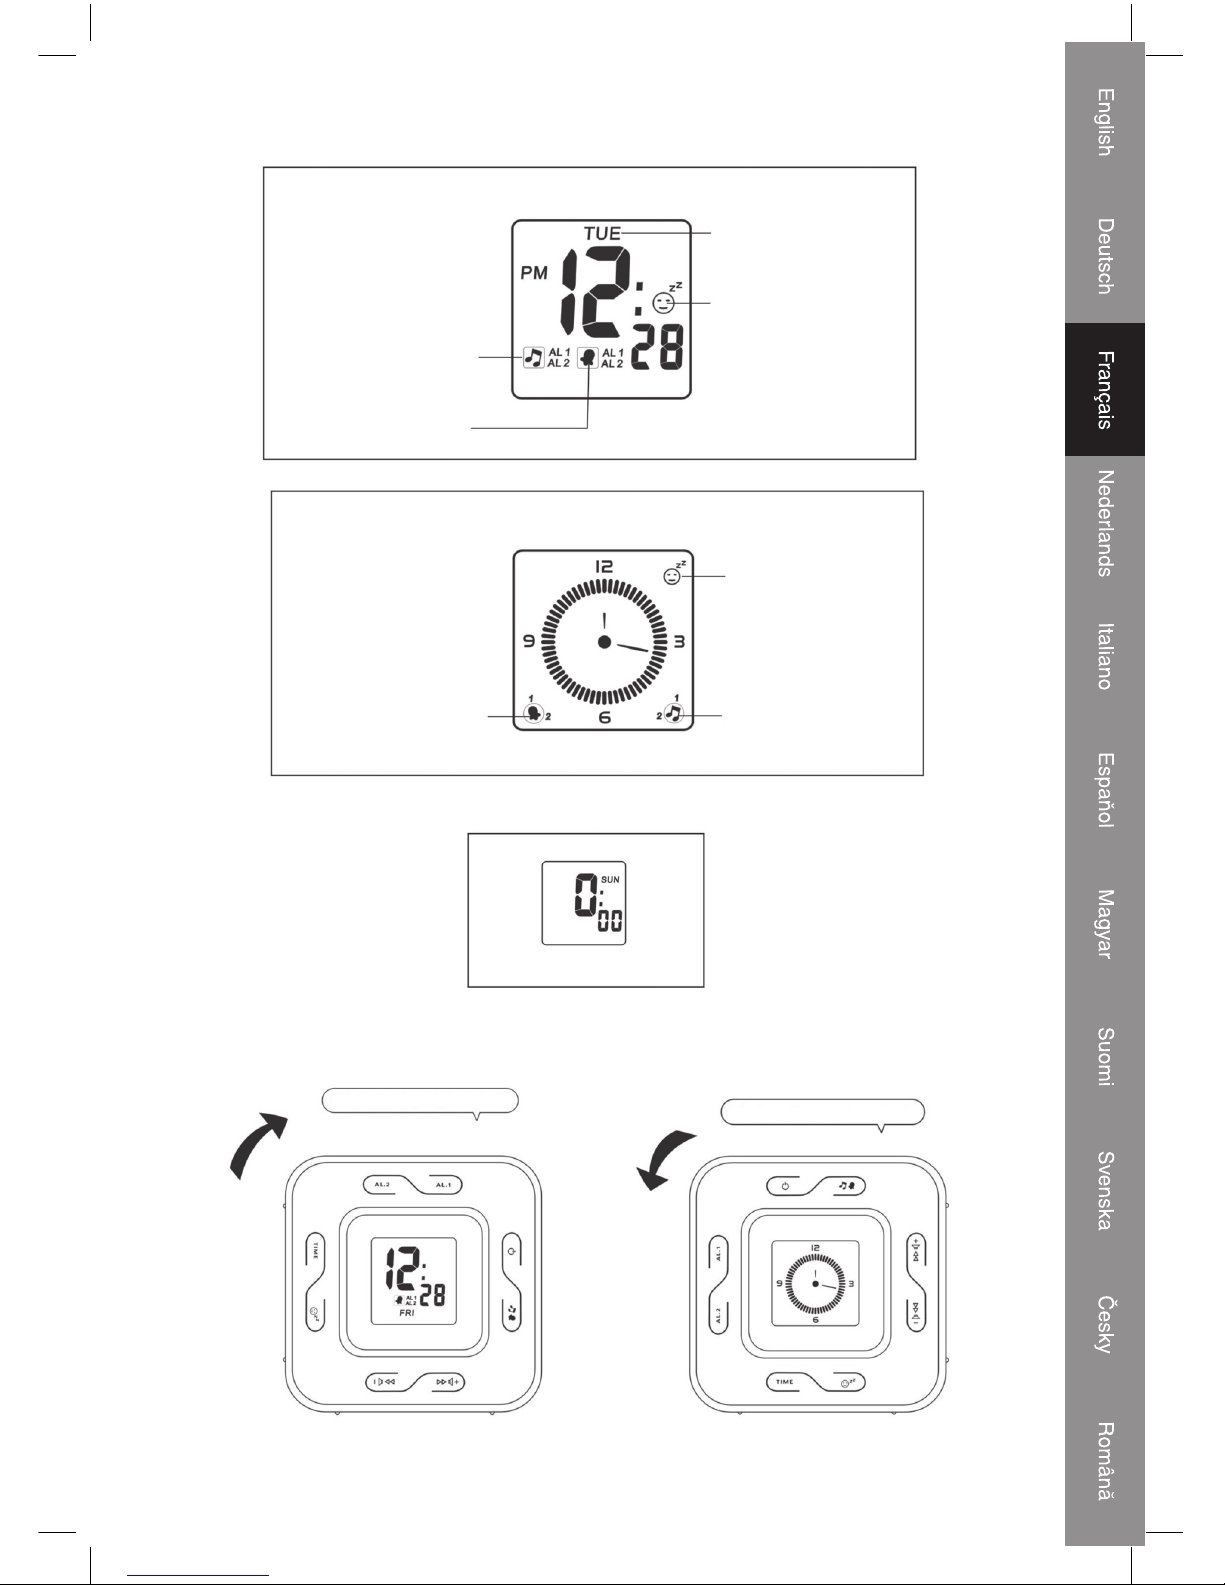
DIGITAL CLOCK MODE
DAY
SLEEP ON
ALARM 1, 2 WAKE BELL
ALARM 1, 2 WAKE RADIO
ALARM CLOCK MODE
SLEEP ON
ALARM 1, 2 WAKE BELL
NOTE:
TIME SETTING / ALARM SETTING / SLEEP
SETTING ONLY IN DIGITAL CLOCK MODE
ALARM 1, 2 WAKE RADIO
90° Rotating digital clock
90° Rotating analog clock
Page 4
4
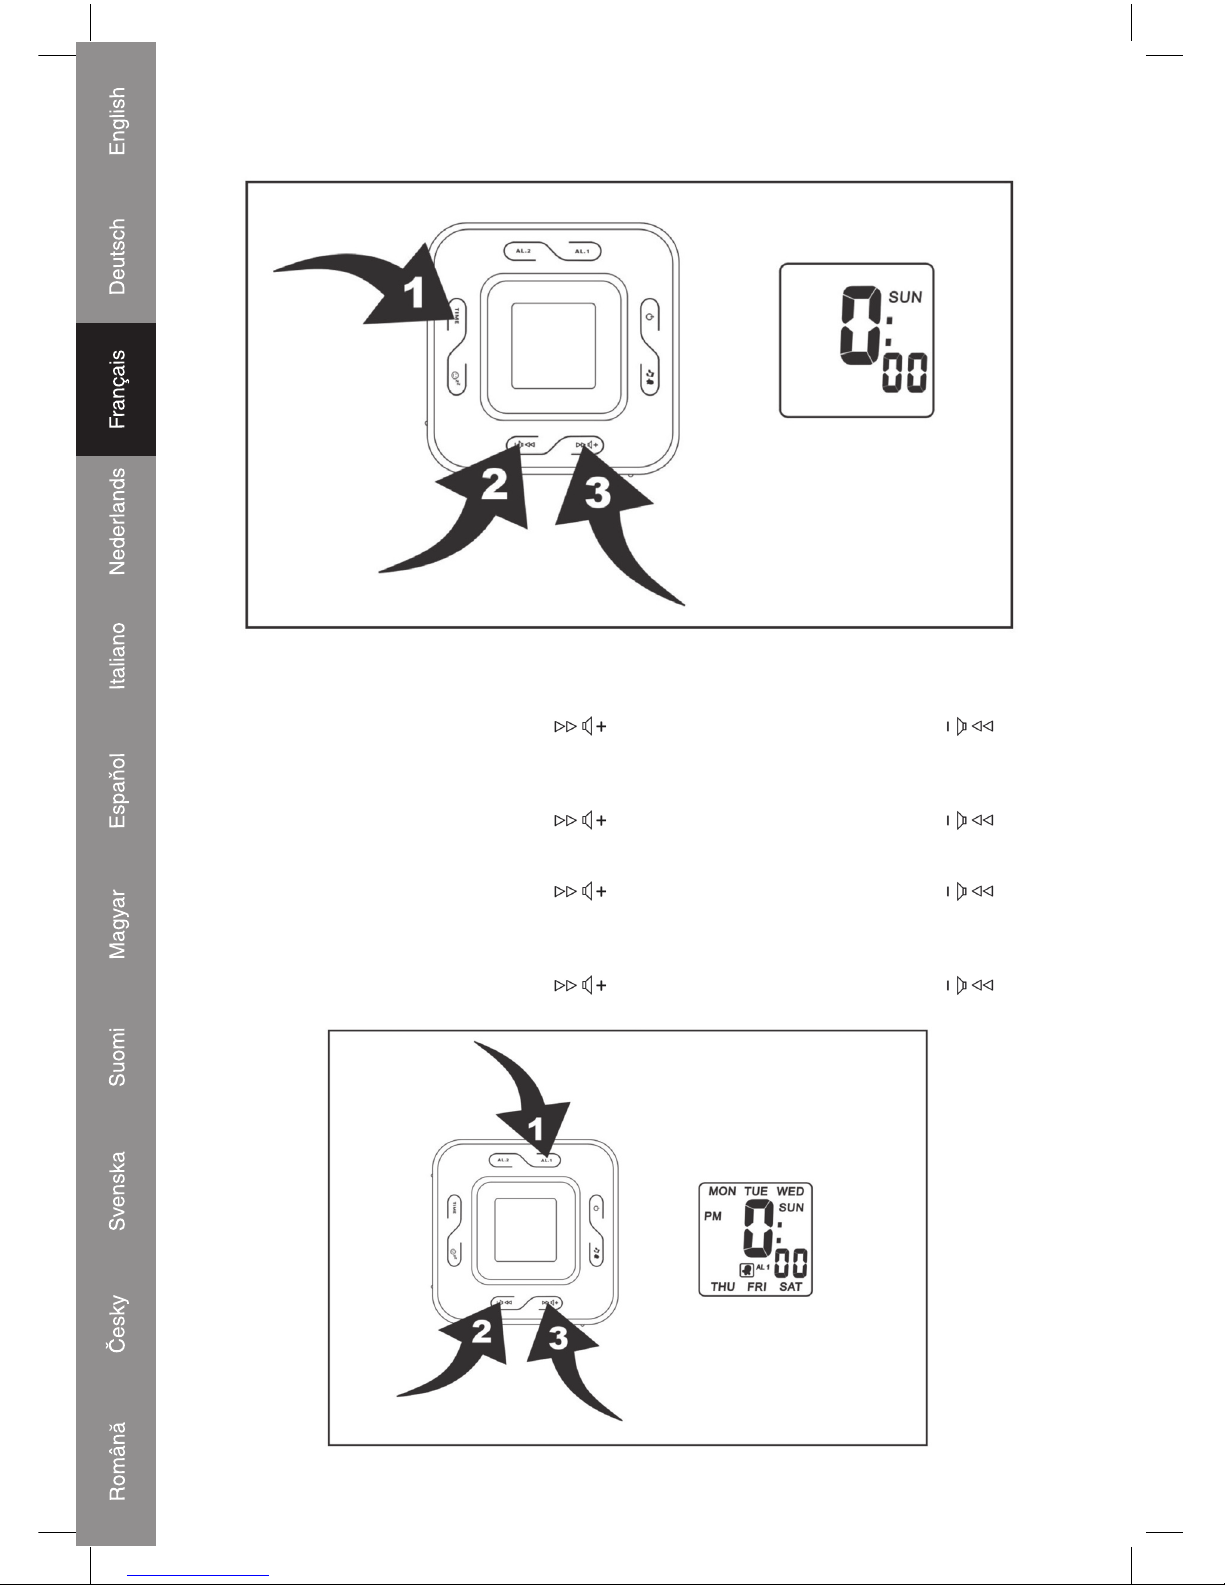
CLOCK SET MODE
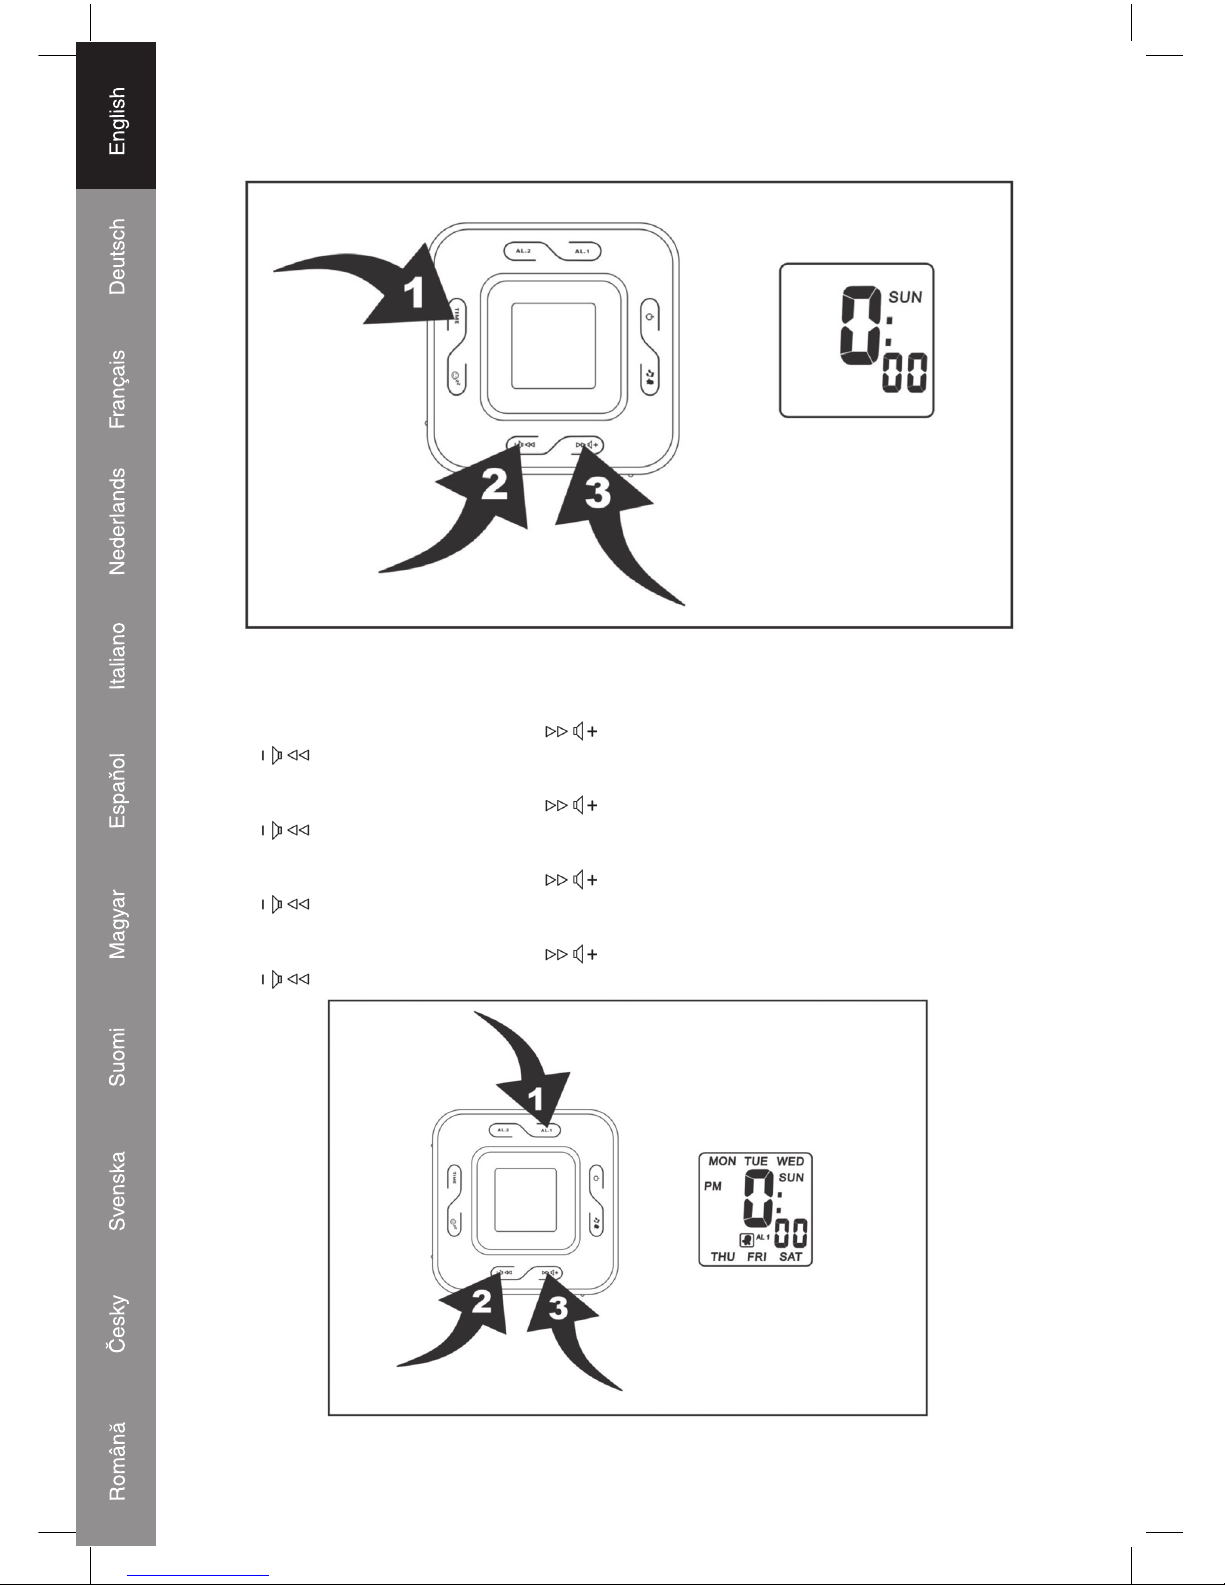
TO SET OR RESET THE ACTUAL TIME
1. Press and hold time set button (12) (position 1) 2 seconds, day will blink.
2. Press volume up control button (3) (position 3) and volume down control button
(4) (position 2) to set day.
3. Press time set button (12) (position 1), 24 hour / 12 hour will blink.
4. Press volume up control button (3) (position 3) and volume down control button
(4) (position 2) to set 24 hour / 12 hour.
5. Press time set button (12) (position 1), hour.
6. Press volume up control button (3) (position 3) and volume down control button
(4) (position 2) to set hour.
7. Press time set button (12) (position 1), minute will blink.
8. Press volume up control button (3) (position 3) and volume down control button
(4) (position 2) to set minute.
ALARM 1 SET MODE
Page 5
5
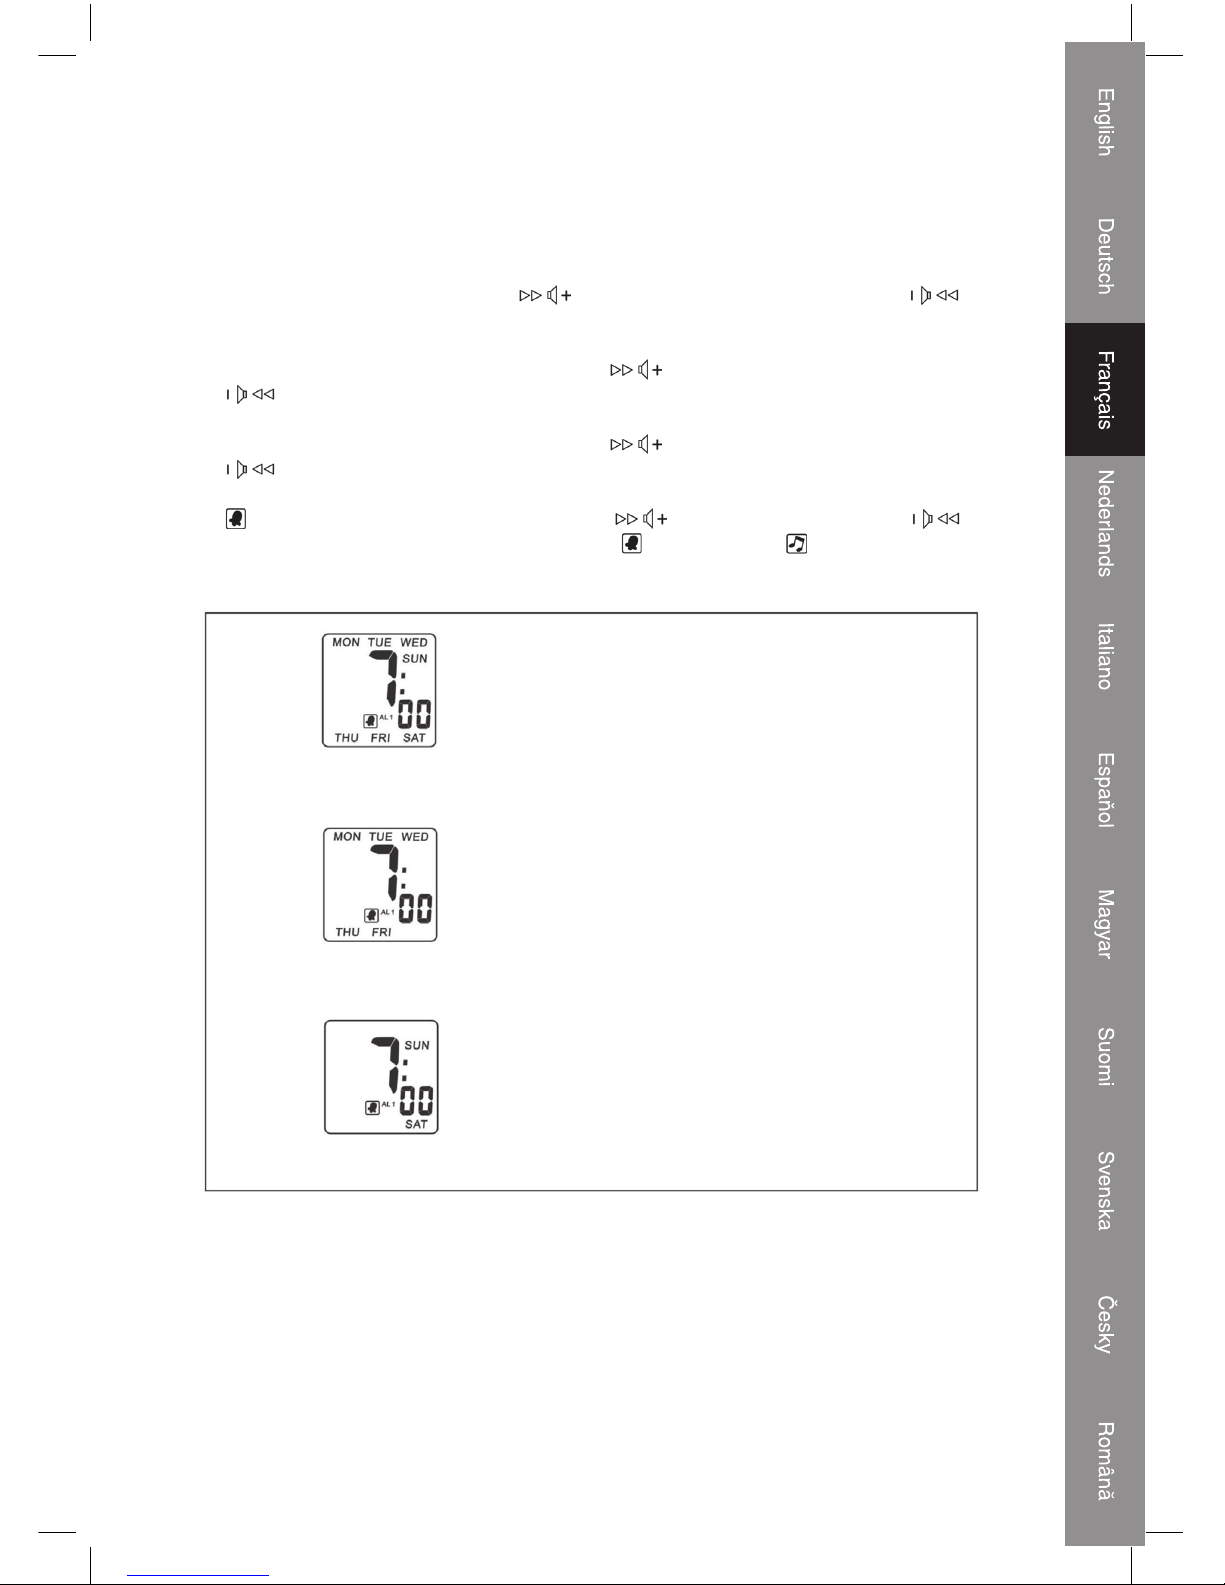
ALARM 1 SETTING
1. Press alarm 1 set button (10) (position 1) to enter into alarm 1 set mode.
2. Press and hold alarm 1 set button (10) (position 1) 2 seconds, day will blink. (Diagram 1)
3. Press volume up control button (3) (position 3) and volume down control button
(4) (position 2) to set day.
4. Press alarm 1 set button (10) (position 1) hour blinking. Press volume up control button
(3) (position 3) and volume down control button (4) (position 2) to set hour.
5. Press alarm 1 set button (10) (position 1) minute blinking. Press volume up control button
(3) (position 3) and volume down control button (4) (position 2) to set minute.
6. Press alarm 1 set button (10) (position 1) alarm 1 bell blinking. Press volume up control
button (3) (position 3) and volume down control button (4) (position 2) to select
alarm 1 bell and alarm radio.
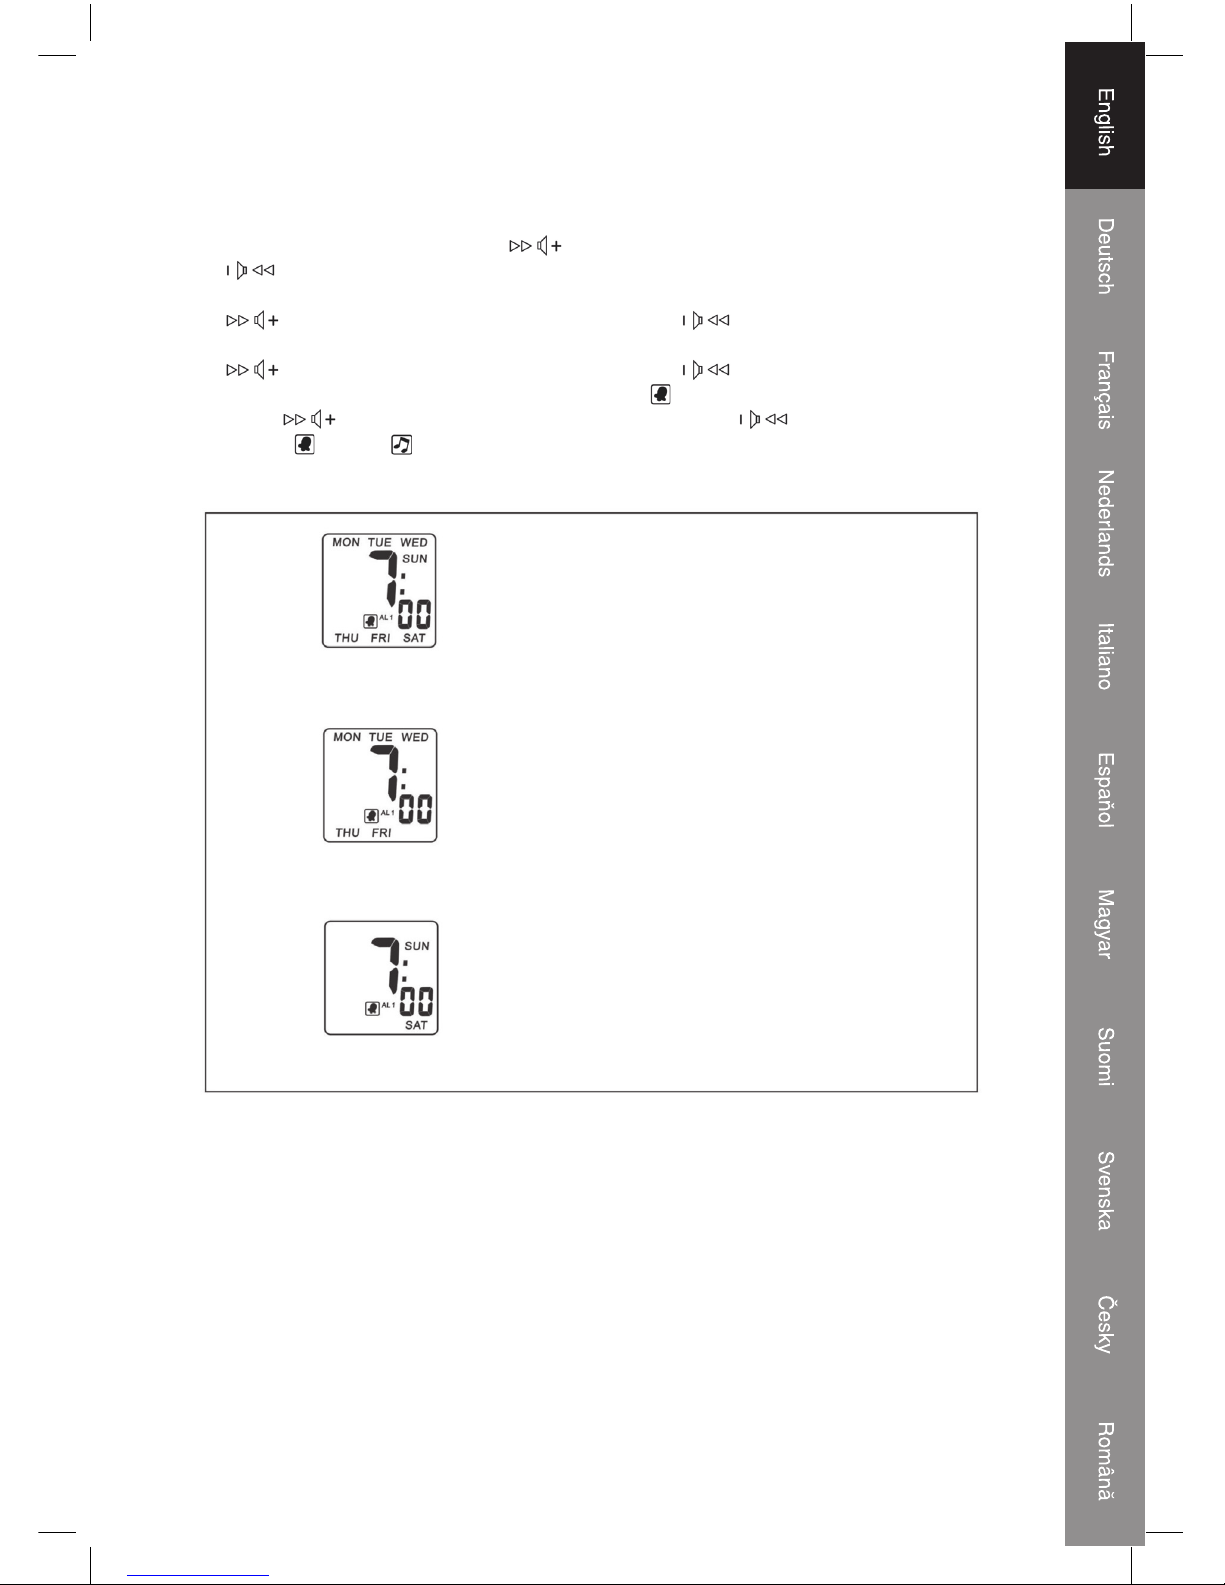
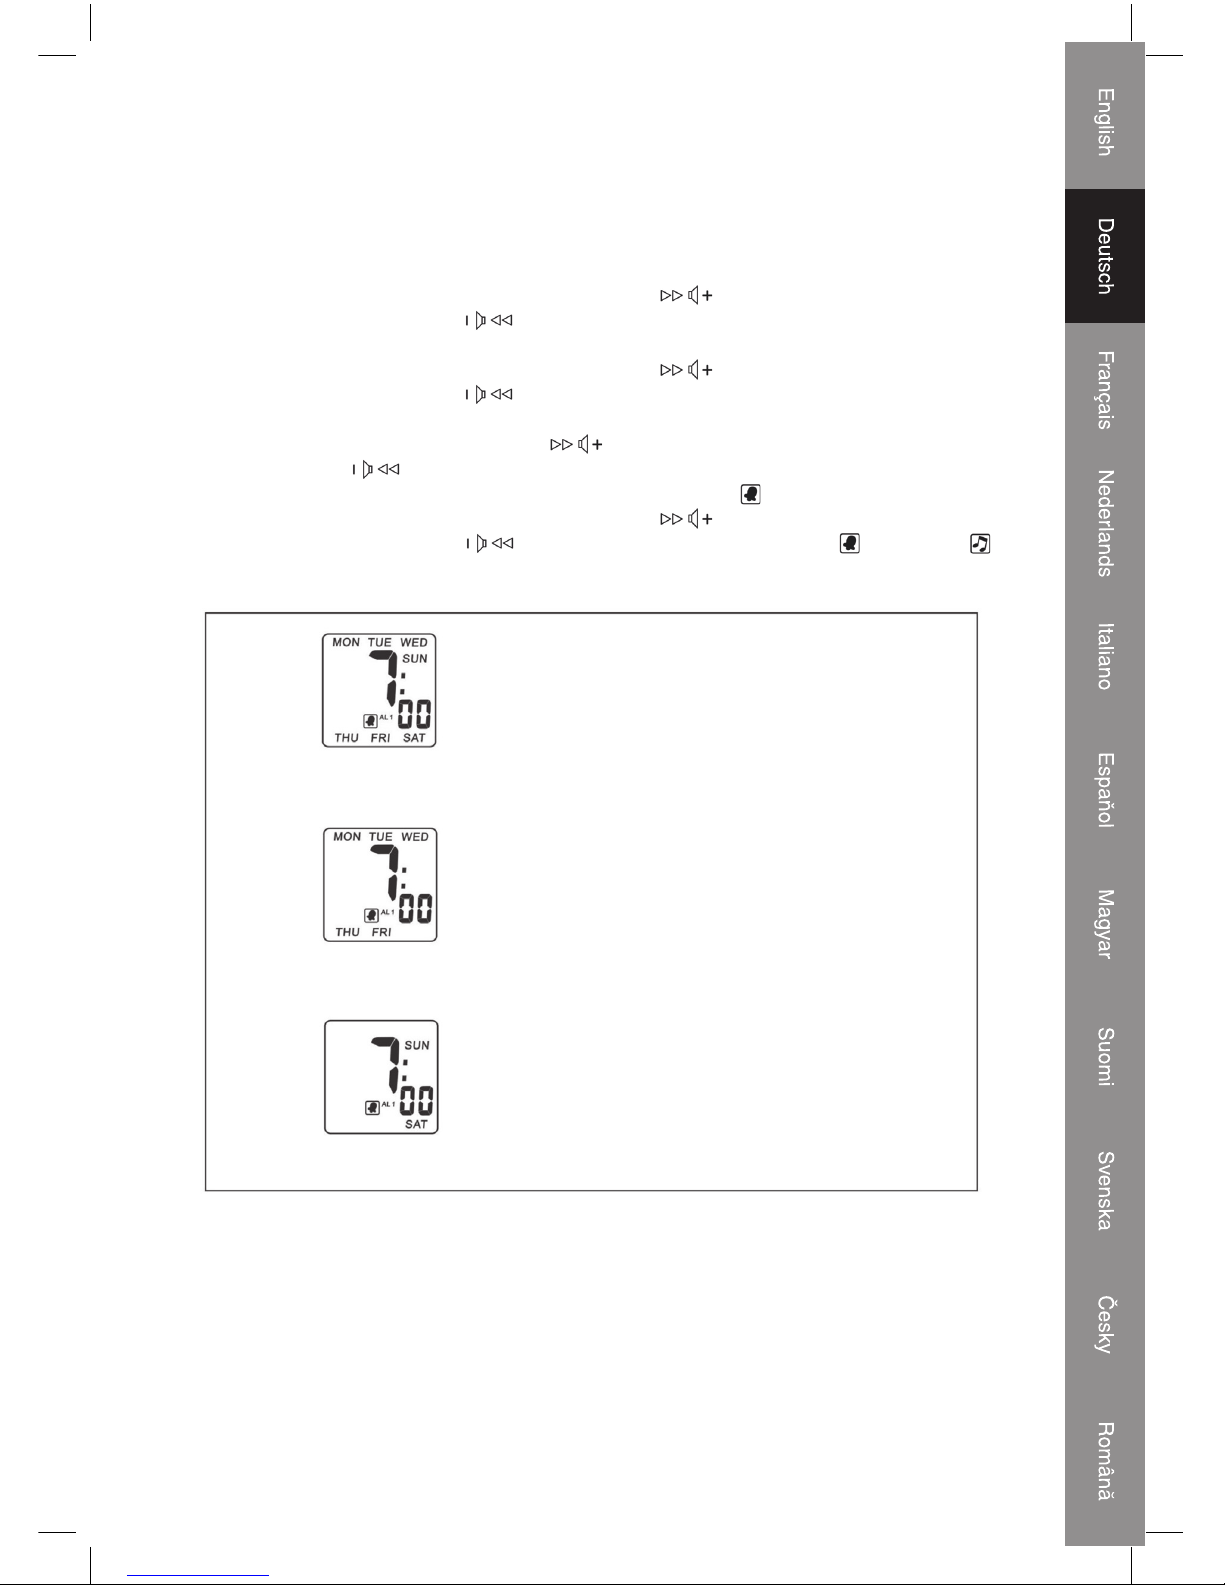
WEEKEND ALARM 1 SET MODE (MON TO SUN)
WEEKEND ALARM 1 SET MODE (MON TO FRI)
WEEKEND ALARM 1 SET MODE (SAT TO SUN)
DIAGRAM 1
Page 6
6
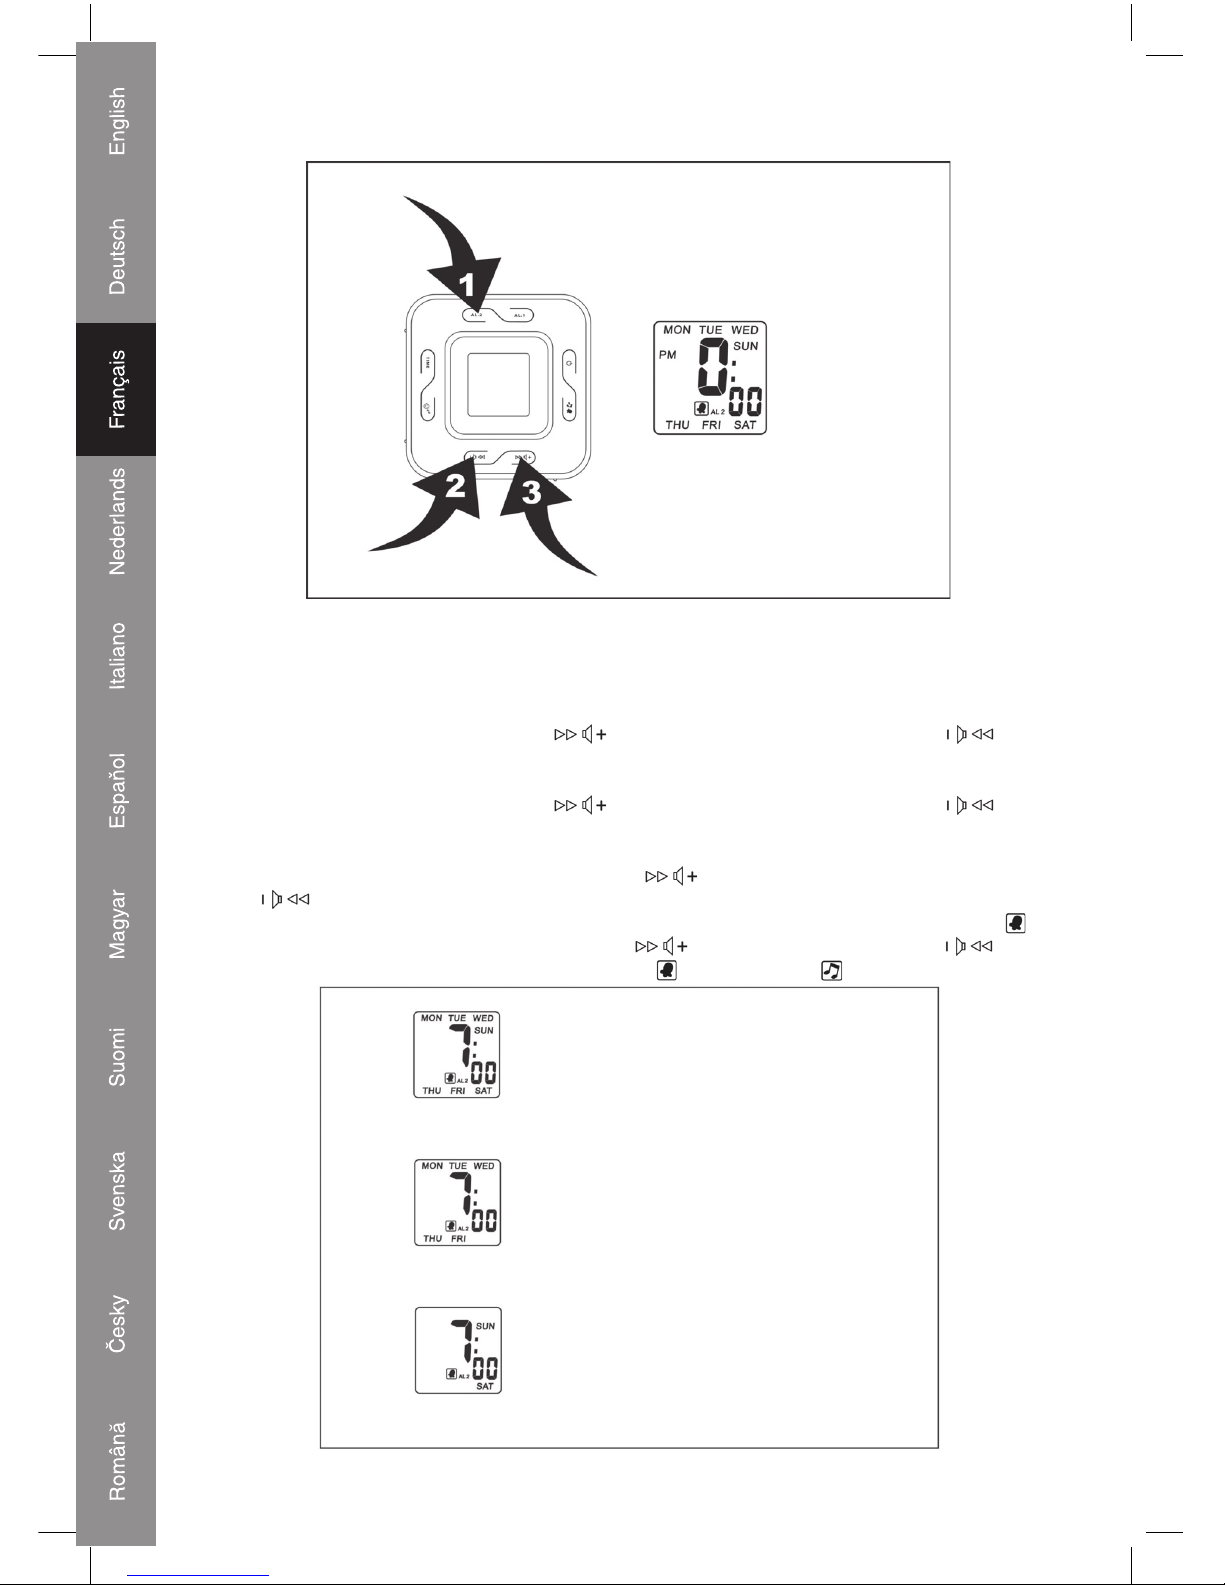
ALARM 2 SET MODE
ALARM 2 SETTING
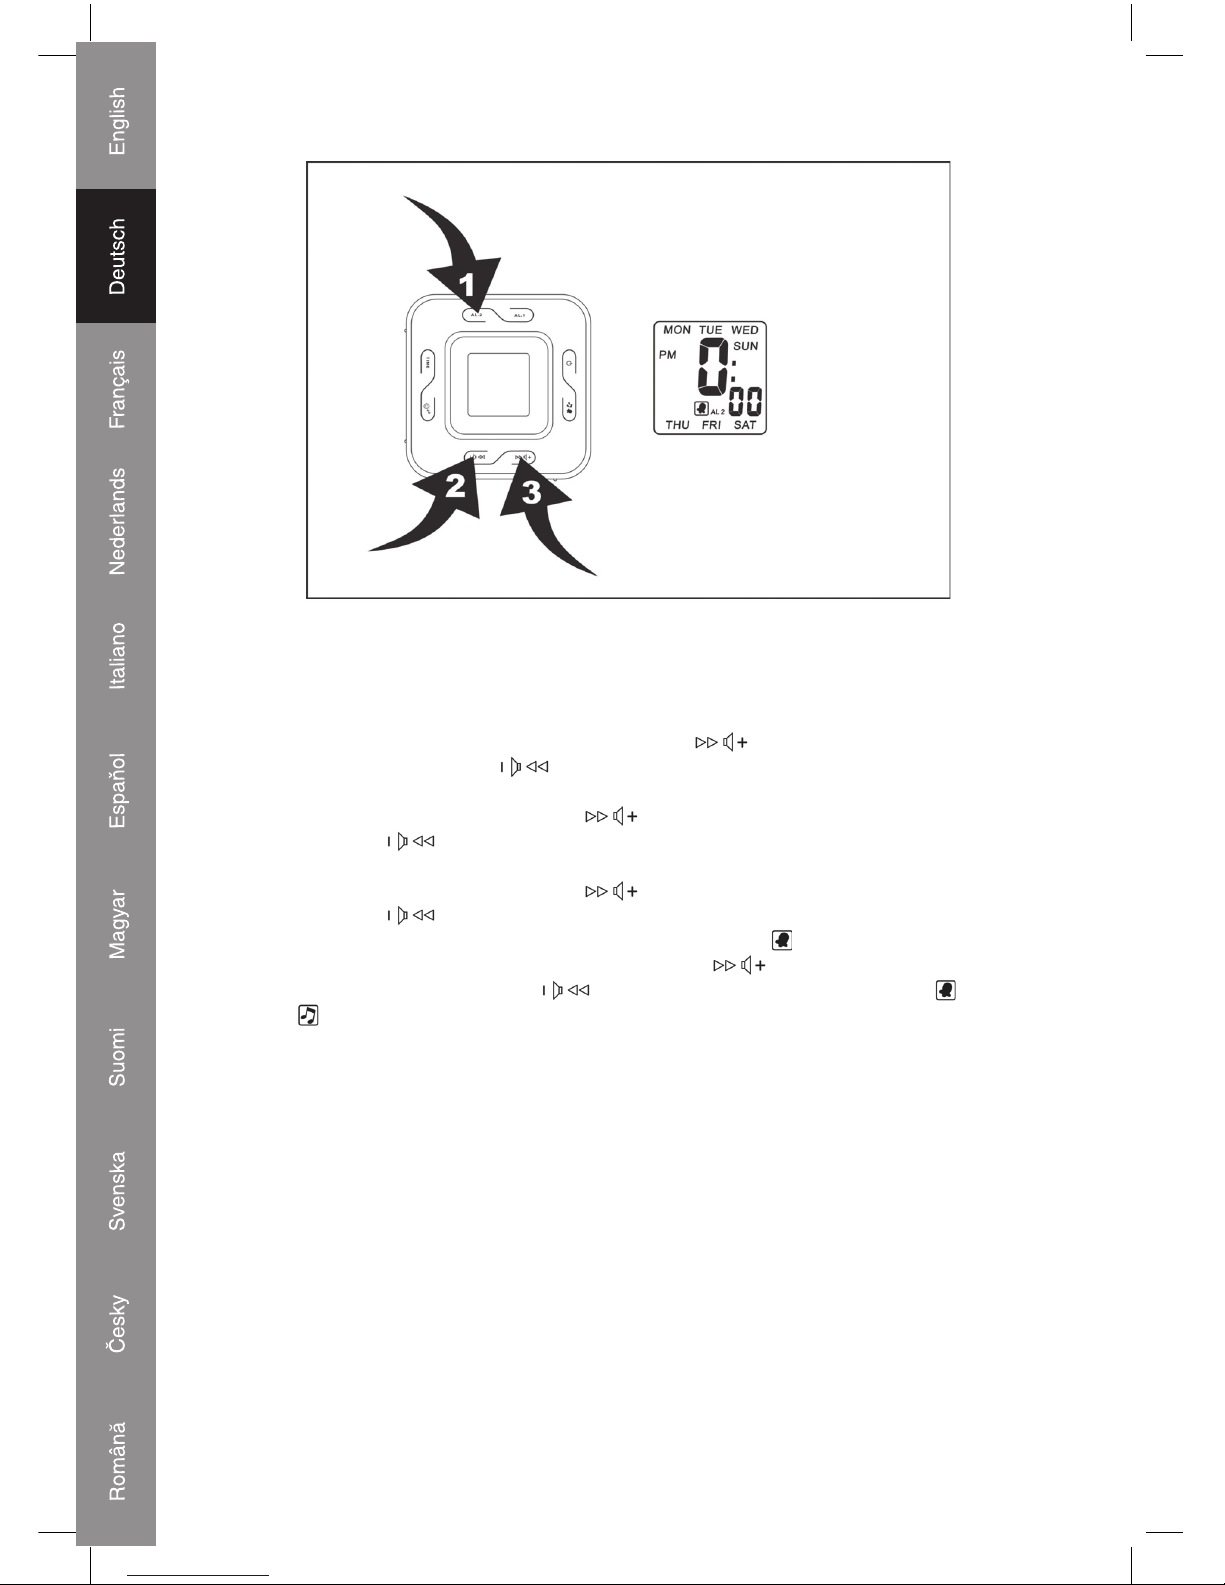
1. Press alarm 2 set button (9) (position 1) to enter into alarm 2 set mode.
2. Press and hold alarm 2 set button (9) 2 seconds, day will blink. (Diagram 2)
3. Press volume up control button
(3) (position 3) and volume down control button
(4) (position 2) to set day.
4. Press alarm 2 set button (9) (position 1) hour will blink. Press volume up control button
(3) (position 3) and volume down control button (4) (position 2) to set hour.
5. Press alarm 2 set button (9) (position 1) minute blinking. Press volume up control button
(3) (position 3) and volume down control button (4) (position 2) to set minute.
6. Press alarm 2 set button (9) (position 1) alarm 2 bell will blink. Press volume up control
button (3) (position 3) and volume down control button (4) (position 2) to select
alarm 2 bell and alarm radio.
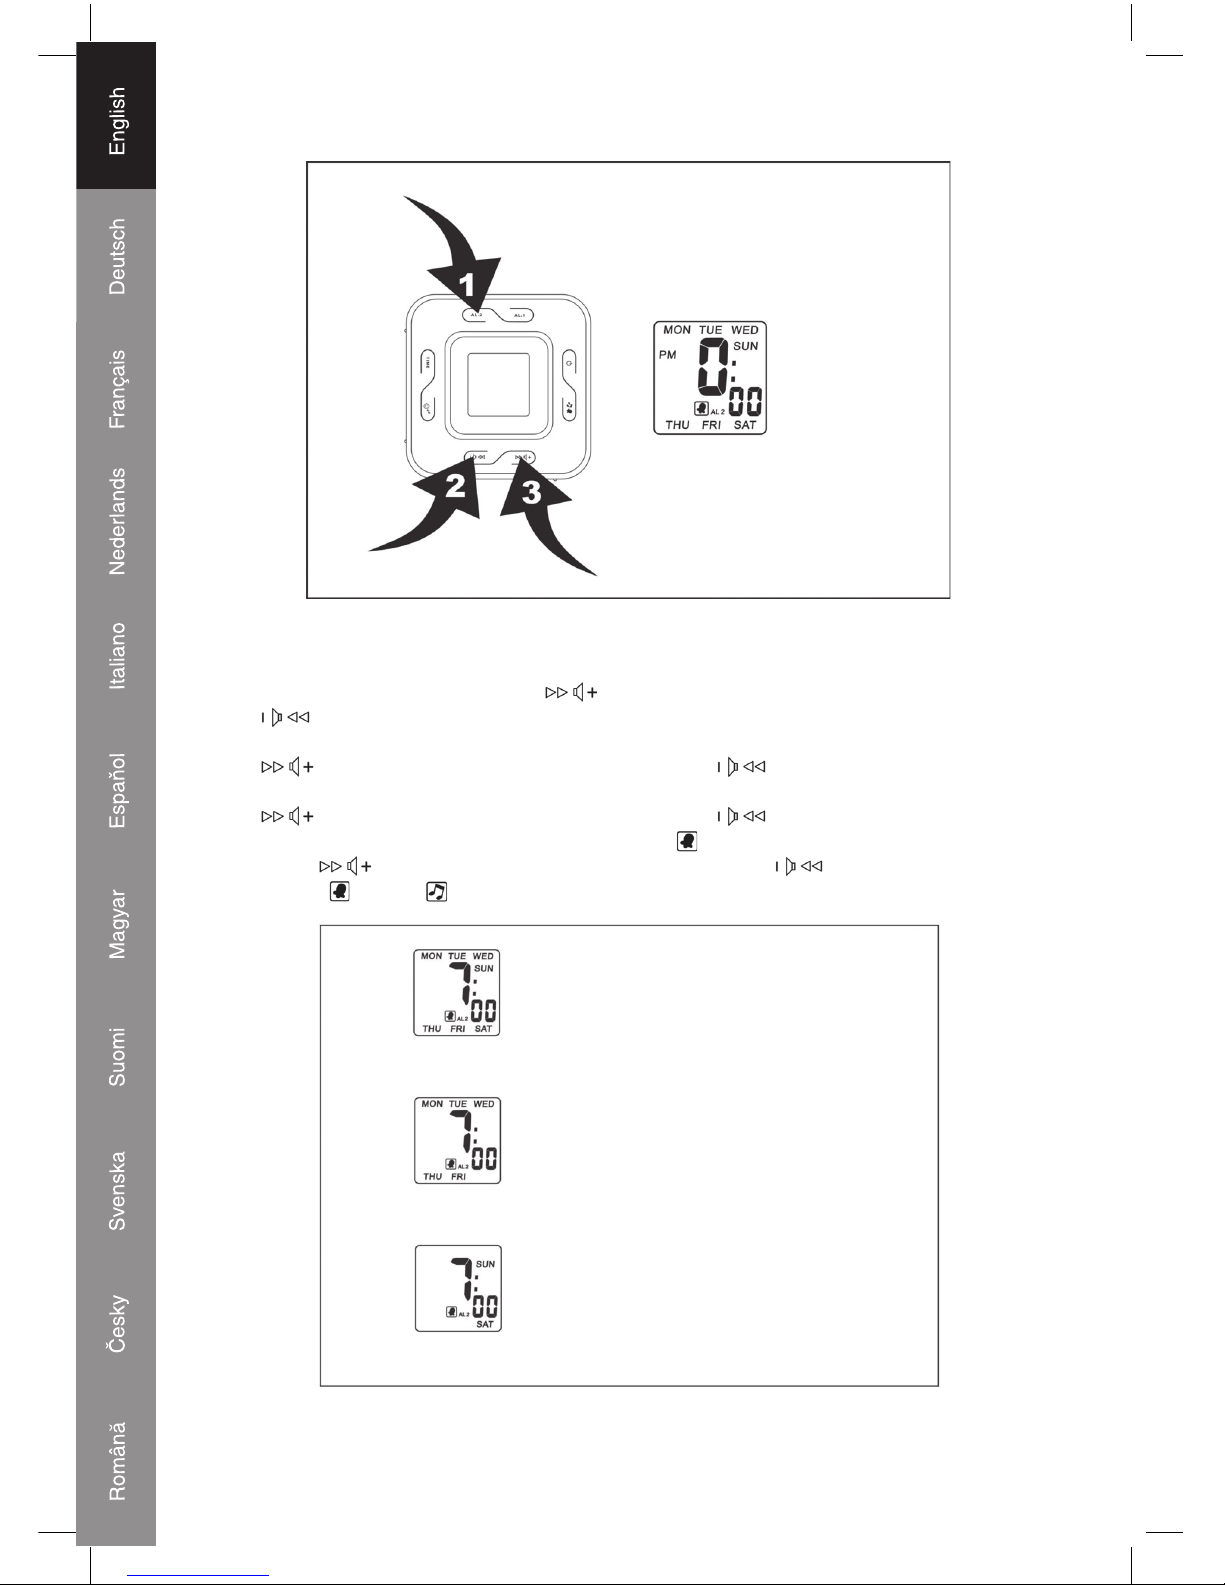
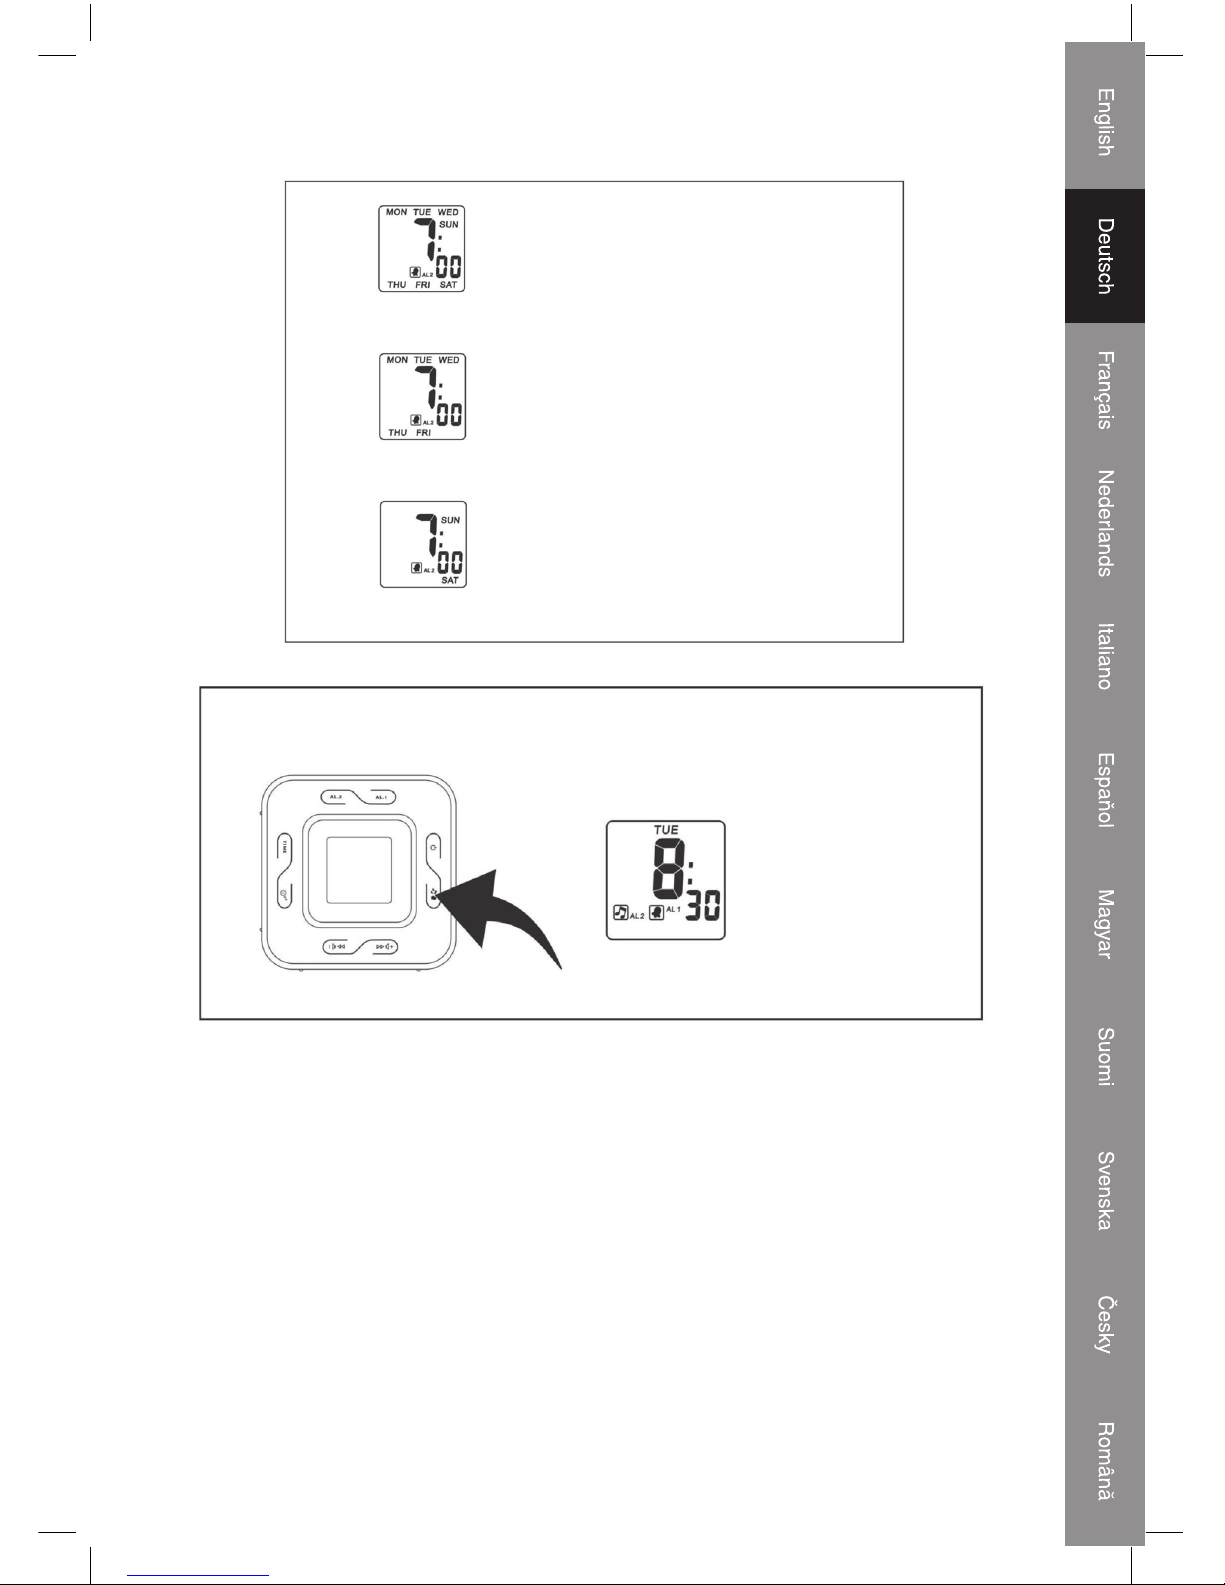
WEEKEND ALARM 2 SET MODE (MON TO SUN)
WEEKEND ALARM 2 SET MODE (MON TO FRI)
WEEKEND ALARM 2 SET MODE (SAT TO SUN)
DIAGRAM 2
Page 7
7
DIAGRAM 3
SLEEP SET MODE
Alarm output setting and alarm on/off
Press alarm 1 / alarm 2 / alarm 1+2 select button (13) to select alarm wake up by bell and radio.
(Diagram 3)
ALARM DURATION
Bell alarm or radio alarm will continue output for 1 hour if no key is pressed. Alarm will stop
automatically and restart at the same alarm set time on next day.
STOP THE ALARM
Press power button (14) to stop the current alarm and to cancel the snooze function as well.
SLEEP SET MODE
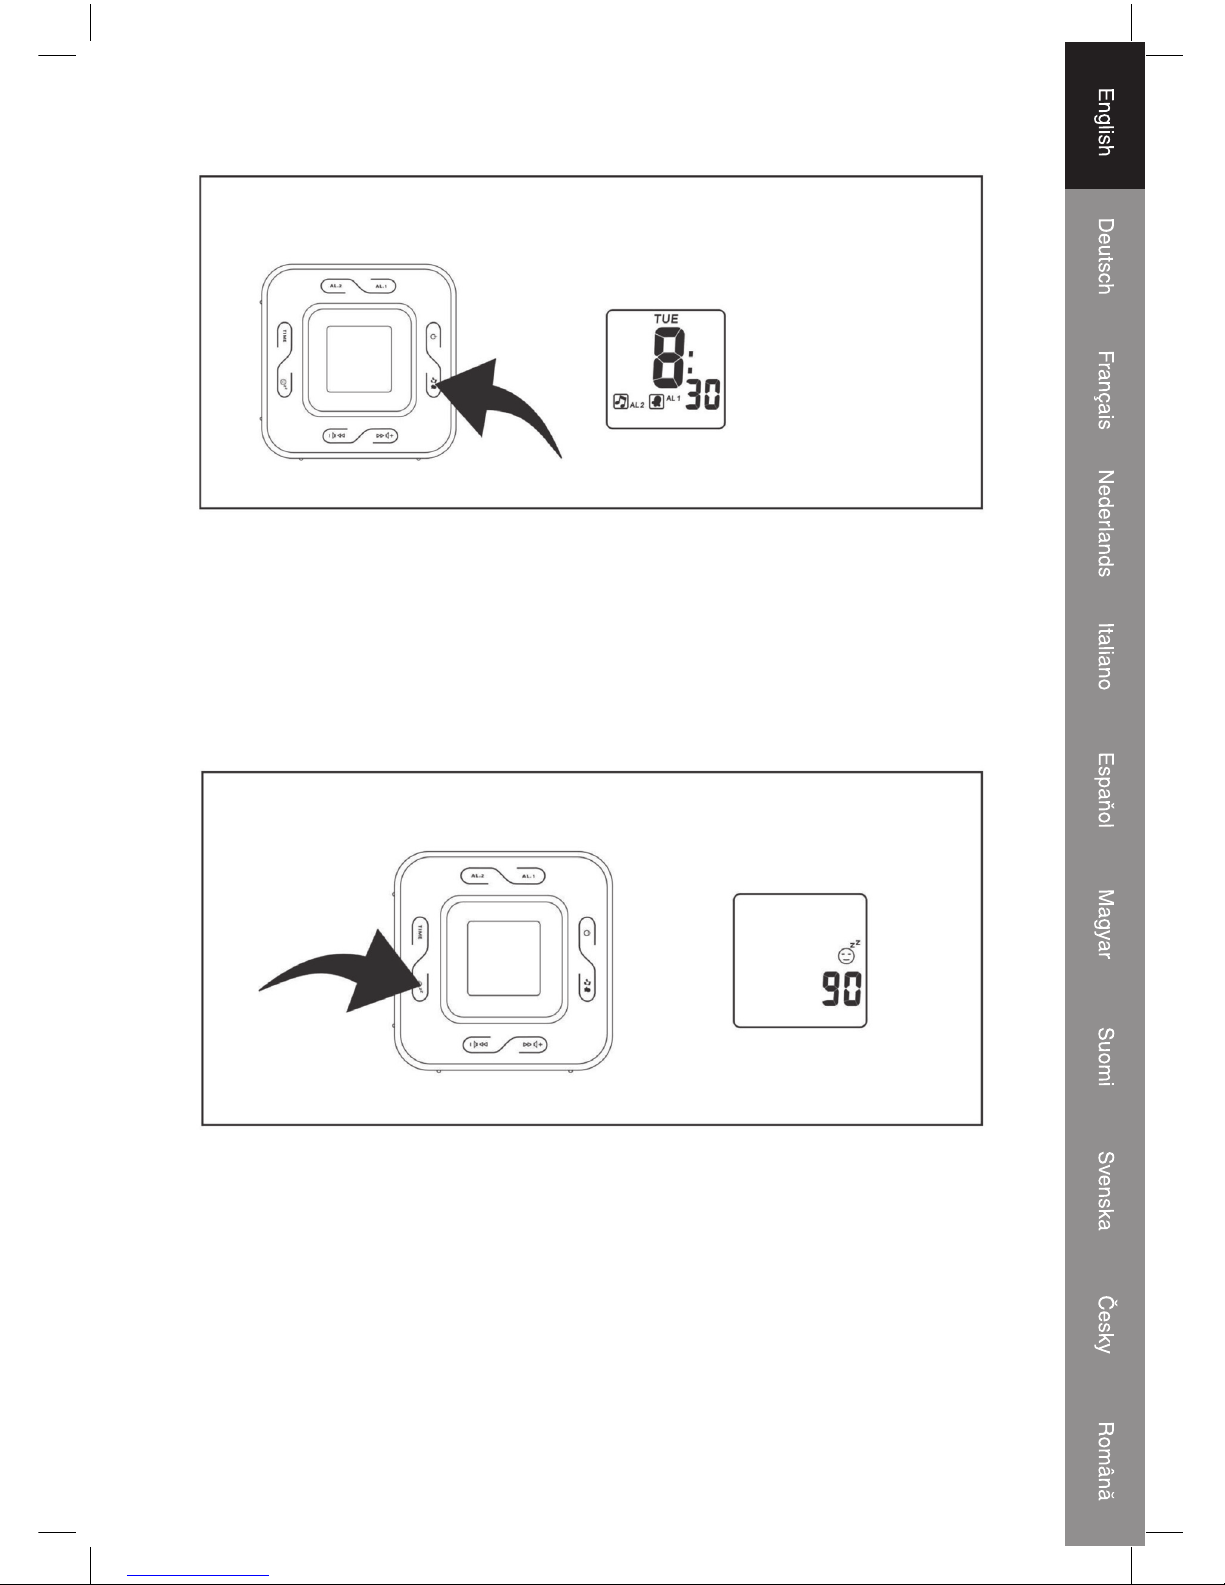
DIAGRAM 4
To Activate the sleep function
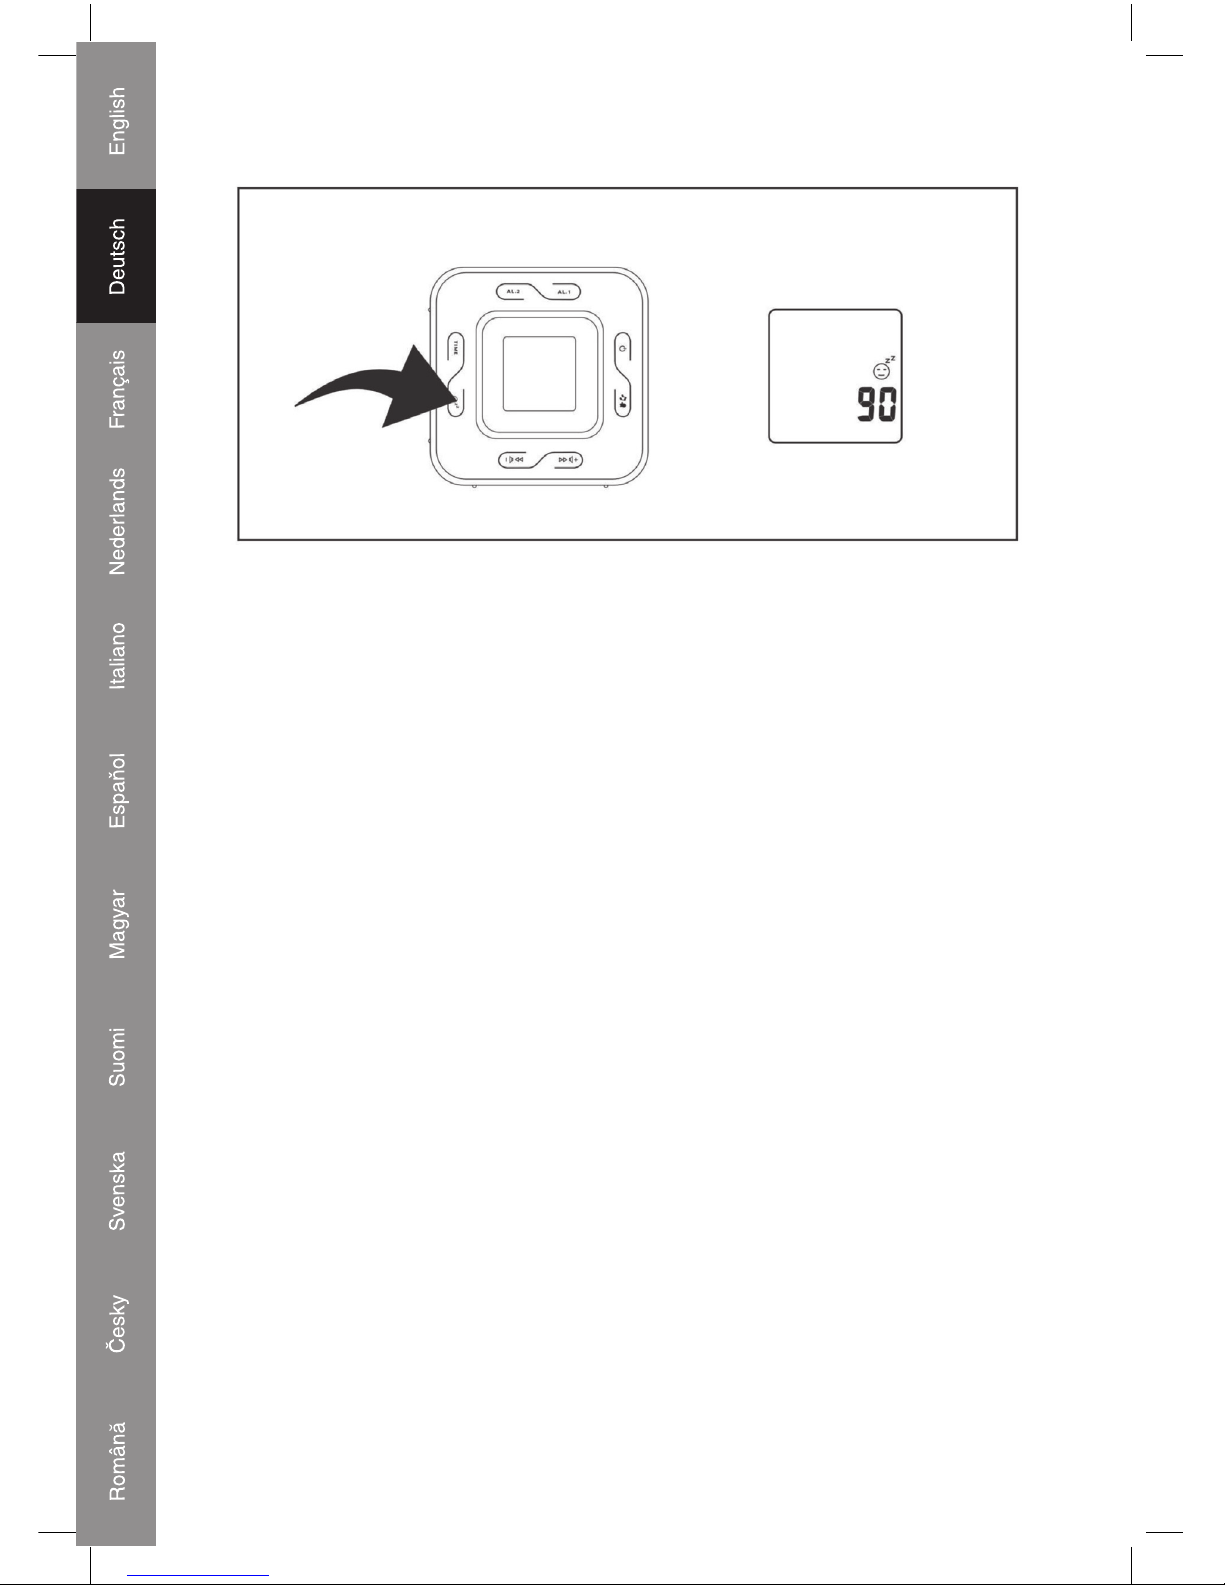
When the radio is on press snooze/sleep button (16), sleep ‘90’ show on display with 2 minutes
decrease sleep timer 90 minute-off by press snooze/sleep button (16) each. (Diagram 4)
NOTE : Press power on/off button (14) to off sleep function.
Snooze function :
1. Press snooze / sleep button (16) to activate snooze function (bell alarm or radio alarm will
stop) when alarming.
2. Snooze interval is 9 minutes.
Page 8
8
WORKING WITH AUDIO SOURCE
1. Use connective wire to join the audio source and the main unit together.
2. Adjust volume of the audio source in order to get a better amplifying effect.
REMARK : DO NOT set the audio source to too high volume to avoid overloading. The output
sound of the main unit will be eliminated and replaced once the ‘AUDIO IN’ JACK (15) has
connected to other audio source. The sound will resume once the connective wire is removed
from the jack.
If ‘audio in’ function is in use and broadcasting music, the alarm sound will insert into the music
at the pre-set wake up time. To stop the sound, simply press the power on/off alarm off button
(14).
RADIO OPERATION
- Press the power on/off button (14) to turn radio on.
- Select AM or FM band using the wave band switch (2).
- Select the station using the tuning control (8).
- Press the volume control button (3)/(4) to adjust volume as required.
- Press the power on/off button (14) to turn radio off.
Note :
- The AM band use an internal directional aerial. Rotate the radio for best reception.
- Ensure that the FM cord antenna (7) is completely unrolled and extended for best FM
reception.
RESET
- The reset button (17) is located on the bottom of unit. Use a ballpoint pen to press it whenever
you change the batteries, or unit is not performing as expected. This will return all settings to
default value, and you will lose any stored data (alarm and clock settings).
SPECIFICATIONS
Frequency range: AM 540 – 1600 KHz
FM 88 – 108 MHz
Output Power: 280 mW
Speaker impedance: 8 Ohm
Battery backup: 1 x CR2032, 3V Flat Lithium (battery not included)
Dimensions: 105 x 48 mm
Power source: AC 230 V ~ 50 Hz, 5 W
Page 9
9
DIAGRAM 1
DIAGRAM 2
DIAGRAM 3
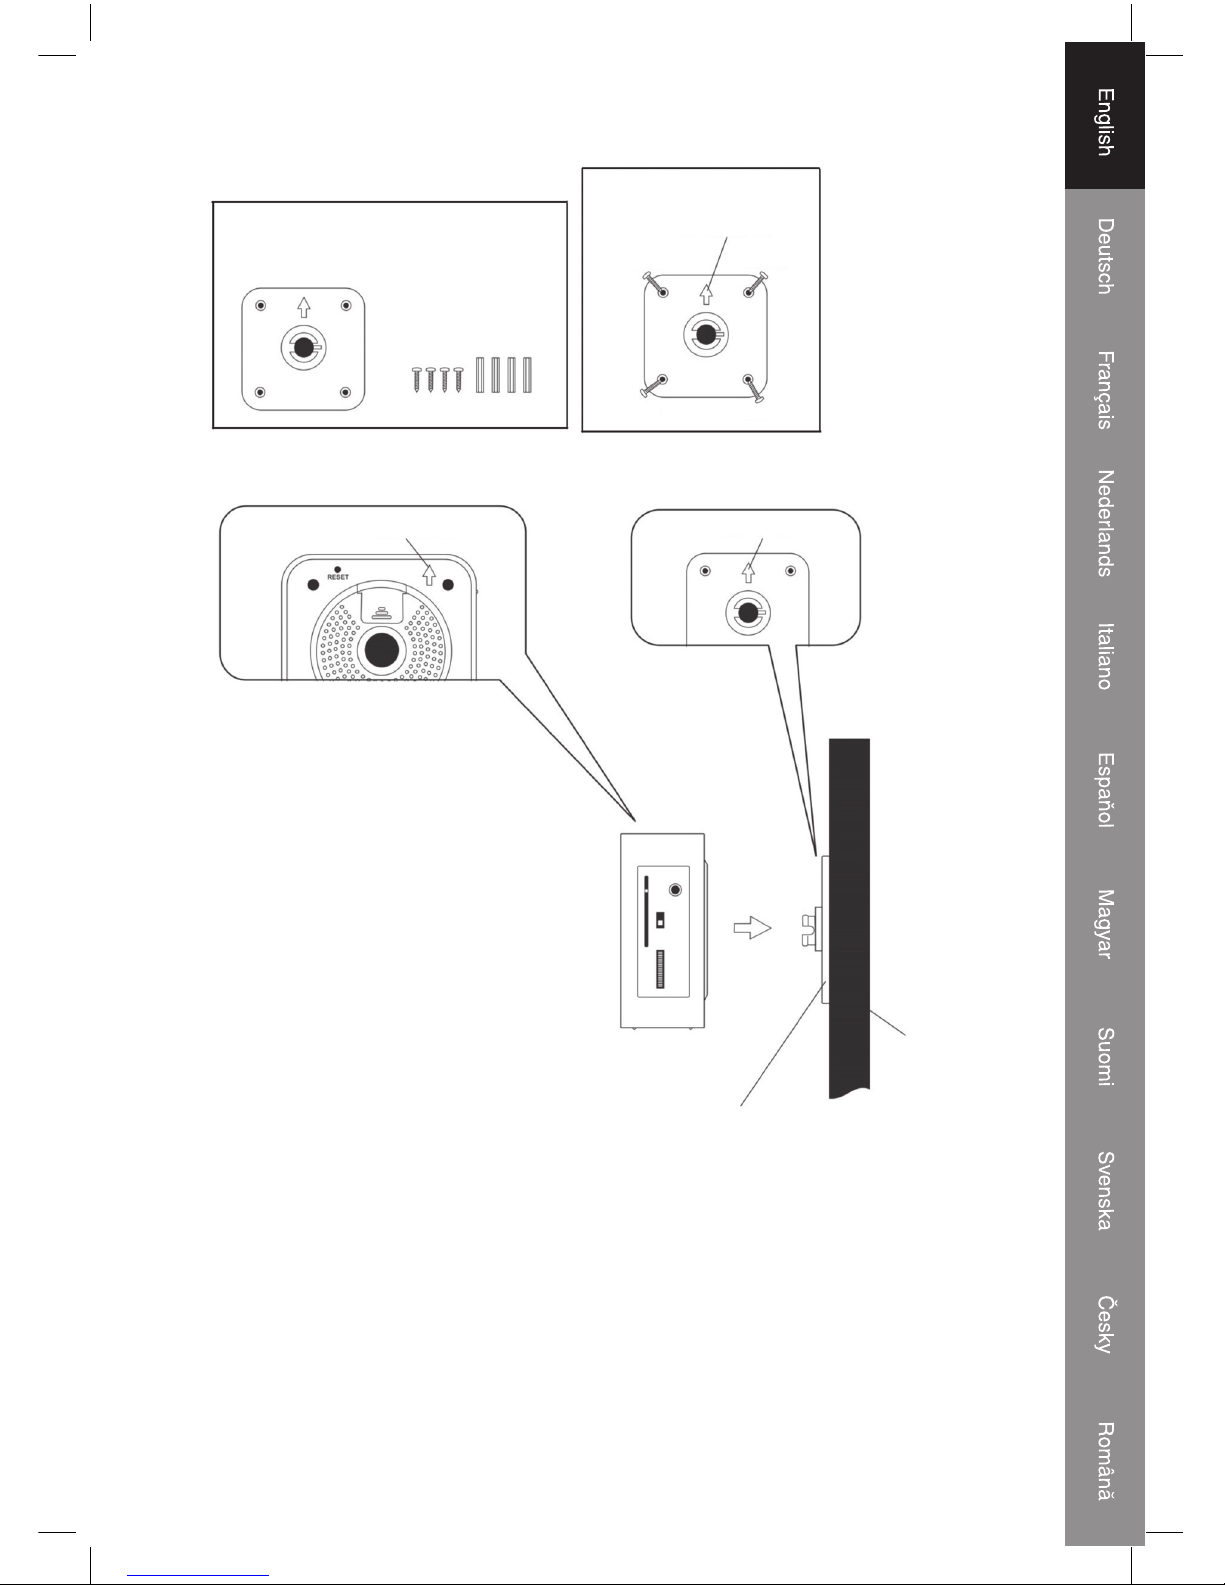
WALL SCREW & POLES
ARROW ON TOP
SCREW SCREW
SCREWSCREW
WALL
WALL BRACKET
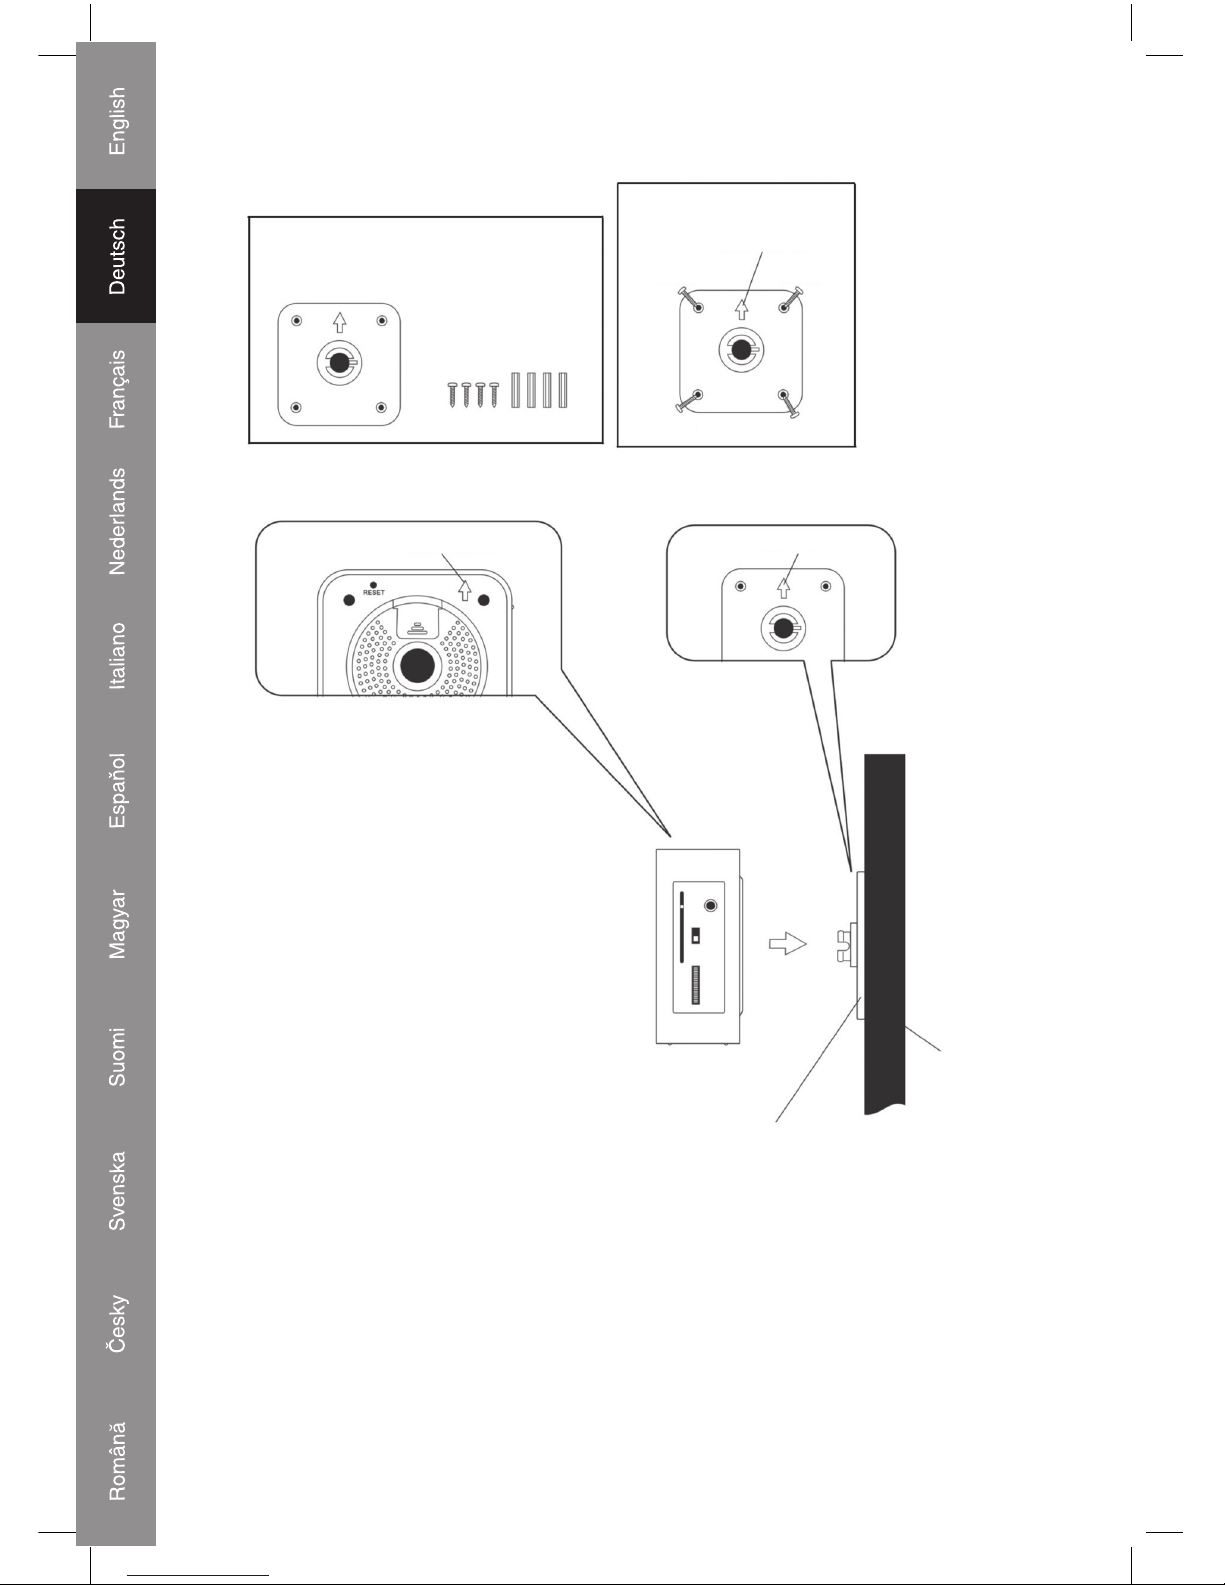
• Determine the wall position for the clock radio.
• Hang the wall bracket by fi xing 4 screws and poles tightly on wall (Diagram 2)
• Put the unit on the bracket and make sure the AC cord and FM antenna is separately outside
of bracket.
• Tighten the bracket screw into the bottom of unit (Diagram 3).
• Re-check again the wall bracket and unit is strongly hanging on the wall.
Page 10
10
Declaration of conformity
We,
Nedis B.V.
De Tweeling 28
5215MC ’s-Hertogenbosch
The Netherlands
Tel.: 0031 73 599 1055
Email: info@nedis.com
Declare that product:
Name: KONIG
Model: HAV-CR70
Description: Clock radio
Is in conformity with the following standards
EMC: EN55013:2001 + A1:2003
EN55020:2002 + A1:2003 + A2:2005
EN61000-3-2:2000 + A2:2005
EN61000-3-3:1995 + A1:2001
LVD: EN60 065:2002
Following the provisions of the 89/336/EEC AND 73/23/EEC directive.
‘s-Hertogenbosch, 2008, April 02
Mrs. J. Gilad
Purchase Director
Page 11
11
Safety precautions:
CAUTION
RISK OF EL ECTRIC SHOCK
DO NOT OPEN
To reduce risk of electric shock, this product should ONLY
be opened by an authorized technician when service is
required. Disconnect the product from mains and other
equipment if a problem should occur. Do not expose the product to water or moisture.
Maintenance:
Clean only with a dry cloth. Do not use cleaning solvents or abrasives.
Warranty:
No guarantee or liability can be accepted for any changes and modifi cations of the product or
damage caused due to incorrect use of this product.
General:
Designs and specifi cations are subject to change without notice.
All logos brands and product names are trademarks or registered trademarks of their respective
holders and are hereby recognized as such.
Attention:
This product is marked with this symbol. It means that used electrical and electronic
products should not be mixed with general household waste. There is a separate
collections system for these products.
Copyright ©
Page 12
12
DEUTSCH
BEDIENANWEISUNGEN
1. LCD-Display
2. AM/FM-Bandschalter
3. Lautstärke erhöhen
4. Lautstärke vermindern
5. Netzkabel
6. Batteriefach
7. FM-Antennendraht
8. Senderwahl
9. Einstelltaste für Alarm 2
10. Einstelltaste für Alarm 1
11. Wählscheibe und Zeiger
12. Zeit-Einstelltaste
13. Wahltaste für Alarm 1 /
Alarm 2 / Alarm 1 + 2
14. Netztaste, Taste für Alarm
aus
15. Audio in-Buchse
16. Schlummer/Schlaf-Taste
17. Rücksetz-Taste
18. Gerätehalterung
19. Typenschild (an der Rückseite des Geräts befestigt)
STROMANSCHLUSS
Stecken Sie den Netzstecker in eine Haushaltssteckdose. Drücken Sie dann die RücksetzTaste (17) mit einem Kugelschreiber. Dieses Gerät ist mit einem Batteriesicherungssystem
ausgestattet, das eine 3 V-Lithium-Batterie erfordert. Legen Sie die Batterie in das Batteriefach
ein, und achten Sie darauf, dass die positiven und negativen (+ und -) Anschlüsse der Batterie
an den entsprechenden Anschlüssen an der Platte im Batteriefach angebracht werden.
Anmerkung: Wenn der Strom ausfällt, schaltet die Uhr automatisch auf Batteriestromversorgung
um, und die Uhr und der Zeitspeicher laufen weiter. Wenn das Stromnetz wieder hergestellt ist,
wird die Uhr wieder zurück ans Netz geschaltet.
Anmerkung zur elektrostatischen Entladung: Bei einer Störung infolge von elektrostatischer
Entladung ist das Gerät nur zurückzusetzen (es kann erforderlich sein, den Netzstecker zu
ziehen), um mit dem normalen Betrieb fortzufahren.
Page 13
13
DIGITALUHR-MODUS
TAG
SCHLAFEN AN
ALARM 1, 2 WECKEN MIT
KLINGEL
ALARM 1, 2 WECKEN MIT
RADIO
ALARMUHR-MODUS
SCHLAFEN AN
ALARM 1, 2 WECKEN MIT
KLINGEL
ANMERKUNG:
ZEITEINSTELLUNG / ALARMEINSTELLUNG
/ SCHLAFEINSTELLUNG NUR IM
DIGITALUHR-MODUS
ALARM 1, 2 WECKEN MIT
RADIO
90°-Drehung Digitaluhr
90°-Drehung Analoguhr
Page 14

14
UHREN-EINSTELLMODUS
AKTUELLE ZEIT EINSTELLEN ODER RÜCKSETZEN
1. Halten Sie die Zeit-Einstelltaste (12) (Position 1) 2 Sekunden lang gedrückt, und es blinkt der
Tag.
2. Drücken Sie die Taste zur Erhöhung der Lautstärke (3) (Position 3) und die Taste zur
Verringerung der Lautstärke (4) (Position 2), um den Tag einzustellen.
3. Drücken Sie die Zeit-Einstelltaste (12) (Position 1), und es blinkt 24/12 Stunden.
4. Drücken Sie die Taste zur Erhöhung der Lautstärke (3) (Position 3) und die Taste zur
Verringerung der Lautstärke (4) (Position 2), um 24/12 Stunden einzustellen.
5. Drücken Sie die Zeit-Einstelltaste (12) (Position 1), und es blinkt die Stunde.
6. Drücken Sie die Taste zur Erhöhung der Lautstärke (3) (Position 3) und die Taste zur
Verringerung der Lautstärke (4) (Position 2), um die Stunde einzustellen.
7. Drücken Sie die Zeit-Einstelltaste (12) (Position 1), und es blinkt die Minute.
8. Drücken Sie die Taste zur Erhöhung der Lautstärke (3) (Position 3) und die Taste zur
Verringerung der Lautstärke (4) (Position 2), um die Minute einzustellen.
ALARM 1-EINSTELLMODUS
Page 15
15
EINSTELLUNG VON ALARM 1
1. Drücken Sie die Einstelltaste für Alarm 1 (10) (Position 1), um in den Einstellmodus für Alarm
1 zu gelangen.
2. Halten Sie die Einstelltaste für Alarm 1 (10) (Position 1) 2 Sekunden lang gedrückt, und es
blinkt der Tag (Diagramm 1).
3. Drücken Sie die Taste zur Erhöhung der Lautstärke (3) (Position 3) und die Taste zur
Verringerung der Lautstärke
(4) (Position 2), um den Tag einzustellen.
4. Drücken Sie die Einstelltaste für Alarm 1 (10) (Position 1), und es blinkt die Stunde.
Drücken Sie die Taste zur Erhöhung der Lautstärke (3) (Position 3) und die Taste zur
Verringerung der Lautstärke (4) (Position 2), um die Stunde einzustellen.
5. Drücken Sie die Einstelltaste für Alarm 1 (10) (Position 1), und es blinkt die Minute. Drücken Sie
die Taste zur Erhöhung der Lautstärke (3) (Position 3) und die Taste zur Verringerung
der Lautstärke (4) (Position 2), um die Minute einzustellen.
6. Drücken Sie die Einstelltaste für Alarm 1 (10) (Position 1) , und es blinkt die Glocke.
Drücken Sie die Taste zur Erhöhung der Lautstärke (3) (Position 3) und die Taste zur
Verringerung der Lautstärke (4) (Position 2), um zwischen Alarm 1 , Klingel und
Alarm Radio auszuwählen.
WOCHENEND-ALARM 1-EINSTELLMODUS (MO BIS SO)
WOCHENEND-ALARM 1-EINSTELLMODUS (MO BIS FR)
WOCHENEND-ALARM 1-EINSTELLMODUS (SA BIS SO)
DIAGRAMM 1
Page 16
16
ALARM 2-
EINSTELLMODUS
EINSTELLUNG VON ALARM 2
1. Drücken Sie die Einstelltaste für Alarm 2 (9) (Position 1), um in den Einstellmodus für Alarm
2 zu gelangen.
2. Halten Sie die Einstelltaste für Alarm 2 (9) 2 Sekunden lang gedrückt, und es blinkt der Tag
(Diagramm 2).
3. Drücken Sie die Taste zur Erhöhung der Lautstärke
(3) (Position 3) und die Taste zur
Verringerung der Lautstärke (4) (Position 2), um den Tag einzustellen.
4. Drücken Sie die Einstelltaste für Alarm 2 (9) (Position 1), und es blinkt die Stunde. Drücken Sie
die Taste zur Erhöhung der Lautstärke (3) (Position 3) und die Taste zur Verringerung
der Lautstärke (4) (Position 2), um die Stunde einzustellen.
5. Drücken Sie die Einstelltaste für Alarm 2 (9) (Position 1), und es blinkt die Minute. Drücken Sie
die Taste zur Erhöhung der Lautstärke (3) (Position 3) und die Taste zur Verringerung
der Lautstärke (4) (Position 2), um die Minute einzustellen.
6. Drücken Sie die Einstelltaste für Alarm 2 (9) (Position 1) , und es blinkt die Glocke.
Drücken Sie die Taste zur Erhöhung der Lautstärke (3) (Position 3) und die Taste
zur Verringerung der Lautstärke (4) (Position 2), um zwischen Alarm 2 , Klingel
und Alarm Radio auszuwählen.
Page 17
17
WOCHENEND-ALARM 2-EINSTELLMODUS (MO BIS SO)
WOCHENEND-ALARM 2-EINSTELLMODUS (MO BIS FR)
WOCHENEND-ALARM 2-EINSTELLMODUS (SA BIS SO)
DIAGRAMM 2
DIAGRAMM 3
SCHLAF-EINSTELLMODUS
Alarmausgangeinstellung und Alarm an/aus
Drücken Sie die Auswahltaste (13) für Alarm 1 / Alarm 2 / Alarm 1+2, um auszuwählen, ob Sie
durch Klingeln oder Radio geweckt werden wollen (Diagramm 3).
DAUER DES ALARMS
Der Alarm durch Klingel oder Radio dauert 1 Stunde, wenn keine Taste gedrückt wird. Der
Alarm wird automatisch beendet und beginnt am nächsten Tag zur selben Zeit.
BEENDEN DES ALARMS
Drücken Sie die Netztaste (14), um den aktuellen Alarm zu beenden, und es wird dabei auch
die Schlummerfunktion beendet.
Page 18
18
SCHLAF-EINSTELLMODUS
DIAGRAMM 4
Schlummerfunktion aktivieren
Wenn das Radio an ist, drücken Sie die Schlummer/Schlaf-Taste (16), und es wird Sleep
'90' angezeigt. Bei jedem Drücken der Schlummer/Schlaf-Taste (16) wird der Schlaf-Timer
beginnend bei 90 Minuten um 2 Minuten zurückgestellt (Diagramm 4).
ANMERKUNG: Drücken Sie die An/Aus-Taste (14), um die Schlaffunktion auszuschalten.
Schlummerfunktion:
1. Drücken Sie die Schlummer/Schlaf-Taste (16), um die Schlummerfunktion zu aktivieren.
Klingelalarm oder Radioalarm wird beendet, wenn Alarm gegeben wird.
2. Das Schlummerintervall beträgt 9 Minuten.
ARBEIT MIT AUDIOQUELLE
1. Verbinden Sie die Audioquelle durch ein Verbindungskabel mit dem Hauptgerät.
2. Stellen Sie die Lautstärke der Audioquelle ein, um eine bessere Verstärkung zu erhalten.
ANMERKUNG: Stellen Sie die Audioquelle NICHT zu laut ein, um eine Überlastung zu
vermeiden. Der Ausgangston des Hauptgeräts wird abgeschaltet und ersetzt, wenn die Audio
in-Buchse (15) an eine andere Audioquelle angeschlossen worden ist. Der Ton kommt wieder,
wenn das Verbindungskabel aus der Buchse gezogen wird.
Wenn die Audio in-Funktion benutzt wird und Musik gesendet wird, wird der Alarmton zur
eingestellten Weckzeit durch Musik ersetzt. Um den Ton zu beenden, drücken Sie einfach die
Taste für Netz an/aus und Alarm aus (14).
RADIOBETRIEB
- Drücken Sie die An/Aus-Taste (14), um das Radio anzuschalten.
- Wählen Sie mit dem Wellenbandschalter (2) das AM- oder FM-Band.
- Wählen Sie mit der Senderwahl (8) den Sender.
- Drücken Sie die Lautstärkeregeltaste (3)/(4), um die gewünschte Lautstärke einzustellen.
- Drücken Sie die An/Aus-Taste (14), um das Radio auszuschalten.
Anmerkung:
- Das AM-Band benutzt eine interne Richtantenne. Drehen Sie das Radio, bis Sie den besten
Empfang haben.
Page 19

19
- Achten Sie darauf, dass der FM-Antennendraht (7) vollständig ausgerollt und ausgestreckt
ist, um den besten FM-Empfang zu bieten.
RESET (RÜCKSETZEN)
- Die Rücksetz-Taste (17) befi ndet sich am Boden des Geräts. Drücken Sie sie mit einem
Kugelschreiber, wenn Sie die Batterien wechseln oder das Gerät nicht wie erwartet arbeitet.
Damit werden alle Einstellungen auf den Standardwert zurückgesetzt, und alle gespeicherten
Daten (Alarm- und Uhreneinstellungen) gehen verloren.
TECHNISCHE DATEN
Frequenzbereich: AM 540 – 1600 kHz
FM 88 - 108 MHz
Ausgangsleistung: 280 mW
Lautsprecherimpedanz: 8 Ohm
Batteriesicherung: 1 x CR2032, 3 V-Lithium-Batterie (Batterie nicht beigefügt)
Abmessungen: 105 x 48 mm
Stromquelle: AC 230 V, 50 Hz, 5 W
Page 20
20
DIAGRAMM 1
DIAGRAMM 2
DIAGRAMM 3
WANDSCHRAUBE &
STANGEN
PFEIL AUF OBERTEIL
SCHRAUBE SCHRAUBE
SCHRAUBESCHRAUBE
WAND
WANDHALTERUNG
• Legen Sie die Wandposition für das Uhrenradio fest.
• Bringen Sie die Wandhalterung mit 4 Befestigungsschrauben und Stangen fest an der Wand
an (Diagramm 2).
• Stellen Sie das Gerät auf die Halterung und achten Sie darauf, dass das Netzkabel und die
FM-Antenne außerhalb der Halterung getrennt sind.
• Ziehen Sie die Halterungsschraube fest in den Boden des Geräts (Diagramm 3.)
• Überprüfen Sie noch einmal die Wandhalterung und ob das Gerät fest an der Wand hängt.
Page 21
21
KONFORMITÄTSERKLÄRUNG
Wir,
Nedis B.V.
De Tweeling 28
5215MC ’s-Hertogenbosch
Niederlande
Tel.: 0031 73 599 1055
Email: info@nedis.com
erklären, dass das Produkt:
Name: KÖNIG
Modell: HAV-CR70
Beschreibung: Radiowecker
den folgenden Standards entspricht:
EMV: EN55013:2001 + A1:2003
EN55020:2002 + A1:2003 + A2:2005
EN61000-3-2:2000 + A2:2005
EN61000-3-3:1995 + A1:2001
LVD: EN60 065:2002
Befolgt die Bestimmungen der Richtlinien 89/336/EEC und 73/23/EEC.
‘s-Hertogenbosch, 2. April 02
J. Gilad
Leiterin Einkauf
Sicherheitsvorkehrungen:
VORSICHT
STROMSCHLAGGEFAHR
NICHT ÖFFNEN
Um das Risiko eines elektrischen Schlags zu verringern,
sollte dieses Produkt AUSSCHLIESSLICH von einem
autorisierten Techniker geöffnet werden, wenn eine Wartung
erforderlich ist. Trennen Sie das Produkt vom Stromnetz und anderen Geräten, wenn ein
Problem auftreten sollte. Sorgen Sie dafür, dass das Gerät nicht mit Wasser oder Feuchtigkeit
in Berührung kommt.
Wartung:
Nur mit einem trockenen Tuch säubern. Keine Lösungsmittel oder Schleifmittel verwenden.
Garantie:
Es kann keine Garantie oder Haftung für irgendwelche Änderungen oder Modifi kationen des
Produkts oder für Schäden übernommen werden, die aufgrund einer nicht ordnungsgemäßen
Anwendung des Produkts entstanden sind.
Allgemeines:
Konstruktionen und technische Daten können ohne vorherige Ankündigung geändert werden.
Alle Logos, Marken und Produktnamen sind Warenzeichen oder registrierte Warenzeichen
ihrer jeweiligen Eigentümer und werden hiermit als solche anerkannt.
Achtung:
Dieses Produkt ist mit diesem Symbol gekennzeichnet. Es bedeutet, dass die
verwendeten elektrischen und elektronischen Produkte nicht im allgemeinen
Haushaltsmüll entsorgt werden dürfen. Für diese Produkte stehen gesonderte
Sammelsysteme zur Verfügung.
Page 22
22
FRANCAIS
INSTRUCTIONS D'UTILISATION
1. Ecran LCD
2. Commutateur bande
AM/FM
3. Touche d'augmentation du
volume
4. Touche de diminution du
volume
5. Cordon électrique CA
6. Compartiment à piles
7. Fil d'antenne FM
8. Touche Réglage Radio
9. Touche Réglage Alarme 2
10. Touche Réglage Alarme 1
11. Echelle circulaire et
pointeur
12. Touche Réglage de l'heure
13. Touche de sélection
Alarme 1 / Alarme 2 /
Alarme 1 + 2
14. Touche Marche/Arrêt
Alarme
15. Prise d'entrée audio
16. Touche Rappel/Veille
17. Touche Réinitialisation
18. Fixation appareil
19. Plaque signalétique (fi xée à l'arrière de l'appareil)
RACCORDEMENT ELECTRIQUE
Branchez le cordon d'alimentation CA dans une prise domestique CA. Appuyez ensuite sur
la touche Réintialisation (17) avec la pointe d'un stylo. Cet appareil est équipé d'un système
de secours sur piles qui nécessite une pile plate au lithium de 3 volts. Insérez la pile dans le
compartiment à pile en faisant attention de respecter les poles + et - qui fi gurent sur l'étiquette
dans le compartiment.
Remarque : En cas de panne de courant, le réveil est automatiquement alimenté par la pile,
l'heure de l'horloge et du réveil restant en mémoire. Lorsque le courant revient, le réveil revient
en mode d'alimentation secteur.
Remarque DES : En cas de dysfonctionnement dû à un décharge électrostatique, réinitialisez
l'appareil (le branchement à une source d'alimentation peut être nécessaire) pour qu'il
refonctionne normalement.
Page 23
23
MODE HORLOGE NUMERIQUE
JOUR
VEILLE ACTIVEE
ALARM 1, 2 SONNERIE
ALARM 1, 2 RADIO
MODE ALARME
VEILLE ACTIVEE
ALARM 1, 2 SONNERIE
NOTE :
REGLAGE HEURE / REGLAGE ALARME /
REGLAGE VEILLE UNIQUEMENT EN MODE
HORLOGE NUMERIQUE
ALARM 1, 2 RADIO
Horloge numérique rotative à 90°
Horloge analogique rotative à 90°
Page 24
24
MODE REGLAGE HORLOGE
POUR REGLER LA DATE
1. Appuyez et maintenez enfoncée la touche de réglage de l'heure (12) (position 1) pendant
2 secondes, le jour clignote.
2. Appuyez sur la touche Volume + (3) (position 3) et la touche volume - (4)
(position 2) pour régler le jour.
3. Appuyez sur touche de réglage de l'heure (12) (position 1), 24 heures / 12 heures
clignotent.
4. Appuyez sur la touche Volume + (3) (position 3) et la touche volume - (4)
(position 2) pour paramétrer l'affi chage sur 24 heures ou 12 heures.
5. Appuyez sur la touche Réglage de l'heure (12) (position 1), les chiffres de l'heure clignotent.
6. Appuyez sur la touche Volume + (3) (position 3) et la touche volume - (4)
(position 2) pour régler l'heure.
7. Appuyez sur touche de réglage de l'heure (12) (position 1), les chiffres des minutes
clignotent.
8. Appuyez sur la touche Volume + (3) (position 3) et la touche volume - (4)
(position 2) pour régler les minutes.
MODE REGLAGE ALARME 1
Page 25
25
REGLAGE DE L'ALARME 1
1. Appuyez sur la touche Réglage Alarme 1 (10) (position 1) pour accéder au mode Réglage de
l'alarme 1.
2. Appuyez et maintenez enfoncée la touche Réglage de l'alarme 1 (10) (position 1) pendant
2 secondes, le jour clignote. (Schéma 1)
3. Appuyez sur la touche Volume + (3) (position 3) et la touche volume - (4)
(position 2) pour régler le jour.
4. Appuyez sur la touche Réglage de l'alarme 1 (10) (position 1), les chiffres de l'heure
clignotent. Appuyez sur la touche Volume +
(3) (position 3) et la touche volume -
(4) (position 2) pour régler l'heure.
5. Appuyez sur la touche Réglage de l'alarme 1 (10) (position 1), les chiffres des minutes
clignotent. Appuyez sur la touche Volume + (3) (position 3) et la touche volume -
(4) (position 2) pour régler les minutes.
6. Appuyez sur la touche Réglage de l'alarme 1 (10) (position 1), la cloche de l'alarme 1
clignote. Appuyez sur la touche Volume + (3) (position 3) et Volume - (4)
(position 2) pour choisir entre l'alarme 1 cloche et l'alarme radio .
MODE REGLAGE ALARME 1 WEEK-END (LUN à DIM)
MODE REGLAGE ALARME 1 WEEK-END (LUN à VEN)
MODE REGLAGE ALARME 1 WEEK-END (SAM et DIM)
SCHEMA 1 :
Page 26
26
MODE REGLAGE
ALARME 2
REGLAGE DE L'ALARME 2
1. Appuyez sur la touche Réglage Alarme 2 (9) (position 1) pour accéder au mode Réglage de
l'alarme 2.
2. Appuyez et maintenez enfoncée la touche de réglage de l'alarme 2 (9) pendant 2 secondes,
le jour clignote. (Schéma 2)
3. Appuyez sur la touche Volume +
(3) (position 3) et la touche volume - (4)
(position 2) pour régler le jour.
4. Appuyez sur la touche Réglage de l'alarme 2 (9) (position 1), les chiffres de l'heure clignotent.
Appuyez sur la touche Volume + (3) (position 3) et la touche volume - (4)
(position 2) pour régler l'heure.
5. Appuyez sur la touche Réglage de l'alarme 2 (9) (position 1), les chiffres des minutes
clignotent. Appuyez sur la touche Volume + (3) (position 3) et la touche volume -
(4) (position 2) pour régler les minutes.
6. Appuyez sur la touche Réglage de l'alarme 2 (9) (position 1), la cloche de l'alarme 2
clignote. Appuyez sur la touche Volume + (3) (position 3) et Volume - (4)
(position 2) pour choisir entre l'alarme 2 cloche et l'alarme radio .
MODE REGLAGE ALARME 2 WEEK-END (LUN à DIM)
MODE REGLAGE ALARME 2 WEEK-END (LUN à VEN)
MODE REGLAGE ALARME 2 WEEK-END (SAM et DIM)
SCHEMA 2
Page 27

27
SCHEMA 3
MODE REGLAGE VEILLE
Réglage de la sortie Alarme, Activation/Désactivation de l'alarme
Appuyez sur la touche de sélection Alarme 1 / Alarme 2 / Alarme 1+2 (13) pour choisir d'être
réveillé par la sonnerie ou la radio. (Schéma 3)
DUREE DE L'ALARME
L'alarme sonnerie ou radio sonne pendant une heure si aucune touche n'est enfoncée. L'alarme
s'arrête automatiquement et re-sonne à l'heure défi nie le jour suivant.
ARRETER L'ALARME
Appuyez sur la touche Marche/Arrêt (14) pour stopper une alarme en cours et également
annuler la fonction Rappel.
MODE REGLAGE VEILLE
SCHEMA 4
Pour activer la fonction Veille
Lorsque la radio est allumée, appuyez sur la touche Rappel/Veille (16), ‚90‘ apparaît à l‘écran. Il
s‘agit du délai de mise en veille. Ce chiffre diminue de 2 minutes chaque fois que vous appuyez
sur la touche Rappel/Veille (16). (Schéma 4)
Remarque : Appuyez sur la touche Marche/Arrêt (14) pour désactiver la fonction Veille.
Fonction Rappel
1. Appuyez sur la touche Rappel/Veille (16) pour activer la fonction Rappel (l'alarme sonnerie
ou radio s'arrête) si l'alarme est en cours.
2. L'intervalle de rappel est de 9 minutes.
Page 28
28
FONCTIONNEMENT AVEC UNE SOURCE AUDIO
1. Utilisez le câble de raccordement pour relier une source audio à l'appareil.
2. Réglez le volume de la source audio afi n d'obtenir un meilleur effet d'amplifi cation.
Remarque : NE REGLEZ PAS LE VOLUME de la source audio trop haut pour éviter la
saturation. Le son de l'appareil est coupé et remplacé par celui de la source dès que celle-ci
est raccordée à la prise d'entrée audio 'AUDIO IN' (15). Le son s'arrête dès que le câble de
raccordement est retiré de la prise.
Si la fonction Entrée Audio est en cours d'utilisation et qu'elle diffuse de la musique, le son de
l'alarme sera celui de l'entrée Audio dès l'heure du réveil atteinte. Pour stopper le son, appuyez
simplement sur la touche Marche/Arrêt Alarme (14).
FONCTIONNEMENT DE LA RADIO
- Appuyez sur la touche Marche/Arrêt (14) pour allumer la radio.
- Choisissez la bande AM ou FM en utilisant le commutateur de bande (2).
- Choisissez une station en utilisant la touche Réglage Radio (8).
- Appuyez sur les touches de réglage du volume (3)/(4) pour régler le son.
- Appuyez sur la touche Marche/Arrêt (14) pour éteindre la radio.
Remarque :
- La bande AM utilise une antenne directionnelle interne. Pivotez la radio pour une meilleure
réception.
- Assurez-vous de parfaitement dérouler et d'étendre le cordon d'antenne FM (7) afi n d'obtenir
la meilleure réception possible.
REINITIALISATION
- La touche Réinitialisation (17) se trouve au bas de l'appareil. Utilisez la pointe d'un stylo pour
l'enfoncer si vous remplacez les piles ou si l'apapreil ne semble pas fonctionner correctement.
Cela réinitialise tous les paramètres par défaut en perdant vos données personnelles (Heure
et Alarme).
Caractéristiques techniques
Gamme de fréquences : AM540- 1600kHz
FM 88 - 108 MHz
Puissance de sortie : 280 mW
Impédance haut-parleur : 8 Ohms
Pile de secours : 1 pile plate CR2032, 3V Lithium (non fournie)
Dimensions : 105 x 48 mm
Alimentation électrique : CA230V ~50 Hz 5W
Page 29

29
SCHEMA 1 :
SCHEMA 2
SCHEMA 3
VIS & CHEVILLES
FLECHE EN HAUT
VIS VIS
VISVIS
MUR
FIXATION MURALE
• Choisissez la position du radio-réveil sur le mur.
• Accrochez la fi xation murale en fi xant 4 vis avec chevilles, fermement dans le mur
(Schéma 2)
• Placez l'appareil sur le support en vous assurant que le cordon d'alimentation et le cordon
antenne FM ne restent pas coincés.
• Fixez la vis dans le bas de l'appareil (Schéma 3).
• Vérifi ez que l'ensemble soit fermement fi xé au mur.
Page 30
30
DECLARATION DE CONFORMITE
Nous,
Nedis B.V.
De Tweeling 28
5215MC ’s-Hertogenbosch
Pays Bas
Tél : 0031 73 599 1055
Email : info@nedis.com
Déclarons que le produit :
Nom : KONIG
Modèle : HAV-CR70
Description : Radio-réveil
est conforme aux normes suivantes:
CEM : EN55013:2001 + A1:2003
EN55020:2002 + A1:2003 + A2:2005
EN61000-3-2:2000 + A2:2005
EN61000-3-3:1995 + A1:2001
DBT : EN60065:2002
conformément aux prescriptions des directives 89/336/CE et 73/23/EG.
‘s-Hertogenbosch, 2 Avril 2008
Mme. J. Gilad
Directeur des Achats
Page 31

31
Consignes de sécurité :
ATTENTION
RISQUE DE CHOC ELECTRIQUE
NE PAS OUVRI R
Afi n de réduire les risques de chocs électriques, ce produit
ne doit être ouvert QUE par un technicien qualifi é agréé en
cas de réparation. Débranchez l'appareil du secteur et des
autres équipements en cas de problème. N'exposez jamais l'appareil à l'eau ou à l'humidité.
Entretien :
Ne nettoyez qu'avec un chiffon sec. N'utilisez pas de solvants ou de produits abrasifs.
Garantie :
Aucune garantie ou responsabilité ne sera acceptée en cas de modifi cation et/ou de
transformation du produit ou en cas de dommages provoqués par une utilisation incorrecte
de l'appareil.
Généralités :
Le design et les caractéristiques techniques sont sujets à modifi cation sans notifi cation
préalable.
Tous les logos de marques et noms de produits sont des marques déposées ou immatriculées
dont leurs détenteurs sont les propriétaires et sont donc reconnus comme telles dans ce
document.
Attention :
Ce symbole fi gure sur l'appareil. Il signifi e que les produits électriques et électroniques
ne doivent pas être jetés avec les déchets domestiques. Le système de collecte est
différent pour ce genre de produits.
Copyright ©
Page 32

32
NEDERLANDS
BEDIENINGSELEMENTEN
1. LCD display
2. AM/FM bandschakelaar
3. Volume hoger knop
4. Volume lager knop
5. Netsnoer
6. Batterijcompartiment
7. FM antenne
8. Afstemknop
9. Alarm 2 instelknop
10. Alarm 1 instelknop
11. Schaalwijzer
12. Tijdinstelknop
13. Alarm 1 / alarm 2 / alarm 1
+ 2 selectieknop
14. Power AAN/UIT alarm UIT
knop
15. Audio in aansluiting
16. Sluimer/slaap knop
17. Resetknop
18. Klamp
19. Typeplaatje (aan de achterzijde van het apparaat)
AANSLUITEN OP HET LICHTNET
Steek de stekker van het netsnoer in een stopcontact. Druk vervolgens de resetknop (17) in
met de punt van een balpen. Dit apparaat is voorzien van een batterij-backupsysteem; hiervoor
is een 3 volt lithium knoopcelbatterij nodig. Plaats de batterij in het batterijcompartiment en let
er daarbij op dat de polariteit (positief en negatief) van de batterijpolen overeenkomt met die
van de aansluitingen in het batterijcompartiment.
NB: In geval van een stroomstoring, schakelt de klok automatisch om naar batterijvoeding; de
klok en het timergeheugen blijven daardoor gewoon werken. Wanneer de netspanning weer
terugkomt, schakelt de klok weer over op voeding vanuit het lichtnet.
ESO opmerking: in geval van een storing door elektrostatische ontlading (ESO) dient u het
apparaat gewoon te resetten (ontkoppelen en weer aansluiten van de voedingsbron is mogelijk
noodzakelijk). Hierna zal het apparaat weer normaal werken.
Page 33

33
DIGITALE KLOK MODUS
DAG
SLAAP AAN
ALARM 1, 2 WEKKEN MET
BEL
ALARM 1, 2 WEKKEN MET
RADIO
ALARMKLOK MODUS
SLAAP AAN
ALARM 1, 2 WEKKEN MET
BEL
NB:
TIJD INSTELLEN / ALARM INSTELLEN /
SLAAP INSTELLEN ALLEEN IN DIGITALE
KLOK MODUS
ALARM 1, 2 WEKKEN MET
RADIO
90° Roterende digitale klok
90° Roterende analoge klok
Page 34

34
KLOK INSTELMODUS
HET INSTELLEN OF RESETTEN VAN DE ACTUELE TIJD
1. Houd de tijdinstelknop (12) (positie 1) 2 seconden ingedrukt; de dagen gaan knipperen.
2. Druk op de volume hoger knop (3) (positie 3) en volume lager knop (4)
(positie 2) om de dag in te stellen.
3. Druk op de tijdinstelknop (12) (positie 1); 24 uur / 12 uur gaan knipperen.
4. Druk op de volume hoger knop (3) (positie 3) en volume lager knop (4)
(positie 2) om 24 uur / 12 uur in te stellen.
5. Druk op de tijdinstelknop (12) (positie 1); de uren gaan knipperen.
6. Druk op de volume hoger knop (3) (positie 3) en volume lager knop (4)
(positie 2) om de uren in te stellen.
7. Druk op de tijdinstelknop (12) (positie 1); de minuten gaan knipperen.
8. Druk op de volume hoger knop (3) (positie 3) en volume lager knop (4)
(positie 2) om de minuten in te stellen.
ALARM 1 INSTELMODUS
Page 35

35
ALARM 1 INSTELLEN
1. Druk op de Alarm 1 instelknop (10) (positie 1) om naar de instelmodus van alarm 1 te gaan.
2. Houd de Alarm 1 instelknop (10) (positie 1) 2 seconden ingedrukt; de dagen gaan knipperen
(afbeelding 1).
3. Druk op de volume hoger knop (3) (positie 3) en volume lager knop (4)
(positie 2) om de dag in te stellen.
4. Druk op de Alarm 1 instelknop (10) (positie 1); de uren gaan knipperen. Druk op de volume
hoger knop
(3) (positie 3) en volume lager knop (4) (positie 2) om de uren in te
stellen.
5. Druk op de Alarm 1 instelknop (10) (positie 1); de minuten gaan knipperen. Druk op de
volume hoger knop (3) (positie 3) en volume lager knop (4) (positie 2) om de
minuten in te stellen.
6. Druk op de Alarm 1 instelknop (10) (positie 1); alarmbel 1 gaat knipperen. Druk op de
volume hoger knop (3) (positie 3) en volume lager knop (4) (positie 2) om
alarmbel 1 of alarmradio te selecteren.
WEEKEND ALARM 1 INSTELMODUS (MA - ZO)
WEEKEND ALARM 1 INSTELMODUS (MA - VR)
WEEKEND ALARM 1 INSTELMODUS (ZA - ZO)
AFBEELDING 1
Page 36

36
ALARM 2
INSTELMODUS
ALARM 2 INSTELLEN
1. Druk op de Alarm 2 instelknop (9) (positie 1) om naar de instelmodus van alarm 2 te gaan.
2. Houd de Alarm 2 instelknop (9) 2 seconden ingedrukt; de dagen gaan knipperen (afbeelding 2).
3. Druk op de volume hoger knop
(3) (positie 3) en volume lager knop (4)
(positie 2) om de dag in te stellen.
4. Druk op de Alarm 2 instelknop (9) (positie 1); de uren gaan knipperen. Druk op de volume
hoger knop (3) (positie 3) en volume lager knop (4) (positie 2) om de uren in te
stellen.
5. Druk op de Alarm 2 instelknop (9) (positie 1); de minuten gaan knipperen. Druk op de volume
hoger knop (3) (positie 3) en volume lager knop (4) (positie 2) om de minuten in
te stellen.
6. Druk op de Alarm 2 instelknop (9) (positie 1); alarmbel 2 gaat knipperen. Druk op de
volume hoger knop (3) (positie 3) en volume lager knop (4) (positie 2) om
alarmbel 2 of alarmradio te selecteren.
WEEKEND ALARM 2 INSTELMODUS (MA - ZO)
WEEKEND ALARM 2 INSTELMODUS (MA - VR)
WEEKEND ALARM 2 INSTELMODUS (ZA - ZO)
AFBEELDING 2
Page 37

37
AFBEELDING 3
SLAAP INSTELMODUS
Alarmtype instellen en alarm aan/uit
Druk op de alarm 1 / alarm 2 / alarm 1+2 selectieknop (13) om voor het ontwaken de bel of de
radio te kiezen (afbeelding 3).
ALARMDUUR
De bel of de radio zullen gedurende 1 uur een alarmsignaal afgeven zolang er geen knop
ingedrukt wordt. Het alarm zal automatisch stoppen en de volgende dag op hetzelfde tijdstip
afgaan.
HET ALARM STOPPEN
Druk op de Power AAN/UIT alarm UIT knop (14) om het actuele alarmsignaal te stoppen; de
sluimerfunctie wordt hierdoor ook gestopt.
SLAAP INSTELMODUS
AFBEELDING 4
Het activeren van de slaapfunctie
Wanneer de radio ingeschakeld is, drukt u op de sluimer/slaap knop (16); in de display
verschijnt een slaapsymbool en ‚90‘. telkens wanneer u op de sluimer/slaap knop (16) drukt,
zal de slaaptijd met 2 minuten afnemen. (afbeelding 4).
NB: druk op de Power AAN/UIT alarm UIT knop (14) om de slaapfunctie uit te schakelen.
Page 38

38
Sluimerfunctie:
1. Druk, wanneer het alarm afgaat, op de sluimer/slaap knop (16) om de sluimerfunctie te
activeren (de alarmbel of de radio zal stoppen).
2. Het sluimerinterval is 9 minuten.
HET GEBRUIK VAN EEN EXTERNE GELUIDSBRON
1. Sluit de externe geluidsbron aan op de klokradio middels de daartoe geschikte kabel.
2. Stel het volume van de externe geluidsbron in voor een optimaal geluid.
OPMERKING: zet het volume van de externe geluidsbron NIET te hoog, dit om overbelasting
te voorkomen. Het geluid van de klokradio schakelt automatisch naar de externe geluidsbron
om, zodra de stekker in de 'AUDIO IN' aansluiting (15) gestoken wordt. Wanneer de stekker uit
de 'AUDIO IN' aansluiting gehaald wordt, is het (eigen) geluid van de klokradio weer te horen.
Als de ‘audio in’ functie in gebruik is en er muziek weergegeven wordt, zal zodra de vooraf
ingestelde alarmtijd bereikt wordt het alarmsignaal door de muziek heen te horen zijn. Om het
alarmsignaal te stoppen, drukt u gewoon op de Power AAN/UIT alarm UIT knop (14).
BEDIENING VAN DE RADIO
- Druk op de Power aan/uit knop (14) om de radio in te schakelen.
- Selecteer de AM of FM band middels de AM/FM bandschakelaar (2).
- Stem middels de afstemknop (8) op een radiostation af.
- Druk op de volume hoger/lager knop (3)/(4) om het gewenste volume in te stellen.
- Druk op de Power aan/uit knop (14) om de radio uit te schakelen.
NB:
- De AM band maakt gebruik van een ingebouwde richtinggevoelige antenne. Draai de radio
eventueel voor de beste ontvangst.
- Zorg dat de FM antenne (7) helemaal afgerold is voor een optimale ontvangst van de FMstations.
RESET
- De resetknop (17) bevindt zich aan de onderzijde van het apparaat. Gebruik de punt van
een balpen om de resetknop in te drukken wanneer u de batterij vervangt of wanneer het
apparaat niet naar behoren werkt. Alle instellingen worden naar de defaultwaarde gereset en
alle opgeslagen gegevens gaan verloren (instellingen van alarm en klok).
SPECIFICATIES
Frequentiebereik: AM 540 – 1600 kHz
FM 88 - 108 MHz
Uitgangsvermogen: 280 mW
Impedantie luidspreker: 8 ohm
Batterij back-up: 1 x CR2032, 3 volt lithium knoopcelbatterij (niet meegeleverd)
Afmetingen: 105 x 48 mm
Voeding: AC 230 V ~ 50 Hz, 5 W
Page 39

39
AFBEELDING 1
AFBEELDING 2
AFBEELDING 3
MUURSCHROEVEN &
PLUGGEN
PIJL NAAR BOVEN
SCHROEF SCHROEF
SCHROEFSCHROEF
MUUR
MUURHOUDER
• Bepaal de plaats op de muur waar u de klokradio wilt bevestigen.
• Monteer de muurhouder stevig op de muur middels de 4 schroeven en pluggen (afbeelding 2).
• Plaats de klokradio op de muurhouder en zorg ervoor dat het netsnoer en de FM-antenne vrij
buiten de muurhouder hangen.
• Draai de schroef in de onderzijde van het apparaat aan (afbeelding 3).
• Controleer nog eens of de muurhouder en de klokradio stevig bevestigd zijn.
Page 40

40
CONFORMITEITVERKLARING
Wij,
Nedis BV
De Tweeling 28
5215 MC ’s-Hertogenbosch
Nederland
Tel.: 0031 73 599 1055
E-mail: info@nedis.com
Verklaren dat het product:
Merknaam: KONIG
Model: HAV-CR70
Omschrijving: Klokradio
in overeenstemming met de volgende normen is:
EMC: EN55013:2001 + A1:2003
EN55020:2002 + A1:2003 + A2:2005
EN61000-3-2:2000 + A2:2005
EN61000-3-3:1995 + A1:2001
LVD: EN60 065:2002
Conform de bepalingen van de richtlijnen 89/336/EC en 73/23/EG.
‘s-Hertogenbosch, 2 april 2008
Mevr. J. Gilad
Directeur inkoop
Page 41

41
Veiligheidsvoorzorgsmaatregelen:
LET OP:
GEVAAR VOOR
ELEKTR ISCHE SCHOK
NIET OPENEN
Wanneer service of reparatie noodzakelijk is, mag dit product
UITSLUITEND door een geautoriseerde technicus geopend
worden; dit om de kans op het krijgen van een elektrische
schok te voorkomen. Als er een probleem optreedt, koppel het product dan los van het lichtnet
en van andere apparatuur. Stel het product niet bloot aan water of vocht.
Onderhoud:
Uitsluitend reinigen met een droge doek. Gebruik geen reinigingsmiddelen of
schuurmiddelen.
Garantie:
Voor wijzigingen en veranderingen aan het product of schade veroorzaakt door een verkeerd
gebruik van dit product, kan geen aansprakelijkheid worden geaccepteerd. Tevens vervalt
daardoor de garantie.
Algemeen:
Wijziging van ontwerp en specifi caties zonder voorafgaande mededeling onder voorbehoud.
Alle logo's, merken en productnamen zijn handelsmerken of geregistreerde handelsmerken
van de respectievelijke eigenaren en worden hierbij als zodanig erkend.
Let op:
Dit product is voorzien van dit symbool. Dit symbool geeft aan dat afgedankte
elektrische en elektronische producten niet met het gewone huisafval verwijderd
mogen worden. Voor dit soort producten zijn er speciale inzamelingspunten.
Copyright ©
Page 42

42
ITALIANO
ISTRUZIONI DI FUNZIONAMENTO
1. Display LCD
2. Interruttore banda (FM/
AM)
3. Controllo volume su
4. Controllo volume giù
5. Cavo CA
6. Vano batteria
7. CAVO ANTENNA FM
8. CONTROLLO
SINTONIZZAZIONE
9. Pulsante impostazione
sveglia 2
10. Pulsante impostazione
sveglia 1
11. Scala quadrante e
indicatore
12. Pulsante Impostazione ora
13. Pulsante di selezione
Sveglia 1 / sveglia 2 /
sveglia 1 + 2
14. Pulsante accensione ON/OFF sveglia OFF
15. Presa Audio in
16. Pulsante Snooze / sleep
17. Pulsante Azzeramento
18. Supporto unità
19. Etichetta di classifi cazione (fi ssata sul retro dell'unità)
COLLEGAMENTO ALIMENTAZIONE
Inserire il cavo di alimentazione CA nella sorgente CA di una presa domestica. Quindi premere
il pulsante azzeramento (17) con una penna a sfera. Questa unità è munita di un sistema
di back up della batteria, richiede una batteria piatta al litio da 3 V. Inserire la batteria nello
scomparto batteria, assicurandosi che i terminali della batteria poisitivi e negativi (+e-) siano
fi ssati ai terminali corrispondenti sulla piastra nello scomparto batteria.
Nota: Se si verifi ca un guasto della corrente CA, l'orologio passa automaticamente
all'alimentazione a batteria, e l'orologio e la memoria del timer continuano a funzionare.
Quando l'alimentazione CA riprende, l'orologio ripassa alla corrente alternata.
Nota sulle scariche elettrostatiche: In caso di malfunzionamento a causa di scarica
elettrostatica, reimpostare il prodotto (potrebbe essere necessario ricollegare la sorgente
elettrica) per riprendere il normale funzionamento.
Page 43

43
MODALITA' OROLOGIO DIGITALE
GIORNO
SLEEP ON
SVEGLIA 1, 2 SVEGLIA
SUONERIA
SVEGLIA 1, 2 SVEGLIA
RADIO
MODALITA' OROLOGIO SVEGLIA
SLEEP ON
SVEGLIA 1, 2 SVEGLIA
SUONERIA
NOTA:
IMPOSTAZIONE ORA / IMPOSTAZIONE
SVEGLIA / IMPOSTAZIONE SLEEP SOLO IN
MODALITA' OROLOGIO DIGITALE
SVEGLIA 1, 2 SVEGLIA
RADIO
90° Orologio digitale rotante
90° Orologio analogico rotante
Page 44

44
MODALITA' IMPOSTAZIONE
OROLOGIO
PER IMPOSTARE O REIMPOSTARE L'ORA EFFETTIVA
1. Premere e tenere premuto il pulsante di impostazione dell'ora (12) (posizione 1) per 2
secondi, il giorno lampeggerà.
2. Premere il pulsante di controllo del volume su (3) (posizione 3) e il pulsante di controllo
del volume giù (4) (posizione 2) per impostare il giorno.
3. Premere il pulsante di impostazione dell'ora (12) (posizione 1), il display 24 ore / 12 ore
lampeggerà.
4. Premere il pulsante di controllo del volume su (3) (posizione 3) e il pulsante di controllo
del volume giù (4) (posizione 2) per impostare il display 24 ore / 12 ore.
5. Premere il pulsante di impostazione dell'ora (12) (posizione 1), ora.
6. Premere il pulsante di controllo del volume su (3) (posizione 3) e il pulsante di controllo
del volume giù (4) (posizione 2) per impostare l'ora.
7. Premere il pulsante di impostazione dell'ora (12) (posizione 1), i minuti lampeggeranno.
8. Premere il pulsante di controllo del volume su (3) (posizione 3) e il pulsante di controllo
del volume giù (4) (posizione 2) per impostare i minuti.
MODALITA' IMPOSTAZIONE
SVEGLIA 1
Page 45

45
IMPOSTAZIONE SVEGLIA 1
1. Premere il pulsante di impostazione sveglia 1 (10) (posizione 1) per entrare nella modalità di
impostazione sveglia 1.
2. Premere e tenere premuto il pulsante di impostazione sveglia 1 (10) (posizione 1) per
2 secondi, il giorno lampeggerà. (Diagramma 1)
3. Premere il pulsante di controllo del volume su (3) (posizione 3) e il pulsante di controllo
del volume giù
(4) (posizione 2) per impostare il giorno.
4. Premere il pulsante di impostazione sveglia 1 (10) (posizione 1), l'ora lampeggerà. Premere
il pulsante di controllo del volume su (3) (posizione 3) e il pulsante di controllo del
volume giù (4) (posizione 2) per impostare l'ora.
5. Premere il pulsante di impostazione sveglia 1 (10) (posizione 1), i minuti lampeggeranno.
Premere il pulsante di controllo del volume su (3) (posizione 3) e il pulsante di controllo
del volume giù (4) (posizione 2) per impostare i minuti.
6. Premere il pulsante di impostazione sveglia 1 (10) (posizione 1) , la suoneria della sveglia
1 lampeggerà Premere il pulsante di controllo del volume su (3) (posizione 3) e il
pulsante di controllo del volume giù (4) (posizione 2) per selezionare la suoneria
della sveglia 1 e la radio sveglia.
MODALITA' IMPOSTAZIONE WEEKEND SVEGLIA 1 (DA LUN A DOM)
MODALITA' IMPOSTAZIONE WEEKEND SVEGLIA 1 (DA LUN A VEN)
MODALITA' IMPOSTAZIONE WEEKEND SVEGLIA 1 (DA SAB A DOM)
DIAGRAMMA 1:
Page 46

46
MODALITA'
IMPOSTAZIONE
SVEGLIA 2
IMPOSTAZIONE SVEGLIA 2
1. Premere il pulsante di impostazione sveglia 2 (9) (posizione 1) per entrare nella modalità di
impostazione sveglia 2.
2. Premere e tenere premuto il pulsante di impostazione sveglia 2 (9) per 2 secondi, il giorno
lampeggerà. (Diagramma 2)
3. Premere il pulsante di controllo del volume su
(3) (posizione 3) e il pulsante di controllo
del volume giù (4) (posizione 2) per impostare il giorno.
4. Premere il pulsante di impostazione sveglia 2 (9) (posizione 1), l'ora lampeggerà. Premere
il pulsante di controllo del volume su (3) (posizione 3) e il pulsante di controllo del
volume giù (4) (posizione 2) per impostare l'ora.
5. Premere il pulsante di impostazione sveglia 2 (9) (posizione 1), i minuti lampeggeranno.
Premere il pulsante di controllo del volume su (3) (posizione 3) e il pulsante di controllo
del volume giù (4) (posizione 2) per impostare i minuti.
6. Premere il pulsante di impostazione sveglia 2 (9) (posizione 1) , la suoneria della sveglia
2 lampeggerà Premere il pulsante di controllo del volume su (3) (posizione 3) e il
pulsante di controllo del volume giù (4) (posizione 2) per selezionare la suoneria
della sveglia 2 e la radio sveglia.
MODALITA' IMPOSTAZIONE WEEKEND SVEGLIA 2 (DA LUN A DOM)
MODALITA' IMPOSTAZIONE WEEKEND SVEGLIA 2 (DA LUN A VEN)
MODALITA' IMPOSTAZIONE WEEKEND SVEGLIA 2 (DA SAB A DOM)
DIAGRAMMA 2
Page 47

47
DIAGRAMMA 3
MODALITA' IMPOSTAZIONE SLEEP
Impostazione di uscita sveglia e sveglia on/off
Premere il pulsante di selezione sveglia 1 / sveglia 2 / sveglia 1+2 (13) per selezionare la
sveglia con suoneria e radio. (Diagramma 3)
DURATA SVEGLIA
La suoneria della sveglia o radio sveglia continuerà per 1 ora se non viene premuto alcun
pulsante. La sveglia si interromperà automaticamente e si riavvierà alla stessa ora di
impostazione della sveglia il giorno successivo.
INTERRUZIONE DELLA SVEGLIA
Premere il pulsante di accensione (14) per interrompere la sveglia corrente, anche la funzione
snooze verrà annullata.
MODALITA' IMPOSTAZIONE SLEEP
DIAGRAMMA 4
Per attivare la funzione sleep
Quando la radio è accesa, premere il pulsante snooze/sleep (16), sleep ‘90’ viene indicato sul
display con 2 minuti diminuire il timer sleep 90 minuti- spegnere premendo il pulsante snooze/
sleep (16) ciascuno. (Diagramma 4)
Nota: Premere il pulsante di accensione on/off (14) per disattivare la funzione sleep.
Page 48

48
Funzione snooze :
1. Premere il pulsante snooze / sleep (16) per attivare la funzione snooze (la suoneria della
sveglia o la radio sveglia si interromperà) durante l'attivazione della sveglia.
2. L'intervallo di snooze è di 9 minuti.
FUNZIONAMENTO CON SORGENTE AUDIO
1. Usare il cavo di collegamento per unire insieme la sorgente audio e l'unità principale.
2. Regolare il volume della sorgente audio per ottenere un migliore effetto di amplifi cazione.
NOTA: NON impostare la sorgente audio su un volume troppo alto per evitare un
sovraccaricamento. Il suono in uscita dell'unità principale verrà eliminato e sostituito una volta
che la PRESA ‘AUDIO IN’ (15) è stata collegata a un'altra sorgente audio. Il suono riprenderà
una volta che il cavo di collegamento è stato rimosso dalla presa.
Se la funzione ‘audio in’ è in uso e sta trasmettendo musica, il suono della sveglia si inserirà
nella musica all'ora della sveglia preimpostata. Per interrompere il suono, è suffi ciente premere
il pulsante di accensione on/off sveglia off (14).
FUNZIONAMENTO RADIO
- Premere il pulsante di accensione on/off (14) per accendere la radio.
- Selezionare la banda AM o FM usando l'interruttore della banda delle onde (2).
- Selezionare la stazione usando il controllo di sintonizzazione (8).
- Premere il pulsante di controllo del volume (3)/(4) per regolare il volume in base alle
necessità.
- Premere il pulsante di accensione on/off (14) per spegnere la radio.
Nota:
- La banda AM impiega un'antenna direzionale interna. Ruotare la radio per una ricezione
ottimale.
- Assicurarsi che l'antenna del cavo FM (7) sia completamente spiegata ed estesa per una
ricezione FM ottimale.
AZZERAMENTO
- Il pulsante di azzeramento (17) è situato sul fondo dell'unità. Usare una penna a sfera
per premerlo quando si cambiano le batterie o l'unità non funziona come previsto. Questo
riporterà tutte le impostazioni al valore predefi nito e si perderanno tutti i dati in memoria
(impostazioni sveglia e orologio).
SPECIFICHE
Gamma di frequenza: AM 540 – 1600 KHz
FM 88 - 108 MHz
Potenza di uscita: 280 mW
Impedenza altoparlanti: 8 Ohm
Backup batteria: 1 x CR2032, 3V Piatta al litio (batteria non in dotazione)
Dimensioni: 105 x 48 mm
Fonte di alimentazione: AC 230 V ~ 50 Hz, 5 W
Page 49

49
DIAGRAMMA 1
DIAGRAMMA 2
DIAGRAMMA 3
VITE A MURO & ASTE
FRECCIA SOPRA
VITE VITE
VITEVITE
MURO
SUPPORTO A MURO
• Determinare la posizione sul muro della radiosveglia.
• Appendere il supporto a muro fi ssando le 4 viti e aste saldamente sul muro (Diagramma 2)
• Posizionare l'unità sul supporto e assicurarsi che il cavo CA e l'antenna FM si trovino
separatamente al di fuori del supporto.
• Serrare la vite del supporto sul fondo dell'unità (Diagramma 3).
• Verifi care nuovamente che il supporto a muro e l'unità siano saldamente appesi al muro.
Page 50

50
DICHIARAZIONE DI CONFORMITÀ
Questa società,
Nedis B.V.
De Tweeling 28
5215MC ’s-Hertogenbosch
Paesi Bassi
Tel.: 0031 73 599 1055
Email: info@nedis.com
Dichiara che il prodotto:
Nome: KONIG
Modello: HAV-CR70
Descrizione: Radiosveglia
è conforme ai seguenti standard:
EMC: EN55013:2001 + A1:2003
EN55020:2002 + A1:2003 + A2:2005
EN61000-3-2:2000 + A2:2005
EN61000-3-3:1995 + A1:2001
LVD: EN60 065:2002
Secondo le disposizioni delle direttive 89/336/EEC E 73/23/EEC.
‘s-Hertogenbosch, 2008, 2 aprile
Sig.ra J. Gilad
Direttore agli acquisti
Page 51

51
Precauzioni di sicurezza:
ATTENZI ONE
RISCH IO DI SCOSSE ELE TTRICHE
NON APRIRE
Per ridurre il rischio di scosse elettriche, questo prodotto
deve essere aperto ESCLUSIVAMENTE da personale
tecnico specializzato, se occorre assistenza. Se si dovessero
verifi care dei problemi, scollegare il prodotto dall'alimentazione di rete e da ogni altra
apparecchiatura. Non esporre il prodotto ad acqua o umidità.
Manutenzione:
Pulire solo con un panno asciutto. Non utilizzare solventi detergenti o abrasivi.
Garanzia:
Non sarà accettata alcuna garanzia o responsabilità in relazione a cambiamenti e modifi che
del prodotto o a danni determinati dall'uso non corretto del prodotto stesso.
Generalità:
Il design e le caratteristiche tecniche sono soggetti a modifi ca senza necessità di preavviso.
Tutti i marchi, logo e i nomi di prodotto sono marchi commerciali o registrati dei rispettivi titolari
e sono in questo documento riconosciuti come tali.
Attenzione:
Il prodotto è contrassegnato con questo simbolo, con il quale si indica che i prodotti
elettrici ed elettronici usati non devono essere gettati insieme ai rifi uti domestici. Per
questi prodotti esiste un sistema di raccolta differenziata.
Copyright ©
Page 52

52
ESPAÑOL
INSTRUCCIONES DE FUNCIONAMIENTO
1. Pantalla LCD
2. Interruptor de banda
(AM/FM)
3. Control de subida de
volumen.
4. Control de bajada de
volumen
5. Cable de CA
6. Compartimento de pilas
7. CABLE DE LA ANTENA
FM
8. CONTROL DE
SINTONIZACIÓN
9. Botón de confi guración de
Alarma 2
10. Botón de confi guración de
Alarma 1
11. Puntero y escala dial
12. Botón de confi guración de
la hora
13. Botón de selección de Alarma 1 / alarma 2 / alarma 1 + 2
14. Botón de ENCENDIDO/APAGADO de la alarma
15. Toma de entrada de audio
16. Botón de REPETIR ALARMA/DORMIR
17. Botón de reinicio
18. Soporte de la unidad
19. Etiqueta de califi cación (fi jada en la parte trasera de la unidad)
Conexión de alimentación
Conecte el cable de alimentación de CA a la toma de red de la fuente de CA. A continuación,
pulse el botón de reinicio (17) con un bolígrafo de bola. Esta unidad está equipada con un
sistema de reserva de batería, exige una batería plana de litio de 3 V. Introduzca la pila en
el compartimento de pilas, haciendo que coincidan las terminales de las pilas con el polo
negativo y positivo de la placa del compartimento de pilas.
NOTA: Si surge un fallo de suministro de alimentación de CA, el reloj pasará automáticamente
al suministro de alimentación de pilas, el reloj y la memoria del temporizador seguirán
funcionando. Cuando se vuelve a recuperar la alimentación de CA, el reloj regresa al modo
de CA de nuevo.
Observación ESD: De surgir un error de funcionamiento debido a una descarga electroestática,
tan sólo deberá reiniciar el producto (quizás tenga que volver a conectar la fuente de
alimentación) para recuperar el funcionamiento normal.
Page 53

53
MODO DE RELOJ DIGITAL
DÍA
ALARMA ENCENDIDA
TIMBRE DESPERTADOR DE
ALARMA 1, 2
RADIO DESPERTADOR DE
ALARMA 1, 2
MODO DE RELOJ DE ALARMA
ALARMA ENCENDIDA
TIMBRE DESPERTADOR DE
ALARMA 1, 2
NOTA:
CONFIGURACIÓN DE LA HORA /
CONFIGURACIÓN DE LA ALARMA /
CONFIGURACIÓN DE DORMIR SÓLO EN EL
MODO DE RELOJ DIGITAL
RADIO DESPERTADOR DE
ALARMA 1, 2
Reloj digital con giro de 90°
Reloj analógico con giro de 90°
Page 54

54
MODO DE CONFIGURACIÓN DEL RELOJ
FIJAR O RECUPERAR LA HORA ACTUAL
1. Pulse y mantenga pulsado el botón de confi guración de hora (12) (posición 1) durante
2 segundos, el día pestañeará.
2. Pulse el botón de control de subida de volumen (3) (posición 3) y el botón de control
de bajada de volumen (4) (posición 2) para fi jar el día.
3. Pulse el botón de confi guración de hora (12) (posición 1), 24 horas / 12 horas pestañeará.
4. Pulse el botón de control de subida de volumen (3) (posición 3) y el botón de control
de bajada de volumen (4) (posición 2) para fi jar el formato de 24 horas/12 horas.
5. Pulse el botón de confi guración de hora (12) (posición 1), hora.
6. Pulse el botón de control de subida de volumen (3) (posición 3) y el botón de control
de bajada de volumen (4) (posición 2) para fi jar la hora.
7. Pulse el botón de confi guración de hora (12) (posición 1), los minutos pestañearán.
8. Pulse el botón de control de subida de volumen (3) (posición 3) y el botón de control
de bajada de volumen (4) (posición 2) para fi jar los minutos.
MODO DE CONFIGURACIÓN DE ALARMA 1
Page 55

55
CONFIGURACIÓN DE LA ALARMA1
1. Pulse el botón de confi guración de la alarma 1 (10) (posición 1) para acceder al modo de
confi guración de la alarma 1.
2. Pulse y mantenga pulsado el botón de confi guración de alarma 1 (10) (posición 1) durante
2 segundos, el día pestañeará. (Diagrama 1)
3. Pulse el botón de control de subida de volumen (3) (posición 3) y el botón de control
de bajada de volumen
(4) (posición 2) para fi jar el día.
4. Pulse el botón de confi guración de la alarma 1 (10) (posición 1) la hora pestañeará. Pulse el
botón de control de subida de volumen (3) (posición 3) y el botón de control de bajada
de volumen (4) (posición 2) para fi jar la hora.
5. Pulse el botón de confi guración de la alarma 1 (10) (posición 1) los minutos pestañearán.
Pulse el botón de control de subida de volumen (3) (posición 3) y el botón de control
de bajada de volumen (4) (posición 2) para fi jar los minutos.
6. Pulse el botón de confi guración de la alarma 1 (10) (posición 1), el timbre
de la alarma 1 pestañeará. Pulse el botón de control de subida de volumen
(3) (posición 3) y el botón de control de bajada de volumen (4) (posición 2) para
seleccionar el timbre de la alarma 1 y la radio de la alarma.
MODO DE CONFIGURACIÓN DE ALARMA DE FIN DE SEMANA 1 (LUNES A DOMINGO)
MODO DE CONFIGURACIÓN DE ALARMA DE FIN DE SEMANA 1 (LUNES A VIERNES)
MODO DE CONFIGURACIÓN DE ALARMA DE FIN DE SEMANA 1 (SÁBADO A DOMINGO)
Diagrama 1:
Page 56

56
MODO DE
CONFIGURACIÓN DE
ALARMA 2
CONFIGURACIÓN DE LA ALARMA 2
1. Pulse el botón de confi guración de la alarma 2 (9) (posición 1) para acceder al modo de
confi guración de la alarma 2.
2. Pulse y mantenga pulsado el botón de confi guración de la alarma 2 (9) durante 2 segundos,
el día pestañeará. (Diagrama 2)
3. Pulse el botón de control de subida de volumen
(3) (posición 3) y el botón de control
de bajada de volumen (4) (posición 2) para fi jar el día.
4. Pulse el botón de confi guración de la alarma 2 (9) (posición 1) la hora pestañeará. Pulse el
botón de control de subida de volumen (3) (posición 3) y el botón de control de bajada
de volumen (4) (posición 2) para fi jar la hora.
5. Pulse el botón de confi guración de la alarma 2 (9) (posición 1) los minutos pestañearán.
Pulse el botón de control de subida de volumen (3) (posición 3) y el botón de control
de bajada de volumen (4) (posición 2) para fi jar los minutos.
6. Pulse el botón de confi guración de la alarma 2 (9) (posición 1), el timbre
de la alarma 2 pestañeará. Pulse el botón de control de subida de volumen
(3) (posición 3) y el botón de control de bajada de volumen (4) (posición 2) para
seleccionar el timbre de la alarma 2 y la radio de la alarma.
Page 57

57
MODO DE CONFIGURACIÓN DE ALARMA DE FIN DE SEMANA 2
(LUNES A DOMINGO)
MODO DE CONFIGURACIÓN DE ALARMA DE FIN DE SEMANA 2
(LUNES A VIERNES)
MODO DE CONFIGURACIÓN DE ALARMA DE FIN DE SEMANA 2
(SÁBADO A DOMINGO)
DIAGRAMA 2
DIAGRAMA 3
MODO DE
CONFIGURACIÓN DE
DORMIR
Confi guración de salida de la alarma y encendido/apagado
Pulse el botón de selección de la alarma 1 / alarma 2 / alarma 1+2 (13) para seleccionar el
disparo de la alarma mediante el timbre y la radio. (Diagrama 3)
DURACIÓN DE LA ALARMA
El timbre de la alarma o la alarma por radio seguirán emitiéndose durante 1 hora si no pulsa
ninguna tecla. La alarma se parará automáticamente y se reiniciará en la misma hora fi jada
el día siguiente.
INTERRUMPIR LA ALARMA
Pulse el botón de encendido (14) para parar la alarma actual y anulará la función de repetición
de la alarma también.
Page 58

58
MODO DE CONFIGURACIÓN DE DORMIR
DIAGRAMA 4
Para activar la función de dormir
En el modo de radio, pulse el botón de repetición de alarma/dormir (16), la indicación de
dormir ‘90’ se muestra en la pantalla con 2 minutos. Reduzca el temporizador de dormir
de desactivación de 90 minutos pulsando el botón de repetición de alarma/dormir (16).
(Diagrama 4)
NOTA: Pulse el botón de encendido/apagado (14) para apagar la función de dormir.
Función de repetición de la alarma:
1. Pulse el botón de repetición de alarma/dormir (16) para activar la función de repetición de
la alarma (timbre de alarma o alarma por radio se parará) cuando se esté emitiendo la
alarma.
2. El intervalo de repetición de alarma es de 9 minutos.
FUNCIONAMIENTO CON FUENTE DE AUDIO
1. Utilice un cable de conexión para unir la fuente de audio a la unidad principal juntos.
2. Ajuste el volumen de la fuente de audio con vistas a lograr el mejor efecto de amplifi cación.
OBSERVACIÓN: NO fi je la fuente de audio con un volumen demasiado alto para impedir la
sobrecarga. El sonido de salida de la unidad principal será eliminado una vez que la TOMA DE
"ENTRADA DE AUDIO" (15) se haya conectado a otra fuente de audio. El sonido se reiniciará
cuando el cable de conexión se saque de la toma.
Si la función de "entrada de audio" está en uso y emite música, el sonido de la alarma se
introducirá en la música en la hora fi jada para despertarse. Para parar el sonido, pulse
simplemente el botón de encendido/apagado de la alarma (14).
FUNCIONAMIENTO DE LA RADIO
- Pulse el interruptor de encendido/apagado (14) para encender la unidad.
- Seleccione la banda AM o FM utilizando el interruptor de banda de onda (2).
- Seleccione la estación utilizando el control de sintonización (8).
- Pulse el botón de control de volumen (3)/(4) para ajustar el volumen como lo necesite.
- Pulse el interruptor de encendido/apagado (14) para apagar la unidad.
Page 59

59
Nota:
- La banda AM utiliza un sistema interno de dirección aerial. Gire la radio para lograr una mejor
recepción.
- Asegúrese de que la antena de cable FM (7) está completamente extendida y desenrrollada
para lograr la mejor recepción FM.
REINICIO
- El botón de reinicio (17) se encuentra ubicado en la parte inferior de la unidad. Utilice un
bolígrafo de bola para pulsar cuando cambie las pilas, o la unidad no actuará como se
espera. Esto hará que todos los parámetros regresen a su valor predefi nido y perderá todos
los datos almacenados (alarma y confi guración del reloj).
ESPECIFICACIONES
Gama de frecuencia: AM 540 – 1600 KHz
FM 88 - 108 MHz
Alimentación de salida: 280 mW
Impedencia del altavoz: 8 Ohm
Copia de seguridad de la batería: 1 x CR2032, 3V litio plano (batería no incluida)
Dimensiones: 105 x 48 mm
Fuente de alimentación: AC 230 V ~ 50 Hz, 5 W
Page 60

60
Diagrama 1:
DIAGRAMA 2
DIAGRAMA 3
TUERCA EN PARED Y POLOS
RE FLEJA EN LA PARTE
SUPERIOR
TUERCA TUERCA
TUERCATUERCA
PARED
REPISA DE PARED
• Determine la posición en pared de la radio reloj.
• Cuelgue la repisa de pared fi jando 4 tornillos y polos estrechamente en la pared
(Diagrama 2)
• Ponga la unidad en la repisa y compruebe que el cable de CA y la antena FM están
separadamente fuera de la repisa.
• Apriete el tornillo de la repisa en la parte inferior de la unidad (Diagrama 3).
• Vuelva a comprobar de nuevo la repisa de la pared y la unidad se colgará fuertemente en la
pared.
Page 61

61
Declaración de conformidad
La empresa infrascrita,
Nedis B.V.
De Tweeling 28
5215MC ’s-Hertogenbosch
Países Bajos
Tel.: 0031 73 599 1055
Correo electrónico: info@nedis.com
Declara que el producto:
Nombre: KONIG
Modelo: HAV-CR70
Descripción: Radio reloj
se encuentra conforme a las siguientes normas:
EMC: EN55013:2001 + A1:2003
EN55020:2002 + A1:2003 + A2:2005
EN61000-3-2:2000 + A2:2005
EN61000-3-3:1995 + A1:2001
LVD: EN60 065:2002
Conforme a las provisiones de la directiva 89/336/EECy 73/23/EEC.
‘s-Hertogenbosch, 2 de abril de 02
Sra. J. Gilad
Director de compras
Medidas de seguridad:
ATENCI ÓN
RIESGO D E ELECTROCUCI ÓN
NO ABRIR
Para reducir los riesgos de electrocución, este producto
deberá ser abierto EXCLUSIVAMENTE por un técnico
habilitado cuando necesite ser reparado. Desconecte el
producto de la red y de cualquier otro equipo si se registra algún problema. No exponga el
producto al agua ni a la humedad.
Mantenimiento:
Limpie sólo con un paño seco. No utilice disolventes ni productos de limpieza agresivos.
Garantía:
No se aceptará ninguna garantía o responsabilidad derivada de cualquier cambio o modifi caciones
realizadas al producto o daños provocados por un uso incorrecto del presente producto.
General:
Las ilustraciones y las especifi caciones podrán sufrir cambios sin previo aviso.
Todas las marcas de los logotipos y los nombres de productos constituyen patentes o marcas
registradas de sus titulares correspondientes, reconocidos como tal.
Cuidado:
Este producto está señalizado con este símbolo. Esto signifi ca que los productos
eléctricos y electrónicos gastados no deberán mezclarse con los desechos
domésticos generales. Existen distintos sistemas de recogida individuales para este
tipo de productos.
Copyright ©
Page 62

62
MAGYAR NYELVŰ
KEZELÉSI ÚTMUTATÓ
1. LCD kijelző
2. AM/FM hullámsáv-váltó
kapcsoló
3. Hangerőnövelő gomb
4. Hangerőcsökkentő gomb
5. Hálózati kábel
6. Elemtartó rekesz
7. FM antennahuzal
8. Állomáskereső
9. 2. ébresztés gombja
10. 1. ébresztés gombja
11. Számskála és mutató
12. Időbeállító gomb
13. 1. ébresztő / 2. ébresztő
/ 1. és 2. ébresztő
választókapcsolója
14. Be- és kikapcsoló/
ébresztő-kikapcsoló gomb
15. Hangbemeneti aljzat
16. Szundi / Elalváskapcsoló
gomb
17. Reset (Alaphelyzet) gomb
18. Tartókonzol
19. Specifi kációs címke (a készülék hátoldalán)
CSATLAKOZTATÁS AZ ÁRAMFORR ÁSRA
Dugaszolja a tápkábelt a konnektorba. Golyóstoll hegyével nyomja meg a reset gombot (17).
Ezen a készüléken egy 3 V-os lapos lítium elem biztosítja az óra folyamatos működését.
Tegye be az elemet az elemtartó rekeszbe, ügyeljen a polaritásra, annak jelzését megtalálja a
rekeszben elhelyezett lemezkén.
MEGJEGYZÉS: Áramkimaradás esetén a készülék automatikusan átkapcsol elemes
működésre, az óra és az időzítő memóriája továbbra is jár. Amint visszaáll a hálózati
áramellátás, a készülék visszakapcsol hálózati táplálásra.
Elektrosztatikus kisülés esetén: Ha elektrosztatikus kisülés miatt üzemzavar következik
be, állítsa alaphelyzetbe (reset) a készüléket (előfordulhat, hogy újból rá kell csatlakozni az
áramforrásra) a normál működés folytatásához.
Page 63

63
DIGITÁLIS ÓRA ÜZEMMÓD
NAP
ELALVÁSIDŐZÍTÉS
BEKAPCSOLVA
1. ÉS 2. ÉBRESZTŐ,
ÉBRESZTÉS
CSENGŐHANGGAL
1. ÉS 2. ÉBRESZTŐ,
ÉBRESZTÉS RÁDIÓVAL
ÉBRESZTŐÓRA MÓD
ELALVÁSIDŐZÍTÉS
BEKAPCSOLVA
1. ÉS 2. ÉBRESZTŐ,
ÉBRESZTÉS
CSENGŐHANGGAL
MEGJEGYZÉS:
ÓRAIDŐ BEÁLLÍTÁSA / ÉBRESZTŐ
BEÁLLÍTÁSA / ELALVÁSKAPCSOLÓ
BEÁLLÍTÁSA CSAK DIGITÁLIS ÓRA
MÓDBAN
1. ÉS 2. ÉBRESZTŐ,
ÉBRESZTÉS RÁDIÓVAL
A digitális óra elforgatása 90°-kal
Az analóg óra elforgatása 90°-kal
Page 64

64
ÓRAIDŐ BEÁLLÍTÁSI MÓD
AZ AKTUÁLIS IDŐ BEÁLLÍTÁSA VAGY ÚJRABEÁLLÍTÁSA
1. Nyomja le és tartsa 2 másodpercig lenyomva az időbeállító gombot (12) (1. pozíció), és a nap
kijelzése fog villogni.
2. A hangerőnövelő gombbal (3) (3. pozíció) és a hangerőcsökkentő gombbal (4)
(2. pozíció) állítsa be a napot.
3. Nyomja le az időbeállító gombot (12) (1. pozíció), a 24 órás / 12 órás időkijelzési mód fog
villogni.
4. A hangerőnövelő gombbal (3) (3. pozíció) és a hangerőcsökkentő gombbal (4)
(2. pozíció) válassza ki a 24 órás vagy 12 órás kijelzési módot.
5. Az időbeállító gombbal (12) (1. pozíció) lépjen az óra beállításához.
6. A hangerőnövelő gombbal (3) (3. pozíció) és a hangerőcsökkentő gombbal (4)
(2. pozíció) állítsa be az órát.
7. Nyomja le az időbeállító gombot (12) (1. pozíció), a percet jelző számjegyek fognak villogni.
8. A hangerőnövelő gombbal (3) (3. pozíció) és a hangerőcsökkentő gombbal (4)
(2. pozíció) állítsa be a percet.
1. ÉBRESZTŐ BEÁLLÍTÁSI MÓD
Page 65

65
Az 1. ÉBRESZTŐ BEÁLLÍTÁSA
1. Az 1. ébresztő gombját (10) (1. pozíció) lenyomva lépjen az 1. ébresztőt beállító módba.
2. Nyomja le és tartsa 2 másodpercig lenyomva az 1. ébresztő gombját (10) (1. pozíció), és a
nap kijelzése fog villogni. (1. ábra)
3. A hangerőnövelő gombbal (3) (3. pozíció) és a hangerőcsökkentő gombbal (4)
(2. pozíció) állítsa be a napot.
4. Az 1. ébresztő gombjának (10) (1. pozíció) lenyomására az órát jelző számjegyek fognak
villogni. A hangerőnövelő gombbal
(3) (3. pozíció) és a hangerőcsökkentő gombbal
(4) (2. pozíció) állítsa be az órát.
5. Az 1. ébresztő gombjának (10) (1. pozíció) lenyomására a percet jelző számjegyek fognak
villogni. A hangerőnövelő gombbal (3) (3. pozíció) és a hangerőcsökkentő gombbal
(4) (2. pozíció) állítsa be a percet.
6. Az 1. ébresztő gombjának (10) (1. pozíció) lenyomására az 1. ébresztő csengőszimbóluma
fog villogni. A hangerőnövelő gombbal (3) (3. pozíció) és a hangerőcsökkentő
gombbal (4) (2. pozíció) válassza ki az 1. ébresztőhöz a csengő vagy rádió
szimbólumot.
1. ÉBRESZTŐ HÉTVÉGI ÉBRESZTŐJÉNEK BEÁLLÍTÁSA (HÉTFŐ – VASÁRNAP)
1. ÉBRESZTŐ HÉTVÉGI ÉBRESZTŐJÉNEK BEÁLLÍTÁSA (HÉTFŐ – PÉNTEK)
1. ÉBRESZTŐ HÉTVÉGI ÉBRESZTŐJÉNEK BEÁLLÍTÁSA (SZOMBAT – VASÁRNAP)
1. ÁBRA
Page 66

66
2. ÉBRESZTŐ
BEÁLLÍTÁSI MÓD
A 2. ÉBRESZTŐ BEÁLLÍTÁSA
1. A 2. ébresztő gombját (9) (1. pozíció) lenyomva lépjen a 2. ébresztőt beállító módba.
2. Nyomja le és tartsa 2 másodpercig lenyomva a 2. ébresztő gombját (9), és a nap kijelzése fog
villogni. (2. ábra)
3. A hangerőnövelő gombbal
(3) (3. pozíció) és a hangerőcsökkentő gombbal (4)
(2. pozíció) állítsa be a napot.
4. A 2. ébresztő gombjának (9) (1. pozíció) lenyomására az órát jelző számjegyek fognak
villogni. A hangerőnövelő gombbal (3) (3. pozíció) és a hangerőcsökkentő gombbal
(4) (2. pozíció) állítsa be az órát.
5. A 2. ébresztő gombjának (9) (1. pozíció) lenyomására a percet jelző számjegyek fognak
villogni. A hangerőnövelő gombbal (3) (3. pozíció) és a hangerőcsökkentő gombbal
(4) (2. pozíció) állítsa be a percet.
6. A 2. ébresztő gombjának (9) (1. pozíció) lenyomására a 2. ébresztő csengőszimbóluma
fog villogni. A hangerőnövelő gombbal (3) (3. pozíció) és a hangerőcsökkentő gombbal
(4) (2. pozíció) válassza ki a 2. ébresztőhöz a csengő vagy rádió szimbólumot.
2. ÉBRESZTŐ HÉTVÉGI ÉBRESZTŐJÉNEK BEÁLLÍTÁSA (HÉTFŐ – VASÁRNAP)
2. ÉBRESZTŐ HÉTVÉGI ÉBRESZTŐJÉNEK BEÁLLÍTÁSA (HÉTFŐ – PÉNTEK)
2. ÉBRESZTŐ HÉTVÉGI ÉBRESZTŐJÉNEK BEÁLLÍTÁSA (SZOMBAT – VASÁRNAP)
2. ÁBRA
Page 67

67
3. ÁBRA
ELALVÁSKAPCSOLÓ BEÁLLÍTÓ MÓD
Az ébresztő hangjelzés kiválasztása és az ébresztő be- és kikapcsolása
Az 1. ébresztő / 2. ébresztő / 1+2. ébresztő kiválasztó gombjával állíthatja be, hogy
csengőhangra vagy rádióra ébredjen. (3. ábra)
AZ ÉBRESZTÉS IDŐTARTAMA
A csengőhangos vagy rádiós ébresztés 1 óráig tart, ha közben semmilyen gombot nem
nyom meg. Az ébresztés ezután automatikusan leáll, és a következő napon ugyanabban az
időpontban újból megszólal.
AZ ÉBRESZTÉS LEÁLLÍTÁSA
A be- és kikapcsoló gombbal (14) állíthatja le a folyamatban lévő ébresztő jelzést és törölheti
a szundi funkciót.
ELALVÁSKAPCSOLÓ BEÁLLÍTÓ MÓD
4. ÁBRA
Az elalvásidőzítés aktiválása
A rádió bekapcsolt állapotában nyomja meg a Szundi/Elalváskapcsoló gombot (16), a kijelzőn
„90“ jelenik meg. Az automatikus kikapcsolásig hátralévő időtartamot a Szundi/Elalváskapcsoló
gombbal (16) 2 perces fokozatokban csökkentheti 90 perctől a kikapcsolásig. (4. ábra)
MEGJEGYZÉS: A be- és kikapcsoló gombbal (14) kikapcsolhatja az elalvásidőzítő funkciót.
Page 68

68
Szundi funkció:
1. A Szundi/Elalváskapcsoló gombbal (16) aktiválhatja a szundi funkciót (a csengőhang vagy
rádiós ébresztés leáll), az ébresztő működése közben.
2. A szundi funkció 9 percenként ismétli a hangjelzést.
A KÉSZÜLÉK MŰKÖDÉSE AUDIOFORRÁSSAL
1. Kábellal kapcsolja össze az audioforrást és a készüléket.
2. Állítsa be az audioforrást a jobb erősítés végett.
MEGJEGYZÉS: A túlterhelés elkerülése érdekében NE állítsa túl nagy hangerőre az
audioforrást. A rádiós óra nem ad hangot, ha az "AUDIO IN" (HANGBEMENETI) ALJZATA
(15) más audioforrásra van kapcsolva. A hang visszaáll, amint a csatlakozókábelt az aljzatból
kihúzták.
Ha az "audio in" (hangbemenet) funkció aktív és zenelejátszás van folyamatban, a beállított
ébresztési időpontban az ébresztő jelzés megszakítja a zenét. A hangjelzést a be- és
kikapcsoló/ ébresztő-kikapcsoló gombbal (14) állíthatja le.
A RÁDIÓ KEZELÉSE
- A rádiót a be- és kikapcsoló gombbal (14) kapcsolhatja be.
- A hullámsáv-váltó kapcsolóval (2) válasszon az AM és FM hullámsávok közül.
- Az állomáskeresővel (8) válasszon adóállomást.
- A hangerőszabályzó gombbal (3)/(4) állítsa be a hangerőt tetszése szerint.
- A rádiót a be- és kikapcsoló gombbal (14) kapcsolhatja ki.
Megjegyzés:
- Az AM hullámsáv belső irányantennával működik. A jobb vétel érdekében forgassa el a
rádiót.
- FM adó vételénél a huzalantennát (7) teljesen tekercselje le és feszítse ki, hogy a vétel a
lehető legjobb legyen.
ALAPHELYZETBE ÁLLÍTÁS
- A reset gombot (17) a készülék alján találja. Elemcserénél, vagy ha nem megfelelően működik
a készülék, golyóstoll hegyével nyomja meg. Ezzel visszaállít minden alapértelmezett
beállítást, és a tárolt adatok (ébresztő és óra beállítása) törlődnek.
MŰSZAKI JELLEMZŐK
Frekvenciatartomány: AM 540 – 1600 KHz
FM: 88 – 108 MHz
Kimenő teljesítmény: 280 mW
Hangszóró impedanciája: 8 Ohm
Elem: 1 db CR2032, 3 V-os lapos lítium elem (nem tartozék)
Méretei: 105 x 48 mm
Energiaigény: AC 230 V / 50 Hz, 5 W
Page 69

69
1. ÁBRA
2. ÁBRA
3. ÁBRA
FALI CSAVAROK ÉS
PERSELYEK
FELFELÉ MUTATÓ NYÍL
CSAVAR CSAVAR
CS AVARCSAVAR
FAL
FALITARTÓ KONZOL
• A rádiós óra falra szerelése
• Rögzítse a tartókonzolt szorosan a falra a 4 csavarral és persellyel (2. ábra).
• Tegye a készüléket a tartókonzolra, és ügyeljen rá, hogy a tápkábel és az antenna külön, a
tartókonzolon kívül legyenek.
• Csavarja be a tartókonzol csavarját a készülék aljába (3. ábra).
• Ellenőrizze újból, hogy a tartókonzol és a készülék stabilan függ-e a falon.
Page 70

70
Megfelelőségi nyilatkozat
Mi,
a Nedis B.V.
De Tweeling 28
5215MC ’s-Hertogenbosch
Hollandia
Tel.: 0031 73 599 1055
E-mail: info@nedis.com
Kijelentjük, hogy a termék:
Neve: KONIG
Típusa: HAV-CR70
Megnevezése: Rádiós óra
Megfelel az alábbi szabványoknak:
EMC (Elektromágneses összeférhetőségre vonatkozó irányelv):
EN55013:2001 + A1:2003
EN55020:2002 + A1:2003 + A2:2005
EN61000-3-2:2000 + A2:2005
EN61000-3-3:1995 + A1:2001
LVD (Kisfeszültségű elektromos termékekre vonatkozó irányelv):
EN60065:2002
A 89/336/EK és 73/23/EGK irányelvek előírásai szerint.
‘s-Hertogenbosch, 2008. április 02.
Mrs. J. Gilad
Értékesítési igazgató
Megfelelőségi nyilatkozat.
Egyetértek és elfogadom a Nedis B.V. Hollandia által adott nyilakozatot.
Jacob Gilad
HQ-Nedis kft.
ügyvezető igazgató
Page 71

71
Biztonsági óvintézkedések:
VIGYÁZAT!
ÁRAMÜTÉS VESZÉLYE!
NE NYISSA FEL!
Az áramütés veszélyének csökkentése érdekében ezt a
készüléket CSAK képzett szakember nyithatja fel, szer vizelés
céljából. Ha gond adódik a készülékkel, kapcsolja le az
elektromos hálózatról és más készülékről. Víztől és nedvességtől védje.
Karbantartás:
Csak száraz ronggyal tisztítsa. Tisztító- és súrolószerek használatát mellőzze.
Jótállás:
Nem vállalunk felelősséget és jótállást, ha a meghibásodás a készüléken végzett változtatás
vagy módosítás következménye, vagy helytelen használat miatt a készülék megrongálódott.
Általános tudnivalók:
A kivitel és a műszaki jellemzők előzetes értesítés nélkül is módosíthatók.
Minden logó, terméknév és márkanév a tulajdonosának márkaneve vagy bejegyzett márkaneve,
azokat ennek tiszteletben tartásával említjük.
Figyelem!
Ezt a terméket ezzel a jelöléssel láttuk el. Azt jelenti, hogy az elhasznált elektromos
és elektronikus készülékeket tilos az általános háztartási hulladékhoz keverni.
Begyűjtésüket külön begyűjtő létesítmény végzi.
Copyright ©
Page 72

72
SUOMI
KÄYTTÖOHJEET
1. LCD-näyttö
2. Kaistakytkin (FM/AM)
3. Äänenvoimakkuuden
lisäys
4. Äänenvoimakkuuden
vähennys
5. Vaihtovirtajohto
6. Paristokotelo
7. FM-antennijohto
8. Viritin
9. Hälytyksen 2
asetuspainike
10. Hälytyksen 1
asetuspainike
11. Säädin ja osoitin
12. Ajan asetuspainike
13. Hälytys 1 / hälytys
2 / hälytys 1 + 2
valintapainike
14. Virtakytkin ON/OFF
hälytyksen vaimennin OFF
15. Audion tuloliitin
16. Torkku-/unipainike
17. Palautuspainike
18. Yksikön kannatin
19. Arvokilpi (laitteen takaosassa)
VIRTALÄHTEESEEN KYTKENTÄ
Kytke vaihtovirtajohto vaihtovirtalähteeseen. Paina sen jälkeen resetointipainiketta (17) kynän
kärjellä. Laitteessa on varaparistojärjestelmä, joka vaatii 3 V tasapintaisen litiumpariston.
Aseta paristo paristokoteloon ja varmista, että positiivinen ja negatiivinen (+ ja -) paristonapa
asetetaan paristokotelon merkintöjen mukaisesti.
HUOM: Jos vaihtovirran syötössä tapahtuu katkos, kello siirtyy automaattisesti paristokäyttöön
ja täten kellon ja ajastimen muistia ei menetetä. Kun vaihtovirran syöttö palautuu, kello siirtyy
käyttämään jälleen vaihtovirtaa.
ESD-merkintä: Jos laitteessa tapahtuu sähköstaattisen purkautumisen aiheuttama
toimintahäiriö, resetoi laite (uudelleen kytkentä virtalähteeseen voi olla tarpeen) normaalin
toiminnan palauttamiseksi.
Page 73

73
DIGITAALINEN KELLOTILA
PÄIVÄ
UNI PÄÄLLÄ
HÄLYTYS 1, 2 MERKKIÄÄNI
HÄLYTYS 1, 2 RADIO
HERÄTYSKELLOTILA
UNI PÄÄLLÄ
HÄLYTYS 1, 2 MERKKIÄÄNI
HUOM:
AJAN ASETUS / HÄLYTYKSEN ASETUS
/ UNIASETUS VAIN DIGITAALISESSA
KELLOTILASSA
HÄLYTYS 1, 2 RADIO
90° kiertävä digitaalinen kello
90° kiertävä analoginen kello
Page 74

74
KELLON ASETUSTILA
AJAN ASETUS TAI UUDELLEEN ASETUS
1. Paina ja pidä alhaalla ajan asetuspainiketta (12) (asema 1) 2 sekuntia, näytössä vilkkuu
päivä.
2. Paina äänenvoimakkuuden lisäyspainiketta (3) (asema 3) ja vähennyspainiketta
(4) (asema 2) asettaaksesi päivän.
3. Paina ajan asetuspainiketta (12) (asema 1), 24 tunnit / 12 tunnit vilkkuvat.
4. Paina äänenvoimakkuuden lisäyspainiketta (3) (asema 3) ja vähennyspainiketta
(4) (asema 2) asettaaksesi 24 tunnit / 12 tunnit.
5. Paina ajan asetuspainiketta (12) (asema 1), tunnit vilkkuvat.
6. Paina äänenvoimakkuuden lisäyspainiketta (3) (asema 3) ja vähennyspainiketta
(4) (asema 2) asettaaksesi tunnit.
7. Paina ajan asetuspainiketta (12) (asema 1), minuutit vilkkuvat.
8. Paina äänenvoimakkuuden lisäyspainiketta (3) (asema 3) ja vähennyspainiketta
(4) (asema 2) asettaaksesi minuutit.
HÄLYTYKSEN 1 ASETUSTILA
Page 75

75
HÄLYTYKSEN 1 ASETUS
1. Paina hälytyksen 1 asetuspainiketta (10) (asema 1) siirtyäksesi hälytyksen 1 asetustilaan.
2. Paina ja pidä alhaalla hälytyksen 1 asetuspainiketta (10) (asema 1) 2 sekuntia, näytössä
vilkkuu päivä. (kaavio 1)
3. Paina äänenvoimakkuuden lisäyspainiketta (3) (asema 3) ja vähennyspainiketta
(4) (asema 2) asettaaksesi päivän.
4. Paina hälytyksen 1 asetuspainiketta (10) (asema 1), tunnit vilkkuvat. Paina äänenvoimakkuuden
lisäyspainiketta
(3) (asema 3) ja vähennyspainiketta (4) (asema 2) asettaaksesi
tunnit.
5. Paina hälytyksen 1 asetuspainiketta (10) (asema 1), minuutit vilkkuvat. Paina
äänenvoimakkuuden lisäyspainiketta (3) (asema 3) ja vähennyspainiketta (4)
(asema 2) asettaaksesi minuutit.
6. Paina hälytyksen 1 asetuspainiketta (10) (asema 1 ), kello vilkkuu. Paina äänenvoimakkuuden
lisäyspainiketta (3) (asema 3) ja vähennyspainiketta (4) (asema 2)
valitaksesi hälytyksen 1 kellon ja hälytyksen radion.
VIIKONLOPUN HÄLYTYKSEN 1 ASETUSTILA (MA-SU)
VIIKONLOPUN HÄLYTYKSEN 1 ASETUSTILA (MA-PE)
VIIKONLOPUN HÄLYTYKSEN 1 ASETUSTILA (LA-SU)
KAAVIO 1
Page 76

76
HÄLYTYKSEN 2
ASETUSTILA
HÄLYTYKSEN 2 ASETUS
1. Paina hälytyksen 2 asetuspainiketta (9) (asema 1) siirtyäksesi hälytyksen 2 asetustilaan.
2. Paina ja pidä alhaalla hälytyksen 2 asetuspainiketta (9) 2 sekuntia, näytössä vilkkuu päivä.
(kaavio 2)
3. Paina äänenvoimakkuuden lisäyspainiketta
(3) (asema 3) ja vähennyspainiketta
(4) (asema 2) asettaaksesi päivän.
4. Paina hälytyksen 2 asetuspainiketta (9) (asema 1), tunnit vilkkuvat. Paina äänenvoimakkuuden
lisäyspainiketta (3) (asema 3) ja vähennyspainiketta (4) (asema 2) asettaaksesi
tunnit.
5. Paina hälytyksen 2 asetuspainiketta (9) (asema 1), minuutit vilkkuvat. Paina
äänenvoimakkuuden lisäyspainiketta (3) (asema 3) ja vähennyspainiketta (4)
(asema 2) asettaaksesi minuutit.
6. Paina hälytyksen 2 asetuspainiketta (9) (asema 1 ), kello vilkkuu. Paina äänenvoimakkuuden
lisäyspainiketta (3) (asema 3) ja vähennyspainiketta (4) (asema 2)
valitaksesi hälytyksen 1 kellon ja hälytyksen radion.
VIIKONLOPUN HÄLYTYKSEN 2 ASETUSTILA (MA-SU)
VIIKONLOPUN HÄLYTYKSEN 2 ASETUSTILA (MA-PE)
VIIKONLOPUN HÄLYTYKSEN 2 ASETUSTILA (LA-SU)
KAAVIO 2
Page 77

77
KAAVIO 3
UNITOIMINNON ASETUSTILA
Hälytyksen ääniasetus ja hälytyksen aktivointi/deaktivointi
Paina hälytyksen 1 / hälytyksen 2 / hälytyksen 1+2 valintapainiketta (13) hälytyksen äänimerkin
ja radion valitsemiseksi. (kaavio 3)
HÄLYTYKSEN KESTO
Hälytyksen äänimerkki tai radio jää päälle 1 tunnin ajaksi, jos mitään painiketta ei paineta.
Hälytys loppuu automaattisesti ja aktivoituu uudelleen samaan aikaan seuraavana päivänä.
HÄLYTYKSEN PYSÄYTYS
Paina virtapainiketta (14) pysäyttääksesi aktivoidun hälytyksen ja peruuttaaksesi
torkkutoiminnon.
UNITOIMINNON ASETUSTILA
KAAVIO 4
Unitoiminnon aktivointi
Kun radiotilassa painetaan torkku-/unipainiketta (16), unitila ‘90’ näkyy näytössä 2 minuutin
ajan. Lyhennä uniajastinta 90 minuutilla painamalla torkku-/unipainiketta (16). (kaavio 4)
HUOM: Paina virtapainiketta (14) deaktivoidaksesi unitoiminnon.
Torkkutoiminto:
1. Paina torkku-/unipainiketta (16) aktivoidaksesi torkkutoiminnon (äänimerkki tai radio sammuu)
hälytyksen aikana.
2. Toiminnon aikaväli on 9 minuuttia.
Page 78

78
TOIMINTA AUDIOLÄHTEELLÄ
1. Käytä liitosjohtoa audiolähteen ja laitteen kytkemiseen.
2. Säädä audiolähteen äänenvoimakkuus paremman tehosteen saavuttamiseksi.
HUOMAUTUS: ÄLÄ aseta audiolähteen äänenvoimakkuutta liian korkealle ylikuormituksen
välttämiseksi. Laitteen äänitaso poistuu käytöstä ja sen korvautuu audiolähteen tasolla silloin,
kun ‘AUDIO IN’ -LIITIN (15) kytketään audiolähteeseen. Ääni palautuu laitteeseen silloin, kun
liitosjohto irrotetaan liittimestä.
Jos käytössä on ‘audio in’ -toiminto ja musiikin lähetys käynnissä, hälytysääneksi tulee musiikki
esiasetettuna hälytysaikana. Ääni voidaan poistaa painamalla virtapainiketta, hälytyksen
vaimenninta (14).
RADION KÄYTTÖ
- Kytke radio päälle painamalla virtapainiketta (14).
- Valitse AM- tai FM-kaista aaltokaistan kytkimellä (2).
- Valitse asema virittimellä (8).
- Säädä äänenvoimakkuus äänenvoimakkuuden säätimellä (3)/(4).
- Kytke radio pois päältä painamalla virtapainiketta (14).
Huom:
- AM-kaista käyttää sisäistä suunta-antennia. Käännä radiota sen vastaanoton
optimoimiseksi.
- Varmista, että FM-johtoantenni (7) on kelattu täysin auki ja pidennetty parhaan FMvastaanoton saavuttamiseksi.
RESETOINTI
- Resetointipainike (17) sijaitsee laitteen pohjassa. Paina sitä kynän päällä aina paristoja
vaihtaessa tai jos laite ei toimi odotetusti. Tällöin kaikki asetukset palautuvat oletusarvoihin ja
kaikki tallennetut tiedot (hälytys- ja kelloasetukset) menetetään.
TEKNISET TIEDOT
Taajuusväli: AM 540 – 1600 KHz
FM 88 - 108 MHz
Lähtöteho: 280 mW
Kaiuttimen impedanssi: 8 Ohm
Varaparisto: 1 x CR2032, 3V tasasivuinen litiumparisto (ei kuulu pakkaukseen)
Mitat: 105 x 48 mm
Virtalähde: AC 230 V ~ 50 Hz, 5 W
Page 79

79
KAAVIO 1
KAAVIO 2
KAAVIO 3
SEINÄRUUVIT & TANGOT
NUOLI YLHÄÄLLÄ
RUUVI RUUVI
RUUVIRUUVI
SEINÄ
SEINÄKANNATIN
• Määritä kelloradion sijainti seinässä.
• Ripusta seinäkannatin 4 ruuvilla ja aseta tangot tiukasti seinään (kaavio 2).
• Aseta laite kannattimeen ja varmista, että vaihtovirtajohto ja FM-antenni ovat erillään
kannattimen ulkopuolella.
• Kiristä kannattimen ruuvi laitteen alaosaan (kaavio 3).
• Tarkista seinäkannattimen ja laitteen hyvä kiinnitys.
Page 80

80
VAATIMUSTENMUKAISUUSVAKUUTUS
Me,
Nedis B.V.
De Tweeling 28
5215MC ’s-Hertogenbosch
Alankomaat
Puh: 0031 73 599 1055
Sähköposti: info@nedis.com
Vakuutamme, että tuote:
Nimi: KONIG
Malli: HAV-CR70
Kuvaus: Kelloradio
Täyttää seuraavat standardit:
EMC: EN55013:2001 + A1:2003
EN55020:2002 + A1:2003 + A2:2005
EN61000-3-2:2000 + A2:2005
EN61000-3-3:1995 + A1:2001
LVD: EN60 065:2002
Direktiivien 89/336/EC ja 73/23/EY mukainen.
‘s-Hertogenbosch, 02. huhtikuuta 2008
Mrs. J. Gilad
Hankintajohtaja
Page 81

81
Turvallisuuteen liittyvät varoitukset:
HUOMIO
SÄHKÖISKUVAARA
ÄLÄ AVAA
Sähköiskuvaaran välttämiseksi tämän laitteen saa avata
huollon yhteydessä VAIN valtuutettu teknikko. Kytke laite
pois verkkovirrasta ja muista laitteista, jos ongelmia esiintyy.
Älä altista tuotetta vedelle tai kosteudelle.
Huolto:
Puhdista ainoastaan kuivalla kankaalla. Älä käytä liuottimia tai hioma-aineita.
Takuu:
Takuu ja vastuuvelvollisuus mitätöityvät, jos tuote vaurioituu siihen tehtyjen muutoksien tai sen
väärinkäytön takia.
Yleistä:
Muutoksia malliin ja teknisiin ominaisuuksiin voidaan tehdä ilmoituksetta.
Kaikki logot, merkit ja tuotenimet ovat niiden vastaavien omistajien tuotemerkkejä tai
rekisteröityjä tuotemerkkejä ja niitä on käsiteltävä sellaisina.
Huomio:
Tuote on varustettu tällä merkillä. Se merkitsee, ettei käytettyjä sähkö- tai elektronisia
tuotteita saa hävittää kotitalousjätteen mukana. Kyseisille tuotteille on olemassa
erillinen keräysjärjestelmä.
Copyright ©
Page 82

82
SVENSKA
BRUKSANVISNING
1. LCD-display
2. AM/FM bandväxlare
3. Volym upp
4. Volym ner
5. Strömsladd
6. Batterifack
7. FM antennkabel
8. Frekvensinställning
9. Alarm 2 inställningsknapp
10. Alarm 1 inställningsknapp
11. Skala och markör
12. Tidsinställningsknapp
13. Alarm 1 / alarm 2 / alarm 1
+ 2 alternativ
14. Ström TILL/FRÅN, alarm
FRÅN
15. Audio in
16. SNOOZE/SLEEP
17. Återställningsknapp
18. Fäste
19. Märketikett (på baksidan av apparaten)
Strömanslutning
Sätt in strömsladden i ett vanligt eluttag. Tryck sedan in återställningsknappen (17) med en
penna. Apparaten har ett backup-system i form av batteri av typ 3 V platt litiumbatteri. Sätt in
batteriet i batterifacket, och var noga med att batteripolerna (+ och -) är vända åt rätt håll enligt
markeringen inne i batterifacket.
Obs! Vid strömavbrott slår klockan automatiskt över till batteriförsörjning och klockan och
minnet fortsätter att fungera. När strömmen kommer tillbaka återgår strömförsörjningen via
elnätet igen.
Angående ESD: Om fel uppstår som en följd av elektrostatisk urladdning kan du bara återställa
apparaten (dra ur och sätt i strömsladden i eluttaget).
Page 83

83
DIGITALKLOCKA
DAG
SLEEP TILL
ALARM 1, 2 VAKNA TILL
SIGNAL
ALARM 1, 2 VAKNA TILL
RADIO
ALARMTID
SLEEP TILL
ALARM 1, 2 VAKNA TILL
SIGNAL
Obs!
TIDSINSTÄLLNING/ALARMINSTÄLLNING/
SLEEPINSTÄLLNING ENDAST VID DIGITALT
KLOCKLÄGE
ALARM 1, 2 VAKNA TILL
RADIO
90° Roterande digital klocka
90° Roterande analog klocka
Page 84

84
INSTÄLLNING AV KLOCKA
INSTÄLLNING AV TID
1. Tryck in och håll kvar inställningsknappen för tid (12) (position 1) i två sekunder. Nu blinkar
dagarna.
2. Tryck ner volym upp-knappen (3) (position 3) och volym ner-knappen (4)
(position 2) och ställ in dag.
3. Tryck in inställningsknappen för tid (12) (position 1). Nu blinkar 24 hour / 12 hour.
4. Tryck ner volym upp-knappen (3) (position 3) och volym ner-knappen (4)
(position 2) och ställ in 12- eller 24-timmarsvisning.
5. Tryck in inställningsknappen för tid (12) (position 1). Nu blinkar timmarna.
6. Tryck ner volym upp-knappen (3) (position 3) och volym ner-knappen (4)
(position 2) och ställ in timma.
7. Tryck in inställningsknappen för tid (12) (position 1). Nu blinkar minuterna.
8. Tryck ner volym upp-knappen (3) (position 3) och volym ner-knappen (4)
(position 2) och ställ in minuter.
INSTÄLLNING AV ALARM 1
Page 85

85
INSTÄLLNING AV ALARM 1
1. Tryck ner inställningsknappen för alarm 1 (10) (position 1) när du vill ställa in alarm 1.
2. Tryck in och håll kvar inställningsknappen för alarm 1 (10) (position 1) i två sekunder. Nu
blinkar dagarna. (Diagram 1)
3. Tryck ner volym upp-knappen (3) (position 3) och volym ner-knappen (4)
(position 2) och ställ in dag.
4. 1 Tryck in inställningsknappen för alarm 1 (10) (position 1). Nu blinkar timmarna. Tryck ner
volym upp-knappen
(3) (position 3) och volym ner-knappen (4) (position 2) och
ställ in timma.
5. 1 Tryck in inställningsknappen för alarm 1 (10) (position 1). Nu blinkar minuterna. Tryck ner
volym upp-knappen (3) (position 3) och volym ner-knappen (4) (position 2) och
ställ in minuter.
6. Tryck in inställningsknappen för alarm 1 (10) (position 1)1 . Nu blinkar klockan. Tryck ner
volym upp-knappen (3) (position 3) och volym ner-knappen (4) (position 2) och
välj alarm 1 klocka och alarm radio.
WEEKEND ALARM 1, INSTÄLLNINGSLÄGE (MÅN TILL SÖN)
WEEKEND ALARM 1, INSTÄLLNINGSLÄGE (MÅN TILL FRE)
WEEKEND ALARM 1, INSTÄLLNINGSLÄGE (LÖR OCH SÖN)
DIAGRAM 1
Page 86

86
INSTÄLLNING AV
ALARM 2
INSTÄLLNING AV ALARM 2
1. Tryck ner inställningsknappen för alarm 2 (9) (position 1) när du vill ställa in alarm 2.
2. Tryck in och håll kvar inställningsknappen för alarm 2 (9) i två sekunder. Nu blinkar dagarna.
(Diagram 2)
3. Tryck ner volym upp-knappen
(3) (position 3) och volym ner-knappen (4)
(position 2) och ställ in dag.
4. Tryck in inställningsknappen för alarm 2 (9) (position 1). Nu blinkar timmarna. Tryck ner volym
upp-knappen (3) (position 3) och volym ner-knappen (4) (position 2) och ställ in
timma.
5. 2 Tryck in inställningsknappen för alarm 1 (9) (position 1). Nu blinkar minuterna. Tryck ner
volym upp-knappen (3) (position 3) och volym ner-knappen (4) (position 2) och
ställ in minuter.
6. Tryck in inställningsknappen för alarm 2 (9) (position 1) . Nu blinkar klockan. Tryck ner
volym upp-knappen (3) (position 3) och volym ner-knappen (4) (position 2) och
välj alarm 2 klocka och alarm radio.
WEEKEND ALARM 2, INSTÄLLNINGSLÄGE (MÅN TILL SÖN)
WEEKEND ALARM 2, INSTÄLLNINGSLÄGE (MÅN TILL FRE)
WEEKEND ALARM 2, INSTÄLLNINGSLÄGE (LÖR OCH SÖN)
DIAGRAM 2
Page 87

87
DIAGRAM 3
SLEEP-INSTÄLLNING
Alarmtypsinställning och alarm av/på
Tryck ner alarm 1 / alarm 2 / alarm 1+2 altertativknapp (13) och välj om du vill vakna till signal
(klocka) eller radio. (Diagram 3)
ALARMETS LÄNGD
Signalen eller radion är igång i en timma och ingen knapp trycks ner. Alarmet stoppar
automatiskt och startar om samma tid nästa dag.
STÄNG AV ALARM
Tryck på TILL/FRÅN (14) så stänger du av både alarmet och snooze-funktionen.
SLEEP-INSTÄLLNING
DIAGRAM 4
Aktivering av sleepfunktion
Låt radion vara på och tryck på snooze/sleep (16) så visas ‘90’ på displayen. Minska tiden med
två minuter i taget genom att trycka på snooze/sleep (16) igen. (Diagram 4)
Obs! Tryck på TILL/FRÅN (14) om du vill stänga av sleepfunktionen.
SNOOZE
1. Tryck på snooze / sleep (16) för att aktivera snoozefunktionen (signalalarmet eller radion
stängs av) när larmet sätter igång.
2. Snooze-intervallet är nio minuter.
Page 88

88
ARBETA MED LJUDKÄLLA
1. Använd anslutningssladden och anslut ljudkällan till apparaten.
2. Justera ljudkällans volym för bättre förstärkareffekt.
Anmärkning: Ställ INTE in ljudkällan på en alltför hög volym, då kan överladdning ske. Det
utgående ljudet från ljudkällan stängs av och ersätts så snart ‘AUDIO IN’ (15) har anslutits till
den andra ljudkällan. När anslutningssladden tas ur uttaget kommer ljudet tillbaka igen.
Om ‘audio in’-funktionen används och musik sänds kommer alarmet att bryta in i musiken vid
den förinställda väckningstiden. Avbryt alarmet med TILL/FRÅN-knappen (14).
RADIOANVÄNDNING
- Tryck på TILL/FRÅN -knappen (14) för att sätta på apparaten.
- Välj AM- eller FM-band med bandväxlaren (2).
- Välj station med reglaget (8).
- Tryck ner volymknappen (3)/(4) och justera volymen.
- Tryck på TILL/FRÅN -knappen (14) för att stänga av apparaten.
Obs!
- AM-bandet använder sig av en inbyggd antenn. Rotera radion för bästa mottagning.
- Se till att FM-antennen (7) är helt utrullad och utdragen för bästa FM-mottagning.
RESET (ÅTERSTÄLLNING)
- Återställningsknappen (17) sitter i botten av apparaten. Använd en penna och tryck in den
när du byter batterier, annars kanske inte klockradion fungerar som den ska. Alla inställningar
återställs till grundinställningarna och du förlorar all sparad data (inställningar för alarm och
klocka).
Specifi kationer
Frekvensområde: AM 540 – 1600 KHz
FM 88 - 108 MHz
Effekt: 280 mW
Högtalarimpendens: 8 Ohm
Batteribackup: 1 x CR2032, 3V platt litiumbatteri (medföljer inte)
Mått: 105 x 48 mm
Strömkälla: AC 230 V ~ 50 Hz, 5 W
Page 89

89
DIAGRAM 1
DIAGRAM 2
DIAGRAM 3
VÄGGSKRUV & PLUGGAR
PIL LÄNGST UPP
SKRUV SKRUV
SKRUVSKRUV
VÄG G
VÄGGFÄSTE
• Bestäm var på väggen klockradion ska sitta.
• Häng upp väggfästet genom att sätta fast fyra skruvar och pluggar ordentligt på väggen
(Diagram 2)
• Sätt upp apparaten på väggen och kontrollera att strömsladden och antennen är utanför
fästet.
• Dra åt fästskruven i botten av apparaten (Diagram 3).
• Kontrollera att fästet och klockradion sitter fast ordentligt.
Page 90

90
ÖVERENSSTÄMMELSEFÖRKLARING
Vi,
Nedis B.V.
De Tweeling 28
5215MC ’s-Hertogenbosch
Holland
Tel.: 0031 73 599 1055
Email: info@nedis.com
Intygar att produkten:
Namn: KONIG
Modell: HAV-CR70
Beskrivning: Klockradio
överensstämmer med följande standarder:
EMC: EN55013:2001 + A1:2003
EN55020:2002 + A1:2003 + A2:2005
EN61000-3-2:2000 + A2:2005
EN61000-3-3:1995 + A1:2001
LVD: EN60 065:2002
Följer villkoren för direktiven 89/336/EEG och 73/23/EEC.
‘s-Hertogenbosch, 2 april 2008
Mrs. J. Gilad
Inköpschef
Page 91

91
Säkerhetsanvisningar:
OBS!
RISK FÖR E LSTÖT
ÖPPNA INTE
För att undvika elstötar får produkten endast öppnas av
behörig tekniker när service behövs. Koppla bort produkten
från nätuttaget och från annan utrustning om problem
uppstår. Utsätt inte produkten för vatten eller fukt.
Underhåll:
Rengör endast med torr trasa. Använd inga rengöringsmedel eller frätande medel.
Garanti:
Ingen garanti gäller vid några ändringar eller modifi eringar av produkten eller för skador som
har uppstått på grund av felaktig användning av denna produkt.
Allmänt:
Utseende och specifi kationer kan komma att ändras utan föregående meddelande.
Alla logotyper och produktnamn är varumärken eller registrerade varumärken som tillhör sina
ägare och är härmed erkända som sådana.
Obs!
Produkten är märkt med denna symbol. Det innebär att använda elektriska eller
elektroniska produkter inte får slängas bland vanliga hushållssopor. Det fi nns
särskilda återvinningssystem för dessa produkter.
Copyright ©
Page 92

92
ČESKY
NÁVOD K POUŽITÍ
1. LCD displej
2. Přepínač frekvenčních
pásem (FM/AM)
3. Zesílení hlasitosti
4. Zeslabení hlasitosti
5. Napájecí šňůra
6. Prostor pro baterie
7. Drát pomocné FM antény
8. Ladění stanic
9. Tlačítko nastavení
Alarmu 2
10. Tlačítko nastavení
Alarmu 1
11. Stupnice a ukazatel ladění
12. Tlačítko nastavení času
13. Tlačítko volby režimu
buzení Alarm 1/alarm 2/
alarm 1 + 2
14. Napájení ON/OFF (Zap/
vyp) a vypnutí buzení
15. Konektor zvukového vstupu Audio in
16. Tlačítko SNOOZE/SLEEP (Opakované buzení/Vypnout rádio časovým spínačem)
17. Tlačítko Reset (Resetování)
18. Konzola přístroje
19. Výrobní štítek (na zadní straně jednotky)
Připojení napájení
Napájecí šňůru zapojte do síťové zásuvky. Pak stiskněte hrotem kuličkového pera tlačítko
Reset. Tato jednotka je vybavena systémem zálohování, napájeného lithiovou knofl íkovou
baterií 3 V. Baterie vložte do držáku, dodržujte přitom jejich správnou polaritu. Označení
kontaktů +/- je zobrazeno na štítku v držáku baterií.
POZNÁMKA: Při výpadku elektrického proudu se hodiny automaticky přepnou na bateriový
provoz, takže hodiny a paměť časovače běží dál. Po obnovení dodávky elektrického proudu se
jednotka znovu přepne zpět do režimu síťového napájení.
Poznámka k ESD: Při nesprávné funkci přístroje způsobené elektrostatickým výbojem (ESD)
postačí k obnovení správné činnosti jednotky stisknout tlačítko Reset (někdy je nutné i odpojit
síťovou šňůru).
Page 93

93
MÓD NASTAVENÍ DIGITÁLNÍCH HODIN
DEN
SLEEP ON (ČASOVÝ
VYPÍNAČ)
ALARM 1, 2 BUZENÍ
ZVONKEM
ALARM 1, 2 BUZENÍ RÁDIEM
MÓD NASTAVENÍ ČASU BUZENÍ
SLEEP ON (ČASOVÝ
VYPÍNAČ)
ALARM 1, 2 BUZENÍ
ZVONKEM
POZNÁMKA:
NASTAVENÍ ČASU / NASTAVENÍ ALARMU /
NASTAVENÍ FUNKCE SLEEP POUZE
V REŽIMU DIGITÁLNÍCH HODIN
ALARM 1, 2 BUZENÍ RÁDIEM
90° Otáčení digitálních hodin
90° Otáčení analogových hodin
Page 94

94
REŽIM NASTAVENÍ HODIN
NASTAVENÍ NEBO OBNOVENÍ AKTUÁLNÍHO ČASU
1. Tlačítko nastavení času (12) (pozice 1) stiskněte na 2 sekundy, začne blikat den.
2. Stiskem tlačítka Volume up (3) (pozice 3) a tlačítka Volume down (4) (pozice 2)
nastavte den.
3. Stiskněte tlačítko nastavení času (12) (pozice 1) a začne blikat symbol režimu zobrazení
času 24 hod./12 hod.
4. Stiskem tlačítka Volume up (3) (pozice 3) a tlačítka Volume down (4) (pozice 2)
nastavte režim 24 hod./12 hod.
5. Stiskněte tlačítko nastavení času (12) (pozice 1) a začne blikat údaj hodin.
6. Stiskem tlačítka Volume up (3) (pozice 3) a tlačítka Volume down (4) (pozice 2)
nastavte hodinu.
7. Stiskněte tlačítko nastavení času (12) (pozice 1) a začnou blikat minuty.
8. Stiskem tlačítka Volume up (3) (pozice 3) a tlačítka Volume down (4) (pozice 2)
nastavte minuty.
REŽIM NASTAVENÍ ALARMU 1
Page 95

95
NASTAVENÍ BUDÍKU 1
1. Stisknutím tlačítka Alarm 1 (10) (pozice 1) vstupte do režimu nastavení Alarmu 1.
2. Tlačítko nastavení Alarmu 1 (10) (pozice 1) stiskněte na 2 sekundy, začne blikat den.
(Diagram 1)
3. Stiskem tlačítka Volume up (3) (pozice 3) a tlačítka Volume down (4) (pozice 2)
nastavte den.
4. Stiskněte tlačítko nastavení Alarmu 1 (10) (pozice 1) a začne blikat údaj hodin. Stiskem
tlačítka Volume up
(3) (pozice 3) a tlačítka Volume down (4) (pozice 2) nastavte
hodinu.
5. Stiskněte tlačítko nastavení Alarmu 1 (10) (pozice 1) a začne blikat minuta. Stiskem tlačítka
Volume up (3) (pozice 3) a tlačítka Volume down (4) (pozice 2) nastavte
minuty.
6. Stiskněte tlačítko nastavení Alarmu 1 (10) (pozice 1) a začne blikat ikonka zvonku.
Stiskem tlačítka Volume up (3) (pozice 3) a tlačítka Volume down (4) (pozice 2)
nastavte (3) (pozice 3) a stiskem tlačítka Volume down (4) (pozice 2) zvolte režim
alarm 1 buzení zvonkem nebo buzení rádiem.
REŽIM NASTAVENÍ VÍKENDOVÉHO ALARM 1 (PO AŽ NE)
REŽIM NASTAVENÍ VÍKENDOVÉHO ALARM 1 (PO AŽ PÁ)
REŽIM NASTAVENÍ VÍKENDOVÉHO ALARM 1 (SO AŽ NE)
DIAGRAM 1
Page 96

96
REŽIM NASTAVENÍ
ALARMU 2
NASTAVENÍ BUDÍKU 2
1. Stisknutím tlačítka Alarm 2 (9) (pozice 1) vstupte do režimu nastavení Alarmu 2.
2. Tlačítko nastavení času 2 (9) stiskněte na 2 sekundy, začne blikat den. (Diagram 2)
3. Stiskem tlačítka Volume up
(3) (pozice 3) a tlačítka Volume down (4) (pozice 2)
nastavte den.
4. Stiskněte tlačítko nastavení Alarmu 2 (9) (pozice 1) a začne blikat údaj hodin. Stiskem
tlačítka Volume up (3) (pozice 3) a tlačítka Volume down (4) (pozice 2) nastavte
hodinu.
5. Stiskněte tlačítko nastavení Alarmu 2 (9) (pozice 1) a začne blikat minuta. Stiskem tlačítka
Volume up (3) (pozice 3) a tlačítka Volume down (4) (pozice 2) nastavte
minuty.
6. Stiskem tlačítko Volume up (3) (pozice 3) a tlačítka Volume down (4) (pozice 2)
nastavte režim alarmu 2 buzení zvonkem nebo buzení rádiem.
REŽIM NASTAVENÍ VÍKENDOVÉHO ALARM 2 (PO AŽ NE)
REŽIM NASTAVENÍ VÍKENDOVÉHO ALARM 2 (PO AŽ PÁ)
REŽIM NASTAVENÍ VÍKENDOVÉHO ALARM 2 (SO AŽ NE)
DIAGRAM 2
Page 97

97
DIAGRAM 3
REŽIM FUNKCE SLEEP
(ČASOVANÝ VYPÍNAČ)
Způsob buzení a vypnutí/zapnutí alarmu (on/off)
Stiskem tlačítka Alarm 1/Alarm 2/Alarm 1+2 (13) zvolte způsob buzení zvonkem nebo rádiem.
Diagram 3:
DÉLKA DOBY BUZENÍ
Pokud nedojde ke stisknutí žádného tlačítka, zvonek nebo rádio budou znít po dobu 1 hodiny.
Pak se buzení automaticky ukončí a nastaví se buzení na následující den ve stejnou dobu.
ZASTAVENÍ BUZENÍ
Stiskem tlačítka Power (14) zastavte buzení. Tím se současně zruší funkce „snooze“ (opakování
buzení).
REŽIM FUNKCE SLEEP (ČASOVANÝ VYPÍNAČ)
DIAGRAM 4
Aktivace funkce „sleep“ (Vypnutí časovým spínačem)
Při zapnutém rádiu stiskněte tlačítko snooze/sleep (16), na displeji se na 2 minuty zobrazí
ikonky „sleep“ a „90“; každým dalším stisknutím tlačítka snooze/sleep (16) se hodnota doby
vypnutí časového spínače postupně snižuje. (Diagram 4)
POZNÁMKA: Stisknutím tlačítka Power on/off (14) zrušíte funkci „sleep“ (Vypnutí časovým
spínačem).
Page 98

98
Funkce opakovaného buzení
1. Stiskem tlačítka snooze/sleep (16) (Opakované buzení/Vypnout rádio) se aktivuje funkce
opakovaného buzení „snooze“ (zvonící budík nebo hrající rádio se vypne).
2. Buzení se opakuje v 9minutovém intervalu.
PRÁCE SE ZVUKOVÝMI ZDROJI
1. K připojení jiného zvukového zdroje použijte odpovídající audio kabel.
2. Nastavením vhodné hlasitosti externího zdroje zvuku získáte lepší zesilovací efekt.
Poznámka: Nezvyšujte však extrémně hlasitost zvukového zdroje, aby nedocházelo k přetížení
vstupu jednotky a tím ke zkreslení výsledné reprodukce zvuku. Připojením kabelu s externím
audio signálem do vstupního konektoru „AUDIO IN“ (15) se vypne zvuk hlavní jednotky. Po
odpojení kabelu z konektoru „AUDIO IN“ se obnoví původní zvuk hlavní jednotky.
Pokud dosáhne aktuální čas předem nastavené doby buzení, zvuk alarmu se vloží do přehrávání
externího zvukového signálu nebo rozhlasového vysílání. Zvuk alarmu zastavte jednoduše
stiskem tlačítka Power on/off, Alarm off (14) (Napájení (Zap/vyp) a vypnutí buzení).
OBSLUHA RÁDIA
Stisknutím tlačítka On/Off (Zap/Vyp) (14) zapněte přístroj.
- Přepínačem frekvenčních pásem (2) zvolte příjem AM nebo FM stanic.
- Knofl íkem ladění (8) nalaďte požadovanou stanici.
- Stiskem tlačítka regulace hlasitosti (3)/(4) nastavte požadovanou hlasitost.
Stisknutím vypínače On/Off (Zap/Vyp) (14) vypněte přístroj.
Poznámka:
- Pásmo AM používá k příjmu zabudovanou směrovou anténu. Otáčením rádia nalezněte
polohu nejlepšího příjmu.
- K dosažení nejlepšího příjmu FM stanice rozmotejte drát pomocné FM antény (7) a nejděte
jeho nejlepší umístění.
RESET (Obnova)
- Tlačítko Reset (17) je umístěno na zadní straně přístroje. Přístroj resetujte stisknutím tlačítka
Reset hrotem kuličkového pera po každé výměně baterií nebo při nesprávné funkci jednotky.
V přístroji se tím zruší všechna uložená data individuálního nastavení (aktuálního času,
alarmů) a dosadí se továrně nastavené původní hodnoty.
SPECIFIKACE
Frekvenční rozsah: AM 540 až 1600 kHz
FM 88 až 108 MHz
Výstupní výkon: 280 mW
Zatěžovací impedance reproduktorů: 8 Ohm
Napájení systému zálohování: Knofl íková lithiová baterie 3 V, 1 x CR2032,
(není součástí dodávky).
Rozměry: 105 x 48 mm
Zdroj napájení: 230 Vstř ~ 50 Hz, 5 W
Page 99

99
DIAGRAM 1
DIAGRAM 2
DIAGRAM 3
ŠROUBEK DO ZDI
HMOŽDINKY
ŠIPKA NAHOŘE
ŠROUBEK ŠROUBEK
ŠROUBEKŠROUBEK
STĚNA
ZÁVĚSNÁ KONZOLA NA STĚNU
• Zvolte pozici na stěně k zavěšení rádia s budíkem.
• Závěsnou konzolu připevněte na zeď 4 šroubky s hmoždinkami. (Diagram 2)
• Jednotku uložte do konzoly a zajistěte, aby síťová šňůra a drátová FM anténa byly od sebe
co nejdále.
• Šroubek na spodní straně jednotky utáhněte do konzoly.
• Přesvědčte se, že konzola i s rádiem na stěně pevně visí.
Page 100

100
PROHLÁŠENÍ O SHODĚ
Společnost
Nedis B.V.
De Tweeling 28
5215MC “s-Hertogenbosch
Nizozemí
Tel.: 0031 73 599 1055
E-mail: info@nedis.com
prohlašuje, že výrobek:
Značka: KONIG
Model: HAV-CR70
Popis: Rádio s budíkem
splňuje následující normy:
Elektromagnetická kompatibilita: EN55013:2001 + A1:2003
EN55020:2002 + A1:2003 + A2:2005
EN61000-3-2:2000 + A2:2005
EN61000-3-3:1995 + A1:2001
Elektronická zařízení napájená ze sítě: EN60065:2002
a následující nařízení směrnic 89/336/EEC a 73/23/EEC.
„s-Hertogenbosch, 2008, 02 duben
Mrs. J. Gilad
Obchodní ředitel
 Loading...