

Page 1
29
WII BEZDRÁTOVÝ HERNÍ
OVLADAČ
23
LANGATON WII-OHJAIN
17
CONTROLADOR WII
INALÁMBRICO
11
WII DRAADLOZE PLAYCHUK
5
DRAHTLOSER PLAYCHUK
FÜR WII™
32
PLAYCHUK WII FĂRĂ FIR
26
WII TRÅDLÖS SPELKONTROLL
20
WII VEZETÉK NÉLKÜLI PLAYCHUK
14
WII WIRELESS PLAYCHUK
8
PLAYCHUK SANS FIL WII
WII WIRELESS PLAYCHUK
GAMWII-WLNUN10
Page 2

2
ENGLISH
Introduction
The wireless playchuk is an extension of the Wii™ Mote. Connect the playchuk to
the Wii™ Mote and the two controllers will work harmoniously together. Due to the
wireless connection between the two there is even more freedom of movement. Each
controller has its specifi c features which makes sure there is even more fun in gaming!
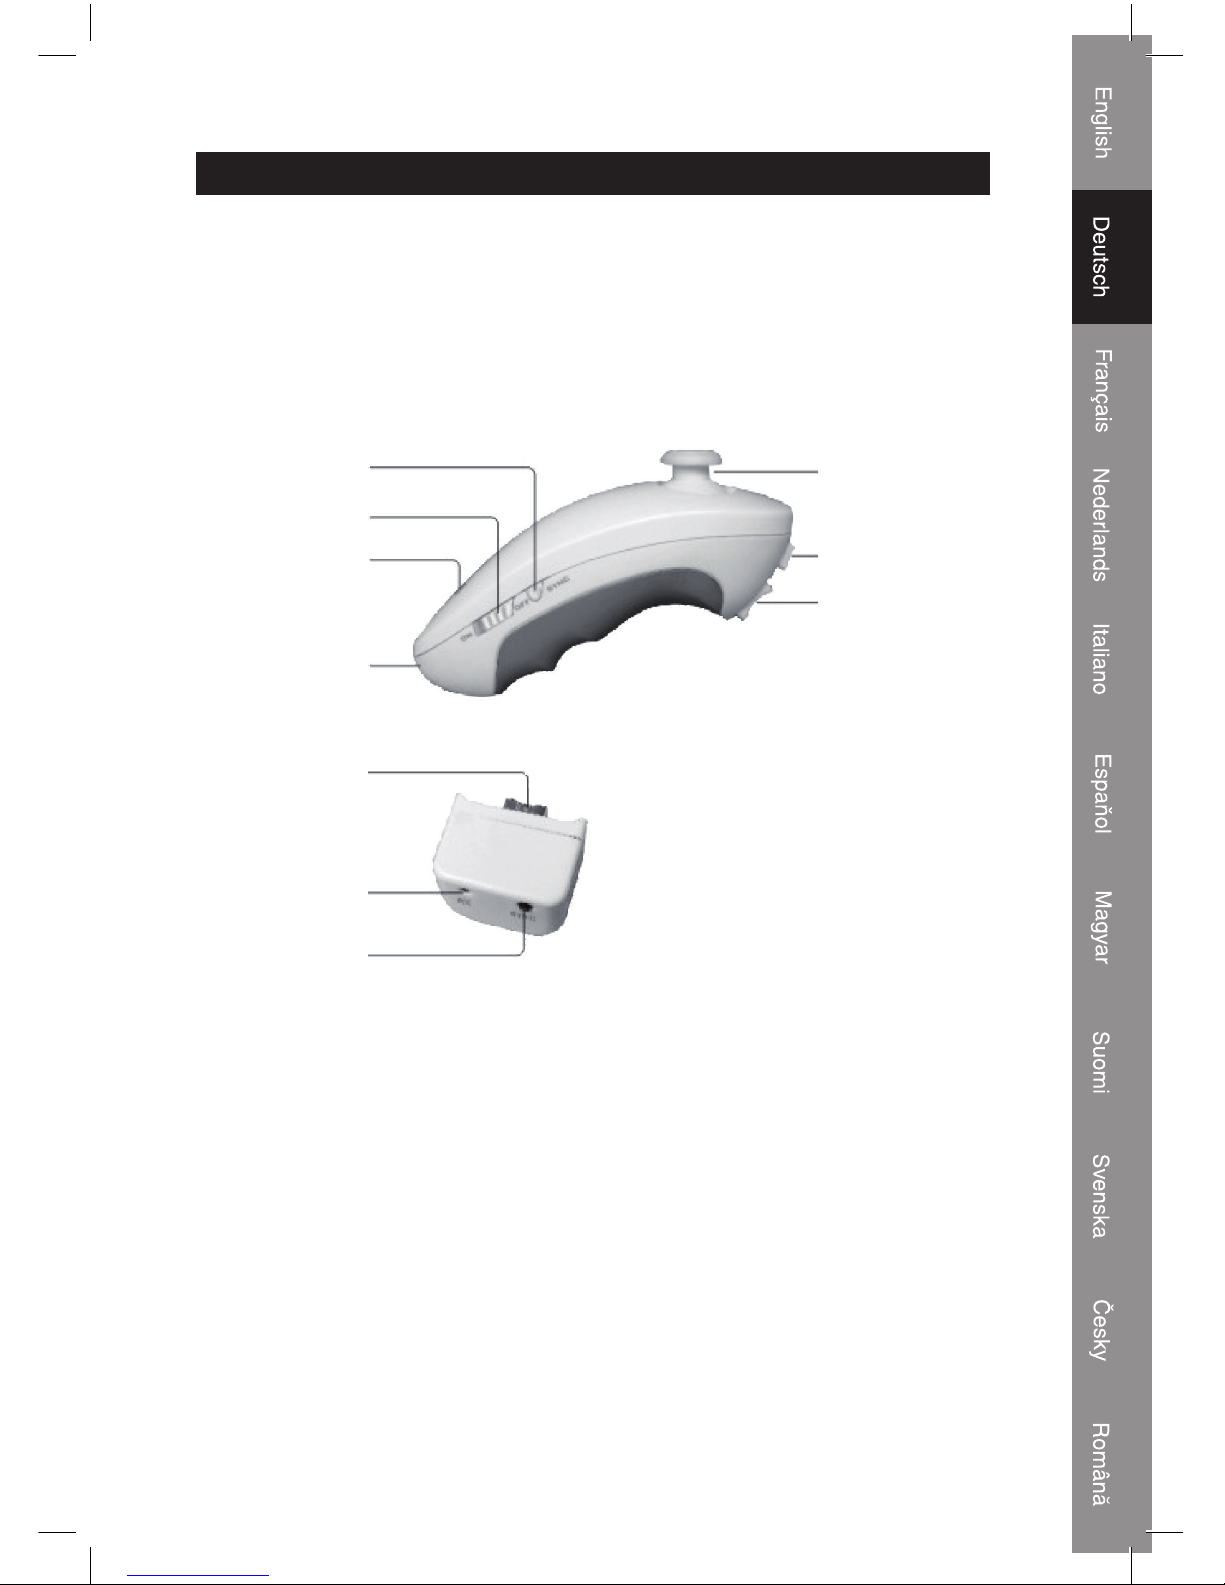
Function
SYNC button
Power switch
LED indication
Charging port
LED indicator
Connector
Sync button
3D stick
C button
Z button
Connection instructions
• Power on the Wii™ console
• Connect the Wii™ remote to the Wii™ console
• Plug the Playchuk receiver into the Wii™ remote and press the SYNC button on the
receiver. The LED on the receiver will begin to fl ash
• Power on the Playchuk and press the SYNC button on the Playchuk (the LED lights will
stop fl ashing)
• The Playchuk is ready for use
Note
• When accidentally pressing the SYNC button, you will have to press the SYNC button
on the receiver to re-establish the connection
• When the Playchuk falls into sleep mode press Z button to activate it again
• Charge the Playchuk while in POWER OFF status
• Always wear the wrist strap when using the Playchuk
Page 3
3
Declaration of conformity
We,
Nedis B.V.
De Tweeling 28
5215MC ’s-Hertogenbosch
The Netherlands
Tel.: 0031 73 599 1055
Email: info@nedis.com
Declare that product:
Brand: KÖNIG
Model: GAMWII-WLNUN10
Description: Wii™ wireless Playchuk
Is in conformity with the following standards
EN50950-1; 2005; EN50371; 2002
ETSI EN 301489-1 V 1.6.1 (2005-08)
ETSI EN 301489-3 V 1.4.1 (2002-08)
ETSI EN 300 440-1 V 1.3.1(2001-09)
ETSI EN 300 440-2 V 1.1.2 (2004-07)
And complies with the requirements of the European Union Directives.
‘s-Hertogenbosch, 25/09/08
Mrs. J. Gilad
Purchase Director
Page 4
4
Safety precautions:
Do not expose the product to water or moisture.
Maintenance:
Clean only with a dry cloth. Do not use cleaning solvents or abrasives.
Warranty:
No guarantee or liability can be accepted for any changes and modifi cations of the
product or damage caused due to incorrect use of this product.
General:
Designs and specifi cations are subject to change without notice.
All logos brands and product names are trademarks or registered trademarks of their
respective holders and are hereby recognized as such.
Attention:
This product is marked with this symbol. It means that used electrical and
electronic products should not be mixed with general household waste. There
is a separate collections system for these products.
Copyright ©
Page 5
5
DEUTSCH
Einführung
Die drahtlose Playchuk ist eine Erweiterung der Wii™ Mote. Schließen Sie die Playchuk
an die Wii™ Mote an, und die beiden Steuerungen arbeiten harmonisch zusammen. Weil
die beiden drahtlos miteinander verbunden sind, haben Sie mehr Bewegungsfreiheit.
Jede Steuerung hat ihre eigenen Merkmale, wodurch das Spielen noch mehr Spaß
macht!
Funktionen
SYNC-Taste
An/Aus Schalter
LED-Anzeige
Ladeanschluss
LED-Anzeige
Stecker
SYNC-Taste
3D-Stick
C-Taste
Z-Taste
Anschlussanleitung
• Schalten Sie die Wii™-Konsole an.
• Schließen Sie die Wii™-Fernsteuerung an die Wii™-Konsole an.
• Stecken Sie den Playchuk-Receiver in die Wii™-Fernsteuerung und drücken
die SYNC-Taste am Receiver. Die LED am Receiver beginnt zu blinken.
• Schalten Sie die Playchuk an und drücken die SYNC-Taste an der Playchuk (die LEDs
blinken stark).
• Die Playchuk ist betriebsbereit.
Anmerkung
• Wenn Sie versehentlich die SYNC-Taste drücken, müssen Sie die SYNC-Taste am
Receiver drücken, damit die Verbindung wiederhergestellt wird.
• Wenn die Playchuk in den Schlaf-Modus geht, drücken Sie die Z-Taste, um sie wieder
zu aktivieren.
• Laden Sie die Playchuk auf, wenn sie ausgeschaltet ist.
• Tragen Sie immer das Handgelenkband, wenn Sie die Playchuk benutzen.
Page 6
6
KONFORMITÄTSERKLÄRUNG
Wir,
Nedis B.V.
De Tweeling 28
5215MC ’s-Hertogenbosch
Niederlande
Tel.: 0031 73 599 1055
Email: info@nedis.com
erklären, dass das Produkt:
Marke: KÖNIG
Modell: GAMWII-WLNUN10
Beschreibung: drahtloser Playchuk für Wii™
den folgenden Standards entspricht:
EN50950-1; 2005; EN50371; 2002
ETSI EN 301489-1 V 1.6.1 (2005-08)
ETSI EN 301489-3 V 1.4.1 (2002-08)
ETSI EN 300 440-1 V 1.3.1(2001-09)
ETSI EN 300 440-2 V 1.1.2 (2004-07)
Und erfüllt die Bestimmungen der EU-Richtlinien.
‘s-Hertogenbosch, 25.09.2008
J. Gilad
Einkaufsleiterin
Page 7
7
Sicherheitsvorkehrungen:
Sorgen Sie dafür, dass das Gerät nicht mit Wasser oder Feuchtigkeit in Berührung
kommt.
Wartung:
Nur mit einem trocknen Tuch säubern. Keine Reinigungs- oder Scheuermittel
verwenden.
Garantie:
Es wird keine Garantie oder Gewährleistung bei Veränderungen, Modifi kationen oder
Schäden durch unsachgemäße Behandlung des Produktes gewährt.
Allgemeines:
Für Konstruktion und Technische Daten behalten wir uns Änderungen vor.
Alle Logos, Marken und Produktnamen sind Warenzeichen oder registrierte Warenzeichen
ihrer jeweiligen Eigentümer und werden hiermit als solche anerkannt.
Achtung:
Dieses Produkt ist mit diesem Symbol gekennzeichnet. Es bedeutet, dass die
verwendeten elektrischen und elektronischen Produkte nicht im allgemeinen
Haushaltsmüll entsorgt werden dürfen. Für diese Produkte stehen gesonderte
Sammelsysteme zur Verfügung.
Copyright ©
Page 8

8
FRANCAIS
Introduction
La playchuk sans fi l est une extension de la Wii™ Mote. Raccordez la playchuk à la Wii™
Mote et les deux contrôleurs fonctionneront ensemble en toute harmonie. Vous gagnerez
en liberté de mouvement du fait de la connexion sans fi l entre les deux. Chaque contrôleur
dispose de ses fonctions propres ce qui vous garantit encore plus de divertissements
pendant le jeu !
Fonctionnement
Tou c h e SY N C
Interrupteur
Voyant
Port de
rechargement
Voyant
Connecteur
Tou c h e SY N C
Joystick 3D
Touche C
Tou c h e Z
Instructions concernant le raccordement
• Allumez la console Wii™
• Raccordez la manette Wii™ à la console Wii™
• Branchez le récepteur de la Playchuk dans la manette de la Wii™ et appuyez sur
la touche SYNC du récepteur. Le voyant sur le récepteur se met à clignoter
• Allumez la Playchuk et appuyez sur la touche SYNC de la Playchuk (les voyants cessent
de clignoter)
• La Playchuk est prête à l'emploi
Remarque
• Si vous appuyez accidentellement sur la touche SYNC, vous devez alors appuyer aussi
sur la touche SYNC du récepteur pour rétablir la connexion.
• Lorsque la Playchuk est en veille, appuyez sur la touche Z pour la réactiver
• Rechargez la Playchuk lorsqu'elle est éteinte
• Veillez à toujours porter la dragonne lorsque vous utilisez la Playchuk
Page 9
9
Déclaration de conformité
Nous,
Nedis B.V.
De Tweeling 28
5215MC ’s-Hertogenbosch
Pays-Bas
Tél.: 0031 73 599 1055
Email : info@nedis.com
Déclarons que le produit :
Marque : KÖNIG
Modèle : GAMWII-WLNUN10
Désignation : Playchuk sans fi l Wii™
est conforme aux normes suivantes :
EN50950-1; 2005. EN50371; 2002
ETSI EN 301489-1 V 1.6.1 (2005-08)
ETSI EN 301489-3 V 1.4.1 (2002-08)
ETSI EN 300 440-1 V 1.3.1 (2001-09)
ETSI EN 300 440-2 V 1.1.2 (2004-07)
et qu'il est conforme aux prescriptions des Directives de l'Union Européenne.
‘s-Hertogenbosch, 25/09/08
Mme. J. Gilad
Directrice des Achats
Page 10
10
Consignes de sécurité :
N'exposez jamais l'appareil à l'eau ou à l'humidité.
Entretien :
Ne nettoyez qu'avec un chiffon sec. N'utilisez pas de solvants ou de produits abrasifs.
Garantie :
Aucune garantie ou responsabilité ne sera acceptée en cas de modifi cation et/ou
de transformation du produit ou en cas de dommages provoqués par une utilisation
incorrecte de l'appareil.
Généralités :
Le design et les caractéristiques techniques sont sujets à modifi cation sans notifi cation
préalable.
Tous les logos de marques et noms de produits sont des marques déposées ou
immatriculées appartenant à leurs titulaires respectifs et sont donc reconnus comme
telles dans ce document.
Attention :
Ce symbole fi gure sur l'appareil. Il signifi e que les produits électriques et
électroniques ne doivent pas être jetés avec les déchets ménagers. Le système
de collecte est différent pour ce genre de produits.
Copyright ©
Page 11
11
NEDERLANDS
Introductie
De draadloze Playchuk is een uitbereiding op de Wii™ Mote. Sluit de Playchuk aan
via de Wii™ Mote en de twee controllers zullen harmonieus samenwerken. Dankzij de
draadloze verbinding tussen de twee is er zelfs meer bewegingsvrijheid. Elke controller
heeft specifi eke eigenschappen die er voor zorgen dat u meer speelplezier beleeft!
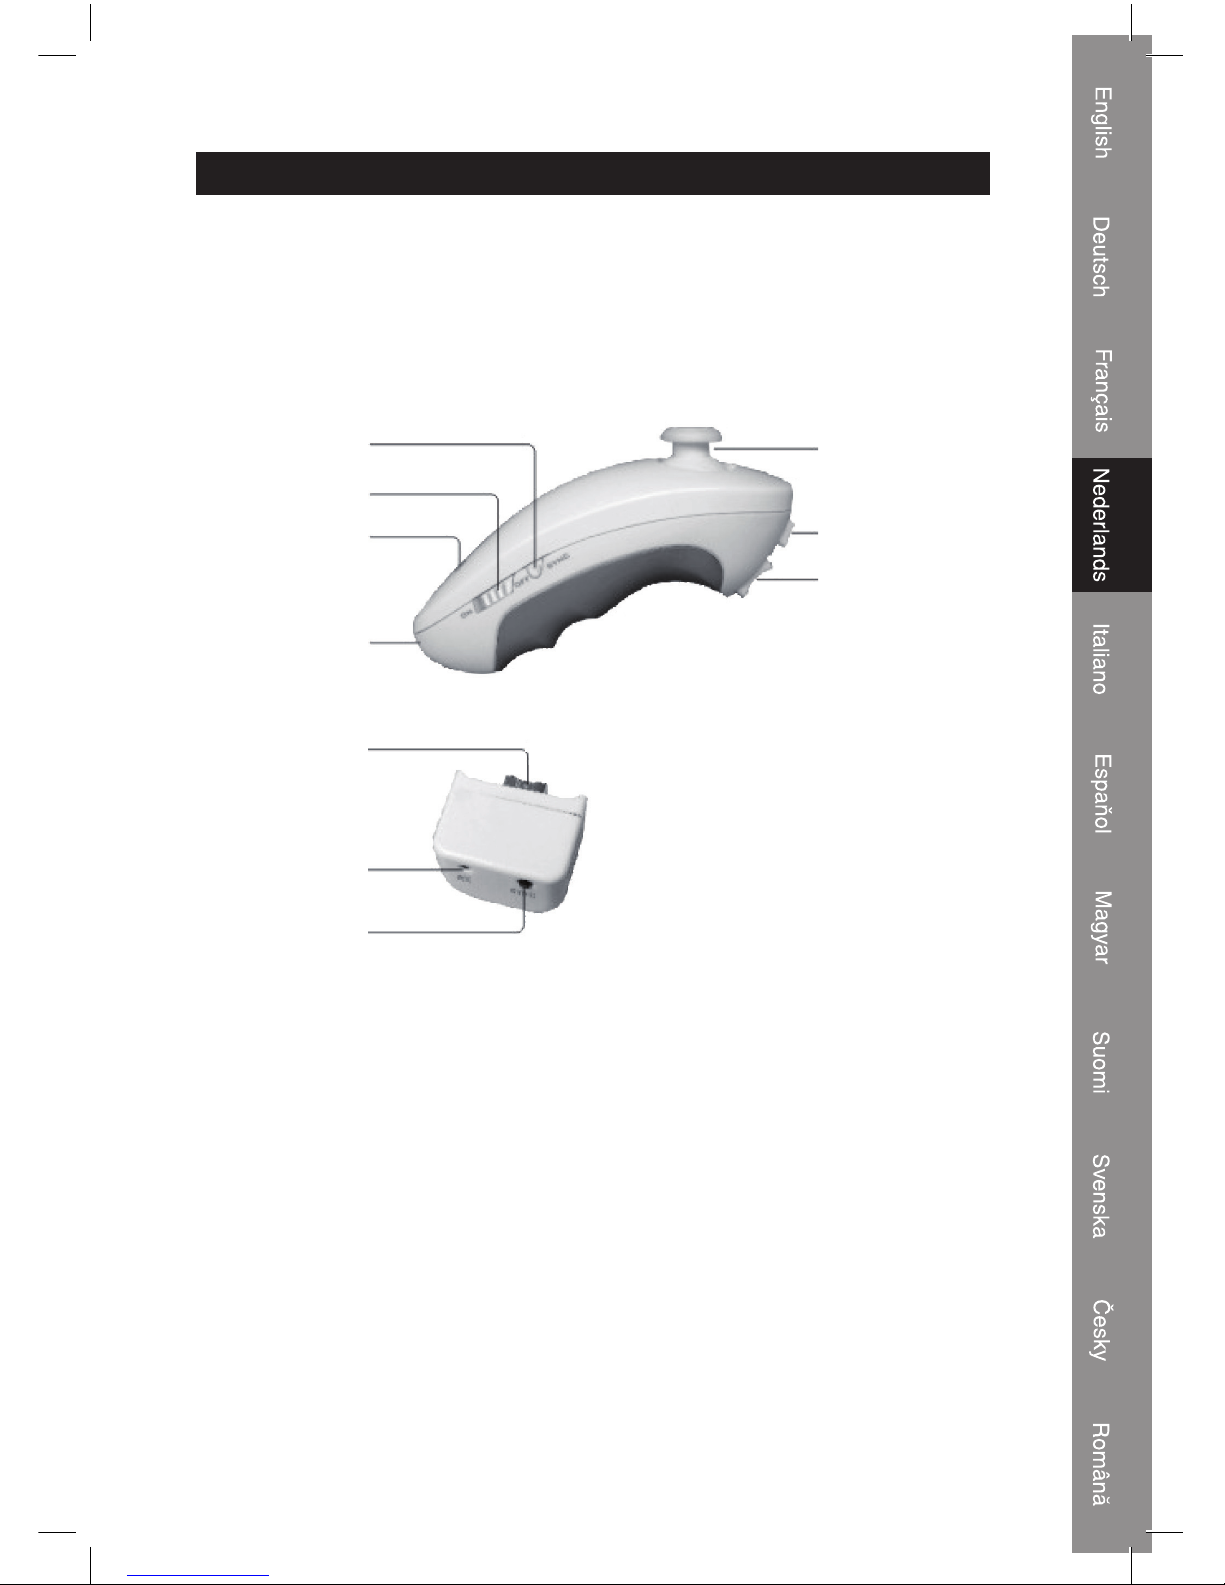
Functie
SYNC knop
Aan-/uitschakelaar.
LED-indicator
Oplaadpoort
LED-indicator
Omzetter
SYNC knop
3D stick
C knop
Z knop
Aansluitinginstructies
• Schakel de Wii™ console in.
• Verbind de Wii™ remote met de Wii™ console.
• Steek de Playchuk ontvanger in de Wii™ remote en druk op de SYNC knop op de
ontvanger. De LED op de ontvanger zal gaan knipperen.
• Schakel de Playchuk in en druk op de SYNC knop op de Playchuk (de LED stopt met
knipperen)
• De Playchuk is nu klaar voor gebruik.
NB
• Wanneer u per ongeluk op de SYNC knop drukt, dient u op de SYNC knop op de
ontvanger te drukken om de verbinding te herstellen.
• Wanneer de Playchuk in de slaapmodus beland, druk dan op de Z knop om het te
activeren.
• Laad de Playchuk op wanneer deze in de POWER OFF status is.
• Draag het polsbandje altijd wanneer u de Playchuk gebruikt.
Page 12

12
CONFORMITEITVERKLARING
Wij,
Nedis BV
De Tweeling 28
5215 MC ’s-Hertogenbosch
Nederland
Tel.: 0031 73 599 1055
E-mail: info@nedis.com
verklaren dat het product:
Merknaam: KÖNIG
Model: GAMWII-WLNUN10
Omschrijving: Wii™ draadloze Playchuk
in overeenstemming met de volgende normen is
EN50950-1; 2005; EN50371; 2002
ETSI EN 301489-1 V 1.6.1 (2005-08)
ETSI EN 301489-3 V 1.4.1 (2002-08)
ETSI EN 300 440-1 V 1.3.1(2001-09)
ETSI EN 300 440-2 V 1.1.2 (2004-07)
en voldoet aan de vereiste richtlijnen van de Europese Unie.
‘s-Hertogenbosch, 25/09/08
Mevr. J. Gilad
Directeur inkoop
Page 13

13
Veiligheidsvoorzorgsmaatregelen:
Stel het apparaat niet bloot aan water of vocht.
Onderhoud:
Uitsluitend reinigen met een droge doek. Gebruik geen reinigingsmiddelen of
schuurmiddelen.
Garantie:
Voor wijzigingen en veranderingen aan het product of schade veroorzaakt door een
verkeerd gebruik van dit product, kan geen aansprakelijkheid worden geaccepteerd.
Tevens vervalt daardoor de garantie.
Algemeen:
Wijziging van ontwerp en specifi caties zonder voorafgaande mededeling onder
voorbehoud.
Alle logo's, merken en productnamen zijn handelsmerken of geregistreerde handelsmerken
van de respectievelijke eigenaren en worden hierbij als zodanig erkend.
Let op:
Dit product is voorzien van dit symbool. Dit symbool geeft aan dat afgedankte
elektrische en elektronische producten niet met het gewone huisafval
verwijderd mogen worden. Voor dit soort producten zijn er speciale
inzamelingspunten.
Copyright ©
Page 14

14
ITALIANO
Introduzione
Il wireless playchuk è una prolunga del Wii™ Mote. Collegare il playchuk al Wii™ Mote e i
due controller lavoreranno armonicamente insieme. Grazie al collegamento senza fi li tra i
due, è possibile una libertà di movimento ancora maggiore. Ogni controller dispone delle
sue funzioni specifi che che assicurano un divertimento ancora maggiore nel gioco!
Funzione
Pulsante SYNC
Interruttore di
alimentazione
Spia LED
Porta di
caricamento
Spia LED
Connettore
Pulsante SYNC
Joystick 3D
Pulsante C
Pulsante Z
Istruzioni di collegamento
• Accendere la consolle Wii™
• Collegare il telecomando Wii™ alla consolle Wii™
• Inserire il ricevitore Playchuk nel telecomando Wii™ e premere il pulsante SYNC sul
ricevitore. Il LED sul ricevitore inizierà a lampeggiare.
• Accendere il Playchuk e premere il pulsante SYNC sul Playchuk (le luci LED smetteranno
di lampeggiare)
• Il Playchuk è pronto all'uso
Nota
• Se si preme accidentalmente il pulsante SYNC, sarà necessario premere il pulsante
SYNC sul ricevitore per ristabilire la connessione.
• Quando il Playchuk passa in modalità autospegnimento, premere il pulsante Z per
riattivarlo
• Caricare il Playchuk in stato di SPEGNIMENTO
• Quando si usa il Playchuk, indossare sempre il cinturino da polso
Page 15

15
DICHIARAZIONE DI CONFORMITÀ
Questa società,
Nedis B.V.
De Tweeling 28
5215MC ’s-Hertogenbosch
Paesi Bassi
Tel.: 0031 73 599 1055
Email: info@nedis.com
Dichiara che il prodotto:
Marca: KÖNIG
Modello: GAMWII-WLNUN10
Descrizione: Wii™ wireless Playchuk
è conforme ai seguenti standard
EN50950-1; 2005; EN50371; 2002
ETSI EN 301489-1 V 1.6.1 (2005-08)
ETSI EN 301489-3 V 1.4.1 (2002-08)
ETSI EN 300 440-1 V 1.3.1(2001-09)
ETSI EN 300 440-2 V 1.1.2 (2004-07)
e rispetta i requisiti delle Direttive dell'Unione Europea.
‘s-Hertogenbosch, 25/09/08
Sig.ra J. Gilad
Direttore agli acquisti
Page 16

16
Precauzioni di sicurezza:
Non esporre il prodotto ad acqua o umidità.
Manutenzione:
Pulire solo con un panno asciutto. Non utilizzare solventi detergenti o abrasivi.
Garanzia:
Non sarà accettata alcuna garanzia o responsabilità in relazione a cambiamenti e
modifi che del prodotto o a danni determinati dall'uso non corretto del prodotto stesso.
Generalità:
Il design e le caratteristiche tecniche sono soggetti a modifi ca senza necessità di
preavviso.
Tutti i marchi a logo e i nomi di prodotto sono marchi commerciali o registrati dei rispettivi
titolari e sono in questo documento riconosciuti come tali.
Attenzione:
Il prodotto è contrassegnato con questo simbolo, con il quale si indica che i
prodotti elettrici ed elettronici usati non devono essere gettati insieme ai rifi uti
domestici. Per questi prodotti esiste un sistema di raccolta differenziata.
Copyright ©
Page 17

17
ESPAÑOL
INTRODUCCIÓN
El controlador inalámbrico es una extensión del Wii™ Mote. Conecte la toma de reproducción
al Wii™ Mote y los dos pilotos funcionarán juntos en armonía. Debido a la conexión
inalámbrica entre los dos, gozará de una mayor libertad de movimiento. Cada piloto cuenta
con funciones específi cas que garantizan su mayor diversión a la hora de jugar.
FUNCIÓN
Botón SINC
Interruptor de
alimentación
Indicación LED
Puerto de recarga
Indicador LED
Conector
Botón SINC
Clavija 3D
Botón C
Botón Z
Instrucciones de conexión
• Encienda la consola Wii™
• Conecte el mando de la Wii™ a la consola Wii™
• Conecte el receptor de la toma de reproducción en el mando de la Wii™ y pulse el
botón de SINC del receptor. La LED del receptor empezará a pestañear
• Encienda el controlador y pulse el botón SINC del mismo (las luces LED dejarán de
pestañear)
• El controlador está listo para su uso
Nota
• Si pulsa accidentalmente el botón SINC, tendrá que pulsar el botón SINC del receptor
para volver a establecer la conexión.
• Cuando el controlador entra en modo de apagado automático, pulse el botón Z para
activarlo de nuevo
• Cargue el controlador mientras esté en estado de APAGADO
• Lleve siempre la muñequera cuando utilice el controlador
Page 18

18
Declaración de conformidad
La empresa infraescrita,
Nedis B.V.
De Tweeling 28
5215MC ’s-Hertogenbosch
Países Bajos
Tel.: 0031 73 599 1055
Email: info@nedis.com
Declara que el producto:
Marca: KÖNIG
Modelo: GAMWII-WLNUN10
Descripción: Controlador inalámbrico Wii™
se encuentra conforme a las siguientes normas:
EN50950-1; 2005; EN50371; 2002
ETSI EN 301489-1 V 1.6.1 (2005-08)
ETSI EN 301489-3 V 1.4.1 (2002-08)
ETSI EN 300 440-1 V 1.3.1(2001-09)
ETSI EN 300 440-2 V 1.1.2 (2004-07)
Y cumple con todos los requisitos de las directivas de la Unión Europea.
‘s-Hertogenbosch, 25/09/08
Dña. J. Gilad
Director de compras
Page 19

19
Medidas de seguridad:
No exponga el producto al agua ni a la humedad.
Mantenimiento:
Limpie sólo con un paño seco. No utilice solventes de limpieza ni abrasivos.
Garantía:
No se aceptará ninguna garantía o responsabilidad derivada de cualquier cambio o
modifi caciones realizadas al producto o daños provocados por un uso incorrecto del
presente producto.
General:
Las ilustraciones y las especifi caciones podrán sufrir cambios sin previo aviso.
Todos los logotipos y los nombres de productos constituyen patentes o marcas registradas
de sus titulares correspondientes y se reconocen aquí como tales.
Cuidado:
Este producto está señalizado con este símbolo. Esto signifi ca que los
productos eléctricos y electrónicos gastados no deberán mezclarse con los
desechos domésticos generales. Existen distintos sistemas de recogida
individuales para este tipo de productos.
Copyright ©
Page 20

20
MAGYAR NYELVŰ
A termék bemutatása
A vezeték nélküli playchuk a Wii™ Mote egyik kiegészítése. Csatlakoztassa a playchuk
vezérlőt a Wii™ Mote-hoz, és a két vezérlő harmonikusan fog működni együtt. A
kettő közti vezeték nélküli kapcsolat még több mozgási szabadságot tesz lehetővé.
Mindegyik vezérlőnek megvannak a saját specifi kus tulajdonságai, amitől a játék még
szórakoztatóbbá válik!
Funkció
SYNC (SZINKRON)
gomb
Be- és kikapcsoló
LED jelző
Töltőcsatlakozás
LED jelző
Csatlakozó
SYNC (SZINKRON)
gomb
3D stick
C gomb
Z gomb
Csatlakoztatási útmutatások
• Kapcsolja be a Wii™ konzolt.
• Csatlakoztassa a Wii™ remote-ot a Wii™ konzolhoz.
• Dugaszolja a playchuk vevőjét a Wii™ remote-ra, majd nyomja meg a vevőn a SYNC
(SZINKRON) gombot. A vevőn a LED villogni kezd.
• Kapcsolja be a playchuk vezérlőt, és nyomja meg a rajta lévő SYNC (SZINKRON)
gombot (a LED-ek villogni fognak)
• A playchuk használatra kész.
Megjegyzés
• Ha véletlenül lenyomja a SYNC (SZINKRON) gombot, a kapcsolat helyreállításához le
kell nyomnia a vevő SYNC (SZINKRON) gombját.
• Ha a playchuk alvó üzemmódra áll, a Z gombbal aktiválhatja.
• A playchuk vezérlőt KIKAPCSOLT állapotban töltse.
• A playchuk használata közben mindig viseljen csuklópántot.
Page 21

21
Megfelelőségi nyilatkozat
Mi,
a Nedis B.V.
De Tweeling 28
5215MC ’s-Hertogenbosch
Hollandia
Tel.: 0031 73 599 1055
E-mail: info@nedis.com
Kijelentjük, hogy a termék, amelynek:
Gyártmánya: KÖNIG
Típusa: GAMWII-WLNUN10
Megnevezése: Wii™ vezeték nélküli playchuk
Összhangban van az alábbi szabványokkal:
EN50950-1; 2005; EN50371; 2002
ETSI EN 301489-1 V 1.6.1 (2005-08)
ETSI EN 301489-3 V 1.4.1 (2002-08)
ETSI EN 300 440-1 V 1.3.1(2001-09)
ETSI EN 300 440-2 V 1.1.2 (2004-07)
Megfelel továbbá az Európai Uniós Irányelvekben támasztott követelményeknek is.
‘s-Hertogenbosch, 25/09/08
Mrs. J. Gilad
Értékesítési igazgató
Megfelelőségi nyilatkozat.
Egyetértek és elfogadom a Nedis B.V. Hollandia által adott nyilakozatot.
Jacob Gilad
HQ-Nedis kft.
ügyvezető igazgató
Page 22

22
Biztonsági óvintézkedések:
Víztől és egyéb nedvességtől óvja.
Karbantartás:
Csak száraz ronggyal tisztítsa. Tisztító- és súrolószerek használatát mellőzze.
Jótállás:
Nem vállalunk felelősséget és jótállást, ha a meghibásodás a készüléken végzett
változtatás vagy módosítás következménye, vagy helytelen használat miatt a készülék
megrongálódott.
Általános tudnivalók:
A kivitel és a műszaki jellemzők előzetes értesítés nélkül is módosulhatnak.
Minden logó, terméknév és márkanév a saját tulajdonosának márkaneve vagy bejegyzett
márkaneve, és azokat ennek tiszteletben tartásával említjük.
Figyelem:
Ezt a terméket ezzel a jelöléssel láttuk el. Azt jelenti, hogy az elhasznált
elektromos és elektronikus készülékek nem keverhetők az általános háztartási
hulladék közé. Begyűjtésüket külön begyűjtő létesítmények végzik.
Copyright ©
Page 23

23
SUOMI
Johdanto
Langaton ohjain on lisäominaisuus Wii™ Motelle. Liitä ohjain Wii™ Moteen ja nämä kaksi
ohjainta toimivat yhdessä. Niiden välisen langattoman yhteyden ansiosta liikkuminen on
vieläkin vapaampaa. Kummassakin ohjaimessa on erityiset ominaisuudet, joka tekee
pelaamisesta vieläkin hauskempaa!
Toiminta
SYNC-painike
Virtakytkin
LED-merkkivalo
Latausportti
LED-merkkivalo
Liitin
SYNC-painike
3D-ohjain
C-painike
Z-p ain ike
Kytkentäohjeet
• Kytke Wii™ -konsoli päälle
• Liitä Wii™ -kauko-ohjain Wii™ -konsoliin
• Liitä ohjaimen vastaanotin Wii™ -kauko-ohjaimeen ja paina vastaanottimen
SYNC-painiketta. Vastaanottimen LED-merkkivalo alkaa vilkkumaan.
• Kytke ohjain päälle ja paina siinä olevaa SYNC-painiketta (LED-merkkivalo eivät enää
vilku)
• Ohjain on valmis käytettäväksi.
Huomautus
• Jos SYNC-painiketta painetaan vahingossa, tulee vastaanottimen SYNC-painiketta
painaa yhteyden luomiseksi uudelleen
• Kun ohjain siirtyy unitilaan, paina Z-painiketta sen aktivoimiseksi
• Lataa ohjain sen ollessa POWER OFF -sammutustilassa
• Käytä aina rannehihnaa ohjainta käytettäessä.
Page 24

24
VAATIMUSTENMUKAISUUSVAKUUTUS
Me,
Nedis B.V.
De Tweeling 28
5215MC ’s-Hertogenbosch
Alankomaat
Puh: 0031 73 599 1055
Sähköposti: info@nedis.com
Vakuutamme, että tuote:
Merkki: KÖNIG
Malli: GAMWII-WLNUN10
Kuvaus: Langaton Wii™ -ohjain
Täyttää seuraavat standardit:
EN50950-1; 2005; EN50371; 2002
ETSI EN 301489-1 V 1.6.1 (2005-08)
ETSI EN 301489-3 V 1.4.1 (2002-08)
ETSI EN 300 440-1 V 1.3.1(2001-09)
ETSI EN 300 440-2 V 1.1.2 (2004-07)
Täyttää EU-direktiivien vaatimukset.
‘s-Hertogenbosch, 25/09/08
Mrs. J. Gilad
Toimi tusj ohta ja
Page 25

25
Turvallisuuteen liittyvät varoitukset:
Älä altista tuotetta vedelle tai kosteudelle.
Huolto:
Puhdista ainoastaan kuivalla kankaalla. Älä käytä liuottimia tai hioma-aineita.
Takuu:
Takuu ja vastuuvelvollisuus mitätöityy, jos tuote vaurioituu siihen tehtyjen muutoksien tai
sen väärinkäytön takia.
Yleistä:
Muutoksia malliin ja teknisiin ominaisuuksiin voidaan tehdä ilmoituksetta.
Kaikki logot, merkit ja tuotenimet ovat niiden vastaavien omistajien tuotemerkkejä tai
rekisteröityjä tuotemerkkejä ja niitä on käsiteltävä sellaisina.
Huomio:
Tuote on varustettu tällä merkillä. Se merkitsee, ettei käytettyjä sähkö- tai
elektronisia tuotteita saa hävittää kotitalousjätteen mukana. Kyseisille tuotteille
on olemassa erillinen keräysjärjestelmä.
Copyright ©
Page 26

26
SVENSKA
Inledning
Den trådlösa spelkontrollen är en utvidgning av Wii™ Mote. Anslut spelkontrollen till
Wii™ Mote och de båda kontrollerna kommer att fungera tillsammans som en enhet. På
grund av den trådlösa förbindelsen mellan de båda enheterna är rörelsefriheten ännu
större. Båda kontrollerna har sina specifi ka egenskaper som garanterar en ännu bättre
spelupplevelse!
Funktion
SYNC knapp
Strömbrytare
LEDindikator
Laddningsport
LED-indikator
Anslutningsdon
Sync-knapp
3D spak
C-knapp
Z-k napp
Anslutningsinstruktioner
• Sätt på Wii™ konsolen
• Koppla Wii™ fjärrkontrollen till Wii™ konsolen
• Plugga in spelkontrollens mottagare i Wii™ fjärrkontrollen och tryck på mottagarens
SYNC-knapp. LED:en på mottagaren börjar blinka
• Koppla på spelkontrollen och tryck på spelkontrollens SYNC-knapp (LED:arna kommer
att sluta blinka)
• Spelkontrollen kan nu användas
Notera
• Om du av misstag trycker på SYNC-knappen, måste du trycka på mottagarens
SYNC-knapp för att återupprätta kontakten
• När spelkontrollen går i viloläge måste du trycka på Z-knappen för att aktivera den igen
• Ladda spelkontrollen när den är i läget POWER OFF (avstängd)
• Ha alltid på dig armbandet när spelkontrollen används
Page 27

27
ÖVERENSSTÄMMELSEFÖRKLARING
Vi:
Nedis B.V.
De Tweeling 28
5215MC ’s-Hertogenbosch
Holland
Tel.: 0031 73 599 1055
E-post: info@nedis.com
Intygar att produkten:
Märke: KÖNIG
Modell: GAMWII-WLNUN10
Beskrivning: Wii™ trådlös spelkontroll
Överensstämmer med följande standarder:
EN50950-1; 2005; EN50371; 2002
ETSI EN 301489-1 V 1.6.1 (2005-08)
ETSI EN 301489-3 V 1.4.1 (2002-08)
ETSI EN 300 440-1 V 1.3.1(2001-09)
ETSI EN 300 440-2 V 1.1.2 (2004-07)
Och uppfyller kraven i den Europeiska unionens direktiv.
‘s-Hertogenbosch, 25/09/08
Fru. J. Gilad
Inköpschef
Page 28

28
Säkerhetsanvisningar:
Utsätt inte produkten för vatten eller fukt.
Underhåll:
Rengör endast med torr trasa. Använd inga rengöringsmedel eller frätande medel.
Garanti:
Ingen garanti gäller vid några ändringar eller modifi eringar av produkten eller för skador
som har uppstått på grund av felaktig användning av denna produkt.
Allmänt:
Utseende och specifi kationer kan komma att ändras utan föregående meddelande.
Alla logotypers varumärken och produktnamn är varumärken eller registrerade
varumärken tillhörande respektive ägare och erkänns härmed som sådana.
Obs!
Produkten är märkt med denna symbol. Det innebär att använda elektriska
eller elektroniska produkter inte får slängas bland vanliga hushållssopor. Det
fi nns särskilda återvinningssystem för dessa produkter.
Copyright ©
Page 29

29
ČESKY
Úvod
Bezdrátový ovladač Wii playchuk je rozšířením Wii™ Mote. Připojte jednotku bezdrátového
ovladače k Wii™ Mote, dva herní ovladače budou pracovat shodně. Díky bezdrátovému
spojení mezi oběma získáte větší volnost pohybu. Každý herní ovladač má své specifi cké
vlastnosti, které dávají ještě větší pocit radosti a uspokojení ze hry.
Funkce
Tlačítko SYNC
Hlavní vypínač
LED indikátor
Nabíjecí port
Indikační LED diody
Konektor
Tlačítko SYNC
3D ovládací páčka
Tlačítko C
Tlačítko Z
Pokyny pro připojení
• Zapněte hrací konzolu Wii™.
• Připojte dálkovou jednotku Wii™ k hrací konzole Wii™.
• Zastrčte přijímač bezdrátového herního ovladače do dálkové jednotky Wii™ a stiskněte
tlačítko „SYNC (Synchronizace)“ na přijímači. LED indikátor na přijímači začne blikat.
• Zapněte vypínač na ovladači Playchuk a stiskněte na něm tlačítko SYNC ( LED diody
začnou krátce blikat).
• Systém bezdrátového herního ovládání je připraven k použití.
Poznámka
• Pokud náhodně stisknete tlačítko the SYNC, musíte k obnovení systému stisknout
tlačítko SYNC na přijímači
• Když se stanice bezdrátového herního ovládání se přepne do pohotovostního stavu
(sleep), můžete ji znovu aktivovat stiskem tlačítka Z.
• Stanici bezdrátového herního ovládání nabíjejte ve vypnutém stavu (POWER OFF).
• Při hraní zavěste herní ovladače řemínkem na zápěstí.
Page 30

30
Prohlášení o shodě
Společnost
Nedis B.V.
De Tweeling 28
5215MC ’s-Hertogenbosch
Nizozemí
Tel.: 0031 73 599 1055
info@nedis.com
prohlašuje, že výrobek:
Značka: KÖNIG
Model: GAMWII-WLNUN10
Popis: Wii™ bezdrátový herní ovladač
Splňuje následující normy:
EN50950-1; 2005; EN50371; 2002
ETSI EN 301489-1 V 1.6.1 (2005-08)
ETSI EN 301489-3 V 1.4.1 (2002-08)
ETSI EN 300 440-1 V 1.3.1(2001-09)
ETSI EN 300 440-2 V 1.1.2 (2004-07)
a je v souladu s požadavky předpisů Evropské unie.
‘s-Hertogenbosch, 25. září 2008
Mrs. J. Gilad
Obchodní ředitelka
Page 31

31
Bezpečnostní opatření:
Nevystavujte zařízení nadměrné vlhkosti nebo vodě.
Údržba:
K čištění používejte pouze suchý hadřík. Nepoužívejte rozpouštědla ani abrazivní
materiály.
Záruka:
Jakékoli změny, modifi kace nebo poškození zařízení v důsledku nesprávného zacházení
se zařízením ruší platnost záruční smlouvy.
Obecné upozornění:
Design a specifi kace výrobku mohou být změněny bez předchozího upozornění.
Všechna loga a názvy výrobků jsou obchodní značky nebo registrované obchodní značky
příslušných vlastníků a jsou chráněny příslušnými zákony.
Upozornění:
Tento výrobek je označen následujícím symbolem. To znamená, že s výrobkem
je nutné zacházet jako s nebezpečným elektrickým a elektronickým odpadem
a nelze jej po skončení životnosti vhazovat do běžného domácího odpadu.
Existují zvláštní sběrná střediska pro likvidaci těchto produktů.
Copyright © (Autorská práva)
Page 32

32
ROMÂNĂ
Introducere
Playchuk-ul fără fi r este o extensie a Wii™ Mote. Conectaţi playchuk-ul la Wii™ Mote şi
cele două controlere vor lucra armonios împreună. Datorită conexiunii fără fi r dintre cele
două, există o mai mare libertate de mişcare. Fiecare controler are caracteristicile sale
specifi ce, ceea ce asigură că veţi avea o şi mai mare plăcere în joacă!
Funcţii
Buton SYNC
Buton de pornire
Indicator LED
Port de încărcare
LED indicator
Conector
Buton SYNC
Comandă 3D
Buton C
Buton Z
Instrucţiuni de conectare
• Porniţi consola Wii™
• Conectaţi comanda de la distanţă Wii™ la consola Wii™
• Conectaţi receptorul Playchuk în comanda de la distanţă Wii™ şi apăsaţi butonul SYNC
de pe receptor. LED-ul de pe receptor va începe să lumineze intermitent
• Porniţi Playchuk-ul şi apăsaţi butonul SYNC de pe Playchuk (lumina intermitentă a LEDului se va opri)
• Playchuk-ul este gata pentru a fi utilizat
Observaţie
• Dacă apăsaţi accidental butonul SYNC, va trebui să apăsaţi şi butonul SYNC de pe
receptor pentru a restabili conexiunea
• Când Playchuk-ul intră în modul de adormire, apăsaţi butonul Z pentru a-l activa din
nou
• Încărcaţi Playchuk-ul în timp ce este în stare de OPRIT
• Purtaţi întotdeauna şiretul de prindere când folosiţi Playchuk
Page 33

33
Declaraţie de conformitate
Noi,
Nedis B.V.
De Tweeling 28
5215MC ’s-Hertogenbosch
Olanda
Tel.: 0031 73 599 1055
Email: info@nedis.com
Declarăm că acest produs:
Marca: KÖNIG
Model: GAMWII-WLNUN10
Descriere: Playchuk Wii fără fi r
Este în conformitate cu următoarele standarde:
EN50950-1; 2005; EN50371; 2002
ETSI EN 301489-1 V 1.6.1 (2005-08)
ETSI EN 301489-3 V 1.4.1 (2002-08)
ETSI EN 300 440-1 V 1.3.1(2001-09)
ETSI EN 300 440-2 V 1.1.2 (2004-07)
Şi este în conformitate cu cerinţele directivelor Uniunii Europene.
‘s-Hertogenbosch, 25/09/08
J. Gilad
Director achiziţii
Page 34

34
Măsuri de siguranţă:
Feriţi produsul de apă şi de umezeală.
Întreţinere:
Curăţarea trebuie făcută cu o cârpă uscată. Nu folosiţi solvenţi sau agenţi de curăţare
abrazivi.
Garanţie:
Nu oferim nicio garanţie şi nu ne asumăm niciun fel de responsabilitate în cazul
schimbărilor sau modifi cărilor aduse acestui produs sau în cazul deteriorării cauzate de
utilizarea incorectă a produsului.
Generalităţi:
Designul şi specifi caţiile produsului pot fi modifi cate fără o notifi care prealabilă.
Toate siglele mărcilor şi numele produselor sunt mărci comerciale sau mărci comerciale
înregistrate ale proprietarilor de drept şi aici sunt recunoscute ca atare.
Atenţie:
Acest produs este marcat cu acest simbol. Acesta indică faptul că produsele
electrice şi electronice uzate nu trebuie aruncate în gunoiul menajer. Aceste
produse au un sistem separat de colectare.
Copyright ©
Page 35

35
Page 36

36
 Loading...