

Page 1
DVB-S2 REC10
MANUAL (p. 2)
High definition DVB-S2 receiver
2013-03-15
Page 2

ENGLISH
High definition DVB-S2 receiver
Introduction:
• We recommend that you read this manual before installing/using this product.
• Keep this manual in a safe place for future reference.
Contents
GENERAL INFORMATION.............................................................................................................................. 4
MAIN FEATURES....................................................................................................................................... 4
FOR YOUR SAFETY.................................................................................................................................. 4
IMPORTANT SAFETY INSTRUCTIONS.................................................................................................... 4
CONTENTS OF PACKAGING.................................................................................................................... 6
GENERAL OPERATION............................................................................................................................. 6
RCU............................................................................................................................................................ 7
REAR PANEL ............................................................................................................................................. 8
CONNECT TO A TV USING SCART SUPPORT........................................................................................ 8
INSTALLATION ............................................................................................................................................... 9
CONNECT TO A TV USING SCART SUPPORT........................................................................................ 9
CONNECT TO A DIGITAL AMPLIFIER....................................................................................................... 9
MENU INFORMATION................................................................................................................................... 10
MAIN MENU ............................................................................................................................................. 10
1. Edit Channel...................................................................................................................................... 10
1.1 TV Channel list .........................................................................................................................11
1.2 Radio Channel List .................................................................................................................. 12
1.3 Delete All ................................................................................................................................. 12
2. Installation ......................................................................................................................................... 13
2.1 Antenna Connection ................................................................................................................ 13
2.2 Satellite List ............................................................................................................................. 13
2.3 Antenna Setup......................................................................................................................... 14
2.4 Single Satellite Search............................................................................................................. 15
2.5 Multi Satellite Search............................................................................................................... 15
2.6 TP List...................................................................................................................................... 16
3. System Setup .................................................................................................................................... 16
3.1 Language................................................................................................................................. 17
3.2 TV System ............................................................................................................................... 17
3.3 Display Setting......................................................................................................................... 17
3.4 Local Time Setting ................................................................................................................... 17
3.5 Timer Setting (Not available for this model)............................................................................. 17
3.6 Parental Lock........................................................................................................................... 18
3.7 OSD Setting............................................................................................................................. 18
3.8 Favourite.................................................................................................................................. 18
3.9 Other........................................................................................................................................ 18
4. To ol s .................................................................................................................................................. 18
4.1 Information............................................................................................................................... 18
4.2 Factory Setting ........................................................................................................................ 19
4.3 Upgrade By RS232.................................................................................................................. 19
4.4 S/W Upgrade by OTA .............................................................................................................. 19
2
Page 3

4.5 Conditional Access (Not active for this model) ........................................................................ 19
4.6 Upgrade by USB...................................................................................................................... 20
4.7 Media Player............................................................................................................................ 21
4.8 Remove USB device safely ..................................................................................................... 21
5. Game................................................................................................................................................. 22
6. REC (Not available for this model) .................................................................................................... 22
6.1 PVR storage information.......................................................................................................... 22
6.2 PVR Setting ............................................................................................................................. 22
7. Hot key .............................................................................................................................................. 22
7.1 Info........................................................................................................................................... 22
7.2 EPG ......................................................................................................................................... 22
7.3 Find.......................................................................................................................................... 23
7.4 Number.................................................................................................................................... 23
7.5 TV/RADIO................................................................................................................................23
7.6 Up/Down (Channel Change).................................................................................................... 23
7.7 Left/Right (Volume+/-).............................................................................................................. 23
7.8 Mute......................................................................................................................................... 23
7.9 Pause ...................................................................................................................................... 23
7.10 OK ........................................................................................................................................... 23
7.11 Audio ....................................................................................................................................... 23
7.12 Recall....................................................................................................................................... 23
7.13 FAV .......................................................................................................................................... 24
7.14 Te le t ex t .................................................................................................................................... 24
7.15 Zoom ....................................................................................................................................... 24
3
Page 4

GENERAL INFORMATION
A Digital Satellite Receiver is a convenient product that allows you to view a variety of programmes via
satellite. This user guide covers the installation of the DSR and the necessary steps to implement various
features. This also explains special features available only in this DSR in detail, which will allow you to make
full use of these features. Information presented in this document is subject to change. We reserve the right,
without notice, to make change in product design or performances, as improvements are made in engineering
or technology.
MAIN FEATURES
• MPEG2 SD, MPEG2 HD, H.264/AVC SD, H.264/AVC HD, MP4
• Embedded Conax
• SCPC and MCPC receivable from C/Ku band satellite
• Automatic PAL/NTSC conversion
• 4000 channels TV and Radio programmable
• 32 different favourite groups selection
• Multi-language OSD
• Fully supports 7 day Electronic Programme Guide (EPG)
• Picture in Graphics (PIG) support
• True colour On Screen Display
• Automatic network search for newly added transponders
• Fully supports DiSEqC 1.2, 13/18V, 0/22K, 0/12V LNB control
• Various channel editing functions (favourite, moving, locking, renaming, deleting and sorting)
• Parental control for channels
• Easy to use Menu System
• Software upgrades through RS232 port and receiver to receiver, support
• USB upgrade
• 8 Timer Reservations, automatically switch to a specific channel (Not active for this model)
• Subtitle support DVB EN300743 and EBU
• Teletext support DVB ETS300472 by VBI and OSD
• Automatic save for last channel
• Channel list can be sorted alphabetically A-Z, Scramble, Favourite, Lock, Sat
• Dual display HD and SD simultaneous
• Supports FAT16/FAT32/FAT12
• Only lists JPEG/BMP files
• 480i/p, 576i/p, 720p, 1080i,1080p with HDCP copy protection
• Games
• 1 recording, then can still perform another pre-programmed recording (not active for this model)
FOR YOUR SAFETY
• To avoid electric shock hazards, do not open the cabinet. Refer servicing to qualified personnel only.
• Keep the receiver away from flower vases, tubs, sinks, etc., in order to avoid damaging the equipment.
• Do not expose the receiver to intense sunlight and keep it away from any heat sources.
• Do not block the ventilation holes of the receiver so that air can circulate freely.
• When a power surge occurs, you should cut off the power immediately.
• Do not touch the receiver during thunderstorms, as it may create electric-shock hazards.
• Switch the receiver off whenever it remains out of service for an extended period.
• Be sure to turn the receiver off and disconnect the AC power cord before cleaning the receiver surface. If
the surface is dirty, wipe clean with a cloth which has been dipped in a weak soap and water solution and
wrung out thoroughly. Then wipe again with a dry cloth.
IMPORTANT SAFETY INSTRUCTIONS
1. All the safety and operating instructions should be read before this product is operated.
2. The safety and operating instructions should be retained for future reference.
3. All warnings on the appliance and in the operating instructions should be adhered to.
4. All operating instructions should be followed.
5. Do not use this apparatus near water. The appliance should not be used near water or moisture, for
example in a damp basement or near a swimming pool.
6. Clean only with a dry cloth.
7. Do not block any ventilation openings. Install in accordance with the manufacturer’s instructions.
8. Do not install near any heat sources such as radiators, heat registers, stoves, or other apparatus
(including amplifiers) that produce heat.
4
Page 5
9.
If the provided plug doesn’t fit into your outlet, consult an electrician for replacement of the obsolete outlet.
10. Protect the power cord from being walked on or pinched, particularly at the plugs, portable receptacles,
and at the point where they exit from the apparatus.
11. Only use attachments/accessories specified by the manufacturer.
12. Use only with the cart, stand, tripod, bracket or table specified by the manufacturer or sold with the
apparatus. When a cart or rack is used, use caution when moving the cart/apparatus combination to avoid
injury from falling furniture. The external wiring connected to the terminals requires installation by qualified
personnel or the use of ready-made leads or cords.
13. Unplug the apparatus during lightning, or during long periods of disuse.
14. Refer all servicing to qualified personnel. Servicing is required when the apparatus has been damaged in
any way, such as power supply cord or plug damage, spilled liquids, objects have fallen onto the
apparatus, the apparatus has been exposed to rain or moisture, does not operate normally or has been
dropped.
15. CAUTION: These servicing instructions are for use by qualified service personnel only. To reduce the risk
of electric shock, do not perform any servicing other than that delineated in the operating instructions
unless you are qualified to do so.
16. Ensure that ventilation is not impeded, by refraining from covering the ventilation openings with items
such as newspapers, table cloths, curtains etc.
17. WARNING: To reduce the risk of fire or electric shock, do not expose this apparatus to rain or moisture.
The apparatus should not be exposed to dripping or splashing and objects filled with liquids, such as
vases, should not be placed on the apparatus.
18. WARNING: Terminals marked with the
symbol may be of sufficient magnitude to constitute a risk of
electric shock. The external wiring connected to the terminals requires installation by qualified personnel
or the use of ready-made leads or cords.
19. CAUTION: Danger of explosion if the battery is incorrectly replaced. Replace only with the same or
equivalent type.
20. WARNING: The batteries should not be exposed to excessive heat such as sunshine, fire or other heat
sources.
21. WARNING: The mains plug is used as a disconnect device, the disconnected device will remain readily
operable.
22. Explanation of symbols, markings, signal lamps or similar indicate that the apparatus is completely
disconnected from the mains.
This equipment is a Class II or double insulated electrical appliance. It
has been designed in such a way that it does not require a safety connection to electrical earth.
23. - This lightning flash with an arrowhead symbol within an equilateral triangle is intended to alert the user
to the presence of non-insulated “dangerous voltage” within the product’s casing that may be of
sufficient magnitude to constitute a risk of electric shock.
- Warning: To reduce the risk of electrical shock, do not remove the cover (or back) as there are no user
serviceable parts inside. Refer servicing to qualified personnel.
- The exclamation point within an equilateral triangle is intended to alert the user to the presence of
important operating and maintenance instructions in the literature accompanying the appliance.
24.
Correct Disposal of this product. This marking indicates that this product should not be disposed of with
other household waste throughout the EU. To prevent possible harm to the environment or human health
from uncontrolled waste disposal, recycle it responsibly to promote the sustainable reuse of material
resources. To return your used device, please use the return and collections systems in your area, or
contact the retailer where the product was purchased. They can take this product for environmentally safe
recycling.
5
Page 6

Problem
Possible causes What to do
The display on the front panel
does not light up
Main cable is not connected. Check if the main cable is plugged
into the power socket.
No sound or picture, but the front
panel shows a red light.
The receiver is in stand-by mode. Press the stand-by button.
No sound or picture. The satellite dish is not pointing at
the satellite
Adjust the dish. Check the signal
level in the antenna setup menu.
No signal or weak signal. Check the cable connections, LNB
and other equipment connected
between the LNB and the receiver
or adjust the dish.
The satellite dish is not pointing at
the satellite.
Adjust the dish.
Signal is too strong. Connect a signal attenuator to the
LNB input.
Bad picture/blocking error. Satellite dish is too small. Change to a larger dish.
LNB noise factor is too high. Change to an LNB with a lower
noise factor.
The LNB is faulty. Change the LNB
The picture is not showing on the
screen when switched on.
The system is connected by RF
leads (coaxial cables).
Check the UHF channel selected
in your system and tunes the UHF
channel properly.
There is interference with your
digital satellite channels, an
existing terrestrial channel or
video signal.
The system is connected by RF
leads and the output channel of the
receiver interferes with an existing
terrestrial channel or video signal.
Change the receiver output
channel to a more suitable
channel or connect the system by
SCART leads.
The RCU is not working Batteries are exhausted. Change the batteries.
RCU is incorrectly aimed. Aim the RCU at the receiver or
check that nothing blocks the front
panel.
Note: If you have tried all of the actions suggested above without solving the problem, please contact your
dealer or service provider.
CONTENTS OF PACKAGING
• 1x DVB-S2 receiver
• 1x Remote control
• 2x AA batteries
• 1x A/V cable
• Manual
GENERAL OPERATION
• Throughout this manual you will notice that the everyday operation of the receiver is based on a series of
user friendly on-screen displays and menus. These menus will help you get the most from your receiver,
guiding you through installation, channel organising, viewing and many other functions.
• All functions can be carried out using the buttons on the RCU, and some of the functions can also be carried
out using the buttons on the front panel.
• The receiver is easy to use, always at your command and adaptable for future technological advances.
• Please be aware that new software may change the functionality of the receiver.
• Should you experience any difficulties with the operation of your receiver, please consult the relevant
section of this manual, including the troubleshooter, or alternatively call your dealer or a customer service
adviser.
6
Page 7
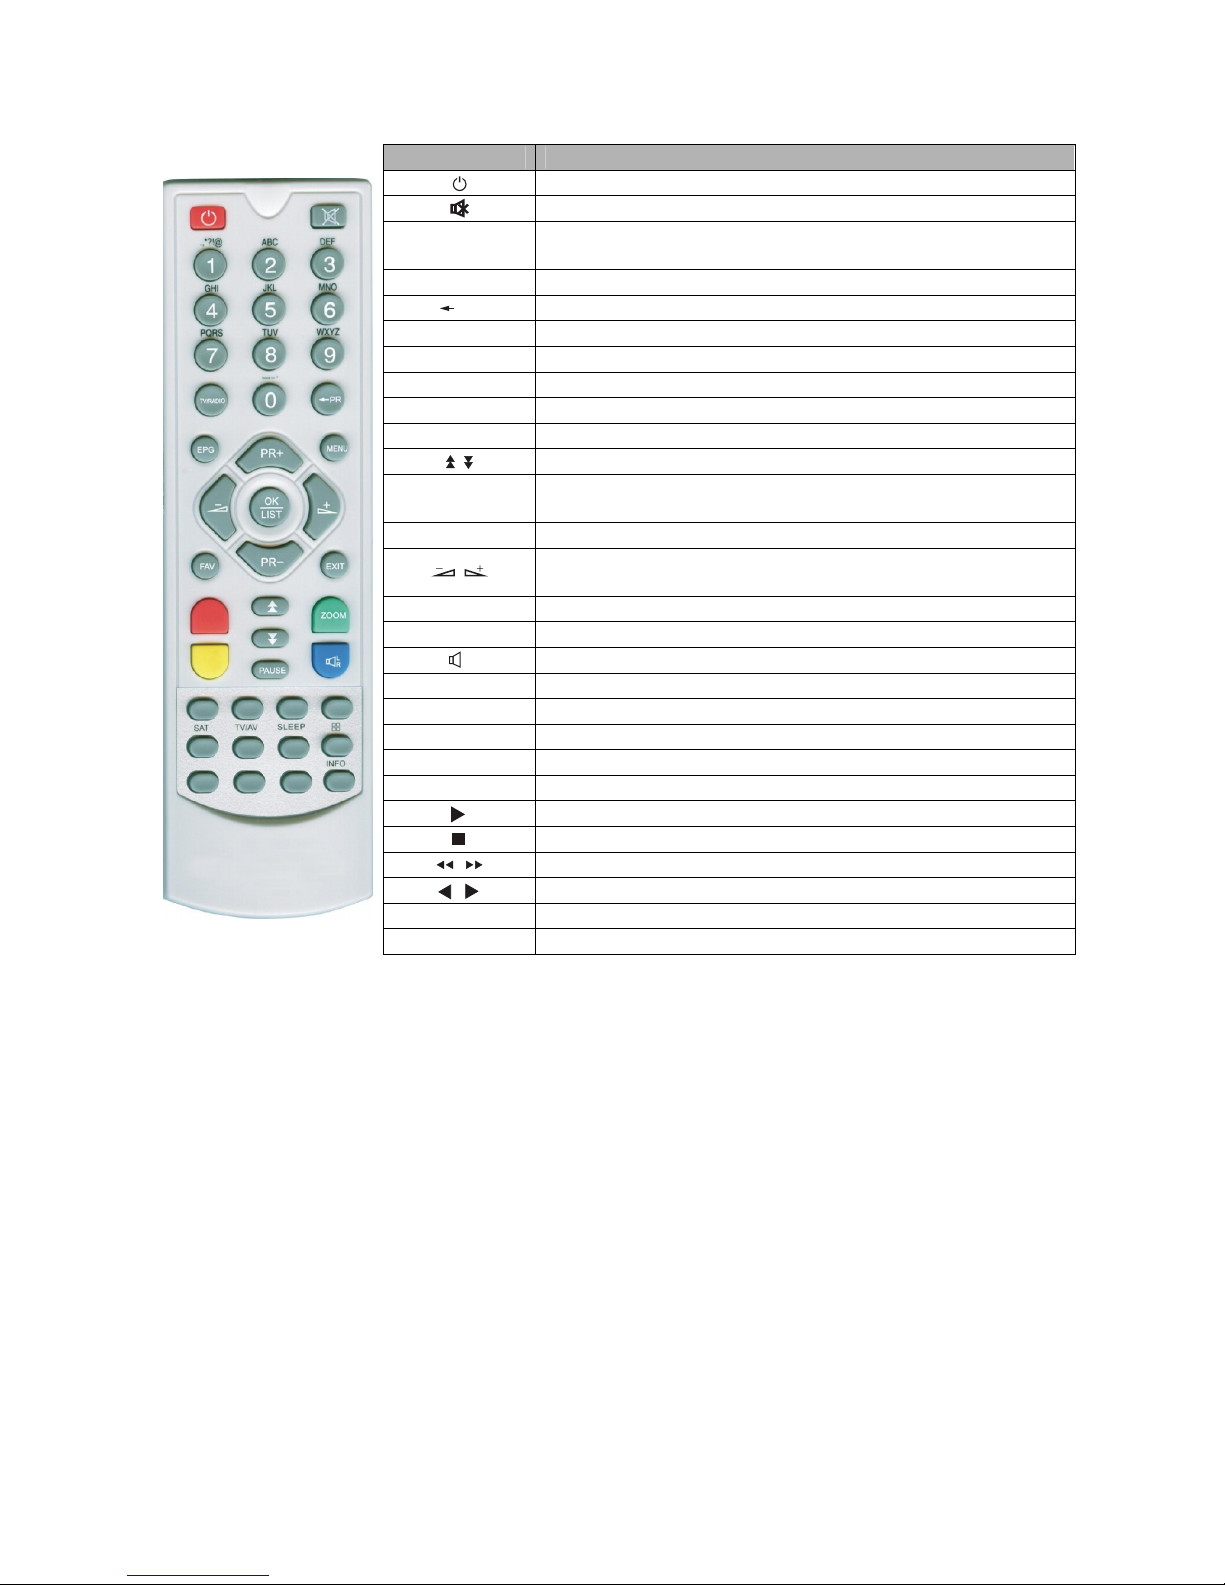
RCU
Key
Function
Turns the DSR power ON/OFF
When watching a channel, mutes the sound
0~9
Enter the number of the required menu item or select a
channel number to search
TV/RADIO
Switches between TV and Radio mode
PR
Switches back to previous channel
FAV
Displays the favourite groups list
SAT
Displays the satellite window
FIND
Displays the Find window
INFO
Information on the current channel
MENU
To open the menu
Page up and page down
OK, LIST
Executes the selected item in the menu screen or enters the
desired value in any input mode.
PR+, PR-
To move one channel up or down
Adjusts the volume up or down, or in the menu moves left or
right
EXIT
Go to the previous menu or exit the menu
EPG
Go to the Electronic Programme Guide
L
R
Go to the audio window
SLEEP
Enter sleep mode
TXT
Enter teletext or subtitle mode
TV/AV
Switches between TV and AV mode
V-FORMAT
Changes the HD format
RECORD
To record a programme
Plays the programme
Stops the programme
Fastforward or rewind
Skip forward or skip backward
SHIFT
Time shift function key (not active for this model)
PAUS E
Press once to pause, press again to unpause
7
Page 8
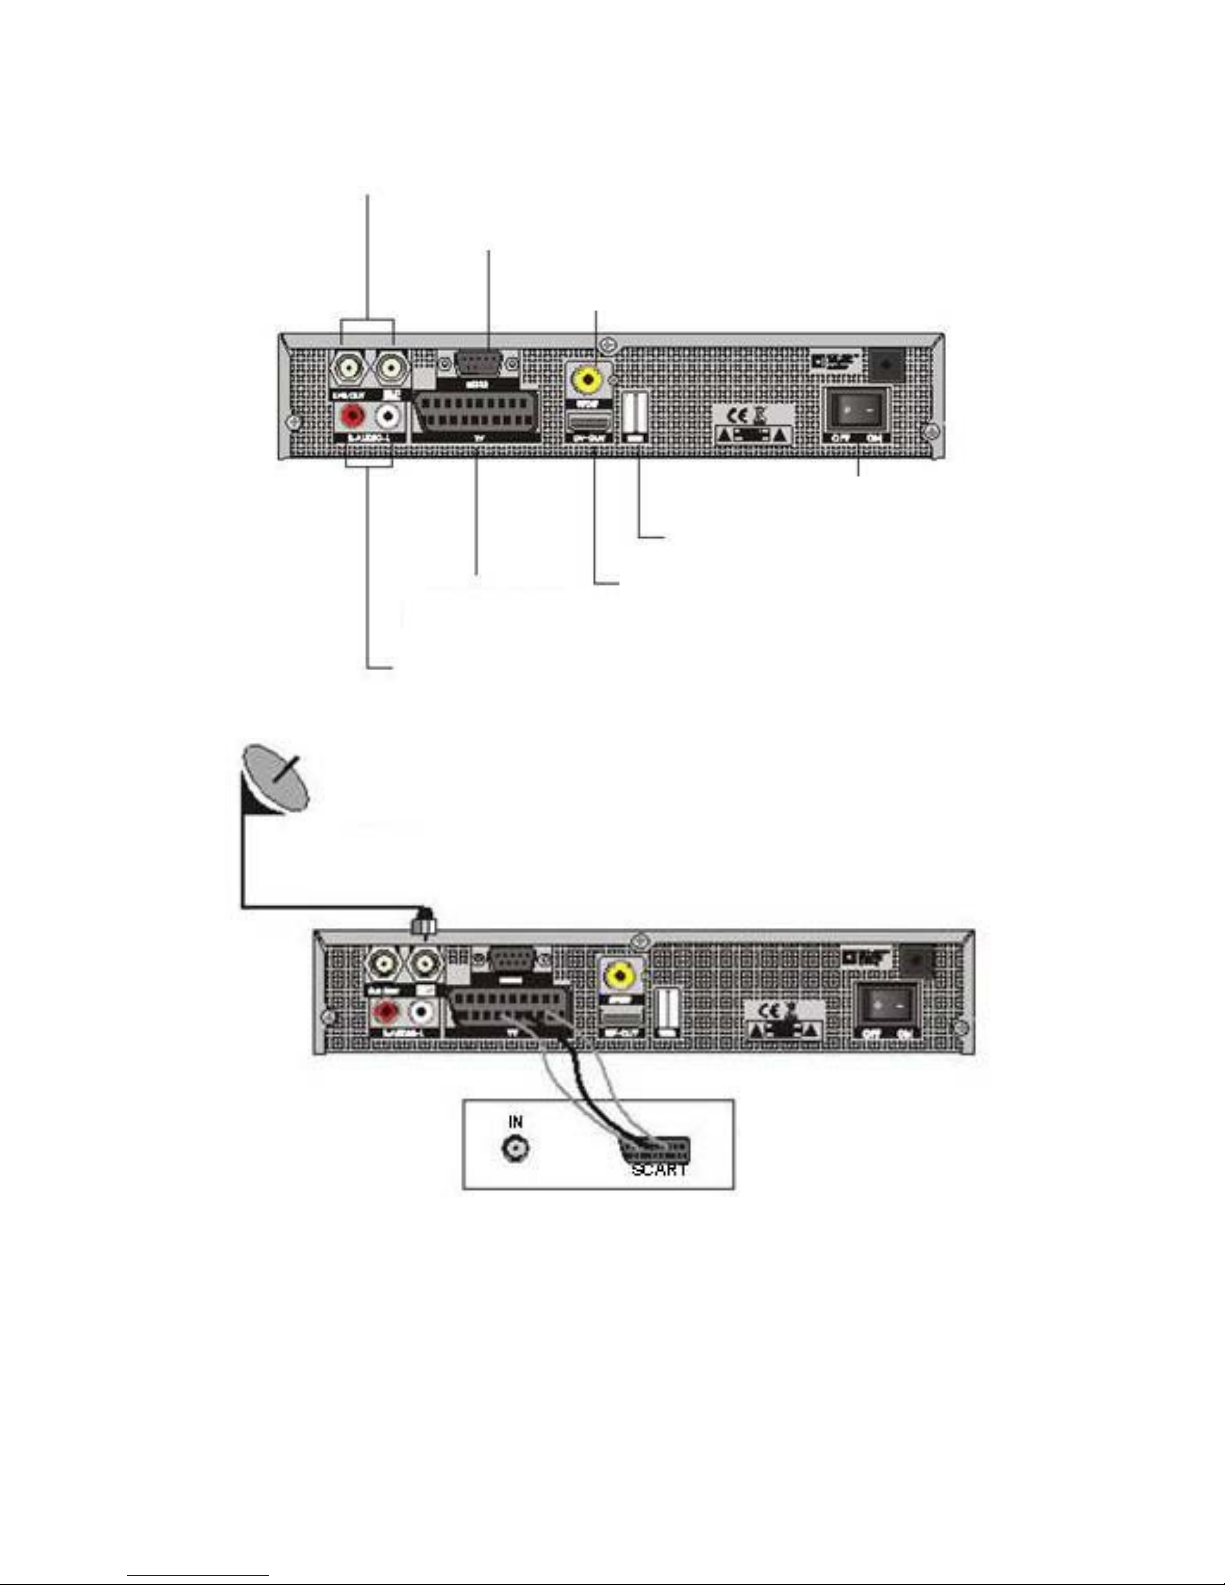
REAR PANEL
LNB IN: CONNECT
TO SATELLITE ANTENNA
LNB OUT: CONNECT TO THE OTHER RECEIVER
CONNECT TO A PC FOR S/W UPGRADE
CONNECT TO A DIGITAL AMPLIFIER
POWER ON/OFF
CONNECT TO A USB DEVICE
CONNECT TO TV USING
A SCART CABLE
CONNECT TO TV SET DV-OUT INPUT
CONNECT TO AUDIO R/L TO TV OR AUDIO TUNER
CONNECT TO A TV USING SCART SUPPORT
Satellite Dish
DSR
TV
• The picture is only for reference; please make the object as the standard.
8
Page 9

INSTALLATION
CONNECT TO A TV USING SCART SUPPORT
Satellite Dish
CONNECT TO A DIGITAL AMPLIFIER
Satellite Dish
DIGITAL AUDIO
CONVERTOR OR
AMPLIFIER
SPEAKER
• The picture is only for reference; please make the object as the standard.
9
Page 10

MENU INFORMATION
MAIN MENU
Make sure that you have properly installed and connected the receiver cables.
If the receiver is in factory status or there is no programme list (when the power is on), the Main Menu window
will be displayed on the screen.
During the normal TV/Radio mode, press the MENU key on the RCU to enter into the Main Menu window.
This menu consists of 6 major main menus:
- Edit Channel
- Installation
- System Setup
- Tools
- Game
- REC
During the installation the OK key confirms a selection and the LIST key shows a Drop Down Box if the
column has a ◄► mark. You can also use the numeric keys on the remote control (RCU) to enter a numeric
value.
Use the PR+, PR- keys to move up and down from one line to another, and use the
key to move from
main menu to sub menu and move from left to right or vice versa.
In the meantime, if you want to escape the menu system, please press the MENU or EXIT key on the RCU.
Sub-menu Turns grey when there is no programme
Edit Channel TV Channel List
Radio Channel List
Delete all
Installation Antenna Connection
Antenna Setup
Multi-Satellite Search
Satellite List
Single Satellite Search
TP List
System Setup Language
Local Time Settings
Parental Lock
Favourite
Display Settings
TV System
Timer Settings
OSD Settings
Other
Tools Information
Upgrade by RS232
Upgrade by USB
Media Player
Remove USB device safely
Factory Settings
S/W Upgrade by OTA
Conditional Access
Game Tetris Othello Sudoku
REC PVR Storage Information
PVR Settings
1. Edit Channel
1. Press the OK or key to pop up the “Input Password” dialogue box.
You cannot enter the menu unless the correct password is input. The
default password is “0000”.
2. Press the PR+, PR- keys to move the cursor up or down.
3. Press the EXIT or
key to move the selection to the left menu.
10
Page 11

1.1
TV Channel list
1. Press the
keys to select the satellite.
2. Press the PR+, PR- keys to select the programme that you want to play
and then press the OK key to view it in the small window. If you move the
yellow cursor to select up or down, you will see a grey line which indicates
the playing programme in the small window.
3. Press the FAV key to move the FAV button upward. Select the programme
and press the OK key to pop up the favourite groups list. In the list, select
the group that you want to add and press the OK key. Then you will find
the favourite marker is displayed on the right side of the selected
programme.
Press the FAV key again to exit from the FAV mode and you will find the
FAV button returns to its original position.
4. Press the red key to move the lock button upward. Select the programme
and press the OK key to mark this programme with the locked marker.
You can cancel this marker by pressing the OK key once more.
Press red key again to exit from the locked mode and you will find the
locked button return to its original position.
5. Press the green key to move the skip button upward. Select the
programme and press the OK key to mark this programme with the skip
marker. You can cancel this marker by pressing the OK key once more.
Press the green key again to exit from skip mode and you will find the skip
button returned to its original position.
6. Press the yellow key to move the move the button upward. Select the
programme and press the OK key to mark this programme with the move
marker. Press the PR+, PR- keys to move the cursor to the position where
you want it and press the OK key to confirm. Press the yellow key again to
exit from yellow mode, and you will find the yellow button returned to its
original position.
7. Press the blue key to enter the Edit channel window.
11
Page 12

i.
Sort (red key)
Press the red key to open the Sort drop-down list.
Name (A-Z): The ascending order, omitting the $ Character. The numbers are
at the beginning, then capital letters, and finally lowercase letters.
Name (Z-A): The opposite order from the above Name (A-Z).
Free/Scramble: All FTA programmes are listed at the beginning, while all
scrambled programmes are listed last.
Lock: all locked programmes are listed last.
ii. Edit (green key)
Press the green key to move the Edit button upwards. Select the programme
and press the OK key to pop up the Rename window.
In the Rename window, press the red key to switch between a capital letter
and lowercase letter; press the green key to delete the character on the
cursor; press the
keys to move the cursor left or right; press the
numeric keys (0-9) to input the characters, please refer to the drop-down
table. Press the yellow key to save and exit or press the blue key to cancel
and exit.
Numeric keys Press the numeric keys repeatedly, displaying in circle
1 .,*?!@1
2 ABC2
3 DEF3
4 GHI4
5 JKL5
6 MN06
7 PQRS7
8 TUV8
9 WXYZ9
0 [space]_-0
If the name is empty, the system will pop up a dialogue box with “Name” once the yellow key is pressed. Press
the OK key to close this dialogue box.
iii. Delete (blue key)
In the delete window, press the blue key to move the delete button upward. Select the programme and press
the OK key to mark this programme with the delete marker. You can cancel this marker by pressing the OK
key again.
Press the EXIT key to pop up the dialogue box “Are you sure you want to save?”. Select the Yes option and
press the OK key to save, or select the NO option and press the OK key to exit without saving.
1.2 Radio Channel List
Same operation as 1.1 TV Channel List. Please look there for operation.
1.3 Delete All
Move cursor to Delete All Items, and press the OK key to pop up the dialogue
box “Warning! Do you really want to delete all channels?”. Press the EXIT key
to pop up the dialogue box “Are you sure you want to save?”. Select the Yes
option and press the OK key to save, or select the NO option and press the
OK key to exit without saving.
12
Page 13

2. Installation
1. Press the OK or key to pop up the “Input Password” dialogue box.
You cannot enter the menu unless the correct password is input. The
default password is “0000”.
2. Press the PR+, PR- keys to move the cursor up or down.
3. Press the EXIT or
key to move the selection to the left menu.
2.1 Antenna Connection
Press the
keys to select between motor antenna and fixed antenna.
2.2 Satellite List
1. Press the PR+, PR- keys to select the satellite up or down. Press the OK
key to select and mark, or you can press the OK key again to cancel the
selection and the mark.
2. If there is no satellite, the red and blue keys will be invalid.
3. Press the red key to pop up the Edit Satellite Window. Press the PR+, PR-
keys to move the cursor up or down.
Name: Use the numeric keys to change the name of the satellite, please
refer to Edit Channel Name.
Longitude: You can press the keys to switch between east longitude and west longitude. After
pressing the OK key, you can use the numeric keys to edit the longitude, press the EXIT key or the PR+, PRkeys to exit editing mode. The range of the longitude is from 1 to 180 degrees. If beyond this range, the
system will inform you “out of range” when you press the yellow key on the RCU.
After setting, press the yellow key to save and exit, or press the blue key to exit without saving.
4. Press the green key to pop up the satellite window.
Since it’s the same operation as the above Edit Satellite Window, Please
read there for operation instructions.
5. Press the blue key to pop up the dialogue box “Are you sure you want to
delete?”. Select the Yes option and press the OK key to delete the
selected satellite. You can cancel this operation by selecting the NO
option.
13
Page 14

2.3 Antenna
Setup
Part A: Fixed
Suppose that you have selected Fixed Antenna in the Antenna Connection
window.
1. Satellite: All selected satellites in the satellite list are displayed in this item.
Press the
keys to select the circled satellite. Or press the OK key
to open the drop-down list, then select the desired satellite in the list and
press the OK key to confirm.
2. LNB Freq, Transponder, DiSEqC 1.0, DiSEqC1.1: The same operation as
above.
3. 22K, 0/12V, polarity: you can press the
keys to select what is
circled.
Part B: Motor
Suppose that you have selected Motor Antenna in the Antenna Connection
window.
1. LNB Type: Select the proper LNB type.
2. Motor Type: Select between DiSEqC1.2 and USALS. If you select
DiSEqC1.2, the following Local Longitude and Local Latitude items will
turn grey.
3. Delete All: Press the OK key to pop up the dialogue box “Are you sure you
want to clear the set satellite position of this tuner?”. Press the OK key on
the Yes option to clear all the memory of satellite positions that are
connected to the current tuner.
4. Motor Settings: Press the OK key to enter the Motor Settings window.
Satellite: Press the
keys to select the circled satellite. Or press
the OK key to open the drop-down list, then select the desired satellite in
the list and press the OK key to confirm.
Transponder: The same operation as above.
Position No., & Save: The range is from 0 to 63. “0” denotes the original position.
You can select the proper value when you rotate the antenna.
Go to X: Press the OK key to open the drop-down list, select the proper position (reference or from 1 to 63), in
order to activate the selected position.
West <Save> East: Press the
key to turn west, or press the key to turn east.
Press the OK key to pop up the dialogue box “Are you sure you want to change this satellite’s position?”.
Press the OK key on the Yes option to save the current position, or press the OK key on the NO option to
cancel the operation.
Recalculation: Press the OK key to pop up the dialogue box “Are you sure you want to change this satellite’s
position?”. Press the OK key on the Yes option for recalculation.
5. Limit Setup: Press the OK key to pop up the Limit Setup window.
Limit Setup: Press the
keys to switch between Disable Limit,
East Limit and West Limit.
Limit Setup: Move the cursor to the Limit Setup button. You can press the
key to turn west, or press the key to turn east.
Go to Reference: Press the OK key to go to reference.
If you select Disable Limit in the above Limit Setup item, this button will
turn grey.
14
Page 15

6.
If you select USALS, Delete All Items will turn grey.
Local Longitude, Local Latitude: Press the
keys to switch
between West and East, or press the
keys to switch between
North and South. Press the OK key to enter editing mode. Use the
numeric keys (0-9) to input the longitude or latitude, press the MENU or
EXIT key to exit. The range of the longitude is from 0 to 180 degrees,
while The range of the latitude is from 0 to 90 degrees. If the input value is
not in this range, the system will pop up an “Out of Range” dialogue box
when you exit this window. You can press the OK key to close this
dialogue box.
7. Motor settings: Press the OK key to enter into the Motor setting window.
Satellite, Transponder: Press the
keys to select satellite or
transponder, or press the OK key to open the drop-down list and select
within the list.
2.4 Single Satellite Search
1. Satellite: Press the
keys to select the circled satellite. Or press
the OK key to open the drop-down list, then select the desired satellite in
the list and press the OK key to confirm.
2. FTA Only: Press the
keys to select between Yes and No.
3. Scan Channel: Press the
keys to select between TV+Radio, TV
Channel, Radio.
4. Network Search: Select between Yes and No. This item turns grey when
Auto Scan is selected in the following Scan mode item.
5. Scan Mode: Press the
keys to select between Auto Scan and
Preset Scan. Auto Scan is a Blind scan, while Preset Scan searches the
preset frequencies.
6. Search: Press the OK key to start searching.
2.5 Multi Satellite Search
From the Multi Satellite Search window you can search several satellites at
the same time.
1. Satellite: All selected satellites in the satellite list window are displayed in
the lower section. You can press the
keys to switch between
them.
2. FTA Only: Press the
keys to select between Yes and No.
3. Scan Channel: Press the
keys to select between TV+Radio, TV
Channel, Radio.
4. Network Search: Select between Yes and No. This item turns grey when
Auto Scan is selected in the following Scan mode item.
5. Scan Mode: Press the
keys to select between Auto Scan and
Preset Scan. Auto Scan is a Blind scan, while Preset Scan searches the
preset frequencies.
6. Search: Press the OK key to start searching.
15
Page 16

2.6 TP
List
1. Press the PR+, PR- keys to select the proper satellite.
2. Press the red key to pop up the Edit TP window.
Frequency, Symbol rate: Press the
keys to add or reduce step by
step. Or press the
numeric keys (0-9) to input the desired value.
The range of the frequency is 3000-13500, while the range of the symbol
rate is 1000~45000. If the input value is beyond this range, the value will
return to the original value.
Polarity: Press the
keys to switch between Vertical and
Horizontal.
3. Press the green key to pop up the Add TP window. Same operation as
the above Edit TP window.
4. Press the yellow key to pop up the dialogue box “Are you sure you want
to delete?”. Press the OK key on the Yes option to delete the selected TP,
or press the EXIT key to cancel the operation.
5. Press the blue key to pop up the Search window.
FTA only, Scan Channel, Network Search:
Press the
keys to select the proper option.
Press the OK key to start searching.
3. System Setup
1. Press the OK or key to move the cursor to the right menu.
2. Press the PR+, PR- keys to move the cursor up or down.
3. Press the EXIT or
key to move the selection to the left menu.
16
Page 17

3.1 Language
1.
Press the OK key to enter the Language window. Press the
keys
to select the language circled, while pressing the PR+, PR- keys to move
the cursor up or down within the circle.
2. Press the MENU or EXIT key to save and exit.
3. For language type, please refer to the customer configuration.
3.2 TV System
Press the PR+, PR- key to move the cursor up or down, while pressing the
keys to change the setting (the setting will take effect immediately).
1. Display Mode: Select between 1080i_25, 1080i_30, 1080p_50, 720p_60,
720p_50, 576p, 576i, 480p, 480i, By Native TV and 1080p_24.
2. Aspect Mode: 4:3 PanScan, 16:9.Select between 4:3LetterBox.
3. Video Output: Select between RGB and CVBS.
4. Digital Audio Out: Select between LPCM Out and BS Out.
3.3 Display Setting
1. Brightness: Press the
key to select from 0-100.
2. Contrast: Press the
key to select from 0-100.
3. Saturation: Press the
key to select from 0-100.
4. Hue: Press the
key to select from 0-100.
5. Sharpness: Press the
key to select from 0-10.
3.4 Local Time Setting
1. Summer Time: Select between ON and OFF. “OFF” delegates the normal
time. If ON is selected, the time will add one hour.
2. GMT Offset: When selecting “ON” in the GMT Usage item, the system will
get the date and time information from the screen automatically. Date and
Time items will turn grey. Select the proper option in the GMT Offset item.
The default setting is GMT ON.
3. Date, Time: When selecting “OFF” in GMT Usage, the Date and Time
items take effect, while GMT Usage turns grey. Use the numeric keys to
input the desired value 5.
After setting, press the MENU or EXIT key to exit and save. If the value is
invalid, the system will display “Invalid input! Continue to edit?”. Press the
OK key on the Yes option to continue with the modification, or press the
OK key on the No option to exit without saving.
3.5 Timer Setting (Not available for this model)
If there is no programme, you cannot enter this window. There are 8 timers
that can be set. Select Timer up or down, and press the OK key to enter the
setting window.
1. Timer mode: The default mode is off. You can set the timer once, daily,
weekly, monthly or yearly.
2. Timer Service: Select between Channel or Record. If the Channel is
selected, the Wakeup Channel is displayed in the following screen. If
Record is selected, the Wakeup Message is displayed in the following
screen. In the wakeup message, you can select between Birthday,
Anniversary, General. At the same time the duration item will turn grey.
3. Wakeup Date, On Time: Use the numeric keys to input the valid date.
Duration: Set the gap time. After waking up, system will power off
automatically after the duration time.
Press the MENU or EXIT key to save and exit.
17
Page 18

3.6 Parent
al Lock
Before entering the Parental Lock window, you need to input the correct
password. The default password is 0000.
1. Menu Lock: Press the
keys to select between Off and On. If you
select “On”, you cannot enter the window before entering the password.
2. Channel Lock: Press the
keys to select between Off and On. The
default value is Off. If you select “On”, you cannot view the locked
channel set in Channel List Edit window until you have input the correct
password.
3. New Password: User the numeric keys (0-9) to input the new password.
4. Confirm Password: Input the new password again. The confirmed
password must be the same as the new password. The system will inform
you “Password changed successfully!” if they are the same, or ask you to
input the password again if they are not the same.
3.7 OSD Setting
1. OSD timeout: Press the
keys to select from 1 to 10 by step 1.
The default value is 5.
2. OSD Transparency: Press the
keys to select between Off, 10%,
20%, 30%, 40%. The default option is Off.
Press the MENU or EXIT key to save and exit.
3.8 Favourite
There are 32 favourites groups listed in this window. Press the PR+, PR- keys
to select one and press the OK key on the rename window.
For explanation please look at: Add Satellite window.
3.9 Other
1. LNB Power: Select between Off and On.
2. Channel Play Type: Select between All, Free, Scramble.
3. Channel Change: Select between black screen and freeze.
4. Tools
1. Press the OK or key to pop up the “Input Password” dialogue box.
You cannot enter the menu unless the correct password is input.
The default password is 0000.
2. Press the PR+, PR- keys to move the cursor up or down.
3. Press the EXIT or key to move the selection to the left menu.
4.1 Information
Press the OK key on the Information window.
18
Page 19

4.2 Factory
Setting
Press the OK key to enter the Factory Setting window.
Select the Yes option and press the OK key to return to the factory setting. All
searched channels and set information will be erased.
Select the No option and press the OK key to cancel this operation, or press
the MENU or EXIT key to cancel and exit.
4.3 Upgrade By RS232
1. Press the
keys to select between all code, Main code, card,
Radio back, key date default db, user db. The default option is all code.
2. Press the OK key on the Start button to start checking the serial port.
4.4 S/W Upgrade by OTA
1. Satellite, Transponder: Select the proper satellite or transponder.
2. Frequency, Symbol Rate, Download PID: Use the numeric keys to input
the proper value.
3. Polarity: Select between H and V.
4. Start: Press the OK key to start upgrading.
If there is no correct information, system will display “Collecting information”.
You can press the OK key on the Stop button and then press the OK key on
the Exit button to return to the previous window.
The system will start upgrading after collecting the information successfully.
Press the OK key on the Download button and press the OK key on the Burn
flash button to start burning. After booting, press the OK key on the Reboot
button to reboot.
4.5 Conditional Access (Not active for this model)
Insert the smart card with the chip facing down.
Push the smart card into the CA slot. Only a few millimeters of the card should
be visible outside the slot.
Select the Conditional Access item and press the OK key.
You will then enter its sub-menu which consists of four items about CA Info,
Change PIN, Change Signature PIN, Maturity Level.
4.5.1 About CA Info
In the About CA Info sub-menu, you can view the basic information about this
conditional access such as Card Status, CAS System ID, Interface Version,
Card Number, Number of sessions, Country Indicator, and Maturity Level.
19
Page 20

4.5.2 Change
PIN
The Change PIN window is designed for changing the smart card’s PIN,
which is required if you want change the maturity level settings.
In order to change the PIN, you must know the current PIN, also called the old
PIN. Input the new PIN you want twice (New PIN and Confirm PIN must be
the same). Move the cursor to the OK button and press the OK key, and the
system will pop up a dialogue box informing you of the PIN change result.
Note that the PIN can only made up of Arabic numerals.
4.5.3 Change Signature PIN
Follow the instructions above for Change PIN.
Note: The signature PIN will be locked after three failed attempts to enter the
correct PIN. If locked, please call the product dealer for help.
4.5.4 Maturity Level
Input the PIN then Move the cursor to Select Maturity level, you can select A-Over18, X-Erotic, G-General
audience, PG-Parental Guidance, then move cursor to the Change Maturity level button and press the OK
key, and the system will pop up a dialogue box informing you of the result.
4.5.5 Subscription Status
View detailed information for the Subscription Status.
4.5.6 Even Status
View the detailed information for the Event Status.
4.3.7 Token Status
View the detailed information for the Tokens Status.
4.6 Upgrade by USB
1. Upgrade File: View the Upgrade File.
2. Upgrade Mode: Select between allcode, maincode, defaultdb, userbd.
and Dump When users change the upgrade mode, Upgrade File will
show the corresponding file according to the table below:
Upgrade Mode File feature
All code: File named as “*.abs”
Main Code: File named as “*.abs”
Radio back: File named as “*.abs”, the
picture will be used as both
the radio back and menu
back
Default db: File named as “*.abs”
Select the upgrade mode and upgrade file, then you can start to upgrade by USB.
3. Press the OK key on the start button to start receiving data from the USB device.
When the USB device is not connected, this item is grey, and you cannot edit it.
20
Page 21

4.7 Media
Player
The USB menu will be automatically shown when inserting a U disk to the
USB port except auto scan, multi picture, upgrade. Or open the USB menu via
to Menu → Tools → USB. Press the OK button to enter this window.
The USB menu will be disabled when no USB device is plugged in. The Media
Play List will not be saved when the USB plug is out or the unit is in standby or
powered off.
Move the scroll bar when pressing the up/down key, page up or down by the
page key. Go into the sub-directory when pressing the ok key in the file
directory, play the selected file when the scroll bar is on the file, it will
automatically return to the USB menu when play is over.
Function Key
Yellow key: press to show the playlist.
Red key: press to show the setup window.
Green key: press to show the sort list.
Blue key: press to show repeat mode.
1. Press the 0 key to add all music to the playlist.
2. Press the 1 key to add all images to the playlist.
3. Press the 2 key to change between different removable devices.
FAV: Press the FAV key to add the image you selected to the playlist.
Playlist
Press the PR+, PR- key to select the image you want and press the FAV key
to add the image to Playlist. Press [OK] on the Playlist button to see the image
you selected, in this list you can play and delete them.
Red key: Plays the image in full screen.
Yellow key: Deletes the image you selected.
Blue key: Deletes all images in the list.
Setup
Slide Show Time: Select between 0-9sec.
Slide Show Repeat: Select between on and off.
Sort
Press [OK] on the Sort button, to open the Sort drop-down list.
Name (A-Z): The ascending order, omitting the $ character, numbers at the
top, then capital letters, and lastly lowercase letters.
Name (Z-A): The opposite order from the above Name (A-Z).
4.8 Remove USB device safely
Press OK on this item to pop up a dialogue box: “You can safely remove the
USB device now!”, then you can remove your USB device safely.
21
Page 22

5. Game
1. Press the OK or key to open the game.
2. Press the PR+, PR- keys to move the cursor up or down.
3. Press the EXIT or
key to move the selection to the left menu.
4. Select the game that you want to play and press the OK key to enter the
window.
6. REC (Not available for this model)
6.1 PVR storage information
Displays information in a separate window.
Yellow key: Press the yellow key to format the disk
Blue key: Press the blue key to pop up the DVR Set window.
6.2 PVR Setting
1. Time shift: Select between Off and On.
2. Jump: Select between 30sec, 1min, 5min, 10min, 30min.
3. Timeshift to Record: Select between On and Off.
4. PS Record: Select between On and Off.
7. Hot key
7.1 Info
Press the INFO key to pop up the Info bar.
Press the INFO key again to pop up the programme guide for the current
program.
7.2 EPG
Press the EPG key to enterthe EPG window.
1. Press the PR+, PR-,
keys to select up or down, left or right.
2. Press the red key to pop up the Time Bar window. Press the PR+, PRkeys to select up or down, while pressing the
keys to select left or
right in the time bar.
: Press the OK key on this button to return to the EPG window.
: Press the OK key on this button to move the cursor to the current time
line.
: Press the OK key to push the time forward or backward by half an
hour.
: Press the OK key to push the time forward or backward by half an
hour.
: Press the OK key to push the time forward or backward by a day.
3. Detailed Information: In the EPG window, press the PR+, PR- keys to
select the channel and programme and press the OK key to view the
detailed information for the current programme.
4. Press the green key to enter the Timer window. You can add the current
programme to the Timer. If 8 timers are already set, the system will inform
you “Timer is full!”.
22
Page 23

7.3 Find
Press the FIND key to pop up the Find window
.
Use the numeric keys to enter the characters and use the coloured keys to
bring up the corresponding operation.
7.4 Number
Use the numeric keys (0-9) to input the number of the desired channel. If the input number is beyond the valid
channel number, the system will show “No such a channel”, press the OK key to close this message.
7.5 TV/RADIO
In normal mode, press the TV/RADIO key to switch between TV mode and Radio mode.
7.6 Up/Down (Channel Change)
Press the PR+, PR- keys to change the channel up or down. If in all satellite groups, you can select the
channel from all searched channels. If for a specific satellite, you can only select the channel from the satellite
group.
7.7 Left/Right (Volume+/-)
Press the
keys to change the volume. Press the keys to decrease the volume, while pressing
the
keys to increase the volume.
7.8 Mute
Press the
key to turn off the volume. You can press the key again to restore the volume, or press the
keys to increase the volume.
7.9 Pause
While viewing, you can press the PAUSE key to stop the picture while the sound continues. You can play the
picture by pressing the PAUSE key once again.
7.10 OK
1. During viewing or listening, press the OK key to pop up the TV
programme list or the Radio programme list.
2. Press the PR+, PR- keys to select the channel up or down, and then
press the OK key to play this channel in full-screen.
3. Press the
keys to select the satellite.
4. Press the MENU or EXIT key to close this window.
7.11 Audio
1. Press the
L
R
keys to enter the Audio window.
2. Press the
keys to select between Left, Right, Stereo and Mono.
3. Changing the audio mode is only connected with the current channel, not
all the channels.
4. Press the MENU or EXIT key to close this window.
7.12 Recall
Press the
PR key to switch the current channel to the previous channel.
23
Page 24

7.13 F
AV
1. Press the FAV key to pop up the favourite group window.
2. Press the
keys to select the favourites group.
Press the PR+, PR- keys to select channel up or down. Press the OK key
on the selected channel to view it in full-screen. Press the MENU or EXIT
key to exit.
3. If there is no favourite channel, the system will display“No FAV Channel!”
when you press the FAV key.
7.14 Teletext
Press the TXT key to open the teletext on the screen. If there is no teletext, the system will display“No Teletext
Data”. Press the EXIT key to exit.
7.15 Zoom
1. Press the ZOOM key to switch between Zoom*1, Zoom*2, Zoom*3, Zoom*4, Zoom*5, Zoom*6, Zoom*8,
Zoom*12, Zoom*16.
2. In zoom mode, press the PR+, PR- or
keys to move the cursor up, left, right or down.
3. Press the MENU or EXIT key to exit.
Problem Possible causes What to do
The display on the front panel
does not light up.
Main cable is not connected.
Check that the main cable is
plugged into the power socket.
No sound or picture, but the
front panel shows a red light.
The receiver is in standby mode. Press the standby button.
The satellite dish is not pointing at the
satellite.
Adjust the dish. Check the signal
level in the Antenna Setup menu.
No sound or picture.
No signal or weak signal.
Check the cable connections, LNB
and other equipment connected
between the LNB and the receiver,
or adjust the dish.
The satellite dish is not pointing at the
satellite.
Adjust the dish.
Signal is too strong.
Connect a signal attenuator to the
LNB input.
Satellite dish is too small. Change to a larger dish.
LNB noise factor is too high.
Change to an LNB with a lower
noise factor.
Bad picture / blocking error.
The LNB is faulty. Change the LNB.
The picture is not showing on
the screen, when switched on.
The system is connected by RF leads.
Check the UHF channel selected in
your system and tune the UHF
channel properly.
There is interference with your
digital satellite channels, an
existing terrestrial channel or
video signal.
The system is connected by RF leads
and the output channel of the receiver
interferes with an existing terrestrial
channel or video signal.
Change the receiver output channel
to a more suitable channel, or
connect the system by SCART
leads.
Batteries are exhausted. Change the batteries.
The RCU is not working.
RCU is incorrectly aimed.
Aim RCU at the receiver, or check
that nothing blocks the front panel.
Note: If you have tried all of the actions suggested above, without resolving the problem, please contact your
dealer or service provider.
24
Page 25

Safety precautions:
To reduce risk of electric shock, this product should ONLY be
opened by an authorised technician when service is required.
Disconnect the product from mains and other equipment if a
problem should occur. Do not expose the product to water or
moisture.
Maintenance:
Clean only with a dry cloth. Do not use cleaning solvents or abrasives.
Warranty:
Any changes and/or modifications to the product will void the warranty. We cannot accept any liability for
damage caused by incorrect use of this product.
Disclaimer:
Designs and specifications are subject to change without notice. All logos, brands and product names are
trademarks or registered trademarks of their respective holders and are hereby recognized as such.
Disposal:
• This product is designated for separate collection at an appropriate collection point. Do not dispose
of this product with household waste.
• For more information, contact the retailer or the local authority responsible for waste management.
25
Page 26

Declaration of conformity
We,
Nedis B.V., De Tweeling 28, 5215MC, ’s-Hertogenbosch
The Netherlands
Tel.: 0031 73 5991055
Email: info@nedis.com
Declare that product:
Brand: KÖNIG ELECTRONIC
Model: DVB-S2 REC10
Description: High definition DVB-S2 receiver
Is in conformity with the following st
andards:
EMC: EN55013 : 2001+A1 : 2003+A2 : 2006 ; EN61000-3-2 : 2006+A1 : 2009+A2, EN61000-3-3: 2008;
EN55020:2007
ERP: EN62301: 2005; IEC62087:2008 (FprEN 62087:2009)
LVD: EN60065:2002+A1: 2006+A11:2008
EU Directive(s):
EMC directive 2004/108/EC; ERP DIRECTIVE 2009/125/EC; LVD DIRECTIVE 2006/95/EC
‘s-Hertogenbosch,
Mr.: Victor Hoynck van Papendrecht
Chief Operating Officer (CEO)
Copyright ©
26
 Loading...