

Page 1
CMP-WNROUT10
Wireless Router
Quick Installation Guide
1 System Requirements
Broadband Internet Access Service (DSL/Cable/Ethernet)
One DSL/Cable modem that h as an RJ45 connector (yo u do not need it if you c onnect the
router to Ethernet)
Each PC on the LAN needs a working Ethernet Adapt er and an Ethernet cable wit h RJ45
connectors
TCP/IP protocol must be inst alled on each PC
Web browser, such as Micros oft Internet Explorer 5.0 or later, Netscape Navigator 6.0 or
later
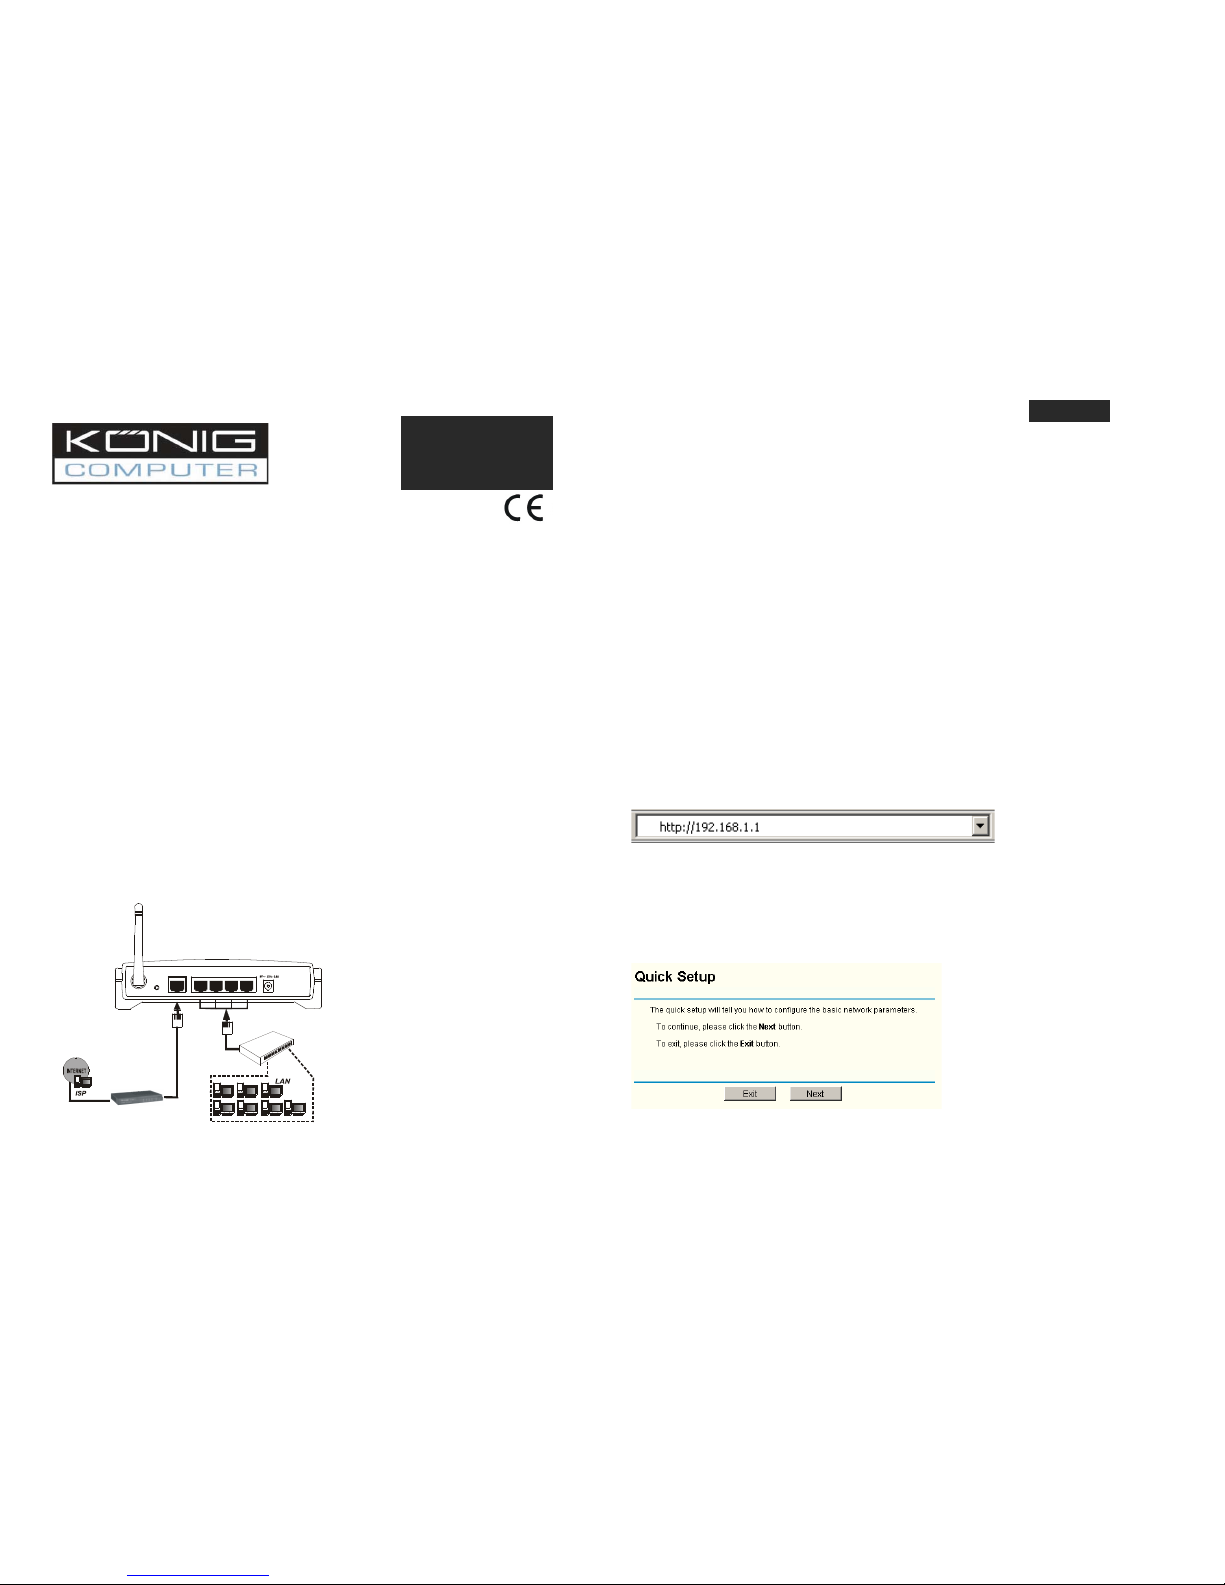
1.1 Connecting the Router
Before you install the router, yo u should connect your PC to the Internet through your broadband
service successfully. If there is any problem, please co ntact your ISP. After that, please install
the router according to the fo llowing steps. Don't forget t o pull out the power.
1. Power off your PC(s), Cable/DSL m odem, and the router.
2. Locate an optimum location for the ro uter. The best place is usu ally near the center of the
area in which your PC(s) will wir elessly connect.
3. Adjust the direction of the antenna. Nor mally, upright is a good direction.
4. Connect the PC(s) and each Switch/H ub on your LAN to the LAN P orts on the router,
shown in figure 1-1.
5. Connect the DSL/Cable Modem to the WAN port on the router, s hown in figure 1-1.
6. Connect the AC power adapter to the AC power socket on the ro uter, and the other end
into an electrical outlet. The router will start to work automatically.
7. Power on your PC(s) and Cable/DSL modem.
To LAN
Switch/Hub
4321WAN
To WAN
RESET
£¨£©XDSL Cable Ethernet¡¢¡¢
Figure 1-1: Hardware Install ation of the CMP-WNROU T10 54Mbps Wireless R outer
After connecting the CMP-WNROU T10 into your network, y ou should configure it. This chapter
describes how to configure t he basic functions of your C MP-WNROUT10. These procedures
only take you a few minutes. Y ou can access the Intern et via the router immediat ely after
successfully configured.
1.3 TCP/IP configuration
The default IP address of the C MP-WNROUT10 is 192.168.1.1, and the default Su bnet Mask is
255.255.255.0. These values ca n be seen from the LAN . They can be changed as y ou desire, as
an example we use the defau lt values for description i n this guide.
Connect the local PCs to the LAN ports on the router. Th ere are then two means to c onfigure the
IP address for your PCs.
Configure the IP address ma nually
1) Set up the TCP/IP Protocol for your PC(s). If you need instr uctions as to how t o do
this, please refer to the deta iled manual on the enclos ed CD.
2) Configure the network para meters. The IP address is 192.168.1.xxx ("xxx " is from 2
to 254), Subnet Mask is 255. 255.255.0, and Gateway is 192.168.1.1 (The router's
default IP address)
Obtain an IP address autom atically
1) Set up the TCP/IP Protocol in "Obtain an IP address automatically" mode on your
PC(s). If you need instructions as to how to do this, pleas e refer to the detailed
manual on the enclosed CD. P ower off the router and PC(s ). Then turn on the router,
and restart the PC(s). The b uilt-in DHCP server will ass ign IP addresses for the
PC(s).
1.4 Installation Guide
With a Web-based (Internet Explorer or Netscape® Navigator) utility, the C MP-WNROUT10 is
easy to configure and manage . The Web-based utility c an be used on any Windows, Macintosh
or UNIX OS with a web browser .
Connect to the router by typin g http://192.168.1.1 in the address field of web br owser.
Figure 1-2 Login to the router
After a moment, a login window will appear. Enter admin for the User Name a nd Password, both
in lower case letters. Then click the OK button or press t he Enter key.
Note: If the above mentione d screen does not prompt, it means that your web-br owser has been
set to a proxy. Go to Tools me nu>Internet Options>Co nnections>LAN Settings, in th e screen
that appears, cancel the Usi ng Proxy checkbox, and cl ick OK to finish it.
If the User Name and Password are correct, you can c onfigure the router using the w eb browser.
Please click the Quick Setup link on the left of the main menu and the Quick Set up screen will
appear.
Figure 1-3 Quick Setup
Click Next, the Choose WAN Connection Type page w ill appear, shown in figur e 1-4.
ENGLISH
INSTRUCTIONS
EN
Page 2
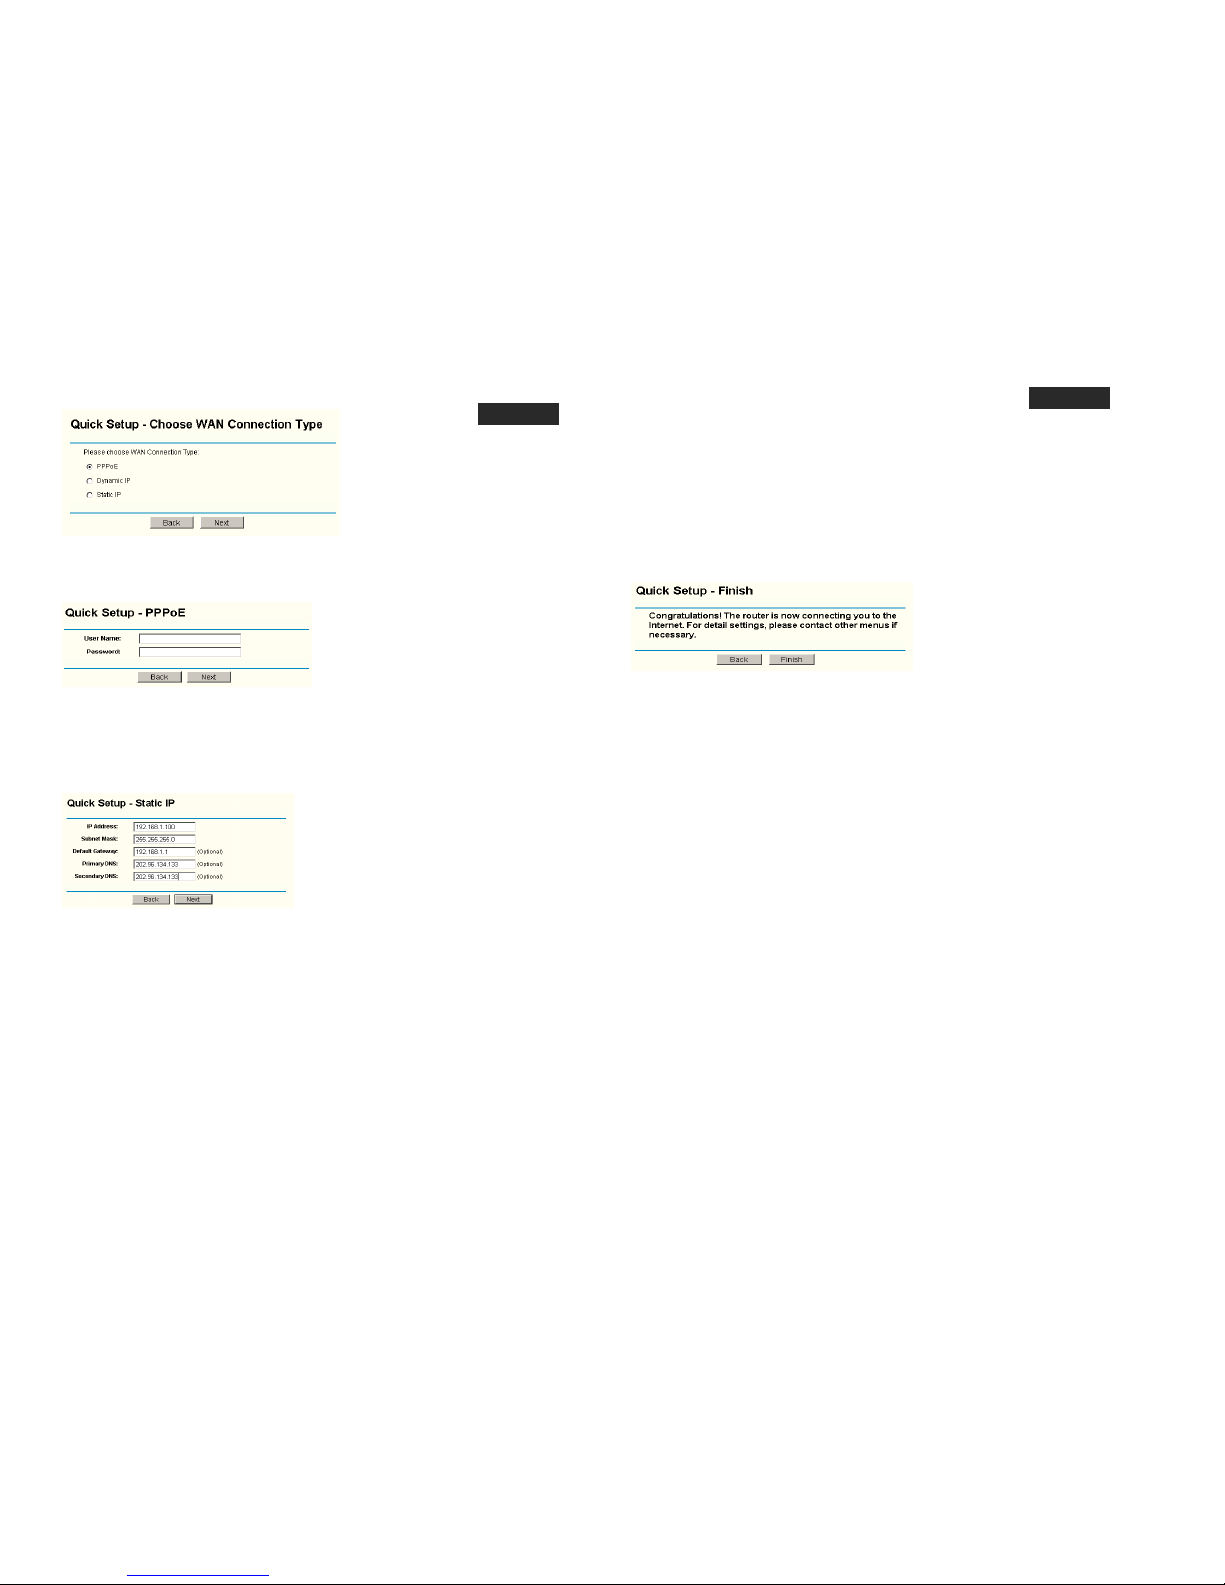
Figure 1-4 Choose WAN Co nnection Type
The router supports three popu lar ways to connect to Int ernet. Please select one co mpatible with
your ISP. Click Next to enter the necessary network parameters.
If you choose "PPPoE", you wi ll see this page shown i n figure 1-5:
Figure 1-5 Quick Setup – PPPoE
User Name and Password - E nter the User Name an d Password provided by yo ur ISP.
These fields are case sensit ive. If you have difficulty wit h this process, please co ntact your
ISP.
If you choose " Dynamic IP", the router will automatica lly receive the IP parameters from your
ISP without needing to enter any parameters.
If you Choose "Static IP", the S tatic IP settings page w ill appear, shown in figure 1-6:
Figure 1-6 Quick Setup - St atic IP
Note: The IP parameters should have been provided by your ISP.
IP Address - This is the WAN IP address as seen by ext ernal users on the Int ernet
(including your ISP). Enter th e IP address into the field.
Subnet Mask - The Subnet Mask is used for the WAN IP address, it is usually
255.255.255.0
Default Gateway - Enter the gateway into the box if re quired.
Primary DNS - Enter the DNS Server IP address into th e boxes if required.
Secondary DNS - If your ISP provides another DNS server, enter it into this field.
When you finished the above and clicking the ‘next’ bu tton you now can configure th e following
wireless parameters:
Wireless Radio - indicates whether the Access Point feat ure of the router is enabled or
disabled. If disabled, the WLAN LED on the front panel w ill not be lit and the wir eless
stations will not be able to access the router. If enabled, t he WLAN LED will be lit up and
wireless stations will be abl e to access the router.
SSID - Enter a value of up to 32 characters. The same SSID must be assigned to all
wireless devices on y our network. The d efault SSID is KÖNIG. This value is case-sensitive.
For example, KÖNIG is NOT the same as könig.
Region - Select your region fro m the pull-down list. This field specifies the regi on where
the wireless function of the rout er can be used. It may be illegal to use the wireless
function of the router in a reg ion other than one of thos e specified in this filed.
Channel - the current channel in use. This field determin es which operating frequency will
be used.
Mode - Indicates the current mode 54Mbps (802.11g), 11Mbps (802.11b). If you se lect
54Mbps (802.11g), it is co mpatible with 11Mbps (802.11b).
These settings are only for basic wireless parameters, f or advanced settings, pleas e refer to the
detailed manual on the enclose d CD.
Note: The change of wireless settings won't take effect until the router reboots! Y ou can reboot it
manually. If you need instructions as to how to do this, p lease refer to the detai led manual on the
enclosed CD.
Click the Next button, you wi ll then see the Finish page :
Figure 1-7 Quick Setup - Finish
After finishing all configurations of basic network param eters, please click Finish b utton to exit
this Quick Setup.
Brand name: KÖNIG
Model: CMP-WNROUT10
Description: 54Mbps Wireless router
Is in conformity with the following standards;
EN 300 328 V.1.4.1 (2003)
EN 301 489-1 V.1.4.1 (2002) / EN 301 489-17 V.1.2.1 (2002)
EN 60950-1: 2001
Following the provisions of the 1999/5/EC R&TTE Directiv e.
Conform this regulation it’s allowed to use this product in
all European Community & EF TA countries.
Nedis BV is not responsible for the use of this product outside
the European Community & EF TA countries.
WARNING:
To reduce risk of electric shock , this product should ONL Y be opened by an author ized
technician if service is required. Disconnect the product from mains and other equ ipment if a
problem should occur. Do not expose the product to wat er of moisture.
WARRANTY:
No guarantee or liability can be accepted for any chang es and modifications of the pr oduct or
damage caused due to inc orrect use of this product.
GENERAL:
Designs and specifications are subject to change with out a notice.
EN
EN
 Loading...