

Page 1

56
USB2.0, IDE/S-ATA ADAPTÉR
44
USB2.0 TO IDE/S-ATA -SOVITIN
32
ADAPTADOR DE USB2.0
A IDE/S-ATA
20
USB2.0 NAAR IDE/S-ATA
ADAPTER
8
USB2.0 AUF IDE/S-ATA ADAPTER
62
ADAPTOR USB 2.0 LA IDE/S-ATA
50
USB2.0 TILL IDE/S-ATA ADAPTER
38
USB2.0 – IDE/S-ATA ADAPTER
26
ADATTATORE DA USB 2.0
A IDE/S-ATA
14
ADAPTATEUR USB2.0 VERS
IDE/S-ATA
USB2.0 TO IDE/S-ATA ADAPTER
CMP-USBIDESAT2
Page 2
2
ENGLISH
Introduction:
With this adapter it is no longer necessary to build in a hard disk when there’s not enough back up
space left in the PC. Just connect a 2.5” or 3.5” hard disk to a USB port, thanks to the included power
supply the PC case can stay closed.
Features:
• High speed USB 2.0 (480Mbit/sec)
• Plug and play without installing the driver
• WIN98SE (driver attached for USB additional)
• Support 3.5” and 2.5” IDE and SATA HDD
• Support ULTRA-ATA/133 and UDMA5 compatible
• Support Serial ATA 1.0 spec. Compatible with ULRA
• ATA/133. Transfer rate of 150 Mbit/sec
• USB 2.0 Interface support Windows 200/ME/XP/Vista and Mac Os system
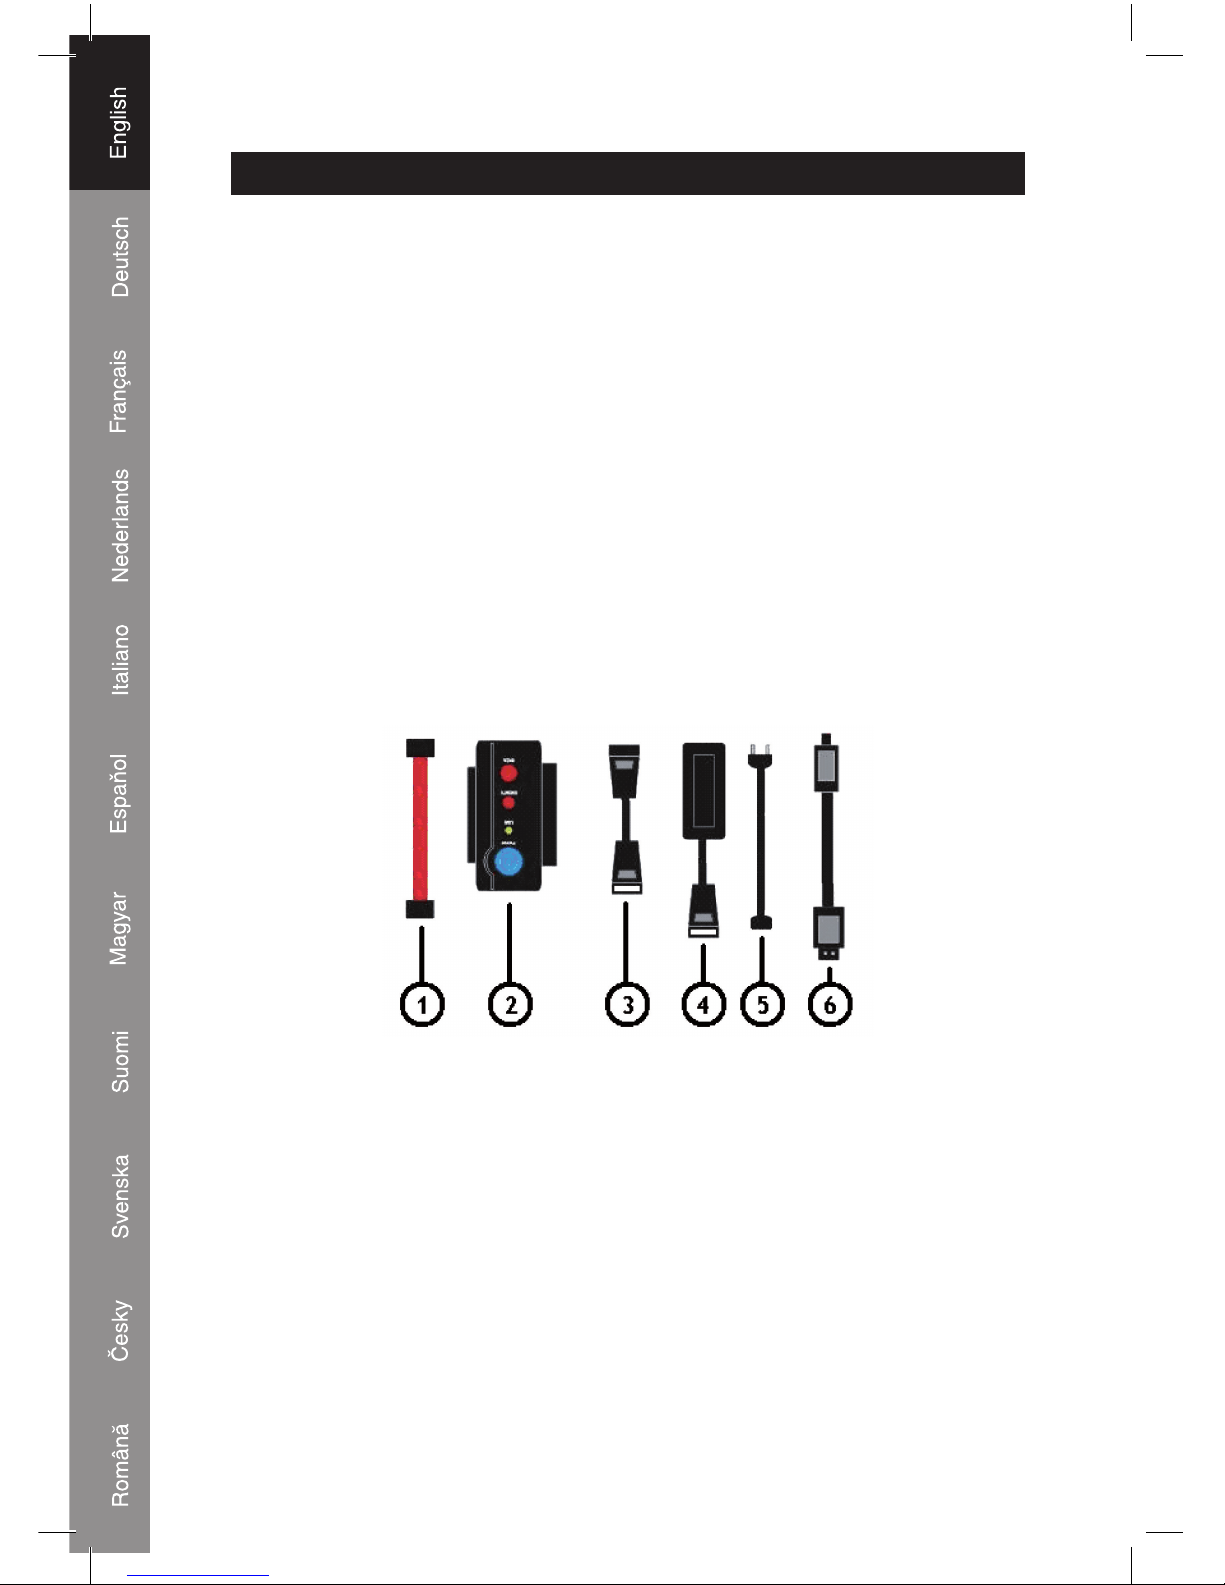
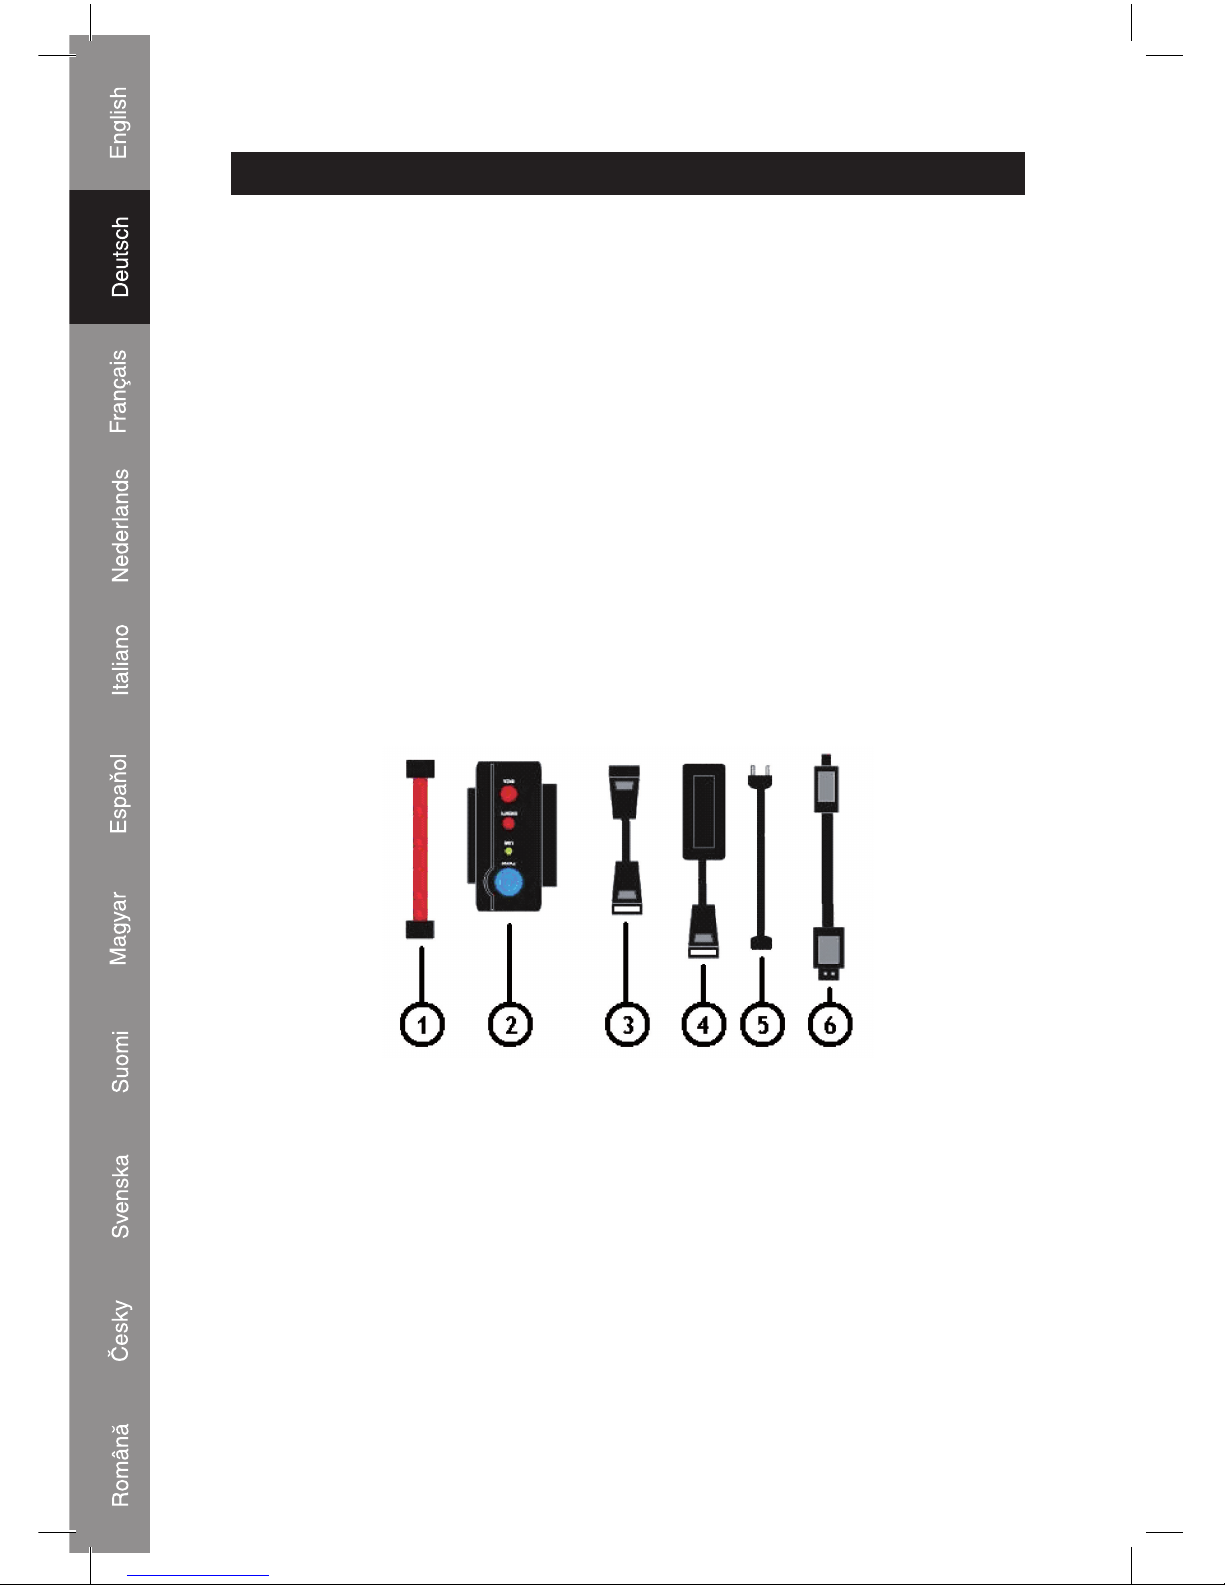
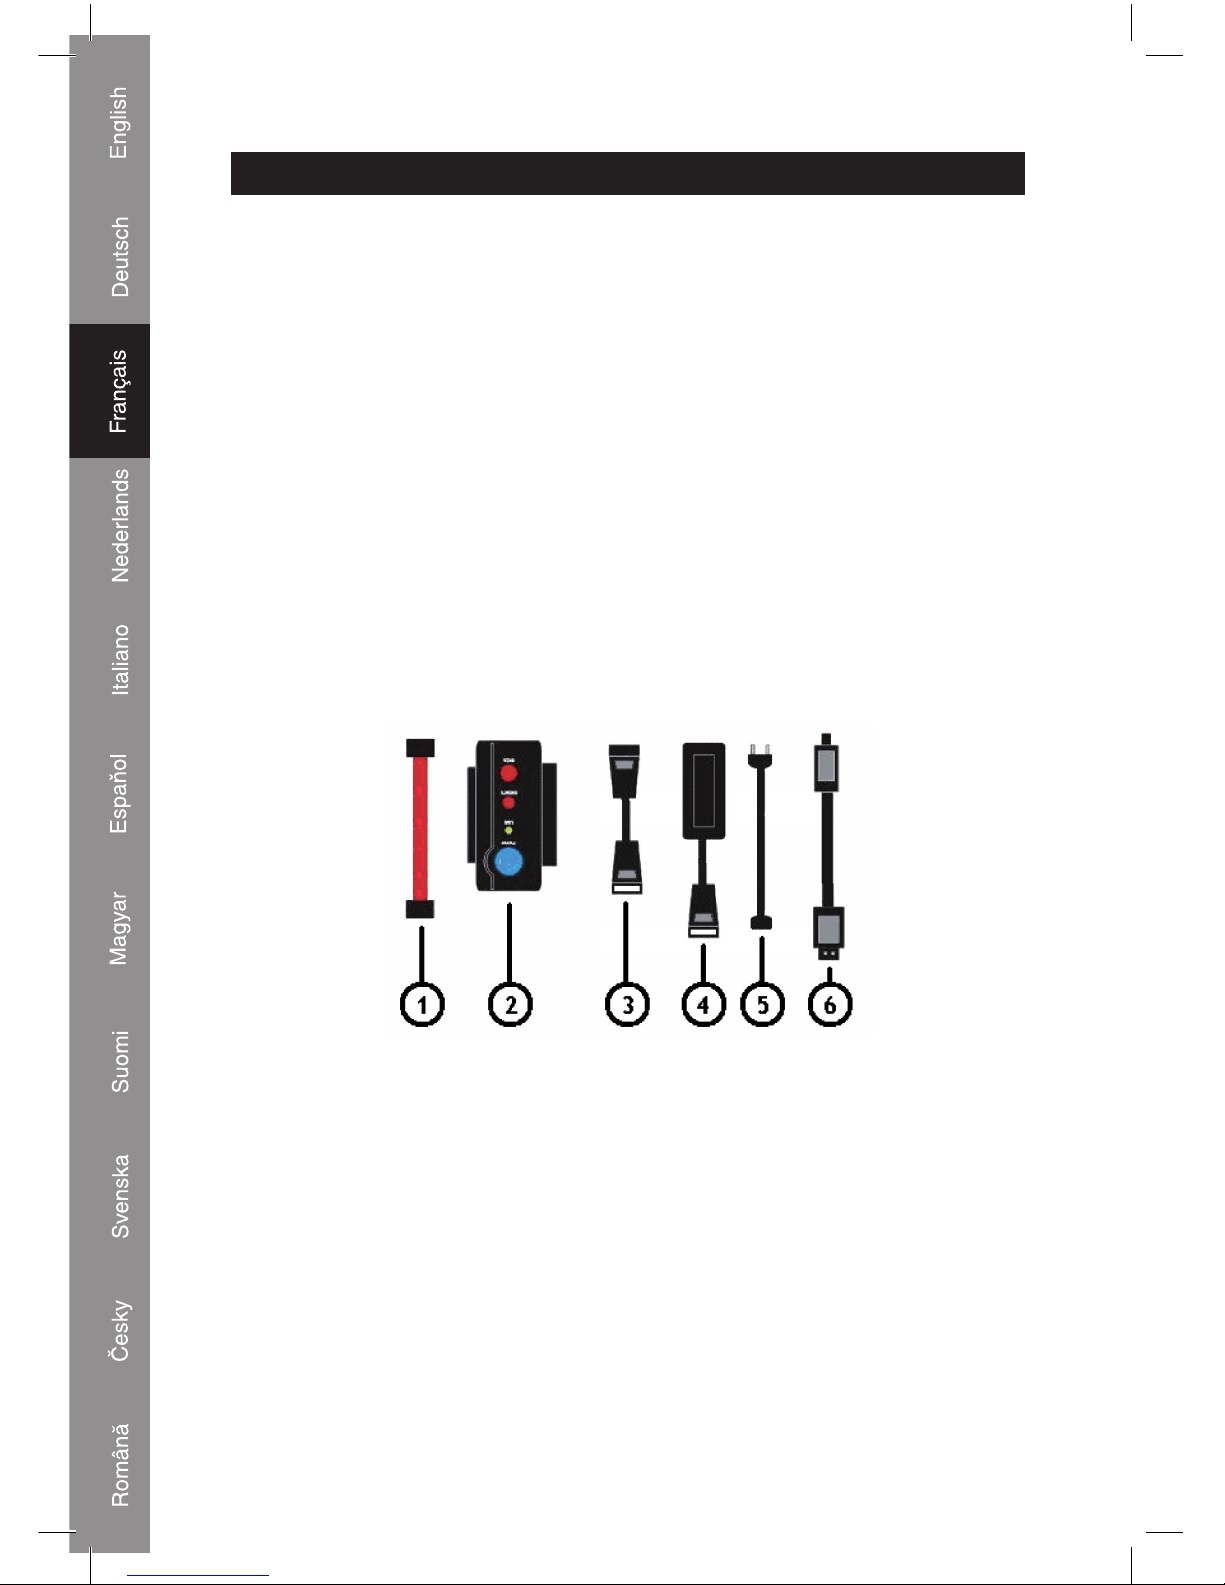
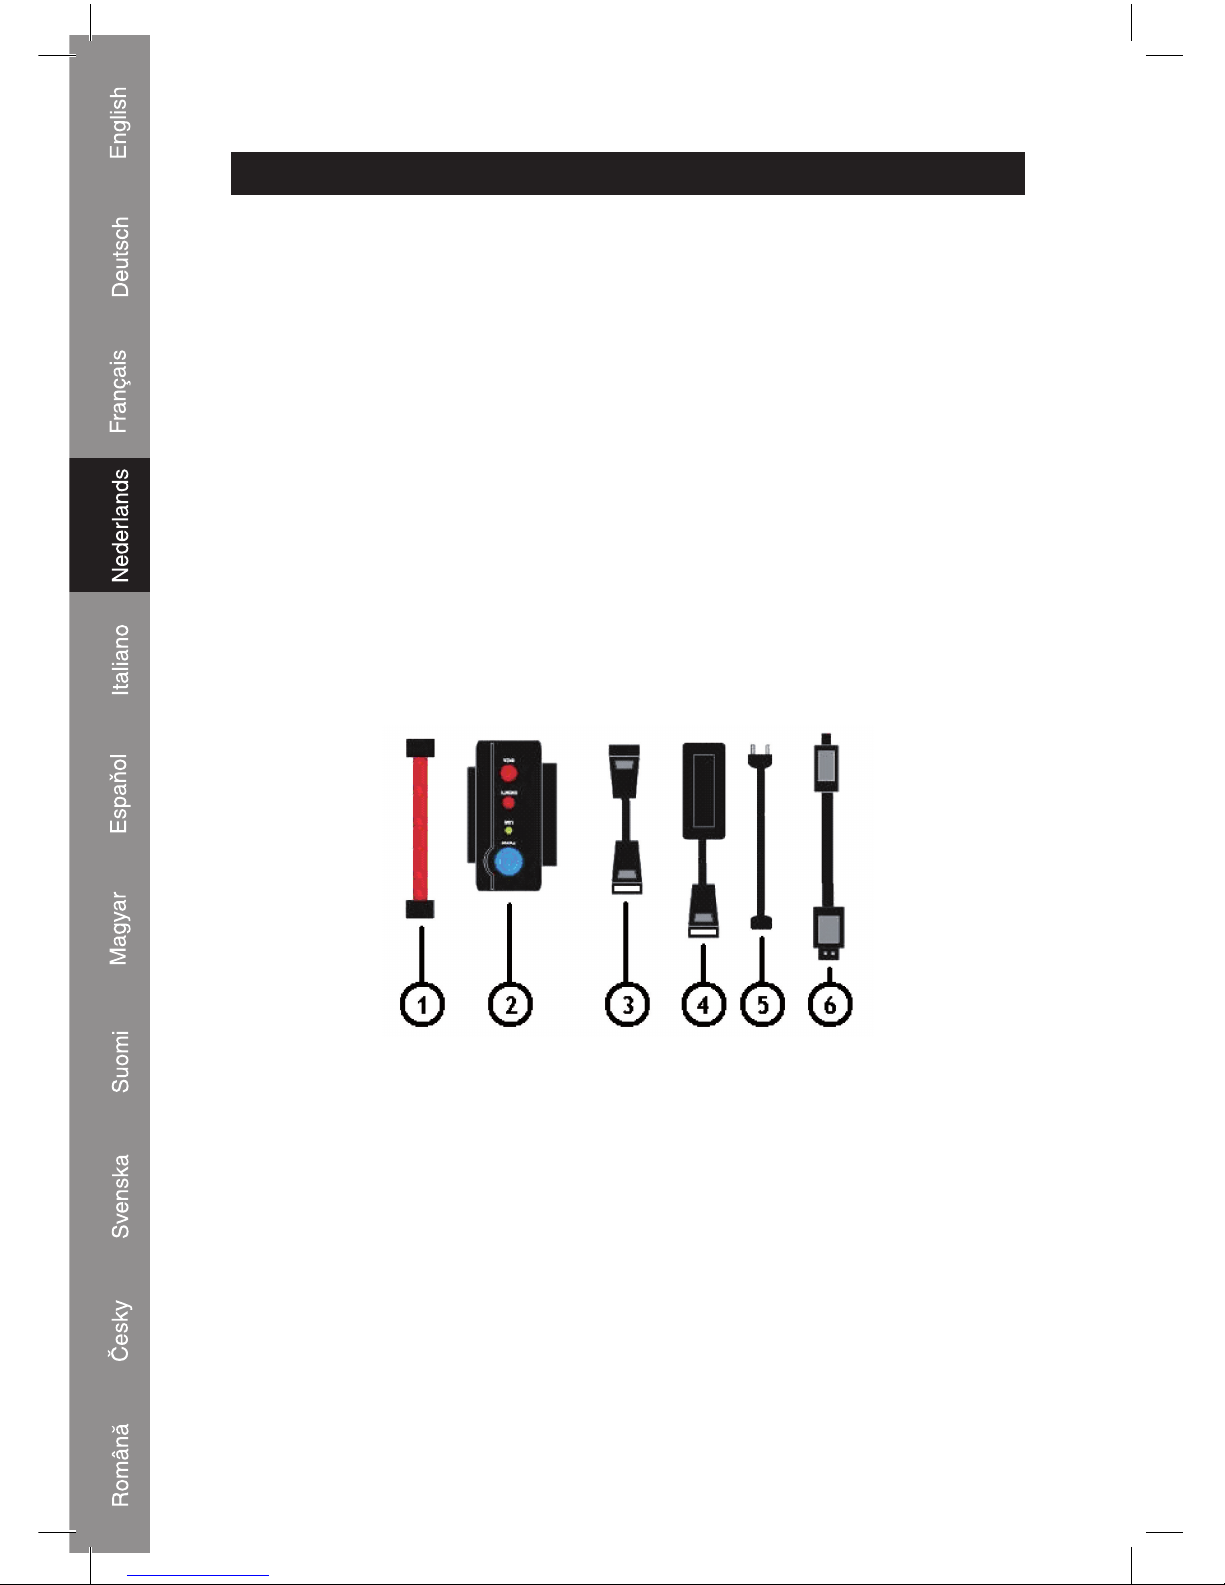
Packaging contents:
1) S-ATA data cable
2) USB2.0 Connecting unit
3) IDE to S-ATA power adapter cable
4) Power adapter unit
5) Power cable
6) USB2.0 A to mini 5pin connection cable
Page 3
3
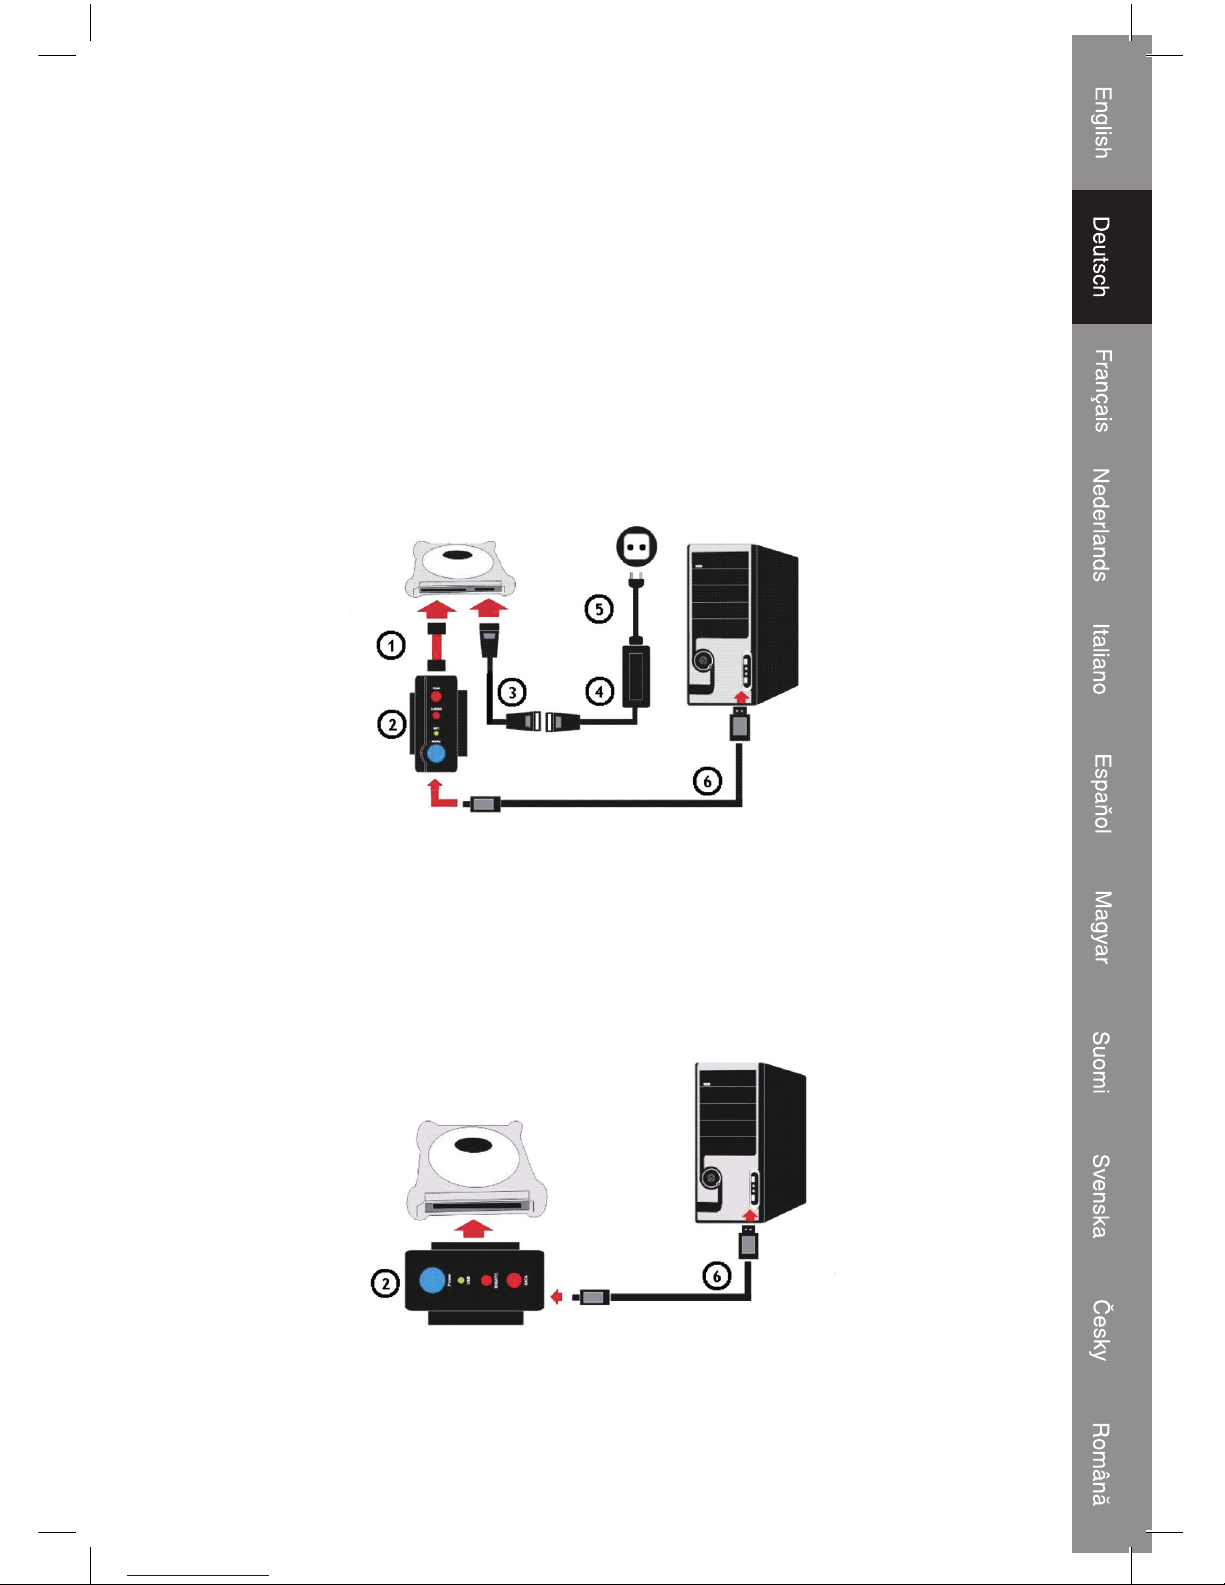
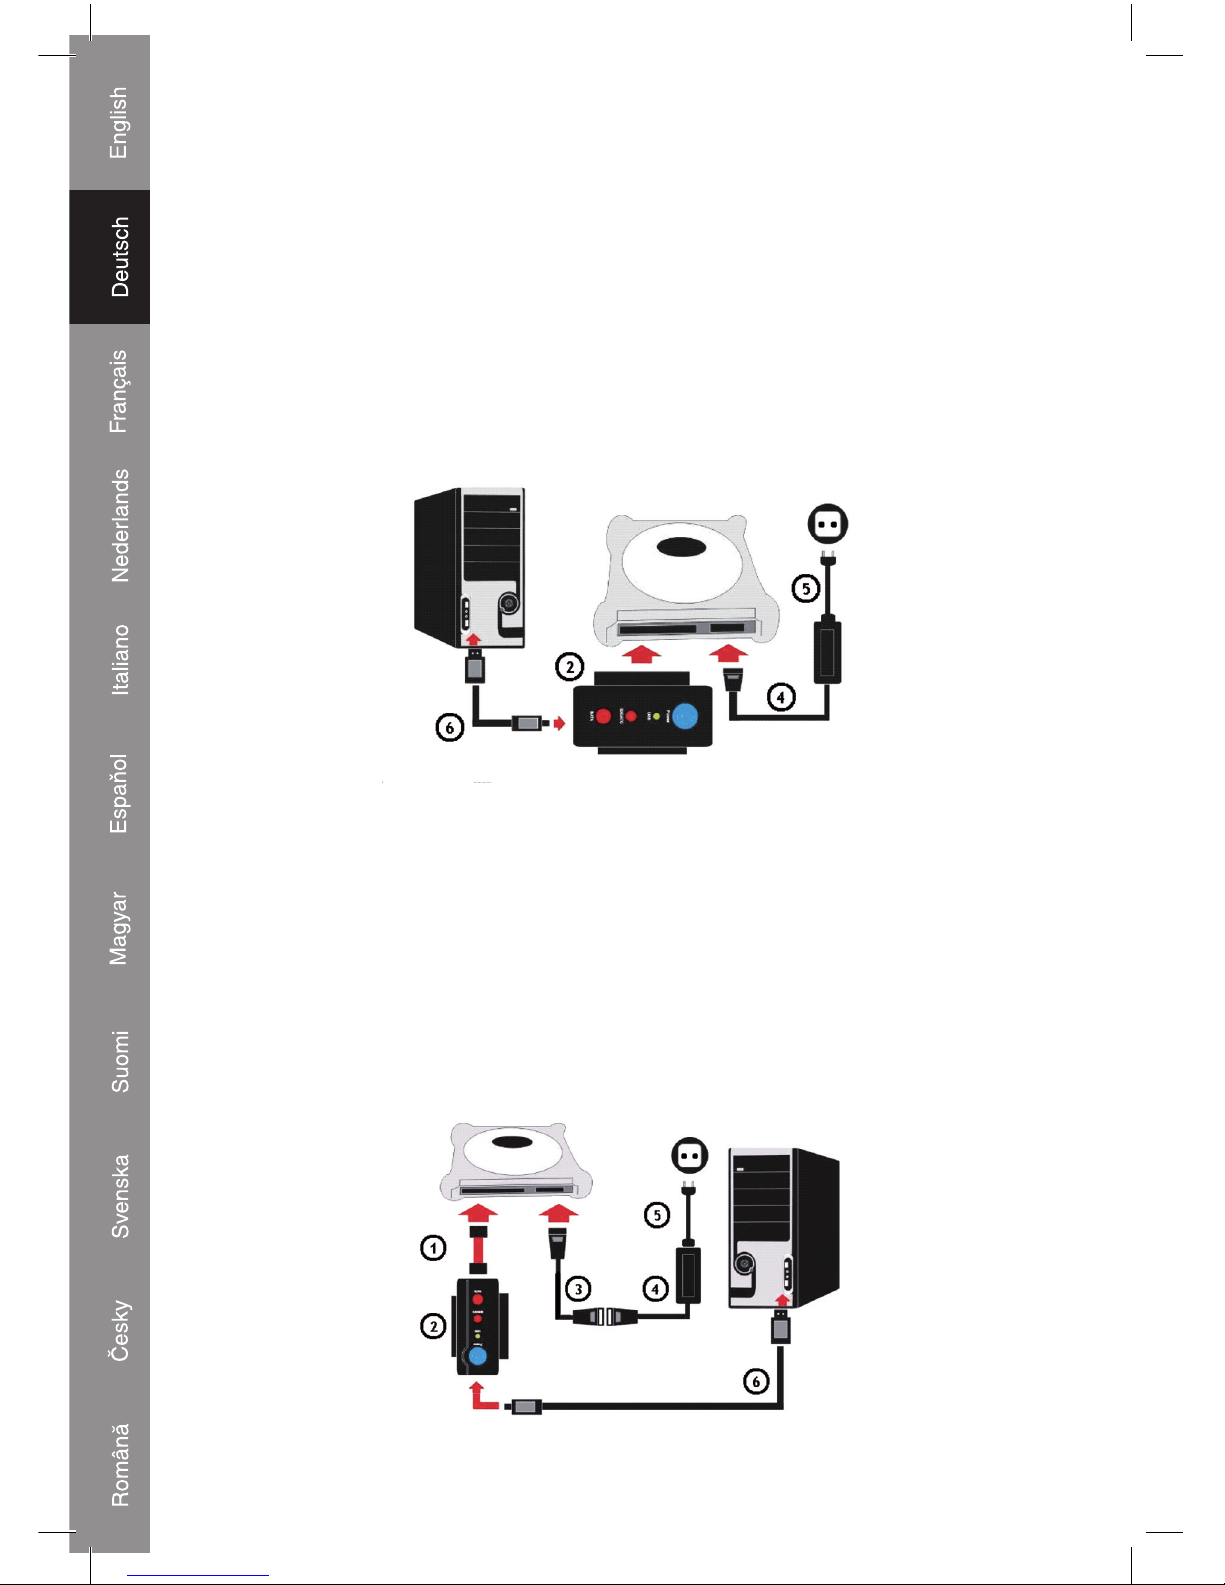
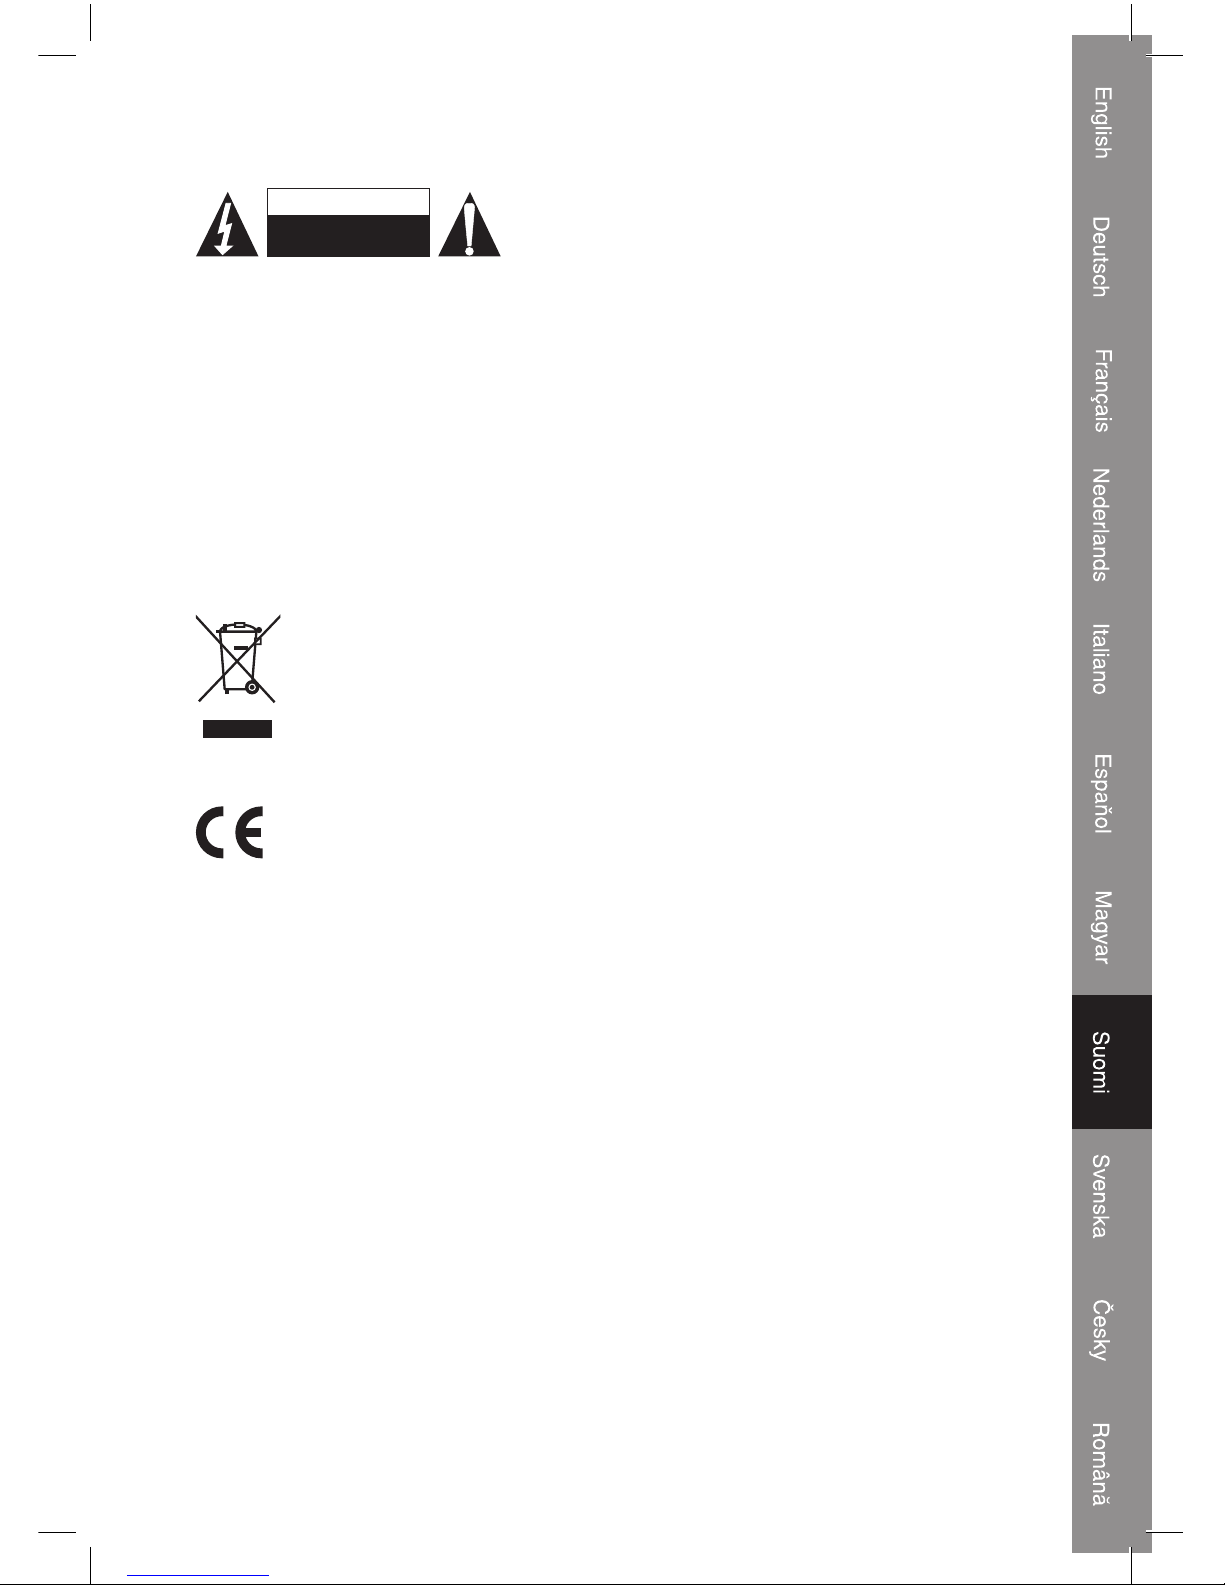
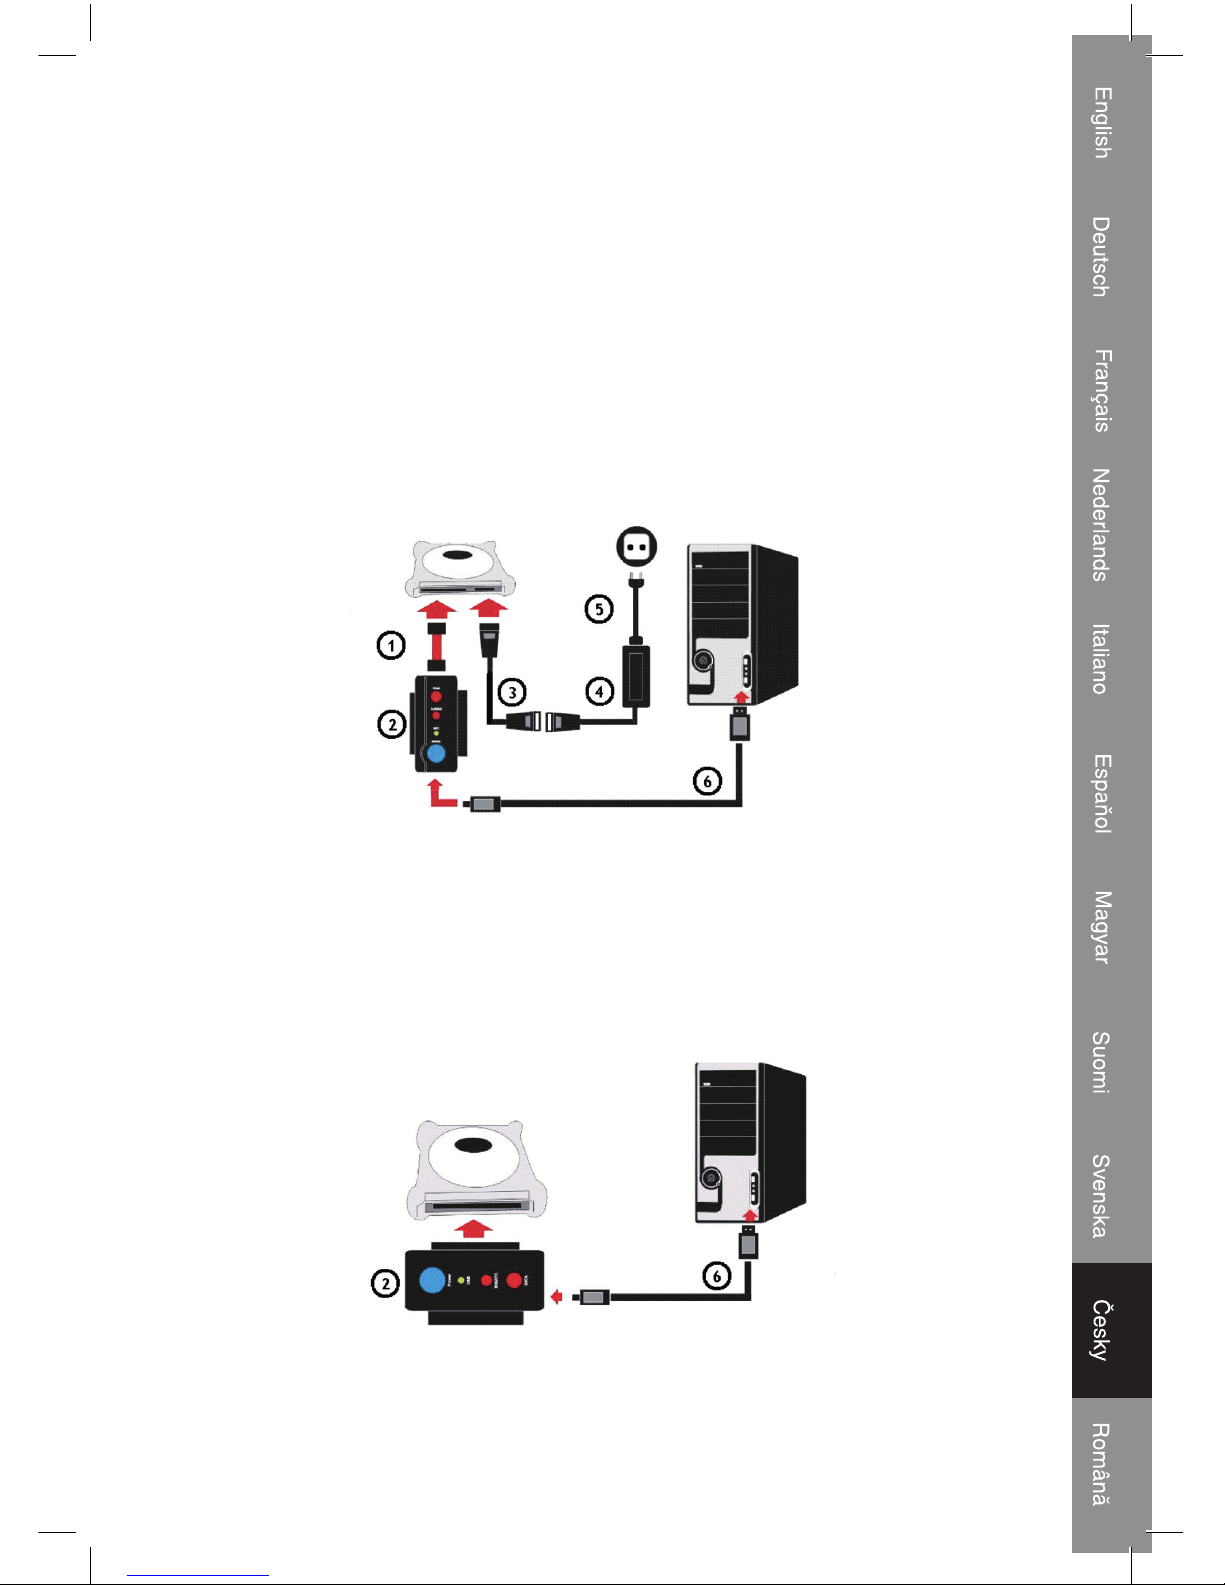
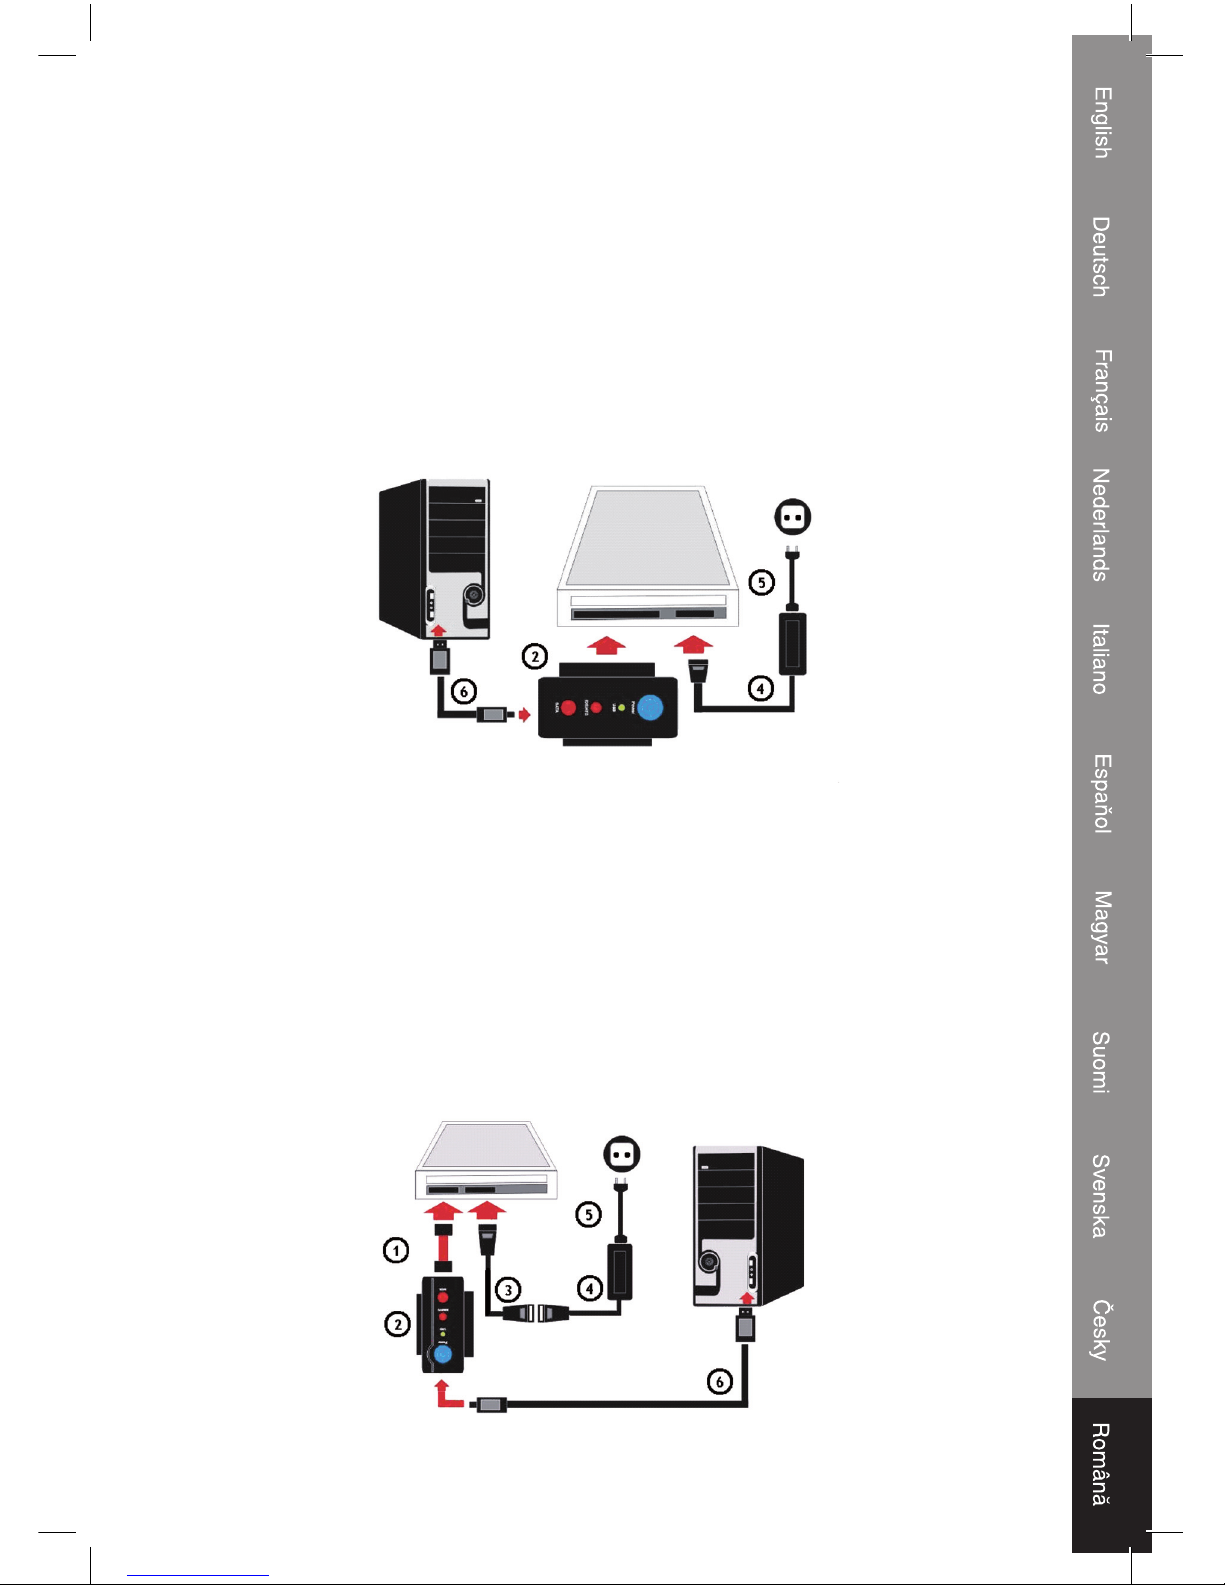
Connecting:
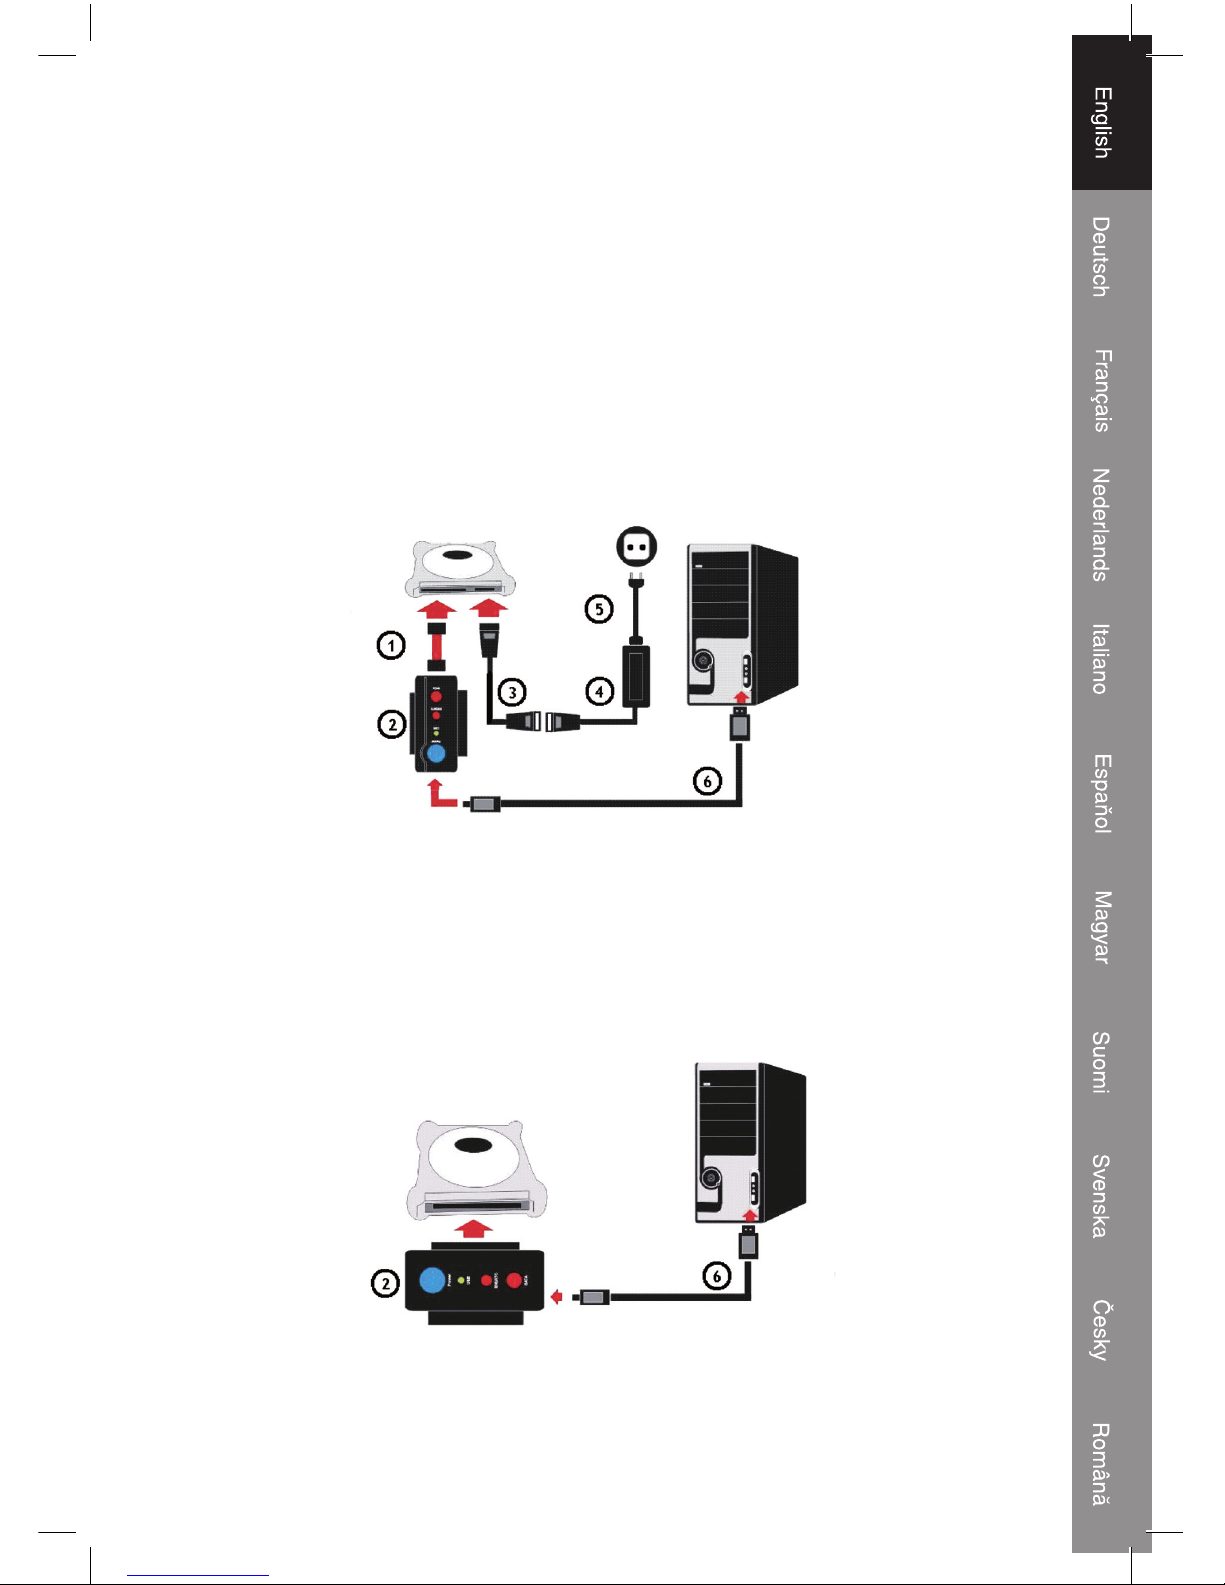
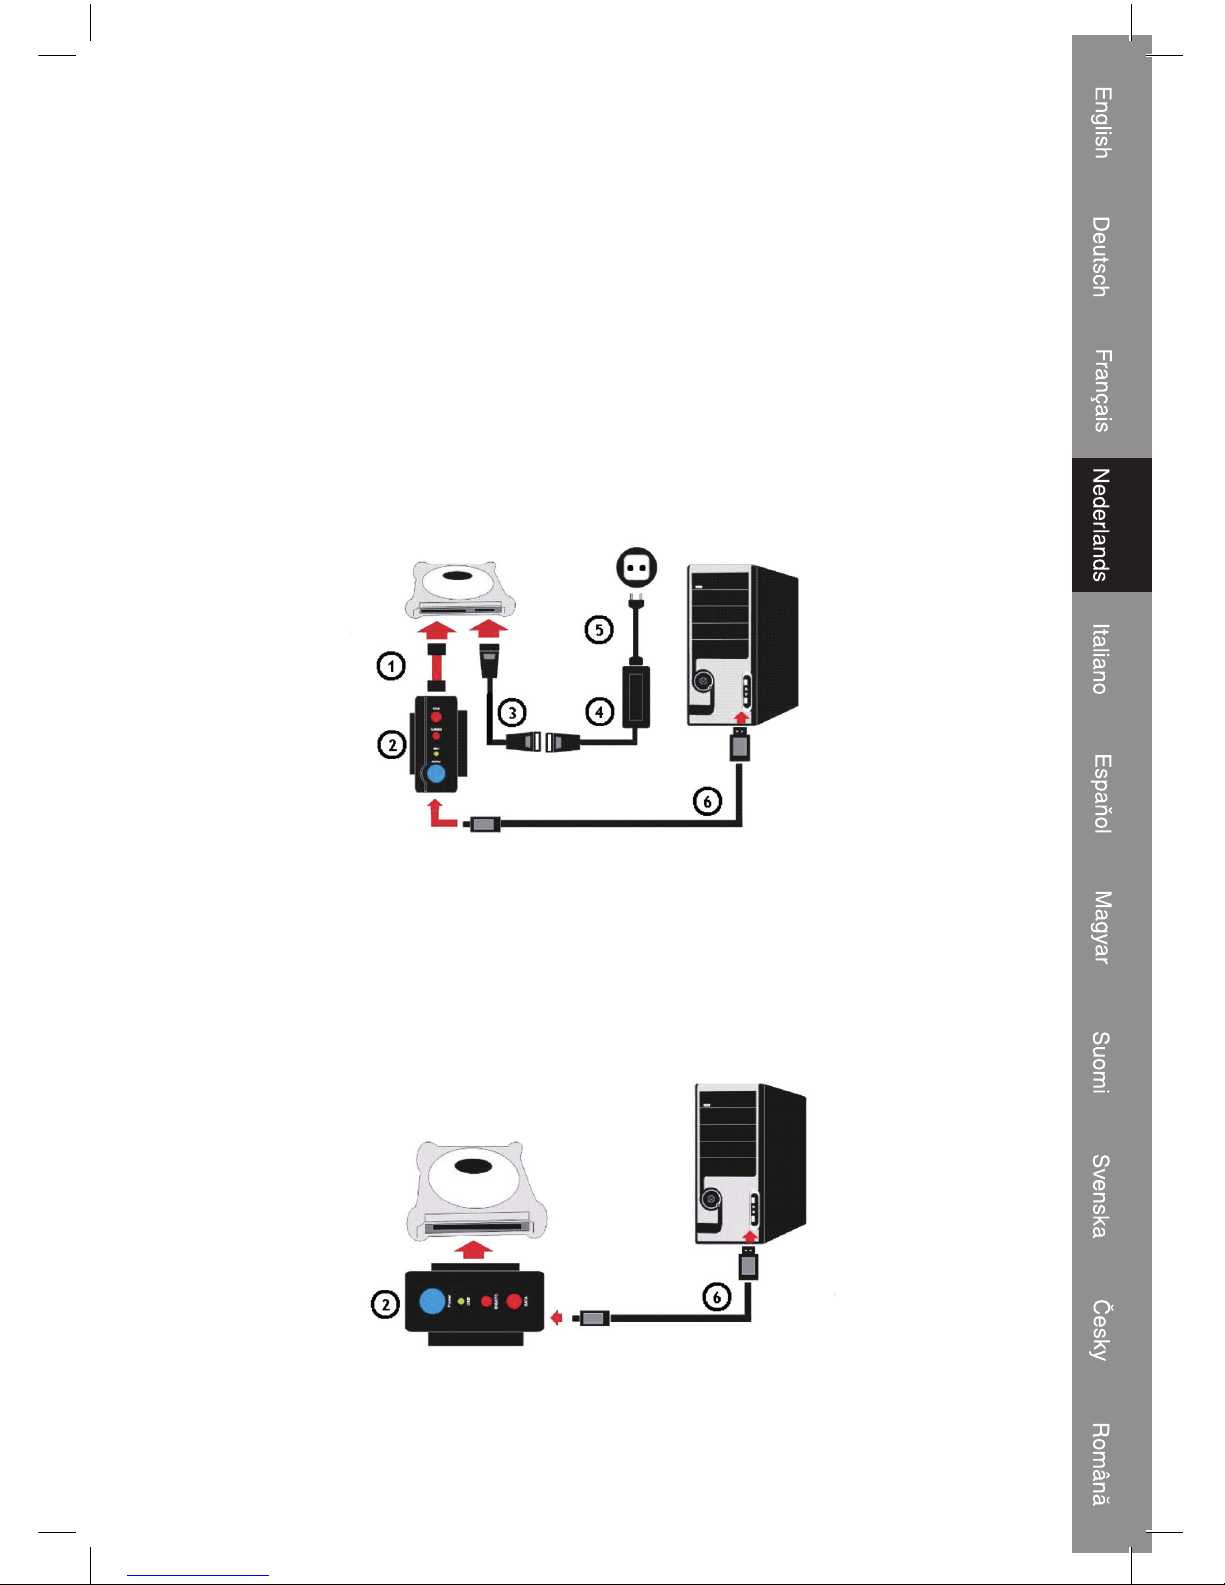
A) Connect to 2.5” S-ATA HDD
Step 1:
Connect the S-ATA data cable (1) to the 2.5” HDD and to the adapter unit (2).
Step 2:
Connect the IDE to S-ATA power adapter cable (3) and the power cable (5) to the power adapter (4)
Step 3:
Plug the S-ATA power adapter cable (3) into the 2.5” HDD
Step 4:
Plug the power cable (5) into the wall outlet
Step 5:
At last connect the USB2.0 cable (6) to the adapter (2) and the computer.
Windows will now detect the device as a “mass storage device”
B) Connect to 2.5” IDE HDD
Step 1:
Connect the adapter (2) to the 2.5” IDE HDD.
Step 2:
Connect the USB2.0 cable (6) to the adapter (2) and the computer.
Windows will now detect the device as a “mass storage device”
Page 4
4
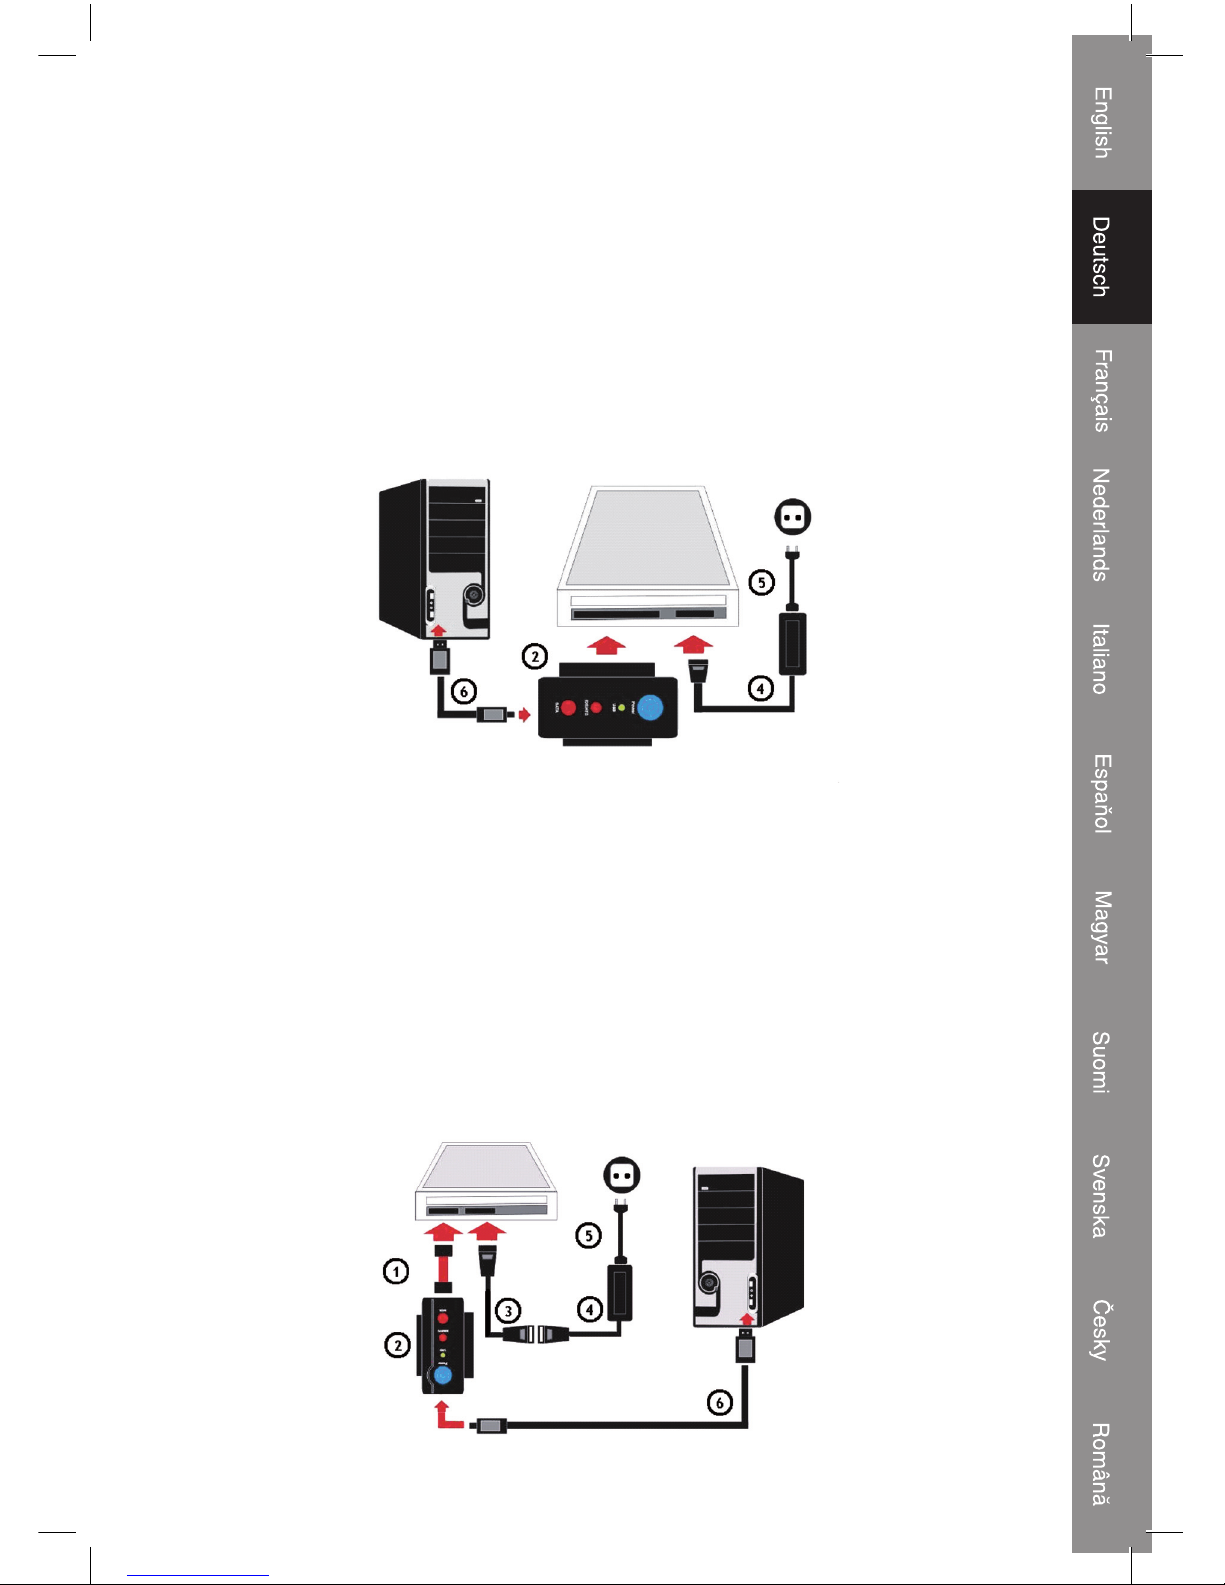
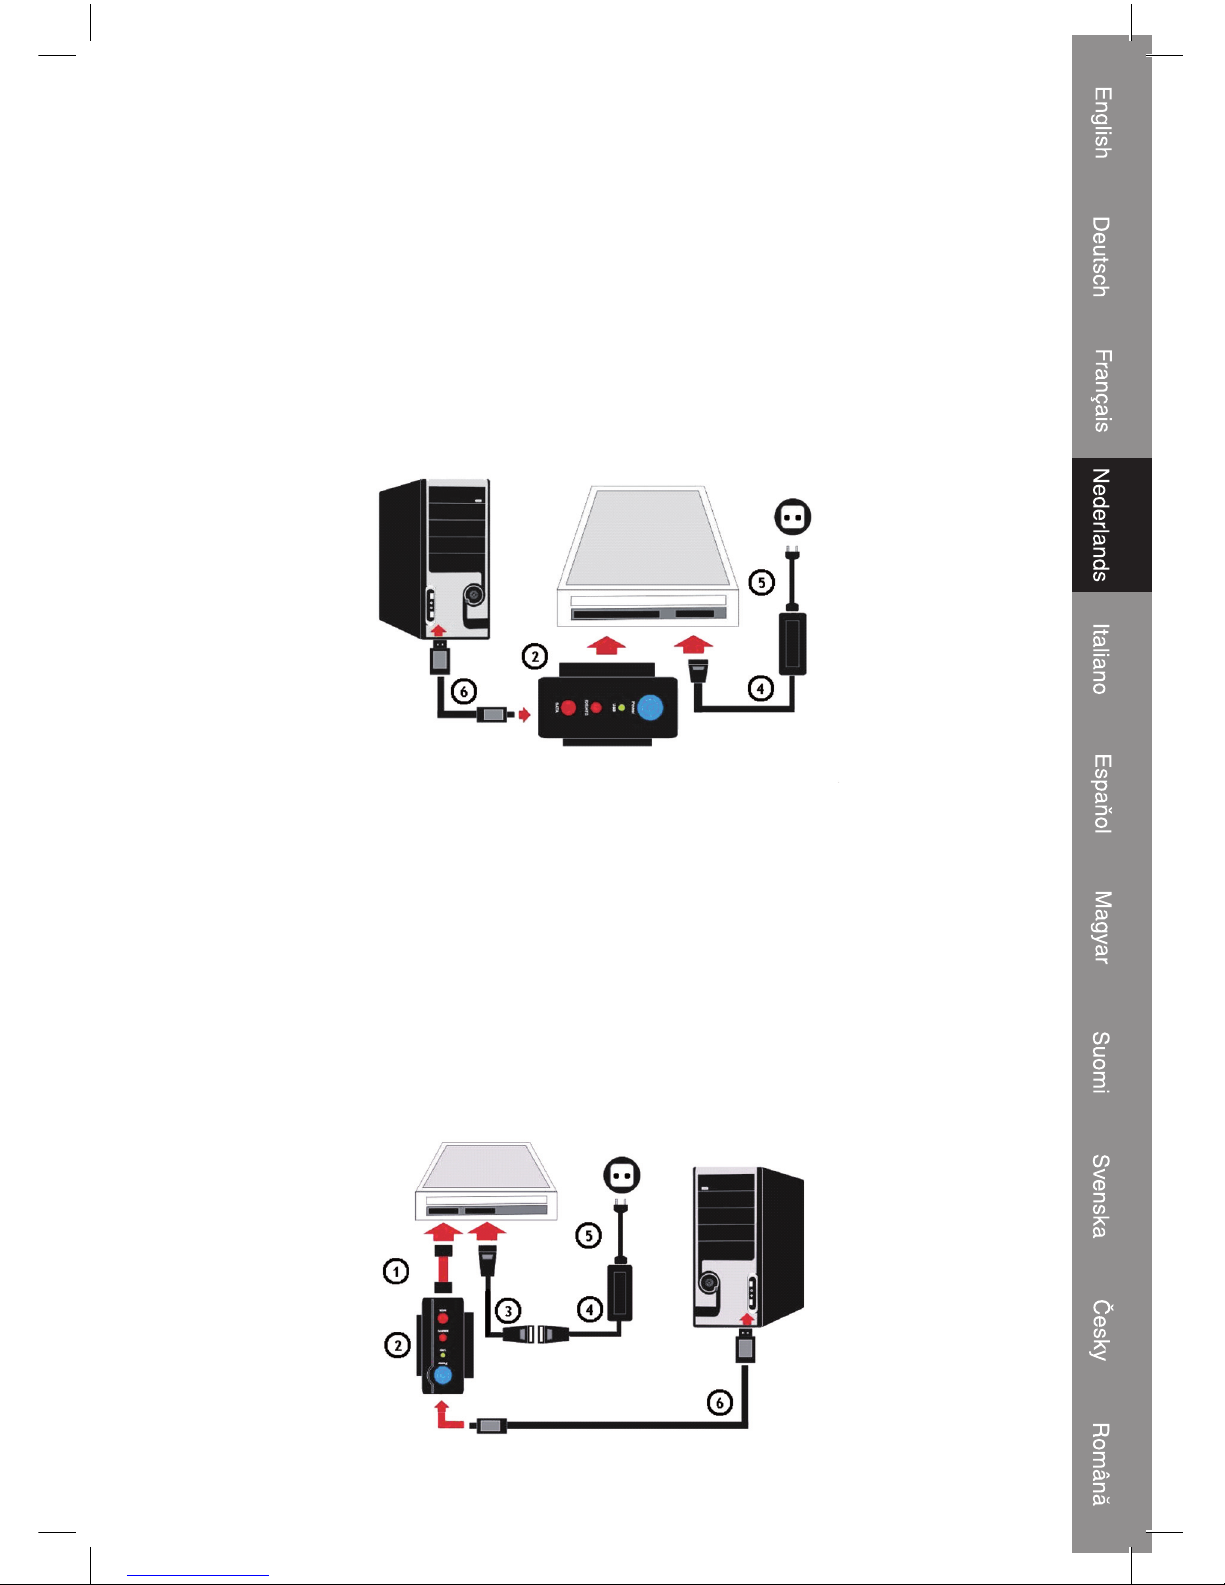
C) Connect to 3.5” IDE HDD
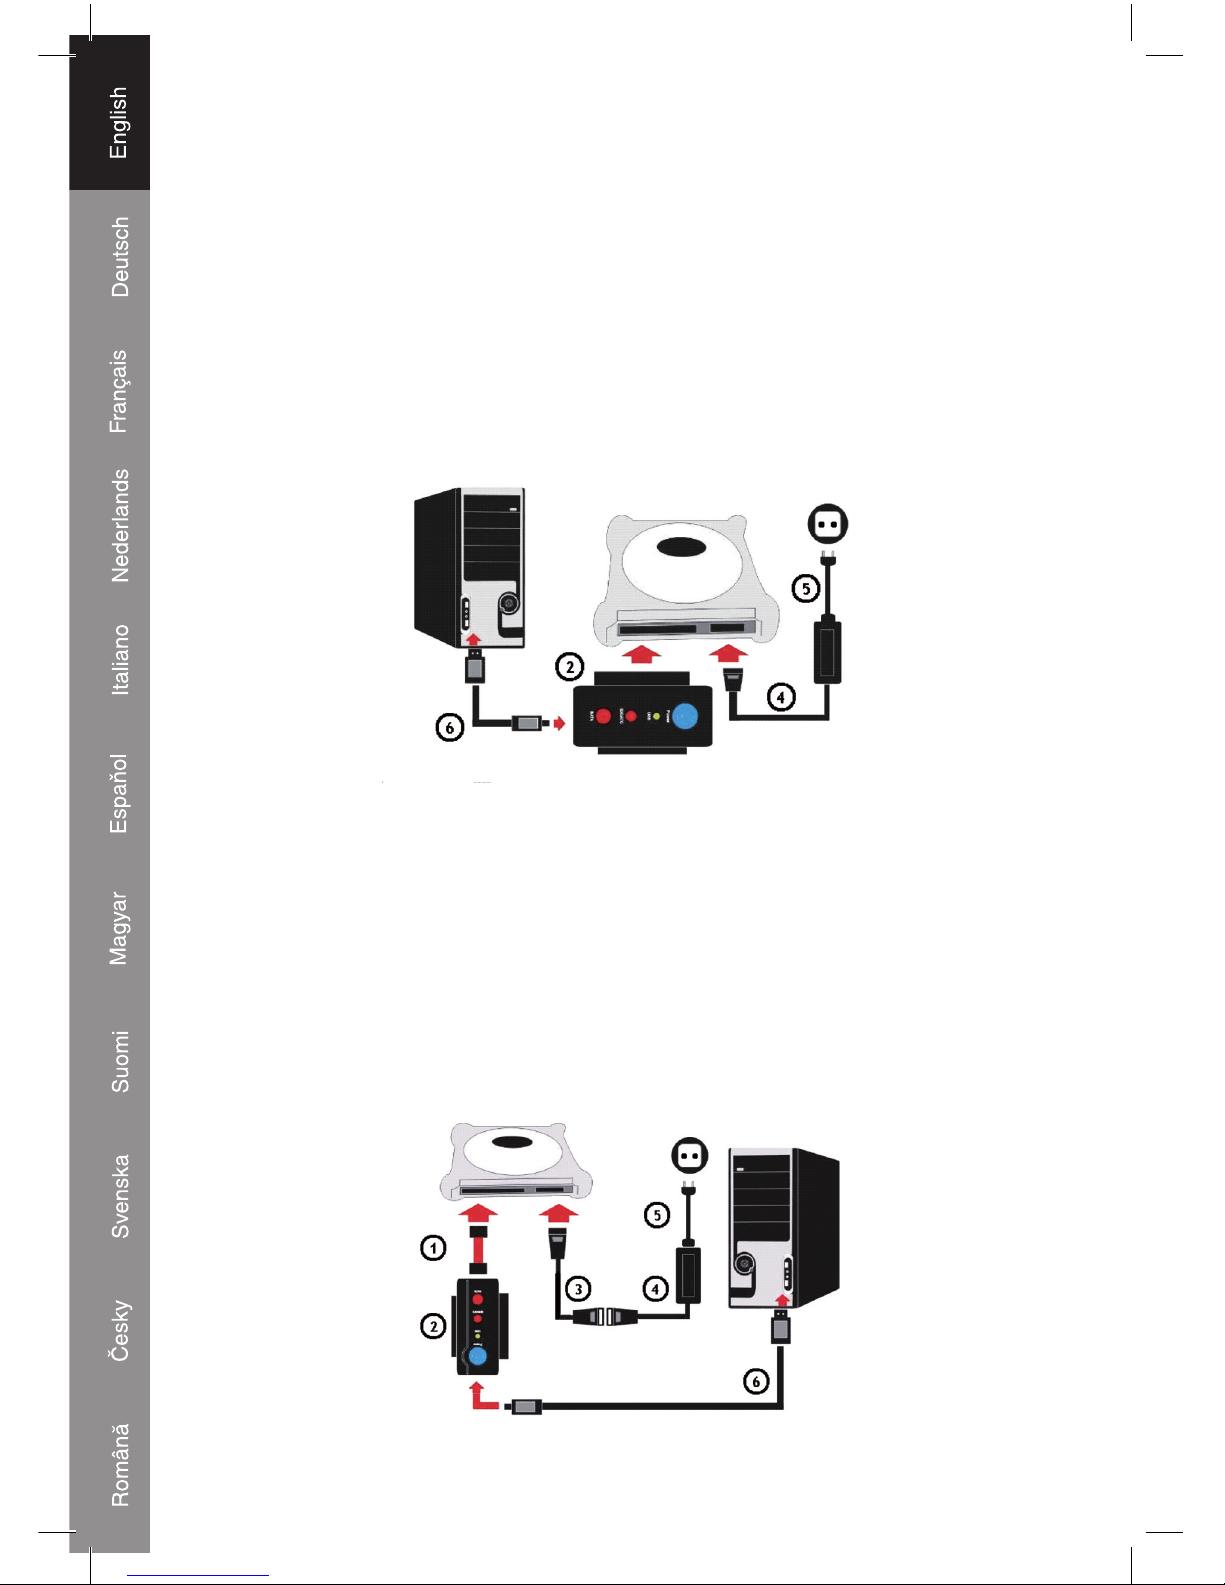
Step 1:
Connect the adapter (2) to the 3.5” IDE HDD
Step 2:
Connect the power cable (5) to the power adapter (4)
Step 3:
Plug the power adapter connection (4) into the 3.5” HDD
Step 4:
Plug the power cable (5) into the wall socket
Step 5:
At last connect the USB2.0 cable (6) to the adapter (2) and the computer
Windows will now detect the device as a “mass storage device”
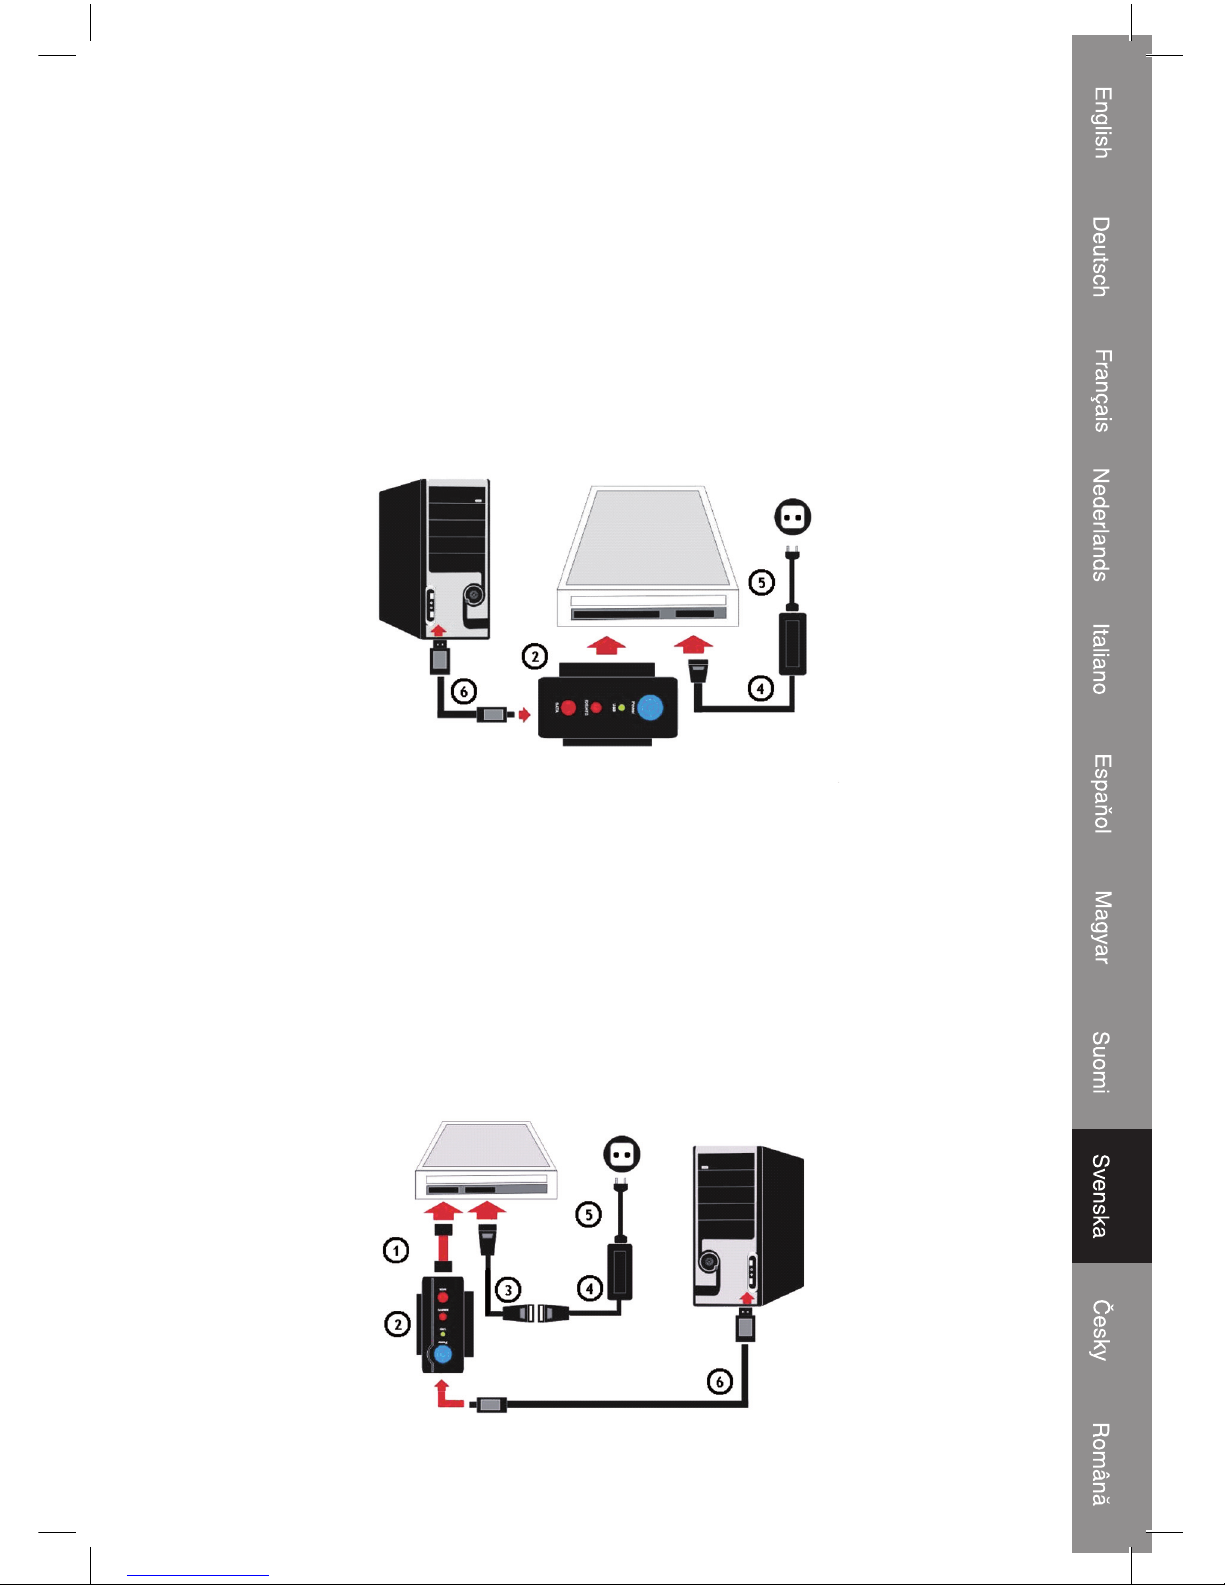
D) Connect to 3.5” SATA HDD
Step 1:
Connect the S-ATA data cable (1) to the 3.5” HDD and to the adapter unit (2)
Step 2:
Connect the IDE to S-ATA power adapter cable (3) and the power cable (5) to the power adapter (4)
Step 3:
Plug the S-ATA power adapter cable (3) into the 3.5” HDD
Step 4:
Plug the power cable (5) into the wall socket
Step 5:
Finally connect the USB2.0 cable (6) to the adapter (2) and the computer
Windows will now detect the device as a “mass storage device”.
Page 5
5
E) Connect to an 5.25” IDE CD-Rom RW DVD-Rom RW
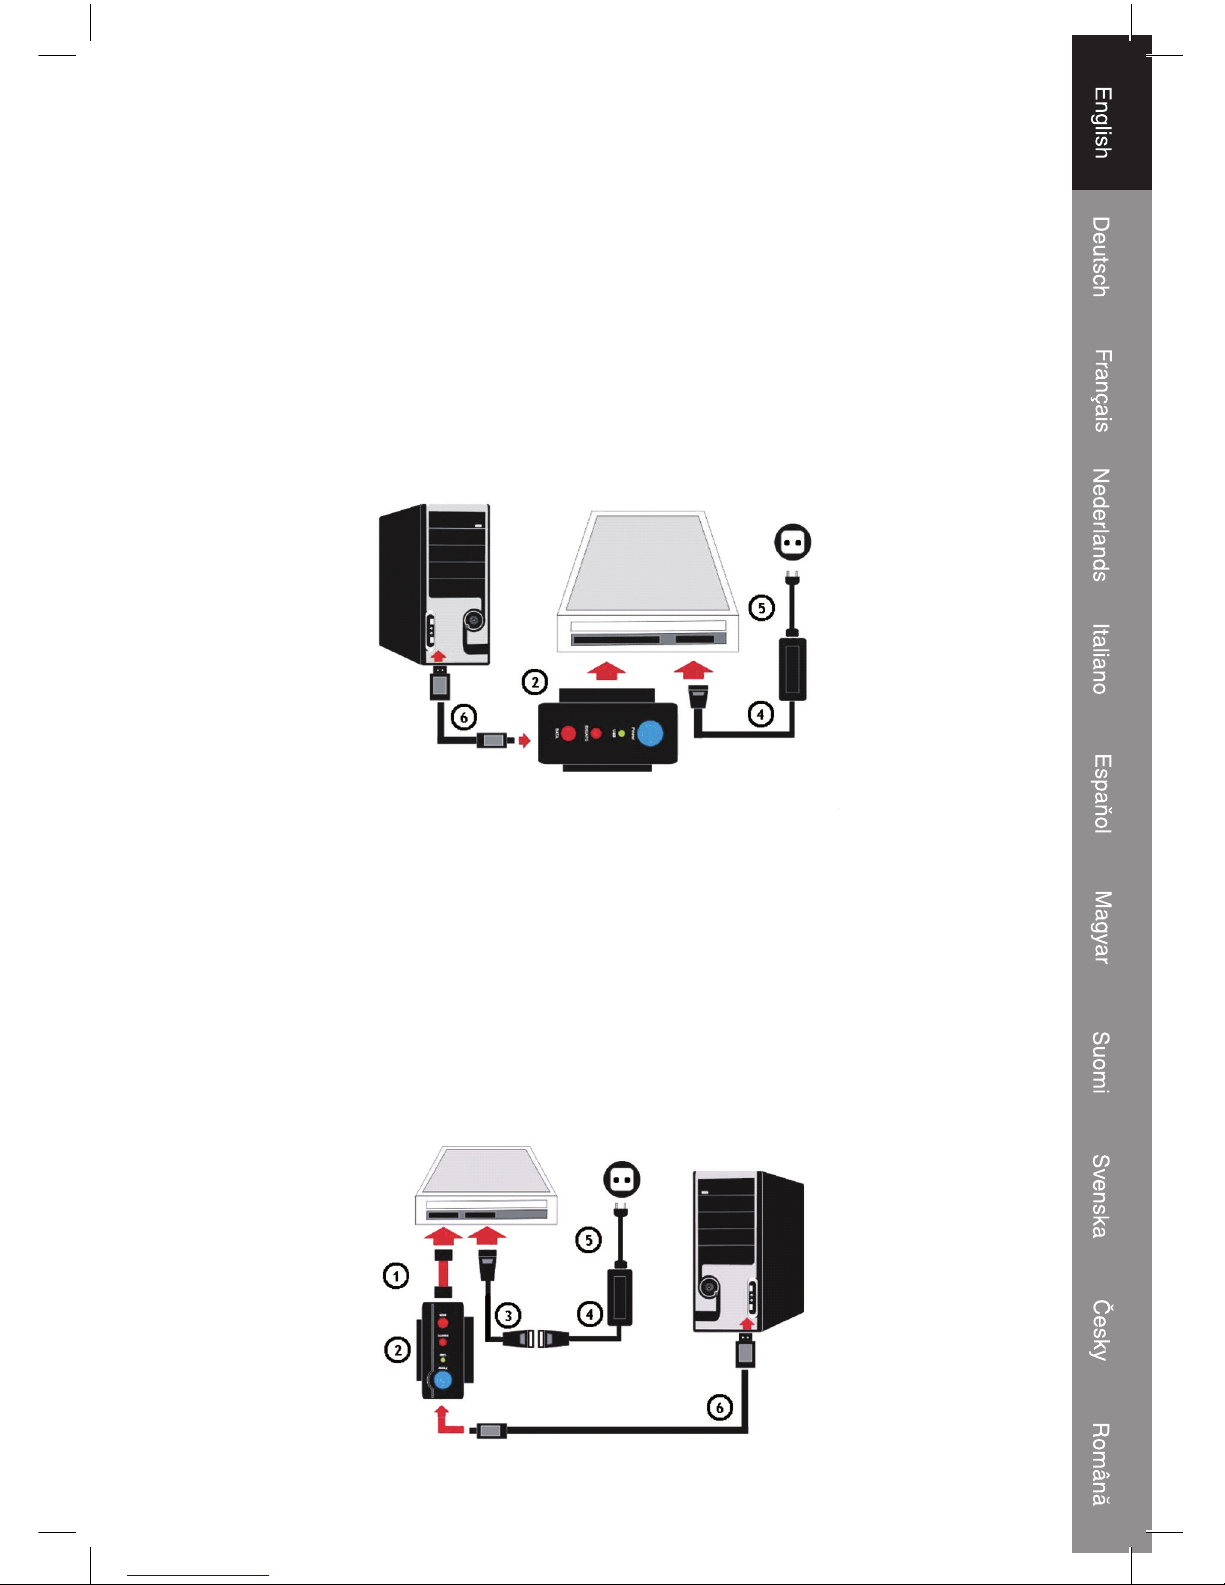
Step 1:
Connect the adapter (2) on the 5.25” IDE CD-Rom
Step 2:
Connect the power cable (5) to the power adapter (4)
Step 3:
Plug the power adapter connection (4) into the 5.25” IDE CD-Rom
Step 4:
Plug the power cable (5) into the wall socket
Step 5:
Finally connect the USB2.0 cable (6) to the adapter (2) and the computer
Windows will now detect the device as a “mass storage device”
F) Connect to 5.25” SATA CD-Rom RW DVD-Rom RW
Step 1:
Connect the S-ATA data cable (1) to the CD-Rom and to the adapter unit (2)
Step 2:
Connect the IDE to S-ATA power adapter cable (3) and the power cable (5) to the power adapter (4)
Step 3:
Plug the S-ATA power adapter cable (3) into the CD-Rom
Step 4:
Plug the power cable (5) into the wall socket
Step 5:
Finally connect the USB2.0 cable (6) to the adapter (2) and the computer
Windows will now detect the device as a “mass storage device”
Page 6
6
Declaration of conformity
We,
Nedis B.V.
De Tweeling 28
5215MC ’s-Hertogenbosch
The Netherlands
Tel.: 0031 73 599 1055
Email: info@nedis.com
Declare that product:
Brand: König Electronic
Model: CMP-USBIDESAT2
Description: USB2.0 to IDE / S-ATA adapter
Is in conformity with the following standards
EMC: EN55022:1998+A1:2000+A2:2003
EN55024:1998+A1:2001+A2:2003
EN61000-3-2:2000
EN61000-3-3:1995+A1:2001
LVD: IEC 60950-1 EN 60950-1
And complies with the requirements of the European Union Directives 89/336/EEC,
93/68/EEC, 2006/95/EC.
‘s-Hertogenbosch, 01 January 2009
Mrs. J. Gilad
Purchase Director
Page 7
7
Safety precautions:
RISK OF E LECTRIC SHOCK
DO NOT OPE N
CAUTION
To reduce risk of electric shock, this product should
ONLY be opened by an authorized technician when
service is required. Disconnect the product from mains
and other equipment if a problem should occur. Do not
expose the product to water or moisture.
Maintenance:
Clean only with a dry cloth. Do not use cleaning solvents or abrasives.
Warranty:
No guarantee or liability can be accepted for any changes and modifications of the
product or damage caused due to incorrect use of this product.
General:
Designs and specifications are subject to change without notice.
All logos brands and product names are trademarks or registered trademarks of their
respective holders and are hereby recognized as such.
Attention:
This product is marked with this symbol. It means that used electrical and
electronic products should not be mixed with general household waste. There
is a separate collections system for these products.
Copyright ©
Page 8
8
DEUTSCH
Einführung:
Mit diesem Adapter brauchen Sie keine Festplatte mehr einzubauen, wenn der PC nicht genügend
Backup Speicher hat. Sie brauchen nur eine 2,5” oder 3,5” Festplatte an einen USB-Anschluss
anzuschließen: dank der vorhandenen Spannungsversorgung kann das PC-Gehäuse geschlossen
bleiben.
Eigenschaften:
• Hochgeschwindigkeits-USB 2.0 (480 Mbit/s)
• Plug and Play ohne Installation eines Treibers
• WIN98SE (zusätzlich Treiber für USB beigefügt)
• Unterstützt 3,5" und 2,5" IDE- und SATA-Festplatte
• Unterstützt ULTRA ATA / 133 und kompatibel mit UDMA5
• Unterstützt SERIAL ATA 1.0 spec. und kompatibel mit ULRA
• ATA / 133 mit Übertragungsgeschwindigkeit von 150 Mbit/s
• USB 2.0-Anschluss unterstützt WINDOWS 2000 / ME / XP / Vista und Mac
Verpackungsinhalt:
1) S-ATA-Datenkabel
2) USB2.0-Anschlusseinheit
3) IDE auf S-ATA Netzadapterkabel
4) Netzadaptereinheit
5) Netzkabel
6) Verbindungskabel von USB2.0 auf 5-poligen Ministecker
Page 9
9
Anschlüsse:
A) Schließen Sie die 2,5” S-ATA-Festplatte an
Schritt 1:
Schließen Sie das S-ATA-Datenkabel (1) an die 2,5” Festplatte und an die Adaptereinheit (2) an.
Schritt 2:
Schließen Sie das IDE auf S-ATA Netzadapterkabel (3) und das Netzkabel (5) an den Netzadapter (4) an.
Schritt 3:
Stecken Sie den S-ATA Netzadapterkabel (3) in die 2,5” Festplatte.
Schritt 4:
Stecken Sie das Netzkabel (5) in die Steckdose.
Schritt 5:
Zum Schluss schließen Sie das USB2.0-Kabel (6) an den Adapter (2) und den Computer an.
Windows erkennt jetzt das Massenspeichergerät.
B) Schließen Sie die 2,5” IDE-Festplatte an
Schritt 1:
Schließen Sie den Adapter (2) an die 2,5” IDE-Festplatte an.
Schritt 2:
Schließen Sie das USB2.0-Kabel (6) an den Adapter (2) und den Computer an.
Windows erkennt jetzt das Massenspeichergerät.
Page 10
10
C) Schließen Sie die 3,5” IDE-Festplatte an
Schritt 1:
Schließen Sie den Adapter (2) an die 3,5” IDE-Festplatte an.
Schritt 2:
Schließen Sie das Netzkabel (5) an den Netzadapter (4) an.
Schritt 3:
Stecken Sie den Netzadapteranschluss (4) in die 3,5” Festplatte.
Schritt 4:
Stecken Sie das Netzkabel (5) in die Steckdose.
Schritt 5:
Zum Schluss schließen Sie das USB2.0-Kabel (6) an den Adapter (2) und den Computer an.
Windows erkennt jetzt das Massenspeichergerät.
D) Schließen Sie die 3,5” SATA-Festplatte an
Schritt 1:
Schließen Sie das S-ATA-Datenkabel (1) an die 3,5” Festplatte und an die Adaptereinheit (2) an.
Schritt 2:
Schließen Sie das IDE auf S-ATA Netzadapterkabel (3) und das Netzkabel (5) an den Netzadapter (4) an.
Schritt 3:
Stecken Sie den S-ATA Netzadapterkabel (3) in die 3,5” Festplatte.
Schritt 4:
Stecken Sie das Netzkabel (5) in die Steckdose.
Schritt 5:
Zum Schluss schließen Sie das USB2.0-Kabel (6) an den Adapter (2) und den Computer an.
Windows erkennt jetzt das Massenspeichergerät.
Page 11
11
E) Schließen Sie ein 5,25” IDE CD-ROM RW oder DVD-ROM RW Laufwerk an
Schritt 1:
Schließen Sie den Adapter (2) an das 5,25” IDE CD-ROM Laufwerk an.
Schritt 2:
Schließen Sie das Netzkabel (5) an den Netzadapter (4) an.
Schritt 3:
Stecken Sie den Netzadapteranschluss (4) in das 5,25” IDE CD-ROM Laufwerk
Schritt 4:
Stecken Sie das Netzkabel (5) in die Steckdose.
Schritt 5:
Zum Schluss schließen Sie das USB2.0-Kabel (6) an den Adapter (2) und den Computer an.
Windows erkennt jetzt das Massenspeichergerät.
F) Schließen Sie ein 5,25” S-ATA CD-ROM RW oder DVD-ROM RW Laufwerk an
Schritt 1:
Schließen Sie das S-ATA-Datenkabel (1) an das CD-ROM Laufwerk und an die Adaptereinheit (2)
an.
Schritt 2:
Schließen Sie das IDE an S-ATA Netzadapterkabel (3) und das Netzkabel (5) an den Netzadapter (4) an.
Schritt 3:
Stecken Sie den S-ATA Netzadapterkabel (3) in das CD-ROM Laufwerk.
Schritt 4:
Stecken Sie das Netzkabel (5) in die Steckdose.
Schritt 5:
Zum Schluss schließen Sie das USB2.0-Kabel (6) an den Adapter (2) und den Computer an.
Windows erkennt jetzt das Massenspeichergerät.
Page 12
12
Konformtitätserklärung
Wir,
Nedis B.V.
De Tweeling 28
5215MC ’s-Hertogenbosch
Niederlande
Tel.: 0031 73 599 1055
Email: info@nedis.com
erklären, dass das Produkt:
Marke: König Electronic
Modell: CMP-USBIDESAT2
Beschreibung: USB2.0 an IDE/S-ATA Adapter
den folgenden Standards entspricht:
EMV: EN55022:1998+A1:2000+A2:2003
EN55024:1998+A1:2001+A2:2003
EN61000-3-2:2000
EN61000-3-3:1995 +A1:2001
LVD: IEC 60950-1 EN 60950-1
Und es erfüllt die Anforderungen der EG-Richtlinien 89/336/EEC, 93/68/EEC und 2006/95/EC.
‘s-Hertogenbosch, 01. Januar 2009
J. Gilad
Einkaufsleiterin
Page 13

13
Sicherheitsvorkehrungen:
STROMSCHLAGGEFAHR
NICHT ÖFFNEN
VORSICHT
Um das Risiko eines elektrischen Schlags zu
verringern, sollte dieses Produkt AUSSCHLIESSLICH
von einem autorisierten Techniker geöffnet werden,
wenn eine Reparatur erforderlich ist. Trennen Sie das
Produkt vom Stromnetz und anderen Geräten, wenn ein Problem auftreten sollte. Sorgen
Sie dafür, dass das Gerät nicht mit Wasser oder Feuchtigkeit in Berührung kommt.
Wartung:
Nur mit einem trockenen Tuch säubern. Keine Reinigungs- oder Scheuermittel
verwenden.
Garantie:
Es kann keine Garantie oder Haftung für irgendwelche Änderungen oder Modifikationen
des Produkts oder für Schäden übernommen werden, die aufgrund einer nicht
ordnungsgemäßen Anwendung des Produkts entstanden sind.
Allgemeines:
Design und Spezifikationen können ohne vorherige Ankündigung geändert werden.
Alle Logos, Marken und Produktnamen sind Warenzeichen oder registrierte Warenzeichen
ihrer jeweiligen Eigentümer und werden hiermit als solche anerkannt.
Achtung:
Dieses Produkt ist mit diesem Symbol gekennzeichnet. Das bedeutet, dass die
ausgedienten elektrischen und elektronischen Produkte nicht im allgemeinen
Haushaltsmüll entsorgt werden dürfen. Für diese Produkte stehen gesonderte
Sammelsysteme zur Verfügung.
Copyright ©
Page 14
14
FRANÇAIS
Introduction :
Grâce à cet adaptateur, plus besoin de monter un disque dur lorsqu'il n'y a plus assez de mémoire
auxiliaire dans le PC. Raccordez simplement un disque dur 2.5” ou 3.5” à un port USB : grâce à
l'alimentation électrique intégrée, le corps du PC peut rester fermé.
Caractéristiques techniques :
• USB 2.0 haute vitesse (480Mo/sec)
• Plug and play sans installation de pilote
• WIN98SE (pilote joint pour USB supplémentaire)
• Compatible disques durs IDE et SATA 3.5 et 2.5
• Compatible ULTRAATA / 133AND UDMA5
• Compatible SERIAL ATA 1.0 spec. Compatible ULRA
• Débit ATA / 133.its de 150MO / SEC
• Interface USB 2.0 compatible avec WINDOWS 2000 / ME / XP / Vista et Mac
Contenu de l'emballage :
1) Câble données S-ATA
2) Dispositif de raccordement USB2.0
3) Câble d'alimentation d'adaptateur IDE vers S-ATA
4) Adaptateur électrique
5) Câble d'alimentation
6) Câble de raccordement USB2.0 A vers mini connecteur 5 broches
Page 15
15
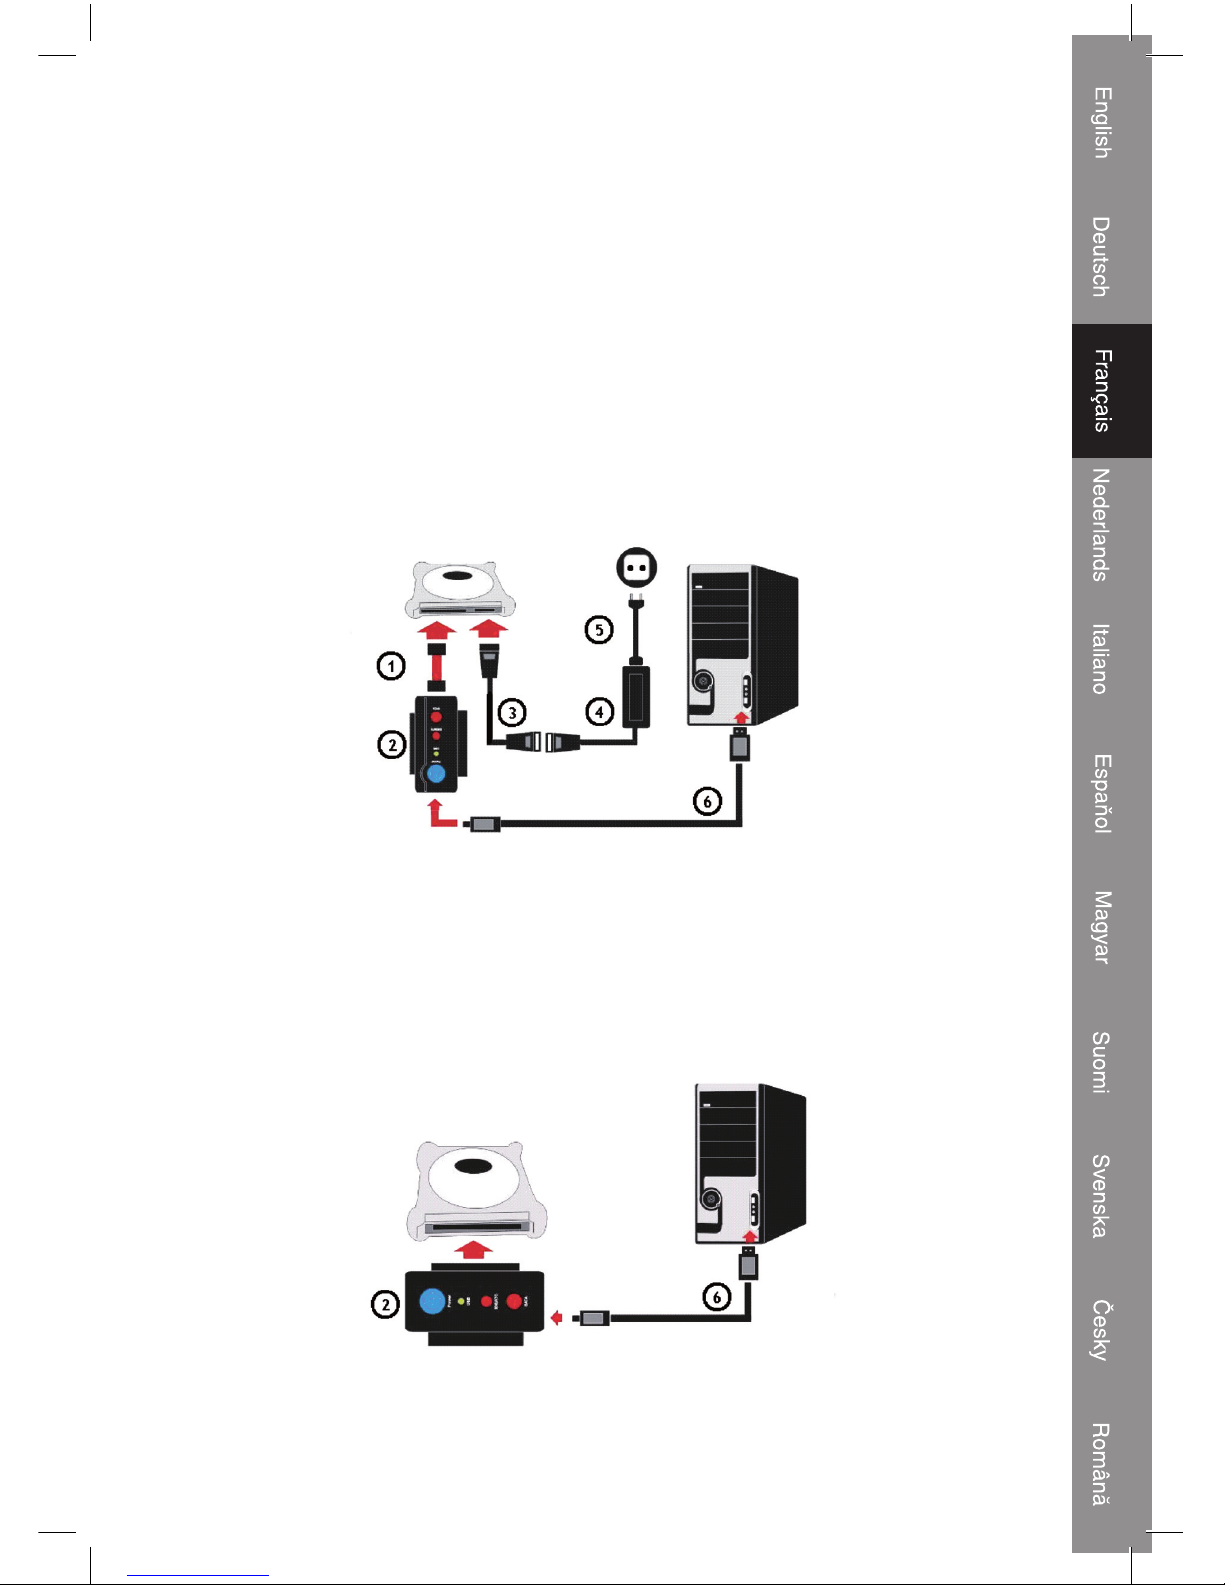
Raccordements :
A) Raccordement à un disque dur SATA 2.5”
Etape 1:
Raccordez le câble données S-ATA (1) au disque dur 2.5” et à l'adaptateur (2).
Etape 2:
Raccordez le câble d'alimentation de l'adaptateur IDE vers S-ATA (3) et le câble d'alimentation (5) à
l'adaptateur électrique (4)
Etape 3:
Branchez le câble de l‘adaptateur électrique S-ATA (3) dans le disque dur 2.5”.
Etape 4:
Branchez le câble d'alimentation (5) dans une prise murale.
Etape 5:
Enfin, raccordez le câble USB2.0 (6) à l'adaptateur (2) et à l'ordinateur.
Windows détecte alors un périphérique de stockage de masse.
B) Raccordement à un disque dur IDE 2.5”
Etape 1:
Raccordez l'adaptateur (2) au disque dur IDE 2.5”.
Etape 2:
Raccordez le câble USB2.0 (6) à l'adaptateur (2) et à l'ordinateur.
Windows détecte alors un périphérique de stockage de masse.
Page 16

16
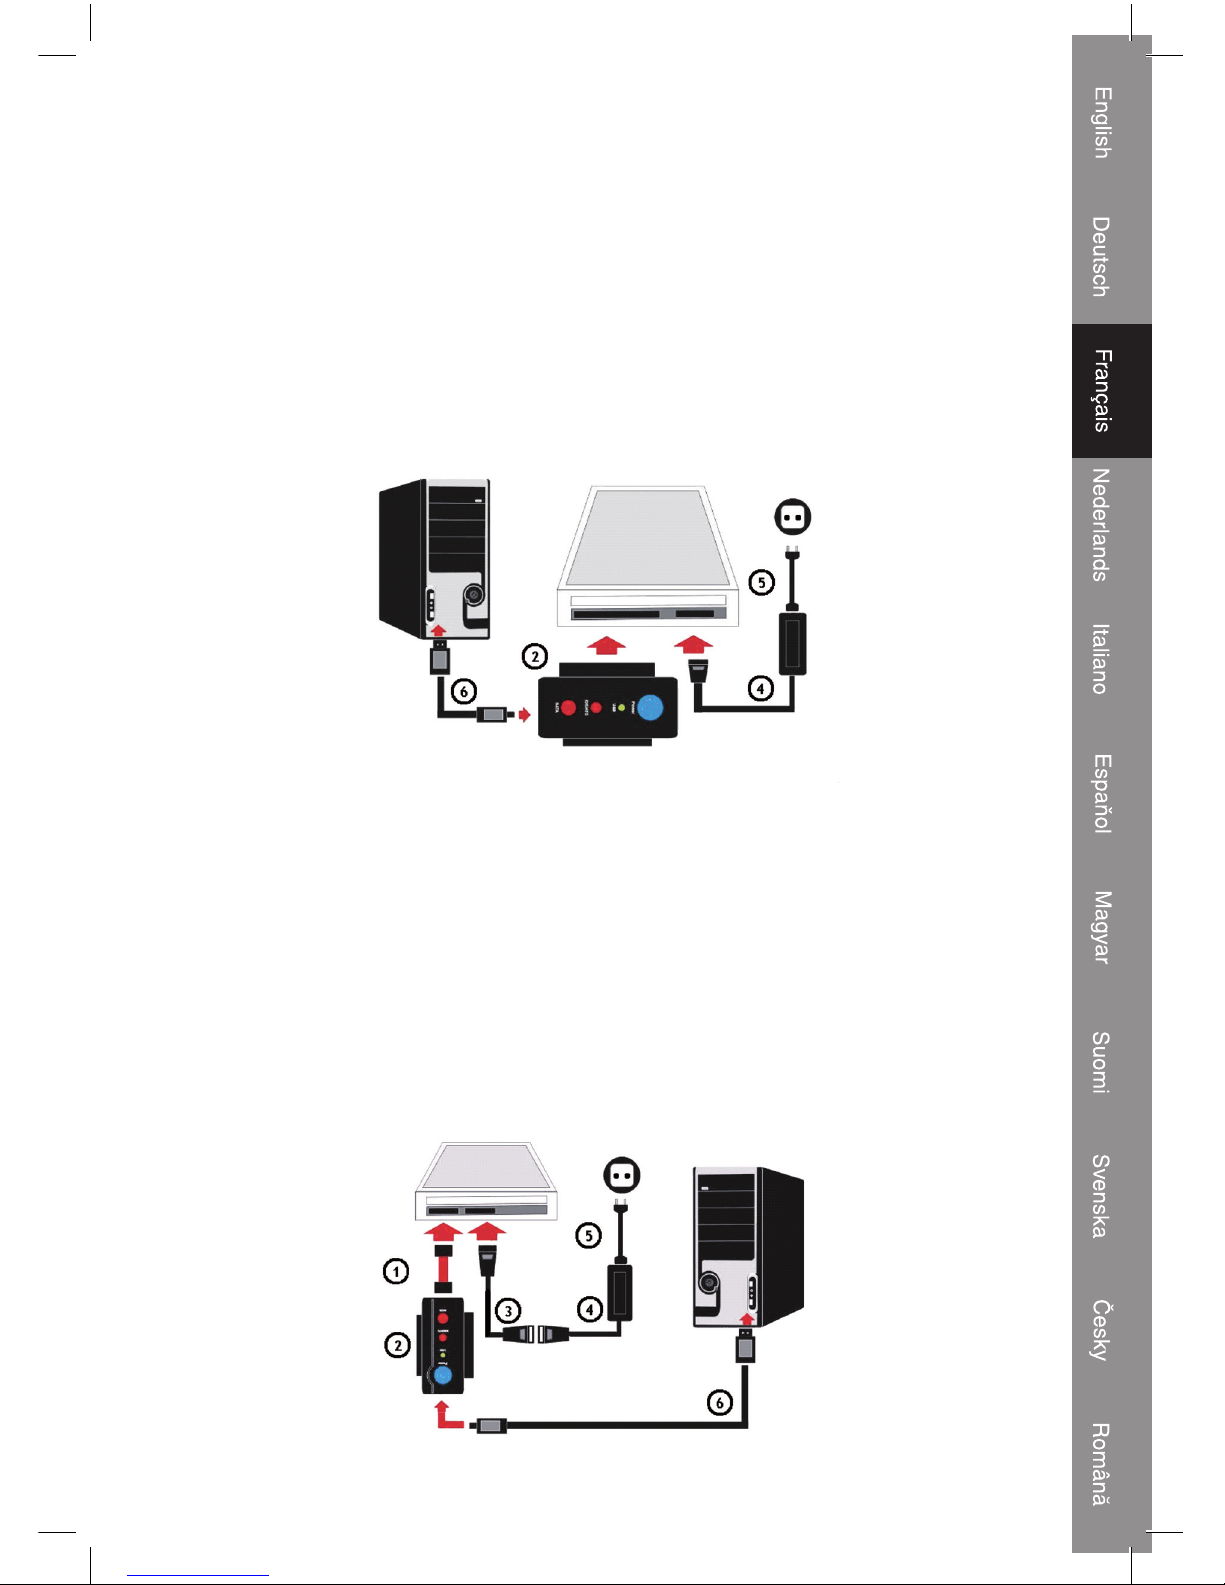
C) Raccordement à un disque dur IDE 3.5”
Etape 1:
Raccordez l'adaptateur (2) au disque dur IDE 3.5”.
Etape 2:
Raccordez le câble d'alimentation (5) à l'adaptateur électrique (4)
Etape 3:
Branchez la prise d'alimentation de l'adaptateur (4) dans le disque dur 3.5”.
Etape 4:
Branchez le câble d'alimentation (5) dans une prise murale.
Etape 5:
Enfin, raccordez le câble USB2.0 (6) à l'adaptateur (2) et à l'ordinateur.
Windows détecte alors un périphérique de stockage de masse.
D) Raccordement à un disque dur SATA 3.5”
Etape 1:
Raccordez le câble données S-ATA (1) au disque dur 3.5” et à l'adaptateur (2).
Etape 2:
Raccordez le câble d'alimentation de l'adaptateur IDE vers S-ATA (3) et le câble d'alimentation (5) à
l'adaptateur électrique (4)
Etape 3:
Branchez le câble de l‘adaptateur électrique S-ATA (3) dans le disque dur 3.5”.
Etape 4:
Branchez le câble d'alimentation (5) dans une prise murale.
Etape 5:
Enfin, raccordez le câble USB2.0 (6) à l'adaptateur (2) et à l'ordinateur.
Windows détecte alors un périphérique de stockage de masse.
Page 17
17
E) Raccordement à un lecteur de CD-Rom RW DVD-Rom RW IDE 5.25”
Etape 1:
Raccordez l'adaptateur (2) au lecteur CD-Rom IDE 5.25”.
Etape 2:
Raccordez le câble d'alimentation (5) à l'adaptateur électrique (4).
Etape 3:
Branchez la prise d'alimentation de l'adaptateur (4) dans le lecteur CD-Rom IDE 5.25”.
Etape 4:
Branchez le câble d'alimentation (5) dans une prise murale.
Etape 5 :
Enfin, raccordez le câble USB2.0 (6) à l'adaptateur (2) et à l'ordinateur.
Windows détecte alors un périphérique de stockage de masse.
F) Raccordement à un lecteur de CD-Rom RW DVD-Rom RW SATA 5.25”
Etape 1:
Raccordez le câble données S-ATA (1) au lecteur CD-Rom et à l'adaptateur (2).
Etape 2:
Raccordez le câble d'alimentation de l'adaptateur IDE vers S-ATA (3) et le câble d'alimentation (5) à
l'adaptateur électrique (4)
Etape 3:
Branchez le câble de l‘adaptateur électrique (3) dans le lecteur CD-ROM.
Etape 4:
Branchez le câble d'alimentation (5) dans une prise murale.
Etape 5:
Enfin, raccordez le câble USB2.0 (6) à l'adaptateur (2) et à l'ordinateur.
Windows détecte alors un périphérique de stockage de masse.
Page 18
18
Déclaration de conformité :
Nous,
Nedis B.V.
De Tweeling 28
5215MC ’s-Hertogenbosch
Pays-Bas
Tél : 0031 73 599 1055
E-mail : info@nedis.com
Déclarons que le produit :
Marque : König Electronic
Modèle : CMP-USBIDESAT2
Désignation : Adaptateur USB2.0 vers IDE/S-ATA
est conforme aux normes suivantes :
CEM : EN55022:1998+A1:2000+A2:2003
EN55024:1998+A1:2001+A2:2003
EN61000-3-2:2000
EN61000-3-3:1995 +A1:2001
DBT: IEC 60950-1 EN 60950-1
Et qu'il est conforme aux prescriptions des Directives de l'Union Européenne 89/336/CEE,
93/68/CEE, 2006/95/CE.
‘s-Hertogenbosch, 1er janvier 2009
Mme. J. Gilad
Directrice des Achats
Page 19
19
Consignes de sécurité :
RISQU E DE CHOC
ELECTRIQUE
NE PAS OUVRI R
ATTENTION
Afin de réduire les risques de chocs électriques, ce
produit ne doit être ouvert QUE par un technicien
qualifié agréé en cas de réparation. Débranchez
l'appareil du secteur et des autres équipements en
cas de problème. N'exposez jamais l'appareil à l'eau ou à l'humidité.
Entretien :
Ne nettoyez qu'avec un chiffon sec. N'utilisez pas de solvants ou de produits abrasifs.
Garantie :
Aucune garantie ou responsabilité ne sera acceptée en cas de modification et/ou
de transformation du produit ou en cas de dommages provoqués par une utilisation
incorrecte de l'appareil.
Généralités :
Le design et les caractéristiques techniques sont sujets à modification sans notification
préalable.
Tous les logos de marques et noms de produits sont des marques déposées ou
immatriculées dont leurs détenteurs sont titulaires et sont donc reconnus comme telles
dans ce document.
Attention :
Ce symbole figure sur l'appareil. Il signifie que les produits électriques et
électroniques usagés ne doivent pas être jetés avec les ordures ménagères.
Le système de collecte est différent pour ce genre de produits.
Copyright ©
Page 20
20
NEDERLANDS
Introductie:
Met deze adapter is het niet langer nodig een harddisk in te bouwen wanneer uw pc niet meer
voldoende back-upruimte over heeft. Sluit gewoon een 2.5” of 3.5” harddisk aan op een USB-poort,
dankzij de meegeleverde voedingsadapter kan de behuizing van de pc gesloten blijven.
Eigenschappen:
• Hoge snelheid USB 2.0 (480 Mbit/sec.)
• Plug & play zonder het installeren van een driver
• WIN98SE (driver meegeleverd voor USB)
• Ondersteunt 3.5” en 2.5” IDE en S-ATA harddisks
• Ondersteunt Ultra-ATA/133 en UDMA-5 compatibel
• Ondersteunt S-ATA 1.0 spec. Ultra compatibel
• ATA/133 met overdrachtssnelheid van 150 Mbit/sec
• USB 2.0 interface ondersteuning bij Windows 2000 / ME / XP / Vista en Mac besturingssystemen
Inhoud van de verpakking:
1) S-ATA datakabel
2) USB2.0 adaptereenheid
3) IDE naar S-ATA voedingsadapterkabel
4) Voedingsadapter
5) Netsnoer
6) USB2.0 A naar mini 5-pin verbindingskabel
Page 21
21
Aansluiten van de harddisk:
A) Aansluiten van een 2.5” S-ATA harddisk
Stap 1:
Sluit de S-ATA datakabel (1) aan op de 2.5” harddisk en op de adaptereenheid (2).
Stap 2:
Sluit de IDE naar S-ATA voedingsadapterkabel (3) en het netsnoer (5) aan op de voedingsadapter
(4).
Stap 3:
Steek de S-ATA voedingsadapterkabel (3) in de 2.5” harddisk.
Stap 4:
Steek de stekker van het netsnoer (5) in het stopcontact.
Stap 5:
Sluit ten slotte de USB2.0 kabel (6) aan op de adapter (2) en de computer.
Windows zal nu een apparaat voor massaopslag vinden.
B) Aansluiten van een 2.5” IDE harddisk
Stap 1:
Sluit de adapter (2) aan op de 2.5” IDE harddisk.
Stap 2:
Sluit de USB2.0 kabel (6) aan op de adapter (2) en de computer.
Windows zal nu een apparaat voor massaopslag vinden.
Page 22

22
C) Aansluiten van een 3.5” IDE harddisk
Stap 1:
Sluit de adapter (2) aan op de 3.5” IDE harddisk.
Stap 2:
Sluit het netsnoer (5) aan op de voedingsadapter (4).
Stap 3:
Steek de voedingsadapterconnector (4) in de 3.5” harddisk.
Stap 4:
Steek de stekker van het netsnoer (5) in het stopcontact.
Stap 5:
Sluit ten slotte de USB2.0 kabel (6) aan op de adapter (2) en de computer.
Windows zal nu een apparaat voor massaopslag vinden.
D) Aansluiten van een 3.5” S-ATA harddisk
Stap 1:
Sluit de S-ATA datakabel (1) aan op de 3.5” harddisk en op de adaptereenheid (2).
Stap 2:
Sluit de IDE naar S-ATA voedingsadapterkabel (3) en het netsnoer (5) aan op de voedingsadapter
(4).
Stap 3:
Steek de S-ATA voedingsadapterkabel (3) in de 3.5” harddisk.
Stap 4:
Steek de stekker van het netsnoer (5) in het stopcontact.
Stap 5:
Sluit ten slotte de USB2.0 kabel (6) aan op de adapter (2) en de computer.
Windows zal nu een apparaat voor massaopslag vinden.
Page 23
23
E) Aansluiten van een 5.25” IDE CD-Rom RW, DVD-Rom RW
Stap 1:
Sluit de adapter (2) aan op de 5.25” IDE CD-Rom.
Stap 2:
Sluit het netsnoer (5) aan op de voedingsadapter (4).
Stap 3:
Steek de voedingsadapterconnector (4) in de 5.25” IDE CD-Rom.
Stap 4:
Steek de stekker van het netsnoer (5) in het stopcontact.
Stap 5:
Sluit ten slotte de USB2.0 kabel (6) aan op de adapter (2) en de computer.
Windows zal nu een apparaat voor massaopslag vinden.
F) Aansluiten van een 5.25” S-ATA CD-Rom RW, DVD-Rom RW
Stap 1:
Sluit de S-ATA datakabel (1) aan op de CD-Rom en op de adaptereenheid (2).
Stap 2:
Sluit de IDE naar S-ATA voedingsadapterkabel (3) en het netsnoer (5) aan op de voedingsadapter
(4).
Stap 3:
Steek de S-ATA voedingsadapterkabel (3) in de CD-Rom.
Stap 4:
Steek de stekker van het netsnoer (5) in het stopcontact.
Stap 5:
Sluit ten slotte de USB2.0 kabel (6) aan op de adapter (2) en de computer.
Windows zal nu een apparaat voor massaopslag vinden.
Page 24

24
Conformiteitsverklaring
Wij,
Nedis BV
De Tweeling 28
5215 MC ’s-Hertogenbosch
Nederland
Tel.: 0031 73 599 1055
E-mail: info@nedis.com
verklaren dat het product:
Merknaam: König Electronic
Model: CMP-USBIDESAT2
Omschrijving: USB2.0 naar IDE/S-ATA adapter
in overeenstemming met de volgende normen is:
EMC: EN55022:1998+A1:2000+A2:2003
EN55024:1998+A1:2001+A2:2003
EN61000-3-2:2000
EN61000-3-3:1995 +A1:2001
LVD: IEC 60950-1 EN 60950-1
en voldoet aan de vereiste richtlijnen van de Europese Unie: 89/336/EEC, 93/68/EEC en
2006/95/EC.
‘s-Hertogenbosch, 1 januari 2009
Mevr. J. Gilad
Directeur inkoop
Page 25

25
Veiligheidsvoorzorgsmaatregelen:
GEVAAR VOOR
ELEKT RISCHE SCHOK
NIET OPENEN
LET OP:
Wanneer service of reparatie noodzakelijk is, mag dit
product UITSLUITEND door een geautoriseerde
technicus geopend worden; dit om de kans op het
krijgen van een elektrische schok te voorkomen. Als
er een probleem optreedt, koppel het product dan los van het lichtnet en van andere
apparatuur. Stel het apparaat niet bloot aan water of vocht.
Onderhoud:
Uitsluitend reinigen met een droge doek. Gebruik geen reinigingsmiddelen of
schuurmiddelen.
Garantie:
Voor wijzigingen en veranderingen aan het product of schade veroorzaakt door een
verkeerd gebruik van dit product, kan geen aansprakelijkheid worden geaccepteerd.
Tevens vervalt daardoor de garantie.
Algemeen:
Wijziging van ontwerp en specificaties zonder voorafgaande mededeling onder
voorbehoud.
Alle logo's, merken en productnamen zijn handelsmerken of geregistreerde handelsmerken
van de respectievelijke eigenaren en worden hierbij als zodanig erkend.
Let op:
Dit product is voorzien van dit symbool. Dit symbool geeft aan dat afgedankte
elektrische en elektronische producten niet met het gewone huisafval
verwijderd mogen worden. Voor dit soort producten zijn er speciale
inzamelingspunten.
Copyright ©
Page 26

26
ITALIANO
Introduzione:
Grazie a questo adattatore non è più necessario installare un disco fisso quando nel PC non resta
spazio sufficiente per il backup. Basta collegare un disco fisso da 2,5” o 3,5” a una porta USB: grazie
all'alimentazione inclusa, il case del PC può rimanere chiuso.
Caratteristiche:
• USB 2.0 ad alta velocità (480 MbBit/sec)
• Plug and play senza installazione del driver
• WIN98SE (driver accluso per USB aggiuntivo)
• Supporta HDD IDE e SATA da 3,5 e 2,5
• Supporta ULTRAATA / 133AND UDMA5 compatibile
• SUPPORTA SERIAL ATA 1.0 spec. Compatibile con ULRA
• Il tasso di trasferimento ATA / 133.its è pari a 150 MBIT/SEC
• L'interfaccia USB 2.0 supporta WINDOWS 2000 / ME / XP / Vista e sistema operativo Mac Os
Contenuto della confezione
1) Cavo dati S-ATA
2) Unità di connessione USB 2.0
3) Cavo di adattatore di corrente da IDE a S-ATA
4) Unità adattatore di corrente
5) Cavo di alimentazione
6) Da USB 2.0 A a cavo di connessione mini 5 pin
Page 27

27
Collegamenti:
A) Collegare all'HDD SATA da 2,5”
Fase 1:
Collegare il cavo dati S-ATA (1) sull'HDD da 2,5” e all'unità adattatore (2).
Fase 2:
Collegare il cavo adattatore di corrente da IDE a S-ATA (3) e il cavo di alimentazione (5) all'adattatore
di corrente (4)
Fase 3:
Inserire il cavo dell‘adattatore di corrente S-ATA (3) nell'HDD da 2,5”.
Fase 4:
Inserire il cavo di alimentazione (5) nella presa a parete.
Fase 5:
Infine collegare il cavo USB 2.0 (6) all'adattatore (2) e al computer.
A questo punto Windows rileverà un'unità di memoria di massa.
B) Collegare all'HDD IDE da 2,5”
Fase 1:
Collegare l'adattatore (2) sull'HDD IDE da 2,5”.
Fase 2:
Collegare il cavo USB 2.0 (6) all'adattatore (2) e al computer.
A questo punto Windows rileverà un'unità di memoria di massa.
Page 28

28
C) Collegare all'HDD IDE da 3,5”
Fase 1:
Collegare l'adattatore (2) sull'HDD IDE da 3,5”.
Fase 2:
Collegare il cavo di alimentazione (5) all'adattatore di corrente (4)
Fase 3:
Inserire la connessione dell'adattatore di corrente (4) all'HDD da 3,5”.
Fase 4:
Inserire il cavo di alimentazione (5) nella presa a parete.
Fase 5:
Infine collegare il cavo USB 2.0 (6) all'adattatore (2) e al computer.
A questo punto Windows rileverà un'unità di memoria di massa.
D) Collegare all'HDD SATA da 3,5”
Fase 1:
Collegare il cavo dati S-ATA (1) sull'HDD da 3,5” e all'unità adattatore (2).
Fase 2:
Collegare il cavo adattatore di corrente da IDE a S-ATA (3) e il cavo di alimentazione (5) all'adattatore
di corrente (4)
Fase 3:
Inserire il cavo dell‘adattatore di corrente S-ATA (3) nell'HDD da 3,5”.
Fase 4:
Inserire il cavo di alimentazione (5) nella presa a parete.
Fase 5:
Infine collegare il cavo USB 2.0 (6) all'adattatore (2) e al computer.
A questo punto Windows rileverà un'unità di memoria di massa.
Page 29

29
E) Collegare a un CD-Rom RW - DVD-Rom RW IDE da 5,25”
Fase 1:
Collegare l'adattatore (2) sul CD-Rom IDE da 5,25”.
Fase 2:
Collegare il cavo di alimentazione (5) all'adattatore di corrente (4)
Fase 3:
Inserire la connessione dell'adattatore di corrente (4) al CD-Rom IDE da 5,25”.
Fase 4:
Inserire il cavo di alimentazione (5) nella presa a parete.
Fase 5:
Infine collegare il cavo USB 2.0 (6) all'adattatore (2) e al computer.
A questo punto Windows rileverà un'unità di memoria di massa.
F) Collegare a un CD-Rom RW - DVD-Rom RW SATA da 5,25”
Fase 1:
Collegare il cavo dati S-ATA (1) sul CD-Rom e all'unità adattatore (2).
Fase 2:
Collegare il cavo adattatore di corrente da IDE a S-ATA (3) e il cavo di alimentazione (5) all'adattatore
di corrente (4)
Fase 3:
Inserire il cavo dell‘adattatore di corrente S-ATA (3) nel CD-Rom.
Fase 4:
Inserire il cavo di alimentazione (5) nella presa a parete.
Fase 5:
Infine collegare il cavo USB 2.0 (6) all'adattatore (2) e al computer.
A questo punto Windows rileverà un'unità di memoria di massa.
Page 30

30
DICHIARAZIONE DI CONFORMITÀ
Questa società,
Nedis B.V.
De Tweeling 28
5215MC ’s-Hertogenbosch
Paesi Bassi
Tel.: 0031 73 599 1055
Email: info@nedis.com
Dichiara che il prodotto:
Marca: König Electronic
Modello: CMP-USBIDESAT2
Descrizione: Adattatore da USB 2.0 a IDE/S-ATA
è conforme ai seguenti standard:
EMC: EN55022:1998+A1:2000+A2:2003
EN55024:1998+A1:2001+A2:2003
EN61000-3-2:2000
EN61000-3-3:1995+A1:2001
LVD: IEC 60950-1 EN 60950-1
ed è conforme ai requisiti delle Direttive dell'Unione Europea 89/336/CEE, 93/68/CEE,
2006/95/CE.
‘s-Hertogenbosch, 1° gennaio 2009
Sig.ra J. Gilad
Direttore agli acquisti
Page 31

31
Precauzioni di sicurezza:
RISCHIO DI SCOSSE
ELETTRICHE
NON APRIRE
ATTENZIONE
Per ridurre il rischio di scosse elettriche, questo
prodotto deve essere aperto ESCLUSIVAMENTE da
personale tecnico specializzato, se occorre
assistenza. Se si dovessero verificare dei problemi,
scollegare il prodotto dall'alimentazione di rete e da ogni altra apparecchiatura. Non
esporre il prodotto ad acqua o umidità.
Manutenzione:
Pulire solo con un panno asciutto. Non utilizzare solventi detergenti o abrasivi.
Garanzia:
Non sarà accettata alcuna garanzia o responsabilità in relazione a cambiamenti e
modifiche del prodotto o a danni determinati dall'uso non corretto del prodotto stesso.
Generalità:
Il design e le caratteristiche tecniche sono soggetti a modifica senza necessità di
preavviso.
Tutti i marchi a logo e i nomi di prodotto sono marchi commerciali o marchi registrati
appartenenti ai rispettivi titolari e sono in questo documento riconosciuti come tali.
Attenzione:
Il prodotto è contrassegnato con questo simbolo, con il quale si indica che i
prodotti elettrici ed elettronici usati non devono essere gettati insieme ai rifiuti
domestici. Per questi prodotti esiste un sistema di raccolta differenziata.
Copyright ©
Page 32

32
ESPAÑOL
Introducción:
Con este adaptador, ya no necesitará elaborar un disco duro cuando no le quede suficiente espacio
libre en el disco del PC. Tan sólo deberá conectar un disco duro de 2.5” o 3.5” al puerto USB: gracias
al suministro de alimentación incluido, la carcasa del PC podrá permanecer cerrada.
Función:
• USB 2.0 de alta velocidad (480Mbbit/seg)
• Conexión y reproducción instantánea sin instalar el piloto
• WIN98SE (piloto unido para otro USB adicional)
• Acepta HDD de 3.5 y 2.5 IDE y SATA
• Compatible con ULTRAATA / 133 y UDMA5
• ACEPTA LA SERIE ATA 1.0 compatible con ULRA
• ATA / 133, velocidad de transmisión de 150MBIT / SEG
• La interfaz USB 2.0 acepta los sistemas operativos WINDOWS 2000 / ME / XP / Vista y Mac
Contenidos del paquete:
1) Cable de datos S-ATA
2) Unidad de conexión USB2.0
3) Cable de adaptador de alimentación de IDE a S-ATA
4) Unidad del adaptador de alimentación
5) Cable de alimentación
6) Cable de conexión de USB2.0 A a 5 mini clavijas
Page 33

33
Conexiones:
A) Conexión a HDD 2.5” SATA
Etapa 1:
Conecte el cable de datos S-ATA (1) al HDD de 2.5” y a la unidad del adaptador (2).
Etapa 2:
Conecte el cable del adaptador de alimentación IDE a S-ATA (3) y el cable de alimentación (5) al
adaptador de alimentación (4)
Etapa 3:
Conecte el cable del adaptador de alimentación SATA (3) al HDD de 2.5”.
Etapa 4:
Conecte el cable de alimentación (5) al enchufe de red.
Etapa 5:
Al menos, conecte el cable USB2.0 (6) al adaptador (2) y al ordenador.
Windows encontrará ahora la unidad de almacenamiento.
B) Conexión a HDD 2.5” IDE
Etapa 1:
Conecte el adaptador (2) al HDD de 2.5” IDE.
Etapa 2:
Conecte el cable USB2.0 (6) al adaptador (2) y al ordenador.
Windows encontrará ahora la unidad de almacenamiento.
Page 34

34
C) Conexión a HDD 3.5” IDE
Etapa 1:
Conecte el adaptador (2) al HDD de 3.5” IDE.
Etapa 2:
Conecte el cable de alimentación (5) al adaptador de alimentación (4)
Etapa 3:
Conecte la conexión del adaptador de alimentación (4) al HDD de 3.5”.
Etapa 4:
Conecte el cable de alimentación (5) al enchufe de red.
Etapa 5:
Al menos, conecte el cable USB2.0 (6) al adaptador (2) y al ordenador.
Windows encontrará ahora la unidad de almacenamiento.
D) Conexión a HDD 3.5” SATA
Etapa 1:
Conecte el cable de datos S-ATA (1) al HDD de 3.5” y a la unidad del adaptador (2).
Etapa 2:
Conecte el cable del adaptador de alimentación IDE a S-ATA (3) y el cable de alimentación (5) al
adaptador de alimentación (4)
Etapa 3:
Conecte el cable del adaptador de alimentación SATA (3) al HDD de 3.5”.
Etapa 4:
Conecte el cable de alimentación (5) al enchufe de red.
Etapa 5:
Al menos, conecte el cable USB2.0 (6) al adaptador (2) y al ordenador.
Windows encontrará ahora la unidad de almacenamiento.
Page 35

35
E) Conecte a un CD-ROM de 5.25” IDE RW DVD-Rom RW
Etapa 1:
Conecte el adaptador (2) al CD-ROM de 5.25” IDE.
Etapa 2:
Conecte el cable de alimentación (5) al adaptador de alimentación (4)
Etapa 3:
Conecte la conexión del adaptador de alimentación (4) al CD-ROM de 5.25”.
Etapa 4:
Conecte el cable de alimentación (5) al enchufe de red.
Etapa 5:
Al menos, conecte el cable USB2.0 (6) al adaptador (2) y al ordenador.
Windows encontrará ahora la unidad de almacenamiento.
F) Conecte a un CD-ROM de 5.25” SATA RW DVD-Rom RW
Etapa 1:
Conecte el cable de datos S-ATA (1) al CD ROM y a la unidad del adaptador (2).
Etapa 2:
Conecte el cable del adaptador de alimentación IDE a S-ATA (3) y el cable de alimentación (5) al
adaptador de alimentación (4)
Etapa 3:
Conecte el cable del adaptador de alimentación SATA (3) al CD-ROM.
Etapa 4:
Conecte el cable de alimentación (5) al enchufe de red.
Etapa 5:
Al menos, conecte el cable USB2.0 (6) al adaptador (2) y al ordenador.
Windows encontrará ahora la unidad de almacenamiento.
Page 36

36
Declaración de conformidad
Con la presente,
Nedis B.V.
De Tweeling 28
5215MC ’s-Hertogenbosch
Países Bajos
Tel.: 0031 73 599 1055
Email: info@nedis.com
Declara que el producto:
Marca: König Electronic
Modelo: CMP-USBIDESAT2
Descripción: Adaptador de USB2.0 a IDE/S-ATA
se encuentra conforme a las siguientes normas:
EMC: EN55022:1998+A1:2000+A2:2003
EN55024:1998+A1:2001+A2:2003
EN61000-3-2:2000
EN61000-3-3:1995 +A1:2001
LVD: IEC 60950-1 EN 60950-1
Y cumple con todos los requisitos de las directivas de la Unión Europea 89/336/EEC,
93/68/EEC y 2006/95/EC.
‘s-Hertogenbosch, 01 de enero de 2009
D. J. Gilad
Director de compras
Page 37

37
Medidas de seguridad:
RIESGO DE
ELECTROCUCIÓN
NO ABRIR
ATENCIÓN
Para reducir los riesgos de electrocución, este
producto deberá ser abierto EXCLUSIVAMENTE por
un técnico habilitado cuando necesite ser reparado.
Desconecte el producto de la red y de cualquier otro
equipo si se registra algún problema. No exponga el producto al agua ni a la humedad.
Mantenimiento:
Limpie sólo con un paño seco. No utilice solventes de limpieza ni abrasivos.
Garantía:
No se aceptará ninguna garantía o responsabilidad derivada de cualquier cambio o
modificaciones realizadas al producto o daños provocados por un uso incorrecto del
presente producto.
General:
Las ilustraciones y las especificaciones podrán sufrir cambios sin previo aviso.
Todas las marcas de los logotipos y los nombres de productos constituyen patentes o
marcas registradas de sus titulares correspondientes, reconocidos como tal.
Cuidado:
Este producto está señalizado con este símbolo. Esto significa que los
productos eléctricos y electrónicos gastados no deberán mezclarse con los
desechos domésticos generales. Existen distintos sistemas de recogida
individuales para este tipo de productos.
Copyright ©
Page 38
38
MAGYAR NYELVŰ
Bemutatása:
Ennek az adapternek a használatával már nincs szükség arra, hogy merevlemezt építsen be a
számítógépébe, ha abban már nincs elég szabad hely. Egyszerűen csak dugaszoljon egy 2,5” vagy
3,5” merevlemezt az egyik USB portra: a beépített tápegységnek köszönhetően a számítógép zárva
is maradhat.
Tulajdonságai:
• Nagy sebességű USB 2.0 (480 Mbit/mp)
• Plug and play rendszerű, illesztőprogram telepítése nélkül működik
• WIN98SE (illesztőprogram mellékelve az USB-hez)
• 3,5 és 2,5 IDE és SATA merevlemezeket támogatja
• ULTRAATA / 133 és UDMA5-kompatibilis
• SOROS ATA 1.0 spec. támogatása. ULRA-kompatibilis
• ATA / 133. adatátviteli sebessége 150 Mbit / mp
• USB 2.0 interfész támogatja: a WINDOWS 2000 / ME / XP / Vista és Mac Os rendszereket
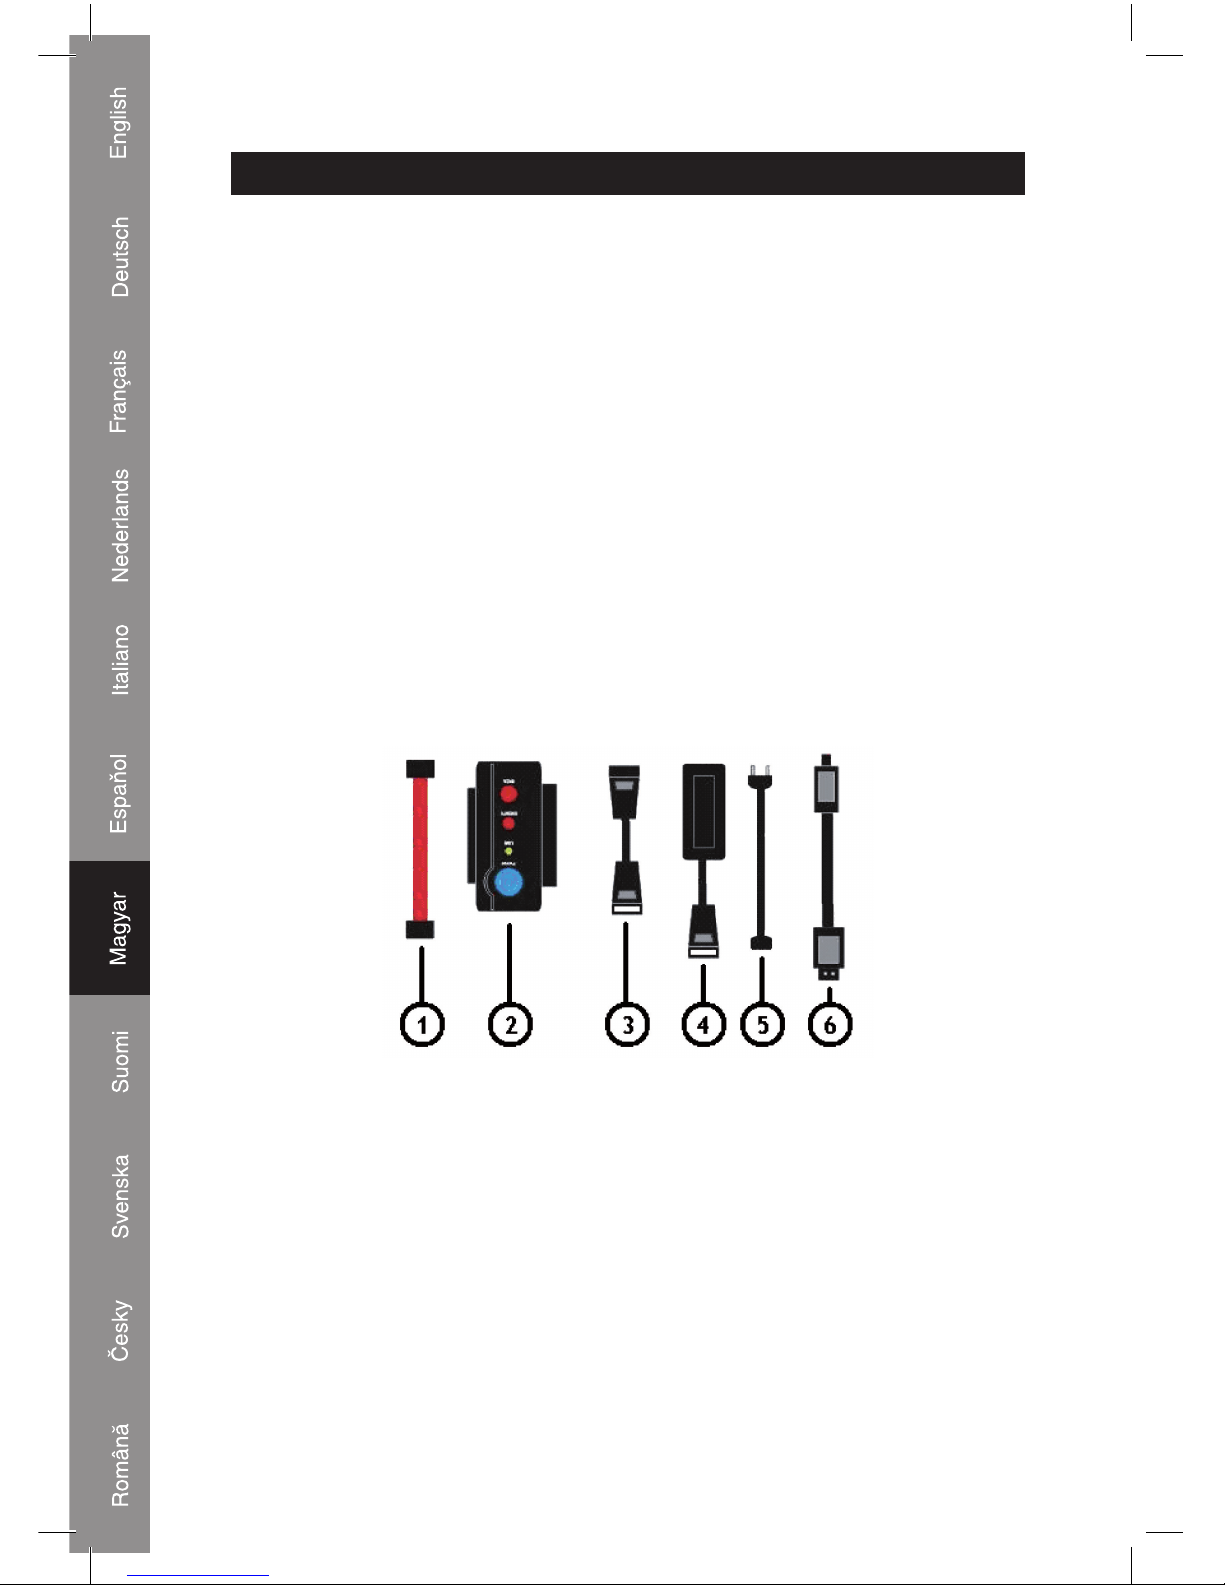
A csomag tartalma:
1) S-ATA adatkábel
2) USB 2.0 csatlakozóegység
3) IDE – S-ATA hálózati adapter kábel
4) Hálózati adapter
5) Tápkábel
6) USB2.0 A – mini, 5-érintkezős csatlakozókábel
Page 39

39
Csatlakoztatások:
A) Csatlakoztatás 2,5” SATA merevlemezhez
1. lépés:
Csatlakoztassa a S-ATA adatkábelt (1) a 2,5” merevlemezhez és az adapterhez (2).
2. lépés:
Csatlakoztassa az IDE – S-ATA hálózati adapter kábelt (3) és a tápkábelt (5) a hálózati adapterhez
(4)
3. lépés:
Dugaszolja a S-ATA hálózati adapter kábelt (3) a 2,5” merevlemezbe.
4. lépés:
Dugaszolja a tápkábelt (5) a konnektorba.
5. lépés:
Végül pedig csatlakoztassa az USB 2.0 kábelt (6) az adapterhez (2) és a számítógéphez.
A Windows háttértároló egységként fogja felismerni.
B) Csatlakoztatás 2,5” IDE merevlemezhez
1. lépés:
Csatlakoztassa az adaptert (2) a 2,5” IDE merevlemezhez.
2. lépés:
Csatlakoztassa az USB 2.0 kábelt (6) az adapterhez (2) és a számítógéphez.
A Windows háttértároló egységként fogja felismerni.
Page 40

40
C) Csatlakoztatás 3,5” IDE merevlemezhez
1. lépés:
Csatlakoztassa az adaptert (2) a 3,5” IDE merevlemezhez.
2. lépés:
Csatlakoztassa a tápkábelt (5) a hálózati adapterhez (4)
3. lépés:
Dugaszolja a hálózati adapter csatlakozót (4) a 3,5” merevlemezbe.
4. lépés:
Dugaszolja a tápkábelt (5) a konnektorba.
5. lépés:
Végül pedig csatlakoztassa az USB 2.0 kábelt (6) az adapterhez (2) és a számítógéphez.
A Windows háttértároló egységként fogja felismerni.
D) Csatlakoztatás 3,5” SATA merevlemezhez
1. lépés:
Csatlakoztassa a S-ATA adatkábelt (1) a 3,5” merevlemezhez és az adapterhez (2).
2. lépés:
Csatlakoztassa az IDE – S-ATA hálózati adapter kábelt (3) és a tápkábelt (5) a hálózati adapterhez
(4)
3. lépés:
Dugaszolja a S-ATA hálózati adapter kábelt (3) a 3,5” merevlemezbe.
4. lépés:
Dugaszolja a tápkábelt (5) a konnektorba.
5. lépés:
Végül pedig csatlakoztassa az USB 2.0 kábelt (6) az adapterhez (2) és a számítógéphez.
A Windows háttértároló egységként fogja felismerni.
Page 41

41
E) Csatlakoztatás 5,25” IDE CD-ROM RW / DVD-ROM RW-hez
1. lépés:
Csatlakoztassa az adaptert (2) az 5,25” IDE CD-ROM-hoz.
2. lépés:
Csatlakoztassa a tápkábelt (5) a hálózati adapterhez (4)
3. lépés:
Dugaszolja a hálózati adapter csatlakozót (4) az 5,25” IDE CD-ROM-ba.
4. lépés:
Dugaszolja a tápkábelt (5) a konnektorba.
5. lépés:
Végül pedig csatlakoztassa az USB 2.0 kábelt (6) az adapterhez (2) és a számítógéphez.
A Windows háttértároló egységként fogja felismerni.
F) Csatlakoztatás 5,25” SATA CD-ROM RW / DVD-ROM RW-hez
1. lépés:
Csatlakoztassa a S-ATA adatkábelt (1) a CD-ROM-hoz és az adapterhez (2).
2. lépés:
Csatlakoztassa az IDE – S-ATA hálózati adapter kábelt (3) és a tápkábelt (5) a hálózati adapterhez (4)
3. lépés:
Dugaszolja a S-ATA hálózati adapter kábelt (3) a CD-ROM-ba.
4. lépés:
Dugaszolja a tápkábelt (5) a konnektorba.
5. lépés:
Végül pedig csatlakoztassa az USB 2.0 kábelt (6) az adapterhez (2) és a számítógéphez.
A Windows háttértároló egységként fogja felismerni.
Page 42

42
Megfelelőségi nyilatkozat
Mi,
a Nedis B.V.
De Tweeling 28
5215MC ’s-Hertogenbosch
Hollandia
Tel.: 0031 73 599 1055
E-mail: info@nedis.com
Kijelentjük, hogy a termék, amelynek:
Gyártmánya: König Electronic
Típusa: CMP-USBIDESAT2
Megnevezése: USB2.0 – IDE/S-ATA adapter
Megfelel az alábbi szabványoknak:
EMC (Elektromágneses összeférhetőségre vonatkozó irányelv):
EN55022:1998+A1:2000+A2:2003
EN55024:1998+A1:2001+A2:2003
EN61000-3-2:2000
EN61000-3-3:1995 +A1:2001
LVD (Kisfeszültségű elektromos termékekre vonatkozó irányelv):
IEC 60950-1 EN 60950-1
Valamint megfelel a 89/336/EGK, 93/68/EGK, 2006/95/EK Európai Uniós irányelvekben
támasztott követelményeknek.
‘s-Hertogenbosch, 2009. január 01.
Mrs. J. Gilad
értékesítési igazgató
Megfelelőségi nyilatkozat.
Egyetértek és elfogadom a Nedis B.V. Hollandia által adott nyilakozatot.
Jacob Gilad
HQ-Nedis kft.
ügyvezető igazgató
Page 43

43
Biztonsági óvintézkedések:
ÁRAMÜTÉS VESZÉLYE!
NE NYISSA FEL!
VIGYÁZAT!
Az áramütés veszélyének csökkentése érdekében ezt
a készüléket CSAK képzett szakember nyithatja fel,
szervizelés céljából. Probléma esetén csatlakoztassa
le a készüléket a hálózatról és más készülékről. Víztől
és egyéb nedvességtől védje.
Karbantartás:
Csak száraz ronggyal tisztítsa. Tisztító- és súrolószereket ne használjon.
Jótállás:
Nem vállalunk jótállást és felelősséget a terméken végzett változtatás vagy módosítás
miatt vagy a termék helytelen használata miatt bekövetkező károkért.
Általános tudnivalók:
A kivitel és a műszaki jellemzők előzetes értesítés nélkül is változhatnak.
Valamennyi logó, terméknév és márkanév a tulajdonosának márkaneve vagy bejegyzett
márkaneve, és azokat ennek tiszteletben tartásával említjük.
Fifgyelem!
Ezt a terméket ezzel a jelöléssel láttuk el. Azt jelenti, hogy az elhasznált
elektromos és elektronikus termékeket tilos az általános háztartási hulladékhoz
keverni. Ezek begyűjtését külön begyűjtő létesítmény végzi.
Copyright ©
Page 44

44
SUOMI
Johdanto:
Tämän sovittimen avulla vältyt kiintolevyn laajentamiselta, kun tietokoneen varmuuskopiointitila
loppuu. Voit liittää 2,5” tai 3,5” kiintolevyn USB-porttiin, ja mukana toimitettavan virtapistokkeen
ansiosta PC:n kotelo voi olla kiinni.
Ominaisuudet::
• Nopea USB 2.0 (480 Mb/sek.)
• Kytke ja käytä ilman ajurin asennusta
• WIN98SE (ajuri lisä-USBia varten)
• 3.5 ja 2.5 IDE sekä SATA HDD tuettu
• ULTRAATA / 133AND UDMA5 -yhteensopiva
• SUPPORT SERIAL ATA 1.0 spec. ULRA-yhteensopiva
• ATA / 133.its siirtonopeus 150 MBIT/ SEK.
• USB 2.0 käyttöliittymätuki WINDOWS 2000 / ME / XP / Vista ja Mac Os
Pakkauksen sisältö:
1) S-ATA -tiedonsiirtokaapeli
2) USB2.0 -kytkentäyksikkö
3) IDE - S-ATA-virtasovittimen kaapeli
4) Virtasovitinyksikkö
5) Virtajohto
6) USB 2.0 A 5-napainen miniliitäntäjohto
Page 45

45
Kytkennät:
A) Liitäntä 2.5” SATA HDD
Vaihe 1:
Kytke S-ATA -tiedonsiirtokaapeli (1) 2.5” HDD:iin ja sovitinyksikköön (2).
Vaihe 2:
Kytke IDE S-ATA -virtasovitinkaapeliin (3) ja virtajohto (5) virtasovittimeen (4)
Vaihe 3:
Liitä S-ATA -virtaliitinjohto (3) 2.5” HDD:iin.
Vaihe 4:
Liitä virtajohto (5) pistorasiaan.
Vaihe 5:
Kytke viimeiseksi USB2.0 -johto (6) sovittimeen (2) ja tietokoneeseen.
Windows löytää nyt massatallennusvälineen.
B) Kytke 2.5” IDE HDD:iin
Vaihe 1:
Kytke sovitin (2) 2.5” IDE HDD:iin.
Vaihe 2:
Kytke USB2.0 -johto (6) sovittimeen (2) ja tietokoneeseen.
Windows löytää nyt massatallennusvälineen.
Page 46

46
C) Kytke 3.5” IDE HDD:iin
Vaihe 1:
Kytke sovitin (2) 3.5” IDE HDD:iin.
Vaihe 2:
Kytke virtajohto (5) sovittimeen (4)
Vaihe 3:
Liitä virtasovittimen liitin (4) 3.5” HDD:iin.
Vaihe 4:
Liitä virtajohto (5) pistorasiaan.
Vaihe 5:
Kytke viimeiseksi USB2.0 -johto (6) sovittimeen (2) ja tietokoneeseen.
Windows löytää nyt massatallennusvälineen.
D) Liitä 3.5” SATA HDD:iin
Vaihe 1:
Kytke S-ATA -tiedonsiirtokaapeli (1) 3.5” HDD:iin ja sovitinyksikköön (2).
Vaihe 2:
Kytke IDE S-ATA -virtasovitinkaapeliin (3) ja virtajohto (5) virtasovittimeen (4)
Vaihe 3:
Liitä S-ATA -virtaliitinjohto (3) 3.5” HDD:iin.
Vaihe 4:
Liitä virtajohto (5) pistorasiaan.
Vaihe 5:
Kytke viimeiseksi USB2.0 -johto (6) sovittimeen (2) ja tietokoneeseen.
Windows löytää nyt massatallennusvälineen.
Page 47

47
E) Kytke 5.25” IDE CD-Rom RW DVD-Rom RW
Vaihe 1:
Kytke sovitin (2) 5.25” IDE CD-Rom:iin.
Vaihe 2:
Kytke virtajohto (5) sovittimeen (4)
Vaihe 3:
Liitä virtasovittimen liitin (4) 5.25” IDE CD-Rom:iin.
Vaihe 4:
Liitä virtajohto (5) pistorasiaan.
Vaihe 5:
Kytke viimeiseksi USB2.0 -johto (6) sovittimeen (2) ja tietokoneeseen.
Windows löytää nyt massatallennusvälineen.
F) Kytke 5.25” SATA CD-Rom RW DVD-Rom RW
Vaihe 1:
Kytke S-ATA -tiedonsiirtokaapeli (1) CD-Rom:iin ja sovitinyksikköön (2).
Vaihe 2:
Kytke IDE S-ATA -virtasovitinkaapeliin (3) ja virtajohto (5) virtasovittimeen (4)
Vaihe 3:
Liitä S-ATA -virtaliitinjohto (3) CD-Rom:iin.
Vaihe 4:
Liitä virtajohto (5) pistorasiaan.
Vaihe 5:
Kytke viimeiseksi USB2.0 -johto (6) sovittimeen (2) ja tietokoneeseen.
Windows löytää nyt massatallennusvälineen.
Page 48

48
Vaatimustenmukaisuusvakuutus
Me,
Nedis B.V.
De Tweeling 28
5215MC ’s-Hertogenbosch
Alankomaat
Puh: 0031 73 599 1055
Sähköposti: info@nedis.com
Vakuutamme, että:
Merkki: König Electronic
Malli: CMP-USBIDESAT2
Kuvaus: USB2.0 to IDE/S-ATA -sovitin
Täyttää seuraavat standardit:
EMC: EN55022:1998+A1:2000+A2:2003
EN55024:1998+A1:2001+A2:2003
EN61000-3-2:2000
EN61000-3-3:1995+A1:2001
LVD: IEC 60950-1 EN 60950-1
Täyttää Euroopan Unionin direktiivien 89/336/EEC, 93/68/EEC, 2006/95/EC vaatimukset.
‘s-Hertogenbosch, 01. tammikuuta 2009
Mrs. J. Gilad
Ostojohtaja
Page 49
49
Turvallisuuteen liittyvät varoitukset:
SÄHKÖISKUVAARA
ÄLÄ AVAA
HUOMIO
Sähköiskuvaaran välttämiseksi tämän laitteen saa avata
huollon yhteydessä VAIN valtuutettu teknikko. Kytke laite
pois verkkovirrasta ja muista laitteista, jos ongelmia
esiintyy. Älä altista tuotetta vedelle tai kosteudelle.
Huolto:
Puhdista ainoastaan kuivalla kankaalla. Älä käytä liuottimia tai hioma-aineita.
Takuu:
Takuu ja vastuuvelvollisuus mitätöityy, jos tuote vaurioituu siihen tehtyjen muutoksien tai
sen väärinkäytön takia.
Yleistä:
Muutoksia malliin ja teknisiin ominaisuuksiin voidaan tehdä ilmoituksetta.
Kaikki logot, merkit ja tuotenimet ovat niiden vastaavien omistajien tuotemerkkejä tai
rekisteröityjä tuotemerkkejä ja niitä on käsiteltävä sellaisina.
Huomio:
Tuote on varustettu tällä merkillä. Se merkitsee, ettei käytettyjä sähkö- tai
elektronisia tuotteita saa hävittää kotitalousjätteen mukana. Kyseisille tuotteille
on olemassa erillinen keräysjärjestelmä.
Copyright ©
Page 50

50
SVENSKA
Inledning:
Med denna adapter är det inte längre nödvändigt att bygga in en ny hårddisk när lagringsutrymmet
tar slut på PC:n. Anslut helt enkelt en 2.5” eller 3.5” hårddisk till USB-uttaget: tack vare den inbyggda
strömförsörjningen behöver man inte öppna PC:ns låda.
Egenskaper
• Höghastighets USB 2.0 (480Mbit/sek)
• Plug & play ingen installation av drivrutin behövs
• WIN98SE (extra USB drivrutin medföljer)
• Stöder 3.5 och 2.5 IDE och SATA HDD
• Stöder ULTRAATA / 133 och UDMA5 kompatibel
• Stöder SERIAL ATA 1.0 spec. Kompatibel med ULRA
• ATA / 133.its överföringshastigheten är 150MBIT / SEK
• USB 2.0 gränssnitt lämpat för WINDOWS 2000 / ME / XP / Vista och Mac Os system
Förpackningen innehåller
1) S-ATA datakabel
2) USB 2.0 anslutningsenhet
3) IDE till S-ATA strömadapterkabel
4) Nätdel
5) Strömkabel
6) USB 2.0 A till mini 5 pin anslutningskabel
Page 51
51
Anslutningar:
A) Anslutning till 2.5” SATA HDD
Steg 1:
Anslut S-ATA datakabeln (1) till 2.5” HDD:n och till anslutningsenheten (2).
Steg 2:
Anslut IDE till S-ATA strömadapterkabeln (3) och strömkabeln (5) till nätdelen (4)
Steg 3:
Stick i S-ATA strömadapterkabel (3) i 2.5” HDD:n.
Steg 4:
Koppla strömkabeln (5) till vägguttaget.
Steg 5:
Koppla slutligen USB 2.0 kabeln (6) till anslutningsenheten (2) och till datorn.
Windows kommer nu att detektera en masslagringsenhet.
B) Anslutning till 2.5” IDE HDD
Steg 1:
Anslut anslutningsenheten (2) till 2.5” IDE HDD:n.
Steg 2:
Anslut USB 2.0 kabeln (6) till anslutningsenheten (2) och till datorn.
Windows kommer nu att detektera en masslagringsenhet.
Page 52

52
C) Anslutning till 3.5” IDE HDD
Steg 1:
Anslut anslutningsenheten (2) till 3.5” IDE HDD:n.
Steg 2:
Anslut strömkabeln (5) till nätdelen (4)
Steg 3:
Anslut kontakten från nätdelen (4) till 3.5” HDD:n.
Steg 4:
Koppla strömkabeln (5) till vägguttaget.
Steg 5:
Koppla slutligen USB 2.0 kabeln (6) till anslutningsenheten (2) och till datorn.
Windows kommer nu att detektera en masslagringsenhet.
D) Anslutning till 3.5” SATA HDD
Steg 1:
Anslut S-ATA datakabeln (1) till 3.5” HDD:n och till anslutningsenheten (2).
Steg 2:
Anslut IDE till S-ATA strömadapterkabeln (3) och strömkabeln (5) till nätdelen (4)
Steg 3:
Koppla S-ATA strömadapterkabel (3) till 3.5” HDD:n.
Steg 4:
Koppla strömkabeln (5) till vägguttaget.
Steg 5:
Koppla slutligen USB 2.0 kabeln (6) till anslutningsenheten (2) och till datorn.
Windows kommer nu att detektera en masslagringsenhet.
Page 53
53
E) Anslutning till en 5.25” IDE CD-Rom RW DVD-Rom RW
Steg 1:
Anslut anslutningsenheten (2) till 5.25” IDE CD-ROM:en.
Steg 2:
Anslut strömkabeln (5) till nätdelen (4)
Steg 3:
Anslut kontakten från nätdelen (4) till 5.25” IDE CD-ROM:en.
Steg 4:
Koppla strömkabeln (5) till vägguttaget.
Steg 5:
Anslut slutligen USB 2.0 kabeln (6) till anslutningsenheten (2) och till datorn.
Windows kommer nu att detektera en masslagringsenhet.
F) Anslutning till en 5.25” SATA CD-Rom RW DVD-Rom RW
Steg 1:
Anslut S-ATA datakabeln (1) till CD-ROM:en och till anslutningsenheten (2).
Steg 2:
Anslut IDE till S-ATA strömadapterkabeln (3) och strömkabeln (5) till nätdelen (4)
Steg 3:
Koppla S-ATA strömadapterkabel (3) till CD-ROM:en.
Steg 4:
Koppla strömkabeln (5) till vägguttaget.
Steg 5:
Anslut slutligen USB 2.0 kabeln (6) till anslutningsenheten (2) och till datorn.
Windows kommer nu att detektera en masslagringsenhet.
Page 54

54
ÖVERENSSTÄMMELSEFÖRKLARING
Vi,
Nedis B.V.
De Tweeling 28
5215MC ’s-Hertogenbosch
Nederländerna
Tel.: 0031 73 599 1055
e-post info@nedis.com
Intygar att produkten:
Märke: König Electronic
Modell: CMP-USBIDESAT2
Beskrivning: USB 2.0 till IDE/S-ATA adapter
överensstämmer med följande standarder:
EMC: EN55022:1998+A1:2000+A2:2003
EN55024:1998+A1:2001+A2:2003
EN61000-3-2:2000
EN61000-3-3:1995 +A1:2001
LVD: IEC 60950-1 EN 60950-1
Och uppfyller kraven i den Europeiska unionens direktiv 89/336/EEC, 93/68/EEC och
2006/95/EEC.
‘s-Hertogenbosch, den 1 Januari 2009
Fru J. Gilad
Inköpsdirektör
Page 55

55
Säkerhetsanvisningar:
RISK FÖR ELSTÖT
ÖPPNA INTE
VARNING
För att undvika elstötar får produkten endast öppnas
av behörig tekniker när service behövs. Koppla ur
produkten ur nätuttaget om ett problem skulle uppstå.
Utsätt inte produkten för vatten eller fukt.
Underhåll:
Rengör endast med en torr trasa. Använd inga rengöringsmedel eller frätande medel.
Garanti:
Ingen garanti gäller vid några ändringar eller modifieringar av produkten eller skador som
har uppstått på grund av felaktig användning av denna produkt.
Allmänt:
Utseende och specifikationer kan komma att ändras utan föregående meddelande.
Alla logotyper och produktnamn är varumärken eller registrerade varumärken som tillhör
sina ägare och är härmed erkända som sådana.
Obs!
Din produkt är markerad med denna symbol. Det innebär att använda elektriska
eller elektroniska produkter inte får slängas bland vanliga hushållssopor. Det
finns särskilda återvinningssystem för dessa produkter.
Copyright ©
Page 56

56
ČESKY
Úvod:
S tímto adaptérem již nemusíte instalovat další pevný disk do vašeho počítače, pokud máte původní
disk nebo disky zaplněny daty. Stačí zapojit pevný disk velikosti 2.5” nebo 3.5” do portu USB ve
vašem počítači: Díky dodávanému napájecímu adaptéru nemusíte rozebírat počítač.
Popis a funkce:
• Vysokorychlostní USB 2.0 port (480 Mbit/s)
• Systém Plug and play bez nutnosti instalace ovladačů
• Používáte-li operační systém WIN98SE, je nutno instalovat ovladače
• Podporuje pevné disky velikosti 3.5” a 2.5”, s rozhraním IDE a SATA
• Podporuje ULTRA ATA-133, kompatibilní s UDMA5
• Podporuje serial ATA 1.0, kompatibilní s ULRA
• Rychlost přenosu dat pro ATA-133 je 150 Mbit/s
• Rozhraní USB 2.0 podporuje operační systémy WINDOWS 2000/ME/XP/Vista a Mac
Balení obsahuje:
1) Datový kabel S-ATA
2) USB2.0 propojovací adaptér
3) Adaptér pro napájecí kabel IDE/S-ATA
4) Napájecí adaptér
5) Napájecí kabel
6) Kabelový adaptér pro konektor USB2.0 A na 5kolíkový USB konektor
Page 57
57
Zapojení:
A) Zapojení pevného disku 2.5” SATA
Krok 1:
Zapojte datový kabel S-ATA (1) do pevného disku 2.5” a do propojovacího adaptéru (2).
Krok 2:
Zapojte napájecí kabel IDE/S-ATA (3) a napájecí kabel (5) do napájecího adaptéru (4).
Krok 3:
Zapojte napájecí adaptér pro kabel S-ATA (3) do pevného disku 2.5”.
Krok 4:
Zapojte napájecí kabel (5) do síťové zásuvky.
Krok 5:
Zapojte datový kabel USB 2.0 (6) do adaptéru (2) a do počítače.
Nyní operační systém Windows vyhledá a rozpozná nové úložiště.
B) Zapojení pevného disku 2.5”
Krok 1:
Zapojte propojovací adaptér (2) do pevného disku 2.5” IDE.
Krok 2:
Zapojte datový kabel USB 2.0 (6) do adaptéru (2) a do počítače.
Nyní operační systém Windows vyhledá a rozpozná nové úložiště.
Page 58

58
C) Zapojení pevného disku 3.5” IDE
Krok 1:
Zapojte propojovací adaptér (2) do pevného disku 3.5” IDE.
Krok 2:
Zapojte napájecí kabel (5) do napájecího adaptéru (4).
Krok 3:
Zapojte napájecí adaptér (4) do pevného disku 3.5”.
Krok 4:
Zapojte napájecí kabel (5) do síťové zásuvky.
Krok 5:
Zapojte datový kabel USB 2.0 (6) do adaptéru (2) a do počítače.
Nyní operační systém Windows vyhledá a rozpozná nové úložiště.
D) Zapojení pevného disku 3.5” SATA
Krok 1:
Zapojte datový kabel S-ATA (1) do pevného disku 3.5” a do propojovacího adaptéru (2).
Krok 2:
Zapojte napájecí kabel IDE/S-ATA (3) a napájecí kabel (5) do napájecího adaptéru (4).
Krok 3:
Zapojte napájecí adaptér pro kabel S-ATA (3) do pevného disku 3.5”.
Krok 4:
Zapojte napájecí kabel (5) do síťové zásuvky.
Krok 5:
Zapojte datový kabel USB 2.0 (6) do adaptéru (2) a do počítače.
Nyní operační systém Windows vyhledá a rozpozná nové úložiště.
Page 59

59
E) Zapojení pevného disku/mechaniky 5.25” IDE CD-ROM RW, DVD-ROM RW
Krok 1:
Zapojte propojovací adaptér (2) do pevného disku 5.25” IDE CD-ROM.
Krok 2:
Zapojte napájecí kabel (5) do napájecího adaptéru (4).
Krok 3:
Zapojte napájecí adaptér (4) do pevného disku 5.25” IDE CD-ROM.
Krok 4:
Zapojte napájecí kabel (5) do síťové zásuvky.
Krok 5:
Zapojte datový kabel USB 2.0 (6) do adaptéru (2) a do počítače.
Nyní operační systém Windows vyhledá a rozpozná nové úložiště.
F) Zapojení pevného disku/mechaniky 5.25” SATA CD-ROM RW, DVD-ROM RW
Krok 1:
Zapojte datový kabel S-ATA (1) do CD-ROM a do propojovacího adaptéru (2).
Krok 2:
Zapojte napájecí kabel IDE/S-ATA (3) a napájecí kabel (5) do napájecího adaptéru (4).
Krok 3:
Zapojte napájecí adaptér pro kabel S-ATA (3) do CD-ROM mechaniky.
Krok 4:
Zapojte napájecí kabel (5) do síťové zásuvky.
Krok 5:
Zapojte datový kabel USB 2.0 (6) do adaptéru (2) a do počítače.
Nyní operační systém Windows vyhledá a rozpozná nové úložiště.
Page 60

60
Prohlášení o shodě
Společnost
Nedis B.V.
De Tweeling 28
5215MC ’s-Hertogenbosch
Nizozemí
Tel.: 0031 73 599 1055
E-mail: info@nedis.com
prohlašuje, že výrobek:
Značka: König Electronic
Model: CMP-USBIDESAT2
Popis: USB2.0, IDE/S-ATA adaptér
splňuje následující normy:
Elektromagnetická kompatibilita:
EN55022:1998+A1:2000+A2:2003
EN55024:1998+A1:2001+A2:2003
EN61000-3-2:2000
EN61000-3-3:1995 +A1:2001
LVD: IEC 60950-1 EN 60950-1
a je v souladu s požadavky směrnic EU 89/336/EEC, 93/68/EEC, 2006/95/EC.
‘s-Hertogenbosch, 1. ledna 2009
paní J. Gilad
Obchodní ředitelka
Page 61
61
Bezpečnostní opatření:
NEBEZPEČÍ ÚRAZU
ELEKT RICKÝM PROUD EM
NEOTEVÍRAT
UPOZORNĚNÍ
Abyste zabránili nebezpečí úrazu elektrickým
proudem, svěřte opravu zařízení POUZE
kvalifikovanému servisnímu technikovi/středisku. Před
prováděním opravy vždy odpojte zařízení od přívodu
elektrické energie a od dalších spotřebičů, které mohou být s vaším zařízením propojeny.
Nevystavujte zařízení nadměrné vlhkosti nebo vodě.
Údržba:
K čištění používejte pouze suchý hadřík. Nepoužívejte rozpouštědla ani abrazivní
materiály.
Záruka:
Jakékoli změny, modifikace nebo poškození zařízení v důsledku nesprávného zacházení
se zařízením ruší platnost záruční smlouvy.
Obecné upozornění:
Design, provedení a parametry výrobku se mohou měnit bez předchozího upozornění
uživatele výrobcem.
Všechna loga a názvy výrobků jsou obchodní značky nebo registrované obchodní značky
příslušných vlastníků a jsou chráněny příslušnými zákony.
Upozornění:
Tento výrobek je označen následujícím symbolem. To znamená, že s výrobkem
je nutné zacházet jako s nebezpečným elektrickým a elektronickým odpadem
a nelze jej po skončení životnosti vhazovat do běžného domácího odpadu.
Výrobek je nutné odevzdat sběrným surovinám nebo recyklačnímu středisku,
které se zabývá zpracováním nebezpečných odpadů.
Copyright © (Autorská práva)
Page 62

62
ROMÂNĂ
Introducere:
Utilizând acest adaptor, nu mai aveţi nevoie de achiziţionarea unui HDD dacă nu mai aveţi destul
spaţiu de back-up pe PC. De acum nu va trebui decât să conectaţi un HDD de 2,5” sau 3,5” la un port
USB: mulţumită alimentatorului inclus, cutia unităţii centrale poate rămâne închisă.
Caracteristici:
• Hi-speed USB 2.0 (480 Mb/sec)
• Plug and play fără necesitatea instalării unui driver
• Win98 SE (driver ataşat pentru un USB suplimentar)
• Sprijină HDD-urile de 3.5" şi 2.5" IDE şi SATA
• Sprijină standardele ULTRAATA / 133AND, compatibil UDMA5
• Sprijină SERIAL ATA 1.0 spec. Compatibil cu ULRA
• ATA / 133. Rata de transfer 150 Mb/sec
• Interfaţă USB 2.0 cu sprijin pentru sistemele de operare: WINDOWS 2000 / ME / XP / Vista şi Mac Os.
Conţinutul pachetului:
1) Cablu de date S-ATA
2) Unitate de conectare cu USB 2.0
3) Cablul adaptorului IDE la S-ATA
4) Adaptor
5) Cablu de alimentare
6) Cablu de conectare cu capete USB 2.0 A şi fişă mini cu 5 pini
Page 63

63
Conexiuni:
A) Conectarea la un HDD SATA de 2.5”
Pasul 1:
Conectaţi cablul de date S-ATA (1) la HDD-ul de 2.5” şi la adaptor (2).
Pasul 2:
Conectaţi cablul adaptorului IDE la S-ATA (3) şi cablul de alimentare (5) la adaptorul de reţea (4).
Pasul 3:
Conectaţi fişa cablului adaptorului S-ATA (3) la HDD-ul de 2.5”.
Pasul 4:
Conectaţi ştecherul cablului de alimentare (5) la priza de perete.
Pasul 5:
Conectaţi la sfârşit cablul USB 2.0 (6) la adaptor (2) şi la calculator.
După aceşti paşi, Windows va găsi unitatea de stocare externă.
B) Conectarea la un HDD IDE de 2.5”
Pasul 1:
Conectaţi adaptorul (2) la HDD-ul IDE de 2.5”.
Pasul 2:
Conectaţi cablul USB 2.0 (6) la adaptor (2) şi la calculator.
După aceşti paşi, Windows va găsi unitatea de stocare externă.
Page 64

64
C) Conectarea la un HDD IDE de 3.5”
Pasul 1:
Conectaţi adaptorul (2) la HDD-ul IDE de 3.5”.
Pasul 2:
Conectaţi cablul de alimentare (5) la adaptorul de reţea (4).
Pasul 3:
Conectaţi fişa adaptorului de reţea (4) la HDD-ul de 3.5”.
Pasul 4:
Conectaţi ştecherul cablului de alimentare (5) la priza de perete.
Pasul 5:
Conectaţi la sfârşit cablul USB 2.0 (6) la adaptor (2) şi la calculator.
După aceşti paşi, Windows va găsi unitatea de stocare externă.
D) Conectarea la un HDD SATA de 3.5”
Pasul 1:
Conectaţi cablul de date S-ATA (1) la HDD-ul de 3.5” şi la adaptor (2).
Pasul 2:
Conectaţi cablul adaptorului IDE la S-ATA (3) şi cablul de alimentare (5) la adaptorul de reţea (4).
Pasul 3:
Conectaţi fişa cablului adaptorului S-ATA (3) la HDD-ul de 3.5”.
Pasul 4:
Conectaţi ştecherul cablului de alimentare (5) la priza de perete.
Pasul 5:
Conectaţi la sfârşit cablul USB 2.0 (6) la adaptor (2) şi la calculator.
După aceşti paşi, Windows va găsi unitatea de stocare externă.
Page 65
65
E) Conectarea la un CD-ROM/DVD-ROM RW de 5.25” IDE
Pasul 1:
Conectaţi adaptorul (2) la CD-ROM IDE de 5.25”.
Pasul 2:
Conectaţi cablul de alimentare (5) la adaptorul de reţea (4).
Pasul 3:
Conectaţi fişa adaptorului de reţea (4) la CD-ROM-ul IDE de 5.25”.
Pasul 4:
Conectaţi ştecherul cablului de alimentare (5) la priza de perete.
Pasul 5:
Conectaţi la sfârşit cablul USB 2.0 (6) la adaptor (2) şi la calculator.
După aceşti paşi, Windows va găsi unitatea de stocare externă.
F) Conectarea la un CD-ROM/DVD-ROM RW de 5.25” SATA
Pasul 1:
Conectaţi cablul de date S-ATA (1) la CD-ROM şi la adaptor (2).
Pasul 2:
Conectaţi cablul adaptorului IDE la S-ATA (3) şi cablul de alimentare (5) la adaptorul de reţea (4).
Pasul 3:
Conectaţi fişa cablului adaptorului S-ATA (3) la CD-ROM.
Pasul 4:
Conectaţi ştecherul cablului de alimentare (5) la priza de perete.
Pasul 5:
Conectaţi la sfârşit cablul USB 2.0 (6) la adaptor (2) şi la calculator.
După aceşti paşi, Windows va găsi unitatea de stocare externă.
Page 66

66
Declaraţie de conformitate
Noi,
Nedis B.V.
De Tweeling 28
5215MC ’s-Hertogenbosch
Olanda
Tel.: 0031 73 599 1055
Email: info@nedis.com
Declarăm că acest produs:
Marca: König Electronic
Model: CMP-USBIDESAT2
Descriere: Adaptor USB 2.0 la IDE/S-ATA
Este în conformitate cu următoarele standarde:
EMC: EN 55022:1998 +A1:2000 +A2:2003
EN 55024:1998 +A1:2001 +A2:2003
EN 61000-3-2:2000
EN 61000-3-3:1995 +A1:2001
LVD: IEC 60950-1 EN 60950-1
Şi este în conformitate cu cerinţele directivelor 89/336/EEC, 93/68/EEC şi 2006/95/EC ale UE.
‘s-Hertogenbosch, 1. ianuarie 2009
J. Gilad
Director achiziţii
Page 67

67
Măsuri de siguranţă:
PERICO L DE
ELECTROCUTARE
NU-L DESCHIDEŢI!
ATENŢIE!
Dacă apare necesitatea serviceului, pentru a evita
riscul de electrocutare, acest produs trebuie deschis
NUMAI de către un tehnician autorizat. Dacă în timpul
funcţionării a apărut o problemă, deconectaţi produsul
de la reţea şi de la celelalte aparate. Feriţi produsul de apă şi de umezeală.
Întreţinere:
Curăţarea trebuie făcută cu o cârpă uscată. Nu folosiţi solvenţi sau agenţi de curăţare
abrazivi.
Garanţie:
Nu oferim nicio garanţie şi nu ne asumăm niciun fel de responsabilitate în cazul
schimbărilor sau modificărilor aduse acestui produs sau în cazul deteriorării cauzate de
utilizarea incorectă a produsului.
Generalităţi:
Designul şi specificaţiile produsului pot fi modificate fără o notificare prealabilă.
Toate siglele şi numele de produse sunt mărci comerciale şi mărci comerciale înregistrate
ale posesorilor acestora şi prin prezenta sunt recunoscute ca atare.
Atenţie:
Acest produs este marcat cu acest simbol. Acesta indică faptul că produsele
electrice şi electronice uzate nu trebuie aruncate în gunoiul menajer. Aceste
produse au un sistem separat de colectare.
Copyright ©
Page 68

68
 Loading...