

Page 1

CMP-MOBSTOR15
CMP-MOBSTOR25
CMP-MOBSTOR120
USER MANUAL
ENGLISH
Page 2

Contents
1 Packaging contents 1
2 System requirements 2
3 Hardware installation 2
4 Driver installation 3
5 Using the USB 2.0 External Drive 7
5.1 Connect External Drive to PC 7
5.2 Disconnect External Drive from PC 7
6 Partition the external USB2.0 hard disk 10
6.1 Windows 98/ME 10
6.2 Windows 2000/XP 12
7.1 NDAS Device Setup Overview 14
7.2 Cable Installation 14
7.3 LAN Share Mode 14
7.4 USB Mode 14
8 Use With NETDISK Mode in Windows 16
8.1 Install LAN Share Device Management 16
8.2 Install NDAS Device Management 17
8.3 LAN Share Administrator 19
8.4 Add/Register a New NDAS device 19
8.5 Add/Register without Registration Wizard 21
8.6 Found New Hardware Wizard 22
8.7 Using NDAS Device 23
8.8 Sharing NDAS Device 23
9 LAN Share Mode in Mac OS X 25
9.1 Install NDAS Device Management 25
9.2 Add / Register LAN Share 25
9.3 Using LAN Share Admin 26
9.4 Using LAN Share 27
9.5 LAN Share in a Mixed Environment 28
9.6 Uninstall LAN Share 29
Safety precautions 30
Only for CMP-MOBSTOR120:
Page 3

1. Packaging contents
CMP-MOBSTOR15
- 2.5” IDE HDD enclosure
- Carrying case
- USB 2.0 cable
- Power cable
- Screws
- Driver CD
- User manual
CMP-MOBSTOR25
- 3.5” IDE HDD enclosure
- HDD stand
- USB 2.0 cable
- Power adapter
- Power cable
- Screws
- Driver CD
- User manual
CMP-MOBSTOR120
- 3.5” IDE HDD LAN SHARE enclosure
- HDD stand
- USB 2.0 cable
- RJ-45 cable
- Power adapter
- Power cable
- Screws
- Driver CD
- User manual
1
Page 4

2. System requirements
2.1 Windows®
- Windows® 98SE / ME / 2000 / XP
- 233 MHz Pentium® II or higher
- 64 MB RAM (128 MB recommended)
- USB 1.1 Port (USB 2.0 recommended)
- CD-ROM drive for installation
- 100Base-T full duplex switch for NDAS mode
(for CMP-MOBSTOR120 only)
2.2 Mac® OS X
- Mac OS X 10.3 or greater
- 128 MB RAM (256 MB recommended)
- USB 1.1 Port (USB 2.0 recommended)
- CD-ROM drive for installation
- 100Base-T full duplex switch for NDAS mode
(for CMP-MOBSTOR120 only)
3. Hardware installation
Step 1:
Boot-up your computer into the operating system and
make sure the USB / USB2.0 port device driver has
been installed properly.
Step 2:
Plug the connector of the USB cable into the USB
Port of your USB2.0 External Drive.
Step 3:
Plug the connector of the USB cable into the USB
port of the computer.
Step 4:
CMP-MOBSTOR15 gets its power from the USB port
of the computer. CMP-MOBSTOR25 and 120 need
the supplied external power adapter. Yo ur USB2.0
External Drive hardware has been set up now.
Step 5:
Follow the Software Installation instructions as shown
in the next chapters to complete driver setup.
2
Page 5

Notes:
1) In order to reach USB 2.0 speed, you must have a
computer or host adapter card that has USB 2.0
support. This device will auto sense the speed of
your USB port and adjust between USB 1.0 and USB
2.0 speed.
2) For some notebooks, the power supplied through
the USB port is not enough to power the USB2.0 hard
drive. If you experience this problem, you need to use
an external power source.
4. Driver installation
4.1 WINDOWS 98SE
1. Boot-up your computer to Windows 98SE and
make sure the USB port device driver has
been installed properly in Windows 98SE.
2. Plug the port connector of the USB cable of
USB2.0 device into the USB port of computer.
3. If this is the first time you plug the USB2.0
Storage d evice into the USB port of the
computer, the [Add New Hardware Wizard]
dialog box appears.
4. Click on [Next], check [Search for the best
driver for your device] and click [Next].
5. Check the [CD-ROM drive] and insert the
device driver CD into your CD-ROM drive.
Click on [Next]. A screen should appear to
show which Storage Devices you can install.
Click on [Next].
6. After the necessary files are copied o your
system, click on [Finish].
3
Page 6
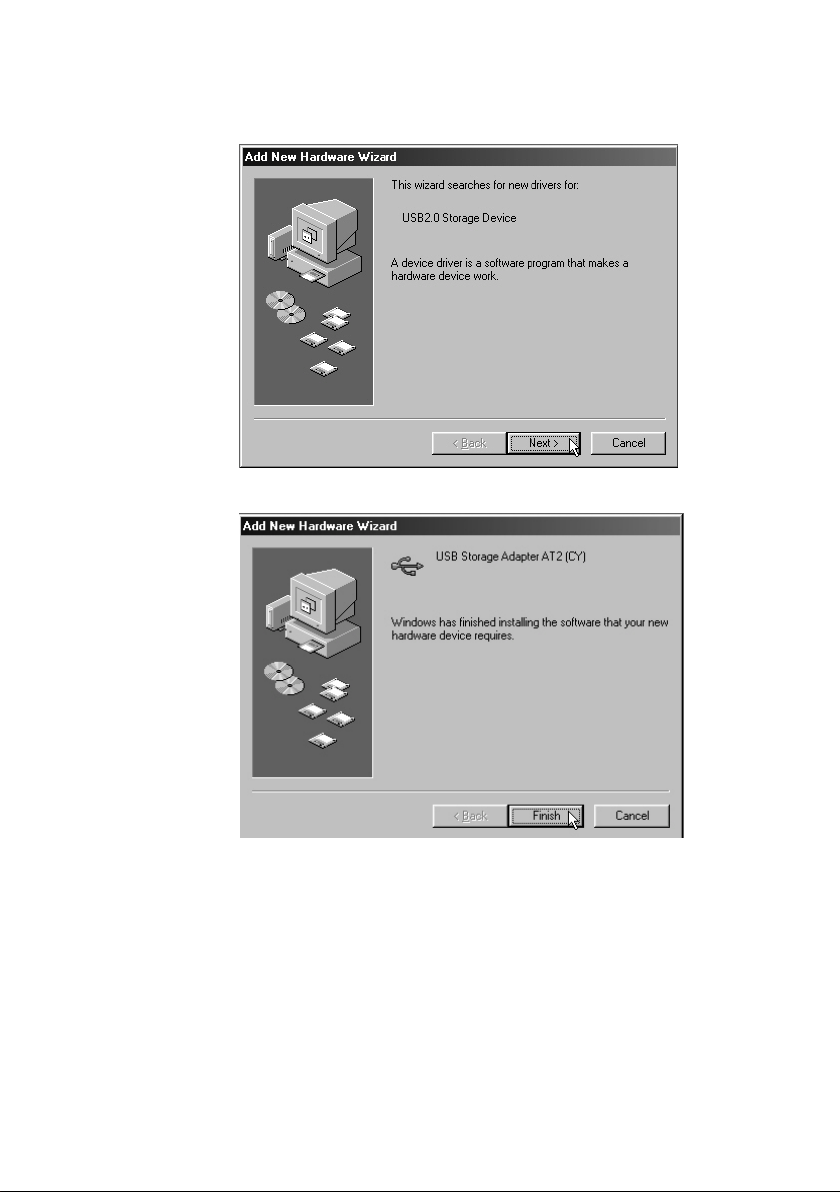
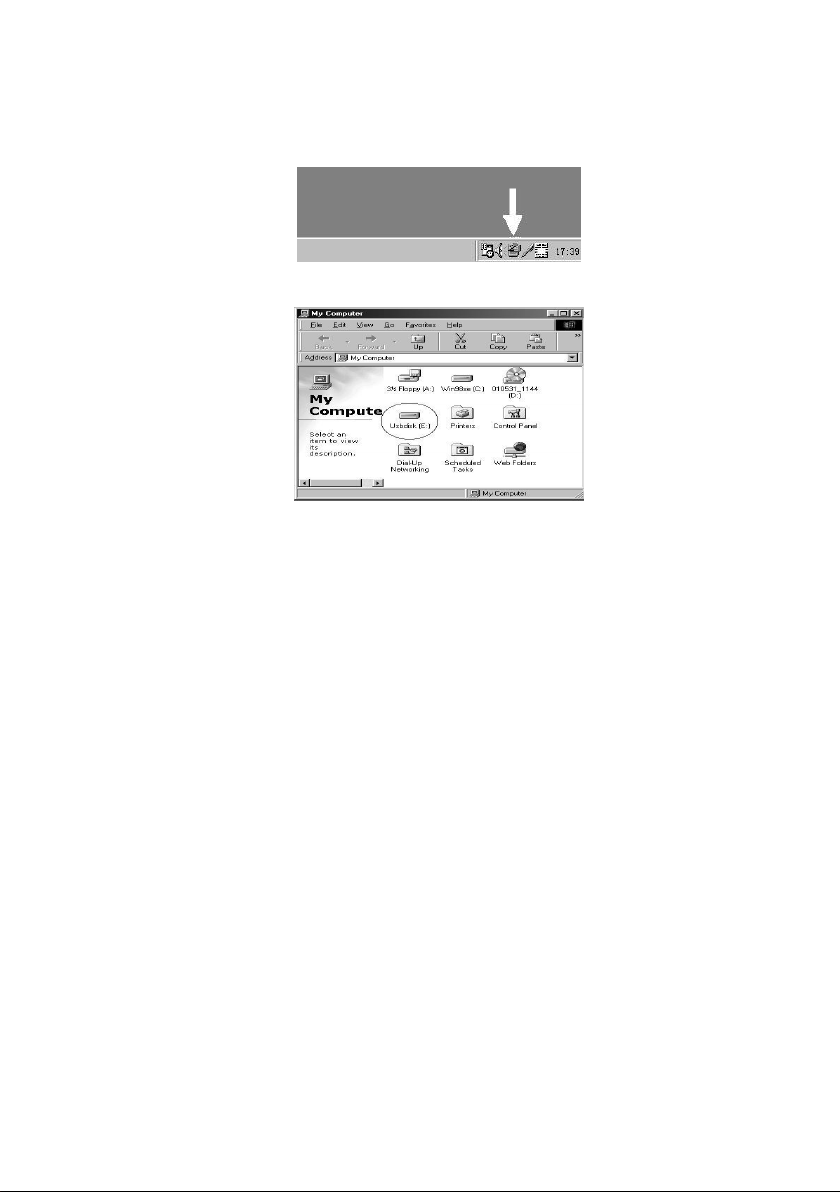
7. After the system installs the driver, double
click on [My Computer]. A new drive letter is
added. This is the USB Storage Device which
has just been installed. A green Unplug or
Eject hardware icon will appear in the system
tray.
4
Page 7
If the new drive doesn’t appear in My Computer, it
means this USB2.0 External Drive is a whole new
hard disk drive which doesn’t contain any partition.
Please refer to the “Partition the USB2.0 External
Hard Disk” chapter to configure your USB2.0
Hard Disk.
4.2 Windows ME / 2000 / XP
Step 1:
If you are plugging the USB External Drive into
your computer for the first time, the system will detect
a USB2.0 Storage Device and install the driver for a
[USB Mass Storage Device] from the system files
automatically.
Step 2:
After the system installed the driver for the USB mass
storage device, double click on [My Computer]. A
new drive will appear. This is the USB2.0 External
Drive which has just been installed.
5
Page 8
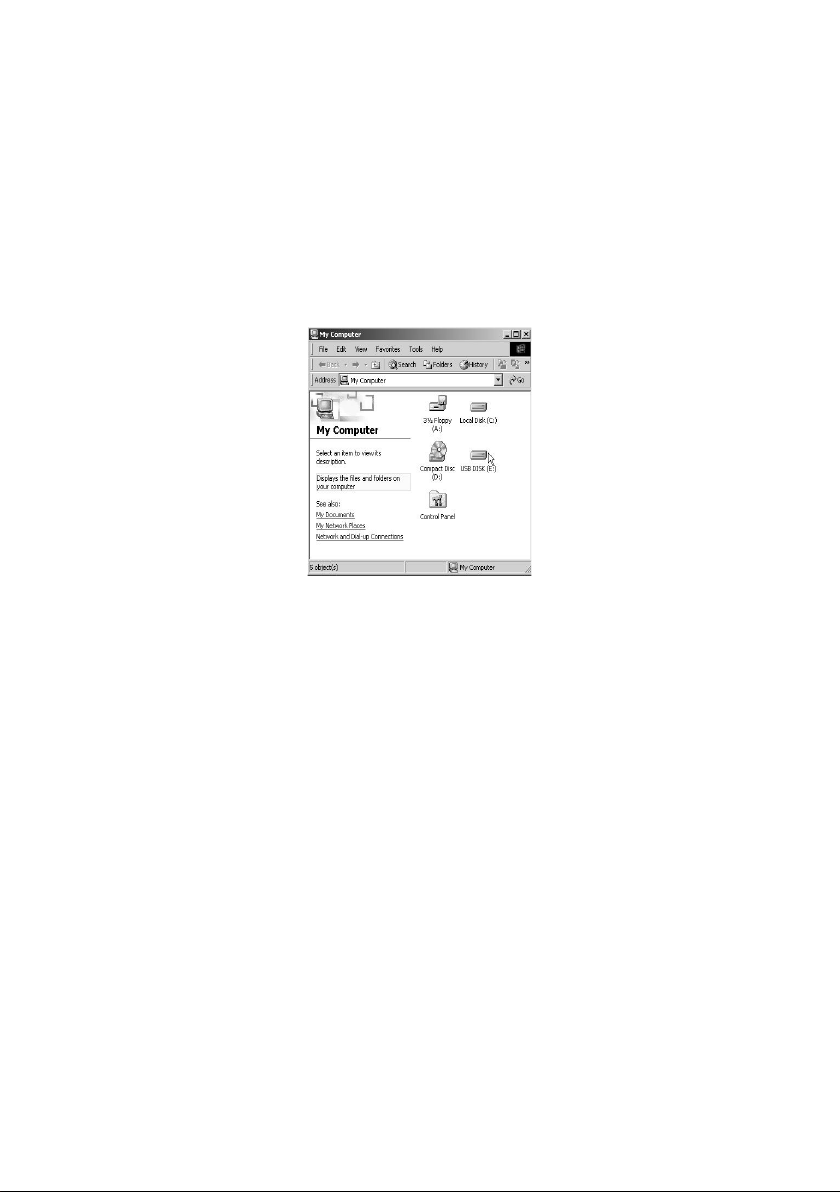
This USB2.0 External Drive is supported as a Mass
Storage D evice in Windows Me/2000/XP directly. You
do not need to install any drivers. If the USB2.0
external Hard Disk is a whole new disk drive which
does not contain any partition, please refer to the
“Partition the USB2.0 External Hard Disk” chapter to
configure your USB2.0 External Disk.
4.3 Mac OS
1. This USB2.0 External Drive is supported by the
Mass Storage Support 1.3.5 software in Mac OS. You
do not need to install any drivers.
2. Versions of Mac OS:
Mac OS 8.6
If you are using Mac OS 8.6, the software for Mass
Storage Support 1.3.5 is require d. You can download
the USB Mass Storage Support 1.3.5 driver from the
Apple Software Updates web site
http://www.apple.com/support.
Mac OS9.0 or later
You d o not need to install any software if you are
using Mac OS 9.0 or above.
3. When you plug this USB Hard Disk into the USB
port of your Mac computer, the mass storage volume
should appear on the desktop automatically.
6
Page 9

5. Using the USB 2.0 External Drive
After the installation, you can connect or disconnect
the USB2.0 External Drive without powering off the
computer. Please follow the following steps when you
want to use the drive:
5.1 Connect the USB2.0 External Drive to the
computer
Step 1:
Plug the port connector of the USB cable into the
USB Port of your USB2.0 External Drive.
Step 2:
Plug the port connector of the USB cable into the
USB port of computer. Plug the AC power cord to the
inlet of your USB2.0 External drive and turn on the
power switch on your USB2.0 External Drive.
Step 3:
The USB2.0 External Drive is ready for use
immediately.
5.2 Disconnect the USB2.0 External Drive from the
computer
5.2.1 Windows 98SE
Step 1:
Double click the green Unplug or Eject hardware icon
in system tray and select the device that you want to
remove and click on [Safely Remove].
7
Page 10
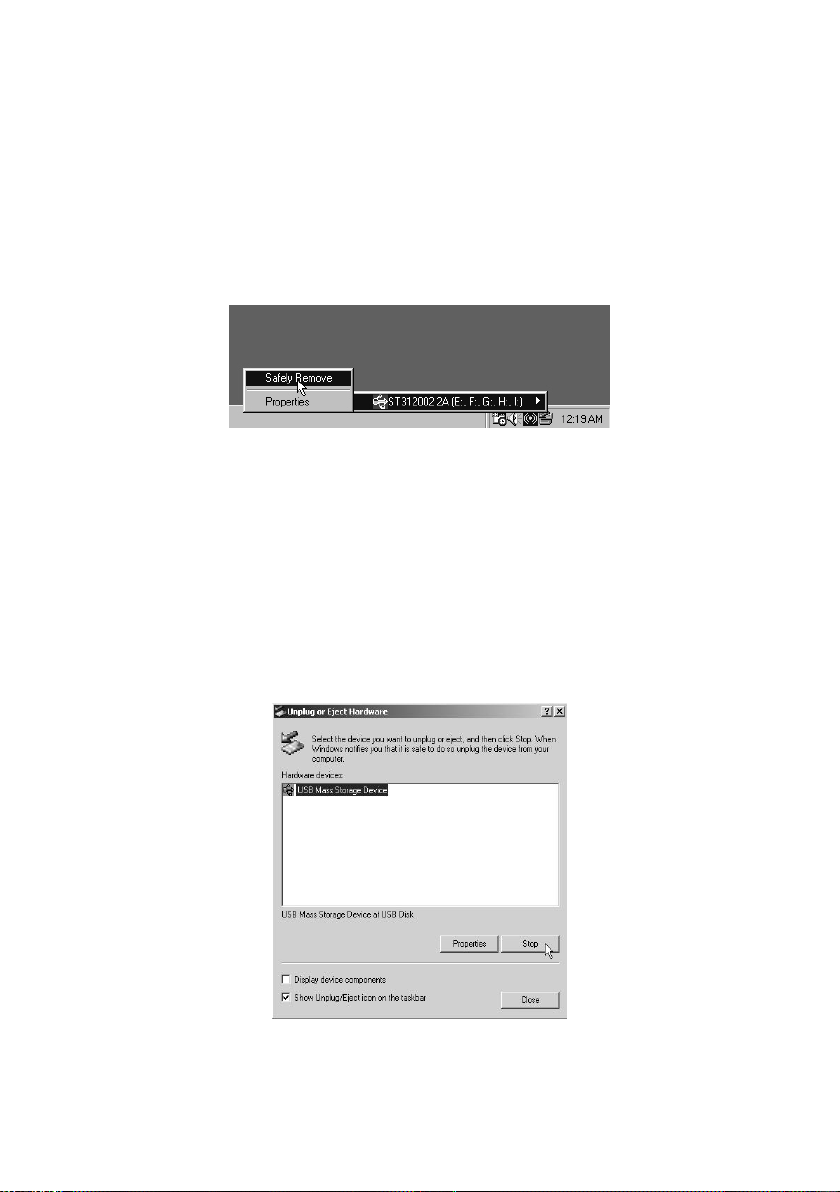
Step 2:
When the system prompts ‘Confirm device to be
stopped’, click on [OK]. When the green Arrow Icon
has disappeared, pull out the USB cable from the
USB port of the computer.
5.2.2 Windows ME/2000/XP
Step1:
Double-click on the [Unplug or Eject Hardware] icon
in the system tray. The Dialog box as shown below
appears:
8
Page 11

Step 2:
Highlight the [USB Mass Storage Device] in the
dialog box and click on [Stop]. Choose the USB2.0
External Drive that you want to disconnect, then click
on [Stop] again in the next screen.
Step 3:
Wait for a few seconds, the system prompts “You
may safely remove this device”. Unplug the USB
cable from the USB port of your computer.
5.2.3 Mac OS
When disconnecting your USB2.0 External Drive from
computer, close all windows and quit all running
applications that are stored on the USB2.0 External
Drive. Then drag the USB2.0 External Drive’s icon
into “Trash” to dismount it from the Desktop prior to
unplugging the USB2.0 External Drive from the USB
port.
CAUTION!
Do not unplug the USB2.0 External Drive from the
USB port of your computer or HUB while copying files
to or from the device or while files or applications
stored on the USB2.0 External Drive are in use.
DOING SO MAY RESULT IN LOSS OF DATA.
9
Page 12

6. Partition the external USB2.0 hard disk
6.1 Partition under Windows 98 / ME
Boot-up the computer in Windows 98/ME. Plug in
your USB2.0 Hard Disk Drive.
Step 1:
Click [Start], choose [Control panel] in [Settings]
and double click [System]. Open [Hard disk]. A
screen appears as shown below:
Step 2:
You c an se e t he US B2.0 hard Disk you just installed.
Highlight the USB Hard Disk and choose [Properties],
then select [Settings], setting the USB2.0 Hard Disk
to [Removable] as shown below:
10
Page 13

Step 3:
After restarting the system, a removable HDD is
added to [My Computer]. Choose the removable
HDD and click the right button of your mouse. Select
[Format] to format your USB2.0 Hard Disk Drive.
You can only set the USB2.0 Hard Disk Drive to
one partition in this method.
11
Page 14

6.2 Partition under Windows 2000/XP
Step 1:
To pa rt it ion t he USB2.0 Hard Disk Drive under
Windows 2000, please plug the USB2.0 Hard Disk,
then click on [Start], choose the [Control Panel] in
[Settings] and open [Administrative Tools]. Double
click [Computer Management]. A window appears as
shown below:
Step 2:
Click on [Disk Management] on the left part of this
window. All connected disk drives will be listed in the
right part. Find the USB2.0 Hard Disk that you added.
On the right side of the window you can see the
status of the partitions of this disk drive. You can
create a new one or delete an existing partition by
right-clicking on this area.
12
Page 15

Step 3:
Right-click on the right area of USB2.0 Hard Disk
Drive, click on [Create Partition....]. The “Create
partition wizard” will appear.
Step 4:
Follow the instructions of the wizard to partition and
format your USB2.0 Hard Disk Drive. Now you have
built a partition in the USB2.0 Hard Disk Drive and
you can write data to it.
13
Page 16

7.1 NDAS Device Setup Overview (ONLY FOR
MOBSTOR120 model with network connection)
7.2 Cable Installation
Do not connect USB cable and Ethernet cable at the
same time.
7.3 LAN Share Mode
1. Connect the included Ethernet cable from the
Ethernet port on LAN Share to a switch (100 Base-T).
2. Wireless users: Connect LAN Share to your
wireless router or access point with included Ethernet
cable.
3. Make sure the power connector is firmly attached
to the LAN Share and connect the power adapter to a
power source.
7.4 USB Mode
7.4.1 Windows 2000 / XP / ME
1. Connect the LAN Share and your computer with
the USB Cable.
2. Connect the power cable, then switch on the
enclosure.
14
Page 17

7.4.2 Windows 98SE
1. Connect the LAN Share and your computer with
USB Cable.
2. Connect the power cable then switch on the
enclosure.
3. The Add New Hardware Wizard will appear. Click
Next.
4. Choose Search for the best driver for your
device. Click Next.
5. Insert the software CD and select D:\USB
Windows98 Driver. Click Next.
6. Click Next again.
7. Click Next, then you can use the HDD enclosure.
8. The USB icon will be displayed in the system tray.
7.4.3 Uninstall the driver
Click Start→ Settings→ Control Panel→ Add/Remove
Programs, choose USB Storage Adapter and then
press Add/Remove Programs.
15
Page 18

8. Use with NETDISK Mode in Windows System
8.1 Install LAN Share Device Management in
Windows XP and Windows 2000
1. Find LAN Share control AP in the driver CD, double
click setup.exe and then choose the language you
need.
2. Install Shield Wizard will appear. Click the Next
button to continue to next step.
3. Accept License Agreement and then click Next to
continue installation.
4. Click the Install button to install drivers.
5. Click “Continue Anyway” if any windows come up
asking if you are sure to install non-certified drivers.
6. Click the Finish button to complete.
7. Click on the Yes button to restart your computer
now, or No to restart later.
16
Page 19

8.2 Install NDAS Device Management in Windows
ME and Windows 98SE
1. Find the LAN Share control AP from the driver CD,
double click it and start the installation.
2. Install Shield Wizard will appear, click Next.
3. Select I accept the terms in the license
agreement, and then click Next..
4. Click Install.
5. When this window appears, insert the Windows
98SE CD and click OK.
6. Select Yes, I want to restart my computer now
then click Finish restart the computer.
17
Page 20

7. If this is the first time installing LAN Share, the Add
New Hardware Wizard will appear. Click Next and
follow further instructions. Otherwise, NetDisk will be
listed as a local drive on My Computer. Drive letter
and name may vary between Personal Computers.
8. Select Search for the best driver for your device.
Click Next.
9. Select Specify a location and click Browse button.
From the Browse for Folder window, search for
NDASUSB folder and click OK. Once the location is
set, click Next from the Add New Hardware Wizard
window.
10. Click Next.
11. Driver has been successfully installed, click
Finished.
18
Page 21

8.3 LAN Share Administrator
When the software installation has completed, you will
find a LAN Share Launcher Icon on your desktop
screen and a LAN Share Administrator Tool icon in
the system tray.
8.4 Add / Register a New NDAS device using the
Registration Wizard
1. Click on the NDAS Device Management Icon
located on the system tray.
2. Select Register A New Device.
3. NDAS Device Registration Wizard will appear.
Click Next to continue.
4. Enter a name for the NDAS device and click Next.
5. Add your NDAS device ID and Write Key. Write
Key is needed to write to NDAS device. Click Next to
continue.
NB: Key and ID can be found on the sticker in front of
this manual.
- If the Write Key was entered in the previous step,
the NetDisk is registered as Read / Write Mode.
- If the Write Key was not entered in the previous
step, the NetDisk is registered as Read Only Mode.
Note: NDAS device ID and Write Key do not
contain the letter O. Please use the number 0 for
all letter O’s.
6. Checking NDAS device status.
7. Select how you want to mount the NDAS device.
19
Page 22

Read/Write Mode: Mounts NDAS device as
Read/Write Mode.
Read-Only Mode: Mounts NDAS device as ReadOnly Mode.
Don’t Mount: NDAS device is left in Connected
(Unmounted) Mode.
Note: Read/Write Mode will be disabled if a user did
not enter the Write Key during step 5.
8. Registration is finished. Click Finish:
20
Page 23

8.5 Add / Register a New NDAS device without
using the Registration Wizard
1. Click on the NDAS Device Management Icon
located on the system tray.
2. Select Register A New Device.
3. The Register a new NDAS Device window will
appear.
4. Enter in a NDAS Device Name.
5. Type in NDAS Device ID and Write Key. Write Key
is needed to write to NDAS device.
Leave the Activate this device after registration
box checked to automatically enable the device after
registration.
Note: NDAS device ID and Write Key do not
contain the letter O. Please use the number 0 for
all letter O’s.
21
Page 24
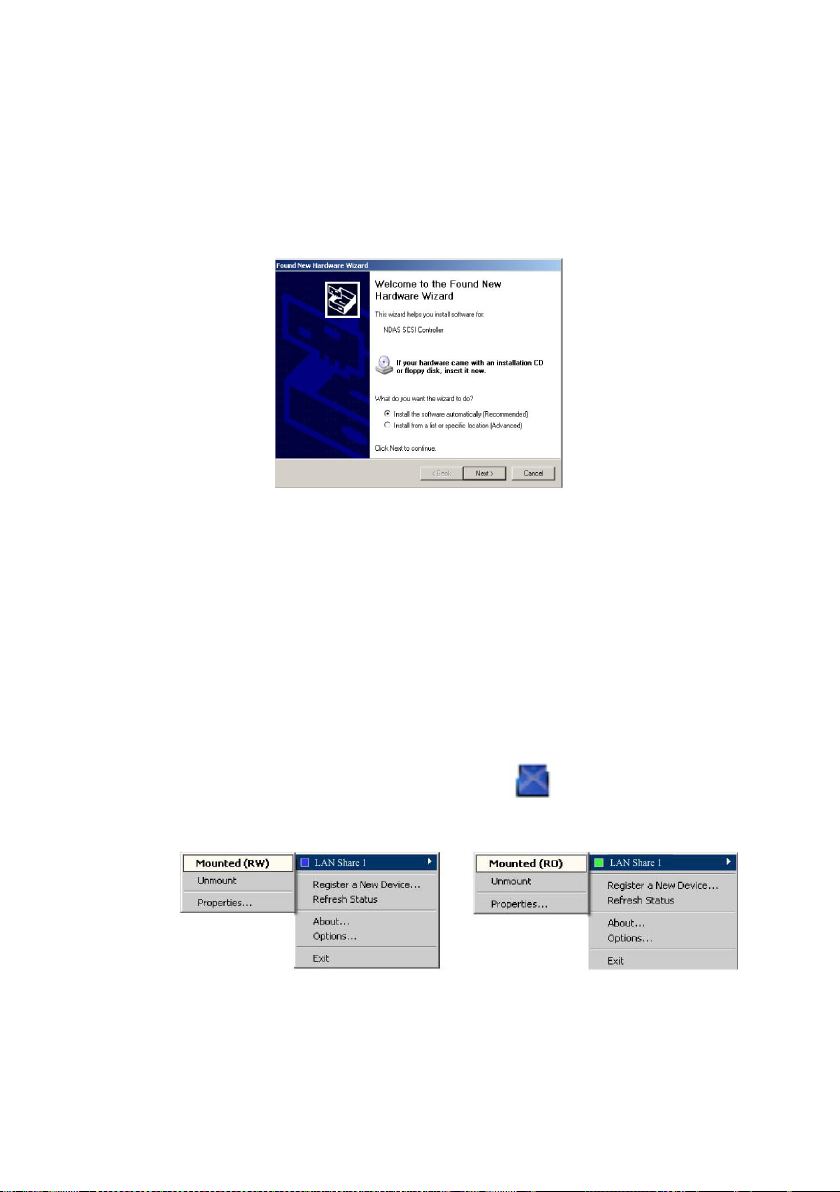
8.6 Found New Hardware Wizard
1. After you have registered, the Found New
Hardware Wizard may appear.
If the window appears, click Next to install the new
NDAS device. It should automatically find the
appropriate drivers for your NDAS Device.
Note: For Windows 2000, the Upgrade Device
Driver Wizard will appear instead.
2. If the Windows Logo Testing message comes up,
click Yes or Continue Anyway to finish the
installation.
3. Registration is complete.
Click NDAS Device Management to see the
registered NDAS device.
Read/Write Mode Read-Only Mode
22
Page 25

Note: If you cannot see your NDAS Device, please
click Refresh Status and check again.
8.7 Using NDAS Device
Your NDAS device will show up as a local drive in My
Computer. Drive letter and NDAS device name may
vary between Personal Computers.
8.8 Sharing NDAS Device
Once NDAS device is connected to your network, it
can be accessed from any computer on your LAN. To
share NDAS device, the following must be done:
Windows 2000/XP Environment:
1. All computers and NDAS device must be on the
same LAN.
2. NDAS device must be connected via Ethernet or
Wireless Router.
3. To share Read and Write access, all computers on
the network using the NDAS device must have the
LAN Share driver version 3.1.x installed.
4. NDAS device must be registered onto each
computer.
23
Page 26

Mixed Environment with Windows and Mac:
1. All computers and LAN Share must be on the same
LAN.
2. LAN Share must be connected via Ethernet or
Wireless Access Point.
3. To share LAN Share each computer on the network
must install the corresponding NetDisk Driver.
- On Windows XP/2000, install LAN Share driver v2.4
(do not use 3.x.x).
- On Windows 98 SE/ME, install LAN Share Driver 1.x
- On Mac OSX, install LAN Share driver 1.x
4. LAN Share must be registered onto each computer.
5. Write access is assigned to one user at a time and
is passed from one user to another.
NOTE: In order to use LAN Share in mixed
environments, LAN Share disks must be
formatted in FAT32. If you use the “Disk
Management” utility in Windows XP or 2000 to format
your LAN Share, then your LAN Share will be reformatted in NTFS. NTFS is not a compatible file
system format with Mac and Windows 98SE, thus
your computers on these OS will not recognize LAN
Share.
Warning:
1. DO NOT perform disk operations (format,
partition and check disk) when multiple PCs have
the NDAS mounted.
2. NDAS device can be formatted, partitioned,
aggregated or mirrored ONLY when one PC is
connected.
3. When sharing LAN Share between Windows 2000
and Windows XP, perform check disk.
24
Page 27

9. Use With LAN Share Mode in Mac OS X
9.1 Install NDAS Device Management
1. Authenticate
Enter Admin Name and Password. Then click
OK.
2. Welcome to the LAN Share Installer
Click Continue.
3. Important Information
Click Continue.
4. Software License Agreement
Click Continue.
If you want to continue installation, please click Agree.
Otherwise click Disagree.
5. Select a Destination
Click Continue.
6. Easy Install
Click Upgrade.
7. Install Software
When software successfully finishes, install, click
Close.
8. Restart your computer
NOTE:Once LAN Share software is installed,
LAN Share needs to be Added / Registered to
your computer before you can start using LAN
Share.
9.2 Add / Register LAN Share
1. Double click Macintosh HD icon on the desktop.
2. Double click Applications folder.
3. Double click NDAdmin icon.
25
Page 28

4. NetDiskAdmin window will appear.
- Enter LAN Share ID and Write Key.
- Click Add.
- Added LAN Share will be displayed in
NDAS IDs window.
NOTE:To add a new LAN Share, repeat the Add /
Register a LAN Share steps.
9.3 Using LAN Share Admin To Get NetDiskAdmin
- Double click Macintosh HD icon on your desktop.
- Double click Applications folder.
- Double click NetDiskAdmin icon.
- NetDiskAdmin window will appear.
NetDiskAdmin has six functions:
Add - Add / Register a LAN Share to your
computer.
Delete - Delete a LAN Share from your computer.
Disable - Disable Reading and Writing to LAN Share.
Enable RW- Enable LAN Share into Read/Write
Mode.
Enable RO - Enable LAN Share into Read Only
Mode.
Quit - End LAN Share Admin.
LAN Share IDs Window
Displays all the LAN Shares that are registered in
the computer.
Configuration Window
Displays LAN Share status user wants to achieve for
that Lan Share.
Status Window
Displays current status of LAN Share.
26
Page 29

9.4 Using LAN Share
Read Only and Read / Write Mode
LAN Share provides users with two basic
functions;Read Only and Read / Write.
1. Read Only Mode
- Any number of users or applications can read from a
LAN Share.
2. Read/Write Mode
- Only one user or application can write to a specific
LAN Share at a time.
- No other users or applications can write to LAN
Share until Read / Write Access is transferred.
Changing Read Only or Read/Write Mode
If LAN Share Admin window is not already opened,
double click Macintosh HD icon on your desktop,
double click Applications folder and double click
LAN Share Admin icon.
Changing to Read Only Mode:
- Select a LAN Share from NDAS IDs window.
- Click Enable RO button.
- Both Configuration and Status will change to Read
Only.
27
Page 30

- Now LAN Share is in Read Only Mode.
Changing to Read / Write Mode:
- Select a LAN Share from NDAS IDs window.
- Click Enable RW button.
- If Write Key was not entered during registration, a
warning window will appear.
- Close the warning window.
- Fill in the Write Key.
- Click Enable RW button.
9.5 Using LAN Share in a Mixed Environment
Mixed Environment with Mac and Windows:
- All computers and LAN Share must be on the same
LAN.
- LAN Share must be connected via Ethernet or
Wireless Access Point.
- To share LAN Share each computer on the network
must install the corresponding LAN Share Driver.
- On Windows XP/2000, install LAN Share driver v2.4
(do not use 3.x.x).
- On Windows 98 SE/ME, install LAN Share Driver 1.x.
- On Mac OSX, install LAN Share driver 1.0.x.
- LAN Share must be registered onto each computer.
- Write access is assigned to one user at a time and
is passed from one user to another.
NOTE:
In order to use LAN Share in mixed environments,
LAN Share must be formatted in FAT32. NTFS is not
a compatible file system format with Mac and
Windows 98SE, thus your computers on these OS will
not recognize LAN Share.
You can use a third party format utility to choose the
file format your LAN Share is formatted in.
28
Page 31

9.6 Uninstall LAN Share
1. Start the Uninstaller by double clicking LAN Share
Uninstaller.
2. Authenticate
Enter Admin Name and Password. Then click OK.
3. Click Uninstall.
4. LAN Share has been successfully uninstalled. Click
Quit.
29
Page 32

SAFETY PRECAUTIONS
To reduce risk of electric shock, this product should
ONLY be opened by an authorized technician if
service is required. Disconnect the product from
mains and other equipment if a problem should occur.
Do not expose the product to water of moisture.
WARRANTY
No guarantee or liability can be accepted for any
changes and modifications of the product or damage
caused due to incorrect use of this product.
GENERAL
Designs and specifications are subject to change
without a notice.
30
Page 33

WWW.KONIGCOMPUTER.COM
 Loading...