

Page 1

1
CMP-HOMEPLUG31
CMP-HOMEPLUG36
MANUAL (p. 2)
HOMEPLUG 200MBPS
MODE D’EMPLOI (p. 5)
Adaptateur CPL 200 MB/S
MANUALE (p. 8)
HOMEPLUG 200MBPS
BRUKSANVISNING (s. 14)
HEMANSLUTNING 200MBPS
MANUAL DE UTILIZARE (p. 17)
HOMEPLUG 200MBPS
HASZNÁLATI ÚTMUTATÓ (o. 11.)
HOMEPLUG, 200 Mbit/s
KÄYTTÖOHJE (s. 12)
HOMEPLUG 200MBPS
ANLEITUNG (s. 3)
HOMEPLUG-ADAPTER 200 Mbit/s
GEBRUIKSAANWIJZING (p. 6)
HUISSTEKKER 200MBPS
MANUAL DE USO (p. 9)
HOMEPLUG 200MBPS
NÁVOD K POUŽITÍ (s. 15)
Zařízení HOMEPLUG 200 MB/S
ΕΓΧΕΙΡΙΔΙΟ XPHΣHΣ (σελ. 19)
HOMEPLUG 200MBPS
Page 2

2
ENGLISH
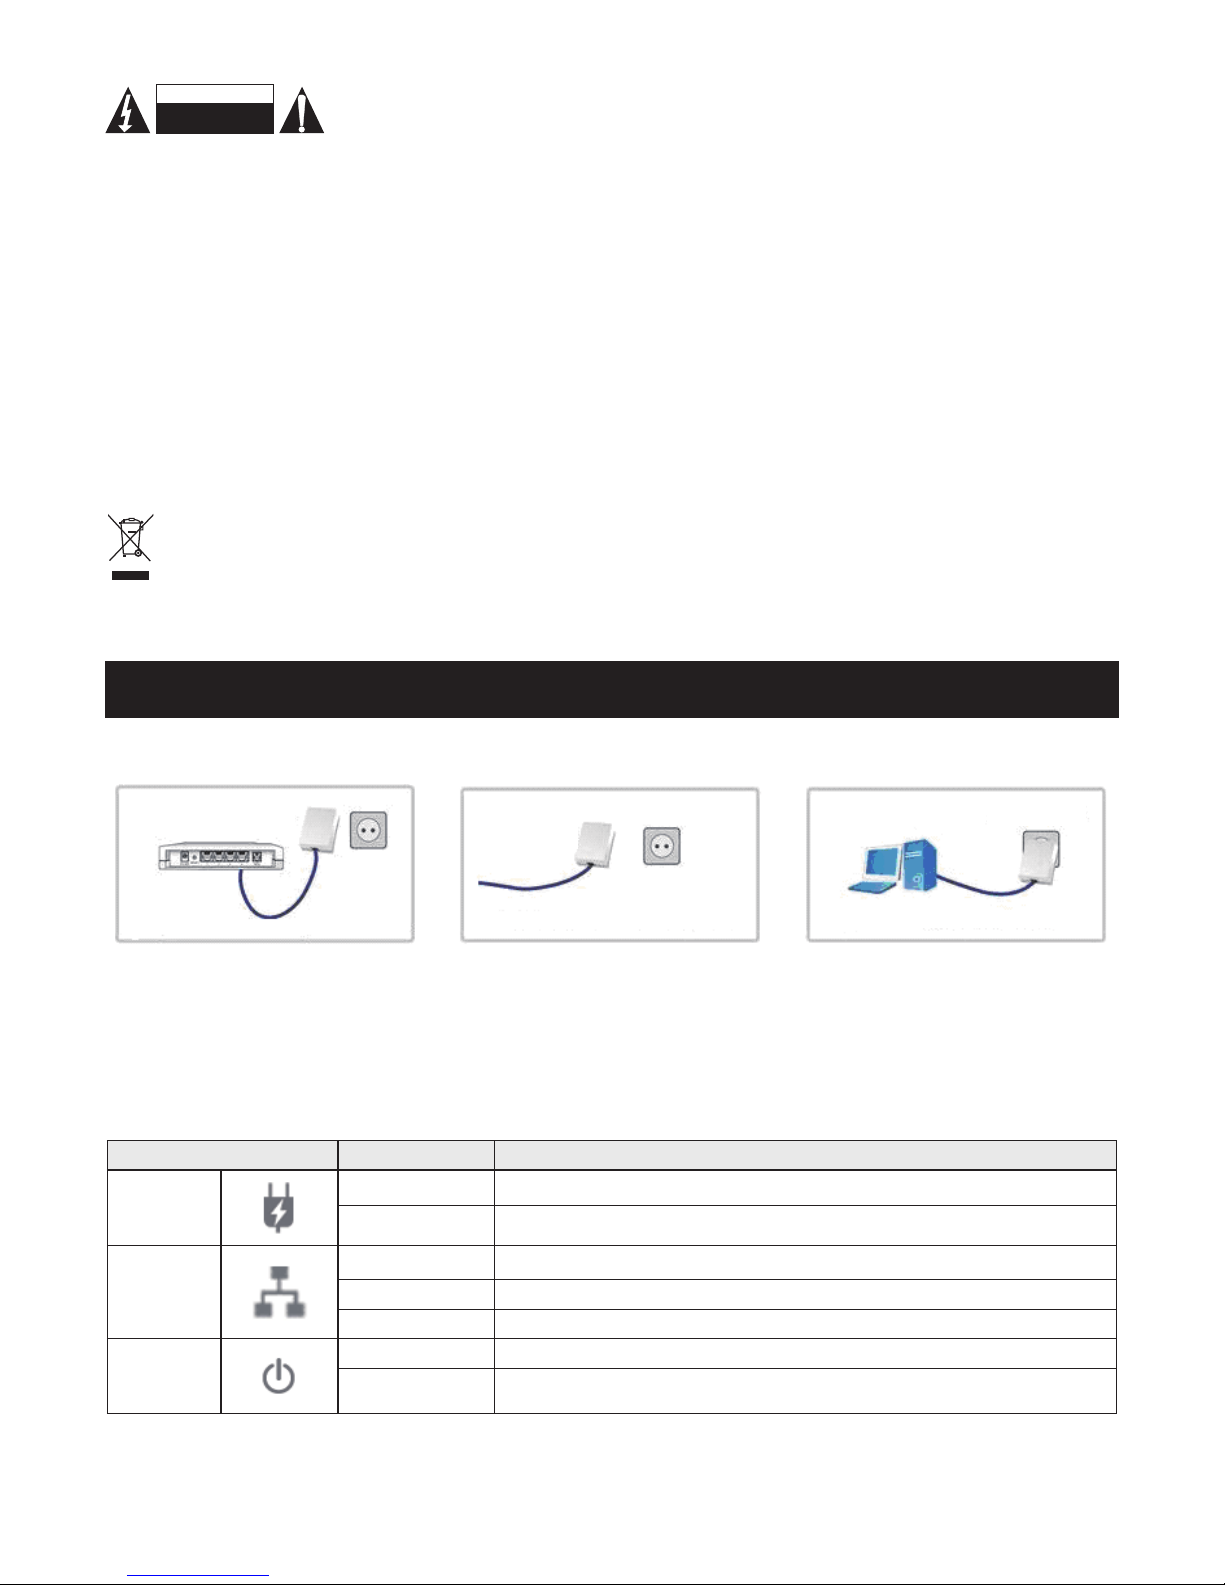
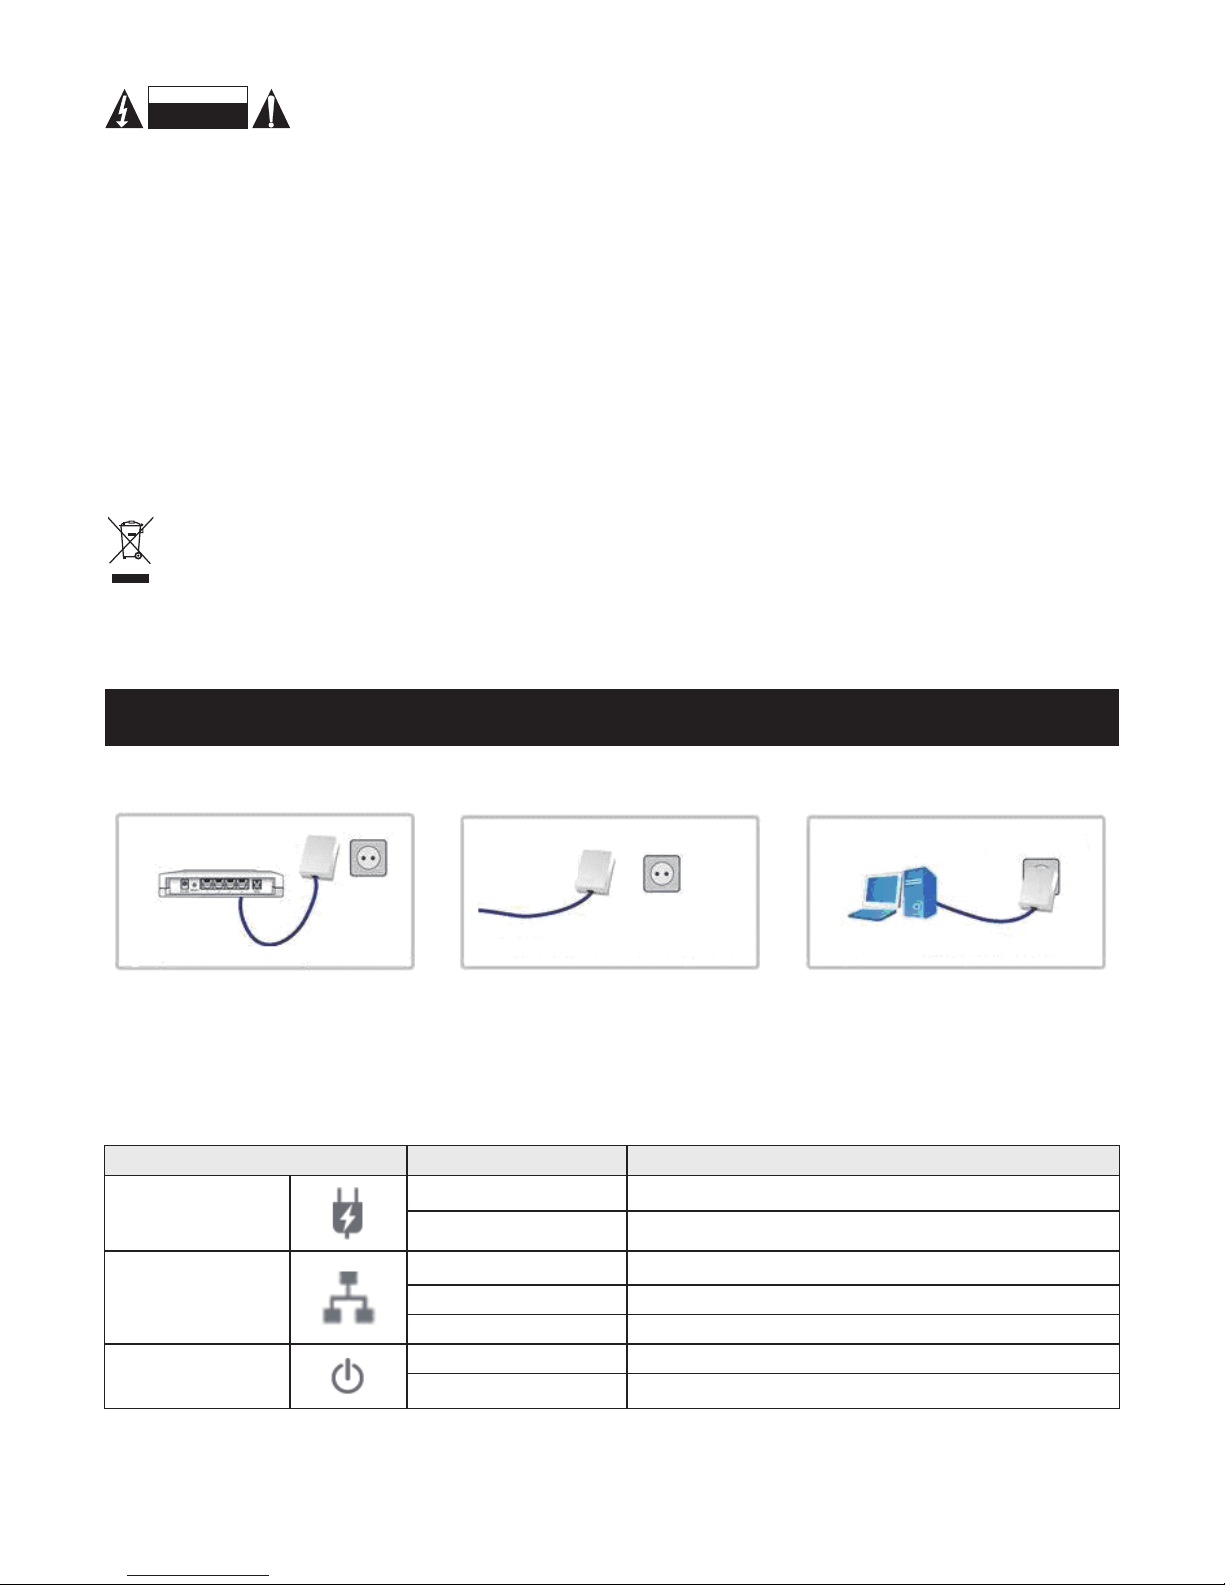
Installing the homeplugs
Power_line Bridge
Power_line Bridge
Power_line Bridge
Step 1: Connect one powerline
adapter to your ADSL or cable
modem’s Ethernet port and plug
the adapter into the nearest power
socket.
Step 2: Plug in the second powerline
adapter next to your PC and connect
the Ethernet ports
Step 3: Internet access from any
power socket in your home
LED Denitions
LED State Description
Powerline
ON Powerline network activity.
OFF
Search or no Powerline network activity.
Ethernet
ON Ethernet connection is OK.
OFF Data transfer.
Flashing No link to Ethernet.
POWER
ON Power on.
OFF Powerline off or failure.
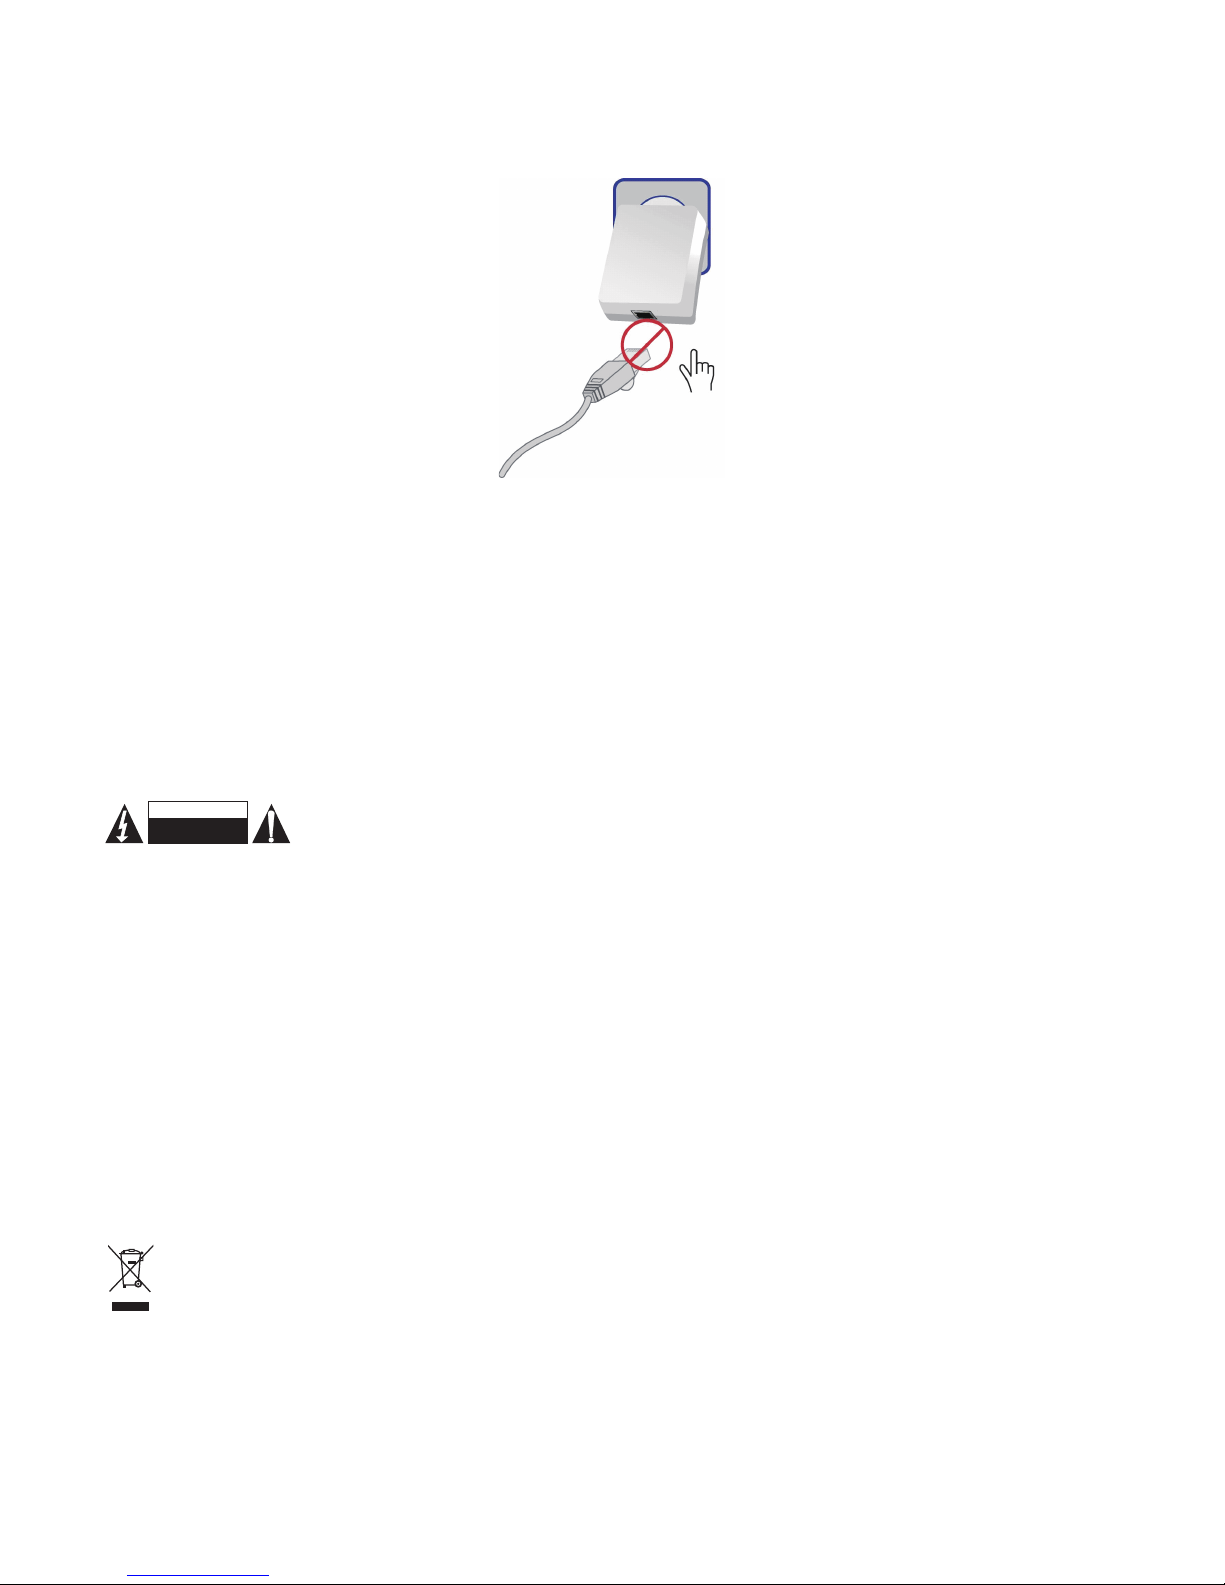
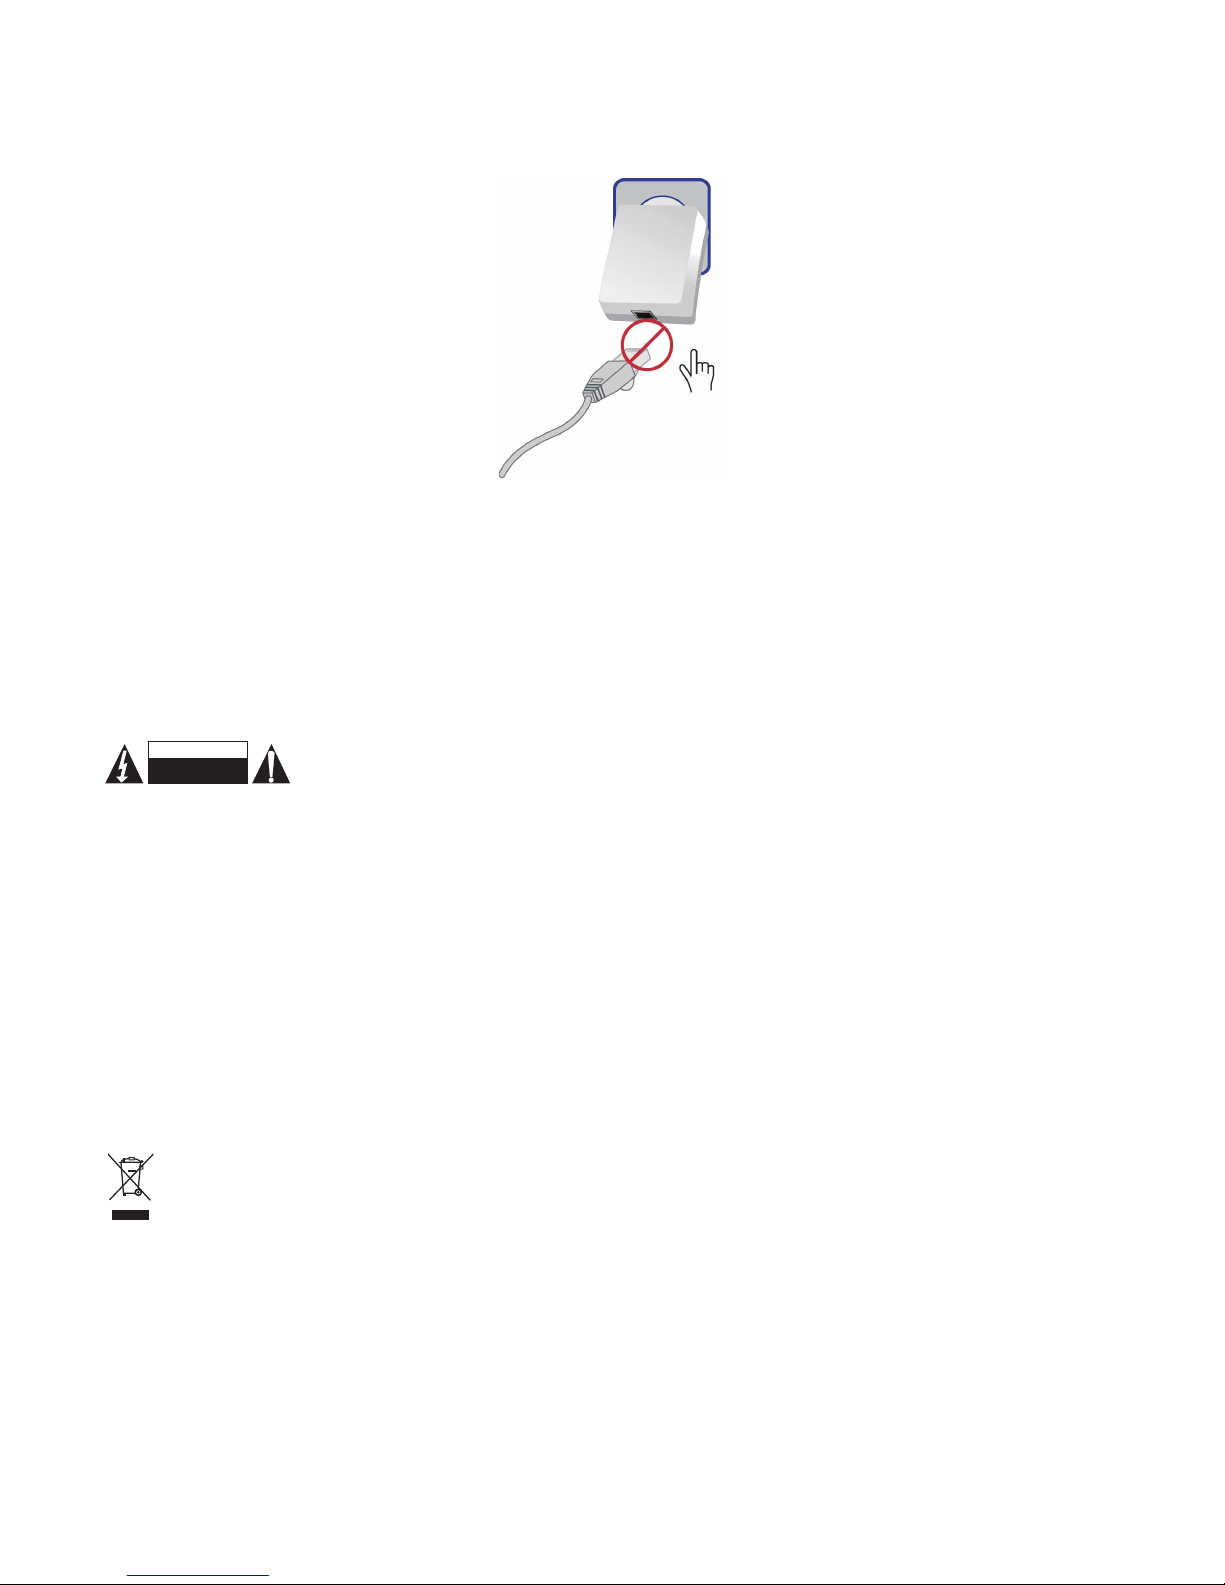
Resetting the homeplug
Reset: Pushing the right button resets the device to the factory default settings. Be careful when pressing the reset
button, please make sure to unplug (remove) the Ethernet cable (RJ-45cable) rst, and then press the reset button.
Press the reset button for 3 seconds and wait for the PWR LED to light up again. Do not power off when the device is in
reset mode.
Secure the home plug
The Secure button on the left can auto secure and group the powerline devices, the following is the scenario for the
secure button.
There are two push button trigger state conditions
“Adder state” for a device providing the NMK for an existing AVLN
“Joiner state” for a device that will join an AVLN
Pushing buttons on any two devices results in one of them becoming an “adder” and the other one a “joiner”
Page 3
3
Safety precautions:
To reduce risk of electric shock, this product should ONLY be opened by an authorized
technician when service is required. Disconnect the product from mains and other equipment
if a problem should occur. Do not expose the product to water or moisture.
Maintenance:
Clean only with a dry cloth. Do not use cleaning solvents or abrasives.
Warranty:
No guarantee or liability can be accepted for any changes and modications of the product or damage caused due to
incorrect use of this product.
General:
Designs and specifications are subject to change without notice.
All logos brands and product names are trademarks or registered trademarks of their respective holders and are hereby
recognized as such.
Keep this manual and packaging for future reference.
Attention:
This product is marked with this symbol. It means that used electrical and electronic products should not be mixed
with general household waste. There is a separate collections system for these products.
DEUTSCH
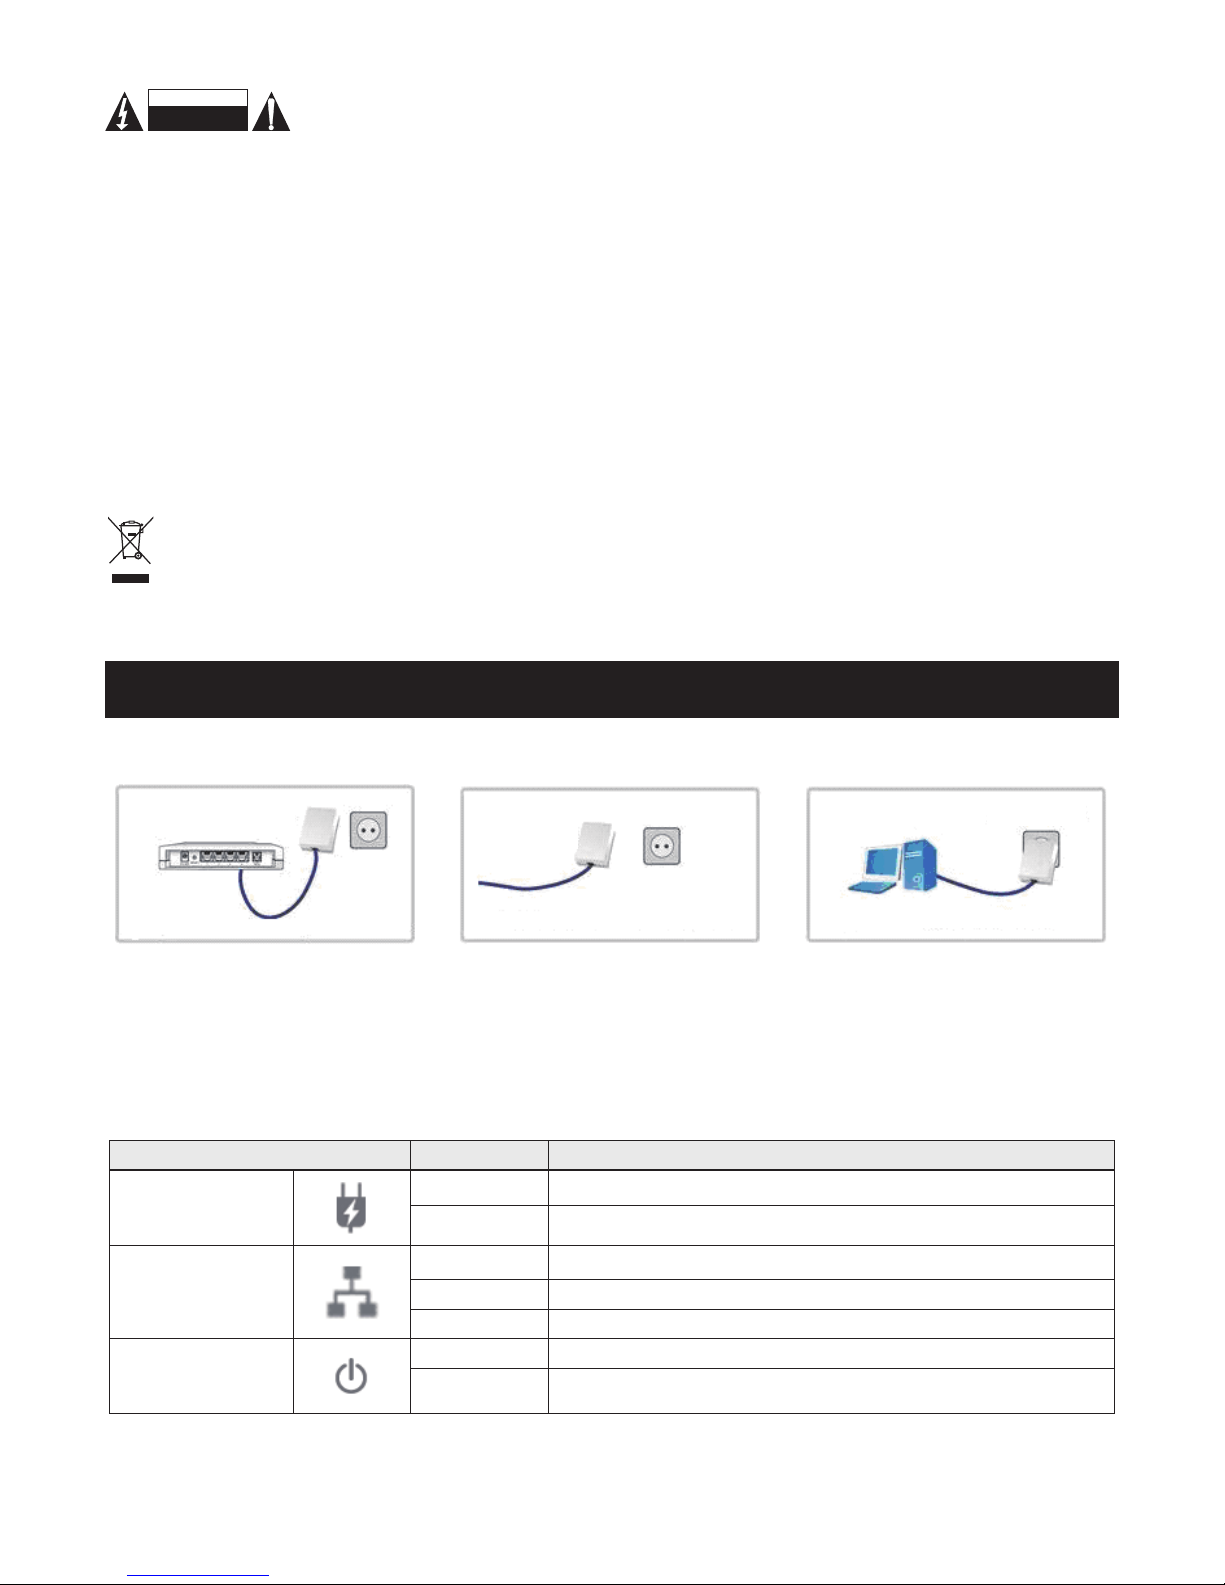
Homeplug installieren
Homeplug-Adapter
Homeplug-Adapter
Homeplug-Adapter
Schritt 1: Schließen Sie einen
Homeplug-Adapter am Ethernet-Port
Ihres DSL-Modems oder Routers an
und stecken Sie den Adapter in die
nächstgelegene Steckdose.
Schritt 2: Stecken Sie den zweiten
Homeplug-Adapter in der Nähe Ihres
PC ein und verbinden Sie ihn mit dem
Netzwerk-Port.
Schritt 3: Sie haben Internetzugang
über jede beliebige Steckdose in Ihrer
Wohnung.
Bedeutung der LEDs
LED Status Beschreibung
Netzkabel
EIN Aktivität auf dem Netzkabel.
AUS Suche oder keine Aktivität auf dem Netzkabel.
Netzwerk
EIN Netzwerkverbindung ist OK.
AUS Datenübertragung.
Blinkt Keine Verbindung zum Netzwerk.
EIN
EIN Eingeschaltet.
AUS Ausgeschaltet oder Fehlfunktion.
RISK OF ELECTRIC SHOCK
DO NOT OPEN
CAUTION
Page 4
4
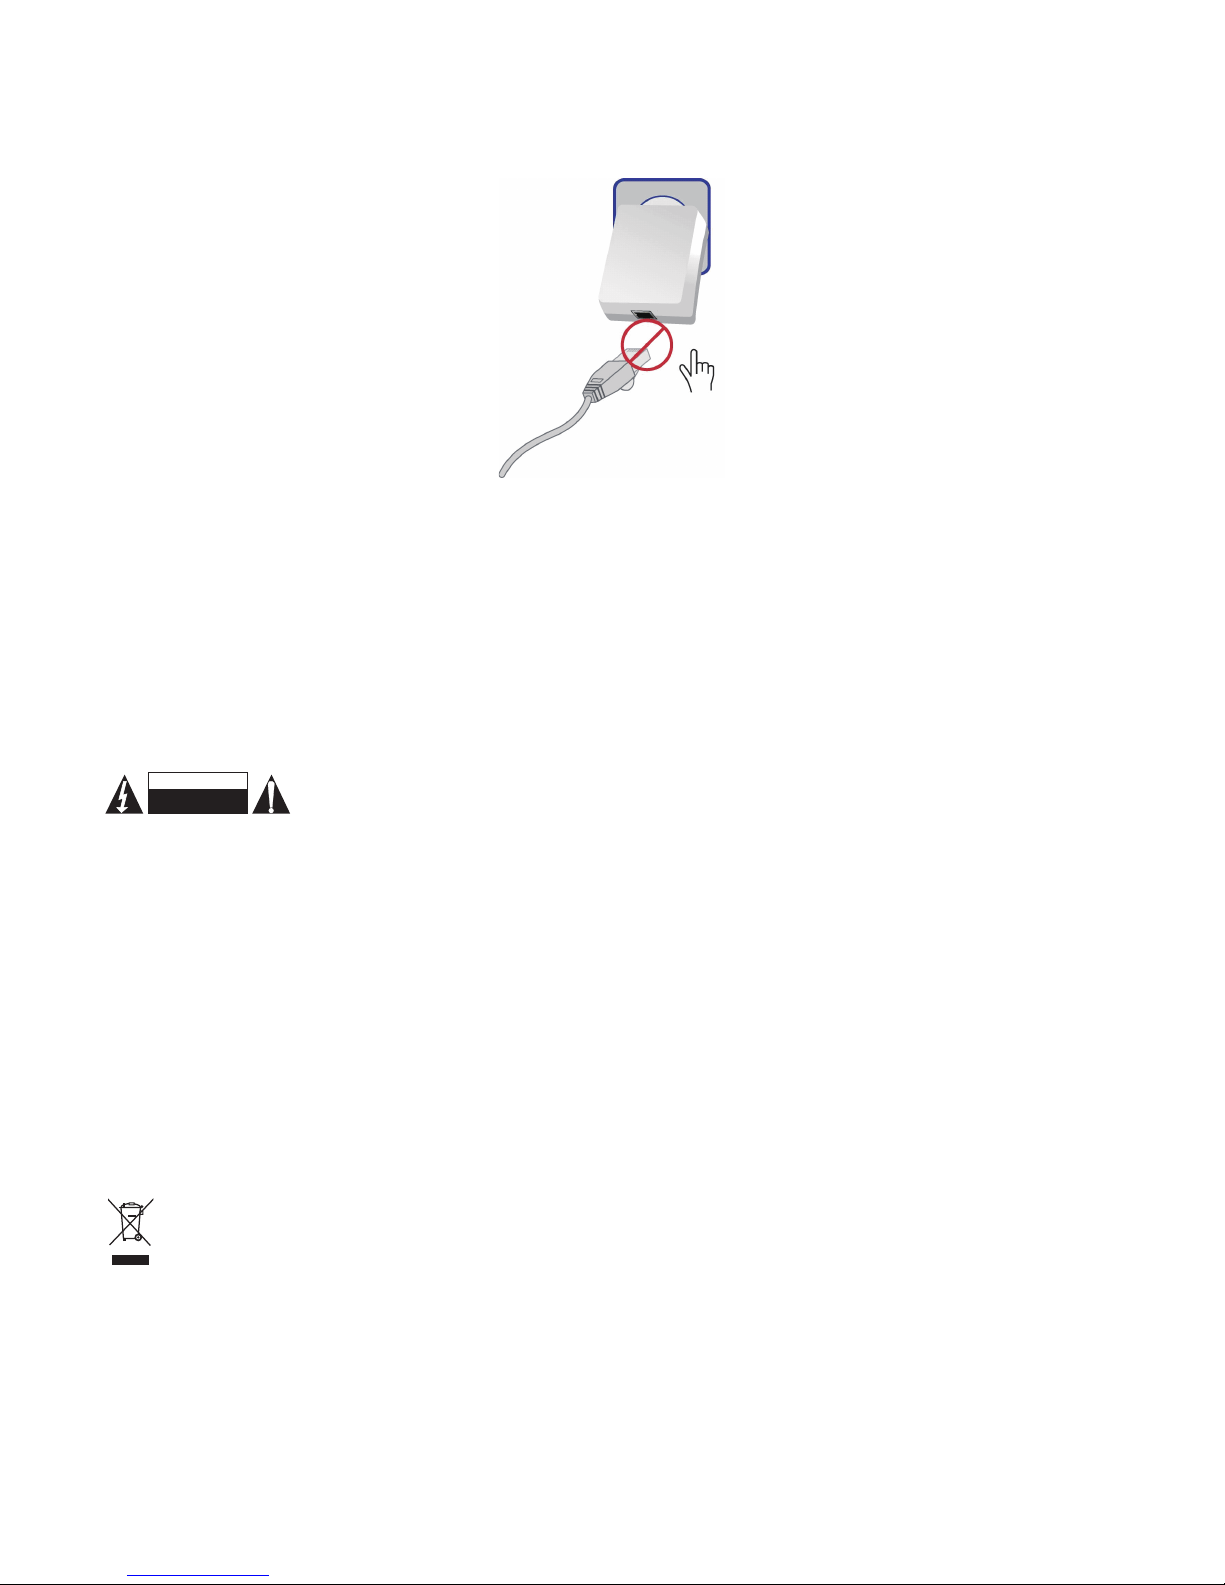
Homeplug zurücksetzen
Reset: Mit Druck auf die rechte Taste stellen Sie auf die Werkseinstellungen zurück. Beim Reset achten Sie bitte
darauf, dass das Ethernetkabel (RJ-45-Kabel) abgezogen ist, dann erst drücken Sie die Reset-Taste. Halten Sie die
Reset-Taste für 3 Sekunden gedrückt und warten Sie ab, bis die EIN-LED wieder leuchtet. Schalten Sie während des
Rückstellmodus nicht aus.
Homeplug sichern
Die Sicherungstaste auf der linken Seite sichert und gruppiert die Homeplug-Geräte automatisch, nachstehend das
Szenario für die Sicherungstaste.
Es gibt zwei Drucktasten-Auslösermodi
„Addermodus“ für ein Gerät zur Bereitstellung eines NMK (Netzwerkmitgliedsschlüssel,
engl.: Network Membership Key) für ein bestehendes AVLN (logisches AV-Netzwerk
engl.: AV Logical Network).
„Joinermodus“ für ein Gerät, welches einem AVLN beitritt
Tastendruck auf zwei beliebigen Geräten macht eines der Geräte zum „Adder“, das andere zum „Joiner“.
Sicherheitsvorkehrungen:
Um das Risiko eines elektrischen Schlags zu verringern, sollte dieses Produkt
AUSSCHLIESSLICH von einem autorisierten Techniker geöffnet werden. Bei Problemen trennen
Sie das Gerät bitte von der Spannungsversorgung und von anderen Geräten ab. Stellen Sie sicher, dass das Gerät nicht
mit Wasser oder Feuchtigkeit in Berührung kommt.
Wartung:
Nur mit einem trockenen Tuch säubern. Keine Reinigungs- oder Scheuermittel verwenden.
Garantie:
Es kann keine Garantie oder Haftung für irgendwelche Änderungen oder Modikationen des Produkts oder für Schäden
übernommen werden, die aufgrund einer nicht ordnungsgemäßen Anwendung des Produkts entstanden sind.
Allgemeines:
Designs and specications are subject to change without notice.
All logos brands and product names are trademarks or registered trademarks of their respective holders and are hereby
recognized as such.
Keep this manual and packaging for future reference.
Achtung:
Dieses Produkt ist mit diesem Symbol gekennzeichnet. Es bedeutet, dass die ausgedienten elektrischen und
elektronischen Produkte nicht mit dem allgemeinen Haushaltsmüll entsorgt werden dürfen. Für diese Produkte
stehen gesonderte Sammelsysteme zur Verfügung.
STROMSCHLAGGEFAHR
NICHT ÖFFNEN
VORSICHT
Page 5

5
FRANÇAIS
Installation des adaptateurs CPL
Adaptateur
Adaptateur
Adaptateur
Etape 1 : Connectez un adaptateur
de Courant Porteur en Ligne au port
Ethernet de votre modem ou au
câble ADSL et branchez-le à la prise
secteur la plus proche.
Etape 2 : Branchez un second
adaptateur à une prise secteur proche
de votre PC et connectez les ports
Ethernet
Etape 3 : Vous pouvez accéder à
Internet à partir de n’importe quelle
prise secteur de votre domicile
Signications des témoins
Témoin Etat Description
Powerline
Allumé Activité réseau de la ligne
Eteint
En cours de recherche ou ligne non active
Ethernet
Allumé Connexion Ethernet marche correctement.
Eteint Transfert de données.
Clignotant Pas de liaison Ethernet.
POWER
Allumé En marche.
Eteint Arrêté ou en panne.
Réinitialiser un adaptateur CPL
Réinitialiser : Vous pouvez restaurer les valeurs par défaut en appuyant sur le bouton situé sur le côté droit. Avant
d’appuyer sur le bouton situé sur le côté, assurez-vous de retirer d’abord le câble Ethernet (RJ-45cable). Appuyez
sur le bouton de réinitialisation pendant 3 secondes et attendez que le témoin d’alimentation s’allume de nouveau. Ne pas
éteindre pendant la procédure de réinitialisation.
Utilisation correcte de l’adaptateur
Le bouton Secure situé sur le côté gauche peut sécuriser et regrouper les appareils connectés, voici les différentes
situations pour ce bouton :
Deux boutons d’états :
“état additionneur” pour un appareil présentant un NMK pour le réseau local existant
“état nouvel arrivant” pour un appareil voulant joindre le réseau local existant
En appuyant sur l’un des boutons des deux appareils, l’un d’eux devient “additionneur” et l’autre “nouvel arrivant”
Page 6
6
Consignes de sécurité :
Pour réduire le risque de choc électrique, ce produit ne doit être ouvert que par un technicien
qualié si une réparation s’impose. Débranchez l’appareil et les autres équipements du secteur s’il
y a un problème. Ne pas exposer l’appareil à l’eau ni à l’humidité.
Entretien :
Ne nettoyez l’appareil qu’avec un chiffon sec. N’utilisez pas de solvants ou de produits abrasifs.
Garantie :
Aucune garantie ou responsabilité ne sera acceptée en cas de modication et/ou de transformation du produit ou en cas
de dommages provoqués par une utilisation incorrecte de l’appareil.
Généralités :
Le design et les caractéristiques techniques sont sujets à modication sans notication préalable.
Tous les logos de marques et noms de produits sont des marques déposées ou immatriculées dont leurs détenteurs sont
les propriétaires et sont donc reconnues comme telles dans ce documents.
Conservez ce manuel et l’emballage pour toute référence ultérieure.
Attention :
Ce symbole gure sur l’appareil. Il signie que les produits électriques et électroniques ne doivent pas être jetés
avec les déchets domestiques. Le système de collecte est différent pour ce genre de produits.
NEDERLANDS
Huisstekkers installeren
Voedingskabel Brug
Voedingskabel
Brug
Voedingskabel Brug
Stap 1: Sluit één voedingskabel
adapter aan op de Ethernetpoort van
uw ADSL of kabelmodem en steek
de adapter in het dichtstbijzijnde
stopcontact.
Stap 2: Sluit de tweede voedingskabel
adapter aan naast uw PC en sluit de
Ethernetpoorten aan.
Stap 3: Internettoegang via elk
gewenst stopcontact in uw huis.
LED Denities
LED Status Beschrijving
Voedingskabel
AAN Voedingskabel netwerkactiviteit.
UIT Zoeken of geen voedingskabel netwerkactiviteit.
Ethernet
AAN Ethernetverbinding is OK.
UIT Gegevensoverdracht.
Knippert Geen link met Ethernet.
AAN/UIT
AAN Ingeschakeld.
UIT Voedingskabel uit of storing.
RISQUE DE CHOC ELECTRIQUE
NE PAS OUVRIR
ATTENTION
Page 7
7
De huisstekker terugstellen
Reset: Druk op de rechter toets om de standaard fabrieksinstellingen te herstellen. Ben a.u.b. voorzichtig wanneer u
de terugsteltoets indrukt, zorg ervoor eerst de Ethernetkabel (RJ-45kabel) los te koppelen en druk daarna pas op
de terugsteltoets. Houd de terugsteltoets 3 seconden ingedrukt en wacht totdat de PWR LED weer oplicht. Schakel het
apparaat in terugstelmodus niet uit.
De huisstekker bevestigen
De Bevestigtoets aan de linkerzijde kan voedingskabelapparatuur automatisch bevestigen en groeperen. Hieronder volgt
een scenario voor de Bevestigingstoets.
Er zijn twee activeringsmodi voor de drukknop
“Toevoeg modus” voor een apparaat dat de NMK verstrekt voor een bestaande AVLN
“Invoeg modus” voor een apparaat dat deelneemt aan een AVLN
Door op de toetsen te drukken van één van de twee apparaten, wordt één apparaat de “toevoeger” en de andere een
“invoeger”
Veiligheidsvoorzorgsmaatregelen:
Om het risico op elektrische schokken te voorkomen mag dit product ALLEEN worden geopend door
een erkende technicus wanneer er onderhoud nodig is. Koppel het product los van de elektrische
voeding en van andere apparatuur als zich problemen voordoen. Stel het product niet bloot aan water of vocht.
Onderhoud:
Uitsluitend reinigen met een droge doek. Gebruik geen reinigingsmiddelen of schuurmiddelen.
Garantie:
Voor wijzigingen en veranderingen aan het product of schade veroorzaakt door een verkeerd gebruik van dit product, kan
geen aansprakelijkheid worden geaccepteerd. Tevens vervalt daardoor de garantie.
Algemeen:
Wijziging van ontwerp en specicaties zonder voorafgaande mededeling onder voorbehoud.
Alle logo’s, merken en productnamen zijn handelsmerken of geregistreerde handelsmerken van de respectievelijke
eigenaren en worden hierbij als zodanig erkend.
Bewaar deze gebruiksaanwijzing voor latere raadpleging.
Let op:
Dit product is voorzien van dit symbool. Dit symbool geeft aan dat afgedankte elektrische en elektronische
producten niet met het gewone huisafval verwijderd mogen worden. Voor dit soort producten zijn er speciale
inzamelingspunten.
GEVAAR VOOR
ELEKTRISCHE SCHOK
NIET OPENEN
LET OP:
Page 8

8
ITALIANO
Istallazione delle homeplug
Ponte linea elettrica
Ponte linea
elettrica
Ponte linea elettrica
Passo 1: Collegare un adattatore per
linea elettrica alla porta Ethernet del
proprio modem ADSL o via cavo e
attaccare la spina dell’adattatore alla
presa elettrica più vicina.
Passo 2: Attaccare la spina nel
secondo adattatore alla linea elettrica
vicino al proprio PC e collegare le
porte Ethernet
Passo 3: Accedere ad internet da
qualsiasi presa elettrica di casa
Denizioni dei LED
LED Stato Descrizione
Linea elettrica
ON Attività della rete sulla linea elettrica.
OFF
Ricerca o assenza di attività della rete su Linea
elettrica.
Ethernet
ON La connessione Ethernet è OK.
OFF Trasferimento dati.
Lampeggiante Nessun collegamento ad Ethernet.
ALIMENTAZIONE
ON Accensione
OFF Spegnimento o guasto della linea elettrica.
Reimpostazione dell’homeplug
Reset: premendo il bottone destro si possono ripristinare le impostazioni predenite di fabbrica. Fare attenzione nel
premere il bottone reset, si prega di assicurarsi di staccare il cavo Ethernet (cavo RJ-45) per primo, e poi premere
il bottone reset. Premere il bottone reset per 3 secondi e attendere che il LED PWR si accenda di nuovo. Non togliere
l’alimentazione quando il dispositivo è in modo reset.
Mettere in sicurezza l’homeplug
Il bottone Sicurezza sulla sinistra può mettere in sicurezza automaticamente e raggruppare i dispositivi su linea elettrica,
ciò che segue è lo scenario per il bottone di sicurezza.
Ci sono due condizioni di stato di attivazione del bottone
“Stato che aggiunge” per un dispositivo che fornisce NMK ad un AVLN esistente
“Stato che si unisce” per un dispositivo che si unisce ad un AVLN
Premendo i bottoni su qualsiasi dei due dispositivi fa sì che uno di loro diventi “quello che aggiunge” e l’altro “quello che si
unisce”
Page 9

9
Precauzioni di sicurezza:
Per ridurre il rischio di shock elettrico, questo prodotto dovrebbe essere aperto SOLO da un tecnico
autorizzato quando è necessario ripararlo. Scollegare il prodotto dall’alimentazione e da altri apparecchi
se dovesse esserci un problema. Non esporre il prodotto ad acqua o umidità.
Manutenzione:
Pulire solo con un panno asciutto. Non utilizzare solventi detergenti o abrasivi.
Garanzia:
Non sarà accettata alcuna garanzia o responsabilità in relazione a cambiamenti e modiche del prodotto o a danni
determinati dall’uso non corretto del prodotto stesso.
Generalità:
Il design e le caratteristiche tecniche sono soggetti a modica senza necessità di preavviso.
Tutti i marchi a logo e i nomi di prodotto sono marchi commerciali o registrati dei rispettivi titolari e sono riconosciuti come
tali in questo documento.
Tenere questo manuale e la confezione per riferimento futuro.
Attenzione:
Il prodotto è contrassegnato con questo simbolo, con il quale si indica che i prodotti elettrici ed elettronici non
devono essere gettati insieme ai riuti domestici. Per questi prodotti esiste un sistema di raccolta differenziata.
ESPAÑOL
Instalar los HomePlugs
Puente de línea eléctrica
Puente de línea eléctrica
Puente de línea eléctrica
Paso 1: Conecte un adaptador de
línea eléctrica a su ADSL o al puerto
Ethernet de su modem, y enchufe el
adaptador a la toma de corriente más
próxima.
Paso 2: Conecte el siguiente
adaptador de línea eléctrica junto a
su PC y conecte los puertos Ethernet
Paso 3: Acceda a Internet desde
cualquier toma de corriente de su
casa.
Deniciones de los LEDs
LED Estado Descripción
Línea eléctrica
Encendido Actividad de red por el tendido eléctrico.
Apagado Buscando o sin actividad en el tendido eléctrico.
Ethernet
Encendido Conexión Ethernet OK.
Apagado Transferencia de datos.
Parpadeando No hay enlace al Ethernet.
Alimentación
Encendido Encendido.
Apagado Apagado o fallo en el tendido eléctrico.
RISCHIO DI SCOSSE ELETTRICHE
NON APRIRE
ATTENZIONE
Page 10

10
Recuperar la conguración del HomePlug
Reset: Pulsando el botón derecho puede recuperar la conguración de fábrica por defecto. Tenga cuidado cuando
pulse el botón Reset, por favor asegúrese de desenchufar (sacar) primero el cable Ethernet (RJ-45cable), y luego
pulse el botón Reset. Presione el botón Reset durante 3 segundos y espere hasta que el LED PWR se ilumine otra vez.
No lo apague cuando el dispositivo está recuperando (modo Reset)
Asegurar el HomePlug
El botón de protección (Secure) de la izquierda, puede asegurar y agrupar los dispositivos conectados por el cableado
eléctrico automáticamente, a continuación le indicamos el escenario para el botón de protección.
Existen dos condiciones de estado de activación de los botones
“Añadidor” para un dispositivo que proporciona la NMK de una AVLN existente
“Añadido” para un dispositivo que se unirá a una AVLN
Pulsando los botones de cualquiera de los dos dispositivos resulta que uno de ellos pasa a ser “añadidor” y el otro
“añadido”.
Medidas de seguridad:
Para reducir el peligro de descarga eléctrica, este producto SÓLO lo debería abrir un técnico
autorizado cuando necesite reparación. Desconecte el producto de la toma de corriente y de los
otros equipos si ocurriera algún problema. No exponga el producto al agua ni a la humedad.
Mantenimiento:
Límpielo sólo con un paño seco. No utilice disolventes de limpieza ni productos abrasivos.
Garantía:
No se aceptará ninguna garantía o responsabilidad derivada de cualquier cambio o modicaciones realizadas al producto
o daños provocados por un uso incorrecto del producto.
General:
Las ilustraciones y las especicaciones podrán sufrir cambios sin previo aviso.
Todas las marcas de logotipos y nombres de productos constituyen patentes o marcas registradas a nombre de sus
titulares correspondientes, reconocidos como tal.
Conserve este manual y el embalaje en caso de futura necesidad.
Atención:
Este producto está señalizado con este símbolo. Esto signica que los productos eléctricos y electrónicos usados
no deberán mezclarse con los desechos domésticos generales. Existe un sistema de recogida individual para este
tipo de productos.
RIESGO DE ELECTROCUCIÓN
NO ABRIR
ATENCIÓN
Page 11

11
MAGYAR
A homeplug készülékek üzembehelyezése
Konnektoros
Konnektoros
Konnektoros
1. lépés: Csatlakoztassa az egyik
konnektoros adatcsatolót az
ADSL- vagy kábelmodem Ethernet
portjához, és dugja az adatcsatolót a
legközelebbi konnektorba.
2. lépés: Dugja a másik konnektoros
adatcsatolót a számítógéphez közel
levő egyik konnektorba, és kösse
össze az adatcsatoló és a számítógép
Ethernet portjait.
3. lépés: A házban bármelyik
konnektorból internetezhet.
A LED-ek jelentése
LED Állapota Jelentés
Adatcsatoló
BE Hálózati tevékenység van az adatcsatolón.
KI
Keres vagy nincs hálózati tevékenység az adatcsatolón.
Ethernet
BE Működik az Ethernet kapcsolat.
KI Adatátvitel.
Villog Nincs Ethernet kapcsolat.
POWER (TÁP)
BE Bekapcsolt állapot.
KI Ki van kapcsolva vagy meghibásodott az adatcsatoló.
A homeplug visszaállítása alapállapotba
Visszaállítás: A jobb gombbal visszaállíthatók a gyári alapbeállítások. A visszaállító (reset) gomb megnyomása előtt
húzza ki az Ethernet (RJ-45) kábelt! Utána nyomja meg és 3 másodpercig tartsa nyomva a visszaállító gombot, és várja
meg, hogy újra kigyulladjon a PWR LED. Visszaállítás közben ne kapcsolja ki az adatcsatolót.
A homeplug levédése
A bal oldali Secure gomb automatikusan levédi és csoportosítja a homeplug adatcsatolókat. A Secure gomb használati
módja a következő.
A nyomógomb által előidézett két állapot
„Hozzáadó állapot” a meglevő AVLN-hez NMK-t adó eszközön
„Csatlakozó állapot” az AVLN-hez csatlakozó eszközön
Bármely két eszközön a gombok megnyomásakor az egyik eszköz „hozzáadó” (adder), a másik „csatlakozó” (joiner) lesz
Page 12
12
Biztonsági óvintézkedések:
Az áramütés veszélyének csökkentése érdekében ezt a terméket KIZÁRÓLAG a márkaszerviz
képviselője nyithatja fel. Hiba esetén húzza ki a termék csatlakozóját a konnektorból, és kösse le
más berendezésekről. Vigyázzon, hogy ne érje a terméket víz vagy nedvesség.
Karbantartás:
Csak száraz ronggyal tisztítsa. Tisztító- és súrolószerek használatát mellőzze.
Jótállás:
Nem vállalunk jótállást és felelősséget a terméken végzett változtatás vagy módosítás vagy a termék helytelen használata
miatt bekövetkező károkért.
Általános tudnivalók:
A kivitel és a műszaki jellemzők előzetes értesítés nélkül is módosulhatnak.
Minden logó, terméknév és márkanév a tulajdonosának márkaneve vagy bejegyzett márkaneve, azokat ennek tiszteletben
tartásával említjük.
Őrizze meg ezt az útmutatót és a csomagolást.
Figyelem:
Ezt a terméket ezzel a jelölésel láttuk el. Azt jelenti, hogy az elhasznált elektromos és elektronikus termékeket tilos
az általános háztartási hulladékhoz keverni. Begyűjtésüket külön begyűjtő létesítmények végzik.
SUOMI
Homeplug-sovittimen asentaminen
Powerline-verkon silta
Powerline-verkon silta
Powerline-verkon silta
Kohta 1: Liitä yksi Powerline-sovitin
ADSL-porttiin tai kaapelimodeemin
Ethernet-porttiin ja kiinnitä sovitin
lähimpään pistorasiaan.
Kohta 2: Kiinnitä toinen Powerlinesovitin tietokoneen viereen ja liitä
Ethernet-portit
Kohta 3: Internetyhteys mistä tahansa
kotisi pistorasiasta
LED määritykset
LED Tila Kuvaus:
Powerline-verkko
PÄÄLLÄ Powerline-verkon aktiivisuus.
POIS Etsintä tai Powerline-verkko ei aktiivinen.
Ethernet
PÄÄLLÄ Ethernet-liitäntä OK.
POIS Tiedonsiirto
Vilkkuu Ei Ethernet-yhteyttä
VIRTA
PÄÄLLÄ Virta päällä
POIS Virta pois tai virhe
ÁRAMÜTÉS VESZÉLYE!
NE NYISSA FEL!
VIGYÁZAT!
Page 13
13
Homeplug-sovittimen asettaminen
Asetus: Oletusasetukset voidaan palauttaa painamalla oikeanpuoleista painiketta. Toimi varoen käyttäessäsi
asetuspainiketta. Kytke ensiksi pois (irrota) Ethernet-johto (RJ-45johto) ja paina sitten asetuspainiketta. Pidä
asetuspainiketta painettuna 3 sekunnin ajan ja odota, että PWR LED syttyy uudestaan. Älä kytke laitetta pois päältä sen
ollessa asetustilassa.
Homeplug-sovittimen kytkentä
Vasemmalla oleva kytkentäpainike kytkee ja ryhmittää automaattisesti verkkolaitteet. Alla on esittely kytkentäpainikkeen
toiminnasta.
Painikkeelle on olemassa kaksi kytkentätilaa
“Lisäystila”, jossa laite antaa NMK:n olemassa olevalle AVLN:lle
“Liittymistila”, jossa laite liittyy AVLN:ään
Kun painat kumman tahansa laitteen painiketta, toinen niistä muuttuu “lisääjäksi” ja toinen “liittyjäksi”
Turvallisuuteen liittyvät varoitukset:
Sähköiskun riskin pienentämiseksi, AINOASTAAN valtuutettu huoltohenkilö saa avata tämän
laitteen huoltoa varten. Jos ongelmia ilmenee, irrota laite verkkovirrasta ja muista laitteista. Älä
altista laitetta vedelle äläkä kosteudelle.
Huolto:
Puhdista ainoastaan kuivalla kankaalla. Älä käytä liuottimia tai hankausaineita.
Takuu:
Takuu ja vastuuvelvollisuus mitätöityvät, jos tuote vaurioituu siihen tehtyjen muutoksien tai sen väärinkäytön takia.
Yleistä:
Muutoksia malliin ja teknisiin ominaisuuksiin voidaan tehdä ilmoituksetta.
Kaikki logot, merkit ja tuotenimet ovat niiden vastaavien omistajien tuotemerkkejä tai rekisteröityjä tuotemerkkejä ja niitä
on käsiteltävä sellaisina.
Säilytä käyttöohjeet ja pakkaus myöhempää käyttötarvetta varten.
Huomio:
Tuote on varustettu tällä merkillä. Se merkitsee, ettei käytettyjä sähkö- tai elektronisia tuotteita saa hävittää
kotitalousjätteen mukana. Kyseisille tuotteille on olemassa erillinen keräysjärjestelmä.
SÄHKÖISKUVAARA
ÄLÄ AVAA
HUOMIO
Page 14

14
SVENSKA
Installera hemanslutningarna
Elnätsadapter
Elnätsadapter
Elnätsadapter
Steg 1: Anslut en elnätsadapter till din
ADSL-port eller Ethernetporten på
kabelmodemet och koppla sedan in
adaptern i närmaste eluttag.
Steg 2: Koppla sedan in nästa
elnätsadapter i din dator och anslut
Ethernet-portarna.
Steg 3: Nu har du internetuppkoppling
i alla eluttag i ditt hem.
LED-beskrivningar
LED Status Beskrivning
Powerline
ON Nätverksaktivitet i elnätet.
OFF
Sökning eller ingen nätverksaktivitet i elnätet.
Ethernet
ON Ethernet-anslutning är OK.
OFF Dataöverföring.
Blinkar Ingen anslutning till Ethernet.
POWER
ON Strömmen på.
OFF Strömmen av eller fel.
Återställning av hemanslutningen
Återställning: Tryck på högra knappen för att återställa fabrikens standardinställningar. Var noga med att ha kopplat ur
Ethernet-kabeln (RJ-45-kabeln) innan du trycker på återställningsknappen. Håll knappen intryckt i 3 sekunder och
vänta på att Power LED tänds igen. Stäng inte av strömmen under återställningsfasen.
Säkra hemanslutningen
Säkringsknappen till vänster kan automatiskt säkra och gruppera elnätsenheterna, följande beskriver ett scenario för
säkringsknappen.
Det nns två olika lägen på knappen
“Adder state” för en enhet som ger NMK till existerande AVLN
“Joiner state” för en enhet som vill komma med i AVLN
Om du trycker på knapparna på två valfria enheter gör att en av dem får status “adder” och den andra får status “joiner”.
Page 15

15
Säkerhetsanvisningar:
För att minska risken för elektriska stötar bör denna produkt ENDAST öppnas av behörig tekniker
när service behövs. Dra ut strömkabeln från eluttaget och koppla ur all annan utrustning om något
problem skulle uppstå. Utsätt inte produkten för vatten eller fukt.
Underhåll:
Rengör endast med torr trasa. Använd inga rengöringsmedel som innehåller lösningsmedel eller slipmedel.
Garanti:
Ingen garanti gäller vid ändringar eller modieringar av produkten eller för skador som har uppstått på grund av felaktig
användning av denna produkt.
Allmänt:
Utseende och specikationer kan komma att ändras utan föregående meddelande.
Alla logotyper och produktnamn är varumärken eller registrerade varumärken som tillhör sina ägare och är härmed
erkända som sådana.
Behåll bruksanvisningen och förpackningen för eventuellt framtida behov.
Obs!
Produkten är märkt med denna symbol som betyder att använda elektriska eller elektroniska produkter inte får
slängas bland vanliga hushållssopor. Det nns särskilda återvinningssystem för dessa produkter.
ČESKY
Instalace zařízení HomePlug
Přemostění el. vedení
Přemostění el. vedení Přemostění el. vedení
Krok 1: Jeden adaptér elektrického
vedení připojte do vašeho ADSL nebo
ethernetového portu na modemu a
adaptér zapojte do nejbližší zásuvky.
Krok 2: Druhý adaptér elektrického
vedení zapojte do vašeho počítače a
připojte ethernetové porty.
Krok 3: Získáte přístup na internet z
kterékoli zásuvky ve vašem domově.
Denice LED
LED Stav Popis
Elektrické vedení
ZAPNUTA Aktivita sítě elektrického vedení.
VYPNUTA Vyhledávání nebo žádná aktivita sítě elektrického vedení.
Ethernet
ZAPNUTA Ethernetové připojení je v pořádku.
VYPNUTA Přenos dat.
Bliká Neexistuje připojení k ethernetu.
NAPÁJENÍ
ZAPNUTA Napájení zapnuto.
VYPNUTA Elektrické vedení vypnuto nebo chyba.
RISK FÖR ELSTÖT
ÖPPNA INTE
VARNING
Page 16

16
Resetování zařízení HomePlug
Resetování: Stisknutím tlačítka na pravé straně lze HomePlug resetovat na výchozí výrobní nastavení. Při mačkání
tlačítka resetování buďte opatrní, nezapomeňte nejprve odpojit ethernetový kabel (kabel RJ-45), pak stiskněte
tlačítko resetování. Tlačítko přidržte stisknuté na 3 sekundy a počkejte, než se znovu rozsvítí LED napájení. Pokud
probíhá resetování, přístroj neodpojujte z napájení.
Zabezpečení HomePlug
Tlačítko zabezpečení na levé straně může automaticky zabezpečit a seskupit zařízení elektrického vedení, viz tento
scénář pro tlačítko zabezpečení.
Existují dvě možnosti stavu aktivace tlačítka
„Stav přidávání” pro zařízení, které poskytuje NMK pro existující AVLN
„Stav připojení” pro zařízení, které připojí AVLN
Stisknutí tlačítek na jakýchkoli dvou zařízeních z jednoho z nich vytvoří „přidávané zařízení” a z druhého „připojené”.
Bezpečnostní opatření:
Abyste snížili riziko úrazu elektrickým šokem, měl by být tento výrobek otevřen POUZE
autorizovaným technikem, je-li to nezbytné. V případě, že dojde k závadě, odpojte výrobek ze sítě
a od jiniých zařízení. Výrobek nevystavujte vodě nebo vlhkosti.
Údržba:
K čištění používejte pouze suchý hadřík. Nepoužívejte čisticí rozpouštědla ani abrazivní prostředky.
Záruka:
Jakékoli změny, modikace nebo poškození zařízení v důsledku nesprávného zacházení se zařízením ruší platnost
záruční smlouvy.
Obecné upozornění:
Design a specikace výrobku mohou být změněny bez předchozího upozornění.
Všechna loga a obchodní názvy jsou registrované obchodní značky příslušných vlastníků a jsou chráněny zákonem.
Pro budoucí použití uschovejte tento návod a obal.
Upozornění:
Tento výrobek je označen tímto symbolem. To znamená, že se s výrobkem musí zacházet jako s nebezpečným
elektrickým a elektronickým odpadem a nelze jej po skončení životnosti vyhazovat s běžným domácím odpadem.
Pro lidkvidaci těchto výrobků existují zvláštní sběrná střediska.
NEBEZPEČÍ ÚRAZU
ELEKTRICKÝM PROUDEM
ÖPPNA INTE
UPOZORNĚNÍ
Page 17

17
ROMÂNĂ
Montarea homeplug-urilor
Punte reţea de calculatoare
prin cablu electric
Punte reţea de
calculatoare prin
cablu electric
Punte reţea de calculatoare
prin cablu electric
Pasul 1: Conectaţi un adaptor de
reţea de calculatoare prin cablul
electric la portul de ethernet al reţelei
dv ADSL sau la modemul prin cablu şi
cuplaţi adaptorul în cea mai apropiată
priză electrică.
Pasul 2: Cuplaţi al doilea adaptor
de reţea de calculatoare prin cablul
electric lângă calculatorul dvs. şi
conectaţi porturile ethernet
Pasul 3: Acces la internet din orice
priză din casa dv
Deniţii LED
LED Stare Descriere
Reţea prin cablu
electric
ACTIV Activitatea în reţeaua prin cablu electric
INACTIV Căutare semnal sau activitate a reţelei prin cablu electric absentă
Ethernet
ACTIV Conexiunea ethernet este în regulă.
INACTIV Transfer de date.
Lumină
intermitentă
Legătură la ethernet absentă.
ALIMENTARE
ACTIV Alimentat electric.
INACTIV Reţeaua prin cablu electric inactivă sau defectă.
Resetarea homeplug-ului
Resetare: Prin apăsarea butonului din dreapta, se poate reveni la setările implicite din fabrică. Aveţi grijă când apăsaţi
butonul de resetare: nu omiteţi să decuplaţi (scoateţi) cablul ethernet (cablu RJ-45) mai întâi, şi apoi apăsaţi
butonul de resetare. Apăsaţi butonul de resetare timp de 3 secunde şi aşteptaţi ca LED-ul de alimentare să se reactiveze.
Nu scoateţi din funcţiune când dispozitivul este în modul de resetare.
Asigurarea homeplug-ului
Butonul de asigurare din stânga poate asigura automat şi grupa dispozitivele din reţeaua prin cablu electric; scenariul de
mai jos vizează butonul de asigurare.
Page 18

18
Există două stări de comutare prin cele două butoane
”Adăugare” pentru un dispozitiv ce furnizează NMK pentru o AVLN existentă
“Alăturare” pentru un dispozitiv care se va alătura unei AVLN
Apăsarea butoanelor de pe oricare dintre cele două dispozitive va face ca unul să intre în starea de „adăugare”, iar
celălalt în cea de ”alăturare”
Măsuri de siguranţă:
Pentru a se reduce pericolul de electrocutare, acest produs va desfăcut NUMAI de către un
tehnician avizat, când este necesară depanarea. Deconectaţi produsul de la priza de reţea sau alte
echipamente în cazul apariţiei unei probleme. Nu expuneţi produsul apei sau umezelii.
Întreţinere:
Curăţarea trebuie făcută cu o cârpă uscată. Nu folosiţi solvenţi sau agenţi de curăţare abrazivi.
Garanţie:
Nu oferim nicio garanţie şi nu ne asumăm niciun fel de responsabilitate în cazul schimbărilor sau modicărilor aduse
acestui produs sau în cazul deteriorării cauzate de utilizarea incorectă a produsului.
Generalităţi:
Designul şi specicaţiile produsului pot modicate fără o noticare prealabilă.
Toate siglele mărcilor şi denumirile produselor sunt mărci comerciale sau mărci comerciale înregistrate ale proprietarilor
de drept şi prin prezenta sunt recunoscute ca atare.
Păstraţi acest manual şi ambalajul pentru consultări ulterioare.
Atenţie:
Pe acest produs se aă acest marcaj. Acesta semnică faptul că produsele electrice şi electronice nu trebuie
eliminate odată cu gunoiul menajer. Aceste produse au un sistem separat de colectare.
PERICOL DE ELECTROCUTARE
NU-L DESCHIDEŢI!
ATENŢIE!
Page 19

19
ΕΛΛΗΝΙΚA
Εγκατάσταση των homeplugs
Γέφυρα γραμμής μεταφοράς
ηλεκτρικής ενέργειας
Γέφυρα γραμμής
μεταφοράς ηλεκτρικής
ενέργειας
Γέφυρα γραμμής μεταφοράς
ηλεκτρικής ενέργειας
Βήμα 1: Συνδέστε έναν αντάπτορα
γραμμής μεταφοράς ηλεκτρικής
ενέργειας στην θύρα Ethernet στο
ADSL ή το καλωδιακό μόντεμ σας και
βάλτε τον στην κοντινότερη ηλεκτρική
πρίζα.
Βήμα 2: Συνδέστε τον δεύτερο
αντάπτορα γραμμής μεταφοράς
ηλεκτρικής ενέργειας δίπλα στον
υπολογιστή σας και συνδέστε τις
θύρες Ethernet
Βήμα 3: Πρόσβαση στο Διαδίκτυο
από οποιονδήποτε ηλεκτρική πρίζα
στο σπίτι σας
Ορισμοί LED
LED Κατάσταση Περιγραφή
Γραμμή
μεταφοράς
ηλεκτρικής
ενέργειας
ON Δραστηριότητα δικτύου γραμμής μεταφοράς ηλεκτρικής ενέργειας.
OFF
Αναζήτηση ή καμία δραστηριότητα δικτύου γραμμής μεταφοράς
ηλεκτρικής ενέργειας.
Ethernet
ON Η σύνδεση Ethernet είναι OK.
OFF Μεταφορά δεδομένων.
Αναβοσβήνει Καμία σύνδεση με Ethernet.
POWER
(ΙΣΧΥΣ)
ON Δέχεται ρεύμα.
OFF Καλώδιο τροφοδοσίας εκτός λειτουργίας (off) ή αποτυχία.
Επαναφορά ρυθμίσεων homeplug
Επαναφορά: Αν πιέσετε το δεξί κουμπί μπορεί να επαναφέρετε τις εργοστασιακές προεπιλεγμένες ρυθμίσεις. Να είστε
προσεκτικοί όταν πιέζετε το κουμπί επαναφοράς, βεβαιωθείτε ότι έχετε βγάλει από την πρίζα (αφαιρέσατε)
το καλώδιο Ethernet (καλώδιο RJ-45) πρώτα, και στην συνέχεια πιέστε το κουμπί επαναφοράς. Πιέστε το κουμπί
επαναφοράς για 3 δευτερόλεπτα και περιμένετε για τον PWR LED να ανάψει ξανά. Μην σταματάτε την τροφοδοσία όταν η
συσκευή βρίσκεται σε κατάσταση επαναφοράς.
Ασφαλίστε το homeplug
Το κουμπί Ασφαλείας στα αριστερά μπορεί να ασφαλίσει αυτόματα και να ομαδοποιήσει τις συσκευές της γραμμής
μεταφοράς ηλεκτρικής ενέργειας, χρησιμοποιήστε το κουμπί ασφαλείας στα παρακάτω σενάρια.
Page 20

20
Υπάρχουν δύο κουμπιά που με το πάτημα τους, πυροδοτούν συνθήκες αλλαγής κατάστασης
“Κατάσταση Αθροιστή (Adder)” για συσκευή που παρέχει το NMK για ένα υπάρχον AVLN
“Κατάσταση Ένωσης (Joiner)” για συσκευή που θα ενωθεί με AVLN
Αν πιέσετε τα κουμπιά σε οποιαδήποτε από τις δύο συσκευές θα έχει ως αποτέλεσμα η μία από αυτές να καταστεί
«αθροιστής» (“adder”) και η άλλης «ένωση» (“joiner”)
Οδηγίες ασφαλείας:
Για να μειώσετε τον κίνδυνο ηλεκτροπληξίας, το προϊόν αυτό θα πρέπει να ανοιχθεί ΜΟΝΟ από
εξουσιοδοτημένο τεχνικό όταν απαιτείται συντήρηση (σέρβις). Αποσυνδέστε το προϊόν από την
πρίζα και άλλο εξοπλισμό αν παρουσιαστεί πρόβλημα. Μην εκθέτετε το προϊόν σε νερό ή υγρασία.
Συντήρηση:
Καθαρίστε μόνο με ένα στεγνό πανί. Μη χρησιμοποιείτε διαλύτες ή λειαντικά.
Εγγύηση:
Ουδεμία εγγύηση ή ευθύνη δεν είναι αποδεκτή σε περίπτωση αλλαγής ή μετατροπής του προϊόντος ή βλάβης που
προκλήθηκε λόγω εσφαλμένης χρήσης του προϊόντος.
Γενικά:
Το σχέδιο και τα χαρακτηριστικά μπορούν να αλλάξουν χωρίς καμία προειδοποίηση.
Όλα τα λογότυπα, οι επωνυμίες και οι ονομασίες προϊόντων είναι εμπορικά σήματα ή σήματα κατατεθέντα των αντίστοιχων
κατόχων και δια του παρόντος αναγνωρίζονται ως τέτοια.
Φυλάξτε το παρόν εγχειρίδιο και τη συσκευασία για μελλοντική αναφορά.
Προσοχή:
Το συγκεκριμένο προϊόν έχει επισημανθεί με αυτό το σύμβολο. Αυτό σημαίνει ότι οι μεταχειρισμένες ηλεκτρικές
και ηλεκτρονικές συσκευές δεν πρέπει να αναμειγνύονται με τα κοινά οικιακά απορρίμματα. Υπάρχει ξεχωριστό
σύστημα συλλογής για αυτά τα αντικείμενα.
ΚΙΝΔΥΝΟΣ ΗΛΕΚΤΡΟΠΛΗΞΙΑΣ
ΜΗΝ ΑΝΟΙΓΕΤΕ
ΠΡΟΣΟΧΗ
Page 21

21
Declaration of conformity / Konformitätserklärung / Déclaration de conformité /
Conformiteitsverklaring / Dichiarazione di conformità / Declaración de conformidad /
Megfelelőségi nyilatkozat / Yhdenmukaisuusvakuutus / Överensstämmelseförklaring /
Prohlášení o shodě / Declaraţie de conformitate
We, / Wir, / Nous, / Wij, / Questa società, / La empresa infrascrita, / Mi, / Me, / Vi, / Společnost, / Noi,
Nedis B.V., De Tweeling 28, 5215MC, ’s-Hertogenbosch
The Netherlands / Niederlande / Pays Bas / Nederland / Paesi Bassi / Países Bajos / Hollandia / Alankomaat / Holland /
Nizozemí / Olanda
Tel. / Tél / Puh: 0031 73 5991055
Email / Couriel / Sähköposti / e-post: info@nedis.com
Declare that product: / erklären, dass das Produkt: / Déclarons que le produit : / verklaren dat het product: / Dichiara che
il prodotto: / Declara que el producto: / Kijelentjük, hogy a termék, amelynek: / Vakuutamme, että: / Intygar att produkten: /
prohlašuje, že výrobek: / Declarăm că acest produs:
Brand: / Marke: / Marque : / Merknaam: / Marca: / Márkája: / Merkki: / Märke: / Značka: König Electronic
Model: / Modell: / Modèle : / Modello: / Modelo: / Típusa: / Malli: CMP-HOMEPLUG31,CMP-HOMEPLUG36
Description: HOMEPLUG 200MBPS
Beschreibung: HOMEPLUG-ADAPTER 200 Mbit/s
Description : Adaptateur CPL 200 MB/S
Omschrijving: HUISSTEKKER 200MBPS
Descrizione: HOMEPLUG 200MBPS
Descripción: HOMEPLUG 200MBPS
Megnevezése: HOMEPLUG, 200 Mbit/s
Kuvaus: HOMEPLUG 200MBPS
Beskrivning: HEMANSLUTNING 200MBPS
Popis: Zařízení HOMEPLUG 200 MB/S
Descriere: HOMEPLUG 200MBPS
Description: HOMEPLUG 200MBPS
Is in conformity with the following standards: / den folgenden Standards entspricht: / est conforme aux normes suivantes: /
in overeenstemming met de volgende normen is: / è conforme ai seguenti standard: / es conforme a las siguientes normas: /
Megfelel az alábbi szabványoknak: / Täyttää seuraavat standardit: / Överensstämmer med följande standarder: /
splňuje následující normy: / Este în conformitate cu următoarele standarde:
EN 60950-1: 2001 + A11 :2004
EN 60950-1: 2001 + A11 :2004
EN 55022: 2006
EN 61000-3-2: 2006
EN 61000-3-3: 1995+A1: 2001+A2: 2005
EN55024: 1998+A1: 2001+A2: 2003
EU Directive(s) / EG-Richtlinie(n) / Directive(s) EU / EU richtlijn(en) / Direttiva(e) EU / Directiva(s) UE / EU direktívák /
EU Toimintaohje(et) / Eu Direktiv(en) / Směrnice EU / Directiva(e) UE: 2004/108/EC, 2006/95/EC.
‘s-Hertogenbosch, 23/07/09
Mrs. / Mme. / Mevr. / Sig.ra / D. / Fru / Paní : J. Gilad
Purchase Director / Einkaufsleiterin / Directrice des Achats / Directeur inkoop /
Direttore agli acquisti / Director de compras / értékesítési igazgató / Ostojohtaja /
Inköpsansvarig / Obchodní ředitelka / Director achiziţii
 Loading...