

Page 1
38
PŘÍRUČNÍ PROHLÍŽEČ
DIGITÁLNÍCH FOTOGRAFIÍ 1,5”
30
KANANMUNAN MUOTOINEN
1,5” DIGITAALINEN KUVAKEHYS
22
MARCO DE FOTO DITIGAL
CON FORMA OVALADA DE 1,5”
14
EIVORMIGE 1,5” DIGITALE
FOTOLIJST
6
EIFÖRMIGER 1,5” DIGITALER
FOTORAHMEN
42
RAMĂ FOTO DIGITALĂ DE 1,5”
ÎN FORMĂ DE OU
34
ÄGGFORMAD 1,5” DIGITAL
FOTORAM
26
TOJÁS ALAKÚ, 1,5 HÜVELYKES
DIGITÁLIS KÉPKERET
18
PORTAFOTO DIGITALE DA
1,5” A UOVO
10
CADRE PHOTOS NUMÉRIQUE
1,5” OVOÏDE
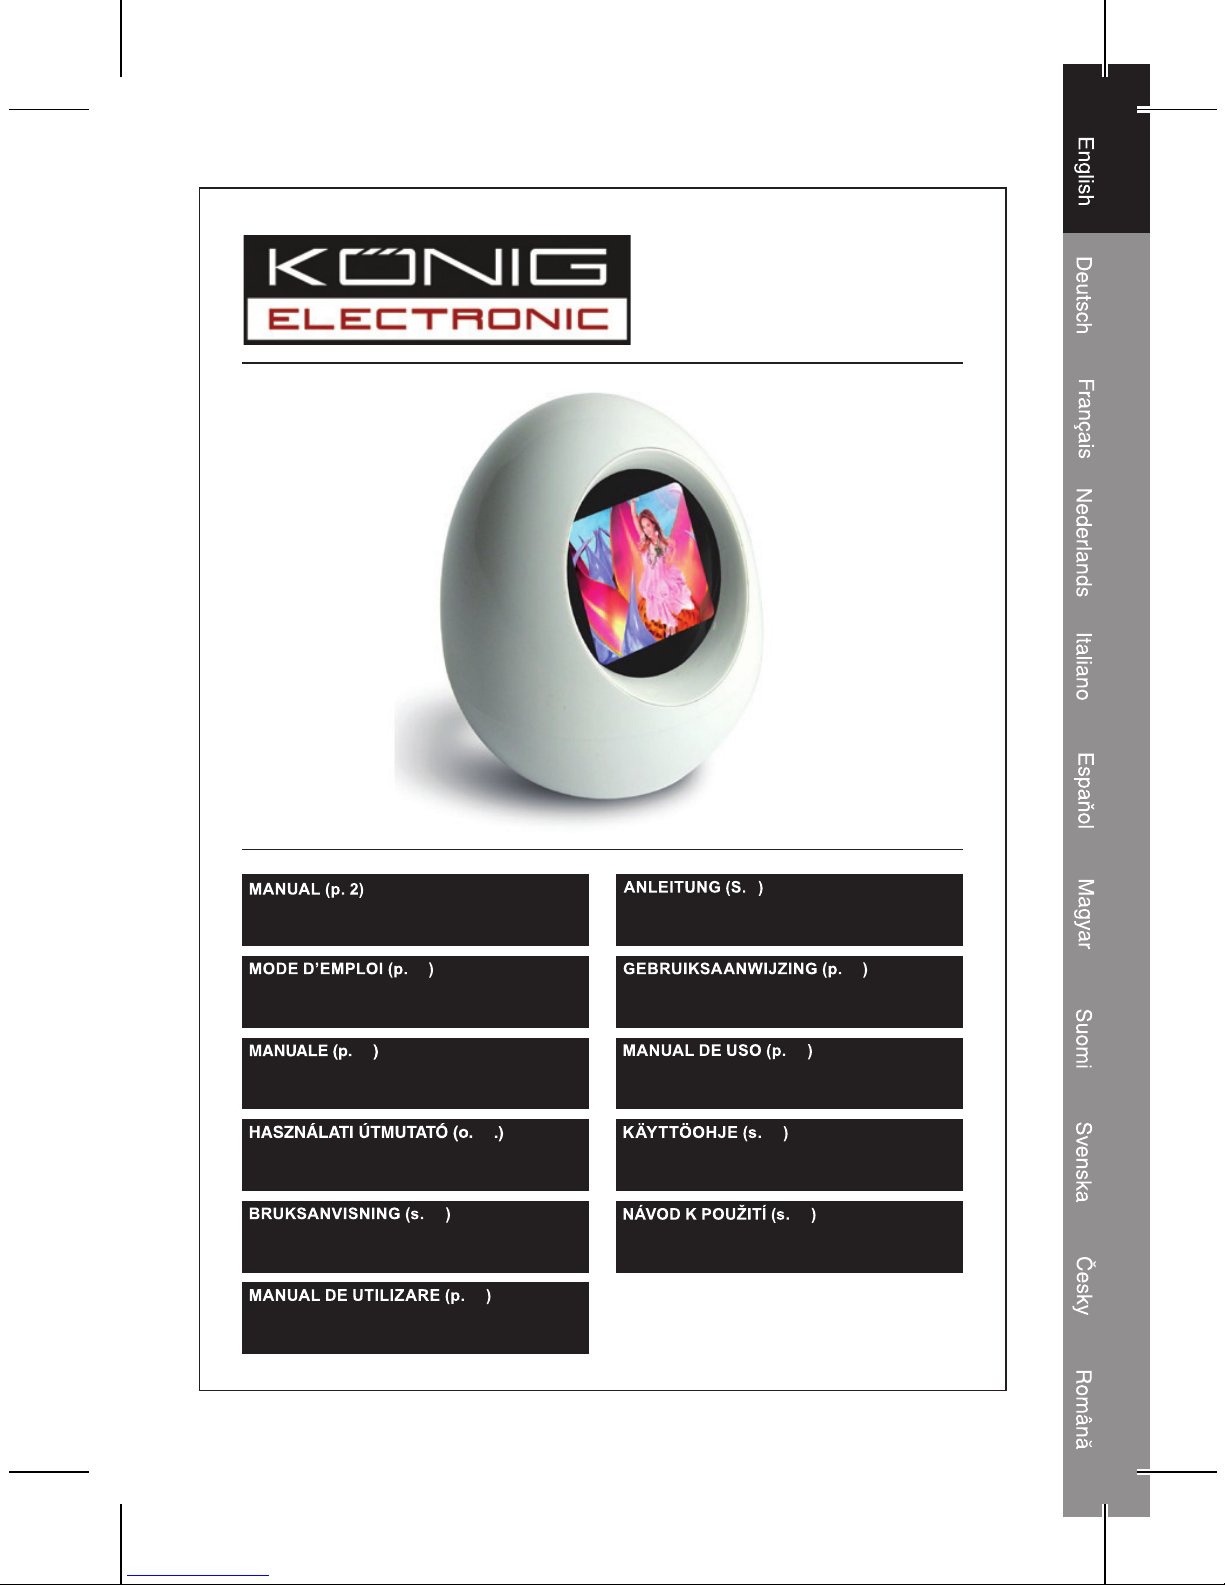
EGG SHAPED 1,5” DIGITAL
PHOTO FRAME
CMP-DIG-EGG10
Page 2
2
ENGLISH
Getting started
Before starting to use the photo frame for the fi rst time, please
charge the battery for at least four hours by connecting it to a USB
port. A battery icon will appear the lower left corner of the frame’s
display.
Powering On/Off the photo frame
Press and hold the M button on the back side of the frame for
3 seconds to turn on the digital photo frame. To switch it off put the
M button for 3 seconds again.
Uploading photos from the computer to the digital photo frame
Before connecting the frame to your computer, please follow these
steps below fi rst:
• Press the M button once to open the main menu.
• Use the arrow buttons to navigate in the menu till USB Connect
is highlighted. Press the M button to enter this submenu.
• Select Yes and press the M button again
Connect the digital photo frame to the PC now. An application
will pop up after Windows has fi nished the installation of this new
hardware. With this application the photos can be uploaded to the
digital photo frame. This works as explained below:
• In the lower left window of the application, search for the map
with the photos you would like to upload.
• Select a photo. When necessary the picture can be rotated and
zoomed using the buttons right to the preview screen.
• To add the photo to the upload selection, click on the Add button.
The picture will appear in the right column.
• Repeat this steps until you have selected all the photos you like
to upload to your photo frame. Click on the download button to
Page 3
3
upload the photos to the photo frame. After all the photos are
uploaded, you can close the application and disconnect the
photo frame from your computer.
Advanced settings
USB Connect - Select Yes in this menu to connect the digital
photo frame to a computer
Slide Show - The slide interval can be set here. To disable the
slide function, set the interval on 00 seconds.
Auto Off - The auto off time can be set here. To disable the
auto off function, set the interval on 00 minutes.
LCD Contrast - The contrast of the LCD screen can be set here
Backlight - The backlight of the LCD screen can be set here
Display Clock - Displays the clock with date on the screen
Set Clock - Time and date can be set here
Delete One - Use this function to delete the photo that was
displayed before you entered the menu.
Delete All - All the photos will be deleted at once when this
function is used.
Exit - to exit the menu
Page 4
4
Declaration of conformity
We,
Nedis B.V.
De Tweeling 28
5215MC ’s-Hertogenbosch
The Netherlands
Tel.: 0031 73 599 1055
Email: info@nedis.com
Declare that product:
Name: König Electronic
Model: CMP-DIG-EGG10
Description: Egg shaped 1,5” digital photo frame
Is in conformity with the following standards
EMC: EN55022:1998 ;EN55024:1998 ;EN61000-3-2:2000;
EN61000-3-3:1995
And complies with the requirements of the 89/336/EEC Directive.
‘s-Hertogenbosch, 3 September 2008
Mrs. J. Gilad
Purchase Director
Page 5

5
Safety precautions:
Do not expose the product to water or moisture.
Maintenance:
Clean only with a dry cloth. Do not use cleaning solvents or
abrasives.
Warranty:
No guarantee or liability can be accepted for any changes and
modifi cations of the product or damage caused due to incorrect use
of this product.
General:
Designs and specifi cations are subject to change without notice.
All logos brands and product names are trademarks or registered
trademarks of their respective holders and are hereby recognized
as such.
Attention:
This product is marked with this symbol. It means that
used electrical and electronic products should not be
mixed with general household waste. There is a separate
collections system for these products.
Copyright ©
Page 6
6
DEUTSCH
Die ersten Schritte
Bevor Sie beginnen, den Fotorahmen das erste Mal zu benutzen,
laden Sie bitte den Akku mindestens 4 Stunden lang über einen
USB-Anschluss auf. In der unteren linken Ecke des Rahmendisplays
wird ein Batteriesysmbol angezeigt.
An-/Ausschalten des Fotorahmens
Halten Sie die M-Taste auf der Rückseite des Rahmens 3 Sekunden
lang gedrückt, um den digitalen Fotorahmen anzuschalten. Um ihn
auszuschalten, drücken Sie die M-Taste noch einmal 3 Sekunden
lang.
Hochladen von Fotos vom Computer auf den digitalen
Fotorahmen
Bevor Sie den Fotorahmen an Ihren Computer anschließen, befolgen
Sie zunächst die folgenden Schritte:
• Drücken Sie die M-Taste einmal, um das Hauptmenü zu öffnen.
• Navigieren Sie mit den Pfeiltasten im Menü, bis USB Connect
hervorgehoben wird. Drücken Sie die M-Taste, um dieses
Untermenü zu öffnen.
• Wählen Sie "Yes" und drücken die M-Taste noch einmal.
Schließen Sie den digitalen Fotorahmen jetzt an den Computer
an. Es wird ein Anwendungsfenster geöffnet, nachdem Windows
die Installation dieser neuen Hardware beendet hat. Mit diesem
Anwendungsprogramm können die Fotos auf den digitalen
Fotorahmen hochgeladen werden. Das funktioniert so, wie es unten
erklärt wird:
• Suchen Sie im unteren linken Fenster des Anwendungsprogramms
den Ordner mit den Fotos, die Sie hochladen möchten.
Page 7
7
• Wählen Sie ein Foto aus. Wenn es erforderlich ist, kann das Bild
mit den Tasten rechts neben dem Vorschaubildschirm gedreht
und gezoomt werden.
• Um das Foto dem Hochlade-Bereich hinzuzufügen, drücken Sie
die Add (Hinzufügen)-Taste. Das Bild wird in der rechten Spalte
angezeigt.
• Wiederholen Sie diese Schritte, bis Sie alle Fotos ausgewählt
haben, die Sie in Ihren Fotorahmen hochladen möchten. Klicken
Sie auf die Download-Taste, um die Fotos in den Fotorahmen
hochzuladen. Nachdem alle Fotos hochgeladen worden sind,
können Sie das Anwendungsprogramm schließen und den
Fotorahmen von Ihrem Computer abtrennen.
Erweiterte Einstellungen
USB Connect - Wählen Sie in diesem Menü "Yes", um den
digitalen Fotorahmen an einen Computer
anzuschließen
Slide Show - Hier kann das Intervall der Dias eingestellt
werden. Um die Dia-Funktion auszuschalten, ist
das Intervall auf 00 Sekunden einzustellen.
Auto Off - Hier kann die Zeit für die automatische
Abschaltung eingestellt werden. Um die Funktion
der automatischen Abschaltung auszuschalten,
ist das Intervall auf 00 Sekunden einzustellen.
LCD Contrast - Hier kann der Kontrast des LCD-Bildschirms
eingestellt werden
Backlight - Hier kann die Hintergrundbeleuchtung des
LCD-Bildschirms eingestellt werden
Display Clock - Zeigt die Uhr mit dem Datum auf dem Bildschirm
an
Set Clock - Hier können Zeit und Datum eingestellt werden
Delete One - Mit dieser Funktion löschen Sie das Foto, das
angezeigt wurde, bevor Sie das Menü geöffnet
haben.
Delete All - Mit dieser Funktion werden alle Fotos mit einem
Mal gelöscht.
Exit - Um das Menü zu schließen.
Page 8
8
KONFORMITÄTSERKLÄRUNG
Wir,
Nedis B.V.
De Tweeling 28
5215MC ’s-Hertogenbosch
Niederlande
Tel.: 0031 73 599 1055
Email: info@nedis.com
erklären, dass das Produkt:
Marke: König Electronic
Modell: CMP-DIG-EGG10
Beschreibung: Eiförmiger 1,5” digitaler Fotorahmen
den folgenden Standards entspricht:
EMV: EN55022:1998 ;EN55024:1998 ;EN61000-3-2:2000;
EN61000-3-3:1995
und die Bestimmungen der EG-Richtlinie 89/336/EEC erfüllt.
‘s-Hertogenbosch, 3. September 2008
J. Gilad
Einkaufsleiterin
Page 9
9
Sicherheitsvorkehrungen:
Sorgen Sie dafür, dass das Gerät nicht mit Wasser oder Feuchtigkeit
in Berührung kommt.
Wartung:
Nur mit einem trocknen Tuch säubern. Keine Reinigungs- oder
Scheuermittel verwenden.
Garantie:
Es wird keine Garantie oder Gewährleistung bei Veränderungen,
Modifi kationen oder Schäden durch unsachgemäße Behandlung
des Produktes gewährt.
Allgemeines:
Konstruktionen und technische Daten können ohne vorherige
Ankündigung geändert werden.
Alle Logos, Marken und Produktnamen sind Warenzeichen oder
registrierte Warenzeichen ihrer jeweiligen Eigentümer und werden
hiermit als solche anerkannt.
Achtung:
Dieses Produkt ist mit diesem Symbol gekennzeichnet. Es
bedeutet, dass die verwendeten elektrischen
und elektronischen Produkte nicht im allgemeinen
Haushaltsmüll entsorgt werden dürfen. Für diese Produkte
stehen gesonderte Sammelsysteme zur Verfügung.
Copyright ©
Page 10
10
FRANCAIS
Démarrage
Avant de commencer à utiliser le cadre photo pour la première fois,
chargez la batterie pendant au moins quatre heures en la raccordant
à un port USB. L'icône d'une batterie apparaît dans le coin inférieur
gauche de l'écran du cadre.
Allumer/Eteindre le cadre photo
Appuyez et maintenez enfoncée la touche M à l'arrière pendant
3 secondes pour allumer le cadre photo numérique. Pour l'éteindre,
appuyez à nouveau pendant 3 secondes sur la touche M.
Transférer des photos vers le cadre photo numérique à partir
d'un ordinateur
Avant de raccorder le cadre à votre ordinateur, veuillez d'abord
suivre les étapes suivantes :
• Appuyez une fois sur la touche M pour ouvrir le menu principal.
• Utilisez les fl èches pour naviguer dans le menu jusqu'à ce que
USB Connect (Connexion USB) soit en surbrillance. Appuyez
sur la touche M pour accéder à ce sous-menu.
• Sélectionnez Yes (Oui) puis appuyez à nouveau sur la touche M
Raccordez alors le cadre photo numérique à votre PC. Une
application apparaît une fois que Windows a terminé l'installation
du nouveau matériel. Grâce à cette application, les photos peuvent
être transférées vers le cadre photo numérique. Cela fonctionne de
la façon suivante :
• Dans la fenêtre inférieure gauche de l'application, recherchez le
fi chier avec les photos que vous souhaitez transférer.
• Sélectionnez une photo. Si nécessaire, l'image peut-être pivotée
et zoomée à l'aide des touches à droite de l'écran d'affi chage.
Page 11
11
• Pour ajouter la photo à la sélection de transfert, cliquez sur la
touche Add (Ajouter). La photo apparaît dans la colonne de
droite.
• Répétez ces étapes jusqu'à avoir sélectionné toutes les photos
que vous souhaitez transférer vers le cadre photo. Cliquez sur
la touche Download (Télécharger) pour transférer les photos
dans le cadre photo. Une fois toutes les photos transférées,
vous pouvez fermer l'application et débrancher le cadre photo de
l'ordinateur.
Paramètres avancés
USB Connect (Connexion USB) - Sélectionnez Yes (Oui) dans
ce menu pour raccorder le
cadre photo numérique à un
ordinateur
Slide Show (Diaporama) - C'est ici que vous pouvez
paramétrer l'intervalle entre les
diapositives. Pour désactiver la
fonction Diaporama, paramétrez
l'intervalle à 00 seconde.
Auto Off (Extinction Auto) - C'est ici que vous pouvez
paramétrer le délai avant
l'extinction automatique. Pour
désactiver la fonction Extinction
Auto, paramétrez l'intervalle à
00 minute.
LCD Contrast (Contraste LCD) - C'est ici que vous pouvez régler
le contraste de l'écran LCD
Backlight (Rétro-éclairage) - C'est ici que vous pouvez régler
le rétro-éclairage de l'écran
LCD
Display Clock (Affi chage Horloge) - Affi che l'horloge à l'écran avec
la date
Set Clock (Réglage Horloge) - L'heure et la date peuvent être
réglées ici
Delete One (Supprimer Une) - Utilisez cette fonction pour
supprimer la photo qui était
Page 12
12
affi chée juste avant que vous
n'accédiez au menu.
Delete All (Supprimer Tout) - Toutes les photos sont effacées
en une seule fois lorsque vous
utilisez cette fonction.
Exit (Quitter) - Permet de quitter le menu
Déclaration de conformité
Nous,
Nedis B.V.
De Tweeling 28
5215MC ’s-Hertogenbosch
Pays-Bas
Tél.: 0031 73 599 1055
Email :info@nedis.com
Déclarons que le produit :
Nom : König Electronic
Modèle : CMP-DIG-EGG10
Désignation : Cadre photo numérique 1,5” ovoïde
est conforme aux normes suivantes :
CEM : EN55022:1998 ;EN55024:1998 ;EN61000-3-2:2000;
EN61000-3-3:1995
et qu'il répond aux prescriptions de la Directive 89/336/CEE.
‘s-Hertogenbosch, 3 Septembre 2008
Mme. J. Gilad
Directrice des Achats
Page 13
13
Consignes de sécurité :
N'exposez jamais l'appareil à l'eau ou à l'humidité.
Entretien :
Ne nettoyez qu'avec un chiffon sec. N'utilisez pas de solvants ou de
produits abrasifs.
Garantie :
Aucune garantie ou responsabilité ne sera acceptée en cas de
modifi cation et/ou de transformation du produit ou en cas de
dommages provoqués par une utilisation incorrecte de l'appareil.
Généralités :
Le design et les caractéristiques techniques sont sujets à
modifi cation sans notifi cation préalable.
Tous les logos de marques et noms de produits sont des marques
déposées ou immatriculées appartenant à leurs titulaires respectifs
et sont donc reconnus comme telles dans ce document.
Attention :
Ce symbole fi gure sur l'appareil. Il signifi e que les produits
électriques et électroniques ne doivent pas être jetés avec
les déchets ménagers. Le système de collecte est différent
pour ce genre de produits.
Copyright ©
Page 14
14
NEDERLANDS
Van start
Voordat u deze fotolijst voor de eerste keer gaat gebruiken dient u de
batterij tenminste vier uur op te laden door hem aan te sluiten op een
USB poort. Een batterijicoon zal verschijnen in de linker onderhoek
van de fotolijst.
De fotolijst in- en uitschakelen
Houd de M toets aan de achterkant van de lijst gedurende
3 seconden ingedrukt om de digitale fotolijst in te schakelen. Om de
digitale fotolijst uit te zetten drukt u opnieuw gedurende 3 seconden
op deze toets.
Foto’s van uw computer naar de digitale fotolijst uploaden
Voordat u de fotolijst aansluit op uw computer, dient u eerst de
onderstaande stappen uit te voeren:
• Druk op de M toets om het hoofdmenu te openen.
• Gebruik de pijltjestoetsen om door het menu te bladeren totdat
USB Connect oplicht. Druk op de M toets om naar dit submenu
te gaan.
• Selecteer Yes en druk opnieuw op de M toets
Sluit de digitale fotolijst nu aan op uw PC. Nadat Windows de
installatie van de nieuwe hardware heeft uitgevoerd zal een
programma worden gestart. Met dit programma kunt u de foto's naar
de digitale fotolijst uploaden. Hieronder staat beschreven hoe dat in
zijn werk gaat:
• In de linker benedenhoek van het programma zoekt u naar de
map met foto's die u wilt uploaden.
• Selecteer een foto. Indien gewenst kunt u met de knoppen rechts
van de voorvertoonde afbeelding een afbeelding roteren of
inzoomen.
Page 15
15
• Om de foto toe te voegen aan de upload selectie, klikt u op de
Add toets. De afbeelding zal verschijnen in de rechter kolom.
• Herhaal deze stappen totdat u alle foto's van uw keuze heeft
geselecteerd. Klik op de downloadtoets om de foto's naar de
fotolijst te uploaden. Nadat alle foto's zijn geupload, kunt u het
programma sluiten en de fotolijst afkoppelen van uw computer.
Geavanceerde instellingen
USB Connect (USB-verbinding) - Selecteer Yes in dit menu om
de digitale fotolijst te verbinden
met een computer.
Slide Show (Diavoorstelling) - De interval kan hier
worden ingesteld. Om de
diavoorstelling te beëindigen,
stelt u de interval op 00
seconden.
Auto Off - De automatische eindtijd kan
hier worden ingesteld. Om
de automatische eindtijd te
beëindigen, stelt u de interval
op 00 minuten.
LCD Contrast - Het contrast van het LCD-
scherm kan hier worden
ingesteld.
Backlight (Achtergrondverlichting) - Het achtergrondlicht van het
LCD-scherm kan hier worden
ingesteld.
Clock display (klokweergave) - Toont de klok met de datum op
het scherm.
Clock set (klok instellen) - Tijd en datum kunnen hier
worden ingesteld.
Delete One - Met deze functie kunt u een
foto verwijderen.
Delete All - Met deze functie kunt u alle
foto's verwijderen.
Exit - Om uit het menu te gaan.
Page 16

16
CONFORMITEITVERKLARING
Wij,
Nedis BV
De Tweeling 28
5215 MC ’s-Hertogenbosch
Nederland
Tel.: 0031 73 599 1055
E-mail: info@nedis.com
verklaren dat het product:
Naam: König Electronic
Model: CMP-DIG-EGG10
Omschrijving: Eivormige 1,5” digitale fotolijst
in overeenstemming met de volgende normen is
EMC: EN55022:1998 ;EN55024:1998 ;EN61000-3-2:2000;
EN61000-3-3:1995
Conform de bepalingen van richtlijn 89/336/EEG.
‘s-Hertogenbosch, 3 september 2008
Mevr. J. Gilad
Directeur inkoop
Page 17

17
Veiligheidsvoorzorgsmaatregelen:
Stel het apparaat niet bloot aan water of vocht.
Onderhoud:
Uitsluitend reinigen met een droge doek. Gebruik geen
reinigingsmiddelen of schuurmiddelen.
Garantie:
Voor wijzigingen en veranderingen aan het product of schade
veroorzaakt door een verkeerd gebruik van dit product, kan geen
aansprakelijkheid worden geaccepteerd. Tevens vervalt daardoor
de garantie.
Algemeen:
Wijziging van ontwerp en specifi caties zonder voorafgaande
mededeling onder voorbehoud.
Alle logo's, merken en productnamen zijn handelsmerken of
geregistreerde handelsmerken van de respectievelijke eigenaren en
worden hierbij als zodanig erkend.
Let op:
Dit product is voorzien van dit symbool. Dit symbool geeft
aan dat afgedankte elektrische en elektronische producten
niet met het gewone huisafval verwijderd mogen worden.
Voor dit soort producten zijn er speciale
inzamelingspunten.
Copyright ©
Page 18

18
ITALIANO
Operazioni preliminari
Prima di iniziare a utilizzare il portafoto per la prima volta, caricare
la batteria per almeno quattro ore collegandola a una porta USB.
Apparirà un'icona con la batteria nell'angolo in basso a sinistra del
display del portafoto.
Accensione/Spegnimento del portafoto
Per accendere il portafoto digitale, tenere premuto il pulsante M sul
retro del portafoto per 3 secondi. Per spegnerlo, tenere di nuovo
premuto per 3 secondo il pulsante M.
Caricamento di foto dal computer al portafoto digitale
Prima di collegare il portafoto al computer, compiere i seguenti
passaggi:
• Premere il pulsante M una volta per aprire il menu principale.
• Utilizzare i pulsanti direzionali a freccia per navigare nel menu
fi no a quando sarà evidenziato USB Connect (Collegamento
USB). Premere il pulsante M per aprire questo sottomenu.
• Selezionare Sì e premere di nuovo il pulsante M.
A questo punto collegare il portafoto digitale al PC. Dopo
l'installazione del nuovo software da parte di Windows, comparirà
un'applicazione, con la quale è possibile caricare le foto nel portafoto
digitale. Il portafoto funziona nel seguente modo.
• Nella fi nestra in basso a sinistra dell'applicazione, cercare la
mappa con le foto che si desidera caricare.
• Selezionare una foto. Se occorre, è possibile ruotare ed eseguire
lo zoom con i pulsanti a destra della schermata di anteprima.
• Per aggiungere foto alla selezione di caricamento, fare clic sul
pulsante Add (Aggiungi). L'immagine apparirà nella colonna a
destra.
Page 19

19
• Ripetere i passaggi appena descritti fi no al termine della
selezione di tutte le foto da caricare nel portafoto. Per caricare
le foto nel portafoto, fare clic sul pulsante download. Dopo il
caricamento di tutte le foto, è possibile chiudere l'applicazione e
scollegare il portafoto dal computer.
Impostazioni avanzate
Collegamento USB - selezionare Sì in questo menu per
collegare il portafoto digitale a un
computer
Presentazione diapositive - qui è possibile impostare l'intervallo
tra le diapositive. Per disattivare
la funzione diapositive, impostare
l'intervallo su 00 secondi.
Spegnimento automatico - qui è possibile impostare il tempo
di spegnimento automatico. Per
disattivare la funzione di spegnimento
automatico, impostare l'intervallo su 00
secondi.
Contrasto LCD - qui è possibile impostare il contrasto
dello schermo LCD
Retroilluminazione - qui è possibile impostare la retro
illuminazione dello schermo LCD
Orologio display - Visualizza sullo schermo l'orologio con
la data
Imposta orologio - qui è possibile impostare ora e data
Cancella uno - Utilizzare questa funzione per
cancellare la foto visualizzata prima di
aprire il menu.
Cancella tutto - Se si utilizza questa funzione saranno
cancellate insieme tutte le foto.
Uscita - per uscire dal menu
Page 20

20
DICHIARAZIONE DI CONFORMITÀ
Questa società,
Nedis B.V.
De Tweeling 28
5215MC ’s-Hertogenbosch
Paesi Bassi
Tel.: 0031 73 599 1055
Email: info@nedis.com
Dichiara che il prodotto:
Nome: König Electronic
Modello: CMP-DIG-EGG10
Descrizione: Portafoto digitale da 1,5” a uovo
è conforme ai seguenti standard
EMC: EN55022:1998 ;EN55024:1998 ;EN61000-3-2:2000;
EN61000-3-3:1995
ed è conforme con i requisiti della direttiva 89/336/CEE.
‘s-Hertogenbosch, 3 settembre 2008
Sig.ra J. Gilad
Direttore agli acquisti
Page 21

21
Precauzioni di sicurezza:
Non esporre il prodotto ad acqua o umidità.
Manutenzione:
Pulire solo con un panno asciutto. Non utilizzare solventi detergenti
o abrasivi.
Garanzia:
Non sarà accettata alcuna garanzia o responsabilità in relazione a
cambiamenti e modifi che del prodotto o a danni determinati dall'uso
non corretto del prodotto stesso.
Generalità:
Il design e le caratteristiche tecniche sono soggetti a modifi ca senza
necessità di preavviso.
Tutti i marchi a logo e i nomi di prodotto sono marchi commerciali
o registrati dei rispettivi titolari e sono in questo documento
riconosciuti come tali.
Attenzione:
Il prodotto è contrassegnato con questo simbolo, con il
quale si indica che i prodotti elettrici ed elettronici usati
non devono essere gettati insieme ai rifi uti domestici. Per
questi prodotti esiste un sistema di raccolta differenziata.
Copyright ©
Page 22

22
ESPAÑOL
Iniciación
Antes de empezar a utilizar su marco de fotos por primera vez, por
favor, cargue la batería durante al menos cuatro horas conectándola
a su puerto USB. Un icono de batería aparecerá en la esquina
inferior izquierda de la pantalla del marco.
Encendido y apagado del marco de fotos
Pulse y mantenga pulsado el botón M en la parte posterior del marco
durante 3 segundos para encender su marco de fotografías digitales.
Para apagarlo, pulse el botón M durante 3 segundos de nuevo.
Carga de fotos desde su ordenador hasta el marco de
fotografías digitales
Antes de conectar el marco a su ordenador, por favor, siga las
etapas indicadas a continuación:
• Pulse el botón M una vez para abrir el menú principal.
• Utilice los botones de fl echas para navegar por el menú hasta
que Conexión USB se resalte. Pulse el botón M para acceder a
este submenú.
• Seleccione Sí y pulse de nuevo el botón M
Conecte el marco de fotos digitales al PC ahora Una aplicación
aparecerá una vez que Windows haya terminado la instalación de
este nuevo material. Con esta aplicación, las fotografías podrán
cargarse en el marco de fotos digitales. Funciona tal y como se
indica a continuación:
• En la ventana inferior izquierda de la aplicación, busque para
localizar las fotografías que desea cargar.
• Seleccione una fotografía. Cuando sea necesario, la imagen
podrá girarse y ampliarse utilizando los botones a la derecha de
la pantalla de visualización.
Page 23

23
• Para añadir la fotografía a la selección de carga, pulse en el
botón Añadir. La imagen apareceá en la columna de la derecha.
• Repita estas etapas hasta que haya seleccionado todas las
fotos que desee cargar en su marco digital. Pulse en el botón
de descargar para cargar las fotografías en el marco de fotos.
Una vez que se hayan cargado todas las fotos, podrá cerrar la
aplicación y desconectar el marco de fotos de su ordenador.
Confi guración avanzada
Conexión de USB - seleccione Sí en este menú para
conectar el marco de fotos digitales
al ordenador
Presentación de diapositivas - el intervalo puede confi gurarse
aquí. Para desactivar la función
de diapositivas, fi je el intervalo en
00 segundos.
Apagado automático - la hora del apagado automático la
podrá fi jar aquí. Para desactivar la
función de apagado automático,
fi je el intervalo en 00 segundos.
Contraste LCD - el contraste de la pantalla LCD
podrá fi jarlo aquí
Luz de fondo - la luz de fondo de la pantalla LCD
podrá fi jarlo aquí
Muestra del reloj - Muestra el reloj con la fecha en la
pantalla
Confi guración del reloj - Podrá fi jar aquí la fecha y la hora
Borrar uno - Utilice esta función para borrar la
foto que apareció antes de acceder
al menú.
Borrar todas - Se borrarán todas las fotos una vez
cuando se utilice esta función.
Salida - para salir del menú
Page 24

24
Declaración de conformidad
La empresa infraescrita,
Nedis B.V.
De Tweeling 28
5215MC ’s-Hertogenbosch
Países Bajos
Tel.: 0031 73 599 1055
Email: info@nedis.com
Declara que el producto:
Nombre: König Electronic
Modelo: CMP-DIG-EGG10
Descripción: Marco de foto ditigal con forma ovalada de 1,5”
se encuentra conforme a las siguientes normas:
EMC: EN55022:1998 ;EN55024:1998 ;EN61000-3-2:2000;
EN61000-3-3:1995
Y cumple con los requisitos de la directiva 89/336/EEC.
‘s-Hertogenbosch, 3 de septiembre de 2008
Dña. J. Gilad
Director de compras
Page 25

25
Medidas de seguridad:
No exponga el producto al agua ni a la humedad.
Mantenimiento:
Limpie sólo con un paño seco. No utilice solventes de limpieza ni
abrasivos.
Garantía:
No se aceptará ninguna garantía o responsabilidad derivada de
cualquier cambio o modifi caciones realizadas al producto o daños
provocados por un uso incorrecto del presente producto.
General:
Las ilustraciones y las especifi caciones podrán sufrir cambios sin
previo aviso.
Todos los logotipos y los nombres de productos constituyen
patentes o marcas registradas de sus titulares correspondientes y
se reconocen aquí como tales.
Cuidado:
Este producto está señalizado con este símbolo. Esto
signifi ca que los productos eléctricos y electrónicos
gastados no deberán mezclarse con los desechos
domésticos generales. Existen distintos sistemas de
recogida individuales para este tipo de productos.
Copyright ©
Page 26

26
MAGYAR NYELVŰ
Az első lépések
A képkeret legelső használatát megelőzően töltse az akkumulátort
egyik USB portra csatlakoztatva legalább négy órán át. A keret
kijelzőjének bal alsó sarkában megjelenik az akkumulátort jelképező
ikon.
A képkeret be- és kikapcsolása
A képkeretet a hátoldalán lévő M gomb 3 másodpercig
tartó lenyomásával kapcsolhatja be. Ugyancsak az M gomb
3 másodpercig tartó lenyomásával kapcsolhatja ki.
Képek feltöltése a számítógépről a digitális képkeretre
Mielőtt a képkeretet a számítógéphez kapcsolná, végezze el az
alábbi műveleteket:
• Az M gomb egyszeri lenyomásával lépjen a főmenübe.
• A menüben a nyílgombokkal addig navigáljon, ameddig a USB
Connect (USB csatlakozás) felirat kiemelten meg nem jelenik.
Az M gombbal lépjen ebbe az almenübe.
• Válassza a Yes (Igen) lehetőséget, és nyomja meg ismét az
M gombot.
Most csatlakoztassa a digitális képkeretet a számítógéphez. Miután
a Windows befejezte ennek az új hardvernek a telepítését, egy
alkalmazás jelenik meg a képernyőn. Az alkalmazás segítségével a
képek feltölthetők a digitális képkeretre. A feltöltést az alábbi módon
végezze:
• Az alkalmazás bal alsó ablakában keresse meg a feltölteni kívánt
képeket tartalmazó mappát.
• Válasszon ki egy képet. Szükség esetén az előnézeti képernyőtől
jobbra lévő gombokkal a kép elforgatható és nagyítható.
Page 27

27
• Az Add (Hozzáadás) gombra kattintva helyezze a kiválasztott
képet a feltöltendő képek közé. A kép a jobb oldali oszlopban
megjelenik.
• Ezeket a műveleteket addig ismételje, amíg az összes feltölteni
kívánt képet fel nem töltötte a digitális képkeretre. A Download
(Letöltés) gombra kattintva töltse fel a képeket a képkeretre.
Ha már mindegyiket feltöltötte, bezárhatja az alkalmazást, és
lecsatlakoztathatja a képkeretet a számítógépről.
Speciális beállítások
USB Connect (USB csatlakozás) - ebben a menüben a Yes
(Igen) opciót választva csatlakoztathatja a digitális képkeretet a
számítógéphez.
Slide Show (Diavetítés) - itt a képtovábbítás időköze állítható be. A
diavetítés funkciót úgy kapcsolhatja ki, hogy a képtovábbítási időközt
00 másodpercre állítja.
Auto Off (Automatikus kikapcsolás) - itt az automatikus kikapcsolás
idejét állíthatja be. Az automatikus kikapcsolási funkciót úgy
kapcsolhatja ki, hogy az időközt 00 másodpercre állítja.
LCD Contrast (A képernyő kontrasztja) - itt állítható be az LCD
képernyő kontrasztja.
Backlight (A képernyő háttérvilágítása) - itt állítható be az LCD
képernyő háttérvilágítása.
Display Clock (Óraidő kijelzése) - a képernyőn a dátumot és időt
jeleníti meg.
Set Clock (Óra beállítása) - itt állítható be a dátum és idő.
Delete One (Egy kép törlése) - ezzel a funkcióval törölheti azt a
képet, amelyik a menübe történő belépés előtt a képernyőn volt.
Delete All (Összes törlése) - Ezzel a funkcióval egyszerre törölheti
az összes képet.
Exit (Kilépés) - ezzel léphet ki a menüből.
Page 28

28
Megfelelőségi nyilatkozat
Mi,
a Nedis B.V.
De Tweeling 28
5215MC ’s-Hertogenbosch
Hollandia
Tel.: 0031 73 599 1055
E-mail: info@nedis.com
Kijelentjük, hogy a termék, amelynek:
Neve: König Electronic
Típusa: CMP-DIG-EGG10
Megnevezése: Tojás alakú, 1,5 hüvelykes digitális képkeret
Összhangban van az alábbi szabványokkal:
EMC (Elektromágneses összeférhetőségre vonatkozó irányelv):
EN55022:1998 ;EN55024:1998 ;EN61000-3-2:2000;
EN61000-3-3:1995
Összhangban van továbbá a A 89/336/EGK irányelv előírásaival is.
‘s-Hertogenbosch, 2008. szeptember 3.
Mrs. J. Gilad
Értékesítési igazgató
Megfelelőségi nyilatkozat.
Egyetértek és elfogadom a Nedis B.V. Hollandia által adott
nyilakozatot.
Jacob Gilad
HQ-Nedis kft.
ügyvezető igazgató
Page 29

29
Biztonsági óvintézkedések:
Víztől és más nedvességtől óvja.
Karbantartás:
Csak száraz ronggyal tisztítsa. Tisztító- és súrolószerek használatát
mellőzze.
Jótállás:
Nem vállalunk felelősséget és jótállást, ha a meghibásodás a
készüléken végzett változtatás vagy módosítás következménye,
vagy helytelen használat miatt a készülék megrongálódott.
Általános tudnivalók:
A kivitel és a műszaki jellemzők előzetes értesítés nélkül is
módosulhatnak.
Minden logó, terméknév és márkanév a saját tulajdonosának
márkaneve vagy bejegyzett márkaneve, és azokat ennek tiszteletben
tartásával említjük.
Figyelem:
Ezt a terméket ezzel a jelöléssel láttuk el. Azt jelenti, hogy
az elhasznált elektromos és elektronikus készülékek nem
keverhetők az általános háztartási hulladék közé.
Begyűjtésüket külön begyűjtő létesítmények végzik.
Copyright ©
Page 30

30
SUOMI
Käyttöönotto
Ennen kuvakehyksen käyttöönottoa on akkua ladattava vähintään
neljä tuntia liittämällä se USB-porttiin. Kehyksen vasempaan
alakulmaan tulee näkyviin akun kuvake.
Kuvakehyksen kytkeminen päälle/pois päältä
Paina ja pidä alhaalla kehyksen takana olevaa M-painiketta
3 sekunnin ajan kuvakehyksen kytkemiseksi päälle. Kytke kehys
pois päältä painamalla M-painiketta uudelleen 3 sekuntia.
Kuvien lataus tietokoneelta digitaaliseen kuvakehykseen
Ennen kehyksen kytkemistä tietokoneeseen noudata näitä ohjeita:
• Paina M-painiketta kerran siirtyäksesi päävalikkoon.
• Selaa valikkoa nuolipainikkeilla, kunnes USB Connect (USB
Yhdistä) on korostettu. Siirry alavalikkoon painamalla M-painiketta.
• Valitse Yes (Kyllä) ja paina M-painiketta uudelleen.
Liitä digitaalinen kuvakehys nyt tietokoneeseen. Sen jälkeen,
kun Windows on suorittanut uuden laitteen asennuksen loppuun,
näkyviin tulee sovellus. Sovelluksen avulla voidaan kuvat ladata
digitaaliseen kuvakehykseen. Latausprosessi on seuraavanlainen:
• Hae ladattavat kuvat sisältävä kartta sovelluksen vasemmassa
alakulmassa olevasta ikkunasta.
• Valitse kuva. Tarvittaessa kuvaa voidaan kääntää ja tarkentaa
esikatseluikkunan oikealla olevilla painikkeilla.
• Lisää kuva latausosioon ja napsauta painiketta Add (Lisää).
Kuva tulee näkyviin oikeaan sarakkeeseen.
• Toista toimenpiteet, kunnes olet valinnut kaikki kuvat, jotka
haluat ladata kuvakehykseen. Lataa kuvat kuvakehykseen
napsauttamalla latauspainiketta. Kun kaikki kuvat on ladattu, voit
sulkea sovelluksen ja irrottaa kuvakehyksen tietokoneesta.
Page 31

31
Edistyneet asetukset
USB-kytkentä - Valitse valikossa Yes (Kyllä) digitaalisen
kuvakehyksen kytkemiseksi
tietokoneeseen.
Kuvaesitys - Kuvien esitysväli voidaan asettaa tässä
kohtaa. Kuvaesitys voidaan deaktivoida
asettamalla aikaväliksi 00 sekuntia.
Automaattinen sammutus - Tässä kohtaa voidaan asettaa
automaattisen sammutuksen aika.
Automaattinen sammutustoiminto
voidaan deaktivoida asettamalla
aikaväliksi 00 sekuntia.
LCD-näytön kontrasti - Tässä kohtaa voidaan asettaa LCD-
näytön kontrasti.
Taustavalo - Tässä kohtaa voidaan asettaa LCD-
näytön taustavalo.
Näytön kellonaika Näyttää kellon ja päivämäärän
näytöllä.
Kellon asetus - Tässä kohtaa voidaan asettaa aika ja
päivämäärä.
Poista yksi - Tällä toiminnolla voidaan poistaa kuva,
joka näkyi ennen valikkoon siirtymistä.
Poista kaikki - Tällä toiminnolla voidaan kaikki kuvat
poistaa kerralla.
Poistu - Valikosta poistuminen.
Page 32

32
VAATIMUSTENMUKAISUUSVAKUUTUS
Me,
Nedis B.V.
De Tweeling 28
5215MC ’s-Hertogenbosch
Alankomaat
Puh: 0031 73 599 1055
Sähköposti: info@nedis.com
Vakuutamme, että tuote:
Nimi: König Electronic
Malli: CMP-DIG-EGG10
Kuvaus: Kananmunan muotoinen 1,5” digitaalinen kuvakehys
Täyttää seuraavat standardit:
EMC: EN55022:1998 ;EN55024:1998 ;EN61000-3-2:2000;
EN61000-3-3:1995
Ja täyttää direktiivin 89/336/EY vaatimukset.
‘s-Hertogenbosch, 3. syyskuuta 2008
Mrs. J. Gilad
Hankintajohtaja
Page 33

33
Turvallisuuteen liittyvät varoitukset:
Älä altista tuotetta vedelle tai kosteudelle.
Huolto:
Puhdista ainoastaan kuivalla kankaalla. Älä käytä liuottimia tai
hioma-aineita.
Takuu:
Takuu ja vastuuvelvollisuus mitätöityy, jos tuote vaurioituu siihen
tehtyjen muutoksien tai sen väärinkäytön takia.
Yleistä:
Muutoksia malliin ja teknisiin ominaisuuksiin voidaan tehdä
ilmoituksetta.
Kaikki logot, merkit ja tuotenimet ovat niiden vastaavien omistajien
tuotemerkkejä tai rekisteröityjä tuotemerkkejä ja niitä on käsiteltävä
sellaisina.
Huomio:
Tuote on varustettu tällä merkillä. Se merkitsee, ettei
käytettyjä sähkö- tai elektronisia tuotteita saa hävittää
kotitalousjätteen mukana. Kyseisille tuotteille on olemassa
erillinen keräysjärjestelmä.
Copyright ©
Page 34

34
SVENSKA
Att komma igång
Ladda fotoramens batteri innan den används för första gången
genom att koppla den till ett USB-uttag under minst 4 timmar. En
batterisymbol kommer att visas i displayens nedre vänstra hörn.
Sätta på/stänga av fotoramen.
Tryck på M-knappen på ramens baksida och håll den intryckt i
3 sekunder för att starta den digitala fotoramen. Håll M-knappen
intryckt i 3 sekunder för att stänga av den igen.
Ladda upp bilder från datorn till den digitala fotoramen
Vidta nedanstående åtgärder innan du kopplar ramen till din dator:
• Tryck en gång på M-knappen för att öppna huvudmenyn.
• Använd pilknapparna för att navigera i menyn tills USB Connect
är markerat. Tryck på M-knappen för att gå in i denna meny.
• Välj Yes (ja) och tryck på M-knappen igen.
Anslut nu den digitala fotoramen till PC:n. En applikation kommer att
öppnas när Windows är färdig med installationen av hårdvaran. Med
denna applikation kan bilderna laddas upp till den digitala fotoramen.
Det fungerar på följande sätt:
• Leta i applikationens nedre vänstra fönster efter katalogen som
innehåller de bilder du vill ladda upp.
• Välj en bild. Om det är nödvändigt kan bilden roteras och zoomas
med knapparna till höger om förhandsvisningen.
• Tryck på Add knappen för att lägga till en bild till urvalet som
skall laddas upp. Bilden visas i den högra spalten.
• Upprepa dessa steg tills du har valt alla bilder som du vill ladda
upp till din fotoram. Tryck på Download-knappen för att ladda
upp bilderna till fotoramen. När alla bilder är uppladdade, kan du
stänga applikationen och koppla bort fotoramen från din dator.
Page 35

35
Avancerade inställningar
USB Connect - välj Yes i denna meny för att
för att koppla den digitala
fotoramen till en dator
Slide Show (bildspel) - intervallen mellan bilderna kan
ställas in här. Ställ intervallen
till 00 sekunder för att koppla
bort bildspelsfunktionen.
Auto Off (automatisk avstängning) - den automatiska
avstängningstiden kan ställas
in här. Ställ intervallen till
00 sekunder för att koppla
bort den automatiska
avstängningsfunktionen.
LCD Contrast (skärmkontrast)- LCD-skärmens kontrast kan
ställas in här.
Backlight (bakgrundsbelysning) - LCD-skärmens
bakgrundsbelysning kan ställas
in här.
Display Clock (displayklocka) - Visar klocka med datum på
skärmen
Set Clock (inställning av klocka) - Tid och datum kan ställas in
här
Delete One (radera en) - Använd denna funktion för
att radera bilden som visades
innan du gick in i menyn.
Delete All (radera alla) - Alla bilder kommer att raderas
när denna funktion används.
Exit (Ut) - för att gå ut ur menyn
Page 36

36
ÖVERENSSTÄMMELSEFÖRKLARING
Vi:
Nedis B.V.
De Tweeling 28
5215MC ’s-Hertogenbosch
Holland
Tel.: 0031 73 599 1055
E-post: info@nedis.com
Intygar att produkten:
Namn: König Electronic
Modell: CMP-DIG-EGG10
Beskrivning: Äggformad 1,5” digital fotoram
Överensstämmer med följande standarder:
EMC: EN55022:1998 ;EN55024:1998 ;EN61000-3-2:2000;
EN61000-3-3:1995
Och uppfyller kraven i direktivet 89/336/EEC.
‘s-Hertogenbosch, den3 september 2008
Fru. J. Gilad
Inköpschef
Page 37

37
Säkerhetsanvisningar:
Utsätt inte produkten för vatten eller fukt.
Underhåll:
Rengör endast med torr trasa. Använd inga rengöringsmedel eller
frätande medel.
Garanti:
Ingen garanti gäller vid några ändringar eller modifi eringar av
produkten eller för skador som har uppstått på grund av felaktig
användning av denna produkt.
Allmänt:
Utseende och specifi kationer kan komma att ändras utan föregående
meddelande.
Alla logotypers varumärken och produktnamn är varumärken eller
registrerade varumärken tillhörande respektive ägare och erkänns
härmed som sådana.
Obs!
Produkten är märkt med denna symbol. Det innebär att
använda elektriska eller elektroniska produkter inte får
slängas bland vanliga hushållssopor. Det fi nns särskilda
återvinningssystem för dessa produkter.
Copyright ©
Page 38

38
ČESKY
Začínáme
Před prvním použitím digitálního prohlížeče fotografi í (fotorámečku)
nabijte jeho baterii po dobu alespoň čtyř hodin připojením rámečku
do USB portu. Na displeji fotorámečku se v levém dolním rohu objeví
ikona nabíjení baterie.
Zapnutí a vypnutí napájení fotorámečku
Přidržením stisknutého tlačítka M po dobu 3 sekund se fotorámeček
zapne. Dalším stisknutím tlačítka M na 3 sekundy se fotorámeček
vypne.
Načítání fotografi í z počítače do digitálního fotorámečku
Před připojením rámečku k vašemu počítači proveďte nejdříve
následující kroky:
• Otevřete nabídku jedním stiskem tlačítka M.
• Pomocí navigačních tlačítek se šipkami procházejte menu, až se
zvýrazní položka USB Connect. Stisknutím tlačítka M otevřete
toto podmenu.
• Vyberte „Yes (Ano)“ a dalším stiskem tlačítka M potvrďte volbu.
Nyní připojte fotorámeček k PC. Jakmile Windows dokončí instalaci
nově připojeného hardware, naskočí okno aplikace. Pomocí této
aplikace můžete načíst fotografi e z PC do digitálního fotorámečku.
Načítání funguje podle následujícího postupu:
• V levém dolním rohu aplikačního okna vyhledejte soupis
fotografi í určených k načítání.
• Zvolte „photo (foto)“. V případě potřeby můžete obrázek otočit
nebo zvětšit pomocí tlačítek vpravo na zobrazení náhledu.
• Kliknutím na tlačítko Add přidejte vybranou fotografi i do výběru
k načítání. Obrázek se objeví v pravém sloupci.
• Opakujte tento postup, až vyberete všechny snímky, které
Page 39

39
chcete načíst, do digitálního fotorámečku. Kliknutím na tlačítko
„download (stahování)“ se vybrané fotografi e načtou do
fotorámečku. Po načtení všech vybraných fotografi í zavřete
aplikaci a fotorámeček odpojte od vašeho počítače.
Pokročilé nastavení
„USB Connect (Připojení USB)“ - V této nabídce potvrďte
položku „Yes (Ano)“ pro
připojení digitálního
fotorámečku k počítači.
„Slide Show (Postupná prezentace)“ - Zde můžete nastavit interval
přechodu na další snímek.
Chcete-li postupnou
prezentaci zastavit,
nastavte interval na hodnotu
00 sekund.
„Auto Off“ - V této položce můžete
nastavit dobu automatického
vypnutí fotorámečku. Chceteli funkci automatického
vypnutí zrušit, nastavte
interval na hodnotu 00 minut.
„LCD Contrast (Kontrast LCD displeje)“ - V této položce můžete
nastavit kontrast zobrazení
na LCD displeji.
„Backlight (Podsvícení)“ - V této položce můžete
nastavit podsvícení LCD
displeje.
„Display Clock (Zobrazení času)“ - Zobrazení data a hodin na
displeji.
„Set Clock (Nastavení data a času)“ - Zde můžete nastavit datum a
čas.
„Delete One (Vymazat jednu)“ - Tuto funkci použijte k
vymazání jedné fotografi e,
která byla zobrazena
v rámečku těsně před
otevřením této nabídky.
Page 40

40
„Delete All (Vymazat všechno)“ - Tuto funkci použijte k
vymazání všech načtených
fotografi í najednou.
„Exit (Vystoupení)“ - Slouží k vystoupení z
nabídky.
Prohlášení o shodě
Společnost
Nedis B.V.
De Tweeling 28
5215MC ’s-Hertogenbosch
Nizozemí
Tel.: 0031 73 599 1055
info@nedis.com
prohlašuje, že výrobek:
Značka: König Electronic
Model: CMP-DIG-EGG10
Popis: Příruční prohlížeč digitálních fotografi í 1,5”
Splňuje následující normy:
Elektromagnetická kompatibilita:
EN55022:1998; EN55024:1998; EN61000-3-2:2000;
EN61000-3-3:1995
a splňuje požadavky směrnice 89/336/EEC.
‘s-Hertogenbosch, ze dne 3. září 2008
Mrs. J. Gilad
Obchodní ředitelka
Page 41

41
Bezpečnostní opatření:
Nevystavujte zařízení nadměrné vlhkosti nebo vodě.
Údržba:
K čištění používejte pouze suchý hadřík. Nepoužívejte rozpouštědla
ani abrazivní materiály.
Záruka:
Jakékoli změny, modifi kace nebo poškození zařízení v důsledku
nesprávného zacházení se zařízením ruší platnost záruční smlouvy.
Obecné upozornění:
Design a specifi kace výrobku mohou být změněny bez předchozího
upozornění.
Všechna loga a názvy výrobků jsou obchodní značky nebo
registrované obchodní značky příslušných vlastníků a jsou chráněny
příslušnými zákony.
Upozornění:
Tento výrobek je označen následujícím symbolem. To
znamená, že s výrobkem je nutné zacházet jako
s nebezpečným elektrickým a elektronickým odpadem
a nelze jej po skončení životnosti vhazovat do běžného
domácího odpadu. Existují zvláštní sběrná střediska pro
likvidaci těchto produktů.
Copyright © (Autorská práva)
Page 42

42
ROMÂNĂ
Pregătiri
Înainte de a începe utilizarea ramei foto pentru prima dată, vă rugăm
să încărcaţi acumulatorul, prin conectarea la portul USB. În colţul
din stânga jos va apărea simbolul baterie.
Pornirea/oprirea ramei foto
Apăsaţi şi ţineţi apăsat butonul M afl at în partea din spate a ramei,
pentru 3 secunde, pentru a porni rama foto digitală . Pentru a o opri,
apăsaţi din nou pentru 3 secunde butonul M.
Încărcarea fotografi ilor din calculator în rama foto digitală
Înainte de conectarea ramei la calculator, vă rugăm să citiţi paşii de
mai jos:
• Apăsaţi odată butonul M pentru a deschide meniul principal.
• Folosiţi tastele săgeată pentru a naviga prin meniu, până când
USB Connect (Conectare USB) este evidenţiat. Apăsaţi butonul
M pentru a intra în acest submeniu.
• Selectaţi Yes (Da) şi apăsaţi din nou butonul M.
Acum, conectaţi rama foto la calculator. O aplicaţie se va porni
după ce Windows a fi nalizat instalarea acestei noi componente. Cu
această aplicaţie, fotografi ile pot fi încărcate în rama foto digitală.
Aceasta funcţionează aşa cum este explicat mai jos:
• În fereastra din partea stângă jos a aplicaţiei, căutaţi locaţia cu
fotografi ile pe care doriţi să le încărcaţi.
• Selectaţi o fotografi e. Dacă acest lucru este necesar, fotografi a
poate fi rotită şi mărită, prin folosirea butoanelor din partea
dreaptă a ecranului de previzualizare.
• Pentru a adăuga fotografi a la selecţia de încărcare, faceţi clic
pe butonul Add (Adăugare). Imaginea va apărea în coloana
dreaptă.
Page 43

43
• Repetaţi aceşti paşi până aţi selectat toate fotografi ile pe care
doriţi să le încărcaţi în rama foto. Faceţi clic pe butonul de
descărcare, pentru a încărca fotografi ile în rama foto. După ce
toate fotografi ile au fost încărcate, puteţi închide aplicaţia şi
puteţi deconecta rama foto de la calculator.
Setări complexe
USB Connect (Conectare USB) - selectaţi Yes (Da) în acest
meniu pentru a conecta rama
foto digitală la un calculator
Slide Show (Afi şare succesivă) - intervalul de afi şare
succesivă poate fi
selectat de aici. Pentru a
dezactiva funcţia de afi şare
selectivă, setaţi intervalul
la 00 secunde.
Auto Off (Oprire automată) - timpul de oprire automată
poate fi setat de aici. Pentru
a dezactiva funcţia de oprire
automată, setaţi intervalul
la 00 minute.
LCD Contrast (Contrast LCD) - contrastul ecranului LCD
poate fi setat de aici
Backlight (Lumină de fundal)- lumina de fundal a ecranului
LCD poate fi setată de aici
Display Clock (Afi şare ceas) - Afi şează ceasul şi data pe
ecran
Set Clock (Reglare ceas) - Ora şi data pot fi reglate de
aici
Delete One (Ştergere una câte una) - Folosiţi această funcţie
pentru a şterge fotografi a
care a fost afi şată înainte de
a intra în acest meniu.
Delete All (Ştergere totală) - Toate fotografi ile vor fi
şterse, când această funcţie
este selectată.
Exit (Ieşire) - pentru a ieşi din meniu
Page 44

44
Declaraţie de conformitate
Noi,
Nedis B.V.
De Tweeling 28
5215MC ’s-Hertogenbosch
Olanda
Tel.: 0031 73 599 1055
Email: info@nedis.com
Declarăm că acest produs:
Denumire: König Electronic
Model: CMP-DIG-EGG10
Descriere: Ramă foto digitală de 1,5” în formă de ou
Este în conformitate cu următoarele standarde:
EMC: EN55022:1998 ;EN55024:1998 ;EN61000-3-2:2000;
EN61000-3-3:1995
Şi respectă prevederile Directivei 89/336/EEC.
‘s-Hertogenbosch, 3 septembrie 2008
J. Gilad
Director achiziţii
Page 45

45
Măsuri de siguranţă:
Feriţi produsul de apă şi de umezeală.
Întreţinere:
Curăţarea trebuie făcută cu o cârpă uscată. Nu folosiţi solvenţi sau
agenţi de curăţare abrazivi.
Garanţie:
Nu oferim nicio garanţie şi nu ne asumăm niciun fel de
responsabilitate în cazul schimbărilor sau modifi cărilor aduse
acestui produs sau în cazul deteriorării cauzate de utilizarea
incorectă a produsului.
Generalităţi:
Designul şi specifi caţiile produsului pot fi m o d i fi c a t e f ă r ă o n o t i fi c a r e
prealabilă.
Toate siglele mărcilor şi numele produselor sunt mărci comerciale
sau mărci comerciale înregistrate ale proprietarilor de drept şi aici
sunt recunoscute ca atare.
Atenţie:
Acest produs este marcat cu acest simbol. Acesta indică
faptul că produsele electrice şi electronice uzate nu trebuie
aruncate în gunoiul menajer. Aceste produse au un sistem
separat de colectare.
Copyright ©
Page 46

46
Page 47

47
Page 48

48
 Loading...