

Page 1

2012-09-26
CMP-BARSCAN21
MANUAL (p. 2)
Barcode scanner
ANLEITUNG (S. 56)
Barcode-Scanner
MODE D’EMPLOI (p. 110)
Lecteur de code à barres
GEBRUIKSAANWIJZING (p. 164)
Barcodescanner
MANUALE (p. 218)
Lettore di codici a barre
MANUAL DE USO (p. 272)
Escáner de código de barras
HASZNÁLATI ÚTMUTATÓ (o. 326.)
Vonalkód olvasó
KÄYTTÖOHJE (s. 380)
Viivakoodinlukija
BRUKSANVISNING (s. 434)
Streckkodsläsare
NÁVOD K POUŽITÍ (s. 488)
Skener čárových kódů
MANUAL DE UTILIZARE (p. 542)
Scanner pentru coduri de bare
ΕΓΧΕΙΡΙ∆ΙΟ XPHΣHΣ (σελ. 596)
TΣαρωτής γραμμωτού κώδικα
BRUGERVEJLEDNING (s. 650)
Stregkodelæser
VEILEDNING (s. 704)
Strekkodeleser
ИНСТРУКЦИЯ (стр. 758)
Сканер штрихкода
Page 2

2
ENGLISH
Barcode scanner
Installing the USB interface scanner
To install the USB interface scanner the host device should have a USB port to receive data from the scanner.
Follow the steps as listed below:
1.) Make sure that the scanner has the right connector for the USB port of the host device.
2.) Connect the cable to the USB port of the device.
3.) If the LED indicator lights up and the buzzer sounds, the scanner is ready for use.
Configuration of the barcode scanner
Setup procedures
1.) Locate a group that contains the parameters to be changed.
2.) Scan the “Enter group #” label. The scanner will make a beeping sound to indicate that setup is in
progress.
3.) Scan the label representing the parameter to be changed.
4.) Scan the “Exit” to end the group currently selected, the scanner will beep.
5.) Repeat the procedure for the other groups, including the parameters to be changed.
Example 1:
Set the operating mode to “Continuous mode”.
1) Scan “Enter Group 5”.
2) Scan “Continuous/Trigger off".
3) Scan "Exit".
Example 2:
Assign the preamble string as "#", and postamble string as "END"
1) Scan "Enter Group 6"
2) Scan preamble
3) Refer to ASCII Table (page 50) and find the code number in hex decimal: # ASCII => 23 hex
The two digit numbers are: 2 3
4) Refer to Table-Hex: HEXADECIMAL (page 49) and scan the two digit labels accordingly.
5) Scan the “Confirm” label in Table-Hex
6) Scan “postamble”
7) Refer to the ASCII Table for the code numbers in hexadecimal (E => 45, N => 4E, D => 44)
8) Refer to Table-Hex: HEXADECIMAL (page 49) and scan the six digit labels consecutively.
4 5 4 E 4 4
9) Scan the “Confirm” Label in Table-Hex.
10) Go back to Group 6 and scan Exit.
Example 3:
Fixed Barcode Length Setting (i.e. Group 9-1 Interleaved 2 OF 5, Barcode Length= 15 digits):
1) Scan the Enter Group 9-1 Label
2) Scan the Length Define Label
3) Scan the Four Digit Labels in Table Hex (Page 49)
Tips:
• Refer to the Hexadecimal-Decimal Conversion Table (page 52) to get the barcode length in
Hexadecimal Number 15 dec => 0F hex
• The Four Digit numbers are: 0 F 0 F
• Refer to the Table-Hex: HEXADECIMAL (page 49) and scan the Four digit Labels accordingly.
4) Scan the Confirm Label in Table-Hex: HEXADECIMAL (Page 49)
5) Go back to Group 9-1 and scan the “Exit” Label.
Example 4:
3-Set Barcode Length Setting (i.e. Group 9-4: CHINA POSTAGE, the 3 Barcode Length Settings are as
below):
11 digits
28 digits
43 digits
Page 3
3
1) Scan the Enter Group 9-4 Label
2) Scan the User Define Label
3) Scan the Six Digit Labels in Table Hex (Page 49)
Tips:
• Refer to the Hexadecimal-Decimal Conversion Table (page 52) to acquire the 3 sets of barcode length
in Hexadecimal Number.
11dec => 0B hex
28dec => 1C hex
43dec => 2B hex
• Refer to the Table-Hex: HEXADECIMAL (page 49) and scan the 3 sets Labels accordingly. 0B 1C 2B
4) Scan the Confirm Label in Table-Hex: HEXADECIMAL (Page 49)
5) Go back to Group 9-4 and scan the “Exit” Label.
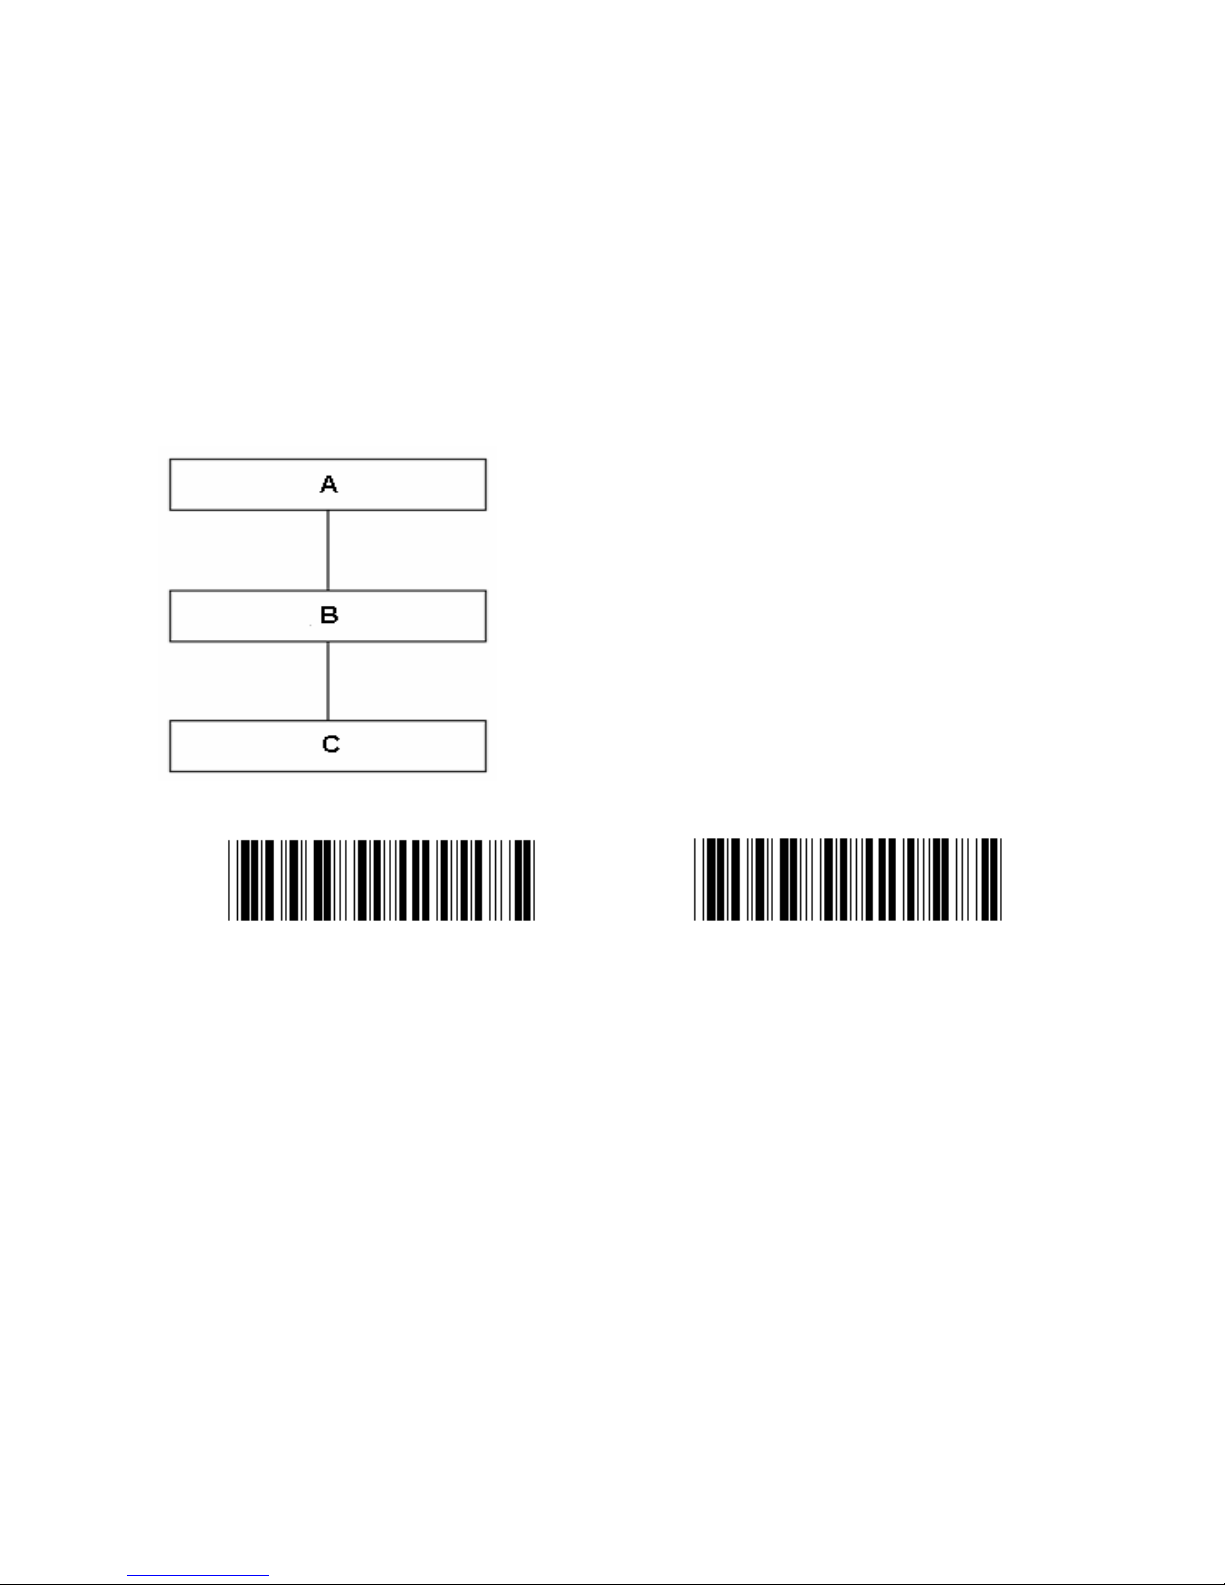
Setup Flow Chart
A. Enter group
B. Select items
C. Exit
Set all defaults Show version
Warning: All current settings will be lost and reset to the factory default.
Note: (*) denotes default setting. Options marked by ( ) are only available upon request.
Page 4
4
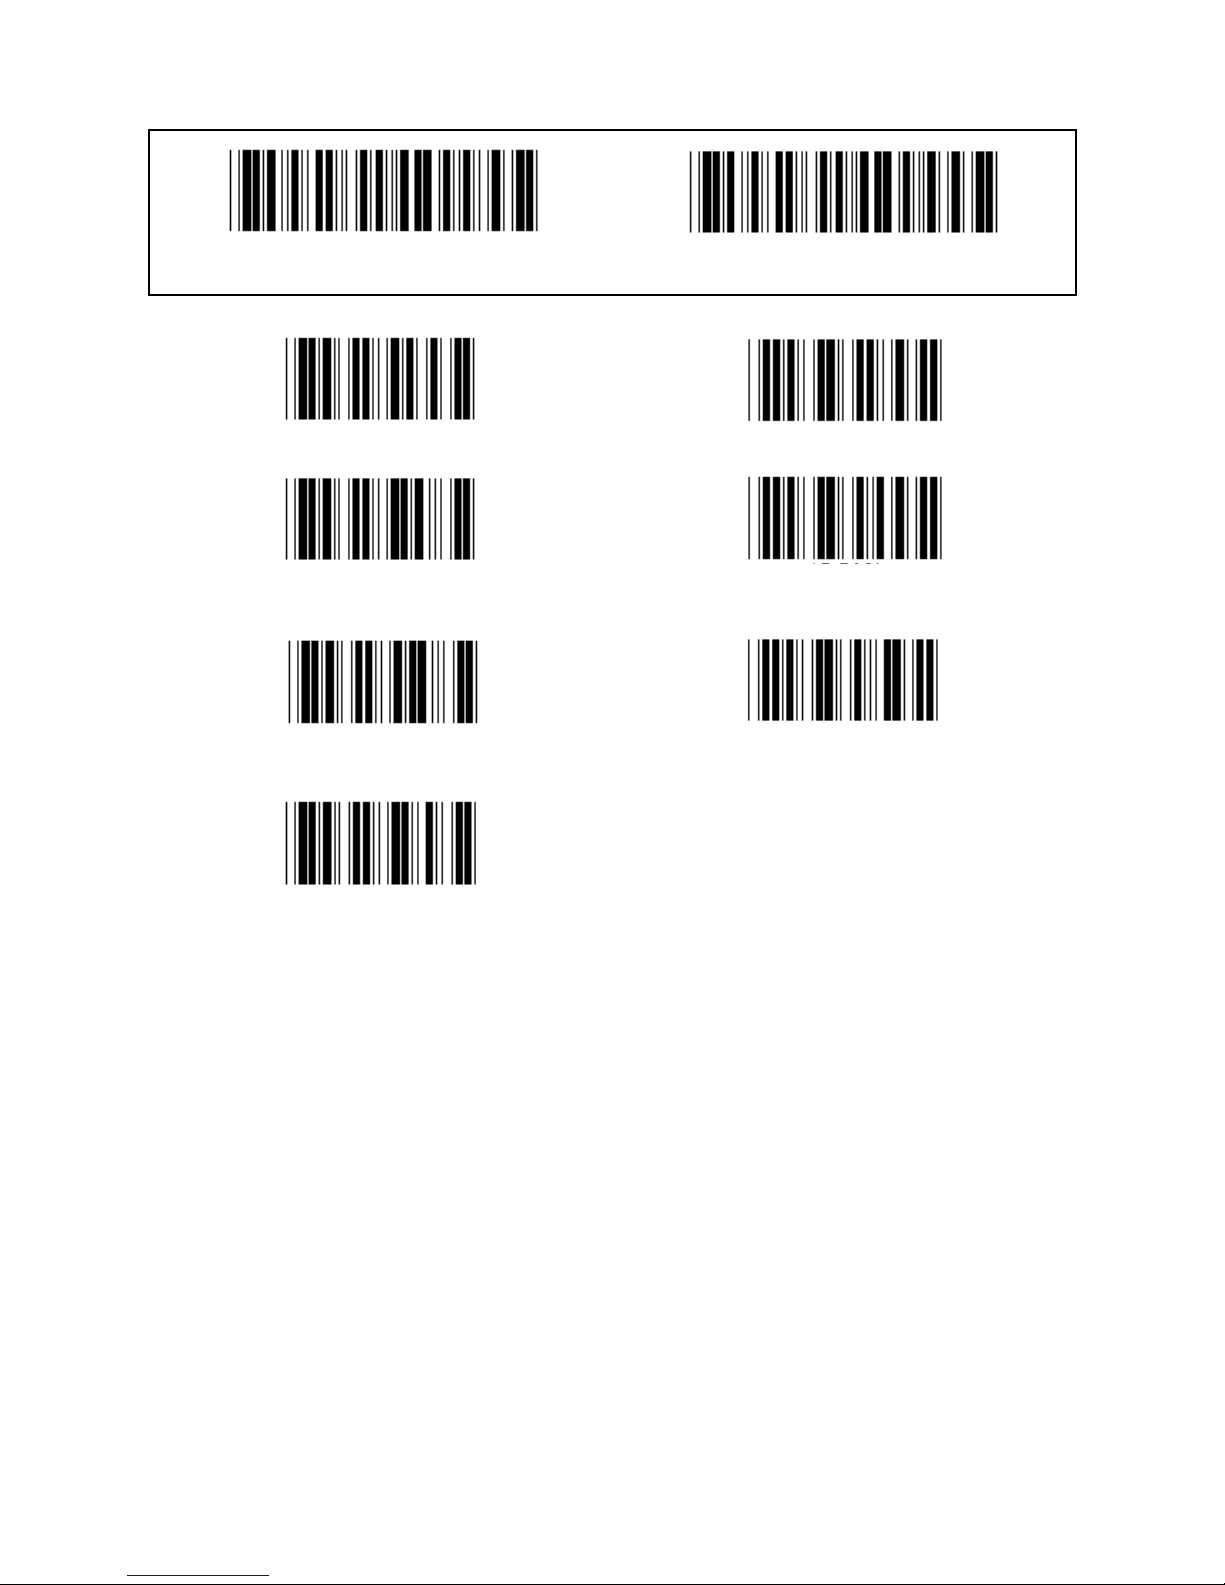
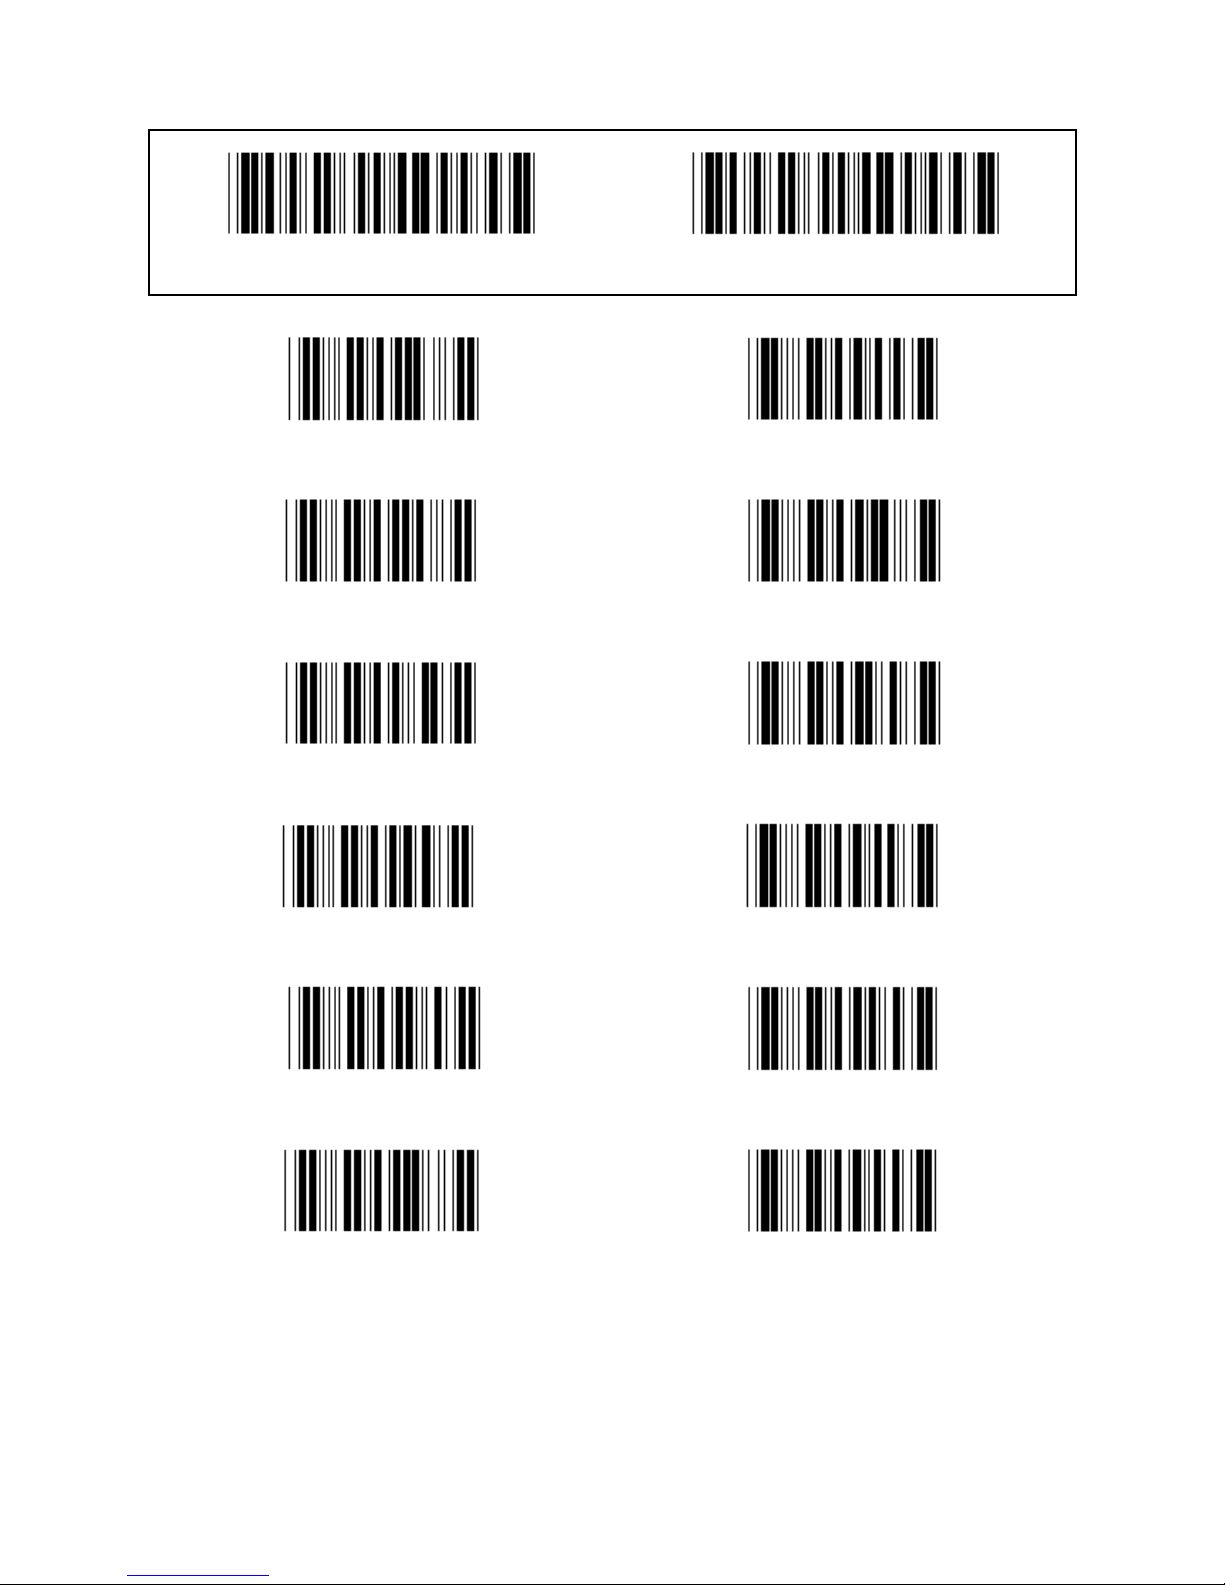
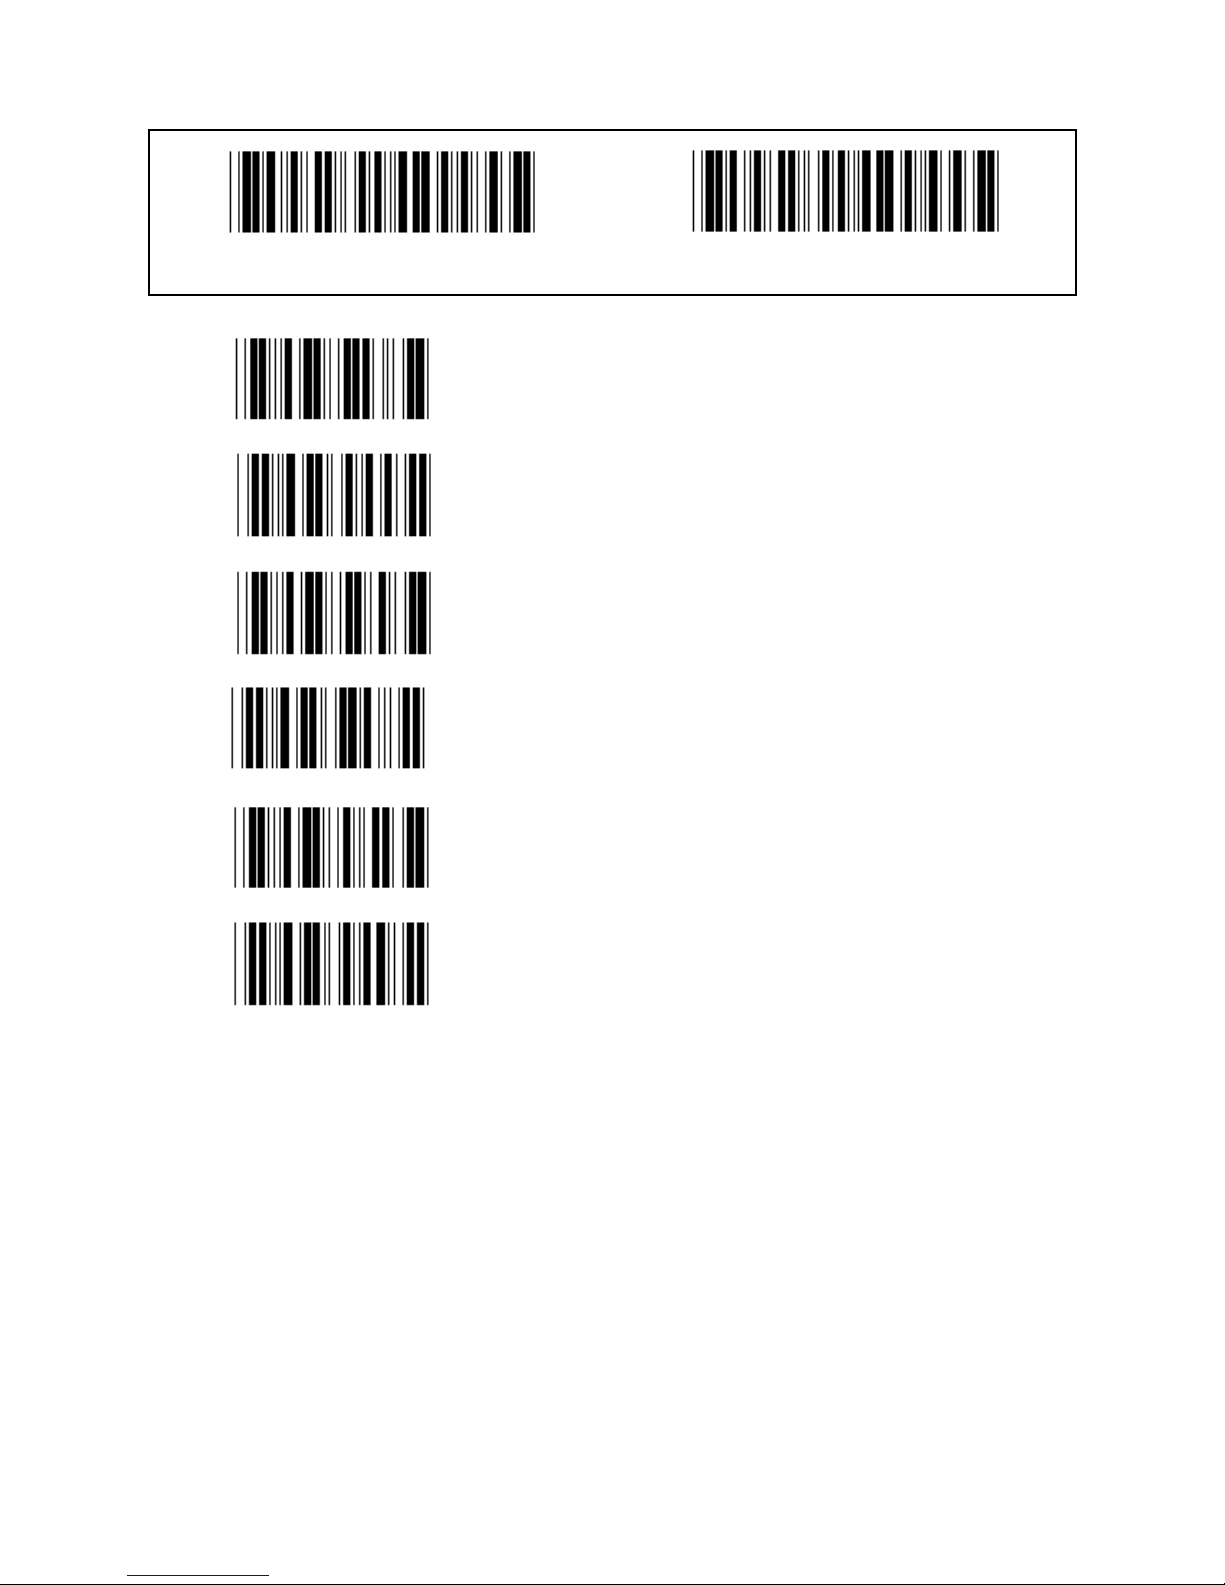
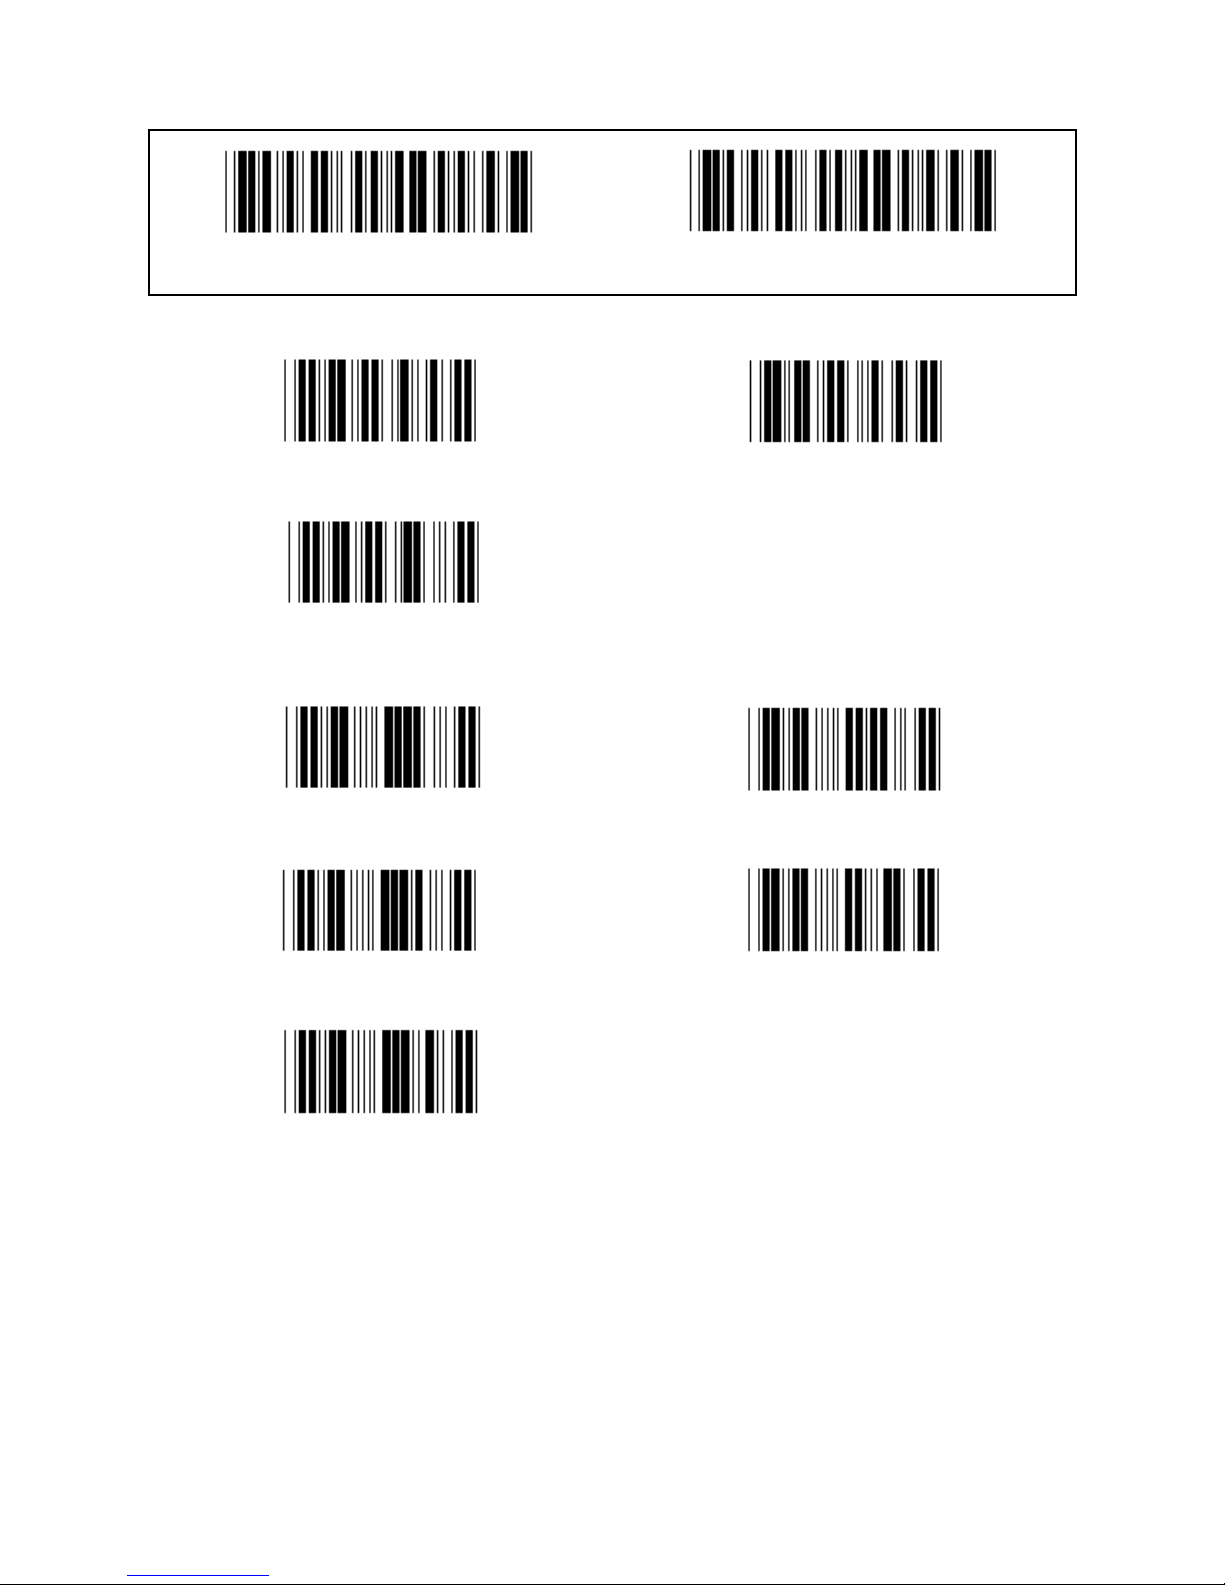
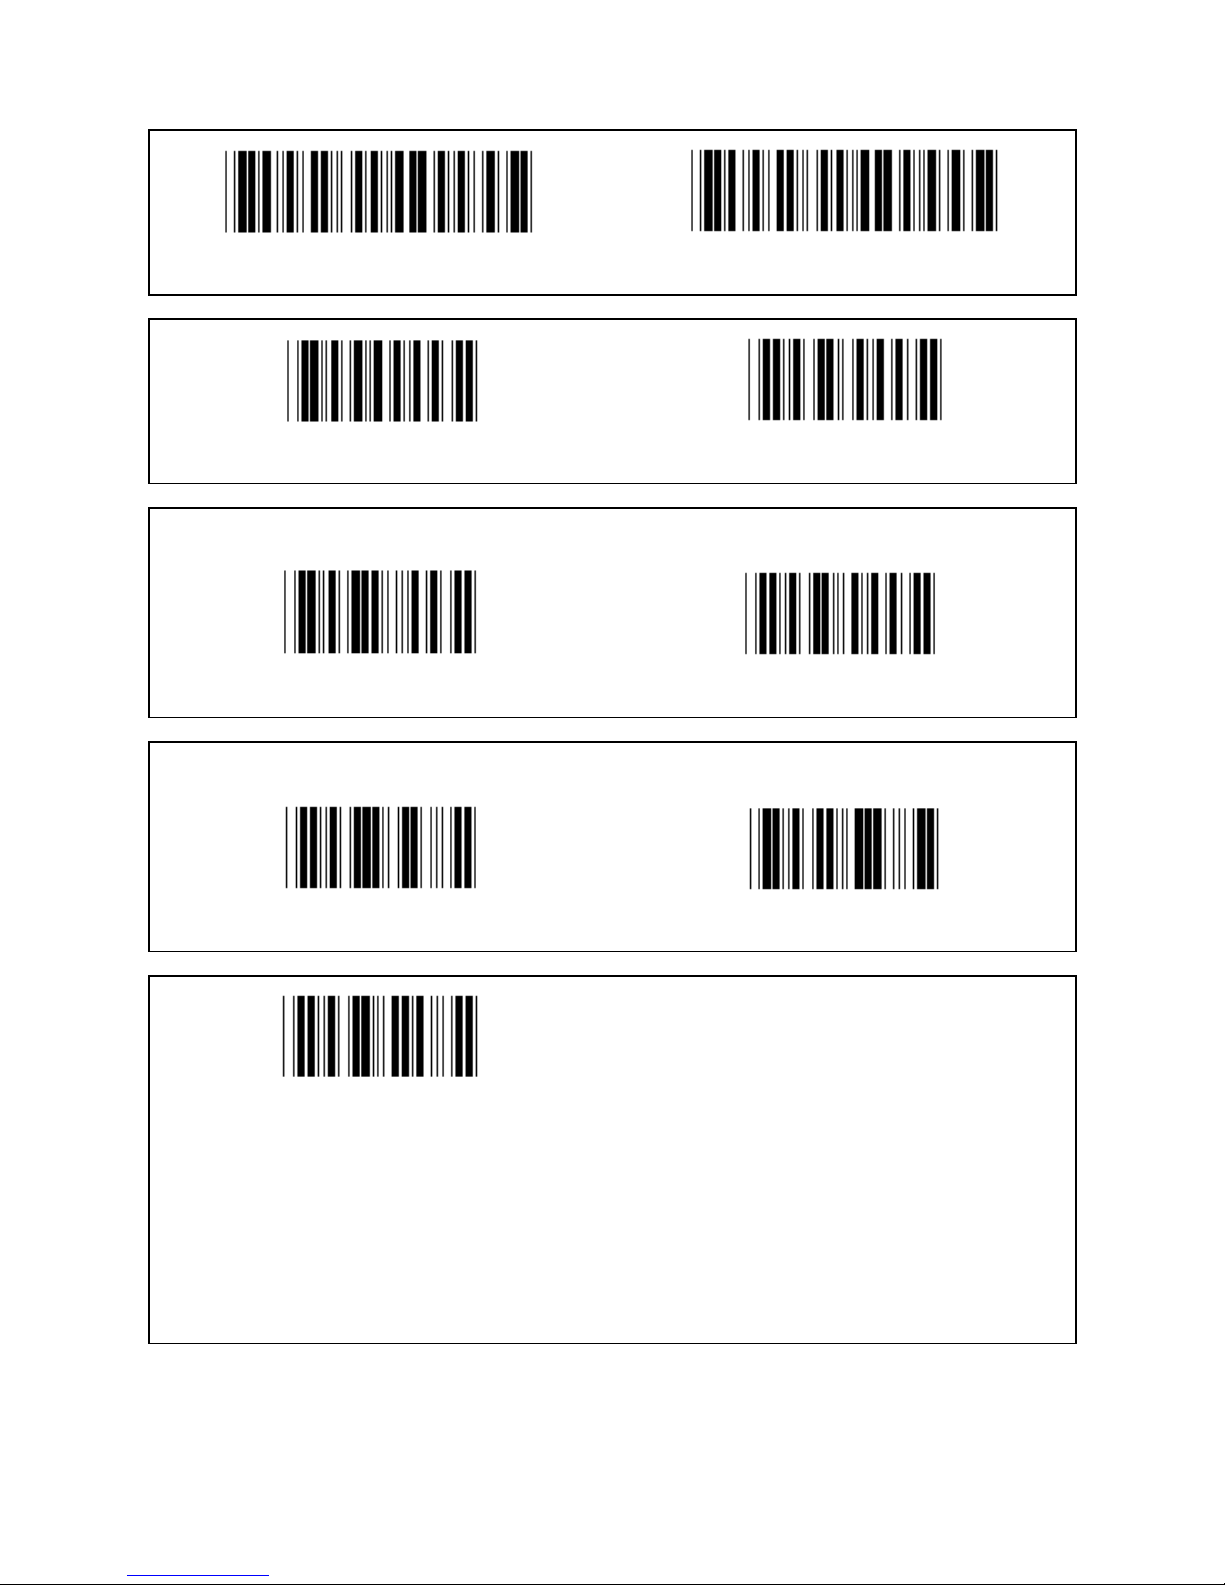
Group 0: Interface selection
Enter group Exit
Keyboard RS-232
(DTMF) (OCIA)
Reserved 2 Reserved 3
Reserved 4
Note: The interface is pre-set at the factory according to the model of the device.
Page 5
5
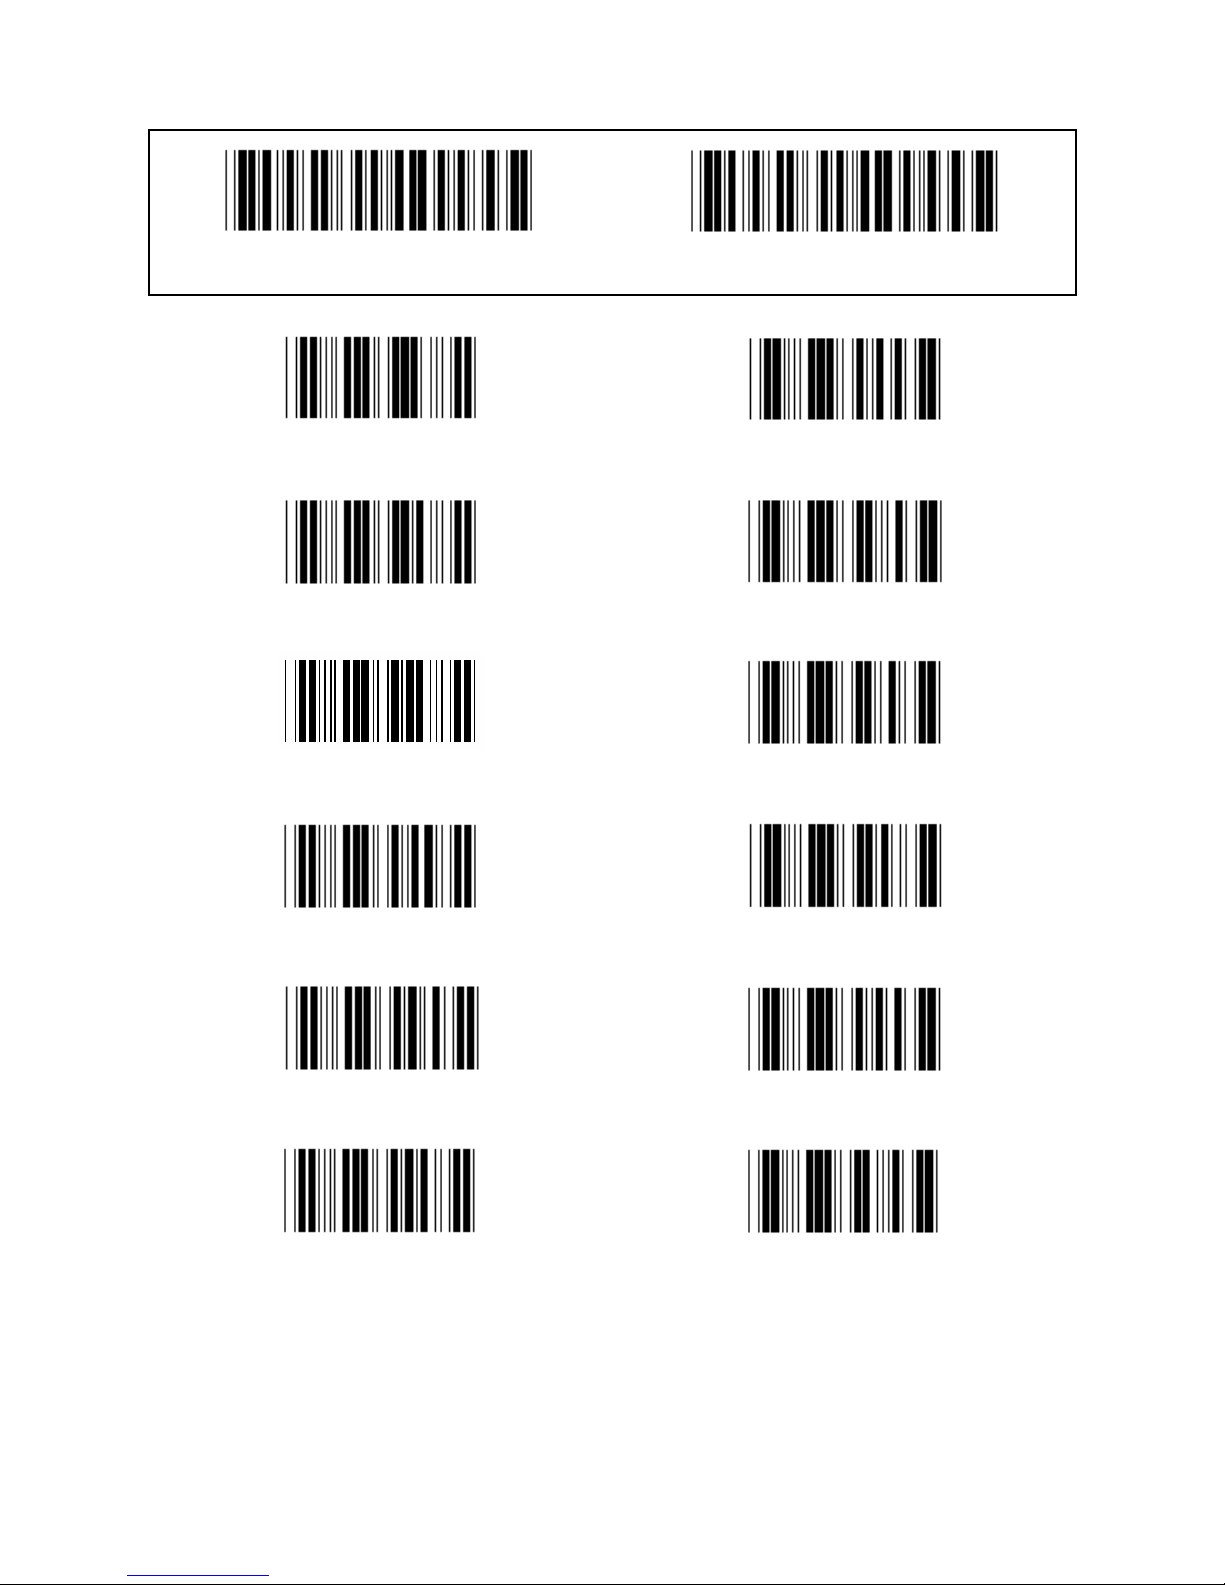
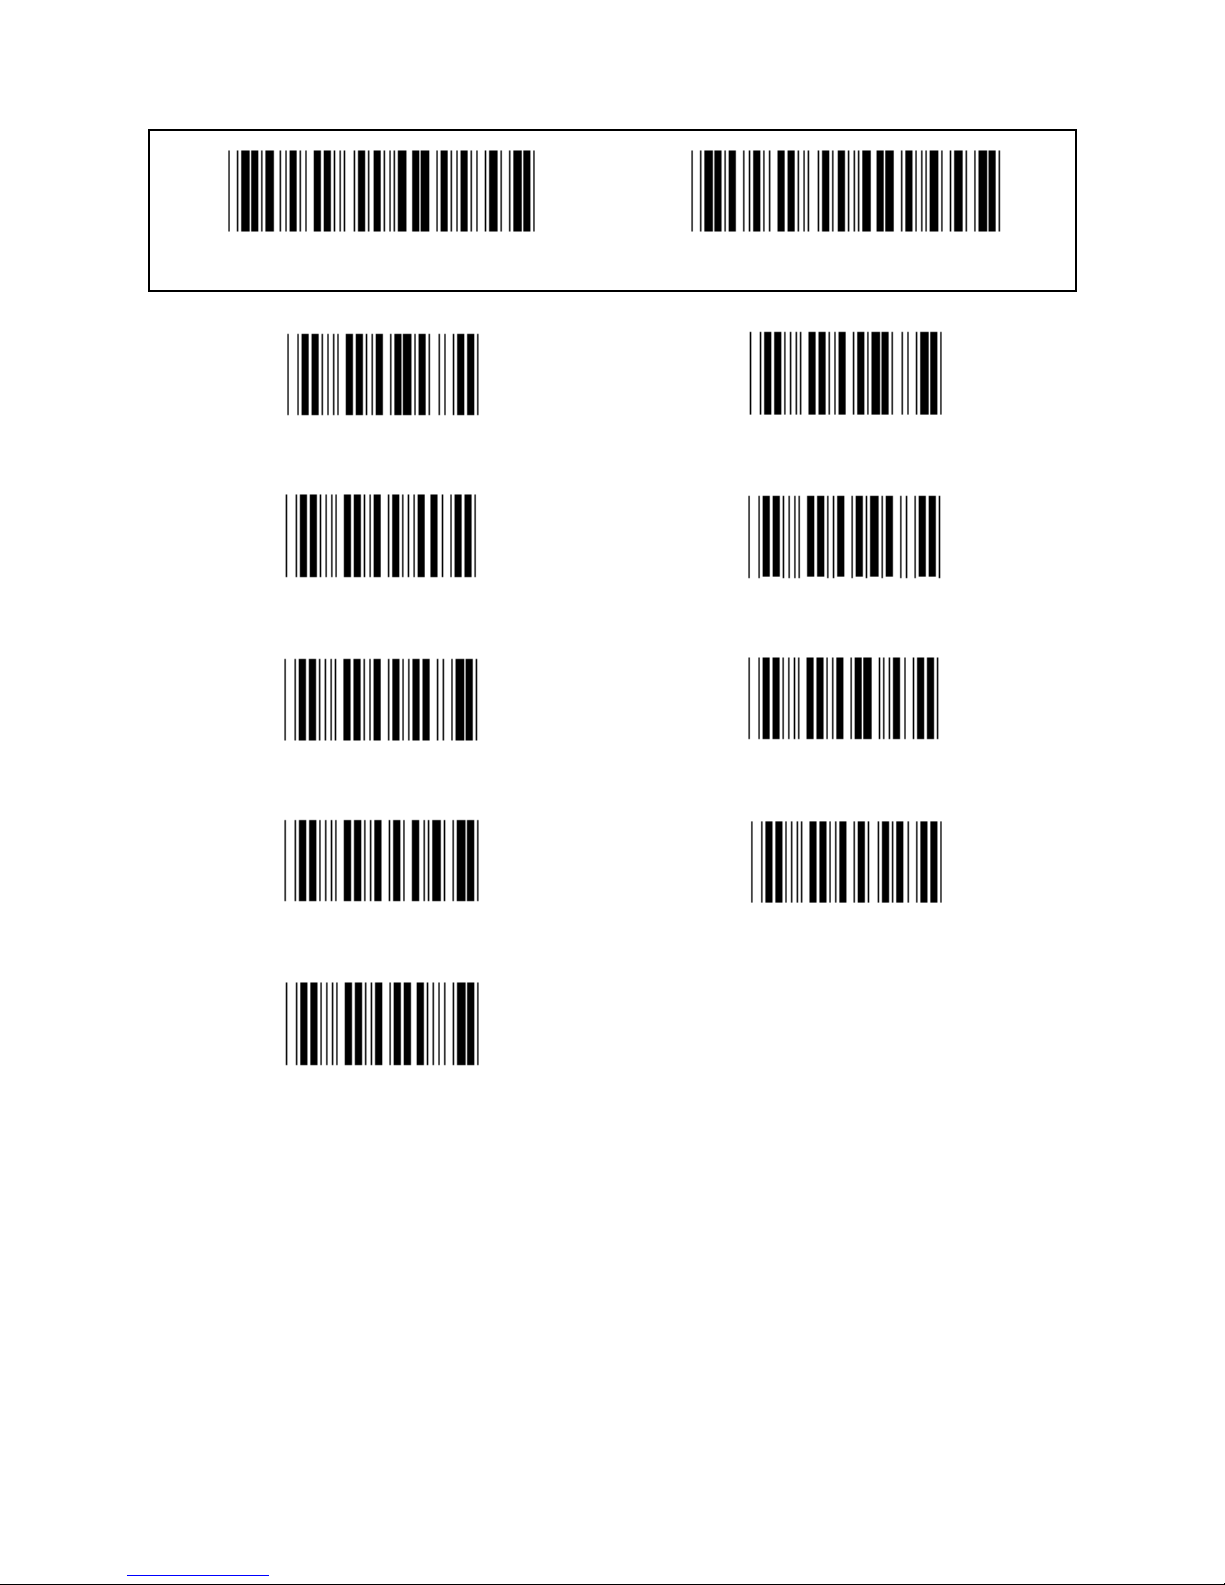
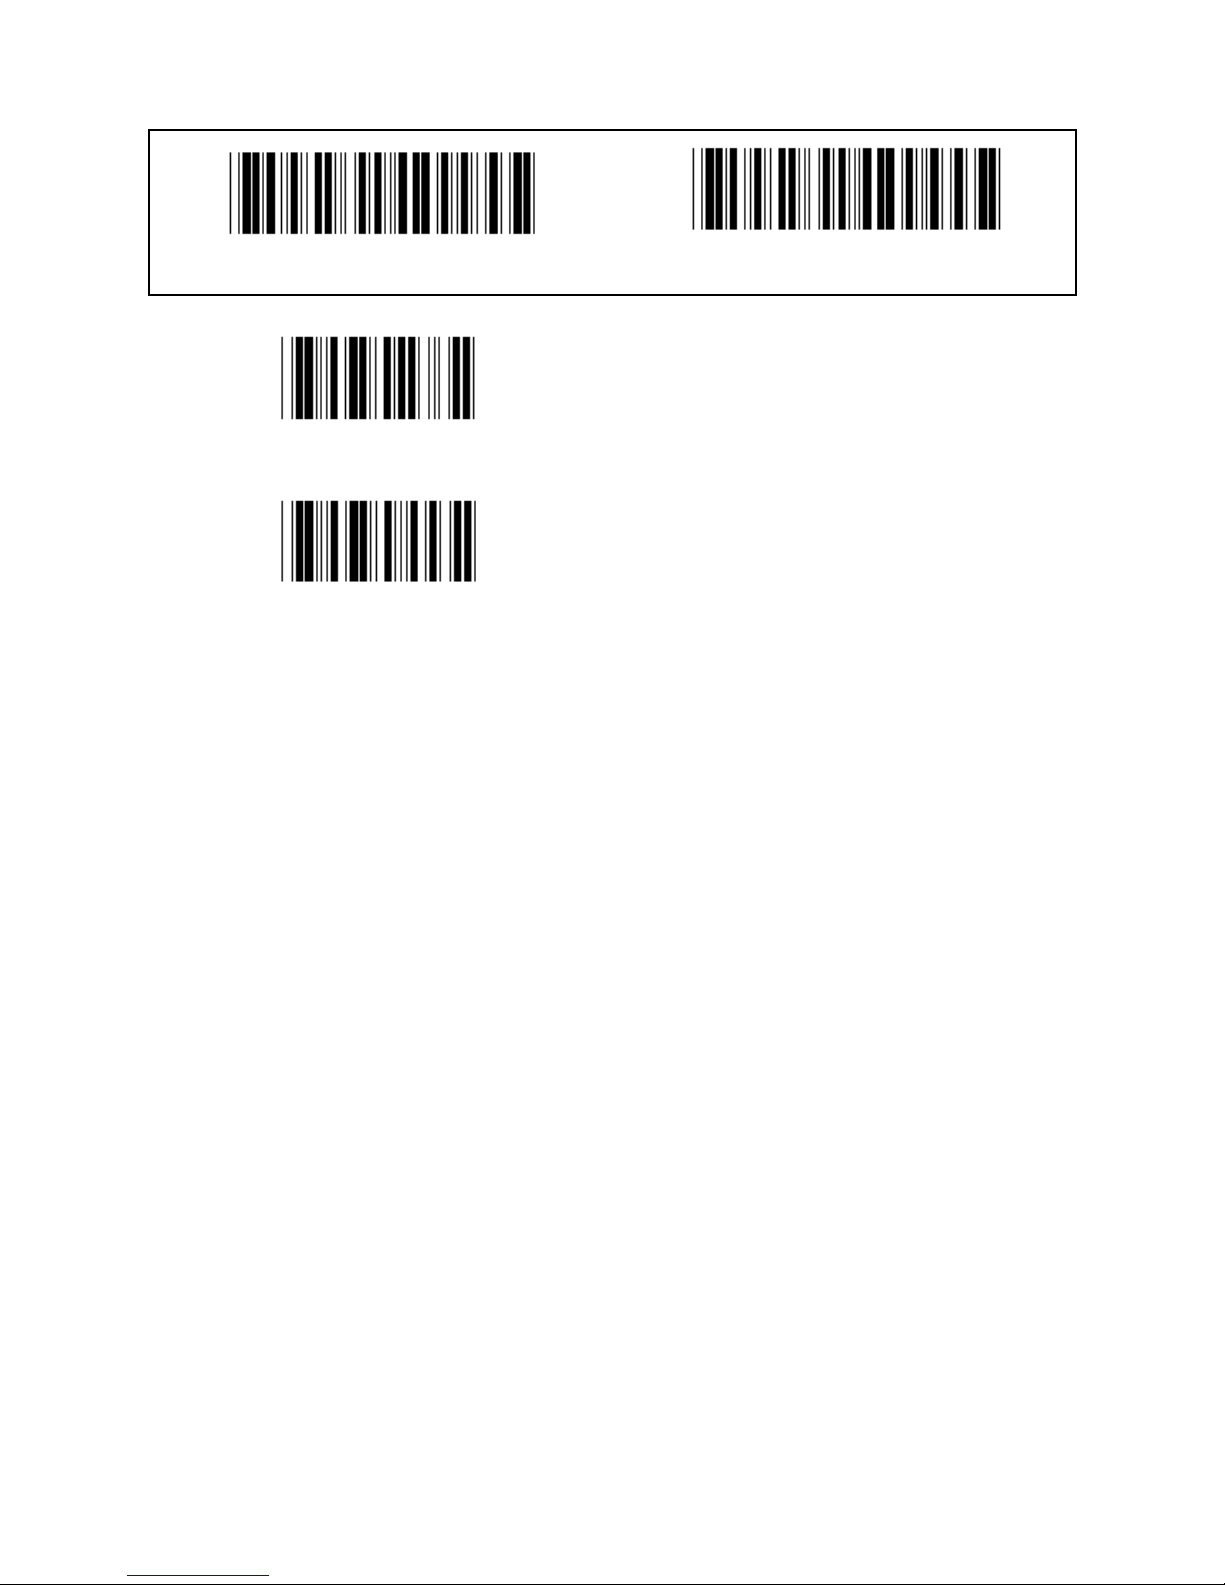
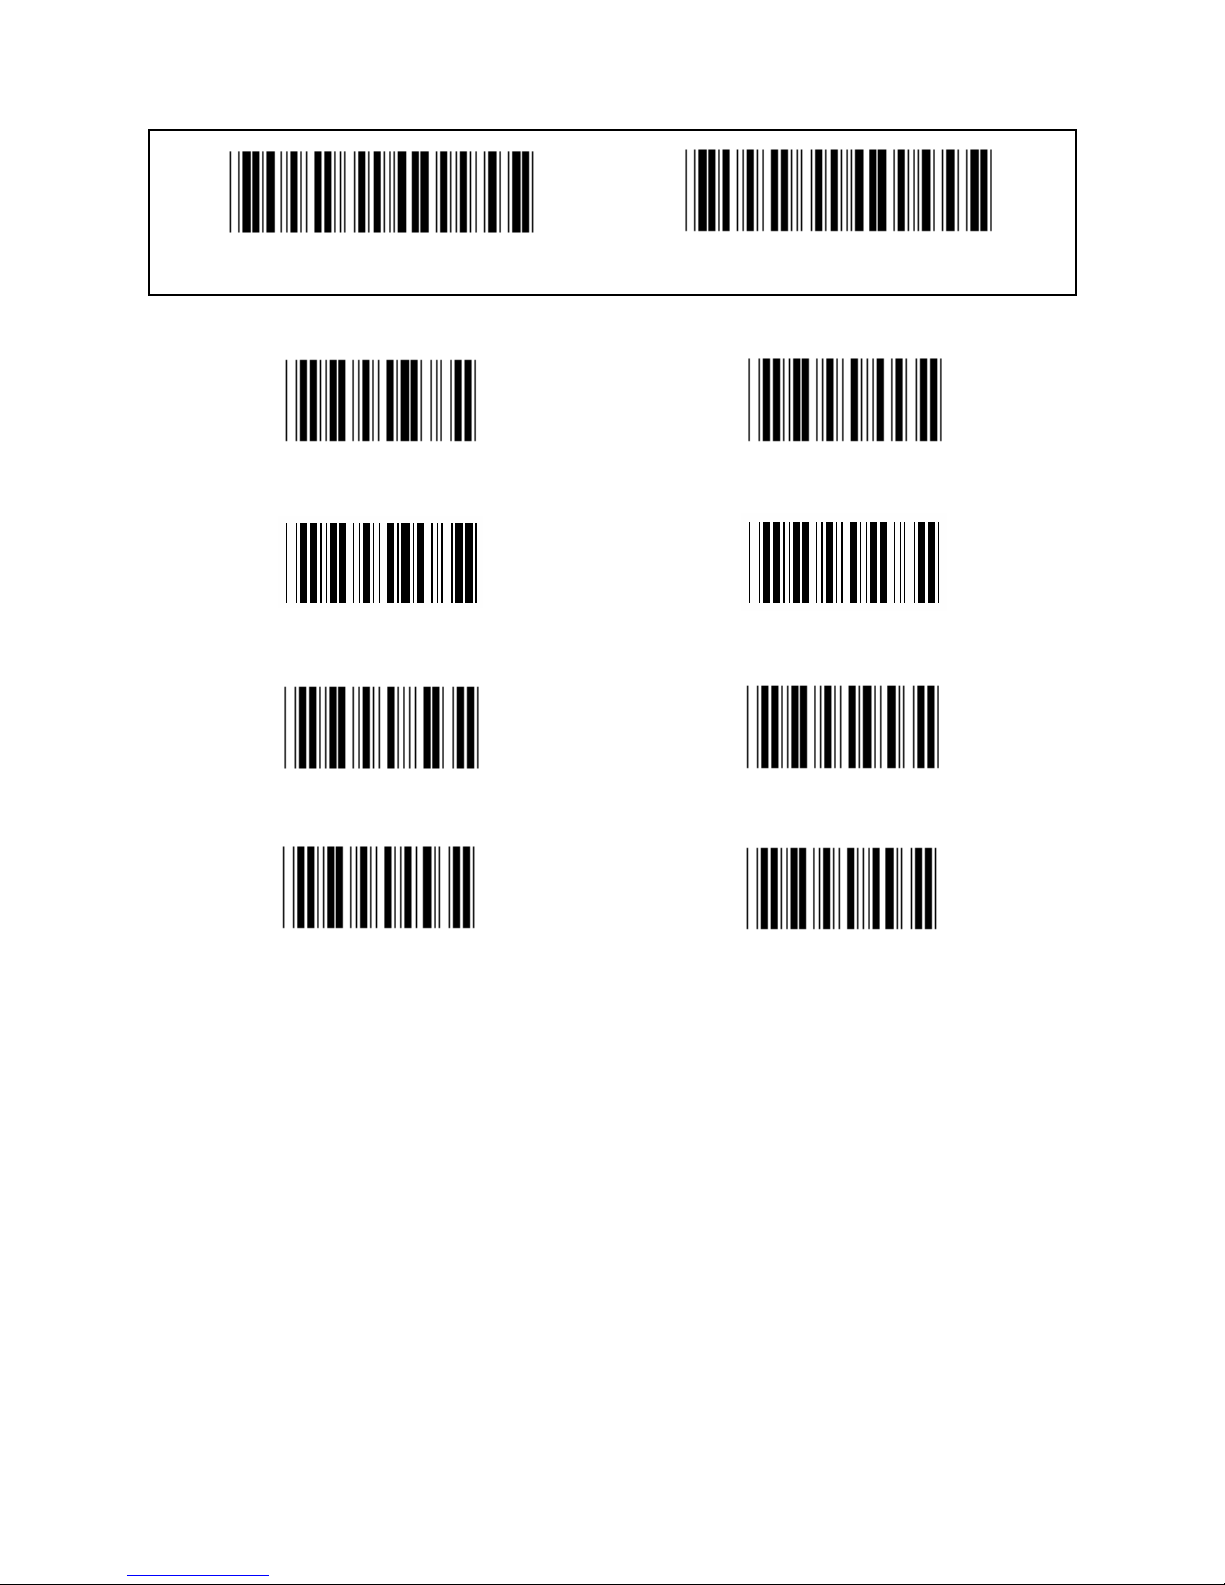
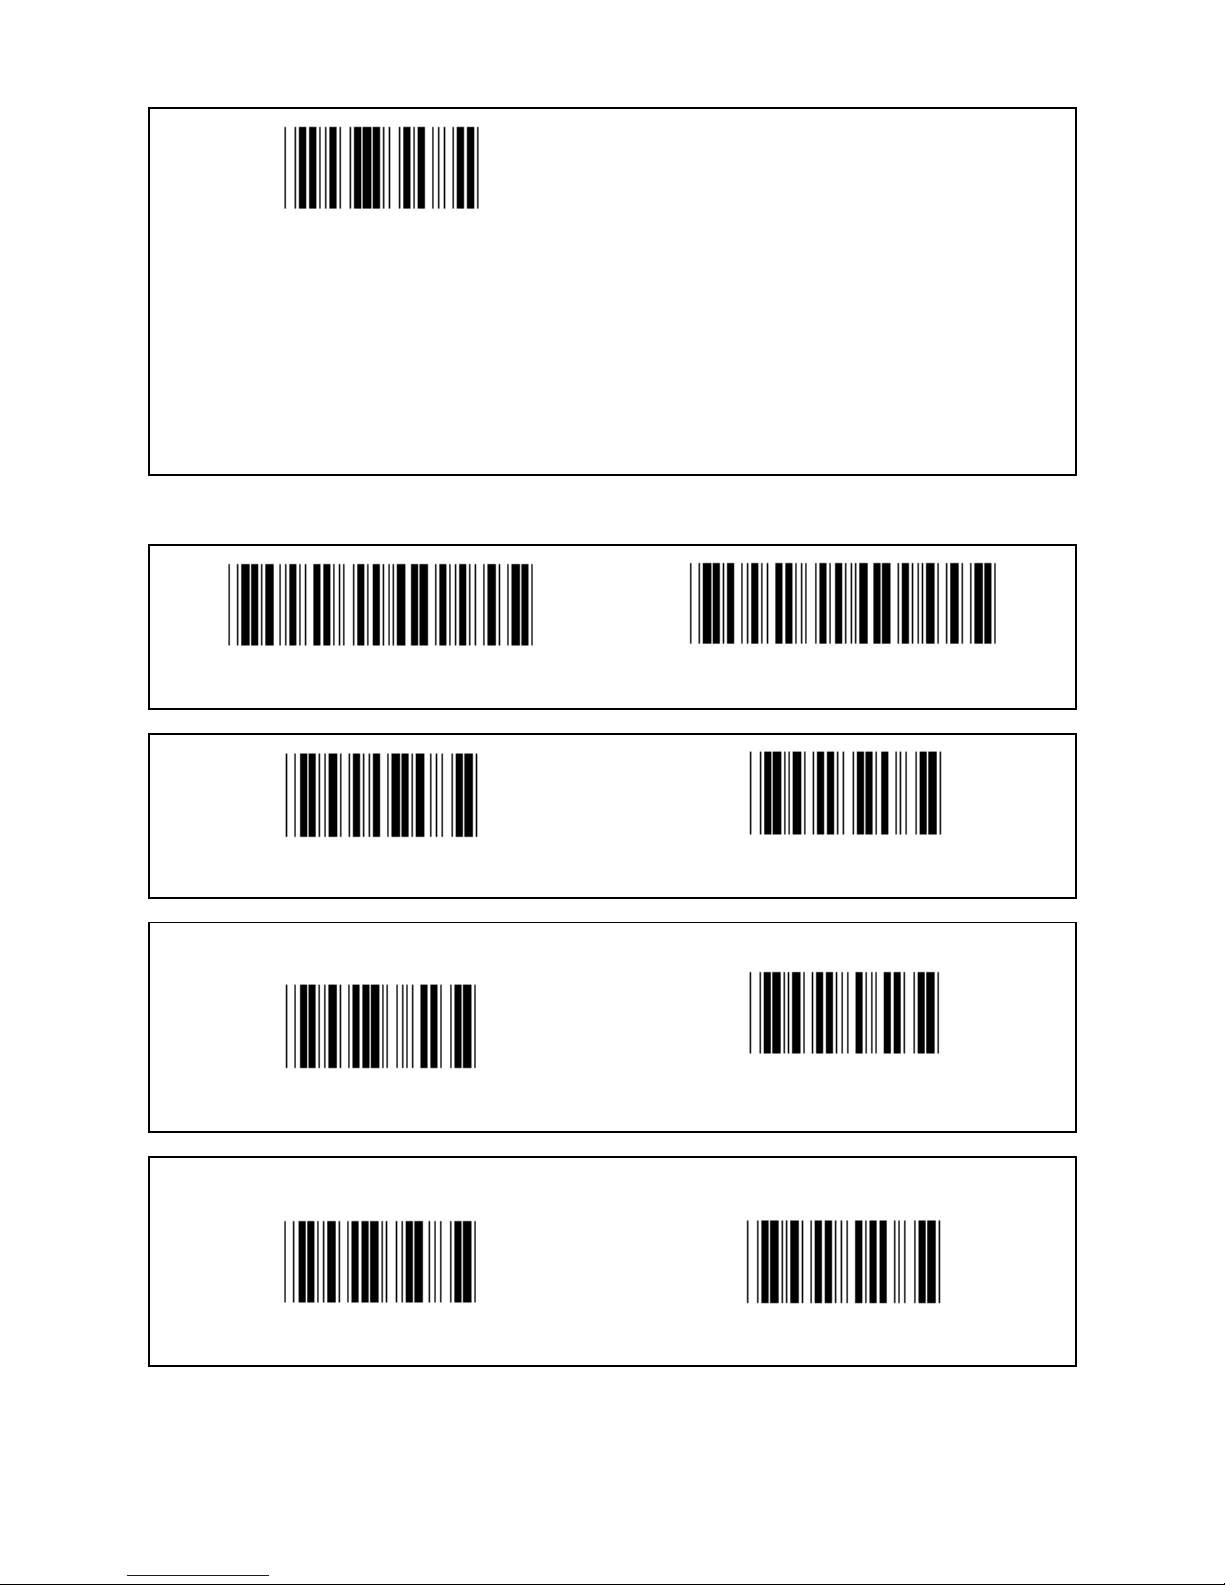
Group 1: Device selection for keyboard interface
Enter group Exit
PC/AT, PS/2 (*) Reserved A
Reserved B Reserved C
Reserved D Reserved E
Reserved F Reserved G
Reserved H Reserved I
Reserved J Reserved K
Note: Options marked by ( ) are only available upon request.
Page 6

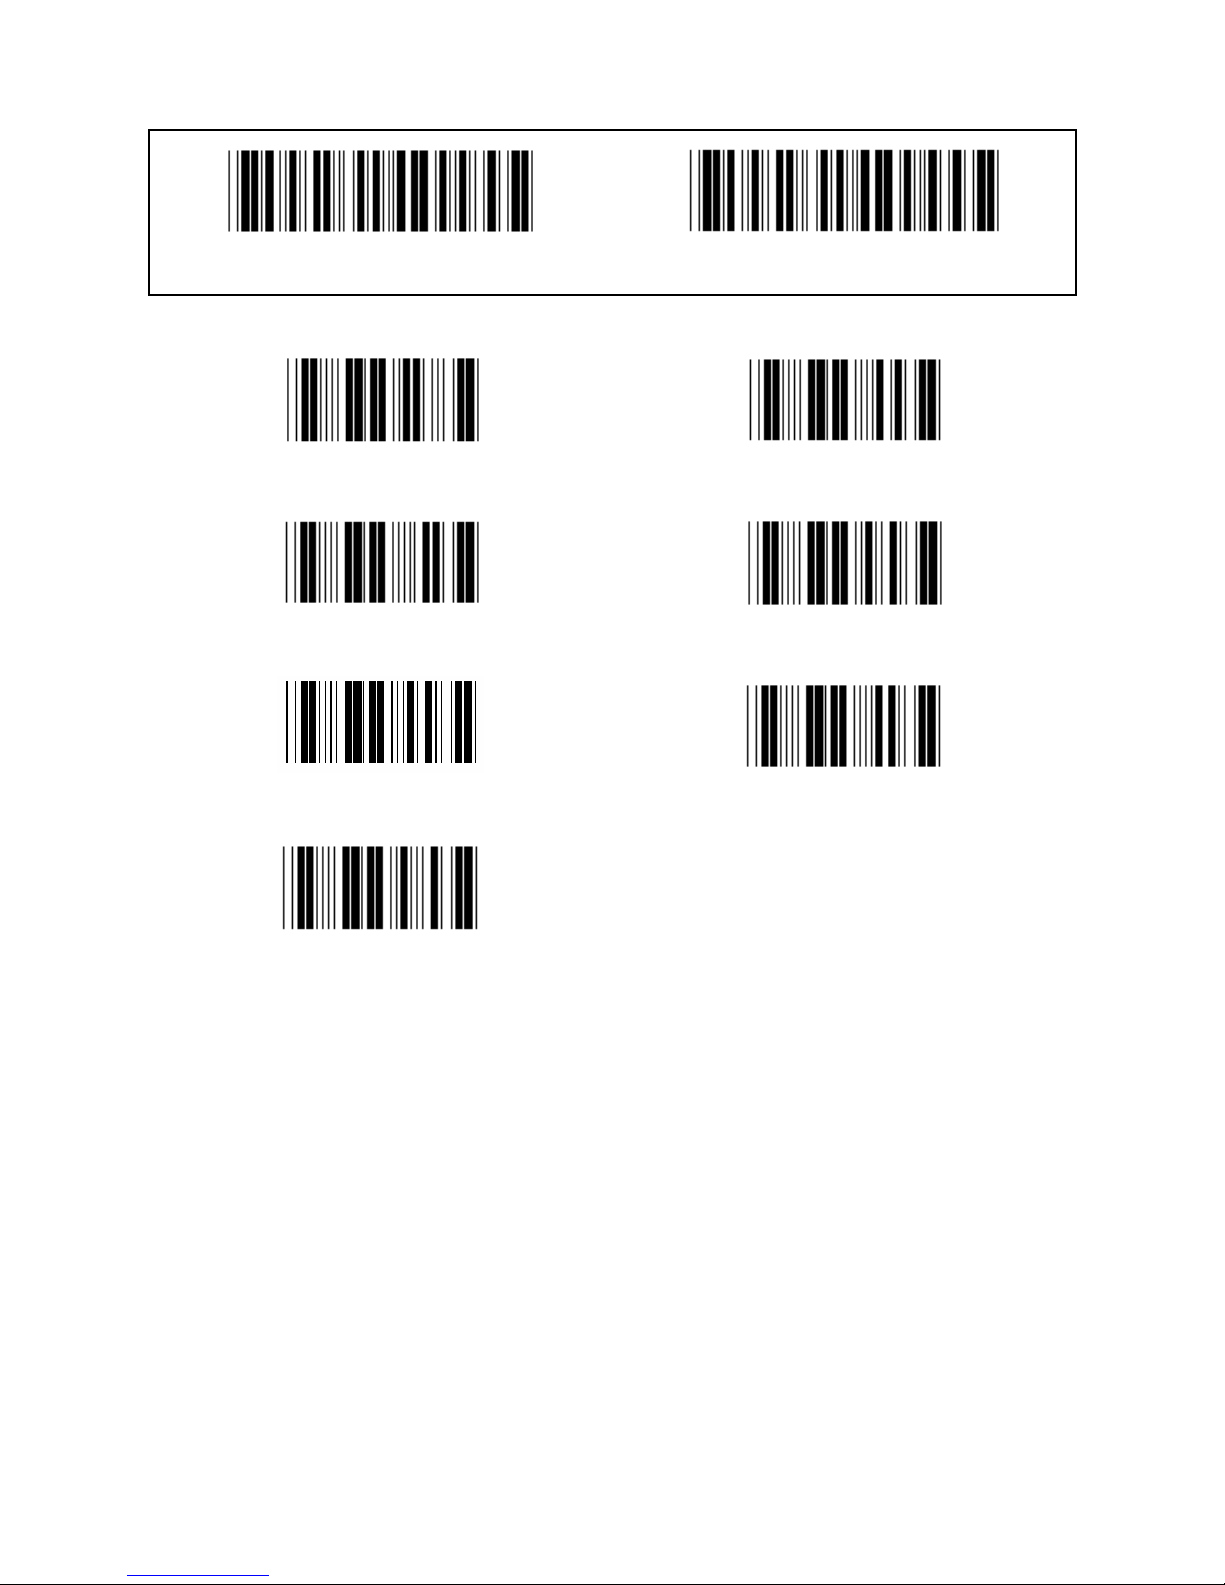
6
Group 1: Device selection for keyboard interface
Enter group Exit
Reserved L Reserved M
Reserved N Reserved O
Reserved P Reserved Q
Reserved R Reserved S
Reserved T Reserved U
Reserved V Reserved W
Page 7
7
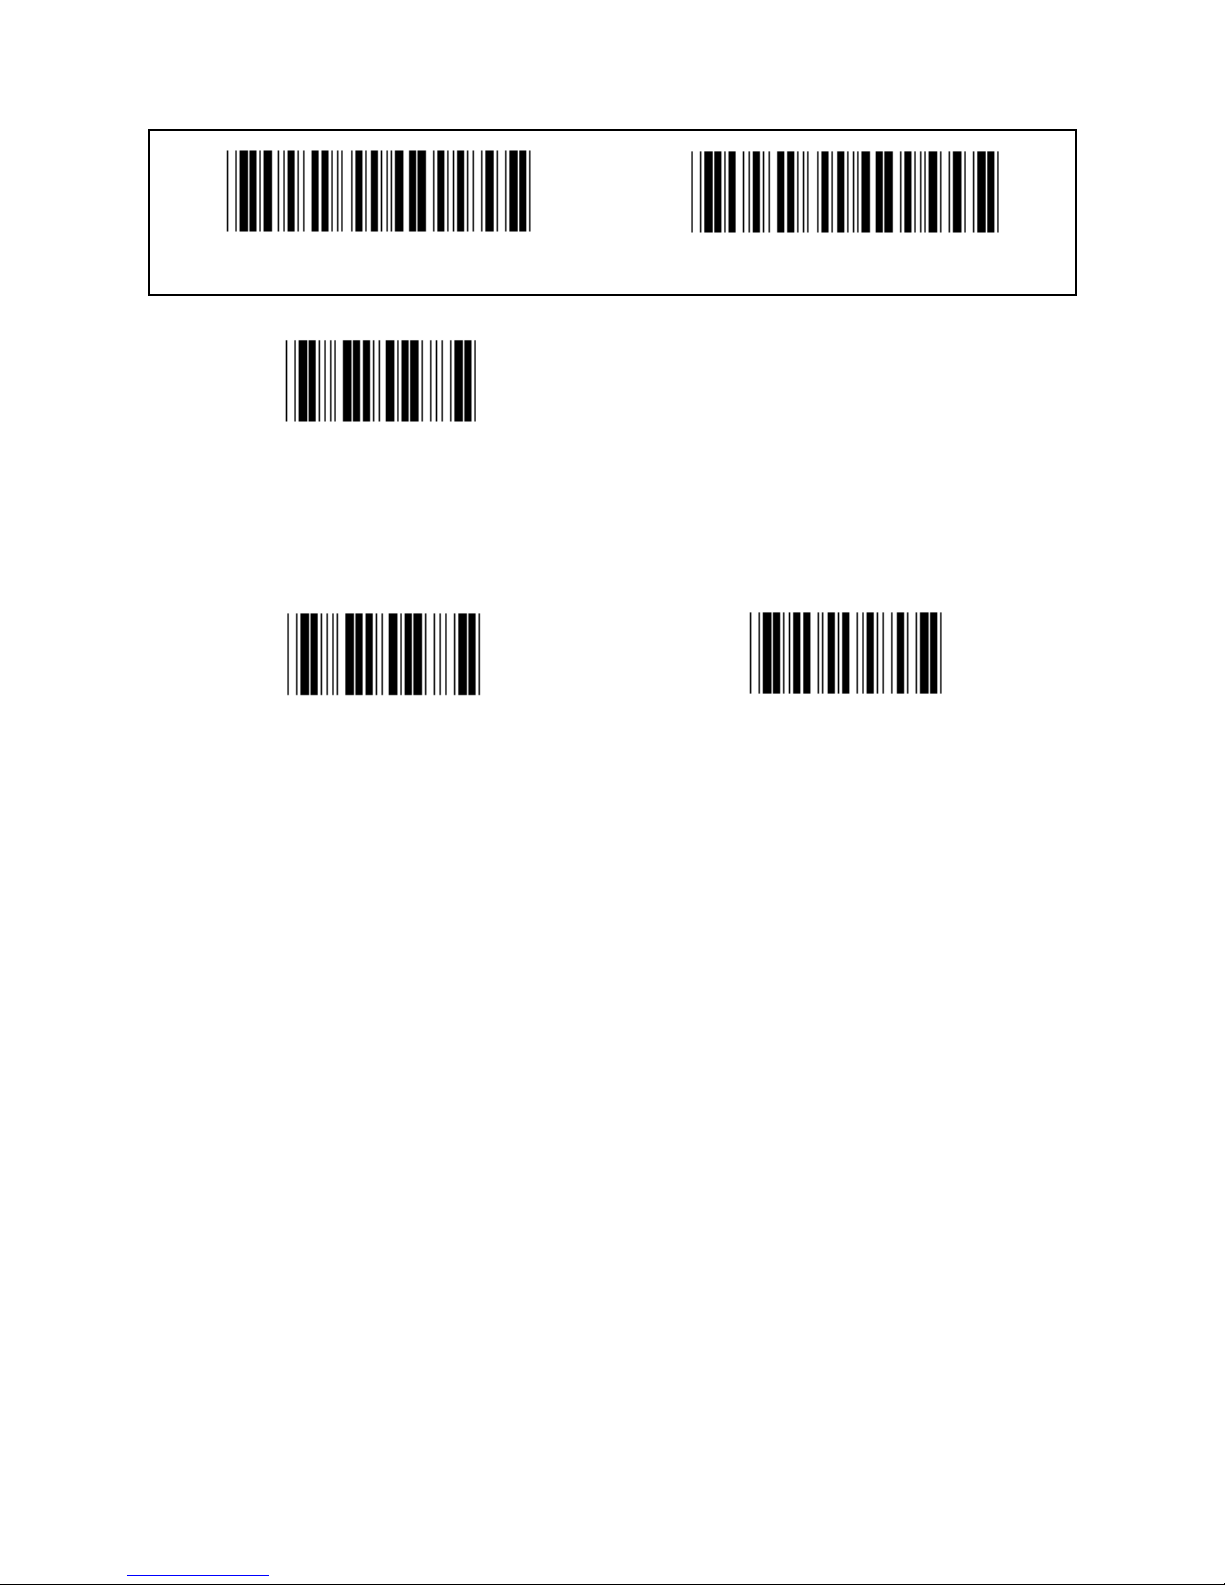
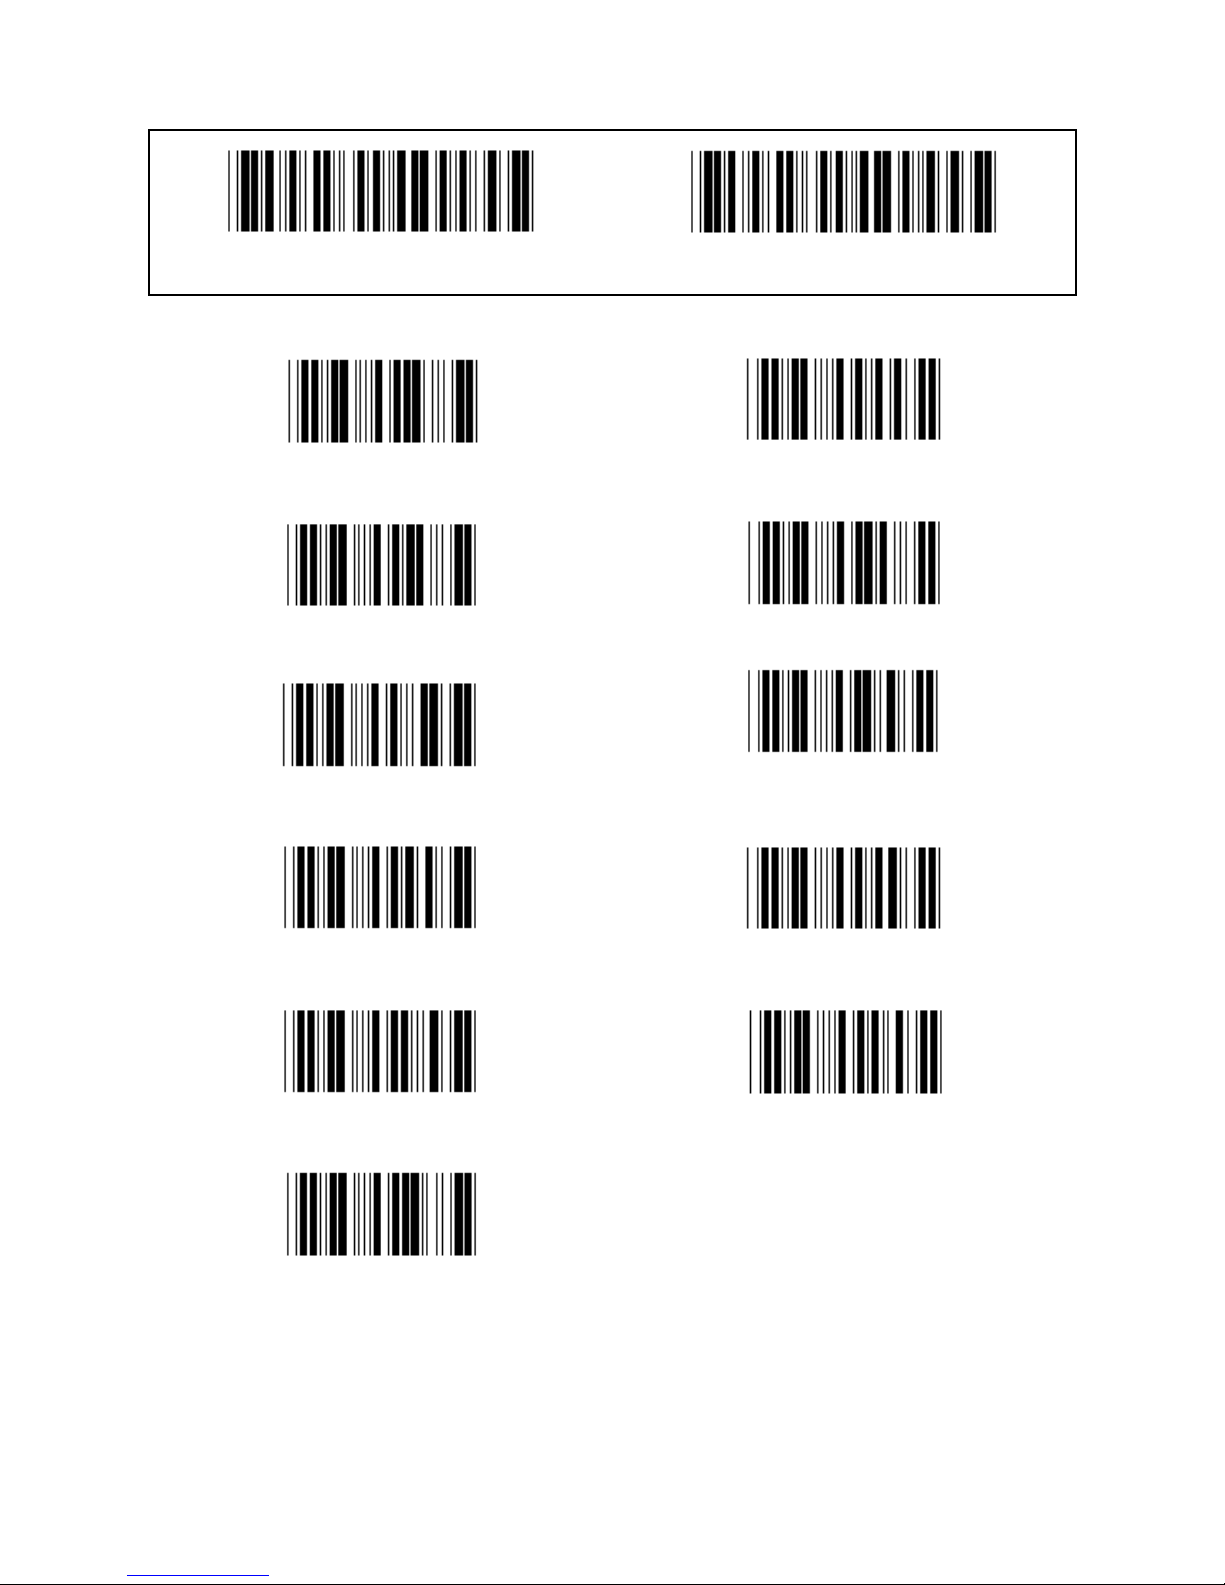
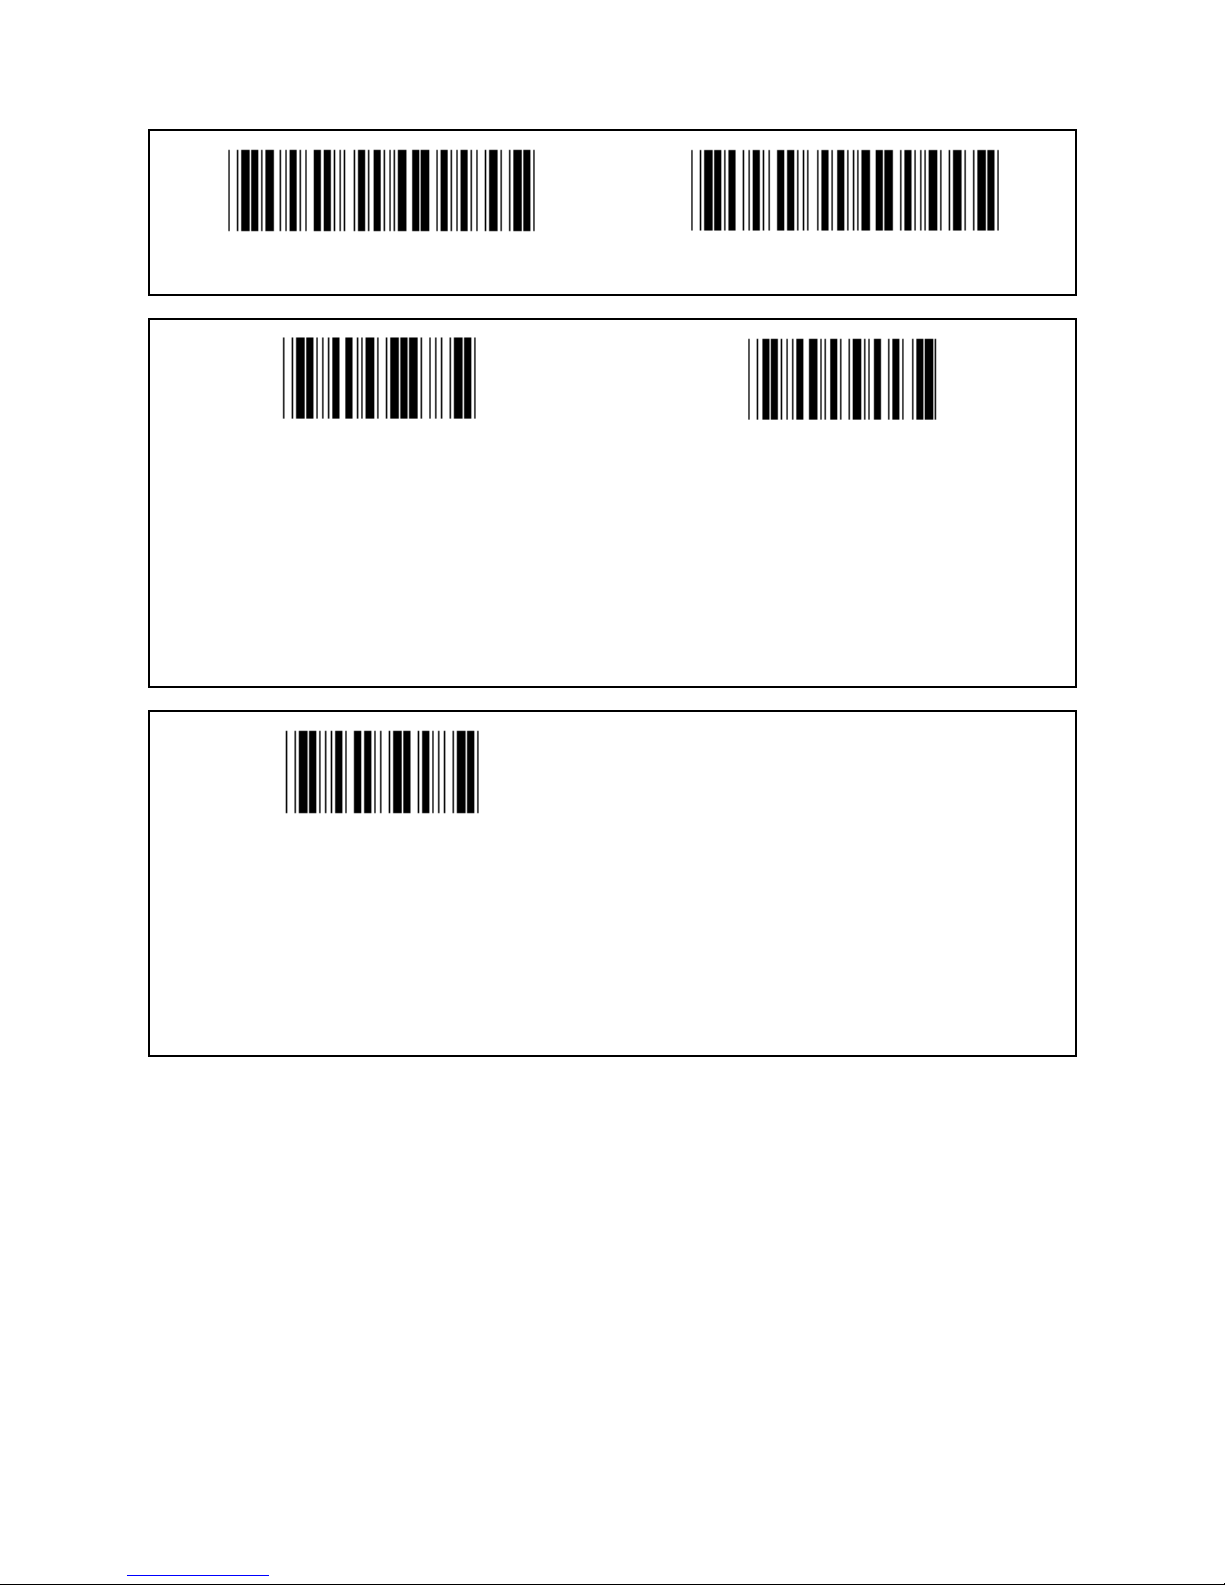
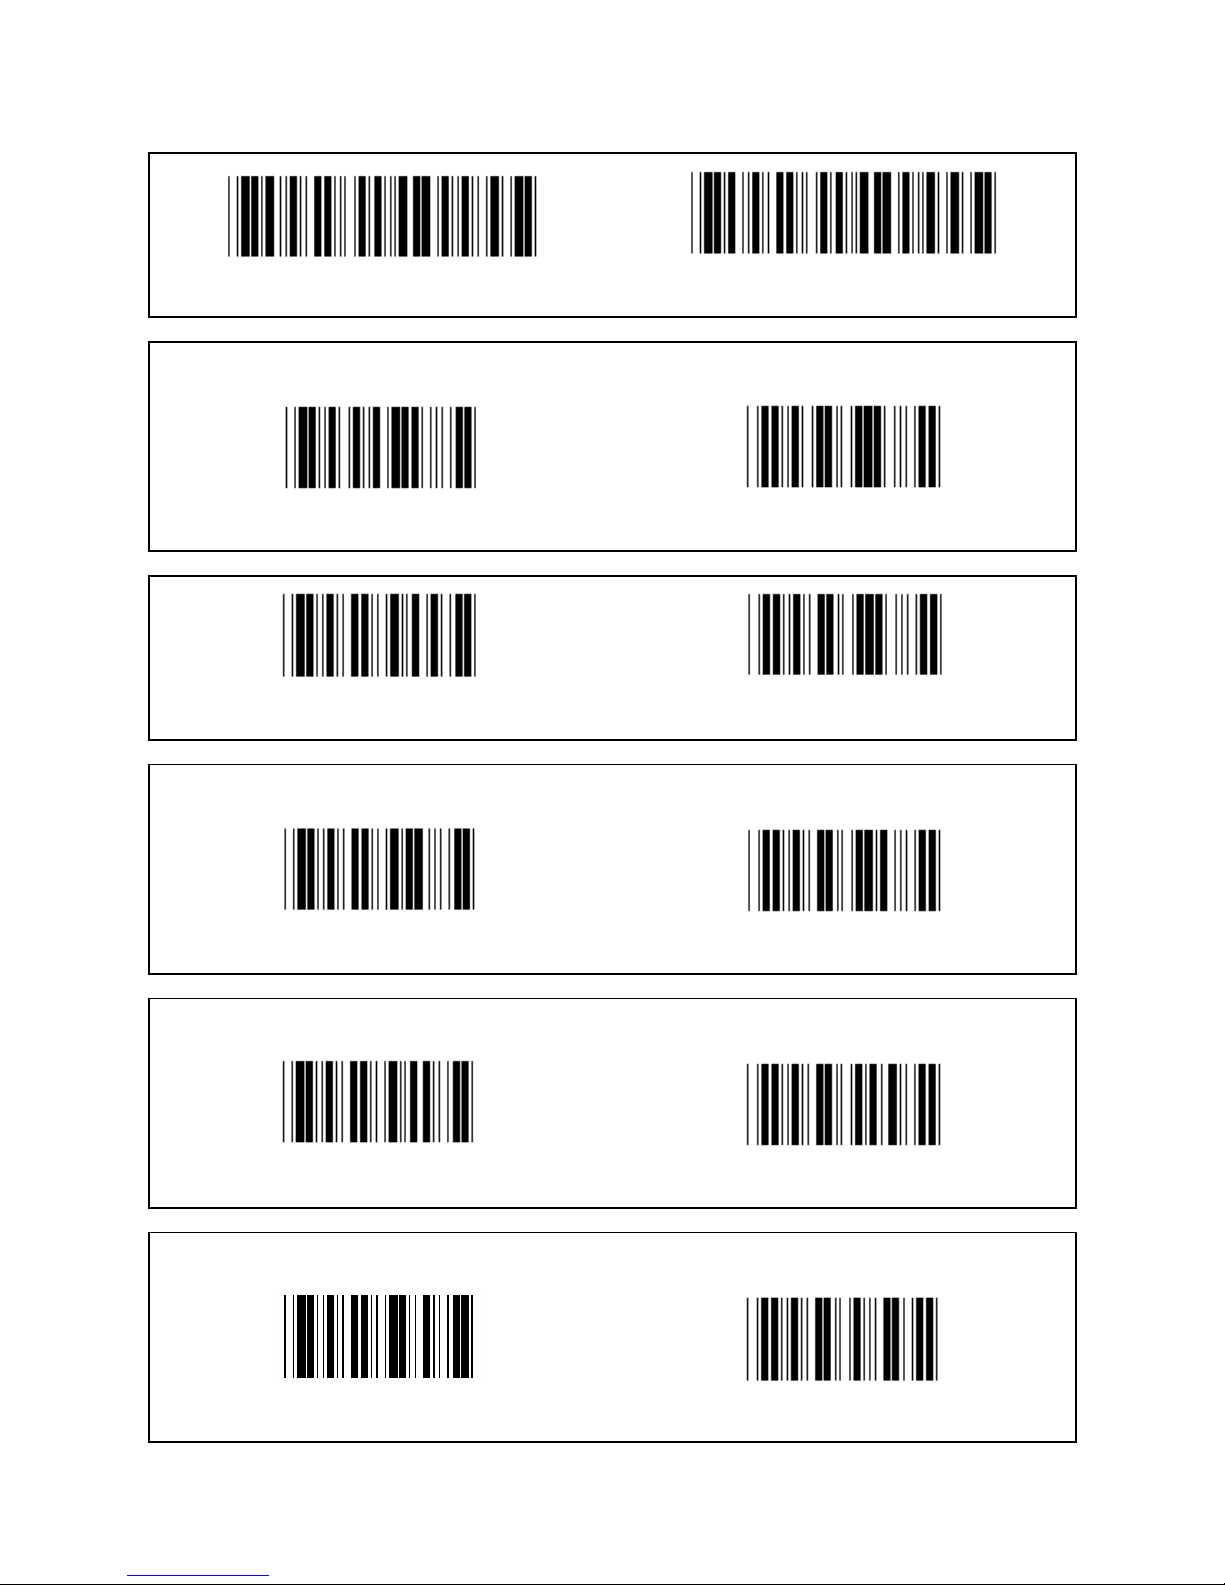
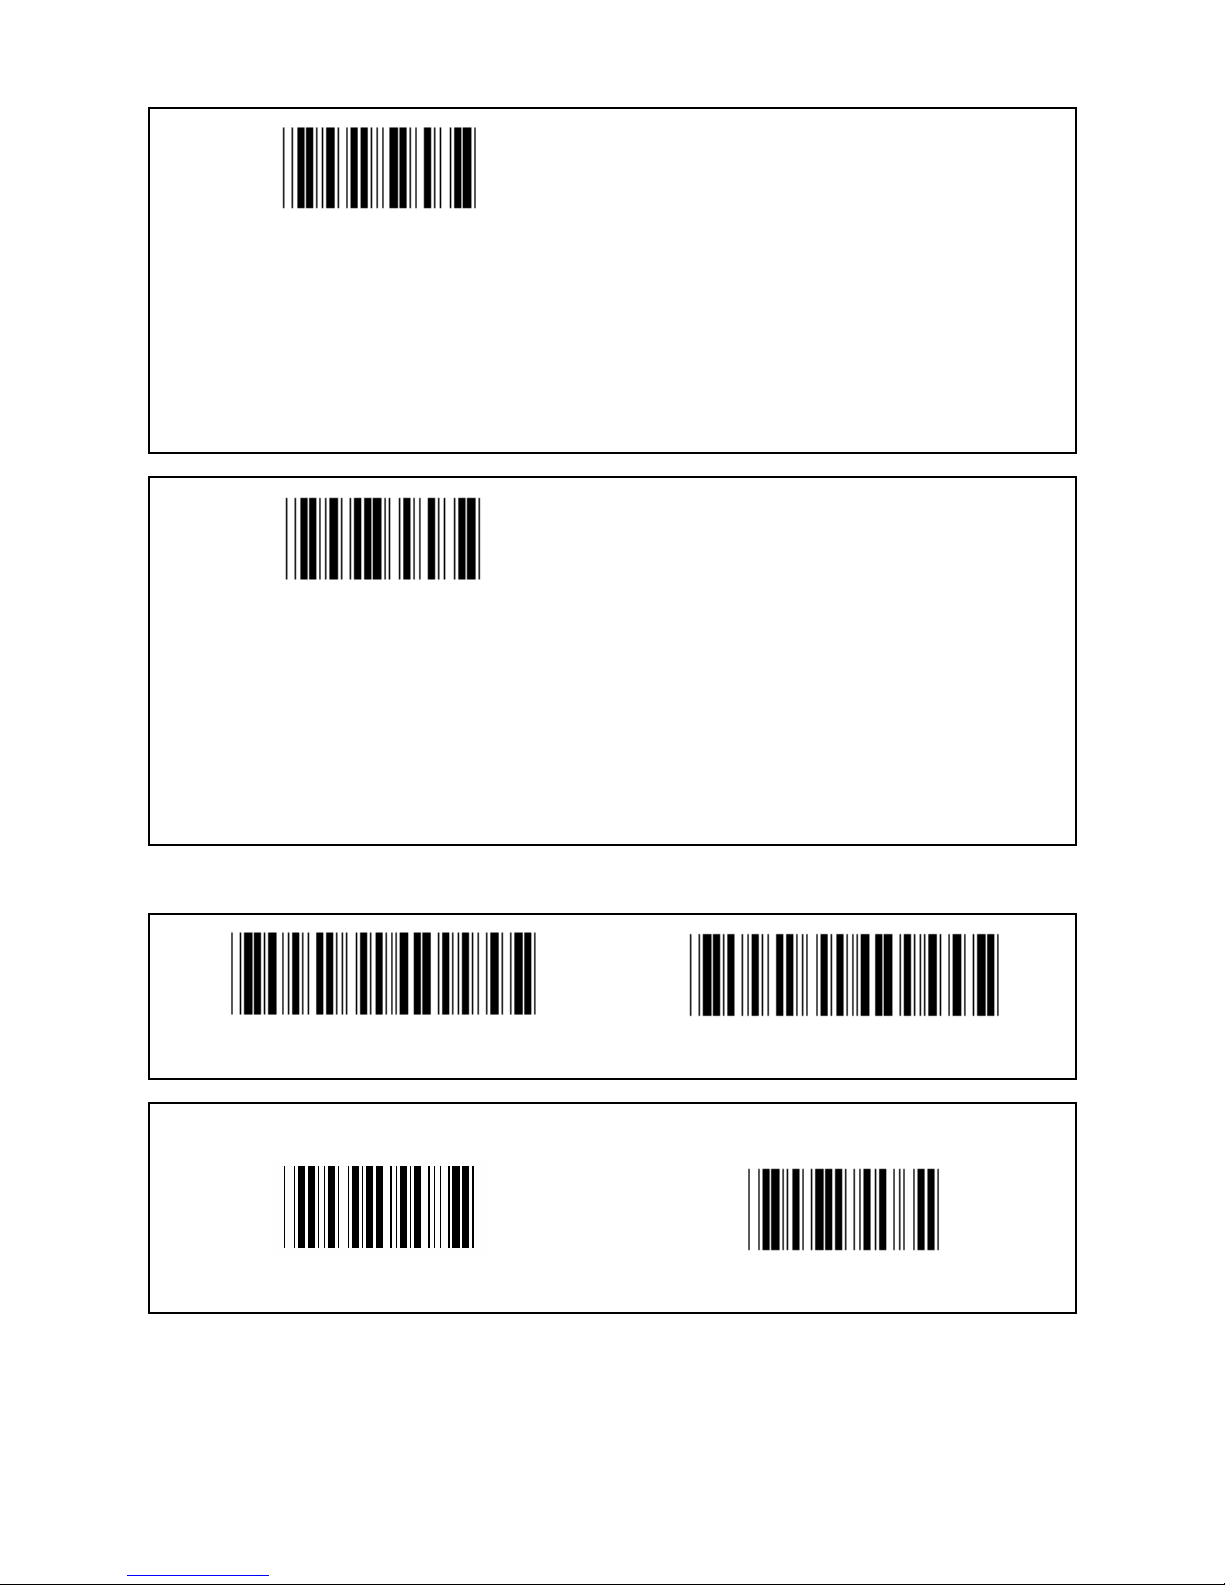
Group 2: Intercharacter delay
Enter group Exit
Start keyboard setting
1.) Scan the enter group 2 label.
2.) Scan the start keyboard (or RS-232/USB) setting label.
3.) Scan the two digits labels in Table-Hex.
4.) Scan the Confirm label in Table-Hex.
Start USB setting Start RS-232 setting
Keyboard default value: 05
RS-232 default value: 00
USB default value: 05
Page 8
8
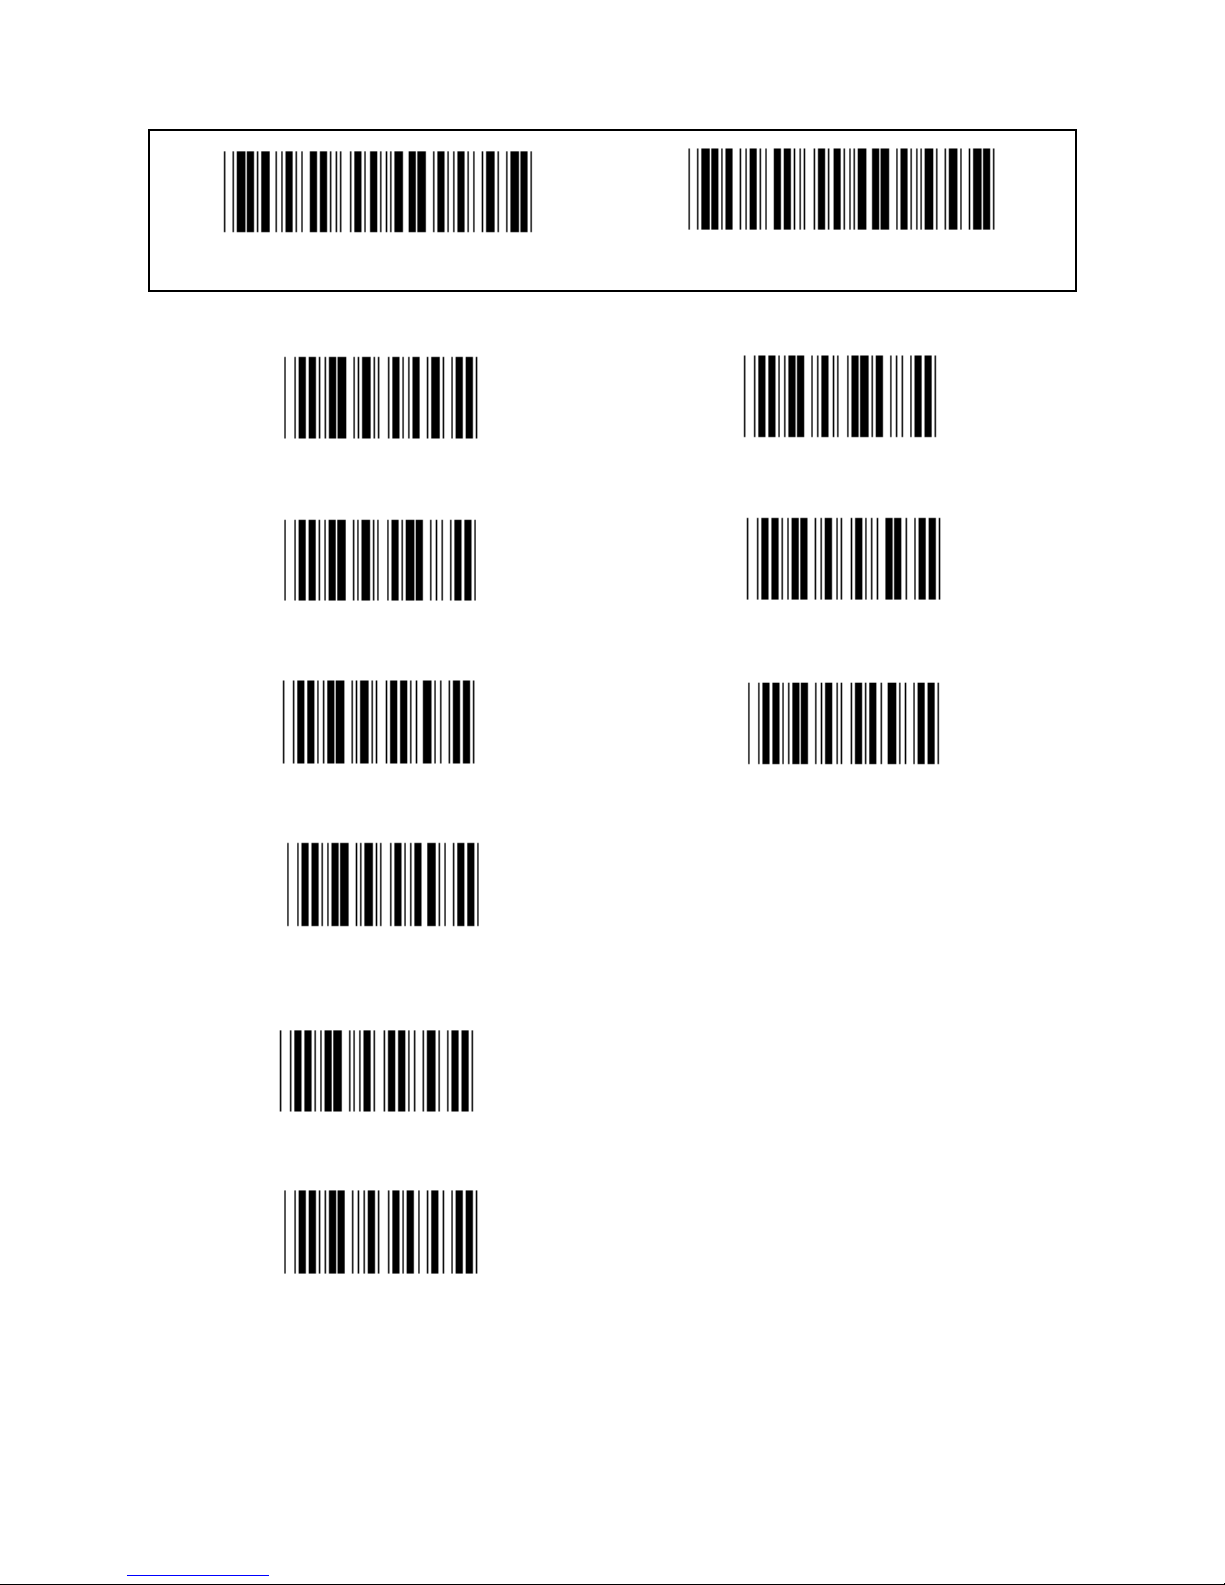
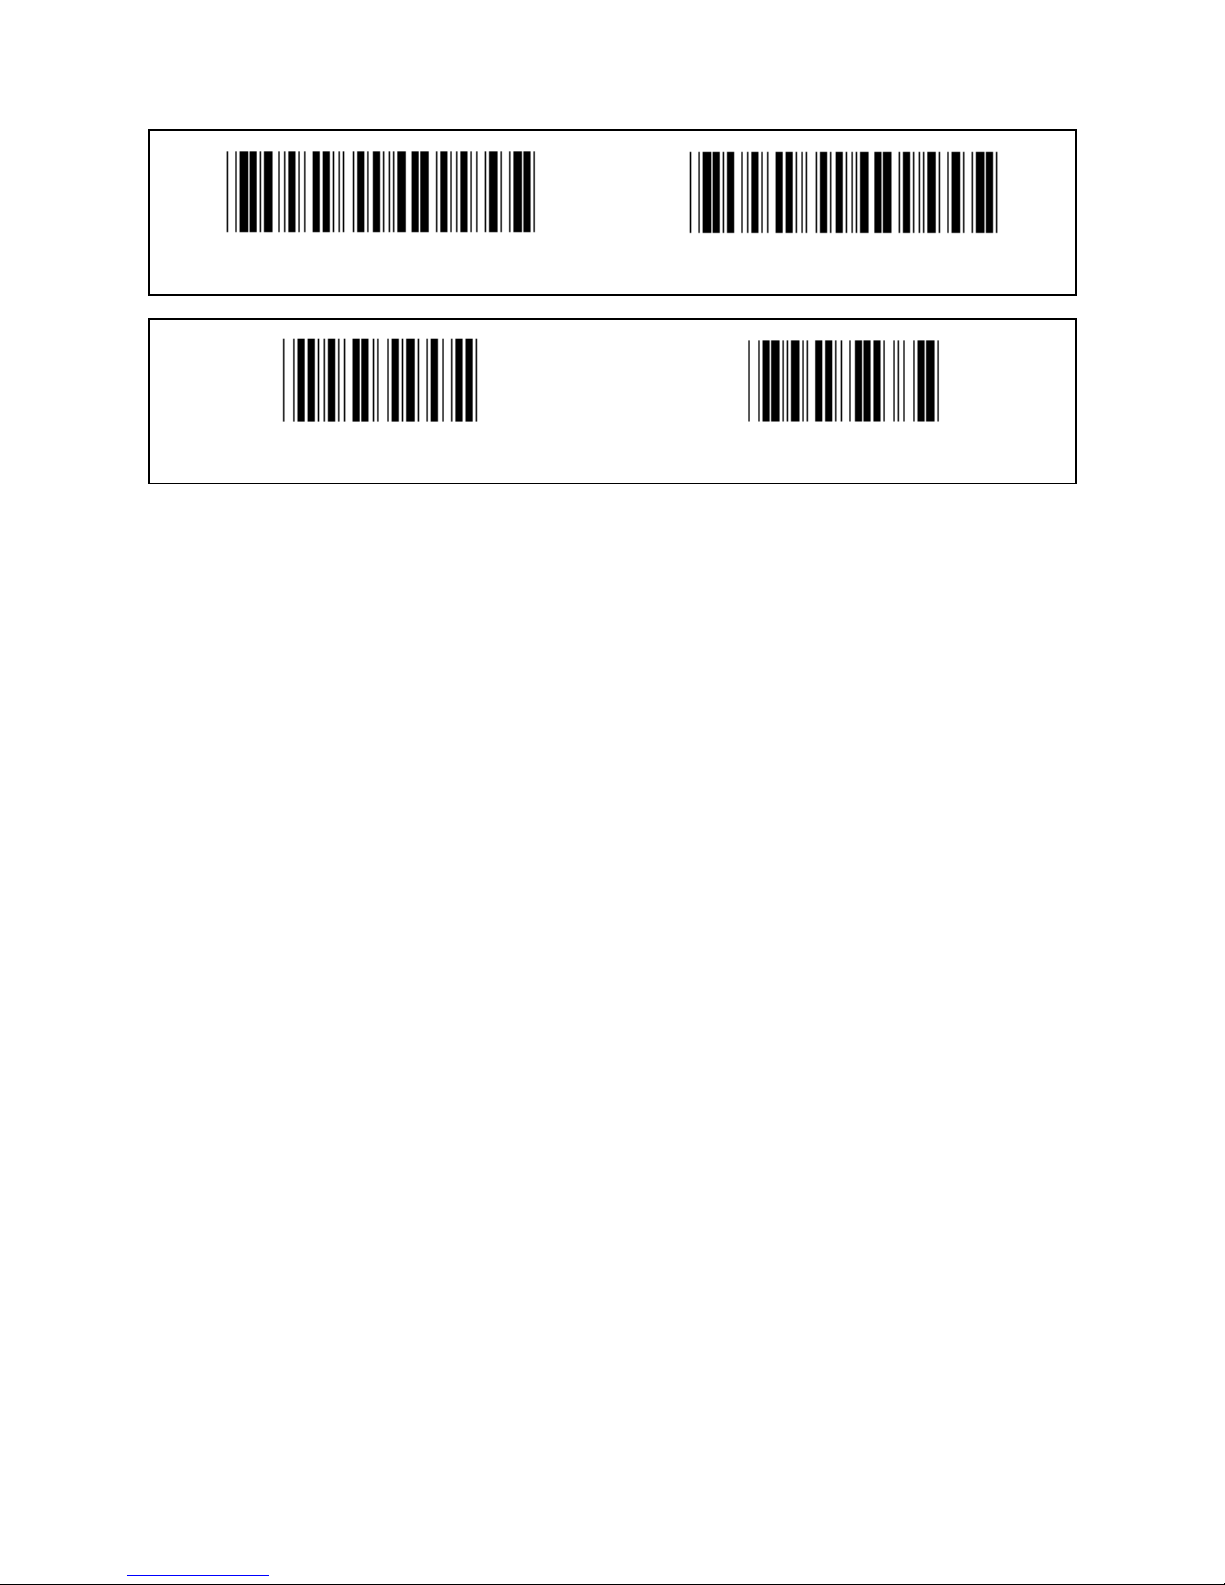
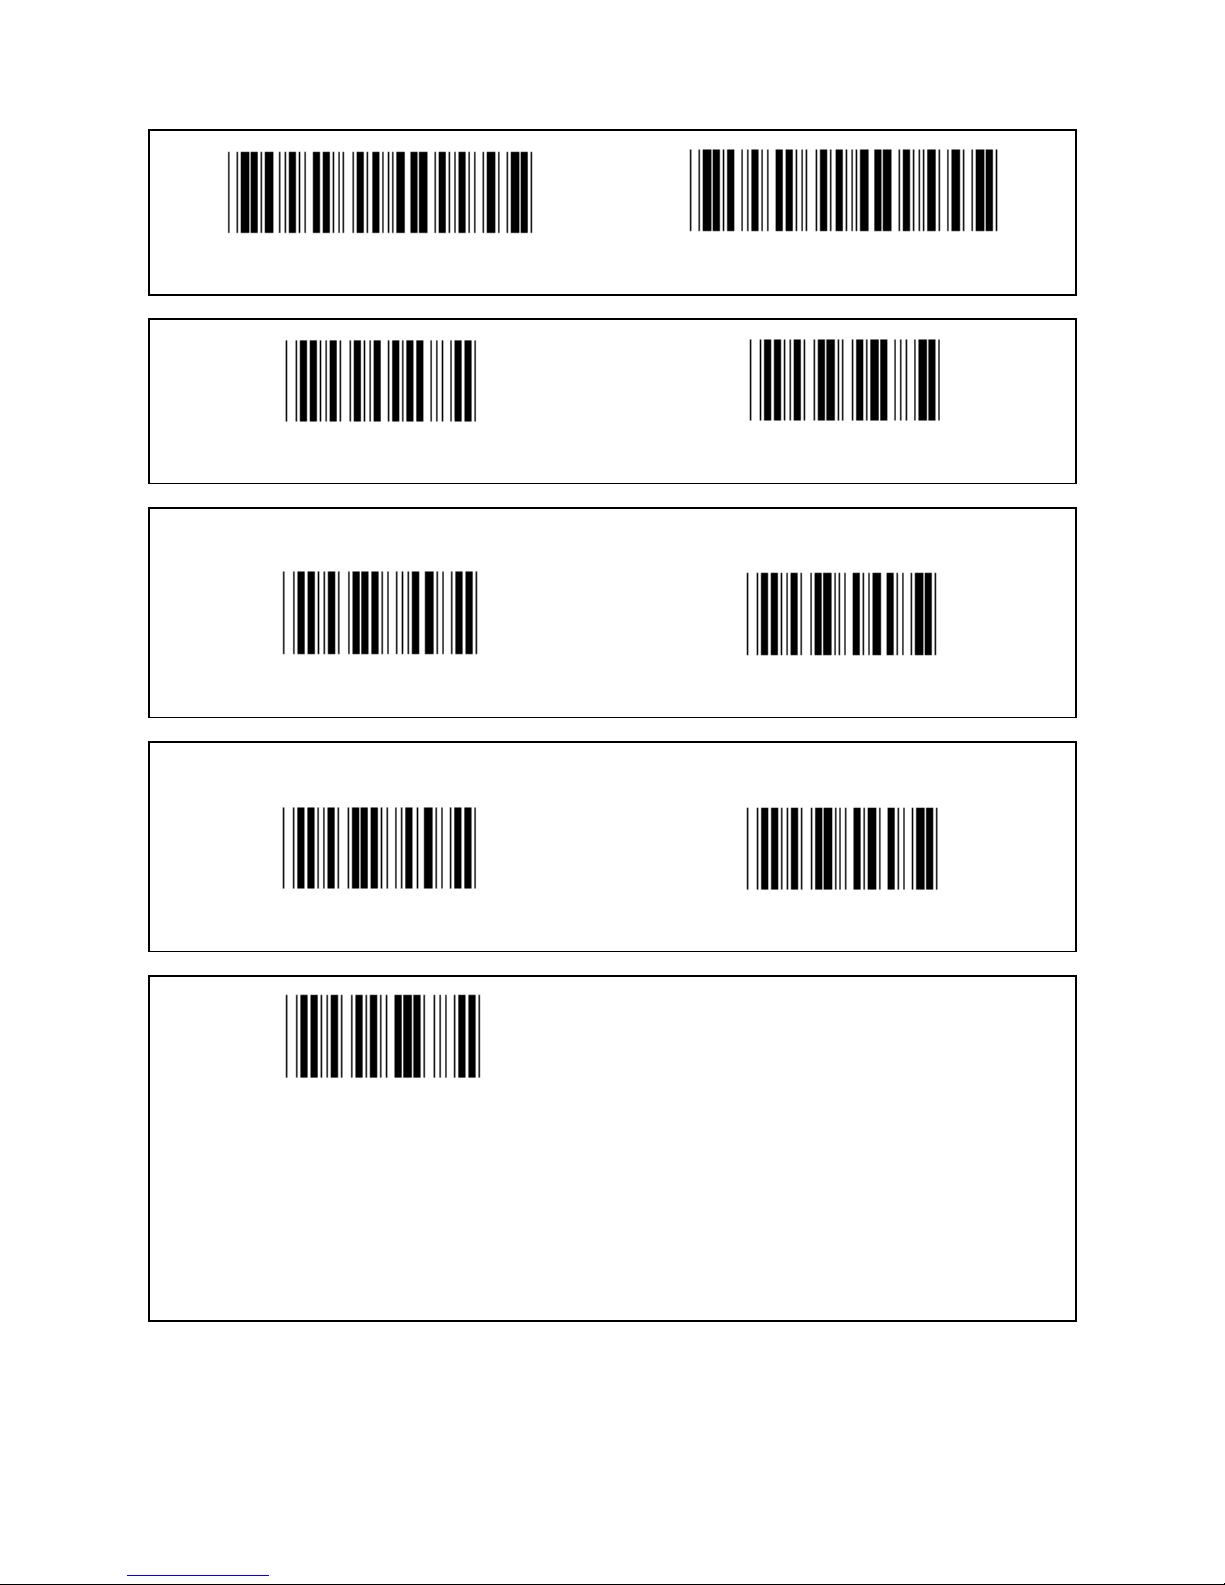
Group 3: Language for keyboard interface
Enter group Exit
U.S. (*) England
France Germany
Italy Belgium
Sweden/Finland Spanish
Denmark Portugal
Switzerland Norway
Note: (*) denotes default setting
Page 9
9
Group 3: Language for keyboard interface
Enter group Exit
Canada Holland
Poland Japan
Reserved 1 Reserved 2
Reserved 3 (IBM Think-pad for Japan)
Panasonic CF-II for Japan
Note: Options marked by ( ) are only available upon request.
Page 10
10
Group 4: Terminator
Enter group Exit
KEYBOARD
NONE CR (*)
SPACE TAB
ESC CTRL-C
EXEC
Page 11
11
Group 4: Terminator
Enter group Exit
RS-232
NONE CR (*)
CR/LF LF
SPACE TAB
ESC CTRL-C
STX.ETX X ON. X OFF
EOT
Page 12
12
Group 5: Scan mode
Enter group Exit
1. Trigger On/Off
2. Trigger On/Good read Off (*)
3. Trigger On/Good read Off/Delay Timeout =?
4. Continuous/Trigger Off
5. Continuous/LED Always on
6. Continuous/No Trigger
Delay Timeout Setting:
1.) Scan the Enter group 5 label.
2.) Scan the label 3 “Delay Timeout”.
3.) Scan the two digit labels in Table-Hex.
4.) Scan the Confirm label in Table-Hex.
5.) Scan the Exit label.
Note: Scan mode setting is only available for the CCD/Laser type scanner.
Page 13
13
Group 5: Scan Mode
Enter group Exit
FLASH OFF (*)
FLASH ON
Note: This programming setting is only available in the continuous mode.
Page 14
14
Group 6: Preamble and Postamble
Enter group Exit
Preamble Postamble
Preamble & Postamble setting:
1.) Scan the Enter group 6 label
2.) Scan the Preamble or Postamble label
3.) Refer to the ASCII Table, scan two digits in the Table-Hex representing one character, a
maximum of 10 characters can be accepted
4.) Scan the Confirm label in Table-Hex
5.) Scan the Exit label
Clear
Clear Preamble & Postamble:
1.) Scan the Enter group 6 label
2.) Scan the Preamble or Postamble label
3.) Scan the Clear label
4.) Scan the Exit label
5.) Scan the Exit label
Page 15
15
Group 7: RS-232 Parameters
Enter group Exit
BAUD RATE
2400 9600 (*)
14400 28800
57600 115200
230400
DATA BIT
BIT 7
BIT 8 (*)
Page 16
16
Group 7: RS-232 parameters
Enter group Exit
PARITY
NONE (*) ODD
EVEN
HANDSHAKING
NONE (*) X ON/ X OFF
SCANNER READY DATA READY
ACK/NAK
Page 17
17
Group 7: RS-232 Parameters
Enter group Exit
(ACK/NAK RESPONSE TIME CTS OBSERVATION TIME:)
100ms 300ms
500ms 1sec
3 sec (*) 5sec
10sec 00
Page 18
18
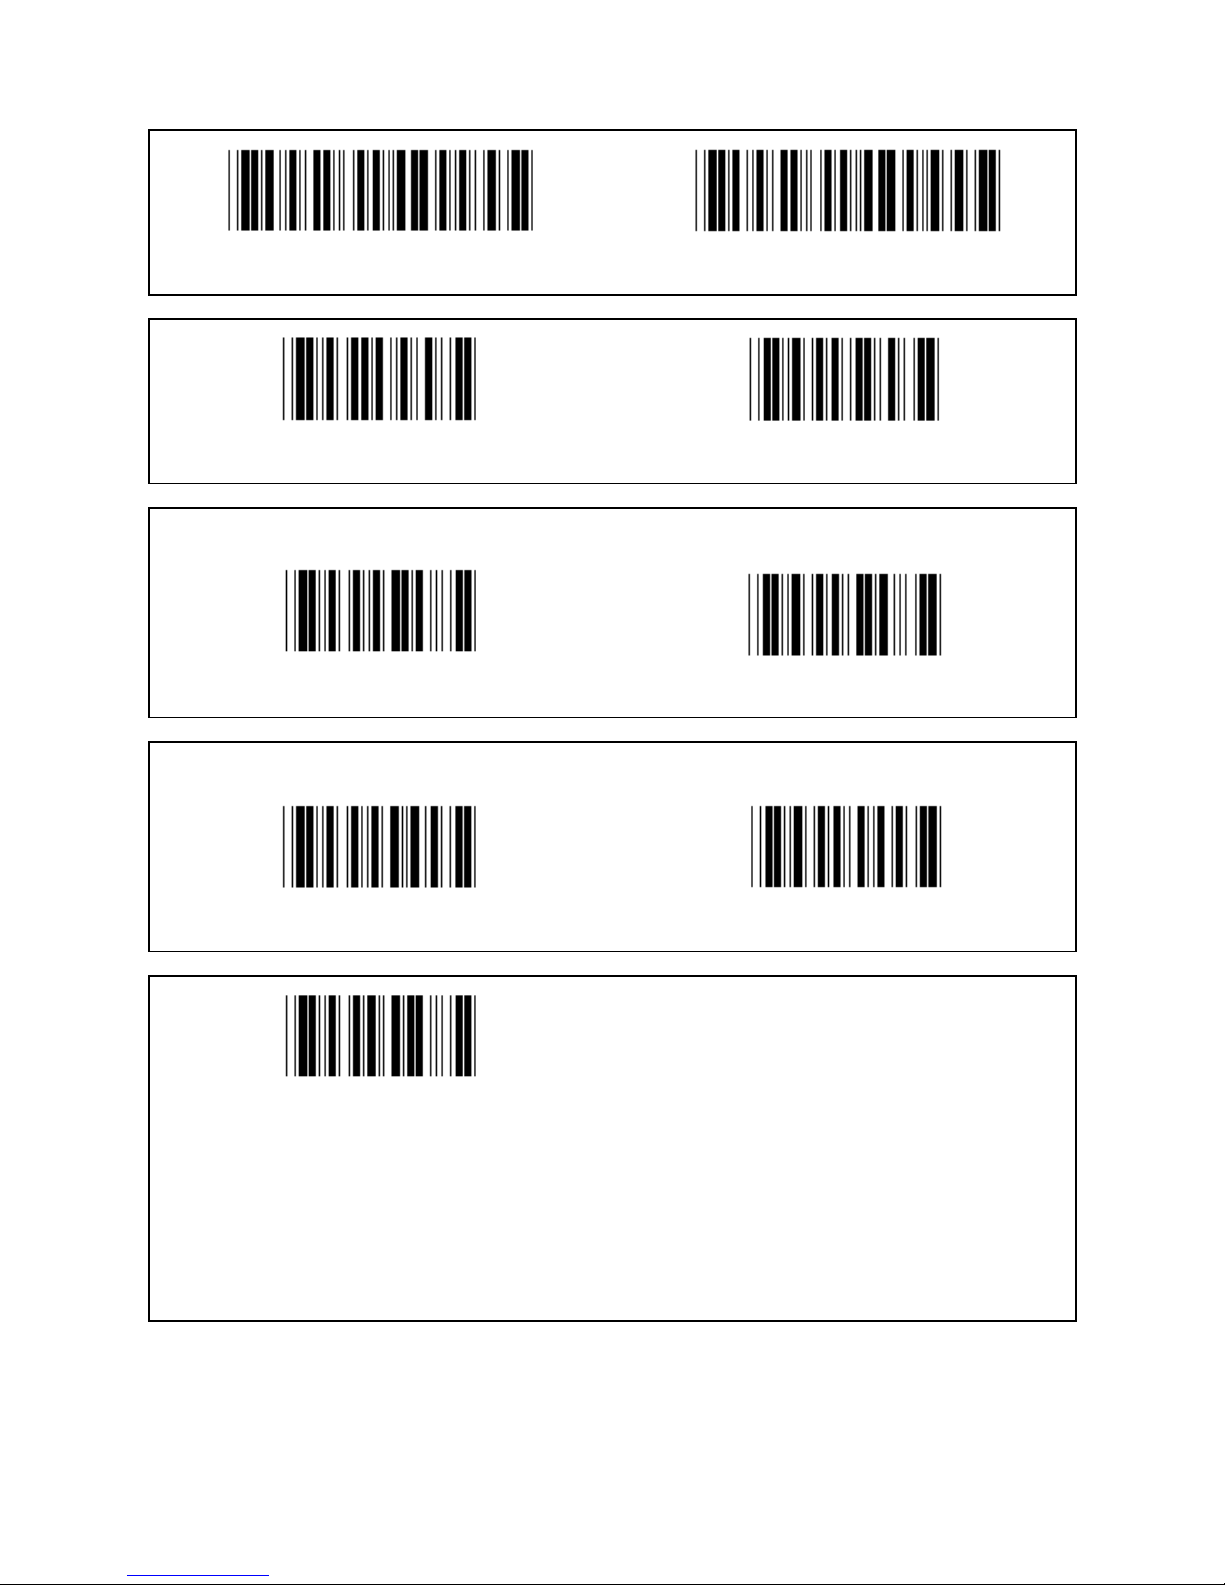
Group 8: CODE 39 / CODE 32
Enter group Exit
Code 39
ENABLE (*) DISABLE
FULL ASCII STANDARD (*)
TRANSMIT START/END CHARACTER
ENABLE DISABLE (*)
TRANSMIT CHECK CHARACTER
ENABLE (*) DISABLE
VERIFY CHECKSUM
ENABLE DISABLE (*)
Page 19
19
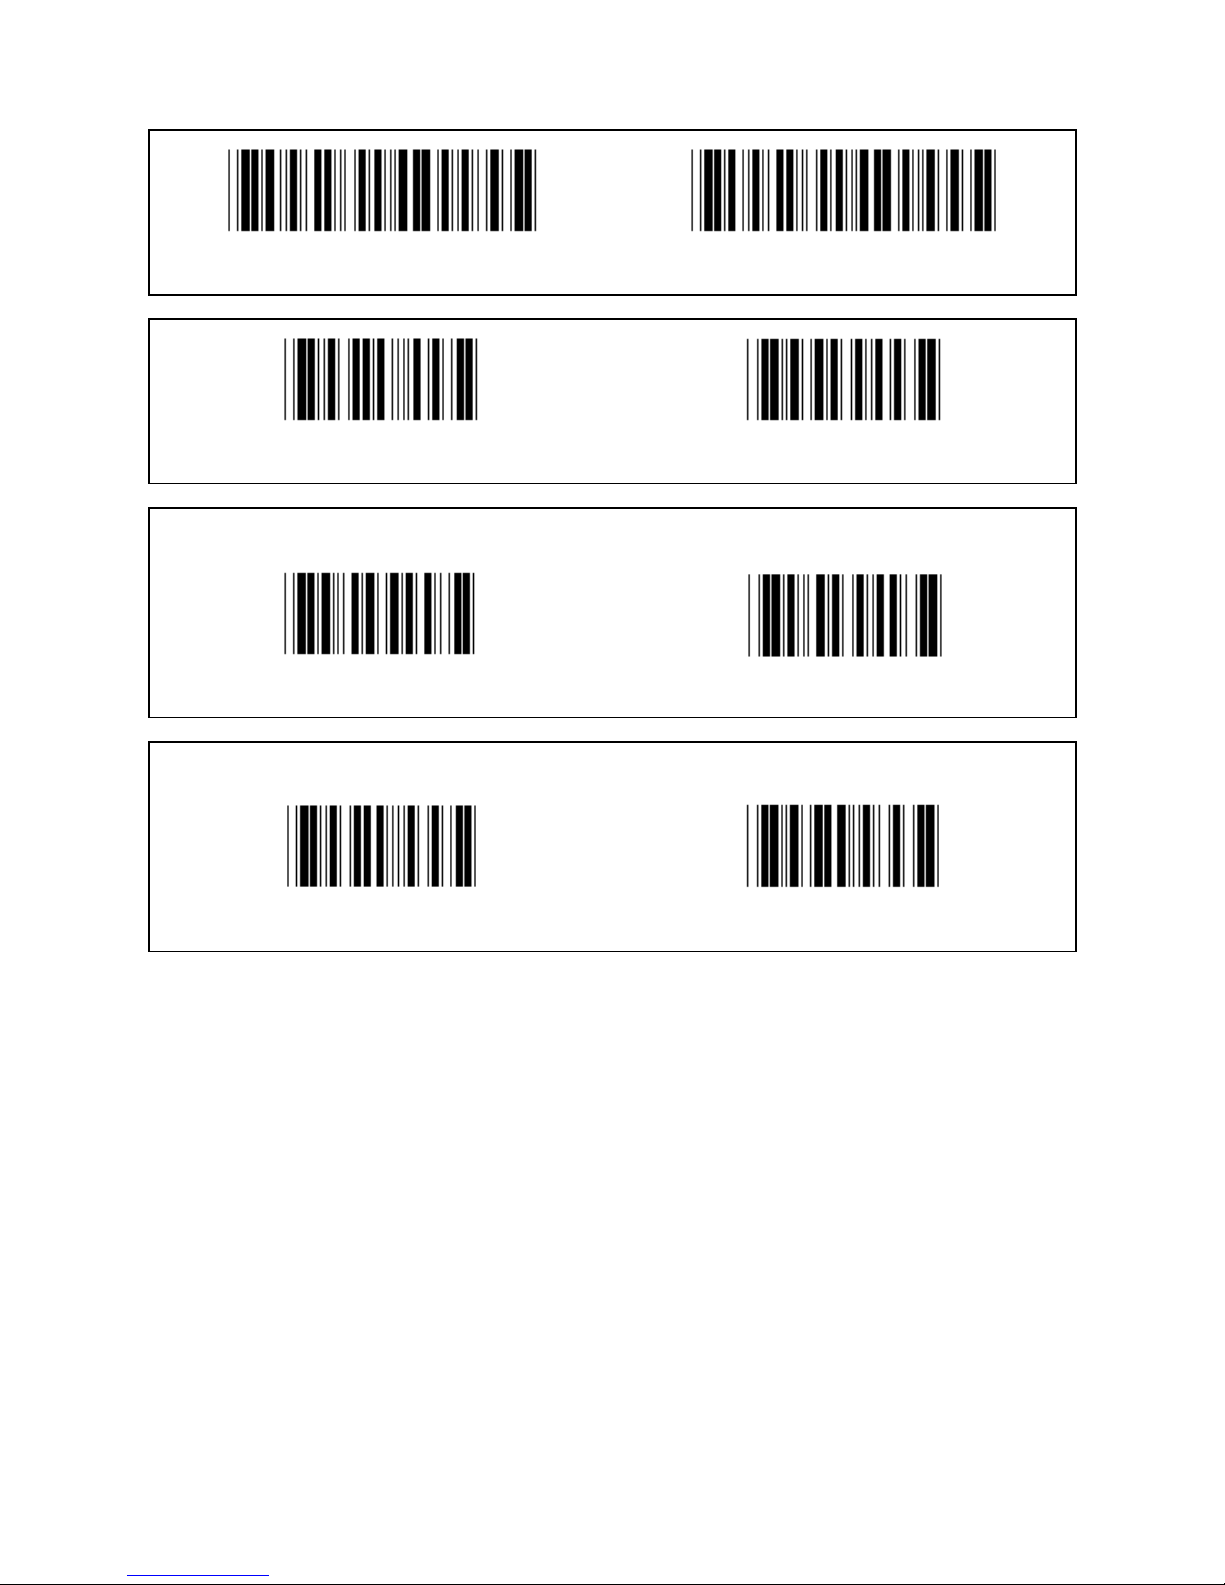
Group 8: CODE 39 / CODE 32
Enter group Exit
Enable CODE 32 Disable CODE 32
Page 20
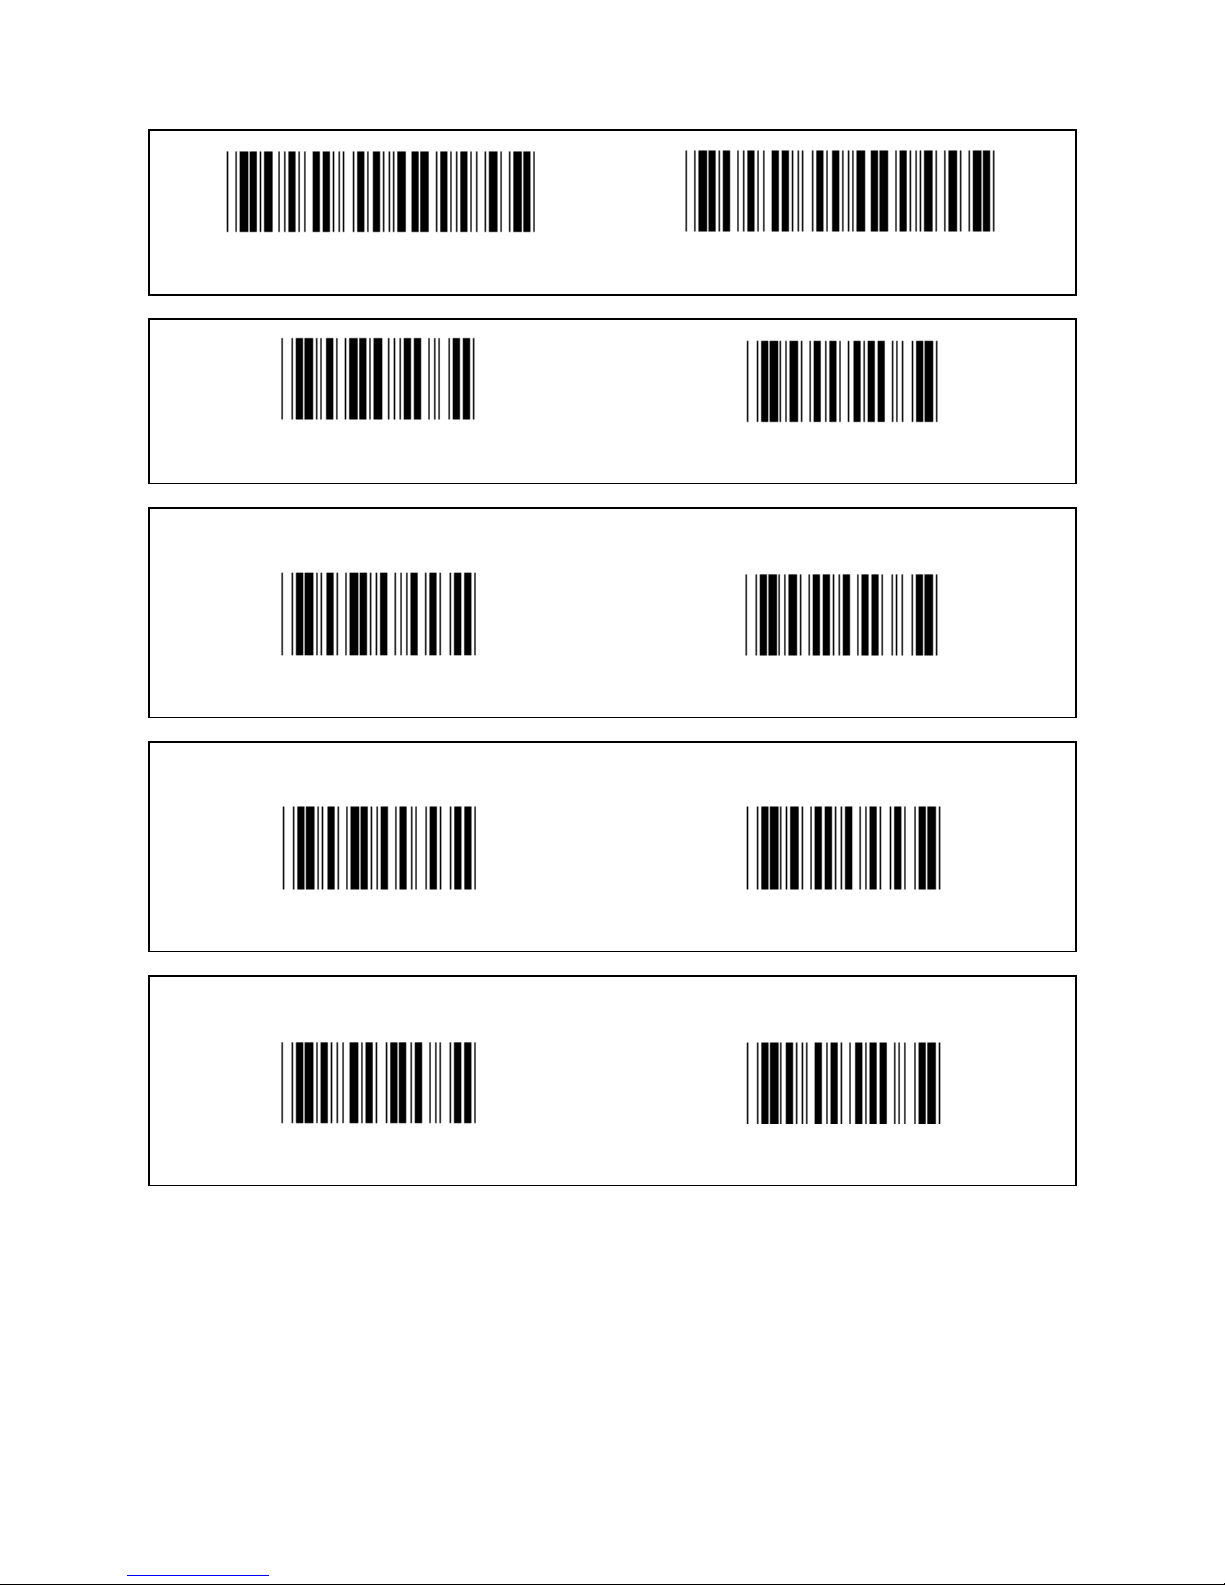
20
Group 9-1: Interleaved 2 OF 5
Enter group Exit
ENABLE DISABLE
TRANSMIT CHECK CHARACTER
ENABLE DISABLE
VERIFY CHECKSUM
ENABLE DISABLE
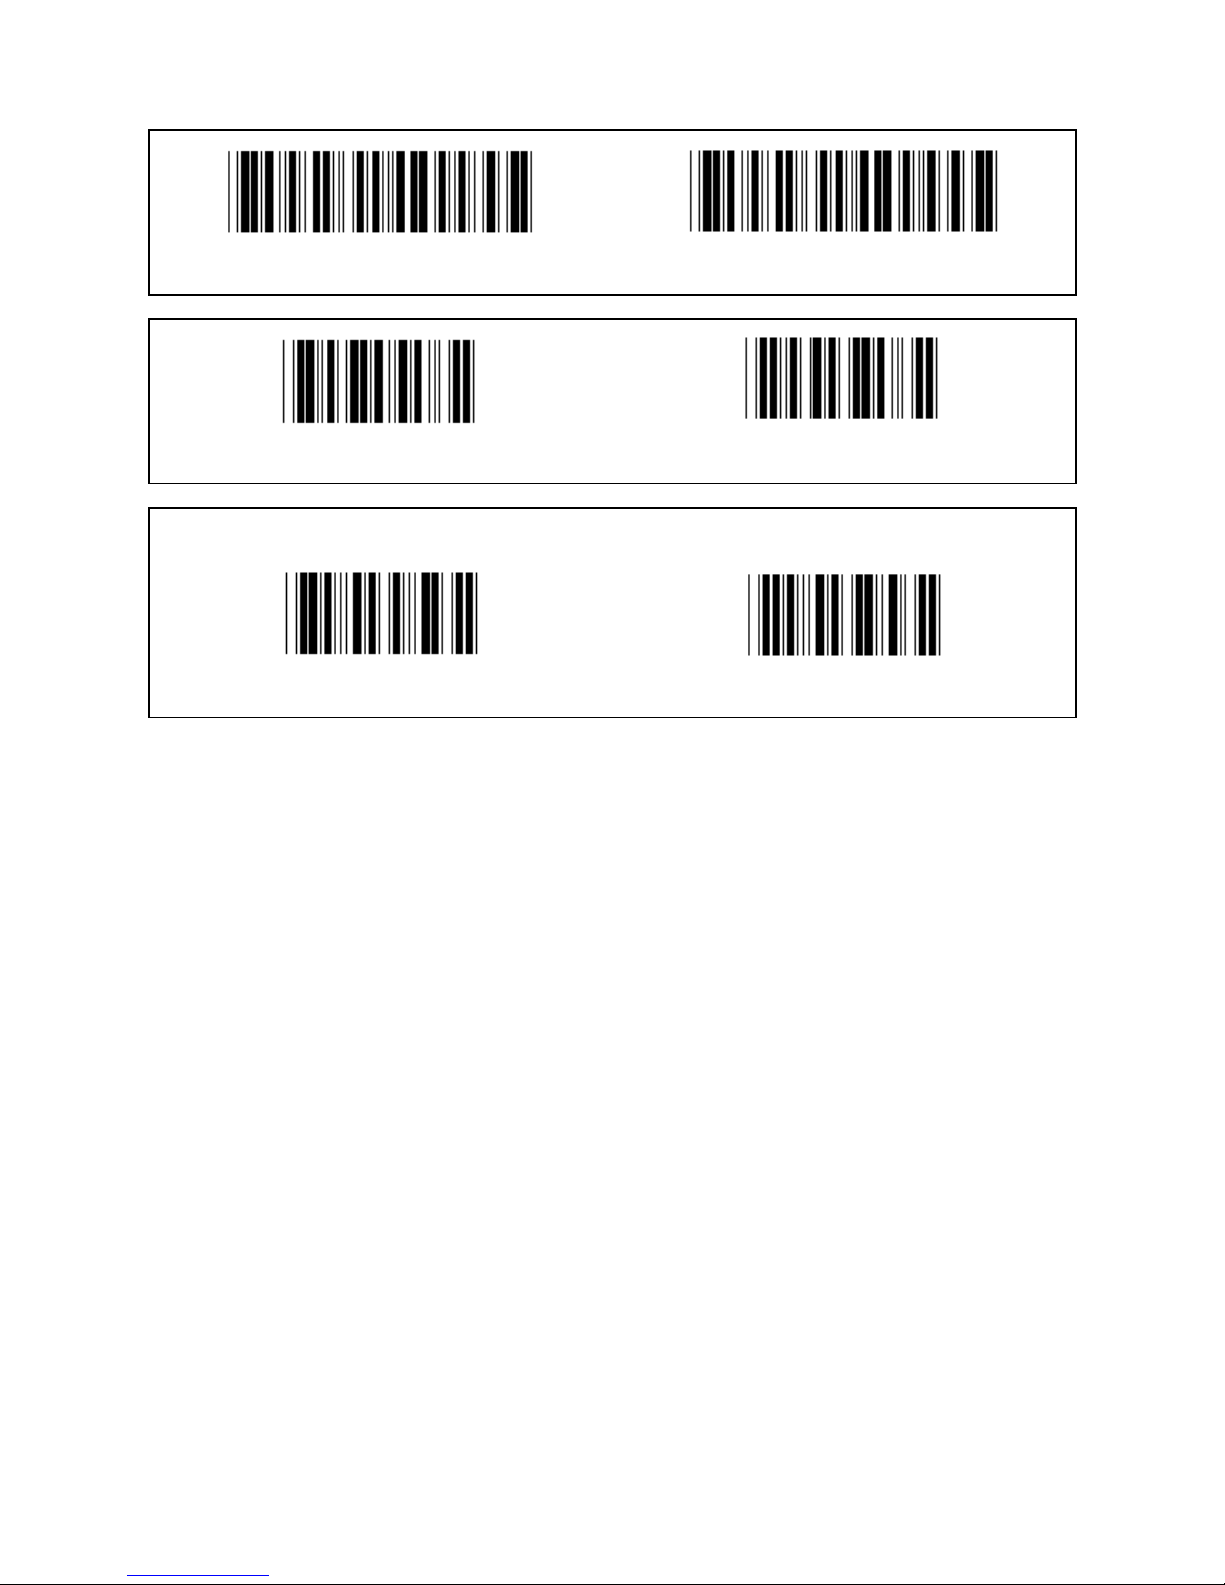
BARCODE LENGTH SETTINGS
Length define
Min: 4
Max:48
1.) Scan the Enter group 9-1 label.
2.) Scan the User Define label.
3.) Scan the Six Digit labels in the Table-Hex (only 3 sets of lengths can be defined).
4.) Scan the Confirm label in the Table-Hex.
5.) Scan the Exit label.
Page 21
21
USER DEFINE LENGTH SETTING
User define (3 sets available)
Min: 4
Max: 48
1.) Scan the Enter group 9-1 label.
2.) Scan the User Define label.
3.) Scan the Six Digit labels in the Table-Hex (only 3 sets of lengths can be defined).
4.) Scan the Confirm label in the Table-Hex.
5.) Scan the Exit label.
Group 9-2: Industrial 2 OF 5 / IATA
Enter group Exit
ENABLE DISABLE (*)
TRANSMIT CHECK CHARACTER
ENABLE (*) DISABLE
VERIFY CHECKSUM
ENABLE DISABLE (*)
Page 22
22
BARCODE LENGTH SETTING
Min: 4
Max: 24
1.) Scan the Enter group 9-2 label.
2.) Scan the User Define label.
3.) Scan the Six Digit labels in the Table-Hex (only 3 sets of lengths can be defined).
4.) Scan the Confirm label in the Table-Hex.
5.) Scan the Exit label.
USER DEFINE LENGTH SETTING
User define (3 sets available)
Min: 4
Max: 24
1.) Scan the Enter group 9-2 label.
2.) Scan the User Define label.
3.) Scan the Six Digit labels in the Table-Hex (only 3 sets of lengths can be defined).
4.) Scan the Confirm label in the Table-Hex.
5.) Scan the Exit label.
Group 9-2: Industrial 2 OF 5 / IATA
Enter group Exit
IATA
ENABLE DISABLE (*)
Page 23
23
Group 9-3: Matrix 2 OF 5
Enter group Exit
ENABLE DISABLE
TRANSMIT CHECK CHARACTER
ENABLE (*) DISABLE
VERIFY CHECKSUM
ENABLE DISABLE (*)
BARCODE LENGTH SETTING
Min: 4
Max:40
1.) Scan the Enter group 9-3 label.
2.) Scan the User Define label.
3.) Scan the Six Digit labels in the Table-Hex (only 3 sets of lengths can be defined).
4.) Scan the Confirm label in the Table-Hex.
5.) Scan the Exit label.
Page 24

24
USER DEFINE LENGTH SETTING
User define (3 sets available)
Min: 4
Max: 40
1.) Scan the Enter group 9-3 label.
2.) Scan the User Define label.
3.) Scan the Six Digit labels in the Table-Hex (only 3 sets of lengths can be defined).
4.) Scan the Confirm label in the Table-Hex.
5.) Scan the Exit label.
Page 25
25
Group 9-4: China postage
Enter group Exit
ENABLE DISABLE (*)
TRANSMIT CHECK CHARACTER
ENABLE (*) DISABLE
VERIFY CHECKSUM
ENABLE DISABLE (*)
BARCODE LENGTH SETTING
Min: 4
Max: 40
6.) Scan the Enter group 9-4 label.
7.) Scan the User Define label.
8.) Scan the Six Digit labels in the Table-Hex (only 3 sets of lengths can be defined).
9.) Scan the Confirm label in the Table-Hex.
10.) Scan the Exit label.
Page 26

26
USER DEFINE LENGTH SETTING
User define (3 sets available)
Min: 4
Max: 40
6.) Scan the Enter group 9-4 label.
7.) Scan the User Define label.
8.) Scan the Six Digit labels in the Table-Hex (only 3 sets of lengths can be defined).
9.) Scan the Confirm label in the Table-Hex.
10.) Scan the Exit label.
Page 27
27
Group 10: Code 128
Enter group Exit
ENABLE (*) DISABLE
ENABLE/DISABLE CHECKDIGIT
ENABLE (*) (do not send checkdigit) DISABLE
UCC/EAN/128
ENABLE DISABLE (*)
Page 28
28
Group 11: CODE 11
Enter group Exit
ENABLE (*) DISABLE
NUMBER OF CHECK CHARACTER
TWO (*) ONE
TRANSMIT CHECK CHARACTER
ENABLE (*) DISABLE
ENABLE/DISABLE CHECKDIGIT
ENABLE (*) DISABLE
Page 29
29
Group 12: Code 93
Enter group Exit
ENABLE DISABLE (*)
VERIFY CHECKDIGIT
ENABLE (*) DISABLE
Page 30
30
Group 13: MSI-PLEASSEY
Enter group Exit
ENABLE (*) DISABLE
VERIFY CHECKDIGIT
ENABLE (*) DISABLE
ENABLE MOD
ENABLE MOD 10-10 ENABLE MOD 10 (*) ENABLE MOD 11-10
TRANSMIT/TRUNCATE CHECKDIGIT
TRUNCATE 1ST CHECKDIGIT TRANSMIT CHECKDIGIT (*) TRUNCATE 1ST & 2ND CHECKDIGIT
Page 31

31
Group 14: CODABAR / NW7
Enter group Exit
ENABLE (*) DISABLE
TRANSMIT START/END CHARACTER
ENABLE DISABLE (*)
START/END TRANSMIT TYPE
ABCD/ABCD ABCD/TN*E
abcd/abcd (*) abcd/tn*e
Page 32

32
Group 15: Code 4
Enter group Exit
ENABLE DISABLE (*)
Page 33

33
Group 16-1: EAN-13/JAN-13
Enter group Exit
ENABLE (*) DISABLE
ADD-ON 2/5
ENABLE DISABLE (*)
TRANSMIT CHECK CHARACTER
ENABLE (*) DISABLE
TRUNCATE 1ST DIGIT
ENABLE DISABLE (*)
TRUNCATE 2ND DIGIT
ENABLE DISABLE (*)
Page 34

34
EAN CHECKDIGIT
ENABLE (*) DISABLE
Page 35

35
Group 16-2: UPC-A
Enter group Exit
ENABLE (*) DISABLE
ADD-ON 2/5
ENABLE DISABLE (*)
TRANSMIT CHECK CHARACTER
ENABLE (*) DISABLE
TRUNCATE LEADING DIGIT
ENABLE DISABLE (*)
UPC-A CONVERT TO EAN-13
ENABLE DISABLE (*)
Page 36

36
Group 16-3: EAN-8/JAN-8
Enter group Exit
ENABLE (*) DISABLE
ADD-ON 2/5
ENABLE DISABLE (*)
TRANSMIT CHECK CHARACTER
ENABLE (*) DISABLE
TRUNCATE CHECK CHARACTER
ENABLE (*) DISABLE
Page 37

37
EAN-8 CONVERT TO EAN-13
ENABLE 1 (add zeros in the front of the barcode)
DISABLE (*)
ENABLE 2 (add zeros in the middle of the barcode)
Page 38

38
Group 16-4: UPC-E
Enter group Exit
ENABLE (*) DISABLE
ADD-ON 2/5
ENABLE DISABLE (*)
TRANSMIT CHECK CHARACTER
ENABLE (*) DISABLE
TRUNCATE LEADING DIGIT
ENABLE DISABLE (*)
UPC-E CONVERT TO UPC-A
ENABLE DISABLE (*)
Page 39

39
Group 16-5: ISBN/ISSN
Enter group Exit
ENABLE (*) DISABLE
ADD-ON 2/5
ENABLE DISABLE (*)
Page 40

40
Group 17: RSS-14
Enter group Exit
RSS-14 ENABLE RSS-14 DISABLE
AI ENABLE AI DISABLE (*)
CHECKSUM ENABLE CHECKSUM DISABLE (*)
GS1-128 ENABLE GS1-128 DISABLE (*)
Page 41

41
Group 18: TRUNCATE HEADER/TRAILER CHARACTER
Enter group Exit
TRUNCATE HEADER CHARACTER
TRUNCATE TRAILER CHARACTER
1.) Scan the Enter group 18 label.
2.) Scan the Header or Trailer label.
3.) Refer to the ASCII Table for the corresponding HEX code.
4.) Scan two digits in the Table-Hex.
5.) Scan the Confirm label in the Table-Hex.
6.) Scan the Exit label.
CLEAR
Clear Header & Trailer
1.) Scan the Enter group 19 label.
2.) Scan the Header or Trailer label.
3.) Scan the Clear label.
4.) Scan the Exit label.
Page 42

42
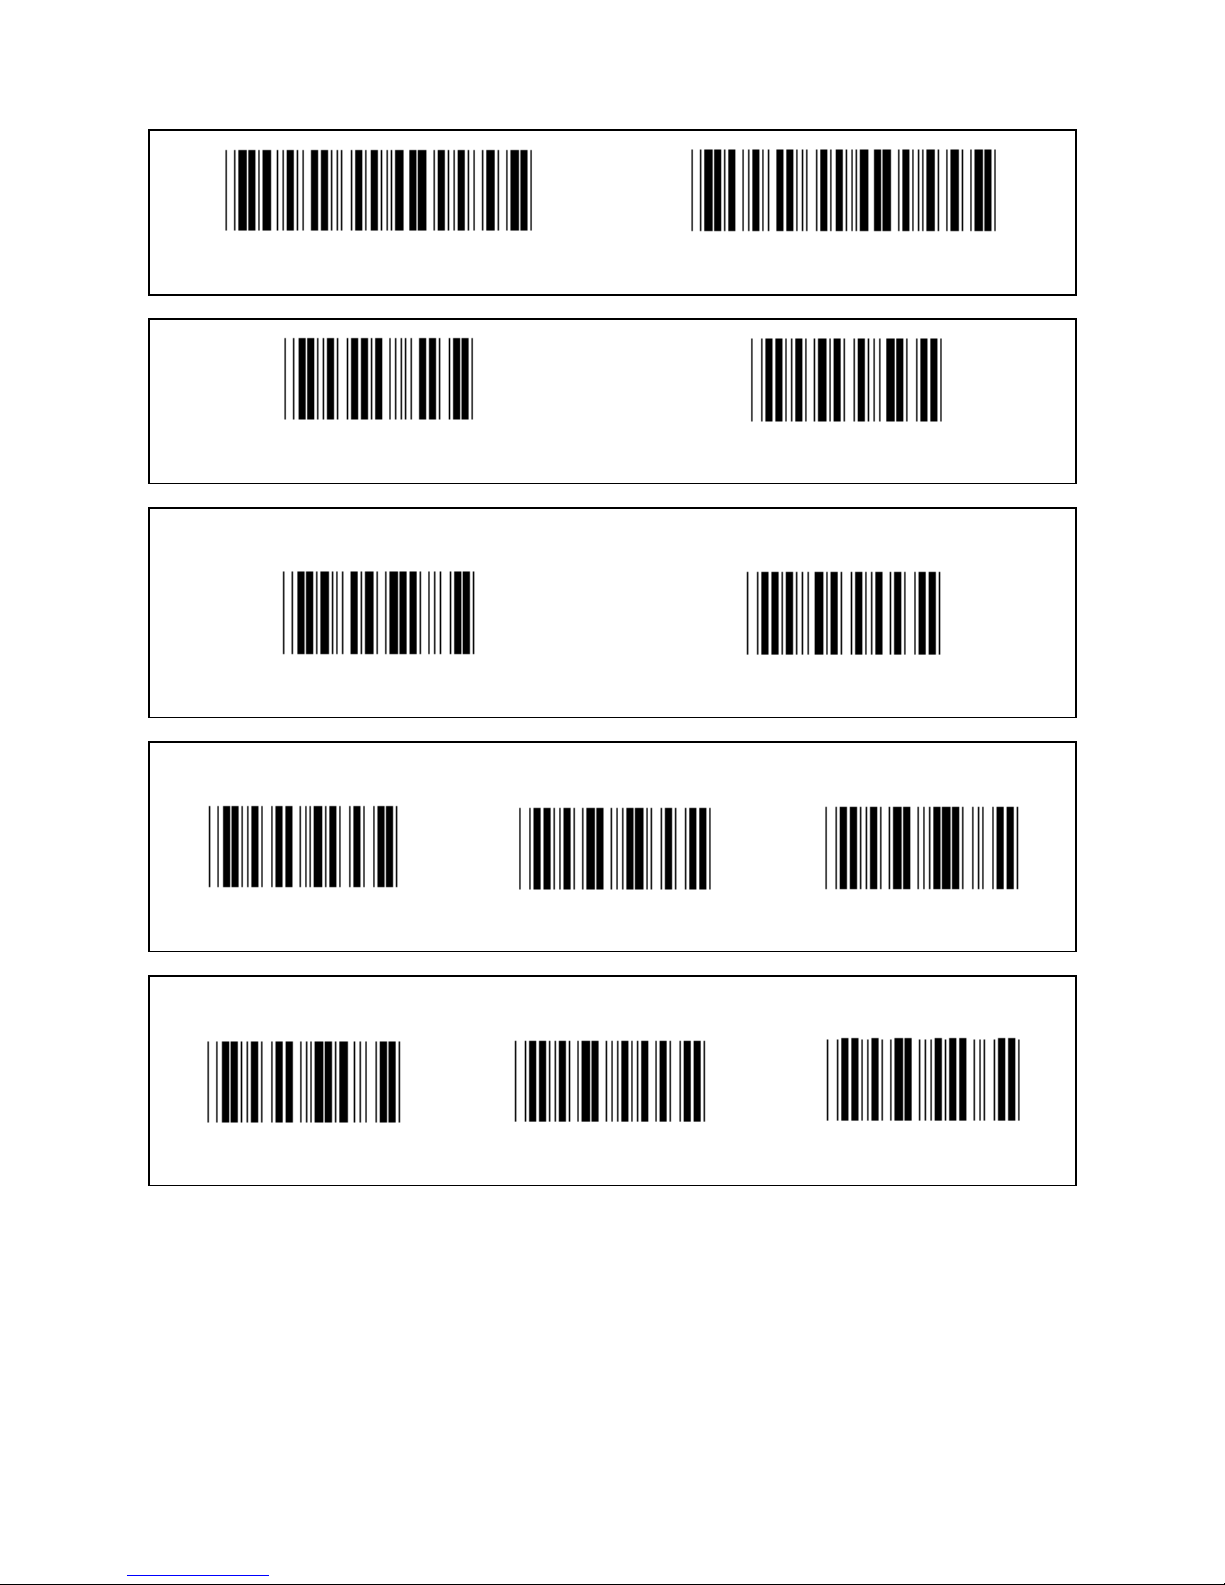
Group 19: Predefined Code ID
Enter group Exit
ENABLE DISABLE (*)
Identifying Barcode ID
The Identifying Barcode ID is an optional code to identify the barcode of the label that the user is scanning.
Please refer to the Pre-Defined Barcode ID for the ID code.
Page 43

43
Group 20: User-Defined Code ID setting
Enter group Exit
CODE 39/CODE 32 INTERLEAVED 2 OF 5
INDUSTRIAL 2 OF 5 MATRIX 2 OF 5
CHINA POSTAGE CODE 128
CODE 93 CODE 11
MSI/PLESSEY
CODABAR/NW7
EAN-13 EAN-8
UPC-E UPC-A
CODE 4
Page 44

44
Note: Refer to the ASCII Table, scan the two hexadecimal labels in the Table-Hex to represent one character.
Warning: Be sure to Disable the Pre-defined Code ID (Group 19) before setup.
Page 45

45
Group 21: Enable All Barcodes
Enter group Exit
ENABLE ALL BARCODES
Page 46

46
Group 22: Function Keys Emulation
Enter group Exit
ENABLE DISABLE (*)
Enable the Function Key Emulation:
1.) Scan the Enter group 22 label.
2.) Scan the Enable label.
3.) Scan the Exit label.
To concatenate a function key with input data, please refer to the Function Key Label for its
hexadecimal representation.
Example: Preamble data with F1
1.) Scan the Enter Group 22 Label.
2.) Scan the Enable Label.
3.) Scan the Label 0 and 1 respectively in the Table-Hex.
4.) Scan the Confirm Label in the Table-Hex.
5.) Scan the Exit Label.
Function Key Table (Full ASCII Code 39 Table)
F1:01 F2:02 F3:03 F4:04
F5:05 F6:06 F7:07 F8:08
F9:09 F10:0A F11:0B F12:0C
Enter:0D Tab:0E BS:0F Up:10
Down:11 Left:12 Home:14 End:15
PgUp:16 PgDn:17 Ins:18 Del:19
Esc:1B Right:13 S-Tab:1C
To scan a function key barcode label, the Full ASCII must be enabled. Please refer to the Full ASCII
Code 39 Table to produce the function key barcode label.
Full ASCII Code 39 Enable
Page 47

47
Group 23: General Parameters
ENTER GROUP EXIT
UPPER CASE (*) LOWER CASE
UNIVERSAL ALT MODE
Buzzer Pitch & Buzzer Duration Settings
BUZZER PITCH (default:21) BUZZER DURATION (default: AA)
To set the default Buzzer Pitch or Buzzer Duration:
1.) Scan the Enter group 23 Label.
2.) Scan the Buzzer Pitch or the Buzzer Duration Label.
3.) Scan Two Digit Labels in the Table-Hex.
4.) Scan the Confirm Label in the Table-Hex.
5.) Scan the Exit Label.
Power Up Beeping
ENABLE (*) DISABLE
Page 48

48
Appendix:
Function Code for PC XT/AT
F1 ($A) F2 ($B) F3 ($C)
F4 ($D) F5 ($E) F6 ($F)
F7 ($G) F8 ($H) F9 ($I)
F10 ($J) F11 ($K) F12 ($L)
Function Code for PC XT/AT
Enter ($M) Tab ($N) BS ($O)
Up ($P) Down ($Q) Left ($R)
Right ($S) End ($U) ($B) PgUp ($V)
PgDn ($W) Ins ($X) Del ($Y)
Esc (%A) Home ($T)
Page 49

49
Table-Hex: HEXADECIMAL
0 1 2
3 4 5
6 7 8
9 A B
C D E
F Confirm
Page 50

50
ASCII TABLE
For example:
ASCII CODE HEX
ESC 1B
DEL 7F
Page 51

51
Hexadecimal-Decimal Conversion Table
For example:
Decimal Hexadecimal
11 0B H:0 L:B
83 53 H:5 L:3
213 D5 H:D L:5
Page 52

52
Pre-Defined Barcode ID
Barcode Symbol Identifying ID
EAN-13 A
EAN-8 B
UPCE C
Code 39 / Code 32 D
CODABAR E
Matrix 2 OF 5 F
Industrial 2 OF 5 / IATA G
Interleaved 2 OF 5 H
Code 128 I
Code 93 J
Code 11 K
MSI-PLESSEY L
Note:
The preset ID values of the Pre-Defined Barcode ID may be changed if the User-Defined Code ID is set and
the values of the Identifying ID are overwritten.
Page 53

53
PIN ASSIGNMENT
10 Pin Modular Plug
RJ-45 Male 10P10C TTL WAND KB RS-232 KB USB
1 X X x X
2 x X X X
3 PWR-CTL x X x
4 GND GND GND GND GND
5 GOOD-READ GOOD-READ PC-DATA X PC-DATA
6 DATA DATA PC-CLK X PC-CLK
7 VCC VCC VCC VCC VCC
8 SW-DET x KB-CLK X X
9 S.O.S. X KB-DATA x X
10 x x x RX x
RS-232 Signal Output
Function DB9F+DC (or without DC)
GND 5
CTS 7
RTS 8
RX 3
TX 2
VCC+5V 9
Note:
For PC applications, a cable with a DC power jack is required to accept an external power input.
DB9F+DC –Jack
Inner (+)
Page 54

54
Keyboard Signal Output
Function Din5F Din5M Mini-Din6M Mini-Din6F
GND 4 4 3 3
PC_Data --- 2 1 ---
PC_CLK --- 1 5 ---
VCC+5V 5 5 4 4
KB_CLK 1 --- --- 5
KB_Data 2 --- --- 1
USB Signal Output
FUNCTION USB-A
GND 4
VCC 1
D+ 3
D- 2
USB PLUG
Page 55

55
Safety precautions:
Do not expose the product to water or moisture.
Maintenance:
Clean only with a dry cloth. Do not use cleaning solvents or abrasives.
Warranty:
No guarantee or liability can be accepted for any changes and modifications of the product or damage caused
due to incorrect use of this product.
General:
- Designs and specifications are subject to change without notice.
- All logos, brands or brand logos and product names are trademarks or registered trademarks of their
respective holders and are hereby recognised as such.
- This manual was produced with care. However, no rights can be derived. König Electronic can not accept
liability for any errors in this manual or their consequences.
- Keep this manual and packaging for future reference.
Attention:
This product is marked with this symbol. It means that used electrical and electronic products should
not be mixed with general household waste. There is a separate collections system for these products.
Page 56

56
DEUTSCH
Barcode-Scanner
Installation der USB-Scannerschnittstelle
Um die USB-Scannerschnittstelle zu installieren, soll das Host-Gerät einen USB-Anschluss haben, um die
Daten von dem Scanner zu erhalten. Folgen Sie den unten aufgeführten Schritten:
1.) Stellen Sie sicher, dass der Scanner den richtigen Stecker für den USB-Anschluss des Host-Geräts
hat.
2.) Schließen Sie das Kabel an den USB-Anschluss des Geräts an.
3.) Wenn die LED leuchtet, und der Summer ertönt, ist der Scanner betriebsbereit.
Konfiguration des Barcode-Scanners
Einrichtungsverfahren
1.) Suchen Sie die Gruppe mit den Parametern, die geändert werden sollen.
2.) Scannen Sie das „Eingabe Gruppe #“-Etikett. Der Piepton des Scanners ertönt, um anzuzeigen, dass
die Einrichtung im Gange ist.
3.) Scannen Sie das Etikett, das die Parameter zur Änderung wiedergibt.
4.) Scannen Sie „Ende“, um die aktuell ausgewählte Gruppe zu beenden, der Scanner piept.
5.) Wiederholen Sie den Vorgang für die anderen Gruppen, einschließlich der Parameter, die geändert
werden sollen.
Beispiel 1:
Stellen Sie den Betriebsmodus auf „Kontinuierlich“ ein.
1) Scannen Sie „Eingabe Gruppe 5“.
2) Scannen Sie „Kontinuierlich /auslösen“.
3) Scannen Sie „Ende“.
Beispiel 2:
Weisen Sie den Präambel-String als „#“ und den Postambel-String als „END“ zu
1) Scannen Sie „Eingabe Gruppe 6“
2) Scannen Sie die Präambel
3) Siehe ASCII-Tabelle (Seite 50) und finden Sie die Ziffer in Hexadezimal: # ASCII =>23 hex
Die beiden Ziffern sind: 2 3
4) Siehe Hex-Tabelle: HEXADEZIMAL (Seite 49) und scannen Sie dementsprechend die zwei
Ziffernetiketten.
5) Scannen Sie das „Bestätigen“-Etikett in der Hex-Tabelle
6) Scannen Sie „postamble“
7) Siehe ASCII-Tabelle für die Ziffer in Hexadezimal (E => 45, N => 4E, D => 44)
8) Siehe Hex-Tabelle: HEXADEZIMAL (Seite 49) und scannen Sie die die sechs Ziffernetiketten
nacheinander.
4 5 4 E 4 4
9) Scannen Sie das „Bestätigen“-Etikett in der Hex-Tabelle.
10) Gehen Sie zurück zur Gruppe 6 und scannen Sie „Ende“.
Beispiel 3:
Feste Barcodelänge-Einstellung (d. h. Gruppe 9-1, Interleaved 2 OF 5, Barcodelänge = 15-stellig):
1) Scannen Sie das Etikett Eingabe der Gruppe 9-1
2) Scannen Sie das Etikett Definieren der Länge
3) Scannen Sie die vier Ziffernetiketten in der Hex-Tabelle (Seite 49)
Tipps:
• Siehe Hexadezimal/Dezimal-Umrechnungstabelle (Seite 52), um die Barcodelänge in hexadezimalen
Zahlen 15 dez => 0F hex zu bekommen
• Die vier Ziffern sind: 0 F 0 F
• Siehe Hex-Tabelle: HEXADEZIMAL (Seite 49) und scannen Sie dementsprechend die vier
Ziffernetiketten.
4) Scannen Sie das Bestätigungsetikett in der Hex-Tabelle: HEXADEZIMAL (Seite 49)
5) Gehen Sie zurück zur Gruppe 9-1 und scannen Sie das „Ende“-Etikett.
Beispiel 4:
Page 57

57
3-Set Barcodelänge-Einstellung (d. h. Gruppe 9-4: CHINA POSTAGE, die 3 Barcodelänge-Einstellungen sind
wie folgt):
11-stellig
28-stellig
43-stellig
1) Scannen Sie das Etikett Eingabe der Gruppe 9-4
2) Scannen Sie das Benutzerdefiniert Etikett
3) Scannen Sie die sechs Ziffernetiketten in der Hex-Tabelle (Seite 49)
Tipps:
• Siehe Hexadezimal/Dezimal-Umrechnungstabelle (Seite 52), um die 3 Sets der Barcodelänge in
hexadezimalen Zahlen zu bekommen.
11dez =>0B hex
28dez =>1C hex
43dez =>2B hex
• Siehe Hex-Tabelle: HEXADEZIMAL (Seite 49) und scannen Sie dementsprechend die 3 Sets der
Etiketten. 0B 1C 2B
4) Scannen Sie das Bestätigungsetikett in der Hex-Tabelle: HEXADEZIMAL (Seite 49)
5) Gehen Sie zurück zur Gruppe 9-4 und scannen Sie das „Ende“-Etikett.
Flussdiagramm zur Konfiguration
A. Eingabe Gruppe
B. Elemente wählen
C. Ende
Standardeinstellungen Version anzeigen
Warnung: Alle aktuellen Einstellungen gehen verloren und werden auf die Werkseinstellungen
zurückgesetzt.
Hinweis: (*) bezeichnet die Standardeinstellung. Mit ( ) gekennzeichnete Optionen sind nur auf Anfrage
erhältlich.
Page 58

58
Gruppe 0: Auswahl der Schnittstelle
Eingabe Gruppe Ende
Tastatur RS-232
(DTMF) (OCIA)
Reserviert 2 Reserviert 3
Reserviert 4
Hinweis: Die Schnittstelle wird ab Werk entsprechend dem Modell des Geräts voreingestellt.
Page 59

59
Gruppe 1: Geräteauswahl für die Tastatur-Schnittstelle
Eingabe Gruppe Ende
PC/AT, PS/2 (*) Reserviert A
Reserviert B Reserviert C
Reserviert D Reserviert E
Reserviert F Reserviert G
Reserviert H Reserviert I
Reserviert J Reserviert K
Hinweis: Mit ( ) gekennzeichnete Optionen sind nur auf Anfrage erhältlich.
Page 60

60
Gruppe 1: Geräteauswahl für die Tastatur-Schnittstelle
Eingabe Gruppe Ende
Reserviert L Reserviert M
Reserviert N Reserviert O
Reserviert P Reserviert Q
Reserviert R Reserviert S
Reserviert T Reserviert U
Reserviert V Reserviert W
Page 61

61
Gruppe 2: Zeichenabstand
Eingabe Gruppe Ende
Start Tastatur Einstellung
1.) Scannen Sie das Etikett Eingabe der Gruppe 2.
2.) Scannen Sie das Einstelletikett Start Tastatur (oder RS-232/USB) .
3.) Scannen Sie die zwei Ziffernetiketten in der Hex-Tabelle.
4.) Scannen Sie das Bestätigungsetikett in der Hex-Tabelle.
USB-Einstellung beginnen RS-232-Einstellung beginnen
Tastatur-Standardwert: 05
RS-232-Standardwert: 00
USB-Standardwert: 05
Page 62

62
Gruppe 3: Sprache für die Tastatur-Schnittstelle
Eingabe Gruppe Ende
US (*) England
Frankreich Deutschland
Italien Belgien
Schweden/Finnland Spanien
Dänemark Portugal
Schweiz Norwegen
Hinweis: (*) bezeichnet die Standardeinstellung
Page 63

63
Gruppe 3: Sprache für die Tastatur-Schnittstelle
Eingabe Gruppe Ende
Kanada Holland
Polen Japan
Reserviert 1 Reserviert 2
Reserviert 3 (IBM Think-Pad für Japan)
Panasonic CF-II für Japan
Hinweis: Mit ( ) gekennzeichnete Optionen sind nur auf Anfrage erhältlich.
Page 64

64
Gruppe 4: Terminator
Eingabe Gruppe Ende
TASTATUR
KEINE CR (*)
SPACE TAB
ESC CTRL-C
EXEC
Page 65

65
Gruppe 4: Terminator
Eingabe Gruppe Ende
RS-232
KEINE CR (*)
CR/LF LF
SPACE TAB
ESC CTRL-C
STX.ETX X EIN. X AUS
EOT
Page 66

66
Gruppe 5: Scanmodus
Eingabe Gruppe Ende
1. Trigger Ein/Aus
2. Trigger Ein/Wert lesen Aus (*)
3. Trigger Ein/Wert Aus/Verzögerungszeit =?
4. Kontinuierlich/Trigger Aus
5. Kontinuierlich/LED immer an
6. Kontinuierlich/Kein Trigger
Verzögerungszeit-Einstellung:
1.) Scannen Sie das Etikett Eingabe der Gruppe 5.
2.) Scannen Sie das Etikett 3 „Verzögerungszeit“.
3.) Scannen Sie die zwei Ziffernetiketten in der Hex-Tabelle.
4.) Scannen Sie das Bestätigungsetikett in der Hex-Tabelle.
5.) Scannen Sie das Etikett Ende.
Hinweis: Scan-Einstellungen sind nur für den Scannertyp CCD/Laser verfügbar.
Page 67

67
Gruppe 5: Scanmodus
Eingabe Gruppe Ende
BLITZ AUS (*)
BLITZ AN
Hinweis: Diese Programmierungseinstellung ist nur im kontinuierlichen Modus verfügbar.
Page 68

68
Gruppe 6: Präambel und Postambel
Eingabe Gruppe Ende
Präambel Postambel
Präambel und Postambel-Einstellung:
1.) Scannen Sie das Etikett Eingabe der Gruppe 6
2.) Scannen Sie das Präambel- oder Postambel-Etikett
3.) Siehe ASCII-Tabelle, scannen Sie zwei Ziffern in der Hex-Tabelle, die einen Buchstaben
repräsentieren; maximal 10 Buchstaben können akzeptiert werden
4.) Scannen Sie das Bestätigungsetikett in der Hex-Tabelle
5.) Scannen Sie das Etikett Ende
Löschen
Präambel und Postambel löschen:
1.) Scannen Sie das Etikett Eingabe der Gruppe 6
2.) Scannen Sie das Präambel- oder Postambel-Etikett
3.) Scannen Sie das Löschen Etikett
4.) Scannen Sie das Etikett Ende
5.) Scannen Sie das Etikett Ende
Page 69

69
Gruppe 7: RS-232-Parameter
Eingabe Gruppe Ende
BAUDRATE
2400 9600 (*)
14400 28800
57600 115200
230400
DATENBIT
BIT 7
BIT 8 (*)
Page 70

70
Gruppe 7: RS-232-Parameter
Eingabe Gruppe Ende
PARITÄT
KEINE (*) UNGERADE
GERADE
HANDSHAKE
KEINE (*) XON/ XOFF
SCANNER BEREIT DATEN BEREIT
ACK/NAK
Page 71

71
Gruppe 7: RS-232-Parameter
Eingabe Gruppe Ende
(ACK/NAK REAKTIONSZEIT SENDEBEREIT BEOBACHTUNGSZEIT:)
100ms 300ms
500ms 1s
3s (*) 5s
10s 00
Page 72

72
Gruppe 8: CODE 39 / CODE 32
Eingabe Gruppe Ende
Code 39
AKTIVIEREN (*) DEAKTIVIEREN
KOMPLETTER ASCII STANDARD (*)
START-/ENDZEICHEN ÜBERMITTELN
AKTIVIEREN DEAKTIVIEREN (*)
PRÜFZEICHEN ÜBERMITTELN
AKTIVIEREN (*) DEAKTIVIEREN
CHECKSUMME ÜBERPRÜFEN
AKTIVIEREN DEAKTIVIEREN (*)
Page 73

73
Gruppe 8: CODE 39 / CODE 32
Eingabe Gruppe Ende
CODE 32 aktivieren CODE 32 deaktivieren
Page 74

74
Gruppe 9-1: Interleaved 2 OF 5
Eingabe Gruppe Ende
AKTIVIEREN DEAKTIVIEREN
PRÜFZEICHEN ÜBERMITTELN
AKTIVIEREN DEAKTIVIEREN
CHECKSUMME ÜBERPRÜFEN
AKTIVIEREN DEAKTIVIEREN
BARCODELÄNGE-EINSTELLUNGEN
Länge definieren
Min.: 4
Max.:48
1.) Scannen Sie das Etikett Eingabe der Gruppe 9-1.
2.) Scannen Sie das Etikett Benutzerdefiniert.
3.) Scannen Sie sechs Ziffernetiketten aus der Hex-Tabelle (nur 3 Sätze von Längen können definiert
werden).
4.) Scannen Sie das Bestätigungsetikett in der Hex-Tabelle.
5.) Scannen Sie das Etikett Ende.
Page 75

75
EINSTELLUNG LÄNGE BENUTZERDEFINIERT
Benutzerdefiniert (3 Sätze verfügbar)
Min.: 4
Max.: 48
1.) Scannen Sie das Etikett Eingabe der Gruppe 9-1.
2.) Scannen Sie das Etikett Benutzerdefiniert.
3.) Scannen Sie sechs Ziffernetiketten aus der Hex-Tabelle (nur 3 Sätze von Längen können definiert
werden).
4.) Scannen Sie das Bestätigungsetikett in der Hex-Tabelle.
5.) Scannen Sie das Etikett Ende.
Gruppe 9-2: Industrial 2 OF 5 / IATA
Eingabe Gruppe Ende
AKTIVIEREN DEAKTIVIEREN (*)
PRÜFZEICHEN ÜBERMITTELN
AKTIVIEREN (*) DEAKTIVIEREN
CHECKSUMME ÜBERPRÜFEN
AKTIVIEREN DEAKTIVIEREN (*)
Page 76

76
BARCODELÄNGE-EINSTELLUNGEN
Min.: 4
Max.: 24
1.) Scannen Sie das Etikett Eingabe der Gruppe 9-2.
2.) Scannen Sie das Etikett Benutzerdefiniert.
3.) Scannen Sie sechs Ziffernetiketten aus der Hex-Tabelle (nur 3 Sätze von Längen können definiert
werden).
4.) Scannen Sie das Bestätigungsetikett in der Hex-Tabelle.
5.) Scannen Sie das Etikett Ende.
EINSTELLUNG LÄNGE BENUTZERDEFINIERT
Benutzerdefiniert (3 Sätze verfügbar)
Min.: 4
Max.: 24
1.) Scannen Sie das Etikett Eingabe der Gruppe 9-2.
2.) Scannen Sie das Etikett Benutzerdefiniert.
3.) Scannen Sie sechs Ziffernetiketten aus der Hex-Tabelle (nur 3 Sätze von Längen können definiert
werden).
4.) Scannen Sie das Bestätigungsetikett in der Hex-Tabelle.
5.) Scannen Sie das Etikett Ende.
Gruppe 9-2: Industrial 2 OF 5 / IATA
Eingabe Gruppe Ende
IATA
AKTIVIEREN DEAKTIVIEREN (*)
Page 77

77
Gruppe 9-3: MATRIX 2 OF 5
Eingabe Gruppe Ende
AKTIVIEREN DEAKTIVIEREN
PRÜFZEICHEN ÜBERMITTELN
AKTIVIEREN (*) DEAKTIVIEREN
CHECKSUMME ÜBERPRÜFEN
AKTIVIEREN DEAKTIVIEREN (*)
BARCODELÄNGE-EINSTELLUNGEN
Min.: 4
Max.:40
1.) Scannen Sie das Etikett Eingabe der Gruppe 9-3.
2.) Scannen Sie das Etikett Benutzerdefiniert.
3.) Scannen Sie sechs Ziffernetiketten aus der Hex-Tabelle (nur 3 Sätze von Längen können definiert
werden).
4.) Scannen Sie das Bestätigungsetikett in der Hex-Tabelle.
5.) Scannen Sie das Etikett Ende.
Page 78

78
EINSTELLUNG LÄNGE BENUTZERDEFINIERT
Benutzerdefiniert (3 Sätze verfügbar)
Min.: 4
Max.: 40
1.) Scannen Sie das Etikett Eingabe der Gruppe 9-3.
2.) Scannen Sie das Etikett Benutzerdefiniert.
3.) Scannen Sie sechs Ziffernetiketten aus der Hex-Tabelle (nur 3 Sätze von Längen können definiert
werden).
4.) Scannen Sie das Bestätigungsetikett in der Hex-Tabelle.
5.) Scannen Sie das Etikett Ende.
Page 79

79
Gruppe 9-4: China Postage
Eingabe Gruppe Ende
AKTIVIEREN DEAKTIVIEREN (*)
PRÜFZEICHEN ÜBERMITTELN
AKTIVIEREN (*) DEAKTIVIEREN
CHECKSUMME ÜBERPRÜFEN
AKTIVIEREN DEAKTIVIEREN (*)
BARCODELÄNGE-EINSTELLUNGEN
Min.: 4
Max.: 40
6.) Scannen Sie das Etikett Eingabe der Gruppe 9-4.
7.) Scannen Sie das Etikett Benutzerdefiniert.
8.) Scannen Sie sechs Ziffernetiketten aus der Hex-Tabelle (nur 3 Sätze von Längen können
definiert werden).
9.) Scannen Sie das Bestätigungsetikett in der Hex-Tabelle.
10.) Scannen Sie das Etikett Ende.
Page 80

80
EINSTELLUNG LÄNGE BENUTZERDEFINIERT
Benutzerdefiniert (3 Sätze verfügbar)
Min.: 4
Max.: 40
6.) Scannen Sie das Etikett Eingabe der Gruppe 9-4.
7.) Scannen Sie das Etikett Benutzerdefiniert.
8.) Scannen Sie sechs Ziffernetiketten aus der Hex-Tabelle (nur 3 Sätze von Längen können definiert
werden).
9.) Scannen Sie das Bestätigungsetikett in der Hex-Tabelle.
10.) Scannen Sie das Etikett Ende.
Page 81

81
Gruppe 10: Code 128
Eingabe Gruppe Ende
AKTIVIEREN (*) DEAKTIVIEREN
PRÜFZAHL AKTIVIEREN/DEAKTIVIEREN
AKTIVIEREN (*) (die Prüfzahl nicht senden) DEAKTIVIEREN
UCC/EAN/128
AKTIVIEREN DEAKTIVIEREN (*)
Page 82

82
Gruppe 11: CODE 11
Eingabe Gruppe Ende
AKTIVIEREN (*) DEAKTIVIEREN
ANZAHL DER PRÜFZEICHEN
ZWEI (*) EINS
PRÜFZEICHEN ÜBERMITTELN
AKTIVIEREN (*) DEAKTIVIEREN
PRÜFZAHL AKTIVIEREN/DEAKTIVIEREN
AKTIVIEREN (*) DEAKTIVIEREN
Page 83

83
Gruppe 12: Code 93
Eingabe Gruppe Ende
AKTIVIEREN DEAKTIVIEREN (*)
PRÜFZAHL VERIFIZIEREN
AKTIVIEREN (*) DEAKTIVIEREN
Page 84

84
Gruppe 13: MSI-PLEASSEY
Eingabe Gruppe Ende
AKTIVIEREN (*) DEAKTIVIEREN
PRÜFZAHL VERIFIZIEREN
AKTIVIEREN (*) DEAKTIVIEREN
MOD AKTIVIEREN
MOD AKTIVIEREN 10-10 MOD AKTIVIEREN 10 (*) MOD AKTIVIEREN 11-10
PRÜFZAHL ÜBERMITTELN/ABSCHNEIDEN
ABSCHNEIDEN 1ST PRÜFZAHL PRÜFZAHL ÜBERMITTELN (*) ABSCHNEIDEN 1STUND 2ND PRÜFZAHL
Page 85

85
Gruppe 14: CODABAR / NW7
Eingabe Gruppe Ende
AKTIVIEREN (*) DEAKTIVIEREN
START-/ENDZEICHEN ÜBERMITTELN
AKTIVIEREN DEAKTIVIEREN (*)
START-/ENDE-ÜBERMITTLUNGSART
ABCD/ABCD ABCD/TN*E
abcd/abcd (*) abcd/tn*e
Page 86

86
Gruppe 15: Code 4
Eingabe Gruppe Ende
AKTIVIEREN DEAKTIVIEREN (*)
Page 87

87
Gruppe 16-1: EAN-13/JAN-13
Eingabe Gruppe Ende
AKTIVIEREN (*) DEAKTIVIEREN
ADD-ON 2/5
AKTIVIEREN DEAKTIVIEREN (*)
PRÜFZEICHEN ÜBERMITTELN
AKTIVIEREN (*) DEAKTIVIEREN
ABSCHNEIDEN 1ST ZAHL
AKTIVIEREN DEAKTIVIEREN (*)
ABSCHNEIDEN2ND ZAHL
AKTIVIEREN DEAKTIVIEREN (*)
Page 88

88
EAN PRÜFZAHL
AKTIVIEREN (*) DEAKTIVIEREN
Page 89

89
Gruppe 16-2: UPC-A
Eingabe Gruppe Ende
AKTIVIEREN (*) DEAKTIVIEREN
ADD-ON 2/5
AKTIVIEREN DEAKTIVIEREN (*)
PRÜFZEICHEN ÜBERMITTELN
AKTIVIEREN (*) DEAKTIVIEREN
FÜHRENDE ZAHL ABSCHNEIDEN
AKTIVIEREN DEAKTIVIEREN (*)
KONVERTIERUNG VON UPC-A ZU EAN-13
AKTIVIEREN DEAKTIVIEREN (*)
Page 90

90
Gruppe 16-3: EAN-8/JAN-8
Eingabe Gruppe Ende
AKTIVIEREN (*) DEAKTIVIEREN
ADD-ON 2/5
AKTIVIEREN DEAKTIVIEREN (*)
PRÜFZEICHEN ÜBERMITTELN
AKTIVIEREN (*) DEAKTIVIEREN
PRÜFZEICHEN ABSCHNEIDEN
AKTIVIEREN (*) DEAKTIVIEREN
Page 91

91
KONVERTIERUNG VON EAN-8 ZU EAN-13
AKTIVIEREN 1 (fügt Nullen an den Anfang des Barcodes
hinzu)
DEAKTIVIEREN (*)
AKTIVIEREN 2 (fügt Nullen in der Mitte des Barcodes hinzu)
Page 92

92
Gruppe 16-4: UPC-E
Eingabe Gruppe Ende
AKTIVIEREN (*) DEAKTIVIEREN
ADD-ON 2/5
AKTIVIEREN DEAKTIVIEREN (*)
PRÜFZEICHEN ÜBERMITTELN
AKTIVIEREN (*) DEAKTIVIEREN
FÜHRENDE ZAHL ABSCHNEIDEN
AKTIVIEREN DEAKTIVIEREN (*)
KONVERTIERUNG VON UPC-E ZU UPC-A
AKTIVIEREN DEAKTIVIEREN (*)
Page 93

93
Gruppe 16-5: ISBN/ISSN
Eingabe Gruppe Ende
AKTIVIEREN (*) DEAKTIVIEREN
ADD-ON 2/5
AKTIVIEREN DEAKTIVIEREN (*)
Page 94

94
Gruppe 17: RSS-14
Eingabe Gruppe Ende
RSS-14 AKTIVIEREN RSS-14 DEAKTIVIEREN
AI AKTIVIEREN AI DEAKTIVIEREN (*)
CHECKSUMME AKTIVIEREN CHECKSUMME DEAKTIVIEREN (*)
GS1-128 AKTIVIEREN GS1-128 DEAKTIVIEREN (*)
Page 95

95
Gruppe 18: TITEL-/TRAILERZEICHEN ABSCHNEIDEN
Eingabe Gruppe Ende
TITELZEICHEN ABSCHNEIDEN
TRAILERZEICHEN ABSCHNEIDEN
1.) Scannen Sie das Etikett Eingabe der Gruppe 18.
2.) Scannen Sie das Titel- oder Trailer-Etikett.
3.) Siehe ASCII-Tabelle für den entsprechenden HEX-Code.
4.) Scannen Sie zwei Ziffern in der Hex-Tabelle.
5.) Scannen Sie das Bestätigungsetikett in der Hex-Tabelle.
6.) Scannen Sie das Etikett Ende.
LÖSCHEN
Löschen Sie Titel und Trailer
1.) Scannen Sie das Etikett Eingabe der Gruppe 19.
2.) Scannen Sie das Titel- oder Trailer-Etikett.
3.) Scannen Sie das Etikett Löschen.
4.) Scannen Sie das Etikett Ende.
Page 96

96
Gruppe 19: Vordefinierte Code-ID
Eingabe Gruppe Ende
AKTIVIEREN DEAKTIVIEREN (*)
Identifizierung der Barcode-ID
Die Identifizierung der Barcode-ID ist ein optionaler Code, um den Barcode des Etiketts, das von dem
Benutzer gescannt wird, zu identifizieren. Bitte beachten Sie die vordefinierte Barcode-ID für den ID-Code.
Page 97

97
Gruppe 20: Einstellung der benutzerdefinierten Code-ID
Eingabe Gruppe Ende
CODE 39/CODE 32 INTERLEAVED 2 OF 5
INDUSTRIAL 2 OF 5 MATRIX 2 OF 5
CHINA POSTAGE CODE 128
CODE 93 CODE 11
MSI/PLESSEY
CODABAR/NW7
EAN-13 EAN-8
UPC-E UPC-A
CODE 4
Page 98

98
Hinweis: Siehe ASCII-Tabelle, scannen Sie zwei hexadezimale Etiketten in der Hex-Tabelle, um ein Zeichen
darzustellen.
Warnung: Stellen Sie sicher, dass die vordefinierte Code-ID (Gruppe 19) vor der Installation deaktiviert wird.
Page 99

99
Gruppe 21: Alle Barcodes aktivieren
Eingabe Gruppe Ende
ALLE BARCODES AKTIVIEREN
Page 100

100
Gruppe 22: Funktionstasten Emulation
Eingabe Gruppe Ende
AKTIVIEREN DEAKTIVIEREN (*)
Funktionstasten Emulation aktivieren:
1.) Scannen Sie das Etikett Eingabe der Gruppe 22.
2.) Scannen Sie das Etikett Aktivieren.
3.) Scannen Sie das Etikett Ende.
Um eine Funktionstaste mit Eingabedaten zu verketten, entnehmen Sie bitte dem
Funktionstaste-Etikett seine hexadezimale Darstellung.
Beispiel: Präambel-Daten mit F1
1.) Scannen Sie das Etikett Eingabe der Gruppe 22.
2.) Scannen Sie das Etikett Aktivieren.
3.) Scannen Sie das Etikett 0 und 1 jeweils in der Hex-Tabelle.
4.) Scannen Sie das Bestätigungsetikett in der Hex-Tabelle.
5.) Scannen Sie das Etikett Ende.
Funktionstasten-Tabelle (Komplette ASCII Code 39 Tabelle)
F1:01 F2:02 F3:03 F4:04
F5:05 F6:06 F7:07 F8:08
F9:09 F10:0A F11:0B F12:0C
Eingabe:0D Tab:0E BS:0F Auf:10
Ab:11 Links:12 Startseite:14 Ende:15
PgUp:16 PgDn:17 Ins:18 Del:19
Esc:1B Rechts:13 S-Tab:1C
Um ein Barcode-Etikett für die Funktionstaste zu scannen, muss die komplette ASCII aktiviert werden.
Bitte beachten Sie die komplette ASCII Code 39-Tabelle, um das Barcode-Etikett für die
Funktionstaste zu erstellen.
Kompletter ASCII-Code 39 aktivieren
 Loading...