

Konig Ceiling alarm with motion detector 130 dB User Manual [en, ru, de, es, fr, it, cs, pl]
Page 1
SAS-APC10
ENGLISH ENGLISH ENGLISH
MANUAL (p. 2)
ANLEITUNG (S. 5)
MODE D’EMPLOI (p. 8)
GEBRUIKSAANWIJZING (p. 11)
MANUALE (p. 14)
MANUAL DE USO (p. 17)
MANUAL (p. 20)
HASZNÁLATI ÚTMUTATÓ (o. 23)
KÄYTTÖOHJE (s. 26)
BRUKSANVISNING (s. 29)
NÁVOD K POUŽITÍ (s. 32)
MANUAL DE UTILIZARE (p. 35)
ΕΓΧΕΙΡΙΔΙΟ XPHΣHΣ (σελ. 38)
BRUGERVEJLEDNING (s. 41)
VEILEDNING (s. 44)
ИНСТРУКЦИЯ (47 стр.)
KILAVUZ (s. 50)
KASUTUSJUHEND (lk. 53)
NÁVOD (s. 56)
ROKASGRĀMATA (lpp. 59)
NAUDOJIMO VADOVAS (62 p.)
PRIRUČNIK (str. 65)
РЪКОВОДСТВО (p. 68)
INSTRUKCJA OBSŁUGI (str. 71)
PRIROČNIK (str. 74)
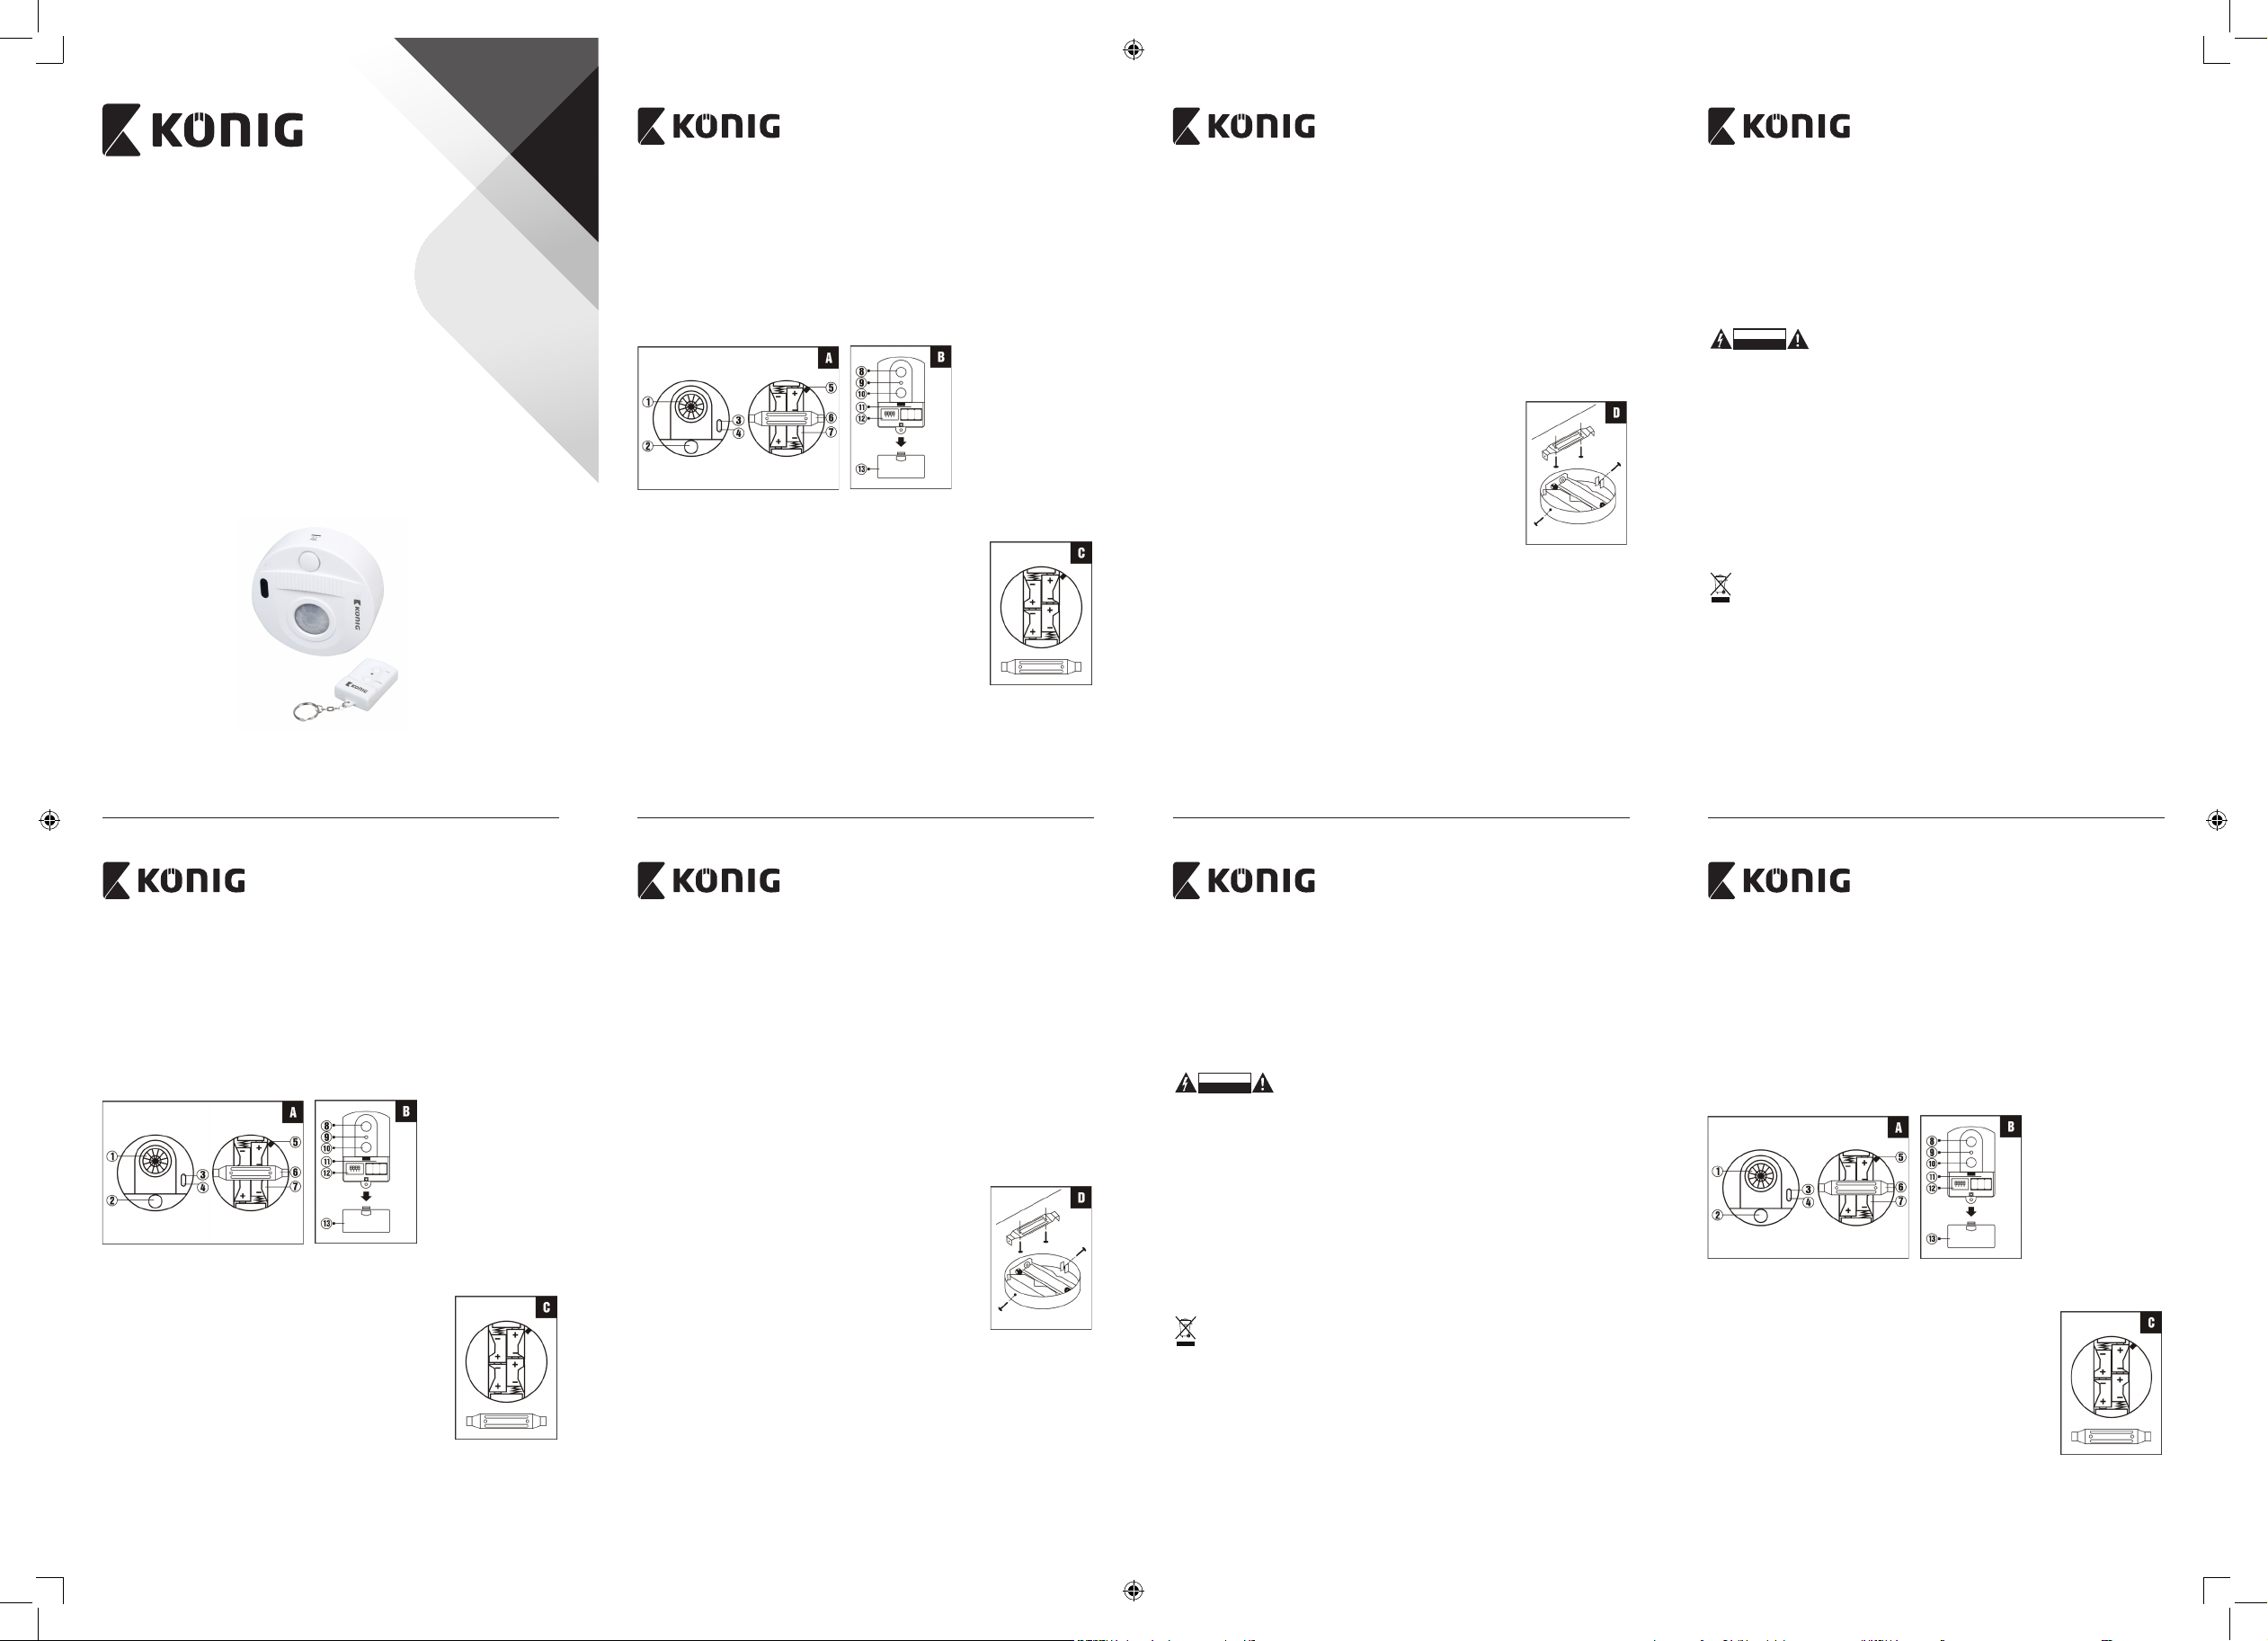
Description:
Figure A
Alarm
1. PIR sensor
2. Siren
3. Infrared sensor
4. Battery LED indicator
5. External power connection
6. Mounting bracket
Figure B
Remote control
8. Arm button
9. LED indicator
10. Disarm button
11. Battery compartment
12. Program switches
13. Battery cover
7. Battery compartment
Front Back
Battery installation:
Alarm:
1. The battery compartment is accessed from the rear of the
alarm by removing the screws of the mounting bracket.
2. Insert 4x C size batteries (not included) according the correct
polarity (see gure C).
3. When the batteries are inserted the alarm will beep very
loud to indicate that the batteries are properly installed.
4. Replace the mounting bracket and x it with the screws. The
battery LED indicator will light when the batteries are LOW
and need to be replaced.
Remote control:
The remote control uses 3x LR44 batteries (included). If the red LED indicator on the
remote control does not light up when the arm or disarm buttons are pressed, then the
batteries need to be replaced.
Program alarm:
1. Set the switches (12) of the remote control to the desired code and remove the
batteries from the alarm. Then wait at least 30seconds for the alarm to reset.
2. Aim, immediately after inserting the batteries, the remote control at the alarm and
press the arm button. The Alarm LED will ash once to indicate that it has learnt the
code of the remote control.
NOTE: The alarm must be programmed again with the remote control each time the
batteries are replaced.
Installation:
1. Locate the desired location for the alarm on the ceiling in
the center of the area that needs to be secured.
2. Remove the mounting bracket and x this to the ceiling
with screws. Then x the alarm to the mounting bracket and
secure this with the screws at the sides.
Operation:
Aim, when leaving the protected area, the remote control at the alarm and press the
arm button. A conrmation tone will indicate that the alarm is armed and you have
30seconds to leave the area. After this time, if motion is detected, the alarm will sound.
Aim, when entering the protected area, the remote control at the alarm and press the
disarm button. There is a short beep, when entering the area, to indicate that motion
has been detected. You have 4seconds delay to disarm the alarm.
Remark: If the LED indicator is constantly on, it means that the batteries need to be
replaced.
CAUTION
RISK OF ELECTRIC SHOCK
DO NOT OPEN
Maintenance:
Clean only with a dry cloth.
Do not use cleaning solvents or abrasives.
Warranty:
No guarantee or liability can be accepted for any changes and modications of the product or damage caused due to
incorrect use of this product.
General:
Designs and specications are subject to change without notice.
All logos brands and product names are trademarks or registered trademarks of their respective holders and are hereby
recognized as such.
This manual was produced with care. However, no rights can be derived. König Electronic can not accept liability for any
errors in this manual or their consequences.
Keep this manual and packaging for future reference.
Attention:
This product is marked with this symbol. It means that used electrical and electronic products should not be
mixed with general household waste. There is a separate collections system for these products.
This product has been manufactured and supplied in compliance with all relevant regulations and directives, valid for all
member states of the European Union. It also complies to all applicable specications and regulations in the country of
sales.
Formal documentation is available upon request. This includes, but is not limited to: Declaration of Conformity (and
product identity), Material Safety Data Sheet, product test report.
Please contact our customer service desk for support:
via website: http://www.nedis.com/en-us/contact/contact-form.htm
via e-mail: service@nedis.com
via telephone: +31 (0)73-5993965 (during oce hours)
NEDIS B.V., De Tweeling 28, 5215 MC ’s-Hertogenbosch, THE NETHERLANDS
Safety precautions:
To reduce risk of electric shock, this product should ONLY be opened by an authorized
technician when service is required.
Disconnect the product from mains and other equipment if a problem should occur.
Do not expose the product to water or moisture.
CEILING ALARM With Remote Control
DEUTSCH DEUTSCH DEUTSCH
Beschreibung:
Bild A
Alarm
1. PIR-Sensor
2. Sirene
3. Sensor-infrarot
4. LED-Batterienanzeige
5. Externer Einspeisungsanschluss
6. Montagekonsole
7. Batteriefach
Frontansicht Rückansicht
Batterieninstallation:
Wecker:
1. Der Raum für Batterien ist von der hinteren Alarmseite
zugänglich – die Schrauben von der hinteren Seite der
Montagekonsole.
2. 4x C Batterien einlegen (warden nicht mitgeliefert) und auf
die richtige Polarität achten – siehe Bild C.
3. Ist die letzte Batterie eingelegt, ertönt der Alarm sehr laut.
Somit wird deutlich, dass die Batterien richtig eingelegt sind.
4. Die Montagekonsole zurückschrauben. Die LED-Anzeige
leuchtet auf, falls die Batterien leer sind und ausgetauscht
werden müssen.
Bild B
Fernbedienung
8. Aktivierungstaste
9. LED-Anzeige
10. Deaktivierungstaste
11. Batteriefach
12. Programmumschaltung
13. Batteriendeckel
5
2 3 4
Fernbedienung:
Die Fernbedienung braucht 3x LR44 Batterien (warden mitgeliefert). Falls die rote LEDAnzeige an der Fernbedienung beim Drücken von aktivierung- oder deaktivierungTasten nicht aueuchtet, ist es nötig, die Batterien auszutauschen.
Alarmprogrammierung:
1. Stellen Sie die Programmumschaltung (12) der Fernbedienung auf den
gewünschten Kode ein und entnehmen Sie die Batterien dem Alarm. Warten Sie
zumindest 30Sekunden, sobald es zum Alarmreset kommt.
2. Zielen Sie unverzüglich nach dem Einlegen von Batterien mit der Fernbedienung
auf den Alarm und drücken Sie die Aktivierungstaste aktivierung. Die LEDAlarmanzeige leuchtet einmal auf und zeigt an, dass es zur Kodeannahme der
Fernbedienung gekommen ist.
HINWEIS: Der Alarm muss erneut mit Hilfe von der Fernbedienung bei jedem
Batterienaustausch programmiert werden.
Installation:
1. Stellen Sie den Alarm in die gewünschte Position an der
Decke ein.
2. Beseitigen Sie die Montagekonsole und befestigen Sie sie an
die Decke mit Hilfe von Schrauben. Anschließend befestigen
Sie den Alarm zur Montagekonsole schrauben Sie ihn fest.
Betrieb:
Zielen Sie mit der Fernbedienung auf den Alarm und drücken Sie die Aktivierungstaste
aktivierung. Der bestätigende Ton wird die Alarmaktivierung anzeigen und der Raum
ist innerhalb von 30Sekunden zu verlassen. Nach Ablauf dieser Zeit wird der Alarm
gelöst, falls es in dem überwachten Raum zur Bewegung kommt.
Zielen Sie mit der Fernbedienung auf den Alarm und drücken Sie die
Deaktivierungstaste deaktivierung. Nach dem Betreten des Raumes ertönt ein
leises Signal, das die Bewegung anzeigt. Sie haben 4Sekunden, um den Alarm zu
deaktivieren.
Hinweis: Falls die LED-Anzeige weiter aueuchtet, bedeutet es, dass es nötig ist, die
Batterien auszutauschen.
6 7 8
VORSICHT
STROMSCHLAGGEFAHR
NICHT ÖFFNEN
Wartung:
Nur mit einem trockenen Tuch säubern.
Keine Reinigungs- oder Scheuermittel verwenden.
Garantie:
Es kann keine Garantie oder Haftung für irgendwelche Änderungen oder Modikationen des Produkts oder für Schäden
übernommen werden, die aufgrund einer nicht ordnungsgemäßen Anwendung des Produkts entstanden sind.
Allgemeines:
Design und technische Daten unterliegen unangekündigten Änderungen.
Alle Logos, Marken und Produktnamen sind Marken oder eingetragene Marken ihrer jeweiligen Eigentümer und werden
hiermit als solche anerkannt.
Diese Bedienungsanleitung wurde sorgfältig verfasst. Dennoch können daraus keine Rechte und Pichten hergeleitet
werden. König Electronic haftet nicht für mögliche Fehler in dieser Bedienungsanleitung oder deren Folgen.
Bitte bewahren Sie Bedienungsanleitung und Verpackung für spätere Verwendung auf.
Achtung:
Dieses Produkt ist mit diesem Symbol gekennzeichnet. Es bedeutet, dass die ausgedienten elektrischen und
elektronischen Produkte nicht mit dem allgemeinen Haushaltsmüll entsorgt werden dürfen. Für diese Produkte
stehen gesonderte Sammelsysteme zur Verfügung.
Dieses Produkt wurde hergestellt und geliefert in Übereinstimmung mit allen geltenden Vorschriften und Richtlinien,
die für alle Mitgliedsstaaten der Europäischen Union gültig sind. Es entspricht allen geltenden Vorschriften und
Bestimmungen im Land des Vertriebs.
Eine formale Dokumentation ist auf Anfrage erhältlich. Diese beinhaltet unter anderem, jedoch nicht ausschließlich:
Konformitätserklärung (und Produktidentität), Sicherheitsdatenblatt, Testreport des Produkts.
Wenden Sie sich bei Fragen bitte an unseren Kundendienst:
per Internet: http://www.nedis.de/de-de/kontakt/kontaktformular.htm
per E-Mail: service@nedis.com
per Telefon: Niederlande +31 (0)73-5993965 (während der Geschäftszeiten)
NEDIS B.V., De Tweeling 28, 5215 MC ’s-Hertogenbosch, NIEDERLANDE
Sicherheitsvorkehrungen:
Um das Risiko eines elektrischen Schlags zu verringern, sollte dieses Produkt
AUSSCHLIESSLICH von einem autorisierten Techniker geönet werden.
Trennen Sie das Produkt von anderen Geräten, wenn ein Problem auftreten sollte.
Setzen Sie das Gerät nicht Wasser oder Feuchtigkeit aus.
Description :
Fig. A
Alarme
1. Capteur PIR
2. Sirène
3. Capteur à IR
4. Indicateur de piles LED
5. Raccordement externe de
l’alimentation
Fig. B
Télécommande
8. Bouton Armer
9. Indicateur DEL
10. Touche désactivation
11. Compartiment de la pile
12. Commutation de programmes
13. Cache des piles
6. Console de montage
7. Compartiment de la pile
Frontale Arrière
Installation des piles:
Alarme:
1. Pour accéder au compartiment à piles, dévissez les vis
situées à l’arrière de la console de montage.
2. Insérez 4 piles C (non incluses) en respectant la polarité (voir
l‘image C).
3. Après l’insertion de la dernière pile, l’alarme émet un bip fort
pour indiquer que les piles sont correctementinstallées.
4. Remettez la console de montage et xez-la solidement à
l’aide des vis. Si les piles sont déchargées, l’indicateur LED
restera allumé en continu, il est donc nécessaire de les
remplacer.
FRANÇAIS
Page 2
FRANÇAIS FRANÇAIS
NEDERLANDS NEDERLANDS
Télécommande :
Utilisez pour la télécommande 3 piles LR44 (incluses). Si le témoin rouge LED sur
la télécommande ne s’allume pas lorsque vous pressez le bouton activation ou
désactivation, il est nécessaire de remplacer les piles.
Programmation de l’alarme :
1. Réglez les commutateurs de la télécommande (12) sur le code demandé et retirez
les piles de l’alarme. Attendez au minimum 30secondes pour que l’alarme puisse
se réinitialiser.
2. Immédiatement après l’insertion des piles, dirigez la télécommande vers l’alarme
et pressez le bouton d’activation. Le témoin LED de l’alarme clignote une fois pour
indiquer la réception du code de la télécommande.
REMARQUE: Après chaque remplacement des piles, il est nécessaire de reprogrammer
l’alarme à l’aide de la télécommande.
Installation:
1. Déterminez la position souhaitée de l’alarme au plafond, au
centre de la pièce à sécuriser.
2. Retirez la console de montage et vissez-la fermement au
plafond à l’aide des vis. Ensuite, xez l’alarme à la console de
montage et bloquezla sur les côtés par des vis.
Fonctionnement:
Lorsque vous quittez le lieu sécurisé, dirigez la télécommande vers l’alarme et pressez
le bouton d’activation. Un son de conrmation indique l’activation de l’alarme. Vous
disposez de 30secondes pour quitter la pièce. Passé ce laps de temps, l’alarme se
déclenche en cas de détection d’un mouvement.
Lorsque vous entrez dans le lieu sécurisé, dirigez la télécommande vers l’alarme et
pressez le bouton de désactivation. Lorsque vous entrez dans la pièce, l’alarme émet
un bip court indiquant qu’elle a détecté un mouvement. Vous disposez de 4secondes
pour désactiver l’alarme.
Remarque: Si le témoin LED reste allumé, il est nécessaire de remplacer les piles.
ATTENTION
RISQUE DE CHOC ELECTRIQUE
NE PAS OUVRIR
Entretien :
Ne nettoyez l'appareil qu'avec un chion sec.
N'utilisez pas de solvants ni des produits abrasifs.
Garantie :
Aucune garantie ou responsabilité ne sera acceptée en cas de modication et/ou de transformation de l'appareil ou en cas
de dommages provoqués par une utilisation incorrecte de l'appareil.
Generale :
Le design et les caractéristiques techniques sont sujets à modication sans notication préalable.
Tous les logos de marques et noms de produits sont des marques déposées ou immatriculées dont leurs détenteurs sont
les propriétaires et sont donc reconnues comme telles dans ce document.
Ce manuel a été produit avec soin. Toutefois, aucun droit ne peut en dériver. König Electronic ne peut être tenu
responsable pour les erreurs contenues dans ce manuel et leurs conséquences.
Conservez ce manuel et l'emballage pour toute référence ultérieure.
Attention :
Ce symbole gure sur l'appareil. Il signie que les produits électriques et électroniques ne doivent pas être jetés
avec les déchets domestiques. Le système de collecte est diérent pour ces produits.
Ce produit est fabriqué et délivré en conformité avec toutes les directives et règlements applicables et en vigueur dans
tous les états membre de l'Union Européenne. Il est également conforme aux spécications et à la réglementation en
vigueur dans le pays de vente.
La documentation ocielle est disponible sur demande. Cela inclut mais ne se limite pas à: La déclaration de conformité (et
à l'identication du produit), la che technique concernant la sécurité des matériaux, les rapports de test du produit.
Veuillez contacter notre centre de service à la clientèle pour plus d'assistance:
via le site Web: http://www.nedis.fr/fr-fr/contact/formulaire-de-contact.htm
via courriel: service@nedis.com
via téléphone: +31 (0)73-5993965 (aux heures de bureau)
NEDIS B.V., De Tweeling 28, 5215 MC ’s-Hertogenbosch, PAYS-BAS
Précautions de sécurité:
Pour réduire le risque de choc électrique, ce produit ne doit être ouvert que par un
technicien qualié si une réparation s’impose.
Débranchez l'appareil et les autres équipements du secteur s'il y a un problème.
Ne pas exposer l’appareil à l’eau ni à l’humidité.
Omschrijving:
Afbeelding A
Alarm
1. Bewegingsmelder
2. Sirene
3. Infraroodsensor
4. Batterij LED indicator
5. Externe stroomaansluiting
6. Bevestigingsbeugel
Afbeelding B
Afstandsbediening
8. Alarm inschakelen
9. LED-indicatie
10. Alarm uitschakelen
11. Batterijvak
12. Programmaschakelaar
13. Batterijklepje
7. Batterijvak
Voorkant Achterkant
Installatie van de batterij:
Alarm:
1. Het batterijcompartiment bevindt zich aan de achterzijde
van het alarm. Verwijder, om toegang te krijgen, de
schroeven van de bevestigingsbeugel.
2. Plaats 4x batterij type C (niet meegeleverd) volgens de
correcte polariteit (zie afbeelding C).
3. Als de batterijen geplaatst zijn is een luide pieptoon
hoorbaar. Dit geeft aan dat de batterijen correct geplaatst
zijn.
4. Plaats de bevestigingsbeugel terug en bevestig deze met de
schroeven. De batterij LED indicator licht op als de batterijen
zwak zijn en vervangen dienen te worden.
Afstandsbediening:
De afstandsbediening maakt gebruik van 3x batterij type LR44 (meegeleverd). Als de
rode LED indicator niet oplicht bij het indrukken van de bewapenen en ontwapenen
toets, dienen de batterijen vervangen te worden.
Programmeren van het alarm:
1. Stel met de programmaschakelaars (12) van de afstandsbediening een gewenste
code in en verwijder de batterijen van het alarm. Wacht tenminste 30seconden
zodat het alarm gereset wordt.
2. Richt, direct na het terugplaatsten van de batterijen, de afstandsbediening op het
alarm en druk op de bewapenen toets. De alarm LED licht op om aan te geven dat
de code van de afstandsbediening is overgenomen.
OPMERKING: Als de batterijen vervangen worden dient het alarm opnieuw
geprogrammeerd te worden.
Installatie:
1. Bepaal een gewenste locatie voor de installatie van het
alarm. Plaats het alarm in het midden van de ruimte die
beveiligd dient te worden.
2. Verwijder de bevestigingsbeugel en bevestig deze met
schroeven aan het plafond. Bevestig vervolgens het alarm
aan de bevestigingsbeugel met behulp van de schroeven
aan beide zijdes.
Functionering:
Richt, bij het verlaten van de beveiligde ruimte, met de afstandsbediening op het alarm
en druk op de bewapenen toets. Een pieptoon is ter bevestiging hoorbaar om aan te
geven dat het alarm is ingeschakeld. U heeft nu 30seconden om de ruimte te verlaten.
Na het verstrijken van deze tijd zal de sirene bij het detecteren van beweging klinken.
Richt, bij het betreden van de beveiligde ruimte, met de afstandsbediening op het
alarm en druk op de ontwapenen toets. Bij het binnentreden is een korte pieptoon
hoorbaar om aan te geven dat er beweging is gedetecteerd. U heeft 4seconden om
het alarm uit te schakelen.
Opmerking: Als de LED indicator constant oplicht, geeft dit aan de batterijen
vervangen dienen te worden.
9
NEDERLANDS
VOORZICHTIG
GEVAAR VOOR ELEKTRISCHE SCHOK
NIET OPENEN
Onderhoud:
Uitsluitend reinigen met een droge doek.
Gebruik geen reinigingsmiddelen of schuurmiddelen.
Garantie:
Voor wijzigingen en veranderingen aan het product of schade veroorzaakt door een verkeerd gebruik van dit product, kan
geen aansprakelijkheid worden geaccepteerd. Tevens vervalt daardoor de garantie.
Algemeen:
Ontwerpen en specicaties kunnen zonder kennisgeving worden gewijzigd.
Alle logo’s, merken en productnamen zijn handelsmerken of geregistreerde handelsmerken van de respectievelijke
eigenaren en worden hierbij als zodanig erkend.
Deze handleiding is met zorg samengesteld. Er kunnen echter geen rechten aan worden ontleend. König Electronic kan
geen aansprakelijkheid aanvaarden voor eventuele fouten in deze handleiding of de gevolgen daarvan.
Bewaar deze gebruiksaanwijzing voor latere raadpleging.
Opgelet:
Dit product is voorzien van dit symbool. Dit symbool geeft aan dat afgedankte elektrische en elektronische
producten niet met het gewone huisafval verwijderd mogen worden. Voor dit soort producten zijn er speciale
inzamelingspunten.
Dit product is vervaardigd en geleverd in overeenstemming met de relevante reglementen en richtlijnen die voor alle
lidstaten van de Europese Unie gelden. Het voldoet ook aan alle toepasselijke specicaties en reglementen van het land
van verkoop.
Op aanvraag is ociële documentatie verkrijgbaar. Inclusief, maar niet uitsluitend: Conformiteitsverklaring (en
productidentiteit), materiaalveiligheidsinformatie en producttestrapport.
Wend u tot onze klantenservice voor ondersteuning:
via de website: http://www.nedis.nl/nl-nl/contact/contact-formulier.htm
via e-mail: service@nedis.nl
telefonisch: +31 (0)73-5993965 (tijdens kantooruren)
NEDIS B.V., De Tweeling 28, 5215 MC ’s-Hertogenbosch, NEDERLAND
Veiligheidsmaatregelen:
Om het risico op elektrische schokken te voorkomen mag dit product ALLEEN worden
geopend door een erkende technicus wanneer er onderhoud nodig is.
Koppel het product los van de elektrische voeding en van andere apparatuur als er zich
problemen voordoen.
Stel het product niet bloot aan water of vocht.
10 11 12
Descrizione:
Figura A
Allarme
1. Sensore PIR
2. Sirena
3. Sensore infrarosso
4. Indicatore LED batterie
5. Collegamento alimentaz. esterna
6. Staa di montaggio
Figura B
Telecomando
8. Tasto di attivazione
9. Indicatore LED
10. Tasto di disattivazione
11. Compartimento batteria
12. Commut. programm
13. Coperchio batterie
7. Compartimento batteria
Frontale Retro
Installazione delle batterie:
Allarme:
1. Si accede allo scomparto delle batterie dal retro dell’allarme,
rimuovendo le viti della staa di montaggio.
2. Inserire 4 batterie misura C (non incluse) rispettando la
polarità corretta (vedere gura C).
3. Quando le batterie sono state inserite, l’allarme emetterà un
breve segnale molto forte ad indicare che le batterie sono
state installate correttamente.
4. Rimettere a posto la staa di montaggio e ssarla con le
viti. L’indicatore LED delle batterie si accenderà quando le
batterie sono quasi scariche e vanno sostituite.
ITALIANO ITALIANO
ITALIANO
Telecomando:
Il telecomando utilizza 3 batterie misura LR44 batterie (incluse). Se l’indicatore LED
rosso del telecomando non si accende quando si premono i tasti di attivazione o
disattivazione, allora le batterie devono essere sostituite.
Programmazione dell’allarme:
1. Impostare i commutatori (12) del telecomando secondo il codice desiderato e
rimuovere le batterie dall’allarme. Poi attendere almeno 30secondi perchè l’allarme
si resetti.
2. Immediatamente dopo aver reinserito le batterie, puntare il telecomando
in direzione dell’allarme e premere il tasto di attivazione. Il LED dell’allarme
lampeggerà una volta, ad indicare che ha memorizzato il codice del telecomando.
NOTA: L’allarme deve venir programmato di nuovo con il telecomando ogni volta che
le batterie vengono sostituite.
Installazione:
1. Individuare la posizione desiderata per l’allarme sul sotto,
al centro dell’area da rendere sicura.
2. Rimuovere la staa di montaggio e ssarla al sotto con le
viti. Poi installare l’allarme sulla staa di montaggio e ssarlo
con le viti sui lati.
Funzionamento:
Quando si sta per lasciare l’area protetta, puntare il telecomando all’allarme e premere
il tasto di attivazione. Un segnale acustico di conferma indicherà che l’allarme è attivato;
si dispone di 30secondi per lasciare l’area. Dopo questo intervallo, ogni movimento
rilevato farà suonare l’allarme.
Rientrando nell’area protetta, puntare il telecomando all’allarme e premere il tasto di
disattivazione. Quando si entra nell’area, si udirà un breve segnale acustico, che indica
che il movimento è stato rilevato. Si dispone di 4secondi di tempo per disattivare
l’allarme.
Nota: Se l’indicatore LED resta sempre acceso, questo signica che la batteria deve
essere sostituita.
PRECAUZIONI
RISCHIO DI SCOSSE ELETTRICHE
NON APRIRE
Manutenzione:
Pulire solo con un panno asciutto.
Non utilizzare solventi detergenti o abrasivi.
Garanzia:
Non sarà accettata alcuna garanzia o responsabilità in relazione a cambiamenti e modiche apportate al prodotto o a
danni determinati dall’uso non corretto del prodotto stesso.
Informazioni generali:
Il design e le caratteristiche tecniche sono soggetti a modica senza necessità di preavviso.
Tutti i marchi a logo e i nomi di prodotto sono marchi commerciali o registrati dei rispettivi titolari e sono riconosciuti
come tali in questo documento.
Questo manuale è stato redatto con cura. Tuttavia non possono essere avanzati diritti. König Electronic non può accettare
responsabilità per errori in questo manuale né per eventuali conseguenze.
Conservare questo manuale e la confezione per riferimenti futuri.
Attenzione:
Il prodotto è contrassegnato con questo simbolo. Questo signica che i prodotti elettrici ed elettronici
non devono essere smaltiti con i normali riuti domestici. Per questi prodotti esiste un sistema di raccolta
dierenziata.
Il presente prodotto è stato realizzato e fornito in conformità a tutte le norme e le direttive vigenti, con validità in tutti gli
stati membri della Comunità Europea. Inoltre è conforme alle speciche e alle normative applicabili nel paese in cui è stato
venduto.
La documentazione uciale è disponibile su richiesta. Essa include a titolo esemplicativo ma non limitativo: Dichiarazione
di conformità (e di identità del prodotto), scheda di sicurezza dei materiali, rapporto di prova del prodotto.
Contattare il nostro servizio clienti per assistenza:
tramite il nostro sito web: http://www.nedis.it/it-it/contatti/modulo-contatto.htm
tramite e-mail: service@nedis.com
tramite telefono: +31 (0)73-5993965 (in orario di ucio)
NEDIS B.V., De Tweeling 28, 5215 MC ’s-Hertogenbosch, Paesi Bassi
Precauzioni di sicurezza:
Per ridurre il rischio di scosse elettriche, il presente dispositivo deve essere aperto SOLO da
un tecnico autorizzato, nel caso sia necessario ripararlo.
Scollegare il prodotto dalla rete di alimentazione e da altri apparecchi se dovesse vericarsi
un problema.
Non esporre l'apparecchio ad acqua o umidità.
13
14 15 16
Page 3
ESPAÑOL ESPAÑOL ESPAÑOL
PORTUGUÊS
Descripción:
Fig. A
Alarma
1. Sensor PIR
2. Sirena de alarma
3. Sensor infrarrojos
4. Indicador LED de pilas
5. Conexión de alimentación externa
6. Soporte de montaje
Fig. B
Mando a distancia
8. Botón Armar
9. Luz indicadora LED
10. Botón Desarmar
11. Compartimento de la batería
12. Interruptores de programa
13. Tapa de pilas
7. Compartimento de la batería
Frontal Posterior
Colocación de las pilas:
Alarma:
1. Se accede al compartimento de pilas desde la parte posterior
de la alarma quitando los tornillos del soporte de montaje.
2. Coloque 4 pilas C (no incluidas) teniendo en cuenta la
polaridad (Ver Fig. C).
3. Después de colocar las pilas la alarma sonará muy fuerte
para indicar que las pilas se han colocado correctamente.
4. Vuelva a poner la tapa y fíjela con los tornillos. El indicador
LED de pilas se enciende cuando las pilas están LOW (bajas)
y necesitan ser cambiadas.
Mando a distancia:
El mando a distancia utiliza 3 pilas LR44 (incluidas). Si el indicador LED rojo del mando
no se enciende cuando se pulsa el botón armar o desarmar es necesario cambiar las
pilas.
Programación de la alarma:
1. Ajuste los interruptores (12) del mando a distancia con el código deseado y saque
las pilas de la alarma. Espere como mínimo 30segundos antes de reajustar la
alarma.
2. Inmediatamente después de colocar las pilas dirija el mando a distancia hacia la
alarma y pulse el botón armar. El LED de la alarma parpadeará una vez para indicar
que el código del mando ha sido aceptado.
NOTA: Cada vez que se cambian las pilas debe programarse de nuevo la alarma con el
mando a distancia.
Instalación:
1. Marque el lugar deseado en el techo para la alarma, en el
centro de la zona a asegurar.
2. Quite el soporte y fíjelo al techo con tornillos. A continuación
je la alarma al soporte y después los tornillos en los lados.
Funcionamiento:
Al abandonar la zona protegida dirija el mando a distancia hacia la alarma y pulse el
botón armar. Un tono de conrmación indicará que la alarma está activada y dispondrá
de 30segundos para abandonar el área. Después de este lapso de tiempo sonará la
alarma.
Al entrar en el área protegida dirija el mando a distancia hacia la alarma y pulse el
botón desarmar. Al entrar en el area protegida se oye un pitido de corta duración para
indicar que se ha detectado un movimiento. Se dispone de 4segundos para desactivar
la alarma.
Observación: Si el indicador LED está siempre encendido, signica que hay que
cambiar las pilas.
PRECAUCIÓN
RIESGO DE ELECTROCUCIÓN
NO ABRIR
Mantenimiento:
Límpielo sólo con un paño seco.
No utilice disolventes de limpieza ni productos abrasivos.
Garantía:
No se aceptará ninguna garantía o responsabilidad derivada de cualquier cambio o modicaciones realizadas al producto
o daños provocados por un uso incorrecto del producto.
General:
Las ilustraciones y las especicaciones podrán sufrir cambios sin previo aviso.
Todas las marcas de logotipos y nombres de productos constituyen patentes o marcas registradas a nombre de sus
titulares correspondientes, reconocidos como tal.
Este manual se ha redactado con sumo cuidado. Aún así, no se ofrece ninguna garantía. König Electronic no será
responsable de los errores de este manual o de las consecuencias derivadas de los mismos.
Conserve este manual y el embalaje en caso de futura necesidad.
Atención:
Este producto está señalizado con este símbolo. Esto signica que los productos eléctricos y electrónicos
usados no deberán mezclarse con los desechos domésticos generales. Existe un sistema de recogida individual
para este tipo de productos.
Este producto se ha fabricado y distribuido de conformidad con todas las normativas y directivas relevantes, válidas para
todos los estados de la Unión Europea. También cumple con todas las especicaciones y normativas en el país en el cual
se comercializa.
Previa solicitud, podremos proporcionarle la documentación formal. Esta documentación incluye, entre otros: Declaración
de conformidad (e identidad del producto), hoja de datos de seguridad del material, informe sobre las pruebas realizadas
al producto.
Póngase en contacto con nuestro servicio de atención al cliente para obtener información adicional:
por medio de nuestro sitio web: http://www.nedis.es/es-es/contacto/formulario-de-contacto.htm
enviando un correo electrónico: service@nedis.com
o llamando por teléfono: +31 (0)73-5993965 (en horario de ocina)
NEDIS B.V., De Tweeling 28, 5215 MC ’s-Hertogenbosch, PAÍSES BAJOS
Precauciones de seguridad:
Para reducir el peligro de descarga eléctrica, este producto SÓLO lo debería abrir un
técnico autorizado cuando necesite reparación.
Desconecte el producto de la toma de corriente y de los otros equipos si ocurriera algún
problema.
No exponga el producto al agua ni a la humedad.
Descrição:
Figura A
Alarme
1. Sensor PIR
2. Sirene
3. Sensor infra-vermelhos
4. Indicador LED da carga das pilhas
5. Ligação de fonte de alimentação
externa
Figura B
Comando
8. Botão para armar
9. Indicador LED
10. Botão para desarmar
11. Compartimento das pilhas
12. Comutadores do programa
13. Tampa da bateria
6. Suporte de montagem
7. Compartimento das pilhas
Vista frontal Retroceder
Instalação da bateria:
Alarme:
1. O compartimento das pilhas é acedido a partir da parte
de trás do alarme, removendo os parafusos do suporte de
montagem.
2. Inserir 4x pilhas tamanho C (não incluídas) respeitando a
polaridade correcta (ver gura C).
3. Quando as pilhas estiverem inseridas o alarme produzirá um
bip muito alto para indicar que as pilhas estão correctamente
instaladas.
4. Voltar a colocar o suporte de montagem e xá-lo com os
parafusos. O indicador LED da carga das pilhas acenderá
quando as pilhas estiverem FRACAS e a necessitar de serem
substituídas.
17
PORTUGUÊS PORTUGUÊS
Comando:
O comando usa 3x pilhas LR44 (incluídas). Se o indicador LED no comando não acender
quando os botões armar ou desarmar forem premidos, então as pilhas necessitam de
ser substituídas.
Programar o alarme:
1. Denir os comutadores (12) do comando no código pretendido e remover as pilhas
do alarme. Depois, aguardar pelo menos 30segundos para o alarme reiniciar.
2. Direccionar, imediatamente depois de inserir as pilhas, o comando para o alarme e
premir o botão armar. O LED do alarme piscará uma vez para indicar que o código
do comando foi reconhecido.
NOTA: O alarme tem de ser programado de novo com o comando sempre que as pilhas
são substituídas.
Instalação:
1. Localizar o local pretendido no tecto para o alarme, no
centro de uma área que necessite de ser protegida.
2. Retirar o suporte de montagem e xar o mesmo ao tecto
com parafusos. Depois, xar o alarme no suporte de
montagem e xar este com os parafusos nas partes laterais.
Funcionamento:
Direccionar, quando abandona a área protegida, o comando para o alarme e premir o
botão armar. Um toque de conrmação indicará que o alarme está armado e que tem
30segundos para abandonar a área. Após este tempo, se for detectado movimento, o
alarme soará.
Direccionar, quando entra na área protegida, o comando para o alarme e premir o
botão desarmar. É produzido um bip curto, quando entra na área, para indicar que o
movimento foi detectado. Tem um período de 4segundos para desarmar o alarme.
Observação: Se o indicador LED estiver sempre aceso, isso signica que as pilhas
necessitam de ser substituídas.
18 19 20
CUIDADO
RISCO DE CHOQUE ELÉCTRICO
NÃO ABRIR
Manutenção:
Limpar apenas com um pano seco.
Não utilizar solventes de limpeza ou produtos abrasivos.
Garantia:
Não é aceitável qualquer garantia ou responsabilidade devidas a alterações e modicações no produto ou de danos
causados pela utilização incorrecta deste produto.
Geral:
Os designs e as especicações estão sujeitos a alteração sem aviso.
Todos os logótipos, marcas ou logótipos de marcas e nomes de produtos são marcas registadas dos respectivos
proprietários e são reconhecidas como tal neste documento.
Este manual foi cuidadosamente elaborado. No entanto, não podem ser derivados quaisquer direitos. A König Electronic
não se responsabiliza por quaisquer erros neste manual nem pelas respectivas consequências.
Guardar este manual e embalagem para consulta futura.
Atenção:
Este produto encontra-se marcado com este símbolo. Signica que os produtos eléctricos e electrónicos usados
não devem ser misturados com o lixo doméstico geral. Existe um sistema de recolha separado para estes
produtos.
Este produto foi fabricado e fornecido em conformidade com todos os regulamentos e directivas relevantes, válidos
para todos os estados membros da União Europeia. Além disso, está em conformidade com todas as especicações e
regulamentos aplicáveis no país de venda.
Mediante pedido, será disponibilizada documentação formal. Isto inclui, mas não se limita a: Declaração de Conformidade
(e identidade do produto), Ficha de Dados de Segurança do Material e relatório de teste do produto.
Contactar o nosso centro de apoio ao cliente para obter assistência:
através da página de internet: http://www.nedis.pt/pt-pt/contacto/formulario-de-contacto.htm
através de e-mail: service@nedis.com
através do telefone: +31 (0)73-5993965 (durante o horário normal de expediente)
NEDIS B.V., De Tweeling 28, 5215 MC ’s-Hertogenbosch, HOLANDA
Precauções de segurança:
Quando necessitar de reparação e para reduzir o risco de choque eléctrico, este produto
deve APENAS ser aberto por um técnico autorizado.
Desligar o produto da tomada de alimentação e outro equipamento se ocorrer um
problema.
Não expor o produto à água ou humidade.
Megnevezése:
A. ábra
Riasztó
1. PIR-érzékelő
2. Sziréna
3. Infravörös érzékelő
4. Elemek LED-jelzőfénye
5. Külső táplálás csatlakozó
6. Szerelőkonzol
B. ábra
A távirányító
8. Aktiválás gombja
9. LED jelzőfény
10. Deaktiválás gombja
11. Elemtartó
12. Programváltás
13. Elemrekesz fedele
7. Elemtartó
Elölnézet Hátulnézet
Elemek behelyezése:
Alarm:
1. Az elemrekesz a riasztó hátoldaláról érhető el úgy, hogy
lecsavarozza a csavarokat a szerelőkonzol hátsó részéről.
2. Tegyen be 4 db C elemet (nem része a csomagolásnak),
ügyeljen a helyes polaritásra (lásd a C. ábrát).
3. Az elemek behelyezése után a riasztó nagyon hangosan
sípol egyet, ezzel jelezve, hogy az elemek telepítése helyes.
4. Tegye vissza a szerelőkonzolt és csavarokkal rögzítse. A LEDjelzőfény folyamatosan világít, ha az elemek kimerültek,
cserélje ki az elemeket.
MAGYAR MAGYAR
A távirányító:
A távirányító 3 db LR44-es elemmel működik (része a csomagolásnak). Ha a piros
LED-jelzőfény a távirányítón az nem gyullad ki, az aktiválás vagy deaktiválás gombok
megnyomása után nem gyullad ki, ki kell cserélni az elemeket.
A riasztó programozása:
1. A távirányítón a kapcsolót (12) állítsa a kívánt kódra és a riasztóból vegye ki az
elemeket. Utána várjon legalább 30másodpercet, amíg a riasztó nem áll vissza
gyári beállításába.
2. Az elemcsere után a távirányító haladéktalanul irányítsa a riasztóra és nyomja
meg az aktiválás gombot. A LEDjelzőfény egyszer felvillan, ezzel jelezve, hogy a
távirányító kódját a riasztó elfogadta.
MEGJEGYZÉS: Az elemek kivétele vagy cseréje után a riasztót mindig újra kell
programozni a távirányító segítségével.
Üzembe helyezés:
1. Jelölje ki a riasztó helyét a mennyezeten a védelemre szánt
helyiség közepén.
2. Távolítsa el a szerelőkonzolt és erősítse fel a mennyezetre
csavarok segítségével. Utána rögzítse a riasztó a
szerelőkonzolra és oldalt csavarokkal rögzítse.
Használat:
A védett helyiségből való távozáskor a távirányítót irányítsa a riasztóra és aktiváláshoz
nyomja meg az aktiválás gombot. A hangjelzés a riasztó aktiválását jelzi. 30másodperc
áll rendelkezésére a helyiség elhagyásához. Ennek az időnek eltelte után mozgás
érzékelésekor megszólal a sziréna.
A védett helyiségbe lépés után irányítsa a távirányítót a riasztóra és deaktiváláshoz
nyomja meg a deaktiválás gombot. A helyiségbe lépés után egy rövid sípolás hallatszik,
mely a mozgás érzékelését jelzi. Ekkor még 4másodperce van a riasztó deaktiválására.
Megjegyzés: Ha a LED-jelzőfény folyamatosan világít, ki kell cserélni az elemeket.
21
22 23 24
Page 4

MAGYAR
SUOMI SUOMI SUOMI
FIGYELMEZTETÉS
ÁRAMÜTÉS VESZÉLYE
NE NYISSA FEL
Karbantartás:
Csak száraz ronggyal tisztítsa.
Ne használjon oldószert vagy súrolószereket.
Jótállás:
Nem vállalunk jótállást és felelősséget a terméken végzett változtatás vagy módosítás vagy a termék helytelen használata
miatt bekövetkező károkért.
ÁLTALÁNOS:
A termék kialakítása és műszaki jellemzői előzetes értesítés nélkül is módosulhatnak.
Minden logó, terméknév és márkanév a tulajdonosának márkaneve vagy bejegyzett márkaneve, azokat ennek tiszteletben
tartásával említjük.
Jelen útmutató nagy gonddal készült. Ennek ellenére abból jogok nem származnak. A König Electronic nem felelős az
útmutató hibáiért, vagy azok következményeiért.
Őrizze meg ezt az útmutatót és a csomagolást.
Figyelem:
Ezt a terméket ezzel a jelölésel láttuk el. Azt jelenti, hogy az elhasznált elektromos és elektronikus termékeket
tilos az általános háztartási hulladékhoz keverni. Begyűjtésüket külön begyűjtő létesítmények végzik.
Ez a termék az Európai Unió minden tagállamában érvényes vonatkozó rendelkezések és irányelvek betartásával készült és
került forgalomba. Megfelel az értékesítési országban rá vonatkozó minden előírásnak és rendelkezésnek.
Kérésre hivatalos dokumentációt is rendelkezésre bocsátunk. A dokumentáció a teljesség igénye nélkül a következőket
tartalmazza: Megfelelőségi (és termékazonossági) nyilatkozat, anyagbiztonsági adatlap, a termék vizsgálati jegyzőkönyve.
Támogatással kapcsolatos ügyekben forduljon ügyfélszolgálatunkhoz:
Weboldalunkon: http://www.nedis.com/en-us/contact/contact-form.htm
E-mailben: service@nedis.com
Telefonon: +31 (0)73-5993965 (munkaidőben)
NEDIS B.V., De Tweeling 28, 5215 MC ’s-Hertogenbosch, HOLLANDIA
Biztonsági óvintézkedések:
Az áramütés veszélyének csökkentése érdekében ezt a terméket KIZÁRÓLAG a
márkaszerviz képviselője nyithatja fel.
Hiba esetén húzza ki a termék csatlakozóját a konnektorból, és kösse le más
berendezésekről.
Vigyázzon, hogy ne érje a terméket víz vagy nedvesség.
Kuvaus:
Kuva A
Hälytin
1. PIR sensori
2. Sireeni
3. Infrapunasensori
4. Paristojen merkkivalo
5. Ulkoisen virransyötön liitin
6. Kiinnityskonsoli
Kuva B
Kaukosäädin
8. Aktivointipainike
9. LED-merkkivalo
10. Deaktivointipainike
11. Akkutila
12. Ohjelmointikytkimet
13. Paristotilan kansi
7. Akkutila
Etuosa Takaosa
Paristojen asennus:
Hälytin:
1. Paristotilaan päästään hälyttimen takaa irrottamalla
kiinnityskonsolin takaosassa olevat ruuvit.
2. Asenna 4x C paristoa (eivät kuulu toimitukseen) oikeinpäin
(ks. kuva C).
3. Paristojen asennuksen jälkeen kuuluu voimakas piippaus,
joka ilmoittaa paristojen olevan oikein asennetut.
4. Asenna kiinnityskonsoli takaisin ja kiinnitä se ruuveilla.
Paristojen jännitteen ollessa liian alhainen palaa merkkivalo
ilmoittaen paristojen vaihdon tarpeesta.
Kaukosäädin:
Kaukosäätimessä käytetään 3x LR44 paristoja (kuuluvat toimitukseen). Jos
kaukosäätimen punainen merkkivalo ei syty painettaessa painiketta aktivoin tai
deaktivoin, on paristot vaihdettava.
Hälyttimen ohjelmointi:
1. Aseta kaukosäätimen kytkimet (12) haluamasi koodin asentoon ja poista paristot
hälyttimestä. Odota sitten vähintään 30sekuntia, jotta hälytin ehtii resetoitua.
2. Suuntaa kaukosäädin heti paristojen asennuksen jälkeen hälyttimeen ja paina
aktivointipainiketta aktivoin. Hälyttimen merkkivalo välähtää yhden kerran
ilmoittaen niin kaukosäätimen koodin vastaanottamisesta.
HUOMAA: Hälytin on ohjelmoitava uudestaan kaukosäätimen avulla aina paristojen
vaihdon yhteydessä.
Asennus:
1. Valitse hälyttimelle sopiva paikka keskellä valvottavan
huoneen kattoa.
2. Irrota kiinnityskonsoli ja kiinnitä se ruuveilla kattoon. Kiinnitä
sitten hälytin kiinnityskonsoliin ja varmista se reunoilta
ruuveilla.
Toimenpide:
Poistuessasi valvotusta tilasta suuntaa kaukosäädin hälyttimeen ja paina
aktivointipainiketta aktivoin. Vahvistusääni ilmoittaa hälyttimen aktivoitumisen ja
sinulla on 30sekuntia aikaa huoneesta poistumiseen. Tämän ajan jälkeen alkaa hälytin
soida sensorin havaitessa liikkeen.
Tullessasi valvottuun tilaan suuntaa kaukosäädin hälyttimeen ja paina
deaktivointipainiketta deaktivoin. Huoneeseen tullessasi kuuluu lyhyt piippaus, joka
ilmoittaa liikkeen havainnosta. Sinulla on 4sekuntia aikaa hälyttimen deaktivointiin.
Huomaa: Paristojen merkkivalon palaessa jatkuvasti on paristot vaihdettava.
VAROITUS
SÄHKÖISKUVAARA
ÄLÄ AVAA
Huolto:
Puhdista ainoastaan kuivalla liinalla.
Älä käytä liuottimia tai hankausaineita.
Takuu:
Takuu ja vastuuvelvollisuus mitätöityvät, jos tuote vaurioituu siihen tehtyjen muutoksien tai sen väärinkäytön takia.
Yleistä:
Muutoksia malliin ja teknisiin ominaisuuksiin voidaan tehdä ilmoituksetta.
Kaikki logot, merkit ja tuotenimet ovat niiden vastaavien omistajien tuotemerkkejä tai rekisteröityjä tuotemerkkejä ja niitä
on käsiteltävä sellaisina.
Tämä ohjekirja on laadittu huolella. Se ei kuitenkaan oikeuta mihinkään vaatimuksiin. König Electronic ei ole vastuussa
mistään tämän käyttöohjeen sisältämistä virheistä tai niiden seurauksista.
Säilytä käyttöohjeet ja pakkaus myöhempää käyttötarvetta varten.
Huomio:
Tämä tuote on merkitty tällä symbolilla. Se merkitsee, ettei käytettyjä sähkö- tai elektronisia tuotteita saa
hävittää kotitalousjätteen mukana. Kyseisille tuotteille on olemassa erillinen keräysjärjestelmä.
Tämä tuote on valmistettu ja toimitettu noudattaen kaikkia sitä koskevia asetuksia ja direktiivejä, jotka ovat voimassa
kaikissa Euroopan unionin jäsenvaltioissa. Se täyttää myös kaikki myyntimaassa sovellettavat vaatimukset ja määräykset.
Viralliset asiakirjat ovat saatavilla pyynnöstä. Asiakirjoihin sisältyvät seuraavat, mutta näihin rajoittumatta:
Vaatimustenmukaisuusvakuutus (ja tuotteen tunniste), käyttöturvallisuustiedote, tuotteen testiraportti.
Saat neuvoja ottamalla yhteyttä asiakaspalveluumme:
verkkosivun kautta: http://www.nedis./-/ota-yhteytta/yhteyslomake.htm
sähköpostilla: service@nedis.com
puhelimitse: +31 (0)73-5993965 (toimistoaikoina)
NEDIS B.V., De Tweeling 28, 5215 MC ’s-Hertogenbosch, ALANKOMAAT
Turvallisuustoimenpiteet:
Sähköiskun riskin pienentämiseksi, AINOASTAAN valtuutettu huoltohenkilö saa avata
tämän laitteen huoltoa varten.
Jos ongelmia ilmenee, irrota laite verkkovirrasta ja muista laitteista.
Älä altista laitetta vedelle ja kosteudelle.
25
Beskrivning:
Bild A
Larm
1. PIR sensor
2. Siren
3. Infraröd sensor
4. LED batteri indikator
5. Extern el anslutning
6. Monterings konsoll
Bild B
Fjärrkontroll
8. Aktiverings tangent
9. LED-indikator
10. Inaktiverings tangent
11. Batterifack
12. Program väljare
13. Batteri hölje
7. Batterifack
Främre Baksida
Instalace baterie:
Alarm:
1. Till batteri utrymmet kommer du från baksidan av larmet
genom att du skruvar bort skruvarna från baksidan av
monterings konsollerna.
2. Sätt i 4x C batterier (de är inte en del i förpackningen) och
håll dig till polerna (se bild C).
3. När batterierna är isatta piper larmet mycket högt och
indikerar på så vis att batterierna är rätt isatta.
4. Sätt tillbaka monterings konsollenoch fäst den me skruvarna.
LED intikatorn till batteriet kommer att lysa, om batteierna är
urladdade är det nödvändigt att byda ut dessa.
26 27 28
SVENSKA SVENSKA SVENSKA
Fjärrkontroll:
Fjärrkontrollen behöver 3x LR44 batterier (de är inte en del av leveransen). Om den röda
LED indikatorn på ärrkontrollen inte lyser när du trycker på tangenterna aktiverings
eller inaktiverings, är det nödvändigt att byta ut batterierna.
Programmering av larmet:
1. Ställ in programväljaren (12) på ärrkontrollen på önskad kod och byt ut batterierna
i larmet. Vänta där efter åtminstone 30sekunder tills larmet återställs.
2. Direkt efter att batterierna har satts i riktar du ärrkontrollen mot larmet och trycker
på tangenten för aktivering aktiverings. LED indikatorn på larmet blinkar en gång
och indikerar på så sätt att det har tagit emot koden från ärrkontrollen.
ANMÄRKNING: Larmet måste på nytt programeras med hjälp av ärrkontrollen vid
varje byte av batterier.
Installation:
1. Bestäm önskad placering av larmets placering i taket mitt i
rummet som ska skyddas.
2. Avlägsna monterings konsollen och fäst den i taket med
hjälp av skruvar. Sedan fäster du larmet till monterings
konsollern och fäster det med skruvar från sidorna.
Användning:
När du lämnar det skyddade utrymmet riktar du ärrkontrollen mot larmet och trycker
på tangenten för aktivering aktiverings. En bekräftelse ton indikerar att larmet är
aktiverat och du har 30sekunder på dig att lämna rummet. Efter den tiden vid eventuell
rörelse sätts ett ljud lar igång.
När du kommer in i ett skyddat utrymme riktar du ärrkontrollen mot larmet och trycker
på tangenten för avaktivering inaktiverings. Efter att du trätt in i rummet hörs ett kort
pip som indikerar detektering av rörelse. Du har 4sekunder på dig att avaktivera larmet.
Anmärkning: Om LED indikatorn fortfarande lyser betyder det att det är nödvändigt att
byta ut den.
FÖRSIKTIGHET
RISK FÖR ELSTÖT
ÖPPNA INTE
Underhåll:
Torka endast av med torr trasa.
Använd inga rengöringsmedel som innehåller lösningsmedel eller slipmedel.
Garanti:
Varken garanti eller skadeståndsskyldighet gäller vid ändringar eller modieringar av produkten, eller för skador som har
uppstått på grund av felaktig användning av denna produkt.
Allmänt:
Utseende och specikationer kan komma att ändras utan föregående meddelande.
Alla logotyper och produktnamn är varumärken eller registrerade varumärken som tillhör sina ägare och är härmed
erkända som sådana.
Den här bruksanvisningen producerades med omsorg. Dock kan inga rättigheter härröras. König Electronic kan inte
acceptera ansvar för några felaktigheter i denna bruksanvisning eller dess konsekvenser.
Behåll bruksanvisningen och förpackningen för eventuellt framtida behov.
Obs:
Denna produkt är märkt med denna symbol. Det betyder att använda elektriska eller elektroniska produkter
inte får slängas bland vanliga hushållssopor. Det nns särskilda återvinningssystem för dessa produkter.
Den här produkten har tillverkats och levereras i enlighet med alla relevanta regler och direktiv som gäller för
alla medlemsstater inom Europeiska Unionen. Den efterlever även alla tillämpliga specikationer och regler i
försäljningslandet.
Formell dokumentation nns att beställa på begäran. Detta omfattar, men är inte begränsat till: Deklaration om
överensstämmelse (och produktidentitet), materialsäkerhetsdatablad, produkttestrapport.
Kontakta vår kundtjänst för att få hjälp:
via webbplatsen: http://www.nedis.com/en-us/contact/contact-form.htm
via e-post: service@nedis.com
via telefon: +31 (0)73-5993965 (under kontorstid)
NEDIS B.V., De Tweeling 28, 5215 MC ’s-Hertogenbosch, NEDERLÄNDERNA
Säkerhetsanvisningar:
För att minska risken för elektriska stötar bör denna produkt ENDAST öppnas av behörig
tekniker när service behövs.
Dra ut strömkabeln från eluttaget och koppla ur all annan utrustning om något problem
skulle uppstå.
Utsätt inte produkten för vatten eller fukt.
Popis:
Obr. A
Alarm
1. PIR senzor
2. Siréna
3. Infračervený senzor
4. LED indikace baterií
5. Externí připojení napájení
6. Montážní konzole
Obr. B
Dálkové ovládání
8. Tlačítko aktivace
9. LED ukazatel
10. Tlačítko deaktivace
11. Prostor pro baterie
12. Přepínání programů
13. Kryt baterie
7. Prostor pro baterie
Přední strana Zadní strana
Instalace baterie:
Alarm:
1. K prostoru pro baterii se dostanete ze zadní strany alarmu
tak, že odstraníte šrouby ze zadní části montážní konzoly.
2. Vložte 4× C baterie (nejsou součástí balení) a dodržte
polaritu (viz obr C).
3. Když jsou baterie vloženy, alarm pípne velmi hlasitě a
indikuje tak, že baterie jsou nainstalovány správně.
4. Dejte zpět montážní konzolu a upevněte ji šrouby. LED
indicator baterií bude svítit, pokud jsou baterie vybité a je
třeba je vyměnit.
ČESKY
29
30 31 32
Page 5

ČESKY ČESKY
ROMÂNĂ ROMÂNĂ
Dálkové ovládání:
Dálkové ovládání využívá 3x LR44 baterie (jsou součástí dodávky). Pokud se červený
LED indikátor na dálkovém ovládání nerozsvítí při zmáčknutí tlačítek aktivace nebo
deaktivace, je třeba baterie vyměnit.
Programování alarmu:
1. Nastavte přepínače (12) dálkového ovládání na požadovaný kód a vyjměte baterie
z alarmu. Následně počkejte alespoň 30 vteřin, dokud se alarm neresetuje.
2. Zamiřte neprodleně po vložení baterií dálkovým ovladačem na alarm a stiskněte
tlačítko pro aktivaci aktivace. LED indikace alarmu jednou zabliká a indikuje tak, že
došlo k přijetí kódu dálkového ovladače.
POZNÁMKA: Alarm musí být naprogramován opětovně pomocí dálkového ovladače
pokaždé při výměně baterií.
Instalace:
1. Stanovte požadovanou pozici pro alarm na stropě uprostřed
místnosti, která má být zabezpečena.
2. Odstraňte montážní konzolu a upevněte ji ke stropu pomocí
šroubů. Následně připevněte alarm k montážní konzoli a
zajistěte jej šrouby po stranách.
Použití:
Zamiřte při odchodu z chráněného prostoru dálkovým ovladačem na alarm a stiskněte
tlačítko pro aktivaci aktivace. Potvrzující tón bude indikovat aktivaci alarmu a vy máte
30 vteřin pro opuštění místnosti. Po této době se v případě detekce pohybu spustí
zvukový alarm.
Zamiřte po příchodu do chráněného prostoru dálkovým ovladačem na alarm a
stiskněte tlačítko pro deaktivaci deaktivace. Po příchodu do místnosti se ozve krátké
pípnutí, které indikuje detekci pohybu. Máte 4 vteřiny na deaktivaci alarmu.
Poznámka: Pokud LED indikátor stále svítí, znamená to, že je třeba vyměnit.
UPOZORNĚNÍ
NEBEZPEČÍ ÚRAZU ELEKTRICKÝM
PROUDEM
NEOTEVÍRAT
Údržba:
Kčištění používejte pouze suchý hadřík.
Nepoužívejte čisticí rozpouštědla ani abrazivní čisticí prostředky.
Záruka:
Za změny, úpravy nebo poškození zařízení vdůsledku nesprávného zacházení není nesena zodpovědnost a není na ně
poskytována záruka.
Obecné upozornění:
Design a specikace výrobku mohou být změněny bez předchozího upozornění.
Všechna loga a obchodní názvy jsou registrované obchodní značky příslušných vlastníků a jsou chráněny zákonem.
Tento návod byl vyhotoven spéčí. Přesto zněj nelze odvozovat žádná práva. König Electronic nepřebírá zodpovědnost za
škody vzniklé v souvislosti s chybami v manuálu.
Pro budoucí použití uschovejte tento návod a obal.
Upozornění:
Tento výrobek je označen tímto symbolem. Znamená, že vyřazené elektrické nebo elektronické výrobky by
neměly být likvidovány společně sběžným domovním odpadem. Pro likvidaci těchto výrobků existují zvláštní
sběrné systémy.
Tento produkt byl vyroben a je dodáván v souladu se všemi příslušnými nařízeními a směrnicemi platnými ve všech
členských státech Evropské Unie. Splňuje také veškeré relevantní specikace a předpisy státu, ve kterém se prodává.
Ociální dokumentaci lze získat na vyžádání. Patří sem např: Prohlášení o shodě (a identikace produktu), materiálový
bezpečnostní list, zpráva o testování produktu.
V případě dotazů kontaktujte naše oddělení služeb zákazníkům:
Webové stránky: http://www.nedis.com/en-us/contact/contact-form.htm
E-mail: service@nedis.com
Telefon: +31 (0)73-5993965 (během otevírací doby)
NEDIS B.V., De Tweeling 28, 5215 MC ’s-Hertogenbosch, NIZOZEMSKO
Bezpečnostní opatření:
Abyste snížili riziko úrazu elektrickým proudem, měl by být vpřípadě potřeby tento
výrobek otevřen POUZE autorizovaným technikem.
Dojde-li kporuše, odpojte zařízení odnapájení a od ostatních zařízení.
Nevystavujte zařízení působení vody nebo vlhkosti.
Descriere:
Figura A
Alarma
1. Senzor PIR
2. Sirenă
3. Senzor cu infraroşii
4. Indicator LED pentru baterii
5. Conectare la sursă de electricitate
externă
Figura B
Telecomandă
8. Buton alarmă
9. Indicator LED
10. Buton dezarmare
11. Compartiment Baterii
12. Întrerupătoare program
13. Capacul compartimentului de baterii
6. Consolă de montare
7. Compartiment Baterii
Faţă Înapoi
Montarea bateriilor:
Alarmă:
1. Compartimentul de baterii este accesat din partea din spate
a alarmei, prin scoaterea şuruburilor aparţinând consolei de
montare.
2. Introduceţi 4 baterii de dimensiune C (neincluse), prin
respectarea polarităţii (a se vedea gura C).
3. Atunci când bateriile sunt introduse, alarma va emite
un semnal sonor tare pentru a indica că bateriile au fost
montate adecvat.
4. Puneţi la loc consola de montare şi xaţi-o cu şuruburi.
Indicatorul LED al bateriilor se va aprinde atunci când
bateriile sunt aproape golite şi trebuie înlocuite.
Telecomandă:
Telecomanda utilizează 3 baterii LR44 (incluse). Dacă indicatorul LED roşu de pe
telecomandă nu se aprinde atunci când sunt apăsate butoanele armare sau dezarmare,
atunci bateriile trebuie înlocuite.
Programarea alarmei:
1. Setaţi întrerupătoarele (12) telecomenzii pentru formarea codului dorit şi
îndepărtaţi bateriile din alarmă. Apoi aşteptaţi minim 30de secunde pentru ca
alarma să se reseteze.
2. Imediat după introducerea bateriilor, îndreptaţi telecomanda spre alarmă şi apăsaţi
butonul armare. LED-ul alarmei se va aprinde odată pentru a indica că alarma a
memorat codul telecomenzii.
NOTĂ: Alarma trebuie programată din nou cu ajutorul telecomenzii, de ecare dată
când schimbaţi bateriile.
Instalare:
1. Identicaţi amplasarea dorită pentru alarma de tavan, în
centrul zonei care trebuie securizată.
2. Îndepărtaţi consola de montare şi xaţi-o pe tavan cu
ajutorul şuruburilor. Apoi, xaţi alarma pe consola de
montare şi asiguraţi-o cu ajutorul şuruburilor pe laterale.
Funcţionare:
Atunci când părăsiţi zona protejată, îndreptaţi telecomanda spre alarmă şi apăsaţi
butonul armare. Un ton de conrmare va indica că alarma este armată şi aveţi 30de
secunde pentru a părăsi zona. După această perioadă de timp, alarma se va declanşa
atunci când detectează mişcare.
Atunci când intraţi în zona protejată, îndreptaţi telecomanda spre alarmă şi apăsaţi
butonul dezarmare. Alarma va emite un semnal sonor scurt, atunci când intraţi în
cameră, pentru a semnaliza că a detectat mişcare. Aveţi 4secunde să dezarmaţi alarma.
Observaţie: Dacă indicatorul LED este aprins constant, aceasta semnică că bateriile
trebuie înlocuite.
33
ROMÂNĂ
ATENŢIE
PERICOL DE ELECTROCUTARE
NU-L DESCHIDEŢI
Întreţinere:
Curăţarea trebuie făcută cu o cârpă uscată.
Nu folosiţi solvenţi sau agenţi de curăţare abrazivi.
Garanţie:
Nu oferim nicio garanţie şi nu ne asumăm niciun fel de responsabilitate în cazul schimbărilor sau modicărilor aduse
acestui produs sau în cazul deteriorării cauzate de utilizarea incorectă a produsului.
Generalităţi:
Designul şi specicaţiile produsului pot modicate fără o noticare prealabilă.
Toate siglele mărcilor şi denumirile produselor sunt mărci comerciale sau mărci comerciale înregistrate ale proprietarilor
de drept şi prin prezenta sunt recunoscute ca atare.
Acest manual a fost conceput cu atenţie. Cu toate acestea, nu se pot oferi drepturi pe baza sa. König Electronic nu acceptă
răspunderea pentru nicio eroare din acest manual sau consecinţele ce decurg din acestea.
Păstraţi acest manual şi ambalajul pentru consultări ulterioare.
Atenţie:
Pe acest produs se aă acest marcaj. Acesta semnică faptul că produsele electrice şi electronice nu trebuie
eliminate odată cu gunoiul menajer. Aceste produse au un sistem separat de colectare.
Acest produs a fost fabricat şi furnizat în conformitate cu toate reglementările şi directivele relevante, valabile în toate
statele membre ale Uniunii Europene. Acesta este, de asemenea, conform cu toate specicaţiile şi reglementările aplicabile
în toate ţările în care se vinde.
Documentaţia originală este disponibilă la cerere. Aceasta include, fără a se limita la acestea, următoarele: Declaraţia de
Conformitate (şi identitatea produsului), Fişa de date pentru Siguranţa Materialului, raportul de testare a produsului.
Vă rugăm să contactaţi biroul nostru de asistenţă clienţi:
de pe site: http://www.nedis.com/en-us/contact/contact-form.htm
prin e-mail: service@nedis.com
Prin telefon: +31 (0)73-5993965 (în timpul orelor de lucru)
NEDIS B.V., De Tweeling 28, 5215 MC ’s-Hertogenbosch, Olanda
Măsuri de siguranţă:
Pentru a se reduce pericolul de electrocutare, acest produs va desfăcut NUMAI de către
un tehnician avizat, când este necesară depanarea.
Deconectaţi produsul de la priza de reţea sau alte echipamente în cazul apariţiei unei
probleme.
Nu expuneţi produsul apei sau umezelii.
37
34 35 36
Περιγραφή:
Εικόνα A
Συναγερμός
1. Αισθητήρας PIR
2. Σειρήνα
3. Υπέρυθρος αισθητήρας
4. LED ένδειξης κατάστασης
μπαταρίας
5. Σύνδεση σε εξωτερική πηγή ισχύος
Εικόνα B
Τηλεχειριστήριο
8. Πλήκτρο ενεργοποίησης
9. Ενδεικτική λυχνία
10. Πλήκτρο απενεργοποίησης
11. Θήκη μπαταριών
12. Διακόπτες προγράμματος
13. Καπάκι θήκης μπαταριών
6. Στήριγμα
7. Θήκη μπαταριών
Μπροστά Πίσω
Τοποθέτηση μπαταριών:
Συναγερμός:
1. Μπορείτε να ανοίξετε τη θήκη μπαταριών από την πίσω
πλευρά του συναγερμού, αφαιρώντας τις βίδες του
στηρίγματος.
2. Τοποθετήστε 4x μπαταρίες μεγέθους C (δεν
συμπεριλαμβάνονται) σύμφωνα με τη σωστή πολικότητα
(βλ.εικόνα C).
3. Αφού τοποθετήσετε τις μπαταρίες, ο συναγερμός θα αρχίσει
να χτυπά πολύ δυνατά, υποδεικνύοντας ότι οι μπαταρίες
έχουν τοποθετηθεί σωστά.
4. Επανατοποθετήστε το στήριγμα και στερεώστε το με τις
βίδες. Η ενδεικτική λυχνία LED της κατάστασης μπαταριών
ανάβει όταν η μπαταρία είναι ΧΑΜΗΛΗ και πρέπει να
αντικατασταθεί.
38 39 40
ΕΛΛΗΝΙΚΑ ΕΛΛΗΝΙΚΑ ΕΛΛΗΝΙΚΑ
Τηλεχειριστήριο:
Το τηλεχειριστήριο λειτουργεί με 3x μπαταρίες LR44 (συμπεριλαμβάνονται). Αν
η κόκκινη λυχνία LED του τηλεχειριστηρίου δεν ανάβει όταν πιέζετε το πλήκτρο
ενεργοποίηση ή απενεργοποίηση, θα πρέπει να αντικαταστήσετε τις μπαταρίες.
Προγραμματισμός συναγερμού:
1. Γυρίστε τους διακόπτες (12) του τηλεχειριστηρίου σχηματίζοντας τον επιθυμητό
κωδικό και αφαιρέστε τις μπαταρίες από το συναγερμό. Περιμένετε τουλάχιστον
30δευτερόλεπτα για την επαναφορά του συναγερμού.
2. Αμέσως μετά την τοποθέτηση των μπαταριών, πιέστε το πλήκτρο ενεργοποίηση
από το τηλεχειριστήριο του συναγερμού. Η λυχνία LED του συναγερμού θα
αναβοσβήσει μία φορά, υποδεικνύοντας ότι έχει αποθηκεύσει των κωδικό του
τηλεχειριστηρίου.
ΣΗΜΕΙΩΣΗ: Μετά από κάθε αντικατάσταση των μπαταριών ο συναγερμός θα πρέπει να
προγραμματίζεται εκ νέου από το τηλεχειριστήριο.
Εγκατάσταση:
1. Επιλέξτε την επιθυμητή τοποθεσία στην οροφή του σπιτιού
σας, στο κέντρο της περιοχής που θέλετε να ασφαλίσετε.
2. Αφαιρέστε το στήριγμα και στερεώστε το στην οροφή με τις
βίδες. Στη συνέχεια, στερεώστε το συναγερμόστο στήριγμα
και ασφαλίστε τον με τις βίδες στα πλάγια.
Λειτουργία:
Κατά την έξοδο από τον προστατευόμενο χώρο, πιέστε το πλήκτρο ενεργοποίηση
από το τηλεχειριστήριο του συναγερμού. Θα ακουστεί ένας ήχος επιβεβαίωσης,
υποδεικνύοντας ότι ο συναγερμός έχει ενεργοποιηθεί και ότι θα πρέπει να
απομακρυνθείτε από το χώρο εντός 30δευτερολέπτων. Σε περίπτωση ανίχνευσης
κίνησης μετά την πάροδο του συγκεκριμένου χρονικού διαστήματος, ο συναγερμός θα
αρχίσει να χτυπά.
Κατά την είσοδο στον προστατευόμενο χώρο, πιέστε το πλήκτρο απενεργοποίηση
από το τηλεχειριστήριο του συναγερμού. Μόλις εισέλθετε στο χώρο, θα ακουστεί ένα
σύντομο «μπιπ», υποδεικνύοντας ότι ανιχνεύτηκε κίνηση. Ο συναγερμός θα πρέπει να
απενεργοποιηθεί εντός 4δευτερολέπτων.
Παρατήρηση: Αν η ενδεικτική λυχνία LED παραμένει αναμμένη, σημαίνει ότι θα πρέπει
να αντικαταστήσετε τις μπαταρίες.
ΠΡΟΣΟΧΗ
ΚΙΝΔΥΝΟΣ ΗΛΕΚΤΡΟΠΛΗΞΙΑΣ
ΜΗΝ ΑΝΟΙΓΕΤΕ
Συντήρηση:
Καθαρίστε μόνο με ένα στεγνό πανί.
Μη χρησιμοποιείτε διαλύτες ή λειαντικά.
Εγγύηση:
Ουδεμία εγγύηση ή ευθύνη δεν είναι αποδεκτή σε περίπτωση αλλαγής ή μετατροπής του προϊόντος ή βλάβης που
προκλήθηκε λόγω εσφαλμένης χρήσης του προϊόντος.
Γενικά:
Το σχέδιο και τα χαρακτηριστικά μπορούν να αλλάξουν χωρίς καμία προειδοποίηση.
Όλα τα λογότυπα, οι επωνυμίες και οι ονομασίες προϊόντων είναι εμπορικά σήματα ή σήματα κατατεθέντα των
αντίστοιχων κατόχων και δια του παρόντος αναγνωρίζονται ως τέτοια.
Αυτό το εγχειρίδιο συντάχτηκε με προσοχή. Ωστόσο, δεν προκύπτουν δικαιώματα. Η König Electronic δεν φέρει καμία
ευθύνη για σφάλματα σε αυτό το εγχειρίδιο ή στις συνέπειές τους.
Φυλάξτε το παρόν εγχειρίδιο και τη συσκευασία για μελλοντική αναφορά.
Προσοχή:
Το συγκεκριμένο προϊόν έχει επισημανθεί με αυτό το σύμβολο. Αυτό σημαίνει ότι οι μεταχειρισμένες ηλεκτρικές
και ηλεκτρονικές συσκευές δεν πρέπει να αναμειγνύονται με τα κοινά οικιακά απορρίμματα. Υπάρχει ξεχωριστό
σύστημα συλλογής για αυτά τα αντικείμενα.
Το προϊόν αυτό κατασκευάστηκε και παρέχεται σε συμμόρφωση με το σύνολο των αντίστοιχων κανονισμών και
οδηγιών που ισχύουν για τα κράτη μέλη της Ευρωπαϊκής Ένωσης. Επίσης, συμμορφώνεται με το σύνολο των ισχυουσών
προδιαγραφών και κανονισμών της χώρας διάθεσης.
Επίσημη τεκμηρίωση διατίθεται κατόπιν αιτήματος. Η τεκμηρίωση περιλαμβάνει, χωρίς περιορισμό, τα εξής: Δήλωση
Συμμόρφωσης (και ταυτότητα προϊόντος), Δελτίο Δεδομένων Ασφάλειας Υλικού, έκθεση δοκιμής προϊόντος.
Επικοινωνήστε με το τμήμα εξυπηρέτησης πελατών μας για υποστήριξη:
από τον ιστότοπο: http://www.nedis.com/en-us/contact/contact-form.htm
μέσω ηλεκτρονικού
ταχυδρομείου:
Τηλεφωνικά: +31 (0)73-5993965 (κατά τη διάρκεια των ωρών εργασίας)
NEDIS B.V., De Tweeling 28, 5215 MC ’s-Hertogenbosch, ΟΛΛΑΝΔΙΑ
Προφυλάξεις ασφαλείας:
Για να μειώσετε τον κίνδυνο ηλεκτροπληξίας, το προϊόν αυτό θα πρέπει να ανοιχθεί ΜΟΝΟ
από εξουσιοδοτημένο τεχνικό όταν απαιτείται συντήρηση (σέρβις).
Αποσυνδέστε το προϊόν από την πρίζα και άλλο εξοπλισμό αν παρουσιαστεί πρόβλημα.
Μην εκθέτετε το προϊόν σε νερό ή υγρασία.
service@nedis.com
Page 6

DANSK DANSK
DANSK
NORSK
Beskrivelse:
Figur A
Alarm
1. PIR-sensor
2. Sirene
3. Infrarød sensor
4. LED-indikator for batterier
5. Strømforbindelse
6. Monteringsbeslag
Figur B
Fjernbetjening
8. Aktiveringsknap
9. LED-indikatorlys
10. Deaktiveringsknap
11. Batterirum
12. Programknapper
13. Batterilåg
7. Batterirum
Frontpanel Bagpanel
Isætning af batterier:
Alarm:
1. Fjern skruerne til monteringsbeslaget på bagsiden af
alarmen for at få adgang til batterirummet.
2. 4x C-batterier (medfølger ikke) indsættes med den rigtige
polaritet (se gur C)
3. Når batterierne er isat, bipper vil alarmen meget højt for at
indikere, at batterierne er korrekt installeret.
4. Sæt monteringsbeslaget på igen, og sæt det fast
med skruerne. Batteriernes LED-indikator lyser, når
batteriniveauet er lavt, og batterierne skal udskiftes.
Fjernbetjening:
Fjernbetjeningen anvender 3x LR44-batterier (inkluderet). Batterierne skal udskiftes,
hvis ernbetjeningens røde LED indikator ikke lyser, når der trykkes på aktivering- eller
deaktivering- knappen.
Alarmprogram:
1. Indstil ernbetjeningens knapper (12) til den ønskede kode, og ern batterierne fra
alarmen. Vent derefter mindst 30 sekunder, indtil alarmen nulstilles.
2. Ret, umiddelbart efter batterierne er indsat, ernbetjeningen mod alarmen, og tryk
på aktivering-knappen. Alarmens LED blinker én gang for at indikere, at den har
modtaget ernbetjeningens kode.
BEMÆRK: Alarmen skal genprogrammeres med ernbetjeningen, hver gang
batterierne udskiftes.
Klargøring:
1. Find den ønskede placering for alarmen i loftet i midten af
det område, der skal sikres.
2. Fjern monteringsbeslaget, og fastgør det til loftet med
skruer. Fastgør derefter alarmen til monteringsbeslaget med
skruerne på siden af alarmen.
Betjening:
Ret, når du forlader det beskyttede område, ernbetjeningen mod alarmen, og tryk på
aktivering-knappen. En bekræftelsestone indikerer, at alarmen er aktiveret, og du har
30sekunder til at forlade omådet. Herefter vil alarmen gå i gang, hvis der registreres
bevægelse.
Ret, når du træder ind i det beskyttede område, ernbetjeningen mod alarmen, og tryk
på deaktivering-knappen. Når du træder ind i området, høres et kort bip, der indikerer,
at der er registreret bevægelse. Du vil have 4 sekunder til at deaktivere alarmen.
Bemærk: Batterierne skal udskiftes, hvis LED-indikatoren lyser konstant.
FORSIGTIG
RISIKO FOR ELEKTRISK STØD
ÅBN IKKE
Vedligeholdelse:
Rengør kun med en tør klud.
Brug ikke opløsningsmidler eller slibende rengøringsmidler.
Garanti:
Ingen garanti og ikke noget ansvar kan påtages for ændringer af produktet eller for skade på grund af forkert brug af dette
produkt.
Generelt:
Design og specikationer kan ændres uden varsel.
Alle bomærker og produktnavne er varemærker eller registrerede varemærker tilhørende deres respektive ejere og anses
herved som sådan.
Denne vejledning blev udført omhyggeligt. Imidlertid kan der ikke aedes nogen rettigheder. König Electronic kan ikke
holdes ansvarlig for eventuelle fejl i denne vejledning eller deres konsekvenser.
Gem brugervejledningen og emballagen til senere brug.
Bemærk:
Dette produkt er mærket med dette symbol. Det betyder, at brugt elektrisk og elektronisk udstyr ikke må
bortskaes sammen med almindeligt husholdningsaald. Der ndes særlige indsamlingssystemer for disse
produkter.
Dette produkt er fremstillet og leveres i overensstemmelse med alle relevante forordninger og direktiver, der er gældende
for alle EUs medlemsstater. Produktet overholder ligeledes alle gældende specikationer og forskrifter i de lande, hvor
produktet sælges.
Formel dokumentation kan fremlægges på forlangende. Dette omfatter, men er ikke begrænset til:
Overensstemmelseserklæring (og produkt-ID), Sikkerhedsdatablad, testrapport for produktet.
Kontakt venligst vores kundeservice for support:
via hjemmeside: http://www.nedis.com/en-us/contact/contact-form.htm
via e-mail: service@nedis.com
via telefon: +31 (0)73-5993965 (i kontortiden)
NEDIS B.V., De Tweeling 28, 5215 MC ’s-Hertogenbosch, NEDERLANDENE
Sikkerhedsforholdsregler:
For at nedsætte risikoen for elektrisk stød, må dette produkt, f.eks. når der kræves service,
KUN åbnes af en autoriseret tekniker.
Frakobl produktet stikkontakten og andet udstyr, hvis der opstår et problem.
Udsæt ikke produktet for vand eller fugt.
Bekrivelse:
Figur A
Alarm
1. PIR sensor
2. Sirene
3. Infrarød sensor
4. Batteri LED indikator
5. Ekstern strømtilkopling
6. Monteringsfeste
Figur B
Fjernkontroll
8. Armeringsknapp
9. LED-indikator
10. Desarmeringsknapp
11. Batterirom
12. Programbrytere
13. Batterilokk
7. Batterirom
Foran Bak
Batteribytting:
Alarm:
1. Man åpner batterirommet bak på alarmen ved å erne
skruene på monteringsfestet.
2. Sett I 4x C-batterier (medfølger ikke) etter riktig polaritet (se
gur C).
3. Når batteriene er korrekt plasser vil alarmen pipe veldig høyt
for å indikere at batteriene er korrekt plasser I alarmen.
4. Sett monteringsfestet på plass igjen og skru i skruene.
Batteri LEDindikatoren vil lyse opp når batteriene nærmer
seg utladet og må skiftes.
41
NORSK NORSK
Fjernkontroll:
Fjernkontrollen bruker 3x LR44 batterier (medfølger). Hvis den røde LED indikatoren
på ernkontrollen ikke lyser opp når armer - eller desarmer-knappene blir trykket inn
trenger batteriene å skiftes.
Programmer alarm:
1. Sett bryterne (12) på ernkontrollen til ønsket kode og ern batteriene fra alarmen.
Vent så minst 30sekunder for alarmen skal tilbakestilles.
2. Sikt, umiddelbart etter du har satt I batteriene, ernkontrollen mot alarmen og
trykk på armer-knappen. Alarmens LED lys vil blinke en gang for å indikere at den
har lært koden fra ernkontrollen.
MERK: Alarmen må programmeres igjen med ernkontrollen hver gang batteriene
skiftes.
Installasjon:
1. Finn ønsket sted for alarmen på taket I midten av området
som trengs sikring.
2. Fjern monteringsfestet og monter det til taket med skruene.
Monter så alarmen på monteringsfestet og sikre den med
skruene på sidene.
Bruk:
Sikt, etter du har gått bort fra det sikrede området, ernkontrollen mot alarmen og
trykk på armer-knappen. En bekreftelseslyd indikerer at alarmen er armert og du har
30sekunder på å forlate området. Etter denne tiden er ute vil alarmen gå av hvis den
merker bevegelse.
Sikt, når du går mot det sikrede området, ernkontrollen mot alarmen og trykk
på desarmer-knappen. Du vil høre et kort pip som indikerer at bevegelse har blitt
oppdaget. Du får 4sekunder på å desarmere alarmen.
Merk: Hvis LED lyset lyser konstant må du bytte batterier.
42 43 44
FORSIKTIG
FARE FOR STRØMSTØT
MÅ IKKE ÅPNES
Vedlikehold:
Rens bare med en tørr klut.
Ikke bruk rensemidler eller skuremidler.
Garanti:
Ingen garanti eller erstatningsansvar aksepteres ved endringer og modiseringer av produktet eller skade forårsaket av
uriktig bruk av dette produktet.
Generelt:
Utforming og spesikasjoner kan endres uten forhåndsvarsel.
Alle logoer, merker og produktnavn er varemerker eller registrerte varemerker til de respektive eierne, og skal behandles
som dette.
Denne bruksanvisningen ble laget med omhu. Imidlertid kan ingen rettigheter utledes. König Electronic kan ikke ta ansvar
for eventuelle feil i denne manualen eller konsekvenser som følger.
Behold denne veiledningen og innpakningen for fremtidig referanse.
OBS:
Dette produktet er markert med dette symbolet. Det betyr at brukte elektriske og elektroniske produkter ikke
må blandes med vanlig husholdningsavfall. Det nnes egne innsamlingssystem for slike produkter.
Dette produktet har blitt produsert og levert i henhold til alle relevante bestemmelser og direktiver, gyldig for alle
medlemsstater i EU. Det overholder også alle gjeldende spesikasjoner og bestemmelser i landet det selges i.
Formell dokumentasjon er tilgjengelig på forespørsel. Dette inkluderer, men begrenser seg ikke til: Samsvarserklæring (og
produktidentitet) dataark for materialsikkerhet produkttestrapport.
Vennligst kontakt kundeservice for hjelp:
via nettstedet: http://www.nedis.com/en-us/contact/contact-form.htm
via e-post: service@nedis.com
via telefon: +31 (0)73-5993965 (i kontortiden)
NEDIS B.V., De Tweeling 28, 5215 MC ’s-Hertogenbosch, THE NETHERLANDS
Sikkerhetsforhåndsregler:
For å redusere faren for strømstøt, skal dette produktet BARE åpnes av en autorisert
tekniker når vedlikehold er nødvendig.
Koble produktet fra strømmen og annet utstyr dersom et problem oppstår.
Ikke utsett produktet for vann eller fuktighet.
Описание:
Рис. A
Звуковой сигнал
1. Пассивный инфракрасный
датчикдвижения
2. Сирена
3. Инфракрасный датчик
4. Индикатор батареи
5. Возможность подключения
Рис. B
Пульт дистанционного управления
8. Кнопка ВКЛ
9. Светодиодный индикатор
10. Кнопка ВЫКЛ
11. Батарейный отсек
12. Переключатели режимов
13. Крышка батарейного отсека
внешнего питания
6. Монтажная скоба
7. Батарейный отсек
Задняя
сторона
Лицевая
сторона
Установка батареи:
Сигнализация:
1. Получить доступ к батарейному отсеку можно с задней
стороны устройства, для чего следует удалить винты
монтажной скобы.
2. Вставьте 4 батареи типа C (в комплект не входят),
соблюдая полярность (см. рис. C).
3. После установки батарей сигнализация издаст очень
громкий сигнал, означающий, что батареи установлены
правильно.
4. Поместите монтажную скобу на место и зафиксируйте
винтами. Когда в батареях остается мало заряда,
загорается индикатор батареи. Разряженные батареи
следует заменить.
РУССКИЙ РУССКИЙ
Пульт дистанционного управления:
В пульте ДУ используются 3 батареи тип LR44 (входят в комплект). Если при
нажатии кнопки вкл или выкл на ПДУ не загорается красный индикатор, замените
разряженные батареи.
Установка нужного режима:
1. Установите переключатели режимов (12) на пульте ДУ в нужное положение,
после чего выньте батареи из сигнализации. Дождитесь сброса сигнализации
(не менее 30 сек).
2. Сразу после установки батарей на место направьте пульт ДУ на сигнализацию
и нажмите кнопку ВКЛ. Индикатор на сигнализации должен мигнуть один раз.
Это означает, что нужный режим включен.
ПРИМЕЧАНИЕ: Установка режима с помощью ПДУ требуется каждый раз после
удаления батарей из сигнализации.
Установка:
1. Найдите на потолке место для сигнализации (в центре
защищаемого помещения).
2. Снимите монтажную скобу и винтами прикрепите
ее к потолку. Установите сигнализацию на скобу и
зафиксируйте винтами по бокам.
Эксплуатация:
Покидая помещение, направьте ПДУ на сигнализацию и нажмите кнопку ВКЛ.
Раздастся подтверждающий включение сигнал, после чего у вас есть 30секунд,
чтобы покинуть помещение. После истечения данного времени при обнаружении
движения сработает сигнализация.
При возвращении в помещение направьте пульт на сигнализацию и нажмите
кнопку ВЫКЛ. При входе в помещение вы услышите короткий звуковой сигнал,
означающий, что сигнализация обнаружила движение. У вас есть 4секунды, чтобы
отключить ее.
Комментарий: Если индикатор на сигнализации горит непрерывно, замените
разряженные батареи.
45
46 47 48
Page 7

РУССКИЙ
TÜRKÇE TÜRKÇE TÜRKÇE
ПРЕДУПРЕЖДЕНИЕ
РИСК ПОРАЖЕНИЯ ЭЛЕКТРИЧЕСКИМ
ТОКОМ НЕ ОТКРЫВАТЬ
Техническое обслуживание:
Очищать только сухой тканью.
Не пытайтесь очистить устройство растворителями или абразивными веществами.
Гарантия:
В случае изменения и модификации устройства, а равно в случае повреждения устройства вследствие его
неправильного использования гарантийные обязательства производителя теряют свою силу.
Общие положения:
Дизайн и технические характеристики могут быть изменены без предварительного уведомления.
Все логотипы брендов и названия продуктов являются товарными знаками или зарегистрированными торговыми
марками их соответствующих владельцев и следовательно признаются таковыми.
Это руководство было составлено тщательным образом. Тем не менее, оно не наделяет никакими правами. König
Electronic не несет ответственности за возможные ошибки в данном руководстве или их последствия.
Храните это руководство и упаковку для дальнейшего использования.
Внимание:
Данный продукт отмечен этим символом. Это означает, что такие электрические или электронные
изделия не должны выбрасываться вместе с бытовыми отходами. Для таких продуктов существует
отдельная система сбора отходов.
Данное изделие было изготовлено и поставлено в соответствии со всеми применимыми положениями и
директивами, действующими для всех стран-членов Европейского Союза. Оно также соответствует всем нормами и
правилами, действующим в стране продажи.
Официальная документация предоставляется по запросу. Эта документация включает (но не ограничивается этим):
Декларация соответствия (и изделий), паспорт безопасности, отчет по проверке продукта.
Для получения помощи обратитесь в нашу службу поддержки клиентов:
через веб-сайт: http://www.nedis.com/en-us/contact/contact-form.htm
по эл. почте: service@nedis.com
по телефону: +31 (0)73-5993965 (в рабочие часы)
NEDIS B.V., De Tweeling 28, 5215 MC ’s-Hertogenbosch, THE NETHERLANDS (НИДЕРЛАНДЫ)
Меры безопасности:
Для снижения риска поражения электрическим током вскрытие устройства для
его обслуживания и ремонта допускаются ТОЛЬКО уполномоченные технические
специалисты.
При возникновении неполадки отключите устройство от сети и другого
оборудования.
Не допускайте воздействия воды или влаги.
Açıklama:
Şekil A
Alarm
1. PIR sensörü
2. Siren
3. Kızılötesi sensörü
4. Batarya LED göstergesi
5. Harici güç bağlantısı
6. Montaj bağlantı parçası
Şekil B
Uzaktan kumanda
8. Etkinleştirme düğmesi
9. LED gösterge
10. Devre dışı bırakma düğmesi
11. Pil yuvası
12. Program anahtarları
13. Pil yuvası kapağı
7. Pil yuvası
Ön Arka
Pilin takılması:
Alarm:
1. Montaj bağlantı parçasının vidalar sökülerek alarm
arkasından pil yuvasına erişilebilir.
2. Doğru kutuplara göre 4x C boyutunda pil (dahil değildir)
takın (şekil C'ye bakın).
3. Piller takıldığında pillerin doğru şekilde takıldığını göstermek
için çok yüksek bir bip sesi verecektir.
4. Montaj bağlantı parçasını yeniden yerleştirin ve vidaları
takın. Pillerin gücü düşük olduğunda ve değiştirilmesi
gerektiğinde pil LED göstergesi yanacaktır.
Uzaktan kumanda:
Uzaktan kumanda 3x LR44 pilleri kullanır (dahil). etkinleştir ve devre dışı bırak
düğmelerine basıldığında uzaktan kumanda üzerindeki kırmızı LED göstergesi
yanmazsa o halde pillerin değiştirilmesi gerekir.
Program alarmı:
1. Uzaktan kumandanın anahtarlarını (12) istenilen koda ayarlayın ve pilleri alarmdan
çıkarın. Ardından alarmın sıfırlanması için en az 30saniye bekleyin.
2. Pilleri taktıktan hemen sonra uzaktan kumandayı alarma doğru tutun ve etkinleştir
düğmesine basın. Uzaktan kumandanın alarmını algıladığını göstermek için alarm
LED'i bir kez yanıp sönecektir.
NOT: Piller her değiştirildiğinde alarm uzaktan kumanda ile yeniden programlanmalıdır.
Kurulum:
1. Güvenlik altına alınması gereken alanın merkezine istenilen
konumda alarmı tavana yerleştirin.
2. Montaj bağlantı aparatını ayırın ve bunu vidalarla tavana
sabitleyin. Ardından alarmı montaj bağlantı aparatına takın
ve bunu yanlardan vidalarla sabitleyin.
Kullanma:
Korunan alanı terk ederken uzaktan kumandayı alarma doğru tutun ve etkinleştir
düğmesine basın. Bir doğrulama sesi alarmın etkinleştirildiğini gösterecektir ve alanı
terk etmek için 30saniyeniz olacaktır. Bu sürenin ardından hareket algılanırsa alarm
çalmaya başlar.
Korunan alana girerken uzaktan kumandayı alarma doğru tutun ve devre dışı bırak
düğmesine basın. Hareket algılandığını göstermek için alana girerken kısa bir bip sesi
duyulur. Alarmı devre dışı bırakmak için 4saniyelik bir gecikmeye sahipsiniz.
Dikkat: LED göstergesi sürekli yanarsa bu, pillerin değiştirilmesi gerektiği anlamına
gelir.
DİKKAT
ELEKTRİK ÇARPMA RİSKİ
AÇMAYIN
Koruyucu Bakım:
Ürünü sadece kuru bir bezle temizleyin.
Temizlik solventleri veya aşındırıcılar kullanmayın.
Garanti:
Ürün üzerindeki değişiklikler veya modikasyonlar ya da ürünün hatalı kullanılmasından kaynaklanan ürün hasarlarında
garanti geçersizdir veya sorumluluk Kabul edilmez.
Genel:
Tasarımlar ve özellikler önceden haber verilmeksizin değiştirilebilir.
Tüm logolar, markalar ve ürün adları ticari markalardır veya ilgili sahiplerinin kayıtlı ticari markalarıdır ve bundan dolayı
böyle geçerlidir.
Bu kılavuz dikkatle hazırlanmıştır. Ancak haklar elde edilmez. König Electronic, bu kılavuzdaki veya sonuçlarındaki hiç bir
hatadan dolayı sorumluluk kabul etmez.
Daha sonra kullanmak üzere bu kılavuzu ve ambalajı saklayın.
Dikkat:
Bu ürün bu işaretle işaretlenmiştir. Bu, eski elektrikli ve elektronik ürünlerin genel evsel atıklarla karıştırılmaması
gerektiği anlamına gelmektedir. Bu ürünler için ayrı bir toplama sistemi mevcuttur.
Bu ürün tüm Avrupa Birliği üye ülkeleri için geçerli olan ilgili tüm yönetmelikler ve yönergelere uygun olarak üretilmiş ve
tedarik edilmiştir. Ayrıca satıldığı ülkedeki tüm geçerli şartnameler ve yönetmeliklere uygundur.
Talep edilmesi durumunda resmi belgelendirme sağlanabilir. Bu aşağıdakileri içerir ancak bunlarla sınırlı değildir: Uygunluk
Beyanı (ve ürün kimliği), Malzeme Güvenliği Veri Sayfası, ürün test raporu.
Lütfen destek için müşteri hizmetleri masamızla irtibat kurun:
web sitesi aracılığıyla: http://www.nedis.com/en-us/contact/contact-form.htm
e-posta aracılığıyla: service@nedis.com
telefonla: +31 (0)73-5993965 (mesai saatlerinde)
NEDIS B.V., De Tweeling 28, 5215 MC ’s-Hertogenbosch, THE NETHERLANDS (HOLLANDA)
Güvenlik önlemleri:
Elektrik çarpma riskini azaltmak için servis gerekli olduğunda bu ürün SADECE uzman bir
teknisyen tarafından açılmalıdır.
Bir sorun meydana geldiğinde ürünün elektrik ve diğer aygıtlarla olan bağlantısını kesin.
Ürünü su veya neme maruz bırakmayın.
49
Kirjeldus:
Joonis A
Häireseade
1. Infrapuna-liikumisandur (PIR)
2. Sireen
3. Infrapunaandur
4. Aku laetuse näidik
5. Välise toite liitmik
6. Kinnituklamber
Joonis B
Kaugjuhtimispult
8. Aktiveerimisnupp
9. LED-märgutuli
10. Deaktiveerimisnupp
11. Patareipesa
12. Programmeerimislülitid
13. Akupesa kate
7. Patareipesa
Eestvaade Tagantvaade
Patarei paigaldamine:
Häireseade:
1. Akupesa saab avada häireseadme tagant, kui keerata lahti
kinnitusklambri kruvid.
2. Pange sisse neli patareid suuruses C (ei kuulu komplekti)
nagu näidatud joonisel C.
3. Kui patareid on sisse pandud, antakse üks väga tugev
helisignaal, mis näitab, et patareid on nõuetekohaselt
paigaldatud.
4. Pange kinnitusklamber oma kohale tagasi ja kinnitage
see kruvidega. Kui patareid on tühjenenud ja vajavad
asendamist, süttib LED-märgutuli.
50 51 52
EESTI EESTI EESTI
Kaugjuhtimispult:
Kaugjuhtimispuldi toiteks kasutatakse kolme patareid LR44 (komplektis). Kui punane
LED-märgutuli ei sütti aktiveerimise või deaktiveerimise nuppe vajutades, tuleb
patareid asendada.
Häireseadme programmeerimiseks tehke järgmist:
1. Seadke kaugjuhtimispuldi lülitid (12) soovitud koodile ja võtke patareid
häireseadmest välja. Seejärel oodake vähemalt 30sekundit, kuni häireseade
lähtestub.
2. Suunake kaugjuhtimispult kohe pärast patareide sisestamist häireseadmele ja
vajutage aktiveerimisnuppu. Häiresedme LED-märgutuli vilgub ühe korra, see
tähendab kaugjuhtimispuldi koodi vastuvõtmist.
MÄRKUS: Häireseade tuleb alati uuesti programmeerida kaugjuhtimispuldiga kui
patareid on asendatud.
Paigaldamine:
1. Leidke häireseadmele sobiv asukoht laes, mis asub turvatava
ala keskpunktis.
2. Võtke kinnitusklamber lahti ja kinnitage see kruvidega
lakke. Seejärel paigaldage häireseade kinnitusklambrile ja
kinnitage külgedelt kruvidega.
Kasutamine:
Kui lahkute turvatud alalt, suunake kaugjuhtimispult häireseadmele ja vajutage
aktiveerimisnuppu. Kinnitussignaal annab teada, et häireseade on aktiveeritud ja teil on
30sekundit aega alalt lahkuda. Pärast selle aja möödumist hakkab häireseade liikumise
tuvastamisel andma häiresignaali.
Kui sisenete turvatud alale, suunake kaugjuhtimispult häireseadmele ja vajutage
aktiveerimisnuppu. Antakse lühike signaal, mis tähendab, et on tuvastatud liikumine.
Teil on neli sekundit, et häireseade deaktiveerida.
Märkus: Kui LED-märgutuli põleb pidevalt, siis see tähendab, et patareid tuleb
asendada.
ETTEVAATUST
ELEKTRILÖÖGI OHT
MITTE AVADA
Hooldus:
Puhastage toodet ainult kuiva lapiga.
Ärge kasutage lahustavaid ega abrasiivseid puhastusvahendeid.
Garantii:
Tootja ei anna garantiid toote mistahes muudatuste või teisenduste ega käesoleva toote valest kasutamisest tuleneva
kahju korral.
Üldandmed:
Väliskuju ja tehnilised andmed võivad muutuda ilma ette teatamiseta.
Kõik logod, kaubamärgid ja tootenimed on nende vastavate omanike kaubamärgid või registreeritud kaubamärgid ning
neid tunnustatakse sellistena.
Juhend on koostatud hoolikalt. Siiski ei ole sellest võimalik tuletada mingeid õigusi. König Electronic ei vastuta võimalike
käesolevas kasutusjuhendis olevate vigade ega nende tagajärgede eest.
Hoidke kasutusjuhend ja pakend hilisemaks kasutamiseks alles.
Tähelepanu:
Toode on tähistatud järgneva märgistusega. See tähendab, et kasutatud elektri- ja elektroonikaseadmeid ei tohi
panna olmeprügi hulka. Nende toodete jaoks on kehtestatud eraldi jäätmekäitluse kord.
Toode on valmistatud ja tarnitud kooskõlas kõigi asjaomaste määruste ja direktiividega, mis kehtivad kõigis Euroopa Liidu
liikmesriikides. Samuti vastab see selle riigi kõigile asjakohastele nõuetele ja eeskirjadele, kus see osteti.
Ametlik dokumentatsioon on saadaval nõudmisel. See sisaldab järgnevat (kuid mitte ainult): vastavusdeklaratsioon (ja
toote andmed), ohutuskaart ja toote katsetusprotokoll.
Võtke küsimuste korral ühendust meie klienditeenistusega:
kodulehel: http://www.nedis.com/en-us/contact/contact-form.htm
e-postiga: service@nedis.com
telefonitsi: +31 (0)73-5993965 (tööajal)
NEDIS B.V., De Tweeling 28, 5215 MC ’s-Hertogenbosch, HOLLAND
Ohutusabinõud:
Elektrilöögi ohu tõttu võib toodet selle hooldusvajaduse korral avada AINULT pädev
elektrik.
Rikke korral ühendage seade toitevõrgust ja teistest seadmetest lahti.
Ärge laske tootel kokku puutuda vee ega niiskusega.
Opis:
Obrázok A
Alarm
1. Pasívny infračervený (PIR) snímač
2. Siréna
3. Snímač infračerveného signálu
4. LED indikátor batérie
5. Pripojenie externého napájania
6. Montážny držiak
Obrázok B
Diaľkový ovládač
8. Tlačidlo na zapnutie
9. LED indikátor
10. Tlačidlo na vypnutie
11. Priehradka na batérie
12. Programové prepínače
13. Kryt batérie
7. Priehradka na batérie
Predná strana Zadná strana
Inštalácia batérií:
Alarm:
1. K priehradke na batérie získate prístup zo zadnej časti
alarmu po odskrutkovaní skrutiek montážneho držiaka.
2. Pri zachovaní správnej polarity vložte 4 batérie typu C (nie
sú súčasťou balenia) (pozrite si obrázok C).
3. Po vložení poslednej batérie alarm veľmi nahlas pípne, čo
znamená správne nainštalovanie batérií.
4. Nasaďte montážny držiak a upevnite ho skrutkami. Keď sú
batérie slabo nabité a treba ich vymeniť, rozsvieti sa LED
indikátor batérie.
SLOVENSKY
53
54 55 56
Page 8

SLOVENSKY SLOVENSKY
LATVIEŠU LATVIEŠU
Diaľkový ovládač:
Diaľkový ovládač je napájaný 3 batériami typu LR44 (sú súčasťou balenia). Ak sa červený
LED indikátor pri stlačení tlačidla na zapnutie alebo vypnutie nerozsvieti, je nutné
vymeniť batérie.
Programovanie alarmu:
1. Nastavte prepínače (12) diaľkového ovládača na požadovaný kód a z alarmu
vyberte batérie. Potom počkajte asi 30sekúnd, kým sa alarm nevynuluje.
2. Okamžite po vložení batérií zacieľte diaľkový ovládač na alarm a stlačte tlačidlo
na zapnutie. LED indikátor alarmu blikne raz, čo indikuje, že došlo k nastaveniu
(naučeniu) kódu diaľkového ovládača.
POZNÁMKA: Po každej výmene batérií je nutné alarm pomocou diaľkového ovládača
znova naprogramovať.
Inštalácia:
1. Nájdite požadované miesto pre montáž alarmu na strope, v
strede priestoru, ktorý má byť zabezpečený.
2. Demontujte montážny držiak a pomocou skrutiek ho
upevnite na strop. Potom k montážnemu držiaku upevnite
alarm a zaistite ho na bokoch skrutkami.
Obsluha:
Pri odchode zo zabezpečeného priestoru zacieľte diaľkový ovládač na alarm a stlačte
tlačidlo na zapnutie. Potvrdzujúci tón znamená zapnutie alarmu; teraz máte 30sekúnd
na opustenie priestoru. Ak po tejto časovej dobe dôjde k zisteniu pohybu, alarm bude
vydávať zvuk.
Pri vstupe do zabezpečeného priestoru zacieľte diaľkový ovládač na alarm a stlačte
tlačidlo na vypnutie. Pri vstupe do priestoru zaznie krátke pípnutie indikujúce zistenie
pohybu. Na vypnutie alarmu máte 4sekundy.
Poznámka: Ak bude LED indikátor trvalo svietiť, znamená to, že je nutné vymeniť
batérie.
UPOZORNENIE
RIZIKO ZASIAHNUTIA ELEKTRICKÝM
PRÚDOM
NEOTVÁRAŤ
Údržba:
Čisťte len suchou tkaninou.
Nepoužívajte čistiace prostriedky ani abrazívne materiály.
Záruka:
Vprípade akýchkoľvek úprav výrobku alebo poškodenia spôsobeného nesprávnym používaním výrobku sa neposkytuje
žiadna záruka ani spoločnosť nepreberá žiadnu zodpovednosť.
Všeobecné:
Vzhľad a technické údaje môžu byť bez oznámenia zmenené.
Všetky logá, značky anázvy výrobkov sú ochranné známky alebo registrované ochranné známky príslušných vlastníkov
aako také ich uznávame.
Tvorbe tohto návodu bola venovaná veľká pozornosť. Žiadne nároky však ztoho nevyplývajú. Spoločnosť König Electronic
nenesie žiadnu zodpovednosť za prípadné chyby vtomto návode ani ich následky.
Tento návod aobal výrobku uschovajte pre možnú potrebu v budúcnosti.
Upozornenie:
Výrobok je označený týmto symbolom. Znamená to, že použité elektrické alebo elektronické výrobky nesmú
byť zamiešané do bežného odpadu z domácností. Pre tieto výrobky existuje systém separovaného zberu.
Tento výrobok bol vyrobený adodaný vsúlade so všetkými príslušnými predpismi asmernicami platnými pre všetky
členské štáty Európskej únie. Je tiež vsúlade so všetkými normami apredpismi platnými vkrajine, kde sa predáva.
Formálna dokumentácia je kdispozícii na vyžiadanie. Okrem iného sem patrí: Vyhlásenie o zhode (a identite výrobku),
karta bezpečnostných údajov aspráva otestovaní výrobku.
So žiadosťou opodporu sa obráťte na zákaznícku službu:
cez webovú lokalitu: http://www.nedis.com/en-us/contact/contact-form.htm
e-mailom: service@nedis.com
telefonicky: +31 (0)73-5993965 (v pracovnom čase)
NEDIS B.V., De Tweeling 28, 5215 MC ’s-Hertogenbosch, THE NETHERLANDS
Bezpečnostné opatrenia:
Vrámci zníženia rizika zasiahnutia elektrickým prúdom môže tento výrobok otvárať
VÝHRADNE poverený technik, ak je potrebný servisný zásah.
Ak sa vyskytne nejaký problém, odpojte výrobok aostatné zariadenia zelektrickej siete.
Nevystavujte výrobok pôsobeniu vody alebo vlhkosti.
Apraksts:
A attēls
Signalizācijas iekārta
1. PIR sensors
2. Sirēna
3. Infrasarkanais sensors
4. Akumulatoru LED indikators
5. Ārējās barošanas pieslēgšanas vieta
6. Uzstādīšanas kronšteins
B attēls
Tālvadības pults
8. Aktivizācijas poga
9. LED indikators
10. Deaktivizācijas poga
11. Akumulatoru nodalījums
12. Iestatīšanas slēdži
13. Akumulatoru nodalījuma vāciņš
7. Akumulatoru nodalījums
No priekšas No aizmugures
Akumulatoru ievietošana:
Signalizācijas iekārta:
1. Akumulatoru nodalījumam var piekļūt no signalizācijas
iekārtas aizmugures, noņemot skrūves no uzstādīšanas
kronšteina.
2. Ievietojiet četrus C izmēra akumulatorus (nav iekļauti
komplektā) atbilstoši polaritātei (skatīt C attēlu).
3. Kad akumulatori būs ievietoti, atskanēs ļoti skaļš signāls,
norādot uz akumulatoru pareizu ievietošanu.
4. Uzlieciet uzstādīšanas kronšteinu atpakaļ un nostipriniet
to ar skrūvēm. Akumulatoru LED indikators iedegas, kad
akumulatoru uzlādes līmenis ir ZEMS un tos nepieciešams
nomainīt.
Tālvadības pults:
Tālvadības pults izmanto trīs LR44 akumulatorus (iekļauti komplektā). Ja LED indikators
uz tālvadības pults neiedegas, nospiežot aktivizācijas vai deaktivizācijas pogas,
nepieciešams nomainīt akumulatorus.
Signalizācijas iestatīšana:
1. Iestatiet vēlamo kodu ar tālvadības pults slēdžiem (12) un izņemiet akumulatorus
no signalizācijas iekārtas. Pēc tam nogaidiet vismaz 30sekundes, lai signalizācijas
iekārta tiktu atiestatīta.
2. Pēc akumulatoru ievietošanas uzreiz pavērsiet tālvadības pulti uz signalizācijas
iekārtu un nospiediet aktivizācijas pogu. Signalizācijas LED vienreiz iedegsies,
norādot, ka iekārta ir saņēmusi tālvadības pults kodu.
PIEZĪME: Ikreiz, kad akumulatori tiek nomainīti, signalizācija ir jāiestata no jauna,
izmantojot tālvadības pulti.
Uzstādīšana:
1. Novietojiet signalizācijas iekārtu pie griestiem apsargājamās
zonas centrā.
2. Noņemiet uzstādīšanas kronšteinu un nostipriniet ar
skrūvēm pie griestiem. Pēc tam novietojiet signalizācijas
iekārtu pie uzstādīšanas kronšteina un nostipriniet ar
skrūvēm sānos.
Lietošana:
Atstājot apsargājamo zonu, pavērsiet tālvadības pulti uz signalizācijas iekārtu un
nospiediet aktivizācijas pogu. Apstiprinājuma signāls norādīs, ka signalizācija ir
aktivizēta un jums ir 30sekundes, lai izietu no zonas. Pēc tam, nosakot kustību, atskanēs
signalizācija.
Ieejot apsargājamajā zonā, pavērsiet tālvadības pulti uz signalizācijas iekārtu un
nospiediet deaktivizācijas pogu. Ieejot zonā, atskan īss signāls, norādot, ka ir noteikta
kustība. Jums ir 4sekundes laika, lai deaktivizētu signalizāciju.
Piezīme: Ja LED indikators ir nepārtraukti ieslēgts, nepieciešams nomainīt
akumulatorus.
57
LATVIEŠU
UZMANĪBU!
ELEKTRISKĀS STRĀVAS TRIECIENA RISKS
NEATVĒRT
Apkope:
Tīriet tikai ar sausu drānu.
Tīrīšanas nolūkos nelietojiet šķīdinātājus un abrazīvus līdzekļus.
Garantija:
Izstrādājuma nepareizas lietošanas gadījumā garantija uz izstrādājuma izmaiņām neattiecas.
Vispārīgi:
Dizains un specikācijas var tikt mainīti bez paziņojuma.
Visi logotipi, zīmoli, zīmolu logotipi un izstrādājumu nosaukumi ir to attiecīgo turētāju prečzīmes vai reģistrētas prečzīmes
un tiek atzīti kā tādi.
Šī rokasgrāmata ir rūpīgi izstrādāta. Tomēr nekādas tiesības nevar tikt iegūtas. König Electronic nevar uzņemties atbildību
par jebkādām kļūdām šajā rokasgrāmatā vai to sekām.
Saglabājiet šo rokasgrāmatu un iepakojumu turpmākai uzziņai.
Uzmanību:
Šis izstrādājums ir apzīmēts ar šādu simbolu. Tas nozīmē, ka nolietotas elektroierīces un elektroniskās ierīces
nedrīkst jaukt ar vispārīgiem sadzīves atkritumiem. Pastāv atsevišķa šo izstrādājumu savākšanas sistēma.
Šis izstrādājums ir izgatavots un tiek piegādāts atbilstoši attiecīgajām regulām un direktīvām, kas ir spēkā visās Eiropas
Savienības dalībvalstīs. Tas atbilst arī visiem piemērojamajiem noteikumiem un tehniskajiem noteikumiem pārdošanas
valstī.
Ociāli dokumenti ir pieejami pēc pieprasījuma. Tas ietver, bet ne tikai, šādus dokumentus: Atbilstības (un izstrādājuma
identiskuma) deklarācija , materiālu drošības datu lapa un izstrādājuma pārbaudes atskaite.
Lai saņemtu atbalstu, sazinieties ar mūsu klientu apkalpošanas dienestu:
tīmekļa vietne: http://www.nedis.com/en-us/contact/contact-form.htm
e-pasts: service@nedis.com
tālrunis: +31 (0)73-5993965 (darba laikā)
NEDIS B.V., De Tweeling 28, 5215 MC ’s-Hertogenbosch, THE NETHERLANDS
Drošības pasākumi:
Ja nepieciešama apkope, šo izstrādājumu drīkst atvērt TIKAI pilnvarots speciālists, lai
mazinātu elektriskās strāvas trieciena risku.
Ja radusies problēma, atvienojiet izstrādājumu no strāvas un cita aprīkojuma.
Nepakļaujiet izstrādājumu ūdens un mitruma iedarbībai.
58 59 60
Aprašymas:
A pavyzdys
Signalizacijos įrenginys
1. PIR jutiklis
2. Sirena
3. Infraraudonųjų spindulių jutiklis
4. Elemento LED indikatorius
5. Išorinė maitinimo jungtis
6. Montavimo laikiklis
B pavyzdys
Nuotolinio valdymo pultas
8. Aktyvinimo mygtukas
9. Šviesos diodo (LED) indikatorius
10. Pasyvinimo mygtukas
11. Maitinimo elementų skyrius
12. Programų jungikliai
13. Maitinimo elementų dangtelis
7. Maitinimo elementų skyrius
Priekis
Užpakalinė
pusė
Elementų įdėjimas:
Signalizacijos įrenginys
1. Elementų skyrius pasiekiamas užpakalinėje signalizacijos
įrenginio pusėje, nuo montavimo laikiklio atsukant varžtus.
2. Įkiškite 4 C dydžio maitinimo elementus (komplekte nėra)
paisydami poliškumo (žr. C pav.).
3. Įdėjus elementus, signalizacijos įrenginys labai garsiai
supypsi, parodydamas, kad elementai įdėti tinkamai.
4. Vėl uždėkite montavimo laikiklį ir pritvirtinkite varžtais.
Kai elementai IŠSENKA ir reikia juos keisti, elemento LED
indikatorius pradeda šviesti.
LIETUVIŠKAI LIETUVIŠKAI LIETUVIŠKAI
Nuotolinio valdymo pultas:
Nuotolinio valdymo pultui maitinimas tiekiamas 3 LR44 tipo elementais (yra). Jei,
paspaudus aktyvinimo arba pasyvinimo mygtukus, raudonas nuotolinio valdymo pulto
LED indikatorius nešviečia, tuomet reikia keisti elementus.
Signalizacijos įrenginio programavimas:
1. Nustatykite norimą nuotolinio pulto jungiklių (12) kodą ir iš signalizacijos įrenginio
išimkite elementus. Tuomet palaukite bent 30sekundžių, kad signalizacijos
įrenginys būtų paleistas iš naujo.
2. Įdėję elementus, nuotolinio valdymo pultą tuoj pat nukreipkite į signalizacijos
įrenginį ir paspauskite aktyvinimo mygtuką. Signalizacijos LED indikatorius vieną
kartą mirktelės, parodydamas, kad įsiminė nuotolinio valdymo pulto kodą.
PASTABA: Kiekvieną kartą pakeitus elementus, signalizacijos įrenginį reikia
perprogramuoti, kad būtų suderintas su nuotolinio valdymo pultu.
Montavimas:
1. Teritorijos, kurią reikia saugoti, viduryje ant lubų raskite
norimą vietą signalizacijai montuoti.
2. Nuimkite montavimo laikiklį ir pritvirtinkite jį prie lubų
varžtais. Tuomet prie montavimo laikiklio pritvirtinkite
signalizacijos įrenginį ir iš šonų priveržkite varžtais.
Veikimas:
Išėję iš saugomos teritorijos, nuotolinio valdymo pultą tuoj pat nukreipkite į
signalizacijos įrenginį ir paspauskite aktyvinimo mygtuką. Patvirtinimo garsas parodo,
kad signalizacijos įrenginys aktyvintas, ir jums reikia per 30sekundžių palikti saugomą
teritoriją. Po to, jei aptinkamas judesys, suskamba signalizacija.
Eidami į saugomą teritoriją, nuotolinio valdymo pultą nukreipkite į signalizacijos
įrenginį ir paspauskite pasyvinimo mygtuką. Įėjus į teritoriją, pasigirsta trumpas
pyptelėjimas, rodantis, kad aptiktas judesys. Turite 4sekundes delsos signalizacijai
pasyvinti.
Pastaba: Jei LED indikatorius šviečia nepertraukiamai, tai reiškia, kad reikia keisti
maitinimo elementus.
DĖMESIO
ELEKTROS SMŪGIO PAVOJUS
NEATIDARYTI
Techninė priežiūra:
Valyti tik sausa šluoste.
Nenaudokite valymo tirpiklių arba abrazyvinių valiklių.
Garantija:
Garantija nesuteikiama, taip pat neprisiimama atsakomybė, jei buvo atlikti įrenginio pakeitimai ar modikacijos arba jis
buvo sugadintas netinkamai naudojant.
Bendroji informacija:
Konstrukcija ir techniniai duomenys gali būti keičiami be įspėjimo.
Visi logotipai, ženklai arba ženklų logotipai ir gaminių vardai yra juos turinčių savininkų prekių ženklai arba registruotieji
prekių ženklai ir šiame dokumente pripažįstami tokiais.
Šis gaminys buvo gaminamas atidžiai. Tačiau teisių įgyti negalima. „König Electronic“ negali prisiimti atsakomybės už
šiame naudojimo vadove padarytas klaidas arba jų pasekmes.
Saugokite šį naudojimo vadovą ir pakuotę, jei prireiktų ateityje.
Dėmesio:
Gaminys pažymėtas šiuo ženklu. Tai reiškia, kad naudoti elektros ir elektroniniai gaminiai negali būti išmetami
kartu su bendromis namų ūkio atliekomis. Šiems gaminiams surinkti yra atskira sistema.
Šis gaminys gaminamas ir tiekiamas laikantis atitinkamų visose Europos Sąjungos valstybėse narėse galiojančių įstatymų ir
reglamentų. Jis taip pat atitinka visas pardavimo šalyje taikomas specikacijas ir taisykles.
Ocialius dokumentus galima gauti paprašius. Jie apima, bet neapsiriboja: atitikties deklaraciją (ir gaminio identikaciją),
medžiagų saugos duomenų lapą ir gaminio bandymo ataskaitą.
Jei reikia pagalbos, kreipkitės į mūsų klientų aptarnavimo skyrių:
per svetainę: http://www.nedis.com/en-us/contact/contact-form.htm
elektroniniu paštu: service@nedis.com
telefonu: +31 (0)73-5993965 (darbo valandomis)
NEDIS B.V., De Tweeling 28, 5215 MC ’s-Hertogenbosch, THE NETHERLANDS
Saugos priemonės:
Siekiant išvengti elektros smūgio, šį gaminį, esant poreikiui jį taisyti, atidaryti gali TIK
įgaliotasis specialistas.
Iškilus nesklandumams, įrenginį atjunkite nuo maitinimo šaltinio ir kitų įrenginių.
Saugokite gaminį nuo vandens ar drėgmės poveikio.
61
62 63 64
Page 9

HRVATSKI HRVATSKI HRVATSKI
БЪЛГАРСКИ
Opis:
Slika A
Alarm
1. PIR senzor
2. Sirena
3. Infracrveni senzor
4. LED lampica baterije
5. Vanjski priključak napona
6. Držač za postavljanje
Slika B
Daljinski upravljač
8. Tipka uključi
9. LED indikator
10. Tipka isključi
11. Baterijski odjeljak
12. Programski prekidači
13. Poklopac baterije
7. Baterijski odjeljak
Prednja Stražnja
Postavljanje baterije:
Alarm:
1. Pristup odjeljku baterije omogućen je sa stražnje strane
alarma uklanjanjem vijaka na držaču za postavljanje.
2. Umetnite 4x C baterije (nisu uključene) ispravno okrenutog
polariteta (vidjeti sliku C).
3. Kada su baterije umetnute začut će se glasan alarm kao znak
da su baterije ispravno umetnute.
4. Vratite držač za postavljanje na mjesto i pričvrstite vijcima.
LED lampica baterije svijetli kada su baterije slabe i potrebno
ih je zamijeniti.
Daljinski upravljač:
Daljinski upravljač koristi 3x LR44 baterije (uključene). Ako crvena LED lampica na
daljinskom upravljaču ne svijetli kada su pritisnute tipke uključi ili isključi, baterije je
potrebno zamijeniti.
Programski alarm:
1. Namjestite prekidače (12) daljinskog upravljača na željeni kod i uklonite baterije iz
alarma. Pričekajte barem 30sekundi kako bi se alarm resetirao.
2. Odmah nakon umetanja baterija, uperite daljinski upravljač u alarm u pritisnite
tipku uključi. LED lampica alarma bljeska jedanput kao znak da je pohranio kod
daljinskog upravljača.
NAPOMENA: Alarm je potrebno ponovno programirati daljinskim upravljačem svaki
puta kod zamjene baterija.
Postavljanje:
1. Alarm na stropu postavite u sredinu prostora koji štitite.
2. Uklonite držač za postavljanje i učvrstite na za strop vijcima.
Zatim pričvrstite alarm na držač za postavljanje i pričvrstite
ga vijcima sa strane.
Rad:
Pri izlasku iz zaštićenog prostora, uperite daljinski upravljač u alarm u pritisnite tipku
uključi. Zvuk potvrde označava uključenje alarma te je potrebno napustiti zaštićenu
prostoriju unutar 30sekundi. Alarm će se nakon tog vremena oglasiti, ako je otkriven
pokret.
Pri ulasku u zaštićeni prostor, uperite daljinski upravljač u alarm u pritisnite tipku
isključi. Alarm se kratko oglasi pri ulasku u prostor, kao znak otkrivanja pokreta. Alarm
je potrebno isključiti za 4sekunde.
Napomena: Ako LED lampica stalno svijetli, potrebno je zamijeniti baterije.
OPREZ
OPASNOST OD ELEKTRIČNOG
UDARA
NE OTVARAJTE
Održavanje:
Čistite samo suhom krpom.
Ne koristite otapala ili abrazivna sredstva za čišćenje.
Jamstvo:
Jamstvo ili odgovornost neće biti prihvaćeni u slučaju promjena i izmjena proizvoda ili oštećenja nastalih uslijed
nepravilne uporabe ovog proizvoda.
Općenito:
Modeli i specikacije podložni su promjeni bez najave.
Svi logotipi, marke i nazivi proizvoda su trgovačke marke ili registrirane trgovačke marke njihovih vlasnika i ovdje su kao
takve prepoznate.
Ovaj priručnik proizveden je s pažnjom. Međutim, iz njih ne proizlaze nikakva prava. König Electronic ne preuzima
odgovornost za bilo kakve pogreške u ovim uputama ni za njihove posljedice.
Čuvajte ovaj priručnik i pakiranje za buduće potrebe.
Pozor:
Proizvod je označen ovim simbolom. On označava da iskorištene električne i elektroničke proizvode ne treba
miješati s općim komunalnim otpadom. Postoje zasebni sustavi za prikupljanje ovih proizvoda.
Ovaj proizvod je proizveden i isporučen u skladu sa svim relevantnim propisima i direktivama koje vrijede za sve države
članice Europske Unije. Također je u skladu sa svim važećim specikacija i propisima zemlje u kojoj se prodaje.
Službena dokumentacija dostupna je na zahtjev. Ovo uključuje ali bez ograničenja na: Izjavu o sukladnosti (i osobinama
proizvoda), listu sa podacima o sigurnosti materijala i izvješće o testiranju proizvoda.
Molimo, obratite se našoj službi za korisničku podršku:
putem web-mjesta: http://www.nedis.com/en-us/contact/contact-form.htm
putem e-pošte: service@nedis.com
putem telefona: +31 (0)73-5993965 (za vrijeme radnog vremena ureda)
NEDIS B.V., De Tweeling 28, 5215 MC ’s-Hertogenbosch, NIZOZEMSKA
Sigurnosne mjere opreza:
Da smanjite opasnost od električnog udara, prepustite otvaranje ovog proizvoda isključivo
ovlaštenom stručnjaku kada je nužan servis.
Isključite proizvod i ostalu opremu iz mrežnog napajanja u slučaju pojave problema.
Ne izlažite proizvod vodi ili vlagi.
Описание:
Фигура A
Аларма
1. PIR сензор
2. Сирена
3. Инфрачервен сензор
4. Светлинен индикатор на
батерията
5. Външна захранваща връзка
6. Монтажна скоба
Фигура B
Дистанционно управление
8. Бутон за включване
9. Светлинен индикатор – светодиод за
състояние (LED)
10. Бутон за изключване
11. Отделение за батерията
12. Програмни превключватели
13. Капак на батерията
7. Отделение за батерията
Предна Отзад
Поставяне на батерия:
Аларма:
1. Достъп до отделението за батерии можете да получите
от задната страна на алармата чрез отстраняване на
винтовете от монтажната скоба.
2. Поставете 4x C батерии (не се включват в доставката)
като спазвате правилния поляритет (вижте фигура C).
3. При поставяне на батериите алармата издава силен
звуков сигнал, за да покаже, че батериите са монтирани
правилно.
4. Върнете на място монтажната скоба и я захванете
с винтовете. Светлинният индикатор на батерията
задейства, когато батерията има НИСКО ниво и трябва да
бъде сменена.
65
БЪЛГАРСКИ БЪЛГАРСКИ
Дистанционно управление:
Дистанционното управление използва 3x батерии LR44 (включени в доставката).
Ако червеният светлинен индикатор на дистанционното управление не задейства
при натискане на бутоните за включване и изключване, батериите трябва да се
сменят.
Програмиране на алармата:
1. Установете превключвателите (12) на дистанционното управление на желания
код и отстранете батериите от алармата. След това изчакайте поне 30секунди
за нулиране на алармата.
2. Насочете дистанционното управление към алармата и натиснете бутона за
включване незабавно след поставяне на батериите. Светлинният индикатор
на алармата примигва веднъж, за да покаже, че е обучена в кода на
дистанционното управление.
ЗАБЕЛЕЖКА: Алармата трябва да се програмира отново за работа с
дистанционното управление при всяка смяна на батериите.
Инсталиране:
1. Разположете алармата в центъра на тавана на зоната,
която трябва да се охранява.
2. Отстранете монтажната скоба и я фиксирайте към тавана
с винтовете. След това фиксирайте монтажната скоба и я
захванете с винтовете отстрани.
Работа:
Насочете дистанционното управление към алармата и натиснете бутона за
включване след като напуснете защитената зона. Потвърдителният тон показва,
че алармата е включена и имате 30секунди да напуснете зоната. След това време
прозвучава аларма при разпознаване на движение.
Насочете дистанционното управление към алармата и натиснете бутона за
деактивиране при влизане в защитената зона. При влизане в зоната се чува кратък
звуков сигнал, за да покаже разпознаване на движение. Имате 4 секунди, за да
деактивирате алармата.
66 67 68
Забележка: Ако светлинният индикатор свети постоянно, означава, че батериите
трябва да бъдат сменени.
ВНИМАНИЕ
РИСК ОТ ТОКОВ УДАР
НЕ ОТВАРЯЙТЕ
Поддръжка:
Почиствайте само със суха кърпа.
Не използвайте за почистване разтворители или абразиви.
Гаранция:
Не се поемат гаранции и отговорност за каквито и да е промени или модификации на продукта или щети,
причинени поради неправилното му използване.
Общи положения:
Дизайнът и спецификациите са предмет на промяна без предизвестие.
Всички емблеми, търговски марки и имена на продукти са търговски марки или регистрирани търговски марки на
съответните притежатели и се признават за такива.
Настоящото ръководство е създадено внимателно. Въпреки това не могат да бъдат дадени никакви гаранции. König
Electronic не поема отговорност за грешки в това ръководство или за техните последствия.
Запазвате ръководството и опаковката за бъдещи справки.
Внимание:
Продуктът е обозначен с този символ. Това означава, че електрическите и електронни продукти не
трябва да се смесват с обикновените домакински отпадъци. За тези продукти съществува друга система
за събиране на отпадъци.
Продуктът е произведен и доставен в съответствие с всички приложими разпоредби и директиви, валидни за
всички страни-членки на Европейския съюз. Освен това съответства на всички приложими спецификации и
разпоредби в страните, в които се предлага.
Можете да получите официалната документация при поискване. Тя включва, но не се ограничава до: Декларация за
съответствие (и идентичност на продукта), паспорт за безопасност на веществата и доклад от тестовете на продукта.
Свържете с с бюрото за обслужване на клиенти за допълнителна информация:
чрез мрежата: http://www.nedis.com/en-us/contact/contact-form.htm
чрез имейл: service@nedis.com
по телефона: +31 (0)73-5993965 (през работно време)
NEDIS B.V., De Tweeling 28, 5215 MC ’s-Hertogenbosch, ХОЛАНДИЯ
Предохранителни мерки:
За да се намали риска от токов удар, продуктът трябва да се отваря САМО от
упълномощени техници при нужда от сервиз.
Изключете продукта от захранването и останалото оборудване, ако възникне
проблем.
Не излагайте продукта на влиянията на времето или на влага.
Opis:
Rysunek A
Alarm
1. Czujnik PIR
2. Sygnał dźwiękowy
3. Czujnik podczerwieni
4. Wskaźnik LED baterii
5. Zewnętrzne złącze zasilania
6. Uchwyt montażowy
Rysunek B
Pilot
8. Przycisk uzbrojenia
9. Wskaźnik LED
10. Przycisk rozbrojenia
11. Komora baterii
12. Przełączniki programowe
13. Pokrywa baterii
7. Komora baterii
Przód Do tyłu
Wkładanie baterii:
Alarm:
1. Do komory baterii można się dostać z tyłu alarmu wyciągając
śruby z uchwytu montażowego.
2. Włożyć 4baterie rozmiaru C (nie są dołączone) zgodnie z
biegunowością (patrz rysunek C).
3. Po włożeniu baterii alarm rozlegnie się bardzo głośno
sygnalizując, że baterie są właściwie włożone.
4. Założyć uchwyt montażowy i zamocować go śrubami.
Wskaźnik LED baterii zaświeci się, kiedy baterie będą się
rozładowywać i będzie trzeba je wymienić.
POLSKI POLSKI
Pilot:
Pilot działa na 3 baterie LR44 (dołączone). Jeśli czerwony wskaźnik LED na pilocie nie
zaświeci się po naciśnięciu przycisku uzbrojenia lub rozbrojenia, należy wymienić
baterie.
Programowanie alarmu:
1. Ustawić przełączniki (12) pilota na żądany kod i wyjąć baterie z alarmu. Następnie
poczekać co najmniej 30sekund na zresetowanie alarmu.
2. Od razu po włożeniu baterii nakierować pilot na alarm i nacisnąć przycisk
uzbrojenia. Dioda LED alarmu mignie raz wskazując, że kod pilota został
zaprogramowany.
UWAGA: Alarm należy programować ponownie za pomocą pilota za każdym razem po
wymianie baterii.
Instalacja:
1. Znaleźć żądaną lokalizację dla alarmu na sucie na środku
zabezpieczanego obszaru.
2. Zdjąć uchwyt montażowy i zamocować go do sutu za
pomocą śrub. Następnie zamontować alarm do uchwytu
montażowego i zamocować go śrubami z boku.
Obsługa:
Wychodząc z obszaru ochronionego nakierować pilot na alarm i nacisnąć przycisk
uzbrojenia. Dźwięk potwierdzenia będzie oznaczał, że alarm jest uzbrojony. Użytkownik
ma 30sekund na opuszczenie obszaru. Po tym czasie w przypadku wykrycia ruchu
rozlegnie się alarm.
Wchodząc do obszaru ochronionego nakierować pilot na alarm i nacisnąć przycisk
rozbrojenia. Podczas wchodzenia do obszaru rozlegnie się krótki sygnał dźwiękowy
wskazujący wykrycie ruchu. Użytkownik ma 4sekundy na rozbrojenie alarmu.
Uwaga: Jeśli wskaźnik LED jest stale włączony, oznacza to konieczność wymiany baterii.
69
70 71 72
Page 10

POLSKI
SLOVENSKI SLOVENSKI SLOVENSKI
OSTRZEŻENIE
RYZYKO PORAŻENIA PRĄDEM
ELEKTRYCZNYM
NIE OTWIERAĆ
Konserwacja:
Czyścić wyłącznie suchą szmatką.
Nie stosować płynów do czyszczenia ani środków ściernych.
Gwarancja:
Producent nie udziela żadnych gwarancji ani nie ponosi odpowiedzialności za żadne zmiany i modykacje produktu ani za
uszkodzenia spowodowane nieprawidłowym użyciem niniejszego produktu.
Informacje ogólne:
Wszystkie projekty i specykacje mogą zostać zmienione bez uprzedniego powiadomienia.
Wszystkie loga oraz nazwy marek i produktów są znakami towarowymi lub zastrzeżonymi znakami towarowymi ich
właścicieli i niniejszym są za takie uznawane.
Instrukcja ta została opracowana ze szczególną uwagą. Nie ma jednak możliwości dochodzenia praw. König Electronic nie
ponosi odpowiedzialności za błędy w niniejszej instrukcji lub ich konsekwencje.
Niniejszą instrukcję oraz opakowanie należy zachować celem wykorzystania w przyszłości.
Uwaga:
Produkt ten jest oznaczony następującym symbolem. Oznacza to, że zużytego sprzętu elektrycznego i
elektronicznego nie można mieszać z innymi odpadami domowymi. Istnieje oddzielny system zbierania takich
produktów.
Produkt ten został wyprodukowany i dostarczony zgodnie z przepisami i dyrektywami obowiązującymi we wszystkich
państwach członkowskich Unii Europejskiej. Produkt jest również zgodny ze wszystkimi obowiązującymi specykacjami i
przepisami krajów, w których jest sprzedawany.
Ocjalna dokumentacja dostępna jest na żądanie. Dokumentacja ta obejmuje, ale nie ogranicza się do: Deklaracji
zgodności (i tożsamości produktu), Karty charakterystyki substancji niebezpiecznej oraz raportu z testów produktu.
Prosimy o kontakt z naszym działem obsługi klienta w celu uzyskania pomocy:
na stronie internetowej: http://www.nedis.com/en-us/contact/contact-form.htm
wysyłając wiadomość e-mail: service@nedis.com
telefonicznie: +31 (0)73-5993965 (w godzinach pracy biura)
NEDIS B.V., De Tweeling 28, 5215 MC ’s-Hertogenbosch, HOLANDIA
Wskazówki dotyczące bezpieczeństwa:
Aby zmniejszyć ryzyko porażenia prądem elektrycznym, produkt ten mogą otwierać
WYŁĄCZNIE upoważnieni technicy, gdy konieczne jest przeprowadzenie prac serwisowych.
W przypadku napotkania problemu należy odłączyć produkt od zasilania oraz od innych
urządzeń.
Nie wystawiać produktu na działanie wody i wilgoci.
Opis:
Slika A
Alarm
1. PIR-senzor
2. Sirena
3. Infrardeči senzor
4. LED-indikator za baterije
5. Zunanje napajanje
6. Montažni nosilec
Slika B
Daljinski upravljalnik
8. Gumb za aktivacijo
9. LED-indikator
10. Gumb za deaktivacijo
11. Predel za baterije
12. Programska stikala
13. Pokrov za baterije
7. Predel za baterije
Spredaj Zadaj
Namestitev baterij:
Alarm:
1. Do predela za baterije lahko dostopate z zadnje strani
alarma, tako da odstranite vijake montažnega nosilca.
2. Vstavite 4x C- baterije (ni priloženo) glede na ustrezno
polariteto (glej sliko C).
3. Ko so baterije vstavljene, bo alarm zelo glasno zapiskal in
tako naznanil, da so baterije vstavljene pravilno.
4. Znova namestite montažni nosilec in ga pričvrstite z vijaki.
LED-indikator za baterije bo zasvetil, ko so baterije prazne in
jih je treba zamenjati.
Daljinski upravljalnik:
Daljinski upravljalnik potrebuje 3x LR44-baterije (priloženo). Če rdeči LED-indikator na
daljinskem upravljalniku ne zasveti, ko pritisnete gumba za aktivacijo ali deaktivacijo,
pomeni, da je treba zamenjati baterije.
Programiranje alarma:
1. Nastavite stikala (12) daljinskega upravljalnika na želeno kodo in odstranite baterije
iz alarma. Nato počakajte vsaj 30sekund, da se alarm resetira.
2. Takoj zatem, ko boste vstavili baterije, usmerite daljinski upravljalnik v alarm in
pritisnite gumb za aktivacijo. LED-lučka na alarmu bo enkrat zasvetila in tako
sporočila, da se je alarm naučil kodo daljinskega upravljalnika.
OPOMBA: Alarm morate sprogramirati z daljinskim upravljalnikom vsakič, ko boste
zamenjali baterije.
Namestitev:
1. Izberite ustrezno lokacijo za alarm na stropu na sredi
območja, ki ga želite varovati.
2. Odstranite montažni nosilec in ga z vijaki pričvrstite na strop.
Nato namestite alarm na montažni nosilec in ga ob straneh
pričvrstite z vijaki.
Delovanje:
Vsakič, ko boste zapustili varovano območje, usmerite daljinski upravljalnik v alarm
in pritisnite gumb za aktivacijo. Potrditveni ton bo sporočil, da je alarm aktiviran in da
imate 30sekund, da zapustite območje. Po preteku 30sekund se bo alarm oglasil, če bo
zaznal gibanje.
Ko vstopate na varovano območje, daljinski upravljalnik usmerite v alarm in pritisnite
gumb za deaktivacijo. Ob vstopu na območje boste zaslišali kratek pisk, ki pomeni, da
je alarm zaznal gibanje. Imate 4sekunde, da deaktivirate alarm.
Opomba: Če LED-indikator sveti neprestano, pomeni, da je treba zamenjati baterije.
PREVIDNO
NEVARNOST ELEKTRIČNEGA UDARA
NE ODPIRAJTE
Vzdrževanje:
Čistite le s suho krpo.
Ne uporabljajte čistilnih raztopin ali abrazivnih sredstev.
Garancija:
Ne sprejemamo nobenega jamstva ali odgovornosti za kakršnekoli spremembe in modikacije izdelka oz. škodo, ki je
povzročena zaradi nepravilne uporabe tega izdelka.
Splošno:
Pridržujemo si pravico do spreminjanja specikacij in oblike brez predhodnega opozorila.
Vsi logotipi in imena izdelkov so prodajne ali registrirane prodajne znamke lastnikov in so tudi tako označene.
Ta priročnik je bil skrbno pripravljen. Kljub temu iz tega ne izhajajo nobene pravice. König Electronic ne sprejema
odgovornosti za kakršnekoli napake v tem priročniku ali za posledice teh napak.
Shranite ta navodila in embalažo za poznejšo uporabo.
Opozorilo:
Ta izdelek je označen s tem simbolom. To pomeni, da se dotrajani električni in elektronski izdelki ne smejo
mešati z običajnimi gospodinjskimi odpadki. Za ta izdelek obstaja posebni zbirni center za odlaganje odpadkov.
Ta izdelek je bil izdelan in dobavljen v skladu z vsemi ustreznimi predpisi in direktivami, ki veljajo za vse države članice
Evropske unije. Prav tako je v skladu z vsemi veljavnimi zahtevami in predpisi v državi, kjer se izdelek prodaja.
Uradna dokumentacija je na voljo na vašo zahtevo. To vključuje, vendar ni omejeno na: Izjavo o skladnosti (in identiteti
izdelka), Varnostni list in Poročilo o preskusu izdelka.
Obrnite se na službo za pomoč strankam:
prek spletne strani: http://www.nedis.com/en-us/contact/contact-form.htm
prek e-pošte: service@nedis.com
ali na tel. št.: +31 (0)73-5993965 (med delovnim časom)
NEDIS B.V., De Tweeling 28, 5215 MC ’s-Hertogenbosch, THE NETHERLANDS
Varnostni ukrepi:
Da se izognete nevarnosti električnega udara, naj napravo servisira SAMO pooblaščeno
servisno osebje, ko je to potrebno.
Če se pojavi napaka v napravi, prekinite omrežno napajanje in jo odklopite od drugih
naprav.
Naprave ne izpostavljajte vodi ali vlagi.
74 75 7673
 Loading...