

Page 1

Installation and user manual
7" LCD Monitor
Type SEC-MON51
Original instructions
Document version: 1
GB - 3
DE - 7
FR - 11
NL - 15
IT - 19
ES - 23
HU - 27
FI - 31
SE - 35
DK - 39
NO - 43
CZ - 47
RO - 51
GR - 55
Page 2
Nedis B.V., part of the Nedis Group
De Tweeling 28
5215 MC ‘s-Hertogenbosch
The Netherlands
Tel: +31 73 599 1055
Fax: +31 73 599 9699
Web: www.nedis.com or www.nedis.nl
© Any unauthorised use of the information in this manual is prohibited. No part of this manual may be
reproduced, stored in a database or retrieval system, or published, in any form or in any way,
electronically or mechanically, by print, photocopy, microfilm or by any other means without the
express written permission of NEDIS.
2
Page 3
7” LCD Monitor
Introduction
The monitor is an easy-to-use electronic device designed for monitoring in all kinds of situations. This
product is especially suited to small shops, offices or homes. The monitor can be placed on a
horizontal surface or can be mounted on an adjustable support (order separately with art. nr.
SEC-BRACK40) which can be mounted at the bottom of the monitor and fitted with 3 screws on a
horizontal or vertical surface.
The monitor can receive sound and images from 4 different cameras. You can easily select different
camera views with the remote control. The images can also be displayed one by one in automatic
mode. This monitor is suitable for use with SEC-CAM12 camera.
• We recommend that you read this manual before installing/using the monitor.
• Keep this manual in a safe place for future reference.
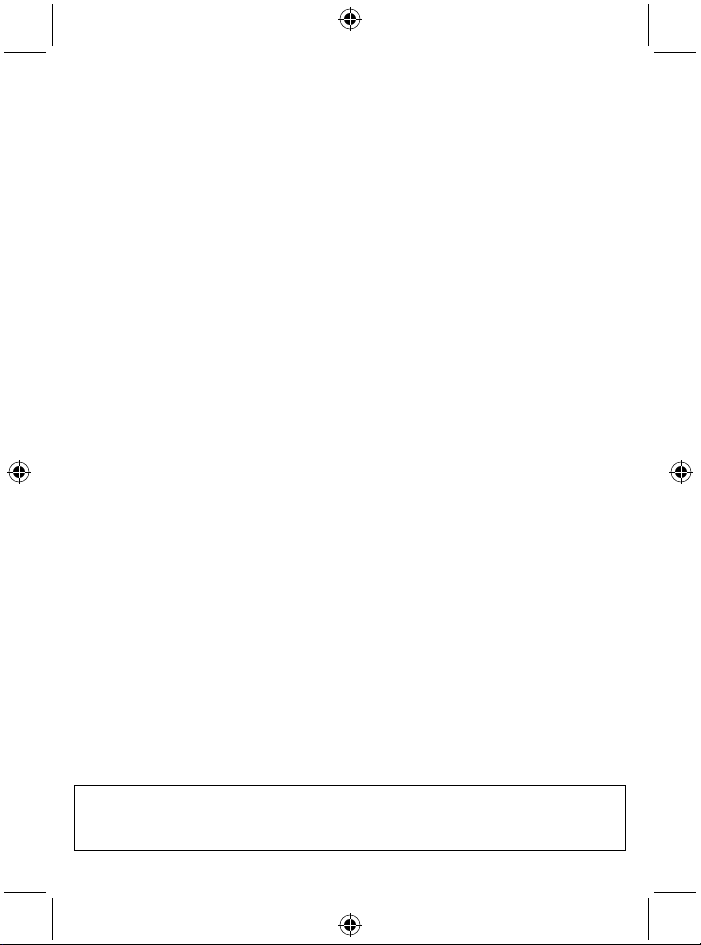
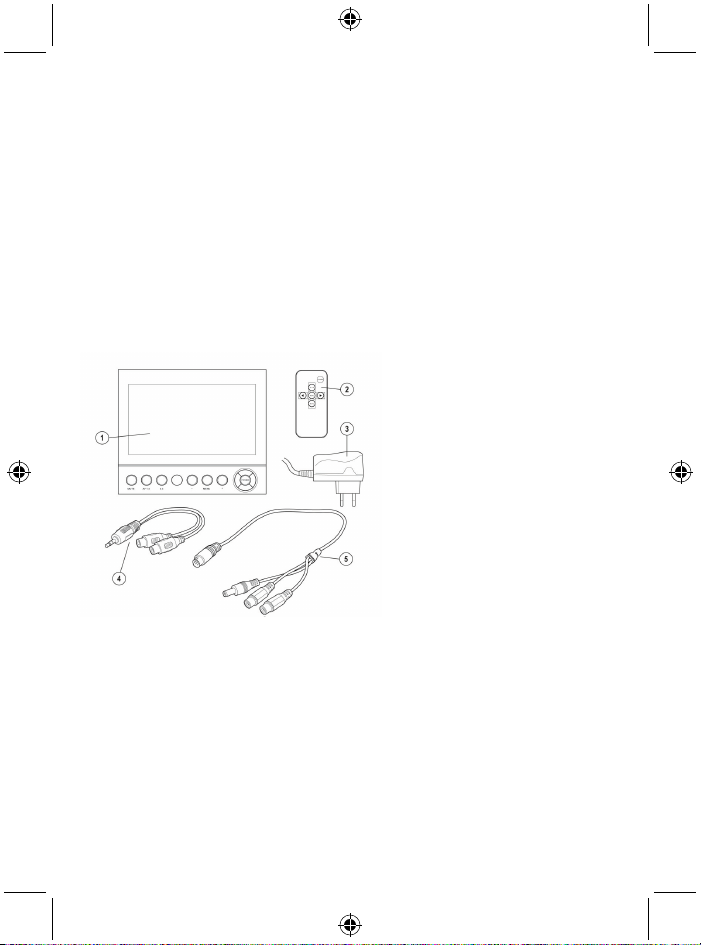
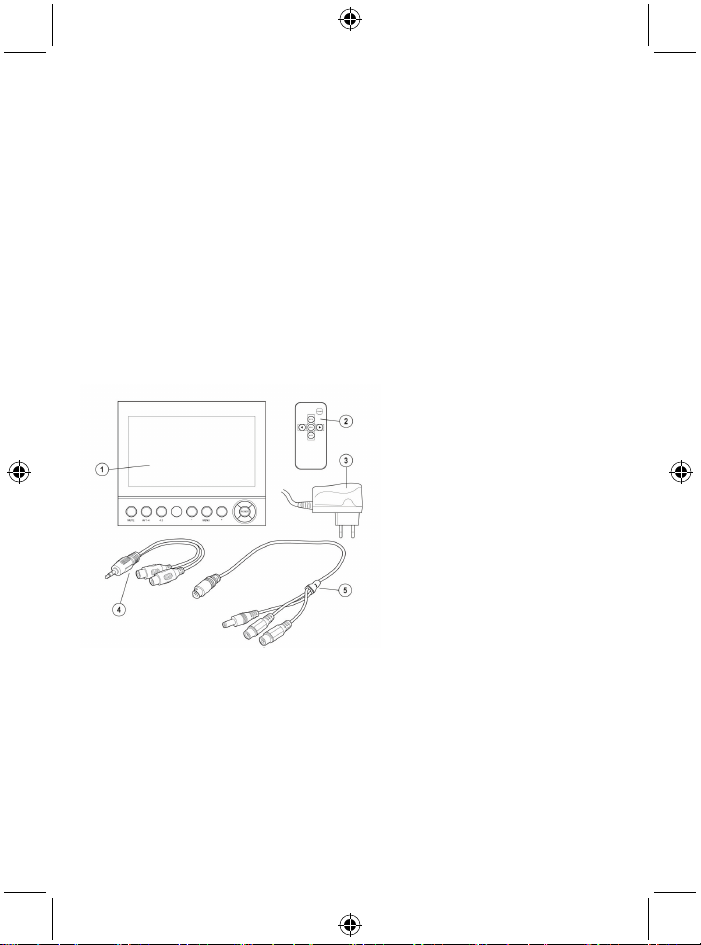
The camera package contains the following items:
1. 1 x 7” LCD monitor
2. 1 x Remote control
3. 1 x AC/DC adapter
4. 1 x AV output cable
5. 4 x AV input cable
Technical specifications
Format: 16 : 9 (4 : 3 mode)
Resolution: 628 x 562 (PAL)
Operating voltage: 12V DC / 1A
AV input: 4x
AV output: 1x
Operating temperature: -10°C to +50°C
Weight: 450 g
Dimensions: 180 x 155 x 25 mm
Safety precautions
• Do not open the monitor in the event of a malfunction. This product should only be opened by a
qualified engineer.
3
Page 4
• Do not expose the monitor to water.
• Do not expose the monitor to high temperatures or humidity.
• Do not install the monitor close to strong magnetic fields, such as a TV or speaker. This may affect
the monitor’s quality.
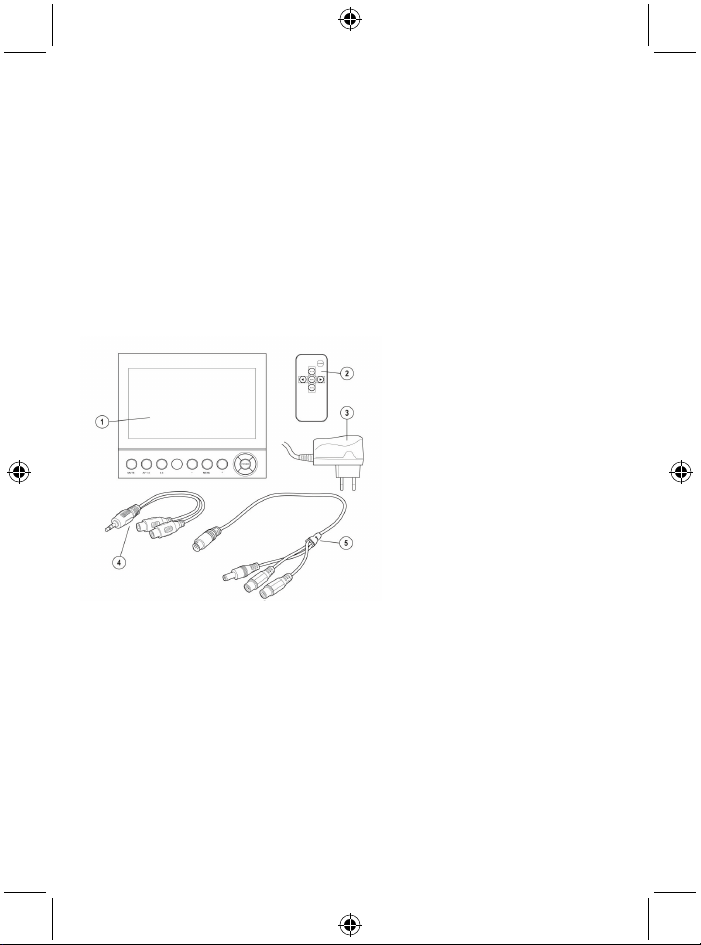
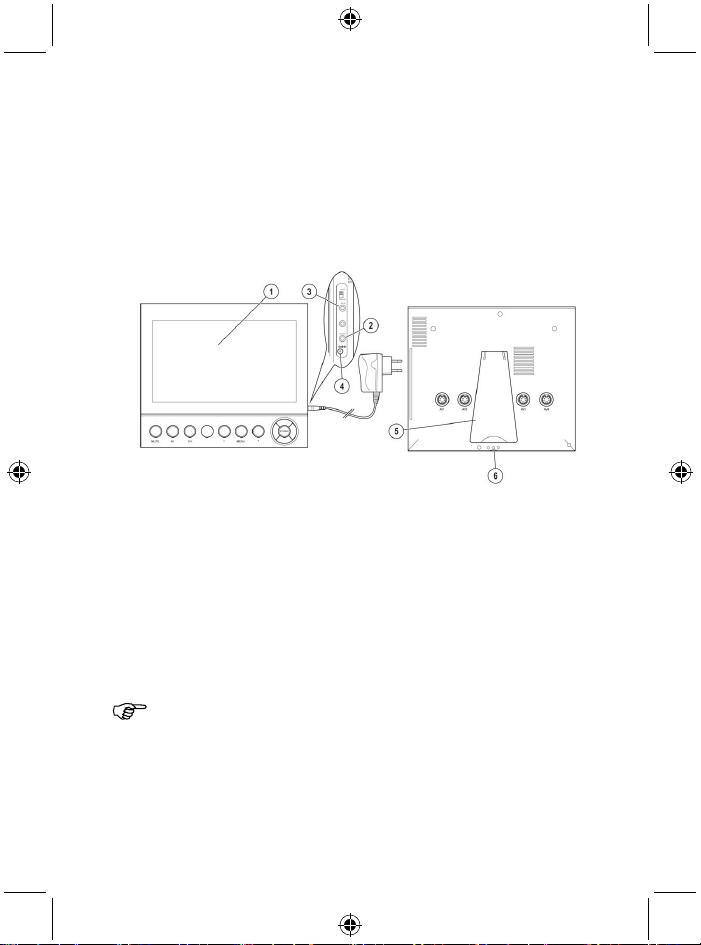
Installation instructions
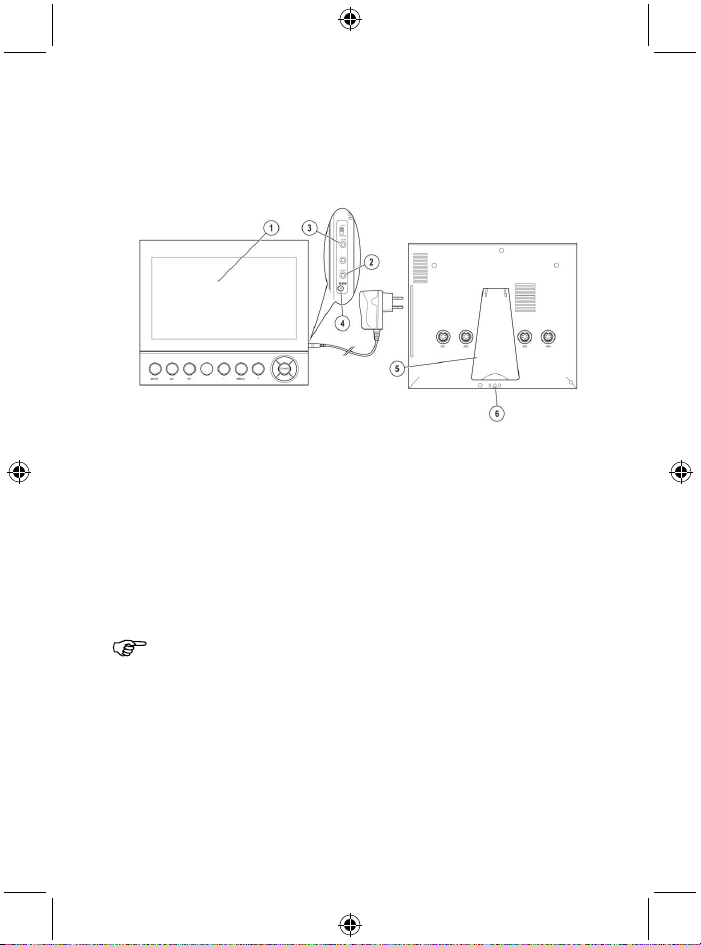
1. Monitor
2. AV output jack connector
3. AV input jack connector
1. Place the monitor on its support (5) on a stable surface.
The monitor can also be mounted on an adjustable support (order separately with art. nr.
SEC-BRACK40) which can be mounted at the bottom of the monitor and fitted with 3 screws on a
horizontal or vertical surface.
2. Insert the DC plug into the DC 12V input jack connector (4).
3. Insert the AC/DC adapter into the wall socket.
4. Connect the camera with the AV input cable to one of the AV input jack connectors (3) on the rear
of the monitor (max. 4 cameras).
5. You can connect an extra monitor to the AV output connector (2).
For information about installing and using the camera, refer to the camera’s
installation manual.
4. DC 12V input jack connector
5. Support
6. Fitting point for adjustable support
4
Page 5
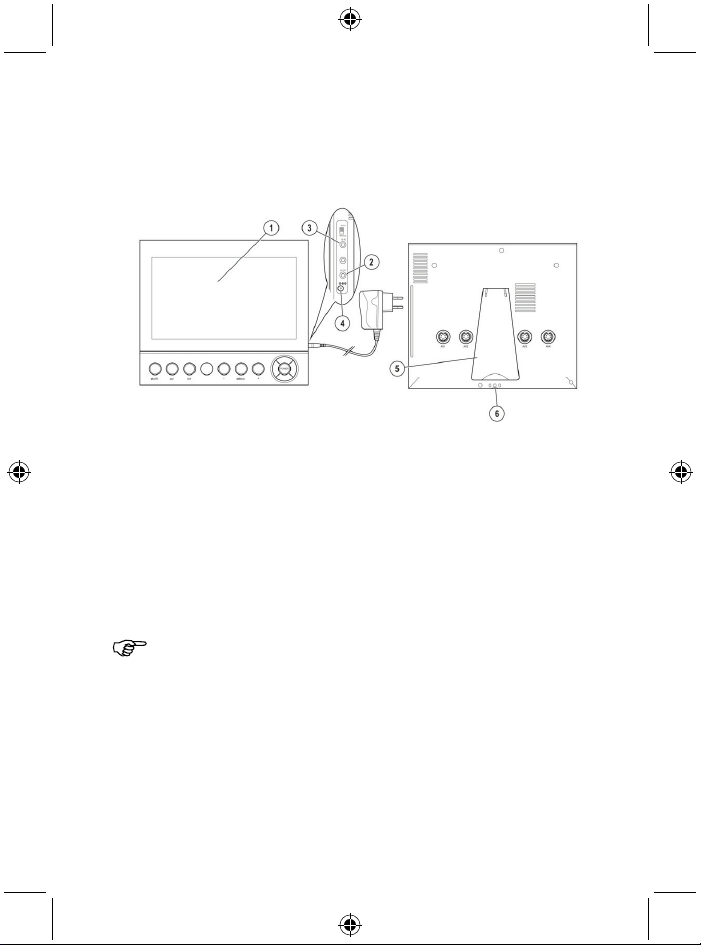
User instructions
1. LCD monitor
2. Mute button
3. AV button
4. 4:3 button
5. IR control sensor
1. Press the Power button (9) to switch on the monitor.
2. Press the AV button (3) to set the correct camera connection.
3. Press the Menu button (7) to navigate to the sub-menus.
The following sub-menus are displayed:
• Display settings: “Bright”, “Contrast”, “Colour” or “Hue”. Adjust the display settings with the + (8)
or – (6) button.
• “AV switched set”
Select the cameras, which will be shown subsequently in automatic mode. Press the + or –
button to switch between cameras and the Menu button to select or deselect a camera.
4. Set the Auto/Manual switch (10) to “auto” to switch between the selected cameras automatically.
5. Press the 4:3 button (4) to change the aspect ratio.
6. Press the Mute button (2) to switch the sound off or on.
“√” indicates that this camera has been selected.
“ο” indicates that this camera has not been selected.
• “Time switched”
Increase or decrease the time interval for automatic mode with the + or – button.
When pressing the AV button, manual switching mode shows all camera images,
including cameras set to “ο”.
For this feature to work, the microphone on the camera needs to be switched on.
6. − button
7. Menu button
8. + button
9. Power button
10. Auto/Manual switch
Maintenance
Clean the camera with a damp cloth.
Do not use cleaning solvents or abrasives.
5
Page 6
Troubleshooting
Carry out the following checks if the monitor is not working properly:
• Make sure that the monitor is set to the correct AV channel (AV1-4).
• Make sure that all of the plugs are correctly fitted into the jack connectors.
• Make sure that the monitor is not damaged.
• Make sure that the power adapter is not damaged.
• Make sure, when automatic switching mode is on, that the cameras in the AV switched set are not
set to “ο”.
• Make sure that the display settings are all set properly.
Warranty
Any changes and/or modifications to the product will void the warranty. We cannot accept any liability
for damage caused by incorrect use of this product.
Disclaimer
Designs and specifications are subject to change without notice. All logos, brands and product names
are trademarks or registered trademarks of their respective holders and are hereby recognised as
such.
Disposal
• This product is designated for separate collection at an appropriate collection point. Do
not dispose of this product with household waste.
• For more information, contact the retailer or the local authority responsible for waste
management.
6
Page 7
7” LCD Monitor
Einleitung
Der Monitor ist ein einfach zu verwendendes elektronisches Gerät, das zur Überwachung aller Arten
von Situationen entwickelt wurde. Dieses Produkt eignet sich speziell für kleine Geschäfte, Büros und
zu Hause. Der Monitor kann auf einer horizontalen Fläche oder an einer justierbaren Halterung
(separat bestellbar) montiert werden, die an der Unterseite des Monitors montiert wird und mit 3
Schrauben an einer horizontalen oder vertikalen Fläche befestigt wird.
Der Monitor kann Bild und Ton von 4 verschiedenen Kameras empfangen. Sie können problemlos
verschiedene Kameraeinstellungen mit der Fernbedienung auswählen. Die Bilder können auch
einzeln im Automatikmodus angezeigt werden. Dieser Monitor ist geeignet zur Verwendung mit der
SEC-CAM12 Kamera.
• Wir empfehlen Ihnen, dieses Handbuch zu lesen, bevor Sie den Monitor installieren/verwenden
• Bewahren Sie diese Anleitung für späteres Nachschlagen auf.
Das Monitorpaket beinhaltet die folgenden Teile:
1. 1 x 7” LCD Monitor
2. 1 x Fernbedienung
3. 1 x Netzteil
4. 1 x AV Ausgangskabel
5. 4 x AV Eingangskabel
Technische Daten
Format: 16 : 9 (4 : 3 Modus)
Auflösung: 628 x 562 (PAL)
Betriebsspannung: 12V DC / 1A
AV Eingang: 4x
AV Ausgang: 1x
Betriebstemperatur: -10°C bis +50°C
Gewicht: 450 g
Abmessungen: 180 x 155 x 25 mm
Sicherheitsvorkehrungen
• Öffnen Sie den Monitor im Falle einer Fehlfunktion nicht. Dieses Produkt sollte nur von einem
qualifizierten Techniker geöffnet werden.
7
Page 8
• Schützen Sie den Monitor vor Flüssigkeiten.
• Schützen Sie den Monitor vor hohen Temperaturen oder hoher Luftfeuchtigkeit.
• Installieren Sie den Monitor nicht in der Nähe starker magnetischer Felder, wie einem
Fernsehgerät oder Lautsprechern. Dies kann die Qualität der Monitordarstellung beeinträchtigen.
Montageanleitung
1. Monitor
2. AV Ausgangsbuchse
3. AV Eingangsbuchse
1. Stellen Sie den Monitor mit dessen Stütze (5) auf eine stabile Oberfläche.
Der Monitor kann auch an einer justierbaren Halterung (separat bestellbar unter Artikel Nr.
SEC-BRACK40) montiert werden, die an der Unterseite des Monitors montiert wird und mit 3
Schrauben an einer horizontalen oder vertikalen Fläche befestigt wird.
2. Stecken Sie das Netzteilkabel in die DC 12V Eingangsbuchse (4).
3. Stecken Sie das Netzteil in eine Netzsteckdose.
4. Schließen Sie die Kamera mit dem AV Eingangskabel an eine der AV Eingangsbuchen (3) an der
Rückseite des Monitors an (max. 4 Kameras).
5. Sie können am AV Ausgang (2) einen zusätzlichen Monitor (2) anschließen.
Weitere Informationen zur Installation und dem Gebrauch der Kamera finden Sie im
Installationshandbuch der Kamera.
4. DC 12V Netzteileingang
5. Stütze
6. Befestigungspunkt für justierbare Stütze
8
Page 9

Bedienungsanleitung
1. LCD Monitor
2. Stummtaste
3. AV Taste
4. 4:3 Taste
5. IR-Empfangssensor
1. Drücken Sie die EIN-/AUS-Taste (9), um den Monitor einzuschalten.
2. Drücken Sie die AV Taste (3), um die gewünschte Kamera auszuwählen.
3. Drücken Sie die Taste MENU (7), um zu den Untermenüs zu navigieren.
Die folgenden Untermenüs werden angezeigt:
• Displayeinstellungen: „Bright (Helligkeit)“, „Contrast“, „Colour (Farbe)“ oder „Hue (Farbton)“.
Nehmen Sie die Displayeinstellungen mit der + (8) oder – (6) Taste vor.
• „AV switched set“
Wählen Sie die Kameras aus, die anschließend im Automatikmodus angezeigt werden.
Drücken Sie die + oder – Taste, um zwischen den Kameras umzuschalten und die Menütaste,
um eine Kamera aus- bzw. abzuwählen.
4. Stellen Sie den Schalter Auto/manuell (10) auf „Auto“ ein, um automatisch zwischen den
5. Drücken Sie die Taste 4:3 (4), um das Bildseitenverhältnis zu ändern.
6. Drücken Sie die Stummtaste (2), um den Ton aus- oder einzuschalten.
„√“ zeigt an, dass diese Kamera ausgewählt wurde.
„ο“ zeigt an, dass diese Kamera nicht ausgewählt wurde.
• „Time switched“
Erhöhen oder verringern Sie den Zeitintervall des Automatikmodus mit der + oder - Taste.
ausgewählten Kameras umzuschalten.
Wenn Sie die AV Taste drücken, zeigt der manuelle Schaltmodus alle Bilder an, inklusive
der Kameras, die auf „ο“ eingestellt sind.
Damit diese Funktion funktioniert, muss das Mikrofon an der Kamera eingeschaltet
werden.
6. − Ta st e
7. Menü Taste
8. + Ta st e
9. EIN-/AUS-Taste
10. Taste Auto/manuell
9
Page 10
Instandhaltung
Reinigen Sie die Kamera mit einem feuchten Tuch.
Verwenden Sie keine Reinigungslösungen oder Scheuermittel.
Fehlerbehebung
Führen Sie die folgenden Überprüfungen durch, falls der Monitor nicht ordnungsgemäß funktioniert:
• Stellen Sie sicher, dass der Monitor auf den richtigen AV Kanal (AV1-4) eingestellt ist.
• Stellen Sie sicher, dass alle Stecker ordnungsgemäß an den Buchsen angeschlossen sind.
• Prüfen Sie, dass der Monitor nicht beschädigt ist.
• Prüfen Sie, dass das Netzteil nicht beschädigt ist.
• Stellen Sie sicher, wenn der Automatikmodus eingeschaltet ist, dass die Kameras im Menü „AV
switched set“ nicht auf „ο“ eingestellt sind.
• Stellen Sie sicher, dass alle Anzeigeeinstellungen ordnungsgemäß eingestellt sind.
Garantie
Alle Änderungen und/oder Veränderungen an dem Produkt machen die Garantie nichtig. Wir
übernehmen keinerlei Haftung für Schäden, die durch falsche Verwendung dieses Produktes
verursacht werden.
Haftungsausschluss
Wir behalten uns das Recht vor, die Ausführung und Spezifikation ohne vorherige Mitteilung zu ändern.
Alle Logos, Marken und Produktnamen sind Handelsnamen oder registrierte Handelsnamen ihrer
entsprechenden Inhaber und werden hiermit als solche anerkannt.
Entsorgung
• Dieses Produkt muss an einem entsprechenden Sammelpunkt zur Entsorgung
abgegeben werden. Entsorgen Sie dieses Produkt nicht mit dem Haushaltsmüll.
• Weitere Informationen erhalten Sie beim Verkäufer oder der für die Abfallwirtschaft
verantwortlichen örtlichen Behörde.
10
Page 11

Moniteur LCD 7”
Introduction
Ce monitor est un appareil électronique facile à utiliser destiné à la surveillance dans toute situation. Ce
produit est particulièrement adapté aux petits magasins, bureaux et résidences. Le moniteur peut être
placé sur une surface horizontale ou peut être monté sur un support réglable (commandé séparément
avec le code article SEC-BRACK40) qui peut être monté en bas du moniteur et fixé avec 3 vis sur une
surface horizontale ou verticale.
Le moniteur peut recevoir du son et des images à partir de 4 caméras différentes. La télécommande
permet de sélectionner facilement différentes vues de caméra. Les images peuvent également être
affichées une par une de façon automatique. Ce moniteur est compatible avec le moniteur
SEC-CAM12.
• Nous vous recommandons de lire attentivement ce manuel avant d'installer/utiliser le moniteur.
• Conservez ce manuel dans un endroit sûr pour toute consultation future.
Le coffret du moniteur contient les articles suivants :
1. 1 moniteur à écran LCD 7"
2. 1 Télécommande
3. 1 Adaptateur secteur
4. 1 Câble de sortie AV
5. 4 Câble d’entrée AV
Spécifications techniques
Format : 16:9 (mode 4:3)
Résolution : 628 x 562 (PAL)
Tension de fonctionnement : 12V CC / 1A
Entrée AV : 4x
Sortie AV : 1x
Température de fonctionnement : -10°C à +50°C
Poids : 450 g
Dimensions : 180 x 155 x 25 mm
Consignes de sécurité
• N’ouvrez pas le moniteur en cas de dysfonctionnement. Cet appareil ne doit être ouvert que par un
technicien qualifié.
11
Page 12

• N’exposez pas le moniteur à l'eau.
• N’exposez pas le moniteur à des températures ou humidité élevées.
• N’installez pas le moniteur à proximité de forts champs magnétiques, tels que téléviseurs,
haut-parleurs etc. Cela peut affecter la qualité du moniteur.
Notice de montage
1. Ecran
2. Connecteur de sortie AV
3. Connecteur d'entrée AV
1. Placez le moniteur sur son support (5) sur une surface stable.
Le moniteur peut également être placé sur un support réglable (commandé séparément avec le
code article SEC-BRACK40) qui peut être monté en bas du moniteur et fixé avec 3 vis sur une
surface horizontale ou verticale.
2. Insérez la fiche CC dans la prise d'entrée 12V CC (4).
3. Branchez l'adaptateur secteur dans une prise murale.
4. Connectez la caméra avec le câble d’entrée AV à l'un des connecteurs d'entrée AV (3) situés à
l'arrière du moniteur (max. 4 caméras).
5. Vous pouvez connecter un moniteur supplémentaire au connecteur de sortie AV (2).
Pour plus d'informations sur l'installation et l'utilisation de la caméra, reportez-vous au
manuel d'installation de la caméra.
4. Prise d’alimentation 12V CC
5. Support
6. Points de réglage du support
12
Page 13

Mode d'emploi
1. Moniteur LCD
2. Touche Mute (couper le son)
3. Touche AV
4. Touche 4:3
5. Touche de contrôle du capteur IR
1. Appuyez sur la touche POWER (9) pour allumer le moniteur.
2. Appuyez sur la touche AV (3) pour choisir la bonne caméra.
3. Appuyez sur la touche Menu (7) pour parcourir les sous-menus.
Les sous-menus suivants sont disponibles :
• Paramètres d'affichage : « Bright » (luminosité), « Contrast » (Contraste), « Colour » (Couleur)
et « Hue » (teinte) Vous pouvez régler les paramètres d'affichage avec les touches + (8) ou - (6).
• « AV activé »
Sélection des caméras qui seront affichées ultérieurement en mode automatique. Appuyez sur
la touche +/- pour basculer entre les caméras et sur la touche Menu pour
sélectionner/désélectionner une caméra.
4. Réglez le commutateur Auto/Manuel (10) sur « Auto » pour basculer automatiquement entre les
5. Appuyez sur la touche 4:3 (4) de changer le format d'image.
6. Appuyez sur la touche Mute (2) pour couper/rétablir le son.
« √ » indique que cette caméra est sélectionnée.
« ο » indique que cette caméra n’est pas sélectionnée.
• « Temps activé »
Augmentez ou diminuez l'intervalle de temps pour le mode automatique avec la touche + ou -.
caméras sélectionnées.
Lorsque vous appuyez sur la touche AV, le mode de commutation manuelle montre toutes
les images des caméras, y compris les caméras marquées « ο ».
Pour utiliser cette fonction il faut que le microphone de la caméra soit activé.
6. Touche -
7. Touche Menu
8. Touche +
9. Touche Power (marche/arrêt)
10. Commutateur automatique/manuel
13
Page 14
Entretien
Nettoyez la caméra avec un chiffon humide.
N’utilisez pas de solvants ou de produits abrasifs.
Dépannage
Effectuez les contrôles suivants si le moniteur ne fonctionne pas correctement :
• Assurez-vous que le moniteur est réglé sur le bon canal AV (AV 1-4).
• Assurez-vous que tous les connecteurs sont correctement connectés.
• Assurez-vous que le moniteur n'est pas endommagé.
• Assurez-vous que l'adaptateur n'est pas endommagé.
• Assurez-vous que lorsque le mode de commutation automatique est activé, les caméras « AV
activé » ne sont pas réglées sur « ο ».
• Assurez-vous que les paramètres d'affichage sont tous réglés correctement.
Garantie
Toute altération et/ou modifications du produit annule la garantie. Nous ne pouvons être tenus
responsables des dommages causés par l'utilisation incorrecte de ce produit.
Avis de non responsabilité
Le design et les spécifications peuvent être modifiés sans préavis. Tous les logos, marques et noms de
produits sont des marques commerciales ou des marques déposées de leurs détenteurs respectifs et
sont reconnues comme telles.
Elimination
• Ce produit doit être jeté séparément des ordures ménagères dans un point de collecte
approprié. Ne jetez pas ce produit avec les ordures ménagères ordinaires.
• Pour plus d'informations, contactez le distributeur ou l'autorité locale responsable de la
gestion des déchets.
14
Page 15
17,8 cm (7”) LCD-Monitor
Inleiding
De monitor een gemakkelijk te gebruiken elektronisch apparaat, dat is ontworpen voor het bewaken
van allerlei situaties. Dit product is in het bijzonder geschikt voor kleine winkels, kantoren of huizen.
De monitor kan op een horizontaal oppervlak worden gezet of kan aan een verstelbare steun (apart te
bestellen als art.nr. SEC-BRACK40) worden bevestigd. Die wordt aan de onderkant van de monitor
gemonteerd en kan met 3 schroeven aan een horizontaal of verticaal oppervlak worden bevestigd.
De monitor kan beeld en geluid van 4 verschillende camera's ontvangen. Met de afstandsbediening
kunt u gemakkelijk verschillende camerabeelden selecteren. De beelden kunnen in de automatische
stand ook één voor één worden weergegeven. Deze monitor is geschikt voor gebruik met
SEC-CAM12 camera's.
• Wij bevelen aan om deze gebruiksaanwijzing door te lezen voordat u de monitor
installeert/gebruikt.
• Bewaar deze gebruiksaanwijzing op een veilige plaats om hem in de toekomst te kunnen
raadplegen.
Het camerapakket bevat de volgende onderdelen:
1. 1 x 17,8 cm (7”) LCD-monitor
2. 1 x afstandsbediening
3. 1 x Lichtnetadapter
4. 1 x AV uitgangskabel
5. 4 x AV ingangskabel
Technische specificaties
Formaat:: 16 : 9 (4: 3 standen)
Resolutie: 628 x 562 (PAL)
Bedrijfsspanning: 12V Gelijkspanning / 1A
AV ingang: 4x
AV uitgang: 1x
Bedrijfstemperatuur: -10°C tot +50°C
Gewicht: 450 g
Afmetingen: 180 x 155 x 25 mm
15
Page 16
Voorzorgsmaatregelen voor de veiligheid
• Maak bij een storing de monitor niet open. Dit product mag uitsluitend worden geopend door een
bevoegde monteur.
• Stel de monitor niet bloot aan water.
• Stel de monitor niet bloot aan hoge temperaturen of vocht.
• Installeer de monitor niet in de buurt van sterke magnetische velden, zoals TV's of luidsprekers. Dit
kan de beeldkwaliteit van de monitor beïnvloeden.
Installatieaanwijzingen
1. Monitor
2. Aansluiting AV-uitgang
3. Aansluiting AV-ingang
1. Zet de monitor op de standaard (5) op een stabiele ondergrond.
De monitor kan ook aan een verstelbare steun (apart te bestellen als art.nr. SEC-BRACK40)
worden bevestigd. Die wordt aan de onderkant van de monitor gemonteerd en wordt met 3
schroeven aan een horizontaal of verticaal oppervlak bevestigd.
2. Steek de voedingsconnector in de voedingsaansluiting voor 12V gelijkspanning (4).
3. Steek de lichtnetadapter in een stopcontact.
4. Sluit de camera met de AV-ingangskabel aan op één van de tulp ingangsaansluitingen (3) aan de
achterkant van de monitor (max. 4 camera's).
5. U kunt een extra monitor aansluiten op de AV-uitgangsaansluiting (2).
Raadpleeg voor informatie over de montage en het gebruik van de camera's de
installatieaanwijzingen van de camera.
4. Ingangsaansluiting 12V gelijkspanning
5. Standaard
6. Bevestigingspunt voor verstelbare steun
16
Page 17

Gebruiksaanwijzing
1. LCD-monitor
2. Demptoets
3. AV-toets
4. 4:3 toets
5. Sensor IR-bediening
1. Druk de Aan-/uittoets (9) om de monitor in the schakelen.
2. Druk de AV toets (3) om de juiste camera-aansluiting in te stellen.
3. Druk de Menutoets (7) om naar de submenu's te navigeren.
De volgende submenu's worden weergegeven:
• Scherminstellingen: “Bright”, “Contrast”, “Colour” of “Hue” Stel de scherminstellingen in met de
+ (8) of – (6) toets.
• “Wisselende AV stand”
Selecteer de camera's die in de automatische stand achtereenvolgens worden getoond. Druk
de + of – toets om te wisselen tussen camera's en de Menutoets om een camera te selecteren
of de selectie ongedaan te maken.
“√” geeft aan dat deze camera is geselecteerd.
“ο” geeft aan dat deze camera niet is geselecteerd.
• “Tijdgeschakeld”
Verleng of verkort het tijdsinterval voor de automatische stand met de + of – toets.
4. Zet de schakelaar voor Auto/Handmatig (10) op “auto” om automatisch te wisselen tussen de
geselecteerde camera's.
Als de AV toets wordt gedrukt, toont de handmatige wisselstand de beelden van alle
5. Druk de 4:3 toets (4) om de beeldverhouding te wijzigen.
6. Druk de Demptoets (2) om het geluid in of uit te schakelen.
camera's, inclusief camera's die zijn ingesteld op “ο”.
Om deze functie te kunnen gebruiken dient de microfoon op de camera ingeschakeld te
zijn.
6. − toets
7. Menutoets
8. + toets
9. Aan-/uittoets
10. Schakelaar Auto/handmatig
17
Page 18
Onderhoud
Reinig de camera met een vochtige doek.
Gebruik geen oplosmiddelen of schurende schoonmaakmiddelen.
Probleemoplossing
Voer de volgende controles uit als de monitor niet goed werkt:
• Zorg ervoor dat de monitor is ingesteld op het overeenkomstige AV kanaal (AV1-4).
• Zorg ervoor dat alle connectors op de juiste wijze zijn aangesloten op de tulpaansluitingen.
• Controleer dat de monitor niet is beschadigd.
• Controleer dat de lichtnetadapter niet is beschadigd.
• Controleer dat wanneer de automatische wisselstand actief is, dat de camera's in the wisselende
AV stand niet zijn ingesteld op “ο”.
• Controleer of alle scherminstellingen juist zijn ingesteld.
Garantie
Wijzigingen en modificaties aan het product maken de garantie ongeldig. Wij accepteren geen
aansprakelijkheid voor schade als gevolg van onjuist gebruik van dit product.
Disclaimer
Ontwerpen en specificaties zijn onderworpen aan wijzigingen zonder voorafgaande aankondiging. Alle
logo's, merk- en productnamen zijn handelsmerken of geregistreerde handelsmerken van de
respectievelijke houders en worden hierbij als zodanig erkend.
Afvoer
• Dit product is bestemd voor gescheiden inzameling bij een daartoe aangewezen
verzamelpunt. Gooi dit product niet weg bij het huishoudelijk afval.
• Neem voor meer informatie contact op met de detailhandelaar of de lokale overheid die
verantwoordelijk is voor het afvalbeheer.
18
Page 19

Monitor LCD da 7”
Introduzione
Questo monitor è un dispositivo elettronico per la videosorveglianza facile da usare in ogni tipo di
situazione. Il prodotto è appositamente adatto per piccoli negozi, uffici o abitazioni. Il monitor può
essere posizionato su una superficie orizzontale o può essere montato su un supporto regolabile
(ordinatelo separatamente con codice articolo SEC-BRACK40) che può essere fissato sul retro del
monitor e fissato con tre viti su una superficie orizzontale o verticale.
Il monitor può ricevere audio e video da 4 telecamere diverse. Potete selezionare facilmente la
visualizzazione da diverse telecamere con il telecomando. Le immagini possono anche essere
visualizzate una ad una in modo automatico. Il monitor è adatto all'uso con la videocamera
SEC-CAM12.
• Raccomandiamo di leggere questo manuale prima di installare/utilizzare il monitor.
• Conservate il manuale in un posto sicuro per future consultazioni.
La confezione contiene i seguenti oggetti:
1. 1 x Monitor LCD da 7”
2. 1 x Telecomando
3. 1 x Alimentatore AC/DC
4. 1 x Cavo uscita AV
5. 4 x AV Cavi ingresso
Specifiche tecniche
Formato: 16 : 9 (Modalità 4 : 3)
Risoluzione: 628 x 562 (PAL)
Tensione di lavoro: 12V DC / 1A
Ingresso AV: 4x
Uscita AV: 1x
Temperatura di funzionamento: da -10°C a +50°C
Peso: 450 g
Dimensioni 180 x 155 x 25 mm
Precauzioni di sicurezza
• Non aprite il monitor in caso di malfunzionamento. Questo prodotto deve essere aperto solo da
tecnici qualificati.
19
Page 20

• Non esponete il monitor all'acqua.
• Non esponete il monitor ad alte temperature o umidità.
• Non installate il monitor vicino a forti campi magnetici, come televisori o altoparlanti. Ciò può
influenzare la qualità dell'immagine del monitor.
Istruzioni di installazione
1. Monitor
2. Connettore spinotto in uscita AV
3. Connettore spinotto in ingresso AV
1. Posizionate il monitor sul suo supporto (5) su una superficie stabile.
Il monitor può essere montato anche su un supporto regolabile (ordinatelo separatamente con
codice articolo SEC-BRACK40) che può essere fissato sul retro del monitor e fissato con tre viti su
una superficie orizzontale o verticale.
2. Inserite la spina DC nel connettore in ingresso DC 12V (4).
3. Inserite l'alimentatore AC/DC nella presa a muro.
4. Collegate la videocamera con il cavo in ingresso AV ad una delle prese in ingresso AV (3) sul retro
del monitor (al massimo 4 videocamere).
5. Potete collegare un monitor aggiuntivo al connettore in uscita AV(2)
Per informazioni sull'installazione e l'uso della videocamera, fate riferimento al
manuale di installazione della videocamera.
4. Connettore spinotto ingresso DC 12V
5. Supporto
6. Punto di inserimento del supporto regolabile.
20
Page 21

Istruzioni dell'utente
1. Monitor LCD
2. Tasto Mute
3. Tasto AV
4. Tasto 4:3
5. Sensore di controllo IR
1. Premete il tasto Alimentazione (9) per accendere il monitor.
2. Premete il tasto AV (3) per impostare la connessione alla videocamera corretta.
3. Premete il tasto Menu (7) per navigare nel sub-menù.
Sono visualizzabili i seguenti sub-menù:
• Impostazioni del Display: “Bright”, “Contrast”, “Colour” o “Hue”. Regolate le impostazioni del
display con i tasti + (8) o – (6).
• “Imposta Scambio AV”
Selezionate le videocamere che saranno visualizzate in sequenza in modalità automatica.
Premete il tasto + o – per passare tra telecamere e il tasto Menù per selezionare o
deselezionare una videocamera.
4. Impostate l'interruttore Automatico/Manuale (10) su “auto” per passare automaticamente tra le
5. Premete il tasto 4:3 (4) per cambiare il ratio dello schermo.
6. Premete il tasto Mute (2) per attivare o disattivare l'audio.
“√” indica che questa videocamera è stata selezionata.
“ο” indica che questa videocamera non è stata selezionata.
• “Intervallo di tempo”
Aumenta o diminuisce l'intervallo di tempo per la modalità automatica con i tasti + o –.
videocamere selezionate.
Quando premete il tasto AV, la modalità scambio manuale mostra tutte le immagini della
videocamera, incluse le videocamere impostate su “ο”.
Perché questa caratteristica funzioni, il microfono sulla videocamera dev'essere acceso.
6. Tasto -
7. Tasto Menu
8. Tasto +
9. Tasto Alimentazione
10. Interruttore automatico/Manuale
21
Page 22

Manutenzione
Pulite la videocamera con un panno umido
Non utilizzate detergenti solventi o abrasivi.
Risoluzione dei problemi
Effettuate i seguenti controlli se il monitor non lavora correttamente.
• Assicuratevi che il monitor sia impostato sul canale AV corretto (AV1-4)
• Assicuratevi che tutte le spine siano correttamente inserite nelle prese.
• Assicuratevi che il monitor non sia danneggiato.
• Assicuratevi che l'alimentatore non sia danneggiato.
• Assicuratevi, quando la modalità di scambio automatico è attiva, che la videocamera
nell'impostazione AV non sia impostata su “ο”.
• Assicuratevi che le impostazioni del display siano tutte corrette.
Garanzia
Qualunque cambiamento e/o modifica al prodotto annullerà la garanzia. La garanzia decade in caso di
danni causati dall'uso scorretto del prodotto.
Disclaimer
I progetti e le specifiche sono soggetti a cambiamenti senza previa notifica. Tutti i loghi, le marche ed i
nomi del prodotto sono marchi commerciali o marchi registrati dei rispettivi proprietari e sono qui
riconosciuti come tali.
Smaltimento
• Questo prodotto è progettato per la raccolta differenziata nei punti di raccolta
appropriati. Non smaltite il prodotto con la spazzatura domestica.
• Per maggiori informazioni, contattate il rivenditore o l'autorità locale responsabile per la
gestione dei rifiuti.
22
Page 23

Pantalla LCD 7”
Introducción
Esta pantalla es un dispositivo electrónico fácil de usar, diseñado para monitorear todo tipo de
situaciones. Este producto es adecuado especialmente para usar en tiendas y oficinas pequeñas, y
en casa. La pantalla se puede montar sobre una superficie horizontal o en un soporte ajustable
(ordénelo por separado indicando el artículo SEC-BRACK40) que se puede montar en la parte inferior
de la pantalla y ajustarlo con 3 tornillos sobre una superficie horizontal o vertical.
La pantalla puede captar sonido e imágenes de 4 cámaras distintas. Usted puede seleccionar con
facilidad diferentes vistas de las cámaras con el mando a distancia. Las imágenes también se pueden
visualizar una por una en el modo automático. Esta pantalla es adecuada para usarla con la cámara
SEC-CAM12.
• Recomendamos que usted lea este manual antes de instalar y utilizar la pantalla.
• Guarde este manual en un lugar seguro para referencia futura.
La pantalla viene en el empaque con los siguientes artículos:
1. 1 pantalla LCD 7”
2. 1 mando a distancia
3. 1 adaptador AC/DC
4. 1 cable de salida AV
5. cable de entrada AV con 4
conectores
Especificaciones técnicas
Formato: 16 : 9 (modo 4 : 3)
Resolución : 628 x 562 (PAL)
Voltaje de funcionamiento: 12V DC / 1A
Entrada AV: 4
Salida AV: 1
Temperatura de funcionamiento: -10°C a +50°C
Peso: 450 g
Dimensiones: 180 x 155 x 25 mm
23
Page 24

Precauciones de seguridad
• No abra la pantalla si no funciona correctamente. Este producto solamente deberá abrirlo un
ingeniero cualificado.
• No exponga la pantalla al agua.
• No exponga la pantalla a altas temperaturas o a la humedad.
• No instale la pantalla cerca de campos magnéticos fuertes, como un televisor o altavoz. Ello puede
afectar la calidad de la pantalla.
Instrucciones de instalación
1. Pantalla
2. Salida AV
3. Entrada AV
1. Coloque la pantalla en el soporte (5) sobre una superficie estable.
La pantalla también se puede montar sobre un soporte ajustable (ordénelo por separado indicando
el artículo SEC-BRACK40)0) que se puede colocar en la parte inferior de la pantalla y ajustarlo con
3 tornillos sobre una superficie horizontal o vertical.
2. Introduzca el conector DC en la entrada del conector DC 12V (4).
3. Conecte el adaptador AC/DC a un tomacorriente.
4. Conecte la cámara con el cable de entrada AV a uno de los conectores de entrada AV (3) en la
parte posterior de la pantalla (máximo 4 cámaras).
5. Usted puede conectar una pantalla adicional a la salida del conector AV (2).
Para información sobre cómo instalar y usar la cámara, consulte el manual de
instalación de la cámara.
4. Entrada para conector DC 12V
5. Soporte
6. Punto de apoyo para el soporte ajustable
24
Page 25

Instrucciones de uso
1. Pantalla LCD
2. Botón silenciar (Mute)
3. Botón AV
4. Botón 4:3
5. Control de sensor IR
1. Oprima el botón de encendido/apagado (9) para encender la pantalla.
2. Oprima el botón AV (3) para ajustar la conexión a la cámara correctamente.
3. Oprima el botón menú (7) para navegar por los submenús.
Visualizará los siguientes submenús:
• Para ajustar la pantalla: “Bright”, “Contrast”, “Colour” o “Hue”. Ajuste seleccionando las
opciones con el botón + (8) o el botón – (6).
• Botón AV para cambiar de una cámara a otra
Seleccione las cámaras, que se visualizarán posteriormente en modo automático. Oprima el
botón + o el botón – para cambiar de una cámara a otra y el botón menú para activar o
desactivar una cámara.
4. Coloque el interruptor Auto/Manual (10) en el modo “auto” para cambiar entre una y otra de las
5. Oprima el botón 4:3 (4) para cambiar la relación de aspecto.
6. Oprima el botón silenciar (2) para activar o desactivar el sonido.
el símbolo “√” indica que es la cámara seleccionada.
el símbolo “ο” indica que no es la cámara seleccionada.
• Interruptor para el tiempo
Para aumentar o disminuir el intervalo de tiempo del modo automático, oprima el botón + o el
botón –.
cámaras seleccionadas en forma automática.
Cuando oprima el botón AV, el modo de conmutación manual muestra todas las
imágenes de la cámara, incluyendo las de las cámaras que están en “ο”.
Para que esta opción funcione, es preciso que el micrófono de la cámara esté encendido.
6. Botón −
7. Botón menú
8. Botón +
9. Botón de encendido/apagado
10.Interruptor Auto/Manual
25
Page 26

Mantención
Limpie la cámara con un paño húmedo.
No utilice productos de limpieza ni abrasivos.
Solución de problemas
Verifique lo siguiente si la cámara no funciona correctamente:
• Asegúrese de que la pantalla se encuentra activada en el canal AV correcto (AV1-4).
• Asegúrese de que todos los terminales estén correctamente enchufados en las entradas de los
conectores.
• Asegúrese de que la pantalla no esté dañada.
• Asegúrese de que el adaptador de alimentación no esté dañado.
• Asegúrese de que cuando el modo de conmutación automática esté activado, que el botón AV de
las cámaras no estén en la opción “ο”.
• Asegúrese de que las opciones de visualización estén activadas correctamente.
Garantía
Cualquier cambio y/o modificación realizada a este producto anulará la garantía. No podemos aceptar
ninguna responsabilidad por daños provocados por el uso incorrecto de este producto.
Exención de responsabilidad
El diseño y especificaciones pueden estar sujetos a cambio sin previo aviso. Todos los logos, marcas
y nombres de este producto son marcas registradas de sus respectivos propietarios y por lo tanto
están reconocidas como tales.
Eliminación
• Este producto está diseñado para desecharlo por separado en un punto de recogida
adecuado. No se deshaga de este producto con la basura doméstica.
• Para obtener más información, póngase en contacto con el vendedor o la
autoridad local responsable de la eliminación de residuos.
26
Page 27

7’' LCD monitor
Bevezetés
Az egyszerűen kezelhető monitor bármilyen helyzet megfigyelésére alkalmas. A termék különösen jól
használható kis üzletekben, irodákban és lakásokban. A monitor vízszintes felületen, vagy egy, a
monitor hátoldalára erősíthető állítható tartón (SEC-BRACK40 cikkszámon rendelhető) is elhelyezhető,
melyet 3 csavar segítségével függőleges vagy vízszintes felületen is rögzíthet.
A monitor 4 különböző kameráról érkező képek és hangok fogadására alkalmas. A távirányítóval
egyszerűen kiválaszthatók az egyes kameranézetek. Automatikus üzemmódban a képek egyesével is
megjeleníthetők. A monitor a SEC-CAM12 kamerával együtt használható.
• Azt javasoljuk, hogy a monitor beszerelése/használata előtt olvassa el a használati útmutatót.
• A használati útmutatót tartsa biztonságos helyen, mert a jövőben még szüksége lehet rá.
A kamera csomagja a következőket tartalmazza:
1. 1 x 7” LCD monitor
2. 1 x távirányító
3. 1 x AC/DC adapter
4. 1 x AV kimeneti kábel
5. 4 x AV bemeneti kábel
Műszaki adatok
Formátum: 16 : 9 (4 : 3 mód)
Felbontás: 628 x 562 (PAL)
Üzemi feszültség: 12V DC / 1A
AV bemenet: 4x
AV-kimenet: 1x
Üzemi hőmérséklet: -10°C és +50°C között
Súly: 450 g
Méretek: 180 x 155 x 25 mm
Biztonsági óvintézkedések
• Hibás működés esetén ne nyissa fel a monitort. A készüléket csak szakember nyithatja fel.
• Ne tegye ki a monitort víznek.
• Ne tegye ki a készüléket magas hőmérsékletnek vagy magas páratartalomnak.
27
Page 28

• Ne szerelje a monitort erős mágneses mező, például televízió vagy hangfal közelébe. Ez
befolyásolhatja a monitor működését.
Beszerelési utasítások
1. Monitor
2. AV kimeneti jack csatlakozó
3. AV bementi jack csatlakozó
1. Helyezze a monitort a tartójába (5) egy stabil felületen.
A monitor a hátoldalára erősíthető állítható tartón (SEC-BRACK40 cikkszámon rendelhető) is
elhelyezhető, melyet 3 csavar segítségével függőleges vagy vízszintes felületen is rögzíthet.
2. Csatlakoztassa az egyenáramú dugót a 12V-os DC bemeneti jack csatlakozóba (4).
3. Dugja az AC/DC adaptert a fali konnektorba.
4. Csatlakoztassa a kamerát az AV bemeneti kábellel a monitor hátoldalán található AV bemeneti jack
csatlakozók (3) egyikébe (max. 4 kamerát csatlakoztathat).
5. Az AV kimeneti csatlakozó (2) használatával egy plusz monitort csatlakoztathat.
A kamera beszerelésével és használatával kapcsolatos információkért tekintse meg
a kamera beszerelési útmutatóját.
4. DC 12V bemeneti jack csatlakozó
5. Tartó
6. Az állítható támasz rögzítési pontja
28
Page 29

Felhasználói utasítások
1. LCD monitor
2. Némítás gomb
3. AV gomb
4. 4:3 gomb
5. Infravörös vezérlőszenzor
1. A monitor bekapcsolásához nyomja meg a Bekapcsoló gombot (9).
2. A megfelelő kamera kapcsolat beállításához nyomja meg az AV gombot (3).
3. Az almenükben történő navigáláshoz nyomja meg a Menü gombot (7).
Az alábbi almenük jelennek meg:
• Kijelző beállítások: „Bright” (Fényerő), „Contrast” (Kontraszt), „Colour” (Szín) és „Hue”
(Színárnyalat). A kijelző beállítások módosításához használja a + (8) vagy - (6) gombot.
• „AV switched set” (Megjelenítendő AV források
Válassza ki, hogy automatikus üzemmódban mely kamerák jelenjenek meg egymás után. A
kamerák közötti váltáshoz használja a + vagy - gombot, míg a kamera kiválasztásához vagy a
kiválasztás megszüntetéséhez használja a Menü gombot.
4. Ha a kiválasztott kamerák között automatikusan szeretne váltogatni, állítsa az
5. A méretarány módosításához nyomja meg a 4:3 gombot (4).
6. A hang ki és bekapcsolásához nyomja meg a Némítás gombot (2).
A „√” szimbólum azt jelzi, hogy az adott kamera kiválasztásra került.
A „ο” szimbólum azt jelzi, hogy az adott kamera nincs kiválasztva.
• „Time switched” (Váltás ideje)
Az automatikus váltás idejének növeléséhez vagy csökkentéséhez használja a + vagy gombot.
Automatikus/Manuális kapcsolót (10) „auto” állásba.
Az AV gomb megnyomásakor manuális váltás üzemmódban minden kamera képe
megjelenik, beleértve az „ο” állapotra állított kamerákat is.
Ehhez a funkcióhoz a kamera mikrofonját előzőleg be kell kapcsolni.
6. − gomb
7. Menü gomb
8. + gomb
9. Bekapcsoló gomb
10. Automatikus/manuális kapcsoló
29
Page 30

Karbantartás
A kamerát nedves törlőkendővel tisztítsa.
Ne használjon oldószereket vagy súrolószereket.
Hibaelhárítás
Ha a monitor nem megfelelően működik, végezze el az alábbi ellenőrzéseket:
• Ellenőrizze, hogy a monitort a megfelelő AV csatornára (AV1-4) állította-e.
• Ellenőrizze, hogy a dugók megfelelően illeszkednek-e a jack csatlakozókba.
• Ellenőrizze, hogy a monitor sértetlen-e.
• Ellenőrizze, hogy az elektromos adapter sértetlen-e.
• Ellenőrizze, hogy automatikus váltás üzemmódban a megjelenítendő AV források menüpontban
kiválasztott kamerák nincsenek-e „ο” állapotra állítva.
• Ellenőrizze, hogy a kijelző beállításai megfelelők-e.
Garancia
A termék bármilyen módon történő megváltoztatása és/vagy módosítása a garancia elvesztésével jár.
A termék nem megfelelő használatából eredő károkért nem vállalunk felelősséget.
Jogi nyilatkozat
A küllem és a műszaki adatok tájékoztatás nélkül módosulhatnak. Minden logó, márka- és terméknév
a megfelelő tulajdonosok védjegye vagy bejegyzett védjegye, amit a jelen dokumentum ezennel
elismer.
Leselejtezés
• A terméket elkülönítve, a megfelelő gyűjtőhelyeken kell leselejtezni. Ne dobja ki a
készüléket a háztartási hulladék közé.
• További információért lépjen kapcsolatba a forgalmazóval, vagy a hulladékkezelésért
felelős helyi hatósággal.
30
Page 31

7-tuumainen LCD-monitori
Esittely
Tämä monitori on helppokäyttöinen, kaikenlaisiin valvontaolosuhteisiin soveltuva sähkölaite. Tämä
tuote soveltuu erityisen hyvin pieniin myymälöihin, toimistotiloihin ja koteihin. Monitori voidaan asettaa
vaakasuoralle pinnalle tai asentaa säädettävään kannattimeen (tilaa erikseen tuotenumerolla
SEC-BRACK40), joka voidaan kiinnittää monitorin pohjaan ja kiinnittää kolmella ruuvilla vaaka- tai
pystysuoralle pinnalle.
Monitori voi vastaanottaa ääntä ja kuvaa neljästä eri kamerasta. Voit helposti vaihtaa eri
kameranäkymien välillä kaukosäätimen avulla. Automaattiasennossa kuvat voidaan näyttää myös
yksitellen. Tämä monitori on yhteensopiva SEC-CAM12-kameran kanssa.
• On suositeltavaa, että tutustut tähän käyttöohjeeseen ennen monitorin asentamista/käyttämistä.
• Säilytä käyttöohje siltä varalta, että tarvitset sitä myöhemmin.
Kamerapakkaus sisältää seuraavat osat:
1. 1 x 7-tuumainen LCD-monitori
2. 1 x kaukosäädin
3. 1 x virtalähde
4. 1 x AV-lähtökaapeli
5. 4 x AV-tulokaapeli
Tekniset ominaisuudet
Formaatti: 16 : 9 (4 : 3 -tila)
Resoluutio: 628 x 562 (PAL)
Käyttöjännite: 12 VDC / 1 A
AV-sisääntulo: 4x
AV-ulostulo: 1x
Toimintalämpötila: –10 °C – +50 °C
Paino: 450 g
Mitat: 180 x 155 x 25 mm
Turvaohjeet
• Toimintahäiriön sattuessa älä avaa monitoria. Laitteen saa avata vain pätevä huoltohenkilö.
• Älä altista monitoria vedelle.
• Älä altista monitoria korkeille lämpötiloille tai kosteudelle.
31
Page 32

• Älä asenna monitoria voimakkaiden magneettikenttien kuten television tai kaiuttimen lähelle, sillä
tämä saattaa vaikuttaa monitorin kuvanlaatuun.
Asennusohjeet
1. Monitori
2. AV-ulostulon liitäntä
3. AV-sisääntulon liitäntä
1. Aseta monitori tukensa (5) varassa vakaalle tasolle.
Monitori voidaan myös asentaa säädettävään kannattimeen (tilaa erikseen tuotenumerolla
SEC-BRACK40), joka voidaan kiinnittää monitorin pohjaan ja kiinnittää kolmella ruuvilla vaaka- tai
pystysuoralle pinnalle.
2. Kytke muuntaja monitorin 12 voltin virtaliitäntään (4).
3. Kytke muuntaja pistorasiaan.
4. Kytke kamera AV-sisääntulokaapelin avulla yhteen monitorin takana olevista
AV-sisääntuloliitännöistä (3) (enintään 4 kameraa).
5. Voit halutessasi kytkeä ylimääräisen monitorin AV-ulostuloliitäntään (2).
Kameran asennus ja käyttö: tutustu kameran asennusoppaaseen.
4. 12 V tasavirtasisääntulon liitäntä
5. Tuki
6. Säädettävän tuen asennuspaikka
32
Page 33

Käyttöohje
1. LCD-monitori
2. Mykistyspainike
3. AV-painike
4. 4:3-painike
5. Infrapunasignaalin tunnistin
1. Kytke monitorin virta päälle painamalla virtapainiketta (9).
2. Aseta oikea kamerayhteys painamalla AV-painiketta (3).
3. Selaa alavalikoita painamalla valikkopainiketta (7).
Esiin tulevat seuraavat alavalikot:
• Näytön asetukset: ”Bright”, ”Contrast”, ”Colour” tai ”Hue”. Säädä näytön asetuksia + (8) ja – (6)
-painikkeiden avulla.
• ”AV-vuorottelutila”
Valitse kamerat, joiden näkymät vuorottelevat automaattitilassa. Paina + tai – -painikkeita
tarkastellaksesi eri kameroiden näkymiä ja valikkopainiketta kameran valitsemiseksi tai
valinnan poistamiseksi.
4. Jos haluat eri kameroiden näkymien vaihtuvan automaattisesti, aseta automaatti-/manuaalikytkin
5. Muuta kuvasuhdetta painamalla 4:3-painiketta (4).
6. Kytke ääni päälle tai pois päältä painamalla mykistyspainiketta (2).
”√” ilmaisee, että kyseinen kamera on valittuna.
”ο” ilmaisee, että kyseinen kamera ei ole valittuna.
• ”Vuorotteluväli”
Lyhennä tai pidennä automaattitilan näkymien vuorotteluväliä painamalla + tai – -painiketta.
(10) ”auto”-tilaan.
Painettaessa AV-painiketta manuaalinen vaihtotila näyttää kaikkien kameroiden
näkymät, mukaan lukien niiden, jotka on asetettu asentoon ”ο”.
Tämän toiminnon toimimiseksi kameran mikrofonin tulee olla kytkettynä päälle.
6. – -painike
7. Valikkopainike
8. + -painike
9. Virtapainike
10. Automaatti-/manuaalikytkin
33
Page 34

Huolto
Puhdista kamera kostealla liinalla.
Älä käytä liuottimia tai hankaavia aineita.
Ongelmanratkaisu
Jos kamera ei toimi asianmukaisesti, suorita seuraavat tarkistustoimenpiteet:
• Varmista, että monitori on asetettu oikealle AV-kanavalle (AV 1–4).
• Varmista, että kaikki liitännät ovat oikein.
• Varmista, että monitori ei ole vahingoittunut.
• Varmista, että muuntaja ei ole vahingoittunut.
• Varmista, että automaattitilan ollessa päällä valitut kamerat eivät ole ”ο”-tilassa.
• Varmista, että näytön asetukset on säädetty oikein.
TTakuu
Kaikki tuotteeseen tehdyt muutokset mitätöivät takuun. Valmistaja ei ota vastuuta tämän tuotteen
epäasianmukaisesta käytöstä syntyvistä vaurioista.
Vastuuvapaus
Tuotteen ulkoasu ja ominaisuudet saattavat muuttua ilman erillistä ilmoitusta. Kaikki logot, tuotemerkit
ja tuotenimet ovat omistajiensa tavaramerkkejä tai rekisteröityjä tavaramerkkejä.
Hävittäminen
• Tämä tuote tulee toimittaa hävitettäväksi asianmukaiseen keräyspisteeseen. Tuotetta ei
tule hävittää kotitalousjätteen mukana.
• Lisätietoja antaa jälleenmyyjä tai paikallinen jätehuollosta vastaava viranomainen.
34
Page 35

7-tums LCD-bildskärm
Inledning
Denna bildskärm är en användarvänlig elektronisk anordning som är utformad för övervakning i alla
möjliga situationer. Denna produkt är speciellt lämpad för små butiker, kontor eller i hemmet.
Bildskärmen kan placeras på en horisontell yta eller kan monteras på ett justerbart stöd (beställs
separat med art.nr. SECBRACK40) som kan monteras längst ner på skärmen och skruvas fast med 3
skruvar på en horisontell eller vertikal yta.
Bildskärmen kan ta emot ljud och bilder från 4 olika kameror. Du kan enkelt välja olika kameravyer
med hjälp av fjärrkontrollen. Bilderna kan också visas en efter en i automatläge. Bildskärmen är
lämplig för användning med SEC-CAM12-kameran.
• Vi rekommenderar att du läser denna manual innan du installerar/använder bildskärmen.
• Spara denna handbok på säker plats för eventuell framtida referens.
Förpackningen innehåller följande artiklar:
1. 1 x 7-tums LCD-bildskärm
2. 1 x Fjärrkontroll
3. 1 x AC/DC-adapter
4. 1 x AV-utgångskabel
5. 4 x AV-ingångskabel
Tekniska specifikationer
Format: 16 : 9 (4 : 3 läge)
Upplösning: 628 x 562 (PAL)
Driftspänning: 12V DC/1A
A/V-ingång: 4x
A/V-utgång: 1x
Arbetstemperatur: -10°C till +50°C
Vikt: 450 g
Mått: 180 x 155 x 25 mm
Säkerhetsanvisningar
• Öppna inte bildskärmen i händelse av ett fel. Denna produkt bör endast öppnas av en behörig
tekniker.
35
Page 36

• Utsätt inte bildskärmen för vatten.
• Utsätt inte bildskärmen för höga temperaturer eller fuktighet.
• Installera inte bildskärmen nära starka magnetiska fält, som till exempel en TV-apparat eller
högtalare. Detta kan påverka bildkvaliteten.
Installationsanvisningar:
1. Bildskärm
2. AV-utgångskontakt
3. AV-ingångskontakt
1. Placera bildskärmen på dess stöd (5) på ett stabilt underlag.
Bildskärmen kan även monteras på ett justerbart stöd (beställs separat med art.nr. SEC-BRACK40)
som kan monteras längst ner på skärmen och skruvas fast med 3 skruvar på en horisontell eller
vertikal yta.
2. Sätt i DC-pluggen i DC 12V-ingångskontakten (4).
3. Sätt i AC/DC-adaptern i vägguttaget.
4. Anslut kameran med A/V-ingångskabeln till en av A/V-ingångskontakter (3) på baksidan av
bildskärmen (max. 4 kameror).
5. Du kan ansluta en extra bildskärm till AV-utgångskontakten (2).
Information om hur du installerar och använder kameran hittar du i kamerans
installationshandbok.
4. DC 12V ingångskontakt
5. Stöd
6. Monteringspunkt för justerbart stöd
36
Page 37

Användarinstruktioner:
1. LCD-bildskärm
2. Ljud-av knapp
3. AV-knapp
4. 4:3 knapp
5. Infraröd kontrollsensor
1. Tryck på strömbrytaren (9) för att starta bildskärmen.
2. Tryck på A/V-knappen (3) för att ställa in rätt kameraanslutning.
3. Tryck på knappen Menu (7) för att navigera till undermenyerna.
Följande undermenyer är tillgängliga:
• Displayinställningar: ”Bright”, ”Contrast”, ”Colour” eller ”Hue”. Justera bildskärmsinställningarna
med + (8) eller – (6) knappen.
• ”AV switched set”
Välj de kameror som senare kommer att visas i automatiskt läge. Tryck på + eller – för att växla
mellan kameror och på menyknappen för att markera eller avmarkera en kamera.
4. Ställ auto/manuell-omkopplare (10) till ”Auto” för att automatiskt växla mellan de valda kamerorna.
5. Tryck på 4:3-knappen (4) för att välja inspelningsläget.
6. Tryck på Mute-knappen (2) för att stänga av eller sätta på ljudet.
”√” anger att denna kamera har valts.
”ο” anger att denna kamera inte har valts.
• ”Time switched”
Öka eller minska tidsintervallet för automatisk läge med + eller – knappen.
När du trycker på AV-knappen visar manuellt växlingsläge alla kamerabilder, inklusive
kamerorna inställda på ”ο”.
För att funktionen ska fungera måste mikrofonen på kameran vara påslagen.
6. − knapp
7. Menyknapp
8. + knapp
9. Strömbrytare
10. Auto/manuell omkopplare
Underhåll
Rengör kameran med en fuktig trasa.
Använd inte rengöringsmedel eller slipmedel.
37
Page 38

Felsökning
Utför följande kontroller om bildskärmen inte fungerar som den ska:
• Se till att bildskärmen är inställd på rätt A/V-kanal (AV1-4).
• Se till att alla pluggar sitter ordentligt i kontakterna.
• Kontrollera att bildskärmen inte är skadad.
• Kontrollera att strömadaptern inte är skadad.
• Se till att när automatiskt växlingsläge är på, kamerorna i AV-omkopplad inställning inte är inställda
på ”ο”.
• Se till att bildskärmsinställningarna alla är inställda på rätt sätt.
Garanti
Alla ändringar och/eller modifieringar på produkten gör garantin ogiltig. Vi kan inte ta något ansvar för
skador som orsakats av felaktig användning av denna produkt.
Friskrivningsklausul
Rätten till ändring av konstruktion och tekniska data förbehålles. Alla logotyper, varumärken och
produktnamn är varumärken eller registrerade varumärken tillhör sina respektive ägare och är härmed
erkända som sådana.
Kassering
• Denna produkt är avsedd för separat insamling vid en lämplig återvinningscentral.
Släng inte denna produkt bland vanligt hushållsavfall.
• För mer information, kontakta återförsäljaren eller myndigheten på ort som ansvarar för
avfallshantering.
38
Page 39

7” LCD-skærm
Præsentation
Skærmen er en brugervenlig elektronisk enhed, beregnet til at overvåge alle slags situationer. Dette
produkt er især velegnet til små butikker, kontorer eller hjem. Skærmen kan placeres på en vandret
overflade eller monteres på en justerbar konsol (bestil separat med art. nr. SECBRACK40), som kan
monteres i bunden af skærmen og fastgøres med 3 skruer på en vandret eller lodret overflade.
Skærmen kan modtage lyd og billeder fra 4 forskellige kameraer. Du kan let vælge forskellige
kameravisninger med fjernbetjeningen. Billederne kan også vises et efter et i automatisk tilstand.
Dette kamera er velegnet til brug med SEC-CAM12 kameraet.
• Vi anbefaler at du læser denne vejledning før du installerer/bruger skærmen.
• Gem denne vejledning på et sikkert sted, for fremtidig reference.
Kamerapakken indeholder de følgende genstande:
1. 1 x 7” LCD-skærm
2. 1 x Fjernbetjening
3. 1 x AC/DC-adapter
4. 1 x AV udgangskabel
5. 4 x AV indgangskabel
Tekniske specifikationer
Format: 16 : 9 (4 : 3 tilstand)
Opløsning: 628 x 562 (PAL)
Driftsspænding: 12V DC / 1A
AV indgang: 4x
AV udgang: 1x
Driftstemperatur: -10 °C til +50 °C
Vægt: 450 g
Mål: 180 x 155 x 25 mm
Sikkerhedsforholdsregler
• Åbn ikke skærmen i tilfælde af defekt. Dette produkt må kun åbnes af en kvalificeret tekniker.
• Udsæt ikke skærmen for vand.
• Udsæt ikke skærmen for høje temperaturer eller fugtighed.
39
Page 40

• Installer ikke skærmen nær ved stærke magnetfelter, som et TV eller højttaler. Dette kan påvirke
skærmens kvalitet.
Installationsvejledninger
1. Skærm
2. AV udgang stiktilslutning
3. AV indgang stiktilslutning
1. Placer skærmen på dens konsol (5) på en stabil overflade.
Skærmen kan også monteres på en justerbar konsol (bestil separat med art. nr. SEC-BRACK40),
som kan monteres i bunden af skærmen og fastgøres med 3 skruer på en vandret eller lodret
overflade.
2. Isæt DC-stikket i DC 12V indgangs stiktilslutningen (4).
3. Isæt AC/DC-adapteren i stikkontakten.
4. Tilslut kameraet med AV indgangskabel til et af AV indgangs stiktilslutningerne (3) på bagsiden af
skærmen (maks. 4 kameraer).
5. Du kan tilslutte en ekstra skærm til AV udgangs tilslutningen (2).
For information om installering og brug af kameraet, se kameraets
installationsvejledning.
4. DC 12V indgang stiktilslutning
5. Konsol
6. Viddemidtpunkt til justerbar konsol
40
Page 41

Brugervejledninger
1. LCD-skærm
2. Lydløs knap
3. AV knap
4. 4:3 knap
5. IR kontrolsensor
1. Tryk på afbryderen 89) for at tænde for skærmen.
2. Tryk på AV knappen (3) for at indstille den korrekte kameratilslutning.
3. Tryk på Menu knappen (7) for at navigere til undermenuerne.
De følgende undermenuer vises.
• Visningsindstillinger: ”Bright”, ”Contrast”, ”Colour” eller ”Hue”. Juster visningsindstillingerne
med + (8) eller – (6) knappen.
• ”AV switched set”
vælg kameraerne, som vil blive vist efterfølgende i automatisk tilstand. Tryk på + eller –
knappen for at skifte mellem kameraer og menu knappen for at vælge eller fravælge et kamera.
4. Indstil knappen Auto/Manuel (10) til ”auto” for at skifte mellem de valgte kameraer automatisk.
5. Tryk på 4:3 knappen (4) for at ændre side forholdet.
6. Tryk på lydløs knappen (2) for at slukke eller tænde for lyden.
”√” angiver at dette kamera er valgt.
”ο” angiver at dette kamera ikke er valgt.
• ”Time switched”
Øger eller sænker tidsintervallet for automatisk tilstand med knappen + eller –.
Når der trykkes på AV knappen, viser manuel omskiftning alle kamerabilleder, inklusive
kameraer indstillet til ”ο”.
For at denne funktion kan fungere, skal kameraets mikrofon være tændt.
6. − knap
7. Menu knap
8. + knap
9. Afbryder
10. Auto/Manuel kontakt
Vedligeholdelse
Rengør kameraet med en fugtig klud.
Brug ikke opløsningsmidler eller slibemidler.
41
Page 42

Problemløsning
Udfør de følgende kontroller hvis skærmen ikke fungerer korrekt:
• Sørg for at skærmen er indstillet til den korrekte AV kanal (AV-1-4).
• Sørg for at alle stikkene er korrekt tilsluttet i stiktilslutningerne.
• Sørg for at skærmen ikke er beskadiget.
• Sørg for at strømadapteren ikke er beskadiget.
• Sørg for, når den automatisk omskiftning er tændt, at kameraer i den AV omskiftede tilstand ikke er
indstillet til ”ο”.
• Sørg for at alle visningsindstillingerne er indstillet korrekt.
Garanti
Alle ændringer og/eller modifikationer til produktet vil gøre garantioen ugyldig. Vi kan ikke påtage os
noget ansvar for skade forårsaget af ukorrekt brug af dette produkt.
Ansvarsfraskrivelse
Design og specifikationer kan ændres uden varsel. Alle logoer, mærker og produktnavne er
varemærker eller registrerede varemærker deres tilhører deres respektive ejere og anerkendes
hermed som disse.
Bortskaffelse
• Dette produkt skal afleveres på et passende affalds indsamlingspunkt. Bortskaf ikke
dette produkt sammen med husholdningsaffald.
• For mere information, kontakt forhandleren eller den lokale myndighed der er ansvarlig
for kontrol af affald.
42
Page 43

7” LCD-monitor
Innledning
Monitoren er en brukervennlig elektronisk enhet, utformet for overvåking i alle typer situasjoner.
Produktet er spesielt godt egnet til små butikker, kontorer eller hus. Monitoren kan plasseres på en
horisontal overflate, eller monteres på en justerbar støtte (bestilles separat, med art. nr.
SEC-BRACK40) som kan festes på undersiden av monitoren og festes med 3 skruer på en horisontal
eller vertikal overflate.
Monitoren kan motta lyd og bilder fra 4 forskjellige kameraer. Du kan enkelt velge andre
kameravisninger med fjernkontrollen. Bildene kan også vises enkeltvis i automatisk modus. Denne
monitoren egner seg for bruk sammen med SEC-CAM12-kameraer.
• Vi anbefaler at du leser denne bruksanvisningen før du monterer/bruker monitoren.
• Denne bruksanvisningen må oppbevares på et sikkert sted, der du finner den i fremtiden.
Kamerapakken inneholder følgende:
1. 1 x 7” LCD-monitor
2. 1 x fjernkontroll
3. 1 x AC/DC-adapter
4. 1 x AV utdatakabel
5. 4 x AV inndatakabel
Tekniske spesifikasjoner
Format: 16 : 9 (4 : 3-modus)
Oppløsning: 628 x 562 (PAL)
Driftsspenning : 12V DC / 1A
AV-innmating: 4x
AV-utmating: 1x
Driftstemperatur: -10 °C til +50 °C
Vekt: 450 g
Dimensjoner: 180 x 155 x 25 mm
Forholdsregler for sikkerhet
• du må ikke åpne monitoren ved feilfunksjon. Dette produktet må kun åpnes av en kvalifisert
tekniker.
43
Page 44

• du må ikke utsette monitoren for vann.
• du må ikke utsette monitoren for høye temperaturer eller fuktighet.
• du må ikke montere monitoren inntil sterke magnetfelt, som f.eks en TV eller høyttaler. Dette kan
påvirke monitorens kvalitet.
Monteringsinstruksjoner
1. Monitor
2. AV-plugg for tilkobling av utdata
3. AV-plugg for tilkobling av inndata
1. Sett monitoren på støtten (5) på en stabil overflate.
Monitoren kan også plasseres på en justerbar støtte (bestilles separat, med art. nr. SEC-BRACK40)
som kan festes på undersiden av monitoren og festes med 3 skruer på en horisontal eller vertikal
overflate.
2. Sett inn DC-pluggen i DC 12V-inndata-tilkobling (4).
3. Sett inn AC/DC-adapteren i veggkontakten.
4. Koble kameraet til med AV-inndatakabelen til en av AV-tilkoblingene (3) på baksiden av monitoren
(maks. 4 kameraer)-
Se bruksanvisningen for informasjon om installasjon og bruk av kameraet.
4. DC 12V plugg for tilkobling av inndata
5. Støtte
6. Festepunkt for justerbar støtte
5. Du kan koble til en ekstra monitor med AV-utdatatilkoblingen (2).
44
Page 45

Brukerveiledning
1. LCD-monitor
2. Dempe-knappen
3. AV-knappen
4. 4:3-knappen
5. IR-kontrollsensor
1. Trykk på strømknappen (9) for å skru på monitoren.
2. Trykk på AV-knappen (3) for å velge riktig kameratilkobling.
3. Trykk på menyknappen (7) for å navigere til undermenyene.
Følgende undermenyer vises.
• visningsinnstillinger: ”Bright”, ”Contrast”, ”Colour” or ”Hue”. Juster visningsinnstillingene med
knappene + (8) eller – (6) button.
• ”AV switched set”
Velg kameraene som skal vises etter hverandre i automatisk modus. Trykk på knappene + eller
– for å veksle mellom kameraene, og menyknappen for å velge eller fjerne et kamera.
4. Still inn AutoManual-bryteren (10) til ”auto” for å veksle automatisk mellom valgte kameraer.
5. Trykk på 4:3 (4) for å endre format.
6. Trykk på dempeknappen (2) for å skru lyden av og på.
”√” viser at dette kameraet har blitt valgt.
”ο” viser at dette kameraet ikke har blitt valgt.
• ”Time switched”
Du kan øke eller senket tidsintervallet for automatisk modus med knappene + eller –.
Når du trykker på AV-knappen, viser manuell vekslingsmodus alle kamerabilder, inkludert
kameraer stilt inn til ”ο”.
For at denne funksjonen skal fungere må mikrofonen på kameraet være skrudd på.
6. Knappen +
7. Menyknappen
8. + knappen
9. Strømknappen
10. Auto/Manual-bryter
Vedlikehold
Rengjør kameraet med en fuktet klut.
Du må ikke bruke rengjøringsmidler eller slipemidler.
45
Page 46

Feilsøking
Du må utføre følgende kontroller hvis monitoren ikke fungerer som det skal:
• Sørg for at monitoren er stilt inn til riktig AV-kanal (AV1-4).
• Sørg for at alle kontaktene er satt inn riktig i støpslene.
• Sørg for at monitoren ikke er skadd.
• Sørg for at strømadapteren ikke er skadd.
• Når kameraene er i automatisk drift, må du sørge for at kameraene med AV ikke er stilt inn til ”ο”.
• Sørg for at alle visningsinnstillinger er riktig stilt inn.
Garanti
Enhver endring og/eller modifikasjon av produktet vil føre til at garantien opphører. Vi påtar oss intet
ansvar for skade som følge av feilaktig bruk av produktet.
Ansvarsfraskrivelse
Design og spesifikasjoner kan endres uten forvarsel. Alle logoer, merke- og produktnavn er
varemerker eller registrerte varemerker tilhørende sine respektive eiere, og anerkjennes herved som
dette.
Avhending
• Dette produktet må avhendes på egnede oppsamlingssteder. Du må ikke avhende
dette produktet som husholdningsavfall.
• Ta kontakt med leverandøren eller lokale myndigheter hvis du ønsker mer informasjon
om avhending.
46
Page 47

7” LCD Monitor
Úvod
Tento monitor je uživatelsky jednoduché elektronické zařízení navržené pro sledování různých situací.
Tento produkt se hodí zejména pro malé obchody, kanceláře nebo domovy. Monitor může být upevněn
na horizontálním povrchu nebo může být upevněn prostřednictvím nastavitelného držáku (objednejte
zvlášť s produktovým číslem SEC-BRACK40). Držák se připevňuje na spodní stranu monitoru a
pomocí 3 šroubků upevňuje na vodorovnou nebo svislou plochu.
Monitor může přijímat zvuk a obraz ze 4 různých kamer. Pomocí dálkového ovládání si můžete
jednoduše zvolit různé pohledy z kamer. Kamery mohou být také zobrazovány jedna po druhé
v automatickém režimu. Tento monitor se hodí pro použití s kamerou SEC-CAM12.
• Doporučujeme, abyste si před instalací kamery přečetli tento manuál
• Uschovejte si tento manuál na bezpečném místě pro budoucí referenci.
Tento balíček s kamerou obsahuje následující položky:
1. 1 x 7” LCD monitor
2. 1 x dálkové ovládání
3. 1 x AC/DC adaptér
4. 1 x AV výstupní kabel
5. 4 x AV vstupní kabel
Technické specifikace
Formát obrazu: 16 : 9 (4 : 3 režim)
Rozlišení: 628 x 562 (PAL)
Provozní napětí: 12V DC / 1A
AV vstup: 4x
AV výstup: 1x
Provozní teplota: -10°C to +50°C
Hmotnost: 450 g
Rozměry: 180 x 155 x 25 mm
Bezpečnostní opatření
• V případě poruchy monitor neotvírejte. Tento produkt by měl být otevřen kvalifikovaným technikem.
• Nevystavujte monitor vodě.
47
Page 48

• Nevystavujte vysokým teplotám nebo vlhkosti.
• Monitor neinstalujte do blízkosti silného magnetického pole, jako např. TV nebo reproduktoru.
Může to ovlivnit kvalitu monitoru.
Instalační pokyny
1. Monitor
2. AV výstupní jack
3. AV vstupní jack
1. Umístěte monitor pomocí jeho podpory (5) na stabilní povrch. Monitor může být připevněn také
prostřednictvím nastavitelného držáku (objednejte si zvlášť pod produktovým číslem:
SEC-BRACK40). Držák může být upevněn na spodní stranu monitoru a pomocí 3 šroubků
připevněn na vodorovný nebo svislý povrch.
2. Vložte DC zástrčku napájecího adaptéru do DC 12V vstupního konektoru (4).
3. Vložte napájecí adaptér AC/DC do zásuvky.
4. Spojte kameru se vstupním kabelem AV k jednomu z AV vstupnímu jacku (3)
na zadní straně monitoru (max. 4 kamery).
5. K výstupnímu konektoru AV (2) můžete připojit ještě jeden monitor.
Pro informace ohledně instalace a použití kamery se podívejte do instalačního
manuál kamery.
4. DC 12V vstupní konektor napájení
5. Podpora
6. Montážní bod pro nastavitelný držák
48
Page 49

Uživatelské pokyny
1. LCD monitor
2. Tlačítko pro ztlumení zvuku
3. Tlačítko AV
4. Tlačítko 4:3
5. IR senzor dálkového ovládání
1. Pro zapnutí monitoru stlačte tlačítko napájení (9).
2. Pro nastavení správného připojení kamery stlačte tlačítko AV (3).
3. Pro navigaci v podmenu stiskněte tlačítko menu (7).
Ukážou se následující podmenu:
• Nastavení displeje: „Bright“, „Contrast“, „Colour“ nebo „Hue“
Upravte nastavení displeje pomocí tlačítek + (8) nebo – (6).
• „Nastavení přepínáním AV“
Zvolte si kamery, které se následně zobrazí v automatickém režimu. Pro přepínání mezi kanály
stlačte tlačítka + nebo – a tlačítko Menu k volbě kanálu.
4. Pro automatickou volbu kanálů nastavte automatický/manuální přepínač (10) na „Auto“.
5. Pro změnu poměru zobrazení stran stlačte tlačítko 4:3 (4).
6. Pro vypnutí/zapnutí zvuku stlačte tlačítko pro ztlumení zvuku (2).
„√“ ukazuje, že byl vybrán tento kanál.
„ο“ ukazuje, že tento kanál nebyl vybrán.
• „Přepínač času“
Pomocí tlačítka + nebo – zvyšte nebo snižte časový interval pro automatický režim.
Při stisknutí tlačítka AV ukazuje manuální režim přepínání všechny kamerové snímky,
včetně kamer nastavených na ο“.
Aby byla funkce k dispozici, musí být mikrofon na kameře zapnutý.
6. − tlačítko
7. Tlačítko menu
8. + tlačítko
9. Tlačítko napájení
10. Auto/Manuální přepínání
49
Page 50

Údržba
Kameru čistěte vlhkým hadříkem.
Nepoužívejte čistící rozpouštědla nebo abrazivní prostředky.
Poradce při potížích
Při případných potížích s fungováním kamery prověřte následující:
• Ujistěte se, že je monitor nastaven na odpovídající kanál AV (1-4).
• Ujistěte se, že monitor není poškozen.
• Ujistěte se, že napájecí adaptér není poškozen.
• Ujistěte se, že nejsou napájecí adaptery poškozeny.
• Ujistěte se, že když je zapnutý automatický režim spínání, tak nejsou kamery v nastavení AV
nastaveny na „ο“.
• Ujistěte se, že je správně nastavený displej.
Záruka
Provedením jakýchkoliv změn či modifikací výrobku dojde ke ztrátě záruky. Nemůžeme akceptovat
žádnou zodpovědnost za škody způsobené nesprávným použitím tohoto produktu.
Vyloučení zodpovědnosti
Design a specifikace produktu mohou být změněny bez předchozího upozornění. Všechna loga,
značky a názvy produktů jsou ochrannými známkami nebo registrovanými ochrannými známkami
příslušných vlastníků a jsou tímto uznány jako takové.
Likvidace
• Tento produkt je určen pro tříděný odpad v příslušné sběrně. Nevyhazujte tento výrobek
s komunálním odpadem.
• Pro více informací se obraťte na prodejce nebo místní orgány odpovědné za nakládání
s odpady.
50
Page 51

Monitor LCD 7”
Introducere
Monitorul este un dispozitiv electronic uşor de utilizat, creat pentru monitorizarea tuturor tipurilor de
situaţii. Acest produs este adecvat în special pentru magazinele mici, birouri sau locuinţe. Acesta
poate fi amplasat pe o suprafaţă orizontală sau poate fi montat pe un suport reglabil (comandat
separat, cu articolul nr. SEC-BRACK40). Acest suport poate fi instalat în partea inferioară a
monitorului şi are 3 şuruburi pentru montarea monitorului pe o suprafaţă orizontală sau verticală.
Monitorul poate recepţiona sunet şi imagini de la 4 camere diferite. Puteţi selecta uşor diferite unghiuri
ale camerelor cu ajutorul telecomenzii. Imaginile pot fi afişate, de asemenea, una câte una, în modul
automat. Acest monitor este adecvat pentru a fi utilizat împreună cu camera de luat vederi
SEC-CAM12.
• Vă recomandăm să citiţi acest manual anterior instalării / utilizării monitorului.
• Păstraţi acest manual într-un loc sigur pentru a-l consulta în viitor.
Pachetul camerei conţine următoarele obiecte:
1. 1 x monitor LCD 7” LCD
2. 1 x telecomandă
3. 1 x adaptor CA / CC
4. 1 x cablu ieşire AV
5. 4 x cablu intrare AV
Specificaţii tehnice
Format: 16 : 9 (mod 4 : 3)
Rezoluţie: 628 x 562 (PAL)
Tensiune de operare: 12V CC / 1A
Intrare AV: 4x
Ieşire AV: 1x
Temperatura de operare: de la -10°C la +50°C
Greutate: 450 g
Dimensiuni: 180 x 155 x 25 mm
Precauţii de siguranţă
• Nu deschideţi monitorul în cazul producerii unei defecţiuni. Acest produs trebuie deschis doar de
un inginer calificat.
51
Page 52

• Nu expuneţi monitorul la apă.
• Nu expuneţi monitorul la temperaturi mari sau umiditate.
• Nu instalaţi monitorul în apropierea câmpurilor magnetice puternice, cum ar fi TV sau boxe.
Acestea ar putea afecta calitatea monitorului.
Instrucţiuni de instalare
1. Monitor
2. Mufă jack ieşire AV
3. Mufă jack intrare AV
1. Puneţi monitorul aflat pe suportul său (5) pe o suprafaţă stabilă.
Monitorul poate fi montat, de asemenea, pe un suport reglabil (comandat separat, cu articolul nr.
SEC-BRACK40). Acest suport poate fi instalat în partea inferioară a monitorului şi are 3 şuruburi
pentru montarea monitorului pe o suprafaţă orizontală sau verticală.
2. Introduceţi ştecherul CC în mufa jack CC 12V (4).
3. Introduceţi adaptorul CA / CC în priza de perete.
4. Conectaţi camera cu cablul intrare AV la una dintre mufele jack intrare AV (3) din partea din spate a
monitorului (maxim 4 camere).
5. Puteţi conecta un monitor suplimentar la mufa ieşire AV (2).
Pentru informaţii despre instalarea şi utilizarea camerei, consultaţi manualul de
instalare a acesteia.
4. Mufă jack intrare CC 12V
5. Suport
6. Punct de fixare pentru suportul reglabil
52
Page 53

Instrucţiuni de utilizare
1. Monitor LCD
2. Buton Fără sonor
3. Buton AV
4. Buton 4:3
5. Senzor de control IR
1. Apăsaţi butonul de alimentare cu electricitate (9) pentru a porni monitorul.
2. Apăsaţi butonul AV (3) pentru a seta conectarea corectă a camerei.
3. Apăsaţi butonul Meniu (7) pentru a naviga în submeniuri.
Se vor afişa următoarele submeniuri:
• Setări pentru afişaj: „Bright”, „Contrast”, „Colour” sau „Hue”. Reglaţi setările de afişaj cu ajutorul
butonului + (8) sau – (6).
• „AV switched set” (Setare comutare pe AV)
Selectaţi camerele de luat vederi care vor fi prezentate ulterior în mod automat. Apăsaţi butonul
+ sau – pentru a schimba între camere şi butonul Meniu pentru a selecta sau deselecta o
cameră.
4. Setaţi întrerupătorul Auto / Manual (10) la „auto” pentru a schimba între camerele selectate în mod
5. Apăsaţi butonul 4:3 (4) pentru a modifica formatul.
6. Apăsaţi butonul Fără sonor (2) pentru a schimba între cu sunet şi fără sunet.
„√” indică că această cameră a fost selectată.
„ο” indică că această cameră nu a fost selectată.
• „Time switched” (Comutator timp)
Creşte sau diminuează intervalul de timp pentru modul automat cu ajutorul butonului + sau –.
automat.
Atunci când apăsaţi butonul AV, modul întrerupător manual prezintă toate imaginile
camerelor, inclusiv camerele setate la „ο”.
Pentru ca această funcţie să fie activată, microfonul camerei trebuie pornit.
6. Buton −
7. Buton Meniu
8. Buton +
9. Buton alimentare cu electricitate
10. Întrerupător Auto / Manual
53
Page 54

Mentenanţă
Curăţaţi camera cu o cârpă umedă.
Nu utilizaţi solvenţi de curăţare sau agenţi abrazivi.
Rezolvarea problemelor
Efectuaţi următoarele verificări dacă monitorul nu funcţionează adecvat:
• Asiguraţi-vă că monitorul este setat pe canalul corect AV (AV1-4).
• Asiguraţi-vă că ştecherele sunt conectate corect la mufele jack.
• Asiguraţi-vă că monitorul nu a fost deteriorat.
• Asiguraţi-vă că adaptorul de electricitate nu a fost deteriorat.
• Atunci când este activat modul de comutare automată, asiguraţi-vă că camerele din setul comutat
pe AV nu sunt setate la „ο”.
• Asiguraţi-vă că toate setările de afişaj sunt setate adecvat.
Garanţie
Orice schimbări şi / sau modificări aduse produsului vor face garanţia nulă. Nu putem accepta nicio
răspundere pentru prejudiciile cauzate de utilizarea incorectă a acestui produs.
Renunţarea la răspundere
Schiţele şi specificaţiile fac obiectul modificării fără notificare prealabilă. Toate schiţele, numele
mărcilor şi denumirile produsului sunt mărci înregistrare ale deţinătorilor lor respectivi şi, prin prezenta,
sunt astfel recunoscute.
Eliminare
• Acest produs a fost creat pentru colectare separată la un punct de colectare adecvat.
Nu eliminaţi acest produs odată cu deşeurile menajare.
• Pentru mai multe informaţii, contactaţi magazinul sau autoritatea locală responsabilă
pentru gestionarea deşeurilor.
54
Page 55

Οθόνη LCD 7”
Εισαγωγή
Αυτή η οθόνη είναι μια εύχρηστη ηλεκτρονική συσκευή, ιδανική για την παρακολούθηση
οποιασδήποτε κατάστασης. Το προϊόν ενδείκνυται ιδιαίτερα για μικρά καταστήματα, γραφεία ή σπίτια.
Η οθόνη μπορεί να τοποθετηθεί σε οριζόντια επιφάνεια ή, εναλλακτικά, μπορείτε να προσθέσετε στη
βάση της ένα ρυθμιζόμενο στήριγμα (διατίθεται ξεχωριστά με αρ. προϊόντος SEC-BRACK40) και να τη
στερεώσετε με 3 βίδες σε οριζόντια ή κάθετη επιφάνεια.
Η οθόνη μπορεί να λάβει σήματα ήχου και εικόνας από 4 διαφορετικές κάμερες. Η επιλογή προβολής
εικόνων από διαφορετική κάμερα πραγματοποιείται εύκολα μέσω του τηλεχειριστηρίου. Επιτρέπεται,
επίσης, η αυτόματη διαδοχική προβολή των εικόνων από τις διάφορες κάμερες με τη σειρά. Η οθόνη
μπορεί να χρησιμοποιηθεί σε συνδυασμό με την κάμερα SEC-CAM12.
• Συνιστάται η ανάγνωση αυτού του εγχειριδίου πριν την εγκατάσταση/χρήση της οθόνης.
• Φυλάξτε το εγχειρίδιο σε ασφαλές μέρος για μελλοντική αναφορά.
Στη συσκευασία της κάμερας περιλαμβάνονται τα ακόλουθα εξαρτήματα:
1. 1 x οθόνη LCD 7”
2. 1 x τηλεχειριστήριο
3. 1 x προσαρμογέας AC/DC
4. 1 x καλώδιο εξόδου AV
5. 4 x καλώδιο εισόδου AV
Τεχνικά χαρακτηριστικά
Μορφή: 16 : 9 (λειτουργία 4 : 3)
Ανάλυση: 628 x 562 (PAL)
Τάση λειτουργίας: 12V DC / 1A
Είσοδος AV: 4 x
Έξοδος AV: 1 x
Θερμοκρασία λειτουργίας: -10°C έως +50°C
Βάρος: 450 g
Διαστάσεις: 180 x 155 x 25 mm
55
Page 56

Προφυλάξεις ασφαλείας
• Μην ανοίγετε την οθόνη σε περίπτωση δυσλειτουργίας. Αυτό το προϊόν θα πρέπει να ανοίγεται
μόνο από εξειδικευμένο μηχανικό.
• Μην εκθέτετε την οθόνη σε νερό.
• Μην εκθέτετε την οθόνη σε υψηλές θερμοκρασίες ή υγρασία.
• Μην τοποθετείτε την οθόνη κοντά σε ισχυρά μαγνητικά πεδία, όπως π.χ. τηλεοράσεις ή ηχεία.
Ενδέχεται να επηρεαστεί η ποιότητα της οθόνης.
Οδηγίες εγκατάστασης
1. Οθόνη
2. Υποδοχή εξόδου AV
3. Υποδοχή εισόδου AV
1. Τοποθετήστε την οθόνη σε σταθερή επιφάνεια με το στήριγμα (5) να πατάει στην επιφάνεια.
Εναλλακτικά, μπορείτε να προσθέσετε στη βάση της οθόνης ένα ρυθμιζόμενο στήριγμα (διατίθεται
ξεχωριστά με αρ. προϊόντος SEC-BRACK40) και να τη στερεώσετε με 3 βίδες σε οριζόντια ή
κάθετη επιφάνεια.
2. Συνδέστε το βύσμα DC στην υποδοχή εισόδου DC 12V (4).
3. Συνδέστε τον προσαρμογέα AC/DC σε μια επιτοίχια πρίζα.
4. Συνδέστε την κάμερα σε μία από τις υποδοχές εισόδου AV (3) στο πίσω μέρος της οθόνης μέσω
του καλωδίου εισόδου AV (μέχρι 4 κάμερες).
6. Μπορείτε, επίσης, να συνδέσετε μια πρόσθετη οθόνη στην υποδοχή εξόδου AV (2).
Για πληροφορίες σχετικά με την εγκατάσταση και χρήση της κάμερας ανατρέξτε στο
εγχειρίδιο εγκατάστασης της κάμερας.
4. Υποδοχή εισόδου DC 12V
5. Στήριγμα
6. Υποδοχή ρυθμιζόμενου στηρίγματος
56
Page 57

Οδηγίες χρήσης
1. Οθόνη LCD
2. Κουμπί Mute (Σίγαση)
3. Κουμπί AV
4. Κουμπί 4:3
5. Αισθητήρας ελέγχου υπερύθρων
1. Πιέστε το κουμπί Power (9) για να ενεργοποιήσετε την οθόνη.
2. Πιέστε το κουμπί AV (3) για να ρυθμίσετε την επιθυμητή σύνδεση κάμερας.
3. Πιέστε το κουμπί Menu (7) για να περιηγηθείτε στα υπομενού.
Εμφανίζονται τα ακόλουθα υπομενού:
• Ρυθμίσεις οθόνης: «Bright», «Contrast», «Colour» ή «Hue». Προσαρμόστε τις ρυθμίσεις
οθόνης με τα κουμπιά + (8) και – (6).
• «AV switched set»
Επιλέξτε τις κάμερες οι εικόνες των οποίων θα προβάλλονται διαδοχικά κατά την αυτόματη
λειτουργία. Πιέστε τα κουμπιά + και – για εναλλαγή μεταξύ των καμερών και το κουμπί Menu για
να επιλέξετε η να καταργήσετε κάποια κάμερα.
4. Γυρίστε το διακόπτη Auto/Manual (10) στη θέση «auto» για αυτόματη εναλλαγή μεταξύ των
5. Πιέστε το κουμπί 4:3 (4) για αλλαγή της αναλογίας των διαστάσεων.
6. Πιέστε το κουμπί Mute (2) για ενεργοποίηση ή απενεργοποίηση του ήχου.
Το σύμβολο «√» υποδεικνύει ότι η συγκεκριμένη κάμερα έχει επιλεγεί.
Το σύμβολο «ο» υποδεικνύει ότι η συγκεκριμένη κάμερα δεν έχει επιλεγεί.
• «Time switched»
Αυξήστε ή μειώστε το χρονικό διάστημα της αυτόματης λειτουργίας με τα κουμπιά + και –.
επιλεγμένων καμερών.
Πιέζοντας το κουμπί AV, εμφανίζονται στη λειτουργία χειροκίνητης εναλλαγής οι εικόνες
όλων των καμερών, ακόμη και εκείνων που είναι ρυθμισμένες στη θέση «ο».
Για τη λειτουργία του συγκεκριμένου χαρακτηριστικού θα πρέπει να ενεργοποιήσετε το
μικρόφωνο της κάμερας.
6. Κουμπί −
7. Κουμπί Menu (Μενού)
8. Κουμπί +
9. Κουμπί Power (Ενεργοποίηση)
10. Διακόπτης Auto/Manual
(Αυτόματα/Χειροκίνητα)
57
Page 58

Συντήρηση
Καθαρίστε την κάμερα με υγρό πανί.
Μην χρησιμοποιείτε διαλύτες ή λειαντικά καθαριστικά.
Αντιμετώπιση προβλημάτων
Σε περίπτωση που η οθόνη δεν λειτουργεί σωστά, πραγματοποιήστε τους παρακάτω ελέγχους:
• Βεβαιωθείτε ότι η οθόνη είναι ρυθμισμένη στο σωστό κανάλι AV (AV1-4).
• Βεβαιωθείτε ότι όλα τα βύσματα έχουν συνδεθεί σωστά στις αντίστοιχες υποδοχές.
• Βεβαιωθείτε ότι η οθόνη δεν έχει υποστεί βλάβες.
• Βεβαιωθείτε ότι ο προσαρμογέας ισχύος δεν έχει υποστεί βλάβες.
• Όταν η οθόνη βρίσκεται σε λειτουργία αυτόματης εναλλαγής, βεβαιωθείτε ότι οι κάμερες του
υπομενού «AV switched set» δεν έχουν ρυθμιστεί στη θέση «ο».
• Βεβαιωθείτε ότι όλες οι ρυθμίσεις οθόνης έχουν ρυθμιστεί σωστά.
Εγγύηση
Τυχ όν αλλαγή ή/και τροποποίηση του προϊόντος επιφέρει ακύρωση της εγγύησης. Δεν φέρουμε καμία
ευθύνη για βλάβες που ενδέχεται να προκύψουν λόγω εσφαλμένης χρήσης του προϊόντος.
Δήλωση αποποίησης ευθύνης
Ο σχεδιασμός και τα τεχνικά χαρακτηριστικά ενδέχεται να μεταβληθούν χωρίς ειδοποίηση. Όλα τα
λογότυπα, οι επωνυμίες και οι ονομασίες των προϊόντων αποτελούν εμπορικά σήματα ή σήματα
κατατεθέντα των αντίστοιχων κατόχων και αναγνωρίζονται διά του παρόντος ως τέτοια.
Απόρριψη
• Αυτό το προϊόν προορίζεται για ξεχωριστή συλλογή σε κατάλληλο σημείο συλλογής.
Μην απορρίπτετε το προϊόν μαζί με τα οικιακά απόβλητα.
• Για περισσότερες πληροφορίες επικοινωνήστε με τον αντιπρόσωπό σας ή τις τοπικές
αρχές διαχείρισης αποβλήτων.
58
Page 59

CE Declaration of Conformity
Declaration of conformity / Konformitätserklärung / Déclaration de conformité / Conformiteitsverklaring /
Dichiarazione di conformità / Declaración de conformidad / Megfelelőségi nyilatkozat /
Yhdenmukaisuusvakuutus / Överensstämmelseförklaring / Prohlášení o shodě / Declaraţie de conformitate /
We, / Wir, / Nous, / Wij, / Questa società, / La empresa infrascrita, / Mi, / Me, / Vi, / Společnost, / Noi, / Εμείς
Nedis B.V., De Tweeling 28, 5215MC, ’s-Hertogenbosch
The Netherlands / Niederlande / Pays Bas / Nederland / Paesi Bassi / Países Bajos / Hollandia / Alankomaat / Holland /
Nizozemí / Olanda / Ολλανδία
Tel. / Tél / Puh / Τηλ. : 0031 73 5991055
Email / Couriel / Sähköposti / e-post: info@nedis.com
Declare that product: / erklären, dass das Produkt: / Déclarons que le produit : / verklaren dat het product: / Dichiara che il
prodotto: / Declara que el producto: / Kijelentjük, hogy a termék, amelynek: / Vakuutamme, että: / Intygar att produkten: /
prohlašuje, že výrobek: / Declarăm că acest produs: / Δηλώνουμε ότι το προϊόν: / Erklærer at produktet: / Forsikrer at
produktet:
Brand: / Marke: / Marque : / Merknaam: / Marca: / Márkája: / Merkki: / Märke: / Značka: / Μάρκα: / Mærke: / Merke: KÖNIG
ELECTRONIC
Model: / Modell: / Modèle : / Modello: / Modelo: / Típusa: / Malli: / Μοντέλο: SEC-CAM12
Description: 7” LCD Monitor Kuvaus: 7-tuumainen LCD-monitori
Beschreibung: 7” LCD Monitor Beskrivning: 7-tums LCD-bildskärm
Description : Moniteur LCD 7” Beskrivelse: 7” LCD-skærm
Omschrijving: 17,8 cm (7”) LCD-Monitor Beskrivelse: 7” LCD-monitor
Descrizione: Monitor LCD da 7” Popis: 7” LCD Monitor
Descripción: Pantalla LCD 7” Descriere: Monitor LCD 7”
Megnevezése: 7’' LCD monitor Περιγραφή: Οθόνη LCD 7”
Is in conformity with the following standards: / den folgenden Standards entspricht: / est conforme aux normes suivantes : /
in overeenstemming met de volgende normen is: / è conforme ai seguenti standard: / es conforme a las siguientes
normas: / Megfelel az alábbi szabványoknak: / Täyttää seuraavat standardit: / Överensstämmer med följande standarder: /
splňuje následující normy: / Este în conformitate cu următoarele standarde: / Συμμορφώνεται με τις ακόλουθες
προδιαγραφές: / Overensstemmelse med følgende standarder: / Overensstemmer med følgende standarder:
EN 55022:2006+A1:2007, EN 55024:1998+A1:2001+A2:2003, EN 61000-3-2:2006+A2:2009, EN 61000-3-3:2008,
EN 60950-1:2006+A11:2009
EU Directive(s) / EG-Richtlinie(n) / Directive(s) EU / EU richtlijn(en) / Direttiva(e)
Toimintaohje(et) / Eu Direktiv(en) / Směrnice EU / Directiva(e) UE / Οδηγία(ες) της ΕΕ / EU direktiv(er) / EU-direktiv(ene):
2004/108/EC, 2006/95/EC
‘s-Hertogenbosch, 10-04-2012
Mr. / Hr. / M. / Dhr. / Sig. / Sr. D. / Úr / Mr. / Herr. / Pan / Dl. / Κ. / Hr. / Herr:
Randolf Richardson
Chief Operating Officer / Geschäftsführer / Chef des operations /
Operationeel Directeur / Responsabile Operativo / Director de Operaciones /
Üzemviteli Igazgató / Käyttöpäällikkö / Driftschef / Provozní ředitel / Director
principal / Γενικός Διευθυντής Επιχειρήσεων / Chief Operating Officer /
Administrerende Driftsdirektør
Δήλωση συμφωνίας / Overensstemmelse erklæring / Overensstemmelse forklaring
EU / Directiva(s) UE / EU direktívák / EU
59
 Loading...