

Page 1
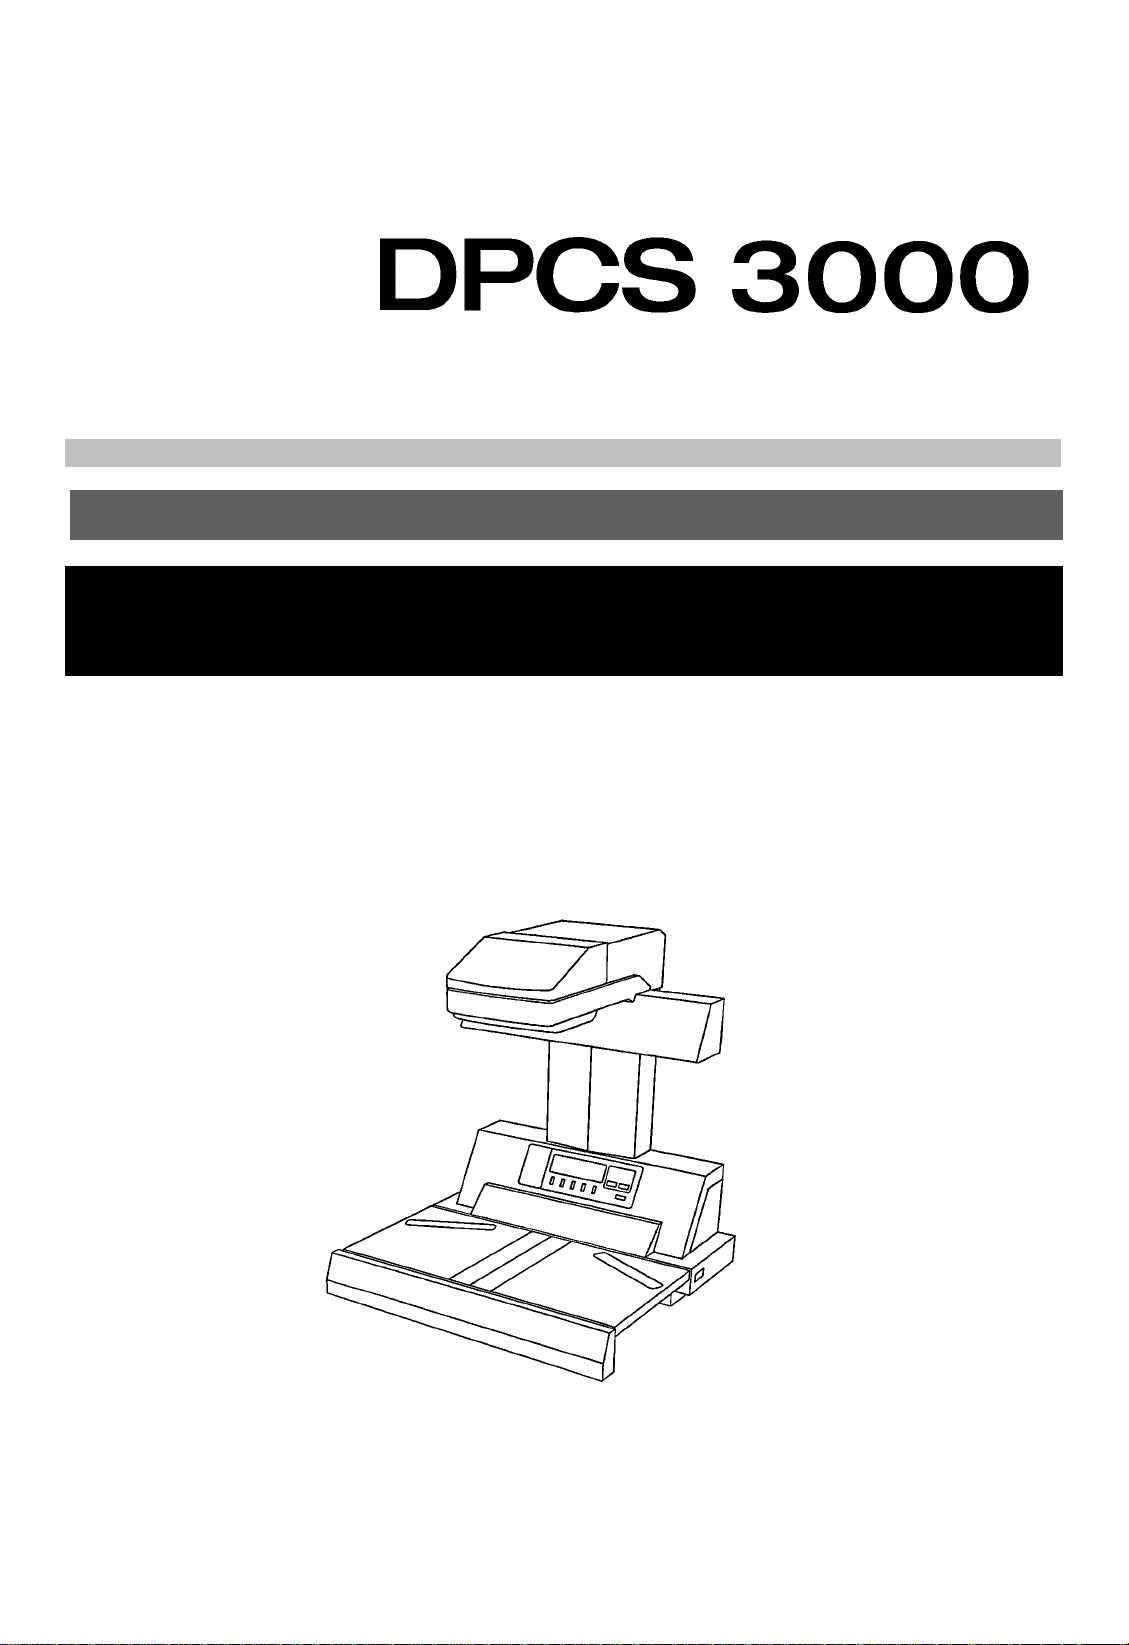
Operator’s Manual
Page 2

PS3000 Operator’s Manual
INTRODUCTION
Thank you for choosing the Minolta DPCS300 0 (PS3000 + Di30). This users
manual explains the various functions provided by the DPCS3000. It also
gives some maintena nce as well as troubleshooting tips. Before o perating this
system, read this manual carefully until you familiarize yourself thoroughly
with its operation and features. After you have read through the manual,
keep it for ready reference. Please also note of the following precautions.
-Use the shielded ca bles f urnish ed with t he s ystem for this
system. Use of an unshielded cable invites rad io frequency
interference.
-Always refer to this manual when operating the system
and do not attempt to to uch the syste m part s for wh ich no
explanation s are given in the text.
-NEVER attempt to disassemble or remodel the system, as
it is very dangerous.
-Call your technica l representa tive when you w ant to move
the system which has been installed.
Using the Operators Manual for Di30
In addition to a printer for the DPCS3000 system, the Di30 can itself function
as a digital PPC. Scanner Selecti on must be performed as necessary before
Di30 can be u sed as a digital PPC (refer to S canner Selection on pag e. 3 -18).
The Di30 is also provided with an operato rs manual w hich is intended for the
digital PPC application. Reference is made to this book (Di30 Operators
Manual) whenever appropriate th roughout the text of this operat or’s manual.
1
Page 3

PS3000 Operator’s Manual
Organization
This manual consists of six chapters. Chapters 1 through 3 give the basic
information, including parts identification, basic operation, and general
precautions, for this system. Be sure to read these chapters b efore attempting
to use your system.
Chapter 1. First Things to Know About DPCS3000
Highlights and configuration of the system and basic information about the different parts including the Display Panel of
PS3000.
Chapter 2. Installing It Properly
About the operating env ironment of the system and connection
to Di30.
Chapter 3. Using the System
About how to make copies and some precautions on the original
to be used with the system.
Chapter 4. Working with the Menu
About the various functions provided by PS3000 and how to
make the various settings using the menu.
Chapter 5. Troubleshooting
About the major messages (warning) given on the Display Panel
and steps to take to correct these faulty conditions as well as
other faulty copier operations.
Chapter 6. Caring for the System
About care for the system including the recommended cleaning
procedure.
Chapter 7. Specifications
Complete specifications of PS3000.
NOTE
In this manual , the bolde d n ames in dic ate the Key names of
PS3000 or the functio n n ames. The symbol " " indicates the
message shown on the displ ay and indicates the reference
chapter or the title.
2
Page 4
PS3000 Operator’s Manual
Chapter 1
Chapter 1. First Things to Know About DPCS3000
Highlights of DPCS3000
DPCS3000 is a copying system used exclusively for making copies from a n
encyclopedia, dictionary, or any other thick book. PS3000 reads the page or
pages of an open bound original placed on its Original Table and Di30 prints
the data on them. In ad dition to being capable of making a clear copy of texts,
the system offers the Photo mode which produces a sharp copy out of a photo.
Di30, which is used a s a printer for the system, can also be independently used
as a digital PPC.
It can be fitted with various options according to your particular needs. For
more details, refer to Copier Overview on page 8 of Di30 Operators Manua l.
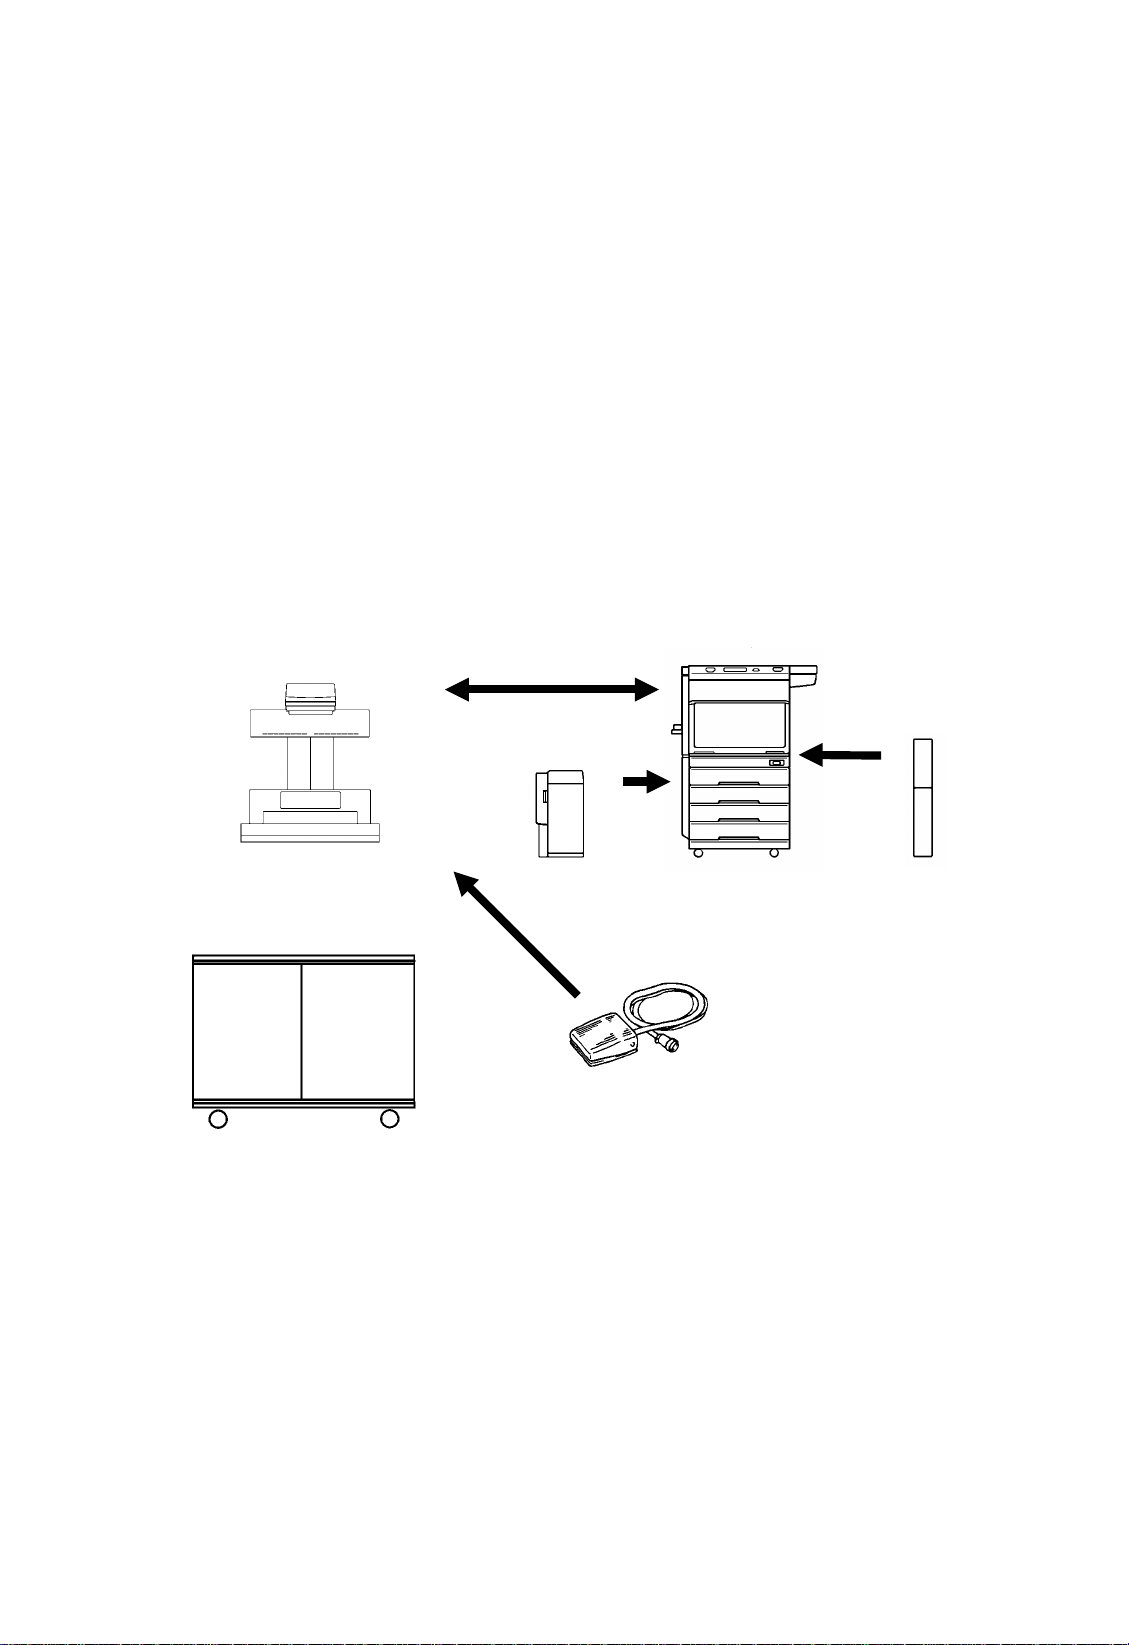
System Configuration
Inter fac e Cable
PS 30000
Cabinet
(Option)
Stacker
(Option)
Foot Switch
(Option)
Di30
AD-4
(Option)
1-1
Page 5
PS3000 Operator’s Manual
Chapter 1
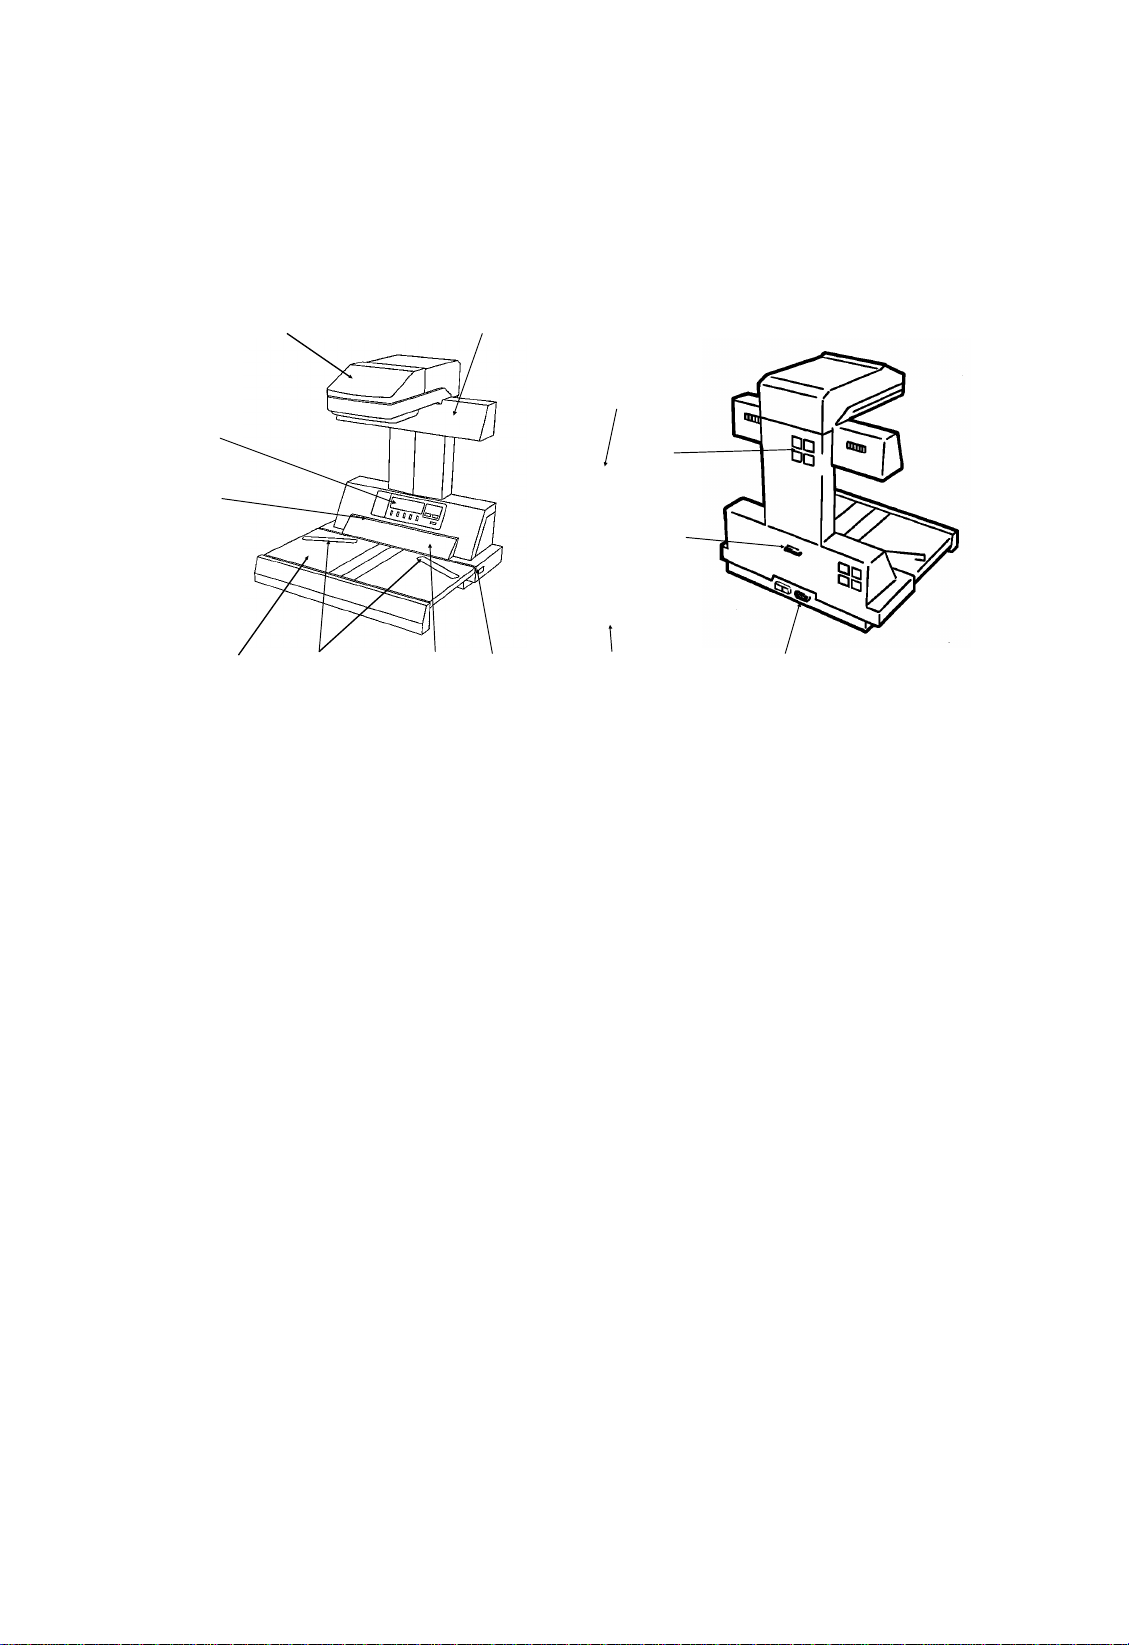
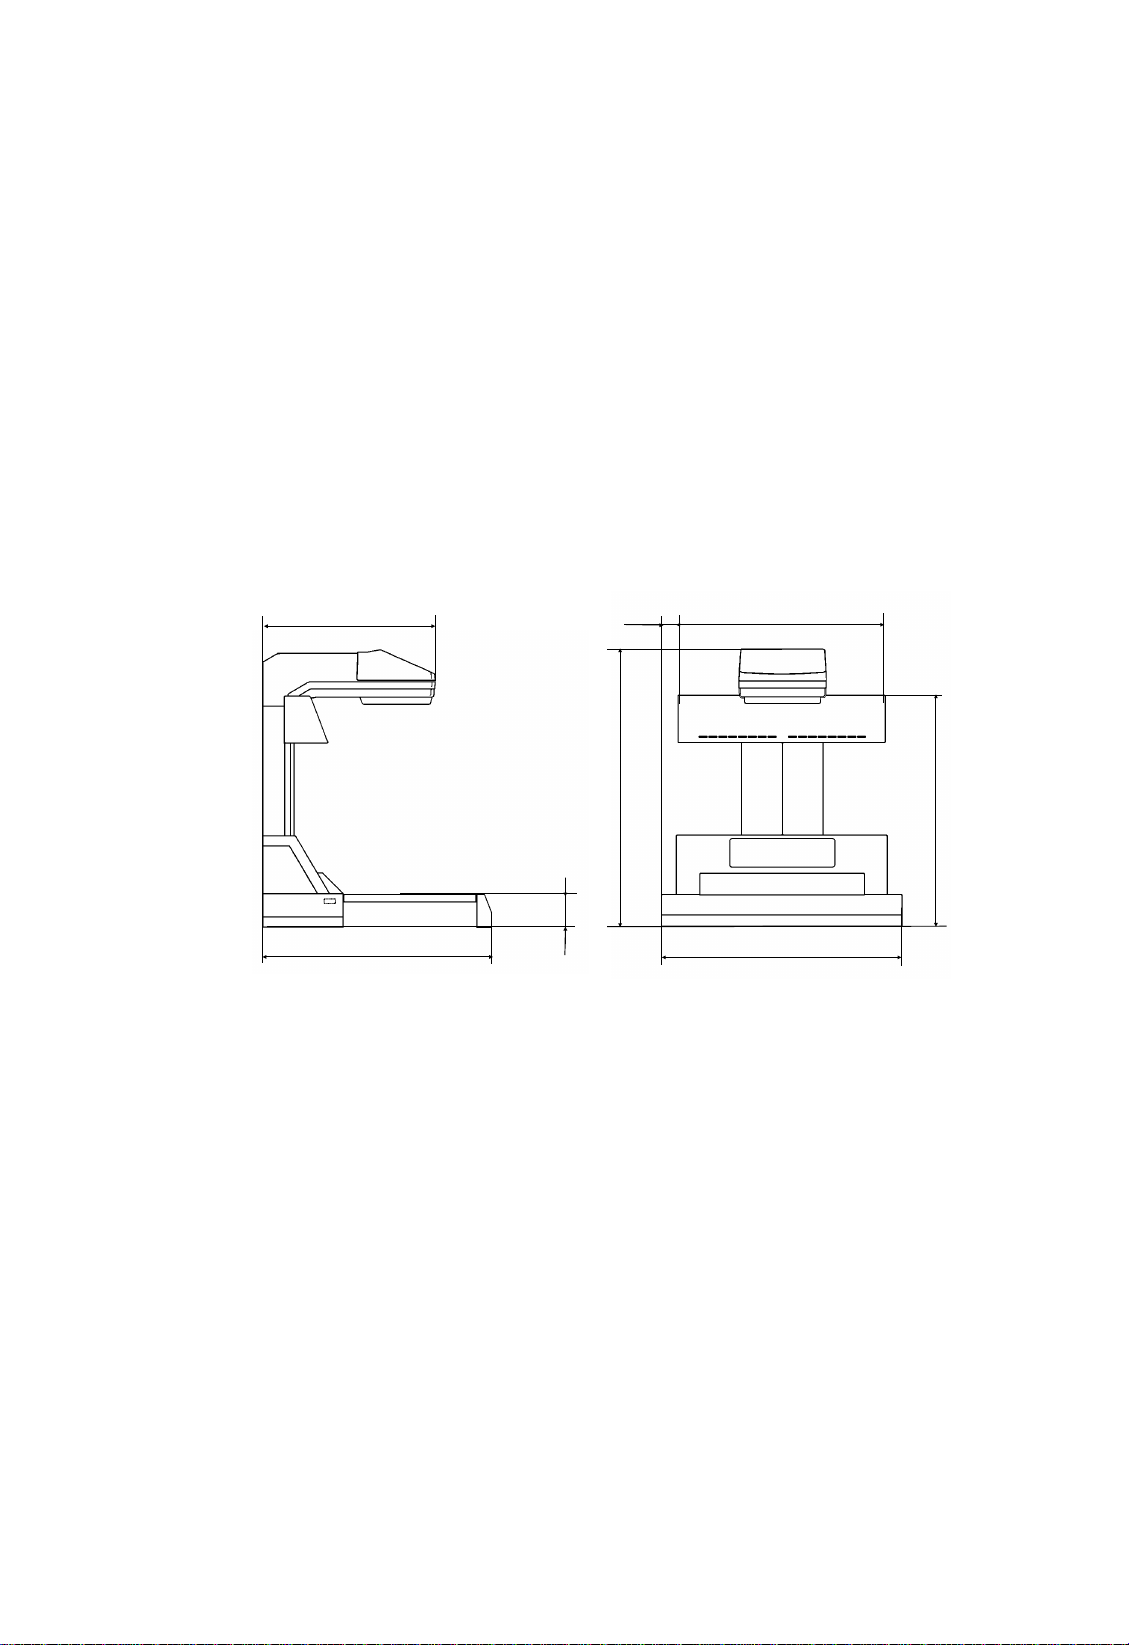
Parts Identification (PS3000)
1
8
7
2
13
9
10
12 1165 43
1. Scanner Unit: The Image Scanner is housed in this unit.
2. Lamp Unit: Illuminates the original when the Scanner Unit reads it.
3. Measurement Plate: Detects the position of the surface of the book original.
4. Main Switch: Use to turn ON or OFF PS3000.
5. Start Key: Press to let PS3000 start reading the original.
(PS3000 reads the original differently depending on the mode it is in.)
6. Original Table: Place your book original face up on this table.
7. Shading Plate: Scanner reading this plate at each scan ning
8. Display Panel: Shows the menu for making various settings, the status of the system, and warning message s.
9. Fan: Cools the Lamp Unit.
10. Interface Connector: Connects PS3000 to Di30 via the interface cable.
11. Power Cord Socket: The male socket pins over which the female power cord is plugged.
12. Interface Cable: Connects PS3000 to Di30 for communications between the two.
13. Power Cord: Connects PS3000 to the power outlet.
-For the Di30 parts, refer to Copie r Pa rts and Access ori es on pp.
10-11 of Di30 Operators Manual.
1-2
Page 6
PS3000 Operator’s Manual
Chapter 1
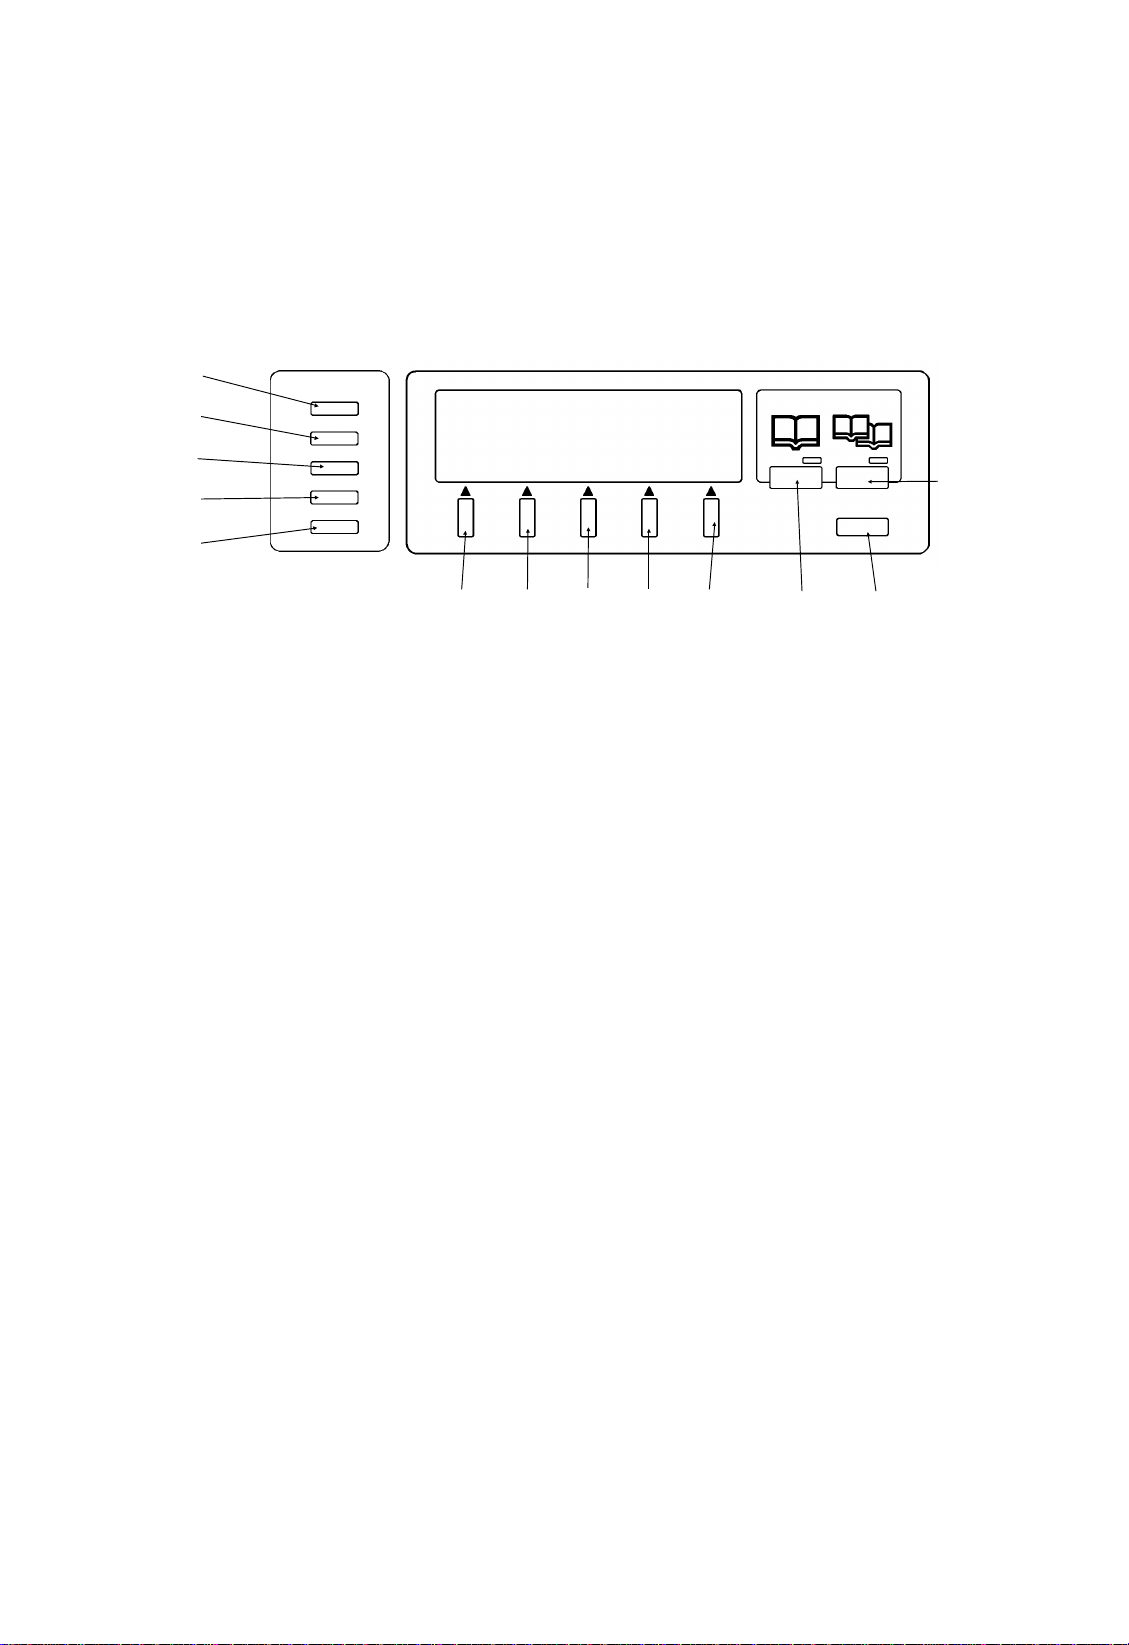
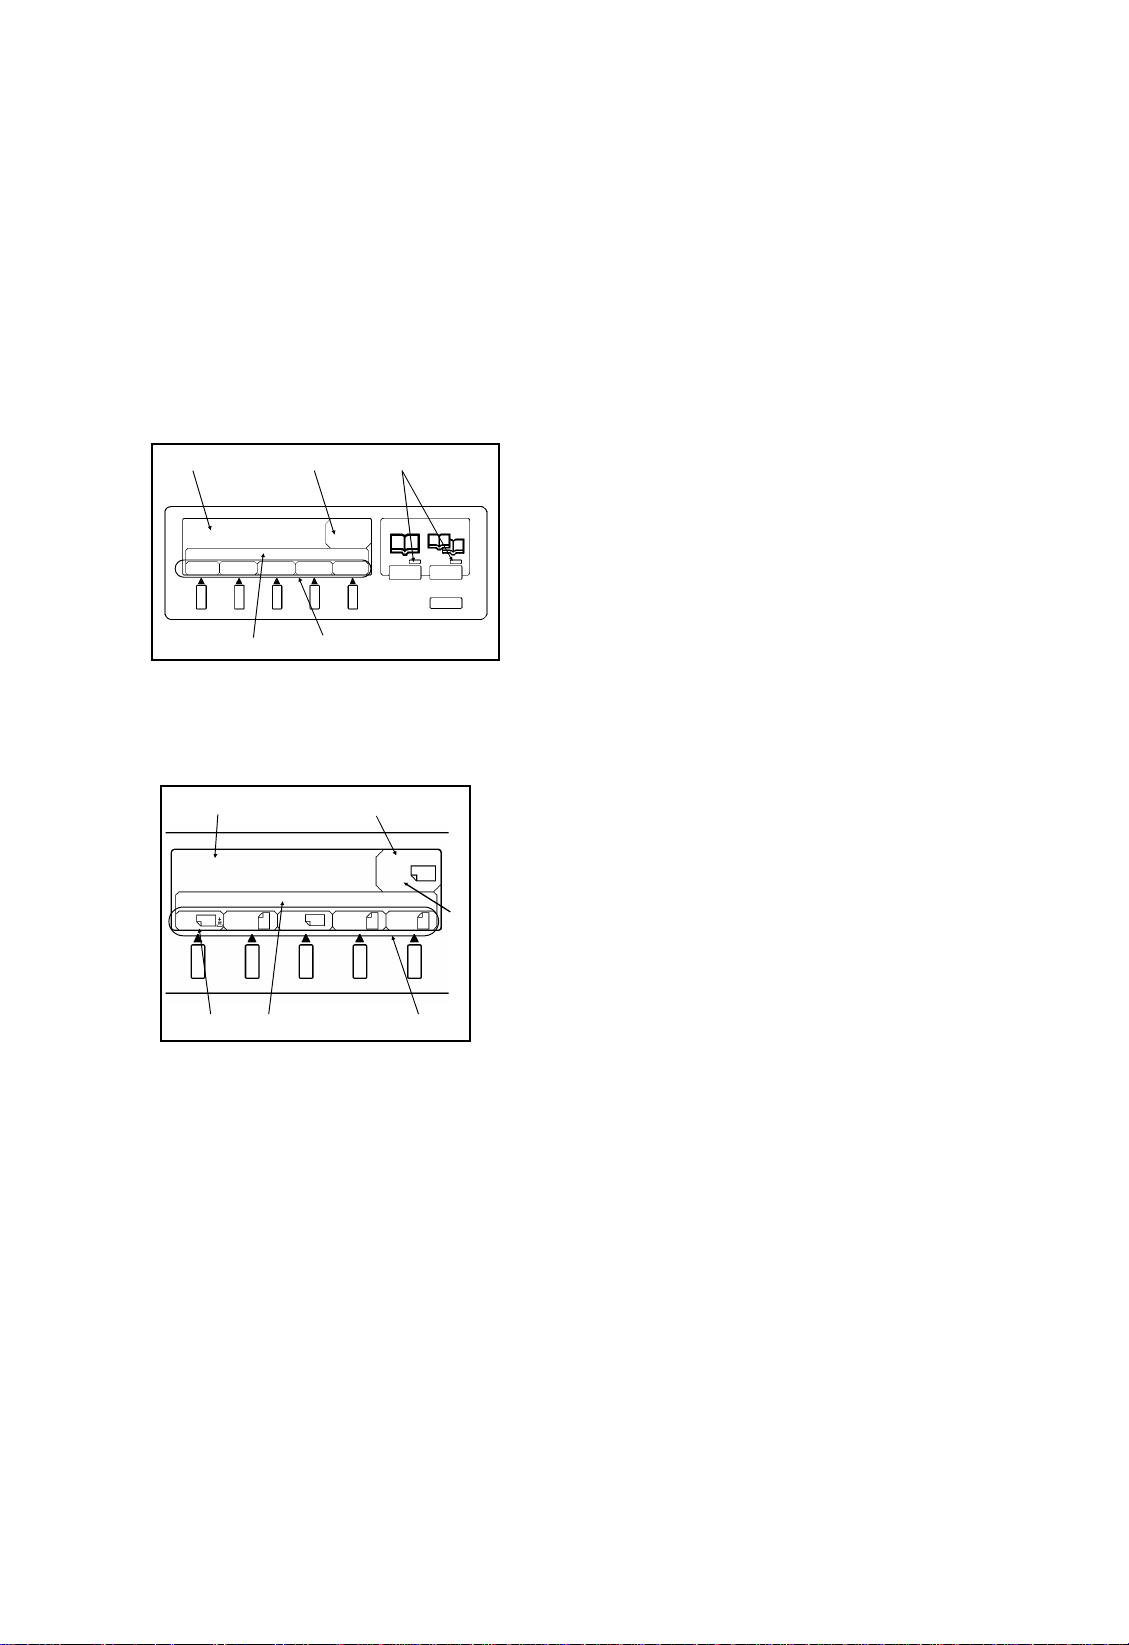
Display Panel Key Identification (PS3000)
D
E
F
G
H
A. Spread Key: Press to select the spread (landscape) copy mod e.
B. Page-by-Page Key: Press to select the page-by-page (portrait)
copy mode .
Spread / Page by Page
B
Panel Reset
CAIIIII
C. Panel Reset Key: Press to reset the control panel settings to the de-
faults.
D. Exposure Key: Press to call the screen that allows you to set the
copy image density and quality.
E. Zoom Key: Press to call the screen that allows you to set the zoom
ratio.
F. Multi-Copy Key: Press to call the screen that allows you to set the
number of copies to be made.
G. Paper Key: Press to call the screen that allows you to set the copy
paper size.
H. Function Key: Press to call the screen (Function menu) that al-
lows you to set the various auxiliary functions including the Book Original and Book
Split settings.
I. Select Key: Press to select the corresponding function shown on the
Display Panel.
Control Panel Keys and touch Panel (Di30)
Refer to the Operator’ s Man ual for Di30.
1-3
Page 7

PS3000 Operator’s Manual
Chapter 2
Chapter 2. Installing It Properly
Installing the system installation Site
To ensure utmost safety and prevent possible m alfunctions of the system,
install it in a location which meets the following requirements.
- A place away from a curtain or other things that catch fire and
burn easily.
- An area where there is no possibility that it might be splashed
with water or other liquid.
- An area free from direct sunlight.
- A place out of the direct air stream of an air conditioner, heater,
or ventilator.
- A well ventilated place.
- A dry place.
- A dust-free location.
- An area not subject to undue vibration.
- A stable and level surface.
Power Source
The power source voltage requirements are as fo llows.
-Use a power source with little voltage fluctuations.
Voltage Fluctuation: Within 10% of AC120V
Within 10% of AC220 - 240V
Frequency Fluctuation : 50 Hz Within ±2.5%
60 Hz Within ±3%
- If any other electrical equipment is sourced from the same power outlet, make sure that the capacity of the outlet is not exceeded.
- The outlet should be located near the system and easily accessible.
- Never connect by means of a multiple socket any other appliances or machines to the outlet being used for the system.
- If an extension cord is needed, use one with a capacity more
than the power consumption of the system.
- Make sure that no unusual, excessive force is being applied to
the power cord or extension cord.
Grounding
To prevent receiving electrical shocks in the case of electrical leakage, always
ground the system. Connect the groun d wire to:
- The ground terminal of the outlet.
- A ground contact which complies with the local electrical standards.
Never connect the ground wire to a gas pipe, the ground wire for a
telephone , or a water pi pe.
2-1
Page 8
PS3000 Operator’s Manual
Chapter 2
Space Requirements
To ensure easy copying operation, supply replacement, and service maintenance, adhere to the recommended space requirements detailed below.
PS3000 is connected to Di30 via a cable which is 2.5 meters long or more;
however, keep a distance of less than 2 meters between the two machines to
prevent load from being applied to the cable and connectors.
For the space requirements for a Di30 and its options, see Space Requirements on p. 3 of the Di30 Operators Man ual.
Operating Environment
The operating environmenta l requ irements of the system are as follows.
Temperature: 10°C to 35°C with a fluctuation of 10°C per hour
Humidity: 15% to 85% with a fluctuation of 20% per hour
2-2
Page 9

PS3000 Operator’s Manual
Chapter 2
Precautions When Making Copies
To ensure the optimum performance of the system, follow the precautions
listed below. At the same time, use the precautions for using Di30. (See
Using the Copier Properly on p. 4 of the Di30 Operators Manual.)
- NEVER place a heavy object on the Original Table or subject it
to shocks.
- NEVER move PS3000 or turn the Main Switch OFF while it is
making copies.
- NEVER bring any magnetized object or use flammable sprays
near the system or cable s.
- NEVER place a vase or vessel conta ining water on PS3000.
- NEVER drop paper clips, staples, or other small pieces of metal
into PS3000. .NEVER attempt to remove any cover or panel
that is secured.
- ALWAYS insert the power plug all the way into the power outlet.
- ALWAYS make sure that the outlet is visible, clear of PS3000
and Di30.
- ALWAYS ensure that PS3000 does not ride on the power cord or
communications cable of other electrical equipment, and it does
not get such a cord or cable wedged into its own mechan ism.
- NEVER leave a damaged or cracked PS3000 power cord or communications cable unattended. If you find any of these conditions, immediately shut down the system, unplug the power cord,
and call your Technical Representative for appropriate action.
- ALWAYS provide good ventilation when making a large number
of continuous copies using the system.
- NEVER leave PS3000 running when it becomes inordinately hot
or produces abnormal noise. If that happens, immediately shut
down the system, unplug it, and call your Technical Representative.
NOTE
A negligib le amoun t of ozone is gener ated during norma l
operation of this system. An unpleasant odor may,
however, be created in poorl y ventil ated rooms durin g
extensive copying operation s. For a comfortable, healthy ,
and safe operatin g env iro nme nt, it is recom men ded that
the room be well ven tilated.
Care of Supplies
2-3
Page 10

PS3000 Operator’s Manual
Chapter 2
PS3000 requires no supplies, but so does Di30 and they are toner, copy paper,
and other copier supplies. For handling of these supplies, see Care of Copier
Supplies on p. 5 of Di30 Operators Manual.
Moving
If you need to tran sport the system over a long distance, consult your Technical
Representative.
2-4
Page 11
PS3000 Operator’s Manual
Chapter 3
Chapter 3. Using the System
Display Panel
With PS3000, you can make a copy when its Start Keys are lit up green. The
LED in each S tart Ke y tells the type of copy, Spread or Page-by-Page, you
can make by pressing either one of them. (See How To Make Copies on p.
3-10.) Different parts on the Display Panel screen give different kinds of
information as follows.
1
4
Press the start key
copy spread page
A3 A4
B4 B5
Paper
32
5
21
x1.00
17
3
654
1. Tells the condition of the system and
gives instructions or a warning. (For
warning s, see p. 4-8.)
2. Shows the copy paper size curren tly selected.
3. Tells the type of copy you can now
make, either the spread (landscape)
or page-by-page (por tr a i t).
4. Gives the title of the menu.
5. Shows the menu items of choice.
Example: Each part tells that:
1. You can make a spread copy by pressing either one of the two Start Keys.
2. PS3000 in the full size mode.
3. A3 paper is fed to make a landscape
copy.
4. The top paper cassette of Di30 is se-
lected as a paper source.
5. The menu shown is Paper selection.
6. Yo u can make a cho ice of the c opy paper size from among these options, either A3, A4, B4, or B5.
What the Paper Directio n Indicato r Mea ns
: Paper is fed to make a landscape copy.
: Paper is fed to make a portrait copy.
3-1
Page 12

PS3000 Operator’s Manual
Chapter 3
Making and Validating a Choice
To select a menu item, press the Select Key immediately under the item of
your choice on the screen. When the key is pressed, the item is highlighted,
which indicates that your selection has been validated.
Default Setting
The default settings are the options of the basic as well as auxiliary fun ctions
that the system uses unl ess you specify another one. They are the factory
settings and can be se lected by pressing the Panel Reset Key. Here are the
details of the default settings.
Basic Functions
Exposure: Auto Exposure (Central setting for tuning)
Image quality: Text
Zoom: Full size (X1.000)
Paper: The size of the paper loaded in the drawer selected
on Di30.
Auxiliary Functions
Book Orig(inal): ON
Book Split: OFF
Dup(lex) Unit: OFF
NOTE
In the case that the Auto Zoom mode has been selected, the
mode is stored in memory even after the power is turned
OFF. And the mode wil l be auto mati ca lly sele cted when the
power is next turned ON.
As to the Set (Sleep, Warn and Edit), PS3000 stores in its memory the
settings valid when the power is turned OFF. T hese settings become valid
when power is next turned ON.
Panel Reset Key
When you press the Panel Reset Key, all of the PS3000 functions are reset
to the defaults. No ch anges are, howeve r, made to the sett ings made b y Set.
3-2
Page 13
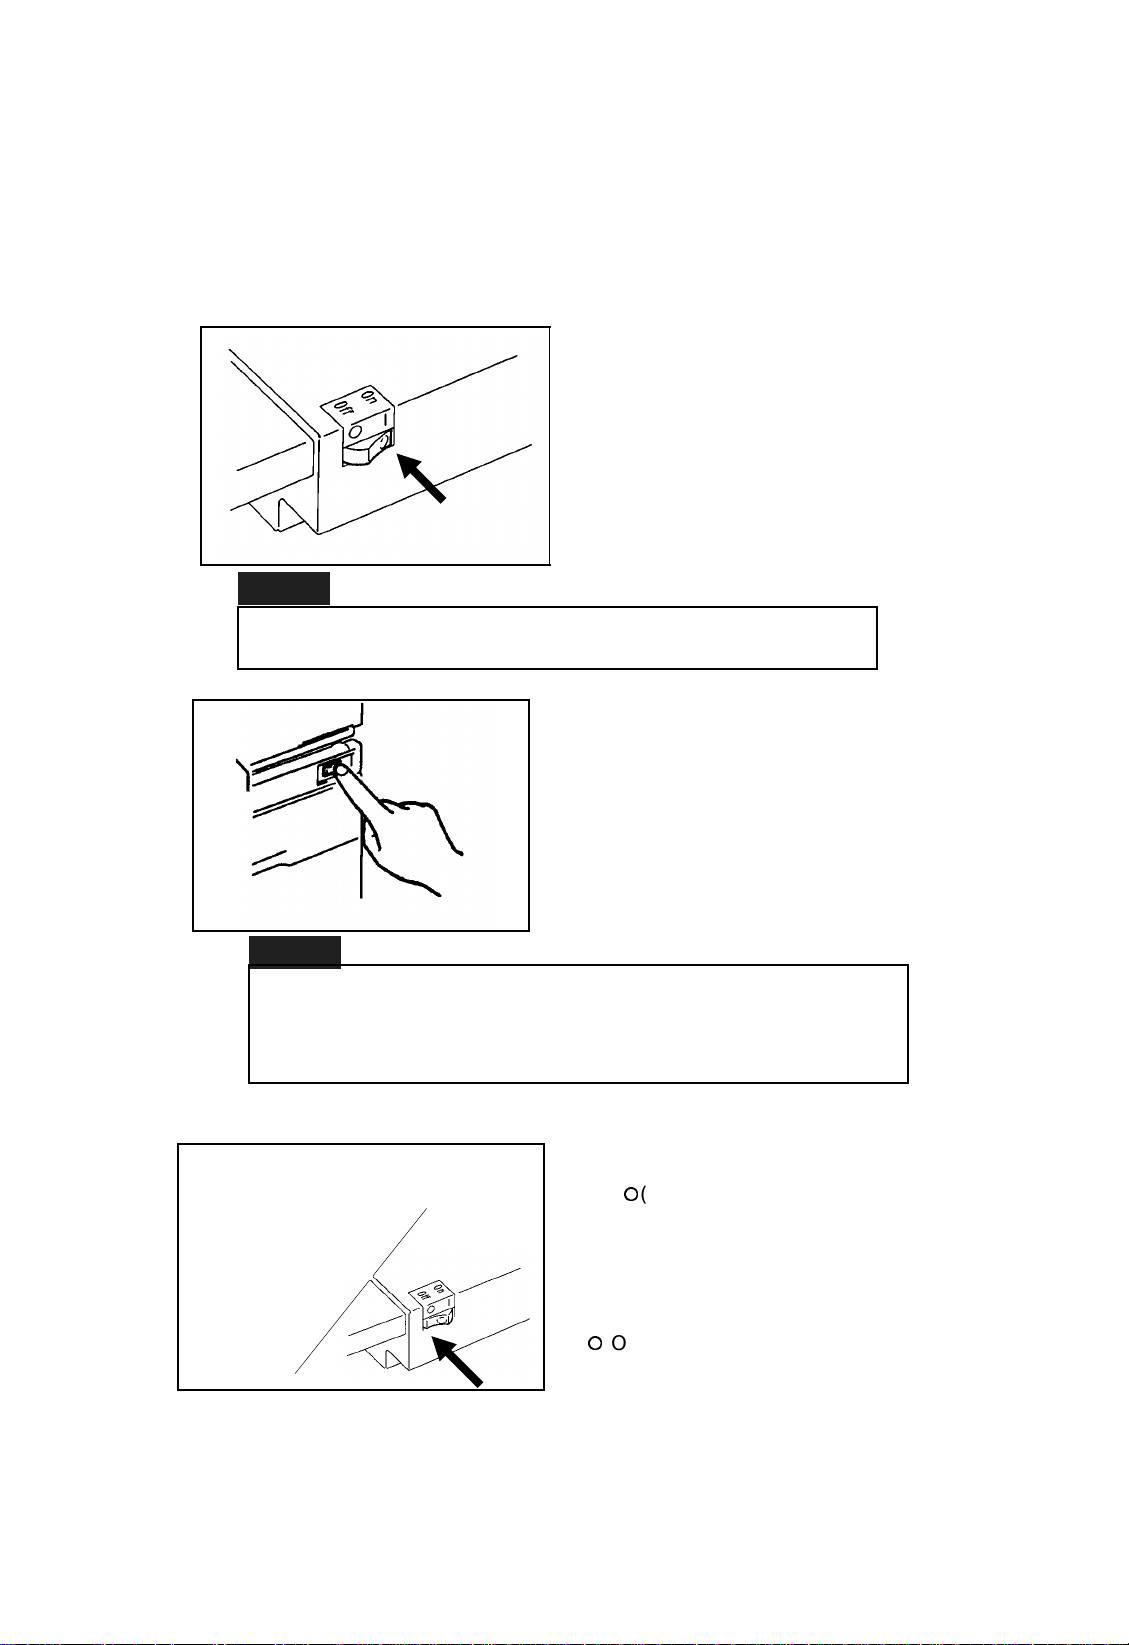
Turning ON and OFF the System
Turning ON
1. Press the Main Switch of PS3000 to
NOTE
Check that PS3000 is connected pos iti ve ly to Di30 via the
Interface Cabl e.
PS3000 Operator’s Manual
Chapter 3
the I (ON) position. At this time, the
PS3000 lamp lights up with its half intensity. (For details, see Lamp
Lighting on p. 3-4.)
NOTE
While Di30 is warming up, PS3000 shows the message on
its Di s p lay Panel. As soo n as Di3 0 be c o mes ready to ma ke
copies, the message chan ges to For details, see Scann er
Selection on p. 3-17.
Turning OFF
2. Press the Power Switch of Di30 to the
I (ON) position. It takes about 3 min.
after this for Di30 to become ready to
make copies. For more details, see 5.
Turning ON and OFF and Resetting
the Copier on p. 23 of Di30 Operators
Manual.
1. Press the Main Switch of PS3000 to
the ¡(OFF) position. Before doing so,
check that the Display Panel show s
the message "" or "". If any other message is being shown, do not turn the
power O FF.
2. Press the Power Switch of Di30 to the
¡
(OFF) position. Before doing this,
check that the message "" is being
shown on the Message Display of the
Touch Panel and the Start Key is gre-
en.
3-3
Page 14

PS3000 Operator’s Manual
Chapter 3
Precautions When Turning Power ON
When the DPCS3000 system is tu rned ON, PS3000 is activated as a sca nner.
The Users Choice function of Di30 , however, allows for making a different
setting whereby PS3000 may be ac tivated as otherwise. (For details, see 7.
Users Choice on pp. 123-126 of Di30 Operators Manual.)
While Di30 is functioning as a digital PPC, PS3000 remains in the standby
state with the message "" being shown on its Display Panel. If Di30 is in
operation, such as while it is in a copy cycle when the application of Di30 is
changed to a printer through key operations on PS3000, th e message "" appears on the Display Panel of PS3000.
While Di30 is fun ction ing as a digital P PC, the Start Keys on P S3000 are l it
up orange. They turn to green as soon as the application of Di30 is switched
to the printer. At this time, the Display Panel shows the message "", etc.
Lamp Lighting
Lighting wi th Half Intensity
PS3000 lights its lamp with half intensity when it is turned ON or w hile any
of its keys is being operat ed. The lamp is lit with half inte nsity when PS3000
is initialized or the menu is switched. It goes out one min. after the key has
been operated. While the lamp remains lit, it is c ooled by a fan which is
stopped one min. after the lamp has gone out.
Lighting with Full Intensity
The lamp is lit up with full intensity while the Scanner Unit is reading an
original. It remains lit as long as the Scanner Unit reads the data. The period
of time it remains lit varies with different original sizes. As soon as the
Scanner Unit completes reading, the intensity of the lamp light is switched to
half.
NOTE
NEVER gaze at the lamp whe n it i s lit wit h ful l in tens ity, as
damaged eyes resu l t.
Off in Sleep
When Sleep is selected of Set available from the auxiliary function (Function)
menu, communications with Di30 are shu t down temporari ly and Di30 can be
used as a digital PPC. At this time, PS3000 gives the message "" on the
Display Panel and turns OFF the lamp.
3-4
Page 15

PS3000 Operator’s Manual
Chapter 3
Notes on Originals
This system is designed for exclusive use in making copies from an encyclopedia, dictionary, or a thick book or file. Note, however, that it may not make
copies reliably from any of the following types of originals.
1. High-gloss originals
Some of the color-photo pages such as gravures of magazines and catalogs
have a gloss level of over 60. If such an original is used, the system gives a
warning, interrupting the copy cycle. In such cases, select the Manual
Exposure mode, adjust the exposure level manually, and hold the original
as flat as possible to run the copy cycle again.
2. Origin a l s having a high background density
By background density, we mean the color of the paper itself on which texts
and photos are printed. When the original has a high background density,
therefore, it is itself colored (other than white), or it is newspaper or a diazo
copy (an A2 or larger drawing u sed in construction sites and other e ngineering
environments). When any of these types of originals is used, the system gives
a warning, interrupting the copy cyc le. In such cases, select the Manual
Exposure mode, adjust the exposure level manually, and hold the original
as flat as possible to run the copy cycle again.
NOTE
If your origi na l is a sheet such as a leafle t, you can al so
use the Photo mode of Di30.
NOTE
If you ignore the warnin g and run the copy cycle, a bad
copy results.
3. Originals having colored background
If the original has a colored (light green or light blue) background (such as a
timetable) with texts of lo w density, the texts may be copied with a den sity so
low that they are illegible. In such cases, use the Tuning function of Auto
Exposure mode.
3-5
Page 16

PS3000 Operator’s Manual
Chapter 3
4. Originals to which Post -it is affi xed
The system may not work properly if
an original is used to which a tag is affixed or a bookmark is placed so that it
30 mm
5. Originals having both texts and photos
This system offers two imag e quality modes, Text and Photo. For an original
having both texts and photos on it, first decide which you want to give top
priorit y. If you make a copy of texts in P hoto mode, you’ll get out-of-focus
texts.
is visible above the top edge of the original or bey on d the rig h t or left e dg e
within a range of 3 cm from the top
edge, as shown at left. (This is because the system takes the tag and
bookmark as part of the original, resulting in false detection.) If you need to
use such an origin al, mov e the tag or
bookmark to a place outside the range
shown on the left before making copies.
6. Originals larger than the Original Table
When the original is larger than the Original Table, you canno t press the
Start Key. If it is a file, remove the page, from which you want to make a
copy, from the file and make a copy. If the original is a book, we recommend
that you use the optional foot switch.
7. Originals havi ng texts or fig ur es in red
If the original has a red text or figure, in addition to black ones (including lines
and arrows), use Text mode for a good result. If Photo mode is used,
however, the red text and figure may be reproduced with light density.
3-6
Page 17

PS3000 Operator’s Manual
Chapter 3
Placing t he Original
Both a book or iginal and a sheet original can b e used on the DPCS3000 sy stem
to make copies from.
Book Originals: Encyclopedia, dictionary, catalog, weekly magazine, etc.
Sheet Originals: A sheet document including a photo
Book Originals
Stopper (reference edge)
Base
Centor
size guide
1. Place the open book origin al fac e up,
aligning its top edge with the Stopper
(reference edge) on the Original Table.
NOTE
If the book is of a nonstandar d siz e, fit the two pages into the
B4 or A3 size lines. If the Start Keys are invisible behind the
book in this case, we recomme nd that you use the optiona l foot
switch.
Sheet Original
2. Align the stitch of the book with the
center of the Original Table. If your
original is of the standard size (A5,
B5, or A4 size when the book is closed), this procedure will bring the two
pages into the area inside the size lines.
Place the original so that its top edge
is aligned with the Stopper (refer en c e
edge) on the Original Table and it is
either aligned wi th the size lines or
correc tly ce ntered.
NOTE
If th e sheet origi nal is wave d
or creased and does not lie
flat, you can use Di30 to make
your copie s.
3-7
Page 18

PS3000 Operator’s Manual
Chapter 3
Holding t he Original
To ensure that you will make a good copy, hold the original so that the two
pages lie flat. If the height of the right-hand half of the book d oes not equal
that of the left-hand half, press the higher half down so that the to p su rfaces
of the two pages level off. Keeping that position, press the Start Key. The
press of the Start Key will automatically lock the Original Table in position.
The Original Table is un locked when th e Scanner com pletes reading the data
on the original (at which the Start Keys turn green).
1. Open your book orig inal. Holding it
with your both hands, plac e the book
face up on the Original Table.
NOTE
If you hold the pages with a
weak force, the central parts
between the pages are curve d
upward, resul ting in a bad
copy. Try to pull your both
thumbs outward.
2. PS3000 is equipped with an auto
focus function that c an be used only
in the Book Or ig mode. The auto
50 mm
PS3000 can be set to give a warning if the surface of the original is outside
this auto focus range. Since it is extremely difficult to visually determine
this aut o f ocu s range, we recommen d that you use this capability offered by
PS3000. For more details, see Warn on p. 4-8 of Function Men u (Auxiliary
Functions).
focus can fu n ction in the range between the su rface of the Original Ta ble and a 50-mm height from it.
Adjust the height of the origin al pag es
so that they are at a height in this range.
3-8
Page 19

PS3000 Operator’s Manual
Chapter 3
3. Press the Start Key. This causes the
Scanner to start reading the data on
the open book. Keep holdin g the book
in position with your two hands until
the Scanner completes readin g the
data (which takes about 10 sec.).
30 mm
NOTE
When the Start Key is pressed,
make sure that the space
enclo se d by th e Sc an n er Un i t
and the right and left edges of
the book is clear of your arm or
any other o bs tacle. If an arm is
inside this space, the system
will be u na b le to make a g o o d
copy.
NOTE
If your finger or hand gets in
the are a shown at left when
holding the book , the Scann er
may not be able to read the dat a
correctly.
NOTE
If the book original is so thick
that its use in the Spr ea d mode
results in the warning, select
the Page-by-Pa ge mod e and
bring each of the two pages
into the auto focus range
separately for makin g
page-by-page copie s.
3-9
Page 20

PS3000 Operators Manual
Chapter 3
How To Make Copies
You can select the copy ing are a, if you make a copy of whole area (two pages)
of a original or only one side (left or right page) of th e original, by the Spread
Key and the Page-by-Page Key. A lit LED or LEDs behind the open-book
graphic symbol in each Star t Ke y tell the area of original to be copied.
Spread
Spread:
The verso (left) and rec to (rig ht) pages
of the open book are copied onto a
single sheet of paper.
Left Start Key
Page-by-Page
Right Start Key
Page-by-Page:
Each of the verso (left) and rect o
(right) pages of the open book is copied
onto a separate single sheet of paper
(vers o only or recto only).
1. Check that the Display Pan el te lls
that the system is ready to mak e copies. (The message should be shown
on the panel.)
2. Place the origin al face up on the Original Table. (See Placing the O riginal
on p.3-7 and Notes on Originals on
p.3-5.)
3. Adjust the heig h t of the right- an d le fthand sides of the Original Table so
that the top surfaces of the two page s
of the original level off, as visually
checked.
3-10
Page 21

PC3000 Operator’s Manual
Chapter 3
4. Press either one of the two Start
Keys.
Example 1:
To make a page-by-p age copy of the
recto (right) page of an op en book or a
sheet original, check that the message
and lit Start Key are as shown in A at
left and then press the righ t Start
Key.
Example 2:
To make a spread copy on a single
sheet of paper of the recto (r ig ht) an d
verso (left) pages of an open book or a
sheet original, check that the message
and lit Start Key are as shown in B at
left and then press either the right or
left Start Key.
5. The lamp lights up with full intensity
and the Scanner starts readin g the
data on the original. At this time, the
Display Panel shows the message, the
Start Key or Ke ys ligh t up oran ge ,
and the Original Table is locked.
6. The lamp then lights up with half intensity and th e Sta rt Key or Keys
turns green. This indicates that the
Scanner has completed readin g the
data. At this time, the Original Table
is unlocked.
NOTE
If Warn of Set is set, a buzzer sounds and a warning is
given on the Dis pl ay Panel if the Scann er is unable to read
the data corre ctly whe n the Start Key is pre ssed. The
reading seq uen ce is interrup ted at this time .
3-11
Page 22

PS3000 Operators Manual
Chapter 3
Types of Copy
The system allows you to make three different types of copy. Select one
according to your need.
Spread Copy
The system copies the image of the ori-
ginal symmetrical aro und the center of
the Original Table onto a single she et
of copy paper. Press the Sp rea d Ke y
12
Page-by-Page Copy
12
PushLeft
Start Key
12
PushRight
Start Key
to select this mode. When the key is
pressed, its LED lights up green.
The system copies each page of the ori-
ginal determin ed with refer en ce to the
center of the Original Table onto a
single separate sheet of paper. This
mode can be selected with the Page-
by -Pag e Ke y . When this key is pressed, its LED indicating the page to be
copied lights up green.
12
Book Split Copy
12
PushLeft
Start Key
2
1
PushRight
Start Key
1
The system copies each page of the ori-
ginal determin ed with refer en ce to the
center of the Original Table onto a
single separate sheet of paper, consecutively from the verso to recto page, or
vice versa. The page for whic h the
Start Key is pressed becomes the first
copy, the opposite page the second
copy. Thi s function is valid under:
2
Book Orig: ON
Book Split: ON
Page-by-Page Key: ON
3-12
Page 23

PS3000 Operator’s Manual
Chapter 3
Book Original Mode (Boo k Orig)
Select this mode when making copies of a book original using PS-3000.
When this mode is selected, the following functions can be set.
Functions Automatically Set
Curved Text Line Correct ion
This function is automatically enabled when Book Orig is se-
lected. It matches the positions of the texts on the curved lines
near the central parts between the pages of an open thick book
with those of other texts, ensuring that a undistorted copy will
be made.
Text Compression Correction
This function is automatically enabled when Book Orig is se-
lected. The texts near the central parts between two pages of an
open book look crowded with little spaces between characters
when viewed from the top, since those parts of the pages are curved. If they are copied as they are, the result is a text squeezed
sideways. This function expands the characters according to
how they are squeezed, prov iding a copy as close as possible the
original form.
Auto Focus
PS-3000 detects the height of the original through its prescan,
thereby bringing the focal point of its Image Scanner to the surface of the original (which should range from 0 to 50 mm with
reference to the original surface). This function is unique only
to the Book Orig mode. When Book Orig is turned OFF, the
focal point is fixed on the surface of the Original Table.
Other Selectable Funct ion s (in clud ing Set)
Functions Auto Exposure (basic/aux.)
Auto Zoom
Book Split
Set Center
Mask
Finger
These functions become selectable only when Boo k Orig is s e lected. They are disabled as soon as Book Orig is turned OFF.
3-13
Page 24

Basic/Auxiliary Functions
Auto Exposu re
Zoom
Dark
Image
Print
to Fit
O K
O K
Light Auto
Auto Zoom
Full Reduct Enlarg
PS3000 Operators Manual
Chapter 3
This function can be selected only
when Text is selected in the Book
Orig mode. It is automatically canceled and, ins tead, the cent ral lev el of
the Manual Exposure mode (default) is set when either Text or Book
Orig is canceled. In the Auto Expo-
sure mode, PS3000 detects the back-
ground (density) level of the original
during prescan an d "blanks out" the
background during scan to print the
texts only .
This function can be selected only
when Book Orig is selected. When
Auto Zoom is selected, PS3000 detects the size of the original dur ing pr escan and enlar ges or redu c es the
image as necessary to match the size
of the copy paper to be fed. When
Auto Zoom is selected, the zoom ratio
shown on the upper right side of the
Display Panel disappears. It appears
only during a copy cycle.
fore-edge width
NOTE
As you make a copy of each
page from an open book (in the
Book Split mode or
Page-by-Page mode),
continuously from one page to
another, the difference in
fore-edge width betw een th e
verso (left) and recto (righ t)
pages becomes so great that
different zoom rations are used
between the verso and recto
pages. In such case s, cancel
Auto Zoom and use a fixed zoom
ratio.
3-14
Page 25

PS3000 Operator’s Manual
Chapter 3
Book Split
Book
Book
Orig
Dup
Unit Set
O K
Split
This function can be selected when
"Book Orig" and "Book Split" are
both selected and, in addition, the
Page-by-Page mode is further selected. It allows you to make a copy
each of the verso (lef t) and re cto (r ig ht)
pages consec utive ly in tha t order or in
reverse order depending on which
Start Key is pressed. The side of the
Start Key depr e ssed is copied fir s t.
3-15
Page 26

Set
Center
PS3000 Operators Manual
Chapter 3
When this function is selected (highlighted), the image is moved
to the center of the copy paper and printed. In normal conditions, the image is printed with reference to the upper part at the
center of the copy paper in the Spread mode. In the Page-by-
Page mode, the image is printed with reference to the upper
left corner of the copy paper when the right Start Key is used
and to the upper right corner of the copy paper when the left
Start K ey is used.
: Base mark
Mask
Finger
Normal
Mask
The Scanner detects the size of the ori-
ginal during its presc an motion and
erases the space s ou tsid e the original
durin g it s copy cyc le.
This function can be selected if Mask
has previously been selected. PS3000
detects the fingers plac ed on both ends
of the original and erases those areas
when making copies.
FingerMask
NOTE
Make sure that your fingers
are pl aced outsi de the texts .
If they are in the te xt s , parts
of the texts may be era sed.
3-16
Page 27

PS3000 Operator’s Manual
Chapter 3
Sheet Original Mode
Select this mode when m aking copies of a sheet o riginal. None of the function s
of Auto Exposure, Auto Zoom, and A ut o Focus can be used in this mode.
(The focal point is fixed on the surface of the Original Table.) When Book
Orig is canceled, PS3000 is automatically set into this Sheet Or iginal mod e
with exposure and zoom set to the defaults.
NOTE
Text mode is the defaul t setting for image qual ity. The result
would be better if you choose Photo for sheet orig inals with
photos.
3-17
Page 28

PS3000 Operator’s Manual
Chapter 3
Scanner Selection
As noted earlier, the DPCS3000 system consists of a PS3000 and a Di30.
PS3000 functions as a scanner, while Di30 serves not only as a printer, but
also as an freestanding digital PPC using its own Scanner (platen). By
shutting off communications between PS3000 and Di30, Di30 becomes a
digital PPC to read the original using its own Scanner and platen.
Shutting Off Communications
1. Press the Function Key to select the
function setting screen.
Sleep Warn Edit check
O K
2. Select Set and select Sleep. At this
time, the lamp, which has been lit
with half intens ity, goes out and the
message "" on the Display Panel changes to " " or " ".
Recovering Co mmun ic at ion s
When you again want to use Di30 as a printer with PS3000 activated as a
scanner, press any key on the PS3000 panel.
Di30 is busy
NOTE
While Di30 is being used as a
digital PPC, the Dis play Panel
on PS3000 give s t he messag e
"Please wait some while.".
NOTE
If the interf ac e cable with
PS30 00 is fa ulty, PS30 00
accepts no key operation wi th
a warning message of shown
on its Display Pane l. When
the fa ult is then eliminated, the
message disappears and
PS3000 accepts key operation.
3-18
Page 29

PS 3000 Operator’s Manual
Chapter 4
Chapter 4. Working with the Menu
When you open the panel cover to the left of the Display Panel, you will find
five menu keys used for making various settings. Pressing one of these keys
will bring you to the corresponding menu screen on the Display Panel. When
OK is pressed on each menu screen, you can go back to the paper selection
screen.
Exposure Menu
When the Exposure Key i s pressed, a
Exporsure k e y
Exposure
Exposure can be set either by Auto or Manual Exposure mode.
menu screen appears allowing you to
set the exposure mode/leve l and image
quality.
Auto Exposu re Mod e
Light Auto
Dark
Image
Auto Exposu re Tun in g
Light Auto
Dark
Image
NOTE
Unlike manual adju stme nt, Auto Exp osu re Tun ing varies the
exposure level only a small amount.
O K
O K
When you select Auto, the system is
set into the Auto Exposure mode. It
can, however, be set only in the Book
Orig mode with Text selected for the
image quality. When in this mode,
PS3000 determines the backgrou nd level of the original thr oug h the Scan ners prescan motion and lets Di30
copy onl y the text of the or iginal by
blanking out the background.
The exposure leve l under the Auto Ex-
posure mode can be fine-tune d by
pressing Light or Dark as necessary
after Auto has been selected. When
Auto is selected, the exposure lev el i s
normally set at the center. One press
of Light or Dark varies the level in 4
steps.
4-1
Page 30

PS 3000 Operator’s Manual
Chapter 4
Manual Exposure Mode
The system is in the Manual Exposu-
re mode when Auto is not selected.
When in this mode, you can manually
vary the exposur e lev el in nine s teps.
Light Auto
Dark
Image
O K
One press of Light or Dark change
the level one step towar d the ke y pre ssed. Both Text and Photo can be
used in the Manual Exposure mode.
Image Quality Menu
When you press the Select Ke y corresponding to Image, the image quality
setting scr een appears. You have either Text or Photo to choose from for
the image quality.
Text
When in this mode, the charac ters of
the text are printed clearly with enhanced outlines. Auto Exposure fun-
Image
Text Phto Memory
O K
ctions only in Text mode and is
canceled when Photo is selec ted.
Photo
Image
Text Phto Memory
Memory
Image
Text Phto
4-2
Memory
O K
O K
When in this mode, emphasis is placed
more on reprodu ction of half tone s. In
Book Orig, Auto Exposure cann o t
function if Photo is selected. Hence,
the message "" appears on the Display
Panel. In this case, press OK to cancel Auto Exposure (Bo o k Orig) or
press the Pane l Reset Key (br ing ing
the menu setting to defaults).
When Memory is selected, the da ta
read by PS3000 is stored in the Di30
memory for later printin g . If you want
to make multiple copies, this fun ction
eliminates the job of holding the original in position until all copies are
made - i.e., you have only to keep the
original in position while the Scanner
reads the data on the original once.
Page 31

PS 3000 Operator’s Manual
Chapter 4
Zoom Menu
When you press the Zoom Key, the zoom ratio setting menu appears on the
Display Panel. On the screen, you have a choice of Auto Zo om or manual
zoom (fixed and variable). With the variable manual zoom, the ratio can
be set in the range betwe en X0.50 and X2.00 in 0.01 increme nts. (Once X0. 50
or X2.00 is reached, the ratio will no longer be changed even by pressing the
key.)
Auto Zoom
Auto Zoom can be selected only when Book Orig has been selected. Whe n in
this mode, PS3000 reads the size of the original during prescan and automa tically enlarges or reduces the image to fit it in the copy paper to be fed. (See
Basic/Auxiliary Functions on p. 3-14.)
Full (x1.00)
Select Full when you want to make a
copy of the same size as the original.
(This is the defa ult setti ng.)
Zoom
Full Reduct
Enlarg
Print
to Fit
Reduct (Reduction )
Zoom
Full Reduct
Enlarg
Print
to Fit
Enlarg (Enlargement)
Zoom
Full Reduct
Enlarg
Print
to Fit
O K
O K
O K
When Reduct is selected, you will
have three reduction ratios to choose
from - A3>B4 / A4>B5, B4>A4, A3>A4
/ B4>B5. For any other reduction ratio, you ca n select Zoom and press Up
or Down as necessary to arrive at
your desired ratio.
When Enlarg is selected, you will
have three enlarg ement ratios to choose from - B4>A3 / B5>A4, A4>B4,
A4>A3 / B5>B4. For any other enlargement ratio, you can selec t Zoom
and press Up or Down as necessary
to arrive at your desired ratio.
4-3
Page 32

PS 3000 Operator’s Manual
Chapter 4
Multi-Copy Menu
When you press the Multi-Copy Key, a screen appears allowing you to set
the number of copies to be made. Any number from 1 to 9 can be set.
Setting No. of Co pies to be Mad e
To set the number of copies to be
made, use the - and/or + key. W he n
either key is pressed, the number on
the display is increased or decreased.
You can press Clear to reset the num-
ber to 1.
Multi Copy
-
1
clear Count
+
Note on Mak in g Mu ltip le Copi es
DPCS3000 turns ou t one copy per each scan motion . If you are
going to make multiple copies, therefore, you need to hold your
original in position while the Scanner makes its scan motions
for the number of copies to be made. For such multiple copies,
you can use Memory available from the image quality setting
screen. Select it, and you have only to hold the original in position while the Scanner make s the first scan motion.
O K
Count(Counter)
Counter
Reset
-Total Counter
Counts the number of copies made by Di30 and cannot be reset
by the user.
-User Counter
Can be reset by the user when he/she presses the Reset key.
NOTE
The two counters can count up to 1,000,000 . They are
reset to 0 over that number.
O K
When you press the Count key, the
counts of Total Counter and User
Counter appear on the Display Panel.
These counts are retaine d in memory
even when the power cord is unplugged.
4-4
Page 33

PS 3000 Operator’s Manual
Chapter 4
Paper Menu
When the Paper Key is pressed, a screen appears allowing you to select the
copy paper size. (Note that there is no OK key on this screen.) PS3000
automatically reads the sizes of the paper loaded in the drawers of Di30 and
shows the corresponding sizes on the screen .
The copy paper sizes shown on the Dis-
play Panel are related to the drawers
of Di30 as shown on the left. The paper size shown on the right end is
shown only if Di30 is equipped wi th an
optional Large Capacity Cassette
(Stacker).
Stacker
The paper size currently selected for
use is highlighted and, at the same
time, shown on the upper right side of
the Display Panel. When a drawer is
slid out of Di30, the corresponding paper size indicator goes out.
Paper
A3 B4 B5 A4
A4
empty mark
NOTE
The paper si ze once selec te d wi ll neve r be ch anged by
changing the settin g of any other function . When the
Spread Key or Pag e-by-Page Key is pressed, or whe n a
zoom ratio is set, che ck that you hav e selected the correct
paper size.
When a Di30 drawer runs out of pa-
per, an empty mark appears beside
the paper size indic ator. If this drawer is currently selec ted, the message
"" appears on the Display Pan el.
When the pow er is turn ed O N, the p aper source set in Di30 is highlighted.
4-5
Page 34

PS3000 Operator’s Manual
Chapter 4
Function Menu (Auxiliary Functions)
When the Fu n ct ion Key is pressed, a screen appears that allows you to set
the various auxiliary functions - they are:
-Book Orig
-Book Split
-Dup(lex) Unit
-Set
Book Orig
This function, when set, allows you to
activate the following function s dur ing
the prescan motion for making copies
from a book original.
-Auto Exposure
-Auto Zoom
-Auto Focus
For details, see Book Orig on p. 3-12.
Book Split
Set this function when you want to
make a copy of the verso (lef t) or recto
(righ t) page on ly . If the Page-by-
Page Key is further pressed, the system outputs two separate copies of
the verso and rect o pages consecutively, the first copy bein g the page on
the side of the S ta rt Key pressed.
(That is, you have two copies by just a
single press of the Start Key.)
If the Page-by-Page Key is pressed
with Spread pr eviously selected, t he
message appears as a warning.
Dup Unit
This function appears if Di30 is equipped with a Duplex Unit AD-4. The
functions you can further selected are Dup Copy (2-sided copi es) and Face
Down (collating).
4-6
Page 35

PS3000 Operator’s Manual
Chapter 4
1
2
1
2
face down
Dup Copy
When this function is selected, the pa-
per direction graph ic symbol show n on
the upper right part of the Display Panel is doubled, indicating tha t the 2-sided copying function is set. Another
marker appears to the right of the message area and left of the paper direction symbol, 1 indicating that th e
current copy cycle is the first one and
2 the second one.
Face Down
The copies are normally fed out face
up on the Copy Tray of Di30. If you
make copies in the ascending order of
page (1 - 2 - 3), the copy of page 3 is on
the top of the copy stack. When Face
Down is set, the copies are fed out
face down. This means that you have
a collated copy set fed out face down
on the Copy Tray if you make copies in
ascendin g order of page (1 - 2 - 3).
Set
When Set is pressed, a screen appears t hat allows you to ma ke various oth er
settings, i.e., Sleep, Warn, Edit, and Check.
Sleep
This function, when set, switches the Scanner from PS3000 to Di30. For
details, see Scanner Selection on p. 3-17.
Edit
This function is conc ern ed with the cor-
rection functions prov ided by PS3000.
They are:
-Center
-Mask (frame erase)
-Finger (finger erase)
These function s can be used only when
Book Orig has previously been selected. For details, see Boo k Orig
on p. 3-12.
4-7
Page 36

PS3000 Operator’s Manual
Chapter 4
Warn(Warning)
When Warn is selected, PS3000 halts the copy cycle giving a corresponding
warning messag e on the Display Panel i f Auto F ocus (Bind Heigh t), Auto
Exposure, and Auto Zoom (Size Detect) do not function properly to make
good copies during the prescan motion. This a voids a m iscopy. This fun ction
is valid only when Book Orig is selected.
Bind Height (Auto Focus)
If PS3000 finds during the prescan mo-
tion that the surface of the original higher than 50 mm from the Origin a l
Book
Orig
O K
Table or the original is not suitable for
use with PS3000, it gives the message
"" on the Display Panel, disabling the
scan motion.
Auto Expo(A uto Exp osure)
Book
Orig
O K
Size Detect (Auto Zoom)
Book
Orig
O K
If PS3000 finds during prescan that
the exposur e level of th e orig inal i s
high overall or Auto Exposure does
not function proper ly, it gives the message "" on the Display Panel, disabling
the scan motion.
If PS3000 finds during prescan that it
is unable to detect the size of the original because the original is placed aslant or away fr om the Me a sur emen t
Plate, it gives the message "" on the
Display Panel, disabling the scan motion.
4-8
Page 37

PS3000 Operator’s Manual
Chapter 4
What You Should Do When a Warning Message is Given
When a warning message appears on the D isplay Panel during the prescan
sequence, the Start K eys turn green an d the copy cycle is halted.
In this condition, y ou cannot press the Start Key. Read the following and
perform these steps to make your copies successfully.
Be careful, once modes and sett ings a re chan ged, th ose re main valid the re after.
Canceling Book Orig
When a warning message appears, a menu option is given on
the bottom le ft of the display to al low you to cancel Boo k Orig.
When the Book Orig key is pressed (i.e., when the mode is swit-
ched from Book Orig to Sheet Orig), you can now make copies.
NOTE
When the mode is switc hed from Book Orig to Sheet
Orig, the focal poi nt is fixed on the sur face of the
Origina l Ta ble (0 mm). So, the sur face o f the origi nal
should be on the Origi na l Tab le. The expos ure mode is
also switched to Manua l, if Auto has been selected.
Meaning that you need to adjust the expos ure level
according to the orig ina l de nsi ty.
Selecting OK to Ca ncel Fault y Fun ction
When OK is pressed, the paper selection screen appears. Now,
press the basic or auxiliary function key corresponding to the
faulty function to cancel it. The following functions can be canceled with Book Orig set.
-Auto Exposu re
-Auto Zoom
-Edit (Center, Mask, Finger)
NOTE
If the warning mess age pers ists ev en after all of these
functions have been canceled, cancel Book Orig.
Selecting OK to Cancel Wa rning Fun ction from War n Menu
4-9
Page 38

PS3000 Operator’s Manual
Chapter 4
When OK is pressed, the paper selection screen appears. Now,
press the Function Key and cancel the warning function from
the Warn menu.
Note the following particulars for each warning function:
Bind Height:
If a copy is made with Bind Height canceled when Auto Focus
is faulty (the height of the original is not detected properly),
Auto Focu s does not function and the Scan ner reads the original with its focal point fixed at a level of 20 mm from the Original Tabl e.
Auto Expo:
If a copy is made with Auto Expo canceled when Auto Exposu-
re is faulty, the exposure level is set at the central value of the
Manual Exposure mode when the Scanner reads the original.
Size Detect:
If a copy is made with Size Detect canceled when the original
size detection function is faulty, Mask (including Finger) and
Center do not function, resulting in fingers and frame of the
Original Table being reproduced on the copy. If the original is a
certain distance away from the Measurement Plate or tilt, however, Mask an d Center do function, though a slight black fra-
me occurring on the copy.
NOTE
Book Orig remains valid until it is canceled or Pho to is
selected. Even if all warni ng functions are canceled,
PS3000 makes a prescan.
4-10
Page 39

PS3000 User’s Manual
Chapter 5
Chapter 5. Troubleshooting
When a malfunction or paper misfeed occurs in either PS3000 or Di30, the
DPCS3000 syst em gives a trouble messa ge on the Display Panel. At this time,
the Start Keys light up orange and the system i s brought to an immediate
stop if it was in the process of reading the original or making copies.
Di30 Trouble
If a malfunction or paper misfeed oc-
curs in Di30, the trouble message as
shown at left appears on the Display
Panel, the Start Keys light up oran-
ge, and the copy cycle is stop ped. At
this time, check for the details of the
trouble on the Touch Panel of Di30
and reset the trouble condition .
If PS3000 is idle due to a Di30 trouble, you can chang e the settings of basic as well as auxiliary functions of PS3000 through
its panel. As soon as Di30 is recovered from the trouble condition, the Star t Keys turn green and the paper size setting screen
reappears on the Display Panel to accept key operation.
PS3000 Trouble
Two different types of trouble messages are given by PS3000 depending on
the type of trouble.
Warning Messag e
With the warning functions set in Book Ori g, if a fault occurs
in Bind Height, Auto Expo, or Size Detect during the pre-
scan motion, a warning message appears on the Display Panel, Start Keys light up green, and the Scanner stops its scan
motion. For details, see Warn on p. 4-8.
Error Message
If an error occurs in PS3000, an error
message appears on the Display Panel, Star t Key s ligh t up or ang e, and a
scan motion and copy cycle are stopped. Then, the system accepts no key
operation. W hen this happens, check
the detail of the error and turn OFF,
then ON, the Main Swi tch. If the
same error message persists, call your
error numbererror name
Technical Representative and give
him/her the error name and error num ber, together with the information on
the DPCS3000 conditions.
5-1
Page 40

PS3000 User’s Manual
Chapter 5
Troubleshooting
Warning Mes sage Possib le Cause Action
Book heigh is
over 50 mm
Book expousure level
is too high
Book size
is not found
⋅ The height of the
surface of the original is
more than 50 mm above
the Original Table.
⋅ A tag or bookmark is on
the book original.
⋅ The height of the
surface of the original is
more than 50 mm above
the Original Table.
⋅ A tag or bookmark is on
the book original.
⋅ The book original is
outside the size lines on
the Original Table.
⋅ The image density of
the entire original
surface is high.
⋅ A tag or bookmark is on
the book original.
⋅ Lower the original so that
its surface is in the range of
height within 50 mm from
the Original Table.
⋅ If the Spread mode has
been selected, select Page-
by-Page to make the copy.
⋅ Thoroughly read Warn on
p. 4-8 and change the
warning function settings.
Thoroughly read Warn on
p. 4-8 and change the
warning function settings.
⋅ Thoroughly read Notes on
Originals on pp. 3-5 to 3-6
and change the settings to
suit the type of original
being used.
⋅ Lower the original so that
its surface is in the range of
height within 50 mm from
the Original Table.
⋅ If the Spread mode has
been selected, select Page-
by-Page to make the copy.
⋅ Thoroughly read Warn on
p. 4-8 and change the
warning function settings.
⋅ Thoroughly read Notes on
Originals on pp. 3-5 to 3-6
and change the settings to
suit the type of original
being used.
⋅ Adjust Tuning of Auto
Exposure.
⋅ Cancel the Auto Exposure
mode and set the exposure
level manually.
⋅ Cancel the Auto Exposure
mode and set the exposure
level manually.
⋅ Thoroughly read Notes on
Originals on pp. 3-5 to 3-6
and change the settings to
suit the type of original
being used.
5-2
Page 41

PS3000 User’s Manual
Warning Mes sage Possib le Cause Action
Chapter 5
⋅ The book original is
outside the size lines on
the Original Table.
⋅ The original is placed
aslant with respect to
the size lines.
⋅ A tag or bookmark is on
the book original.
⋅ The original is tilt with
respect to the Stopper.
⋅ The original is not
pressed up against the
Stopper.
⋅ The Measurement Plate
is dirty.
⋅ Align the original with the
size lines.
⋅ Align the original with the
size lines.
⋅ Thoroughly read Notes on
Originals on pp. 3-5 to 3-6
and change the settings to
suit the type of original
being used.
⋅ Press the original up
against the Stopper.
⋅ Clean the Measurement
Plate by referring to
Cleaning on p. 6-1 before
making the copy.
NOTE
A warning message app ears onl y when Book Orig and
Warn menu items have previou sly been set.
5-3
Page 42

PS3000 Operator’s Manual
Chapter 6
Chapter 6. Caring for the System
To keep the DPCS3000 system in the best possible condition and ensure
utmost safety , make th e following daily checks and clean the system parts as
instructed below.
NOTE
PS3000 has different service items from Di30. For these
service items for Di30, refer to Care of the Copier on pp.
170 to 172 of Di30 Operators
Daily Checks
Any of the following conditions could dama ge the system or other electrical
equipment. Move the system immediatel y and eliminate the possible cause
of malfunction.
-PS3000 or Di30 rides on the power cord or interface cable.
-PS3000 or Di30 rides on the cord of other electrical component.
If any of the following conditions is noted, immediately turn OFF th e system,
unplug the power cord from the outlet, and call your Technical Representative.
-A scratch or crack is evident on the power cord or interface cable.
-The power cord jacket has frayed to expose the wires inside.
Cleaning
Scanner Glass and Illumin ation Glass
The Scanner may fail to read the origi-
Scanner Glass
Illumination Glass
nal correctly if the Scan ner Glass or Illumination Glass is dirty. Wipe the
surfaces clean of dirt with a dry, soft
cloth.
Measurement Plate, Shardi ng Plate
6-1
Page 43

PS3000 Operator’s Manual
Chapter 6
The height of the orig inal is not cor -
rectly measu re d if the Measur emen t
Plate or Sharding plate(white tape) is
dirty, resulting in a warning messa-
ge. Wipe the surface clean of dirt with
a dry, soft cloth.
Measurement Plate
NOTE
Before cleaning the surfaces, make sure that the PS3000
power cord has been unpl ugge d.
Sharding Plate
6-2
Page 44

Copyright
1995 MINOLTA CO., LTD
1995. 2
0814-7701-01
Minolta Corporation, Document Imaging Systems, 101 Williams Drive, Ramsey, NJ, 07446. USA
Minolta CO., LTD. Image Infomation Products, 3-13, 2-chome, Azuchi-machi, Chuo-ku, Osaka. 541. Japan
Printed in Japan
 Loading...