

Page 1
PS3000
PR version
Operator´s Manual
Page 2

Using the Machine Properly
To ensure the optimum performance of the machine, follow the precautions listed
below.
‹ Never place a heavy object on the machine.
‹ Never subject the machine to shocks.
‹ Never open any doors or turn the machine off while the machine is making
prints.
‹ Never bring any magnetized object near the machine.
‹ Never use flammable sprays, liquids or gases near the machine.
‹ Never modify the machine, as a fire or electrical shock could result.
‹ Never remove any panel or cover which is secured. The machine contains high
voltage components which can cause electrical shock.
‹ Never tamper with the laser mechanism in laser-equipped models, as blindness
or other injury may result.
‹ Never drop paper clips, staples or other small pieces of metal through the vents
or other openings in the machine, as a fire or electrical shock can result.
‹ Never place containers of liquid on the machine. If liquids get inside the
machine, they can cause fire or electrical shock. If a piece of metal or any liquid
gets inside the machine, immediately turn the machine off, unplug the power
cord and call your Minolta authorized dealer . A fire or electrical shock can result
if the machine remains plugged in or is operated after metal or liquid gets inside.
‹ Never leave the machine running if it becomes unusually hot, or if smoke or an
unusual odor or noise is detected. Should any of these conditions occur,
immediately turn the machine off, unplug the power cord and call your Minolta
authorized diealer. A fire or electrical shock can result if the machine remains
plugged in under any of these conditions.
‹ Always insert the power plug all the way into the outlet.
‹ Always make sure that the outlet is visible, clear of the machine or machine
cabinet.
‹ Always provide good ventilation when making a large number of continuous
prints.
‹ Never pull on the power cord, and always hold the plug when unplugging the
power cord. A damaged cord could result in a fire or cause an electrical shock.
‹ Never unplug the power cord with a wet hand, as it could cause an electrical
shock.
‹ Always unplug the po wer cord before mo ving the machine. Movin g the machine
with the power cord plugg ed in can damage the cord resulting in a fi re or causing
an electrical shock.
‹ Always unplug the power cord when the machine is not going to be used for a
long time.
i
Page 3

ii
‹ Never place a heavy object on the power cord, or pull or bend it, as a fire or
electrical shock can result.
‹ Always ensure that the machine does not sit on or move onto the power cord or
communications cable of other electrical equipment, as malfunctioning
equipment or a fire could result.
‹ Always ensure that the power cord or communications cable of other electrical
equipment does not become wedged into the machine mechanism, as
malfunctioning equipment or a fire could result.
‹ Always use the correct power voltage, as improper voltage can cause a fire or
electrical shock.
‹ Never use a multiple outlet adapter, as a fire or electrical shock can result.
‹ Should the power cord become damaged, immediately turn the machine off,
unplug the power cord and call your Minolta authorized dealer. A damaged cord
can result in a fire or cause an electric shock.
‹ If an extension cord is needed, use one with a greater rated capacity than the
maximum power req uirements of the machine. The use of an e xtension cord that
falls short of supporting the maximum power requirements can result in
overheating or a fire.
‹ Always unplug the machine whenever anything unusual is observed during
operation. Make sure that the outlet is nearby and clear of the machine and
furniture.
Note: =Locate the Machine in a Well Ventilated Room=
A negligible amount of ozone is generated during normal operation of this machine . An
unpleasant odor may, however, be created in poorly ventilated rooms during extensive
machine operations. For a comfo rta ble, h ealt hy and s afe o per ating environment, it i s recommended that the room be well ventilated.
Remarque:= Placer le líappareil dans une pièce largement ventilée=
Une quantité díozone négligeble est dégagée pendant le fonctionnement du líappaeil quand
celui-ci est utilisé normalement. Cependant, une odeur désagréable peut être ressentie dans
les pièces dont líaération est insuffisante et lorsquíune utilisation prolongée du líappareil est
effectuée. Pour avoir la certitude de travailler dans un environnement réunissant des conditions de confort, santé et de sécurité, il est pré férable de bien aérer la pièce ou se trouve le
líappareil.
Page 4
iii
Welcome
Thank you for choosing Minolta quality. For over 30 years Minolta has been a leader on the
forefront of office equipment technology and service. Our desire has always been to bring you
highly reliabl e p rodu cts. W e ple dge to c ont in ue to pro vi de yo u, ou r cu stome r, wi th ou r stat e
of the art equipment, as well as full custo mer service for a ll our prod ucts. We lo ok forward to
a long healthy relationship with you and our c ompany. If you have a ny questio ns or comm ents
about Minolta, our product or service, please let us know. Our fax number is 800-237-8087
(for U.S.A. an d C an a da ) . Thank you again.
This operator's manual exp lains how to operate th e unit and rep lenish its supplies. It al so gives
some troubleshooting tips as well as general precautions to be observed when operating the
unit.
To ensure the best performance and effective use of your unit, read this manual carefully until
you familiarize yourself thoroughly with the unit's operation and features. Please keep this
manual and use it as a quick and handy reference tool for immediately clarifying any questions
that may arise.
Please follow the instructions given in this manual when handling the system and do not touch
any part of the system the manual does not cover.
NEVER attempt to disassemble or remodel the system.
The contents of this manual are subject to change without notice.
No part of this manu al may be quoted, reproduced, or translated into any other language.
Page 5

iv
Safety Inform ation (PS3000 Scanne r)
All areas
- Use the shielded cable furnished with the this system. Use of an unshielded cable invites
radio frequency interference.
- Always refer to this manual when operating the scanner and do not attempt to touch the
scanner parts for which no explanations a re given in the text.
-NEVER attempt to disassemble or remodel the scanner, as it is very dangerous.
- Call your Minolt a authorized dealer when y ou want to move a scanner which has been
installed.
U.S.A. only
NOTE
This equipment has been tested and found to comply with the limits for a Class A digital
device, pursuant to Part 15 of the FCC Rules. These limits are designed to provide
reasonable protection ag ainst harmful interference when th e equipment is operat ed in a
commercial environment. This equipment generates, uses, and can radiate radio
frequency energy and, if not installed and used in accordance with the instruction
manual, may cause harmful interference to radio communications. Operation of this
equipment in a residential area is likely to cause harmful interference in which case the
user will be required to correct the interference at his own expense.
WARNING
The design and production of this unit conform to FCC regulations, and any changes or
modifications must be registered with the FCC and are subject to FCC control. Any
changes made by the purchaser or user without first contacting the manufacturer will be
subject to penalty under FCC regu lations.
Copyright
Books, magazines, journals and other materials may be
copyrighted. Unauthorized scanning into a computer and
subsequent printing of such copyrighted materials may be
contrary to the provisions of the United States copyright laws,
title 17 of the United States Code.
You are encouraged to obtain a license from an organization
such as the Copyright Clearance Center in those circumstances
where it is a ppropriate.
Post a copy of the above notice where it will be clearly visible to
users of the scanner.
Page 6

Scanning int o a c omput er an d su bse qu ent p r int in g of th e fo llo w ing i s a ls o pro hib it ed by l aw
under some circumstances.
1. Paper Money of the United States or any Foreign Government
2. Obligations or Securities of th e United States
3. Postage stamps, Postal Money Orders or Internal Revenue Stamps
4. Passports
5. Badges, Identification Card, Passes or Insignia carried by Federal Departments
6. Obligations or Securities of any Foreign Government, Bank or Corporation
The above list is not all inclusive, and no liability is assumed for its completeness. In case
you have doubt, consult your lawyer.
Canada only
This Class A digital apparatus complies with Canadian ICES-003.
Cet appareil numérique de la classe A est conforme à la norme NMB-003 du Canada.
v
Minolta Co., Ltd. reserves the right to modify this documentation for improvements at
any time without prior notice.
The information disclosed in this documentation, including all designs and related
materials, is the property of Minolta Co., Ltd.
No part of this documentation may be reproduced, transmitted, transcribed, stored in a
retrieval scanner, or translated into other languages without prior written consent from
Minolta Co., Ltd.
Page 7

vi
Safety Information (MSP3000 Printer)
Laser Safety
This printer is a page printer which operates by means of a laser. There is no possibility of
danger from the laser, provided the printer is operated according to the instructions provided
in this manual.
Since radiation emitted by the laser is completely confined within protective housing, the laser
beam cannot escape from the machine during any phase of u s er operation.
Internal Laser Radiation
Maximum Radiation Power: 8.8 ×10⁻⁴(W)
Wave Length: 770-810 (nm)
This is a Class IIIb Laser Diode Assy. that has an invisible laser beam. The print head unit is
NOT A FIELD SERVICE ITEM. Therefore, the print head unit should not be opened under
any circumstances.
For United States
Laser Safety
This printer is certified as a Cl ass 1 Laser prod uct un der the
Human Service (DHHS)
trol for Health and Safety Act of 1968. This means that the printer does not produce hazardous
laser radiation.
Radiation Performance Standard according to the Radiation Con-
U.S. Department of Healt h an d
CDRH Regulations
Center for Devices and Radiological Health (CDRH)
The
ministration implemented regu lations for la ser products on Aug ust 2, 1976. Th ese regulations
apply to laser products manufactured from August 1. Compliance is mandatory for products
marketed in the United States. The label shown below indicates compliance with the CDRH
regulations and must be at tached to laser products marketed in the United Stat es.
WARNING:
specified in this manual may result in hazardous radiation exposure.
Use of controls, adjustments or performance of procedures other than those
of the U.S. Food and Drug Ad-
All other users
WARNING:
specified in this manual may result in hazardous radiation exposure.
This is a semiconductor laser. The maximum power of the laser diode is 8.8 × 10
the wavelength is 770-810 nm.
Use of controls, adjustments of performance or procedures other than those
-4
W and
Page 8
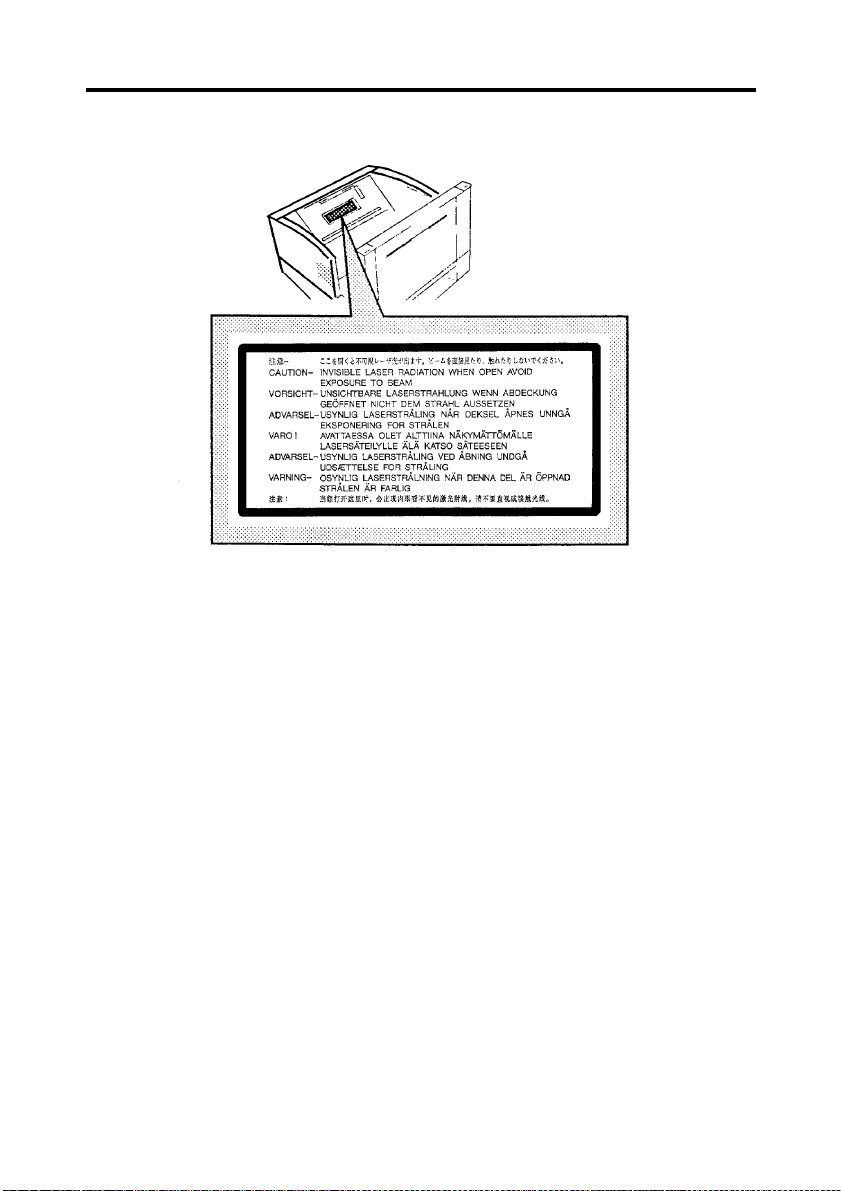
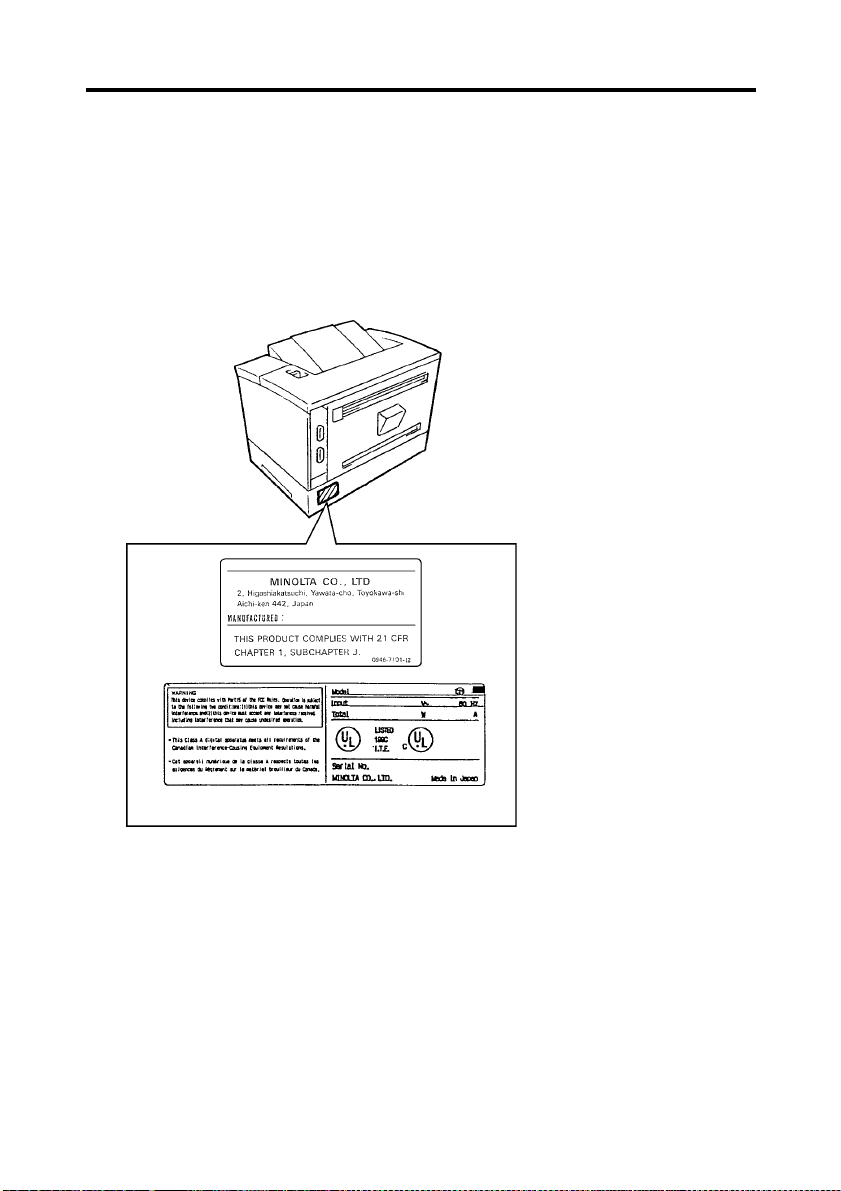
WARNING LABEL
vii
Page 9
viii
OZONE RELEASE (For all Users)
During printer operation, a small quantity of ozone is released. This amount is not large
enough to cause any adverse affects or harm. However, be sure the room where the machi ne
is being used has a deq uate venti lation , e spec ial ly if yo u are print ing a hi gh volum e of mater ials, or if the machine is being used continuously over a long period.
WARNING LABEL
Page 10

Organization
This manual consists of the following seven chapters. Chapters 1 and 2 contain basic
information about the Scanner, including safety precautions for installation/operation,
system configuration, and features. Be sure to read these chapters be fore using the Scanner.
Chapter 1 Precautions for Installation & Operation
Provides safety precautions required to ensure correct installation and
operation of the Scanner.
Chapter 2 Overview
An overview of the features, system configuration, functions and part
names for each section and control panel.
Chapter 3 Operation
Describes operatio n precautions and pro cedures (including control panel
descriptions), menu flow charts, and settings for each function.
Chapter 4 Printer
Describes functions, operation procedu res and part names for the prin ter.
Chapter 5 Troubleshooting
Describes error and warning messages that appear on the control panel,
and procedures for eliminating these problems.
ix
Chapter 6 Maintenance
Describes daily maintenance required for satisfactory operation of the
Scanner.
Chapter 7 Specifications
Complete specifications of the Scanner.
NOTE
In this manual, important points requiring special attention are described in sections
marked with “NOTE”. The key name that appears on the display is shown in brackets [ ].
Referenced chapters or their titles are enclosed by double quotation marks “ ”.
Page 11

x
Contents
Chapter 1. Precautions for Installation & Operation
Installation ..................................................................................... 1-1
Installation Environment ............................................................ 1-1
Power Source ............................................................................. 1-1
Grounding .................................................................................. 1-1
Moving the Scanner ................... .... .... ........................................ 1-2
Space Requirements ................................................................... 1-2
Operation ....................................................................................... 1-3
Operating Environment .............................................................. 1-3
Precautions When Operating the Scanne r ...................... ... .... ....1-3
Moving the Scanner ................... .... .... ........................................ 1-4
Precautions When Operating the Print er ........................ ........... 1-5
Moving the Printer ..................... .... ................................. ........... 1-5
Chapter 2. Overview
Features .......................................................................................... 2-1
System Configuration ................................................................ 2-1
Types of Copy ...............................................................................2-2
Page-by-Page Copy .................................................................... 2-2
Spread Copy ............................................................................... 2-2
Book Split Copy .............. .... ................................. ...................... 2-2
Part Identification and Functio ns ....... ................................. ........... 2-3
Control Panel Keys ................................ ........................................ 2-5
How to Read the Display ........................................................... 2-6
Basic screen ........................................................................ 2-6
Panel Reset Key ......................................................................... 2-7
Functions .................................................................................... 2-8
Chapter 3. Operation
Precautions for Operation .............................................................. 3-1
Lamp Status ............................ ....................................................... 3-2
Half Intensity ............................. .... ............................................ 3-2
Full Intensity .............................................................................. 3-2
Turning ON and OFF the System .................................................. 3-3
Turning ON ................................................................................ 3-3
Turning OFF .............................................................................. 3-5
Placing the Original ....................................................................... 3-6
How to Make Copies ..................................................................... 3-7
Book/Sheet Original .................................................................... 3-11
Book Original mode ................................................................. 3-11
Functions automatically activated .................................... 3-11
Other available functions ................................................. 3-11
Page 12

Contents
Sheet Original mode ................................................................3-12
Note on Originals ........................................................................ 3-13
1. High-gloss Originals ...................... ... .... ... .... ........................ 3-13
2. Originals having high backgroun d density .......................... 3-13
3. Originals with a tag attached or bookmark .......................... 3-14
4. Originals with both text and photographs ............................3-14
5. Originals larger than the book table ..................................... 3-14
6. Originals with foldings, wrinkles or warps ..........................3-14
7. Originals having texts or figures in red ............................... 3-14
Menu Flow Chart ........................................................ ................. 3-15
Adjusting Exposure ..................................................................... 3-16
Auto ......................................................................................... 3-16
Manual Adjustment .................................................................. 3-17
Setting Image Type ...................................................................... 3-18
Text mode .................... ... .... ..................................................... 3-18
Photo mode .............................................................................. 3-18
Setting Magnification .................................................................. 3-19
Auto ......................................................................................... 3-19
Reduction ................................................................................. 3-20
Full (x 1.00) ............................................................................. 3-21
Enlargement ............................................................................. 3-22
Setting the Number of Copies ..................................................... 3-23
Confirming the Number of Scans ............................ .................... 3-24
Total Counter ..................................... ................................ ...... 3-24
User Counter ............................................................................3-24
Selecting the Copy Size ............................................................... 3-25
Page-by-Page Copy ................................................................. 3-26
Spread Copy ............................................................................ 3-26
Book Split Copy ...................................................................... 3-26
How to Use the Functions ........................................................... 3-28
Function menu ......................................................................... 3-28
Selecting the Type of Original .................................................... 3-29
Center Erase ................................................................................. 3-30
User Choice ................................................................................. 3-31
Expo ......................................................................................... 3-32
Center Erase ............................................................................. 3-32
Print to Fit ................................................................................ 3-32
Using the Edit Function ............................................................... 3-33
Using the Edit menu ................................................................ 3-33
Frame Masking ........................................................................ 3-34
Centering .................................................................................. 3-35
Finger Erase ............................................................................. 3-36
Warning ....................................................................................... 3-37
Confirming the Current User Setting .......................................... 3-38
xi
Page 13

xii
Contents
Chapter 4. Printer
Using the Printer ............................................................................ 4-1
Parts of the Printer ..................................................................... 4-1
Troubleshooting and Maintenance ................................................ 4-3
Replenishing the Paper Supply .................................................. 4-3
Replacing the Toner Cartridge ................................................... 4-7
Clearing Misfeeds ....................................................................4-10
Solving Irregular Printing Problems ........................................ 4-13
Chapter 5. Troubleshooting
Potential Problems ......................................................................... 5-1
Warning Message ................................. ..................................... 5-1
Error Message ............................................................................ 5-1
Troubleshooting Warning Messages ............................................. 5-2
Chapter 6. Maintenance
Maintenance .................................................................................. 6-1
Daily Checks .............................................................................. 6-1
Cleaning ..................................................................................... 6-1
Scanner glass and illumination glass .................................. 6-1
Steel mirror and shading plate ............................................ 6-1
Cleaning the Printer ............................................................ 6-2
Chapter 7. Specifications
Product Specifications ...................................................................7-1
For Key Operator’s Use ................................................................. 7-3
Page 14

Chapter 1
Precautions for Installation & Operation
Chapter 1
Precautions for Installation & O per ation
Page 15

1-1
Installation
Installation Environment
Install the Scanner in a location which meets the following requirements to ensure safe
operation and utmost performance.
‹
Chapter 1
Precautions for Installation & O per ation
A place where the illumination onto the book table is less than 100 0 lx (e.g. 4.5 m x 6.5 m
area with ceiling height of 8.5ft (2.6 m), and 12 or less 40 W fluorescent lamps).
‹
A place the room lighting or the light from a window does not directly strike the scanner
unit or reflect from the steel mirror.
‹
A place away from curtains or other obj ects that catch fire and burn easily.
‹
A place where there is no possibility of being splashed with water or other liquid.
‹
An area free from direct sunlight.
‹
A place not in the direct air stream from an air conditioner, heater, and/or ventilator,
ensuring fairly constant temperature.
‹
A well-ventilated place.
‹
A dry place.
‹
A dust-free location.
‹
An area not subject to undue vibration.
‹
A stable and level surface.
Power Source
The power source voltage requirements are as follows.
‹
Use a power source with little voltage/frequency fluctuations.
Voltage fluctuation: 120 VAC ±10%
Frequency fluctuation: 60 Hz ±3 Hz
‹
When a 15A or less power sou rce is to be used, connect the Scanne r and print er to sep arate outlets. When a 20A or more power source is to be used, these two machines can be
connected to the same outlet.
‹
If any other electrica l eq uipm ent uses t he sa me power o utl et, m ake sure t hat th e c apaci ty
of the outlet is not exceeded.
‹
The outlet should be located near the Scanner and easily accessible so that the power cord
can be disconnected whenever necessary.
‹
NEVER use a multiple adapter to connect other equipment or machines to the outlet used
by the Scanner.
‹
If an extension cord i s requi re d, us e one with a capa ci ty hi gher t han th e p ower con sum ption of the Scanner.
‹
Make sure that no unusual, excessive force is applied to the power cord or extension cord.
Grounding
Connect the Scanner’s g round wire t o any of th e following to prevent electrical shocks due
to electrical leakage.
‹
Ground terminal of the outlet.
‹
Ground contact that complies with local electrical standards.
Never connect the g round cable t o a gas pipe, groun d wire for a tele phone line, or a water
pipe.
Page 16
1-2
Installation
Moving the Scanner
Please contact your Minolta authorized dealer before moving the Scanner to a new location.
Space Requirements
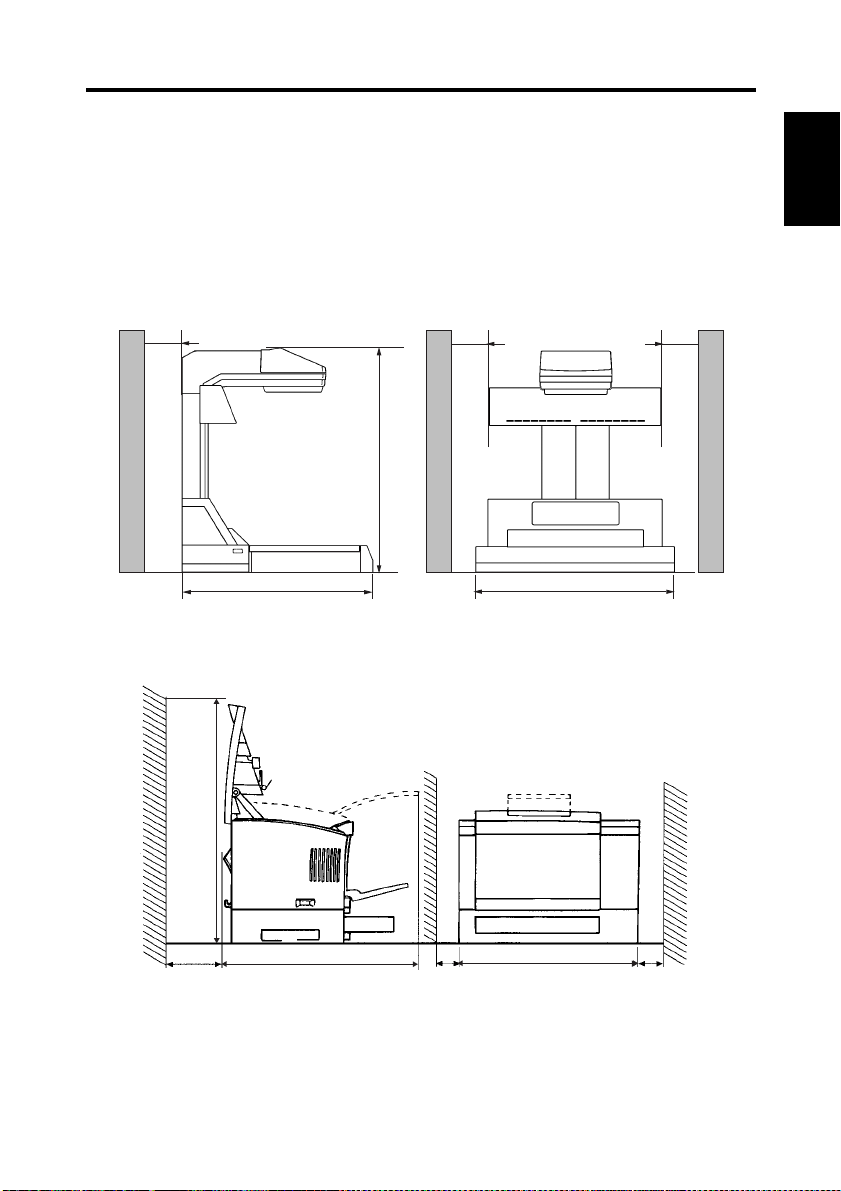
‹
Secure the recommended spac e shown in the figure belo w to ensure easy operation and
maintenance of the Scanner.
5 7/8"
(150mm)
30 2/3"
(763mm)
23 1/2" (598mm)
‹
Also, secure the recommended space shown in the figure below to ensure easy opera tion,
5 7/8"
(150mm)
25 5/8" (651mm)
replacement of consumables and maintenance of the printer.
5 7/8"
(150mm)
Chapter 1
Precautions for Installation & O per ation
29 1/4"
(743mm)
5 7/8"
(150mm)
‹
The Scanner is connected to the print er via an interface cable which is 9.3 ft. (2.8m) long
23 7/8"
(606mm)
5 7/8"
(150mm)
22"
(545mm)
5 7/8"
(150mm)
or more. However, keep a distan ce of less than 6 .7 ft . (2m) bet ween t he tw o machine s to
prevent a load from being applied to the cable and connectors.
Page 17

1-3
Operation
Operating Environment
The following environment is required for consistent performance of the Scanner.
Temperature: 50 to 95°F (10 to 35°C) with temperature variation not exceeding 50°F
Chapter 1
Humidity: 15 to 85% RH with hu midity variation not exceeding 20% RH per hour
Precautions When Operating the Scanner
Observe the following precautions to ensure the optimum performa nce of the Scanner.
‹
NEVER place any objec t other than the original on the book table or apply excessiv e
pressure to the book table.
‹
NEVER turn the main switch off during operation.
‹
NEVER bring any magnetized object or use flammable sprays/liquids near the Scanner.
‹
NEVER place a vase or vessel containing water on the Scanner.
‹
NEVER drop paper clips, staples, or ot her small pieces of met al into the Scan ner. If this
occurs, contact your Mi nolta authorized dealer.
‹
NEVER remove the shading plate (refer to page 2-2), outer cover, mirror, or control
panel. Always keep the shading plate clean (refer to page 6-1 for cleaning).
‹
NEVER place the Scanner or the ca binet on the power cord or interfa ce cables of other
electrica l equipment.
‹
Precautions for Installation & O per ation
NEVER leave a damaged or cracked power c ord or interface ca ble unrepaired . If any of
these conditions are found, immed iately shut d own the Scanne r, unplug the power cor d,
and call your Minolta authorized dealer for appropriate action.
‹
NEVER place an object on the lamp unit.
‹
ALWAYS completely insert the power cord plug into the power outlet.
‹
ALWAYS make sure that the outlet into which the power cord is plugged is visible.
‹
ALWAYS be sure to turn the power switch off, unplug the po wer cord, and call your
Minolta authorized de aler for appropria te action when th e Scanner becomes excessively
hot or produces abnormal noise.
(10°C) per hour
NOTE
W e recommend that you take a 5 minute break every hour to rest your eyes when operating
the Scanner.
NOTE
A negligible amount of ozone is generated during normal operation of this machine. An
unpleasant odor may, however, be created in poorly ven tilated rooms during extensive
machine operation. For a comfortable, healthy and safe operating environment, it is
recommended that the room be well ventilated.
Page 18
Operation
Moving the Scanner
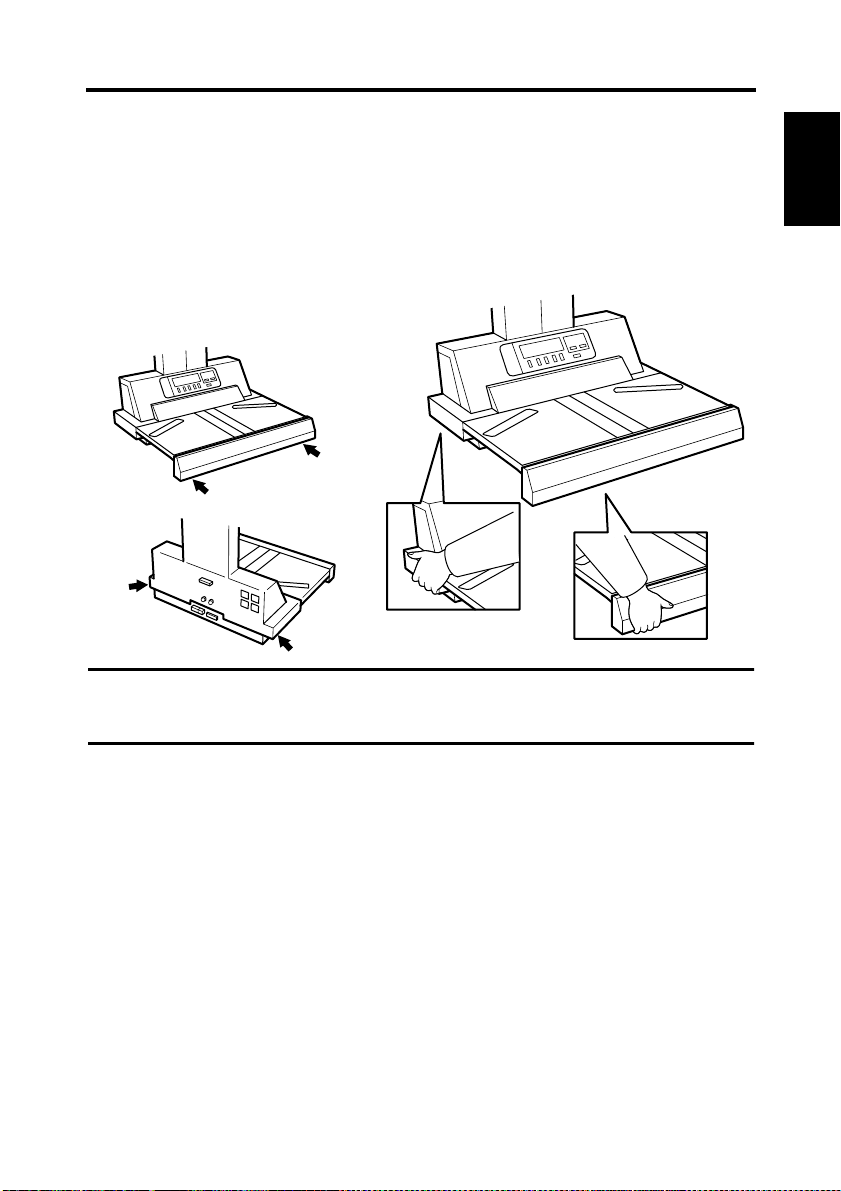
When moving the Scanner, observe the following.
‹
The Scanner body weighs 43kg (95lbs). When carrying the Scanner, hold the parts identi-
fied with arrows in the figure below. Be careful not to hurt your back. Do not carry the
Scanner alone but with the assistance of at least one other person.
‹
When moving the Scanner, be sure to disconnect the power cord and the interface cable.
‹
When transporting the Scanner, contact your Minolta authorized dealer.
1-4
Chapter 1
Precautions for Installation & O per ation
NOTE
Never hold any parts other than the parts indentified with arrows in the figure (e.g.,lamp
cover, book table) or the Scanner may be damaged.
Page 19
1-5
Operation
Precautions When Operating the Printer
Observe the following precautions to ensure the optimum performa nce of the printer.
‹
NEVER place a heavy object on the printer or apply e xcessive pressure to the pri nter.
‹
Chapter 1
NEVER turn the power switch off during operation.
‹
NEVER use any flammable sprays/liquids near the printer.
‹
NEVER place a vase or vessel containing water on the printer.
‹
NEVER drop paper clips, staples, or other small pieces of metal into the printer. If this
occurs, contact your Mi nolta authorized dealer.
‹
NEVER place the prin ter or the cabinet on the power cord or interface c ables of other
electrica l equipment.
‹
NEVER leave a damaged or cracked power c ord or interface ca ble unrepaired . If any of
these conditions are found, immediately shut down the printer, unplug the power cord,
and call your Minolta authorized dealer for appropriate action.
‹
ALWAYS completely insert the power cord plug into the power outlet.
‹
ALWAYS make sure that the outlet into which the power cord is plugged is visible.
‹
ALWAYS be sure to turn the power switch off, unplug the po wer cord, and call your
Minolta authorized d ealer for appropriate action when th e printer becomes excessively
hot or produces abnormal noise.
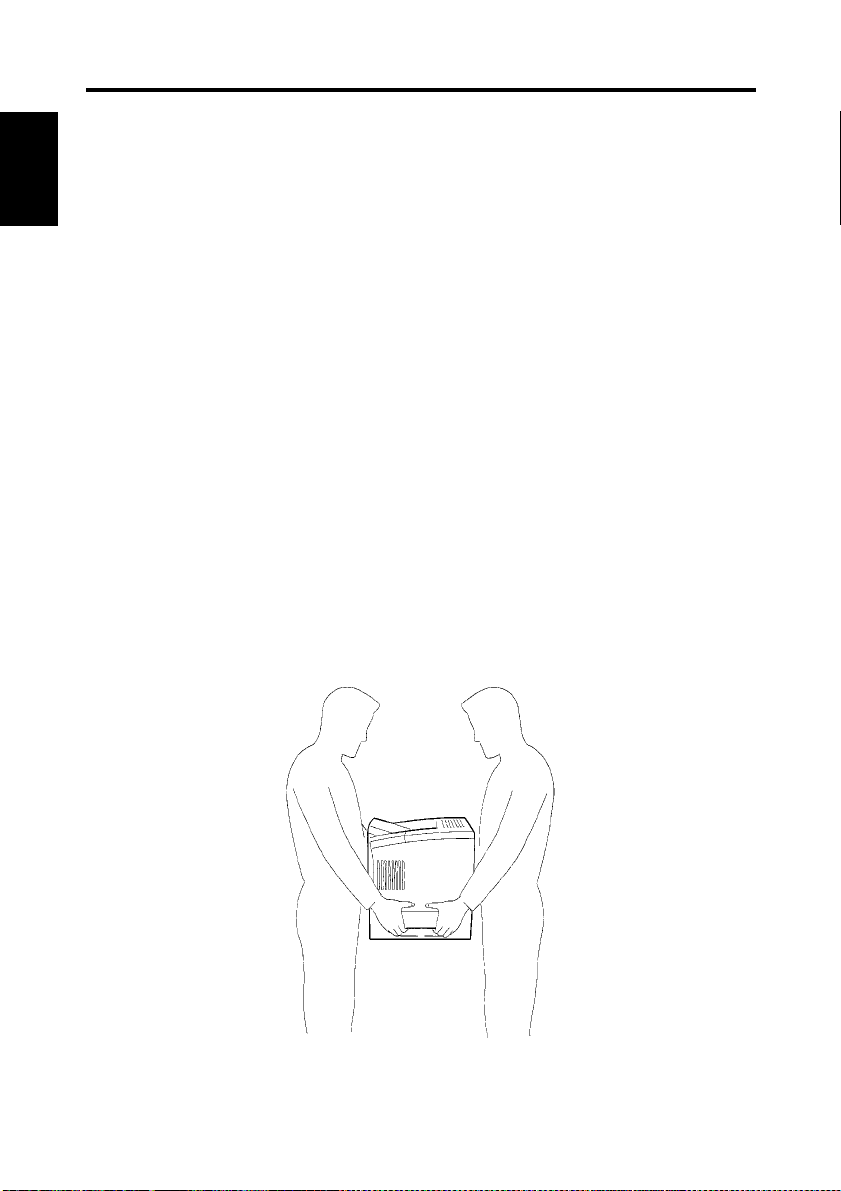
Moving the Printer
Precautions for Installation & O per ation
When moving the pri nte r, ob s erv e the f ollowing.
‹
The printer body weighs about 28kg (61 3 /4lbs). Be careful not to hurt your back. Do not
carry the Scanner alone but with the assistance of at least one othe r person.
‹
When moving or transporting the printer, be sure to remove the imaging cartridge before-
hand.
Page 20

Chapter 2
Overview
Chapter 2
Overview
Page 21
2-1
Features
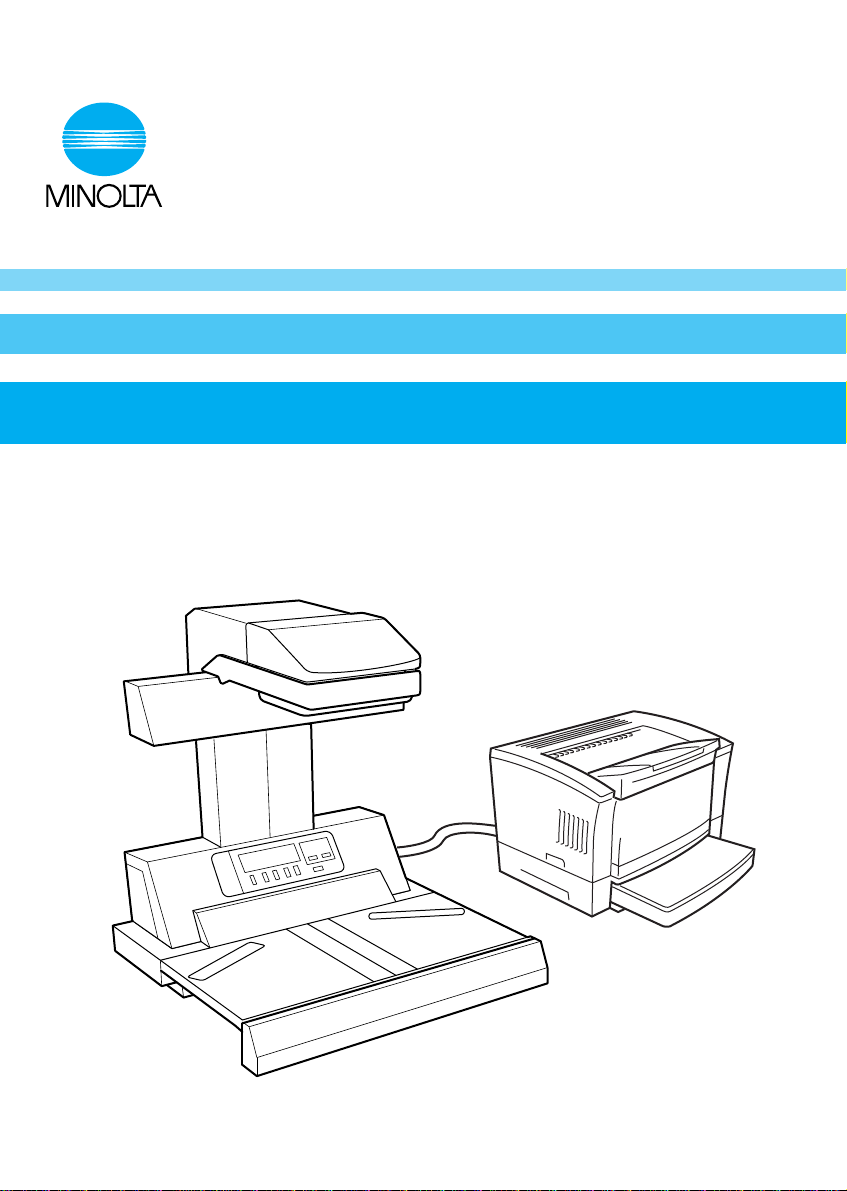
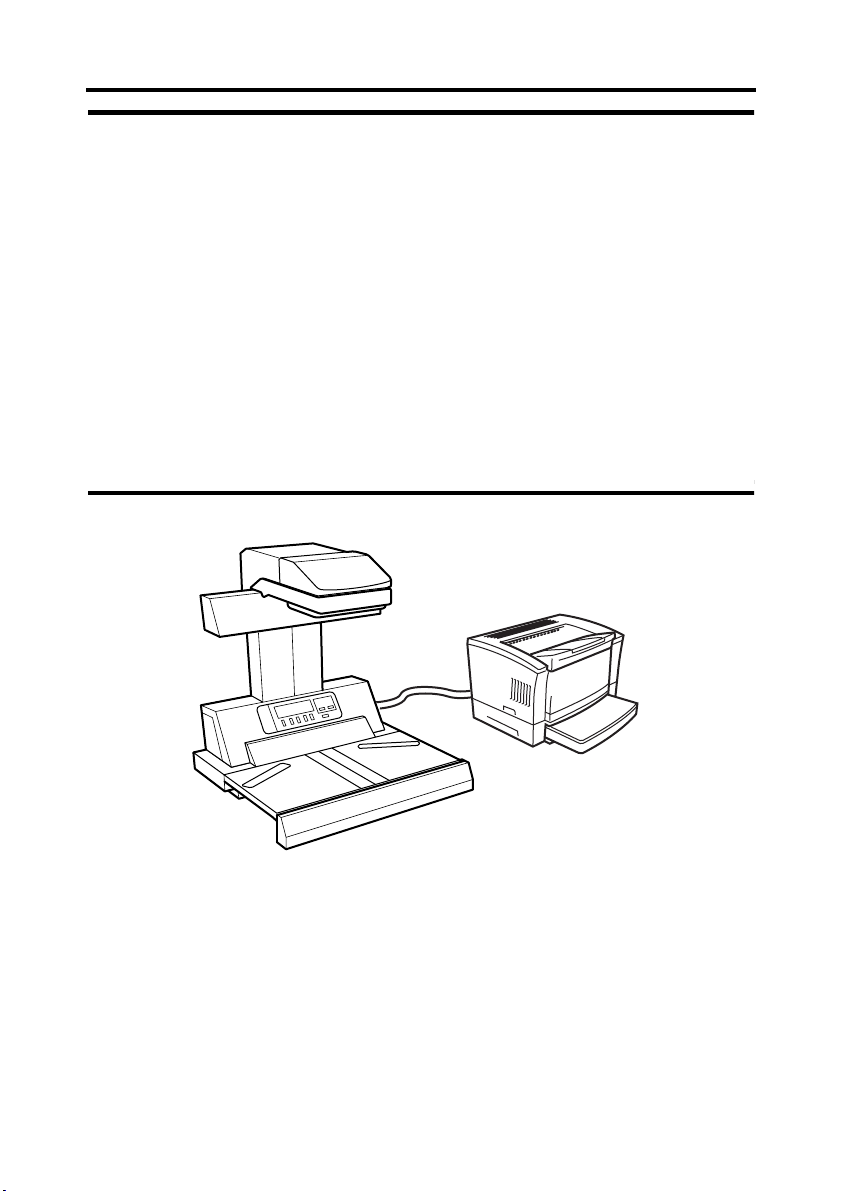
This system is design ed for making quality copies of books and other bound originals.
The Scanner reads the images of an open book placed on the Book Table and the Printer
copies them. The Scanner is designed to scan books set face up on the book table. This
makes placement of the book very easy and reduces concerns that the book may be creased
or damaged. In addition, warped text lines and text compression are corrected, ensuring
clearer images. Various options such as a foot switch, etc. are also provided.
System Configuration
Chapter 2
The system is configured as follows:
Overview
Book Scanner
Printer
Page 22
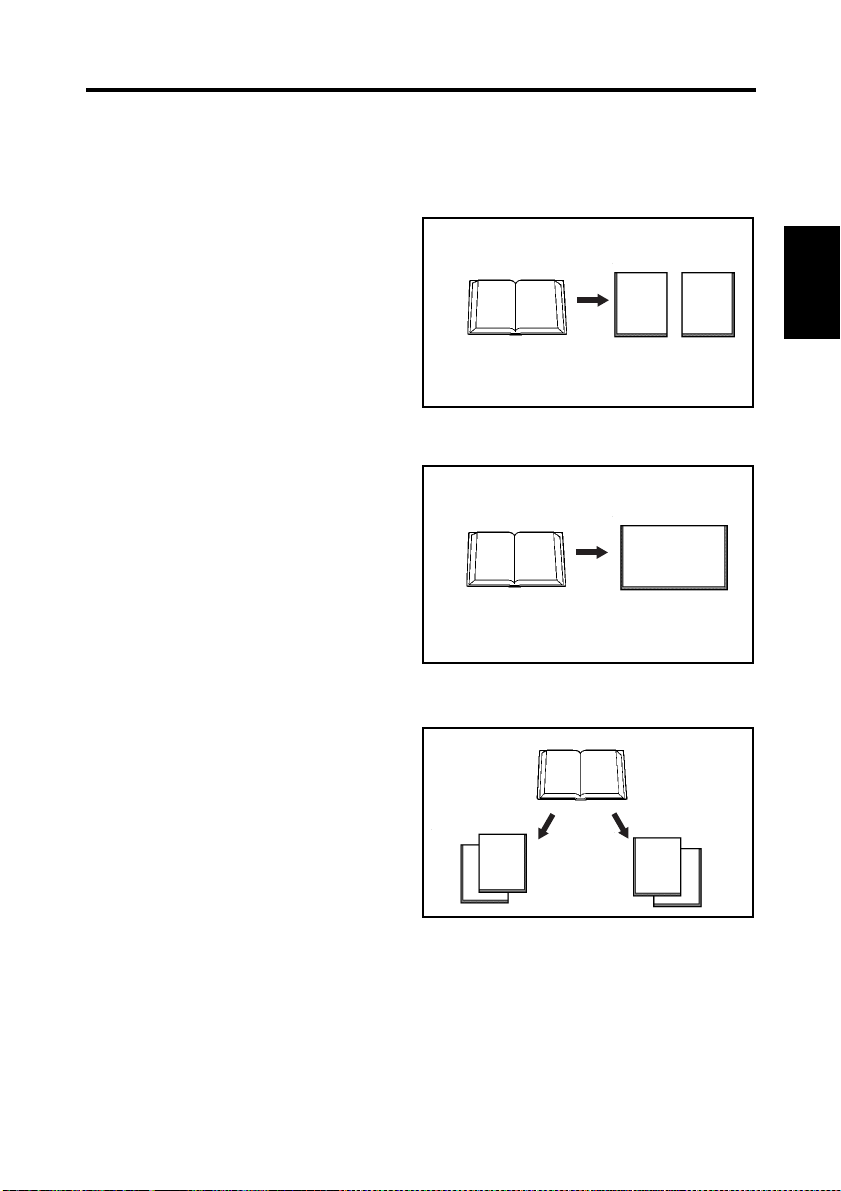
Types of Copy
The system allows you to make three different types of copy: Page-by-Page Copy, Spread
Copy, and Book Split Copy.
Page-by-Page Copy
The system copies the right or left pa ge of
the original, determined with referenc e to
the center of the book table, onto a single
separate sheet of copy paper.
12
Spread Copy
The system copies the right and left pages
of the original, determined with reference
to the center of the book table, onto a sin-
gle sheet of copy paper.
12 1 2
12
2-2
Chapter 2
Overview
Book Split Copy
The system copies the right and left pages
of the original, determined with reference
to the center of the book table, onto sepa-
rate sheets of copy paper.
12
2
1
1
2
Page 23
2-3
Part Identification and Functions
2
3
4
5
1
Chapter 2
6
8
Overview
13
14
1.
Lamp unit:
7
11
15
Illuminates the original when th e scanner unit reads the
9
10
12
image.
2.
Scanner unit:
3.
Control panel:
The image scanner in this unit scans the original.
Used to set the operating mode and displays operati ng
status and error/warning messages. Refer to “Control
panel keys” on page 2-5 for details.
4.
Shading plate:
5.
Steel mirror :
6.
Book table:
7.
Start key:
8.
Main swit ch:
9.
Printer connector:
10.
Power cord socket:
11.
Power cord:
12.
Interfac e cable:
Used to adjust the exposure.
Detects the position (height) of the original.
Place the original (book) face up on this table.
Press this key to start scanning the original.
Turns the Scanner on and off.
Connect the printer cable to this connector.
Plug the power cord into this socket.
Connects the Scanner to the powe r outlet.
Connects the Scanner to the printer.
Page 24

2-4
Part Identification and Functions
13.
Stopper:
14.
Center mark:
15.
Size guide:
Used as the reference position for the original. When
placing the original, align its top edge with this position.
Adjust the center of the original to this mark.
Indicates the scannable range of the original.
The 5-1/2" x 8-1/2" (A5) Size Guide is used for 5-1/2" x
8-1/2" (A5) originals to be enlarged to other sizes.
However, this system cann ot make copies onto the
5-1/2" x 8-1/2" (A5) paper.
Chapter 2
Overview
Page 25
2-5
Control Panel Key s
1
2
3
Chapter 2
4
5
Exposure
Zoom
Multi-Copy
Paper
Function
6
10
Page by PageSpread
Panel Reset
9
7
8
Overview
1.
Exposure key:
2.
Zoom key:
3.
Multi-Copy key:
4.
Paper key:
5.
Function key:
6.
Display:
7.
Selection keys:
8.
Page Selection keys:
9.
Panel Rese t key:
10.
Copy Type Indicators:
Press to select functions shown on the display.
Press to select the exposure and image type settings
(Text or Photo).
Press to set the enlarge or reduction settings.
Press to set the number of copies to be made.
Press to set the copy size.
Press to access the function menu in cluding the
following settings:
-Book Original
-Center Erase
-User Choice
-Warn Setting
-Edit (Mask, Centering, Finger Erase)
-Check (Current user setting)
Displays current status, operation instructions, warning
messages, and functions available for selection. For the
information on how to read the display, refer to “How to
Read the Display” on pag e 2-6.
These keys do not fun ct i on .
Resets the settings to defaults. For details of the default
settings, refer to “Panel Reset Key” on page 2-7.
Displays the type of copy. In the Spread Copy mode, the
“Spread” is lighting, and in the Page-by-Page Copy or
Book Split Copy mode, “Page-by-Page” is lighting.
Page 26
Control Panel Keys
How to Read the Display
When the power switch is turned on, the basic screen (size selection menu) is displayed on
the Display
Basic screen
21
Spread
Press Start Key
Copy Single Page
LTR
11x17
Size
x1.00
LTR
2LTR
1
Page by Page
2-6
Chapter 2
1.
Message area:
2.
Zoom and Size area:
3.
Menu:
4.
Choice:
Panel Reset
43
Overview
Displays the current status, op eration instructions, and
warning and caution messages.
Displays the current copy size, direction, magnification
and number of copies.
Displays the name of the current menu screen.
Displays the currently available choices.
Use the selection keys below the display to select or set
functions. The specified functions are highlighted.
Page 27

2-7
Control Panel Keys
Panel Reset Key
Pressing this key returns all settings to their de fault setting s and di splays the basic screen.
All settings revert to default settings when the main switch is turned on.
Default settings are as follows:
Function Default Setting
Exposure*
Chapter 2
Overview
Image Type Text
Zoom* Full (x1.00)
Copy Size Current Copy Size
Book Original ON
Book Split OFF
Center Erase* OFF (0.0")
Edit
Warning ON for all functions
Number of Copies 1
Auto: ON
Center of auto/manual exposure adjustment settin g
Mask (Frame Masking): ON
Center: ON
Finger Erase: ON
*The settings of Exposure, Zoom and Center Erase can be changed by using “User
Choice.” Refer to “User Choice” on page 3-31 for details.
NOTE
To change the default settings of Image Type, Book Split, Edit and Warning, contact your
Minolta authorized dealer.
Page 28

Control Panel Keys
Functions
Function Default Setting/Explanation
ON
Auto clear
Power Save
Buzzer
NOTE
To change the settings of Auto Clear, Power Save and Buzzer, contact your Minolta
authorized dealer.
Auto Clear resets the unit to the initial paper selection menu at the
time when the lamp turns off and returns all setting to default
settings.
OFF
Power Save is a power-saving function that switches the system
into the standby state without turning off the power. In one minute
after the Scanner lamp goes off, the Printer fusing unit is turned off,
and the system enters the standby state.
ON
A buzzer sounds with Control Panel key operation.
2-8
Chapter 2
Overview
Page 29

2-9
Control Panel Keys
Chapter 2
Overview
Page 30

Chapter 3
Chapter 3
Operation
Operation
Page 31

3-1
,,,,,,,,,,,,
,,,,,,
Precautions for Operation
The following parts require special attention when operating the Scanner.
Do not place any object on the scanner unit.
Be careful not to knock
your head against the
scanner unit.
Do not look directly at the lamp
light visible through the front
slits or from the bottom.
Chapter 3
Operation
Do not hold the sides when
pushing the book table down,
or your hands or fingers may
be caught. Place your hand
on the top surface of the table.
Do not stick tags, labels,
memo paper or the like
removed from the original
onto the steel mirror or
book table.
Be careful not to get your
fingers or nails caught in the
central part of the book table.
When only one side of the book table
is pushed down, the other side rises
slightly. Be careful not to get your
hands, fingers, or clothing caught.
The steel mirror is an important
component for reading the height of
the original based on the reflections
of the top edge of the original. Do not
damage or stain the steel mirror.
Do not place any object other
than the original on the table.
Note that reflections from wrist watches,
rings, manicures or the like may cause the
image correction function to malfunction.
Page 32

3-2
Lamp Status
Half Intensity
The Scanner’s lamp lights at ha lf i nten sity whe n any k ey is p ressed to se lect menu s, e tc. Th e
lamp goes out when no key is pr es sed for o ne m inu te . Th e fan cooling the lamp is turned off
one minute after the lamp has gone out.
Full Intensity
The Scanner’s lamp lights at full intensity when the Scanner is reading the original. The
lamp returns to half intensity after scanning is completed.
NOTE
The halogen lamp used in the Scanner is safe and not hazardous to health. However , never
look directly at the lamp when lit. Looking directly at the lamp when lit may result in eye
damage. When th e Sc anner is operated for a long time, we recommend you take a 5 mi nu te
break every hour to rest your eyes.
Chapter 3
Operation
Page 33

3-3
Turning ON and OFF the System
Turning ON
Check that the Scanner is conne cted to the printer with the printer inte rface cable.
1
Turn the power switch of the printer
2
to the “|” position (ON).
Chapter 3
Operation
Turn the main switch of the scanner
3
to the “|” position (ON).
NOTE
Turn on the printer before turning on the Scanner. If the Scanner is turned on before the
printer, an error message appears on the display. However, you can still turn the printer on
at this time.
“Warming Up” appears on the
4
display and the start key turns red.
Start key
Page 34

Turning ON and OFF the System
When the initial ope ration of Scan ner
5
is completed, the initial screen
appears.
When warming-up of Printer is
completed, the start key turns green.
Press Start Key
Copy Single Page
LTR
11x17
Size
x1.00
LTR 1
2LTR
NOTE
When the printer interface cable is not connected properly, the error message “Turn
Printer ON” appears on the display.
3-4
Chapter 3
Operation
Page 35

3-5
Turning ON and OFF the System
Turning OFF
Return the display to the initial
1
screen.
Turn the main switch of the scanner
2
to the “O” position (OFF).
Chapter 3
Operation
NOTE
Never turn the main switch off while the Scanner is reading the original.
Press Start Key
Copy Single Page
LTR
11x17
x1.00
LTR 1
Size
2LTR
Turn the switch of the printer to the
3
“O” position (OFF).
Page 36

Placing the Origin al
Original
Stopper
Opening
3-6
Place the Original face up on the boo k
table, aligning the top edge of the book
with the stopper on the book table, and the
spine of the book with the cente r mark.
Check that the Original is positioned with
the corresponding size guide, if possible.
When placing the Original, observe the
following.
Do not place the Original askew.
Do not place the Original with its top
edge beyond the stopper. Be careful
that if the Original is pressed from the
bottom, this may happen.
Stopper
Size guide
Center mark
Chapter 3
Operation
When the Original is spread open, be
careful not to produce openings
between pages . Gently press both pages
down and out from the s pin e .
Page 37

3-7
Original
Stopper
How to Make Copies
Place the Original face up on the
1
book table, aligning the top edge of
the book with the stopper on the
book table, and the spine of the book
with the center mark. Check that the
Original is positioned with the
corresponding size guide, if
possible.
NOTE
In placing the Original, make sure that
its top edge is not beyond the stopper.
Chapter 3
Stopper
Size guide
Center mark
Operation
Select the Original type.
2
For thick Originals, such as a
dictionary and book, select “Book
Original mode,” and for a sheet of a
document, select “Sheet Original
mode.”
For switching th e “B ook Original
mode” and the “Sheet Original
mode”, [Book Orig] is used in
Function Menu.
Refer to page 3-29 “Selecting the
Type of Original” for de ta ils.
Select the basic settings (Exposur e,
3
Zoom and Multi-Copy) to make
copies. When the Exposure key,
Zoom key or the Multi-Co py key is
pressed, the setting screen for each
function appears.
Press Start Key
Copy Single Page
BOOK
Orig
Exposure
Zoom
Multi-Copy
Paper
Function
Center
Erase
Set
x1.00
LTR 1
OK
Page 38

Select the type and siz e of copy in
4
the size setting screen.
For more detail, refer to “Selecting
the Copy Size” on page 3-2 5
A: Page-by-Page Copy.....LTR
Press Start Key
Copy Single Page
LTR
11x17
3-8
How to Make Copies
x1.00
LTR 1
Size
2LTR
B: Spread Copy................11x17
C: Book Split Copy..........2LTR
NOTE
The size of copy displayed at B depends on the size of Paper set in the Pap er Cassette of the
Printer.
Hold the edges of both pages in the
5
middle with your ha nd s and pre ss
the book down, pulling the pages
slightly apart. At the same time,
adjust the height of the right and left
pages by pressing the hi gher side
down.
A CB
Chapter 3
Operation
NOTE
When the inclination of the pag e at the
center of the book exceeds 60° the image
cannot be read correctly.
60˚
Page 39

3-9
How to Make Copies
NOTE
Auto Focus is only effective within the
range of 2" (50mm) above the usual
height of the book table.(4" (100mm)
from the book table when it is lowered.)
Adjust the book table height so that the
original is placed in the effective Auto
Focus range.
6
Chapter 3
Operation
NOTE
If the book original is so thick that its
use in the Spread mode results in a
warning, select the Page-by-Page mode
and bring each page into the auto focus
range separately for making page-bypage copies.
2" (50mm) 4" (100mm)
Press the Start key. Either key can be
pressed when the Spread mode is
selected. When the Page-by-Page or
Book Split mode is selected, pre ss the
key on the side to be copied.
The pressed Start key tur n s red an d
copying is started. When copying is
completed, the Start key turns green
and the next copy can be start ed.
Page 40

3-10
How to Make Copies
NOTE
Never place your arm, head or any other obstacle into the space enclosed by the scanner
unit and the right an d left edges of the book, or the Scanner will not be able to obtain a
good image. Be sure not to move your hands and arms until scanning is completed.
NOTE
When the Scanner fails to r ead the original c orr e ctly, a buzzer goes off, a warning message
appears on the displ ay, and scannin g is stopped. Refer to page 5-2 “Troubleshooting for
warning messages” for the appropriate action.
Chapter 3
Operation
Page 41

3-11
Book/Sheet Original
Book Original mode
Select this mode when making copies of a
thick original (book). Selecting this mode
automatically activate s the followin g
functions:
Functions automatically activated
Curved text line correction
Chapter 3
Operation
This function corrects the position of the text on the curved surface near the center of the
book (area between pages) of a thick open book, ensuring that an undistorted image is
made.
Text compression correction
The text at the center of the book (area bet w een pages) of an open book often looks
crowded with little space betwee n chara cters, when view ed from a bove, d ue to t he cu rved
surface. If simply copied as is, the text appears compressed. This function expands the
characters accordingly, providing an image as close as possible to the original form.
NOTE
When the text is within 0.2" (5 mm) from the spine of the book or the inclination at the
center exceeds 60°, proper correction may not be made.
Auto focus
This function is available only for Book Original. The original height is detected, and the
focal point of the Scanner can be adjusted to be within a range from 0" to 2" (0 to 50mm)
above the book table according to the detected original height.
Other available functions
The following menus become available only when Book Original is selected. These are
automatically disabled when Sheet Original is selected.
◆
Exposure (Auto): Only when Text mode is selected
◆
Zoom (Auto)
◆
Frame Masking
◆
Finger Erase: Only when Frame Mask ing is selected
◆
Centering: Only when Frame Masking is selected
◆
Center Erase
◆
Warning
Page 42

Book/Sheet Original
Sheet Original mode
The Sheet Original mode is used to copy
individual phot ographs or documents wh e n
they cannot be copied without error
messages or clearly copied in the Book
Original mode.
When Book Original mode is canceled, the
system is automatically set into this Sheet
Original mode. (This mode dose not appear
on the display.)
NOTE
In Sheet Original mode, Auto Focus, Exposure (Auto), Zoom (Auto), Center Erase, Frame
Masking, Finger Erase, and Centering are not available.
NOTE
In the Sheet Original mode, the focus of the Image Scanner is fixed on the Book Table (0
mm).
3-12
Chapter 3
Operation
Page 43

3-13
Note on Originals
Name of book parts
Back
Cover
Head
Tassel
The Scanner is designed for exclusive use with book original images from a book or file.
Note, however, that it may not make reliable copies from any of the following types of
originals. (If a warning message appears, refer to page 5-2 “Troubleshooting for warning
Chapter 3
messages”.) If any originals other than the following cannot be copied, contact the Minolta
authorized dealer.
Foot
Gutter
1. High-gloss Originals
Operation
High quality images cannot be assured when making copies from high-gloss pages such
as gravures of magazines and catalogs in Auto Exposure mode. In thi s case, select Man-
ual Exposure mode and hold the original as flat as possible. Refer to page 3-16 “Adjusting
Exposure” for Auto/manual Exposure Adjustment.
2. Originals having high background density
The background density is the color of the actual paper on which text and photographs are
printed. Papers of high background density include colored (other than white) paper,
newspaper, train timetables, or diazo copy materials (A2 or larger drawings used at con-
struction sites and other engineering environments). When any of these types is used,
select Manual Exposure mode and hold the original as flat as poss ib le.
NOTE
If an [Auto Exposure] warning is not triggere d from among the function warnings, the
image may be overwhelme d by the background. In this case, adjust the exposure to the
[Manual Exposure Adjustmen t] before copying. Refer to page 3-17 “Manual Adjustment”
for Manual Exposure Adjustment.
Page 44

3. Originals with a tag attached or bookmark
The Scanner may not work correctly
when a tag is attached or a bookmark is
placed within 1 1/8” (3 0 mm) of the top
and bottom edges as shown in the figure.
In this case, remove the tag or bookm ark
before making copies. If tags are
attached only to the top edge of the orig -
inal, place the original up side down on
the book table for making copies.
If a tassel is placed in the original, put
them away in the original so that t hey
may not hit th e steel mirror.
3-14
Note on Originals
1 1/8"
(30mm)
1 1/8"
(30mm)
Chapter 3
Tassel
4. Originals with both text and photographs
Two image types are available to this system: Text and Photo.
When one original ha s both photographs and texts, determine which should be given
higher priority, the texts or the photographs, before copying. For information how to
select the image type, refer to 3-18 “Setting Im age Type”. For selecting the Exposure, use
Auto adjustment for fine adjustment or Manual adjustment.
5. Originals larger than the book table
The start key cannot be pressed when the original is larger than the book table. use the
optional foot switch, or if the original is bound in a file, take out the required page and
place it on the book table.
6. Originals with foldings, wrinkles or warps
If the original is folded, wrinkled or warpe d , stre tch th e or igi nal as muc h as possible, and
then place it on the book table for making c opies.
7. Originals having texts or figures in red
If the original has a red text or figure, in addition to black ones (including lines and
arrows), use Text mode for a good result. If Photo mode is used, the red text and figure
may be reproduced very lightly.
Operation
Page 45

3-15
Menu Flow Chart
Pressing the keys on the control panel display the corresponding menus as shown below.
Chapter 3
Operation
Exposure
Sets exposure for
scanning. In
addition to turning
[Auto] on and off,
nine levels of
exposure can be
selected using
[Light] or [Dark].
Zoom
Sets the magnification
for scanning. Select
[Print to Fit] (automatic
adjustment), [Reduc],
[Full], or [Enlg]
(enlargement). You
can specify the
magnification when
[Reduc] or [Enlg] is
selected.
Multi-Copy
Sets the number of
copies to be output.
Paper
Selects the paper on
which the image is
output. Specifies the
scan size and
direction (portrait or
landscape).
Light
1
Auto
Dark
Image
OK
Full
Reduc
Enlg
Print to Fit
2
OK
Clear
Count
OK
LTR
Paper Cassette
2LTR
BOOK Orig
Selects the Original type.
Text
Photo
OK
LGL LTR
11x17 LGL
11x17 LTR
Zoom
OK
LGL 11x17
LTR 11x14
LTR 11x17
Zoom
OK
Reset
OK
Narrow
Wide
Clear
OK
1
Available only in Book Original mode
and Text mode.
2
Available only in Book Original mode.
Full
(-0.01)
(+0.01)
OK
Expo
Center Erase
Print to Fit
Light
Auto
Dark
Function
Center Erase
The shadow generated
in the center of the open
book is removed.
2
Set
OK
User Choice
The Exposure and
Auto Zoom can
be set to any value.
Warn
The type of Warning
display is set.
2
Edit
Turns the Masking,
Centering and
Finger Erase
functions on and off.
Check
Displays the current settings.
OK
Bind Height
Auto Expo
1
Size Detect
OK
Mask
Center
Finger Erase
OK
OK
2
2
Narrow
Wide
Clear
OK
Page 46

Adjusting Exposure
Set the exposure for making copies by
pressing the Exposure key on the control
panel. The Exposure Setting screen
appears.
Auto
The appropriate exposure is automatically selected according to the type of original.
Select [Auto]. The menu name is
highlighted and the function is activated.
Exposure
Zoom
Multi-Copy
Paper
Function
Press Start Key
Copy Single Page
x1.00
LTR 1
3-16
Chapter 3
Select [OK] to return to the size setting
Light Auto Dark Image OK
screen.
NOTE
When the “Sheet Original mode” or “Photo” is selected, [Auto] cannot be set to “ON”.
The exposure can be further adjusted after
[Auto] is set. Press the [Light] or [Dark]
key for fine adjustment.
Select [OK] to return to the size setting
screen.
Light Auto Dark Image OK
x1.00
LTR 1
Operation
Page 47

3-17
Adjusting Exposure
Manual Adjustment
Manually adjust the exposu re. The exposure can be set in nine stages from “Light” to
“Dark” respectively.
Select [Auto] to return the menu name
1
to normal, indicating [Auto ] is tu rned
off.
Press Start Key
Copy Single Page
Light Auto Dark Image OK
x1.00
LTR 1
Chapter 3
Operation
Select [Light] or [Dark] to set the
2
exposure for the original.
Select [OK] to return to the size
setting screen.
x1.00
LTR 1
Light Auto Dark Image OK
Page 48

3-18
Setting Image Type
The Image Type is selected according to the original. Two Image Types are available: Text
and Photo.
Press the Exposure key on the
1
Control Panel. The Exposure Setting
screen appears.
Select [Image].
2
The Image Type Setting screen
appears.
Select [OK] to return to the size
setting screen.
Text mode
This Image Type is suitable for a text
original. The image contour is empha-
sized, and the letters in the ori gi nal are
clearly copied.
Exposure
Zoom
Multi-Copy
Paper
Function
Press Start Key
Copy Single Page
Light Dark Image OK
Press Start Key
Copy Single Page
Text Photo OK
Auto
Image Type
x1.00
LTR 1
x1.00
LTR 1
Chapter 3
Operation
Select [OK] to return to the Exposure
Setting screen.
Photo mode
This Image Type is suitable to the photo
original. The reproducibility of neutral
tints is emphasized.
Select [OK] to return to the Exposure
Setting screen.
Press Start Key
Copy Single Page
Image Type
Text Photo OK
x1.00
LTR 1
Page 49

3-19
Setting Magnification
The Zoom at which the original is copied is set.
Press the Zoom key on the Control Panel.
The Zoom Setting screen appears.
Exposure
Zoom
Multi-Copy
Paper
Function
Auto
The ratio of the original size to the selected copy size is calculated and the magnification is
automatically adjusted (the smaller value is used when different ratios are obtained from
length and width calculations).
Chapter 3
Select [Print to Fit]. The menu name
is highlighted and the fun ction is
activat ed.
Operation
Select [OK] to return to the size
setting screen.
NOTE
[Print to Fit] cannot be selected in Sheet Original.
Press Start Key
Copy Single Page
Zoom
Print
to Fit
LTR
1
OKEnlgFull Reduc
NOTE
Place only the original on the book table when [Print to Fit] is selected or the paper size
may not be detected.
Page 50

3-20
Setting Magnification
Reduction
The original is copied and the image siz e is reduced. The reduction ratio can be specifi ed by
the user.
Select [Reduc]. The Reduction
1
Setting screen appears.
Press Start Key
Copy Single Page
Zoom
Print
to Fit
x1.00
LTR
OKEnlgFull Reduc
1
Select a fixed reduction ratio.
2
You have three fixe d reduction ratios
to select from [LGR>LTR]
[11x17>LGL] [11x17>LTR].
Select [OK] to return to the size
setting screen.
For any other reduction ratio, you can
3
select [Zoom]. The zoom setting
screen appears. The desired
magnification can be set fro m 0.5 0 to
2.00 in 0.01 increments.
The value increases or decreases
continuously while the up or down
key is held down. The set value is
displayed in the Zoom and Size area.
Magnification is reset to x 1.00 when [ Full] is selected.
Select [OK] to return to the size setting screen.
Press Start Key
Copy Single Page
Reduction
11x17 LTRLGL LTR 11x17 LGL
Press Start Key
Copy Single Page
Zoom
Full
Zoom
x0.79
LTR
OK
x0.77
LTR
Chapter 3
1
Operation
1
OK
Page 51

3-21
Setting Magnification
Full (x 1.00)
The original is scanned at full size (100%).
When [Full] is pressed, Print to Fit is
cleared, and [Full] is highlighted.
Chapter 3
Operation
Press Start Key
Copy Single Page
Zoom
Full Reduc Enlg
Print
to Fit
x1.00
LTR
OK
1
Page 52

3-22
Setting Magnification
Enlargement
The original is scanned and the image is enlarged. The enlargement ratio can be specified by
the user.
Select [Enlg]. The Enlargement
1
Setting screen appears.
Press Start Key
Copy Single Page
Zoom
Full Reduc Enlg
Print
to Fit
x1.00
LTR
OK
1
Select a fixed enlargement rat io.
2
You have three fixe d enlargement
ratios to select from:
[LGR>11x17], [LTR>11x14],
[LTR>11x17].
Select [OK] to return to the size
setting screen.
For any other reduction ratio, you can
3
select [Zoom]. The zoom setting
screen appears. The desired
magnification can be set fro m 0.5 0 to
2.00 in 0.01 increments.
The value increases or decreases
continuously while the up or down
key is held down. The set value is
displayed in the Zoom and Size area.
Magnification is reset to x 1.00 when [ Full] is selected.
Select [OK] to return to the size setting screen.
Press Start Key
Copy Single Page
Enlargement
LTR 11x17LGL 11x17 LTR 11x14
Press Start Key
Copy Single Page
Zoom
Full
Zoom
x1.21
LTR
OK
x1.24
LTR
Chapter 3
1
Operation
1
OK
Page 53

3-23
Setting the Number of Copies
Set the number of copies produced.
Press the Multi-Copy key on the
1
control panel.
The screen for setting the number of
copies appear.
When the [-]or [+] key is pressed, up
2
Chapter 3
Operation
to nine copies can be set in
increments of 1.
The set value appears.
Exposure
Zoom
Multi-Copy
Paper
Function
Press Start Key
Copy Single Page
Multi Copy
Clear Count OK
x1.00
LTR
1
Select [Clear] to reset number of
3
copies to “1.”
Select [OK] to return to the size
setting screen.
NOTE
While multiple copies are being made, a Stop Key appears on the display. If you want to
cancel the copy cycle, press this key.
Press Start Key
Copy Single Page
Multi Copy
Clear Count OK
x1.00
LTR
1
Page 54

Confirming the Number of Scans
The number of scans is confirmed and cleared.
Press the Multi-Copy key on the
1
control panel.
The Multi-Copy Setting screen
appears.
Select [Count].
2
The Counter screen appears.
Total Counter
The To ta l Coun ter displa y s the nu mbe r
of scans made after the installatio n of the
system. The setting of the Total Counter
cannot be reset.
Exposure
Zoom
Multi-Copy
Paper
Function
Press Start Key
Copy Single Page
-+Clear Count OK
Total Counter 000024
User Counter 000000
Reset
Multi Copy
Counter
x1.00
LTR
x1.00
LTR
OK
3-24
1
1
Chapter 3
Operation
User Counter
The User Counter displays the number
of scans made. Select [Reset] to reset the
User Counter to “0.”
NOTE
The Total Counter and th e User Counter cannot be reset to “0” even if the power code is
unplugged.
NOTE
The Total Counter and the User Counter are reset to “0” when they reach 1,000,000,
respectively.
Select [OK] to return to the size setting screen.
Page 55

3-25
Selecting the Cop y Size
Select the scan size of the full size co py and the direction of the original .
Press the Paper ke y on the Control
1
Chapter 3
Panel.
The size setting screen appears.
Select the size of copy in the size
2
setting screen.
The type of copy is fixed according
to the selected size of copy.
Exposure
Zoom
Multi-Copy
Paper
Function
Press Start Key
Copy Single Page
LTR
11x17
x1.00
LTR 1
Size
2LTR
Operation
Key Copy Size Copy Type
A
LTR
B
11x17
LGL
LTR
LTR
C
2LTR Book Split Copy
NOTE
Which size can be specified by t he B key depends on the size of Paper set in the Paper
Cassette of the Printer.
If the desired size of Copy is not displayed, set the desir e d size of Pap er in the Pap er
Cassette.
A CB
Page-by-Page Copy
Spread Copy
Page-by-Page Copy
Page 56

Page-by-Page Copy
The system copies the right or left pa ge of
the original, determined with referenc e to
the center of the book table, onto a single
separate sheet of copy paper.
Spread Copy
The system copies the right and left pages
of the original, determined with reference
to the center of the book table, onto a sin-
gle sheet of copy paper.
3-26
Selecting the Copy Size
12
12 1 2
12
Chapter 3
Operation
Book Split Copy
The system copies the right and left pages
of the original, determined with reference
to the center of the book table, onto sepa-
rate sheets of copy paper.
12
Press the start key. The page on the side
for which the start key was pressed is
copied first, and the page on the ot her
side is copied seco nd.
2
1
1
NOTE
These types of copy are automatically changed according to the selected size of copy.
2
Page 57

3-27
x
L
Selecting the Copy Size
NOTE
When the Paper Feeding Tray or Paper
Cassette runs out of paper , an empty mark
appears beside the c opy size indicator. If
this paper source is currently selected, a
message such as the one in the illustratio n
appears on the display.
Chapter 3
When the LTR is set in the Tray
(Paper Feeding Tray) and Cassette (Paper
Cassette) of the Printer, the display is like
the right figure.
Operation
When the Tray is selected, the Paper in the
Paper Feeding Tray can be used, and when
the Cassette is selected, the Paper in the
Paper Cassette can be used.
Supply Paper on Tray
LTR 11x17
empty mark
Press Start Key
Copy Single Page
Size
LTR
LTR
Tray Cassette
Size
x1.00
LTR 1
2LTR
NOTE
When selected the
first.
2LTR
mode (Book Split C opy), the paper in the Tray is used
Page 58

How to Use the Functions
Function menu
Press the Function key on the Control
Panel.
The Function menu appears.
Select [OK] to return to the size
setting screen.
Exposure
Zoom
Multi-Copy
Paper
Function
Press Start Key
Copy Single Page
BOOK
Orig
Center
Erase
Set
x1.00
LTR 1
OK
3-28
Chapter 3
Operation
Page 59

3-29
Selecting the Type of Original
Specify the type of original to be scanned.Refer to page 3-11 “Book /Sheet Original” for
details.
Press the Function key on the Control
Panel.
Select [Book Orig] when scanning a
Chapter 3
Operation
thick original (books or dictionaries).
Select [OK] to return to the size setting
screen.
Exposure
Zoom
Multi-Copy
Paper
Function
Press Start Key
Copy Single Page
BOOK
Orig
Center
Erase
Set
x1.00
LTR 1
OK
Cancel [Book Orig] when scanning a
sheet original (photograph or a single-
page documen t ) .
Select [OK] to return to the size setting
screen.
Press Start Key
Copy Single Page
BOOK
Orig
Center
Erase
Set
x1.00
LTR 1
OK
Page 60

Center Erase
The shadow generated in the center of the open book is removed.
3-30
Spread mode
Erasing width
Select [Center Erase] from the Function
menu. The center erase setting screen
appears.
Select [Narrow] or [Wide]. The erasing
width can be adjusted from 0" to 0.6" (0 to
15 mm) in 0.1" (2.5 mm) increments. The
set value is displayed in the message area.
Select [Clear] to reset the value to “0”.
Single or Book Split mode
Erasing width
Press Start Key
Copy Single Page
BOOK
Orig
Center
Erase
Set
Press Start Key
Copy Single Page
Center Erase Width 0.1inch
ClearWideNarrow
x1.00
LTR 1
OK
x1.00
LTR
OK
Chapter 3
Operation
1
Select [OK] to return to the size setting
screen.
NOTE
Center Erase cannot be selected in Sheet Original.
Page 61

3-31
User Choice
The Exposure and Auto Zoom can be set to any value. The contents selected here are stored
as the default settings, and maintained even if the Panel Reset key is pressed or the main
switch is turned off and then turned on.
Select [Set] from the Function menu.
Chapter 3
Operation
1
The setting menu appears.
Select [User Choice].
2
The User Choice menu appears.
Press Start Key
Copy Single Page
BOOK
Orig
Press Start Key
Copy Single Page
User
Choice
Center
Erase
Set
Edit CheckWarn OK
Set
x1.00
LTR 1
OK
x1.00
LTR
1
Select the desired item .
3
Select [OK] to return to the size
setting screen.
User Choice Settings
Set
Print
to Fit
Expo
Center
Erase
OK
Page 62

Expo
The exposure is automatically set
according to the Exposure detected in
reading the original.
Select [Expo] from the User Choice
menu. The Exposer Setting screen
appears.
For information on how to select the
Exposure Setting, refer to “Auto” on
page 3-16.
Select [OK] to return to the set menu.
Center Erase
The shadow generated in the center of
the open book is r e moved.
Select [Center Erase] from the User
Choice menu. The Center Erase screen
appears.
For the information on how to select
center erase, refer to “Center Erase” on
page 3-30.
User Choice Settings
Light Auto OKDark
User Coice Settings
Center Erase Width 0.1inch
ClearWideNarrow
3-32
User Choice
Chapter 3
OK
Operation
Print to Fit
The ratio of the original size to the selected paper size is calculated and the magnificati on
is automatically adjusted (the smaller value is used when different ratios are obtained
from length and width calculations).
Select [Print to Fit] from the User Choice menu. The menu name is highlighted and the
function is activated.
Page 63

3-33
Using the Edit Function
Using the Edit menu
Select [Set] from the Function menu.
The Set menu appears.
Select [Edit].
Press Start Key
Copy Single Page
BOOK
Orig
Center
Erase
Set
x1.00
LTR 1
OK
The Edit menu appears.
Chapter 3
Operation
Select the desired item .
NOTE
The Edit menu cannot be selected in Sheet Original.
Press Start Key
Copy Single Page
User
Choice
Press Start Key
Copy Single Page
Mask
Cen-
ter
x1.00
LTR
Set
Edit CheckWarn OK
x1.00
LTR 1
Finger
Erase
Edit
1
OK
Page 64

Using the Edit Function
Frame Masking
Objects outside the original image are erased to prevent a shadowed (bla ck) frame from
being created on the output, such as when the selected paper is larger than the original.
Frame Masking OFF
12
3-34
12
12
Frame Masking ON
NOTE
This function is not effective when an image exists within 2 mm of the edge of the original.
Frame Masking may af fect scanning depending on the density and colors of the original.
When any portion of the required image is erased, turn off Frame Masking.
Select [Mask]. The menu name is
highlighted and the function is activated.
Select [OK] to return to the previous
screen.
Press Start Key
Copy Single Page
Mask
Cen-
ter
Finger
Erase
x1.00
LTR 1
Edit
OK
NOTE
Frame Masking cannot be selected in S heet Origin al. Frame Masking must be on to turn on
Finger Masking an d C en te r in g.
Chapter 3
Operation
Page 65

3-35
Using the Edit Function
Centering
Any shift away from the center of the origi nal is corrected and the scanned image is placed
in the center of the paper when print ed.
Centering ON
Centering OFF
1
Chapter 3
Select [Center]. The menu name is
highlighted and the function is activated.
Operation
Select [OK] to return to the previous
screen.
NOTE
Centering canno t be activ a te d wh en Fr am e Mask in g is off .
Centering is canceled automatically when Frame Masking is turned off.
In the spread copy mode, be sure to align the center of the original with the center mark of
the Book Table.
In the spr ea d cop y m od e, cen te r in g ca nnot be performed in the horizo ntal direction.
12
2
Centering ON Centering OFF
1
Page by page mode
Press Start Key
Copy Single Page
Mask
Cen-
ter
12
Spread mode
1
Finger
Erase
x1.00
LTR 1
Edit
OK
Page 66

Using the Edit Function
Finger Erase
This function removes the image of the fingers holding the original from the copy image.
Finger Erase OFF
3-36
1
12
12
2
Finger Erase ON
NOTE
Finger Erase m ay a ffec t cop ying de pend ing on the densit y and co lors of the o rigi nal. W h en
any portion of the required image is erased, turn off Finger Erase.
Finger Erase is not effective when:
• a fi nger is not placed on the original,
• a finger is placed further than 4" (10 cm) inside the edge of the original,
• a finger is closer to the center than the edge, even when the distance from the edge of the
original is less than 4" (10 cm),
• a finger is placed on the bottom edge of the original, or
• a finger is placed within 1-1/8" (3cm) of the top edge of the original
• th e original contains an image (photograph) and a finger is placed within 1/4" (6 mm)
of this image.
Select [Finger Erase]. The menu name is
highlighted and the function is activated.
Select [OK] to return to the previous
screen.
Press Start Key
Copy Single Page
Cen-
Mask
Finger
ter
Erase
x1.00
LTR 1
Edit
OK
Chapter 3
Operation
NOTE
Finger Erase cannot be activated when Frame Masking is off.
Finger Erase is canceled automatically when Frame Masking is turned off.
Page 67

3-37
Warning
The type of Warning display is set.
Three functions are available to W arning: Bind Height, Auto Exposure and Size Detect. If
the function for which the Warning is selected cannot work for some reason, copying is
stopped, and the Warni ng is issued.
Select [Set] from the Function menu.
Chapter 3
Operation
1
Select [Warn] of the Set menu.
2
Press Start Key
Copy Single Page
BOOK
Orig
Press Start Key
Copy Single Page
User
Choice
Center
Erase
Set
Edit CheckWarn OK
Set
x1.00
LTR 1
OK
x1.00
LTR
1
Press any or all of the keys to a ctivate
3
or deactivate items to be checked
during copying.
Activated items are highlighte d.
Press Start Key
Copy Single Page
Bind
Height
Auto
Expo
Size
Detect
x1.00
LTR 1
Warn
These menu names will be
deactivated and displayed normally
when the corresponding key is
pressed again.
Select [OK] to define the detection items.
NOTE
When any one of the above settings is selected, a contaminated Shading Plate is also
detectable.
The Warning function cannot be selected when Sheet Orig in al mode has been selected.
When “Photo” is selected for the Image type, [Auto Expo] cannot be set to “ON”.
OK
Page 68

Confirming the Current User Setting
The state of the current user setting is confirmed.
Select [Set] from the Function menu.
1
Select [Check] from the Set menu.
2
The current setting is displayed.
3
Select [OK] to return to the size
setting screen.
Press Start Key
Copy Single Page
BOOK
Orig
Press Start Key
Copy Single Page
User
Choice
Auto
Text BookExpo5
Cen-
ter
ON
Center
Erase
Warn
ON
Mask
Set
Set
Edit CheckWarn OK
Fin-
ON
ger
ON
x1.00
LTR 1
OK
x1.00
LTR
Center
Erase
0.3"
OK
3-38
1
Chapter 3
Operation
Page 69

3-39
Confirming the Current User Setting
Chapter 3
Operation
Page 70

Chapter 4
Printer
Chapter 4
Printer
Page 71

4-1
Using the Printe r
Parts of the Printer
Printer Chapter 4
Upper Unit Lock
Use to open the Upper Unit.
Release Lever:
Power Indicator:
Print T ra y:
Paper Guides:
Paper Feeding Tray:
Paper Cassette:
Power Switch:
Light indicates when the Printer is turned ON.
Prints are output from the Printer, face down o nto this tr ay
which can hold up to 50 0 sh e ets of standard paper .
Slide the guides to secure the paper stack.
Capable of holding up to 150 sheets of 8-1/2" × 11" (crosswise) paper .
Capable of holding up to 250 sheets of standard-size paper.
(8-1/2" × 11", 11" × 17", 8-1/2"
Use to turn the Printer ON and OFF.
× 14
")
Page 72

4-2
Using the Printer
Chapter 4
Power Cord Socket:
Upper Unit:
Image Transfer
Roller:
Fusing Unit:
Interface Connectors:
Imaging Cartridge:
Seal:
Printer
The power cord is plugged into this socket.
Open to replace the Imaging Cartridge and to clear misfed
sheets of paper .
Transfers the image onto the sheet of pa per. Be careful to
avoid touching it with your bare hands.
Permanently fixes the image onto the sheet of paper.
Facilitates connections for the Scanner.
* The Printer has two connectors to facilitate connection
with two separate Scanner units. However, this system
(PS3000) can only a ccommodate one scanner.
Where the image is generated for transfer onto the sheet of
paper. Be caref ul to avoid to uching it with your bare h ands.
Remove the seal before installing the new cartridge.
Page 73

4-3
Troubleshooting and Maintenance
Replenishing the Paper Supply
Use only the following types of paper:
Type
Size
Capacity
Plain and recycled paper (weight 16 to 24 lbs. / 60 to 90 g/ m2)
Standard sizes: 11" × 17", 8-1/2"
Paper Feeding Tray: 8-1/2" × 11"(crosswise)
plain and recyc led paper up to 150 sheets
Paper Cassette: 8-1/2"
plain and recyc led paper up to 250 sheets
× 14
× 14
", 8-1/2" × 11"
", 8-1/2" × 11", 11" × 8-1/2", and 11" × 17"
Loading Paper into the Paper Feeding Tray (Upper Tray)
Swing down the P a pe r Fe ed ing Tray.
1
Printer Chapter 4
Fan the paper stack thor oughly and
2
align the edges.
Page 74

Troubleshooting and Maintenance
Load the paper stack face up in the tray
3
and adjust the Paper Guides to secure
the paper stac k .
NOTES
•Make sure that the paper stack does not exceed the Maximum Level Indicator
•Load a new paper stack only afte r the old one has run out.
•Paper can be set only in the crosswise direction.
4-4
.
Chapter 4
Close the Paper Feeding Tray.
4
Printer
Page 75

4-5
Troubleshooting and Maintenance
Loading Paper in the Paper Cassette (Lower Cassette)
Pull the cassette out of the Printer and
1
open the Cover.
Press down the P ape r Liftin g Pla te until
2
it locks. Fan the paper stack thoroughly,
align the edges, and place th e paper in
the cassette.
Printer Chapter 4
Secure the paper stack in the Paper
3
Cassette with the Paper Guides.
Page 76

Close the Cover and insert the cassette
4
into the Printer.
4-6
Troubleshooting and Maintenance
Chapter 4
Printer
Page 77

4-7
Troubleshooting and Maintenance
Replacing the Toner Cartridge
Open the upper unit by pulling the
1
Upper Unit Lock Release Lever
forward.
Remove the old Imaging Cartridge
2
from the printer .
Printer Chapter 4
Take a new Imaging Cartri dge out of
3
the box. Holding it with both hands,
shake it well in the directions indicated
by the arrows.
Page 78

Remove the seal from the Imaging
4
Cartridge by firmly pulling it straight
out.
Shake the Imaging Cartridge four or
5
five more times as shown to evenly
distribute the toner inside.
4-8
Troubleshooting and Maintenance
Chapter 4
Slide the pins located on both sides of
6
the Imaging Cartridge into the grooves
of the printer as shown and gently push
the Imaging Cartridge securely into
place.
Printer
Page 79

4-9
Troubleshooting and Maintenance
Close the Upper Unit.
7
NOTE
Push the Print Tray in before opening the
Upper Unit.
Printer Chapter 4
Page 80

4-10
Troubleshooting and Maintenance
Clearing Misfeeds
A misfeed has occurred in the Printer. Clear the shee t of misfed paper by following the pr ocedure given below.
CAUTION
The Fusing Unit inside the printer becomes very hot during operation. To avoid a burn, be
very careful not to touch it.
Open the Upper Unit by pulling the
1
Upper Unit Lock Release Lever
forward.
NOTE
Push the Print Tray in before opening the Upper Unit.
Remove the Imaging Cartridge.
2
NOTE
Be sure to co ver th e Ima g ing Ca rtrid g e with a he a vy clo th to protect it from light when it is
removed from the Printer.
Chapter 4
Printer
Page 81

4-11
Troubleshooting and Maintenance
Remove the misfed sheet of paper.
3
Clearing a Misfeed from the Paper Feeding Tray
Remove the sheet(s) of paper that caused the
misfeed from the Paper Feeding Tray.
Clearing a Misfeed from the Paper Cassette
Remove the sheet(s) of paper that caused the
misfeed as shown.
Printer Chapter 4
Clearing a Misfeed from inside the Printer
If the misfeed occurred before the sheet of paper entered the Fusing Unit, gently pull the
misfed sheet up and out as shown.
If the misfeed occurred after the sheet of paper
entered the Fusing Unit, g ently pull th e misfed
sheet toward you and out as shown.
Page 82

Troubleshooting and Maintenance
NOTE
• Since the toner has not yet been fixed onto the sheet of paper, be careful not to soil your
hands or clothes when pulling out the misfed sheet.
• Do not remove the misfeed by pulling on
the sheet of pap er towa r d the output end of
the Fusing Unit as shown.
Check that no misfed paper is left in the
4
Printer and then reinstall the Imaging
Cartridge.
4-12
Chapter 4
Close the Upper Unit.
5
Printer
Page 83

4-13
Troubleshooting and Maintenance
Solving Irregular Printing Problems
Use the following procedur es to fix minor prin ting problems. If print quality doe s not improve
after implementing the proced ures below, contact your Minolt a authorized dealer.
Symptom Cause Action
Light image Print density is not properly
A
B
C
D
E
F
A
B
C
D
E
F
A
B
C
D
E
F
A
B
C
D
E
F
A
B
C
D
E
F
set.
Toner in the Imaging Cartridge is running out.
Change the exposure setting as necessary.
Replace the Imaging Cartridge with a new one.
Dark image Print density is not properly
A
A
A
A
A
B
B
B
B
B
C
C
C
C
C
D
D
D
D
D
E
E
E
E
E
F
F
F
F
F
Printer Chapter 4
Partial void image The paper in the tray is
A
A
A
A
A
B
B
B
B
B
C
C
C
C
C
D
D
D
D
D
E
E
E
E
E
F
F
F
F
F
set.
damp.
Change the exposure setting as necessary.
Replace the damp paper
with fresh, dry paper.
Page 84

4-14
Troubleshooting and Maintenance
Symptom
Uneven image density Toner in the Imaging Car-
A
A
A
A
A
B
B
B
B
B
C
C
C
C
C
D
D
D
D
D
E
E
E
E
E
F
F
F
F
F
Blank print The Printer has malfunc-
tridge is not evenly distributed.
tioned.
Cause Action
Remove the Imaging Cartridge, shake it several
times and replace.
Contact your Minolta authorized dealer.
Chapter 4
Printer
Page 85

4-15
Troubleshooting and Maintenance
Printer Chapter 4
Page 86

Chapter 5
Troubleshooting
Chapter 5
Troubleshooting
Page 87

5-1
Potential Problems
Two types of messages appear on the display accordin g to the nature of the problem.
Warning Message
When any error occurs in parameters for
auto focus, auto exposure, or paper size
detection prior to scanning, a warning
message appears on the displ ay and the
Scanner stops. Warning messages can be
reset by pressing [OK] on the display.
Refer to the following pages to the action
required for each message.
As soon as the printer recover from the
trouble condition, the basic screen
reappears on the display and accepts key
operation.
Error Message
When any error occurs in the Scanner, an
error message appears on the display, the
start key turns red, and scanning stops. In
this case, turn the power switch off and
then back on. If the same message appears
again, che ck th e er r or co de and call your
Chapter 5
Minolta authorized dealer.
Book is Not Straight
BOOK
Orig
Warning message
Reset Main Switch
Scanner Trouble
x1.00
LTR 1
OK
XXXX
Troubleshooting
Error code
Page 88

Troubleshooting Warning Messages
Warning message Possible cause Action
Bind Size is Too High
Press Down Book Table
Bind Size is Not Detected • A tag or bookmark is attached
Book Exposure Level is Not
Detected
• The height of the sur face of
the original is more than 2
50 mm) above the book
(
table.
• The steel mirror is dirty. • Clean the steel mirror.
• Light from the roo m l ighting
or from the window refl ec ts
on the steel mirror.
• Change settings appropriately for the original, referring to “Note
on originals”.
to the original.
• The book original is out side
the size guides on the Book
Table.
• Indices are provided on the
top of the origi nal.
• Change settings appropriately for the original, referring to “Note
on originals”.
• The density of the or igi n a l
surface is too high.
• The original is not correctly
set.
• No original is set.
• Lower the original so that its
surface is within the 2
"
50 mm) above the book
(
table.
• Relocate the Scan n er to a
place where light from the
room lighting or from the
window does not reflect on
the steel mirror.
• Take off tags and bookmarks.
• Set the original upsi de down.
• If the Spread mode has be en
selected, select Page-by-Page
to make the copy.
• Set the original upsi de down.
• Cancel the setting for au to
exposure.
• Turn off Frame Masking.
• Select Sheet Original m ode .
• Change settings appropriately
for the original, referring to
“Notes on originals”.
• Set the original correctly.
"
5-2
range
Chapter 5
Troubleshooting
Page 89

5-3
Troubleshooting Warning Messages
Warning message Possible cause Action
Book Size is Not Detected • A tag or bookmark is attached
Right (Left) Siz e is N ot
Detected
Reset Book or Change Shee t
Book is Not straight • The book original is placed
Chapter 5
Move book Forward to Stopp er • The original is askew with
Troubleshooting
Clean the shadin g plate • The shading plate is dirty. • C l ean the shading plate.
Turn Printer ON • The printer is not tu rne d on. • Turn the printer on.
• Take off tags and bookmarks.
to the original.
• The Book Original is outside
the size guides on the Book
Table.
• Indices are provided on the
top of the origi nal.
• The original is not set
correctly.
• No original is set.
• [Spread] is selected, but no
original is placed on the right
or left half of the book table.
• Change settings ap propriately for the original, referring to
“Notes on originals”.
askew to the si ze guides.
• A tag or bookmark is attached
to the original.
• Change settings ap propriately for the original, referring to
“Notes on originals”.
respect to the stop pe r.
• The original is not pressed up
against the stopper.
• The steel mirror is dirty. • Clean the steel mirror.
• Your hands or arms were
placed over the or igi n a l
during scanning.
• An obstacle is blocking the
lamp.
• The printer is disco nne cted. • Connect the printer.
• Set the original upsi de down.
• If the Spread mode has be en
selected, select Page-by-Page
to make the copy.
• Select the Sheet Original
mode.
• Change settings appropriately
for the original, referring to
“Notes on originals”.
• Set the original correctly.
• Select [Page-by-page] when
scanning only one page.
• Set the original correctly
when scanning a two page
spread.
• Reposition the original,
aligning it wit h the size
guides.
• Take off tags and bookmarks.
• Set the original upsi de down.
• Press the original up against
the stopper.
• Never move your ha nds and
arms after the sta rt s w itch is
pressed.
• Remove the obstacle blocking
the lamp.
Page 90

Troubleshooting Warning Messages
Warning message Possible cause Action
Remove Paper on Drum (in
Take Up, in Fusing)
Supply Paper on Tray (in Cass.) • Out of paper. • Supply the correct paper.
Toner Near Empty • Empt y of toner. • Replace the Toner Cartridge.
To ner Empty
Exchange Imagin g Ctg
Close Printer Cover • The printer cover (Upper unit)
Irregular Paper Size
Change Paper Size
Paper Size Error
Open and Close Cover
Printer Trouble XXXX
Turn OFF and ON
• Paper is jammed in the
printer.
• Out of toner. • Replace the toner cartridge.
is open.
• the wrong paper is selected. • Select the appropriate paper
• Paper inap propriate for the
printer is loaded in the printer.
• Paper fed into the printer is
the wrong size.
• More than one sheet of paper
is fed into the printer at the
same time.
• Printer Trouble • Turn the printer off and on.
• Open the printer cover and
remove the jammed paper.
• Close the printer cover
(Upper unit).
type.
• Supply paper appropriate for
the printer.
• Check the size of the paper set
on the tray an d close the cove r
of the printer.
•
If the same message
appears again, check the
error code and call your
Minolta authorized deal er.
5-4
Chapter 5
Troubleshooting
Page 91

5-5
Troubleshooting Warning Messages
Chapter 5
Troubleshooting
Page 92

Chapter 6
Maintenance
Chapter 6
Maintenance
Page 93

6-1
Maintenance
The following daily checks and cleaning are required to ensure the best possible
performance and utmost safety from the Scanner.
Daily Checks
1. Any of the following conditions could damage the Scanner or other electrical equipment. Move the Scanner immediately a nd eliminate the possible cause of malfunction.
• The Scanner is placed on the power cord or othe r cables.
• The Scanner is placed on any cord o f o th er electrical devices.
2. If any of the following conditions is found, turn the Scanner off immediately, unplug
the power cord from the outlet, and call your Minolta authorized dealer.
• The power cord or interface cable is damaged.
• The insulation of the power cord is damaged and the bare wires are exposed.
Cleaning
Scanner glass and illumination glass
The Scanner may not scan the origi nal
correctly if the scanner glass or
illumination glass is dirty. Wipe the
surfaces with a dry soft cloth to remove
dust.
Scanner glass
Steel mirror and shading plate
The height of the original is not correctly
measured if the steel mirror or shading
Chapter 6
plate is dirty, resulting in a warning
message. Wipe the surfaces with a dry soft
cloth to remove dus t .
Maintenance
NOTE
Be sure to turn the Scanner off and unplug the power cord before cleaning.
Illumination glass
Shading plate
Steel mirror
Page 94

Maintenance
Cleaning the Printer
Clean the Printer at regular intervals.
NOTE
Before clean ing th e Printer, turn OFF the power and un plug th e cord from th e power o utlet.
Use a soft cloth and NEVER use abrasives or corrosive detergents.
Exterior Panels
Clean the exter ior pa ne ls wi th a s of t, dry cloth. A damp cloth and a mild home detergent
can be used for heavier cleaning.
6-2
Chapter 6
Maintenance
Page 95

6-3
Maintenance
Chapter 6
Maintenance
Page 96

Chapter 7
Specifications
Chapter 7
Specifications
Page 97

7-1
Product Specif i ca ti o ns
Type: Scanner for face-up original
Scanning system: CCD Scanning system
Original type: Book, Sheet
Original size: Min. 5-1/2" x 8-1/2" (A5: 148mm x 210mm)
Max. 11" x 17" (A3: 297mm x 420mm)
Original thickness: within 4" (100 mm): except hardcover
Resolution: 400 dpi (350dpi in scanning main direction and 400 dpi
in sub-scanning directi on)
Image sensor: Reducing-type line CCD (5000 pixels)
Light source: Long cylindrical halogen lamp (DC77V, 350 W)
Exposure adjustment: Automatic (9 steps) or Manual (9 steps)
Auto focus: Automatic focus system by the measurement data of
original height
Image correction: Curved text line correction by zoom adjustment in
scanning direction
Text compression correction by space adjustment in sub-
scanning direction
Text/Photo mode: Outline accentuation and smoot hing me th od
Center erase: The shadow generated in the center of the open book is
removed.
Finger erase: Fingers holdi ng the original erased
Frame masking: Object (frame) outside the original erased
Centering: Scanned image printed out in the ce nt er of the pa pe r
Type of copy: Spread Copy, Page-by-Page Copy, Book Split Copy
Copy size: 11" x 17", 8-1/2" x 14 ", 8-1/2" x 11"
Magnification: x0.5 to x2.0 (0.01step)
First print speed: 14 seconds (8-1/2" x 11" cro sswise, book mode)
Printer Warm-up time: Less than 70 seconds
Multiple printing: 1-9 sheets
Chapter 7
Paper supply: Paper Tray (150 sheets max)
Paper Cassette (250 sheets max)
Dimensions: Scanner: 25-5/8"(W) x 23-1/2"(D) x 30-2/3" (H) or
651 mm (W) x 598 mm (D) x 76 3 mm (H)
Printer: 22" (W) x 20-1/2" (D) x 16" (H) or
Specifications
Weight: Scanner: 95 lbs (43 kg)
Printer: 61-3/4lbs (28kg)
Power source: 120 V, 60Hz
545 mm (W) x 521 mm (D) x 40 3 mm (H)
Page 98

Specifications
Max. power consumption: Scanner: Less than 550 W, Printer: Less than 750 W
Operation nois e: 55 dB or less
Printer Interface: Video I/F
Option: Foot Pedal (Contact your local authorized dealer.)
7-2
Chapter 7
Specifications
Page 99

7-3
For Key Operator’s Use
When you need to call for service, the Key Operator should be prepared to provide the
following information to your local authorized Dealer.
1. Your Company Name, Address, Telephone Number, Department Name, Floor Number, Machin e Lo catio n, etc.
2. Model Name, Serial Number, Condition or System(s) Indication(s) on the Display. etc.
For your reference purpose.
Scanner Name PS3000 (PR Version)
Serial No.
Chapter 7
Printer Name MSP 3000 Printer
Installation Date
Authorized Dealer's Name
TEL. No.
Address
Serial No.
Specifications
Page 100

1999. 11
Copyright
1999 MINOLTA CO., LTD
Printed in Japan
The information contained in this manual is
subject to change without notice to
incorporate improvements made on the
product or products the manual covers.
MINOLTA CO., LTD.
Image Information Products Marketing Headquarters
3-13, 2-chome, Azuchi-machi, Chuo-ku, Osaka. 541-8556, Japan
 Loading...