

Page 1

Printgroove
POD Serve
Quick Start Guide
Page 2

Table of Contents
Table of Contents
1 Introduction
1.1 Welcome ............................................................................................ 1-1
1.2 Printgroove Suite Overview ............................................................. 1-3
1.3 Printgroove POD Serve Overview ................................................... 1-5
1.4 System Specifications ...................................................................... 1-7
1.5 System Requirements ...................................................................... 1-7
1.6 Licensing Overview .......................................................................... 1-8
1.7 Where to Go from Here .................................................................... 1-9
2 Default Settings and Screens
2.1 Default Users .................................................................................... 2-2
2.2 Default Permissions ......................................................................... 2-3
2.3 Default Groups .................................................................................. 2-4
2.4 Job Ticket Format, Job Ticket Number Format and Price Lists for the
Default Group .................................................................................... 2-5
2.5 Screens .............................................................................................. 2-6
3 Preparation for Use
3.1 Apply for an Account ........................................................................ 3-3
3.2 Login .................................................................................................. 3-8
3.3 Set the Profile Data ........................................................................ 3-10
3.4 Logoff ............................................................................................... 3-16
3.5 Download and Install the Printgroove POD Driver ...................... 3-17
4 Operations for Placing an Order
4.1 Placing an Order ............................................................................... 4-1
4.2 Modify an Order .............................................................................. 4-19
4.3 Delete an Order ............................................................................... 4-20
Printgroove POD Serve Quick Start Guide i
Page 3

Page 4

Introduction
1 Introduction
1.1 Welcome
The purpose of this guide is to get you started using the Printgroove POD
Serve application quickly. Detailed instructions for all features can be found
in the User’s Guide. Printgroove POD Serve is the web service module of the
Printgroove POD application suite--used for submitting and customizing
print jobs, performing proof checks, and tracking order status, over the Internet.
2
Note
For details about the Printgroove POD server setup, see the Printgroove
POD Queue Quick Install Guide.
Trademark Acknowledgements
KONICA MINOLTA, the KONICA MINOLTA logo, the symbol mark, and “The
essentials of imaging” are registered trademarks or trademarks of KONICA
MINOLTA HOLDINGS, INC.
bizhub and bizhub PRO are registered trademarks or trademarks of KONICA
MINOLTA BUSINESS TECHNOLOGIES, INC.
PDFNet SDK is copyright PDFTron Systems 2001-2006 and distributed by
Konica Minolta Business Technologies, Inc. under license. All rights reserved.
Portions Copyright © 2001 artofcode LLC.
This software is based in part on the work of the Independent JPEG Group.
Portions Copyright © 1998 Soft Horizons.
All Rights Reserved.
Linux is a registered trademark of Linus Torvalds.
LEADTOOLS is a registered trademark of LEAD Technologies, Inc.
Artifex, the Artifex logo, Ghostscript, and the Ghostscript logo are registered
trademarks of Artifex Software, Inc.
Adobe, Acrobat, and PostScript are either registered trademarks or trademarks of Adobe Systems Incorporated in the United States and/or other
countries.
Intel and Pentium are trademarks or registered trademarks of Intel Corporation or its subsidiaries in the United States and other countries.
1
Printgroove POD Serve Quick Start Guide 1-1
Page 5

1
Introduction
Microsoft and Windows are either registered trademarks or trademarks of
Microsoft Corporation in the United States and/or other countries.
Sun, Sun Microsystems, Java and Solaris are trademarks or registered
trademarks of Sun Microsystems, Inc. in the United States and other countries.
All other company and product names are either trademarks or registered
trademarks of their respective companies.
Copyright © 2009 KONICA MINOLTA BUSINESS TECHNOLOGIES, INC. All
rights reserved.
The actual dialog boxes that appear in the screen may be slightly different
from the screen images used in this user guide.
In order to incorporate improvements in the product, the contents of this user
guide are subject to change without notice.
1-2 Printgroove POD Serve Quick Start Guide
Page 6
Introduction
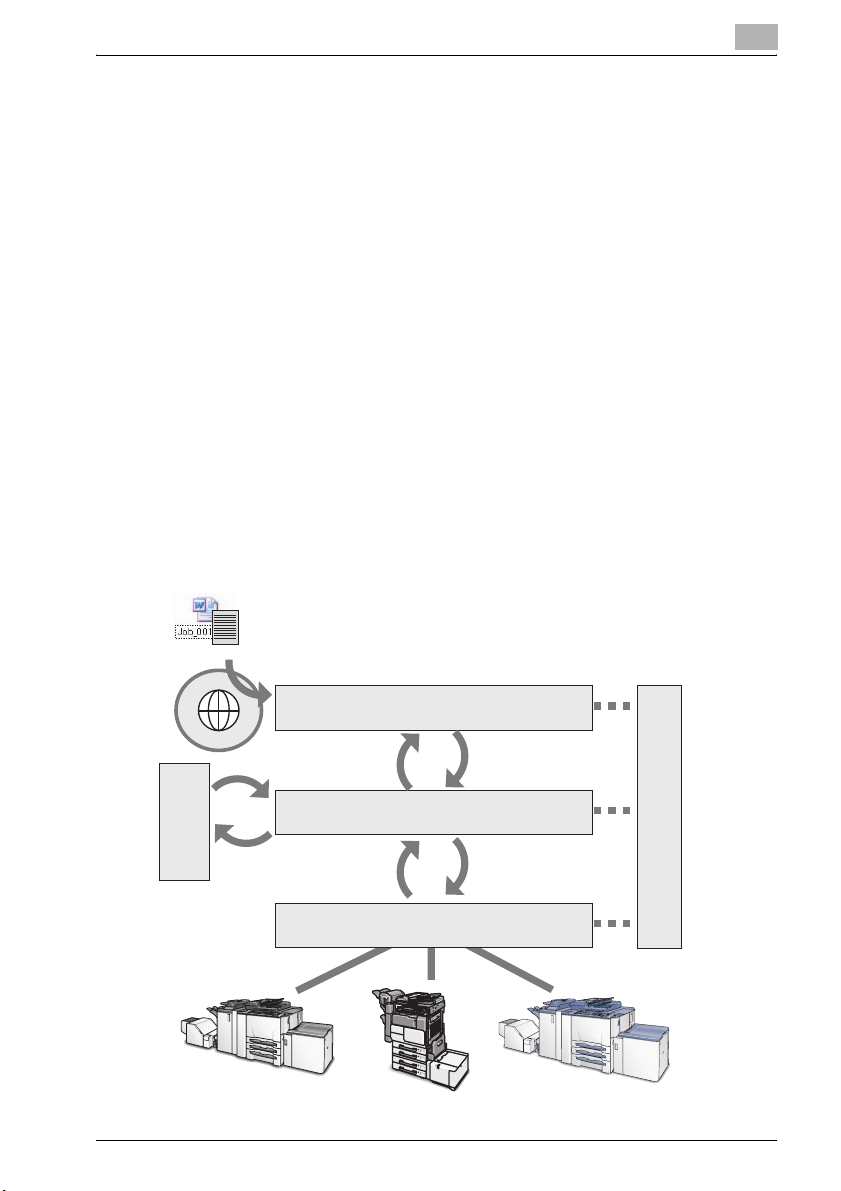
1.2 Printgroove Suite Overview
The Printgroove POD Suite is a Digital Workflow Solution that helps CRD/reprographics departments meet the needs of increasingly demanding markets. Printgroove’s modular design provides the flexibility to integrate all
stages from job submission to fulfilment. Ideal for small to mid-size operations, Printgroove is an affordable solution for all your reproduction and publishing needs.
The Printgroove POD Suite is comprised of four modules.
- Printgroove POD Serve: a web service for print job submission by the external user. It also enables the external user to verify the status of the job
in real-time.
- Printgroove POD Guide: a process control tool. It designs the Workflow,
monitors job tracking, and also handles customer account management,
cost estimates and billing information.
- Printgroove POD Ready: a Make Ready tool. Automatic and manual imposition, page layout and late-stage editing are all supported.
- Printgroove POD Queue: a print management tool. The status and workload of discovered printers are monitored. Incoming, processing and
completed jobs are routed and tracked and last-minute job ticket editing
is supported.
1
Job Ticket
Printgroove POD Serve
Internet
Printgroove POD Guide
Printgroove
POD Ready
Printgroove POD Queue
Printgroove POD Serve Quick Start Guide 1-3
::Admin for Printgroove
Page 7

1
Introduction
The Printgroove POD Suite improves the productivity of the entire Workflow
and helps prevent print errors caused by users by providing the following
functions:
- Printgroove POD Guide receives orders from Printgroove POD Serve
through the Web. The customer creates a job ticket which is saved and
submitted to the CRD/reprographics department. There the ticket can be
reviewed and modified.
- A tracking number is issued and the user can trace the status of a print
order using Printgroove POD Serve/Guide.
- Process management is handled in Printgroove POD Guide. POD Guides
Workflow functions also enable comprehensive oversight of a job’s
progress.
- After Printgroove POD Guide sends the job data to Printgroove POD
Queue, the Printgroove POD Queue selects the optimum output engine
and automatically processes the job.
- Printgroove POD Queue supports the export/import of job tickets, allows
the user to change a job ticket, and a simple method of reprinting, all of
which improve the productivity of the print job process.
Printgroove POD Queue can function as a stand-alone application or in any
combination with the other modules.
In addition to these modules, the Printgroove POD Suite provides the Printgroove POD Driver which enables you to convert native file jobs to JDF/PDF
files and then send them directly to the selected Printgroove POD module for
processing.
2
Note
Printgroove POD Serve is one method used to submit jobs. It is pri-
–
marily used by customers of your reprographics department to
send you jobs.
–
::Admin for Printgroove is a web utility that enables administration
of the Printgroove POD system. For details, please refer to the user's guide of ::Admin for Printgroove.
1-4 Printgroove POD Serve Quick Start Guide
Page 8

Introduction
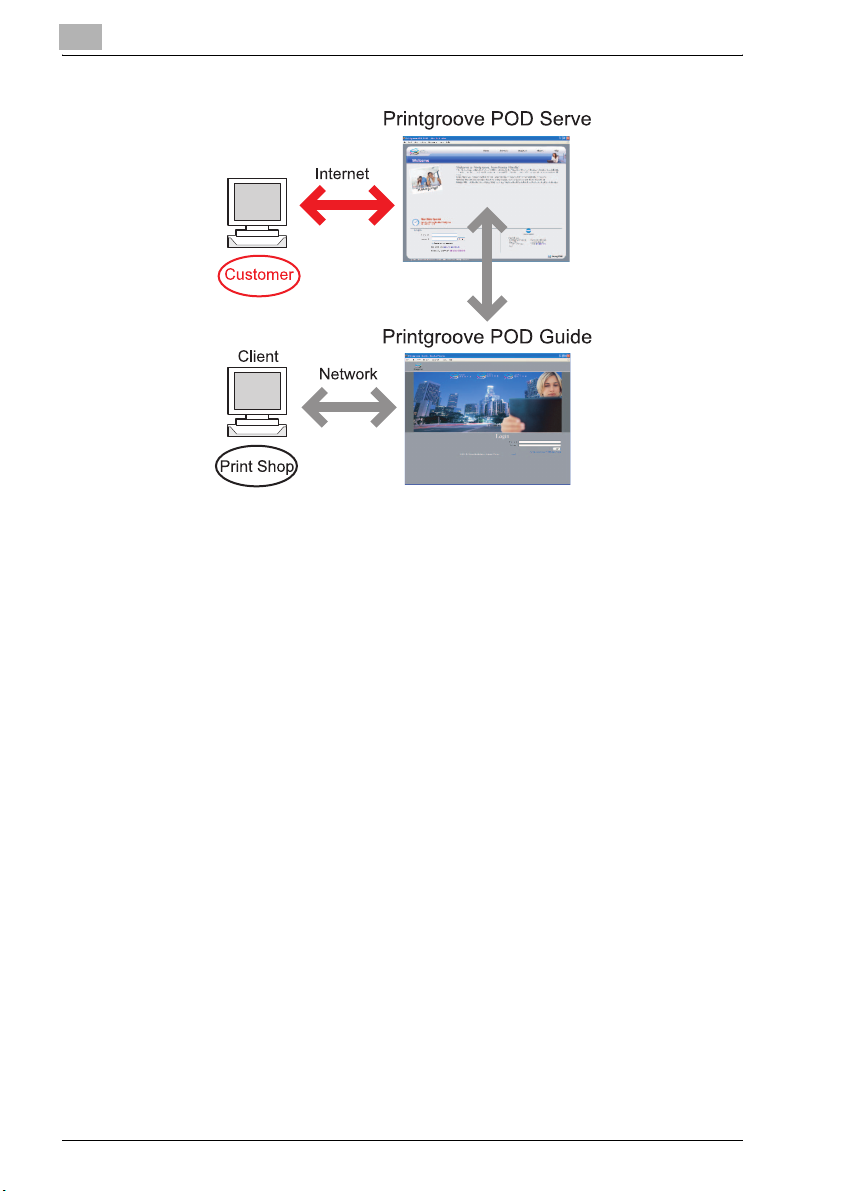
1.3 Printgroove POD Serve Overview
Printgroove POD Serve is the application installed on the Printgroove POD
Server. Printgroove POD Serve is used by the external customer of the printshop via the Internet.
Printgroove POD Serve enables the customer to submit/customize jobs, perform proof checks and track the status of orders, all via the Internet.
The external customer creates a job ticket, specifying the settings, then submits the job to Printgroove POD Guide, where it is reviewed and, as required,
modified by the printshop operator. This provides an effective exchange of
information between the customer and the printshop, and greatly reduces
print errors caused by human input.
2
Note
–
Customers of a printshop are typically other companies. Customers of a CRD are typically other departments with the same company, such as Human Resources, Marketing, Engineering, etc.
–
An Internal employee can use Printgroove POD Serve on their intranet to place an order. While Printgroove POD Guide has the
same functions as Printgroove POD Serve, POD Guide has more
administrative functions. For this reason, it is recommended that internal employees use Printgroove POD Guide.
Printgroove POD Serve makes job requests much easier because the customer can:
- Place orders, upload files and review proofs via the webCheck order status on the web
- Check order status via the web
- Send requests to the printshop via e-mail and receive responses back.
As well, automatic e-mail notification about job processing can be sent
back to the external user, these notifications enabled by printshop users.
1
Printgroove POD Serve Quick Start Guide 1-5
Page 9
1
Introduction
To place an order using Printgroove POD Serve, use the Place an Order
menu. There are two ways to access the menu:
- by submitting a native file using the Printgroove POD Driver
- via the Printgroove POD Serve Home page
To submit a native file to Printgroove POD Serve using the Printgroove POD
Driver, you must first install the Printgroove POD Driver. See “Download and
Install the Printgroove POD Driver” on page 3-17.
1-6 Printgroove POD Serve Quick Start Guide
Page 10

Introduction
1.4 System Specifications
Printgroove POD Server
Operating System Hardware (minimum specifications)
Ubuntu v8.04 (Hardy Heron) Processor: Pentium 4, 2.8 GHz
RAID Support
RAID5
Memory: 512 MB
HDD Capacity: 20GB free space
NIC: 10/100/1000 Mbps
Other Media: DVD-ROM Drive
1.5 System Requirements
Client Computer
Web Browser for Windows
Internet Explorer 6.0, 7.0 or 8.0
Firefox 2.0 or 3.0
1
Web Browser for Mac
Firefox 2.0 or 3.0
2
Note
If you open Printgroove POD Serve in a different browser than those noted above, a pop-up message will open and request that you use a supported browser. Click the [OK] button if you wish to try running POD
Guide on the non-supported browser. If you select the “Stop executing
scripts on this page” checkbox on the pop-up message, JavaScript is
disabled and Printgroove POD Guide will not run. The pop-up will appear
prior to log in and any time you Refresh the browser.
Plugins
Flash Player 9 or later
Optional Plugins and Applications
Adobe Reader 8 or later
Printgroove POD Serve Quick Start Guide 1-7
Page 11

1
AntiVirus Software
Several application are supported by Ubuntu but ClamAV Antivirus is recommended. Please see: “https://help.ubuntu.com/community/ClamAV”.
1.6 Licensing Overview
The features of the Printgroove POD Serve are afforded based on the license.
To upgrade, additional licensing is required. Please see your Konica Minolta
Sales Representative for details.
Basic and upgrade levels of each feature are noted below:
Printgroove POD Serve Licensing
Standard Includes the following as standard:
Additional External 100 Users
- 100 External customer user licenses
(2 users defined as default users - joeuser and sueboss)
- 5 internal PrintShop user licenses
(2 users defined as default users - psc and appadmin)
External 200 Users
External 1000 Users
Internal 10 Users
Internal 20 Users
Internal 50 Users
PFP Package
Introduction
1-8 Printgroove POD Serve Quick Start Guide
Page 12

Introduction
1.7 Where to Go from Here
To help you quickly locate the information you require, an overview of each
chapter follows:
Chapter 2: Default Settings and Screens
This chapter provides information about default users, default groups, default permissions and important screens. This chapter is useful for all users
to help you understand the basic terms and functionality of Printgroove POD
Serve.
Chapter 3: Preparation for Use
Preparation procedures are required before Printgroove POD Serve can be
used to place orders. Those procedures are discussed in this chapter along
with basic operations like login and log off, etc.
Chapter 4: Placing an Order
This chapter provides complete procedures for placing an order. After reading this, all users will have the basic understanding required to place an order.
1
Printgroove POD Serve Quick Start Guide 1-9
Page 13

Page 14

Default Settings and Screens
2 Default Settings and Screens
To make it easier to start using Printgroove POD Serve, some predefined default settings are included. These settings are generic and typical, so you can
start using Printgroove POD Serve immediately. As long as you do not
change the default settings, you can test Printgroove POD Serve using these
defaults.
This chapter provides information for default Users, default Groups, default
Permissions and details about important screens. After reading it, you should
understand the basic terminology and functionality of Printgroove POD
Serve.
For all users, the following browser-limitations should be noted:
- The [Refresh/Reload], [Back] and [Forward] buttons of the browser used
to view Printgroove POD Serve should not be used.
- The Function Key shortcuts (F3, F5, etc.) of the browser used to view
Printgroove POD Serve should not be used.
For all users, the following File Name character behavior should be noted:
- When uploading a file to an order, the following characters will be modified: [+], [=], [%] and [ ] (blank space). Printgroove will replace these characters with an underscore ( _ ).
- For example Chpt+Ind%File.pdf would be changed to Chpt_Ind_File.pdf.
This chapter is useful for all users to understand terms and functions of the
Printgroove POD Serve.
2
Printgroove POD Serve Quick Start Guide 2-1
Page 15

2
2.1 Default Users
To use Printgroove POD Serve, User accounts are necessary.
Default Users are as follows:
User Password Description
sueboss password Manager User
joeuser password Non-Manager User
Printgroove POD Guide’s Application Administrator must enable Printgroove
POD Serve’s default Manager User/“sueboss” account before anyone can
start using Printgroove POD Serve. If the default accounts are not suitable
for your company, you may apply for a new account. See “Apply for an Account” on page 3-3.
If you use the defaults, both the Application Administrator and the customer
Manager User, “sueboss,” can create accounts for other customer Users.
If you are a Manager and you use the “sueboss” account, you may either create new accounts, or allow other Users to use the default account “joeuser”
to start using Printgroove POD Serve.
Default Settings and Screens
2-2 Printgroove POD Serve Quick Start Guide
Page 16

Default Settings and Screens
2.2 Default Permissions
All Users have permissions to perform certain actions on job orders.
All Users can be assigned multiple permissions.
Customers have the following permissions:
Permissions Description
Place Order Allows User to place job orders.
View All Orders Allows User to view all orders of the group to which the User belongs.
View Statistics The statistical information of the jobs is allowed to be checked.
User Management Create Users
User Management Edit Users
User Management Delete Users
User Management Approve New Accounts
Jobs - Give Approval Allows the user to approve orders submitted by other Users.
Jobs - Jobs require
approval from [select
a User]
The setting of this permission is made by the application administrator
of the Printgroove POD Guide.
Gives the Manager the ability to create and add new Users to a group.
Gives the Manager the ability to edit other Users in a group.
Gives the Manager the ability to delete Users in a group.
Gives the Manager the ability to approve new Users in a group.
Specifies that the User must get approval from another user to submit
jobs. The approval User is specified via a drop-down menu.
2
Permissions of Default Users
Default Permissions of the default Users are as follows:
Permissions sueboss joeuser
Place Order ON ON
View All Orders ON -
View Statistics - -
User Management - Create Users ON -
User Management - Edit Users ON -
User Management - Delete Users ON -
User Management - Approve New Accounts ON -
Jobs - Give Approval ON -
Jobs - Jobs Require Approval from [select a User] - ON
from “sueboss”
Printgroove POD Serve Quick Start Guide 2-3
Page 17
2
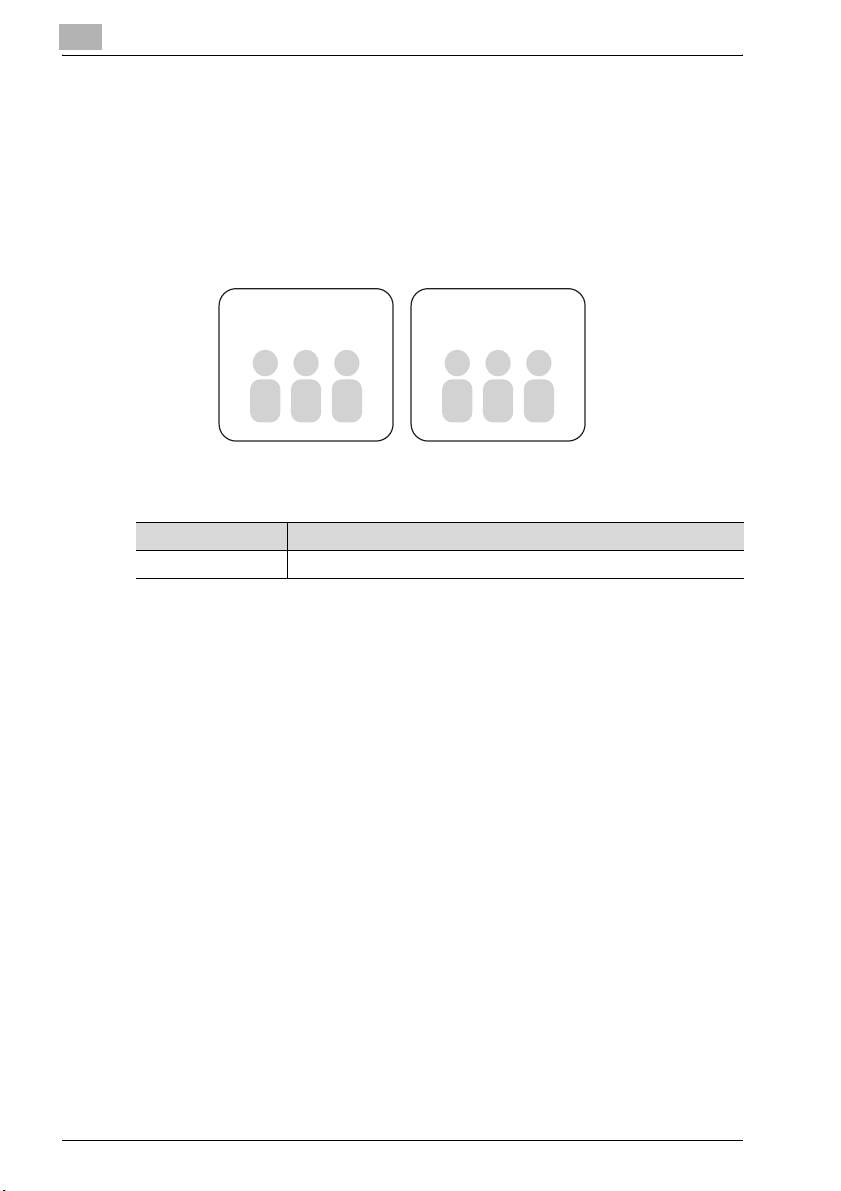
2.3 Default Groups
All Users belong to a Group. A Group is a collection of users that use the
same Job Ticket, the same Job Ticket Number Format, and the same Price
List.
Groups are defined by the Application Administrator or Users who have permission to create Groups on Printgroove POD Guide.
Default Settings and Screens
Group “A”
Same Job Ticket Format
Same JT Number Format
Same Price List
UserAUserBUser
C
Group “B”
Same Job Ticket Format
Same JT Number Format
Same Price List
UserDUserEUser
F
Default groups are as follows:
Group Name Description
HR Customer User Group. “sueboss” and “joeuser” belong to this Group.
Instead of creating a new group, the Application Administrator may allow the
use of the default group “HR,” for which the default Job Ticket Format and
Job Ticket Number Format are predefined.
2-4 Printgroove POD Serve Quick Start Guide
Page 18

Default Settings and Screens
2.4 Job Ticket Format, Job Ticket Number Format and Price Lists for the Default Group
Job Ticket Format is the form that users fill out to place an order. There are
two basic types of Job Ticket Formats: Standard Order and Quick Order.
The Standard Order contains all the available job ticket settings.
Quick Orders provide the user with real time price quotes for a job but the
job tickets have limited settings.
Job Ticket Number format is the combinations of letters, sequence numbers
or date, the order was placed, all these values used to identify the Job Ticket.
A Price List contains all the costing values for all supported job ticket settings
as well as all Delivery, Internal Service and Special Pricing costs. The Application Administrator assigns the values to a Price List in Printgroove POD
Guide. A single price list is assigned to a group. every job processed by that
group will be costed based on the values set in the Price List.
The Application Administrator may designate different Job Ticket Formats,
Job Ticket Number format options and Price Lists to different groups based
on their needs.
Predefined settings of Job Ticket Format and Job Ticket Number format for
the default group, “HR,” are as follows:
2
Setting Description
Job Ticket Format “Default Order-All”. This format enable user to fill out the all
Job Ticket Numbering Scheme KM_%system-counter%
settings available on thePrintgroove POD Guide.
2
Note
See “Placing an Order” on page 4-1, for more information.
The Printshop must create at least one Price List before jobs can be created.
Printgroove POD Serve Quick Start Guide 2-5
Page 19
2
2.5 Screens
You can place orders or view orders from specific Printgroove POD Serve
screens.
This section provides the outline of screens helps you to understand the
functions of the Printgroove POD Serve.
2
Note
In this Guide, all screen captures are from Printgroove POD Serve
–
running on Firefox.
–
For details about each screen see, “Placing an Order” on page 4-1.
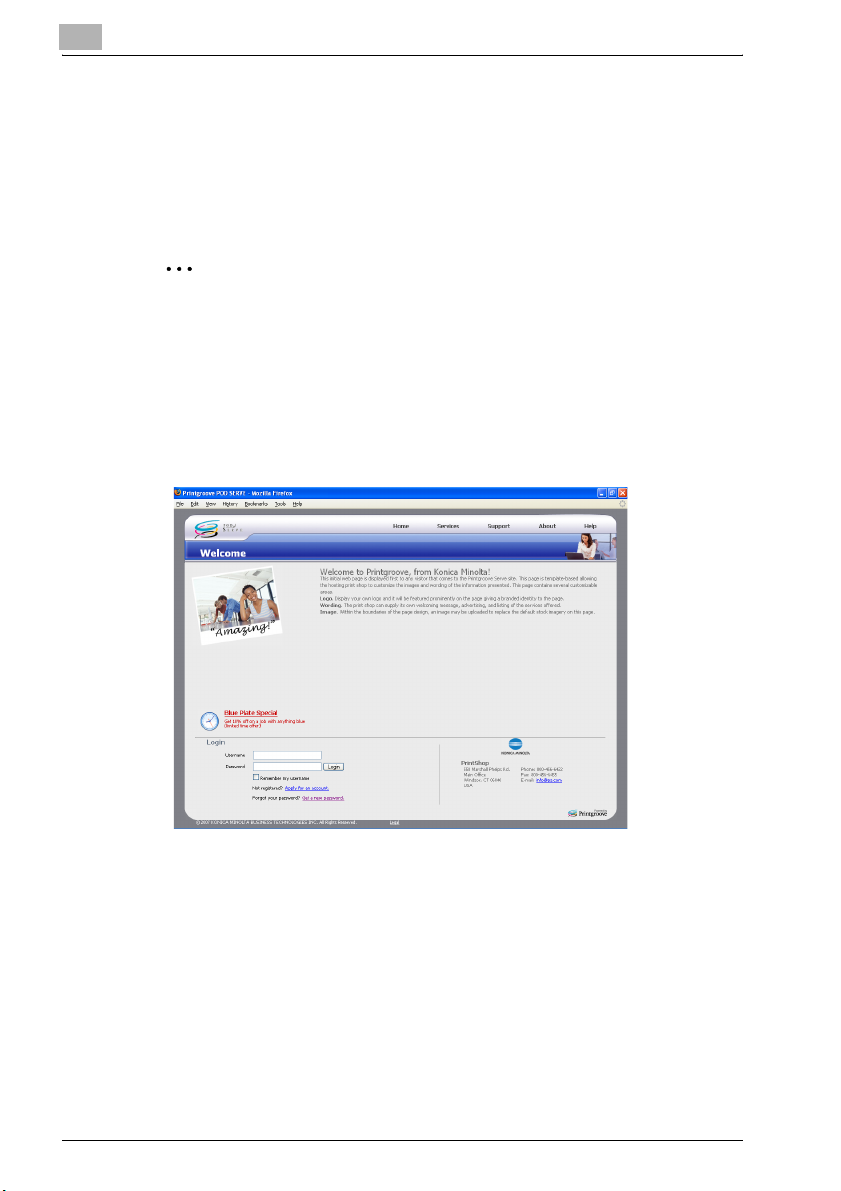
2.5.1 Welcome Screen
When you launch Printgroove POD Serve, the Welcome screen appears. You
can login to Printgroove POD Serve from this screen.
Default Settings and Screens
From the Welcome screen, you can access several areas including Services,
Support, About and Help. All these options are available to you at all times,
both before and after logging in, via the quick links at the top of the screen.
- Services: Click on [Services] to bring up a message about the services offered by the printshop.
- Support: Click on [Support] to bring up contact information for a variety
of support options. This contact information is entered by the Application
Administrator. Click on any of the e-mail links (these are blue and underlined) to bring up your default email tool. Your e-mail will be addressed to
the Support Contact. Just fill in the message and send.
2-6 Printgroove POD Serve Quick Start Guide
Page 20
Default Settings and Screens
- About: Click on [About] to bring up basic developer and version information for Printgroove POD.
- Help: Click on [Help] to bring up the context-sensitive Help files as well
as a link to this document.
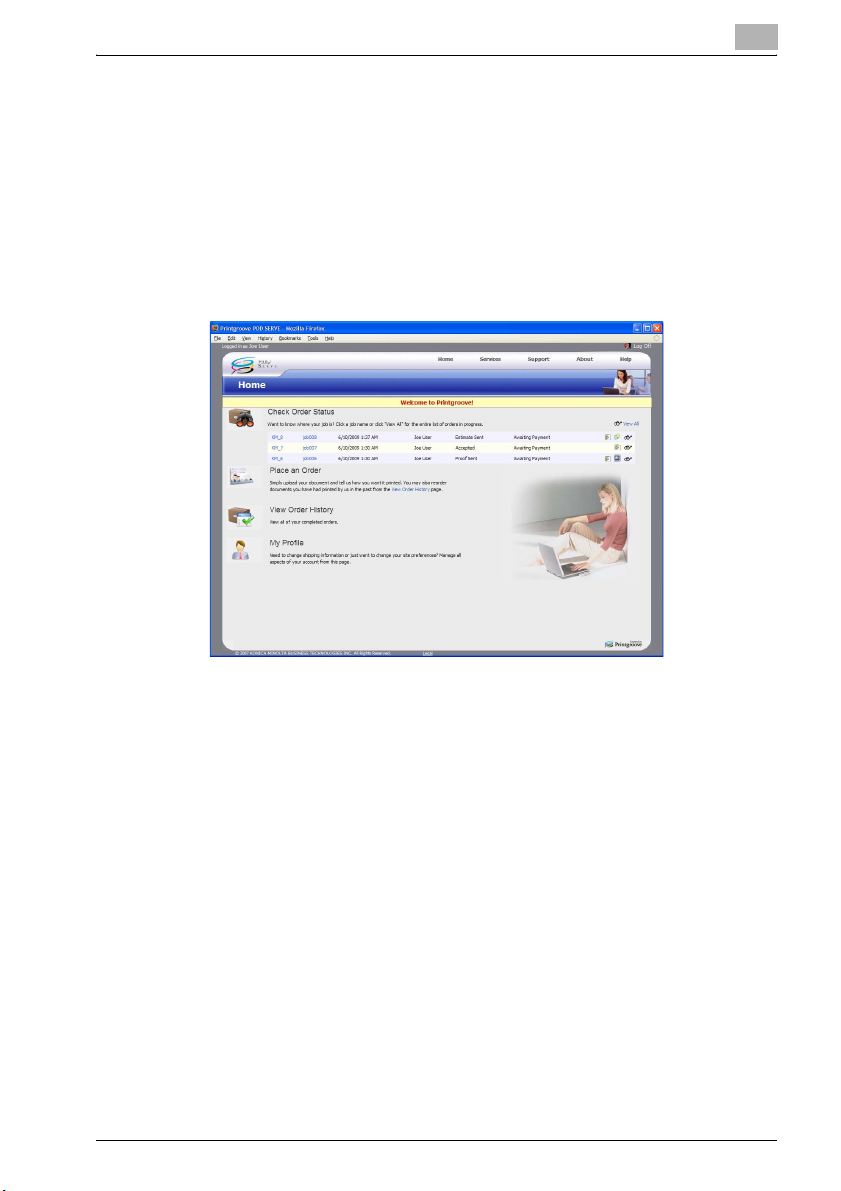
2.5.2 Home Page
When you login to Printgroove POD Serve, your Home page opens. The
menus on your home page allow you to access all of the functions in Printgroove POD Serve to which you have been given permission.
2
Printgroove POD Serve Quick Start Guide 2-7
Page 21
2
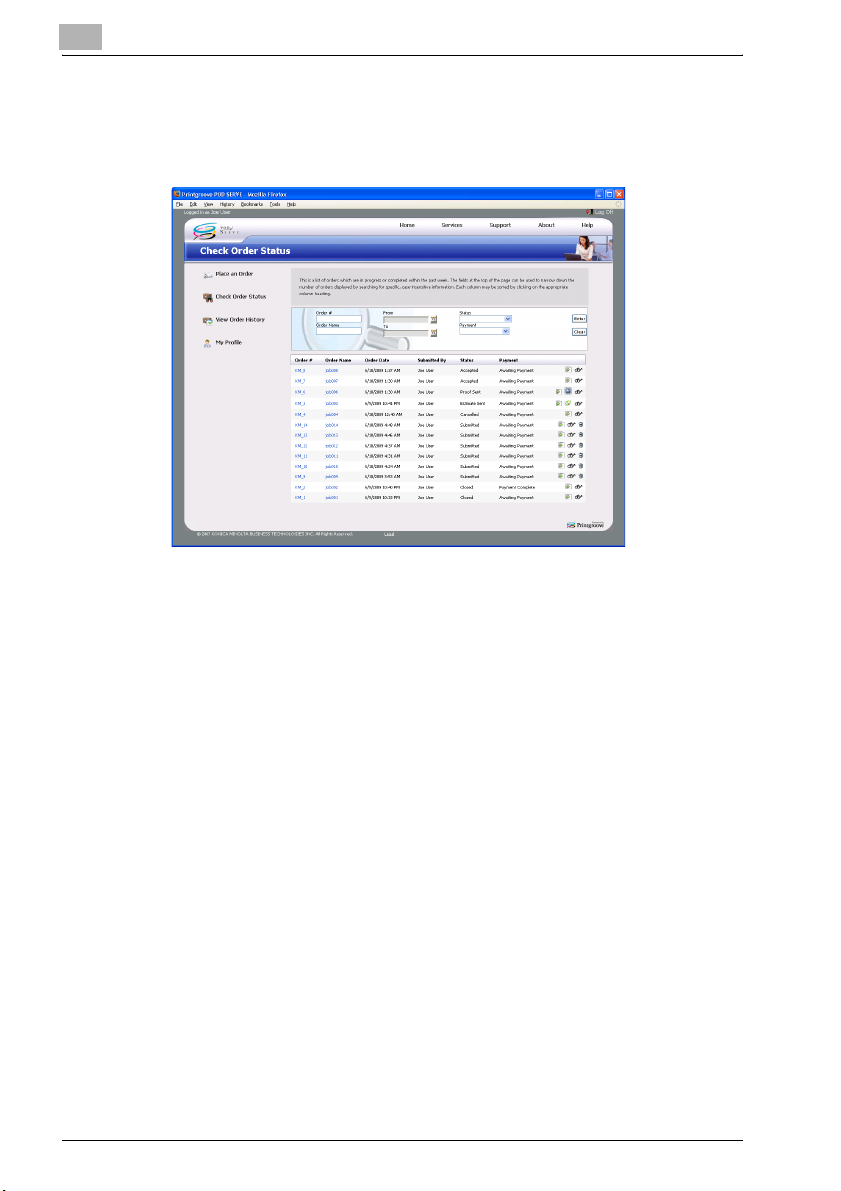
2.5.3 Check Order Status Screen
When you click [Check Order Status] on your Home page, the [Check Order
Status] screen opens. This screen lists your active jobs.
Default Settings and Screens
2-8 Printgroove POD Serve Quick Start Guide
Page 22

Default Settings and Screens
2.5.4 Place an Order Screen
When you click [Place an Order] on your Home page, the [Select a Job Ticket
Template] screen opens:
Select either the Quick Order or Standard Order option by clicking on an
icon. The [Place an Order] screen opens. (The contents of this screen will
vary based upon the type of Job Ticket Template you selected.) The name of
the selected template will appear in the header row. You can place an order
on this screen.
2
Printgroove POD Serve Quick Start Guide 2-9
Page 23

2
2.5.5 View Order History Screen
When you click [View Order History] on your Home page, the [View Order
History] screen opens. Here you can view all of your completed orders. However, once a job has been closed and archived, it cannot be accessed via
Printgroove POD Serve and will not appear on this page.
If you have a user account that has [View Statistics] permission, a [Statistics]
link will appear in the upper-left corner of the [View Order History] screen.
Default Settings and Screens
2.5.6 My Profile Screen
When you click [My Profile] on your home page, the [My Profile] screen
opens. You can edit your Profile Data.
2-10 Printgroove POD Serve Quick Start Guide
Page 24

Default Settings and Screens
2.5.7 Management Screens
Certain permissions are given to a Department Manager, so they can manage the print order needs of the department.
If logged in at the Manager User-level, two additional menus appear on the
Home page.
- Orders Awaiting Approval: A list of jobs requiring the manager’s review
and approval.
- Manage accounts: a place where the manager can Manage User accounts within their Group.
2
Printgroove POD Serve Quick Start Guide 2-11
Page 25

Page 26

Preparation for Use
3 Preparation for Use
Once Printgroove POD Server is live, Printgroove POD Serve can be
launched.
The procedures described to this chapter prepare Printgroove POD Serve so
that it can be used by customers. You must complete the following procedures:
- Apply for an Account
- Login and accept license
- Set the Profile Data
- Logoff
- Download and Install the Printgroove POD Driver
3
Printgroove POD Serve Quick Start Guide 3-1
Page 27

3
User
Preparation for Use
A
You have no
available account
Launch the Printgroove POD Serve
Apply an Account
Approved by your
manager (customer)
User
B
You use a default account
You have an account
or
Login
Accept the Agreement
Set the Profile Data
Logoff
Download/Install
the Printgroove POD Driver
To use the Printgroove POD Serve, you must have a User account.
If you do not have an account, you may apply for one as described on the
next page.
When you have your account, you can login to Printgroove POD Serve.
3-2 Printgroove POD Serve Quick Start Guide
Page 28

Preparation for Use
3.1 Apply for an Account
If you do not have an account, ask your Manager, to create your account.
—Or—
Follow the steps below.
2
Note
Predefined default accounts are already defined. See “Default Users” on
page 2-2.
To apply for an account:
1 In the Address bar, enter the IP address of Printgroove server/serve/,
and press Enter.
2 In the Address bar, enter the IP address of Printgroove server/serve/,
and press Enter.
For example, if the IP address for Printgroove server is 192.168.1.20,
enter, “http://192.168.1.20/serve/”. The [Welcome] screen appears.
3
Printgroove POD Serve Quick Start Guide 3-3
Page 29

3
Preparation for Use
3 Click Apply for an account.
4 Enter your Username (either create one or use the name given to you
by your administrator or manager).
5 Enter and confirm your password. The password has the following lim-
itations:
– The password must be a minimum of 7 characters
– Numbers and symbols are allowed
– The value is case-sensitive
– Spaces are not allowed
6 Supply a Secret Question and Answer. These are used for security
when you lose your password.
7 In [Group Name], enter the name of your Group.
– If you do not know the name of your Group, click the [If you don’t
know the name of your group click here] link. The value [No Group]
is automatically added to the field. When the new account is reviewed for approval, the administrative user can enter the proper
value.
3-4 Printgroove POD Serve Quick Start Guide
Page 30

Preparation for Use
8 Select a language.
9 Enter the number of days to retain orders in Closed Orders.
10 Select a Color Scheme.
11 Click [Continue].
12 Enter your First Name, Last Name, E-mail and Work phone number.
Home and Mobile phone numbers are optional.
3
13 Click [Continue].
Printgroove POD Serve Quick Start Guide 3-5
Page 31

3
Preparation for Use
14 The Company section is optional. You can enter information at any
time.
15 When you have finished filling out the required account information,
click [Save] to submit your request. If all required field are filled out
properly, your account request is successfully sent.
16 Close the Browser.
– If you are joining an existing Group, you will be notified via e-mail
when your new account is ready to be used and you can login.
– If you are adding a new Group, the Application Administrator will
need to approve the new account. You will be notified via e-mail
when your new account is ready to be used and you can login.
3-6 Printgroove POD Serve Quick Start Guide
Page 32

Preparation for Use
2
Note
Click [Get a new password.] on the [Welcome] screen to change your
password.
3
Printgroove POD Serve Quick Start Guide 3-7
Page 33

3
3.2 Login
Once you have an account, you can login to Printgroove POD Serve.
To login:
1 Start your Web browser.
2 Enter the IP address of the Printgroove server, and press Enter.
– For example, if the IP address for Printgroove server is
3 Type your Username and password in the corresponding fields located
at the bottom-left of the Welcome screen. See Step 5 of “To apply for
an account:” on page 3-3.
Preparation for Use
192.168.1.20, enter
“http://192.168.1.20/serve/”. The Welcome screen appears.
4 Click Login. The License Agreement appears.
3-8 Printgroove POD Serve Quick Start Guide
Page 34

Preparation for Use
5 Read the License Agreement and click I accept. The [Home] screen
opens.
– The look of the Home page will vary slightly depending on the user-
2
Note
If you want the login screen to remember your username so that it will be
preloaded every time you arrive at the screen, click on the [Remember my
username] checkbox prior to logging in.
3
level of the user.
Printgroove POD Serve Quick Start Guide 3-9
Page 35

3
3.3 Set the Profile Data
Your profile data is your contact, shipping, billing, and payment information.
You can edit your profile data any time.
There are six sections of Profile Data:
- Account
- Preference
- Personal
- Company
- Shipping
- Billing
The first four of these are part of the account application process and may
already be completed. Shipping and Billing information are not completed,
except those edited by your Manager.
At least one Shipping address is required to submit jobs.
Only one Billing Method is required to submit jobs.
To set the Profile Data:
1 Click [My Profile] located at the bottom of your Home page.
Preparation for Use
3-10 Printgroove POD Serve Quick Start Guide
Page 36

Preparation for Use
2 Click [Shipping (default)]-[Edit].
3 Click [New].
3
Printgroove POD Serve Quick Start Guide 3-11
Page 37

3
Preparation for Use
4 Enter [Profile Name].
– To use this Shipping Address as a default, check Set as default.
5 Enter the required information, indicated by red asterisks.
6 Click [Save Shipping Address]. If all required field are filled correctly,
the Shipping Address is successfully saved.
– To edit the created Shipping Address, see “Printgroove POD Serve
User’s Guide”.
– To delete the created Shipping Address, see “Printgroove POD
Serve User’s Guide”.
7 Click [Billing].
3-12 Printgroove POD Serve Quick Start Guide
Page 38

Preparation for Use
8 Click [New].
9 From the [Method] pull-down, select a billing method.
3
Printgroove POD Serve Quick Start Guide 3-13
Page 39

3
Preparation for Use
10 The fields that appear are based on the Method selected. Enter the re-
quired information. Fields with a red asterisk are mandatory.
11 Click [Save Billing Option]. If all required field are filled correctly, the
Billing Method is successfully saved.
– To edit the created Billing method, see “Printgroove POD Serve Us-
er’s Guide”.
– To delete the created Billing method, see “Printgroove POD Serve
User’s Guide”.
3-14 Printgroove POD Serve Quick Start Guide
Page 40

Preparation for Use
12 Click [Save]. If all required field are filled, your Profile Data is success-
fully saved.
3
Printgroove POD Serve Quick Start Guide 3-15
Page 41

3
3.4 Logoff
To logoff, click Logoff at the top-right of your Home page.
2
Note
Printgroove POD Serve will automatically log you off if too much time
passes since your last operation. The amount of time is determined by
your application administrator.
Preparation for Use
3-16 Printgroove POD Serve Quick Start Guide
Page 42

Preparation for Use
3.5 Download and Install the Printgroove POD Driver
If you install the Printgroove POD Driver on your PC, you can launch Printgroove POD Serve directly when you use an application to create or revise a
native file.
The latest Printgroove POD Driver can be downloaded via your Home page.
Though instructions for installing the Printgroove POD Driver on a Windows
or a Mac system are nearly identical, minor changes exist. The following instructions provide screen captures for both installs. When instructions differ,
all differences are noted.
3.5.1 Setting the Proxy Bypass for Firefox
If you are using Firefox as your browser and a proxy server is in use, you must
enter an exception in order to ensure communication between the Printgroove POD Driver and the Printgroove POD server.
1 Launch Firefox.
2 From the main menu select Tools --> Options. The Options screen
opens.
3
3 Select the [Advanced] icon then click the [Network] tab.
4 In the [Connection] section click the [Settings...] button. The Connec-
tion Settings screen opens.
5 In the [No Proxy for] text box, enter the IP Address of the Printgroove
POD Server.
6 Click [OK].
7 The Options screen remains open. Click [OK] to close it.
Printgroove POD Serve Quick Start Guide 3-17
Page 43

3
3.5.2 Setting the Default Value for .txt-type Files (Windows only)
Before submitting a .txt-type file to the Printgroove POD Driver, you must
first make sure the default program for opening .txt-type files is Notepad.
Preparation for Use
1 Locate the txt-type file you want to submit.
2 Right-click on the file and select Open With --> Choose Program.
3 On the pop-up screen that opens, select the [Select the program from
a list] radio button then click [OK]. The Open With screen opens.
4 Locate Notepad in the [Programs] list and select it.
5 Select the [Always use the selected program to open this kind of file]
check box.
6 Click [OK].
3-18 Printgroove POD Serve Quick Start Guide
Page 44

Preparation for Use
3.5.3 Installing on Windows/Mac
To install the Printgroove POD Driver:
1 Click [Support] at the top of your home page.
2 Click [Download Printgroove POD Driver] at the top of the [Support]
screen.
3
3 When the [File Download] dialog appears, click [Save].
4 Specify the location to save and click [Save].
Printgroove POD Serve Quick Start Guide 3-19
Page 45

3
Preparation for Use
5 Locate the file you saved in Step 4. Its default name is “printgroove-
driver-setup.exe”. Double-click the file to start the installation. The
[Choose Setup Language] screen opens.
6 Select the Setup Language from the drop-down menu then click the
[OK] button.
7 InstallShield (Windows) or InstallAnywhere (Mac) Wizard is launched. A
progress bar tracks the process. When complete, the [Welcome] (Windows)/[Introduction] (Mac) screen opens:
8 Click the [Next] button.
– If you are installing the Printgroove POD Driver on a Windows sys-
tem, skip ahead to Step 10.
9 For Mac Installs Only: The Administrator Authentication screen opens.
Enter the UserName and Password of any user who has admin-level
rights then click [Next]. If an incorrect value is entered in either field, a
pop-up error message will open.
3-20 Printgroove POD Serve Quick Start Guide
Page 46

Preparation for Use
10 The [License Agreement] screen opens:
11 There are two radio buttons:
– I accept the terms of the license agreement
– I do not accept the terms of the license agreement
– Read through the License Agreement and then select one of the ra-
12 Click the [Next] button. The [Choose Destination Location] (Windows)/
[Choose Install Folder] (Mac) screen opens:
3
dio buttons. If you select the first radio button, continue to Step 12.
If you select the second radio button, the installation is cancelled.
– The default destination is:
(Win) C:\Program Files\KONICA MINOLTA\Printgroove POD Driver\
(Mac) \Applications\KONICA MINOLTA\Printgroove POD Driver\.
13 If you want to specify a different destination, click the [Browse] button
(for Windows) or the [Choose...] button (for Mac). The [Choose Folder]
screen opens. Navigate to the desired folder, select it and click the [OK]
button. The [Choose Folder] screen closes and the selected destination
appears in the [Destination Folder] field of the [Choose Destination Location] screen.
Printgroove POD Serve Quick Start Guide 3-21
Page 47

3
Preparation for Use
14 For Mac installs only. Click the [Next] button. The [Pre-Installation
Summary] screen opens. If all the information is correct, click the [Install] button to begin the install. A progress bar tracks the process.
15 For Windows installs only. Click the [Install] button to begin the install.
A progress bar tracks the process.
16 When the installation process completes, the [InstallShield Wizard
Complete] (Windows/[Install Complete] (Mac) screen opens:
17 For Windows installs only. A restart is required to complete the instal-
lation. By default the [Yes, I want to restart my computer now] radio
button is selected. Remove any disks from their drives, close any open
applications and then click [Finish] to complete the install. If you prefer
to restart later, select the [No, I will restart my computer later] radio button. The driver is not available for use until after the restart.
18 For Mac installs only. Click the [Done] button. The screen closes and
the install is complete.
3-22 Printgroove POD Serve Quick Start Guide
Page 48

Preparation for Use
3.5.4 Verifying the Installation (Windows)
To verify the installation, follow this procedure:
1 Open the [Printers and Faxes] window or [Printers] window.
– For Windows XP, select [Start] --> [Printers and Faxes].
– For Windows Vista, select [Start] --> [Control Panel], and then se-
lect [Printers] from [Hardware and Sound].
– For Windows 2000, select [Start] --> [Settings] --> [Printers].
2 A [Printgroove POD Driver] icon should appear in the list. This Print-
groove POD Driver is used when submitting jobs to any of the Printgroove POD modules. For details about the job submission process,
please see “Printgroove POD Driver User’s Guide”.
Any document printed using the Printgroove POD Driver will be printed at the
Printgroove POD Port. This is a virtual port, a place where data is converted
and held until it is sent to a Printgroove POD module.
3
Printgroove POD Serve Quick Start Guide 3-23
Page 49

3
3.5.5 Verifying the Installation (Mac)
To verify the installation, follow this procedure:
1 Select [System Preferences] --> [Hardware] --> [Print & Fax]. The [Print
& Fax] folder opens:
2 [Printgroove POD Driver] should appear in the left-side menu. Select
the driver then click the [Printer Setup...] button. The Printer Info screen
opens.
Preparation for Use
3 Select [Printer Model] from the drop-down menu located at the top of
the screen. The version information about Printgroove POD Driver is
displayed.
4 Close the screen. You may now use the Printgroove POD Driver.
3-24 Printgroove POD Serve Quick Start Guide
Page 50

Operations for Placing an Order
4 Operations for Placing an Order
The Printgroove POD Serve enables customers to place, modify or delete orders over the Internet. There are two types of orders that may be placed:
Quick Order and Standard Order.
A Standard Order contains all available job ticket settings. The job must be
submitted to the printshop in order for pricing to be completed.
A Quick Order contains limited job ticket settings. However, a real-time price
quote is provided on-screen when you place a Quick Order. The job is then
submitted to the printshop and they immediately begin processing the job.
Both types of order are made by filling out a Job ticket, which consists of six
sections: Job, Files, Options, Catalog, Shipping and Billing.
The format of a Job ticket can be edited by the application administrator.
4.1 Placing an Order
There are two ways to place an order:
- From your Home page
- From another application
To place an order from your Home page, you can create a Job Ticket for your
order, on the Place an Order screen.
To place an order from another application, you need the Printgroove POD
Driver.
4
2
Note
See, “Download and Install the Printgroove POD Driver” on page 3-17.
Printgroove POD Serve Quick Start Guide 4-1
Page 51

4
4.1.1 Placing an Order from Another Application
To place order from other application:
Operations for Placing an Order
1 Open the file in the native application.
2 Select [Print] from the application's drop-down menu or select [Ctrl +
P] to launch a [Print Document]-type screen.
– Note: The process for selecting the print function will vary depend-
ing upon the application used to create your document. The contents of the [Print Document] screen will also vary from the screen
pictured here.
3 Click the [Setup] button. The [Print Setup] screen opens:
4 Select [Printgroove POD Driver] from the [Name] drop-down menu.
5 Click the [OK] button. The [Print Setup] screen closes.
4-2 Printgroove POD Serve Quick Start Guide
Page 52

Operations for Placing an Order
6 The [Print Document] screen remains opened. Initiate printing from this
screen (the process will vary). The screen closes and the document is
printed on the virtual port. A print progress screen may open and track
the print operation.
When the document completes printing to the virtual port, Printgroove
POD Driver converts the file to PRN format.
7 When the PRN conversion is complete, the pop-up screen closes and
the [File Selection] screen opens:
– The [Available File List] contains the newly created PRN file. The file
has the same name it did in the native application but the extension
now includes “.prn”.
– If you have multiple native files you would like combined into a sin-
gle PDF document, you may add those files now.
– To add another file, click the [Add New] button. On the screen that
opens, navigate to the file you wish to add. Select the file then click
the [Open] button. The file opens in its native application. Repeat
Steps 1 through 6 on the new file. When PRN conversion is complete, the file is added to [Available Drivers]. Repeat this procedure
to add all required files.
– All files in the list will be combined sequentially into a single PDF file,
the first file will be at the beginning of the PDF file, the last file, at
the end. To change the position of a file in the list, click on the file
then use the [Up] and [Down] buttons to modify the file’s position.
– To remove a file from the list, select the file and click the [Delete]
button.
– To remove all files from the list, click the [Delete All] button.
– Note: If you Delete files, a pop-up screen will verify your request.
4
Printgroove POD Serve Quick Start Guide 4-3
Page 53

4
Operations for Placing an Order
8 When [Available Drivers] contains all files you want to transfer, in the or-
der in which you want them combined, click the [Next] button. The
[Driver Selection] screen opens:
– All supported Printgroove POD modules appear in [Available Driv-
ers] drop-down menu.
9 Select [Printgroove POD Serve] from the [Available Drivers] drop-down.
10 Click the [Options>>] button on the [Driver Selection] screen. The
screen expands to include all Options and Module Configuration settings:
– If this is the first time you have sent a job through the Printgroove
POD Driver, verify that the IP Address and Port field values of your
Printgroove POD server are entered properly. These settings will
not need to be modified unless the server information changes.
– Select [Printgroove POD Serve] - [Set As Default] radio button to
make Printgroove POD Serve the default selection of [Available
Drivers] drop-down.
– Note: Jobs cannot be transferred unless these values are correct. If
you are uncertain of these values, please check with your System
Administrator.
11 Enter the same user name and password which you use to login the
Printgroove POD Serve to [User Name] and [Password]. Values entered
in these fields remain as set until you modify them.
4-4 Printgroove POD Serve Quick Start Guide
Page 54

Operations for Placing an Order
– Note: Please check with your System Administrator if you have
questions about these settings.
12 When the required information is entered, click the [OK] button. A pop-
up message will inform you if the [User Name] and/or the [Password]
are incorrect.
– If authentication is completed successfully and if this is the first
time you send a job to Printgroove POD Serve using the driver, the
[Security Warning] screen will open:
– Printgroove POD Serve and the Printgroove POD Driver must share
digital certificates in order to enable all future authentication re-
quests. Click the [Yes] button to initiate this exchange.
– Note: This screen will only appear the first time you use the Print-
groove POD Driver to send a document to Printgroove POD Serve.
– Authentication is now complete. The driver can now combine all
PRN files into a single PDF file and transfer it to Printgroove POD
Serve.
4
13 While the driver completes these steps, one or more progress bars
track the process. When the transfer is complete, Printgroove POD
driver launches the Printgroove POD Serve which opens in your computer’s default browser. The [Select a Job Ticket Template] screen
Printgroove POD Serve Quick Start Guide 4-5
Page 55

4
Operations for Placing an Order
opens. Select a job ticket template. The print job appears in the [File]
section with a [Preview] icon next to the file name.
4-6 Printgroove POD Serve Quick Start Guide
Page 56

Operations for Placing an Order
4.1.2 Placing an Order from Your Home Page
The processes for placing a Quick Order and a Standard Order are similar.
The discussion that follows will note the differences. Except for these noted
exceptions, the order placing process is identical.
To place an order from your Home page:
1 Launch your browser and access Printgroove POD Serve.
2 Login. Your Home page appears.
4
3 Select [Place an Order]. The [Select a Job Ticket Template] screen
opens:
Printgroove POD Serve Quick Start Guide 4-7
Page 57

4
Operations for Placing an Order
4 Select either a Quick Order or Standard Order by clicking on an icon.
The Place an Order -Job section appears. (The contents of the screen
will vary based upon the type of Job Ticket Template you selected.)
The name of the selected template will appear in the header row:
– If the ticket type is Quick Order, an Estimated Cost of the job will
display in the far left menu, near the bottom of the screen. This is a
real-time quote and will continue to update as the job ticket is filled
out. If the text is blue, it is a hyperlink. Click the hyperlink to open a
pop-up screen that contains a detailed breakdown of the job costing. This feature is not supported for Standard-type Orders.
– If your Application Administrator has configured Printgroove POD
Serve to display the Remaining Budget for your Group, the Remaining Budget appears as a dollar value at the upper right of the screen
of any selected job to which a budget applies. If the remaining
budget is less than $0.00, the dollar value is in red. (See the Printgroove POD Guide User’s Guide for details about this setting.)
4-8 Printgroove POD Serve Quick Start Guide
Page 58

Operations for Placing an Order
– Required information is indicated by red asterisks.
– The Job section is the first section of a job ticket. Here, you can add
a note to the job ticket, name the order, specify the date you would
like it completed, and specify whether a proof is needed before the
job is performed. The parts are: Standard, Priority and Proof.
– a. Click Note and enter optional comments in the box displayed
at the left.
– b. Enter a name for the job.
– c. Select the Due Date from the calendar.
– d. Indicate whether an Estimate is required. This option is not
available for Quick Orders.
– When your estimate is ready an icon appears next to the job on the
Check Order Status page. Click the [Estimate Ready] icon to view
the estimate. This option is not available for Quick Orders.
4
– You also receive the estimate via email.
– e. Indicate whether the priority is Normal or Rush.
– f. Indicate whether a Proof is required. The Soft Proof option is
not available for Quick Orders.
Printgroove POD Serve Quick Start Guide 4-9
Page 59

4
Operations for Placing an Order
5 Standard Order. Go to Step 6 below for Quick Orders. Click [Continue].
The [Files] section opens.
– Required information is indicated by red asterisks.
– The Files section of the job ticket allows submission of files over the
web copying the file from your computer to the web site.
– a. Click Note and enter optional comments in the box displayed
at the left.
– b. To submit files, click the [Upload] button. The [Warning - Secu-
rity] pop-up opens:
4-10 Printgroove POD Serve Quick Start Guide
Page 60

Operations for Placing an Order
– c. If you want to avoid this step in future uploads, select the [Al-
ways trust content from this publisher] checkbox then click the
[Yes] button. A second [Warning - Security] pop-up opens:
– d. If you want to avoid this step in future uploads, select the [Al-
ways trust content from this publisher] checkbox then click the
[Run] button. The [Upload Files] screen opens:
4
– e. Click the [Browse] button, navigate to the file(s) you want to up-
load, select them then click the [Open] button. The files appear
in the [Upload Files] screen main panel. You may upload up to
ten files. The maximum file size is 2 GB. If multiple files are add-
ed and all are larger files, performance may be significantly re-
duced. A combine file size of 5 GB or less is recommended for
optimal performance.
– f. Once the files are selected, click the [Upload] button. A
progress bar will track the upload process (in the case of larger
files, it may take a little longer for the progress bar to appear).
If you click the [Stop] button, the upload is stopped and you re-
turn to the previous step above.
– g. When the files are uploaded, the progress bar will inform you
that the task is complete. Click the [Back] button to close the
[Upload Files] pop-up.
– h. The uploaded files will appear on the Printgroove POD Serve
screen.
Printgroove POD Serve Quick Start Guide 4-11
Page 61

4
Operations for Placing an Order
– i. Mark Delete Files After Use to delete the files after the print or-
der is complete.
– j. Select how the job originals are to be delivered. The choices
are: CD/DVD, Email, Instant Messaging, Upload, Postal, Hard
copy and Other.
6 Quick Order. If the job ticket type was Quick Order, the [Files] section
is identical to the Standard Order section. The only difference is that
you are limited to uploading a single PDF file. (You may also remove
and replace the PDF file.)
– The Upload Files process noted in Step 5 is identical for Quick Or-
ders.
7 Click [Continue]. The [Options] section opens.
Required information is indicated by red asterisks.
8 The Options section deals with the material aspects of the job.
– The options shown are the defaults delivered with the application.
Your application administrator may add or edit these options.
– a Click a triangle icon at the left of the category name to expand
the category and display items.
– b Click Note and enter optional comments in the box displayed at
the left.
– c Enter the number of copies to print.
4-12 Printgroove POD Serve Quick Start Guide
Page 62

Operations for Placing an Order
– d Click color, black and white or mixed. If the job ticket type is
Quick Order, mixed is not available.
– e Select High Chroma (Optional).
– f Select media. (Optional.)
If the job ticket type is Quick Order, Media Type is not available.
– g Select layout. (Optional.)
– h Select Paper. (Optional.)
– i Select Front, Back, Two sided head-to-head, or Two sided
head-to-foot. (Optional.)
– j Specify Collation. (Optional.)
– k Specify Punching. (Optional.)
– l Specify Folding. (Optional.)
– m Specify Front Cover. (Optional.)
– n Specify Back Cover. (Optional.)
– o Specify Binding. (Optional.)
– p Specify Offset. (Optional.)
– q Specify Trim. (Optional.)
9 Click [Continue]. The [Catalog] section opens.
4
– The Catalog section is not required on a print job order.
– The Catalog section is used to offer items provided for sale by the
Printshop - apart from print jobs.
– To order an item, enter a quantity.
– Click Note and enter optional comments in the box displayed at the
left.
Printgroove POD Serve Quick Start Guide 4-13
Page 63

4
Operations for Placing an Order
10 Click [Continue]. The [Shipping] section opens.
11 Complete the shipping section.
– If you have specified a default shipping address in your user profile,
it will automatically populate the Ship To field when your order is
placed.
– a If you have not specified a default shipping address, select a lo-
cation from your address book and drag it down to Ship To.
– b To remove a selected address, drag it back into the address
book.
– c Click New to enter a new or different shipping address. The Cre-
ate Shipping Address pop-up window appears.
– i Fill in all of the required fields.
– ii Mark Set as default and/or Add to profile to save this Ship-
ping information in your Profile. Setting the address as default will cause any new job tickets to use that address
without your typing it in each time you place an order.
– iii Click Save Shipping Address.
– d Click in the space under “Options” to change the options infor-
mation.
The list of Shipping Options shown is the default. Additional options can be added by the Printgroove POD Guide Application
Administrator.
– e Click Note to enter optional comments in the box displayed at
the left.
4-14 Printgroove POD Serve Quick Start Guide
Page 64

Operations for Placing an Order
12 Click [Continue]. The [Billing] section opens.
13 The Billing section allows you to choose and design a specific billing
method from a pre-populated list of billing options. All available billing
methods are displayed. The values displayed are determined by the
Printshop.
– a. Click [New] to enter a new Billing Method. The [Create Billing
Options] pop-up window appears.
– b. If you wish to use the same billing address you entered in Step
11 above, click [Same as Shipping Address]. All texts fields are
automatically populated with the information entered in the
current Shipping Address field.
– c. If you wish to enter a new billing address, enter data in all of the
required fields and mark both [Save to profile] and [Set as default], if you want this option to be used whenever you place an
order.
– d. Click [Save Billing Option] to save the new billing address infor-
mation.
4
14 Select the [I AGREE TO THE TERMS & CONDITIONS] check box. The
[Place Order] button is not active until the check box has been selected. (If you wish to read the Terms and Conditions, click the hyperlink to
open a pop-up screen. Click [Close] to close the pop-up and continue
with the job.
Printgroove POD Serve Quick Start Guide 4-15
Page 65

4
Operations for Placing an Order
15 Click Place Order to submit the job to the Printshop.
– If all the necessary data has been entered properly, a green-check-
mark-in-a-circle icon will appear to the left of each section and a
Job Saved message will appear.
– If there is an error or omission in the job ticket, a red-X-in-a-circle
icon will appear to the left of the section that requires modification.
The job is rejected and a “Your job did not pass validation. Please
correct all errors and try again.” message will be displayed in an orange bar below the sections. Once errors or omissions have been
corrected, the job can be resubmitted by clicking [Place Order]
again.
16 If you have a permission to require approval from someone among
multiple approvers, [Select Approver] pop-up window appears. In this
case, select an approver and click [Submit For Approval].
17 Once a job has been successfully saved and submitted, a confirmation
page will display with basic information about your order. The ticket
number, job name, file(s) uploaded, and shipping/billing information will
be displayed. If the job is a Quick Order, the ticket summary will also
contain a detailed Estimated Cost section at the bottom of the screen.
4-16 Printgroove POD Serve Quick Start Guide
Page 66

Operations for Placing an Order
This also provides details about the cost of the job. If your Payment
Method was PayPal, a [Pay Now] button will also appear on the screen.
Please see the “User’s Guide of Printgroove POD Serve” for details
about this button and other payment options.
4
– Click [Place Another Order] to place another order. The same job
ticket template will be used. If you wish to create a new job using a
different template, click the [Place an Order] menu item.
– For Standard Orders only: Click [Set as Default Order] to set all of
the information saved on this job to an order template. To clear
these values, click [Restore System Settings]. A prompt will verify
your request.
– Note
– Once you have clicked [Set as Default Order], Printgroove POD
Serve will retain all the values and display them each time you place
a new order. To clear these values, click [Restore System Settings].
A prompt will verify your request. If you select [Yes], all default values are removed and will need to be entered each time you create
a new print job.
– Before an order is placed, any of the above sections can be opened
and edited. To cancel or delete the entire order, click [Reset] in the
lower right of the screen.
Printgroove POD Serve Quick Start Guide 4-17
Page 67

4
Operations for Placing an Order
18 When your order is approved, you receive an e-mail that your order is
approved.
– When your order is submitted, you receive an e-mail that your order
is submitted. After your order is submitted, but before it is accepted, you may copy, modify, and delete the order.
– After the printshop accepts your order, you receive an e-mail that
your order is accepted.
– For Standard Orders only. If you require an estimate, see Print-
groove POD Serve User’s Guide.
– If you require a proof, see Printgroove POD Serve User’s Guide.
2
Note
When the notice mail function such as the Accept/Reject mail, the estimate confirmation request mail or the proof confirmation request mail is
used, it is necessary to make the setting of the mail server for the ::Admin
for Printgroove.
4-18 Printgroove POD Serve Quick Start Guide
Page 68

Operations for Placing an Order
4.2 Modify an Order
You can modify an order after it has been submitted but only before it has
been accepted by the printshop.
Modifying an order is a three step process involving duplicating the order,
modifying the duplication and deleting the original order.
1 Find the submitted job under Check Order Status on your home page.
The Status of the order must be [Submitted] in order for you to continue.
2 Click the Copy icon to the right of the order.
The Duplicate Order screen appears, with all sections copied.
3 Edit the details for the new order and click Resubmit Order.
4 Click the Delete icon to the right of the original order.
4
Printgroove POD Serve Quick Start Guide 4-19
Page 69

4
4.3 Delete an Order
You can delete an order after it has been submitted but only before it has
been accepted by the printshop.
To delete the order:
1 Find the submitted job under Check Order Status on your home page.
The Status of the order must be [Submitted] in order for you to continue.
2 Click the Delete icon to the right of the original order.
Operations for Placing an Order
4-20 Printgroove POD Serve Quick Start Guide
Page 70

http://konicaminolta.com
A0E2955822
2009
Copyright
Printed in Japan
2009. 9
 Loading...