

Page 1

Revision 1.6
Page 2

Printgroove POD Serve
TABLE OF CONTENTS
1.0 Introduction ........................................................................................................................................................1
2.0 Overview............................................................................................................................................................1
3.0 Defaults..............................................................................................................................................................2
3.1
Default Users and Job Tickets....................................................................................................................2
3.2
Client Browser Requirements .....................................................................................................................2
4.0 User Interface.....................................................................................................................................................3
4.1
Browser.......................................................................................................................................................4
4.2
Services Screen..........................................................................................................................................4
4.3
Support Screen...........................................................................................................................................5
4.3.1 Support: Printgroove Driver....................................................................................................................5
4.4
About ..........................................................................................................................................................7
4.5
Help ............................................................................................................................................................8
4.6
Legal...........................................................................................................................................................9
5.0 Customer Interface (User Login)......................................................................................................................10
5.1
Applying for an Account............................................................................................................................11
5.1.1 Apply for Account: Customer Account Information...............................................................................11
5.1.2 Apply for Account: Group Information ..................................................................................................11
5.1.3 Apply for Account: Preferences............................................................................................................12
5.1.4 Apply for Account: Personal Section ....................................................................................................12
5.1.5 Apply for Account: Company Section...................................................................................................13
5.1.6 Complete the New Account Request....................................................................................................13
5.2
Retrieve Password....................................................................................................................................13
5.3
Login.........................................................................................................................................................14
5.4
My Profile..................................................................................................................................................16
5.4.1 User Profile: Customer Account...........................................................................................................17
5.4.2 User Profile: Personal Section .............................................................................................................17
5.4.3 User Profile: Company Section ............................................................................................................18
5.4.4 User Profile: Shipping...........................................................................................................................18
5.4.5 User Profile: Billing Section..................................................................................................................19
5.4.5.1 Billing Method: Billing Address ........................................................................................................20
5.4.5.2 Billing Method: Credit Card..............................................................................................................20
5.4.5.3 Billing Method: Cash On Delivery....................................................................................................21
5.4.5.4 Billing Method: Purchase Order.......................................................................................................21
5.4.5.5 Billing Method: Cross Charge..........................................................................................................21
6.0 User Menus......................................................................................................................................................22
6.1
Place an Order Menu (User Creates a Job Ticket) ...................................................................................23
6.1.1 Job Ticket: Job Section ........................................................................................................................23
6.1.2 Job Ticket: Upload Files.......................................................................................................................24
6.1.3 Upload Different File Versions..............................................................................................................25
6.1.4 Job Ticket: Options...............................................................................................................................26
6.1.5 Job Ticket: Catalog Section..................................................................................................................28
6.1.6 Job Ticket: Shipping Address...............................................................................................................28
6.1.6.1 Create New Shipping Address.........................................................................................................29
6.1.7 Job Ticket: Billing Method ....................................................................................................................30
6.1.7.1 Create a New Billing Method...........................................................................................................30
6.1.8 Job Ticket: Cancel/Modify an Order .....................................................................................................31
6.1.9 Job Ticket: Place the Order..................................................................................................................31
6.1.10 Job Ticket: Confirmation.......................................................................................................................32
6.1.11 Job Ticket: Set as Default Order ..........................................................................................................32
6.1.12 Job Ticket Rejected by Printshop.........................................................................................................33
6.1.13 Place Order Directly From Your Document..........................................................................................33
Check Order Status Menu........................................................................................................................................37
6.1.14 Proofs or Estimates Sent from Printshop .............................................................................................38
6.2
View Order History Menu..........................................................................................................................41
6.2.1 Copy a Previous Order.........................................................................................................................42
6.3
Customer “Manager” User ........................................................................................................................43
6.3.1 Orders Awaiting Approval.....................................................................................................................43
6.3.2 Manage User Accounts........................................................................................................................44
6.3.2.1 Create a New User in your Group ...................................................................................................45
6.3.2.2 Edit a User Account.........................................................................................................................47
6.3.2.3 Delete a User Account.....................................................................................................................48
7.0 Printshop coordinator Interface ........................................................................................................................49
7.1
Printshop coordinator (PSC) Home Page .................................................................................................50
2
User’s Reference Guide Rev.1.6
Page 3

Printgroove POD Serve
7.1.1 Printshop coordinator Menus ...............................................................................................................50
7.2
PSC Main Menus > Inbox .........................................................................................................................50
7.2.1 Inbox Search Fields..............................................................................................................................52
7.3
Main Menus > Tracker..............................................................................................................................53
7.3.1 Tracker Search Filters..........................................................................................................................53
7.4
Main Menu > Reports................................................................................................................................54
7.4.1 Reports: All Jobs Report ......................................................................................................................54
7.4.2 Reports: Job Activity Chart...................................................................................................................56
7.4.3 Job Status Chart...................................................................................................................................56
7.5
Main Menu > Statistics..............................................................................................................................57
7.6
Main Menu >Send Alert ............................................................................................................................58
8.0 PSC Jobs Menu ...............................................................................................................................................59
8.1
Jobs Menu > New (Place an Order)..........................................................................................................59
8.1.1 Jobs > New: Job Section......................................................................................................................60
8.1.2 Jobs > New: Upload Files.....................................................................................................................61
8.1.3 Jobs > New: Options Section...............................................................................................................62
8.1.4 Job New: Catalog Section....................................................................................................................63
8.1.5 Jobs > New: Shipping Address ............................................................................................................64
8.1.6 Jobs > New: Billing Section..................................................................................................................65
8.1.7 Jobs > New: Saving the Order .............................................................................................................66
8.2
Jobs > Browse Menu ................................................................................................................................67
8.3
Jobs > Archive Menu ................................................................................................................................67
8.4
Job Ticket Menu (Internal to the Print Shop).............................................................................................68
8.4.1 Job Ticket Menu: Details......................................................................................................................68
8.4.1.1 Convert Uploaded File to PDF.........................................................................................................69
8.4.2 Job Ticket Menu: History......................................................................................................................69
8.4.3 Job Ticket Menu: Print..........................................................................................................................70
8.4.4 Job Ticket Menu: Tracker.....................................................................................................................71
8.4.5 Job Ticket Menu: Subscribe.................................................................................................................72
8.4.6 Job Ticket Menu: Edit...........................................................................................................................72
8.4.7 Job Ticket Menu: Costing.....................................................................................................................73
8.4.8 Job Ticket Menu: Add Note..................................................................................................................75
8.4.9 Job Ticket Menu: Add Files..................................................................................................................75
8.4.10 Job Ticket Menus: Submit Proof...........................................................................................................76
8.4.11 Job Ticket Menus: Submit Estimate .....................................................................................................76
8.4.12 Job Ticket Menus: Start/Stop ...............................................................................................................77
8.4.13 Job Ticket Menu: Status.......................................................................................................................77
8.4.14 Job Ticket Menu: Done ........................................................................................................................77
8.4.15 Job Ticket Menu: Cancel, Restore, Delete...........................................................................................78
8.5
Jobs > Quote ............................................................................................................................................79
8.5.1 Activate Quote as a Job .......................................................................................................................81
8.6
Configure > Shipping > Labels..................................................................................................................83
8.6.1.1 Shipping Label Logo Image.............................................................................................................84
8.6.1.2 Shipping Label Title.........................................................................................................................84
8.6.1.3 Shipping Label Address...................................................................................................................84
8.6.1.4 Preview a Shipping Label................................................................................................................85
8.6.1.5 Printing a Label................................................................................................................................85
9.0 Application Administrator..................................................................................................................................87
9.1
AppAdmin Login........................................................................................................................................87
9.2
Print Shop User Menus: AppAdmin ..........................................................................................................87
9.3
Groups, Users, and Permissions ..............................................................................................................88
9.4
Defining External Groups, Users and Permissions ...................................................................................88
9.4.1 AppAdmin Menu User > Groups (External)..........................................................................................89
9.4.1.1 Edit a Customer Group....................................................................................................................90
9.4.2 AppAdmin Menu Users > Users (External)...........................................................................................91
9.4.2.1 New User Shipping and Billing ........................................................................................................94
9.5
Defining Roles (Create Internal Printshop Users) .....................................................................................95
9.5.1 Role Permissions: Main........................................................................................................................97
9.5.2 Role Permissions: Jobs........................................................................................................................98
9.5.3 Role Permissions: User Administration ..............................................................................................100
9.5.4 Role Permissions: Configuration........................................................................................................101
9.5.5 AppAdmin Users > Users (Create Internal User) ...............................................................................103
9.5.5.1 Edit Printshop Group .....................................................................................................................104
9.5.6 Delete a Print Shop User Account......................................................................................................105
9.6
Configuration Menus (AppAdmin)...........................................................................................................106
Rev. 1.6 User’s Reference Guide
3
Page 4

Printgroove POD Serve
9.6.1 Configure > Shipping > Methods........................................................................................................106
9.6.2 Configuration > Payment > Methods..................................................................................................108
9.6.2.1 Payment Methods..........................................................................................................................108
9.6.2.2 Credit Card....................................................................................................................................108
9.6.3 Configuration > Payment > Invoice Template ....................................................................................109
9.6.4 Configuration > Services > Printing....................................................................................................110
9.6.5 Edit Printing Services: Copies............................................................................................................111
9.6.6 Add a New Printing Service................................................................................................................112
9.6.7 Configuration > Services > Internal....................................................................................................112
9.6.8 Configuration > Services > Catalog....................................................................................................114
9.6.9 Configuration > Services > Special Pricing ........................................................................................116
9.7
Configuration > Job Ticket Menu ............................................................................................................117
9.7.1 Configuration > Job Ticket > JT Numbering.......................................................................................117
9.7.1.1 Use Case Example: Add a Unique Numbering Scheme for HR Tickets........................................117
9.7.2 Configuration > Job Ticket > JT Builder .............................................................................................119
9.7.2.1 Job Ticket Sections, Categories and Items ...................................................................................119
9.7.2.2 Copy and Edit an Existing Job Ticket Template ............................................................................121
9.7.2.2.5 Edit Job Ticket Template: Shipping Section....................................................................................... 125
9.7.2.3 Create a New Job Ticket Template ...............................................................................................127
9.7.2.3.1 New Ticket Template: Job Section..................................................................................................... 127
9.7.2.3.2 New Ticket Template: Files Section................................................................................................... 130
9.7.2.3.3 New Ticket Template: Options Section.............................................................................................. 132
9.7.2.3.4 New Ticket Template: Catalog Section .............................................................................................. 135
10.0 Configuration > Site........................................................................................................................................138
10.1.1 Configuration > Site > Contacts .........................................................................................................138
10.1.2 Configuration > Site > Pages .............................................................................................................138
10.1.3 Configuration > Site > Advertising......................................................................................................140
10.1.4 Configuration > Site > Logo................................................................................................................140
1.0 APPENDIX: Glossary of Terms..........................................................................................................................1
2.0 Icons...................................................................................................................................................................2
3.0 Data Entry Field Format & Limitations................................................................................................................4
4.0 Licensing Agreement .........................................................................................................................................5
5.0 Troubleshooting .................................................................................................................................................7
5.1
Success ......................................................................................................................................................7
5.2
Error............................................................................................................................................................7
5.3
Warning.......................................................................................................................................................7
5.4
Pop-up Windows.........................................................................................................................................7
5.5
Upload File Error Message .........................................................................................................................8
5.5.1 Proxy Server Settings.............................................................................................................................8
5.5.2 Linux “No Proxy” Settings.....................................................................................................................10
5.5.3 Internet Explorer Browser Settings.......................................................................................................10
5.5.4 Server Disk Full....................................................................................................................................11
SSL Certificate Warnings.........................................................................................................................................12
5.6
Time Changes...........................................................................................................................................13
5.7
User Logged Out by System.....................................................................................................................13
6.0 Licenses (Legal Information)............................................................................................................................14
Revisions since 6/25/07:
6/25/07 Page 32, Options for Printgroove POD Driver selection window, the new picture shows the
Port field, which may need to be entered the first time a user goes to Printgroove directly from
their document.
6/27/07 Added section to Appendix on how to set “no_proxy” for uploading files to Linux.
6/28/07
6/29/07 Added section 5.5.3 to Appendix for Internet Explorer browser settings.
7/5/07 Changed out screen shots for Manage Accounts section 6.3.2.
7/6/07 Added section 6.1.3 on File Upload and File Versions.
Added information on Set as Default Order for Serve users to save their job ticket as a default
to enable quicker job submission. Section 6.1.1.10 page 31.
4
User’s Reference Guide Rev.1.6
Page 5

Printgroove POD Serve
1.0 Introduction
Printgroove POD
increasingly demanding markets.
stages from job submission to fulfillment. Ideal for small to mid-size operations, Printgroove is an
affordable solution for all your reproduction and publishing needs.
Customers of the CRD/print shop are typically other corporate departments such as Human Resources,
Marketing, Engineering, etc. These different divisions have very different printing and publishing needs
which need to be explained to the print shop manager/coordinator when placing a job order.
The
Printgroove POD Suite
Serve: web service for print job submission with real-time status verification
Guide: workflow management - application administration and job ticket processing
Admin: configures the server, controls licensing and system settings
Queue: print management from device control to last-minute job ticket editing
is a Digital Workflow Solution that helps CRD/print shops meet the needs of
Printgroove’s
is comprised of four solutions:
modular design provides the flexibility to integrate all
Figure 1.0 – Four Printgroove POD Solutions
2.0 Overview
The
Printgroove POD Serve
submit/customize jobs, perform proof checks and track the status of their print orders, all via the
Intranet/Internet. This Print On Demand application enables the print shop to expand the ability to reach
their customers and provides advanced capabilities for set up, processing, tracking and administrative
tasks for the printshop employee.
Serve
makes job requests much easier because the customer can:
Place orders, upload files, review proofs on the web
Check order status
Receive custom quotes
Receive automatic e-mail notification
application works as a virtual storefront enabling external customers to
Rev. 1.6 User’s Reference Guide
1
Page 6

Printgroove POD Serve
3.0 Defaults
To make it easier to start using the
the external customer (manager and non-manager) as well as the internal (print shop) employee. Your
printshop’s AppAdmin default user may add users and groups at any time. The predefined defaults are
intended to allow you to begin using the product immediately.
3.1 Default Users and Job Tickets
Printgroove Serve
Customers Print Shop Employees Default for Both
is delivered with the defaults listed below:
Serve
application, we have included Predefined Defaults for both
Customer User Group: HR Employee Group: print shop
HR Manager: Sue Boss Printshop coordinator: PSC
HR employee: Joe User Application Administrator: AppAdmin
The Secret Question for default user “Sue Boss” is “nickname” and her Secret Answer is “password.”
The Secret Question for default user “Joe User” is “cat’s name” and his Secret Answer is “password.”
Job Ticket Number Scheme
Basic Job Ticket Format
IMPORTANT NOTE: It is recommended that you change the user passwords if you
started using the system with the defaults. It is also suggested that you add your own
user names and passwords as soon as possible.
3.2 Client Browser Requirements
These are the requirements for the client PC running the Serve application:
Browsers:
Firefox 1.5.x+ (1.5.9+ recommended)
www.getfirefox.com
Internet Explorer 7+ - www.microsoft.com/windows/downloads/ie/getitnow.mspx
Required Plugins:
Flash Player 9+
www.adobe.com/shockwave/download/download.cgi?P1_Prod_Version=ShockwaveFlash
Optional Plugins and Applications:
Adobe Reader 8+
www.adobe.com/products/acrobat/readstep2.html
2
User’s Reference Guide Rev.1.6
Page 7
Printgroove POD Serve
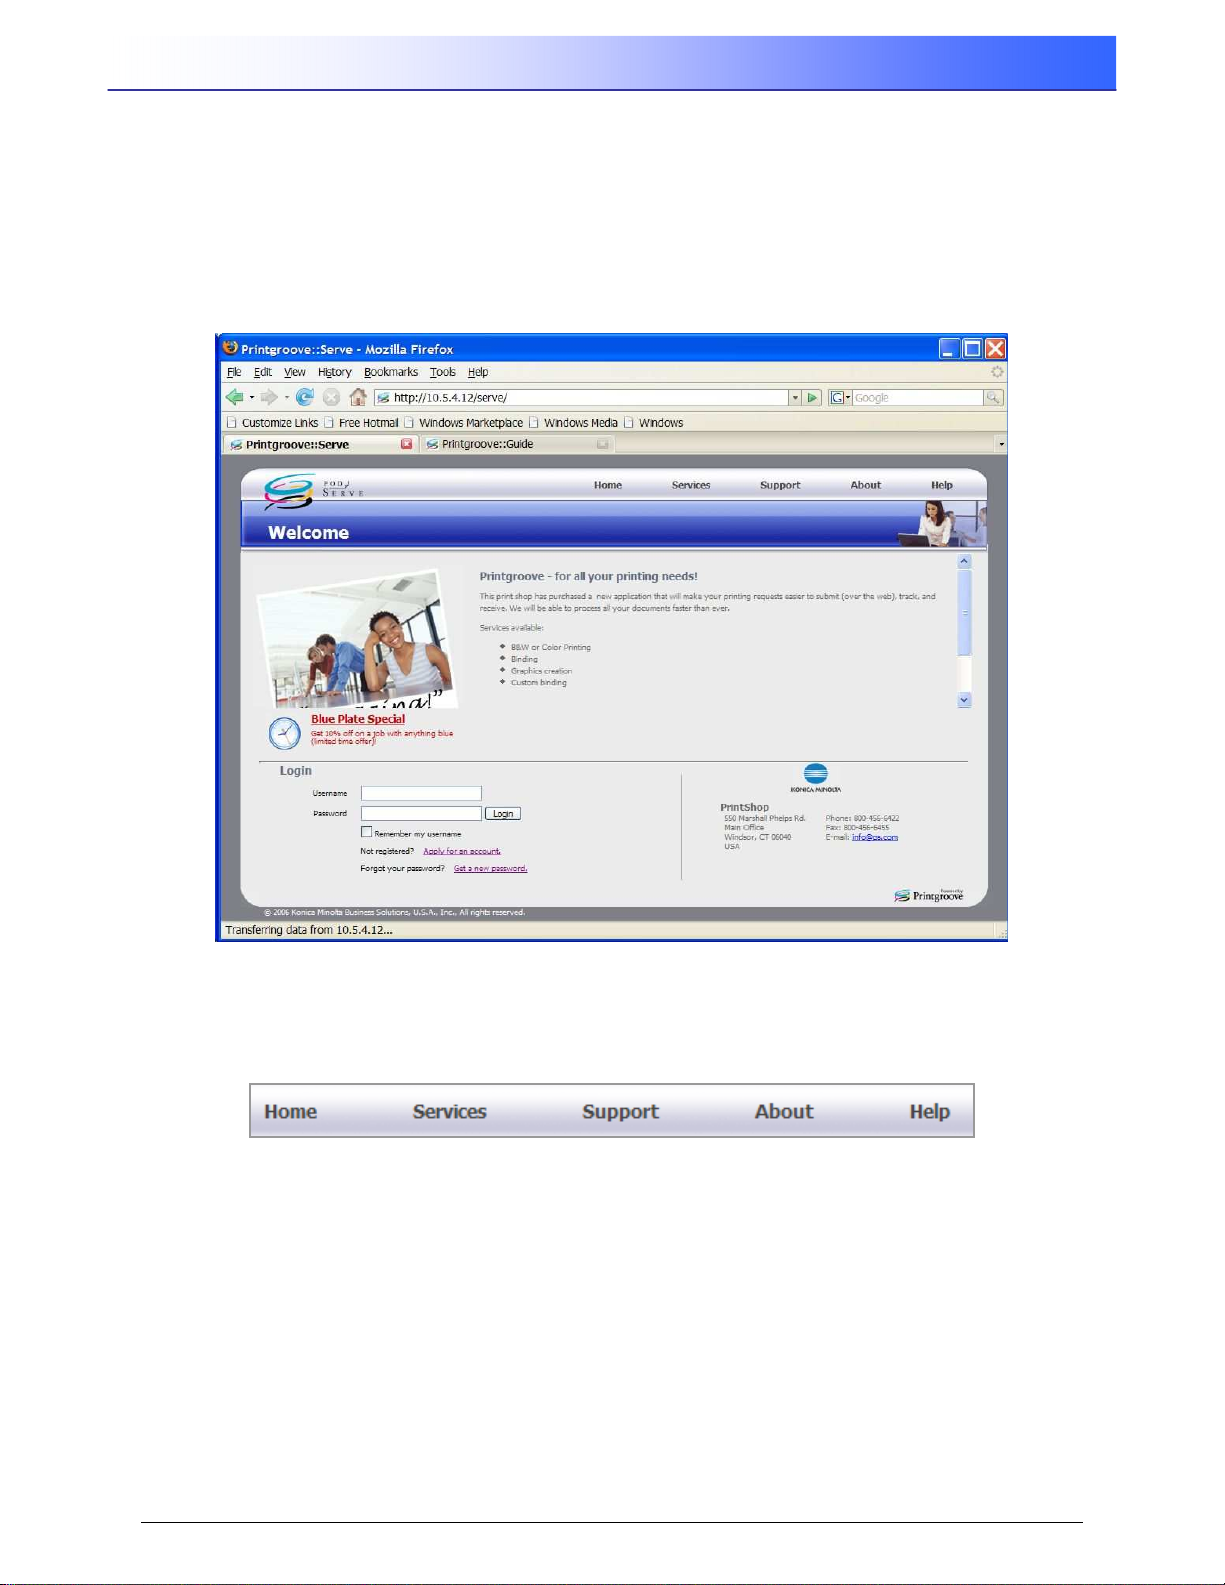
4.0 User Interface
To access the
IP address or host name that was supplied to you by your Administrator in this format: https://<IP
address or hostname>/ and press Enter to bring up the Welcome Screen shown below.
The panel in the lower left-hand corner is the login area of the screen. The print shop’s logo, address, and
contact information are displayed in the lower right-hand corner.
Printgroove POD Serve
application as a printshop customer on your network, enter the
Figure 4.0 – Customer User Interface
From the Welcome screen, you can access several areas including Services, Support, About and Help.
These are available to you at all times, before and after logging in, via quick links at the top of your
screen.
Figure 4.1 – Home Page Links
Rev. 1.6 User’s Reference Guide
3
Page 8
Printgroove POD Serve
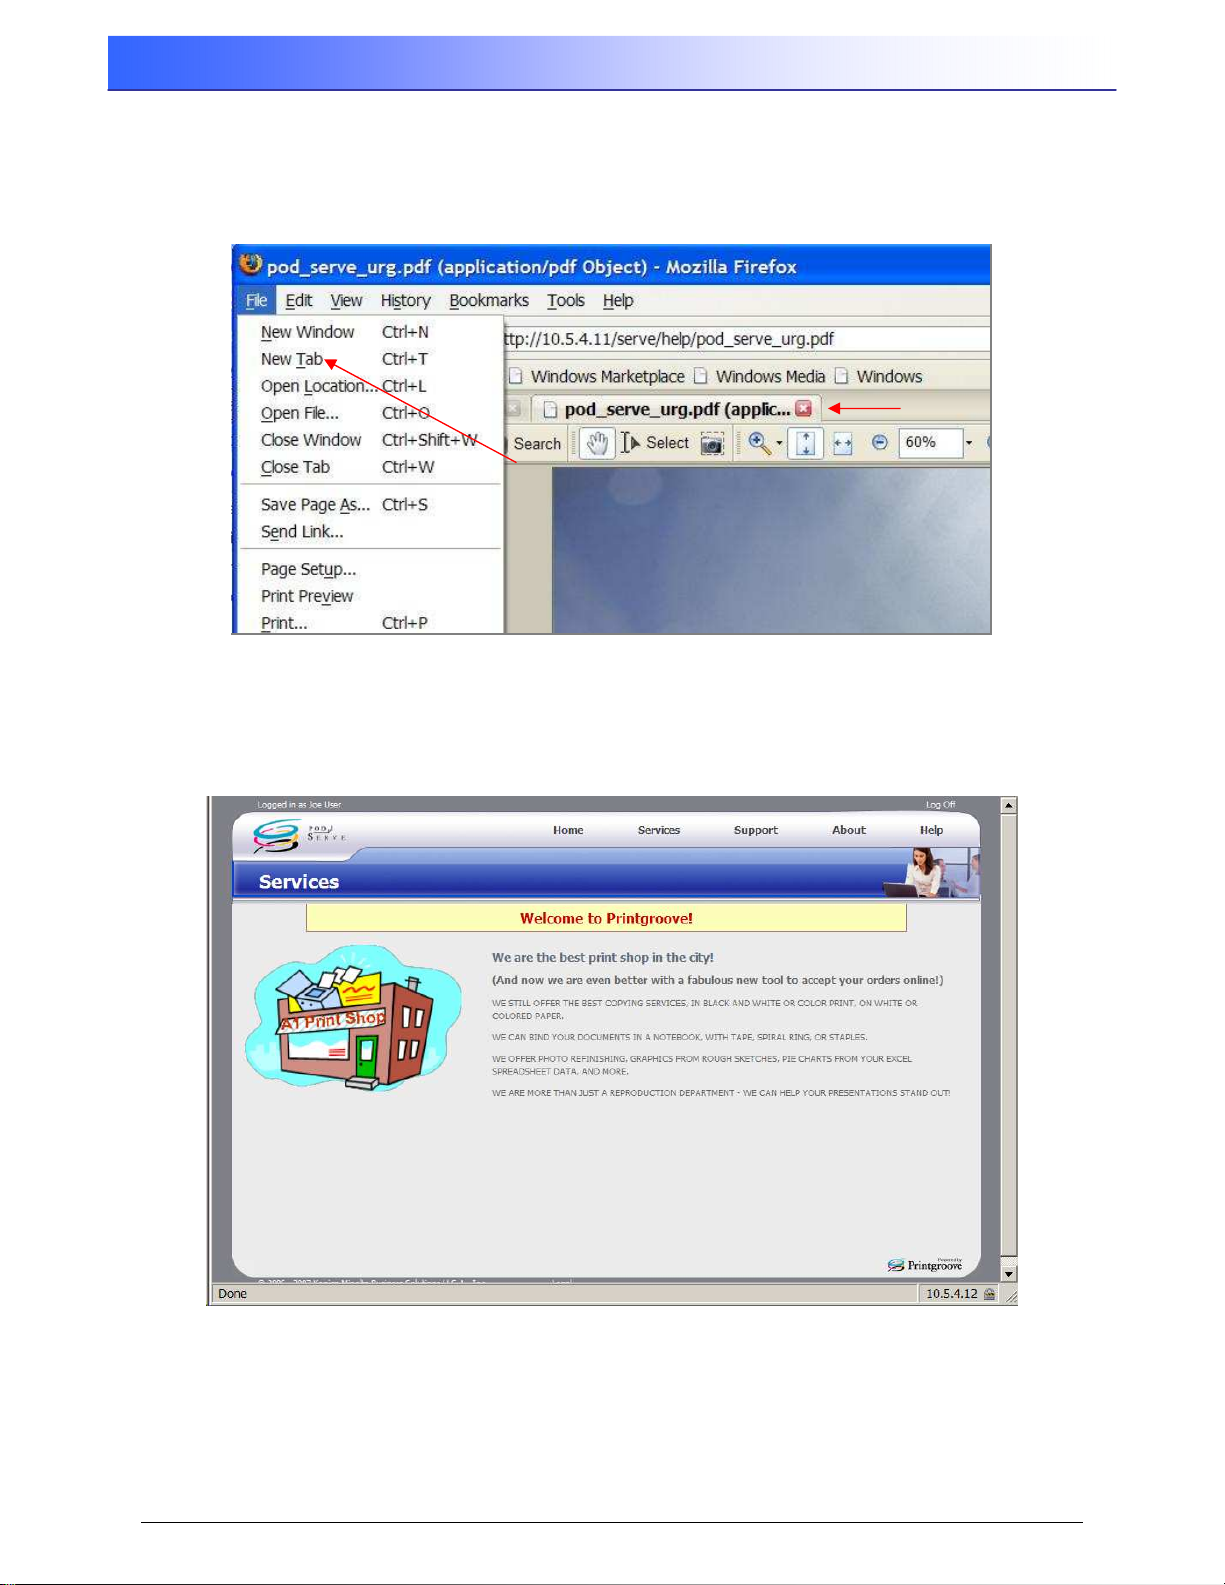
4.1 Browser
Depending on the settings on your network, opening some screens may open a new Window, or,
as shown below, open another Tab. To return to the original screen, click on the other Window or
Tab, or close the new screen by clicking on the “X” in the upper right corner.
Figure 4.1-1 – Browser Tabs
4.2 Services Screen
Click on the Services link to bring up a message about the services offered by the printshop. The
screen below is an example of what your print shop might have on their Services page.
Figure 4.2 – Services Screen
4
User’s Reference Guide Rev.1.6
Page 9
Printgroove POD Serve
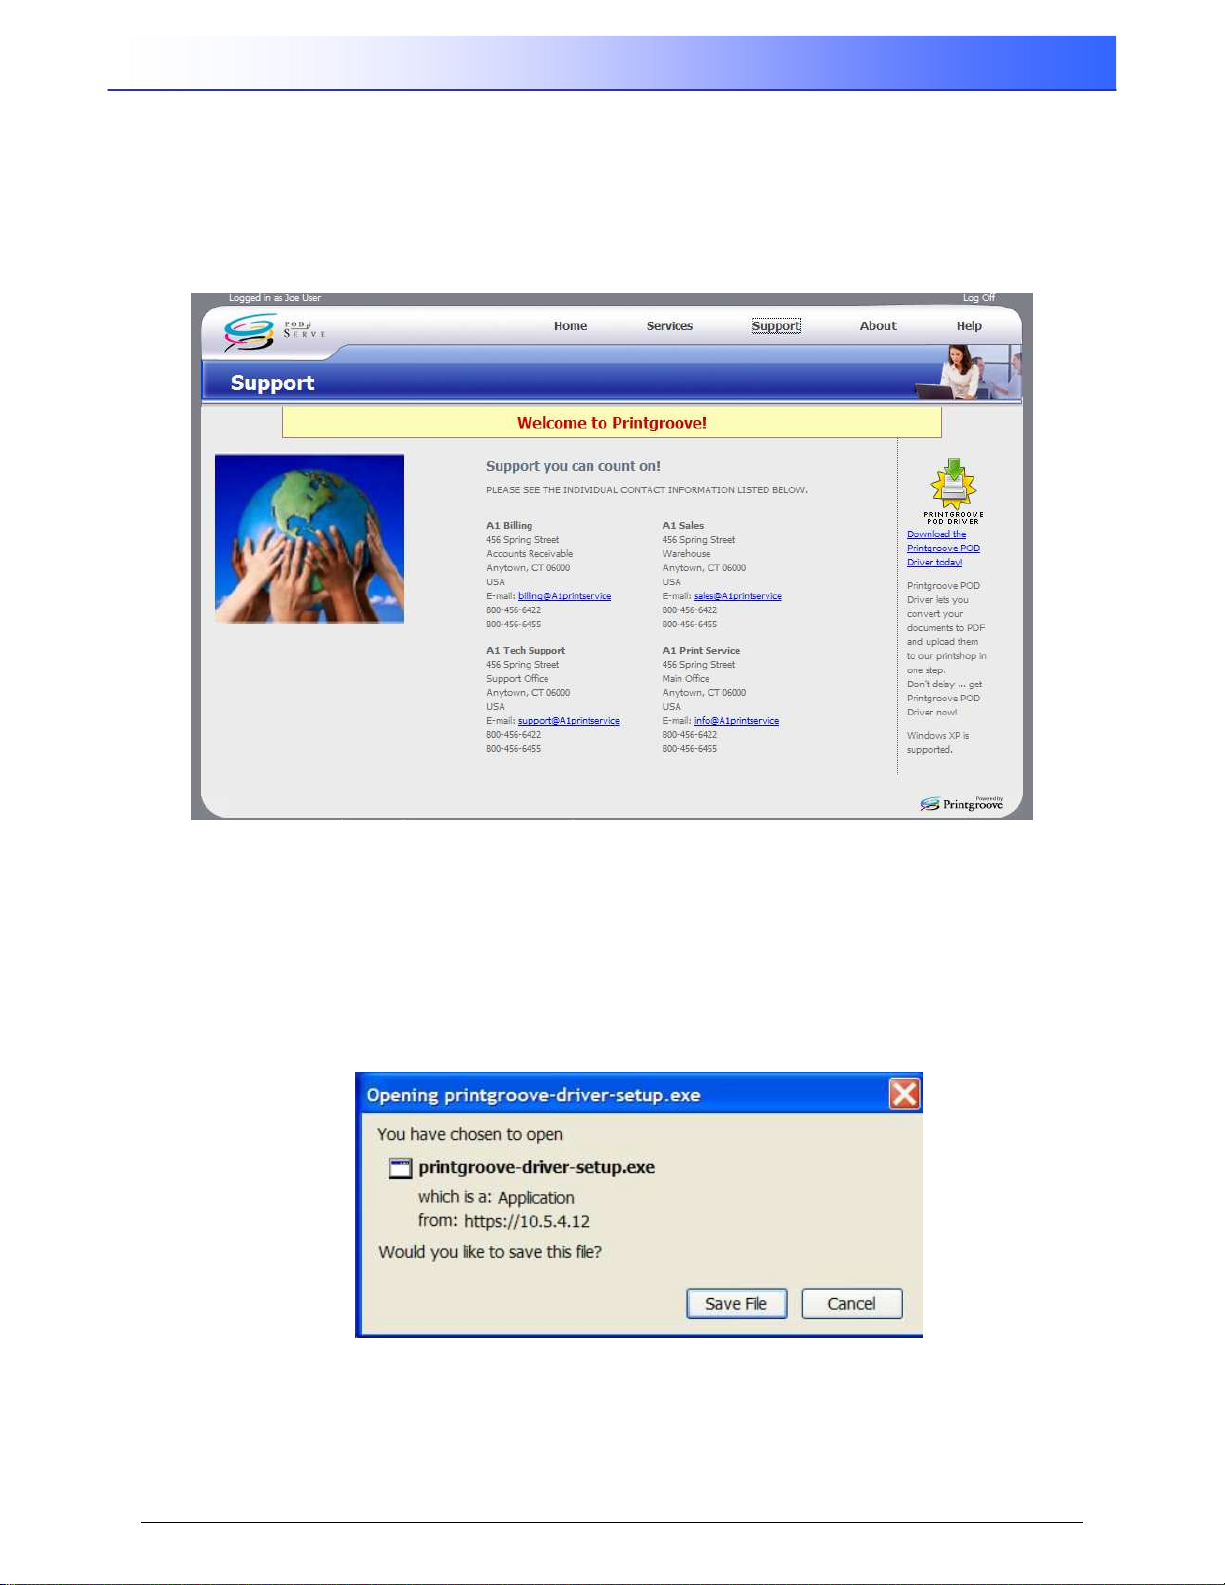
4.3 Support Screen
Click on Support to bring up contact information for a variety of printshop customer support. (This
contact information is entered by the Application Administrator.) Click on any of the e-mail links
(which are blue and underlined) to bring up your default e-mail tool already addressed to the
Support Contact chosen. (Note: The Printgroove driver download is only available on the
support page after login.) An example is shown below.
Figure 4.3 – Support Screen
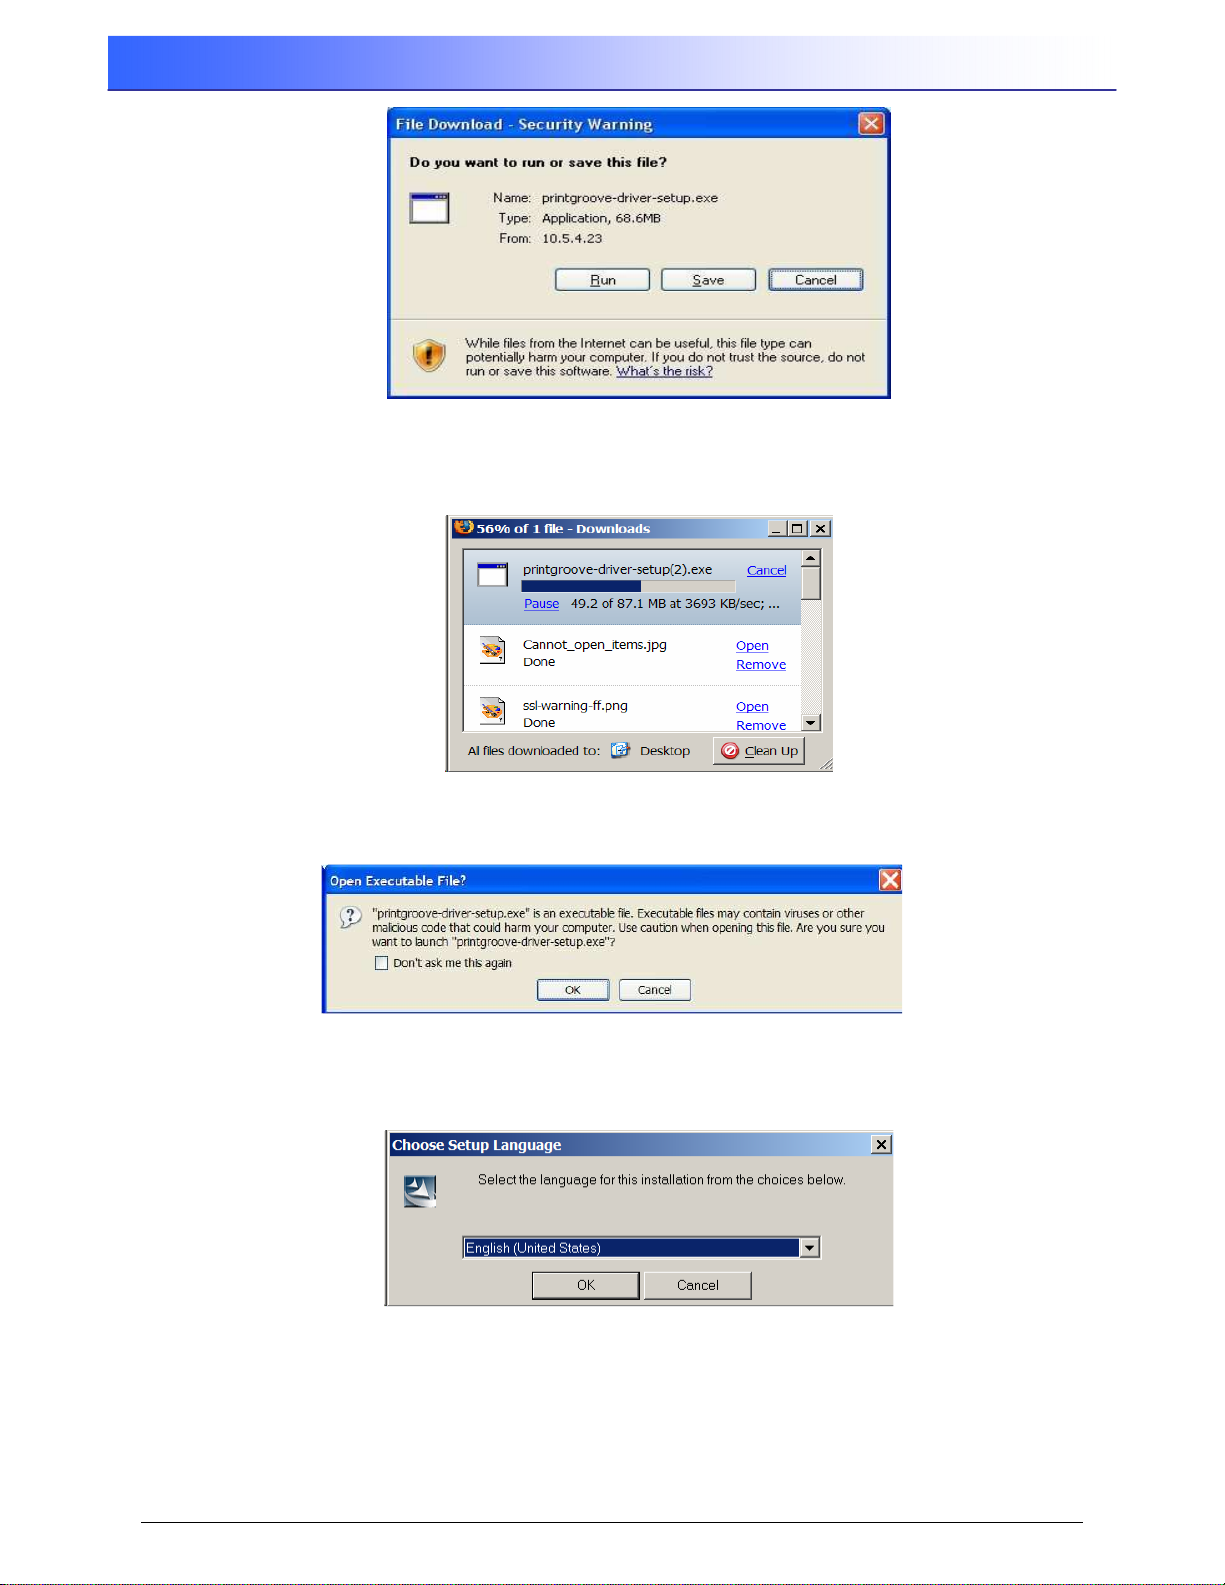
4.3.1 Support: Printgroove Driver
The Printgroove Driver download is located on the right hand side of the Serve Support page
after you login. Click on the underlined link to “download the Printgroove Driver today” which will
enable you to send files to
MS Word.
You will get a dialog box that asks if you want to save the file. Click Save File.
Figure 4.3.1 – Open Printgroove Driver File (Firefox)
Printgroove
directly from the application you are working in, such as
Rev. 1.6 User’s Reference Guide
5
Page 10
Printgroove POD Serve
Figure 4.3.1-2 - Open Printgroove Driver File (IE7 warning dialog)
The driver file will be downloaded. Click Open in the next screen once the “printgroove-driversetup.exe” file completes the download.
Figure 4.3.1-3 – Printgroove Driver Download
Click OK to open the executable file.
Figure 4.3.1-4 – Open Printgroove Driver Executable
Clicking OK displays a window asking you to choose the setup language.
Figure 4.3.1-5 –Printgroove Driver Setup Language
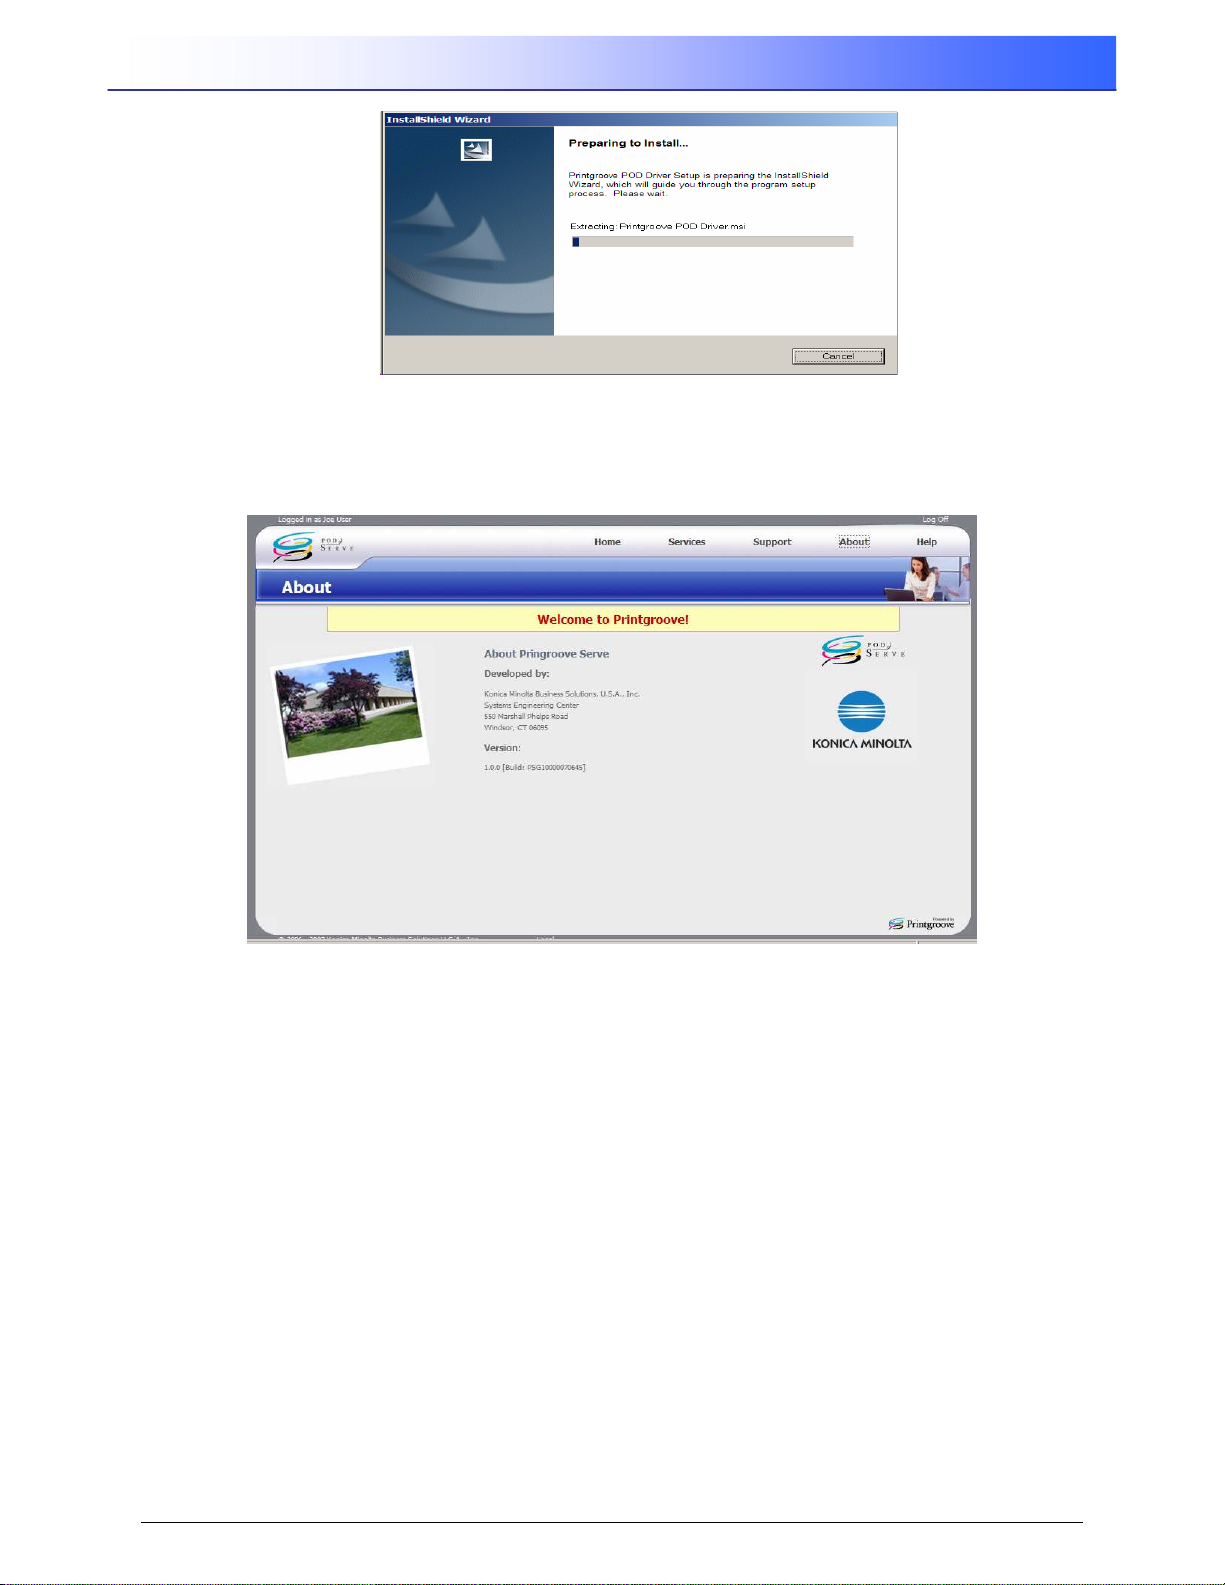
Choose the appropriate language and click OK. The Windows Installshield Wizard should launch
and you can follow the prompts to finish the installation of the Printgroove driver.
6
User’s Reference Guide Rev.1.6
Page 11
Printgroove POD Serve
Figure 4.3.1-6 – Install Printgroove Driver
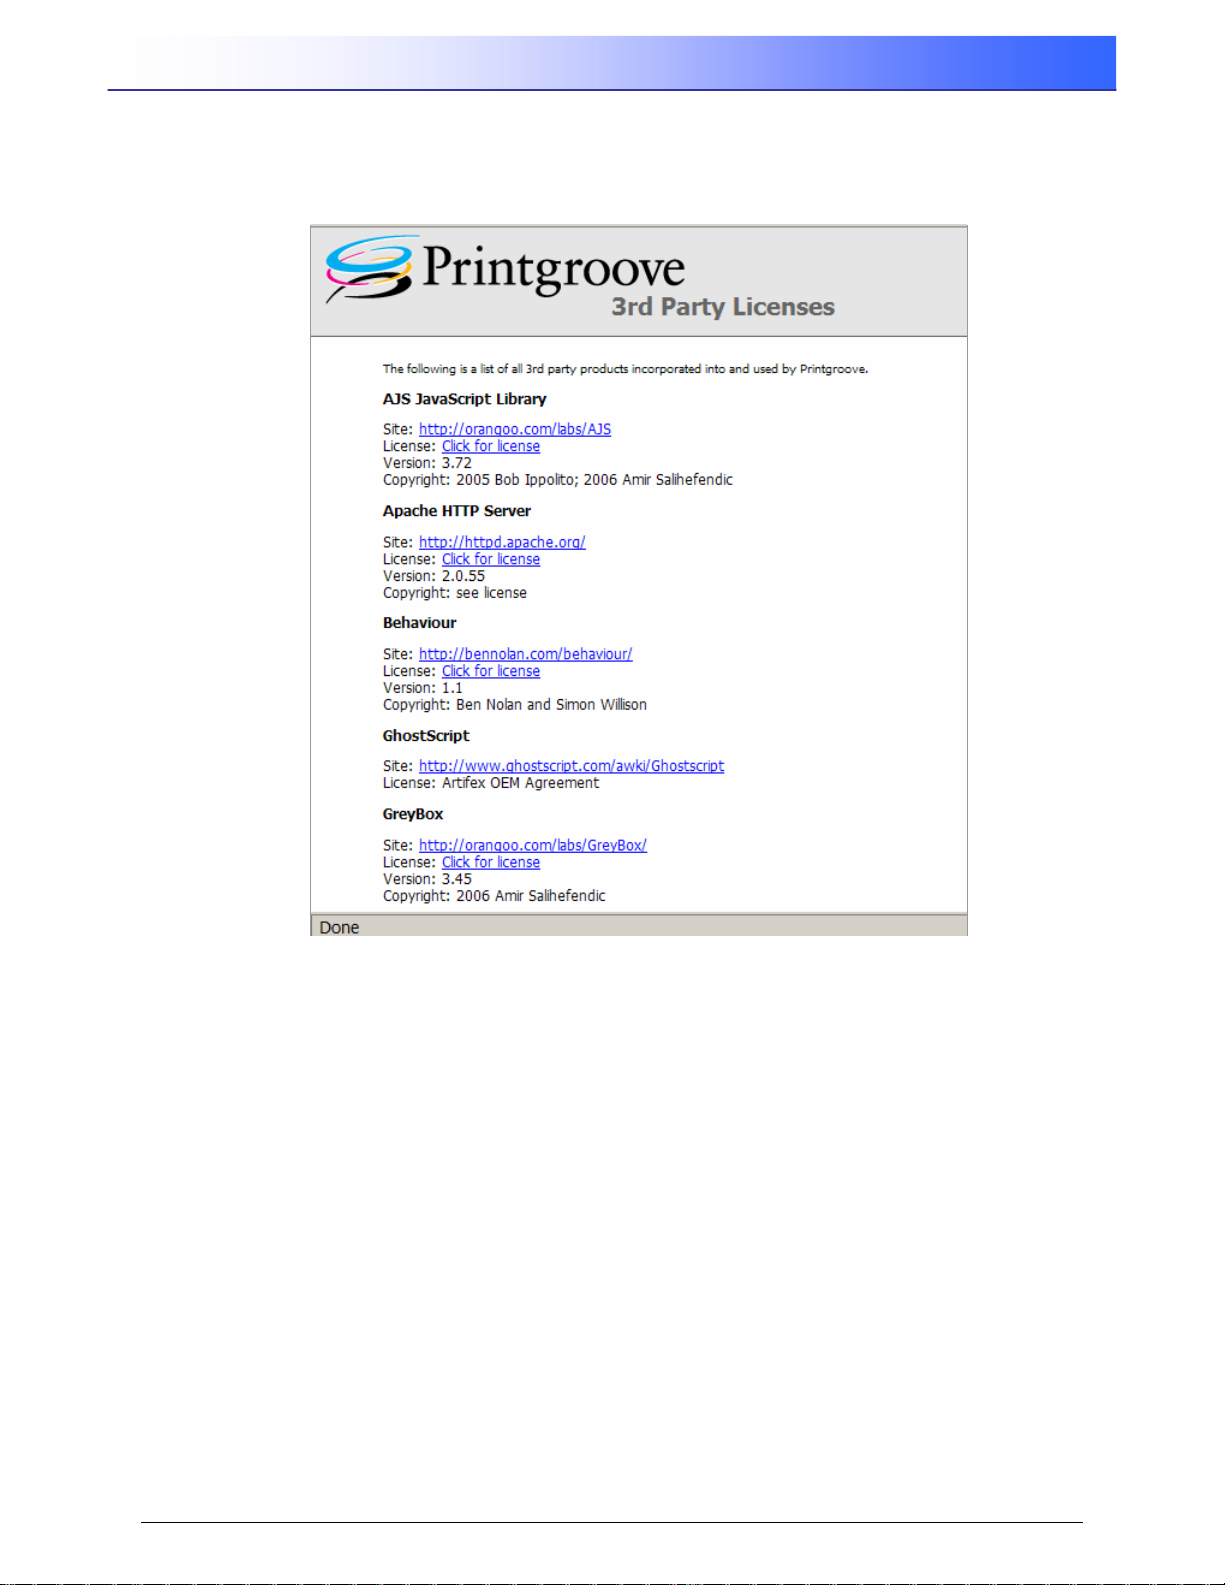
4.4 About
Click on the About link to bring up basic developer and version information for
Printgroove POD
.
Figure 4.4 – About Printgroove Screen
Rev. 1.6 User’s Reference Guide
7
Page 12

Printgroove POD Serve
4.5 Help
Clicking on Help brings up a Help file, which is context-sensitive to the screen in which you are
located. The Help file also contains a link with which to download the PDF version of this URG.
Figure 4.5 –Printgroove Help
8
User’s Reference Guide Rev.1.6
Page 13
Printgroove POD Serve
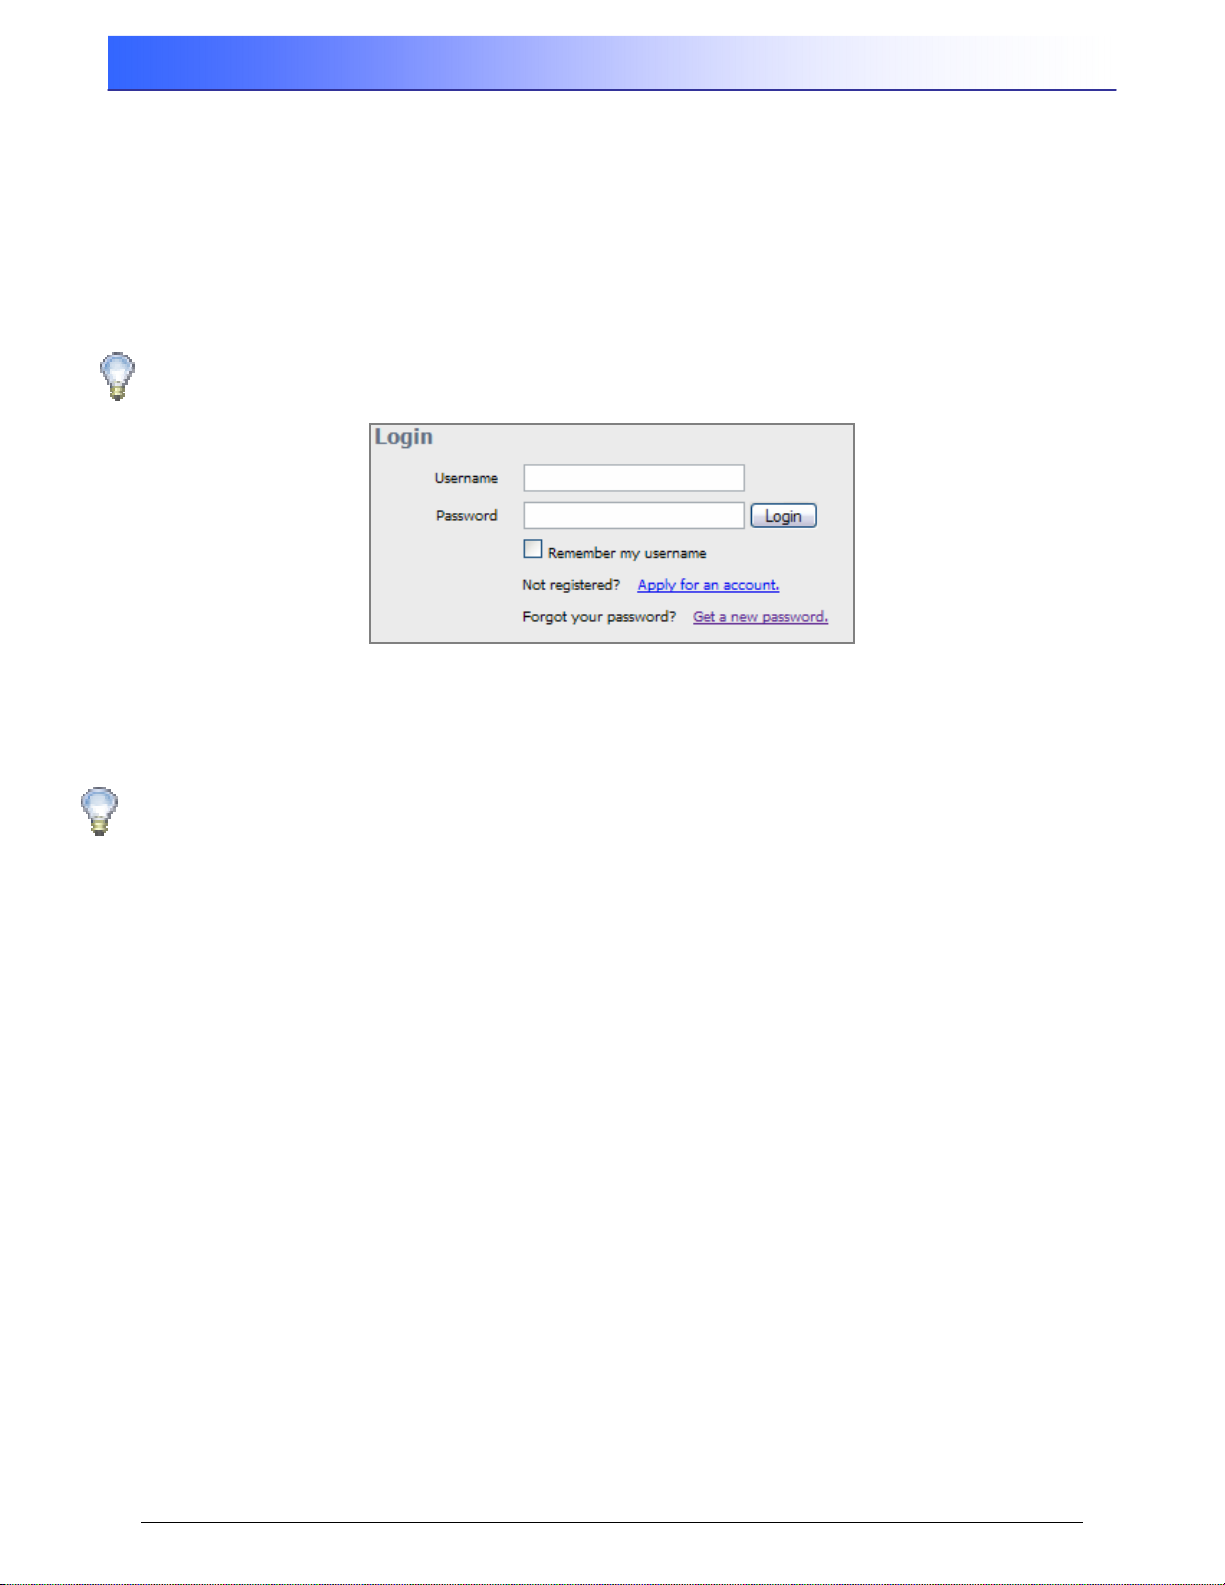
4.6 Legal
The Legal link at the bottom of every screen displays a list of all third-party licenses used by
Printgroove. This list can also be viewed in the Appendix section of this document.
Figure 4.6 – Legal - Licenses
Rev. 1.6 User’s Reference Guide
9
Page 14
Printgroove POD Serve
5.0 Customer Interface (User Login)
The user login section is located at the bottom-left of the Welcome screen. Users are given various
permissions to use the different functions within the
have permission to Place and View orders, whereas a Manager User may have additional
permission to Create and Edit the Users within their Group.
These next steps are for a non-manager user who can login and create job orders and then view
the status of each job order placed by anyone in their Group.
Please Note: Customer “Manager User” permissions, screens and options are
discussed in the Users and Groups section of this manual.
Figure 5.0 – Customer User Login
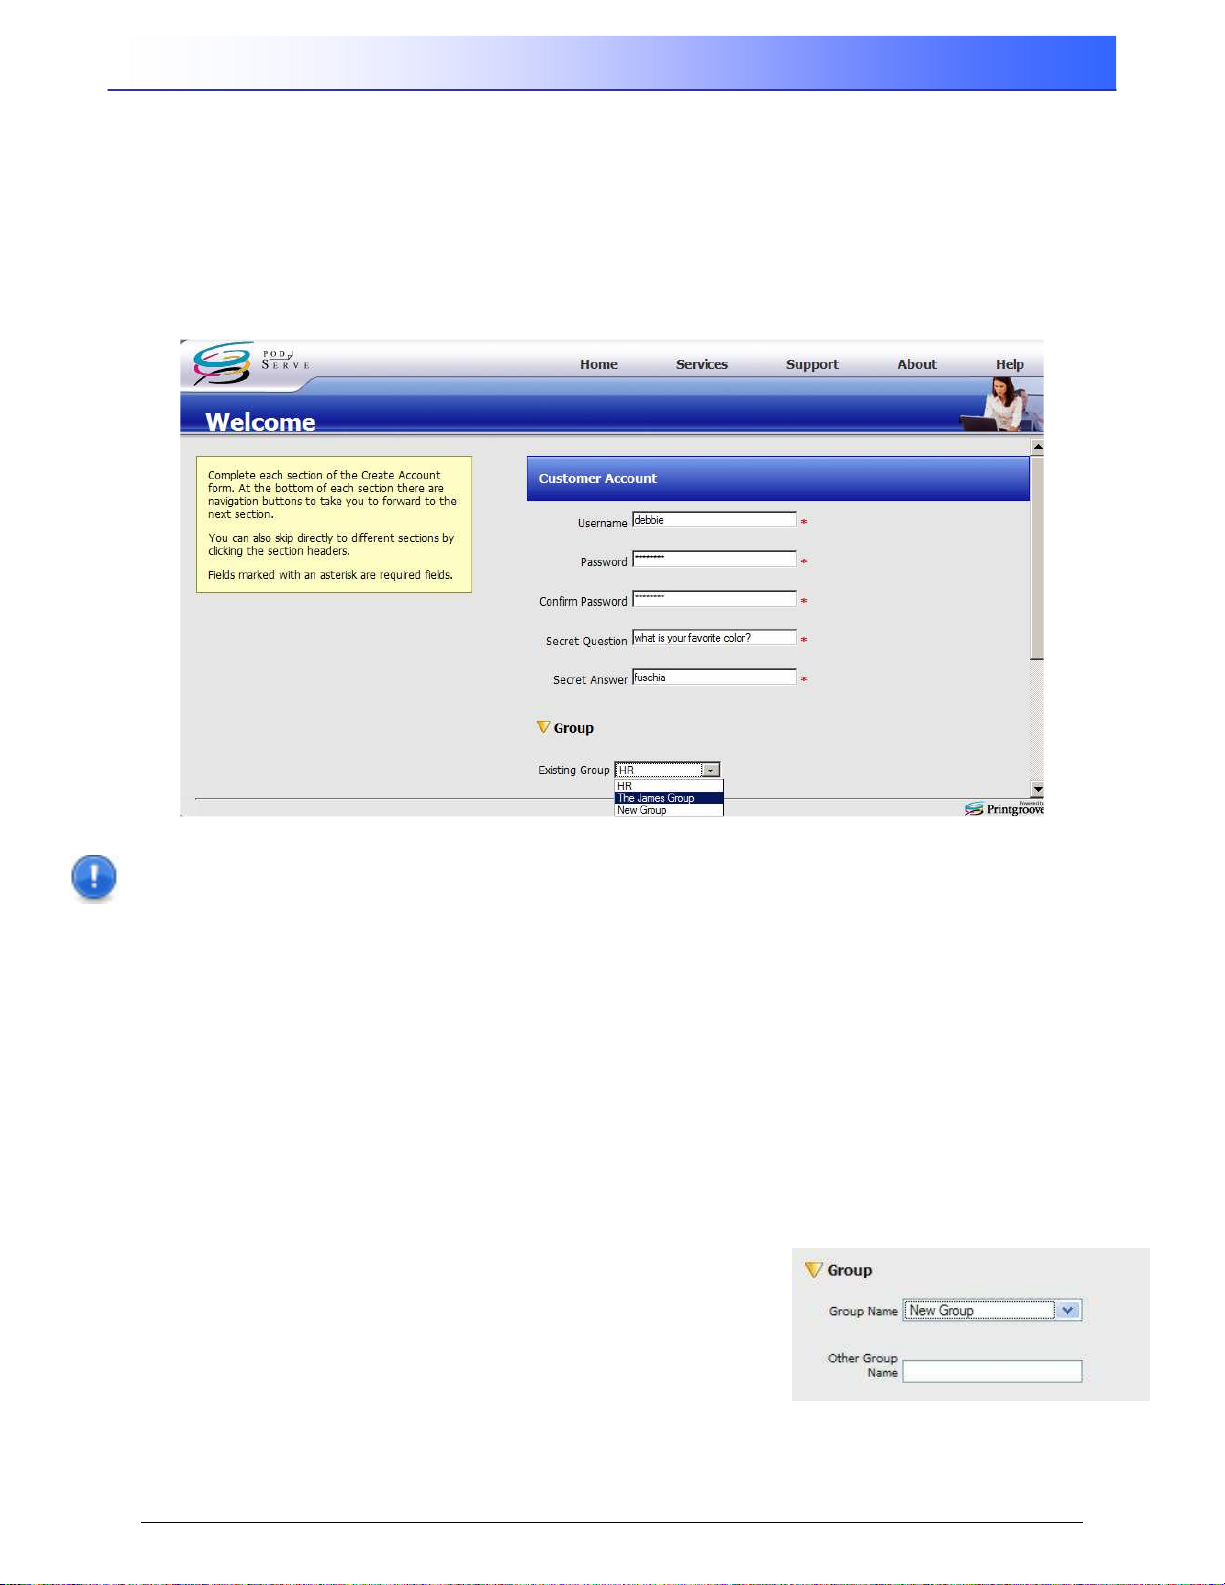
If you already have an Account, enter your username and password in the corresponding fields
and then click on Login.
Note: If you want the login screen to remember your username and password so that it
will be preloaded every time you arrive at this screen (so you do not have to type it in),
click on the checkbox: “Remember my username” before clicking on Login.
If you do not have an Account, click on the Apply for an account link and follow the instructions in
the next section.
Serve
application. For example, a User may
10
User’s Reference Guide Rev.1.6
Page 15
Printgroove POD Serve
5.1 Applying for an Account
Click on the Apply for an account link in the login area to start the account application process.
You must fill out the required fields, those marked with a red asterisk, to submit a user account
request. If you plan to join an existing Group, your manager may have the appropriate permissions
to approve your request. If your account request adds a new Group, the Application Administrator
will need to approve the new account.
The screen below shows the first section to add when applying for a new account.
Figure 5.1 – Apply for an Account, Customer Account
Note: Throughout the application required fields are marked with a red asterisk.
5.1.1 Apply for Account: Customer Account Information
As shown in the picture, fill out the required fields.
1. Enter your username (Either create one or use the name your supervisor gave you).
2. Enter your password.
3. Type the same password in the Confirm Password field.
4. Fill in the Secret Question and Secret Answer fields. These will be necessary as security
should you lose your password.
5.1.2 Apply for Account: Group Information
1. Group is the department or organizational unit to which you belong. If the pull-down does
not contain an appropriate Group, a new one may be
added by selecting New Group.
2. If you choose to select New Group, a textbox will
display below the pull-down. Enter the new Group
name. Your Application Administrator will have the final
word as to which group you are assigned to, and
whether or not to accept a New Group.
Rev. 1.6 User’s Reference Guide
11
Page 16
Printgroove POD Serve
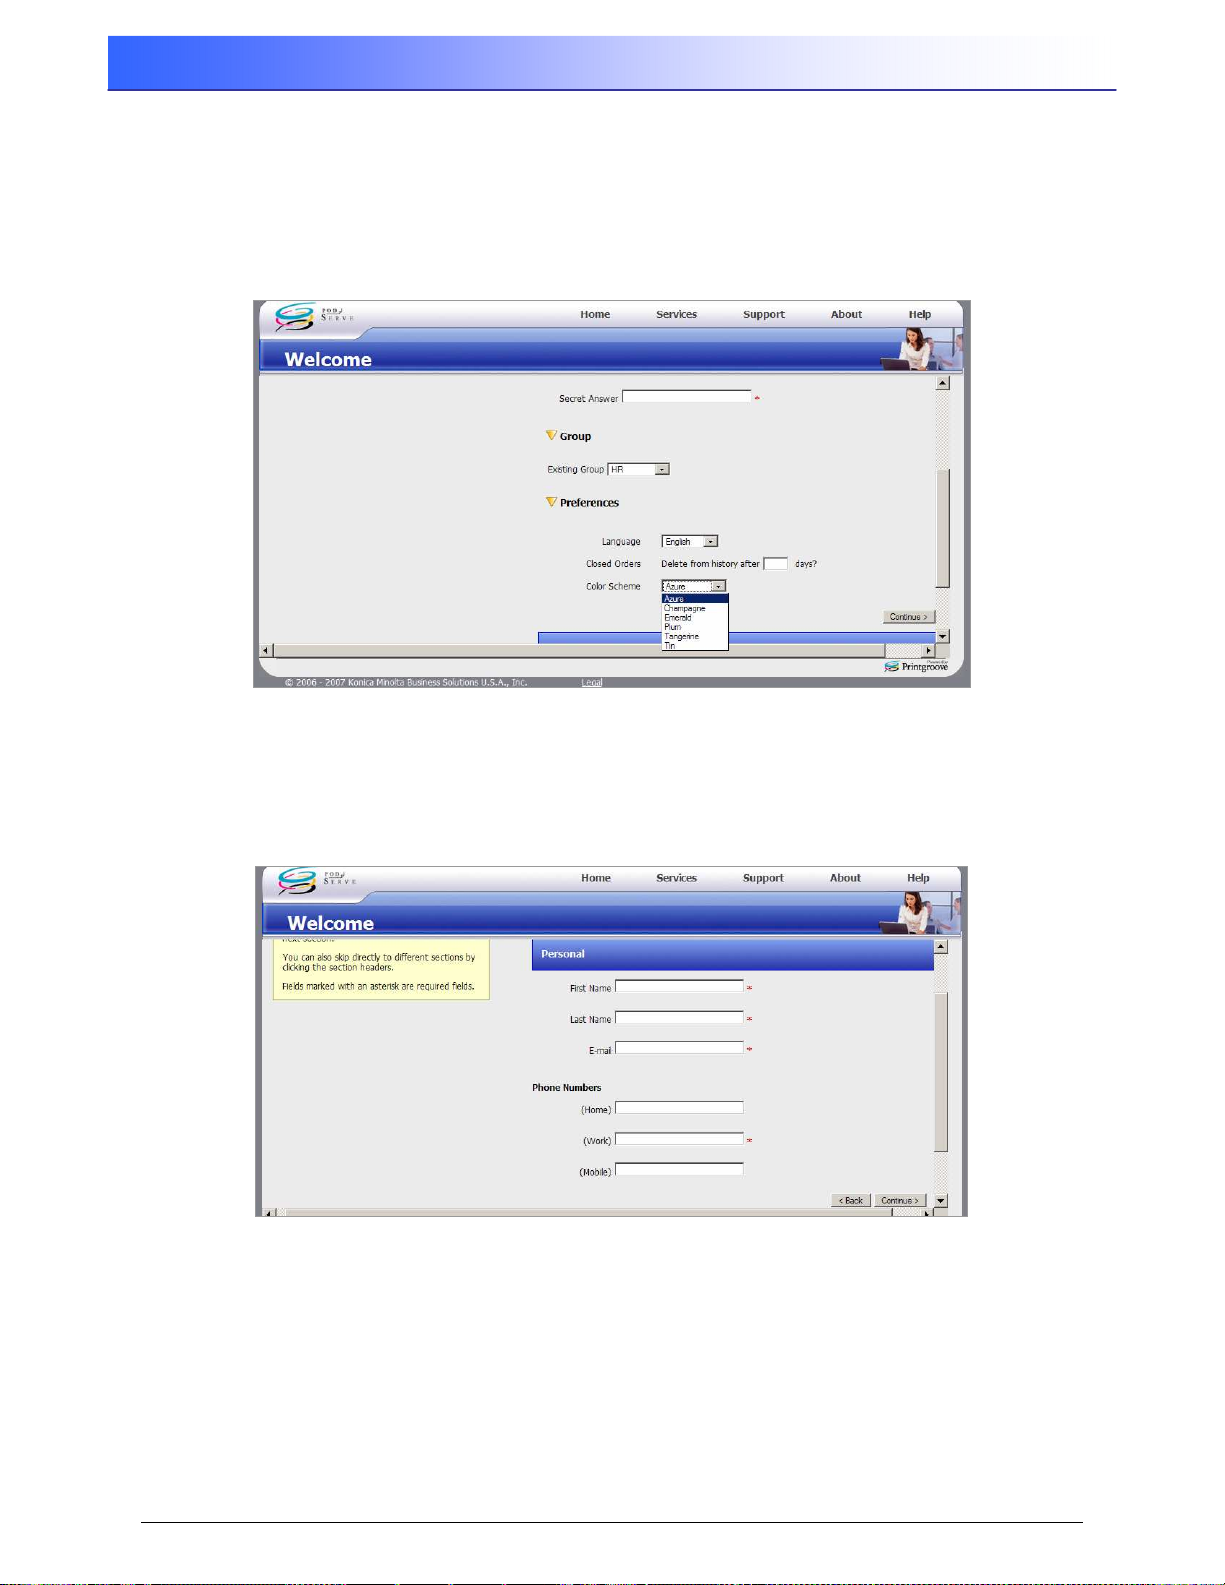
5.1.3 Apply for Account: Preferences
1. Select your preferred language from the pull-down menu. Currently the language choices
available are English and Japanese.
2. In the Closed Orders – Delete from history after ______ days? section, enter the number
of days after which you want Closed orders deleted from your history file.
3. Select the default color scheme for your application from the pull-down menu which offers
the standard Azure, as well as Champagne, Emerald, Plum, Tangerine, and Tin.
Figure 5.1.3 – Apply for an Account - Preferences
Click Continue or on the blue heading bar to bring up the next section to be completed.
5.1.4 Apply for Account: Personal Section
Figure 5.1.4 – Apply for an Account - Personal
As a minimum, you must enter your first and last name, e-mail address, and work phone number.
Home and mobile phone numbers are optional.
12
User’s Reference Guide Rev.1.6
Page 17
Printgroove POD Serve
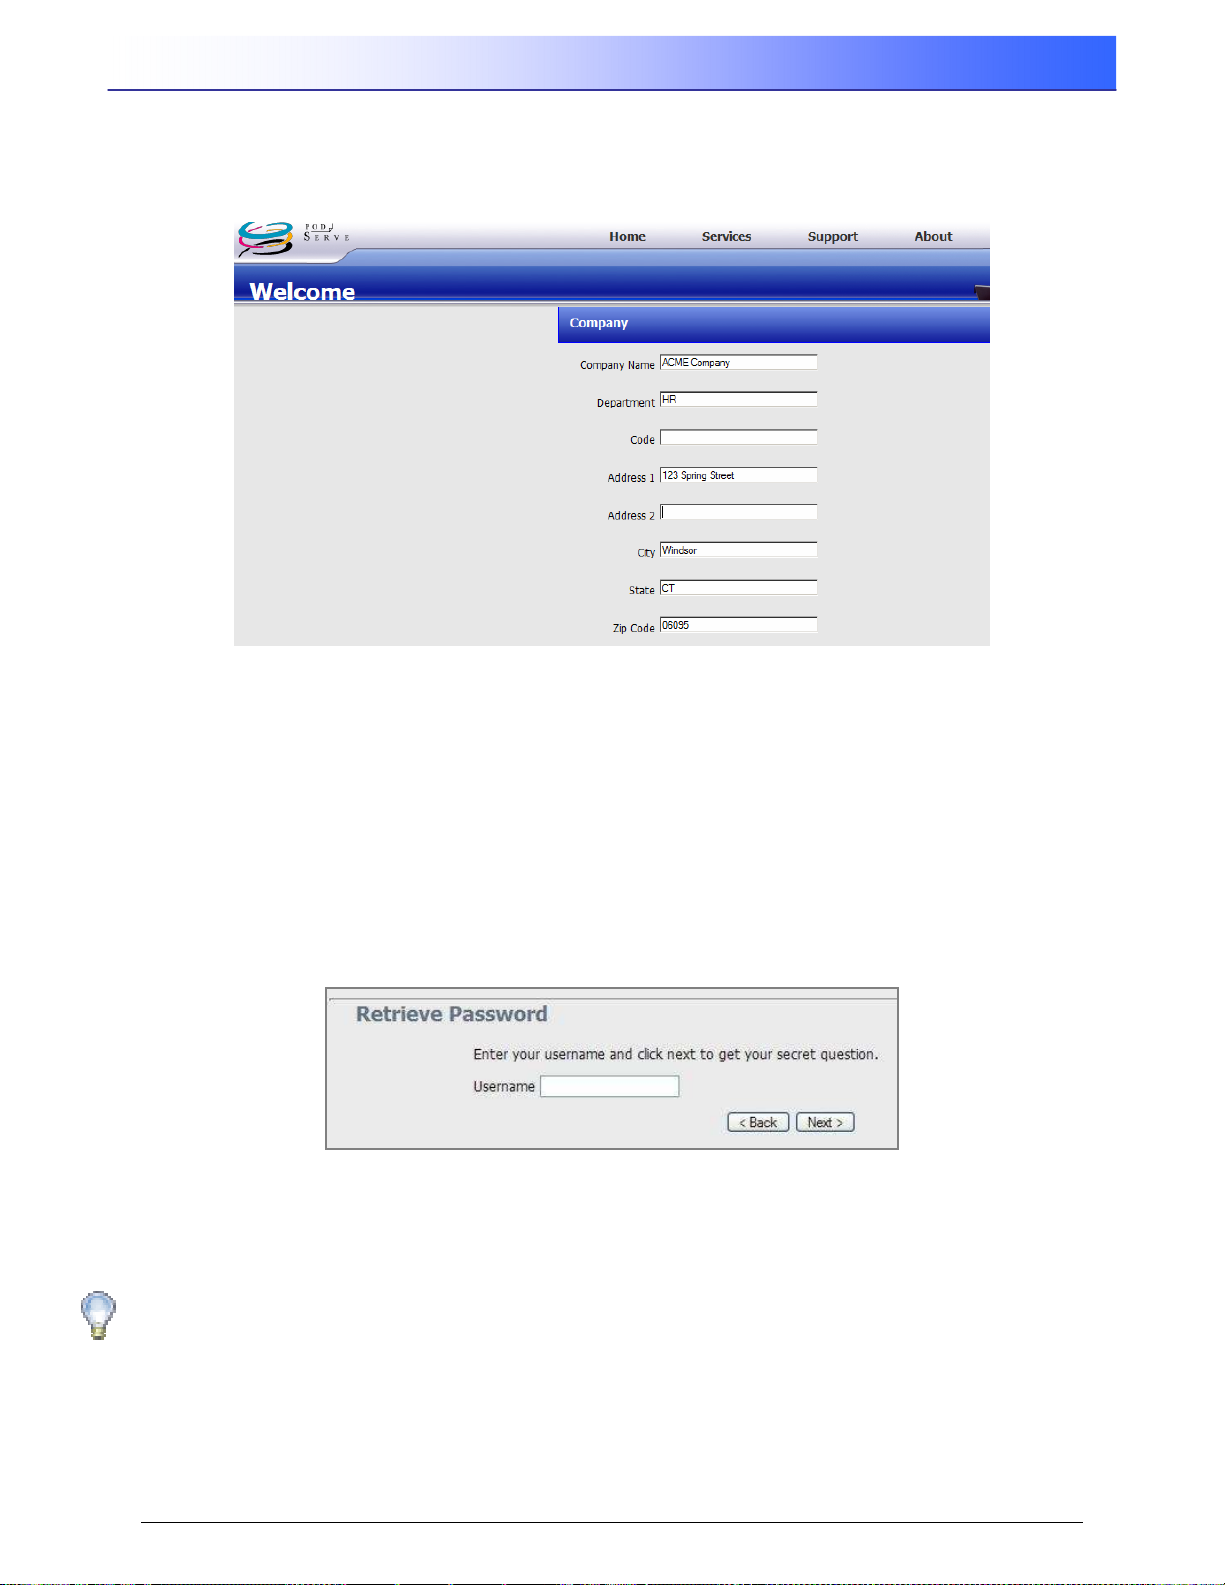
5.1.5 Apply for Account: Company Section
The Company section is optional and therefore is not required to apply for an account. You can
enter the appropriate information now, or at another time by updating your Profile.
Figure 5.1.5 – Apply for an Account – Company Section
5.1.6 Complete the New Account Request
When you have finished filling out the required account information, click on Save to submit your
request. If you are joining an existing Group, your manager may have the appropriate permissions
to approve your submission. If your account request is adding a new Group, the Application
Administrator will need to approve the new account. You will be notified via e-mail when your new
account is ready to be used and you can login.
5.2 Retrieve Password
If you have a login account but have forgotten your password, click on Get a New Password in the
login section to bring up this prompt:
Figure 5.2 – Retrieve Password
Enter your case sensitive username and click on Next to be prompted with the Secret Question
from your Account Profile. If you respond with the correct Secret Answer, a new password will be
sent to your e-mail address.
Hint: You can use the “Get a new password” option any time you want to change/reset
your password.
Rev. 1.6 User’s Reference Guide
13
Page 18
Printgroove POD Serve
5.3 Login
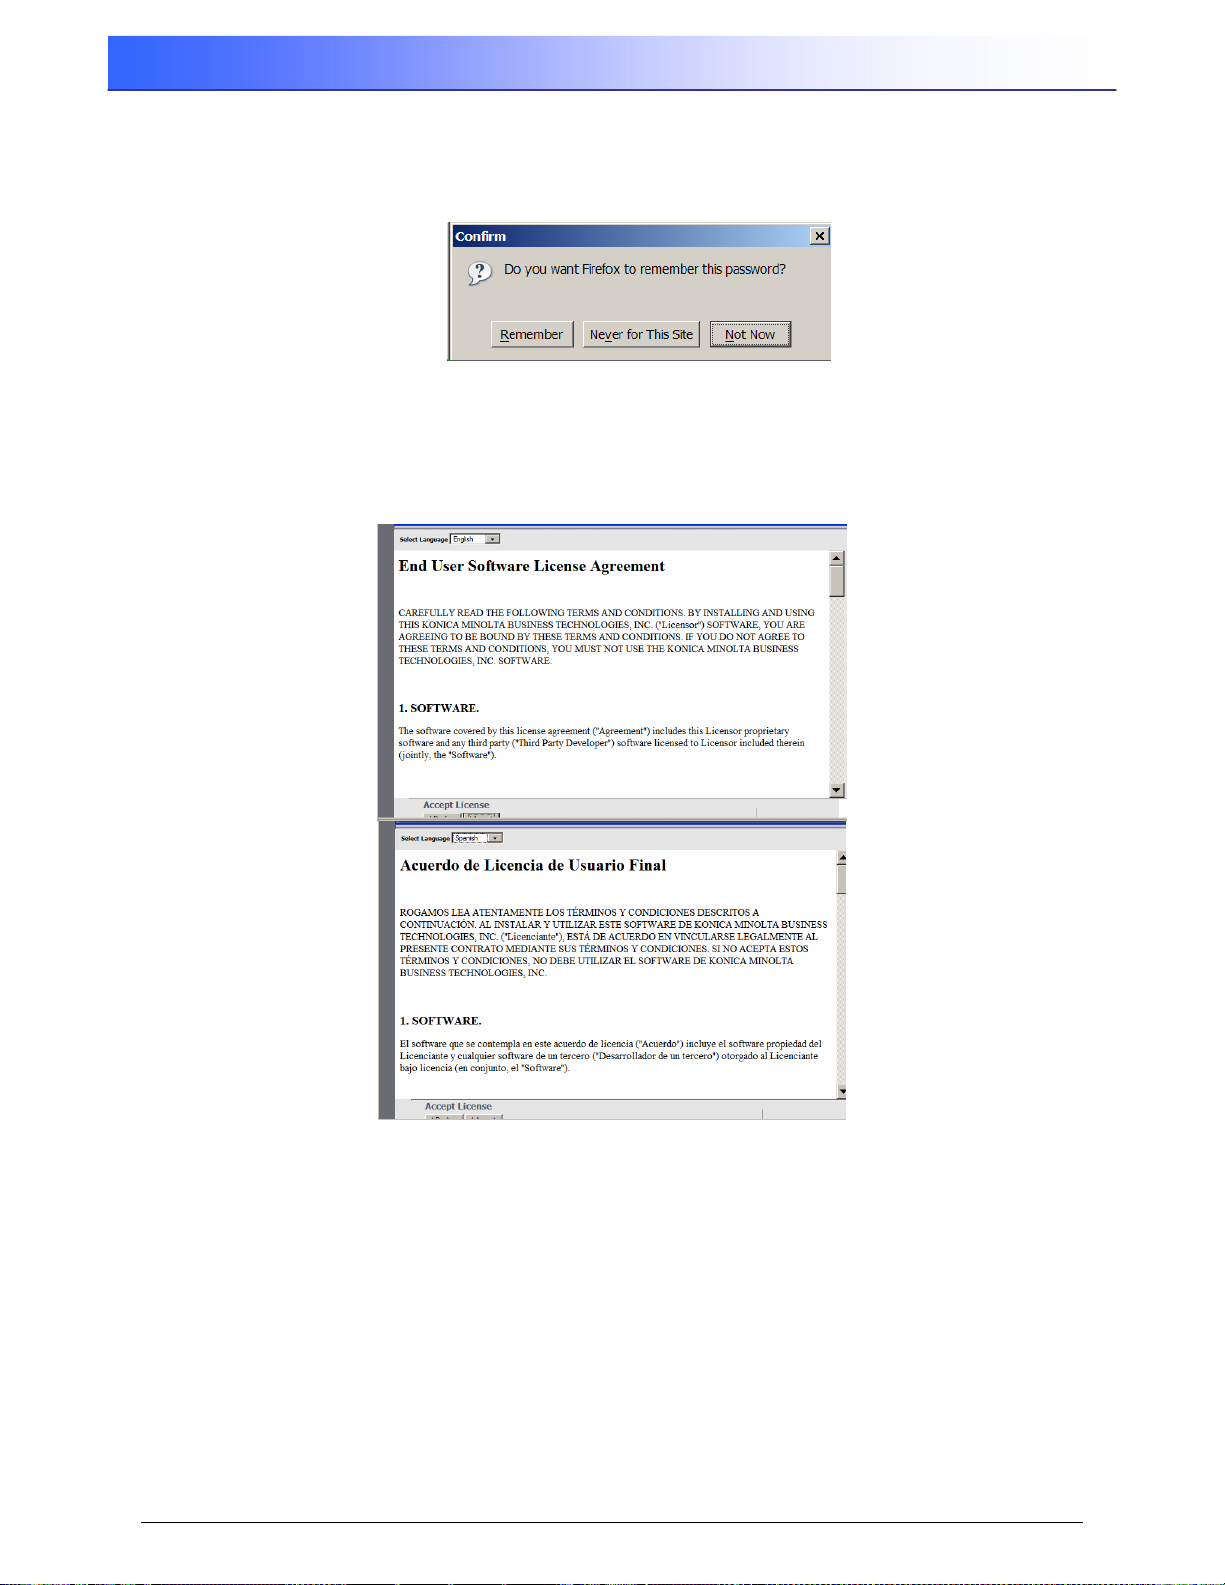
Once you have an account, type your username and password in the corresponding fields and
click on Login. The application may ask if you want your username and password remembered.
Figure 5.3-1 – Login – Remember Password?
Click on the response of your choice to continue. The first time you log in to the application, you will
be shown the End User Software License Agreement. There is also a drop-down menu with
language options. Please choose your preferred language, read the agreement by scrolling through
the text, and then click I Accept to continue logging in.
Figure 5.3-2 – Example End User Software License Agreement
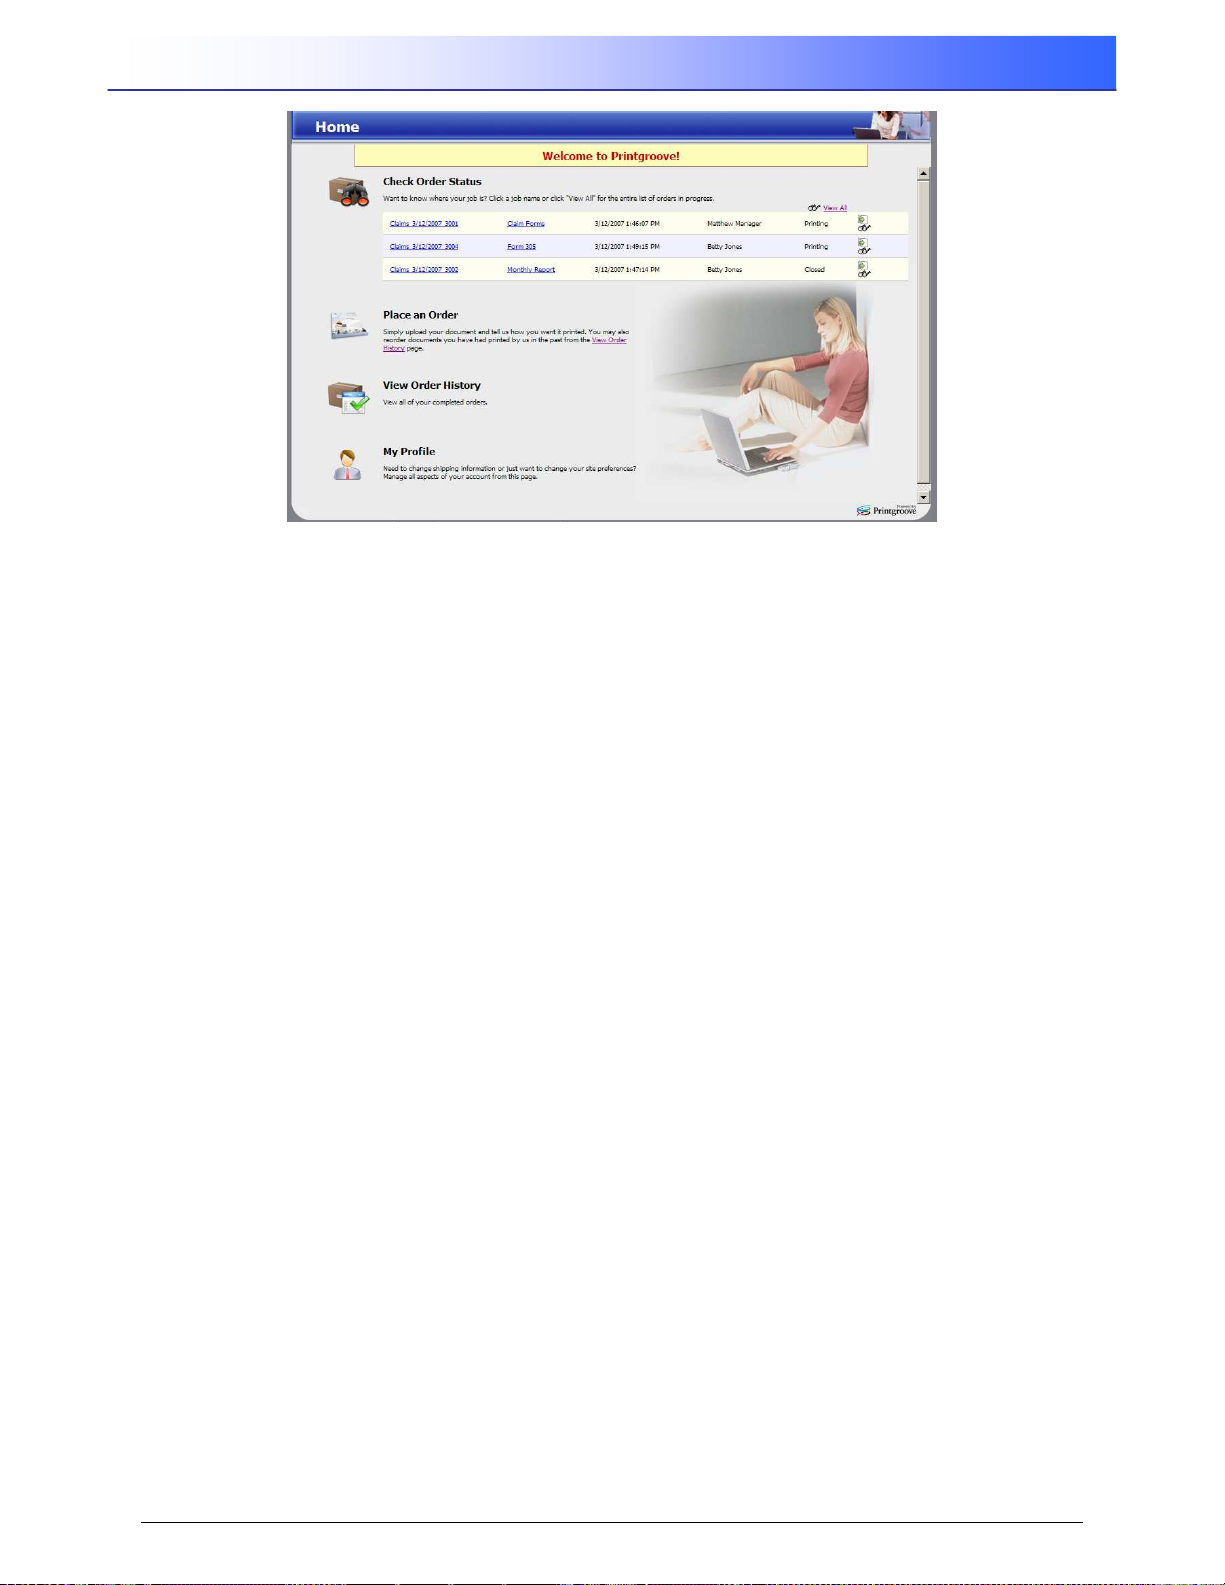
A sample Home page after login, displays orders placed by users in your Group.
14
User’s Reference Guide Rev.1.6
Page 19
Printgroove POD Serve
Figure 5.3-3 – Customer User Home Page
Rev. 1.6 User’s Reference Guide
15
Page 20
Printgroove POD Serve
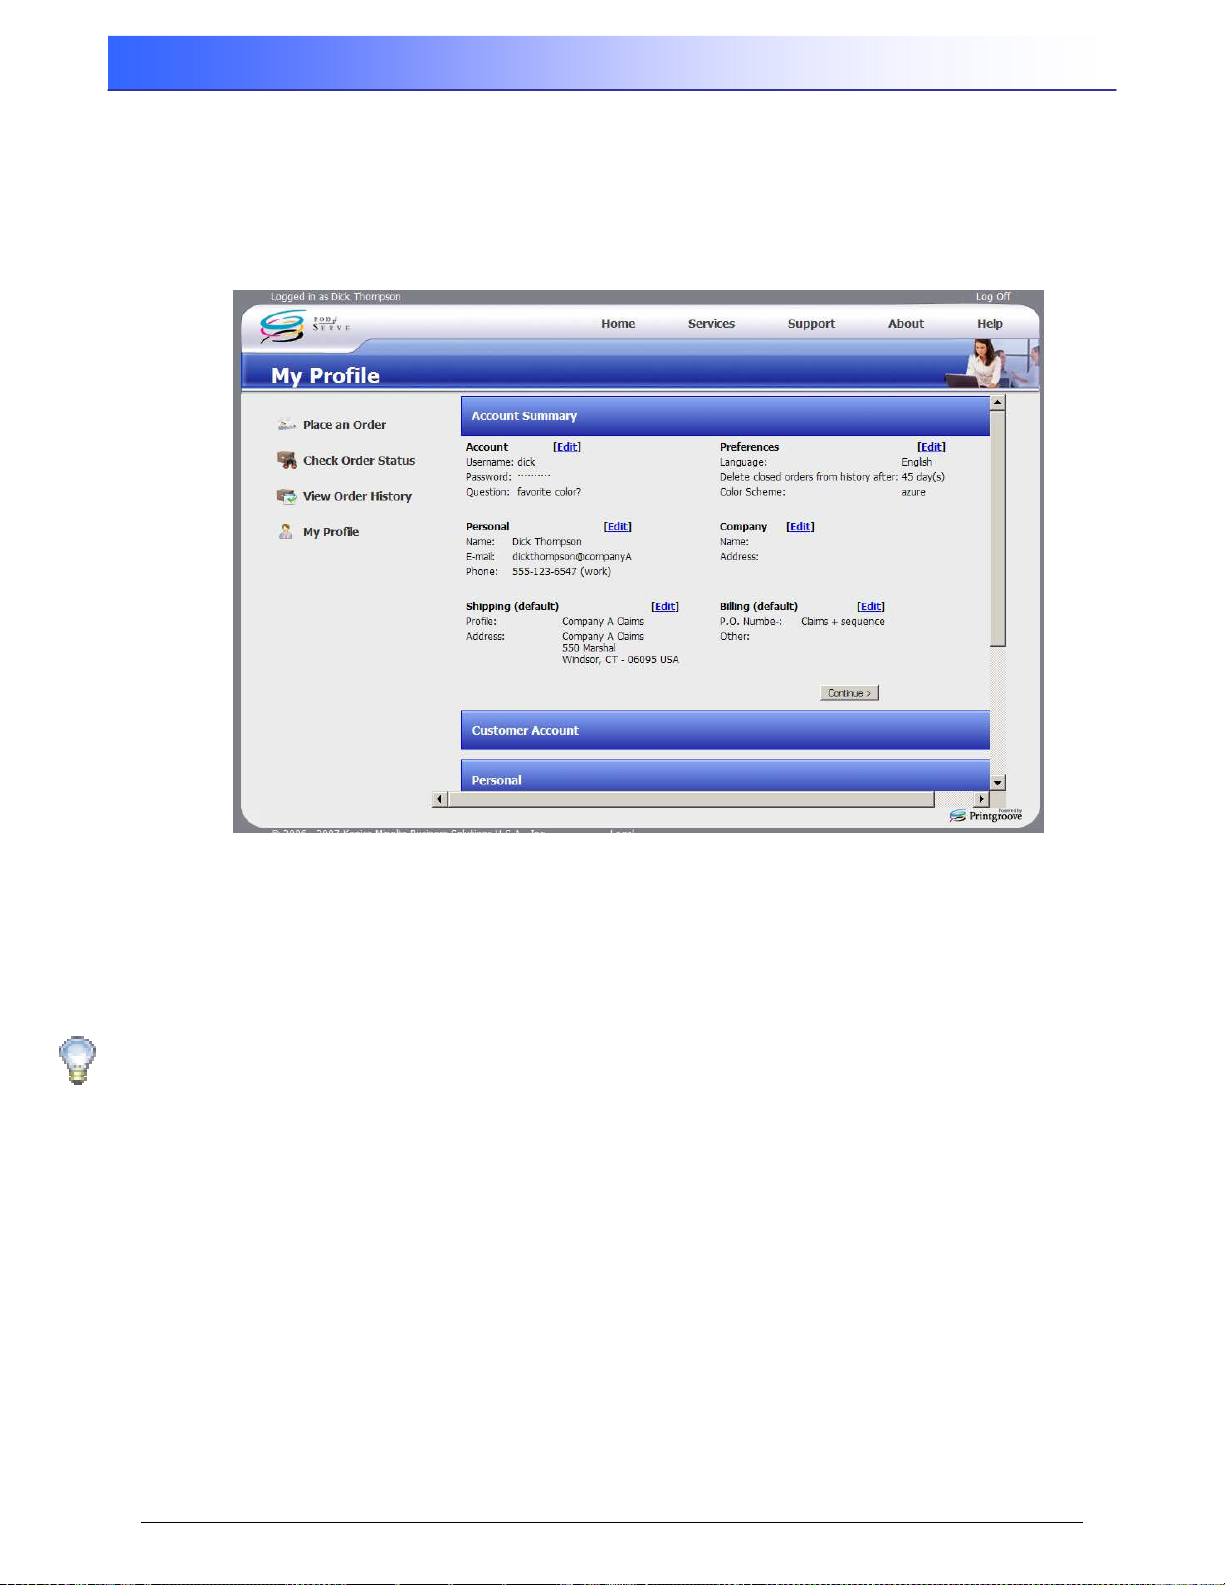
5.4 My Profile
The My Profile menu on the Home page contains information about you that is necessary before
you can place orders. Your Profile consists of your contact information, shipping and billing
methods, and payment methods. Your Profile must be complete before you can place any job
orders in the application. To edit your profile click on the My Profile menu (the bottom menu on
your Home page).
Figure 5.4 – User’s My Profile Screen
Your Profile opens with the Account Summary at the top which summarizes all of the data currently
in the Profile. There are five sections of Profile data: Customer Account, Personal, Company,
Shipping and Billing. If you applied for your account through the application, most of the
information is already completed. Before you can submit an order to the print shop, you must add
Shipping and Billing information. Click on an Edit link to update the information for the section.
Note: Shipping and Billing may not have been added when your Profile was created, but
must be filled in before jobs can be submitted.
16
User’s Reference Guide Rev.1.6
Page 21

Printgroove POD Serve
5.4.1 User Profile: Customer Account
Click on the Customer Account blue bar, and then on Preferences to bring up this screen.
Figure 5.4.1 – User Profile Customer Account Screen
Edit any of the fields as desired and click Continue to go to the next section of the Profile.
5.4.2 User Profile: Personal Section
Click on the Personal blue bar to enter data in that section.
Figure 5.4.2 – User Profile Personal Section
Enter Your Name, E-mail and Phone Numbers and click Continue or on the next blue bar.
Rev. 1.6 User’s Reference Guide
17
Page 22
Printgroove POD Serve
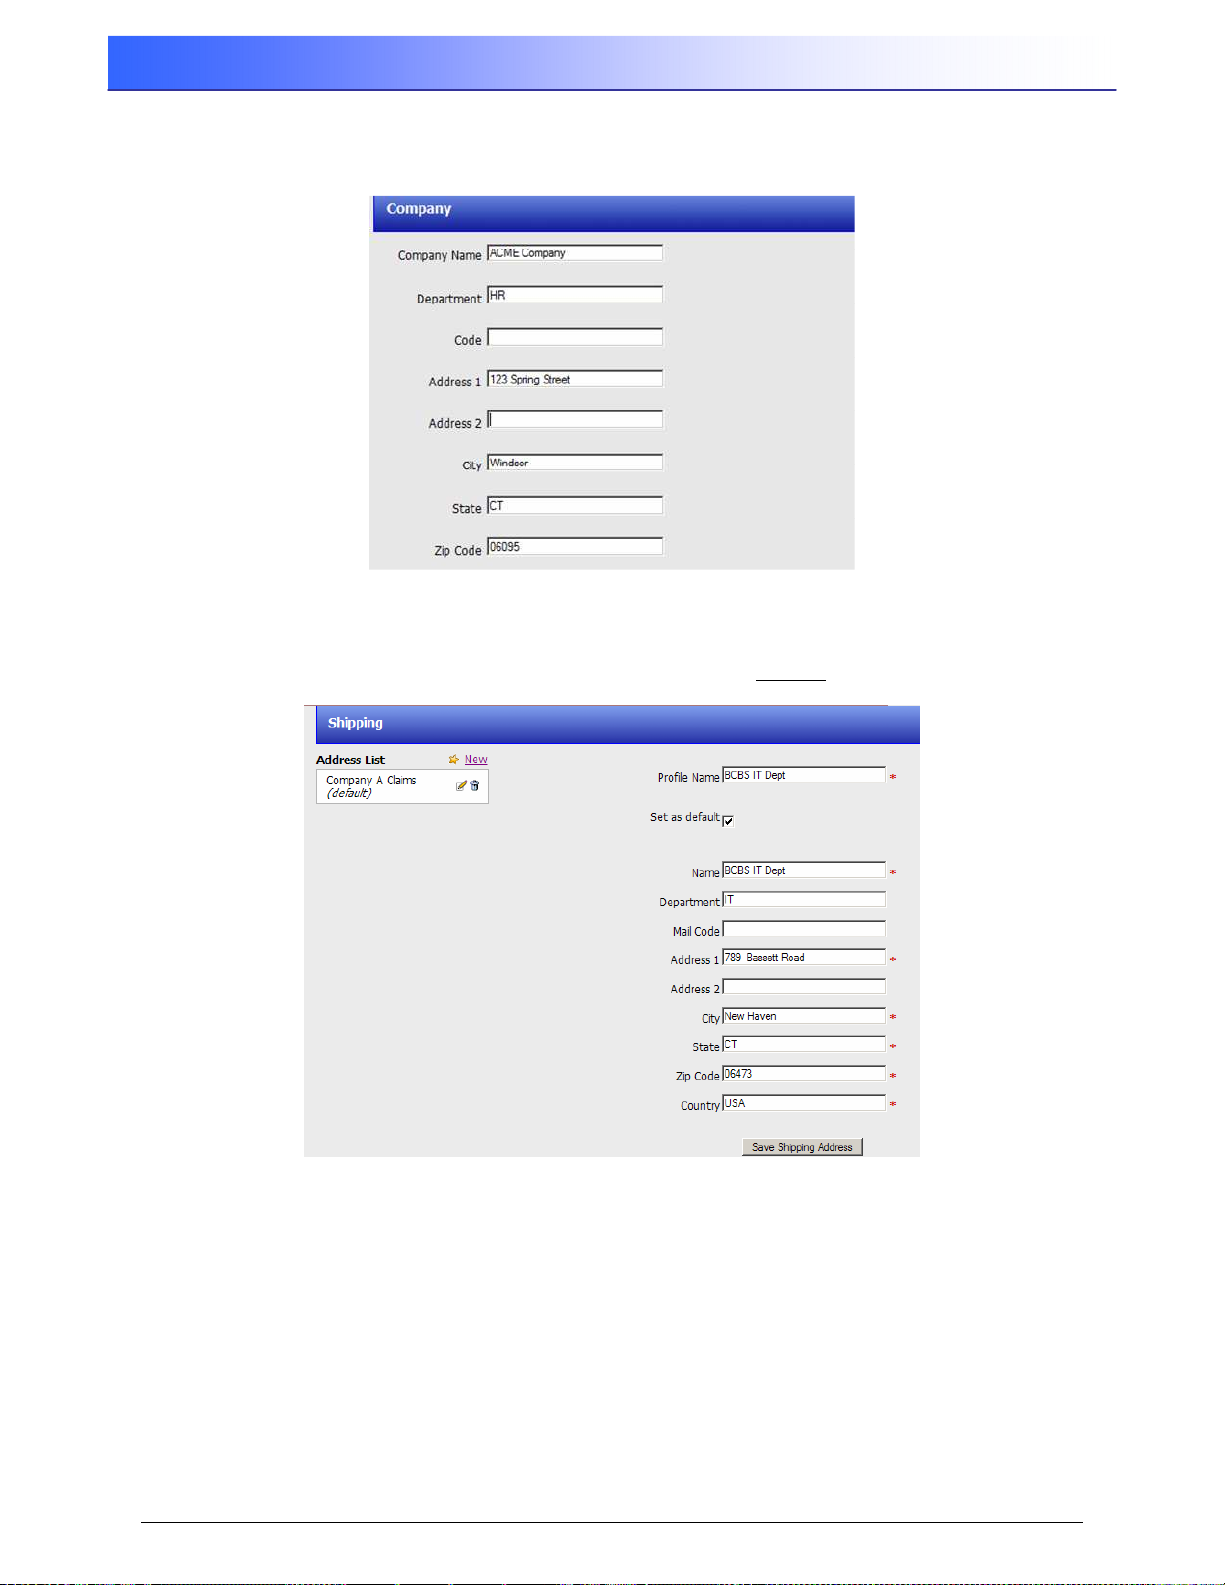
5.4.3 User Profile: Company Section
Company information is optional. Enter the data you want to save in the system.
Figure 5.4.3 – User Profile Company Section
5.4.4 User Profile: Shipping
Click on the Shipping section and then on the New link to add at least one shipping address.
Figure 5.4.4-1 – User Profile Shipping Section
Give the new Shipping address a Profile Name that is meaningful enough to use as a reference.
Click on the Set as default check box to save this address as the default whenever you place an
order. Fill in each of the required fields and then click on Save Shipping Address.
18
User’s Reference Guide Rev.1.6
Page 23
Printgroove POD Serve
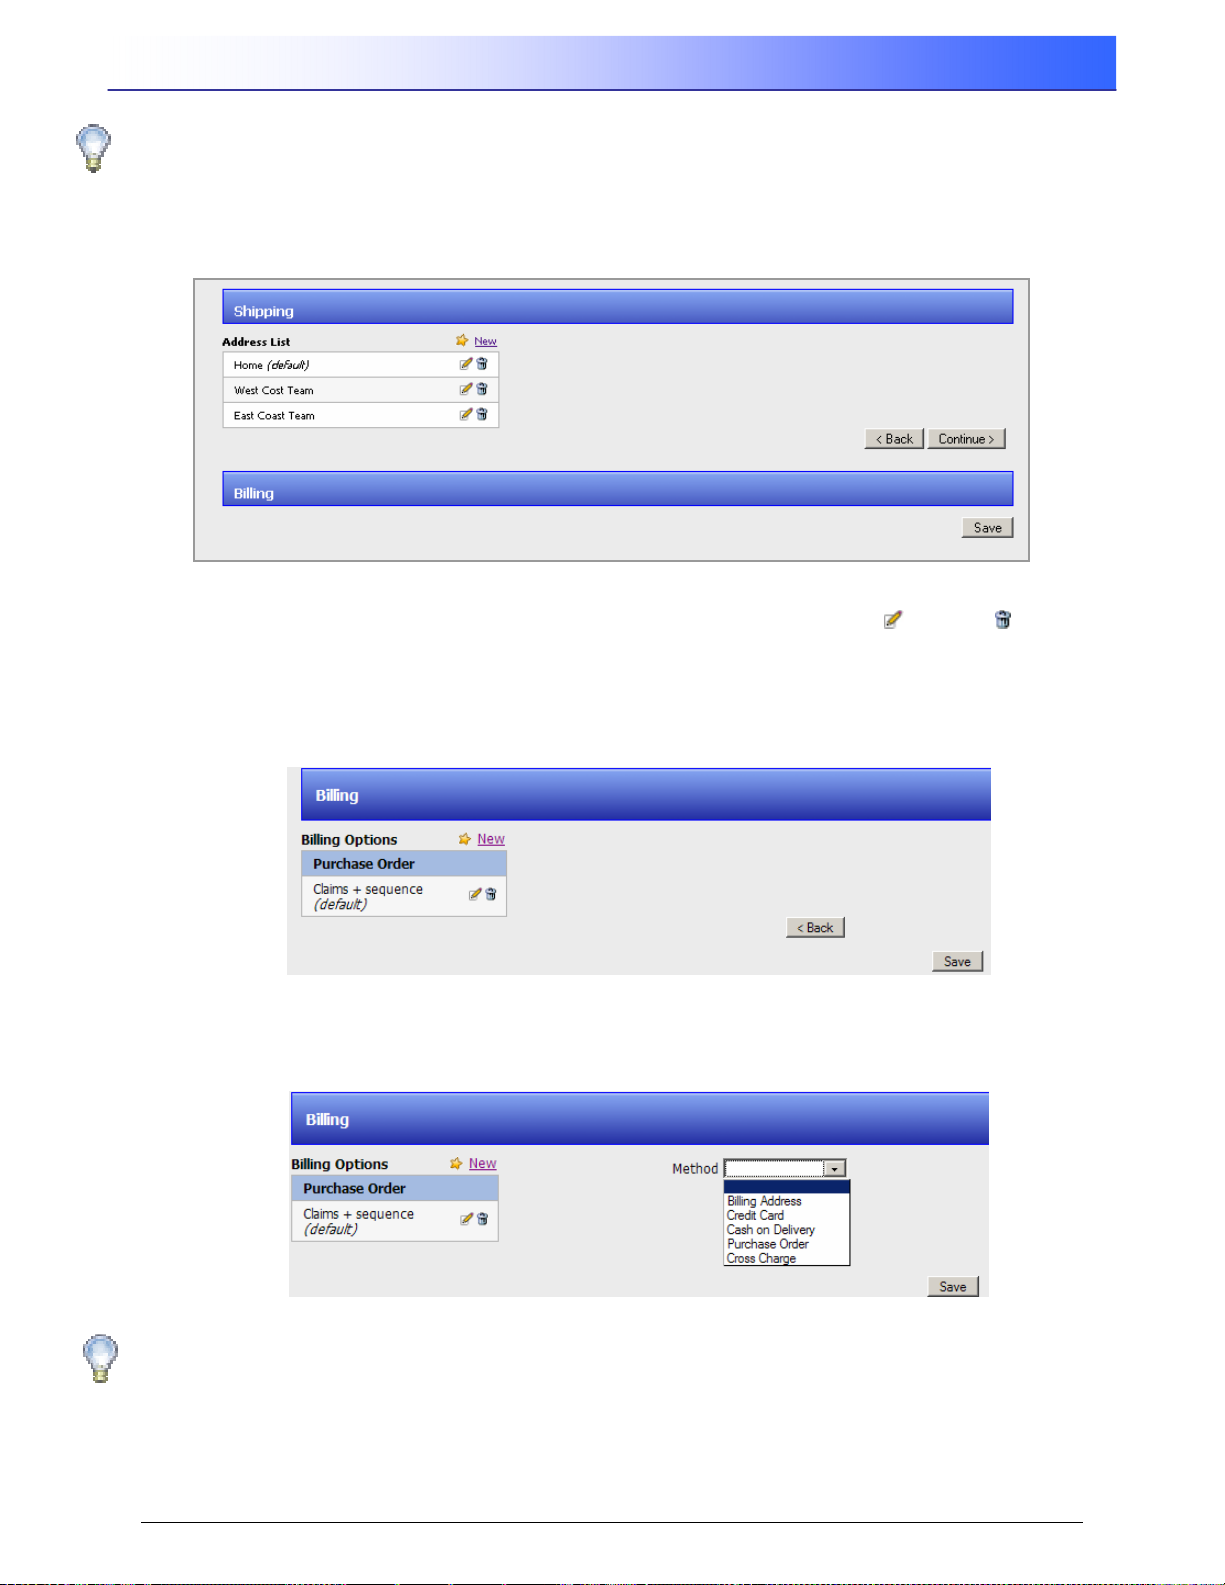
Hint: You might use “My Office, West Coast Team, and East Coast Team” to specify
division addresses for the shipping section of the profile.
For Example: after entering three shipping addresses and identifying the Home Address as your
default, the Shipping section will look something like this:
Figure 5.4.4-2 – User Profile Shipping Multiple Entries
Shipping addresses may be edited/deleted at any time by clicking on the Edit or Delete icons.
5.4.5 User Profile: Billing Section
Click on the section header bar to open the Billing section and click on the New link to add a new
Billing Option.
Figure 5.4.5-1 – User Profile Billing Options
Five built-in billing methods are supported by the application: Billing Address, Credit Card, Cash on
Delivery, Purchase Order and Cross Charge.
Figure 5.4.5-2 – User Profile Billing Method
Hint: It is recommended that you make one Billing Method your default.
Rev. 1.6 User’s Reference Guide
19
Page 24
Printgroove POD Serve
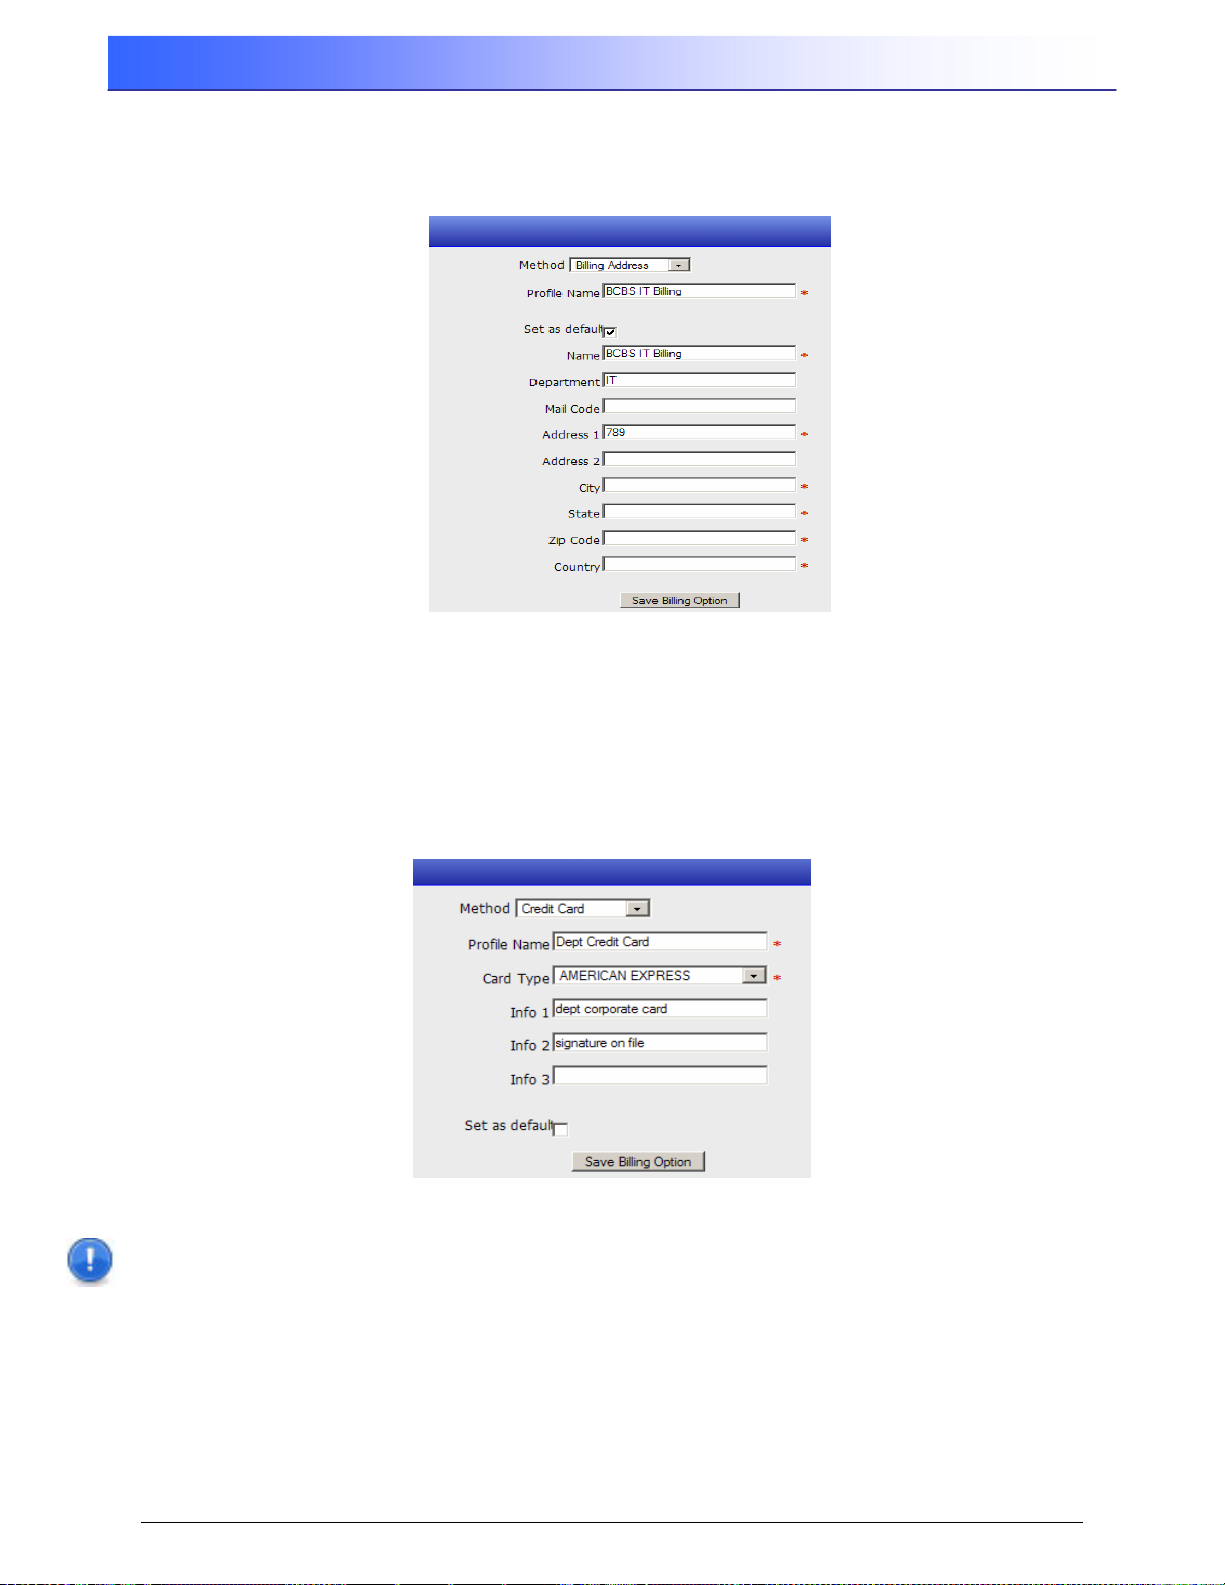
5.4.5.1 Billing Method: Billing Address
Each Billing Method must be given a Profile Name for use when submitted a job. Select the Billing
Address method from the pull-down menu to display the input fields below.
Figure 5.4.5.1 – Billing Method: Billing Address
Enter information in all of the required fields and click Save Billing Option when finished.
5.4.5.2 Billing Method: Credit Card
If the Billing Method is to be via Credit Card, enter a Profile Name and then select the credit card
type (Visa, MasterCard, etc.) The list of valid credit card types can be changed by the Application
Administrator or anyone with Create Billing Options permissions. Enter data into the required fields
and the desired “info” fields and click on Save Billing Option.
Figure 5.4.5.2 – Billing Method: Credit Card
Important Note: The Info fields can be used for any data, but are not encrypted and so
should be used with caution. It is up to the printshop whether or not to enter actual credit
card numbers and personal information.
20
User’s Reference Guide Rev.1.6
Page 25
Printgroove POD Serve
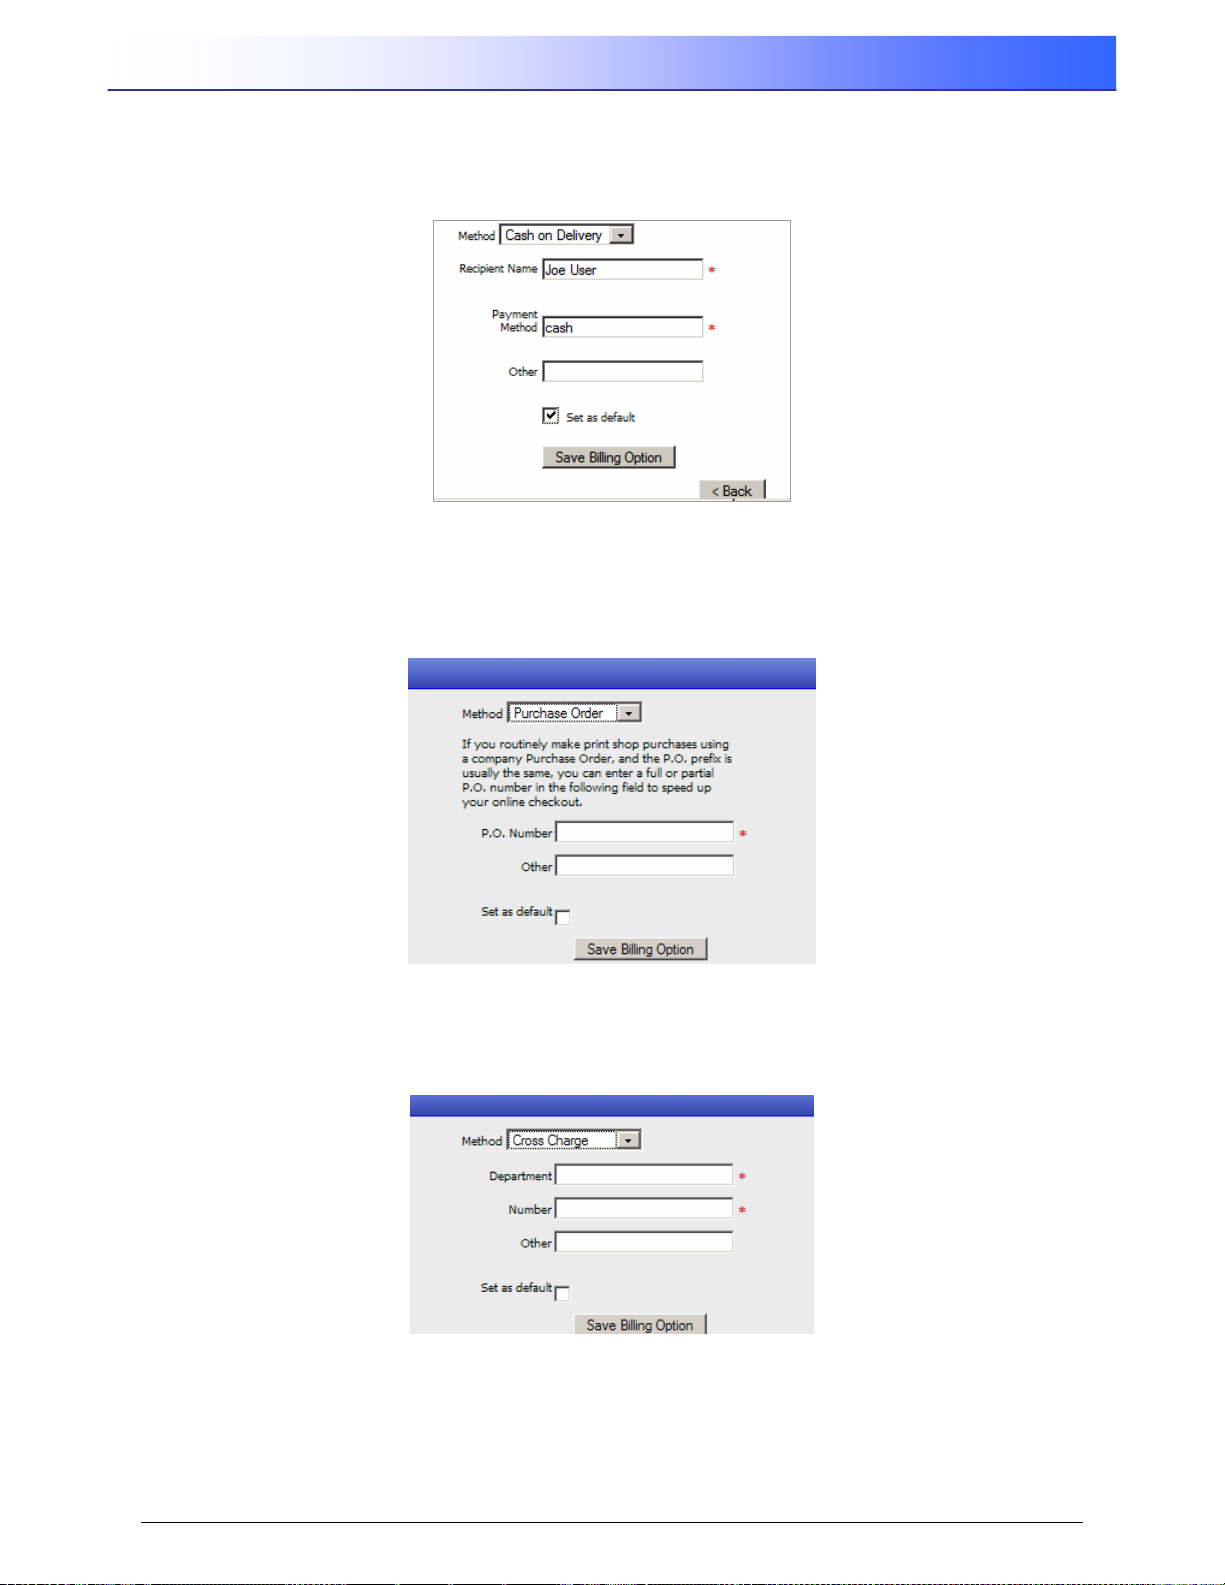
5.4.5.3 Billing Method: Cash On Delivery
If your Group will pay for jobs by “Cash on Delivery,” enter the Recipient Name, payment method,
and any other information, and click Save Billing Option.
Figure 5.4.5.3 – Billing Method: Cash on Delivery
5.4.5.4 Billing Method: Purchase Order
If your company uses “Purchase Orders” for orders, enter the Purchase Order number for this job
ticket plus any other information and click Save Billing Option.
5.4.5.5 Billing Method: Cross Charge
For “Cross Charging,” enter the Department, the Cross Charge number, and any other information
and Save Billing Option.
Rev. 1.6 User’s Reference Guide
21
Page 26
Printgroove POD Serve
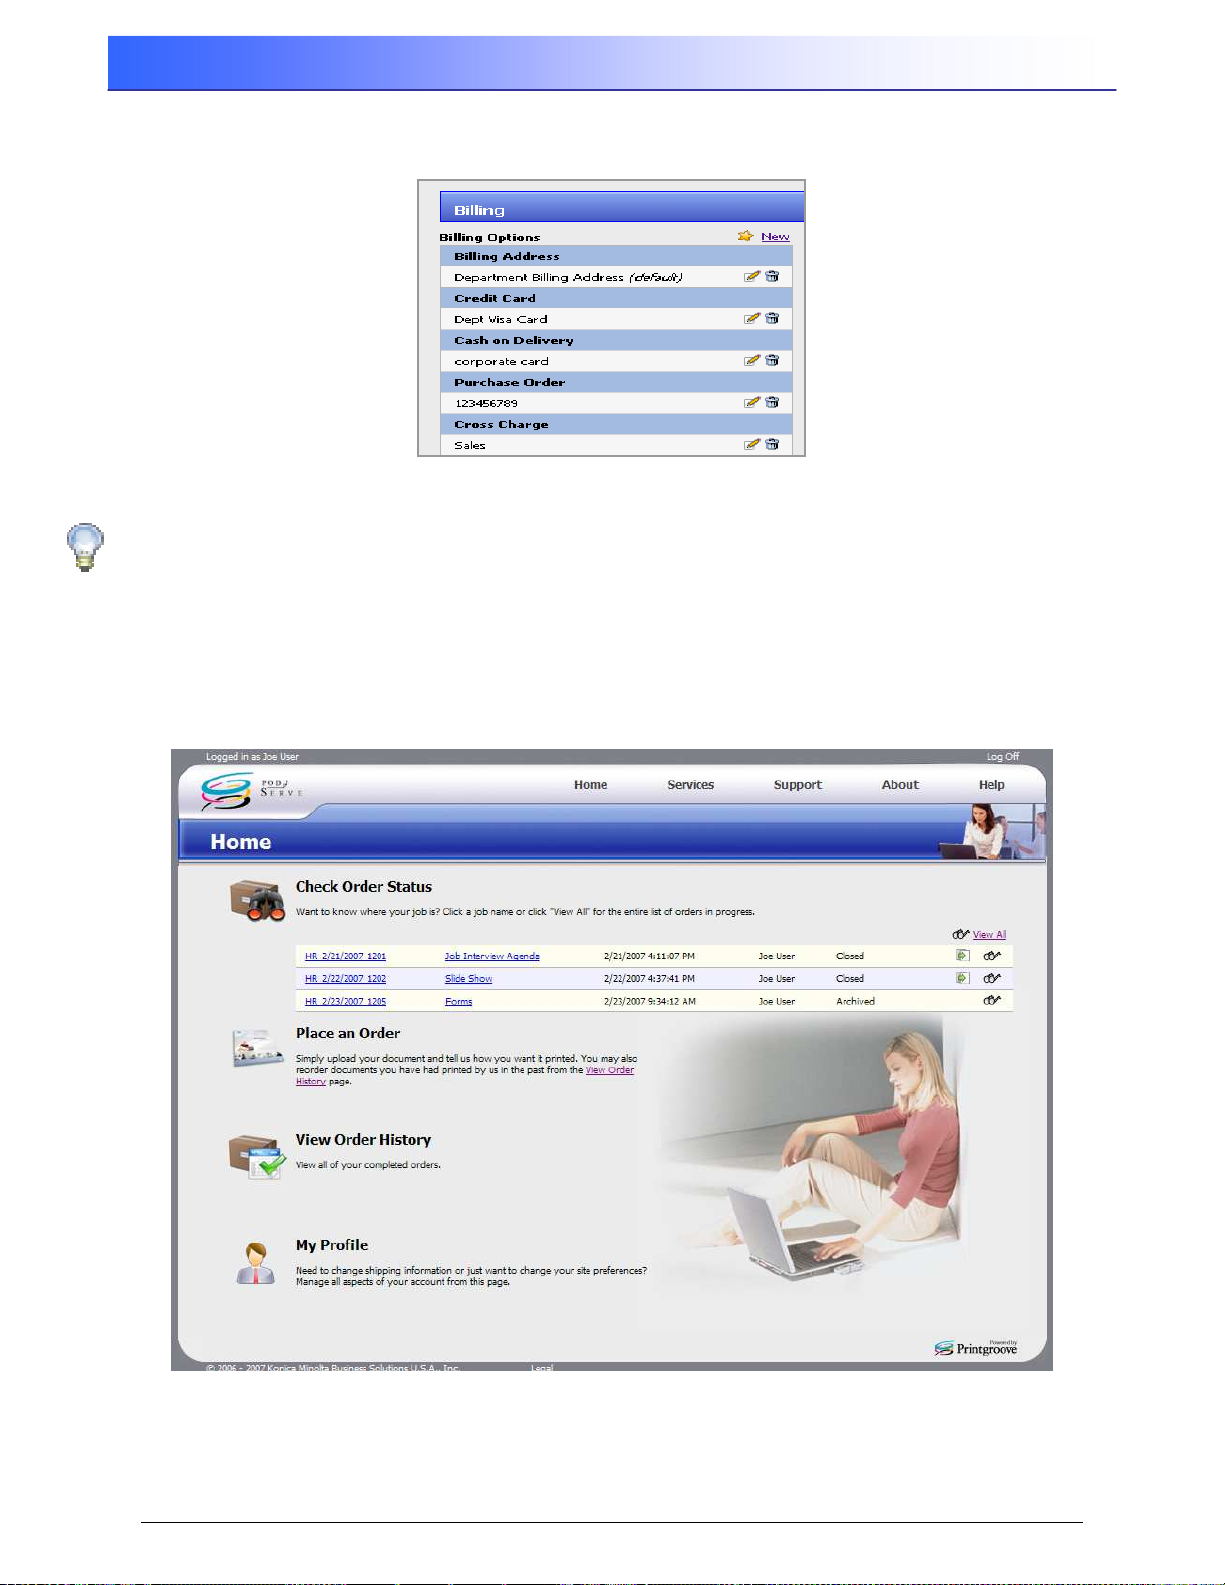
If all five Billing Methods are added, the Billing Options section will look similar to this:
Only one Billing Method is required in your Profile to be able to place orders.
Please note that credit card numbers and expiration dates can be entered in the available
fields, but due to personal identity issues, some printshops will keep this data offline.
6.0 User Menus
The default menus on your Home page allow you to access all of the functions in
have been given permissions. A “typical” Home page is displayed below.
Serve
to which you
22
User’s Reference Guide Rev.1.6
Page 27
Printgroove POD Serve
6.1 Place an Order Menu (User Creates a Job Ticket)
To place a job order, click on Place an Order. All print orders are in the form of a job ticket and the
ticket template assigned to your Group will be displayed. A job ticket consists of at least five
sections: Job, Files, Options, Shipping and Billing, the Catalog section is optional.
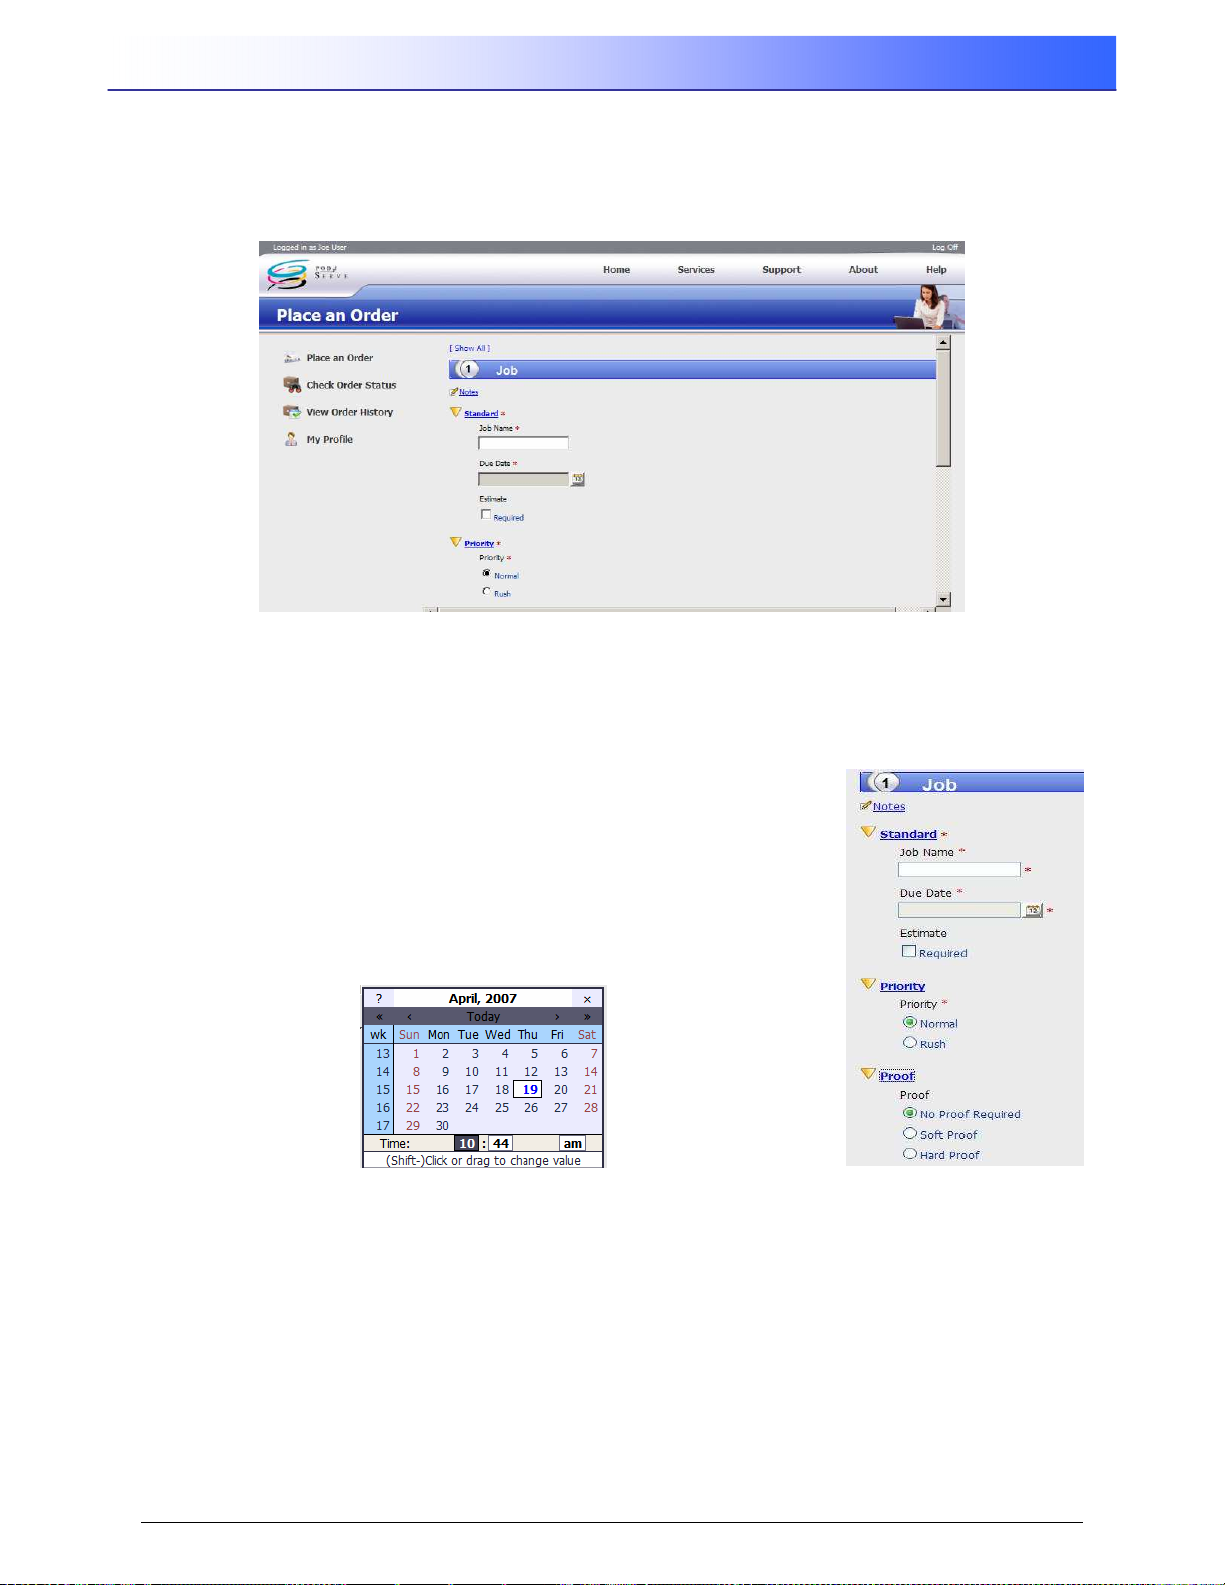
6.1.1 Job Ticket: Job Section
The first section of a default job ticket, Job, is where you name the order, tell the print shop when
you would like it completed, and identify whether or not a proof is needed before the print job is
performed. The parts are: Standard, Priority and Proof. Begin with the Standard item.
Job Name: Enter a name for the job being created.
Due Date: To the right of the field is a calendar icon which
opens a calendar of the current month. Click on a day of the
month to select that day as your due date. Click on the hours
and minutes to the right of “Time” to change the time of day.
To return to the current date, click on “Today” near the top of
the calendar. To change months/years, use the arrows on
either side of the word “Today.”
Estimate: Indicate whether or not an Estimate is required.
Priority: Indicate whether the order is Normal or Rush.
Proof: Indicate whether or not a Proof is required, and if so, whether a Soft (electronic) or Hard
proof (paper copy).
Rev. 1.6 User’s Reference Guide
23
Page 28
Printgroove POD Serve
Note: It is not necessary to close one section before opening another, but you may have
to scroll down to see all of the available fields.
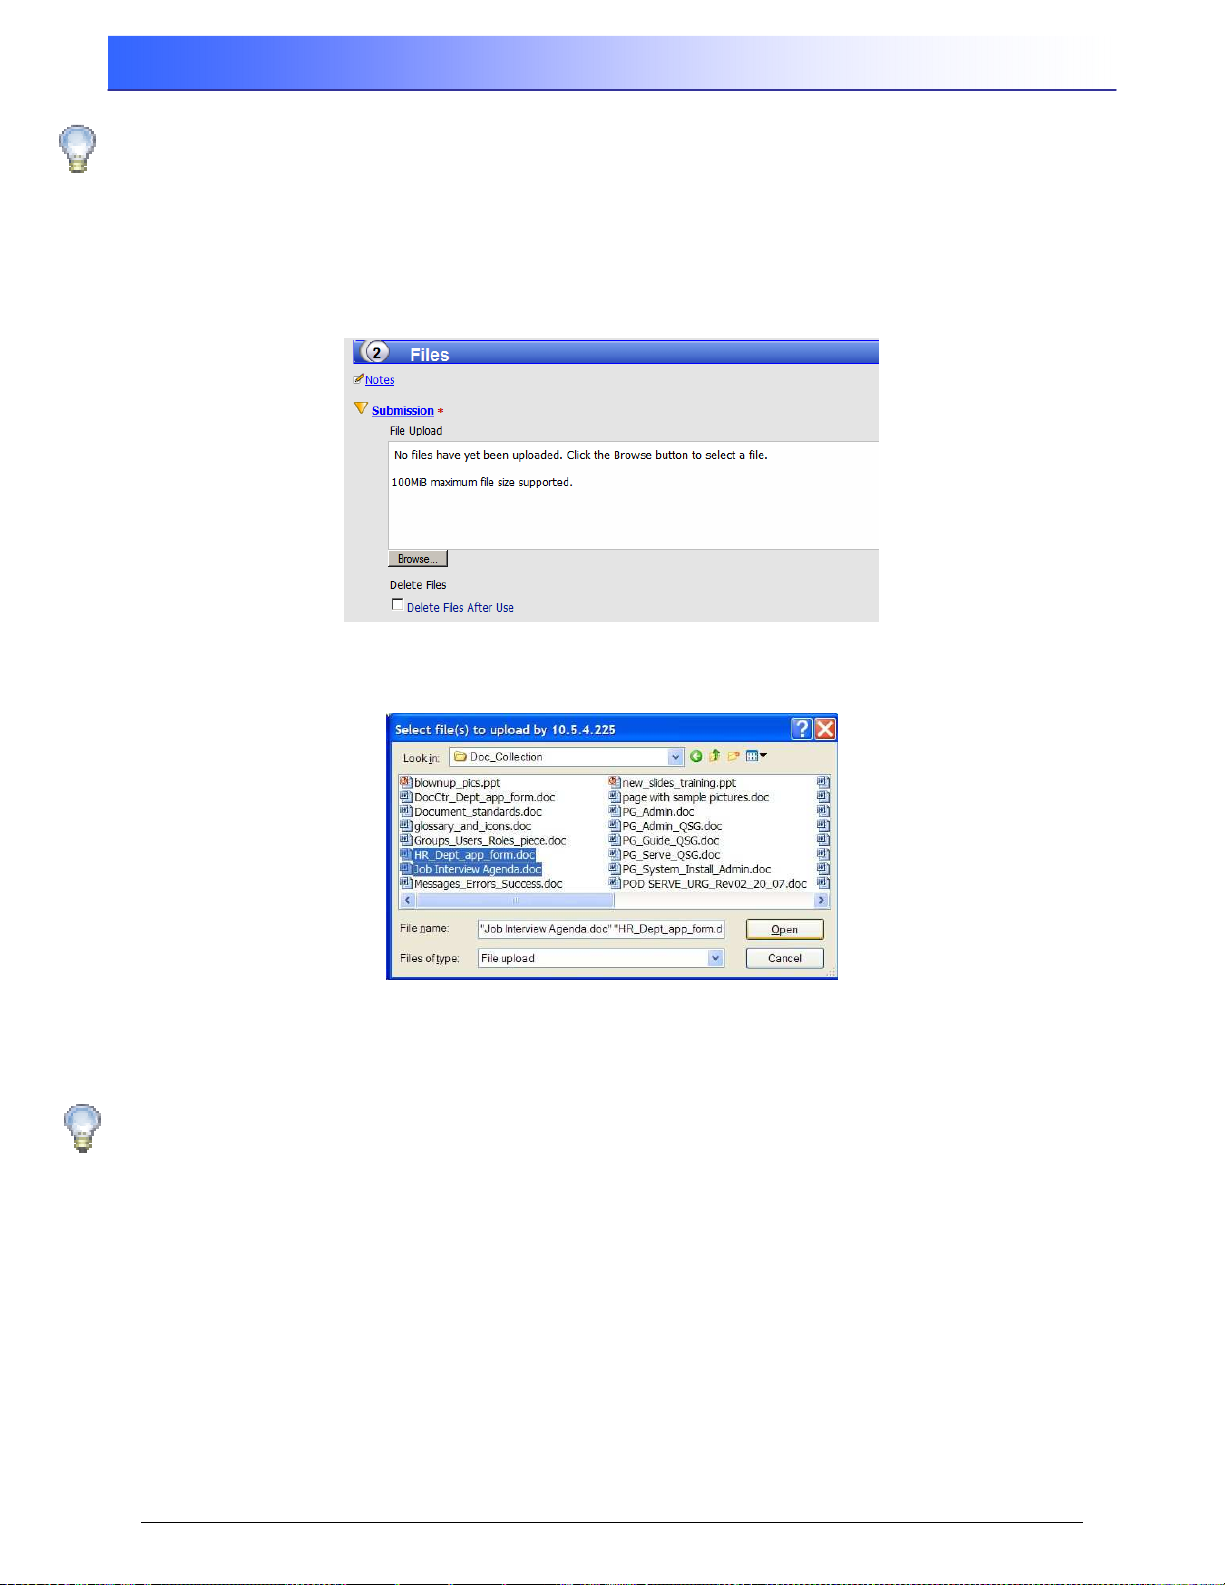
6.1.2 Job Ticket: Upload Files
The next section of the job ticket allows submission of files over the web (copying the file from your
computer to the web site). A very important part of a job is Submission, which starts with File
Upload. To select a file to be uploaded to the web site for printing, press the Browse button.
When the File Upload panel opens (sample snapshot below), browse for the file(s) to be uploaded,
select the file(s) and click Open. The file(s) will upload to the web site attached to your job ticket.
The uploaded file(s), which can be up to 100 MB in size, will be shown in the Files Submission
window. If you upload a file that you did not want, delete it by clicking on the trash can icon to its
right.
Please note that once the job is submitted, only the print shop user can delete an
uploaded file because the trash can icon is replaced with an information icon which
allows multiple versions of a file to be uploaded.
24
User’s Reference Guide Rev.1.6
Page 29
Printgroove POD Serve
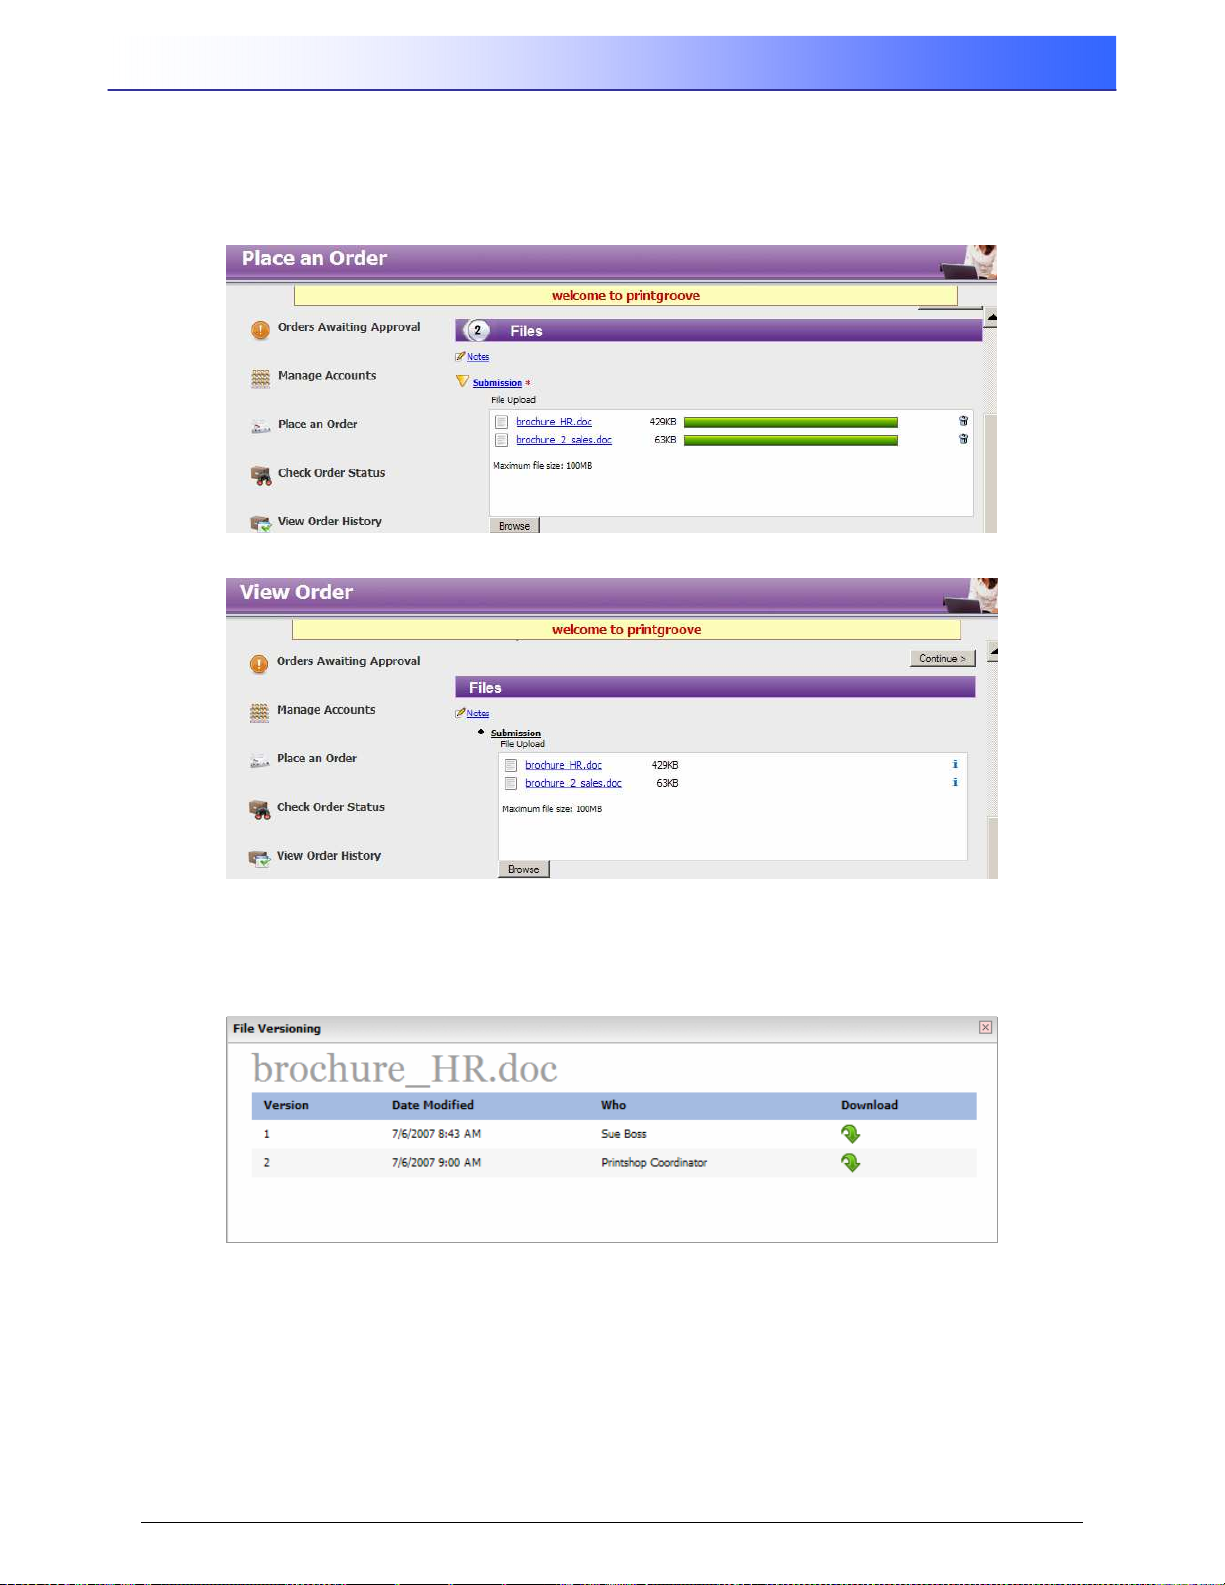
6.1.3 Upload Different File Versions
The first picture below shows the files uploaded when you are placing an order. The second picture
shows the file upload after the job is submitted to the printshop. You can no longer make changes
to your order once it has been submitted.
Placing the Order
Viewing the Submitted Order
If you change the contents of a file that you have already submitted to the print shop, you can send the
newer file and have the print shop user upload the new version for you. Click on the blue info icon to see
the versions of your file.
New Version of File Uploaded by the PSC
The File Versioning screen will tell you who uploaded the original file and who uploaded the new version.
You can click on the download arrow to download the file version to verify that it is the one you want
printed.
Rev. 1.6 User’s Reference Guide
25
Page 30
Printgroove POD Serve
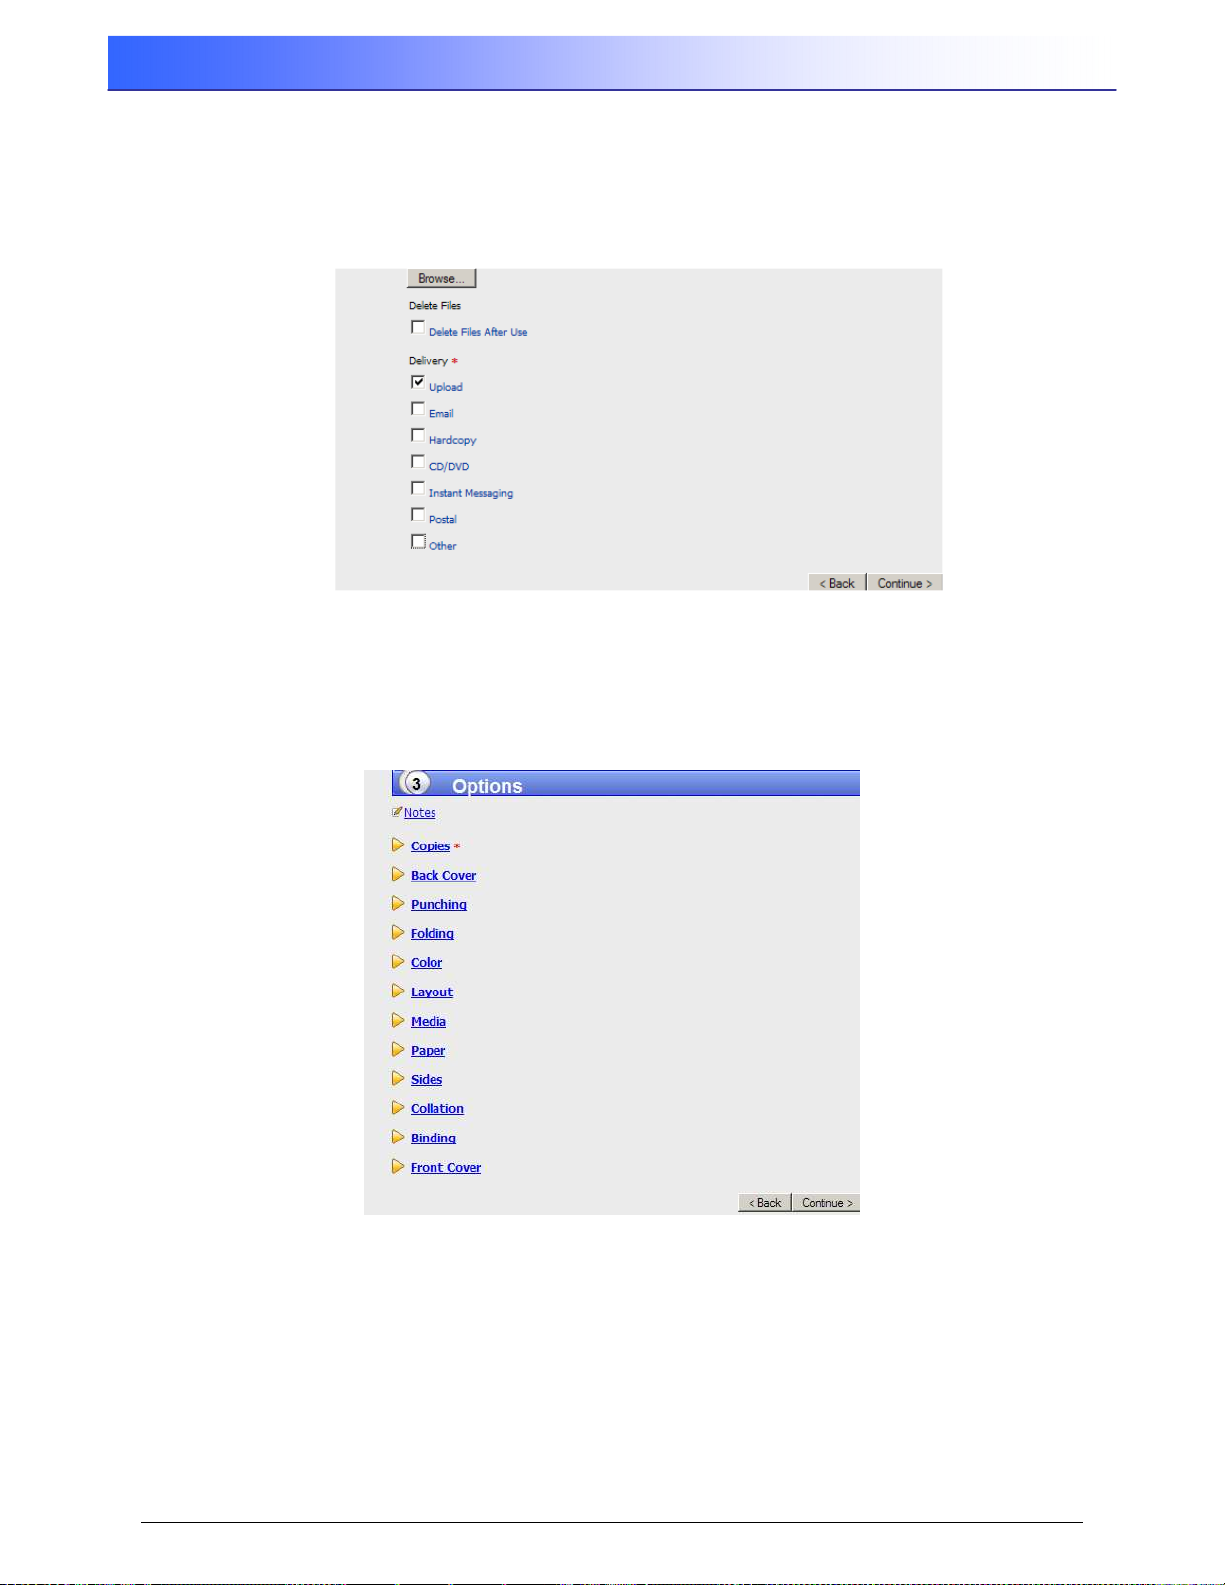
Mark the Delete Files checkbox if you want the uploaded files deleted after the print order is
completed/closed.
If the Delivery section is required on your ticket (designated by a red asterisk), you must select how
you will deliver the job originals to the printshop. The choices are: CD/DVD, E-mail, Instant
Messaging, Upload, Postal, Hardcopy, and Other. (Example shown below.)
6.1.4 Job Ticket: Options
The next section, Options, deals with the material aspects of the job. Click on any of the links to
open the item for detailed options and enter/select the information specific to your job The options
shown in the list below are the defaults delivered with the application. Your AppAdmin user may
add to or edit these options based on the services offered by the print shop.
Copies is the only required item in this section on a default job ticket, as indicated by the red
asterisk following its title. Click on the link to enter a numerical value for the number of copies to be
printed from your uploaded file(s).
26
User’s Reference Guide Rev.1.6
Page 31

Printgroove POD Serve
Back Cover criteria is not required for all job tickets but can be used to specify the desired cover by
selecting the desired characteristics from the pull-down menus.
Punching criteria may be entered, but is not required.
Folding criteria may be selected from the menu options offered by the print shop.
Color of the printing is chosen by clicking on either the Color or B&W radio button.
Media, Collation, and Trim fields are also optional.
Rev. 1.6 User’s Reference Guide
27
Page 32

Printgroove POD Serve
6.1.5 Job Ticket: Catalog Section
The Catalog section is not required on a print job order. The catalog section is used to offer items
provided for sale by the print shop - apart from print jobs. As with the other sections explained
here, the AppAdmin user creates this section and can customize the items being offered through
the catalog.
Sample catalog items “Paper” and “Pencils,” (shown below) are links that open and display more
details and a quantity field for you to enter the desired number of the item.
6.1.6 Job Ticket: Shipping Address
Shipping information is required to place an order and is located in an “address book.” If a default
Shipping address is in a user’s Profile, it will automatically be put in the Ship To field when placing
an order. A shipping address, found under the “Location” column of the “Address Book” can be
dragged down to Ship To. To remove a selected address from the Ship To field, drag it back into
the Address Book.
Click on the link under the Options column to change the shipping option.
28
User’s Reference Guide Rev.1.6
Page 33

Printgroove POD Serve
Note: The list of Shipping Options shown is the default. Additional options can be added
by AppAdmin using the Configuration menus, Shipping Methods and JT Builder.
6.1.6.1 Create New Shipping Address
As mentioned before, you cannot place an order without entering at least one Shipping Address.
Click on the New link (shown in the previous screen shot) to add a new Shipping address.
Fill in all of the required fields. Check the boxes for Add to profile and/or Set as default to save this
Shipping information in your Profile. Setting the address as default will cause any new job tickets to
use that address without your typing it in each time you place an order.
Click on Save Shipping Address to save the new shipping information.
Rev. 1.6 User’s Reference Guide
29
Page 34

Printgroove POD Serve
6.1.7 Job Ticket: Billing Method
The Billing section of a job ticket allows you to choose and define a specific billing method from a
pre-populated list of billing options. The default billing methods are shown below, and can be
customized by the print shop user with appropriate permissions.
6.1.7.1 Create a New Billing Method
A new Billing Method can be entered either through the My Profile menu on your Home page (as
explained in a previous section) or when placing an order. Click on the billing section blue bar and
then on the New link to display the Method drop down menu and select Billing Address to display a
billing address data entry form.
Enter data in all of the required fields and mark both the Save to profile and Set as default boxes if you
want this option to be used whenever you place an order. When you have filled out all of the data, click
Save Billing Option.
30
User’s Reference Guide Rev.1.6
Page 35

Printgroove POD Serve
6.1.8 Job Ticket: Cancel/Modify an Order
Before an order is placed, any of sections described above can be opened and the entries edited.
To cancel or delete the entire order, click on the Reset button in the lower right of the screen.
6.1.9 Job Ticket: Place the Order
After completing all of the sections that are pertinent to your job, click the Place Order button to
submit the job to the print shop.
If there is an error or omission in the job ticket, the job will be rejected and a “Your job did not pass
validation. Please correct all errors and try again.” message will be displayed in an orange bar.
A red “X” will be displayed in front of the fields that need correcting and sections that have no errors
will display the green checkmark. Once any errors or omissions have been corrected, the job can
be submitted by clicking on the Place Order button again.
If you are a user who needs approval from another user to submit jobs, and there is more than one
Approver in your Group, you may get a pop-up window that asks you to select the Approver. Select
the user from the pull-down menu and click Submit For Approval.
Rev. 1.6 User’s Reference Guide
31
Page 36

Printgroove POD Serve
6.1.10 Job Ticket: Confirmation
Once a job has been successfully saved and submitted, a confirmation page will display with basic
information about your order. The ticket number, job name, file(s) uploaded, and shipping/billing
information will be displayed. You will be reminded to print the screen and asked to make a note of
the information for future use when communicating with the print shop. A sample Job Ticket
confirmation screen is shown here. (Jobs requiring approval have a slightly different message in the
green confirmation bar.
6.1.11 Job Ticket: Set as Default Order
The confirmation window now has three buttons in the bottom right corner to perform additional
actions on this ticket. Click on the Set as Default Order button to set all of the information saved on
this job to an order “template.”
Once this is set, each time you click on Place an Order, the ticket will be filled out exactly the same
way as the ticket you chose as the default. For each new order you will only need to delete the
uploaded file and replace it with the new job, change the job name and due date (if you want a
different due date) and any of the options selected in the default ticket. Click on the Print Order
button to print the job order. Click on the Place Another Order button to place another order now.
32
User’s Reference Guide Rev.1.6
Page 37

Printgroove POD Serve
6.1.12 Job Ticket Rejected by Printshop
Once you send an order to the printshop, the PSC can either Accept or Reject your job. In either
instance, you will receive e-mail notification from the printshop. If your job is Rejected, you should
also be notified with a reason for the rejection.
A new function allows you to Edit and Resubmit, or Delete a rejected job. The status column in
your Check Order Status screen will show the job as Rejected. Your options are listed below:
1. You can open the job, add a Note, upload additional files, edit the options and click
Resubmit Order.
2. You can click Delete Order to delete the rejected order.
6.1.13 Place Order Directly From Your Document
Serve
within your document. This can only be accomplished if you have downloaded the Printgroove
Driver and have installed it on your PC.
Use Case Example: Open a document in Word. We’ll use a flyer about the annual spring picnic.
You have finished writing the text and want to send it to be printed. Click File, Print and look for the
printer named Printgroove POD Driver.
allows you, the customer, to place a print order, or create a new job ticket, directly from
Rev. 1.6 User’s Reference Guide
33
Page 38

Printgroove POD Serve
Select the Printgroove POD Driver and click OK. This will bring up a File Selection window.
Highlight the file for which you want to Place an Order, and click Next.
A pop-up window will confirm that you want to send this file through the Printgroove Driver.
Click on Options so you can choose the correct application (
and a valid username and password. (For example, Joe User is the user requesting a print job.)
34
User’s Reference Guide Rev.1.6
Serve
is where you place an order),
Page 39

Printgroove POD Serve
Set Serve as the default, enter your User Name, Password, IP Address, and port number.
Please note that you should only have to fill in the fields on the options screen the first
time you use the Printgroove POD Driver.
Click OK and the file will be converted to PDF and uploaded to
A
Serve
creating your job ticket.
application session will be opened in the Place an Order screen, having already started
Printgroove
.
Rev. 1.6 User’s Reference Guide
35
Page 40

Printgroove POD Serve
Fill out the required sections of the job ticket as you would for any order and click Place Order.
The same rules apply as when you create a job ticket in Serve and upload your files – meaning that
you are required to enter the number of copies, any Options, and your Shipping and Billing
information. Job Confirmation for this job is the same as any other order placed with the print shop.
You have now placed a print order with Printgroove directly from your Word document!
36
User’s Reference Guide Rev.1.6
Page 41

Printgroove POD Serve
Check Order Status Menu
On your Home page, Check Order Status lists the last three jobs by your Group.
Click on the Check Order Status menu or the View All link to display the complete list of orders
with filter/search fields to help to narrow down your view. Jobs for your Group will be listed until
seven (7) days from the date of closure, and will then be viewable under View Order History.
Click on the Order # or Order Name link of any job you want to review. A “read-only” View Order
screen will be displayed (sample shown in this section). Once an order has been submitted, only
the PSC (or printshop user with the right permissions) can edit any of the sections of a job ticket.
You can add a Note or additional Files, but you cannot change any field data.
Click on a column heading to sort the column alphabetically. The sort affects all jobs in the list, not
just those that you can see on the screen, and toggles between ascending and descending order.
Rev. 1.6 User’s Reference Guide
37
Page 42

Printgroove POD Serve
Closed Jobs will remain in the Check Order Status view for seven (7) days to let the user know that
the job was completed quickly. After the seven days, Closed orders will be listed under View Order
History and will remain there until the time set in the user’s profile requested that they be deleted.
6.1.14 Proofs or Estimates Sent from Printshop
Click on Check Order Status. If anyone in your Group requested either an Estimate or a Proof that
need to be reviewed before the printshop can proceed, and the Estimate/Proof is ready, an icon will
be displayed next to the copy icon. (See the Estimate money stack and Proof picture icons in the
screen shot below.)
As a user with the permissions to approve or reject a proof or estimate from the printshop, click on
the Estimate or Proof icon to get a pop-up window with which to Accept or Reject the offer.
38
User’s Reference Guide Rev.1.6
Page 43

Printgroove POD Serve
The snapshot below shows an example of the manager rejecting the estimate to find out if it would
cost less if they picked up the order. A Rejected estimate requires that you enter an explanation.
If the manager Accepted the estimate, the Notes field would be grayed out and unavailable. Click
Send Reply to let the print shop know your decision.
When a Proof is sent to the customer for approval, it works the same way. Click on the Proof icon to
get this pop-up screen.
Rev. 1.6 User’s Reference Guide
39
Page 44

Printgroove POD Serve
Click on the Proof icon to download the soft (electronic) proof file.
Open the proof file and then choose to Accept or Reject, and click Send Reply.
After you refresh your screen, the Check Order Status listing will show the jobs with the appropriate
status, either Estimate Accepted or Estimate Rejected and the icons will no longer be displayed.
40
User’s Reference Guide Rev.1.6
Page 45

Printgroove POD Serve
6.2 View Order History Menu
Click on View Order History to display all Closed orders for your Group> The only Closed Orders
that will not be shown in the View Order History are those that have been archived or deleted.
Using the search fields at the top of the page, you can search for a specific job, or narrow the list
down to jobs containing specific characteristics. To search, enter data in one or more of the filter
fields and click Enter. Leaving all fields blank will populate the list with all Closed jobs.
There are three ways to open and review a specific job ticket/order: Click on the Order #, Order
Name link, or on the glasses icon to the right of the order for a “read-only” view of the job.
Click on a column heading to sort the column alphabetically. The sort affects all jobs in the list, not
just those that you can see on the screen, and toggles between ascending and descending order.
Rev. 1.6 User’s Reference Guide
41
Page 46

Printgroove POD Serve
6.2.1 Copy a Previous Order
One of your Closed orders can be Copied to make submitting similar print job requests faster and
easier. If you are printing something today that you know you printed last month, find the previously
completed job under View Order History and click on the green “duplicate this order” icon (shown
below).
Once a Closed job has been archived by the printshop it can no longer be accessed!
Fill out the fields that have changed, if any, and click on Resubmit The Order. You will get a Job
Confirmation as you do with any order.
42
User’s Reference Guide Rev.1.6
Page 47

Printgroove POD Serve
6.3 Customer “Manager” User
Some of the external, or customer, users of the
“Place an Order” or “View Orders.” Your print shop Application Administrator can grant these
additional permissions to a department manager, for example, so that they can manage their own
Group’s needs regarding print shop orders and Users within their department.
The managerial user has two additional menus on their Home page when they login (shown below).
Serve
application will be given permissions beyond
6.3.1 Orders Awaiting Approval
The manager can be defined with permissions to approve orders from other users in the
department prior to submission to the print shop. If you are logged in as a manager level user, click
on the Orders Awaiting Approval or the Check Order Status menu to see a list of jobs requiring
your review and approval. Please note that those jobs requiring approval have an exclamation point
in an orange circle.
Click on the exclamation point to bring the job up for review. When you are finished, click on either
Approve or Reject at the bottom of the screen. If you click Approve, the job will be submitted and
the user who placed the order will be notified via e-mail of the decision and action taken. If you are
going to Reject the job, sending it back to the originator, it is recommended that you add a Note to
the job explaining why it is not being approved.
Remember, there is a Notes link at the top left of each section in a job ticket and Notes
can be added at any time in Printgroove!
Rev. 1.6 User’s Reference Guide
43
Page 48

Printgroove POD Serve
6.3.2 Manage User Accounts
The managerial user can Manage User Accounts within their defined Group. A note is displayed on
the Home page if there are new accounts pending.
Click on the Manage Accounts menu to see a list of users requesting an account in your Group.
(Please note that if a user applies for an account with a New Group, the Application Administrator
will have to approve or reject the new account.)
The above screen shows an example list of users for whom you have the ability to change their
permissions within the application. The list gives you a bit of information about the user, including
their first and last names, their e-mail, and username.
44
User’s Reference Guide Rev.1.6
Page 49

Printgroove POD Serve
You will also have icons with which you can activate/deactivate, edit and/or delete users in your
Group. (The ability to perform any of these actions depends on which permissions the printshop
AppAdmin has given you.)
Here is a summary of the available actions in the Manage Accounts screen:
• To activate or de-activate a user, click the (deactivate) or (activate) icon.
• To edit a user’s information, click .
• To delete a user, click the trash can icon . (Please see Section 6.3.2.3.)
• To create a new user, click on the New Customer link.
6.3.2.1 Create a New User in your Group
To create a new user in your Group, click on New Customer and the screen below will display.
Fill out the basic information about your new user, including user name, password, a secret
question and a secret answer. Then put a checkmark in the box for the permissions the new user
should have.
Hint: You can only add and edit permissions for users in your own Group!
Rev. 1.6 User’s Reference Guide
45
Page 50

Printgroove POD Serve
Job Permissions and Preferences (for the New Customer User)
• Place an order – allows new user to place job orders
• View all orders – allows user to view all orders by their group
User Management Permissions
• Create users – gives the ability to create new users in the group
• Edit users – permits editing of other users in the group
• Delete users – gives manager the ability to delete users (in their group only)
• Approve new accounts - gives the manager the ability to approve new users in the group
• Give Approval – this user can approve orders submitted by users who require approval
• Jobs require approval from – specifies that the user must get approval from someone in the
Give Approval list to submit an order
Customer (new user) Preferences
• Language - determines language in which to display the application
• Closed Orders – defines number of days before job tickets will be removed from job list
• Color Scheme – determines the application’s color scheme on the user’s display
Personal
Click on the header bar of the next section or click Continue. Fill out the user’s first and last name
and work phone number. When you are finished with the Personal section, click Continue to enter
the company data, or scroll to the bottom of the form and click Save (the Company section is not
required to add a user).
46
User’s Reference Guide Rev.1.6
Page 51

Printgroove POD Serve
If you clicked Save, you will get a Confirmation popup window confirming successful creation of the
new user and asking if you want to complete the shipping and billing sections for this user.
Click Continue to add shipping and billing for your new user. After entering both section, click Save
to save the changes to the users profile. You should get a green success bar after each save.
If you chose Cancel instead of Continue, you could have your new user add shipping and billing to
their Profile.
6.3.2.2 Edit a User Account
To Edit a user in the Manage Accounts list, click the Edit icon in the row of the user.
Rev. 1.6 User’s Reference Guide
47
Page 52

Printgroove POD Serve
A screen with an Account Summary and Edit links will display. Click on Edit and change the
necessary information, and then click Save to update the user’s permissions or data.
6.3.2.3 Delete a User Account
To Delete a user in the Manage Accounts list, click the trash can icon in the row of the user. You
will not be able to delete a user for whom there are jobs currently in the system. When you click on
the trash can icon, a prompt will be displayed:
Click OK if you are sure you want to delete this member of your Group, and another window will be
displayed if the user has current jobs:
Once all of the user’s jobs are finished, either by being completed, closed, archived, canceled or
deleted, you can return to the Manage Accounts screen and delete the user.
48
User’s Reference Guide Rev.1.6
Page 53

Printgroove POD Serve
7.0 Printshop coordinator Interface
The predefined default print shop users included with the
(Printshop coordinator) and the AppAdmin (Application Administrator). The PSC manages the workflow of
print jobs, accepts or rejects the incoming Job Tickets, and oversees the users and groups within the print
shop environment. The AppAdmin manages the application.
To launch the application, enter the web address given to you by your system administrator in this format:
https://<IP address/hostname>/sg and press Enter. You will note that the Login screen is
different than that of the external customer. Enter the default Printshop coordinator username, psc, and
the password provided, in the lower right-hand login portion of the screen, and click Login.
The first time you log in to the application, you will get a screen asking you to Accept Licensing
Agreement. Please read the agreement and click I Accept to proceed.
Printgroove
application are the PSC
Note: Remember that username and passwords are case sensitive! If you have forgotten
the password, click on “Forgotten your password? Click here to reset.”
After you answer the Secret Question correctly, a new password will be e-mailed to you.
Rev. 1.6 User’s Reference Guide
49
Page 54

Printgroove POD Serve
7.1 Printshop coordinator (PSC) Home Page
The PSC user Home (Welcome) page has many options available for managing print shop jobs.
This screen shows current information, top right corner shows a summary of Total Jobs, how many
are Rush or Late. The two month calendar will browse jobs by due date, and the Recent
Notes/Files links show the last four jobs updated with a Note or a File that are owned by the PSC.
The bold red wording in the upper portion of the screen is an alert. This alert can be entered by the
PSC or AppAdmin (or any print shop user with the appropriate permissions) and is displayed for a
set length of time for all users logged into the application.
7.1.1 Printshop coordinator Menus
The menus below are unique to the default PSC. Default Application Administrator specific menus
will be discussed in the AppAdmin section of this document.
Main:
o Inbox: displays list of incoming job tickets
o Tracker: lists all jobs marked to be tracked through the print shop
o Reports: provides choice of report, sorting and date range (if applicable)
o Statistics: displays key
o Send Alert: allows PSC to send a message that displays on all user screens
Jobs
o New: provides the PSC the capability to enter a new order
o Browse: allows the PSC to browse through current jobs
o Archive: allows the PSC to view any Closed jobs that have been Archived
o Quote: provides printshop Users the ability to create a quote to send to a customer
o Open: allows user to open a specific Job Ticket by number
Users
o Users: allows PSC to view users information
Configuration
o Shipping > Labels: allows PSC to create custom shipping labels
Printgroove
system informational statistics
7.2 PSC Main Menus > Inbox
The PSC Main Menus are on the left side of the screen. The picture in the previous section shows
the menus expanded to give you a better idea of the sub-menus available to the PSC and each is
explained within this User’s Reference Guide.
50
User’s Reference Guide Rev.1.6
Page 55

Printgroove POD Serve
For the PSC, the Inbox is displayed as the upper section of the Home page, which is the first page
upon login, and it displays a list of jobs assigned to the PSC. To display the Inbox separately, press
the View All link or click on the Inbox menu.
Click on either the Ticket # or the Job Name link in the Inbox list to open Job Ticket Details.
General data on each job is provided in the Inbox list displayed. Click on a column heading to sort
the column alphabetically. The sort affects all jobs in the list, not just those that you can see on the
screen, and toggles between ascending and descending order.
The columns of data include:
Date:
Date indicates the date and time a job was entered. An exclamation point icon shown to the left of a
job indicates that it is a Rush job, and a lighting bolt indicates that the order is Late.
Ticket #:
This is a pre-configured numbering scheme assigned to a customer group by your AppAdmin. The
ticket number is also a link with which to open the job.
Job Name:
The name given to the job when it was created.
Customer:
The name of the customer requesting the job.
Acceptance:
A Yes or No indication of whether the PSC has accepted the job or not.
Status:
This is an indication of where the job is in the print shop’s process. As the job moves through the
steps necessary for its completion, the status in real time is displayed in this column.
Rev. 1.6 User’s Reference Guide
51
Page 56

Printgroove POD Serve
7.2.1 Inbox Search Fields
Go to the Inbox instead of the Home page to see the Search fields included. These filtering fields
allow specific information to be located more efficiently. Using more than one filtering criteria will
narrow your search, or you can type in the actual ticket number and press Enter.
The Search filters include:
Date:
Clicking the Calendar icon to the right of the Date field opens a calendar of the current month.
Clicking on a day of the month will select that day as the search criteria. To return to the current
date, click on Today and use the directional arrows to change months or years.
Ticket:
To search for one specific Job Ticket number, type that number into this field.
Job:
To search for one or more specific Job(s) by name, type the name of the job in this field. Adding a
wildcard (* or #) to this field will broaden the search within the job name field.
Customer:
To search for one or more specific job(s) by Customer name, type the name of the customer in this
field. A wildcard character (* or #) may be used in this field also.
Accepted:
Use the Yes or No indicator to filter by whether or not the job has been accepted.
Status:
This filter confines a search to the Status definition selected from an extensive drop-down menu.
Enter and Clear:
After making entries in the selected filters, pressing the Enter button begins the search. The Clear
button will empty all of the fields or will return the list to its initial state.
52
User’s Reference Guide Rev.1.6
Page 57

Printgroove POD Serve
7.3 Main Menus > Tracker
The PSC can mark jobs that they want tracked as they are processed through the print shop. This
feature might be used if a job is very important or a critical rush job. The Tracker section of the
Home page lists the jobs that are being tracked and can be viewed separately by clicking the View
All link or selecting Tracker from the Main Menu. Tracker looks similar to the picture below.
Clicking on either the Ticket # or the Job Name link will open a Details page and displays all
available information about the particular job. The columnar data shown for each job is almost the
same as in the Inbox: Date, Ticket #, Job Name, Customer, Owner (meaning which print shop user
currently is assigned the ticket), and Status.
Click on a column heading to sort the column alphabetically. The sort affects all jobs in the list, not
just those that you can see on the screen, and toggles between ascending and descending order.
7.3.1 Tracker Search Filters
The Search filters allow specific information to be located more efficiently. Using more than one
field narrows the search. Filters include: Date, Ticket #, Job Name, Customer, Owner, and Status.
To search for one or more specific Job(s) enter valid values in the fields. Adding a wildcard (* or #)
to a search field will broaden the search within that field.
Rev. 1.6 User’s Reference Guide
53
Page 58

Printgroove POD Serve
7.4 Main Menu > Reports
Job Reports allow both the PSC and AppAdmin to view a report on jobs based on specified
criteria. A job report will give the name of all the jobs, their dates, status, and all actions performed
on that job. You can refine the job report by specifying certain dates and by sorting by one or two
criteria. Job Reports can also compile charts of the jobs based on the specifications of the user.
The picture above shows the current list of possible report types, with a date range of March 9th
through 14th, and a sort request by Job Name. Once a First Sort is chosen, the Second Sort By field
becomes available.
7.4.1 Reports: All Jobs Report
Select the desired Report Type from the pull-down menu and click Generate to create a report
populated with jobs that satisfy the chosen category. The All Jobs Report compiles a report of all
the jobs currently being processed.
To create a report of jobs within a certain time frame, the From Date and To Date fields must be
completed. To fill these fields, click on the calendar to the right of the field and select the dates.
The Sort By options allow the PSC to select the methods by which the report will be sorted. The
First Sort By option will be the primary sort for the report, and if, for example, the primary sort
option was date, the report will first be sorted chronologically.
The Second Sort By
option is only available if
the First Sort By option
is chosen. The
secondary sort is useful
when the primary sort
does not adequately sort
all of the jobs in the
report.
54
User’s Reference Guide Rev.1.6
Page 59

Printgroove POD Serve
It is common to have multiple jobs on the same day, so even if the report is in chronological order,
jobs having the same date will not be in any logical order. If a secondary sort were selected, jobs
having the same day could be additionally sorted by the Job Name, Priority, Status, or Owner.
To create a report, select a Report Type and click Generate. The report will be displayed in the
lower portion of the screen. An example of an All Jobs Report is shown below.
Clicking on the blue link labeled Download Report enables the user to print the job report. Clicking
this link causes a pop up window (shown). Select to open the file with Adobe Acrobat Reader and
click OK.
Rev. 1.6 User’s Reference Guide
55
Page 60

Printgroove POD Serve
A new page opens with the customized job report which can now be printed from Adobe Acrobat.
7.4.2 Reports: Job Activity Chart
The job activity chart is columnar and shows the amount of jobs over a specified range of dates.
The report includes three columns, representing jobs that are Open, Closed, or Late, quantifying
the number of jobs. The graph scale is set to months and increments of 15 jobs.
7.4.3 Job Status Chart
The job status chart shows a pie chart of the jobs status. The difference between the job activity
chart and the job status report is that the pie chart does not display the information over a date
range – it shows status as of the current date.
56
User’s Reference Guide Rev.1.6
Page 61

Printgroove POD Serve
7.5 Main Menu > Statistics
The Statistics page can be viewed by the PSC and AppAdmin. This page is a graphical
representation of the current system. Statistics are included on the number of users, the status of
jobs, the amount of space used, and the status of the system.
Users –
In the example shown, the bars represent
the total number of users that have an
active username and password in the
system and the bottom bar represents the
number of those users that are logged
onto the system. Per the chart, there are
currently 12
Queue
Jobs – Total, Open, and Closed
The bars in this section of the Statistics
screen represent the Total number of jobs
in the system, the Open and Closed
tickets.
Jobs – Late
The Late category would show if any jobs
were not on schedule.
Jobs – Rush
The Rush bar is representative of all the jobs that are open and have been submitted as rush
priority. This rush bar shown tells the user that 11 open tickets have been submitted as rush jobs.
Jobs – Proof, Estimate
These bars represents the total number of open tickets that requested Proofs or Estimates.
Systems
The systems portion of the Statistics page shows how much space has been used, and how much
space is remaining. In this example, 8.31GB are being used out of the total 136.88, leaving
128.56GB free.
Status
The Status portion of the Statistics page shows
which modules of the application are running.
When
running, a green light will be shown next to the
label. If any of these parts aren’t functioning, a
red light will display. This display on the
Statistics page may help prevent, fix, or
identify problems within the application.
Hint: To get to Statistics quickly from other parts of the application, click the statistics
icon (top-left of the Home page).
Serve, Guide, Queue
Serve
, 3
Guide
users logged onto
Serve, Guide
, and
, and 1
Printgroove
Queue
are
.
Rev. 1.6 User’s Reference Guide
57
Page 62

Printgroove POD Serve
7.6 Main Menu >Send Alert
By default, the PSC and AppAdmin have the ability to send system-wide alerts. Other print shop
users can be given the privilege to send alerts when the AppAdmin assigns their permissions.
Alerts are messages that are displayed in red at the top of every page in the application.
To send an alert, click Main > Send Alert.
Type in the message that you want displayed, select the date range to display the message from
the From and To date fields (calendars) and when finished, click Save. The alert will be displayed
on all of the screens, as shown below.
To cancel an alert, go to Main > Send Alert and click Delete.
58
User’s Reference Guide Rev.1.6
Page 63

Printgroove POD Serve
8.0 PSC Jobs Menu
Jobs (also known as print orders) are the most important items in the application. In the form of tickets,
jobs are the main source of communication among users of
with which the PSC user manages all orders within the print shop.
8.1 Jobs Menu > New (Place an Order)
Orders placed with the print shop through
consists of at least five sections: Job, Files, Options, Shipping and Billing. A sixth section, Catalog,
is optional. Job Tickets can be entered into the application by both external and internal users.
If given the privilege, a print shop user can place an order for a customer. They enter the same
fields on a ticket that the customer would, plus a section that identifies the customer information.
The PSC places a new order using the Jobs > New menu. All of the required fields, marked with a
red asterisk, must be filled in to submit the new job. The picture below shows the default job ticket
as it is displayed when an internal user clicks Jobs > New.
Printgroove
Printgroove
are submitted via Job Tickets. A job ticket
. There are numerous options
The default Job Ticket required fields are listed below:
Job Files Options Shipping Billing
Job Name
Due Date
Upload File Number of Copies Default Address Default Method
Hint: Required fields throughout the application are indicated by red asterisks.
Rev. 1.6 User’s Reference Guide
59
Page 64

Printgroove POD Serve
8.1.1 Jobs > New: Job Section
The first section of a job ticket, Job, contains sub-sections: Standard, Customer Info, Priority and
Proof, three of which are required.
Job Name: Enter a name for the order being placed.
Due Date: To the right of the field is a calendar which opens to the current month. Click on a day
of the month to select that day as the Due Date. To return to the current date, click on “Today”
near the top of the calendar. To change months/years, use the arrows on either side of the link.
Estimate: Indicate whether or not an Estimate is required.
Priority: Indicate whether this is a Normal or Rush job.
Proof: Indicate whether or not an Proof is required.
Customer Info: Jobs entered by the print shop user need to identify the Customer by entering
their first and last names and an e-mail address.
When the required fields have been entered, click on the blue bar to close the section. To open
any of the remaining sections, click on their blue (title) bar.
60
User’s Reference Guide Rev.1.6
Page 65

Printgroove POD Serve
8.1.2 Jobs > New: Upload Files
The next section of the Job Ticket allows submission of files over the web. The file is copied from
your PC to the web site into the Submission section, identifying the File Uploaded.
Press the Browse button to browse for the file(s) to be uploaded, select the file(s) and double-click
or single click on the filename and press Open. The file will upload into the application. To select
two files for uploading, hold down the <Ctrl> key, click on each file, and then click Open.
Mark the Delete Files checkbox if the uploaded files should be deleted after the print order is
complete. Select how you will deliver the job originals to the printshop. The default ticket choices
are: CD/DVD, E-mail, Instant Messaging, Upload, Postal, Hardcopy, and Other (the order they are
displayed in is editable by the AppAdmin user).
When finished with the Files section, click on the next title bar for Options.
Please Note: If your files do not upload, your system may be using a “proxy” server. You
will need to change the proxy settings for Internet Explorer (use Control Panel, Internet
Options) and Mozilla Firefox. (Tools, Options) Please see the instructions in Section 5.5
in the Appendix.
Rev. 1.6 User’s Reference Guide
61
Page 66

Printgroove POD Serve
8.1.3 Jobs > New: Options Section
The third section of a job ticket, Options, deals with the material aspects of the job such as paper
color and weight, print color, binding, covers, etc. Click on any of the links to open and select/enter
the specific information for your job. The AppAdmin user can add more fields to the Options
section, so this document discusses only the defaults shipped with the product. Required fields are
again marked with a red asterisk.
Copies is the only field required as a default in this section. Enter a numerical value for the number
of copies to be printed. This field must have a value for the job to be submitted.
Back Cover criteria is not required for all job tickets but can be used to specify the desired cover.
Punching criteria may be entered, but is not required.
62
User’s Reference Guide Rev.1.6
Page 67

Printgroove POD Serve
Color (print color) is chosen by clicking on the color or black and white radio button.
Media, Folding, Trim and Collation fields are also optional.
8.1.4 Job New: Catalog Section
The Catalog section is used to offer items provided for sale by the print shop - apart from the print
jobs you may be submitting. This section may only be used to order office supplies and is not
required. The AppAdmin user defines catalog items for the application.
Sample catalog items shown here, Paper and Pencils, are links that open and display more details
on the item and a field for entering the quantity you want to order.
Rev. 1.6 User’s Reference Guide
63
Page 68

Printgroove POD Serve
8.1.5 Jobs > New: Shipping Address
Shipping information is required to place an order and is located in an “address book.” If a default
Shipping address is in the user’s Profile, it will automatically be put in the Ship To field when they
place an order. A shipping address, found under the “Location” column of the “Address Book” can
be dragged down to Ship To. To remove a selected address, drag it back into the Address Book.
Hint: A printshop user can create a shipping option named “Customer Pick Up” under
the Configuration menu and add the option to the job ticket for use by the printshop
when they place orders for a customer.
Clicking in the space under the “Options” column in the Ship To address list will allow the shipping
Options data to be edited. Click on the New link to enter a new shipping address.
Important: All job tickets must have Shipping information for the order to be saved.
64
User’s Reference Guide Rev.1.6
Page 69

Printgroove POD Serve
8.1.6 Jobs > New: Billing Section
Click on the section header bar to enter Billing information and click on the New link to add a new
Billing Option. There are five built-in options: Billing Address, Credit Card, Cash on Delivery,
Purchase Order and Cross Charge.
Billing Options:
When a printshop user is entering a job order for a customer, they should obtain the Billing
information for the ticket. Select the Billing Method from the list if an entry is available, or click New
to create a new Billing Option.
Entering a new Billing Option on a job order was discussed in Section 5.4.5 of this reference guide.
Please refer to the details on adding a new Billing Option and click Save Billing Option when done.
As with Shipping, this section is also required before an order can be saved/submitted.
Rev. 1.6 User’s Reference Guide
65
Page 70

Printgroove POD Serve
8.1.7 Jobs > New: Saving the Order
Before an order is placed, any of sections described above can be opened and the entries edited or
deleted. To delete all the field entries, click on the Reset button located in the lower right corner of
the screen, which will clear all the fields on the ticket.
When you finish an order and click Place Order, the job should be submitted either to the printshop
of to a manager for approval. if there is an error or an omission in any of the job ticket data, the
order submission will be rejected and a “Your job did not pass validation. Please correct all errors
and try again.” message will be displayed in an orange bar. A red “x” in a circle will be displayed in
front of the fields that need correcting. Sections that have no errors will display the checkmark
within a green circle.
Once any errors have been corrected, the job can be submitted by clicking on the Place Order
button again.
After completing all of the Job Ticket sections properly, clicking the Place Order button will submit
the job for the print shop. A Job Confirmation screen will display with the ticket number and other
important information which you can provide as reference to the customer.
Important: Don’t forget to give the customer the job ticket number for future
communications about the print order.
66
User’s Reference Guide Rev.1.6
Page 71

Printgroove POD Serve
8.2 Jobs > Browse Menu
The Jobs > Browse menu allows existing jobs to be located, viewed and opened for editing. The
jobs Browser shown below is for the PSC.
The top portion of the Jobs Browser contains search fields and the lower part lists the jobs. The
data shown for each job includes Date, Ticket #, Job Name, Customer, Owner, and Status. Click on
a column heading to sort the column alphabetically. The sort affects all jobs in the list, not just those
that you can see on the screen, and toggles between ascending and descending order.
A search field has been added to the filter section so the printshop user can find any jobs being
processed in a workflow, but if Serve is the only Printgroove module, workflows will not exist.
8.3 Jobs > Archive Menu
The Jobs > Archive menu allows archived jobs to be located and viewed. Jobs that have been
archived cannot be edited. The PSC can, however, “Unarchive” the job ticket by opening the order
and using the internal job ticket menus.
The Archive page contains search fields at the top of the screen to enable you to narrow your list.
Only printshop users with the appropriate permissions can Unarchive a job.
Rev. 1.6 User’s Reference Guide
67
Page 72

Printgroove POD Serve
8.4 Job Ticket Menu (Internal to the Print Shop)
The PSC and other print shop users with the appropriate Role have access to an internal Job Ticket
menu, which is used to perform the requirements on the job. There are many tasks the print shop
users can perform on a submitted Job Ticket.
Login as the PSC and go to Main > Inbox or Jobs > Browse. Open a newly
submitted ticket which brings up the internal job ticket menu shown here
In order for the job to be processed, the PSC must click Accept. If the job is
Accepted, more options will become available on the menu (shown below).
If information is missing on the job ticket or the PSC feels there is something wrong with the order
as submitted, they can Reject the ticket and send an explanation e-mail to the creator. The internal
job ticket menu items will vary depending on the type of job submitted, the job status, and the
current owner of the job.
8.4.1 Job Ticket Menu: Details
Details will display all the details of the job ticket (default).
Click on the title bar of any section of the job to view it’s details. Open and view or Close all
sections of the ticket using the Show All/Hide All options above the Job Title Bar.
If the print shop user logged in does not have permissions for an internal menu item, the item will
not be shown on the menu. If the print shop user has the correct permissions, but the job required
Submit Proof or Submit Estimate, one of these will be grayed out if the other is the current status.
68
User’s Reference Guide Rev.1.6
Page 73

Printgroove POD Serve
8.4.1.1 Convert Uploaded File to PDF
If a certain type of printer needs to have a file as a PDF (Portable Document Format), the PSC can
click on the Files section and use the ToPDF button to convert the file. This function is only
available to the print shop user if the Printgroove Driver has been installed.
Important! This feature requires that the Printgroove Driver be installed. The print shop
should have access to a utility CD, delivered with the Printgroove product, which
contains the driver for installation.
8.4.2 Job Ticket Menu: History
The Job Ticket History menu will bring up this job’s history, meaning all actions taken on the order.
While logged in as the PSC, go to a job Details screen as shown below. The job used in this
example was sent to Queue and had several options changed before being printed.
Click on the History menu to view the job’s history, which may include:
1. Job Updates, to tell you the changes you made to the job, such as add/edit/delete to any of the
job options in queue, and an appropriate message about the change will be logged into the job
ticket history.
2. Media Usage, to give you the details about each media used in the process, such as type of
media, color, weight and actual amount of media used etc.
3. Ink Usage identifies the actual amount of ink used in milli grams.
4. Staples Usage will tell you the number of staples used.
5. Punching gives the details about number of holes per operation and number of operations.
6. Process Run will tell you the process run time details, like job processed date, execution time and
process status.
Rev. 1.6 User’s Reference Guide
69
Page 74

Printgroove POD Serve
This History shows that the job was submitted by the to the PSC on 5/11/2007 at 11:56am. The
PSC accepted the ticket at 11:59am and then sent the job to Queue. A signal was sent to Queue to
complete setup. The PSC logged in and changed the options values for Sides, Offset, and
Punching and then the job was processed at 2:12pm and transitioned back to Guide.
The Scope column lets the user know that the change in status was made Public, meaning all users
could see the change, or Private, meaning that only users internal to the print shop could see it.
8.4.3 Job Ticket Menu: Print
From a job ticket listing such as Inbox or Browser, click on the job name or number of an accepted
job to display the ticket details. Click on the Print menu to open a printable view of the ticket and all
of the job details (shown).
70
User’s Reference Guide Rev.1.6
Page 75

Printgroove POD Serve
8.4.4 Job Ticket Menu: Tracker
This menu allows the PSC to mark the job ticket so that it will be included in the list under Tracker.
From a job ticket listing such as Inbox or Browser, click on the job name or number of an Accepted
job to display the ticket details (Ticket HR_3/21/2007_510 shown below).
When the PSC clicks on the Track menu, the ticket is added to Tracker and a message is shown in
a green bar to confirm that it was added to Tracker successfully. This allows the PSC to track the
order status at all times in the print shop from acceptance through completion by looking at the
Home page.
Click on Untrack on the job ticket menu to remove the job from Tracker.
Rev. 1.6 User’s Reference Guide
71
Page 76

Printgroove POD Serve
8.4.5 Job Ticket Menu: Subscribe
A job ticket marked Subscribe will auto-notify you with e-mails whenever the status of the job
changes. Click on Subscribe for this function, and Unsubscribe when you no longer require the email notification about the job.
8.4.6 Job Ticket Menu: Edit
The Edit menu will bring up an editable version of the job ticket for a user assigned the privilege. It
may be that a customer called and asks the PSC to increase the number of copies requested on
the job ticket, or they may need to correct some of the ticket information. The PSC can tell is the
ticket is in “Edit mode” because the word Edit replaces Details in the upper left of the ticket.
If you make changes to a job ticket, be sure to click Update Order to save your changes.
Reset will clear all the job fields!
72
User’s Reference Guide Rev.1.6
Page 77

Printgroove POD Serve
8.4.7 Job Ticket Menu: Costing
The internal job ticket menu option Costing, allows a print shop user to calculate the cost of the
order. To begin, click on the Costing link in the menu.
Under the Options section, enter the number of pages to be printed/copied in the Pages Per Copy
field. (For example, if you uploaded two documents, one 3 pages and the other 4 pages, enter 7 in
Pages Per Copy field.) Click the Set button to multiply the number of pages by the number of
copies you have requested. This number will be used in the remainder of the costing process. In
the example below, the document(s) to be printed has fifteen (15) pages, which will be multiplied by
the two hundred (200) copies requested.
Once the number of pages has been set, the quantities and costs are updated automatically in the
table. To edit a quantity, click on the value in the Quantity column. The cost of the individual
options are set under Configuration > Services > Printing.
The costing breakdown is shown in the Internal section. The print shop cost, retail price and
subtotals are shown in the listing. Any applied discounts and additional costs are also detailed here.
The cost of the order can be adjusted by editing the Markup multiplier and the Additional field.
Rev. 1.6 User’s Reference Guide
73
Page 78

Printgroove POD Serve
When costing is complete, click on the Update Cost button. The ticket is then updated with the new
cost of the order.
74
User’s Reference Guide Rev.1.6
Page 79

Printgroove POD Serve
8.4.8 Job Ticket Menu: Add Note
Add Note menu allows the internal print shop user to add a note to the job ticket. The Note Type
may be set to either Internal or Public. A picture of the Add Note screen is shown here.
Notes defined as Internal will not be visible to your customers, Public Notes will be visible to all
users. As an internal print shop user, you also have the option to e-mail a Note to an external user
address.
8.4.9 Job Ticket Menu: Add Files
The PSC may select Add Files to upload additional files to the ticket. Clicking on Add Files opens
up the browser so you may choose the additional files to be uploaded.
Don’t forget the cost of the job will change due to the additional files uploaded!
Rev. 1.6 User’s Reference Guide
75
Page 80

Printgroove POD Serve
8.4.10 Job Ticket Menus: Submit Proof
For a job that requires a proof, select Submit a Proof from the internal job ticket menus. The dialog
box shown below will be displayed. A message to the customer can be entered with the proof.
If it is a soft proof, click on Browse and select the proof’s file, enter your message, and click Send.
Otherwise, select Hard Proof/Handled off-line.
8.4.11 Job Ticket Menus: Submit Estimate
The PSC may click on Submit an Estimate for two options: (1) send an e-mail to the customer; or
(2) include the estimate directly on the job ticket. One or both options may be selected.
Please note that the printshop cannot send a proof and an estimate at the same time.
Once a proof is sent to a customer, the Submit Estimate menu option will be grayed out.
76
User’s Reference Guide Rev.1.6
Page 81

Printgroove POD Serve
8.4.12 Job Ticket Menus: Start/Stop
Clicking on Start/Stop will start/stop recording the time it takes to perform the job. This is
necessary for jobs requiring services that are charged by the hour, such as graphics or artwork.
8.4.13 Job Ticket Menu: Status
After a job is Accepted, the job status of the ticket may be changed manually by choosing Status
from the job ticket internal menu. The current status is displayed in a dialog box.
To change the status, click on the drop down list (shown here) and select the status to which the
ticket should be changed.
8.4.14 Job Ticket Menu: Done
When any member of the print shop is finished with their part of an active job, they need to decide
what to do with it next. Click on Done in the Job Ticket menu to bring up the following screen:
Rev. 1.6 User’s Reference Guide
77
Page 82

Printgroove POD Serve
You are given different options, depending on which stage the job is in:
• Close the job – Changes the status of the job to Closed (No further changes will be allowed
on this job except archive, copy, or resubmit as new – meaning you can no longer do costing
or generate an invoice for the job!)
• Send to Queue – sends the job to Queue for printing
• Reassign to a person in your group – Allows you to choose a person in your group to
whom you can reassign the Job Ticket (if you have been granted the appropriate
permissions)
Important Note: Once you Close a Job you can no longer cost it, generate an invoice, or
print labels. A new prompt will ask you if you really want to Close the job now.
8.4.15 Job Ticket Menu: Cancel, Restore, Delete
If a job is rejected by the printshop, a new menu option, Cancel, will become available. Cancelling
a job will remove it completely from the database, so no record will be stored.
Once a job is Closed, a new menu option, Delete, will become available on the internal job menu.
Deleting a job, as opposed to Archiving the job, will remove it from all records, making it
irretrievable.
Please note that neither Cancel nor Delete is immediate. The system will run a scheduled
process nightly (or within a time period set by your administrator) to complete the Cancel
or Delete request. The printshop users, with appropriate permissions, can Restore the
files prior to their final removal.
78
User’s Reference Guide Rev.1.6
Page 83

Printgroove POD Serve
8.5 Jobs > Quote
The PSC uses the Jobs . Quote menu to quote the price of the job to the customer. Quotes can be
activated or deleted (click on activate/deactivate icon) copied (click on the green copy icon), or
created (click on the New Quote link). Quotes are e-mailed directly to the interested user. Go to the
Jobs > Quote menu and click on New Quote.
The New Quote screen looks very similar to a new job ticket and many of the same fields are
required. If your customer accepts the quote and wants to place the order, the quote can be saved
as a new job ticket without re-entering the print job information.
Rev. 1.6 User’s Reference Guide
79
Page 84

Printgroove POD Serve
Fill in the required fields under Standard and Customer Info and then open the Options section.
Enter the number of Copies (required) and any other options and scroll down to the bottom of the
section to cost out the Quote.
In the first field enter the number of pages to be printed, the second field is filled based on the
number of copies requested, then click on Set to calculate the total for you, which includes any
other options selected. Note that you can Discard the values you entered and re-do the Quote or
press Save to keep the Quote and send it to the customer.
Go to the bottom half of the Quote to Internal Services and add any values you feel will be added to
this if it becomes a job order, such as shipping costs, internal services, etc. Click Save and you will
get a Send Email button which, when clicked, will send the Quote to the e-mail address you
entered for your customer under Customer Info.
Click Send Email to send the quote information to your customer.
80
User’s Reference Guide Rev.1.6
Page 85

Printgroove POD Serve
The picture below is an example of the e-mail sent to the customer with the quote information.
8.5.1 Activate Quote as a Job
Using the example in the previous section, which sent a Quote of $41.25 for Job Name “HR
Brochure May” to Sue Boss, let’s assume that Sue wants the job performed. In this scenario, the
customer will e-mail or call the printshop and tell them to proceed with the job. The PSC will log in
and go to the Jobs > Quote menu option to display the list of saved quotes. Each saved quote has
an icon (green box with a check mark in it) with which the quote can be Activated.
Rev. 1.6 User’s Reference Guide
81
Page 86

Printgroove POD Serve
Click on the Activate icon for the quote the customer has accepted. This will open an Edit screen
which now has Shipping and Billing sections which can be added to make the quote an active job.
Add the appropriate Shipping and Billing information and any other Options or Catalog items the
customer has requested. Notice that this now looks like a regular job ticket.
82
User’s Reference Guide Rev.1.6
Page 87

Printgroove POD Serve
Click Activate and you should receive a Job Confirmation message, like the one shown below.
Now the quote has become a regular job ticket and it can be processed by the printshop.
8.6 Configure > Shipping > Labels
Both the PSC and the AppAdmin have the ability to customize printing labels with their own print
shop addresses, logos, and titles. Login as either the PSC or AppAdmin and go to the Configure >
Shipping > Labels menu for a label template (shown below).
Rev. 1.6 User’s Reference Guide
83
Page 88

Printgroove POD Serve
8.6.1.1 Shipping Label Logo Image
The Logo Image section allows you to upload a new graphic for the label. To change the logo, click
Browse. When you have found the image you want, select it and click Open on the dialog box.
The logo image will display the file you uploaded.
8.6.1.2 Shipping Label Title
Enter a desired title for your company to go at the top of the shipping label (no more than 35
characters in length, white spaces included). In the Address field, enter your company’s address
just as it would be seen on an envelope.
Don’t worry about the address of the customer because this will be automatically filled in from the
job ticket placed by the customer. The application automatically changes the customer’s address
on the shipping label when the PSC decides to print them.
8.6.1.3 Shipping Label Address
Type the rest of your company address into this field just as you would in a word processing
application or e-mail application. This field does support multi-line entry. As you type, the preview
section for the label will update in real-time.
84
User’s Reference Guide Rev.1.6
Page 89

Printgroove POD Serve
8.6.1.4 Preview a Shipping Label
The preview section is a real-time preview of what your shipping label will look like when it is
printed. Be sure to click Save at the bottom of the page when you are satisfied with your changes to
the shipping label template. While the preview is updated in real-time as you edit the values of the
fields, no data is permanently saved until the Save button is clicked.
8.6.1.5 Printing a Label
When a job is complete, one or more shipping labels can be generated by the system for you to
affix to the outgoing packages. Printgroove labels are designed to work best with the Dymo Label
Writer 400 format, but can be used with other label printers.
You must have a PDF-capable application installed on your computer to utilize this
feature (i.e., Adobe Acrobat Reader).
To print a shipping label:
1. Login as a user with the permission to view jobs (for example, the PSC)
2. Open an existing job ticket.
when the order was placed. If it did not, the application cannot print labels for
this job.
3. Expand the Shipping section as shown below.
Note: the job ticket must have had a shipping section
In the labels column, enter the number of labels needed. In the figure above, the PSC has
entered “2” to generate two labels.
4. Click the Print Labels button.
After a few moments, the browser will attempt to download a printable PDF file which
contains the labels. Click OK or check the box to do this automatically from now on.
Rev. 1.6 User’s Reference Guide
85
Page 90

Printgroove POD Serve
5. The file is opened in Adobe Acrobat Reader which should look similar to the picture below.
6. If your printer is set up for printing labels, select File, Print to finish printing the labels.
Here is an example of what a printed label should look like.
86
User’s Reference Guide Rev.1.6
Page 91

Printgroove POD Serve
9.0 Application Administrator
The default user, AppAdmin (Application Administrator) manages the
users and groups, and configures several settings, such as job ticket numbering, the fields on job tickets,
and your site’s web pages.
9.1 AppAdmin Login
Enter the web address for the application in this format: https://<IP_address/hostname>/sg
and press Enter. Enter the default Administrator username, appadmin, and the password provided
with the product, and click Login. The first time you log in to the application, you will get the Accept
Licensing Agreement notice. Please read the agreement and click I Accept to proceed.
9.2 Print Shop User Menus: AppAdmin
The bold blue menus below are unique to the Application Administrator, not the PSC. Since the
print shop users were already described for the PSC, only those that differ for the AppAdmin user
will be detailed in this section.
Printgroove
application, creates
Main:
o Account Requests: displays new user account requests that add a new Group to approve
o Home: displays all menus available to the AppAdmin user
o Tracker: lists all jobs marked to be tracked
o Reports: provides choice of report, sorting and date range (if applicable)
o Statistics: displays key
o Send Alert: allows AppAdmin to send a message that displays on all user screens
Jobs
o Browse: provides the capability to browse through Closed jobs
o Open: allows user to open a specific job ticket by number
Rev. 1.6 User’s Reference Guide
Printgroove
system informational statistics
87
Page 92

Printgroove POD Serve
Users
o Users: allows AppAdmin to configure both customer and print shop users
o Groups: allows edit of user Groups which may given specific attributes
Configuration
o Shipping: allows definition of Shipping options offered and custom labels
o Payment: allows definition of Billing methods offered and custom invoices
o Services: allows AppAdmin to determine the services, printing, catalog, special pricing
o Job Ticket: allows AppAdmin to configure Job Tickets and numbering schemes
o Site: allows AppAdmin to customize web pages, icons, images, and ads
9.3 Groups, Users, and Permissions
Users of the application are defined as either Internal (to the print shop) or External (as the
customer). The built-in user functions are based on these assumptions:
All Users belong to a Group.
Internal Users belong to the same Group, the Printshop group.
All Users have permissions to perform certain actions on job orders.
Internal Users have permissions that are combined into Roles.
All Users can be assigned multiple permissions.
Internal Users can be assigned multiple Roles.
The Application Administrator has the permission to add Users either external or internal to the print
shop. External (customer) user permissions are defined separately for each user. Internal print
shop user permissions are defined as Roles, and each printshop user can have more than one
Role, meaning more than one set of permissions.
The default Groups delivered with the application include one external group, HR, and one internal
group, the Printshop Group. It is possible to use the Printgroove application immediately by logging
in as one of the default Users shipped with the product.
9.4 Defining External Groups, Users and Permissions
Each external user (customer) must be defined as part of a Group, and the application is delivered
with only one default Group, HR, so the first step towards defining new customer users is for the
Application Administrator to define New Groups.
Hint: Some Groups you might use are IT, Finance, Payroll, Training, Sales, etc.
88
User’s Reference Guide Rev.1.6
Page 93

Printgroove POD Serve
9.4.1 AppAdmin Menu User > Groups (External)
A Group is a collection of users under the same special pricing and job ticket. The Groups function
is only accessible by the Application Administrator. Here the Application Administrator can search,
edit, delete, activate, deactivate, and create new groups using the appropriate icons.
Go to the Users > Group menu to display the Groups screen. Using the filter at the top of the page,
you can search through the list of current Groups. To use the search filtering fields, enter search
criteria or select search options from the pull-down menus. Not all of the fields need to be filled out,
but the more data given, the more narrow the search. Click Enter to obtain your search results, or
click Clear to clear all the fields and restart the search.
To create a new Group, click the New link, and enter the criteria you want as valid for the Group.
New Group criteria includes:
Group Name – give the group a meaningful name
Description – describe the group
Use Ticket – choose the job ticket this group will use
Ticket Numbering scheme – choose the ticket numbering scheme for the group
Discount– identify the percentage of discount to be given to this group (if any)
In the example above, we have added a new group for the Information Technology (IT) Group.
When the fields are complete for your new Group, click Save.
Rev. 1.6 User’s Reference Guide
89
Page 94

Printgroove POD Serve
9.4.1.1 Edit a Customer Group
Once Groups have been defined, you can Edit, Delete, and Add New Users from the Users >
Group menu. Go to Users > Groups to see that the Users are shown within the Group section.
The example below shows the HR group and the assigned users.
Figure 9.4.1.1 -1 Customer Group
Click on the Edit icon to change permissions or personal information about a user. Click on the
trash can icon in the users row to Delete the user.
Please Note that if the user has current jobs in process, they cannot be deleted.
Figure 9.4.1.2-2 Cannot Delete User
90
User’s Reference Guide Rev.1.6
Page 95

Printgroove POD Serve
9.4.2 AppAdmin Menu Users > Users (External)
You must be logged in as the Application Administrator and then navigate to the Users > Users
menu to see the list of customer or external Users.
Using the filter at the top of the page, you can search through the list of current Users. To use the
search filtering fields, enter search criteria or select search options from the pull-down menus. Not
all of the fields need to be filled out, but the more data given, the more narrow the search. Click
Enter to obtain your search results, or click Clear to clear all the fields and restart.
To create a new external User, click the New Customer link. Clicking this link brings up a New
Account screen where you will enter basic information for the new customer account.
The username and the password fields entered will be used when the user logs into the system as
a customer. The secret question and secret answer portions of the form are used if the customer
forgets their password. (You can reassign a new password through e-mail for the customer.)
Rev. 1.6 User’s Reference Guide
91
Page 96

Printgroove POD Serve
To assign a new user to a Group, select the group of choice from the pull down menu. Or, if the
customer is to be put into a new group, select the New Group option and enter the required
information.
The recommended default permission is that all customer users be allowed to place
orders.
As always, fields marked with a red asterisk on this form are required. Enter the required fields and
determine the permissions for each new user. The options include:
• Permissions
o Place Orders – allows user to place orders
o View All Jobs – allows user to view all jobs in their Group (not just their own)
o Manage Account – enables the following checkboxes for fine permission control related
to others users in the same Group
Create Users – allows user to create additional users (in this group)
Edit Users – allows user to edit users (in this group)
Give Approval – allows user to grant approval to jobs (gives Approval Authority)
Jobs Require Approval by {select a user} – causes jobs submitted by this user to
require the approval of another user in the group (can be further defined as requiring
approval only if over a set $ amount)
• Preferences
o Language – select the user’s desired language – this will show the user interface
in that language
o Closed Orders – enter the number of days after which files will be deleted from
history
o Color Scheme – selects the color scheme of the application for the user
The customer, or external, user account screen used to assign permissions is shown below.
Un-checking a box means that the new user will not have that privilege. Check View All Orders to
allow the user to view all orders for their assigned group. This privilege allows the customer to view
any and all orders dealing with the customer’s group. Check Create, Edit, and Delete Users to
allow this customer to perform those functions on other Users in their group.
92
User’s Reference Guide Rev.1.6
Page 97

Printgroove POD Serve
Approve New Accounts refers to the permission to approve and activate new users for the group.
Sometimes a group manager wants to approve orders for their users. Give Approval allows the
user being defined to approve orders by other users in the group. This permission would allow the
user to approve or reject orders for their group.
The Jobs Require Approval From checkbox means that the user being defined requires approval
from another user in the Group before their job gets submitted. The list of users in the drop down
are those in the Group who have been assigned the Give Approval permission.
Under Preferences, select: Language: selection of the appropriate language for the application;
Closed Orders: identify the number of days closed orders will remain in history, and Color
Scheme: selection of a color scheme. (Or, since Preferences are not required, you may keep the
defaults.) An example of a new user for the IT Group is shown here:
Rev. 1.6 User’s Reference Guide
93
Page 98

Printgroove POD Serve
The Personal section must be filled out but the Company section is optional. Click on the blue title
bar to open the Personal section. Enter the new users first name, last name, e-mail address and
phone number.
To save this new customer user, click Save, or add Company information and then click Save.
9.4.2.1 New User Shipping and Billing
Prior to placing an order, all user Profiles must contain a Shipping address and Billing method. To
this end, a prompt has been added so that the Administrator may add these defaults when defining
the new user. After saving the new user, the dialog box shown below is displayed.
Click Continue to go to the user’s profile and add Shipping and Billing information. Save each of
the sections to complete the addition of your new customer user.
94
User’s Reference Guide Rev.1.6
Page 99

Printgroove POD Serve
9.5 Defining Roles (Create Internal Printshop Users)
All employees within the print shop are in one default group, the Printshop group. The application is
shipped with two default internal users: AppAdmin and PSC. The first thing your Application
Administrator might want to do is create more internal print shop Users (e.g., pre-press, printer,
graphics, binding, shipping, etc.).
To set up users internal to the print shop, the Application Administrator must define Roles. Roles
include sets of permissions that can be assigned to print shop employees. To add new Roles, login
as Application Administrator and navigate to the Users > Users menu shown below.
Click on the New Printshop User link to get the New (Printshop) Account screen.
Rev. 1.6 User’s Reference Guide
95
Page 100

Printgroove POD Serve
Click on the New link to the right of “Available Roles” to create a new Role. This brings up the
screen shown below which contains permissions to assign as part of each Role.
Start by giving the Role a meaningful Role Name (i.e., printer, graphics, shipping). This is
recommended so that you can assign Roles to new internal users. If you define a Role using a
specific person’s name, you might not remember enough about the permissions you chose to give
that Role to another printshop user in the future.
Fill in the permissions for this new Role under each section, including: Main, Jobs, User
Administration, and Configuration.
Please Note that permissions for internal Roles pertain to the use of AppAdmin and PSC
menus and screens as well as internal menus that specifically affect the jobs being
performed. (Please refer to the Job Ticket menu section of this document.)
Each permission can have up to five check boxes to the right of it for: Create, Edit, Delete, View,
and Activate. At the bottom of each of the lists in the form, there is a row labeled Select All.
Checking one of the boxes in this row causes all of the boxes directly above it to be selected.
Navigation through this form can be done quickly and easily by either clicking the Continue button,
or by clicking on the blue bars that head each section.
96
User’s Reference Guide Rev.1.6
 Loading...