

Page 1
Page 2

Page 3

2001 by Konica Business Technologies, Inc.
MAINTENANCE AGREEMENT
The KONICA 7115/7118 Workgroup Document System will give you many years of troublefree service. To ensure high quality copying performance and to prevent premature wear and
failure of precision parts an d com ponen ts, sc hedul e perio dic c leanin g and ro utine adjus tments .
We recommend that you co ntact your s ervice cen ter to discu ss the benef its and adva ntages of
Konica’s Customer Ser vice Maintenanc e Agreement and to be shown how a maint enance plan
can be tailored to your individual copying needs.
NOTICE:
Konica Business Te chnologi es, Inc. has made ev ery effort to ensure that the i nformatio n in this
manual is complete and accurate. However, constant efforts are also being made to improve
and update the product. Therefore, Konica Business Technologies, Inc. shall not be liable for
errors in this manual or for any consequential damages resulting from the use of this manual.
The information contained herein is subject to change without notice.
FEDERAL OR STATE STATUTES MAY PROHIBIT THE COPYING OF CERTAIN
DOCUMENTS OR INFORMATION, RESULTING IN FINES OR INPRISONMENT FOR
VIOLATORS.
MANUAL PART NUMBER:
OP-7115/7118-01
WEB SITE ADDRESS
http://www.konicabt.com
CORRESPONDENCE:
Correspondence regarding this manual may be mailed to the address shown below.
KONICA BUSINESS TECHNOLOGIES, INC.
CORPORATE PUBLICATIONS
500 DAY HILL ROAD
WINDSOR, CT 06095
Page 4

Energy Star
As an ENERGY STAR® Partner, we have determined that this machine meets the ENERGY
®
STAR
Guidelines for energy efficiency.
What is an ENERGY STAR
An ENERGY STAR
“low-power mode” after a period of inactivity. An ENERGY STAR
®
®
Product?
®
product has a special feature that allows it to automatically switch to a
®
product uses energy more
efficiently, saves you money on utility bills and helps protect the environment.
Trademarks and Registered Tradema rk s
Fiery and the Fiery logo are registered trademarks of Electronics for Imaging, Inc.
All other product nam es men tioned are trademarks or regist ered tradem arks of their res pective
companies.
Page 5

Contents
1 Introduction
1.1 SAFETY INFORMATION................................................................................................ 1-2
Warning and Precaution Symbols................................................................................... 1-2
Meaning of Symbols........................................................................................................ 1-2
WARNING....................................................................................................................... 1-3
CAUTION........................................................................................................................ 1-4
Precautions for Routine Use...........................................................................................1-5
USER INSTRUCTIONS FCC PART 15 - RADIO
FREQUENCY DEVICES (For U.S.A. Users).......................... ........................................ 1-6
INTERFERENCE-CAUSING EQUIPMENT STANDARD
(ICES-003 ISSUE3) (For Canada Users)........................................................................ 1-6
Laser Safety....................................................................................................................1-7
Internal Laser Radiation..................................................................................................1-7
CDRH Regulation............................................................................................................1-8
WARNING LABEL....................................... .................................. ..... ...... ...... ..... ...... ...... 1-9
Ozone Release.............................................................................................................1-10
1.2 About the User’s Manual............................................................................................1-11
Explanation of Manual Conventions..............................................................................1-11
[ ] key............................................................................................................................. 1-11
1.3 Explanation of Basic Concepts and Symbols..........................................................1-11
Paper Feeding...............................................................................................................1-12
“Width” and “Length”.....................................................................................................1-13
Paper Orientation..........................................................................................................1-13
2 Precautions
2.1 Installation Precautions................................................................................................ 2-1
Installation site................................................................................................................ 2-1
Power source..................................................................................................................2-1
Space Requirements....................................................................................................... 2-2
2.2 Operation Precautions.................................................................................................. 2-3
Operating Environment................................................ ...... ..... ...... ..... .............................2-3
Proper Use......................................................................................................................2-3
Transporting the Copier ..................................................................................................2-4
Care of Copier Supplies.................................................................................................. 2-4
2.3 Legal Restrictions on Copying....................................................................................2-5
3 Before Making Copies
3.1 Available Features.......................................... ..... ...... ...... ..... .................................. ..... .3-1
3.2 Components and Their Functions...............................................................................3-4
3.3 Parts Names and Their Functions............................................................................... 3-6
Copier.............................................................................................................................. 3-6
Konica 7115/7118 i
Page 6

Inside the Copier .................................... ...... ..... .................................. ...... ..... ...... ...........3-8
Options............................................................................................................................3-9
3.4 Control Panel...............................................................................................................3-12
Names of Control Panel Parts and Their Functions......................................................3-12
Icons on the Control Panel............................................................................................3-14
3.5 Turning ON and OFF and the Initial Mode.................................................................3-15
How to Turn the Copier ON/OFF...................................................................................3-15
When Copier is Turned ON...........................................................................................3-15
Default Settings.............................................................................................................3-16
3.6 Useful Functions.........................................................................................................3-17
Panel Resetting.............................................................................................................3-17
Auto Panel Reset...........................................................................................................3-17
Power Saver..................................................................................................................3-18
Auto Shut-OFF ..............................................................................................................3-18
Auto Copy Start.............................................................................................................3-18
Interrupting Copy Jobs................................. .................................. ..... ...... ..... ...............3-19
Auto Tray Switching.......................................................................................................3-19
Account Number............................................................................................................3-20
To enter an account number.........................................................................................3-20
Printing from the Personal Computer............................................................................3-21
Sending and Receiving Faxes Using the Copier...........................................................3-21
3.7 Copy Paper...................................................................................................................3-22
Paper Specifications................................................ .................................. ..... ...... ...... ...3-22
4 Loading Originals
4.1 Two Ways to Load the Original............................................. .................................. .....4-1
Specific Types of Originals..............................................................................................4-1
4.2 Loading Originals in the Automatic Document Feeder .............................................4-2
Precautions for Using the Automatic Document Feeder .................................................4-2
Mixed Originals........................................................ ...... ..... ...... .................................. .....4-4
4.3 Place the Original on the Platen Glass........................................................................4-6
Precautions for Placing the Original on the Platen Glass................................................4-6
Highly Transparent Originals...........................................................................................4-8
Books...............................................................................................................................4-9
5 Making Copies
5.1 Copying..........................................................................................................................5-1
5.2 Selecting the Paper.......................................................................................................5-3
5.3 Feeding Paper Manually ...............................................................................................5-5
Making Copies by Using the Bypass Tray.......................................................................5-6
5.4 Specifying the Zoom Ratio.........................................................................................5-11
Setting the Zoom Ratio..................................................................................................5-12
5.5 Adjusting the Image Density......................................................................................5-16
5.6 Interrupting a Copy Job........................................ .................................. ..... ...... ...... ...5-18
ii Konica 7115/7118
Page 7

6 Advanced Copying
6.1 Making 1-Sided Copies................................................................................................. 6-1
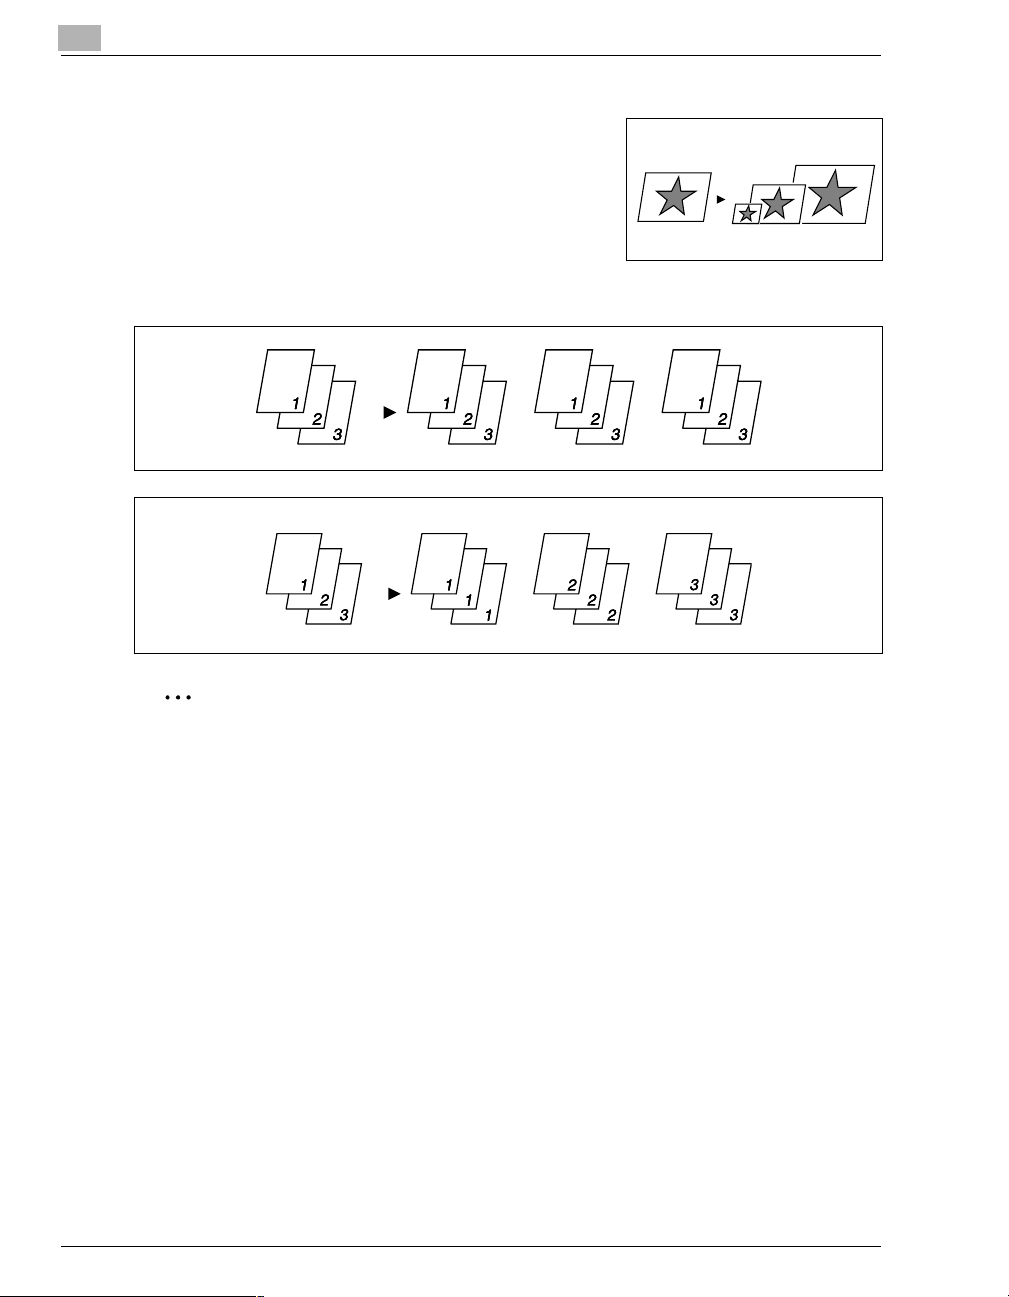
6.2 Output Copies (Sort and Group)..................................................................................6-5
Three Output Types........................................................................................................6-5
Sorting............................................................................................................................. 6-6
Grouping.........................................................................................................................6-8
6.3 Erasing Part of Original Image (Margin Erase)......................................................... 6-10
Precautions for Erase Position......................................................................................6-11
6.4 Reversing Original Tonal Arrangements (Reverse Image) .....................................6-13
6.5 Providing a IMAGE SHIFT .......................................................................................... 6-14
Precautions for IMAGE SHIFT Position........................................................................6-14
7 Using the Utility Mode
7.1 User’s Choice.............................................................................. ..... ...... ...... ..... ............7-2
Mixed Orig....................................................................................................................... 7-6
Paper Priority..................................................................................................................7-6
Copy Priority....................................................................................................................7-6
Density Priority................................................................................................................7-6
Exposure Level Priority (Auto)........................................................................................7-6
Exposure Level Priority (Manual)....................................................................................7-7
Output Priority.............................................................. ...... ..... ...... ..................................7-7
Crisscross Mode.............................................................................................................7-7
4 in 1 Copy Order............................................................................................................ 7-7
Book Binding Position.....................................................................................................7-7
IMAGE SHIFT Width Adjust............................................................................................ 7-7
Erase Setting (Left, Upper, and Frame).......................................................................... 7-8
Auto Panel Reset............................................................................................................7-8
Power Saver....................................................................................................................7-8
Auto Shut-OFF................................................................................................................ 7-8
Density (ADF)..................................................................................................................7-8
Printer Density.................................................................................................................7-8
Paper Auto Detection...................................................................................................... 7-9
Paper Size Detection......................................................................................................7-9
Paper Type (1st Tray).....................................................................................................7-9
Paper Type (Bypass Tray)..............................................................................................7-9
Special Paper Setting......................................................................................................7-9
Making the User’s Choice Settings...............................................................................7-10
7.2 Drum Dehumidify........................................................................................................7-12
7.3 Toner Replenisher (Auxiliary Toner Replenishing) .................................................7-13
7.4 Custom Size Input....................................................................................................... 7-14
7.5 Administrator Mode.................................................................................................... 7-16
Administrator Mode....................................................................................................... 7-16
Copy Track....................................................................................................................7-18
Disable Auto Shut OFF.................................................................................................7-26
7.6 Checking the Total Number of Copies/Prints Produced.........................................7-28
Konica 7115/7118 iii
Page 8

7.7 Storing a Job................................................................................................................7-30
8 Error Displays and Other Indicators
8.1 Major Error Displays and Remedial Actions...............................................................8-1
8.2 When the Add Paper Indicator Lights .........................................................................8-4
Adding Paper...................................................................................................................8-4
8.3 When the Add Toner Indicator Lights .........................................................................8-8
8.4 When the Paper Misfeed Indicator Lights.................................................................8-11
Misfeed Indications and Misfeed Locations...................................................................8-11
Clearing a Paper Misfeed..............................................................................................8-12
9 Troubleshooting Tips
9.1 When This Type of Copy is Produced.........................................................................9-1
9.2 When the Copier is not Operating Correctly...............................................................9-3
10 Appendix
10.1 Specifications..............................................................................................................10-1
Copier Konica 7115/7118..............................................................................................10-1
Automatic Document Feeder DF-217............................................................................10-3
Paper Feed Cabinet PF-121..........................................................................................10-3
Shifting Unit IS-101................................. ...... ..... ...... ...... ..... .................................. ...... ...10-4
Job Tray IT-102..................... .................................. ...... ..... ...... .................................. ...10-4
Multiple Bypass Tray MT-102........................................................................................10-4
10.2 Care of the Copier .......................................................................................................10-5
Cleaning ........................................................................................................................10-5
10.3 Function Combination Table......................................................................................10-6
Function Combination Table..........................................................................................10-6
Conditions for Combined Functions ..............................................................................10-6
10.4 List of Paper Sizes and Zoom Ratios ........................................................................10-7
Paper Sizes................ ...... ..... ...... ...... ................................. ...... ...... ..... ...... ....................10-7
Zoom Ratios(Original Size to Paper Size).....................................................................10-8
iv Konica 7115/7118
Page 9

Introduction
1 Introduction
Thank you for choosing a Konica 7115/7118.
This User’s Manual describes the functions, operating procedures, precautions, and basic
troubleshooting for th e Ko ni ca 7115/7118 copier. Befo re u si ng thi s c op ier , be s ure to re ad the
User’s Manual thoroughly in order to en sur e that you use th e cop ie r efficiently. After y ou ha ve
gone through the m anu al, s tore it in the holder on th e rear si de of the copier an d k ee p it handy
at all times.
1
Konica 7115/7118 1-1
Page 10
1
1.1 SAFETY INFORMATION
This section contains detailed instructions on the operation and maintenance of this machine.
To achieve optimum use of this de vice, all opera tors should ca refully read and follow the instruc tions in this manual. Please keep this manual in a handy place near the machine.
Please read the next section before using this device. It contains important information related to user safety and
preventing equipment problems.
Make sure you observe all of the precautions listed in this manual.
* Please note that some parts of the contents of this section may not correspond with the purchased product.
Warning and Precaution Symbols
Introduction
WARNING:
CAUTION:
Meaning of Symbols
A triangle indicates a danger against which you should take precaution.
A diagonal line indicates a prohibited course of action.
A black circle indicates an imperative course of action.
Ignoring this warning could cause serious injury or even death.
Ignoring this caution could cause injury or damage to property.
This symbol warns against possible electrical shock.
This symbol warns against dismantling the device.
This symbol indicates you must unplug the device.
1-2 Konica 7115/7118
Page 11
Introduction
WARNING
• Do not modify this product: Fire, electrical shock, or breakdown could result. If the product employs
a laser, the laser beam source could cause blindness.
• Do not attempt to remove the covers and panels which have been fixed to the product. Some products have a high-voltage part or a laser beam source inside that could cause an electrical shock
or blindness.
• Use only the power cord supplied in the package. Failure to use this cord could result in fire or
electrical shock.
• Use only the specified power source voltage. Failure to do so could result in fire or electrical shock.
• Do not use a multiple outlet adapter to connect any other appliances or machines. Use of a power
outlet for more than the marked current value could result in fire or electrical shock.
Do not unplug and plug in the power cord with a wet hand: An electrical shock could result.
Plug the power cord all the way into the power outlet. Failure to do so could result in fire or electrical
shock.
• Do not scratch, abrade, place a heavy object on, heat, twist, bend, pull on, or damage the power
cord. Use of a damaged power cord (exposed core wire, broken wire, etc.) could result in fire or
breakdown.
Should any of these conditions be found, immediately turn OFF the power switch, unplug the
power cord from the power outlet, and then call your authorized service rep resentat ive.
• In principle, do not use an extension cord. Use of an extension cord could cause fire or electrical
shock. Contact your authorized service representative if an extension cord is required.
Do not place a flower vase or other container that contains water, or metal clips or other small metallic
objects on this product. Spilled water or metallic objects dropped inside the product could result in
fire, electrical shock, or brea k-down.
Should a piece of metal, water, or any other similar foreign matter get inside the product, immediately
turn OFF the power switch, unplug the power cord from the power outlet, and then call your authorized service representative.
• If this product becomes inordinately hot or emits smoke, or emits an unusual odor or noise, immediately turn OFF the power switch, unplug the power cord from the power outlet, and then call your
authorized service representative. If you keep on using it as is, fire or electrical shock could result.
• If this product has been dropped or its cover damaged, immediately turn OFF the power switch,
unplug the power cord from the power outlet, and then call your authorized service representative.
If you keep on using it as is, fire or electrical shock could result.
Do not throw the toner cartridge or toner into an open flame. The hot toner may scatter and cause
burns or other damage.
1
Connect the power cord only to an electrical outlet that is equipped with a grounding terminal.
Konica 7115/7118 1-3
Page 12
1
CAUTION
Introduction
• Do not use flammable sprays, liquids, or gases near this product, as fire could result.
• Do not leave a toner unit or drum unit in a place within easy reach of children.
Licking or ingesting any of these substances could injure your health.
• Do not let any object plug the ventilation holes of this product. Heat could accumulate inside the
product, resulting in a fire or malfunction.
• Do not install this product at a site that is exposed to direct sunlight, or near an air conditioner or
heating apparatus. The resultant temperature changes inside the product could cause a malfunction, fire, or electrical shock.
• Do not place the product in a dusty place, or a site exposed to soot or steam, near a kitchen table,
bath, or a humidifier. Fire, electrical shock, or breakdown could result.
• Do not place this product on an unstable or tilted bench, or in a location subject to a lot of vibration
and shock. It could drop or fall, causing personal injury or mechanical breakdown.
• After installing this product, mount it on a secure base. If the unit moves or falls, it may cause personal injury.
• Do not store toner units and PC drum units near a floppy disk or watch that are susceptible to magnetism. They could cause these products to malfunction.
The inside of this product has areas subject to high temperature, which may cause burns. When
checking the inside of the unit for malfunctions such as a paper misfeed, do not touch the locations
(around the fusing unit, etc.) which are indicated by a “Caution! High Temperature!” warning label.
Do not place any objects around the power plug, as the power plug may be difficult to pull out if an
emergency occurs.
• Always use this product in a well ventilated location. Operating the product in a poorly ventilated
room for an extended period of time could injure your health. Ventilate the room at regular intervals.
• Whenever moving this product, be sure to disconnect the power cord and other cables. Failure to
do this could damage the cord or cable, resulting in fire, electrical shock, or breakdown.
• When moving this product, always hold it by the locations specified in the user’s manual or other
documents. If the unit falls it may cause severe personal injury. The product may also be damaged
or malfunction.
• Remove the power plug from the outlet at least twice a year and clean the area between the plug
terminals. Dust that accumulates between the plug terminals could cause a fire.
• When unplugging the power cord, be sure to hold onto the plug. Pulling on the power cord could
damage the cord, resulting in fire or electrical shock.
1-4 Konica 7115/7118
Page 13
Introduction
Precautions for Routine Use
• Do not store toner units, PC drum units, or other supplies and consumables in a place subject to
direct sunlight and high temperature or humidity, as poor image quality and malfunction could result.
• Do not attempt to replace the toner unit and PC drum unit in a place exposed to direct sunlight. If
the PC drum is exposed to intense light, poor image quality could result.
• Do not unpack a toner unit or PC drum unit until the time of use. Do not leave an unpacked unit
standing. Install it immediately or poor image quality could result.
• Do not keep toner units and PC drum units in an upright position or upside down, as poor image
quality could result.
• Do not throw or drop a toner unit or PC drum unit, as poor image quality could result.
• Do not use this product in an area where ammonia or other gases or chemicals are present. Failure
to do so may shorten the service life of the product, cause damage or decrease performance.
• Do not use this product in an environment with a temperature outside the range specified in the
user’s manual, as breakdown or malfunction could result.
• Do not attempt to feed stapled paper, carbon paper or aluminum foil through this product, as malfunction or fire could result.
Do not touch or scratch the surface of the toner unit developing roller or the PC drum, as poor image
quality could result.
Use the supplies and consumables recommended by the dealer. Use of any supply or consumable
not recommended could result in poor image quality or breakdown.
1
Konica 7115/7118 1-5
Page 14

1
Introduction
USER INSTRUCTIONS FCC PART 15 - RADIO FREQUENCY DEVICES (For U.S.A. Users)
NOTE: This equipment has been tested a nd found to comply with the l imits for a C lass A dig ital
device, pursuant to Part 15 of the FCC R ules. These limits are d esign ed to provid e reas onable
protection against harmful interference when the equipment is operated in a commercial
environment. This equipment generates, uses and can radiate radio frequency energy and, if
not installed and used in accordance with the instruction manual, may cause harmful
interference to radio comm unica tions . Ope rati on of this equi pment in a resi dentia l area i s li kely
to cause harmful interfe rence, in whi ch case the user wil l be required to co rrect the interfe rence
at his own expense.
WARNING: The design and production of this unit conform to FCC regulations, and any
changes or modifica tions must be registered with the FCC and ar e subject to FCC control. Any
changes made by the purc haser or user without first con tacting the manufactur er will be subject
to penalty under FCC regulations.
This device must be used with shielded interface (Parallel) cable and shielded network (10/
100BaseT) cable.
This use of non-shield ed cables is l ikely to result in interference with radio comm unications a nd
is prohibited under FCC rules.
INTERFERENCE-CAUSING EQUIPMENT STANDARD (ICES-003 ISSUE3) (For Canada Users)
This Class A digital apparatus complies with Canadian ICES-003.
Cet appareil numérique de la classe A est conforme à la norme NMB-003 du Canada.
1-6 Konica 7115/7118
Page 15
Introduction
Laser Safety
This is a digital m achine whi ch operates usi ng a laser. Th ere is no pos sibility of danger from the
laser provided the machine is operated according to the instructions in this manual.
Since radiation emitted by the laser is completely confined within protective housing, the laser
beam cannot escape from the machine during any phase of user operation.
This machine is certified as a Cla ss 1 la ser produc t: This means th e machi ne does not produ ce
hazardous laser radiation.
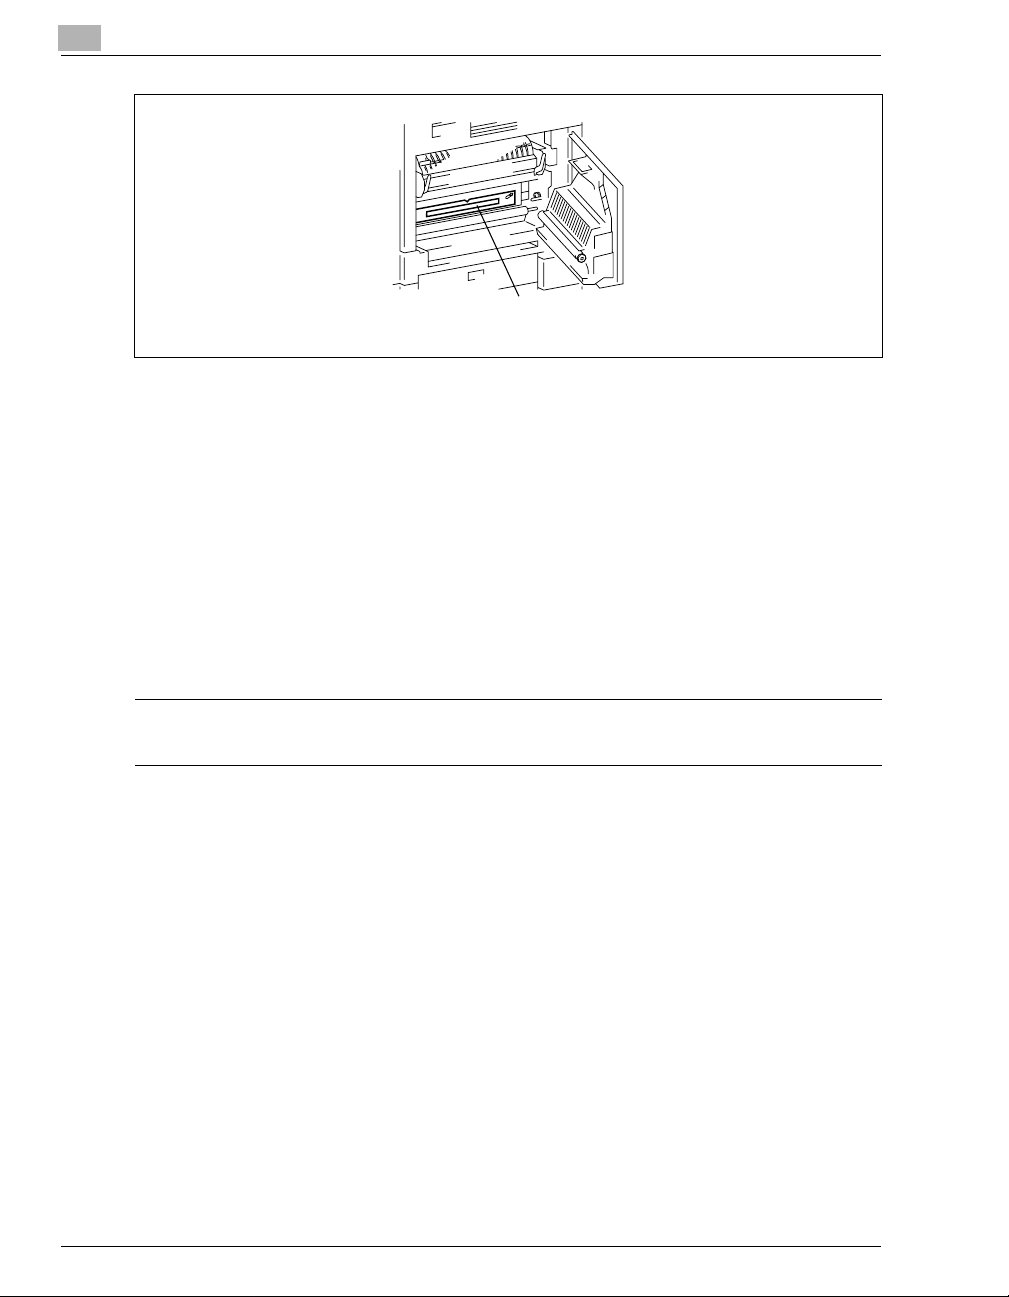
Internal Laser Radiation
Maximum Average Radiation Power: 26.4 µW at the laser aperture of the print head unit.
Wavelength: 770-795 nm
This product employs a Class 3b laser diode that emits an invisible laser beam.
The laser diode and the scanning polygon mirror are incorporated in the print head unit.
The print head unit is NOT A FIELD SERVICE ITEM.
Therefore, the print head unit should not be opened under any circumstances.
1
Print Head
Konica 7115/7118 1-7
Page 16
1
Introduction
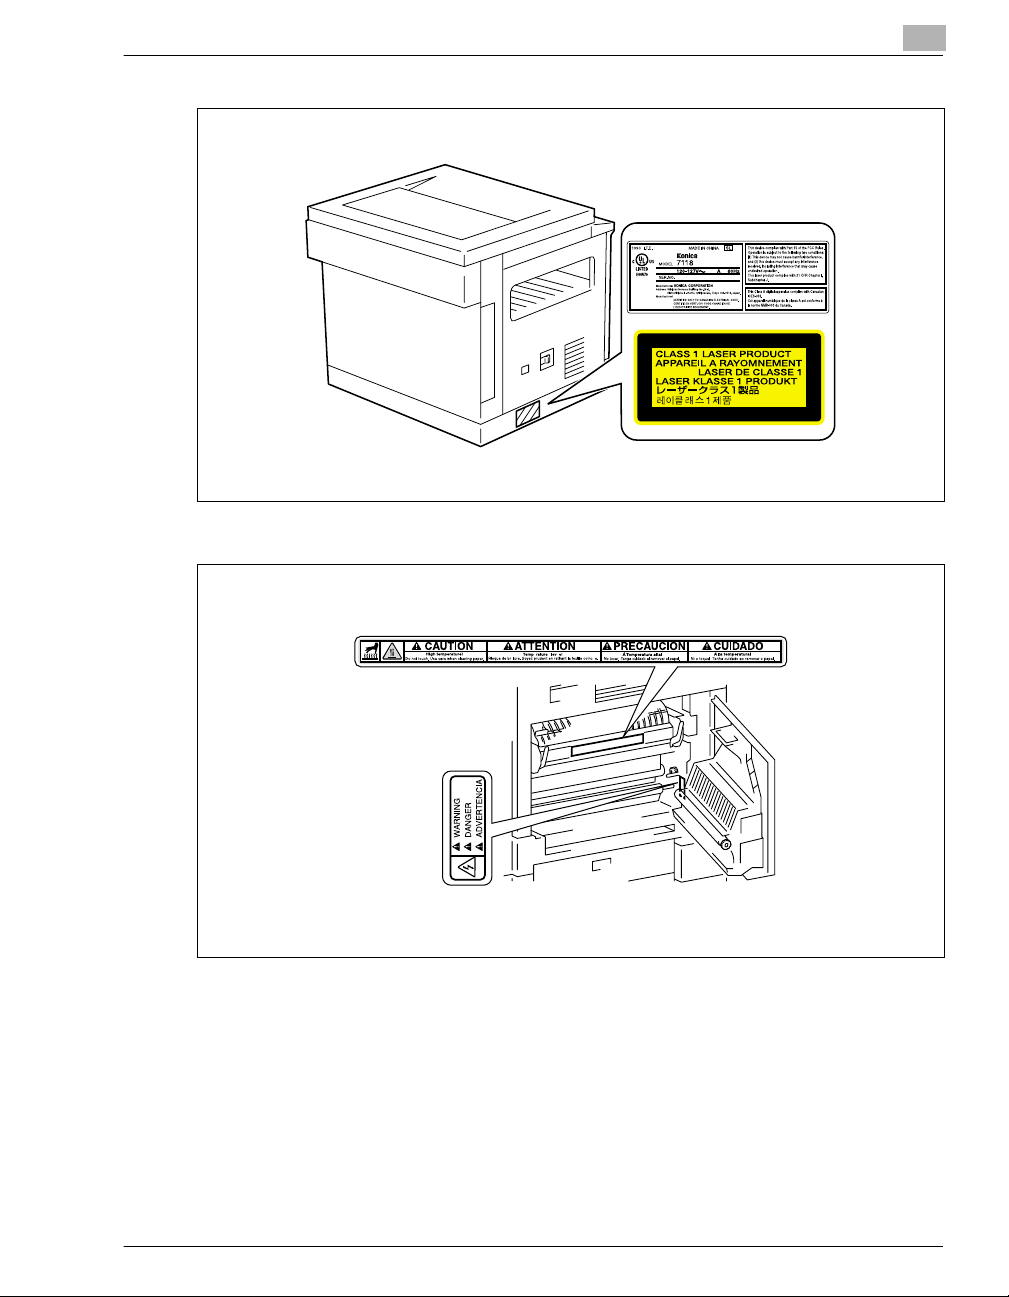
Laser Aperture of the
Print Head Unit
There is a laser aperture at th e location shown above, w hich must, however, NEV ER be viewed
directly by the user.
CDRH Regulation
This machine is certified as a Class 1 Laser product under Radiation Performance Standard
according to the Food, Drug and Cosmetic Act of 1990. Compliance is mandatory for Laser
products marketed in the United States and is reported to the Center for Devices and
Radiological Health (CDRH) of the U.S. Food and Drug Administration of the U.S. Department
of Health and Human Services (DHHS). This means that the device does not produce
hazardous laser radiation.
The label shown on page 1-9 indicates compliance with the CDRH regulations and must be
attached to laser products marketed in the United States.
CAUTION
Use of controls, ad jus tments or performance of procedures othe r th an those specified i n this
manual may result in hazardous radiation exposure.
This is a semiconductor laser. The maximum power of the laser diode is 5 mW and the
wavelength is 770-795 nm.
1-8 Konica 7115/7118
Page 17
Introduction
W ARNING LABEL
1
Konica 7115/7118 1-9
Page 18

1
Introduction
Ozone Release
NOTE
= Locate the Machine in a Well Ventilated Room =
A negligible amount of ozone is generated during normal operation of this machine. An unpleasant odor may, howev er, be created in poorly ventilated room s during extensiv e m achi ne
operations. For a comfortable, healthy, and safe operating environment, it is recommended
that the room is well ventilated.
REMARQUE
= Placer l’appareil dans une pièce largement ventilée =
Une quantité d'oz one négligable est dégagée pendant le f o nctio nneme nt d e l’ap pareil quand
celui-ci est ut ilisé normalemen t. Cependan t, une od eur désagréab le peut être ressentie dans
les pièces dont l'aération est insuffisant e et lorsqu e une util isation p rolongée d e l’appare il est
effectuée. Pour avoir la certitude de travailler dans un environnement réunissant des conditions de conf ort, santé et de sécurité, il est préférable de b ien aérer la pièce ou se tr ouve l’ap-
pareil.
1-10 Konica 7115/7118
Page 19
Introduction
1.2 About the User’s Manual
Explanation of Manual Conventions
The marks and text formats used in this manual are described below.
WARNING
Failure to observe instructions highlighted in this manner may result in critical or fatal
injuries.
Observe all warnings in order to ensure safe use of the copier.
➜
CAUTION
Failure to observe instructions highlight ed in this manner ma y result in serious inju ries
or property damage.
Observe all cautions in order to ensure safe use of the copier.
➜
✎
1
Note
(* May also appear as “Important” or “Tip”)
Text highlighted in this manner contains useful information and tips to ensure safe use of
the copier and serve as s upplemen tary info rmat ion. It is recom mende d that you read all of
them.
1
The number 1 as formatted here indicate s the first step of
a sequence of actions.
2
Subsequent numbers as formatted here indicate subsequent steps of a sequence of actions.
Text formatted in this style provides additional assist-
?
ance.
Text formatted in this style describes the action that
➜
will ensure the desired results are achieved.
[ ] key
The names of keys on the control panel are written as shown above.
An illustration inserted here shows
what operations must be perform ed.
Konica 7115/7118 1-11
Page 20
1
1.3 Explanation of Basic Concepts and Symbols
The use of words and symbols in this manual are explained below.
Paper Feeding
During printing, paper is s upp li ed fro m th e rig ht s ide of th e co pie r and fed into the Exit Tray on
top with the printed su rface o f the pag e facin g dow n. The p aper fee d direc tion is shown b y the
arrows in the diagram below.
Introduction
1-12 Konica 7115/7118
Page 21
Introduction
“Width” and “Length”
Whenever paper dimensions are mentioned in this manual,
the first value alwa ys re fers to th e w i dth of the pa pe r (s how n
as “A” in the illust ration) and the seco nd to the le ngth (sho wn
as “B”).
A: Width
B: Length
Paper Orientation
Lengthwise ( )
If the width (A) of the paper is shorter th an the length (B), the
paper has a vertical or portrai t orientation, in dicated by either
“L” or .
Crosswise ( )
If the width (A) of the paper i s l ong er tha n th e le ngth (B), the
paper has a horizontal or lan dscape or ientation, indicated by
either “C” or .
1
Konica 7115/7118 1-13
Page 22

1
Introduction
1-14 Konica 7115/7118
Page 23

Precautions
2 Precautions
Observe the following precautions to keep the copier in the best possible conditions.
2.1 Installation Precautions
Installation site
To ensure utmost s afe ty a nd prev en t po ss ibl e m al func tions, install the cop ie r in a lo cat ion that
meets the following requirements:
-
A location away from curtains, etc. that may catch fire and burn easily
-
A location that is not exposed to water or other liquids
-
A location free from direct sunlight
-
A location out of the direct airflow of an air conditioner or heater, and not exposed to extremely hi gh or low temperatures
-
A well-ventilated location
-
A location that is not exposed to high humidity
-
A location that is not extremely dusty
-
A location not subjected to undue vibrations
-
A stable and level location
-
A location where ammonia or other organic gases are not generated
-
A location that does not put the operator in the direct airflow of exhaust from the copier
-
A location that is not near any kind of heating devices
2
Power source
The power source requirements are as follows.
Voltage Fluctuation: Within ±10%
G
Frequency Fluctuation: Within ±0.3Hz
G
Konica 7115/7118 2-1
Page 24
2
Precautions
Space Requirements
To ensure easy copier operation, supply replacement, and maintenance, adhere to the recommended space requirements detailed below.
Konica 7115
23.1 (588)
Konica 7118
43.7 (1109)
37.8 (959)
45.1 (1145)
39.2 (995)
5.9
(150)
5.9
(150)
44.8 (1138)
40.9 (1038) 3.9 (100)
41.9 (1065)
Unit: inch (mm)
44.8 (1138)
40.9 (1038) 3.9 (100)
60.0 (1524)
41.5 (1055)
Unit: inch (mm)
✎
Note
Be sure to allow a clearance of 3.9 in. (100 mm) or more at the back of the copier for the
ventilation duct and 5.9 in. (150 mm) o r more at the right of th e copier for the removal of the
misfed papers.
2-2 Konica 7115/7118
Page 25
Precautions
2.2 Operation Precautions
Operating Environment
The environmental requirements for correct operation of the copier are as follows:
Temperature: 50°F (10°C) to 86°F (30°C) with fluctuations of no more than 18°F (10°C)
G
within an hour
Humidity: 15% to 85% with fluctuations of no more than 10% within an hour
G
Proper Use
To ensure the optimum performance of the copier, follow the precautions listed below:
-
Never place heavy objects on the Platen Glass or subject it to shocks.
-
Never open any co pie r doors or turn OFF the copier while it i s ma ki ng copies/printing, as a
paper misfeed could result.
-
Never bring any magnetized object near the copier.
-
Never use flammable sprays or liquids near the copier.
-
Always make sure that the power plug is completely plugged into the electrical output.
-
Always make sure that the copier’s power plug is visible and not hidden by the copier.
-
Always unplug the copier from the electrical outlet if the copier is not to be used for a long
period of time.
-
Always provide good ventilation w he n mak in g a l arge number of co ntin uou s copies/printed
pages.
2
CAUTION
A negligible amount of ozone is generated during normal operation of this copier. An
unpleasant odor may, however, be de tected in po orly ventilate d rooms during extensive
copier operations.
For a comfortable operating environment, it is recommended that the room be well
➜
ventilated.
Konica 7115/7118 2-3
Page 26
2
Precautions
CAUTION
The area around the Fusing Unit is extremely hot.
To reduce the risk of burns , do not touch areas not specifically autho rized in the manual. Be
➜
especially careful not to touch parts marked with warning labels, and their surrounding
areas.
Transporting the Copier
If you need to transpo rt the co pier ove r a lon g distan ce, con sult yo ur authori zed Koni ca Servi ce
Representative.
Care of Copier Supplies
Use the following precautions when handling the copier supplies (toner, paper, etc.).
-
Store the supplies in a location that meets the following requirements:
Free from direct sunlight
Away from any heating apparatus
Not subjected to high humidity
Not extremely dusty
-
Paper that has been removed from i ts wrapper b ut not loaded in the copi er should be stored
in a sealed plastic bag in a cool, dark place.
-
Use only toner that has been manufactured specifically for this copier. Never use other
types of toner.
-
Keep all supplies out of the reach of children.
CAUTION
Be careful not to spill toner inside the copier or get toner on your clothes or hands.
If your hands become soiled with toner, immediately wash them with soap and water.
➜
2-4 Konica 7115/7118
Page 27

Precautions
2.3 Legal Restrictions on Copying
Certain types of docu ments must not be copied with the purpose or intent to pass cop ies of such
documents off as the originals.
The following is not a complete list, but is meant to be used as a guide to responsible copying.
<Financial Instruments>
Personal checks
G
Travelers checks
G
Money orders
G
Certificates of deposit
G
Bonds or other certificates of indebtedness
G
Stock certificates
G
<Legal Documents>
Food stamps
G
Postage stamps (canceled or uncanceled)
G
Checks or drafts drawn by government agencies
G
Internal revenue stamps (canceled or uncanceled)
G
Passports
G
Immigration papers
G
Motor vehicle licenses and titles
G
House and property titles and deeds
G
<General>
Identification cards, badges, or insignias
G
Copyrighted works without permission of the copyright owner
G
You are prohibited unde r any ci rcu ms tan ce s to c opy do me sti c or fo rei gn c urren cy. In a ddi tio n,
you are prohibited to copy works of art without permission of the copyright owner.
When in doubt about the nature of a document, consult with legal counsel.
2
Konica 7115/7118 2-5
Page 28

2
Precautions
2-6 Konica 7115/7118
Page 29

Before Making Copies
3 Before Making Copies
3.1 Available Feature s
The main copy settings availab le with this co pier are listed below. For de tails on their operation,
refer to the pages indicated.
Copies
1-sided copies (p.6-1)
G
2 in 1 copies (p.6-1)
G
3
4 in 1 copies (p.6-1)
G
Book Copy (p.6-2)
G
Konica 7115/7118 3-1
Page 30
3
Zoom Ratio
Reduced/Full Size/Enlarge (p.5-11)
G
Output
Sort (p.6-6)
G
Group (p.6-8)
G
Before Making Copies
✎
Note
The Sort and Grou p f unc tio ns a re available when the c opi er i s eq uip ped w it h a n Auto matic
Document Feeder, 16MB Mem ory fo r Copier o r 32MB Mem ory for Copier, a nd Paper Feed
Cabinet or Multiple Bypass Tray.
3-2 Konica 7115/7118
Page 31

Before Making Copies
Applications
Margin Erase (p.6-10)
G
Reverse Image (p.6-13)
G
X/Y Zoom (p.5-14)
G
Image Shift(p.6-14)
G
3
Mixed Orig. Detection
Mixed Originals (p.4-4)
G
✎
Note
The Mixed Orig. Detection function is available when the copier is equipped with an
Automatic Document Feeder.
Konica 7115/7118 3-3
Page 32

3
3.2 Components and Their Functions
Copier
Konica 7115/7118
G
Original Cover Kit CV-117 (option)
Presses down on an original placed on the Platen Glass.
G
Standard on Konica 7115.
Automatic Document Feeder DF-217 (option)
Automatically feeds originals one page after another for
G
scanning and copying.
Before Making Copies
Paper Feed Cabinet PF-121 (option)
Capable of holding up to 250 sheets of paper.
G
Shifting Unit IS-101 (option)
Permits sorting or grouping of copies according to the particular finishing setting made.
G
Job Tray IT-102 (option)
Performs sorting and grouping of faxes, printed pages, and copies into the upper or lower
G
bin.
3-4 Konica 7115/7118
Page 33

Before Making Copies
Multiple Bypass MT-102 (option)
Up to 50 sheets of Paper can be loaded in the Bypass
G
Tray.
Fax Unit for Konica 7115/7118 FK-117 (option)
Permits fax transmission using this copier.
G
Printer Controller IP-413 (option)
A built-in type printer c ontrol ler that allow s the copie r to be used a s a pri nter with the co pier
G
connected to a personal computer.
Network Interface Card KN-305 (option)
Allows the copier to be used as a network printer.
G
16MB Memory for Copier MU-409 (option)
32MB Memory for Copier MU-410 (option)
Expands the memory capac ity of the copier (16MB, 32M B), thereby allow ing image rotation
G
and 2 in 1 copying to be performed.
3
Konica 7115/7118 3-5
Page 34

3
3.3 Parts Names and Their Functions
Copier
1
Before Making Copies
2
3
8
7
6
5
4
9
10
11
* The above illustrations represen t a copie r mounted with the optional Original Cov er Kit.
3-6 Konica 7115/7118
Page 35

Before Making Copies
No. Part Name Description
1 Copy Tray Holds copies fed out face down from the copier.
2 Front Cover Open when replacing the Toner Bottle. (p.8-8)
3 1st Tray Holds up t o 250 s heet s of pa per a nd ea sily adjus ts to diffe rent paper
4 Manual Bypass Tray Use for manual feeding of paper.
5 Lock Relase Cover Use to unlock the Side Cover.
6 Side Cover Open to clear a misfed sheet of paper.
7 Power Switch Use to turn the copier ON and OFF. (p.3-15)
8 Original Scales Use to align the original. (p.4-7)
9 Original Cover Holds the original a gainst the P laten Glass.
10 Platen Glass Place your original on this glass to allow the copier to scan it. The
11 Control Panel Use to start a copy cycle and make necessary settings. (p.3-12)
sizes.
Special paper can be used. (p.3-22)
The paper is fed one sheet at a time.
Special paper can be used. (p.5-6)
original is to be placed face down. (p.4-6)
3
Konica 7115/7118 3-7
Page 36

3
Before Making Copies
Inside the Copier
3
2
1
No. Part Name Description
1 Imaging Unit Forms a copy image.
2 Toner Bottle Holder Open to replace the Toner Bottle.
3 Pressure Lever Use to clear a misfed sheet of paper at the Fusing Unit. (p.8-12)
The Imaging Unit is to be replaced only by your authorized Konica
Service Representative.
3-8 Konica 7115/7118
Page 37

Before Making Copies
Options
Automatic Document Feeder
3
3
2
1
4
5
6
No. Part Name Description
1 Document Exit Tray Receives originals which have been scanned by the copier.
2 Document Guide Plate Slide the guide plate to the size of the originals. (p.4-3)
3 Document Feeder Cover (Doc.
Feed Cover)
4 Document Feeder Tray Load the originals to be copied face up on this tray. (p.4-3)
Open when clearing an original that has been misfed. (p.8-18)
Multiple Bypass Tray
No. Part Name Description
5 Bypass Tray Up to 50 sheets of plain paper or 20 sheets of special paper can be
6 Bypass Tray Extender Slide this Bypass Tray Extender out to load paper of a large size.
loaded on this tray. (p.8-7)
Konica 7115/7118 3-9
Page 38

3
10
Before Making Copies
7
8
9
11
Paper Feed Cabinet
No. Part Name Description
7 2nd Tray Up to 250 sheets of plain paper can be loaded. (p.8-6)
83rd Tray
94thTray
10 5thTray
11 Side Cover Open to clear a misfed sheet of paper. (p.8-15)
Konica 7118 accepts a Paper Feed Cabinet of four trays.
Konica 7115 accepts a Paper Feed Cabin et of one tra y.
3-10 Konica 7115/7118
Page 39

Before Making Copies
3
When Job Tray is Mounted
13
12
14
15
Shifting Unit
No. Part Name Description
12 Copy Tray Receives copy sets sorted.
Job Tray
No. Part Name Description
13 Copy Tray Indicator Lights up when paper is fed into the Upper Copy Tray.
14 Upper Copy Tray Receives printed pages produced via the personal computer or
15 Lower Copy Tray Receives copies made.
faxes received.
Konica 7115/7118 3-11
Page 40

3
3.4 Control Panel
Names of Control Panel Parts and Their Functions
Before Making Copies
1
2
11
10
3
4
5
6
9
78
12
13
14
16
15
18
17
21
22
26
25
27
No. Part Name Description
1 PRINT • Lit while data received from personal computer is being printed.
2 JOB STORE • Press to select the Job Input mode. Two different jobs can be
3 COUNTER • Press to display the Total Counter or Size Counter value.
4 REVERSE IMAGE • Press to copy an original with the original tonal arrangements
5 ORIGINAL • Press to select the Mixed Original or Book copy function.
6 COMBINATION • Press to select the 2 in 1 or 4 in 1 function.
7 MARGIN ERASE • Press to select the erase position.
8OUTPUT • Press to select the finishing function.
9 IMAGE SHIFT • Press to select the Image Shift mode.
10 X/Y ZOOM • Press to make a copy with different zoom ratios set for X
24
19
Blinks while data is being transferred.
For details, refer to the Printer Controller User’s Manual.
programmed.
reversed.
(horizontal) and Y (vertical) directions.
23
20
3-12 Konica 7115/7118
Page 41

Before Making Copies
No. Part Name Description
11 JOB RECALL • Press to recall either one of the two jobs previously stored in
12 BYPASS TRAY SIZE SELECT • Press to select the size of the paper loaded in the Bypass Tray.
13 ZOOM • Press to change the zoom ratio in the range between 50% and
14 DISPLAY • Shows the number of copies to be made, the zoom ratio, and
15 KEYPAD • Use to type in the number of copies to be made and any other
16 ID • Press when entering an account number.
17 POWER SAVE • Press to set the copier into the Power Saver mode.
18 INTERRUPT • Press to interrupt a copy job.
19 AUTO RESET • Press to reset all copy functions and settings to their defaults.
20 CLEAR • Press to reset the number of copies to “1.”
21 STOP • Press to stop a print cycle.
22 START • Press to start a scanning sequence.
23 ENTER • Press to validate the setting just made.
24 RE • Press to select a zoom ratio from among those fixed ratios
25 APS/AMS • Press to select either Auto Paper or Auto Size.
26 SIZE • Press to select the paper size
27 DENSITY SET • Press to adjust the image density of the copy.
memory.
200% in 1% increments.
• What is shown on the Display changes from the number of copies
to be made to the zoom ratio.
other setting data.
numeric data.
• Becomes valid only when Copy Track has been set.
• Holding down the key for 3 seconds or more will set the copier
into the Utility mode.
• Press to stop a scanning sequence.
• Press to start a print cycle.
• Press to validate the setting just made.
• The key lights up green when the copier is ready to make copies,
orange when it is not ready to make copies.
available as standard.
.
3
Konica 7115/7118 3-13
Page 42

3
Before Making Copies
Icons on the Control Panel
Icon Name Description
Paper Misfeed Indicator Lights up when a paper misfeed occurs in the copier.
Malfunction Indicator Lights up when a malfunction occurs in the copier.
Maintenance Indicator Blinks or lights up when the time approaches that copier
Add Paper Indicator Lights up when the paper source currently selected for use
Add Toner Indicator Lights up when toner will soon run out.
needs maintenance service.
Call your authorized Konica Service Representative.
runs out of paper.
3-14 Konica 7115/7118
Page 43

Before Making Copies
3.5 Turning ON and OFF and the Initial Mode
How to Turn the Copier ON/OFF
Turning Copier ON:
Press the Power Switch to the 1 (ON) position.
➜
Turning Copier OFF:
Press the Power Switch to the 2 (OFF) position.
➜
✎
Note
Do not turn the copier OFF while a copy cycle is being run, as paper misfeed will result.
Before attempting to turn the copier OFF, always be sure that the current copy cycle has
been completed.
Turning the copier OFF will initialize all settings except those for the jobs previously
programmed and Utility Mode.
✎
Note
The copier automatically enters the Energy Saver mode 15 min after it has been touched
last. It enters the Aut o Shu t O FF m od e au tom ati ca lly 30 mi n after it has been tou ch ed l ast .
The time for the copier to enter the Energy Saver and Auto Shut OFF mode can be set in
the User’s Choice mode. For details, refer to “Using the Utility Mode” (p.7-1, p.7-8).
3
When Copier is Turned ON
When the Power Switch is turned ON , the [START] k ey starts blinkin g indicat ing that the copier
is warming up.
At this time, the copier can be spe cified for the Auto Co py Start func tion by loadi ng a docum ent
in the Automatic Document Feeder and pressing the [START] key.
Pressing the [START] key at thi s time will not immed iately start the c opy cycle. Rathe r, you are
going to have to wait for about 30 seconds (at an ambient temperature of 73.4°F/23°C).
Konica 7115/7118 3-15
Page 44

3
Before Making Copies
Default Settings
When the copier is turned ON, the function indicators on the control panel will indicate the
default settings which serve as the reference for all control panel settings to be made later.
Default settings
Number of copies: 1
G
Exposure: Auto
G
Zoom ratio: 100% (full size)
G
Paper: APS (When Automatic Document Feeder is mounted)
G
Output: Non-Sort
G
✎
Tip
The default settings can be customized in the User’s Choice mode. (p.7-2)
3-16 Konica 7115/7118
Page 45

Before Making Copies
3.6 Useful Functions
Panel Resetting
Press the [AUTO RESET] key to return all m odes and func tions (zoom rati o, number of cop ies,
etc.) to their defaults. (All selected settings are canceled.)
✎
Tip
The [AUTO RESET] key comes in handy for canceling all selected settings at one time.
To avoid accidentally using settings from the previous copy job, press the [AUTO RESET]
key to return all functions and settings to their defaults before making any setting for your
current job.
Auto Panel Reset
Without pressing the [AUTO RESET] key, the copier automatically resets all functions and
settings to their defaults 1 min after a copy cycle has been completed or a key has been
touched.
✎
Tip
The length of time before the copier automatically resets itself can be set between 30
seconds and 5 min. The Auto Panel Reset function can even be disabled.
For more details, refer to “User’s Choice” (p.7-2, p.7-8).
3
Konica 7115/7118 3-17
Page 46

3
Before Making Copies
Power Saver
Instead of turning the copier OFF, it can be set to standby mode (Power Saver mode).
To set the copier into the Po wer Saver mode, press the [POWER SAVE ] key. In addition, i f the
copier is not used fo r a set leng th of time, it will automati cally ente r the Power Saver m ode. The
default length of time is 15 min.
To cancel the Power Saver mode, press any key on the control panel.
✎
Note
If the Auto Shut-OFF fun cti on is ac tiv ated while the copier is in the Power Saver mode, the
copier will automatically turn itself OFF.
✎
Tip
The length of time before the copier enters the Power Saver mode can be set between 1
min and 240 min.
For more details, refer to “User’s Choice” (p.7-2, p.7-8).
Auto Shut-OFF
If a set length of time elapses after the copier has been used last, the copier is designed to
automatically turn itself OFF to save energy. The default length of time is 30 min.
✎
Tip
The length of time before the Auto Shut-OFF function is activated can be set between 15
min and 240 min. The Auto Shut-O FF function can also be di sabled. For more detai ls, refer
to “User’s Choice” (p.7-2, p.7-8 and p.7-26).
Auto Copy Start
If a document is loaded and the [START] ke y is pressed during the period after the co pie r has
been turned ON but b efore it is read y to make copie s, the copier will automatically start the copy
cycle as soon as it completes the warm-up cycle.
3-18 Konica 7115/7118
Page 47

Before Making Copies
Interrupting Copy Jobs
During a long conti nuous copy or prin t cycle, the copie r may be needed to quickly run a dif ferent
job. To interrupt a current job, press the [INTERRUPT] key.
Press the [INTERRUPT] key a second time to return to the stopped job.
✎
Note
Depending on the specific settings made, the current job may reject the Interrupt mode.
Also, some funct ions are not avail able f or the I nterrupt mode. For m ore det ails, refer to the
“Function Combination Table” (p.10-6).
Auto Tray Switching
If the current tray runs out of paper during a copy cycle and there is another tray loaded with
paper of the same size and in the same direction, the copier will automatically select that tray
to continue copying.
3
Konica 7115/7118 3-19
Page 48

3
Before Making Copies
Account Number
If account numbers ha ve been programmed, use of the c op ier c an be l im ite d to ce rtain people
or to a specified number of copies for each account.
✎
Note
If account numbers have been programmed, the copier
cannot be used unless the specific account numbe r is
entered first.
<Account number entry screen>
To use this function, set “Copy Track” of “Administrator
Mode” under the Utility mode. (p.7-20)
To enter an account number
1
Enter the 3-digit account number on the KEYPAD.
Do you want to correct the access number just
?
entered?
Press the [CLEAR] key and then enter the correct
➜
account number.
2
Press the [ID] key.
3
The account number entry screen changes to the default setting indication, indicating that
the copier is ready to make copies. Run the desired copy cycle.
4
When the copy cycle is completed, press the [ID] key a second time.
3-20 Konica 7115/7118
Page 49

Before Making Copies
Printing from the Personal Computer
When the optional prin ter co ntro lle r is ins tall ed , the c opi er can be used as a printer confi gure d
to a computer network.
For details of operation, refer to the Printer Controller User’s Manual.
Sending and Receiving Faxes Using the Copier
When the optional Fax Unit is mounted, fax transmission can be made using this copier.
For details of operation, refer to the Fax Unit User’s Manual, available separately.
3
Konica 7115/7118 3-21
Page 50

3
3.7 Copy Paper
Paper Specifications
The following table s pecifi es the type and size of pap er to be us ed with ea ch t ray toge ther with
its capacity.
1st Tray Specifications
Paper Type • Plain paper, recycled paper (16 lbs. to 24 lbs.)
Paper Size • 11×17L, 11×14L, Legal L, Letter, Invoice
Capacity • Plain paper, recycled paper: 250 sheets
2nd Tray Specifications
Paper Type Plain paper, recycled paper (16 lbs. to 24 lbs.)
Paper Size 11 × 17L to Invoice L
Capacity 250 sheets
* Same with the 3rd, 4th, and 5th Tray
Before Making Copies
• Special paper:
Card (24-1/4 lbs. to 41-3/4 lbs.), OHP transparencies, postcards, labels
Width: 3-9/16 in. to 11-11/16 in.
Length: 5-1/2 in. to 17 in.
• Special paper: 20 shee ts
Manual Bypass Tray Specifications
Paper Type • Plain paper, recycled paper (16 lbs. to 24 lbs.)
Paper Size • Width: 3-9/16 in. to 11-11/16 in.
Capacity 1 sheet
Multiple Bypass Tray Specifications
Paper Type • Plain paper, recycled paper (16 lbs. to 24 lbs.)
Paper Size • Width: 3-9/16 in. to 11-11/16 in.
Capacity • Plain paper, recycled paper: 50 sheets
• Special paper:
Card (24-1/4 lbs. to 41-3/4 lbs.), OHP transparencies, postcards, labels
• Length: 5-1/2 in. to 17 in.
• Special paper:
Card (24-1/4 lbs. to 41-3/4 lbs.), OHP transparencies, postcards, labels
• Length: 5-1/2 in. to 17 in.
• Special paper: 20 shee ts
3-22 Konica 7115/7118
Page 51

Before Making Copies
Precauti ons for Loading Paper
Be sure to adhere to the paper spe cifications for e ach tray (i. e., pape r type, paper size, an d
G
capacity). Otherwise, a paper misfeed can occur.
When loading paper me asured in metric (A4, B4) in th e tray, change “Paper Auto Detec tion”
G
in the User’s Choice mode. (p.7-9)
The metric indicator lights when the tray is loaded with paper measured in metric (A4, B4).
G
When loading nons tan dard si ze pa per in the 1st Tray, se t “Cus tom Si ze Inpu t” in the Utility
G
mode. (p.7-14)
When loading nonst and ard s iz e p ape r in th e By pas s T ray , perf orm the “C u sto m Si ze Input
G
(Bypass Tray)” procedure under “Making Copies.” (p.5-9)
When loading Cards, OHP transparencies, or postcards in the 1st Tray, change “Paper
G
Type (1st Tray)” in the User’s Choi ce mo de. (p.7-9)
When loading Cards, O HP transparencie s, or postcards in the Bypass Tray , change “Paper
G
Type (Bypass Tray)” in the User’s Choice mode. (p.7-9
To disable Auto Paper or Auto Tray Switching with recycled paper loaded in the tray, chang e
G
“Special Paper Setting” in the User’s Choice mode. (p.7-9)
When loading paper of any FLS size other than the default setting (210 mm × 330 mm),
G
setting by your authorized Konica Service Representative is necessary. Consult your
authorized Konica Service Representative for this setting.
For information regard ing loading paper, refer to “When the Add Paper In dicator Lights .” (p.8-4)
3
)
Konica 7115/7118 3-23
Page 52

3
Before Making Copies
3-24 Konica 7115/7118
Page 53

Loading Originals
4 Loading Originals
4.1 Two Ways to Load the Original
The original may be load ed in the Automa tic Documen t Feeder or place d directly on the Platen
Glass. Choose the appropriate method according to the type of the original.
Specific Types of Originals
Original Loading Original Type Original Size
Automatic Document Feeder Sheet originals
Platen Glass Max. weight of sheet originals,
• Weight of originals: 13-1/4 lbs. to
29-1/4 lbs.
• Weight of originals of mixed sizes:
16 lbs. to 24 lbs.
books, or three-dimensional objects:
6-1/2 lbs.
11×17L to InvoiceL
• Original width: 3-9/16 in. to 11-11/16 in.
• Original length: 8-1/4 in. to 17 in.
11×17L to Invoice
• Original width: Up to 11-11/16 in.
• Original length: Up to 17 in.
4
Konica 7115/7118 4-1
Page 54

4
4.2 Loading Originals in the Automatic Document Feeder
The Automatic Docum ent Feeder au tomatical ly feeds or iginals on e page after an other and le ts
the copier scan the data on each original. After the copier completes scanning the data, the
Automatic Document Feed er ejec ts it into its tray . To ensure the best possi ble perfo rmanc e of
the Automatic Document Feeder, use only originals of the appropriate type.
Precautions for Using the Automatic Document Feeder
The following types of o rig inals are not suitable fo r us e in the Autom at ic Do cu me nt Fe ed er, as
a misfeed or dama ged ori ginal c ould re sult. Place th ese ty pes o f origin als on the Plat en Gla ss.
Typing paper, paraffin paper, and other thin paper
G
Cards
G
Originals larger than 11×17L or smaller than 5-1/2×8-1/2
G
OHP transparencies, translucent paper
G
Wrinkled, dog-eared, curled, or torn originals
G
Clipped or stapled originals
G
Coated originals such as carbon-backed paper
G
✎
Note
When the originals are lo ade d int o the Automatic Document Feede r, the original sizes that
can be detected in the Auto Paper mode are 11”×17”, 8.5”×14”, 8.5”×11”L, 8.5”×11”,
5.5”×8.5”L. The copier may not be able to detect, or may detect another or irregular size.
Loading Originals
4-2 Konica 7115/7118
Page 55

Loading Originals
Loading the Originals
1
Slide the front adjustable Document Guide Plate to the
size of the originals.
2
Place the stack of originals face up on the Document
Feeder Tray.
?
➜
➜
➜
➜
4
Is the stack of originals neat?
The maximum numbe r of origi nals that can be loa ded
is 50.
Be sure that the top l evel of the origi nal stack does no t
exceed the Ä marking.
Be sure that the Document Guide Plates touch both
the front and rear edges of the original stack. If they
are not pressed snugly against the original stack, skewed feeding could result.
You can make copies automatically from originals of assorted sizes loaded in the
Automatic Document Feeder. Refer to “Mixed Original s.” (p.4-4)
3
Make the necessary settings.
Making Copies (p.5-1)
❍
Advanced Copying (p.6-1)
❍
4
Press the [START] key to start feeding and copying the
originals from the top page.
Konica 7115/7118 4-3
Page 56

4
Loading Originals
Mixed Originals
A stack of originals of different sizes can be copied as a set using the Automatic Document
Feeder.
Originals
(APS)
Copies
✎
Note
This feature can be used only if the width of the originals is the same. E.g.: Ledger and
Letter
Making Copies from Originals of Mixed Sizes
1
Slide the fr ont adjustable Document Guide Plate to the
front of the copier.
2
Load the originals face up in the Document Feeder Tray
so that their rear edges are in correct alignment with the
Document Guide Plate.
4-4 Konica 7115/7118
Page 57

Loading Originals
3
Press the front adjustable Document Guide Plate tightly
up against the front edges of the originals.
?
➜
➜
➜
4
Press the [ORIGINAL] key to lig ht the MIXED O RIGINAL
indicator.
5
Press the [APS/AMS] key to light the Auto Paper
indicator.
4
Is the stack of originals neat?
The maximum numbe r of origi nals that can be loa ded
is 50.
Be sure that the top l evel of the origi nal stack does no t
exceed the Ä marking.
Be sure that the Document Guide Plates touch both
the front and rear edges of the original stack. If they
are not pressed snugly against the original stack, skewed feeding could result.
6
Press the [START] key to start feeding and copying the
originals from the top page.
Konica 7115/7118 4-5
Page 58

4
4.3 Place the Original on the Platen Glass
The method for positioning the original differs depending on the type of original being used. Be
sure to use the appropriate method that best suits the type of original. Refer to p.4-2 for
information on using the Automatic Document Feeder.
Precautions for Placing the Original on the Platen Glass
Care should be used when positioning the following types of originals.
An original of a nonstandard size:
The copier is unabl e to de tect t he orig ina l size automa tical ly, mean ing tha t n either APS nor
G
AMS can be used. Therefore, use the [SIZE] key to select the paper size, or the [RE] key
to select the zoom ratio. (p.5-11)
A highly transparent original (OHP transparencies, translucent paper, etc.):
Place a blank sheet of paper of the same size over the original. (p.4-8)
G
A book or other three-dimensional object:
Let the copier scan the contents of the original with the Original Cover or the Automatic
G
Document Feeder r aised. Do not attempt to push th e Platen Glass with ex cessive force, as
a malfunction could res ult . (The maxi mum lo ad resis tance of the Platen Gl ass is 6-1/2 lbs. )
Loading Originals
4-6 Konica 7115/7118
Page 59

Loading Originals
How to position a sheet original
Use the following procedure to position plain paper or an original that is not suitable for use in
the Automatic Document Feeder.
1
Raise the Automatic Document Feeder or Original Cover.
2
Place the original face down on the Platen Glass.
3
Position the origi nal in the l eft rear corner aligned w ith the
marker on the scale.
4
4
Gently lower the Automatic Document Feeder or Original Cover.
5
Make the necessary settings.
Making Copies (p.5-1)
❍
Advanced Copying (p.6-1)
❍
6
Press the [START] key to start the copy cycle.
Konica 7115/7118 4-7
Page 60

4
Loading Originals
Highly Transparent Originals
When making a copy from OHP transparencies, translucent paper, or other highly
transparent original, position the original as detailed below.
1
Raise the Automatic Document Feeder or Original Cover.
2
Place the original face down on the Platen Glass.
3
Position the origi nal in the l eft rear corne r aligned with the
marker on the scale.
4
Place a blank sheet of paper of the same size over the
original.
5
Gently lower the Automatic Document Feeder or Original Cover.
6
Make the necessary settings.
Making Copies (p.5-1)
❍
Advanced Copying (p.6-1)
❍
7
Press the [START] key to start the copy cycle.
4-8 Konica 7115/7118
Page 61

Loading Originals
Books
When copying an open book or magazine, position the original as detailed below.
1
Raise the Automatic Document Feeder or Original Cover.
2
Position the bo ok face d own on the Platen Gl ass, with t he
top of the book toward the rear of the copier and the
center of the open book aligned with the book mark
( ) on the scale.
?
➜
3
Gently lower the Automa tic Docume nt Feeder or Orig inal
Cover.
?
➜
4
Are there any cauti ons when you pl ace a book di rectly
on the Platen Glass?
Do not place any object that weighs more than 6-1/2
lbs. on the Platen Glass. In addition, do not press
down hard on the book, as damage to the Platen
Glass could result.
Is a thick book or object being copied?
Let the copier scan the original without lowering the Automatic Document Feeder or
Original Cover. Do not look directly at the Platen Glass surface during a scanning
sequence since a s trong beam of light is emitted. This ligh t beam is not, however, a laser
beam and is not as dangerous.
4
Make the Book Copy setting.
Book Copy (p.6-3)
❍
Konica 7115/7118 4-9
Page 62

4
Loading Originals
4-10 Konica 7115/7118
Page 63

Making Copies
5 Making Copies
5.1 Copying
The following procedure describes how to place an original and make a copy of it.
Making a Basic Copy
1
Position the original.
Original Loading (p.4-1)
❍
5
2
Make the necessary control panel settings.
Selecting the Paper (p.5-3)
❍
Zoom Ratio (p.5-11)
❍
Image Density (p.5-16)
❍
3
Enter the number of copies to be made on the KEYPAD.
Any number from 1 to 99 can be entered.
Konica 7115/7118 5-1
Page 64

5
4
Press the [START] key.
This will start the copy cycle.
To stop the copy cycl e in mid-operation, pre ss the [STOP]
key.
Making Copies
5-2 Konica 7115/7118
Page 65

Making Copies
5.2 Selecting the Paper
Before making a copy, you must select the tray containing the paper you wish to use.
The paper source is either selected automatically when the size of the original is detected, or
you specify the specific paper source manually.
APS:
G
When “APS” is selected, the tray containing the most suitable size of paper is selected
based on the size of the original and the set zoom ratio.
Manual paper selection:
G
The tray containing the paper you want to use can be manually selected.
✎
Note
The copier must be equipped with an Automatic Document Feeder to use “APS.”
Using “APS”
1
Load the originals in the Automatic Document Feeder.
Original Loading (p.4-1)
❍
2
Press the [APS/AMS] key on the control p anel to ligh t the
APS indicator.
5
3
Make the other necessary settings.
Zoom Ratio (p.5-11)
❍
Image Density (p.5-16)
❍
4
Enter the number of copies to be made on the KEYPAD and press the [START] key.
✎
Note
If the copier does not find paper of the appropriate size immediately after the [START] key
has been pressed, this paper size indicator on the control panel starts blinking. Load the
paper or press the [SIZE] key and select another desired paper size before pressing the
[START] key again.
Konica 7115/7118 5-3
Page 66

5
Manual Paper Selection
1
Position the original.
Original Loading. (p.4-1)
❍
2
Press the [SIZE] key on the contro l panel until the desi red
paper size indicator lights.
3
Make the other necessary settings.
Zoom Ratio (p.5-11)
❍
Image Density (p.5-16)
❍
4
Enter the number of copies to be made on the KEYPAD and press the [START] key.
✎
Making Copies
Tip
The Display shows different marks according to the type of paper set by selecting User’s
Choice. Details:
Cards and postcards
If plain paper is set in User’s Choice, the “
postcards, or OHP transparencies, are loaded in the tray.
OHP transparencies
” mark will not be displayed even if cards or
1
Plain paper
5-4 Konica 7115/7118
Page 67

Making Copies
5.3 Feeding Paper Manually
Paper can be fed manually through the Bypass Tray if you want to copy onto paper that is not
loaded in any tray, or if you want to copy onto special paper, such as OHP transparencies,
postcards, or cards.
The following types of paper can be fed through the Bypass Tray
Plain paper (weighing 16 lbs. to 24 lbs.)
G
Recycled paper (weighing 16 lbs. to 24 lbs.)
G
Special paper: Card (weighing 24-1/4 lbs. to 42 lbs.), OHP transparencies, postcards, and
G
labels
Sizes of paper that can be fed through the Bypass Tray
Maximum size: 11-11/16 in. × 17 in.
G
Minimum size: 3-9/16 in. × 5-1/2 in.
G
✎
Note
Insert one shee t o f p ape r at a time when us in g the Manual Bypas s Tray to make a copy. If
the optional Multi ple Bypass is moun ted, the Bypass Tray can hold up to 50 sheets of paper,
or 20 sheets of cards, postcard, or OHP transparencies.
5
Konica 7115/7118 5-5
Page 68

5
Making Copies by Using the Bypass Tray
<Manual Bypass Tray>
1
Position the original.
Original Loading (p.4-1)
❍
2
Slide the Paper Guides to the size of the paper. Load a
sheet of paper so that the front side of the paper faces
down. At this time, gently insert the paper until it is
stopped. Note that the Byp ass T ray lo cation indic ator on
the control panel lights.
Do you want to use a type of paper other than plain
?
paper?
To use cards, postcards , or OHP transp arencies, firs t
➜
change the type of pape r selecting User’s Ch oice. Refer to “Paper T ype (Bypass Tr ay)”
(p.7-9).
When loading cards or postcards, be sure to smooth out any curl in the paper.
➜
3
Press the [BYPASS TRAY SIZE SELECT] key until the
size of the paper loaded indicator blinks.
If the paper used is of custom size, its size must be
❍
input. Refer to the “C ustom Size Input (Bypass Tray)”
procedure that follows. (p.5-9)
Do you know which FLS size has been set?
?
The FLS size has been set to 210 mm × 330 mm.
➜
Ask your authorized Konica Service Representat ive if
you want to change the FLS size.
Making Copies
4
Press the [ENTER] key.
5-6 Konica 7115/7118
Page 69

Making Copies
5
Make any other necessary settings.
❍
❍
6
Press the [START] key.
✎
Tip
If the same setti ngs apply to the sec on d and subsequent s he ets o f p aper, you have onl y to
load the paper in the Bypass Tray. This will automatically start the new copy cycle.
✎
Tip
To make copies continuously on cards, OHP transparencies, or postcards, load the paper
in the 1st Tray. Refer to “Copy Paper”(p.3-22) and “Adding Paper” (p.8-4).
5
Zoom Ratio (p.5-11)
Image Density (p.5-16)
Konica 7115/7118 5-7
Page 70

5
<Multiple Bypass Tray>
1
Position the original.
Original Loading (p.4-1)
❍
2
Adjust the Paper Gui des and the Bypass Tray Extender to
the size of the paper. Load a stack of paper so that the
paper faces down. At this time, gently insert the paper
stack until it is stopped. Note that the Bypass Tray
location indicator on the control panel lights.
Do you want to use a type of paper other than plain
?
paper?
To use cards, postcards , or OHP transp arencies, firs t
➜
change the type of paper selectin g User’s Choice.
Refer to “Paper Type (Bypass Tray)” (p.7-9).
When loading cards or postcards, be sure to smooth out any curl in the paper.
➜
3
Press the [BYPASS TRAY SIZE SELECT] key until the
size of the paper loaded blinks.
If the paper used is of custom size, its size must be
❍
input. Refer to the “C ustom Size Input (Bypass Tray)”
procedure that follows. (p.5-9)
Do you know which FLS size has been set?
?
The FLS size has been set to 210 mm × 330 mm.
➜
Ask your authorized Konica Service Representat ive if
you want to change the FLS size.
Making Copies
4
Press the [ENTER] key.
5
Make any other necessary settings.
Zoom Ratio (p.5-11)
❍
Image Density (p.5-16)
❍
6
Press the [START] key.
5-8 Konica 7115/7118
Page 71

Making Copies
<Custom Size Input (Bypass Tray)>
1
Slide the Paper Guides to the size of the paper. Gently
insert the paper with the paper facing down until it is
stopped. Note that the Byp ass T ray loc ation indicato r on
the control panel lights.
2
Press the [BYPASS TRAY SIZE SELECT] key until the
Custom Size indi cator blinks.
3
Press the [ENTER] key.
5
4
Press the [CLEAR] key to clear the old value shown on
the Display.
Konica 7115/7118 5-9
Page 72

5
5
Enter the length (mm) of the paper on the KEYPAD.
Do you know what is the range for the paper width of
?
custom size?
The width can range from 90 mm to 297 mm.
➜
Do you want to change the value just entered?
?
Press the [CLEAR] key and then re-enter the new
➜
value.
What are the precautions for entering a custom size?
?
Note the conventions for the pape r dimensions , width
➜
and length.
6
Press the [ENTER] key.
7
Press the [CLEAR] key to clear the old value shown on
the Display.
Making Copies
Width
Length
8
Enter the length (mm) of the paper on the KEYPAD.
Do you know the range for paper length of custom
?
size?
The length can range from 140 mm to 432 mm.
➜
Do you want to change the value just entered?
?
Press the [CLEAR] key and then re-enter the new
➜
value.
9
Press the [ENTER] key.
✎
TIP
Enter the value by mm using the KEYPAD.
Refer to the conversion rate below.
1 inch = 25.4 mm
5-10 Konica 7115/7118
Page 73

Making Copies
5.4 Specifying the Zoom Ratio
By specifying a zoom ratio, the copy can be enlarged or reduced.
Types of Zoom Ratio Setting Description
AMS This setting automatically selects the most appropriate zoom ratio based on the
Fixed ratios The following optimum zoom ratios are available for making copies from
Ratios set using Zoom ([ ][ ])
key
Full Size This setting makes a copy the same size as the original (100%).
X/Y Zoom This setting allows the zoom ratio to be set independently for X (horizontal) and Y
size of the original loaded and the paper size selected for use. The copier must
be equipped with an Automatic Document Feeder.
commonly used original sizes to standard paper sizes.
• 50%
• 64% (11×17 Ö 8.5×11)
• 77% (11×17 Ö 8.5×14)
• 129% (8.5×11 Ö 11×17)
• 155% (5.5×8.5 Ö 8.5×14)
• 200%
Touching the [ ] or [ ] key increases or decreases the zoom ratio in 1%
increments. The ratio can range from 50% to 200%.
(vertical) directions.
The ratios can be set directly on the KEYPAD, in the range between 50% and
100%.
5
Konica 7115/7118 5-11
Page 74

5
Making Copies
Setting the Zoom Ratio
<AMS>
1
Position the original.
Original Loading (p.4-1)
❍
2
Press the [APS/AMS] key on the control panel until the
AMS indicator lights.
3
Make any other necessary settings.
Image Density (p.5-16)
❍
4
Enter the number of copies to be made on the KEYPAD and then press the [START] key.
5-12 Konica 7115/7118
Page 75

Making Copies
<Fixed and Variable Zoom Ratios>
1
Position the original.
❍
2
Press the [RE] key on the control panel until the desired
zoom ratio indicator lights.
❍
3
Make any other necessary settings.
❍
❍
4
Enter the number of copies to be made on the KEYPAD and then press the [START] key.
5
Original Loading (p.4-1)
To set a custom zoom ratio, press [ ] or [ ] key to
reach the desired ratio . Pressing this key chan ges the
ratio in 1% increments.
Paper (p.5-3)
Image Density (p.5-16)
Konica 7115/7118 5-13
Page 76

5
Making Copies
X/Y Zoom
This setting allows you to enter the zoom ratio for X and Y independently on the KEYPAD.
1
Position the original.
Original Loading (p. 4-1)
❍
2
Press the [X/Y ZOOM] key on the c ontrol panel to light the
X/Y ZOOM indicator.
3
Press the [CLEAR] key to clear the old value for X
(length).
4
First, enter the zoom ratio (%) for X (length) on the
KEYPAD and then press the [ENTER] key.
Do you know the range for the value X in X/Y Zoom?
?
The ratio can range from 50% to 100%.
➜
Do you want to change the value just entered?
?
Press the [CLEAR] key and then re-enter the new
➜
value.
What happens when a value outside the specified range is entered?
?
The Display shows “Err.” Press the [CLEAR] key and
➜
re-enter a new value that falls within the range.
Y (width)
X
(length)
5
Press the [CLEAR] key to clear the old value fo r Y (width).
5-14 Konica 7115/7118
Page 77

Making Copies
6
Enter the zoom ratio (%) for Y (width) on the KEYPAD and
then press the [ENTER] key.
?
➜
7
Make any other necessary settings.
❍
❍
8
Enter the number of copies to be made on the KEYPAD and then press the [START] key.
5
Do you know the range for the value Y in X/Y Zoom?
The ratio can range from 50% to 100%.
Zoom Ratio (p.5-11)
Image Density (p.5-16)
Konica 7115/7118 5-15
Page 78

5
5.5 Adjusting the Image Density
The image density setting can be adjusted in two broad modes, “Text” and “Photo.”
Image Density Setting
Text mode:
G
The image density can be adjusted either automatically (Auto) or manually in five steps.
The image density is adjusted aut omatical ly according to the orig inal from whi ch a copy wil l
❍
be made.
When you want to make a copy from newspaper or magazine and you do not want the
❍
backside image to b e produced on the co py , us e th e [ ] key to select a lig hte r setting. To
reproduce a pale color of a bright image, use the [ ] key to select a darker setting.
Selecting a darker se tting could result in a bac kground image bein g reproduced on the copy ,
while selecting a lighter setting could make the copy image itself too light: Select the
appropriate level according to your original.
Photo mode:
G
Select Photo when making a copy from an original having a large halftone image, such as
photos.
Setting the Image Density
1
Position the original.
Original Loading (p.4-1)
❍
Making Copies
2
Press the [DENSITY SET] key on the control panel to
select the desired mode.
Do you know how to select Auto?
?
Light the auto exposure indicator as shown on the
➜
right.
Auto
5-16 Konica 7115/7118
Page 79

Making Copies
3
If you want to adjust the image density manually, press
the [ ] or [ ] key to select the desired setting.
?
➜
?
➜
?
➜
Do you know how to select Photo?
Light the Photo indicator. In the Photo mode, Auto
cannot be selected.
Do you know how to select Photo?
Light the MANUAL/PHOTO indicator. In the Photo
mode, Auto cannot be selected.
Do you know what to do after selecting Manual?
Refer to the diagram on the right for the relationship
between the control panel indication and image
density.
Lightest
(Level -2)
Lighter
(Level -1)
Medium
(Level 0)
5
Darker
(Level 1)
Darkest
(Level 2)
4
Make any other necessary settings.
Paper (p.5-3)
❍
Image Density (p.5-16)
❍
5
Enter the number of copies to be made on the KEYPAD and then press the [START] key.
Konica 7115/7118 5-17
Page 80

5
5.6 Interrupting a Copy Job
By selecting the [INT E RRUP T] ke y, a mu lti - cop y c ycle can be stopped at any tim e to ma ke a n
urgent copy.
✎
Note
Some functions cannot be interrupted. Also, some settings may not be available when a
copy job is interrup ted. For more deta ils, refer to th e “Function Co mbination Ta ble” (p.10-6).
To Interrupt a Copy Job
1
Press the [INTERRUPT] key.
The Interrupt indicator lights and the current copy cycle
pauses.
Do you know what set tings c an be s elect ed wh en the
?
[INTERRUPT] key is pressed?
When the [INTERRUPT] key is pressed, all functions
➜
and settings indica ted on the control pa nel are reset to
their defaults.
2
Remove the original of the in terru pte d co py jo b and then
position the new one that you want to copy.
Making Copies
5-18 Konica 7115/7118
Page 81

Making Copies
3
Make any other necessary settings.
❍
❍
❍
4
Enter the number of copies to be made on the KEYPAD and then press the [START] key.
This will start the interrupt copy cycle.
5
After the interrupt copy has been made, press the [INTERRUPT] key:
The Interrupt indic ator wi ll go out an d the settin gs wil l be recov ered fo r the i nterrupt ed co py
job.
6
Reposition the original for the interrupted copy job that has been removed in step 2.
7
Press the [START] key.
The interrupted copy job will be resumed.
5
Paper (p.5-3)
Zoom Ratio (p.5-11)
Image Density (p.5-16)
Konica 7115/7118 5-19
Page 82

5
Making Copies
5-20 Konica 7115/7118
Page 83

Advanced Copying
6 Advanced Copying
This section describ es the setting combin ations for the various ty pes of originals and copie s and
the procedure for selectin g the appropriate setting s to produce the intended result s. The [ORIGINAL] key and the [COMBIN ATION] k ey on the co ntrol panel allow you to m ake the various setting combinations.
6.1 Making 1-Sided Copies
1-sided:
This is the or dinary 1-sided c opy that this c opier can make
➜
from a 1-sided original.
2 in 1:
Important
This setting is available only when the copier is equipped with an Automatic Document
✔
Feeder.
The copier makes a 1-s ided side-by-sid e copy from two 1-
➜
sided originals.
6
Original Copy
Originals Copy
4 in 1:
Important
This setting is available only when the copier is equipped with an Automatic Document
✔
Feeder.
The copier copies four different 1-sided originals onto one
➜
side of a single sheet of paper.
Konica 7115/7118 6-1
Originals Copy
Page 84

6
Book Copy
The copier makes 1-sided page-by-page copies of an
➜
open book.
Making Settings for 2 in 1 and 4 in 1 Copies
1
Load the originals in the Automatic Document Feeder.
Original Loading (p.4-1)
❍
2
Press the [COMBINATION] key to light eithe r the 2 in 1 o r
4 in 1 indicator.
Advanced Copying
Original Copies
3
Make any other necessary settings.
4
Enter the number of copies to be made on the KEYPAD and then press the [START] key.
6-2 Konica 7115/7118
Page 85

Advanced Copying
Making Settings for Book Copy
1
Position the original.
Original Loading (p.4-1)
❍
2
Press the [ORIGINAL] key to light the BOOK COPY indicator.
Is your book left-bound or right-bound?
?
User’s Choice allows you to select the type of book.
➜
The default setting is left-bound. If your book is rightbound, change the sett ing for “Book Binding Pos ition.”
(p.7-7)
3
If you want to erase the four edges or the center of the original , press the [MARGIN ERASE]
key to specify the erase position.
Which one of the three options available for book erase do you want to select?
?
Frame Erase:
➜
Erases a given width along the outside edges.
6
Original Copies
Center Erase:
➜
Erases a given width down the center.
Frame + Center Erase:
➜
Erases a given w id th alo ng the outside edges as well
as down the center.
Konica 7115/7118 6-3
Original Copies
Original Copies
Page 86

6
Advanced Copying
Do you know how to set the erase width for each erase function?
?
The frame erase width can be set in the range between 1/4 and 3/4, in 1-mm (1/16) in-
➜
crements. The default value is 1/2.
Only 1/2 is available for the center erase width.
➜
To change the setting for the fr ame erase width, use “Erase Setting ” in the User’s Choice
➜
mode. (p.7-8)
4
Make any other necessary settings.
5
Enter the number of copies to be made on the KEYPAD and then press the [START] key.
6-4 Konica 7115/7118
Page 87

Advanced Copying
6.2 Output Copies (Sort and Group)
When copying or printing two or more copies of a document, the copies can be divided either
by sets containing a copy of each page (Sort) or by pages (Group).
Three Output Types
Non-Sort:
The copies are stacked on top of each other as they are
➜
made.
Sort:
The copies are automatically divided into sets with each
➜
set containing a copy of each page.
6
Originals Copies
Originals Copies
Group:
The copies are automa tically divided into stacks with each
➜
stack containing copies of the same page.
Konica 7115/7118 6-5
Originals Copies
Page 88

6
Advanced Copying
Sorting
The copies are automatically divided into sets with each set containing a copy of each page.
The following three types are available: electronic sorting, shift sorting, and crisscross sorting.
What is electronic sorting?
Important
The copier must be equi pped with an Automat ic Document Feed er and a 16MB Memory for
✔
Copier or 32MB Memory for Copier.
The copies are sorted into complete sets of the originals.
➜
What is shift sorting?
Important
The copier must be equipped with an Automatic Document Feeder and a Shifting Unit.
✔
The sorted copy sets are stacked in the same direction,
➜
but in a sawtooth ma nner by shifti ng the t ray for each set.
6-6 Konica 7115/7118
Page 89

Advanced Copying
What is crisscross sorting?
Important
The copier must be equipp ed with an Automatic Document Feeder, 16 MB Memory for Copi-
✔
er or 32MB Memory for Copier and Paper Feed Cabinet or Multiple Bypass Tray.
The sorted copy sets are s tacked in a cri sscross m anner,
➜
one set stacked lengthw ise on top of an other set sta cked
crosswise.
✎
Note
To enable crissc ross sorting, the copie r m us t be lo aded with paper of th e s am e s iz e, but in
two different directions.
✎
6
Note
Crisscross sorting cannot be effected if a Shifting Unit is mounted.
Konica 7115/7118 6-7
Page 90

6
Advanced Copying
Grouping
The copies are autom atically divided in to stacks wi th each stac k contain ing copies of the same
page. The following two types are available: shift grouping and crisscross grouping.
What is shift grouping?
Important
The copier must be equipped with an Automatic Document Feeder and a Shifting Unit.
✔
The grouped copy stacks are stack ed in the sa me dire c-
➜
tion, but in a saw tooth manner by shifting the tray for each
stack.
What is crisscross grouping?
Important
The copier must be equip ped with an Automatic Document Feed er, 16MB Memory for Cop i-
✔
er or 32MB Memory for Copier and Paper Feed Cabinet or Multiple Bypass Tray.
The grouped copy stacks are stack ed in a cris sc ros s
➜
manner, one stack lengthwise on top of another stack
crosswise.
✎
Note
To enable crisscross gro upi ng, the cop ier must be loaded with paper of th e sam e size , but
in two different directions.
✎
Note
Crisscross grouping cannot be effected if a Shifting Unit is mounted.
6-8 Konica 7115/7118
Page 91

Advanced Copying
Choosing a set for Finishing
1
Load the originals in the Automatic Document Feeder.
Original Loading (p.4-1)
❍
2
Press the [OUTPUT] key to select the desired finishing
function.
Do you know what it means when both Sort and Group
?
indicators are off?
It means that Non-Sort is currently selected for use.
➜
6
3
Make any other necessary settings.
4
Enter the number of copies to be made on the KEYPAD and then press the [START] key.
Konica 7115/7118 6-9
Page 92

6
6.3 Erasing Part of Original Image (Margin Erase)
The copier erases a margin of a s et wi dth alo ng the edges or eras es any o the r unwante d ima ges. One of the following four different erase functions can be selected:
What is Left Erase?
A given width is erased from the left edge of the copy.
➜
What is Upper Erase?
A given width is erased from the top edge of the copy.
➜
What is Frame Erase?
A given width along all four edges is erased.
➜
Advanced Copying
Original Copy
Original Copy
Original Copy
What is Center Erase?
A given width is erased down the center.
➜
Original Copies
✎
Note
The Center Erase setting is available only when Book Copy is selected.
6-10 Konica 7115/7118
Page 93

Advanced Copying
✎
Tip
Frame + Center Erase can be set only if Book Copy has been selected. (p.6-3)
Precautions for Erase Position
Note the correct direct ion of positio ning the original whe n making copies in the Erase mode. For
more details, refer to the table given below.
Result Platen Glass Automatic Document Feeder
Left Erase
Upper Erase
6
Frame Erase
Konica 7115/7118 6-11
Page 94

6
Setting the Margin Erase Function
1
Position the original.
Original Loading (p.4-1)
❍
2
Press the [MARGIN ERASE] key to light the desired
erase position indicator.
Do you know how to set the erase width for each
?
erase function?
The Left, Upper, and Frame era se width can be set in
➜
the range between 1/4 and 3/4, in 1-mm (1/16) increments. The default value is 1/2.
Only 1/2 is available for the Center erase width.
➜
To change the erase width, change the setting for
➜
“Erase Setting” of User’s Choice. (p.7-8)
Advanced Copying
3
Make any other necessary settings.
4
Enter the number of copies to be made on the KEYPAD and then press the [START] key.
6-12 Konica 7115/7118
Page 95

Advanced Copying
6.4 Reversing Original Tonal Arrangements (Rever se Image)
The white part (background) and the black part (text) are reversed on the copy.
Original Copy
Setting Reverse Image
1
Position the original.
Original Loading (p.4-1)
❍
2
Press the [REVERSE IMAGE] k ey and make sure that the
REVERSE IMAGE indicator lights.
6
3
Make any other necessary settings.
4
Enter the number of copies to be made on the KEYPAD and then press the [START] key.
Konica 7115/7118 6-13
Page 96

6
6.5 Providing a IMAGE SHIFT
The copier provides a file margin along the leading edge for ease in filing.
Advanced Copying
What is IMAGE SHIFT?
The image of the original is shifted to the right to leave a
➜
margin along the left edge of the copy.
Precautions for IMAGE SHIFT Position
Study the illustratio n bel ow to be sure of the correct directi on of plac in g the original when making a copy with an image shift.
Platen Glass Automatic Document Feeder
Setting IMAGE SHIFT
1
Position the original.
Original Loading (p.4-1)
❍
2
Press the [IMAGE SHIFT] key to light the IMAGE SHIFT
indicator.
Do you know how to set the image shift width?
?
The IMAGE SHIFT width can be set in the range be-
➜
tween 0 and 3/4, in 1-mm (1/16) increments. The default value is 1/2.
To change the IMAGE SHIFT width, change the set-
➜
ting for “IMAGE SHIFT Width Adjust” in the User’s
Choice mode. (p.7-7)
Original Copy
3
Make any other necessary settings.
4
Enter the number of copies to be made on the KEYPAD and then press the [Start] key.
6-14 Konica 7115/7118
Page 97

Using the Utility Mode
7 Using the Utility Mode
The Utility mode offers the following subfunctions.
Code Name Description
1 User’s Choice Allows you to select the default setting for each of the
2 Drum Dehumidify Removes dewdrops that have formed on the surface of the
3 Toner Replenisher Replenishes the supply of toner to make up for a lower
4 Custom Size Input Sets a custom size for the 1st Tray if it is loaded with paper
5 Administrator Mode Allows the administrator of the copier to make settings for
Calling the Utility Mode to the Display
1
Hold down the [AUTO RESET] key for 3 seconds.
7
various functions.
PC Drum.
toner-to-carr ier rat i o.
of a nonstandard size.
operating and maintaining the copier.
2
Check that “U--” appears on the Display.
3
Using the KEYPAD, enter the code correspond ing to the
desired subfunction.
E.g.: Enter “1” to make a setting in User’s Choice.
4
Press the [START] key.
Konica 7115/7118 7-1
Page 98

7
7.1 User’s Choice
The functions set and established on the control panel when the copier is turned ON or the
[AUTO RESET] key is pressed are called the de fault se ttings . These settings can be modifi ed
by selectin g User’s Choice. Refer to the table given below for the code and default value of
each function.
Using the Utility Mode
Code Name Setting Setting Details
1 Mixed Orig. 0 Mixed Orig. enabled
1 Mixed Orig. disabled
2 Paper Priority 0 A3L
1B4L
2A4L
3B5L
4A5L
5FLS L
6A4C
7B5C
8A5C
10 11x17L
11 11x14L
12 Legal L
13 Letter L
14 5-1/2x8-1/2L
15 Letter C
16 5-1/2x8-1/2C
20 1st Tray
21 2nd Tray
22 3rd Tray *1
23 4th Tray *1
24 5th Tray *1
25 Multiple Bypass Tray
3Copy Priority 0APS
1AMS
2 Manual
4 Density Priority 0 Auto
1 Manual
2 Photo Manual
5 Density Level (Auto) 0 Lighter
1Normal
2 Darker
Default
Value
2
2
2
2
2
7-2 Konica 7115/7118
Page 99

Using the Utility Mode
7
Code Name Setting Setting Details
6 Density Level (Manual) 1 Step 1
2Step 2
3Step 3
4Step 4
5Step 5
7 Output Priority 0 Non-Sort
1Sort
2Group
8 Crisscross Mode 0 Crisscross stacking enabled
1 Crisscross stacking disabled
9 4 in 1 Copy Order 0 Pattern A
1 Pattern B
10 Book Binding Position 0 Left-bound
1 Right-bound
11 IMAGE SHIFT Width Adjust 0 0
::
10 1/2
::
20 3/4
12 Erase Setting (Left) 5 1/4
::
10 1/2
::
20 3/4
13 Erase Setting (Upper) 5 1/4
::
10 1/2
::
20 3/4
14 Erase Setting (Frame) 5 1/4
::
10 1/2
::
20 3/4
Default
Value
2
2
2
2
2
2
2
2
2
Konica 7115/7118 7-3
Page 100

7
Using the Utility Mode
Code Name Setting Setting Details
15 Auto Panel Reset 0 30 seconds
11 min
22 min
33 min
44 min
55 min
6 Auto Panel Reset disabled
16 Power Saver 1 1 min
::
15 15 min
::
240 240 min
17 Auto Shut OFF 0 Auto Shut OFF disabled
15 15 min
::
30 30 min
::
240 240 min
18 Density (ADF) 0 Mode 1
1 Mode 2
19 Print Density 0 -2
1-1
20
31
42
20 Paper Auto Detection (1st Tray) 0 Inch
1Metric
21 Paper Auto Detection (2nd Tray) 0 Inch
1Metric
22 Paper Auto Detection (3rd Tray)
*1
23 Paper Auto Detection (4thTray)
*1
24 Paper Auto Detection (5thTray)
*1
25 Paper Size Detection (1st Tray) 0 Automatic detection
26 Paper Type (1st Tray) 0 Plain paper
0Inch
1Metric
0Inch
1Metric
0Inch
1Metric
1 Size input
1 Cards, postcards
2 OHP transparencies
Default
Value
2
2
2
2
2
2
2
2
2
2
2
2
7-4 Konica 7115/7118
 Loading...