

Konica Minolta PI7500 User Manual

User Manual
Pi7500 PCL6 Printer Driver
www.minoltaeurope.com

Table of Contents
Welcome ........................................................................................ X-1
Trademark Acknowledgments....................................................... X-1
1 Before Using the Printer Driver
1.1 Features of the Printer Driver ..................................................... 1-1
Various Printing Functions ..............................................................1-2
Administrative Functions ................................................................1-5
1.2 Installing the Printer Drivers ....................................................... 1-6
2 Installing the Printer Driver
2.1 Windows 95/98/Me ...................................................................... 2-1
Operating Environment ...................................................................2-1
Installation.......................................................................................2-2
Making General Settings Before Using the Printer.........................2-7
Displaying a Property Sheet ...........................................................2-8
Displaying a Property Sheet from the Printer Folder ......................2-8
Displaying a Property Sheet from an Application Menu.................2-9
2.2 Windows 2000/NT 4.0 ................................................................ 2-10
Operating Environment .................................................................2-10
Installation.....................................................................................2-11
Making General Settings Before Using the Printer.......................2-16
Displaying a Property Sheet .........................................................2-17
Displaying a Property Sheet from the Printer Folder ....................2-17
Displaying a Property Sheet from an Application Menu...............2-18
3 Property Sheets
3.1 Description of Each Property Sheet........................................... 3-1
3.2 “Device Options Setting” Property Sheet.................................. 3-2
Functions of the “Device Options Setting” Property Sheet............3-2
3.3 Functions that are Common to Various Property Sheets ........ 3-4
Functions that are Common to Various Property Sheets ...............3-4
Functions of the “Save Easy Set Name” Dialog Box......................3-5
3.4 “Setup” Property Sheet ............................................................... 3-6
Functions of the “Setup” Property Sheet .......................................3-6
Functions of the “Watermark” Dialog Box....................................3-11
Watermark detailed settings .........................................................3-12
Pi7500

Functions of the “Detail of Paper Source” Dialog Box................. 3-14
Functions of the “Detail Of Output Setting” Dialog Box...............3-16
3.5 “Paper” Property Sheet .............................................................3-18
Functions of the “Paper” Property Sheet..................................... 3-18
Functions of the “Custom Paper” Dialog Box..............................3-21
Custom Paper setting dialog box................................................. 3-22
3.6 “Quality” Property Sheet............................................................3-23
Functions of the “Quality” Property Sheet ...................................3-23
3.7 “Job Management” Property Sheet..........................................3-25
Functions of the “Job Management” Property Sheet .................. 3-25
3.8 “Conflicts” Dialog Box ............................................................... 3-27
Functions of the “Conflicts” Dialog Box.......................................3-27
4 Operations on Machine
4.1 Unlocking a Job............................................................................4-1
4.2 Inputting password ......................................................................4-3
4.3 Checking or deleting the job....................................................... 4-3
5 Troubleshooting
5.1 Unable to Print ..............................................................................5-1
5.2 Unable to Make Correct Settings / to Print Exactly as Set ......5-3
5.3 Poor Print Quality .........................................................................5-6
6Appendix
6.1 Function Combination Matrix......................................................6-1
6.2 Number of registrations...............................................................6-4
Number of registrations/Usable range for Easy Set....................... 6-4
Number of registrations/Usable range for Watermark ................... 6-5
Number of registrations/Usable range for Custom Paper.............. 6-6
6.3 Index .............................................................................................. 6-7
Pi7500

Welcome
Thank you for purchasing the controller.
This Operator’s Manual explains how to run print cycles on the machine
to which the controller is connected. It also gives precautions that you
should review before attempting to actually use the controller. So first
read this manual carefully and thoroughly; then keep it close at hand so
you can refer to it whenever it becomes necessary.
When operating the controller and machine, follow the instructions given
in this manual and in the one for the machine. Do not attempt to touch
any part that is not covered in these manuals. To prevent possible
hazardous conditions, never attempt to disassemble or alter any pieces
of equipment.
Some of the screens shown in this manual may look different from what
you will view in actual applications.
Trademark Acknowledgments
Minolta is a registered trademark of MINOLTA CO., LTD.
Microsoft, Windows 95, Windows 98, Windows Me, Windows 2000 and
Windows NT 4.0 are registered trademarks of Microsoft Corporation.
IBM and PC/AT are registered trademarks of International Business
Machines Corporation.
PCL is a registered trademark of Hewlett-Packard Company.
All other products or brand names are trademarks or registered
trademarks of their respective companies or organizations.
Pi7500 X-1

X-2 Pi7500
Before Using the Printer Driver
1 Before Using the Printer Driver
1.1 Features of the Printer Driver
This controller is an image controller designed to use the machine as a
printer, allowing you to print documents directly to the machine from a
computer to which the controller is connected. The printer driver, which
is used during printing, is equipped with various functions that make the
most out of the features of the machine, to enable you to use the same
functions as those offered by the machine. When actually running a print
cycle, you can specify various functions of the machine on your computer
screen.
NOTES
è Some functions offered by the machine cannot be combined, such as
Cover Page and OHP Interleaving, and some others may not be
possible because of the paper size involved. The functions that
cannot be selected appear dimmed.
Furthermore, if functions that are incompatible with each other are
specified, the Conflicts dialog box will appear, prompting you to
change the settings. When this dialog box appears, check the details
and reselect the functions to ensure function compatibility.
è Some settings which are refused by the machine because of
restricted combinations of different functions can at times be
accepted by the printer driver. If a print command is issued from the
personal computer with such settings made, the machine will not
produce the output correctly: Make sure that you make correct
settings.
1
Pi7500 1-1
1
Before Using the Printer Driver
Various Printing Functions
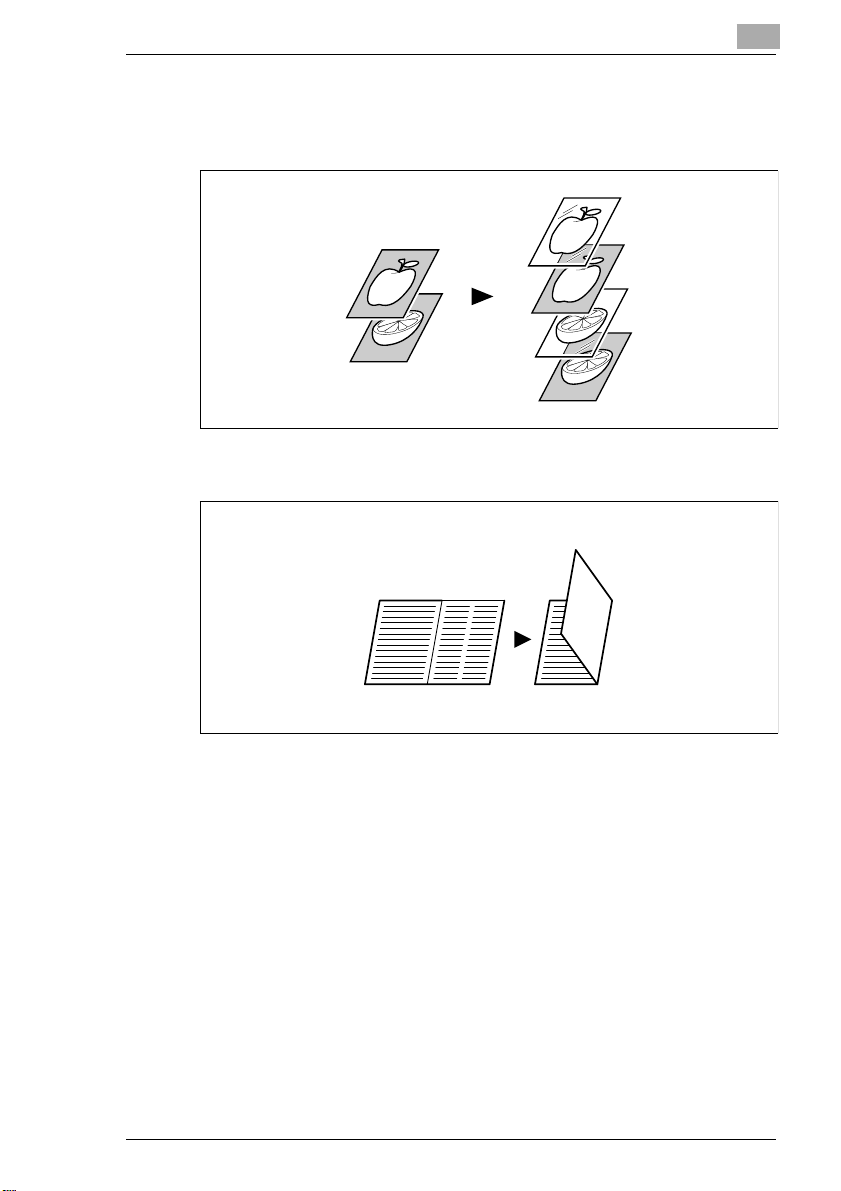
l Makes prints that are sorted into complete sets of the originals or
grouped into uncollated groups, each containing prints of one
original. For details, see page 3-20.
l Prints two pages of originals on both front and back sides of a single
sheet of paper. For details, see page 3-8.
Long Edge Binding
l Enlarges or reduces the image on the original. For details, see page
3-19.
1-2 Pi7500
Short Edge Binding
Before Using the Printer Driver
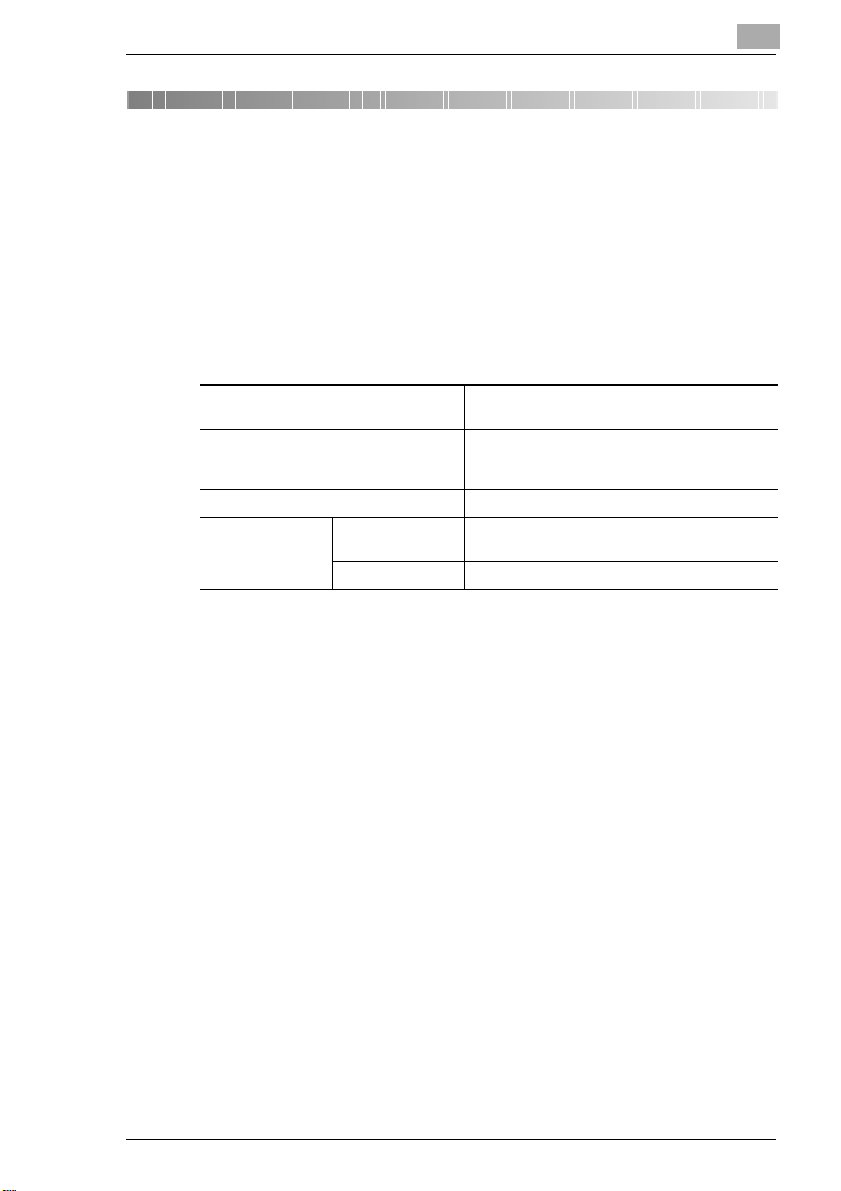
l Prints two pages or four pages of originals on a single sheet of paper.
A maximum of 16 pages of originals can be printed on a single sheet
of paper. For details, see page 3-6.
1
2up
l Prints four pages of originals on both front and back sides of a single
sheet of paper. For details, see page 3-8.
l Places text in the background. For details, see page 3-7.
4up
Pi7500 1-3
1
Before Using the Printer Driver
l Makes prints of complete sets of the original stapled together. For
details, see page 3-9.
By using sorting, you can make complete sets of documents for
immediate delivery without having to do any further processing.
l Prints only the cover on a different type of paper (such as colored
paper). For details, see page 3-9.
1-4 Pi7500
Before Using the Printer Driver
l Capable of printing on OHP transparencies. You can also insert
interleaves, either blank or printed with the same contents as those
on the OHP transparencies. For details, see page 3-9.
l Folds copies during finishing. For details, see page 3-17.
1
Administrative Functions
l E.C.M. (E.K.C.) Function can also be used, just as when using the
machine as a copier.
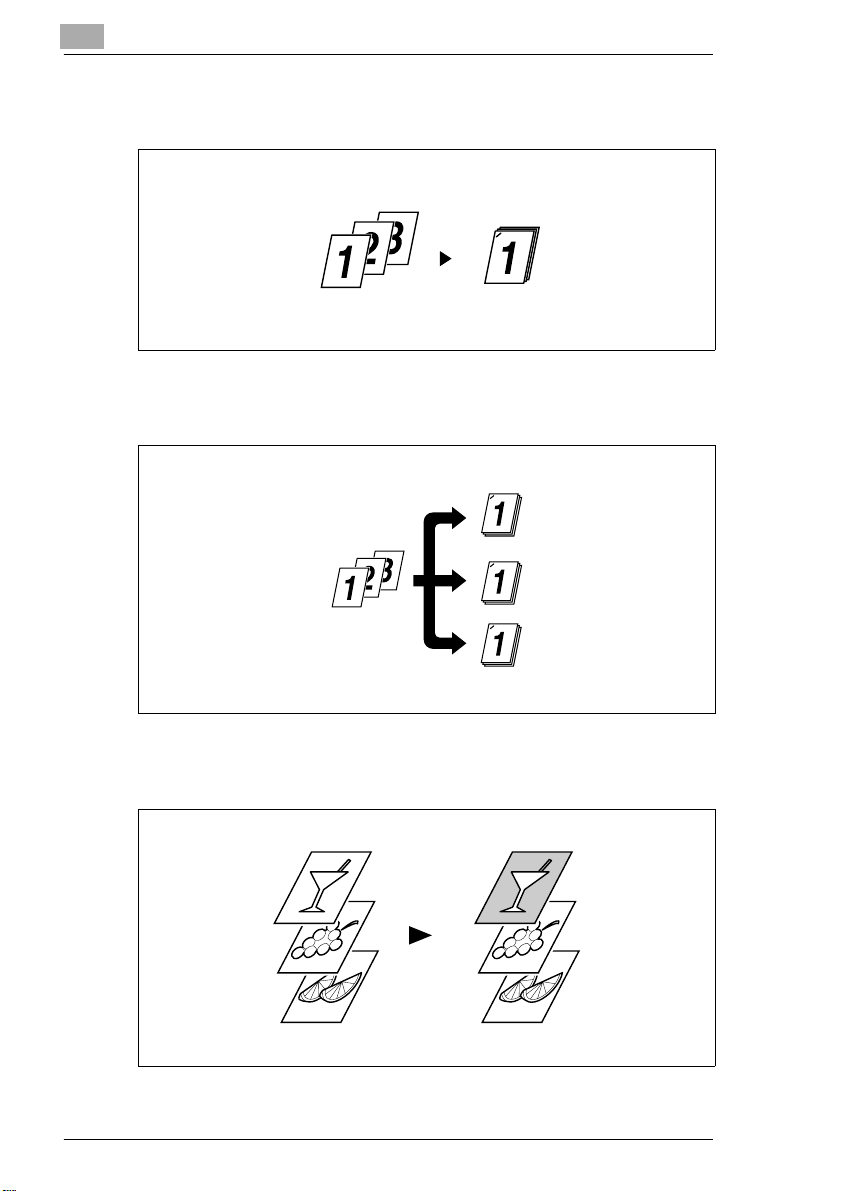
l Printing of confidential documents may be withheld until a legitimate
password is entered on the machine.
Pi7500 1-5

1
1.2 Installing the Printer Drivers
To make 100% use of the functions offered by the machine mounted with
the controller, install the attached printer drivers in your computer. The
controller is furnished with the following printer drivers:
l PCL6 printer driver for Windows 95
l PCL6 printer driver for Windows 98/Me/2000
l PCL6 printer driver for Windows NT4.0
Install the printer driver suitable for the operating system that runs on
your computer. For installation procedures, see the relevant page as
detailed below:
Installing the Windows printer driver:
l Windows 95/98/Me, see page 2-1
l Windows 2000/NT4.0, see page 2-10
Before Using the Printer Driver
1-6 Pi7500
Installing the Printer Driver
2 Installing the Printer Driver
2.1 Windows 95/98/Me
Operating Environment
This section explains the required environment for the printer driver.
Before installing the printer driver, make sure that your computer meets
the following requirements. If it doesn’t, the printer driver may not
function properly.
2
Personal computer IBM PC or compatible with an 80486, AMD, or
Operating system Windows 95 (English)
Memory 24MB or more
I/O interface Parallel Centronics interface
Network 10/100BaseT (UTP)
Pentium processor
Windows 98 (English)
Windows Me (English)
(Conforming to IEEE1284)
l Windows 2000/NT 4.0
For operating environment and installation procedure for the
Windows 2000/NT 4.0 printer driver, see page 2-10.
Pi7500 2-1
2
Installing the Printer Driver
Installation
This section explains the installation procedure for the Windows 98
printer driver.
NOTES
è Before starting to install the printer driver, be sure first to quit all other
applications.
è For Windows 98 read Windows 95 or Windows Me as necessary,
according to the applicable OS.
1 Click the [Start] button. From the menu that appears, select
“Settings,” then click “Printers.”
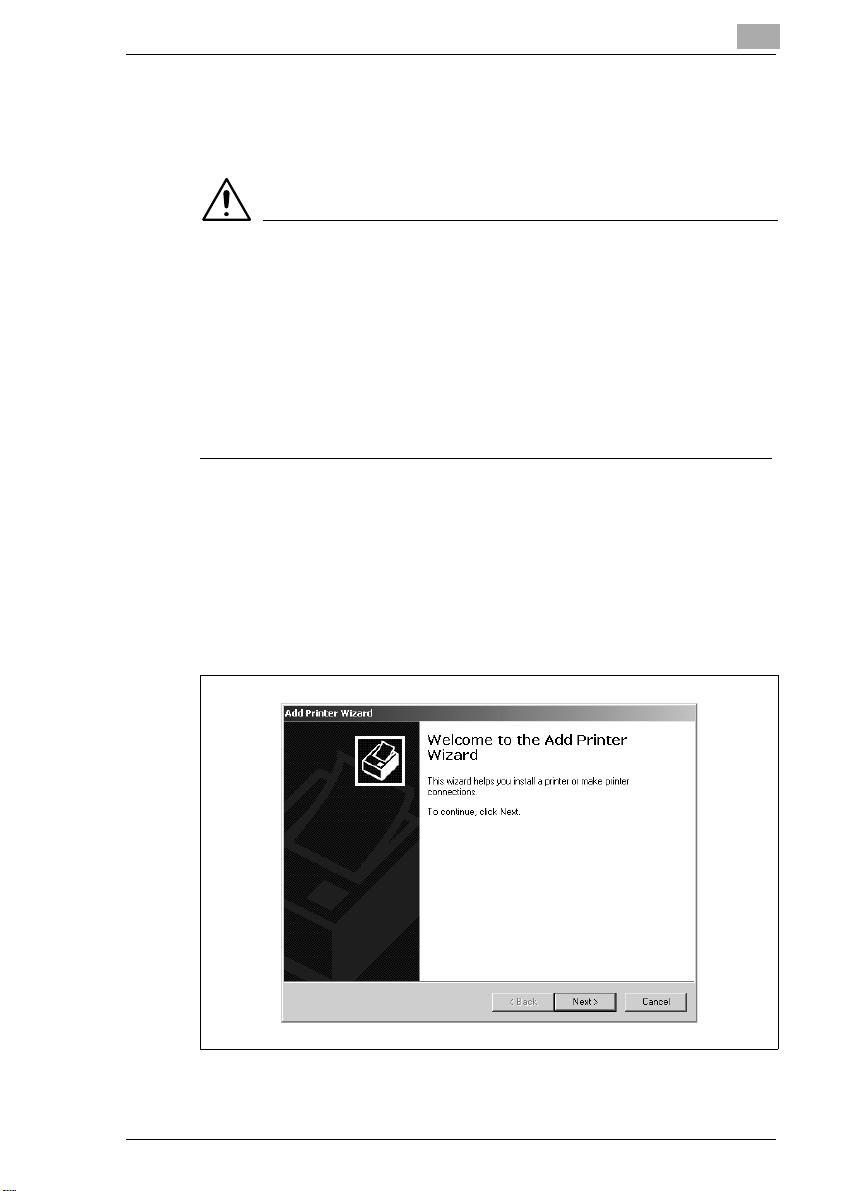
2 The Printers window will appear. Double-click the “Add Printer” icon.
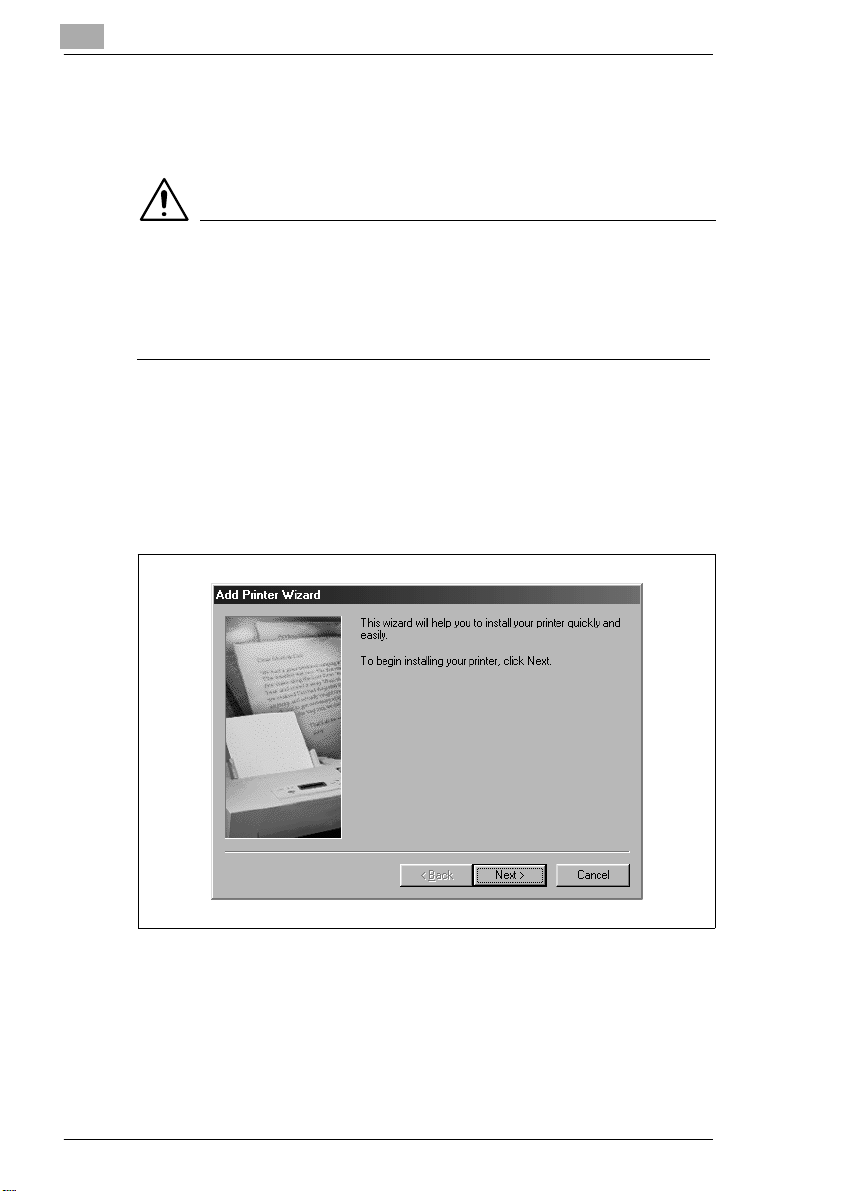
3 Start the “Add Printer Wizard.” Click the [Next>] button.
2-2 Pi7500
Installing the Printer Driver
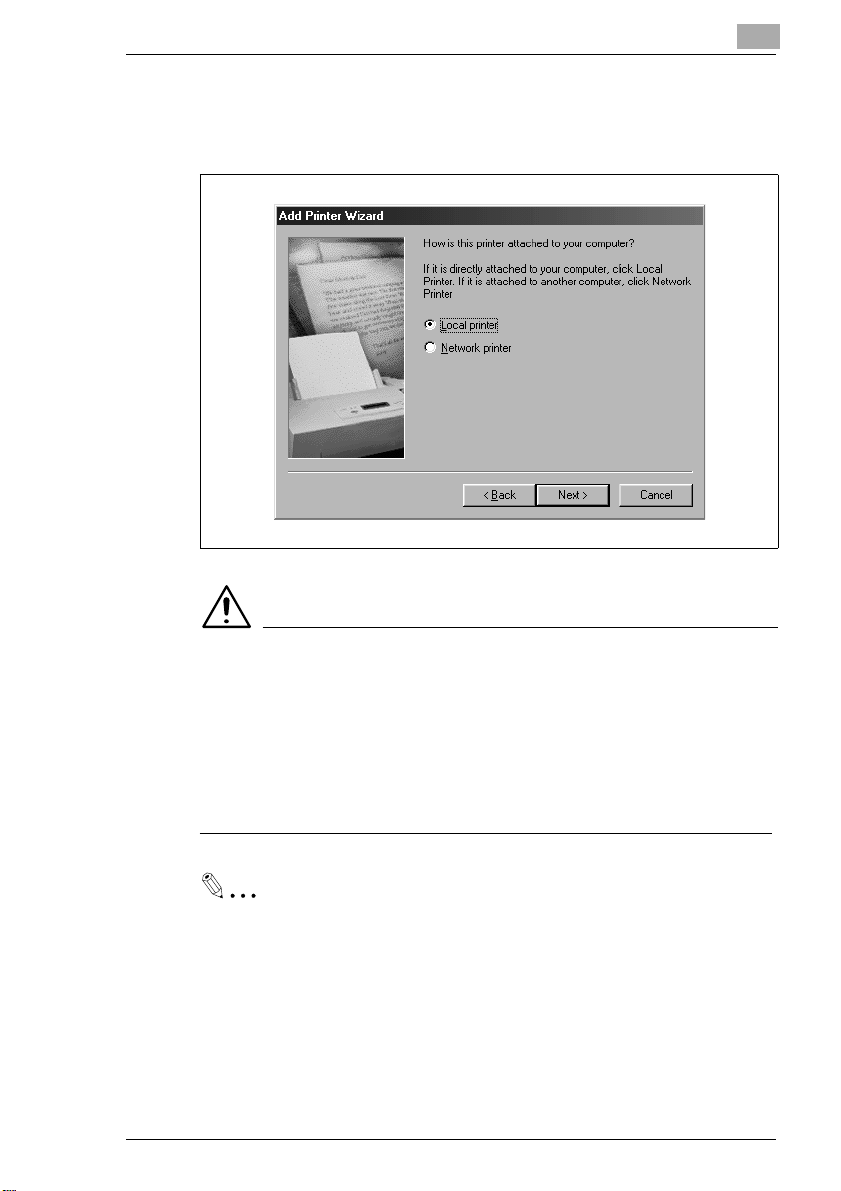
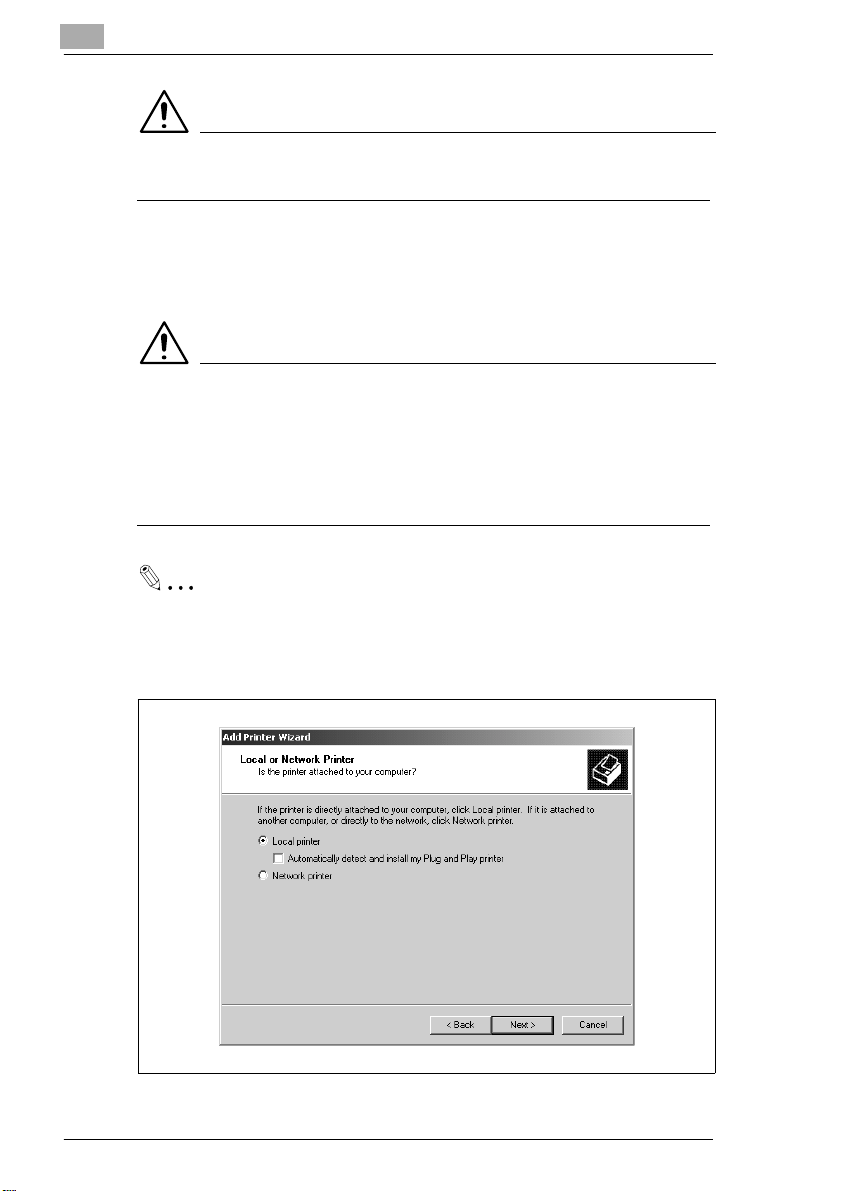
4 A window will appear, asking how the printer is to be connected.
If your computer is directly connected to the controller, select “Local
printer” and then click the [Next>] button.
2
NOTES
è When installing the printer driver in a computer connected to the
controller via a network, be sure to consult the network administrator.
è This is a request to be made of the network administrator. To install
the printer driver in a computer connected to a network, select
“Network printer” and click the [Next] button. Then, a window will
appear prompting you to enter the path to the printer server: Enter the
path.
TIP
To make settings for using the network, it is recommended that you
read “Fiery X3 Getting Started”, which comes with the controller.
Pi7500 2-3
2
Installing the Printer Driver
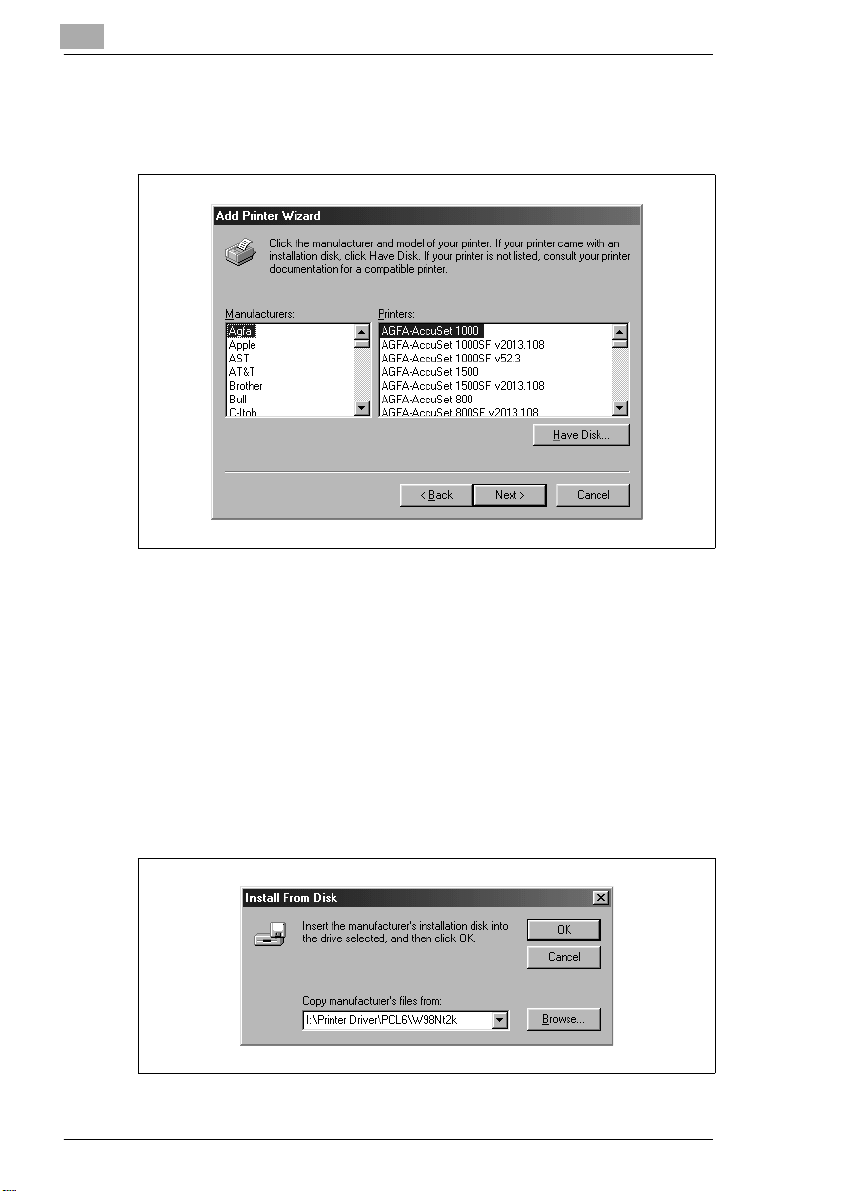
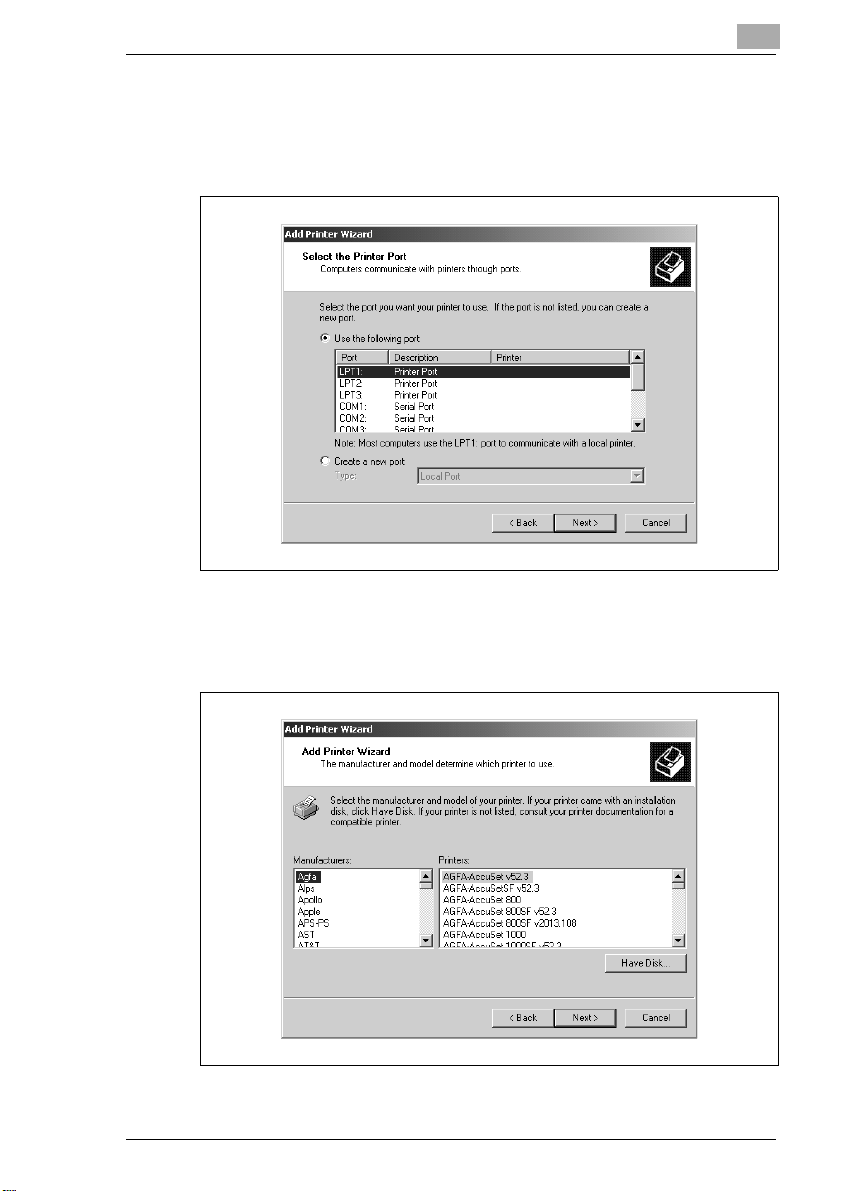
5 A window will appear, prompting you to select the manufacturer and
model of your printer. Click the [Have Disk...] button on the lower right
part of the screen.
6 The “Install From Disk” dialog box will appear. Install the controller
driver CD-ROM that is included with the controller in the CD-ROM
drive of your computer.
7 Type the file location of the driver to be installed in the “Copy
manufacturer’s files from” box. (As an example, the CD-ROM drive is
drive I.)
To install the driver with Windows 95:
I:\Printer Driver\PCL6\W95
To install the driver with Windows 98/Me:
I:\Printer Driver\PCL6\W98Nt2k
2-4 Pi7500
Installing the Printer Driver
8 A “Printers” list will appear.
Select the driver to be installed and click the [Next>] button.
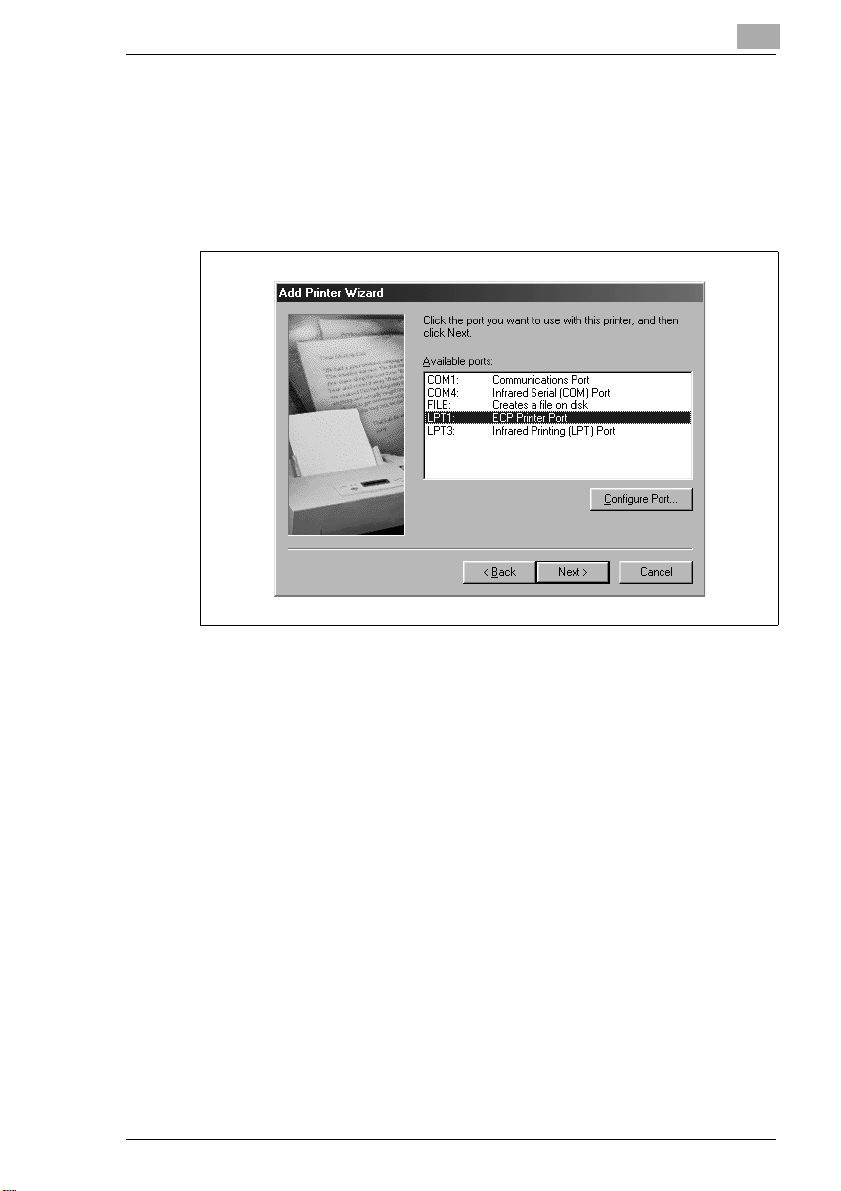
9 A window that prompts you to select the port will appear. Select the
name of the port (normally “LPT:”) to be used and click the [Next>]
button.
2
10A window that asks you to confirm the printer name will appear.
Check the printer name. If you want to designate this printer as the
default printer, select “Yes.” (In this example, the printer name is
changed to “Minolta Pi7500ver2 PCL6.”)
Click the [Next>] button.
11A screen that allows you to select printing of a test page will appear.
If you want to print a test page, select “Yes (recommended).” It is
recommended that a test page be printed to ensure that the printer
driver has been installed properly. Now, click the [Finish] button.
Pi7500 2-5
2
Installing the Printer Driver
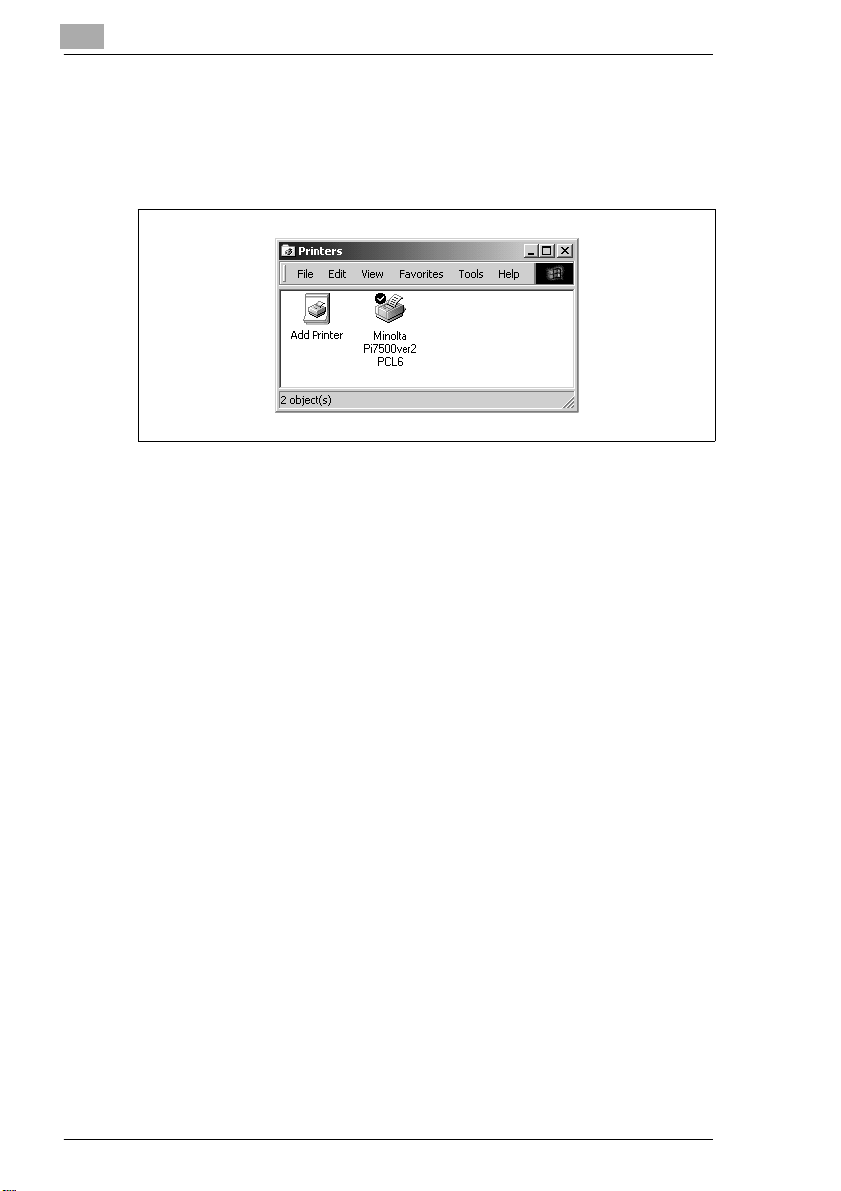
12Installation will start.
When installation is completed, the corresponding icon will be added
to the “Printers” window.
This completes installation.
2-6 Pi7500
Installing the Printer Driver
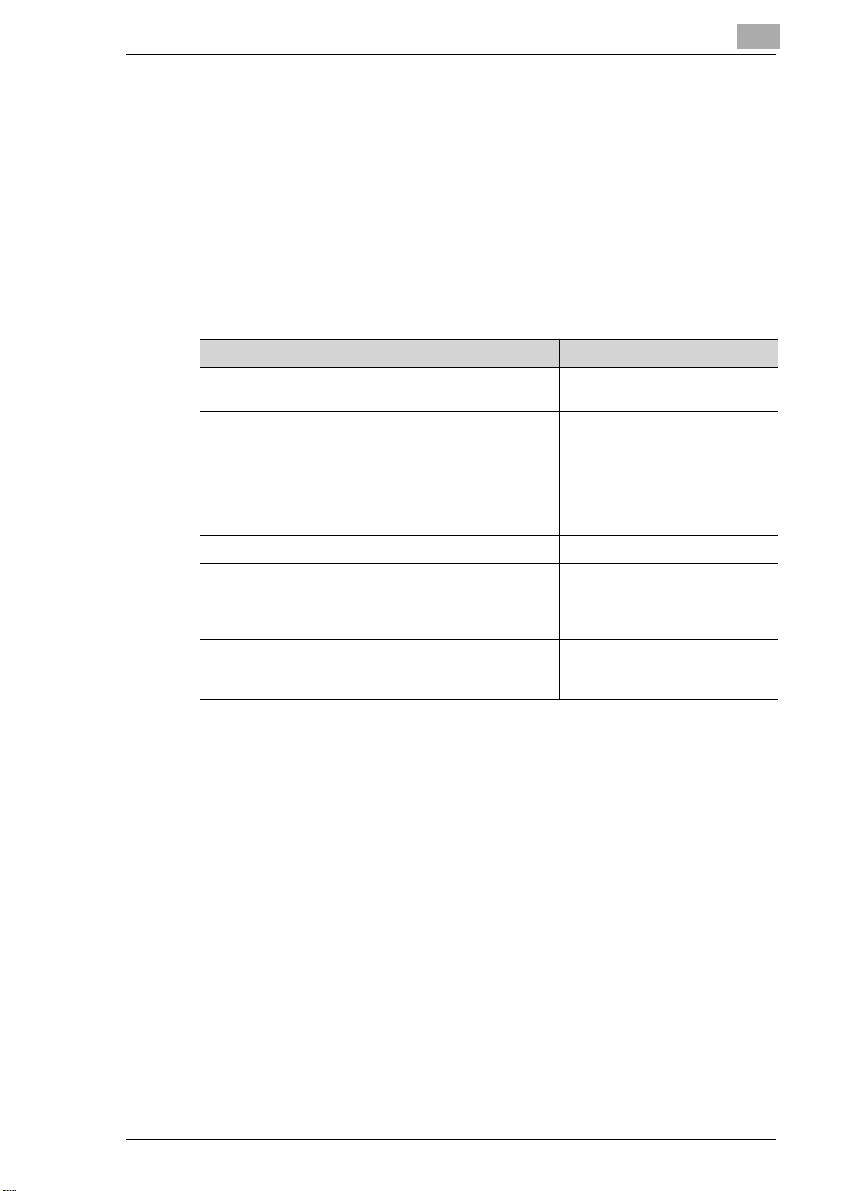
Making General Settings Before Using the Printer
The printer driver requires setting of items that are common to all print
jobs, including the port to which the printer cable is connected and any
optional devices configured with the machine. These settings must be
made using property sheets available from the Properties command after
the printer driver has been installed, or whenever the operating
environment changes.
The most common settings were made when the printer driver was
installed, meaning that you do not usually need to change them. Some
items must, however, be changed in the following cases.
Cases where changes are necessary Applicable property sheets
l You want to add a comment to distinguish the printer
from others
l The computer’s connecting port has been changed
l You want to change the conditions for the display of
a timeout error
l You want to designate a port to which the machine is
connected via a network (this setting must be made
on a computer that is connected to the controller via
a network)
l This setting is not related to printing. “Color Management”
l You want to share the machine with other computers
connected to the same network (this setting must be
made on the computer directly connected to the
controller)
l You want to change the setting in the “Minolta
Pi7500ver2 PCL6 Properties” dialog box.
For details, see Chapter 3.
2
“General”
“Details”
“Sharing”
“32-bit Super Driver Setup”
Pi7500 2-7

2
Installing the Printer Driver
Displaying a Property Sheet
There are two different steps to take to display a property sheet. The
contents of a particular property sheet differ slightly depending on how
you access it. Select the appropriate one according to your need.
(1) To display a property sheet from the printer folder
(2) To display a property sheet from an application menu
Below are the detailed procedures for each approach.
Displaying a Property Sheet from the Printer Folder
1 Click the [Start] button and select “Settings.” Then click “Printers.”
2 Click the icon of “Minolta Pi7500ver2 PCL6.”
3 Select “Properties” from the menu that will appear. This will display
the property sheet.
This method allows you to set the environment in which you will use the
printer. The settings made through this method are valid in all
applications.
2-8 Pi7500
Installing the Printer Driver
Displaying a Property Sheet from an Application Menu
1 Select [Print...] from the [File] menu of the application.
2 Make sure that the “Name” of the “Printer” is “Minolta Pi7500ver2
PCL6”: If “Minolta Pi7500ver2 PCL6” is not listed, click [Ä] and, from
the menu that will then appear, select “Minolta Pi7500ver2 PCL6.”
3 Click the [Properties] button. This shows the property sheet.
This method allows you to set the number of copies and paper for each
document.
Note that the settings made on the property sheet accessed through the
application are valid only for that particular application.
TIPS
To set the Device Options Setting, which need not be changed unless
device is changed, open from the printer folder to set.
To show a property sheet other than Setup, click the corresponding
tab located on the top part of the screen.
2
NOTE
è The steps to display a property sheet may be different depending on
the application. Follow the correct procedure according to the
application. The procedure above is based on the application
WordPad.
Pi7500 2-9
2
2.2 Windows 2000/NT 4.0
Operating Environment
This section explains the required environment for the printer driver.
Before installing the printer driver, make sure that your computer meets
the following requirements. If it doesn’t, the printer driver may not
function properly.
Installing the Printer Driver
Personal computer IBM PC or compatible with an 80486, AMD, or
Operating system Windows 2000 (English)
Memory 64MB or more (Windows 2000)
I/O interface Parallel Centronics interface
Network 10/100BaseT (UTP)
Pentium processor
Windows NT 4.0 (En glish)
32MB or more (Windows NT)
(Conforming to IEEE1284)
l Windows 95/98/Me
For operating environment and installation procedure for the
Windows 95/98/Me printer driver, see page 2-1.
2-10 Pi7500
Installing the Printer Driver
Installation
This section explains the installation procedure for the Windows 2000
printer driver.
NOTES
è Before starting to install the printer driver, be sure first to quit all other
applications.
è Before starting to install the printer driver, log in with Administrator.
è The screen for installation differs between Windows 2000 and
Windows NT 4.0.
è For Windows 2000 read Windows NT 4.0 as necessary according to
the applicable OS. Two function or item names are given as
applicable if they differ between the two OSs.
1 Click the [Start] button. From the menu that appears, select
“Settings,” then click “Printers.”
2 The Printers window will appear. Double-click the “Add Printer” icon.
3 Start the Add Printer Wizard.
Click the [Next>] button.
2
Pi7500 2-11
2
Installing the Printer Driver
NOTE
è This screen is not available on Windows NT 4.0. Go to step 4.
4 A screen that allows you to select the type of connection for the
printer will appear. If the controller is directly connected to the
computer, select “Local Printer”.
NOTES
è When installing the printer driver in a computer connected to the
machine via a network, be sure to consult the network administrator.
è Different function or item names are given on Windows NT 4.0. Read
“My Computer” for “Local printer” and “Network printer server” for
“Network printer.”
TIP
To make settings for using the network, it is recommended that you
read “Fiery X3 Getting Started”, which comes with the controller.
2-12 Pi7500
Installing the Printer Driver
5 Click the [Next>] button.
6 A window that prompts you to select the port will appear. Select the
name of the port to be used and click the [Next>] button.
7 A window will appear prompting you to select the manufacturer and
model of your printer. Click the [Have Disk...] button on the lower right
part of the screen.
2
Pi7500 2-13
 Loading...